Android
Android is an open-source mobile operating system developed by Google. It powers a wide range of smartphones, tablets, and other devices. With its customizable nature, Android offers users the flexibility to personalize their device, choose from a vast selection of apps on the Google Play Store, and customize settings to suit their preferences. Android provides seamless integration with Google services, including Gmail, Google Maps, Google Drive, and Google Assistant, enhancing productivity and convenience. It also supports features like multi-tasking, notifications, and various customization options. Android's versatility, extensive app ecosystem, and frequent updates make it a popular choice for users seeking a diverse and user-friendly mobile experience.
- Android EMM Zero-Touch Enrollment
- Embed WiFi in EMM Enrollment QR
- Force Location for EMM Android Devices
- Geofencing
- Deploying Google Play Apps
- Deploying Google Play Web Apps
- Android EMM Policies and Permissions
- Android apps are not installing immediately
- Android Lost Mode
- Android EMM Global Default Policy Change (14.9+)
- Android devices with multiple policies
- Android System Apps
- Troubleshooting
Android EMM Zero-Touch Enrollment
What
Android Zero Touch Enrollment (ZTE) is a method for automatic device enrollment based on the device's participation in your organization's Zero-Touch Enrollment Portal.
ZTE Portal
The portal is located at : https://partner.android.com/zerotouch
But requires enrollment into the program before you can login.
When/Why
We'll want to use ZTE to ensure that devices are enrolled and are under Enterprise management. (Opt-in enrollments will almost always end up with some devices not being enrolled. and we would like to ensure our devices are all managed, preferably without us ever touching them). ZTE ensures that the device is enrolled when first setup.
How
Much of the setup for ZTE is done from outside of FileWave, but the Android ZTE portal must know about your FileWave MDM server, hence there is some configuration necessary.
You must have an Android ZTE Configuration created in your portal to configure your ZTE devices to point to FileWave. You'll find detailed information on setting up your ZTE portal and configuration here: https://support.google.com/work/android/answer/7514005
When you create the configuration, you'll fill out the names and such for your organization, but two pieces of information will be driven from your use of FileWave. First, you'll set the EMM DPC as Android Device Policy and second you will copy/paste in the FileWave JSON into the DPC extras field. You get this JSON text from the FileWave Admin in Preferences→ Google→ Configure Enterprise → Copy ZeroTouch Configuration. You'll see the FileWave Admin and Portal Configuration below:


Once the configuration is created, you simply need to assign devices in your portal to the configuration that you want them to use. Example shown below:

Once devices are in the portal, and a configuration is assigned to each, the devices will automatically enroll in your management when first setup.
|
Devices appear in your Zero Touch Portal through information imported from your Resellers. You must coordinate with your resellers to establish this workflow. Additionally, each device must have a configuration assigned after it is imported. At this time, there is no automatic association available in the ZTE Portal. |
Related Content
Embed WiFi in EMM Enrollment QR
If you have an Android EMM Google Policy Fileset with network settings, select it while generating an enrollment QR code. FileWave embeds that WiFi profile in the QR enrollment payload so the device can join the network during enrollment.
 |
|---|
| Figure 1.1 - WiFi selected in enrollment QR |
Steps
- Create or verify a Google Policy Fileset with WiFi network settings (Android EMM Policies and Permissions).
- Generate a new enrollment QR code:
- Open Assistant > Enroll Android Devices....
- Click + in the bottom left.
- Select the needed WiFi Profile from the drop-down menu.
- Enroll the device as normal (Quickstart Guide for Android EMM).
Most Android 8+ devices include a QR reader during setup. Older devices may need to connect to WiFi after the seven-tap setup flow before they can download a QR reader app.
The generated QR code contains the WiFi password in plain text.
Treat the QR code like a credential. Do not leave it displayed, printed, or shared beyond the enrollment window.
Force Location for EMM Android Devices
Description
This article describes the process of enabling Location Services on Android Devices.
The EMM FileWave client companion app sends coordinates every 15min, once configured.
A server side setting is required since FW 13.3.x. Details highlighted in: Location Tracking
Ingredients
- FileWave Central Admin App
- EMM enrolled Android Device (fully managed)
- Background Permissions enabled for the FileWave Client in Location Settings.
- On Android 14+, the FileWave Client App must be version 15.5.3 or higher
It may be necessary for users to self update the FileWave Client App.
Directions
Android Policy
The policy created will enable location reporting once active on devices. From the FileWave Central Admin App, create a New Fileset, for Google > Android > Policy and name the policy, e.g. "Force Location On".
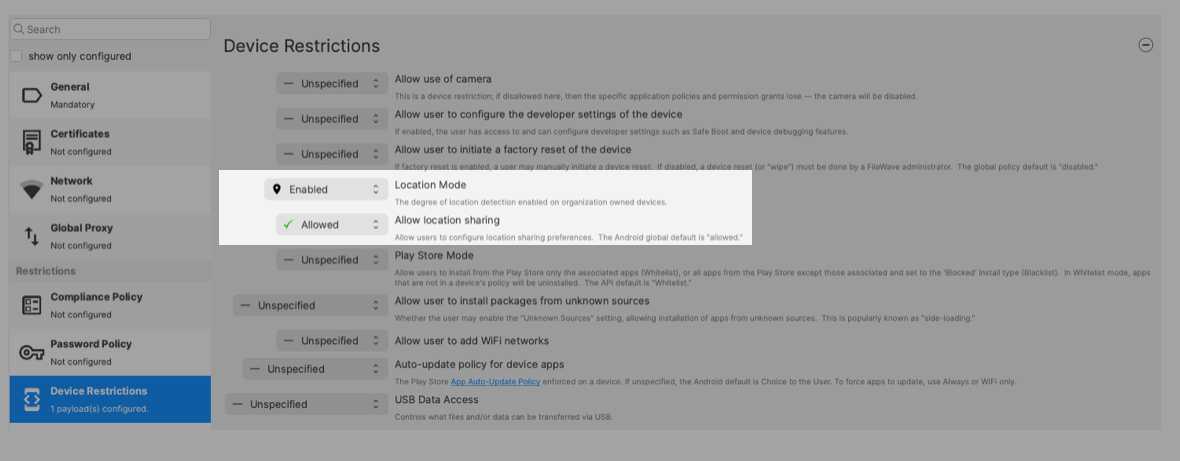
Device Restrictions
- Highlight "Device Restrictions" and select "Configure..."
- Alter Location Mode and Sharing to Enabled and Allowed respectively, as per the screenshot:

Assignment
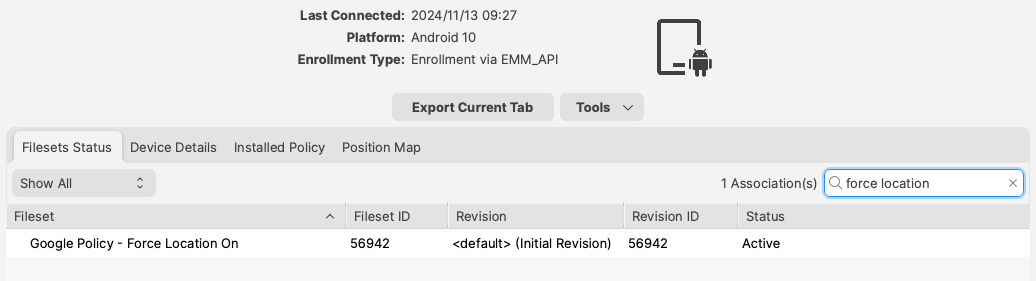
On saving the Policy, choose to assign the Policy to devices either as an Association or Deployment and Update Model.
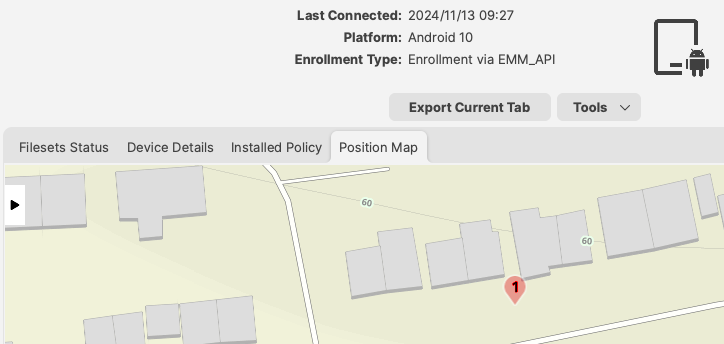
From assignment, opening the Device Info for a relevant device should now show an additional tab called "Position Map". However, until the Policy is active and the device has subsequently returned the initial coordinates, no map will yet be shown.
If Device Info is already open, Position Map may remain this way until the Device Info window is closed and re-opened.
The Status of the Policy may be observed from the Fileset Status view:
Background Permissions for the FileWave Client to provide Location, may be observed locally on the device through:
- Settings > Location > App Permissions
The FileWave Client should show under the list 'ALLOWED ALL THE TIME'.
The map should then display the device location once reported.
Geofencing
What
In FileWave 14.1+ you are able to make policies for FileWave endpoint devices to specify when they are in or out of a particular geographical area.
Remember: A FileWave policy is a fileset for specifying things in/for a filewave endpoint.
This is not the same as a configuration profile, or an Android Policy
When/Why
In 14.1.* this feature is supported on Android EMM devices only, but other platforms are under development and we hope to support them in the future.
Using a geo-fence can be useful if you want to make the devices unusable by an individual that removes a device from a specific location, or just notify them they have gone too far away from "home".
An example would be a tablet used in a store for customers to browse an online library...if the device leaves the store location, you might like to disable functionality and tell the person to return the device.
The reason that this is a FileWave client policy and not something run on the FileWave server is that the client will know soonest that it is has left the location, and might not have connectivity to send info to the server.
Also think about the type of devices typically managed - these are usually WiFi only devices. If a user was to take a device, and leave an area (and also WiFi range), how would your FileWave server be able to reach that device, tell it it is out-of-bounds, and make action on it? It can't, there is no channel for communication at this point.
So, a client policy is much more effective because the client can take action without needing communication to the FileWave services, or the internet at all.
How
Requirements
Before we can setup a geofencing policy, we need to be actively receiving location data from end points. We can verify this by looking at a device in the native admin or web admin ( Individual Device View ).
If you need help getting location tracking to work, check out this KB: Location Tracking for more details.
Here is a tl;dr summary:
-
iOS needs the Enterprise IPA App
-
Android EMM might need Force Location for EMM Android Devices
-
Windows, iOS*, MacOS all need Location services to be on
*iOS Lost Mode, triggered by setting the device to "Missing" in FileWave will force location services on, but it also disables the device, where tracking from the IPA does not impact device behavior but does have a pre-requisite of location services enabled and the app approved by the customer.
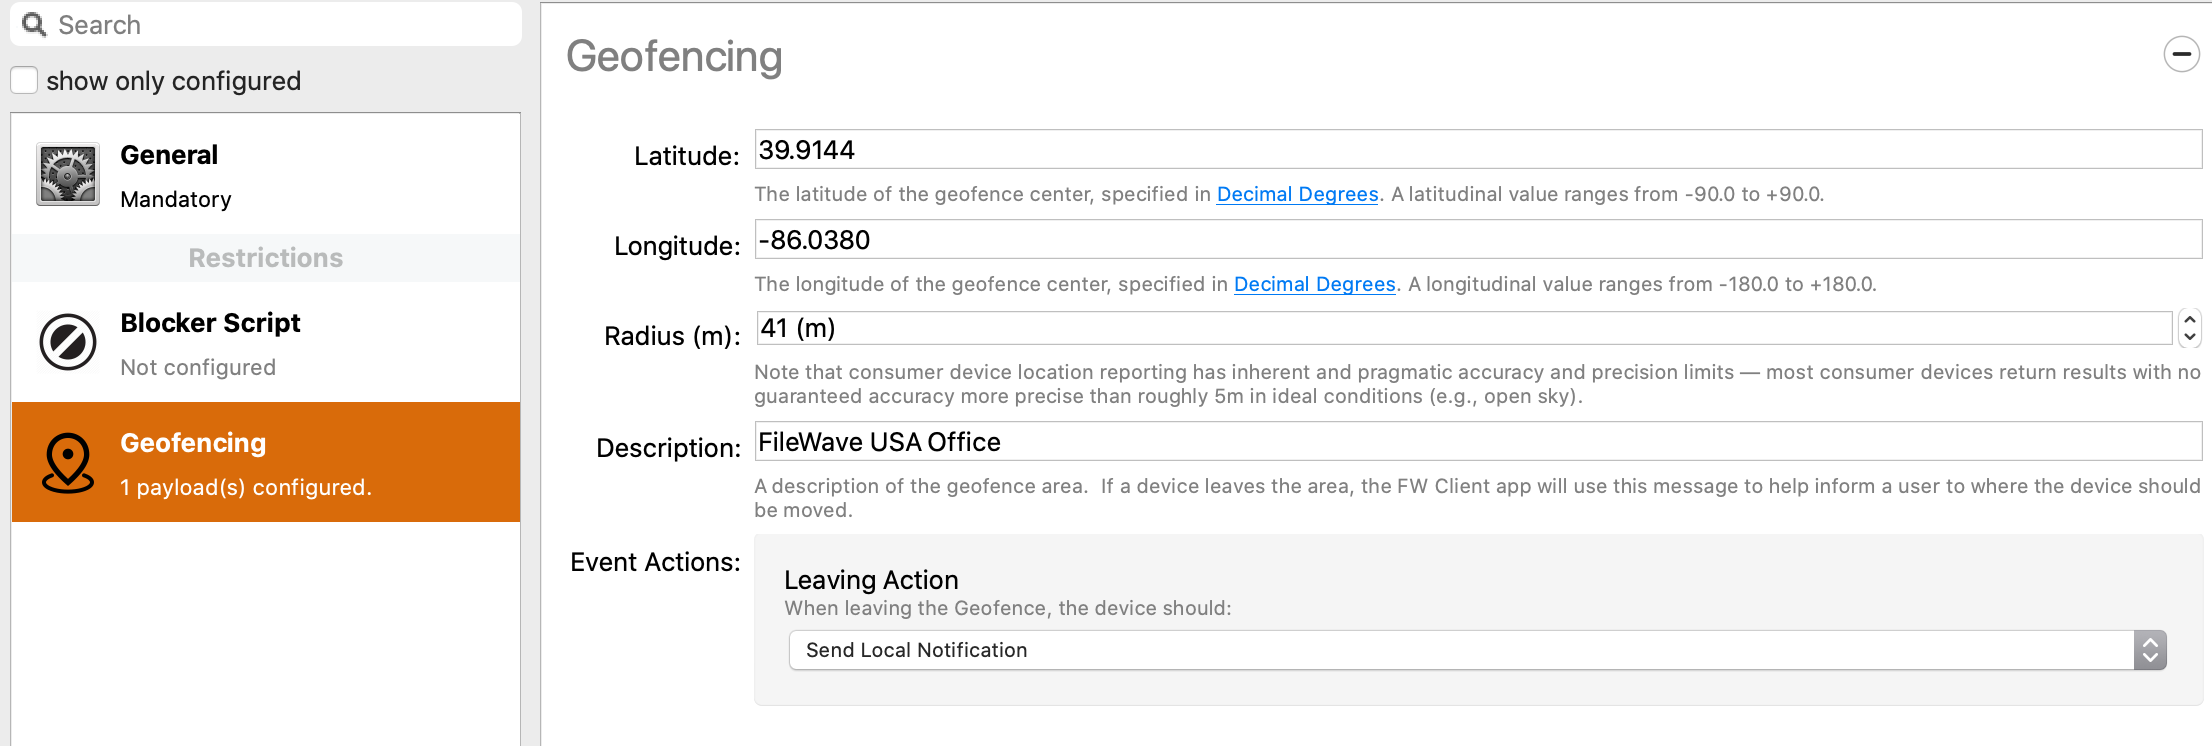
Creating the Geofencing Policy
In case you were wondering, the standard for GPS is in meters, so please keep that in mind when specifying this policy.
To set a geo-fence, I first need to know the longitude and latitude of my location, then how far out from that center point I want my boundary.
An easy way to do this is to:
-
Go to a maps site like http://maps.google.com/ and enter the address of the location I want.
-
Right-click in the center and copy the Latitude and Longitude.
-
Then right-click and select "measure distance"
-
Move the first dot to the middle of your location (if needed)
-
Then place a second dot with a standard click at the farthest location of your geofence
-
Take note of the distance in meters
| Figure 1.1 - Obtain coordinate and radius from a map |
Now, we need to specify that data into the FileWave Policy
-
Filesets > New Desktop Fileset > Policy
-
Under General: give it a name (like: "Site A Geofence")
-
Under the Geofencing payload, enter the latitude, longitude, and radius you obtained from the map
-
For Description, enter a location. Ideally the location you would want a device returned to, as this description will be used in the message on the device. A bad example would be something too generic like in Figure 1.3
-
Event Action: you can select one of two things
-
Send Location Notification: This is the more subtle approach, a user actively on the device might see this, but continue on their way. If they are unlocking the device they would also see this message, but it could be dismissed
-
Disable All Applications: This is the more stern approach, a user actively on the device would not be able to use it anymore, tapping the notification would tell them why that is happening (Figure 1.3)
-
|
|
| Figure 1.2 - Geofencing Policy |
|
|
| Figure 1.3 - Full screen message after user tapped notification |

Finally, we need to assign policy out
To do that, you simply associate the Fileset as you would any other Fileset (aka payload), to:
-
a smart group
-
a group
-
a specific device
Then update the model and you are done.
At present there is no inventory data sent back to the FileWave server to indicate there was a geo-fence breach or that the device was returned to the location, but this is under development and we hope to add this in a future release.
Deploying Google Play Apps
Follow this guide to deploy Google Play apps to you EMM (Enterprise Mobility Management) enrolled Android devices.
At this time, Google Android Management does not support the deployment of paid Play Store Apps.
Creating the Fileset

- From the Filesets view
- Select "New Mobile Fileset"
- Select "Play Store"
- Search for the app you want to deploy (figure 1.2)
- Click on the app and then press "Select" (figure 1.3)
FileWave will make the fileset in the background and leave the window open so you can keep searching for additional apps - Now associate the app to devices.
 |
| Figure 1.2 - Search for the app |
See: Using Associations with Filesets for steps on creating associations
If you have a Fileset Group selected before clicking the "New Mobile Fileset" button, any filesets you create will be placed into that Fileset Group by default.
 |
| Figure 1.3 - Select the app |
 |
| Figure 1.4 - App added |
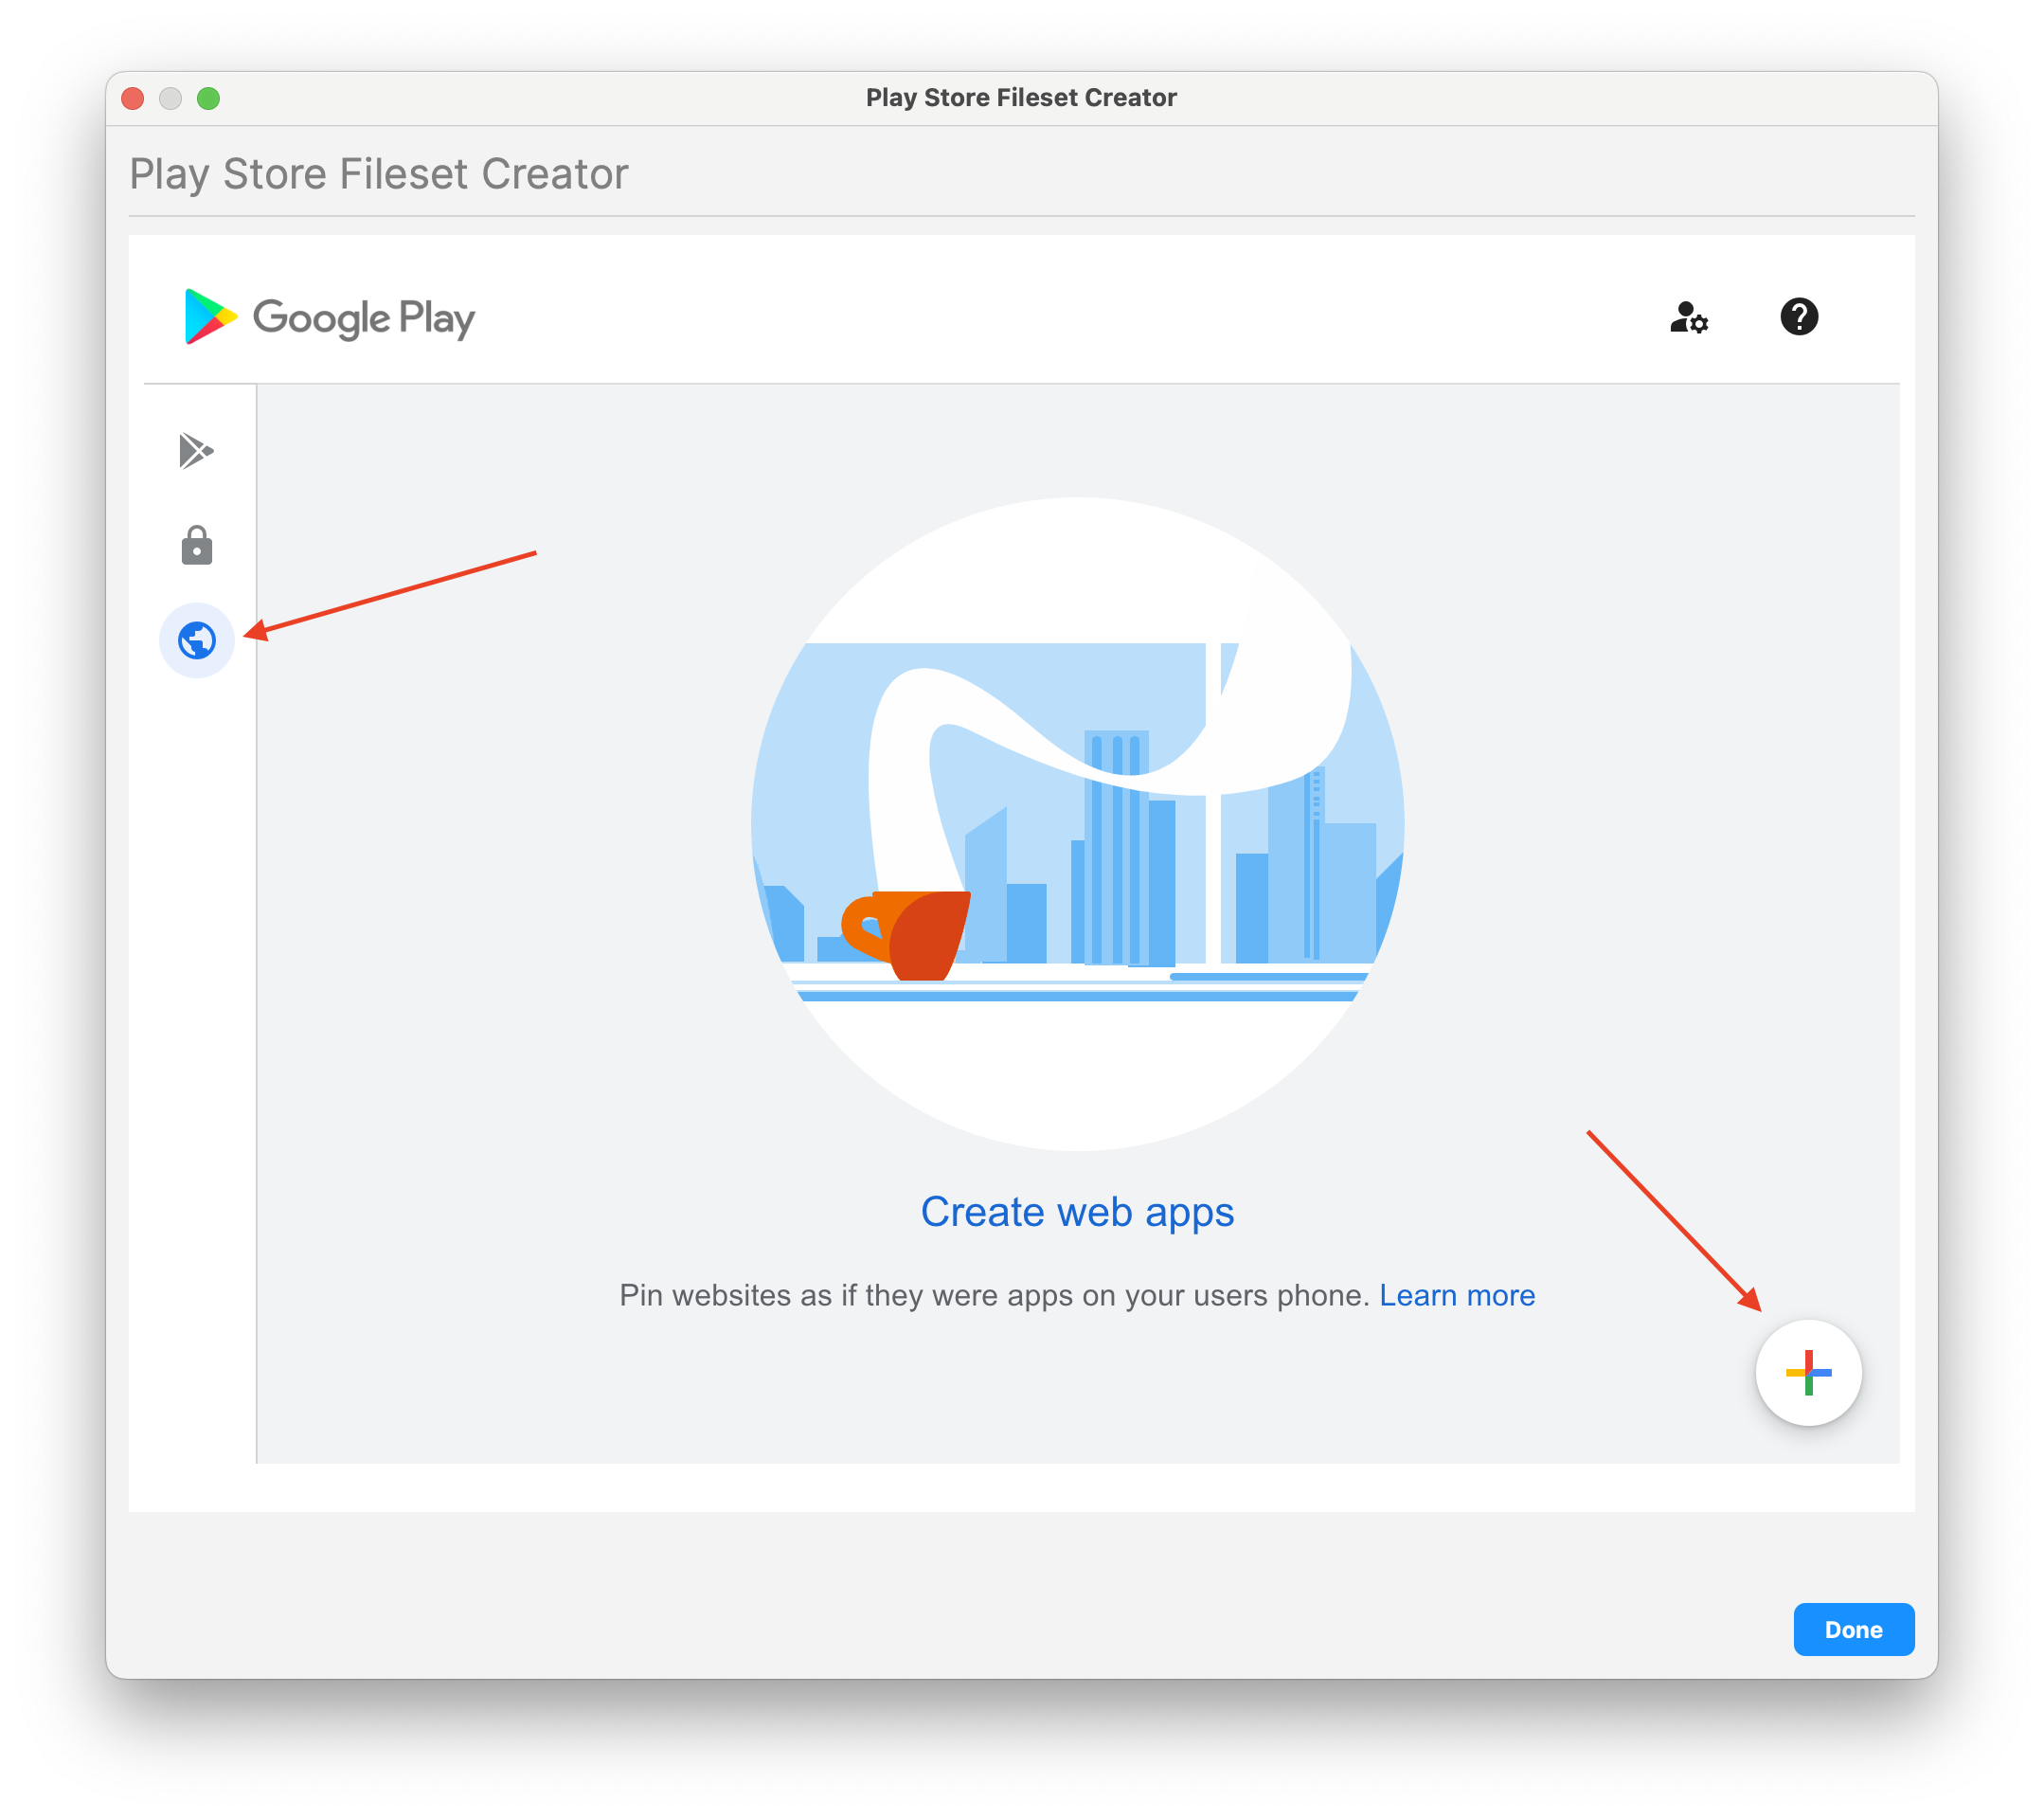
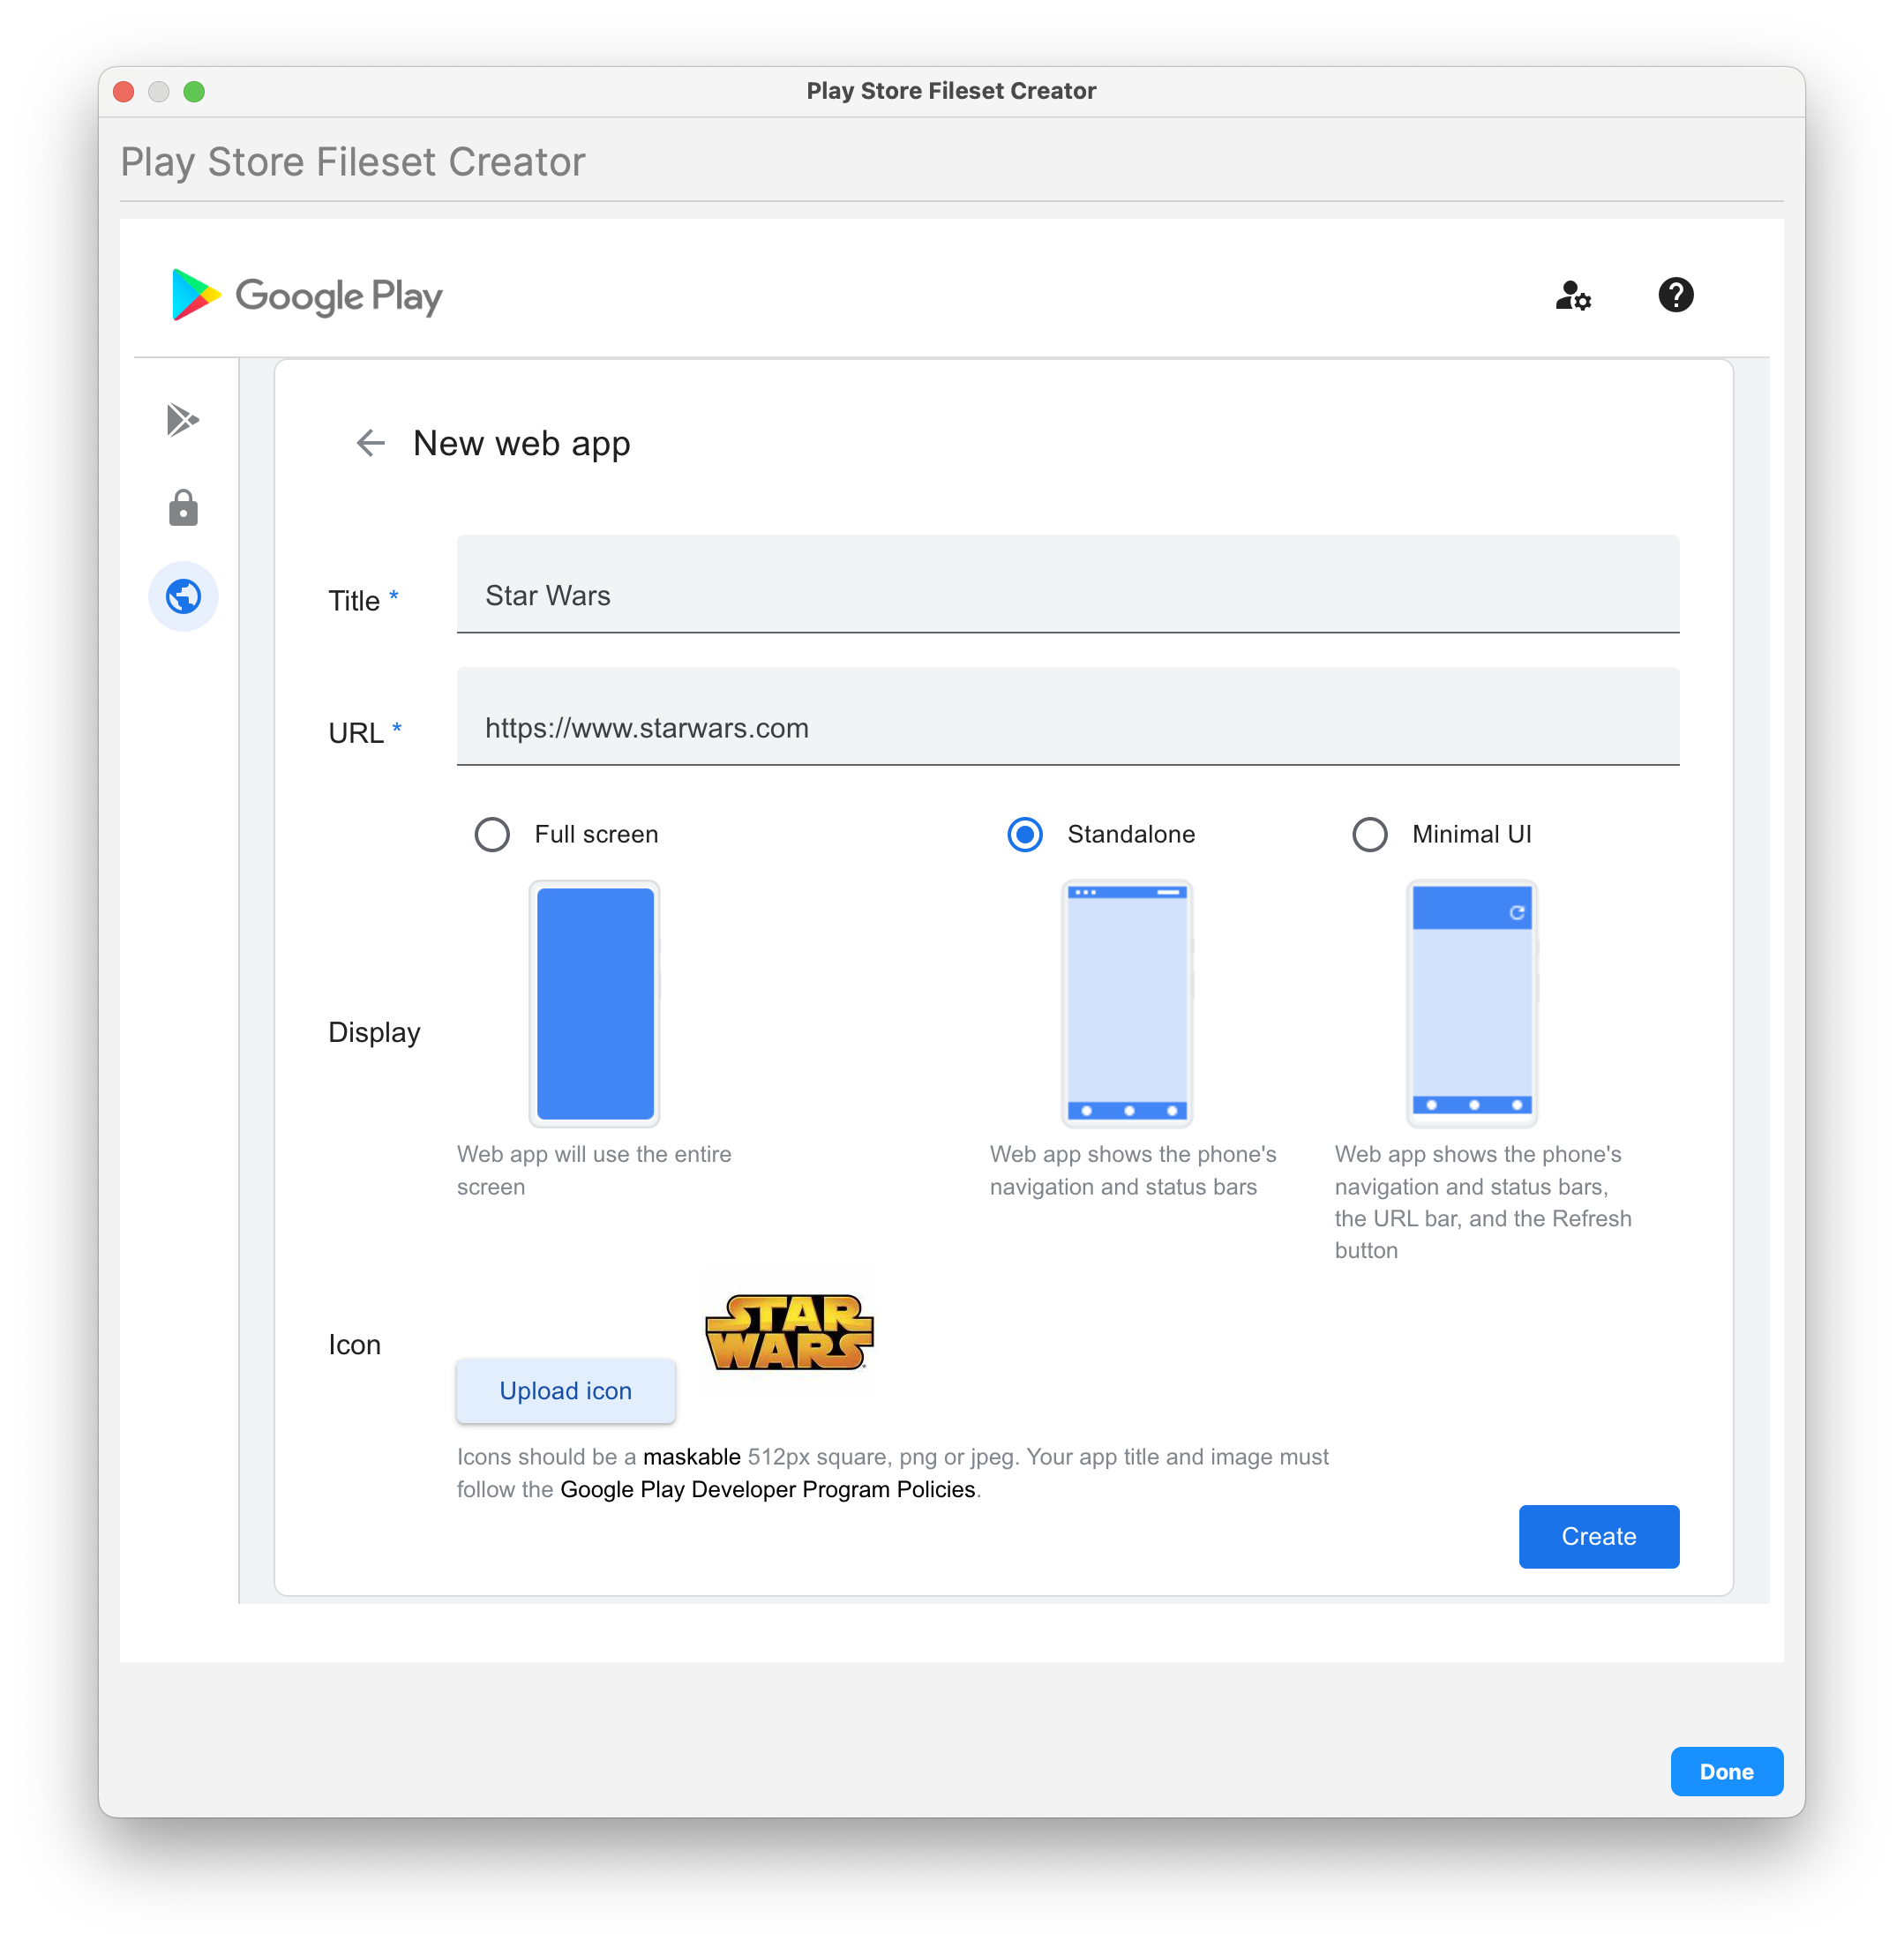
Deploying Google Play Web Apps
Sometimes called a web clips, these are items that look like apps, but open to webpages.
Creating the Fileset
You need to have the Google Chrome app installed or allowed for web apps to work.
-
From the Filesets view
-
Select "New Mobile Fileset"
-
Select "Play Store"
-
On the left, select the globe (Web app) and then click on the plus icon in the bottom right
- Enter in your desired Name and URL for the new Web App
- Enter Name/Label
- Enter URL
- Choose Display (Full Screen, Standalone, or Minimal UI)
- Icon image (optional)
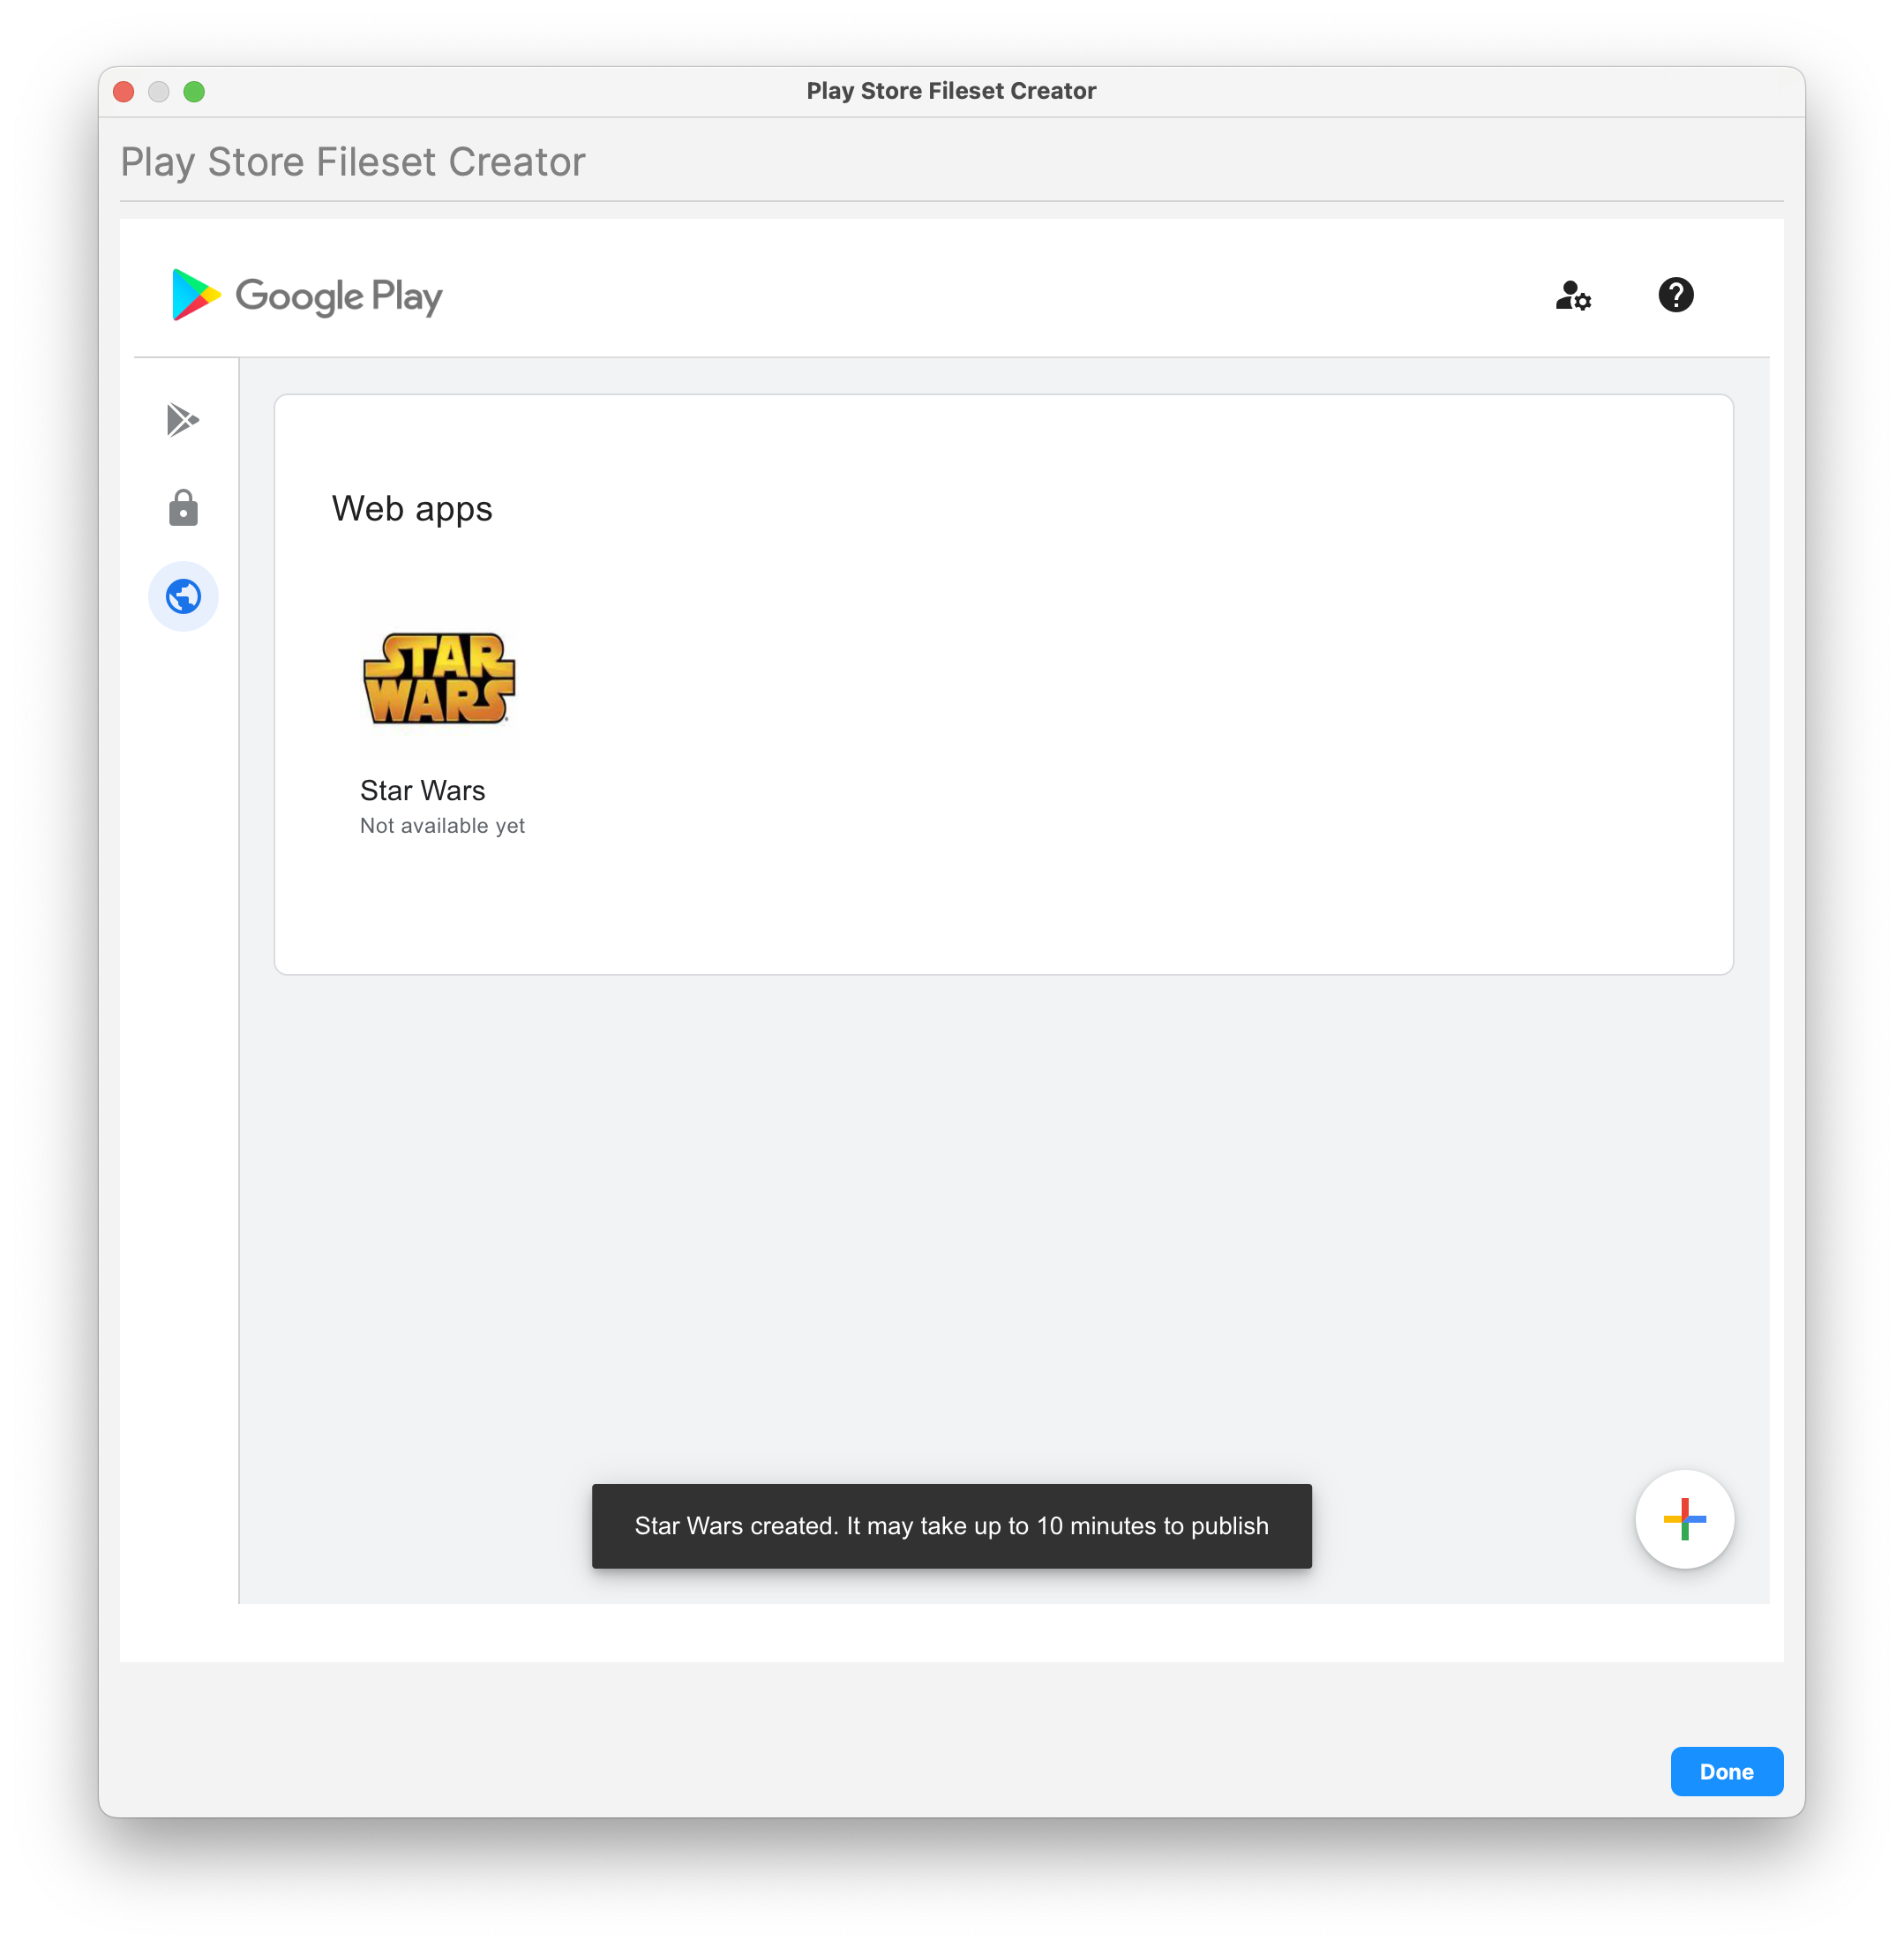
- Click "Create" on the bottom right (Wait for the App to process and it will appear when ready)
- Click on the newly created Web app
- Scroll down and then click on "Select"
- Highlight the new Fileset and assign to your device(s).
FileWave will create the Fileset in the background and leave the window open. You are welcome to create another Web app, search for additional apps to create or close.
| Create new Web app | Enter and Customize your Web app | Select newly Web app to create Fileset |
 |
 |
 |

See: Using Associations with Filesets for steps on creating associations
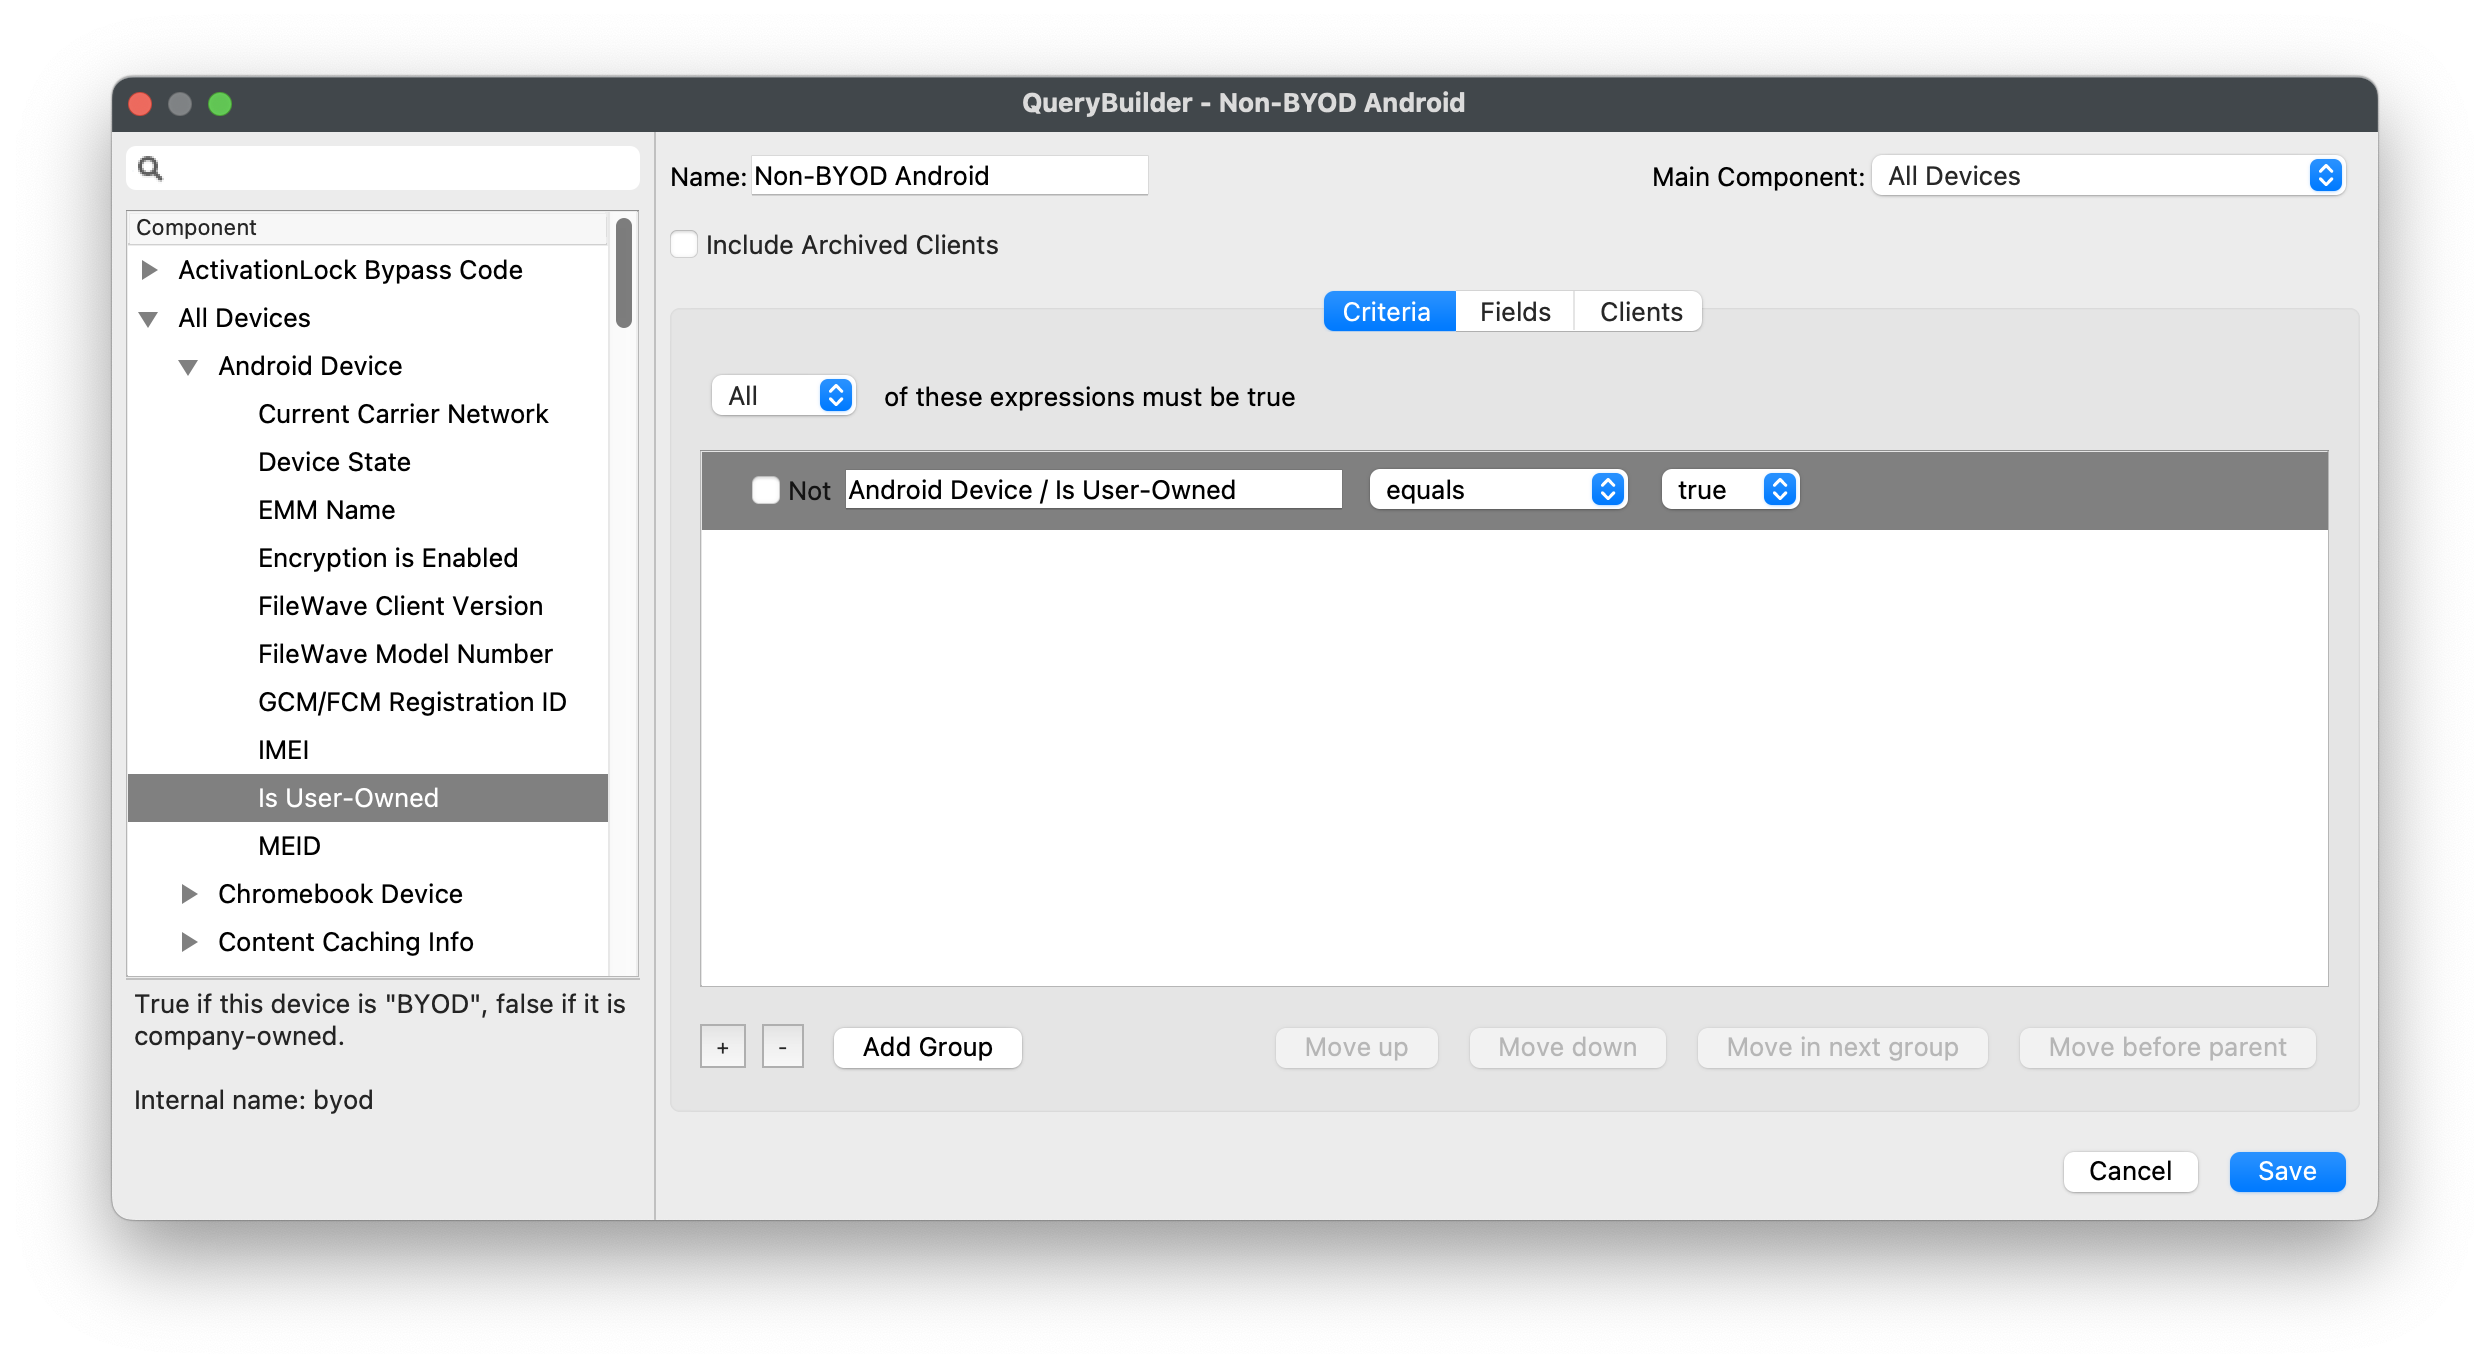
Android EMM Policies and Permissions
Android EMM (Enterprise Mobile Management) allows you to create permissions and send policies.
Permissions Types
Permission settings may be configured on multiple levels. They are applied in this priority (low number wins).
- Application specific permission grant (list below dropdown in Permissions tab in applications fileset properties)
- Specific permission for all applications (configured in Policy Fileset)
- Application default (Play Store App Fileset → Permissions tab)
- Global default (Android Default Policy Editor)
1. Within Each App
After you have created a Google Play Apps Fileset:
- Double click the Play Store App fileset
- Permissions tab (Figure 1.1)
- App Default Permission - The default action devices will take when an app requests a permissions
- Application specific permission grant - The setting for a specific permission within this app
- Choices
- Use Default - Defer to another setting
- Prompt - App prompts the user to approve
- Grant - Allowed, user can not change
- Deny - Not Allowed, user can no change
2. Policy Fileset - Permissions
You can create a policy fileset and associate that to a device to specify permission grants/denies.
See below for steps.
3. Global Policy
Specify the default application permission choice. (Figure 1.2)
Found under FileWave Admin → Preferences → Google → Configure Default Policy
- Unspecified
- Prompt
- Grant
- Deny
After you chance the default policy, you must update the model to apply the change.
Policies
You can create a Policy for (Figure 2.1)
- Network
- Compliance
- Password
- Device Restrictions
- Permission Grants
Network
Settings to join a WiFi network
As of 15.4, additional options have been added for DomainSuffixMatch and UseSystemCA for EAP network configuration.

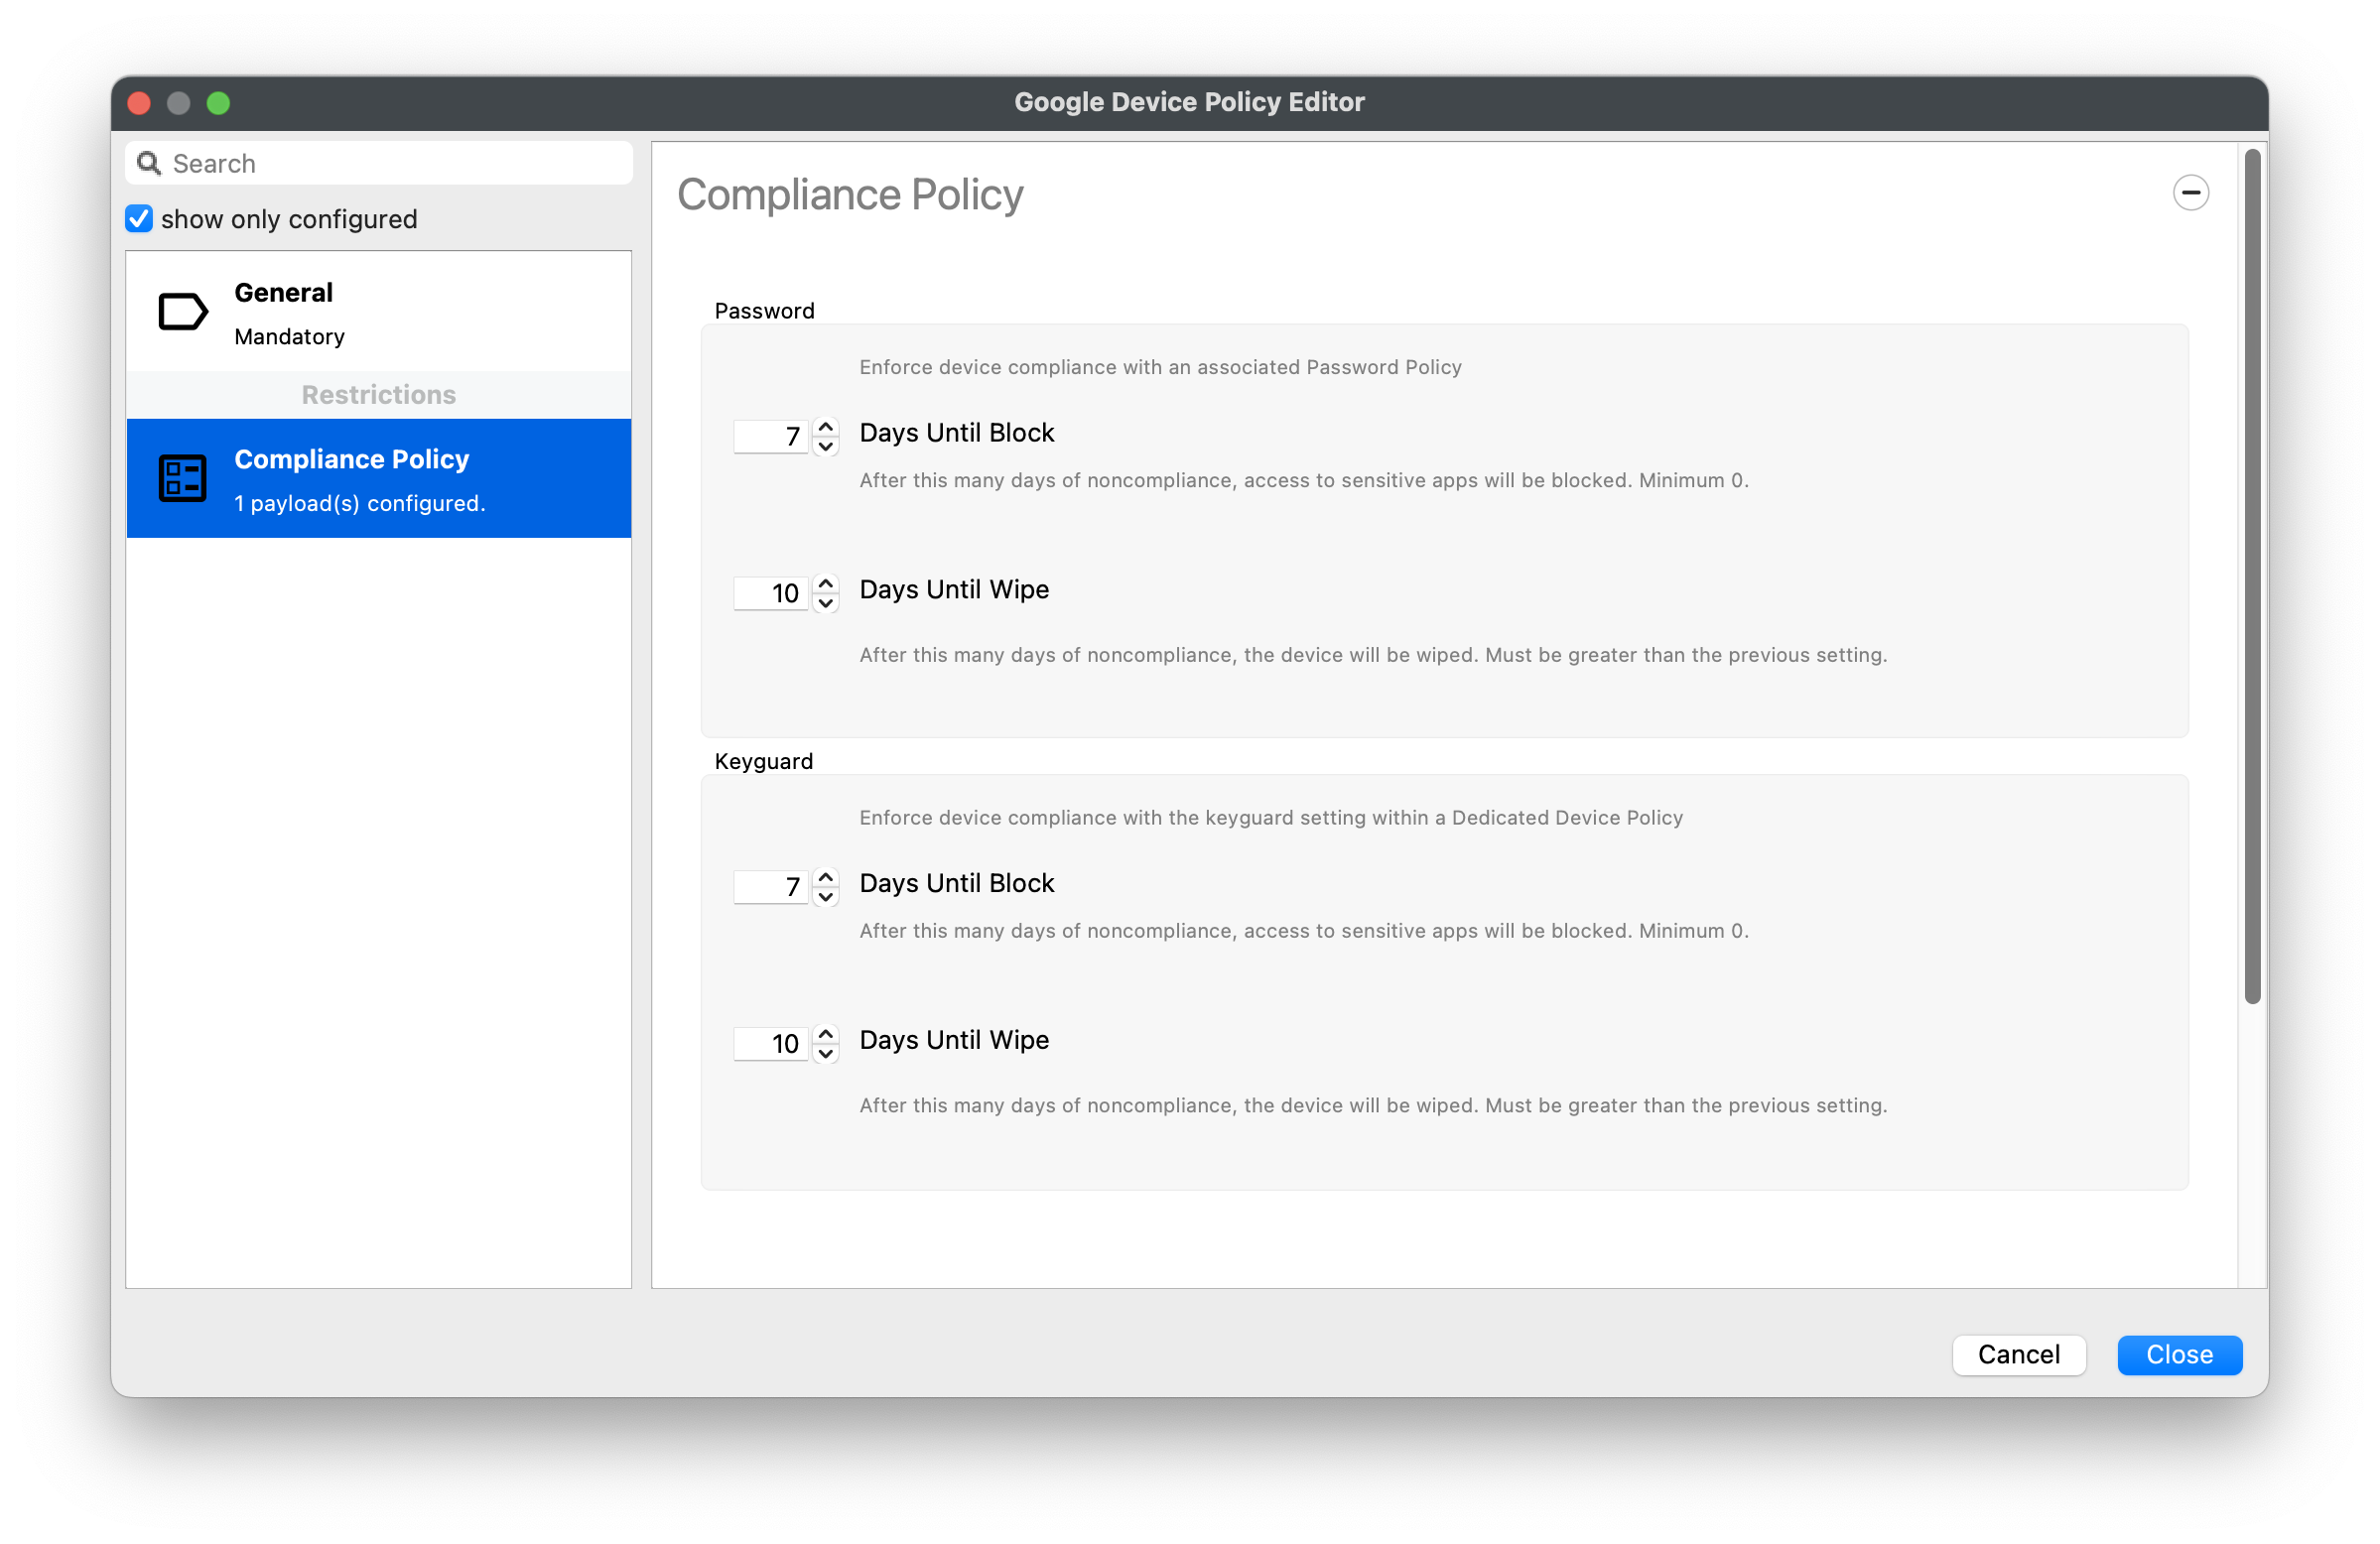
Compliance Policy
Set compliance level of associated devices.
- None - Do not enforce any compliance. When other settings are sent they can be ignored and the device will operate
- Low (Default) - Require password compliance. If not compliant, no other apps will open
- High - same as low, but additionally disables any device running below Android 7.

Password Policy
Set password constraints
- Password History Length - The length of the password history. After setting this field, the user won't be able to enter a new password that is the same as any password in the history. A value of 0 means there is no restriction
- Count of Failed Passwords for Wipe - Number of incorrect device-unlock passwords that can be entered before a device is wiped. A value of 0 means there is no restriction.
- Password Expiration Timeout - A duration after which a password must be changed. A value of 0 means that passwords do not expire.
- Password Quality - The restrictions an Android device will enforce
- Weak Biometric - The device must be secured with a low-security biometric recognition technology, at minimum. This includes technologies that can recognize the identity of an individual that are roughly equivalent to a 3-digit PIN (false detection is less than 1 in 1,000)
- Password Required - A password is required, but there are no restrictions on what the password must contain.
- Numeric - Must contain numeric characters
- Minimum Length
- Numeric , Non repeating - Must contain numeric characters with no repeating (4444) or ordered (1234, 4321, 2468) sequences.
- Minimum Length
- Alphabetic - The password must contain alphabetic (or symbol) characters.
- Minimum Length
- Alphanumeric - The password must contain both numeric and alphabetic (or symbol) characters
- Minimum Length
- Complex - The password must contain at least a letter, a numerical digit and a special symbol. Other password constraints, for example, passwordMinimumLetters are enforced.
- Minimum length
- Minimum count of letters
- Minimum count of uppercase letters
- Minimum count of non-alphanumerics
- Minimum count of numerals
- Minimum count of special symbols

Device Restrictions
Restrict access to device functionality
You can choose Unspecified, Allowed, Disallowed for:
- Use of camera
- Debugging
- Install packages from unknown sources
- Allow user to add own WiFi networks
As of 15.4, a new restriction for USB Data Access has been included to allow or disallow file or data transfer for Android devices.
Key Name: "usbDataAccess", Values: Unspecified / (Don't Save), Allowed / ALLOW_USB_DATA_TRANSFER, Disallow File Transfer / DISALLOW_USB_FILE_TRANSFER, Disallow Data Transfer / DISALLOW_USB_DATA_TRANSFER.

Permission Grants
A detailed list of permission settings for settings that have been classified
- Dangerous
- Normal
- No Classification
And includes everything from allowing answering of calls, camera, NFC, vibrate, to battery status, and system alerts

Toggle to show all Permission options... Expand source
ACCEPT_HANDOVER
ACCESS_BACKGROUND_LOCATION
ACCESS_COARSE_LOCATION
ACCESS_FINE_LOCATION
ACTIVITY_RECOGNITION
ADD_VOICEMAIL
ANSWER_PHONE_CALLS
BODY_SENSORS
CALL_PHONE
CAMERA
GET_ACCOUNTS
PROCESS_OUTGOING_CALLS
READ_CALENDAR
READ_CALL_LOG
READ_CONTACTS
READ_EXTERNAL_STORAGE
READ_PHONE_NUMBERS
READ_PHONE_STATE
READ_SMS
RECEIVE_MMS
RECEIVE_SMS
RECEIVE_WAP_PUSH
RECORD_AUDIO
SEND_SMS
USE_SIP
WRITE_CALENDAR
WRITE_CALL_LOG
WRITE_CONTACTS
WRITE_EXTERNAL_STORAGE
ACCESS_LOCATION_EXTRA_COMMANDS
ACCESS_NETWORK_STATE
ACCESS_NOTIFICATION_POLICY
ACCESS_WIFI_STATE
BLUETOOTH
BLUETOOTH_ADMIN
BROADCAST_STICKY
CALL_COMPANION_APP
CHANGE_NETWORK_STATE
CHANGE_WIFI_MULTICAST_STATE
CHANGE_WIFI_STATE
DISABLE_KEYGUARD
EXPAND_STATUS_BAR
FOREGROUND_SERVICE
GET_AND_REQUEST_SCREEN_LOCK_COMPLEXITY
GET_PACKAGE_SIZE
INSTALL_SHORTCUT
INTERNET
KILL_BACKGROUND_PROCESSES
MANAGE_OWN_CALLS
MODIFY_AUDIO_SETTINGS
NFC
NFC_TRANSACTION_EVENT
READ_SYNC_SETTINGS
READ_SYNC_STATS
RECEIVE_BOOT_COMPLETED
REORDER_TASKS
REQUEST_COMPANION_RUN_IN_BACKGROUND
REQUEST_COMPANION_USE_DATA_IN_BACKGROUND
REQUEST_DELETE_PACKAGES
REQUEST_IGNORE_BATTERY_OPTIMIZATIONS
SET_ALARM
SET_WALLPAPER
SET_WALLPAPER_HINTS
TRANSMIT_IR
USE_BIOMETRIC
USE_FINGERPRINT
VIBRATE
WAKE_LOCK
WRITE_SYNC_SETTINGS
ACCESS_MEDIA_LOCATION
BATTERY_STATS
BIND_REMOTEVIEWS
BIND_SMS_APP_SERVICE
CHANGE_CONFIGURATION
GET_ACCOUNTS_PRIVILEGED
GET_TASKS
GLOBAL_SEARCH
INSTANT_APP_FOREGROUND_SERVICE
PACKAGE_USAGE_STATS
PERSISTENT_ACTIVITY
READ_MEDIA_AUDIO
READ_MEDIA_IMAGES
READ_MEDIA_VIDEO
SMS_FINANCIAL_TRANSACTIONS
SYSTEM_ALERT_WINDOW
USE_FULL_SCREEN_INTENT
 |
| Figure 1.1 - App |
 |
| Figure 1.2 - Global |
 |
| Figure 2.1 - Policy Options |
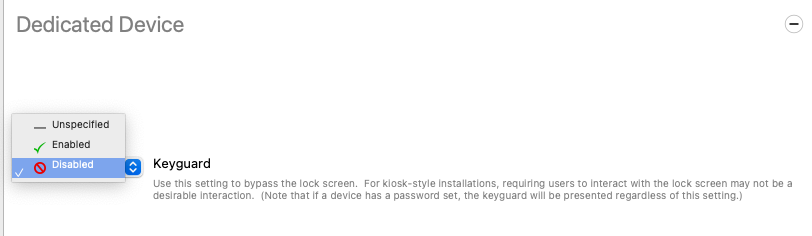
DEDICATED DEVICE
Keyguard
This feature enables you to lock and unlock your screen.
Disabled option will bypass the lock screen.
Custom Launcher
When enabled, it will set your device to kiosk mode. All the applications available on device screen were deployed through FileWave.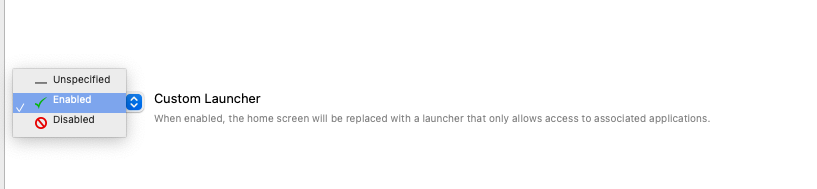
Locked Task
This option will lock the device to open only a single app. The App must be downloaded and installed via FileWave. 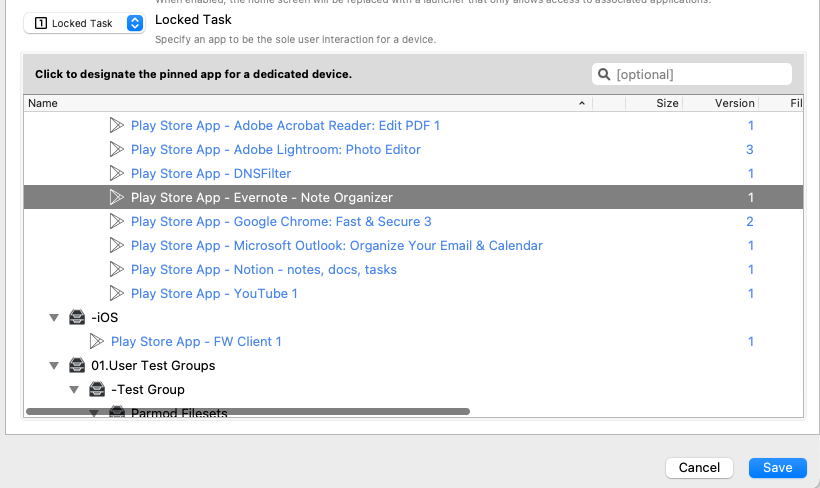
You can also use custom Google Play Web Apps to set as a locked task if you want to lock just a particular webpage instead of the entire Chrome browser.
Android apps are not installing immediately
What
As an administrator, you use FileWave to send Android policy changes to a device. The policy is enforced on the device, but Android controls the exact timing for installing or updating apps.
When/Why
Google prioritizes battery life, network state, and user experience for Android users. As a result, Android Play Store Filesets associated with a device may take time to install or update. In normal priority mode, app changes can take up to 24 hours to apply.
How
You can check the Android Device Policy app on the device. The Policies section shows the status of apps specified by the policy.

Options to speed up app installation
There are several ways to reduce the wait, depending on the app configuration and whether the user can interact with the device:
- If the app appears as available in the user's managed Play Store shortly after the Fileset is associated, the user can choose to install it immediately.
- The user can put the device into a favorable state for policy processing: connect to Wi-Fi, connect to power, close running apps, and leave the device idle for a period of time.
- For apps that need faster update behavior, configure the Android Play Store app payload's auto-update mode as High Priority. FileWave exposes this option for Play Store app payloads, and Google's Android Enterprise behavior expects high-priority app updates to start quickly when the device is online.
If none of the acceleration options are practical, wait for the Android policy cycle to complete. The policy will eventually apply and the apps will install or update.
Related Content
Android Lost Mode
What
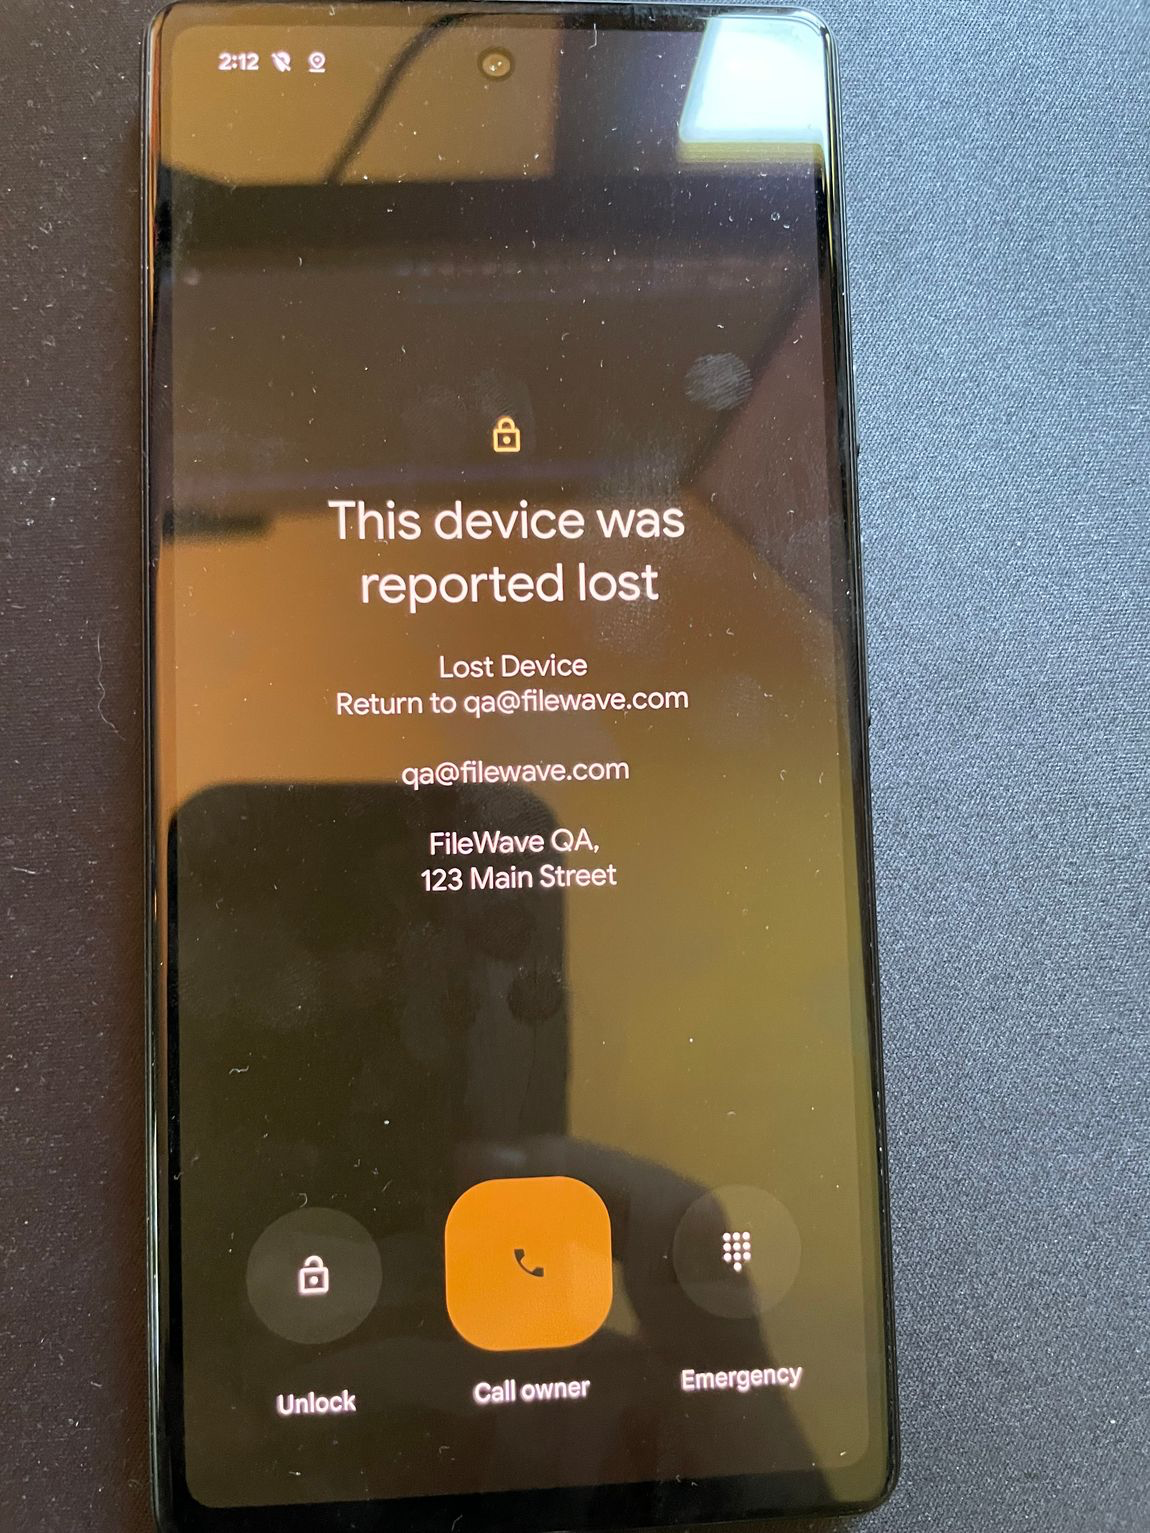
Android Lost Mode is a FileWave EMM security action for corporate-owned Android devices. It remotely locks an enrolled device reported as missing, shows a custom message, and prevents normal use until the device is unlocked with the correct passcode.
When/Why
Use Android Lost Mode when a managed Android device is misplaced, suspected stolen, or needs to stay locked while you decide whether to recover or wipe it. Lost Mode helps protect organizational data by blocking normal device use and showing recovery information on the lock screen.
How
Device Eligibility
Before activating Lost Mode, make sure the device meets these requirements:
- Corporate-owned Android 11 or later: The device must be corporate-owned, not BYOD, and must run Android 11 or later.
- Not already in Lost Mode: The device should not currently be in Lost Mode.
- No recent password reset: The device must not have had a password reset in the last 12 hours.
- No recent manual exit from Lost Mode: The device must not have been manually exited from Lost Mode in the last 12 hours.
Activating Android Lost Mode via FileWave
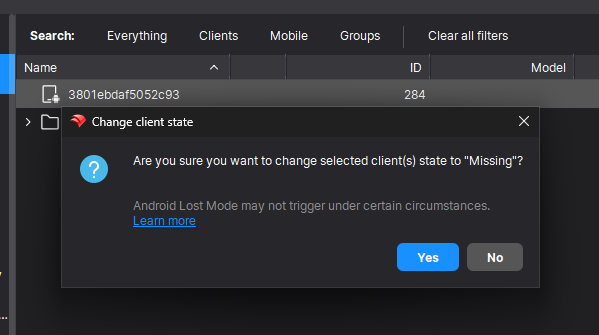
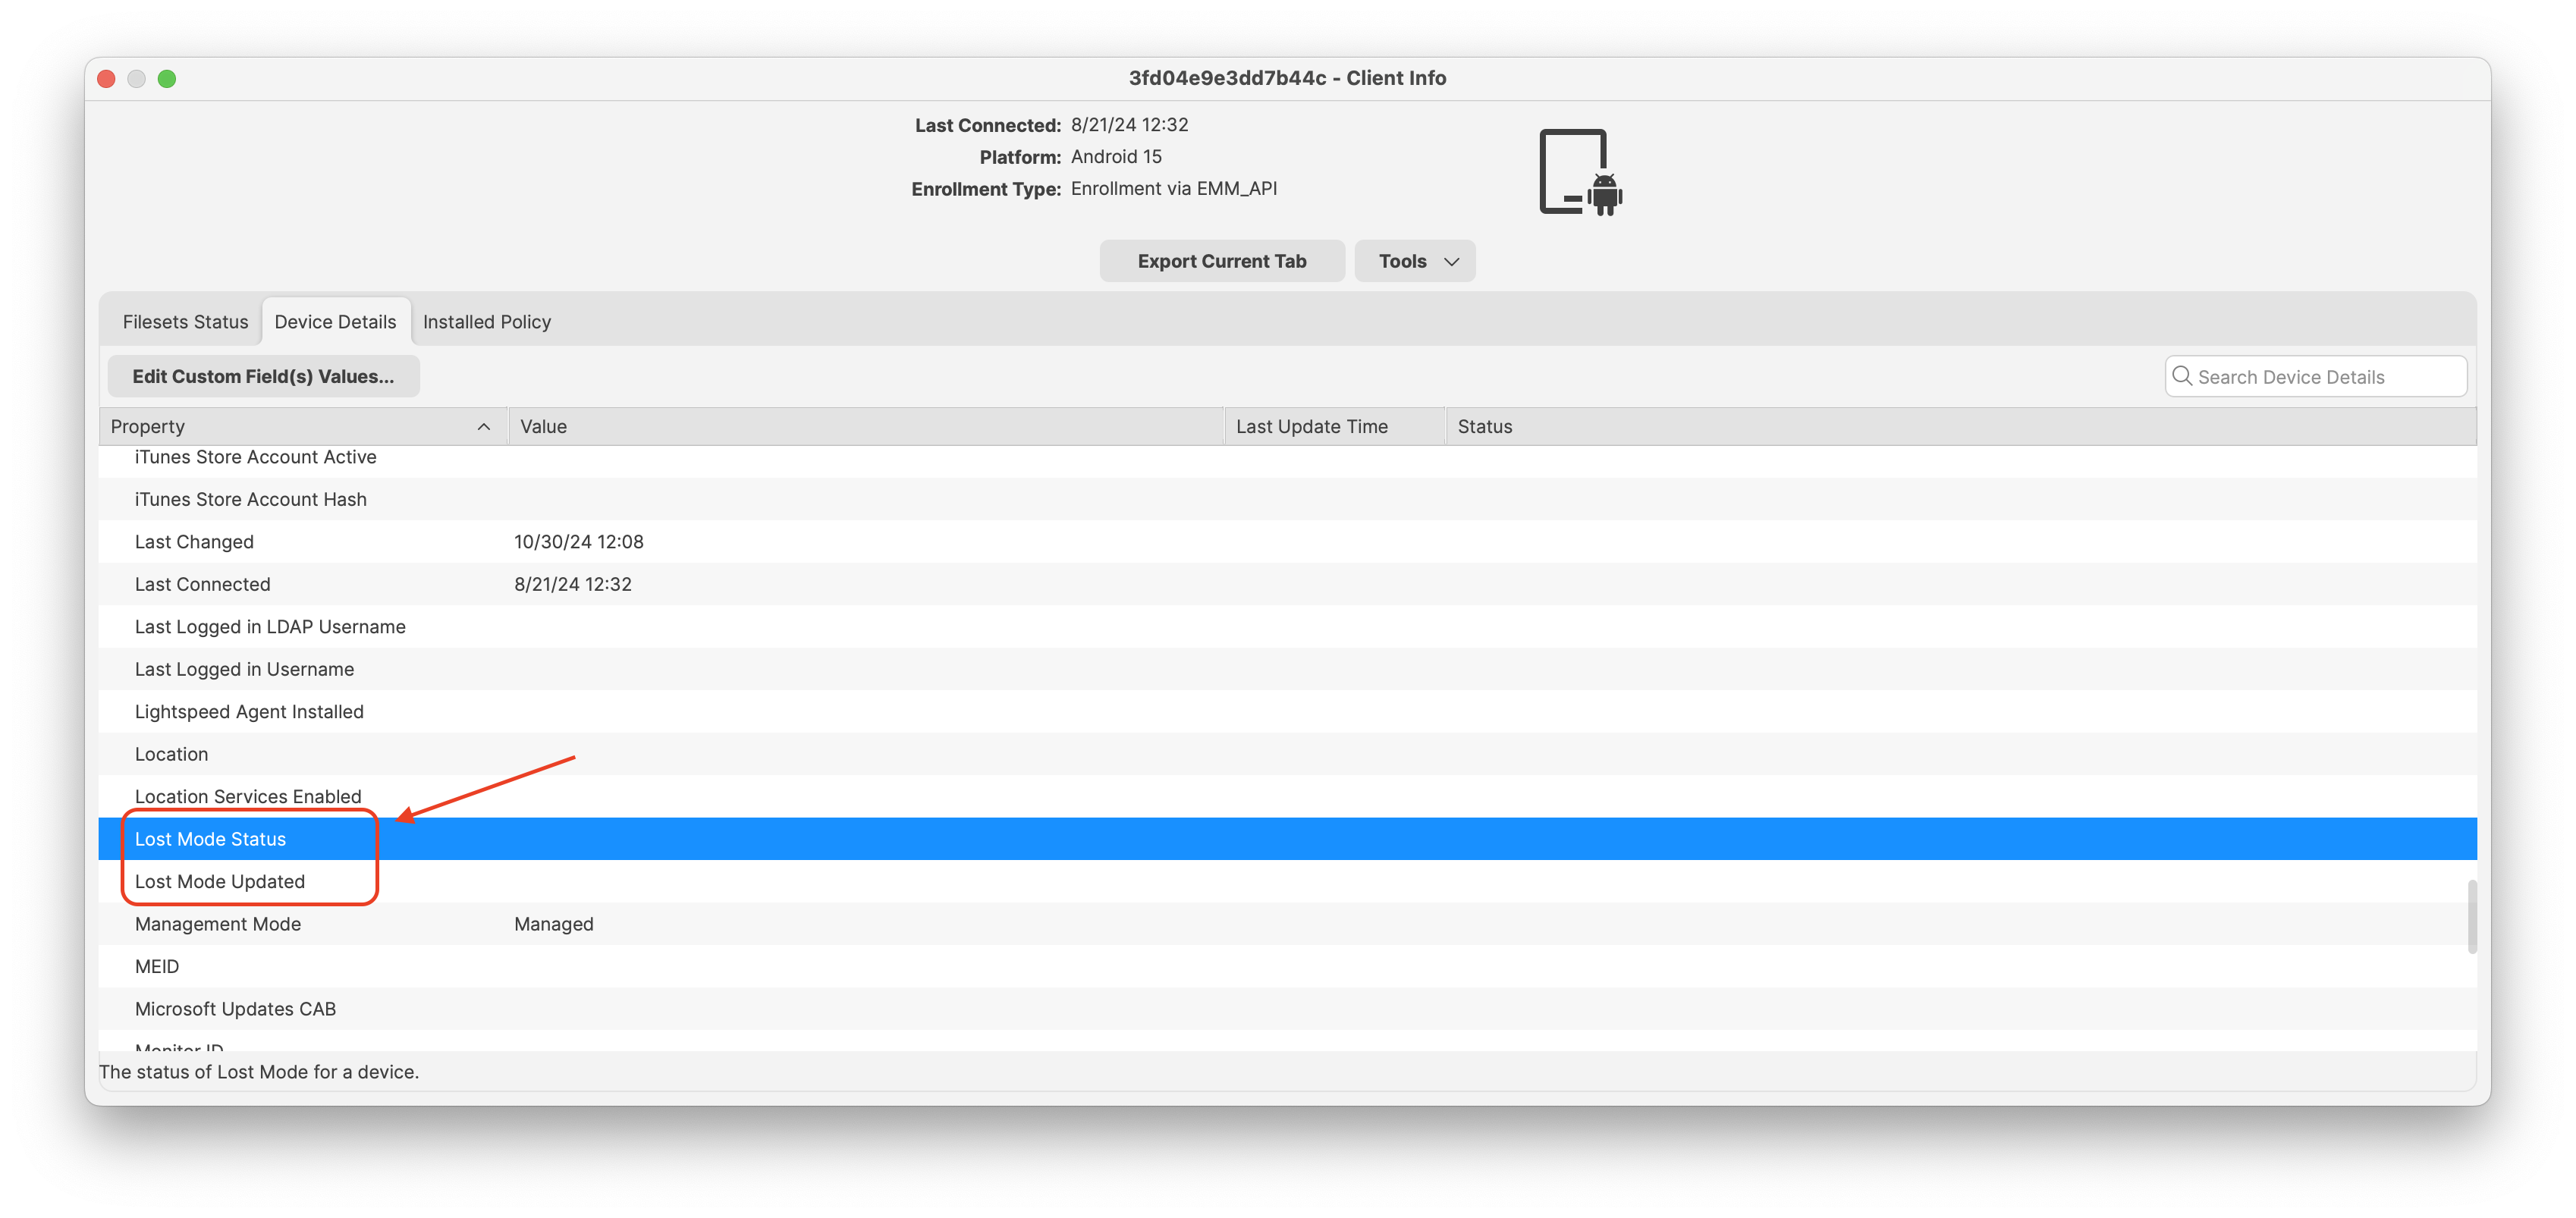
EMM devices in the Missing Client State use Android Lost Mode. In FileWave Central, right-click the device and choose Client State > Missing.
Android Lost Mode allows the end user to exit Lost Mode by entering the device passcode. FileWave reports both the current state and expected state in inventory. After the device is in Lost Mode, you can right-click it and choose Play Lost Mode Alert.
The status report appears in Device Details.
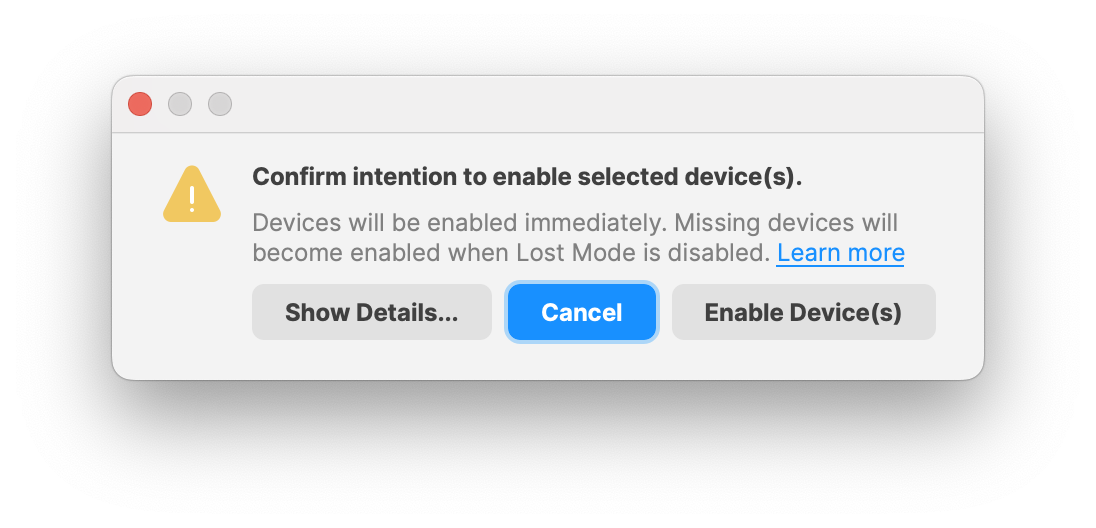
Disabled Devices and Lost Mode
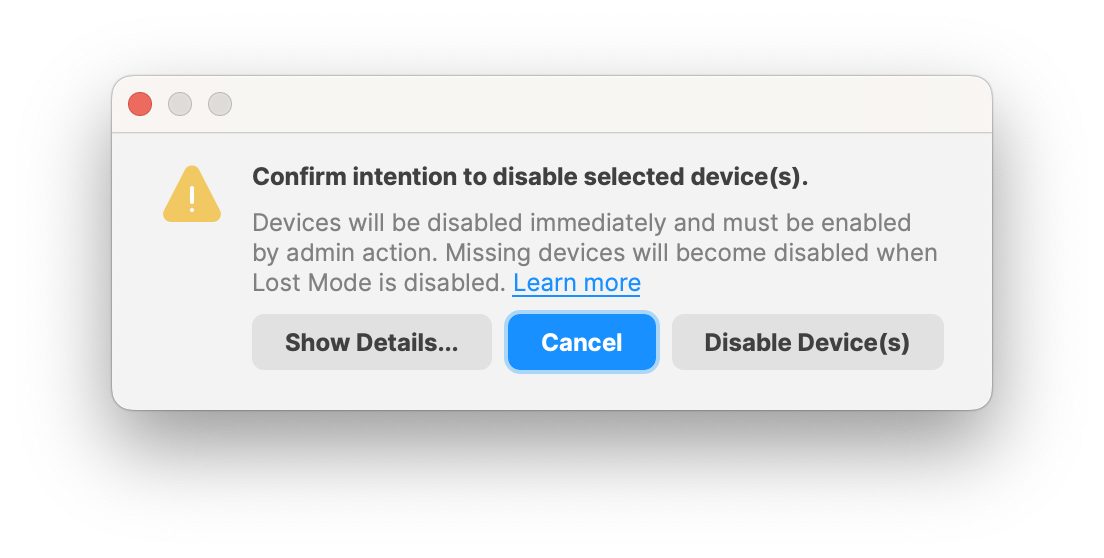 |
 |
When selecting an Android device, you can enable or disable the selected device. When an Android device is set to Disabled, FileWave limits the device to Google services instead of normal device use. Core apps such as Phone, Google Play Store, and Settings are part of that restriction.
When the device is set back to Enabled, Google Play services resume and all apps are usable again. If the device was in Lost Mode while disabled, it resumes the disabled state after Lost Mode ends.
Important Considerations
- Passcode requirement: Devices should require a passcode so Lost Mode can be exited only by an authorized user.
- User communication: Tell users what Lost Mode does and how they can exit it by entering their passcode.
- Policy compliance: Use Lost Mode as part of your organization's missing-device and data-protection process.
Related Content
Android EMM Global Default Policy Change (14.9+)
What
Prior to version 14.9 of FIleWave, Password and Keyguard policies were included automatically in an Android Default Custom Policy. An Android Default Custom Policy sets certain device parameters for ALL managed Android EMM devices. In Version 14.9, this behavior is changed because inclusion of Keyguard/Password elements in the default policy can cause issues with BYOD enrollment, so those elements are now removed from all default policies.
When/Why
Default Policies are used to set global settings for enrolled Android devices. If you don’t use them, or are just starting now to use them, this article has no impact on your environment. If you used them prior though, and Keyguard and Password Policies are important to your environment, you MUST make the changes outlined below.
How
Because those two settings are removed from the default policy, you’ll likely want to make the following change BEFORE upgrade to ensure a seamless policy shift (afterword is OK too, but devices won’t have the policies in the meantime). Basically, it is a simple change…instead of including those policy configs in the global policy, we’ll just put them in a normal (fileset) policy and apply that by smart group instead. The best option would be to apply that policy via a smart group to all non-BYOD Android devices. Then, as soon as your server is upgraded, all devices that need the “new” policies will have them. Example fileset policy and smart group definition shown below:
Android devices with multiple policies
What
Android Policies manage settings on Android Enterprise devices. For examples of available settings, see Android EMM Policies and Permissions.
When/Why
When more than one Android Policy is assigned, FileWave has to merge the policy fragments before sending one effective policy to the device. This article explains which setting wins when fragments conflict.
How
For most settings, FileWave applies the most restrictive value. For settings where two fragments provide competing values, such as two Wi-Fi configurations, the later fragment wins. FileWave orders fragments by distance first, descending, then by the most recently created association.
- Closer assignments override farther assignments because this merge path uses last-one-wins ordering.
- When distance ties, the newer association wins. Other FileWave code paths may not order beyond distance and association ID, so use the Installed Policy tab to confirm the final result.
To confirm what FileWave sent to the device, open Device Details in FileWave Central and review the Installed Policy tab. This shows the effective Android policy after the fragments are merged.
Related Content
Android System Apps
During provisioning of devices, Android, by default, disables the built-in System Apps. This of course, may be undesirable.
FileWave 15.3+ includes an additional custom setting to alter this behaviour.
Configuring the below will impact all Android devices during enrolment, where DPC Extras are supported.
DPC Extras
Device Provision Controller Extras are optional key/value pairs providing additional enrolment features and are only supported by some enrolment methods, as indicated by Google's article:
Workaround
The following file should be edited:
/usr/local/filewave/django/filewave/settings_custom.pyAdd an additional entry as shown:
EMM_PROVISIONING_DEFAULT_APPS_ENABLED = TrueOnce saved, restart the FileWave Server service:
fwcontrol server restartHosted customers should contact support to enable this feature if desired.
Troubleshooting
Troubleshooting of Android management issues.
Android EMM Known Issues
Functionality
| Issue | Notes | Reference |
| Enrollment of more than 500 devices is blocked by Google's API | https://bayton.org/blog/2024/03/amapi-permissible-usage/ discusses this issue introduced in Q4/2024 by Google. The AMAPI API has a hard limit now of 500 devices by default. There is a form: https://goo.gle/android-enterprise-response that can request that Google raise this limit for your account. | |
| Can not import or create placeholders | FileWave hopes to implement in future release | |
| Devices do not show in smart groups | ||
| No paid app distribution (AKA group license purchases) | Paid apps not currently implemented in Google API | |
| Wiping device, but not removing from FW does not get previous associations | FileWave hopes to implement in future release | GOOG-216 |
| Compliance policy breaks model update Error at model update: |
Google API was suddenly changed. Code fix already in future release. If you were on 13.1.0 when EMM was enabled in your license, then you will need a fix before or after upgrading to 13.1.1. To request a patch use the Feedback Portal : Question (must be apart of the EMM program to use) |
|
| Default Apps removed after enrolment |
Google standard behaviour is to remove default, installed apps on enrolment.
GUI option to follow in a future update. |
GOOG-965 |
Minor (Aesthetics) Issues
| Issue | Notes | Reference |
| You cannot put the FileWave Client APK on an EMM enrolled device | ||
| Closing and reopening the Android signup window before completion will display the wrong Google Org Name | FileWave hopes to implement in future release | GOOG-187 |
| No Command History in device details | FileWave hopes to implement in future release | |
| The Serial Number I see in FileWave does not match the Serial Number I see on the device. | Some devices (Predominately Samsung) have two serial numbers, to see these on the device: Settings > Google > Device Policy > ⋮ (vertical ellipse) > Device Details. Scroll to the bottom to see the serials. |
Google Play Store Errors
Android EMM Google Play Store errors
Use this article when FileWave cannot open or negotiate a managed Google Play Store instance and shows a 403 or 500 error.
403: Caller is not authorized to manage enterprise
If you see this error:
Server error; FileWave was unable to negotiate a Play Store instance with Google.
Please try reopening this Play Store window.
Server said (403): Caller is not authorized to manage enterprise.
Figure 1.1 - 403 error
Check that your FileWave administrator account has the required permissions. See Managing FileWave Administrators.
If the permissions look correct and the error continues, wait before reopening the Google Play window. Repeated attempts can temporarily disable the EMM connection and may lead to the 500 error below.
500: Problem with Android EMM enterprise
If you see this error:
Server error; FileWave was unable to negotiate a Play Store instance with Google.
Please try reopening this Play Store window.
Server said (500): Problem with Android EMM enterprise; Please check your FileWave Dashboard.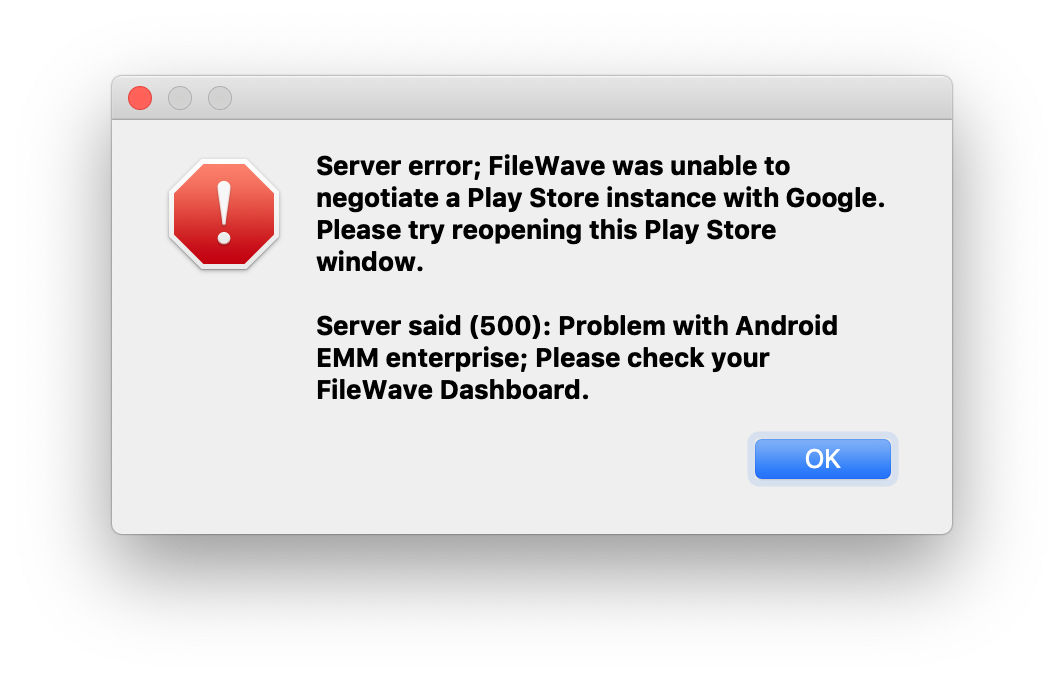
Figure 1.2 - 500 error
The Android EMM enterprise may be disabled or need attention. Check the FileWave Dashboard for related errors, then go to Admin > Preferences > Google > Configure Service Account.
Select Re-Enable Enterprise.
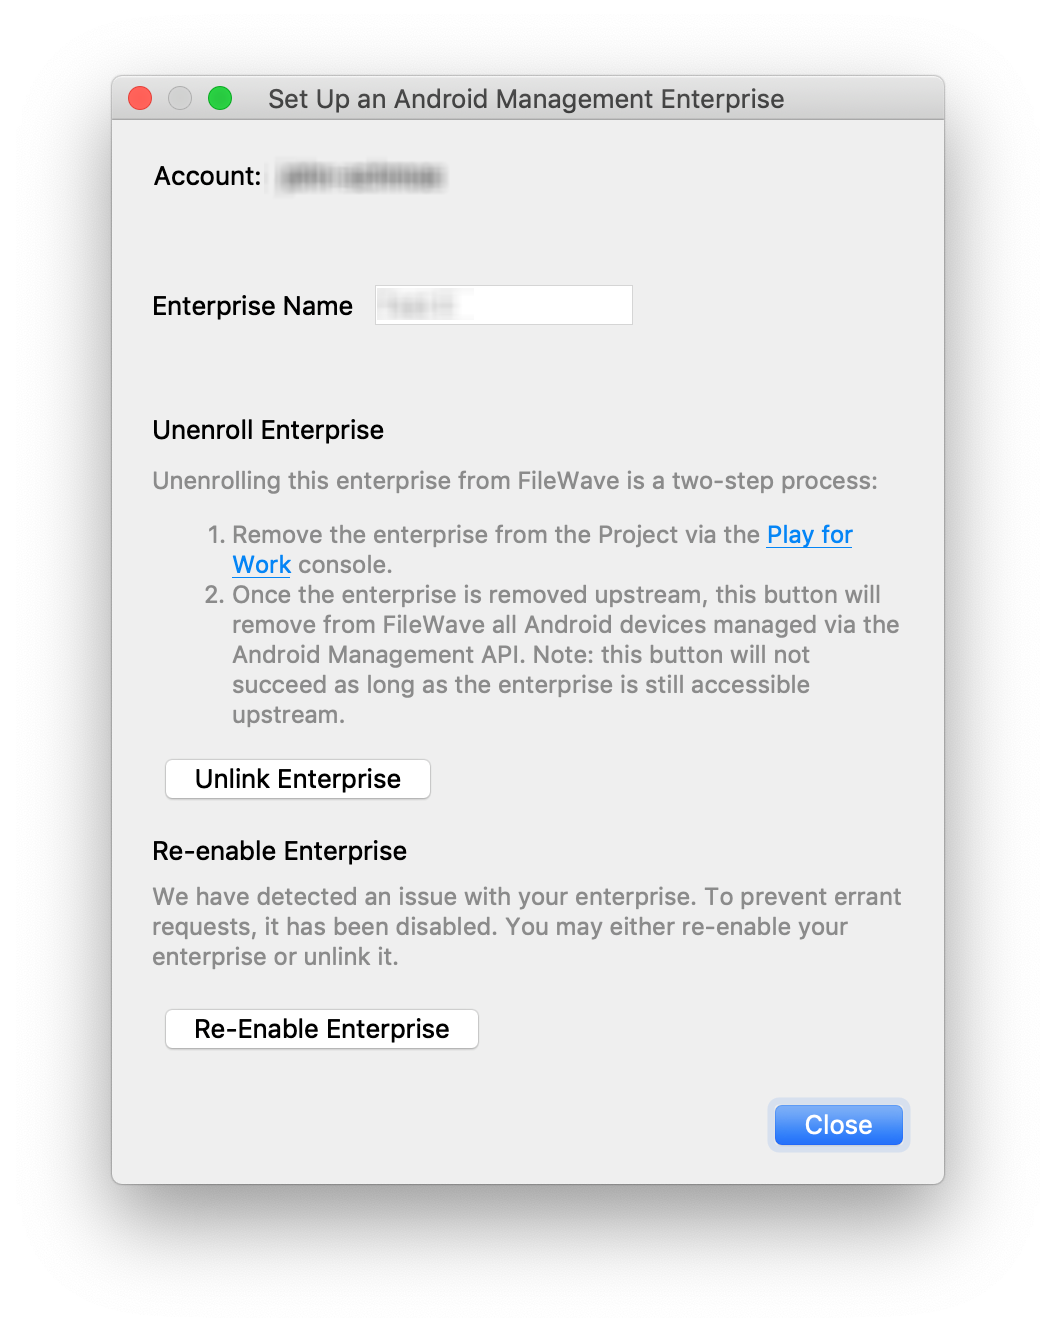
Figure 1.3 - Store has been disabled
Android 500 device limit on enrollment
This article will be updated as we find out more information. As of now this issue is resolved. Last updated: April 11, 2025
What
Google's Permissible Usage page has updated from no explicit maximum number of devices per project (it was a soft 1000 prior, referenced below) to now topping out at 500 devices. In addition, the Android Enterprise features list (requirements) has additionally been updated from the prior 1000 devices to reflect the updated quota.
When/Why
In the past this quota was not automatically enforced, and the number of devices in the documented limit for an unverified AMAPI solution was 1000 although not ever seen to be enforced. FileWave is a validated partner however as you can see: https://androidenterprisepartners.withgoogle.com/provider/#!/5163783169245184 It was discovered on December 16, 2024 that there is a 500 device limit being enforced suddenly.
The AMAPI API now enforces this quota, which wasn't the case before. The addition of two new events returned to project administrators via a UsageLogEvent, which is a collection of various events logged on devices from the use of ADB to power on/off, external media mounting, and so on, suggest the API itself has the limits baked right in:
"MAX_DEVICES_REGISTRATION_QUOTA_WARNING",
"MAX_DEVICES_REGISTRATION_QUOTA_EXHAUSTED"
How
Despite the addition of these new, actively enforced quotas, it remains possible to request a higher limit on a case by case basis. Google now provide a form to - amongst other things - "respond to a quota limit":
Updated Dec 18, 2024: You can create a support case with Customer Technical Support and then we will ask Google to adjust the limit. FileWave is investigating what the longer term solution is for this with Google. Google is aware that FileWave is a validated partner ( https://androidenterprisepartners.withgoogle.com/provider/#!/5163783169245184 ) so this issue appears on the surface to be an error on Google's part that they are enforcing a lower limit, but we are investigating.
Updated April 11, 2025: We have met with Google and have both a workaround in place as well as an open line of communication. This should not be an issue moving forward.