Apple Classroom
Apple Classroom is an application developed by Apple for educational environments. It is designed to assist teachers in managing and monitoring students' iPad activities during class. With Apple Classroom, teachers can launch apps, lock screens, send and receive documents, view students' screens, and control their iPad usage remotely. It provides educators with tools to guide and enhance the learning experience, promote collaboration, and maintain a focused classroom environment. Apple Classroom enables teachers to better engage with students and tailor instruction to individual needs using iPads as educational tools.
- Use Apple Classroom with FileWave
- Classroom – Shared iPad
- Classroom – SIS Data
- Classroom – Image Service
- Classroom – Shared iPad
- Apple Classroom Deployment Scenarios
- Classroom – What we don’t support
- Managed Apple IDs
- Getting student images into Classroom
- Force shared device passcode type
- Classroom – Identity Certificate Management
Use Apple Classroom with FileWave

Apple Classroom is a teacher app for supported iPad and Mac devices. Teachers can open apps and websites, view or lock student screens, share student work through Apple TV, and manage Shared iPad sessions. FileWave can deploy the app to teacher devices and deliver the education configuration profile used by MDM-created classes.

Main features:
- Show, for each device, what the student is doing (which app is in the foreground)
- Lock student devices (eyes up front)
- Open an app or a specific Safari page on student devices, with or without Single App Mode
- Observe (without interaction) student devices
- Pre-assign shared iPad to student to ease login
- Display student iPad screen on Apple TVs
- Sign users out
- Change user passwords (with Managed Apple IDs)
Install Classroom on teacher devices. Student devices receive class configuration through MDM and do not need the Classroom app. Apple supports classes synced from Apple School Manager, classes created directly by an MDM solution, and unmanaged nearby classes. Apple School Manager is required when the workflow relies on Managed Apple IDs or Shared iPad.
For MDM-created classes, review Apple's current Classroom device, network, supervision, and Managed Apple ID requirements before rollout.
How FileWave supports Apple Classroom
For an MDM-created class, every teacher and student device must be enrolled and receive the class configuration from FileWave. The workflow uses:
- Client SSL certificates for each device
- A specific profile ("education payload") that will configure both the Classroom app and Shared iPad devices
For MDM-created classes, FileWave sends Apple's education configuration through the device channel on iPadOS and the user channel on macOS.
On macOS, user-channel payloads apply only to users managed through MDM. Review Apple's MDM device and user management guidance before relying on Classroom for multiple local users.

Federated authentication in Apple School Manager can connect an identity provider to Managed Apple IDs used by Classroom and Shared iPad.
FileWave classroom workflow
- Import class and roster information from a supported SIS source.
- Associate people with one-to-one devices or associate classes with shared-device carts.
- Support both one-to-one and Shared iPad deployments.
- Generate and deploy the education configuration for each assigned device.
- Import device placeholders so app and profile assignments can be prepared before devices arrive.
Classroom assignments use the same FileWave workflow as other app and profile deployments.
Classroom – Shared iPad
Terms and Definitions
Classroom – this is this is Apple's application for teachers allowing them to manage a class of students using iPad devices. Main features:
- Lock student devices
- Start application or Safari on a given web page on student devices
- Observe (without interaction) student devices
- Pre-assign shared iPad to students
- Display student iPad screen on Apple TVs
- Only one user is logged in at a time
- Personal data are downloaded from iCloud on first login on the device and cached on the device
- You can configure how many "user caches" can be stored on the device
- Managed Apple IDs are required
Apple School Manager - this is Apple "Super DEP" portal for education.
- Works as a normal DEP account (you can create multiple "virtual servers" and use them to deploy your devices)
- Integrates VPP
- Integrates Student Information System data
- Integrates Managed Apple IDs management
One-to-One (1:1) context - this is a deployment model where a person is getting a device that is not shared with another person.
Cart - this is a Group of devices that usually stay in one classroom, and that are shared by students. They do not have to actually be stored in a cart; this is just a logical grouping that we chose to call a Cart.
While Classroom and Shared iPad share the same underlying concepts, it is not mandatory to use both together:
- Classroom only can be used in 1:1 context without Shared iPad
- Shared iPad can be used without a teacher running Classroom
Hardware Requirements
Apple has the hardware requirements listed here: https://help.apple.com/classroom/ipad/1.1/#/cadc1b9b4f8a (I know that it's an ugly URL, but it takes you where you need to go). On this page, you will see that the following applies:
- All devices require Bluetooth LE (Low Energy) support
- Nothing additional for teacher devices
- 1:1 student devices must be supervised
- Shared iPad requires more storage space
How it works: Classroom
- Classroom is configured using a special "education" payload (profile), which has to be sent via MDM.
- The profile has to contain data based on SIS data, indicating who is using what.
- From a communication point of view, Apple uses Bluetooth LE (hence the hardware limitation) to initiate the connection between devices and then establish a TCP/IP connection, using SSL certificates for security.
- Devices have to be in an ASM account.
- There is a special option you have to enable in DEP profile before activating the device.
- Once the device is activated, it will be prepared for Shared iPad (it will reboot just after enrollment).
- Users can log into the device using a Managed Apple ID from the same ASM account.
- Device space will be shared:
- iOS
- Common apps, media
- For each user, local cache of personal data
- When user logs in / out, data are synchronized via iCloud.
Classroom – SIS Data
SIS Support
To know how to configure devices, FileWave needs to import SIS data; mainly person details and class organization.
We currently support:
- ASM import (AKA "roster API")
- CSV import
ASM data will be synchronized once every day (at midnight). You can force a refresh in Education settings of FileWave Admin Preferences.
Classroom
Classroom has import settings. The format for the CSV files is the same, but the syntax to import these is different
Importing CSV files for students, teachers, and classes for Classroom
SSH into the FileWave Server, then run the following commands as appropriate (note, the full path to python and django have to be specified):
/usr/local/filewave/python/bin/python /usr/local/filewave/django/manage.pyc sis_csv_data_import --teachers <full path to teachers.csv> [full|-incremental]
/usr/local/filewave/python/bin/python /usr/local/filewave/django/manage.pyc sis_csv_data_import --students <full path to students.csv> [full|-incremental]
/usr/local/filewave/python/bin/python /usr/local/filewave/django/manage.pyc sis_csv_data_import --classes <full path to classes.csv> [full|-incremental]Required Data
Classroom is an application that allows teachers to use their iPads to manage student devices during a class. Classroom requires the devices to be configured by MDM; with the configuration defining:
For teacher devices:
- Which classes are lead by the teacher
- Which students are in the classes
- Which devices are used by those students
For student devices (1:1):
-
- Which device(s) are used by the student
- Which classes are attended by the student
-
- Which classes will use this cart (defined as a Group of devices used with Classroom, irrespective of whether they are in a physical cart).
- Which students will use this cart (because they are in the class)
This means that in order to configure Classroom, you need to know:
- Which devices you are managing
- SIS data, which tells you which students are in a class lead by which teacher
- A link between the device(s) and person(s):
- Either a direct link for 1:1 (teachers or for 1:1 students deployment model); or
- A link between a Group of devices ("a cart") to a Group of students ("a class")
Devices
Single devices
Any device already enrolled in FileWave can be used for Classroom. However, at times it may be useful to prepare your deployment system upfront, before devices are actually enrolled. This is more important in a 1:1 deployment model where you want to have your students unboxing and enrolling devices with their own usernames, but you don't want to wait hours (or days) until all VPP licenses finally land to the device.
FileWave 11.1+ allows the creation of placeholders for iOS devices and preparation of your deployment workflow as well as your classroom settings before real enrollment occurs:
- Any iOS device in a DEP account can be imported as placeholder (if not enrolled yet)
- You can import a CSV file based on serial number for non-DEP devices.
Carts
Classroom support introduces concept of Carts, which are nothing more than a special Group of iOS devices. These apply to the term Cart:
- A Cart contains only Clones of iOS devices.
- A device can have a Clone in one and only one Cart.
- You can create a Cart by clicking on the toolbar icon.
- You can add a device to a cart by right-clicking on an iOS device and select "Add to Cart" or by drag-and-drop. Note: this will move any existing Clone currently in another Cart into the target Cart.
Define how persons are using devices
You need to tell FileWave who will be using which device. This can be:
- A direct 1:1 association for teachers
- A direct 1:1 association for students in a 1:1 deployment model
- An association between Group of devices (cart) and Group of students (class)
- Import a CSV file for 1:1 associations

- Import a CSV file for cart:class associations

- Authentication for 1:1 with LDAP
You can configure FileWave to automatically associate a device to a person using the enrollment auth username. Upon enrollment, FileWave can then look into SIS data and if there is a person having the same identifier in your SIS data, then the auth username link will be made. This can be enabled in Classroom preferences.
- Manually via drag-and-drop
In order to import CSV files, you have to first specify that you will be using CSV files using the SIS pane of the Education settings of FileWave Admin Preferences, by clicking on the "Edit Settings…" button, authenticating as the super user (fwadmin), as shown on the next page.

The import dialog should default to "None / CSV" in the selection box of "SIS data source."

If not, select that option.

You then need to enable Classroom support in FileWave Admin by selecting the following checkbox in the "Apple Classroom" pane the Education tab of FileWave Admin Preferences.

Classroom security relies on SSL Certificates, which will be deployed on each device. FileWave has to create those certificates prior to configuring Classroom. The first time you enable Classroom, you'll then be prompted to generate those certificates:

You'll then be able to save the main CA (certificate authority) private key - you'll need it if you want to revoke / renew certificates. (You also need super user credentials for that):

You will then be warned that the Private Key will not be stored within FileWave. It is your responsibility to maintain a copy of this in a safe location. Be sure to note where you are saving this so that you can put is somewhere safe. Also note that the file will be named "FileWave Classroom Private Key.key."
Note: If you have Keynote installed on your admin machine, the icon for this file will be a Keynote deck icon!
The dialog will display the certificates in a tree structure, where the root CA certificate is the top level item in the tree. The serial number and the expiry date of each certificate are also displayed. Certificates that will expire in less than one month are displayed with a yellow background, while expired certificates are displayed with red letters. You can sort by any column and filter certificates by typing some criteria in the search box and pressing Enter.

You can renew and revoke any certificates. In order to do so, select one or more certificates. The view supports multiple selection by holding the Ctrl key (Command or ⌘ on Mac) and clicking entries. You can then either right-click to get a contextual menu or use the corresponding buttons on the lower left corner of the dialog. When revoking a certificate, all its child certificates will also be revoked. The certificate and its child certificates will be renewed automatically right after revocation.
You don't need the private key for renewing or revoking leader or member certificates. However, renewing/revoking any intermediate CAs requires the private key of the Root CA that was generated before. The first time you renew or revoke an intermediate CA certificate, you will be asked to open the private key. It will be remembered for the duration of the dialog, so you won't need to open it again for any subsequent operations on CA certificates, unless an operation fails. If you close the dialog and open it again later, you will need to provide the private key again for renewing/revoking CA certificates.
Although not recommended, it is possible to revoke the root CA without providing the private key by clicking "Cancel" in the file dialog to open the private key. This is useful for example in case you lose the private key. After revoking the root CA, the whole certificate tree will be regenerated automatically.
After getting the certificates taken care of and storing your Private Key, clicking OK in the Preferences will result in the main window of FileWave Admin having a new category listed in the left-hand column labeled "Classroom."
CSV File Formats
The Entities supported
Before importing your mappings for Person:Device and Cart:Class associations, you first have to get Teacher, Student, Class data into the database, which you can do through the use of CSV files. There are three different entities for which you can import/update instances in the DB. Here they are with the supported fields you can specify in the CSV files:
Students:
-
- username (ID, required): username used for logging in.
- password: password used for authentication
- first_name
- last_name
- district_id
- school_id
- birth_date (ISO encoded date)
- grade
- managed_apple_id
Teachers
-
- username (ID, required): username used for logging in.
- password: password used for authentication
- first_name
- last_name
- district_id
- school_id
- title
- managed_apple_id
Classes:
-
- class_id (ID, required)
- teachers: a '|' (pipe) - separated list of teachers' usernames
- district_id
- school_id
- name
- description
- grade
- start_date
- end_date
- students: a '|' (pipe) - separated list of students' usernames
To import the CSV file, change your path to:
/usr/local/filewave/Django/ (on Mac or Linux)
then run this command:
/usr/local/filewave/python/bin/python manage.pyc sis_csv_data_import -classes <path to classes.csv> --teachers <path to teachers.csv> --students <path to students.csv> [-full|–incremental]Note: This is a single command without carriage returns at the end of the line.
Where:
- <path to classes.csv> gives the path to the CSV file that defines the classes to import
- <path to teachers.csv> gives the path to the CSV file that defines the teachers to import
- <path to students.csv> gives the path to the CSV file that defines the students to import
- --full or --incremental (default is --full): The full sync is handled so that a record that is in the DB but not in the file is marked as inactive (for later deletion). An incremental sync on the other hand is just updating or inserting records without touching the ones that are not referenced.
It's possible also to specify only one file
CSV Structure
Each file is a CSV with a header. In the header you have to specify which fields you want to insert/update for each of the records. Each entity type has a field that uniquely identifies it (see entity description for detailed info).
When a CSV file is imported, we try to find the corresponding record in the DB with that identifier. If we can we update the fields that are specified in the file (and leave the other fields as they were before).
The new "Classroom" view is not enabled by default. We do not want to have this showing for all customers unless they are using Classroom.

From the Classroom view you can:
- Import One-to-One or Cart associations CSV files
- Change associations via drag and drop:
- Drop one device to a single person for 1:1
- Drop one person to a single device for 1:1
- Drop a cart to a class for shared iPad model
- Drop a class to a cart
- See the current association state
Clicking on "Import one-to-one association(s)" results in this dialog box:

Note the "Download template" button, which produces a CSV file that is commented to make it easy for you to produce files in the proper format.
Clicking on the "Import Cart:Class association(s)" button results in this dialog box, which also has a "Download template" button:

Once the import is successfully done, you will receive a prompt asking if you want to re-generate the Education Profiles. In cases where you are importing both 1:1 associations and carts mappings, the suggested workflow is to generate the Profiles only after the second import.
Cart CSV File
You can also produce the Cart:Device associations via CSV import. The file format needs to contain three columns:
- cart_name: identifier of the cart
- devices: list of serial_numbers separated by pipe "|"
- classes: list of class identifiers separated by pipe "|"
This is an example
cart_name,devices,classes
cart-1,SN-1|SN-2|SN-3,class-1|class-2
cart-2,SN-4|SN-5,class-2
Notes:
- In incremental mode is possible to omit the devices or the classes column.
- So this file updates only the list of the classes:
cart_name,classes
cart-1,class-1|class-2
cart-2,class-2
- And this file updates only the list of devices belonging to the carts
cart_name,devices
cart-1,SN-1|SN-2|SN-3
- A device can belong only to one cart. If the same serial number is listed multiple times, the last assignment will be the final one
Mappings Validity
To validate the mappings (1:1 or cart/class) the code applies the following rules:
- Rule #0: a mapping is invalid if the related item does not exist
- Rule #1: Devices in cart cannot have 1:1 mapping
- Rule #2: A 1:1 device can have only 1 mapping
- Rule #3: Teachers can have multiple 1:1 devices assigned
- Rule #4: Students can have only 1:1 mapping and use cart devices
Each time the check is performed a mapping is validated only if it is compliant with all the rules, otherwise it will be marked as invalid.
Invalid mappings are not taken in account for Education Profile generation
Information about invalid mappings are shown in the Dashboard

Classroom – Image Service
The Classroom app can display student pictures. If no picture is available, Classroom uses the student's initials. FileWave needs a configured image service so it knows where to request those pictures.
Classroom uses SSL for communication and uses the device certificate to authenticate to the image service. FileWave receives the request from the device, checks whether the certificate is valid, then requests the image from the configured picture-hosting service and returns it to the device.
People in the Classroom environment, including teachers and students, have an identifier (sis_id). Images are stored on the referenced server in two sizes: small and large. Recommended image sizes are 675x1024 pixels for the small image and 2700x4100 pixels for the large image. Test a few images before deploying hundreds so you can confirm they display correctly on your student devices.
In FileWave Central, go to Preferences > Education > Apple Classroom to specify where FileWave requests Classroom images from. FileWave supports HTTP and HTTPS image URLs, plus basic and digest authentication.

Classroom and Shared iPad login screens cache images for a long time based on the image URL. The reset button shown above does not clear the cache directly. It generates a new URL for each image so devices download the images again.
If you are troubleshooting missing student photos, stale Classroom pictures, or Shared iPad user images that will not refresh, check the Apple Classroom image service settings and use the reset option to force new image URLs.
For more information about setting up your Classroom image service, see Getting student images into Classroom.
Classroom – Shared iPad
Keep in mind that Shared iPad and Classroom are independent; they use the same configuration system (education profile), but they can be used separately.
Enable Shared iPad
- Devices have to be in an ASM DEP account; check also hardware requirements - they are pretty high.
- There is a new option in DEP profile

- Device must then be re-activated (wiped)
Shared iPad and multiple users
Maximum resident users
You can define, in the DEP profile, the maximum number of users that can use a Shared iPad. Note: this only configures how many slices the user space will be divided into. For instance, on a 128 GB iPad, if you allocate 10 max users, each user will have an equal amount of storage space for personal data. Ten students can log into the device and will have a nearly instant login once their data is cached on the device. If an 11th student logs in, the oldest account will be deleted to free space for this user - so the login will be pretty long (sync user 1 data to iCloud, remove user 1 data from device, download user 11 data from iCloud).
User Management
There is a new entry in the Client Info dialog showing users on a shared device:

It returns data regarding who is logged in and the amount of space used by that user.
You can:
- Delete a user's current cache on a device: next login will be slower, but this will save a slot
- Log a user out

Shared iPad and Login
- Enter full Apple ID
- Select one of the recent users
- Select a class and then a user from the class
- Use "Assign" feature from Classroom app

Passcode is still required; this is pre-login only.
By default, FileWave will use passcode type "four." This can be changed.
- add this in settings_custom.py and restart apache
- supported values are "four", "six", "complex"
settings.CLASSROOM_DEFAULT_PASSCODE_TYPE = "six"
Supported values are complex, four, or six
This file is located at:
on Mac OS X / Linux -/usr/local/filewave/django/filewave
Roster API currently only returns "Name" - no distinction between first and last name. In that case, FileWave will take the first word as first name and the rest as last name.
Shared iPad restrictions
Application installation
Applications can only be installed when there is no logged in User - MDM will report invalid MDM command when it's done while a user is logged in on a shared iPad.
The recommended workflow is:
- Pre-deploy all required apps before school starts
- If you need to deploy an app during school time, then:
- FileWave can be configured to automatically log out users at a given time and proceed with Application self-healing. You can prepare app installation during the day and let FileWave log users out and then install apps overnight; or,
- If urgent, you have to either force logout of all users or get them to manually log out.

Apple Classroom Deployment Scenarios
Apple Classroom deployments in FileWave need device enrollment, teacher and student identity data, class data, and the correct device-to-person or cart-to-class associations.
- All devices enrolled in FileWave
- Teacher devices identified, with the Apple Classroom app installed
- One-to-one student devices associated with the correct student
- Cart Groups configured for shared devices
- Class data, including teachers, students, and carts, loaded into FileWave
Complete these parts of the deployment:
- Enroll devices
- Import SIS data (classes, teachers, students)
- Associate one-to-one and teacher devices with users, and associate shared-device carts with classes
- Deploy Classroom app to teacher devices
FileWave does not require one fixed order. Choose a sequence that matches when devices and SIS data become available.
Example: enroll shared carts first
- Enroll Cart devices and create carts
- Import SIS data
- Associate classes to carts
- Create placeholders for teacher devices
- Associate each teacher device to its teacher
- Deploy Classroom to teacher devices
- Use one-to-one automatic enrollment when the MDM authentication username matches the SIS identifier, allowing students to unbox and enroll their assigned iPad
Example: prepare identity and class data first
When SIS data and device assignments are known before enrollment, prepare the structure first:
- Import SIS data
- Import placeholders for 1:1 devices
- Enroll cart devices
- Associate classes with carts and devices with people
- Deploy Classroom to teacher devices
- Enroll one-to-one devices
You can make incremental changes later. For example, when a new student arrives, add the student and device-to-person association without rebuilding the existing classes or carts.
Classroom – What we don’t support
- FileWave Classroom assigns a cart to a whole class. It cannot split one cart between the first 10 students and another cart between the remaining students.
- FileWave cannot read a person's ASM passcode type, so it cannot choose the exact passcode keyboard ahead of time.
- FileWave does not group Apple Classroom classes by department.
- Class-level deployment is still class-scoped: when you associate an app to a class, devices used by that class receive the app and users in that class see it. Apps can still be deployed outside the Classroom workflow, so a device in a cart group may show apps that were not assigned through that class.
Managed Apple IDs
Apple IDs has always been the central piece of Apple ecosystem - linked to an iTunes account, it was the only way to get software licenses until VPP device based licenses have been added. It was becoming more and more complicated for Education Organization to maintain, even after Apple introduced education / under-age Apple ids.
This is why Apple introduced, in conjunction with Apple School Manager, "Managed Apple Ids" - those Apple Ids behave like any other, but instead of being "owned" by a user, they are "managed" by an education organization.
Silent invite
It is now possible to assign licenses to Managed Apple IDs, via VPP Users. While most of the apps now support Device Based assignment, a few apps still require user based licenses, and books are still using User Based Licenses. On this level, Managed Apple IDs are like normal Apple IDs: they have to be associated to a VPP user for the corresponding VPP token so the token organization can assign licenses to the Apple ID.
To improve customers workflow, Apple introduced the ability for MDMs to automatically and silently link a VPP user and a Managed Apple IDs. This makes organization life easier as they don't have to rely on human interaction to link their Apple ID to your VPP organization.
With the release of FileWave 12.7 FileWave have implemented this feature for 1:1 devices. Whenever a change occurs in the "Classroom" panel, FileWave will link the VPP user to the device;
- from the same Organization as the DEP token used for SIS extraction
- used in a 1:1 association for SIS
When this happens a VPP user will be associated to the user Managed Apple ID - and therefore user based licenses, including those for books, can be deployed, without the need of manually joining the organization. You will no longer need to accept the Apple terms and conditions on each device you are managing.
How to implement Managed Apple IDs with user assignment with FileWave
The user will need to sign in to the App store on their device with their managed Apple ID. Without this there is no way to know what managed Apple ID should be on which device. To do this the user will need to go to Settings -> iTunes & App Store -> Sign in with the account. If you are already signing the devices in with the managed Apple ID for iCloud you still will need to sign them in to the iTunes App store settings on the device.
One tip with this setup would be to sign in with the Managed Apple ID on the device during DEP setup on the individual devices. This would allow you to skip a step of signing the devices in after Enrollment is finished. So for this you would want to Enable Apple ID setup in your DEP profile so that this is not skipped during initial activation.
Getting student images into Classroom
Do you want student images to show up in Apple's Classroom tool? You have come to the right place.
Overview
- Images
- Large and small format of each student's image
- Properly named
- %user_identifier% = SIS/Student ID
- %size% = large or small
- Web server to host images
- Some form of security
- Enter the URL into FileWave Admin Preferences
Images
Many photography companies will name and resize images to whatever you need. Try contacting them before spending too much time creating perfect images.
It might also be work checking out how you SIS and/or Library checkout system store and share images, you may just be able to share that folder.
Image Name
Student image files have three requirements.
- %user_identifier% = SIS/Student ID
- %size% = large or small
- extension = png or jpg
%user_identifier%
If I was looking at ASM (Apple School Manager), and my students were showing with IDs like S0001, S0002 etc.

Then I would know that S0001 should be used for %user_identifier%
Be Careful: Apple School Manager lists "Person Number" and "Person ID" and you want to use "Person Number" when naming the images
%size%
As of the writing of this document, Apple has specified small and large versions of images are needed, but not the size.
FileWave's recommendation regarding image size are:
Small: 675x1024 pixels
Large: 2700x4100 pixels
Test a few before deploying hundreds of images to ensure that these sizes work well with your student devices.
Web Server
There are two main ways to list and share images (with some minor variation)
- A web server with a directory(folder) of student images
- A web server running some scripts (like python, java)
We will only talk about option one here, if you are advanced enough to program option two, you probably don't need FileWave's help.
What if I don't know which one to do?
If you don't know which one is best or you can do. A directory of images is by far the easiest. But always feel free to contact support with further questions and help.
Directory
In this setup you typically have a flat structure (meaning images are not in folders, just one folder will all student images in it), and would look something like:

Setup for your web server will vary depending on which one you selected. But if you can navigate via a browser to a URL simular to
https://fwusa.filewave.com/images/stu/S0001-small.jpg
Then you are ready to move on
Security
Student images are personally identifiable pieces of information and are important to maintain privacy. You will want to give reasonable assurance that you have done your best to prevent these images being released into the wild.
Below could be considered minimum recommendation, but always make things as secure as you can.
Setup will vary depending on the web server selected, so please refer to best practice or hardening guides of the respective server solution.
Internal only
This web server should not be accessable from outside your network. So using the main district web server, a computer sitting in a Firewall's DMZ or a hosted server are all insecure solutions.
You could start up a virtual machine running a free linux OS, enable server.app's webserver on an macOS computer, or use windows. Whichever you do, use something that will always have the same IP/domain name, and is always running.
HTTPS
These days there are few excuses for not doing https. Certificates are cheap or free, and using a secure connections helps prevent data interception from source to destination. Just do https (Port 443/TCP), and even disable http (Port 80/TCP)
Password Protected
Many web servers can enable password protection for a whole site or even just a section of a site. If using apache an .htaccess file simular to this:
AuthType Basic
AuthName "Protected Student pictures"
AuthBasicProvider file
AuthUserFile /var/www/.htpasswd
Require valid-user
Can be placed inside the student images folder to password protect it.
(see https://httpd.apache.org/docs/current/howto/htaccess.html for more info on apache .htaccess files including setup and use)
And a user can be created by something like:
htpasswd -c /var/www/.htpasswd picture_user
Note: that the password file is the same /var/www/.htpasswd in both .htaccess and htpasswd (see https://httpd.apache.org/docs/current/programs/htpasswd.html for usage).
Constructing the URL for Admin Preferences
If we were able to access the images via browser at a URL like
https://fwusa.filewave.com/images/stu/S0001-small.jpg
Then we can use that as our template
https://fwusa.filewave.com/images/stu/S0001-small.jpg

Would become:
https://fwusa.filewave.com/images/stu/%user_identifier%-%size%.jpg
Note how the - needed to stay in the URL, and that it was an https server.

Force shared device passcode type
Use this setting when Shared iPad users need one default passcode keyboard because roster data does not provide the passcode type FileWave should display.
FileWave uses Apple's Roster API to import Apple School Manager SIS data such as classes, students, and shared-device passcode requirements. Apple School Manager can define passcode requirements from a 4-digit PIN through a complex alphanumeric password, but FileWave may not receive enough roster detail to choose the matching keyboard automatically.
When that happens, set one default passcode type for all affected shared devices. On a self-managed Linux/macOS FileWave Server, edit the full path below. Hosted FileWave customers should contact FileWave Technical Support because they do not have direct access to edit settings_custom.py on the Hosted FileWave Server.
/usr/local/filewave/django/filewave/settings_custom.py
# add this in settings_custom.py and restart apache
# supported values are "four", "six", "complex"
settings.CLASSROOM_DEFAULT_PASSCODE_TYPE = "six"You can use either
four
six
complex
These values correspond to Apple's passcode policy options:

Classroom – Identity Certificate Management
Overview
FileWave 11.1 includes support for Apple Classroom. The setup recommended by Apple for MDM providers is to have one root CA, intermediate CAs for leaders (teachers) and members (students) and one certificate per device. This means we need a UI where administrators are able to generate, view and manage those certificates, which allows renewing/revoking certificates, as well as creating the initial root CA and intermediate CAs.
In the Admin
Dashboard
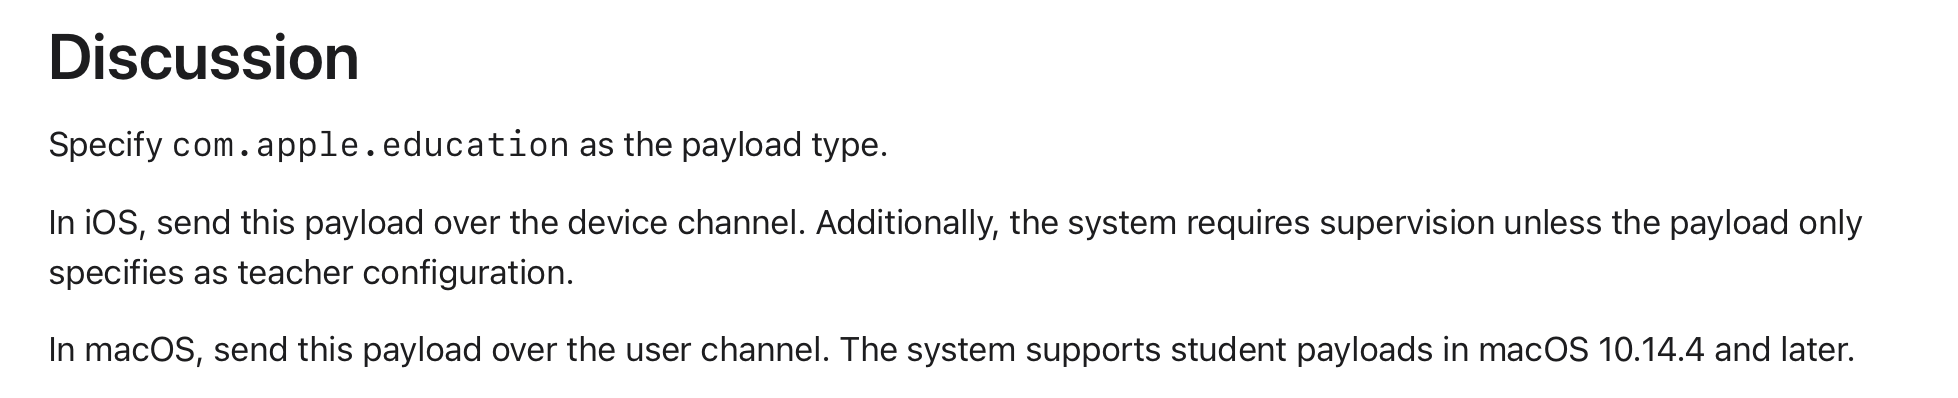
First place where you might see anything that is related to classroom is in the dashboard. By default we check if all the certificates are ok. It goes into warning state (yellow) if a certificate is about to expire (in less than 30 days) or if the whole classroom CA/certificate chain is absent. IT goes into error if at least on the the certificate is already expired.
In case of warning or error, you can click on "Go to settings" and it will ask you the super user credentials and if you want to create the defaut CA/Certificates (see following on how to proceed).
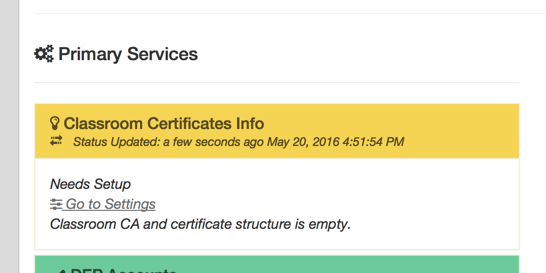
After it has refreshed (can take a few seconds), it will look like that:
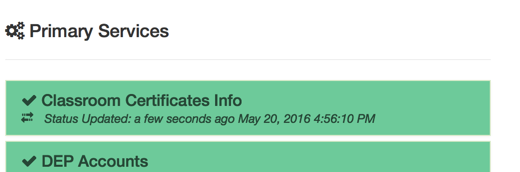
Preferences
The certificate management UI is available in the Preferences, in the Education section, on the Apple Classroom tab. Click "Manage Certificates" to open the Classroom certificate management UI. You will need to enter fwadmin credentials.
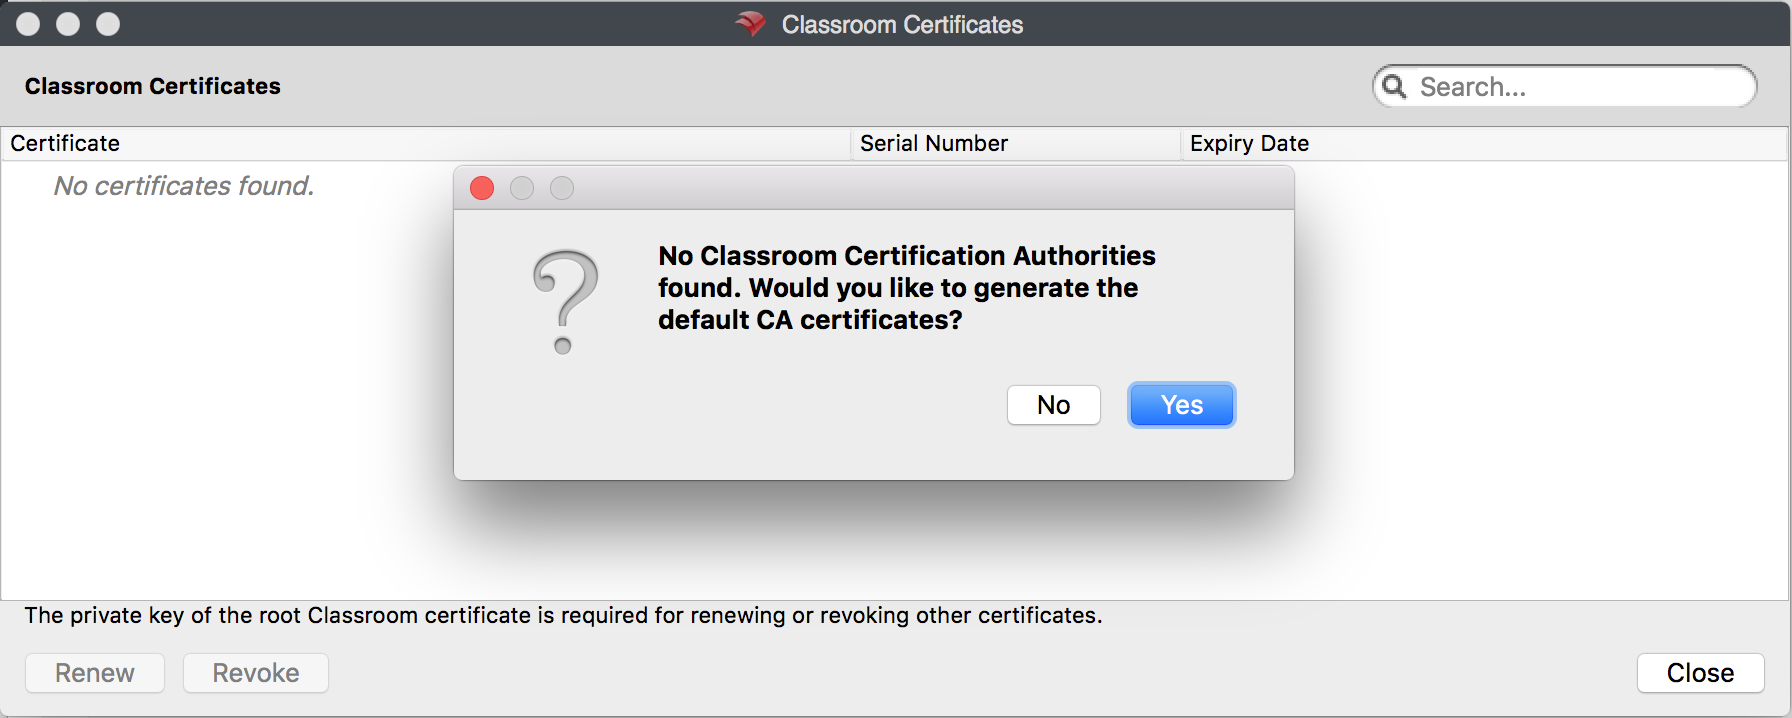
The first time you open the Manage Certificates dialog, no certificates exist at all. Therefore, FileWave Admin asks you whether you want to generate the certificates:
As part of the process, a private key for the root CA certificate is generated. FileWave does not store a copy of this private key. It is your responsibility to store this key in a secure location, as you can see in the warning that is displayed.
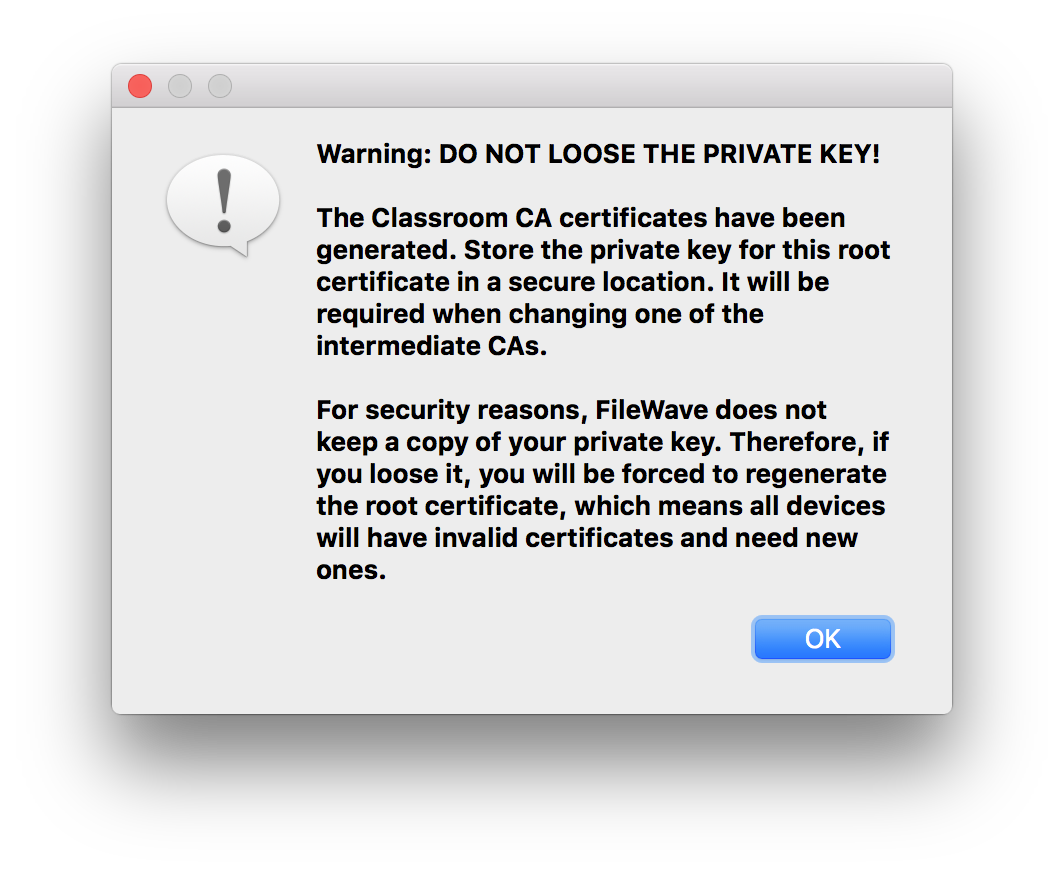
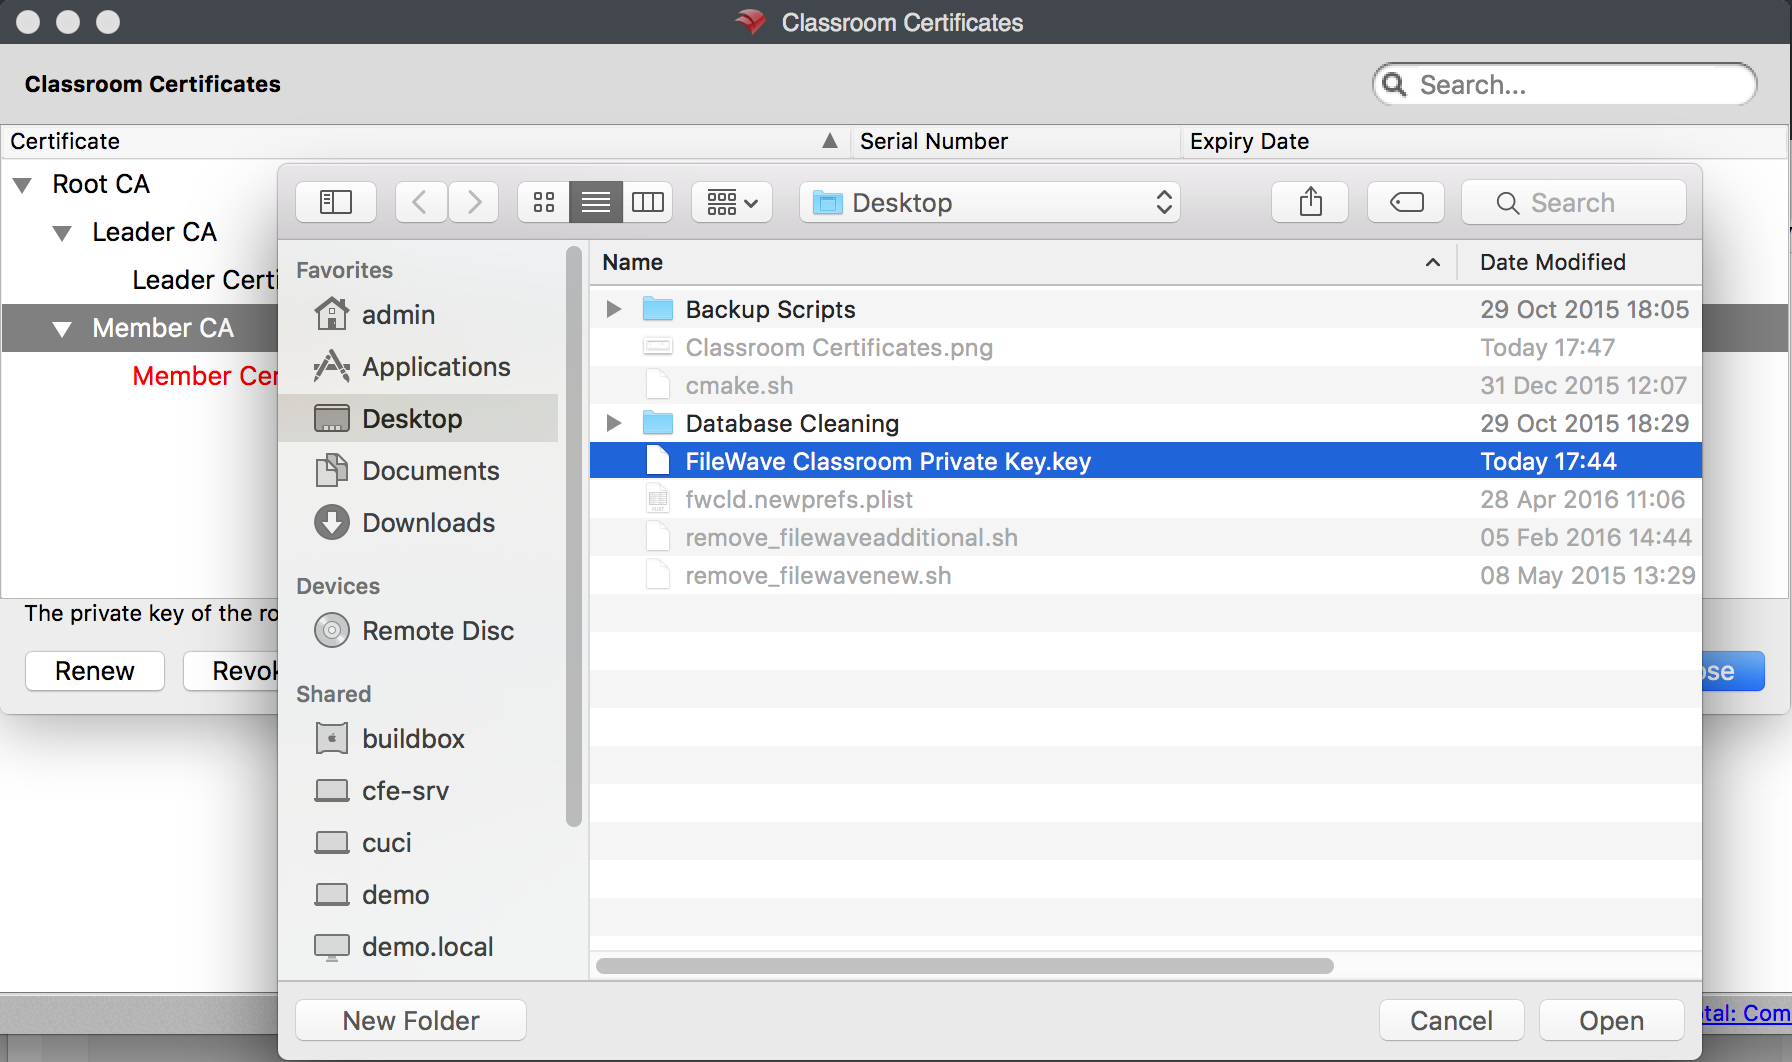
FileWave will ask you to store the private key as soon as the certificate generation is completed successfully. The private key is a PKCS #8 key stored in DER format. FileWave Admin saves this private key in the local disk of the computer where it is running and sets restrictive permissions on the file. You will need to provide this private key when renewing or revoking certificates. The default file name is "FileWave Classroom Private Key.key" and it is stored on the Desktop by default. If you press Cancel or the Esc key by mistake while on the save dialog, FileWave stores the private key on the default location anyway, so you won't need to regenerate the root CA.
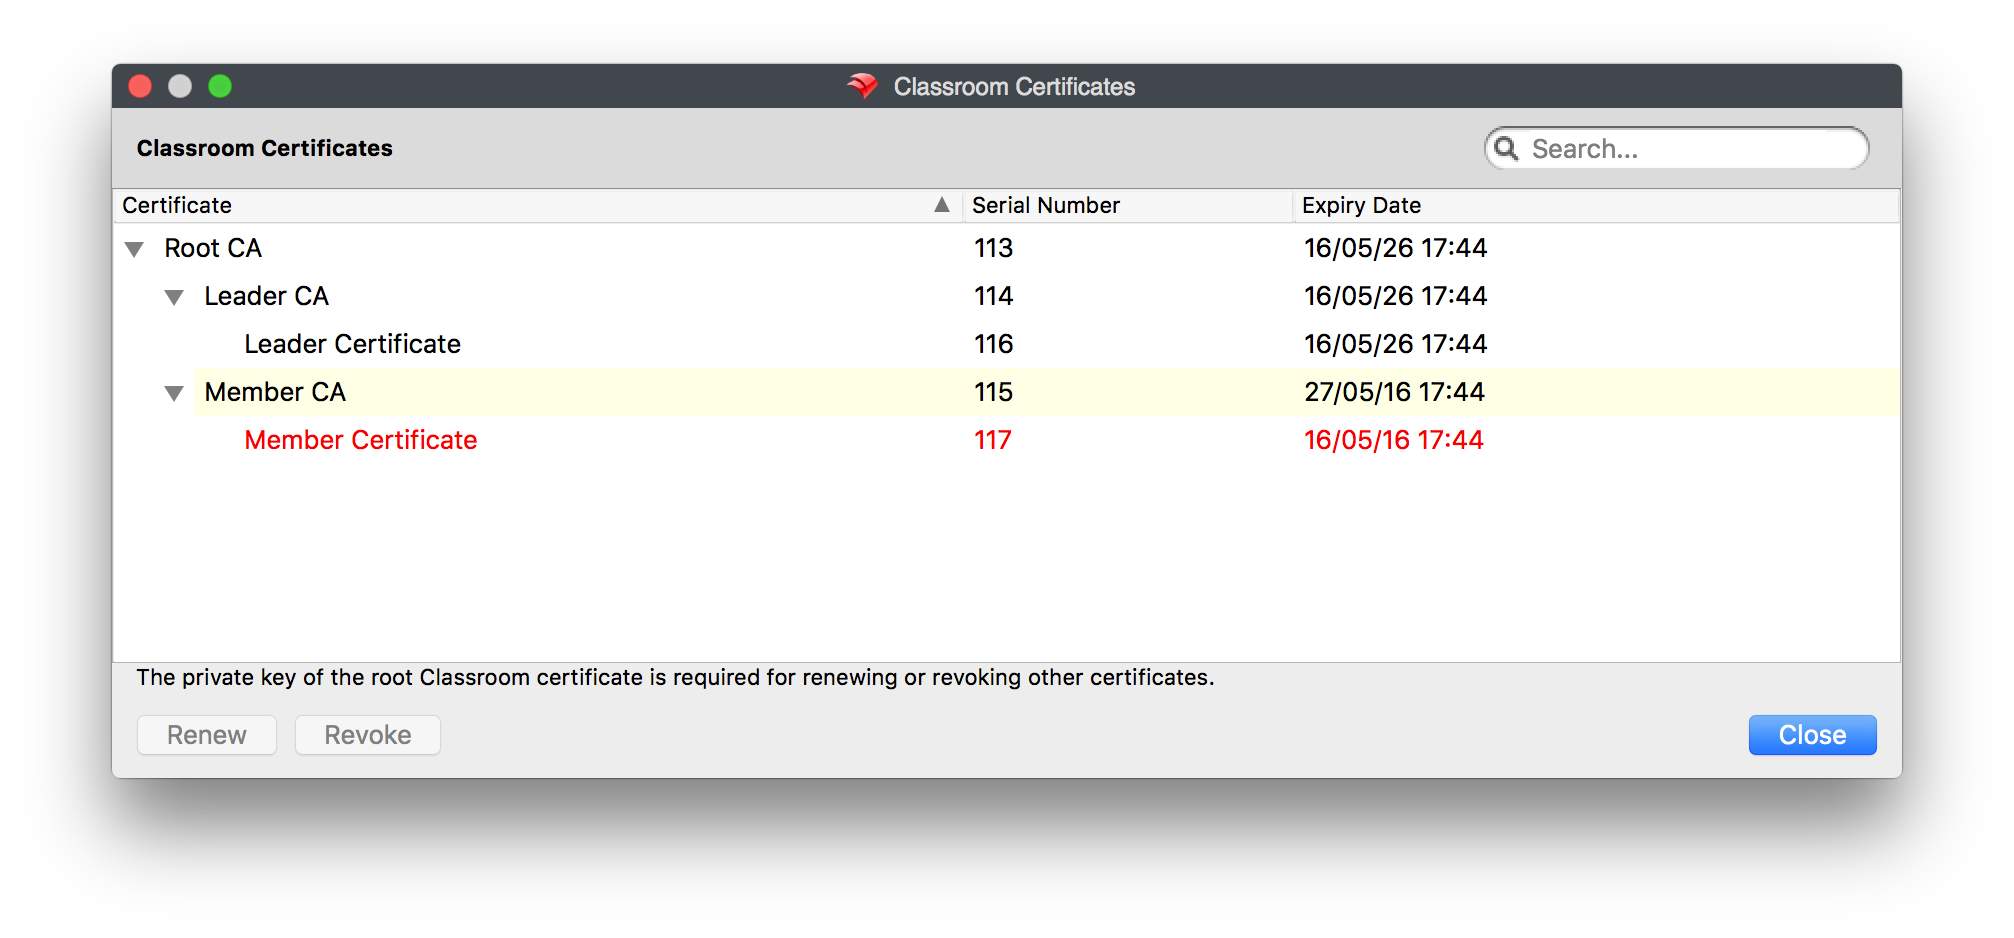
The dialog displays the certificates in a tree structure, where the root CA certificate is the top level item in the tree and child certificates appear as child items. The serial number and the expiry date of each certificate are also displayed next to it. Certificates that will expire in less than one month are displayed with a yellow background, while expired certificates are displayed with red letters. You can sort by any column and filter certificates by typing some criteria in the search box and pressing Enter.
You can renew and revoke any certificates. In order to do so, select one or more certificates. The view supports multiple selection by holding the Ctrl key (⌘ on Mac) and clicking entries. You can then either right-click to get a context menu or use the corresponding buttons on the lower left corner of the dialog. When revoking a certificate, all its child certificates will also be revoked. The certificate and its child certificates will be renewed automatically right after revocation.
You don't need the private key for renewing or revoking leader or member certificates. However, renewing/revoking any intermediate CAs requires the private key of the Root CA that was generated before. The first time you renew or revoke an intermediate CA certificate, you will be asked to open the private key. It will be remembered for the duration of the dialog, so you won't need to open it again for any subsequent operations on CA certificates, unless any operation fails. If you close the dialog and open it again later, you will need to provide the private key again for renewing/revoking CA certificates.
Although not recommended, it is possible to revoke the root CA without providing the private key by clicking Cancel in the file dialog to open the private key. This is useful for example in case you loose the private key. Beware it will not be possible to revoke intermediate CAs before renewing the root CA certificate. However, after revoking the root CA, the whole certificate tree will be regenerated automatically, including intermediate CA certificates and their child certificates.
What is the impact if I lost my private key? You can revoke and start a new one. On devices they will get the new keys when they check in. Shared iPads will need each user to logout and login again.
Under the Hood
Device certificates are valid for 10 years. FileWave takes care of renewing device certificates automatically when they are about to expire. This is done 30 days before the expiry date. On the other hand, CAs cannot be renewed automatically because the private key is required. For this reason, administrators should take care of renewing the CA certificates manually. When the CA certificates are about to expire, a warning is displayed in the Dashboard.