Apple General Info
The Apple General Info section serves as a catch-all resource for a wide range of Apple-related information that doesn't fit within specific categories. From tips and tricks for maximizing productivity on your Apple devices to discussions on Apple services, accessories, and general troubleshooting guidance, this section covers it all. Stay up to date with the latest Apple announcements, explore lesser-known features and functionalities, and find solutions to common issues you may encounter. Discover insights and helpful advice that will enhance your overall Apple experience and make the most of your devices and services. The Apple General Info section is your go-to destination for all things Apple beyond the scope of specific topics.
- Apple MDM
- Adapting to Apple's TLS Server Certificate Validity Limits
- Apple App Store and Automatic Updates
- Apple Content Caching service
- Bypassing DPI for Apple Traffic in MDM Communication
- Hardware Encryption Capabilities for Apple Hardware
- macOS Sonoma and iOS/iPadOS 17 Compatibility with FileWave 15.1
- Prepare FileWave Server and Booster for Apple's stricter TLS requirements
- Microsoft Enterprise SSO plug-in for Apple devices
- Understanding Similar and Identical Software Update Names in FileWave for Apple Devices
- macOS Malware Knowledge Base (by Stuart Ashenbrenner)
- Why is FileWave Support referring me to Apple Enterprise?
Apple MDM
With the exception of macOS, all Apple devices are managed purely through MDM. macOS devices on the other hand, relies upon the FileWave Client, however, when MDM enrolled, benefit from the additional features
Apple MDM Lost Mode
What
Apple Managed Lost Mode is an MDM command for supervised iPhone and iPad devices. When FileWave places a supported device in the Missing Client State, FileWave sends Apple’s Lost Mode MDM command. The device is locked from use until Lost Mode is disabled by MDM.
Managed Lost Mode applies to supervised iOS and iPadOS devices. Apple does not provide the same Managed Lost Mode workflow for macOS.
Why
Use Lost Mode when a supervised iPhone or iPad is misplaced, lost, or suspected stolen. It helps protect the device by locking the current user out while still allowing an administrator to display a recovery message, request location, and play a sound after the device receives the command.
Information
Lost Mode is enabled by setting a supported device into the Missing Client State from the right-click contextual menu:
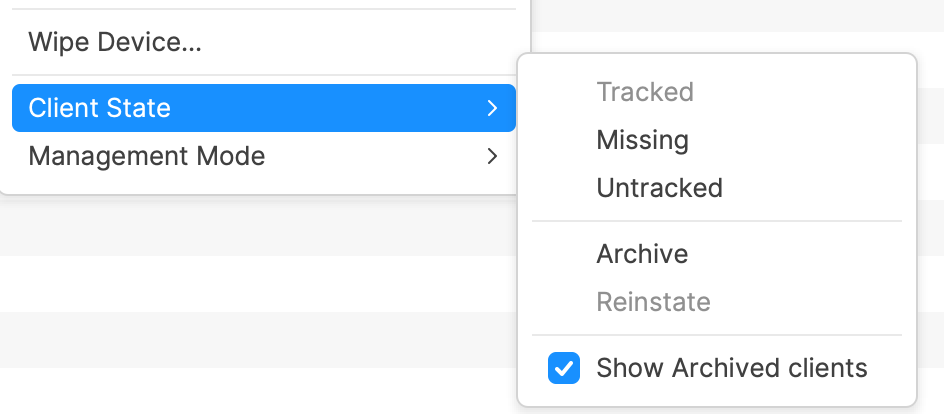
To disable Lost Mode, select another Client State, such as Tracked or Untracked. A Model Update is required after changing the Client State before the MDM command is sent to the device.
Devices require a network connection to receive the command to enable or disable Lost Mode.
If a device is locked and cannot connect because nearby Wi-Fi networks are not configured, consider connecting the device to Ethernet. An adapter may be required.
Locating Devices
While a supported device is in Lost Mode, FileWave can help locate it in addition to keeping the device locked.
Location
After a supported device is set as Missing, location data is sent back to the FileWave Server when the device has a network connection. Location may be viewed on a map from the Client Info view, and related location data is available from Inventory Queries.
Apple’s Managed Lost Mode can request location from a supervised iPhone or iPad even if Location Services are off, and it does not require Find My to be enabled on the device.
Sound
Location is useful, but sometimes the device is in a bag, cupboard, or similar place. To further assist retrieval, when a supported device is in the Lost Mode Missing state, an additional right-click menu option is available: Play Lost Mode Sound. The previous volume setting is not considered; the device plays an audible set of tones.
macOS and other Apple devices
macOS does not support Apple MDM Managed Lost Mode. For Mac, Apple provides different MDM security commands instead:
- Lock Device: Locks a Mac with a six-digit PIN and message. After receiving the command, the Mac restarts and cannot boot back into macOS until the PIN is entered and validated. Locking a Mac with Apple silicon requires macOS 11.5 or later.
- Erase Device: Remotely erases a Mac when data protection is more important than recovery.
- Activation Lock management: Available for supported supervised Macs with Apple silicon or the Apple T2 Security Chip.
These Mac commands are separate from Managed Lost Mode and do not provide the same iOS/iPadOS Lost Mode location and sound workflow.
Apple reference: Lock and locate Apple devices.
Apple MDM Command History
What
Any Apple devices that are MDM enrolled should receive MDM Requests. Each Client Info lists the requests for that device.
Why
MDM Command History exists to display all requests queued and sent to devices, along with the result of those requests; additionally showing if the request was designed for the User of the device or the System
When referring to Users and MDM, Apple allow for any amount of directory users to be managed, but only one local user is considered to be managed. This is the first local user to log into the device after enrolment. System requests impact all users.
The Request Types include:
- Inventory
- Profile instals and uninstalls
- VPP App instals and uninstalls
- Commands, e.g. erasing a device, renaming the device, etc.
Information
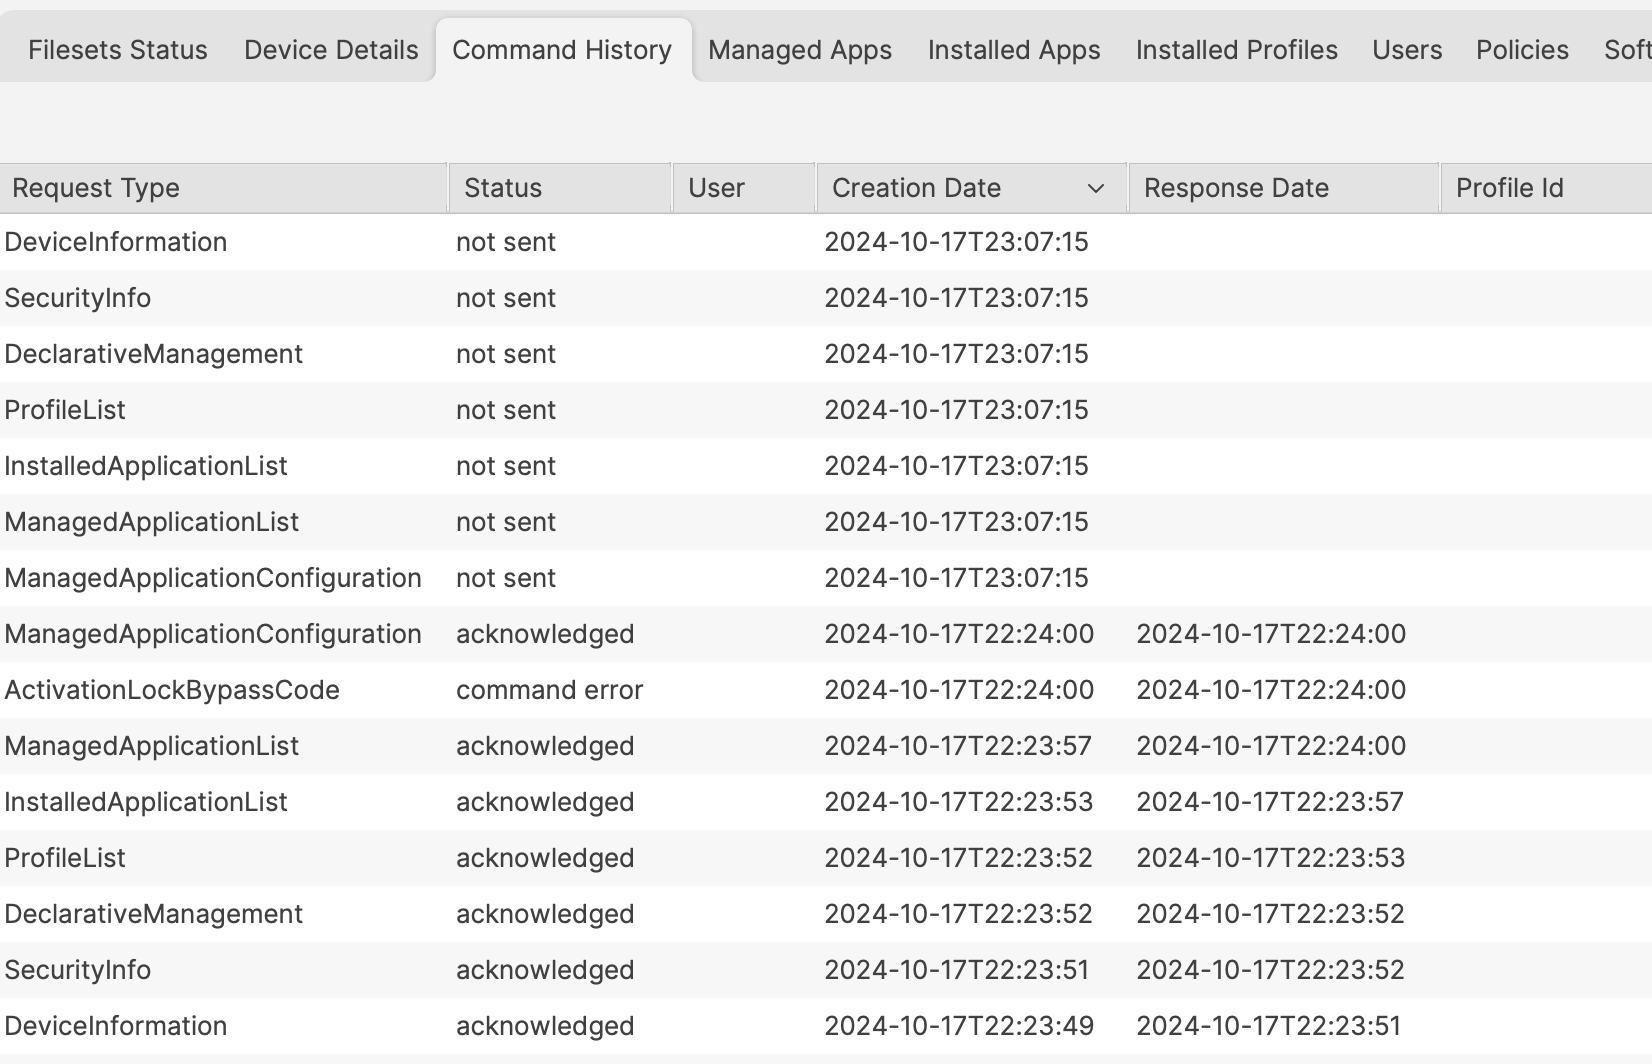
Opening the Client Info for an Apple MDM enrolled device and selecting the Command History tab should show something similar to the below image:
Request Types are defined by Apple and details may be viewed on the Apple Development Pages
Status and Error messages are those reported by Apple, with the exception of 'not sent'. The possible values are:
| Status | Details | Apple Request Response |
| not sent | The command is queued and awaiting for the device to reply to the APNs request | - |
| acknowledged | Device has processed the request | Acknowledged |
| not now | Device has received the request, but is unable to process the request at this time | NotNow |
| command error | An error has occurred | Error or CommandFormatError |
As of FileWave 15.5, the status of Command Queue requests are now accessible from within standard Inventory Queries
'not sent'
Before any requests may be sent to a device, the FileWave Server sends an Apple Push Notification (APN) request to Apple. Apple queue these APNs requests and only after the device checks in with Apple and pulls the APNs request, will the device then check-in with the defined server.
APNs request is nothing more that a notification for the device to check-in with the defined server.
Whilst waiting for the device to receive the APNs request and check-in, the Command History will display 'not sent'
Where requests are 'not sent' or 'not now', new requests will not be added to the queue for the same Request Types, since there is already a queued request waiting. The 'Creation Date' displays the time and day the request was added to the queue.
Response Commands
Once the APNs request has been received by the device, on check-in, queued requests may then be sent to the device.
'acknowledged'
The request has been received by the device, processed and reported back to the FileWave Server as completed.
'not now'
Some requests will not be accepted, until the device is in a certain state. For example, a user may need to be logged into the device to process the provided request.
Hence, the request has been received and the device has responded, but the request is awaiting the desired state before it will finish processing the request and report back as much.
'command error'
In some instances, the request may not be able to complete, due to an error. Apple have two defined error status values:
- 'Error' - An error occurred (the device will report error details in the response to the request)
- 'CommandFormatError' - The request protocol was incorrect, e.g. a malformed request
The 'Error Msg' column shown in the Command History view reports information provided by the device back to FileWave Server and contains information as set out by Apple.
Apple's developer page demonstrates greater depth on MDM requests:
Sending MDM Commands to a Device
User vs System
The user column contains the channel used for the request. Where the user column is blank, this implies the request is a System Channel request. Otherwise the name of any managed users existing on the device will be displayed for those requests.
Some Request Types are required for both User and System, e.g.
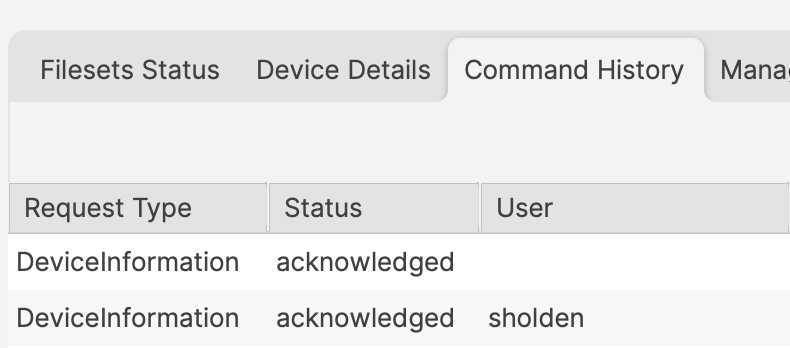
DeviceInformation may report inventory regarding the System and the User. As such there are multiple requests, one per Managed User and one for System.
Profile Installation
Profile Settings defines whether a Profile should be Installed for the System or User:
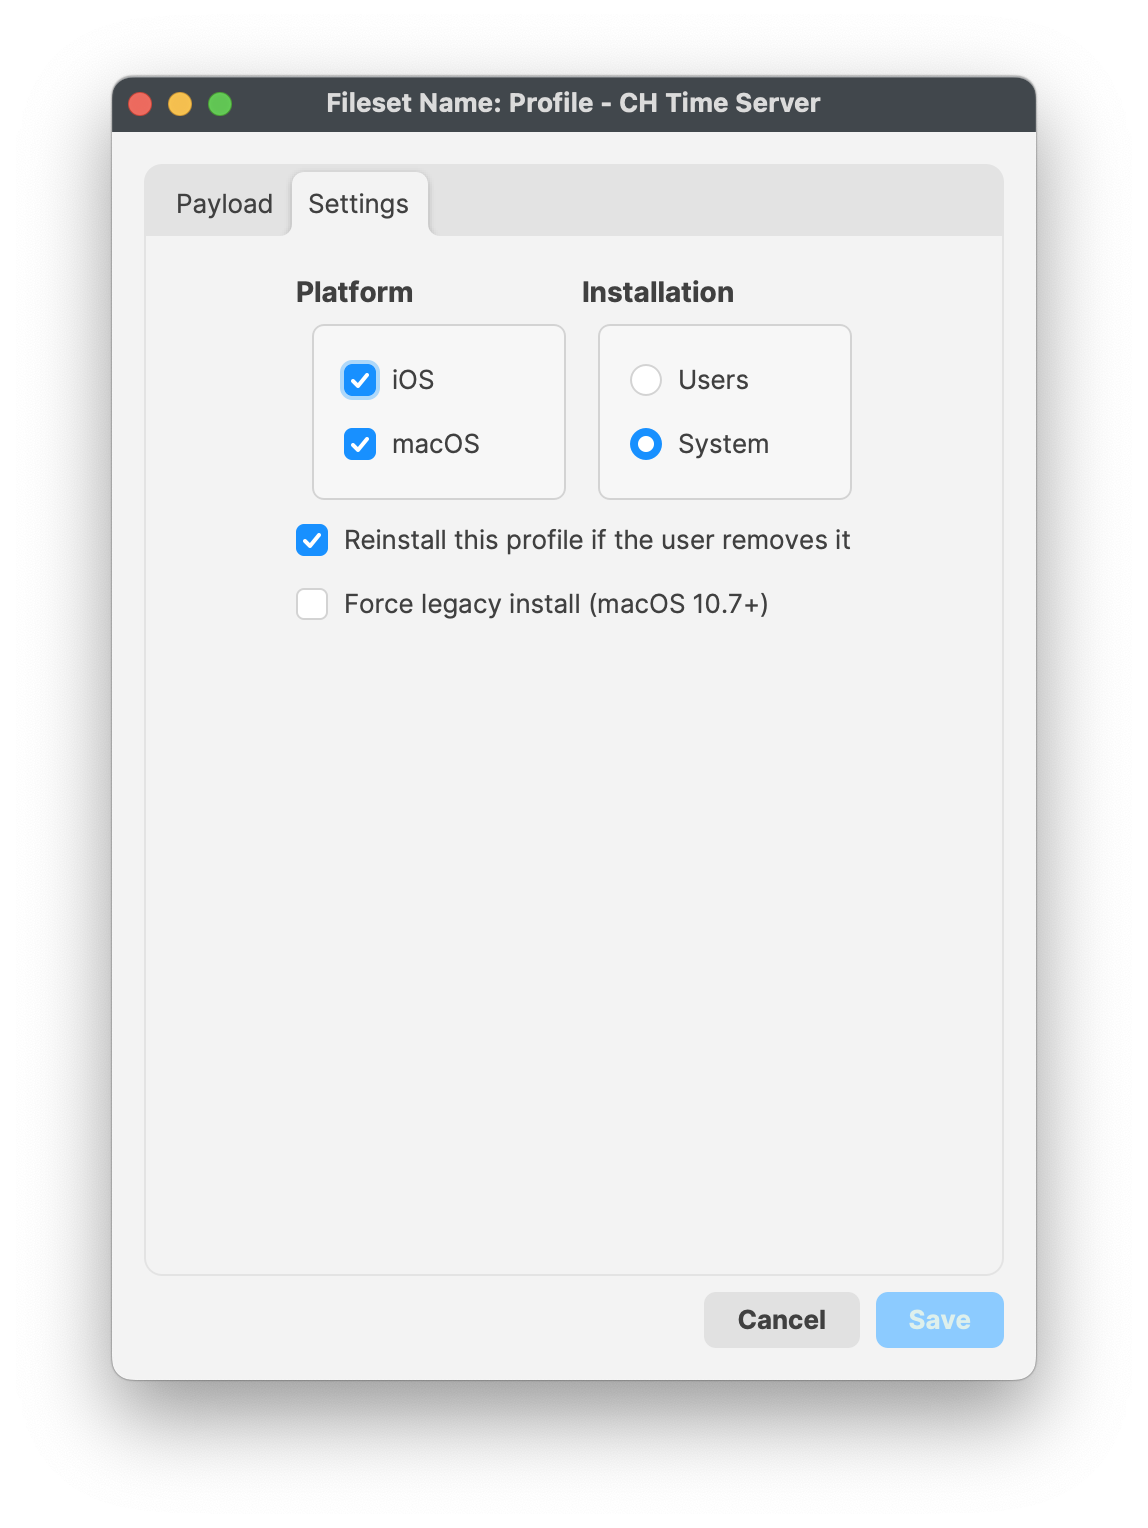
As with other Request Types, if the Profile is configured for System Installation, the User channel column should be blank, whilst those set as User should show a Request Type of 'InstallProfile' per managed user.
The below image shows installation of two differing Profiles, one set as System and the other set as User:

There was a period of time where all Profiles could be set as either User or System regardless. Apple enforced 'correct' Installation channels several major versions back. As such, if Profiles were delivered before such change, it may be possible that the User column may show a User despite the Profile being set as System. This should no longer be the case for newly delivered requests
Although altered values in a Profile Payload will just cause the Profile to be updated on a device, changing the Installation channel from User to System or vice versa, will cause the Profile to be uninstalled and then re-installed using the newly defined Installation channel.
Only some Profile Payloads may be defined as either User or System. If one option is greyed out, the Profile Setting cannot be changed.
Commands
Some requests are commands designed to action an event, e.g. rename a device, erase a device, etc. If the request is altering a setting, the Request Type reported is 'Settings' and the 'Settings Items' column will display details regarding the setting to be altered.
The below image shows a request to alter the name of the device:

An Update Model will be required before the Setting request is added to the device's request queue.
Further details regarding 'Command Policy' Fileset Payloads can be viewed in the following KB:
Troubleshooting
Some typical items to consider when reviewing Command History:
- The Command History tab will not be present if the device is not MDM enrolled (i.e. a macOS device with only the FileWave Client installed)
- A profile does not show on the device, yet command is acknowledged. This is typically seen where a Profile is set as User, but the currently logged in user is a local user, but not the local managed user. Compare the Command History User column with the currently logged in user.
- Where possible, it only might be prudent to set Profiles as System rather than user, if all local users require management (Note: this may also impact Administrators logging into systems, when attempting to fix a user's issue)
- Where an error has occurred, review the 'Error Msg' column. If the error message does not appear clear, consider raising a ticket with the FileWave Support team.
- As noted above, when a Profile Setting is changed, the existing Profile is removed before being re-delivered through the newly specified Installation channel (User or System). If the Profile is essential for network connectivity, the device will lose its network connection, making it impossible to receive the updated Profile.
Managing Apple Vision Pro and visionOS
What
FileWave 16.4 manages Apple Vision Pro as an Apple mobile device through Apple’s MDM framework. Vision Pro uses the same FileWave enrollment and management workflows as iPhone and iPad; it does not use the macOS FileWave Client package.
FileWave can send the same mobile-device commands and configurations to Vision Pro when Apple supports that capability on the installed visionOS version. A command, profile payload, app, or restriction that Apple does not support on visionOS cannot be added by FileWave.
Enroll Apple Vision Pro
Automated Device Enrollment
Organization-owned Vision Pro devices can follow the same Automated Device Enrollment (ADE) workflow used for iPhone and iPad:
- Make the device available in Apple School Manager or Apple Business Manager and assign it to the FileWave MDM server.
- Synchronize ADE in FileWave Central.
- Assign the appropriate ADE profile.
- Start or reset the Vision Pro and complete Apple’s Remote Management flow.
- In FileWave Central, add the device from New Client > Enrolled Mobile Devices when it is not already in the model, then update the Model.
Manual or URL enrollment
When ADE is not being used, follow the same FileWave mobile-device URL enrollment workflow used for iPhone and iPad. The user opens the FileWave enrollment address from Vision Pro, downloads and approves the MDM enrollment profile, and completes any configured authentication steps.
Manual enrollment can allow the user to remove the MDM profile. Use ADE for organization-owned devices when the enrollment must remain enforced after setup or reset.
Manage Vision Pro in FileWave
After enrollment, Vision Pro appears with other mobile devices in FileWave Central. Administrators can use the same mobile-device workflows for inventory, groups, associations or Deployments, profiles, applications, and management commands.
- Commands: Use the same FileWave mobile-device command workflow used for iPhone and iPad. The command is available and executes only when Apple supports it on the device’s visionOS version and enrollment state.
- Profiles and restrictions: Before deployment, verify that the selected Apple payload explicitly supports visionOS. Similar-looking iOS or iPadOS settings are not automatically available on visionOS.
- Apps and content: Deploy Apps and Books applications or other supported content through the normal FileWave mobile Fileset and Deployment workflow. Confirm that the application supports Apple Vision Pro.
- Inventory and reporting: Include Vision Pro devices in mobile-device Inventory Reports, Smart Groups, and compliance reviews rather than treating them as macOS computers.
Evaluation workflow
During a FileWave evaluation, treat Vision Pro as another Apple mobile platform alongside iPhone and iPad:
- Configure APNs and Apple School Manager or Apple Business Manager integration.
- Enroll through ADE or the mobile URL-enrollment workflow.
- Add the device to the FileWave model and place it in the intended mobile-device group.
- Test one supported profile, application, inventory query, and management command before expanding the scope.
- Verify each intended feature against the target visionOS version.
Related content
- Evaluation Guide: Apple Client Pre-Requisites
- Evaluation Guide: Apple ADE Enrollment
- Evaluation Guide: Apple Manual Enrollment
- Working with Apple’s Automated Device Enrollment (ADE)
- Enrolling Mobile Devices into FileWave
- FileWave Version 16.4.0
Adapting to Apple's TLS Server Certificate Validity Limits
What
This article provides guidance on adapting to Apple's updated policy regarding the maximum allowed lifetimes of TLS server certificates. Effective from September 1, 2020, 00:00 GMT/UTC, TLS server certificates must have a validity period no greater than 398 days. This policy, part of Apple's efforts to enhance web security, affects TLS server certificates issued from Root CAs preinstalled with iOS, iPadOS, macOS, watchOS, and tvOS.
When/Why
The policy is critical for administrators using FileWave to manage Apple devices. It ensures that device profiles and their associated TLS server certificates comply with the new security standards. Non-compliance results in network and application failures, and can prevent websites from loading on affected Apple devices.
How
To comply with Apple's policy:
- Certificate Issuance and Renewal: Certificates should be issued with a maximum validity of 397 days to avoid edge case issues.
- Check Existing Certificates: Certificates issued before September 1, 2020, are not affected by this change. However, their renewal must comply with the 398-day limit.
- Profile Deployment in FileWave: Ensure all TLS server certificates embedded in profiles for Apple devices meet these validity requirements.
- Monitoring and Planning: Regularly monitor certificate expiration dates and plan renewals accordingly.
Related Links
- Apple's Certificate Policy Announcement - Details on the TLS server certificate validity limit.
- RFC 5280, Section 4.1.2.5 - Reference for certificate validity period definition.
Digging Deeper
This policy shift reflects a broader move towards enhancing digital security and trustworthiness in online environments. By reducing certificate lifetimes, Apple aims to mitigate risks such as certificate compromise and mis-issuance. For FileWave users, adapting to these new requirements is essential for maintaining secure, reliable, and compliant management of Apple devices across various environments.
Apple App Store and Automatic Updates
FileWave can request updates for managed App Store apps when a newer version is available. For admins, this usually shows up as an app that keeps reinstalling or updating after device check-in, even when the assignment has not changed.
How does FileWave detect if there is an update?
For iOS 11.3 and later, and macOS 10.13.4 and later:
Apple's MDM protocol returns update information when FileWave requests the installed application list. Each App Store app can report the HasUpdateAvailable flag. When that flag is true, FileWave can send the device an InstallApplication command to update the app.
For previous OS versions:
Every hour, FileWave contacts Apple's iTunes database and updates metadata for applications used in your environment. When a device checks in for Verify, FileWave compares the application version reported by the device with the version from iTunes. If the iTunes version is higher, FileWave treats the app as update-eligible.
The automatic update process does not work as expected, what could be the reasons?
If the flag is not provided by the device (older iOS / macOS version for instance), it may happen that the version from iTunes and the version reported by the device are not accurate (they are filled by hand by the developer and they may be incorrect). Apple introduced the hasUpdateAvailable flag exactly to solve this problem.
From Apple's documentation:
If true, the app has an update available. This key is present only for App Store apps. In macOS, this key is present only for Volume Purchase Program (VPP) apps. This status updates daily and isn’t always up-to-date when installing an app.
The flag provided by the device is not always reliable. FileWave only requests an app update once a day. The InstallApplication command is not sent again on the same day when the device reports HasUpdateAvailable=True and FileWave has already sent that command. If the device still reports the flag the next day, FileWave will request the update again.
Some iOS versions have reported this flag incorrectly even after the application is already up to date. If the flag does not update within 24 hours, FileWave may request the app update again each day, which can affect users and network bandwidth. In this situation, contact FileWave Support and AppleCare so the required FileWave and device logs can be collected. Updating iOS or macOS to the latest available version often resolves the device-side reporting problem.
In FileWave Client Info for impacted devices, check the Managed Applications tab. If the flag is always "True" after the app is already current, the issue is likely at the device or Apple MDM reporting level rather than the FileWave assignment.
Apple Content Caching service
What
Apple Content Caching is a macOS service that stores Apple-distributed software, apps, and supported iCloud content locally so nearby Apple devices can download it from the cache instead of pulling the same content from Apple each time. For FileWave-managed fleets, this can reduce internet traffic during OS updates, app updates, and Apple app/VPP deployments.
When/Why
Use a Mac on the same network as the devices it should serve. Apple recommends a Mac with a wired Ethernet connection for best performance. Client devices discover an available content cache automatically; they do not need a FileWave client setting for the cache.
How
When a managed device requests an OS update, an App Store app, or another Apple-hosted asset, Apple can direct it to a registered local content cache. The first request downloads the asset to the caching Mac. Later devices on the network can receive that asset from the local cache, reducing WAN usage and download time.
Related Content
- Intro to content caching – Apple Support (UK)
- macOS User Guide – Apple Support (UK)
- Set up content caching on Mac – Apple Support (UK)
Digging Deeper
Content Caching stores its configuration in this file:
/Library/Preferences/com.apple.AssetCache.plistUse this Custom Field code to report whether Content Caching is enabled. It returns Boolean 0 (False) or 1 (True):
defaults read /Library/Preferences/com.apple.AssetCache.plist ActivatedA Custom Settings payload can enable Content Caching by setting Activated to true in the com.apple.AssetCache domain:

Bypassing DPI for Apple Traffic in MDM Communication
What
This article explains the importance of bypassing Deep Packet Inspection (DPI) on network traffic directed to Apple's IP range (17.0.0.0/8) to ensure seamless communication between Apple devices and the FileWave Mobile Device Management (MDM) solution.
When/Why
Deep Packet Inspection is a network packet filtering technique that examines the data part (and possibly also the header) of a packet as it passes an inspection point, to determine what to do with the packet based on its content. This is often employed in firewalls, intrusion prevention systems, and content filters to scrutinize traffic for security and compliance purposes.
However, when managing Apple devices via an MDM solution like FileWave, it's crucial to ensure uninterrupted communication with Apple's network. The DPI can interfere with the SSL traffic to and from Apple's servers, thus hindering the communication between your managed devices and the MDM server. This is particularly vital for the initial device setup, software updates, and continuous management operations.
How
To prevent any interference with the communication between Apple devices and FileWave MDM, it's advised to configure your network's firewall and content filters to bypass or disable Deep Packet Inspection for traffic destined to or originating from the IP range 17.0.0.0/8. Here are general steps:
-
Access Firewall/Content Filter Settings:
- Log in to your firewall or content filter management interface.
-
Create a Bypass Rule:
- Navigate to the section where you can create rules or policies.
- Create a new rule to bypass DPI for the IP range 17.0.0.0/8.
-
Verify Configuration:
- After setting the rule, verify the configuration by testing the communication between your MDM and an Apple device.
- You can also check the logs to ensure traffic is flowing correctly without any SSL manipulation.
Related Links
- Deep Packet Inspection (Wikipedia) - Overview of Deep Packet Inspection.
- Apple's Managed Devices - Understanding Apple's Managed Devices and their communication.
- Default TCP and UDP Port Usage - FileWave port usage.
Digging Deeper
Understanding the technical intricacies of network traffic inspection and its implications on MDM communication is crucial for ensuring a seamless operation of managed Apple devices. Disabling DPI for specified traffic ensures that the necessary communication between your FileWave MDM server and managed Apple devices remains uninterrupted, providing a stable and reliable management infrastructure.
Hardware Encryption Capabilities for Apple Hardware
What
Apple devices can report hardware encryption details through MDM. These values help confirm whether a device supports block-level encryption, file-level encryption, or both.
When/Why
FileWave can report Apple's HardwareEncryptionCaps value as part of the MDM security information returned by supported devices. Apple documents this value in the SecurityInfo response: https://developer.apple.com/documentation/devicemanagement/securityinforesponse/securityinfo.
How
- Hardware Encryption Capabilities reports supported encryption for iOS 4+ and tvOS 6+ devices.
- Passcode Present helps determine whether data protection is active on iOS 4+ and tvOS 6+ devices when read together with Hardware Encryption Capabilities.
- Is Recovery Lock Enabled reports whether Recovery Lock is enabled on Apple silicon Macs running macOS 11.5+.
Digging Deeper
HardwareEncryptionCaps is an integer that indicates the underlying hardware encryption capabilities of the device, which is one of the following values:
-
1: Block-level encryption -
2: File-level encryption -
3: Both block-level and file-level encryption
This value is available in iOS 4 and later, and tvOS 6 and later.
For a device to have data protection, HardwareEncryptionCaps must be 3 and PasscodePresent must be true.
macOS Sonoma and iOS/iPadOS 17 Compatibility with FileWave 15.1
What
Historical compatibility guidance: This page documents the 2023 transition to iOS, iPadOS, and tvOS 17, macOS 14 Sonoma, and FileWave 15.1. Use the current Downloads pages for supported FileWave and operating system versions.
Apple released iOS, iPadOS, and tvOS 17 on September 18, 2023, macOS 14 Sonoma on September 26, 2023, and FileWave released 15.1.0 on September 21, 2023.
When/Why
Use this compatibility note when reviewing an older Sonoma or iOS/iPadOS 17 rollout, troubleshooting the FileWave 15.0 to 15.1 Client transition, or planning a historical upgrade path.
How
iOS, iPadOS, and tvOS 17
FileWave 15.1.0 added management support and features for devices running iOS, iPadOS, and tvOS 17.
macOS 14 Sonoma
The FileWave Server and desktop Client needed the 15.1 update to report macOS Sonoma correctly and support version-sensitive features such as SIP detection in Filesets.
macOS Sonoma changed application sandboxing in a way that required a restart when upgrading a FileWave 15.0 or earlier desktop Client after the operating system upgrade. The preferred sequence was to upgrade the FileWave Client to 15.1 before upgrading macOS.
If a device reached macOS Sonoma before its FileWave Client reached 15.1:
- The device might not report its macOS version correctly until the FileWave Client was upgraded to 15.1 or later.
- A restart was required to complete the FileWave Client 15.1 upgrade. Administrators could automate the prompt by enabling Requires reboot in the upgrade Fileset properties.
FileWave tested beta operating systems before release, then completed production support checks against Apple's final builds. For current compatibility, use the active FileWave release page rather than this historical note.
Related Content
Prepare FileWave Server and Booster for Apple's stricter TLS requirements
What
Apple are suggesting the next major OS releases (version 27 for iOS, iPadOS, macOS, watchOS, tvOS and visionOS) 'might' observe their new stricter security requirements.
Prepare your network environment for stricter security requirements
FileWave servers have been successfully tested using Apple's provided methods
Apple is tightening TLS requirements for managed-device traffic. Starting as early as the next major Apple operating system release, Apple devices may refuse HTTPS connections to servers that do not meet Apple's App Transport Security (ATS) requirements.
For FileWave, check any customer-managed HTTPS endpoint that Apple devices contact for MDM, Declarative Device Management (DDM), Automated Device Enrollment, profile installation, app installation, enterprise app distribution, or software updates. This may include a FileWave Server, FileWave Booster, reverse proxy, load balancer, or custom hosted domain.
Apple says affected servers must:
- Support TLS 1.2 or later
- Use ATS-compliant ciphersuites
- Present valid certificates that meet ATS standards
FileWave Server and Booster have supported compliant TLS 1.2 for many years. Apple's requirement is TLS 1.2 or later with ATS-compliant ciphersuites and certificates, so a supported FileWave Server or Booster is not non-compliant just because it does not yet offer TLS 1.3. TLS 1.3 is preferred by Apple when available and is planned for a future FileWave release, but TLS 1.3 is not required for Apple's validation. For TLS 1.2, Apple calls out Perfect Forward Secrecy ciphersuites and the extended master secret extension.
When/Why
Use this article when Apple devices connect to customer-owned FileWave infrastructure, such as an on-premise FileWave Server, a macOS Server or Booster, a customer-managed Booster, a reverse proxy, a load balancer, a custom hosted domain, or a manually managed certificate.
For FileWave-hosted services using FileWave-managed standard hostnames, FileWave manages the public TLS endpoint. Customers should still check any customer-controlled endpoint Apple devices contact directly. The customer action is to validate the actual HTTPS endpoint and fix the certificate, TLS configuration, or TLS termination path if the Apple test fails.
How
1. List the HTTPS endpoints to test
List the FileWave-related hostnames Apple devices may contact. Start with:
- The FileWave Server URL
- Externally reachable FileWave Booster URLs
- Reverse proxy or load balancer hostnames in front of FileWave Server or Boosters
- Custom FileWave hosted domains
- Kiosk, App Portal, enterprise app distribution, or manifest URLs
- Staging, test, or disaster recovery FileWave environments
Do not test only the main FileWave Server if devices also use Boosters, proxy hostnames, or custom domains.
2. Test each endpoint from macOS
Apple's diagnostic tool, nscurl, is included with macOS. The helper script attached to this article is a macOS script, not a Linux or Windows script.
You can run the test on the FileWave Server Mac, on a Booster Mac, or from any other Mac that can reach the endpoint being tested. The test checks the endpoint from the Mac and network path where the command is run. If devices use different paths, such as internal DNS, external DNS, VPN, reverse proxy, load balancer, or different Boosters, test each path separately.
From a Mac, run Apple's nscurl diagnostic against each HTTPS endpoint:
/usr/bin/nscurl --ats-diagnostics https://fw.example.org/
In the output, look for the FCP v2.1 result:
Configuring NIAP TLS package version requirements

---
FCP_v2.1
Result : PASS
---
If this result is PASS, Apple says the server meets the stricter requirements checked by that diagnostic.
You can also use the attached helper script to summarize the Apple diagnostic and add a quick OpenSSL check:
Download the helper script: validate-apple-network-security.sh
After downloading it:
chmod +x validate-apple-network-security.sh
./validate-apple-network-security.sh https://fw.example.org
./validate-apple-network-security.sh fw.example.org:443
The helper script exits with:
0when Standard ATS and FCP_v2.1 both pass2when Standard ATS or FCP_v2.1 fails1or3when the script could not complete or parse the result
3. If the test fails
A failed result does not automatically mean that macOS is unsupported. It means the tested HTTPS endpoint did not meet Apple's ATS/FCP_v2.1 requirements from that Mac and network path.
First, identify what is presenting HTTPS to Apple devices:
- If FileWave Server or Booster on macOS presents TLS directly, confirm it is a supported FileWave version, replace or fix the certificate if needed, and upgrade macOS if the current OS cannot provide compliant TLS 1.2.
- If a reverse proxy, load balancer, firewall, or other TLS termination point is in front of FileWave, fix the TLS configuration there.
- If the failure is certificate-related, replace the certificate or chain. Check expiration, Subject Alternative Name, weak signature algorithms, weak key sizes, and missing intermediate certificates.
- If SSL/TLS inspection is involved, bypass inspection for the FileWave endpoint so Apple devices see the real server certificate.
- If only one network path fails, fix that path. The FileWave Server itself may not be the problem.
For current FileWave Server and Booster versions, focus on a compliant TLS 1.2 configuration with modern ciphersuites and a valid certificate trusted by Apple devices. TLS 1.3 can be used where available, but a TLS 1.3 failure alone is not the issue Apple is asking administrators to remediate.
4. Retest
After remediation, rerun the nscurl diagnostic or helper script for each endpoint. Then test the FileWave workflow that depends on that endpoint, such as ADE, MDM enrollment and check-in, profile installation, app installation, Kiosk or App Portal installation, software updates, or Booster content delivery.
If a workflow still fails, collect the tested URL, nscurl output, helper script output if used, FileWave Server/Booster version, server operating system version, network path details, affected Apple OS version, and relevant FileWave or Apple device logs.
Related Content
- Apple: Prepare your network environment for stricter security requirements
- Apple Developer: App Transport Security
- Apple Developer: Functional Package for Transport Layer Security version 2.1
- Root Trusted SSL Certificate (Using and Renewing)
- Let's Encrypt Setup for FileWave Server (macOS)
- Adapting to Apple's TLS Server Certificate Validity Limits
- Bypassing DPI for Apple Traffic in MDM Communication
Microsoft Enterprise SSO plug-in for Apple devices
What
The Microsoft Single Sign-On (SSO) plug-in for Apple devices is a software extension that allows users to log in to Microsoft services on their Apple devices without needing to enter their credentials each time. This plug-in enables users to authenticate once and use Microsoft services seamlessly across multiple applications and services. For more information, you may visit, Microsoft Enterprise SSO plug-in for Apple devices.
When/Why
Using the Microsoft SSO plug-in for Apple devices offers several advantages. First, it saves time by eliminating the need to enter login credentials each time a user needs to access Microsoft services. This can be particularly useful for users using Microsoft services on their Apple devices.
Second, the Microsoft SSO plug-in provides an added layer of security. Users can use multi-factor authentication (MFA) to secure their login credentials and protect their data from unauthorized access. The plug-in provides a more secure way to access Microsoft services on Apple devices than standard login credentials.
Finally, the Microsoft SSO plug-in offers a more streamlined and user-friendly experience. Users can easily switch between different Microsoft services without needing to log in again and quickly access their files and data on any device.
How
Below are the following requirements and configuration creation steps for deployment.
Requirements:
- The device must support and have an installed app that has the Microsoft Enterprise SSO plug-in for Apple devices:
- iOS 13.0 and later: Microsoft Authenticator app
- iPadOS 13.0 and later: Microsoft Authenticator app
- macOS 10.15 and later: Intune Company Portal app
- The device must be enrolled in MDM, i.e. DEP enrolled.
- Configuration must be pushed to the device to enable the Enterprise SSO plug-in. Apple requires this security constraint.
Please Note: On macOS devices, Apple requires the Company Portal app be installed. Users don't need to use or configure the Company Portal app, it just needs to be installed on the device. You may download here: Download the Company Portal app installer package.
Microsoft Authenticator app deployment:
You may acquire and deploy the Microsoft Authenticator app via your ASM/ABM account. A similar method as any VPP application, search the ASM/ABM, enter in the number of licenses for the VPP application, and click on GET.

Creating the Configuration profile to be deployed to your devices:
- Open FileWave Central
- Select Filesets from the left side menu
- Select New Desktop Fileset
- Click on Profile
- Enter in the name of the Profile, example: Microsoft Single-Sign On
- Select the Single Sign-On Extensions payload
- Enter in the following for specified payload:
- iOS settings:
- Extension ID:
com.microsoft.azureauthenticator.ssoextension - Team ID: This field isn't needed for iOS but you can use
UBF8T346G9
- Extension ID:
- macOS settings:
- Extension ID:
com.microsoft.CompanyPortalMac.ssoextension - Team ID:
UBF8T346G9
- Extension ID:
- Sign-On Type:
- Type: Redirect
- URL identity providers:
https://login.microsoftonline.comhttps://login.microsoft.comhttps://sts.windows.nethttps://login.partner.microsoftonline.cnhttps://login.chinacloudapi.cnhttps://login.microsoftonline.ushttps://login-us.microsoftonline.com
- Optional Custom Configurations (Not required):
- Enable SSO for all apps with specific bundle IDs or prefix IDs: Key:AppPreFixAllowList - Type:String - Value:com.microsoft., com.apple., or com.business.travelapp
- Sign in with browser that don’t use MSAL and Safari: Key:browser_sso_interaction_enabled - Type:Number - Value:1
- Disable OAuth 2 app prompts: Key:disable_explicit_app_prompt - Type:Number - Value:1
- iOS settings:

Deployment
Next deploy the Microsoft Authenticator app and Configuration profile on a few devices. If you're not deploying the Microsoft Authenticator app using an app policy, then users must install it manually. Users don't need to use the Authenticator app, it just needs to be installed on the device.

Users sign in to any supported app or website to bootstrap the extension.
Bootstrap is the process of signing in for the first time, which sets up the extension. After users sign in successfully, the extension is automatically used to sign in to any other supported app or website.
Meaning the end users will need to sign into their Microsoft account for their first time manually for the extension to authenticate successfully.
You can test single sign-on by opening Safari in private mode (opens Apple's web site) and opening the https://portal.office.com site. If configured successfully, no username and password will be required.
Related Content
Understanding Similar and Identical Software Update Names in FileWave for Apple Devices
What
As a Unified Endpoint Management tool, FileWave manages a wide range of devices, including Apple devices such as macOS, iOS, iPadOS, and tvOS. In the Software Updates list for these devices, you may notice updates that have similar or identical names, such as "iPadOS 16.1," "iPadOSs 16.1," and "iOS 16.1." This can be confusing, as it may seem like there are duplicate updates or that the updates are intended for different devices.
When/Why
This is due to how Apple publishes updates for its devices. Different devices, as well as different versions of macOS and iOS, may have updates with slightly different names. For example, an update for iPadOS may have the same version number as an update for iOS, but the names will be slightly different to reflect the intended device.
How
To ensure that all of your Apple devices are updated with the latest patches, it is important to enable all variations of the patch for a specific version (e.g., 16.1) that you are trying to update. This will ensure that all relevant devices receive the necessary updates. Ensuring that all of your Apple devices are up to date is crucial for maintaining the security and functionality of your organization's technology.
Related Content
macOS Malware Knowledge Base (by Stuart Ashenbrenner)
What
The macOS Malware Knowledge Base is Stuart Ashenbrenner's collection of macOS malware research notes. It gives admins and security teams one place to look up known macOS malware families, behavior notes, indicators of compromise (IOCs), and related analysis.
When/Why
Use this resource when you are investigating a suspected macOS malware case, checking whether a process or indicator is tied to a known family, or building context for a threat report. It is a research reference, not a FileWave remediation workflow.
How
Open the Crash Security macOS Malware Knowledge Base and choose the malware family you want to research: Crash Security macOS Malware Knowledge Base.
Why is FileWave Support referring me to Apple Enterprise?
What
In some FileWave support cases, we identify that part of the issue involves components specific to Apple products or services. Because Apple has visibility into those internal systems and behaviors that third parties cannot access, our support team may refer you to Apple's Enterprise Support at enterprise.apple.com to report the issue directly.
When/Why
You may be referred to Apple Enterprise Support when:
-
FileWave has identified that the issue involves components of Apple hardware, software, or services.
-
Collaboration between FileWave and Apple is required for resolution.
Engaging directly with Apple ensures they are fully aware of your issue's impact and urgency. Sharing your Apple Enterprise Support ticket information with FileWave enables our team to collaborate effectively with Apple on your behalf.
How
To properly escalate issues to Apple:
-
Visit enterprise.apple.com.
-
Open an official support ticket with Apple Enterprise Support.
-
Provide detailed descriptions, relevant logs, screenshots, and clearly state the impact of the issue.
-
After creating the ticket, share the Apple Enterprise Support ticket number with your FileWave support representative.
If you don't currently have Apple Enterprise Support:
-
Check if your organization has an assigned Apple Systems Engineer (SE). In some cases, the SE is able to escalate the issue within Apple, but this is not always possible.
-
Consider obtaining Apple Enterprise Support for direct official engagement.
Note: Apple Education Support and Apple Enterprise Support are distinct services. Only Apple Enterprise Support facilitates direct collaborative troubleshooting between Apple and FileWave Support.
Current Known Issues with Apple
The following table lists known issues currently under investigation by FileWave in collaboration with Apple. Please note that even if your issue is listed here, opening an Apple Enterprise Support case helps communicate customer impact more clearly to Apple.
| FileWave DSL Ticket | Description | Workarounds | Apple Enterprise Ticket | Status |
|---|---|---|---|---|
| DSL-1292 |
When attempting to re-enroll an Apple device previously associated with a DEP profile into FileWave, the device may bypass the expected Automated Device Enrollment (ADE) workflow, enrolling instead as an unmanaged device. |
Currently, the recommended workaround is to remove the device’s DEP association in FileWave, perform a DEP sync with Apple, then re-apply the DEP association within FileWave and perform an additional DEP sync. |
102529820471 | In Progress |
| DSL-1366 |
Clients stuck at Handled via MDM and require a reboot of the entire OS to successfully finish installing profiles |
Rebooting the client. | 102592078127 | In Progress |
|
Unable to enroll iOS 16 or older devices via ADE/DEP |
None at this time. Apple is investigating and is aware of this. | 102613991439 | In Progress |