Automated Device Enrollment (ADE)
This was formerly known as the Device Enrollment Program (DEP).
- Apple's Automated Device Enrolment
- Working with Apple’s Automated Device Enrollment (ADE)
- Add or Renewing your ADE (DEP) Account Token
- ADE Naming
- Apple ADE - MDM Certificate vs. MDM Trust Chain
- Automatically Assign ADE profiles
- Control Await Configuration state (ADE enrolled devices)
- Apple TV Automatic Advance (ADE/DEP)
- DEP Notify - How to provide progress visibility during ADE activation (macOS)
- Minimum OS version for enrolling Apple devices via ADE
- Test macOS ADE (DEP) Enrolments with a Virtual Machine
- ADE Troubleshooting
- DEP/ADE Forbidden Error
Apple's Automated Device Enrolment
What
From inception known as Device Enrolment Programme (DEP), Apple's Automated Device Enrolment (ADE) is a zero touch enrolment method for Apple devices.
This article aims to cover the generic processes.
When/Why
Typically this process is used with new devices or those erased.
Registration
The basics:
- Devices, purchased from a supplier signed up to Apple's programme, are registered with Apple
- FileWave MDM server is registered with Apple
- Devices are assigned to the FileWave MDM server within the Apple Business or School account: ABM or ASM
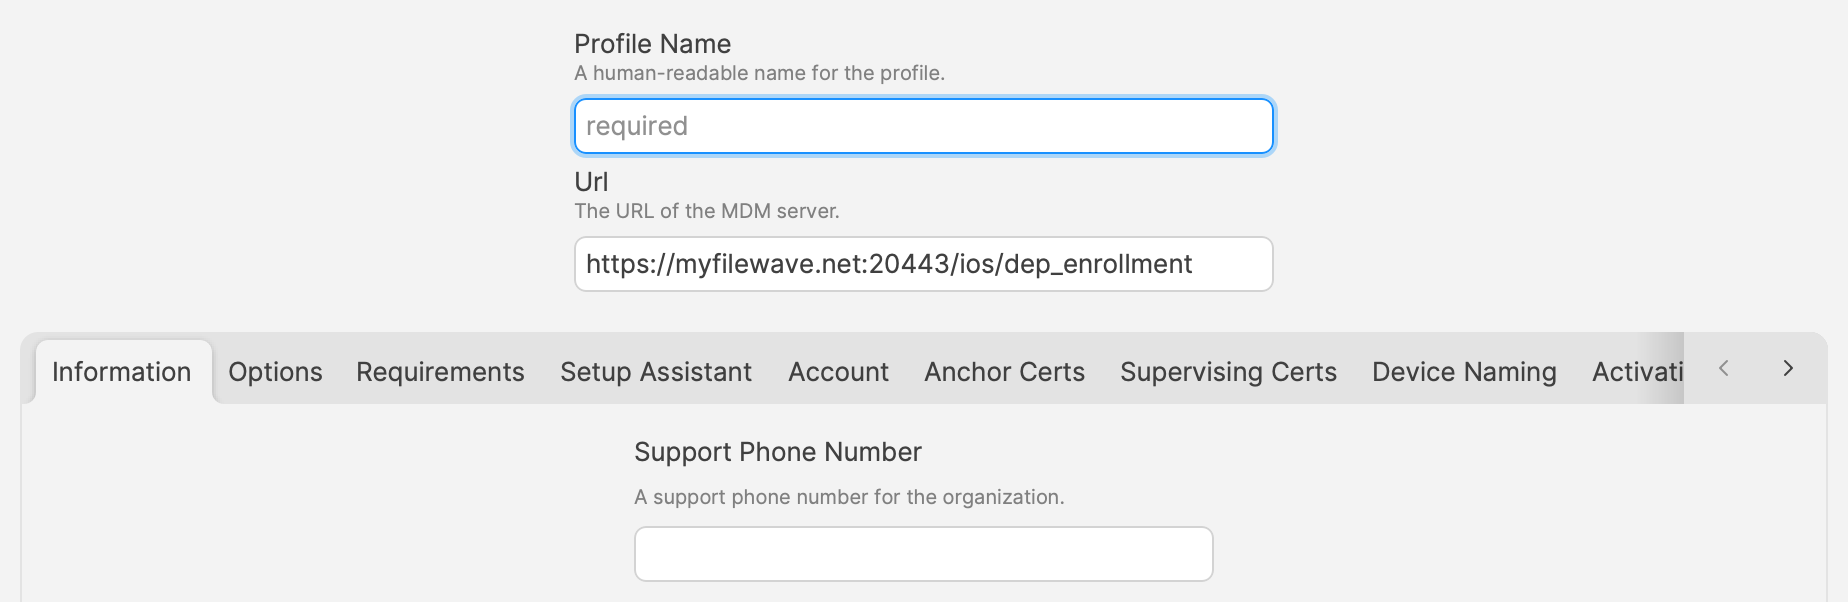
Enrolment Profile
Enrolment Profile has options, e.g which Setup Assistant items are shown. When an Enrolment Profile is associated with one or more devices, the Enrolment Profile is sent to Apple; differing Enrolment Profiles may be configured and associated with different devices.
Working with Apple’s Device Enrollment Program (DEP)
How
Enrolment Stages
Enrolment Profile delivery
When the device is first connected to a network, the device will initially communicate with Apple. Apple observe the identity of the device and if there is an associated Enrolment Profile with this device, the Profile is sent to the device.
Once the Enrolment Profile is delivered, it will remain on the device, even if rebooted. Only a subsequent erase of the device will remove the Enrolment Profile and the process be re-triggered from scratch.
A key item in the Enrolment Profile is the MDM Server URL.
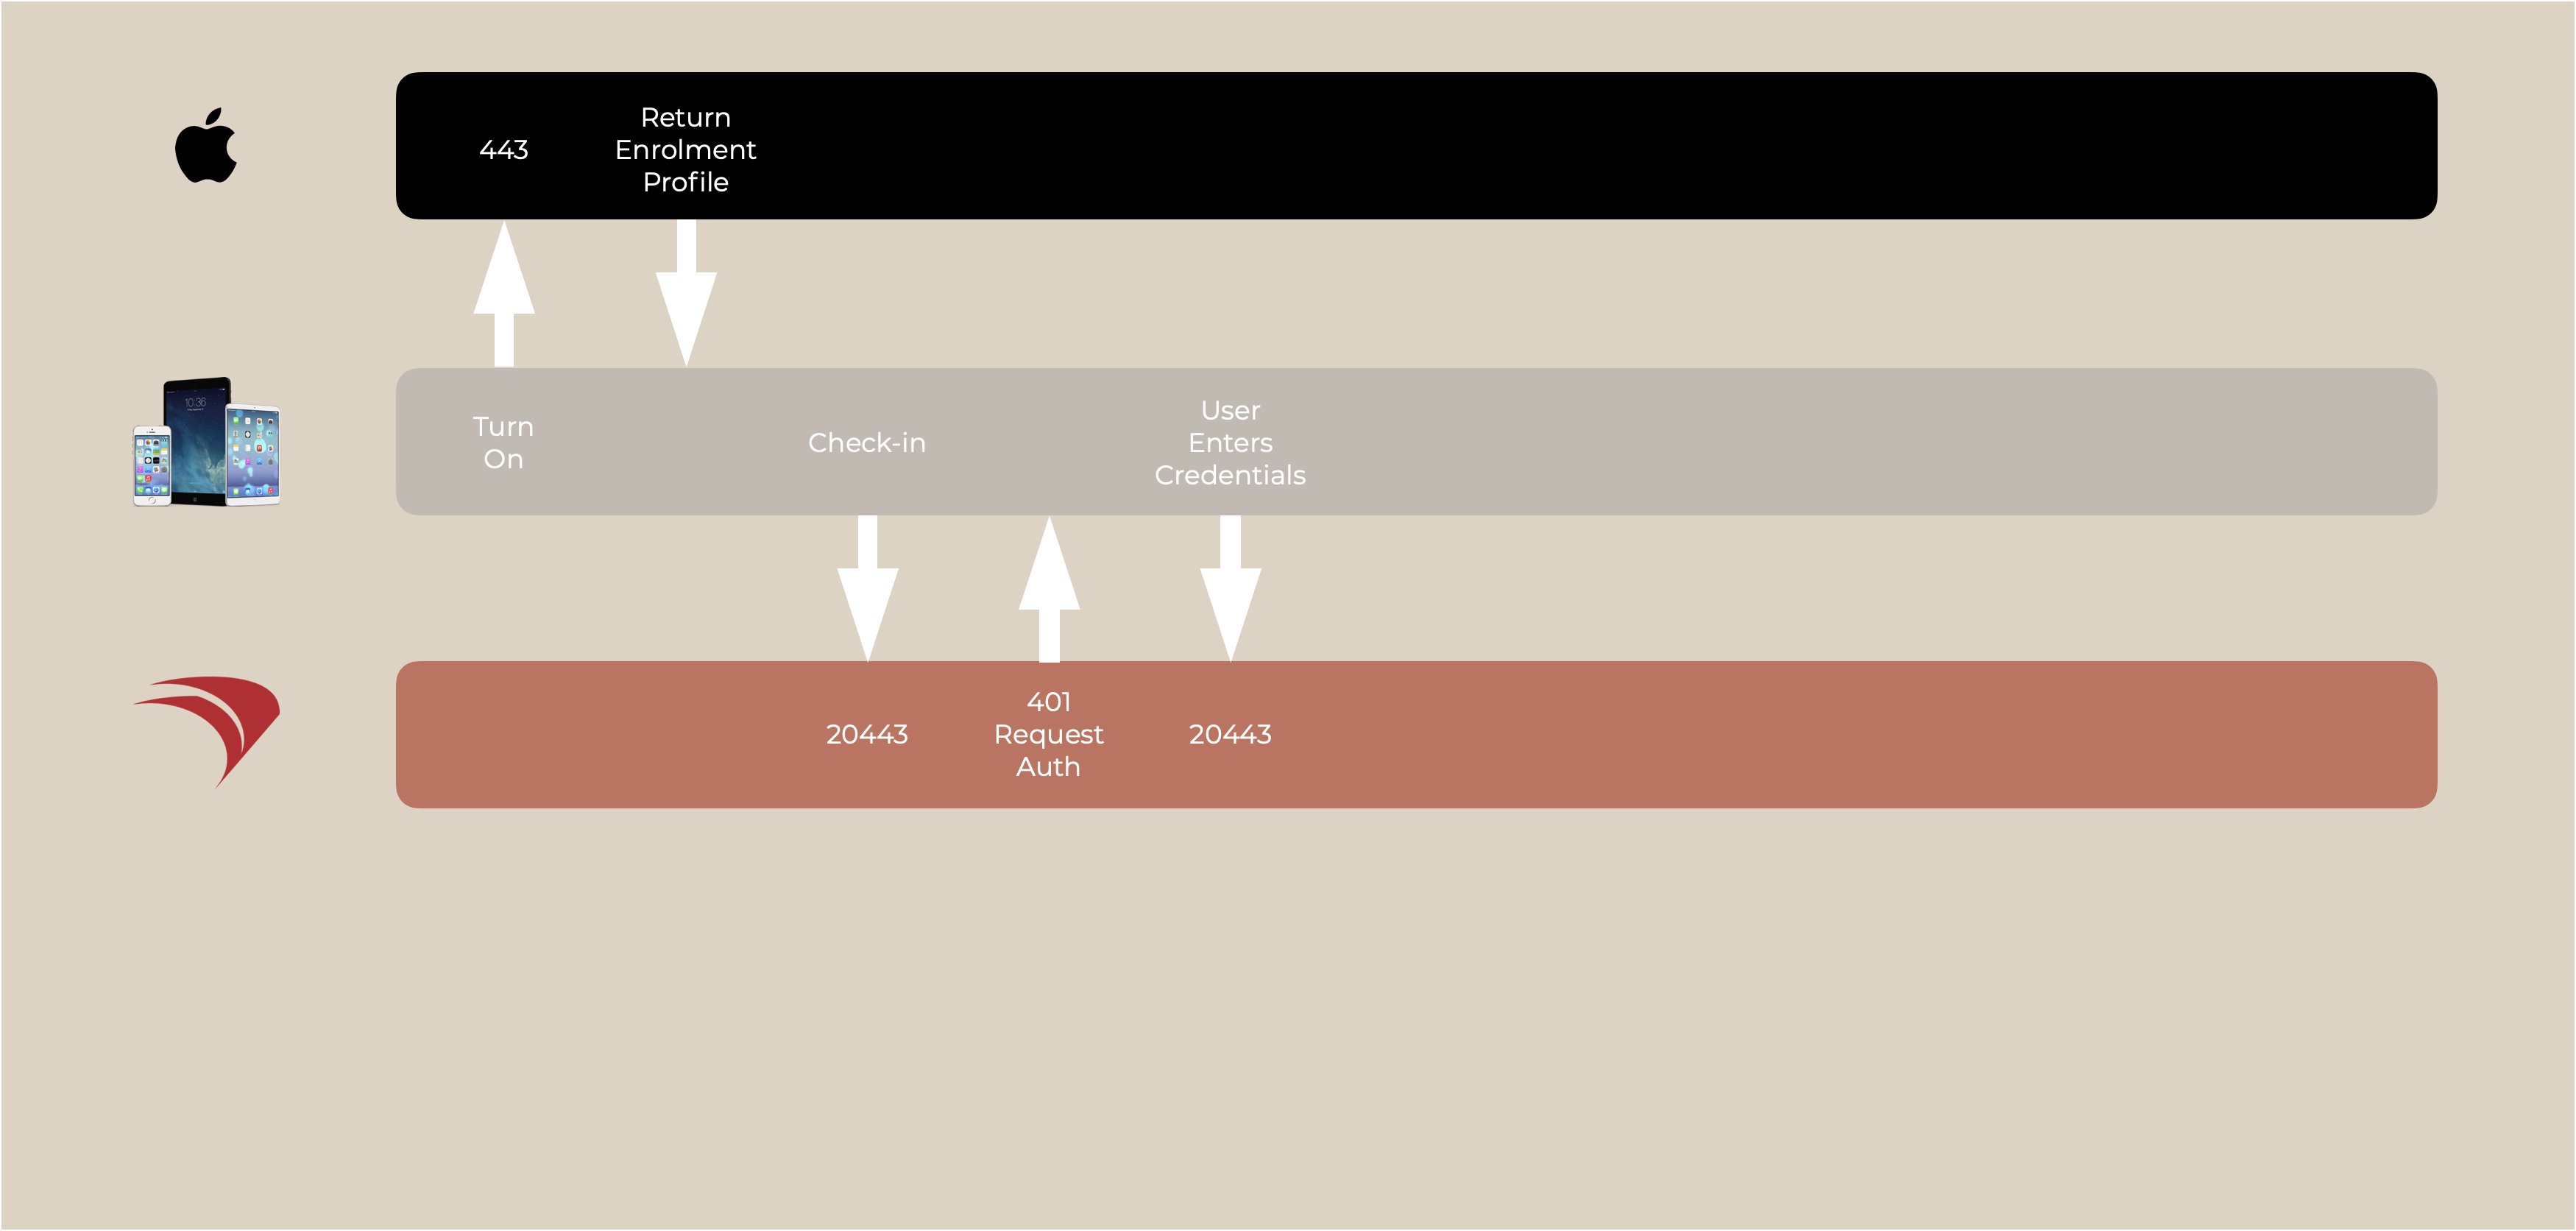
Check-in
The device reads the MDM Server URL and the enrolment process can then begin.
Authentication
The next requirement from check-in is authentication.
On initial check-in, FileWave server returns a 401 due to no authentication and then informs the device how to authenticate.
| Local Authentication | FileWave is configured with a local username and password encrypted on the FileWave Server (Default) |
| No Authentication | FileWave Server is configured to allow devices to enrol with no authentication required |
| LDAP | An LDAP server, e.g. Active Directory, is configured, allowing directory users to authenticate enrolment |
| IdP | Okta, Google or Entra users may authenticate enrolment |
Local and No authentication are configured through the server command line, LDAP may be configured through FileWave Central, whilst IdP is configured through FileWave Anywhere.
Basic Authentication
IdP Authentication
IdP requires a special mention here due to the additional steps involved.
FileWave server informs the device with a URL to direct the authentication; the IdP. The IdP custom authentication screen should be presented to the user and on entering details, if successful, the IdP uses the configured redirect, to contact the FileWave server to inform of success.

Redirects provided to IdP for connection with FileWave Server may be viewed from FileWave Anywhere, for example:
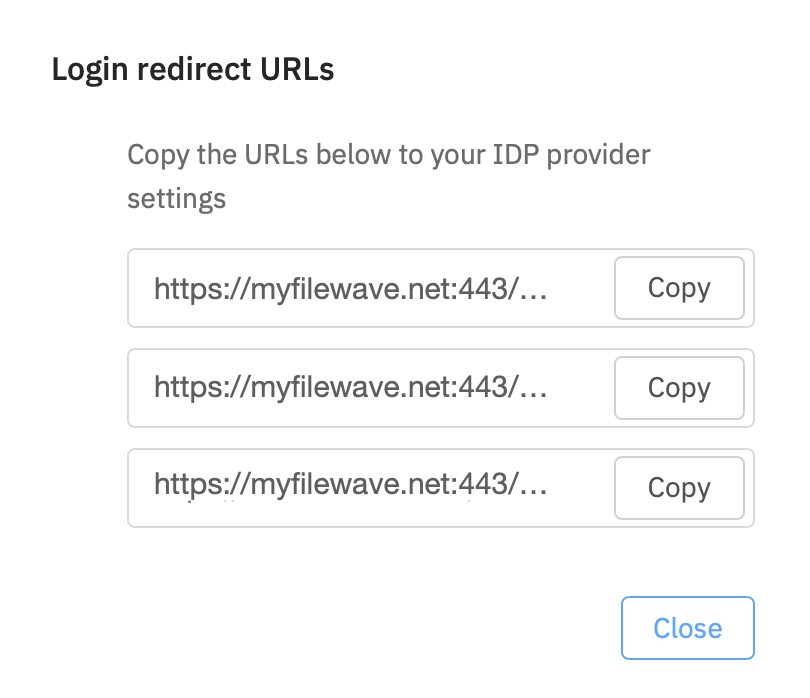
FileWave Server informs the IDP where to respond to the FileWave Server once complete. The FileWave returned URL to send on the code from the device will be through port 20443 and includes the auth code as a parameter within the URL.
Federated Authentication
An extension of IdP, Federated Authentication is an offering from Apple, which allows Apple IDs/passwords to be synchronised with an IdP. This is configured within Apple's Management portal; FileWave is not involved with this configuration.
https://support.apple.com/en-gb/guide/apple-business-manager/axmb19317543/web
Working with Apple’s Automated Device Enrollment (ADE)
ADE only works with devices purchased from Apple authorized sources or added via Configurator to ABM/ASM. For information on approved devices in ADE, see the following reference:
https://help.apple.com/deployment/business/
The features of ADE include:
- Zero-touch configuration - supported Apple devices, including iPhone, iPad, Apple Vision Pro, and Mac, can receive preassigned applications, profiles, and settings during activation.
- Automatic enrollment and management - devices can automatically enroll with the FileWave MDM server and receive management profiles without hands-on work by IT.
- Supervision and enforced management - ADE can provide additional management control and prevent removal of management when Apple supports those capabilities for the platform and enrollment.
- Streamlined Setup Assistant - devices can skip supported setup steps and receive their assigned configuration during activation.
ADE Workflow Overview
- IT signs up for ADE account (or accounts)
- Institution purchases devices via an authorized seller
- IT doesn't see devices in the online ADE list until the shipping confirmation arrives from Apple (prior to that, Apple doesn't know what serial numbers are going to be shipped)
- IT assigns the devices from the online ADE list to the FileWave MDM server by serial number (You can also assign defaults in ASM & ABM)
- Wait for the ADE list and the FileWave MDM list to synchronize (24hr default sync, or triggered manually in the DEP UI
- IT assigns ADE profiles to the serial numbers of the devices prior to arrival (Automatically Assign ADE profiles)
- Devices arrive and, at first boot, are auto-enrolled and configured as managed devices (macOS computers will auto-enroll if connected to the Internet for push notification and the MDM server for enrollment.)
For more information see: https://support.apple.com/en-us/HT204142
Configuring ADE with FileWave
This process is covered in VPP and ADE preferences
FileWave Client for macOS ADE
FileWave Server 16.4.0 and later: Build the signed macOS enrollment package in FileWave Central > Preferences > Mobile > macOS. Select Show settings, configure the package, and use Build macOS client package. Earlier supported FileWave Server versions continue to use custom.filewave.com until the Server is upgraded to 16.4.

"Use for initial enrollment only" is highly recommended. This means that FileWave will only attempt to install the PKG the first time a devices enrolls. If it is unchecked, and you upload a new PKG, FileWave will send this out via an APN immediately. This could cause existing devices to loose their configuration (like boosters)
Understanding devices and profiles for ADE
Once you have registered your FileWave Server with the ADE system, you can begin setting up your devices for automatic enrollment and management. You will be able to view a list of your devices along with certain characteristics of those devices, such as model number, color of the device, asset tag information, and serial number.
You will also be able to apply a "profile" to the device.
The "profile" in ADE is not the same as a management profile. Instead of a property list (plist), the ADE profile is a set of data formatted in JSON (JavaScript Object Notation) format. The profile is applied through Apple when the device is initialized. It will contain settings that you configure including:
- The MDM server URL
- MDM options, such as supervision and management profiles
- MDM server certificate(s)
- Pairing certificates
- Device setup assistant options
The process for setting up your devices is done through the /Assistants/ADE Association Management… pane:
The ADE Associations pane looks similar to other FileWave windows with three sections. In this case, they are:
- The Device list in the upper left, which you can filter by the different accounts devices are purchased under;
- The Profiles list in the upper right, which lists all of the profiles available to associate to devices with the number of devices each is assigned to; and,
- The Associations list on the bottom, which displays the device by serial number, the name of the profile it is associated with, and various date-time Groups showing assignment dates and times.
Security prerequisites for ADE
ADE uses Basic and Digest Authentication. Basic is for iOS v7.1(+) devices, and we implemented Digest Authentication for iOS v7.0.x devices. In order to configure up your FileWave MDM server for Digest Authentication, you need to use a separate command, similar to the fwcontrol mdm adduser command used for your MDM server configuration. The command is:
sudo fwcontrol mdm adddepuser <user_name>The adddepuser command requires you to provide a user name in the command, and respond to the prompt to add a password for that user, then to confirm the password. This user name and password will be requested by the device during ADE enrollment. These commands are issued on the FileWave MDM server either directly or remotely through terminal services.
Authentication with LDAP
If you are using LDAP and ADE, you will have to use iOS v7.1.x(+) devices. The mdm_auth.conf.example_ldap_auth file we provide is based on basic authentication, while the default is using digest. If you have not already edited the mdm_auth.conf, then review the information in LDAP Preferences
Configuring ADE profiles
FileWave 16.4 and later: macOS ADE profiles include Managed Migration Assistant controls for Mac-to-Mac migration during Setup Assistant. See ADE Profiles for the supported control areas, validation boundary, and related DDM workflow.
You create ADE profiles within the ADE Associations pane by clicking on the + button in the profile section of the window.

Here is a view of the ADE Profile creation window:
Information
This information will be set in the MDM profile once installed on the MDM device.
Options

These settings are for the key behaviors of the registered device:
- Do not allow user to skip enrollment step - the device must become enrolled in order to complete setup
- Supervise (iOS only) - the device will have supervision enabled
- Is MDM removable - if unchecked, the MDM profile is locked to the device and cannot be removed by the user through the UI
- Allow pairing - if checked, the user can pair the device with their own iTunes account to synchronize personal content
- Automatic Advance - if checked, the Apple TV will automatically advance through setup assistant (If you use the remote on the Apple TV this option will be canceled)
- Enable Shared iPad - Device will be configured as a Shared iPad. Devices that do not meet requirements ignore the option.
- Maximum number of users - Sets the maximum number of users that can use a shared iPad, based on the storage capacity. If greater than the maximum possible number of users supported on the device, the device will be configured with the maximum possible number of users instead.
Setup Assistant

- Skip setup items - this allows the FileWave administrator the ability to configure which portions of the setup assistant are made available to the end user when they configure the device. If none of the items are allowed, then the device must be pre-configured using MDM profiles with all of the appropriate settings to ensure functionality.
Account (requires client running macOS v10.11+)
A feature in ADE is the ability to create a local administrator account in advance of a user being guided through creating their own local account. If you configure this pane with a local administrator account, then the user will be allowed to create a local account of their own; but it will be a non-admin user. The local admin account can be somewhat hidden (the home directory will still be in /Users/ but it will not show up in the Users and Groups System Preference pane). If this pane is configured with only the local account setup, the user setting up the device will be guided through setting up a local administrator account of their own.

Note: Disallowing "Local Account Setup" During ADE enrollment may prevent your machines from completing their enrollment steps unless the local administrator account logs in on the machine.
Anchor Certs & Supervising Certs
The "Certs" tabs are for adding the necessary certificates to the device to allow trusted connections and specialized pairing permissions. The FileWave MDM server certificate is automatically added to the Anchor Certs list.


Device Naming
The devices being enrolled can have a rule-based name applied. In a 1:1 deployment with users authenticating with LDAP credentials, the device name can reflect an institutionally-derived naming convention punctuated by the user's name. This function is limited to supervised iOS devices running iOS 9+ and macOS computers running 10.11+.

See: ADE Naming for more information
Activation Lock
Apple provides an anti-theft feature called Activation Lock. When wiped and activated again, the device is locked and will require an Apple ID credential to be unlocked. FileWave can ease the process by escrowing a bypass code which can be used to bypass iCloud credentials. The code can either be entered manually or automatically, typically just before refreshing the device.
Activation Lock can be against:
- a normal Apple ID - end user has to log in with iCloud on the device and enable Find My Phone
- a ADE (ASM or ABM) account ; in this case, the corresponding Apple ID is the Apple ID managing the ADE server.
In both cases, FileWave can escrow the key and use it to unlock the device during refresh. You can configure Activation Lock:
- for each ADE device, at the ADE profile level
- globally, for all non ADE devices
For ADE devices:
- No lock AKA Disabled

Use iCloud

Use your AMS/ABM account

Associations
Associating a ADE profile to a device (or set of devices) is done using the same drag & drop functions used in the other FileWave associations panes. You can drag a profile on top of a device, or select a set of devices and drag them on top of a profile. The associations will appear in the lower section of the ADE Associations window. The device will have the associated profile applied upon activation.

To automate see: Automatically Assign ADE profiles
End Result of ADE associations
The end result of associating ADE profiles to devices is that upon activation, the device will automatically become a FileWave Client with specific setup settings. You can have device Placeholders prepositioned in your FileWave Clients view, assigned to Groups, with Filesets ready to activate as soon as the device checks in.
Add or Renewing your ADE (DEP) Account Token
Description
ADE is the optimal way to enroll your Apple devices. ADE enrollment is required for countless features and management tools. Once added, you will need to renew your ADE token every year.
If you're renewing your token, it's not necessary to re-upload the server certificate (steps 1, 2, 5 & 6) each time unless the cert has changed or you are receiving a FORBIDDEN error when syncing ADE.
Step-by-step guide
- Download the ADE Certificate from FileWave Admin
- Save the certificate "FileWave ADE" to your desktop.
FileWave Anywhere
Sources > ADE Accounts > '+' > Download

FileWave Central
Preferences > VPP & ADE

3. Go to the relevant Apple ADE site,
school.apple.com or business.apple.com
4. Once signed in, go to Preferences under your account name in the bottom left of ASM/ABM
5. Select the MDM Server that needs to be renewed and click edit
6. Under MDM Server settings, 'Upload New' MDM certificate
