Once the Enrolment Profile is delivered, it will remain on the device, even if rebooted. Only a subsequent erase of the device will remove the Enrolment Profile and the process be re-triggered from scratch.
A key item in the Enrolment Profile is the MDM Server URL. [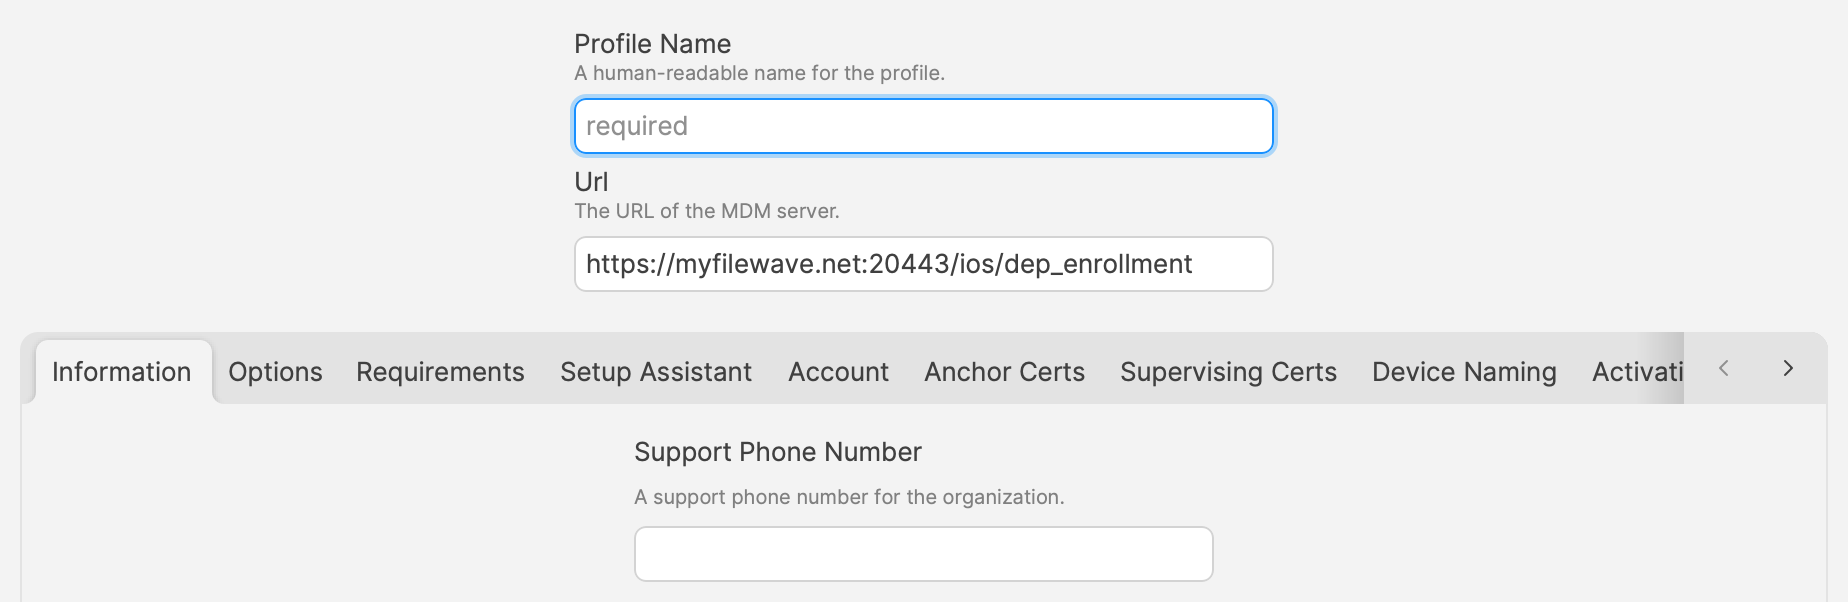](https://kb.filewave.com/uploads/images/gallery/2024-08/K21uYJka35rRjkaC-image.png) #### Check-in The device reads the MDM Server URL and the enrolment process can then begin. #### Authentication The next requirement from check-in is authentication.On initial check-in, FileWave server returns a 401 due to no authentication and then informs the device how to authenticate.
| Local Authentication | FileWave is configured with a local username and password encrypted on the FileWave Server (Default) |
| No Authentication | FileWave Server is configured to allow devices to enrol with no authentication required |
| LDAP | An LDAP server, e.g. Active Directory, is configured, allowing directory users to authenticate enrolment |
| IdP | Okta, Google or Entra users may authenticate enrolment |
ADE only works with devices purchased from Apple authorized sources or added via Configurator to ABM/ASM. For information on approved devices in ADE, see the following reference: [https://help.apple.com/deployment/business/](https://help.apple.com/deployment/business/)
The features of ADE include: - *Zero-touch configuration* - supported Apple devices, including iPhone, iPad, [Apple Vision Pro](https://kb.filewave.com/books/apple-general-info/page/managing-apple-vision-pro-and-visionos), and Mac, can receive preassigned applications, profiles, and settings during activation. - *Automatic enrollment and management* - devices can automatically enroll with the FileWave MDM server and receive management profiles without hands-on work by IT. - *Supervision and enforced management* - ADE can provide additional management control and prevent removal of management when Apple supports those capabilities for the platform and enrollment. - *Streamlined Setup Assistant* - devices can skip supported setup steps and receive their assigned configuration during activation. ## ADE Workflow Overview 1. IT signs up for ADE account (or accounts) 2. Institution purchases devices via an authorized seller 3. IT doesn't see devices in the online ADE list until the shipping confirmation arrives from Apple (prior to that, Apple doesn't know what serial numbers are going to be shipped) 4. IT assigns the devices from the online ADE list to the FileWave MDM server by serial number (You can also assign defaults in ASM & ABM) 5. Wait for the ADE list and the FileWave MDM list to synchronize (24hr default sync, or triggered manually in the DEP UI 6. IT assigns ADE profiles to the serial numbers of the devices prior to arrival ([Automatically Assign ADE profiles](https://kb.filewave.com/books/apple-school-business-manager/page/automatically-assign-ade-profiles "Automatically Assign ADE profiles")) 7. Devices arrive and, at first boot, are auto-enrolled and configured as managed devices (macOS computers will auto-enroll if connected to the Internet for push notification and the MDM server for enrollment.)For more information see: [https://support.apple.com/en-us/HT204142](https://support.apple.com/en-us/HT204142)
## Configuring ADE with FileWave This process is covered in [VPP and ADE preferences](https://kb.filewave.com/books/filewave-central-anywhere/page/vpp-and-ade-preferences "VPP and ADE Preferences") ## FileWave Client for macOS ADE **FileWave Server 16.4.0 and later:** Build the signed macOS enrollment package in **FileWave Central > Preferences > Mobile > macOS**. Select **Show settings**, configure the package, and use **Build macOS client package**. Earlier supported FileWave Server versions continue to use [custom.filewave.com](https://custom.filewave.com/py/custom_client_mac.py) until the Server is upgraded to 16.4. 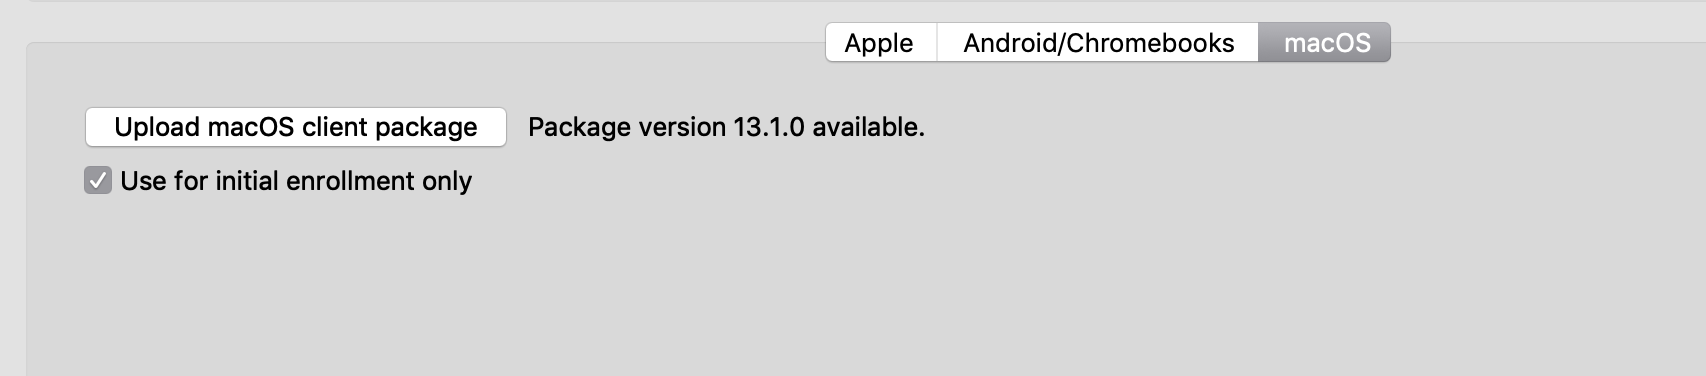"Use for initial enrollment only" is highly recommended. This means that FileWave will only attempt to install the PKG the first time a devices enrolls. If it is unchecked, and you upload a new PKG, FileWave will send this out via an APN immediately. This could cause existing devices to loose their configuration (like boosters)
## Understanding devices and profiles for ADE Once you have registered your FileWave Server with the ADE system, you can begin setting up your devices for automatic enrollment and management. You will be able to view a list of your devices along with certain characteristics of those devices, such as model number, color of the device, asset tag information, and serial number. You will also be able to apply a "profile" to the device. The "profile" in ADE is not the same as a management profile. Instead of a property list (plist), the ADE profile is a set of data formatted in **JSON** (JavaScript Object Notation) format. The profile is applied through Apple when the device is initialized. It will contain settings that you configure including: - The MDM server URL - MDM options, such as supervision and management profiles - MDM server certificate(s) - Pairing certificates - Device setup assistant options The process for setting up your devices is done through the **/Assistants/ADE Association Management…** pane: 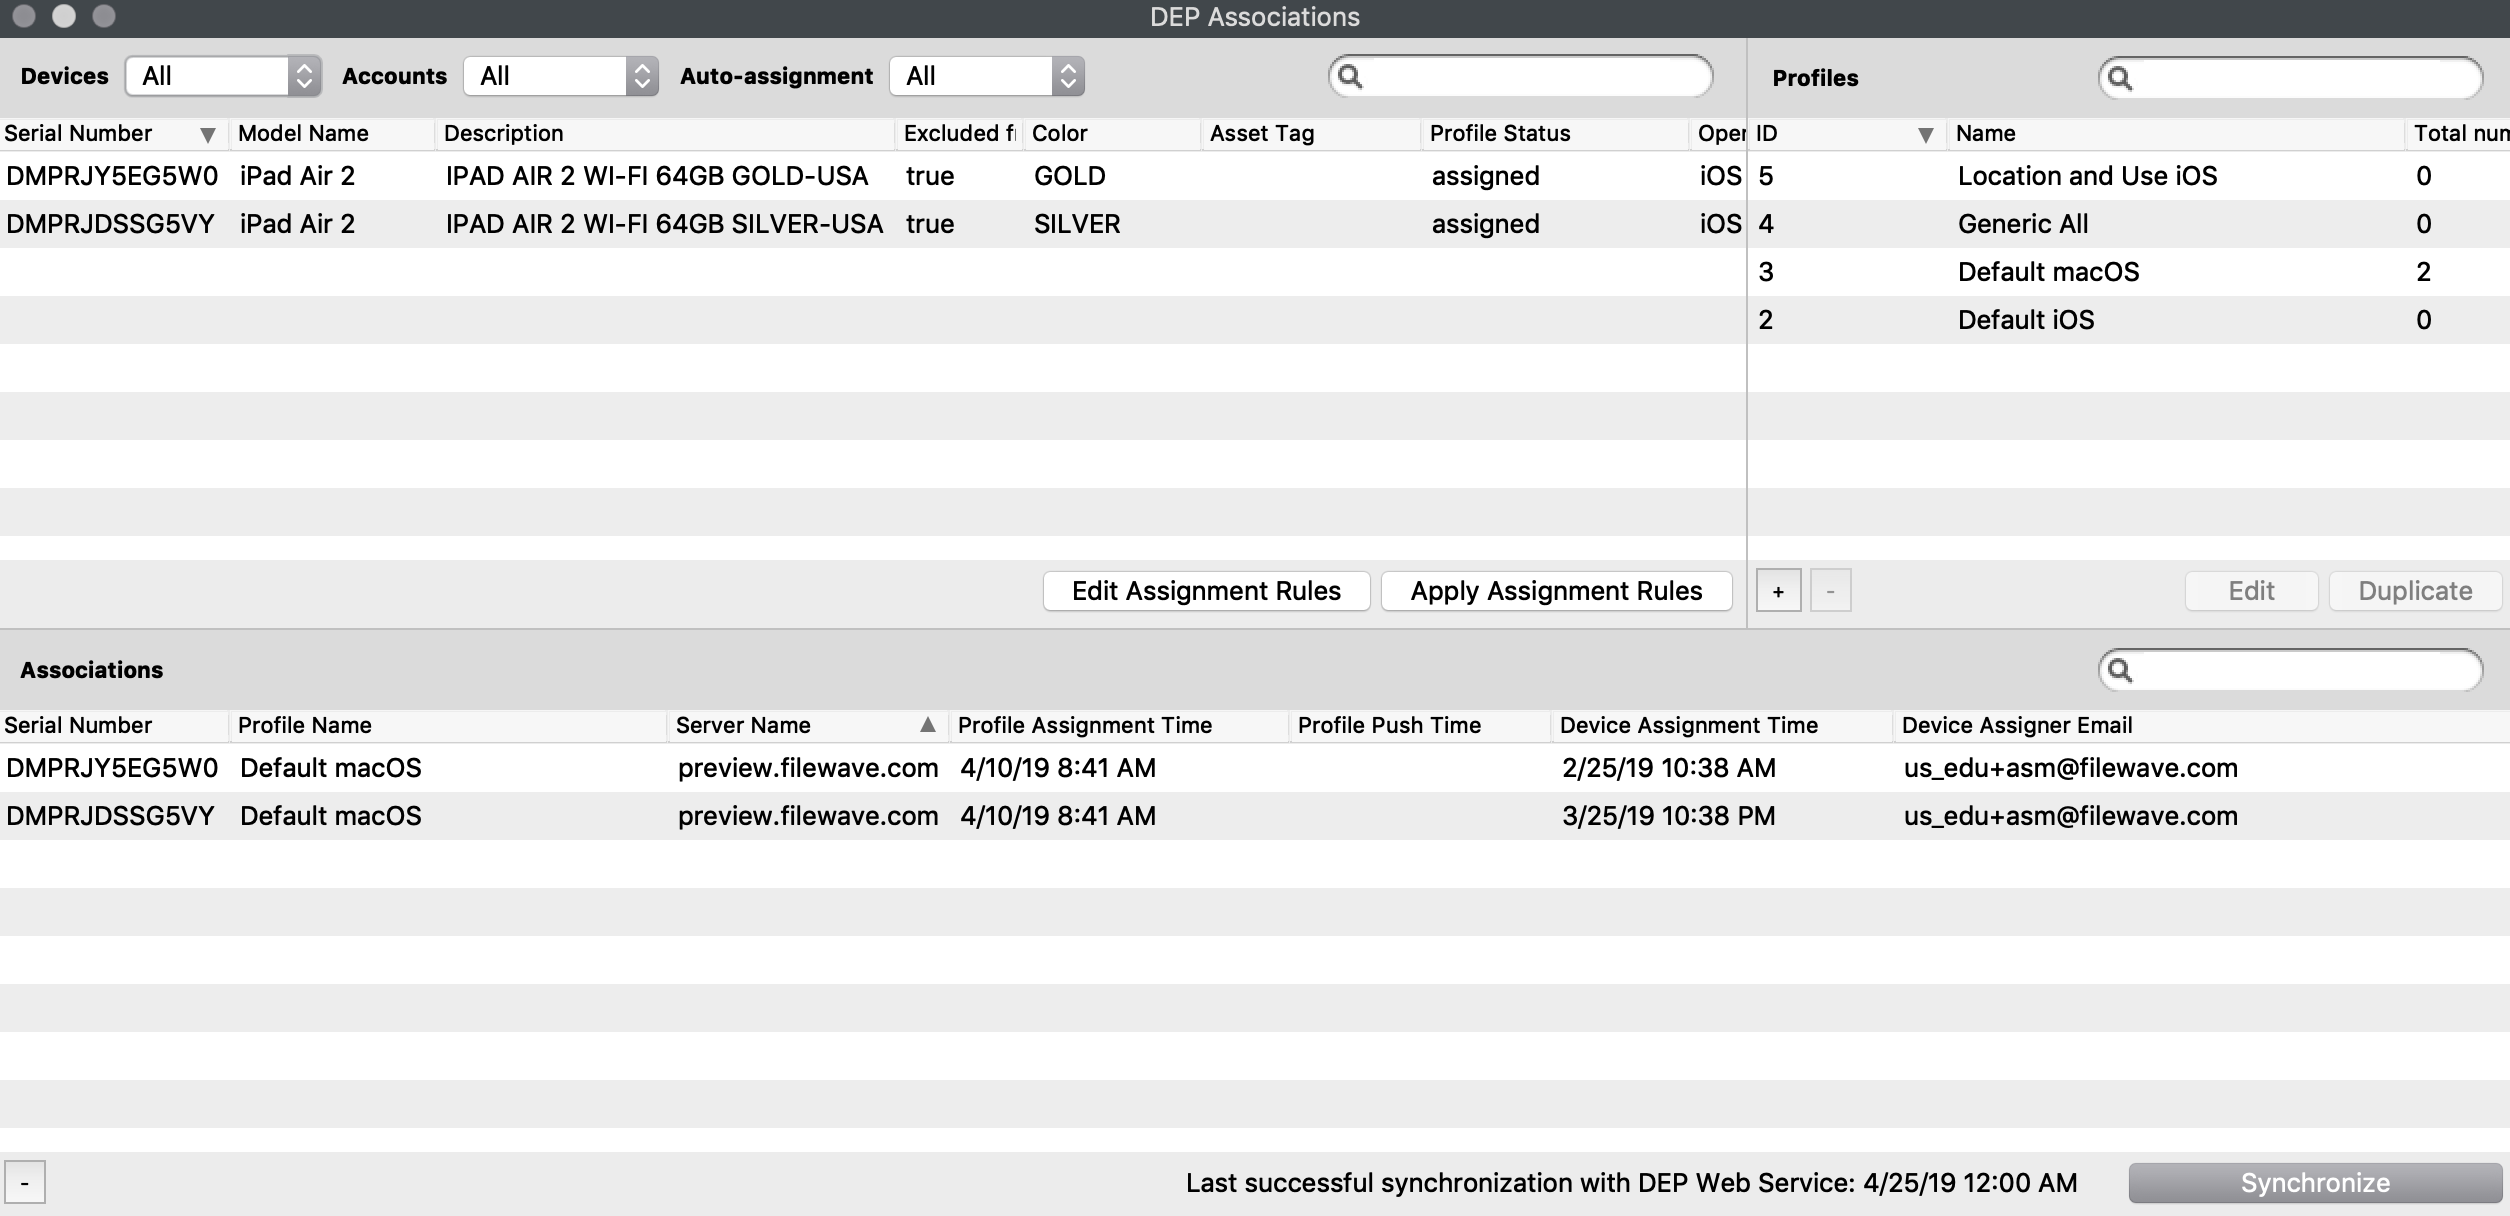 The ADE **Associations** pane looks similar to other FileWave windows with three sections. In this case, they are: - The **Device list** in the upper left, which you can filter by the different accounts devices are purchased under; - The **Profiles list** in the upper right, which lists all of the profiles available to associate to devices with the number of devices each is assigned to; and, - The **Associations list** on the bottom, which displays the device by serial number, the name of the profile it is associated with, and various date-time Groups showing assignment dates and times. ## Security prerequisites for ADE ADE uses Basic and Digest Authentication. Basic is for iOS v7.1(+) devices, and we implemented Digest Authentication for iOS v7.0.x devices. In order to configure up your FileWave MDM server for Digest Authentication, you need to use a separate command, similar to the **fwcontrol mdm adduser** command used for your MDM server configuration. The command is: ``` sudo fwcontrol mdm adddepuser**FileWave 16.4 and later:** macOS ADE profiles include Managed Migration Assistant controls for Mac-to-Mac migration during Setup Assistant. See [ADE Profiles](https://kb.filewave.com/books/filewave-anywhere-help-menus/page/ade-profiles) for the supported control areas, validation boundary, and related DDM workflow.
You create ADE profiles within the **ADE Associations** pane by clicking on the **+** button in the profile section of the window. 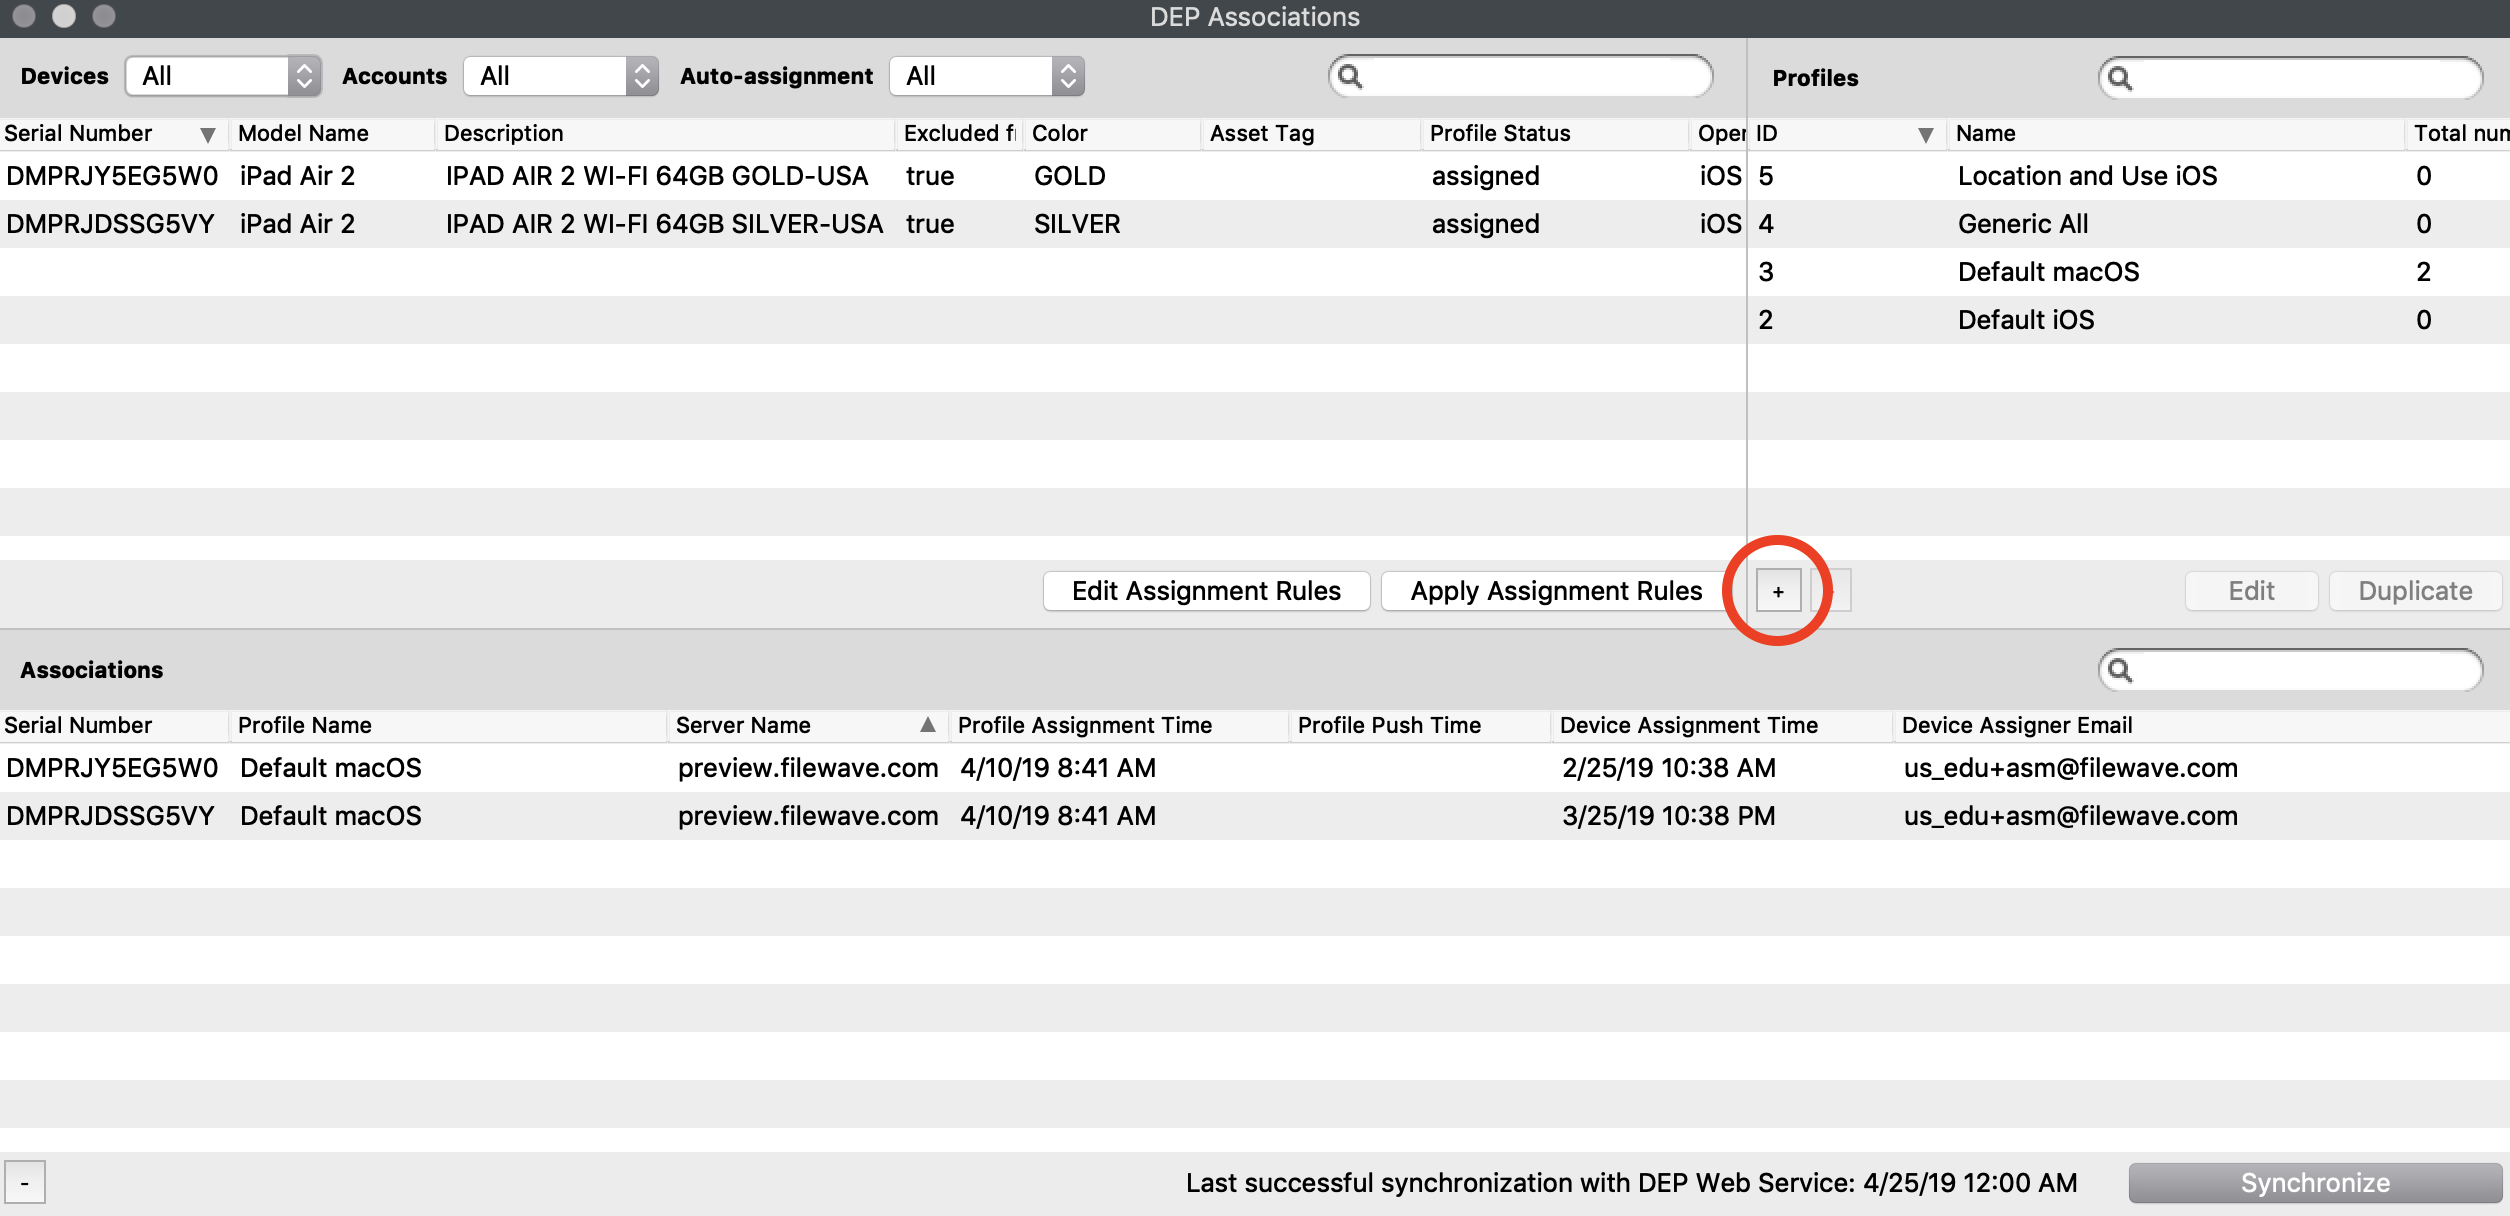 Here is a view of the **ADE Profile** creation window: ### Information This information will be set in the MDM profile once installed on the MDM device. ### Options 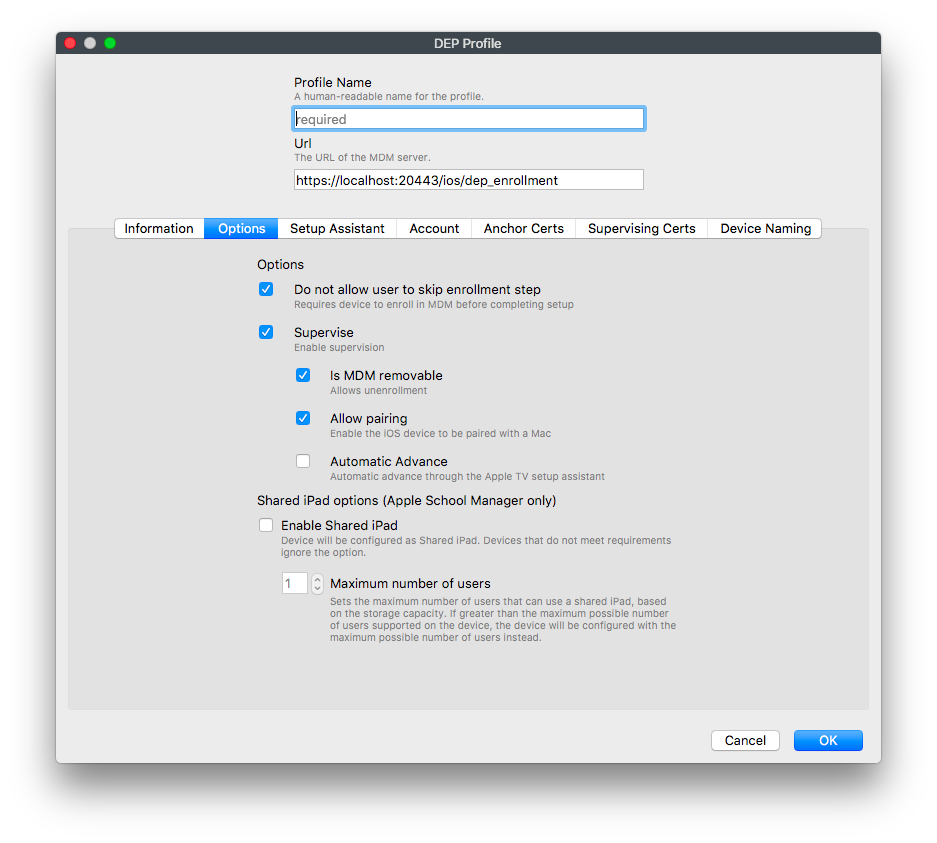 These settings are for the key behaviors of the registered device: - ***Do not allow user to skip enrollment step*** - the device must become enrolled in order to complete setup - ***Supervise (iOS only)*** - the device will have supervision enabled - ***Is MDM removable*** - if unchecked, the MDM profile is locked to the device and cannot be removed by the user through the UI - ***Allow pairing*** - if checked, the user can pair the device with their own iTunes account to synchronize personal content - ***Automatic Advance*** - if checked, the Apple TV will automatically advance through setup assistant (If you use the remote on the Apple TV this option will be canceled) - ***Enable Shared iPad*** - Device will be configured as a Shared iPad. Devices that do not meet requirements ignore the option. - ***Maximum number of users*** - Sets the maximum number of users that can use a shared iPad, based on the storage capacity. If greater than the maximum possible number of users supported on the device, the device will be configured with the maximum possible number of users instead. ### Setup Assistant 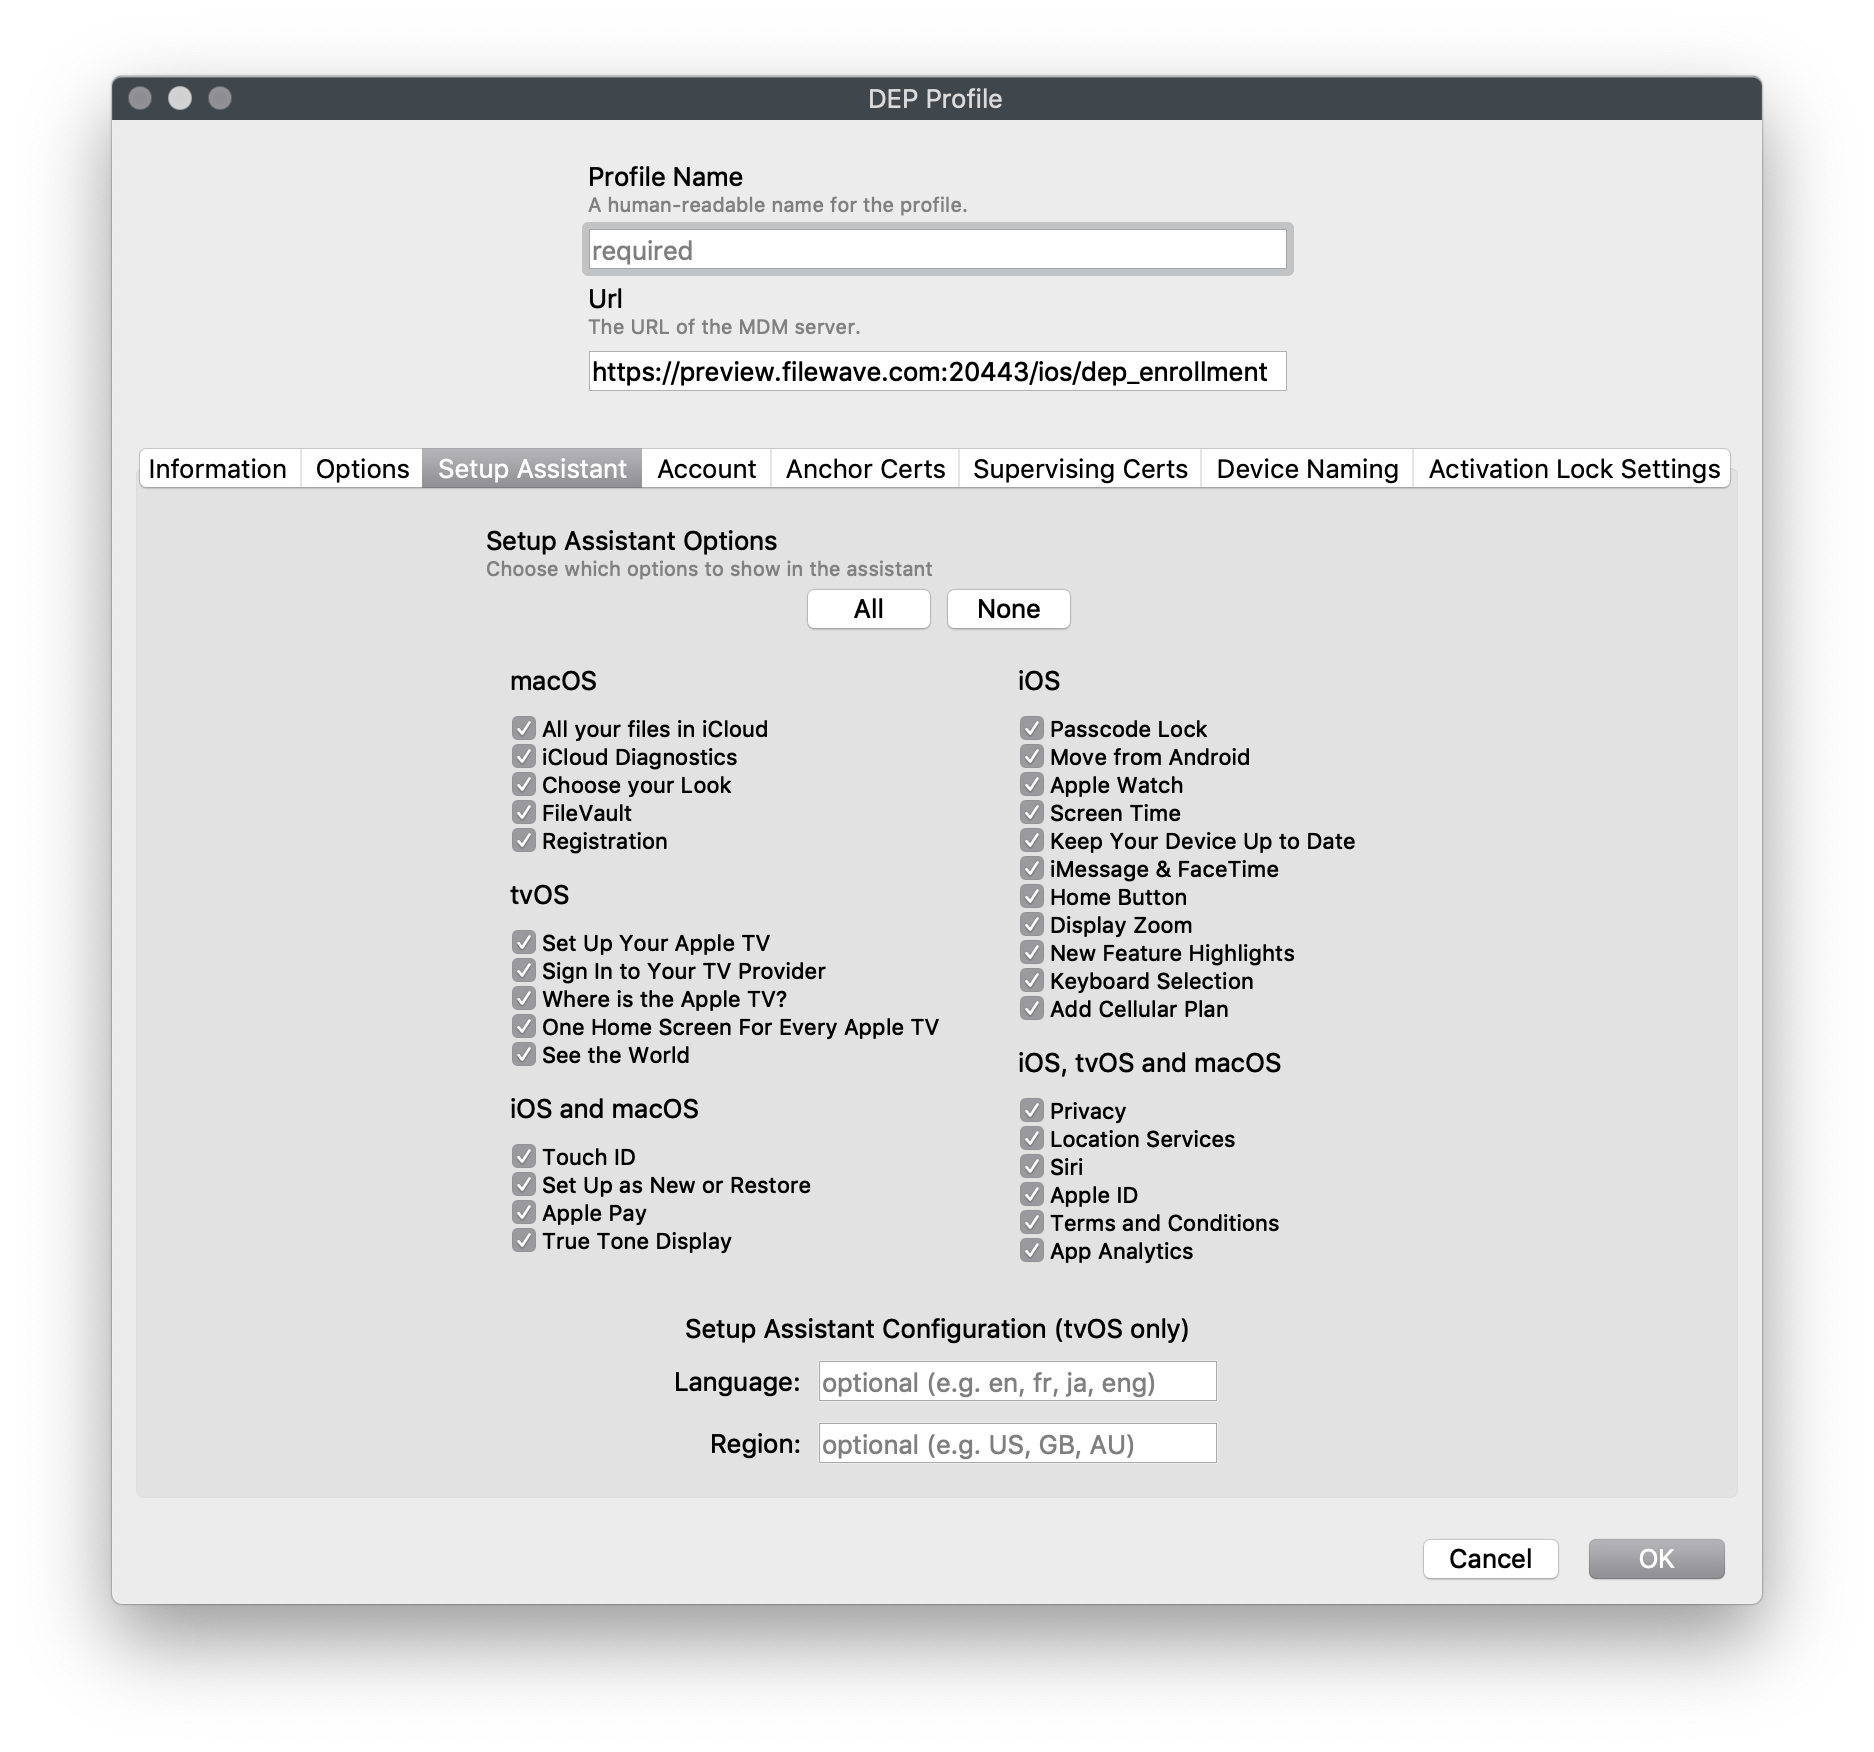 - ***Skip setup items*** - this allows the FileWave administrator the ability to configure which portions of the setup assistant are made available to the end user when they configure the device. If none of the items are allowed, then the device must be pre-configured using MDM profiles with all of the appropriate settings to ensure functionality. ### Account (requires client running macOS v10.11+) A feature in ADE is the ability to create a local administrator account in advance of a user being guided through creating their own local account. If you configure this pane with a local administrator account, then the user will be allowed to create a local account of their own; but it will be a non-admin user. The local admin account can be somewhat hidden (the home directory will still be in /Users/ but it will not show up in the Users and Groups System Preference pane). 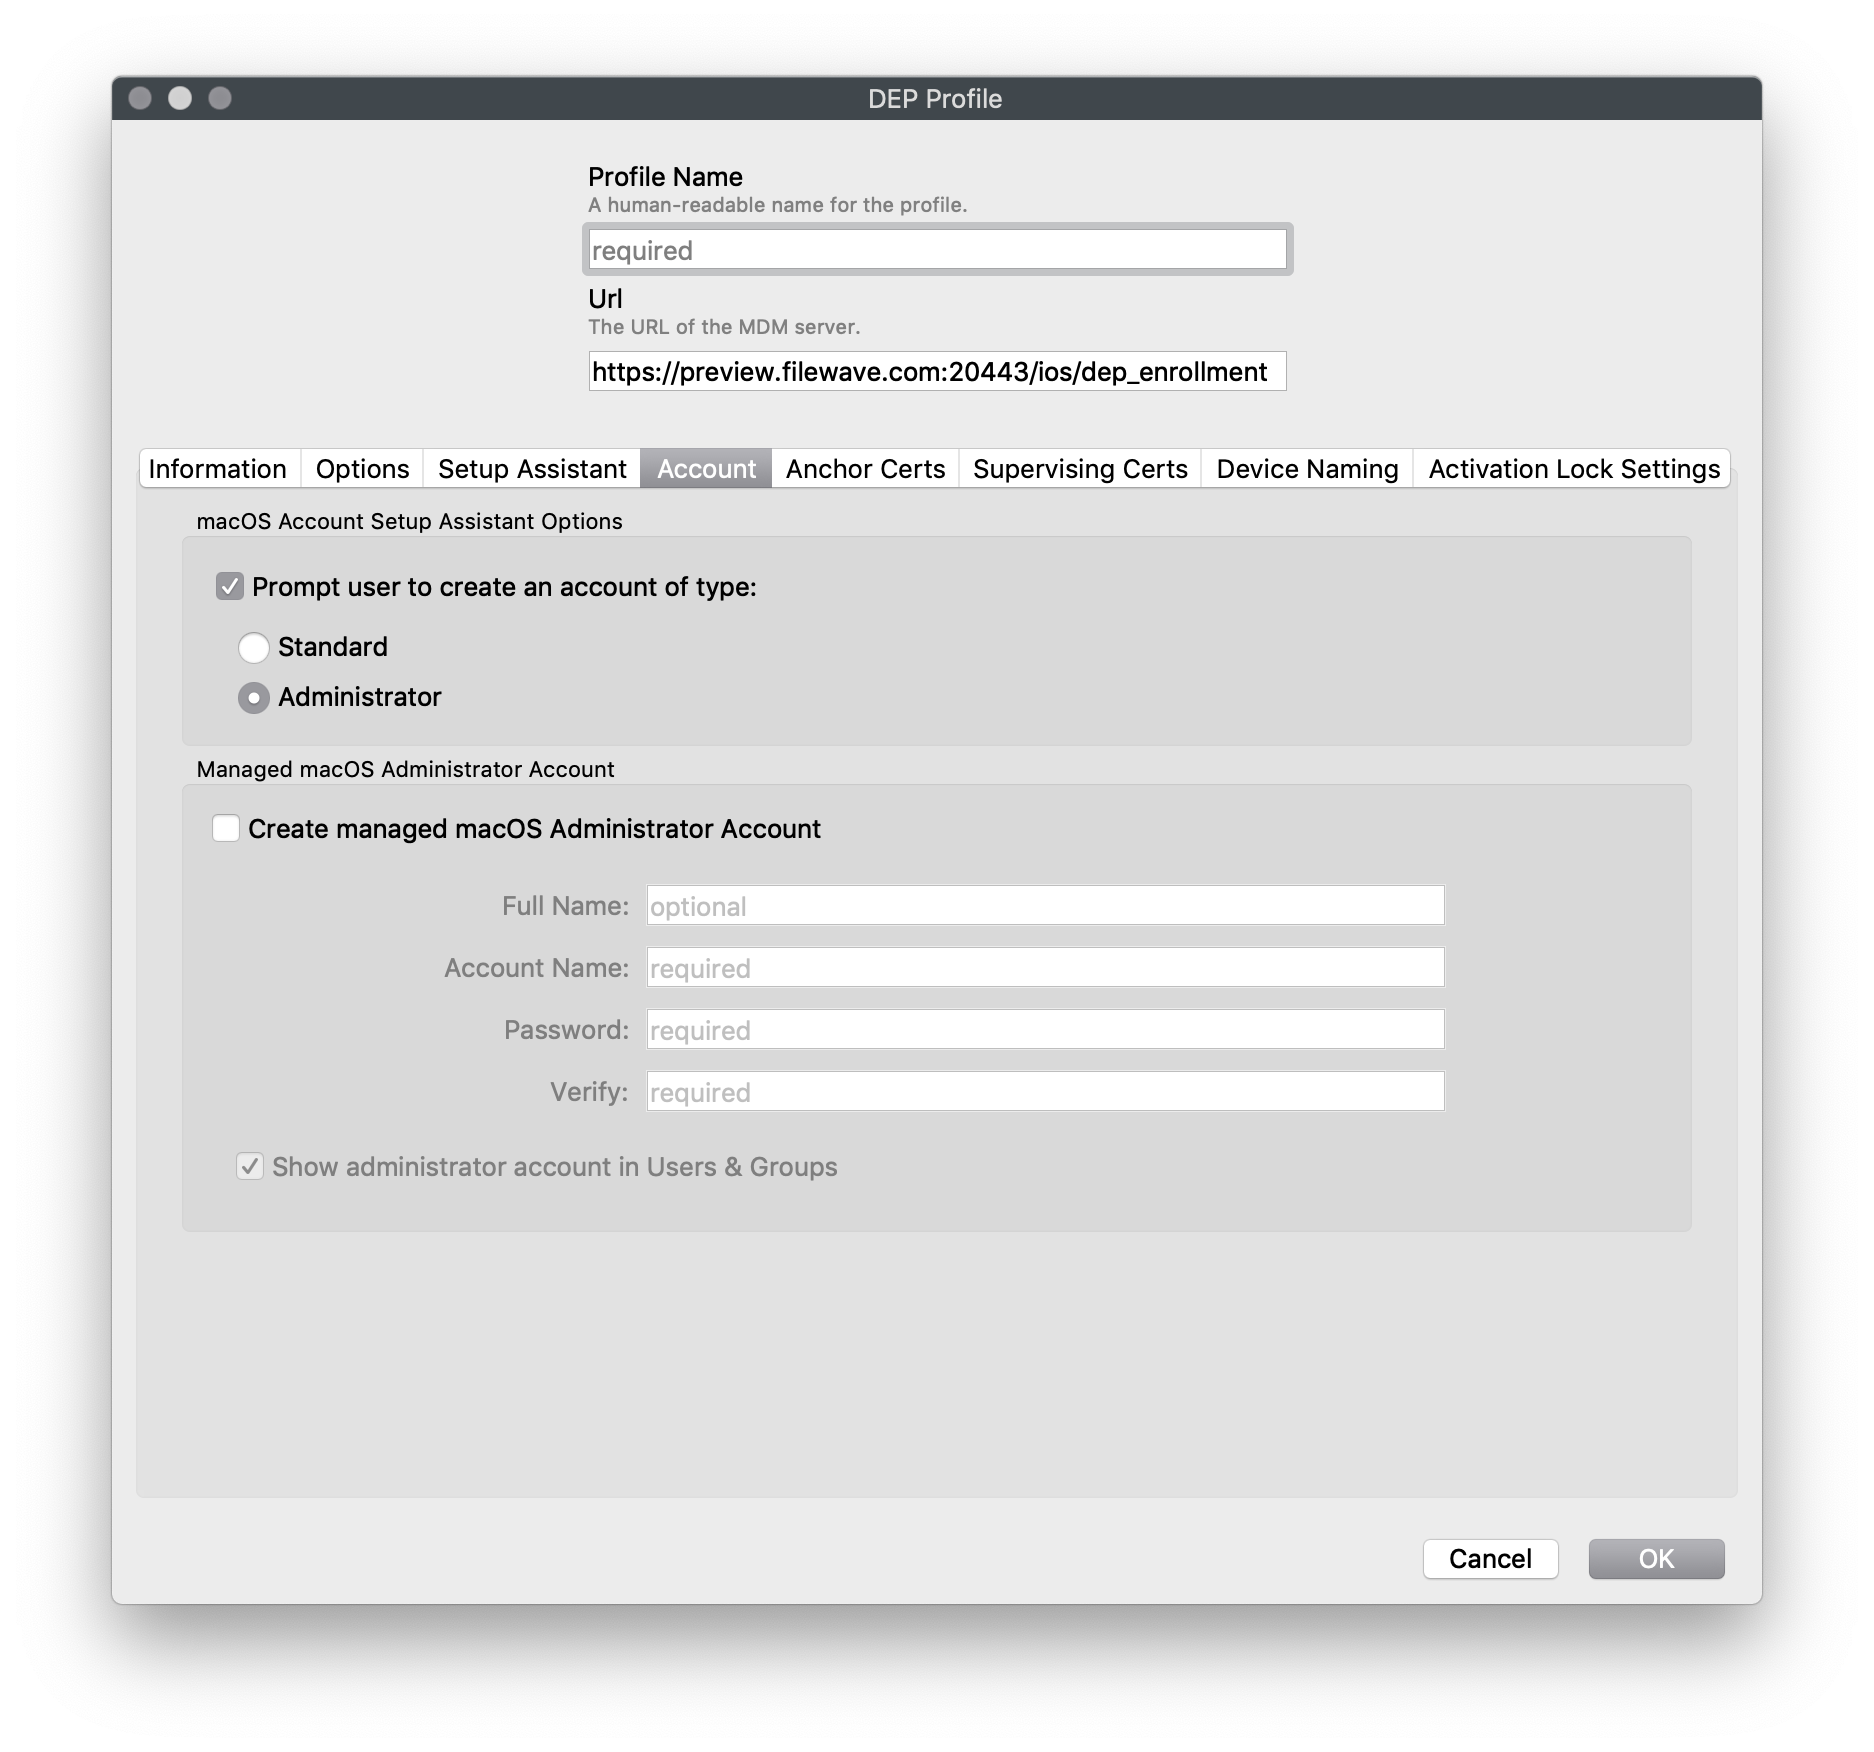 If this pane is configured with only the local account setup, the user setting up the device will be guided through setting up a local administrator account of their own.  Note: Disallowing "Local Account Setup" During ADE enrollment may prevent your machines from completing their enrollment steps unless the local administrator account logs in on the machine. ### Anchor Certs & Supervising Certs The "Certs" tabs are for adding the necessary certificates to the device to allow trusted connections and specialized pairing permissions. The FileWave MDM server certificate is automatically added to the **Anchor Certs** list. 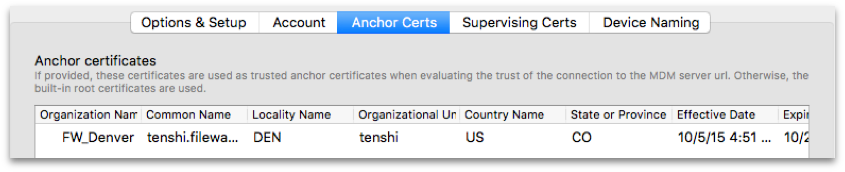  ### Device Naming The devices being enrolled can have a rule-based name applied. In a 1:1 deployment with users authenticating with LDAP credentials, the device name can reflect an institutionally-derived naming convention punctuated by the user's name. This function is limited to supervised iOS devices running iOS 9+ and macOS computers running 10.11+. See: [ADE Naming](https://kb.filewave.com/books/apple-school-business-manager/page/ade-naming "ADE Naming") for more information
### Activation Lock Apple provides an anti-theft feature called Activation Lock. When wiped and activated again, the device is locked and will require an Apple ID credential to be unlocked. FileWave can ease the process by escrowing a bypass code which can be used to bypass iCloud credentials. The code can either be entered manually or automatically, typically just before refreshing the device. Activation Lock can be against: - a normal Apple ID - end user has to log in with iCloud on the device and enable Find My Phone - a ADE (ASM or ABM) account ; in this case, the corresponding Apple ID is the Apple ID managing the ADE server. In both cases, FileWave can escrow the key and use it to unlock the device during refresh. You can configure Activation Lock: - for each ADE device, at the ADE profile level - globally, for all non ADE devices For ADE devices: - No lock AKA Disabled 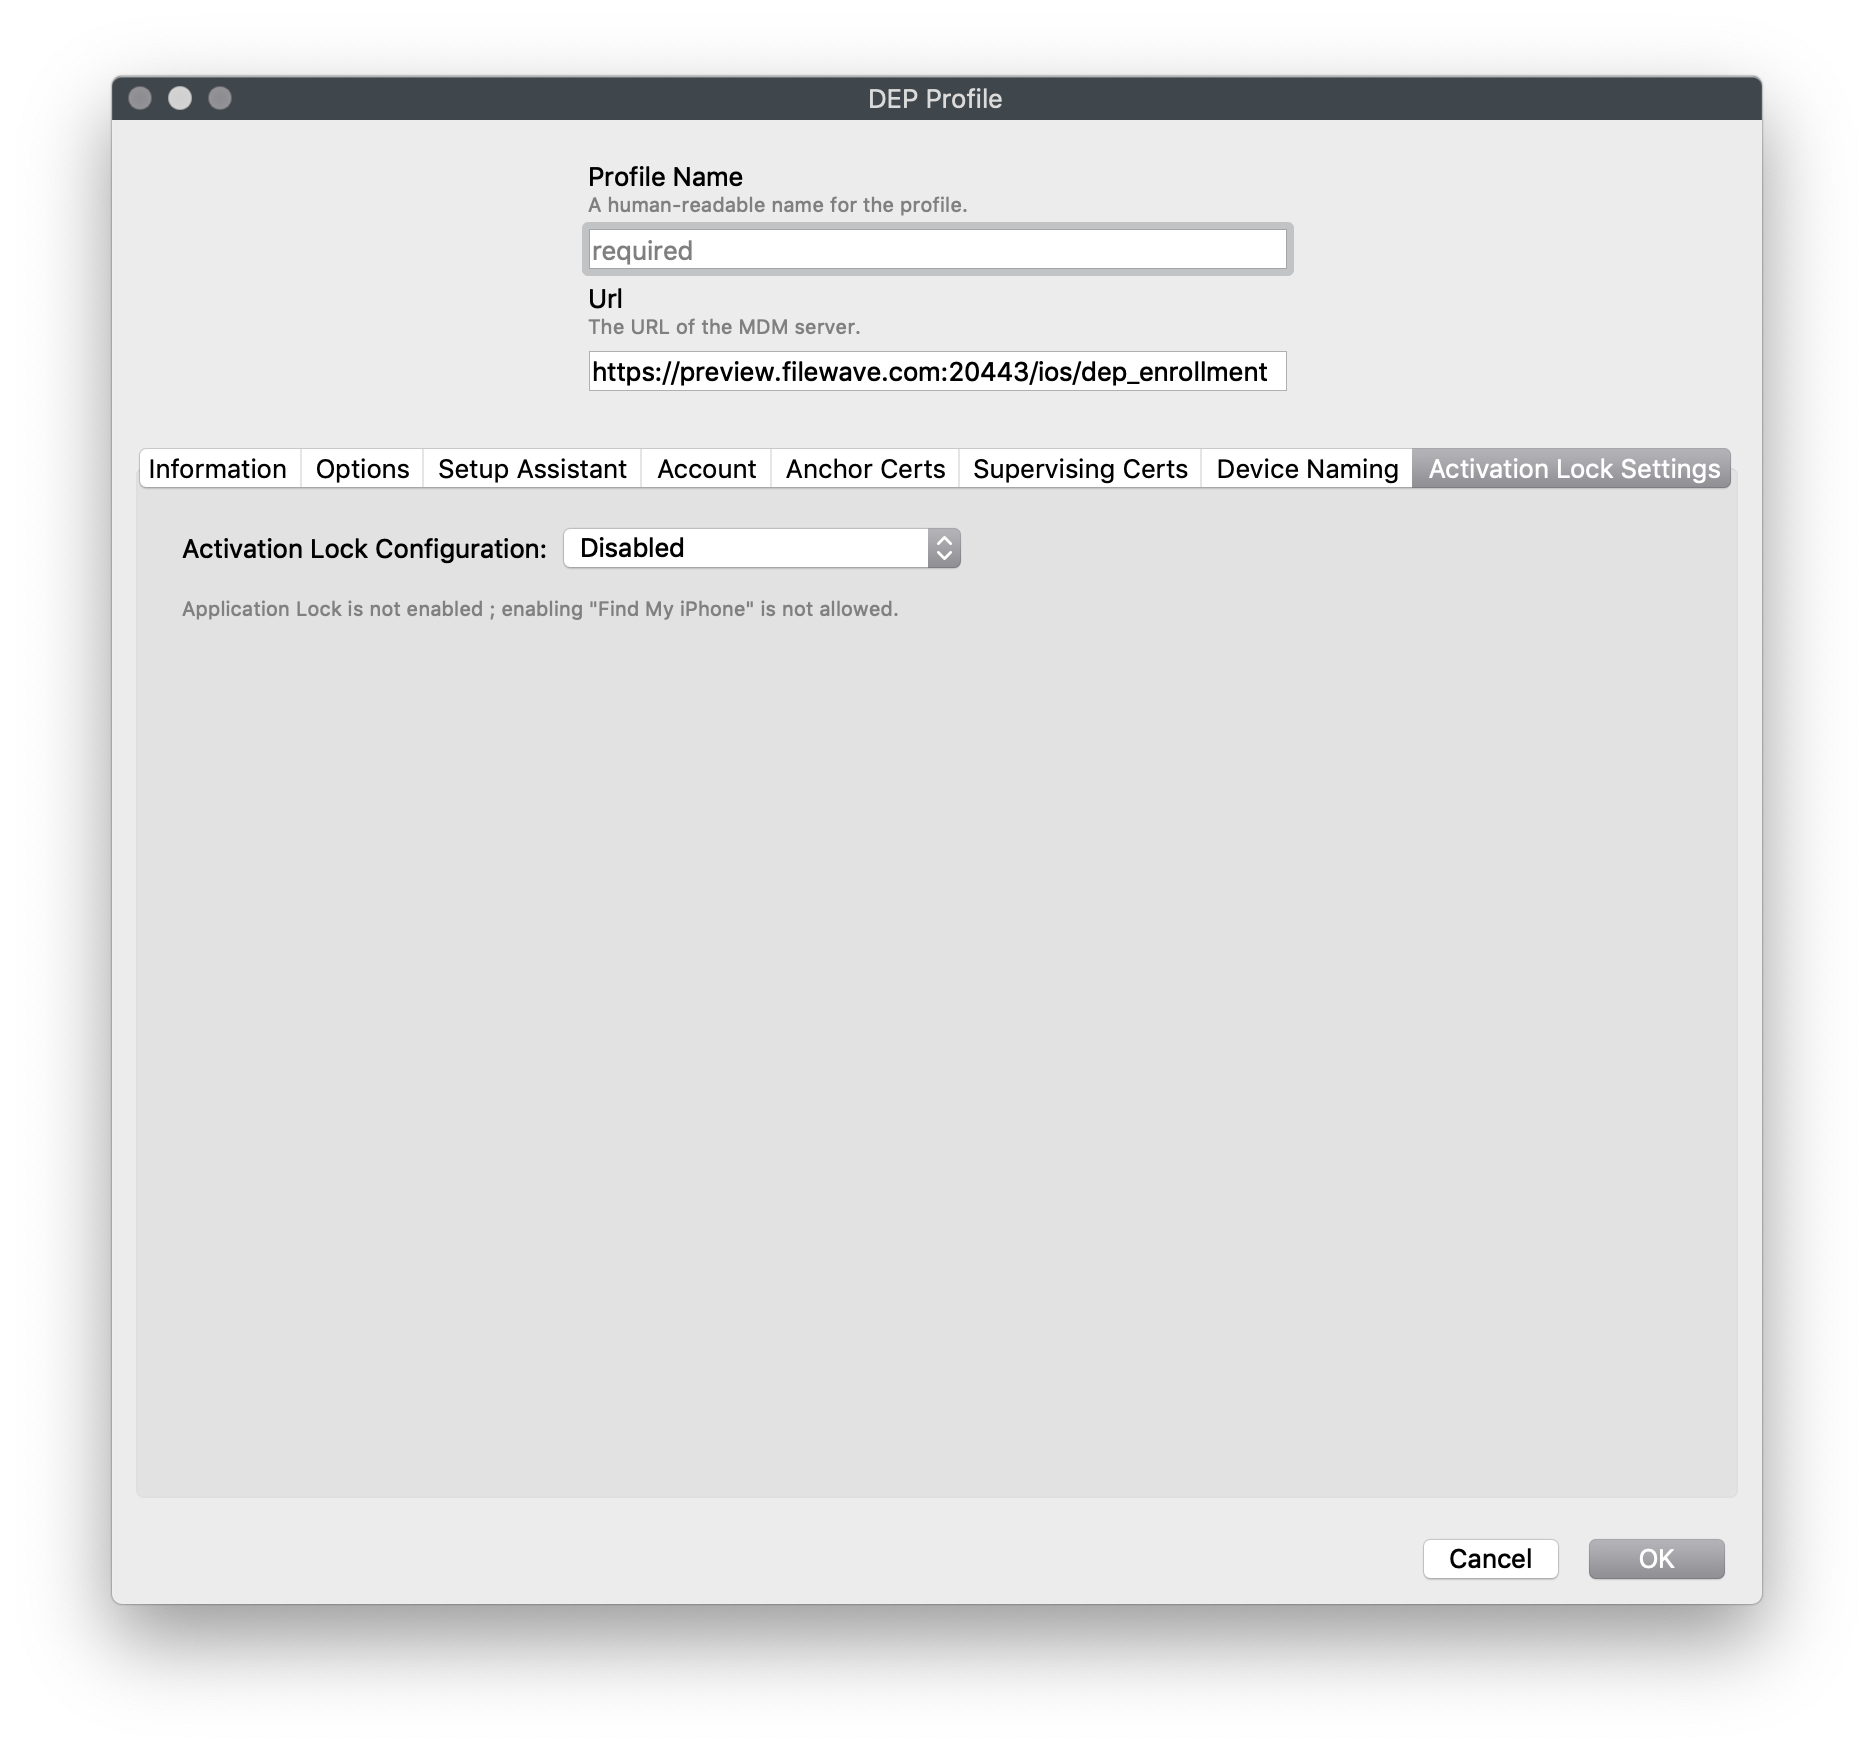 #### Use iCloud 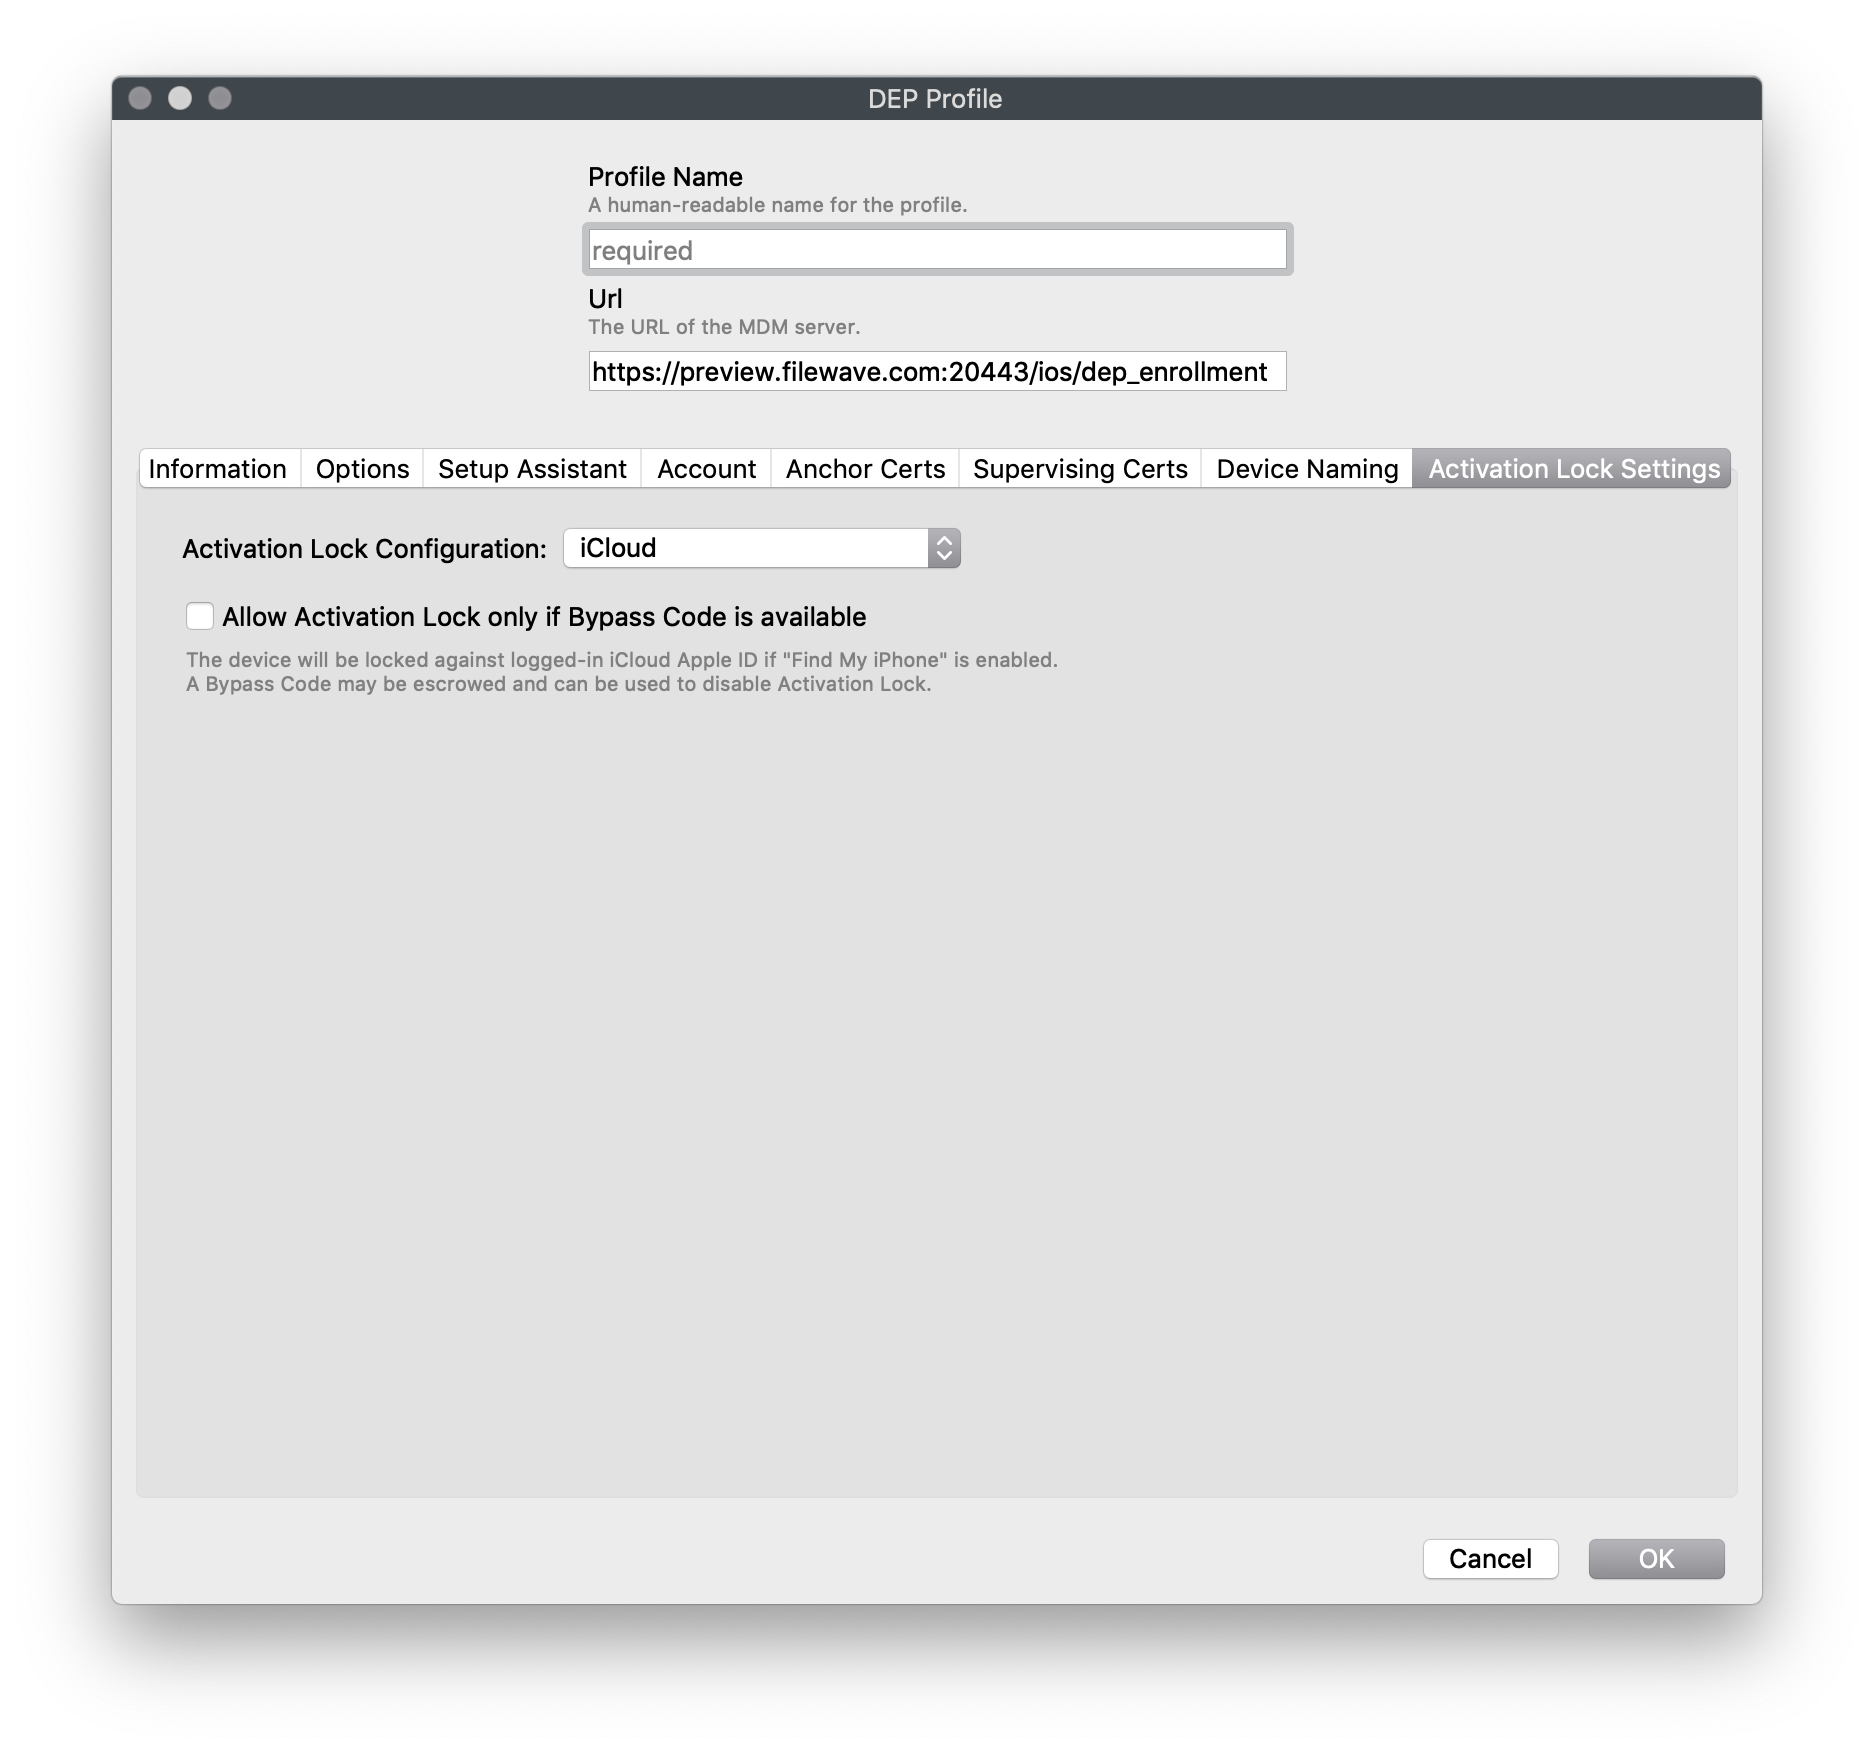 #### Use your AMS/ABM account 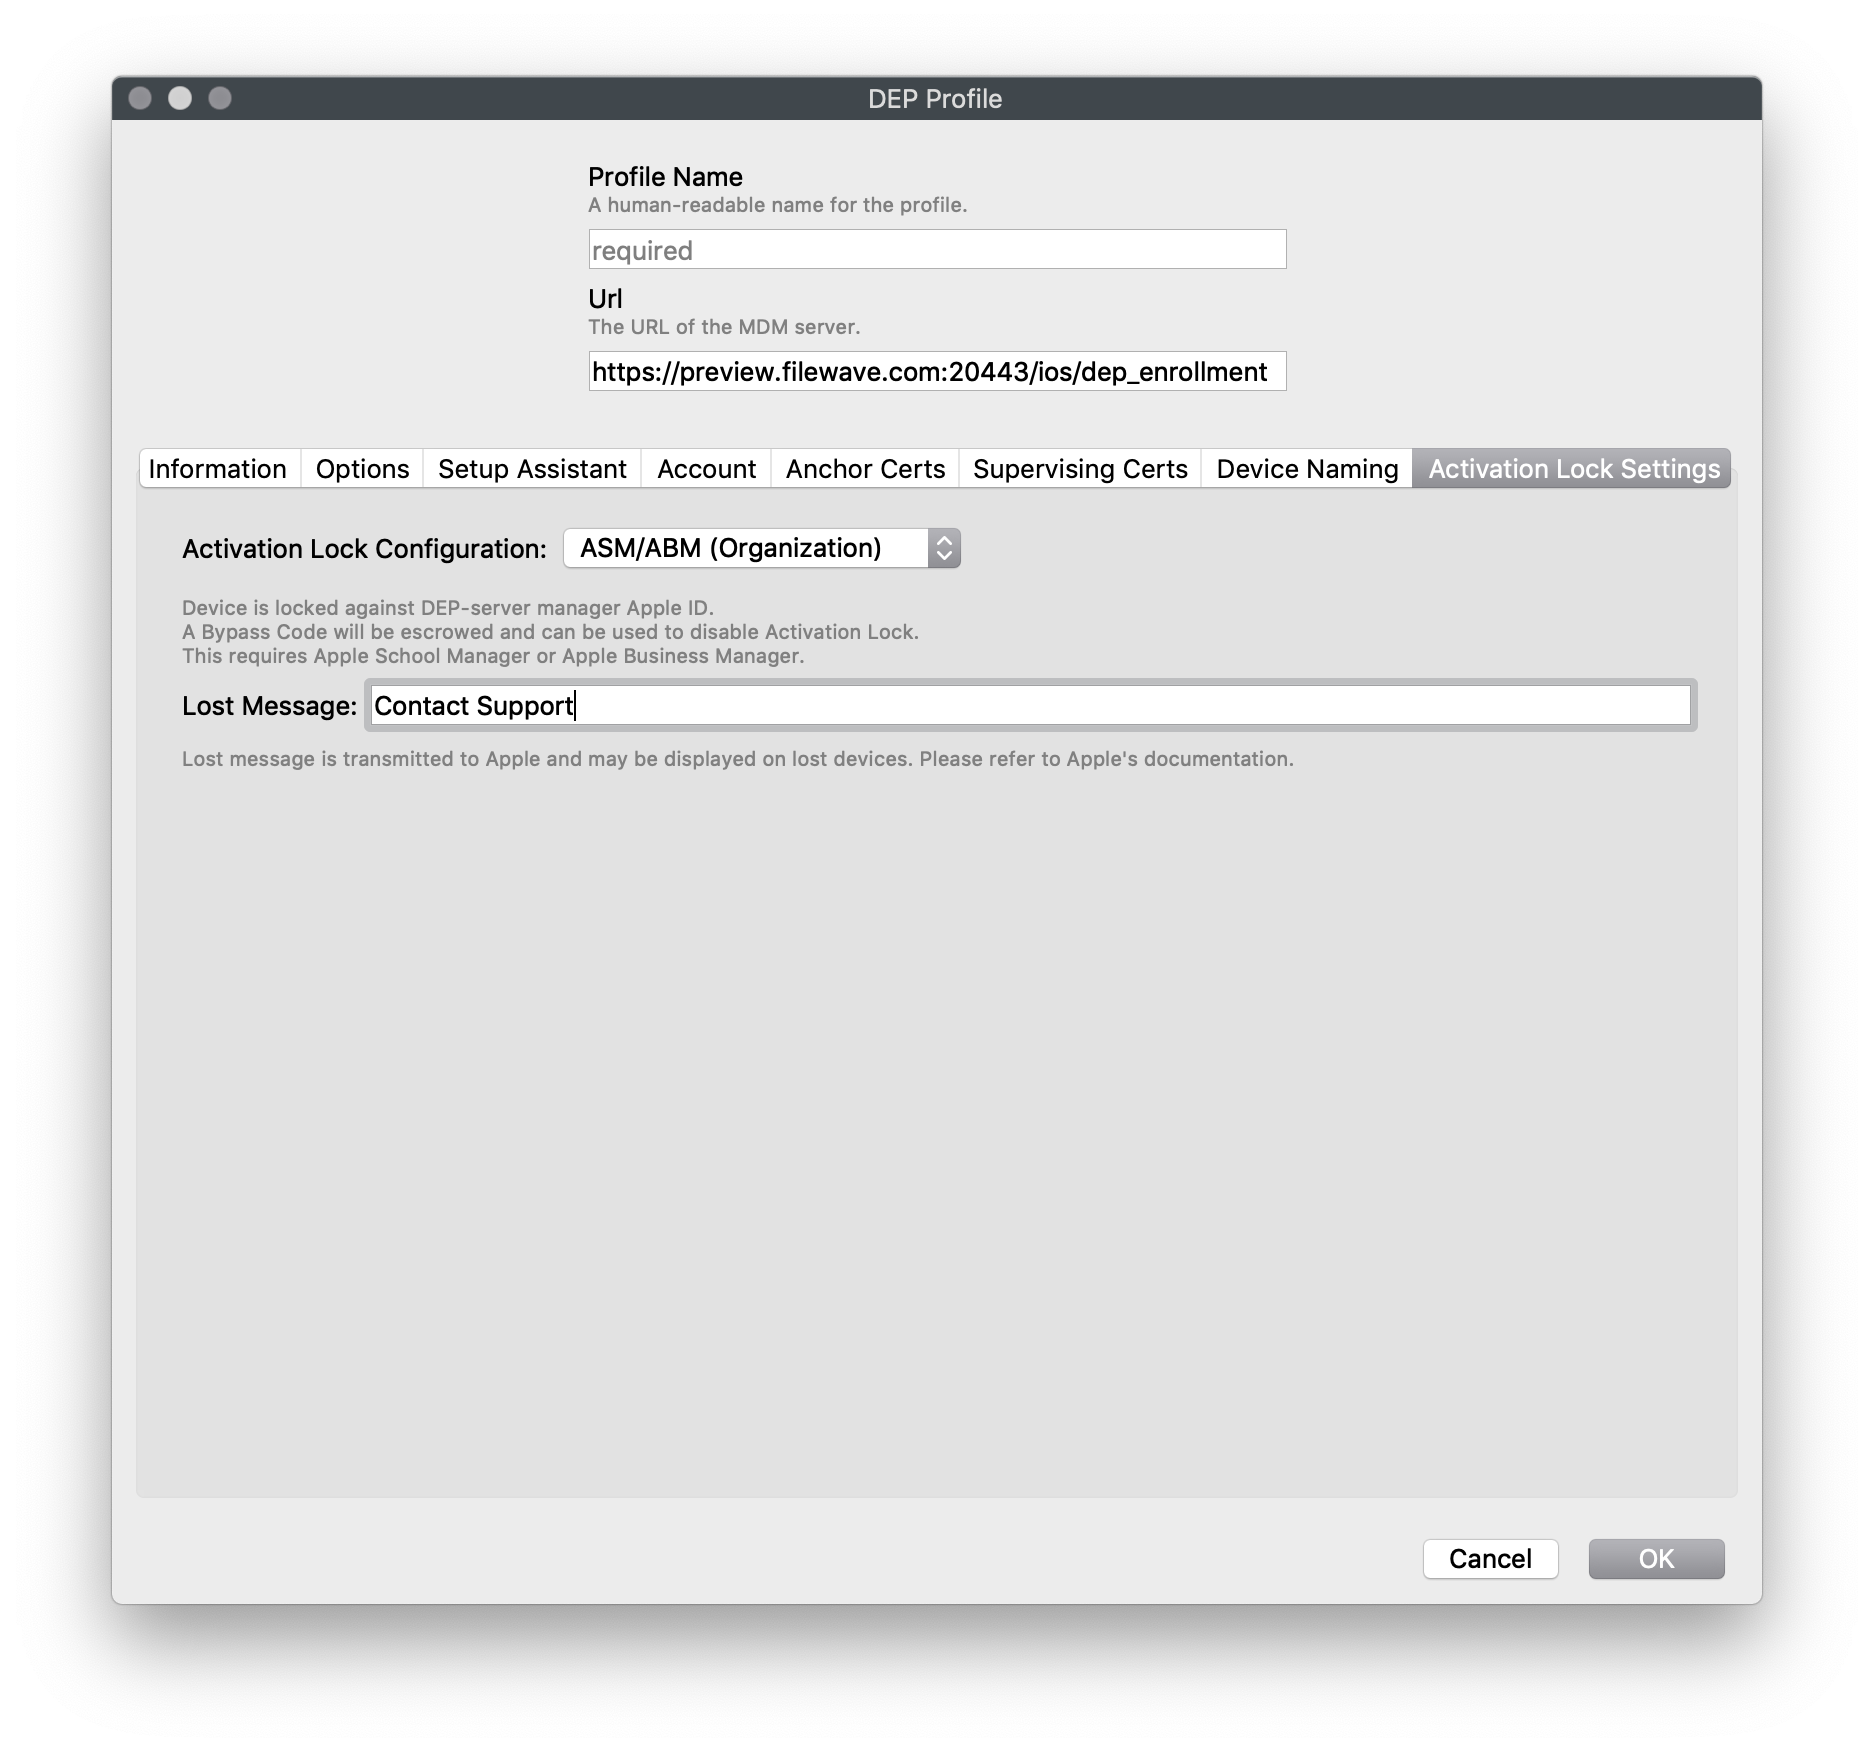 ### Associations Associating a ADE profile to a device (or set of devices) is done using the same drag & drop functions used in the other FileWave associations panes. You can drag a profile on top of a device, or select a set of devices and drag them on top of a profile. The associations will appear in the lower section of the **ADE Associations** window. The device will have the associated profile applied upon activation. 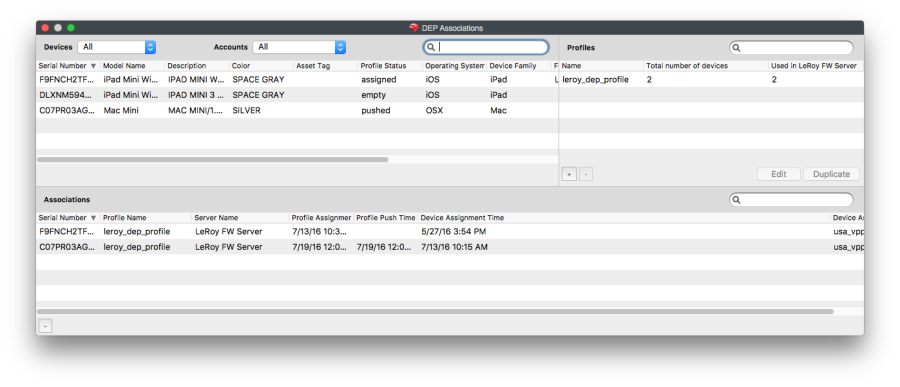To automate see: [Automatically Assign ADE profiles](https://kb.filewave.com/books/apple-school-business-manager/page/automatically-assign-ade-profiles "Automatically Assign ADE profiles")
### End Result of ADE associations The end result of associating ADE profiles to devices is that upon activation, the device will automatically become a FileWave Client with specific setup settings. You can have device [Placeholders](https://kb.filewave.com/books/filewave-client/page/placeholders "Placeholders") prepositioned in your FileWave Clients view, assigned to Groups, with Filesets ready to activate as soon as the device checks in. # Add or Renewing your ADE (DEP) Account Token ## Description ADE is the optimal way to enroll your Apple devices. ADE enrollment is required for countless features and management tools. Once added, you will need to renew your ADE token every year.If you're renewing your token, it's not necessary to re-upload the server certificate (steps 1, 2, 5 & 6) each time unless the cert has changed or you are receiving a FORBIDDEN error when syncing ADE.
## Step-by-step guide 1. **Download the ADE Certificate from FileWave Admin** 2. **Save the certificate "FileWave ADE" to your desktop.** #### FileWave Anywhere Sources > ADE Accounts > '+' > Download  #### FileWave Central Preferences > VPP & ADE 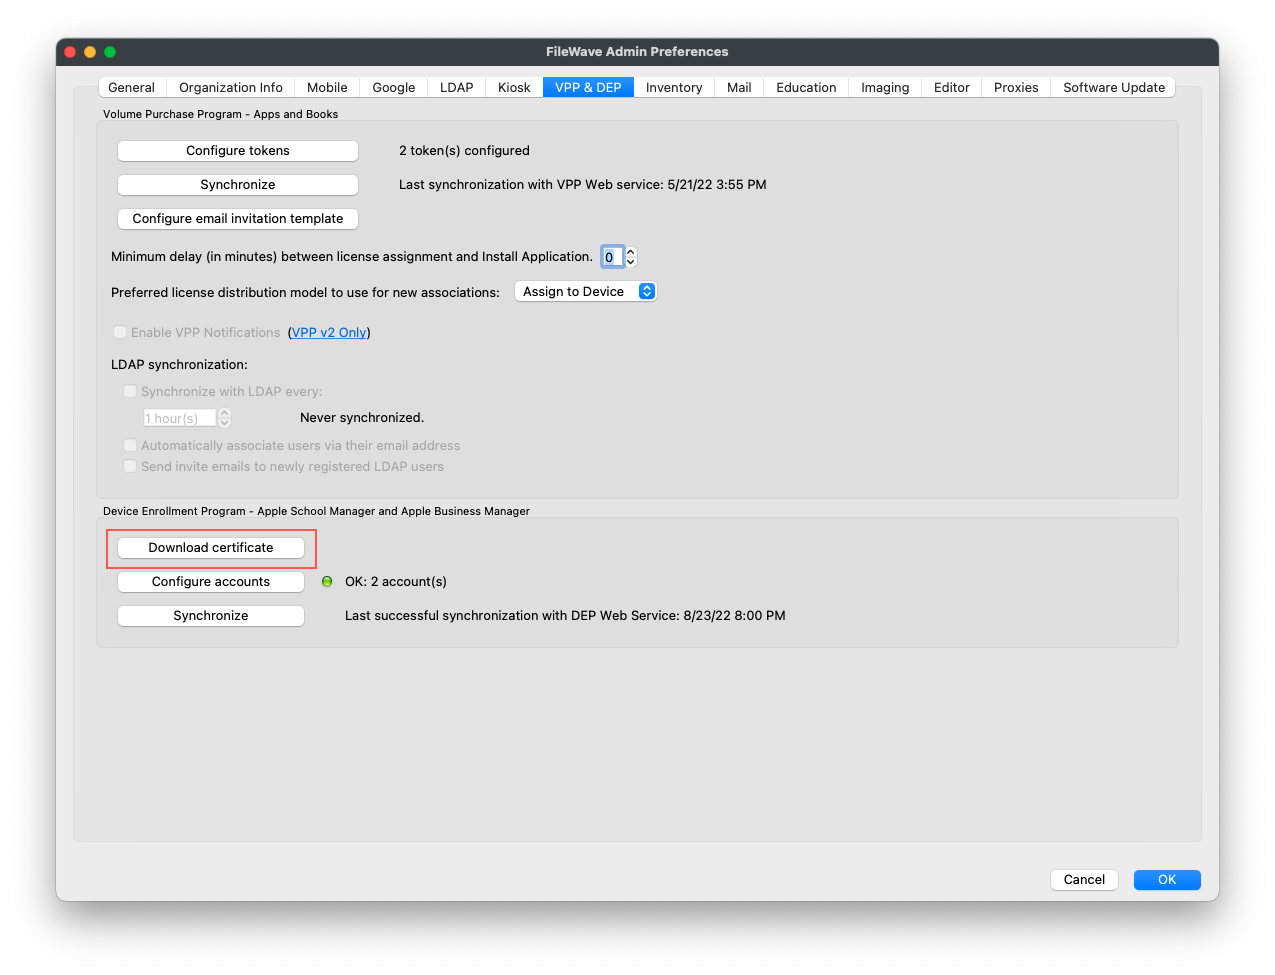 3\. **Go to the relevant Apple ADE site,** [**school.apple.com**](http://school.apple.com/) **or** [**business.apple.com**](https://business.apple.com) 4\. **Once signed in, go to Preferences under your account name in the bottom left of ASM/ABM** 5\. **Select the MDM Server that needs to be renewed and click edit** 6\. **Under MDM Server settings, 'Upload New' MDM certificate**  7\. **Once saved, download the token from ASM/ABM** 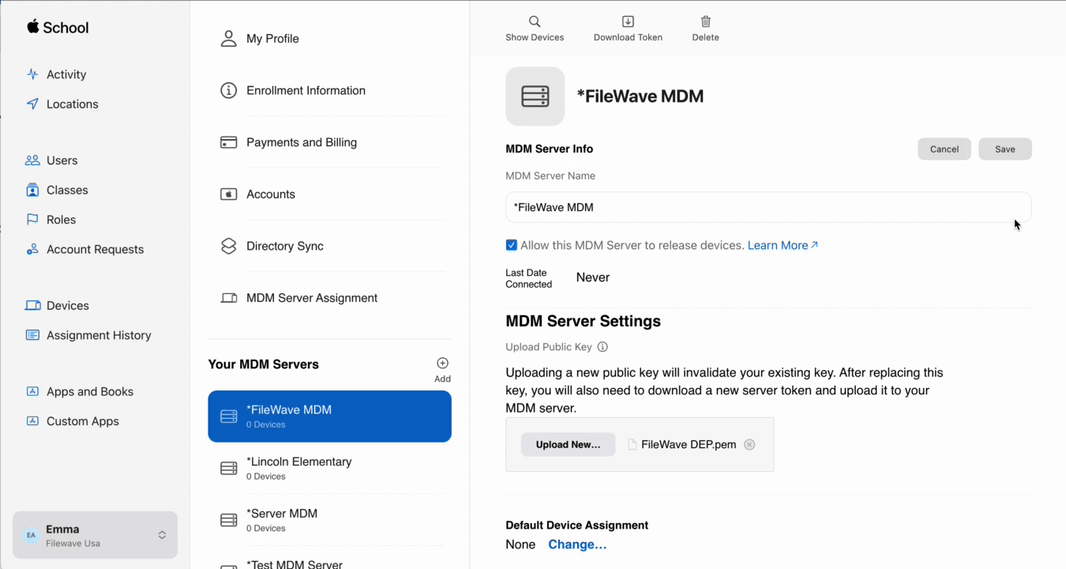 8\. **Go back to FileWave Central and upload the token** NOTE: At the end of this step, If any attributes have changed in the token, note that the dialog in FW may not reflect the new values for 10 - 30 minutes. (i.e. Server Name) and that is normal. ## Renewing Token #### FileWave Anywhere In Sources, under ADE Accounts, select the ellipses next to the correct ADE account and choose ‘Edit’. Select Browse and upload the Apple Token downloaded in step 7 of this document. Click Save.  #### FileWave Central In Preferences > VPP & ADE, select Configure Accounts and enter your password. Select the correct ADE account and select ‘Upload new Access Token’. upload the Apple Token downloaded in step 7 of this document and click Open. Now you can close this window. [](https://kb.filewave.com/uploads/images/gallery/2023-07/3useVVG02psF7pI9-screen-recording-8-24-2022-at-10-28-am.gif) ## Adding New Token #### FileWave Anywhere In Sources, under ADE Accounts, select the '+' to the right. Steps 1 & 2 were completed earlier, so skip down to Step 3 and upload the Apple Token downloaded in step 7 of this document. Click Save. 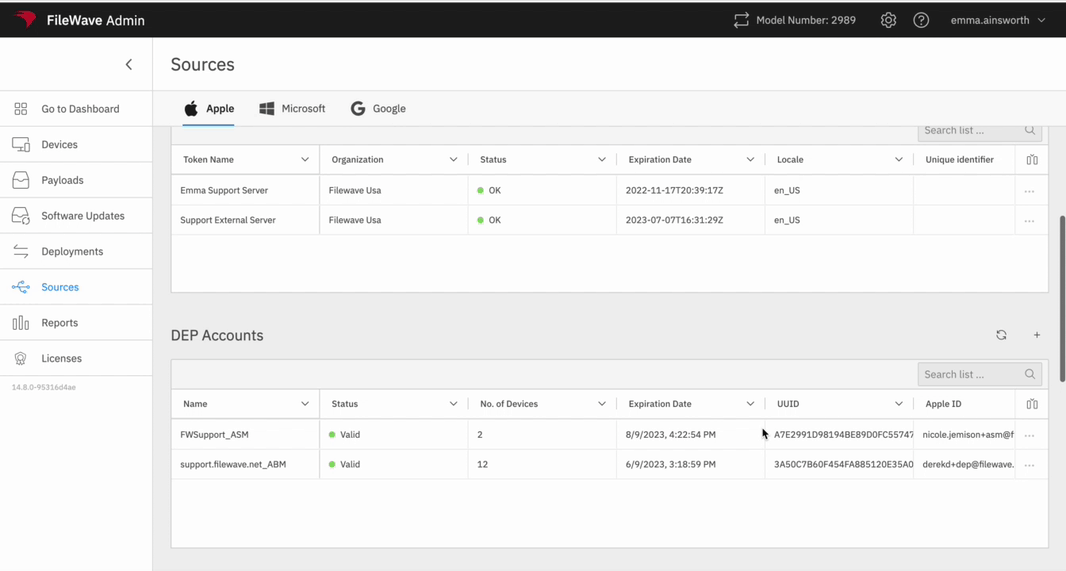 #### FileWave Central In Preferences > VPP & ADE, select Configure Accounts and enter your password. Select the '+' on the bottom left of the Configure Accounts window and select the token downloaded in step 7 of this document. Click Save and close the window. 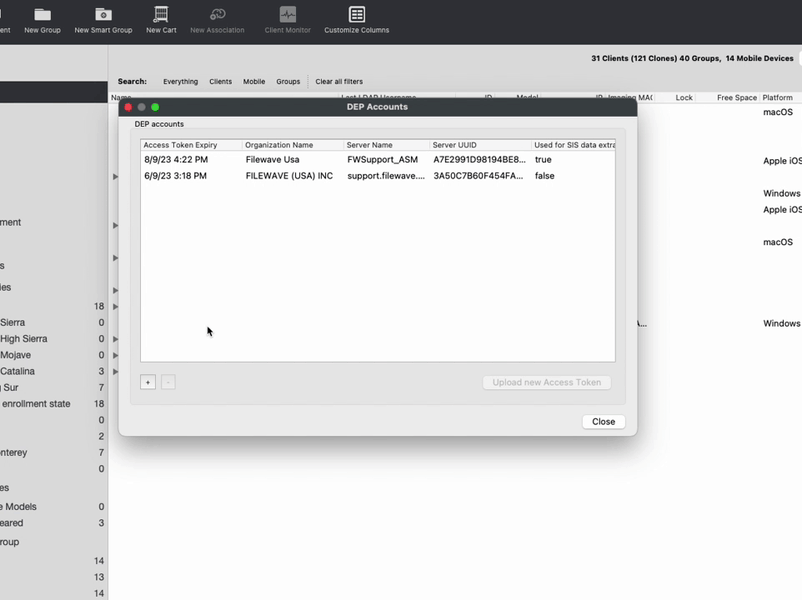 9\. **After the token is uploaded, run a full ADE sync.** ## Perform full ADE sync #### FileWave Anywhere In the Sources tab, select the Sync icon next to ADE Account and choose Full Sync. 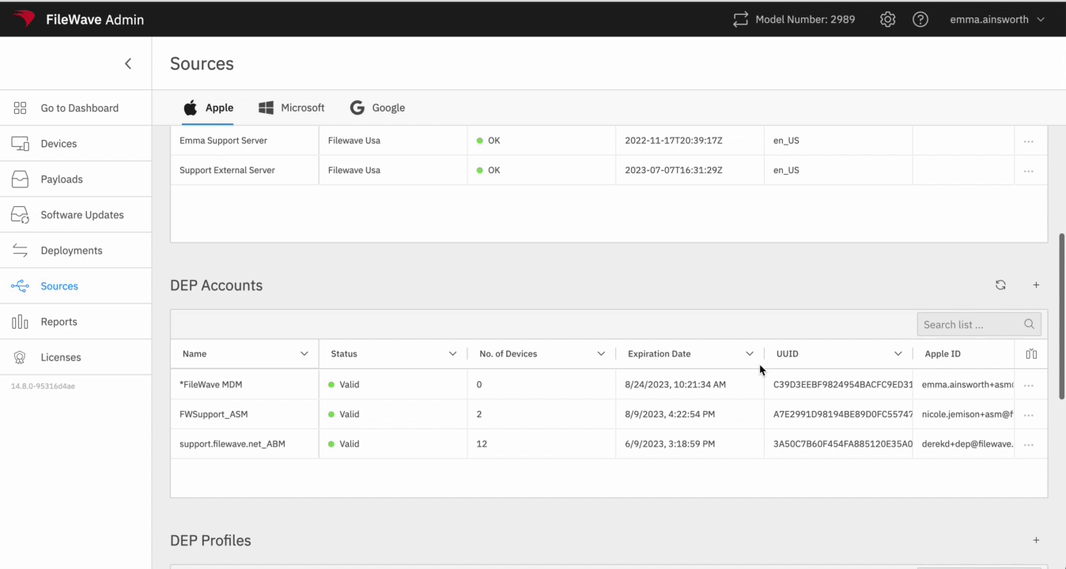 #### FileWave Central Go to Preferences > VPP & ADE. While holding down the option/alt key, press ‘Synchronize (full sync)’. 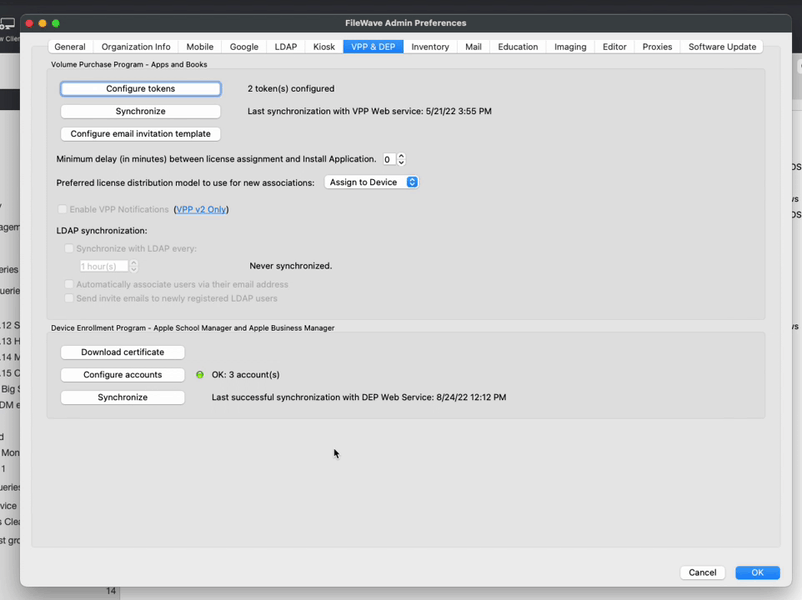 You’re all set! If you renewed your token, you should see a new expiration date. If you added a new token, you can learn more about managing your devices with ADE and FileWave here: [Apple ADE Enrollment](https://kb.filewave.com/books/evaluation-guide/page/apple-ade-enrollment "Apple ADE Enrollment"). # ADE Naming This article is for individuals who want to customize naming of ADE (formerly known as DEP) devices. It will cover placeholders and their ability to accept name, as well as using custom and built-in strings in the ADE profile. Placeholders are most useful for new incoming devices where the name is highly customized. And where you want to use additional attributes like custom fields. ## Placeholders ### Step-by-step guide 1. Generate a text file, ideally of serial numbers as one column and the custom name as the other. See [Importing Computer Clients from a file](https://kb.filewave.com/books/filewave-client/page/importing-computer-clients-from-a-file "Importing Computer Clients from a File") and [Enrolling Computer Clients](https://kb.filewave.com/books/filewave-client/page/enrolling-computer-clients-into-filewave "Enrolling Computer Clients in to FileWave") 2. Import any custom field values if needed See [Custom Fields](https://kb.filewave.com/books/custom-fields/page/custom-fields "Custom Fields"): Importing CSV for more information ## Variables in the ADE profile ### Step-by-step guide 1. Generate a ADE profile See [Working with Apple's Device Enrollment Program (ADE)](https://kb.filewave.com/books/apple-school-business-manager/page/working-with-apples-automated-device-enrollment-ade "Working with Apple’s Device Enrollment Program (ADE)") 2. In the naming tab of the ADE profile you can use any: Built-in inventory variables (for a list of variables see [Using variables in Apple iOS/macOS Profiles](https://kb.filewave.com/books/profiles-apple/page/using-parameters-in-apple-iosmacos-profiles "Using variables in Apple iOS/macOS Profiles") ) Custom inventory variables, using the %custom\_field.INTERNAL\_NAME% (see more at [Custom Fields](https://kb.filewave.com/books/custom-fields/page/custom-fields "Custom Fields") ) 3. It would also be recommended that you create an automatic ADE rule to only assign this profile to devices that have the variables set: see the example in [Automatically Assign ADE profiles](https://kb.filewave.com/books/apple-school-business-manager/page/automatically-assign-ade-profiles "Automatically Assign ADE profiles") ## FileWave Foundry Video Sign into FileWave Foundry and watch a video here regarding [ADE Naming](https://foundry.filewave.com/mod/scorm/view.php?id=450). # Apple ADE - MDM Certificate vs. MDM Trust Chain ## What For ADE/DEP enrollments there are certificates that go in the enrollment profile. In FileWave 16.2.0 we have made a change to what is included in that profile by default. ## When/Why We've had some support issues where customers would see ADE/DEP profiles duplicate. Investigation has found that because of the way we would include the certificates we would sometimes have to update the profiles when certain things like renewing your SSL certificate would happen. After investigation with Apple we had found that our method was very secure, but created complexity that could be avoided. The root cause of DEP profile duplication is that we add MDM server in ADE profile, which is the most secure (device checks if MDM server has the same certificate as the one in ADE profile), but it requires us to recreate profiles when certificate is renewed. ## How In FileWave 16.2 we are changing what we are including in the ADE/DEP enrollment profiles by default. We have new setting to only add trust chain (parent certificates), so enrolment will work, but the device will not verify the cert (cert must still be valid, but device won't verify it's the same cert). It's a bit less secure, but still secure (unless someone has a way to create his own cert with your fqdn). But this allows us to not recreate ADE profiles each time we renew certificates, because it's not required anymore. You'll find the setting in Central's Preferences as shown in the below image. It is in the VPP & ADE tab there. We recommend leaving it on MDM Trust Chain to avoid duplication of ADE/DEP enrollment profiles. We have left the option there to pick MDM Certificate in case there was a customer who had the security requirement to do that, but know that it can result in profiles being duplicated when you update your SSL certificates if you change it to MDM Certificate. [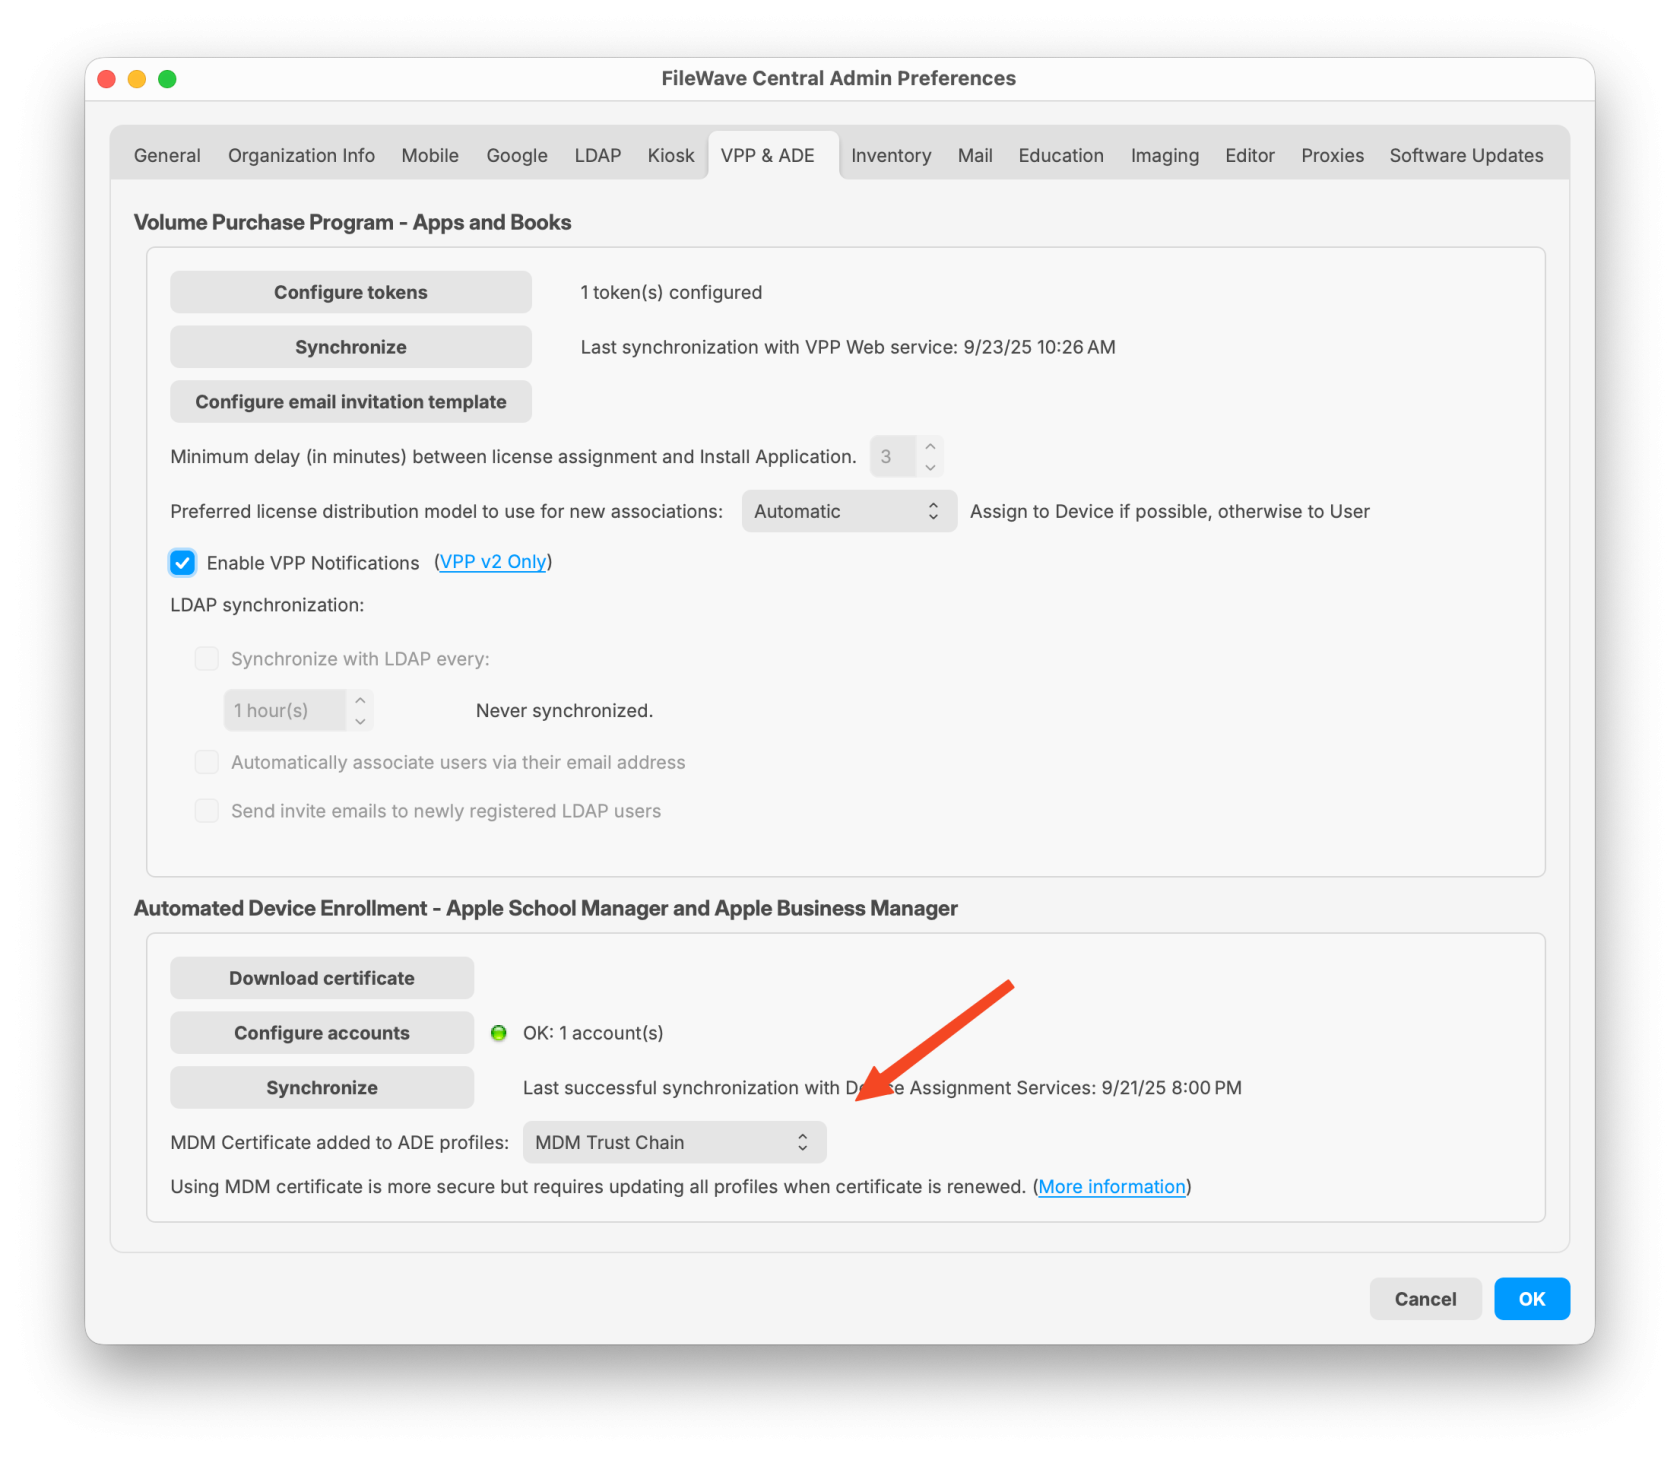](https://kb.filewave.com/uploads/images/gallery/2025-09/XNepaXB3wR3Kv3lY-filewave-admin-2025-09-23-10-26-44.png) ## Related Content - [Automated Device Enrollment (ADE)](https://kb.filewave.com/books/apple-school-business-manager/chapter/automated-device-enrollment-ade "Automated Device Enrollment (ADE)") # Automatically Assign ADE profiles Starting in FileWave version 13.1.0 you now have the ability to automatically assign ADE (formerly known as DEP) profiles to devices. ## Step-by-step guide Start by opening up the ADE Profiles UI (Assistant → ADE Association Management), and verify you have profiles created. It is recommended that you have a highly generic rule that will work with all iOS and macOS devices, and then profiles for your needed situations. ## Assign Default Rule 1. Open the "Edit Assignment Rules" UI 2. Choose a Default ADE Profile (Figure 1.1) 3. Hit OK to save it You can then choose between creating rules on simple things or advanced things: ## Assign based on model/operating system (Simple) 1. Open the "Edit Assignment Rules" UI 2. Hit the \[+\] to create a new profile rule 3. Select your default profile for an OS (iOS in this example) 4. Drag the ADE Devices / Operating System component from the left into the Criteria 5. Set to "Contains" : "iOS" (See figure 2.1) 6. Save 7. Repeat again for "OS X" and "tv" as needed ## Assign based on custom fields (Advanced) 1. Create Custom fields (in this example "usage" and "location")See [Custom Fields](https://kb.filewave.com/books/custom-fields/page/custom-fields "Custom Fields") for more information
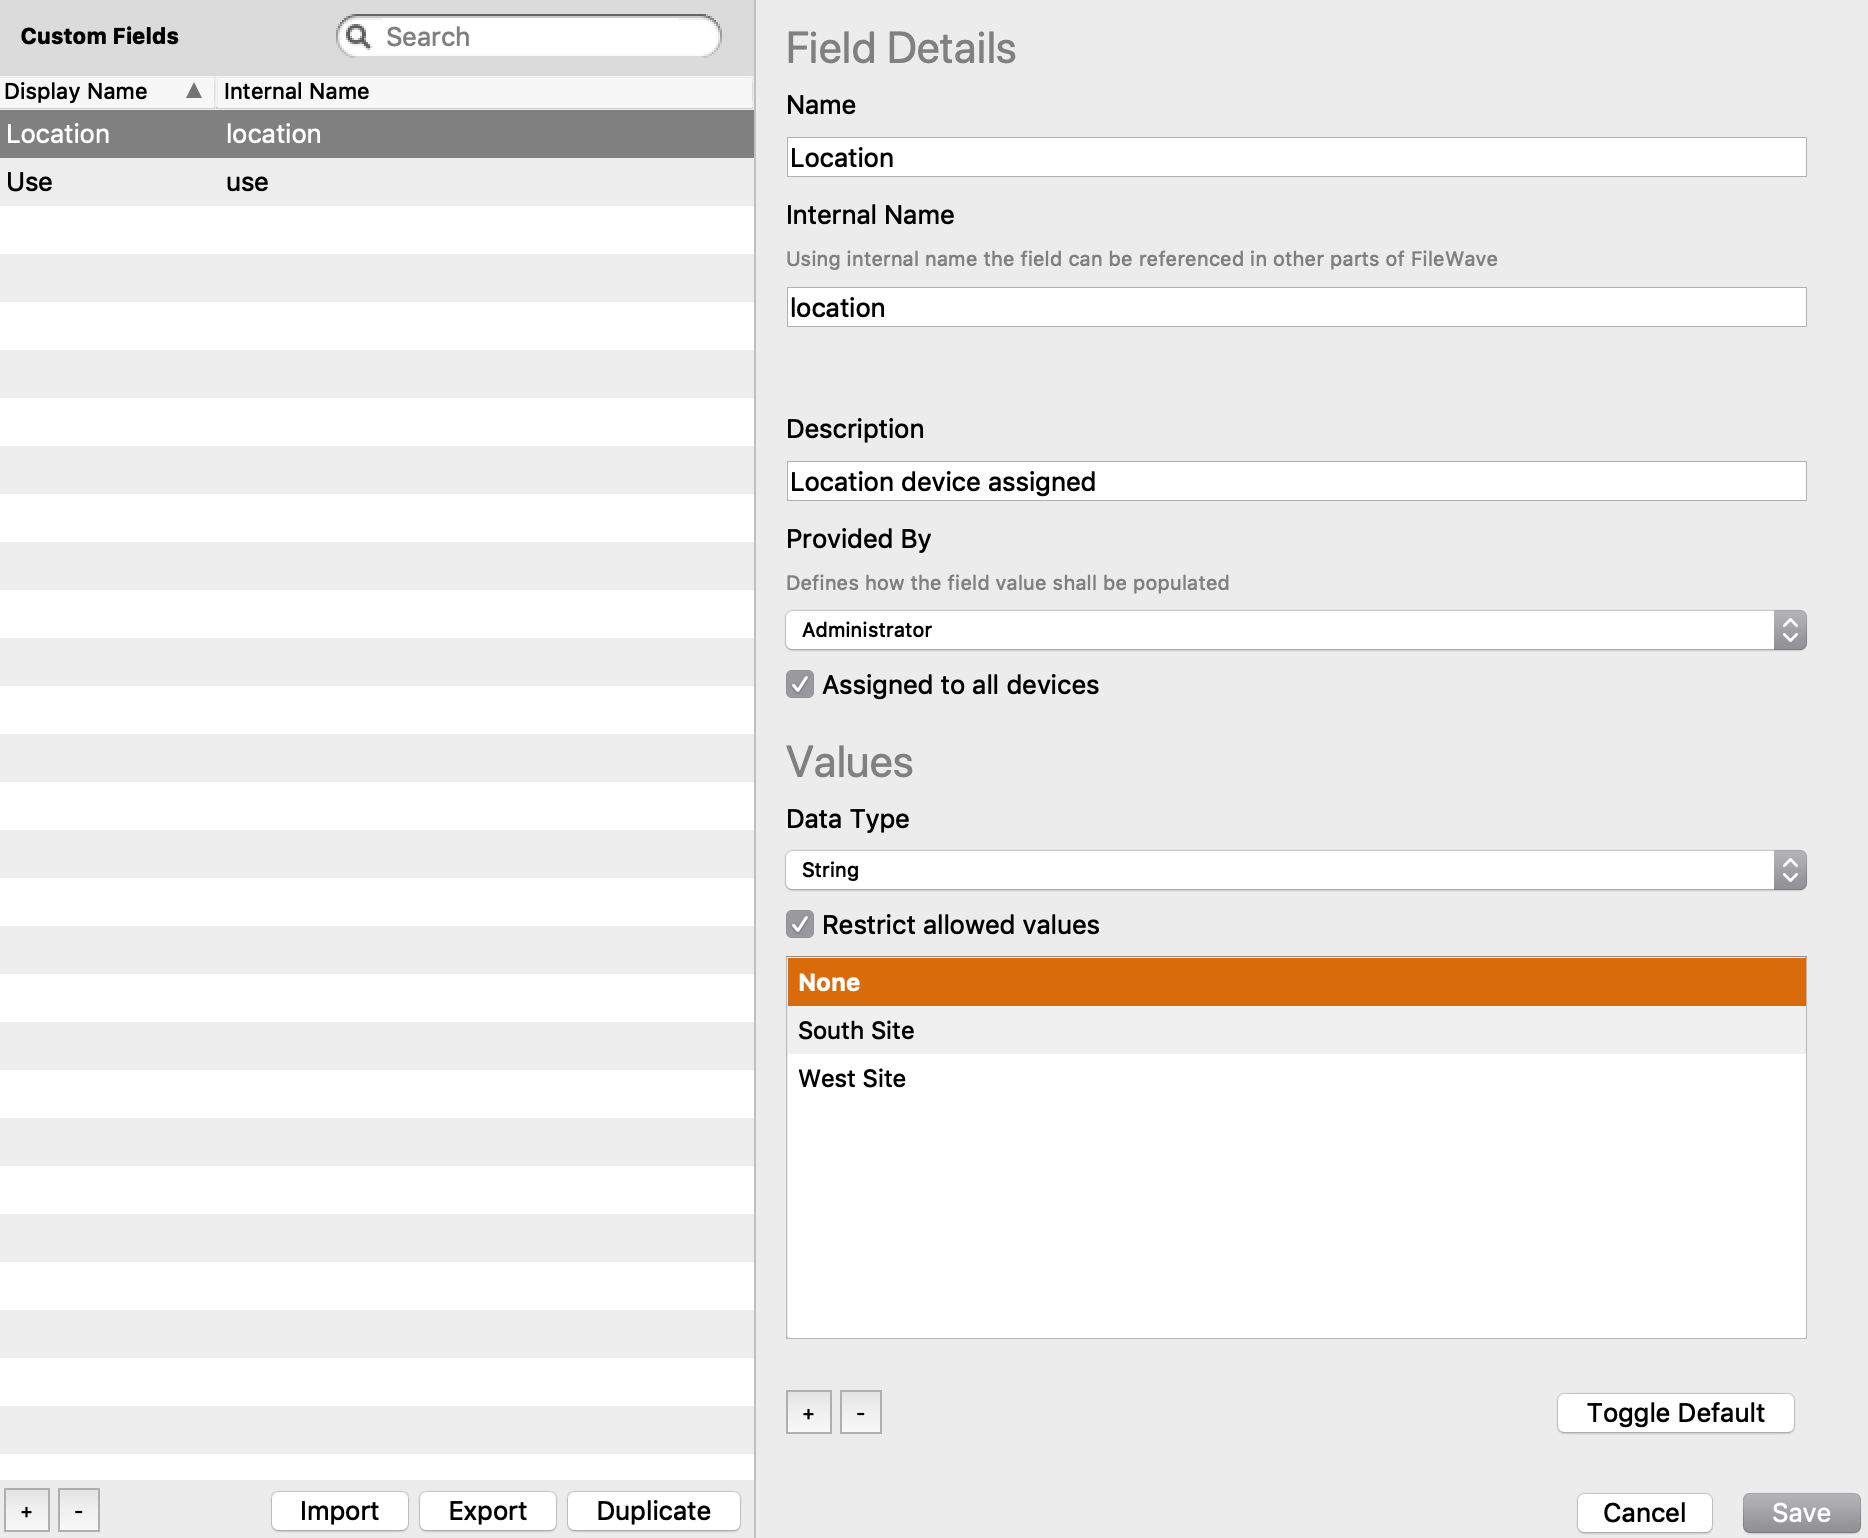
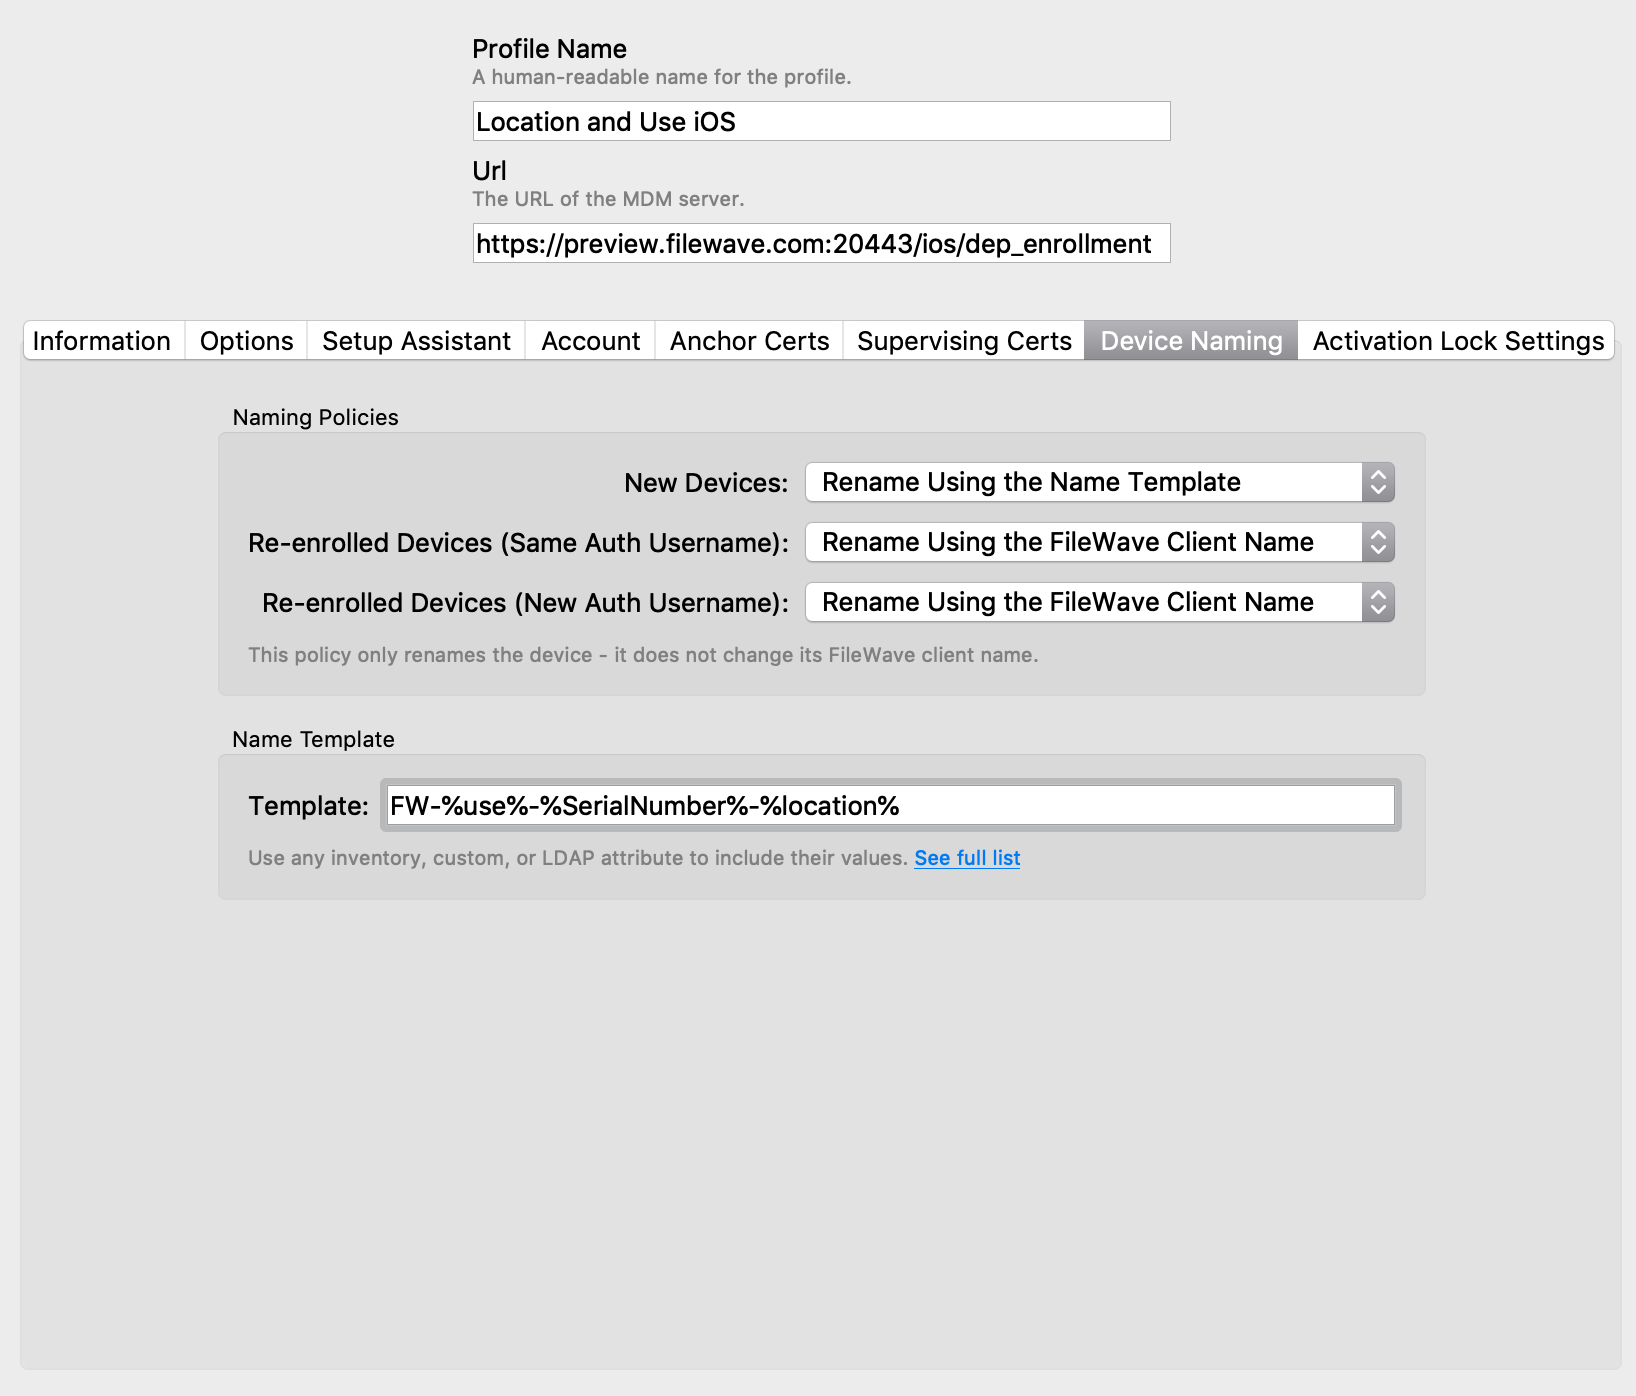
1. Use: Provided: Admin, Type: string, Restricted: True, Values: None (DEFAULT), Faculty, Student, Administration (See Figure 3.1) 2. Location: Provided: Admin, Type: string, Restricted: True, Values: None (Default), Site A, Site B... (Figure 3.2) 3. Take note of the "Internal Name" from the custom fields 2. Open the ADE UI 3. Hit the \[+\] to create a new ADE profile 1. Use the internal name in naming (see Figure 3.3)See [ADE Naming](https://kb.filewave.com/books/apple-school-business-manager/page/ade-naming "ADE Naming") for more information
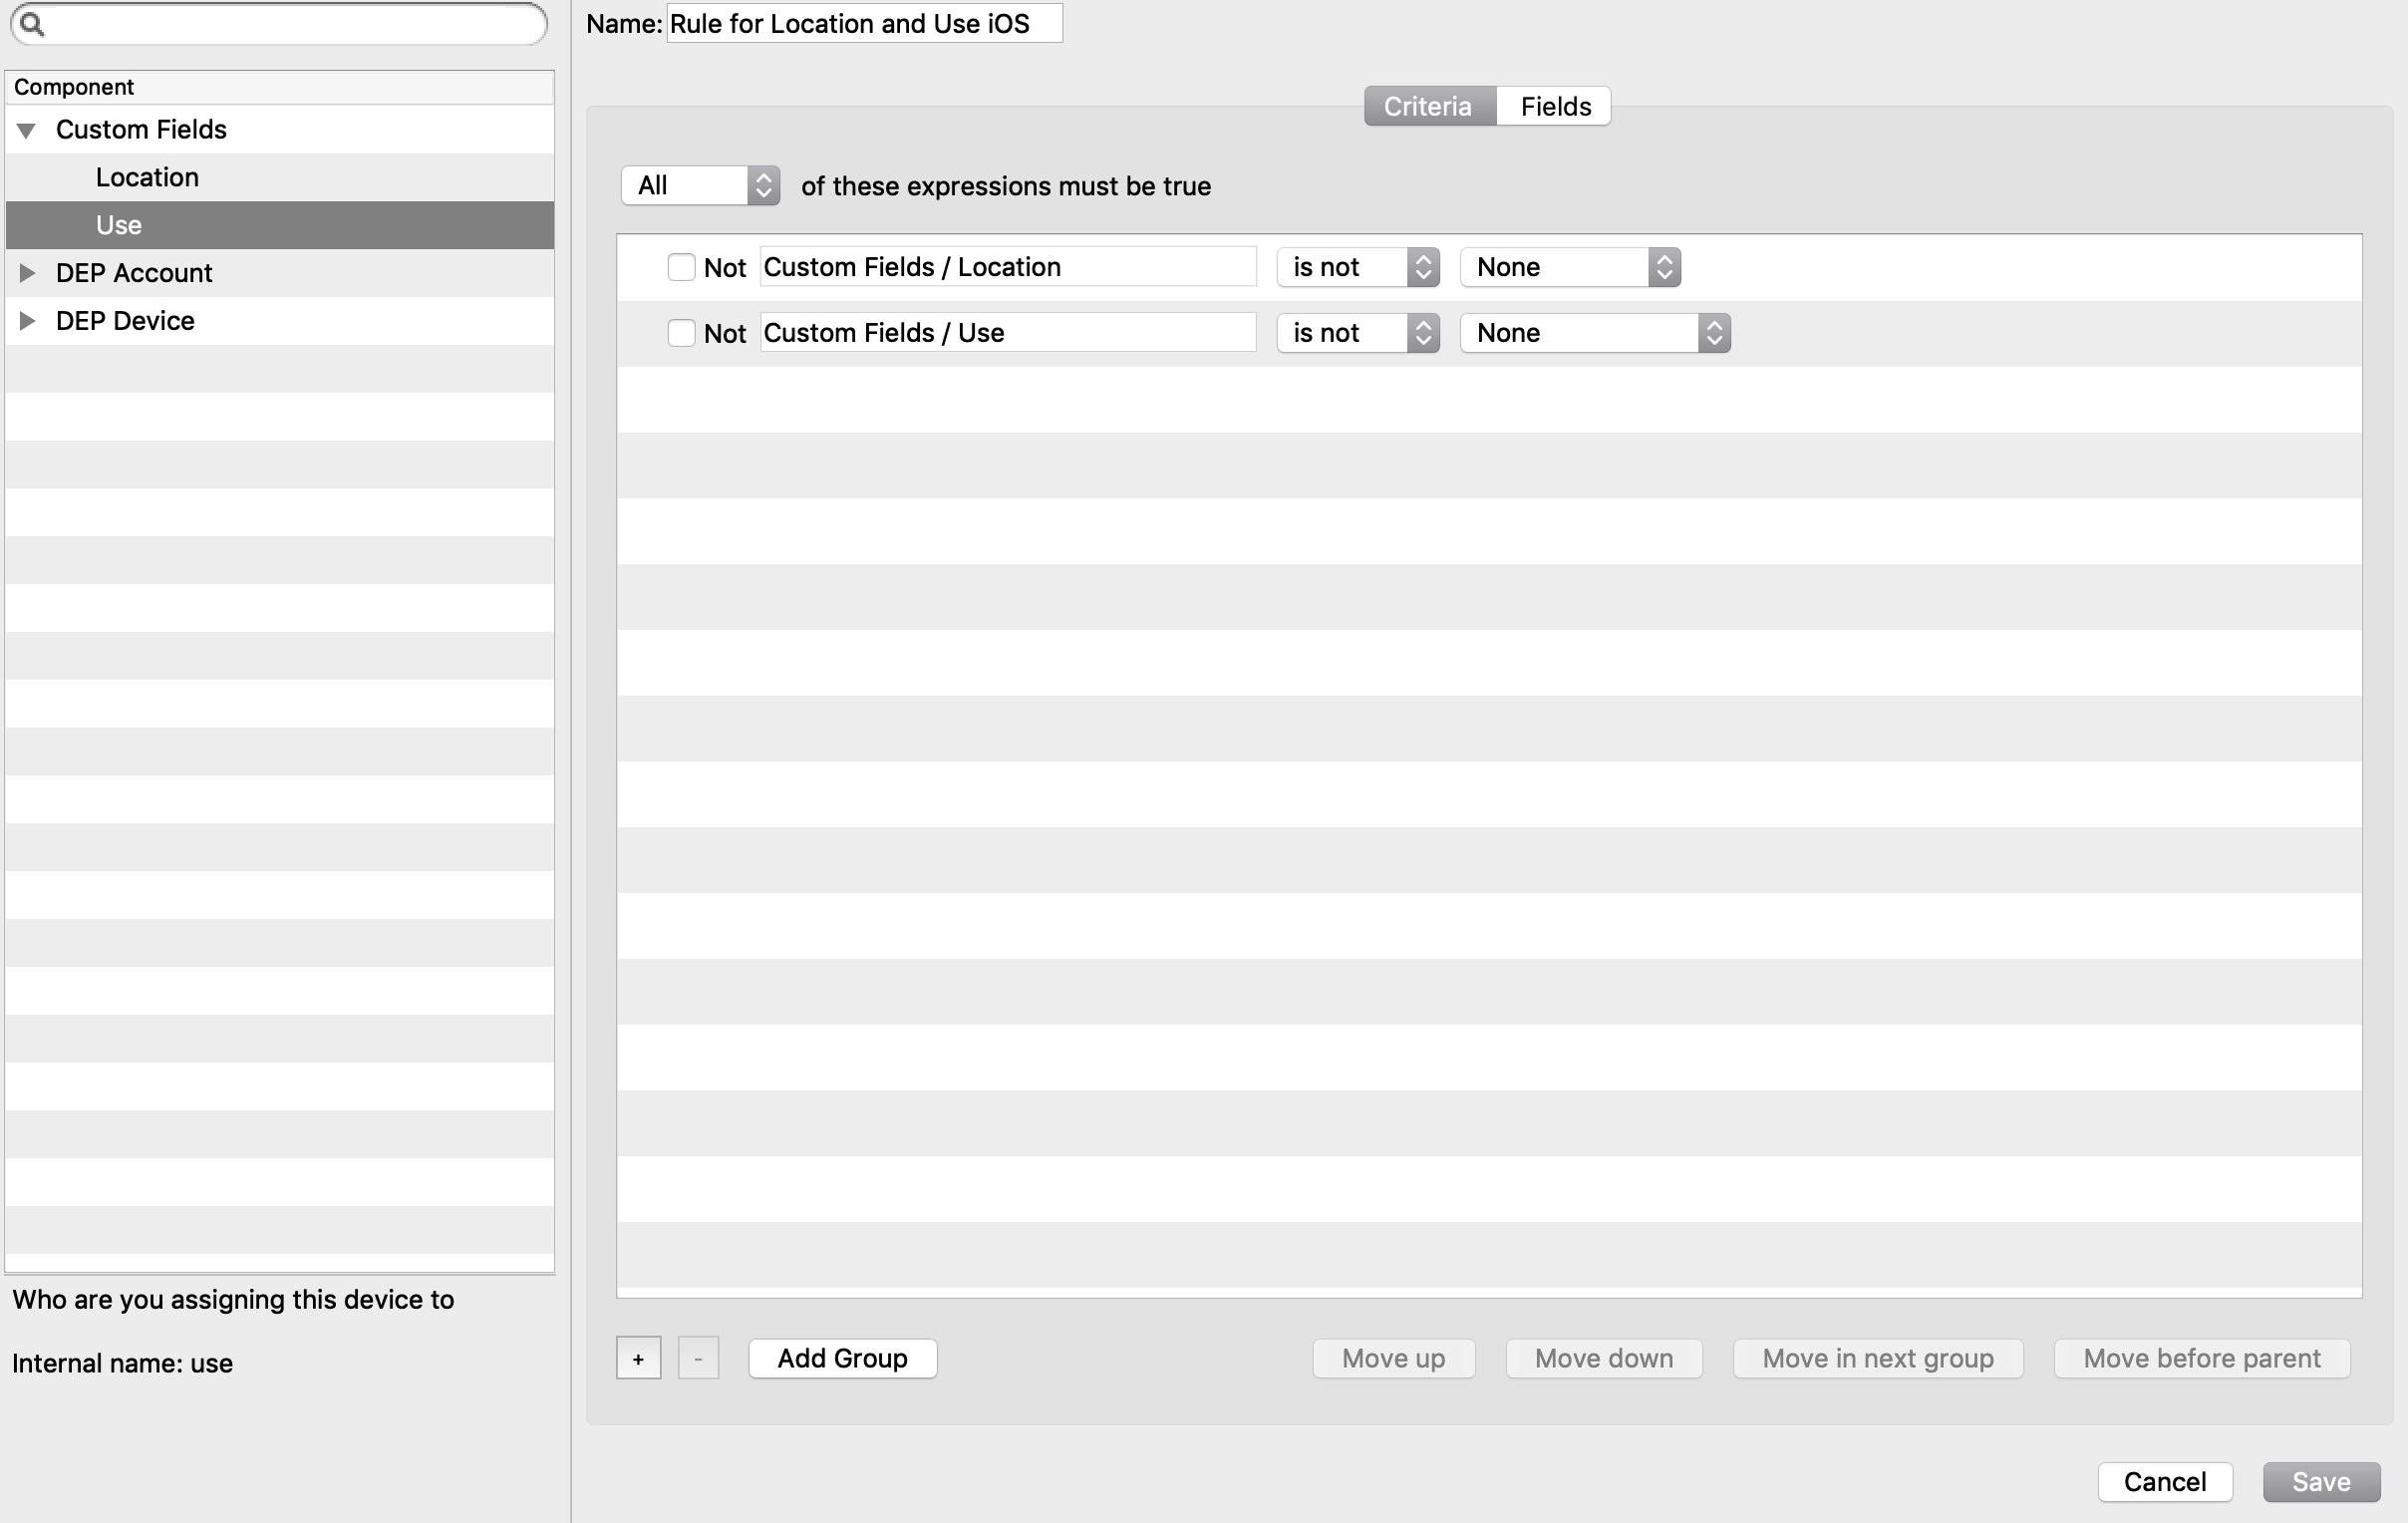
2. Open the "Edit Assignment Rules" UI 3. Hit the \[+\] to create a new profile rule 4. Select the profile you just created 1. You will now see the Custom Fields component on the left Component list 2. Open it and bring in location and use 3. set them both to is not None (Figure 3.4) ## Excluding serials from Auto Rules You will notice a column named "Excluded from automatic assignment" with True or False (Figure 4.1)| 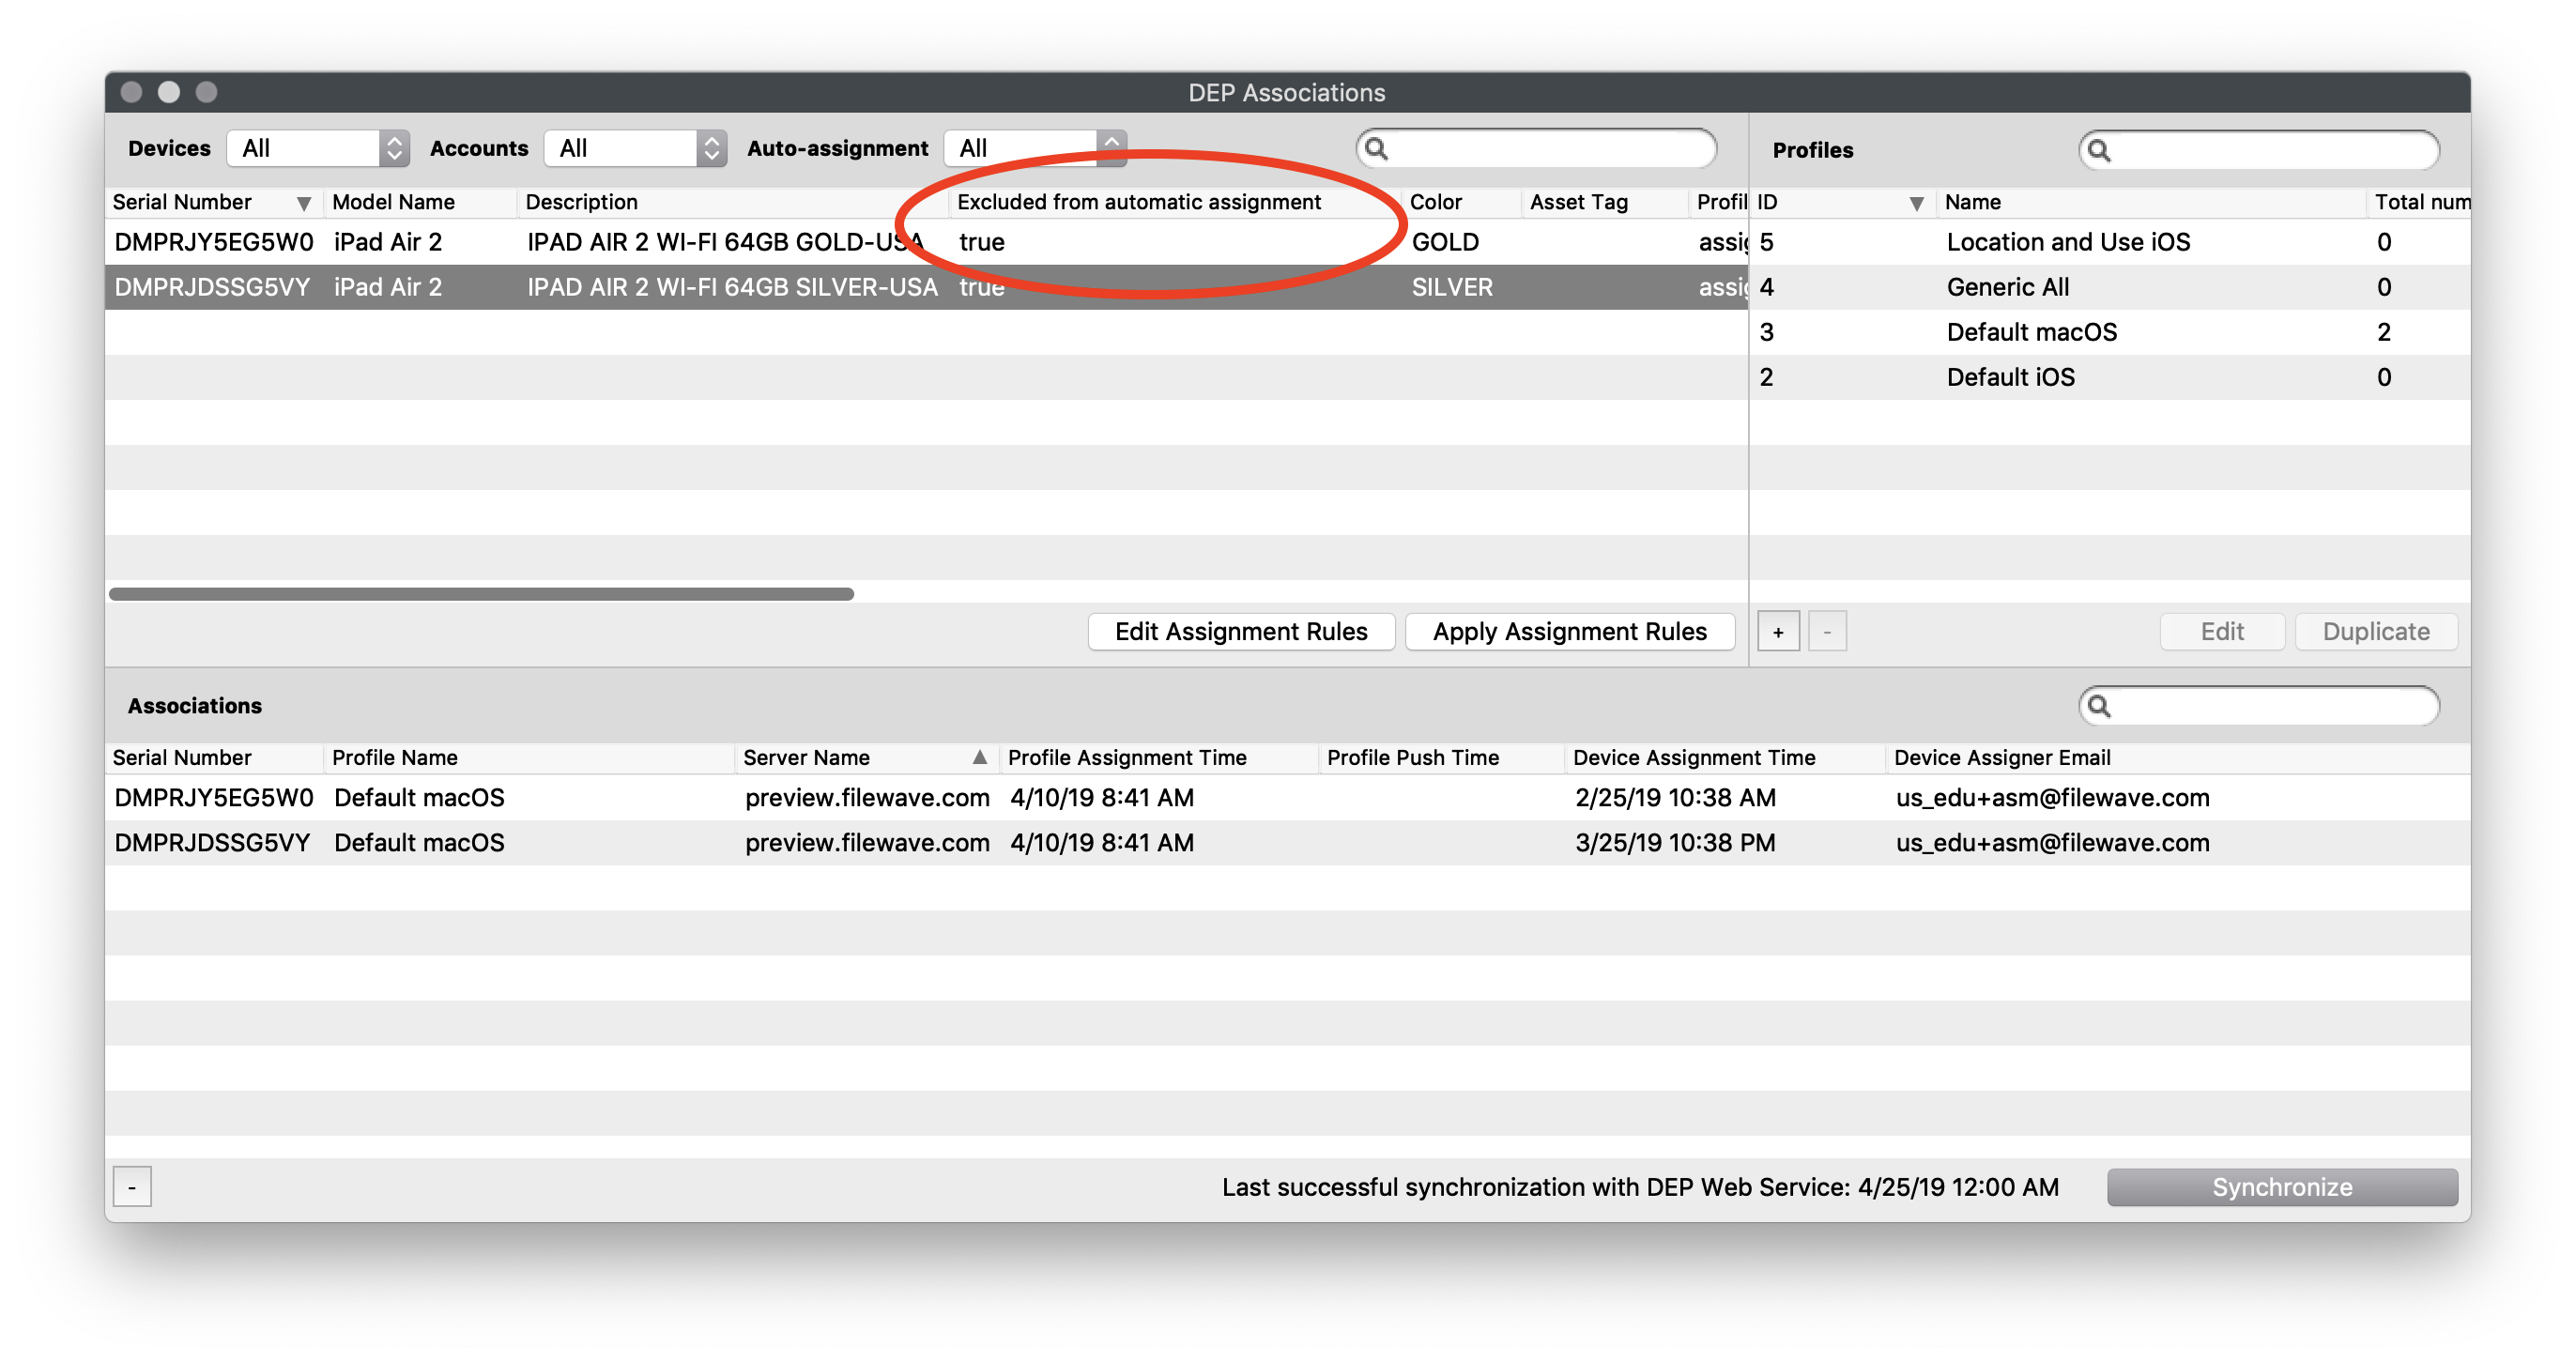 |
| Figure 4.1 - Exclude Column |
| **true** is the default for devices that were in your ADE list before an upgrade to 13.1 to protect those devices from changing before you have built new rules |
| 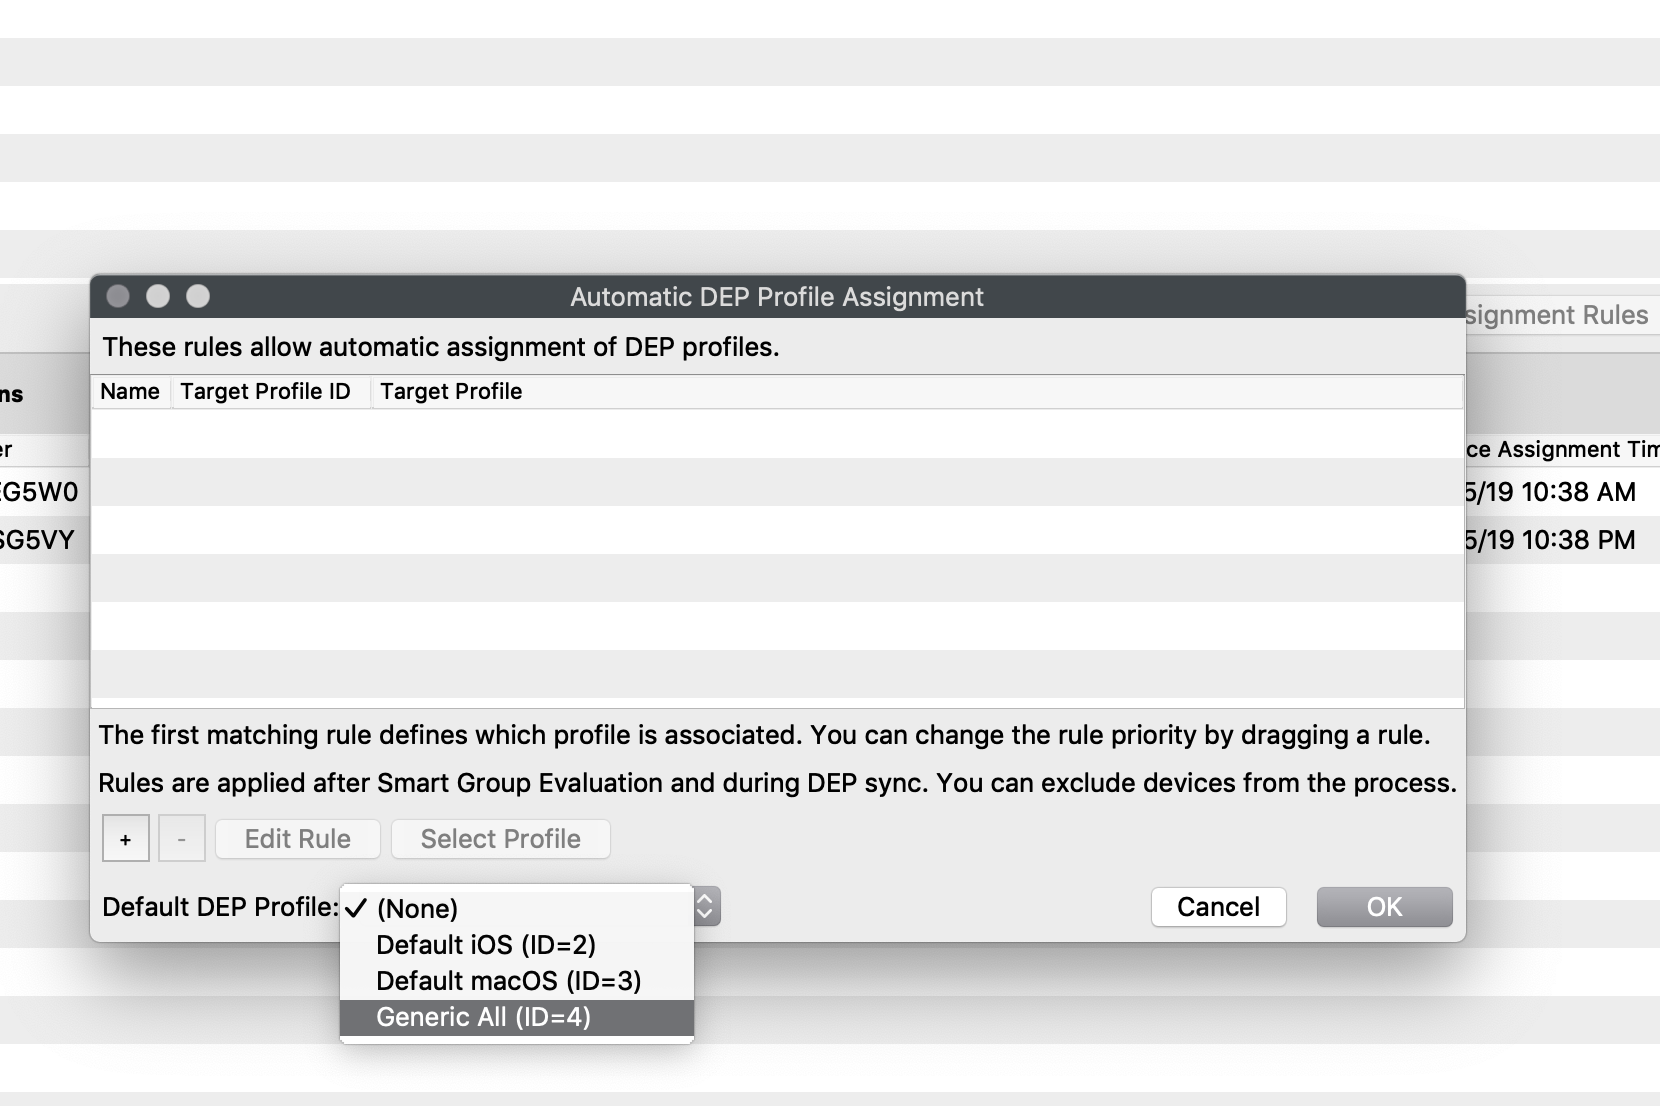 |
| Figure 1.1 - Default Rule |
| 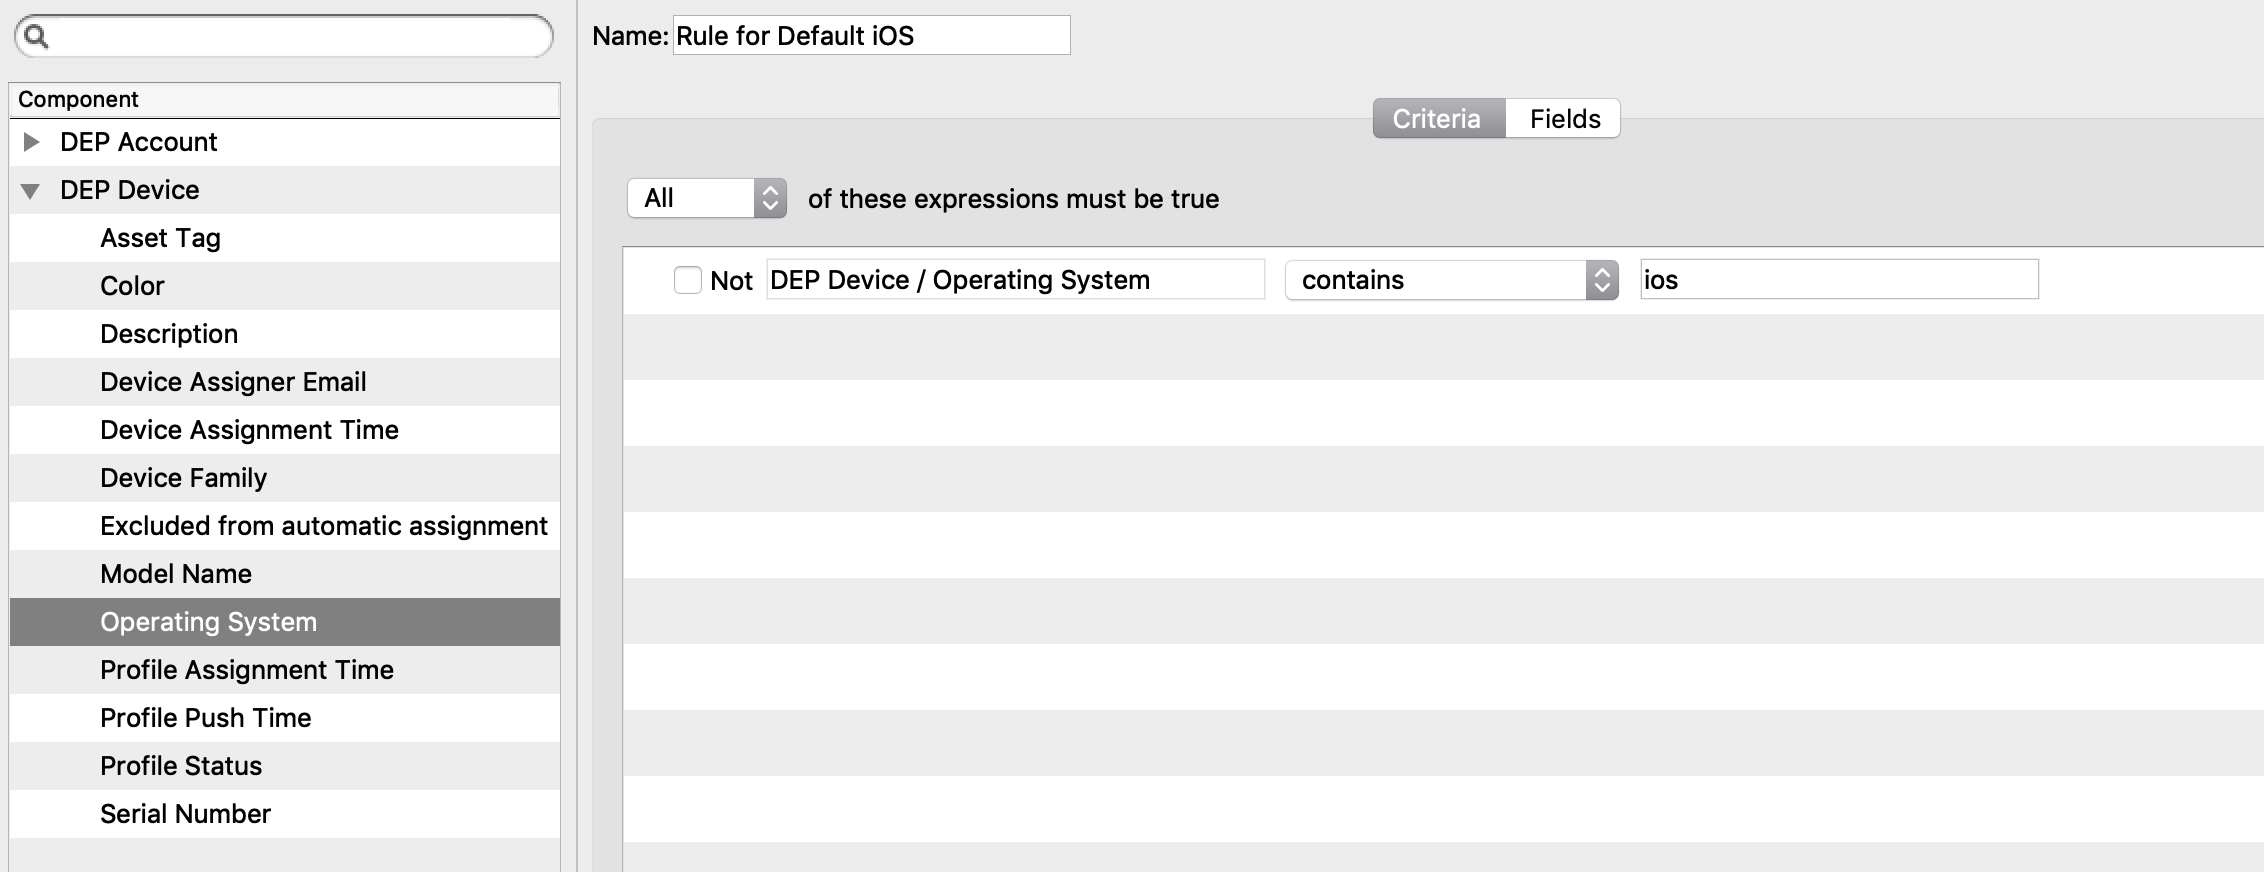 |
| Figure 2.1 - iOS Simple Rule |
| 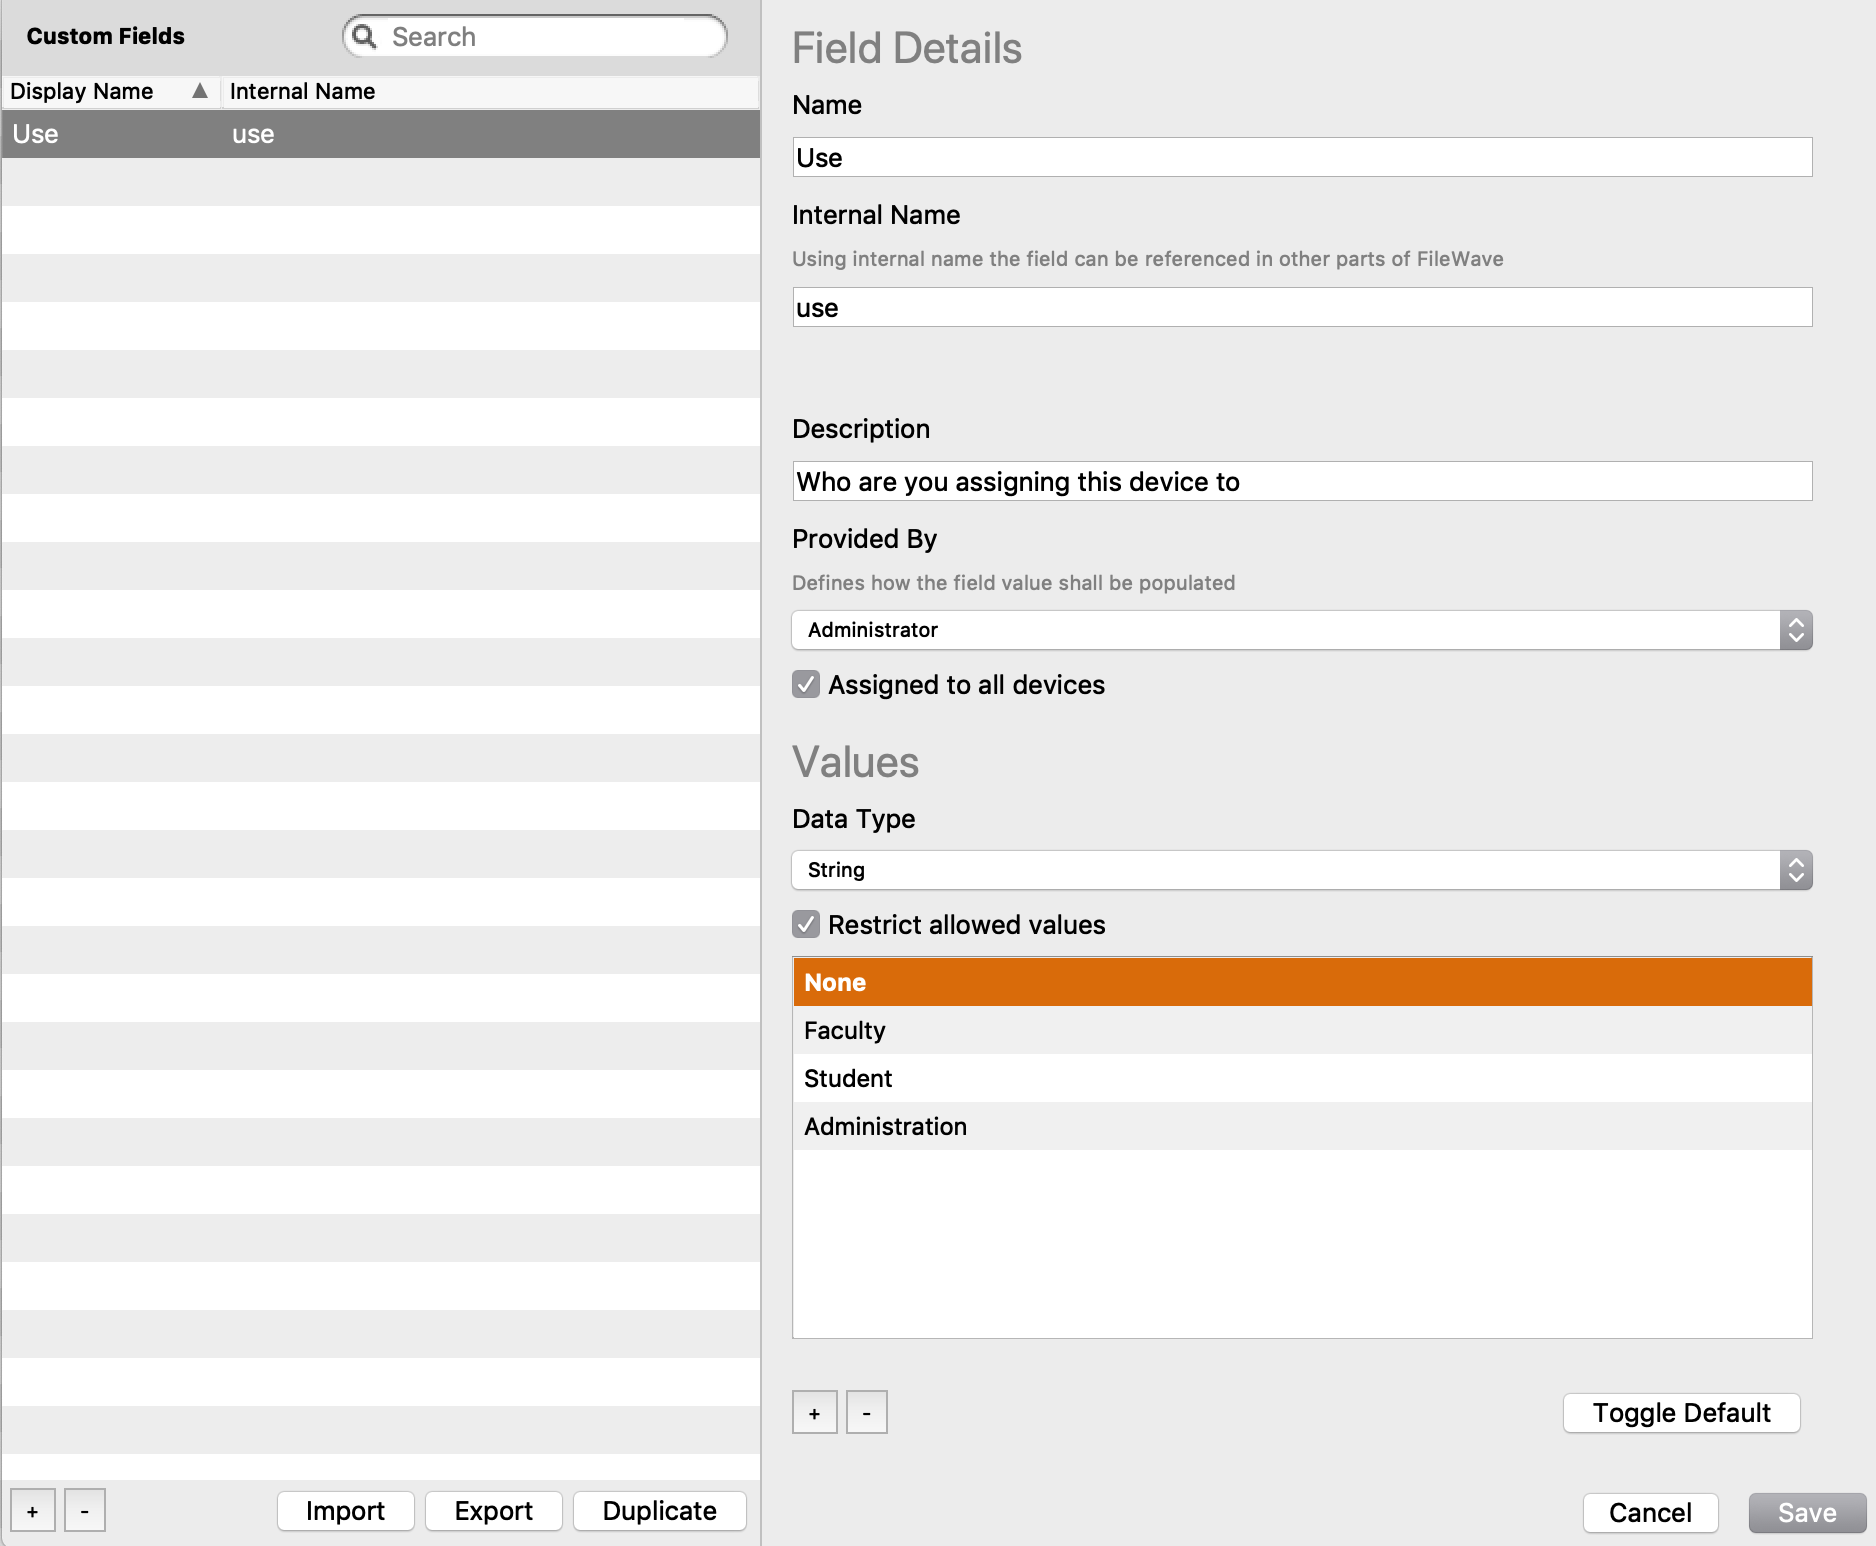 |
| Figure 3.1 - Custom Use |
|  |
| Figure 3.2 - Custom Location |
|  |
| Figure 3.3 - Custom Naming |
|  |
| Figure 3.4 - Custom Name Rule |
**Note:** In FileWave Central, devices that remain in the **Waiting for Device Configured** / **Awaiting Configuration** state may appear highlighted in light yellow in the Clients list. This color is informational: the device is still waiting for the **Device Configured** command. You can send the command manually from the device context menu under **MDM -> Send Device Configured Command**, or automate release using a Command Policy Fileset that allows devices waiting for configuration to complete Setup Assistant.
[](https://kb.filewave.com/uploads/images/gallery/2024-10/tJ9QFUfqVCoGNj92-image.png) ## Related Content - [Automated Device Enrollment (ADE)](https://kb.filewave.com/books/apple-school-business-manager/chapter/automated-device-enrollment-ade "Automated Device Enrollment (ADE)") - [Apple ADE Enrollment](https://kb.filewave.com/books/evaluation-guide/page/apple-ade-enrollment "Apple ADE Enrollment") ## Digging Deeper The introduction of this feature in **FileWave 15.5.0** provides administrators with enhanced control over the device enrollment and configuration process. By keeping devices in the “Await Configuration” state, you can ensure that: - **All Required Configurations are Applied**: Devices won’t be accessible to users until every necessary app, profile, and setting is installed. - **Improved Security**: Prevents users from accessing the device with incomplete security policies, reducing potential vulnerabilities. - **Customized Deployment Workflow**: Aligns device readiness with organizational schedules, training sessions, or specific events. ##### **Automating the Release Process** Using Command Policy Filesets to send the **Device Configured** command allows for automation based on specific triggers or conditions, such as: - **Time-Based Triggers**: Release devices at a specific time as set in the Association or Deployment properties. - **Configuration Completion**: Automatically release once all deployments are confirmed as installed. - **Event-Based Triggers**: Release devices in batches aligned with department needs or project phases. ##### **Considerations** - **User Experience**: Communicate with end-users about the deployment timeline to manage expectations. - **Testing**: Before wide-scale implementation, test the process with a small group to ensure configurations apply as intended. - **Monitoring**: Utilize FileWave’s monitoring tools to track the status of devices in the “Await Configuration” state. By leveraging this feature, organizations can enhance their deployment strategy, ensuring devices are secure, compliant, and fully configured right out of the box. # Apple TV Automatic Advance (ADE/DEP) ## Description This recipe will walk you through the steps of enrolling an Apple TV HD 4th gen into FileWave with ADE (formerly known as DEP) utilizing the Automatic Advance setting.This setting is only available if you are using an Apple TV HD 4th gen and FileWave v12. Recommended to use wired connection for Automatic enrollment.
In the steps below please remember do not set up the Apple TV manually in anyway or the Automatic Advance feature will not work. This includes pairing the remote. Touching anything stops the process.
## Ingredients - ADE setup - Ethernet Cable - USB 3 Cable ## Direction 1. Go to the Assistants menu -> ADE Association Management This opens the ADE Associations window 1. Fill out as much of the profile as you need in the Options, Setup Assistant, and the Device Naming tabs. At the very least you will need to have the **Automatic Advance** option set. **Please Note:** If you do not setup the **Device Naming** tab it will default as the serial number.  1. Save the profile and assign it to your devices. All you have to do is find your Apple TV(s) on the left pane, find your profile on the right, then click, drag, and drop. You will see the association(s) in the bottom pane. 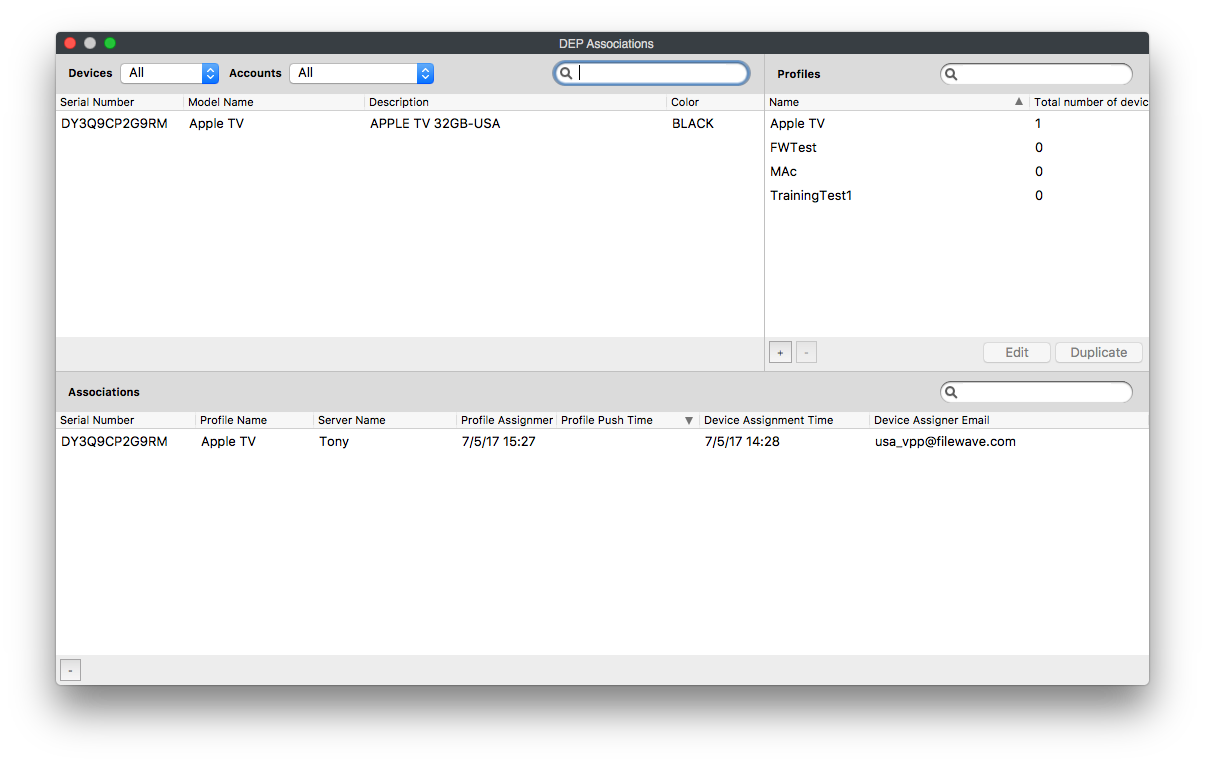 1. Now you will need to plug your Apple TV(s) into power and ethernet. If you are going to attach it to a TV/Monitor at this point remember do no pair the remote or go through any of the prompts. The settings you setup will automatically advance through all those for you but will not if you do any setup at this point. When the Apple TV(s) is at the Pair your Remote prompt if will wait 19 secs or so then the device will auto advance through all prompts.  1. After the Apple TV(s) completed the setup you can now bring it into FileWave as you would any other Mobile device through the Admin. # DEP Notify - How to provide progress visibility during ADE activation (macOS) New to Automated Device Enrollment (ADE) process? Do you have a create full of macOS devices that need to be prepared and issued to end users? Did this need to happen yesterday? The world of ADE device provisioning has been a great help and has improved the speed at which devices can be issued to end users. Gone are the days of monolithic imaging! Long live ADE! But what is happening when a macOS device is going through the Setup Assistant process? Want to get some visibility on what is being installed during the device activation? Traditionally, when a device goes through the ADE assistant, any number of applications can be deployed to the device. The problem with this approach is that there is not any indication given to the end user as to what is happening during this time interval. To an end user, it could appear that there is a problem with the device, and they may create support tickets to your Help Desk on the subject. In order to avoid that, we need to provide some visual indication of what is happening behind the scenes during this setup time. To do so, we will leverage two separate open source projects that are in use in the mac community, namely InstallApplications and DEPNotify. FileWave, by default, will provision a ADE device, enroll it into the MDM server, then deploy the custom macOS client to the device. The process looks something like this: 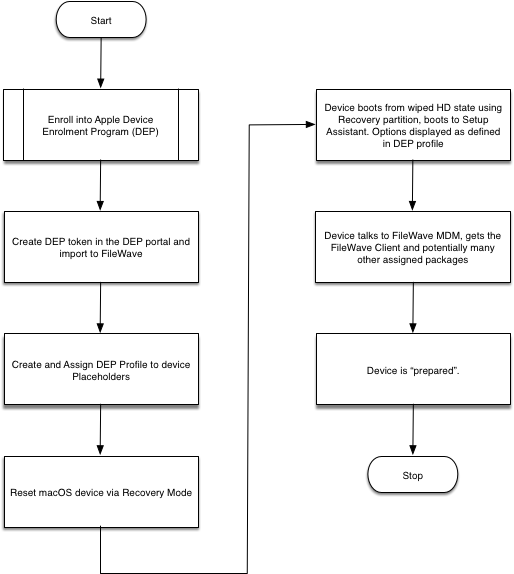 We need to instruct the FileWave server to deploy the open source package InstallApplications first so that we can set up the DEPNotify package and get feedback with all the great logging information that FileWave gives via its client log. The modified process looks something like this:  ## Step-by-step guide ### Create, configure, and deploy the InstallApplications package ### Create boostrap.json 1. Visit [Erik Gomez's blog](http://blog.eriknicolasgomez.com/2017/12/18/Custom-DEP-Part-9-A-practical-example-of-InstallApplications-Crypt-DEPNotify-and-Munki/) to get a practical example of configuring InstallApplications as well as some history and background on the project. 2. Visit [Erik Gomez's github site ](https://github.com/erikng/installapplications)and download the latest code. For the purposes of this document, I have used version 1.1. 3. Follow the instructions on the above site to configure your bootstrap.json file. Also, see the section below "Generating your bootstrap.json" for a simple example to get started with. To make troubleshooting easier, configure one or two packages defined in your bootstrap.json and ensure your packages are downloading correctly and your Install Application launch agent and launch daemon work successfully. If you have too many packages defined, it may be more difficult to determine where your configuration problem lies. 4. Generate your bootstrap.json with the generatejson.py script on Erik's site, which automatically generates the SHA256 hashes for you. 5. Once you have the bootstrap.json file generated (below is a sample boostrap.json), you will need to host it somewhere (like your filewave server) in order for the macOS client to download it during DEP activation. #### bootstrap.json ``` { "preflight": [], "setupassistant": [ { "file": "/some_path/DEPNotify_installer.pkg", "url": "https://Note: In the above bootstrap.json, the preflight stage is required, even if it is empty. If you don't have it defined, the script will error out (01/20/2018).
### Hosting and Serving your packages via the FileWave Server (Linux) To serve packages from FileWave, we will need to modify the httpd\_custom.conf file for apache. To do this: 1. On the FileWave server, open "/usr/local/filewave/apache/conf/httpd\_custom.conf" and add the following: ``` Alias /custompkg /usr/local/filewave/custompkgAny one serial number of a device should only occur once in FileWave. Therefore, if there is an old or broken device which is registered in ABM/ASM, consider using the serial number from this device otherwise a serial number from a usable, physical device will need to be taken, meaning that physical device cannot be used within FileWave otherwise. [Mactracker](https://mactracker.ca) may be used to show the Model Identifier of devices, since ASM/ABM only provides the Model Name
## Directions 1. Use VMware Fusion to create a new image from disc and use the macOS installer app or choose to create an image from the recovery partition 2. Once completed, **do no hit play**. Instead, locate the virtual machine in Finder. **If the VM starts, shut it down before continuing**. 3. From Virtual Machine Library, right click and choose show in Finder. 4. From Finder, right click the highlighted VM and choose 'Show Package Contents' or use Terminal to navigate inside this VM 5. Locate the file with a .vmx extension and choose an editor to edit this .vmx file 6. Two lines need to be added as below. Replace Serial Number and Model Identifier as appropriate (remove brackets, but keep quotes): ``` serialNumber = "[Serial Number]" hw.model = "[Model Identifier]" ``` 1. Now Play the VM 2. Select language and once the option to re-instal the operating system is shown, choose utilities and Terminal 3. Type the following line to confirm that the VM has the appropriate serial number: ``` ioreg -l | grep "IOPlatformSerialNumber" ``` 1. Quit Terminal and choose to re-instal the operating system 2. Have a cup of tea! 3. Disable network settings at the earliest, allowable moment, before the device comes back up and finalises the installation 4. Snapshot the VM when the Choose Language prompt is shownA device receives an associated ADE profile before the option to select the language appears after installing the operating system. Once in place, the device will maintain this profile across reboots. If the network is not disabled before receiving the Enrolment profile, then changes to the Enrolment profile associated or assigning a new ADE profile subsequently, will have zero impact on a fresh Enrolment; the original Enrolment settings will continue to apply. By disabling the network before the Enrolment profile is in place and then taking the snapshot, multiple Enrolment profiles or changes may be tested with each restore of the snapshot. On each restore, the network should require enabling.
Tested on VMware Fusion 10, 11 and 12 # ADE Troubleshooting Apple Automated Device Enrollment (ADE), formerly known as DEP, lets organizations assign iPhone, iPad, Mac, and Apple TV devices to an MDM server before users start Setup Assistant. Use this page to confirm the expected ADE path and isolate common enrollment failures. # Correct ADE Workflow| [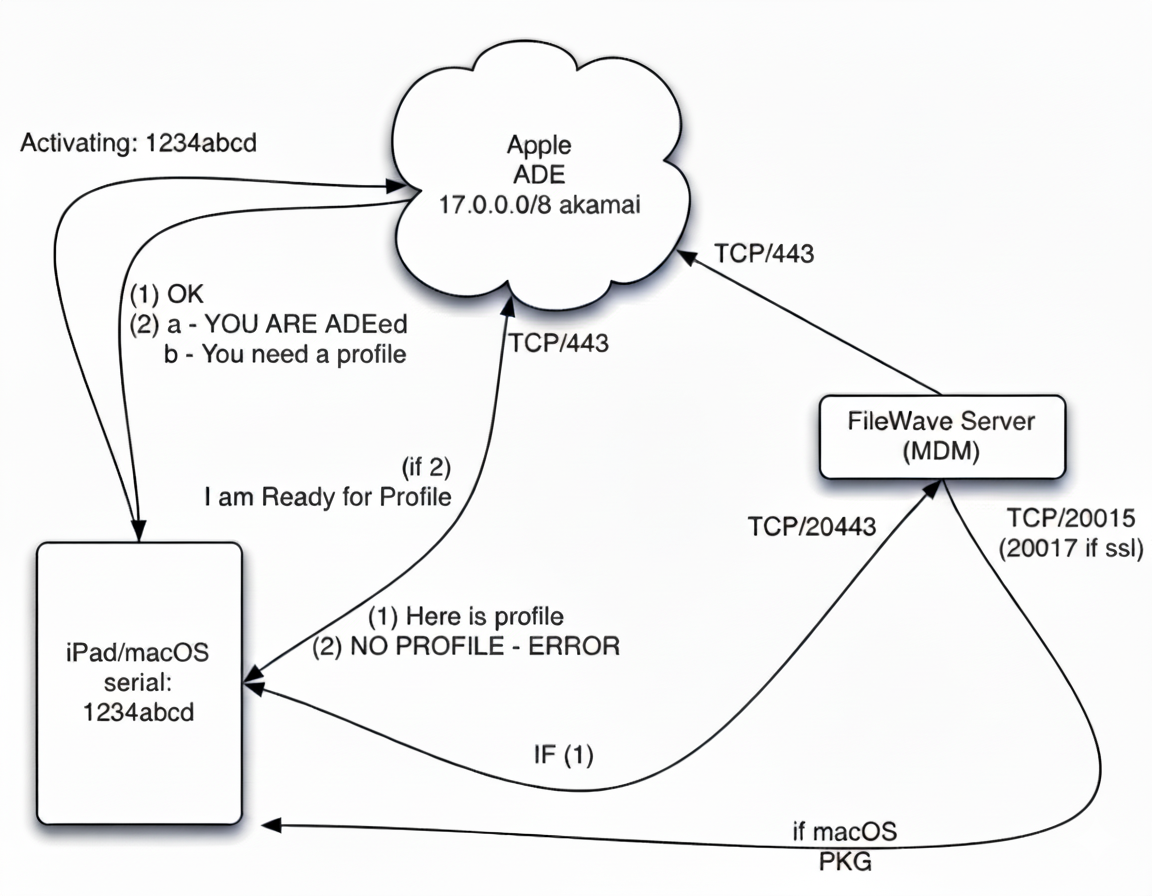](https://kb.filewave.com/uploads/images/gallery/2025-09/vMXDnJ67zsMdWwBE-image.png) |
| Figure 1.1 - ADE Workflow |
You can download a FileWave port testing tool from [https://supportresources.filewave.com/](https://supportresources.filewave.com/ "https://supportresources.filewave.com/")
- Put a test device, such as a laptop, on the same Wi-Fi network used for enrollment. - Try enrolling iOS/iPadOS devices over Ethernet or a mobile hotspot to see whether the normal network is blocking required traffic. You can connect supported iPhone or iPad devices to Ethernet with: - Apple's "Lightning to USB 3 Camera Adapter" (the one with a female USB and another lightning port) - Apple's "Apple USB Ethernet Adapter" - A USB charger supplying 2+ amps of power Plug in the device and make sure you get a link light. ### Check the profile Because ADE profiles are stored with Apple for assigned devices, FileWave cannot automatically add newly available options to profiles that already exist. If you recently upgraded FileWave, create a new ADE profile and update your automatic assignment rules ([Automatically Assign ADE profiles](https://kb.filewave.com/books/apple-school-business-manager/page/automatically-assign-ade-profiles "Automatically Assign ADE profiles")). Do not duplicate an existing profile. # DEP/ADE Forbidden Error ## Description When creating an ADE (formerly DEP) association or running another ADE synchronization action, FileWave may show this error: **DEP error: Forbidden**. The most likely causes are: - The FileWave Server SSL certificate changed. Check **Preferences > Mobile** to confirm that the server SSL certificate is not revoked or expired. - The external IP address of the FileWave Server changed. Apple stores the external IP address of the FileWave Server from the last successful contact. If that IP address differs during synchronization, the action can fail and the ADE Server Token must be replaced. You can check the stored IP address in the relevant ADE account: - [Apple Business Manager](https://business.apple.com) - [Apple School Manager](https://school.apple.com) In the Apple portal, open **Settings**, select the MDM server, and choose **Edit**. The **Last Date Connected** and **Last IP Connected** values appear in the MDM Server Information view. 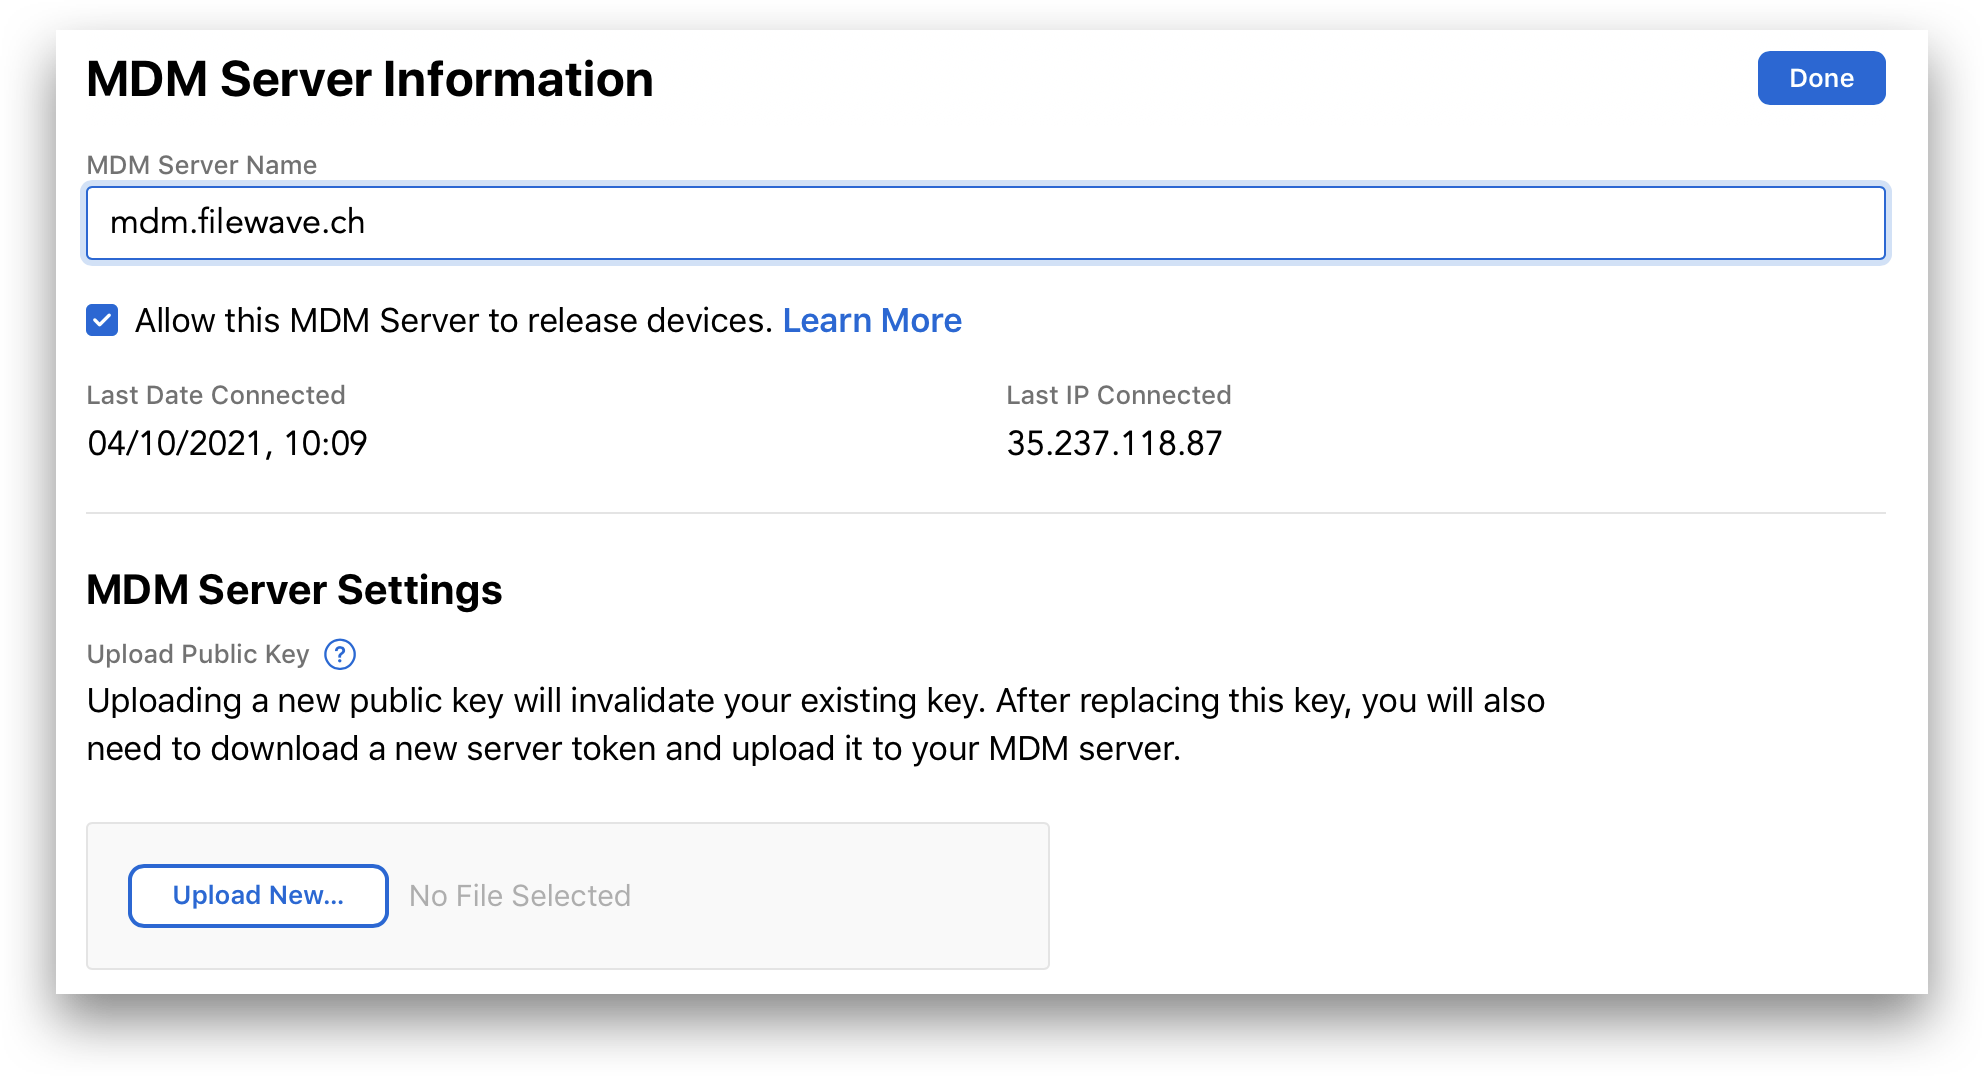 ## Requirements - FileWave MDM ADE certificate ## Resolution A Forbidden error requires replacing the ADE Server Token, not updating it in place. In FileWave Central, go to **Preferences > VPP & ADE**: 1. Choose **Download certificate** (requires the fwadmin password) and save the certificate. In the relevant Apple ADE account, [Apple Business Manager](https://business.apple.com) or [Apple School Manager](https://school.apple.com): 1. Select **Settings**. 2. Highlight the MDM server from the list and choose **Edit**. 3. Select **Upload New...** and select the certificate downloaded from FileWave. 4. When prompted, download the ADE Server Token. Back in FileWave Central, go to **Preferences > VPP & ADE**: 1. Click **Configure Accounts** (requires the fwadmin password). 2. Select the Forbidden token and use the **-** button to remove it. 3. Select the **+** button and choose the ADE Server Token downloaded from Apple. 4. Run an ADE Full Sync. Hold **Alt/Option** while choosing the synchronization action; the button name changes to indicate a full sync. After the token is replaced and the full sync completes, synchronization should succeed.If the ADE Server Token is currently configured in the Education tab of Preferences, remove that association before removing the ADE token. You can add it again afterward.