API Sample Code
- Bulk Update the iOS Enrollment User (auth_username) and Client Name using API
- Bulk Update the Enrollment User (auth_username) using API
- How to write to a custom field using the FileWave API
- Managing Client States via the FileWave API
- Returning Device Information as a JSON
- Sending MDM Commands
- Restarting Devices with API
Bulk Update the iOS Enrollment User (auth_username) and Client Name using API
What
The api_UpdateiPadNameandAuthUser script is a tool that allows FileWave admins to update the names and assigned users of multiple iOS devices in bulk, using a CSV file containing the serial numbers, desired device names, and LDAP usernames of the devices. This can be particularly useful for education organizations, but may also be useful for others who do mass re-distributions of devices like iPads.
When/Why
If you need to quickly and easily reassign a large number of iPads to different users, the api_UpdateiPadNameandAuthUser script can save you time and effort. Instead of manually updating each device individually, you can simply prepare a CSV file with the necessary information and use the script to apply the changes to all of the devices at once. This can be especially useful when you need to set up a large number of new devices for use by different users or when you need to make changes to the assignments of existing devices.
How
To use the api_UpdateiPadNameandAuthUser script, you will need to follow the instructions in the README file that accompanies the script:
- Download the zip file that contains the script and the README.
Download: api_UpdateiPadNameANDAuthUser_v2.zip - Edit the CSV file to contain a list of serial numbers, device names, and LDAP usernames for the devices you want to update.
- Open Terminal (on a Mac or Linux) and navigate to the directory that contains the script and CSV file.
- Make the script executable by running the following command
chmod +x ./api_UpdateiPadNameandAuthUser.sh - Run the script using the following command, replacing the parameters, leaving only spaces in between.
Parameters:./api_UpdateiPadNameandAuthUser.sh <SERVER URL> <BASE64TOKEN> <PATH TO CSVFILE>- <Server URL>: Your FileWave Anywhere address. For example, https://server.filewave.com
- <BASE64 TOKEN>: The base64 API token, found in FileWave Admin under Assistants > Manage Administrators > (select a username) > Application Tokens > Token (base64). For example,
ezcyMjczOTQyLTc1YjctNDFmMC1iYTlhLTE1MWM3OThiOWFhMH0=
- <PATH TO CSVFILE>: The full path to the .csv file. For example, /Users/admin/Desktop/api_UpdateiPadNameandAuthUser.csv
The script's output will show you the progress of the updates and will indicate when the process is complete.
If you are running into an issue where the script says that it completed and is Updating Model, but no changes are made, please add a blank line at the end of your .csv, save it, and try the command again.
Bulk Update the Enrollment User (auth_username) using API
What
This problem and solution came from a customer who had many devices in FileWave, yet did not have the 'Enrollment User' (internally known as auth_username) populated. In order for automatic associations of iPads with Apple Classroom, devices must have an enrolment user set. While it’s possible to set these one by one, that does not scale well. Even hosted customers could benefit from this example. It can set the Enrollment User for both iOS as well as macOS devices in FileWave.
When/Why
The below solution leverages the FileWave Anywhere API (v2) and is a great example that any customer could build. You can run this script from your mac, Windows, or Linux computer, and it will talk to the API and make the changes in bulk.
This example happens to be a Python script. As such, if ran on the FileWave Server, Python will already be installed. However, for hosted customers, the script will not be ran on the server and it should be necessary to have Python installed on the device running this script. We have also included a zsh script which may be easier for someone to modify or use.
https://www.python.org/downloads/
https://docs.python.org/3/using/windows.html
How
- The first step is to download the script:
Bulk Update Enrollment User.zip
-
Once downloaded, the zip contains three files: bulk_change_device_authname.py, bulk_change_device_authname_updated.zsh and auth_username.csv and you can run either the .py or the .zsh script as they will do the same thing.
-
If the Python script is not being ran directly on a FileWave Server, it may be necessary to alter the first line of code, to specify the location of Python on the device running the script. For example, on macOS, that may be: #/usr/local/bin/python3
- If you do not have python installed, you may use the updated shell script. The README text file will have the updated instruction guide on using the shell script.
-
The CSV file should be edited to include the desired list of Devices with Users. The supplied template looks like:
Device ID,Enrollment Username
67d6f4bfcf27fa62bb9815365c67ebf7fed8f9c3,test
An Inventory query could be used to obtain the list of Device IDs. Note, the script is only expecting two columns in the order of Device ID and Enrollment Username.
It may assists to initially export additional columns to assist with device identification, but after adding the usernames, be sure to remove any of these additional columns in the CSV file.
- Obtain the desired users base64 Application Token from the FileWave Administrators Assistant view

The following commands may now be executed on macOS or Linux (a similar command could be executed on Windows) to action the process.
Python script command:
./bulk_change_device_authname.py --token {b5cb89a0-fe59-4cb1-9359-d72b79369c0} --host ExampleCo.filewave.net --mapping ./auth_username.csvUpdated shell script command:
./bulk_change_device_authname_updated.zsh --host your.filewave.net --token {your_API_token} --mapping ./auth_username.csvThe script will give you feedback about the success or failure of any records.
Python Imports
The beginning of the Python script has a list of imports:
import argparse
import base64
import csv
import os
import re
import requests
import sys
If any are missing, e.g 'requests', it should be necessary to instal them. The script should report such an error if any are missing when ran. Some are available on a default Python setup.
It is possible to instal any missing. For example, on macOS or Linux, the command may appear as (depending upon the location of Python)
/usr/local/bin/python3 -m pip install requestsHopefully the script at this point has been successful and can be see as a great example of bulk actions.
Related articles
How to write to a custom field using the FileWave API
It is often desirable to alter FileWave Custom Field values, especially when it comes to driving automated workflows.
API calls have the distinct advantage of changing Custom Field values directly on the server, essentially making the change immediate.
Where Custom Field values are driving Smart Group device inclusion, despite the API call making an immediate change, there will still be a period of time before the next Smart Group evaluation.
How
Writing back to a Custom Field relies upon the following details:
- Server URL
- A way to recognise which device's Custom Field should be updated
- A way to recognise the Custom Field
- Custom Field type
- An authentication token
Some Custom Fields may have restricted values. Only one of these values should be posted in the API call to ensure expected behaviour.
Restricted Values
Value restriction may be observed from within the Custom Field definition.
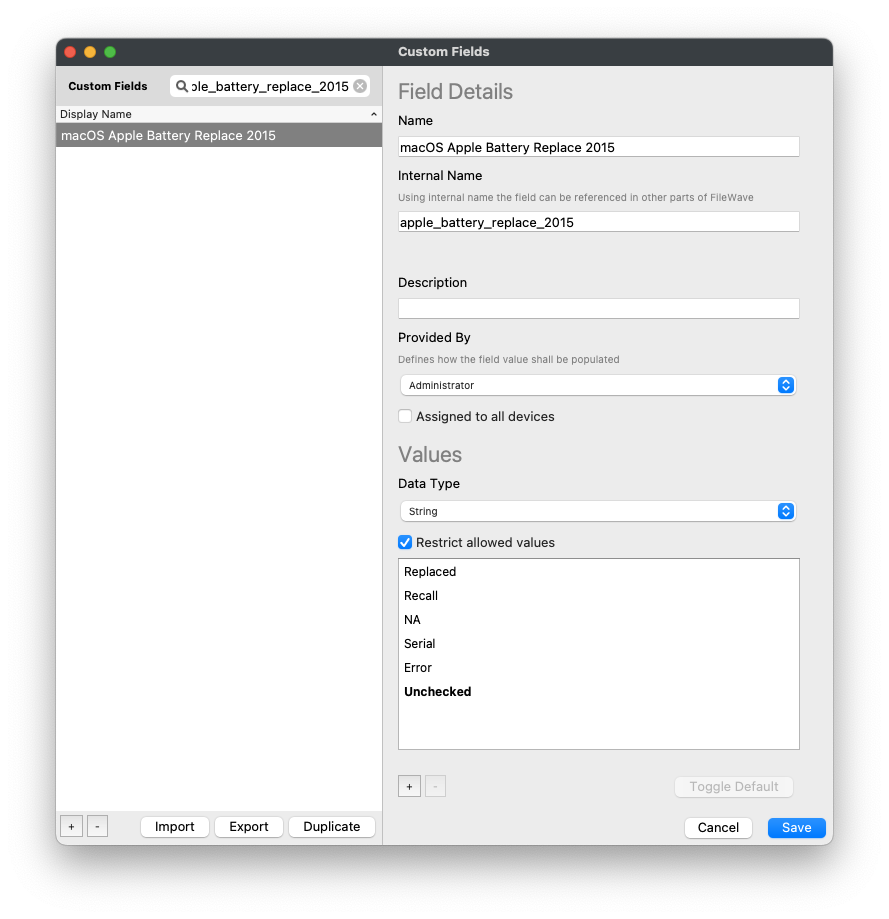
It is also possible to use Swagger (or therefore another API call) to return the 'choices' list of any Custom Field, by observing the Custom Field definition:
URL path for query:
/api/inv/api/v1/custom_field/
Query response:
  {
    "to_be_deleted": false,
    "field_name": "apple_battery_replace_2015",
    "display_name": "macOS Apple Battery Replace 2015",
    "data_type": "string",
    "provider": 0,
    "metadata": {},
    "description": "",
    "default_value": "Unchecked",
    "choices": [
      "Replaced",
      "Recall",
      "NA",
      "Serial",
      "Error",
      "Unchecked"
    ],
    "is_global": false,
    "used_in_inventory_queries": false,
    "used_in_smart_groups": false,
    "used_in_filesets": false,
    "used_in_license_definitions": false,
    "used_in_dep_profiles": false,
    "used_in_dep_rules": false,
    "used_in_workflows": false
  },
Which API
Custom Fields, as mentioned in the other API KB documents, are best targeted with the Command Line RESTful API.
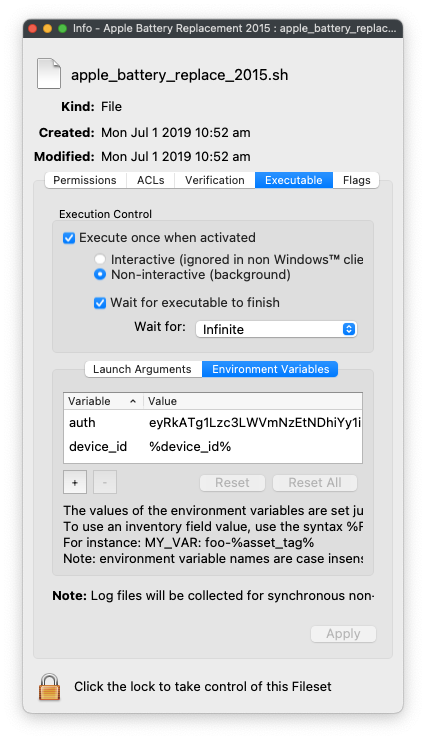
This example is demonstrating the possibility of targeting devices using both Serial Number and Device ID. The Server's FQDN, API authentication token and Device ID can be supplied as Launch Arguments, however, for security reasons it is better to supply the token as an Environment variable. When targeting Internal Names of Custom Fields (as either Launch Arguments or Environment Variables), surround the Internal Name with % symbols.
The start of a macOS script may look like:
#!/bin/zsh

# Environment Variables
# $auth - base64 authentication token
# $device_id  - Device ID

server_fqdn=$(defaults read /usr/local/etc/fwcld.plist server) # FW Server FQDN
serial_number=$(ioreg -l -d 2 | awk -F "\"" '/IOPlatformSerialNumber/ {print $(NF-1)}') # device serial number
It is of course possible that all of these values could be supplied to the script as Executable variables.
The start of a PowerShell script may look like:
# Environment Variables
# $Env:auth - base64 authentication token
# $Env:device_id - Device ID
# $Env:serial_number - device serial number
# $Env:server_fqdn - FW Server FQDN
Reading a Custom Field
It may be necessary to read the Custom Field during the script execution. A JSON will be required for the data portion of the command:
{"criteria":
  {
    "column":"serial_number",
    "component":"Client",
    "operator":"is",
    "qualifier":'\"$serial_number\"'
  },
  "fields":
  [
    {
      "column":"apple_battery_replace_2015",
      "component":"CustomFields"
    }
  ],
  "main_component":"Client"
}
To continue the scripts, this could be assigned in the script as a variable
macOS script:
query='{"criteria":{"column":"serial_number","component":"Client","operator":"is","qualifier":'\"$serial_number\"'},"fields":[{"column":"apple_battery_replace_2015","component":"CustomFields"}],"main_component":"Client"}'Windows PowerShell:
$query = '{"criteria":{"column":"serial_number","component":"Client","operator":"is","qualifier":"' + $serial_number + '"},"fields":[{"column":"apple_battery_replace_2015","component":"CustomFields"}],"main_component":"Client"}'With the server details and JSON configured, it is now possible to read the value with a command:
macOS script:
curl -s -H "Authorization: $auth" https://$server_fqdn:20445/inv/api/v1/query_result/ --data $query -H "Content-Type: application/json"The response may look something like:
{"offset":0,"fields":["CustomFields_apple_battery_replace_2015"],"values":[["Replaced"]],"filter_results":1,"total_results":1,"version":0}Windows PowerShell script:
$header = @{Authorization=“$auth"}
$api = "https://" + $server_dns + ":20445/inv/api/v1/query_result/"

Invoke-RestMethod -Method GET -Headers $header -Uri $api
Due to this being a Custom Field designed for an Apple replacement programme, hopefully the response will look something like:
{"offset":0,"fields":["CustomFields_apple_battery_replace_2015"],"values":[["NA"]],"filter_results":1,"total_results":1,"version":0}Handling JSON response
As noted earlier, since the response is also a JSON block, the desired information is somewhat buried within the response. Windows PowerShell has tools to directly work with JSON and as such the desired item is more easily attainable.
macOS on the other hand, it would be beneficial to either instal Python and use Pythons tools to extract the response or get crazy with a tool like 'AWK'.
curl -s -H "Authorization: $auth" \
  https://$server_fqdn:20445/inv/api/v1/query_result/ \
  --data $query -H "Content-Type: application/json" \
  | awk -F  '[\\\[|\\\]]' '{gsub(/\"/,"",$0);print  substr( $(NF-2), 1, length($(NF-2)))}'
Response with AWK:
ReplacedWriting a Custom Field
Once the script has continued and actioned anything else desired, it then may be desirable to set the Custom Field to a new value, which may vary depending upon the outcome of the scripting.
In this example, we will consider the script will be writing back NA to the Custom Field:
current_time=$(date -u +"%FT%TZ")
data='{"CustomFields":{"apple_battery_replace_2015":{"exitCode":null,"status":0,"updateTime":"'$current_time'","value":"NA"}}}'

curl -X PATCH https://$server_fqdn:20445/inv/api/v1/client/$device_id -d "$data" -H 'content-type: application/json'  -s -H "authorization: $auth_key"
Note:
- This is now using the PATCH option, since an already existing value is being altered by the script
- The date is being supplied as a variable to ensure the current time is pushed back with the API JSON data
- This command is referencing 'device_id' in the URL path
Related articles
Managing Client States via the FileWave API
What
Use the FileWave API to move a device between the Tracked, Archived, Missing, and Untracked states.
0= Tracked1= Archived2= Missing3= Untracked
When/Why
This is useful when you need to archive a retired device, reinstate a device that should be managed again, or script state changes as part of cleanup or offboarding work.
Archiving Apple MDM-enrolled devices can remove or break their MDM enrollment. Reinstating the record later does not automatically restore that enrollment.
How
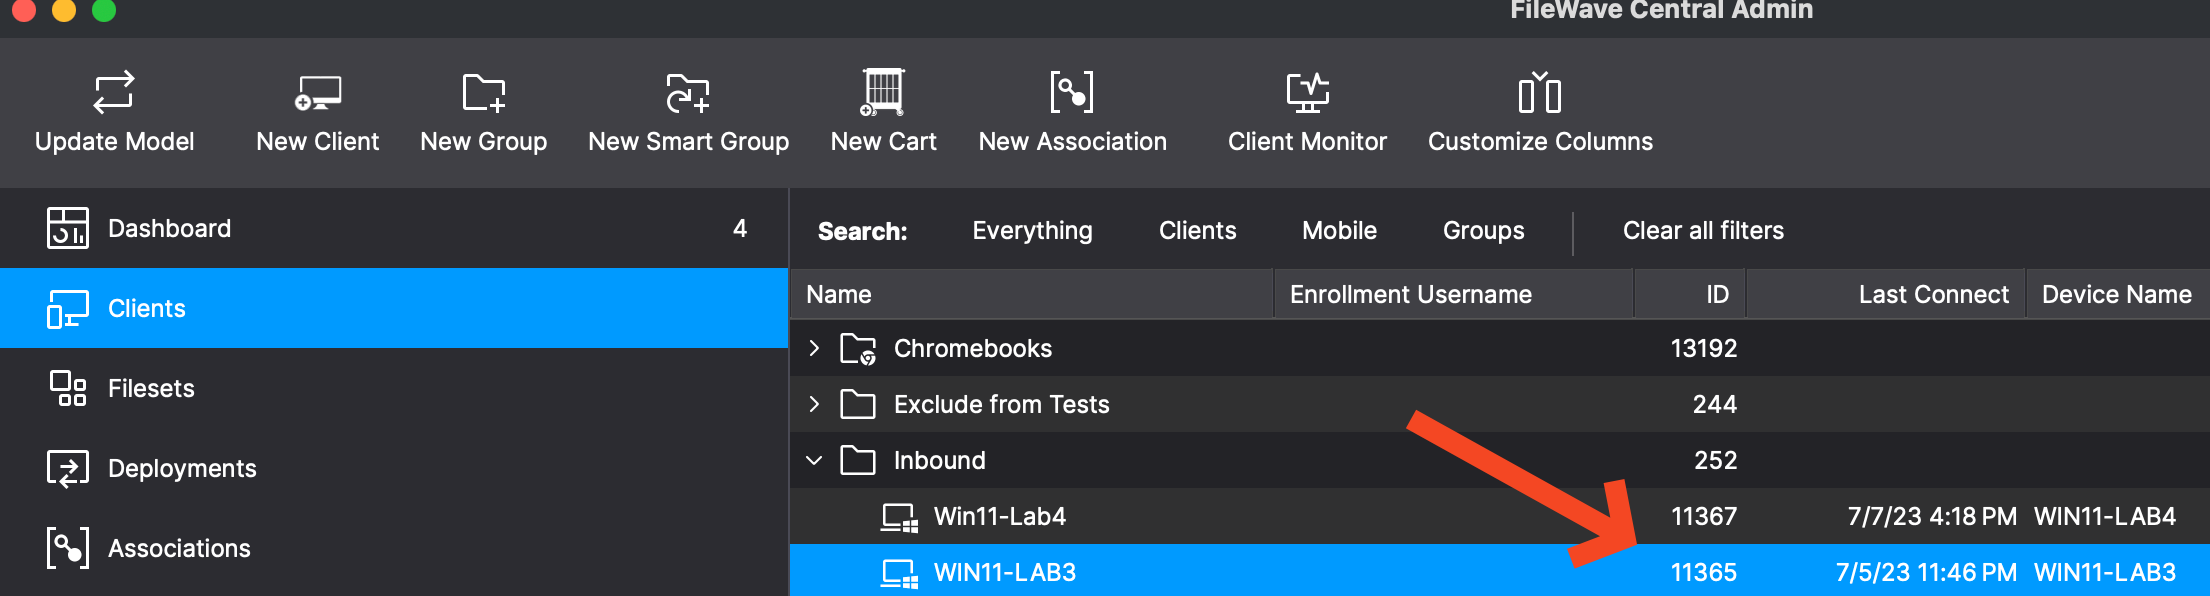
Find the DeviceID in FileWave Central, as shown below, or copy it from the URL in FileWave Anywhere when viewing the device. Then send a PATCH request to update the state and run update_model so the change is reflected in the FileWave management interface.
Shell script:
#!/bin/zsh

# Variables
ServerURL="https://fwjoshlab.filewave.net"   # Replace with your server address.
Token="your_token_here"  # Replace with your actual token.
DeviceID="11365"         # Specify the device ID.
NewState="0"             # Set the desired state (0: Tracked, 1: Archived, 2: Missing, 3: Untracked).

# Update device state
curl -X PATCH "$ServerURL/filewave/api/devices/v1/devices/$DeviceID" \
     -H "Authorization: Bearer $Token" \
     -H 'Content-Type: application/json' \
     -d '{"state":'$NewState'}'

# Update the model to reflect changes
curl -X POST "$ServerURL/filewave/api/fwserver/update_model" \
     -H "Authorization: Bearer $Token" \
     -H 'Content-Type: application/json'
PowerShell:
# PowerShell Script to Manage FileWave Client States

# Variables
$ServerURL = "https://fwjoshlab.filewave.net" # Replace with your server address.
$Token = "your_token_here"  # Replace with your actual token.
$DeviceID = "11365"         # Specify the device ID.
$NewState = "0"             # Set the desired state (0: Tracked, 1: Archived, 2: Missing, 3: Untracked).

# Headers for authorization and content type
$headers = @{
    "Authorization" = "Bearer $Token"
    "Content-Type" = "application/json"
}

# Body data for changing the state
$body = @{
    "state" = $NewState
} | ConvertTo-Json

# Update device state
Invoke-RestMethod -Uri "$ServerURL/filewave/api/devices/v1/devices/$DeviceID" -Method Patch -Headers $headers -Body $body

# Update the model to reflect changes
Invoke-RestMethod -Uri "$ServerURL/filewave/api/fwserver/update_model" -Method Post -Headers $headers

# Output for user confirmation
Write-Host "Device state updated and model refreshed successfully."
Tips
- Ensure that the
Tokenvariable contains a valid authorization token. - Replace
DeviceIDandNewStatewith the values you need. - If you are changing many devices, refresh the model after the updates so the new state is visible in the admin tools.
Related Links
- FileWave API Documentation - Official API documentation.
- curl command line tool - curl manual.
Digging Deeper
The update_model API call tells the FileWave server to rebuild its internal model so the state change is reflected in the management interface. That is especially helpful after bulk state changes.
Returning Device Information as a JSON
What
The Client Info > Device Details of a particular client, contains a wealth of information that may be useful to repurpose in other systems (Help Desks, centralised inventory systems, etc). Using the FileWave API, this information could be pulled by alternate systems or to a file locally on the client
Since the command refers to Device IDs, it may be necessary to make 2 calls from external systems. The first to obtain Device IDs and the second to target particular devices based upon their Device ID.
When ran through Filesets, Device ID may be sent with the Fileset as either a Launch Argument or Environment Variable
HOW
This information could be returned using either the FileWave Anywhere API or the Command Line RESTful API
Remove the pipe to Python if not installed. This just displays the output as multiple lines instead of one long line.
FileWave Anywhere API from macOS or Linux:
curl -s -H "Authorization: $auth" \
  https://$server_dns/api/inv/api/v1/client/details/${device_id}/DesktopClient \
  -H "Content-Type: application/json" \
  | python3 -mjson.tool
Command Line RESTful API from macOS or Linux:
curl -s -H "Authorization: $auth" \
    https://$server_dns:20445/inv/api/v1/client/details/${device_id}/DesktopClient \
    -H "Content-Type: application/json" \
    | python3 -mjson.tool
Note, the commands look almost identical, but just the additional /api at the beginning of the path for the FileWave Anywhere API call.
The output should look similar to the below, where an appropriate device_id is supplied:
{
    "CustomFields__ldap_username": {
        "status": 0,
        "type": "string",
        "updateTime": "2018-06-21T19:37:23.585851Z",
        "value": "mdm mdm"
    },
    "CustomFields__local_ip_address": {
        "status": 0,
        "type": "string",
        "updateTime": "2018-06-21T19:49:51Z",
        "value": "10.20.30.29"
    },
    "CustomFields__malwarebytes_installed": {
        "status": 0,
        "type": "bool",
        "updateTime": "2018-06-21T19:49:51Z",
        "value": false
    },
    "CustomFields__po_number": {
        "status": 0,
        "type": "string",
        "updateTime": "2018-06-21T19:49:51Z",
        "value": "54654561"
    },
    "CustomFields__property_tag": {
		"status": 0,
        "updateTime": "2018-06-21T19:49:51Z",
        "type": "string",
        "value": "Device Owned by FileWave"
    },
    "CustomFields__purchase_date": {
        "updateTime": null,
        "value": null
    },
    "CustomFields__school_name": {
       	"status": 0,
        "type": "string",
        "updateTime": "2018-06-21T19:49:51Z",
        "value": "Landing Trail Elementary"
    },
    "CustomFields__site_description": {
        "updateTime": null,
        "value": null
    },
    "CustomFields__textedit_version": {
        "status": 0,
        "type": "string",
        "updateTime": "2018-06-21T19:49:51Z",
        "value": "1.13"
    },
    "CustomFields__user_role": {
        "updateTime": null,
        "value": null
    },
    "archived": null,
    "auth_username": "mdm",
    "building": null,
    "cpu_count": 2,
    "cpu_speed": 2759000000,
    "cpu_type": "Intel(R) Core(TM) i5-3470S CPU @ 2.90GHz",
    "current_ip_address": "10.20.30.29",
    "deleted_from_admin": false,
    "department": null,
    "device_id": "f96b8c66c50b358889ba2fbf2dc53bc21036406a",
    "device_manufacturer": "VMware, Inc.",
    "device_name": "FUSION-VM1-10.12",
    "device_product_name": "VMware7,1",
    "enroll_date": "2018-06-17T17:11:08.709785Z",
    "enrollment_state": 2,
    "filewave_client_locked": false,
    "filewave_client_name": "FUSION-VM1-10.13",
    "filewave_client_version": "12.8.1",
    "filewave_id": 219,
    "filewave_model_number": 617,
    "free_disk_space": 56772587520,
    "is_system_integrity_protection_enabled": true,
    "is_tracking_enabled": false,
    "last_check_in": "2018-06-21T19:54:31.615710Z",
    "last_enterprise_app_validation_date": null,
    "last_ldap_username": null,
    "last_logged_in_username": "dhadmin",
    "last_state_change_date": "2018-06-21T19:50:09.339609Z",
    "location": null,
    "management_mode": 0,
    "monitor_id": null,
    "operating_system__build": "17B48",
    "operating_system__edition": "Desktop",
    "operating_system__name": "macOS 10.13 High Sierra",
    "operating_system__type": "OSX",
    "operating_system__version": "10.13.1",
    "operating_system__version_major": 10,
    "operating_system__version_minor": 13,
    "operating_system__version_patch": 1,
    "ram_size": 2147483648,
    "rom_bios_version": "VMW71.00V.0.B64.1706210604",
    "security__enrolled_via_dep": null,
    "security__fde_enabled": false,
    "security__firmware_password_change_pending": false,
    "security__firmware_password_exists": false,
    "security__firmware_password_rom_enabled": true,
    "security__hardware_encryption_caps": null,
    "security__passcode_is_compliant": null,
    "security__passcode_is_compliant_with_profiles": null,
    "security__passcode_lock_grace_period": null,
    "security__passcode_lock_grace_period_enforced": null,
    "security__passcode_present": null,
    "security__system_integrity_protection_enabled": true,
    "security__user_approved_enrollment": null,
    "serial_number": "VMx4NvUkh/Co",
    "state": 0,
    "total_disk_space": 85689589760,
    "unenrolled": false
}
If desired, the information could be stored into a JSON file:
curl -s -H "Authorization: $auth" \
  https://$server_dns/api/inv/api/v1/client/details/${device_id}/DesktopClient \
  -H "Content-Type: application/json" \
  | python3 -mjson.tool > /my/path/device_info_${device_id}.json
The same $device_id variable has been used to define the name of the JSON file also. Alter /my/path for a path of choice.
Obtaining Device IDs
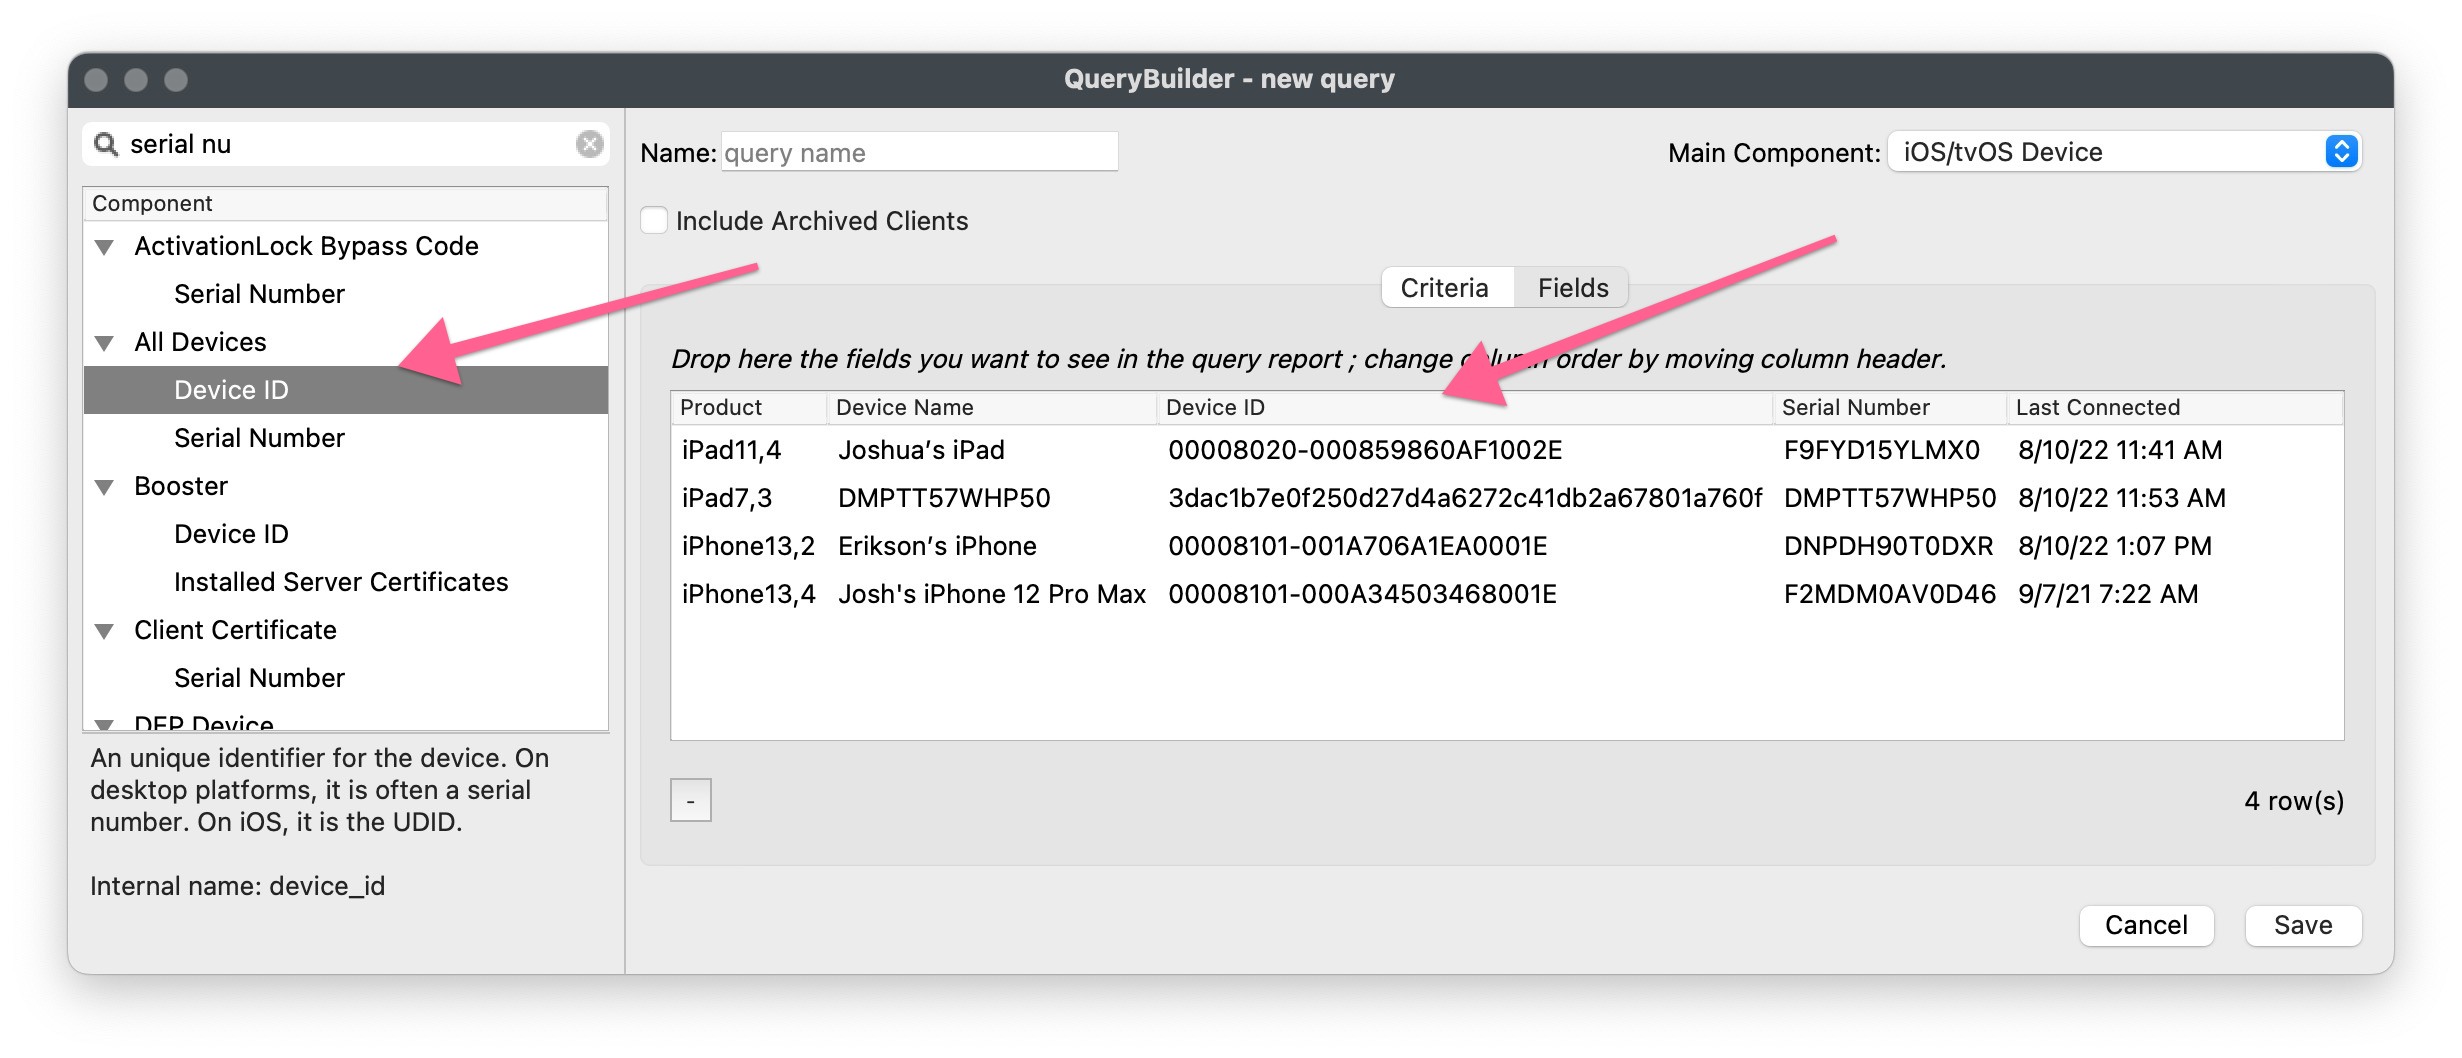
One way to retrieve a bulk list of Device IDs is via an Inventory Query. First make a query to include desired columns, one of which will need to be Device ID. In the below example Device ID and Device Name have been included as columns for the Fields:

Once saved, use the details outlined in the FileWave Anywhere Documentation, to locate the ID of this Inventory Query. The query result may then be used to pull a list of Device IDs. From the below example, set $query_id to the value of the chosen Inventory Query. Make sure to set $auth to the token and server to your server:
#!/bin/zsh
# Shell script for macOS/Linux
$server = "widget.filewave.net"
$token = "ezMyxxxM2UyLTNjN2ItNxxxS04ZjQ5LTkxMxxxxzEzODZmNn0="
$query_id = "65"

curl -s  -H "Authorization: $auth" \
  https://$server/api/inv/api/v1/query_result/$query_id
#PowerShell for Windows
$server = "widget.filewave.net"
$token = "ezMyxxxM2UyLTNjN2ItNxxxS04ZjQ5LTkxMxxxxzEzODZmNn0="
$header = @{Authorization=“$token"}
$query_id = "65"
Invoke-RestMethod -Method GET \
-Headers $header \
-ContentType application/json \
-Uri https://$server:/api/inv/api/v1/query_result/$query_idRelated articles
Sending MDM Commands
What
FileWave Anywhere can send MDM commands to devices, and the FileWave Anywhere API can trigger those same commands for scripted or integrated workflows.
The Swagger documentation shows the request structure:
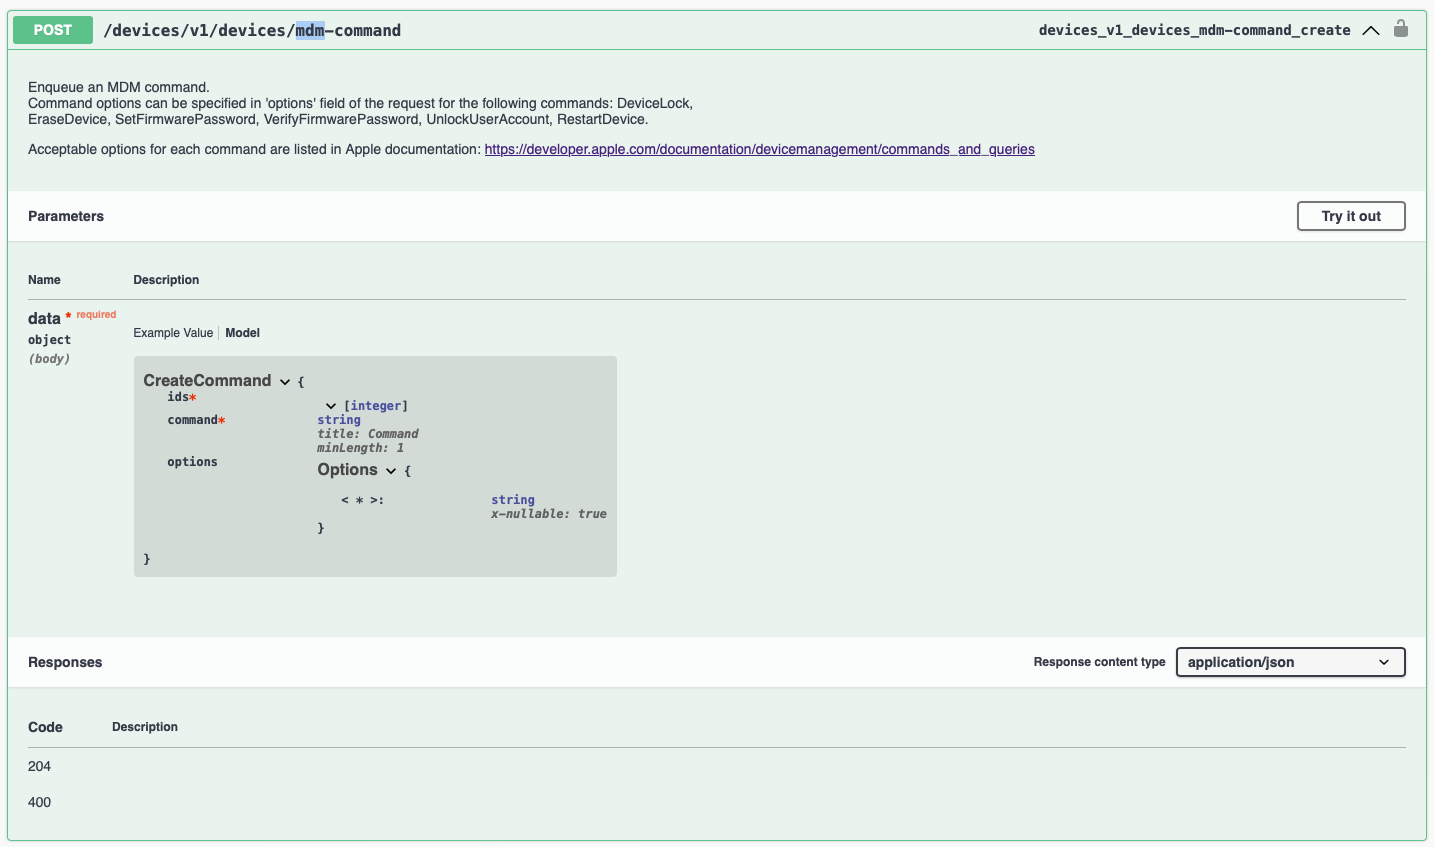
Note the reference to the device(s) is now by 'ids'. This refers to the Client ID, as opposed to the Device ID, and is always an Integer.
Example data could look like:
{
  "ids": [
    737581
  ],
  "command": "DeviceInformation"
}
'ids' is a list of devices, so multiple devices could be targeted in one RESTful API command.
Commands sent by the API will show in the device's Client Info:

HOW
This is an example of a RESTful API request that is only available through the FileWave Anywhere API.
Running the command from the Swagger Documentation will show the URL path required to send a command. For example, to lock devices:
macOS and Linux:
mdm_command='{"ids": [737581, 562620],"command": "DeviceLock"}'curl -H "Authorization: $auth" \
-X POST https://${server_dns}/api/devices/v1/devices/mdm-command \
-d "$mdm_command" \
-H "Content-Type: application/json"Windows PowerShell:
$mdm_command = '{"ids": [737581, 562620],"command": "DeviceLock"}'$header = @{Authorization="$auth"}
Invoke-RestMethod -Method POST \
-Headers $header \
-ContentType application/json \
-Uri https://${server_dns}/api/devices/v1/devices/mdm-command \
-Body $mdm_commandWhat commands are available
From the Swagger, there is the following text:
Command options can be specified in 'options' field of the request for the following commands: DeviceLock,
EraseDevice, SetFirmwarePassword, VerifyFirmwarePassword, UnlockUserAccount, RestartDevice.
Acceptable options for each command are listed in Apple documentation: https://developer.apple.com/documentation/devicemanagement/commands_and_queries
Some commands have been listed, but the link to Apple's documentation shows all possible commands:
If a new command is released by Apple before it appears in FileWave, the API should be able to trigger that command
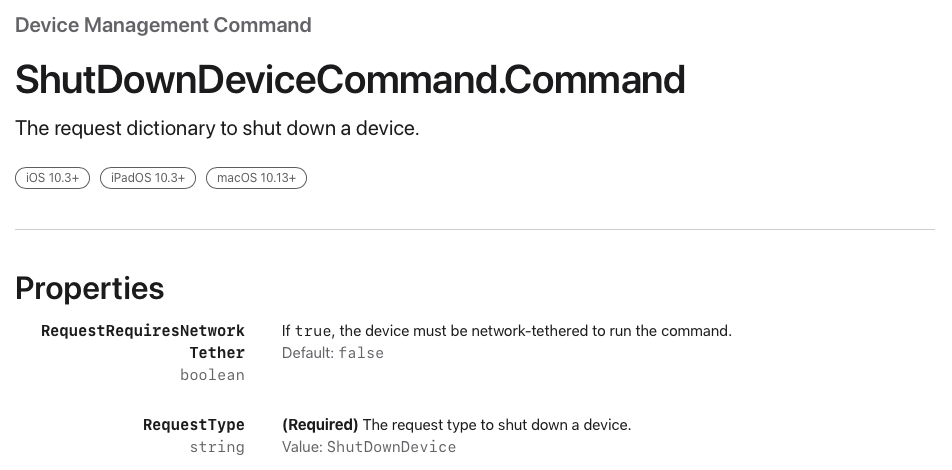
To use Apple's documentation, navigate through the pages for the chosen command to locate the 'RequestType'. For example, the following shows the command to shut a device down is: ShutDownDevice
Related articles
Restarting Devices with API
What
Like to restart many devices in bulk? API can deliver this.
How
The data block for posting restart commands relies upon the 'ids' of devices. This is the Client ID as either viewed in the Client View or as shown when creating Inventory Queries with Client ID added.
Establish a list of device Client IDs that require rebooting. These should be supplied as a comma separated list of integers. Inventory Queries could assist with obtaining the list.
Both the API URL and the data block for the API request is different per OS.
In each of the below, an example server names has been supplied 'demo.filewave.ch'. This should be altered to match the FileWave Server's address as seen in the Mobile tab of Preferences in the FileWave Central App.
Example Server Name:

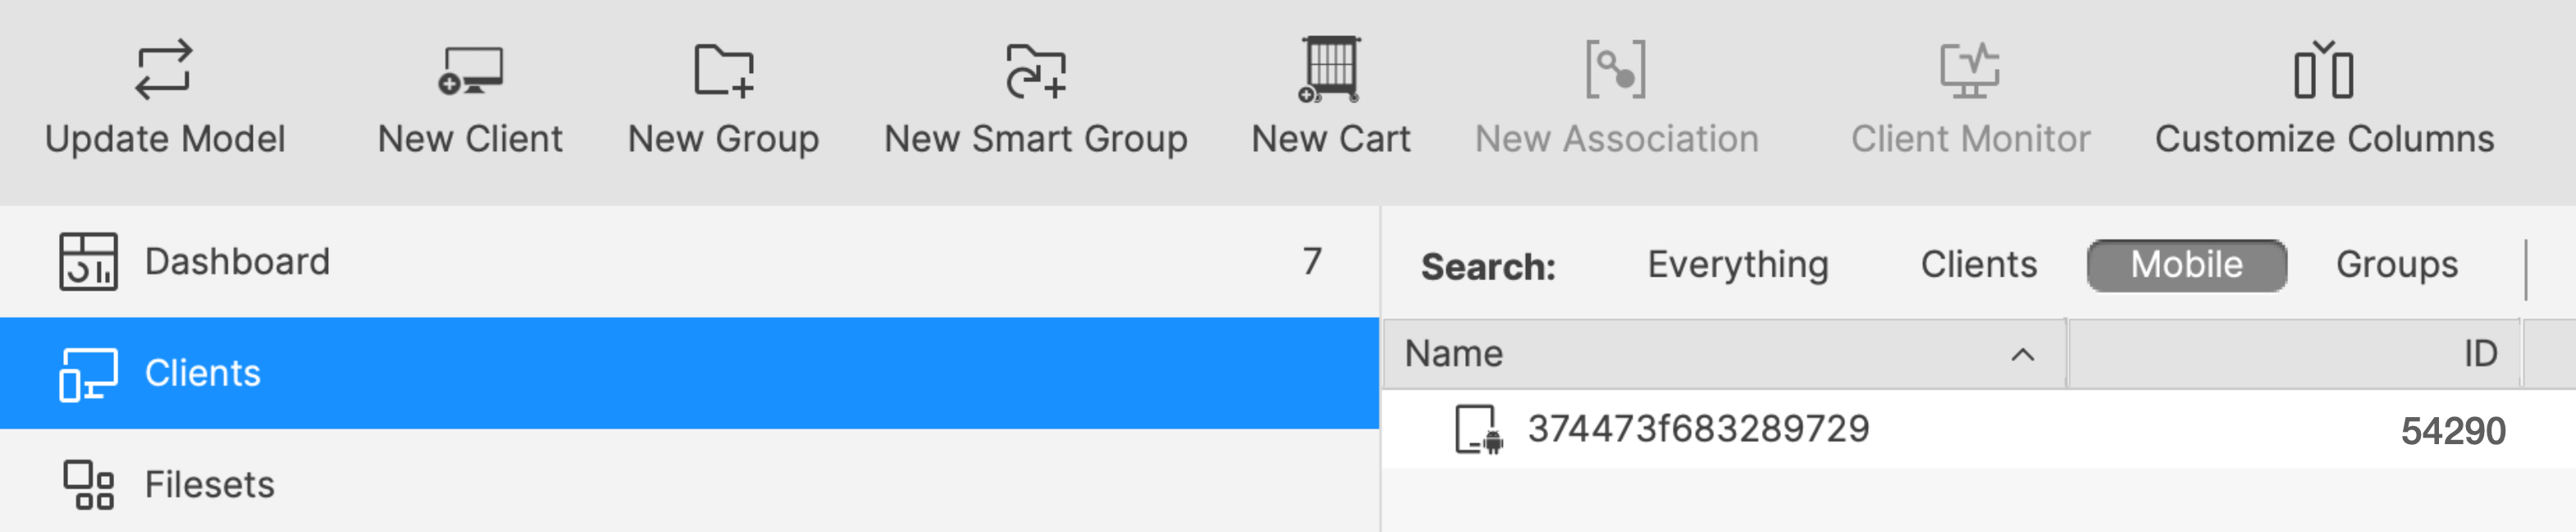
Android
Example device:
API URL:
"https://demo.filewave.ch/api/android/restart_devices"Data Block:
{
  "ids": [
    54290
  ]
}
Apple
Example device:
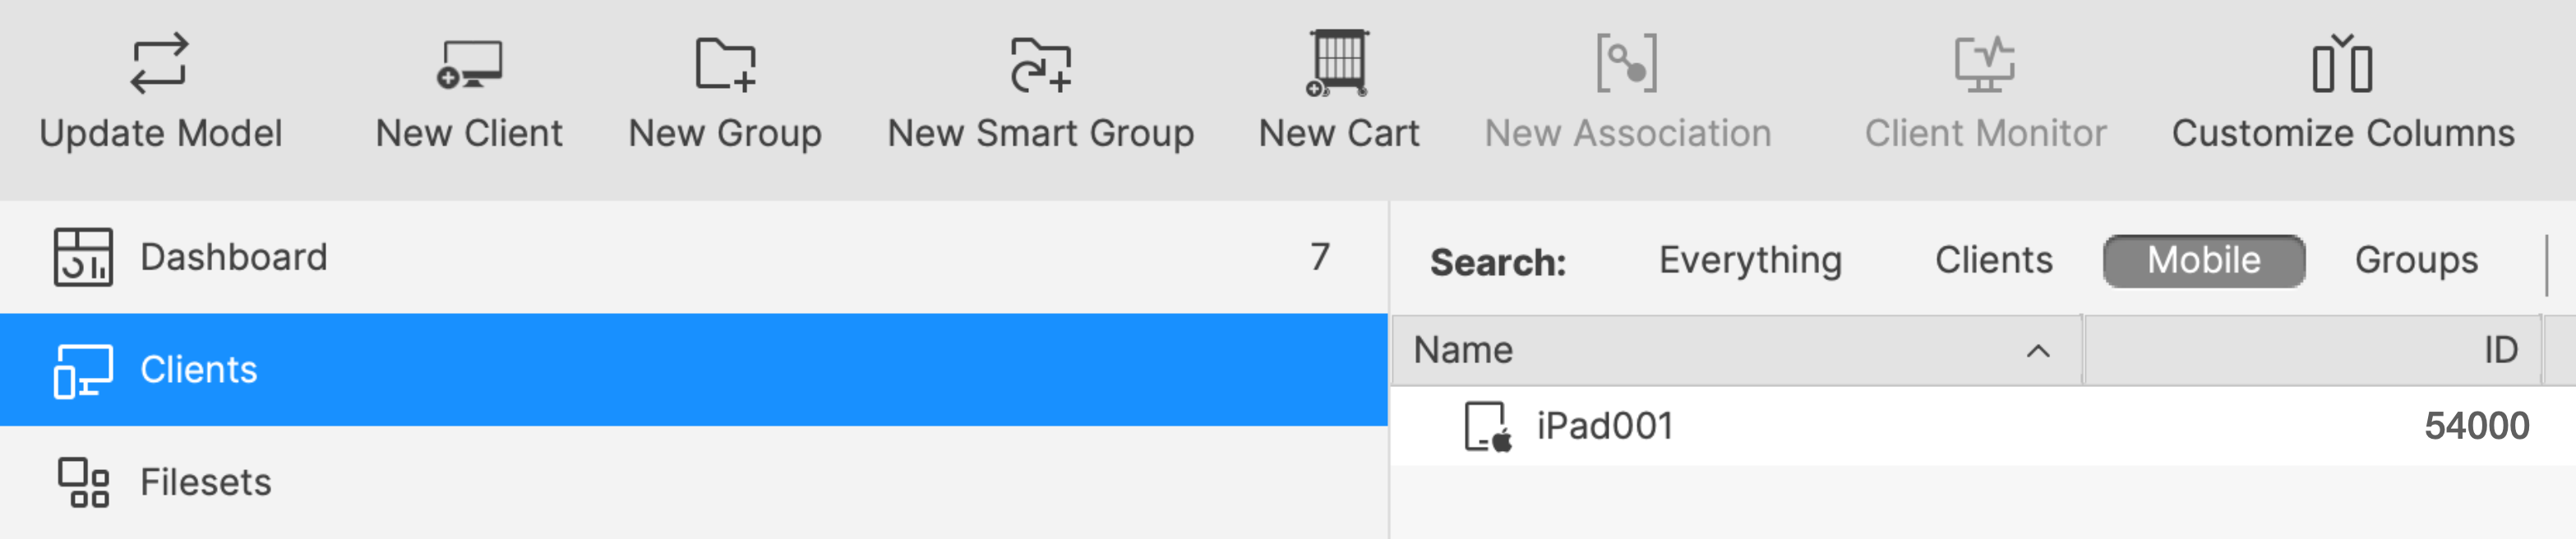
API URL
"https://demo.filewave.ch/api/devices/v1/devices/mdm-command"Data Block
{
  "ids": [
    54000
  ],
  "command": "RestartDevice"
}
Windows
Example device:
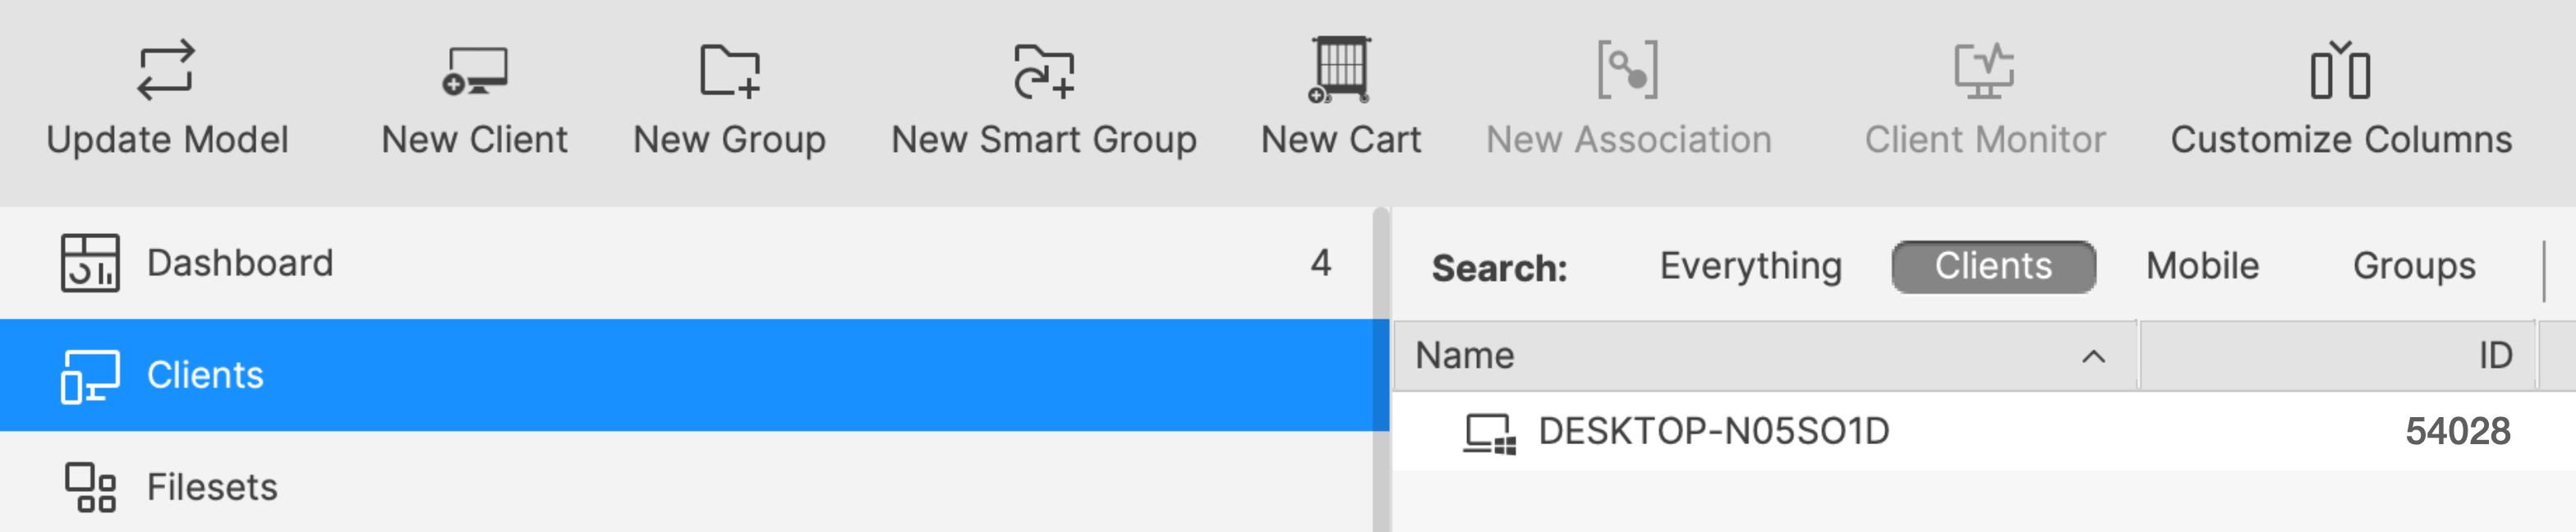
API URL
"https://demo.filewave.ch/api/devices/v1/devices/windows-restart"Data Block
[
  {
    "ids": [
      54028
    ]
  }
]
Example:
To restart two Apple devices, whose Client IDs are 737581 and 562620, as well as requiring the server's FQDN, the API token is also required. Administrator API Tokens are available from:
- FileWave Central Admin App > Manage Administrators > [select a user] > Application Tokens (tab)
Tokens are unique per user and each user may have multiple tokens
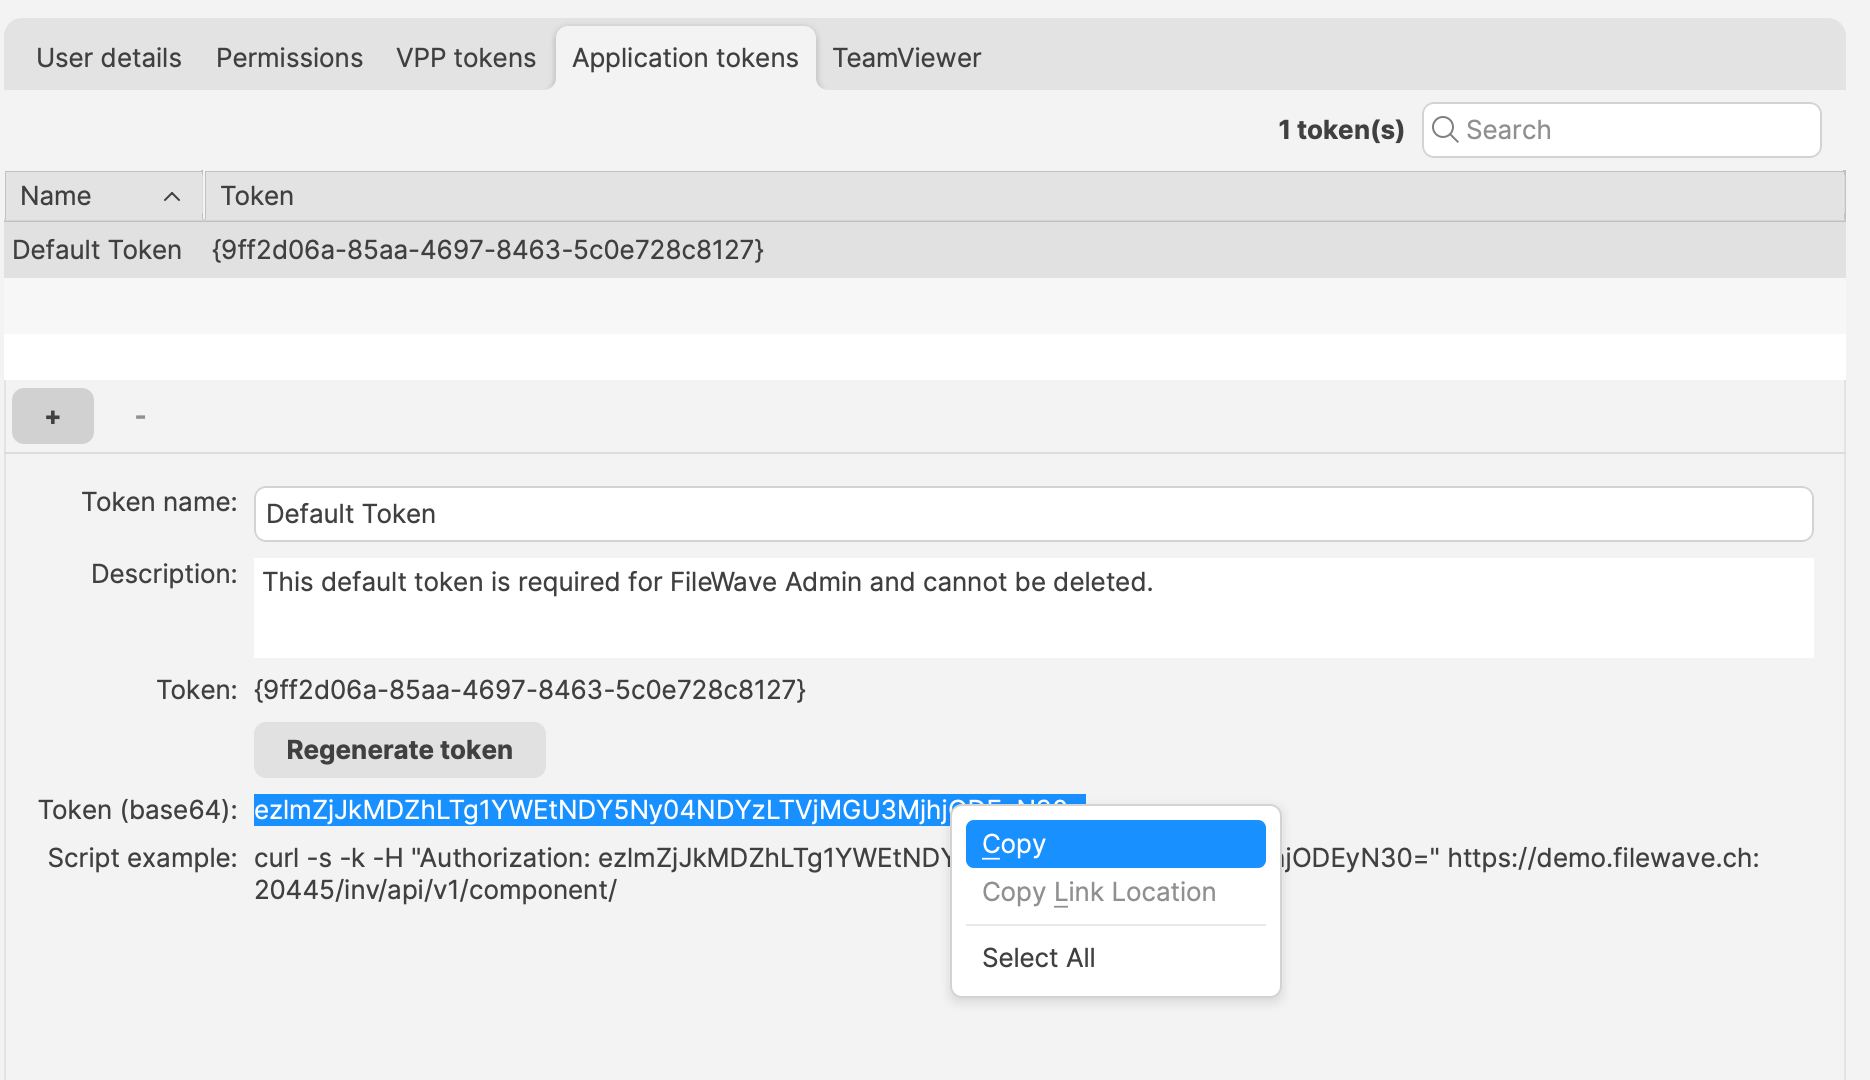
Different tokens could be used for different tasks. Consider creating a user specific for API or multiple API users, depending upon requirements, and limit each API user's 'Permissions' to only those items required to achieve the API request(s).
Alter the 'ids' list, server FQDN and API Authorisation Token as required
macOS/Linux:
mdm_command='{"ids": [737581, 562620],"command": "RestartDevice"}'

curl -H "Authorization: ezlmZjJkMDZhLTg1YWEtNDY5Ny04NDYzLTVjMGU3MjhjODEyN30=" \
  -X POST https://demo.filewave.ch/api/devices/v1/devices/mdm-command \
  -d "$mdm_command" \
  -H "Content-Type: application/json"
Windows:
$mdm_command = '{"ids": [737581, 562620],"command": "RestartDevice"}'

$header = @{Authorization=“ezlmZjJkMDZhLTg1YWEtNDY5Ny04NDYzLTVjMGU3MjhjODEyN30="}

Invoke-RestMethod -Method POST \
    -Headers $header \
    -ContentType application/json \
    -Uri https://demo.filewave.ch/api/devices/v1/devices/mdm-command \
    -Body $mdm_command