# Application Programming Interface (API)

The API section is a comprehensive resource that provides detailed documentation and guidance on utilizing the FileWave API. Whether you're a developer or an IT professional looking to integrate FileWave functionality into your own applications or workflows, this section offers valuable insights. Discover comprehensive API reference documentation, code samples, and tutorials that walk you through the process of leveraging the FileWave API. By leveraging the API, you can automate tasks, streamline workflows, and integrate FileWave functionality seamlessly into your existing systems. Unlock the full potential of FileWave by harnessing the power of the API and customizing your FileWave deployment to suit your specific needs.

# What is an API?

## What

Application Programming Interface (API). APIs programmatically provide the reading or writing of information to one or more services.

FileWave has a rich set of APIs to allow customers to build connections. Some vendors also produce integrations, utilising FileWave API, without needing to work with the API directly.

## When/Why

APIs extend the capability and integration of FileWave with other Systems.

## How

The articles linked to this article are a good starting point. Professional Services can also help with learning and using APIs.

- [Command Line API (v1)](https://kb.filewave.com/books/application-programming-interface-api/page/command-line-api-v1 "Command Line API (v1)")
- [Anywhere API (v2)](https://kb.filewave.com/books/application-programming-interface-api/page/filewave-anywhere-api-v2 "Anywhere API (v2)")
- [How do I export the results of an Inventory query?](https://kb.filewave.com/books/filewave-central-anywhere/page/how-do-i-export-the-results-of-an-inventory-query "How do I export the results of an Inventory query?")
- [Using the RESTful API to limit, sort, and offset values returned](https://kb.filewave.com/books/application-programming-interface-api/page/using-the-command-line-api-to-limit-sort-and-offset-values-returned "Using the RESTful API to limit, sort, and offset values returned")

## An important note on URLs

FileWave has 2 APIs

##### History

For inventory purposes, FileWave has a Command Line API, designed to interact with Inventory Queries. This API has existed for years and can work on either port 20443 or port 20445.

Since the introduction of the FileWave web admin, 'FileWave Anywhere', a new API was created. FileWave Anywhere interacts with the FileWave Server using this new API. Unless configured otherwise, FileWave Anywhere works over port 443.

The Web API has its own paths, when compared with the Command Line version (note the extra /api at the beginning of the path. Below is an example, which creates a new Inventory Query, using both APIs.

TCP port 443 (default port if not specified in URL). Notice that it begins with **/api/inv/api/**

```shell
curl -s -H "Authorization: e2M2sssYjIwLTxxx1hMzdiLTFmyyyGIwYTdjOH0=" https://myserver.filewave.net/api/inv/api/v1/query/ \ 
    --header "Content-Type: application/json" -X POST -d @ios16_incompatible.json
```

TCP port 20445 (could also use port 20443). Notice that it begins **/inv/api/**

```shell
curl -s -H "Authorization: e2M2sssYjIwLTxxx1hMzdiLTFmyyyGIwYTdjOH0=" https://myserver.filewave.net:20445/inv/api/v1/query/ \ 
    --header "Content-Type: application/json" -X POST -d @ios16_incompatible.json
```

<p class="callout info">Since the Web API is used for all server interaction, strictly speaking anything that can be achieved in FileWave Anywhere may also be programmed. As such, the scope of the Web API is broader in the main than that of the Command Line version.</p>

<p class="callout warning">The Web API has both public and private URLs. Private URLs can be changed, between FileWave versions, at any time without warning or notification and as such should be avoided in scripts and other systems interacting with FileWave. They are easily recognisable by the word 'internal' in their URL paths, as per below:  
</p>

```shell
https://${server_dns}/filewave/api/devices/internal/devices/${filewave_id}/details/custom_fields/fields
```

# Working With APIs

## Getting Started

The purpose of this guides is two fold:

- First, to provide an introduction to those unfamiliar with using the FileWave API
- Second, to be a reference for commands that can be used within the API

**Command Line API** refers to the original RESTful API. Recognisable both by the port used and URL paths commencing:

- **/inv/**

**FileWave Anywhere API v2** refers to the newer web admin, FileWave Anywhere, API and recognisable by paths commencing:

- **/api/**

## Purpose of an API

As described, APIs are designed to communicate with systems. As such, FileWave may be leveraged by other systems, e.g. SCCM data engines, in-house databases, etc. To maintain security, there must be an authentication method to allow such communication to take place. The API provides this kind of ability to provide in-depth integration on an as-needed basis.

Basic, non-specific command line examples:

macOS shell

```shell
curl -s -H "Authorization: $auth" \
    https://$server_dns:20445/inv/api/v1/query_result/ \
    --data $query \
    -H "Content-Type: application/json"
```

Windows PowerShell

```powershell
$header = @{Authorization=“$auth"}

Invoke-RestMethod -Method POST \ 
    -Headers $header \
    -ContentType application/json \
    -Uri https://$server_dns:20445/inv/api/v1/query_result/ \
    -Body $query
```

The macOS 'Authorization' or Window's 'Headers' make use of base64 tokens. From the above code, $auth would need to be set as one of these tokens.

<p class="callout info">Each user generated will have their own unique base64 token automatically generated. This token can be revoked and new tokens created. Each user may have multiple tokens.</p>

## The Token is the Key

<p class="callout warning">The token allows access to any API calls from anything that has access to the FileWave Server. It should not be shared unnecessarily and otherwise should be kept secret.</p>

Tokens may be viewed from FileWave Central App:

- Assistants &gt; Manage Administrators

Select a desired Administrator and choose the 'Application Tokens' tab. The token value to copy is the 'Token (base64)'

[![image.png](https://kb.filewave.com/uploads/images/gallery/2024-03/scaled-1680-/6UaK3wqeakbRp9YP-image.png)](https://kb.filewave.com/uploads/images/gallery/2024-03/6UaK3wqeakbRp9YP-image.png)
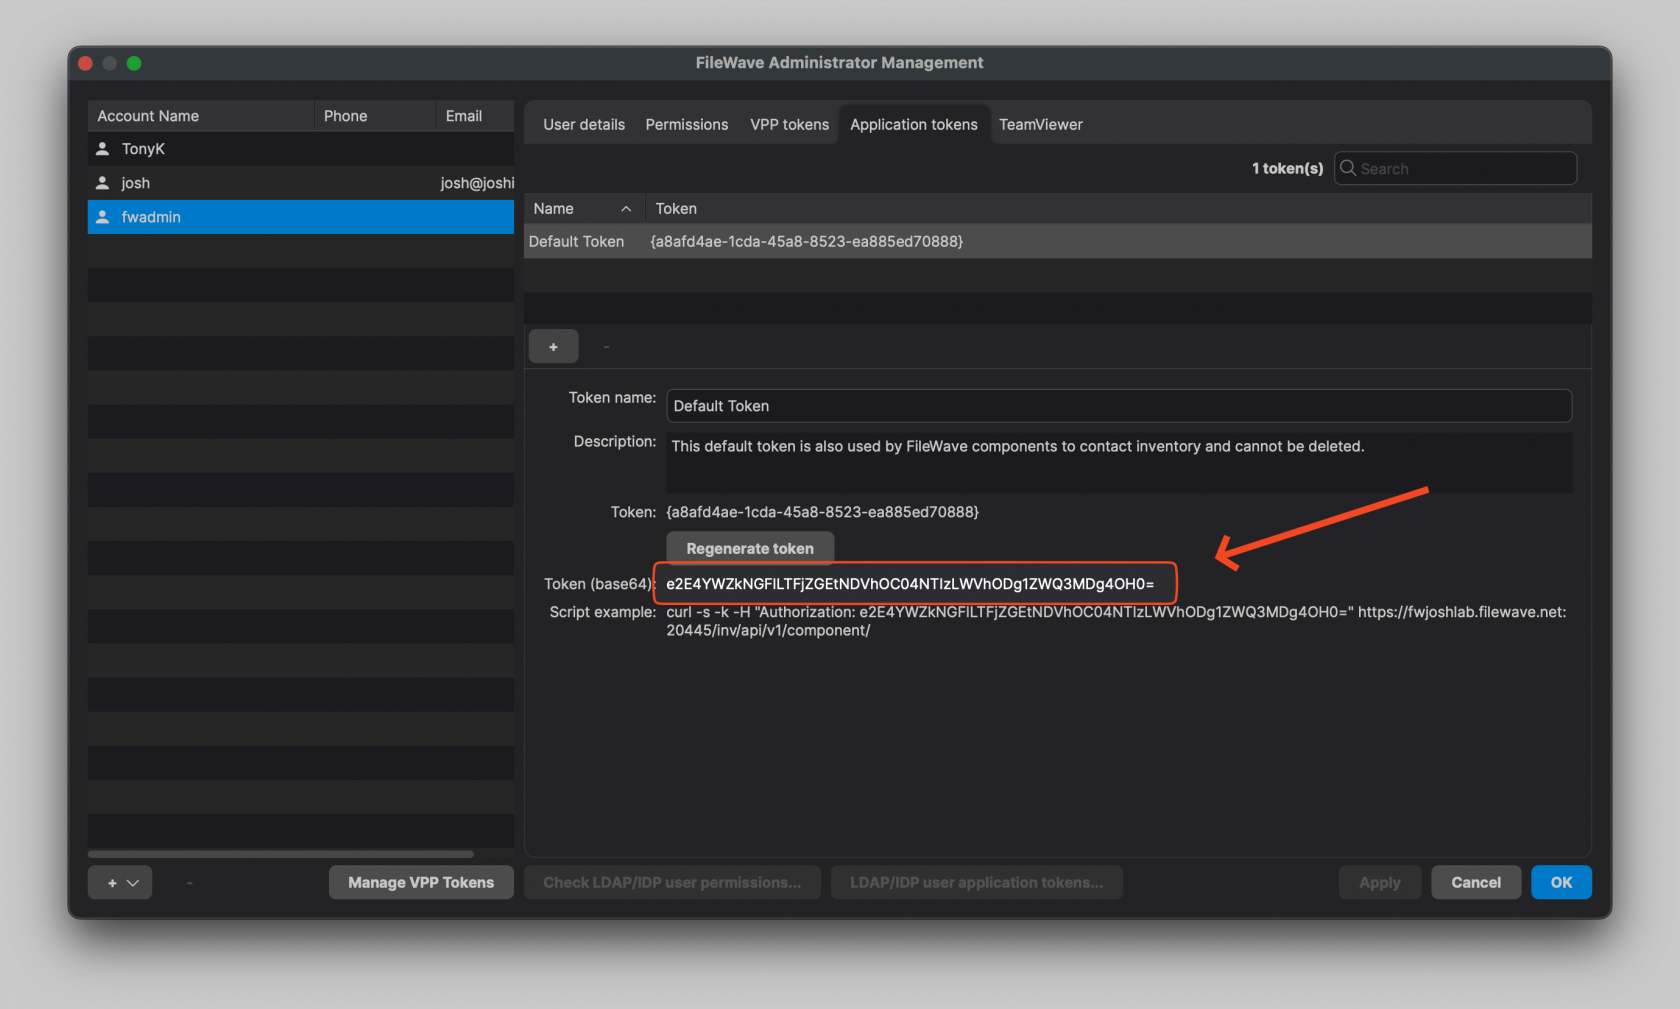
Token value from above image:

```
e2E4YWZkNGFlLTFjZGEtNDVhOC04NTIzLWVhODg1ZWQ3MDg4OH0=
```

<p class="callout success">When choosing accounts and tokens for API interaction, consider making dedicated users for the task(s) required. Set the permissions of that user to limit their ability to the required task alone. If the token is compromised, this will limit not only the scope of how that token could be used by an attacker, but when revoking and generating a new token, minimal impact would be experienced.  
  
For more information on the Application Tokens see the page: [Managing FileWave Administrators (Application Tokens)](https://kb.filewave.com/wiki/pages/createpage.action?spaceKey=DRAFT&title=Managing%20FileWave%20Administrators%20%28Application%20Tokens)  
</p>

<span style="color:rgb(34,34,34);font-size:2.8275em;font-weight:400;">API Requests</span>

Requests could be one of:

<table id="bkmrk-command-type-descrip" style="border-collapse:collapse;width:100%;"><colgroup><col style="width:50%;"></col><col style="width:50%;"></col></colgroup><tbody><tr><td>Command Type</td><td>Description</td></tr><tr><td>GET</td><td>Returns a resource value</td></tr><tr><td>PUT</td><td>Replaces a resource</td></tr><tr><td>PATCH</td><td>Updates a resource</td></tr><tr><td>POST</td><td>Creates a resource</td></tr><tr><td>DELETE</td><td>Removes a resource</td></tr></tbody></table>

Data sent with requests are in the form of a JSON, as are the responses from those requests.

JSON data is broken into keys/value pairs, where values could even be lists inside of lists.

#### Examples

<p class="callout info">Below examples are using a python tool to reformat the returned response. Python must be installed to benefit from this. If not, remove the piped section of the command or instal Python.</p>

For example, actioning a GET to list of all FileWave Server Inventory Queries, could return a JSON similar to the below:

##### List Existing Inventory Queries

**1) Get all Queries**

```shell
curl -s  -H "Authorization: e2FjYzRkYmQzLTI3ZjYtNDEyMi1iMGVhLTI1YmY0OGNmYWM0NX0=" \
    https://myserver.company.org:20445/inv/api/v1/query/ | python3 -mjson.tool
```

```json
[
    {
        "id": 1,
        "name": "All Windows",
        "favorite": true,
        "group": 1,
        "version": 1
    },
    {
        "id": 2,
        "name": "Mac OS X 10.7-10.11",
        "favorite": false,
        "group": 1,
        "version": 5
    },
...
    {
        "id": 103,
        "name": "All Computers to retire",
        "favorite": false,
        "group": 3,
        "version": 2
    }
]
```

<table id="bkmrk-%C2%A0-%C2%A0-%C2%A0-key-value-desc" style="width:100%;height:206px;"><tbody><tr style="background-color:rgb(251,238,184);height:29px;"><td style="width:10.3832%;height:29px;">Key</td><td style="width:15.4457%;height:29px;">Value</td><td style="width:74.1711%;height:29px;">Description</td></tr><tr style="height:29px;"><td style="width:10.3832%;height:29px;">`id`</td><td style="width:15.4457%;height:29px;">`integer`</td><td style="width:74.1711%;height:29px;">The unique number for the query. To be used as reference</td></tr><tr style="height:29px;"><td style="width:10.3832%;height:29px;">`name`</td><td style="width:15.4457%;height:29px;">`string`</td><td style="width:74.1711%;height:29px;">The name given to the query</td></tr><tr style="height:29px;"><td style="width:10.3832%;height:29px;">`favorite`</td><td style="width:15.4457%;height:29px;">`true/false`</td><td style="width:74.1711%;height:29px;">Whether or not the query should show in the sidebar</td></tr><tr style="height:45px;"><td style="width:10.3832%;height:45px;">`group`</td><td style="width:15.4457%;height:45px;">`integer`</td><td style="width:74.1711%;height:45px;">The group number given. built-in queries – for example – would be in the "Sample Queries" group, which is group 1. If the user made new groups</td></tr><tr style="height:45px;"><td style="width:10.3832%;height:45px;">`version`</td><td style="width:15.4457%;height:45px;">`integer`</td><td style="width:74.1711%;height:45px;">The version for the query. How many times has the query been altered and saved, starting with 1</td></tr></tbody></table>

##### Return the definition of a chosen query

The query definition, not the results of the query. Using ID 1 as an example:

**2) Get Query**

```shell
curl -s -H "Authorization: e2FjYzRkYmQzLTI3ZjYtNDEyMi1iMGVhLTI1YmY0OGNmYWM0NX0=" \
    https://myserver.company.org:20445/inv/api/v1/query/1 | python3 -mjson.tool
```

```json
{
    "criteria": {
        "expressions": [
            {
                "column": "type",
                "component": "OperatingSystem",
                "operator": "=",
                "qualifier": "WIN"
            }
        ],
        "logic": "all"
    },
    "favorite": true,
    "fields": [
        {
            "column": "device_name",
            "component": "Client"
        },
        {
            "column": "filewave_client_name",
            "component": "Client"
        },
        {
            "column": "name",
            "component": "OperatingSystem"
        },
        {
            "column": "version",
            "component": "OperatingSystem"
        },
        {
            "column": "build",
            "component": "OperatingSystem"
        },
        {
            "column": "edition",
            "component": "OperatingSystem"
        }
    ],
    "main_component": "Client",
    "name": "All Windows",
    "id": 1,
    "version": 1,
    "group": 1
}
```

<table id="bkmrk-key-value-descriptio" style="border-collapse:collapse;width:100%;height:969.3125px;"><colgroup><col style="width:17.777778%;"></col><col style="width:18.395062%;"></col><col style="width:0.040509%;"></col><col style="width:0.042438%;"></col><col style="width:0.040509%;"></col><col style="width:0%;"></col><col style="width:63.580247%;"></col></colgroup><tbody><tr style="height:29px;"><td style="background-color:rgb(251,238,184);height:29px;">Key</td><td style="background-color:rgb(251,238,184);height:29px;">Value</td><td colspan="5" style="background-color:rgb(251,238,184);height:29px;">Description</td></tr><tr style="height:29px;"><td style="height:29px;">`criteria`</td><td style="height:29px;">`array`</td><td colspan="5" style="height:29px;">Expressions and logic of query</td></tr><tr style="height:524.875px;"><td style="height:524.875px;">  
</td><td colspan="6" style="height:524.875px;">Criteria Expressions (Each entry will require all of the below. Add multiple entries to the array as required): <table style="border-collapse:collapse;width:100.143859%;height:159px;"><colgroup><col style="width:14.814815%;"></col><col style="width:45.833333%;"></col><col style="width:39.197531%;"></col></colgroup><tbody><tr style="height:29px;"><td style="background-color:rgb(251,238,184);height:29px;">Key</td><td style="background-color:rgb(251,238,184);height:29px;">Value</td><td style="background-color:rgb(251,238,184);height:29px;">Description</td></tr><tr style="height:48px;"><td style="height:48px;">`column`</td><td style="height:48px;">Multiple values

e.g. 'version', 'device\_id', etc.

</td><td style="height:48px;">Chosen search component

(Figure 1.2 #1)

</td></tr><tr style="height:29px;"><td style="height:29px;">`component`</td><td style="height:29px;">Multiple values

e.g. 'Client', 'OperatingSystem', etc.

</td><td style="height:29px;">Group containing above component

 (Figure 1.2 #2)

</td></tr><tr style="height:29px;"><td style="height:29px;">`operator`</td><td style="height:29px;">Multiple values

e.g.'is', 'begins', etc.

</td><td style="height:29px;">Method of comparison

(Figure 1.2 #3)

</td></tr><tr style="height:29px;"><td style="height:29px;">`qualifier`</td><td style="height:29px;">Multiple values

(Either a: String, Integer, Date or Boolean value)

</td><td style="height:29px;">Value for comparison

(Figure 1.2 #4)

</td></tr></tbody></table>

Logic:

<table style="border-collapse:collapse;width:100.143859%;height:159px;"><colgroup><col style="width:14.814815%;"></col><col style="width:45.833333%;"></col><col style="width:39.197531%;"></col></colgroup><tbody><tr style="height:29px;"><td style="background-color:rgb(251,238,184);height:29px;">Key</td><td style="background-color:rgb(251,238,184);height:29px;">Value</td><td style="background-color:rgb(251,238,184);height:29px;">Description</td></tr><tr style="height:48px;"><td style="height:48px;">`logic`

</td><td style="height:48px;">Multiple values

'all', 'none' or 'one'

</td><td style="height:48px;">How Components should be logically considered for correct return of results

(Figure 1.2 #5)

</td></tr></tbody></table>

</td></tr><tr style="height:29px;"><td style="height:29px;">`favourite`</td><td style="height:29px;">`true/false`</td><td style="height:29px;">  
</td><td style="height:29px;">  
</td><td style="height:29px;">Show/Hide from FileWave Central sidebar Inventory Queries</td></tr><tr style="height:29px;"><td style="height:29px;">`fields`</td><td style="height:29px;">`array`</td><td style="height:29px;">  
</td><td style="height:29px;">  
</td><td style="height:29px;">Which components will be shown (ordered first to last)</td></tr><tr style="height:212.4375px;"><td style="height:212.4375px;">  
</td><td colspan="6" style="height:212.4375px;">Fields to display (Each entry will require all of the below. Add multiple entries to the array as required): <table style="border-collapse:collapse;width:100.143859%;height:159px;"><colgroup><col style="width:14.814815%;"></col><col style="width:45.833333%;"></col><col style="width:39.197531%;"></col></colgroup><tbody><tr style="height:29px;"><td style="background-color:rgb(251,238,184);height:29px;">Key</td><td style="background-color:rgb(251,238,184);height:29px;">Value</td><td style="background-color:rgb(251,238,184);height:29px;">Description</td></tr><tr style="height:48px;"><td style="height:48px;">`column`

</td><td style="height:48px;">Multiple values

e.g. 'device\_name', 'name', etc.

</td><td style="height:48px;">Component to display

(Figure 1.2 #1)

</td></tr><tr style="height:29px;"><td style="height:29px;">`component`</td><td style="height:29px;">Multiple values

e.g. 'Client', 'OperatingSystem', etc.

</td><td style="height:29px;">Group containing above component

 (Figure 1.2 #2)

</td></tr></tbody></table>

</td></tr><tr style="height:29px;"><td style="height:29px;">`main_component`</td><td style="height:29px;">Selection Box</td><td style="height:29px;">  
</td><td style="height:29px;">  
</td><td style="height:29px;">Important this is set correctly (Figure 1.2 #6)</td></tr><tr style="height:29px;"><td style="height:29px;">`name`</td><td style="height:29px;">`string`</td><td style="height:29px;">  
</td><td style="height:29px;">  
</td><td style="height:29px;">Inventory Query name shown in FileWave Central</td></tr><tr style="height:29px;"><td style="height:29px;">`id`</td><td style="height:29px;">`integer`</td><td style="height:29px;">  
</td><td style="height:29px;">  
</td><td style="height:29px;">Inventory Query unique number, not already in use.

(Each query has a unique number, starting at 1 and incremented with each new query generated when actioned through FileWave)

</td></tr><tr style="height:29px;"><td style="height:29px;">`version`

</td><td style="height:29px;">`integer`</td><td style="height:29px;">  
</td><td style="height:29px;">  
</td><td style="height:29px;">Increment by 1 for each alteration</td></tr><tr><td>`group`

</td><td>`integer`</td><td>  
</td><td>  
</td><td>  
</td><td>  
</td><td>The Inventory Query group which the query should be displayed within.

E.g. 'group' value of 1 would be within the 'Sample Queries' group

</td></tr></tbody></table>

<table id="bkmrk-%C2%A0-figure-1.2---query"><thead><tr><th> </th></tr></thead><tbody><tr><td>[![image.png](https://kb.filewave.com/uploads/images/gallery/2023-07/scaled-1680-/rR4CkF1K8VQYOGU1-image.png)](https://kb.filewave.com/uploads/images/gallery/2023-07/rR4CkF1K8VQYOGU1-image.png)

</td></tr><tr><td>Figure 1.2 - Query Builder Criteria</td></tr></tbody></table>


#### Return the Inventory Query Results

**3) Get Query Results**

```shell
curl -s  -H "Authorization: e2FjYzRkYmQzLTI3ZjYtNDEyMi1iMGVhLTI1YmY0OGNmYWM0NX0=" \
  https://myserver.company.org:20445/inv/api/v1/query_result/1 \
  | python3 -mjson.tool
```

```json
{
    "total_results": 13,
    "filter_results": 13,
    "offset": 0,
    "values": [
        [
            "FW-BLUE-02",
            "FW-Blue-02",
            "Windows 10.0",
            "10.0.0",
            "10240",
            "Microsoft Windows 10 Home"
        ],
        [
            "LAPTOP-C6LLFGH6",
            "FH-History3",
            "Windows 10.0",
            "10.0.0",
            "14393",
            "Microsoft Windows 10 Home"
        ],
...
    ],
    "version": 3
}
```

<table id="bkmrk-%C2%A0-%C2%A0-%C2%A0-key-value-desc-1" style="width:100%;"><tbody><tr style="background-color:rgb(251,238,184);"><td style="width:20.5192%;">Key</td><td style="width:9.51594%;">Value</td><td style="width:70.0885%;">Description</td></tr><tr><td style="width:20.5192%;">`total_results`</td><td style="width:9.51594%;">`integer`</td><td style="width:70.0885%;">Total count of results</td></tr><tr><td style="width:20.5192%;">`filter_results`</td><td style="width:9.51594%;">`integer`</td><td style="width:70.0885%;"> </td></tr><tr><td style="width:20.5192%;">`offset`</td><td style="width:9.51594%;">`integer`</td><td style="width:70.0885%;"> </td></tr><tr><td style="width:20.5192%;">`values`</td><td style="width:9.51594%;">`array`</td><td style="width:70.0885%;">The results. Repeated for each result. Items depends on what your specified in the fields</td></tr><tr><td style="width:20.5192%;">`version`</td><td style="width:9.51594%;">`integer`</td><td style="width:70.0885%;">The version for the query. How many times has the query been altered and saved, starting with 1</td></tr></tbody></table>

### JSON

Verify JSON Formatting:

- [https://jsonlint.com/](https://jsonlint.com/)

### API Application 

- Postman [https://www.getpostman.com/](https://www.getpostman.com/) (macOS, Windows, and Linux)

### Browser Extensions

- Mod-Header [https://mod-header.appspot.com/](https://mod-header.appspot.com/) Will allow you to use the Google Chrome Browser to view and interact with the FileWave API

### Commands

Remember: All URLs start with

```
https://myserver.company.org:20445/inv/api/v1/
```

Must include the authorization header

Below are the possible options:

### URLs

<table id="bkmrk-%C2%A0-%C2%A0-%C2%A0-url-use-option"><tbody><tr style="background-color:rgb(251,238,184);"><td>URL</td><td>Use</td><td>Options</td></tr><tr><td class="align-center" colspan="3">**Inventory**  
</td></tr><tr><td>`query`</td><td>Show all queries</td><td>`GET POST`</td></tr><tr><td>`query/#`</td><td>Show information on a single query  
  
Where # is the query ID</td><td>`GET PUT DELETE`</td></tr><tr><td>`query_group/`</td><td>Show all query group</td><td>`GET POST`</td></tr><tr><td>`query_group/#`</td><td>Detail information on a single group  
  
Where # is the group ID</td><td>`GET PUT DELETE`</td></tr><tr><td>`query_result/#`</td><td>Show the results of one query  
  
Where # is the query ID</td><td>`GET POST`</td></tr><tr><td>`query_count`</td><td> </td><td>`POST`</td></tr><tr><td>`component`</td><td>Show all component options on your instance</td><td>`GET`</td></tr><tr><td>`field_type`</td><td>Show all fields on your instance</td><td>`GET`</td></tr><tr><td class="align-center" colspan="3">**License**  
</td></tr><tr><td>`license_definition`</td><td>Show all query</td><td>`GET`</td></tr><tr><td>`license_definition/#`</td><td>Show information on a single license  
  
Where # is the license ID</td><td>`GET`</td></tr><tr><td class="align-center" colspan="3">**Custom Fields**  
</td></tr><tr><td>`custom_field/`</td><td>Show all custom fields</td><td> </td></tr><tr><td>`custom_field/get_association`</td><td> </td><td>`POST`</td></tr><tr><td>`custom_field/set_association`</td><td> </td><td>`POST`</td></tr><tr><td>`custom_field/upload`</td><td> </td><td>`POST`</td></tr><tr><td>`custom_field/usages/<Field_Name>`</td><td>Where &lt;Field\_Name&gt; is the Internal Name (E.G "battery\_cycle\_count")</td><td>`GET`</td></tr><tr><td>`custom_field/values/`</td><td> </td><td>`POST`</td></tr><tr><td>`custom_field/edit/`</td><td> </td><td>`POST`</td></tr></tbody></table>

## Examples

### Using a browser extension

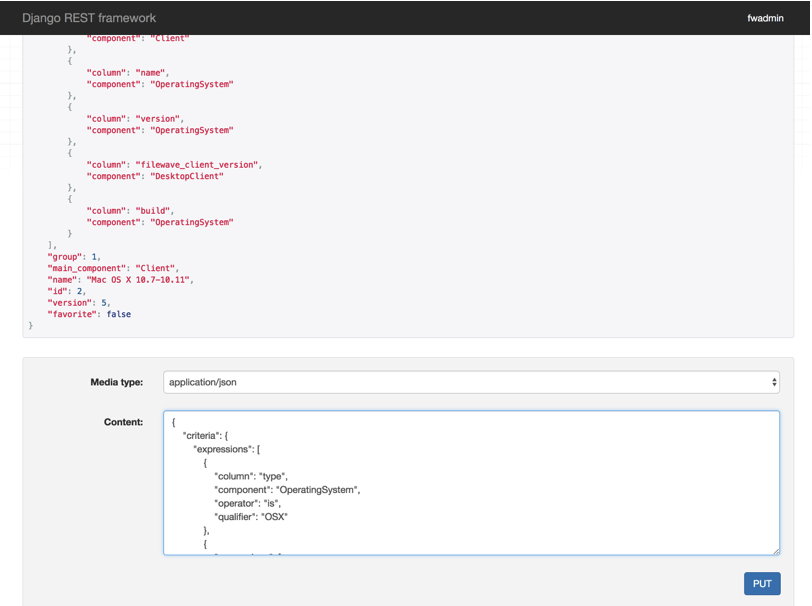
Using Mod-Header (see tools section), you can make Chrome a RESTful API browser by taking advantage of the FileWave Django Framework. Leveraging URLs and authorisation token to return Query Results.

[![image.png](https://kb.filewave.com/uploads/images/gallery/2023-07/scaled-1680-/ERZYt6qyxPFZzcyf-image.png)](https://kb.filewave.com/uploads/images/gallery/2023-07/ERZYt6qyxPFZzcyf-image.png)
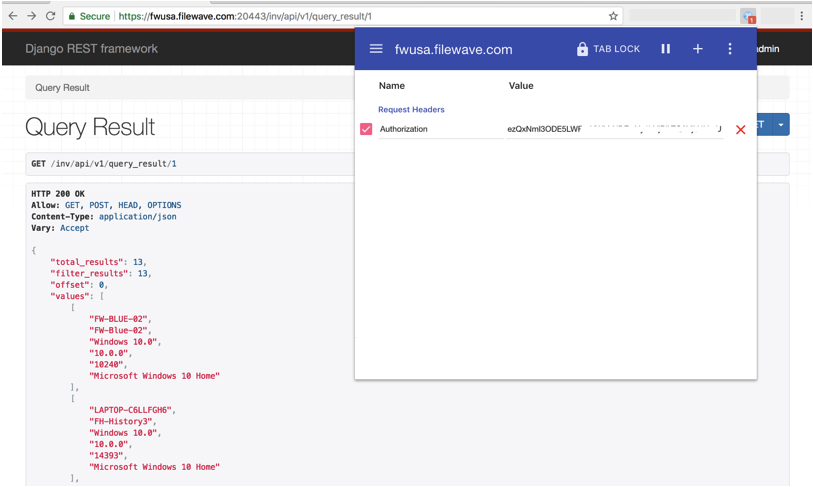
Even if the URL is typically a POST, it provides an output similar to the following

[![image.png](https://kb.filewave.com/uploads/images/gallery/2023-07/scaled-1680-/mlMeZiXBTqqgEWpM-image.png)](https://kb.filewave.com/uploads/images/gallery/2023-07/mlMeZiXBTqqgEWpM-image.png)
### Using the curl command

Viewing all available queries (GET)

```
curl -s -H "Authorization: e2FjYzRkYmQzLTI3ZjYtNDEyMi1iMGVhLTI1YmY0OGNmYWM0NX0=" \
  https://myserver.company.org:20445/inv/api/v1/query/ \
  | python3 -mjson.tool
```

Posting a new query (POST)

```
curl -s -H "Authorization: e2FjYzRkYmQzLTI3ZjYtNDEyMi1iMGVhLTI1YmY0OGNmYWM0NX0=" \
  --header "Content-Type: application/json" \
  -X POST \
  -d @<path/name of new query.json> \
  https://myserver.company.org:20445/inv/api/v1/query/
```

Removing a query (DELETE)

```
curl -s -H "Authorization: e2FjYzRkYmQzLTI3ZjYtNDEyMi1iMGVhLTI1YmY0OGNmYWM0NX0=" \
  -X DELETE https://myserver.company.org:20445/inv/api/v1/query/<id#>
```

For more curl help, see: [Using the RESTful API to limit, sort, and offset values returned](https://kb.filewave.com/books/application-programming-interface-api/page/using-the-command-line-api-to-limit-sort-and-offset-values-returned "Using the Command Line API to limit, sort, and offset values returned")

### Self-Signed Certificates

Hopefully everyone is using official certificates. However, if the FileWave Server does have a self-signed certificate, the above commands should fail. To ignore the warnings the following is required.

##### macOS

Add the -k option to the command. E.g.

```
curl -s -k -H "Authorization: e2FjYzRkYmQzLTI3ZjYtNDEyMi1iMGVhLTI1YmY0OGNmYWM0NX0=" \
  https://myserver.company.org:20445/inv/api/v1/query/ \
  | python3 -mjson.tool
```

##### Windows

PowerShell requires somewhat more code to ignore the warning. Add the below to the beginning of any script calling an API to a server with a self-signed certificate:

```powershell
# Required for self-signed certs only
function Ignore-SSLCertificates
{
    $Provider = New-Object Microsoft.CSharp.CSharpCodeProvider
    $Compiler = $Provider.CreateCompiler()
    $Params = New-Object System.CodeDom.Compiler.CompilerParameters
    $Params.GenerateExecutable = $false
    $Params.GenerateInMemory = $true
    $Params.IncludeDebugInformation = $false
    $Params.ReferencedAssemblies.Add("System.DLL") > $null
    $TASource=@'
        namespace Local.ToolkitExtensions.Net.CertificatePolicy
        {
            public class TrustAll : System.Net.ICertificatePolicy
            {
                public bool CheckValidationResult(System.Net.ServicePoint sp,System.Security.Cryptography.X509Certificates.X509Certificate cert, System.Net.WebRequest req, int problem)
                {
                    return true;
                }
            }
        }
'@ 
    $TAResults=$Provider.CompileAssemblyFromSource($Params,$TASource)
    $TAAssembly=$TAResults.CompiledAssembly
    ## We create an instance of TrustAll and attach it to the ServicePointManager
    $TrustAll = $TAAssembly.CreateInstance("Local.ToolkitExtensions.Net.CertificatePolicy.TrustAll")
    $AllProtocols = [System.Net.SecurityProtocolType]'Ssl3,Tls,Tls11,Tls12'
    [System.Net.ServicePointManager]::SecurityProtocol = $AllProtocols
    [System.Net.ServicePointManager]::CertificatePolicy = $TrustAll
}
 
Ignore-SSLCertificates

```

### Using PHP

Saved as a php file (like inv.php), update the URL and auth code, then place the file on a web server where PHP has been enabled. This creates a 'view only' web page version of the inventory. People can enter the URL for the query, hit refresh as many times as they like and will always see the latest information in inventory. All without having to hassle IT for the latest data.

The output of the query results isn't fancy, but this is to illustrate what can be achieved.

<details id="bkmrk-php-inventory-viewer"><summary>PHP Inventory Viewer</summary>

```php
<html xmlns="http://www.w3.org/1999/xhtml">
<html>
<?php
$baseurl="myserver.company.org";
$port="20445";
$authcode="e2FjYzRkYmQzLTI3ZjYtNDEyMi1iMGVhLTI1YmY0OGNmYWM0NX0=";


ini_set('display_errors', 'On');
### do not edit below ###
if (!isset($_GET["qid"])){
	$url = "https://".$baseurl.":".$port."/inv/api/v1/query/";
} else {
	$url = "https://".$baseurl.":".$port."/inv/api/v1/query_result/".$_GET["qid"];
}
//  Initiate curl
$ch = curl_init();
// Set the url
curl_setopt($ch, CURLOPT_URL,$url);
// Disable SSL verification
curl_setopt($ch, CURLOPT_SSL_VERIFYHOST, FALSE);
curl_setopt($ch, CURLOPT_SSL_VERIFYPEER, FALSE);
curl_setopt($ch, CURLOPT_SSLVERSION, 1);
// Will return the response, if false it print the response
curl_setopt($ch, CURLOPT_RETURNTRANSFER, TRUE);
//authenticate
curl_setopt($ch, CURLOPT_HTTPHEADER,array('Authorization:<'.$authcode.'>=')); 
// Display errors if any
if (curl_errno($ch)) { 
   print curl_error($ch); 
} 
// Execute
$result=curl_exec($ch);
if (curl_errno($ch)) { 
   print curl_error($ch); 
} 
$output=json_decode($result, true);
curl_close($ch);

//create function for looping unknown dimensional array
function printAll($a) {
  if (!is_array($a)) {
    echo $a, ' <br/>';
    return;
  }
echo "<br/>";
  foreach($a as $v) {
    printAll($v);
  }
}

// Start html Page 
echo '<head>'
.'<meta http-equiv="Content-Type" content="text/html; charset=UTF-8" />'
.'<title>'.$baseurl.'Inventory Page</title>'
.'</head>'
.'<body>'
.'<style type="text/css">'
."body {font-family:'Helvetica Neue Light', 'Helvetica Neue', Helvetica, Arial, 'Lucida Grande', sans-serif;}"
.'h1,h2,h3,h4,{font-weight:100;}'
.'div {padding:10px; color:#fff; background:#333;}'
.'div.output{border:1px solid rgba(0,0,0,0.1); background: rgba(0,0,0,0.03); color:#555;-webkit-border-radius:3px;border-radius:3px;margin:15px 25px; padding:10px;}'
.'tr:nth-child(even) {background: rgba(255,255,255,0.85);}'
.'tr:nth-child(odd) {background: rgba(0,0,0,0.05);}'
.'a, a:hover {color:#ce1300; text-decoration:none;}'
.'</style>'
.'<div><h1><img src="https://www.filewave.com/images/filewave-1024x788.png" height="60" />'.$baseurl.' Inventory</h1></div>'
.'<br/>';

// Default homepage
if (!isset($_GET["qid"])){
	echo "<table>"
	."<thead>"
	."<tr>"
	."<th>&hearts;</th>"
	."<th>Query Name</th>"
	."<th>Query ID</th>"
	."</tr>"
	."</thead>"
	."<tbody>";
	foreach ($output as &$value) {
		if ($value['favorite'] == true) { $fav="&hearts;";} elseif ($value['favorite'] == false) {$fav=" ";}
		echo "<tr><td>".$fav."</td><td>".$value['name']."</td><td><a href='".$_SERVER['PHP_SELF']."?qid=".$value['id']."&n=".$value['name']."'>".$value['id']."</a></td></tr>";	
	}
	echo"</tbody></table>";
}
//If an individual query has been selected
elseif (isset($_GET["qid"],$_GET["n"]))  {
	echo "<h3>Home &gt; Query: "
	.$_GET["n"]
	."</h3><hr/>"
	."<strong>Total Results: </strong>"
	.$output['total_results']
	."<br/>"
	.'<strong>First Column results: </strong>';

	foreach ($output['values'] as &$value) {
		echo $value['0'].' <strong> &nbsp; | &nbsp; </strong>';
	}
echo "<br/>"
."<strong> All Results: </strong><br/><div class='output'>";
printAll($output['values']);
echo "</div>";	
#var_dump($result);
}
else {
	echo "<h1 style='color:#ff0000;'> An error has occurred</h1> Parhaps you used a bookmark and the URL has changed";
}
?>
<hr/>
<center><font style=" font-size:9px;"><a href="http://filewave.com" target="_blank">&copy; BenM@ FileWave</a></font></center>
</body>
</html>
```

</details></body></html>

# Command Line API (v1)

## Command Line RESTful API

It is probably easiest to consider this API as an interaction with Inventory Queries, allowing for example:

- Ad-hoc queries to be run to return results
- New Inventory Queries to be created
- The returning of Current Query results
- Deleting queries

There is even the ability to read or alter Custom Field values for devices.

### Examples:

#### Returning an Inventory Query request

##### FileWave GUI example

Imagine it is desirable to return a list of macOS devices which have a network interface name that contains 'en', the Field to be returned is the Device Name and the Main Component is 'MacOS Device'. The criteria would appear as below:

[![image.png](https://kb.filewave.com/uploads/images/gallery/2023-07/scaled-1680-/0HkuknCwKIO9clyw-image.png)](https://kb.filewave.com/uploads/images/gallery/2023-07/0HkuknCwKIO9clyw-image.png)

##### JSON Data Example

A RESTful API query, to return the same set of results, would have a JSON structure set out as:

```shell
{
    “criteria”: {
        “column":"interface_name",
        “component":"NetworkInterface",
        “operator”:”contains",
        “qualifier":"en"
    },
    “fields":[
        {
            “column”:"device_name",
            “component":"Client"
        }
    ],
    “main_component":"MacOSClient"
}
```

It can be seen that the JSON block is just mimicking the FileWave Central Inventory Query.

#### Creating an Inventory Query

On the KB page explaining what an API is, the following examples were shown:

**FileWave Anywhere API**:

```shell
curl -s -H "Authorization: e2M2sssYjIwLTxxx1hMzdiLTFmyyyGIwYTdjOH0=" https://myserver.filewave.net/api/inv/api/v1/query/ \ 
    --header "Content-Type: application/json" -X POST -d @ios16_incompatible.json
```

**Command Line API**:

```shell
curl -s -H "Authorization: e2M2sssYjIwLTxxx1hMzdiLTFmyyyGIwYTdjOH0=" https://myserver.filewave.net:20445/inv/api/v1/query/ \ 
    --header "Content-Type: application/json" -X POST -d @ios16_incompatible.json
```

These demonstrate a method of creating a new Inventory Query by providing the JSON as a file, rather than text in the actual script line, using the POST option. Also note the subtle difference in URL path.

#### Interacting with Custom Fields

The first thing to appreciate, is all Inventory items have an 'Internal Name'. This is unique to each item and of course Custom Fields also therefore have their own Internal Name.

Internal Names may be viewed in FileWave Central when in the Inventory Query viewer. Select any item in the left hand sidebar and the bottom of the window will report the Internal Name.

[![image.png](https://kb.filewave.com/uploads/images/gallery/2023-07/scaled-1680-/aV0oQZhic69pTCRp-image.png)](https://kb.filewave.com/uploads/images/gallery/2023-07/aV0oQZhic69pTCRp-image.png)

##### Reading Values

Perhaps it would be desirable to read the Custom Field value of the above 'macOS Instal Flag' Custom Field for a device, for example, based upon its serial number. The JSON data block might look something like:

```
{
  "criteria":
    {
      "column":"serial_number",
      "component":"Client",
      "operator":"is",
      "qualifier":'\"$serial_number\"'
  },
  "fields":
    [
       {
        "column":"macos_instal_flag",
        "component":"CustomFields"
      }
  ],
  "main_component":"Client"
}
```

Using this method, it is possible to provide the Serial Number as a variable value; as such the same script could be ran on all devices, without the need to edit the script. Note the internal name used for the Custom Field as well as the single quotes around the $serial\_number variable.

##### Editing Values

<p class="callout success">When referencing devices using the Command Line API, the endpoint refers to the device\_id. This may differ from V2 API used by Anywhere.</p>

As an alteration of a current value, the command would then use the PATCH option.

Example call:

```
curl -X PATCH https://$server_dns:20445/inv/api/v1/client/5e968b7947d74f064eb47ee2bcbbb67cb87eb122 -d $data -H "Content-Type: application/json" -H "Authorization: $auth"
```

The data variable would contain the desired payload to amend, in a JSON data block. In the below example, the Custom Field to alter has an 'internal name' of 'admin\_test', is a Boolean entry and the JSON data block could look like:

```
{
  "CustomFields":
    {
      "admin_test":
      {  
          "exitCode":null,
          "status":0,
          "updateTime":"'$current_time'",
          "value":true
      }
    }
}
```

When Custom Fields are updated, a time stamp of when the update occurred is shown. When altering the value from the Command Line API, the time should be supplied, along with the value and a couple of other key/value pairs. There should be no reason to provide other values than those shown for 'exitCode' and 'status', when adjusting using the API.

Date is important and should be of the format "2018-09-10T15:48:08Z":

macOS example:

```
current_time=$(date -u +"%FT%TZ")
```

Windows PowerShell:

```
$current_time = $(Get-Date -UFormat "%Y-%m-%d %R:%S")
```

The code would look something like the following, where $query would be set as the content of the JSON:

macOS shell

```shell
curl -s -H "Authorization: $auth" \
    https://$server_dns:20445/inv/api/v1/query_result/ \
    -X PATCH \
    -data $query \
    -H "Content-Type: application/json"
```

Windows PowerShell

```powershell
$header = @{Authorization=“$auth"}

Invoke-RestMethod -Method PATCH \ 
    -Headers $header \
    -ContentType application/json \
    -Uri https://$server_dns:20445/inv/api/v1/query_result/ \
    -Body $query
```

<p class="callout success">As with any Inventory Query, the criteria can be based upon any inventory item. This makes the Command Line API very powerful.</p>

# FileWave Anywhere API (v2)

## What

FileWave Anywhere (formerly WebAdmin) talks to FileWave Server through API calls. You can use the same style of calls from scripts or third-party tools when you need automation that matches what FileWave Anywhere does.

## When/Why

Use this when a workflow needs to GET, POST, PATCH, or DELETE FileWave Server data from a script, integration, or managed device.

## How

Most requests look similar to Command Line RESTful API requests. Use a base64 FileWave Administrator token, and review the Working with APIs KB article for token setup and general API guidance.

### Read a current Inventory Report (formerly Query)

For example, to read an existing Inventory Report with an ID of 191, compare the Command Line API path with the FileWave Anywhere API path below.

Command Line:

```
curl -s  -H "Authorization: $auth" https://$server_dns:20445/inv/api/v1/query_result/191
```

FileWave Anywhere:

```
curl -s  -H "Authorization: $auth" https://$server_dns/api/inv/api/v1/query_result/191
```

FileWave Anywhere uses HTTPS on port 443 by default and adds `/api` at the beginning of the URL path.

In an example setup, both calls return the same output, which might look like this:

```
{
  "offset":0,
  "fields":
    [
      "Client_device_name"
  ],
  "values":
    [
      ["C02Z90WDLVDQ"],
      ["FW1063"],
      ["mac0001"],
      ["macadmin1"],
      ["mini"],
      ["ML1015VMNEWNAME"],
      ["ml1063"],
      ["Orac"],
      ["pro"]
  ],
  "filter_results":9,
  "total_results":9,
  "version":3
}
```

### Send an MDM Command

FileWave Anywhere covers more than basic inventory-report reads. This example sends an MDM restart command to an Android device by device ID:

```
curl -X POST "https://${server}/api/android/restart_devices" \
  -H  "Content-Type: application/json" \
  -H "authorization: ${auth}" \
  -d '{"device_ids": ["3aa9cea3eb7ea992"]}'
```

Some FileWave Anywhere API workflows have limits that matter when choosing between API paths.

- The legacy `/api/inv/api/v1/query_result/{id}` path reads an existing saved Inventory Query or Inventory Report.
- Custom Field values for a device are available through an internal API path, and that method returns all Custom Field values associated with the device.
- Setting Custom Field values through the FileWave Anywhere API does not include a timestamp.

For those cases, prefer the Command Line API when it gives you the needed object or value directly.

### Use the FileWave 16.4+ Deployments API

FileWave Server 16.4 adds supported public endpoints for creating, listing, reading, updating, and deleting Deployments. Use [Managing Deployments with the FileWave API (16.4+)](https://kb.filewave.com/books/application-programming-interface-api/page/managing-deployments-with-the-filewave-api-164) for the endpoint table, authentication, Swagger discovery, a safe read-only example, write verification, and deletion safeguards.

### Use the 15.5+ Reports and notifications endpoints

FileWave 15.5.0 added public FileWave Anywhere API endpoints for integrations that need FileWave inventory/report data or notification data as JSON without a manual export. Use the [FileWave Anywhere API Documentation](https://kb.filewave.com/link/314) article and the Swagger page on your own FileWave Server for the exact request and response details.

- `GET /reports/v1/reports` lists available saved Inventory Reports.
- `GET /reports/v1/reports/{id}` returns the results for a saved Inventory Report ID.
- Use the Reports Preview API when an integration needs ad-hoc Inventory Report results without saving the report first. The preview request body is documented in Swagger.
- `GET /notifications/v1/notifications` returns FileWave notification data for integrations that need to display or process notifications outside FileWave.

For large report results, use the documented paging, sorting, limit, offset, page-size, or filter controls instead of pulling every row in one request. See [Using the Command Line API to limit, sort, and offset values returned](https://kb.filewave.com/link/311) for the same general paging pattern.

Please see the [FileWave Anywhere API Documentation](https://kb.filewave.com/link/314) for a more in-depth look at the possible API options available.

<p class="callout info">When referencing devices using the FileWave Anywhere API, the endpoint refers to the filewave\_id. This may differ from the V1 Command Line API.</p>

<p class="callout success">When FileWave runs API calls from scripts, you can pass inventory values as Launch Arguments or environment variables. This can include, for example, `filewave_id`.</p>

# FileWave Anywhere API Documentation

## What

FileWave Anywhere includes a Swagger/OpenAPI documentation page for supported public API paths.

The page lists public, non-internal URL paths and includes a *Try it out* option that can execute an API command directly from the documentation.

<p class="callout danger">Executing a command from the Swagger API documentation is a live action on the FileWave Server. It runs exactly as requested and can be destructive. Confirm the command, target object, and payload before executing it.</p>

## When/Why

Use the API documentation when you need to confirm whether an API call exists, which JSON keys are required, what a field is called, or which object ID should be targeted.

These are some of the questions the Swagger documentation can answer.

<p class="callout info">Executing commands from the Swagger documentation requires an active FileWave Anywhere login. If the session times out, log in again before using *Try it out*.</p>

## How

<p class="callout info">On earlier versions of FileWave, the Documentation page may be accessed without logging in first, but it may then only be viewed as 'read only'.   
This is no longer the case and it should be expected to log into FileWave Anywhere to access the API documentation.</p>

First log into FileWave Anywhere through a web browser. The address should be the same as shown in the FileWave Central Mobile Preferences:

[![image.png](https://kb.filewave.com/uploads/images/gallery/2023-07/scaled-1680-/gHj9dwnaw1aEtpyY-image.png)](https://kb.filewave.com/uploads/images/gallery/2023-07/gHj9dwnaw1aEtpyY-image.png)

The URL for the Swagger documents page is the server address appended with /api/doc/. From the example above, it would look as follows:

`<a href="https://demoz.filewave.com/api/doc/" target="_blank">https://demoz.filewave.com/api/doc/</a>`

<details id="bkmrk-example-get-the-belo"><summary>Example GET</summary>

The below shows an example of using a 'GET' to return the DEP Profiles:

[![image.gif](https://kb.filewave.com/uploads/images/gallery/2023-07/awxd4u5CJXYmw4vV-image.gif)](https://kb.filewave.com/uploads/images/gallery/2023-07/awxd4u5CJXYmw4vV-image.gif)

</details>The response section from an executed action shows the curl command, the requested URL and the returned response (code and body)

[![image.png](https://kb.filewave.com/uploads/images/gallery/2023-07/scaled-1680-/bcYfsFadf1bT8h7a-image.png)](https://kb.filewave.com/uploads/images/gallery/2023-07/bcYfsFadf1bT8h7a-image.png)

Swagger uses an X-CSRFToken for commands run inside the documentation page. Use that token only in Swagger. If you copy the generated curl command into a script or another tool, remove the X-CSRFToken portion and use the correct API authentication token from FileWave Central instead.

### Discovering Content

Swagger can not only be used for testing API calls and discovering the URL paths, but also determining the necessary content of the key/value pairs.

To simply locate all paths relating to queries, for example, the browse 'find' feature could easily assist:

[![image.png](https://kb.filewave.com/uploads/images/gallery/2023-07/scaled-1680-/Gm1d5XKlAV8yNJbC-image.png)](https://kb.filewave.com/uploads/images/gallery/2023-07/Gm1d5XKlAV8yNJbC-image.png)

Executing a list of all queries:

[![image.png](https://kb.filewave.com/uploads/images/gallery/2023-07/scaled-1680-/sjg6906Ub4fGE8YH-image.png)](https://kb.filewave.com/uploads/images/gallery/2023-07/sjg6906Ub4fGE8YH-image.png)

The response could then be searched to find the ID of a particular query:

[![image.png](https://kb.filewave.com/uploads/images/gallery/2023-07/scaled-1680-/9fVrx9g70H10wTxr-image.png)](https://kb.filewave.com/uploads/images/gallery/2023-07/9fVrx9g70H10wTxr-image.png)

Using Query ID 191 as an example, that ID may then be used in a following GET, which will respond with the definition of that query:

[![image.png](https://kb.filewave.com/uploads/images/gallery/2023-07/scaled-1680-/g7laa76ocZL9yGsK-image.png)](https://kb.filewave.com/uploads/images/gallery/2023-07/g7laa76ocZL9yGsK-image.png)

The Query Definition shows the various key/value pairs and can be used to identify values which could then be submitted in other API calls.

<p class="callout success">To discover the name used as a value for a particular item, consider building a query in FileWave Central, then using the above steps to locate the name to be used within the API call. For example: interface\_name, device\_name, DesktopClient.  
</p>

Taking that another step forward, the same ID could be used to show the response of query results:

[![image.png](https://kb.filewave.com/uploads/images/gallery/2023-07/scaled-1680-/8jsIYicLmiCGHd5W-image.png)](https://kb.filewave.com/uploads/images/gallery/2023-07/8jsIYicLmiCGHd5W-image.png)

The same documentation can therefore be used to assist with the Command Line RESTful API, just remember the path needs to be altered if copying them.

Use the Swagger documentation to discover JSON formatting, key/value names, URL paths, and available API commands before building or troubleshooting API workflows.

## FileWave 16.4 Deployments API

On a FileWave 16.4 or later Server, search Swagger for `deployments` to inspect the public create, list, get, update, and delete operations. See [Managing Deployments with the FileWave API (16.4+)](https://kb.filewave.com/books/application-programming-interface-api/page/managing-deployments-with-the-filewave-api-164) for the supported paths and a guarded automation workflow.

## Related Content

- [What is an API?](https://kb.filewave.com/books/application-programming-interface-api/page/what-is-an-api "What is an API?")
- [Command Line API (v1)](https://kb.filewave.com/books/application-programming-interface-api/page/command-line-api-v1 "Command Line API (v1)")

# Using the Command Line API to limit, sort, and offset values returned

## Problem

When utilizing FileWave's Command Line API to extract inventory information, you may find the need to limit the values returned, sort the data, or return results that are offset by a certain number of values.

Because it can be a topic that can trip someone up it is important to note that API calls are normally done on TCP 443. You may see references to 20445 in some documentation, but that is the [Command Line API (v1)](https://kb.filewave.com/books/application-programming-interface-api/page/command-line-api-v1 "Command Line API (v1)") and it is on TCP 20445 however you can make a small change in the URL for the API endpoint and use TCP 443 for all calls by prepending **/api/** on to the **/inv/api/** URLs to make it **/api/inv/api/** in the URLs.

## Environment

FileWave [Command Line API (v1)](https://kb.filewave.com/books/application-programming-interface-api/page/command-line-api-v1 "Command Line API (v1)")

## Resolution

<p class="callout info">The following examples include the pipe to Python to make the output multiple line. Remove this pipe if Python is not installed. This also assumes 'python3' is pathed, such that the full path is not required.</p>

Limit Values

Syntax required to limit the number of values returned in a query to a value of 25:

```shell
curl -s -H "Authorization: not_the_real_key_here" https://<your_server_fqdn>:20445/inv/api/v1/query_result/<queryID>?limit=25 | python3 -mjson.tool
```

Of course, you can modify the number of values returned to any number that you like.

#### Sort Values

You can also sort the results of data returned based on the &lt;column\_name&gt; value. For example, to sort the results returned by "device name", ascending:

```shell
curl -s -H "Authorization: not_the_real_key_here" https://<your_server_fqdn>:20445/inv/api/v1/query_result/<queryID>?sort=device_name | python3 -mjson.tool
```

To do the same sort, but in descending order (note the "-" in front of the column name):

```shell
curl -s -H "Authorization: not_the_real_key_here" https://<your_server_fqdn>:20445/inv/api/v1/query_result/<queryID>?sort=-device_name | python3 -mjson.tool
```

#### Offset Values

In order to return only a subset of results, offset by some initial number of values returned, you can apply the below syntax:

```shell
curl -s -H "Authorization: not_the_real_key_here" https://<your_server_fqdn>:20445/inv/api/v1/query_result/<queryID>?offset=300 | python3 -mjson.tool
```

The above example will return all values, starting from the 300th value.

## Related articles

- [How to write to a custom field using the FileWave API](https://kb.filewave.com/books/application-programming-interface-api/page/how-to-write-to-a-custom-field-using-the-filewave-api "How to write to a custom field using the FileWave API")
- [Command Line API (v1)](https://kb.filewave.com/books/application-programming-interface-api/page/command-line-api-v1 "Command Line API (v1)")
- [Anywhere API (v2)](https://kb.filewave.com/books/application-programming-interface-api/page/filewave-anywhere-api-v2 "Anywhere API (v2)")

# Last Changed Inventory Field

## What

The **“Last Changed”** inventory field records when a device’s inventory data changed or when the device last reported inventory. It was added in FileWave 15.5.0 and is useful for reports, API sync jobs, and troubleshooting stale inventory.

## When/Why

The **“Last Changed”** field is useful in the following scenarios:

- **Inventory monitoring**: See when a device’s inventory data last changed.
- **Data synchronization**: Let external systems decide whether they need to pull updated FileWave inventory.
- **Change review**: Use the timestamp as a quick audit signal when inventory fields change.
- **API integration**: Include the timestamp in sync logic so integrations can avoid unnecessary inventory pulls.

## How

#### Understanding the “Last Changed” Field

- **Records Updates**: The “Last Changed” field automatically updates the timestamp when: 
    - Any custom or built-in field value is changed for a client.
    - The client reports new information to the inventory.
    - A new custom field is associated with or disassociated from the device.

#### Viewing the “Last Changed” Field

- **In FileWave Central**: 
    - Open **FileWave Central**.
    - Navigate to the <span class="s2">**Clients** tab.</span>
    - Select the device you wish to inspect.
    - Locate the **“Last Changed”** field within the device’s inventory details.

[![image.png](https://kb.filewave.com/uploads/images/gallery/2024-10/scaled-1680-/p0WgNuUkPNpQ6ROS-image.png)](https://kb.filewave.com/uploads/images/gallery/2024-10/p0WgNuUkPNpQ6ROS-image.png)

- **In FileWave Anywhere**: 
    - Log in to **FileWave Anywhere** through your web browser.
    - Go to the <span class="s2">**Devices** section.</span>
    - Click on the specific device to view its details.
    - Find the **“Last Changed”** field in the inventory information.

## [![image.png](https://kb.filewave.com/uploads/images/gallery/2024-10/scaled-1680-/CXzA6itHP4ZXPzVb-image.png)](https://kb.filewave.com/uploads/images/gallery/2024-10/CXzA6itHP4ZXPzVb-image.png)

#### Utilizing the “Last Changed” Field

- **Field Updates**: 
    - The field provides a precise timestamp, helping you determine the exact moment a change occurred.
    - Useful for troubleshooting and verifying when specific updates were made.
- **API Integration**: 
    - The “Last Changed” field is included in public inventory API responses.
    - Enables developers to: 
        - **Optimize data sync**: Check the “Last Changed” timestamp before pulling updated data.
        - **Improve automation timing**: Trigger scripts or integrations only when inventory has changed.

#### Important Notes

- **Custom Fields Association**: 
    - Associating or disassociating custom fields with a device updates the “Last Changed” timestamp.
    - Helps in tracking changes to custom data points specific to your organization’s needs.
- **Client Reporting**: 
    - Each client inventory report updates the “Last Changed” field.
    - If a device appears stale, compare this value with the device’s last check-in and inventory reporting behavior.

## Related Content

- [Working With APIs](https://kb.filewave.com/books/application-programming-interface-api/page/working-with-apis "Working With APIs")

# API Sample Code

# Bulk Update the iOS Enrollment User (auth_username) and Client Name using API

## What

The api\_UpdateiPadNameandAuthUser script is a tool that allows FileWave admins to update the names and assigned users of multiple iOS devices in bulk, using a CSV file containing the serial numbers, desired device names, and LDAP usernames of the devices. This can be particularly useful for education organizations, but may also be useful for others who do mass re-distributions of devices like iPads.

## When/Why

If you need to quickly and easily reassign a large number of iPads to different users, the api\_UpdateiPadNameandAuthUser script can save you time and effort. Instead of manually updating each device individually, you can simply prepare a CSV file with the necessary information and use the script to apply the changes to all of the devices at once. This can be especially useful when you need to set up a large number of new devices for use by different users or when you need to make changes to the assignments of existing devices.

## How

To use the api\_UpdateiPadNameandAuthUser script, you will need to follow the instructions in the README file that accompanies the script:

1. Download the zip file that contains the script and the README.  
      
    Download: [api\_UpdateiPadNameANDAuthUser\_v2.zip](https://kb.filewave.com/attachments/319)
2. Edit the CSV file to contain a list of serial numbers, device names, and LDAP usernames for the devices you want to update.
3. Open Terminal (on a Mac or Linux) and navigate to the directory that contains the script and CSV file.
4. Make the script executable by running the following command  
      
    ```
    chmod +x ./api_UpdateiPadNameandAuthUser.sh
    ```
5. Run the script using the following command, replacing the parameters, leaving only spaces in between.  
      
    ```
    ./api_UpdateiPadNameandAuthUser.sh <SERVER URL> <BASE64TOKEN> <PATH TO CSVFILE>
    ```
    
    Parameters: 
    - &lt;Server URL&gt;: Your FileWave Anywhere address. For example, https://server.filewave.com
    - &lt;BASE64 TOKEN&gt;: The base64 API token, found in FileWave Admin under Assistants &gt; Manage Administrators &gt; (select a username) &gt; Application Tokens &gt; Token (base64). For example, ezcyMjczOTQyLTc1YjctNDFmMC1iYTlhLTE1MWM3OThiOWFhMH0=
    - &lt;PATH TO CSVFILE&gt;: The full path to the .csv file. For example, /Users/admin/Desktop/api\_UpdateiPadNameandAuthUser.csv

The script's output will show you the progress of the updates and will indicate when the process is complete.

<p class="callout info">If you are running into an issue where the script says that it completed and is Updating Model, but no changes are made, please add a blank line at the end of your .csv, save it, and try the command again.</p>

# Bulk Update the Enrollment User (auth_username) using API

## What

This problem and solution came from a customer who had many devices in FileWave, yet did not have the 'Enrollment User' (internally known as auth\_username) populated. In order for automatic associations of iPads with Apple Classroom, devices must have an enrolment user set. While it’s possible to set these one by one, that does not scale well. Even hosted customers could benefit from this example. It can set the Enrollment User for both iOS as well as macOS devices in FileWave.

## When/Why

The below solution leverages the [FileWave Anywhere API (v2)](https://kb.filewave.com/books/application-programming-interface-api/page/filewave-anywhere-api-v2 "FileWave Anywhere API (v2)") and is a great example that any customer could build. You can run this script from your mac, Windows, or Linux computer, and it will talk to the API and make the changes in bulk.

<p class="callout info">This example happens to be a Python script. As such, if ran on the FileWave Server, Python will already be installed. However, for hosted customers, the script will not be ran on the server and it should be necessary to have Python installed on the device running this script. We have also included a zsh script which may be easier for someone to modify or use.  
[https://www.python.org/downloads/](https://www.python.org/downloads/)  
[https://docs.python.org/3/using/windows.html](https://docs.python.org/3/using/windows.html)   
</p>

## How

- The first step is to download the script:  
      
    [Bulk Update Enrollment User.zip](https://kb.filewave.com/attachments/461)

- Once downloaded, the zip contains three files: **bulk\_change\_device\_authname.py**, **bulk\_change\_device\_authname\_updated.zsh** and **auth\_username.csv** and you can run either the .py or the .zsh script as they will do the same thing.
- If the Python script is not being ran directly on a FileWave Server, it may be necessary to alter the first line of code, to specify the location of Python on the device running the script. For example, on macOS, that may be: **\#/usr/local/bin/python3**
- If you do not have python installed, you may use the updated shell script. The README text file will have the updated instruction guide on using the shell script.
- The CSV file should be edited to include the desired list of Devices with Users. The supplied template looks like:

```
Device ID,Enrollment Username
67d6f4bfcf27fa62bb9815365c67ebf7fed8f9c3,test
```

An Inventory query could be used to obtain the list of Device IDs. Note, the script is only expecting two columns in the order of Device ID and Enrollment Username.

<p class="callout success">It may assists to initially export additional columns to assist with device identification, but after adding the usernames, be sure to remove any of these additional columns in the CSV file.</p>

[![image.png](https://kb.filewave.com/uploads/images/gallery/2023-07/scaled-1680-/dEfivbDOyKFgCwGU-image.png)](https://kb.filewave.com/uploads/images/gallery/2023-07/dEfivbDOyKFgCwGU-image.png)

- Obtain the desired users base64 Application Token from the FileWave Administrators Assistant view

![api-key.png](https://kb.filewave.com/uploads/images/gallery/2023-07/oDB0sVWkFeANM106-api-key.png)

The following commands may now be executed on macOS or Linux (a similar command could be executed on Windows) to action the process.

Python script command:

```shell
./bulk_change_device_authname.py --token {b5cb89a0-fe59-4cb1-9359-d72b79369c0} --host ExampleCo.filewave.net --mapping ./auth_username.csv
```

Updated shell script command:

```
./bulk_change_device_authname_updated.zsh --host your.filewave.net --token {your_API_token} --mapping ./auth_username.csv
```

The script will give you feedback about the success or failure of any records.

##### Python Imports

The beginning of the Python script has a list of imports:

```
import argparse
import base64
import csv
import os
import re
import requests
import sys
```

If any are missing, e.g 'requests', it should be necessary to instal them. The script should report such an error if any are missing when ran. Some are available on a default Python setup.

It is possible to instal any missing. For example, on macOS or Linux, the command may appear as (depending upon the location of Python)

```shell
/usr/local/bin/python3 -m pip install requests
```

Hopefully the script at this point has been successful and can be see as a great example of bulk actions.

## Related articles

- [How to write to a custom field using the FileWave API](https://kb.filewave.com/books/application-programming-interface-api/page/how-to-write-to-a-custom-field-using-the-filewave-api "How to write to a custom field using the FileWave API")
- [Command Line API (v1)](https://kb.filewave.com/books/application-programming-interface-api/page/command-line-api-v1 "Command Line API (v1)")
- [Anywhere API (v2)](https://kb.filewave.com/books/application-programming-interface-api/page/filewave-anywhere-api-v2 "Anywhere API (v2)")

# How to write to a custom field using the FileWave API

It is often desirable to alter FileWave Custom Field values, especially when it comes to driving automated workflows.

<p class="callout info">API calls have the distinct advantage of changing Custom Field values directly on the server, essentially making the change immediate.</p>

<p class="callout warning">Where Custom Field values are driving Smart Group device inclusion, despite the API call making an immediate change, there will still be a period of time before the next Smart Group evaluation.</p>

## How

Writing back to a Custom Field relies upon the following details:

- Server URL
- A way to recognise which device's Custom Field should be updated
- A way to recognise the Custom Field
- Custom Field type
- An authentication token

<p class="callout warning">Some Custom Fields may have restricted values. Only one of these values should be posted in the API call to ensure expected behaviour.</p>

### Restricted Values

Value restriction may be observed from within the Custom Field definition.

[![image.png](https://kb.filewave.com/uploads/images/gallery/2023-07/scaled-1680-/Aan2lcn3kiWLE6gl-image.png)](https://kb.filewave.com/uploads/images/gallery/2023-07/Aan2lcn3kiWLE6gl-image.png)

It is also possible to use Swagger (or therefore another API call) to return the 'choices' list of any Custom Field, by observing the Custom Field definition:

URL path for query:

```
/api/inv/api/v1/custom_field/
```

Query response:

```
  {
    "to_be_deleted": false,
    "field_name": "apple_battery_replace_2015",
    "display_name": "macOS Apple Battery Replace 2015",
    "data_type": "string",
    "provider": 0,
    "metadata": {},
    "description": "",
    "default_value": "Unchecked",
    "choices": [
      "Replaced",
      "Recall",
      "NA",
      "Serial",
      "Error",
      "Unchecked"
    ],
    "is_global": false,
    "used_in_inventory_queries": false,
    "used_in_smart_groups": false,
    "used_in_filesets": false,
    "used_in_license_definitions": false,
    "used_in_dep_profiles": false,
    "used_in_dep_rules": false,
    "used_in_workflows": false
  },
```

### Which API

Custom Fields, as mentioned in the other API KB documents, are best targeted with the Command Line RESTful API.

This example is demonstrating the possibility of targeting devices using both Serial Number and Device ID. The Server's FQDN, API authentication token and Device ID can be supplied as Launch Arguments, however, for security reasons it is better to supply the token as an Environment variable. When targeting Internal Names of Custom Fields (as either Launch Arguments or Environment Variables), surround the Internal Name with % symbols.

[![image.png](https://kb.filewave.com/uploads/images/gallery/2023-07/scaled-1680-/9s8UIJNKcvSExGjC-image.png)](https://kb.filewave.com/uploads/images/gallery/2023-07/9s8UIJNKcvSExGjC-image.png)

The start of a macOS script may look like:

```
#!/bin/zsh

# Environment Variables
# $auth - base64 authentication token
# $device_id  - Device ID

server_fqdn=$(defaults read /usr/local/etc/fwcld.plist server) # FW Server FQDN
serial_number=$(ioreg -l -d 2 | awk -F "\"" '/IOPlatformSerialNumber/ {print $(NF-1)}') # device serial number
```

It is of course possible that all of these values could be supplied to the script as Executable variables.

The start of a PowerShell script may look like:

```
# Environment Variables
# $Env:auth - base64 authentication token
# $Env:device_id - Device ID
# $Env:serial_number - device serial number
# $Env:server_fqdn - FW Server FQDN

```

#### Reading a Custom Field

It may be necessary to read the Custom Field during the script execution. A JSON will be required for the data portion of the command:

```
{"criteria":
  {
    "column":"serial_number",
    "component":"Client",
    "operator":"is",
    "qualifier":'\"$serial_number\"'
  },
  "fields":
  [
    {
      "column":"apple_battery_replace_2015",
      "component":"CustomFields"
    }
  ],
  "main_component":"Client"
}

```

To continue the scripts, this could be assigned in the script as a variable

macOS script:

```
query='{"criteria":{"column":"serial_number","component":"Client","operator":"is","qualifier":'\"$serial_number\"'},"fields":[{"column":"apple_battery_replace_2015","component":"CustomFields"}],"main_component":"Client"}'
```

Windows PowerShell:

```
$query = '{"criteria":{"column":"serial_number","component":"Client","operator":"is","qualifier":"' + $serial_number + '"},"fields":[{"column":"apple_battery_replace_2015","component":"CustomFields"}],"main_component":"Client"}'
```

With the server details and JSON configured, it is now possible to read the value with a command:

macOS script:

```
curl -s -H "Authorization: $auth" https://$server_fqdn:20445/inv/api/v1/query_result/ --data $query -H "Content-Type: application/json"
```

The response may look something like:

```
{"offset":0,"fields":["CustomFields_apple_battery_replace_2015"],"values":[["Replaced"]],"filter_results":1,"total_results":1,"version":0}
```

Windows PowerShell script:

```
$header = @{Authorization=“$auth"}
$api = "https://" + $server_dns + ":20445/inv/api/v1/query_result/"

Invoke-RestMethod -Method GET -Headers $header -Uri $api
```

Due to this being a Custom Field designed for an Apple replacement programme, hopefully the response will look something like:

```
{"offset":0,"fields":["CustomFields_apple_battery_replace_2015"],"values":[["NA"]],"filter_results":1,"total_results":1,"version":0}
```

##### Handling JSON response

As noted earlier, since the response is also a JSON block, the desired information is somewhat buried within the response. Windows PowerShell has tools to directly work with JSON and as such the desired item is more easily attainable.

[ConvertFrom-Json](https://learn.microsoft.com/en-us/powershell/module/microsoft.powershell.utility/convertfrom-json?view=powershell-7.3)

[ConvertTo-Json](https://learn.microsoft.com/en-us/powershell/module/microsoft.powershell.utility/convertto-json?view=powershell-7.3)

macOS on the other hand, it would be beneficial to either instal Python and use Pythons tools to extract the response or get crazy with a tool like 'AWK'.

```
curl -s -H "Authorization: $auth" \
  https://$server_fqdn:20445/inv/api/v1/query_result/ \
  --data $query -H "Content-Type: application/json" \
  | awk -F  '[\\\[|\\\]]' '{gsub(/\"/,"",$0);print  substr( $(NF-2), 1, length($(NF-2)))}'
```

Response with AWK:

```
Replaced
```

#### Writing a Custom Field

Once the script has continued and actioned anything else desired, it then may be desirable to set the Custom Field to a new value, which may vary depending upon the outcome of the scripting.

In this example, we will consider the script will be writing back NA to the Custom Field:

```
current_time=$(date -u +"%FT%TZ")
data='{"CustomFields":{"apple_battery_replace_2015":{"exitCode":null,"status":0,"updateTime":"'$current_time'","value":"NA"}}}'

curl -X PATCH https://$server_fqdn:20445/inv/api/v1/client/$device_id -d "$data" -H 'content-type: application/json'  -s -H "authorization: $auth_key"

```

Note:

- This is now using the PATCH option, since an already existing value is being altered by the script
- The date is being supplied as a variable to ensure the current time is pushed back with the API JSON data
- This command is referencing 'device\_id' in the URL path

## Related articles

- [How to write to a custom field using the FileWave API](https://kb.filewave.com/books/application-programming-interface-api/page/how-to-write-to-a-custom-field-using-the-filewave-api "How to write to a custom field using the FileWave API")
- [Command Line API (v1)](https://kb.filewave.com/books/application-programming-interface-api/page/command-line-api-v1 "Command Line API (v1)")
- [Anywhere API (v2)](https://kb.filewave.com/books/application-programming-interface-api/page/filewave-anywhere-api-v2 "Anywhere API (v2)")

# Managing Client States via the FileWave API

## What

Use the FileWave API to move a device between the Tracked, Archived, Missing, and Untracked states.

- `0` = Tracked
- `1` = Archived
- `2` = Missing
- `3` = Untracked

## When/Why

This is useful when you need to archive a retired device, reinstate a device that should be managed again, or script state changes as part of cleanup or offboarding work.

<p class="callout warning">Archiving Apple MDM-enrolled devices can remove or break their MDM enrollment. Reinstating the record later does not automatically restore that enrollment.</p>

## How

Find the `DeviceID` in FileWave Central, as shown below, or copy it from the URL in FileWave Anywhere when viewing the device. Then send a `PATCH` request to update the state and run `update_model` so the change is reflected in the FileWave management interface.

[![image.png](https://kb.filewave.com/uploads/images/gallery/2024-04/scaled-1680-/g3DPzNAke77ybLzf-image.png)](https://kb.filewave.com/uploads/images/gallery/2024-04/g3DPzNAke77ybLzf-image.png)

Shell script:

```shell
#!/bin/zsh

# Variables
ServerURL="https://fwjoshlab.filewave.net"   # Replace with your server address.
Token="your_token_here"  # Replace with your actual token.
DeviceID="11365"         # Specify the device ID.
NewState="0"             # Set the desired state (0: Tracked, 1: Archived, 2: Missing, 3: Untracked).

# Update device state
curl -X PATCH "$ServerURL/filewave/api/devices/v1/devices/$DeviceID" \
     -H "Authorization: Bearer $Token" \
     -H 'Content-Type: application/json' \
     -d '{"state":'$NewState'}'

# Update the model to reflect changes
curl -X POST "$ServerURL/filewave/api/fwserver/update_model" \
     -H "Authorization: Bearer $Token" \
     -H 'Content-Type: application/json'

```

PowerShell:

```powershell
# PowerShell Script to Manage FileWave Client States

# Variables
$ServerURL = "https://fwjoshlab.filewave.net" # Replace with your server address.
$Token = "your_token_here"  # Replace with your actual token.
$DeviceID = "11365"         # Specify the device ID.
$NewState = "0"             # Set the desired state (0: Tracked, 1: Archived, 2: Missing, 3: Untracked).

# Headers for authorization and content type
$headers = @{
    "Authorization" = "Bearer $Token"
    "Content-Type" = "application/json"
}

# Body data for changing the state
$body = @{
    "state" = $NewState
} | ConvertTo-Json

# Update device state
Invoke-RestMethod -Uri "$ServerURL/filewave/api/devices/v1/devices/$DeviceID" -Method Patch -Headers $headers -Body $body

# Update the model to reflect changes
Invoke-RestMethod -Uri "$ServerURL/filewave/api/fwserver/update_model" -Method Post -Headers $headers

# Output for user confirmation
Write-Host "Device state updated and model refreshed successfully."

```

### Tips

- Ensure that the `Token` variable contains a valid authorization token.
- Replace `DeviceID` and `NewState` with the values you need.
- If you are changing many devices, refresh the model after the updates so the new state is visible in the admin tools.

## Related Links

- [FileWave API Documentation](https://kb.filewave.com/books/application-programming-interface-api "FileWave API Documentation") - Official API documentation.
- [curl command line tool](https://curl.se/docs/manpage.html) - curl manual.

## Digging Deeper

The `update_model` API call tells the FileWave server to rebuild its internal model so the state change is reflected in the management interface. That is especially helpful after bulk state changes.

# Returning Device Information as a JSON

## What

The Client Info &gt; Device Details of a particular client, contains a wealth of information that may be useful to repurpose in other systems (Help Desks, centralised inventory systems, etc). Using the FileWave API, this information could be pulled by alternate systems or to a file locally on the client

<p class="callout info">Since the command refers to Device IDs, it may be necessary to make 2 calls from external systems. The first to obtain Device IDs and the second to target particular devices based upon their Device ID.</p>

<p class="callout success">When ran through Filesets, Device ID may be sent with the Fileset as either a Launch Argument or Environment Variable</p>

## HOW

This information could be returned using either the FileWave Anywhere API or the Command Line RESTful API

<p class="callout info">Remove the pipe to Python if not installed. This just displays the output as multiple lines instead of one long line.</p>

FileWave Anywhere API from macOS or Linux:

```
curl -s -H "Authorization: $auth" \
  https://$server_dns/api/inv/api/v1/client/details/${device_id}/DesktopClient \
  -H "Content-Type: application/json" \
  | python3 -mjson.tool
```

Command Line RESTful API from macOS or Linux:

```
curl -s -H "Authorization: $auth" \
    https://$server_dns:20445/inv/api/v1/client/details/${device_id}/DesktopClient \
    -H "Content-Type: application/json" \
    | python3 -mjson.tool
```

<p class="callout info">Note, the commands look almost identical, but just the additional /api at the beginning of the path for the FileWave Anywhere API call.</p>

The output should look similar to the below, where an appropriate device\_id is supplied:

```json
{
    "CustomFields__ldap_username": {
        "status": 0,
        "type": "string",
        "updateTime": "2018-06-21T19:37:23.585851Z",
        "value": "mdm mdm"
    },
    "CustomFields__local_ip_address": {
        "status": 0,
        "type": "string",
        "updateTime": "2018-06-21T19:49:51Z",
        "value": "10.20.30.29"
    },
    "CustomFields__malwarebytes_installed": {
        "status": 0,
        "type": "bool",
        "updateTime": "2018-06-21T19:49:51Z",
        "value": false
    },
    "CustomFields__po_number": {
        "status": 0,
        "type": "string",
        "updateTime": "2018-06-21T19:49:51Z",
        "value": "54654561"
    },
    "CustomFields__property_tag": {
		"status": 0,
        "updateTime": "2018-06-21T19:49:51Z",
        "type": "string",
        "value": "Device Owned by FileWave"
    },
    "CustomFields__purchase_date": {
        "updateTime": null,
        "value": null
    },
    "CustomFields__school_name": {
       	"status": 0,
        "type": "string",
        "updateTime": "2018-06-21T19:49:51Z",
        "value": "Landing Trail Elementary"
    },
    "CustomFields__site_description": {
        "updateTime": null,
        "value": null
    },
    "CustomFields__textedit_version": {
        "status": 0,
        "type": "string",
        "updateTime": "2018-06-21T19:49:51Z",
        "value": "1.13"
    },
    "CustomFields__user_role": {
        "updateTime": null,
        "value": null
    },
    "archived": null,
    "auth_username": "mdm",
    "building": null,
    "cpu_count": 2,
    "cpu_speed": 2759000000,
    "cpu_type": "Intel(R) Core(TM) i5-3470S CPU @ 2.90GHz",
    "current_ip_address": "10.20.30.29",
    "deleted_from_admin": false,
    "department": null,
    "device_id": "f96b8c66c50b358889ba2fbf2dc53bc21036406a",
    "device_manufacturer": "VMware, Inc.",
    "device_name": "FUSION-VM1-10.12",
    "device_product_name": "VMware7,1",
    "enroll_date": "2018-06-17T17:11:08.709785Z",
    "enrollment_state": 2,
    "filewave_client_locked": false,
    "filewave_client_name": "FUSION-VM1-10.13",
    "filewave_client_version": "12.8.1",
    "filewave_id": 219,
    "filewave_model_number": 617,
    "free_disk_space": 56772587520,
    "is_system_integrity_protection_enabled": true,
    "is_tracking_enabled": false,
    "last_check_in": "2018-06-21T19:54:31.615710Z",
    "last_enterprise_app_validation_date": null,
    "last_ldap_username": null,
    "last_logged_in_username": "dhadmin",
    "last_state_change_date": "2018-06-21T19:50:09.339609Z",
    "location": null,
    "management_mode": 0,
    "monitor_id": null,
    "operating_system__build": "17B48",
    "operating_system__edition": "Desktop",
    "operating_system__name": "macOS 10.13 High Sierra",
    "operating_system__type": "OSX",
    "operating_system__version": "10.13.1",
    "operating_system__version_major": 10,
    "operating_system__version_minor": 13,
    "operating_system__version_patch": 1,
    "ram_size": 2147483648,
    "rom_bios_version": "VMW71.00V.0.B64.1706210604",
    "security__enrolled_via_dep": null,
    "security__fde_enabled": false,
    "security__firmware_password_change_pending": false,
    "security__firmware_password_exists": false,
    "security__firmware_password_rom_enabled": true,
    "security__hardware_encryption_caps": null,
    "security__passcode_is_compliant": null,
    "security__passcode_is_compliant_with_profiles": null,
    "security__passcode_lock_grace_period": null,
    "security__passcode_lock_grace_period_enforced": null,
    "security__passcode_present": null,
    "security__system_integrity_protection_enabled": true,
    "security__user_approved_enrollment": null,
    "serial_number": "VMx4NvUkh/Co",
    "state": 0,
    "total_disk_space": 85689589760,
    "unenrolled": false
}
```

If desired, the information could be stored into a JSON file:

```
curl -s -H "Authorization: $auth" \
  https://$server_dns/api/inv/api/v1/client/details/${device_id}/DesktopClient \
  -H "Content-Type: application/json" \
  | python3 -mjson.tool > /my/path/device_info_${device_id}.json
```

<p class="callout success">The same $device\_id variable has been used to define the name of the JSON file also. Alter /my/path for a path of choice.</p>

### Obtaining Device IDs

One way to retrieve a bulk list of Device IDs is via an Inventory Query. First make a query to include desired columns, one of which will need to be Device ID. In the below example Device ID and Device Name have been included as columns for the Fields:

[![image.png](https://kb.filewave.com/uploads/images/gallery/2023-07/scaled-1680-/xAMuf7rBofeoOCm9-image.png)](https://kb.filewave.com/uploads/images/gallery/2023-07/xAMuf7rBofeoOCm9-image.png)

Once saved, use the details outlined in the [FileWave Anywhere Documentation](https://kb.filewave.com/books/application-programming-interface-api/page/filewave-anywhere-api-documentation), to locate the ID of this Inventory Query. The query result may then be used to pull a list of Device IDs. From the below example, set $query\_id to the value of the chosen Inventory Query. Make sure to set $auth to the token and server to your server:

```shell
#!/bin/zsh
# Shell script for macOS/Linux
$server = "widget.filewave.net"
$token = "ezMyxxxM2UyLTNjN2ItNxxxS04ZjQ5LTkxMxxxxzEzODZmNn0="
$query_id = "65"

curl -s  -H "Authorization: $auth" \
  https://$server/api/inv/api/v1/query_result/$query_id
```

```powershell
#PowerShell for Windows
$server = "widget.filewave.net"
$token = "ezMyxxxM2UyLTNjN2ItNxxxS04ZjQ5LTkxMxxxxzEzODZmNn0="
$header = @{Authorization=“$token"}
$query_id = "65"

Invoke-RestMethod -Method GET \ 
    -Headers $header \
    -ContentType application/json \
    -Uri https://$server:/api/inv/api/v1/query_result/$query_id
```

## Related articles

- [How to write to a custom field using the FileWave API](https://kb.filewave.com/books/application-programming-interface-api/page/how-to-write-to-a-custom-field-using-the-filewave-api "How to write to a custom field using the FileWave API")
- [Command Line API (v1)](https://kb.filewave.com/books/application-programming-interface-api/page/command-line-api-v1 "Command Line API (v1)")
- [Anywhere API (v2)](https://kb.filewave.com/books/application-programming-interface-api/page/filewave-anywhere-api-v2 "Anywhere API (v2)")

# Sending MDM Commands

## What

FileWave Anywhere can send MDM commands to devices, and the FileWave Anywhere API can trigger those same commands for scripted or integrated workflows.

The Swagger documentation shows the request structure:

[![image.png](https://kb.filewave.com/uploads/images/gallery/2023-07/scaled-1680-/6GLNb1o1wvXcp6rk-image.png)](https://kb.filewave.com/uploads/images/gallery/2023-07/6GLNb1o1wvXcp6rk-image.png)

<p class="callout info">Note the reference to the device(s) is now by 'ids'. This refers to the Client ID, as opposed to the Device ID, and is always an Integer.</p>

Example data could look like:

```
{
  "ids": [
    737581
  ],
  "command": "DeviceInformation"
}
```

<p class="callout success">'ids' is a list of devices, so multiple devices could be targeted in one RESTful API command.</p>

Commands sent by the API will show in the device's Client Info:

[![image.png](https://kb.filewave.com/uploads/images/gallery/2023-07/scaled-1680-/748qJZ5yPtjKonrf-image.png)](https://kb.filewave.com/uploads/images/gallery/2023-07/748qJZ5yPtjKonrf-image.png)

## HOW

This is an example of a RESTful API request that is only available through the FileWave Anywhere API.

Running the command from the Swagger Documentation will show the URL path required to send a command. For example, to lock devices:

macOS and Linux:

```
mdm_command='{"ids": [737581, 562620],"command": "DeviceLock"}'
```

```
curl -H "Authorization: $auth" \
  -X POST https://${server_dns}/api/devices/v1/devices/mdm-command \
  -d "$mdm_command" \
  -H "Content-Type: application/json"
```

Windows PowerShell:

```
$mdm_command = '{"ids": [737581, 562620],"command": "DeviceLock"}'
```

```powershell
$header = @{Authorization="$auth"}

Invoke-RestMethod -Method POST \ 
    -Headers $header \
    -ContentType application/json \
    -Uri https://${server_dns}/api/devices/v1/devices/mdm-command \
    -Body $mdm_command
```

#### What commands are available

From the Swagger, there is the following text:

*Command options can be specified in 'options' field of the request for the following commands: DeviceLock,*  
*EraseDevice, SetFirmwarePassword, VerifyFirmwarePassword, UnlockUserAccount, RestartDevice.*

*Acceptable options for each command are listed in Apple documentation: [https://developer.apple.com/documentation/devicemanagement/commands\_and\_queries](https://developer.apple.com/documentation/devicemanagement/commands_and_queries)*

Some commands have been listed, but the link to Apple's documentation shows all possible commands:

<p class="callout success">If a new command is released by Apple before it appears in FileWave, the API should be able to trigger that command</p>

To use Apple's documentation, navigate through the pages for the chosen command to locate the 'RequestType'. For example, the following shows the command to shut a device down is: ShutDownDevice

[![image.png](https://kb.filewave.com/uploads/images/gallery/2023-07/scaled-1680-/BzWEzMkbnvwEd0LA-image.png)](https://kb.filewave.com/uploads/images/gallery/2023-07/BzWEzMkbnvwEd0LA-image.png)

## Related articles

- [How to write to a custom field using the FileWave API](https://kb.filewave.com/books/application-programming-interface-api/page/how-to-write-to-a-custom-field-using-the-filewave-api "How to write to a custom field using the FileWave API")
- [Command Line API (v1)](https://kb.filewave.com/books/application-programming-interface-api/page/command-line-api-v1 "Command Line API (v1)")
- [Anywhere API (v2)](https://kb.filewave.com/books/application-programming-interface-api/page/filewave-anywhere-api-v2 "Anywhere API (v2)")

# Restarting Devices with API

## What

Like to restart many devices in bulk? API can deliver this.

## How

The data block for posting restart commands relies upon the 'ids' of devices. This is the Client ID as either viewed in the Client View or as shown when creating Inventory Queries with Client ID added.

Establish a list of device Client IDs that require rebooting. These should be supplied as a comma separated list of integers. Inventory Queries could assist with obtaining the list.

Both the API URL and the data block for the API request is different per OS.

<p class="callout info">In each of the below, an example server names has been supplied 'demo.filewave.ch'. This should be altered to match the FileWave Server's address as seen in the Mobile tab of Preferences in the FileWave Central App.</p>

##### Example Server Name:

[![image.png](https://kb.filewave.com/uploads/images/gallery/2024-09/scaled-1680-/Xv6IcCHQhRerETMe-image.png)](https://kb.filewave.com/uploads/images/gallery/2024-09/Xv6IcCHQhRerETMe-image.png)

### Android

##### Example device:

[![image.png](https://kb.filewave.com/uploads/images/gallery/2024-09/scaled-1680-/pbtNfB2HM0K1jbVZ-image.png)](https://kb.filewave.com/uploads/images/gallery/2024-09/pbtNfB2HM0K1jbVZ-image.png)

##### API URL:

```
"https://demo.filewave.ch/api/android/restart_devices"
```

##### Data Block:

```
{
  "ids": [
    54290
  ]
}
```

### Apple

##### Example device:

[![image.png](https://kb.filewave.com/uploads/images/gallery/2024-09/scaled-1680-/FKYOSZGhCllGBiGK-image.png)](https://kb.filewave.com/uploads/images/gallery/2024-09/FKYOSZGhCllGBiGK-image.png)

##### API URL

```
"https://demo.filewave.ch/api/devices/v1/devices/mdm-command"
```

##### Data Block

```
{
  "ids": [
    54000
  ],
  "command": "RestartDevice"
}
```

### Windows

##### Example device:

[![image.png](https://kb.filewave.com/uploads/images/gallery/2024-09/scaled-1680-/qqRWYmY6QYemWtjT-image.png)](https://kb.filewave.com/uploads/images/gallery/2024-09/qqRWYmY6QYemWtjT-image.png)

##### API URL

```
"https://demo.filewave.ch/api/devices/v1/devices/windows-restart"
```

##### Data Block

```
[
  {
    "ids": [
      54028
    ]
  }
]
```

### Example:

To restart two Apple devices, whose Client IDs are 737581 and 562620, as well as requiring the server's FQDN, the API token is also required. Administrator API Tokens are available from:

- FileWave Central Admin App &gt; Manage Administrators &gt; \[select a user\] &gt; Application Tokens (tab)

<p class="callout info">Tokens are unique per user and each user may have multiple tokens</p>

[![image.png](https://kb.filewave.com/uploads/images/gallery/2024-09/scaled-1680-/RaeAD70OGhcTLRzb-image.png)](https://kb.filewave.com/uploads/images/gallery/2024-09/RaeAD70OGhcTLRzb-image.png)

<p class="callout success">Different tokens could be used for different tasks. Consider creating a user specific for API or multiple API users, depending upon requirements, and limit each API user's 'Permissions' to only those items required to achieve the API request(s).</p>

<p class="callout info">Alter the 'ids' list, server FQDN and API Authorisation Token as required</p>

##### macOS/Linux:

```
mdm_command='{"ids": [737581, 562620],"command": "RestartDevice"}'

curl -H "Authorization: ezlmZjJkMDZhLTg1YWEtNDY5Ny04NDYzLTVjMGU3MjhjODEyN30=" \
  -X POST https://demo.filewave.ch/api/devices/v1/devices/mdm-command \
  -d "$mdm_command" \
  -H "Content-Type: application/json"
```

##### Windows:

```
$mdm_command = '{"ids": [737581, 562620],"command": "RestartDevice"}'

$header = @{Authorization=“ezlmZjJkMDZhLTg1YWEtNDY5Ny04NDYzLTVjMGU3MjhjODEyN30="}

Invoke-RestMethod -Method POST \ 
    -Headers $header \
    -ContentType application/json \
    -Uri https://demo.filewave.ch/api/devices/v1/devices/mdm-command \
    -Body $mdm_command
```

# Managing Deployments with the FileWave API (16.4+)

## What

FileWave 16.4 adds supported public API endpoints for creating, listing, reading, updating, and deleting Deployments. These endpoints allow integrations and administrative automation to manage the same Deployment objects used by FileWave Central and FileWave Anywhere.

<p class="callout info">**Version boundary:** The public Deployments API described here requires FileWave Server 16.4.0 or later. Earlier FileWave versions do not provide these public Deployment endpoints.</p>

## Deployment endpoints

<table id="bkmrk-endpoint-table"><thead><tr><th>Method</th><th>Path</th><th>Operation</th></tr></thead><tbody><tr><td>`POST`</td><td>`/filewave/api/deployments/public/deployments`</td><td>Create a Deployment.</td></tr><tr><td>`GET`</td><td>`/filewave/api/deployments/public/deployments`</td><td>List Deployments.</td></tr><tr><td>`GET`</td><td>`/filewave/api/deployments/public/deployments/<id>`</td><td>Return one Deployment by its documented identifier.</td></tr><tr><td>`PUT`</td><td>`/filewave/api/deployments/public/deployments/<id>`</td><td>Update a Deployment using the documented request body.</td></tr><tr><td>`DELETE`</td><td>`/filewave/api/deployments/public/deployments/<id>`</td><td>Delete a Deployment.</td></tr></tbody></table>

Use HTTPS on the FileWave Server hostname. For example, the collection endpoint is `https://<filewave-server>/filewave/api/deployments/public/deployments`.

## Authentication and permissions

For scripts and integrations, send a FileWave administrator application token in the `Authorization` header. Application tokens are created and revoked in FileWave Central under **Assistants &gt; Manage Administrators &gt; Application Tokens**.

```
Authorization: <base64-application-token>
```

- Use a dedicated administrator identity with only the FileWave permissions the integration requires.
- Store the token in a secret manager or protected environment variable rather than in source code.
- Do not include real tokens, server names, Deployment IDs, or payload data in public examples or support screenshots.
- Revoke and replace a token if it is exposed.

## Confirm the current schema in Swagger

Sign in to FileWave Anywhere, then open `https://<filewave-server>/api/doc/`. Search the Swagger/OpenAPI documentation for `deployments` to inspect the request body, required fields, identifier format, response schema, and current status codes on that Server version.

<p class="callout warning">**Do not build create or update payloads from guesses or private/internal endpoints.** Use the public paths above and the schema published by the target FileWave Server. A `PUT` request is not a promise of PATCH semantics; submit the complete body required by the documented operation.</p>

Swagger uses an `X-CSRFToken` for commands run inside its documentation page. A standalone script should instead use the FileWave application token described above. Do not copy the Swagger session token into production automation.

## Read-only example

This example lists Deployments without modifying the FileWave Model:

```
export FILEWAVE_SERVER='filewave.example.com'
export FILEWAVE_TOKEN='<base64-application-token>'

curl --fail --silent --show-error \
  -H "Authorization: ${FILEWAVE_TOKEN}" \
  -H "Accept: application/json" \
  "https://${FILEWAVE_SERVER}/filewave/api/deployments/public/deployments"
```

After obtaining a Deployment identifier from the list response, inspect that object with `GET /filewave/api/deployments/public/deployments/<id>` before changing or deleting it.

## Safe write workflow

1. Use `GET` to record the current Deployment and related object identifiers.
2. Build the create or update body from the target Server’s Swagger schema.
3. Test against a non-production Deployment and a limited target set.
4. Submit the `POST` or `PUT` request and capture the HTTP status plus response body.
5. Read the resulting Deployment back with `GET` and confirm its Filesets, targets, exclusions, installation type, timing, license distribution, and tags.
6. Review the Deployment in FileWave Central before updating the FileWave Model or expanding its scope.

<p class="callout danger">**DELETE is destructive.** Confirm the Deployment identifier and current contents immediately before sending the request. Do not assume the API provides a preview, recycle bin, or automatic rollback.</p>

## Troubleshooting

<table id="bkmrk-troubleshooting-table"><thead><tr><th>Result</th><th>Check</th></tr></thead><tbody><tr><td>**401 or 403**</td><td>Confirm the application token, owning administrator, token revocation state, and Deployment permissions.</td></tr><tr><td>**404**</td><td>Confirm the Server is running 16.4.0 or later, use the public path exactly, and verify the Deployment identifier.</td></tr><tr><td>**400 or validation error**</td><td>Compare the submitted JSON with the target Server’s Swagger schema and verify every referenced Fileset, target, group, tag, and option.</td></tr><tr><td>**Request succeeded but content is unexpected**</td><td>Read the Deployment back with `GET`, inspect it in Central, and do not update the Model until the result is understood.</td></tr></tbody></table>

## Related Content

- [Working With APIs](https://kb.filewave.com/books/application-programming-interface-api/page/working-with-apis)
- [FileWave Anywhere API Documentation](https://kb.filewave.com/books/application-programming-interface-api/page/filewave-anywhere-api-documentation)
- [Deployments in FileWave Central](https://kb.filewave.com/books/filesets-payloads/page/deployments-in-filewave-central)
- [What makes Deployments better than Associations?](https://kb.filewave.com/books/filesets-payloads/page/what-makes-deployments-better-than-associations)