Booster Setup
Everything you need to set up your Booster Environment
- Booster System Requirements
- Booster Installation
- Booster Monitor and Configuration Settings
- Device Details - Booster Client Preferences Reporting
Booster System Requirements
Requirements
As of January 2025 v15.5.1 the below are supported for running Boosters, but for updated information always consult the specific release on the Downloads Page. The FileWave Booster can also be installed on a Virtual Machine.
- macOS 12, 13 (Intel and Apple Silicon)
- Windows 10 (Ent/Pro 21H1 and above), 11 (Ent/Pro 21H2 and above)
- Windows Server 2022, Windows Server 2025
- Debian 12.x
The general guidance on CPU / RAM / Network / Storage is:
- CPU: For physical hardware use at least the equivalent of an Intel Core i5 or Apple Silicon
- CPU: For virtual hardware, use at least 2 virtual processors
- RAM: Use a minimum of 8Gb of RAM with 16Gb recommended
- Network: At least 1Gb network connection
- Storage: 1Tb is a recommended minimum, but this will depend highly on OS updates and Filesets as well as if Windows Imaging is in use leveraging a Booster
Make sure you have enough space on your hard disk to store the cached Filesets for your FileWave Clients. A Booster could conceivably contain a full mirrored set of all Filesets on the main FileWave server.
Booster Installation
Description
A FileWave Booster can run on macOS, Windows, or Debian. Installers, appliances, and current install commands are on FileWave Software Downloads.
Installers
Debian
Debian has two options. FileWave provides a pre-built Debian VM, similar to the FileWave Server appliance, or you can self-install the Booster software on a Debian system.
macOS & Windows
Installers are available as PKG or MSI.
The Windows MSI can install, repair, or remove the Booster software.
Install Paths
Booster installs the software to one of the following locations:
- Windows: C:\Program Files\FileWave\fwBooster.exe
- macOS, Debian: /usr/local/sbin/fwBooster
Booster Configuration
Once installed, configuration is via the Booster Monitor application, available for both macOS and Windows from the same downloads page.
Note that the standalone application, Booster Monitor, will only be able to connect to a Booster for initial configuration. Once a Booster is configured you must access Booster Monitor from FileWave Central in the Boosters section. This is because authentication is protected, and the FileWave Central application provides a secure connection. Launching Booster Monitor directly would not have that same authentication, and you will see an error about the Booster not running.
Installation
Debian
If using the pre-built Debian Appliance, simply add the VM to the VM infrastructure. Alternatively, follow the commands provided on the downloads page.
macOS & Windows
Run the relevant PKG or MSI installer, accepting any terms and agreements.
Custom Installers may be created, pre-defining details, e.g. Server Address, Port and Booster Monitor Preferences password: Custom Installers
Configuration
Network Address
Configure a static IP for the Booster and consider adding a Domain Name within the DNS for this IP.
macOS and Windows Boosters can be configured through Settings. Debian Boosters require command-line network configuration.
Debian IP Setup
Network Interface
The current IP may be determined with the 'ip addr' command:
# ip addr
1: lo: <LOOPBACK,UP,LOWER_UP> mtu 65536 qdisc noqueue state UNKNOWN group default qlen 1000
link/loopback 00:00:00:00:00:00 brd 00:00:00:00:00:00
inet 127.0.0.1/8 scope host lo
valid_lft forever preferred_lft forever
inet6 ::1/128 scope host noprefixroute
valid_lft forever preferred_lft forever
2: ens192: <BROADCAST,MULTICAST,UP,LOWER_UP> mtu 1500 qdisc mq state UP group default qlen 1000
link/ether 00:0c:29:9d:4d:7e brd ff:ff:ff:ff:ff:ff
altname enp11s0
inet 192.168.1.98/24 brd 192.168.1.255 scope global dynamic ens192
valid_lft 68853sec preferred_lft 68853sec
inet6 fe80::20c:29ff:fe9d:4d7e/64 scope link
valid_lft forever preferred_lft foreverThe key part here is the name of the network interface. In the above example, this is 'ens192'.
Edit Network File
Make a backup of the current file:
cp /etc/network/interfaces /etc/network/interfaces-mybackupEdit the original file:
sudo nano /etc/network/interfacesAdd the chosen IP and other necessary details for this interface. Given the details above, it may look something like the below once edited:
# This file describes the network interfaces available on your system
# and how to activate them. For more information, see interfaces(5).
source /etc/network/interfaces.d/*
# The loopback network interface
auto lo
iface lo inet loopback
# The primary network interface
iface ens192 inet static
address 192.168.1.22
netmask 255.255.255.0
gateway 192.168.1.255
dns-nameservers 8.8.4.4 8.8.8.8Once complete, save and then restart the network service:
sudo systemctl restart networkingRe-running the 'ip addr' command should now show the new details.
Add a name with this IP on the DNS.
Booster Setup
Install Booster Monitor on a macOS or Windows device. When you launch Booster Monitor, connect to the network address you created for the Booster. The initial view is similar to FileWave Client Monitor, but it shows Booster-specific details:

Select Preferences, then enter the password you created, or the default password from the Downloads page.
Change the default Booster Monitor password during setup.
This password is only used to access the Preferences from the Booster Monitor.
The Booster Monitor may then be used to configure the Booster. At a very basic level, the Server Address and port should be added.
Approving Boosters
Once a Booster is setup on the network with the relevant FileWave Server details, it should then check-in with the server and be visible in the Booster section of the FileWave Central admin application software.
Current Boosters use certificate-based approval before the FileWave Server trusts them.

The approval process generates a certificate for the Booster. There are four ways to generate a certificate for a booster.
- Select booster(s) in the Booster view → right-click → Create Certificate/Enroll Booster
- Select booster(s) in the Booster view → Create Certificate/Enroll Booster (in the button bar)
- Select booster(s) in the Booster Details → right-click → Create Certificate/Enroll Booster
- Select booster(s) in the Booster Details → Create Certificate/Enroll Booster (in the button bar)

Booster Deletion
If you delete a Booster from FileWave, FileWave revokes its certificate. If the Booster is still running, it must be approved again after its next check-in.
Booster Monitor and Configuration Settings
Booster Monitor

When you first launch Booster Monitor, it will attempt to connect to the Booster at the default address of 127.0.0.1 with the assumption that you are running the monitor on the system you installed it on. You can change that address to any valid IP address or FQDN of a Booster you have installed. If you try to connect to a Booster from FileWave Central on the list of Boosters, and it won’t connect you should check what IP it lists there for the Booster. For some network setups, the FW server may see the Booster coming from a different address than what your clients connect to it on.
Note that the standalone application, Booster Monitor, will only be able to connect to a Booster for initial configuration. Once a Booster is configured you must access Booster Monitor from FileWave Central in the Boosters section. This is because authentication is protected, and the FileWave Central application provides a secure connection. Launching Booster Monitor directly would not have that same authentication, and you will see an error about the Booster not running.
The default password will be "filewave" or if you used the https://custom.filewave.com website, it may be "f1lewav3" or whatever you set it to.
Once you have connected with your Booster, you will see its Status Monitor window. The status window lets you see the current settings and cache of the Booster.
You can set the Booster preferences to choose how the Booster can be reached, how it works with other Boosters, the main FileWave Server, and how it handles network traffic.
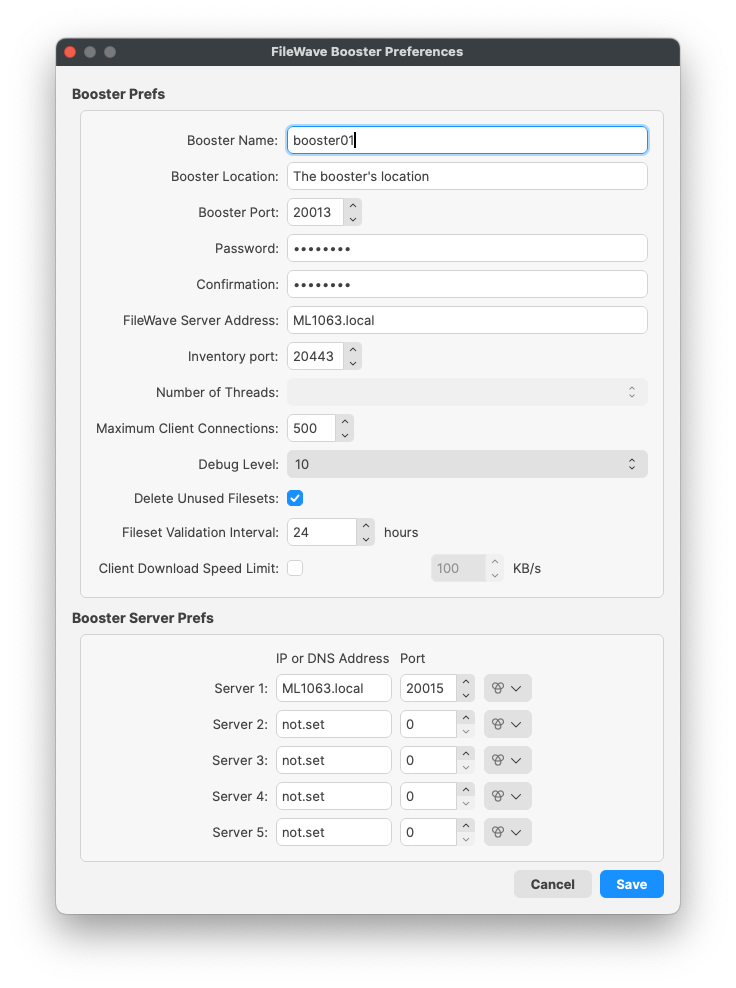
Booster Prefs

-
Booster Name – This is an identifier for you to distinguish a Booster in the FileWave Admin GUI. It does not have to be the hostname of the Booster, but would be a good practice to follow.
-
Booster Location – This is a text field to help someone know the physical location of the Booster (it shows in the Booster view of FileWave
-
Booster Port – By default, this is 20013; but you can change it to any valid TCP port that won't interfere with active connections on your network. This port should also be open in the network firewall for external connections and you need to make your booster listen on this port.
-
Booster Publish Port – This is no longer used but was for the Observe client before 14.8.0.
-
Password / Confirmation – the default password is "filewave" or “f1lewav3“ or a custom password depending on how you installed.
-
FileWave Server Address – THIS SHOULD BE THE FQDN of the FileWave Server that the booster talks with.
-
Inventory port – This should be the 20443 which is the port inventories are sent to.
-
Number of Threads – This is not used in this interface anymore and can not be changed.
-
Maximum Client Connections – This is the number of connections the Booster can accept. For macOS and Windows-based Boosters, the limit is 400, but Linux can support up to 2000 connections. After a Booster runs out of connections then clients will be sent to the next Booster in their list. If no additional Boosters are in the list of Boosters, then the client will fall back to the FileWave Server.
-
Debug Level – you can change this value if you are troubleshooting an issue with FileWave Support. The higher the level, the more log files generated.
-
Delete Unused Filesets – this setting will cause the Booster to delete any Filesets that have been deleted at the main FileWave Server. If you leave this setting unchecked, then the Booster will keep every Fileset it has cached. This can come in handy as an ad-hoc backup of all your Filesets for recovery purposes. We recommend keeping this checked so your Booster does not run out of space from old Fileset / Payload files.
-
Fileset Validation interval – this value determines how often the Booster checks to make sure it has every Fileset that the clients have requested and that the versions of the Filesets are correct and up-to-date.
-
Client Download Speed Limit – you can use this setting to throttle the bandwidth that the Booster will utilize with a given client. A word of caution though, if the Booster is feeding an IVS, you probably don't want to limit the download speed between the Booster and the IVS, as images can be quite large and take a lot of time to copy when unrestricted.
Booster Server Prefs
These settings are where you build your distribution "tree" by assigning where this Booster connects. This specifies the order in which connection attempts will be made. The best way to set this up is to follow these guidelines:
-
Set Server 1 to be the next Booster upstream from your Booster. This may be the main FileWave Server or another Booster upstream from this one.
-
Set the other servers to be Boosters in the same general area or location as this Booster or ones that are upstream from each other (e.g., #2 would be upstream from #1). Do not set these to the other Boosters in a DNS "round-robin" configuration - that would leave these Boosters all asking each other for Filesets none of them may have.
-
If you have not entered the FileWave Server as server 1, set the last value in the table to the main server. This guarantees that if all the other Boosters never respond, the main FileWave Server will be contacted.
-
The Port should be 20015 if the entry is a FW server, and 20013 if it is a Booster. This is true even though you will note that a different port is really used. FileWave will automatically change the port to the SSL port so use these values as stated here.
-
The Subscriptions Port is not used anymore but as long as it is there you can put 20003 if Server1 is a Booster and 20005 if it is a FileWave server until we remove this, but it is not used anymore.
Configuring Clients to use Boosters for Server Messages
To activate the server message routing functionality introduced with FileWave 11, you must enable it using either the option on the Booster page of Superprefs or Client Preferences. More detail on this feature is here: What are "Server Messages" and why do I want them?

Boosters View

On the above screenshot you can see new options in the Boosters tab in Boosters view:
"Device Name" column contains the name of the Booster. This is configured in Booster's preferences.
"Booster Status" column indicates green/orange/red icon based on last check-in time:
-
green = OK (check-in within the last 5 minutes and everything is fine)
-
orange = Warning / Requires Attention
-
Check-in between the last 5 and 10 minutes
-
Booster is Outdated. See: Booster Auto-Upgrade for upgrading
-
Certificate Not Installed. See for Booster installation certificate approval)
-
-
red = Danger (check-in more than 10 minutes ago and booster is offline)
"Next Scan Start Time" column indicates the start time of the next scan
"Requests per Second" column indicates the number of Booster requests per second within the last 15 minutes. Additionally, Booster statistics are sent by the Booster every 15 minutes at fixed times e.g. 0:00, 0:15, 0:30, 0:45.
"Booster Overload" column indicates if there are any clients' requests that couldn't be served by Booster. This doesn't necessarily mean the Booster is failing; it simply implies that the client has been told to retry later.
"Location" column contains location configured in Booster's preferences.
View Modes
The Boosters view offers two primary view modes: the Cards view (which requires OpenGL on the administrator machine running FileWave Admin) and the Details view. These modes operate independently. Double-clicking on a Booster in either view opens the Booster Monitor for that particular Booster.

In the Cards view, each Booster is displayed as a card, with just an overview of its status. Besides using the contextual menu, on the top-right corner of each card there are two gears that when clicked open the same menu.
When the Booster Details tab is clicked on, the Boosters tab switches to the Details view. In this mode, a list with many columns is displayed instead:

Device Details - Booster Client Preferences Reporting
What
Use these Custom Fields when you need inventory visibility into FileWave Client Booster settings, including configured Booster connections, tickle interval, current upstream server, and whether Route server messages via boosters is enabled.
When/Why
After deploying Boosters, these fields help you confirm which clients are using them and which clients are still talking directly to the FileWave Server. They can also expose check-in timing, route-server-message state, upstream server, and memory-usage details for reporting or troubleshooting.
How
Below are the custom fields that may be imported into FileWave Central (native admin). Navigate to Assistants > Custom Fields > Edit Custom Fields… > Import and select the custom fields file to import.

Once imported, you will see listed Client Config fields ready to be assigned to your devices.

After importing, highlight the Client Configuration fields you want to assign. Assigning them broadly is useful when you want a fleet-wide view of Booster use and tickle-interval settings. After selecting the desired fields, click Save.
Give the devices time to check in and acquire the new custom fields to report their data values.
As each device checks in, view these values in FileWave Client Info > Device Details. Scroll to Client Config Booster1, Booster2, and related fields to see what the client reported. The screenshot below shows an example Inventory Report (formerly Query) for routing messages, Booster upstream connections, and tickle interval.

After the fields populate, build Reports to show which devices are connected to each Booster and which clients are still going to the FileWave Server when you expected them to use a Booster.
Digging Deeper
These custom fields report the .plist data from the FileWave Client directly so the values will be accurate unless a device has not submitted inventory. Check when it last connected to see if it has and use Verify to ask a device to check in now.