Boosters
FileWave Boosters help you reduce bandwidth use in deploying to remote sites, and also help the server have fewer connections.
- Booster Overview
- Booster Deployment Planning
- Booster Setup
- Booster System Requirements
- Booster Installation
- Booster Monitor and Configuration Settings
- Device Details - Booster Client Preferences Reporting
- Booster Auto-Upgrade
- Upgrading a Single Booster
- Upgrading Multiple Boosters
- Reporting / Monitoring Booster Upgrade Process
- Adjustment of Windows Booster Settings via Scripting
- FileWave Boosters Improved Server Message Routing
- Automated Booster Configuration for Dynamic Network Environments
- Troubleshooting
Booster Overview
Introduction
A Booster in the context of FileWave is a component designed to scale the management of devices within a network. It is a server component that can be installed on macOS, Windows, and Linux systems and is used to distribute data from the FileWave server to devices. Boosters can be used with both FileWave-hosted and on-premise servers. They are optional, but often valuable for environments that need local caching, reduced WAN traffic, or better deployment performance.
Booster Planning for Customers
Hosted Customers
For Hosted customers, a Booster is optional, not required. It is often recommended when you manage macOS or Windows devices from a FileWave-hosted server because it can cache Filesets and application installers closer to clients, reduce WAN traffic to the hosted server, and improve deployment performance. For Windows devices, Boosters can also cache Microsoft OS updates and patches. Boosters do not help Android, ChromeOS, iPad, iPhone, or Apple TV device-only workflows. For Apple OS updates and upgrades on macOS, iOS, iPadOS, and tvOS, use Apple Content Caching instead.
If you choose to deploy Boosters, consider the architecture and placement before rollout. For this, refer to the Booster Deployment Planning article, which provides valuable insights and recommendations on Booster planning.
On-Premise Customers
For On-Premise customers, Boosters remain a valid and common architecture choice for caching, reducing server or WAN load, supporting distributed sites, and improving deployment performance. Refer to the Booster Deployment Planning article to plan and architect your Boosters effectively.
Why Consider Boosters?
- Enhanced Performance: Implementing Boosters can significantly reduce the load on your hosted FileWave Server, ensuring smoother, faster operations.
- Optimized Bandwidth Use: Especially if your clients primarily connect via a work network or VPN without split-tunneling, Boosters can help manage bandwidth more efficiently.
- Cost Management: One of our aims is to continuously provide you with the best services at competitive rates. The more we collaborate in optimizing bandwidth (a significant factor in our pricing), the easier it is for us to maintain and possibly reduce costs. This mutual effort benefits us all.
Key Insights on Boosters
- Applicable For: macOS and Windows Fileset/application caching, plus Microsoft OS update caching for Windows. For Apple OS updates and upgrades on macOS, iOS, iPadOS, and tvOS, use Apple Content Caching.
- Platform Compatibility: Can run on macOS, Windows, and Linux. While macOS and Windows support around 400 connections, Linux can handle a whopping 2,000 connections. Even a Linux setup within VirtualBox on macOS or Windows can cater to these 2,000 connections.
- Functionality: Boosters essentially cache Filesets from the FileWave Server. • Resources: For a more visual understanding, please check our Boosters best practices video. Moreover, we've compiled a range of KB articles right here for your convenience.
Clients are configured to use Boosters. Where configured, the first client requesting any Non-MDM Fileset from the server, waits for the Booster to download the Fileset first; the client in-turn receives the Fileset from the Booster. Any subsequent clients, requesting an already Boosted Fileset, will benefit immediately from the Fileset now stored on the Booster.
Since clients are the driving force, there is no need to store the entire repository of Fileset, but just those requested by downstream clients. Boosters may also be configured to remove boosted Filesets which are deleted from the server, essentially self managing their storage space.
Boosters may be cascaded with each other, handling even the most complex network environments.
Whether your clients are on a centralized network or scattered across multiple networks (like remote workers or students), Boosters can be immensely beneficial.
What's Next?
If you're unsure about how to set up Boosters, or if you believe you've already implemented them but would like a configuration review, we're here to help! A quick call can clarify and assist. Please connect with Customer Technical Support about any issues that arise, but use Professional Services & Training for guidance on best practices as a paid service or leverage the YouTube video listed below.
Related Content
Booster Deployment Planning
Planning
Scalability is largely determined by how many devices can be maintained simultaneously in a managed environment. A standalone FileWave Server can support a limited number of devices. Linux and macOS-based FileWave Servers can support between 1000-1500 desktop/laptop devices. Because the Filesets sent to iOS devices usually consist of either profiles or URLs to the iTunes/App Store. The amount of data sent from the FileWave Server is a lot less with iOS devices, so a FileWave server can support many more iOS devices than it can computers.
If you also include Apple caching servers into your environment this will then allow iOS and MDM enrolled macOS devices to download VPP apps from your Apple caching servers instead of having to leave your network to get them.
Some rules-of-thumb for Booster planning:
- A Booster should be configured for every set of 2,000 or fewer devices.
- A Booster should be configured to support every physical location, such as a building, campus, or city.
- If there are multiple locations in a given geographic area that is removed from the data center hosting the FileWave Server, each of the location Boosters should connect to a central area Booster; e.g., city A has an area Booster, sites 1 – 4 each has at least one Booster, that is connected to Booster A, which in turn is connected to the FileWave Server.
The end result of the configuration model above is that each of the sites has between 1-3 FileWave Boosters, some of which are serving a couple of locations due to lighter loads, and some are consolidated into a "round-robin" load balancing cluster. There are a series of Boosters directly connected to the FileWave server to begin spreading out the load, then those Boosters provide Filesets to the individual site Boosters.


Boosters and Imaging
Since FileWave v9, Imaging has been able to take advantage of Boosters. Images are stored as Filesets, and as such, can be cached on Boosters. When you create an Image Fileset to use in deployment, the Imaging Virtual Server (IVS) handles the network boot drive for PXE boot; but the Image Fileset that is used in the deployment is stored at the main FileWave server - unless there is a Booster on the subnet where the IVS resides. In that case, the original Fileset will remain on the main server; but the Image Fileset that is used for the imaging process will come from the Booster on that subnet.
Booster Setup
Everything you need to set up your Booster Environment
Booster System Requirements
Requirements
As of January 2025 v15.5.1 the below are supported for running Boosters, but for updated information always consult the specific release on the Downloads Page. The FileWave Booster can also be installed on a Virtual Machine.
- macOS 12, 13 (Intel and Apple Silicon)
- Windows 10 (Ent/Pro 21H1 and above), 11 (Ent/Pro 21H2 and above)
- Windows Server 2022, Windows Server 2025
- Debian 12.x
The general guidance on CPU / RAM / Network / Storage is:
- CPU: For physical hardware use at least the equivalent of an Intel Core i5 or Apple Silicon
- CPU: For virtual hardware, use at least 2 virtual processors
- RAM: Use a minimum of 8Gb of RAM with 16Gb recommended
- Network: At least 1Gb network connection
- Storage: 1Tb is a recommended minimum, but this will depend highly on OS updates and Filesets as well as if Windows Imaging is in use leveraging a Booster
Make sure you have enough space on your hard disk to store the cached Filesets for your FileWave Clients. A Booster could conceivably contain a full mirrored set of all Filesets on the main FileWave server.
Booster Installation
Description
A FileWave Booster can run on macOS, Windows, or Debian. Installers, appliances, and current install commands are on FileWave Software Downloads.
Installers
Debian
Debian has two options. FileWave provides a pre-built Debian VM, similar to the FileWave Server appliance, or you can self-install the Booster software on a Debian system.
macOS & Windows
Installers are available as PKG or MSI.
The Windows MSI can install, repair, or remove the Booster software.
Install Paths
Booster installs the software to one of the following locations:
- Windows: C:\Program Files\FileWave\fwBooster.exe
- macOS, Debian: /usr/local/sbin/fwBooster
Booster Configuration
Once installed, configuration is via the Booster Monitor application, available for both macOS and Windows from the same downloads page.
Note that the standalone application, Booster Monitor, will only be able to connect to a Booster for initial configuration. Once a Booster is configured you must access Booster Monitor from FileWave Central in the Boosters section. This is because authentication is protected, and the FileWave Central application provides a secure connection. Launching Booster Monitor directly would not have that same authentication, and you will see an error about the Booster not running.
Installation
Debian
If using the pre-built Debian Appliance, simply add the VM to the VM infrastructure. Alternatively, follow the commands provided on the downloads page.
macOS & Windows
Run the relevant PKG or MSI installer, accepting any terms and agreements.
Custom Installers may be created, pre-defining details, e.g. Server Address, Port and Booster Monitor Preferences password: Custom Installers
Configuration
Network Address
Configure a static IP for the Booster and consider adding a Domain Name within the DNS for this IP.
macOS and Windows Boosters can be configured through Settings. Debian Boosters require command-line network configuration.
Debian IP Setup
Network Interface
The current IP may be determined with the 'ip addr' command:
# ip addr
1: lo: <LOOPBACK,UP,LOWER_UP> mtu 65536 qdisc noqueue state UNKNOWN group default qlen 1000
link/loopback 00:00:00:00:00:00 brd 00:00:00:00:00:00
inet 127.0.0.1/8 scope host lo
valid_lft forever preferred_lft forever
inet6 ::1/128 scope host noprefixroute
valid_lft forever preferred_lft forever
2: ens192: <BROADCAST,MULTICAST,UP,LOWER_UP> mtu 1500 qdisc mq state UP group default qlen 1000
link/ether 00:0c:29:9d:4d:7e brd ff:ff:ff:ff:ff:ff
altname enp11s0
inet 192.168.1.98/24 brd 192.168.1.255 scope global dynamic ens192
valid_lft 68853sec preferred_lft 68853sec
inet6 fe80::20c:29ff:fe9d:4d7e/64 scope link
valid_lft forever preferred_lft foreverThe key part here is the name of the network interface. In the above example, this is 'ens192'.
Edit Network File
Make a backup of the current file:
cp /etc/network/interfaces /etc/network/interfaces-mybackupEdit the original file:
sudo nano /etc/network/interfacesAdd the chosen IP and other necessary details for this interface. Given the details above, it may look something like the below once edited:
# This file describes the network interfaces available on your system
# and how to activate them. For more information, see interfaces(5).
source /etc/network/interfaces.d/*
# The loopback network interface
auto lo
iface lo inet loopback
# The primary network interface
iface ens192 inet static
address 192.168.1.22
netmask 255.255.255.0
gateway 192.168.1.255
dns-nameservers 8.8.4.4 8.8.8.8Once complete, save and then restart the network service:
sudo systemctl restart networkingRe-running the 'ip addr' command should now show the new details.
Add a name with this IP on the DNS.
Booster Setup
Install Booster Monitor on a macOS or Windows device. When you launch Booster Monitor, connect to the network address you created for the Booster. The initial view is similar to FileWave Client Monitor, but it shows Booster-specific details:

Select Preferences, then enter the password you created, or the default password from the Downloads page.
Change the default Booster Monitor password during setup.
This password is only used to access the Preferences from the Booster Monitor.
The Booster Monitor may then be used to configure the Booster. At a very basic level, the Server Address and port should be added.
Approving Boosters
Once a Booster is setup on the network with the relevant FileWave Server details, it should then check-in with the server and be visible in the Booster section of the FileWave Central admin application software.
Current Boosters use certificate-based approval before the FileWave Server trusts them.

The approval process generates a certificate for the Booster. There are four ways to generate a certificate for a booster.
- Select booster(s) in the Booster view → right-click → Create Certificate/Enroll Booster
- Select booster(s) in the Booster view → Create Certificate/Enroll Booster (in the button bar)
- Select booster(s) in the Booster Details → right-click → Create Certificate/Enroll Booster
- Select booster(s) in the Booster Details → Create Certificate/Enroll Booster (in the button bar)

Booster Deletion
If you delete a Booster from FileWave, FileWave revokes its certificate. If the Booster is still running, it must be approved again after its next check-in.
Booster Monitor and Configuration Settings
Booster Monitor

When you first launch Booster Monitor, it will attempt to connect to the Booster at the default address of 127.0.0.1 with the assumption that you are running the monitor on the system you installed it on. You can change that address to any valid IP address or FQDN of a Booster you have installed. If you try to connect to a Booster from FileWave Central on the list of Boosters, and it won’t connect you should check what IP it lists there for the Booster. For some network setups, the FW server may see the Booster coming from a different address than what your clients connect to it on.
Note that the standalone application, Booster Monitor, will only be able to connect to a Booster for initial configuration. Once a Booster is configured you must access Booster Monitor from FileWave Central in the Boosters section. This is because authentication is protected, and the FileWave Central application provides a secure connection. Launching Booster Monitor directly would not have that same authentication, and you will see an error about the Booster not running.
The default password will be "filewave" or if you used the https://custom.filewave.com website, it may be "f1lewav3" or whatever you set it to.
Once you have connected with your Booster, you will see its Status Monitor window. The status window lets you see the current settings and cache of the Booster.
You can set the Booster preferences to choose how the Booster can be reached, how it works with other Boosters, the main FileWave Server, and how it handles network traffic.
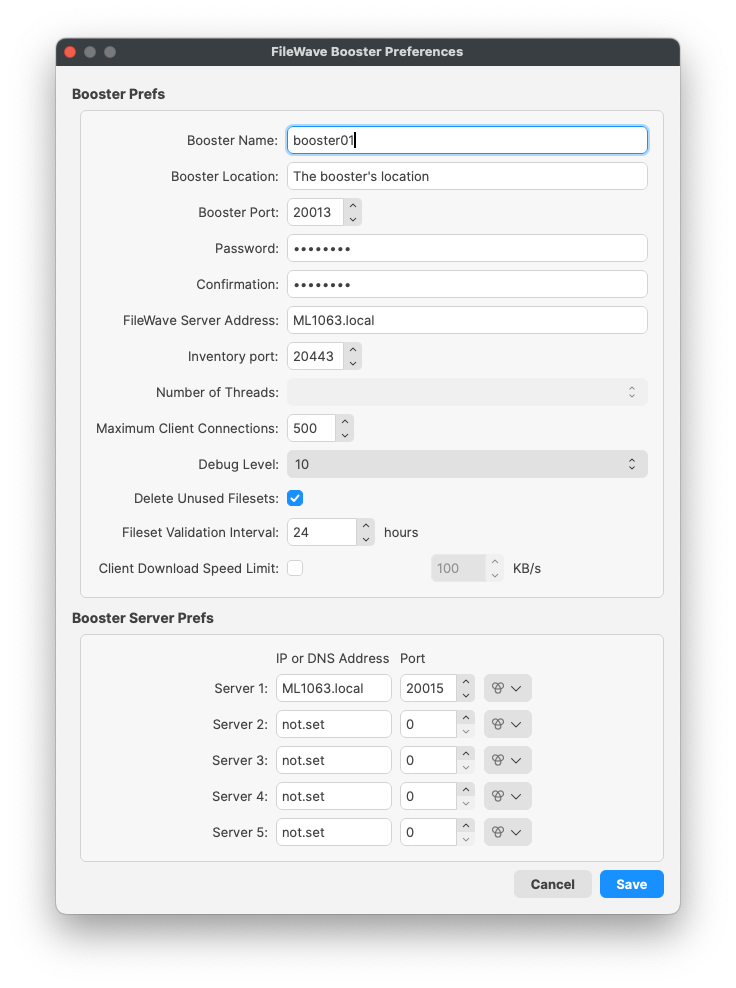
Booster Prefs

-
Booster Name – This is an identifier for you to distinguish a Booster in the FileWave Admin GUI. It does not have to be the hostname of the Booster, but would be a good practice to follow.
-
Booster Location – This is a text field to help someone know the physical location of the Booster (it shows in the Booster view of FileWave
-
Booster Port – By default, this is 20013; but you can change it to any valid TCP port that won't interfere with active connections on your network. This port should also be open in the network firewall for external connections and you need to make your booster listen on this port.
-
Booster Publish Port – This is no longer used but was for the Observe client before 14.8.0.
-
Password / Confirmation – the default password is "filewave" or “f1lewav3“ or a custom password depending on how you installed.
-
FileWave Server Address – THIS SHOULD BE THE FQDN of the FileWave Server that the booster talks with.
-
Inventory port – This should be the 20443 which is the port inventories are sent to.
-
Number of Threads – This is not used in this interface anymore and can not be changed.
-
Maximum Client Connections – This is the number of connections the Booster can accept. For macOS and Windows-based Boosters, the limit is 400, but Linux can support up to 2000 connections. After a Booster runs out of connections then clients will be sent to the next Booster in their list. If no additional Boosters are in the list of Boosters, then the client will fall back to the FileWave Server.
-
Debug Level – you can change this value if you are troubleshooting an issue with FileWave Support. The higher the level, the more log files generated.
-
Delete Unused Filesets – this setting will cause the Booster to delete any Filesets that have been deleted at the main FileWave Server. If you leave this setting unchecked, then the Booster will keep every Fileset it has cached. This can come in handy as an ad-hoc backup of all your Filesets for recovery purposes. We recommend keeping this checked so your Booster does not run out of space from old Fileset / Payload files.
-
Fileset Validation interval – this value determines how often the Booster checks to make sure it has every Fileset that the clients have requested and that the versions of the Filesets are correct and up-to-date.
-
Client Download Speed Limit – you can use this setting to throttle the bandwidth that the Booster will utilize with a given client. A word of caution though, if the Booster is feeding an IVS, you probably don't want to limit the download speed between the Booster and the IVS, as images can be quite large and take a lot of time to copy when unrestricted.
Booster Server Prefs
These settings are where you build your distribution "tree" by assigning where this Booster connects. This specifies the order in which connection attempts will be made. The best way to set this up is to follow these guidelines:
-
Set Server 1 to be the next Booster upstream from your Booster. This may be the main FileWave Server or another Booster upstream from this one.
-
Set the other servers to be Boosters in the same general area or location as this Booster or ones that are upstream from each other (e.g., #2 would be upstream from #1). Do not set these to the other Boosters in a DNS "round-robin" configuration - that would leave these Boosters all asking each other for Filesets none of them may have.
-
If you have not entered the FileWave Server as server 1, set the last value in the table to the main server. This guarantees that if all the other Boosters never respond, the main FileWave Server will be contacted.
-
The Port should be 20015 if the entry is a FW server, and 20013 if it is a Booster. This is true even though you will note that a different port is really used. FileWave will automatically change the port to the SSL port so use these values as stated here.
-
The Subscriptions Port is not used anymore but as long as it is there you can put 20003 if Server1 is a Booster and 20005 if it is a FileWave server until we remove this, but it is not used anymore.
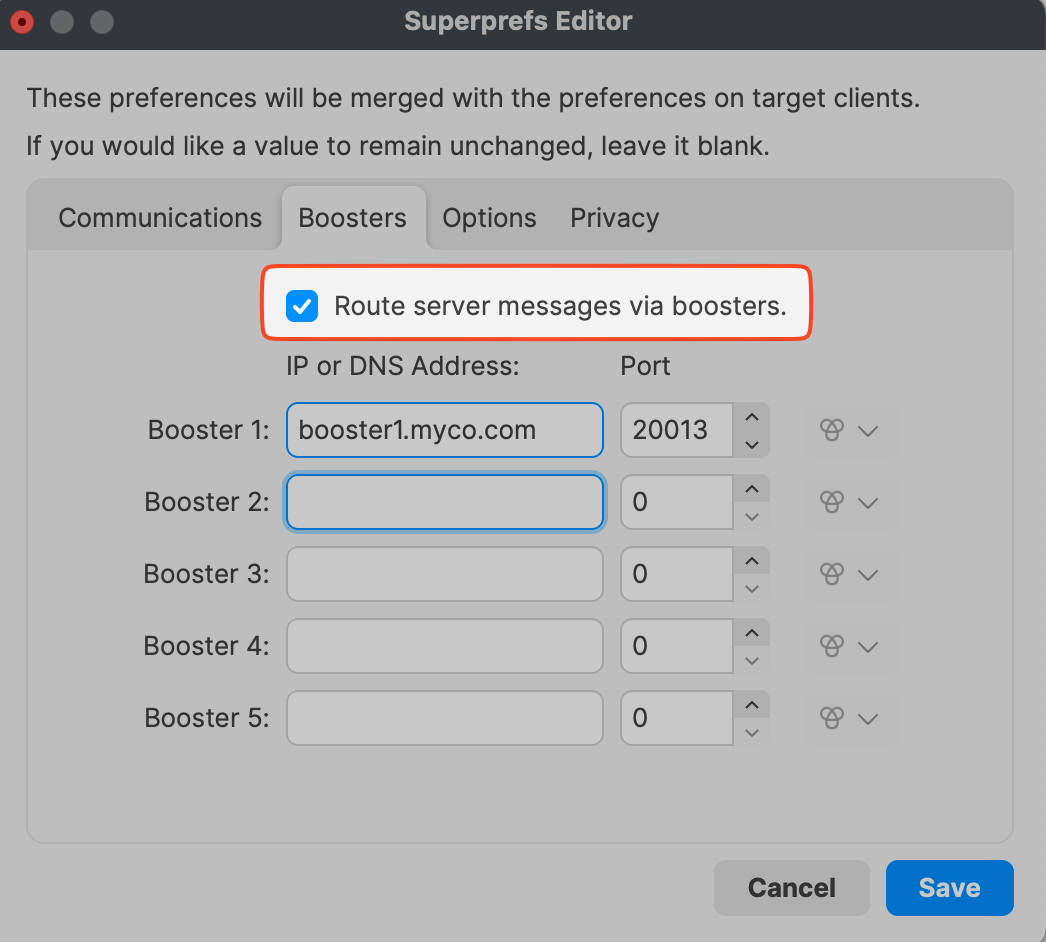
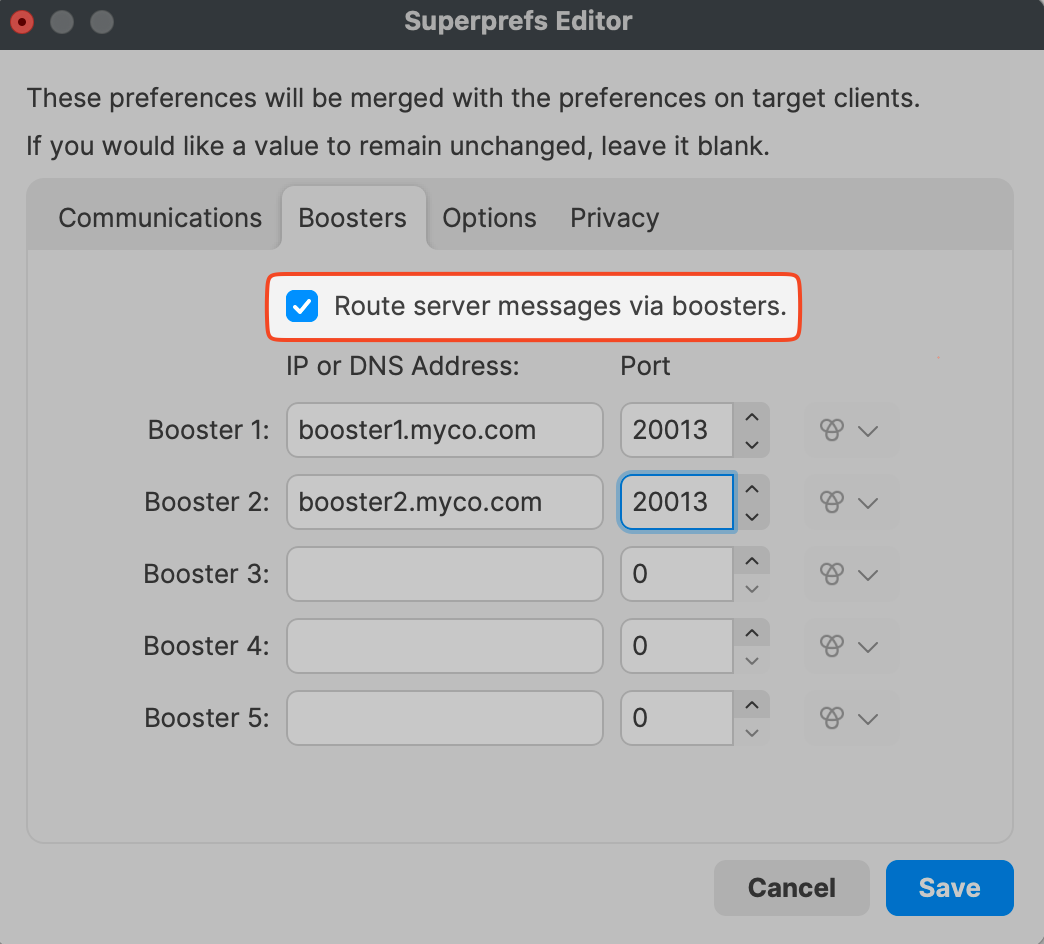
Configuring Clients to use Boosters for Server Messages
To activate the server message routing functionality introduced with FileWave 11, you must enable it using either the option on the Booster page of Superprefs or Client Preferences. More detail on this feature is here: What are "Server Messages" and why do I want them?

Boosters View

On the above screenshot you can see new options in the Boosters tab in Boosters view:
"Device Name" column contains the name of the Booster. This is configured in Booster's preferences.
"Booster Status" column indicates green/orange/red icon based on last check-in time:
-
green = OK (check-in within the last 5 minutes and everything is fine)
-
orange = Warning / Requires Attention
-
Check-in between the last 5 and 10 minutes
-
Booster is Outdated. See: Booster Auto-Upgrade for upgrading
-
Certificate Not Installed. See for Booster installation certificate approval)
-
-
red = Danger (check-in more than 10 minutes ago and booster is offline)
"Next Scan Start Time" column indicates the start time of the next scan
"Requests per Second" column indicates the number of Booster requests per second within the last 15 minutes. Additionally, Booster statistics are sent by the Booster every 15 minutes at fixed times e.g. 0:00, 0:15, 0:30, 0:45.
"Booster Overload" column indicates if there are any clients' requests that couldn't be served by Booster. This doesn't necessarily mean the Booster is failing; it simply implies that the client has been told to retry later.
"Location" column contains location configured in Booster's preferences.
View Modes
The Boosters view offers two primary view modes: the Cards view (which requires OpenGL on the administrator machine running FileWave Admin) and the Details view. These modes operate independently. Double-clicking on a Booster in either view opens the Booster Monitor for that particular Booster.

In the Cards view, each Booster is displayed as a card, with just an overview of its status. Besides using the contextual menu, on the top-right corner of each card there are two gears that when clicked open the same menu.
When the Booster Details tab is clicked on, the Boosters tab switches to the Details view. In this mode, a list with many columns is displayed instead:

Device Details - Booster Client Preferences Reporting
What
Use these Custom Fields when you need inventory visibility into FileWave Client Booster settings, including configured Booster connections, tickle interval, current upstream server, and whether Route server messages via boosters is enabled.
When/Why
After deploying Boosters, these fields help you confirm which clients are using them and which clients are still talking directly to the FileWave Server. They can also expose check-in timing, route-server-message state, upstream server, and memory-usage details for reporting or troubleshooting.
How
Below are the custom fields that may be imported into FileWave Central (native admin). Navigate to Assistants > Custom Fields > Edit Custom Fields… > Import and select the custom fields file to import.

Once imported, you will see listed Client Config fields ready to be assigned to your devices.

After importing, highlight the Client Configuration fields you want to assign. Assigning them broadly is useful when you want a fleet-wide view of Booster use and tickle-interval settings. After selecting the desired fields, click Save.
Give the devices time to check in and acquire the new custom fields to report their data values.
As each device checks in, view these values in FileWave Client Info > Device Details. Scroll to Client Config Booster1, Booster2, and related fields to see what the client reported. The screenshot below shows an example Inventory Report (formerly Query) for routing messages, Booster upstream connections, and tickle interval.

After the fields populate, build Reports to show which devices are connected to each Booster and which clients are still going to the FileWave Server when you expected them to use a Booster.
Digging Deeper
These custom fields report the .plist data from the FileWave Client directly so the values will be accurate unless a device has not submitted inventory. Check when it last connected to see if it has and use Verify to ask a device to check in now.
Booster Auto-Upgrade
Centralized Booster upgrade from within FileWave, including single-Booster upgrades, multi-Booster scheduling, and monitoring. Starting with FileWave 16.3.0, compatible outdated Boosters can also be automatically scheduled for upgrade after a FileWave Server upgrade.
Upgrading a Single Booster
What
The Booster upgrade feature gives FileWave administrators a centralized way to upgrade Boosters from within FileWave.
When/Why
Having to use SSH or remote control for every Booster upgrade takes too much time. Starting with FileWave 14.4, the Boosters and Booster Details tabs provide a manual upgrade action when an applicable upgrade is available. Starting with FileWave 16.3.0, compatible outdated Boosters can also be scheduled automatically after a FileWave Server upgrade. The default delay is seven days. On FileWave 16.3.x, change it in FileWave Central > Preferences > General. Starting with FileWave 16.4.0, the setting is in FileWave Central > Preferences > Upgrades. Make the change before upgrading the Server. A value of 0 days schedules eligible Boosters immediately. The value is evaluated when the Server upgrade creates the Booster schedule; changing it afterward does not retroactively move already scheduled work.
FileWave 16.4 makes automatic Booster upgrades more resilient. FileWave now checks both the reported upgrade status and the installed Booster version before treating an upgrade as complete. A failed attempt can be retried automatically within defined limits, and the attempts are logged. If the Booster remains below the target version or reports Failed after the automatic retries, investigate the logs and manually schedule the upgrade again.
Some criteria used to determine whether an applicable upgrade is available are:
- Booster has to be at least 14.4
- The operating system version has to be supported by the target version
- The booster has to be running in order to trigger an upgrade
- The version number of the target version has to be higher than the currently installed version (i.e you cannot use this feature to reinstall/downgrade to a specific version)
This article discusses manually upgrading a single Booster immediately. In FileWave 16.3.0 and later, this is especially useful when you do not want to wait for the automatic post-Server-upgrade schedule or when you want to handle one Booster separately.
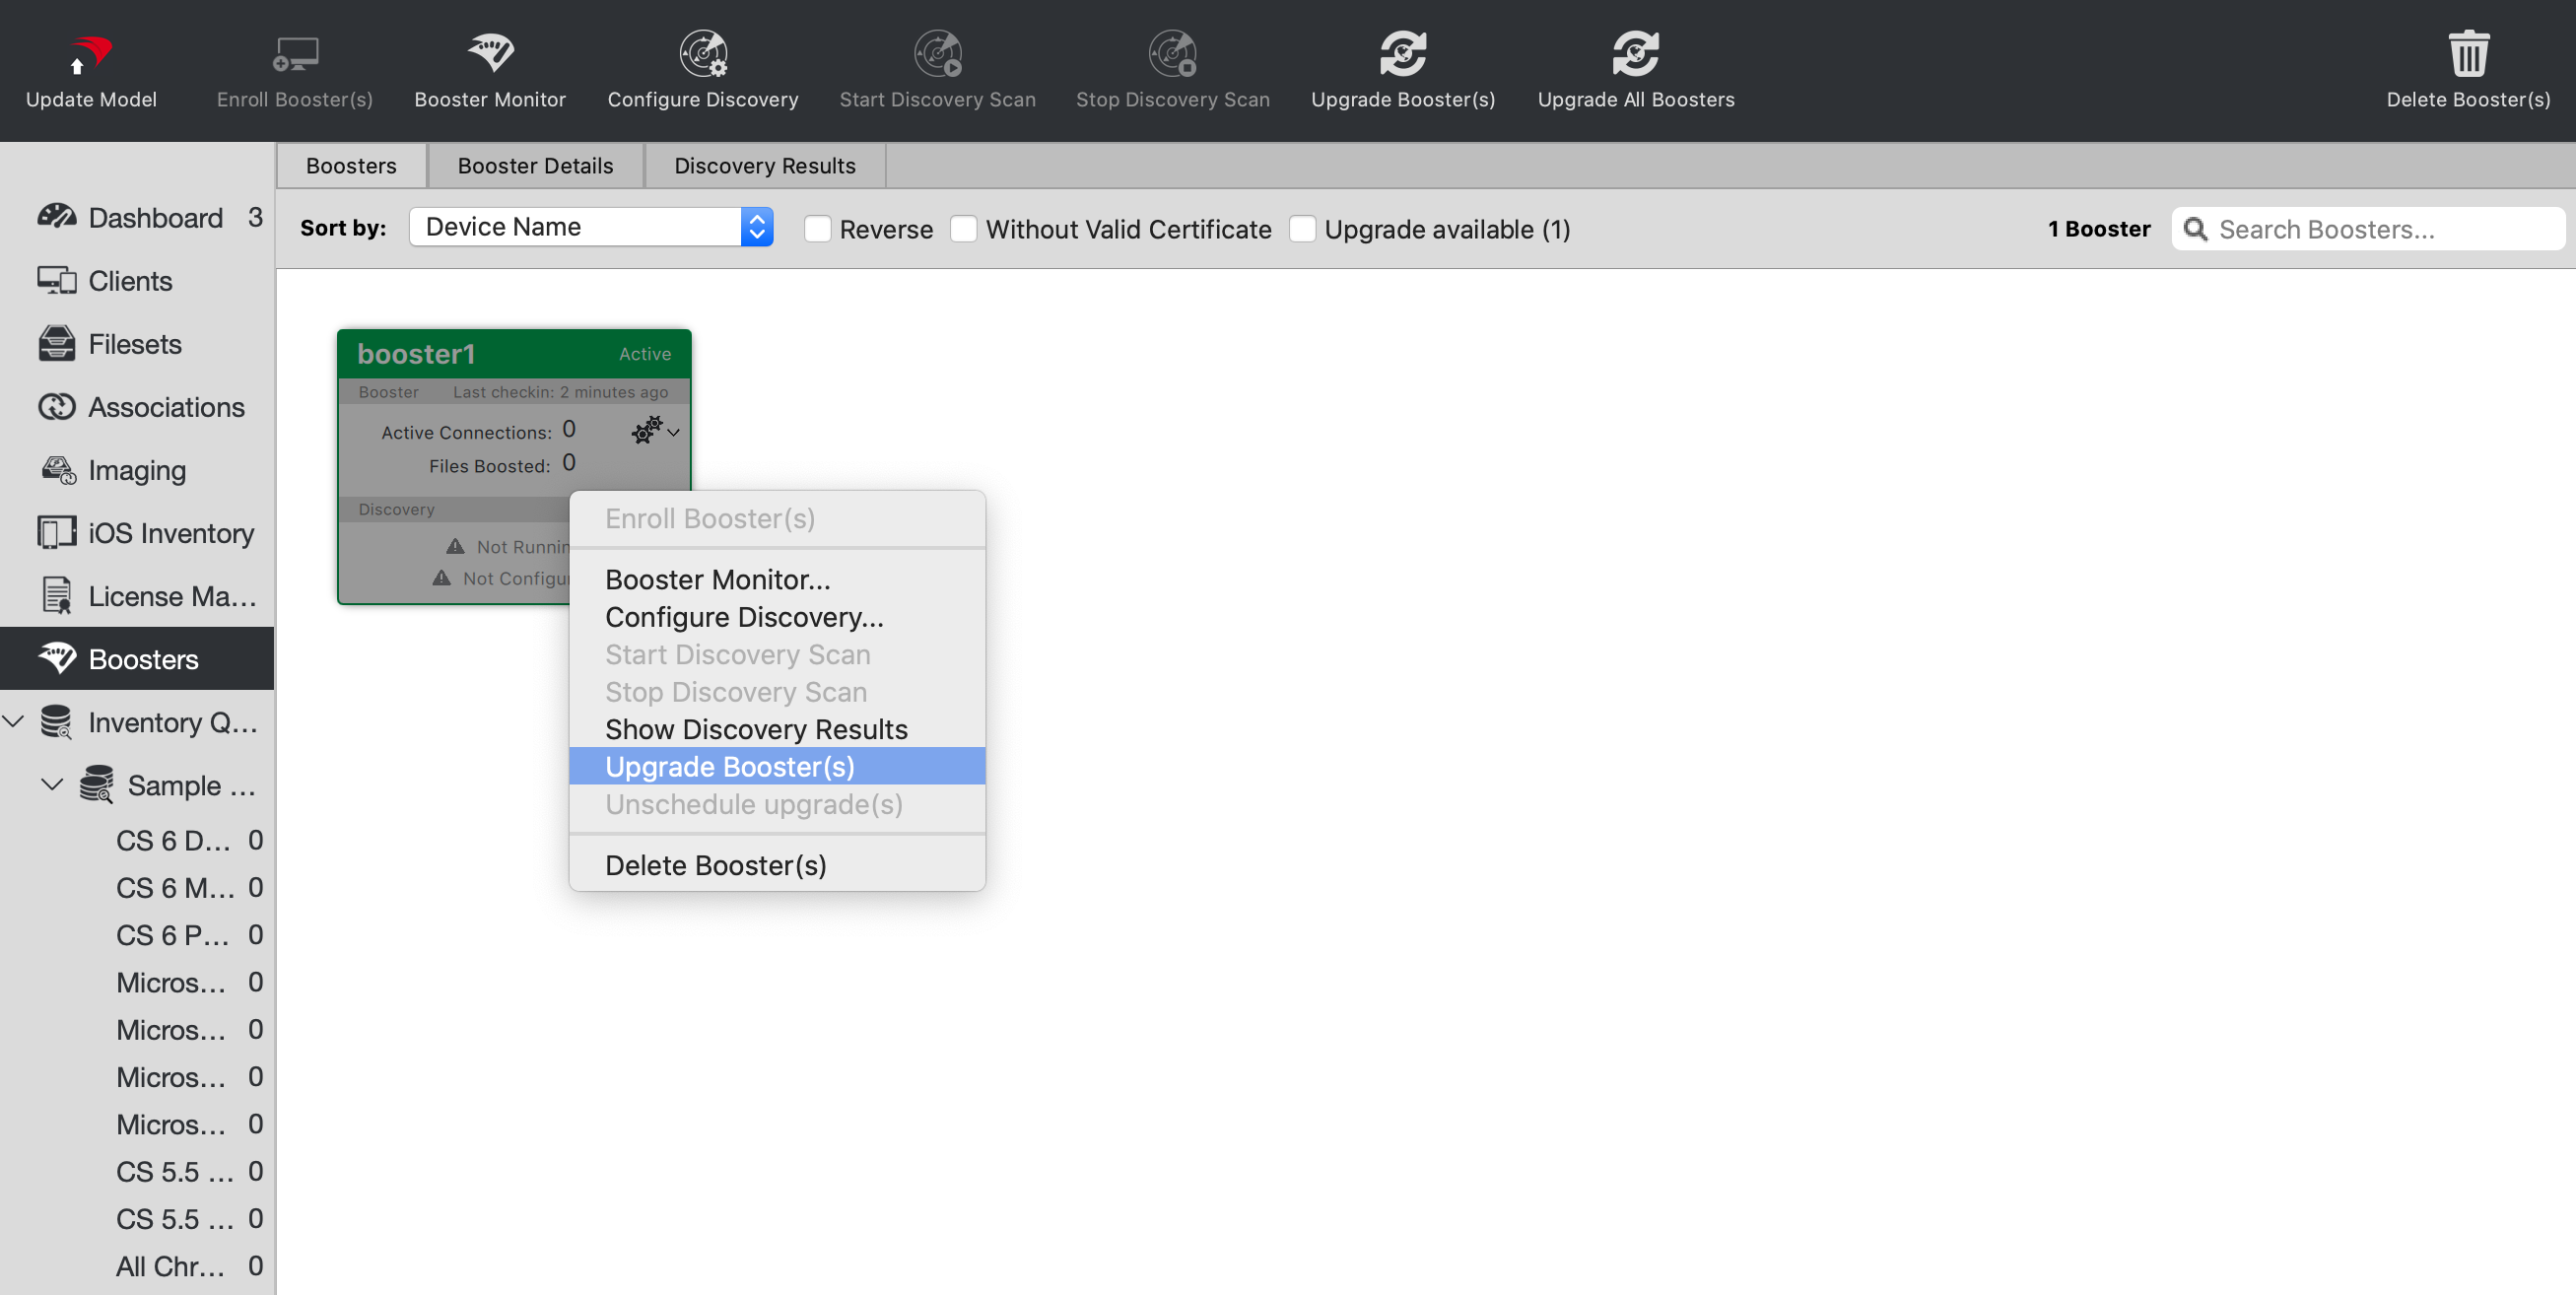
How
To upgrade a particular booster, just right-click it and select "Upgrade Booster". You can also right-click the booster in the "Booster Details" tab.
Upgrading Multiple Boosters
What
The Booster upgrade feature gives FileWave administrators a centralized way to upgrade multiple Boosters from within FileWave.
When/Why
Having to use SSH or remote control for every Booster upgrade takes too much time. Starting with FileWave 14.4, the Boosters and Booster Details tabs provide manual upgrade actions when an applicable upgrade is available. Starting with FileWave 16.3.0, compatible outdated Boosters can also be scheduled automatically after a FileWave Server upgrade. The default delay is seven days. On FileWave 16.3.x, change it in FileWave Central > Preferences > General. Starting with FileWave 16.4.0, the setting is in FileWave Central > Preferences > Upgrades. Make the change before upgrading the Server. A value of 0 days schedules eligible Boosters immediately. The value is evaluated when the Server upgrade creates the Booster schedule; changing it afterward does not retroactively move already scheduled work.
FileWave 16.4 makes automatic Booster upgrades more resilient. FileWave now checks both the reported upgrade status and the installed Booster version before treating an upgrade as complete. Failed attempts can be retried automatically within defined limits, and each attempt is logged. Use the Booster views to confirm the installed version and identify Boosters that still require manual attention after retries are exhausted.
Some criteria used to determine whether an applicable upgrade is available are:
- Booster has to be at least 14.4
- The operating system version has to be supported by the target version
- The booster has to be running in order to trigger an upgrade
- The version number of the target version has to be higher than the currently installed version (i.e you cannot use this feature to reinstall/downgrade to a specific version)
This article discusses manually scheduling upgrades for multiple Boosters. In FileWave 16.3.0 and later, it also complements the automatic post-Server-upgrade scheduling workflow when you want to start upgrades immediately or control the selection yourself.
How
It is also possible to schedule multiple Boosters for upgrade at once. In this case, one Booster will be upgraded after another in alphabetical order. In FileWave 16.3.0 and later, compatible outdated Boosters may already be scheduled automatically after a Server upgrade. The simplest way to start that process immediately, or to manually schedule multiple Boosters yourself, is to use the "Upgrade All Boosters" button in the toolbar of the Boosters section of the native console:

It automatically schedules all selected Boosters to upgrade. Alternatively, you can select multiple Boosters and use the context menu or toolbar button to upgrade them.
The preference moved in FileWave 16.4.
- FileWave 16.3.x: FileWave Central > Preferences > General
- FileWave 16.4.0 and later: FileWave Central > Preferences > Upgrades
The default delay is 7 days after upgrading the Server. Set it to 0 days before the Server upgrade when eligible Boosters should be scheduled immediately. This preference is evaluated when the Server upgrade creates the Booster schedule, so changing it afterward does not retroactively reschedule Boosters already in the queue.
On FileWave 16.3.x, a failed automatic attempt requires administrator intervention. Starting with FileWave 16.4.0, FileWave validates the reported result against the installed Booster version and can retry failed attempts automatically within defined limits. If a Booster still reports Failed or remains below the target version after those retries, inspect its upgrade log and schedule it again manually.
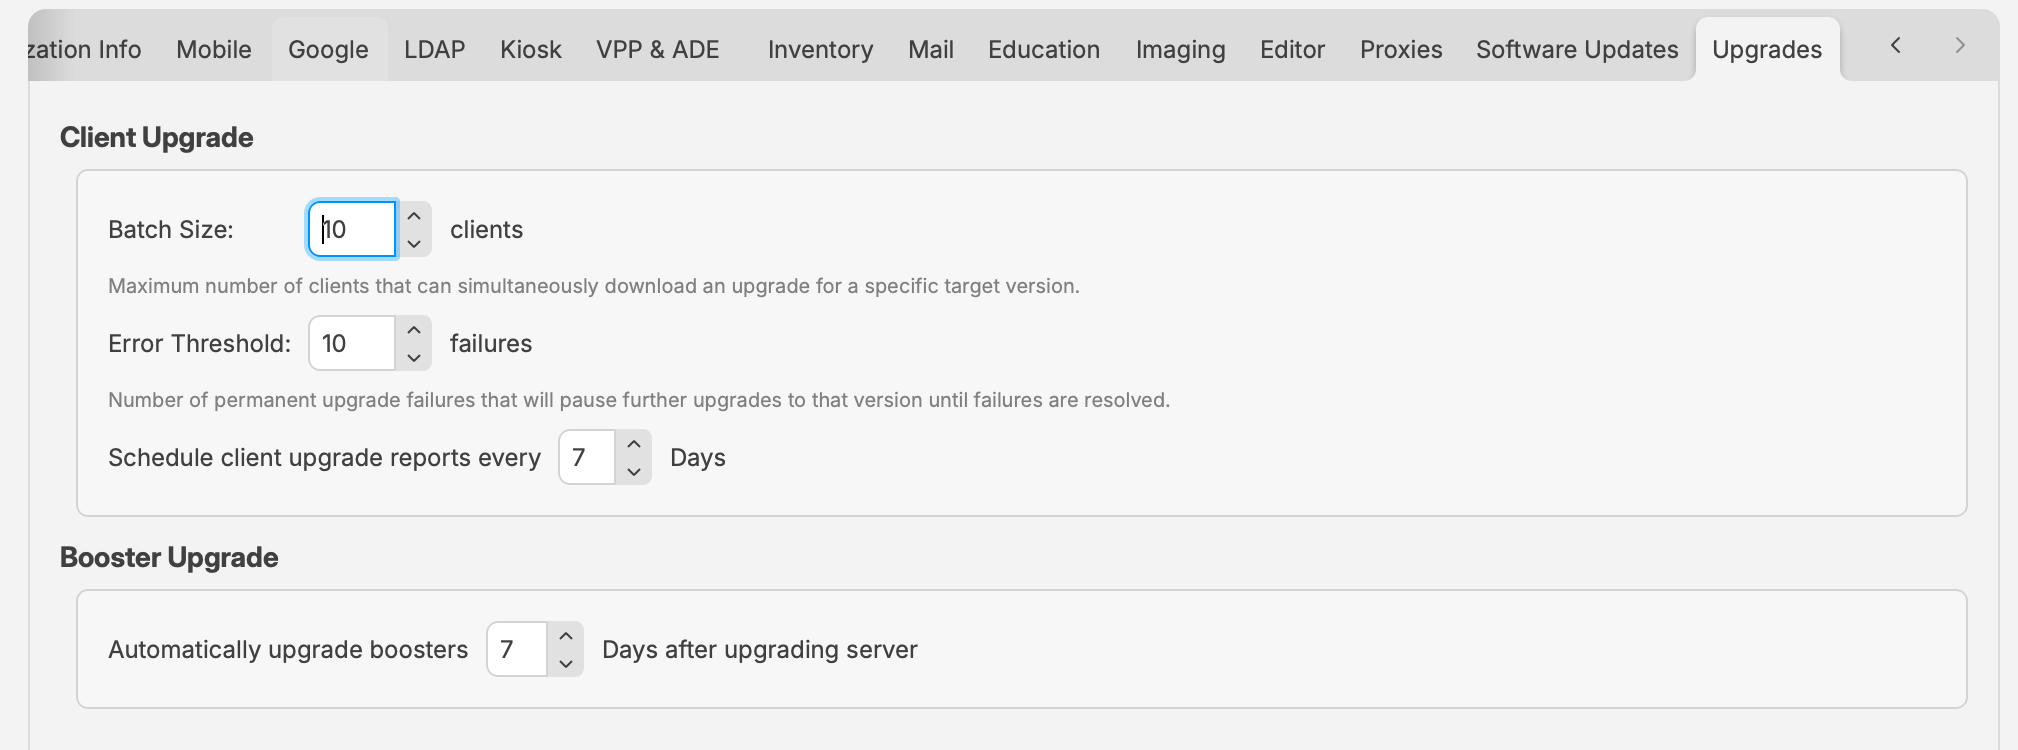
FileWave Central 16.4.0 and later: the automatic Booster-upgrade delay is in the Upgrades preferences tab.
To track the progress of upgrading multiple boosters, you can use the new Booster Upgrade status field mentioned earlier. You can also use the new check box Upgrade available which allows you to filter out boosters that have no upgrade available. This check box is displayed in both the Boosters and Booster Details tabs:


With this new functionality, the process to upgrade Boosters should be greatly simplified, especially for larger environments.
Related Content
- Booster deployment planning
- Booster installation
- Upgrading a Single Booster
- Reporting / Monitoring Booster Upgrade Process
Reporting / Monitoring Booster Upgrade Process
What
The Booster upgrade feature gives FileWave administrators a centralized way to schedule and monitor Booster upgrades from within FileWave.
When/Why
Having to use SSH or remote control for every Booster upgrade takes too much time. Starting with FileWave 14.4, the Boosters and Booster Details tabs provide upgrade actions when an applicable upgrade is available. Starting with FileWave 16.3.0, compatible outdated Boosters can also be scheduled automatically after a FileWave Server upgrade. The default delay is seven days. On FileWave 16.3.x, change it in FileWave Central > Preferences > General. Starting with FileWave 16.4.0, the setting is in FileWave Central > Preferences > Upgrades. Make the change before upgrading the Server. A value of 0 days schedules eligible Boosters immediately. The preference is evaluated when the Server upgrade creates the schedule; changing it afterward does not retroactively move work already in the queue.
Starting with FileWave 16.4.0, automatic Booster reporting validates the installed version as well as the reported status, and failed attempts can be retried automatically within defined limits.
Some criteria used to determine whether an applicable upgrade is available are:
- Booster has to be at least 14.4
- The operating system version has to be supported by the target version
- The booster has to be running in order to trigger an upgrade
- The version number of the target version has to be higher than the currently installed version (i.e you cannot use this feature to reinstall/downgrade to a specific version)
This article discusses the reporting and monitoring functions around both manually scheduled Booster upgrades and the automatic post-Server-upgrade scheduling introduced in FileWave 16.3.0.
How
In the "Booster Details" tab, there are three fields that indicate the status of the Booster upgrade queue. These fields apply whether the upgrade was scheduled manually or automatically after a Server upgrade:
Upgrade Status - This field shows the current progress of the booster with one of the below statuses:
- No upgrade in progress: Currently, no upgrade is being installed. This status is also shown when the last upgrade was successful.
- Downloading: Indicates that the booster is currently downloading a new booster upgrade from the server; a necessary step before the upgrade can be installed.
- Installing: The booster is currently installing an update. This should either lead to the "No upgrade in progress" or "Failed" state. The default timeout is one hour.
- Failed: Indicating the upgrade was unable to complete.
Available Upgrade Version - Reports which upgrade version is available to this particular booster, given its operating system.
Scheduled for Upgrade - This flag indicates whether the booster is in the current upgrade queue.
- 'true': Booster is either processing an upgrade or waiting for a preceding Booster to finalize an upgrade, including failures.
- 'false': No upgrade is scheduled
Automatic-upgrade behavior depends on the FileWave version.
- FileWave 16.3.x: each Booster receives one automatic attempt in the scheduled run. A failure can require the administrator to address the Booster or remove it from the schedule before continuing.
- FileWave 16.4.0 and later: FileWave verifies both the reported upgrade result and the installed Booster version before marking the work complete. Failed attempts can be retried automatically within defined limits, and each attempt is logged.
After a FileWave 16.4 retry sequence, investigate any Booster that still reports Failed or remains below the Available Upgrade Version. Do not treat a restart or No upgrade in progress status by itself as proof that the target version was installed.
- Booster deployment planning
- Booster installation
- Upgrading a Single Booster
- Upgrading Multiple Boosters
Digging Deeper
When an upgrade is triggered through FileWave Central, the server sends a notification to the Booster with a URL parameter pointing to the upgrade package (deb for Linux, pkg for Mac, MSI for Windows) that shall be downloaded and installed. Currently, this URL will point to the FileWave CDN (https://fwdl.filewave.com/) for official releases. Both "Boosters" and "Booster Details" view offer a filter to only show Boosters that can be upgraded.
The location for auto upgrade logs is;
- Linux and MacOS:
/var/log/fwbooster_upgrade.log - Windows:
C:\ProgramData\FileWave\FWBooster\Data Folder\upgradeBooster.log
Adjustment of Windows Booster Settings via Scripting
Description
Boosters running on Windows systems may be configured with a SuperPrefs Fileset: Creating a Superprefs Fileset
Alternatively, it is possible to script Booster settings using a script. The following script may be used to change booster settings of multiple clients preferences:
Directions
@echo off
NET STOP "FileWave WinClient">NUL
REG ADD HKLM\SOFTWARE\WOW6432Node\FileWave\WinClient /v booster1 /t REG_SZ /d no.booster.set /f
REG ADD HKLM\SOFTWARE\WOW6432Node\FileWave\WinClient /v booster1port /t REG_DWORD /d 0 /f
REG ADD HKLM\SOFTWARE\WOW6432Node\FileWave\WinClient /v booster2 /t REG_SZ /d no.booster.set /f
REG ADD HKLM\SOFTWARE\WOW6432Node\FileWave\WinClient /v booster2port /t REG_DWORD /d 0 /f
REG ADD HKLM\SOFTWARE\WOW6432Node\FileWave\WinClient /v booster3 /t REG_SZ /d no.booster.set /f
REG ADD HKLM\SOFTWARE\WOW6432Node\FileWave\WinClient /v booster3port /t REG_DWORD /d 0 /f
REG ADD HKLM\SOFTWARE\WOW6432Node\FileWave\WinClient /v booster4 /t REG_SZ /d no.booster.set /f
REG ADD HKLM\SOFTWARE\WOW6432Node\FileWave\WinClient /v booster4port /t REG_DWORD /d 0 /f
REG ADD HKLM\SOFTWARE\WOW6432Node\FileWave\WinClient /v booster5 /t REG_SZ /d no.booster.set /f
REG ADD HKLM\SOFTWARE\WOW6432Node\FileWave\WinClient /v booster5port /t REG_DWORD /d 0 /f
NET START "FileWave WinClient"
exit
Copy this script to a text editor. This script can change the names of all boosters, from booster1 through booster5. Add and remove lines according to requirements. Edit each entry per Booster, replacing:
- 'no.booster.set' with the name of the Booster
- Booster port to the required port; set as 20013 if Booster uses default settings
Leave as 'no.booster.set' where there is no Booster required.
Always use Fully Qualified Domain Names for the Booster name
Save the script with the .bat extension. Ensure the script is configured for 'Execute once when activated' from the 'Get Info' > 'Executables' tab.
Example
Modify Booster 1 as:
- 'booster1.filewave.com'
- 20013
REG ADD HKLM\SOFTWARE\WOW6432Node\FileWave\WinClient /v booster1 /t REG_SZ /d booster1.filewave.com /f
REG ADD HKLM\SOFTWARE\WOW6432Node\FileWave\WinClient /v booster1port /t REG_DWORD /d 20013 /fFileWave Boosters Improved Server Message Routing
What
FileWave 11 introduced Booster Routing, a feature that allows off-loading direct traffic to the server by routing messages via Booster. This feature provides additional security if you only allow boosters to connect to your server and have all your devices only reach boosters. With FileWave 15.0, the internal notification system has switched entirely to NATS, replacing ZMQ; NATS, in addition to built-in security features and improved performances, brings much more flexibility and can then be used in more areas.
When/Why
FileWave 15.3 can now use NATS as the communication protocol for all maintenance messages between client and server. Fileset delivery still uses the classic protocol, but messages like Fileset status or check-in now use the lightweight and fast delivery mechanism offered by NATS.
How
Please review the Boosters documentation. If you manage Windows or macOS systems in either a FileWave-hosted or on-premise environment, one or more Boosters are optional but often recommended, especially when many clients share a LAN or VPN path. Boosters can minimize server and WAN traffic by caching Filesets and application installers closer to clients; in hosted deployments this also reduces traffic from the hosted FileWave server. For Windows devices, Boosters can also cache Microsoft OS updates and patches. For Apple OS updates and upgrades on macOS, iOS, and iPadOS, use Apple Content Caching instead. If you use Boosters for server-message routing, ensure that "Route server messages via boosters." is enabled in your Superprefs or Custom FileWave Client.
Automated Booster Configuration for Dynamic Network Environments
Description
Automated Booster configuration is useful when macOS or Windows devices move between offices, home networks, or other network locations. This example shows one way to let clients adjust their Booster settings based on location criteria.
Information
The included Fileset provides a macOS example. The Windows section gives a comparable approach using Task Scheduler.
Requirements:
- Provided Booster Configuration Fileset - BoosterConfiguration.fileset.zip
- Editing of 'booster_list.plist'
The Fileset contains the following items:
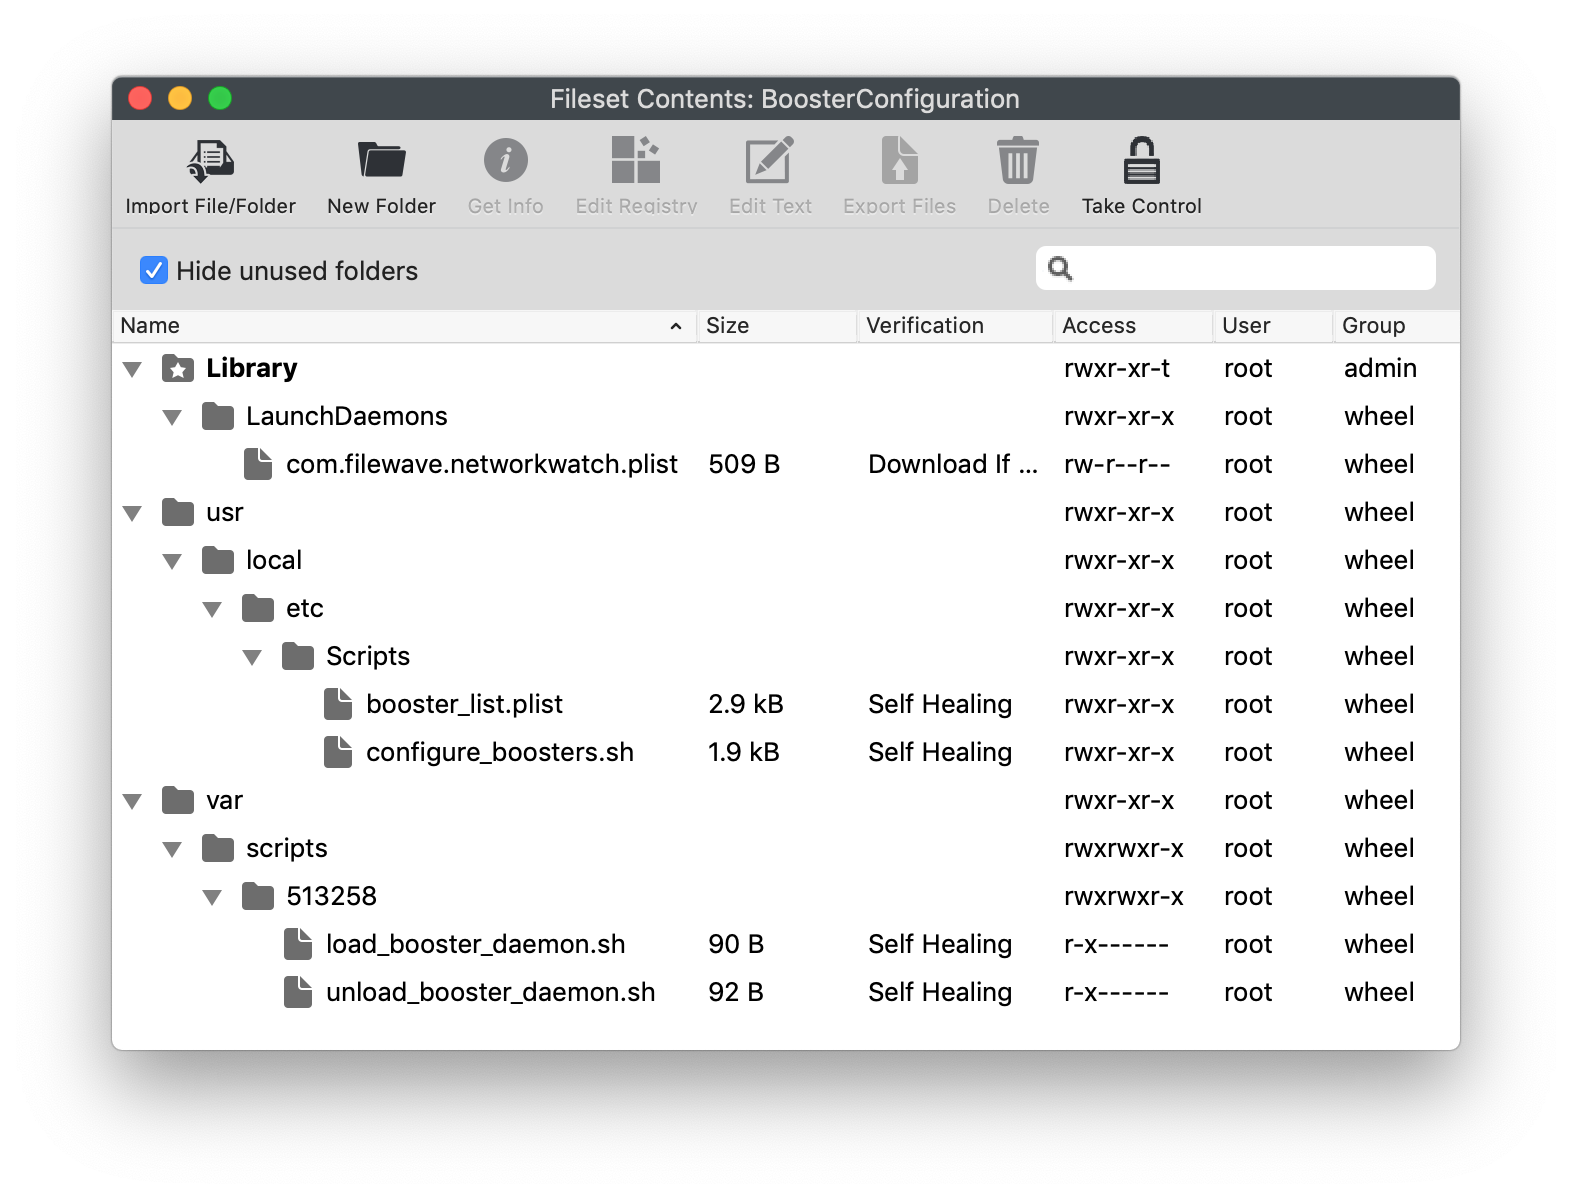
- Activation Script: load_booster_daemon.sh
- Pre-Uninstallation Script: unload_booster_daemon.sh
- LaunchDaemon: com.filewave.networkwatch.plist
- Script: configure_boosters.sh
- Plist file: booster_list.plist
The Fileset will place the LaunchDaemon which is set to be triggered on load and any network change. Where a network change has occurred, the provided script will run, reconfigure the Booster settings if required and then restart the FileWave client. By providing an additional plist file for booster settings per domain, the file may be updated without the requirement to reload the LaunchDaemon to react to the updated settings.
LaunchDaemon Verification
The verification settings of the LaunchDaemon are set to 'Download if missing'. The script triggered by the daemon will read and write to this file, preventing unnecessary re-runs. Therefore, the file should not be changed to Self-Healing.
As of FileWave 16, editing the client plist file will automatically cause the client to re-read the plist, without the need to restart the client. Although restarting the client is not necessary, it won't harm. The 'configure_boosters.sh' script contained within the Fileset restarts the client. The bundled script still restarts the client; leave it in place unless you have tested the behavior in your environment. Below is the line that can be commented out if desired.
# Restart the client to pick up the change
/usr/local/bin/fwcontrol client restartTo comment out the restart, place a hash symbol at the beginning of the line, as per the line above.
If commenting out this line, the change will only be picked up once the LaunchDaemon is reloaded, after the client receives the newly updated script.
Directions
- Download and import the Fileset into FileWave Central
- Edit the 'booster_list.plist' file to meet requirements
The example uses the device hostname to identify a domain. The script then reads the matching dictionary from booster_list.plist, writes those Booster settings to the client preferences, and restarts the client.
For example, if the command returned the following:
hostname
$ hostname
ML1015.filewave.ch
The script would look in the booster_list.plist file for a dictionary called 'filewave.ch' and configure the client to match this dictionary. The example file has been provided with 3 dictionaries for the following domains:
- 'filewave.ch'
- 'local'
- 'home'
The example dictionary from the 'booster_list.plist' for 'filewave.ch' is:
booster_list.plist
<key>filewave.ch</key>
<dict>
<key>booster1</key>
<string>booster1.filewave.ch</string>
<key>booster1Port</key>
<integer>20013</integer>
<key>booster1PublishPort</key>
<integer>20003</integer>
<key>booster2</key>
<string>booster2.filewave.ch</string>
<key>booster2Port</key>
<integer>20013</integer>
<key>booster2PublishPort</key>
<integer>20003</integer>
<key>booster3</key>
<string>booster3.filewave.ch</string>
<key>booster3Port</key>
<integer>20013</integer>
<key>booster3PublishPort</key>
<integer>20003</integer>
<key>booster4</key>
<string>booster4.filewave.ch</string>
<key>booster4Port</key>
<integer>20013</integer>
<key>booster4PublishPort</key>
<integer>20003</integer>
<key>booster5</key>
<string>no.booster.set</string>
<key>booster5Port</key>
<integer>0</integer>
<key>booster5PublishPort</key>
<integer>0</integer>
<key>boosterRouting</key>
<false/>
</dict>
Edit the domain name, Booster names, and settings for each dictionary to match your environment. If no Booster should be used for one of the five Booster slots, use no.booster.set as shown for booster5.
If the device reports a domain that is not in the list, a default domain will be used. Specify which default domain should be used within the 'booster_list.plist' file. The example provided is set to use 'local' as the default domain and if implemented, the values of the 'local' dictionary keys will be read from the 'booster_list.plist' file.
Default Domain
<key>default</key>
<string>local</string>
Once all domains have been set, with relevant criteria for each dictionary, the Fileset may be associated, tested and then implemented.
Windows
Windows has a similar option to LaunchDaemons, 'Task Scheduler'. Powershell may be used to import scheduled tasks:
A scheduled task can be triggered from network event IDs such as:
- Log: Microsoft-Windows-NetworkProfile/Operational
- Source: NetworkProfile
- Event ID 10000 Connection to a network
- Event ID 10001 Disconnection from a network
This task could trigger a script. Once created, it may then be exported, added to a Fileset with an appropriate script to be triggered by the task, designed to update the booster configuration of the client, and installed using an Activation script by the register-scheduledtask Powershell command.
Conclusion
This is one example of automatic Booster configuration. IP ranges can also be used, but overlapping ranges between locations can cause the wrong settings to apply. Some environments may need both domain and IP-range checks.
There is no one-size-fits-all Fileset for this. Choose a location signal that reliably distinguishes the networks where each Booster configuration should apply.
Incorrect Configuration
If devices receive a Booster configuration that does not match their location, management traffic may fail until the misconfiguration is corrected. Test with a small group before broad deployment.
Troubleshooting
What are "Server Messages" and why do I want them?
What
Route server messages via boosters sends selected FileWave Client/server messages through Boosters instead of requiring every client to communicate directly with the FileWave Server for those messages. You may see this option in Superprefs Editor or Client Monitor.
When/Why
FileWave Clients check in with the FileWave Server on a schedule (2 minutes by default). Server messages cover the additional client/server communication that lets the client receive status, commands, and related updates.
The Default TCP and UDP Port Usage article lists 20015 and 20017 for client/server communication. NATS ports also handle notifications for workflows such as initiating a TeamViewer session.
Note: The default port setting is 20015. However, SSL is now required, and the system will automatically use port 20017 instead when 20015 is entered. Do not manually set the port to 20017. Always enter 20015, and the system will handle the SSL port change for you.
How
Server messages are the communications a client needs to work with the server. If routing is enabled, publishing and routing services can send messages like the ones below through Boosters. Enable this option when Boosters should handle more of that client communication and reduce direct load on the FileWave Server.
-
Checkin
-
Fileset properties and status
-
Software updates
-
Lock / Unlock client
-
Kiosk categories and item info
Booster ID Generation
Description
If cloned Booster VMs keep the same Booster ID, FileWave may show one Booster as missing or let multiple Boosters overwrite the same Booster record. Regenerate the ID on each clone so every Booster enrolls as a separate record.
Regenerate the Booster ID when IDs conflict.
Directions
Run the following command in a Booster shell to remove the existing Booster identity files and generate a new Booster ID.
Linux & macOS
fwcontrol booster stop && rm -f /etc/xdg/FileWave/Booster.conf && rm -f /var/FWBooster/*.key && rm -f /var/FWBooster/*.crt && fwcontrol booster start
After the Booster restarts, use 'Enroll Booster(s)' from its contextual menu, even if it was enrolled before.
Enable core dumps for booster crashes
For Debian
It is important that you undo this after the issue has been identified.
Step-by-step guide
-
edit this file:
sudo vi /usr/local/etc/filewave/supervisor/supervisord-booster.conf -
Uncomment this line:
command=/bin/bash -c "ulimit -c unlimited && /usr/local/sbin/fwbooster -
restart the booster:
sudo /etc/init.d/fw-booster restart -
edit this file:
sudo vi /etc/sysctl.conf -
Add the lines below:
kernel.core_uses_pid = 1kernel.core_pattern = /tmp/core-%e-%s-%u-%g-%p-%tfs.suid_dumpable = 2 -
Reload the settings in /etc/sysctl.conf:
sysctl -p -
Open the limits configuration file:
sudo vi /etc/security/limits.conf -
Add the following lines to set unlimited core dump sizes for all users:
* soft core unlimited* hard core unlimited -
Save and close the file. Note: Changes take effect upon the next login. You may need to restart the system or re-login for the settings to apply.
For testing purpose:
Kill booster process e.g:
(ps ax | grep fw)kill -6 3014
Check if a core dump is generated under /tmp.
Should be something like this:
core-fwbooster-6-0-0-8440-1509016449