Apple provide a list of certificates automatically trusted per OS and OS version: [Apple Trusted Certs](https://support.apple.com/en-gb/HT209143)
## Information Root trusted SSL certificates can be purchased from a Certificate Authority (CA). Apple provides lists of trusted root certificates: [https://support.apple.com/en-gb/HT204132](https://support.apple.com/en-gb/HT204132) CA Vendors include: - GoDaddy - Digicert - GlobalSign / AlphaSSL - Trustwave - and many more... As FileWave supports wildcard certificates, if you already have a wildcard certificate this could be uploaded without additional purchase. Wildcard certificates are indicated by a \* before the domain name. e.g. - Wildcard cert: \*.initech.com - Dedicated cert: filewave.initech.comIf you already have a certificate bundle but it isn’t in the .p12 format, you can use this link to convert the file - [Digicert: How to convert a certificate into the appropriate format](https://knowledge.digicert.com/solution/SO26449.html)
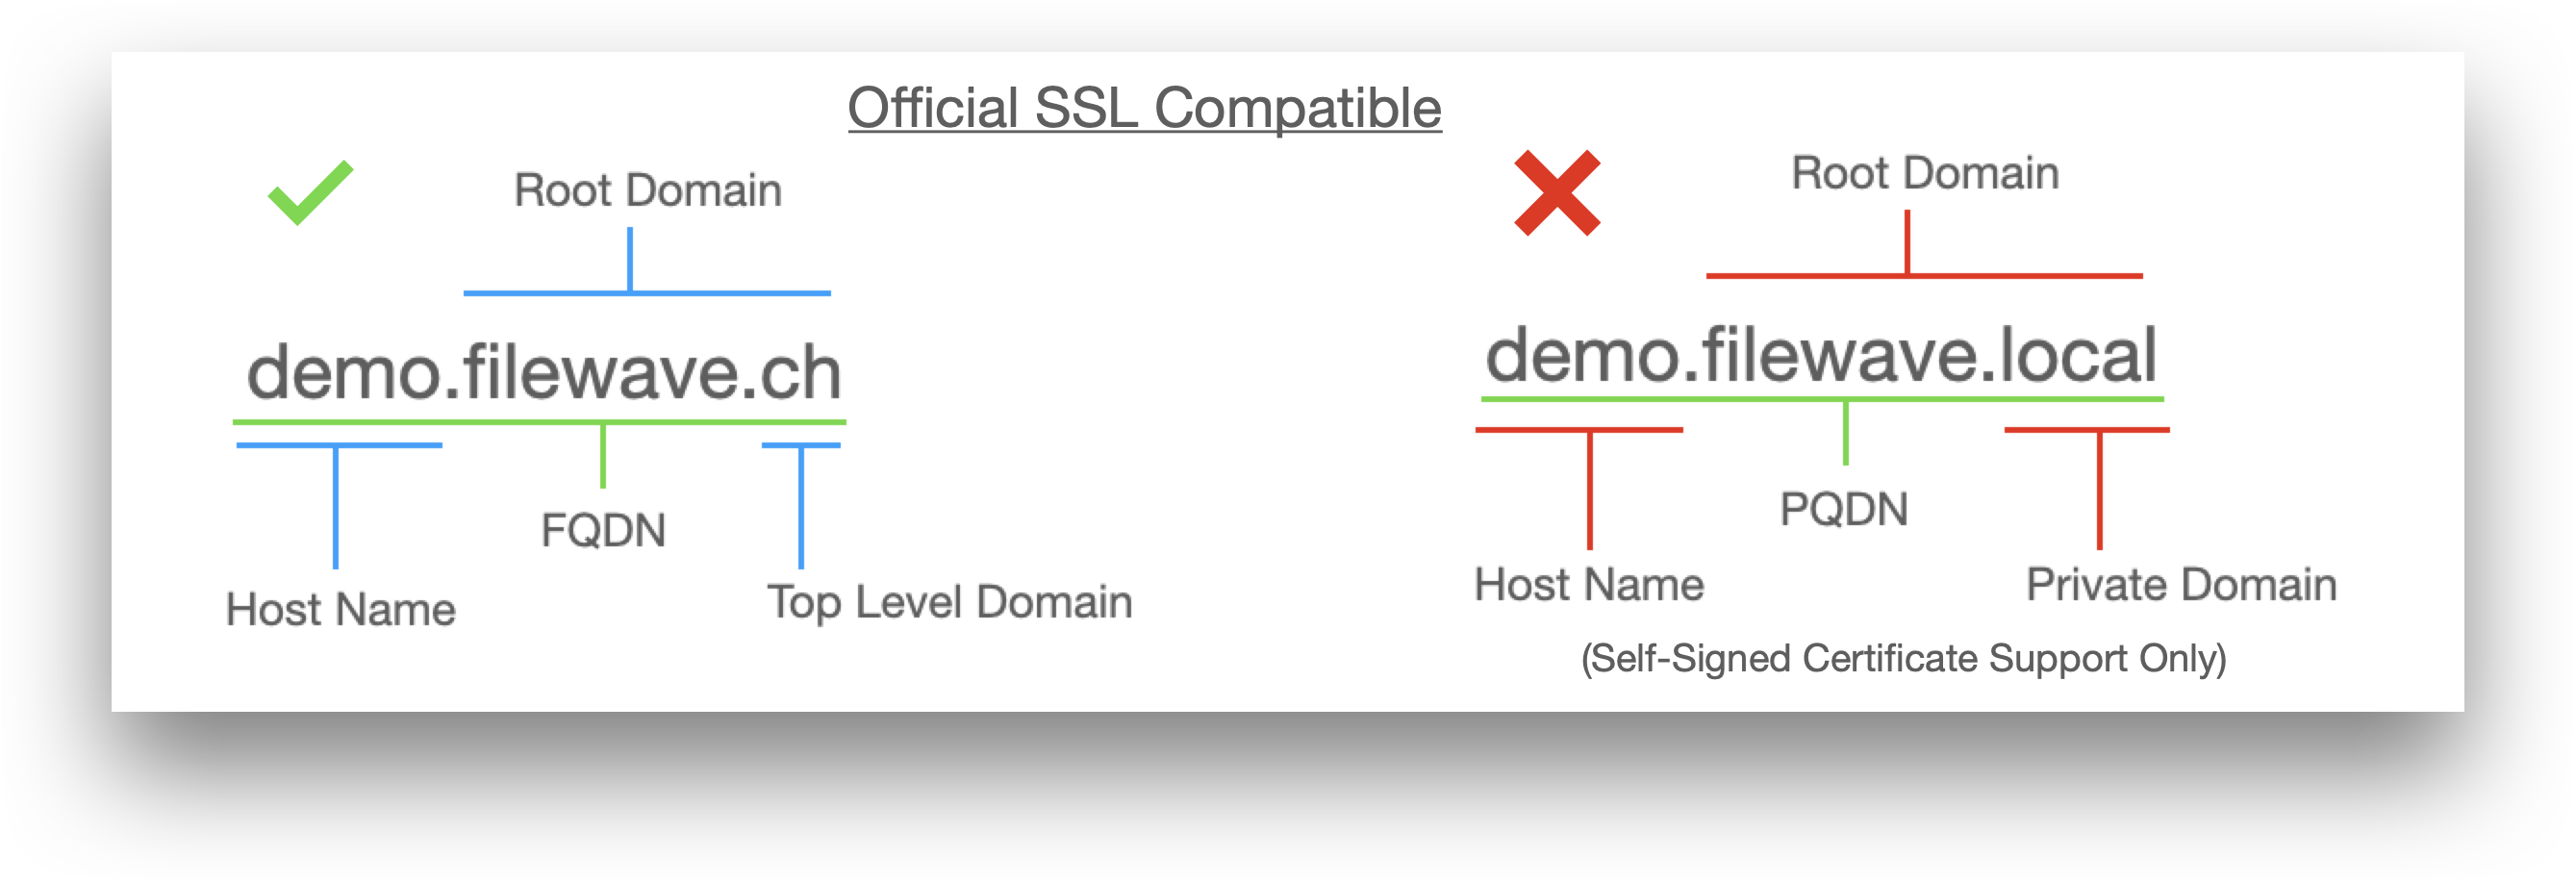
## Requirements Obtaining an official 3rd party root trusted SSL certificate will be dependent upon the Server's current domain. Only a domain that includes an official 'Top Level Domain' (TLD) may qualify for a root trusted SSL certificate and the root domain must be registered to purchase a certificate. Where the Server uses an internal-only domain, it is not possible to transition to an official certificate without first changing the domain where the Server belongs. See migration below. Example TLD: - .com - .org - .edu In the context of a Website, the root domain refers to the highest level of the hierarchy, e.g apple.com, microsoft.com, google.com For example: - demo.filewave.ch is a Fully Qualified Domain Name (FQDN) of a server called 'demo' in the root domain 'filewave.ch', the TLD being 'ch'. - demo.filewave.local does not have a TLD and instead is using a private internal domain of '.local'. Without a TLD they are known as a Partially Qualified Domain Name (PQDN)Often the term FQDN is used as a way to indicate the idea of writing the Server name along with its connected domain. Strictly speaking, with internal private-only domains, this should be referred to as PQDN. Not only does FileWave recommend using an FQDN, but regardless of using an FQDN or PQDN, always specify the Server name along with its connected domain name (rather than just the hostname) when setting any preferences, be that for Server, Clients, Boosters, etc. We also discourage the use of IP in settings.
 ## Migration Migration of certificates will not pose any issues as long as: - Wildcard cert: domain matches the domain name of the previous self-signed certificate - Dedicated cert: Server name and domain matches the name of the previous self-signed certificateIf during migration the Server's Host Name and/or Domain Name changes, all MDM devices will lose MDM communication with the FileWave Server and require re-enrolment into MDM
| Case | Current Certificate | New Certificate | Result |
| Any certificate to any certificate (changing name) | Self-signed cert = filewave.initech.com | Root trusted cert = fw.initech.com | CHANGING THE FQDN WILL REQUIRE DEVICES TO BE ENROLLED AGAIN |
| Self-signed to root trusted (keeping the same name) | Self-signed cert = filewave.initech.com | Root trusted cert = filewave.initech.com | This will NOT require devices to be enrolled again |
| Self-signed to wildcard | Self-signed cert = filewave.initech.com | Wild Card cert = \*.initech.com | This will NOT require devices to be enrolled again |
| Root trusted to root trusted | Root trusted cert = filewave.initech.com | Root trusted cert = filewave.initech.com | This will NOT require devices to be enrolled again |
**Renewing Certificates** When renewing a current expiring certificate with a CA, step 1 is not required, if your CA allows the use of previously used private keys and certificate requests. You will however require the key in step 3. If you have not stored the key elsewhere, the key should always be accessible on your current FileWave Server in /usr/local/filewave/certs/. If you have not stored the key safely and the Server was to break such that the key was not retrievable, the whole process would need to be repeated instead.
**Certificate Expiry** Certificate expiry should be avoided. Renewing certificates should be done in advance to maintain full working order. If the certificate expires before you have a chance to renew, managed devices will not be able to connect to the FileWave Server. However, once it is renewed your devices will check back in.
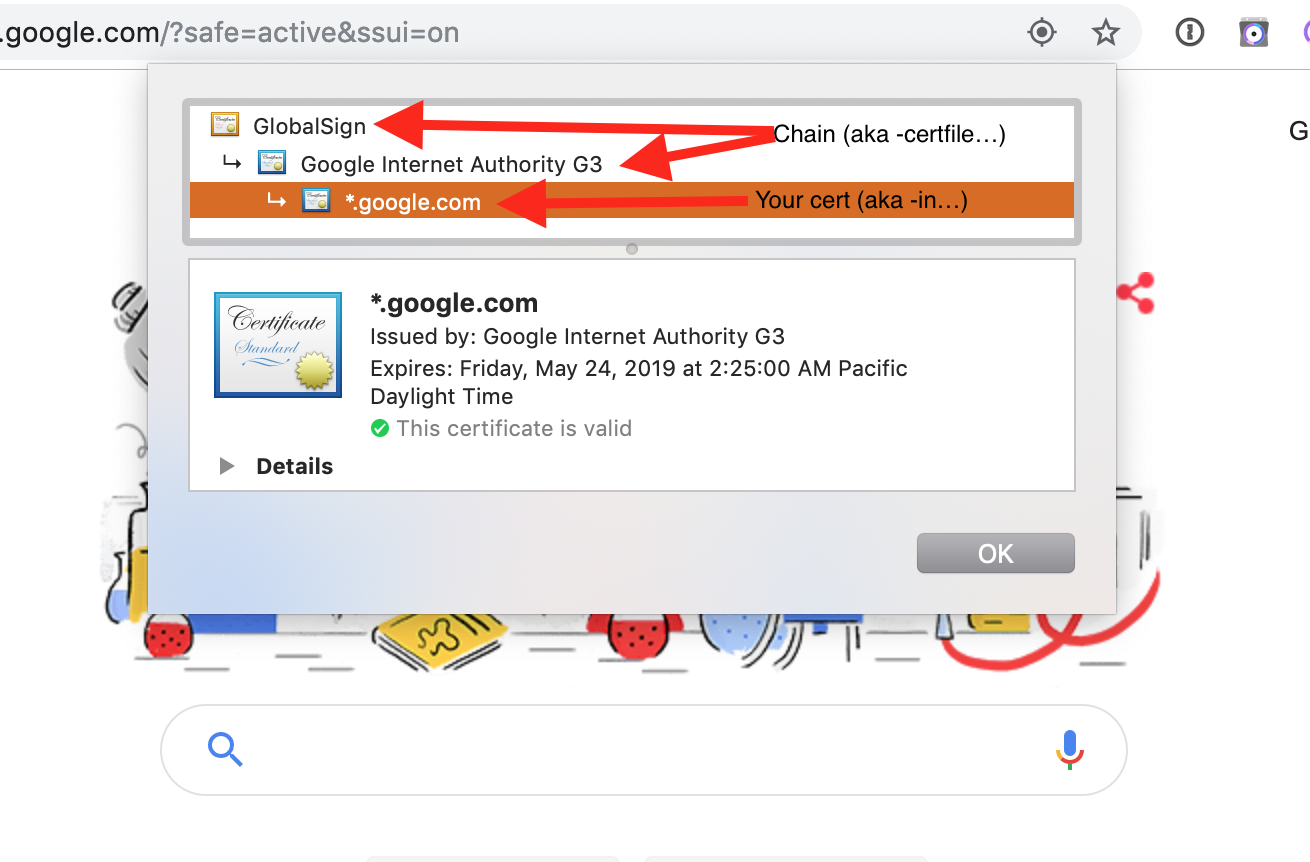
## Example process For example: - FileWave Server FQDN = fw.initech.com - Files will be saved to created folder Certificates - The certificate was purchased from AlphaSSL Pre-requisite: OpenSSL. Unix-based systems have this by default. To follow this process on Windows will require an appropriate version of [OpenSSL](https://slproweb.com/products/Win32OpenSSL.html) ### Step 1 Create the.CSR and . KEY from OpenSSL From a command prompt type the following: **macOS and Unix** ```shell sudo openssl req -new -newkey rsa:2048 -nodes -keyout /certificates/fw.initech.com.key -out /certificates/fw.initech.com.csr ``` **Windows** ``` C:\OpenSSL-Win64\bin\openssl.exe req -new -newkey rsa:2048 -nodes -keyout C:\certificates\fw.initech.com.key -out C:\certificates\fw.initech.com.csr ``` You will be prompted for the following: - Country Name (2-letter code) - State or Province Name Locality Name (eg, city) - Organization Name (eg, company) - Organizational Unit Name (eg, section) - Common Name (e.g. Server FQDN or YOUR name) - Email Address - A challenge password - An optional company name For this example the details should be: - Common Name: fw.initech.com - Do not enter a password The Certificates folder should now show: ``` fw.initech.com.csr fw.initech.com.key ``` The KEY should be held safely. The CSR will need to be uploaded to the CA during the request of the certificate creation. You should receive confirmation from the CA, regarding domain ownership and how to retrieve the generated certificate along with some general instructions. ### Step 2 Create CRT files from the downloaded certificates It is typical, that the SSL certificate will also require an intermediate certificate. These should be readily available from the CA's website. If required, contact the CA for details of which intermediate you will require. Once the SSL and intermediate certificate have been downloaded, instructions can be followed to create the CRT files. In the case of the email from AlphaSSL, only steps 1-4 should be followed. Sample email from AlphaSSL. 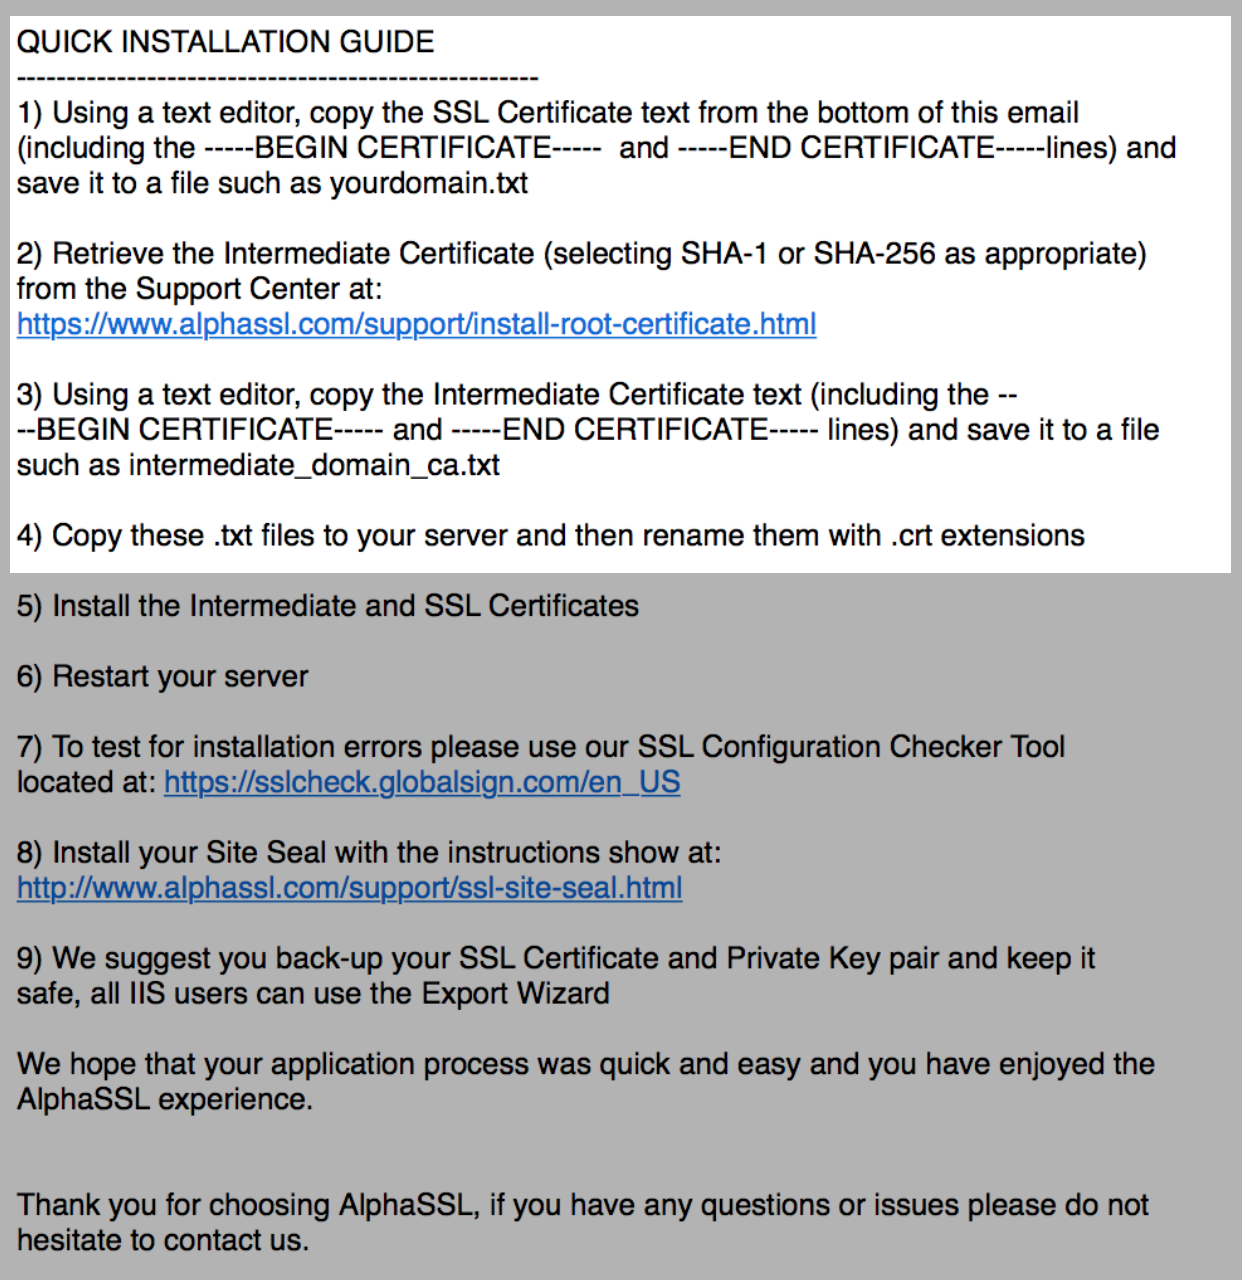 These 2 CRT files can be copied to the Certificates folder from Step 1. From the example: - SSL certificate: purchasedcert.crt - Intermediate certificate: AlphaSSLCA.crt The certificates folder should now show: ``` AlphaSSLCAS.crt fw.initech.com.csr fw.initech.com.key purchasedcert.crt ``` ### Step 3 Convert the certificate to p12 to upload to the FileWave Server The necessary files are now available to create the p12. From the command line type the following: **macOS/Linux** ``` sudo openssl pkcs12 -export -out /certificates/fw.initech.p12 -inkey /certificates/fw.initech.key -in /certificates/purchasedcert.crt -certfile /certificates/AlphaSSLCA.crt ``` **Windows** ``` C:\OpenSSL-Win64\bin\openssl.exe pkcs12 -export -out C:\certificates\fw.initech.com.p12 -inkey C:\certificates\fw.initech.com.key -in C:\certificates\purchasedcert.crt -certfile C:\certificates\AlphaSSLCAS.crt ``` When OpenSSL prompts for an export password, enter a password and keep it available for the upload step. The p12 certificate can then be uploaded to the Server through the Admin console: Preferences > General Tab > SSL Certificate Management; FileWave will request the p12 password during upload. Once uploaded, check the 'Common Name' on the General tab matches the Server name in the Mobile Tab. For wildcard certificates, only the domain should match. Apache web server service will automatically restart and the FileWave Server is now ready for MDM. ### Command Overview**Explanation of OpenSSL command OpenSSL pkcs12** #Create a p12 (also know as pkcs12) **-export -out /certificates/fw.initrode.us.p12** #Output location and name of p12 to upload to FileWave **-inkey /certificates/fw.initrode.us.key** #Location and name of the private key file used to generate the CSR **-in /certificates/purchasedcert.crt** #Location and name of the purchased certificate provided by the 3rd party supplier **-certfile /certificates/AlphaSSLCA.crt** #Location and name of Intermediate certificate, (will often contain more than one cert)
 # Let's Encrypt Setup for FileWave Server (Debian) ## What This Knowledge Base (KB) article covers a Debian-focused shell script that automates Let's Encrypt SSL certificate setup for a FileWave server on Debian 12/13. The script supports **two challenge methods**: - **HTTP-01 (standalone certbot)** - **DNS-01 (Cloudflare)** Both paths handle certificate request, FileWave certificate injection, and renewal automation. ## When/Why FileWave administrators use this when they need a trusted SSL certificate for secure communication. - Use **HTTP-01** when port 80 can be reached from the internet. - Use **DNS-01 (Cloudflare)** when port 80 is blocked/unavailable or you prefer DNS validation.This documented process is for Debian 12/13. If you are a Hosted customer, FileWave can handle certificate management for you: [SSL Certificate Management for Custom Domains (FileWave-Hosted Servers)](https://kb.filewave.com/books/community-engagement/page/ssl-certificate-management-for-custom-domains-filewave-hosted-servers).
## How ### Prerequisites - FileWave server on Debian 12 or 13 - Root/sudo access - Public DNS name (FQDN) for the FileWave server - If using DNS validation: Cloudflare API token with DNS edit permissions for the zone ### Challenge method guidance - **HTTP-01**: requires inbound TCP/80 reachability for Let's Encrypt validation. Also verify that any host firewall on the FileWave Server allows HTTP on port 80; on systems using `firewalld`, check with `sudo firewall-cmd --list-services` or `sudo firewall-cmd --list-ports`. - **DNS-01 (Cloudflare)**: does not require inbound TCP/80.If TCP/80 is not available, select DNS-01 (Cloudflare) during install.
If HTTP-01 fails even though DNS is correct, check both upstream network access and the local server firewall. For a Debian server using `firewalld`, allow HTTP with `sudo firewall-cmd --permanent --add-service=http` followed by `sudo firewall-cmd --reload`. Keep port 80 reachable for HTTP-01 renewals, or use DNS-01 if you cannot keep HTTP open.
### Install steps 1. Download the script with `wget`: ```bash wget -O filewave-letsencrypt-debian.sh https://kb.filewave.com/attachments/413 ``` 2. Make it executable: ```bash chmod +x filewave-letsencrypt-debian.sh ``` 3. Run install: ```bash sudo ./filewave-letsencrypt-debian.sh --install ``` 4. Follow prompts for: - Hostname (FQDN) - Email - Validation method: - `1` = HTTP-01 - `2` = DNS-01 (Cloudflare) - If DNS-01 is selected: Cloudflare API token 5. Confirm values when prompted. 6. Verify output for success messages and final summary. ### What the script does - Validates Debian and root execution - Validates that FileWave server paths exist (`/usr/local/bin/fwcontrol`, `/usr/local/filewave/certs`) - Validates hostname and email - Validates DNS resolution (tries `8.8.8.8`, then system resolver fallback) - Backs up existing certs under `/usr/local/filewave/certs/backup-This documented process is for macOS 14 or newer. If you are a Hosted customer, FileWave can handle certificate management for you: [SSL Certificate Management for Custom Domains (FileWave-Hosted Servers)](https://kb.filewave.com/books/community-engagement/page/ssl-certificate-management-for-custom-domains-filewave-hosted-servers).
## How ### Prerequisites - FileWave server on **macOS 14 or newer** - Root/sudo access - Public DNS name (FQDN) for the FileWave server - Homebrew installed (`https://brew.sh`) - If using DNS validation: Cloudflare API token with DNS edit permissions for the zone - DNS utilities available (`nslookup` or `dig`)If TCP/80 is not available, select DNS-01 (Cloudflare) during install.
### Homebrew note The script must be launched with `sudo` from a normal macOS admin account (so Homebrew actions can run as the invoking user). - ✅ Expected: user shell → `sudo ./filewave-letsencrypt-macos.zsh --install` - ❌ Not supported: direct root shell (`sudo su -` then run script) If Homebrew is missing, the script stops and prompts you to install Homebrew from `https://brew.sh`, then re-run. ### Install steps 1. Download the script with `wget`: ```bash brew install wget wget -O filewave-letsencrypt-macos.zsh https://kb.filewave.com/attachments/498 ``` 2. Make it executable: ```bash chmod +x filewave-letsencrypt-macos.zsh ``` 3. Run install: ```bash sudo ./filewave-letsencrypt-macos.zsh --install ``` 4. Follow prompts for: - Hostname (FQDN) - Email - Validation method: - `1` = HTTP-01 - `2` = DNS-01 (Cloudflare) - If DNS-01 is selected: Cloudflare API token 5. Confirm values when prompted. 6. Verify output for success messages and final summary. ### What the script does - Validates macOS version (14+) and root execution - Validates that FileWave server paths exist (`/usr/local/bin/fwcontrol`, `/usr/local/filewave/certs`) - Validates hostname and email - Validates DNS resolution (tries `8.8.8.8`, then system resolver fallback) - Backs up existing certs under `/usr/local/filewave/certs/backup-APNs is the Apple service FileWave uses to wake Apple devices for MDM/DDM check-ins. The device still contacts the FileWave server for the actual management commands; APNs only delivers the wake-up notification.
Push notifications allow apps to notify users with alerts, sounds, badges, or silent updates. Users control which notifications are visible or silenced in Settings. Developers of apps that use APNs register their app with Apple and integrate the APNs token into their app server.FileWave administrators generate the APNs token as part of the Apple MDM setup covered in the related certificate articles.
For APNs to work, the app and third-party server must trust Apple’s APNs service. Their trust stores must include the current Apple APNs root certificate. ### APNs Certificate Update: At times the Root Certificate used by APNs will require replacing, prior to expiry.| **APNs Cert** | **Service** | **Up to Date** | **From Date** | **Expiry Date** |
| [AAA Certificate Services root certificate](https://comodoca.my.salesforce.com/sfc/dist/version/download/?oid=00D1N000002Ljih&ids=0683l00000G9fLm&d=%2Fa%2F3l000000VbG0%2Fh70Hv.GWfGuD79pR_if0MtGjJFcUj.NRZS_RLqEyC_4&asPdf=false) | Sandbox | Jan 2025 | - | Dec 31 23:59:59 2028 GMT |
| Production | Feb 2025 | - | ||
| [SHA-2 Root : USERTrust RSA Certification Authority certificate](https://www.sectigo.com/knowledge-base/detail/Sectigo-Intermediate-Certificates/kA01N000000rfBO) | Sandbox | - | Jan 2025 | Jan 18 23:59:59 2038 GMT |
| Production | - | Feb 2025 |
FileWave Server already includes both of the above listed certificates within its Trust Store.
### Third-party apps Installing an app that requires APNs registers that app with APNs, and the device receives a unique device token for that app. Messages pushed can include: - Display Alert Message to User - Apply Badge Icon to App’s Icon - Play a Sound - Deliver Notification Silently Both Message and Unique Device Token are sent by the App’s Server when attempting to initiate a notification. Notifications are relayed through Apple’s APNs service. When the device receives the notification, it acts according to the payload, such as displaying a message to the user. In essence, the message payload therefore consists of: - APS Dictionary: Message content - Alert Keys: Assist notification processing, e.g. an identifier to a particular conversation of a messaging app. - Device ID: Unique Device TokenThe App should contain the current APNs Root Certificate within its Trust Store
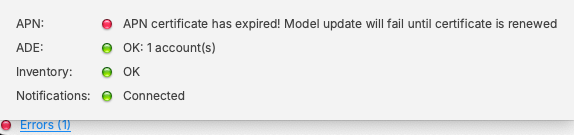
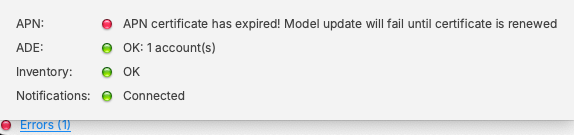
### MDM/DDM MDM and DDM communication also rely on APNs, with a few important differences from user-facing app notifications: - The act of enrolment is equivalent to installing the App, initiating the receipt of the Unique Device Token. - The App in question is a binary, included in the Operating System by Apple: '/usr/libexec/mdmclient'. - APS dictionary should not be included in the payload from an MDM server. MDM APNs messages are only a request for the device to contact the MDM server. Commands are sent directly between the device and the MDM server after the device checks in. Since Apple are the developers of the 'mdmclient', Apple manage its Trust Store. Apple’s list of supported Root Certificates per OS version are available from their KB: [https://support.apple.com/en-gb/103272](https://support.apple.com/en-gb/103272) # APNs Certificate Creation & Renewal on macOS Computers (Keychain) ## Description Apple Mobile Device Management (MDM) requires an Apple Push Notification service (APNs) certificate; renewable yearly.**APNs Expiry** If APNs certificates are allowed to expire, all MDM communication will be lost, until renewed. Update Model will also fail until renewed.
[](https://kb.filewave.com/uploads/images/gallery/2026-02/fhcPHbbdCiRSEEnr-image.png) The following guide provides the steps to create and renew an APNs certificate using macOS with Keychain app.**APNs Topic** An APNs certificate has a unique topic, in the form of a hexadecimal string, and belongs to the Apple ID used to create the certificate. When renewing, the topic must match to ensure devices continue to communicate with the server. As such, not only must the same Apple ID be used when renewing an APNs certificate, but the current certificate must also be selected for renewal.
## Step-By-Step Guide #### Creating the Certificate Signing Request (CSR) 1. Open Keychain Access, located in: Applications > Utilities > Keychain Access.app. 2. Create a CSR. Keychain Access > Certificate Assistant > Request a Certificate from a Certificate Authority... [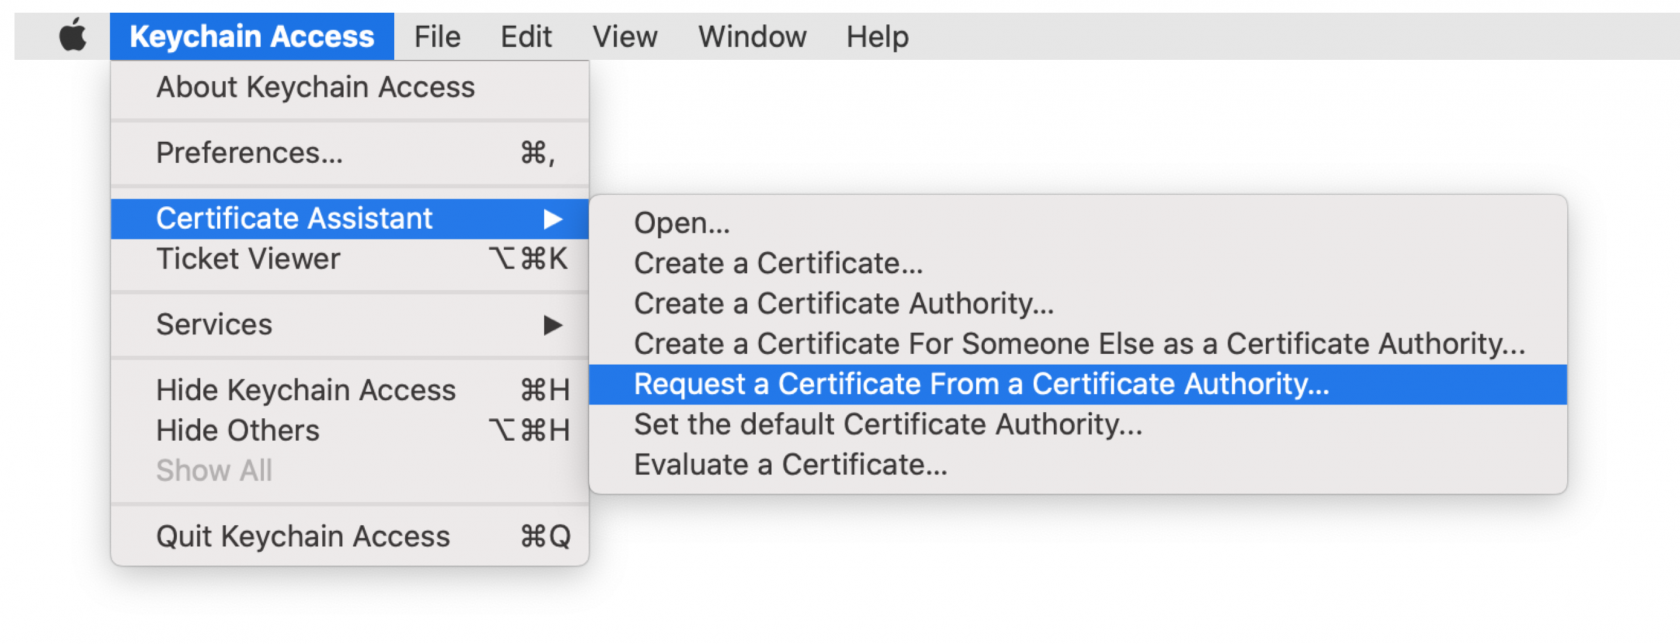](https://kb.filewave.com/uploads/images/gallery/2023-07/alhme0ulSOWeQObZ-image.png) 3. Enter the AppleID and Server name that you are going to be associating with this certificate in the "Common Name" field.**Common Name** Certificate Private Key names are visible in Keychain and the Common Name is used to set the Private Key name. Supplying the Apple ID and Server as the Common Name, ensures the Apple ID used to generate the certificate will be stored for future reference.
[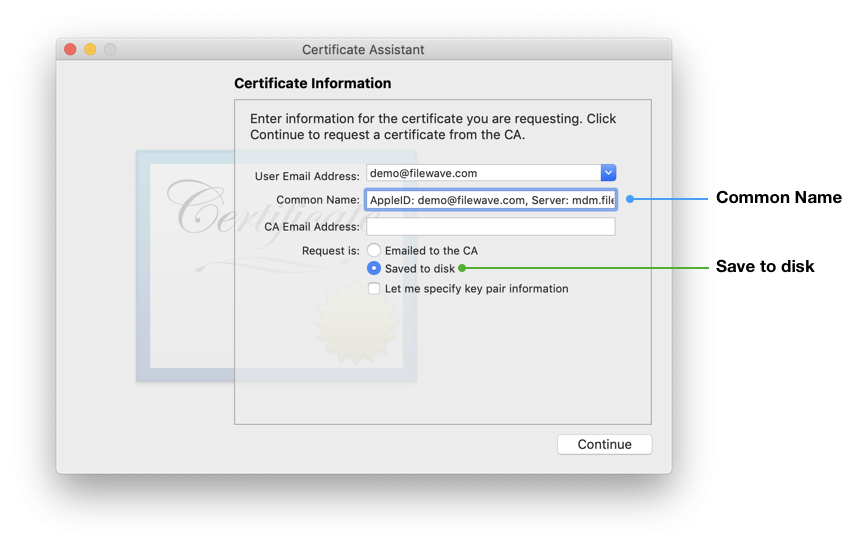](https://kb.filewave.com/uploads/images/gallery/2023-07/WI3uC33RSK2VtDKp-image.png) 4. Select the radio button "Saved to disk" and click Continue. 5. Save the CSR request, ready to upload to FileWave in the next section.Certificate Storage Consider creating a secure location to store the created certificates and sub divide them using the date or year, e.g folder named: 'MDM APNs certificates 2020'.
#### Sign the CSR CSR requests must be signed before uploading to Apple. FileWave has a portal for this process, which requires an active FileWave account. 1. Navigate to [https://csr.filewave.com/](https://csr.filewave.com/) and login. 2. Upload the previously created CSR. 3. 'Download signed CSR' should list this uploaded and now signed CSR. 4. Download this newly signed CSR, ready for upload to Apple in the next section. Again consider where this certificate is stored. [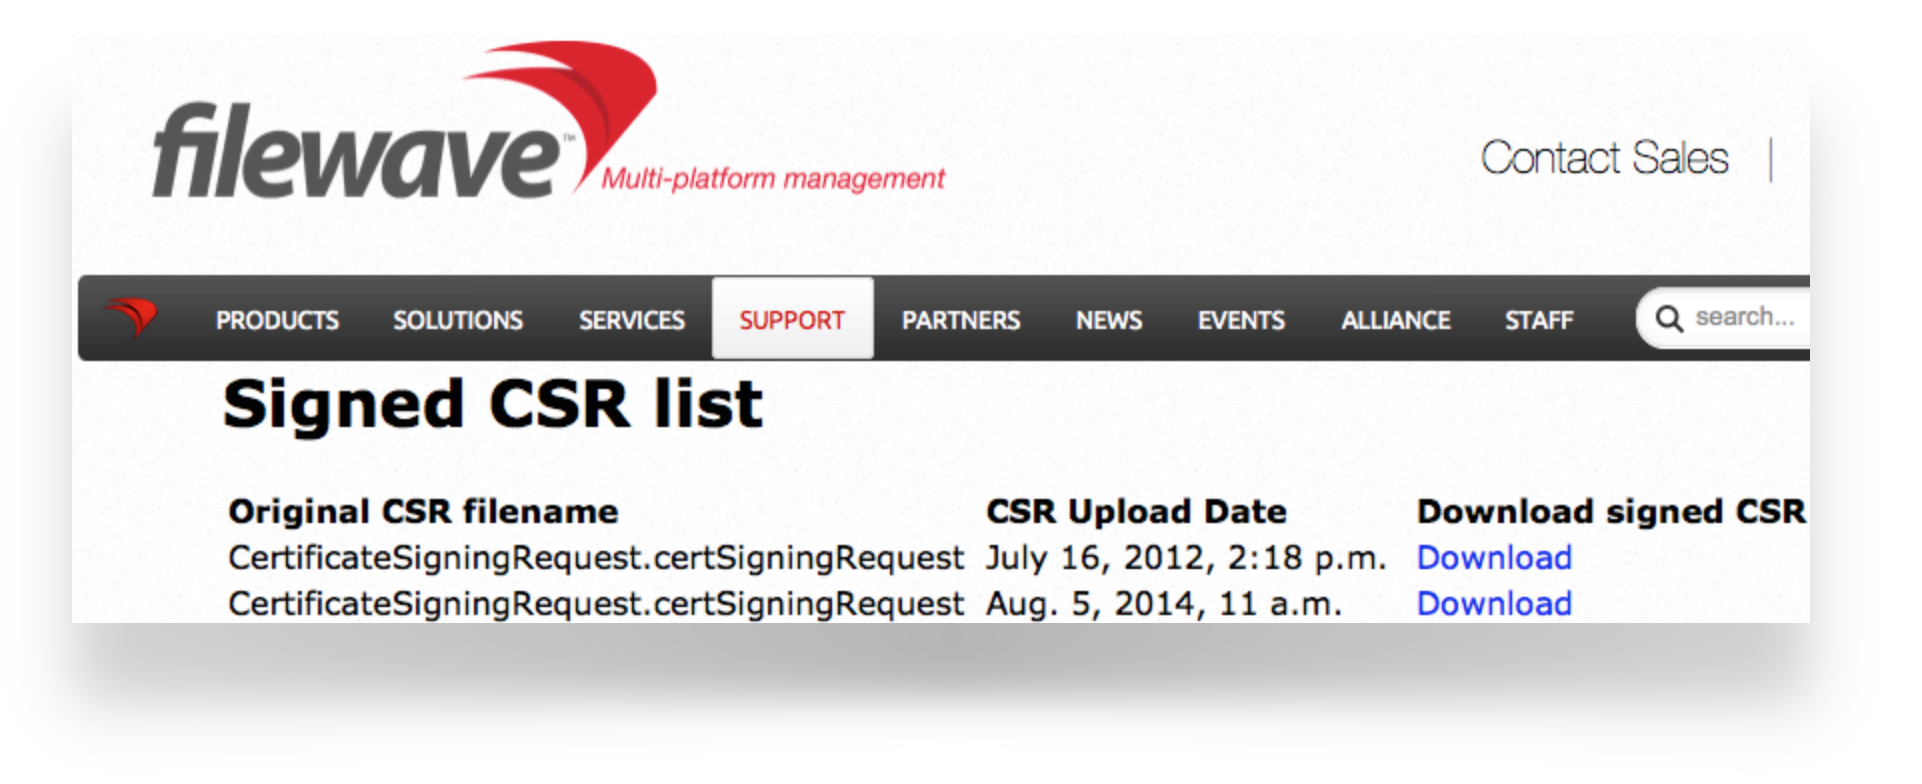](https://kb.filewave.com/uploads/images/gallery/2023-07/aUMBuc33HyIemxTq-image.png) #### Upload the signed FileWave CSR to Apple ##### Creating a new Certificate If you are renewing a certificate then jump to [Renewing a Certificate](#bkmrk-renewing-a-certifica) 1. Navigate to: [https://identity.apple.com/pushcert/](https://identity.apple.com/pushcert/) and log in with an Apple ID. This Apple ID will own the certificate and is required for every renewal. Do not use a personal Apple ID, to avoid complications if that person where to leave the business or institution. 2. Click 'Create'. 3. 'Accept' Apple's 'Terms of Use'. [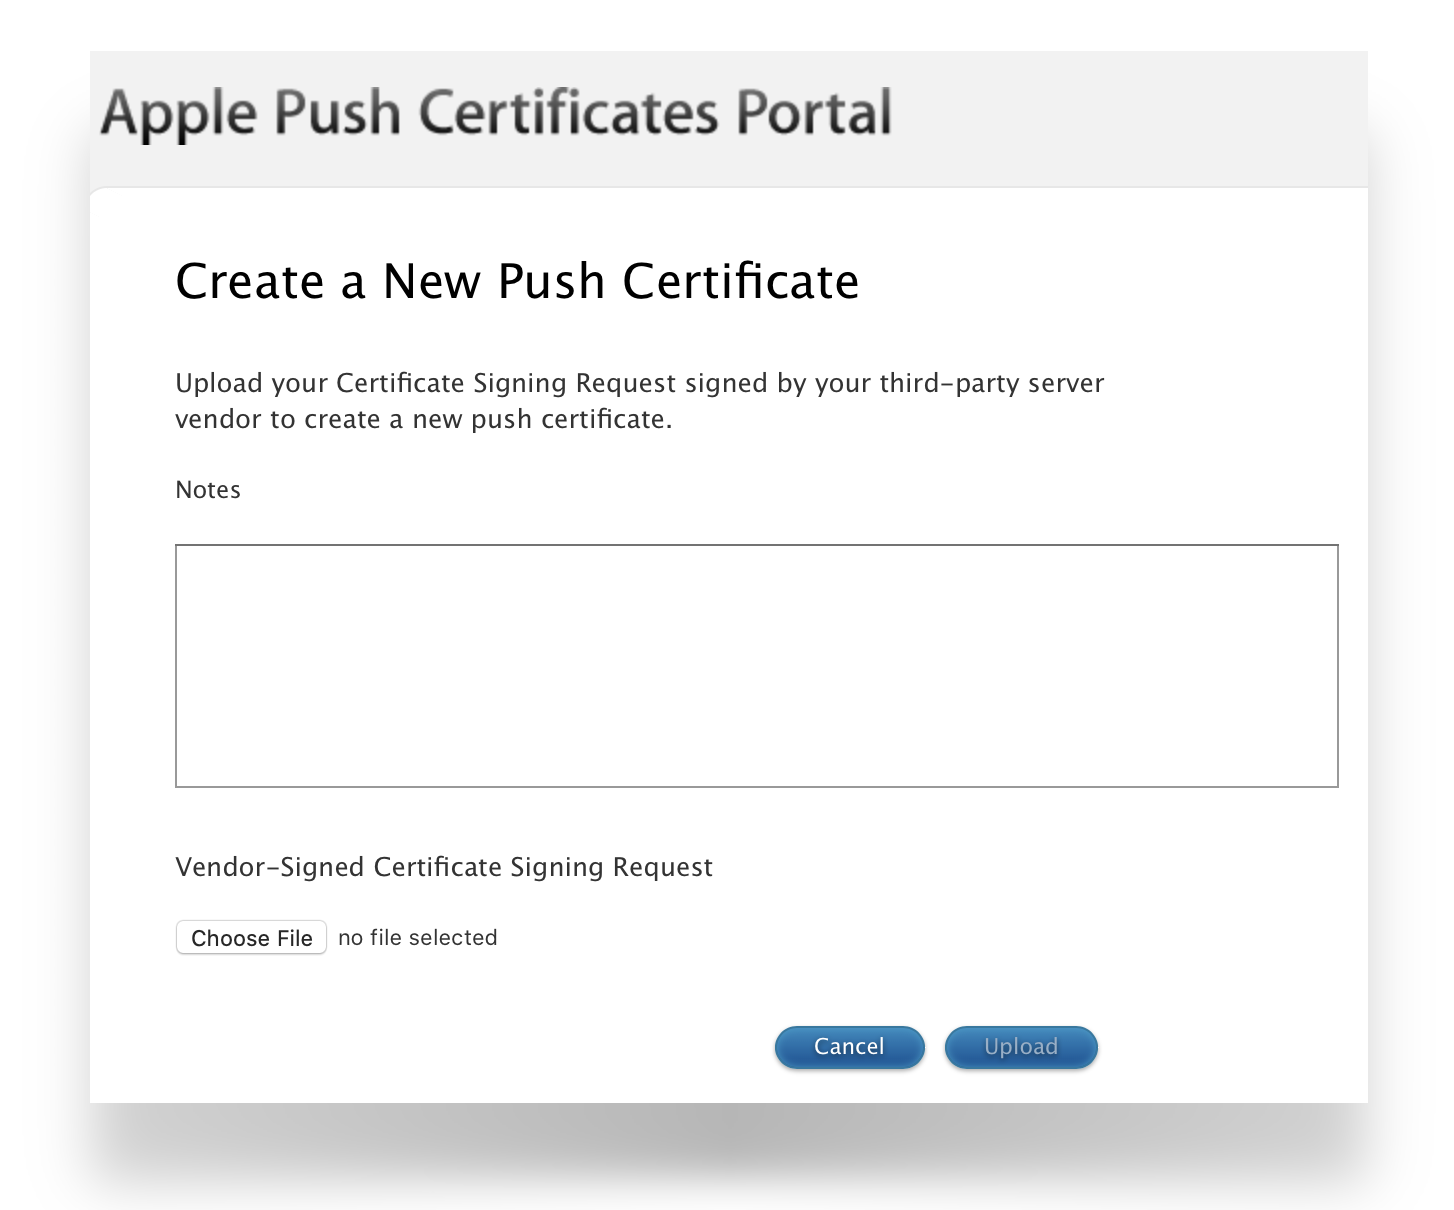](https://kb.filewave.com/uploads/images/gallery/2023-07/q3SFfJ5UMpW5OH2c-image.png) ##### Renewing a Certificate 1. Navigate to: [https://identity.apple.com/pushcert/](https://identity.apple.com/pushcert/) and **log in with the Apple ID used to initially create the certificate.** 2. Confirm the Certificate to renew. 3. Select 'Renew'. To confirm the certificate, compare the Subject DN (Topic) and current certificate. Clicking the 'i' button will show the certificate details, including the Topic: [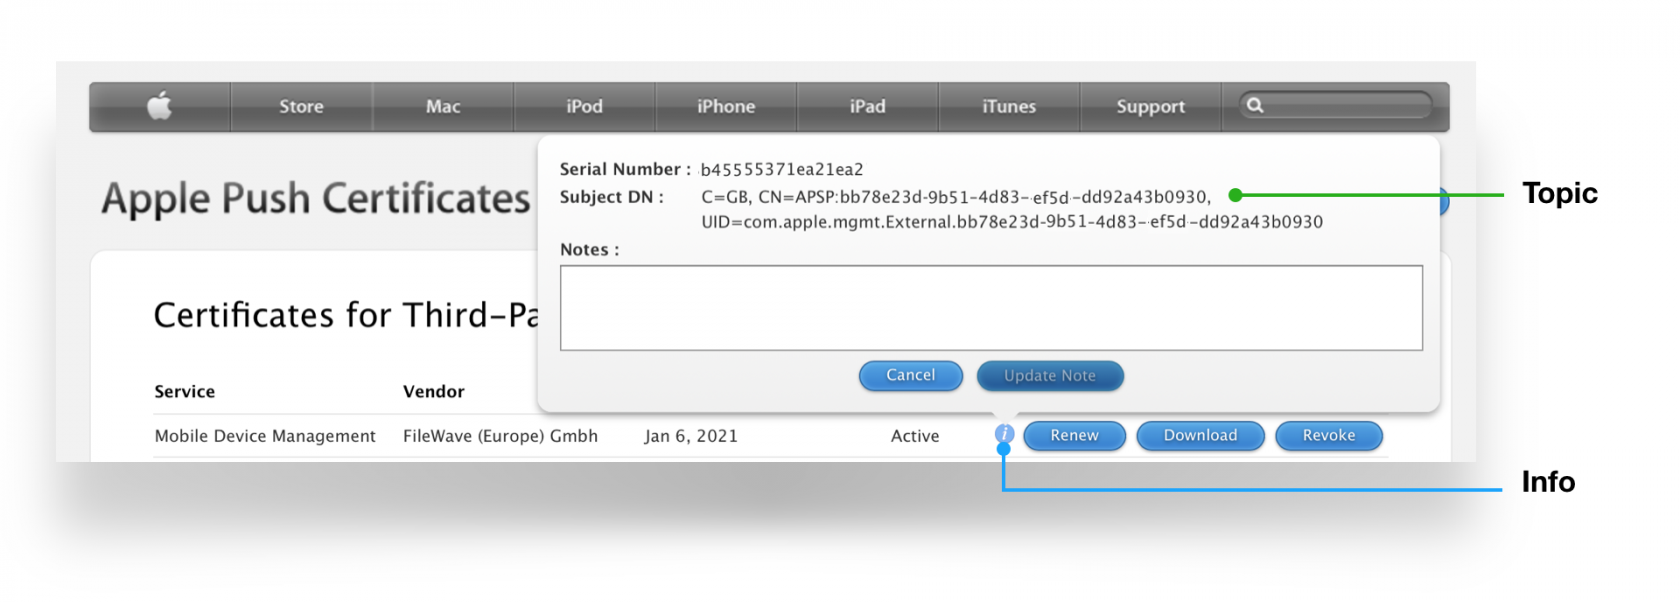](https://kb.filewave.com/uploads/images/gallery/2023-07/EY8Q5DZth1VIaIlJ-image.png) Ensure this matches with the 'Current Certificate' in FileWave Admin > Preferences > Mobile > Apple Push Notification Certificate: [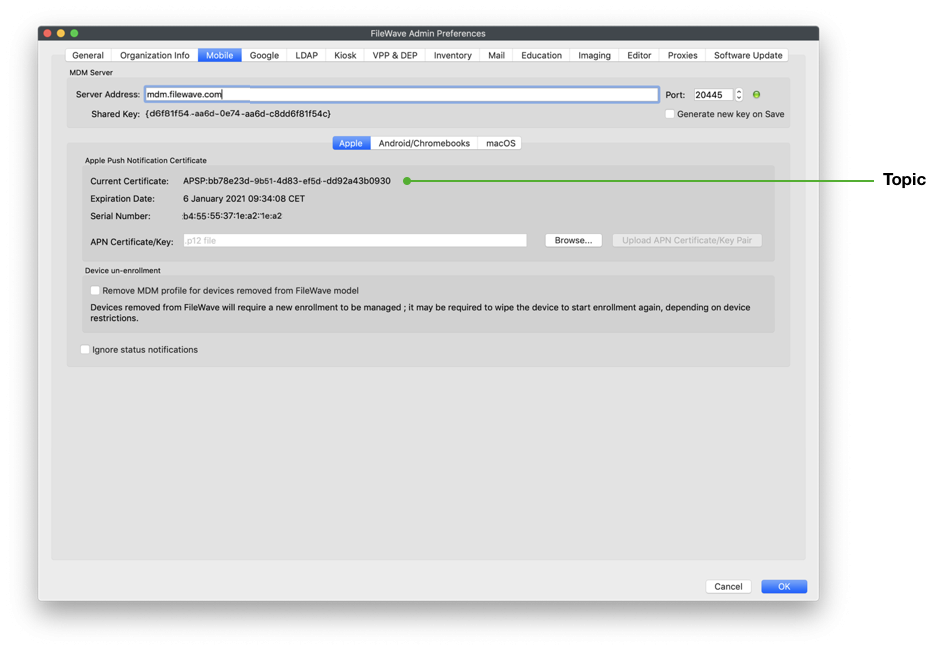](https://kb.filewave.com/uploads/images/gallery/2023-07/5UNFgg1tC7c2u7NY-image.png)If the 'Topics' do not match do not continue. If the correct certificate is not in the list on Apple's website, this is the wrong Apple ID. If this guide was followed in creating the original certificate, the previously used Apple ID will be viewable from the certificate "Private Key".
Click 'Choose File' and browse to the signed FileWave CSR from the previous section. Click 'Upload' and Apple will return a 'Confirmation'. [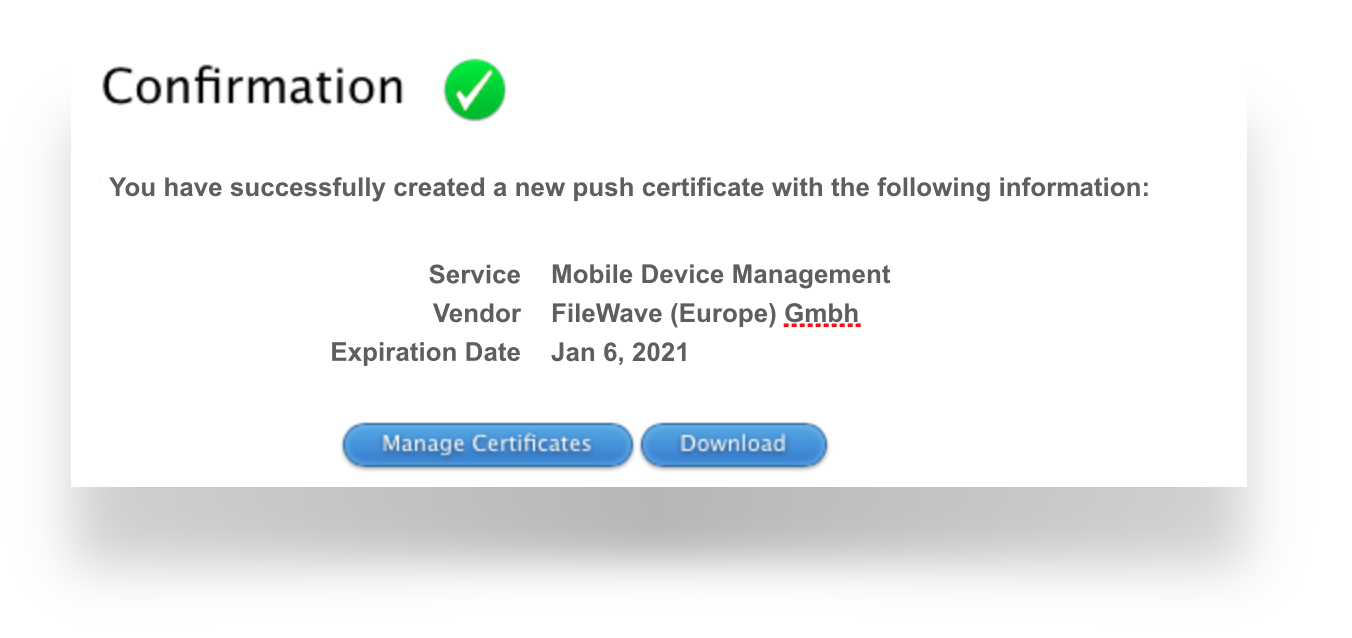](https://kb.filewave.com/uploads/images/gallery/2023-07/WFKdWCVHQSMrPtXm-image.png) Click 'Download' and save the ".pem" file. Again consider where this certificate is stored. [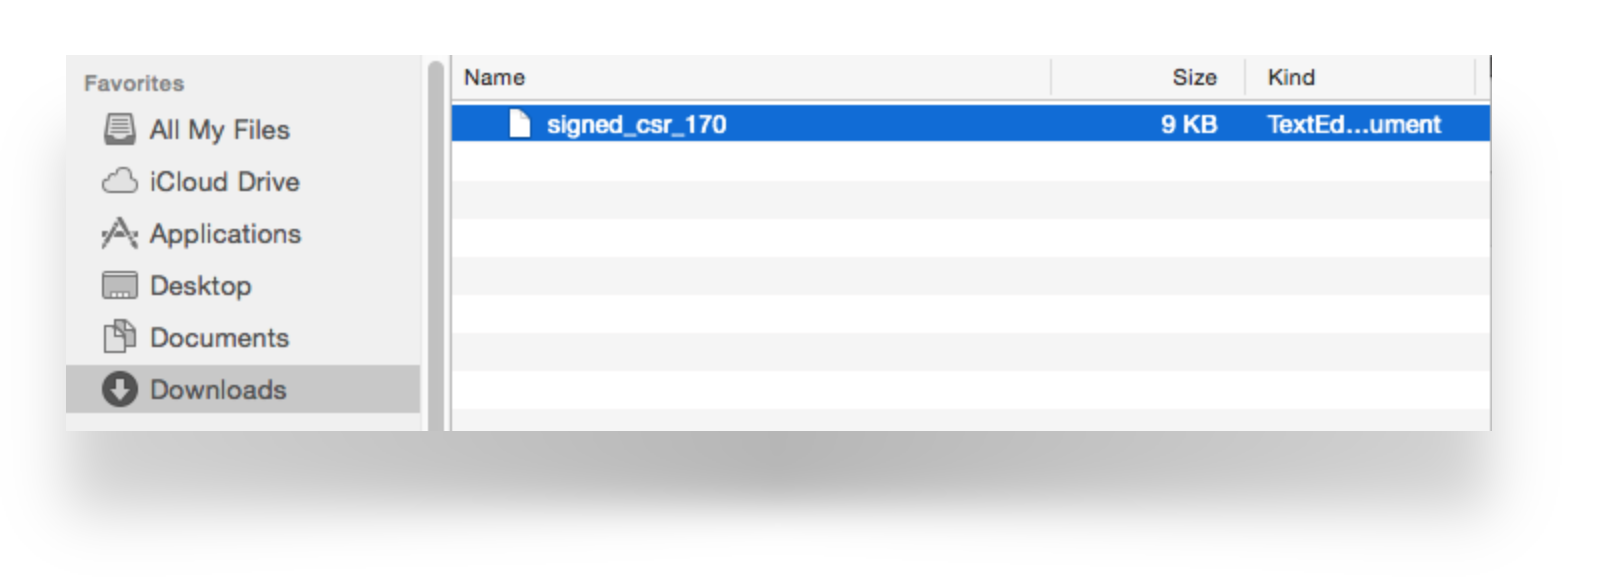](https://kb.filewave.com/uploads/images/gallery/2023-07/HycVQrfrgEDWv8DU-image.png) #### Create a ".p12" from the Signed CSR 1. Open Keychain Access app, select login from the Keychains list and then choose 'My Certificates' tab.**Keychain** If imported into the System Keychain, the Private Key will not be accessible. **If 'All Items' tab is selected, private keys will not be available!**
2. Drag the downloaded PEM file into the Keychain main window. 3. Locate the imported certificate. It will begin with "APSP:". 4. Click the disclosure triangle and select the expanded private key.Common Name and Topic The name of the Private Key will show the value defined as the "Common Name" from the creation of the CSR. Where recommendation was followed, this should list the Apple ID and Server name. Additionally the name of the Certificate is the same as the Topic.
[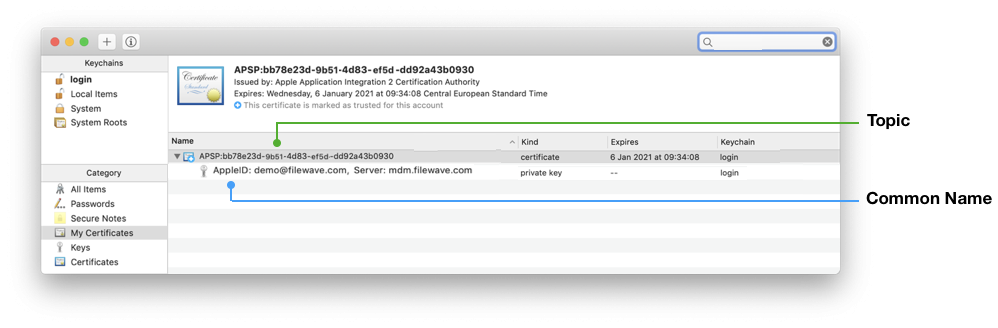](https://kb.filewave.com/uploads/images/gallery/2023-07/uuFHabp3h5NmLvXI-image.png) 5. From the 'File' menu, choose 'Export Items...'. [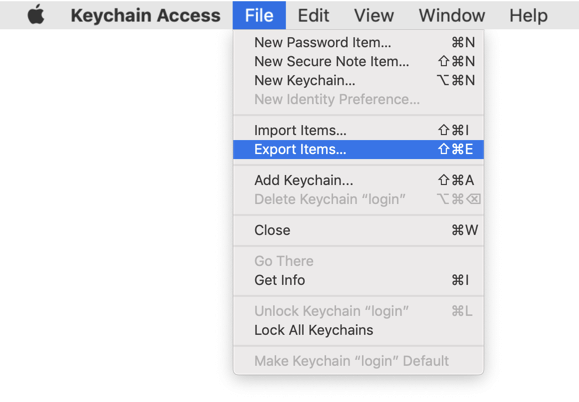](https://kb.filewave.com/uploads/images/gallery/2023-07/5u8xeq96035BvYly-image.png) 6. Export as a .p12 file. Again consider where this certificate is stored. 7. Click Save. [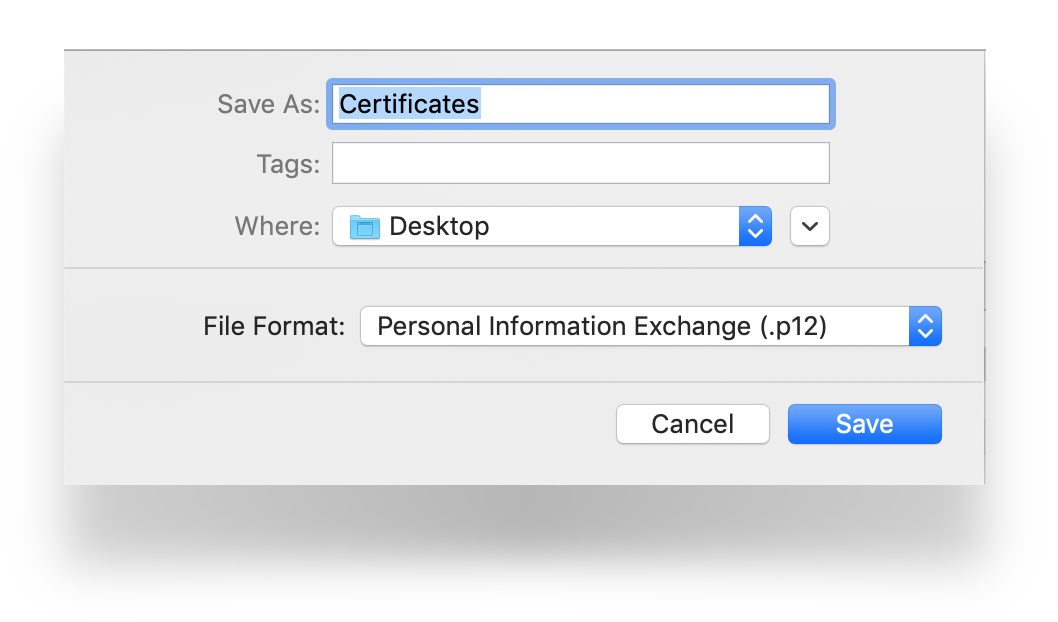](https://kb.filewave.com/uploads/images/gallery/2023-07/OH8JkN1mLliLtY9o-image.png) 8. Leave the password blank. [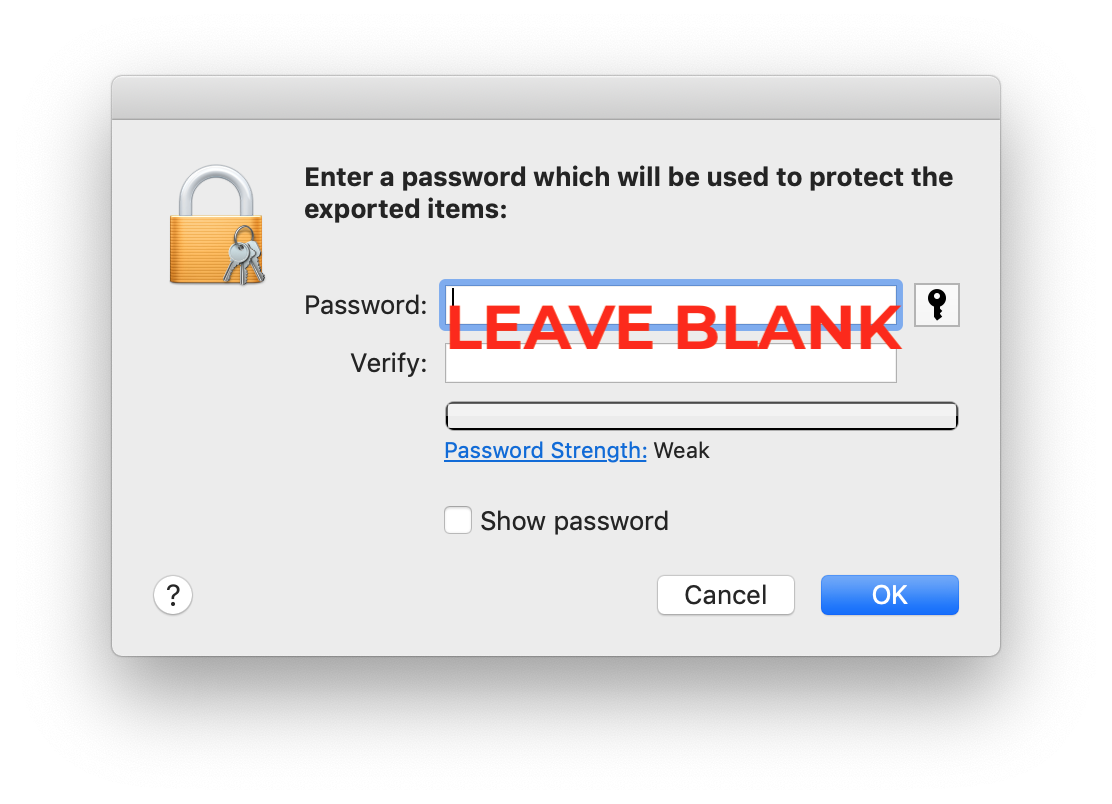](https://kb.filewave.com/uploads/images/gallery/2023-07/QwHLlAdx7FwEmFei-image.png) 9. Enter your local admin account, when prompted, allowing Keychain to export. [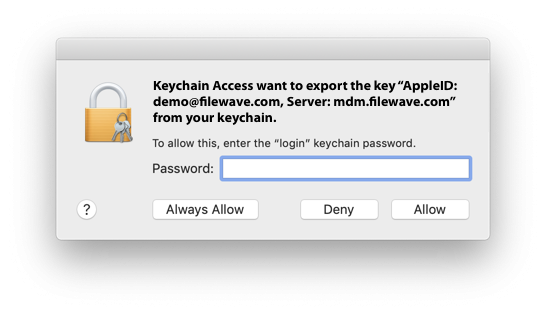](https://kb.filewave.com/uploads/images/gallery/2023-07/wYvhPBxbO3qgRPHq-image.png) #### Uploading the Certificate into FileWave 1. Launch the FileWave Admin and login to the FileWave server. 2. Open the FileWave Admin Preferences. [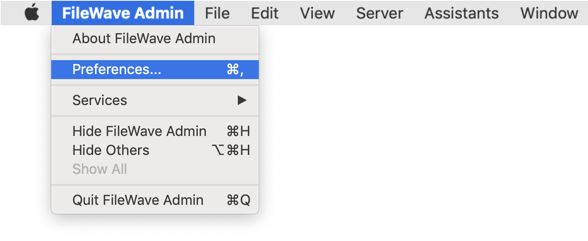](https://kb.filewave.com/uploads/images/gallery/2023-07/PZDUQSCEcAP5ab0F-image.png) 3. Select the 'Mobile' tab. 4. Click 'Browse' and navigate to the saved ".p12" APNs certificate. 5. Select the exported ".p12" certificate. 6. Click 'Upload APN Certificate/Key Pair'. [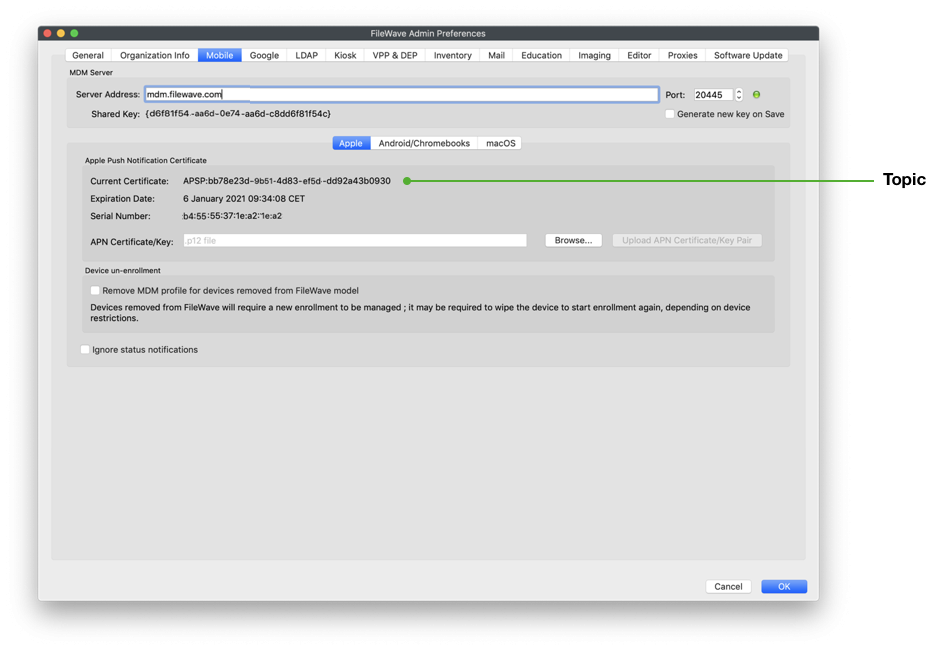](https://kb.filewave.com/uploads/images/gallery/2023-07/I23j4sVN66E3Nhh0-image.png) The topic should match the previous topic. FileWave Central should warn if the topics do not match before accepting the upload: [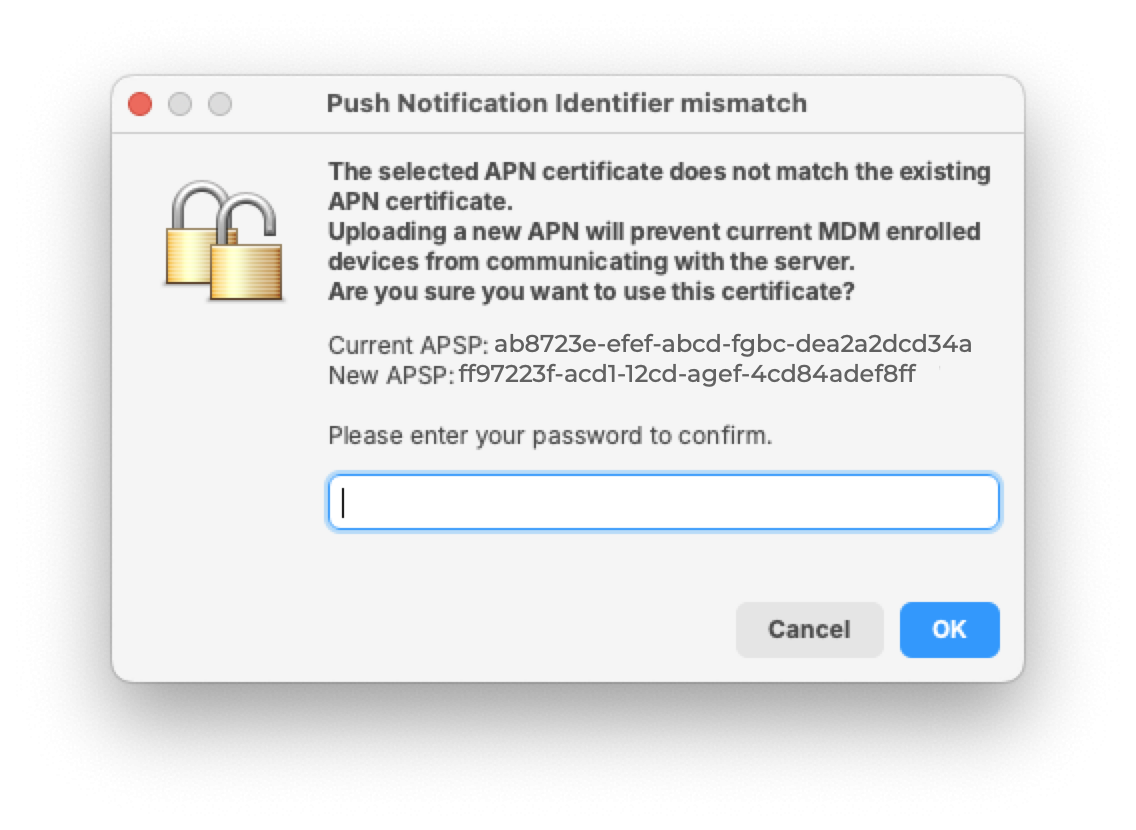](https://kb.filewave.com/uploads/images/gallery/2026-02/DZkb0W7U8C9M5XxQ-apns-mismatch-warning.png) Click 'OK' to save and close the Preferences dialog. That is it! FileWave may now manage Apple devices using Apple’s Push Notification Service.APNs certificates require yearly renewals. Through FileWave Admin > Dashboard > Alert Settings, automated emails may configured. Consider adding 'APN for MDM'. Note this requires the Email preferences in Admin to be configured.
## Contact Apple for help If you forgot the email tied to your Apple Push Notiifcation you may reach out to Apple for assistant [Contact Apple for help with APN](https://support.apple.com/en-us/118629) ## Related articles - [APNs Certificate Creation & Renewal on macOS Computers (XCA)](https://kb.filewave.com/books/certificates/page/apns-certificate-creation-renewal-on-macos-computers-xca "APNs Certificate Creation & Renewal on macOS Computers (XCA)") - [APNs Certificate Creation & Renewal on Windows](https://kb.filewave.com/books/certificates/page/apns-certificate-creation-renewal-on-windows-computers "APNs Certificate Creation & Renewal on Windows Computers") # APNs Certificate Creation & Renewal on macOS Computers (XCA) ## Description Apple Mobile Device Management (MDM) requires an Apple Push Notification service (APNs) certificate; renewable yearly.**APNs Expiry** If APNs certificates are allowed to expire, all MDM communication will be lost, until renewed. Update Model will also fail until renewed.
[](https://kb.filewave.com/uploads/images/gallery/2026-02/owIFDXr7VebYFYur-image.png) This guide explains how to create the Apple Push Notification Service (APNS) certificate for FileWave **using an online CSR generator and the XCA certificate management tool, instead of the Apple Keychain**. The Apple Keychain often causes issues with private key handling on newer macOS versions, so this method provides a more reliable alternative. You may use any online CSR generator (for example ssl.com), it does not have to be ssl.com specifically.**APNs Topic** An APNs certificate has a unique topic, in the form of a hexadecimal string, and belongs to the Apple ID used to create the certificate. When renewing, the topic must match to ensure devices continue to communicate with the server. As such, not only must the same Apple ID be used when renewing an APNs certificate, but the current certificate must also be selected for renewal.
## Step-By-Step Guide #### **Prerequisites** - Access to the **Apple Push Certificates Portal** ( [https://identity.apple.com/pushcert/](https://identity.apple.com/pushcert/) ). - A valid **Apple Business/School Manager account** or Apple ID. - Access to the **FileWave Central** console. - Installed **XCA** tool: [https://github.com/chris2511/xca/releases](https://github.com/chris2511/xca/releases) #### **Step 1: Generate CSR (Certificate Signing Request)** 1. Open the **CSR generator** at [ssl.com](https://www.ssl.com/online-csr-and-key-generator/). ( [https://www.ssl.com/online-csr-and-key-generator/](https://www.ssl.com/online-csr-and-key-generator/) ) 2. Enter the required details: - **Common Name (CN):** e.g. FileWave APNS - **Organization (O):** your company or school name - **Organizational Unit (OU):** optional, e.g. IT Department - **Country (C):** two-letter ISO code (e.g. DE) 3. Generate the CSR and download the files: - **CSR file (.csr)** - **Private Key (.key)**⚠️ Keep the **.key file** safe – you will need it later in XCA.
#### **Step 2: Sign the CSR with FileWave** Before the CSR can be uploaded to Apple, it must be signed by FileWave. 1. Navigate to [https://csr.filewave.com/](https://csr.filewave.com/) and log in with your FileWave account. 2. Upload the previously created **.csr file**. 3. Under *Download signed CSR*, your uploaded CSR should now appear as signed. 4. Download this newly signed CSR – this is the file you will upload to Apple in the next step. 5. Store the file in a secure location. [](https://kb.filewave.com/uploads/images/gallery/2023-07/aUMBuc33HyIemxTq-image.png) #### **Step 3: Upload the signed FileWave CSR to Apple** If you are renewing a certificate then jump to [Renewing a Certificate](#bkmrk-renewing-an-existing) ##### **Creating a new certificate** 1. Go to the **Apple Push Certificates Portal**: [https://identity.apple.com/pushcert/](https://identity.apple.com/pushcert/). 2. Sign in with an Apple ID (⚠️ do not use a personal Apple ID – use a generic business or institution Apple ID for long-term use). 3. Click **Create**. 4. Accept Apple’s *Terms of Use*. 5. Click **Choose File** and upload the **signed FileWave CSR**. 6. Click **Upload** – Apple will confirm the request. 7. Download the issued **APNS certificate (.pem or .cer)**. [](https://kb.filewave.com/uploads/images/gallery/2023-07/q3SFfJ5UMpW5OH2c-image.png) ##### **Renewing an existing certificate** 1. Go to [https://identity.apple.com/pushcert/](https://identity.apple.com/pushcert/) and log in with the same Apple ID that owns the certificate. 2. Locate the certificate to renew, confirm the *Subject DN (Topic)* matches the certificate in FileWave Admin. 3. Click **Renew**. 4. Upload the **signed FileWave CSR**. 5. Download the renewed **APNS certificate (.pem or .cer)**.If the 'Topics' do not match do not continue. If the correct certificate is not in the list on Apple's website, this is the wrong Apple ID. If this guide was followed in creating the original certificate, the previously used Apple ID will be viewable from the certificate "Private Key".
##### To confirm the certificate, compare the Subject DN (Topic) and current certificate. Clicking the 'i' button will show the certificate details, including the Topic: [](https://kb.filewave.com/uploads/images/gallery/2023-07/EY8Q5DZth1VIaIlJ-image.png) Ensure this matches with the 'Current Certificate' in FileWave Admin > Preferences > Mobile > Apple Push Notification Certificate: [](https://kb.filewave.com/uploads/images/gallery/2023-07/5UNFgg1tC7c2u7NY-image.png) #### **Step 4: Import and process the certificate in XCA** 1. First, download **XCA for macOS**: [https://github.com/chris2511/xca/releases](https://github.com/chris2511/xca/releases) 2. Install and start **XCA**. 3. Go to **Private Keys** → *Import* and select the previously saved **.key file** from Step 1. 4. Go to **Certificates** → *Import* and load the APNS certificate you downloaded from Apple (.cer/.pem). 5. Link the certificate with the corresponding private key in XCA. 6. **Export the certificate as a PKCS #12 (.pfx) file – important: without a password.** 7. After export, **rename the .pfx file to .p12** (FileWave requires the .p12 extension). #### **Step 5: Import the certificate into FileWave** 1. Open the **FileWave Admin**. 2. Go to **Preferences** → **Mobile**. [](https://kb.filewave.com/uploads/images/gallery/2023-07/PZDUQSCEcAP5ab0F-image.png) 3. Import the **.p12 file** you exported from XCA by browsing to the file and then picking to Upload. The topic should match the previous topic. FileWave Central should warn if the topics do match before accepting the upload. [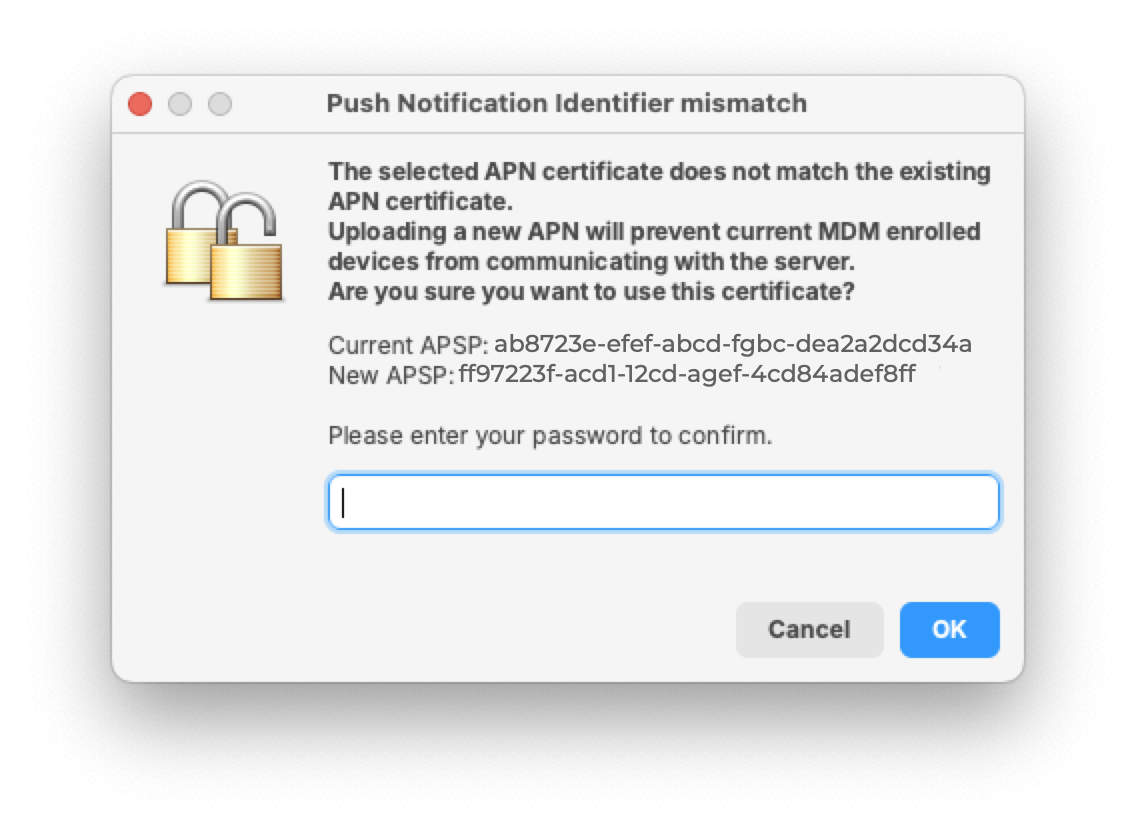](https://kb.filewave.com/uploads/images/gallery/2026-02/M8qpq5EUMPbud9Aq-image.png)  4. Save the settings by clicking OK to close the preferences dialog and verify that devices are communicating. #### **Step 6: Verification** - Test whether new or existing MDM clients correctly connect to the APNS service. - Check the logs in FileWave Admin to ensure there are no certificate errors.APNs certificates require yearly renewals. Through FileWave Admin > Dashboard > Alert Settings, automated emails may configured. Consider adding 'APN for MDM'. Note this requires the Email preferences in Admin to be configured.
## Contact Apple for help If you forgot the email tied to your Apple Push Notiifcation you may reach out to Apple for assistant [Contact Apple for help with APN](https://support.apple.com/en-us/118629) ## Related articles - [APNs Certificate Creation & Renewal on macOS Computers (Keychain)](https://kb.filewave.com/books/certificates/page/apns-certificate-creation-renewal-on-macos-computers-keychain "APNs Certificate Creation & Renewal on macOS Computers (Keychain)") - [APNs Certificate Creation & Renewal on Windows](https://kb.filewave.com/books/certificates/page/apns-certificate-creation-renewal-on-windows-computers "APNs Certificate Creation & Renewal on Windows Computers") # APNs Certificate Creation & Renewal on Windows Computers ## Description Apple Mobile Device Management (MDM) requires an Apple Push Notification service (APNs) certificate; renewable yearly.**APNs Expiry** If APNs certificates are allowed to expire, all MDM communication will be lost, until renewed. Update Model will also fail until renewed.
[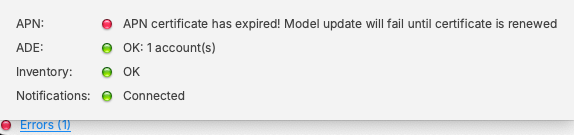](https://kb.filewave.com/uploads/images/gallery/2026-02/zeiTOyrwFm3LNsoH-image.png) This guide explains how to create the Apple Push Notification Service (APNS) certificate for FileWave on Windows computers using OpenSSL. You will generate a Certificate Signing Request (CSR), have it signed by FileWave, upload it to Apple, and then convert it to a format FileWave can import.**APNs Topic** An APNs certificate has a unique topic, in the form of a hexadecimal string, and belongs to the Apple ID used to create the certificate. When renewing, the topic must match to ensure devices continue to communicate with the server. As such, not only must the same Apple ID be used when renewing an APNs certificate, but the current certificate must also be selected for renewal.
## Step-By-Step Guide #### **Prerequisites** - Access to the **Apple Push Certificates Portal** ([https://identity.apple.com/pushcert/](https://identity.apple.com/pushcert/)) - A valid **Apple Business/School Manager account** or Apple ID - Access to the **FileWave Central** console - **OpenSSL for Windows** installed: [https://slproweb.com/products/Win32OpenSSL.html](https://slproweb.com/products/Win32OpenSSL.html) - Download the full version (not the light version, as it needs configuration files)**Administrator Access** All cmd.exe commands in this guide must be run with 'Run as Administrator'.
#### **Step 1: Generate CSR (Certificate Signing Request)** 1. Open **cmd.exe** as an Administrator 2. Create a CSR by entering the following command. This will create two files on the Desktop: `request.csr` and `privateKey.key`: ``` "C:\Program Files\OpenSSL-Win64\bin\openssl.exe" req -out "%USERPROFILE%\Desktop\request.csr" -new -newkey rsa:2048 -nodes -keyout "%USERPROFILE%\Desktop\privateKey.key" -config "C:\Program Files\OpenSSL-Win64\bin\cnf\openssl.cnf" ``` 3. When prompted, enter values for the certificate fields. For **Common Name**, use a descriptive name like your Apple ID and server name (e.g., `company@example.com - FileWave Server`). This helps you identify the certificate later.**Common Name and Private Key** The Common Name you enter will be stored in the Private Key name. Using your Apple ID and server name ensures you can identify which Apple ID created this certificate in the future—important when renewing.
[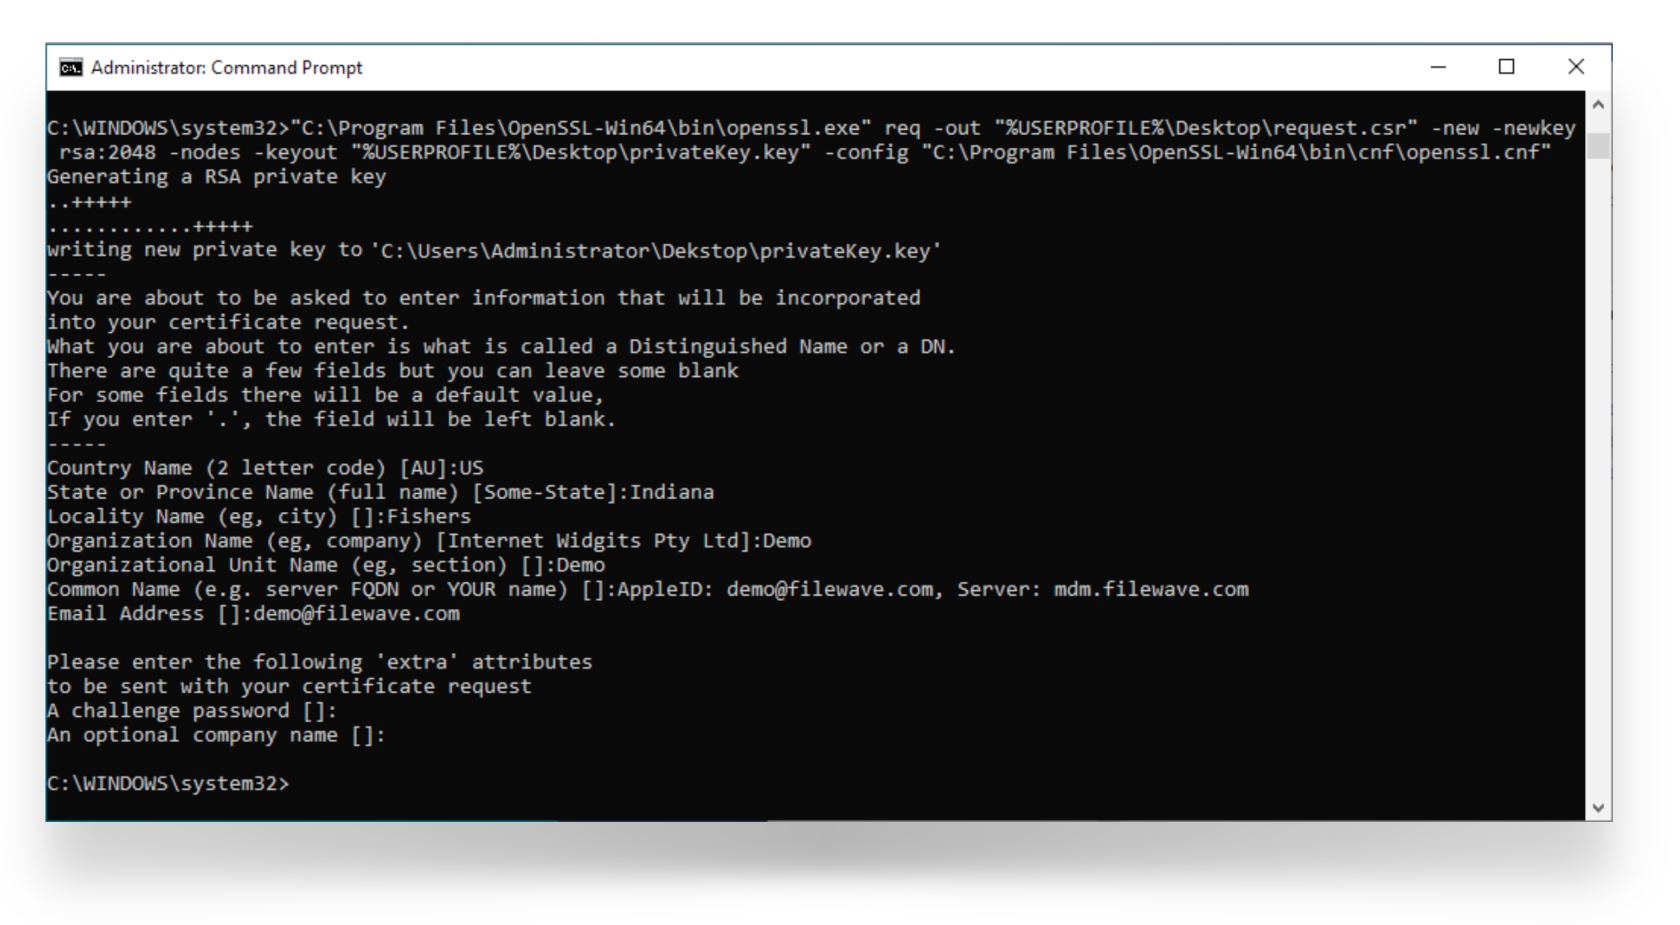](https://kb.filewave.com/uploads/images/gallery/2026-01/oOuKYCQKixxAANkB-1-windows-cmd-csr-creation.png) #### **Step 2: Sign the CSR with FileWave** Before the CSR can be uploaded to Apple, it must be signed by FileWave. 1. Navigate to [https://csr.filewave.com/](https://csr.filewave.com/) and log in with your FileWave account 2. Upload the `request.csr` file you created in Step 1 3. Under **Download signed CSR**, your uploaded CSR should now appear as signed 4. Download this newly signed CSR – this is the file you will upload to Apple in the next step 5. Store the file in a secure location [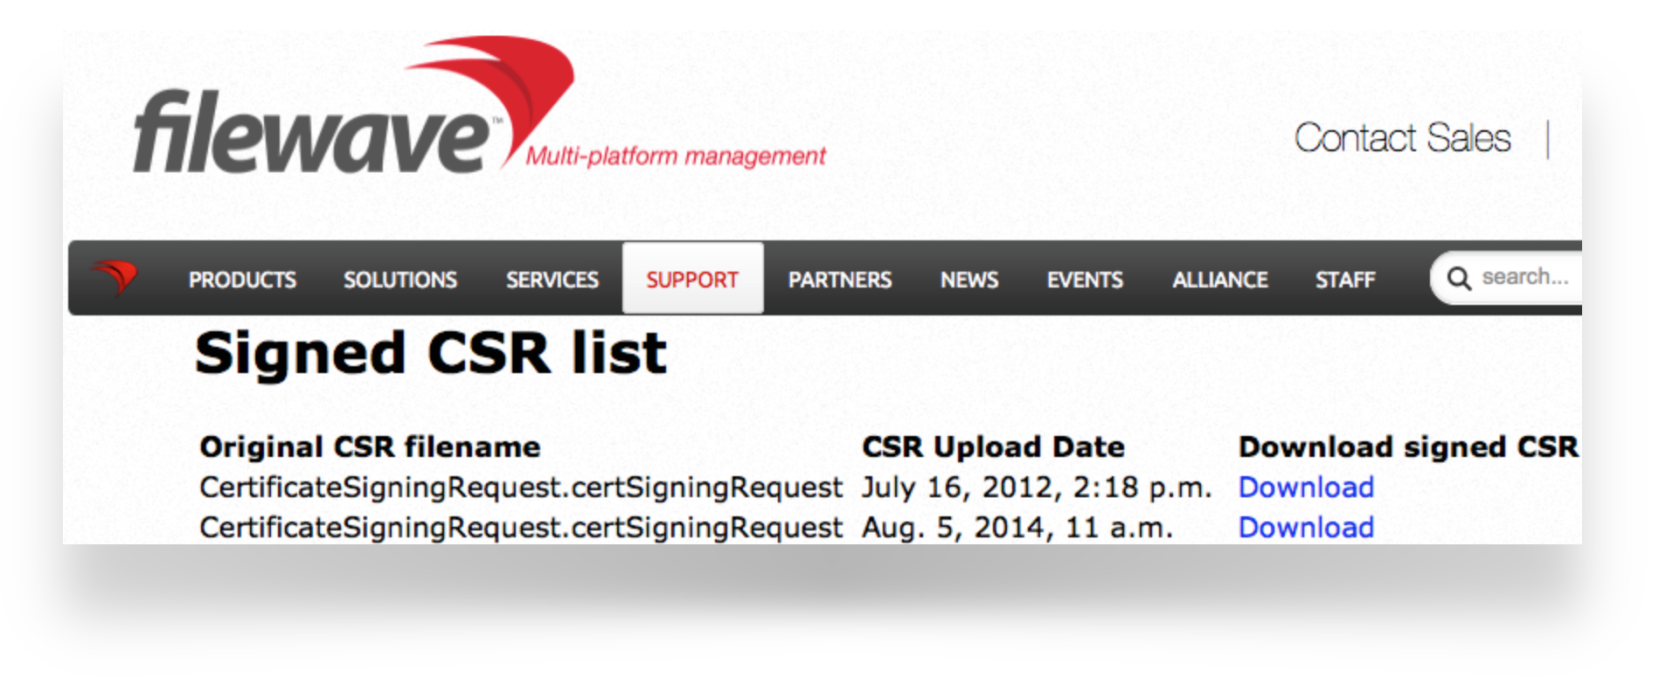](https://kb.filewave.com/uploads/images/gallery/2026-01/vDujlITxq2cGB7mV-csr-portal.png) #### **Step 3: Upload the signed FileWave CSR to Apple** If you are renewing a certificate, skip to **Renewing an existing certificate** below. ##### **Creating a new certificate** 1. Go to the **Apple Push Certificates Portal**: [https://identity.apple.com/pushcert/](https://identity.apple.com/pushcert/) 2. Sign in with an Apple ID (⚠️ do not use a personal Apple ID – use a generic business or institution Apple ID for long-term use) 3. Click **Create** 4. Accept Apple's **Terms of Use** 5. Click **Choose File** and upload the **signed FileWave CSR** from Step 2 6. Click **Upload** – Apple will confirm the request 7. Download the issued **APNS certificate (.pem or .cer)** and store it securely [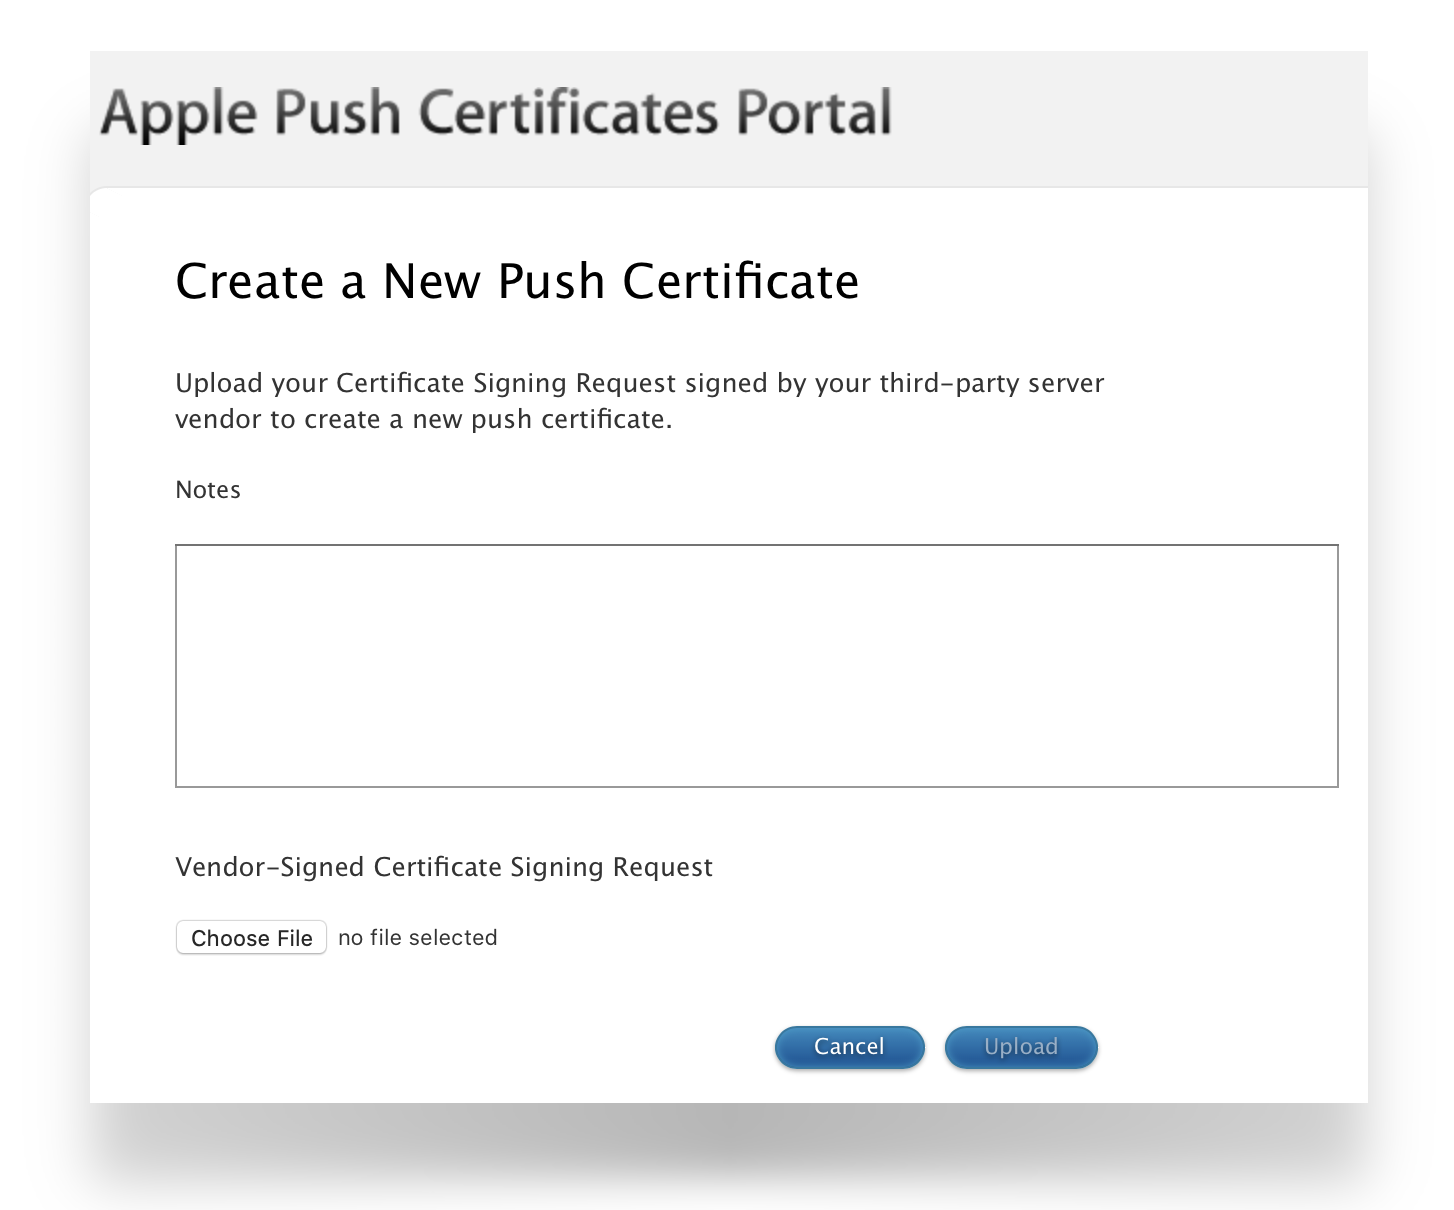](https://kb.filewave.com/uploads/images/gallery/2026-01/nH1NkLoy7Lx62m6w-create-push.png) ##### **Renewing an existing certificate** 1. Go to [https://identity.apple.com/pushcert/](https://identity.apple.com/pushcert/) and log in with the **same Apple ID** that owns the certificate 2. Locate the certificate to renew and click the **info (i)** button to view certificate details, including the **Topic** [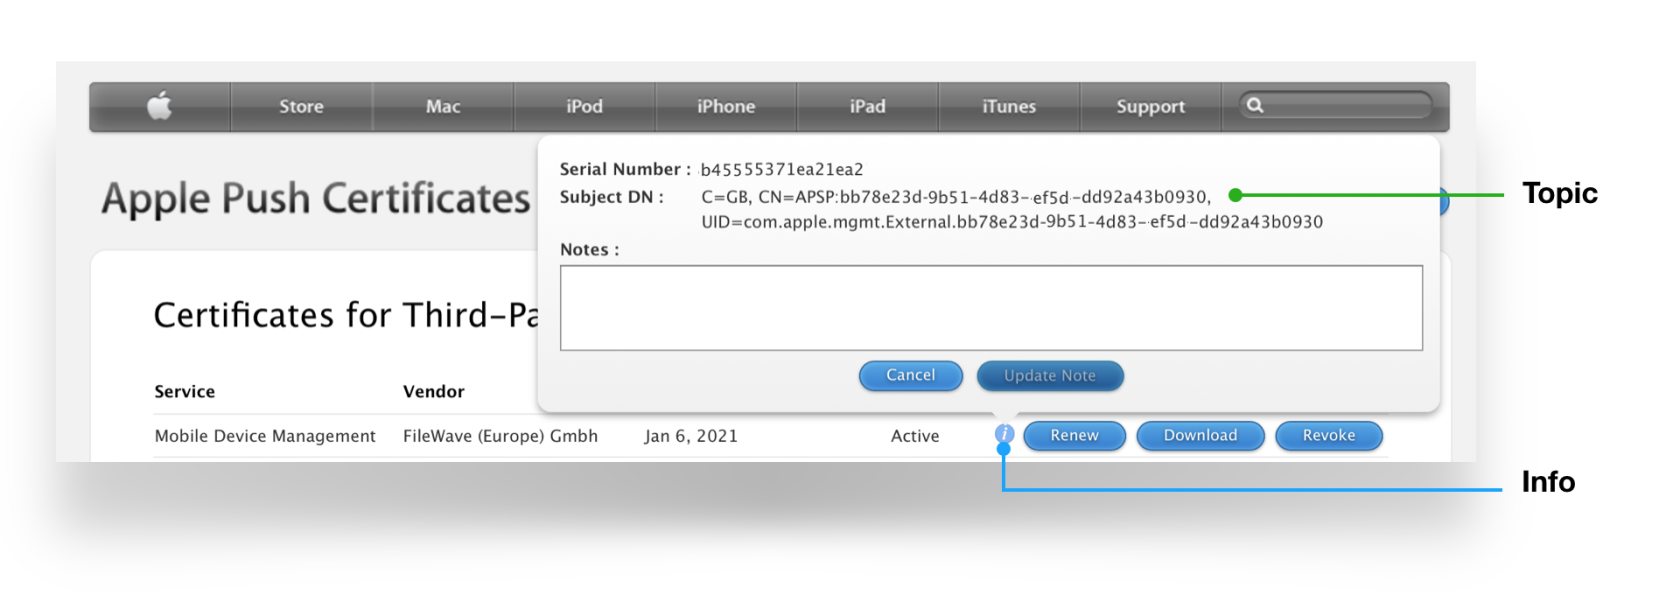](https://kb.filewave.com/uploads/images/gallery/2026-01/ah9EE6tNfUf5rEl8-apns-renewal-003.png) 3. Compare this Topic with the 'Current Certificate' in **FileWave Admin > Preferences > Mobile > Apple Push Notification Certificate** [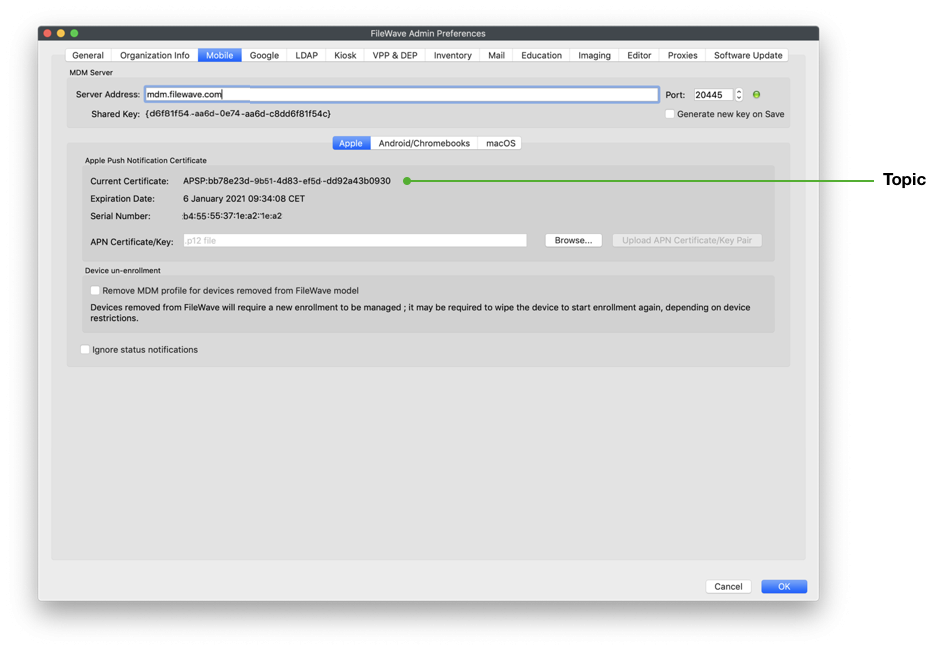](https://kb.filewave.com/uploads/images/gallery/2026-01/KLlcGQKeZcgUB00C-apns-renewal-001.png)**Topic Mismatch** If the Topics do not match, do not continue. If the correct certificate is not in the list on Apple's website, you are using the wrong Apple ID. You can identify the correct Apple ID by reviewing the Private Key name from the original CSR (which should contain your Apple ID).
4. Click **Renew** 5. Upload the **signed FileWave CSR** from Step 2 6. Click **Upload** – Apple will confirm the request [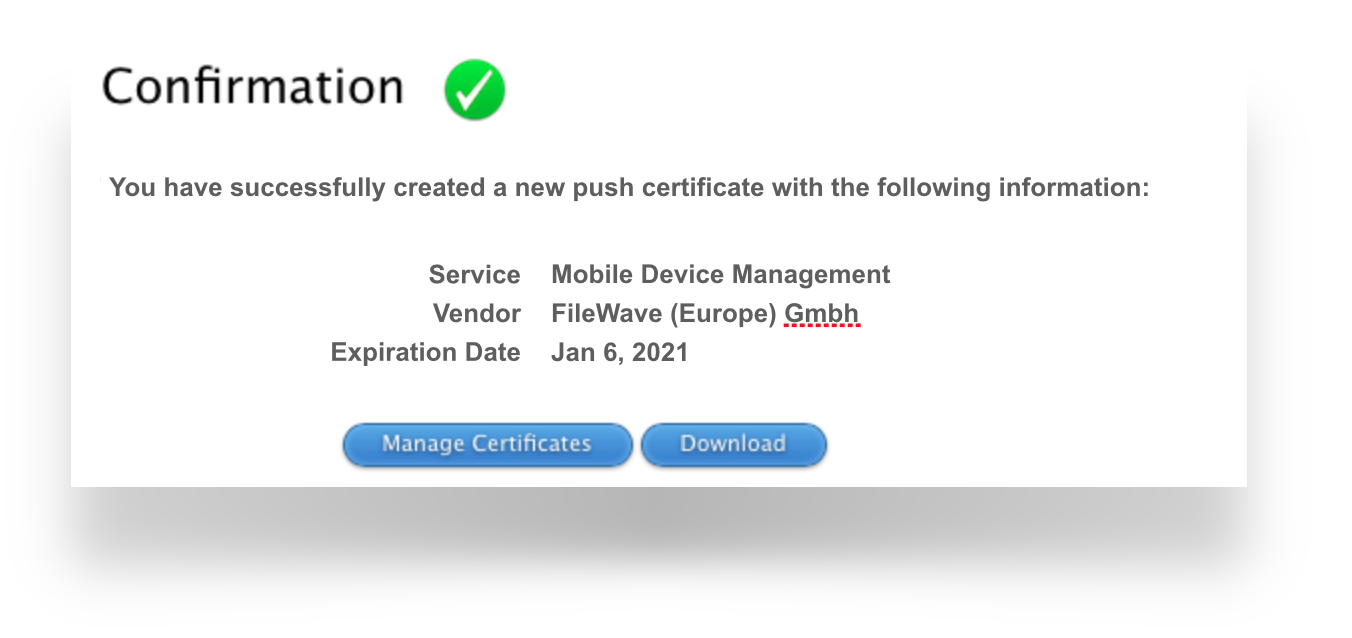](https://kb.filewave.com/uploads/images/gallery/2026-01/7PKkG4SXXfh7z5TH-apns-confirmation.png) 7. Download the renewed **APNS certificate (.pem or .cer)** and store it securely [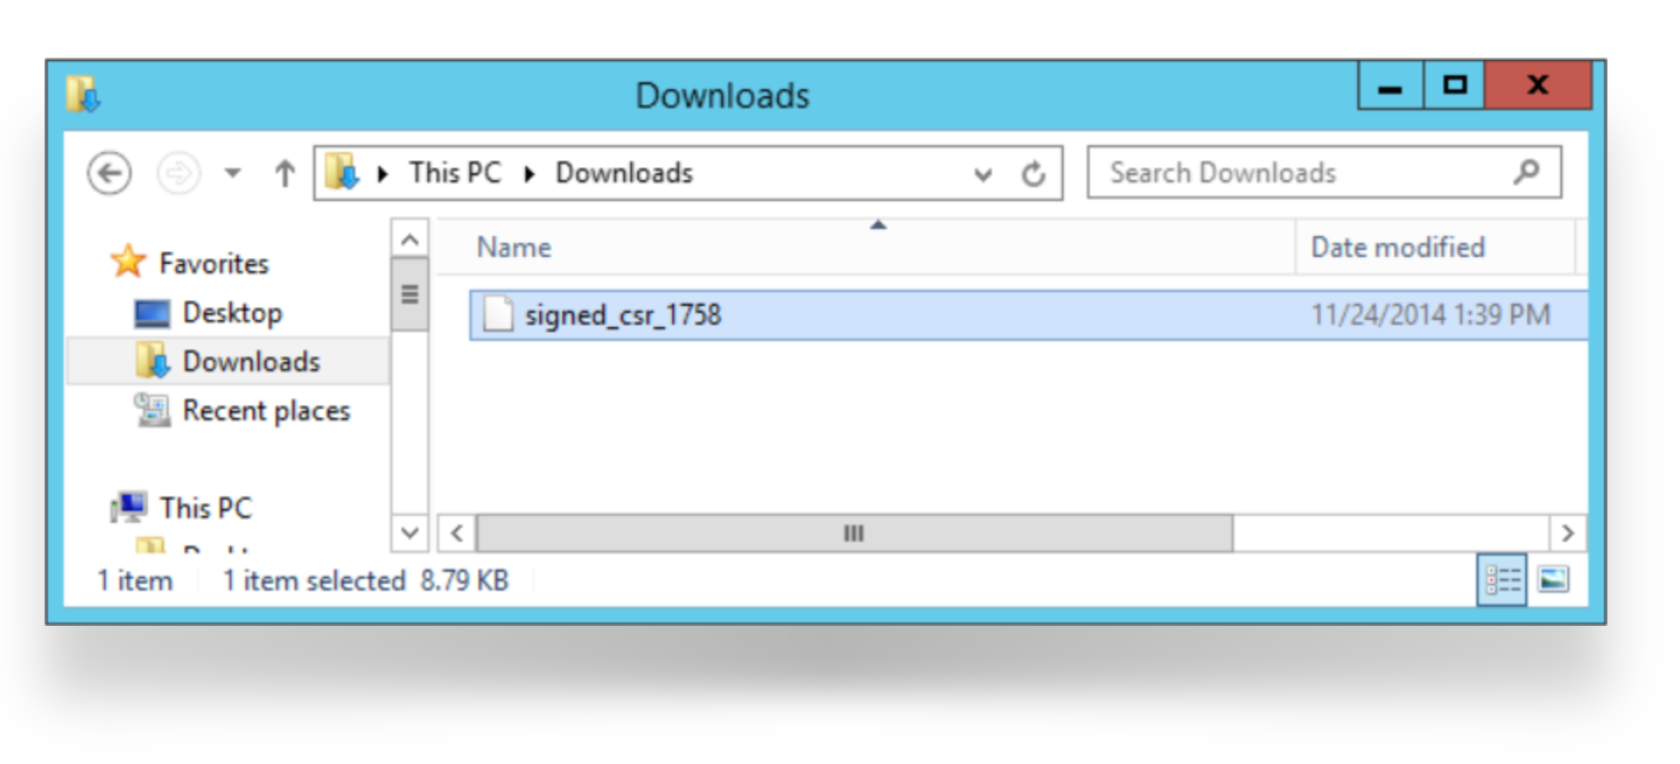](https://kb.filewave.com/uploads/images/gallery/2026-01/I1DsMZM5J61zQk2R-signed-csr-download.png) #### **Step 4: Create a .p12 file from the Signed Certificate** 1. Open **cmd.exe** as an Administrator 2. Create a `.p12` file by entering the following command. Replace the file paths if necessary, and note that `MDM_FileWave.pem` is an example – use your actual downloaded certificate filename: ``` "C:\Program Files\OpenSSL-Win64\bin\openssl.exe" pkcs12 -export -in "%USERPROFILE%\Downloads\MDM_FileWave.pem" -inkey "%USERPROFILE%\Desktop\privateKey.key" -out "%USERPROFILE%\Desktop\push_cert.p12" -name fw-apns ``` 3. When prompted for the **Export Password**, leave it blank and press Enter [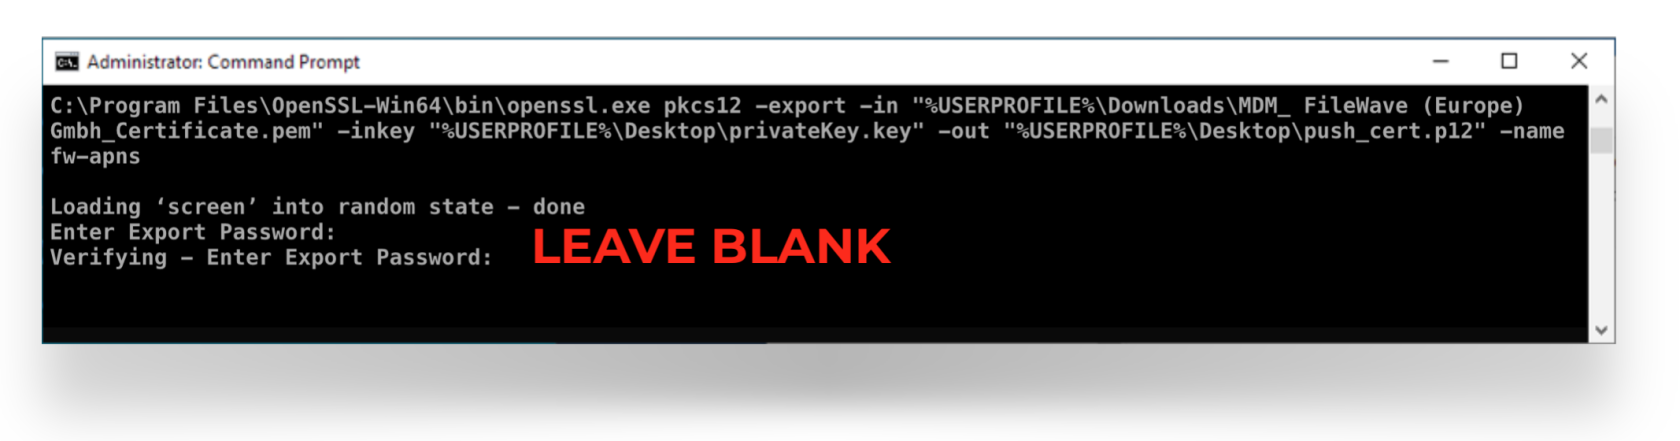](https://kb.filewave.com/uploads/images/gallery/2026-01/odCqISOpVBqlf5WV-cerate-p12.png)**Path Issues** If the command errors when creating the .p12 file, replace the %USERPROFILE% variable with the full file path (e.g., C:\\Users\\YourUsername\\).
4. Verify the certificate was created correctly by running: ``` "C:\Program Files\OpenSSL-Win64\bin\openssl.exe" pkcs12 -info -in "%USERPROFILE%\Desktop\push_cert.p12" ``` This will display certificate details. Confirm that the **Common Name** matches the value you entered in Step 1, and that the **Topic** matches the value from Apple. [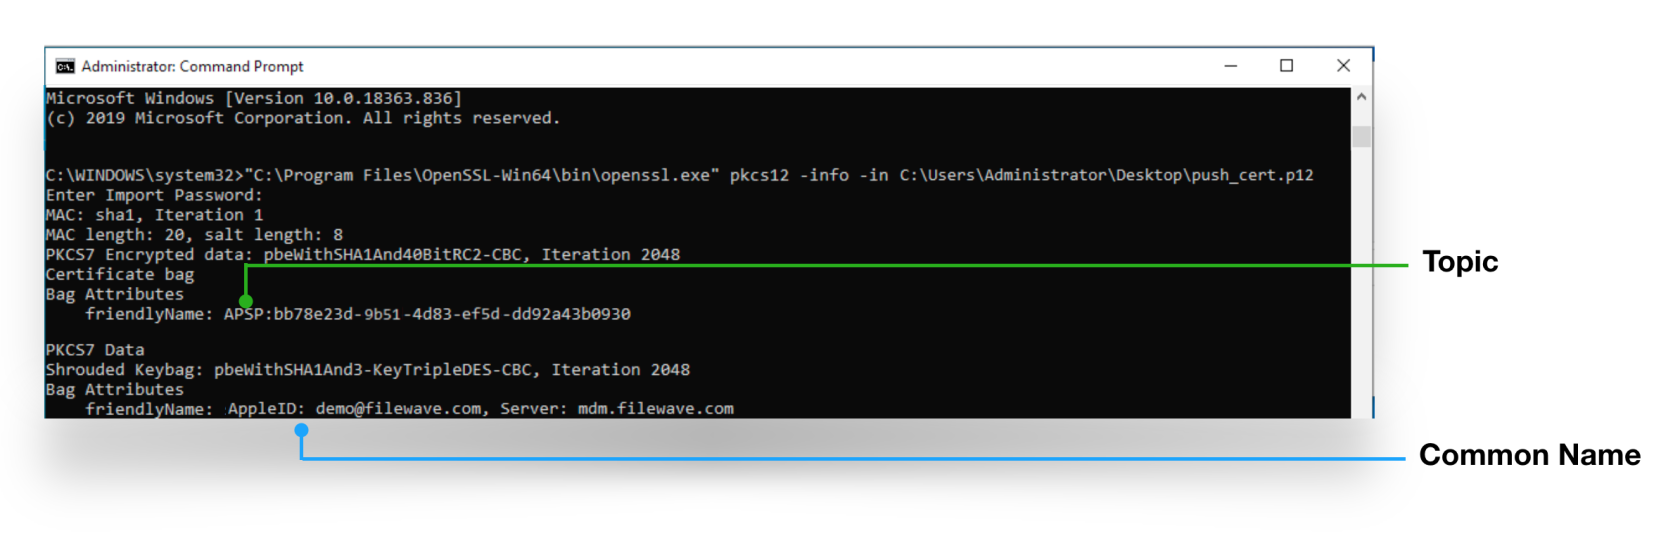](https://kb.filewave.com/uploads/images/gallery/2026-01/IPw6DYAGQJLo77Rd-openssl-private-key.png)**Common Name and Topic** The Private Key name will display the Common Name you entered when creating the CSR. The certificate name is the same as the Topic. Both should match the certificate you created or renewed at Apple.
#### **Step 5: Upload the certificate into FileWave** 1. Launch **FileWave Admin** and log in to your FileWave server 2. Open **Preferences** [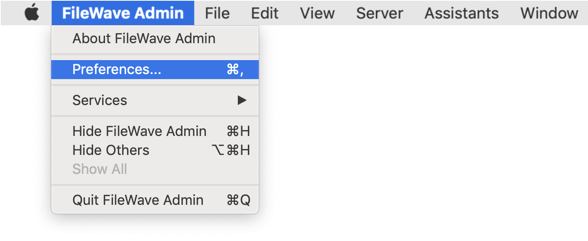](https://kb.filewave.com/uploads/images/gallery/2026-01/LxUUQK6q2z5nAL7v-filewave-admin-prefs.png) 3. Select the **Mobile** tab 4. Click **Browse** and navigate to the `push_cert.p12` file you created in Step 4 5. Select the file and click **Upload APN Certificate/Key Pair** [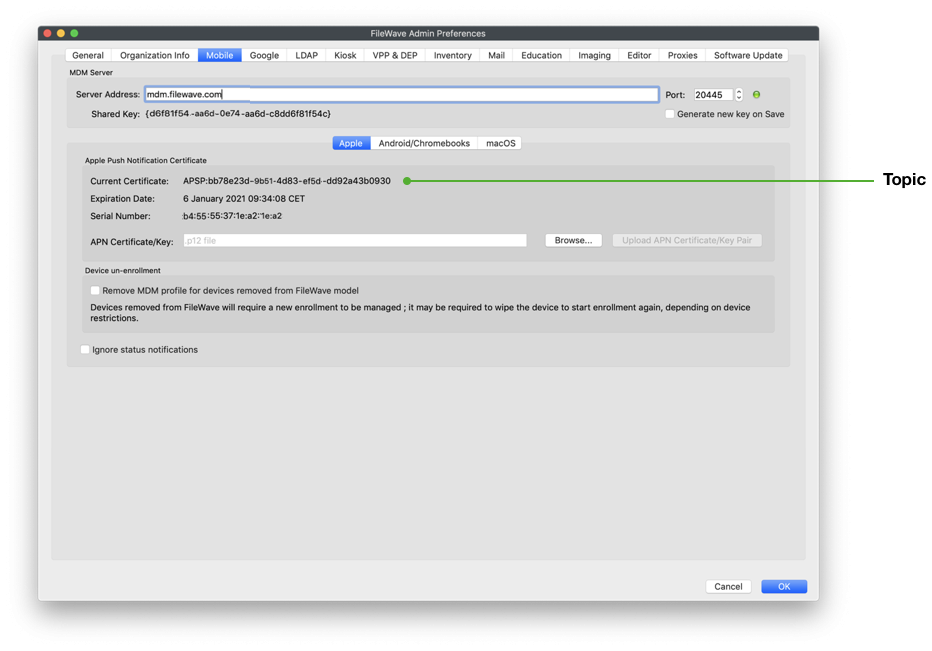](https://kb.filewave.com/uploads/images/gallery/2026-01/WNkas6lTSFZCruWH-apns-renewal-001.png) The topic should match the previous topic. FileWave Central should warn if the topics do match before accepting the upload: [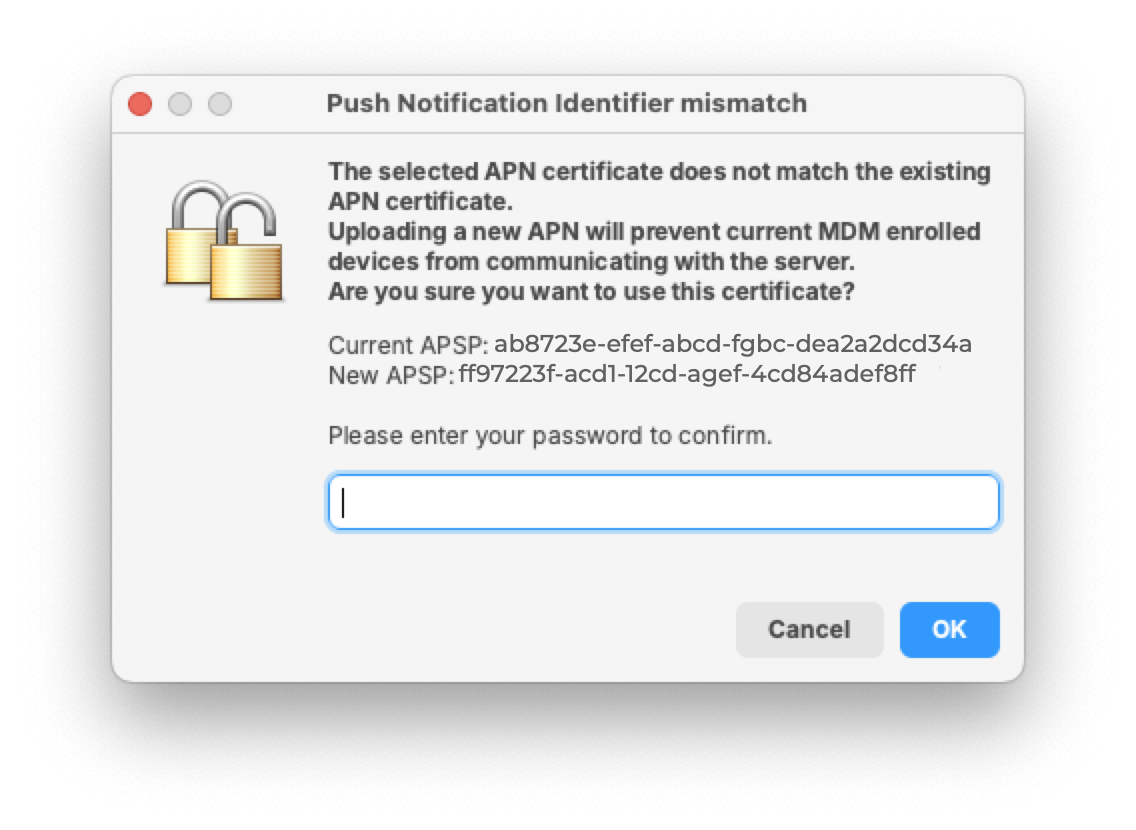](https://kb.filewave.com/uploads/images/gallery/2026-02/1Gee8BgJGxherpat-apns-mismatch-warning.png) Click **OK** to save and close the Preferences dialog. FileWave may now manage Apple devices using Apple's Push Notification Service. #### **Step 6: Verification** - Test whether new or existing MDM clients correctly connect to the APNS service - Check the logs in FileWave Admin to ensure there are no certificate errorsAPNs certificates require yearly renewals. Through **FileWave Admin > Dashboard > Alert Settings**, you can configure automated email reminders. Consider enabling the 'APN for MDM' alert. Note: this requires Email preferences in Admin to be configured.
## Contact Apple for help If you forgot the email tied to your Apple Push Notification certificate, you may reach out to Apple for assistance: [Contact Apple for help with APN](https://support.apple.com/en-us/118629) ## Related articles - [APNs Certificate Creation & Renewal on macOS Computers (XCA)](https://kb.filewave.com/books/certificates/page/apns-certificate-creation-renewal-on-macos-computers-xca) - [APNs Certificate Creation & Renewal on macOS Computers (Keychain)](https://kb.filewave.com/books/certificates/page/apns-certificate-creation-renewal-on-macos-computers-keychain) # Self-signed SSL Certificates # Self-Signed SSL Certificates Going Forward Using a self-signed certificate is not the recommended option and needs to be given a second thought before implementation. Having a certificate trusted by a Global Certificate Authority (CA) is not only the most recommended and most secure option but also becoming more of a requirement for a lot of processes in the tech world. Having a certificate trusted from a CA will also make sure all of your FileWave communication is as secure and user experience as simplified as possible. If you’re FileWave server is going to be managing Chromebooks then a root trusted certificate is required, where as managing iOS devices were self-signed certs can work, you will have to manually trust the certificate during OTA enrollment for the device to communicate with FileWave. Of course there are some use cases where a self-signed certificate makes sense such as a test or evaluation server. ## FileWave Clients When using a self-signed certificate your client devices will need this certificate to trust for proper and secure communication with FileWave. ### Initial Install If the FileWave Client has never been installed on your macOS or Windows devices then you will need to create a custom PKG/MSI. This custom package will need to be filled out with your server address, booster info, and other important data to make sure your clients connect successfully to the FileWave Server. One of those options is Server Certificate, you will need to upload your self-signed certificate into this option so that your new client devices will be trusted by the FileWave server. - [macOS Custom PKG](https://custom.filewave.com/py/custom_client_mac.py) - [Windows Custom MSI](https://custom.filewave.com/py/custom_client_win.py)  #### ***How do you get the self-signed certificate to upload?*** To get the self-signed certificate that needs to be uploaded just follow the steps below: 1. Log into the FileWave Admin 2. Go to FileWave Admin → Preferences 3. While in the General Tab find the SSL Certificate Management pane 4. Finally click the Get Current Certificate button, this will download the current SSL certificate you have in FileWave  iOS devices will enroll normally during DEP but, during OTA enrollment the FileWave certificate will need to be trusted manually. Please refer to the [KB article linked here](https://kb.filewave.com/books/certificates/page/self-signed-certificate-error-during-ios-ota-enrollment "Self Signed Certificate Error during iOS OTA Enrollment") for more information. ### Upgrade All macOS and Windows clients on FW version 12.9.1 and below will still communicate with the FileWave server, but once upgraded to version 13 the self-signed certificate will need to be pushed to the devices. This will be done automatically when you upload the FileWave version 13 upgrade Fileset into the Filesets section the FileWave Admin. 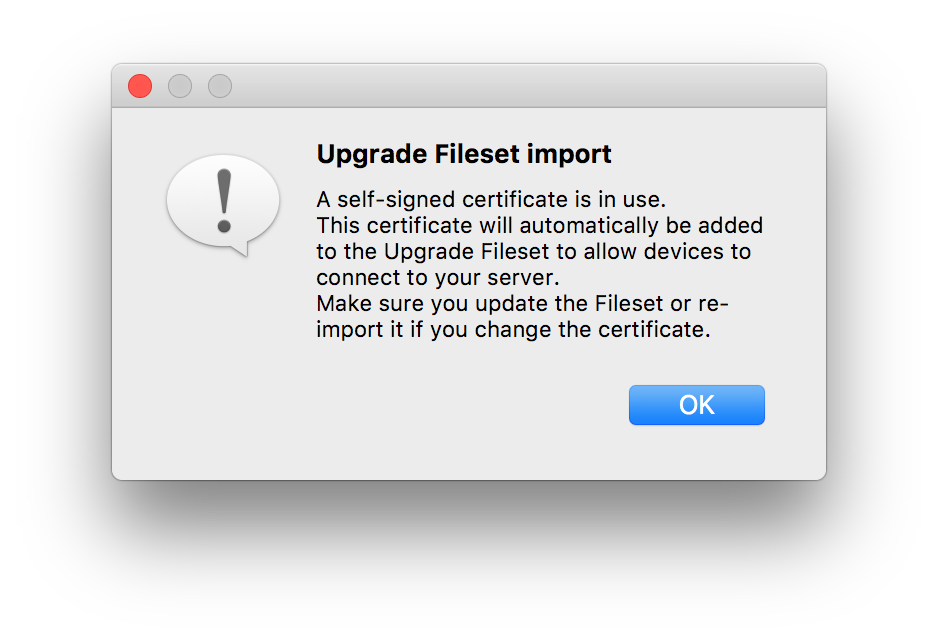 iOS devices will not need anything pushed out, when the FileWave server is updated. But keep in mind during OTA enrollment the FileWave certificate will need to be trusted manually. Please refer to the [KB article linked here](https://kb.filewave.com/books/certificates/page/self-signed-certificate-error-during-ios-ota-enrollment "Self Signed Certificate Error during iOS OTA Enrollment") for more information. If you need to renew your self-signed certificate please refer the [KB article linked here](https://kb.filewave.com/books/certificates/page/renew-filewave-server-self-signed-certificate "Renew FileWave Server Self-signed Certificate") for those steps. ## FileWave Admin If using a self-signed certificate the FileWave Admin won’t be able to verify the identity of the server. When you log into the Admin you will be prompted that the server doesn’t trust the certificate and you have the option to continue with the connection being untrusted or you can add the certificate to your trust store then connect. Also when you connect via the Web Console you will be warned that the connection is not private.  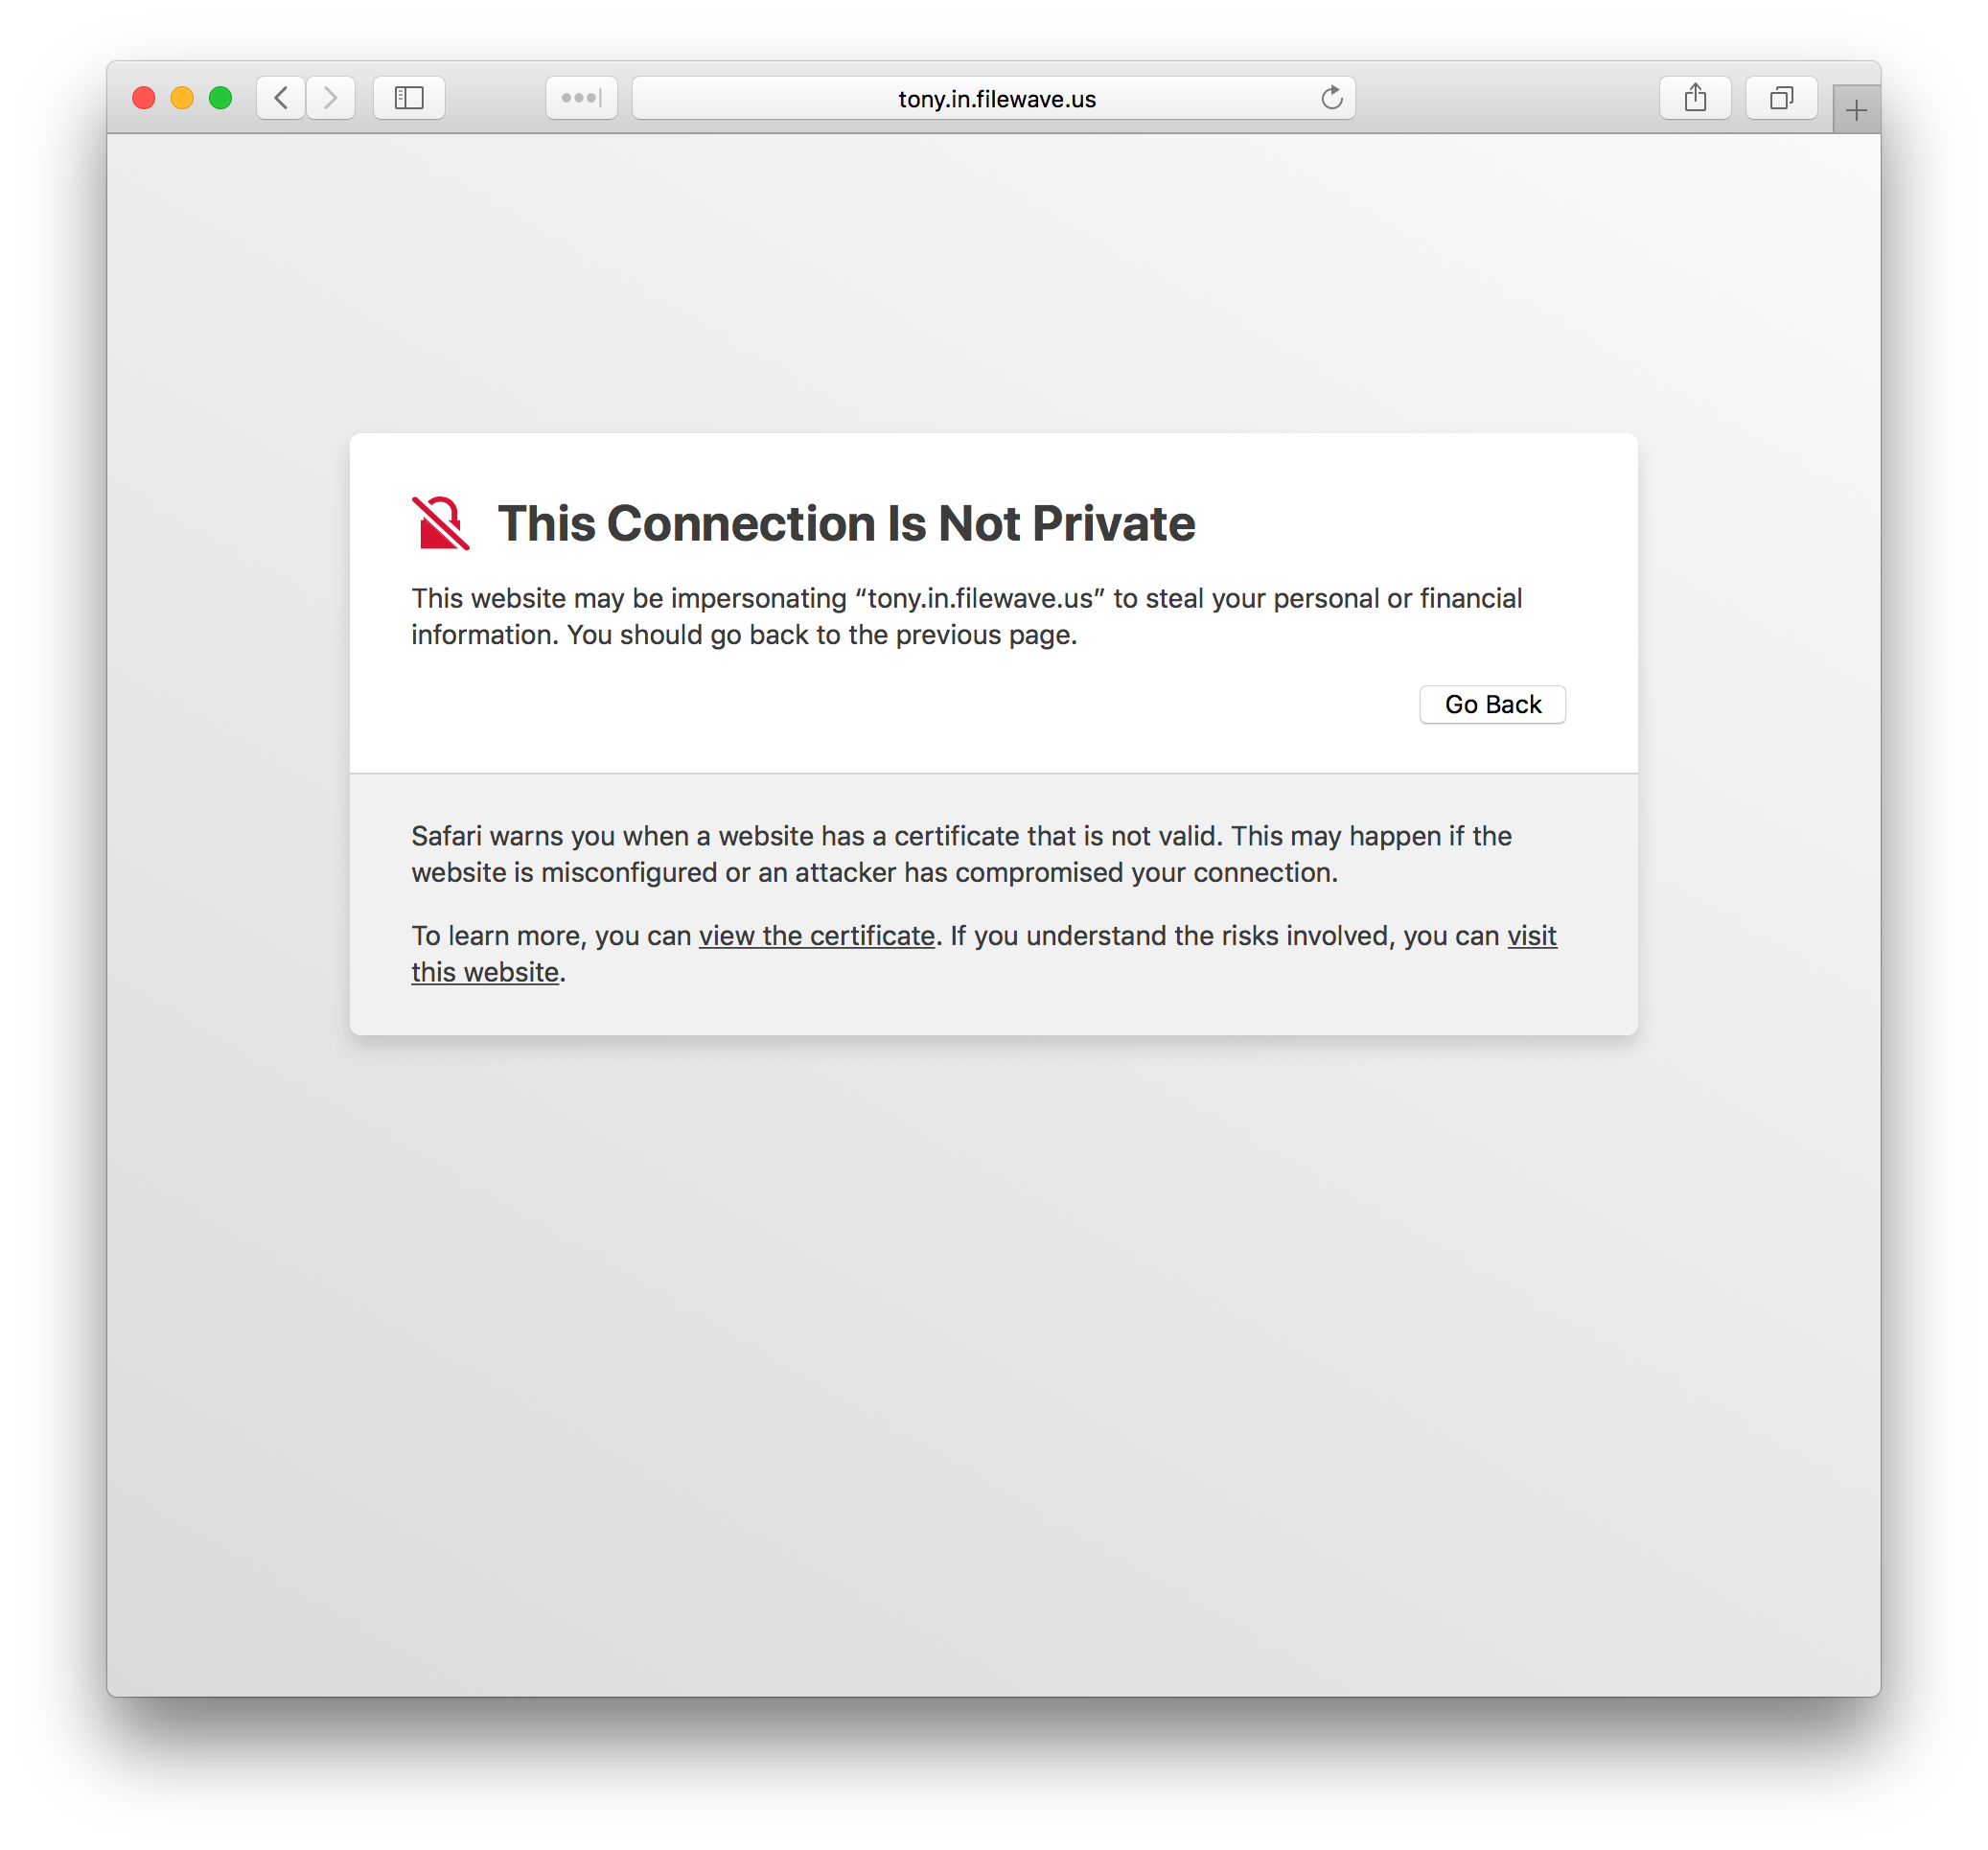On macOS, certificates manually added to trust store require explicit "Trust for SSL" permission.
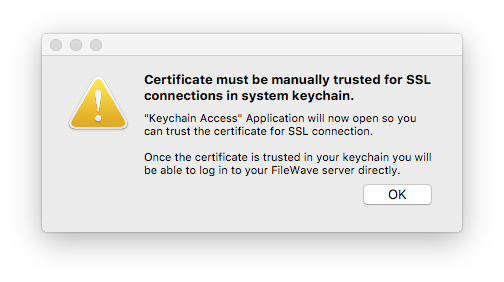 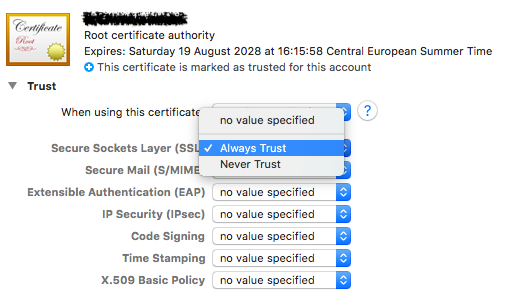 ## Imaging Virtual Server When using self-signed certificates the FileWave server will automatically transfer the certificate to a newly created IVS, but existing imaging servers will need to be pushed the certificate. 1. Log into the FileWave Admin 2. Go to FileWave Admin → Preferences → Imaging 3. Select an imaging server then the Upload Certificate button at the bottom right of the pane  This will send the SSL certificate to the IVS, you have to do this for any existing IVS you have attached to your FileWave server. You can check the status of the IVS to see whether or not the certificate is uploaded, by selecting the IVS and clicking the Status… button. 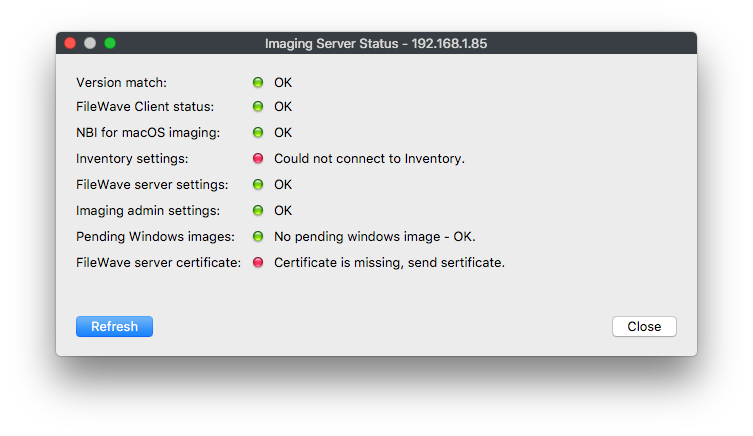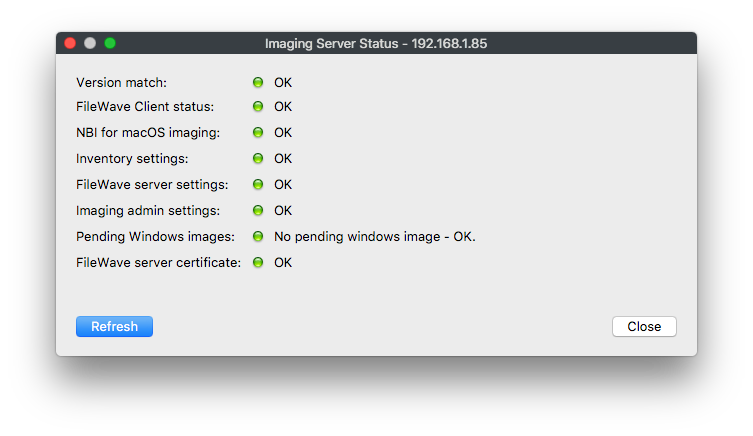 ## Related Content - [Let's Encrypt Setup for FileWave Server (Debian)](https://kb.filewave.com/books/certificates/page/lets-encrypt-setup-for-filewave-server-debian "Let's Encrypt Setup for FileWave Server (Debian)") - [FileWave Server SSL Certificate from Windows](https://kb.filewave.com/books/archived-articles/page/filewave-server-ssl-certificate-from-windows "FileWave Server SSL Certificate from Windows") # Renew FileWave Server Self-signed Certificate ## Description For simplicity, we should recommend [Renewing with an Official SSL certificate](https://kb.filewave.com/books/certificates/page/root-trusted-ssl-certificate-using-and-renewing "Root Trusted SSL Certificate (Using and Renewing)") or [Let's Encrypt Setup for FileWave Server (Debian)](https://kb.filewave.com/books/certificates/page/lets-encrypt-setup-for-filewave-server-debian "Let's Encrypt Setup for FileWave Server (Debian)")Using a self-signed certificate is strongly discouraged for a production server.
## Information A self-signed certificate may not be trusted by devices out of the box. Instead, the device requires a local copy to be able to trust the certificate. Prior to FileWave 13, this has only affected Mobile devices: [Renew MDM self signed SSL certificate on iOS](https://kb.filewave.com/books/certificates/page/renew-mdm-self-signed-ssl-certificate-with-ios-devices "Renew MDM self signed SSL certificate on iOS") However, FileWave uses the certificate for additional security for non MDM communication and initial installation or upgrading to FileWave 13 from a release of 12 or lower.Renewal though requires additional steps to ensure device communication is not lost.
## Directions The 'fwcontrol' command for creating certificates is now a 2 step process, where 'fqdn' should be the Fully Qualified Domain Name of your FileWave Server, e.g. demo.filewave.ch: ```shell sudo fwcontrol server generateSelfSignedCert --create --cn=fqdn [--country COUNTRY] [--state STATE] [--locality LOCALITY] [--organization ORGANIZATION] [--ou ORGANIZATIONAL_UNIT] [--email EMAIL] [--ignore_name_mismatch] sudo fwcontrol server generateSelfSignedCert --install ``` Bracketed options are not required, but may be specified. ### Step 1 #### Certificate Generation Using demo.filewave.ch as an example: ```shell sudo fwcontrol server generateSelfSignedCert --create --cn=demo.filewave.ch. --country Switzerland ``` This first step generates a new certificate, but unlike before, it does not overwrite the current active certificate. Instead, this certificate is in a 'pending' state. You should see the following warning when creating the certificate: ```shell WARNING: Self-signed certificates are NOT recommended! If you install one, clients in version 13 or greater will no longer allow connections with the FileWave Server unless you put the new self-signed certificate in their trust store. A self-signed certificate has been successfully created and is now pending for later installation on the server. IMPORTANT! - Before installing it, you must deploy it to the trust store of any device whose FileWave Client is in version 13 or greater, otherwise these clients will no longer be able to connect to the server! To do so, you can create a fileset with a copy of /usr/local/filewave/certs/server.crt.pending to be deployed in the trust store folder. - Once you are ready to install the new self-signed certificate and if you understand the risks, please run this command again with option --install. running restart apache command ``` Instead a new certificate key/crt pair of files may be seen in the following server folder and will show as 'pending', along with the original key/crt pair: ```shell /usr/local/filewave/certs/server.crt /usr/local/filewave/certs/server.crt.pending /usr/local/filewave/certs/server.key /usr/local/filewave/certs/server.key.pending ``` As indicated by the Important message, all clients will require a copy of this certificate to communicate with the server. During transition, it is important that both original and new certificate are installed on devices. Copy the server.crt.pending and rename appropriately for deployment. e.g. server.2019.04.30.crt #### Mobile Devices Installing the new certificate on Mobile devices is as before, except a profile needs to be made with this new certificate as well as the current certificate: [Renew MDM self signed SSL certificate with iOS devices](https://kb.filewave.com/books/certificates/page/renew-mdm-self-signed-ssl-certificate-with-ios-devices "Renew MDM self signed SSL certificate with iOS devices") #### Computers Installing the new certificate on Computers is the same as the process for Upgrading to FileWave 13, but this new certificate needs to be added to a Fileset manually. This could either be the current FileWave Upgrade Fileset or a new Fileset. Location of the file is either: macOS: ##### macOS Client/Booster Trust Store ``` /private/var/FileWave/trust_store ``` Windows: ##### Windows Client/Booster Trust Store ``` C:\ProgramData\FileWave\FWClient\trust_store ```Set the certificate 'Verification' to 'Ignore At Verify' to ensure it is never removed
If the new certificate should become live on the server prior to the clients receiving this Fileset, those devices will no longer be manageable through FileWave and a manual process will be required to locally instal the certificate.
Whichever option is chosen, a method should be designed to monitor the installation process. Only once all devices are updated, should the 'pending' certificate become the active server certificate. Options for monitoring could include: - Fileset Reports - Custom Fields A Custom Field could take the following form (assuming the example file name of 'server.2019.04.30.crt'): ##### macOS Example Custom Field ```shell #!/bin/bash server_cert=$(find /var/FileWave/trust_store -name "server.*.crt") if [[ "$server_cert" != "" ]] then echo Yes else echo No fi exit 0 ``` ### Step 2 This second step enables the 'pending' certificate as the active certificate, replacing the original server certificate file. ``` sudo fwcontrol server generateSelfSignedCert --install ``` Once all clients have the new certificate within their respective trust stores, the 'pending' server certificate may now become active. When this update of the certificate occurs, any other elements requiring the server certificate should also be updated as this time. #### DEP The server certificate is stored as an 'Anchor certificate' within any created DEP profile. As with any certificate change, once the certificate is renewed, new DEP profiles should be created; do not duplicate. #### Custom PKG/MSI The Custom Client Installer also needs to include the certificate. The following links allow for uploading the current server certificate within the 'Options' - [macOS Custom Client Builder](https://custom.filewave.com/py/custom_client_mac.py) - [Windows Custom Client Builder](https://custom.filewave.com/py/custom_client_win.py) Details highlighted on: [Self-Signed Certificates Going Forward](https://kb.filewave.com/books/certificates/page/self-signed-ssl-certificates-going-forward "Self-Signed SSL Certificates Going Forward") # Renew MDM self signed SSL certificate with iOS devices ## Self Signed certificate renewal Renewing MDM self-signed certificate can be done if the current certificate has to be changed: - the certificate is or is about to expire - the certificate is not or will not be trusted by devices anymore The main issue with self-signed certificate is that, by definition, those certificates are not issued by a trusted Certificate Authority (CA), and are not trusted by default on devices. To have devices trust those certificates, the certificate must be added to the trust store. This can be achieved by: - DEP enrollment, which can add the server certificate - Deploying a profile - manually installing and trusting the certificateIn production environment, it is highly recommended to use trusted CA issued certificate ; self-signed certificates should only be used for testing and evaluation purpose. The best and most simple way to solve self-signed certificate renewal issues is to stop using self-signed certificate and use trusted CA certificates. There are free options like [Let's Encrypt](https://kb.filewave.com/books/certificates/page/lets-encrypt-setup-for-filewave-server-debian "Let's Encrypt Setup for FileWave Server (CentOS)") to have a trusted cert.
## Planned renewal In case you need to renew a self-signed certificate, you need to ensure all your devices will trust the new certificate before you renew it ; this implies the following steps: 1. Create a new private key and certificate ```shell $ openssl req -x509 -nodes -sha256 -days 3650 -newkey rsa:2048 -keyout /tmp/server.key -out /tmp/server.crt Generating a 2048 bit RSA private key ...........................................................+++ ....................+++ writing new private key to 'server.key' ----- You are about to be asked to enter information that will be incorporated into your certificate request. What you are about to enter is what is called a Distinguished Name or a DN. There are quite a few fields but you can leave some blank For some fields there will be a default value, If you enter '.', the field will be left blank. ----- Country Name (2 letter code) []: State or Province Name (full name) []: Locality Name (eg, city) []: Organization Name (eg, company) []: Organizational Unit Name (eg, section) []: Common Name (eg, fully qualified host name) []:filewave.acme.org Email Address []: ``` 2\. Import server.crt file into a profile fileset 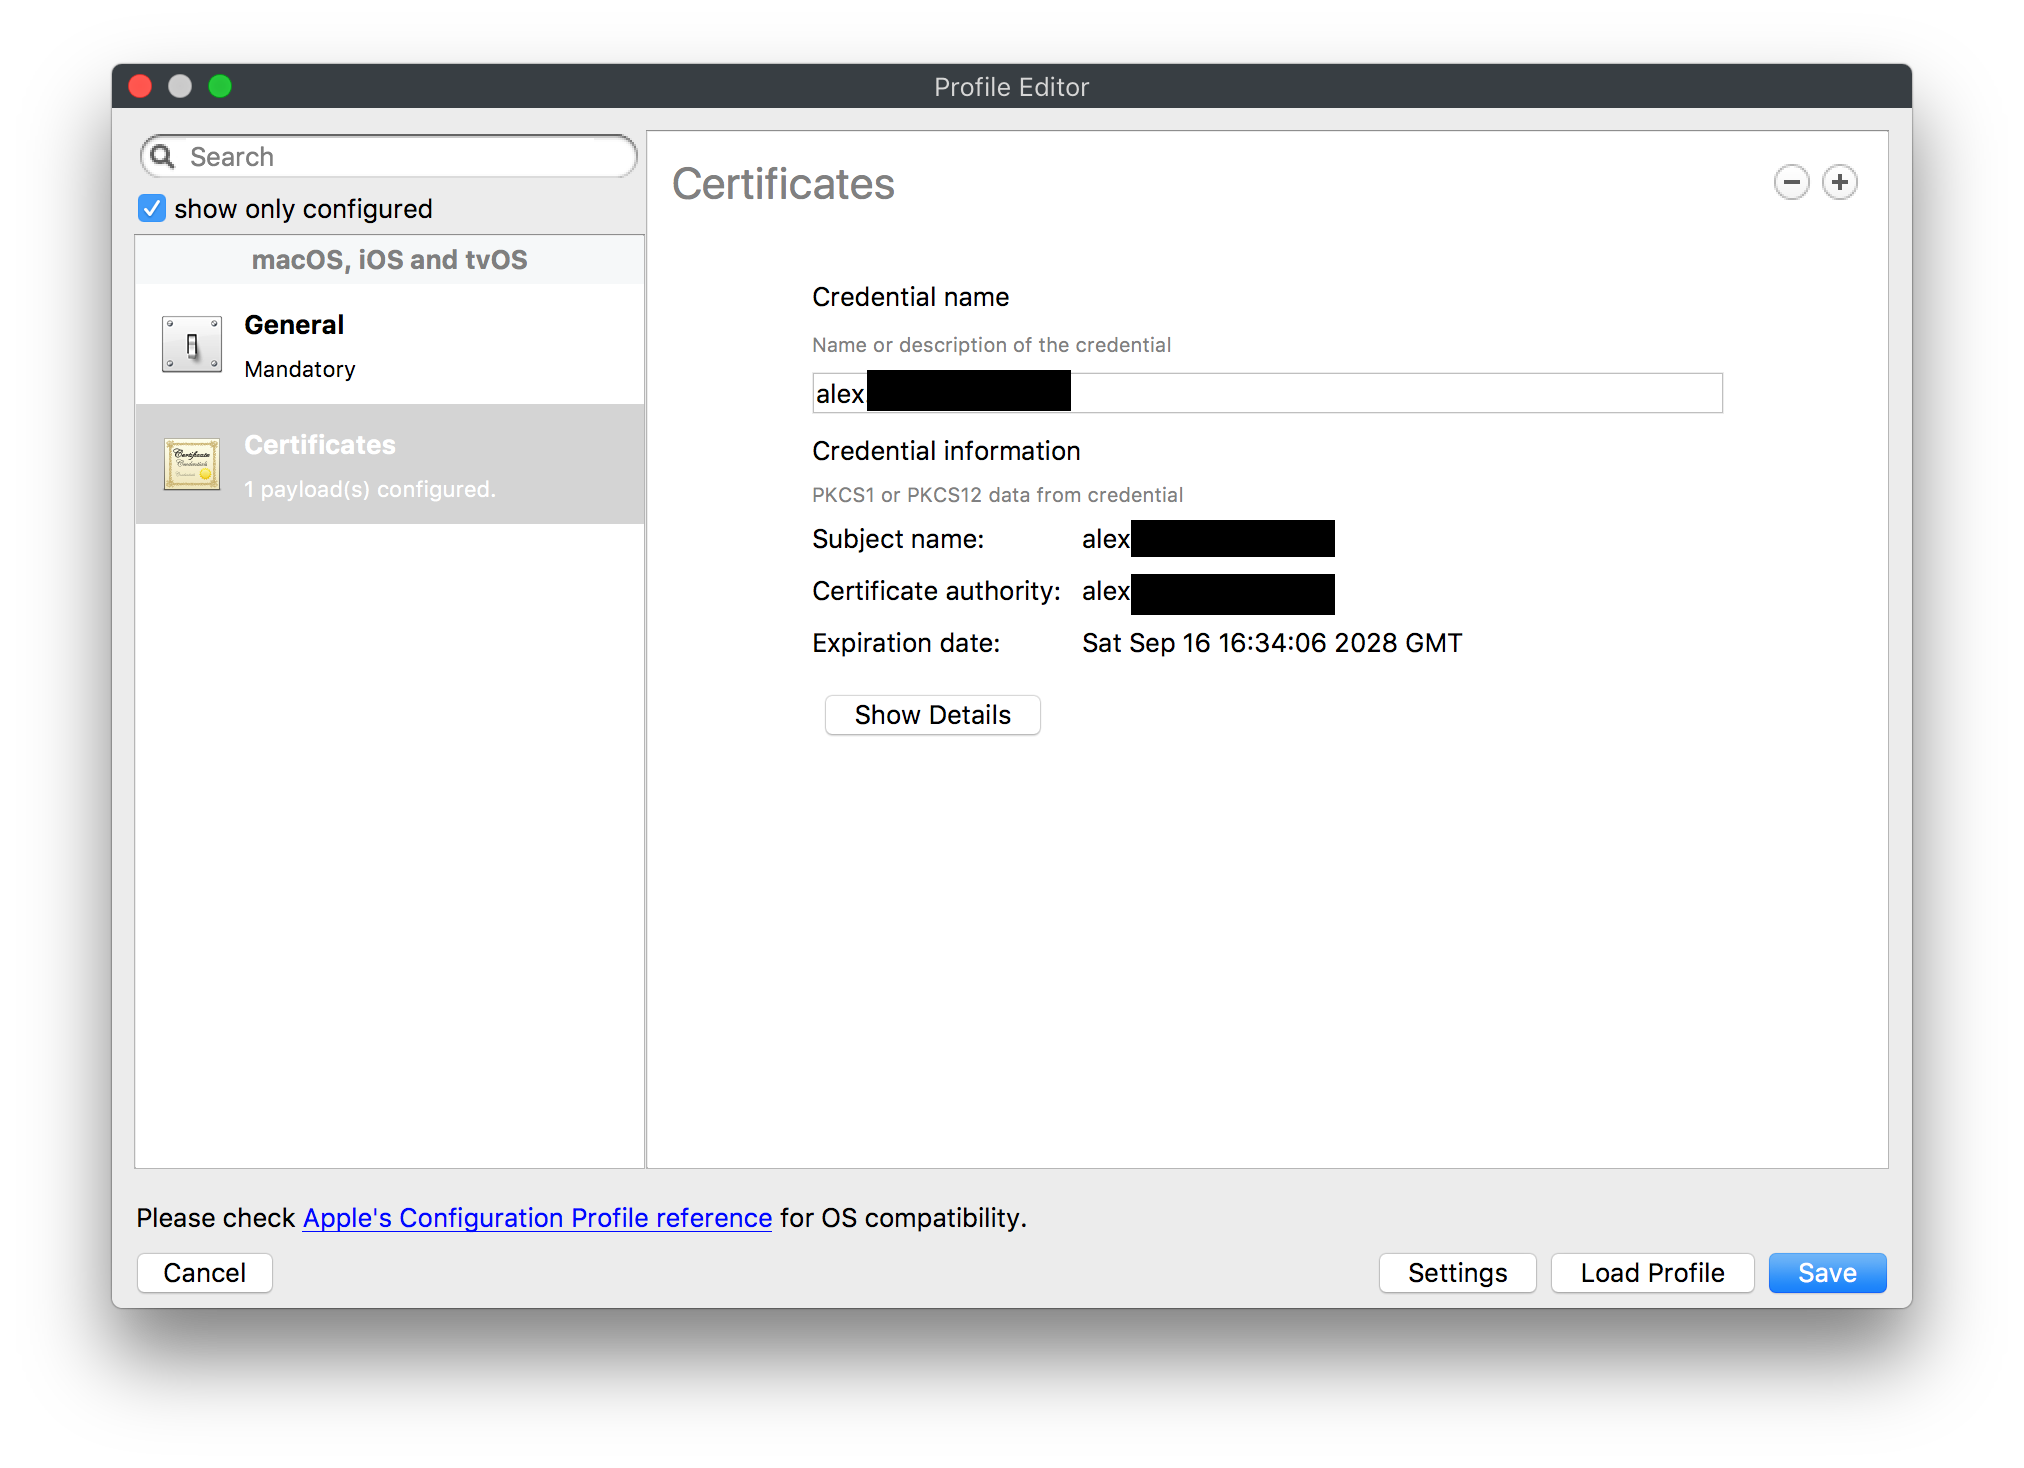 3\. Deploy the profile filest to all your devices 4\. You are able to confirm that the profile was received and trusted by the device by going to Settings → General → About → Certificate Trust Settings, and should see your old as well as new self-signed certificate listed and trusted. The screen shot below shows what you will see with the device trusting both certificates. 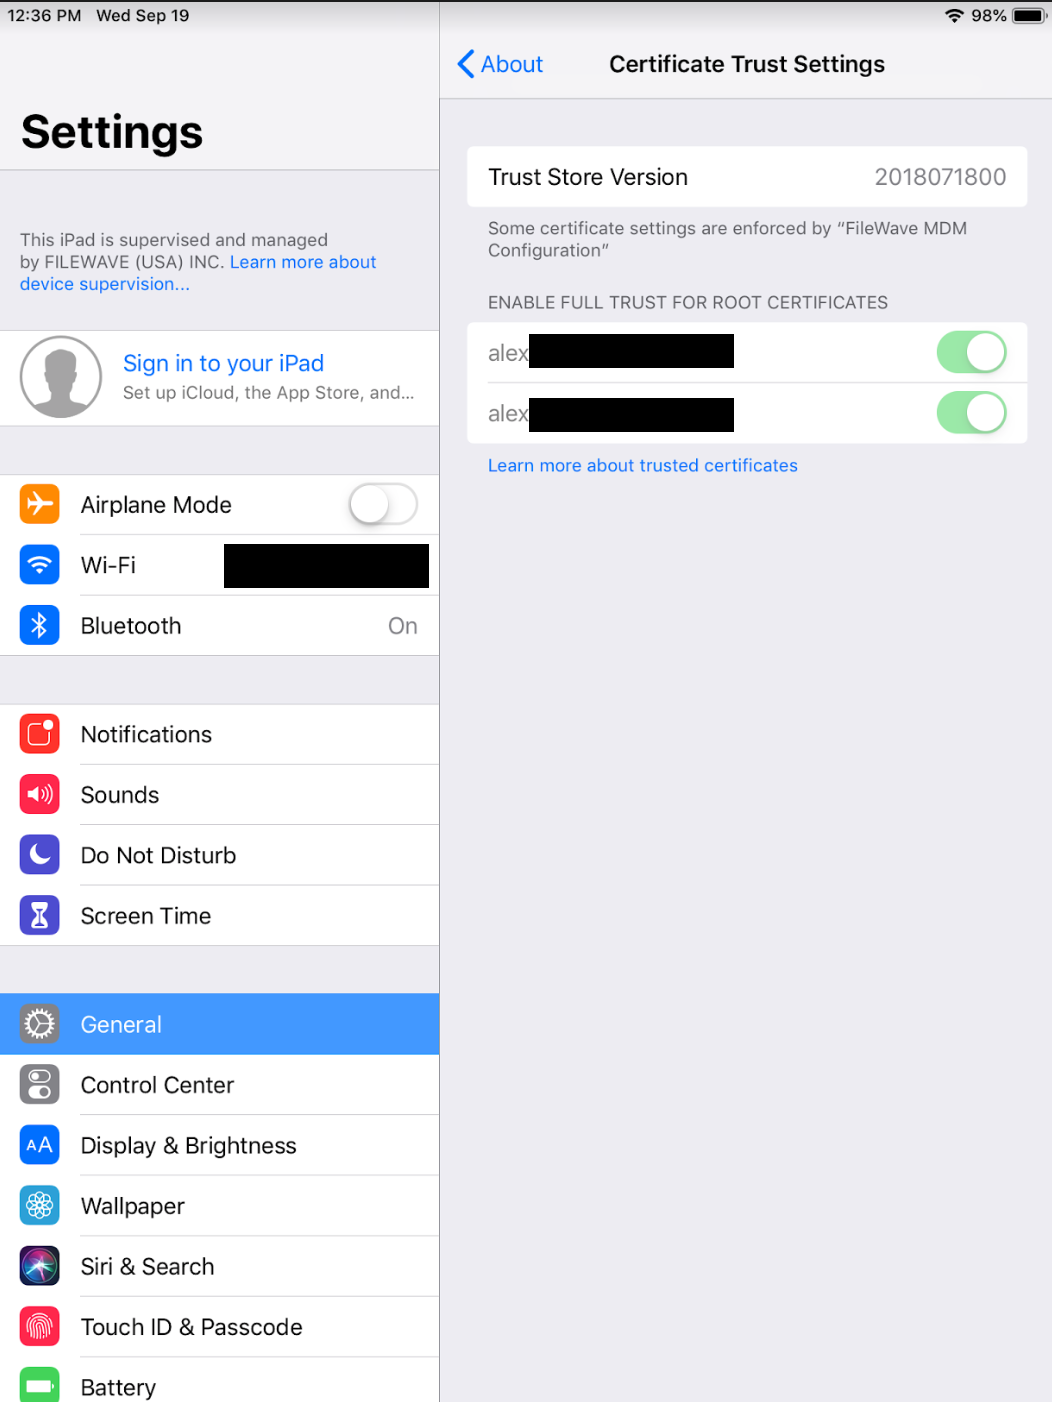 5\. Once **all** devices have the profile, you can switch the key and certificate. The path to your new "server.crt" and "server.key" may change depending on where the certificate is located on your FileWave server: ```shell $ cd /usr/local/filewave/certs $ mkdir old_certs $ mv server.crt server.key old_certs $ cp /tmp/server.* $ fwcontrol apache restart ``` 6\. Re-create DEP profiles and associations as the DEP profile contains a **copy** of the certificate and is sent to Apple at association time ; a new certificate implies a new DEP profile.Failure to update your DEP profiles to have the new profile will cause trust issues at enrollment
## Unplanned or late renewalWorst case possibility using a self-signed cert that expires.
If the current certificate is not trusted by devices anymore (or because some devices did not get the new certificate before the switch), the renewal process remains the same, but with one exception: as devices will stop trusting the server certificate it's not possible to use FileWave to deploy the new certificate. At this point, the best solution is to move forward with a trusted CA certificate ; your devices will start communicating immediately to your server as soon as the certificate is in place. In case trusted CA is not possible, you will have to manually add the certificate to each impacted device: 1. deploy the new certificate to devices ; you can either send it via e-mail, or send your users to the usual enrollment page and ask them to install the cert via "step 1" 2. in the trust store, the newly installed certificate must be granted "use for SSL" permission ## Related Content - [Renew FileWave Server Self-signed Certificate](https://kb.filewave.com/books/certificates/page/renew-filewave-server-self-signed-certificate "Renew FileWave Server Self-signed Certificate") - [Let's Encrypt Setup for FileWave Server (Debian)](https://kb.filewave.com/books/certificates/page/lets-encrypt-setup-for-filewave-server-debian "Let's Encrypt Setup for FileWave Server (Debian)") # Troubleshooting # Export .p12 SSL Certificate from Windows When managing mobile devices, install a trusted SSL certificate on the FileWave Server. The server SSL certificate is configured in *FileWave Central > Preferences > Mobile*. If you generated the Certificate Signing Request (CSR) on a Windows-based system and completed the certificate generation process, Windows can export the SSL certificate and intermediate bundle as a .pfx file. That bundle should include the private key, public certificate, Root CA certificate, and intermediate certificate bundle. Rename the .pfx file to .p12, then upload it in *FileWave Central > Preferences > Mobile* without modifying the certificate contents. ## Step-by-step guide - Open a *Run* dialog and enter "mmc". - Go to *File > Add/Remove Snap-in*. - Add the *Certificates* snap-in and click the *Add >* button in the middle. - Choose *Computer account*. - Pick *Local computer* and click *Finish*. - Click the *OK* button. - In the MMC console browse to *Certificates (Local Computer) > Personal > Certificates* on the left. If your certificate is not there, browse the rest of the *Certificates (Local Computer)* tree until you find it.  - Select your certificate in the middle pane, right-click, and pick *All Tasks > Export*. - When prompted, pick *Yes, export the private key*. 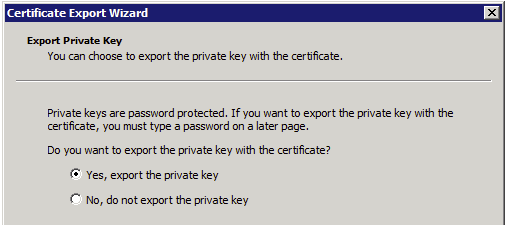 - Under *Personal Information Exchange - PKCS #12 (.PFX)*, check *Include all certificates in the certification path if possible*. Leave the other two checkboxes unchecked. 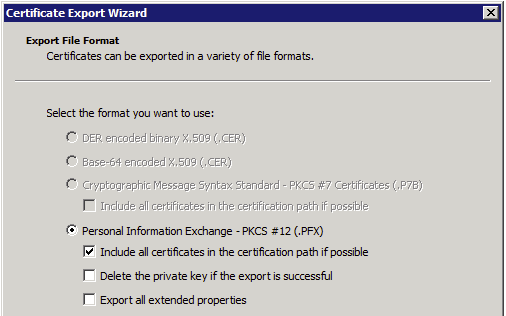 - Click the *Next* button and specify an export password. FileWave Central will prompt for this password when you upload the SSL certificate in *Preferences > Mobile*. - Save the file to your desktop. - Change the file extension from .pfx to .p12. - Upload the .p12 file in the *Mobile* preferences tab of FileWave Central. # Determine Correct Intermediates Bundle for SSL Certificate Some SSL providers include multiple intermediate certificate bundles with your SSL certificate. Your SSL certificate must be merged with the correct intermediate bundle and your private key to generate the .p12 certificate file uploaded in the *Mobile* preferences tab of FileWave Admin. If the wrong intermediate bundle is used, interactive MDM enrollment may show an extra certificate-install step before *Enroll Device*, and client devices may not be able to communicate with the FileWave MDM server correctly. A healthy trust chain normally shows only the *Enroll Device* step. 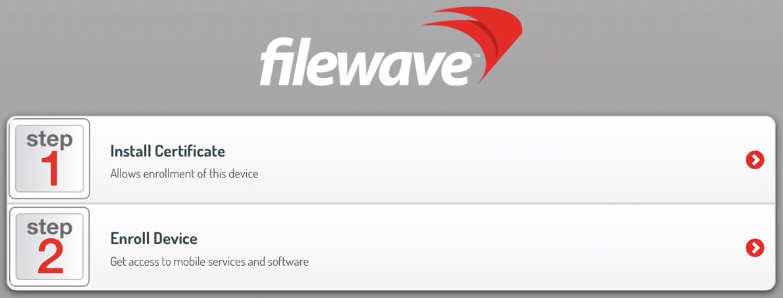 #### Step-by-step guide Follow the steps below to determine the correct intermediates bundle to pair with your SSL certificate so that only one step appears on the interactive enrollment page. 1. When downloading your SSL certificate from your provider, choose Apache format if that option is available. If the certificate files do not have a .crt extension, download them again in Apache format. 2. Go to the *Intermediate Certificate Check* page at [https://tools.keycdn.com/ssl](https://tools.keycdn.com/ssl). 3. Paste the contents of the SSL .crt file from your SSL provider. 4. Paste the contents of the intermediate .crt bundle directly below it. The intermediate bundle may contain multiple certificates; include the full bundle below your SSL certificate. 5. Click the *Validate* button. 6. The checker returns either *No chain issues detected* or *Chain issues detected*. If chain issues are detected, repeat the check with the next intermediate bundle from your provider. Use the intermediate bundle that returns no chain issues when generating the .p12 file for FileWave. 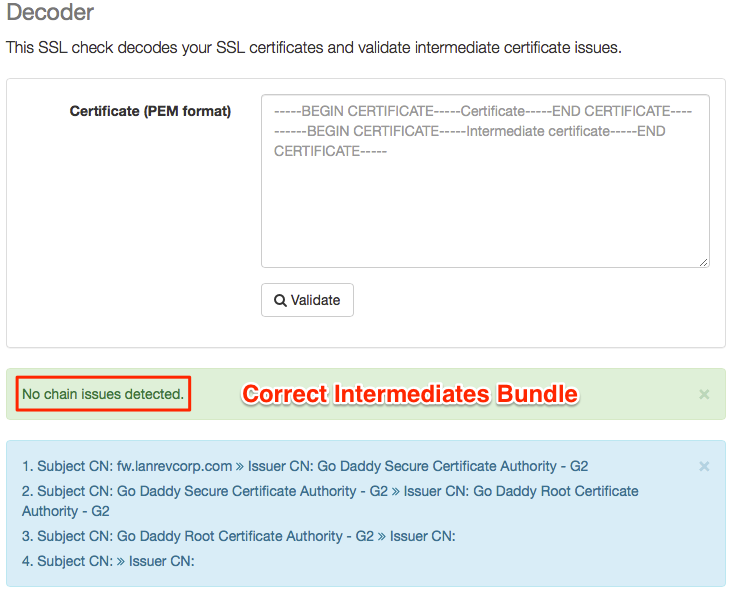 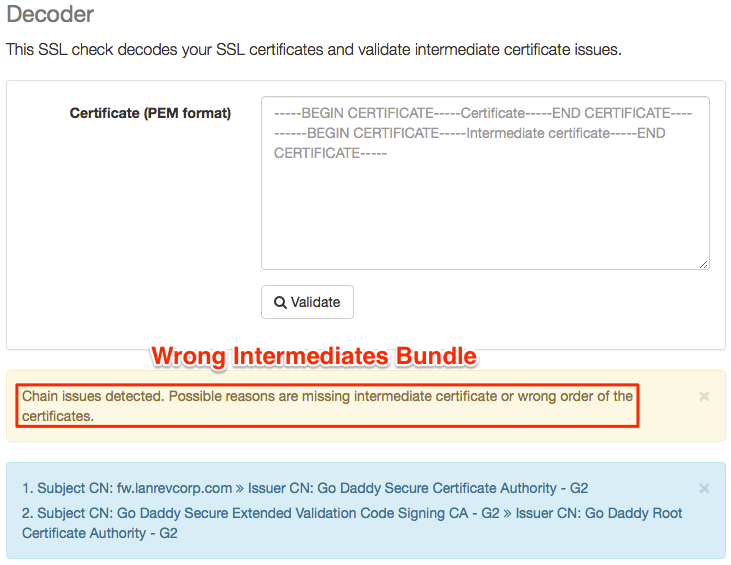 # Self Signed Certificate Error during iOS OTA Enrollment This article shows how to resolve the certificate-trust error that can appear when you manually enroll iOS or iPadOS devices through OTA enrollment while the FileWave Server uses a self-signed certificate. For production environments, use a publicly trusted server certificate when possible. If the server still uses a self-signed certificate, confirm the certificate shown in **FileWave Central → Preferences → Mobile → HTTPS certificate**.  Automated Device Enrollment can still work with this certificate state, but manual OTA enrollment may fail until the device trusts the installed root certificate. 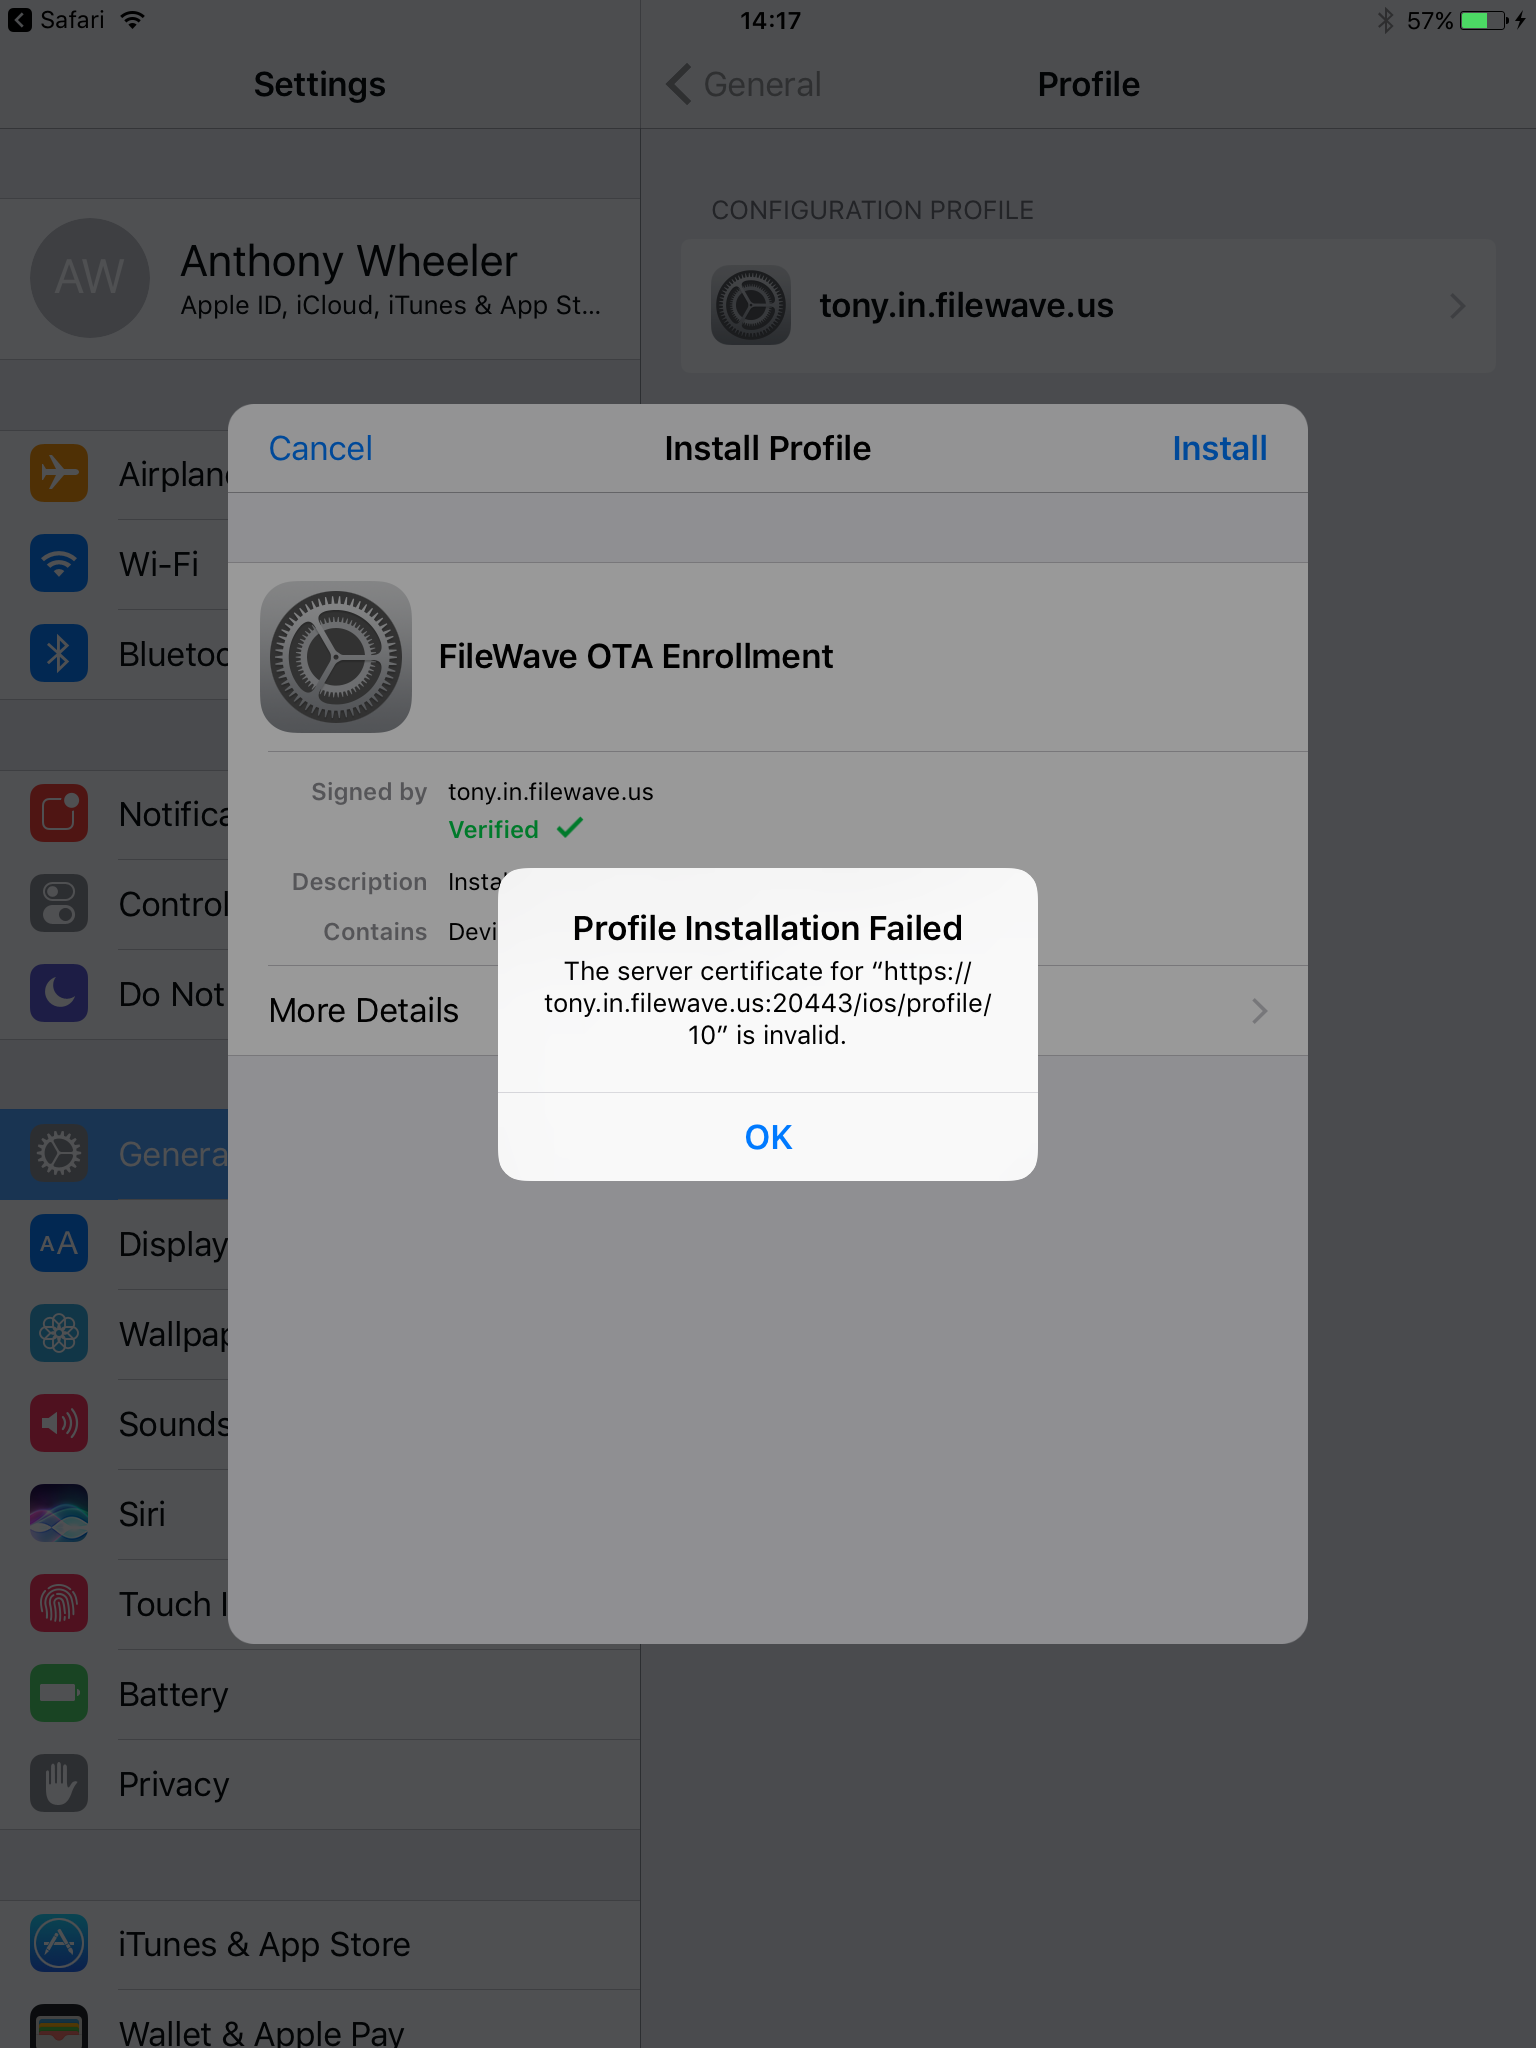 If you keep the self-signed certificate, use the steps below on the device before starting the enrollment step. Replacing the self-signed certificate with a publicly trusted certificate avoids this manual trust workflow. ### Steps to resolve when keeping a self-signed certificate 1. Open the manual enrollment address on the device: https://your.fw.server.DNS.here:20443/ios 2. Select **Step 1 - Install Certificate**. 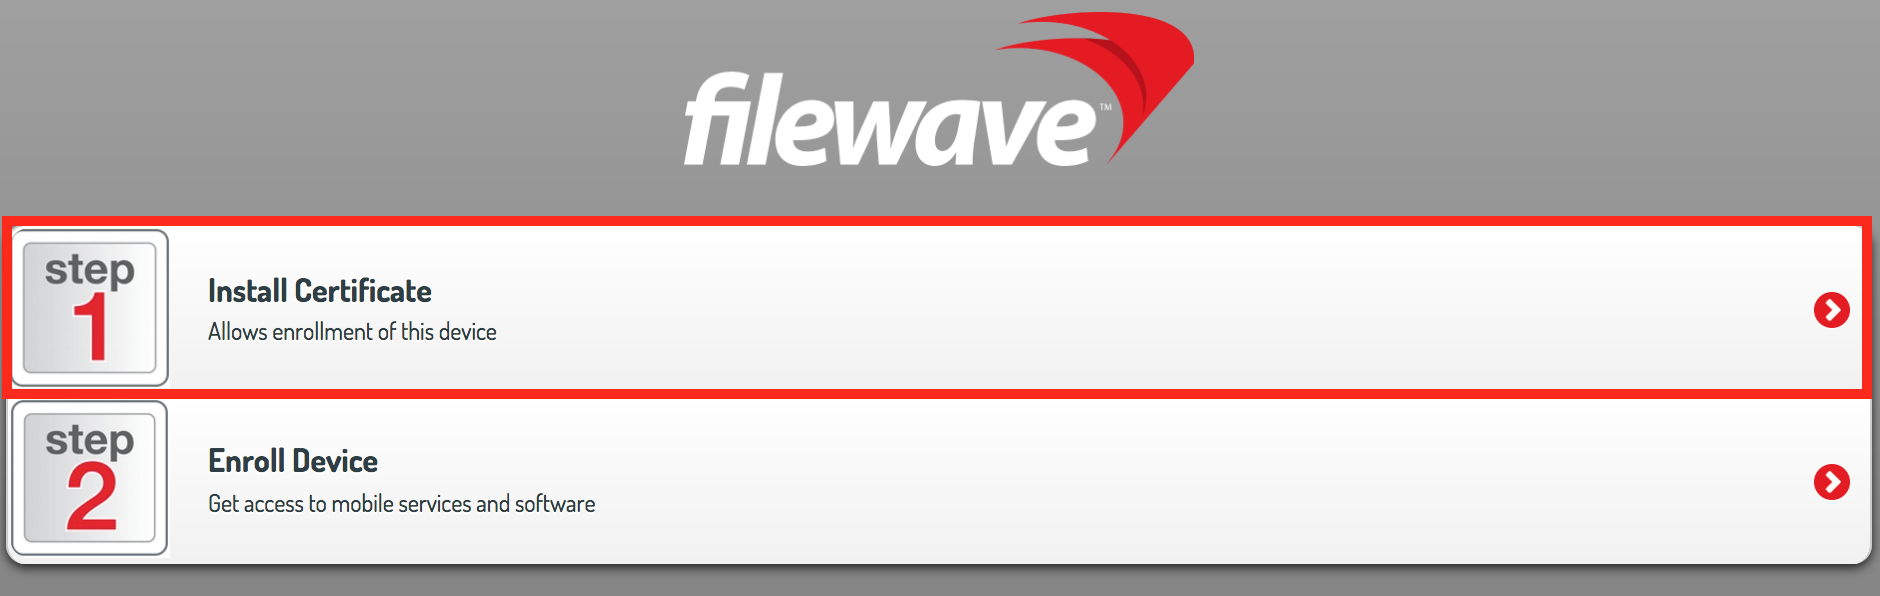 3. Follow the device prompts to install the certificate. Tap **Install** through the prompts, then tap **Done**. 4. After the certificate is installed, open the **Settings** app. Do not start **Step 2 - Enroll Device** yet, because the device has not trusted the certificate. 5. Go to **General → About**. 6. At the bottom of **About**, tap **Certificate Trust Settings**. 7. Under **ENABLE FULL TRUST FOR ROOT CERTIFICATES**, enable trust for the newly installed certificate. 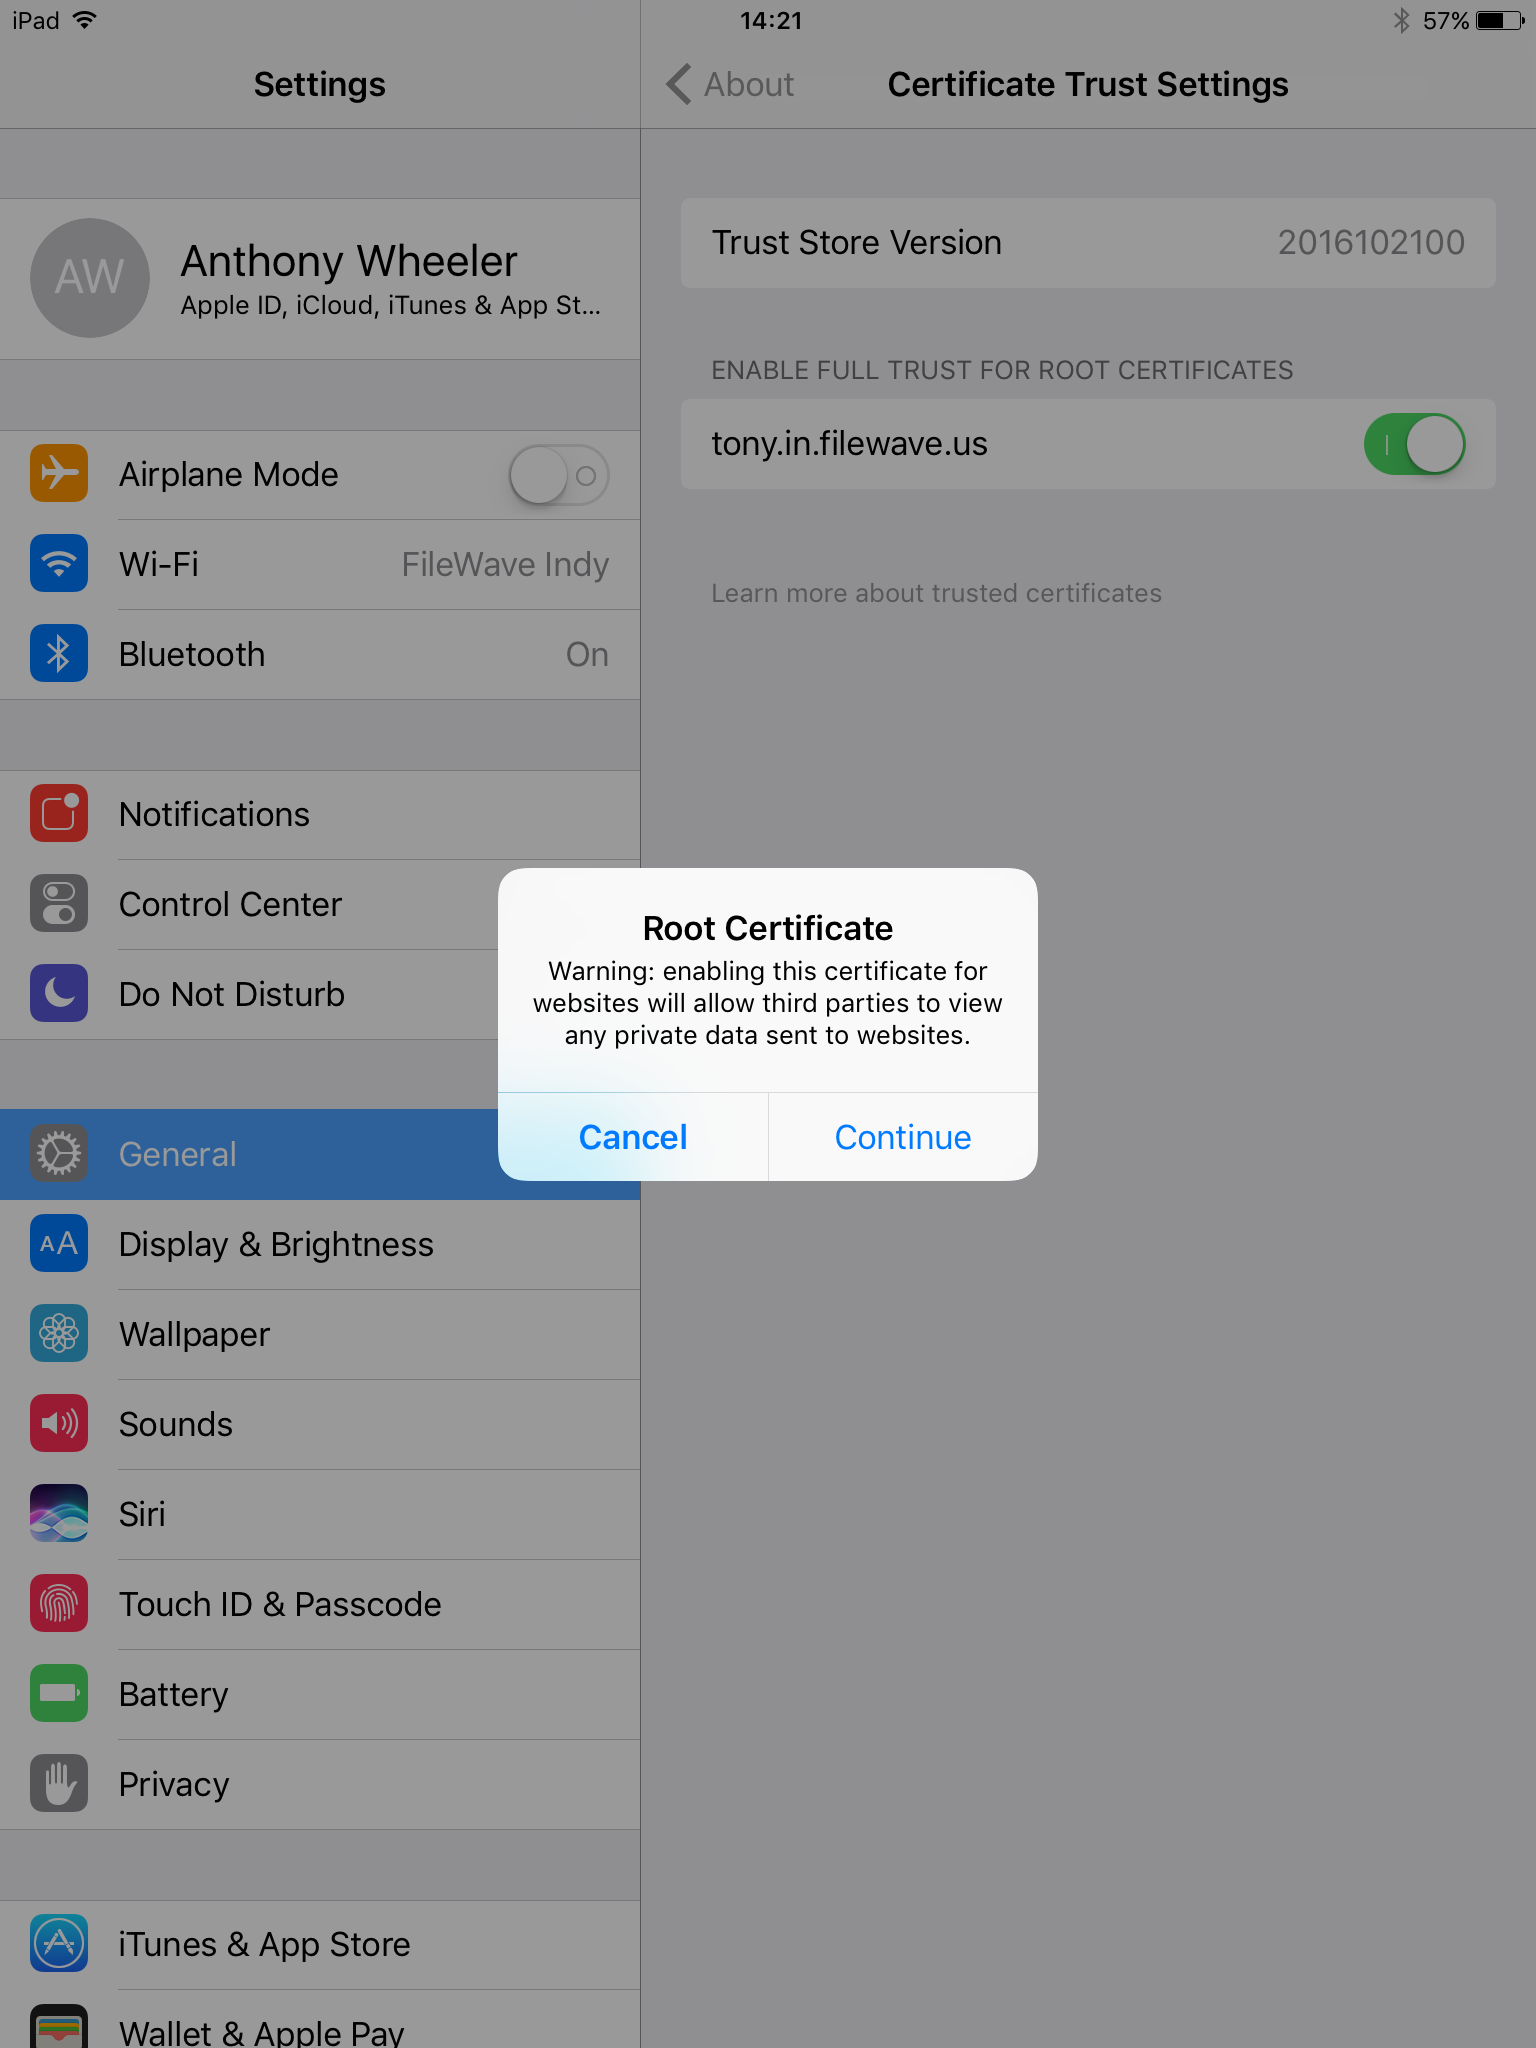 Return to the manual enrollment page and continue with **Step 2 - Enroll Device**. # SSL Server Certificates - iOS 13 and macOS 10.15 Apple have updated their requirements for certificates for their new operating system releases: [https://support.apple.com/en-us/103769](https://support.apple.com/en-us/103769) The new requirements can be broken down in the 3 major sections: 1. The mandatory presence of a Subject Alternative Name 2. Presence of an OID (1.3.6.1.5.5.7.3.1) designating the use of the certificate for TLS Web Server Authentication 3. Maximum validity period of 825 days Requirement 1 is confirmed to render MDM clients unable to connect to the MDM server when not being met. Requirements 2 and 3 are not currently ( as of 24th of September 2019 ) interfering with MDM function when not being met. These two new requirements are not met by newly generated self-signed certificates as of FileWave Server 13.1.3 - so renewing your self-signed certificate will not mitigate this issue permanently. FileWave Server will be updated in a future release to accommodate these new guidelines in order to comply with self-signed certificates. If you are using a self-signed certificate on a production server we recommend you purchase a valid 3rdparty certificate that has been signed by a [trusted root CA](https://support.apple.com/en-us/HT209143). To verify whether your certificate is affected by a missing subject alternative Name, please run the following command on your Linux/macOS server : ```bash certSANCheck=$(openssl x509 -in /usr/local/filewave/certs/server.crt -text -noout | awk '/DNS/'; ); if [[ "$certSANCheck" == "" ]]; then echo "Certificate requires updating"; else echo "Certificate has SAN, no action required"; fi ``` If the above script returns "Certificate has SAN , no action required" , please verify the presence of the OID extension using the next snippet . Otherwise, please jump to "[Directions](#SSLServerCertificates-iOS13andmacOS10.15-Directions)" below to read on for instructions on how to mitigate this issue. ```bash certOIDCheck=$(openssl x509 -in /usr/local/filewave/certs/server.crt -text -noout | awk '/TLS Web Server Authentication/'; ); if [[ "$certOIDCheck" == "" ]]; then echo "Certificate requires updating"; else echo "Certificate has OID, no action required"; fi ``` If the above script returns "Certificate has OID , no action required" , you can stop reading now . Otherwise, please check this page for updates on how to mitigate this issue . **To verify a Windows Server based Installation, please browse to your iOS enrollment page and verify the certificate as shown below :** **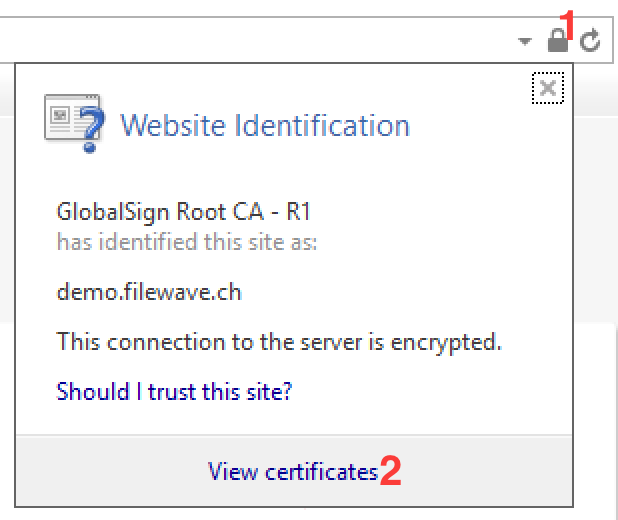 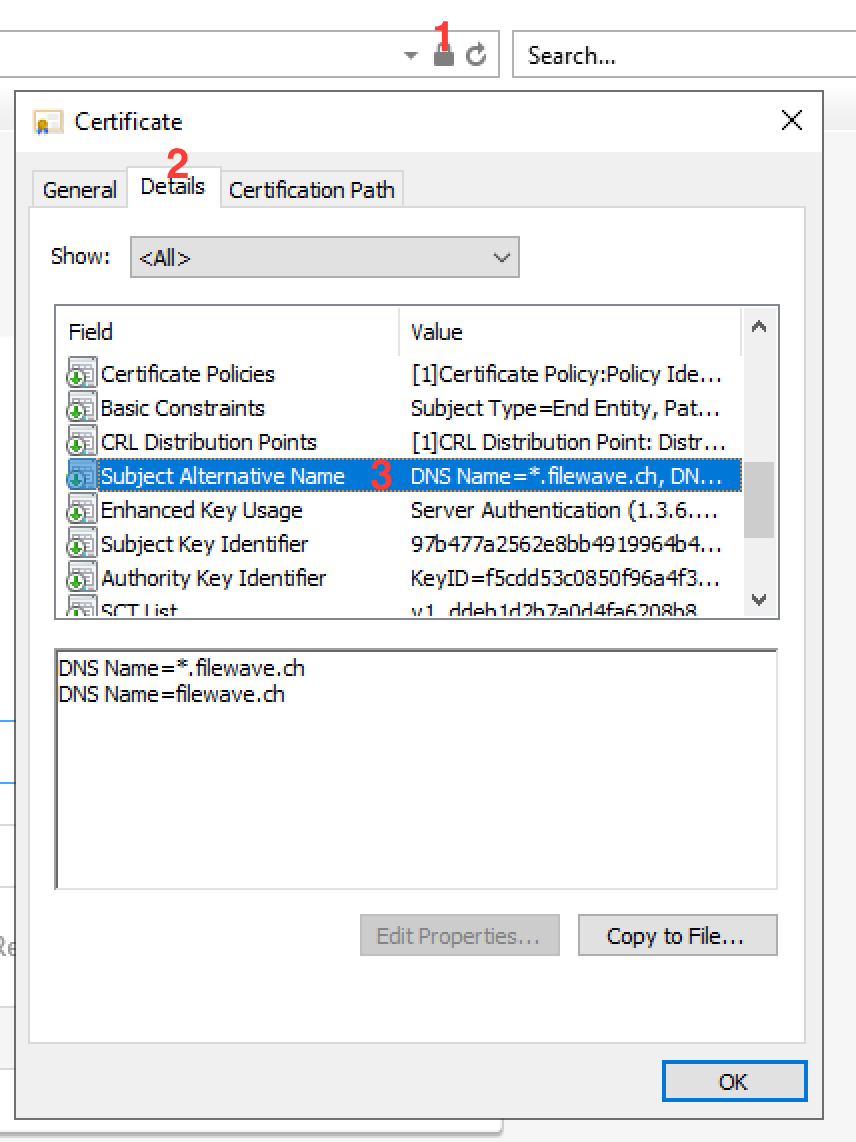 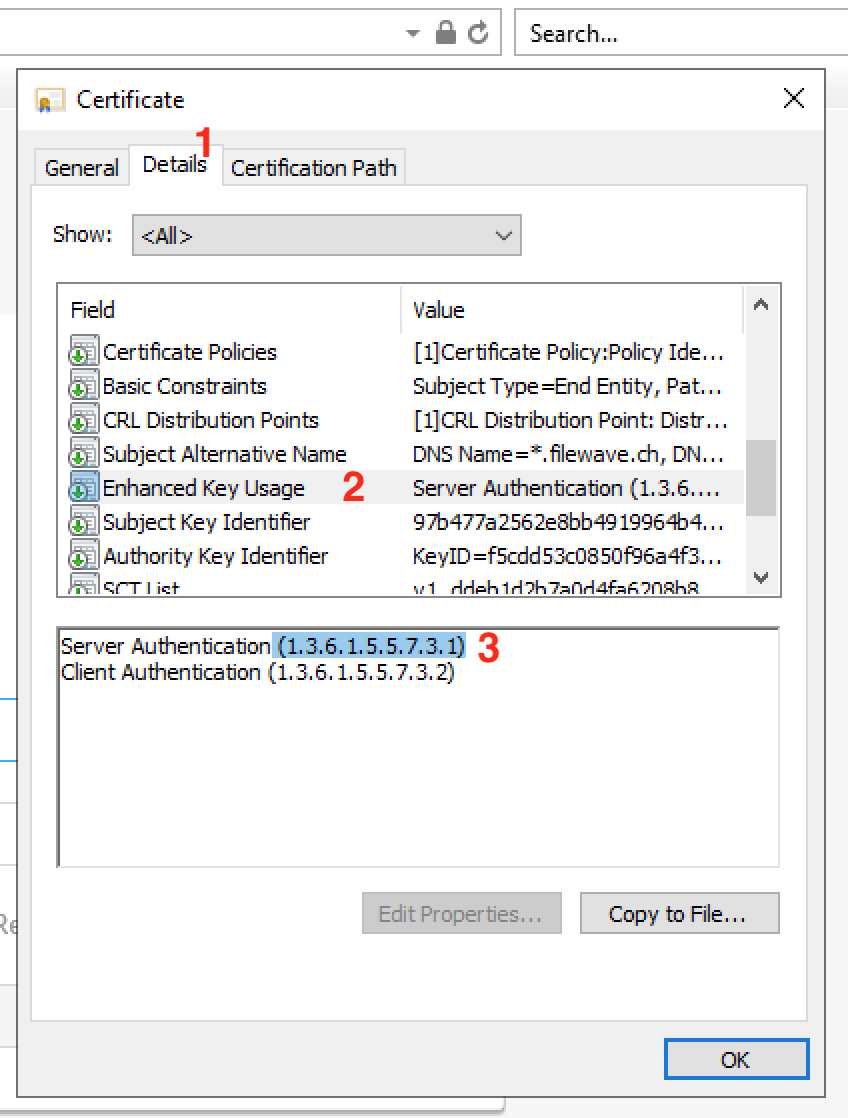** If the above "Subject Alternative Name" is visible in the Certificate Details, and the "Enhanced Key usage" shows the OID 1.3.6.1.5.5.7.3.1, you can stop reading now. Otherwise, please read on for instructions on how to mitigate this issue. ### Description Apple have updated their requirements for certificates for their new operating system releases: [https://support.apple.com/en-us/103769](https://support.apple.com/en-us/103769) Some of these restrictions were in place with earlier versions of iOS and macOS: [https://support.apple.com/en-gb/100758](https://support.apple.com/en-gb/100758)Loss of Device Management This could affect device communication if using non-compliant certificates. Certificate should be updated as per the following guide before updating devices or MDM device management will be lost.
Self-Signed and 3rd Party Certificates Although this is likely to be an issue with older self-signed certificates, official 3rd party certificates could also be affected. Where 3rd party certificates are affected, contact your supplier for an updated certificate.
Information Requirements: - FileWave Server version 13.1.0+ Particular interest should be paid to the following: - *TLS server certificates must present the DNS name of the server in the Subject Alternative Name extension of the certificate. DNS names in the CommonName of a certificate are no longer trusted.* When using self-signed certificates, if the certificate does not have a SAN entry, it will no longer be trusted in Apple's new operating systems. FileWave has an option to generate self-signed certificates: ```bash sudo fwcontrol mdm generateSelfSignedCert --cn=fqdn [--country COUNTRY] [--state STATE] [--locality LOCALITY] [--organization ORGANIZATION] [--ou ORGANIZATIONAL_UNIT] [--email EMAIL] [--replace] [--ignore_name_mismatch] ``` However, earlier versions of FileWave did not generate a certificate with a Subject Alternate Name (SAN). As of FileWave 13.1.0, fwcontrol generates a certificate that includes a SANCertificate Generation Although a newer version of FileWave may be in place now, what is relevant here is the version of FileWave that was running when the certificate was generated.
### Directions This is a good opportunity to switch to an official SSL certificate, using our guide to ensure device management continuity: [Root Trusted SSL Certificate (Using and Renewing)](https://kb.filewave.com/books/certificates/page/root-trusted-ssl-certificate-using-and-renewing-CiW) If you cannot make the switch at this time , please observe the following KB for distribution in profiles through MDM: [Renew MDM self signed certificate](https://kb.filewave.com/books/certificates/page/renew-filewave-server-self-signed-certificate) For clients, the new certificate needs be added to the client's 'Trust Store' prior to making the pending generated certificate live. Details found on the following KB. [Renew Self-signed Certificate - FileWave 13+](https://kb.filewave.com/books/certificates/page/self-signed-ssl-certificates-going-forward) Recovery For devices upgraded when the server certificate did not meet requirements there are options: - Obtain an official SSL 3rd party certificate (highly recommended) - Manually install and trust the server certificate on each affected device - Update the self-signed certificate as per the details then re-enrol all affected devices (may involve erasure of device)