ChromeOS
Chrome OS is a lightweight operating system developed by Google, primarily designed for Chromebook devices. It is based on the Linux kernel and primarily revolves around the Google Chrome web browser. Chrome OS is known for its simplicity, speed, and security. It focuses on cloud-based computing, with most applications and data stored and accessed through the Chrome web browser and cloud services. Chromebooks running Chrome OS offer a streamlined user experience, automatic updates, and integration with Google services such as Gmail, Google Drive, and Google Docs. With its emphasis on web-centric usage and cloud-based productivity, Chrome OS provides an efficient and secure computing environment for users who primarily rely on web-based applications and services.
- Chromebook Management
- Chrome OS: FileWave Inventory Extension Behavior (FAQ)
- Chrome Troubleshooting Guide
- Chrome OS: FileWave Inventory Extension Capabilities
- Disable Chrome OS in FileWave
- Powerwash / Wipe Users on ChromeOS (15.3+)
- Restart ChromeOS Devices
- Google Admin Sync Interval for ChromeOS
- Custom Field Annotated Field Sync for ChromeOS (15.3+)
- Forcing wiped ChromeOS devices to re-enroll (15.3+)
- Confirming Firebase APIs are enabled for Chromebooks (15.4+)
Chromebook Management
FileWave syncs Chromebook data from Google Admin Console so you can view Chromebook inventory alongside the rest of your managed devices. FileWave does not replace Google Admin Console, but it gives you reporting, inventory, custom field, and location tools for Chromebook management.
So what can we do?
FileWave can report Chromebook inventory data such as available disk space, the last logged-in user, and login timing. You can use that data in Reports, scheduled emails, custom fields, and exports.
FileWave can also gather location data and show it on a map in FileWave Central.
How do I set all this up?
Before managing Chromebooks in FileWave, complete the Google Admin Console sync and license setup.
- Confirm that FileWave has enough Chromebook licenses. In FileWave Central, check this under Server > Activation Code.

FileWave syncs the full Chromebook device list from Google Admin Console. If FileWave does not have enough Chromebook licenses for the devices you manage in Google Admin Console, you will not be able to update the model.
- Follow the linked quick start guide to sync Google Admin Console with FileWave and enroll your Chromebooks: Quick Start Guide for Chromebooks
After the sync is complete, FileWave Central shows the synced Chromebook groups in Clients.

These devices and groups are synced from Google Admin Console, so they cannot be deleted directly from FileWave.
For removal and offboarding decisions, see Removing ChromeOS / Chromebook devices. That page explains when to deprovision in Google Admin Console, when to wipe or reassign a Chromebook, and when to disable ChromeOS management for the whole FileWave environment.
Chrome OS: FileWave Inventory Extension Behavior (FAQ)
What
The FileWave Chromebook Inventory extension collects Chromebook inventory details that are not available from the Google Admin console alone. This FAQ explains when the extension reports data and why FileWave inventory dates may differ from Google Admin console dates.
When/Why
Use the Inventory extension to collect additional Chromebook inventory, request updated inventory, and start remote control sessions.
How does it work?
Q: How do I install the Inventory extension?
A: Use the Quick Start Guide for Chromebooks.
Q: What does the Inventory extension do?
A: See Chrome OS: FileWave Inventory Extension Capabilities for the full capability list.
Q: How frequently does the extension report data?
A: The extension reports data based on the frequency in the JSON configuration file. The default is once per day, and you can change it in the JSON.
Q: Will the extension send data no matter what?
A: No. These conditions must be true before the extension can send data:
-
The device is on and connected to a network.
-
The device is not asleep.
-
A user is logged in, because the extension runs in the user context.
-
The extension is installed for that user.
-
The endpoint can reach the FileWave server. For off-network devices, that means the FileWave server must be reachable from the internet path the Chromebook is using.
Q: What happens if the device is offline, off, or asleep when it should send inventory?
A: Nothing happens immediately. When the device comes back online with a user logged in, it should submit inventory right away.
Q: Will the Inventory extension work if Chrome is not open?
A: No. The Inventory extension is a browser extension, so it works only when a user is logged in and Chrome is open.
Q: Why are Last Sync and Last Connected different in inventory?
A: Last Connected is usually the more useful value. It shows when the device last talked directly to your FileWave server through the extension. Last Sync shows when the device last checked in with the Google Admin console.
Q: How frequently does FileWave receive data from the Google Admin console?
A: By default, the FileWave server synchronizes with Google nightly at midnight. You can force an on-demand synchronization from the Google preferences tab.
Q: Why does Google Admin console data differ from FileWave inventory?
A: The data probably changed after the last Google-to-FileWave synchronization. The device checks in with Google on one schedule, and FileWave synchronizes with Google on another. A manual synchronization should bring the data up to date.
Related Content
Chrome Troubleshooting Guide
You have already:
- Enrolled devices into your Google Suite (https://support.google.com/chrome/a/answer/1360534?hl=en)
- Followed the Quick Start Guide for Chromebooks to install the extension on your devices
- Verified you have a license for Chrome devices
Problem
Having issues with Chrome OS devices communicating with FileWave Admin.
Solution
Verify Chrome extension is installed in the policy
Verify FileWave extension has registered with FCM/GCM by looking at the log
Devices are not showing at all in FileWave
-
In the native client open Preferences > Google as shown
-
Is the status icon not green? Anything other than green would indicate an issue
-
If you have a large number of ChromeOS devices it is possible that the server is timing out when trying to sync with Google. This can be especially true on the first sync
-
A solution is to edit this file on the FileWave server:
/usr/local/filewave/apache/conf/httpd.conf
-
Look for a section in the file like this:
# chrome app WSGIDaemonProcess chrome display-name=filewave-chrome processes=1 threads=2 python-eggs=/usr/local/filewave/apache/.python-eggs shutdown-timeout=5 deadlock-timeout=300 inactivity-timeout=3600 request-timeout=3600 socket-timeout=3600 -
Change the timeout values so that deadlock-timeout=600 but otherwise the values above should match your server. If any values are lower in your config you should make them at least match the above listed values
-
Restart everything with;
fwcontrol server restart -
If the issue was a timeout then the sync should now complete. For about 50,000 devices the sync can take 10+ minutes to complete on first sync.

Devices are not showing Geolocation information in FileWave
If devices are showing in FileWave, but Geolocation details are not showing up, and possibly the FileWave Inventory Extension icon is not showing even if you set it to Force Install + Pin then you very likely enabled Geolocation as well as the Extension for an OU that only includes the Device, but not the User who is logging in. You must ensure that both OUs are enabled or put the User and Device in the same OU for testing. This should not be an issue if you have set Geolocation and the Inventory Extension enabled for your entire domain, but frequently when someone is evaluating FileWave they might enable it for only one OU for testing. If you do that then make sure that the User and Device are in that same testing OU.

View the device policy
- Open a Google Chrome window
- Browse to the URL: chrome://policy
- Scroll down to ExtensionInstallForcelist and select show more
- Look for the ID of the FileWave Inventory Extension ( ldhgnmkjehdokljjhcpkbhcmhoficdio Figure 1.1 )
- If you see it there, scroll to the very bottom
- There will be a whole section for the FileWave Inventory Extension
- Verify all the policy fields are there ( Figure 1.2 )
 |
| Figure 1.1 - Chrome Policy Force List |
 |
| Figure 1.2 - Chrome Policy for FileWave |
View the Extension Console Log
- Open a Google Chrome window
- Browse to the URL: chrome://extensions
- Be sure Developer mode is enabled
- Click Details (Figure 2.1)
- Open the Background page (Figure 2.2)
- Select the Console tab to view the log
- Verify the log contains "FCM Registration" (Figure 2.3)
- The is the messaging system FileWave uses to talk to the device, if it does not register then we can not communicate.
- If it failed or is empty. make sure the JSON used in the extension configuration contained FCM information
- Verify the log contains "... Report sent successfully"
- This confirms that the device is able to talk to your FileWave server
- if it is unable to send reports, then verify your JSON contains your server name and an inventory token
 |
| Figure 2.1 - Chrome Extensions |
 |
| Figure 2.2 - Chrome Extension Details |
 |
| Figure 2.3 - Extension log |
| Error | Details | Solution |
| GCM failed to register | The device(s) are unable to use the information they received to contact Google's GCM/Firebase services | Be sure you have GCM registered properly (Google Cloud Messaging (GCM/Firebase) Setup) in your admin preferences BEFORE you exported the settings for upload into Google Suite. You can always export it again. |
| Failed to load resource: net : : ERR_INSECURE_RESPONSE | The device(s) is unable to connect to your server with a secure connections | * Verify the server has a valid certificate * Verify the server's certificate is either root trusted or has been uploaded to your google suite (see Quick Start Guide for Chromebooks) * Verify the ports between devices and server are open (see: Default TCP and UDP Port Usage ) |
| Error: failed to gather Geolocation data: All attempts exhausted | The FileWave client on the device was unable to receive location information from the devices' OS | * Verify in the devices security preferences the app has admin rights to location information |
| Failed to send inventory data | The device was unable to contact the inventory port on the server | * Verify the ports between devices and server are open (see: Default TCP and UDP Port Usage ) * Verify you have all your settings in preferences BEFORE you exported the settings for upload into Google Suite. You can always export it again. |
| GET https://server.name:20445/inv/api/v1/client/settings/asdasdasd net : : ERR_NAME_RESOLUTION_FAILED | There was a problem looking up the same of your server from the information received during enrollment | * Verify you have all your settings in preferences BEFORE you exported the settings for upload into Google Suite. You can always export it again. |
| Uncaught (in Promise) TypeError: Cannot read property 'state' of undefined at ... | Device was unable to contact the FileWave server OR the device was able to contact the FileWave server but the state of the device could not be read. | * Attempt to change the state FileWave Admin and update the mode. Wait for the device to verify or force a verify of the device. * If the problem persists contact FileWave support. |
Chrome OS: FileWave Inventory Extension Capabilities
What
The optional FileWave Chromebook Inventory extension collects data and provides actions beyond the standard Google Admin console synchronization. This article lists those capabilities; the related behavior FAQ explains when and how the extension reports.
When/Why
Use the Inventory extension for these additional inventory fields and actions:
- Additional inventory beyond the Google Admin console data:
- Installed apps and extensions
- The currently signed-in user
- Network information, including the current IP address
- Installed fonts
- Device storage and available drive space
- Geolocation, only when an administrator explicitly enables it
- Last Connected, which records the last time the device communicated directly with the FileWave server and is different from the Google synchronization time
- Start a TeamViewer remote support session.
- Send Verify to request an immediate extension check-in.
How
Use the Quick Start Guide for Chromebooks to install and configure the extension. For reporting schedules, offline behavior, and the difference between Last Connected and Last Sync, see the FileWave Inventory Extension Behavior FAQ.
Disable Chrome OS in FileWave
Use this workflow when you need to remove the Google OAuth token from FileWave and stop ChromeOS management for the environment. This disables ChromeOS integration in FileWave Central and returns the ChromeOS license count to zero.
This page disables ChromeOS management for the whole FileWave environment. If you only need to retire, sell, dispose of, or reassign individual Chromebooks, use Removing ChromeOS / Chromebook devices. For reset or reassignment actions, see Powerwash / Wipe Users on ChromeOS.
Disable ChromeOS management in FileWave
-
Open Preferences in FileWave Central.
-
Go to the Chromebooks tab.
-
Click Configure OAuth token.
-
Sign in with your superuser credentials.
-
In the window that opens, click Clear.

-
Confirm that you want to proceed by clicking Yes.

ChromeOS management is now disabled in FileWave, and the ChromeOS license count is zero.
Related Content
Powerwash / Wipe Users on ChromeOS (15.3+)
What
Powerwash and Wipe Users are ChromeOS reset actions you can send from FileWave. Powerwash resets the Chromebook to a factory-reset state. Wipe Users clears local user data while keeping the Chromebook enrolled for the next user.
When/Why
Powerwash
Powerwash is ChromeOS’s factory reset process. It removes user accounts, local files, and device settings, so use it when a Chromebook is being retired, reassigned with a full reset, or troubleshooting requires a clean device state.
Technical Perspective:
- Use Case: Ideal for individuals returning, selling, or reassigning their Chromebook. Also used for troubleshooting device issues that cannot be resolved through standard fixes.
- Process: Initiated through the settings menu under "Advanced" settings or via a keyboard shortcut at the login screen (pressing Ctrl + Alt + Shift + R).
- Considerations: Before performing a Powerwash, it's crucial to back up any important data stored on the device, as the process will delete everything.
Wipe Users
Wipe Users is the reset option for shared or reassigned managed Chromebooks. It clears local user data without removing the device’s managed enrollment, which makes it useful between students, staff, or loaner-device users.
Technical Perspective:
- Use Case: Primarily used by administrators to quickly clear all personal data from devices between different users while retaining device management settings and policies.
- Process: Can be executed remotely via Google Admin Console, under the device management section, allowing for bulk operations across multiple devices.
- Considerations: Ensures that devices remain under organizational control and policies after user data is wiped, streamlining the reassignment process.
For FileWave admins, the important difference is enrollment state. Use Wipe Users when the device should stay managed. Use Wipe Device/REMOTE_POWERWASH when you intentionally want a full reset.
If this reset is part of retiring or removing a Chromebook from management, review Removing ChromeOS / Chromebook devices first. FileWave wipe actions reset the device, but Google Admin Console still controls whether the Chromebook remains managed.
How
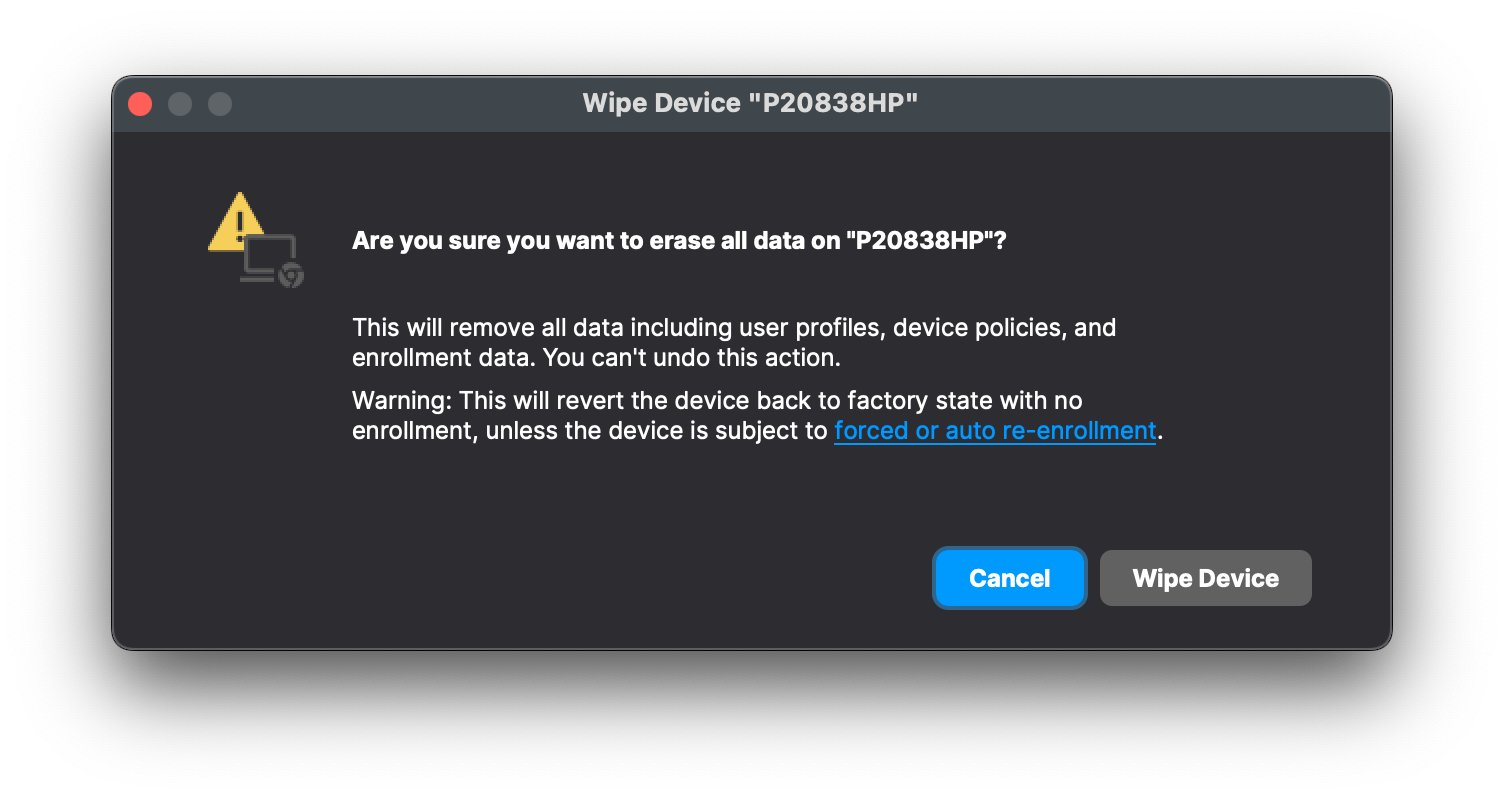
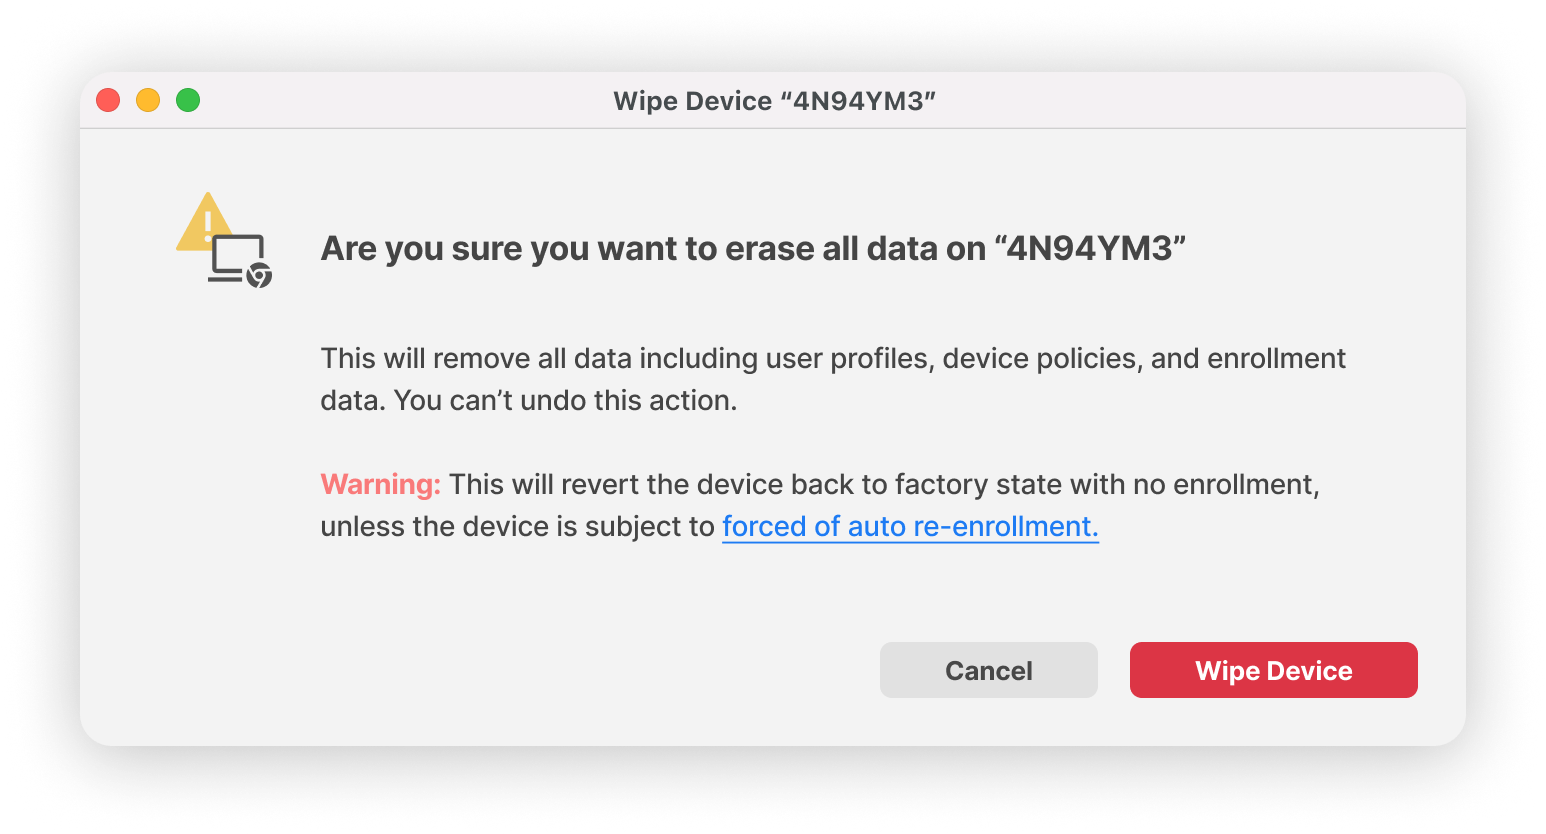
To send either command, right-click one or more Chromebooks and choose Wipe Device or Wipe Users.

REMOTE_POWERWASH Command (Wipe Device)
-
Description: System administrators can remotely Powerwash ChromeOS devices, resetting them to factory settings for efficient troubleshooting and maintaining device security.
-
Execution: Initiates the Powerwash process, erasing all user data and configurations.
-
Access:
-
The REMOTE_POWERWASH command is available in FileWave Central and FileWave Anywhere for ChromeOS devices.
-
Find the command in the dropdown menu labeled "Wipe device(s)..."
-
Modify Clients/Groups and Wipe Devices permissions are required.
-
When wiping a device, remember that Wipe Device fully resets the Chromebook. If you need the device to re-enroll afterward, review Force wiped ChromeOS devices to re-enroll (15.3+).
WIPE_USERS Command
-
Description: System administrators can remotely wipe local user data from managed ChromeOS devices while keeping the device enrolled.
-
Execution: Initiates the data-wiping process on all user accounts.
-
Access:
-
The WIPE_USERS command is available in FileWave Central and FileWave Anywhere for ChromeOS devices.
-
Find the command in the dropdown menu labeled "Wipe user(s)..."
- Modify Clients/Groups and Wipe Devices permissions are required.
-
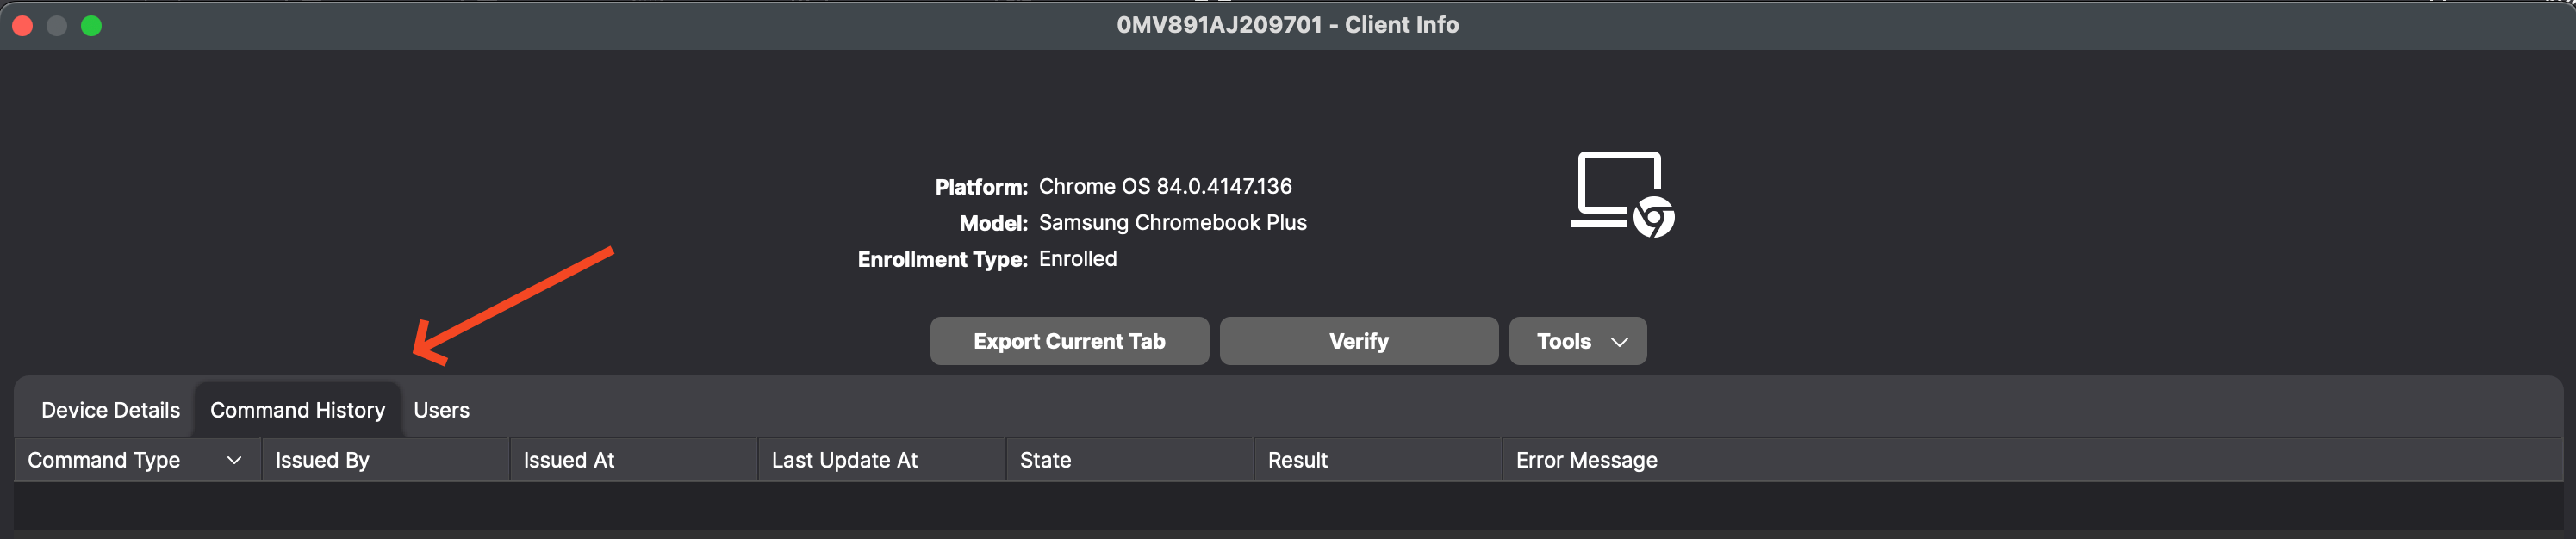
Command History tab
-
Description: Users can now view all information related to sending REMOTE_POWERWASH, WIPE_USERS, and REBOOT Commands in the Command History tab for Chromebook devices. As shown below you can see this when looking at device details for a Chromebook.
Related Content
Restart ChromeOS Devices
What
Send Restart from FileWave Central or FileWave Anywhere to reboot one or more managed Chromebooks. Use it after an update that requires a restart or as a targeted troubleshooting step.
Before you restart a Chromebook
Plan around the active user
- Restart interrupts the current session, so notify users before a planned maintenance restart.
- Choose a maintenance window or confirm that the selected devices are not in active use.
- Start with a small group when the restart is part of a broader update or policy rollout.
Good reasons to restart
- An installed ChromeOS update is waiting for a restart.
- A specific Chromebook is unresponsive or has a problem that a normal restart may clear.
- A tested configuration change explicitly requires the device to restart.
Verify the result
- Open the Chromebook's Command History tab and review the command state, result, and any error message.
- Confirm that the device returns to normal inventory and communication after it starts again.
A successful command confirms that FileWave delivered the restart request. Continue troubleshooting if the Chromebook returns with the same symptom.
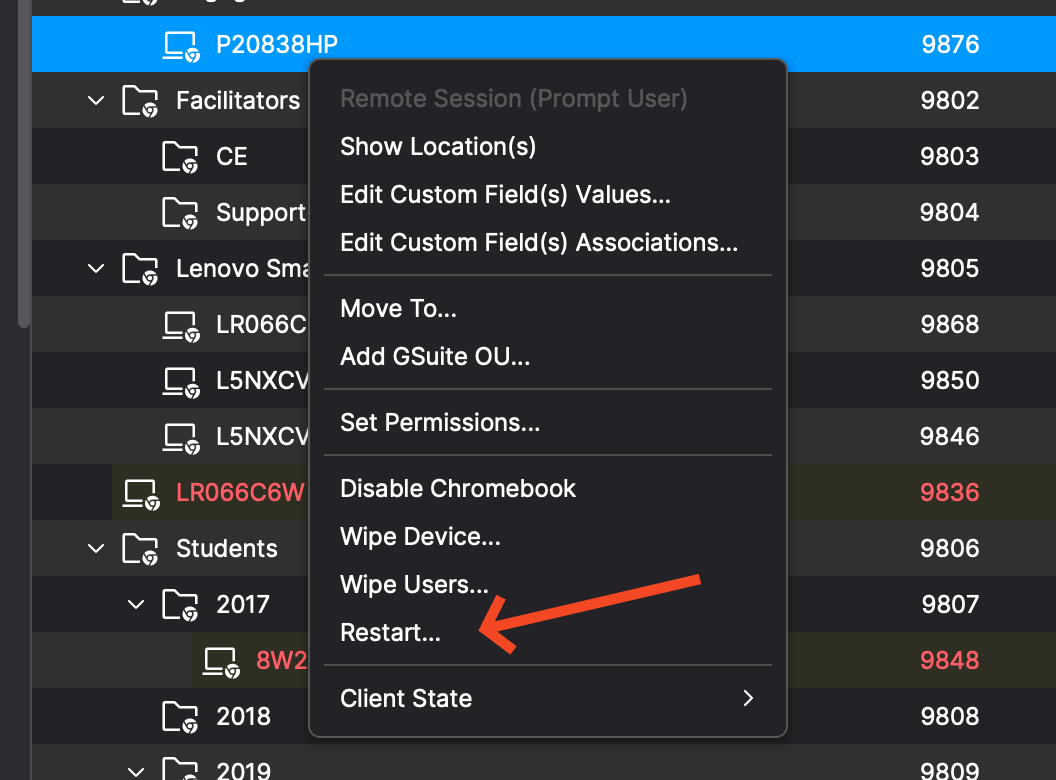
Send Restart
Select one or more Chromebooks, open the device action menu or right-click the selection, then choose Restart... as shown below.
Restart command details
-
Command: FileWave sends the ChromeOS
REBOOTcommand when you choose Restart.... -
Scope: The action applies to the selected Chromebook or Chromebooks.
-
Access:
-
The action is available for ChromeOS devices in FileWave Central and FileWave Anywhere.
-
The visible menu label is Restart....
-
If Restart... is unavailable, check that the administrator role can view the Chromebook and send device actions.
-
Check Command History
-
The Chromebook's Command History tab records
REMOTE_POWERWASH,WIPE_USERS, andREBOOTcommands with the issuer, timestamps, state, result, and error message.
Related content
Google Admin Sync Interval for ChromeOS
What
As an administrator managing ChromeOS devices, you may want to change how often FileWave syncs with Google Admin.
When/Why
FileWave syncs ChromeOS data from Google Admin, including the organizational unit a device belongs to. If you make frequent ChromeOS changes, a shorter sync interval can help FileWave pick up those changes sooner.
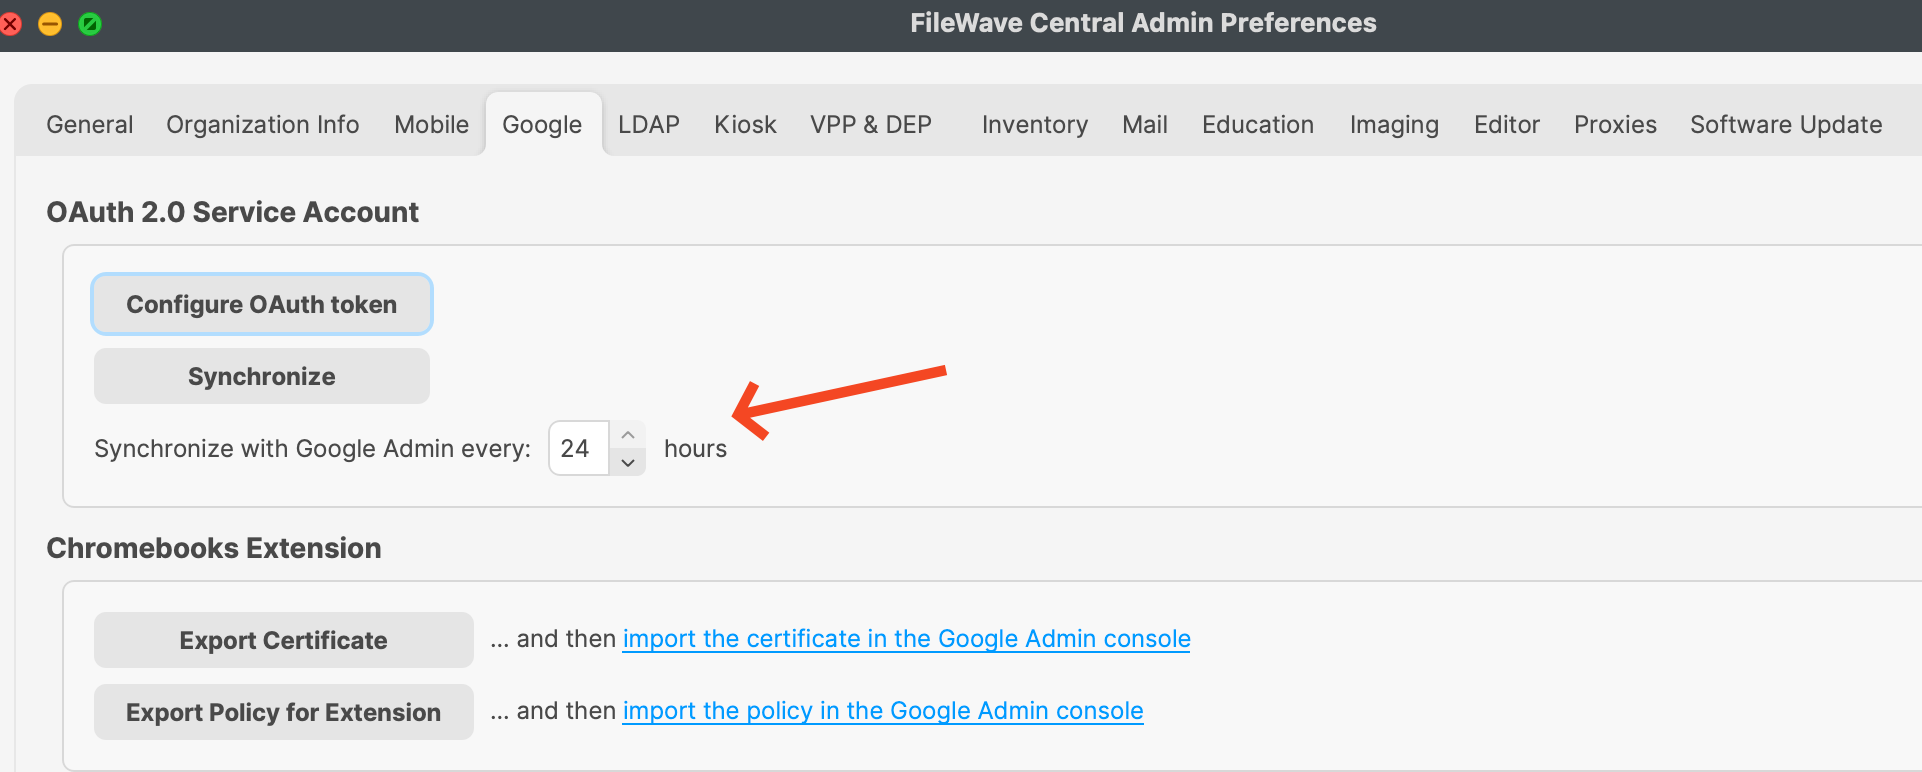
How
In FileWave Central, go to Preferences > Google, then adjust the value for "Synchronize with Google Admin every 24 hours." The value can be between 1 and 24 hours. The default is 24 hours.
Related Content
Custom Field Annotated Field Sync for ChromeOS (15.3+)
What
As an administrator managing ChromeOS devices you want to update the Annotated Custom fields in FileWave, but aren't sure how soon those changes will be reflected in the Google Admin console.
When/Why
In FileWave 15.3+ we have changed how Annotated Custom Fields are synced with Google. In the past there would be issues reported because the fields would only sync on the 24 hour sync interval for all ChromeOS information with Google.
How
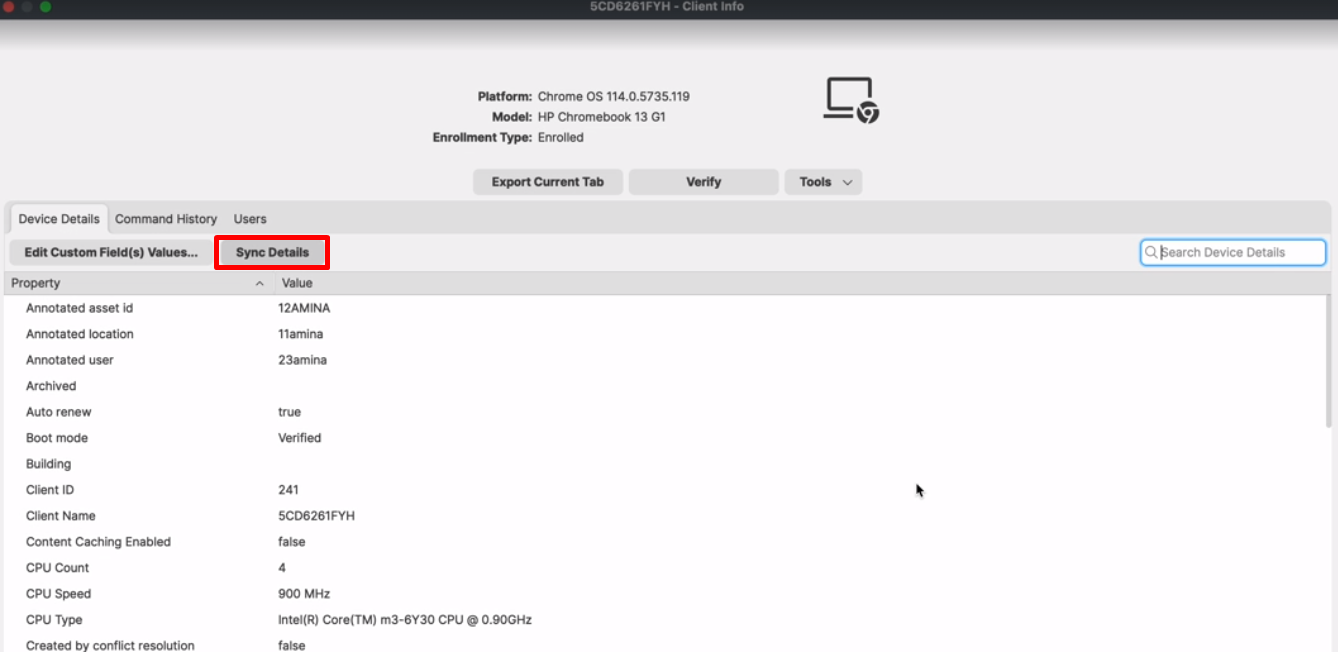
Annotated fields in Edit Custom Fields in 15.3+ now update immediately upon clicking Save, independently of the Model Update, ensuring swift and accurate changes.
-
The Chromebook Data tab in Device Details is removed. Users can access Chromebook-related info by double-clicking on the device, eliminating the need for an additional tab.
-
The Device Details View now offers a more informative and user-friendly experience for Annotated fields.
-
Annotated fields are seamlessly displayed and editable in the Edit Custom Fields dialog, like any other custom fields.
-
A convenient button in the Client Info dialog allows users to sync annotated fields (one way: Google to FileWave) individually for specific devices, offering granular control over data synchronization.
Forcing wiped ChromeOS devices to re-enroll (15.3+)
What
By default, wiped ChromeOS devices automatically re-enroll into your account without users having to enter their username and password. Re-enrollment ensures that the ChromeOS devices remain managed and policies you set are enforced on the ChromeOS device. Otherwise, users can't sign in, browse in guest mode, or see the consumer sign-in screen.
When/Why
Don’t force ChromeOS devices that are used in developer mode to re-enroll. Instead, put them in a different organizational unit and turn off forced re-enrollment for that organization. If a ChromeOS device is no longer going to be managed by your account, you should deprovision the device. For the full removal path, see Removing ChromeOS / Chromebook devices.
How
For convenience we've included Google's documentation below from: Force wiped ChromeOS devices to re-enroll - Chrome Enterprise and Education Help (google.com)
Turn forced re-enrollment on or off
-
Sign in to your Google Admin console.
Sign in using an administrator account, not your current account bob@gmail.com
-
In the Admin console, go to Menu
Devices
Chrome
- To apply the setting to all devices, leave the top organizational unit selected. Otherwise, select a child organizational unit.
- Go to Enrollment and access.
- Configure the Forced re-enrollment setting:
- Force device to automatically re-enroll after wiping—Wiped ChromeOS devices automatically re-enroll into your account without users having to enter their username and password.
- Force device to re-enroll with user credentials after wiping—Users must manually re-enroll ChromeOS devices into your account.
- Device is not forced to re-enroll after wiping—Users can use the ChromeOS device without re-enrolling it into your account.
- Click Save.
Settings typically take effect within minutes, but it might take up to an hour to propagate through your organization.
Sometimes, ChromeOS devices might not be able to automatically re-enroll themselves. If an error occurs during automatic re-enrollment, users are notified. They can click Enroll manually to proceed with manual re-enrollment. ChromeOS devices that don’t support automatic re-enrollment show a screen that prompts users to manually re-enroll them.
Related Content
- Removing ChromeOS / Chromebook devices
- Powerwash / Wipe Users on ChromeOS (15.3+)
- Force wiped ChromeOS devices to re-enroll - Chrome Enterprise and Education Help (google.com)
Confirming Firebase APIs are enabled for Chromebooks (15.4+)
What
When setting up Chromebooks you need to ensure that the right APIs are enabled. In FileWave 15.4 there are 2 APIs that are required that were not previously needed. You may have these enabled, but you should still do this process just in case they are not.
When/Why
You will want to do this when you are using FileWave 15.4.0 or higher with Chromebooks to make sure everything is right. If you have not previously, you definitely need to enable the 2 APIs. You can enable them on a 15.3.1 server as well, but the APIs are required for 15.4.0 and beyond, and required to be on 15.4.0 after June 20, 2024.
How
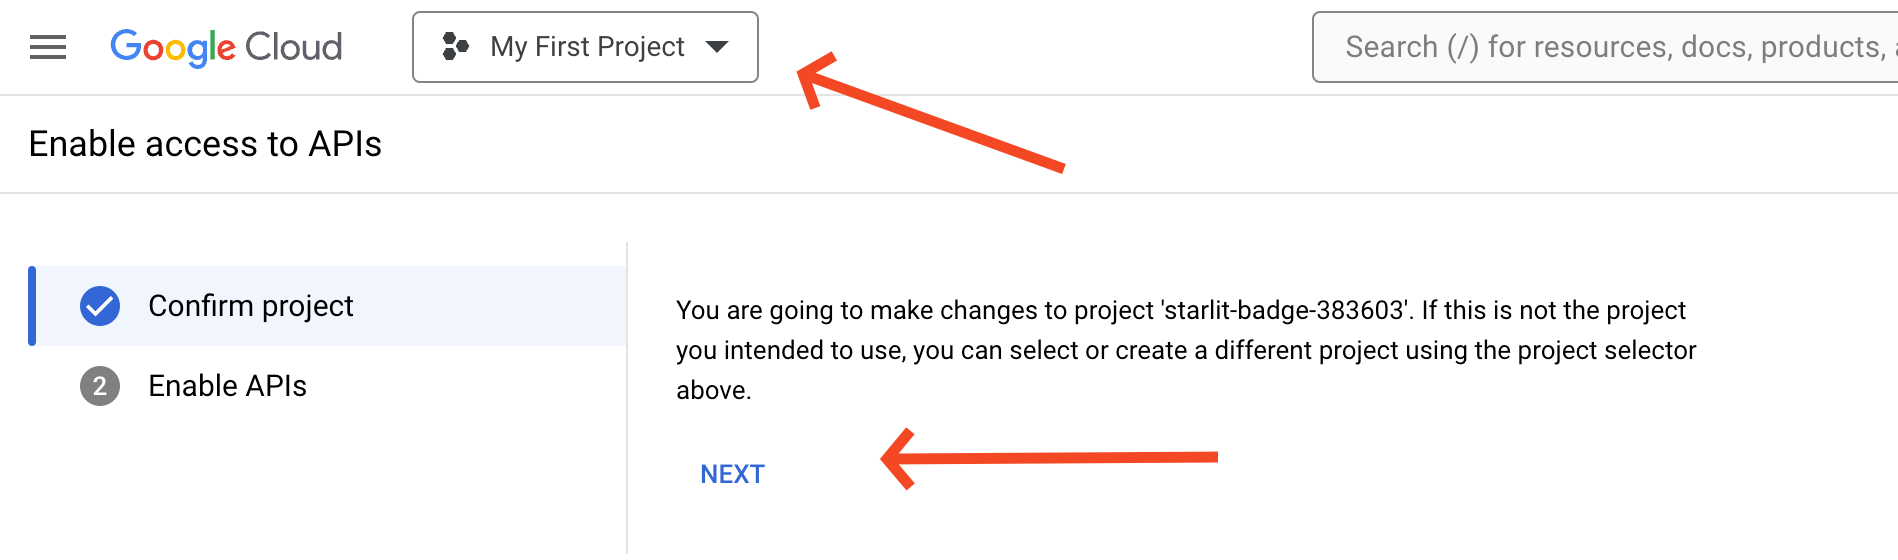
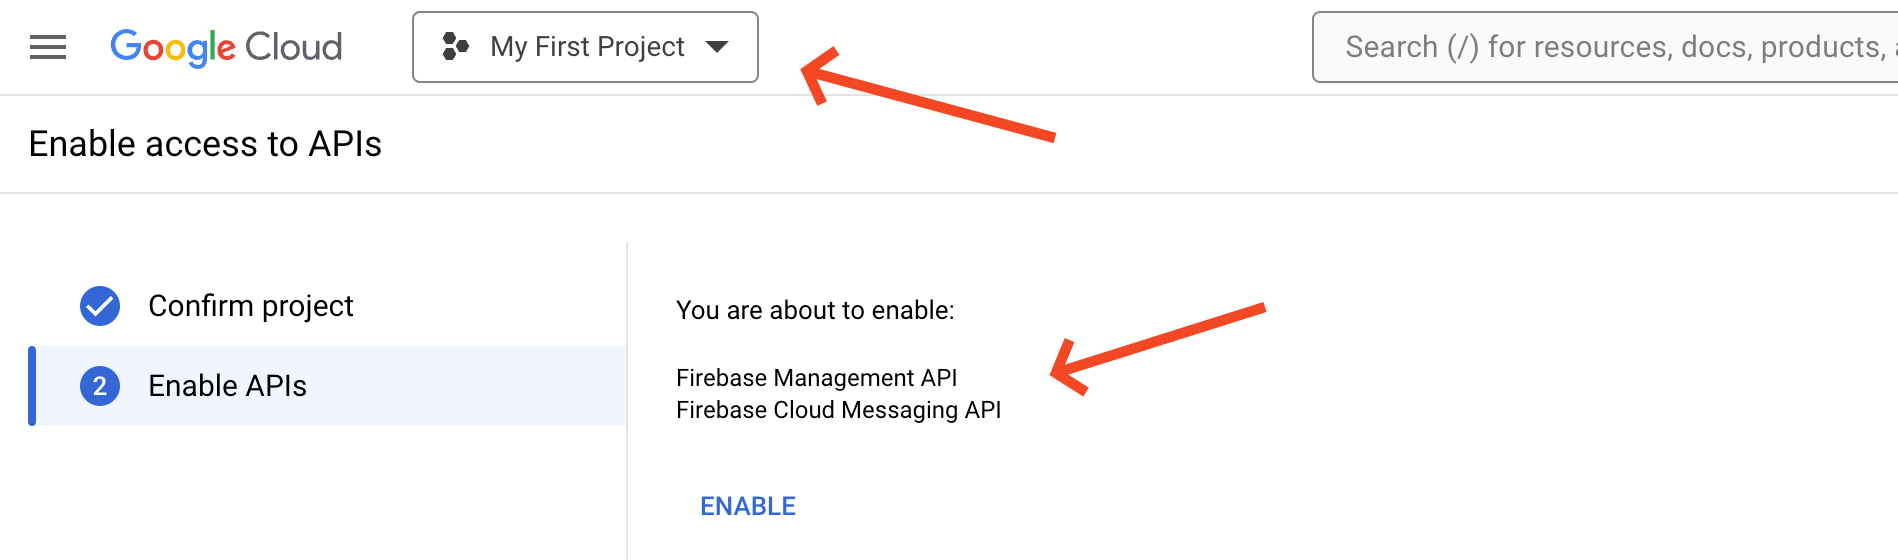
To enable the 2 APIS you may go to https://console.cloud.google.com/apis/dashboard and enable them. You would be looking for Firebase Cloud Messaging API and Firebase Management API. To simplify here is a more direct URL to add them to a project: https://console.developers.google.com/flows/enableapi?apiid=firebase.googleapis.com,fcm.googleapis.com which should be straightforward if you only have 1 Firebase project. If you don't really know how Chromebooks were setup in the past you could go through Chromebook Client Pre-Requisites and set it up again.
When you go to the URL you should see something like this next screen where you can pick a project and click Next.
Next you will see the 2 APIs to enable and you'll click Enable.
Once you have enabled this you should see in FileWave Central on v15.4 that it is able to sync by going to Settings -> Google and viewing the sync status there.