Do not use special characters in Custom Field names.
See [Importing and Exporting Custom Field Files](https://kb.filewave.com/books/custom-fields/page/importing-and-exporting-custom-field-files "Importing and Exporting Custom Field Files")
## Display Name The customer-facing name admins see when they work with the Custom Field later. ## Internal Name The system-wide variable name used to reference the Custom Field value.FileWave can create a Custom Field internal name that matches a built-in inventory item, such as `%location%`. When you reference custom values, use the prefixes below to avoid collisions with built-in inventory variables.
| Method | Prefix | Example |
| MDM Profile | custom\_field | %custom\_field.location% |
| Scripted (Launch Argument or Environment Variable) | CustomFields | %CustomFields.location% |
***Important:** Python and Perl will need to be installed on your Windows clients. When installing Python and Perl make sure a system path is added to environment variables during install.*
The script runs after each verify, before the client sends inventory data. You can also pass launch arguments and environment variables into scripts, including scripts in desktop Filesets. This lets a script use existing inventory field values as inputs. 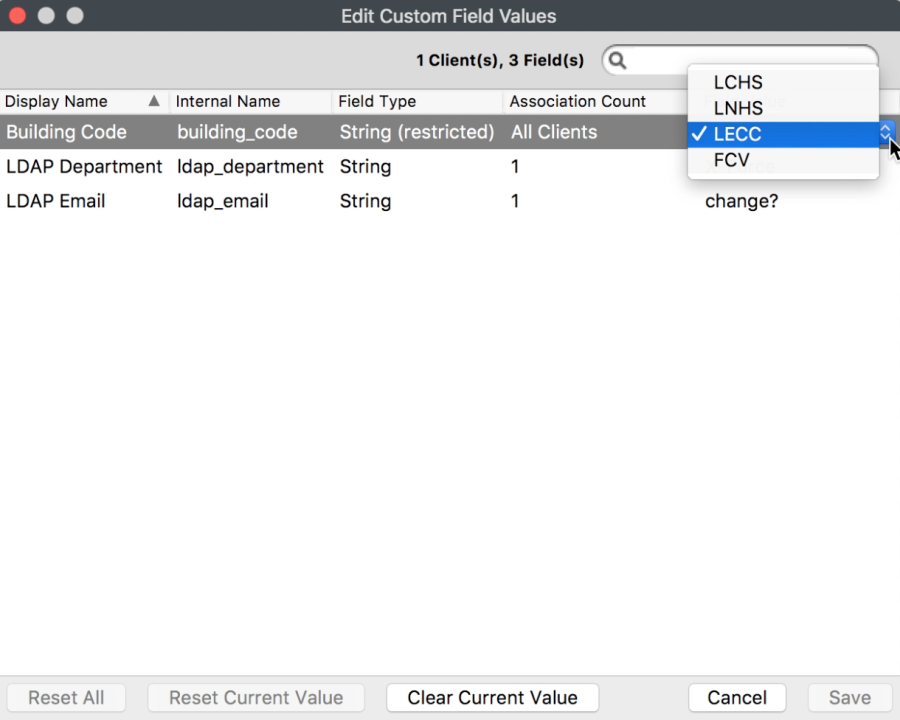 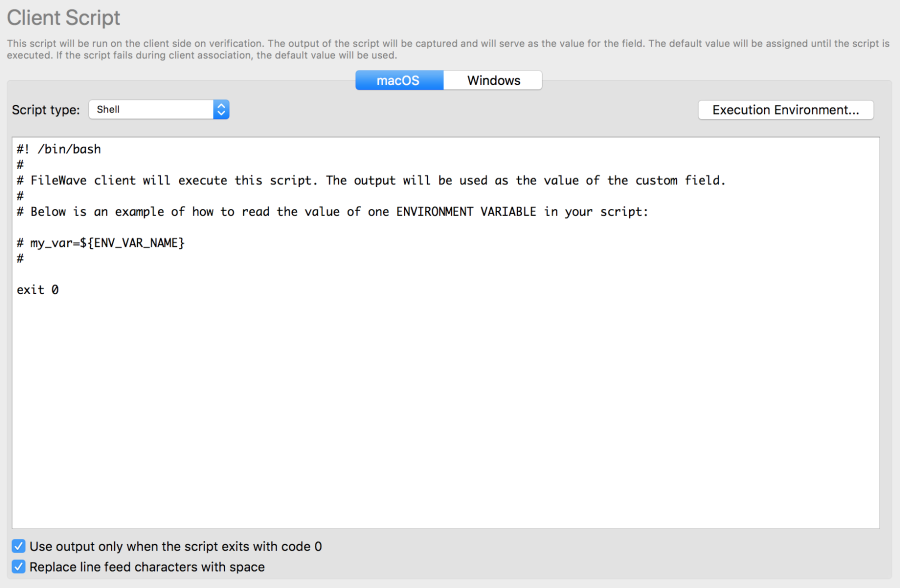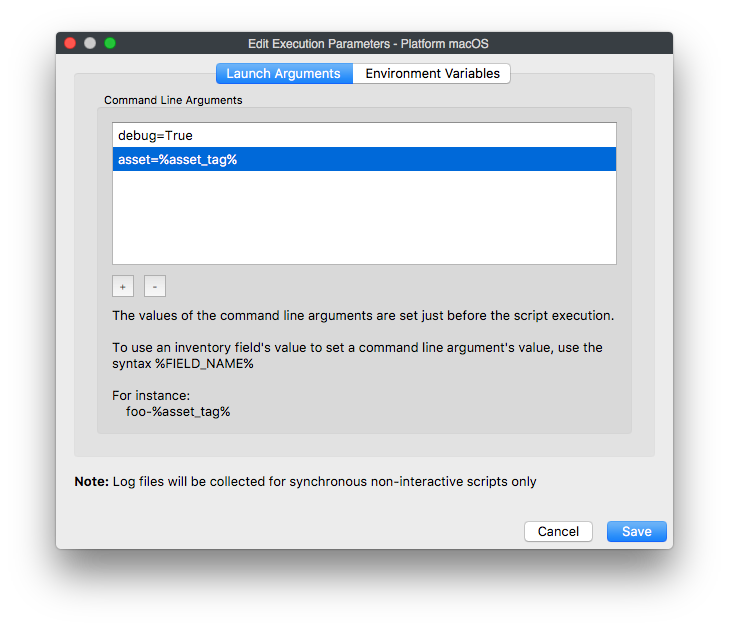 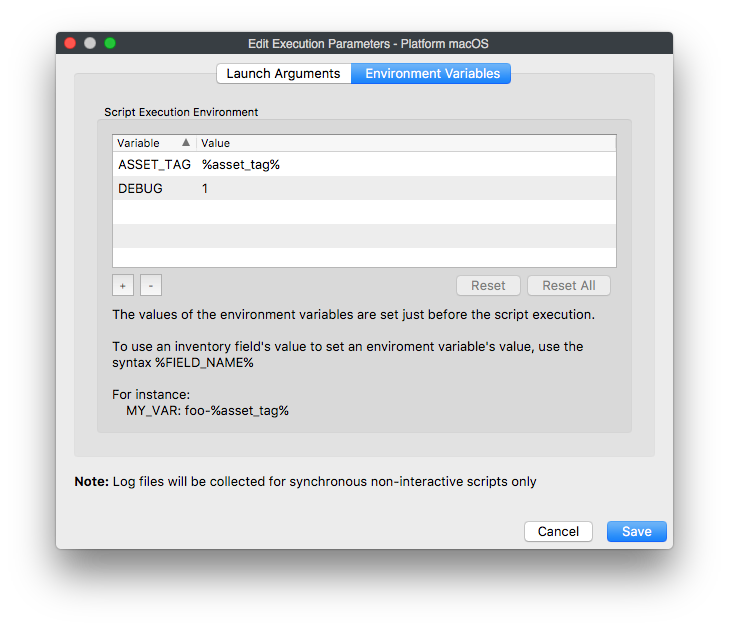Dates must be ISO-8601 format (for instance: 2011-08-27T23:22:37Z).
The last line feed will be ignored to ease conversion, as commands like "echo" (bash) or "print" (python) add a line feed at the end of standard output. Scripts are stored encrypted on the disk and the FileWave client will automatically decrypt them when it needs to run. The encryption used is RSA 2048 bits, with no symmetric key exchange (only RSA). ### Client Command Line **Client Command Line** is for legacy Custom Fields that used a script to write to `custom.ini` on the client. Use Client Script for new Custom Fields. If you previously used custom inventory values in FileWave, those values still appear in the Custom Fields window, and you can rename defaults such as `custom_string_01` to clearer names. ### LDAP LDAP Custom Fields pull attribute values from the directory service configured in the LDAP tab of FileWave Preferences. FileWave assigns those values to devices so they can be used in inventory and reporting. Choose the LDAP attribute, such as `department`, then choose the data type: String, Integer, Boolean, or Date/Time. If the LDAP value does not match the selected data type, FileWave reports a type conversion error. Then choose whether the object class is user or computer: - *User:* LDAP entry is matched using either Authusername for iPads or the last LDAP user to log into a macOS and Windows device. - *Computer:* LDAP entry is found using the device name in inventory against the computer name in the LDAP directory. 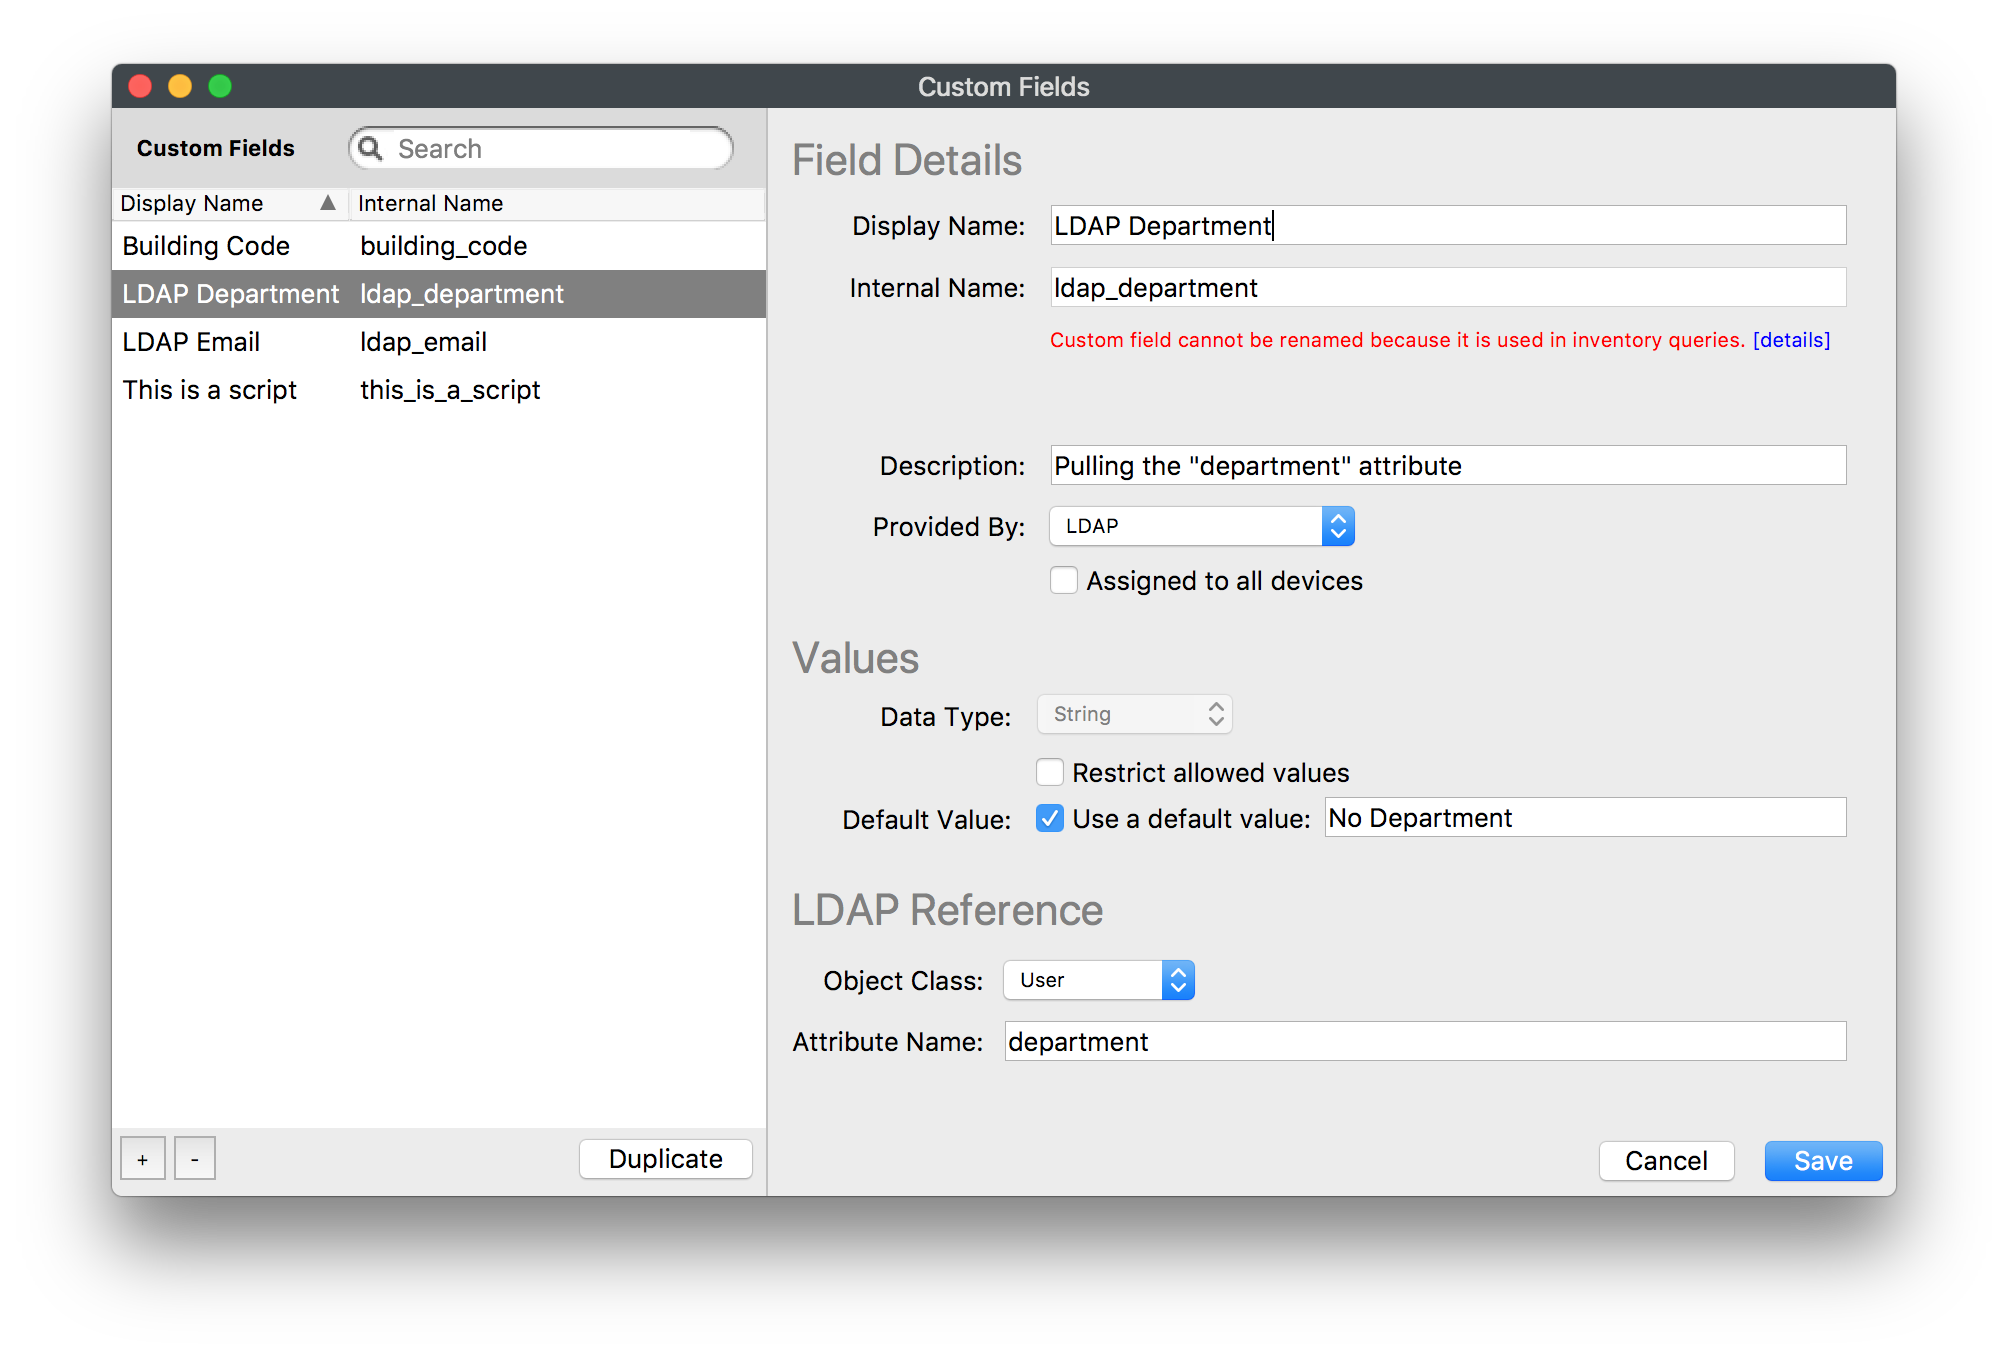 **How often does LDAP get scanned for updated values?** FileWave scans LDAP when a Custom Field is assigned to a device or when the LDAP server syncs in FileWave Preferences, either manually or at the configured refresh interval. If an LDAP Custom Field is modified, FileWave schedules the directory scan after 120 seconds, which is the minimum delay. To change that delay, contact FileWave Support. 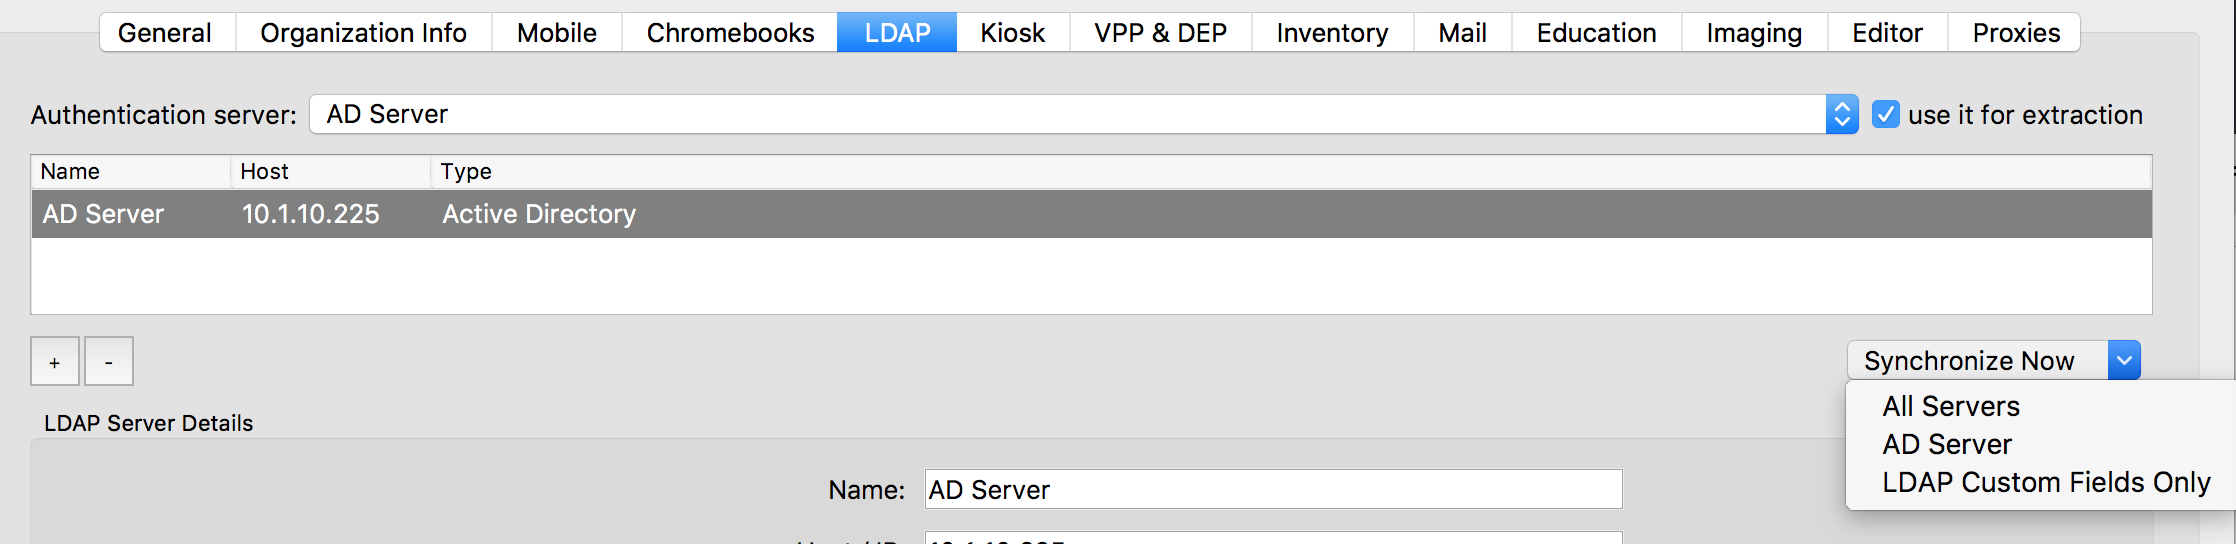**Other LDAP Considerations:** If the value of the attribute you specified is empty or the attribute is not found in LDAP, then the value of the Custom Field will simply be empty. In the case of an attribute that has multiple entries, all entries will be returned as encoded JSON array for string custom fields. For other types of custom fields the value would contain the type conversion error flag instead. The order of entries in the JSON array is not specified. It may happen where no matching LDAP user or computer is found for a given client associated with LDAP custom field(s). In this case, the appropriate status for custom fields values will be set upon extraction ("Matching LDAP User/Computer Not Found"). Administrator has a global option to clear current custom field(s) value when such situation occurs. The option can be found in Preferences, Inventory tab, "Clear value if there is no match between client and LDAP user or computer" checkbox.
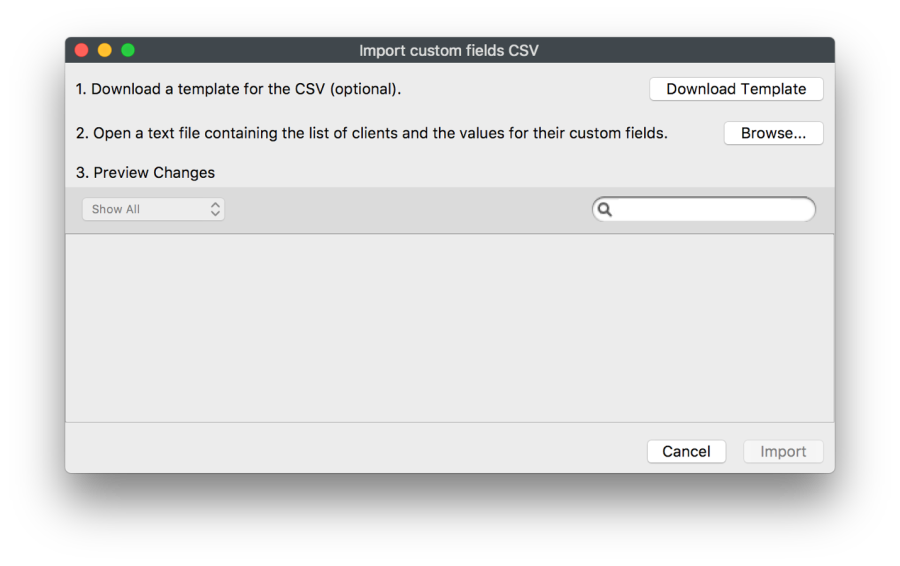
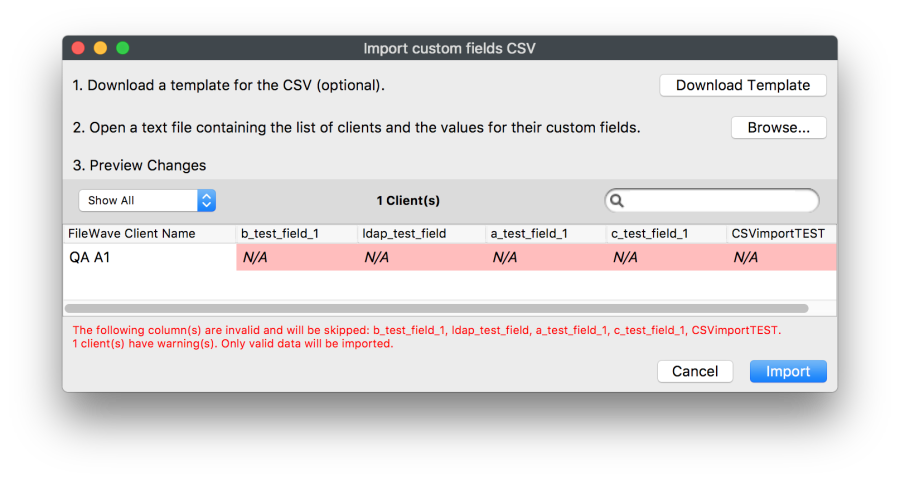
## Importing from a CSV Use CSV import to update values for Custom Fields that are already associated with devices. In the Import Custom Fields CSV window, FileWave provides a template where you choose the Custom Fields to include and the device identifier to use. Devices can be identified by FileWave Client Name, Serial Number, Device ID, or FileWave ID.CSV import updates only Custom Fields already associated with the target devices. If a CSV includes a value for a device that does not already have that Custom Field associated, FileWave skips that value and reports an error.
  ## Related Content - [Importing and Exporting Custom Field Files](https://kb.filewave.com/books/custom-fields/page/importing-and-exporting-custom-field-files "Importing and Exporting Custom Field Files") # Running Built-in PowerShell Commands with Custom Fields Current FileWave Windows clients are 64-bit, and Windows client-script Custom Fields can run in a 64-bit execution context. In the Custom Field editor, leave **On Windows, run as 64-bit** enabled when the script uses 64-bit PowerShell modules, 64-bit Windows components, or registry locations that are redirected for 32-bit processes. Older Custom Fields may still be configured to run as 32-bit after an upgrade. FileWave preserves that setting so existing scripts continue to behave the same way. If an older field, or a field intentionally configured for 32-bit execution, needs to call 64-bit PowerShell, use one of the patterns below. The example below lists the members of the local Administrators group. For a Custom Field running in the normal 64-bit context, run it directly as a PowerShell script: ```powershell Get-LocalGroupMember -Group 'Administrators' | Select Name ``` 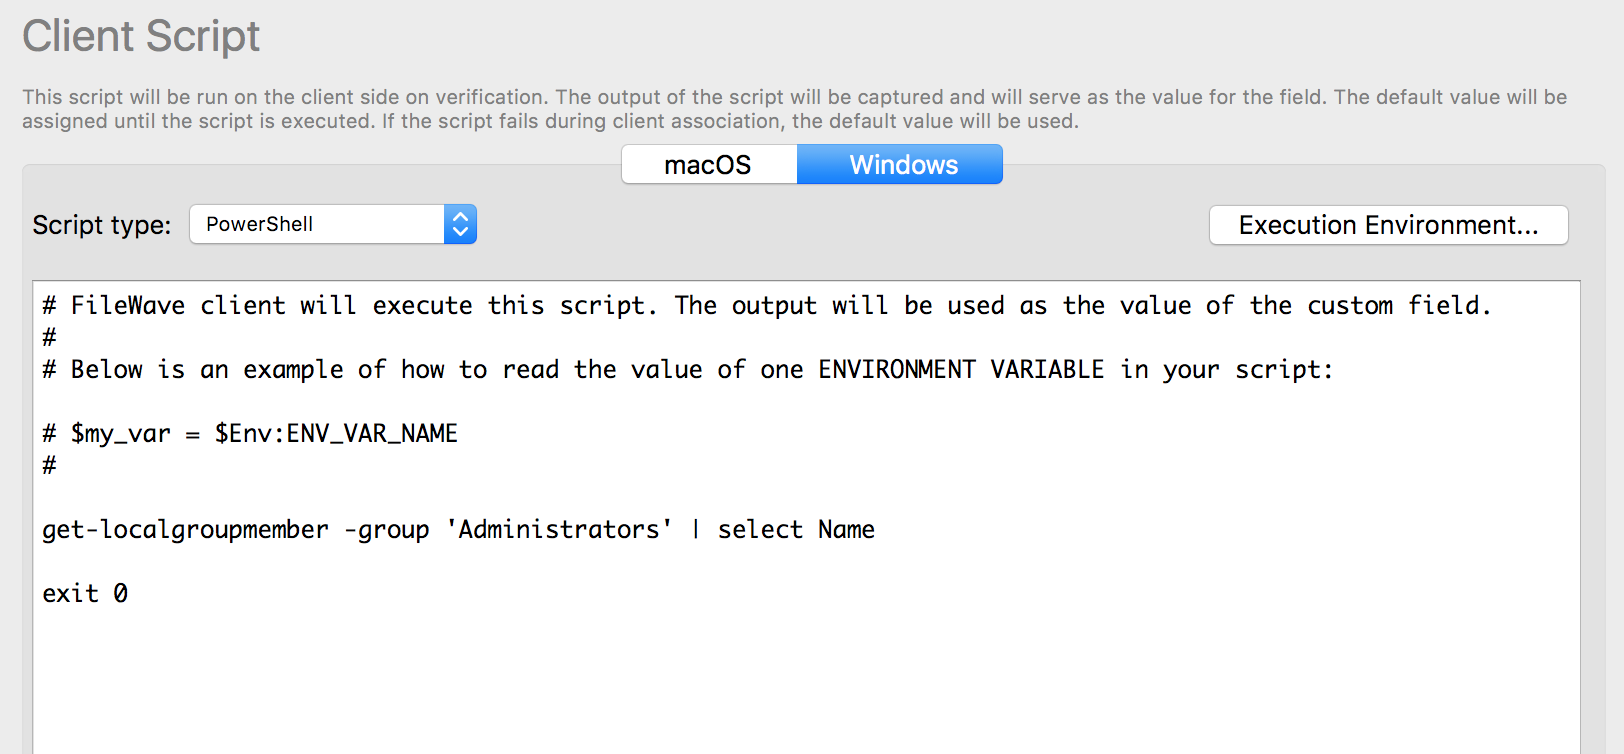 If the Custom Field is configured to run in a 32-bit context, some built-in cmdlets and modules may not be available. In that case, create the Custom Field as a BAT script and call the 64-bit executable explicitly. Use the **Sysnative** path when the command is launched from a 32-bit process on a 64-bit Windows device. ```bat C:\Windows\sysnative\windowsPowerShell\v1.0\powershell.exe "Get-LocalGroupMember -Group 'Administrators' | Select Name" exit 0 ```  If an entire PowerShell script needs to relaunch itself from a 32-bit PowerShell process into 64-bit PowerShell, use the following wrapper: ```powershell ############################################################################# # If PowerShell is running the 32-bit version on a 64-bit machine, we # need to force PowerShell to run in 64-bit mode. ############################################################################# if ($env:PROCESSOR_ARCHITEW6432 -eq "AMD64") { # write-warning "Take me to 64-bit....." if ($myInvocation.Line) { &"$env:WINDIR\sysnative\windowspowershell\v1.0\powershell.exe" -NonInteractive -NoProfile $myInvocation.Line } else { &"$env:WINDIR\sysnative\windowspowershell\v1.0\powershell.exe" -NonInteractive -NoProfile -file "$($myInvocation.InvocationName)" $args } exit $lastexitcode } # Main script # Uncomment the next line to prove that we are always in 64-bit #[Environment]::Is64BitProcess # Your 64-bit script here. ############################################################################# # End ############################################################################# ``` **Related Content** - [Scripting Languages supported in FileWave](https://kb.filewave.com/books/filewave-general-info/page/scripting-languages-supported-in-filewave) - [Script Best Practices](https://kb.filewave.com/books/filewave-general-info/page/script-best-practices) # Importing and Exporting Custom Field Files Starting in FileWave version 13.1 you can import and export custom field definitions. This is ideal for sharing powerful fields not built into standard inventory.Always check a script before deploying to all devices. No, really, always!
## Exporting: 1. Open your (Assistance → Custom Fields → ) "Edit Custom Fields" UI 2. Select one or more custom fields 3. Press "Export" 4. Save the "FileWave Custom Fields.customfields" file 5. Share online, or store for later ## Importing: 1. Download the custom field file 2. Open your (Assistance → Custom Fields → ) "Edit Custom Fields" UI 3. Press "import" Browse for file 4. If the fileset contains a script, verify it is safe for your environment 5. Associate the field with the needed device(s) 6. You may also want to import custom field values See [Custom Fields](https://kb.filewave.com/books/custom-fields/page/custom-fields "Custom Fields") for more on assigning fields to devices, and importing custom field values. ## Conflicts: ### Custom vs Internal FileWave will let you re-use an internal name that is the same as another inventory element. If a Custom Field were added with an internal name of 'location', two 'location' internal names would co-exist the built-in internal name and the added Custom Field. A prefix may be added to avoid confusion on matching inventory names. The prefix varies depending upon the method being used to reference the internal name.| Method | Prefix | Example |
| MDM Profile | custom\_field | %custom\_field.location% |
| Scripted (Launch Argument or Environment Variable) | CustomFields | %CustomFields.location% |
Just because you CAN overwrite an existing custom field doesn't mean that is a good idea. Best practice would be to import it as an additional field and resolve the conflict manually.
If the internal names are in use (Smart Groups, Inventory Queries , DEP auto) when you press "**overwrite existing"** you will see this telling you where it is in use: 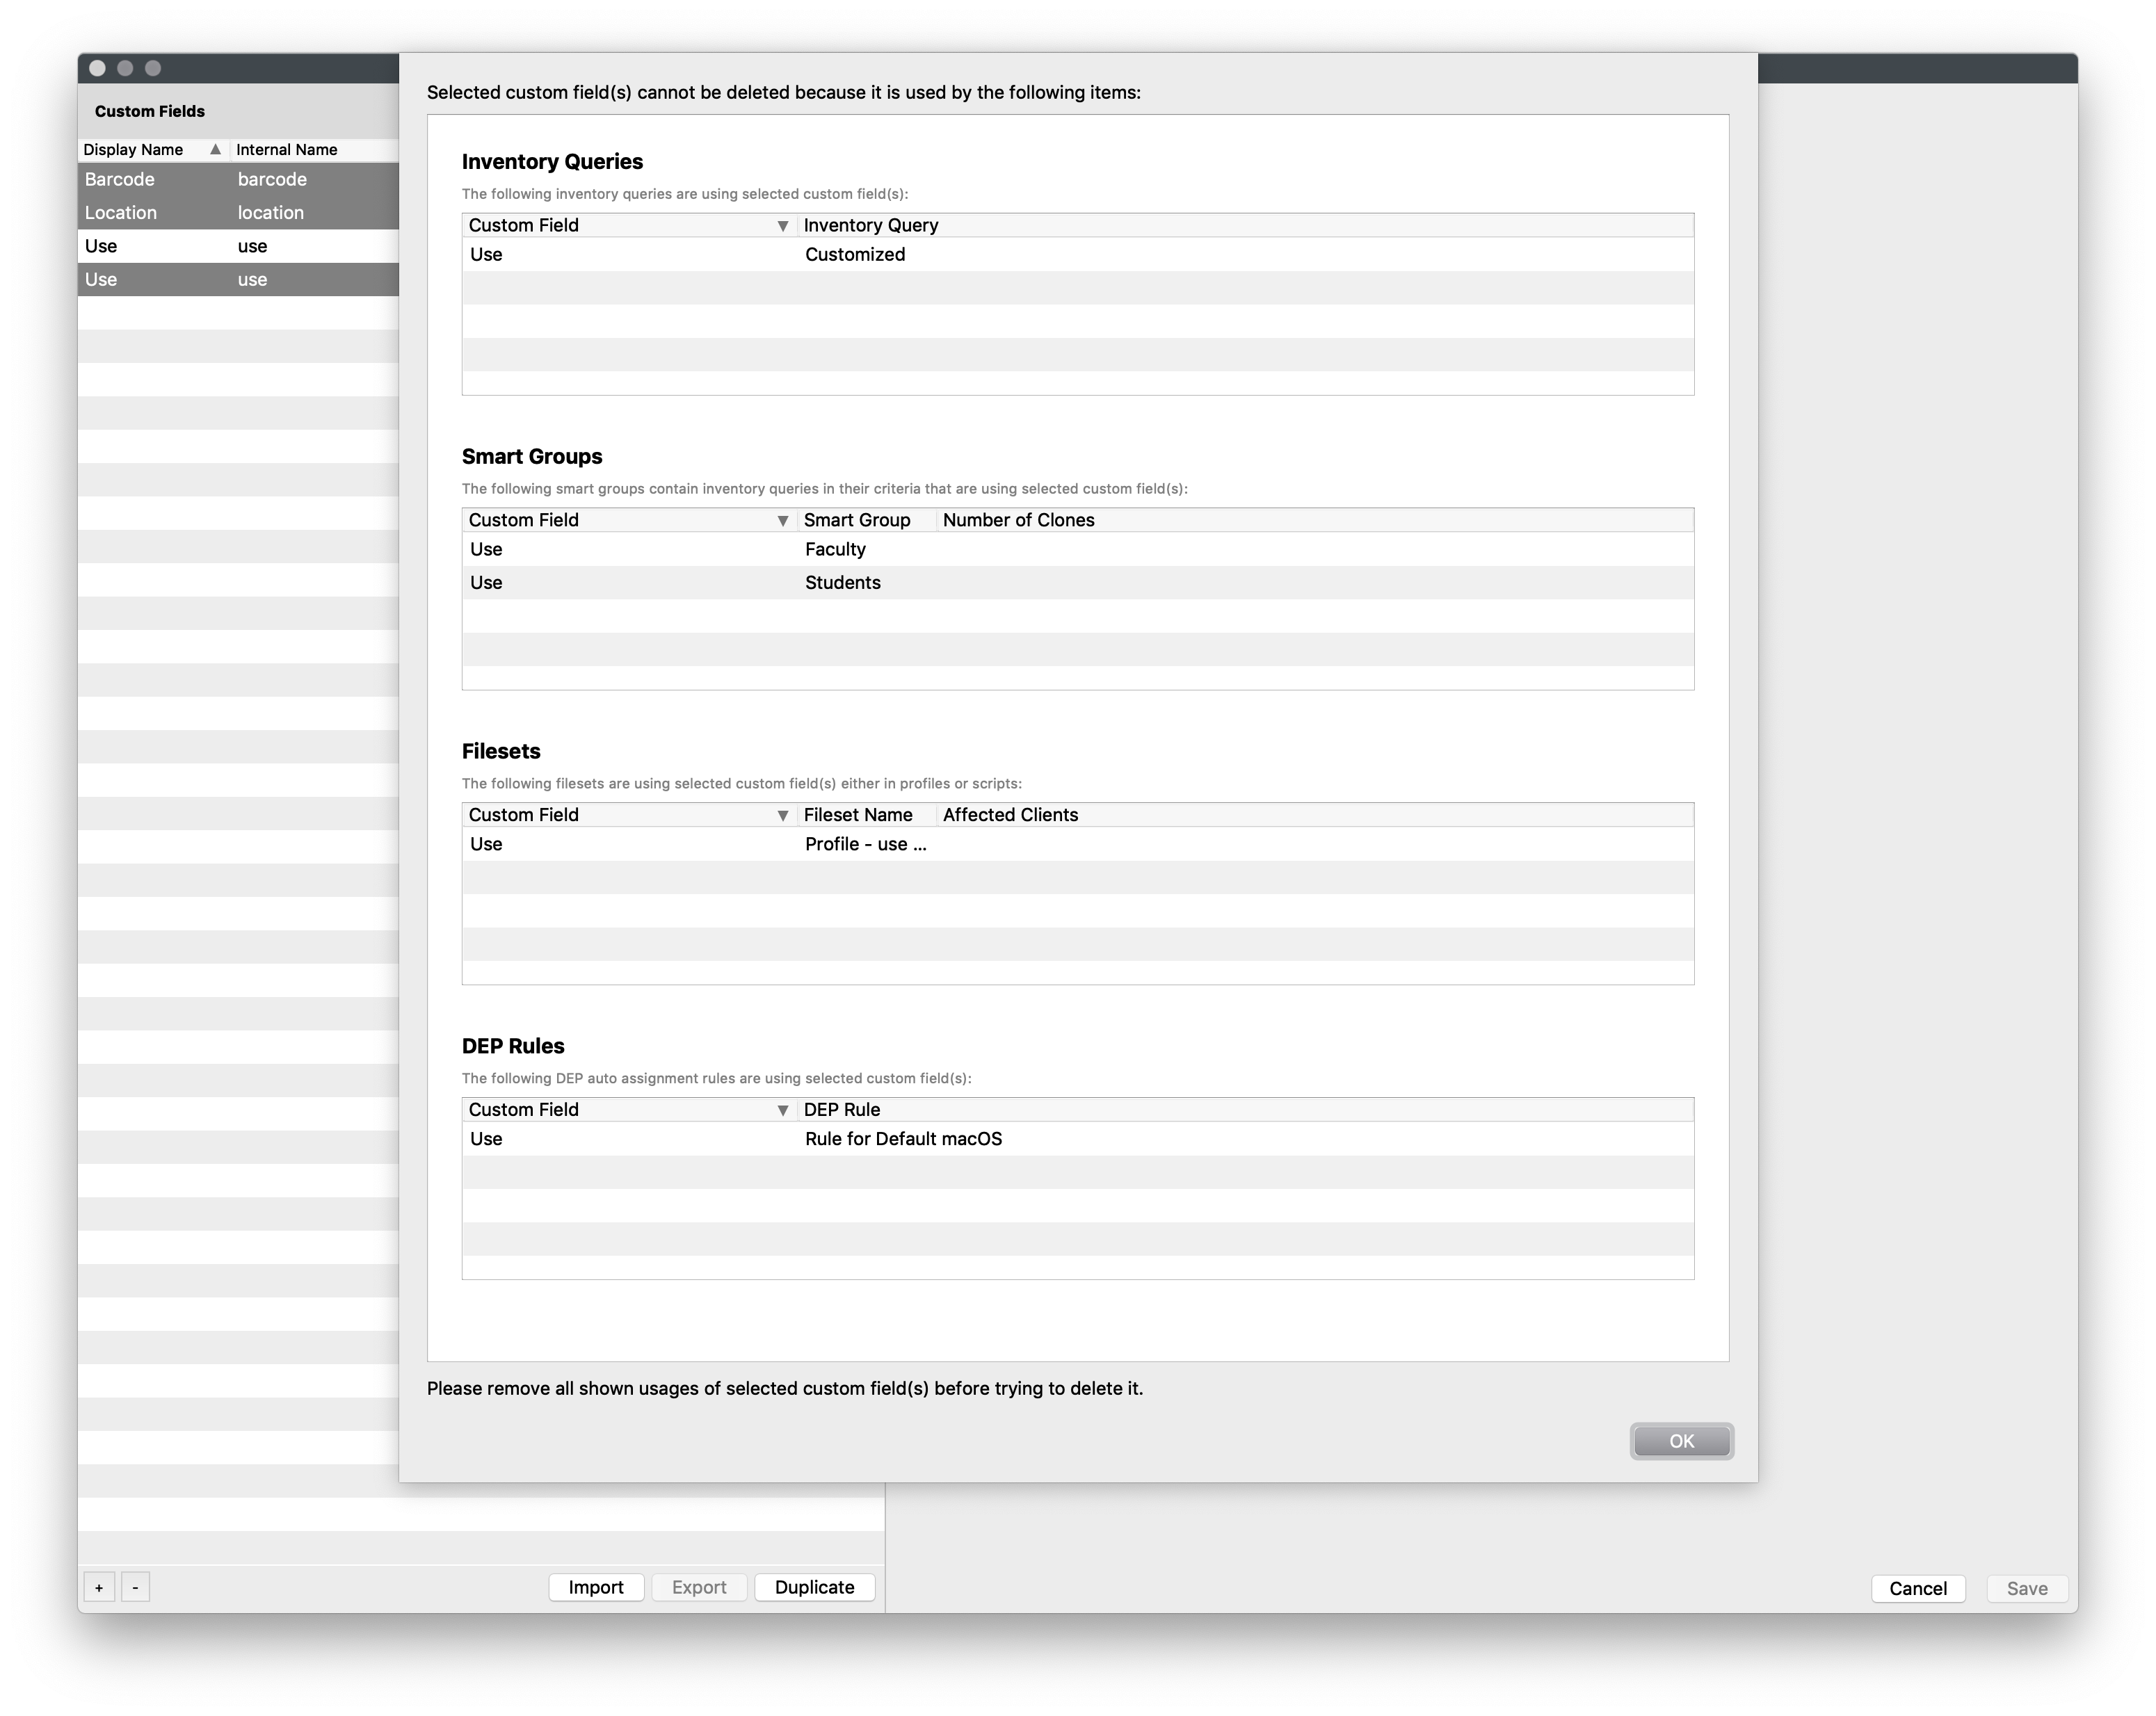 # Custom Fields and Multi-Lined Outputs ## Description [Custom Fields](https://kb.filewave.com/books/custom-fields/page/custom-fields "Custom Fields") are useful for returning small, reportable values that are not part of standard inventory. When a script finds a long list of results, return a concise value in the Custom Field and store the full list somewhere easier to read. ## Information A scripted Custom Field uses the script output as the inventory value. If the script discovers many items, decide what short value should appear in inventory and where the full output should be stored for review. - What is the best information to return as a value, which can concisely provide meaningful information - Where is the best place to store the required values for reference For example, macOS 10.15 and later do not run 32-bit apps. A script that returns every 32-bit item as the Custom Field value would be hard to read and search. A better pattern is to return the count as an integer, then store the detailed list in the FileWave Client log. The required list of 32-bit Apps, though, still needs to be stored, preferably located in an easy to obtain location for analysis. ## Details Continuing with the example, as of macOS 10.15 Apple dropped support for 32-bit Apps. Consideration was then required for listing 32-bit Apps on devices prior to upgrading to 10.15, such that software upgrades or alternate software could be implemented to replace those utilised. For this example the chosen options are: - Return the quantity of 32-bit Apps as an Integer - Output the list of 32-bit Apps into the FileWave Client log. With the count stored as an integer, Inventory Reports (formerly Queries) can target devices with the highest number of 32-bit apps first. As software is replaced, the count should drop until all affected apps have been handled. The FileWave Client log can be reviewed from FileWave Central. Use a consistent keyword in the script output so the detailed list is easy to find. The script could look something like the following, which consists of: - A python section to provide a dated format to match the current log - A function to define the output if either an Application or Framework has been located (consideration has been made to identify Apps with Apps or within Frameworks, etc) - A default output for any other identified binary, library, etc - A command to identify the apps, pushed into a loop to trigger the above - A total count to report back as the overall integer value ```shell #!/bin/zsh testline="" linecount=0 logfile=/private/var/log/fwcld.log function time_formatted { python - <After you add an inventory field, it still appears the next time you open the Select Inventory UI. If you select a field that is already in Client View, FileWave closes the selector. Open it again and choose a field that has not already been added.
The Select Inventory Fields UI has fewer fields than QueryBuilder because Client View only supports direct 1:1 inventory fields.
Hiding the built-in **IP** column and adding **Inventory: All Devices / IP Address Column** does not change which IP address Client Monitor uses.
## Related Content - See [Custom Fields](https://kb.filewave.com/books/custom-fields/page/custom-fields "Custom Fields") for more. # Add FileWave Custom Inventory fields remotely using a Fileset ## DescriptionAlthough these forms of Custom Field may still be used, since FileWave 12.7 additional new methods of Custom Fields have been introduced. The newer form allow for backward compatibility to these older Custom Fields, but provide much greater flexibility and would be recommended. Details on these may be found here: [Custom Fields](https://kb.filewave.com/books/custom-fields/page/custom-fields "Custom Fields")
Let's say you are using FileWave Integrated Inventory and you want to collect inventory data fields that FileWave does not report yet (you can check if you field is supported in the component list when you edit a query). The solution is to use the custom inventory fields introduced in FileWave version 7.0.0. There are 20 fields for each data type : String, Integer, Boolean, Date. Starting in version 8.5 the FileWave Client can accept input. You can use this recipe to deploy a Fileset that is able to add the value you want based on a shell command. The script is already written for you and available in the Fileset, you only need to provide the command that outputs the value you want to add. ``` $ fwcld -custom_write -keyDate format may be supplied as either YYYY/MM/DDTHH:MM:SS or YYYY-MM-DDTHH:MM:SS. E.g 2014/02/20T15:22:43 or 2014-02-20T15:22:43
## Examples Setting "custom\_bool\_13" to a false: ``` $ fwcld -custom_write -key custom_bool_13 -value 0 $ fwcld -custom_write -key custom_bool_13 -value false ``` Setting "custom\_bool\_13" to true: ``` $ fwcld -custom_write -key custom_bool_13 -value 1 $ fwcld -custom_write -key custom_bool_13 -value true $ fwcld -custom_write -key custom_bool_13 -value something ``` Setting "custom\_date\_02" to a date: ``` $ fwcld -custom_write -key custom_date_02 -value 2014-02-20T15:22:43 ``` To remove any key value, just leave off the -value parameter - so to reset the "custom\_date\_02" value back to it's default. ``` $ fwcld -custom_write -key custom_date_02 ``` Example: Saving admins to string 01 ``` #!/bin/sh # This script is a verification sample # benm @ fw now=$(date +"%Y-%m-%d-%H-%M") echo "$now -- Writing current admins to inventory" #writes the current administrators to an inventory field currentadmins=$(dscacheutil -q group -a name admin |grep users) /usr/local/sbin/FileWave.app/Contents/MacOS/fwcld -custom_write -key custom_string_01 -value "$currentadmins" ``` ## Notes If you set your script to run at the "verification" phase then it will continue to run (default every 24hrs), for more on scripts see: [Fileset Scripts](https://kb.filewave.com/books/filesets-payloads/page/fileset-scripts-overview "Fileset Scripts"). ## Useful Commands - The current logged in user: `stat -f%Su /dev/console` - The Kernel version: `uname -r` - Battery Condition: `system_profiler SPPowerDataType | awk '/Condition/ {print $NF}'` - Current admins: `dscl . read /Groups/admin GroupMembership | cut -d " " -f 2-` # Example Custom Fields Some example fields. # Detecting the Display Model using a Custom Field Use a FileWave Custom Field to collect the display model reported by Mac and Windows devices. This is useful when you want display information available in inventory, Smart Groups, or device lists without manually checking each computer. ## Adding the Custom Field 1. Download the Custom Field export: [Display Model Custom Field.customfields](https://kb.filewave.com/attachments/138). 2. In FileWave Admin, go to **Assistants > Custom Fields > Edit Custom Fields > Import** and import the downloaded file. 3. Save the changes in the Custom Fields dialog. 4. Assign the Custom Field to the devices that should report display model information. You can right-click selected devices and choose **Edit Custom Field(s) Associations**, use a Smart Group to target the field, or enable **Assigned to all devices** while editing the Custom Field. 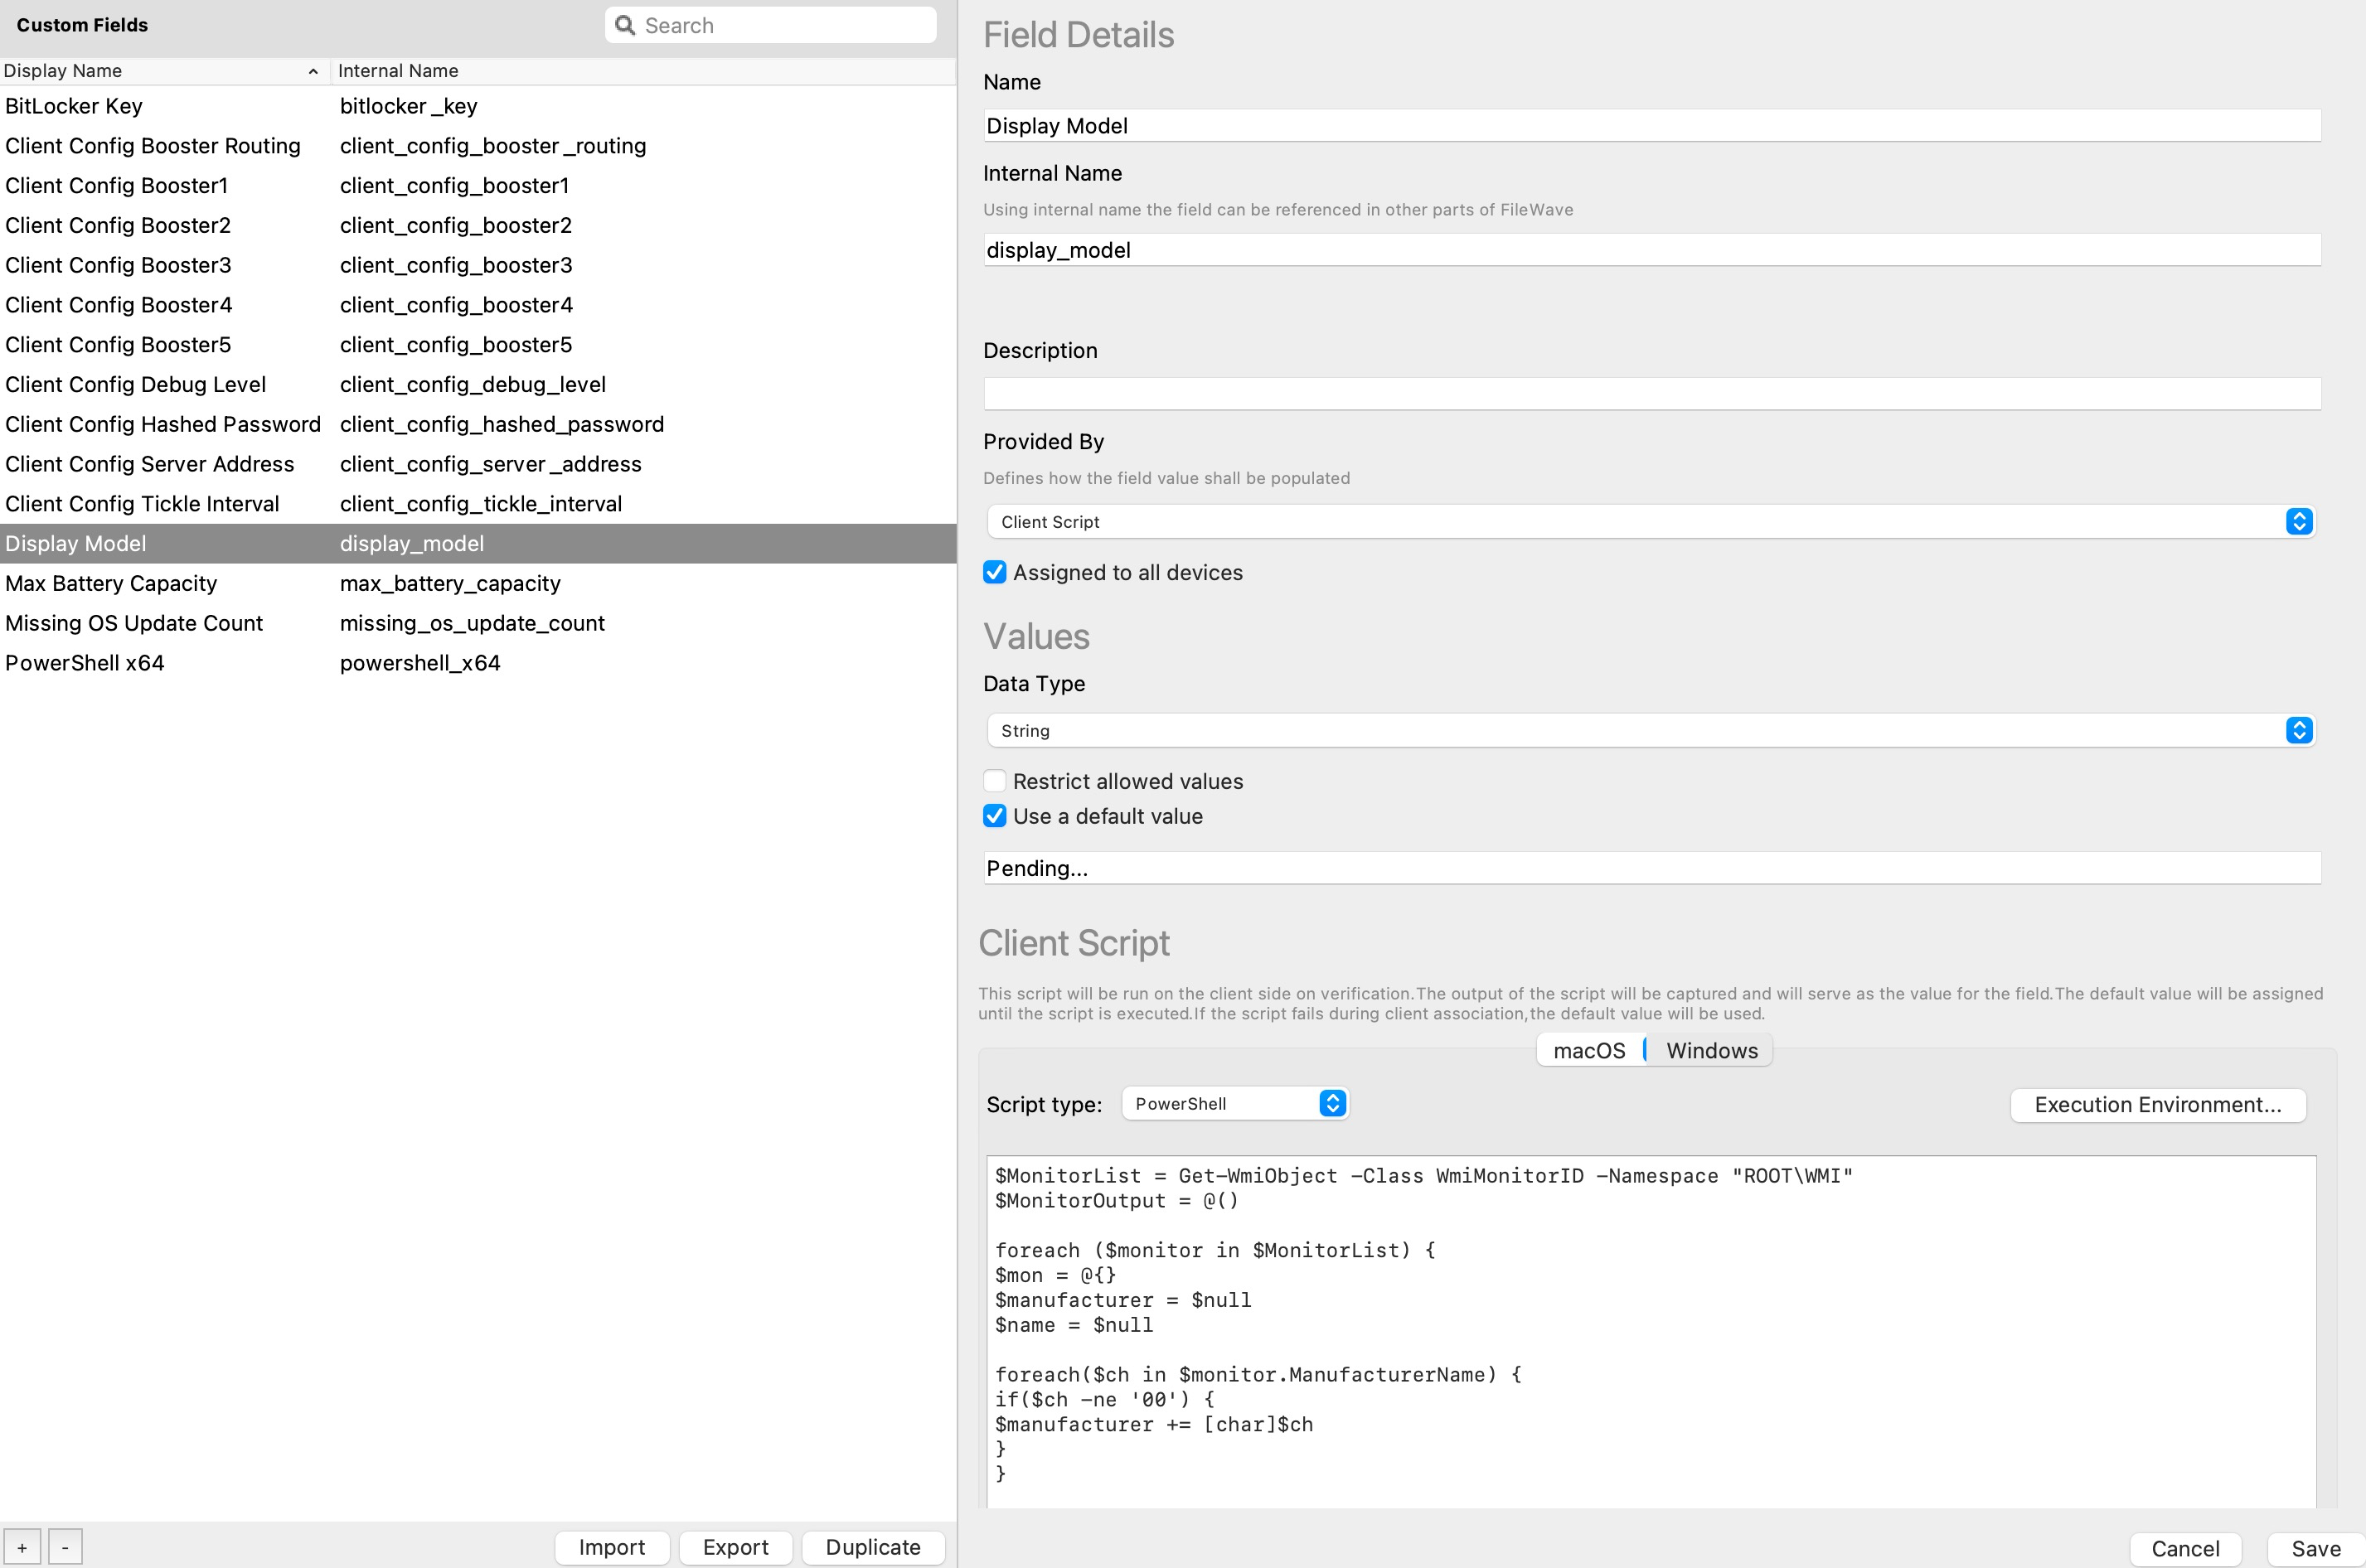 The imported field uses a client script. The Windows section uses PowerShell to read monitor information from `ROOT\WMI`: ```powershell $MonitorList = Get-WmiObject -Class WmiMonitorID -Namespace "ROOT\WMI" $MonitorOutput = @() foreach ($monitor in $MonitorList) { $mon = @{} $manufacturer = $null $name = $null foreach($ch in $monitor.ManufacturerName) { if($ch -ne '00') { $manufacturer += [char]$ch } } foreach($ch in $monitor.UserFriendlyName) { if($ch -ne '00') { $name += [char]$ch } } $mon = $manufacturer + " " + $name $MonitorOutput += $mon } $MonitorOutput=$MonitorOutput -join ', ' $MonitorOutput exit 0 ``` The macOS section uses a shell script to read display details from `system_profiler`: ```shell #!/bin/bash DisplayModel=`system_profiler SPDisplaysDataType | grep "Resolution:" -B1 | awk -v n=3 'NR%n==1' | sed "s/^[ \t]*//" | sed 's/:/,/g' | tr '\n' ' '` echo ${DisplayModel} exit 0 ``` After the field is imported and assigned, save the Custom Fields dialog and allow clients to check in. Devices with more than one attached display may report multiple display models as a comma-separated value. ## Results Once inventory has updated, add the **Display Model** column to the Clients view, use it in Smart Group criteria, or reference it anywhere Custom Field inventory values are useful. ## Related articles - [Custom Fields](https://kb.filewave.com/books/custom-fields/page/custom-fields "Custom Fields")