1. Installation and Setup
Please follow this "Installation and Setup" guide step by step to determine how FileWave will fit into your existing environment.
- FileWave Server Setup
- FileWave Central Setup
- FileWave Central Preferences
- Organize Devices with Client Groups
- Software Group Structure
FileWave Server Setup
What server type is best for me?
The first step to begin your FileWave Evaluation is to determine your FileWave Server hosting preference. FileWave offers both a Cloud-Hosted server and an on-premise virtualized server appliance for either Hyper-V or VMWare.
Cloud-Hosted Server
If you desire a FileWave Cloud-Hosted server and have not already received the login information, please request a Cloud-Hosted server from your dedicated FileWave SE, and they will provide you with the server's address, username, and password. The FileWave Cloud-Hosted Server will be a "production" server so that any progress you make during the evaluation will persist if you choose to purchase FileWave.
Please note that choosing a Cloud-Hosted Server may have an additional cost, depending on the licensing structure selected at the time of your purchase. Also, to better manage the cost incurred by FileWave during your evaluation, your FileWave SE will discuss your organization's timeline to determine the best possible start date and expiration date for your evaluation. Thank you in advance for your understanding in regards to these matters.
Pros of FileWave's Cloud-Hosted Server
- Near instant availability with limited setup time required
- Managed public FQDN and SSL certificate
- Ability to manage devices on any network with an internet connection
- Free "hands-off" upgrades of FileWave
- Guaranteed server uptime
- Automated Backups
- Low maintenance
On-Premise Server
If you desire to host the FileWave Server on-premise by installing on a macOS machine or virtualizing our pre-built appliance in Hyper-V or VMWare, please continue to read the following section.
Requirements
Most steps required for an on-premise server will be in regards to your local network's infrastructure, including virtual environment, DNS, and Firewall/Content Filter. If you do not have direct access to these systems, please coordinate with your Network Administrator or other qualified personnel before proceeding.
Before importing the FileWave Server virtual appliance, we recommend setting aside a static IP and DNS name for it. This will make it easier to move the server to another IP in the future and possible to manage off-premise devices over the Internet. Although technically possible, it is highly unrecommended to only use an IP address to reference the FileWave Server, so please configure a valid and potentially publicly-resolvable fully qualified domain name (FQDN) for the FileWave Server.
Note that the FQDN selected must be resolvable on all network segments from which you plan to manage the client devices. If you want to manage devices both on and off your network, then the same FQDN must be resolvable both on and off your network. Inside your LAN, this FQDN will resolve to the internal IP address of your FileWave server. Externally, that same FQDN will resolve to the public IP address of the internet router in front of the FileWave Server. Mobile devices such as iPhone, iPad, and Apple Vision Pro can leave the local network, so they must be able to reach the FileWave Server whenever they are off-network.
Off-Premise device management via the Internet
A static IP allows you to easily forward the ports used by the FileWave server to its internal IP on your LAN, ensuring that requests from client devices are still able to reach it even when they are off-network. The following ports must be forwarded to the FileWave Server. Some of the ports, such as 20016, are optional if the IT staff will only be accessing the FileWave Admin while on the LAN.
A full listing of FileWave ports and port diagrams is available here.
FileWave Server Installation
The FileWave Server can be installed onto any macOS 15+ machine with minimum specs of 16GB RAM / 8 CPU, or virtualized in either Hyper-V or VMWare using our pre-built virtual appliance based on Debian. If virtualization is available, we highly recommend using our pre-built server appliance versus a macOS machine because of the flexibility to extend allotted server resources. When choosing a virtualization platform for your FileWave Server virtual appliance, we recommend a server platform such as vSphere or Hyper-V over a client platform like VMware Workstation/Fusion or VirtualBox. A VM server platform does not require that you be logged into a user session for the VM to be running. Also, in the event that the physical system hosting the VM server restarts, the VMs hosted on it can also be configured to start up automatically.
Software Downloads
All software downloads outlined in the following steps can be found here. Please always select the latest version of FileWave unless instructed otherwise by your FileWave SE.
Importing the Server Virtual Appliance
You can find instructions on how to import our appliances into many different virtual environments here: FileWave Virtual Appliances
Configuring the Linux Appliance Network Settings
Once you are done importing the FileWave Server Linux appliance, please power it on and configure the network settings using one of the guides below. Once the network settings have been configured, please create an internal DNS A-Record to set a fully qualified domain name (FQDN) for your FileWave Server that points to the Static IP Address configured below. If you plan on managing devices off-network, please ensure the FQDN is resolvable via the Internet and that you have the ability to obtain an SSL certificate that can protect your FQDN.
You will find two sections below, Command Line and Webmin GUI. Please select only one of the two sections based on your preference to configure the settings.
Please disregard this section if using a macOS FileWave Server as you will configure macOS System Preference to configure Static IP address.
Debian Command Line
Debian Command Line Networking
Access FileWave Server's Command Line Interface (CLI) via direct console access or SSH using the "fwadmin" user and password "filewave" and you will be prompted to change the password. (For FileWave prior to 15.5.0 the user was root.)
SSH into FileWave Server
ssh fwadmin@192.168.1.85Change the FileWave Server's password when prompted and take note of it in a secure location. You will not see password being typed, press Enter when finished.
The following guide is tailored for Debian servers using the interfaces file, but you could also use Webmin (below) on your server assuming the server comes online initially with DHCP.
-
Locate Network Interface:
First, identify the network interface you wish to configure. You can list all network interfaces using:
networkctl list
- Edit the /etc/network/interfaces file: Using 'nano', edit the interfaces file to set the network configurations.
nano /etc/network/interfacesYour default interfaces file should look something like this (your interface name may be different):
# The loopback network interface auto lo eth0 iface lo inet loopback # The primary network interface iface eth0 inet dhcpChange the file to look like this, using your network preferences (note 'dhcp' has been changed to 'static' in line 6)
# The loopback network interface auto lo eth0 iface lo inet loopback # The primary network interface iface eth0 inet static address 192.168.10.33 netmask 255.255.255.0 broadcast 192.168.10.255 dns-nameservers 192.168.10.254 192.168.10.255 - Verify Resolv.conf, hosts and hostname files: Verify that these files in /etc/ are configured correctly for your network and server.
/etc/resolv.conf: This file should list your DNS servers
/etc/hosts: This file should point your FQDN to localhost (127.0.0.1)
/etc/hostname: Specifies the hostname for your server. This is filewave by default. - Restart/Check Network Status:
systemctl restart networking.service systemctl status networking.service - Verify IP:
ip a

Webmin GUI
For Webmin on Debian know that you will need to go to Webmin -> Webmin Configuration -> Operating System and Environment and make sure it's set to Debian 12.4 (Or whatever version we are at when you set up your system. You can see this with cat /etc/debian_version on the server.
- At the login screen note the URL to remotely manage the server, ex: https://myorg.filwave.net:10000
- If there is no IP address specified because DHCP is not available on the subnet for your FileWave Linux Appliance, login with the username "fwadmin" with password "filewave" and in prior versions of FileWave it was username "root" with the same password.
- CentOS (Deprecated):
Run "nmtui" at the command prompt to launch the Network Manager Text UI so you can configure the networking for the FileWave VM appliance. You'll need to reload the IP stack with "service network restart". - Debian: Please see our KB on network configuration: Networking - Assign static IP Address for a FileWave Appliance
- Skip the network configuration steps later in the Webmin.
- Browse to this URL and log in with username "fwadmin" and password "filewave". We will change this password later.
- Browse to Hardware > System Time on the left, pick the Change timezone tab on the right, pick your time zone and click Save. North American time zones all start with "America".
- Go to System > Change Passwords on the left and select the "root" account on the right from the list of usernames. Enter a new root password, confirm it, and click Change. Note that this will change the default password for the root account used to log into the server from "filewave" to whatever you choose so enter a secure password that is easy for you to remember.
- Choose Networking > Network Configuration on the left, and Network Interfaces on the right. Click the blue link labeled "ens160" or "ens32" for the Ethernet adapter. Change the IPv4 address settings to "Static configuration", enter a static IP, enter a subnet mask, and click Save at the bottom to continue configuring the DNS and routing.
- You will no longer be able to access the Webmin UI for the FileWave servers via its old DHCP IP address. Change the address in your browser's address bar to use the new static IP address for the FileWave server that you configured in the previous step. Browse to Networking > Network Configuration on the left, and Hostname and DNS Client on the right. Enter the IP address for your DNS server and click Save.
- Select Networking > Network Configuration on the left, and Routing and Gateways on the right. Pick "ens160" or "ens32" from the Default routes pull-down, enter the default gateway address for the subnet the FileWave server is hosted on, and click Save.
- Go to System > Bootup and Shutdown_ on the left, scroll to the bottom on the right, and click the Reboot System button. When asked to confirm if you want to reboot the system with "shutdown -r now" click the Reboot System button again.


FileWave Central Setup
Let's log in!
Now that you have the FileWave Server up and running, it is time to connect using FileWave Central. FileWave Central is a native application capable of running on macOS or Windows and is currently considered to be the "daily driver". Starting with FileWave 14, you can now access the FileWave interface via a web browser to accomplish any Inventory, Location Tracking, or Deployment needs (Fileset creation not yet supported).
Download and Install the FileWave Admin
-
Visit FileWave's Software Downloads page here.
-
Click on the version of your FileWave Server.
-
Scroll down to either "macOS Downloads" or "Windows Downloads", under "Upgrading Your Environment".
-
Download either the "macOS Admin" or "Windows Admin", respectively.
-
Run the FileWave Admin PKG or FileWave Admin MSI and accept the licensing agreement to install.
Log into FileWave Admin
 Open the FileWave Admin
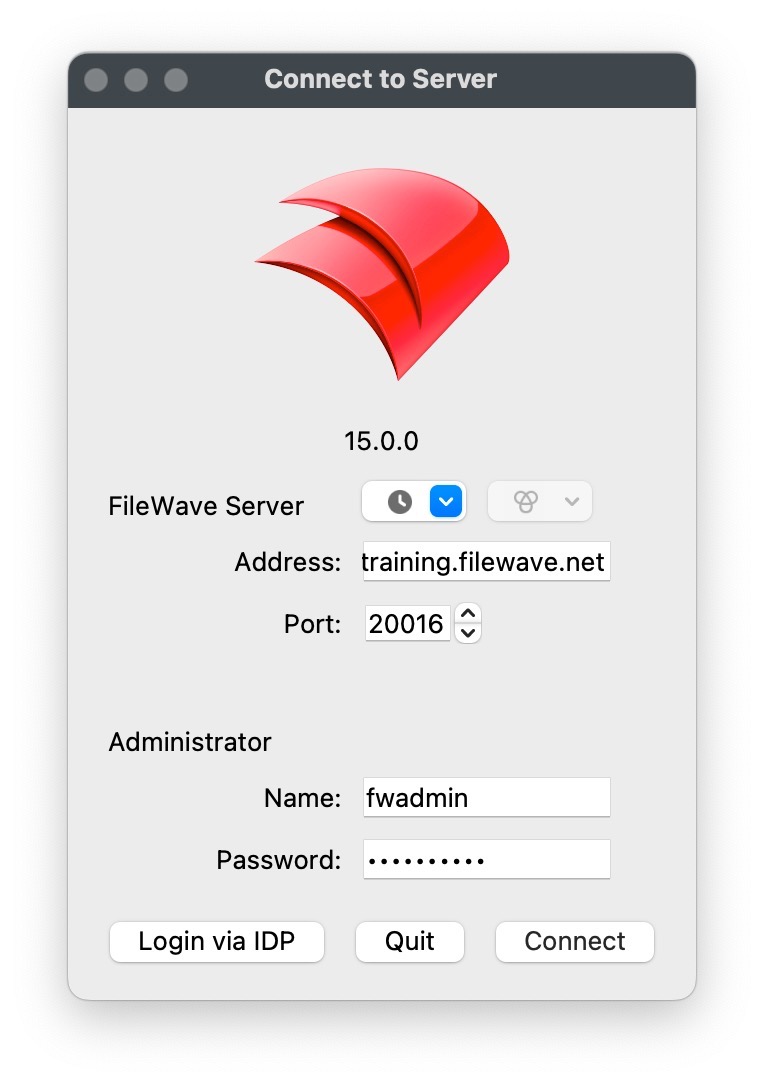
Enter the Server Address, Username, and Password and then "Connect"
- Do not include "https://" in "Address" field
- Do not change the "Port" from "20016"
Credentials
- Hosted Servers: Address, Username, and Password will be provided by your FileWave Sales Engineer.
- On-Premise Server: Username: "fwadmin" Password: "filewave"
How to Save and Commit changes
As you will see, the FileWave Admin interface is simply laid out and intuitive however, one thing that may be unfamiliar is the concept of "Update Model". The "Update Model" button is essentially the FileWave "Save" button. For example, when you associate a software package to a Client device, FileWave will not apply that change in real-time but yet wait until you "Update Model" to commit the changes to the device. This gives you a window of opportunity to correct any accidental associations, deletions, or any other unwanted modifications.
After "Update Model" you will notice the "Model Number" will increment by one in the lower right-hand side of the FileWave Admin. Your Clients will check in periodically (Tickle Interval; 120 seconds) to see if there is a new Model version available. If there is a new Model available, the Client will download a new user-manifest and apply any changes that have been made for that Client. If there are no new changes for the Client or new Model, the Client will continue to idle for another 120 seconds.

FileWave Central Preferences
What
FileWave Central Preferences contains server-wide configuration, platform integrations, content-delivery defaults, inventory behavior, and settings that apply only to the local Central installation. Use this overview to find the correct area, then follow the linked workflow article for settings that need detailed preparation.
FileWave 16.4 navigation: This page reflects the Preferences categories and locations in FileWave Central 16.4. Earlier releases may place some settings elsewhere. In particular, automatic Booster-upgrade timing is under Preferences > General in 16.3.x and Preferences > Upgrades in 16.4.0 and later.
Open Preferences
Open Preferences from FileWave Central. The categories appear as tabs across the top of the window. Use the left and right arrows when the window is not wide enough to display every tab.
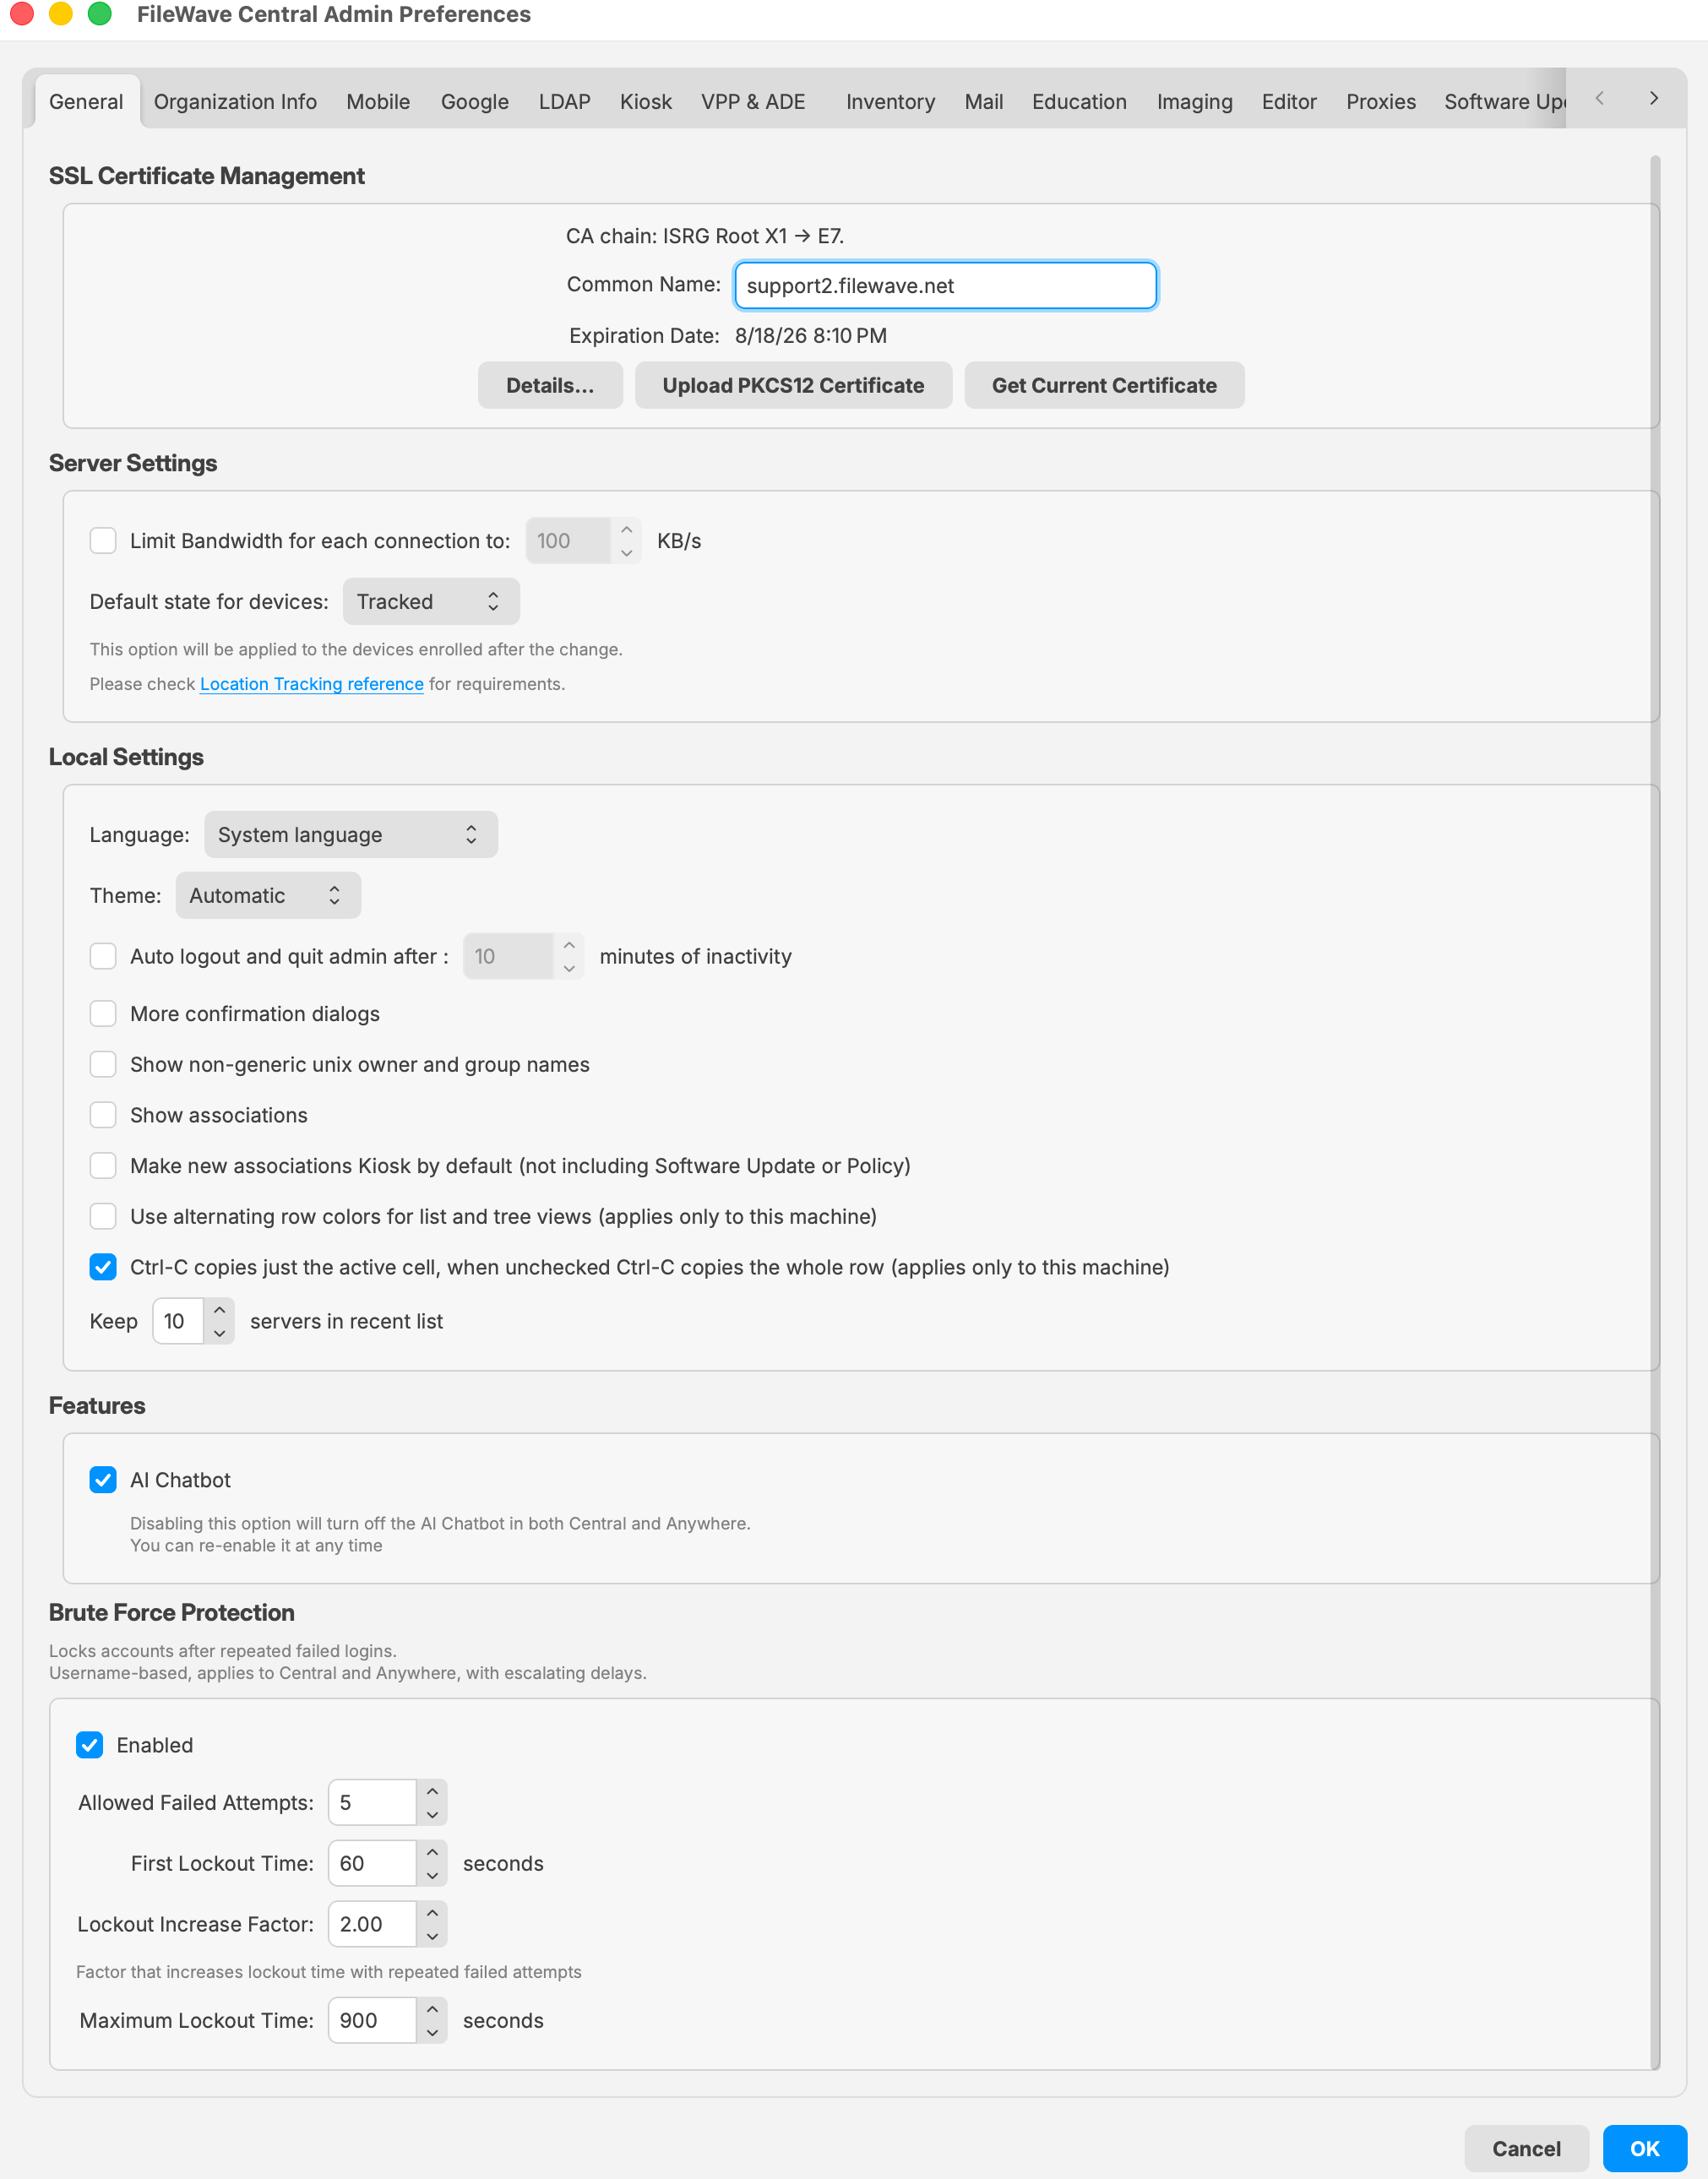
FileWave Central 16.4 General Preferences provides the current category navigation and server, security, certificate, and local Central settings.
An administrator needs the applicable permission before opening or changing a protected area. Sensitive operations can also require the currently signed-in administrator to authenticate again. Use named administrator accounts and least-privilege permissions for daily work instead of sharing the fwadmin account.
See Managing FileWave Administrators for account and permission management.
Evaluation and initial-configuration priorities
- General: Review the active SSL certificate, server-wide defaults, local Central behavior, and brute-force protection.
- Organization Info: Enter the organization information that should be associated with managed-device records.
- Mobile: Verify the MDM server address, APNs configuration, and Apple mobile-management prerequisites. FileWave 16.4 also builds and stores macOS and Windows enrollment packages here.
- Platform integrations: Configure only the services in scope for the evaluation—such as Google, LDAP, VPP & ADE, Education, or Imaging—and validate each integration before expanding enrollment.
- Inventory and Mail: Confirm reporting cadence and notification delivery without making intervals more aggressive than the evaluation requires.
- Upgrades: Review client-upgrade concurrency, failure thresholds, reporting cadence, and the automatic Booster-upgrade delay before using integrated upgrades.
FileWave Central 16.4 Preferences map
| Category | Use it for |
|---|---|
| General | SSL certificate management, server defaults, device tracking default, local Central behavior—including the recent-server list—optional AI Chatbot access, and brute-force protection. |
| Organization Info | Organization metadata associated with the FileWave environment and managed-device information. |
| Mobile | MDM server connectivity, Apple push configuration, mobile-management settings, and FileWave 16.4 macOS/Windows enrollment-package builds. |
| Google and Android EMM integration and its organization-wide configuration. | |
| LDAP | Directory connections, synchronization safeguards, directory-backed groups, enrollment identity, and parameterized data. |
| Kiosk | Kiosk categories and organization of self-service content. |
| VPP & ADE | Apps and Books tokens, Automated Device Enrollment services, Apple School or Business Manager API accounts, synchronization, and advanced Apple service settings. |
| Inventory | Apple MDM inventory polling, Smart Group refresh timing, LDAP Custom Field cleanup behavior, and IDP Custom Field synchronization. |
| Outgoing email configuration used by FileWave notifications and tests. | |
| Education | Education-specific integrations and classroom-related server configuration. |
| Imaging | Imaging Virtual Server registration, status, and FileWave 16.4-managed IVS upgrades. |
| Editor | Preferences that control supported content-editor behavior in FileWave Central. |
| Proxies | Proxy settings used when FileWave services must reach external resources through an intermediary. |
| Software Updates | Server-level Software Update behavior used by the Software Updates workflow. |
| Upgrades | Client upgrade batch size, permanent-failure threshold, scheduled reports, and automatic Booster-upgrade delay. |
Configure the recent-server list
FileWave Central 16.4 adds Keep n servers in recent list under Preferences > General. Set the number of recently used FileWave Servers that Central should retain for the login window.
- Increase the value when the same administrator regularly connects to several FileWave environments.
- Use a smaller value on shared administration Macs or where old environment names should not remain in the login history.
- This setting changes the recent list in FileWave Central; it does not add, remove, rename, or reconfigure a FileWave Server.
Enrollment authentication during setup
For most evaluations—and for many organization-owned devices using Automated Device Enrollment—FileWave recommends leaving generic URL/ADE enrollment authentication disabled unless the organization has a deliberate enrollment-identity requirement. Requiring a shared username and password can interrupt zero-touch enrollment after a wipe or reassignment. When user identity is required, configure LDAP or an identity-provider enrollment workflow instead of distributing generic credentials.
FileWave-hosted Servers
The SSH and mdm_auth.conf steps below do not apply to FileWave-hosted Servers. Hosted environments are normally provisioned without generic enrollment authentication unless another configuration was requested. Contact FileWave Support or the assigned FileWave representative when that server-side behavior needs to be confirmed or changed.
On-premises FileWave Appliances
On new Debian-based FileWave Appliances, sign in through the console or SSH as fwadmin. The initial password is filewave, and the Appliance requires it to be changed on first login. Direct root login is disabled on new Appliances beginning with FileWave 15.5; use sudo for administrative commands. See Setting the Password on First Login to FileWave Appliances.
To disable generic enrollment authentication on an on-premises Appliance:
- Connect from a trusted network or use the Appliance console:
ssh fwadmin@filewave-server.example.org - Back up the current authentication configuration:
sudo cp /usr/local/filewave/apache/conf/mdm_auth.conf /usr/local/filewave/apache/conf/mdm_auth.conf.backup - Edit the active configuration:
sudo nano /usr/local/filewave/apache/conf/mdm_auth.conf - Comment out the complete active
<Location>blocks—including each opening and closing tag—that require generic credentials for enrollment. Preserve any unrelated configuration. - Save the file and reload Apache gracefully:
sudo /usr/local/filewave/apache/bin/apachectl graceful - Test the FileWave enrollment URL from a non-production device. Confirm that the enrollment profile downloads without a generic credential prompt and that the device still completes MDM enrollment.
Keep the backup until enrollment is verified. If the result is not correct, restore the backup and reload Apache. Limit SSH access to trusted networks and change the Appliance’s initial password immediately.
Change Preferences safely
- Record the current value before changing a server-wide setting.
- Change one integration or operational behavior at a time and test it before continuing.
- Do not replace certificates, shared keys, service tokens, package settings, or enrollment authentication casually; those changes can affect existing devices and integrations.
- Keep credentials, private keys, tenant identifiers, tokens, server hostnames, and certificate details out of screenshots and support notes unless the destination is approved for that data.
- Use the focused workflow articles below instead of treating this overview as the procedure for every Preferences category.
Related content
Organize Devices with Client Groups
Plan your Client group structure
A clear group structure makes device targeting easier to understand and maintain. This article covers standard groups, FileWave Smart Groups, LDAP-based Smart Groups, and clones for organizing Client devices around enrollment, platform, department, or other operational needs.
Creating a basic structure for automatic device enrollment
The first two groups we will create are to enable automatic device enrollment for both Client (Windows, macOS) and Mobile (iOS, tvOS, Android) devices. This "-Enrollment" group will contain all of the original device records within FileWave, therefore it is recommended to treat this group as a "safe zone". We will create other group structures to associate software and settings to your devices based on more granular criteria.
Create a New Group
- Open FileWave Admin and navigate to "Clients" from the left pane.
- Click "New Group" from the black menubar.
- Name the first group as "-Enrollment".
- We use a "-" so that the group floats to the top when sorted alphabetically.
Repeat the process to create a "Computers" group and a "Mobile" group inside "-Enrollment". If you create a group in the wrong location, drag it into the intended parent group.


Enable automatic device enrollment
By default, new devices will come into a "waiting area" so that you can manually add them to FileWave. We are going to make this process more efficient by enabling automatic device enrollment.
- Select the "Computers" group from the previous section.
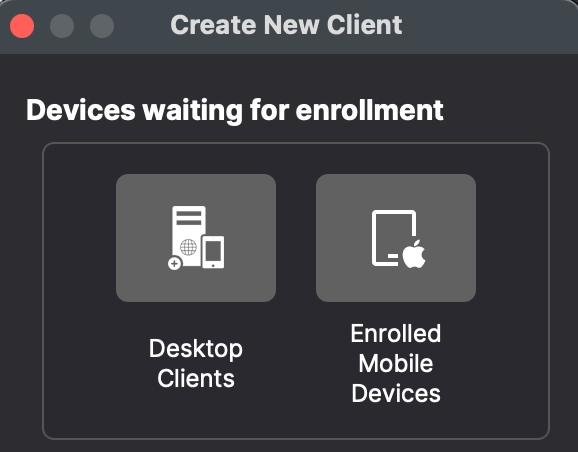
- Click "New Client" from the black menubar.
- Select "Desktop Clients" from the "Devices waiting for enrollment" section.
- Check the box for "Automatically add all new clients to select group" unless you always want to approve new clients. This is discussed in more detail in Conflict Resolution.
- Click "Save".
We will now repeat this process for the "Mobile" group by selecting "Enrolled Mobile Devices" from the "Devices waiting for enrollment" section.
And finally, as stated in the New Client window, we must "Update Model" to save our changes and finalized automatic device enrollment.


Creating Smart Groups
A Smart Group is a group that automatically "clones" devices based on a set of Inventory data points. These data points include hardware information, software information, LDAP information, and unique Custom Fields. If a device meets the specified criteria, it will be automatically "cloned" or duplicated into the Smart Group, and if it no longer meets the criteria it will be removed from the Smart Group. This allows for very dynamic associations to software and settings. For example, deploy Adobe Creative Suite to all macOS devices that have a custom "Department" field set to "Media".
For demonstration purposes we will create several Smart Groups based on the device's Operating System Platform. These Smart Groups can be used in production when establishing a baseline software group for each specific OS type.
Create "Platform" Smart Groups
 Open FileWave Admin and navigate to "Clients" from the left pane.
- Create a standard Group named "-Platform" following the steps above.
- Select the "-Platform" group and click "New Smart Group" from the black menubar.
- Name the Smart Group based on the Operating System. We will first start with "Windows".
- Click the "[+]" button in the lower left-hand corner.
- Select "Client OS Platform" from the dropdown menu on the left.
- Select "Windows" from the dropdown menu on the right.
- Click "OK" to save the changes.
We will repeat these steps for:
- macOS - Client OS Platform [equals] macOS
- iOS - iOS Device Type [equals] Any iOS Device
Creating more advanced Smart Groups
We will now create a slightly more advanced Smart Group that leverages FileWave's more robust Inventory Query Builder. The Inventory Query Builder will give us access to over 1000 data points that FileWave natively collects from the different device types along with any Custom Fields you have imported.
The next steps will outline how to use the Inventory Query Builder to round out our "-Platform" group by targeting Android devices.
 Open FileWave Admin and navigate to "Clients" from the left pane.
- Select the "-Platform" group and click "New Smart Group" from the black menubar.
- Name the Smart Group based on the Operating System, in this case "Android".
- Click the "[+]" button in the lower left-hand corner.
- Select "Inventory Query" from the dropdown menu on the left.
- Click the "[...]" button to the right.
- Find the criteria that will be targeted using "Search" or by opening each sub-group, in this case "Operating System > OS Type".
- Drag-n-Drop the desired criteria from the left pane into the right-hand side "Criteria" pane.
- Verify that the expected results appear in the right-hand "Clients" pane.
- "Save" the Inventory Query and "OK" the Smart Group window.
Finishing up

Now that you have defined your Platform-based Smart Groups, any time a new device enrolls it will be automatically "cloned" into its respective Smart Group. It is recommended that you target these Smart Groups when deploying content to an OS type rather than targeting devices within the "-Enrollment" groups. Please note that Chromebook devices will adhere to their own group structure and will not belong to any other typical FileWave groups.
And as always, please "Update Model" to save your group modifications.
Cloning devices
If you find yourself needing to group devices that don't have any unique attributes that you can target in a Smart Group, you can simply "clone" the devices into any group you'd like. This allows you to still have flexibility with content associations while not jeopardizing the original Client record in the "-Enrollment" group. You can delete or move a clone of a device without affecting the original Client record or any other clones of that same device. For example, Tommy participates in both "Interactive Media" and "STEM" classes during first semester but in second semester he only participates in "Interactive Media". Since Tommy's device no longer needs the "STEM" software, we can delete his cloned device from the "STEM" Client group without affecting his "Interactive Media" content associations.
Creating a clone
 Right-click on any device or device clone and select "Create Clone".
- Select the Client group where you want the clone to be created.
- You will now see a new clone indicated by italics font and an upwards facing arrow on the Client's icon.
 Right-click on any device or device clone and select "Create Clone".

Software Group Structure
You get a group and you get a group, everybody gets a group!
Again, really? Yep. We recommend that you stay just as organized with your Software (Fileset) groups as you do with your Client groups. This will enable you to do "Group to Group" associations, allowing for even more dynamic and automated deployments. For example, if we have an "Interactive Media" Client group and an "Interactive Media" Software group, we can associate them at the group level so any time a new piece of software gets added to the Software group it will be deployed to all devices in the Client group... and vice versa, a new Client gets added to the Client group and it will receive all software in the Software group, all without having to make a new Association.
Creating Software (Fileset) Groups
Your group structure will great depend on your organization's structure but a good place to start is by sorting out your software by the intended Operating System.

New Fileset Group
- Open FileWave Admin and navigate to "Filesets".
- Click "New Fileset Group" from the black menubar and name accordingly, in this case "iOS".
- That's it! You can now create additional sub-groups if desired.
- FileWave honors the "parent/child" relationship when associating content.
Configuring automatic VPP Fileset imports
This section is intended for those going to sync with Apple's Volume Purchase Program as described in this future section. When syncing VPP licenses into FileWave, you can specify which group each VPP Token's Fileset will be created within. This is very helpful especially if you have multiple VPP Tokens designated for different departments and/or sites.

Auto create VPP Filesets
- Ensure that you have the target group created prior, we will be using the "iOS - VPP" group.
- Open "FileWave Admin > Preferences > VPP & DEP", click "Configure tokens" from the "Volume Purchase Program" section, and authenticate.
- Double-click your existing VPP Token.
- Click "Choose" from the "Auto create filesets" section and select your desired Fileset group, in this case "iOS - VPP".
- Click "Save" on the "VPP service token" window, "Close" and "OK" the other Preferences windows.
- Repeat these steps for any other VPP Tokens.