# 2. Client Pre-Requisites
Please review all steps in the sections that correspond with each device type you would like to manage in FileWave.
# Android Client Pre-Requisites
## Obtaining JSON File
Android EMM (Enterprise Mobility Management) is built into FileWave as of version 13.1. This feature requires activation. Activation may be generated by opening a [Technical Support](https://kb.filewave.com/books/community-engagement/page/customer-technical-support "Customer Technical Support") case and support will get you the JSON file.
### Setup
#### Requirements
- Server and Admin running FileWave Version 13.1.0 +
- Android 8 or newer Device(s) as of FileWave 15.3.0 (Requirements may change, confirm with latest release notes)
- Generated JSON key (see above)
- Network Port 443 inbound and outbound between FileWave server and Google (See [Default TCP and UDP Port Usage](https://kb.filewave.com/books/filewave-general-info/page/default-tcp-and-udp-port-usage "Default TCP and UDP Port Usage") for full list and topology)
- A **standard Google** account or **G-Suite** account
- Perform the changes in FileWave as the fwadmin user specifically because some steps will not be able to be accomplished without doing so
**A Google account may only be registered to a single EMM instance:**
Unlike standard Google or **Gmail** accounts, a **G Suite** administrator manages all accounts associated with each of these editions. **G Suite** provides access to a core set of apps that include **Gmail**, Calendar, Drive, Docs, Sheets, Slides, Forms, Google+, Hangouts Meet, Hangouts Chat, Sites, and Groups.
You are not required to setup Google Cloud Messaging (GCM/Firebase) for Android EMM to work. Any references to it are for Chromebooks.
### Configure Service Account
Open FileWave Admin 'Preferences' > 'Google' tab and click 'Configure Enterprise' under the EMM Configuration section. If the Google tab is not yet apparent, the FileWave server service will require a restart after requesting the JSON.
1. Proceed by selecting the 'Choose File' button in the 'Set Up an Android Management Enterprise' window
2. Select service account file, then press 'Upload'
3. When requested, enter a display name for your enterprise and 'Sign Up'. This is merely an internal identifier but will be visible on devices.
4. Press 'Click here' link to finalize the setup. The link opens a browser, navigating to Google Play website. Finalize enterprise creation using the chosen Google account.
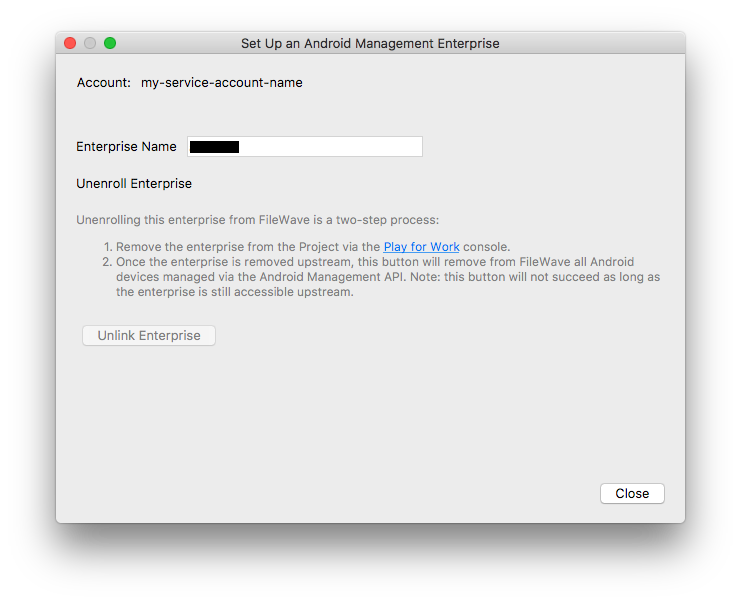
5. On registration completion, the browser should redirect to the FileWave server website informing success. 'Enterprise "\[display name\]" successfully created.'
The FileWave Admin should now display the successfully configured Android EMM account:
## Enrolling Android Devices
You are now set to enroll Android devices as described here: [Android Enrollment](https://kb.filewave.com/books/evaluation-guide/page/android-enrollment "Android Enrollment")
# Apple Client Pre-Requisites
Now that we have the FileWave basics taken care of, let us start integrating the Apple services into FileWave. This section covers creating an APNs certificate and synchronizing FileWave with Apple Automated Device Enrollment (ADE) and Apps and Books.
## Apple Push Notification Service (APNS) Certificate
---
The Apple Push Notification service certificate, or APNs certificate, allows FileWave to send push notifications to managed Apple devices, including macOS, iOS, iPadOS, visionOS, and tvOS. This step is critical for Apple device management in FileWave.
To create and upload an APNS certificate follow the instructions at one of the following links depending on your platform [macOS](https://kb.filewave.com/books/certificates/page/apns-certificate-creation-renewal-on-macos-computers-keychain "APNs Certificate Creation & Renewal on macOS Computers") or [Windows](https://kb.filewave.com/books/certificates/page/apns-certificate-creation-renewal-on-windows-computers "APNs Certificate Creation & Renewal on Windows Computers"). If you have a macOS machine available, the process is usually found to be easier on the Mac versus a Windows machine since macOS includes the built-in Keychain Assistant.
Since the APNS certificate must be renewed annually, we recommend you create calendar reminders 45, 30, and 15 days before the expiration. The FileWave Admin's Dashboard can also be configured to give you an alert of expiration via email.
When renewing your APNS certificate, be sure to use the same Apple ID that was used to originally create it. Creating a new certificate, or creating a certificate with a different Apple ID, rather than renewing the existing one used by FileWave, will break MDM communication with your mobile devices and require un-enrollment and re-enrollment. Take the following precaution to prevent this.
- Click the "*Info"* icon for your APNS certificate in your Apple Push Certificates Portal account and enter the DNS name for your server in the *Notes* field. This lets you know which server it is intended for.
- Verify that the topic for the APNS certificate you’re trying to renew matches the topic listed in the *"Mobile"* tab of the FileWave preferences. If they don’t match then you’re renewing the wrong APNS certificate and you run the risk of preventing Apple device management.
## Apple Automated Device Enrollment (ADE)
---
After importing the APNs certificate, use Apple Automated Device Enrollment to automate enrollment for supported macOS, iOS, iPadOS, visionOS, and tvOS devices.
### Add new MDM Server to Apple
1. Log into [Apple School Manager](https://school.apple.com) (ASM) or [Apple Business Manager](https://business.apple.com) (ABM) using your organization's Administrator account.
2. Navigate to *"Settings"* in the lower left-hand corner.
3. Select *"Device Management Settings"* from the middle pane.
4. Click *"Add MDM Server"* from the right pane.
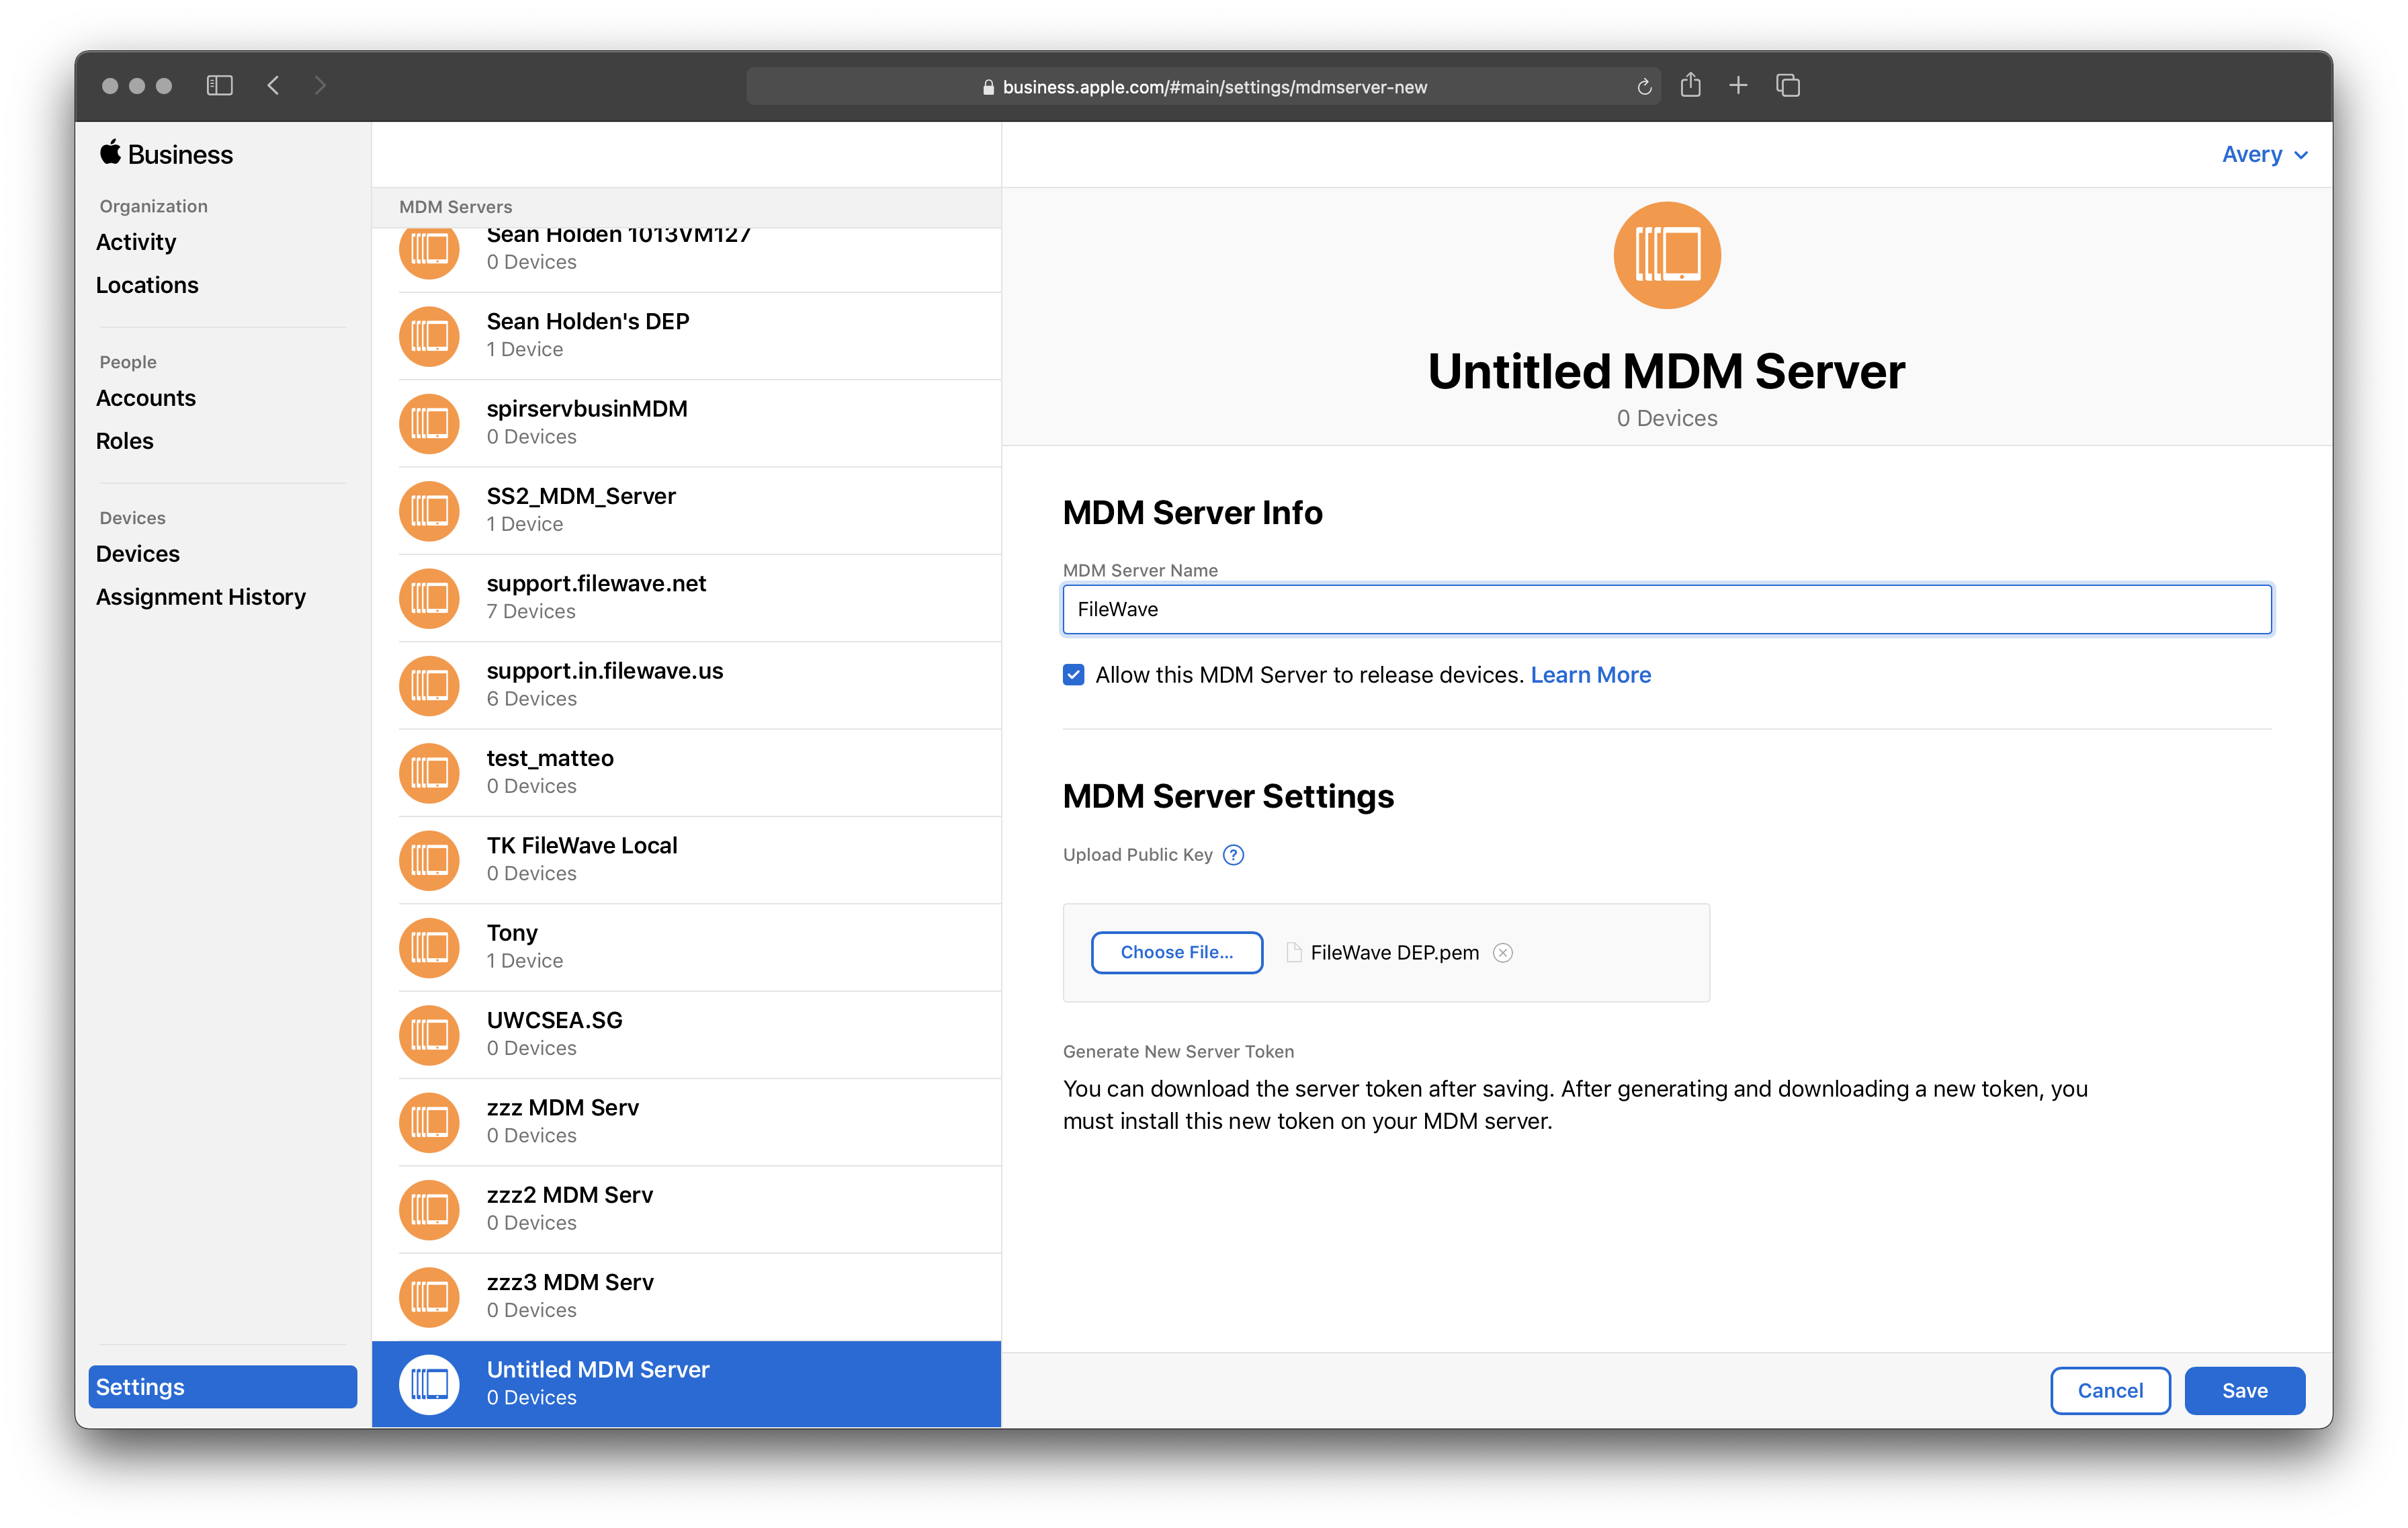
5. Change the *"MDM Server Name"* to *"FileWave"* or something distinguishable.
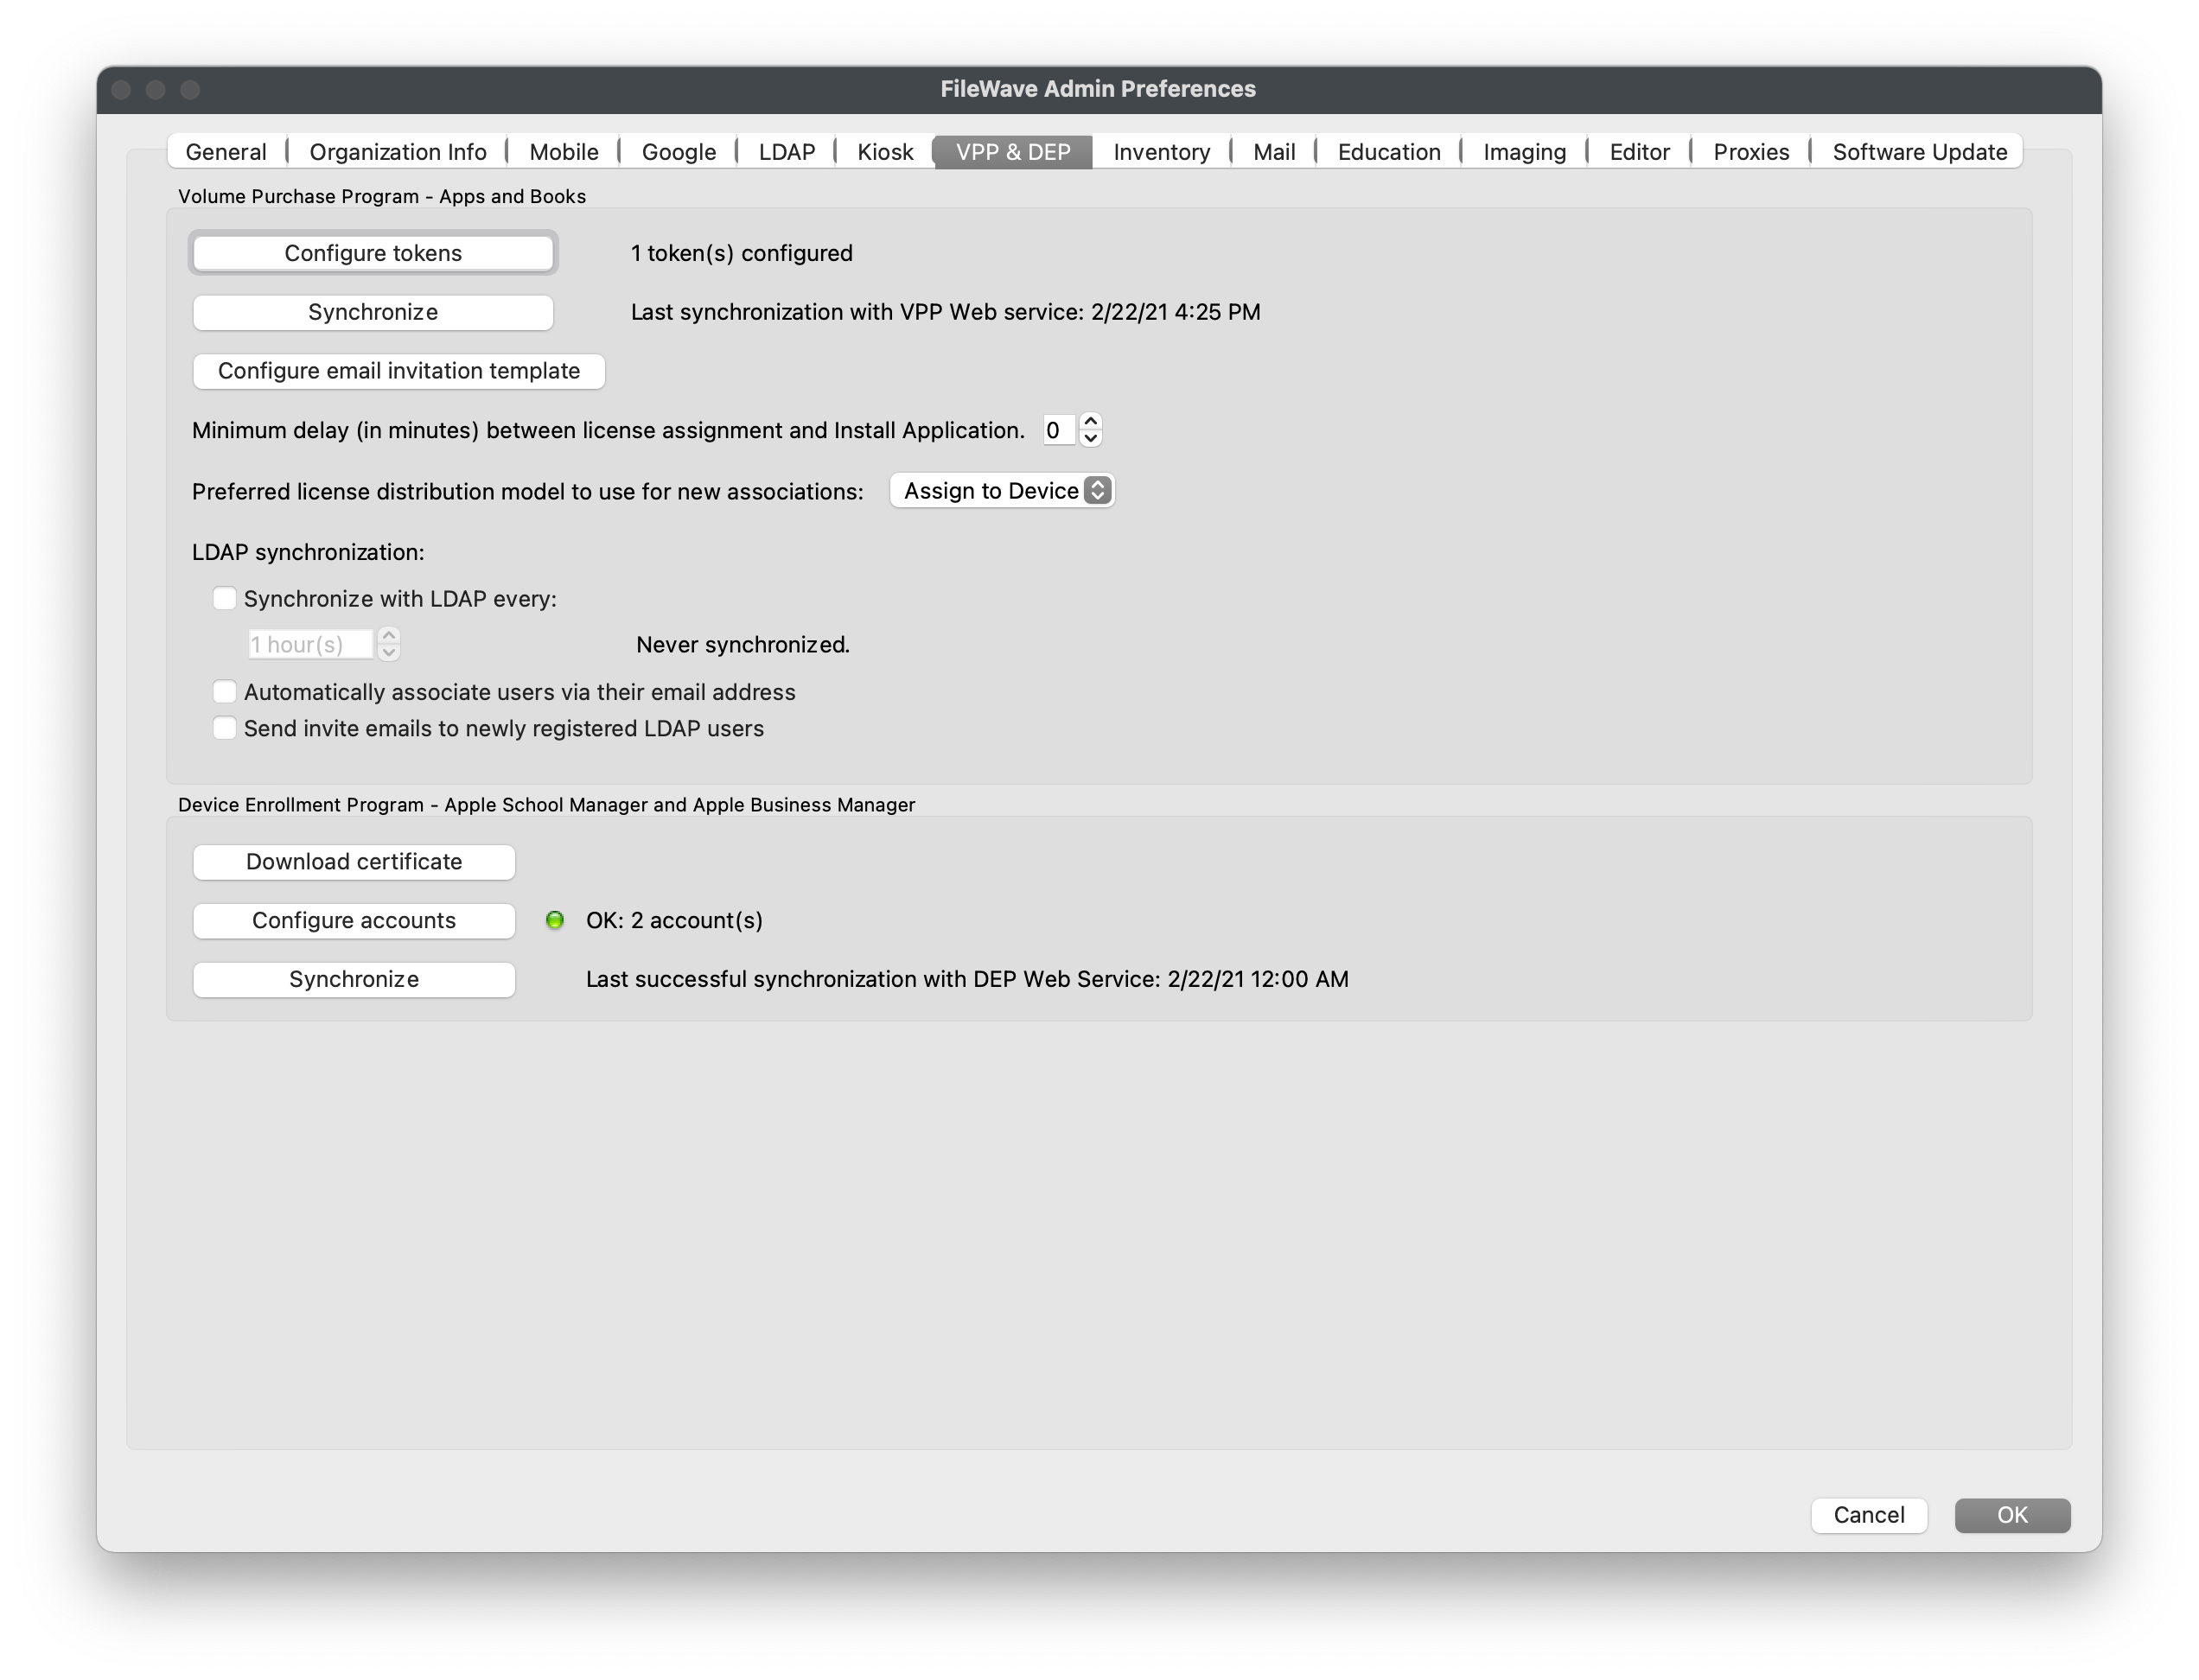
6. Navigate to *"FileWave Admin > Preferences > VPP & ADE"*, click *"Download Certificate"* from the bottom *"Device Enrollment Program"* section, and authenticate.
7. Navigate back to ASM/ABM and *"Choose File"* to select the recently downloaded *"FileWave ADE.pem".*
8. Click *"Save"*.
### **Sync Apple ADE within FileWave**
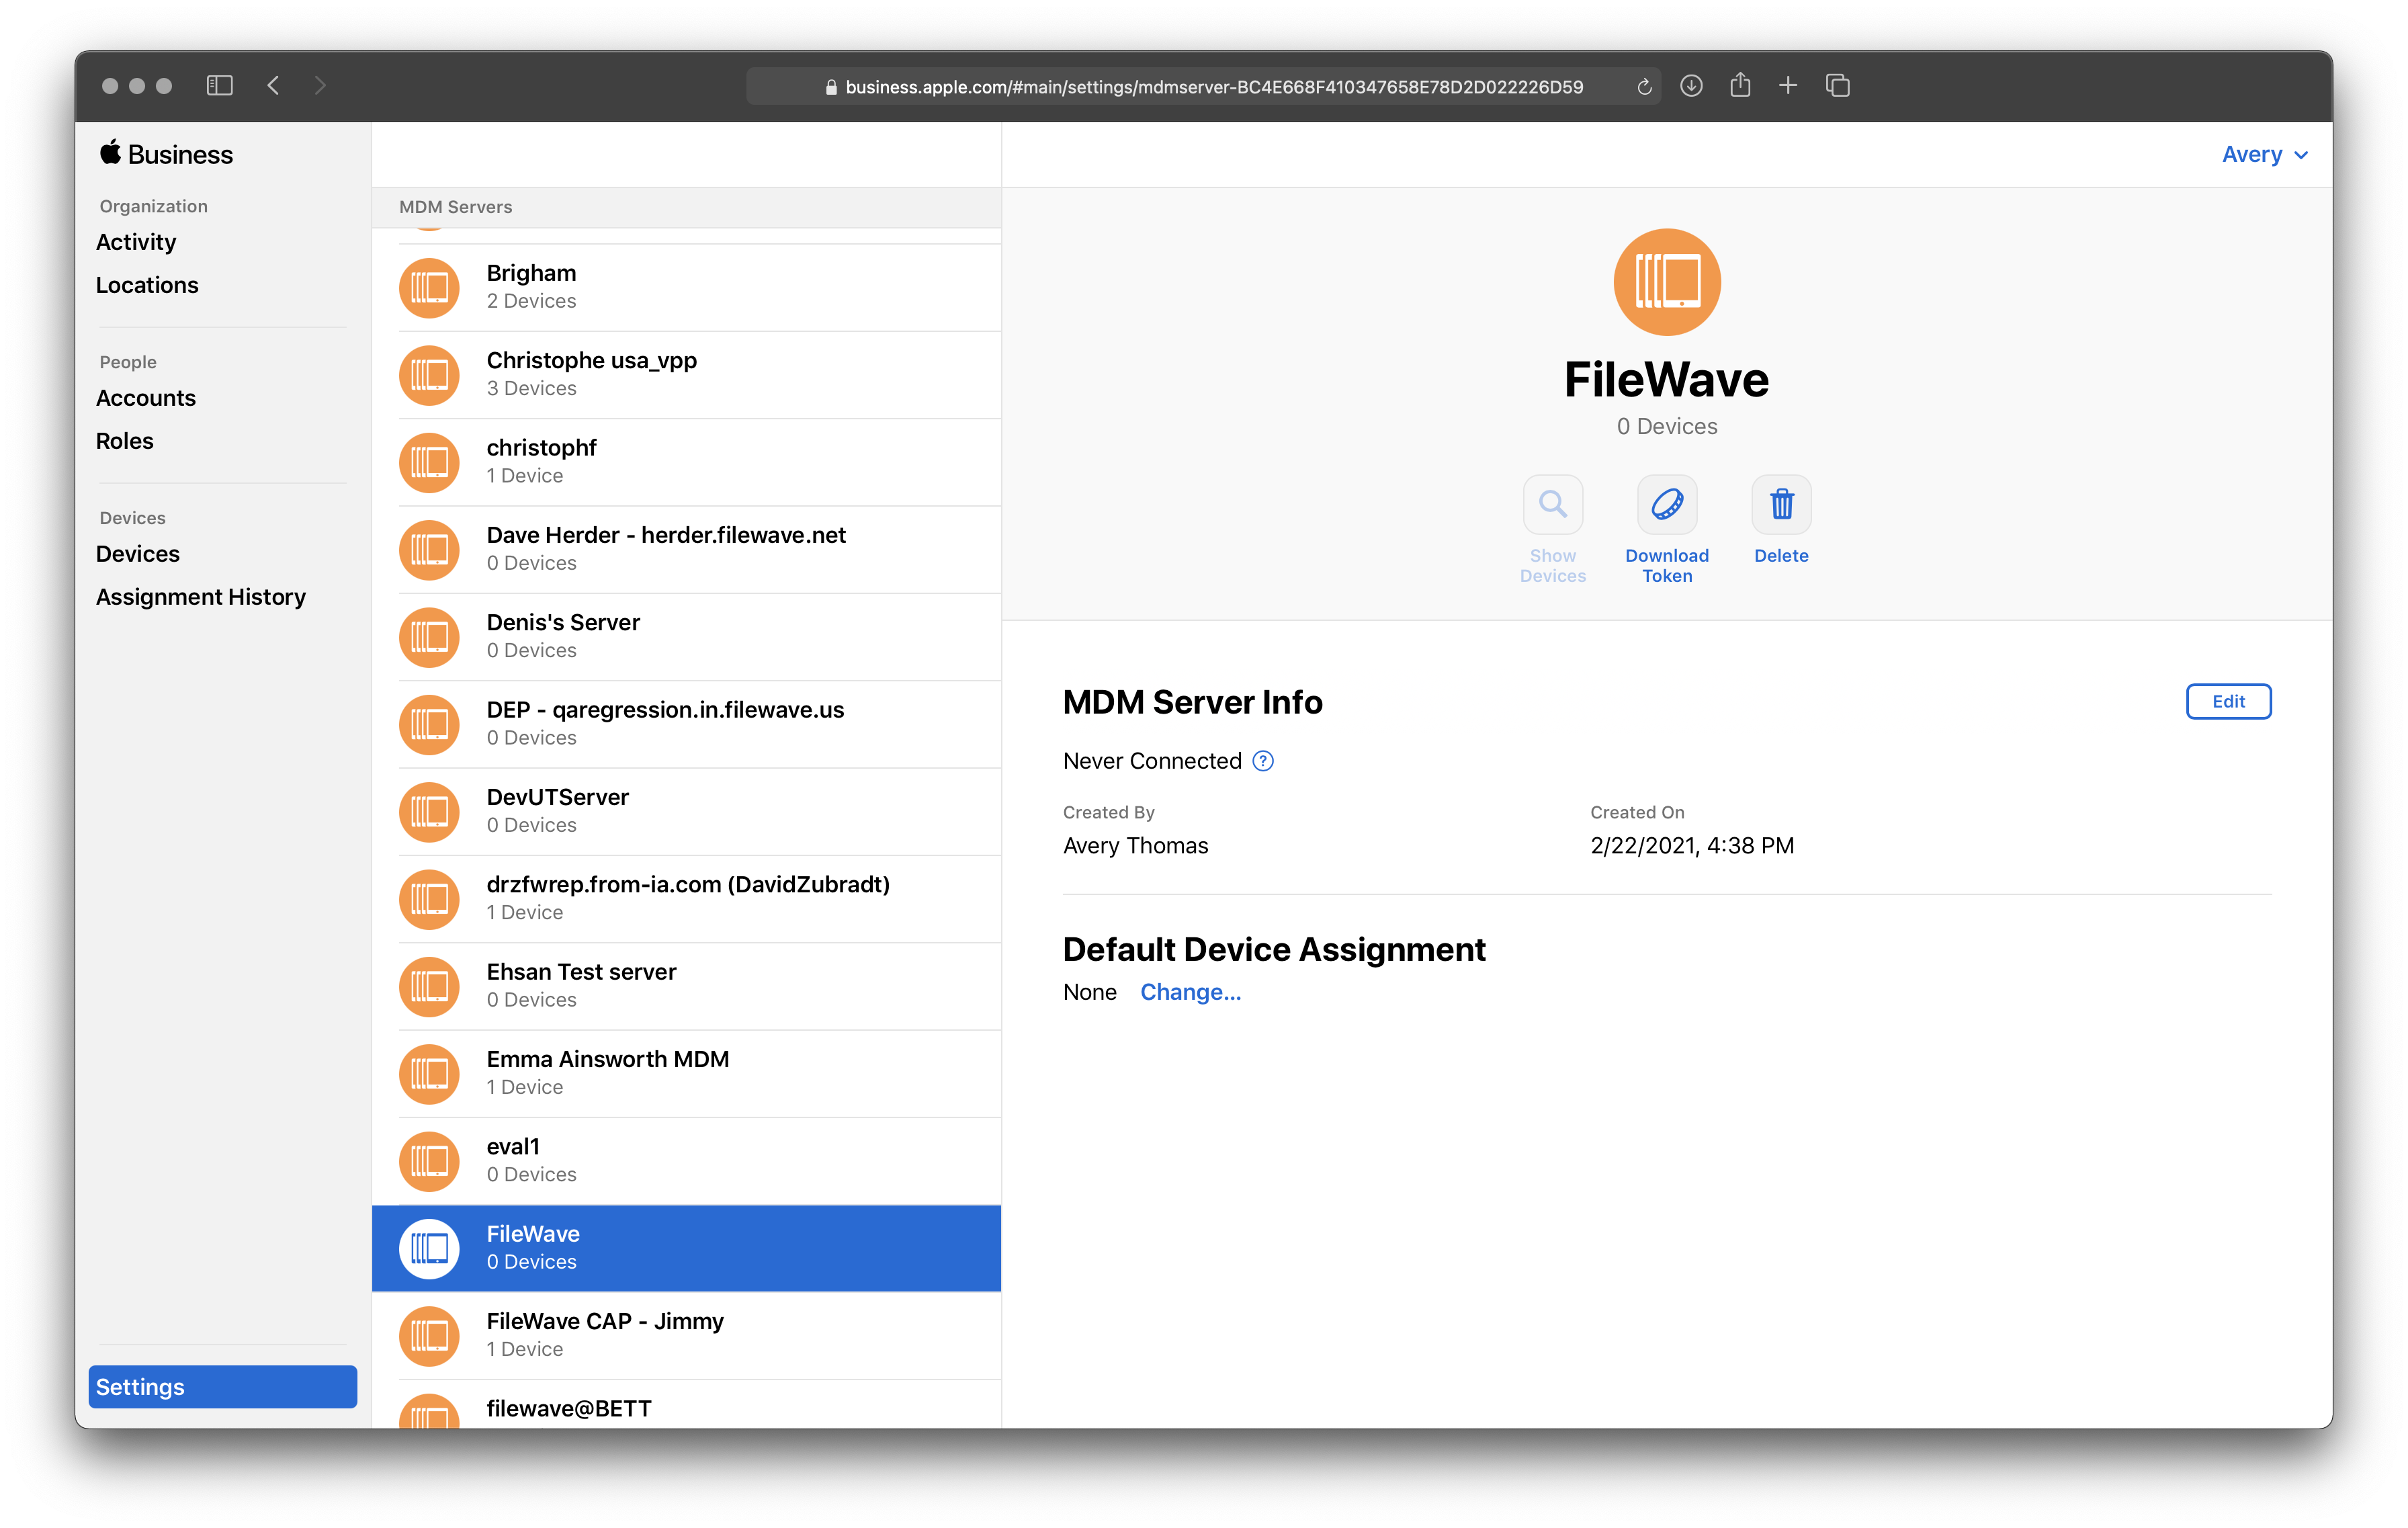
1. After creating new MDM Server, select the new server from the list.
2. Click *"Download Token"* and accept the warning message.
3. Navigate to *"FileWave Admin > Preferences > VPP & ADE"*, click *"Configure accounts"* from the bottom *"Device Enrollment Program"* section, and authenticate.
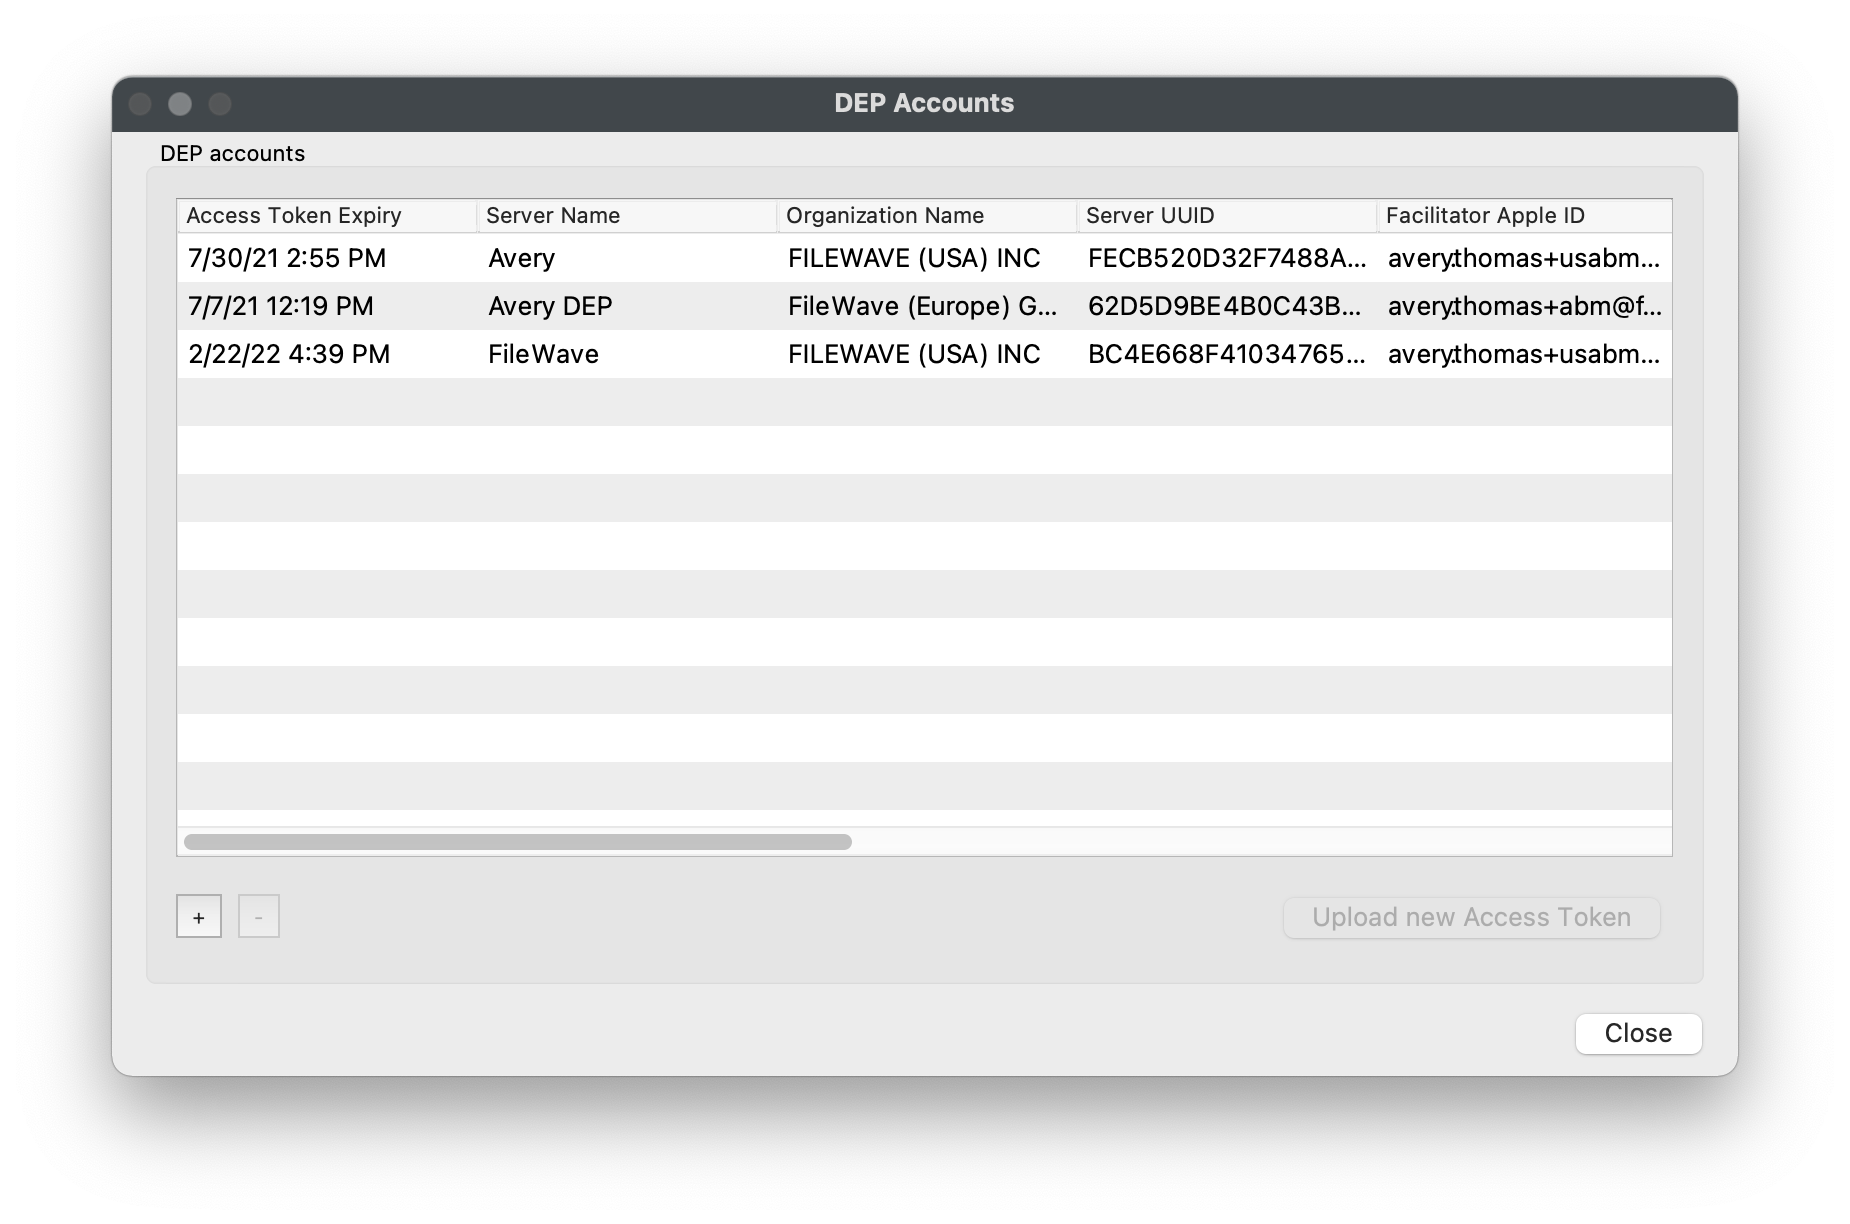
4. Click the "\[+\]" button in the lower left-hand corner and select the recently downloaded "FileWave\_Token\_XXXX-XX-XXTXX-XX-XXZ\_smime.p7m" token file.
5. If data is populated in all of the columns of the *"ADE Accounts"* window, the token import was successful.
### Assign devices from ASM/ABM to FileWave MDM Server
1. Select *"Devices"* from the left-hand pane within ASM/ABM.
2. Search for devices by Serial Number (comma separated) or use the Filter icon to choose all *"Unassigned"* devices.
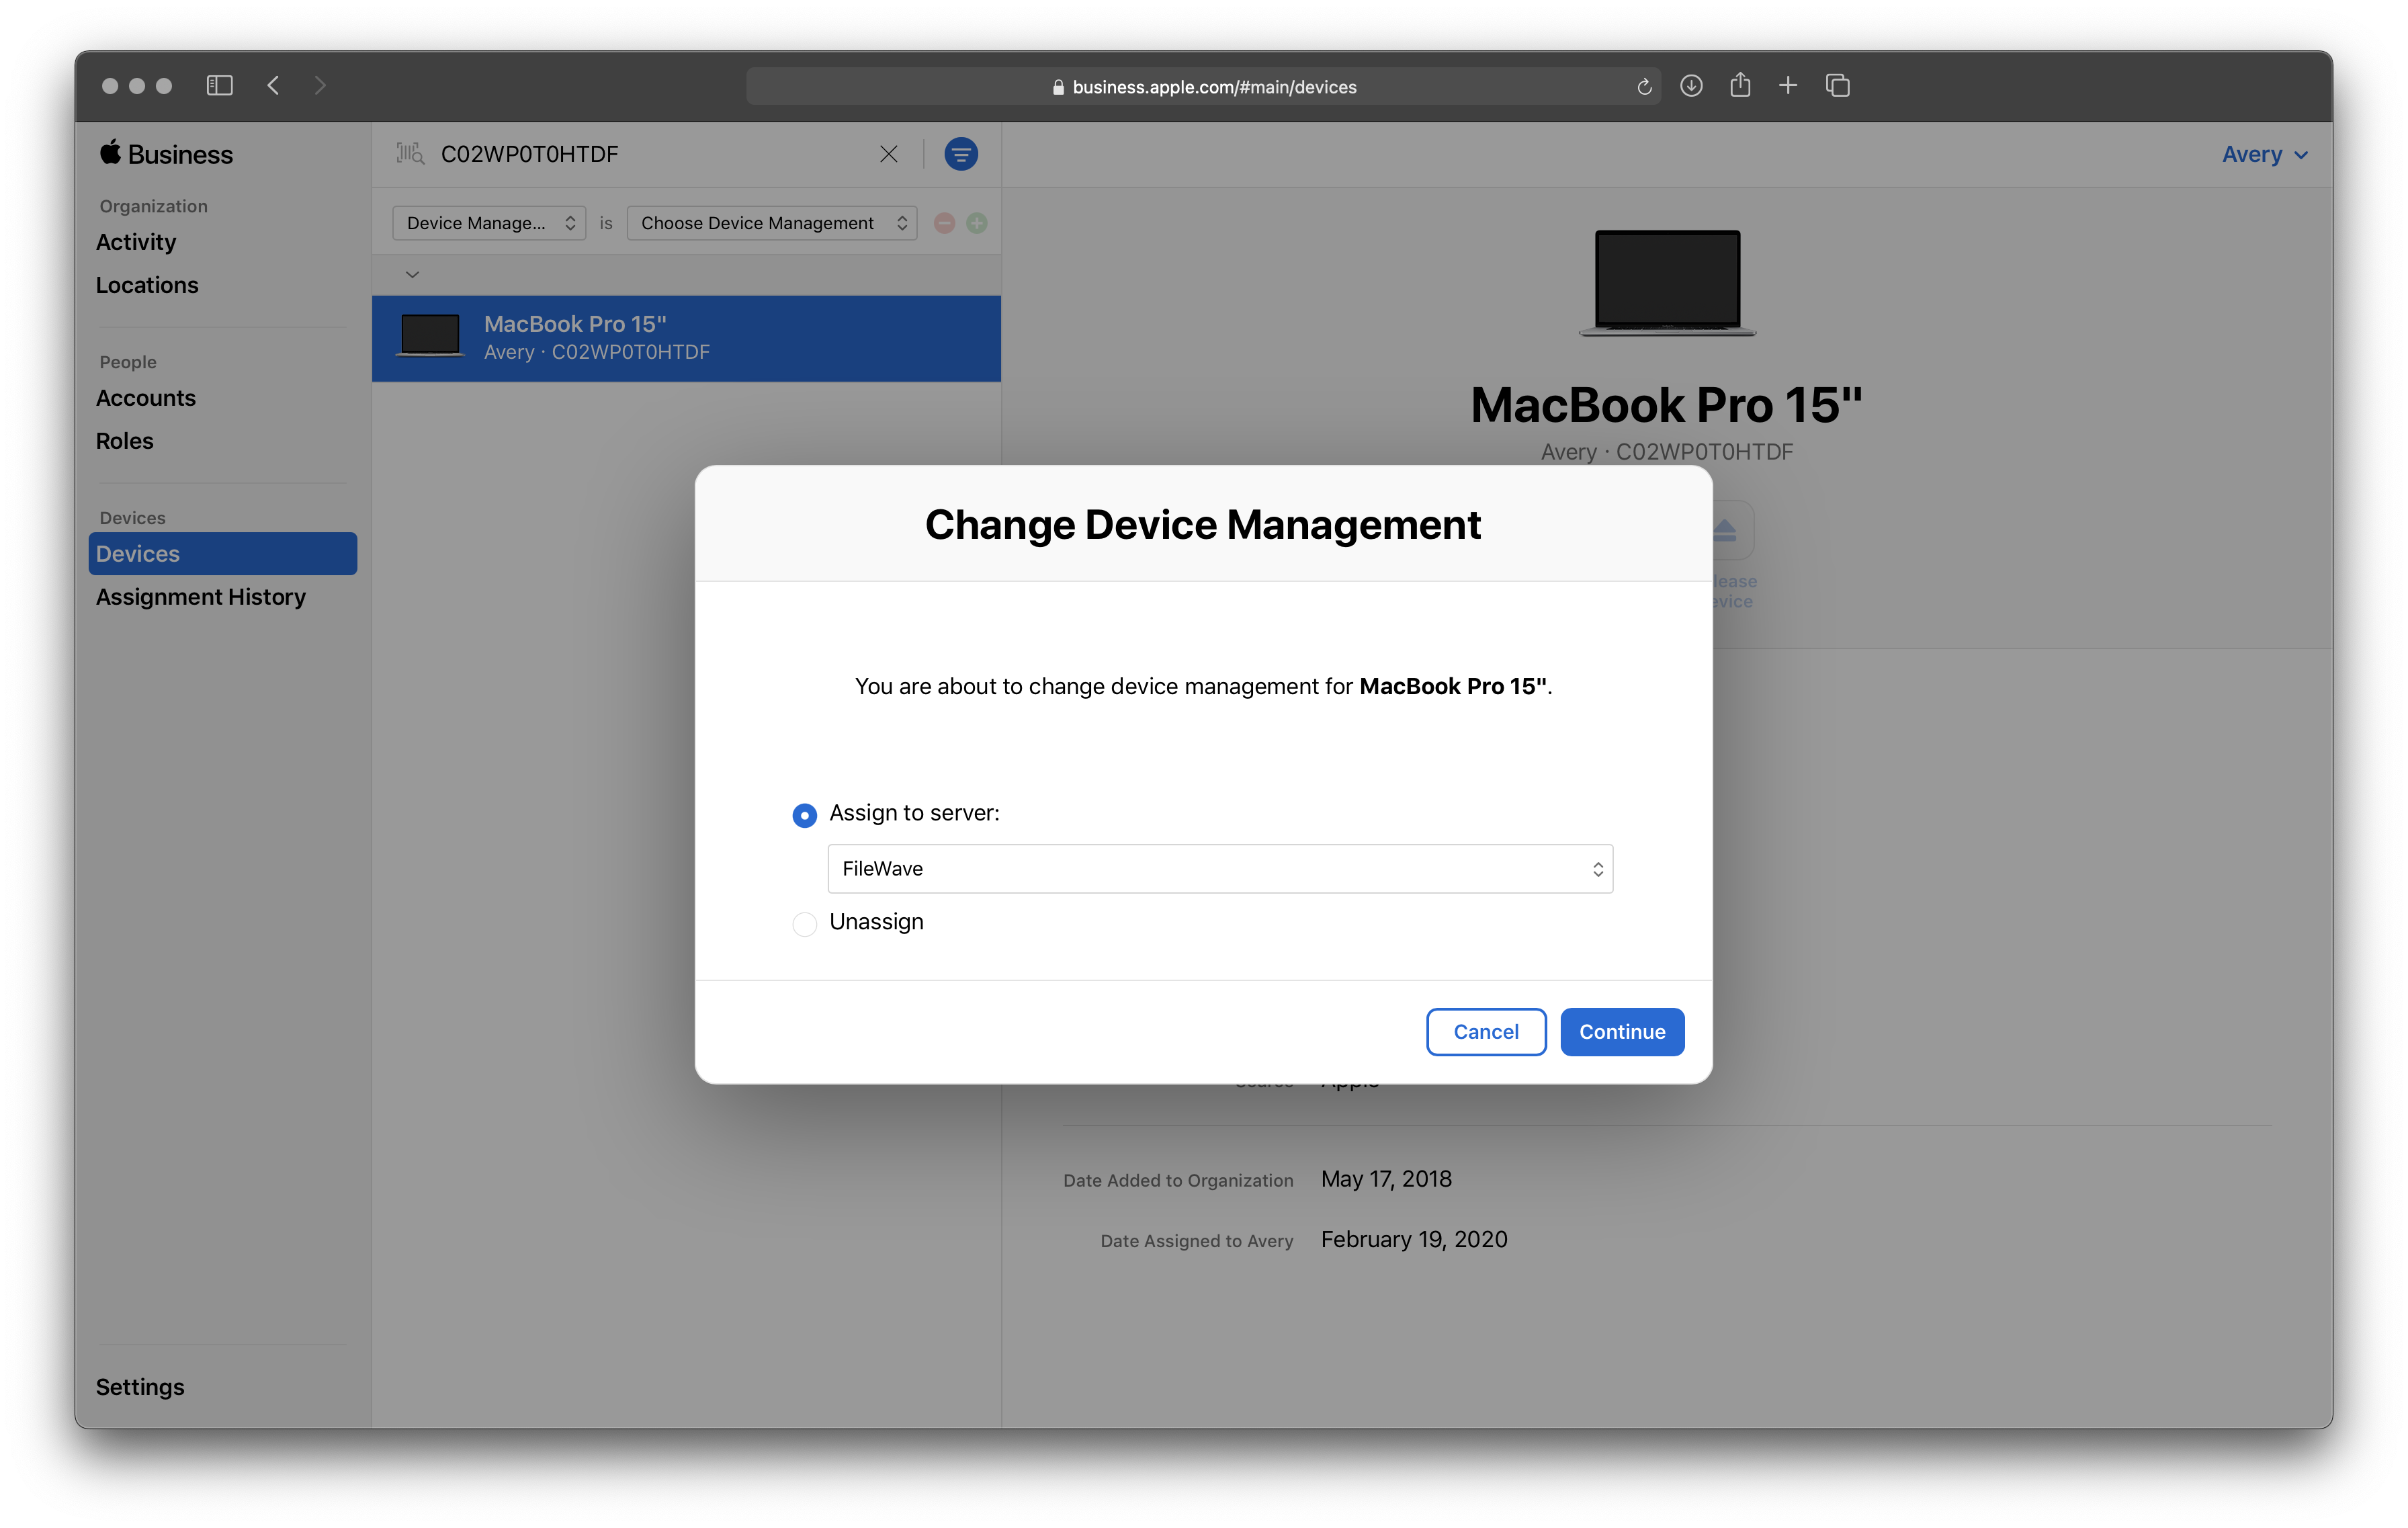
3. With the device(s) selected, click *"Edit Device Management"* and select the newly created FileWave MDM Server.
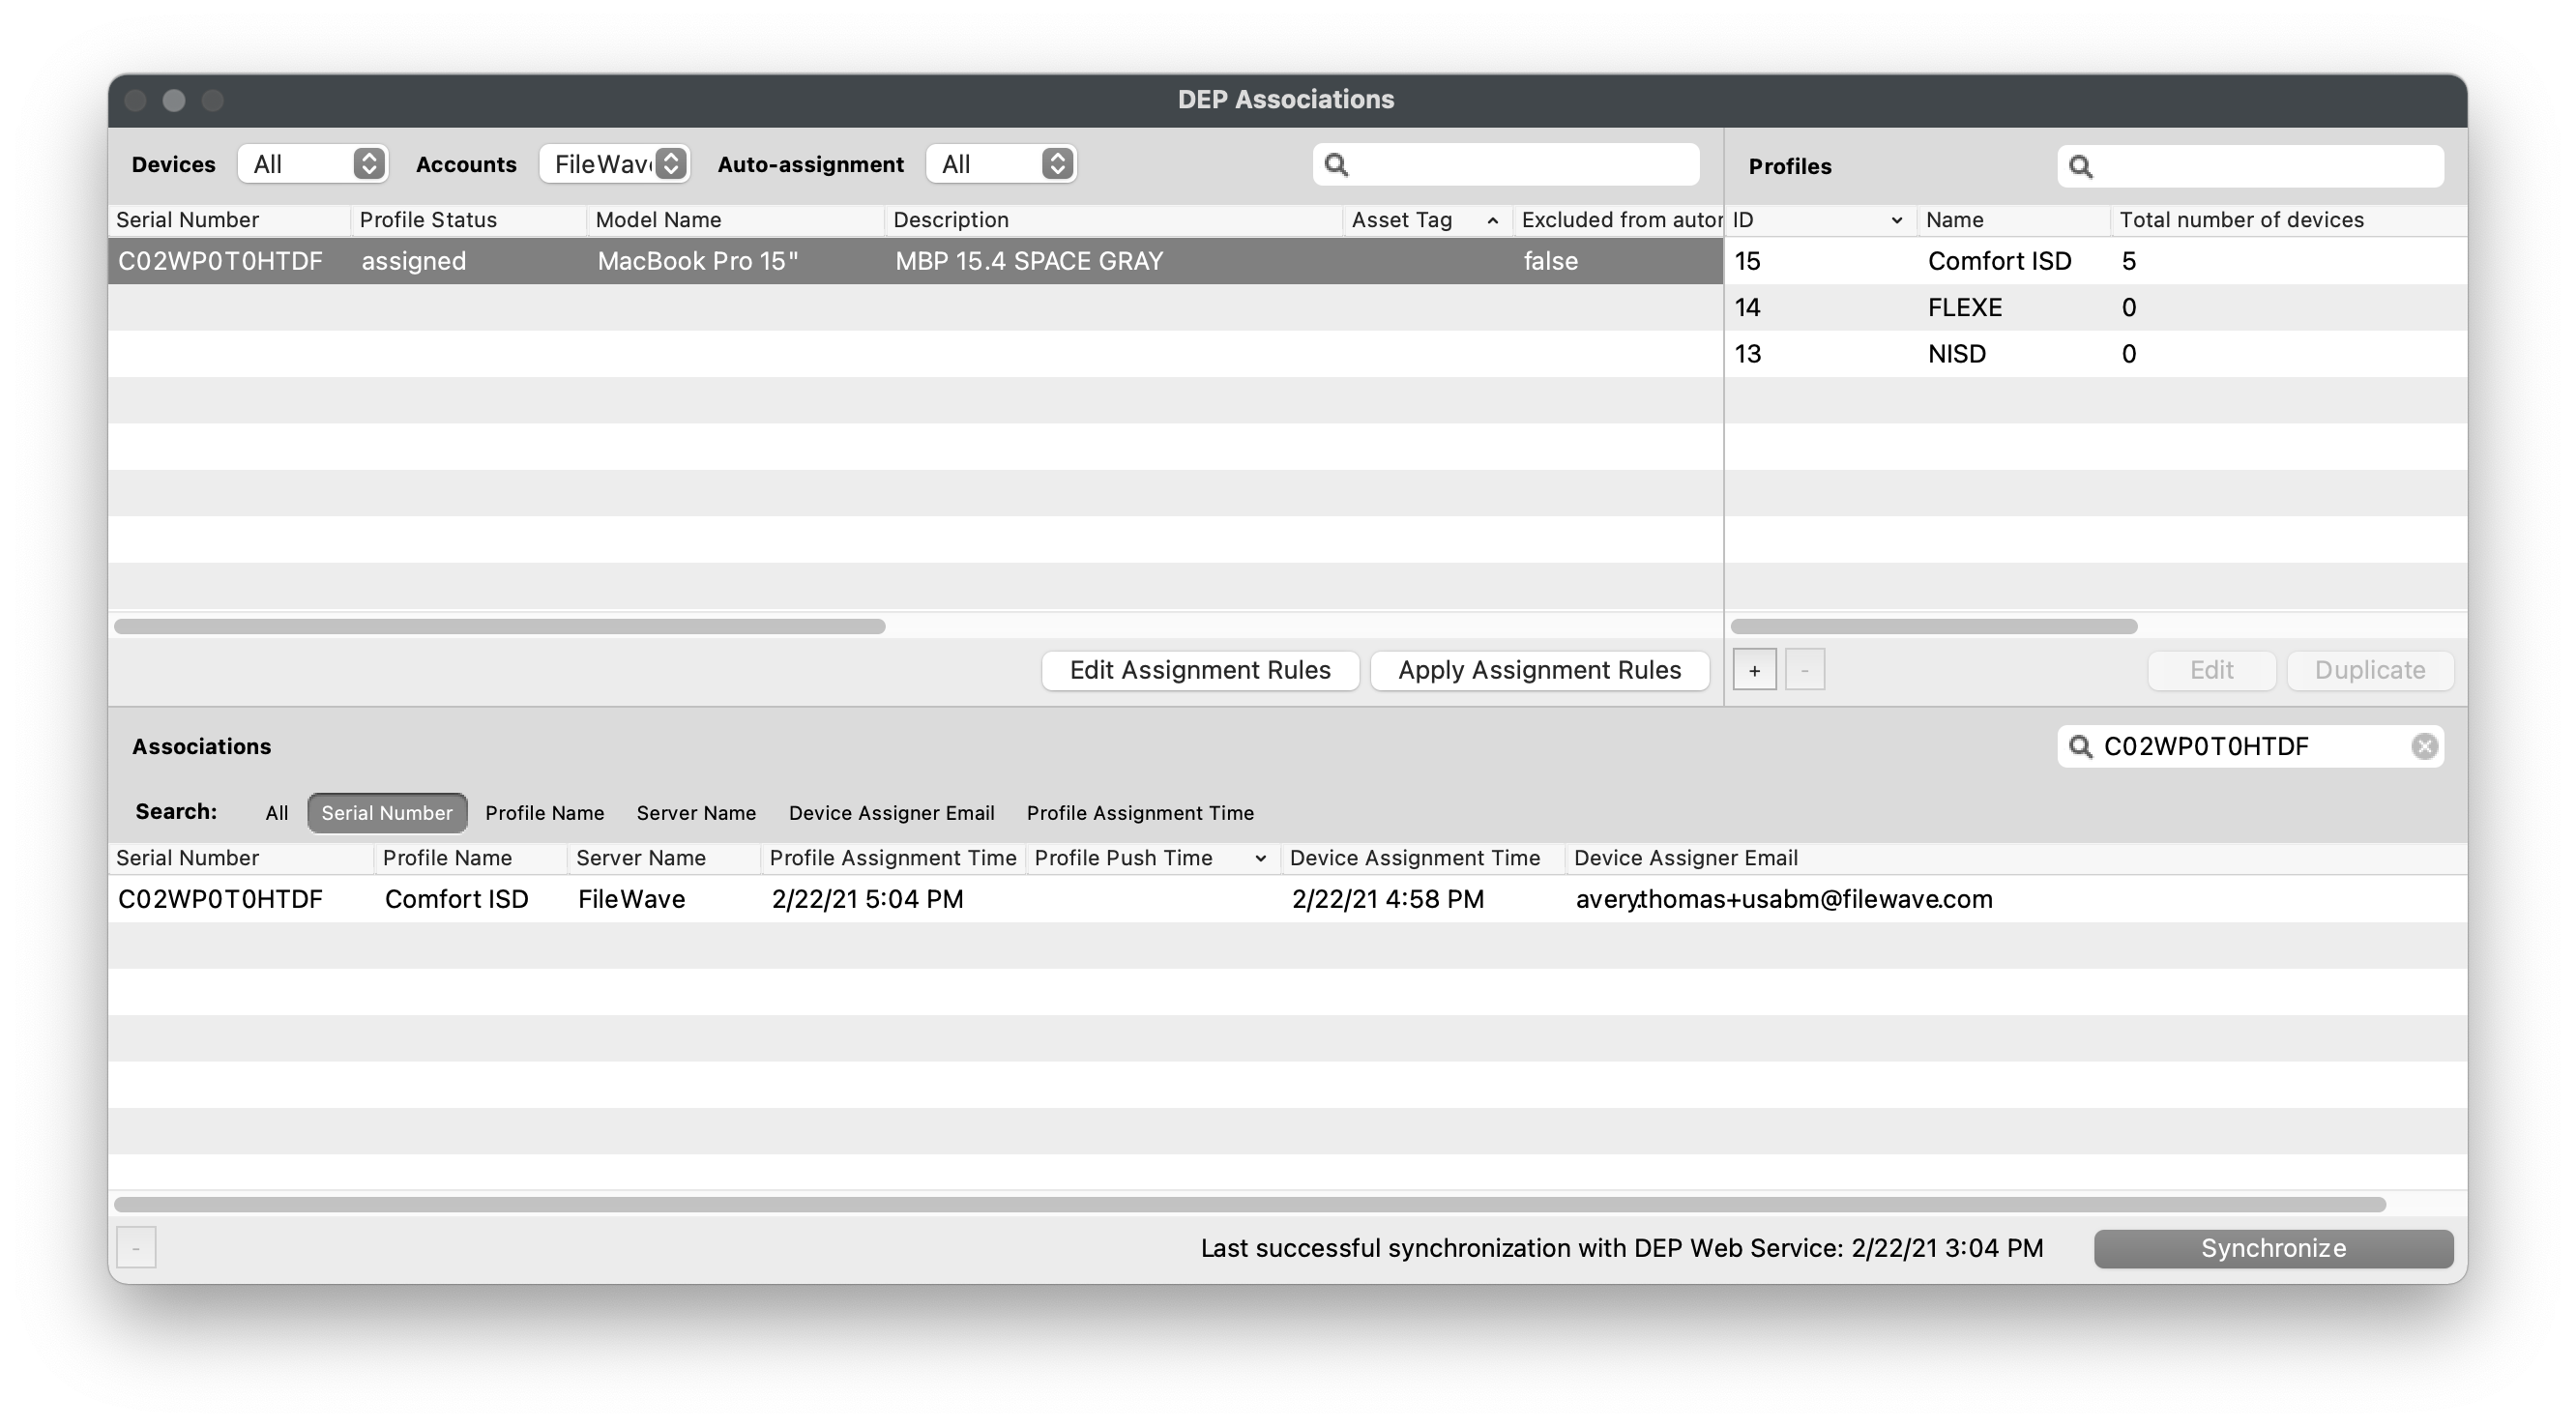
4. Navigate to *"FileWave Admin > Assistants > ADE Association Management"*
5. Hold down the Option or Alt key on your keyboard and click the *"Synchronize (full sync)"* button in the lower right-hand corner.
6. You should now see all devices assigned in Step 3 within FileWave's ADE Associations window.
### Create ADE Profile and enroll Apple Devices
- These workflows will be covered in the [ADE Enrollment](https://kb.filewave.com/books/evaluation-guide/page/apple-ade-enrollment "Apple ADE Enrollment") section.
## Apple Volume Purchase Program (VPP)
---
The Apple Volume Purchase Program (VPP) is integrated into Apple School Manager and Apple Business Manager and allows you to purchase and deploy applications from the App Store. When purchasing (free or paid) VPP licenses you will need to assign the licenses to a "Location" within ASM/ABM and each "Location" within ASM/ABM corresponds with a VPP Token. You will import each VPP Token into FileWave to sync the licenses assigned to the particular "Location".
If you are just starting out with ASM/ABM, you'll most likely just have one "Location" and therefore one VPP Token. If you are currently using a VPP Token in another MDM it is recommended to create a new "Location" for the evaluation of FileWave. This is recommended because importing a VPP Token that is used in another MDM will result in the automatic revoking of any deployed VPP licenses from that MDM. If you are not concerned with the licenses being revoked, please feel free to continue to import the existing VPP Token.
This section will not cover creating a new "Location" in ASM/ABM but more information can be found [here](https://support.apple.com/en-am/guide/apple-school-manager/tesfdbe2cb0d/web) from Apple School Manager User Guide or found [here](https://support.apple.com/en-am/guide/apple-business-manager/tesfdbe2cb0d/web) from Apple Business Manager User Guide.
### Download VPP Token from ASM/ABM
1. Log into [Apple School Manager](https://school.apple.com) (ASM) or [Apple Business Manager](https://business.apple.com) (ABM) using your organization's Administrator account.
2. Navigate to *"Preferences"* in the lower left-hand corner.
3. Select *"Payments and Billing"* from the middle pane.
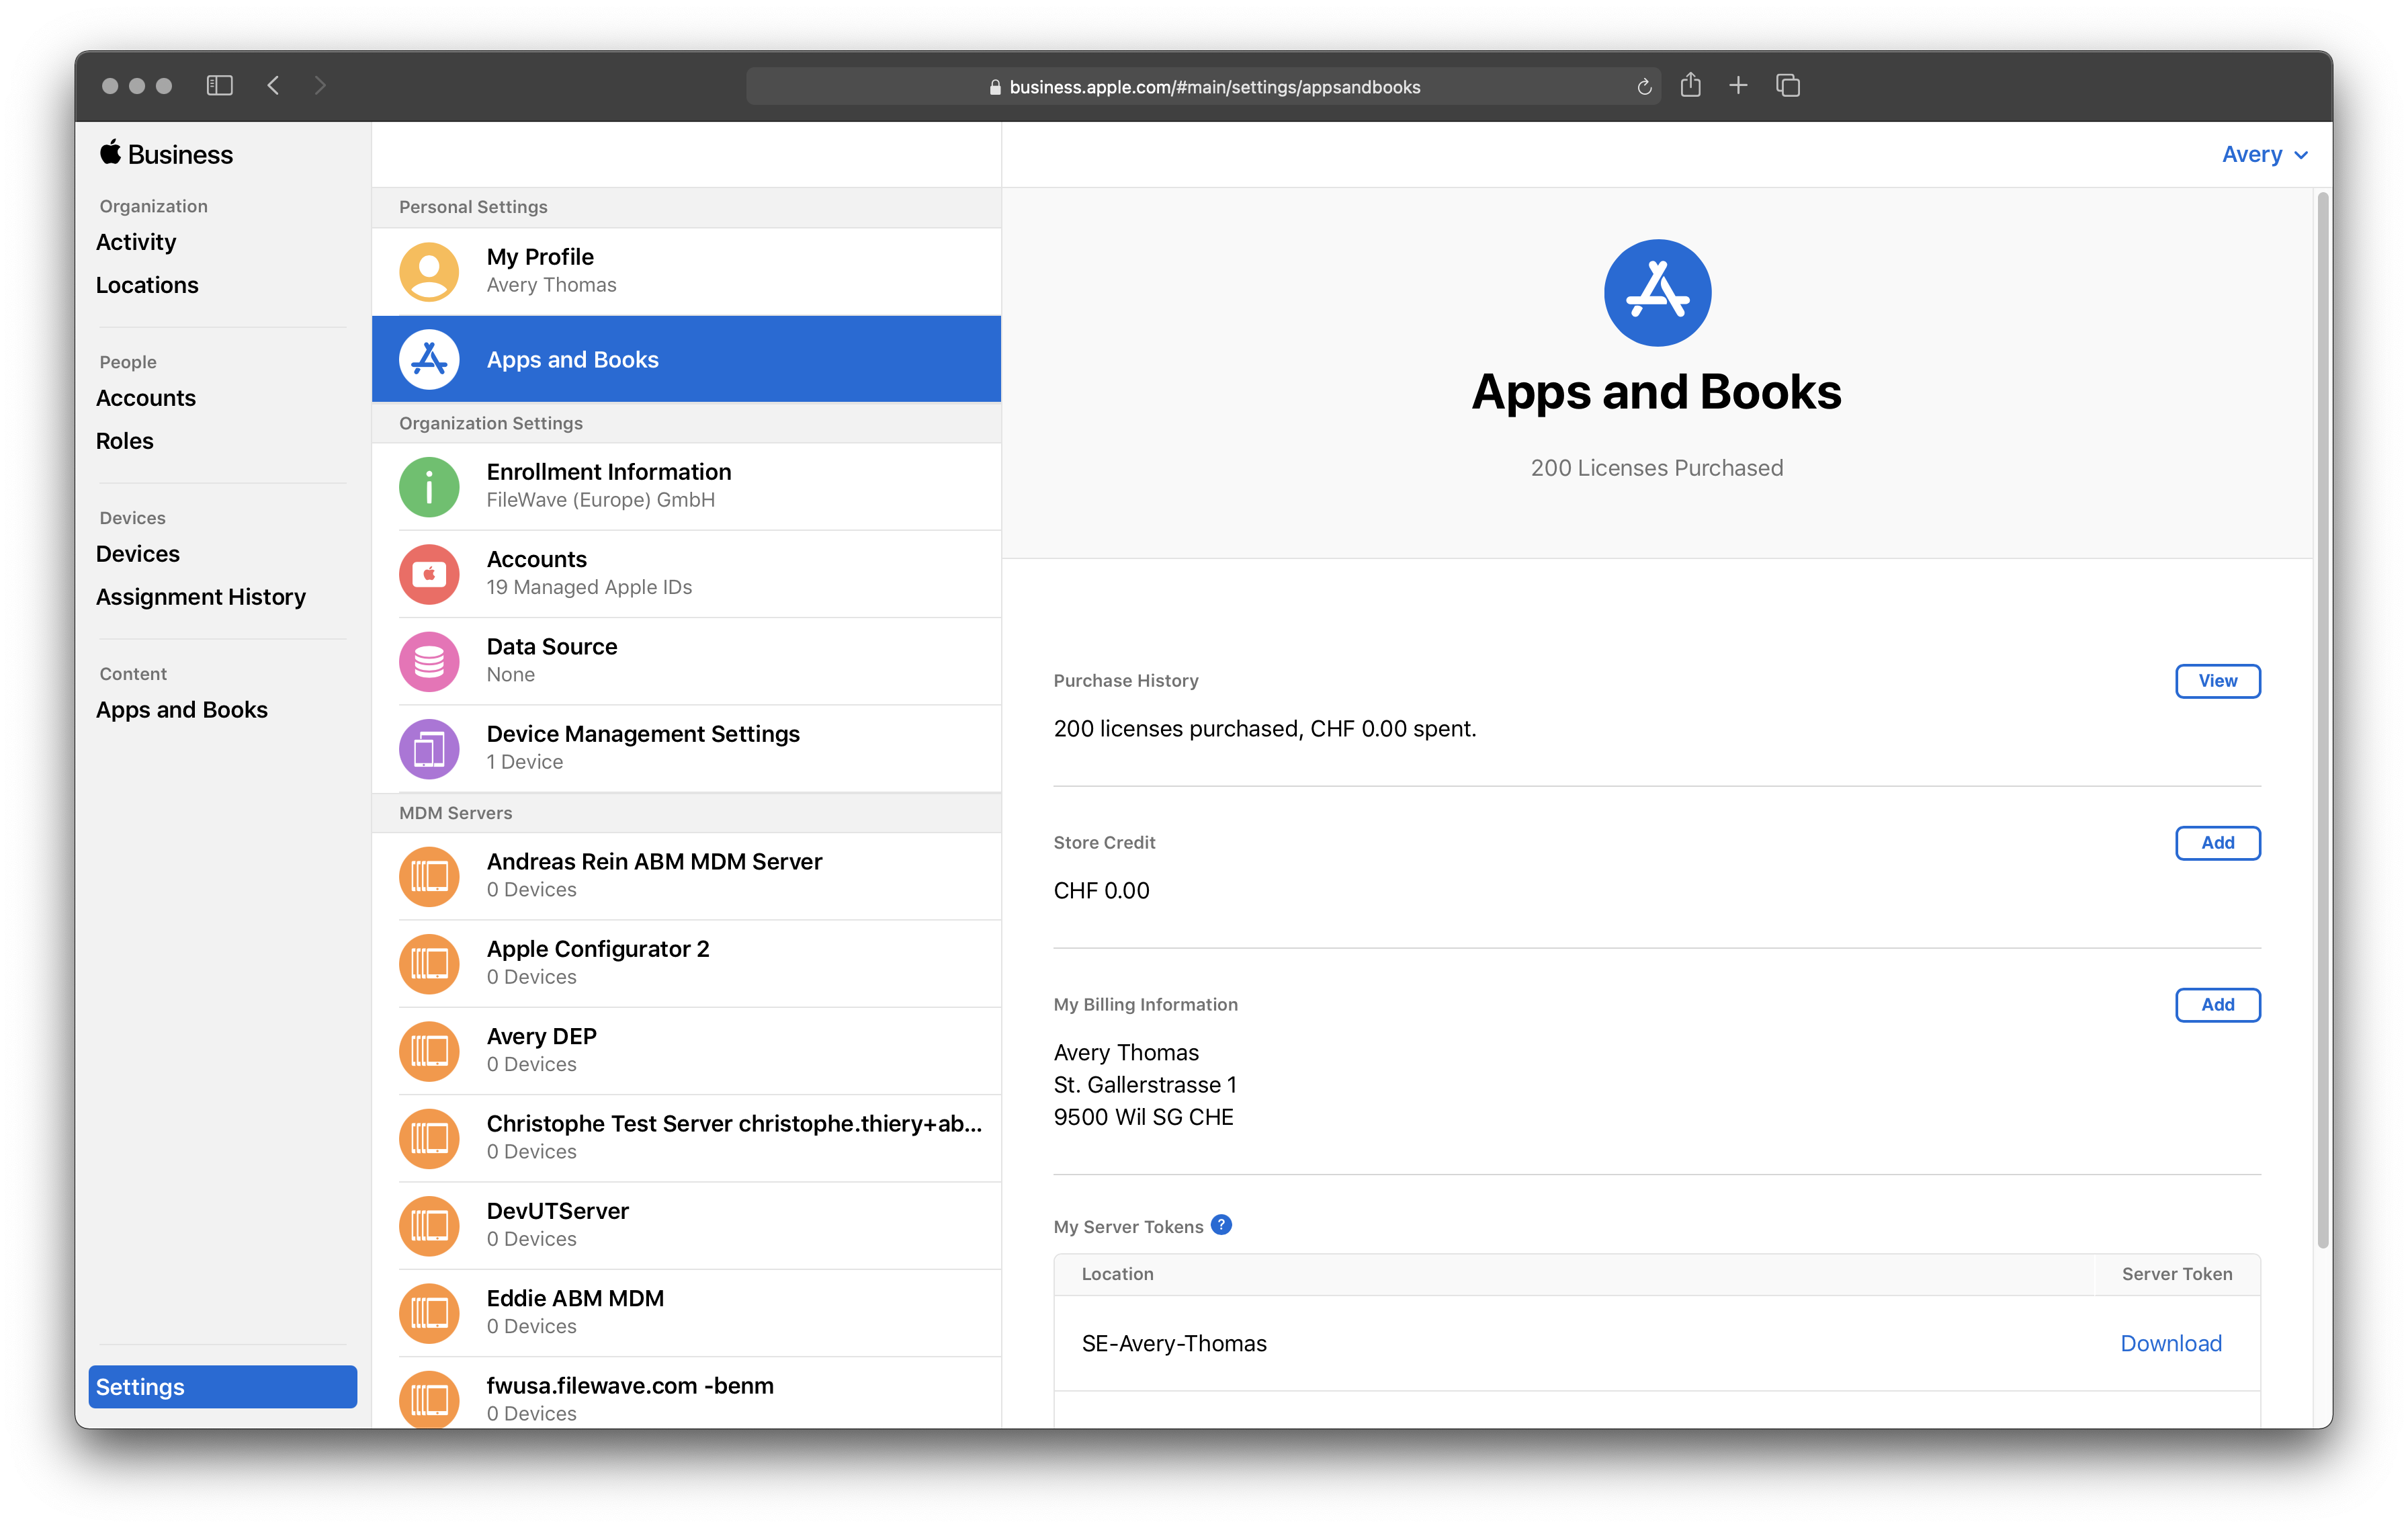
4. Find the desired *"Location"* name from the *"My Server Tokens"* section.
5. Click *"Download"*.
### Import VPP Token into FileWave Admin
1. Navigate to *"FileWave Admin > Preferences > VPP & ADE",* click *"Configure tokens"* from the top *"Volume Purchase Program"* section, and authenticate.
2. Click the "\[+\]" button and name the Token. This name is only used to distinguish the VPP Tokens within FileWave.
3. Optionally, fill out the *"Department"*, *"Owner"*, and *"Owner Email"* fields.
4. Click *"Import"* button and select the recently download VPP Token *"sToken\_for\_XXXX.vpptoken"*.
5. The VPP Token should now be visible in the *"Edit Apps and Books server tokens"* window and ready for use.
### VPP Token Permission
If you do not see the added VPP Token this is because your FileWave Admin account has not been granted permission to the VPP Token. Please consult the *"*[*Allow new users to access existing VPP Tokens*](https://kb.filewave.com/books/evaluation-guide/page/filewave-central-preferences "FileWave Central Preferences")*"* section to grant permission to the VPP Token.
If you receive a message about the VPP Token being owned by another VPP tool, please inform your FileWave SE and they can assist in taking ownership of the VPP Token. Taking ownership of the VPP Token will result in the revoking of any previously deployed VPP licenses from another MDM so please proceed with caution. If you want to avoid licenses being revoked, please create a new "Location" within ASM/ABM and purchase new license or assign existing license to the new "Location".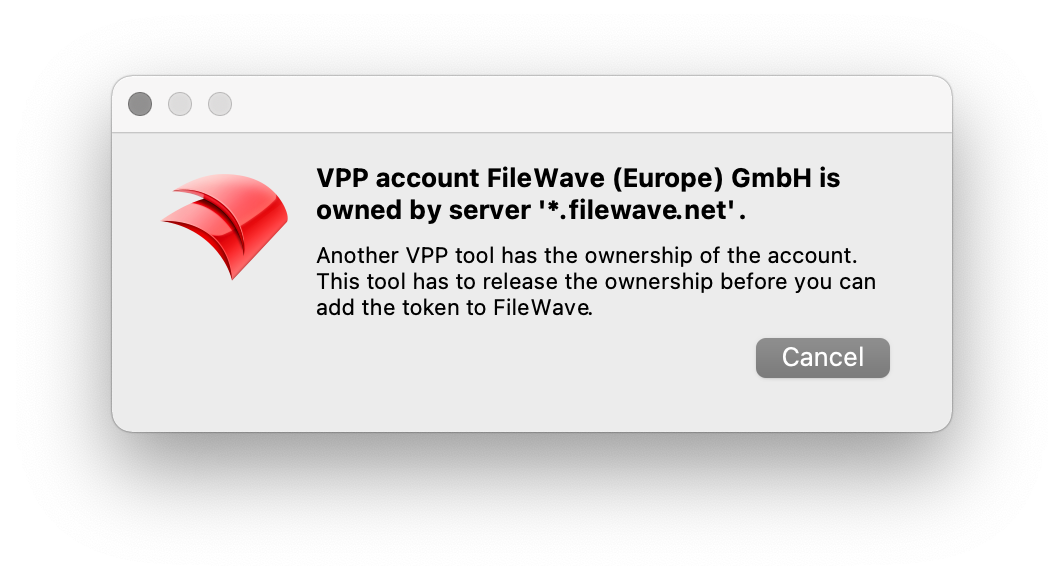
## Purchase VPP Licenses from ASM/ABM
---
Please consult [Apple School Manager User Guide](https://support.apple.com/en-am/guide/apple-school-manager/asmc21817890/web) or [Apple Business Manager User Guide](https://support.apple.com/hr-hr/guide/apple-business-manager/asmc21817890/web) for more in-depth information regarding purchasing Apps and Books.
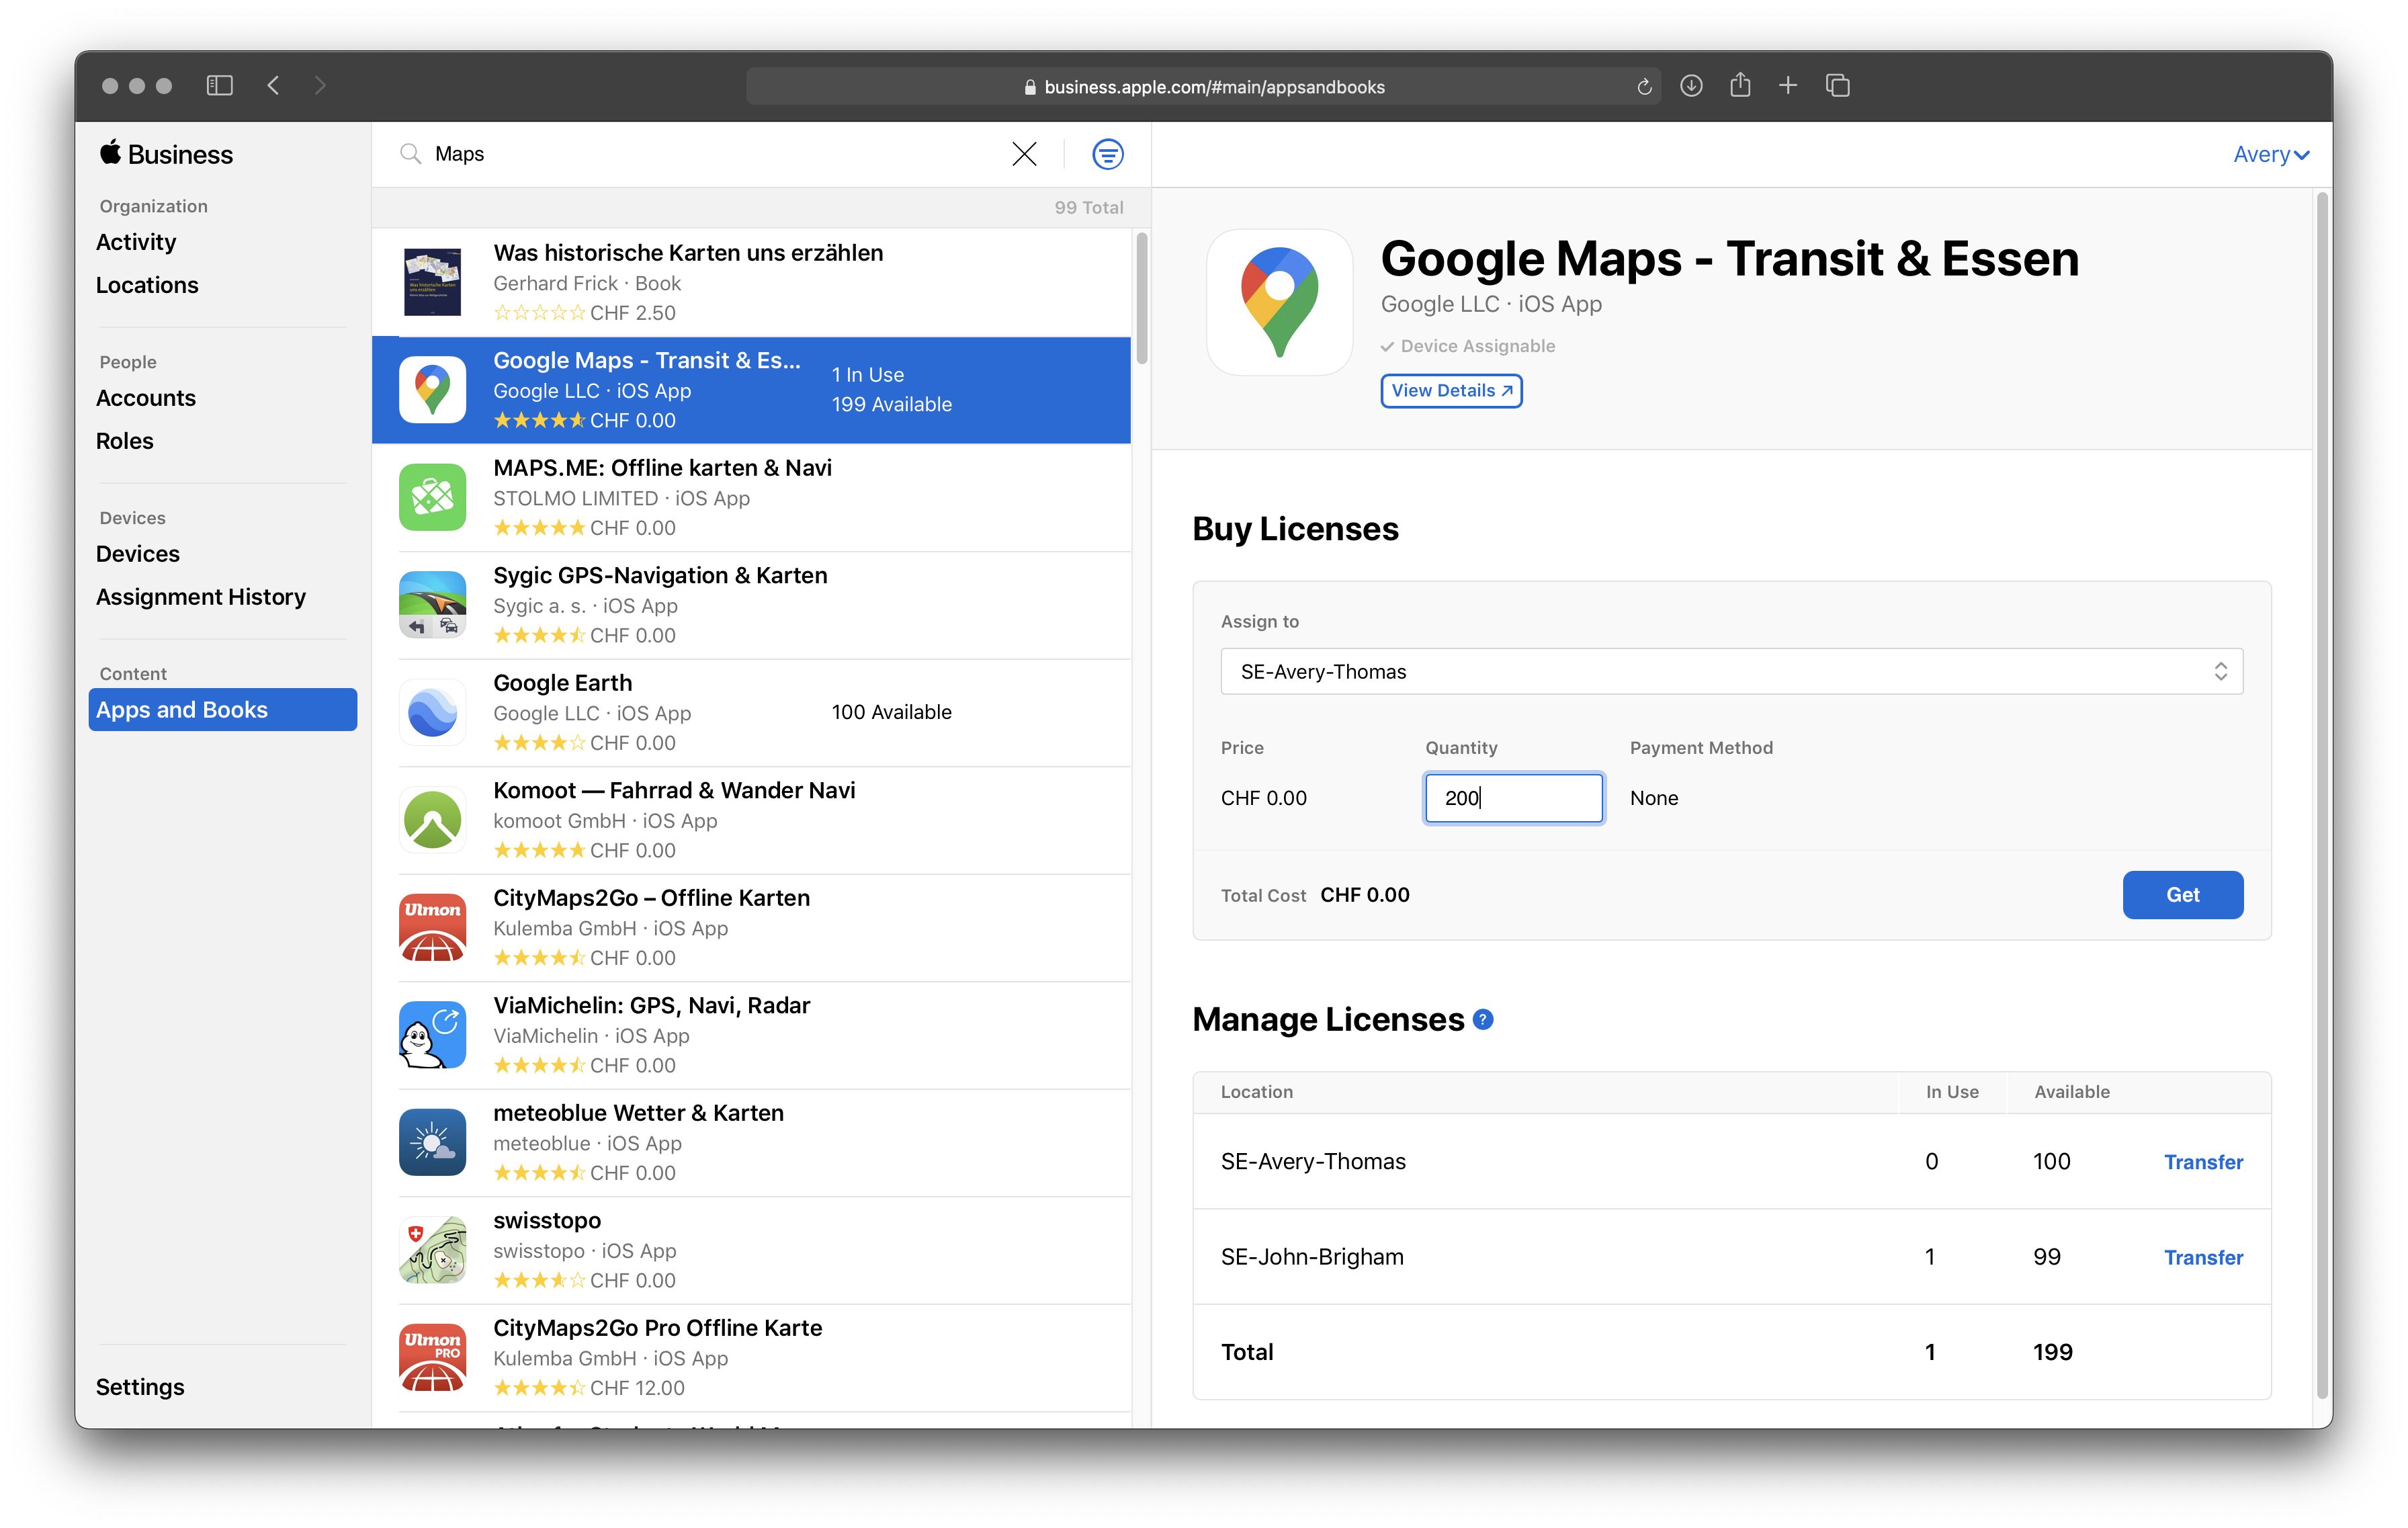
1. Log into [Apple School Manager](https://school.apple.com) (ASM) or [Apple Business Manager](https://business.apple.com) (ABM) using your organization's Administrator or Content Manager account.
2. Select *"Apps and Books"* from the left pane.
3. Search for the application name you wish to purchase and verify its intended platform (iOS App vs. macOS App).
4. Select the desired "Location" from the *"Assign to"* drop-down menu.
5. Specify the quantity of licenses you'd like to purchase.
1. Please enter a reasonable amount of licenses to cover your future device population but not too many (100,000+) as it may slow down the VPP sync process.
6. Click *"Get"* button to complete your purchase.
7. Licenses will usually be available within 5 minutes of purchase and you will be emailed by Apple when your licenses are available.
## Sync VPP Licenses into FileWave
---
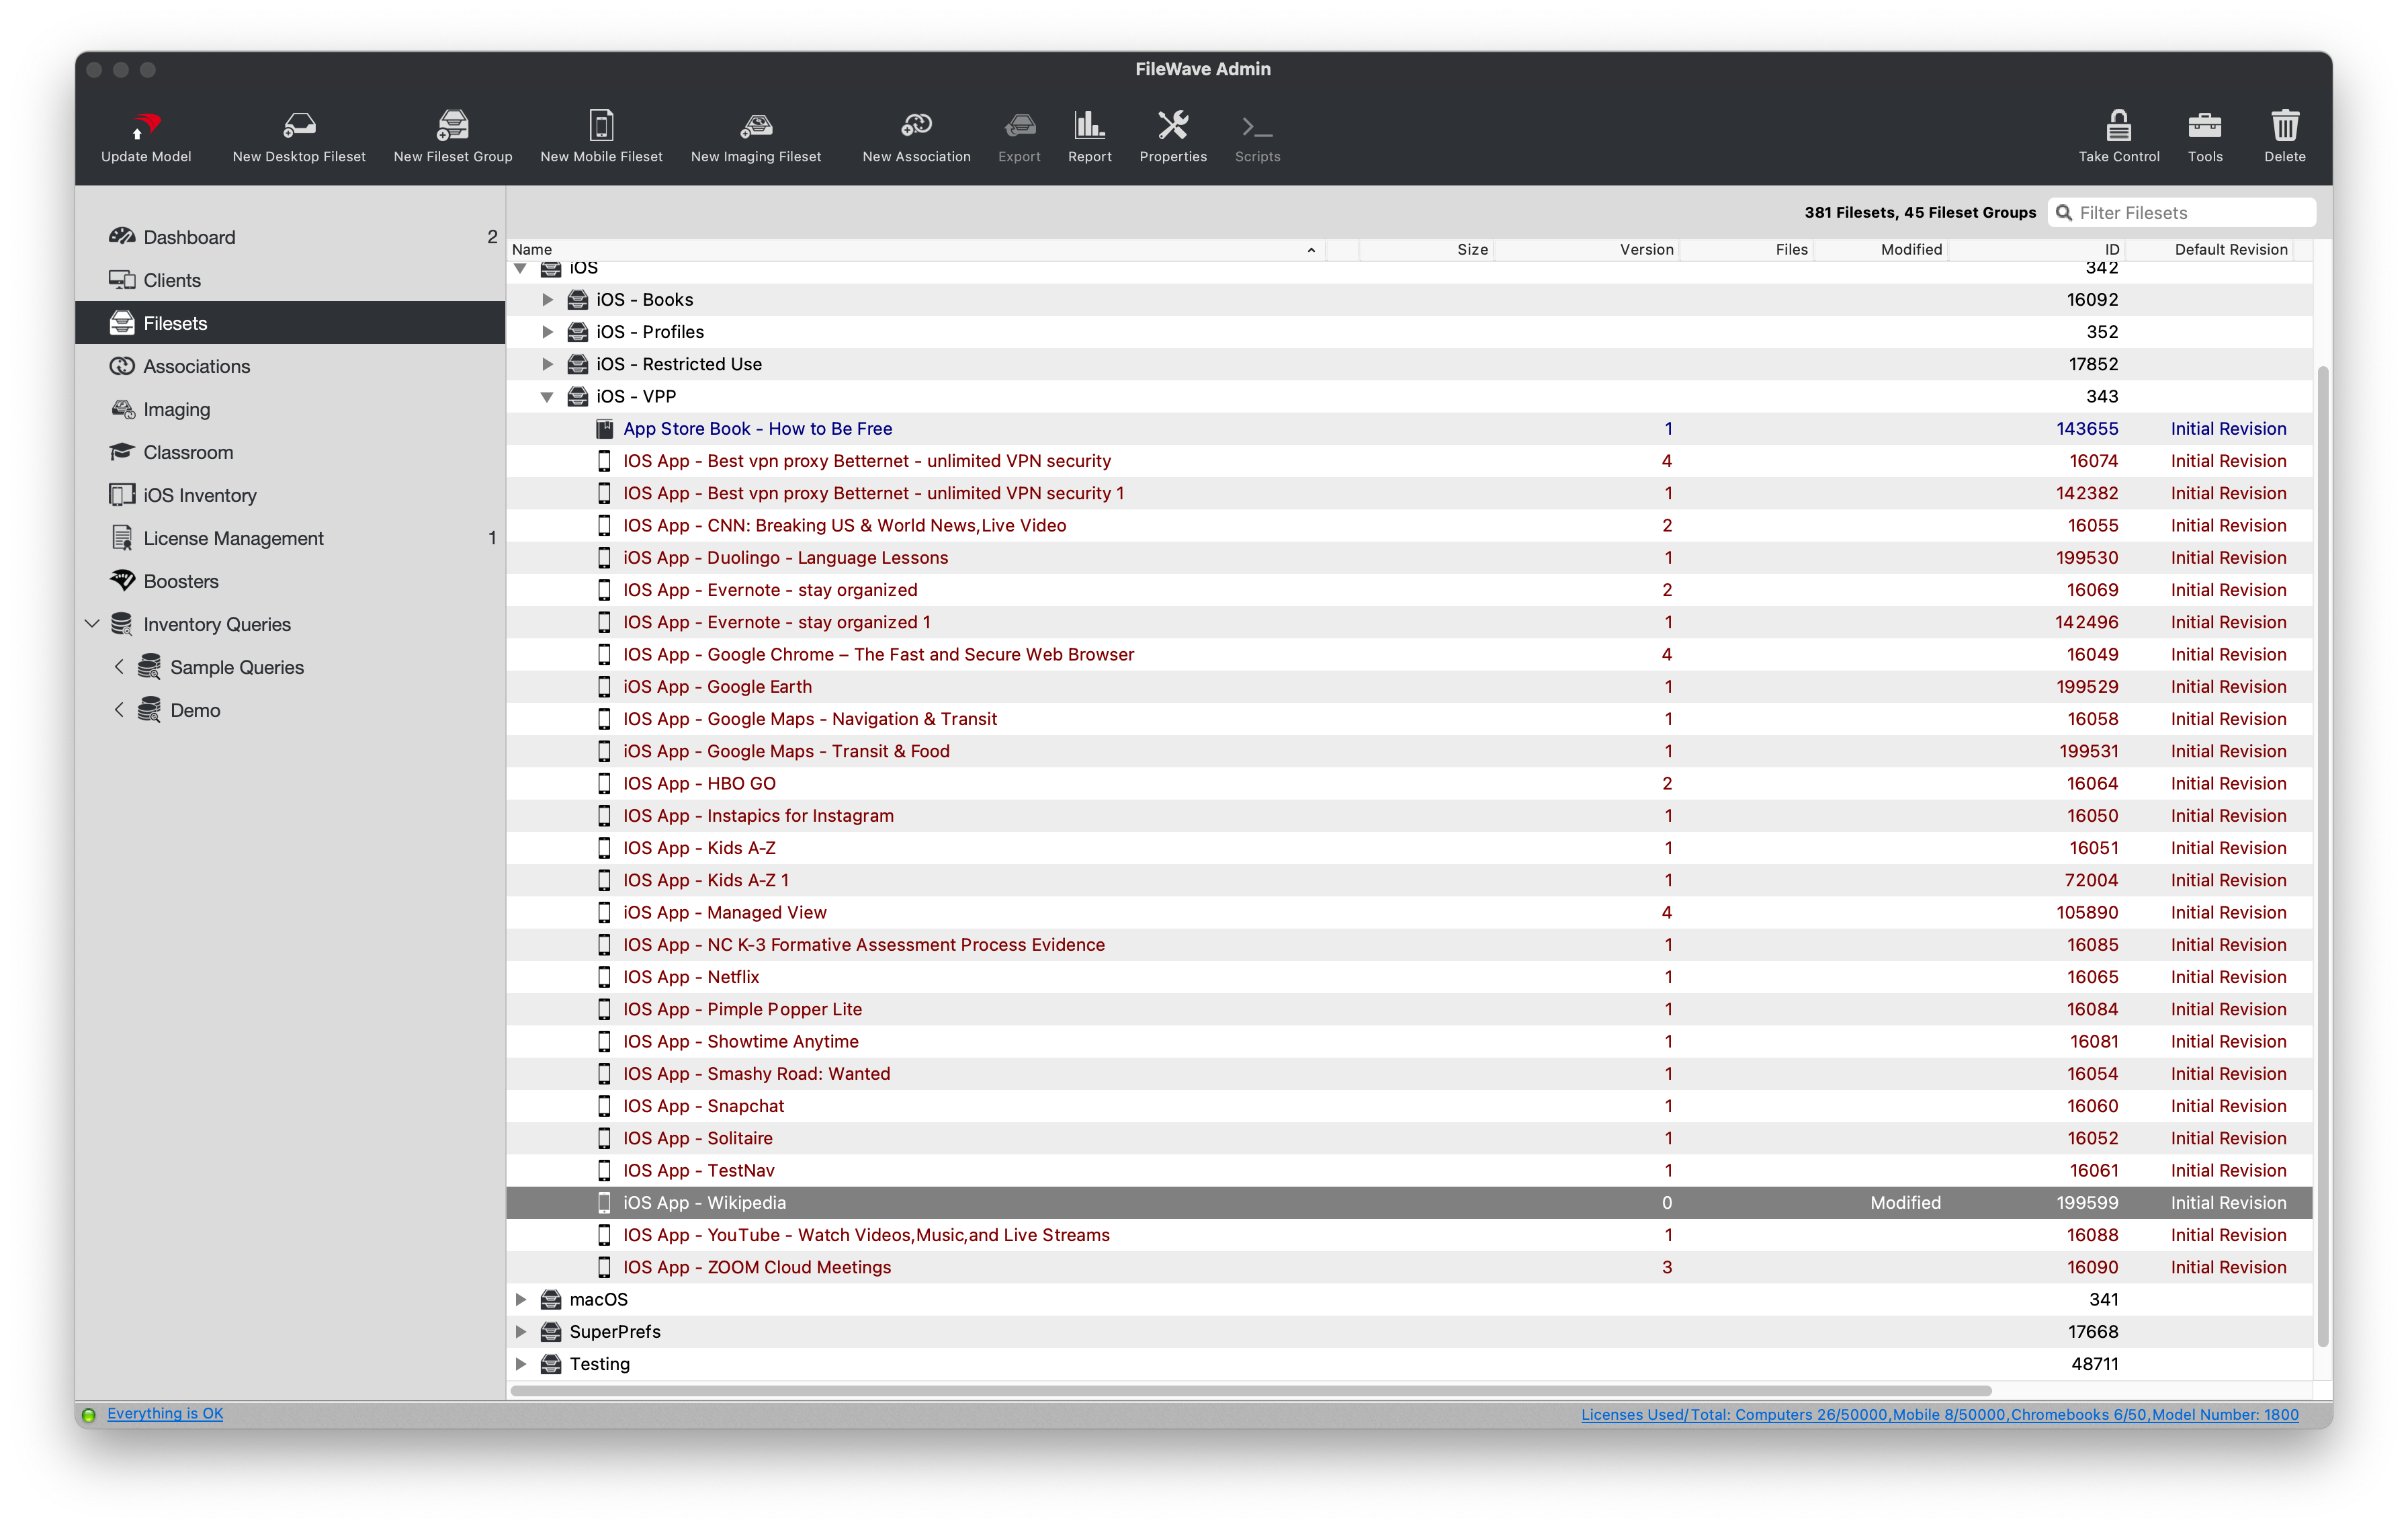
Now that we have at least one VPP Token imported into FileWave and licenses purchased, we can sync VPP within FileWave and automatically create Filesets for each VPP application.
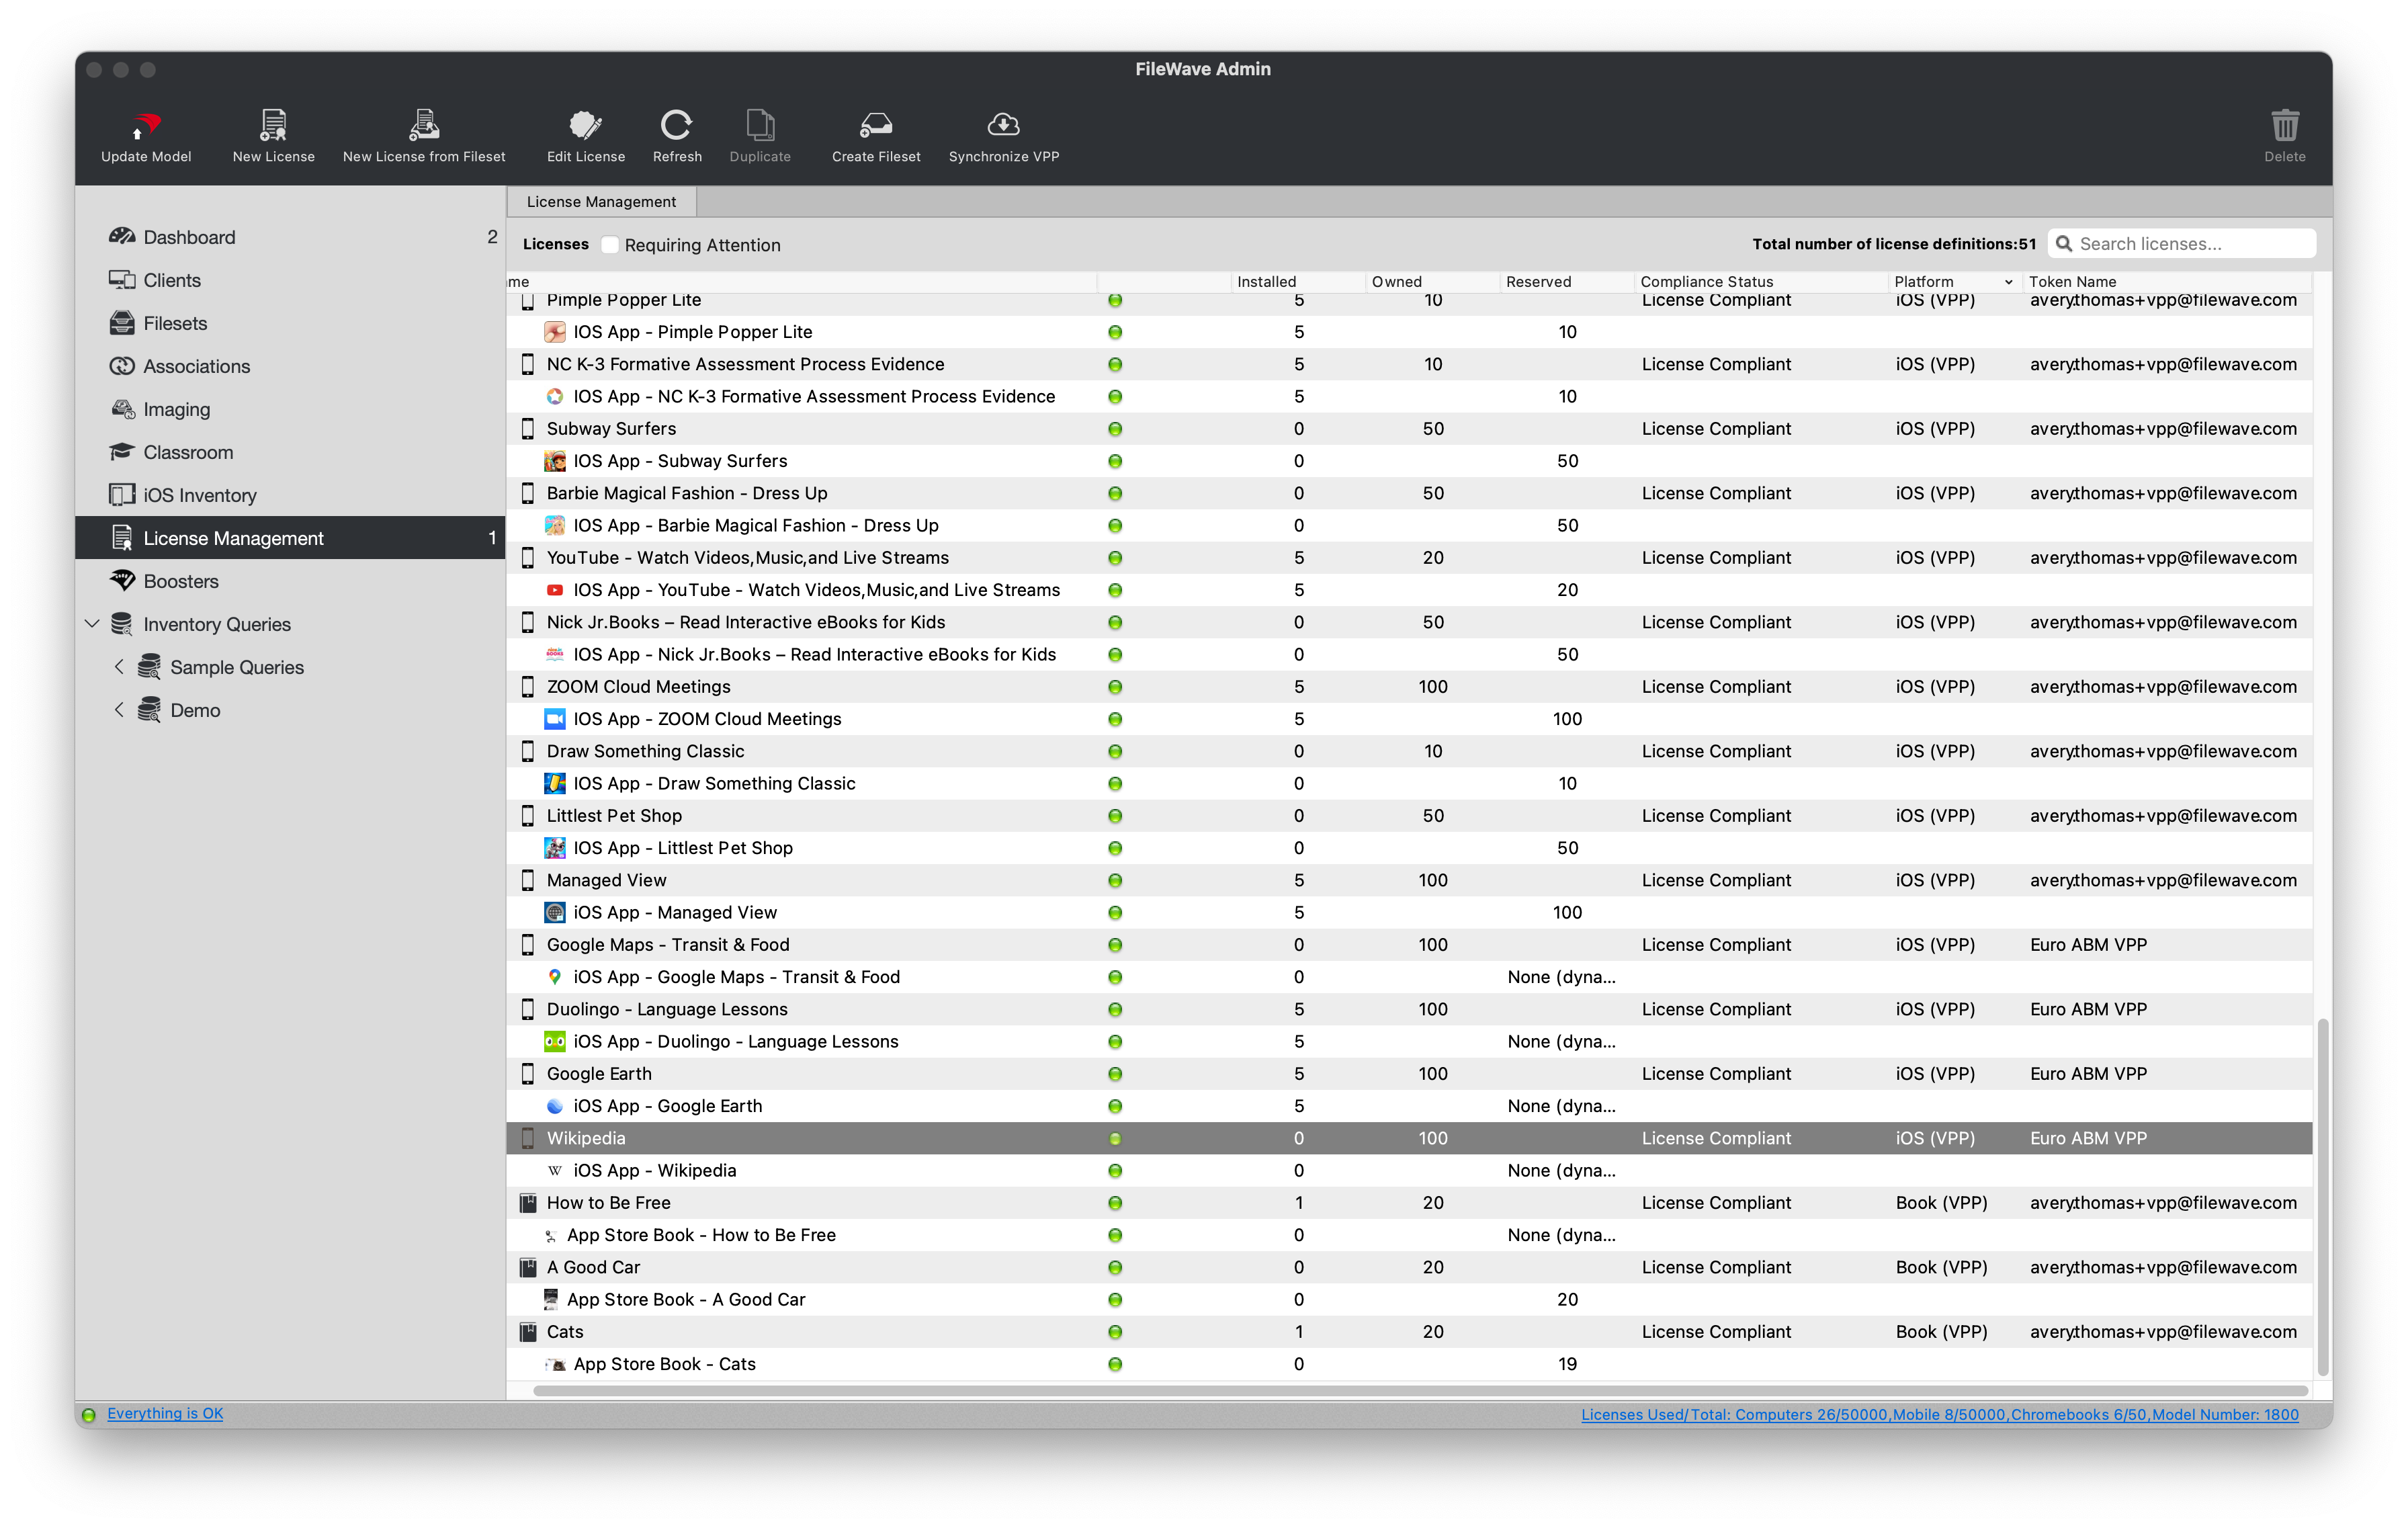
1. Open FileWave Admin and navigate to *"License Management"* from the left pane.
2. Click the *"Synchronize VPP"* button in the black menu bar.
- FileWave syncs with VPP automatically every 5 minutes but this will force a VPP synchronization and "Refreshes" the view.
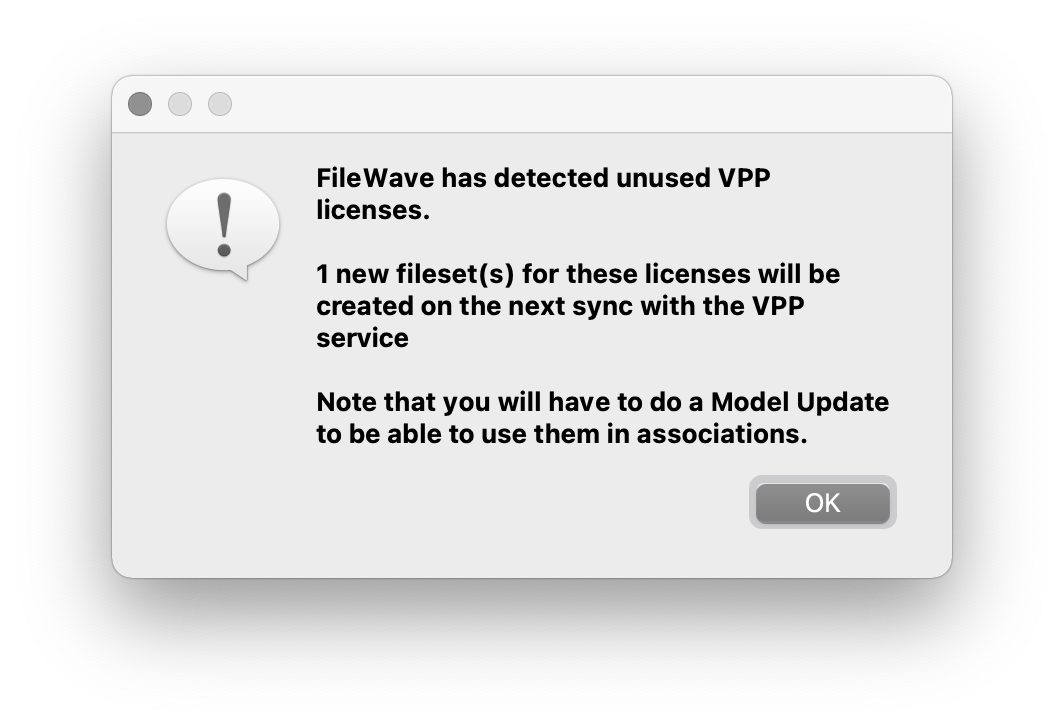
3. You should receive a pop up message asking if you'd like to automatically create Filesets for your VPP applications. Click *"OK"*.
4. You should now see the VPP License information in the *"License Management"* section and a new Fileset in the *"Filesets"* section.
- If you'd like to change where the VPP Filesets are imported to, please refer to this [section](https://kb.filewave.com/books/evaluation-guide/page/software-group-structure "Software Group Structure") of *"Software Group Structure"*.
## Enrollment Credentials
If you choose, you can prompt the user to authenticate the enrollment with a generic account name and password or with your AD/Okta/Google Credentials. You can also turn off authentication completely if you want a more streamlined process.
- Okta Credentials:[IdP Setup: Okta](https://kb.filewave.com/books/identity-provider-idp-integration/page/idp-setup-okta "IdP Setup: Okta")
- Google Credentials:[IdP Setup: Google](https://kb.filewave.com/books/identity-provider-idp-integration/page/idp-setup-google "IdP Setup: Google")
- Microsoft Entra AD: [IdP Setup: Microsoft Entra ID](https://kb.filewave.com/books/identity-provider-idp-integration/page/idp-setup-microsoft-entra-id-azure "IdP Setup: Microsoft Entra ID")
- LDAP Credentials: [Using LDAP to enroll macOS/iOS/Android devices](https://kb.filewave.com/books/evaluation-guide/page/using-ldap-to-enroll-macosiosandroid-devices "Using LDAP to enroll macOS/iOS/Android devices")
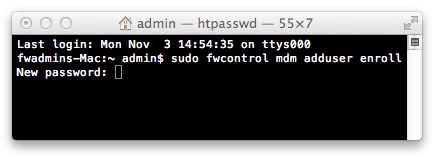
Generic Username/Password:
1. From the server type one of the following, depending on your enrollment strategy:
Manual Enrollment(OTA)
```
sudo fwcontrol mdm adduser [name]
```
Automated Device Enrollment (ADE):
```
sudo fwcontrol mdm adddepuser [name]
```
Where **\[name\]** is the name of the account
2. Enter your server’s root password
3. Enter a password for this account
### No Authentication:
1. From the server type the following:
```
cp /usr/local/filewave/apache/conf/mdm_auth.conf.example_no_auth /usr/local/filewave/apache/conf/mdm_auth.conf
```
2. When asked to overwrite the original, enter 'y' for yes
3. Restart the apache service to put the new configuration into place
```
/usr/local/filewave/apache/bin/apachectl graceful
```
# Chromebook Client Pre-Requisites
Before beginning the setup of the Chromebooks, we must first provide you with a temporary Activation Code to license the amount Chromebooks you currently have under management in Google Admin Console. Please email the total number of "Provisioned" Chromebooks to your FileWave Account Executive or FileWave Systems Engineer, and we will send the Activation Code to you as soon as possible.
If you are unsure whether or not you are able to use Chromebooks with FileWave, please click to see the resources below.
List of countries where Chrome OS Management licenses are sold directly by Google to end customers:
Go to [https://eduproducts.withgoogle.com/](https://eduproducts.withgoogle.com/) , click 'contact sales', and then look at the drop-down menu 'Country' - if the country is in the list, it's supported.
Even if the country is not listed under the link above, a local google partner might be able to help :
[https://www.google.com/a/partnersearch](https://www.google.com/a/partnersearch)
## Chromebook features
---
- Location Tracking
- Disable / Deprovision device
- Historical user login activity
- FileWave and Google Custom Fields
- Google OU creation, renaming, and move device
- Full hardware and software (extensions) Inventory reporting
- Powerwash & Wipe Users
- Reboot
## Setup
### Required Items
- Google Domain
- Admin rights within the Google Domain
- At least one Chromebook
- Chromebooks Enterprise enrolled
- Pre-existing Google Organizational Unit structure (RECOMMENDED)
- Running FileWave Server
- Enough FileWave Chromebook licenses to cover every Chromebook in the Google OU
- FileWave Server must use a root trusted SSL certificate and not a self-signed one
### Google Cloud Messaging / Firebase Setup
First, you’ll need to configure Google Cloud Messaging (GCM/Firebase) so that FileWave can send push notifications to your Chromebook devices. The following steps will help you get your FileWave server setup with Google Cloud Messaging which is required for Android and Chromebook support.
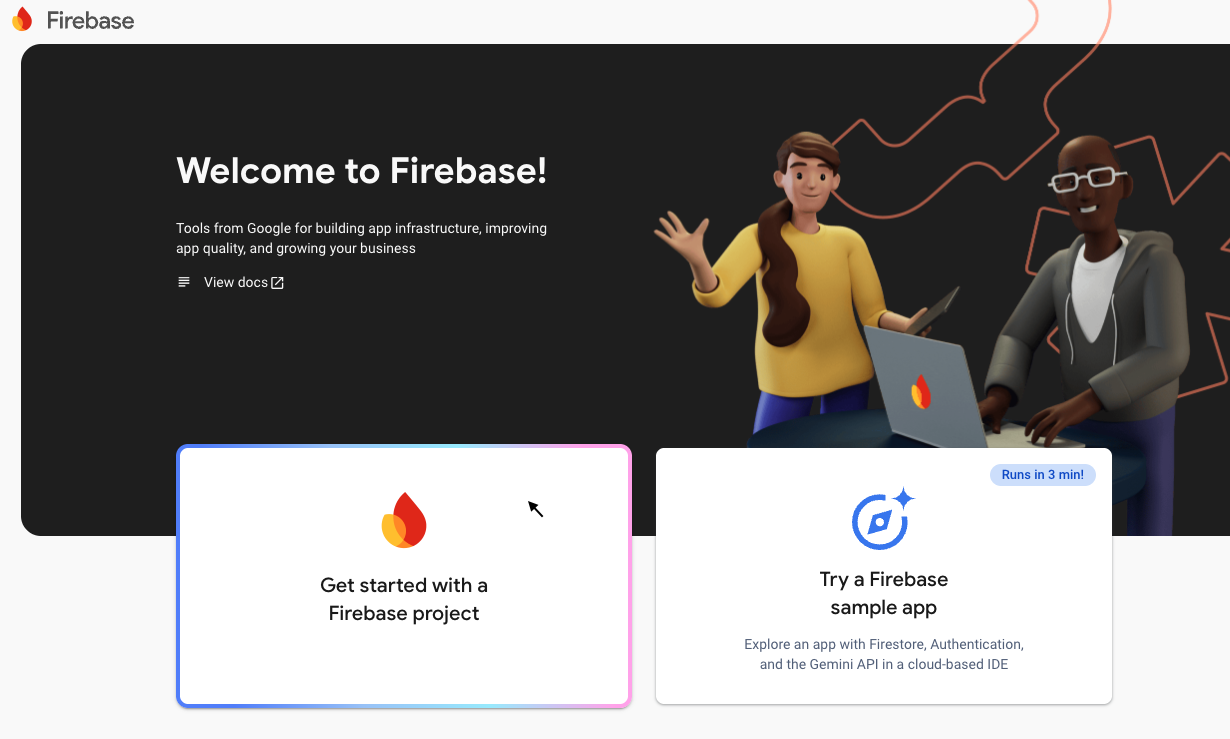
1. Go to [console.firebase.google.com](http://console.firebase.google.com/) in your web browser
2. Sign into your Google Account
3. Accept the user agreement (if necessary)
4. Select "Get started with a Firebase Project"
[](https://kb.filewave.com/uploads/images/gallery/2024-12/B3By3fl8dZsCcQ5c-screenshot-2024-12-18-at-1-35-23-pm.png)
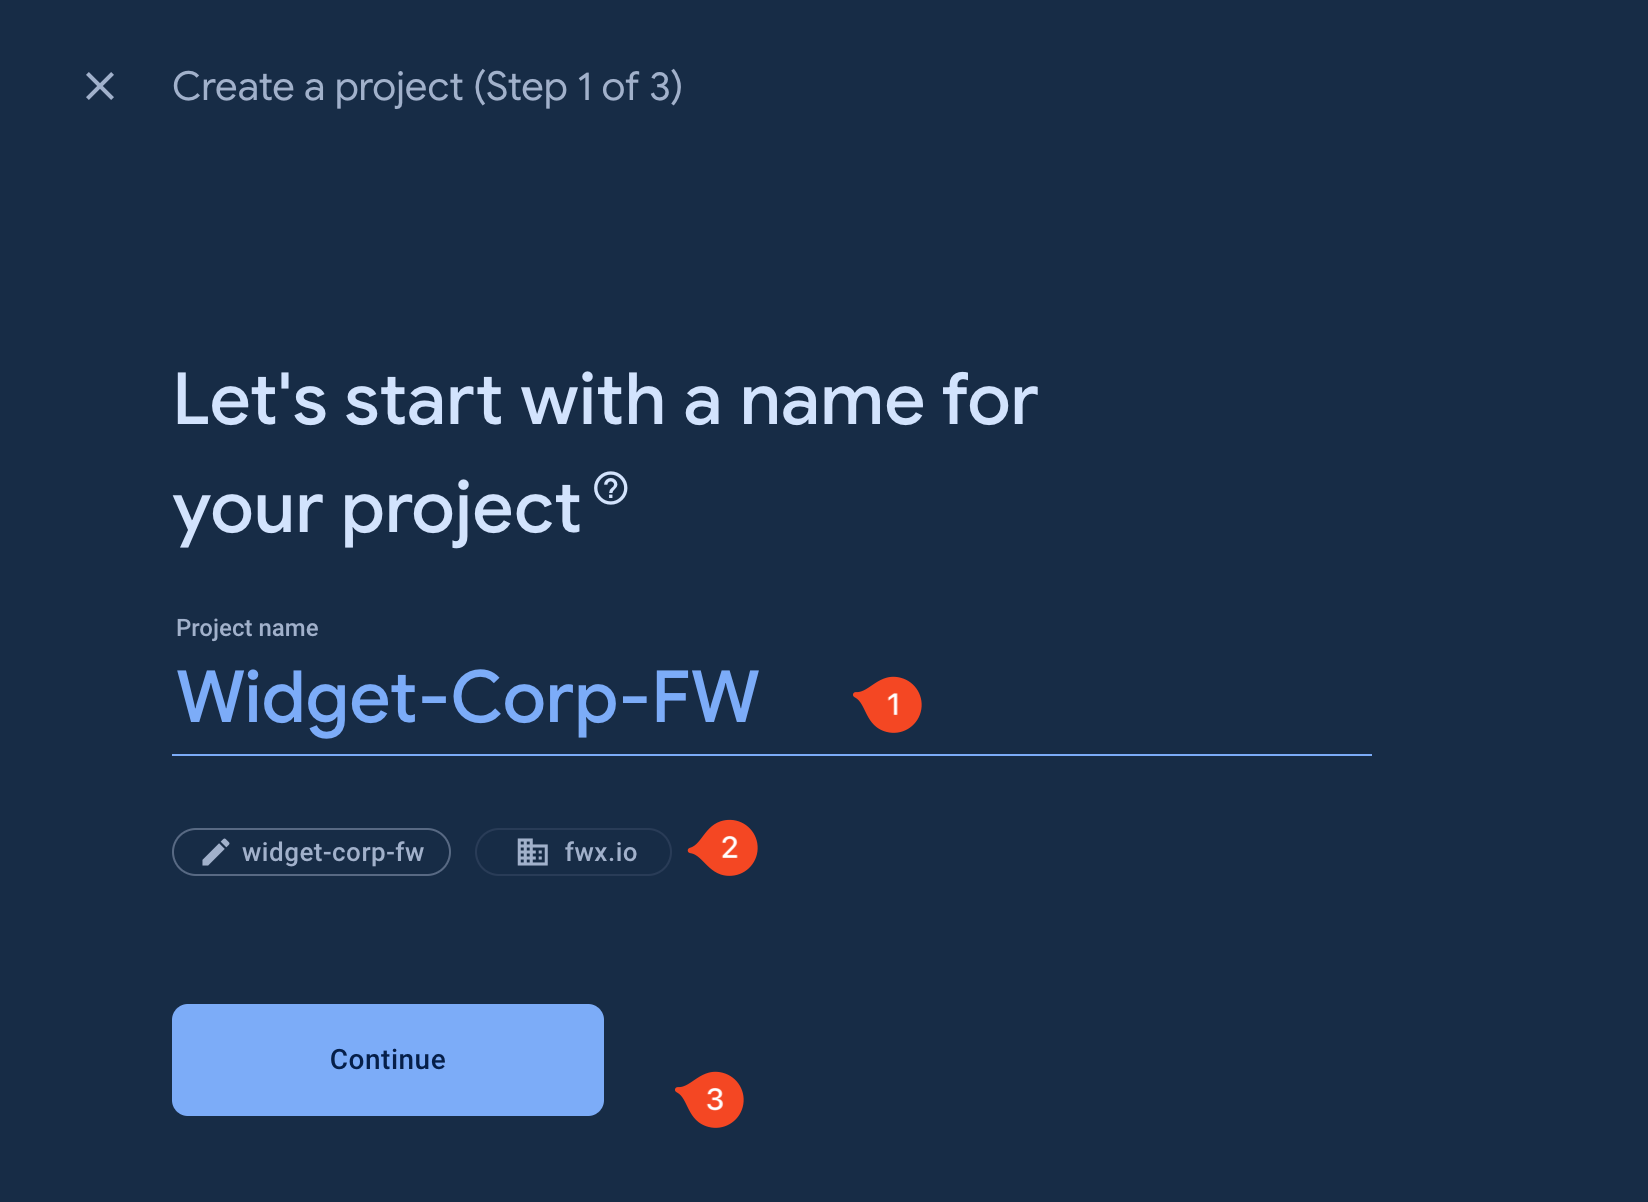
Enter name for the project and Agree to Terms – then click Create Project. Note below the fwx.io is the organization. Make sure the right organization is there or click on it and you can select the organization. Some types of accounts may not offer to let you pick an organization.
[](https://kb.filewave.com/uploads/images/gallery/2024-05/v9vEe8fNjpx4dtAE-image.png)
Choose to Disable Google Analytics for this project and then let it create the project.
Once the project creation has been completed, select Continue and you'll be on to the next steps.
---
### Configuring Google Chromebooks to Sync with FileWave
The following processes and steps will walk you through setting up your FileWave server to manage Chromebooks. Current functionality will allow you to pull/query inventory data and utilize our location tracking feature in FileWave.
#### Enable Access to APIs
1. Go to the below address to start the process:
[https://console.developers.google.com/flows/enableapi?apiid=admin,calendar,classroom,drive,driveactivity.googleapis.com,gmail,groupssettings,licensing,plus,contacts,firebase.googleapis.com,fcm.googleapis.com](https://console.developers.google.com/flows/enableapi?apiid=admin,calendar,classroom,drive,driveactivity.googleapis.com,gmail,groupssettings,licensing,plus,contacts,firebase.googleapis.com,fcm.googleapis.com)
**If you just completed the** [Google Cloud Messaging / Firebase Setup](#bkmrk-google-cloud-messagi)**, the project will already be selected and will use the project created during the GCM setup (this MUST be set up to continue). If it's not automatically selected, select the drop-down at the top of the screen and choose the correct project. You can also create a new one if you'd like. My Project is called 'FileWave Chromebooks'.**
2. **Confirm** the Project and **Enable** the APIs for the project
1. Now a service account has to be created, click the hamburger icon in the top left corner and select **Credentials** under **APIs & Services**
2. Select **Create Credentials > Service Account**
3. Give the Service Account a name. I use the same name as my project but you may name it whatever you want
4. Select **'Create and Continue'**
5. Grant this service account **OWNER** privileges under **Basic**
6. Click **'Continue'**
7. Skip the next section by selecting **'Done'**
8. On the next screen, **c**lick '**Manage Service Accounts'**
9. Click the menu on the right side of the Service Account you just created and then click **Manage keys**
10. Select **'ADD KEY'**, then **'Create New Key'** and download the JSON file
**Save this JSON file. We'll use it later.**
#### Adding a Delegated User
1. Select **Manage service accounts** by the **Service Accounts** section
2. Check the checkbox to the left of your service account
3. Select the menu at the top right of the window, then click **MANAGE ACCESS** at the top of the page
4. Then click **ADD** **PRINCIPAL** on the dialog that appears
5. Add the Google User (make sure this user has the permissions stated above) and give it the **Service Account User** and **Service Account Token Creator** roles
6. **SAVE**
#### OAuth Client ID & Authorizing API Scopes
1. In the same Service Accounts window (**IAM & Admin > Service Accounts)**, click on the Action menu next to your Service Account and select '**Manage Details**'
3. Select '**Advanced Settings**' to expand
4. Copy **Client ID** under **Domain-wide Delegation**, we'll use it in the next section.
1. Open another tab or browser and navigate to Google Admin, [admin.google.com](https://admin.google.com)
2. In the main menu, select **Security > Access and data control**
3. Select **API Controls**
4. Click **Manage Domain Wide Delegation**
5. Select **Add New**
6. Paste the copied **Client ID** from the previous step in this section into the **Client Name** field
7. Copy and paste the following into the **One or More API Scopes** field all at once then hit **Authorize**
```
https://www.googleapis.com/auth/admin.directory.device.chromeos,
https://www.googleapis.com/auth/admin.directory.customer,
https://www.googleapis.com/auth/admin.directory.orgunit
```
#### Sync Google with FileWave
1. Be sure you have already set up [Google Cloud Messaging / Firebase Setup](#bkmrk-google-cloud-messagi)
2. Open your **FileWave Admin Preferences** and select the **Google Tab**
3. Once there, click the **Configure OAuth token** button at the top, you will be prompted for your credentials
4. After authenticating simply type in the Google Account you associated with the service account
5. The last step will be to import the .json file you saved at the beginning of this document
6. After you press **OK** FileWave will sync automatically with Google
Now if you go into the Clients section in FileWave you will see a Chromebooks group with the same structure and devices you have in your Google Admin. This may take some time.
#### Deploying FileWave Inventory Extension to Chromebooks
1\. In **FileWave Admin** open **Preferences**
2\. Go to the **Google/Chromebooks** tab
3\. Click **Export Policy for Extension** and save the file
4\. Open [admin.google.com](http://admin.google.com/)
5\. On the left sidebar, Click **Devices > Chrome > Apps & Extensions,** then select the **Users & browsers** tab.
6\. On the left sidebar, select the OU you want to assign the extensions too
7\. Click the yellow Plus Sign **'+'** on the bottom right of the page and then the icon that looks like a grid of squares, **Add Chrome app or extension by ID**
8\. You can add the Apps/Extensions using the following extension ID: **ldhgnmkjehdokljjhcpkbhcmhoficdio**
9\. Click **Save**
10\. Scroll down to '**Policy for extensions'**
11\. Upload the JSON you downloaded in step 3 of this section\*\*
12\. **Save** your changes above
13\. At this point, you will want to consider the Installation policy for the FileWave extensions. You will either want to **Force install** or to **Force install + pin to the browser toolbar** to ensure the extensions are active. If you have several Organizational Units you may want to consider if you are going to set this at the domain level and if all the OUs will inherit the setting.
It is important that the OUs that you enable this on either be all of them or at a minimum you need to enable it for both the User and Device OUs that you will be using with FileWave.
#### Changing check-in frequency
If you want to change the frequency of check-in, you can modify the following attribute in the JSON to reflect check-in frequency (in minutes). The default is 1440, or once per day.
```
"UpdateIntervalInMinutes": {
"Value": 1440
}
```
#### Location Tracking Permissions
If you're wanting to use Location Tracking, you will need to "Allow sites to detect Users' geolocation" in Google Admin. You will find this option in **Devices** > **Chrome** > **Settings**, on the page that loads it will be under **Security** > **Geolocation**. For this setting, you want to ensure that you set it at the level in the organization that it should apply. In the image below we only enabled it for **Foundry Chromebooks** but did not set it for all. If you would like to enable Geolocation for all devices then make sure you set it at the domain level and also make sure that none of your OUs are set to ignore the inheritance of this setting. Simply check the setting on each OU and you will see what it is set to.
Just like with the Extensions, it is **important** that the OUs that you enable this on either be all of them or, at a minimum, you need to enable it for both the User and Device OUs that you will be using with FileWave.
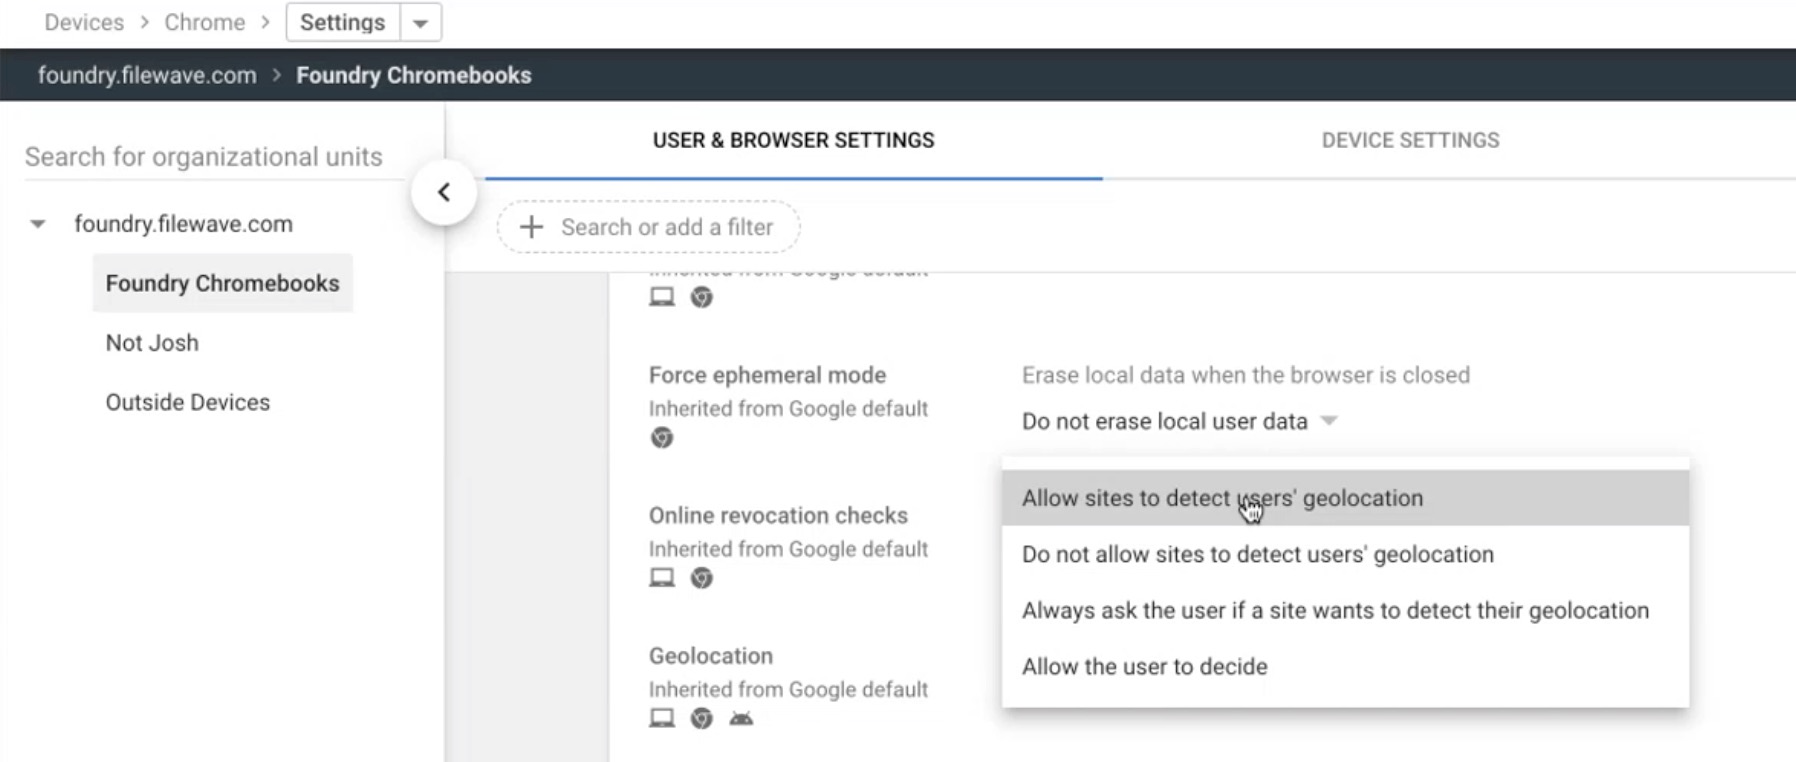
Congratulations, you can now manage your Chromebooks with FileWave!
### Troubleshooting
If for any reason you experience issues seeing your ChromeOS devices in FileWave or issues with reporting then see the notes in our [Chrome Troubleshooting Guide](https://kb.filewave.com/books/chromeos/page/chrome-troubleshooting-guide "Chrome Troubleshooting Guide")
# Windows Client Pre-Requisites
All you need to do to enroll a Windows Client is to deploy a customized FileWave Client MSI to your machines. We typically recommend using an existing tool capable of deploying a MSI such as Group Policy. This customized MSI can also be "baked" into a Windows image that can be deployed via FileWave's Imaging Virtual Server (IVS) so that freshly imaged Windows machines will automatically enroll into FileWave. Lastly, the FileWave Client MSI can be manually distributed and installed on any Windows machine that has local Administrator privileges.
If your organization uses Microsoft Entra ID and your users authenticate using Microsoft Entra ID credentials into their Windows machines, please consider enrolling your Windows machines into FileWave via Microsoft Entra ID. This will also allow for Windows MDM management within FileWave. Learn more on our [Windows MDM](https://kb.filewave.com/books/microsoft-windows-mdm "Microsoft Windows MDM") article.
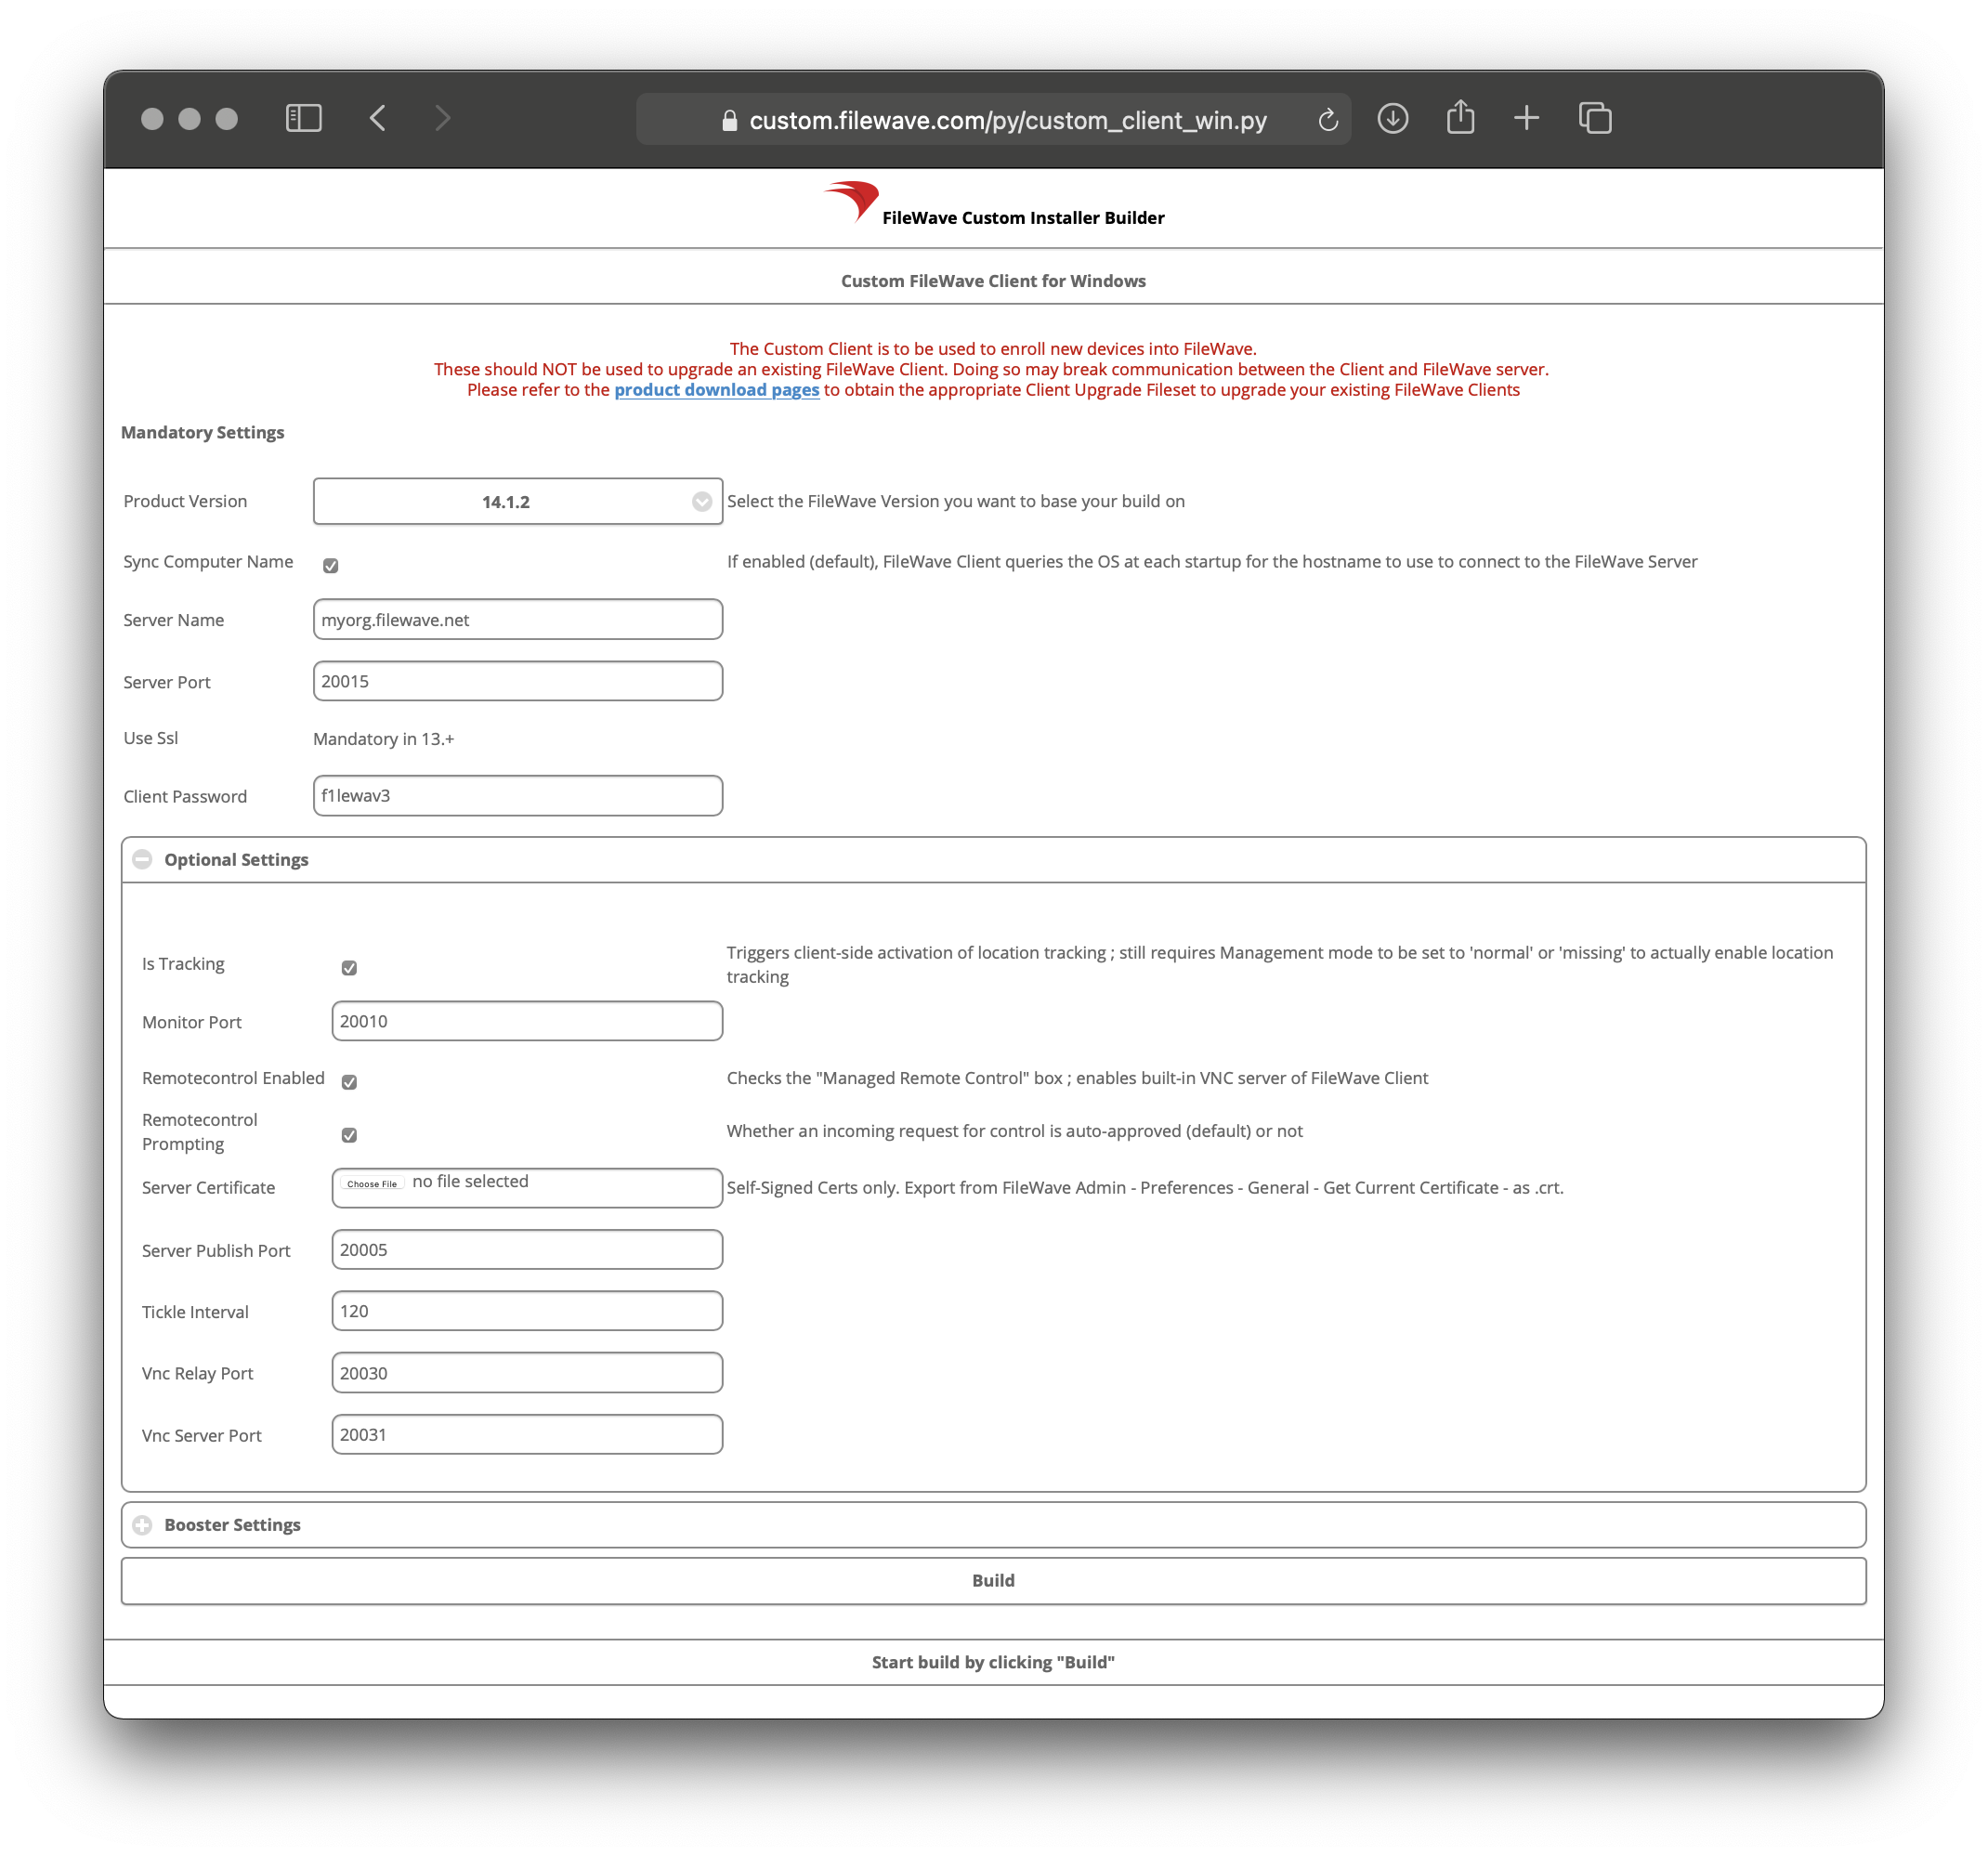
### Generating a custom FileWave Client MSI
1. Open the [FileWave Customer Installer Builder](https://custom.filewave.com/py/custom_client_win.py) for Windows.
2. Fill out the settings accordingly.
3. Click the *"Build"* button and wait for the automatic download.
4. Extract ZIP and install the customized FileWave Client MSI.
**Mandatory Settings**
**Product Version =** Your FileWave Server Version
**Sync Computer Name =** Windows Hostname will be FileWave Client Name (recommended)
**Server Name =** Fully Qualified Domain Name of your FileWave Server (required)
**Server Port =** 20015 (do not modify)
**Client Password =** Password used to modify client preferences remotely (not used in FW 16.0+)
Note: The default Server Port setting above is 20015. However, SSL is now required, and the system will automatically use port 20017 instead when 20015 is entered. Do not manually set the port to 20017. Always enter 20015, and the system will handle the SSL port change for you.
**Optional Settings**
**Is Tracking =** Is Location Tracking Enabled for Windows Clients
**Monitor Port =** Port used for FileWave Client Monitor - 20010 (do not modify but also this port is no longer used as of FileWave 16.0.0)
**Remotecontrol Enabled =** Screen-sharing enabled for Windows Clients
**Remotecontrol Prompting =** Whether or not to Prompt the end-user before starting screen-sharing session
**Server Certificate =** Self-Signed Certificate only; not required for CA-signed certificate
**Server Publish Port =** 20005 (do not modify)
**Tickle Interval =** Idle time for Windows Clients before checking for new Model Update (do not modify)
**Vnc Relay Port =** 20030 (do not modify)
**Vnc Server Port =** 20031 (do not modify)
**Booster Settings**
Initially you may want to make an installer that does not include Boosters. Read more about them here: [Boosters](https://kb.filewave.com/books/boosters "Boosters")
### Deploying the FileWave Client with Group Policy (Startup Script)
If you have no other way to easily deploy the FileWave Client to Windows sytems, but they are all tied to an Active Directory then leveraging Group Policy (GPO) can allow you to rapidly deploy the client with very little effort.
**Customize the Script**
- Save the script shown below and save it to **Deploy‑FileWave.ps1** on your desktop.
- You will want to make sure you edit it to point at the correct server location for the MSI installer that you created from [https://custom.filewave.com](https://custom.filewave.com) to use for the install and make sure that the computer has permission to access the file.
- Open **\\<your‑domain>\\SYSVOL\\<your‑domain>\\Policies\\{YourGPO\_GUID}\\Machine\\Scripts\\Startup** in File Explorer (or use the GPMC “Show Files…” button on the Startup Scripts pane) to put the script in your domain.
- The machine’s computer account (DOMAIN\\COMPUTER$) must have **read** permission on \\\\server\\share\\FileWaveCustom.msi. If it doesn’t, the copy step will fail—so be sure your share ACLs allow Domain Computers or the specific computer objects.
- The script copies the MSI to **C:\\ProgramData\\FileWave\\MSICache** and installs from that local copy. This gives Windows Installer a durable local source instead of depending on the original UNC path after startup. Do not manually place files in **C:\\Windows\\Installer**; Windows manages that cache.
**Create FileWave Client Group Policy**
- Open Group Policy Management in the Active Directory.
-
Create a GPO and navigate to Computer Configuration >> Policies >> Windows Settings >> Scripts (Startup/Shutdown) >> Startup
- Double‑click **Startup**, then click the **PowerShell Scripts** tab.
- Click **Add…**, then **Browse…** and pick **Deploy‑FileWave.ps1** from the Startup folder.
- Click **OK** to close out all dialogs and link the GPO where you need it. (Please test against 1 machine first)
**Enable "Turn on Script Execution" Policy (This policy can be combined into above GPO)**
-
Open Group Policy Management in the Active Directory
-
Navigate to Computer Configuration >> Policies >> Administrative Templates >> Windows Components/Windows PowerShell >> Turn on Script Execution: Set to Enabled and click OK.
**ADDITIONAL INFORMATION**
The script checks whether the FileWave Client process (**fwcld**) is running. If it is not running, the script refreshes the MSI in **C:\\ProgramData\\FileWave\\MSICache**, installs from that local copy, and writes logs to **C:\\temp\\Deploy‑FileWave.log** and **C:\\temp\\FileWaveInstall.log**. If Windows Installer returns **3010**, the install completed and Windows is reporting that a restart is required.
**Deploy‑FileWave.ps1 script:**
```powershell
<#
.SYNOPSIS
Deploys the FileWave agent via a Group Policy startup script, always logging output.
.DESCRIPTION
Checks whether the FileWave process is running. If not, copies the MSI from the network share
to a persistent local directory and installs it from that local cache. All verbose, warning,
and error output is logged to C:\temp\Deploy-FileWave.log, trimmed to the last 100 KB at each run.
.NOTES
- Verbose output is forced by setting $VerbosePreference = 'Continue'.
- Update $installerSharePath to point to your customized FileWave Client MSI.
#>
# Force verbose output so all Write-Verbose messages appear in transcript
$VerbosePreference = 'Continue'
# Define directories and log files
$logDir = 'C:\temp'
$logFile = Join-Path -Path $logDir -ChildPath 'Deploy-FileWave.log'
$maxBytes = 100KB
# Persistent MSI cache location
$cacheDir = 'C:\ProgramData\FileWave\MSICache'
$msiName = 'FileWaveCustom.msi'
$installerLocalPath = Join-Path -Path $cacheDir -ChildPath $msiName
$installerSharePath = '\\server\share\FileWaveCustom.msi' # Update to your actual UNC path
# Ensure the log directory exists
if (-not (Test-Path -Path $logDir)) {
try {
New-Item -Path $logDir -ItemType Directory -Force | Out-Null
} catch {
Write-Error "Failed to create log directory '$logDir': $_"
Exit 1
}
}
# Trim existing log to last 100 KB
if (Test-Path -Path $logFile) {
try {
$fs = [System.IO.File]::Open($logFile, 'Open', 'ReadWrite')
if ($fs.Length -gt $maxBytes) {
$buffer = New-Object byte[] $maxBytes
$fs.Seek(-$maxBytes, 'End') | Out-Null
$fs.Read($buffer, 0, $maxBytes) | Out-Null
$fs.SetLength(0)
$fs.Write($buffer, 0, $maxBytes)
}
$fs.Close()
} catch {
Write-Warning "Failed to trim log file: $_"
}
}
# Start transcript logging
Start-Transcript -Path $logFile -Append
Write-Verbose "Transcript started at '$logFile'."
# Check if FileWave agent is already running
$ProcessName = 'fwcld'
Write-Verbose "Checking for process '$ProcessName'..."
try {
Get-Process -Name $ProcessName -ErrorAction Stop | Out-Null
Write-Verbose "Process '$ProcessName' is currently running."
$isRunning = $true
} catch {
Write-Verbose "Process '$ProcessName' not found. Proceeding with installation."
$isRunning = $false
}
if (-not $isRunning) {
Write-Verbose "Deploying FileWave agent..."
# Ensure the MSI cache directory exists
if (-not (Test-Path -Path $cacheDir)) {
try {
New-Item -Path $cacheDir -ItemType Directory -Force | Out-Null
Write-Verbose "Created MSI cache directory: $cacheDir"
} catch {
Write-Error "Failed to create MSI cache directory '$cacheDir': $_"
Stop-Transcript
Exit 1
}
}
# Refresh the local MSI cache from the network share on each install attempt
if (-not (Test-Path -Path $installerSharePath)) {
Write-Error "Installer was not found at '$installerSharePath'. Check the UNC path and share permissions for the computer account."
Stop-Transcript
Exit 1
}
Write-Verbose "Copying MSI from '$installerSharePath' to '$installerLocalPath'..."
try {
Copy-Item -Path $installerSharePath -Destination $installerLocalPath -Force
Write-Verbose "Successfully refreshed local MSI cache."
} catch {
Write-Error "Failed to copy installer: $_"
Stop-Transcript
Exit 1
}
# Install MSI silently and log output
$installLog = Join-Path -Path $logDir -ChildPath 'FileWaveInstall.log'
$msiArgs = @('/i', $installerLocalPath, '/qn', '/norestart', '/l*vx', $installLog)
Write-Verbose "Starting MSI installation from '$installerLocalPath'. Log: '$installLog'."
$process = Start-Process -FilePath 'msiexec.exe' -ArgumentList $msiArgs -Wait -PassThru
switch ($process.ExitCode) {
0 {
Write-Verbose "Installation completed successfully (exit code 0). Log: '$installLog'."
}
3010 {
Write-Warning "Installation completed and Windows reports that a restart is required (exit code 3010). Log: '$installLog'."
}
default {
Write-Error "MSI installation failed (exit code $($process.ExitCode)). See '$installLog'."
Stop-Transcript
Exit $process.ExitCode
}
}
Write-Verbose 'FileWave installation process finished.'
} else {
Write-Verbose "Skipping deployment; '$ProcessName' already running."
}
# Stop transcript logging
Stop-Transcript
Exit 0
```