4. Fileset Creation and Deployment
Please review the sub-sections in this "Fileset Creation and Deployment" guide for your managed OS platforms. Once you have you have at least one Fileset created, please review the guide on how to Associate your Filesets.
- Fileset Creation and Deployment
- Windows Software
- iOS Software and Profiles
- macOS Software and Profiles
- Android Software and Policies
- Set Up the FileWave Imaging Virtual Server (IVS)
- Windows Imaging - Capture Image
- Deploy a Windows Image with FileWave IVS
- OS Software Updates
Fileset Creation and Deployment
Section Details
Use the platform sections below to create the Filesets or profiles you need. After you have at least one Fileset, use this page to associate it with devices or groups.
- Windows Software
- iOS Software and Profiles
- macOS Software and Profiles
- Android Software and Policies
- Windows Imaging Setup
- OS Software Updates
FileWave 16.4 and later: If Central reports an upload-validation problem while creating or editing a Fileset, do not associate or deploy it yet. Review Advanced Fileset Editing, correct the incomplete upload, and verify the Fileset contents first.
Associate Filesets to Clients
After a Fileset exists, associate it with client devices or groups. A standard association installs in the background, a Kiosk association makes the item available on demand, and scheduled association options let you control download, activation, inactivation, deletion, and reboot timing. This section covers the common association workflow in FileWave Central. You can also create associations from the Clients or Filesets views when that is faster for your workflow.
Associate Fileset using drag-and-drop
- Open FileWave Central and navigate to Associations.
- Find and select an individual device or client group from the left pane.
- This example uses the macOS device named "Avery Thomas".
- Find and select an individual Fileset or Fileset group from the right pane.
- This example uses the macOS Fileset named "macOS - Google Chrome".
- Drag the "macOS - Google Chrome" Fileset from the right pane onto the "Avery Thomas" macOS device.
- You can associate Filesets one-to-one, one-to-many, or many-to-one.
- A new Standard association appears in the bottom pane.
- Standard associations are the default and install in the background without user interaction.

Deploy Fileset in the Kiosk
A Standard association installs in the background. To make the Fileset optional for the end user, change the association type to Kiosk. FileWave Kiosk is available on macOS, Windows, and iOS (App Portal), and can be customized to match your organization's look and feel.
- Open FileWave Central and navigate to Associations.
- Double-click an existing association from the bottom pane.
- Check Kiosk Association.
- Click OK to save the change.
- Run Update Model to commit the association change to devices.


Schedule Fileset deployment
Use association scheduling when a Fileset or group of Filesets needs a specific deployment window. Kiosk associations cannot be scheduled except for the Reboot deadline at option.
- Open FileWave Central and navigate to Associations.
- Double-click an existing association from the bottom pane.
- Specify a date and time for any needed scheduled events.
- Start Downloading at: Downloads Fileset files, including installers, to a temporary location.
- Activate files at: Moves Fileset files to their final location and runs installers or activation scripts.
- Make files inactive at: Moves Fileset files from their final location back to a temporary location.
- Delete files at: Deletes the Fileset files from the device.
- Reboot deadline at: Forces a reboot of the client device. The Fileset must have Requires Reboot enabled in Fileset Properties.
- Click OK to save the changes.
- Run Update Model to commit the association changes to devices.

Windows Software
Windows Filesets
FileWave allows you to deploy any file, native installer, or script to a Windows machine. FileWave has no file-type or file-size restrictions and all scripts and installers will be launched with elevated privileges by default.
After creating a Fileset, please make sure to review the Fileset Creation and Deployment page to learn how to associate and deploy your new Filesets.
Create an MSI Fileset
Deploying an MSI is very easy in FileWave and also supports native MSI behavior for the uninstallation process. If you're looking to deploy a piece of Windows software very quickly, an MSI Fileset is the recommended way to go. However, since a MSI is a native installer, FileWave's Self-Healing is not supported.
- Open FileWave Admin and navigate to "Filesets".
- Drag-n-drop your desired MSI directly into the "Filesets" view.
- Or...
- Select "New Desktop Fileset" from the black menubar.
- Click "MSI / PKG" and select your desired MSI.
- You should now see your MSI Fileset in the "Filesets" view.
- The Fileset will display in red text while it is being uploaded to the FileWave Server. Upload progress can be viewed from the bottom bar of the FileWave Admin.
- The Fileset will be labeled as "Modified" indicating the it has not yet been saved.
- "Update Model" if you'd like to save the changes.

Create an EXE Fileset
Creating an EXE Fileset is also very easy but does require a slightly different workflow to accommodate an EXE's support for Launch Arguments. If a software package offers both an MSI and EXE, the MSI installer is recommended. If you find that the EXE does not allow for provisioning/customization using Launch Arguments, please consider leveraging the Fileset Magic workflow outlined below. Please note that Self-Healing does not apply to EXE Filesets.
- Open FileWave Admin and navigate to "Filesets".
- Select "New Desktop Fileset" from the black menubar.
- Click "Empty" and name the Fileset accordingly.
- Double-click on the new Fileset to open the "Fileset Contents".
- Uncheck "Hide unused folders" if enabled.
- Navigate to "ProgramData" and click "New Folder" from the menubar.
- Name the new folder "fwEXE".
- The location and name of the folder can be whatever you'd like, however it is recommended to deploy EXEs to a "discreet" location on the machine's hard drive.
- Drag-n-drop the desired EXE into the "fwEXE" folder.
- Select the EXE and click "Get Info" from the menubar.
- Navigate to the "Executable" tab.
- Check the "Execute once when activated" box and the "Non-interactive (background)" box. Then click the "Wait for executable to finish" and set it to 15 minutes.
- Optionally, click the "[+]" button to add any Launch Arguments to the EXE's installation.
- Click "Apply" to save your changes and Close the "Get Info" window.
- Close the "Fileset Contents" window.
- You should now see your EXE Fileset in the "Filesets" view.
* The Fileset will be labeled as "Modified" indicating the it has not yet been saved. - "Update Model" if you'd like to save the changes.


Deploy a file or folder with Self-Healing
One of the main things that separates FileWave from the other solutions on the market is FileWave's ability to deploy any file directly to the Client's local filesystem and enable true Self-Healing. When you deploy a file with Self-Healing enabled, FileWave will automatically re-download the original file whenever the file is modified or deleted on the Client machine, however we can tweak this behavior per file to account for all deployment situations using the three "Verification" options.
Verification options

FileWave's "Verification" options allow you to granularly specify how each file in a Fileset deployment will behave. You can also set the "Verification" settings from a Fileset's Properties that will apply to all files within a given Fileset.
- Self-Healing = Re-downloads file if modified or deleted upon device reboot, 24 hours (default), or manual "Verify". Removes files if Fileset disassociated.
- Download If Missing = Re-downloads file if deleted upon device reboot, 24 hours (default), or manual "Verify". Removes files if Fileset disassociated.
- Ignore at Verify (Left Behind) = Does not monitor file modification or re-download. Leaves files intact if Fileset disassociated.

Deploy PDF to every user's Desktop
- Open FileWave Admin and navigate to "Filesets".
- Select "New Desktop Fileset" from the black menubar.
- Click "Empty" and name the Fileset accordingly.
- Double-click on the new Fileset to open the "Fileset Contents".
- Uncheck "Hide unused folders" if enabled.
- Navigate to "Users > All Users > Desktop".
- Drag-n-drop PDF file into the "Desktop" folder.
- Select the PDF and click "Get Info" from the menubar.
- Navigate to the "Verification" tab and select your desired Verification preference.
- Click "Apply" to save changes and Close the "Get Info" window and Fileset Contents window.
- You should now see your PDF Fileset in the "Filesets" view.
* The Fileset will be labeled as "Modified" indicating the it has not yet been saved. - "Update Model" if you'd like to save the changes.

Capture customized software installations using Fileset Magic
You might discover that a software's installer does not allow for the software to be provisioned or customized to meet your organization's needs. This is where Fileset Magic plays a huge role. Fileset Magic allows you to capture a customized software installation at the file-level and deploy it with Self-Healing enabled by leveraging a series of Snapshots taken from a "build" machine. The customizations may include software preferences, licensing, updates, and shortcuts.
While using Fileset Magic, please do your best to limit background activities to prevent unnecessary changes from being capture.
-
Open FileWave Admin and navigate to "Assistants > Fileset Magic".
-
Select "Create Snapshot".
-
Select the "Scan Volume".
-
Select the "Scan Type".
-
Use "Entire Disk" if you are unsure of where the application installs to.
-
Use "Program Files, Program Data and Users" for most common installations.
-
-
Wait for the File and Registry scan to complete.
-
Install your desired software without proceeding in Fileset Magic.
- Open, update, license, and customize your software.
-
Click "Continue" to proceed in the Fileset Magic window.
-
Wait for Fileset Magic to scan the select volume and compare File and Registry changes.
-
View the File differences and select only what is necessary for the newly installed application.
- There may be background Windows activity that is captured. Do your best to exclude this content.
-
View the Registry differences and select only what is necessary for the newly installed application.
- There may be background Windows activity that is captured. Do your best to exclude this content.
-
Choose either to Save or Export the Fileset.
-
Wait for the Fileset to be uploaded to the FileWave Server.
-
Verify your Fileset Contents within the FileWave Admin.
|
1
|
2
|
|
3
|
4
|
|
5
|
6
|
|
7
|
8
|
|
9
|
10
|
|
11
|
12
|


Windows Driver Filesets
A Windows Driver Fileset is used only during the Windows Imaging process. This type of Fileset accepts .CAB and .INF driver files. These files will be automatically injected into the "C:\Windows\system32\drivers\" folder during the imaging process and before Windows boots up to start the Out of Box Experience hardware scan.
-
Open FileWave Admin and navigate to "Filesets".
-
Select "New Imaging Fileset" from the black menubar.
-
Click the "Windows Drivers" button_._
-
Select a folder containing .CAB or .INF files.
-
Your Windows Driver Fileset can now be Associated to a Windows Image deployment.
iOS Software and Profiles
iOS Filesets
FileWave can deploy supported profiles, Apps and Books applications, custom applications, books, and documents to iPhone and iPad using Filesets.
Apple Vision Pro uses the same FileWave mobile profile, application, Fileset, and Deployment workflows. Before deploying, confirm that the payload, setting, application, or content type is supported by the target visionOS version.
After creating a Fileset, please make sure to review the Fileset Creation and Deployment page to learn how to associate and deploy your new Filesets.
Manage iOS settings using Profiles
FileWave being a full-blown MDM for iOS allows you to modify majority of iOS Preferences using Profiles. It is recommended to configure each Profile Payload in its own Profile Fileset (most notably the "Network" payload), however once you are confident is a Profile's configuration, you can combine multiple Profile Payloads into one Profile Fileset. You can also create Parameterized Profiles to automatically inject inventory data into the Profile fields using the "%custom_field%" format.
- Open FileWave Admin and navigate to "Filesets".
- Click "New Mobile Fileset" from the black menubar and select "Profile".
- Name the Profile from within the "General" section and review other settings.
- Select your desired Profile Payload and verify it is compatible with your intended operating system.
- Every Profile Payload is broken out into each supported platform indicated by the header of section.
- "Configure" the Profile Payload with any required fields.
- "Save" changes.
- You should now see your Profile Fileset in the "Filesets" view so it's ready for Association and deployment.
- The Fileset will be labeled as "Modified" indicating the it has not yet been saved and committed.
- "Update Model" if you'd like to save the changes.


Deploy VPP Filesets to iOS
FileWave can deploy applications from the Apple App Store by leveraging Apple's Volume Purchase Program. Since you simply associate VPP Filesets like any other Filesets, this section will cover some of the more granular settings associated with VPP Filesets.
If you have not already, please review this section on the guide to learn more about how to sync VPP into FileWave and create VPP application Filesets.
Reserve VPP Licenses for Fileset
FileWave allows you to duplicate a VPP Fileset, even if you just have one VPP Token where the licenses are coming from. This will allow you to split up the licenses for each VPP Fileset for one given VPP application so that you can group your software more dynamically. For example, you purchase 100 licenses of Duolingo from one VPP Token and need to deploy 50 licenses to 1st grade and 50 licenses to 2nd grade, each from their respective group.
- Open FileWave Admin and navigate to "Filesets".
- Duplicate your desired VPP Fileset.
- Double-click on one instance of the VPP Fileset.
- Check the box for "Reserve a maximum of" and fill out the maximum licenses available for that instance of the VPP Fileset.
- Repeat Step 3 & 4 for the other instance of the VPP Fileset, otherwise the other instance will automatically consume the remainder of the VPP licenses.
- You may now move the VPP Fileset into their appropriate groups and Associate to devices/device groups.

iOS App Configuration
FileWave support iOS App Configuration or "App Config" to allow you to customize and provision a VPP application either before or after its initial deployment. These configuration settings are entirely determined by the Application Developer. More information and examples of App Configs can be found here.
- Open FileWave Admin and navigate to "Filesets".
- Duplicate your desired VPP Fileset.
- Double-click on one instance of the VPP Fileset.
- Navigate to the "Configuration" tab.
- Add keys manually or import XML file provided by Application Developer.
- Click "OK" to save the changes.
- The changes will either be available during initial deployment or configure the application after initial deployment.

Deploy IPA to iOS devices
FileWave can deploy "in-house" applications or IPA files to your iOS devices. These are typically applications that are not available in the App Store or customized versions of an application. The best example of this is the FileWave App Portal as we need to deploy this IPA in order to collect Location Information from the iOS devices and report it back to the FileWave Server.
- Open FileWave Admin and navigate to "Filesets".
- Click "New Mobile Fileset" from the black menubar.
- Click "Enterprise" from the "iOS" section.
- Make sure "Import a local file" is selected, click "Browse", and choose your IPA.
- Name the Fileset, click "Import", and wait for upload to complete.
- Click "Done".
- Your IPA Fileset is now ready Association and deployment.

Deploy documents to iOS (PDF, ePub, iBook)
FileWave allows you to deploy PDF, ePub, or iBook content to iOS 8+ devices. These documents will be accessible via the iOS "Books" application.
- Open FileWave Admin and navigate to "Filesets".
- Click "New Mobile Fileset" from the black menubar.
- Click "Document (iOS 8+)" from the "iOS" section.
- Make sure "Import a local file" is selected, click "Browse", and choose your .pdf, .epub, or .ibooks file.
- Name the Fileset, click "Import", and wait for upload to complete.
- Click "Done".
- Your iOS Document Fileset is now ready Association and deployment.

macOS Software and Profiles
macOS Filesets
FileWave allows you to deploy any file, native installer, scripts, or Profiles to a macOS machine. FileWave has no file-type or file-size restrictions and all scripts and installers will be launched with elevated privileges by default.
After creating a Fileset, please make sure to review the Fileset Creation and Deployment page to learn how to associate and deploy your new Filesets.
Manage macOS settings using Profiles
FileWave being a full-blown MDM for macOS allows you to modify majority of macOS Preferences using Profiles. It is recommended to configure each Profile Payload in its own Profile Fileset (most notably the "Network" payload), however once you are confident is a Profile's configuration, you can combine multiple Profile Payloads into one Profile Fileset. You can also create Parameterized Profiles to automatically inject inventory data into the Profile fields using the "%custom_field%" format.
- Open FileWave Admin and navigate to "Filesets".
- Click "New Desktop Fileset" from the black menubar and select "Profile".
- Name the Profile from within the "General" section and review other settings.
- Select your desired Profile Payload and verify it is compatible with your intended operating system.
- Every Profile Payload is broken out into each supported platform indicated by the header of section.
- "Configure" the Profile Payload with any required fields.
- "Save" changes.
- You should now see your Profile Fileset in the "Filesets" view.
- The Fileset will be labeled as "Modified" indicating the it has not yet been saved and committed.
- "Update Model" if you'd like to save the changes.
Create a PKG Fileset
Deploying a PKG is very easy in FileWave. If you're looking to deploy a piece of macOS software that's not available in the App Store, a PKG Fileset is the recommended way to go. However, since a PKG is a native installer, FileWave's Self-Healing is not supported.
- Open FileWave Admin and navigate to "Filesets".
- Drag-n-drop your desired PKG directly into the "Filesets" view.
- Or...
- Select "New Desktop Fileset" from the black menubar.
- Click "MSI / PKG" and select your desired PKG.
- You should now see your PKG Fileset in the "Filesets" view.
- The Fileset will display in red text while it is being uploaded to the FileWave Server. Upload progress can be viewed from the bottom bar of the FileWave Admin.
- The Fileset will be labeled as "Modified" indicating the it has not yet been saved.
- "Update Model" if you'd like to save the changes.

Deploy VPP Filesets to macOS
FileWave can deploy applications from the Apple App Store by leveraging Apple's Volume Purchase Program. Since you simply associate VPP Filesets like any other Filesets, this section will cover some of the more granular settings associated with VPP Filesets.
If you have not already, please review this section on the guide to learn more about how to sync VPP into FileWave and create VPP application Filesets.
Reserve VPP Licenses for Fileset
FileWave allows you to duplicate a VPP Fileset, even if you just have one VPP Token where the licenses are coming from. This will allow you to split up the licenses for each VPP Fileset for one given VPP application so that you can group your software more dynamically. For example, you purchase 10 licenses of Slack from one VPP Token and need to deploy 5 licenses to Development and 5 licenses to QA, each from their respective group.
- Open FileWave Admin and navigate to "Filesets".
- Duplicate your desired VPP Fileset.
- Double-click on one instance of the VPP Fileset.
- Check the box for "Reserve a maximum of" and fill out the maximum licenses available for that instance of the VPP Fileset.
- Repeat Step 3 & 4 for the other instance of the VPP Fileset, otherwise the other instance will automatically consume the remainder of the VPP licenses.
- You may now move the VPP Fileset into their appropriate groups and Associate to devices/device groups.

Deploy a file or folder with Self-Healing
One of the main things that separates FileWave from the other solutions on the market is FileWave's ability to deploy any file directly to the Client's local filesystem and enable true Self-Healing. When you deploy a file with Self-Healing enabled, FileWave will automatically re-download the original file whenever the file is modified or deleted on the Client machine, however we can tweak this behavior per file to account for all deployment situations using the three "Verification" options.
Verification options
FileWave's "Verification" options allow you to granularly specify how each file in a Fileset deployment will behave. You can also set the "Verification" settings from a Fileset's Properties that will apply to all files within a given Fileset.
- Self-Healing = Re-downloads file if modified or deleted upon device reboot, 24 hours (default), or manual "Verify". Removes files if Fileset disassociated.
- Download If Missing = Re-downloads file if deleted upon device reboot, 24 hours (default), or manual "Verify". Removes files if Fileset disassociated.
- Ignore at Verify (Left Behind) = Does not monitor file modification or re-download. Leaves files intact if Fileset disassociated.


Deploy PDF to every user's Desktop
- Open FileWave Admin and navigate to "Filesets".
- Select "New Desktop Fileset" from the black menubar.
- Click "Empty" and name the Fileset accordingly.
- Double-click on the new Fileset to open the "Fileset Contents".
- Uncheck "Hide unused folders" if enabled.
- Navigate to "Users > All Users > Desktop".
- Drag-n-drop PDF file into the "Desktop" folder.
- Select the PDF and click "Get Info" from the menubar.
- Navigate to the "Verification" tab and select your desired Verification preference.
- Click "Apply" to save changes and Close the "Get Info" window and Fileset Contents window.
- You should now see your PDF Fileset in the "Filesets" view.
* The Fileset will be labeled as "Modified" indicating the it has not yet been saved. - "Update Model" if you'd like to save the changes.

Deploy .app to macOS Applications folder
Since FileWave can deploy content at the file-level, we can also deploy an entire macOS ".app" directly to the macOS Applications folder and enable Self-Healing. This method is useful if you don't have the original PKG or the software is distributed within a DMG containing just the ".app".
- Open FileWave Admin and navigate to "Filesets".
- Select "New Desktop Fileset" from the black menubar.
- Click "App / Folder" and select your desired ".app".
- Double-click the Fileset and verify the ".app" is in the "Applications" folder.
- FileWave is context aware and will automatically add ".app" to "Applications" folder if it was originally in the "Applications" folder on the Admin machine.
- ".app" coming from any other location that "Applications" will have to be dragged into the "Applications" folder within the Fileset (ex: from DMG).
- Optionally, right-click the Fileset and click "Properties", choose your desired Verification preference, and "OK" to save changes.
- You may consider using "Download If Missing" if the software is set to automatically update (ex: Chrome) to prevent software and FileWave from conflicting.
- You should now see your ".app" Fileset in the "Filesets" view.
- The Fileset will be labeled as "Modified" indicating the it has not yet been saved.
- "Update Model" if you'd like to save the changes.


Capture customized software installations using Fileset Magic
You might discover that a software's installer does not allow for the software to be provisioned or customized to meet your organization's needs. This is where Fileset Magic plays a huge role. Fileset Magic allows you to capture a customized software installation at the file-level and deploy it with Self-Healing enabled by leveraging a series of Snapshots taken from a "build" machine. The customizations may include software preferences, licensing, updates, and shortcuts.
While using Fileset Magic, please do your best to limit background activities to prevent unnecessary changes from being capture.
-
Open "Applications>FileWave>FileWave Admin (root).app" and navigate to "Assistants > Fileset Magic".
-
Select "Create Snapshot".
-
Select the "Scan Volume".
-
Select the "Scan Type".
-
Wait for the File scan to complete.
-
Install your desired software without proceeding in Fileset Magic.
- Open, update, license, and customize your software.
-
Click "Continue" to proceed in the Fileset Magic window.
-
Select the disk volume where the snapshot was taken.
-
Wait for Fileset Magic to scan the select volume and compare File changes.
-
View the File differences and select only what is necessary for the newly installed application.
- There may be background Windows activity that is captured. Do your best to exclude this content.
- Choose either to Save or Export the Fileset.
- Wait for the Fileset to be uploaded to the FileWave Server.
- Verify your Fileset Contents within the FileWave Admin.
|
1
|
2 |
|
3
|
4
|
|
5
|
6
|
|
7
|
8
|
|
9
|
10
|
|
11
|
12
|


Android Software and Policies
Use these Android app and policy articles during an evaluation to test public or private Google Play apps, managed web apps, permissions, compliance, network settings, password rules, and device restrictions.
Android apps and web apps
Android policies and permissions
Review policy scope and permission precedence before assigning Android policy Filesets to evaluation devices.
Set Up the FileWave Imaging Virtual Server (IVS)
What the Imaging Virtual Server does
FileWave Windows network imaging uses an on-premises Imaging Virtual Server (IVS). The virtual appliance runs in Hyper-V or VMware, PXE boots Windows devices in UEFI or legacy BIOS mode, captures or deploys disk images, and transfers captured images to the FileWave Server. Keep the base image thin when possible, then deploy applications and model-specific drivers through FileWave after imaging.
Import the IVS virtual appliance
- Download the latest version of the FileWave IVS that matches your FileWave Server version and virtual environment.
- Import the virtual appliance into Hyper-V or VMware. The FileWave Server Setup article shows the same virtual-appliance import pattern.
Configure IVS network settings
-
Access the FileWave IVS console via virtual environment.
-
Log into the FileWave console with the username "root" and the password "filewave".
-
Verify and take note of the current network settings obtained via DHCP using the commands below.
IP address and netmask
ifconfigGateway / Router
ip rDNS Servers
less /etc/resolv.conf -
Set a Static IP address for the FileWave IVS using the command below.
Set static IP address
imaging-control networksetup static

Add the IVS to FileWave Central
Hosted FileWave customers should also follow FileWave Hosted Servers and IVS Setup for the hosted-server connection requirements.
- Open FileWave Central and go to Preferences > Imaging.
- Click the "[+]" button to add a new FileWave IVS.
- Enter the IP address of the FileWave IVS and confirm that the status light turns green.
- Leave the port as "20444".
- Verify that the "Generate new key on Save" box is checked.
- Click "OK" on the "Add Imaging Server" window.
- Verify that the "FileWave certificate was successfully uploaded to the IVS" pop-up appears.
- Verify that the "FileWave Server Address" is correct within the "FileWave Imaging Appliance Preferences" window.
- Leave the port as "20015". Note: The default port setting is 20015. However, SSL is now required, and the system will automatically use port 20017 instead when 20015 is entered. Do not manually set the port to 20017. Always enter 20015, and the system will handle the SSL port change for you.
- Click "OK" within the "FileWave Imaging Appliance Preferences" window.
- Select OK in FileWave Central Preferences to save the changes and generate the shared key.
- Open FileWave Central Preferences again and return to Imaging.
- Click the right-most button for either "Enroll Imaging Server" or "Create client-side Certificate".
- Wait for the "Imaging Server enrolled successfully" pop-up message.
- Select OK in FileWave Central Preferences to save the changes.
- Create at least one Imaging Association, then confirm that the IVS completes check-in.


Windows Imaging - Capture Image
One image to rule them all
Well, at least that's the plan. Since FileWave recommends using a thin image that has been Sysprep'd with "/generalize" and "/oobe", your Master Image will not be specific to any make/model of computer and will go through the default Windows Out of Box Experience to scan for any hardware. This will allow you to deploy one image to all of your Windows machines and deploy device specific drivers and software after the imaging process has completed. The only reason you'd possibly have multiple images is to account for differences in your machine's BIOS (Legacy vs. UEFI) or architecture (32bit vs. 64bit).
Preparing your build machine
The first step is to prepare the machine you plan to capture the Master Image from. This can be a physical machine or a virtual machine, however most prefer to use a virtual machine as they can install Windows much quicker via ISO and more easily put the VM on the same VLAN as the IVS. Putting the machine on the same VLAN/subnet is crucial as by default, the IVS only listens to DHCP traffic on the subnet it resides on. After ensuring the essential imaging traffic is OK on the same subnet, we can later configure the IVS to listen to multiple subnets by leveraging IP Helpers. This section will cover creating a virtual machine but the same steps will apply to a physical machine.
-
Create a blank virtual machine within your virtual environment.
-
Configure your VM's BIOS to match your environment's most used BIOS, Legacy or UEFI (with Secure Boot disabled).
-
Configure the VM's network interface to be on the same VLAN/subnet as the FileWave IVS.
-
Configure the VM's hard disk to be as small as your smallest drive in your environment. 40GB is a good baseline.
-
Download and attach the Windows 10 ISO or Windows 11 ISO to your VM's optical drive.
- If you are attempting to download from a Windows machine you will be redirected to another page and not have access to the ISO.
- Use this guide to change how your browser identifies to access the ISO.
-
Boot your VM to the DVD/optical drive and install Windows 10/11 with default disk partition settings.
-
Create an Offline (non-Microsoft) Administrator user account.
- This account will persist after Sysprep so name and set password accordingly.
-
Once at the Desktop, open Powershell as Administrator.
-
Copy and paste the following Powershell commands into the Powershell window and press Enter.
-
These commands will remove the built-in Windows Apps that have been known to prevent Sysprep from completing successfully.
-
These commands are sourced from Experts Exchange - Windows 10 Sysprep Guide.
-
If copy/paste into VM is not working, please consider opening this page directly within VM.
Remove built-in Windows Apps
Get-AppxPackage *3dbuilder* | Remove-AppxPackage Get-AppxPackage *windowsalarms* | Remove-AppxPackage Get-AppxPackage *Appconnector* | Remove-AppxPackage Get-AppxPackage *windowscalculator* | Remove-AppxPackage Get-AppxPackage *windowscommunicationsapps* | Remove-AppxPackage Get-AppxPackage *windowscamera* | Remove-AppxPackage Get-AppxPackage *CandyCrushSaga* | Remove-AppxPackage Get-AppxPackage *officehub* | Remove-AppxPackage Get-AppxPackage *skypeapp* | Remove-AppxPackage Get-AppxPackage *getstarted* | Remove-AppxPackage Get-AppxPackage *zunemusic* | Remove-AppxPackage Get-AppxPackage *windowsmaps* | Remove-AppxPackage Get-AppxPackage *Messaging* | Remove-AppxPackage Get-AppxPackage *solitairecollection* | Remove-AppxPackage Get-AppxPackage *ConnectivityStore* | Remove-AppxPackage Get-AppxPackage *bingfinance* | Remove-AppxPackage Get-AppxPackage *zunevideo* | Remove-AppxPackage Get-AppxPackage *bingnews* | Remove-AppxPackage Get-AppxPackage *onenote* | Remove-AppxPackage Get-AppxPackage *people* | Remove-AppxPackage Get-AppxPackage *CommsPhone* | Remove-AppxPackage Get-AppxPackage *windowsphone* | Remove-AppxPackage Get-AppxPackage *photos* | Remove-AppxPackage Get-AppxPackage *WindowsScan* | Remove-AppxPackage Get-AppxPackage *bingsports* | Remove-AppxPackage Get-AppxPackage *windowsstore* | Remove-AppxPackage Get-AppxPackage *Office.Sway* | Remove-AppxPackage Get-AppxPackage *Twitter* | Remove-AppxPackage Get-AppxPackage *soundrecorder* | Remove-AppxPackage Get-AppxPackage *bingweather* | Remove-AppxPackage Get-AppxPackage *xboxapp* | Remove-AppxPackage Get-AppxPackage *XboxOneSmartGlass* | Remove-AppxPackage
-
-
Press Enter once more to ensure the last command is executed.
-
Close the Powershell window.
-
Generate and install your Custom FileWave Client MSI. * More instructions on how to do so can be found in the Windows setup section. * This can be done directly from the VM if file transfer is difficult.
-
Generate and download a Sysprep unattended answer file via Answer File Generator. * "Computer Name" can be any generic placeholder. * "Product Key" is not required for remote Windows activations. * "Domain Join" is optional, FileWave can join machines to Active Directory after the imaging process. * This can be done directly from the VM if file transfer is difficult. An alternative tool that has some nice options is https://schneegans.de/windows/unattend-generator/
-
After the "unattend.xml" file is downloaded, move the file to "C:\Windows\".
- Run the Check Disk command before your Sysprep the image. This will ensure the disk is cleared of any errors. The below commands are run in Command Prompt run as administrator.
chkdsk /R shutdown -r -t 0 -
Open Command Prompt as Administrator and run the following commands to Sysprep and shutdown your machine.
cd Sysprep sysprep.exe /generalize /oobe /shutdown /unattend:C:\Windows\unattend.xml -
Your machine will shutdown automatically, do not boot until instructed in future section.
Create a placeholder for Master Image association
To capture an image from our build machine we must add the Client machine as a Placeholder within FileWave using its desired Windows Hostname and its Ethernet MAC address.
- Open FileWave Admin and navigate to "Clients".
- If your build machine checked into FileWave during the preparation stage, please delete the Client from FileWave and "Update Model".
- Click "New Client" button from black menubar and select "Enter Name" from the "Desktop device placeholders" section.
- Enter in a generic name for the placeholder and optionally add a "Comment".
- Reference your VM's settings and obtain the Ethernet MAC address used by the VM.
- Click "OK" to finish adding the Placeholder.
- Navigate to "Imaging".
- Drag-n-drop the "Master Image" item from the right-hand pane to the newly added Placeholder.
- "Update Model" to save changes.
- Navigate to "Preferences > Imaging", select your FileWave IVS, and click "Monitor".
- Wait for at least 5 minutes and verify that the FileWave IVS is getting the latest Model. * The current Server Model Number can be found in the lower-right hand corner of the FileWave Admin.
- Once the FileWave IVS is fully checking in and getting the latest Model, proceed to capturing the Master Image.


Capture Master Image
Now that the FileWave is aware of the Master Image association, it is time to PXE Boot your build machine and capture your image.
- Verify that your build machine is set to Network Boot and is on the same subnet as the FileWave IVS.
- PXE boot you build machine.
- If using Legacy BIOS, you will see progress text as the PXELinux environment is loading.
- If using UEFI, please be patient as no boot progress will be shown, only a black screen.
- After successful PXE, name your Windows image.
- It is recommended to include the Windows build version, architecture, and BIOS type in the image name.
- Ex: Windows10_20H2_x64_UEFI
- You should now see a blue screen showing progress as it captures each partition and uploads it to the FileWave IVS.
- After the capture, you will see a black screen with white text.
- Please be patient as the Master Image is being uploaded to the FileWave Server for permanent storage.
- "Press any key to continue" and shutdown the build machine.
- You should see your newly captured image in the FileWave Admin.
- If you do not see the image, please contact your FileWave SE and do not attempt to recapture image or boot the build machine.
|
1
|
2
|
|
3
|
4
|
|
5
|
6
|
|
7
|
|


Troubleshooting
If you receive the error “Filenames are invalid for imaging” when associating a placeholder with your Master Image, the issue is typically related to the placeholder’s name.
To resolve this:
-
Rename the placeholder to remove special characters, symbols, and spaces.
-
Ensure the placeholder’s client name is 15 characters or fewer, as Windows imaging enforces this limit.
After renaming, try the association again.
Post Imaging Content
If you run into an issue regarding BitLocker activation, please refer to:
Deploy a Windows Image with FileWave IVS
Start the deployment
After capturing the master image, associate it with target devices, confirm that the IVS has downloaded it, and PXE boot a representative device before wider deployment.
Associate an image with devices
Associate the image with an enrolled FileWave Client or with a bare-metal device represented by a placeholder. For a placeholder workflow, complete steps 1–6 in Windows Imaging - Capture Image first.
- Open FileWave Central and navigate to "Imaging".
- Drag the new image to an individual device or a device group.
- Confirm the imaging associations.
- You should now see your new image association in the bottom pane of the "Imaging" tab.
- Optionally, drag a Windows Driver Fileset onto the association.
- Select Update Model to save the associations.
- Your image will now be downloaded to the FileWave IVS.
- In Preferences > Imaging, select the IVS and choose Monitor to verify that it received the current Model.
- You should see the image download progress from the FileWave Server to the FileWave IVS.
- The image remains on the IVS while at least one association references it.
- Once the image has completed downloading, proceed to PXE Booting your Windows machines.


PXE boot the target devices
- Verify that your target machine is set to Network Boot and is on the same subnet as the FileWave IVS.
- PXE boot your target machine.
- If using Legacy BIOS, you will see progress text as the PXELinux environment is loading.
- With UEFI, the device may show a black screen without progress text while the environment loads.
- You should now see a blue screen showing progress as it restores each partition from the FileWave IVS.
- After the restore, you will see a black screen with white text.
- The device should restart into Windows and begin the Out-of-Box Experience defined by the unattended answer file.
- If you get a message similar to "no boot media found" after reboot, please reboot again and ensure the machine is not set to Network/PXE boot.
- Since the Master Image contained the FileWave Client, it should start communicating with FileWave immediately.
Resolve Client conflicts
A reimaged device may check in with an identity that conflicts with its previous Client record. Resolve the conflict carefully so the intended associations and inventory history stay with the managed device.
- Open FileWave Central and navigate to "Clients".
- Select "New Client" from the black menubar.
- Select "Desktop Clients" from the "Devices waiting for enrollment section".
- Locate and select the Client that is reporting a conflict and click the "Solve Conflict" button.
- Select the option that matches the device state.
-
Remove the new client
- Select this option if you want to refuse the client for now. You can fix the device identifier and re-enroll it later
-
Remove the old client and enroll the new client
- Select this option if the old entry is obsolete and can be safely removed; all clones will be removed
-
Replace the old client with the new client (recommended)
- Select this option if you want the new client to replace the existing entry (this will take over the old record with all clones, associations, etc.)
-
- Confirm that the newly imaged Windows Client checks in and downloads Filesets associated with the retained Client record.
OS Software Updates
Stay Patched with FileWave
Keeping your Windows, macOS, iOS, and tvOS device's operating systems updated is one of the most important steps to ensuring device security. FileWave sync with the default Microsoft and Apple Software Update catalogs allowing you to bring in all updates, test them, and then automatically deploy the requested Software Updates to machines.
Automatic Software Update deployment
Using FileWave to automatically deploy Software Updates to requesting machines is the easiest and recommended method of deploying updates to your various devices. After "Approving" a Software Update, FileWave will determine if the update is eligible for your devices and automatically deploy it on your behalf.
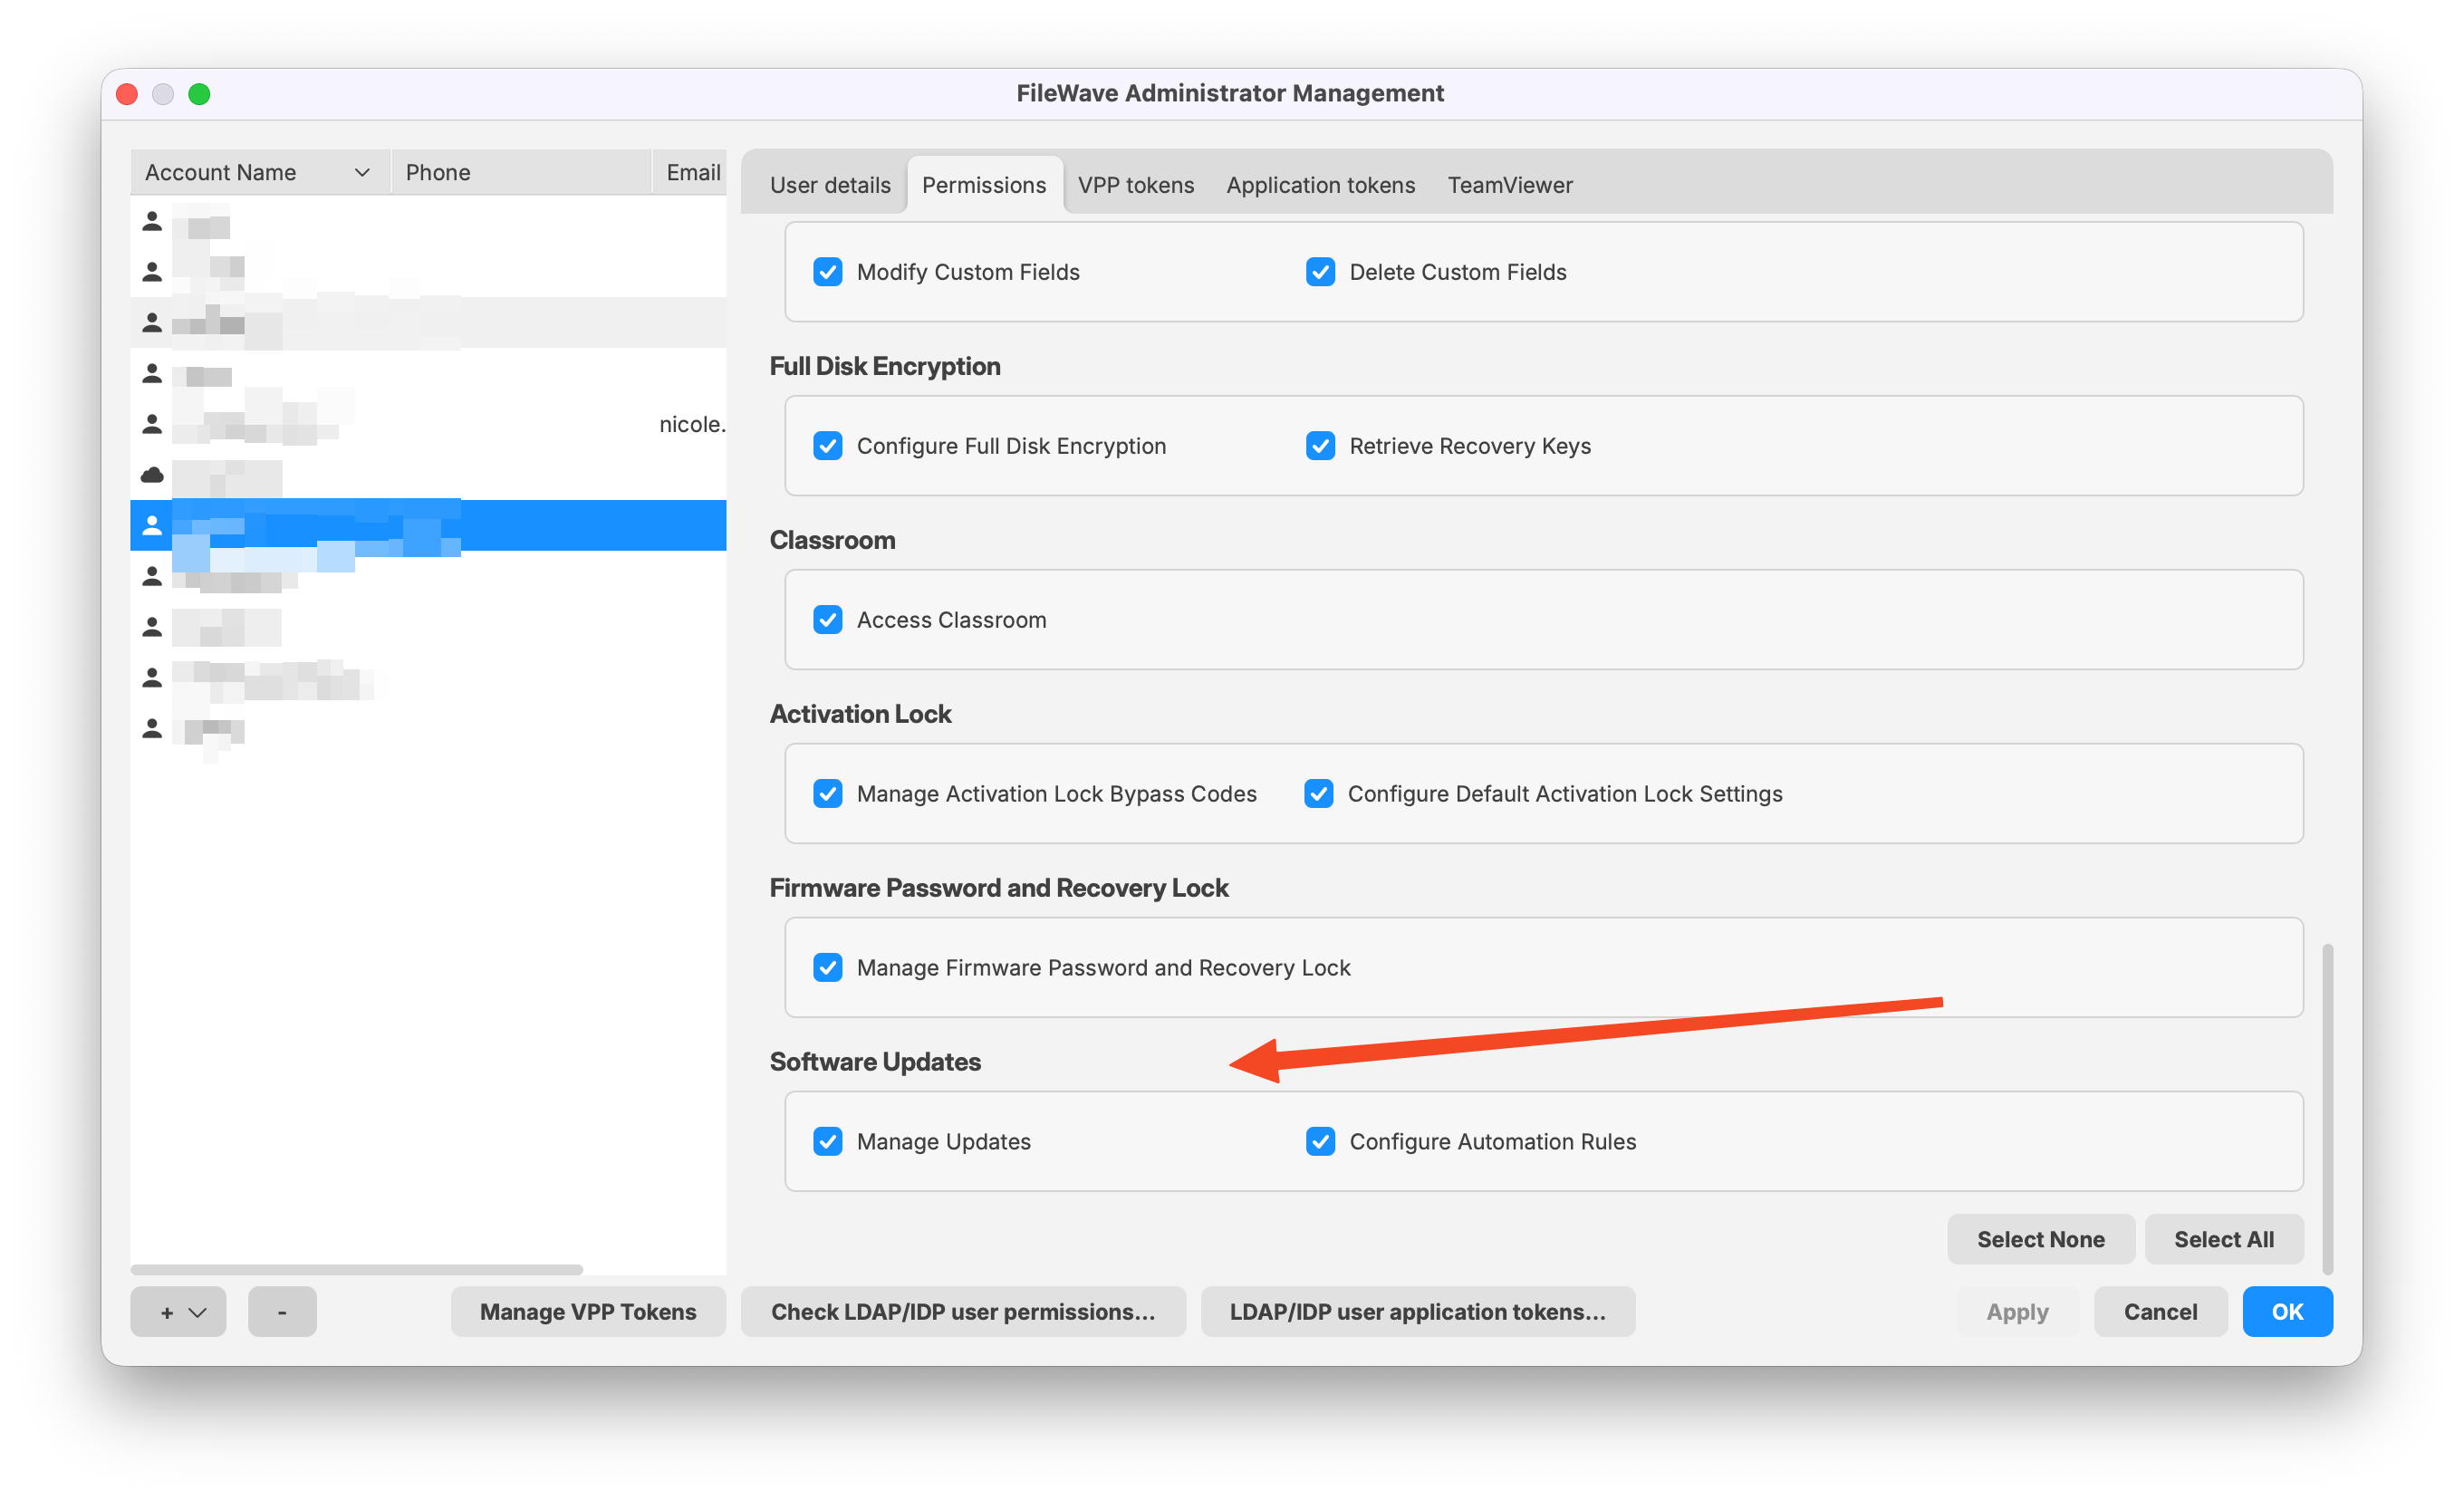
First it is important that your account has permissions to perform these actions. In Assistants -> Manage Administrators as shown in the below image notice if you have Manage Updates and Configure Automation Rules enabled.
Now you can;
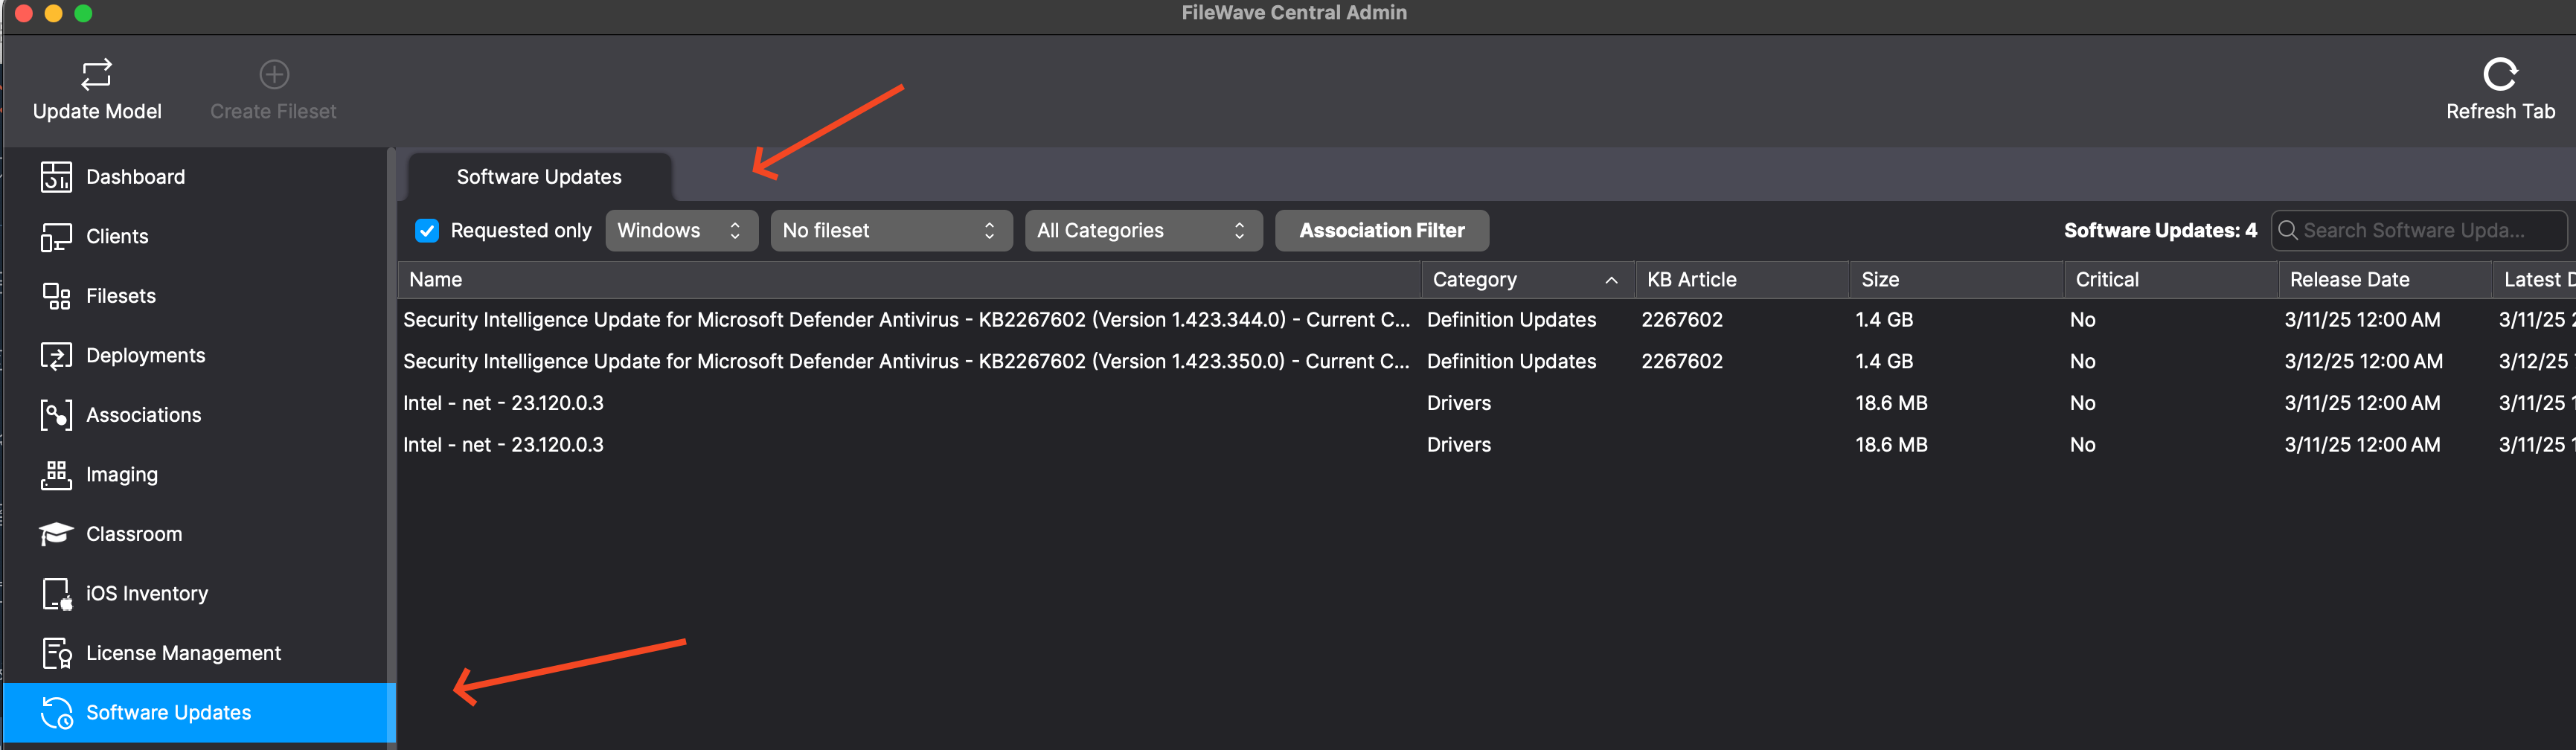
- Open FileWave Central and navigate to "Software Updates" on the left.
- Select the desired Operating System from the drop-down menu. As you can see in the below image, Windows is selected. Also notice that Requested Only is checked so as to limit the view to only updates devices believe that they need. Note also that No fileset is selected which further limits what is being shown so that my list of actionable updates is very short.
- Now you can select one or all of the updates and right-click to pick Create Filesets... and then pick where you want these updates to appear as far as what Fileset Group they are stored in. It makes a lot of sense to have a Fileset Group in the Filesets area specifically for Windows and then another for Apple updates.
- If you would like the updates to automatically deploy when created then just create a Deployment that assigns the Fileset Group to a Smart Group like All macOS or All iOS or All tvOS or All Windows so that as soon as you create them they are assigned. If you would like to do testing first then you could create the patches in a Fileset Group that is for testing and then later move them to the production Fileset Group.
Note that you want to avoid assigning Windows OS updates to pre-16.0.0 clients because they will not function correctly. You can simply add a criteria to your All Windows SmartGroup to check if the "FileWave Client Version" begins with "16." and that would protect you until you can work to upgrade all of your devices.
Also note that Windows OS updates from before FileWave 16 should be purged from your server to free up disk space, and because they will not function correctly. This transition from the old format to this new format should be a one-time exercise to remove the old style of Windows OS updates and ensure your clients are upgraded to FileWave 16.0 or higher.
- "Update Model" to save the changes.
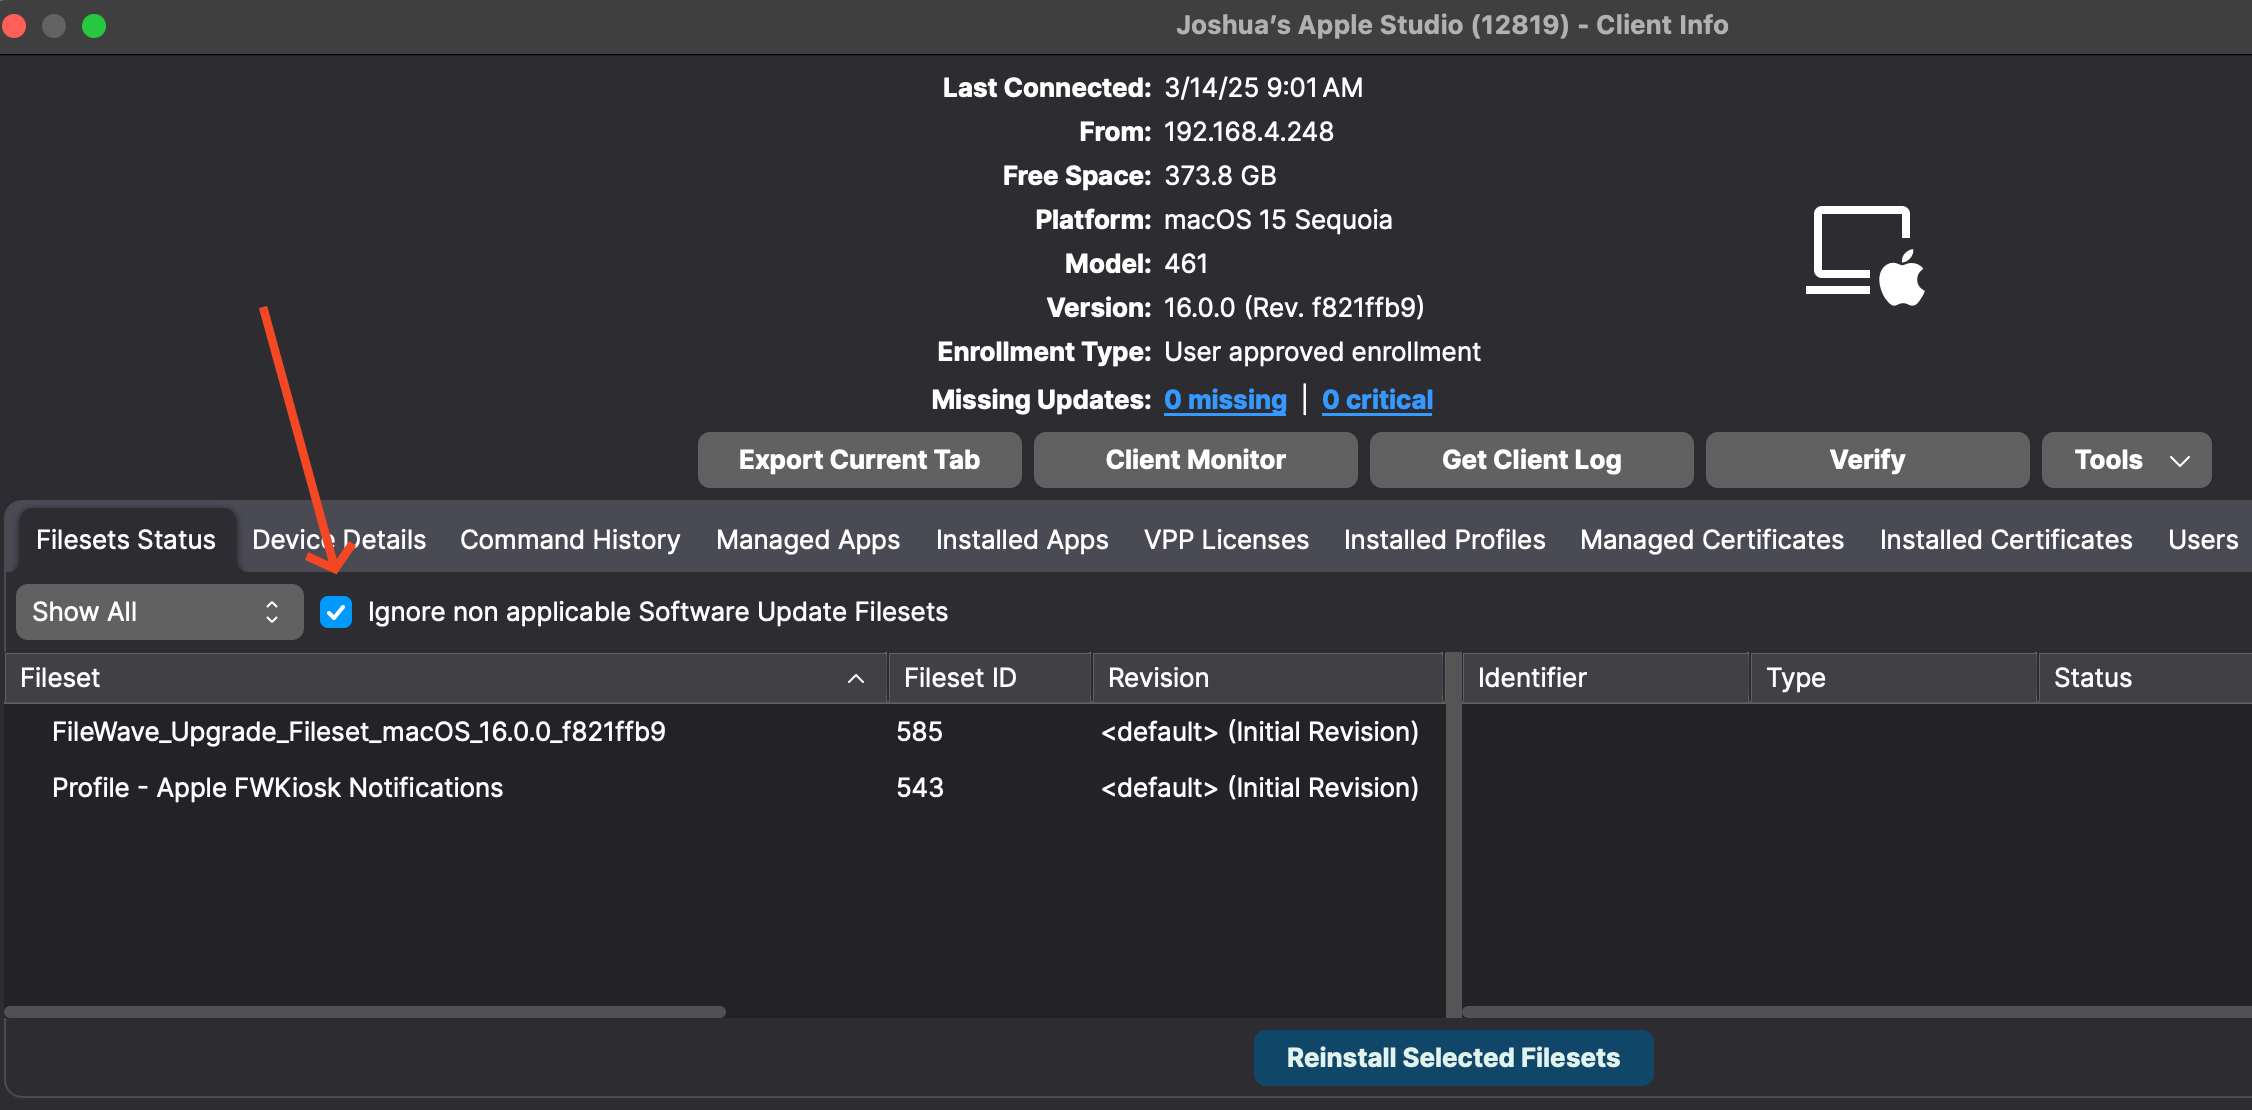
It should be noted that you don't have to make everything so clean as to seperate out the patches by platform. There was another enhancement in FileWave 16.0 where even if a patch was assigned to a device it would be skipped if it didn't apply. You can see this below as the "Ignore non applicable Software Update Filesets" checkbox. When checked you will only see the updates that were applicable. Deselecting it will show the patches that didn't apply but have a Deployment that assigned them.
Manually deploy Software Updates with Scheduling
FileWave can also deploy Software Updates just like any other Fileset and allow you to schedule the deployment of the Software Update Fileset.
- Open FileWave Central and navigate to Deployments on the left hand side of the window.
- Create a new Deployment that contains your Windows or Apple patches and for the target use a Smart Group that is your Windows or Apple devices. You may have already done this earlier, and if you have this already then you can just edit that Deployment.
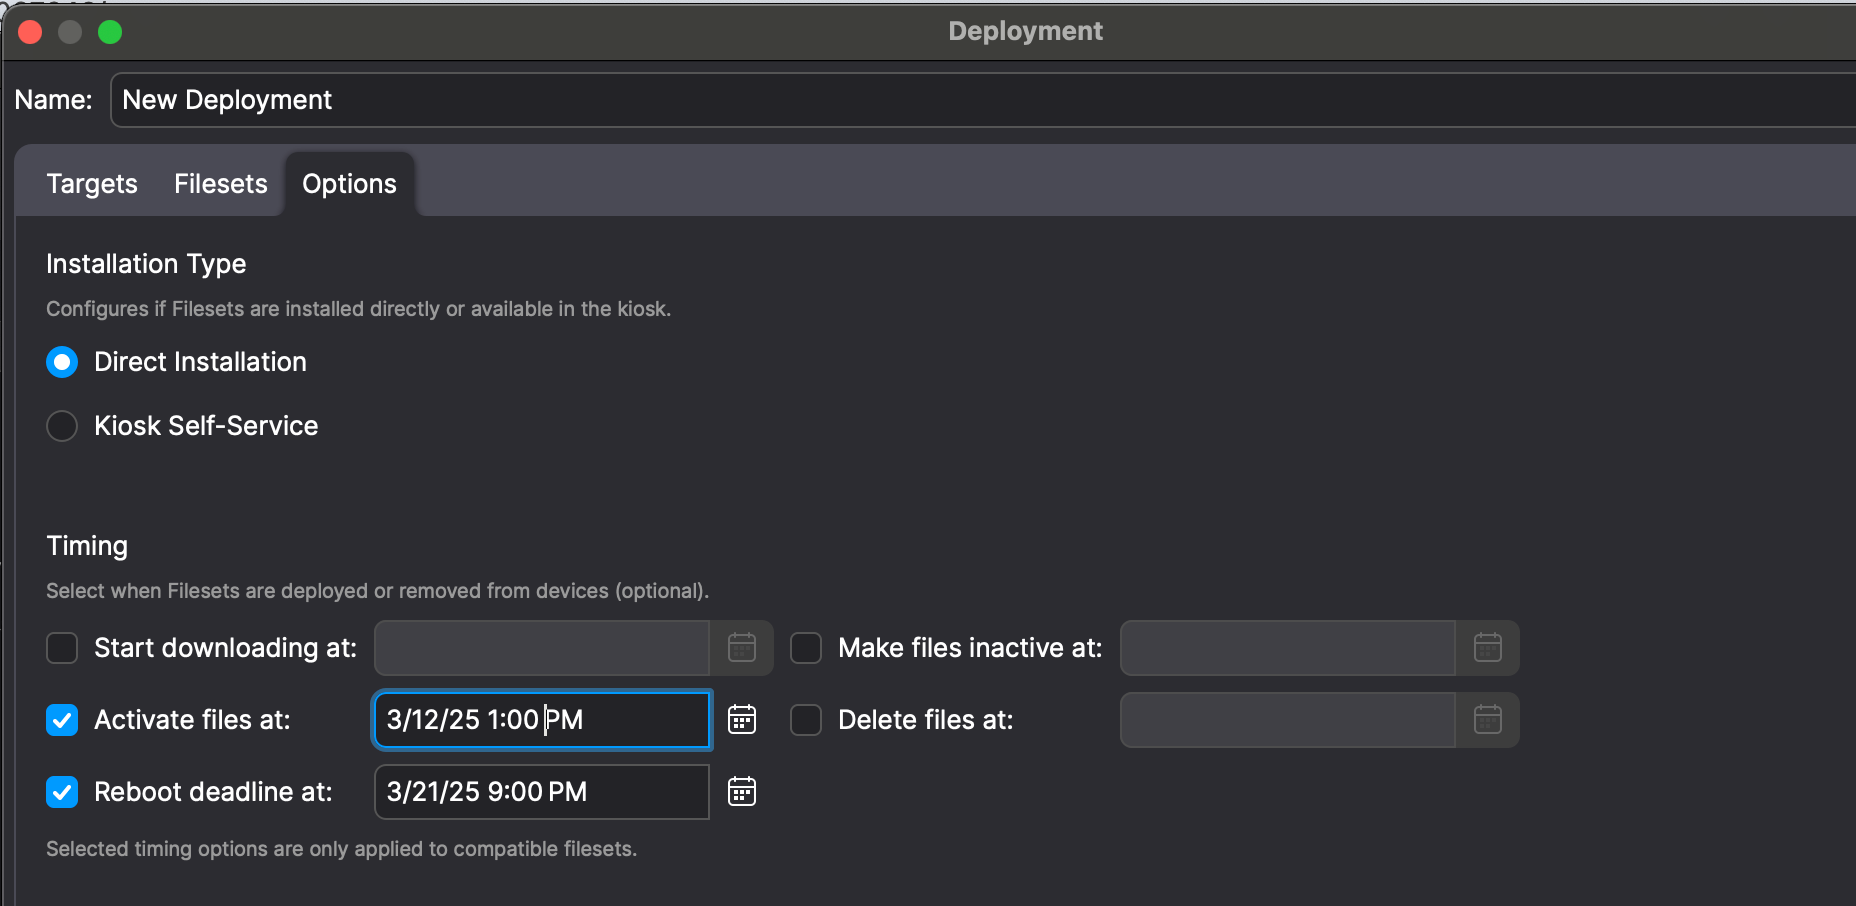
- In the Properties for the Deployment you will see on the Options tab that you can decide when to Activate (Install) the patches. You can also set a Reboot deadline. If you re-use this Deployment for monthly patches then know that you'll need to keep changing these dates or else new patches will immediately be past their deadline after enough time passes.
- "Update Model" to save the changes.
Windows BIOS/UEFI Firmware and Driver Updates
The latest Windows Software Update filesets now include BIOS/UEFI firmware updates from certain OEM vendors (e.g., Dell, HP, Lenovo). While these updates may appear alongside OS patches, please be careful when deploying.
The latest Windows Software Update filesets now also includes third-party driver updates, such as those for monitors, audio devices, and peripheral hardware. While these updates can improve compatibility and stability, they often have the following impact:
- Many of these drivers require a reboot to complete installation.
- Automatic deployment may result in unexpected restarts, potentially disrupting end-user workflows.
To maintain a smooth user experience and prevent unplanned reboots, you may want to deploy driver updates via Self-Service Kiosk instead of automatic enforcement.
Next Steps
Now that you have the basics you may want to dig deeper and read the Best Practice Guide: Software Update Deployment (16.0+) to implement more processes to make your patching effective and efficient.