Fileset Scripts
- Fileset Scripts Overview
- Fileset / Payload Script Exit Code Status
- Windows Requirement Script Examples
- Mitigating Privilege Escalation in Fileset Executables
Fileset Scripts Overview
FileWave can run scripts at seven stages of Fileset deployment, called activation states:
- Requirements
- Preflight
- Activation
- Postflight
- Verification
- Pre-Uninstallation
- Post-Uninstallation
In FileWave Admin, open the Filesets view, select the Fileset you want to edit, and click the Scripts toolbar icon. The Scripts dialog shows each script and the activation state where it will run.

Scripts in the same activation state run from top to bottom as shown in the list. Drag scripts to change their execution order.
Use the create or import buttons to add scripts. You can also edit a script, or drag a script from Finder into the dialog to import it.
Click OK to save changes to the Fileset. Click Cancel to discard the changes.
Double-clicking a script opens the file properties dialog. Most script attributes can be changed in the same way as files in an open Fileset, but some settings are locked because the Fileset workflow depends on them. For example, the Execute flag cannot be cleared. Requirement scripts also cannot be changed between interactive and non-interactive execution because the client must be able to use the script exit code to decide whether the Fileset should download.
The checkbox Re-run requirement scripts on change and uninstall active Fileset if they failed controls the same internal setting as Evaluate requirements on change and uninstall active Fileset if they failed in the Requirements tab of the Fileset properties. When this option is enabled and the Fileset changes, the client re-evaluates the Fileset requirements, including requirement scripts. If any requirement or requirement script fails, the Fileset is uninstalled.
Fileset script types
- Requirements Scripts – Run before the Fileset or its dependencies are downloaded. If any requirement script returns a non-zero exit code, the Fileset and its dependencies are not downloaded or installed.
- Preflight Scripts – Run after dependencies are installed, but before the Fileset downloads. If any preflight script returns a non-zero exit code, the Fileset is not downloaded or installed.
- Activation Scripts – Run when the Fileset is activated.
- Postflight Scripts – Run after the Fileset installation has completed.
- Verification Scripts – Run after postflight scripts and during each verification of the Fileset.
- Pre-Uninstallation Scripts – Run when a Fileset is inactivated, immediately before the Fileset is uninstalled. Use this state when the script needs access to files that self-healing will remove during uninstall.
- Post-Uninstallation Scripts – Run immediately after the Fileset and its dependencies have been uninstalled or removed from the client.
Related Content
Fileset / Payload Script Exit Code Status
Script Exit Codes
FileWave uses script exit codes to decide whether a Fileset should continue, retry, be skipped, or stop until an administrator takes action.
Quick answer: exit code 0 means success, 210 means the requirements check succeeded but the Fileset should be skipped, and 220 means the requirements check failed and FileWave should not retry automatically.
If a Fileset is skipped, missing from Kiosk, or blocked because a requirements script returned 210 or 220, use this table to confirm the expected behavior before troubleshooting the installer or activation scripts.
Status Value |
Status Description |
Severity |
Status Details |
|---|---|---|---|
| 220 | Failed! (Will Not Retry) | ERROR | Script exited with a failure, do not automatically retry |
| 210 | Success (Skipped Install) | ERROR | Script exited successfully, report Fileset as installed but skip actual installation |
| 0 | Success | OK | Script exited successfully |
| -1000 | Crashed | ERROR | Script crashed during execution |
| -1001 | Time Out Exceeded | ERROR | Script execution time took longer than Get Info > Executable > 'Wait for executable to finish' > 'Wait for:' |
| -1002 | No Logged In User | ERROR | Script could not run because no user is currently logged in |
| -1003 | Failed To Start | ERROR | Script could not run because the script failed to start |
Expected behavior
Requirements scripts processing rules
- If any requirements script returns 220, FileWave stops running scripts and stops trying to install the Fileset. No further action occurs unless an administrator manually requests it or a newer version of the Fileset becomes available. The Fileset status is reported as Requirements Not Met: Will Not Retry.
- If any requirements script returns a non-zero value other than 210, FileWave stops running scripts. Requirements scripts run again 2 minutes later.
- If a requirements script returns 210 and all other scripts return 0, the Fileset status is reported as Skipped. The Fileset is not installed.
- Only when all requirements scripts return 0 does FileWave install the Fileset.
Kiosk
If a requirements script returns 210 or 220, the Fileset is not available in Kiosk.
If a dependency Fileset has a requirements script that returns 210, it does not affect the availability of the main Fileset. If that dependency returns 220, the dependency fails and the main Fileset is not available in Kiosk.
Dependencies
- If the main Fileset is in the Skipped state, its dependencies are still processed and installed.
- If a dependency is in the Requirements Not Met: Will Not Retry state, that status does not propagate up the dependency tree. The main Fileset still fails because a requirement failed, but it is reported as a download, activation, or update failure for the dependency Fileset.
Other scripts
When a requirements script returns 210 or 220, the Fileset is not installed, so preflight, activation, and other later script types do not run. If the requirements scripts run again later and return values that allow installation, the other script types run as usual.
Inventory
- Filesets in Skipped status are reported to inventory as though they were installed.
- Filesets in Requirements Not Met: Will Not Retry status are not reported to inventory.
Windows Requirement Script Examples
Requirement scripts run on client devices at each tickle interval, 2 minutes by default, to check whether installation conditions are met. A script can check for a file, registry key, service, or process before allowing Fileset activation. Common uses include:
- Block redundant installations if the app is already present or
- Ensure prerequisites are present or
- Enforce a particular installation order.
If a requirement script returns any exit code other than 0, such as 1 or -1, FileWave treats it as a failure and reports Requirements Failure: Script in the Client Info window and Fileset Report. The Fileset contents will not download or install until all requirement scripts return 0. To check multiple conditions, add multiple requirement scripts.

The examples below are Windows requirement scripts you can adapt. If you need the opposite condition, swap the exit codes in the example.
Install if registry key present
::Replace HKLM\path\to\registry\key with the actual path to the registry key, e.g. HKLM\SOFTWARE\Macromedia\FlashPlayer

reg query "HKLM\path\to\registry\key"
if %ERRORLEVEL% EQU 0 (
    exit 0
) else (
    exit 1
)
Install if registry value present
::Replace HKLM\path\to\registry\key with the actual path to the registry key containing your value, e.g. HKLM\SOFTWARE\Macromedia\FlashPlayer
::Replace <value> with the actual name of the value, e.g. CurrentVersion in this example

reg query "HKLM\path\to\registry\key" /v <value>
if %ERRORLEVEL% EQU 0 (
    exit 0
) else (
    exit 1
)
Install if file or folder present
::Replace <drive>:\path\to\file\or\folder with the actual path to the file or folder, e.g. %ProgramFiles(x86)%\Mozilla Firefox\firefox.exe

if exist "<drive>:\path\to\file\or\folder" (
    exit 0
) else (
    exit 1
)
Install if application present in Programs & Features
::Replace <AppName> with the name of your app, e.g. Adobe Acrobat Reader DC
::Be as specific as possible because partial app names may provide a match when you don't necessarily want it to, e.g. Adobe will match both Adobe Acrobat Reader DC and Adobe Flash

reg export HKLM\Software\Microsoft\Windows\CurrentVersion\Uninstall %temp%\applist1.txt
reg export HKLM\Software\Wow6432Node\Microsoft\Windows\CurrentVersion\Uninstall %temp%\applist2.txt
copy %temp%\applist1.txt + %temp%\applist2.txt %temp%\applisttemp.txt
find "DisplayName" %temp%\applisttemp.txt > %temp%\applist.txt

find "<AppName>" %temp%\applist.txt
if %ERRORLEVEL% EQU 0 (
    del %temp%\applist*
    exit 0
) else (
    del %temp%\applist*
    exit 1
)
Install if service present
::Replace <service> with the name of your service from the Services control panel, e.g. Adobe Acrobat Update Service
::Be as specific as possible because partial service names may provide a match when you don't necessarily want it to, e.g. FileWave will match both FileWave Client and FileWave UltraVNC Server

sc query | find "DISPLAY_NAME" | find "<service>"
if %ERRORLEVEL% EQU 0 (
    exit 0
) else (
    exit 1
)
Install if process present
::Replace <process> with the name of your process, e.g. notepad.exe

tasklist /FI "IMAGENAME eq <process>" 2>NUL | find /I /N "<process>"
if %ERRORLEVEL% EQU 0 (
    exit 0
) else (
    exit 1
)
If you find that you need to delete a requirement script for any reason, right-click that script and choose Reveal in Fileset. That will open the Fileset Contents window with the script file highlighted. Click the Delete icon in the toolbar to delete your script.


Test requirement scripts locally before adding them to a Fileset. These examples provide building blocks for Windows Filesets that should install only when specific local conditions are true.
Mitigating Privilege Escalation in Fileset Executables
What
This article reflects the behavior in FileWave 16.0.0+
When deploying Filesets in FileWave;
- It’s possible to include a Verification Script that runs every 24 hours (or at system restart) on Windows and macOS.
- You might also have a Requirements Script that runs every 2 minutes to test for a condition needed to install something.
These scripts are typically used for tasks such as re-applying Group Policy settings—using tools like LGPO.exe on Windows—as an example. However, if an executable (like LGPO.exe) is replaced by a non-administrator, there’s a risk that the malicious replacement could be executed with elevated privileges (SYSTEM on Windows or root on macOS).
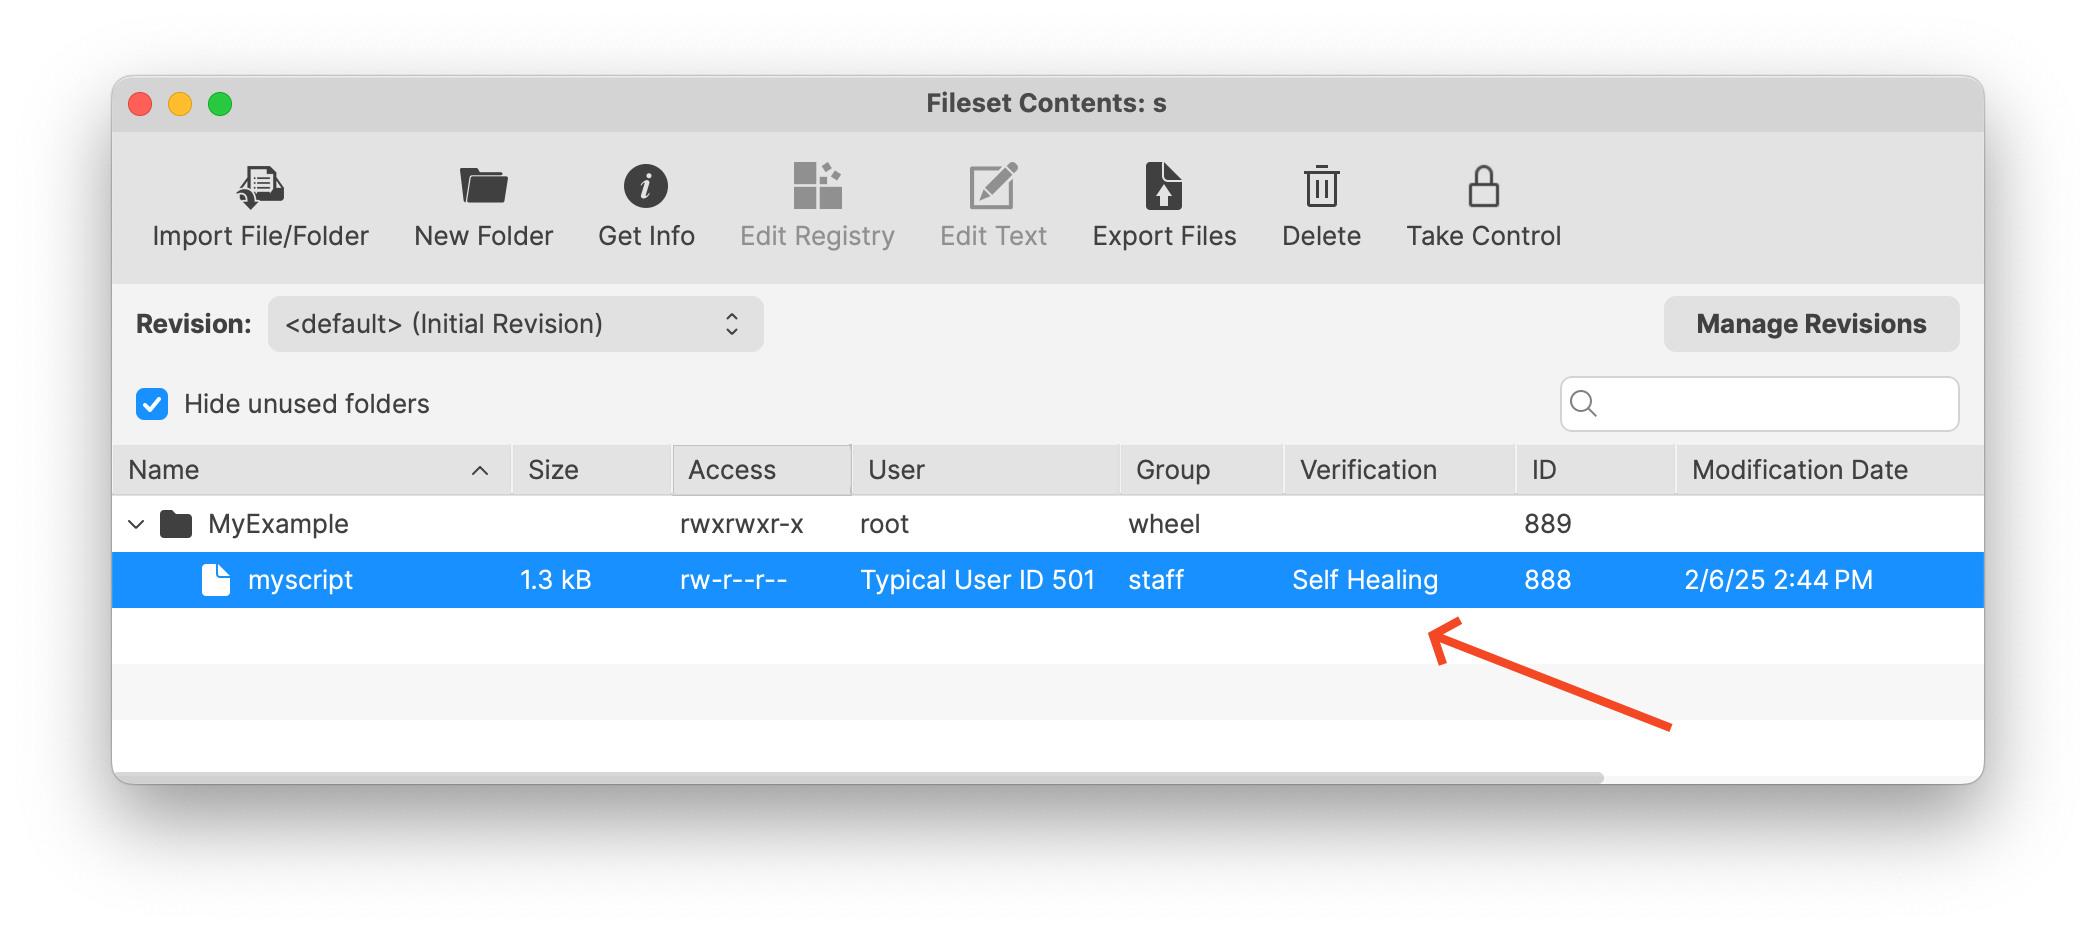
By default, Filesets benefit from a self-healing mechanism. If an executable is modified, the Fileset will restore the original file before the Verification Script executes. An image below shows this status and picking Get Info for a file may be used to change this on a per-file basis. Properties for a Fileset can be used to change the behavior across the entire Fileset as well.
This same protection applies when the executable is deployed and then called by a Custom Field—the Fileset’s verification step precedes the Custom Field execution, thereby mitigating the risk of local privilege escalation.
However, there is one scenario where this protection of Self-Healing does not apply: the Blocker Script, which by default runs every 5 minutes. Its more frequent execution window could allow a local user to replace an executable before the next Fileset verification occurs. However this too can be mitigated as we will discuss below.
When/Why
This article is particularly relevant in environments where:
- Executable files (e.g., LGPO.exe) are deployed via Filesets that also include a Verification Script or are triggered via Custom Fields.
- There is a risk of local users, who lack administrator rights, replacing these executables to attempt privilege escalation.
- The deployment involves Blocker Scripts, which run at more frequent intervals (every 5 minutes), thus presenting a window where an attacker might replace a file before it is healed by the Fileset.
Why is this important?
Ensuring that only the intended executable is run with elevated privileges is critical for system security. A malicious modification could lead to unauthorized privilege escalation. Mitigating this risk by enforcing strict file ownership and permission settings prevents non-administrative users from replacing or modifying executable files.
How
To mitigate this risk, it is recommended to either pick properties on the file in the Fileset and properly secure it or use a Postflight Script in your Fileset deployment that sets the file permissions so that only SYSTEM (on Windows) or root (on macOS) can modify the file.
On Windows systems as of FileWave 16.0.0 the c:\ProgramData\FileWave\ directories like FWClient and the scripts directory are restricted so that a non-Administrator is unable to manipulate files located there. This is one way that FileWave will prevent a local attack by default. Files on Windows will also inherit the permissions of the directory that they are deployed in to which will help for a more consistent permissions experience.
For some examples of setting permissions on files please take a look at the below. For the scripts you could have them run as Fileset scripts when deploying the files to adjust permissions to how you'd like.
macOS Example (Properties of file in Fileset)
In the below images you can see an example file in a Fileset where Get Info has been clicked in the toolbar when viewing the Fileset and the permissions have been adjusted so only root:wheel has access to the file. Make sure you click Apply on each screen to make the setting change.


macOS Example (zsh Script)
Below is an example zsh script that sets the ownership to root:wheel and the permissions to 770 for the target executable.
#!/bin/zsh
# Define the path to the executable deployed via the Fileset
TARGET_FILE="/path/to/executable"

# Change the ownership of the file to root:wheel
chown root:wheel "$TARGET_FILE"

# Set the permissions to 770 (owner and group have full permissions, others have none)
chmod 770 "$TARGET_FILE"

# Explanation:
# - chown root:wheel: sets the file owner to root and group to wheel.
# - chmod 770: grants read, write, and execute permissions to the owner and group,
#   while denying any permissions to others.
Windows Example (PowerShell Script)
The following PowerShell script sets the file’s owner to SYSTEM and adjusts the permissions so that only Administrators and SYSTEM have full control. This ensures that no non-administrator can replace the file.
# Define the path to the executable deployed via the Fileset
$TargetFile = "C:\Path\To\executable.exe"

# Set the owner of the file to SYSTEM using icacls
icacls $TargetFile /setowner "SYSTEM"

# Remove inherited permissions to ensure only our defined permissions are in place
icacls $TargetFile /inheritance:r

# Grant full control (F) to SYSTEM
icacls $TargetFile /grant SYSTEM:(F)

# Grant full control (F) to Administrators
icacls $TargetFile /grant Administrators:(F)

# Explanation:
# - icacls /setowner "SYSTEM": sets the file owner to SYSTEM.
# - icacls /inheritance:r: removes inherited permissions so only our custom permissions apply.
# - icacls /grant SYSTEM:(F) and /grant Administrators:(F):
#   ensures that only SYSTEM and Administrators have full control over the file.