If you look at the various folders shown above, you will notice that most of them are the standard items that show up on any computer.
The **All Users** folder is there to allow you to take an item and drag it from the location path where you originally found it into a folder that will be placed into the home directory of every user account on a computer. In this case, we captured the folder item **Key Info** from the path **/Users/johnd/Desktop** and we want it to be distributed into the Desktop folder of every user who has access to a computer managed by FileWave. What you would need to do is locate the original location in the Fileset Contents window, and drag that item into the final distribution location, as shown on the next page: 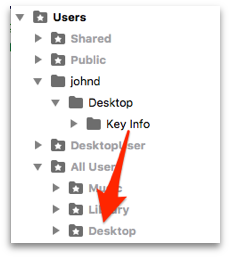 becomes… 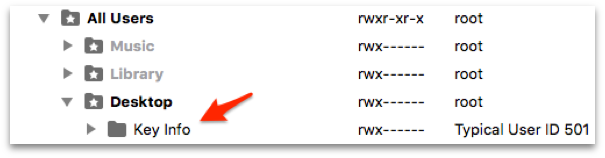 A significant strength of this type of Fileset is that you can make changes to it at any time, update the model, and those changes propagate out to the associated clients, such as adding another document to the set, or replacing one. ### Empty Empty Filesets are best used for placeholders. You get an empty container that you can add content to at any time. This is an excellent Fileset to 'kickstart' the Kiosk on computers (the Kiosk shows up on a managed computer when at least one Fileset designated as a Kiosk item has been associated with that computer Client).  Once created, you can double-click on the Fileset to view the content window and add items as needed. #### Scripts in Filesets Empty Filesets can also be used to deploy scripts. You can create a script, save it as a *shell script* file, for example <myscript>.sh, and place that into a Fileset. The template for any script is simple: ``` #!/bin/zsh # Put any script content here exit 0 ``` You can use any of the common shell dialects, such as **sh, bash, tcsh, or zsh**. By default, the script is executed once, by **root,** when the Fileset is deployed to the Client. You would set a path for the script to be placed in a location that allows the system to access the appropriate controls, such as in **/usr/local/bin/**. Once the script file is added to the Fileset, you can set its permissions and other variables using the **Contents** window, which is accessed by double-clicking the script file inside the Fileset. **Note: You do NOT put the "sudo" command into a script that is used in a Fileset; scripts run as root when executed by FileWave.** #### Superprefs and Empty Filesets One excellent use of the Empty Fileset is for Superprefs files. You can create a Superprefs file (see Section **5.8**) and just drop the file it creates (fwcld.newprefs.plist) into the Properties window. The settings will be activated upon arrival at the Client. #### System Integrity Protection Apple introduced a security policy with OS X v10.11 (El Capitan) that restricts any non-Apple code from running in protected areas of the system. Make sure none of your scripts try to write to, or edit code, in these areas: **/System, /bin, /sbin**, or **/usr**.For more information on SIP, see this Wikipedia article: [https://en.wikipedia.org/wiki/System\_Integrity\_Protection](https://en.wikipedia.org/wiki/System_Integrity_Protection)
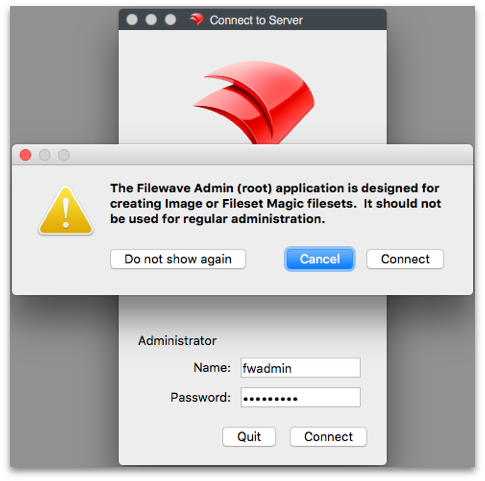
### Fileset Magic Sometimes, the content you want to distribute cannot be found in a completely deployable state. Fileset Magic allows you to build a Fileset from system snapshots taken before the installation/configuration of some software and after, resulting in a Fileset that contains the differences between the two snapshots. Fileset Magic on macOS is accessible from FileWave Admin, but you should use the special version of the Admin application - labeled **FileWave Admin (root)** - which runs as a root process in order to capture all possible file system changes needed to build a complete distribution. This is in /Applications/FileWave/ and was installed as part of the administration software. For Windows administrators, Fileset Magic can be accessed from the FileWave Admin login window as well as inside the Admin application. This allows you to run a Fileset Magic snapshot without the FileWave Admin interfering with Registry changes. 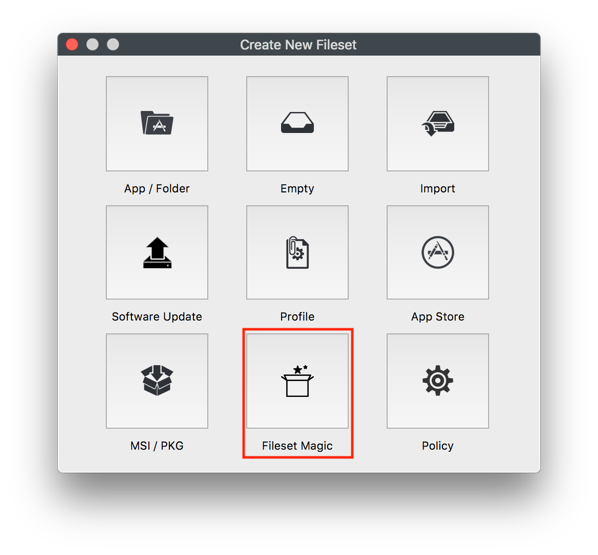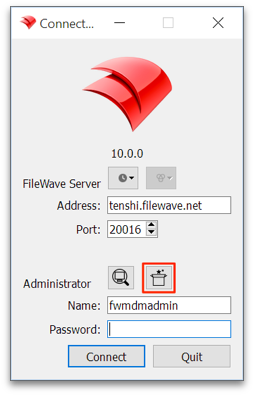Note: When using Fileset Magic, you should quit all other running applications besides the required installers or updaters for your custom Fileset.
 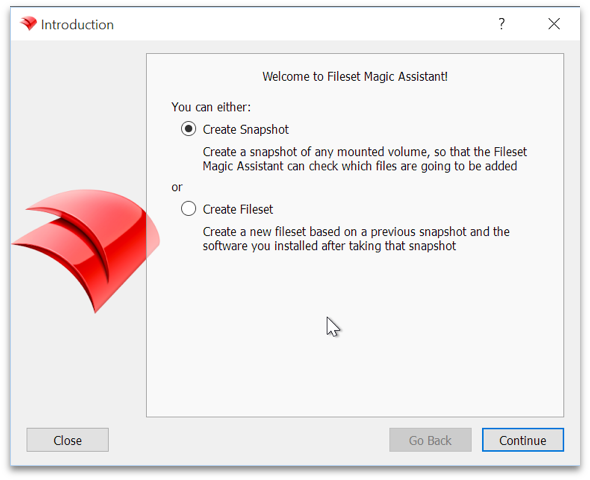 Once you have quit all unneeded applications, you create a snapshot of your system. It is a good practice to use a clean system for this process instead of your normal administrator machine. This will ensure that you are working with the files you want to add and avoiding dealing with all the additional files that get created on a production system from normal use. In other words, the snapshotting processes will run faster with a smaller number of files to scan.  Next, you choose the level of scan desired. Depending on what you are installing or modifying, you may need to deep scan the entire system. If you know where the contents are going to be placed, you can narrow down the scan. The **Expert Settings…** button lets you choose exactly what folders/directories you want scanned. 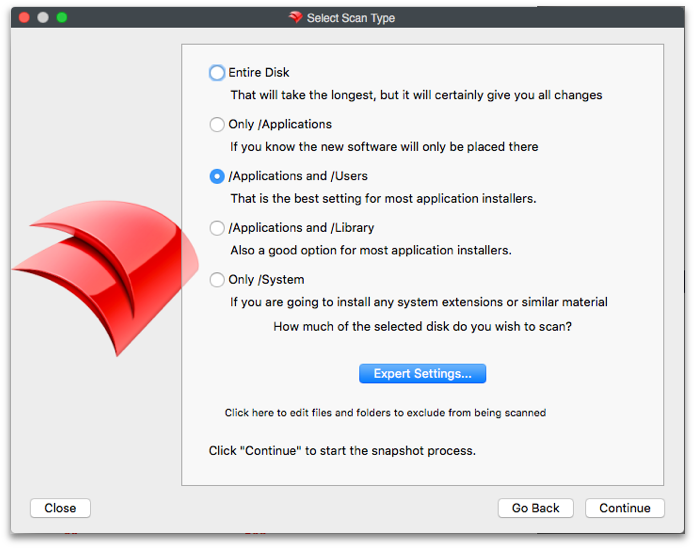 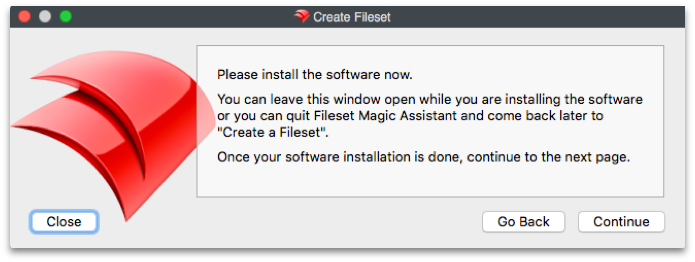 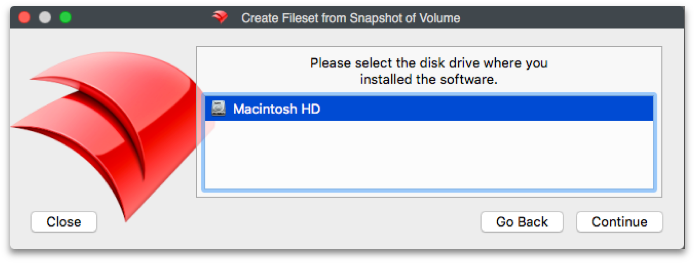  Once the initial scan is complete, you perform your installs and updates as needed. Run the second scan to get a comparison between the two scans, and choose which files you want to keep in your new Fileset. Once you have picked the files you need, you will name the Fileset and save it. You can also choose to move any files that are needed by all users from the local account where they showed up into the **All Users** location in Fileset Contents. This would be general user-level application support files or specific settings for a local user. You can open the Fileset by double-clicking on it and edit / add / delete contents as needed. For Windows systems, you will need to pay close attention to the Registry. Make sure you do not overwrite any Registry items that existed prior to your Fileset creation unless you are absolutely sure those changes are needed. You should also try to disable any virus-scanning software, backup utilities, and other software that might generate unnecessary files or Registry changes during the construction of the Fileset. ### Import The *Import* Fileset is actually a dialog that allows you to import a previously created Fileset. ### Policy The Policy option contains several payloads that help configure FileWave Clients. *Blocker Script:* This policy applies to desktop devices and allows you to suspend management with a script. The script runs every 5 minutes or during verification. If it exits with a non-zero status, the client suspends management; if it exits with 0, management continues or resumes. FileWave reflects suspended management in inventory under the Component type "FileWave Policy" and in the "Policies" tab in the Client Info window. [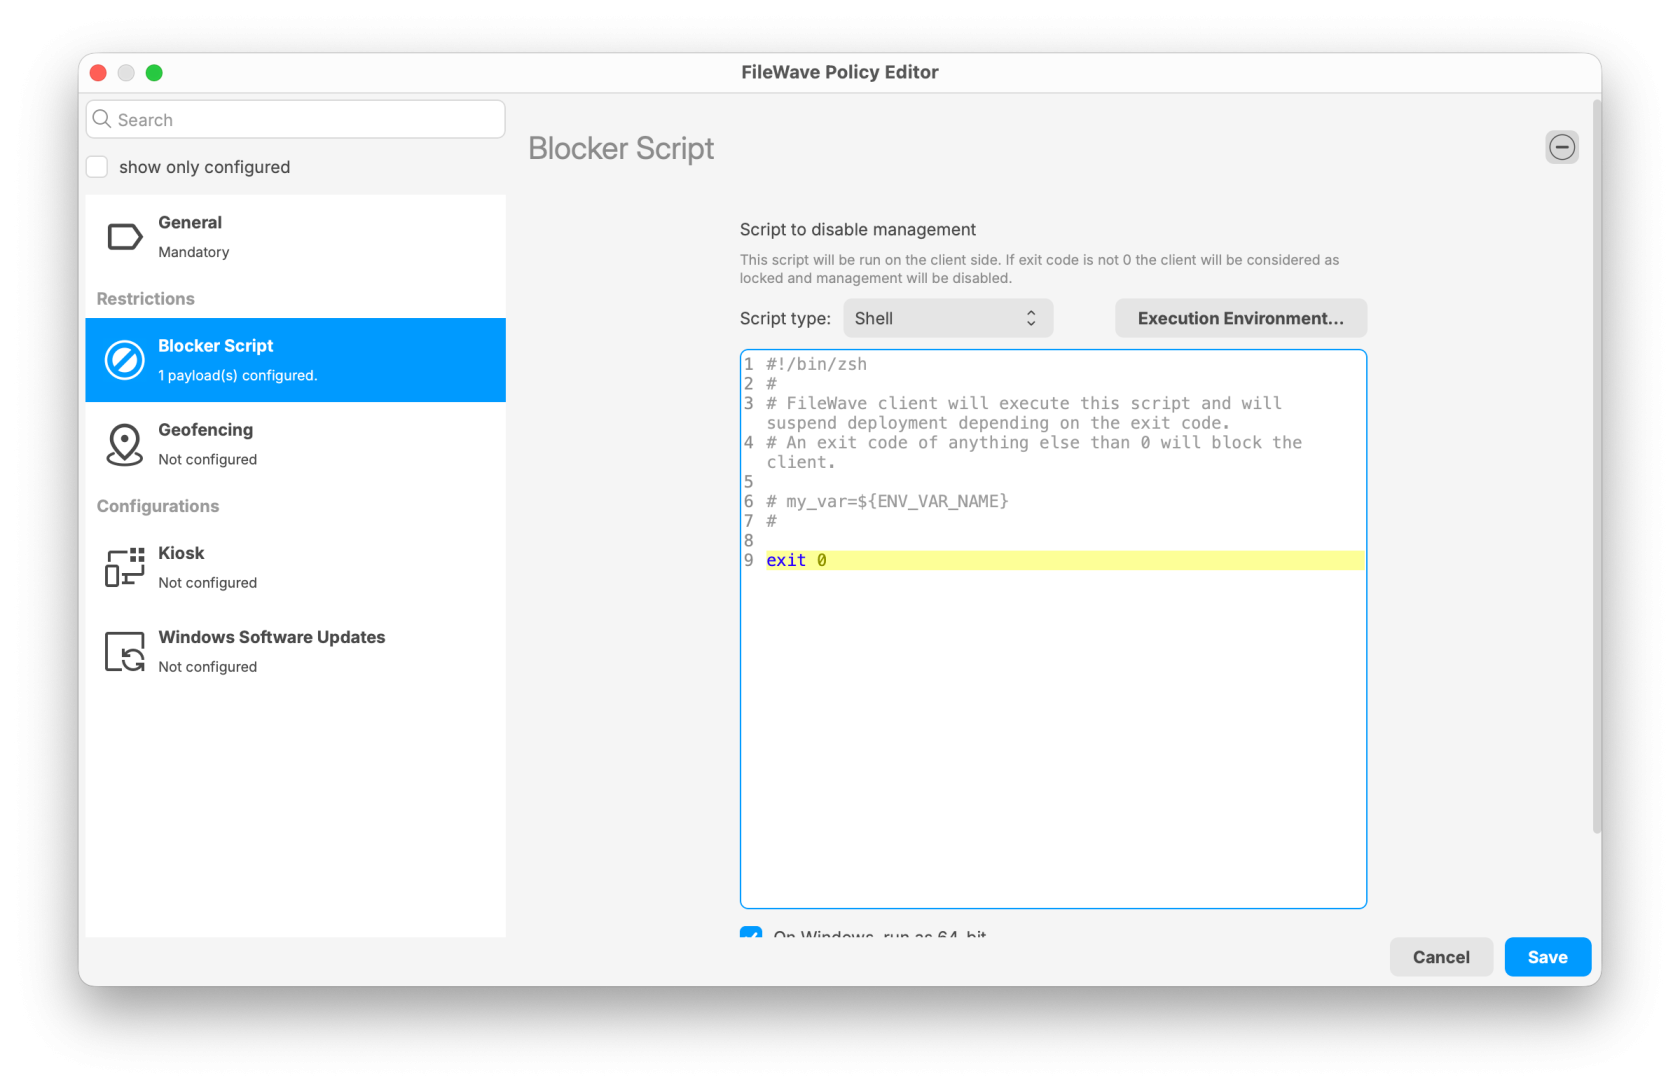](https://kb.filewave.com/uploads/images/gallery/2025-09/e3ymZwAKRoDdwyJP-image.png) *Geofencing*: This applies to Android devices and can run an action when a device leaves a geofenced area. More details in [Geofencing](https://kb.filewave.com/books/android/page/geofencing "Geofencing") [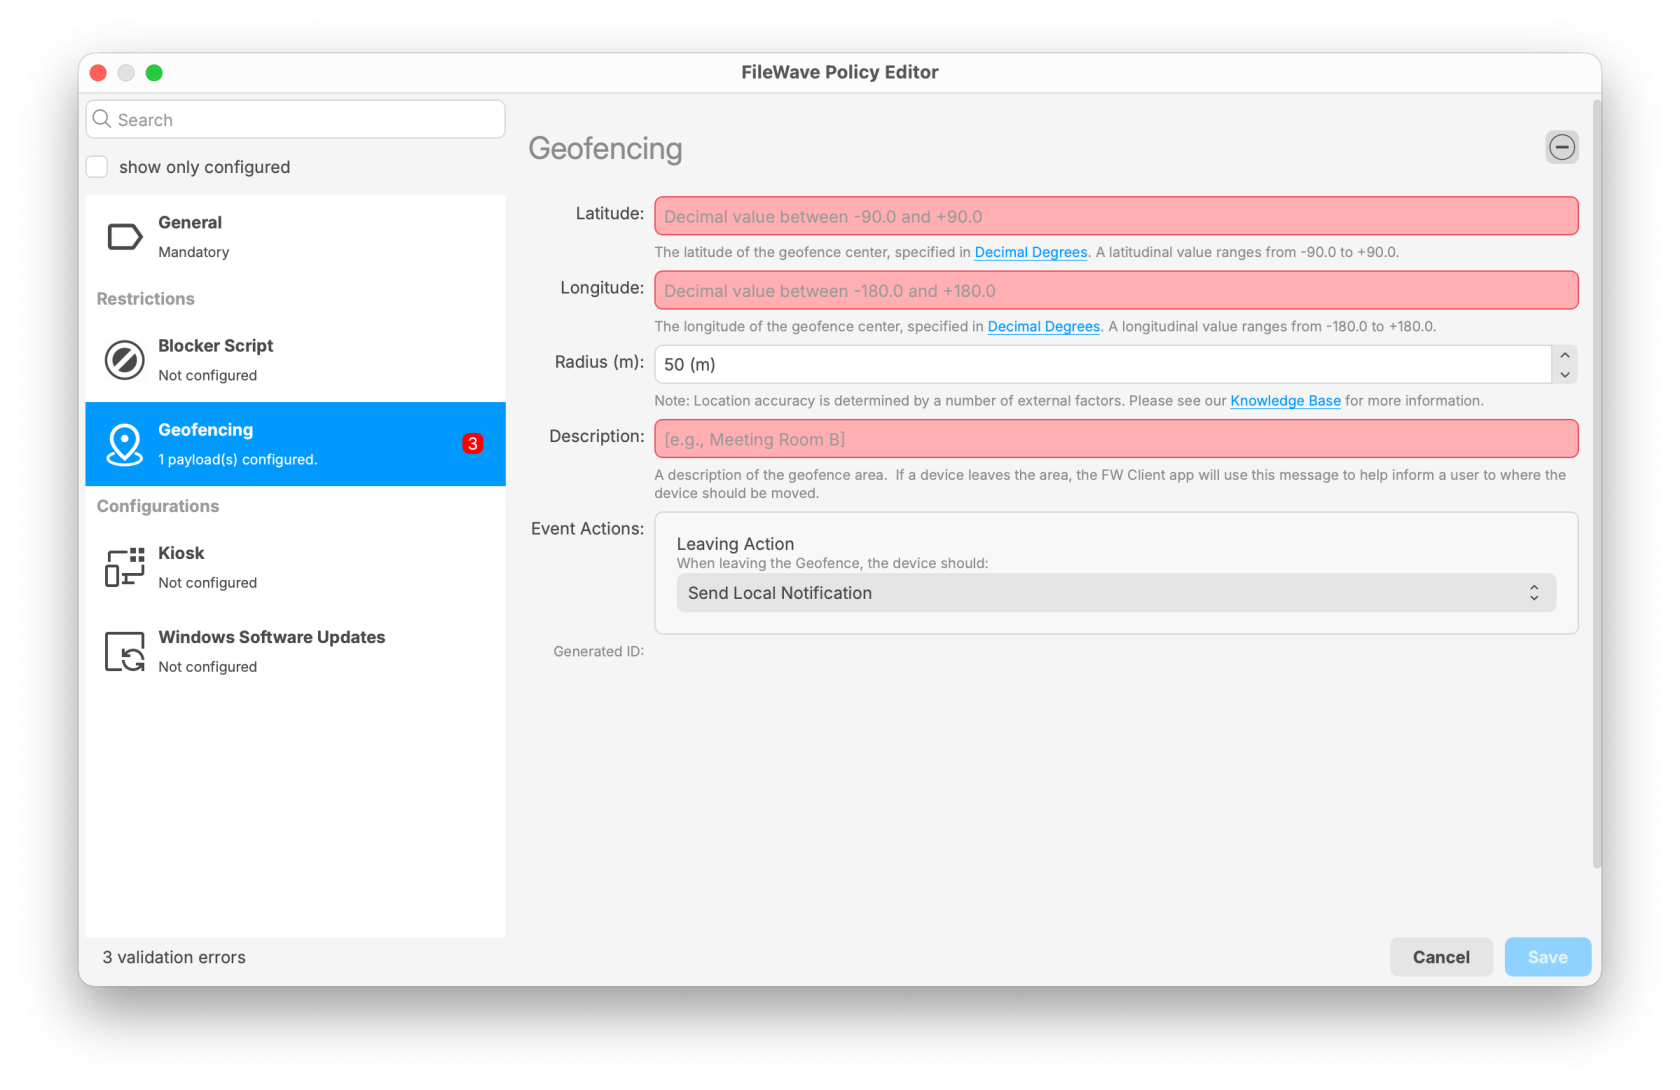](https://kb.filewave.com/uploads/images/gallery/2025-09/AYBubpCkP2h14XNf-image.png) *Kiosk*: This can customize the look of the Kiosk as outlined here [Setting the Primary Colour, Name and Logo in Kiosk/App Portal (16.0+)](https://kb.filewave.com/books/kiosk/page/setting-the-primary-colour-name-and-logo-in-kioskapp-portal-160 "Setting the Primary Colour, Name and Logo in Kiosk/App Portal (16.0+)") [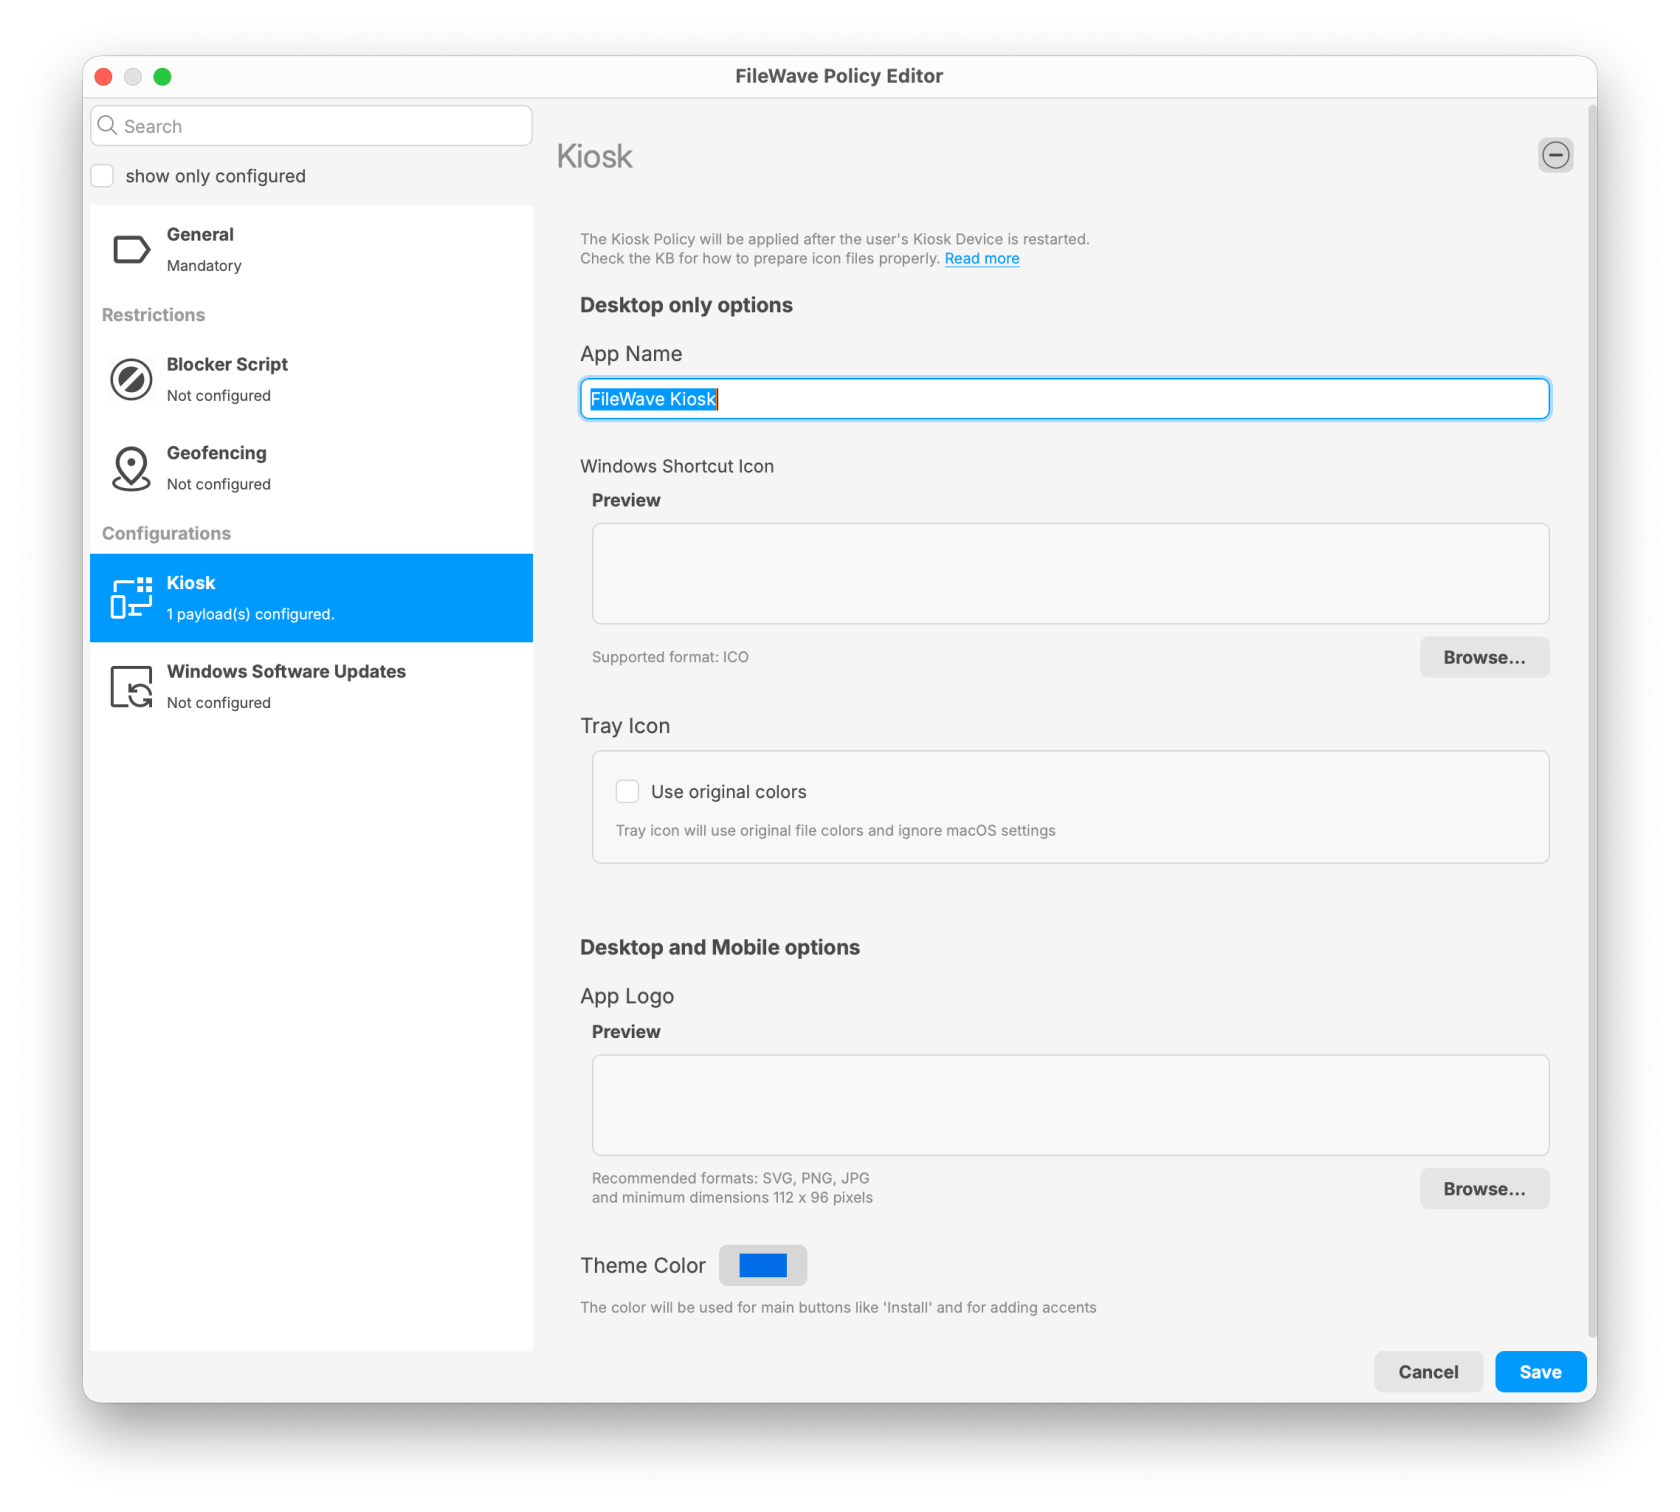](https://kb.filewave.com/uploads/images/gallery/2025-09/jGN1Do4dVxLoADjU-image.png) *Windows Software Updates*: This can automate the deployment of Windows OS updates as covered here as of FileWave 16.2.0; [Automated Windows OS Updates Policy](https://kb.filewave.com/books/software-updates-windows/page/automated-windows-os-updates-policy "Automated Windows OS Updates Policy") [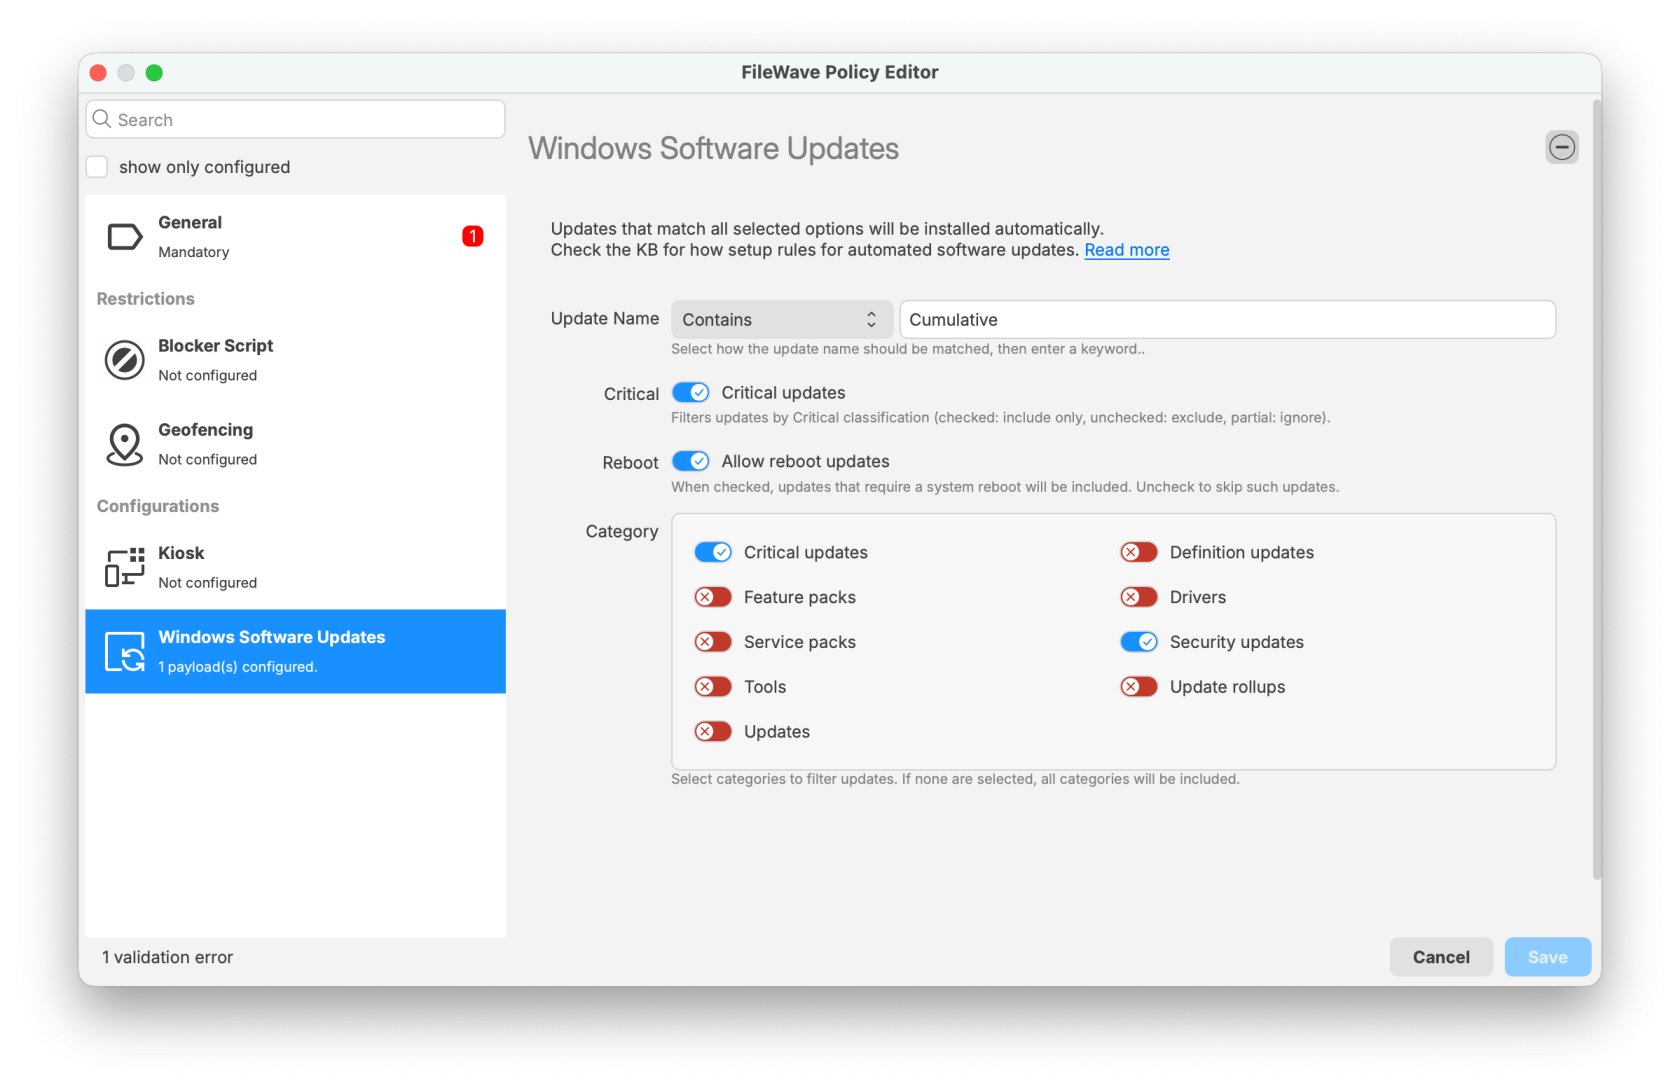](https://kb.filewave.com/uploads/images/gallery/2025-09/Bz5vMiK2fHbQLvOm-filewave-admin-2025-09-23-09-22-57.png) ### Software Update FileWave allows you to capture the software updates provided by both Apple and Microsoft through their software update mechanisms and convert those updates to Filesets. The list of software update servers used by both providers is located in the FileWave Preferences under the General settings. These URLs can be edited as changes are made. The updates do not include items that Apple provides only through the iTunes Store or App Store. If you deploy a large number of macOS, iOS, or iPadOS devices, consider using Apple's macOS content caching service on your network. Content caching stores Apple software and iCloud content that local devices have already downloaded so other devices can retrieve it without downloading it again from the internet. See [Apple's content caching deployment guide](https://support.apple.com/guide/deployment/intro-to-content-caching-depde72e125f/web) for more information. #### Deploying software updates When you choose to create a Software Update Fileset, you will see a window that shows you either every software update available for the selected OS platform (iOS, macOS, or Windows), or just the updates requested by your Clients. With FileWave Admin, you will be able to capture the updates you want as Filesets. Once you create a Fileset from any of the updates, you can then select the Clients to associate with that update. Be careful of manually associating Software Update Filesets with just any Client. You should associate the Filesets with requesting clients only. As always, test any updates on a non-production device before mass deployment. Finally, check all updates for dependency issues. Make sure an update is not going to break any existing software.Note: These updates do not include items from the iTunes or App Store; it shows iOS operating system updates only.
--- ## Apple ### Profile The Profile Fileset contains all of the settings used for both computer and mobile device management on macOS and iOS. The Profile Editor in the Desktop Fileset window is identical to the one in the Mobile Fileset window. ### DDM Asset Think of a DDM Asset as a configuration setting. DDM Assets include Authentication credentials and User identity. ### DDM Configuration Think of a DDM Configuration as a more modern Profile. It has options you can set and then assign. DDM Configurations cover settings such as Passcode Settings, Screen Sharing Connections, and Software Update Settings. The design is similar to Profiles in the FileWave interface, but it uses Apple's declarative device management engine on the client. ### App Store You can create Filesets for Apple Clients using content from the Mac App Store. As with the iOS App Store Fileset, you are not actually storing the application or eBook inside the Fileset; but providing the URL to the content online. Filesets created in this manner can be distributed to a user's computer and require the user to enter their Apple ID in order to access the content, or you can link the Fileset to the Apple VPP store and provide either redeemable codes or managed distribution licenses for the provided content. With FileWave, you have the ability to associate App Store content directly to a device, or to a user's Apple ID as part of a VPP distribution. ### AutoPkg AutoPkg lets you search for and add an AutoPkg-generated installer. You can read more in [AutoPKG](https://kb.filewave.com/books/integrations/page/autopkg-filewave-integrated-v155 "AutoPKG"). ### PKG The two Filesets that do not store their contents as individual files are the PKG Fileset and MSI Fileset. For the PKG Fileset, you select a downloaded installer for macOS (.pkg and .mpkg). When the Fileset is deployed to the Client, upon activation it will run as an installer with local administrator privileges. ### Document With the ability to set "Open in…" characteristics in iOS 8+, you can also create Filesets with document content. This type of Fileset can contain **pdf**, **ePub**, and non-Apple iBookstore **iBooks** formatted items (ones created with *iBooks Author*). They are delivered to the iBooks Library as a **managed document** which means it can be given and taken away. 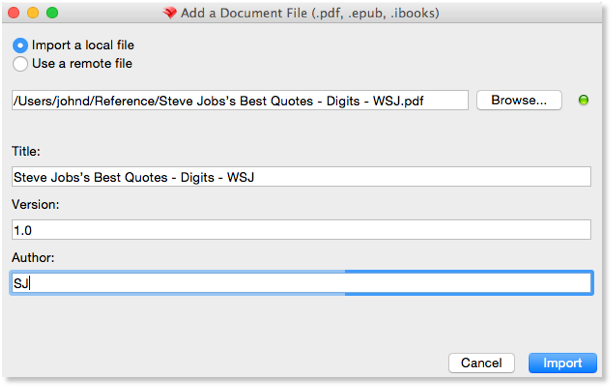 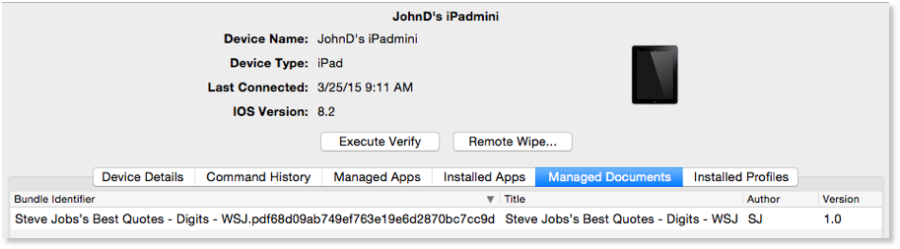 ### Enterprise The Enterprise Fileset is designed for you to distribute an **internally-created** iOS application. Apple does not condone or support using this type of Fileset to distribute Apple App Store or iTunes Store content. You can easily distribute software you have created with this Fileset by locating the **.ipa** file for the application on your administrator system and adding it to the Fileset list. All of the custom controls and settings are available for use with this distribution. You can select a remote location for the .**ipa** distribution. Normal configuration is to import the **.ipa** into your FileWave Server and wrap it up as a Fileset. The new method allows you to enter a URL to the **.ipa**, such as a web server, where the item can reside. --- ## Microsoft ### MSI Fileset The two Filesets that do not store their contents as individual files are the *MSI* */* *PKG* Filesets. For this Fileset, you select a downloaded installer for Windows (.msi). When the Fileset is deployed to the Client, upon activation it will run as an installer with local administrator privileges.Note: Filesets based on .msi will uninstall the contents when the Fileset is removed/disassociated. Instead of just removing the installer, the Fileset will perform an actual uninstall process.
Windows-based distributions may come pre-packaged in the Microsoft Installer format (MSI). Customizations to MSI files can be made through Microsoft Transform (MST) files. FileWave supports MSI and MST through its Patch Installer feature. The MSI file must have a lower case MSI extension, such as *Application Installer.msi*, for the MSI file to be recognized by the Admin software. MST is supported by modifying a Patch Installer Fileset. An MST file must be copied into the same directory in the Fileset Contents Window as the MSI file. (This location is generally *FileWave\\FileWaveInstallers\\Application.msi*). Additionally, the MST file must be named exactly the same as the MSI file with a lower-case MST extension such as "*Application Installer.mst"*. #### Installations with Setup.exe Installers Complex installations are contained in an executable file often named "*Setup.exe.*" It may be simpler to deploy the executable file and have it run on the local computer rather than creating a Fileset based on snapshots. FileWave's Windows Client and FileWave Admin have features to handle the deployment of Setup.exe style installers. The steps for this kind of deployment are as follows: - Copy the Setup.exe file to the Desktop of the computer where the FileWave Admin program is running connected to a FileWave Server. - Create a New Empty Fileset, give it a name and optional comment. - Open the Fileset & uncheck the "Hide used folders" checkbox. - Create a folder structure of where you would like the EXE file deployed. A good place is *Documents* and *Settings\\All Users\\Application Data\\FileWave\\Installers*. - Copy the Setup.exe file from the Desktop of the Admin's computer into the folder created in the Fileset Contents Window. This will be the folder where the Setup.exe will be delivered to on the client computers. - Select the Setup.exe file in the Fileset Contents Window and click on the Get Info button in the toolbar. - Click on the tab labeled Executable. - Check the checkbox labeled "Execute once when activated." - Add any arguments or options to include as part of the installation process. Sometimes it is preferable to run installers silently. Many Setup.exe installers take a /quiet or /s or /silent argument.Note: If you are unsure about the arguments, try dragging the Setup.exe into a Windows Command Prompt window and pass the /h or /help or /? argument to see a number of argument possibilities.
### Winget WinGet lets you create installers for many Windows-based applications with a single click. More information is located in [Microsoft WinGet Overview](https://kb.filewave.com/books/microsoft-windows-package-manager-winget/page/microsoft-winget-overview "Microsoft WinGet Overview"). Import Image FileWave Imaging involves creating Windows images that are used to image new computers or to re-image current computers. This workflow allows Boosters to act as imaging caches during the imaging process. More information on Imaging is in [Network Imaging / IVS](https://kb.filewave.com/books/network-imaging-ivs "Network Imaging / IVS"). ### Windows Drivers FileWave Imaging involves creating Windows images that are used to image new computers or to re-image current computers. This workflow allows Boosters to act as imaging caches during the imaging process. More information on Imaging is in [Network Imaging / IVS](https://kb.filewave.com/books/network-imaging-ivs "Network Imaging / IVS"). --- ## Google ### Play Store You can use this to create Filesets from the Google Play store. This method also lets you select Private Apps that you have published in the Play store as well in case you need to send an APK to a device that isn't a public application there. ### Policy This is discussed with more detail in [Android EMM Policies and Permissions](https://kb.filewave.com/books/android/page/android-emm-policies-and-permissions "Android EMM Policies and Permissions") but this is a way to set various settings on your EMM enrolled Android devices. # Fileset Groups Fileset Groups organize related Filesets and let you assign the group to a client or Client Group in one workflow. Create one with **New Fileset Group**, then drag existing Filesets into it. You can nest Fileset Groups to match your deployment structure. A Fileset or Fileset Group can belong to only one parent group because these items cannot be cloned. Moving an item changes where it is organized; it does not create a second copy. # Advanced Fileset Editing - Contents, Properties, Settings, and Dependencies While you can create a Fileset and associate it with a Client without doing any additional steps. However, your ability to customize the Fileset contents, specify its properties, and alter its settings gives you a tremendous amount of flexibility in your deployment models. Once you have created a Fileset, it will appear in the main **Filesets** window. The basic properties of that Fileset are shown in the window menu bar: 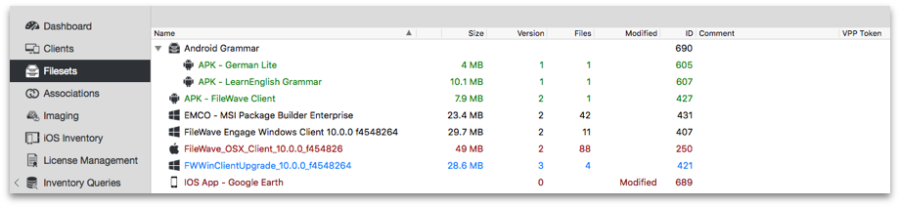 - ***Name*** – This is the title of the Fileset you created. - ***Size*** – This is the size of the Fileset in bytes as it is stored on the FileWave server. This can also affect your Boosters in terms of how much storage they will need to handle cached Filesets. - ***Version*** – When a Fileset is first created, it is version "0" until you edit the Fileset and update the server model. As you make changes to the Fileset, its version number will increment. - ***Files*** – This is the total number of files contained in the Fileset. - ***ID*** – This is a unique identifier used by the FileWave server to keep track of your Filesets - ***Comment*** – This is any optional text you enter to add information about the Fileset - ***VPP Token*** – This designates which Apple Volume Purchase Program token is assigned to a particular Fileset. The contents of a Fileset can be edited and altered as desired, depending on the type of Fileset. You can get specific information on items within a Fileset in order to customize its behavior when distributed. By double-clicking on a Fileset, you will see one of three different windows depending on the Fileset type . ## Fileset upload validation in FileWave 16.4 FileWave Central 16.4 performs additional validation while Fileset content is uploaded to FileWave Server. The checks are intended to catch incomplete or inconsistent uploads before damaged content is distributed to devices.**Do not deploy a Fileset after Central reports an upload-validation problem.** A Fileset object may exist even though its intended content was not transferred completely. Resolve the upload first, then inspect the Fileset before associating it or running a Model Update.
### Handle an incomplete or failed upload 1. Keep the upload message available and record the Fileset name, source file, time, and FileWave Central/Server version. 2. Confirm that the source file or folder is readable and complete on the administrator computer. 3. Confirm that Central still has a stable connection to FileWave Server and that the Server has sufficient storage. 4. Open the Fileset and compare its displayed size, file count, and contents with the intended source. 5. Retry the import after correcting the source, storage, or connection problem. For a large Fileset, avoid changing networks or closing Central while the upload is active. 6. Only associate or deploy the Fileset after the upload completes without a validation warning. **Upload validation is different from client verification.** The 16.4 upload checks protect the transfer from Central to FileWave Server. The Verification settings below control how the FileWave Client later checks installed files on a managed device. ## Desktop Fileset contents The Desktop Fileset contents are the specific items to be installed along with their designated paths. Examples are: 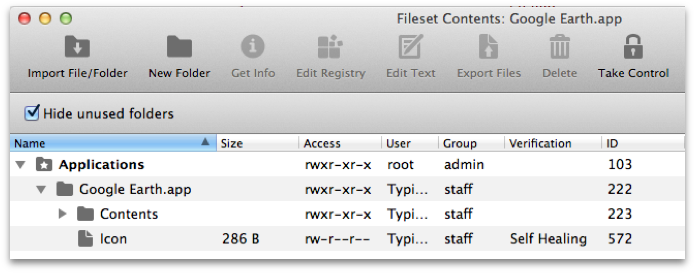 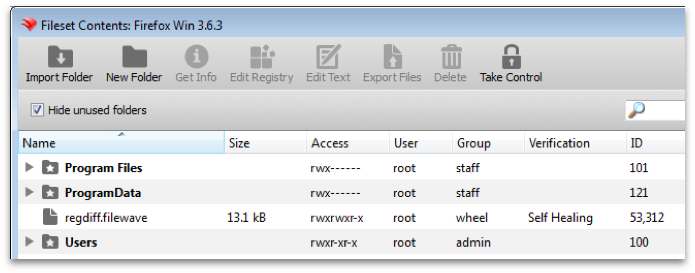 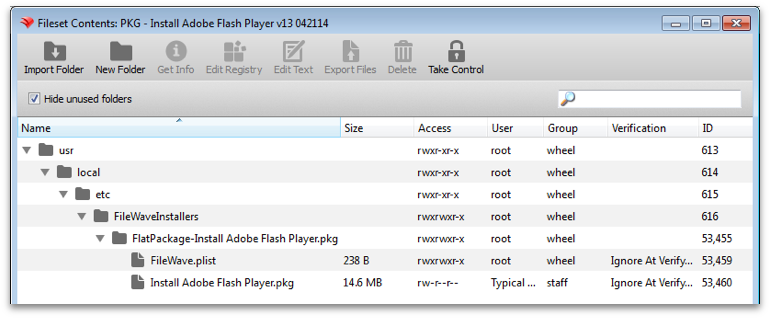 You can add items to the contents with the **New Folder** and **Import Folder** buttons. You can also remove any items that you are sure will not be needed in the final Fileset. By double-clicking on a specific item or selecting an item and clicking on the **Get Info** tool, you can inspect file level information. This includes basic file information, permissions, ACLs if any are in use, Verification settings, script Executable details, and Flags that can be set.For Windows systems as of FileWave 16.0.0 it is important to understand that a file will by default inherit the permissions of the directory it is placed within and that C:\\ProgramData\\FileWave\\ and specifically C:\\ProgramData\\FileWave\\FWClient\\ and C:\\ProgramData\\FileWave\\scripts\\ are further restricted to try to prevent end users from manipulation of files.
 ## Verification FileWave, by default, sets many of these values correctly for the type of Fileset you are distributing. It is important, however, that you understand the **Verification** settings and how they impact the Fileset. There are three primary verification settings. Each of these settings causes the related file(s) to behave differently once deployed. 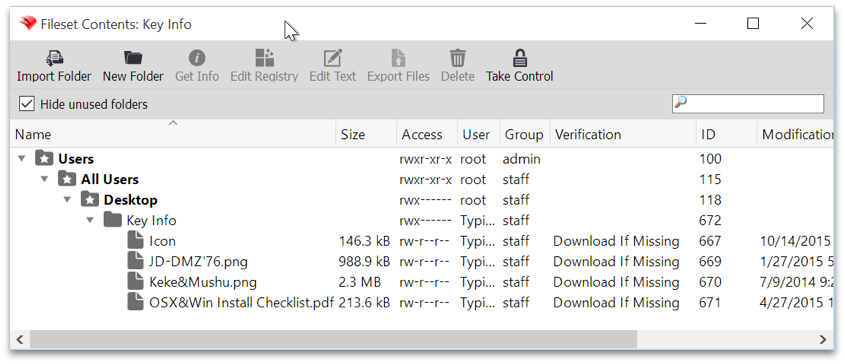 - ***Self Healing*** – A file designated as self-healing will always be repaired or replaced by the FileWave Server if it is altered in any way. If you have items deployed that require their contents remain unchanged and intact at all times, you would set the files to be self-healing. - ***Download if Missing*** – This setting will force a Client to re-download the file if the FileWave Client reports this portion of a Fileset as missing. The file will not be replaced if it has been altered; but only if it is deleted. - ***Ignore At Verify (Left Behind)*** – Some files need to be dropped onto a client and left alone. This setting tells the FileWave Client to ignore any changes in this portion of the Fileset during a verification. - ***Don't overwrite existing files upon deployment*** – This setting can be chosen to go with either the *Download if Missing* or *Ignore At Verify (Left Behind)*. You can tell FileWave to not write over top of any files that already exist when the Fileset is activated. - ***Overwrite only if the existing file is older*** –This setting is a subset of the one above, in that you might choose to allow older files to replaced only by newer versions of the same item.Note: All file comparisons are done by filename and modification date.
## Edit Registry When you are working with Windows Filesets, you may need to explore the Registry entries. Within Fileset Contents, you can select the registry file and edit the contents. If you need to distribute a Registry file, you can add one to an empty Fileset. 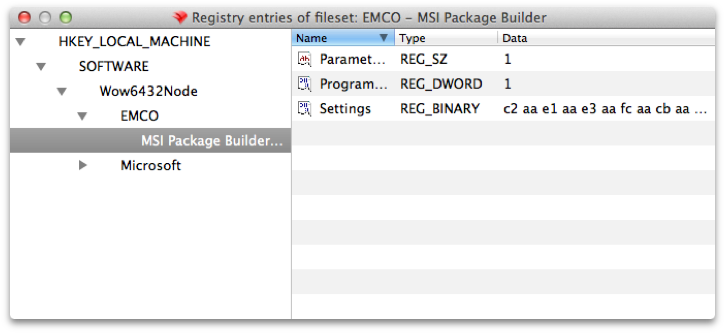 - ***Edit Text*** – You can edit many of the text based files in a Fileset directly. In FileWave Admin's Preferences, you will see all of the various file type extensions that are supported. - ***Export Files*** – Any file in a Fileset can be exported for use elsewhere. This capability can be used to open a complex Fileset and export portions of it for use in another Fileset. ## iOS App and Enterprise Fileset contents Filesets for iOS applications are focused more on behavior and end user information than actual file level content. The content consists of three panes: Details; Kiosk; and, Configuration. **Details** contains general application information, management flags, and VPP information. The management flags include the ability to force application removal when the MDM profile is removed, and the ability restrict application data from being backed up in iTunes. A flag introduced in FW 10+ allows you to **take management** of an existing version of this application. If a user has installed an application that needs to be managed; because their device is managed, you can "take over" control of that application. This would allow you to control distribution and settings. VPP shows the connection between a Fileset and a VPP account. A warning is shown (see screenshot on next page) if a VPP token is associated with the application noting that the Fileset cannot be attached to a different VPP account token. 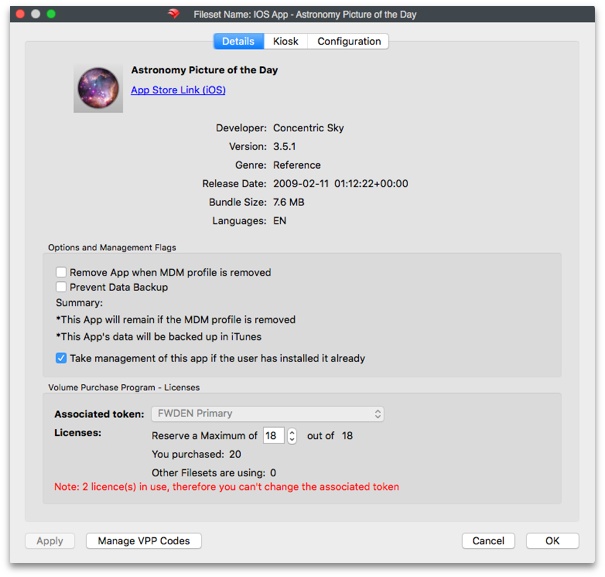 **Kiosk** displays the information from the iTunes Store, online review ratings, and allows you to choose a category for the item when displayed in the Kiosk. You can edit the text of the application title, as well as the description. This allows you to personalize the information for your organization versus using the marketing material provides by the developer to the iTunes/App Store. In FW 10+, you can customize the information with tags, such as **Bold**, and underlined, for readability; plus you can add URLs within the information pane. 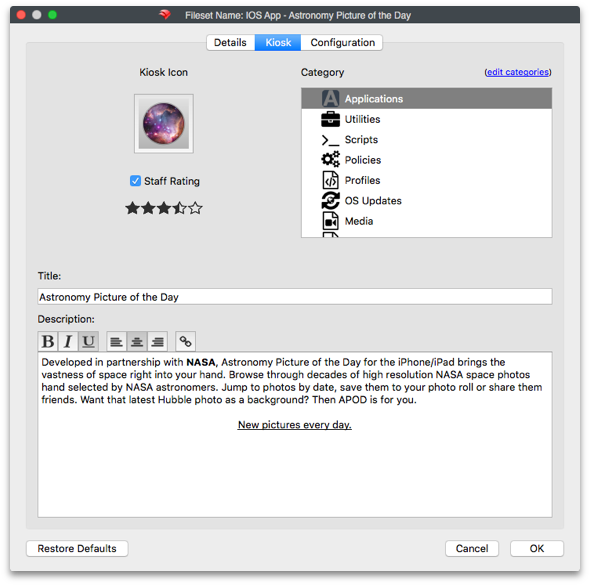 The **Configuration** pane allows you to add management settings for a specific application, if that application supports the use of a *preference manifest*. The settings must come from the application developer and will be in the form of a *property list* file (.plist). There is much more information on what these files are and how they are constructed in Apple's Developer site - [https://developer.apple.com/library/ios/documentation/General/Reference/InfoPlistKeyReference/Articles/AboutInformationPropertyListFiles.html](https://developer.apple.com/library/ios/documentation/General/Reference/InfoPlistKeyReference/Articles/AboutInformationPropertyListFiles.html) ## macOS App / iOS eBook Fileset contents Application Filesets for macOS and eBook Filesets contain the same type of content information in the **Details** pane, including the VPP token information. The **Kiosk** pane contains the same information as discussed in the iOS App Fileset contents. 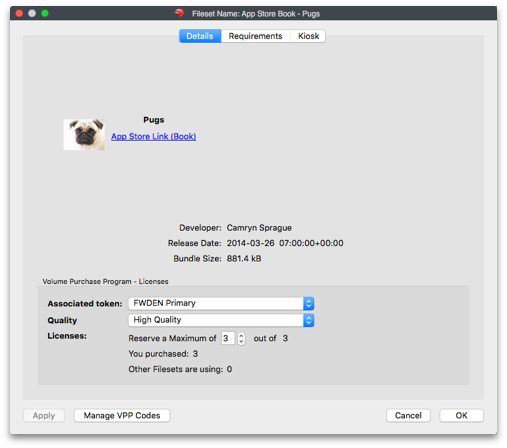 The **Requirements** pane specifies the platforms the eBook can be distributed to and allows you to retroactively change these settings on actively deployed Filesets. Selecting *Apply to Active Filesets* lets you retroactively change Filesets that have been deployed. 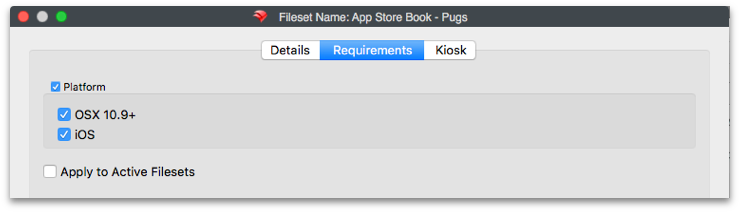 **Kiosk** settings are the same across all Fileset types. You can set the category of the item, and edit the title and item description to better match your organizational needs. If you select *Restore Defaults*, the item's title and description will revert to what is posted in the iTunes/App Store online. ## Profile Fileset contents Profile Filesets have a simple contents window. You can view the various payloads that are contained in the profile, edit the payloads, export payloads, and choose the device settings. Settings include **Platform** choices which must match the categories in Profile Editor. The **Installation** choice determines whether the profile will be activated at system level (as a Daemon), which is prior to Login Window, or at user level (as a Launch Agent), which is at Finder launch. You can force the profile to reinstall if the user removes it. Devices that are running OS X 10.6 - 10.9 can have the **legacy install** flag set. This will force the settings that these devices get to be **MCX** **.plist** formatted, if the computers are running a FileWave Client earlier than version 9.  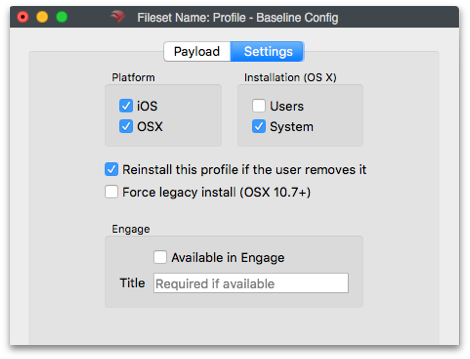 Details on profiles and configuring them are in Chapter **7 (Mobile Device Management)**. ## Android Fileset contents The Fileset created for Android contains only the **.apk** file. The file cannot be relocated, and other files should not be added to the set. The *Get Info* button exposes the permissions and other settings; but those values should not be changed from the defaults. 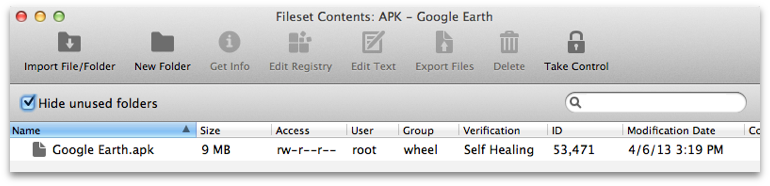 The Fileset will send the contents to the Android device's Kiosk. From there, the end user can select to install the item, which will place the contents in the Downloads folder for manual installation. ## Fileset Properties Once you have created a Fileset, you can access a wide range of properties that enhance the effectiveness of that Fileset in your deployment. The properties available vary depending on the specific type of Fileset. In most cases, the information presented does not need to be altered or edited; but this information is presented to allow you to understand the depth of control you have over your file level deployments.Note: Making changes to Filesets can result in unexpected behavior, please test on a non-production device prior to mass deployment. Better yet - just test everything on a non-production system first.
## Properties - basic settings The first tab is the primary properties for the Fileset. The basic options are: - ***Require Reboot (with Message)*** – In most cases, you won't need to require the computer to reboot; but software update Filesets usually do. You can provide a message to be displayed for the end user as a warning that software is being installed and a reboot will be required. Once you have configured a Fileset for **reboot**, you can also set a "Reboot deadline" to force the completion of the Fileset installation. This process is covered in the **Associations** section. - ***Ignore Permissions on Existing Folders*** – Normally, the Fileset will overwrite permissions on existing files and folders during a distribution. You can choose to leave permissions in place; but recognize that in some cases, portions of the Fileset may not be installed. - ***Installation Priority*** – When you are working with a Fileset Group or a series of Filesets to be distributed as a single workflow, the deployment often requires certain items installed before others. The Installation Priority lets you assign an order of activation. Highest items first, then lower priorities. When the installation priority is the same, the Fileset ID determines priority with lower ID numbers having the higher priority. - ***Color*** - you can assign colors to your Filesets to differentiate them in the Fileset view. ## Properties - Verification settings - ***Self Healing*** – Use this setting to force the re-distribution of the file if any changes have been made to the existing Fileset files that have this label. This function will repair settings and other files that were accidentally or purposely changed. - ***Download If Missing*** – During verification, if a file is no longer present, it will be replaced from the master Fileset. - ***Ignore At Verify (Left Behind)*** – This setting will tell the verification to ignore anything with this label. This setting is often used in files that are meant to be dropped into a location once, and ignored after that. - ***Don't Overwrite existing files upon deployment*** – This setting is a subset of the two settings above. It allows you to keep any existing files from being overwritten by other files with the same names. - ***Overwrite only if existing file is older*** – This setting is also a subset of *Download if Missing* and *Ignore At Verify (Left Behind)*, and can be activated if the above setting is in effect. It will allow only older versions of the same named files to be replaced. ## Properties - Requirements These settings establish the device definition that will allow the FileWave Client application (fwcld) to download and activate a Fileset. You can choose specific operating system platforms, architectures, memory, and system versions. Selecting *Apply to Active Filesets* will force these settings to be re-applied on deployed Filesets. If a device no longer meets the verification criteria, the Fileset will be dis-associated and removed. 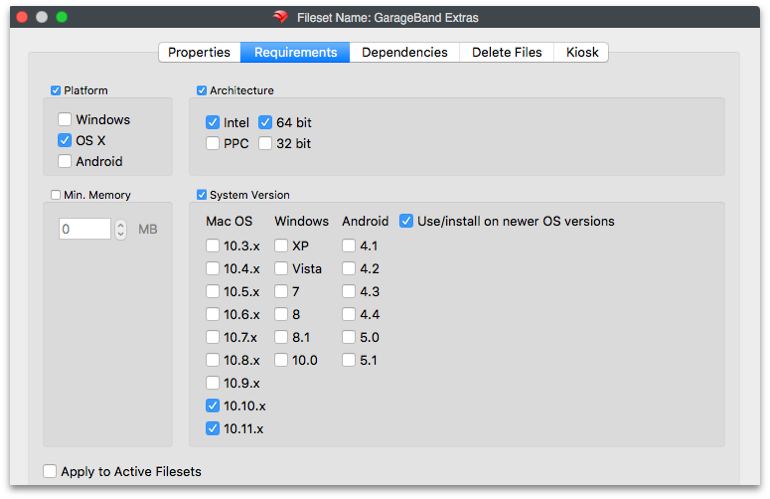 ## Properties - Delete Files Use this tab to provide the paths to files that need to be deleted when this Fileset activates. ## Properties - Kiosk You use this tab to configure the appearance of your Fileset in the Kiosk. You can can change the icon, place the Fileset into a designated category, and edit the title and description of the Fileset. This includes changing the information provided from the iTunes/App Store to be something more oriented toward your deployment needs. With FileWave 10+, you can use Rich Text formatting to improve the look and feel of the Description. ## Properties - Details Details contains general application information, management flags, and VPP information. The management flags include the ability to force application removal when the MDM profile is removed, and the ability restrict application data from being backed up in iTunes. VPP shows the connection between Fileset and a VPP account (what VPP token was used for the item, if applicable). A warning is shown if a VPP token is associated with the application noting that the Fileset cannot be attached to a different VPP account token. It is the same information you would see on that Fileset if you double-clicked on it or selected *Get Info* for that item. Those settings are reserved for Filesets from Apple App Store or iTunes Store content. ## Exporting Filesets Filesets can be exported for transfer to another FileWave server. They can be compressed and stored for future use or archived. iOS Filesets, however, cannot be exported. ## Dependencies (introduced in FW v10) You can designate one of more Filesets that must be activated/installed before another can be activated. If you associate a Fileset that has dependencies, then the other Filesets will automatically get associated and will be applied before the dependent one. It works with multiple, cascading dependencies also. The only Filesets that do not contain the ability to show dependency are the Apple App Store and iTunes Store Filesets. In the Properties of a Fileset that has dependencies, you just click on the \[+\] to add any Fileset that must be activated prior to your dependent Fileset. You can also drag and drop Filesets within the Dependency pane to rearrange them in order of need. The first one to get activated will be at the top of the list. There is also a toggle at the bottom to check and see if there are Filesets dependent upon the Fileset that you are examining.  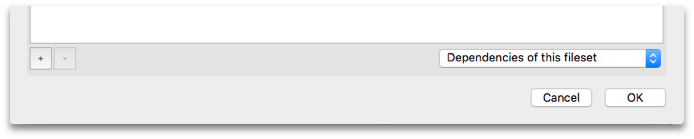   Starting with FileWave 11, is the ability to see a dependence chain when looking at the Fileset Status report in the Client Info dialog, where dependencies appear as children of the Filesets that require them. # Fileset Scripts # Fileset Scripts Overview FileWave can run scripts at seven stages of Fileset deployment, called **activation states**: - Requirements - Preflight - Activation - Postflight - Verification - Pre-Uninstallation - Post-Uninstallation In FileWave Admin, open the **Filesets** view, select the Fileset you want to edit, and click the **Scripts** toolbar icon. The Scripts dialog shows each script and the activation state where it will run. 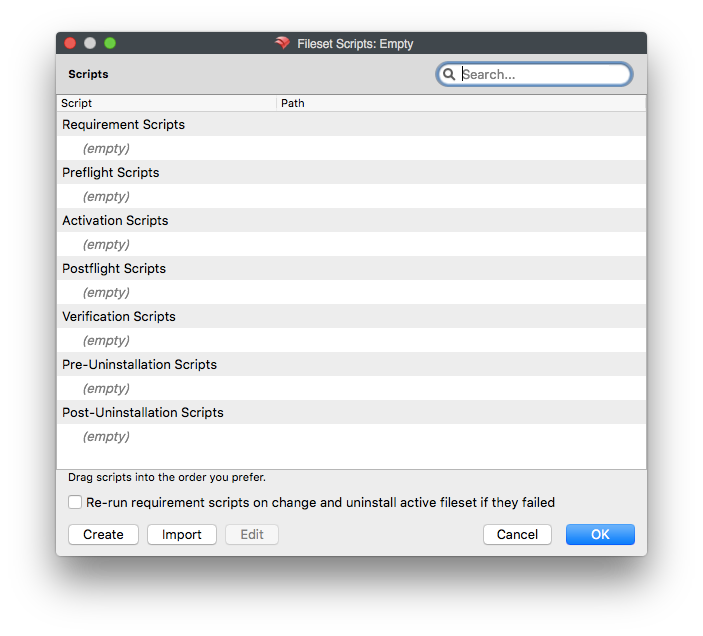 Scripts in the same activation state run from top to bottom as shown in the list. Drag scripts to change their execution order. Use the create or import buttons to add scripts. You can also edit a script, or drag a script from Finder into the dialog to import it. Click **OK** to save changes to the Fileset. Click **Cancel** to discard the changes. Double-clicking a script opens the file properties dialog. Most script attributes can be changed in the same way as files in an open Fileset, but some settings are locked because the Fileset workflow depends on them. For example, the Execute flag cannot be cleared. Requirement scripts also cannot be changed between interactive and non-interactive execution because the client must be able to use the script exit code to decide whether the Fileset should download. The checkbox **Re-run requirement scripts on change and uninstall active Fileset if they failed** controls the same internal setting as **Evaluate requirements on change and uninstall active Fileset if they failed** in the Requirements tab of the Fileset properties. When this option is enabled and the Fileset changes, the client re-evaluates the Fileset requirements, including requirement scripts. If any requirement or requirement script fails, the Fileset is uninstalled. ## Fileset script types - ***Requirements Scripts*** – Run before the Fileset or its dependencies are downloaded. If any requirement script returns a non-zero exit code, the Fileset and its dependencies are not downloaded or installed. - ***Preflight Scripts*** – Run after dependencies are installed, but before the Fileset downloads. If any preflight script returns a non-zero exit code, the Fileset is not downloaded or installed. - ***Activation Scripts*** – Run when the Fileset is activated. - ***Postflight Scripts*** – Run after the Fileset installation has completed. - ***Verification Scripts*** – Run after postflight scripts and during each verification of the Fileset. - ***Pre-Uninstallation Scripts*** – Run when a Fileset is inactivated, immediately before the Fileset is uninstalled. Use this state when the script needs access to files that self-healing will remove during uninstall. - ***Post-Uninstallation Scripts*** – Run immediately after the Fileset and its dependencies have been uninstalled or removed from the client. ## Related Content - [Fileset / Payload Script Exit Code Status](https://kb.filewave.com/books/filesets-payloads/page/fileset-payload-script-exit-code-status "Fileset / Payload Script Exit Code Status") - [Script Best Practices](https://kb.filewave.com/books/filewave-general-info/page/script-best-practices "Script Best Practices") - [How the Client Communicates](https://kb.filewave.com/books/filewave-client/page/how-the-filewave-client-communicates) # Fileset / Payload Script Exit Code Status ## Script Exit Codes FileWave uses script exit codes to decide whether a Fileset should continue, retry, be skipped, or stop until an administrator takes action. **Quick answer:** exit code 0 means success, **210** means the requirements check succeeded but the Fileset should be skipped, and **220** means the requirements check failed and FileWave should not retry automatically. If a Fileset is skipped, missing from Kiosk, or blocked because a requirements script returned **210** or **220**, use this table to confirm the expected behavior before troubleshooting the installer or activation scripts.Status Value | Status Description | Severity | Status Details |
|---|---|---|---|
| 220 | Failed! (Will Not Retry) | ERROR | Script exited with a failure, do not automatically retry |
| 210 | Success (Skipped Install) | ERROR | Script exited successfully, report Fileset as installed but skip actual installation |
| 0 | Success | OK | Script exited successfully |
| -1000 | Crashed | ERROR | Script crashed during execution |
| -1001 | Time Out Exceeded | ERROR | Script execution time took longer than Get Info > Executable > 'Wait for executable to finish' > 'Wait for:' |
| -1002 | No Logged In User | ERROR | Script could not run because no user is currently logged in |
| -1003 | Failed To Start | ERROR | Script could not run because the script failed to start |
This article reflects the behavior in FileWave 16.0.0+
When deploying Filesets in FileWave; - It’s possible to include a Verification Script that runs every 24 hours (or at system restart) on Windows and macOS. - You might also have a Requirements Script that runs every 2 minutes to test for a condition needed to install something. These scripts are typically used for tasks such as re-applying Group Policy settings—using tools like LGPO.exe on Windows—as an example. However, if an executable (like LGPO.exe) is replaced by a non-administrator, there’s a risk that the malicious replacement could be executed with elevated privileges (SYSTEM on Windows or root on macOS). By default, Filesets benefit from a self-healing mechanism. If an executable is modified, the Fileset will restore the original file before the Verification Script executes. An image below shows this status and picking **Get Info** for a file may be used to change this on a per-file basis. Properties for a Fileset can be used to change the behavior across the entire Fileset as well. [](https://kb.filewave.com/uploads/images/gallery/2025-02/qXzyhyqHfvEn8zaa-image.png) This same protection applies when the executable is deployed and then called by a Custom Field—the Fileset’s verification step precedes the Custom Field execution, thereby mitigating the risk of local privilege escalation. However, there is one scenario where this protection of Self-Healing does not apply: the Blocker Script, which by default runs every 5 minutes. Its more frequent execution window could allow a local user to replace an executable before the next Fileset verification occurs. However this too can be mitigated as we will discuss below. ## When/Why This article is particularly relevant in environments where: - Executable files (e.g., LGPO.exe) are deployed via Filesets that also include a Verification Script or are triggered via Custom Fields. - There is a risk of local users, who lack administrator rights, replacing these executables to attempt privilege escalation. - The deployment involves Blocker Scripts, which run at more frequent intervals (every 5 minutes), thus presenting a window where an attacker might replace a file before it is healed by the Fileset. #### **Why is this important?** Ensuring that only the intended executable is run with elevated privileges is critical for system security. A malicious modification could lead to unauthorized privilege escalation. Mitigating this risk by enforcing strict file ownership and permission settings prevents non-administrative users from replacing or modifying executable files. ## How To mitigate this risk, it is recommended to either pick properties on the file in the Fileset and properly secure it or use a Postflight Script in your Fileset deployment that sets the file permissions so that only SYSTEM (on Windows) or root (on macOS) can modify the file. On Windows systems as of FileWave 16.0.0 the c:\\ProgramData\\FileWave\\ directories like FWClient and the scripts directory are restricted so that a non-Administrator is unable to manipulate files located there. This is one way that FileWave will prevent a local attack by default. Files on Windows will also inherit the permissions of the directory that they are deployed in to which will help for a more consistent permissions experience. For some examples of setting permissions on files please take a look at the below. For the scripts you could have them run as Fileset scripts when deploying the files to adjust permissions to how you'd like. #### **macOS Example (Properties of file in Fileset)** In the below images you can see an example file in a Fileset where **Get Info** has been clicked in the toolbar when viewing the Fileset and the permissions have been adjusted so only root:wheel has access to the file. Make sure you click **Apply** on each screen to make the setting change. 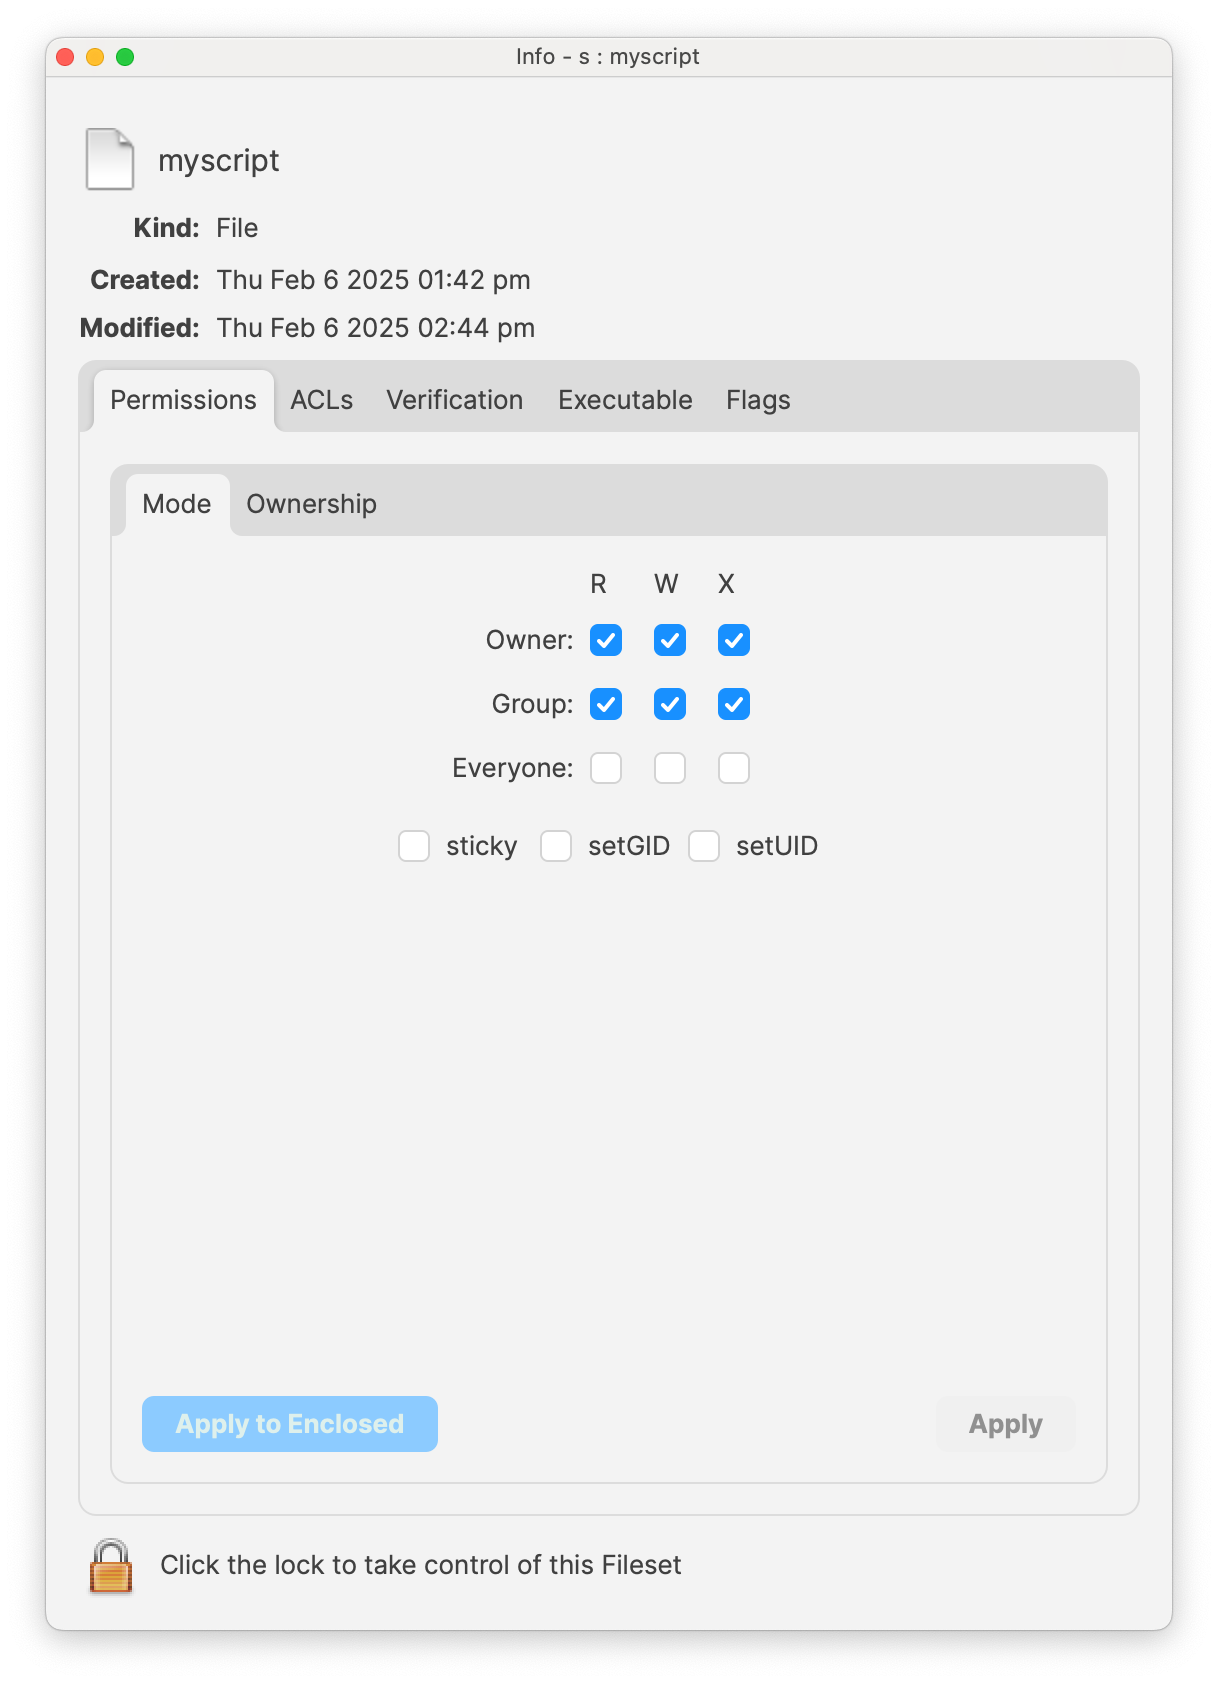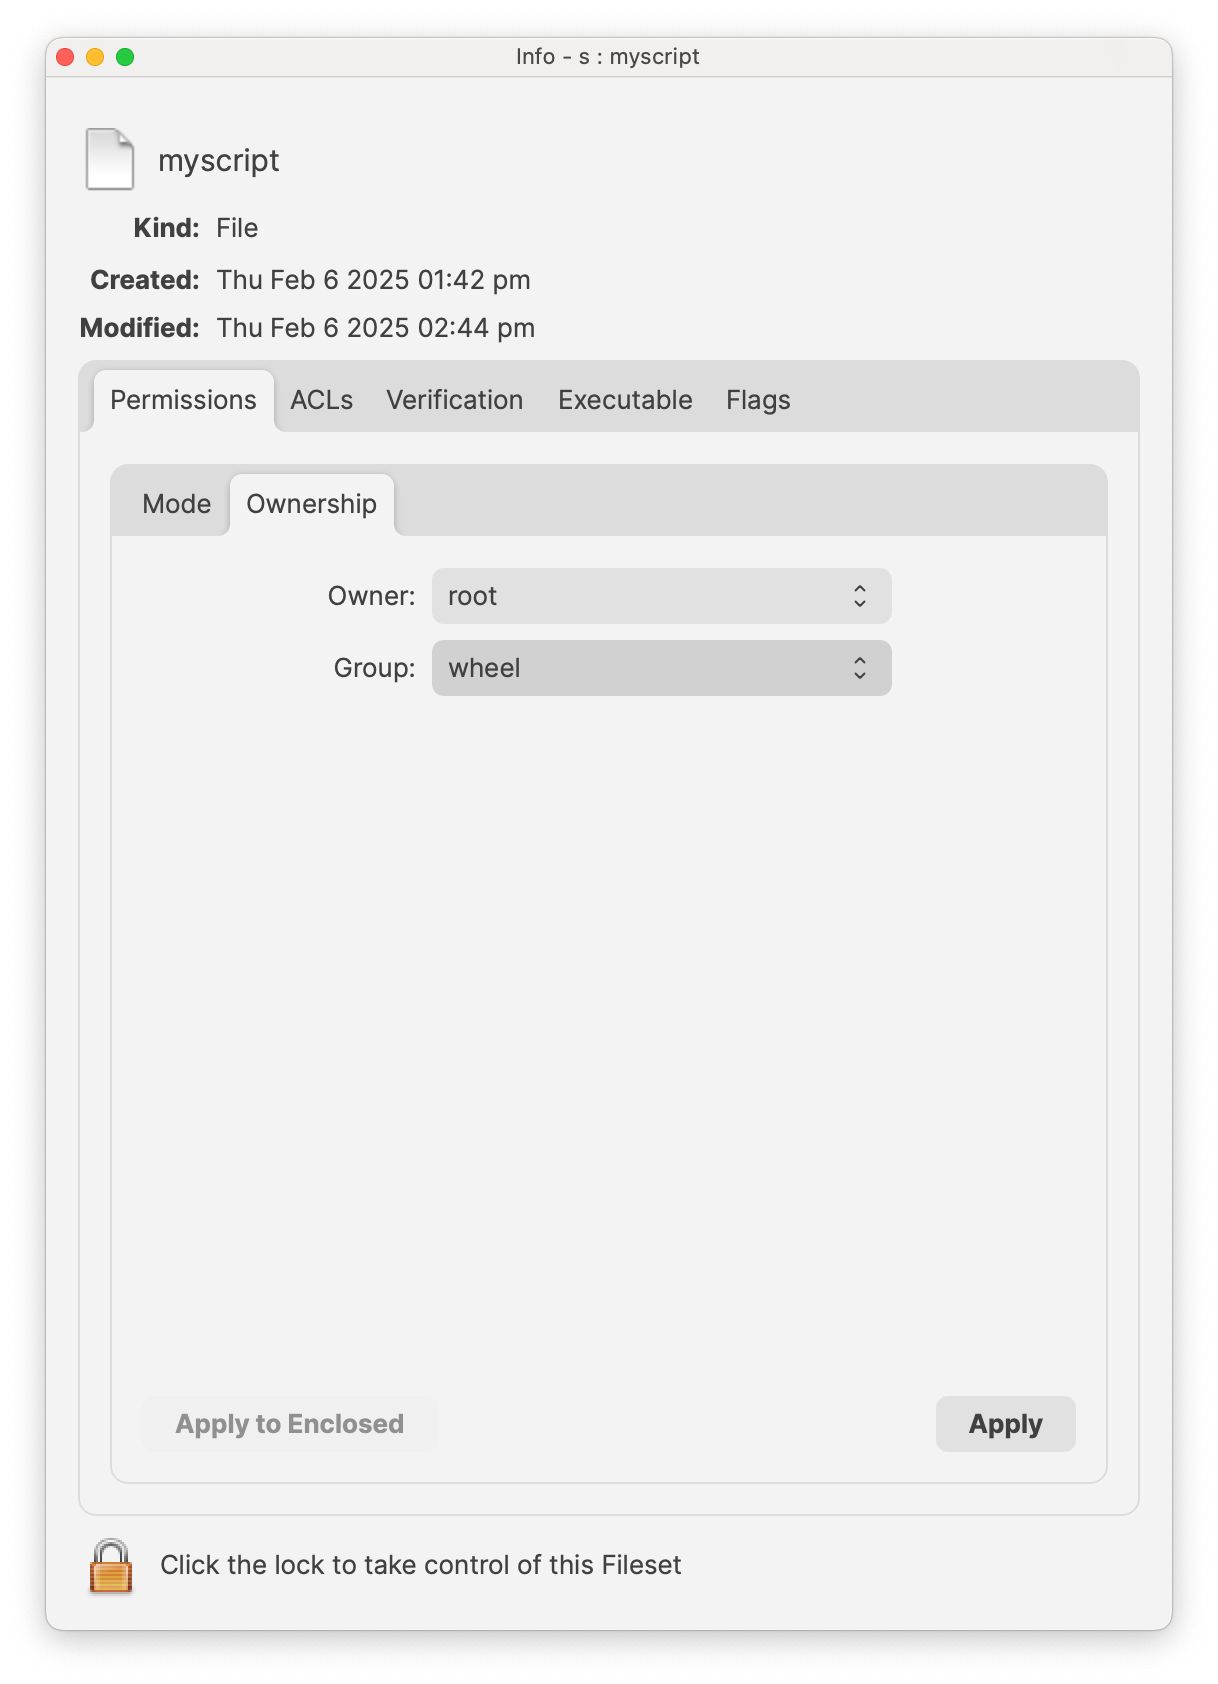 #### **macOS Example (zsh Script)** Below is an example zsh script that sets the ownership to root:wheel and the permissions to 770 for the target executable. ```shell #!/bin/zsh # Define the path to the executable deployed via the Fileset TARGET_FILE="/path/to/executable" # Change the ownership of the file to root:wheel chown root:wheel "$TARGET_FILE" # Set the permissions to 770 (owner and group have full permissions, others have none) chmod 770 "$TARGET_FILE" # Explanation: # - chown root:wheel: sets the file owner to root and group to wheel. # - chmod 770: grants read, write, and execute permissions to the owner and group, # while denying any permissions to others. ``` #### **Windows Example (PowerShell Script)** The following PowerShell script sets the file’s owner to SYSTEM and adjusts the permissions so that only Administrators and SYSTEM have full control. This ensures that no non-administrator can replace the file. ```powershell # Define the path to the executable deployed via the Fileset $TargetFile = "C:\Path\To\executable.exe" # Set the owner of the file to SYSTEM using icacls icacls $TargetFile /setowner "SYSTEM" # Remove inherited permissions to ensure only our defined permissions are in place icacls $TargetFile /inheritance:r # Grant full control (F) to SYSTEM icacls $TargetFile /grant SYSTEM:(F) # Grant full control (F) to Administrators icacls $TargetFile /grant Administrators:(F) # Explanation: # - icacls /setowner "SYSTEM": sets the file owner to SYSTEM. # - icacls /inheritance:r: removes inherited permissions so only our custom permissions apply. # - icacls /grant SYSTEM:(F) and /grant Administrators:(F): # ensures that only SYSTEM and Administrators have full control over the file. ``` ## Related Content - [FileWave Version 16.0.2 Security Notices](https://kb.filewave.com/link/1045#bkmrk-security-notices-the) - [Verification](https://kb.filewave.com/books/filesets-payloads/page/verification "Verification") - [Script Best Practices](https://kb.filewave.com/books/filewave-general-info/page/script-best-practices "Script Best Practices") - [Fileset Scripts Overview](https://kb.filewave.com/books/filesets-payloads/page/fileset-scripts-overview "Fileset Scripts Overview") # Filesets - A Closer Look Contents, Properties, Settings, Revisions and Dependencies # Filesets View The Filesets view in FileWave Central is where you create, organize, and review Filesets before assigning them to devices. A Fileset can be a straightforward PKG, MSI, or VPP app, or it can include scripts, requirements, properties, revisions, and other deployment settings. Use the columns in this view to check a Fileset's identity, size, contents, and revision state: [](https://kb.filewave.com/uploads/images/gallery/2024-07/OzIsYoFTS5f9JYtC-duh8fmevu5idjppp-embedded-image-p7qfarhr.png)| **Name** | The Fileset title shown in FileWave Central. |
| **Size** | The Fileset's stored size on the FileWave Server, and on Boosters or clients after transfer. |
| **Version** | The Fileset version. FileWave increments this number after a changed Fileset is included in a Model Update. |
| **Files** | The total number of files stored in the Fileset. |
| **ID** | The unique identifier FileWave uses to track the Fileset. |
| **Comment** | An administrator note shown in FileWave Central. |
| **VPP Token** | The Apple volume-purchasing token associated with the app. |
| **Default Revision** | The revision deployed by default when the Fileset has multiple revisions. |
| **Revision Count** | The number of revisions available for the Fileset. |
You can select files in a Fileset and export them back to your local device.
# Create and Update PKG and MSI Filesets ## What FileWave can create installer-aware Filesets for macOS PKG and Windows MSI packages. The Fileset runs the installer when its deployment activates. ## Why Use this Fileset type for a standard PKG or MSI that does not need custom install arguments or extra orchestration. Use an empty Fileset when the installer needs custom commands, supporting files, or a different uninstall workflow. ## How In FileWave Central, choose **New Fileset**, select the PKG or MSI Fileset type, and choose the installer. FileWave creates the installer-aware Fileset for you.You can also drag a PKG or MSI file into the Filesets view to create the same Fileset type.
Drop the installer onto a Fileset Group when you want the new Fileset created in that group.Before the first upload, consider removing the version number from the installer filename and putting it in the revision name instead. This makes later in-place installer replacement easier.
## Information Opening a PKG or MSI Fileset will show the contents similar to the below: [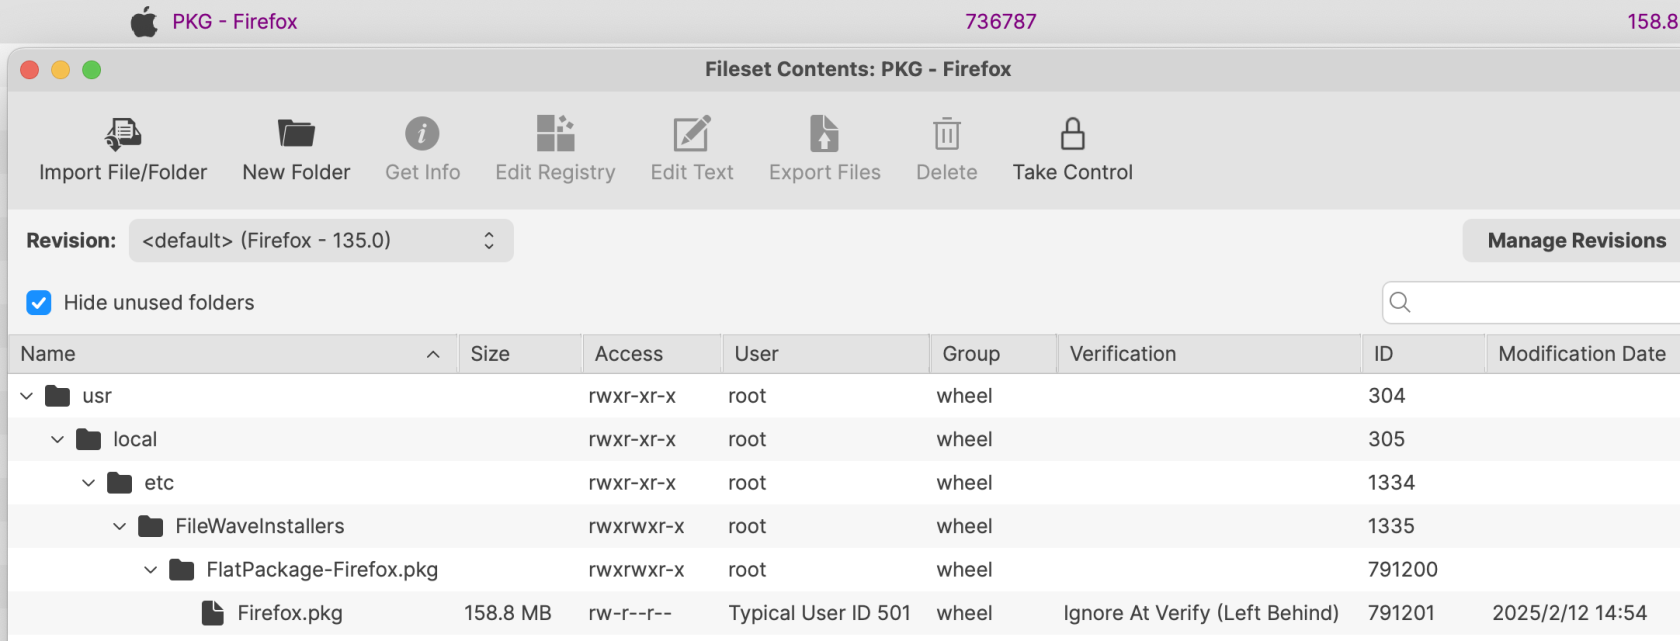](https://kb.filewave.com/uploads/images/gallery/2025-02/6ojD9S4X0N5yip78-image.png) The Fileset records the installer filename used when it was created.When you replace the installer manually inside a PKG or MSI Fileset, the new file must use the same filename as the installer it replaces.
### Revisions Use revisions to test a newer installer while preserving the current deployment and its additional Fileset content. There are two ways to create a new revision: - Drag and drop a new installer onto the existing Fileset - Open the existing Fileset, choose the option to Manage Revisions and from the button to add a new revision, choose to duplicate #### Drag & Drop When dragging a PKG installer onto a current PKG Fileset or an MSI onto a current MSI Fileset, a prompt similar to the below should be shown: [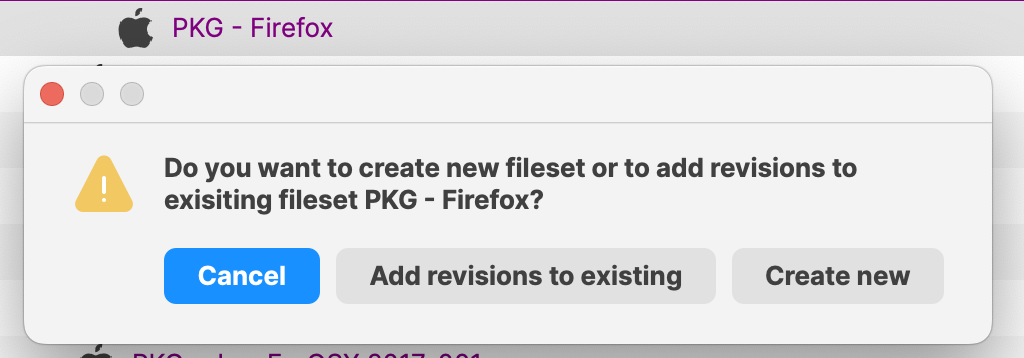](https://kb.filewave.com/uploads/images/gallery/2025-02/UULkHQ1A5CEXDqHa-image.png) Choose **Add revisions to existing** to create a revision with the new installer. The installer reaches devices only after you assign that revision or make it the default revision for the applicable associations.Name the new revision with the installer version so administrators can tell which package each assignment uses.
#### Duplication When choosing to Manage Revisions from within the Fileset, there is the option to duplicate a revision of choice. On doing so, everything from the prior Revision can be copied over to this new revision. [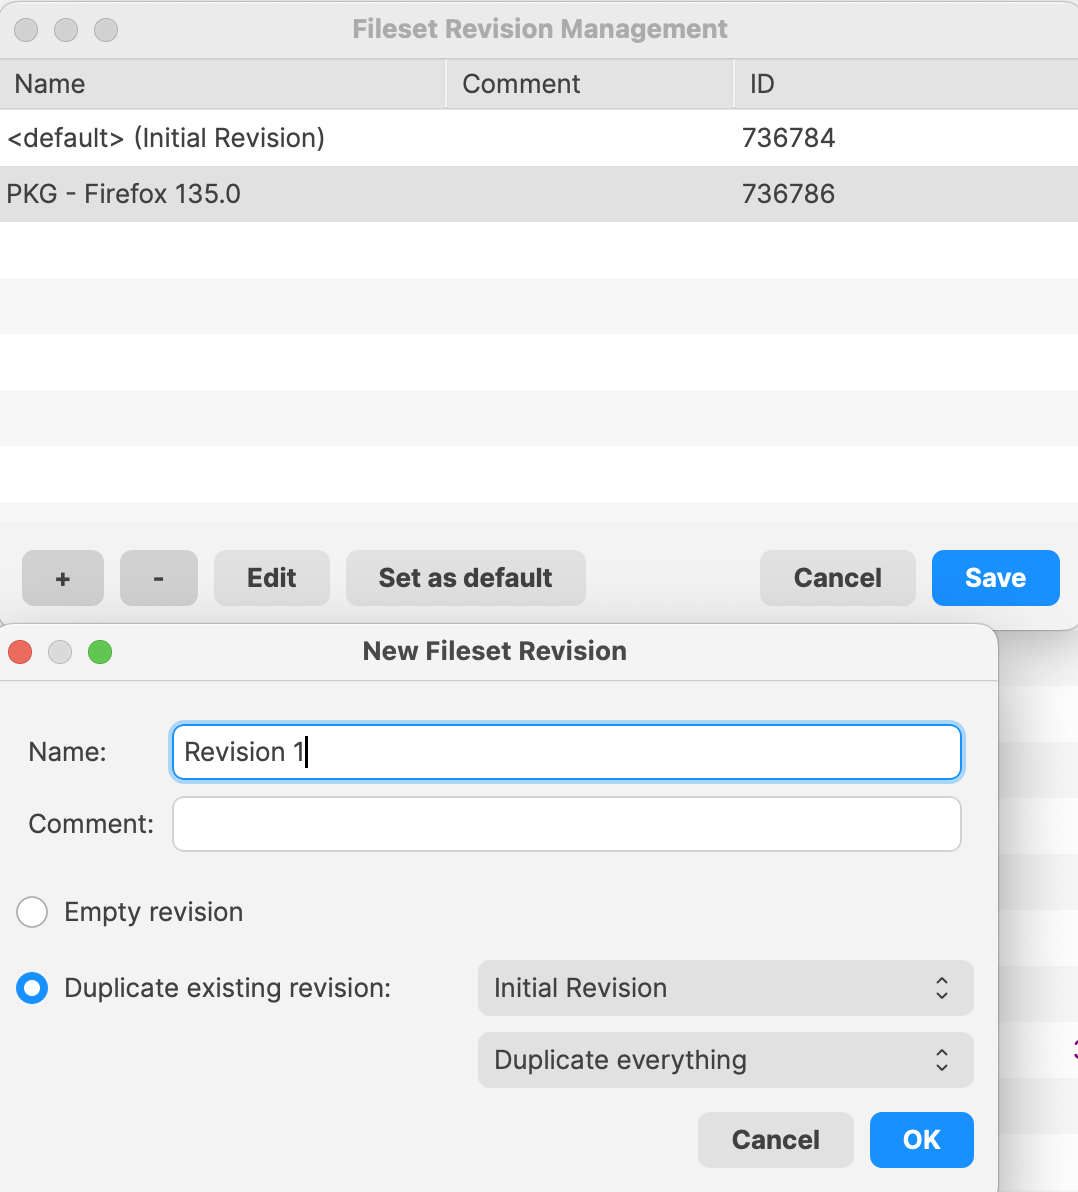](https://kb.filewave.com/uploads/images/gallery/2025-02/jaEvwtaKpwub0doQ-image.png) Duplicate a revision when the Fileset includes supporting files or settings that should carry forward. The installer filename rule still applies. When replacing the installer in a duplicated revision, **the new installer filename must match the filename already stored in the Fileset**.Before creating the first Fileset for a given installer, rename the installer to exclude the version number before uploading. Instead, add the version number into the name of the revision instead.
The name of the installer to be uploaded does not need to match, but the name of the installer within the Fileset must match. If the name of the installer file does not match before upload, 'copy' the name from within the Fileset, upload the new installer into the same folder as the original installer, delete the original installer and rename the new installer using 'paste'.
If the name of the initial installer uploaded includes the version number, when manually altering the revision, since the name must match, the newly uploaded version would have to be misnamed with a version number that does not make sense.
File Level Filesets (including PKG and MSI Filesets) can be exported for transfer to another FileWave server. They can also be compressed and stored for future use or archived.
Most installers only handle upgrade, not downgrade. If there is a desire to rollback to an older revision, it is likely the currently installed version on the device will need to be deleted beforehand.
After a successful installation, FileWave removes the local `.msi` staging file. [Uninstalling Filesets](https://kb.filewave.com/books/filesets-payloads/page/uninstalling-filesets) explains the **Use MSI uninstaller** option. Use an empty Fileset when installation or removal requires custom switches or commands.
## Related Content - [Fileset Revisions](https://kb.filewave.com/books/filesets-payloads/chapter/fileset-revisions) - [Uninstalling Filesets](https://kb.filewave.com/books/filesets-payloads/page/uninstalling-filesets) # Verification There are three primary verification settings. Each of these settings causes the related file(s) to behave differently once deployed. 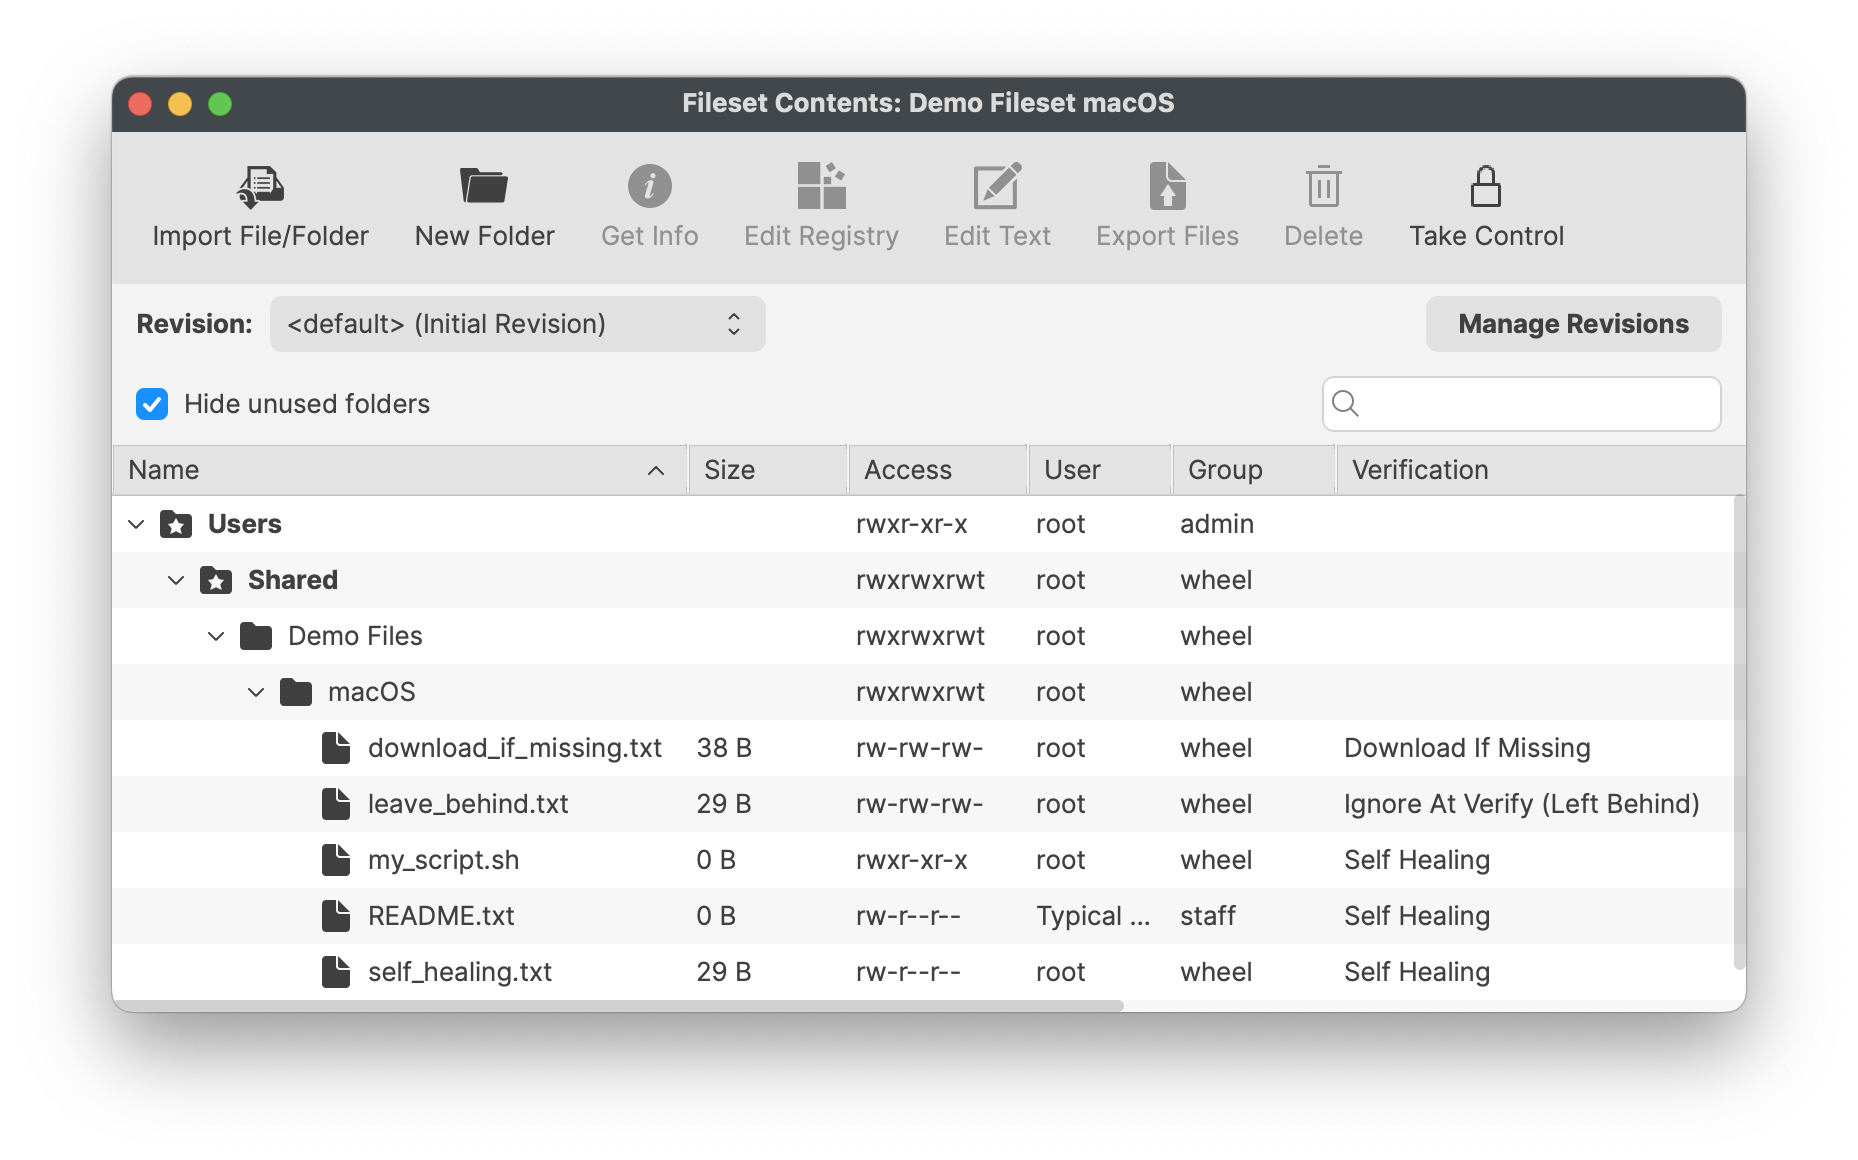| **Self Healing** | Files set as self-healing will be replaced on devices with those within the Fileset, if different, or added if missing. The act of Verification re-confirms all included files. | On disassociation, Files included in the Fileset will be removed from the device |
| **Download if Missing** | Similar to self-healing, however, the file will only be added if the file is missing. After initial deployment, the file may be altered, without repair occurring at Verification | On disassociation, Files included in the Fileset will be removed from the device |
| **Ignore At Verify (Left Behind)** | Once delivered, the file may be altered. | On disassociation, delivered files will remain on the device. |
| **Don’t overwrite existing files upon deployment** | If enabled, only deliver the file if it does net exist. |
| **Overwrite only if the existing file is older** | A sub option to the overwrite option, only replace the current file on the device, if that existing file has an older timestamp than the matching file in the Fileset. |
Any files that already exist between one Fileset and another, will not be transferred between server and client since they already exist as required; with the exception of the overwrite option on initial deployment.
# Windows Registry Windows registry files can be included in a Windows Fileset and reviewed in FileWave before deployment. This is useful when a Windows application, driver, or FileWave Client setting is controlled by documented registry keys and there is not a better native policy, installer option, ADMX setting, or application configuration file to manage the same behavior.**Quick answer:** Use a Windows Registry Fileset when you need FileWave to deliver registry keys or values to Windows clients. Review the registry path, value type, and data before assigning the Fileset, especially when the setting affects application behavior, security, Windows policy, or FileWave Client behavior.
## What is the Windows Registry? The Windows Registry is a hierarchical database that Windows and many applications use for configuration. Registry content is organized into **keys** and **values**. A value has a name, a type such as `REG_SZ`, `REG_DWORD`, or `REG_BINARY`, and the data Windows or the application reads. - `HKEY_LOCAL_MACHINE` / `HKLM` stores machine-wide settings. - `HKEY_CURRENT_USER` / `HKCU` stores settings for the currently loaded user profile. - On 64-bit Windows, settings for 32-bit applications may appear under `HKLM\SOFTWARE\Wow6432Node`. For more background, see Microsoft’s [Structure of the Registry](https://learn.microsoft.com/en-us/windows/win32/sysinfo/structure-of-the-registry), [Windows registry information for advanced users](https://learn.microsoft.com/en-us/troubleshoot/windows-server/performance/windows-registry-advanced-users), and [Registry Redirector](https://learn.microsoft.com/en-us/windows/win32/winprog64/registry-redirector) articles. ## How FileWave helps FileWave shows registry entries in the Fileset so you can inspect the tree, the value names, the registry types, and the data before deployment. That review step matters because a small path or type mistake can make a setting do nothing, apply to the wrong registry view, or change behavior more broadly than intended.  ## When this is helpful - A vendor documents a registry value that must be set after installation and the installer does not provide a reliable command-line switch or configuration file. - You need the same machine-wide application setting on a group of Windows devices, such as a setting under `HKLM\SOFTWARE\Vendor\Product` or, for 32-bit apps on 64-bit Windows, `HKLM\SOFTWARE\Wow6432Node\Vendor\Product`. - Support asks you to apply a documented troubleshooting value to a scoped group instead of editing every endpoint manually. ## Example: scoped FileWave Client troubleshooting One practical example is temporarily changing a documented FileWave Client configuration value for a small Windows pilot group. FileWave Client settings on Windows are stored in the registry; for FileWave 15.5.0 and higher, the client settings are documented under `HKLM\Software\FileWave\WOW6432\WinClient`. If Support asks you to adjust a value such as `debugLevel` while troubleshooting, a Windows Registry Fileset can apply that change consistently to the pilot group. Keep a rollback Fileset or documented manual steps ready so the value can be restored after testing. Use the exact path and supported values from [FileWave Client Configuration Settings](https://kb.filewave.com/link/240). Do not guess at FileWave Client registry values or leave troubleshooting-level logging enabled longer than needed. ## Before you deploy - Test the registry change on a disposable or pilot Windows device first. - Export or document the original key/value so you have a rollback path. Microsoft’s [back up and restore the registry](https://support.microsoft.com/en-us/topic/how-to-back-up-and-restore-the-registry-in-windows-855140ad-e318-2a13-2829-d428a2ab0692) guidance explains the manual Registry Editor workflow. - Prefer `HKLM` for device-wide settings. Treat `HKCU` carefully because it is tied to a specific loaded user profile. - Confirm the value type, not just the value name. `REG_DWORD` value `1` is not the same thing as text value `"1"`. - Avoid broadly deploying machine-specific values, user SIDs, license secrets, one-time tokens, or copied binary blobs unless the vendor explicitly documents that approach. - Assign the Fileset to a small pilot first, verify the application or Windows behavior, then widen the assignment only after the result is confirmed. ## Related links - [FileWave Client Configuration Settings](https://kb.filewave.com/link/240) - [Microsoft Learn: Structure of the Registry](https://learn.microsoft.com/en-us/windows/win32/sysinfo/structure-of-the-registry) - [Microsoft Learn: Windows registry information for advanced users](https://learn.microsoft.com/en-us/troubleshoot/windows-server/performance/windows-registry-advanced-users) - [Microsoft Support: Back up and restore the registry](https://support.microsoft.com/en-us/topic/how-to-back-up-and-restore-the-registry-in-windows-855140ad-e318-2a13-2829-d428a2ab0692) # Apple VPP Apps Unlike File Level Filesets, Apple VPP Filesets contain the details of the App from the App Store, including the link to the App, with 3 distinct tabs, Details, Kiosk and Configuration.FileWave does not store Apps from the App Store, devices will pull the Apps directly from the App Store on successful activation.
#### Details Amongst these are some key entries:| **Remove App when MDM profile is removed** | If the device has the MDM enrolment profile removed, this option will force Apps managed by MDM to be removed. |
| **Prevent Data Backup** | Disallow the App from backing up user data |
| **Take management of this app if the user has installed it already** | For Apps already installed, the MDM server will take over management of the App from the user. This is required if you want FileWave to manage deployment behavior, updates, and related settings for that App. |
| **Application update (DDM)** | For supported apps installed through DDM in FileWave 16.3.x, this controls how the App is updated on iOS, iPadOS, and macOS. Choose **Follow Store Settings**, **Always On**, **Always Off**, or **Pin specific version**. If you choose **Pin specific version**, use the version field to target the exact App Store version to install and keep. |
| **User** | Only set when a managed user logs in |
| **System** | Payload settings applied regardless of user logged in. |
Apple allows the management of any amount of directory users for a single device. However, only one local user will be managed. This user will be the first user after enrolment of the device.
Profiles are stored directly within the Fileset and delivered to devices after MDM communication has been established. # Android Apps ## What Android Filesets can be created from public or private Google Play apps. Web apps can also be added when you need to publish a managed web shortcut. 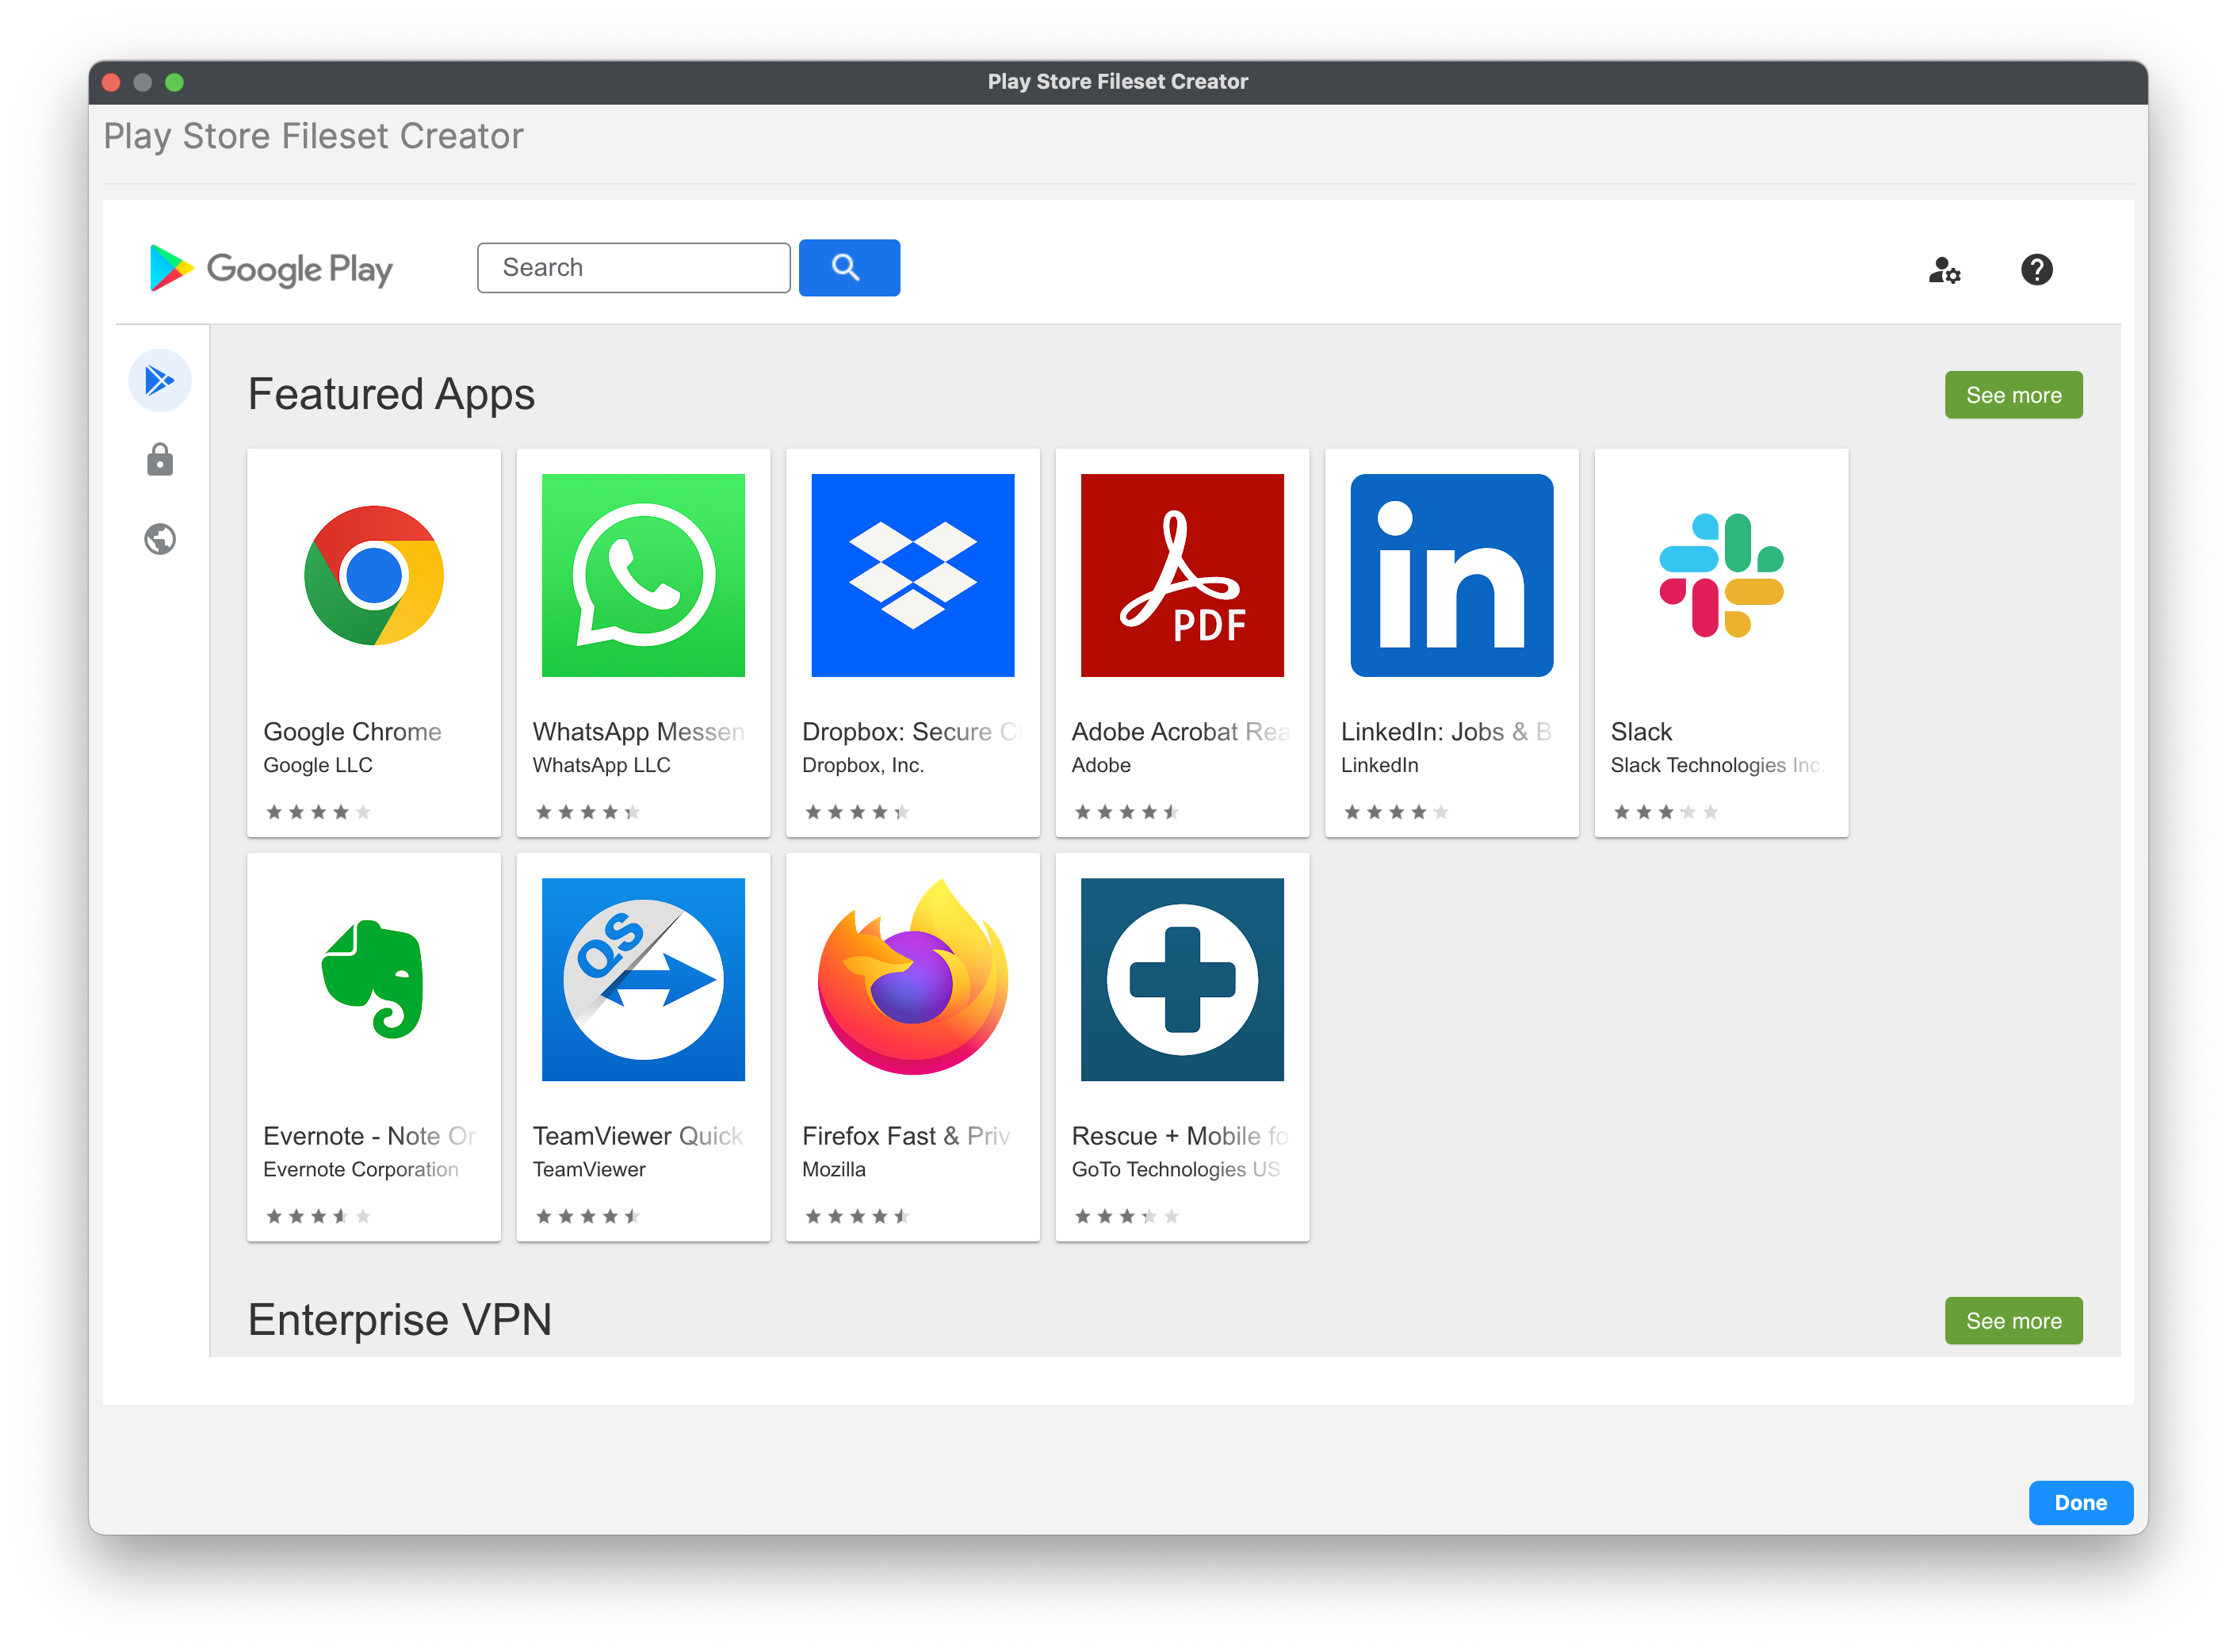 A Play Store App Fileset has Configuration, Permissions, and Managed Properties controls. Managed Properties appear only when the app developer exposes managed configuration settings. 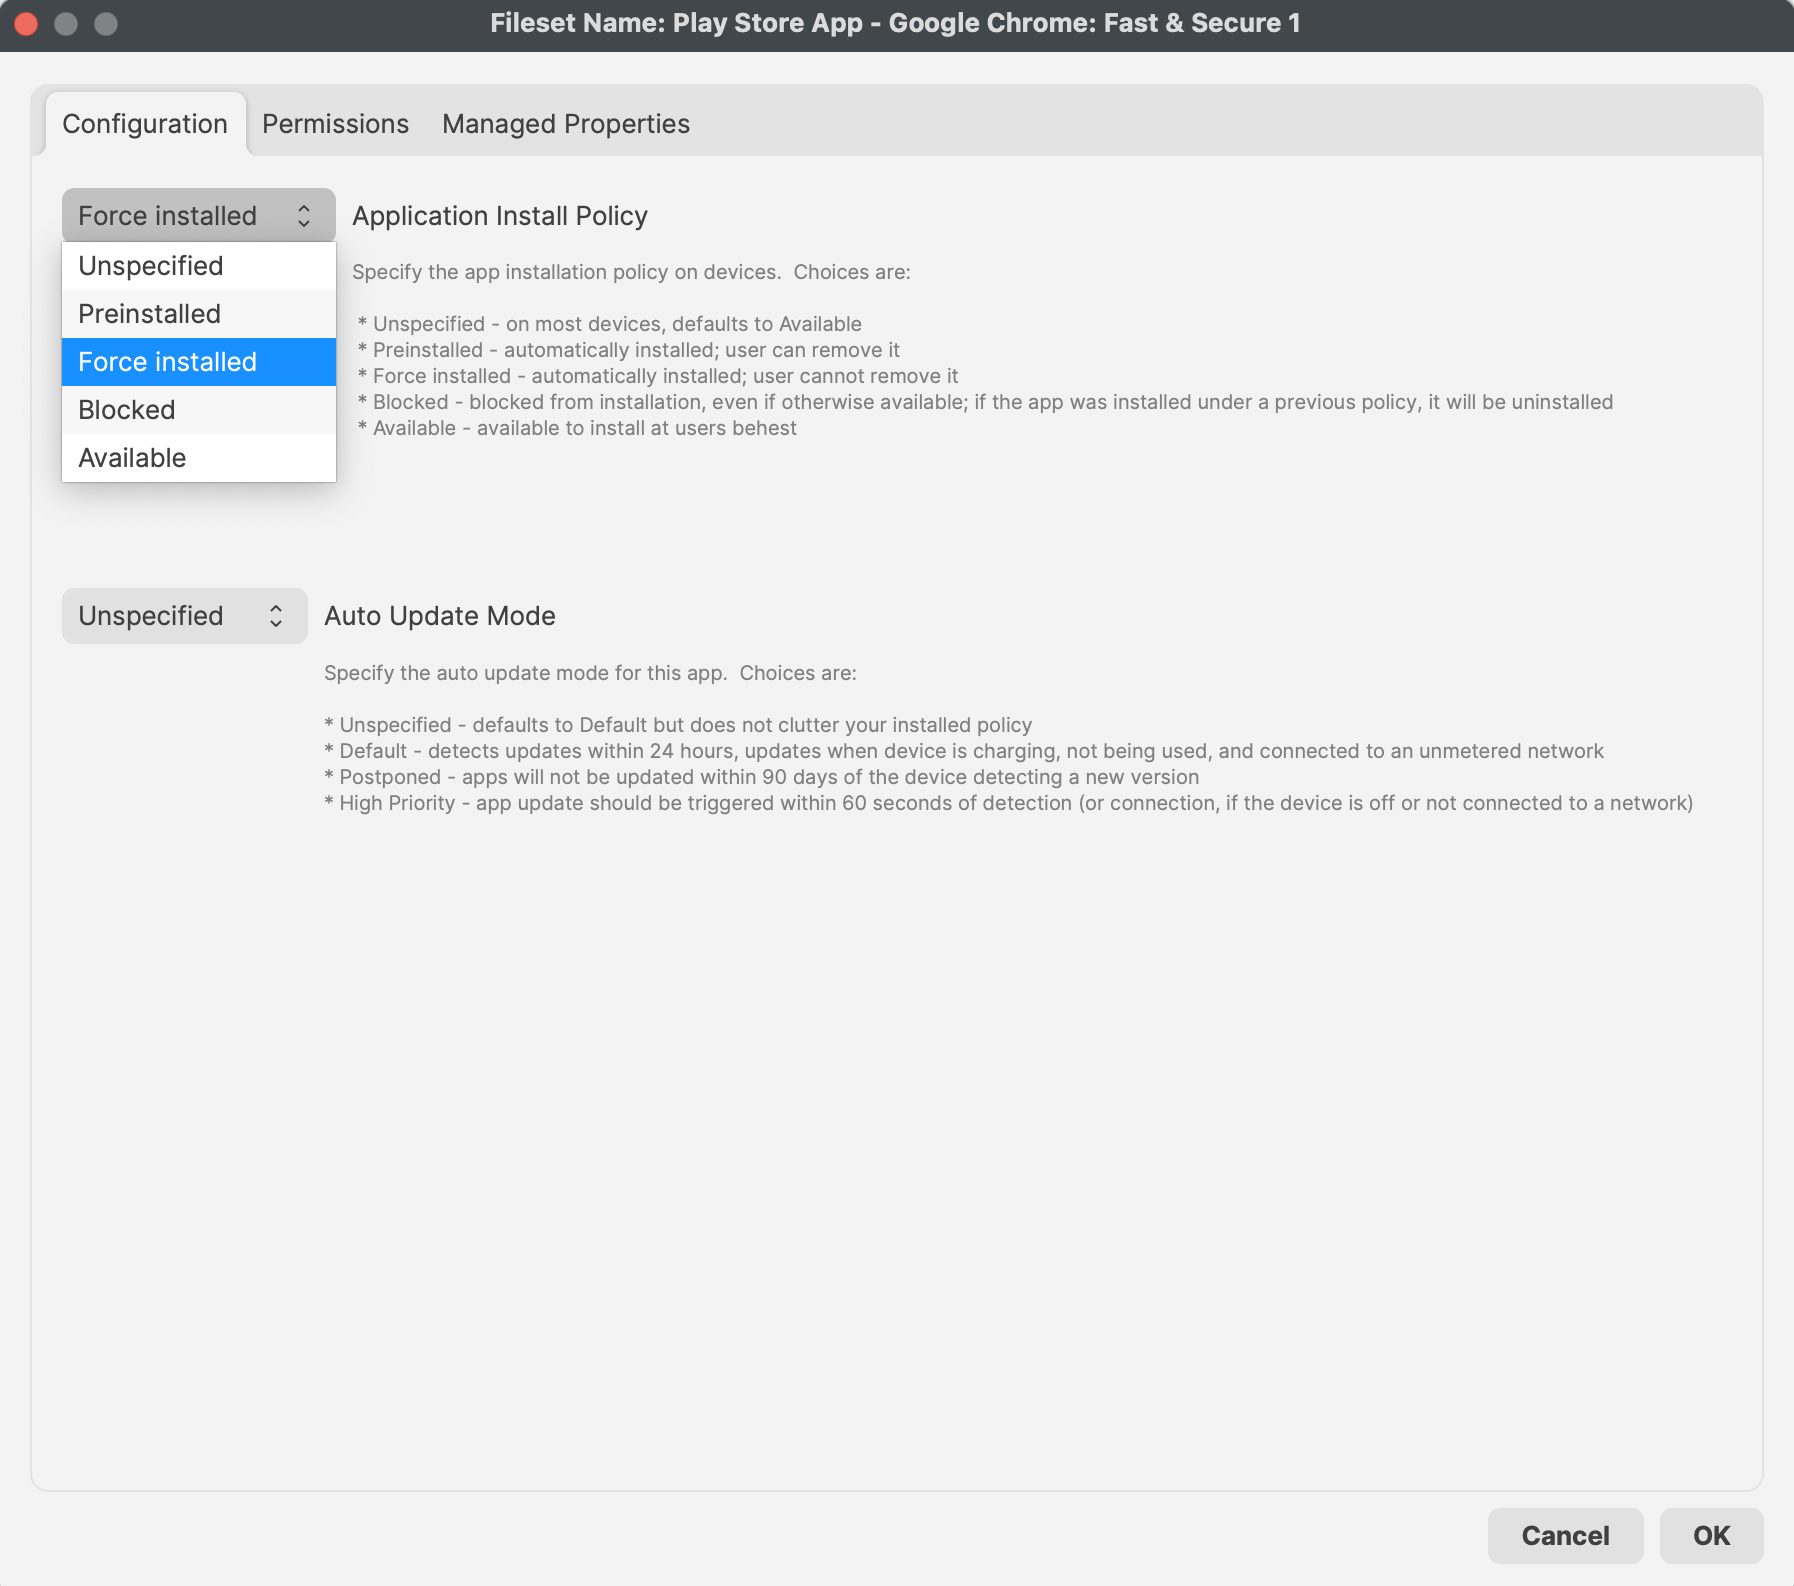 ## FileWave 16.4 app policy controls ### Auto Update Mode FileWave 16.4 exposes **Auto Update Mode** in each Android Play Store app Fileset’s **Properties > Configuration** tab. This is an app-specific setting.| Mode | Behavior |
|---|---|
| **Unspecified** | Leaves the value unspecified in the installed policy; Android uses its Default update behavior. |
| **Default** | Detects app updates within 24 hours and installs them when the device is charging, not in use, and connected to an unmetered network. |
| **Postponed** | Defers the app update for up to 90 days after the device detects the new version. |
| **High Priority** | Requests the app update within 60 seconds of detection, or after the device reconnects if it was offline. |
| **Properties** | Additional features include Reboot, the Force sub-option, priority, and an option to change verification for the entire Fileset. Priority provides extra control over the order of Fileset activation. |
| **Requirements** | Settings define the OS and hardware requirements for the Fileset. The Fileset downloads and activates only on devices that match these requirements. |
| **Dependencies** | Dependencies are covered in more detail elsewhere. In essence, the Fileset activates only after another defined Fileset installs first. |
| **Delete Files** | A defined list of files to be removed during activation |
| **Kiosk** | Details shown to users via the Kiosk Self-Service menu and system tray item. |
Profiles may only be a dependency in one direction, to prevent unexpected delay of Fileset installations.
FileWave has no control over the MDM protocol and relies on Apple’s process for delivering MDM items. For this reason, dependencies can make an MDM Fileset, such as a profile or VPP app, install after a non-MDM Fileset has activated, but other Filesets cannot depend on an MDM Fileset.
# Use Fileset Dependencies to Control Installation Order Fileset dependencies make one Fileset a prerequisite of another. When you associate the dependent Fileset, FileWave installs its required dependency first. ## How dependency order works The screenshot shows the dependency properties for both sides of a two-Fileset chain: - **Left:** The prerequisite Fileset. Select it as a dependency; you normally do not need a separate device association solely to satisfy this chain. - **Right:** The dependent Fileset that you associate with devices. Its properties show the left-hand Fileset as a dependency, so it installs afterward. 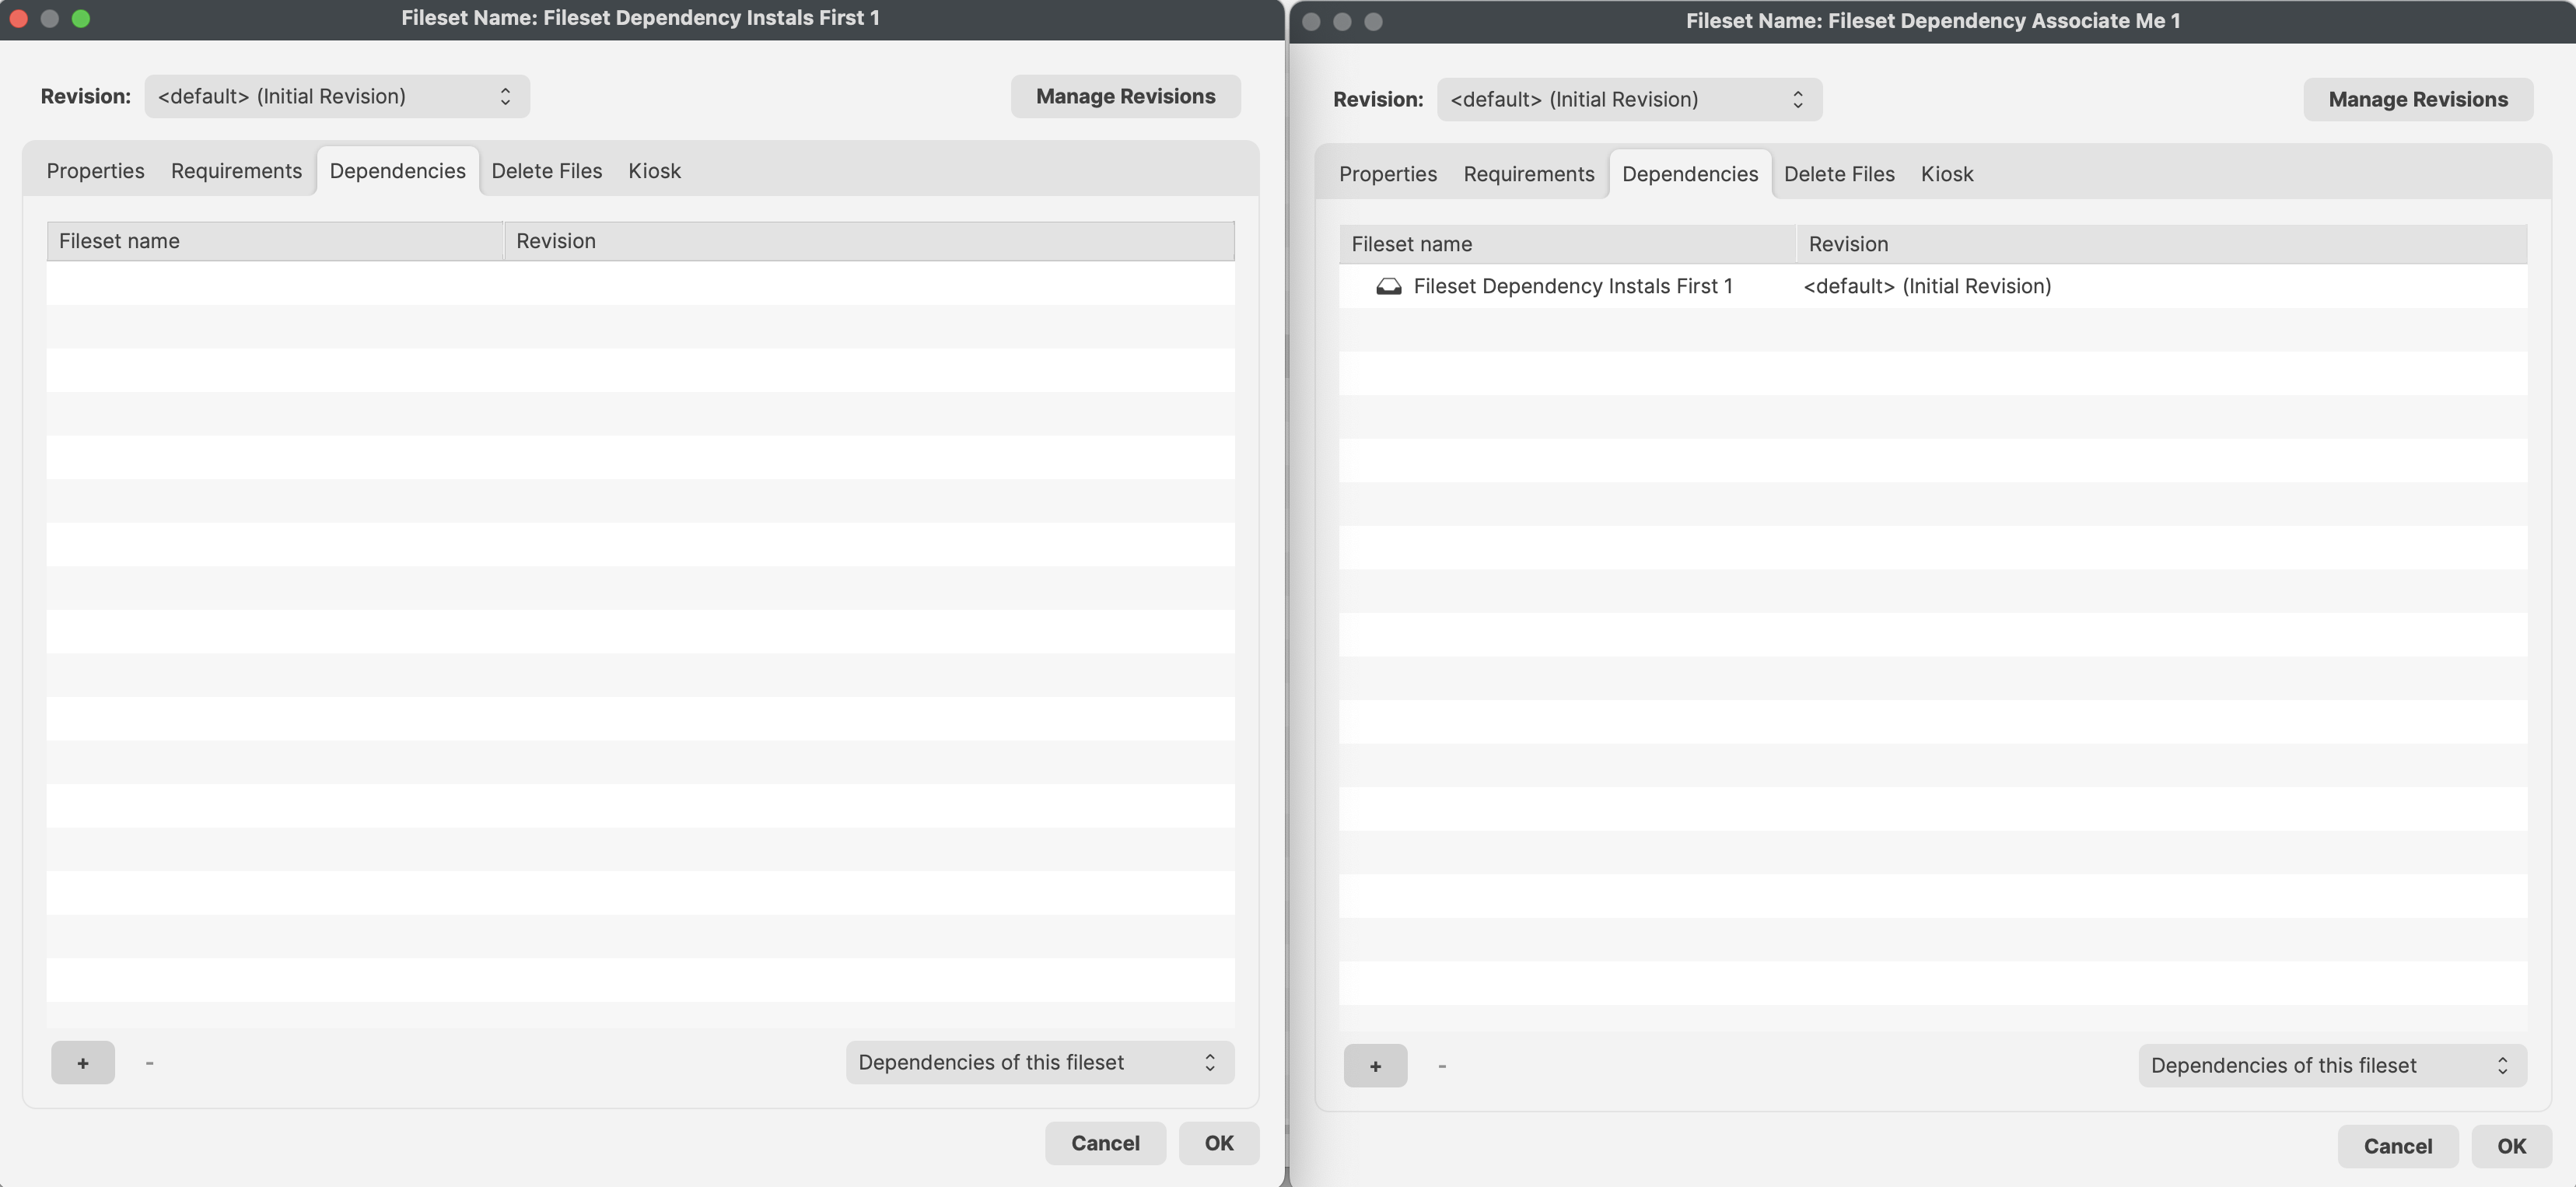 ## Build longer dependency chains A Fileset can depend on more than one prerequisite. A dependent Fileset can also become the prerequisite for another Fileset, creating a longer installation chain. Keep the order deliberate and test the full chain on a small device group before broad deployment. # Revisions Previously, updating one version of a software, for example, to a newer version, would require: a new Fileset created, new association or deployment generated and then the prior association removed. Revisions simplifies this process. To prevent associations or deployments being altered, a Fileset becomes a container of multiple revisions. 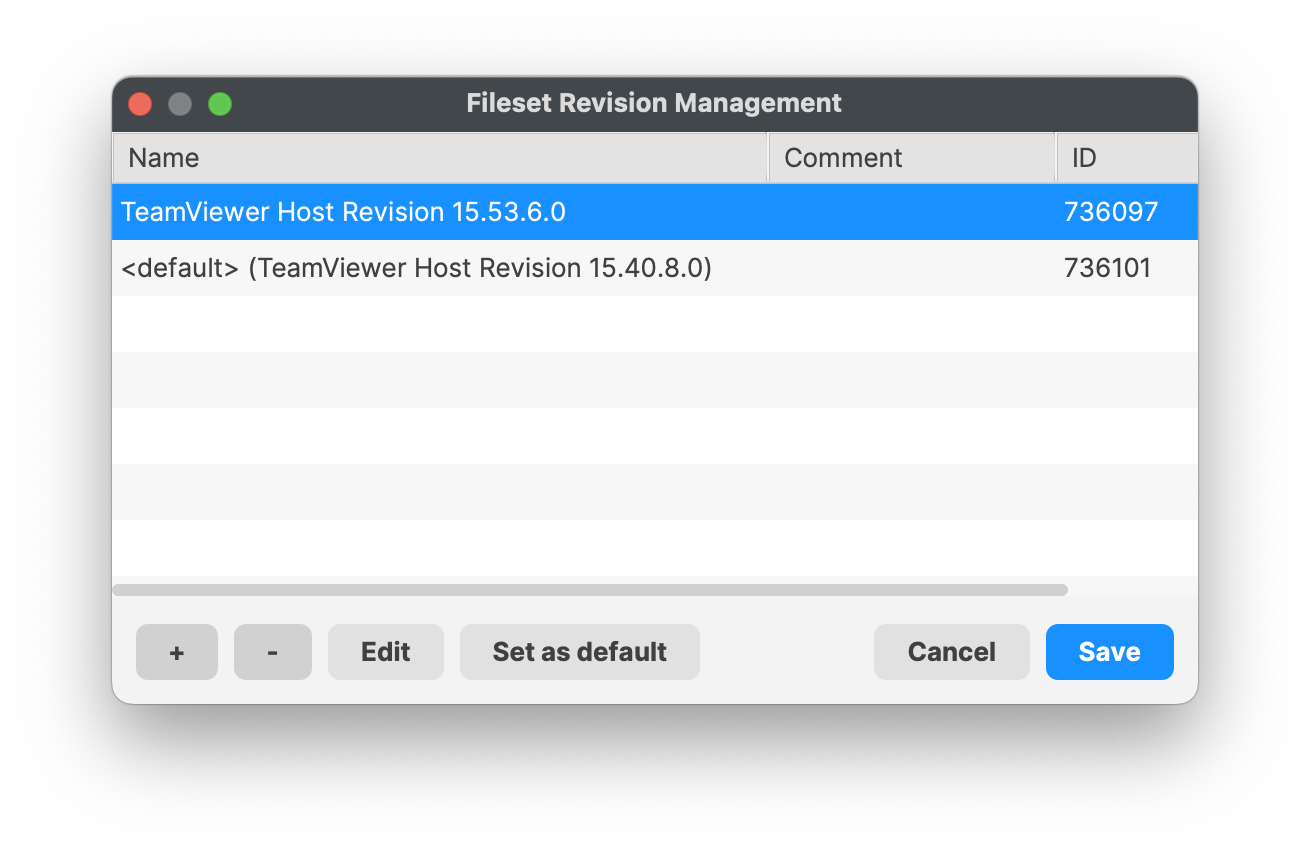 The version associated with devices may be altered within the Fileset. This allows for efficient update of Filesets on devices, simplified process between testing and mass assignment, whilst at the same time providing an easy method to roll back if found to be necessary; depending upon Fileset Type.Behind the scenes, swapping from one revision to another is the same as actually swapping between two different Filesets. All contents will be reconsidered and any scripts ran, e.g. a post-uninstaller script will run if included in the Fileset Revision that is being unassigned.
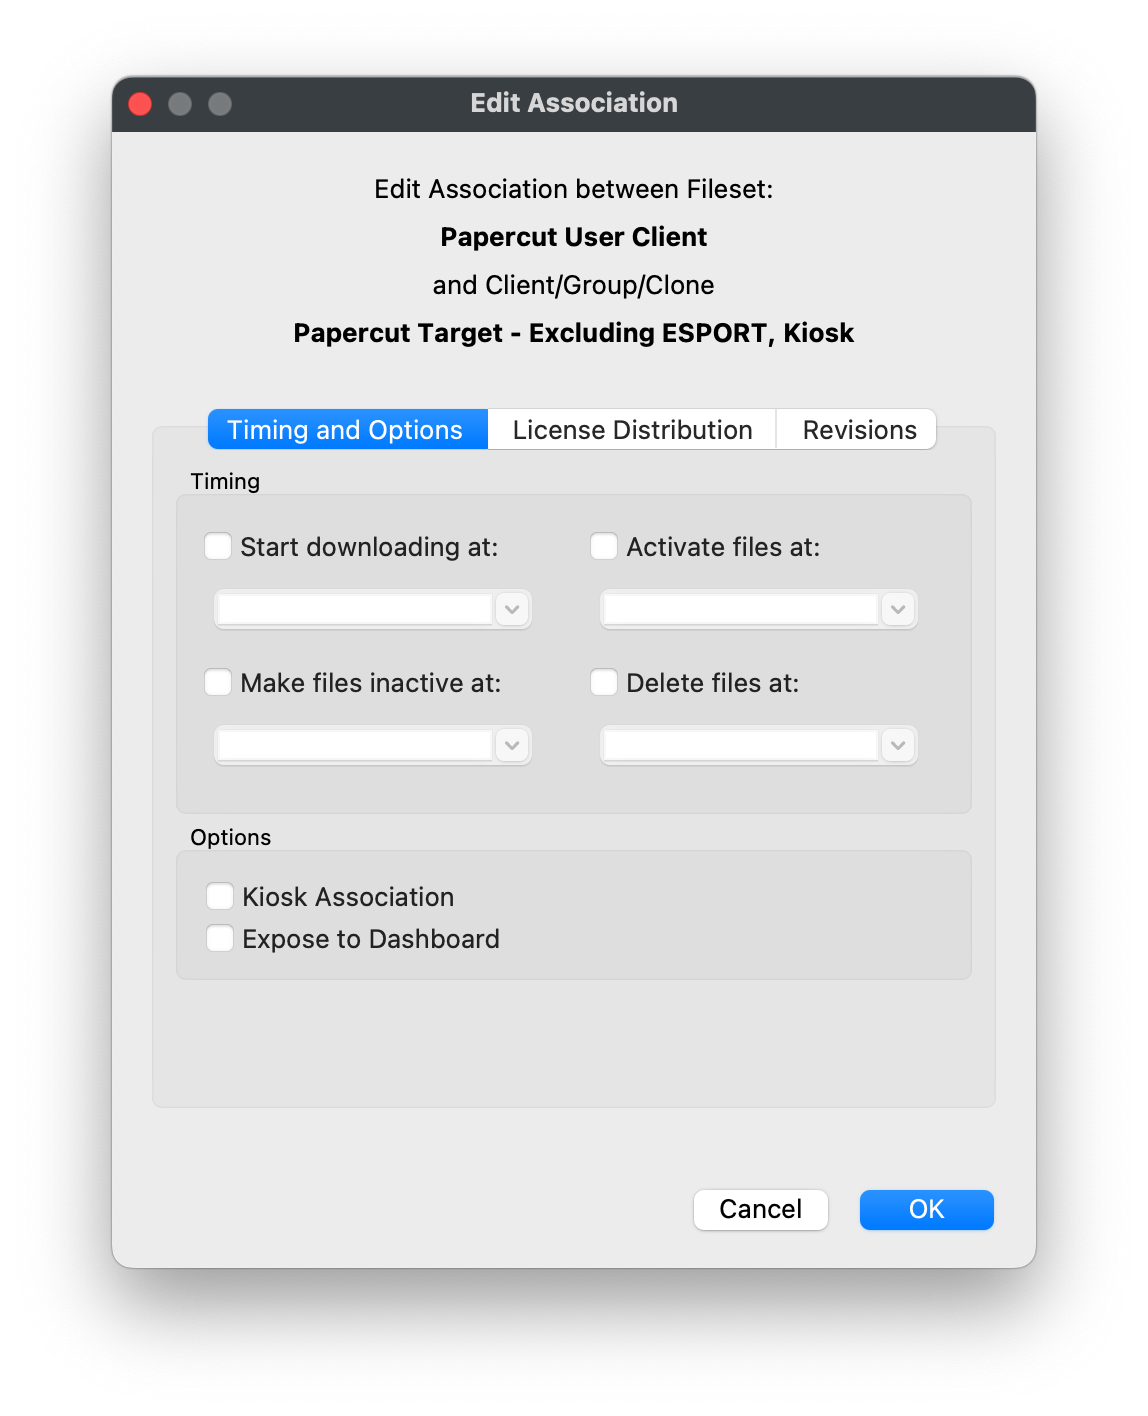
# Create and Manage Fileset Associations Use FileWave Central's **Associations** pane to connect Filesets with Clients, device groups, Smart Groups, and clones. The pane also controls deployment timing, Kiosk availability, deactivation, and removal behavior. 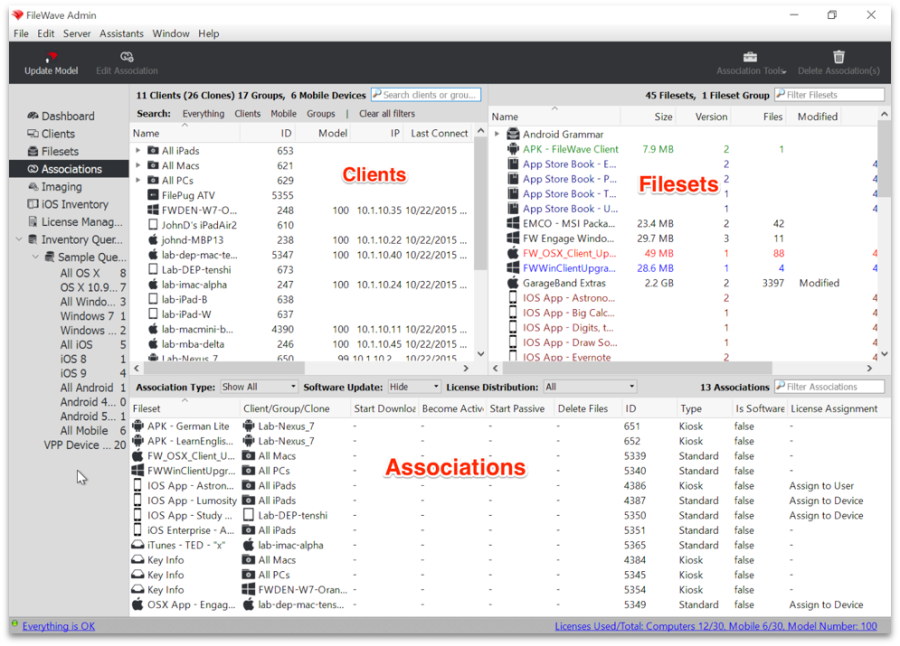 An **association** is the link between a Fileset and a Client or group. FileWave distributes the Fileset according to the settings on the winning association. ## Basic association workflow Select a Fileset, associate it with a Client or group, then update the Model. 1. You choose a Fileset from the upper right pane:  1. Drag the Fileset into the Clients pane and drop it on the target Client or group. 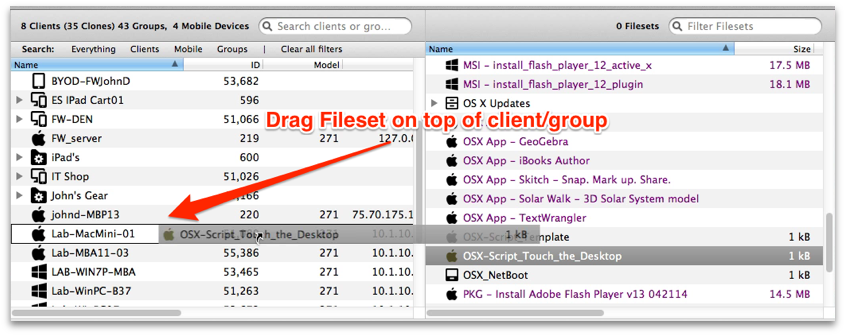 1. Select **Update Model**, or use *Command-U* on macOS or *Ctrl-U* on Windows, to publish the association. ## Customizing the Association After the Model update, the Client receives a new manifest at check-in. It compares that manifest with its local catalog and builds a work list for changes such as downloading, activating, deactivating, or removing Filesets. Edit the association when you need staged downloads, an activation window, Kiosk availability, or a defined deactivation and removal schedule. ## View associations for one Client or group Right-click a Client or group and choose **Show Associated Fileset** to see its direct associations. Filesets inherited through a parent group, Smart Group, or clone may not appear in that direct view. If a Client receives a Fileset you cannot find there, select the Fileset and show all of its associations instead. ## View Clients associated with one Fileset Select a Fileset and show all associations to trace every Client, group, Smart Group, or clone path that can deliver it. ## Searching and filtering the Associations window Another powerful function is in the Search / Filter window. You can enter any text into the Search window, press *Return,* then choose the criteria for your view of any association that is active. Your criteria can be to look for a Fileset with that text, a client, Group or Clone, a Fileset ID, of Fileset type (such as Kiosk), or just select *All Columns* to let the search find every association that has that text in it no matter what it applies to.  ## Editing the Association Another capability of the Associations window is the ability to edit Fileset associations. Within this functionality, you have the power to designate the deployment schedule, change the type of Fileset from standard to self-service Kiosk, and choose when the Fileset is deactivated and removed from the client. 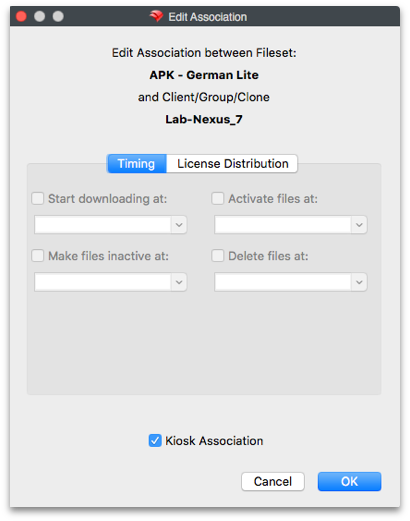  There are two Edit windows available, depending on the type of Fileset being deployed. Most computer and Android Filesets have the ability to designate a full range of settings: - ***Start downloading at*** – This tells the Client to start downloading the Fileset at a specific date and time. The Fileset will be downloaded and cached locally, but is inert; i.e., it will have no impact on the Client (other than storage space on the drive) until it is activated. This allows the FileWave administrator to pre-stage Filesets out on clients using a staggered deployment schedule prior to activation. Using a staggered schedule would allow systems administrators to minimize network traffic bottlenecks when distributing large deployment sets. This action can also be used when you have staged a Fileset that is still being tested, and there was a problem with the test results. Instead of having to reset devices, you just delete the Fileset prior to activation. - ***Activate files at*** – This tells the Client when (date and time) to activate the Fileset. Installers will run, shell scripts will execute, and any files will be placed into their proper places. Since this command is only a signal to the client to have the Fileset perform its action, the network traffic is minimal. - ***Make files inactive at*** – This tells the Client to locate and move all components of that Fileset back into the local cache, so that the Fileset no longer has an effect on the operation of the Client computer or device. - ***Delete files at*** – This tells the Client to delete the Fileset at a specific date and time. - ***Kiosk Association*** – This converts the Fileset from a standard distribution to a self-service Kiosk item. Filesets that have been distributed as standard items can be converted to Kiosk mode and vice versa. iOS Filesets can be installed, deleted, and changed to Kiosk items. Apple iBooks can be installed by time or changed to be Kiosk items. iBooks cannot be deleted - once deployed, they are the property of the end user. ## Apple Apps and Books license distribution For an Apple Apps and Books app, **License Distribution** controls whether managed-distribution licenses are assigned to devices or users. Device assignment is available only when the app supports it. Set the default user or device licensing method in FileWave Central Preferences, then override it per Fileset when the app supports both methods. In the older example below, *Assign License to Device* is unavailable for an app that supports user assignment only. 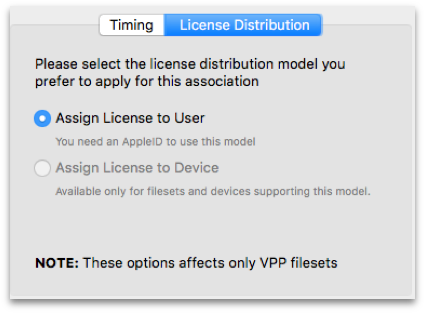 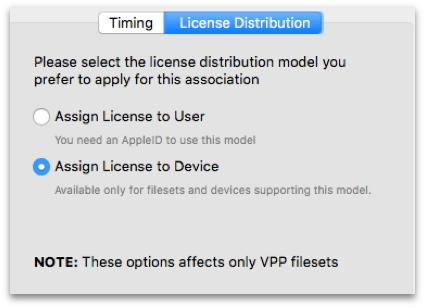Note: If you want to provide custom settings for deployment times to a large number of Filesets, using a Fileset Group is the best way to achieve this goal. Filesets within Fileset Groups that are associated to Clients or Client Groups will all get the same settings you designate with the *Edit Association* pane for that Group.
## Set a reboot deadline For a Fileset that requires a reboot, set a deadline in the **Associations** editor. You can apply the deadline to one Fileset or a Fileset Group. At the deadline, the device restarts to complete the installation, so plan the schedule and user communication before deployment. 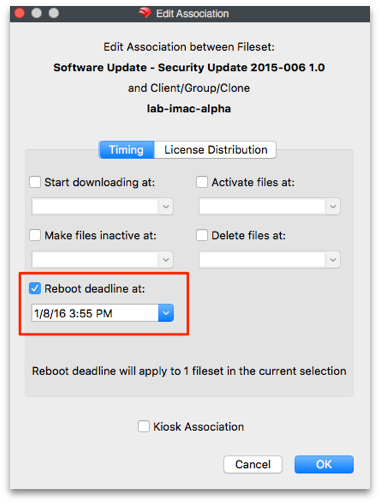 ## Association Tools The tools and actions available to associations allow you to see the various aspects of the association: - ***Reveal Client/Group/Clone*** – This displays and highlights the Client/Group/Clone related to this association in the upper-left portion of the window. - ***Show all Associations of this Client/Group/Clone*** – This displays and highlights all associations related to the client/Group/Clone in the lower portion of window. - ***Reveal Fileset*** – This displays and highlights the Fileset in the upper-right portion of window. - ***Open Fileset*** – This displays the contents of the Fileset (same as double-clicking on Fileset in the Filesets view). - ***Open Fileset Report Window*** – This displays the report showing the status of a Fileset, Filesets, or Fileset Group's distribution. - ***Show all Associations of this Fileset*** – This displays all of the Clients associated with this Fileset - ***Delete Association(s)*** – This removes the linkage between the Client/Group and the Fileset. In most cases, this will result in the Fileset contents being removed from the Client/Group. With VPP managed distribution, the license is revoked and added back to the list of available licenses. ## Association Conflict Resolution The algorithm for computing which Client receive which associations is quite complex. As a result, you may end up "double associating" a Fileset to a Client (e.g. if it is cloned into two Groups, both Groups are associated with the same Fileset). We have solved this issue by allowing only one Association-Fileset-Client chain. A Fileset can only be associated to a client via one Association. The chosen Association's commands will be followed, and all other associations ignored. The "winner" association is determined by *association* *distance*. ## Association Distance The FileWave Server resolves conflicting associations by choosing the most direct association. For example, an association directly from a Fileset to a Client is more direct than to its Group, and an association to a Client's direct parent is closer than an association to its grandparent. Clones also increase distance. **Closer** associations always win. **Equidistant** Associations are treated by ID-descending, meaning that new associations (higher ID numbers) beat older ones. This is discussed further in [Fileset Association types and precedence](https://kb.filewave.com/books/filesets-payloads/page/fileset-association-types-and-precedence "Fileset Association types and precedence"). ## Smart Groups Smart Group associations are calculated separately, following the same distance method. However, if a Client is associated by both a Smart Group and a regular association, the regular association will always win. When you view Associations, you will only see the Filesets that are directly associated with that Client or Group. Associations made to a Smart Group will not show up when viewing the Client associations and vice versa. ## Imaging associations Imaging Filesets and their associations are covered in [Network Imaging / IVS](https://kb.filewave.com/books/network-imaging-ivs "Network Imaging / IVS"). # Fileset Association types and precedence There are several ways Filesets may be associated with devices, and the method used will affect activation. This article shares example associations.It does not matter if this is an Association or a Deployment. Each client has one manifest and the below rules apply, however the link between Fileset and Client is established.
## 1:1 Associations These are direct associations between a Fileset and a device (or clone) ## Standard Association Automatically installed without user intervention 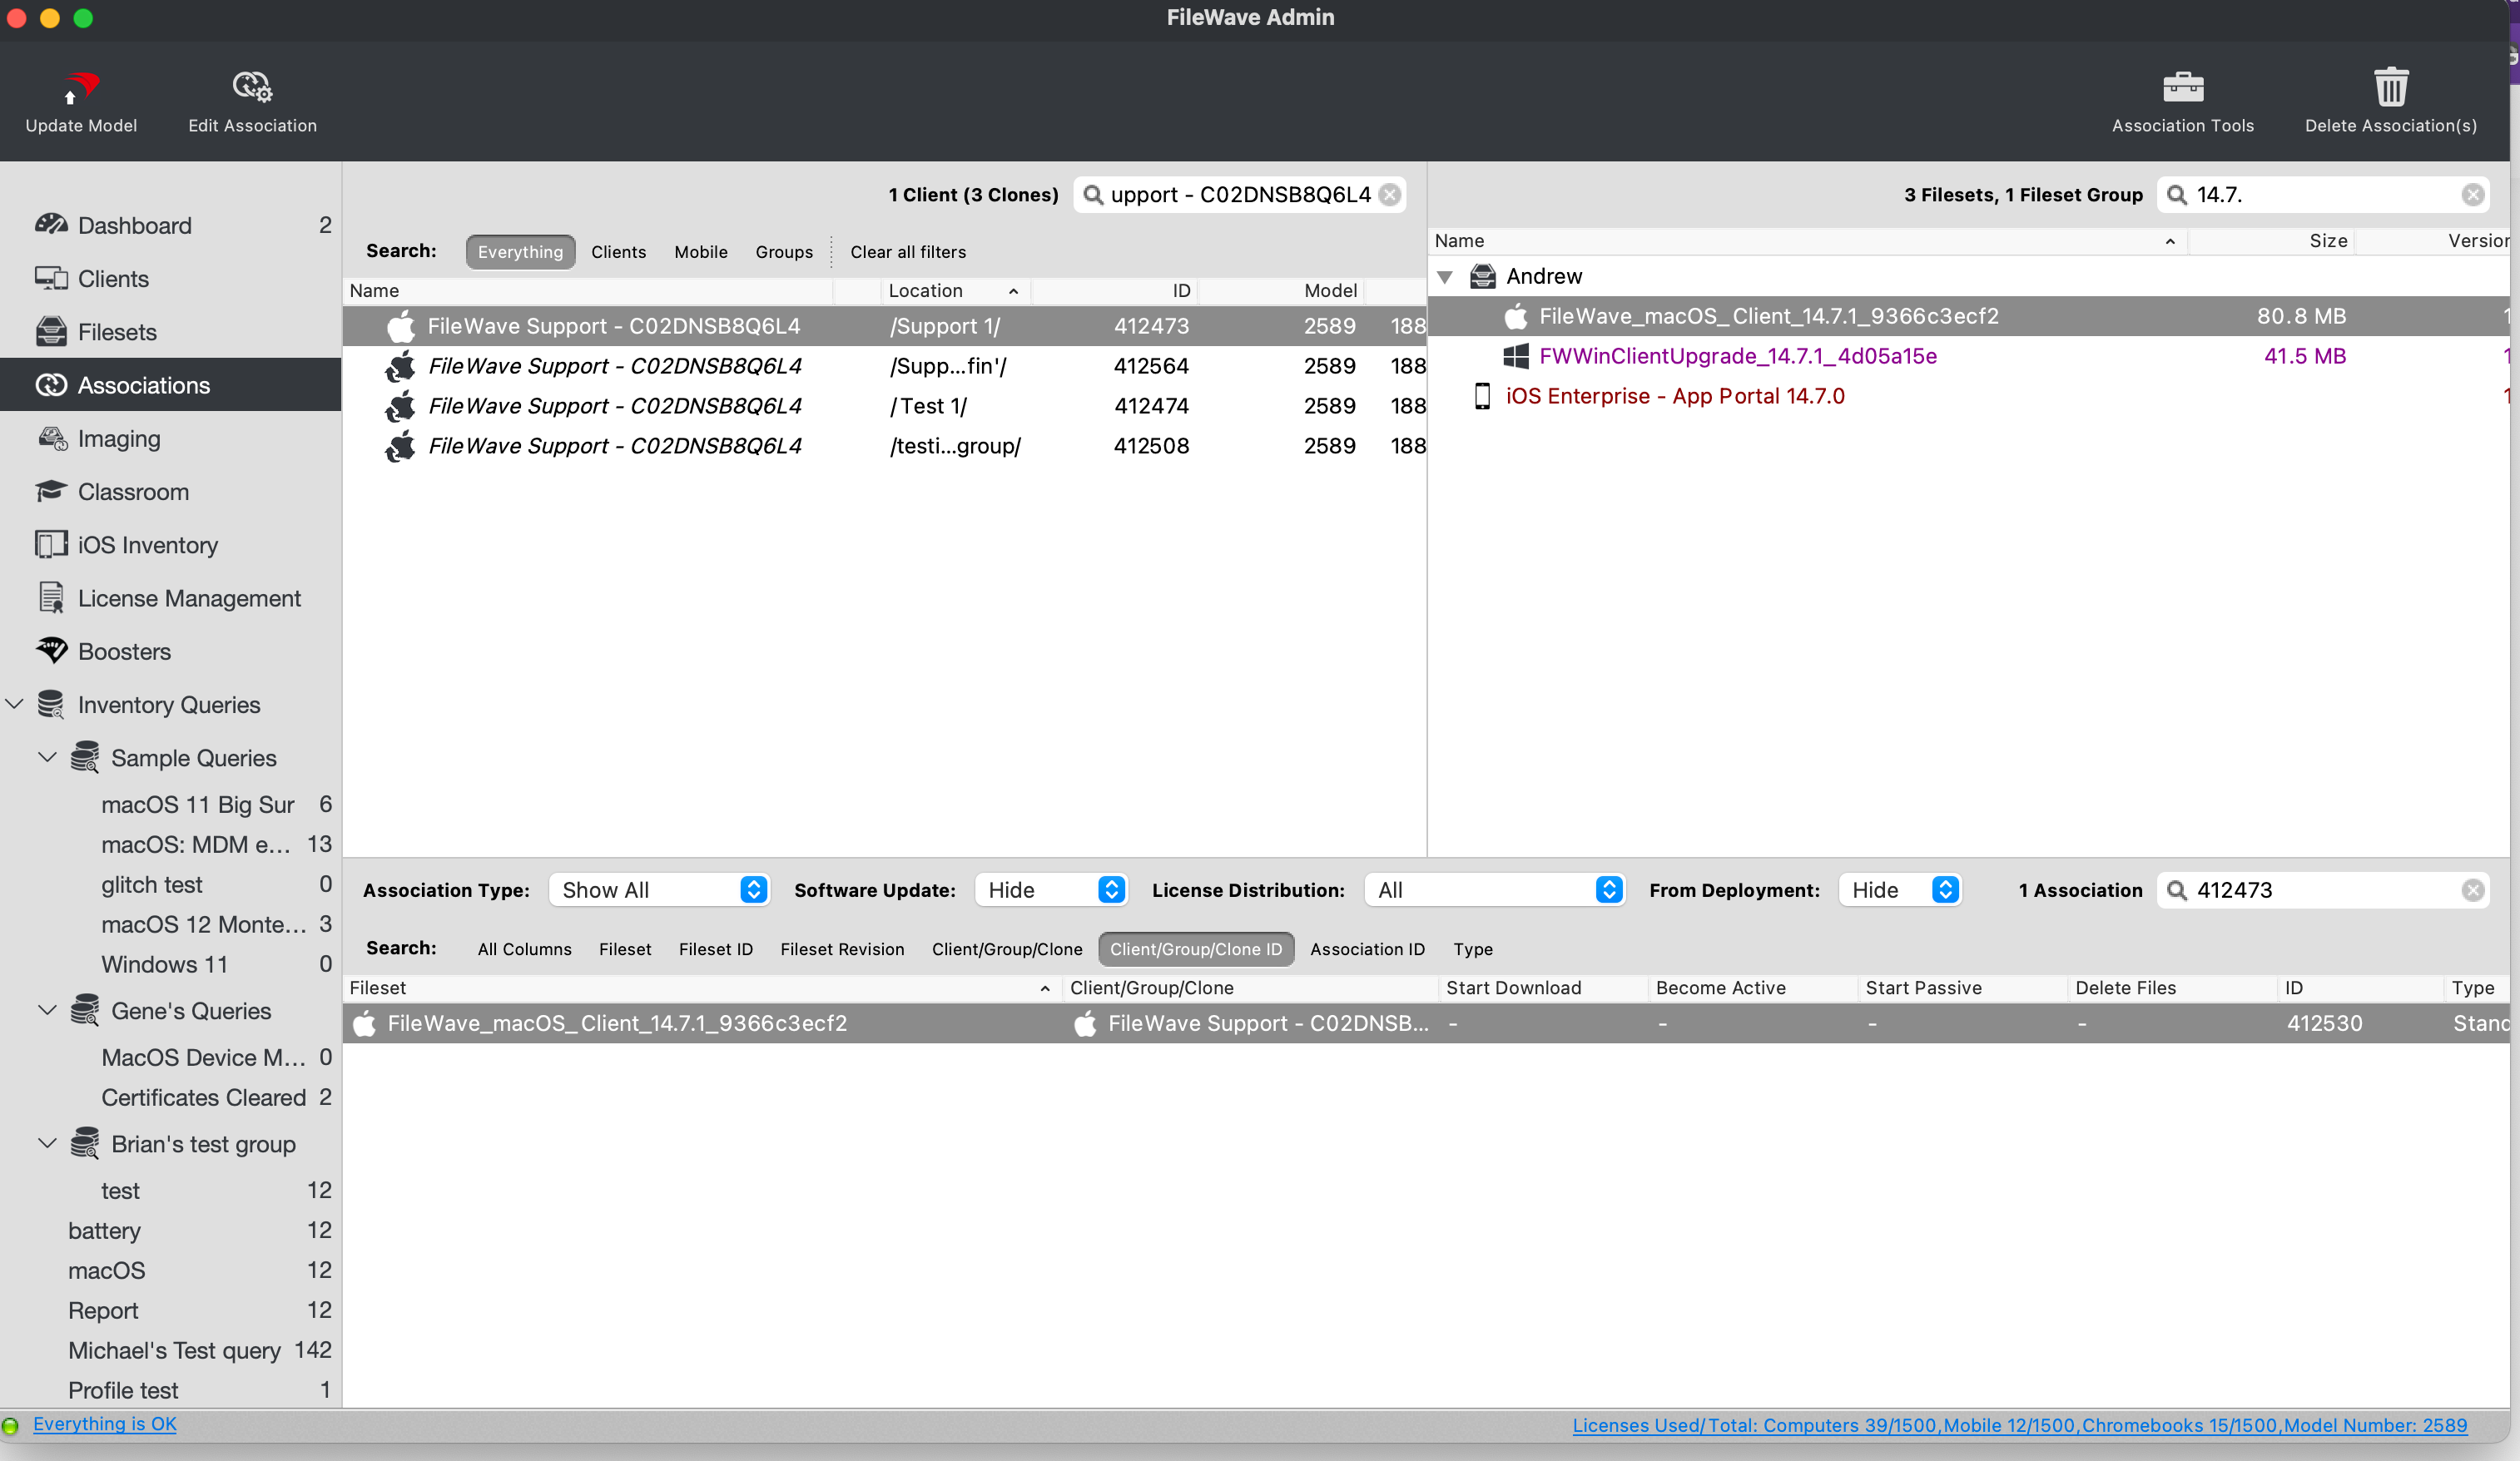 In the above image, one Fileset is associated directly with this device; **Type – Standard** ## Kiosk Associations User initiated installation from the Kiosk Menu Item or System Tray. 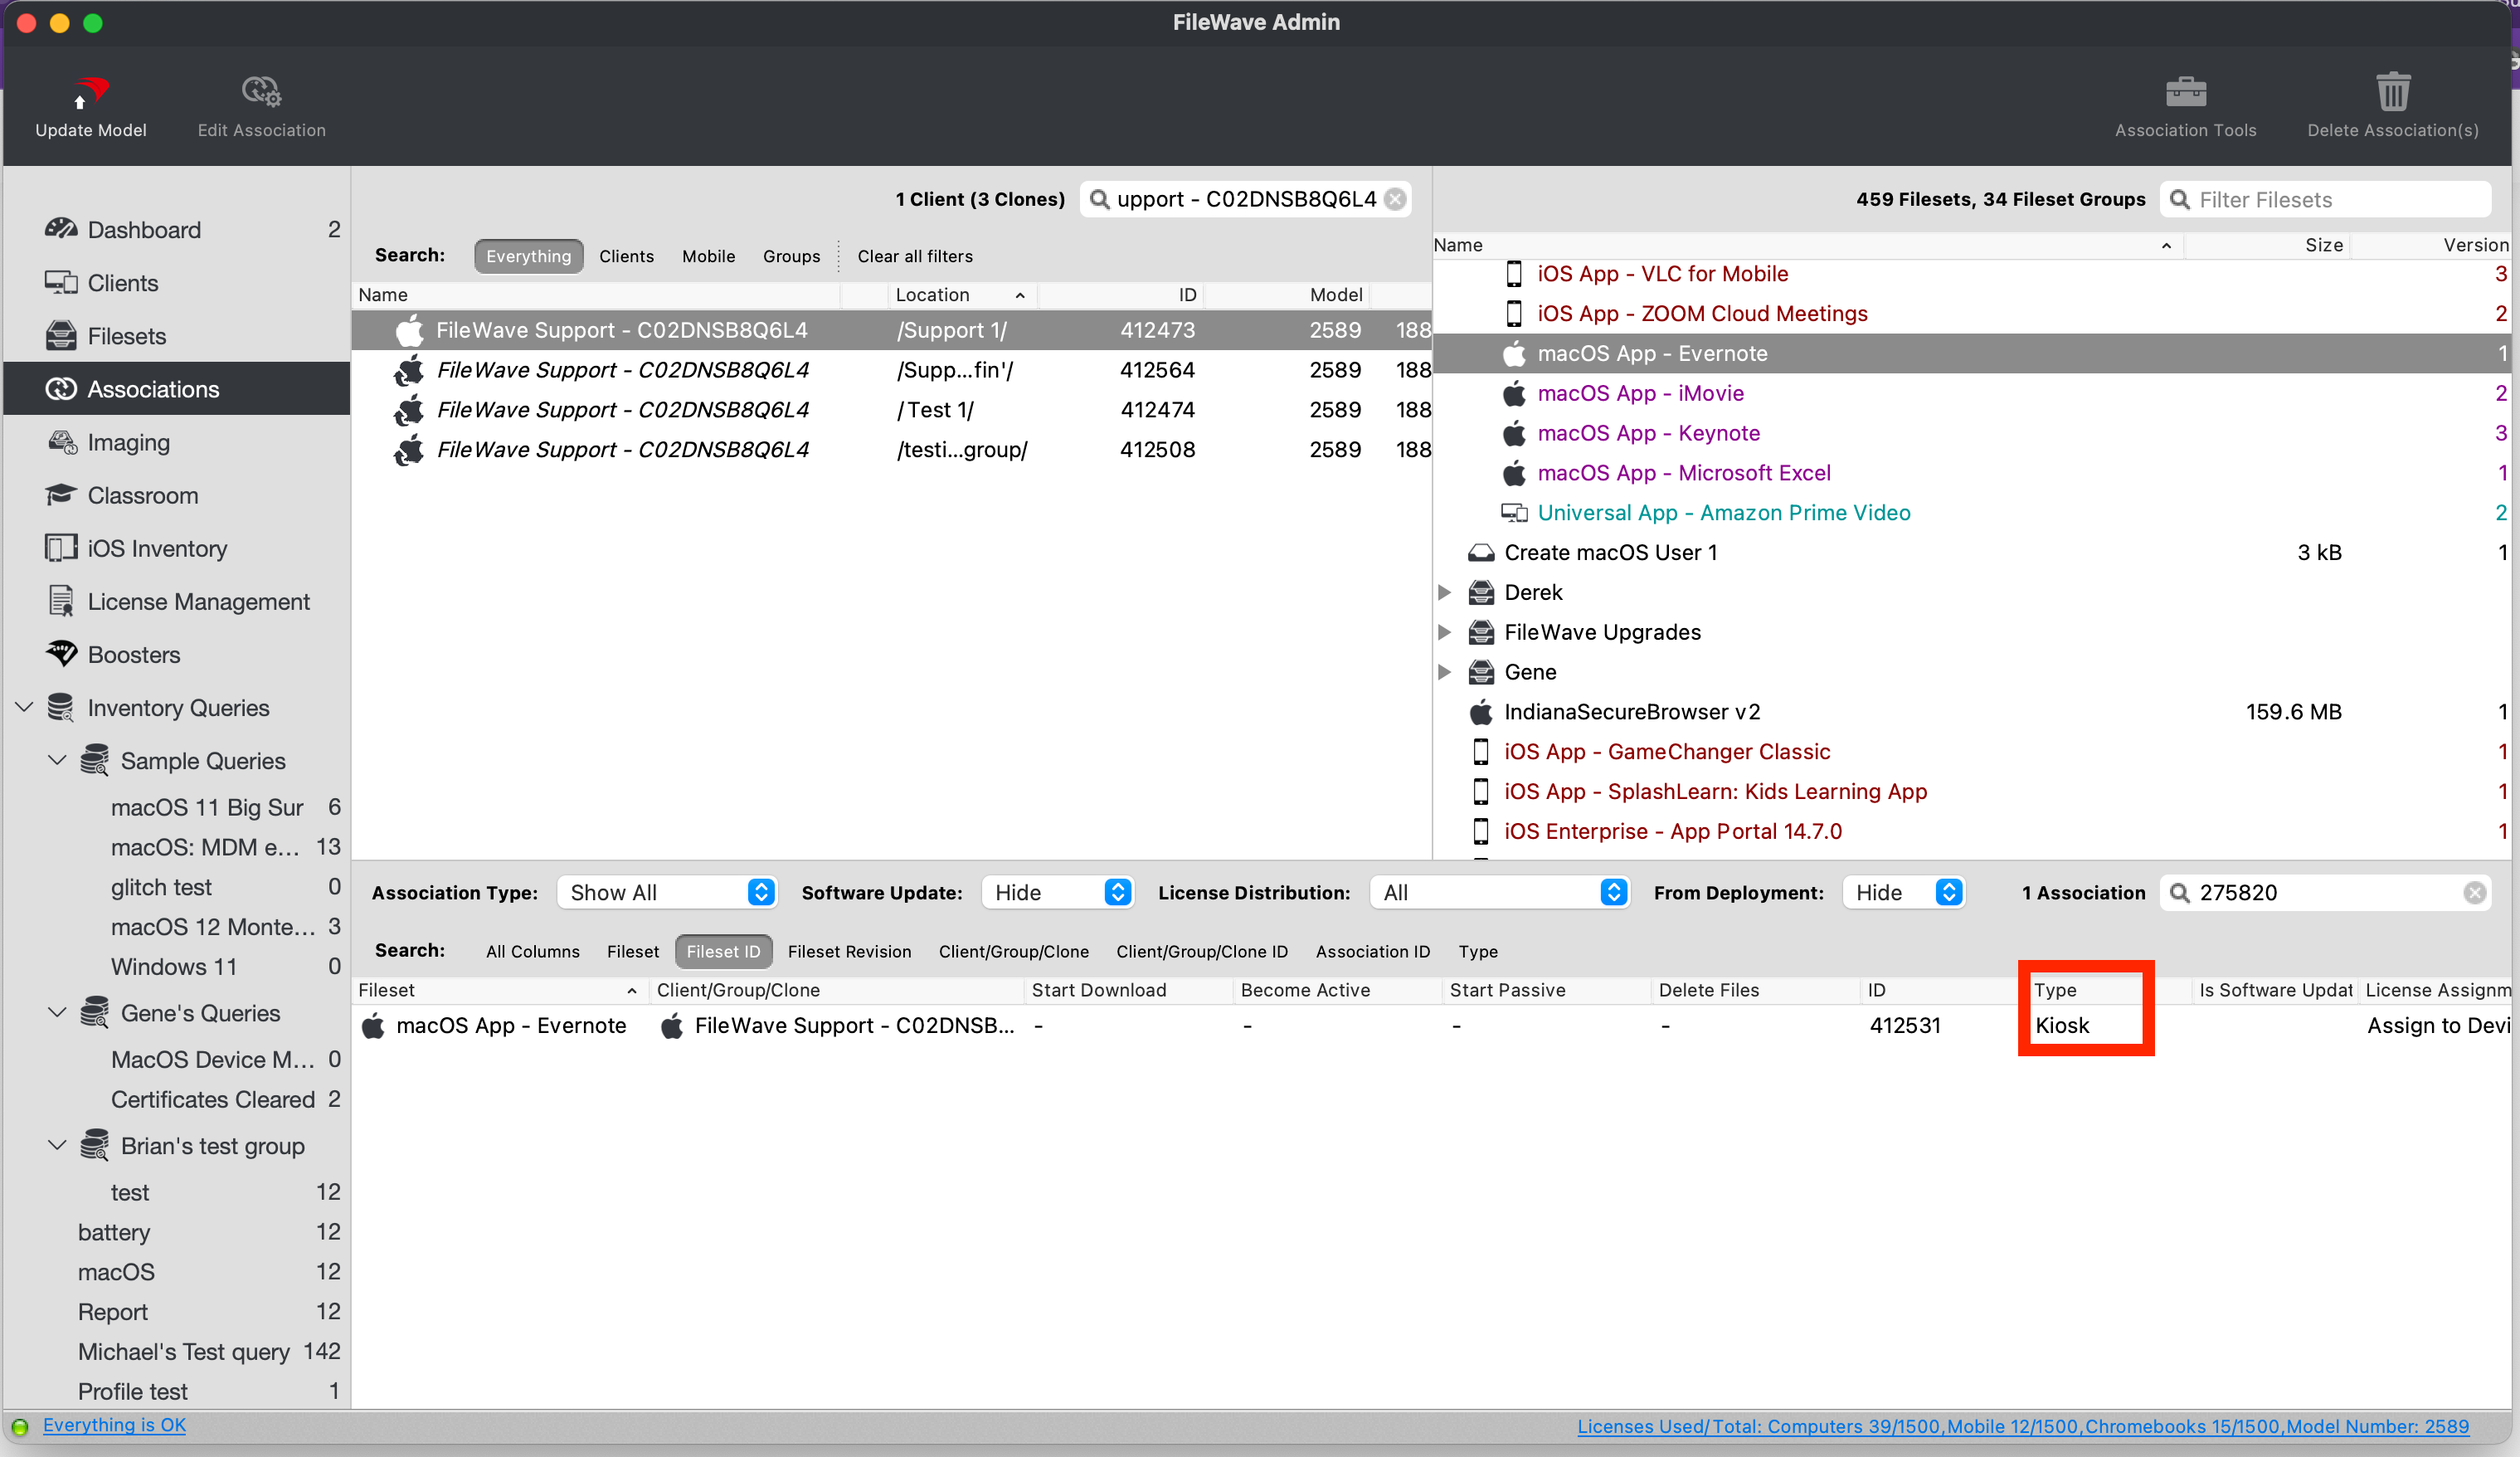 In the above image, one Fileset is associated directly with this device; **Type – Kiosk** ## Group Based Associations These are associations between a Fileset and a Client Group. The below image shows the same Fileset associated with two different client groups; one group nested inside another group. 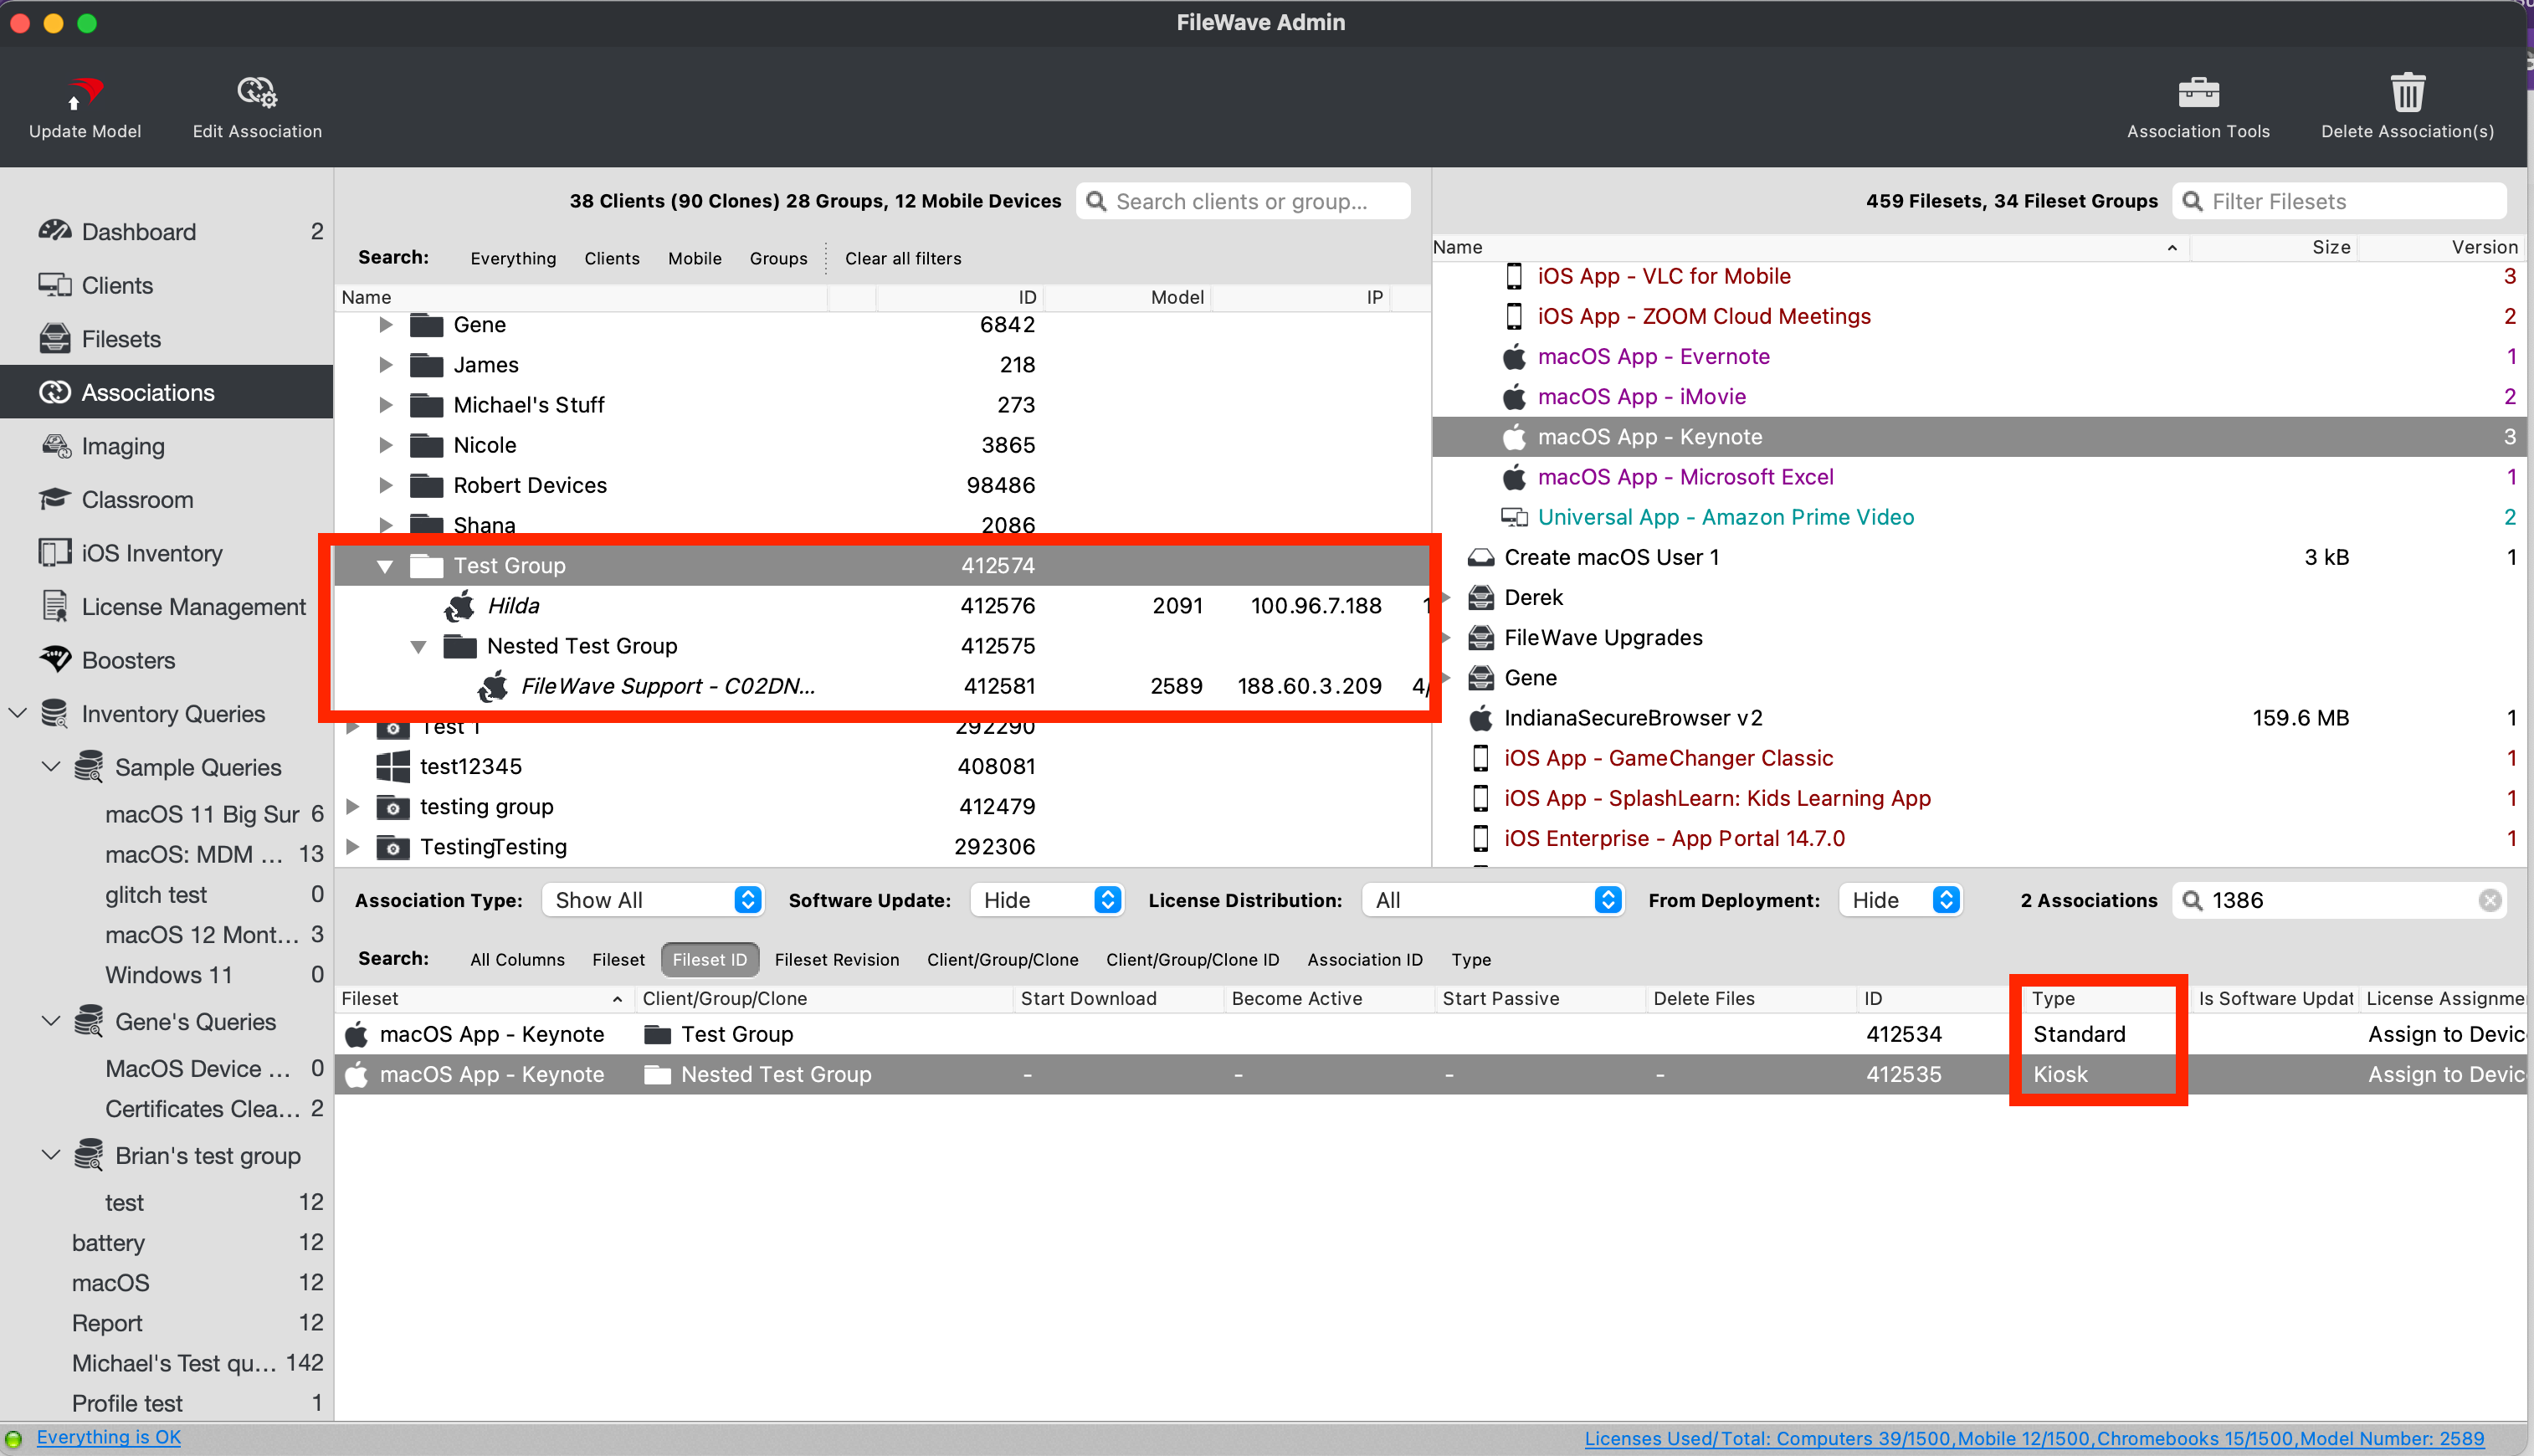 This example demonstrates the Keynote Fileset associated with two Client Groups: Test Group and Nested Test Group. Expected behavior: - Client 'Hilda' will install Keynote without user intervention - Client 'FileWave Support - C02DNSB8Q6L4' will have Keynote available to the user via the Kiosk. The below image provides another more complex example, with more nested groups. 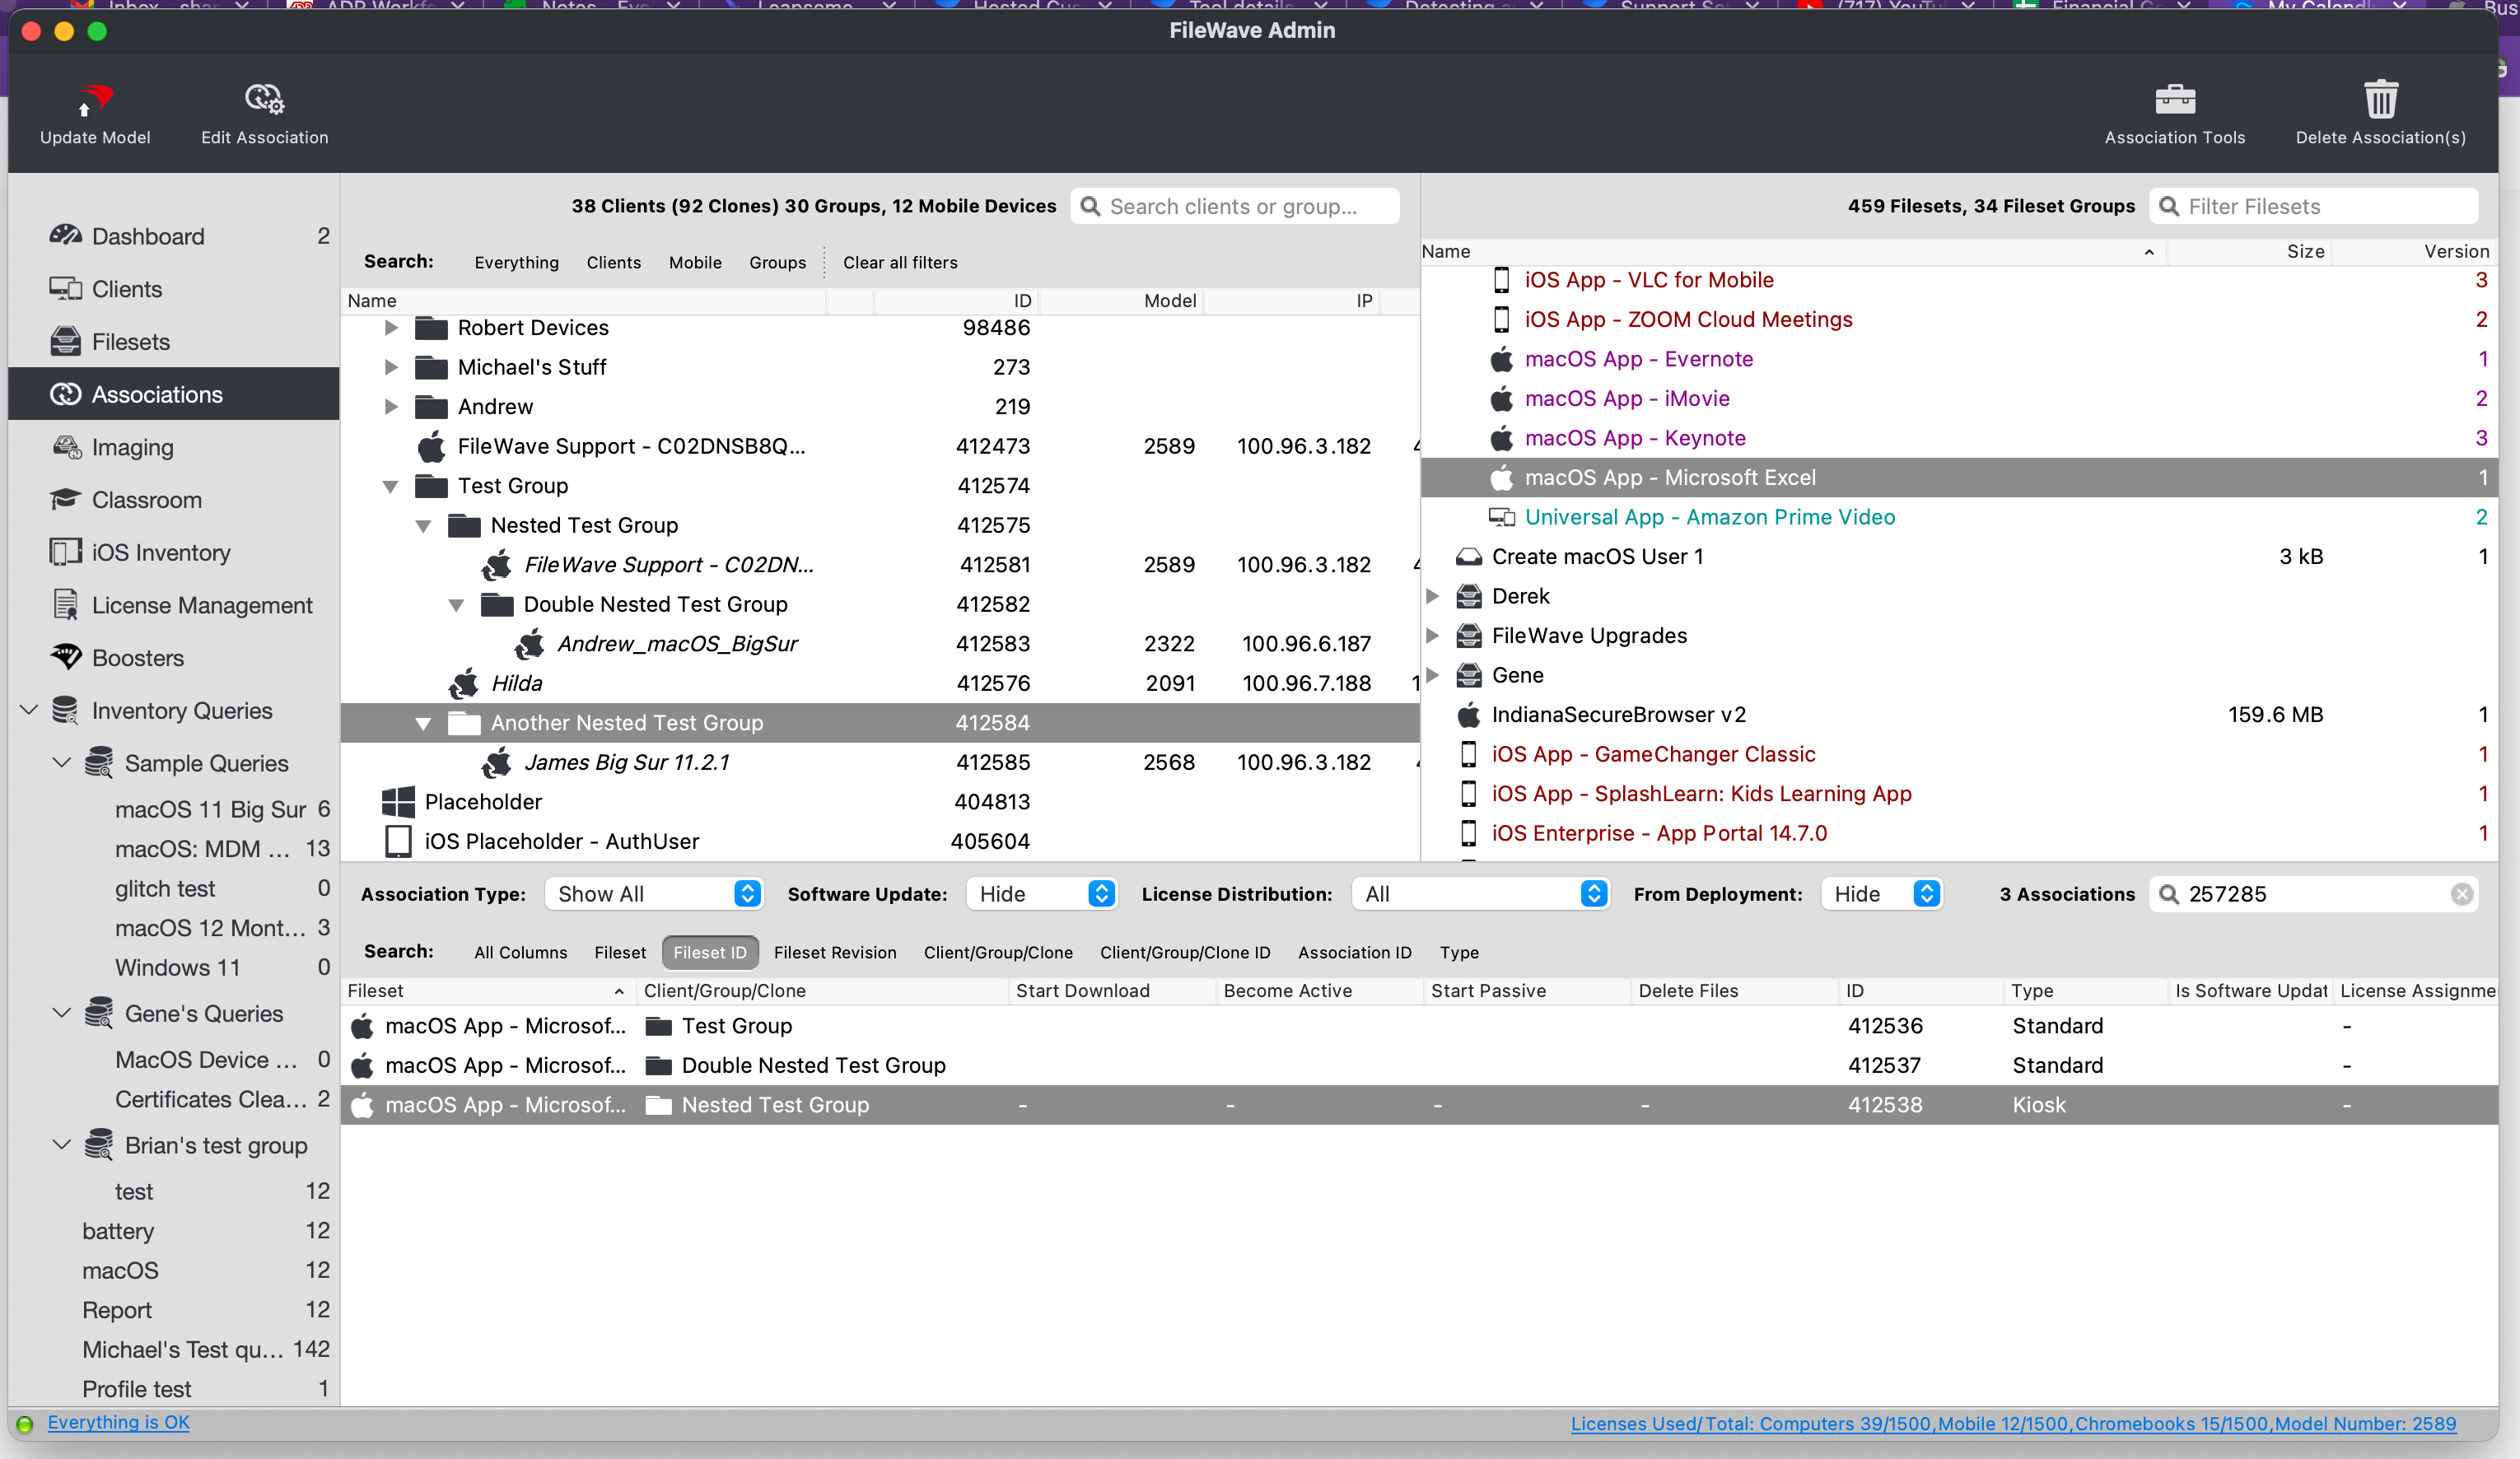 Excel Fileset is associated with three groups: Test Group, Nested Test Group, and Double Nested Test Group. Expected behavior: - Client 'FileWave Support - C02DNSB8Q6L4' will have Excel available via Kiosk. - Client 'James Big Sur 11.2.1', 'Andrew\_macOS\_BigSur' and 'Hilda' will install Excel without user intervention. ## Association Distance Where the same Fileset is associated to a device by more than one path, the device's 'closest' association should win. - Direct Association to devices is closer than a Direct Association to a Clone - Association to a parent group is closer than one if its nested groups - Association to a group is closer than a Clone within that group. Each association is given a score.| Association to... | Score |
| Device | 0 |
| Device Clone | 1 |
| Static/Smart Group | 2 |
| Clone of Static/Smart Group | 2 |
| Association to... | Scoring | Total |
| Static Group 1 | 1 + 2 + 2 + 2 + 2 | 9 |
| Static Group 3 | 1 + 2 + 2 | 5 |
| Smart Group 1 | 1 + 2 | 3 |
| Clone of device in Smart Group 1 | 1 | 1 |
| Static Group 4 | 1 + 2 + 2 | 5 |
| Smart Group 2 | 1 + 2 | 3 |
| [](https://kb.filewave.com/uploads/images/gallery/2023-07/2Pyn3vK0VBevFXqE-image.png) | [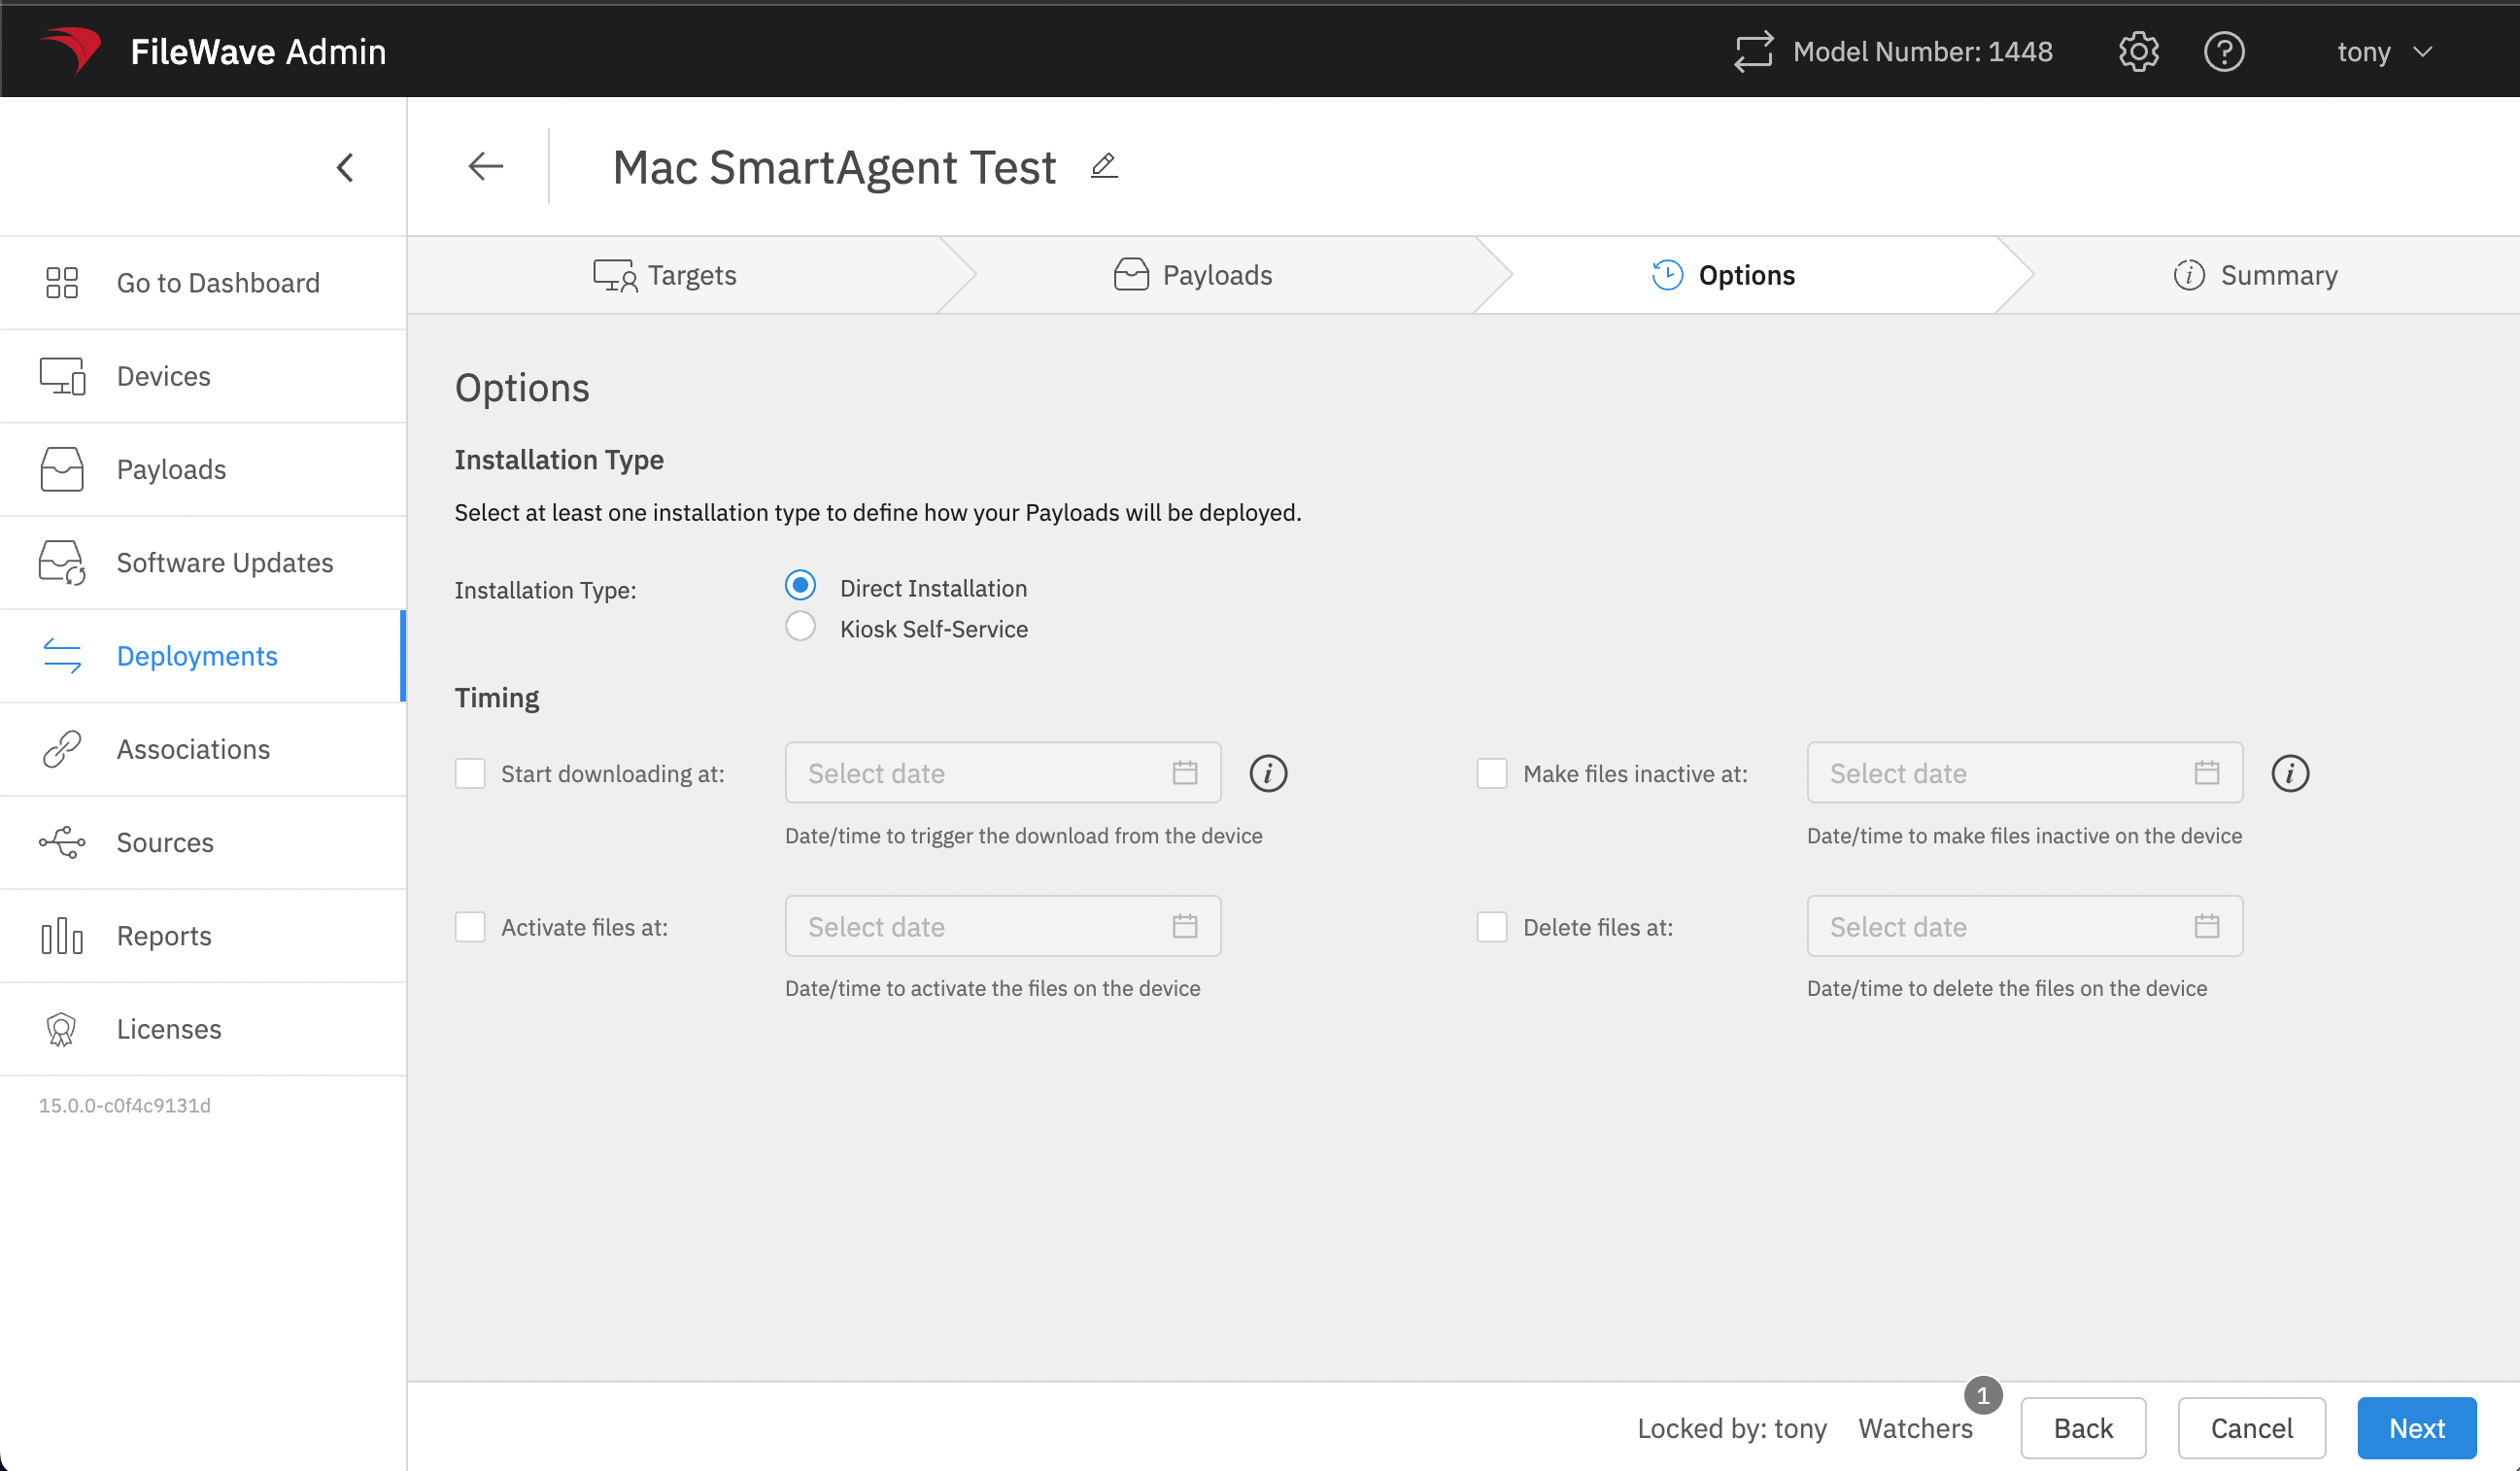](https://kb.filewave.com/uploads/images/gallery/2023-07/IYO7eI43VFKhQVUg-image.png) |
Deployments are not automatically better for every existing assignment. Use them when the included content should share the same behavior. Keep or split assignments when timing, installation type, licensing, targets, exclusions, or Fileset revisions need to differ.
## Why use Deployments?| Deployment capability | Operational benefit |
|---|---|
| **Multiple Filesets and targets in one rule** | Update the shared assignment once instead of finding and editing a set of separate Associations. |
| **Exclusions** | Target a broad group and omit specific devices or subgroups without building a separate assignment structure. |
| **Shared options** | Apply one installation type, timing configuration, and applicable VPP/Apps and Books license-distribution model to the included content. |
| **Tags and names** | Group and find related content-delivery rules without reorganizing the Fileset tree around each assignment. |
| **Ongoing maintenance** | Add or remove targets and Filesets later while retaining the Deployment's shared options. |
**Association conversion is a real replacement.** The conversion tool replaces the selected Associations with the resulting Deployment after you publish the preview. Review every target, Fileset, option, revision, and added or removed assignment before publishing.
## FileWave Central 16.4 FileWave Central 16.4 shows included targets and Filesets side by side in a unified Deployment editor. Exclusions and shared options expand below the included items, and Tags are available for organization and filtering. [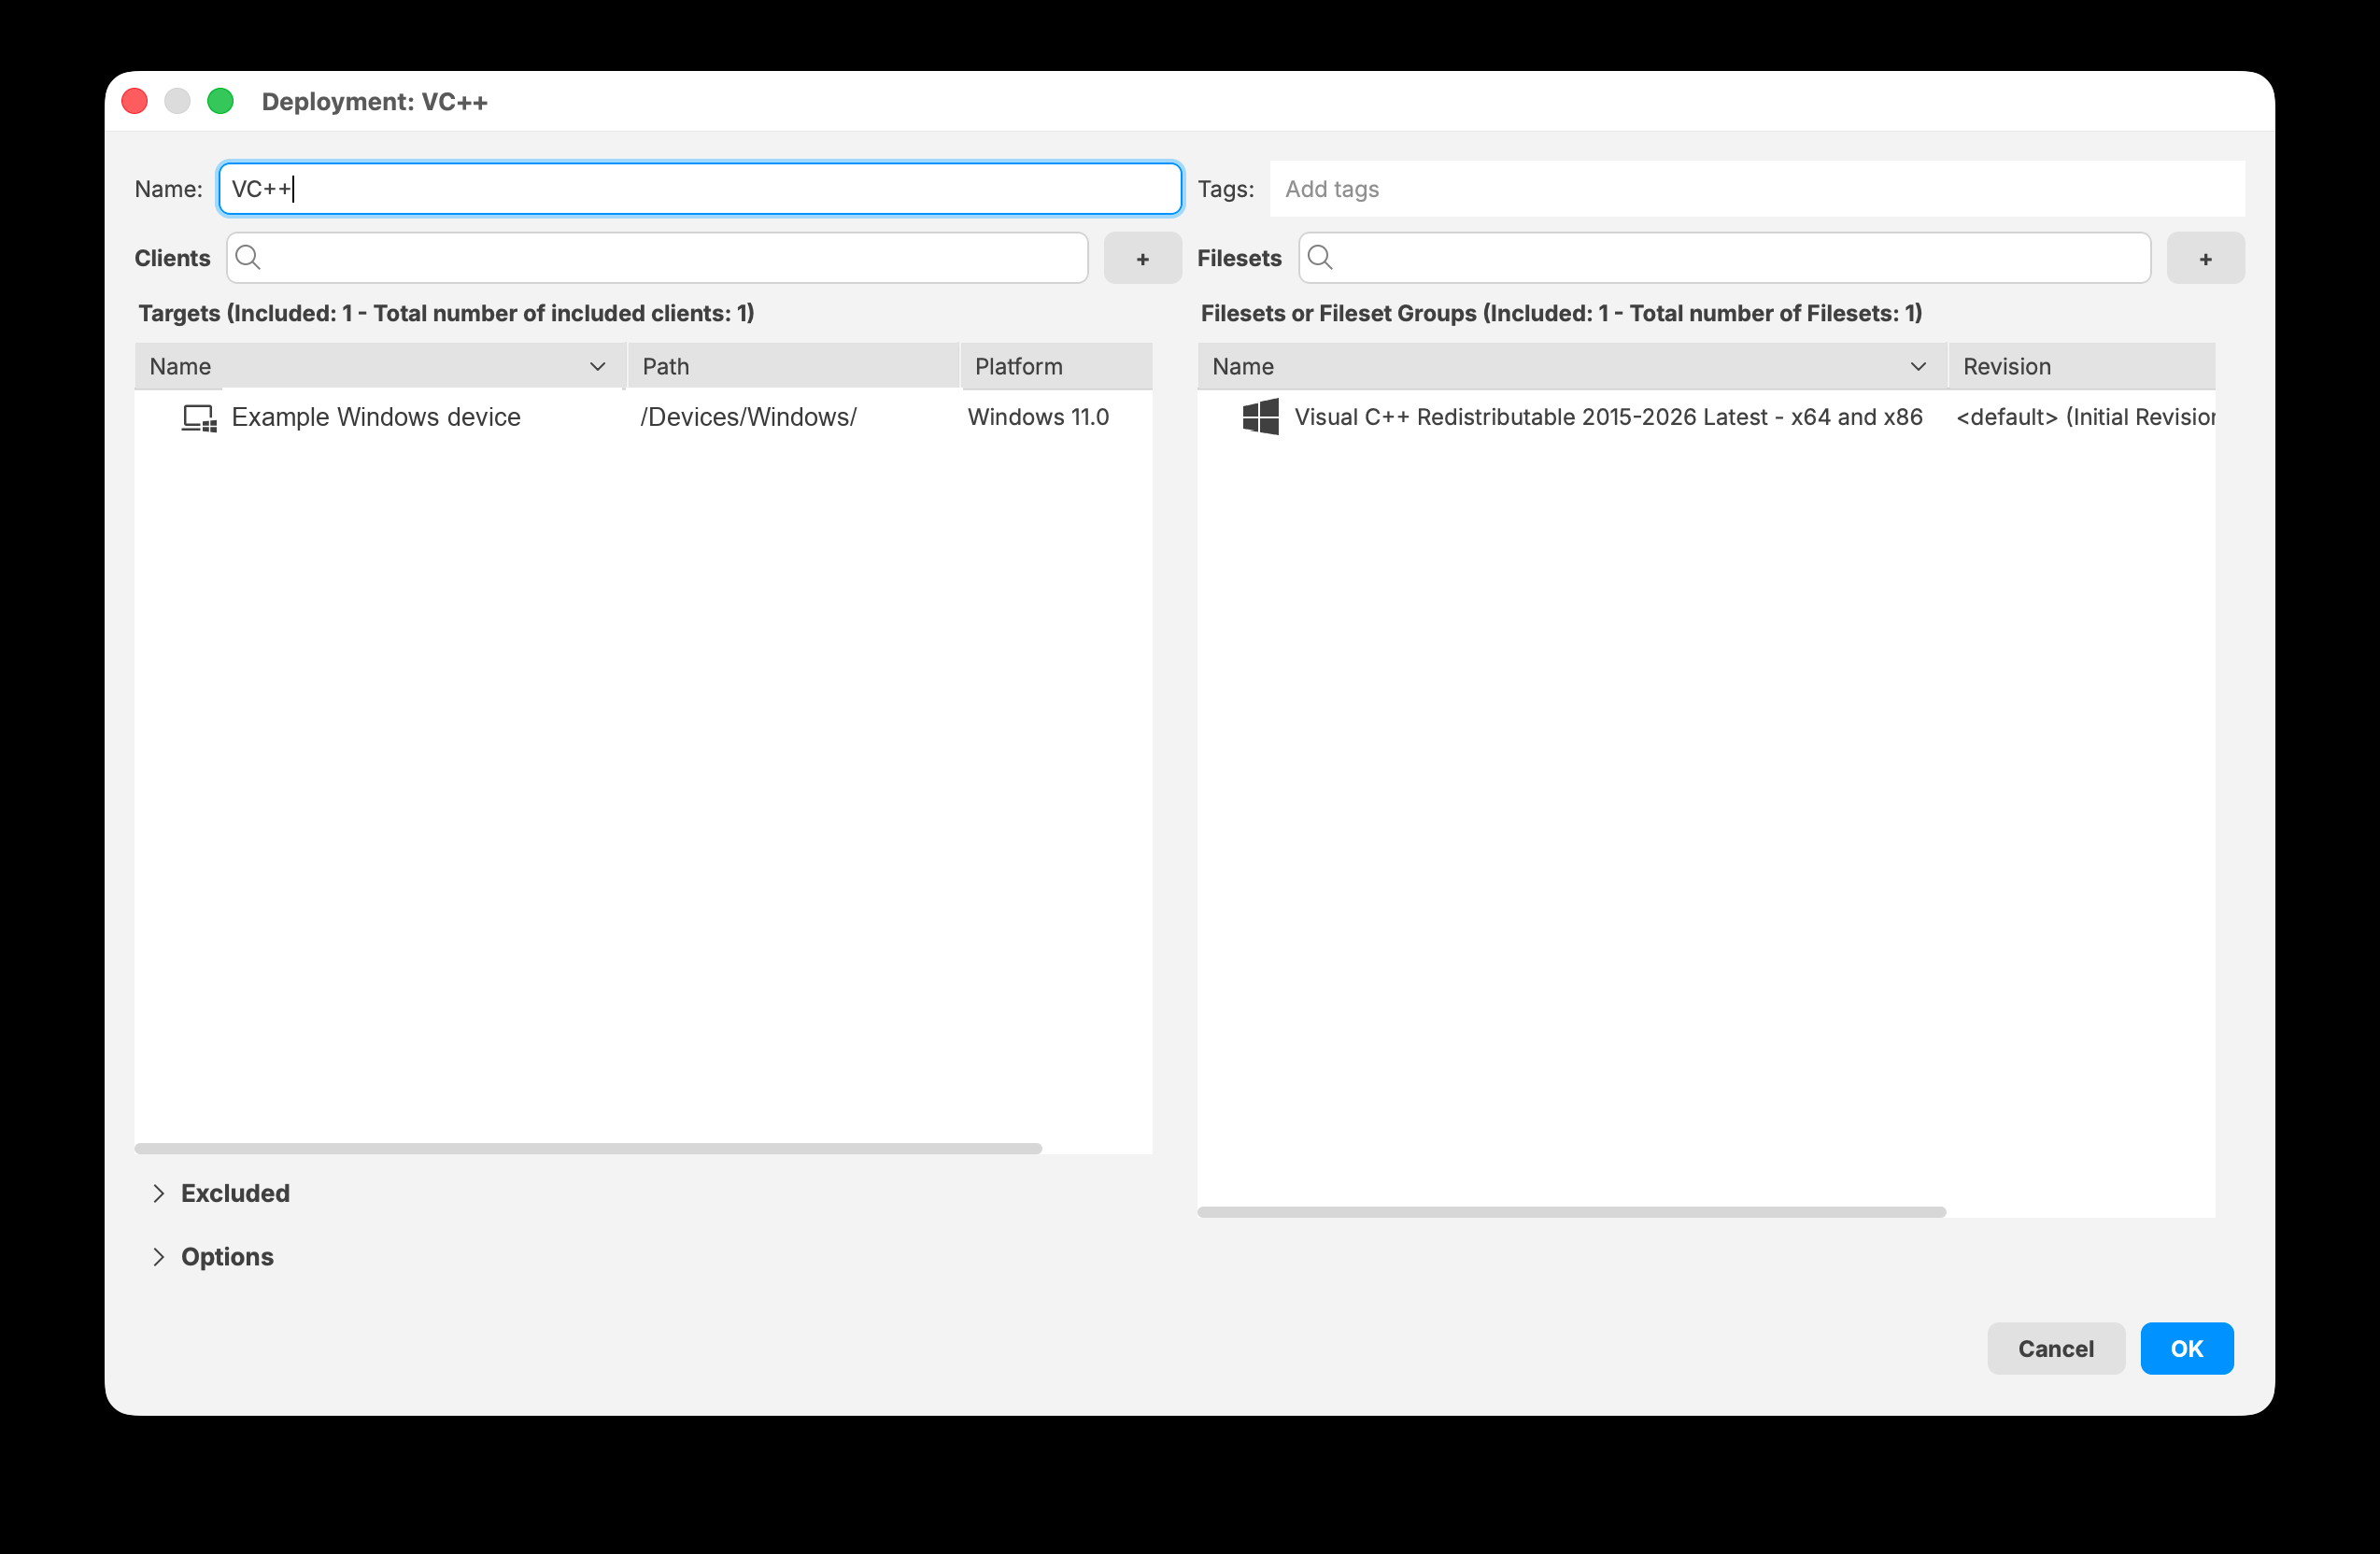](https://kb.filewave.com/uploads/images/gallery/2026-07/YtMfJmzxKPzobFbG-filewave-central-16-4-deployment-editor.png) *FileWave Central 16.4 keeps included targets and Filesets together in the Deployment editor.* ## Decision summary| Situation | Recommended approach |
|---|---|
| Content shares targets, exclusions, installation type, timing, licensing, and revision behavior | Use one Deployment. |
| Only one part of the assignment needs different behavior | Use a separate Deployment for that content or target scope. |
| Existing Associations already express intentional differences | Keep them until the conversion preview proves that a Deployment preserves the intended result. |
| Several matching Associations should be managed together | Use the Associations-to-Deployment conversion tool and review the preview before publishing. |
**Conversion replaces the selected Associations.** Do not combine Associations merely to reduce their count. If the preview adds content to a target, removes an assignment, changes timing, or resolves a revision differently than intended, cancel and split the conversion.
## Quick metadata check| Compare | Question before combining |
|---|---|
| Targets and exclusions | Should every included target receive every included Fileset, with the same exclusions? |
| Installation Type | Should all content use Direct Installation or all use Kiosk Self-Service? |
| Timing | Should download, activation, inactivation, and deletion timing apply together? |
| License Distribution | Should applicable Apps and Books licenses use the same Device or User model? |
| Fileset revisions | Can the resulting Deployment use one intended revision of each Fileset? |
| Setting | Use separate Deployments when |
|---|---|
| Assignment type | Some content installs automatically, appears in Kiosk, or exists only for license assignment |
| Activation and deactivation | Payloads need different start or end dates |
| Installation timing | Payloads need different installation windows |
| Kiosk rules | Items need different self-service visibility or presentation |
| Deployment on request | Only some payloads or target groups should use self-pickup behavior |
| Payload requirements | Platform, Booster, dependency, or runtime requirements do not match |
Fewer Deployments are easier to maintain only when the assignments genuinely share the same rules. Combining unrelated assignments merely to reduce the Deployment count makes later changes harder to understand and riskier to scope.
## Organize by payload or destination As a primary pattern, organize Deployments around the payloads being delivered or around the destinations receiving them. Avoid making both dimensions vary inside one Deployment unless the assignments still share every relevant delivery rule. Delivery method and platform are common reasons to separate otherwise similar assignments. ## Worked example For a simple example, Firefox and Chrome can share one Deployment assigned to the IT and HR groups only when both groups should receive both Filesets and every Deployment option matches. For a larger example, suppose the following applications must be assigned to all managed Windows and macOS devices:| Payload | Delivery | Destination |
|---|---|---|
| Google Chrome - Windows | Automatic installation | All Windows Devices |
| Google Chrome - macOS | Automatic installation | All macOS Devices |
| Firefox - Windows | Kiosk | All Windows Devices |
| Firefox - macOS | Kiosk | All macOS Devices |
| Adobe Acrobat Reader - Windows | Automatic installation | All Windows Devices |
| Adobe Acrobat Reader - macOS | Automatic installation | All macOS Devices |
| TeamViewer Host - Windows | Automatic installation | All Windows Devices |
| TeamViewer Host - macOS | Automatic installation | All macOS Devices |
Conversion replaces the selected Associations with a Deployment. Pilot a small set, compare the preview with the original assignments, and verify device behavior before converting the next batch.
# Resolving Conflicts in Associations Conversion ## What The guidance we have given in other articles is about making sure metadata matches when converting associations. But sometimes, we need to convert items that don’t match in order to “fix” them. This article covers how “conflicts” are handled within conversion. ## When/Why Use the conflict resolution tool to resolve conversion conflicts and preview the impact before saving. That preview is the safety check: it shows whether the conversion will make the changes you intend. The most likely conflicts are: - changing from Kiosk to Standard deployment (or vice versa) - having more than one target (not technically a conflict, but important to understand) - differences in timing options - differing payload revisions ## How The examples below show common conflict types and the preview output to check before publishing the conversion:| **Conflict Type** | |
| **Conflicting Installation Type** | [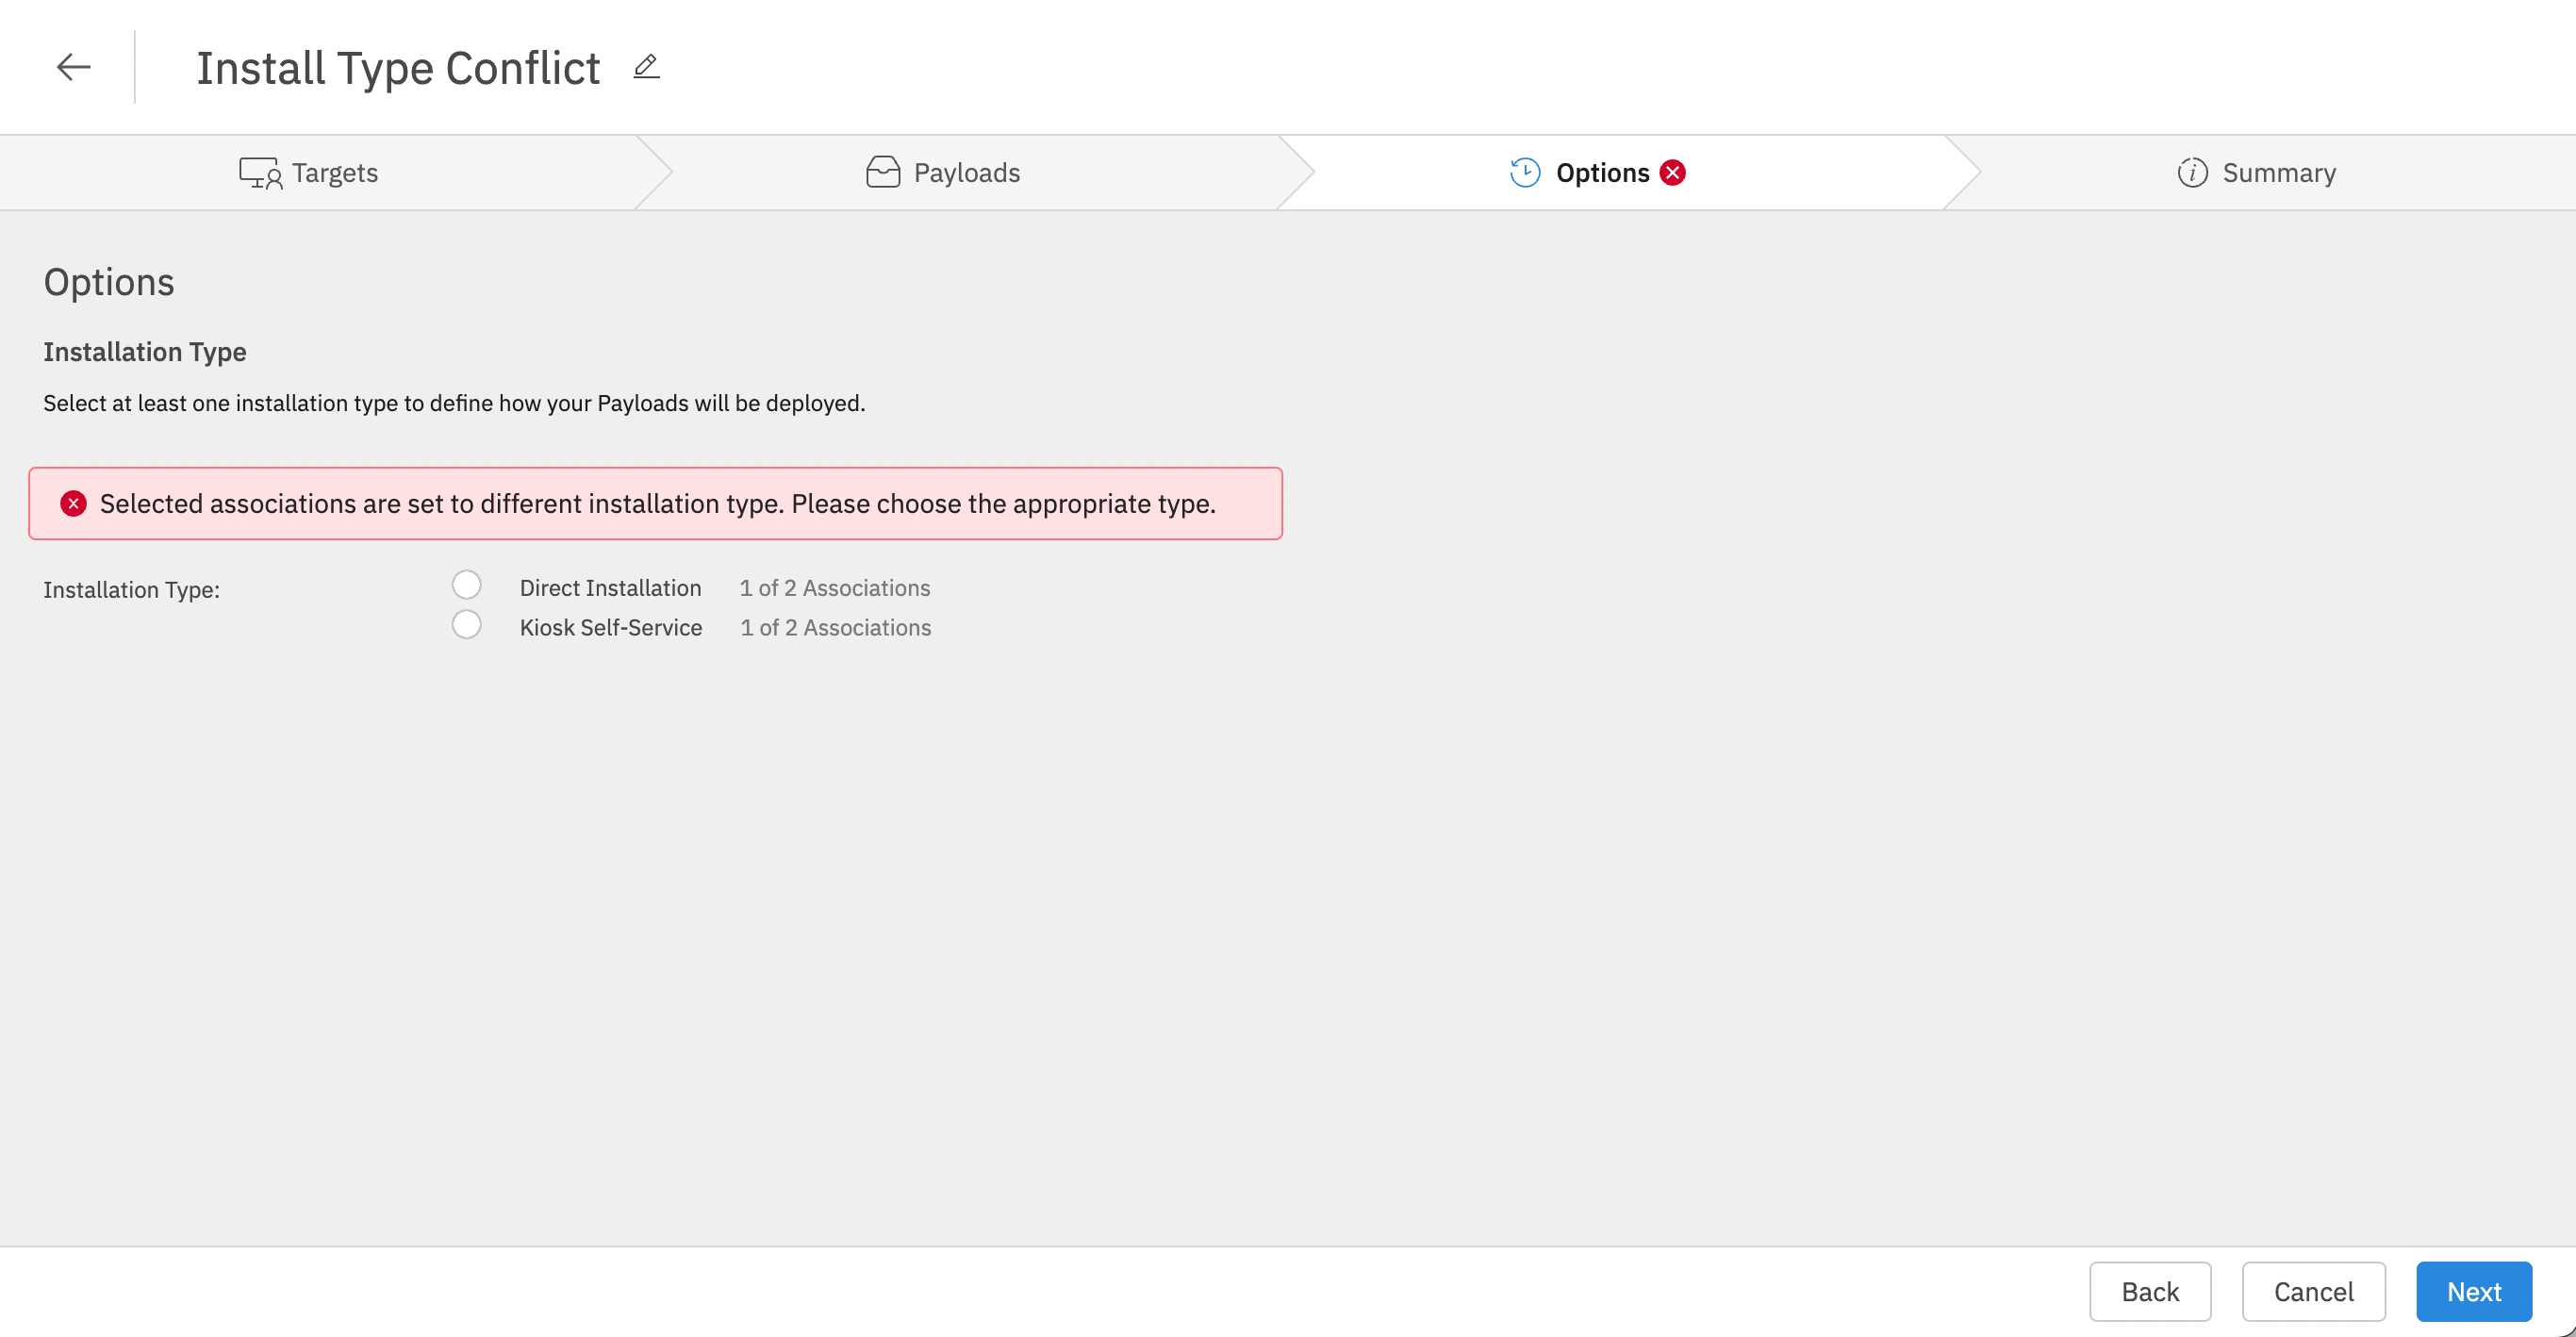](https://kb.filewave.com/uploads/images/gallery/2023-07/4ylnhQjKXctFdw3r-image.png) Note that you have to choose which installation type you want to have before you can preview |
| [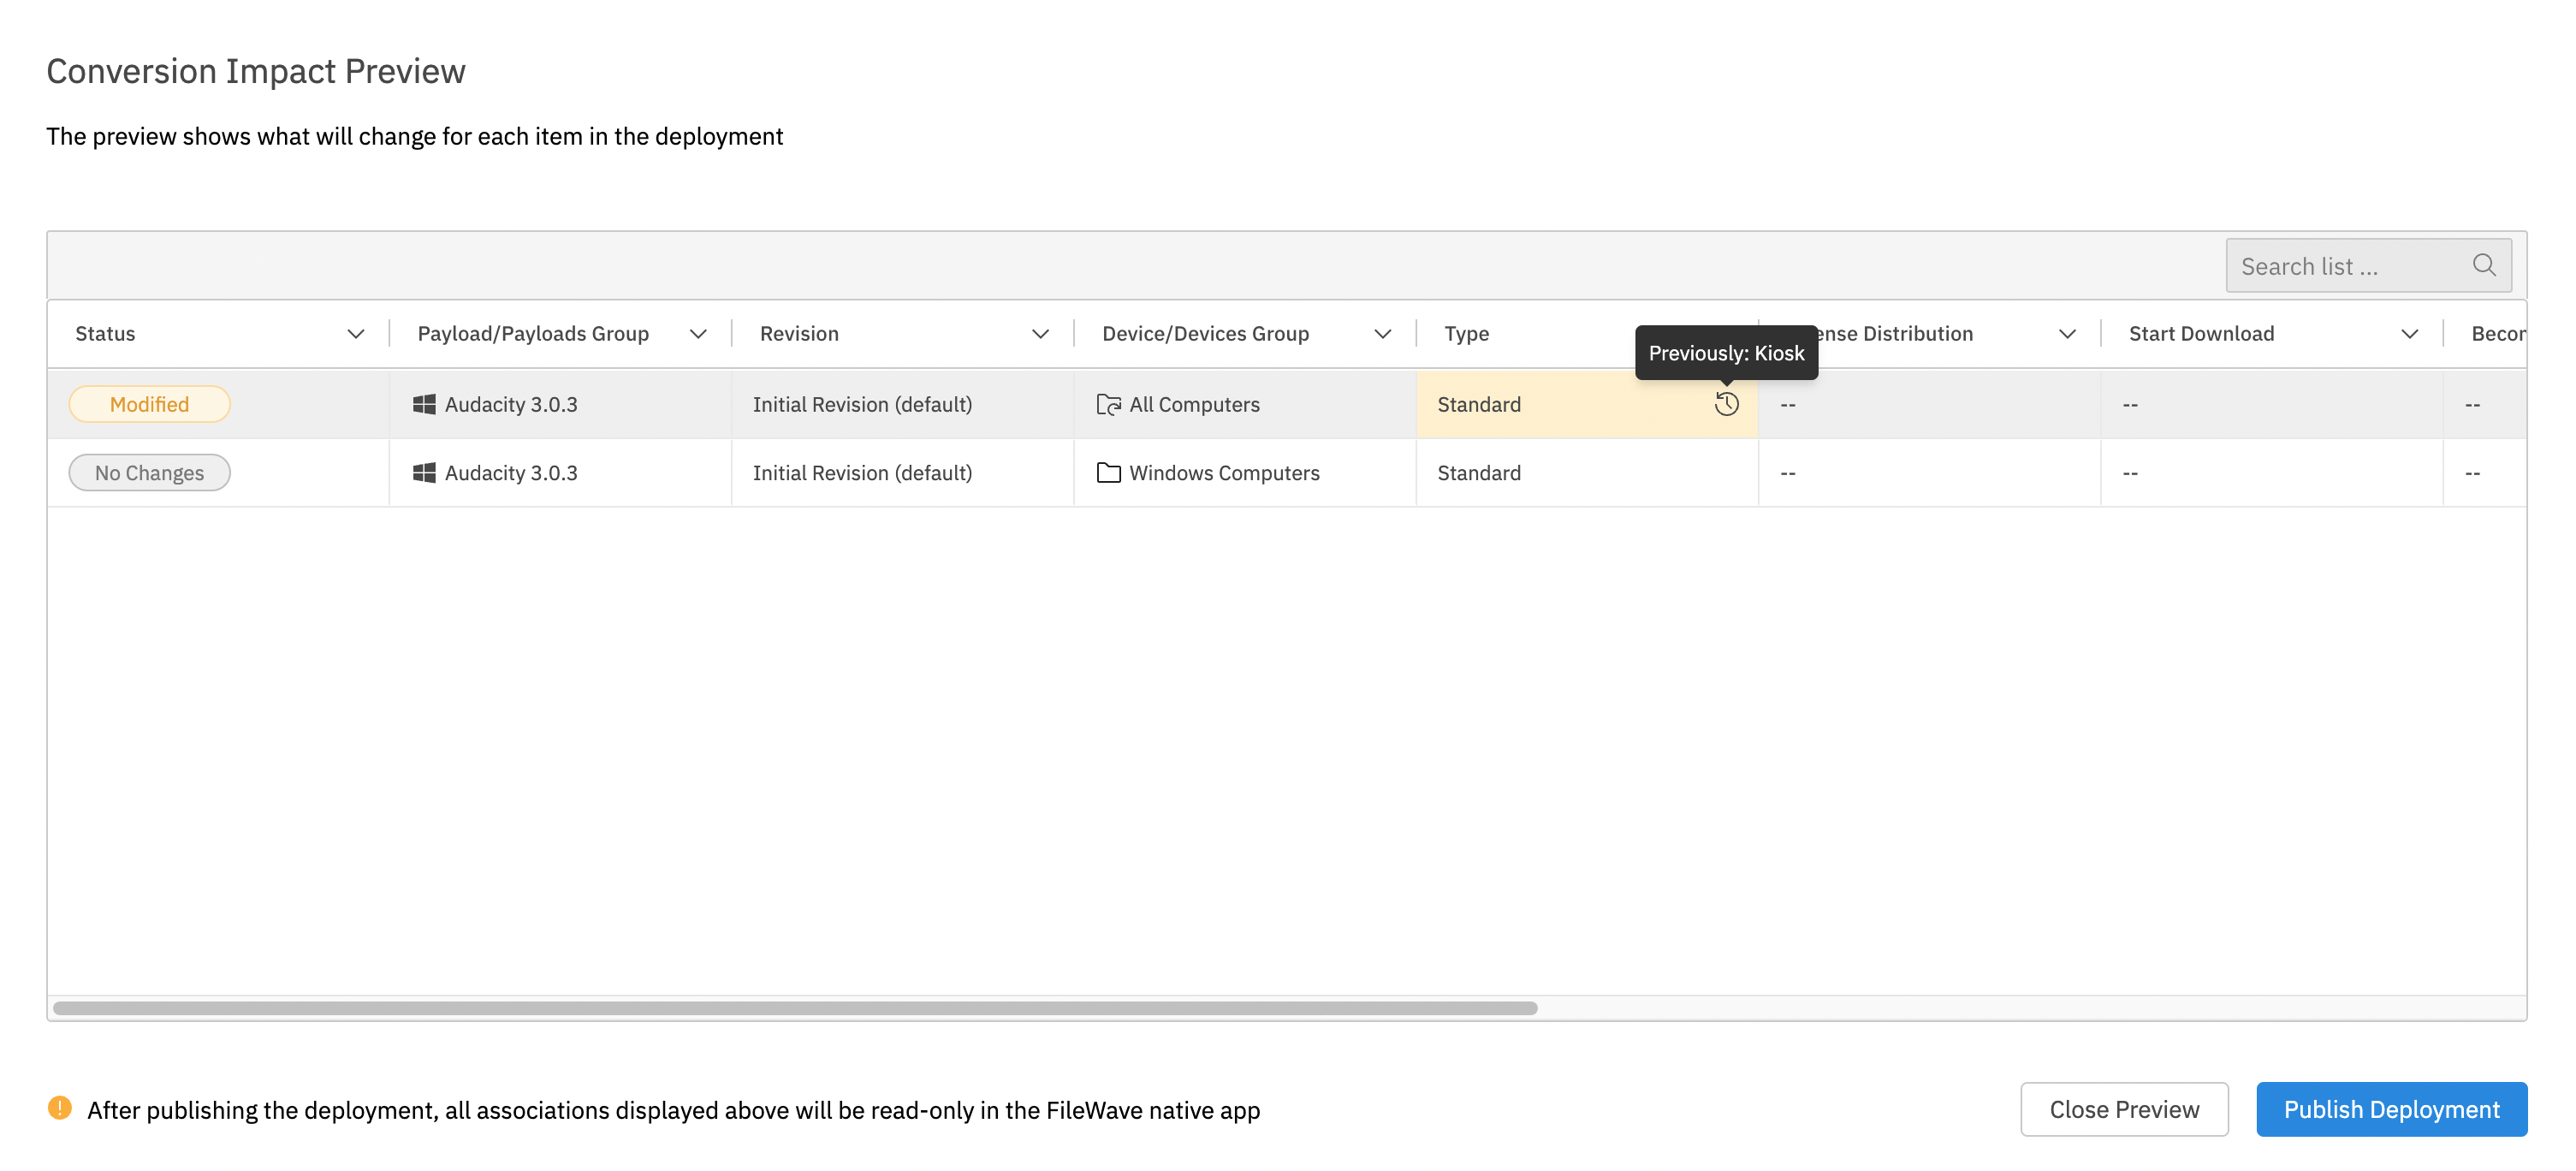](https://kb.filewave.com/uploads/images/gallery/2023-07/iXHgZg4uex0VHthO-image.png) And the preview shows you which association changed, and how it changed | |
| **Mixing targets and/or payloads** | Technically this is not a conflict, as mixing two targets that have differing payloads simply means all payloads will be installed on all targets, so there is nothing to “resolve”. (I.e. If we combined one association of IT/Firefox with HR/Chrome, then all devices will get both Firefox and Chrome) [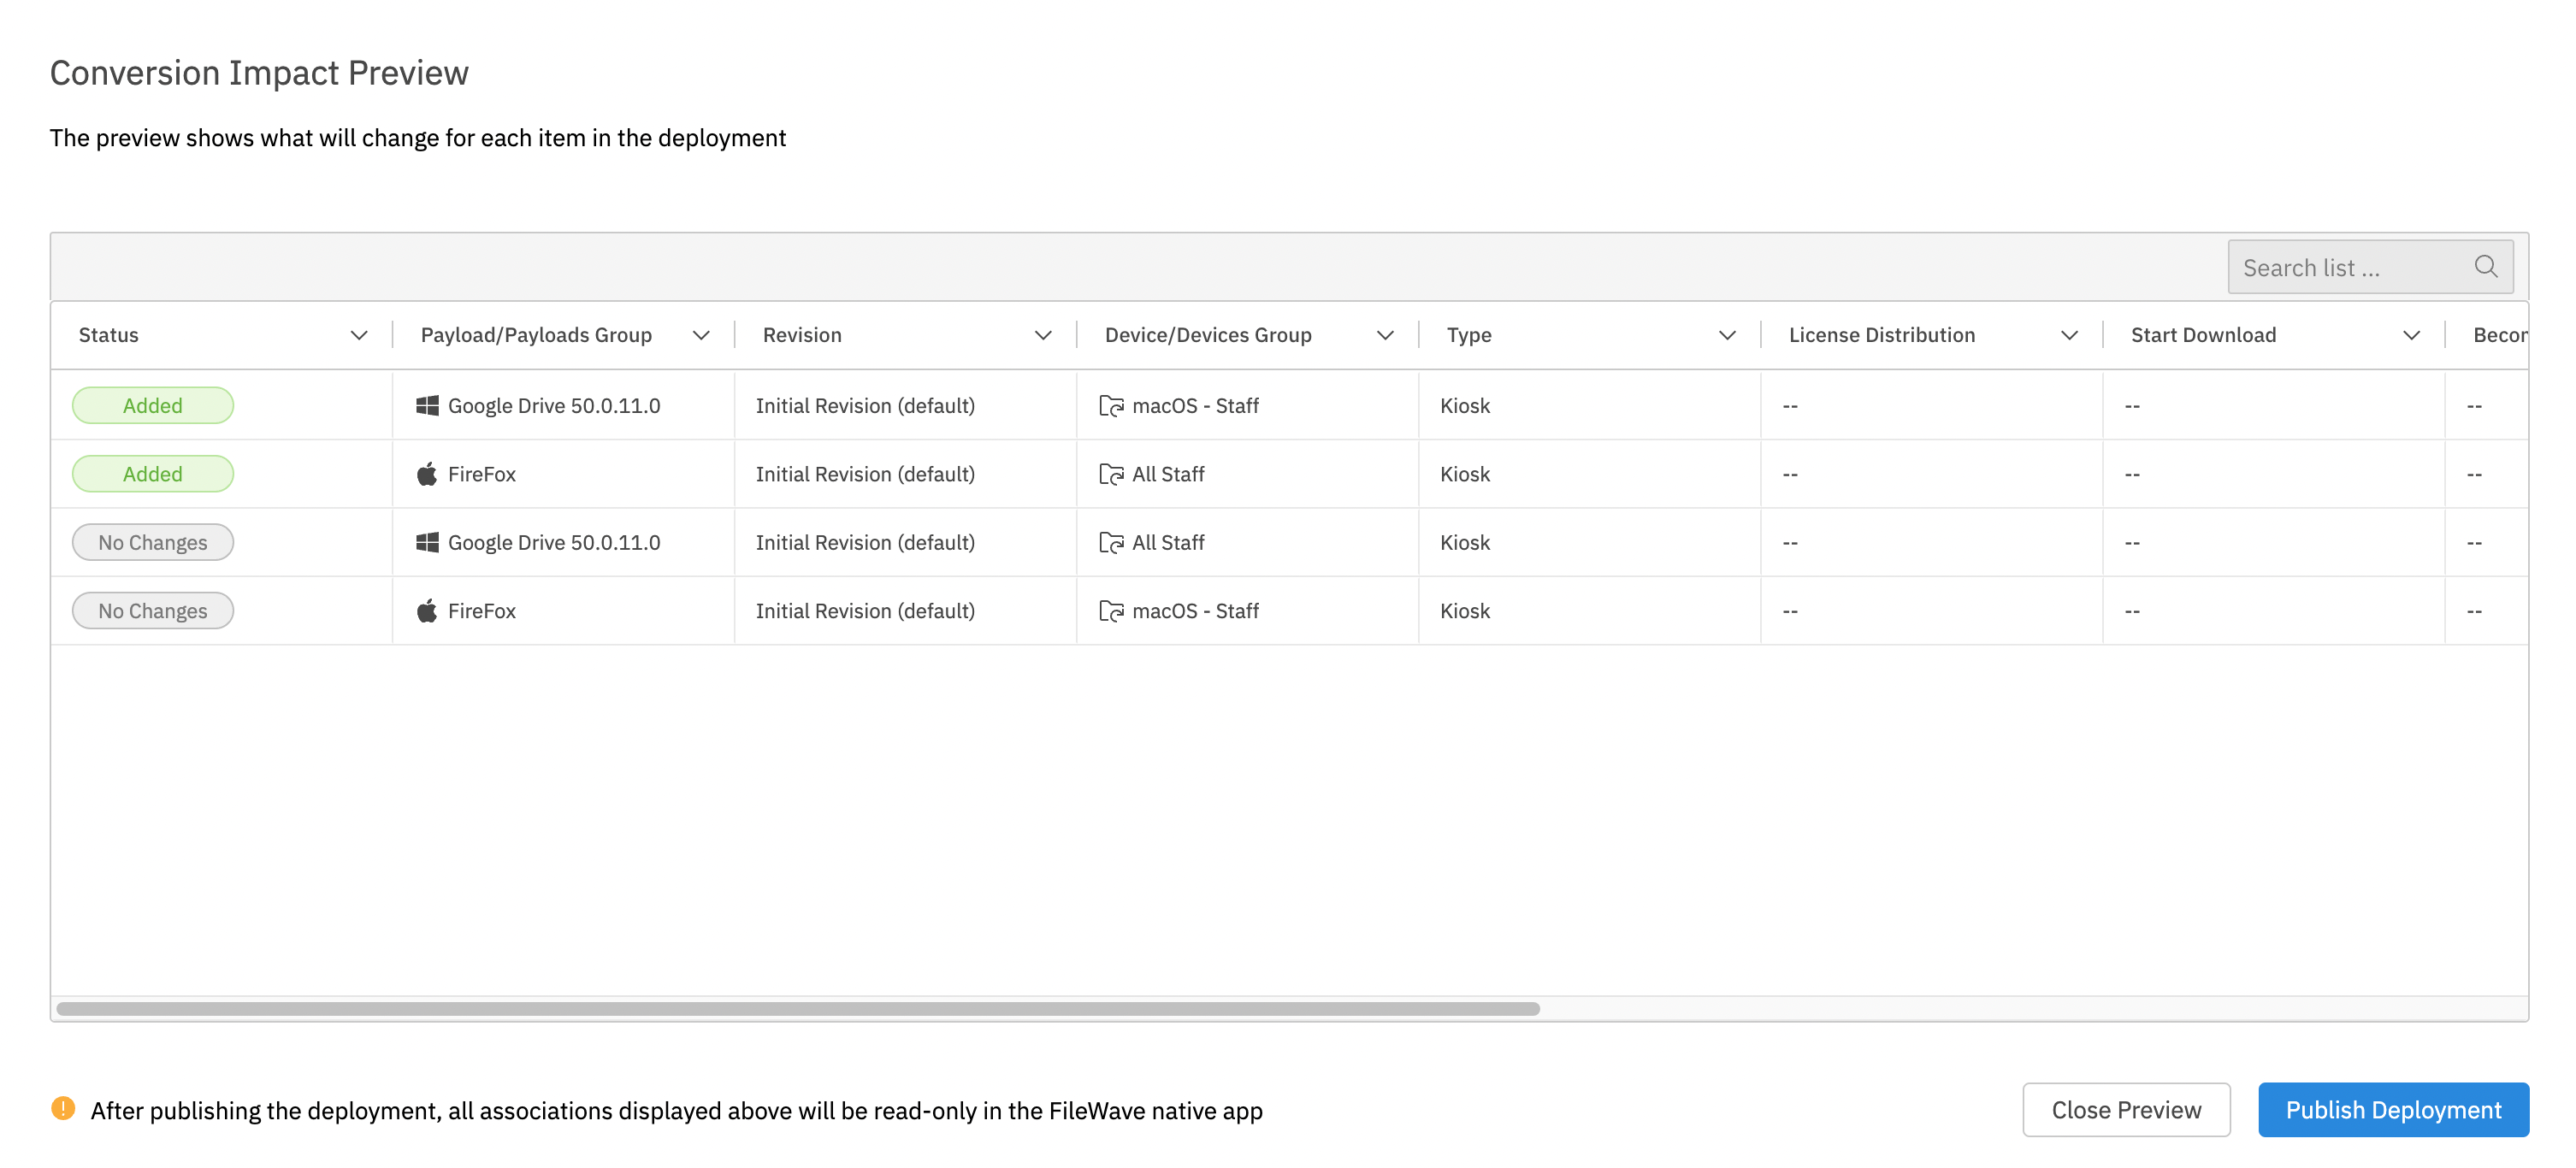](https://kb.filewave.com/uploads/images/gallery/2023-07/E14NGBcOcXWYFgZ5-image.png) Notice though that in preview, we see the “added” payloads to the corresponding groups. |
| **Differences in Timing** | [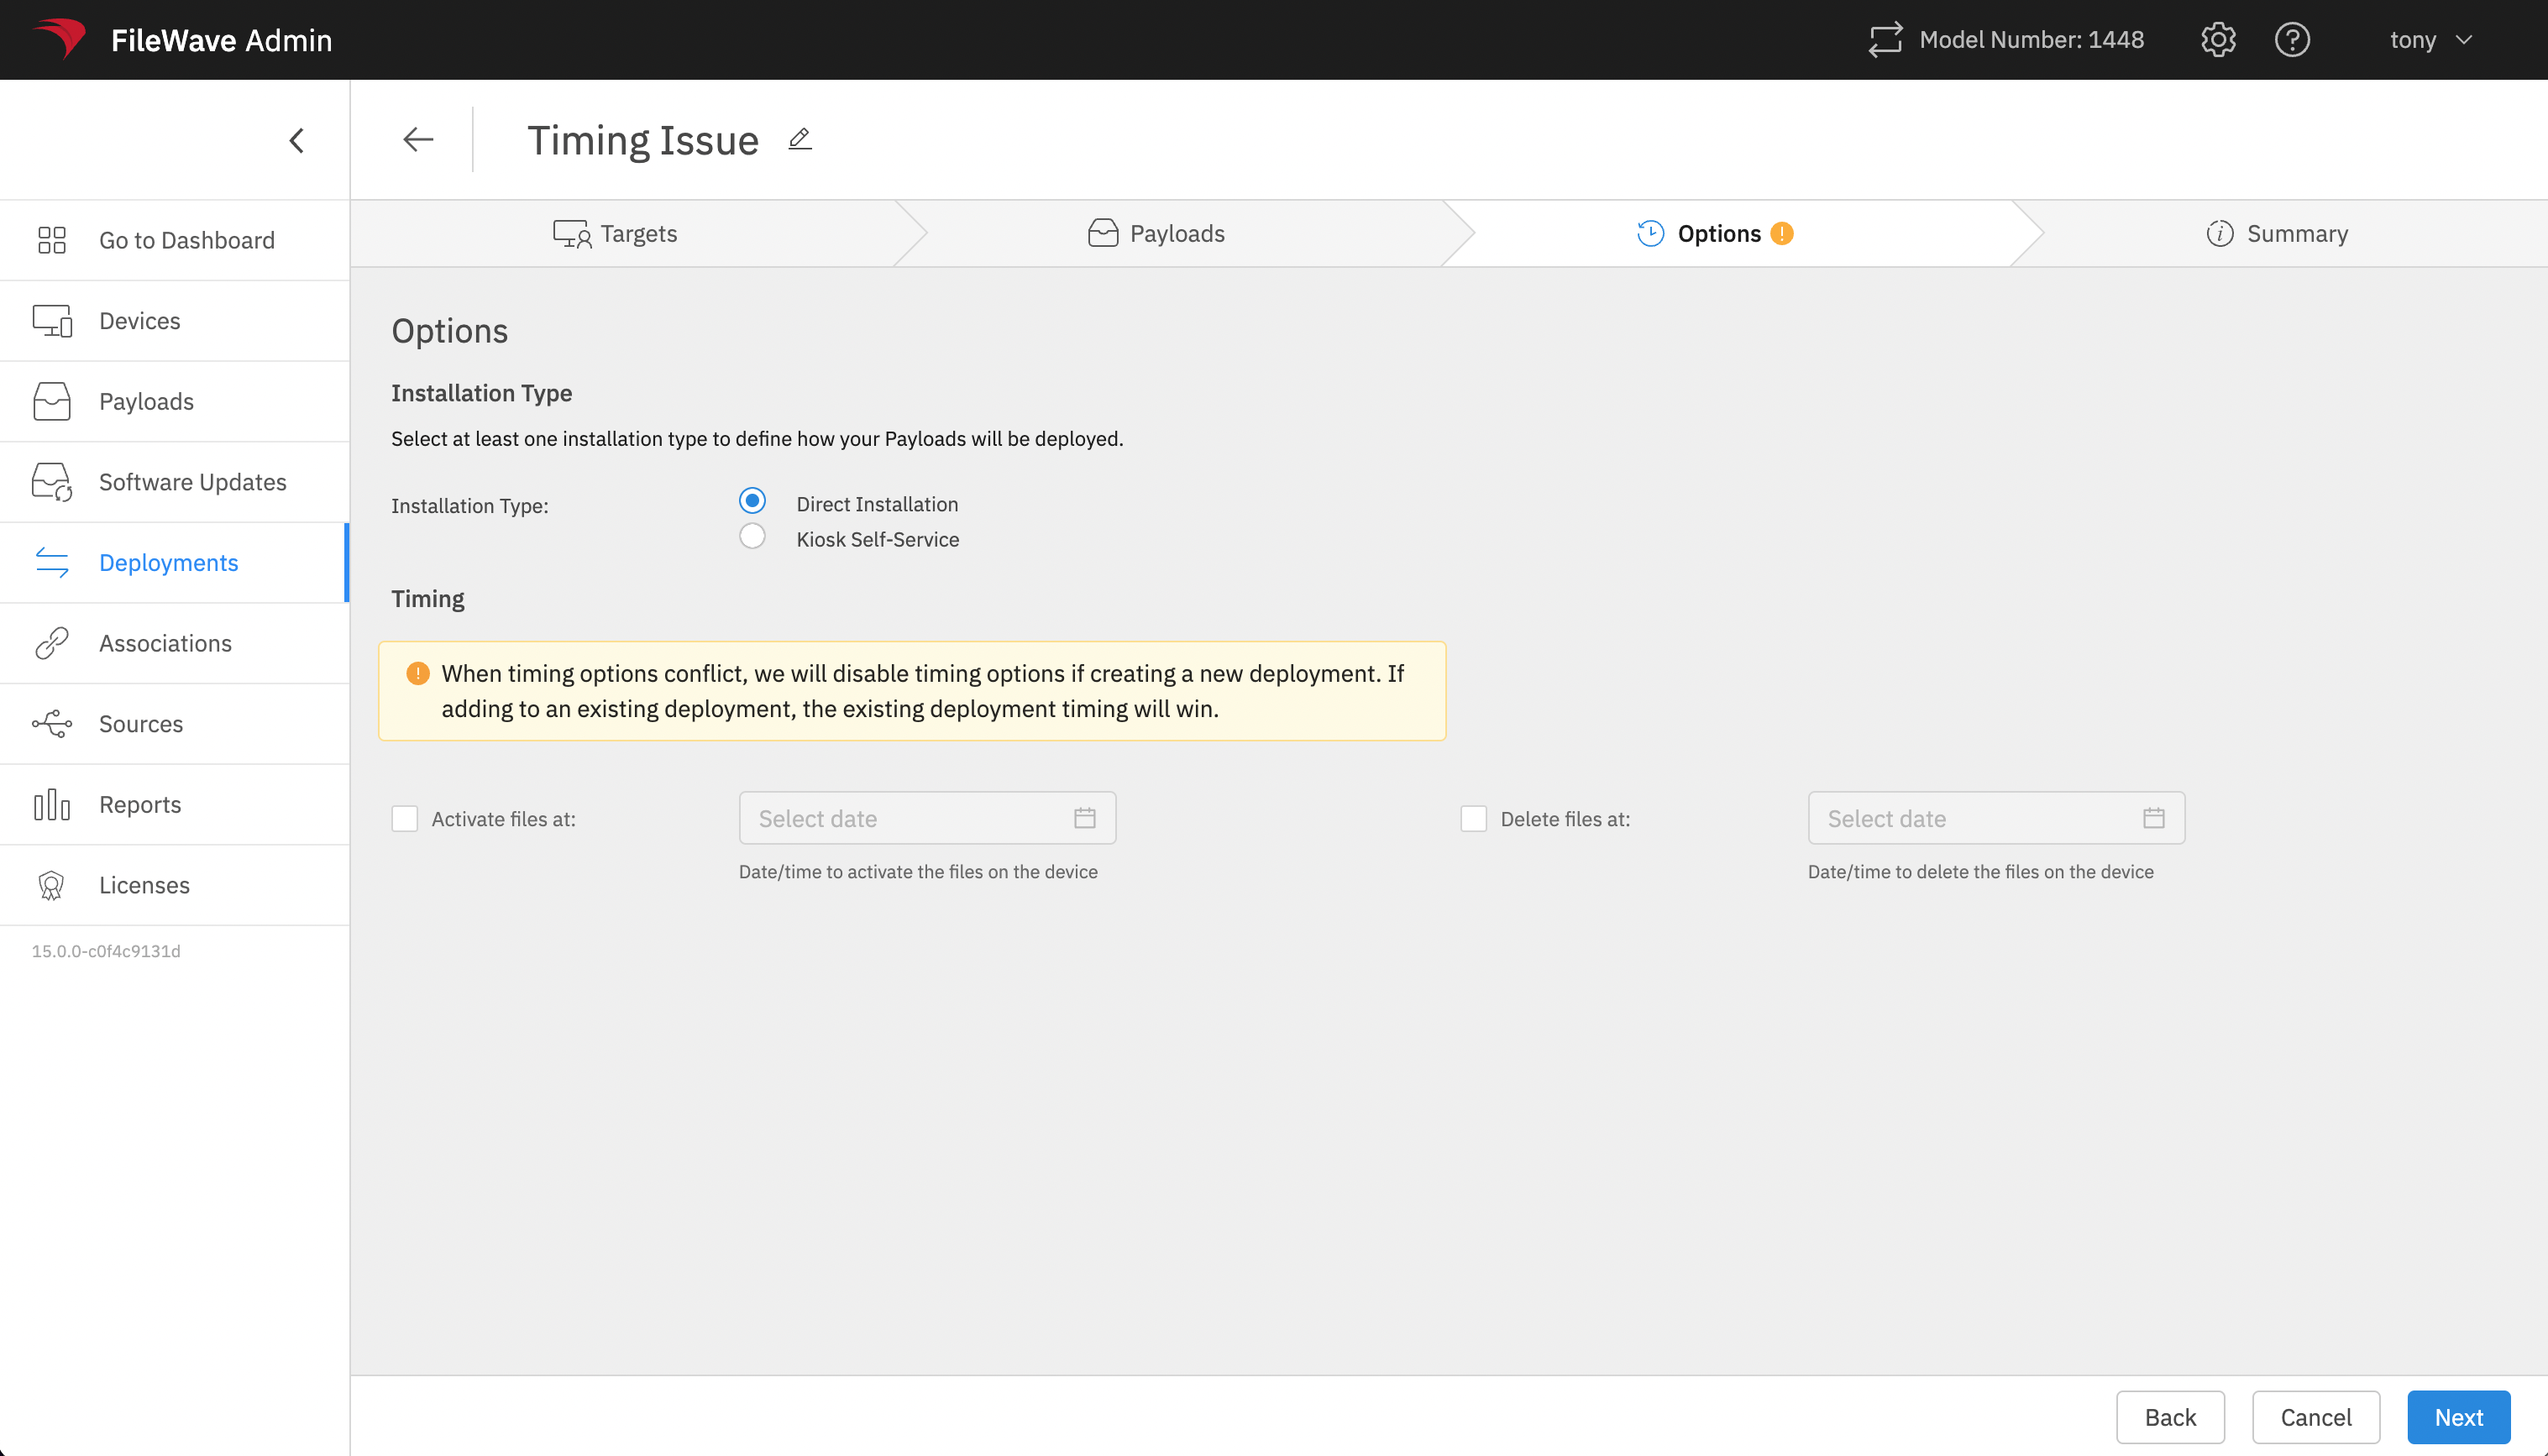](https://kb.filewave.com/uploads/images/gallery/2023-07/EEa5AUgVf7edCWPA-image.png) When timing options differ in a new deployment, we zero everything out. If adding to an existing deployment, the original deployment settings win. [](https://kb.filewave.com/uploads/images/gallery/2023-07/41pMy8n5jv6Eyvaq-image.png) Note that timing option changes will show in preview too. |
| **Differing Payload (Fileset) Revisions** | [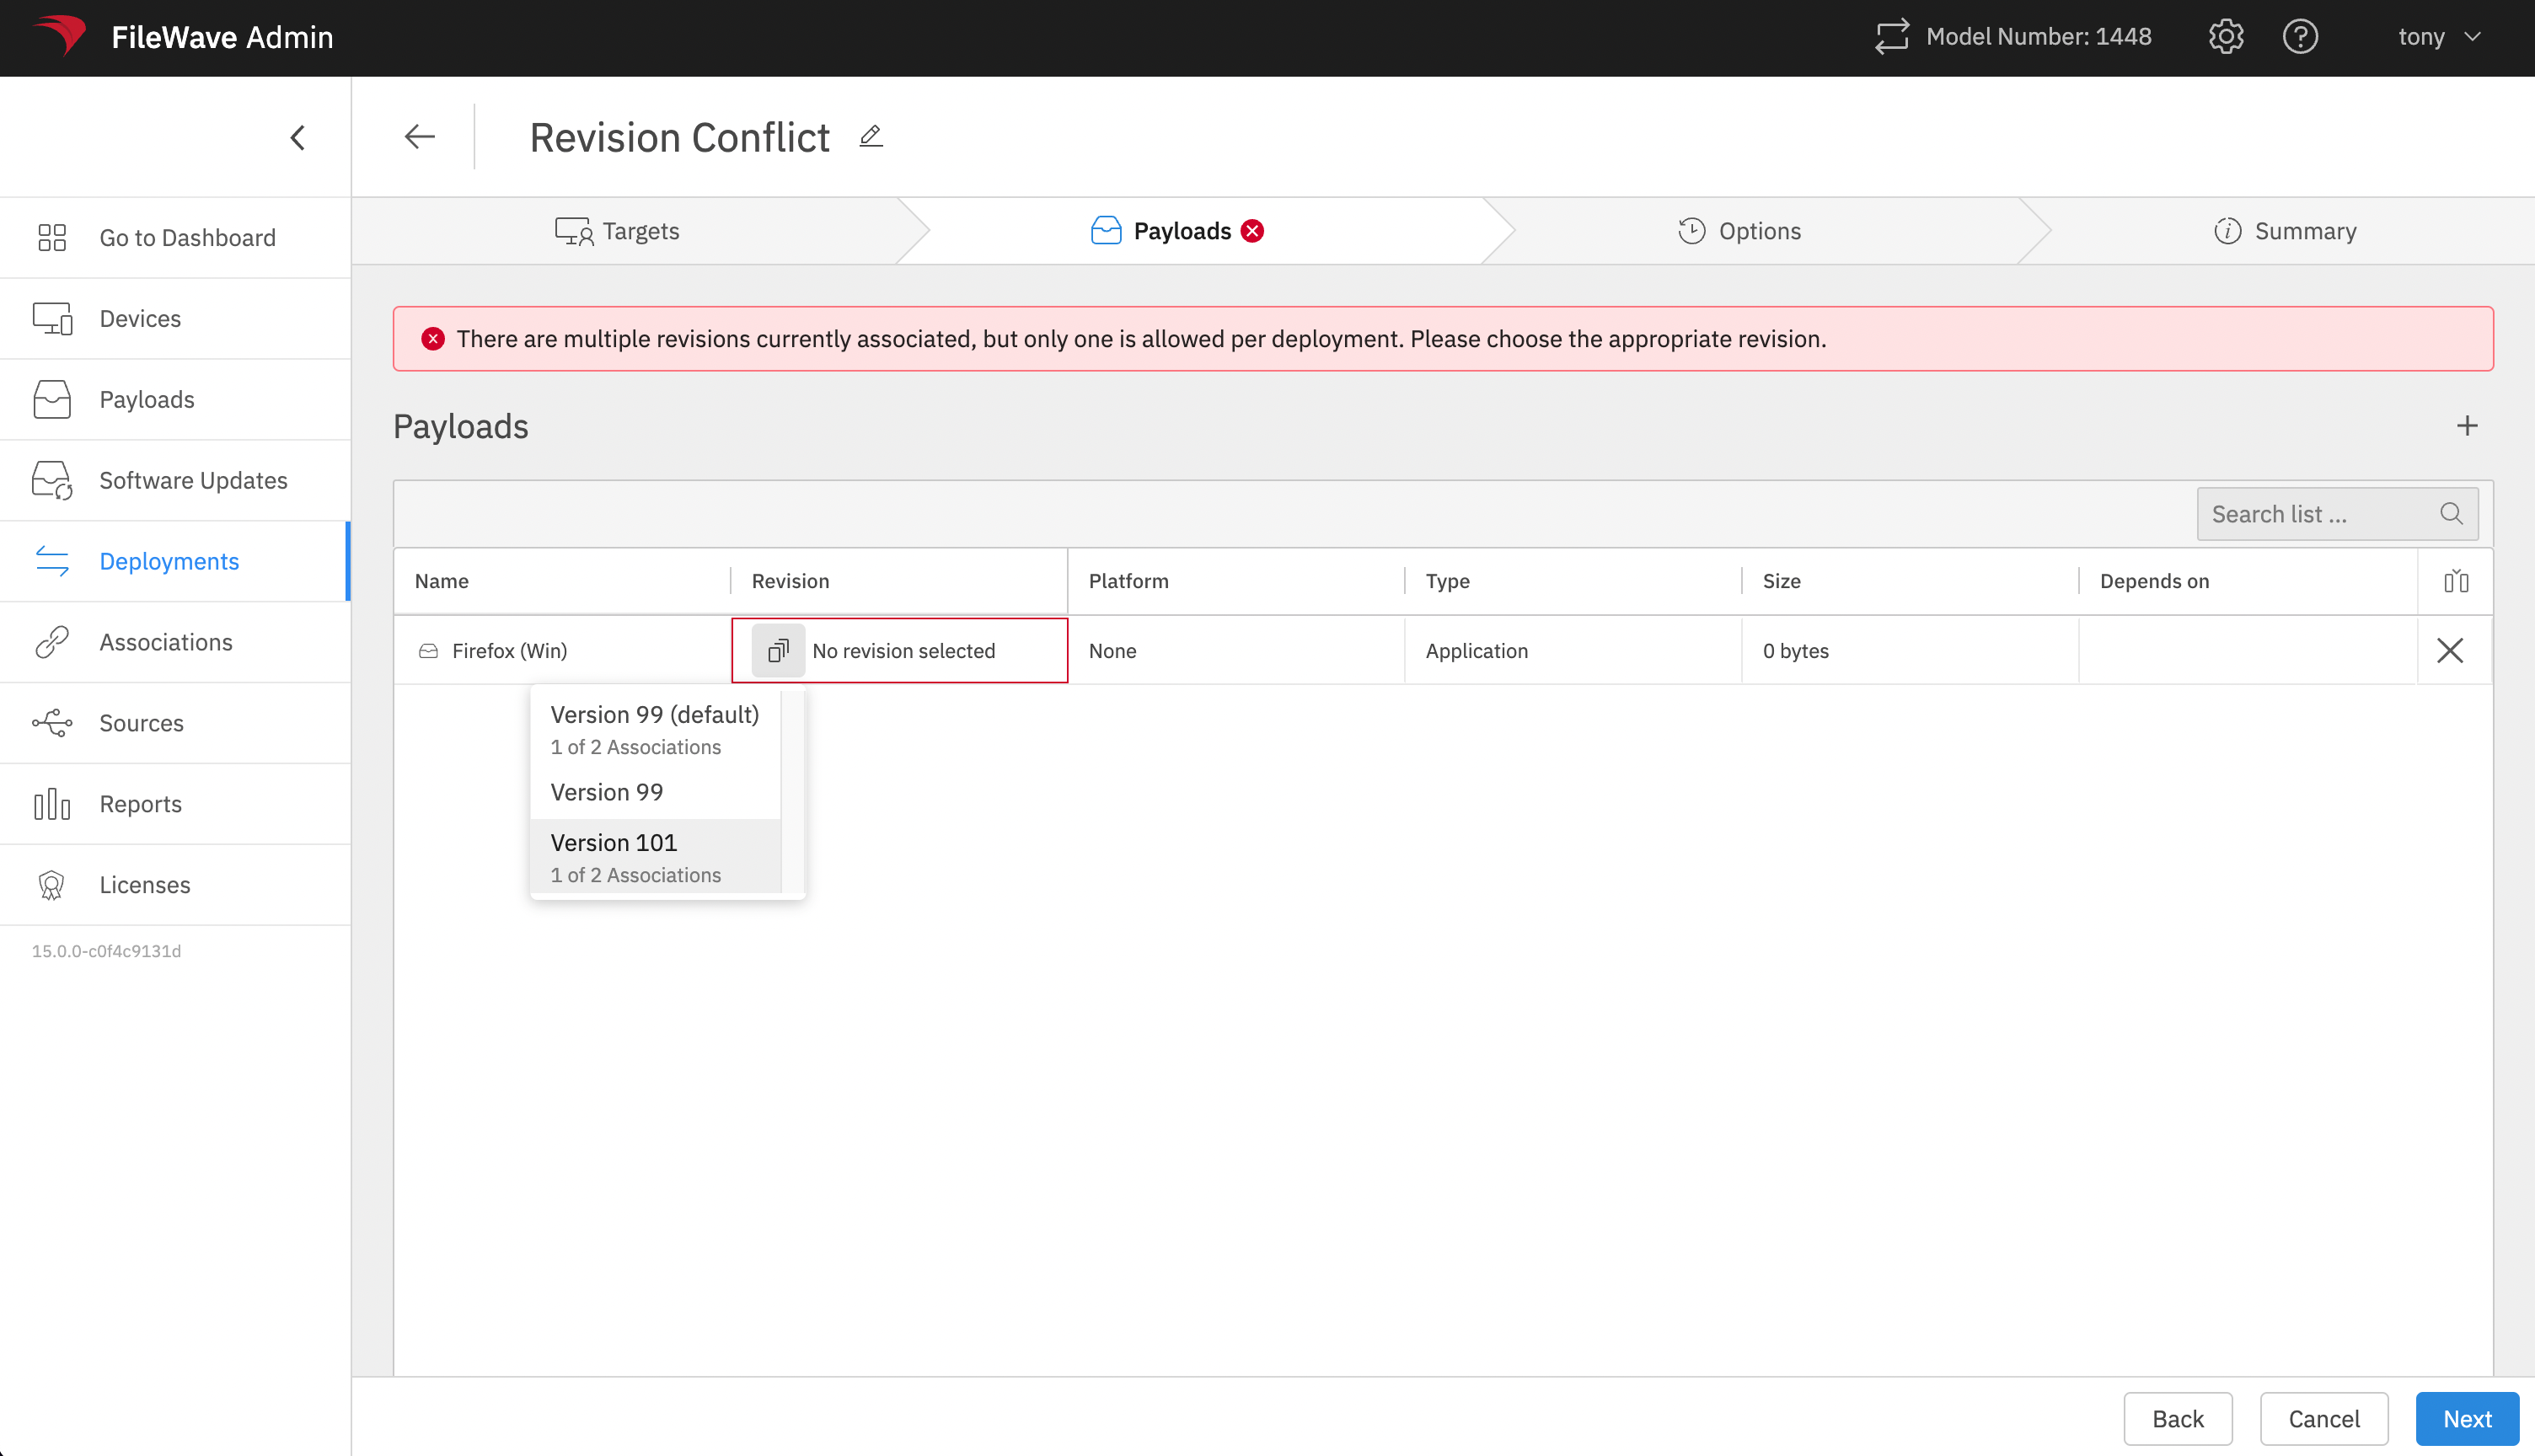](https://kb.filewave.com/uploads/images/gallery/2023-07/2ajpsAbFE0x3L22S-image.png) A single deployment can only have one revision of a payload/Fileset. When revisions conflict, choose the revision you want the resulting deployment to use. [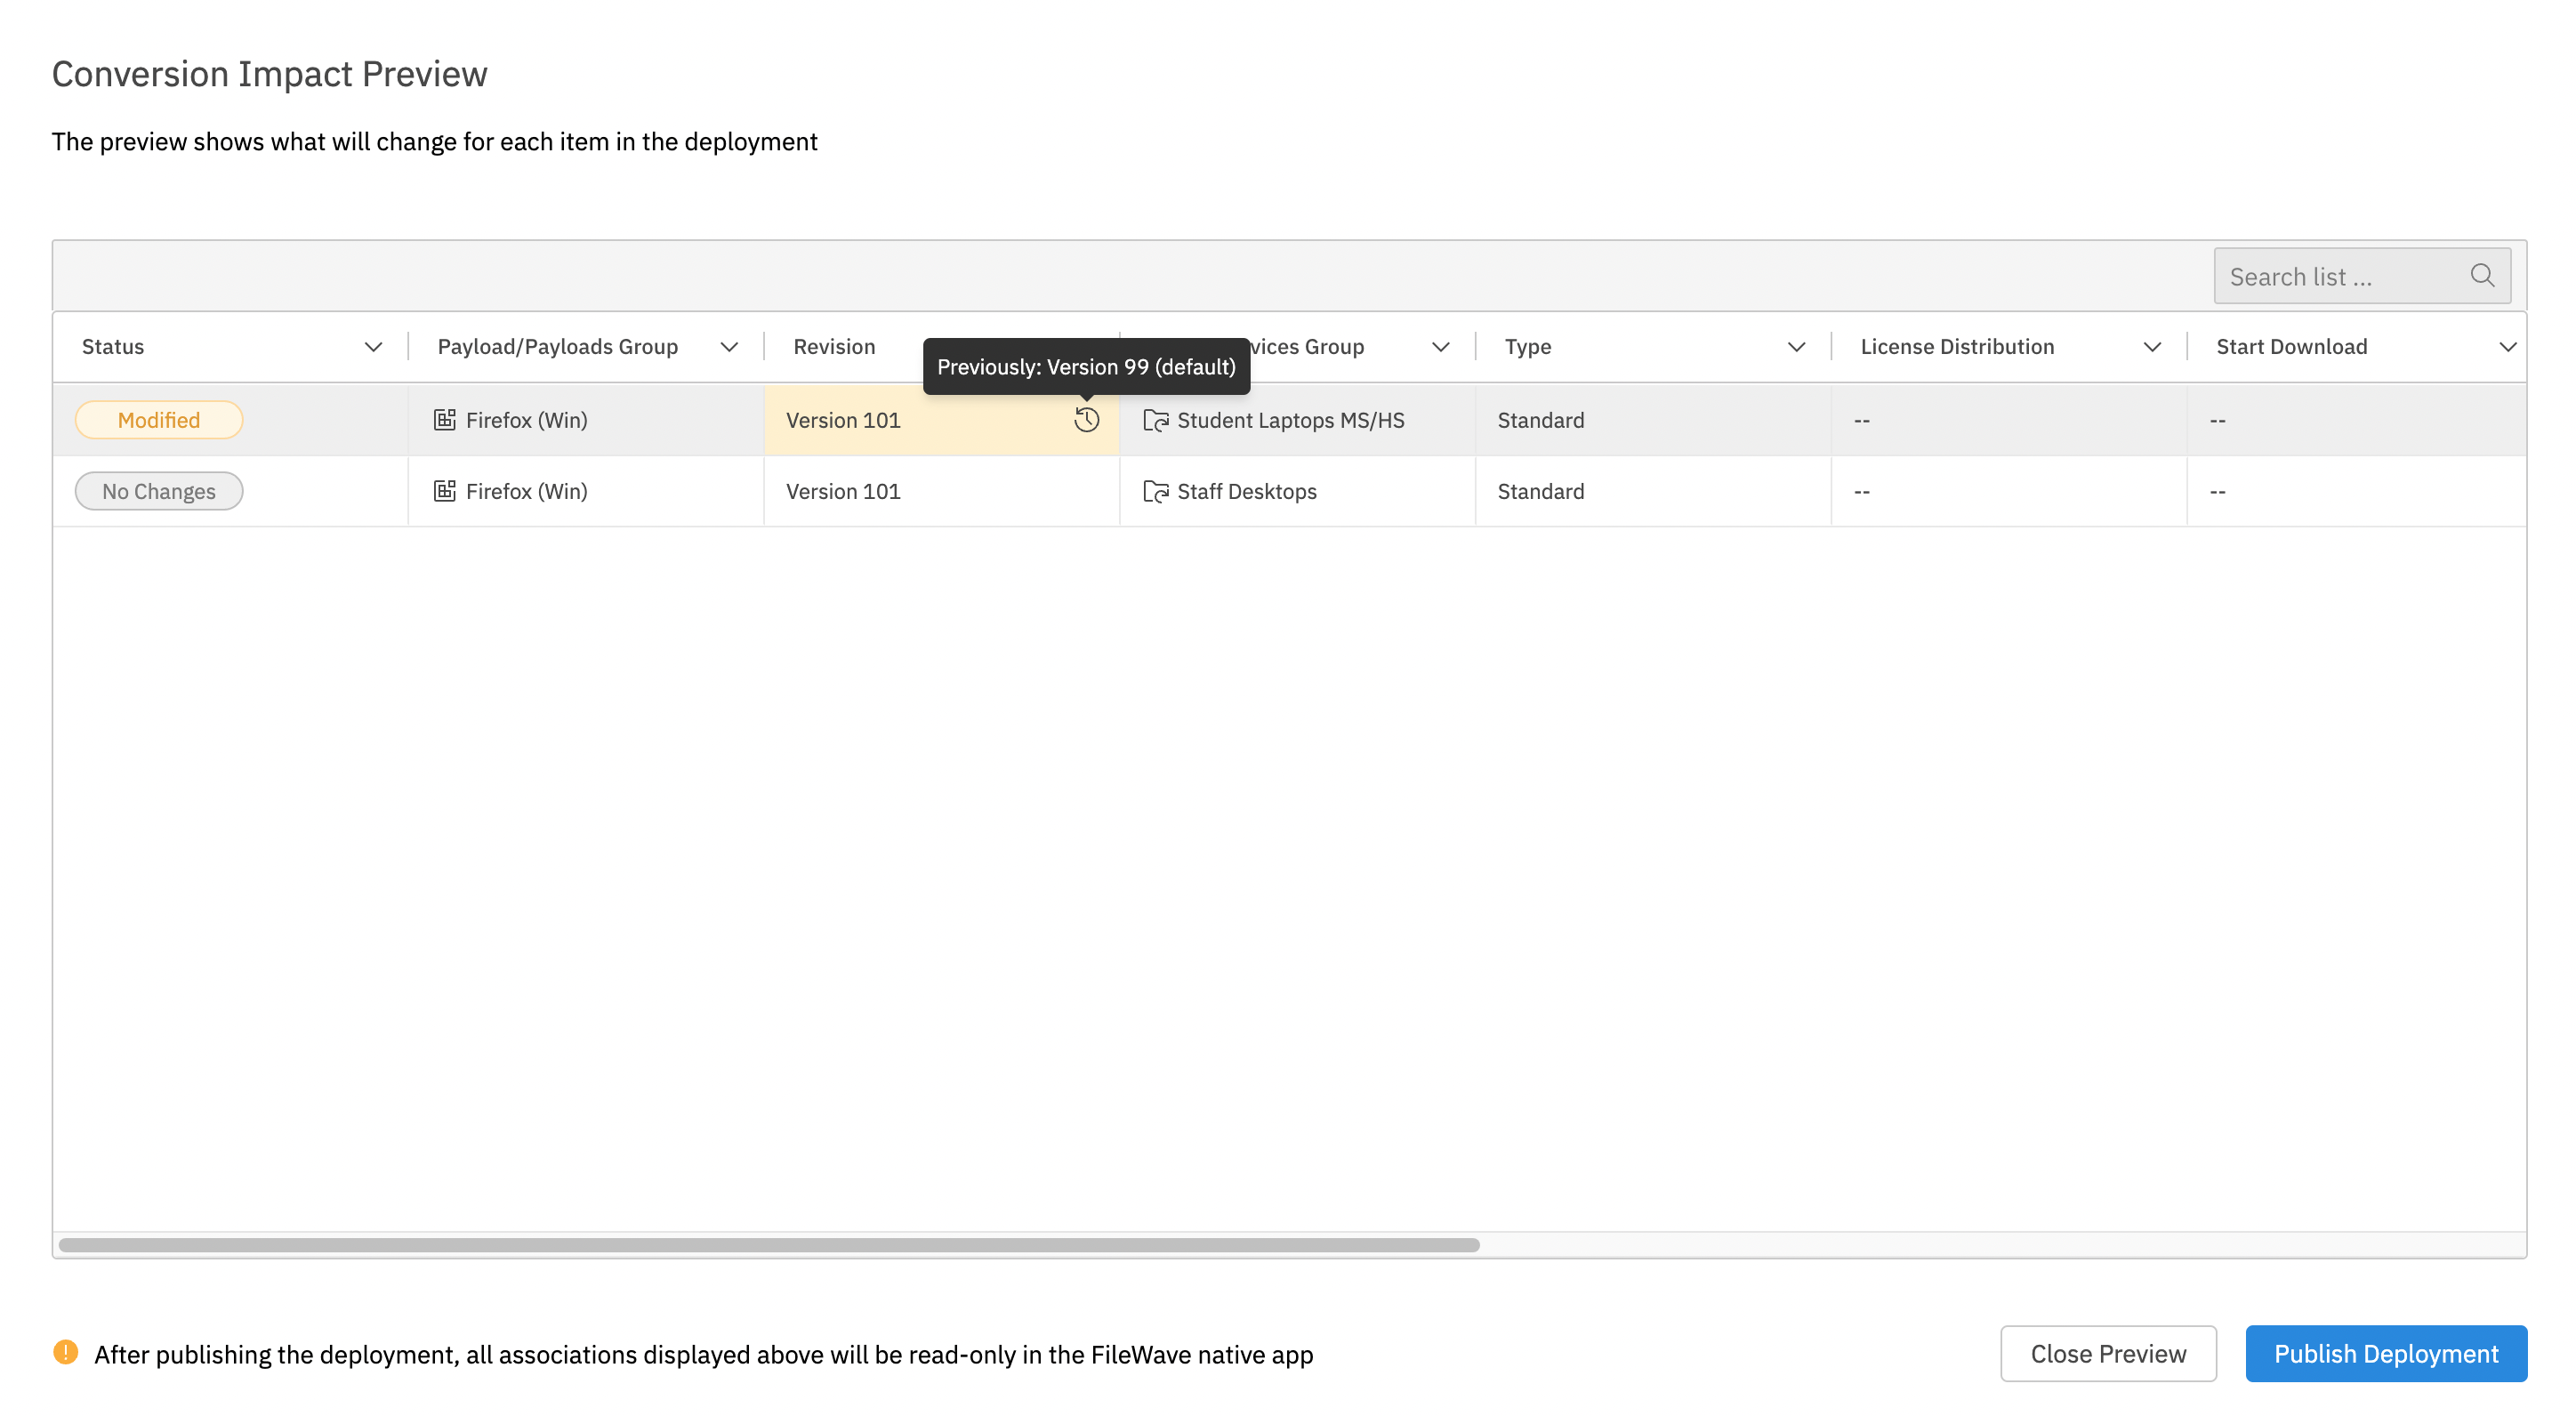](https://kb.filewave.com/uploads/images/gallery/2023-07/gWFf7xQiQsUVE2yY-image.png) In preview then, you will see the changed revision. |
When converting Associations that use clones, test slowly. Changing the target from the clone to the original device or group can affect which association wins if your environment has overlapping rules.
Use the [View - Deployments](https://kb.filewave.com/books/filewave-anywhere-help-menus/chapter/view-deployments "View - Deployments") articles for the basic Deployment workflow. The related Associations to Deployments articles also explain how to use the conversion tool and when Deployments are a better fit than older Associations. # Deployments in FileWave Central ## What A FileWave Deployment keeps its target rules, Filesets, exclusions, and deployment options together. In FileWave Central 16.4, included targets and Filesets appear side by side in one editor instead of on separate tabs. ## When/Why Use a Deployment when you want to assign Filesets, applications, profiles, or other content to devices with consistent settings. You can add or remove targets and content later without rebuilding the assignment, and all content in the Deployment uses the same applicable installation, timing, and license-distribution options. ## How ### Use the FileWave 16.4 Deployment list columns FileWave Central and FileWave Anywhere 16.4 provide the same predefined Deployment columns so administrators can review and organize Deployments consistently across both interfaces:| Column | Use it for |
|---|---|
| **Installation Type** | Distinguish Direct Installation from Kiosk Self-Service Deployments. |
| **License Assignment** | Identify the Device or User assignment model used when VPP/Apps and Books licensing applies. |
| **Creation Date** | Find newly created or older Deployments during review and cleanup. |
| **Tags** | Group Deployments by purpose, owner, rollout, environment, or another organization-defined convention. |
The Tools menu is context-sensitive. Options can vary by the selected item, administrator permissions, and FileWave Central feature visibility. If Associations are hidden in Central, *Create Association(s)...* may not appear; use *Create Deployment...* or *Add to Deployment...* for the deployment-centered workflow.
[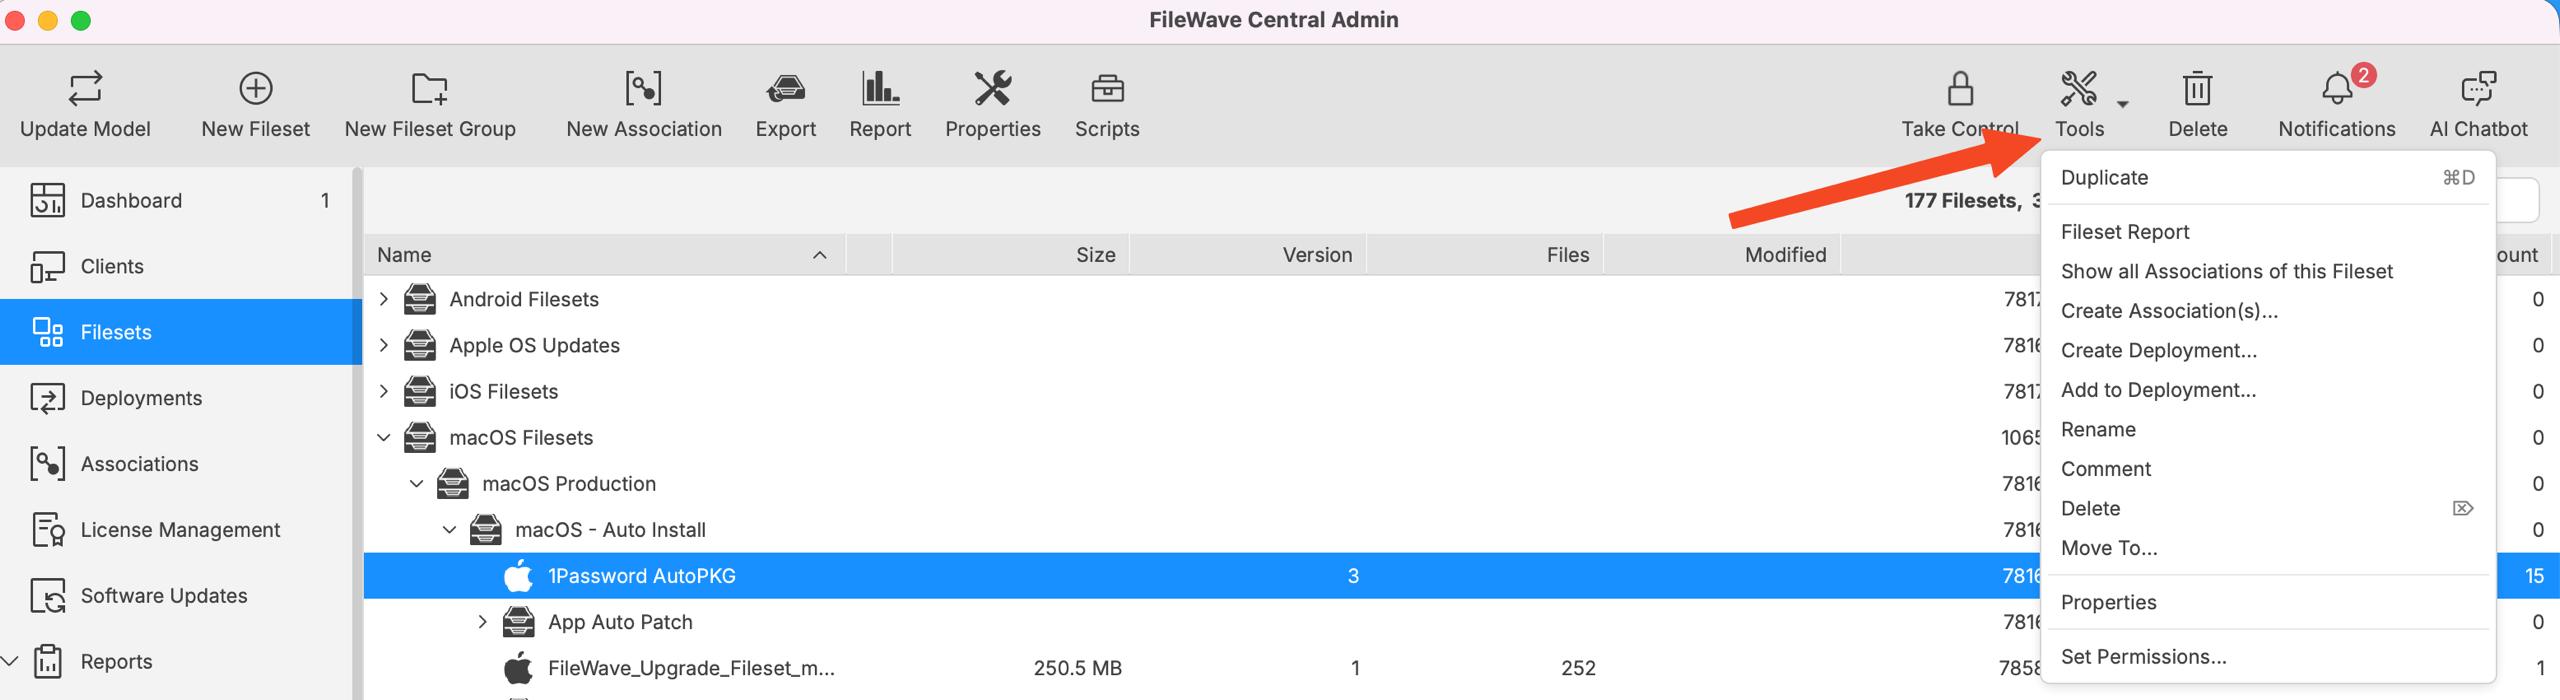](https://kb.filewave.com/uploads/images/gallery/2026-06/gpAGYoCvqIghZgoT-filewave-central-fileset-tools-menu-2026-06-16.jpg) - ***Duplicate*** – Create a copy of a fully configured Fileset. FileWave adds the suffix "copy." Use this when different administrators need separate deployment options, or when VPP tokens require separate licenses for the same content. - ***Fileset Report*** – Open a report for the selected Fileset. - ***Show all Associations of this Fileset*** – Open the **Associations** pane so you can view the Fileset and its assigned clients. - ***Create Association(s)...*** – Open a searchable list of clients that you can associate with the Fileset. This option may be hidden when FileWave Central is configured to hide Associations; new FileWave instances commonly hide Associations by default as deployments become the preferred workflow. - ***Create Deployment...*** – Start a new Deployment using the selected Fileset. - ***Add to Deployment...*** – Add the selected Fileset to an existing Deployment. - ***Rename*** – Change the Fileset name after creation. - ***Comment*** – Add a comment that appears in the Fileset view to help track purpose, ownership, or rollout notes. - ***Delete*** – Delete the selected Fileset from the database. - ***Move To...*** – Move the selected Fileset to another Fileset Group. - ***Properties*** – Open the selected Fileset's properties. - ***Set Permissions...*** – Set administrator access for a specific Fileset or Fileset Group. # Fileset (Payload) Status in Inventory ## What It has long been possible to compile "FileSet Reports" in the FileSet view within the FileWave admin, but it was not possible previously to create Inventory Queries (Reports) using the same info. With FileWave 14.5+, this issue is resolved, and more traditional reports can now be created in the Native and WebAdmin consoles. ## When/Why We'll want to use these new inventory fields whenever we want to report on deployment status. For instance, a report can be used to feed data to the integrated Grafana dashboard, or we may simply want a report of only Office 365 failures. ## How For any new report, you can utilize the data elements shown below for "Fileset deployment status". In the example shown, we are specifically choosing to look at all failures generally, but this report could also be fileset/payload specific of course. 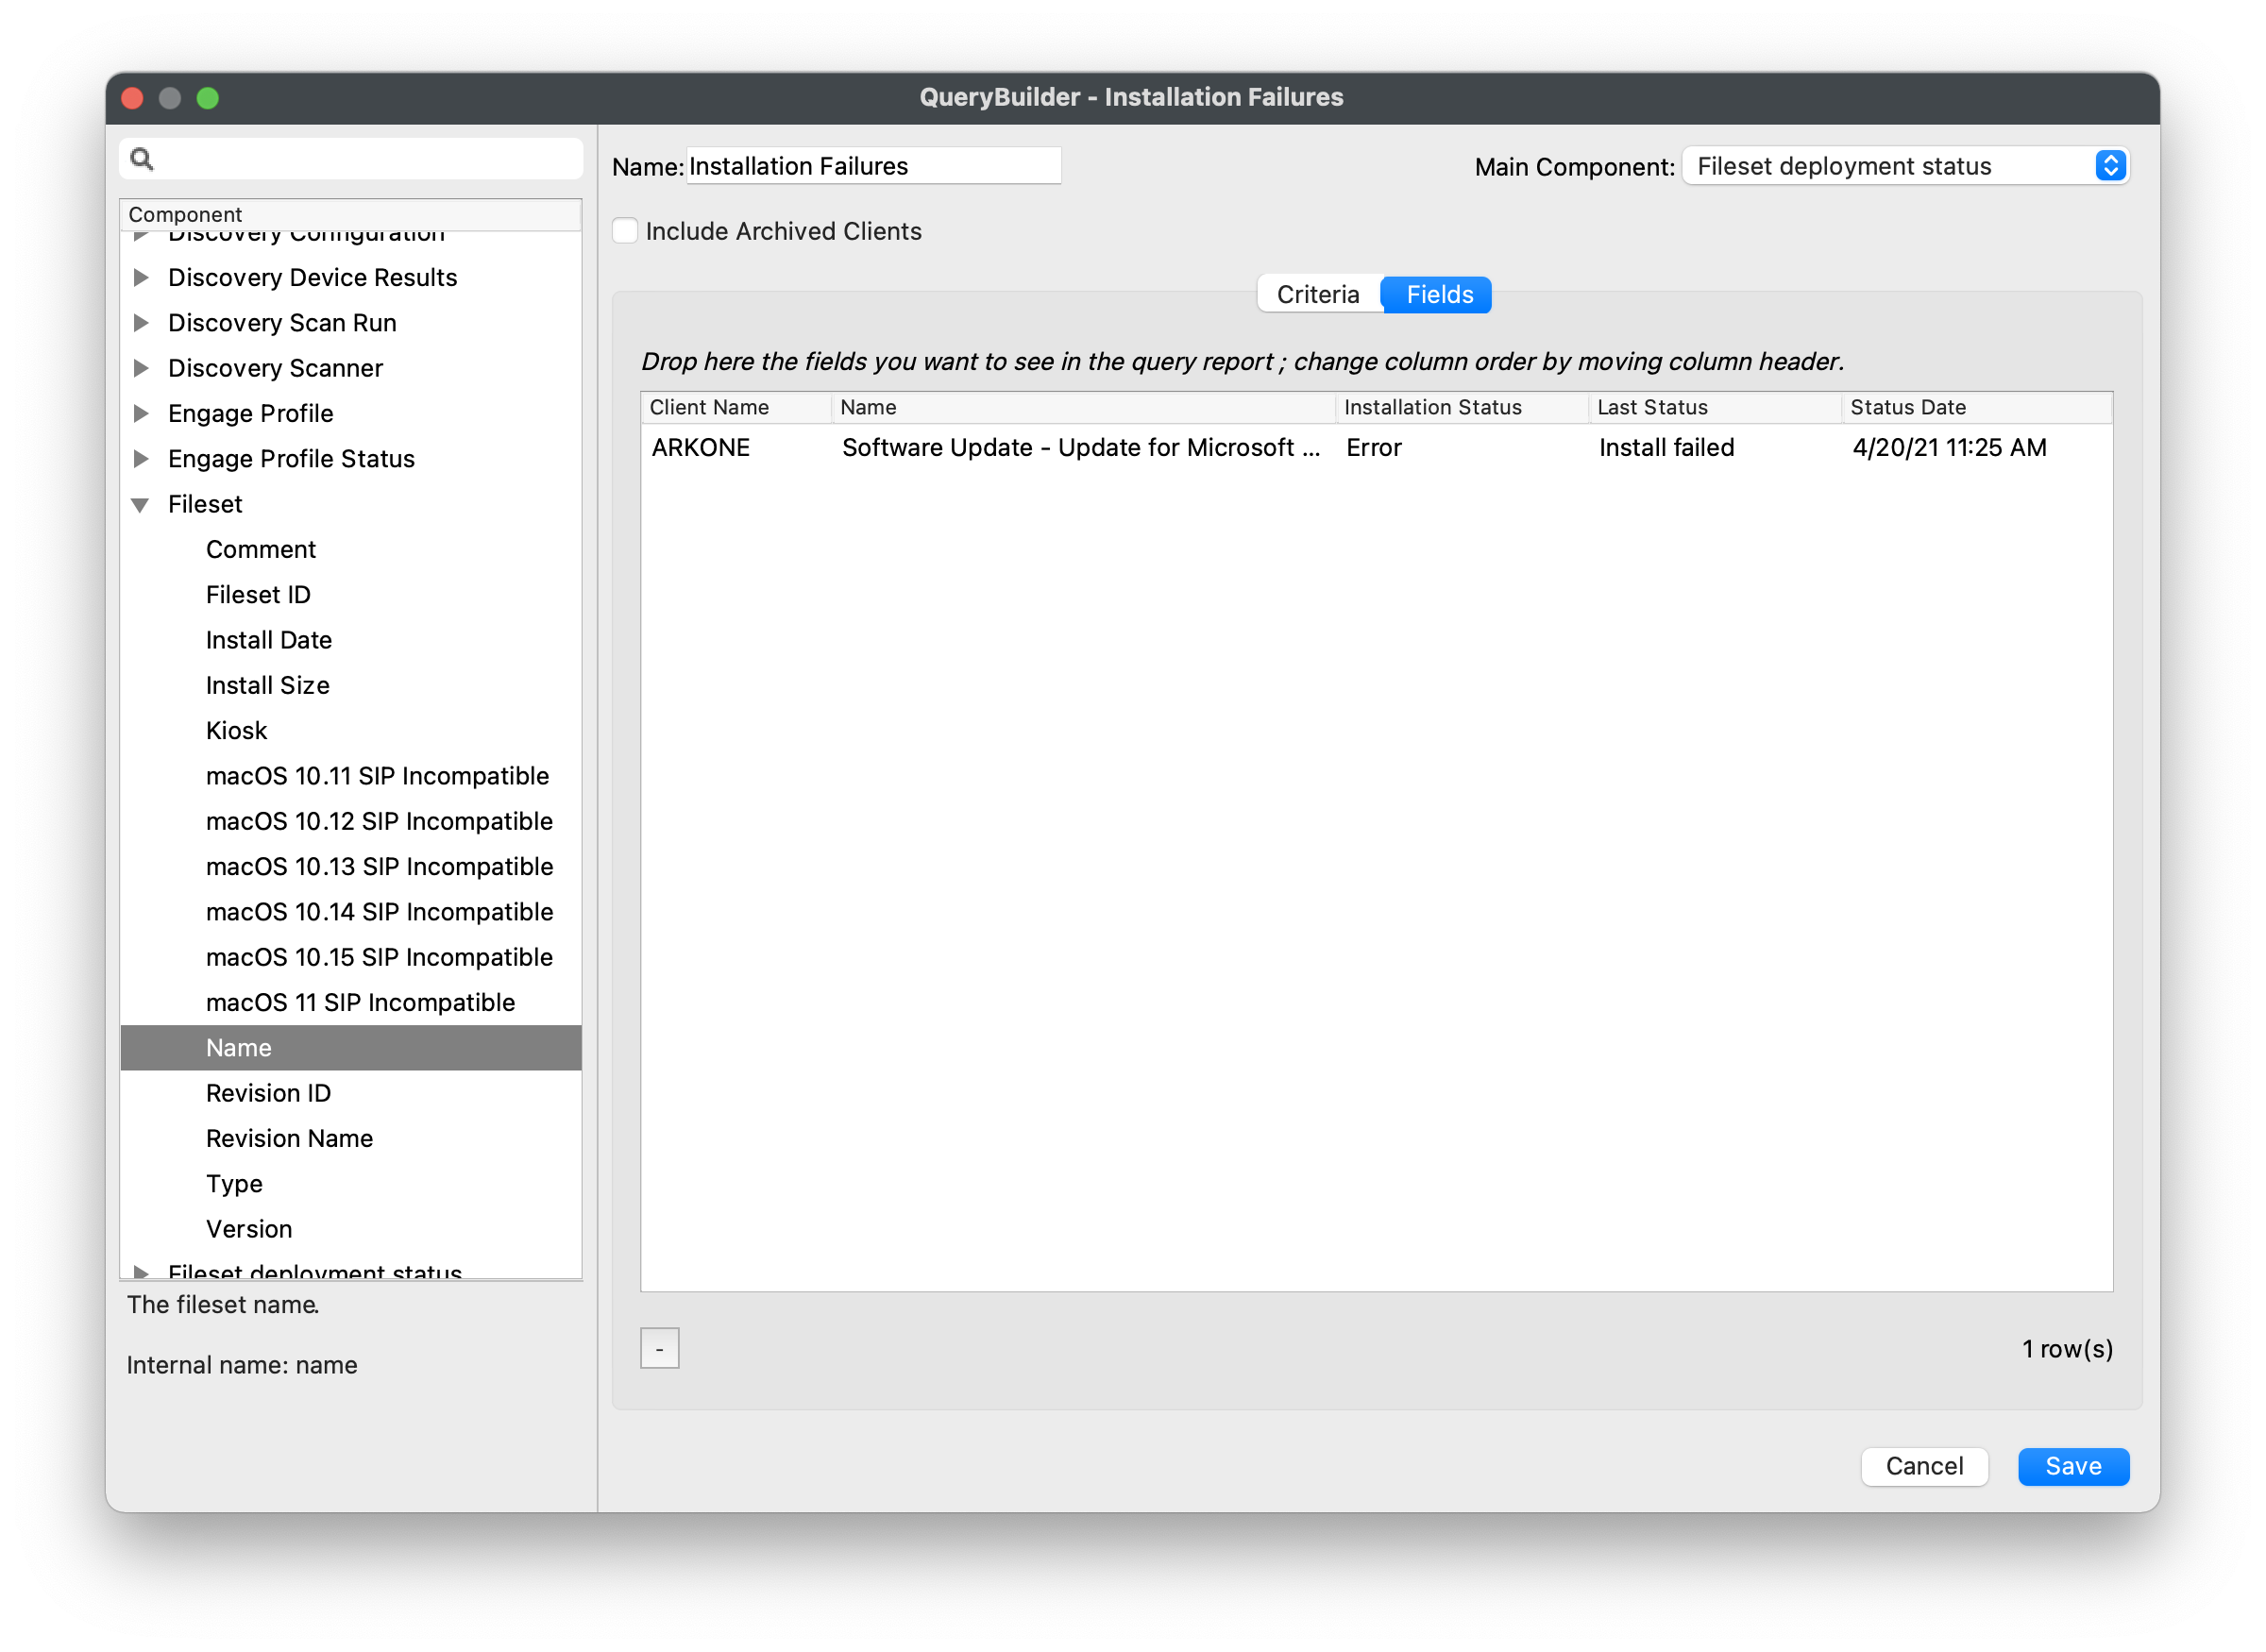 And the report itself: 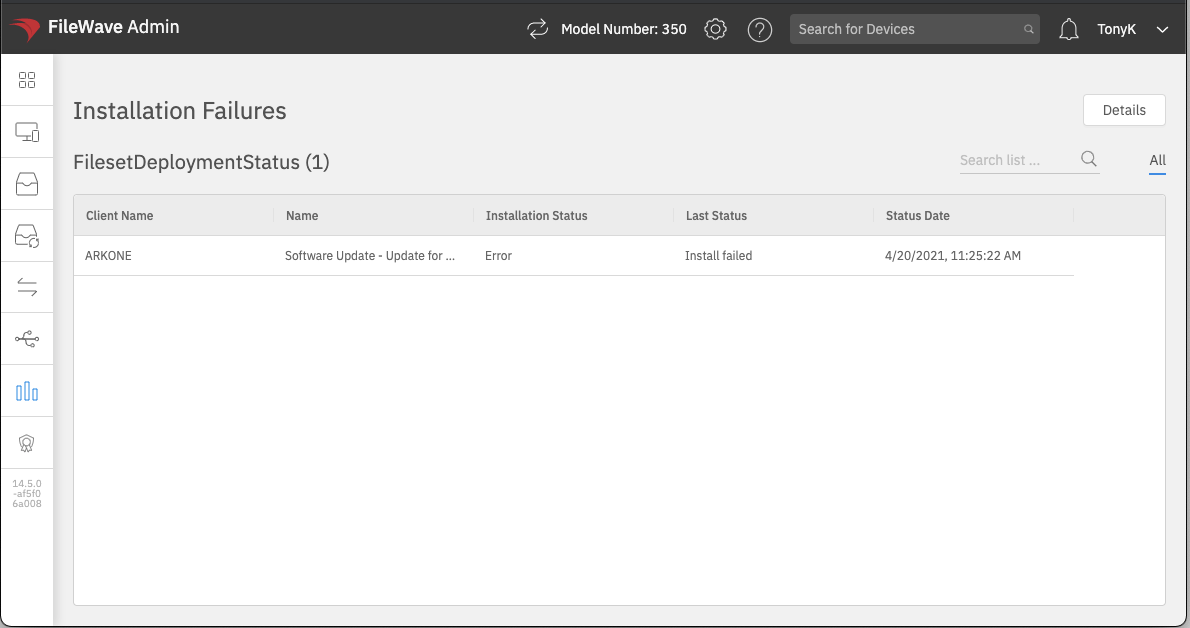 # Fileset Reports Use the **Report** toolbar button on a selected Fileset, multiple selected Filesets, or a Fileset Group to check deployment status for the selected item.  In FileWave 16.1 and later, the Fileset Report table includes **Client Name**, **Client ID**, **Fileset Revision Name**, **Fileset Revision ID**, **Fileset Version**, **Status**, **Status Date**, **Deploy Date**, and **Install Date**. When the report contains multiple Filesets, it also includes **Fileset Name** and **Fileset ID** so you can identify which Fileset each row belongs to. **Single selected Fileset report** 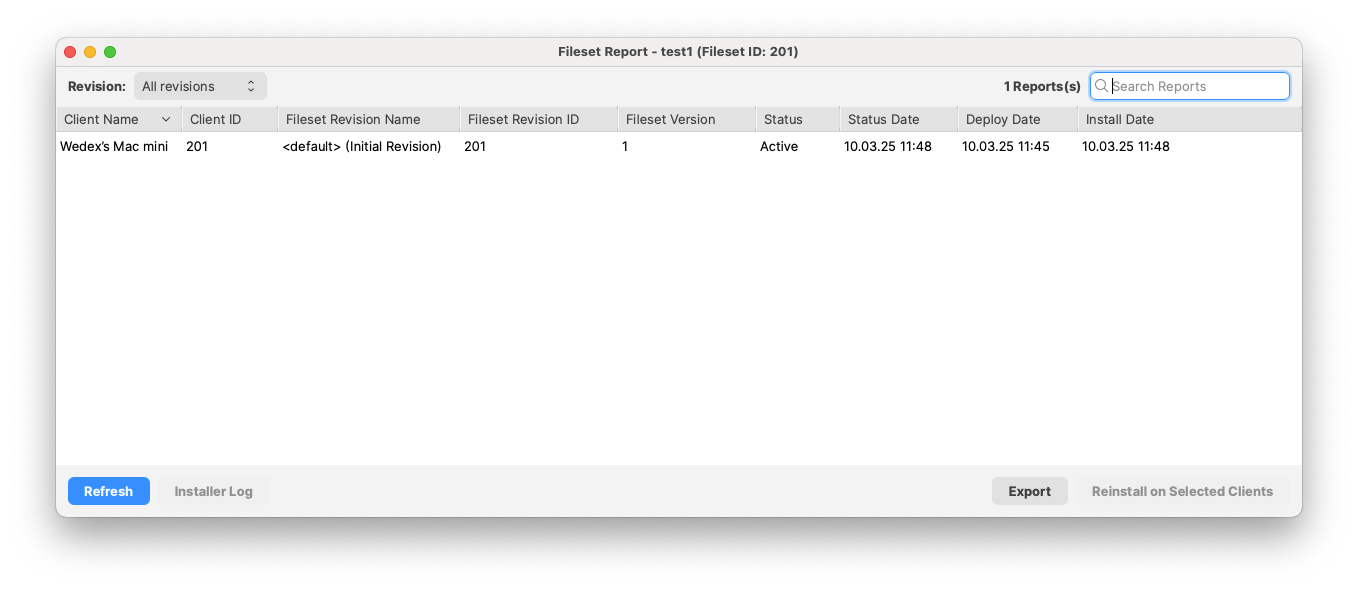 **Multiple selected Filesets report** 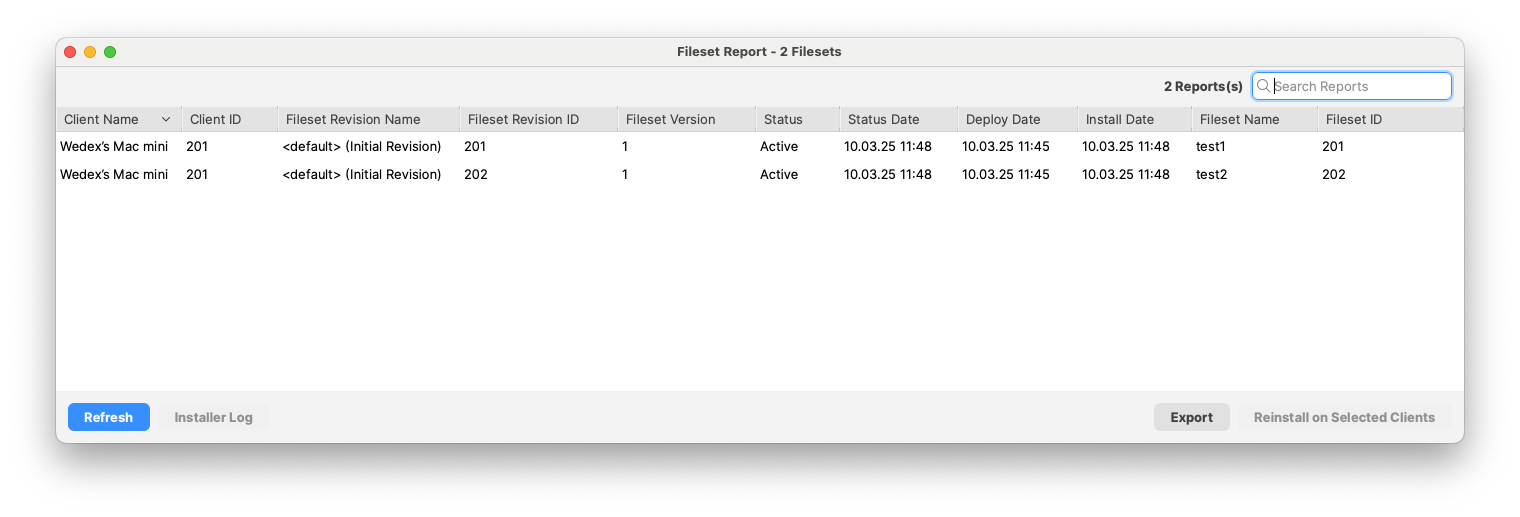 Use the **Revision** selector to view all revisions or a specific Fileset revision when reporting on one Fileset. Use **Search Reports** to filter visible rows, **Refresh** to update the report, and **Export** to save the report as a CSV file. For installer Filesets, such as `.pkg` or `.msi` packages, you can also review the **Installer Log**, select a client, and choose **Reinstall on Selected Clients** when needed. # Custom MSI installer parameters ## What FileWave can add custom parameters to MSI Filesets. This applies to Filesets created from MSI files, but not to Filesets that FileWave creates automatically from Windows software updates. ## When/Why Some MSI installers accept custom parameters that will change the way software is installed. For example, many MSI installers allow the software installation path to be defined via an additional option at runtime. Two such examples are:| **Application** | **Instal Path** |
| UltraEdit | TARGETDIR="<my-desired.path>" |
| 7Zip | INSTALLDIR="<my-desired.path>" |
For example, to install TeamViewer Host with multiple properties, use a format like this: SETTINGSFILE="YOURPATH\\yourfilename.tvopt" APITOKEN=xxxxxx CUSTOMCONFIGID=xxxxxx
### Parameters Parameters may be used to define options, including Custom Fields. #### Example For TeamViewer Host, you may want to keep the APITOKEN out of the visible MSI options while still passing it to the installer at runtime. A Custom Field can store that value. [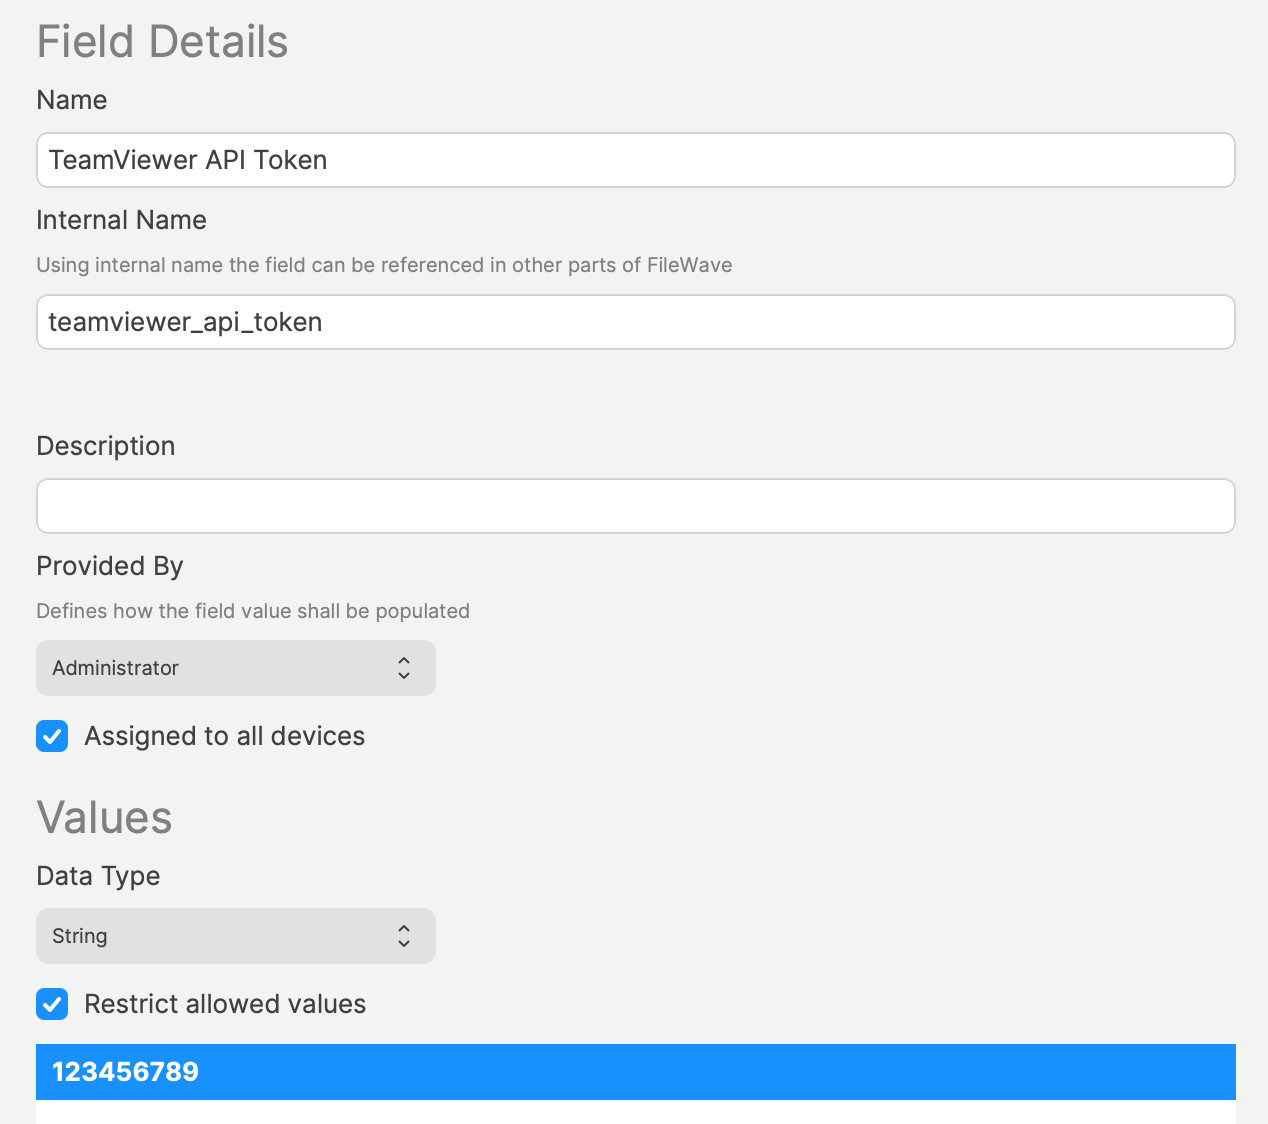](https://kb.filewave.com/uploads/images/gallery/2023-11/GwnMjpIoK9kaX6GB-image.png) The Custom MSI install options could then be: `APITOKEN=%teamviewer_api_token%` Parameters can include MSI properties such as SETTINGSFILE, APITOKEN, or CUSTOMCONFIGID.Custom MSI settings can define options that start with a leading `/` or special parameters such as ALLUSERS. When you use Custom Fields as parameters, FileWave removes options with a leading `/` and special parameters such as ALLUSERS so hidden parameter values cannot silently force behavior such as a reboot.
In both FileWave Central and Anywhere there are also "Learn More" links directing to this page.
## Information Option definitions:| **Custom MSI install options** | Options passed to the MSI during Fileset activation. |
| **Custom MSI uninstall options** | Options passed to the MSI when the Fileset is disassociated. *Requires 'Use MSI Uninstaller' to be enabled and that the MSI uninstaller supports this option.* *(Firefox is an example of an MSI that does not support this feature)* |
| Count | Argument |
| 1 | /s |
| 2 | /name=MyOrg |
| 3 | /reg |
| 4 | ABC123 |
| Count | Argument |
| 1 | /s |
| 2 | /name="My |
| 3 | Org" |
| 4 | /reg |
| 5 | ABC123 |
| 6 | /l |
| 7 | "c:\\windows\\temp\\My |
| 8 | App\\install.log" |
Before merging, duplicate the original Fileset and test the duplicate. A merge changes the selected Fileset contents, so keep a known-good copy available until testing is complete.
## Procedure Start from a machine that has the original, non-updated software installed. Run the first Fileset Magic snapshot, install and test the update, then run the second snapshot. The comparison view shows added, modified, and deleted files. Added files are selected by default, while modified and deleted files are not selected by default. Review the differences carefully and select the modified files that should become part of the updated Fileset. ## Steps 1. Duplicate the Fileset you plan to update. 2. Run FileWave Admin as root when building or updating macOS Filesets with Fileset Magic. 3. Take the first snapshot. 4. Install the software update, launch the application if needed, and confirm the update completed. 5. Take the second snapshot. 6. In the comparison view, browse the changes, keep the required added files selected, select the modified files that should be merged, and click **Continue**. 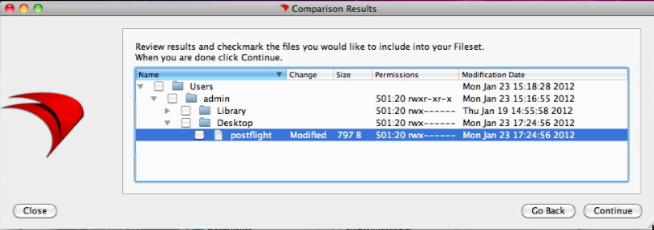 7. Enable **Merge To Fileset** and click **Choose...**. 8. Select the duplicate Fileset and click **OK**. 9. Continue through the assistant and verify that the selected changes were merged into the Fileset. 10. Test the updated Fileset before deploying it broadly. 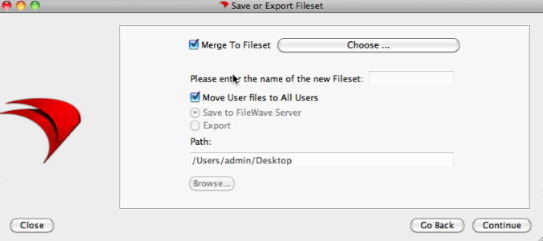 # Fileset Revisions # Fileset Revisions Overview ## What Fileset revisions let you keep two or more versions of the same fileset or payload inside a single FileWave fileset object. ## When/Why Revisions are useful when a payload changes over time, especially for application upgrades. For example, assume you are deploying Firefox v79 and need to test Firefox v80. Without revisions, you might duplicate the fileset or create a new one, move test devices from the v79 association to a new v80 association, and then, after testing, remove the old production association and replace it with the new one. That production cutover can become a timing problem. If removing the old association also removes the old app before the new one is ready, admins may have to carefully overlap or sequence the old and new associations so users are not interrupted during the upgrade. With fileset revisions, v80 can live in the same fileset that already contains v79. You can then choose which revision an association uses, instead of replacing the whole fileset or rebuilding the association from scratch. ## How When a fileset has multiple revisions, the association workflow includes a revision choice. In the example below, the association can use the default revision, the initial revision, or the newer `v80` revision: 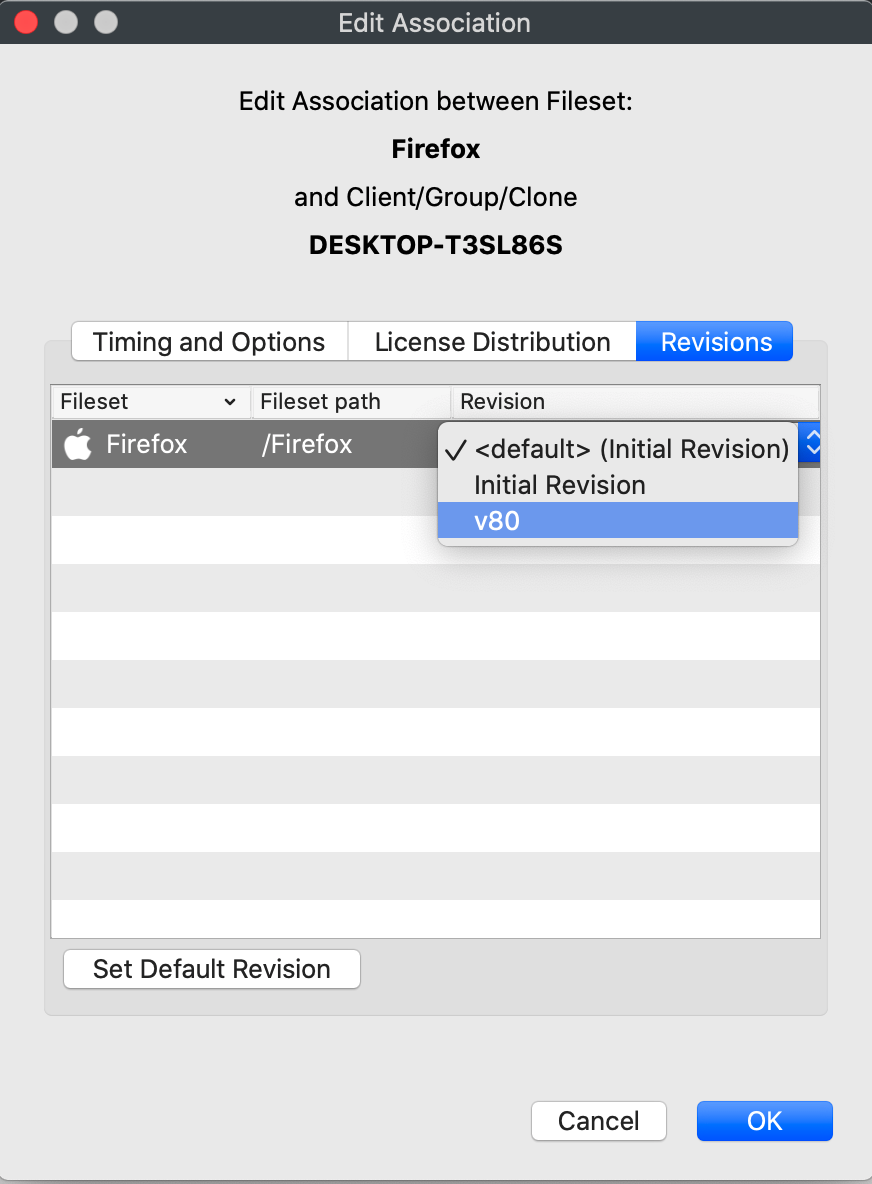You do not have to use fileset revisions. If you ignore revisions, filesets continue to work the way they always have. When you do need staged application updates or controlled testing, revisions can make that workflow cleaner.
## Related Content - [Associating a Fileset Revision](https://kb.filewave.com/books/filesets-payloads/page/associate-a-specific-fileset-revision "Associating a Fileset Revision") - [Editing Filesets that have Revisions](https://kb.filewave.com/books/filesets-payloads/page/editing-filesets-that-have-revisions "Editing Filesets that have Revisions") - [Managing Revisions](https://kb.filewave.com/books/filesets-payloads/page/managing-revisions "Managing Revisions") # Associate a Specific Fileset Revision ## What When a Fileset has revisions, FileWave Central asks which revision the new association should use. A Fileset without revisions follows the normal association workflow. ## When/Why For example, a Firefox Fileset might contain separate revisions for versions 79 and 80. Select the revision you want the target devices to install when you create the association. ## How Create the association in FileWave Central, then choose the required revision in the prompt shown below: The **default** option follows whichever revision is marked as the Fileset's default. See **"Default" Revisions** below before using that option in production. ## Related Content - ["Default" Revisions](https://kb.filewave.com/books/filesets-payloads/page/default-revisions ""Default" Revisions") - [Editing Filesets that have Revisions](https://kb.filewave.com/books/filesets-payloads/page/editing-filesets-that-have-revisions "Editing Filesets that have Revisions") - [Managing Revisions](https://kb.filewave.com/books/filesets-payloads/page/managing-revisions "Managing Revisions") # Editing Filesets that have Revisions ## What You may need to edit an existing Fileset after it has more than one revision. The revision selector controls which revision you are changing. ## When/Why For example, assume a Firefox Fileset has two revisions: v79 and v80. You might need to change a file only in v80, or you might need to make the same change in both revisions. Check the revision selector before editing so you know which Fileset revision is open. ## How In both the Fileset editor and the script editor, use the **Revision** drop-down menu to choose the revision you want to edit. In the screenshots below, the Fileset window is showing v79 and the script editor is showing v80:  To switch revisions in either window, change the value in the drop-down. If you do not use Fileset revisions, leave the selector at the default revision and continue editing the Fileset the usual way. ## Related Content - [Associating a Fileset Revision](https://kb.filewave.com/books/filesets-payloads/page/associate-a-specific-fileset-revision "Associating a Fileset Revision") - [Managing Revisions](https://kb.filewave.com/books/filesets-payloads/page/managing-revisions "Managing Revisions") # Managing Revisions ## What FileWave revisions let you keep multiple versions of a Fileset, profile, or script available for testing, rollback, and production deployment. ## When/Why The revision management actions are: - Edit revision metadata to change the revision name or description without changing the revision contents. - Create a revision to add another version within the current Fileset. - Delete a revision when that version should no longer be available. - Set a revision as *Default* to control which revision existing associations use for testing or production. ## How Access these actions through the *Manage Revisions* button in the Fileset Editor, Script Editor, or Fileset Properties window, as shown below: 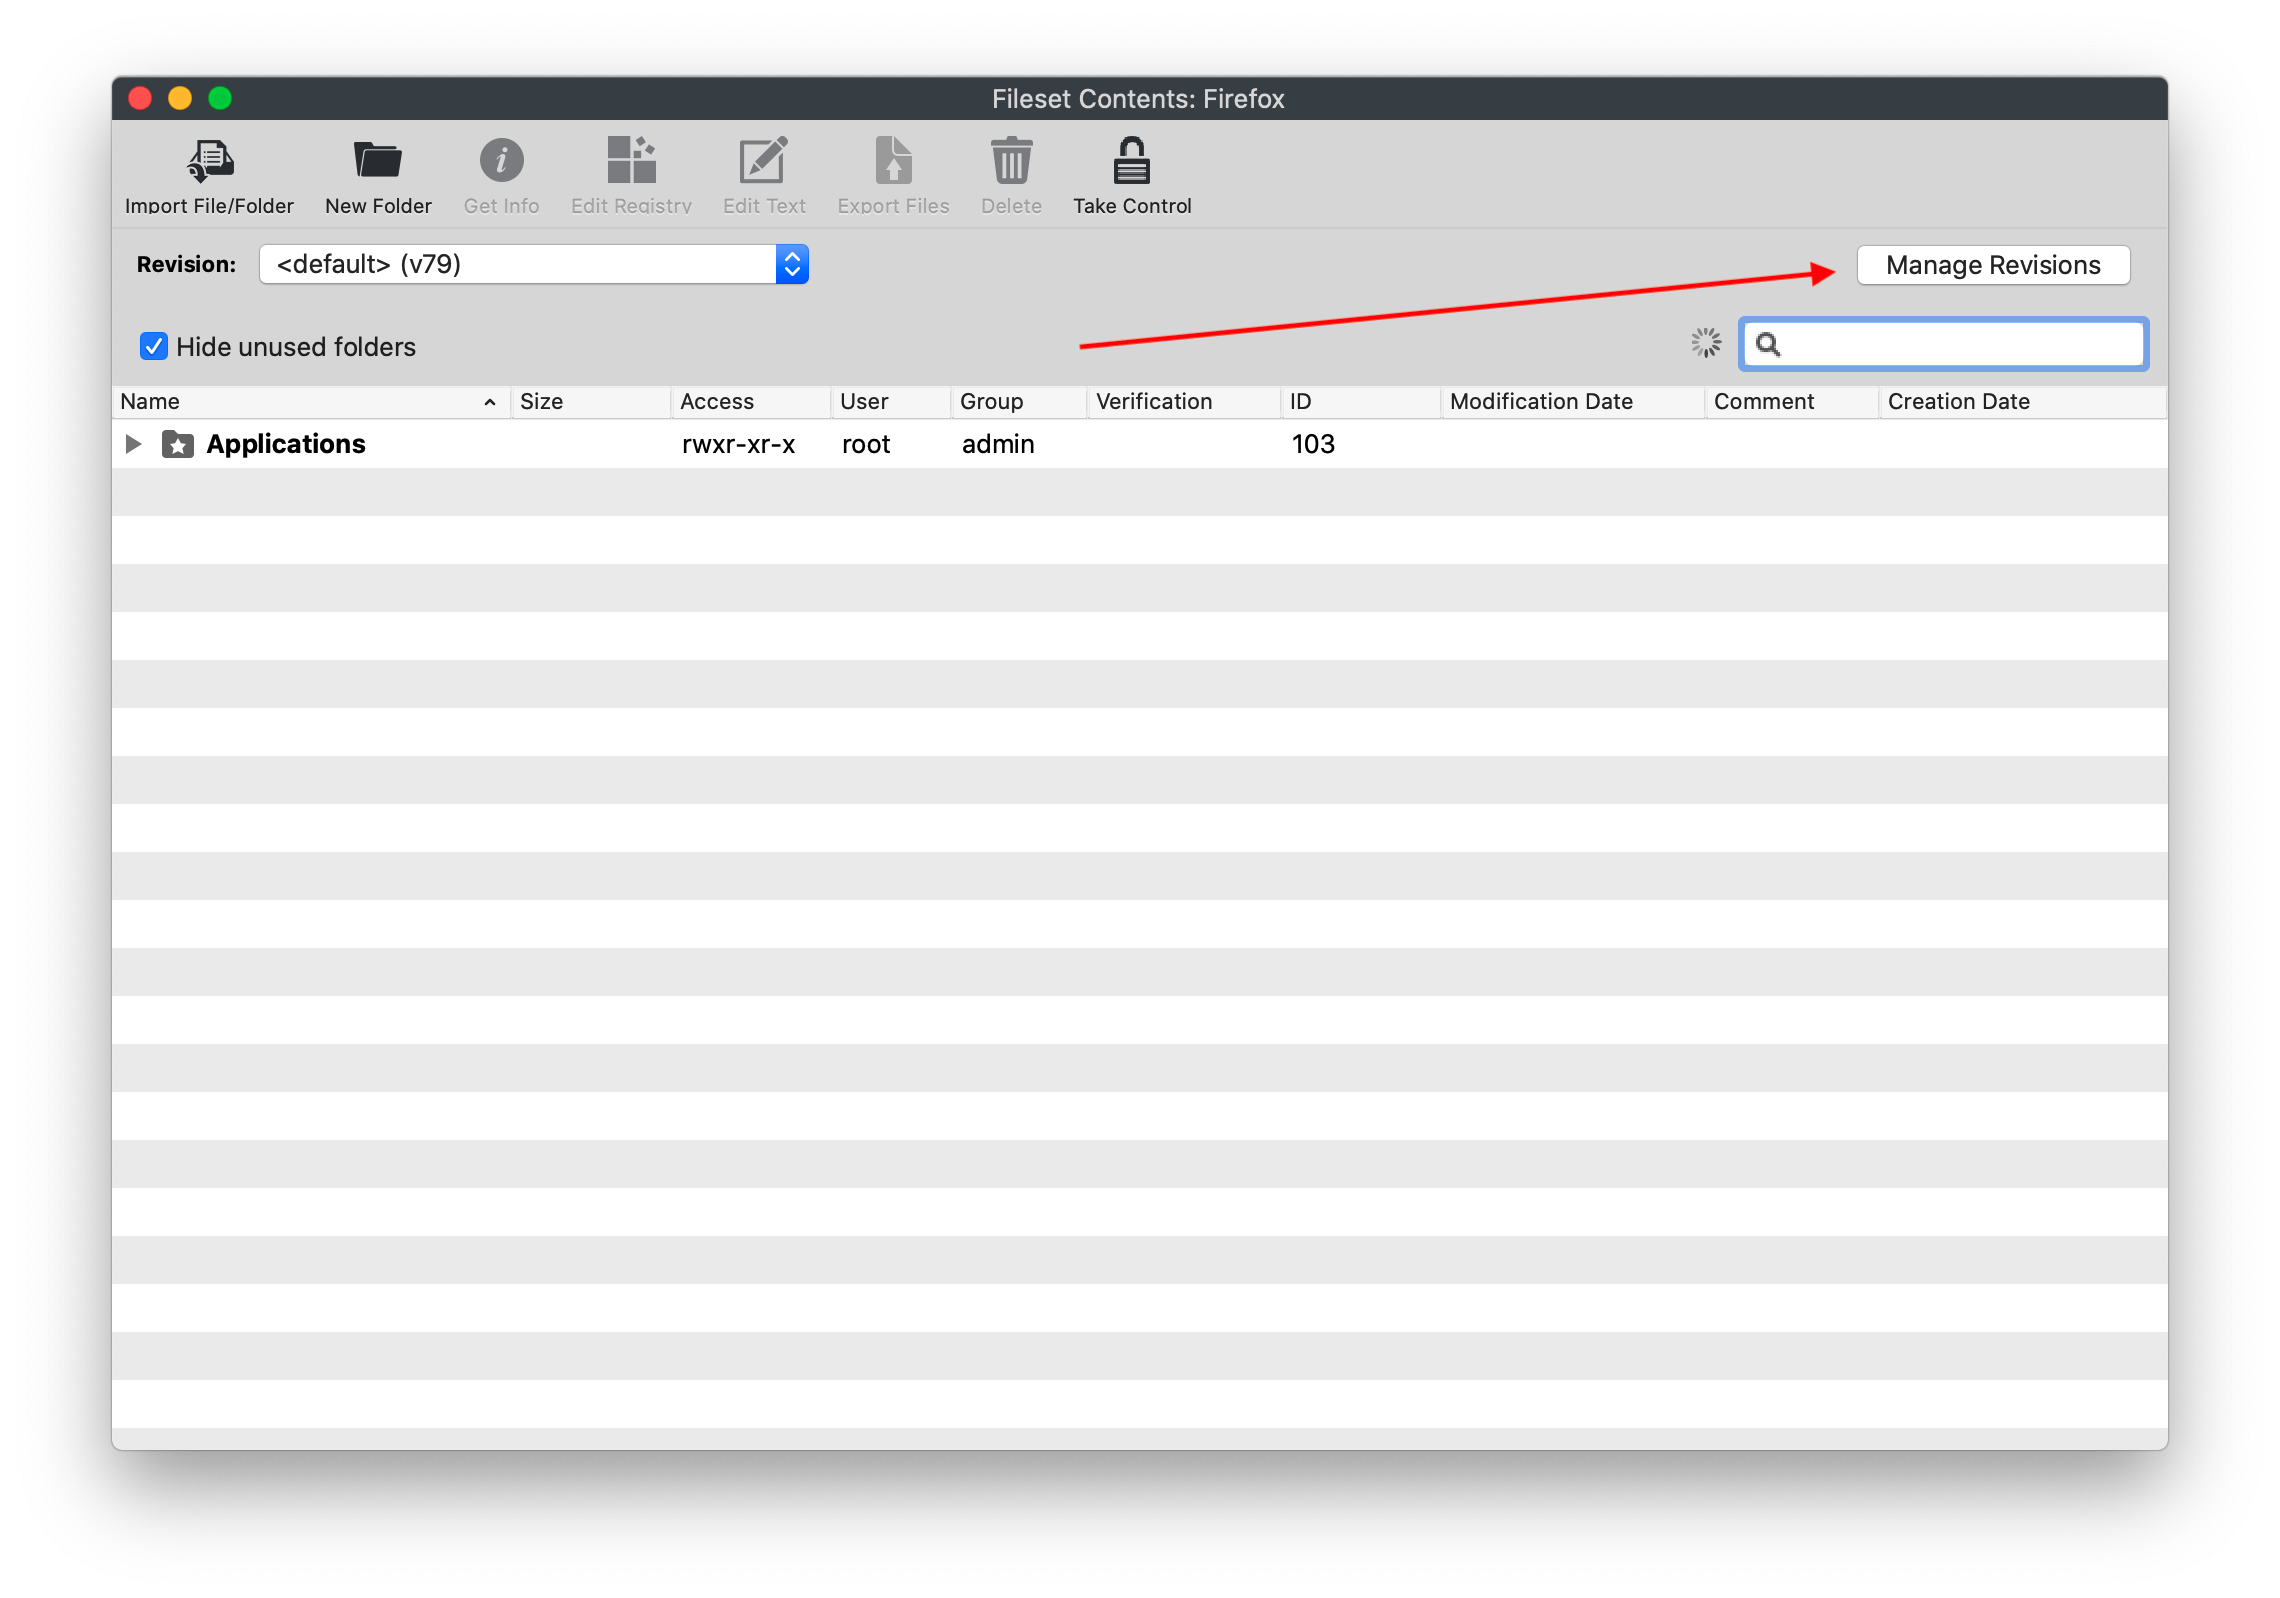 Use the related articles below for the step-by-step workflow for each revision action. ## Related Content - ["Default" Revisions](https://kb.filewave.com/books/filesets-payloads/page/default-revisions ""Default" Revisions") - [Creating a New Revision](https://kb.filewave.com/books/filesets-payloads/page/creating-a-new-revision "Creating a New Revision") - [Editing Fileset Revisions](https://kb.filewave.com/books/filesets-payloads/page/editing-fileset-revisions "Editing Fileset Revisions") - [Removing/Deleting a Revision](https://kb.filewave.com/books/filesets-payloads/page/removingdeleting-a-revision "Removing/Deleting a Revision") # "Default" Revisions ## What Default revisions let you point an association at whichever Fileset revision is marked as the default, instead of hard-coding that association to a named revision. This is useful when you test a new revision with a small group first, then promote it for production without editing every production association. ## When/Why In this example, Firefox v79 is assigned to all devices through two associations:  In the screenshot, the Production group is associated to <default> (currently v79), while the Beta Testers group is associated directly to v79. Both groups install v79 today, but only the Production association will follow the default revision when that default changes. ## How Test the new revision before promoting it. In this example, edit the patch testers association first so that group receives v80: 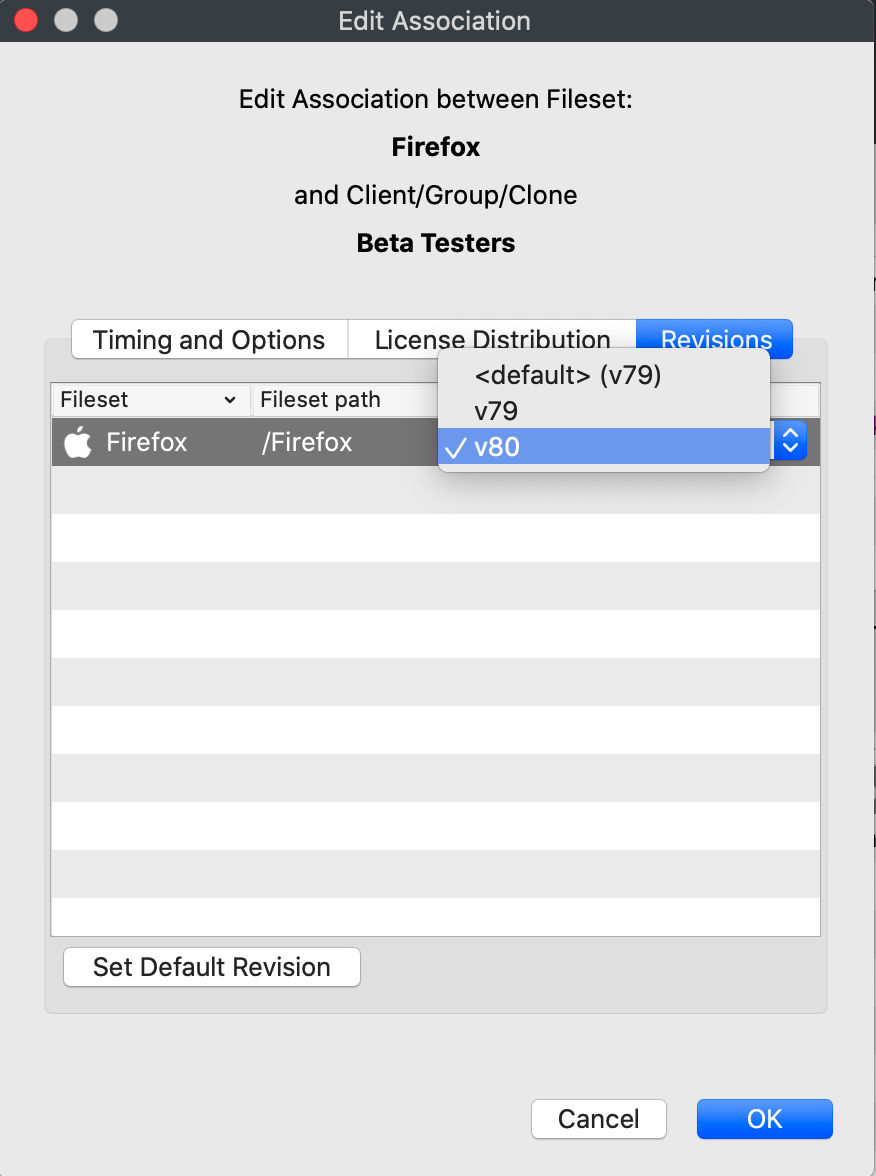 Once we save this association and update the model, all patch testers will get the new version. No deleting of the association or creating a new one is required. After testing, you could edit every production association one by one, but default revisions are designed to avoid that. The Production association points to the default revision of the Fileset, not directly to v79. Change the Fileset's default revision to v80, then update the model. 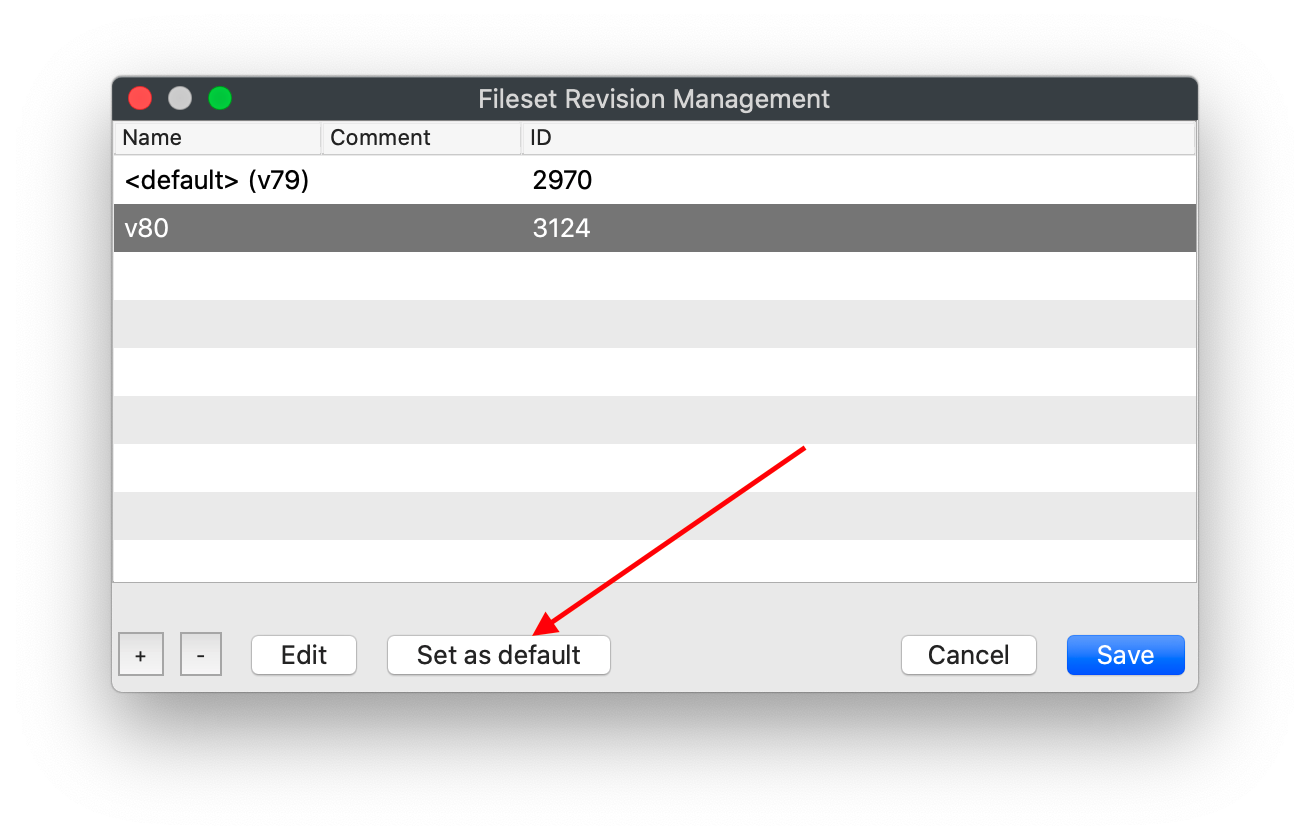 Once we save that change, and update the model, you'll see the change reflected in the association: 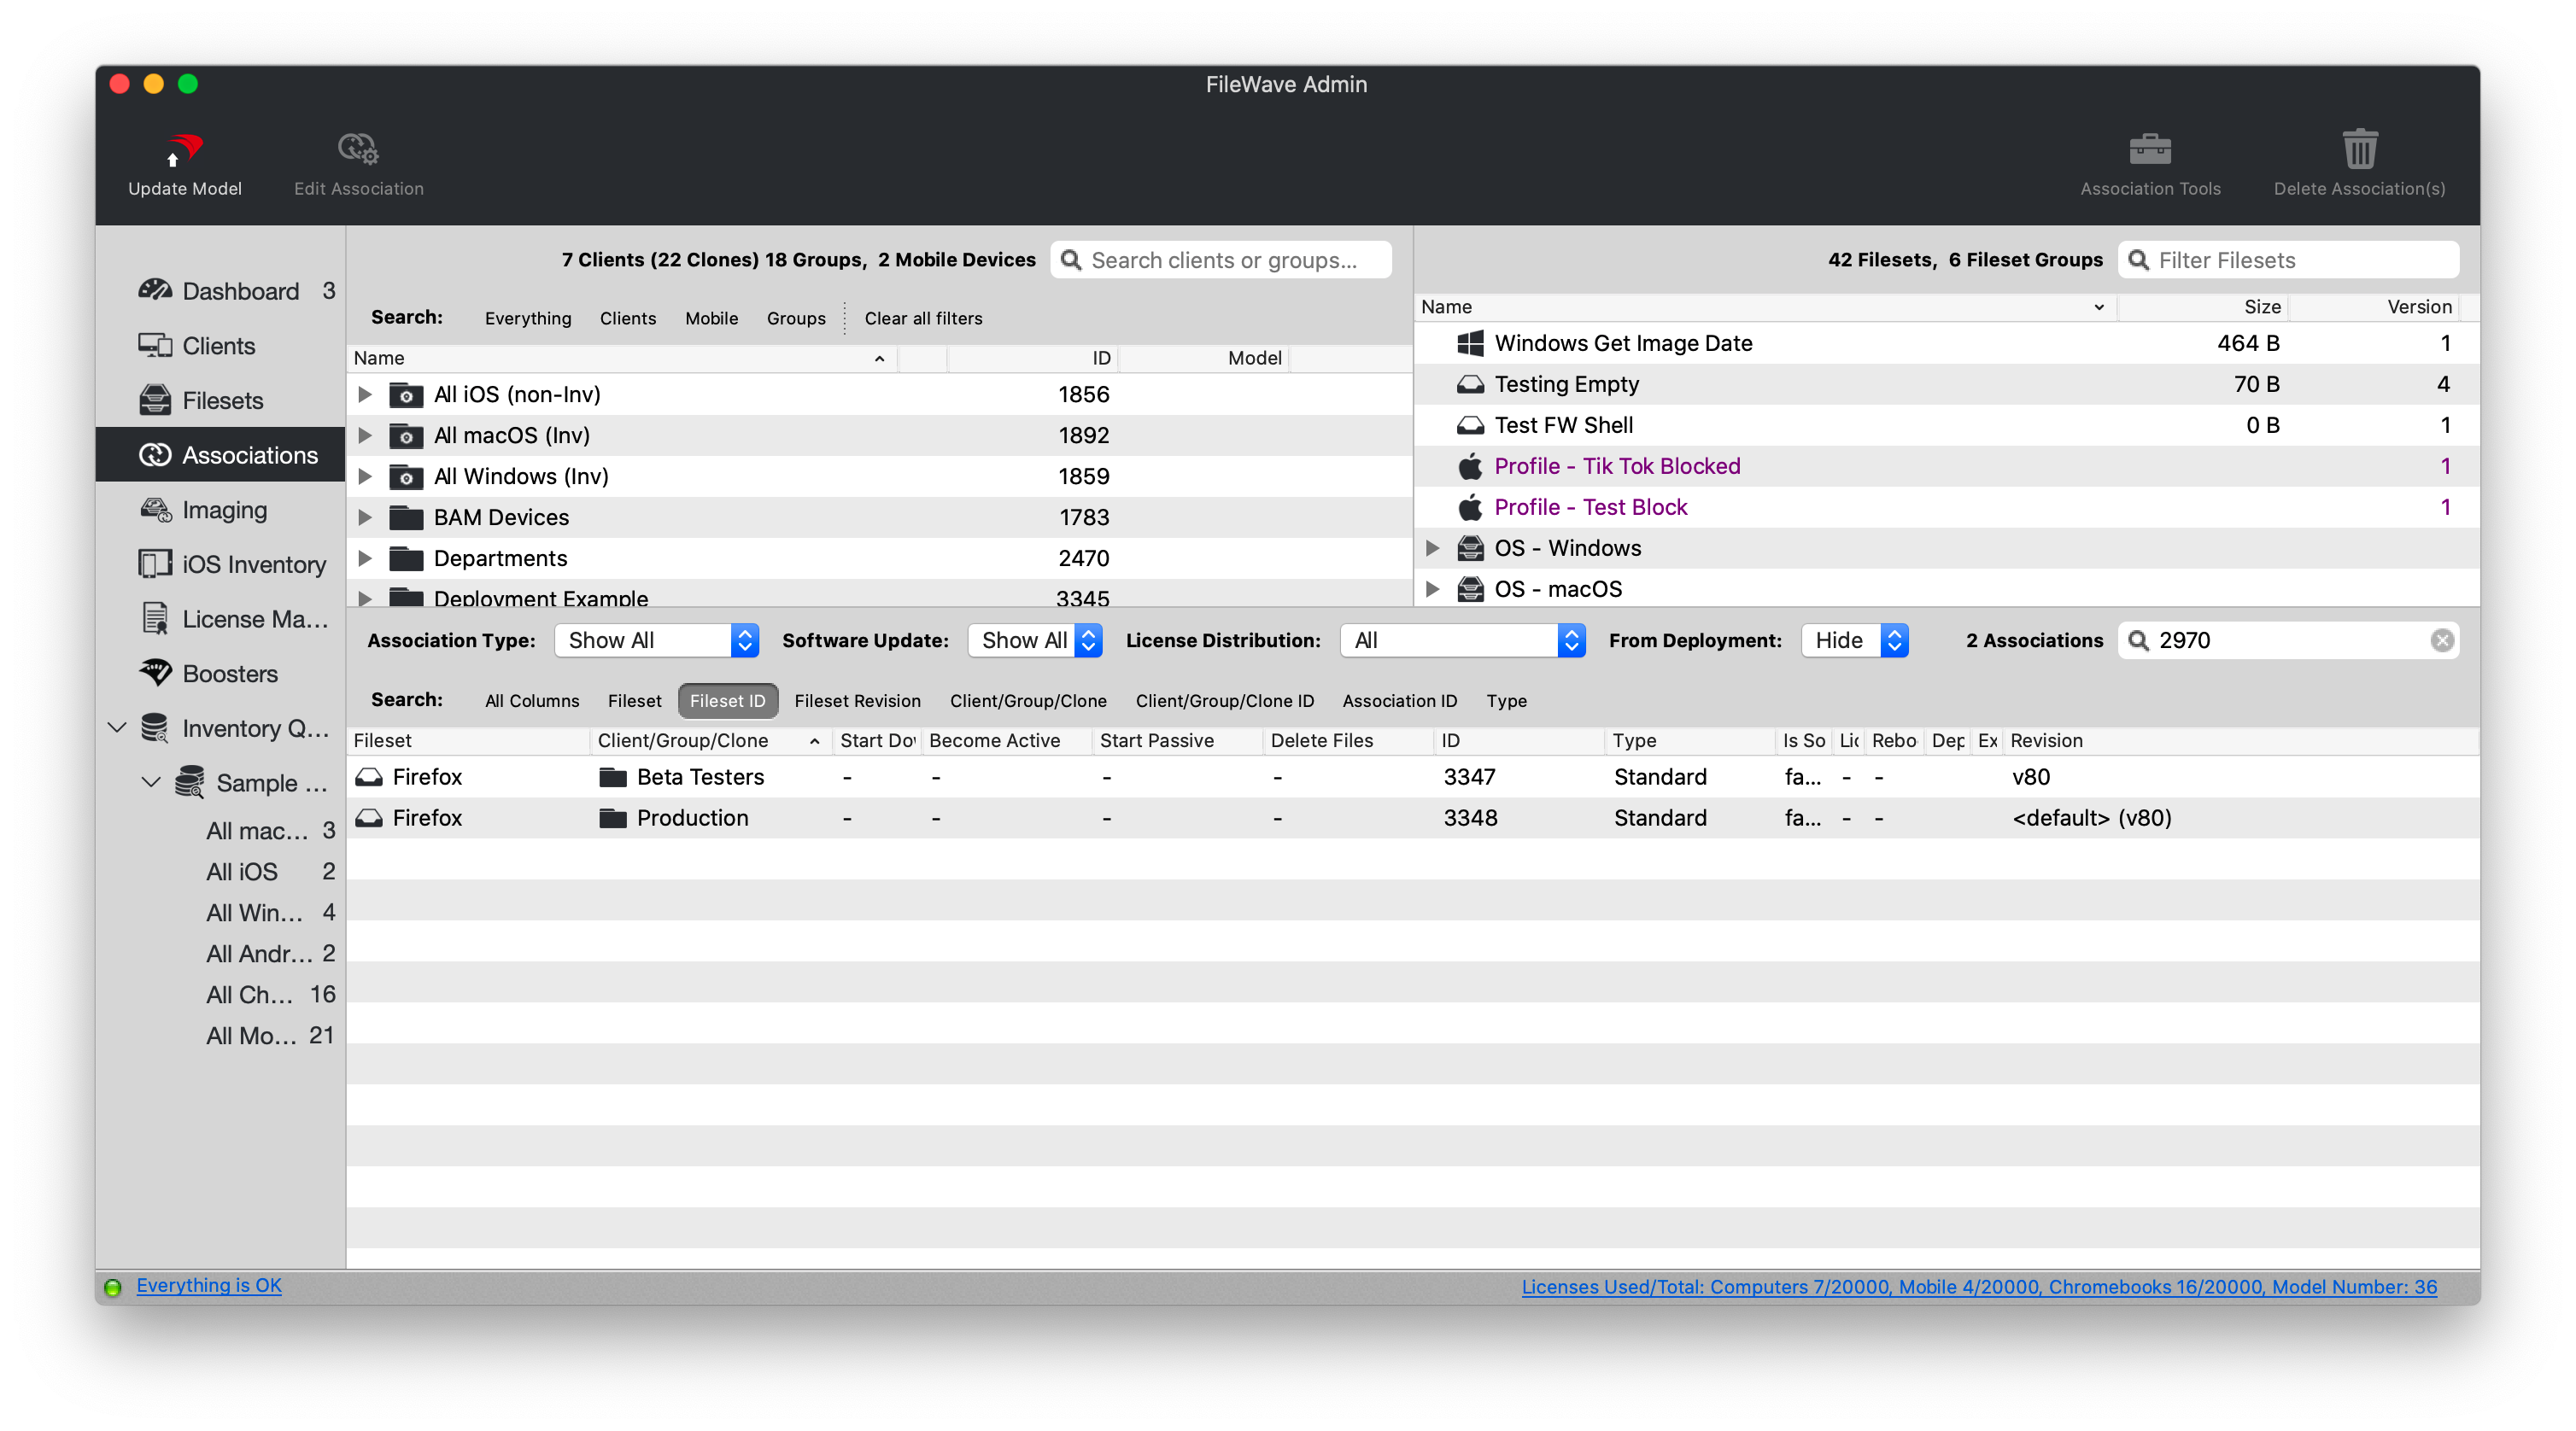 And, upon next check-in, all "Production" devices will upgrade to v80.FileWave handles the revision transition through the model update and normal client check-in process. Use a test group first so you control when the new revision reaches production devices.
## Related Content - [Managing Revisions](https://kb.filewave.com/books/filesets-payloads/page/managing-revisions "Managing Revisions") - ["Default" Revisions](https://kb.filewave.com/books/filesets-payloads/page/default-revisions ""Default" Revisions") - [Creating a New Revision](https://kb.filewave.com/books/filesets-payloads/page/creating-a-new-revision "Creating a New Revision") - [Editing Fileset Revisions](https://kb.filewave.com/books/filesets-payloads/page/editing-fileset-revisions "Editing Fileset Revisions") - [Removing/Deleting a Revision](https://kb.filewave.com/books/filesets-payloads/page/removingdeleting-a-revision "Removing/Deleting a Revision") # Creating a New Revision ## What Create a new Fileset revision when you need to update an existing Fileset without losing the earlier version. ## When/Why Fileset revisions are useful for applications and payloads that will be updated over time. For example, you can keep the current Firefox revision assigned while preparing a newer Firefox revision for testing or rollout. ## How Add a revision from the *Manage Revisions* view by clicking the plus icon: Choose the revision type that matches the change. Start empty when you do not want files from the previous revision. Duplicate the previous revision when you want to keep existing content, scripts, or properties and edit from there. Once the revision is created, edit it like any other Fileset. When creating a new revision, choose how much of the previous revision should be copied: 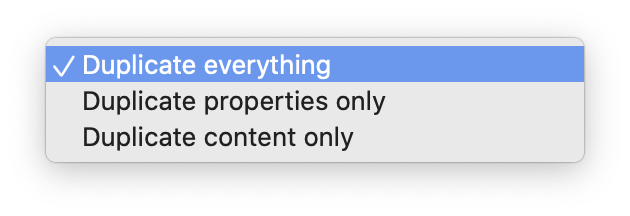 You can duplicate everything, duplicate only the properties, or duplicate only the content from an earlier revision.**Drag-and-drop revisions** You can also create Fileset revisions by dragging files from the file system onto an existing Fileset. FileWave will prompt you to create a new Fileset or add revisions to the existing Fileset.
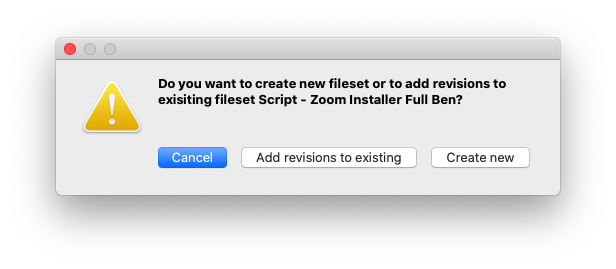 If you add revisions, FileWave will ask which revision should be the default after import: 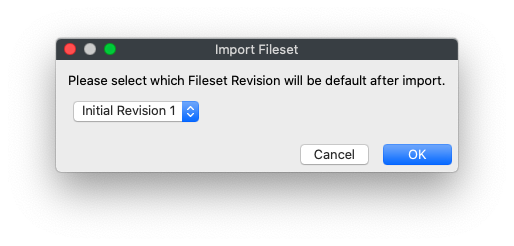 ## Related Content - [Managing Revisions](https://kb.filewave.com/books/filesets-payloads/page/managing-revisions "Managing Revisions") - ["Default" Revisions](https://kb.filewave.com/books/filesets-payloads/page/default-revisions ""Default" Revisions") - [Editing Fileset Revisions](https://kb.filewave.com/books/filesets-payloads/page/editing-fileset-revisions "Editing Fileset Revisions") - [Removing/Deleting a Revision](https://kb.filewave.com/books/filesets-payloads/page/removingdeleting-a-revision "Removing/Deleting a Revision") # Editing Fileset Revisions ## What A Fileset revision has two editable properties: its name and its description. ## When/Why Use the **Manage Revisions** window when you need to rename a revision or add a clearer description. For example, the first revision is named **Initial Revision** by default. Replacing that with a short description can make later associations easier to understand. ## How Open **Manage Revisions** for the Fileset, select the revision, then choose **Edit**: 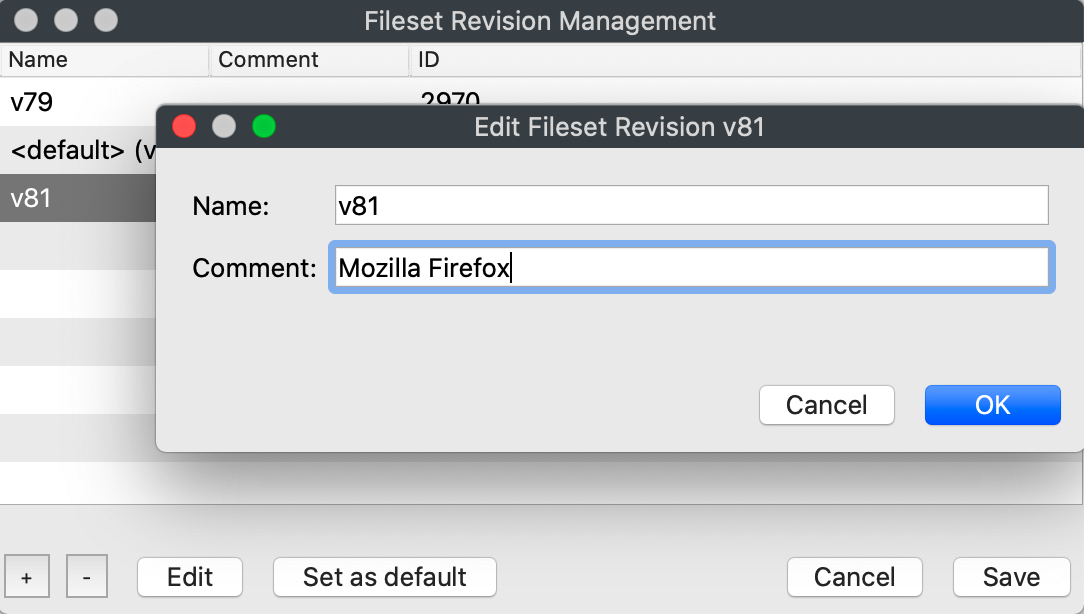 Use descriptive values in both fields so admins can tell which revision they are associating later. ## Related Content**Symlinks are always replaced.**
## Plan a Fileset upgrade Assume Fileset v1 is active and Fileset v2 contains the replacement version. Choose one of these rollout sequences: 1. **Immediate:** Create the v2 association, delete the v1 association, then run Model Update. 2. **Scheduled:** Schedule v2 to activate first, for example at 6:00 PM, then schedule v1 to delete after activation, for example at 6:01 PM. Shared files remain available to v2 and do not need to be downloaded again. # Fileset Status Meanings ## What Fileset status values show where a Fileset is in the client deployment workflow. Use this reference when Client Info > Fileset Status or deployment reporting shows a status code or status text that needs explanation. ## MDM and DDM Fileset details in FileWave 16.4 FileWave 16.4 expands **Client Info > Fileset Status** for Apple MDM and Declarative Device Management (DDM) Filesets. In addition to the status itself, the view can expose application metadata, profile information, asset or configuration details, and deployment-specific attributes for the selected row.**Version boundary:** The expanded MDM/DDM details and direct troubleshooting navigation described here require FileWave Central and FileWave Server 16.4 or later. The status-code reference below remains useful for other Fileset deployment paths and earlier versions.
Do not treat an informational status as a universal device-health verdict. Fileset Status, Command History, DDM declaration state, inventory, and the device’s actual installed configuration answer different parts of the troubleshooting question.
## Status reference The table below lists known Fileset status codes, their severity, the status text shown in Client Info, the deployment status category, and example ways to reproduce some statuses. Some statuses are platform-specific or only appear in certain deployment paths.| **Code** | **Status Type** | **Severity** | **Fileset Status (Client Info)** | **Deployment Status** | **Available Platform(s)** | **Steps to Reproduce** |
| 0 | UNKNOWN\_ERROR | WARNING | Fileset Error | WARNING | ||
| **1** | STATUS\_IDLE | OK | Idle | REMAINING | N/A | |
| **2** | STATUS\_FILESET\_DOWNLOADING | ACTIVITY | Downloading: #% | REMAINING | ||
| **3** | STATUS\_FILESET\_DOWNLOADED | OK | Downloaded | REMAINING | ||
| **4** | STATUS\_FILESET\_ACTIVATED | OK | Installed as dependency Installed via Kiosk Active | COMPLETED | macOS Windows | |
| **5** | STATUS\_FILESET\_MADE\_PASSIVE | OK | Passive | COMPLETED | 1. Create and associate a fileset to a client 2. Edit the association to make the files passive in the near future 3. Update Model 4. Check Client Info > Filesets Status at time when fileset is to be made passive 1. Create Deployment with an Exclusion; you may see the Passive Status prior to showing Excluded. | |
| **6** | STATUS\_FILESET\_DELETED | OK | Deleted | COMPLETED | iOS | Easiest to see with iOS 1. Create an iOS App Store fileset 2. Associate the fileset to an iOS client 3. Update Model 4. After app installs and Client Info > Filesets Status shows 'Installed Successfully', delete the app from the device 5. Close and reopen Client Info (triggers MDM commands) 6. Open Client Info > Filesets Status for the client |
| **7** | STATUS\_FILESET\_INSTALLED\_SUCCESSFULLY | OK | Installed successfully | COMPLETED | iOS | |
| **8** | STATUS\_FILESET\_INSTALL\_FAILURE | WARNING | Install failed | ERROR | ||
| **9** | STATUS\_FILESET\_DISK\_FULL | WARNING | Disk full | ERROR | 1. Create a massive dummy file on the client to eat up disk space 1. Windows: fsutil file createnew FILENAME BYTES 2. macOS: mkfile -n SIZE\[b|k|m|g\] FILENAME 2. Create another massive dummy file on the Admin to use in fileset 3. Create an Empty fileset and add the dummy file 4. Associate the fileset to a client 5. Update Model & perform Verify for client | |
| **10** | STATUS\_FILESET\_INSTALLER\_RUNNING | ACTIVITY | Installer running now | REMAINING | ||
| **11** | STATUS\_FILESET\_ERROR | WARNING | iOS: Please log in to your iTunes Store account Desktop: Error: 4 | ERROR | Now only see "Error: 4" if setting last\_status for fileset to 11 manually in admin.user\_status table Steps (iOS)... 1. Do not sign into iTunes on an iOS client 2. Create an App Store fileset 3. Associate the fileset to an iOS client 4. Update Model 5. On the client, tap 'Cancel' when prompted to sign into iTunes | |
| **13** | CANT\_LOAD\_DATA\_FILE\_FROM\_SERVER\_ERROR | WARNING | Error while downloading from server | WARNING | Note: Only have seen 'Fileset Error' | |
| **14** | STATUS\_FILESET\_ASSOCIATED | IGNORE | Associated | REMAINING | macOS Windows Android iOS | 1. Create any type of fileset 2. Associate the fileset to a client 3. Update Model 4. Open Client Info > Filesets Status for client before client gets new model |
| **15** | BOOSTER\_SERVER\_DISK\_FULL\_STATUS | ERROR | Booster/Server disk full | ERROR | ||
| **16** | STATUS\_FILESET\_INSTALLATION\_CANCELLED | WARNING | Installation cancelled by the user | COMPLETED | Android | Easiest to see with Android 1. Create an APK fileset 2. Associate the APK with an Android client 3. Update Model 4. On the Android device, tap \[Cancel\] when prompted to install the APK |
| **17** | STATUS\_FILESET\_INSTALLER\_OUTDATED | WARNING | Fileset install failed, a more recent version is installed | ERROR | ||
| **18** | STATUS\_FILESET\_UNINSTALLER\_RUNNING | ACTIVITY | Uninstaller running now | REMAINING | ||
| **19** | STATUS\_FILESET\_UNINSTALL\_FAILURE | WARNING | Uninstall failed | WARNING | ||
| **21** | ACTIVATING\_STATUS | ACTIVITY | Activating | REMAINING | ||
| **22** | STATUS\_FILESET\_SCRIPT\_FAILED | WARNING | Script execution failure | ERROR | ||
| **23** | STATUS\_INVENTORY\_ONLY\_CLIENT | WARNING | Not installed: client is inventory only | COMPLETED | ||
| **25** | STATUS\_IN\_KIOSK\_UNINSTALLED | OK | Excluded from Kiosk (Dependency) Available in Kiosk | COMPLETED | macOS Windows | |
| **-52** | PLEASE\_REBOOT\_RESULT | ACTIVITY | Waiting for user to log out | REMAINING | macOS Windows | |
| **-51** | FAILED\_TO\_LOGOUT\_RESULT | ACTIVITY | Waiting for user to log out | REMAINING | macOS Windows | |
| **-50** | WAITING\_FOR\_USER\_TO\_LOGIN\_RESULT | ACTIVITY | Waiting for user to log in | REMAINING | macOS Windows | |
| **99** | FILESET\_PRIORITY\_ERROR | ACTIVITY | Waiting for higher priority filesets | REMAINING | 1. Create 2 filesets A and B 2. In Fileset Properties set fileset A's Installation Priority to Highest, and fileset B's to Lowest 3. Select fileset A an click the \[Scripts\] button in Filesets view 4. Create a script under 'Activation Scripts' that will cause a wait 1. e.g. for batch, add a PAUSE 5. Associate filesets A and B with a client 6. Update Model & perform a Verify for client | |
| **98** | FILESET\_REQUIREMENTS\_ARCH\_ERROR | INFO | Requirements not met: architecture | COMPLETED | 1. Create a fileset that allows setting Requirements 2. In Fileset Properties > Requirements, check the box for 'Architecture' and (un)select options that would make fileset fail to install on client 3. Associate fileset to a client 4. Update Model & perform Verify for client | |
| **97** | FILESET\_REQUIREMENTS\_VERSION\_ERROR | INFO | Requirements not met: system version | COMPLETED | 1. Create a fileset that allows setting Requirements 2. In Fileset Properties > Requirements, check the box for 'System Version' or 'Platform' and (un)select options that would make fileset fail to install on client 3. Associate fileset to a client 4. Update Model & perform Verify for client | |
| **96** | FILESET\_REQUIREMENTS\_MEMORY\_ERROR | INFO | Requirements not met: insufficient memory | COMPLETED | 1. Create a fileset that allows setting Requirements 2. In Fileset Properties > Requirements, check the box for 'Min. Memory' and set the minimum memory (in MB) to greater than the total memory for a client 3. Associate fileset to a client 4. Update Model & perform Verify for client | |
| **95** | FILESET\_REQUIREMENTS\_SCRIPT\_ERROR | INFO | Requirements not met: script | COMPLETED | 1. Create a fileset that allows adding Scripts 2. Click the Scripts button and Create a script under 'Requirement Scripts' 3. Have the script exit with a failure (exit 1) 4. Associate fileset to a client 5. Update Model & perform Verify for client | |
| **666** | FILESET\_REMOTE\_WIPE\_EXECUTED | ACTIVITY | Remote wipe executed | REMAINING | ||
| **-5** | WAITING\_FOR\_BOOSTER\_RESULT | ACTIVITY | Waiting for booster | REMAINING | ||
| **-32** | NETWORK\_GENERIC\_ERROR | WARNING | Network error | ERROR | ||
| **-149** | FAILED\_CRC\_CHECK\_ERROR | ERROR | Failed CRC validation | ERROR | ||
| **101** | MAC\_APP\_STORE\_FATAL\_ERROR | WARNING | Mac App Store license fatal error | ERROR | ||
| **102** | MAC\_APP\_STORE\_LICENSE\_ASSOCIATED | IGNORE | Mac App Store license associated | REMAINING | ||
| **103** | MAC\_APP\_STORE\_NOT\_ENOUGH\_LICENSES | WARNING | Not enough Mac App Store VPP license | WARNING | ||
| **104** | MAC\_APP\_STORE\_VPP\_USER\_NOT\_ASSOCIATED | WARNING | User needs to accept the invite to the organization with a valid iTunes account | REMAINING | ||
| **105** | MAC\_APP\_STORE\_NO\_LICENSE\_NEEDED | WARNING | No VPP license associated to this fileset | REMAINING | ||
| **106** | MAC\_APP\_STORE\_NO\_VPP\_USER | WARNING | No VPP user for this application's VPP token associated to the device | WARNING | ||
| **107** | MAC\_APP\_STORE\_VPP\_USER\_RETIRED | WARNING | VPP user is retired | WARNING | ||
| **108** | MAC\_APP\_STORE\_NO\_VPP\_TOKEN | WARNING | No VPP token associated to this fileset | WARNING | ||
| **109** | MAC\_APP\_STORE\_INSTALLED | OK | Installed via Mac App Store | COMPLETED | ||
| **110** | MAC\_APP\_STORE\_INSTALLING | ACTIVITY | Installing via Mac App Store (can take some time) | REMAINING | ||
| **111** | MAC\_APP\_STORE\_ASSET\_NO\_DEVICE\_ASSIGNABLE | WARNING | VPP license for asset can not be assigned to a device | WARNING | ||
| **112** | MAC\_APP\_STORE\_NOT\_VPP\_APP | WARNING | Not a VPP application Fileset Error | WARNING | Note: Only have seen 'Fileset Error' | |
| **130** | DEPENDENCIES\_DOWNLOAD\_FAILED | WARNING | Download of dependency fileset failure | ERROR | 1. Create 2 Empty filesets, A & B 2. Make B a dependency of A 3. Set the Requirements on B such that it will fail 4. Associate A with a client 5. Update Model & perform Verify for client | |
| **131** | DEPENDENCIES\_ACTIVATION\_FAILED | WARNING | Activation of dependency fileset failure | ERROR | ||
| **132** | DEPENDENCIES\_PASSIVE\_FAILED | WARNING | Failed to make dependencies passive | WARNING | Note: Only have seen 'Fileset Error' | |
| **133** | DEPENDENCIES\_DELETE\_FAILED | WARNING | Failed to delete dependencies | WARNING | Note: Only have seen 'Fileset Error' | |
| **134** | DEPENDENCIES\_UPDATE\_FAILED | WARNING | Update of dependency fileset failure | ERROR | ||
| **135** | DEPENDENCIES\_LOGOUT\_FAILED | ACTIVITY | Waiting for user to log out to install dependency | REMAINING | ||
| **136** | DEPENDENCIES\_FAILED | WARNING | Dependency fileset failed | WARNING | ||
| **210** | FILESET\_REQUIREMENTS\_OK\_SKIP\_INSTALL | OK | Skipped | COMPLETED | ||
| **220** | FILESET\_REQUIREMENTS\_ERROR\_STOP\_TRYING | INFO | Requirements not met: will not retry | COMPLETED | ||
| **1024** | CHECK\_REQUIREMENTS\_OK | ACTIVITY | Requirements met | REMAINING | ||
| **2048** | STATUS\_FILESET\_INSTALLED\_BY\_PROFILES\_COMMAND | OK | Installed | COMPLETED | ||
| **2049** | STATUS\_FILESET\_INSTALLED\_BY\_MDM\_SERVER | OK | Handled via MDM | COMPLETED | ||
| **2050** | STATUS\_FILESET\_FAILED\_TO\_INSTALL\_BY\_PROFILES\_COMMAND | ERROR | Profile Installation Failure | ERROR |
Note, just because a vendor has provided an uninstaller, does not necessarily mean it is a full uninstaller and some files may still be left behind.
FileWave has a couple of ways that these could be dealt with, once identified. ##### Script A script could be created to run removal commands against each of these files or folders ##### Fileset Files An additional Fileset could be built to include these extra files and would be set as download if missing. Download if missing does not overwrite files if they exist (even if they differ), but will remove files on dissociation. #### Windows MSI, EXE and registry. MSI have the potential to removal files based upon the MSI identifier. MSI specific Filesets may use the tick box in the Fileset properties to trigger the uninstaller when disassociated; 'Use MSI uninstaller'. [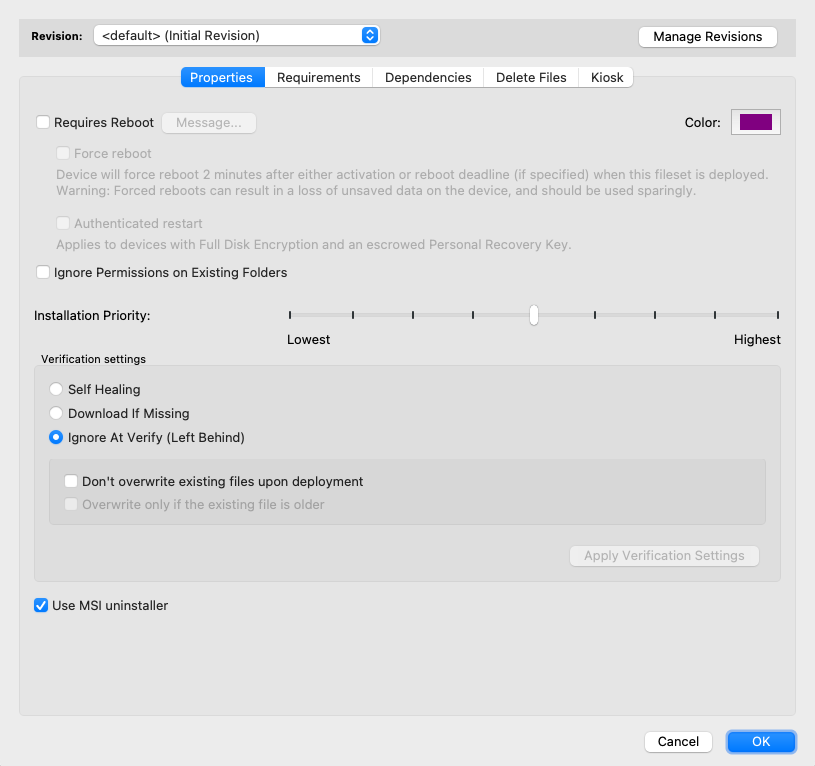](https://kb.filewave.com/uploads/images/gallery/2023-07/OysT2v88N7MTeqN6-image.png)It is possible to create non-MSI Filesets, e.g create a standard Fileset, add the MSI as file and then use a script to instal the MSI. In this case, the Fileset is unaware of the MSI and as such this method would not work.
It is possible to script the removal instead, by way of the uninstall string. The uninstall strings are stored in the register and can be found using the following PowerShell script. The example is set to return installers with FileWave in their name: ``` # Edit the name of the string to search $Display_Name_Search = "FileWave" Get-ChildItem -Path HKLM:\SOFTWARE\Microsoft\Windows\CurrentVersion\Uninstall, HKLM:\SOFTWARE\Wow6432Node\Microsoft\Windows\CurrentVersion\Uninstall | Get-ItemProperty | Where-Object {$_.DisplayName -match $Display_Name_Search } | Select-Object -Property DisplayName, UninstallString ``` The output might look something like: [](https://kb.filewave.com/uploads/images/gallery/2025-07/4E3HHnIDcma4eA9n-image.png) One uninstall string for FileWave Admin and another for FileWave Client. The uninstall string may then be used in a Fileset PowerShell Script. EXE on the other hand, do not have such an option. Again, if not developer supplied, one of the above generic methods would need to be considered. Likewise, registry entries would require a method for removal if required, during a disassociation of the Fileset. #### macOS PKG installers have no built-in uninstaller. In some instances, vendors will supply an uninstaller, but all of the considerations mentioned in the generic section would need to be considered. ### How to Uninstall Not so much how, but when. Many example recipes provide an uninstaller within the Fileset. As such, if the Fileset is disassociated, the uninstaller will trigger. However, this may not be ideal. For example. ##### Problem Imagine you have a self-healing Fileset for the new imaginary web app, EyeBrowse version 1.0. Let's assume, that this adds additional files in the user environment when ran. The following might be actioned: - Identify additional files - Script the removal - Add an uninstaller script within the same Fileset [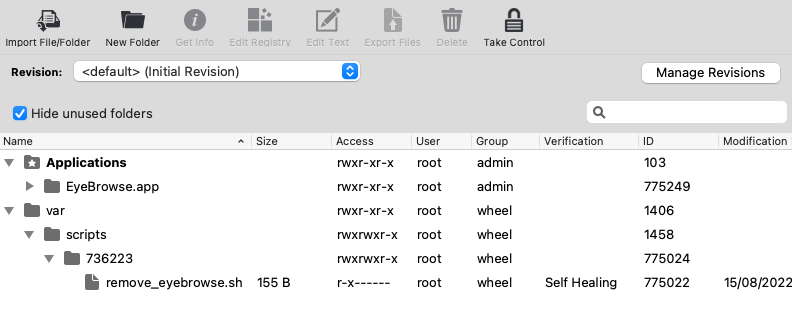](https://kb.filewave.com/uploads/images/gallery/2023-07/GsbUAraReZt3pLXf-image.png) Now consider the release of version 1.2. - Create a new Fileset, revision or duplicate the original - Edit this Fileset for the version 1.2 When transitioning between these two versions, the original Fileset should become disassociated. However, when this occurs, the uninstaller script will run, removing the identified, user specific files. This is likely to be an unwanted outcome, since the user is still using the software, the intention is for them to have a newer version. ##### Resolution What would be better is to create a Fileset Group. The group would require: - The EyeBrowse App Fileset (holding just the installer and any configuration) - The additional user data removal uninstaller Fileset - The Fileset Group is associated to devices ('EyeBrowse Associated') [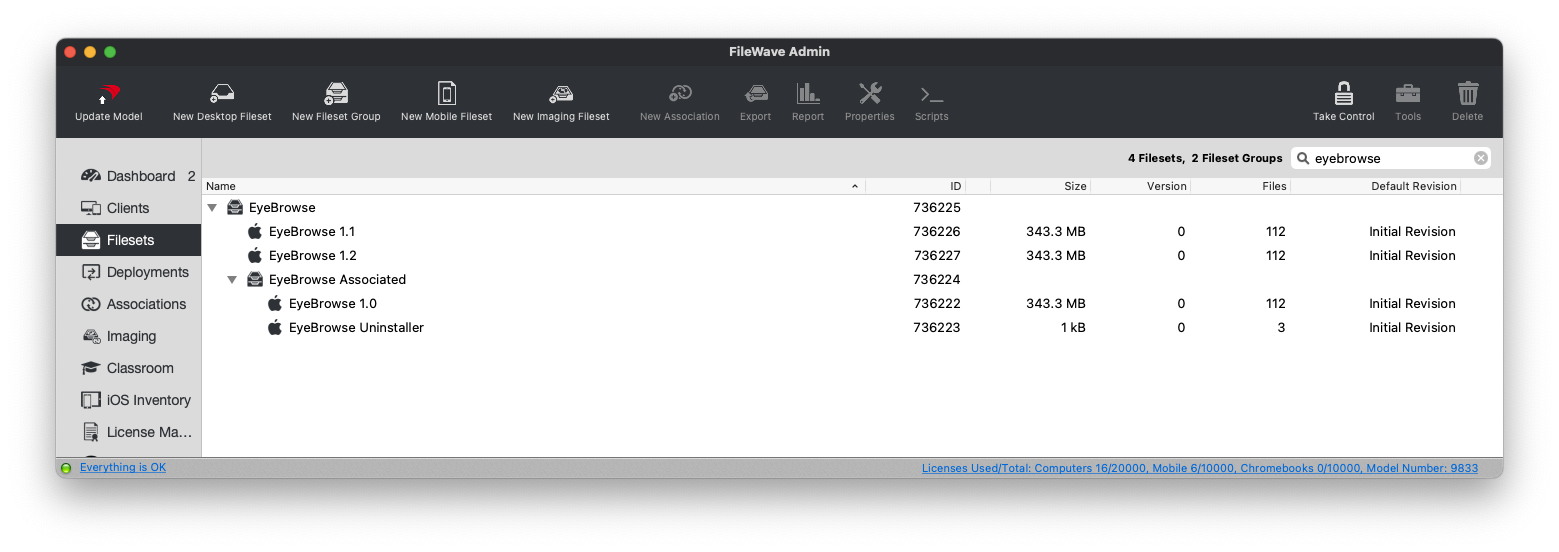](https://kb.filewave.com/uploads/images/gallery/2023-07/Kcx1fpYyYiLeBDf8-image.png) With the above configuration, when changing between version 1.0 to 1.2 of the App, the EyeBrowse App Fileset would be swapped out of the Fileset group or the revision altered. If the App and all associated files needed to be completely removed, at this point the Fileset Group would be disassociated, which in turn would also cause the uninstaller script to run, from the additional, contained Fileset.When downloading recipe Filesets with uninstaller included, consider if it is desirable to separate the installer from this Fileset. If so, consider duplicating the supplied Fileset, placing both into one Fileset Group, and removing the installer from one and the uninstaller from the other.
In some instances, it may be desirable to run the uninstaller on each new update, providing a clean instance. Each Fileset should be considered in its own right.
### Updating Uninstallers Installers are forever changing, with point and major releases being offered frequently. This may of course mean Uninstallers also require updating. For vendor supplied ones, check for newer supplied versions, but for self built methods, these should be checked and updated if need be. Some installers can be downloaded and actioned all in one process. Brew has an example of this: [https://github.com/homebrew/install#uninstall-homebrew](https://github.com/homebrew/install#uninstall-homebrew) For example: ``` NONINTERACTIVE=1 /bin/bash -c "$(curl -fsSL https://raw.githubusercontent.com/Homebrew/install/HEAD/uninstall.sh)" ``` As such, an uninstaller Fileset script could be created, which, in theory, could just include this line. This is both advantageous and also troublesome. #### Pros The uninstaller actioned will aways be the latest version #### Cons If the version currently installed is not the latest version, but one or move versions older, the script may no longer be appropriate #### Consideration If the uninstaller is downloaded at the same time as the installer, then the two should align. A Fileset uninstaller script could be built to contain the contents of this script and as such, should be the correct uninstaller for the active Fileset. With each update, the uninstaller could also be compared.Note, there could still be extra checks. Since FileWave runs as 'System' on Windows and 'root' on macOS, any vendor supplied script should be checked for user specific paths and how these paths are addressed, for example.