Device Actions
Device Actions are all of the "actions" or "commands" that you can execute against an endpoint from the FileWave WebAdmin. Actions are taken from the (...) button in the Devices view, or from the detail view of any particular device.
Having inventory devices is never quite enough. We will frequently want to do something to the devices in the field immediately, and the Actions list is a way to do that. Note that all actions have some degree of pre-requisite...i.e the device might need to be supervised, or a certain command can't work if the device is BYOD user enrolled for instance. Some pre-requisites are accounted for in the UI and those commands won't show if not applicable. For instance, Wipe Device won't show if the device happens to be user enrolled.
- Device Actions Overview
- Clear Activation Lock
- Clear Passcode
- Clear Restrictions Passcode
- Copy to Group
- Edit Device Fields
- Lock Device
- Move to Group
- Performing Actions on Multiple Devices
- Remove from Group
- Remove from System
- Rename
- Restart (Windows)
- Send Verify Command
- NAT Support for Client Monitor/Verify
- Set Tracking Mode
- Wipe Device
- Windows MDM Wipe Command
Device Actions Overview
What
Device Actions are the commands you can send to a device from FileWave WebAdmin. Open the three-dot menu in the Devices view, or open the device details page, to see the actions available for that device.
When/Why
Use Device Actions when you need to do something on a managed device right away, such as locking it, sending Verify, or clearing supported settings. The available actions depend on the device and its management state. For example, some actions require supervision, and others are hidden when they do not apply. A user-enrolled device, for example, will not show Wipe Device.
How
In Devices, click the three-dot menu next to the device, or open the device details page and use the same menu.

Clear Activation Lock
What
The Clear Activation Lock command removes an Activation Lock that has been imposed on a device through the use of an AppleID and the FindMy options.
When/Why
There are two main instances when you'll use this command...while erasing a device, Clear Activation Lock is an option of the Wipe Device command and can also be done as a direct command from the device actions menu:

How
To clear an Activation Lock from a device, select Clear> Clear Activation Lock

You can also configure Activation lock in the DEP profile.
Clear Passcode
What
The Clear Passcode command is used to remove the current passcode that is assigned to a device. (Will not show unless a passcode is set on the device in question)
When/Why
You can use this command clear that passcode (if set). Particularly useful when the user "forgot" the passcode.
How
Use the ellipsis ( ) to the right of the device in the View - Devices and select "Clear Passcode"
Clear Restrictions Passcode
What
The Clear Restrictions Passcode command removes a passcode that was set to prevent restrictions from being changed. A restrictions passcode must already be set on the device for this command to appear in FileWave Anywhere.
You can also deploy an Apple Profile that prevents a restrictions passcode from being set.
When/Why
Use this command when a restrictions passcode was set and is unknown or forgotten. The device must be managed in a way that supports this command; for example, it cannot be sent to a User Enrollment BYOD device.
How
In FileWave Anywhere, go to View - Devices, open the ellipsis (...) menu to the right of the device, and select Clear Restrictions Passcode.
Copy to Group
What
A device can have many clones/alias/copies in many groups
When/Why
Use this function to place a clone/alias/copy into many groups
How
Use the ellipsis (...) to the right of the device in the View - Devices and select "Copy to Group(s)"
Edit Device Fields
What
A device record can include both built-in inventory fields and custom fields.
When/Why
Use this option when you need to update fields for one device. For bulk changes, use the Upload Devices and/or Data workflow instead.
For changing many devices at once, see Upload Devices and/or Data.
How
- In View - Devices, use the ellipsis () to the right of the device and select "Edit Device Fields".
- In the Edit Device Fields window, add, edit, or delete field values as needed.
- Select "Save" when you are done.

Lock Device
What
You can use Lock device in FileWave Anywhere to remotely lock a managed iOS device. If the device already has a passcode, that same passcode is still required to unlock it. If no passcode exists, the device can be unlocked without one.
When/Why
Use this action when you need to lock a device immediately or confirm that the device can receive MDM commands.
How
In View - Devices, click the three-dot menu to the right of the device and select "Lock device".

Move to Group
What
The Move to Group command is similar to the Copy to Group command, but Move to Group will move the current object rather than copy it. This also means that the selected object must be capable of being moved. For instance, a copy in a smart group can be copied, but it can't be moved.
When/Why
This command can be used with both Groups and devices and allows the move of objects (and their children). It is a very useful command, especially when reorganizing. Always remember though that you have to be very careful about unintended deployment related complications from using move. (That is, devices could lose or gain software inadvertently.)
How
Use the ellipsis () to the right of the device in the View - Devices and select "Move to Group..."

Performing Actions on Multiple Devices
What
We are pleased to announce that in version 14.5+ of the FileWave WebAdmin console, you can now perform "Actions" on multiple devices at a time.
When/Why
When managing a large environment, it is a frequent occurrence to want to make the same change to multiple devices at one time. Version 14.5+ of the WebAdmin console now gives you the ability to perform like-actions on multiple devices at the same time. This is especially important when we want to do something like erase multiple iOS devices, or maybe bulk-change a custom field.
How
It is very simple to use this feature. In the Devices view, simply choose multiple devices by selecting the checkboxes in the tree-view as shown:

Then, when you select the Action menu, and possible bulk actions will be shown:

Note that you will only see Actions that are available for the types of devices chosen. In the above case, because we have two iPads chosen, we see elements available for iPads, such as Wipe and Restart. If we were to mix client types though (such as Windows devices), the list of actions would not show either of those iPad-specific options.
Remove from Group
What
Use "Remove from Group" when you want to remove one copy of a device from a manual group without deleting the device from FileWave.
When/Why
This is useful when a device no longer belongs in a specific manual group, or when that group should stop applying deployments to that copy. The device record remains in FileWave, other copies of the same device remain unchanged, and inventory data is preserved.
If the group copy was receiving content through a deployment, removing the copy from the group also removes that group-based deployment path for the device. Use "Remove from system" only when you intend to delete the device record from FileWave.
How
Select a device copy in a manual group, open the (...) action menu, and choose "Remove from Group":

Remove from System
What
The "Remove from System" command is what you might remember from the native FileWave admin as "Delete", and it has the same consequences. But, in the native admin Delete was the same for the original object and the copies, even though the result was different. The WebAdmin has split this into two commands to help clarify.
When/Why
The "Remove from System" command entirely (and destructively) removes a device and all of its copies from the system. Any payloads through deployments will be lost, and all inventory from this object will be removed from the system. In the case of an MDM-enrolled device, the deletion acts as an unenroll and can not be reversed. The model has to be updated in order to fully remove the device from the system.
An un-enrol will be triggered, only if the following FileWave Central preference is enabled:
Preferences > Mobile > 'Remove MDM profile from devices removed from FileWave model'
This preference will send a command to remove the enrolment profile, which should be honored by devices, even if the enrolment profile is configured to be non-removable in DEP settings.
For client devices, they will check in again as long as a client remains installed but has to be onboarded again.
Note; Remove from System is a destructive command, and should only be done when you are certain.
How
To perform this action, choose "Remove from System" from the Device action menu (...) and Update Model when finished.

Rename
What
The "Rename" command as the name implies is a command for renaming a device. The behavior of this command varies widely based on the OS of the device and other factors.
When/Why
In its simplest form, this command (<iOS 12 with no naming restrictions or iOS 13+ with or without restrictions) will send an MDM command to rename the device itself, and rename the record for the device within FileWave. If a computer client, or an iOS device with renaming restrictions, is the recipient of the command then the device itself will NOT be renamed, but the record within FileWave will have the name updated to reflect the chosen name. (This isn't highly recommended though as it can become confusing to support)
Renaming devices in FileWave can be complex and have unintended consequences. Before any mass-updating of device names, we suggest you check your plan with our Service Desk folks to ensure the plan is solid.
How
To send the Rename command, choose "Rename" from the Device Action menu (...):

Note that there is a followup prompt to choose the device name you would like:

Restart (Windows)
What
Starting from FileWave version 14.7+ we added support for remotely rebooting a Windows system from both the Web and Native administrators.
When/Why
As an IT administrator, a remote reboot is sometimes required to address a problem or complete an installation.
How
This new action can be performed from both the Web and Native admin interfaces.
There is no "confirm" dialog when issuing the restart command. Choosing the command directly executes the restart action.
FileWave Central
In the Native admin there is a Restart Windows Devices command that can be seen when right-clicking one or multiple devices as shown here:

FileWave Anywhere
In the Web Admin there is a Device Action seen when viewing the details of a device:

And, from the devices view, you can also select multiple devices as shown and then Restart several at once:

After issuing the reboot command a dialog will be seen by any logged-in user that will look similar to the first dialog below. Note that the below images are from Windows 11, and this will look slightly different on Windows 10.

.
3 minutes after the first dialog appears another dialog will display similar to the below dialog. After this second warning has shown indicating that a device reboot is 2 minutes away the Windows system will reboot 2 minutes later.

.
Send Verify Command
What
The Send Verify command is one of the most frequently used commands because it is such an excellent way to find out "Is stuff working?"
When/Why
This command sends a series of inventory requests to the device in question. Basically we are asking the device "Tell me all about yourself". It is exceptionally useful to measure the speed of MDM command processing, and brings all device information up to date. What actual inventory commands are sent though are defined by the type of device and type of device enrollment.
How
We can execute the "Send Verify" command from the Device action menu (...) and from the device detail views ( ):
):

Note that we can watch the progress of this (and other) MDM commands from the Device Detail View Command History tab.
Related Content
NAT Support for Client Monitor/Verify
What
FileWave can send a Verify command to managed devices even when the admin workstation does not have direct network line-of-sight to the client. This is useful for remote devices behind NAT, at home, or on networks where the admin console cannot directly reach the device.
When/Why
Use Verify when testing a new payload or Fileset, troubleshooting check-in behavior, or prompting a remote client to re-evaluate assigned content. Historically, Client Monitor workflows depended on direct network reachability. Current FileWave workflows provide a remote-friendly path from FileWave Anywhere, and the 16.0+ Client Monitor adds broader NAT-compatible monitoring.
How
From the Devices pane in FileWave Anywhere, open the device action menu and choose Send verify command for a single device:
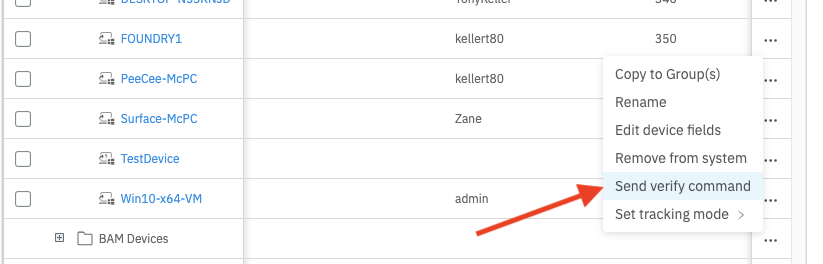
You can also select multiple devices and send the same Verify command to the selected devices:

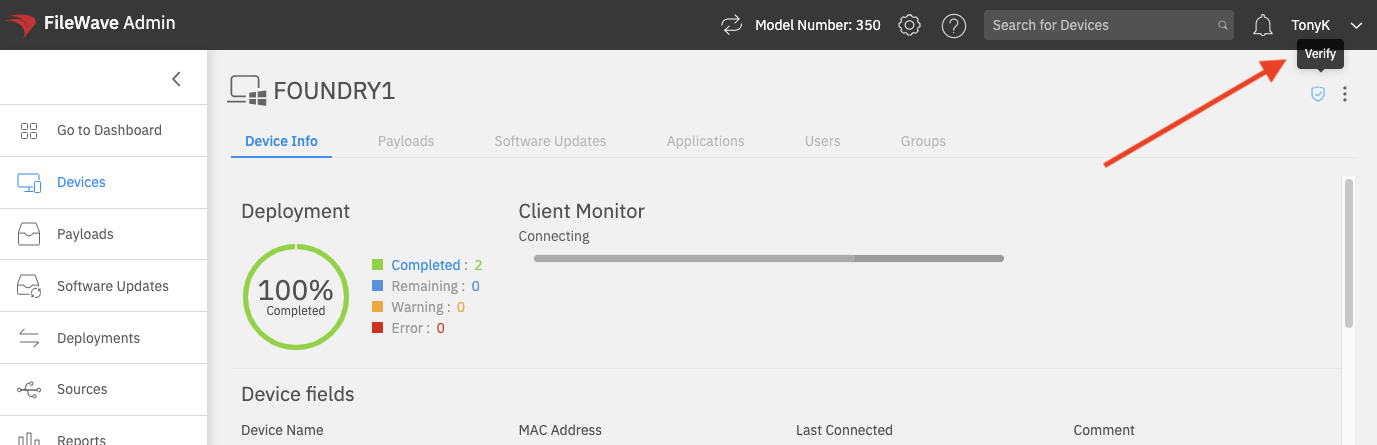
From an individual device page, use the Verify action in the device toolbar:
Client Monitor includes additional troubleshooting tools beyond the Verify workflow shown here. For the current 16.0+ Client Monitor behavior, including NAT-compatible monitoring through the newer connection model, see the related Client Monitor article.
Related Content
Set Tracking Mode
What
Tracking Mode controls whether FileWave requests location information from a managed device. Location availability depends on the device platform, enrollment type, operating-system privacy controls, and user choices on the device, so results can vary.
When/Why
Some organizations use tracking for ongoing device-location visibility, but the most common practical use is Missing mode for supervised iOS and iPadOS devices that have been misplaced. FileWave Missing mode uses Apple's Lost Mode functionality to lock the device and help locate it.
How
From the device actions menu, choose Set tracking mode, then select one of these modes:
- Untracked: The default mode. FileWave does not request ongoing location data.
- Tracked: FileWave performs occasional location lookups when the platform and device settings allow it.
- Missing: FileWave places supported supervised Apple devices into Missing/Lost Mode.

Location data is treated as personally identifying information by operating systems and may require specific permissions, supervision, enrollment types, and end-user consent. Review Location Tracking Setup before relying on tracking for a workflow.
When FileWave receives location data from the device, the device appears on the map in the Location tab of Device Detail.
Wipe Device
What
The command name of "Wipe Device" is probably warning enough, but this command is a destructive command to erase the current device. In v14 of the WebAdmin, this command is restricted to iOS devices.
When/Why
With iOS devices, the Wipe command is the equivalent of being local to the device and clicking on the Erase all Contents and Settings command. This command is frequently used whenever you want to erase and re-enroll a device in FileWave MDM.
As stated above, the Wipe Device command is a destructive command.
How
To execute the command, simply choose "Wipe Device" from the Device Action command (...):

Note that there is a subsequent dialog to choose options:

Remove Activation Lock is particularly important so that if an Activation Lock exists it will be removed during wipe...otherwise you are left with a device prompting for AppleID credentials.
Activation Lock properties can now be set in DEP profiles to control when/if Activation Lock can be used.
Related Content
Windows MDM Wipe Command
What
FileWave Anywhere can send a Wipe command to Windows devices that are enrolled through Windows MDM. Windows MDM is separate from a standard FileWave Client (fwcld) enrollment; for enrollment context, see Manually enrolling a device into FileWave Windows MDM.
When/Why
Use the device action menu when you need to wipe an MDM-enrolled Windows device.
The Wipe option is visible only for Windows devices that are enrolled through Windows MDM.
How
- Select the Windows device.
- Open the ellipsis action menu.
- Choose Wipe.

