OS filters, group selection, and manual filters combine. If the results look too narrow, check all three places before assuming a device is missing.
## How Select a group on the left to show only items in that group. Add an OS filter to narrow by platform, then use a manual filter to narrow the visible results further. # Adding Devices ## What This page shows devices awaiting enrollment and lets you create placeholders. You can also specify [Actions](#bkmrk-actions), such as which group to add devices to, which fields to set, and what should happen after import. ## When/Why Use this dialog when automatic import is not enabled for new clients, or when you want to create placeholders for devices that do not exist in FileWave yet. For example, you can create a placeholder for a Windows device before imaging it, or assign content ahead of enrollment so the device receives it as soon as it checks in. Use the Plus and Upload icons in the Devices view to add devices:  ## How From the devices view press the plus () to enter the UI on the [Selected Devices](#bkmrk-selected-devices) screen. See articles listed below to get details on the individual tabs within the dialog. ### ActionsFields, destinations, and other actions to take once a devices is brought in
"Actions" is where you can set data for inventory fields, manually assign a DEP profile, and set destinations for the imported devices/copies (aka "clones") after a device has been enrolled. You would use the import actions listed above typically only when you don't have "automatic" import turned on. These actions are only preformed after everything has been saved. #### How 1. Select the action dropdown and choose one of the following: 1. Assign Field Value - *Allows you to set inventory values fields* 1. Then select a Device Field (like "Comment") 2. Then Select a Value for that field (like "Front Desk Checkin Station") 3. (Optional for string/text fields) Select "Replace" (overwrite any value the device currently has), or "Append" (add your text to the end of the value) 2. Import/Move to group - *Specify the group where the original device will go* 1. Then select the group you want the original sent to 3. Create Copies in Group(s) - *Specify where clones/alias/copies of the original will be created* 1. Then select **any** groups you want copies created in 4. Copy in the same group - *Copy your incoming devices to that of an already existing device (i.e. mirror its groups)* 1. Then select an existing placeholder or device 5. Associate DEP Profile - *Manually assign a specific DEP profile for this device* 1. Then select the specific DEP profile 2. If you need more than one action taken, press "Add Action" and start from 1 againAssign Field Value can be added many times. The other Actions can only be selected once.
If you select "Import/Move to group" you can't also select "Copy in the Same Group". Similarly, if you select "Copy in the Same Group" you can't select "Import/Move to group"
### Add Placeholder A placeholder is a temporary item that represents a device you intend to enroll at a later date. You can use placeholders for a device that you will be adding eventually. Placeholders allow you to specify the connections from payloads to the device through deployments so that when a device is ultimately enrolled, it will immediately get all assigned content. #### How 1. From the [Selected Devices](#bkmrk-selected-devices) interface, press the "Add placeholder" button 2. Enter text into the fields - Name (required) - Comment (optional) - Platform (required) - Serial / MAC (Serial number for Apple devices, MAC address for Windows devices) 3. Press "Add Placeholder" #### Related Content - [Upload Devices and/or Data](https://kb.filewave.com/books/filewave-anywhere-help-menus/page/upload-devices-andor-data "Upload Devices and/or Data") - [Importing Computer Clients from a File](https://kb.filewave.com/books/filewave-client/page/importing-computer-clients-from-a-file "Importing Computer Clients from a File") #### Digging Deeper - Keep in mind that you can also create a clone by doing a [Copy to Group](https://kb.filewave.com/books/filewave-anywhere-help-menus/page/copy-to-group "Copy to Group") thereby creating many instances of your original. These groups can also have associations/deployments on them. Use this to create a layered structure. ### Selected DevicesThese are devices pending enrollment. They can be devices checking-in with a client already installed or from a service such as Apple DEP/ Android EMM
Shows a list of pending devices that are either clients checking-in or devices in your pending DEP/EMM list. You will select devices from the list for import whenever you are ready for them to be a part of the managed environment. You do not have to import all devices that show in this list (you can pick and choose individuals). #### How Once you have started the Adding Devices process, Select Devices is the first tab showing what can be added. 1. From the **Pending Requests** section you can select devices or DEP/EMM placeholders for import 2. Select the checkbox to the left of each device you wish to include 3. Press the Move to Selected Devices button 4. (Observe) that device moves to the lower list 5. (Optional) [Add Placeholder](#bkmrk-add-placeholder) devices 6. Select "Next" to move onto [Actions](#bkmrk-actions) ### SummaryPreview the results of your changes
The summary tab view will show a preview of the action you are about to perform.Some views, Like the Summary in Mass import [Upload Devices and/or Data](https://kb.filewave.com/books/filewave-anywhere-help-menus/page/upload-devices-andor-data "Upload Devices and/or Data") will have check boxes for confirmation of changes.
Use this view to verify what you want to happen. #### How - If everything look correct, hit "Save" - If there are issues select "Back" and change them - If you want to stop the process, or perhaps start over, select "Cancel" 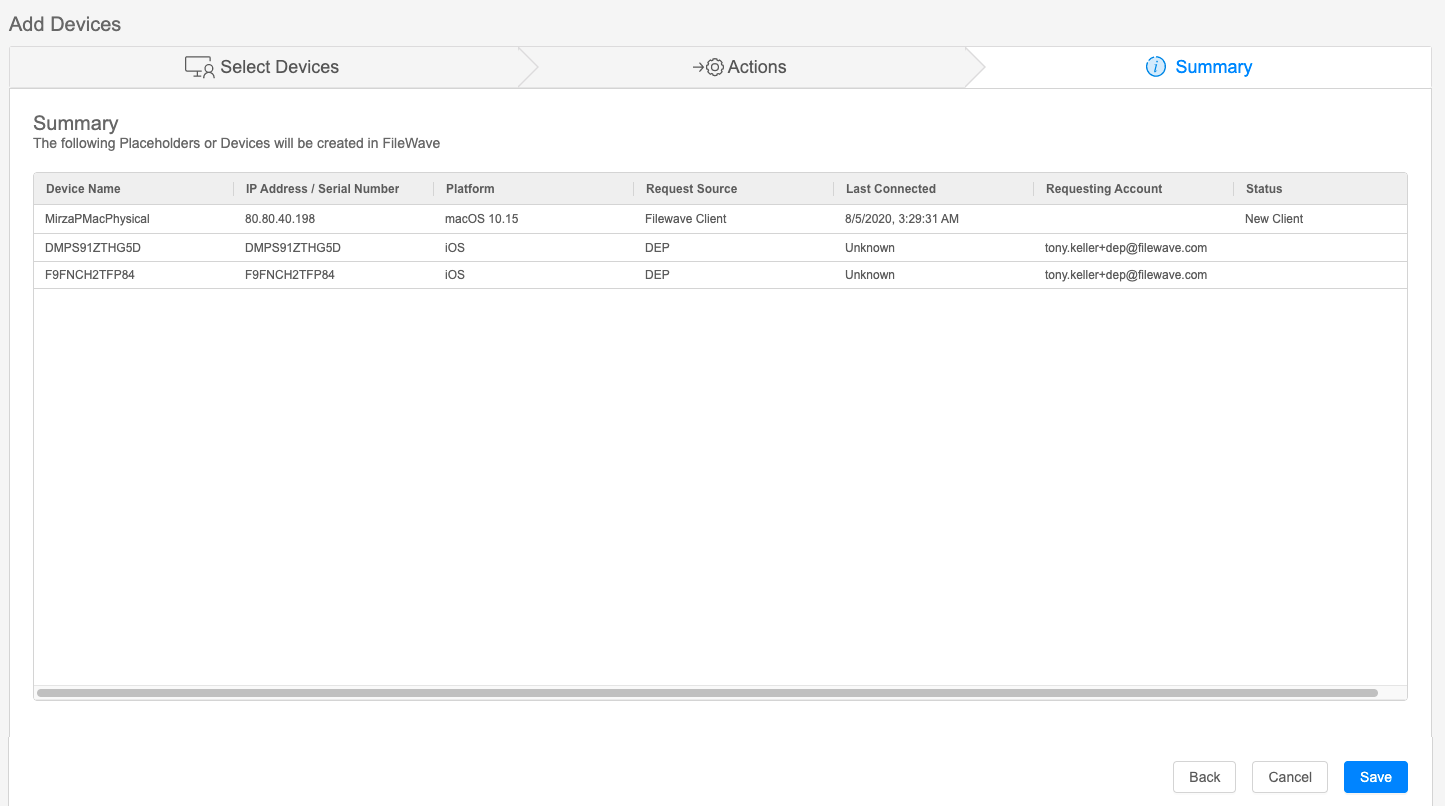 # Upload Devices and/or Data ## WhatMass import devices or inventory data from a CSV or TXT file
The upload option () lets you import device placeholders or update inventory fields for many devices at once. During import, FileWave Anywhere lets you map columns from the uploaded file to FileWave fields and choose additional import actions. ## When/Why Use this workflow when you need to create many placeholders at once or update field data across many devices. For example, if an asset-management export maps device serial numbers to physical asset tags, you can import that data into FileWave instead of updating each device manually. ## How 1. Open [View - Devices](https://kb.filewave.com/books/filewave-anywhere-help-menus/chapter/view-devices "View - Devices"). 2. Click the upload icon.  1. The [Import File](#bkmrk-import-file-tool) tool opens. 2. Select your TXT or CSV file and continue to [Map Fields](#bkmrk-map-fields). 3. In **Map Fields**, match the columns from your file to FileWave fields. 4. In **Actions**, choose any additional import options that apply. ### Import File tool The Import File tool imports a large amount of data from a CSV or TXT source. - A hardware vendor might provide a spreadsheet for 100 incoming laptops with MAC addresses and asset-tag values. Importing placeholders lets you prepare those devices before they arrive. - Your property-management team might provide a spreadsheet that links existing device serial numbers to physical asset tags. Importing that file updates the matching FileWave inventory fields for quick reference. #### How To import a file: - Create a CSV or TXT file with a header row followed by one row for each device. ``` "Serial Number","OS Type","Device Name",comment,location,asset_tag C02WP0hgHTDF,macOS,"HR-John-MBP","John's laptop","north site","123456" ABC456123DEF,iOS,"ThatsABeautClark","no comment","Normal, IL","651241" 215487958754,Windows,"PR-Sal-1258","that other device","south site","654321" ```The columns can be in any order, but a placeholder import must include at least a device name and OS Type. When updating existing devices, include a reliable matching field such as serial number.
- Browse for the file with the Browse button (). - Preview your upload and continue to [Map Fields](#bkmrk-map-fields). ### Map FieldsConnect CSV columns with FileWave inventory fields
Map Fields is where you match each uploaded column heading with the correct FileWave inventory field. #### How 1. Open the field dropdown for a column. 2. Choose the FileWave inventory field that matches the column heading. 3. Continue to the **Actions** tab. # Group Navigation (Devices View) ## What Use the Groups pane on the left side of Devices to move around the device tree and change which devices appear in the list. ## When/Why You will use group navigation constantly in Devices. It is the quickest way to move between locations, departments, smart groups, and other parts of your tree. ## How The group tree reflects however you have organized groups and smart groups in FileWave. Each level is sorted alphabetically, just as it is in FileWave Central. Expand or collapse groups as needed, then select a group to show only that group's devices in the list on the right.Group selection is additive with the other Devices filters. For example, if you first filter for macOS and then select a specific group, the list shows only macOS devices inside that group. The filters do not change the group tree itself, so the pane on the left remains available for navigation.
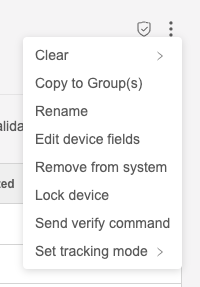
# Individual Device View ## What The individual device view is a detailed level view of all pertinent details about any individual device. The URL for this view is always going to be in the form of https://my.server.address/devices/<fw\_device\_id>/info. This deep url allows you to easily share a link to this specific device with any other administrator. ## When/Why We'll use this view extensively for general data browsing purposes, but especially when we are looking to troubleshoot the behavior of any particular device. ## How The Device Detail view is accessed primarily by clicking on the name of any device showing in the Devices View: 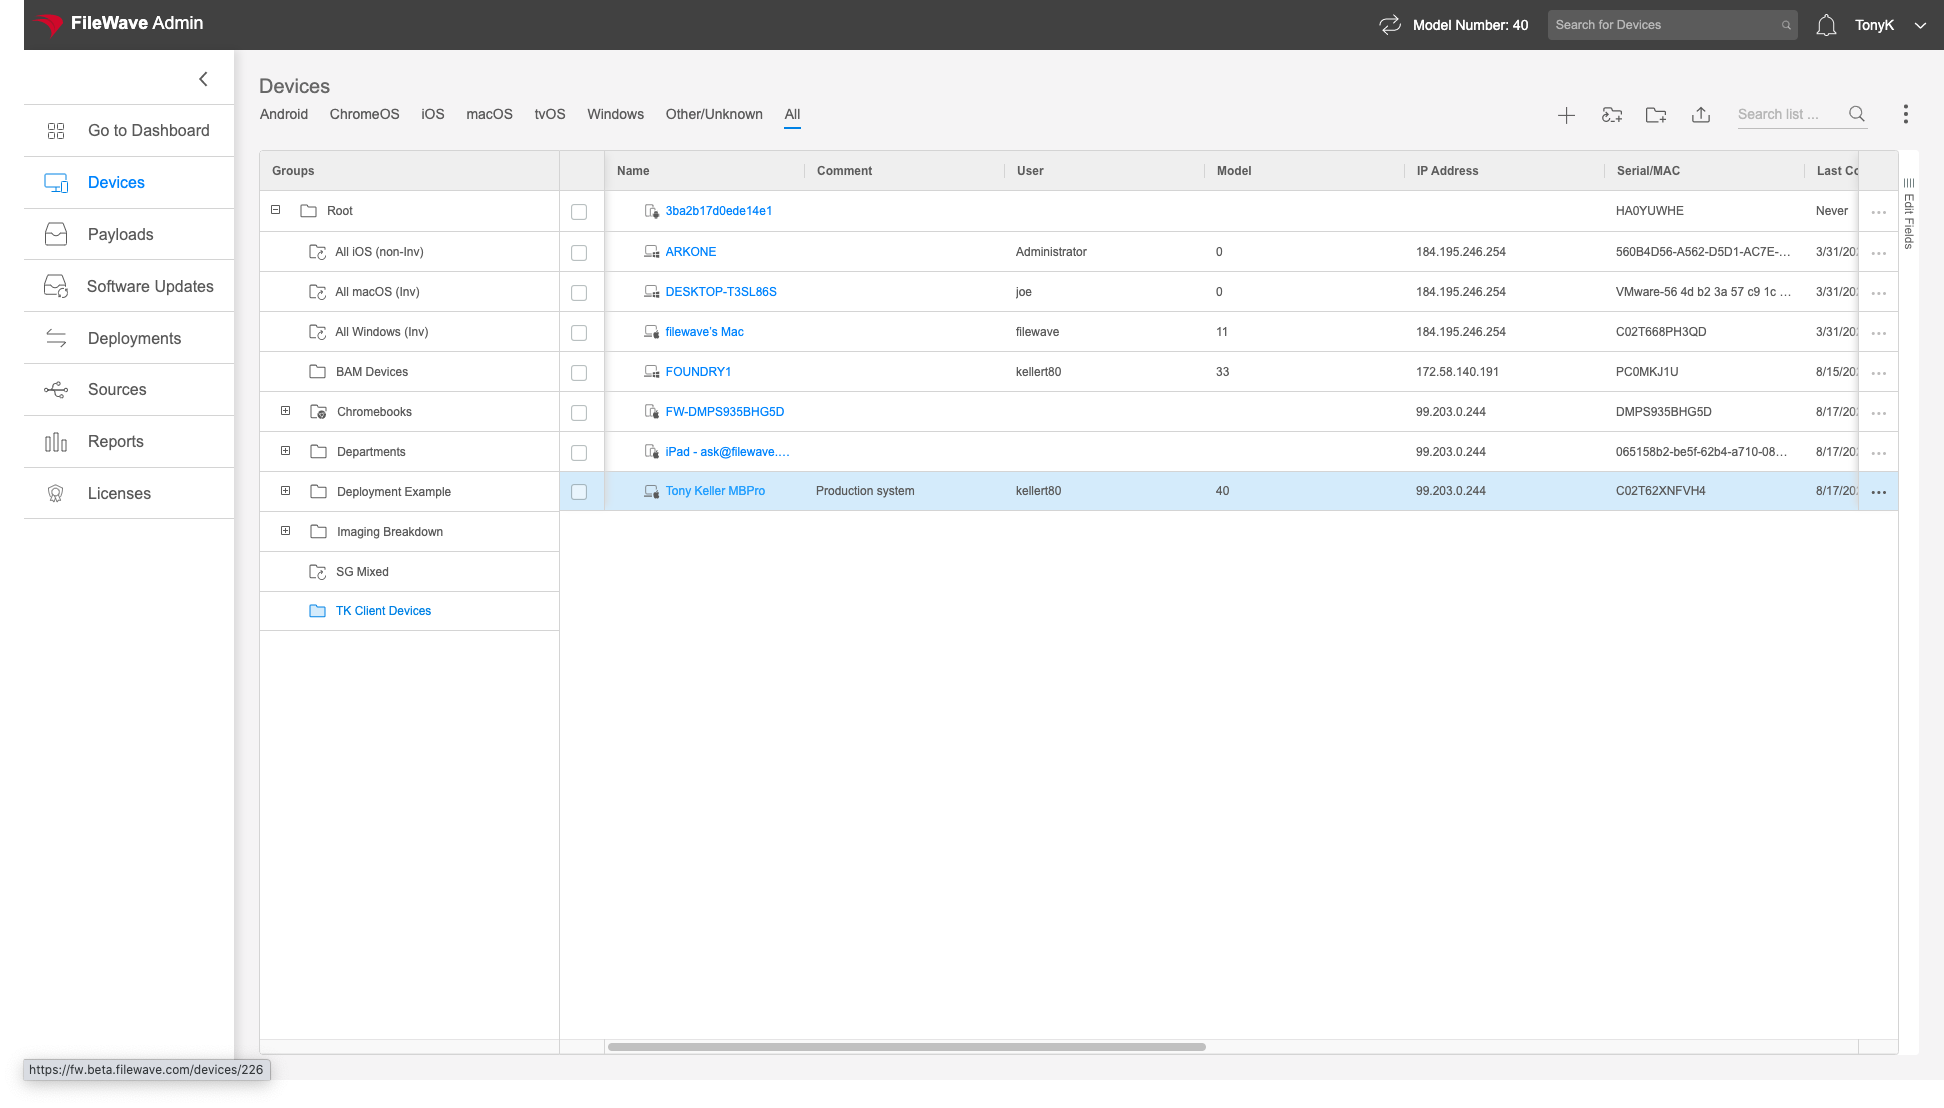 Once you are in the detail view, you'll see tabs that break out all of the data. We'll cover each of the tabs in the articles linked to below 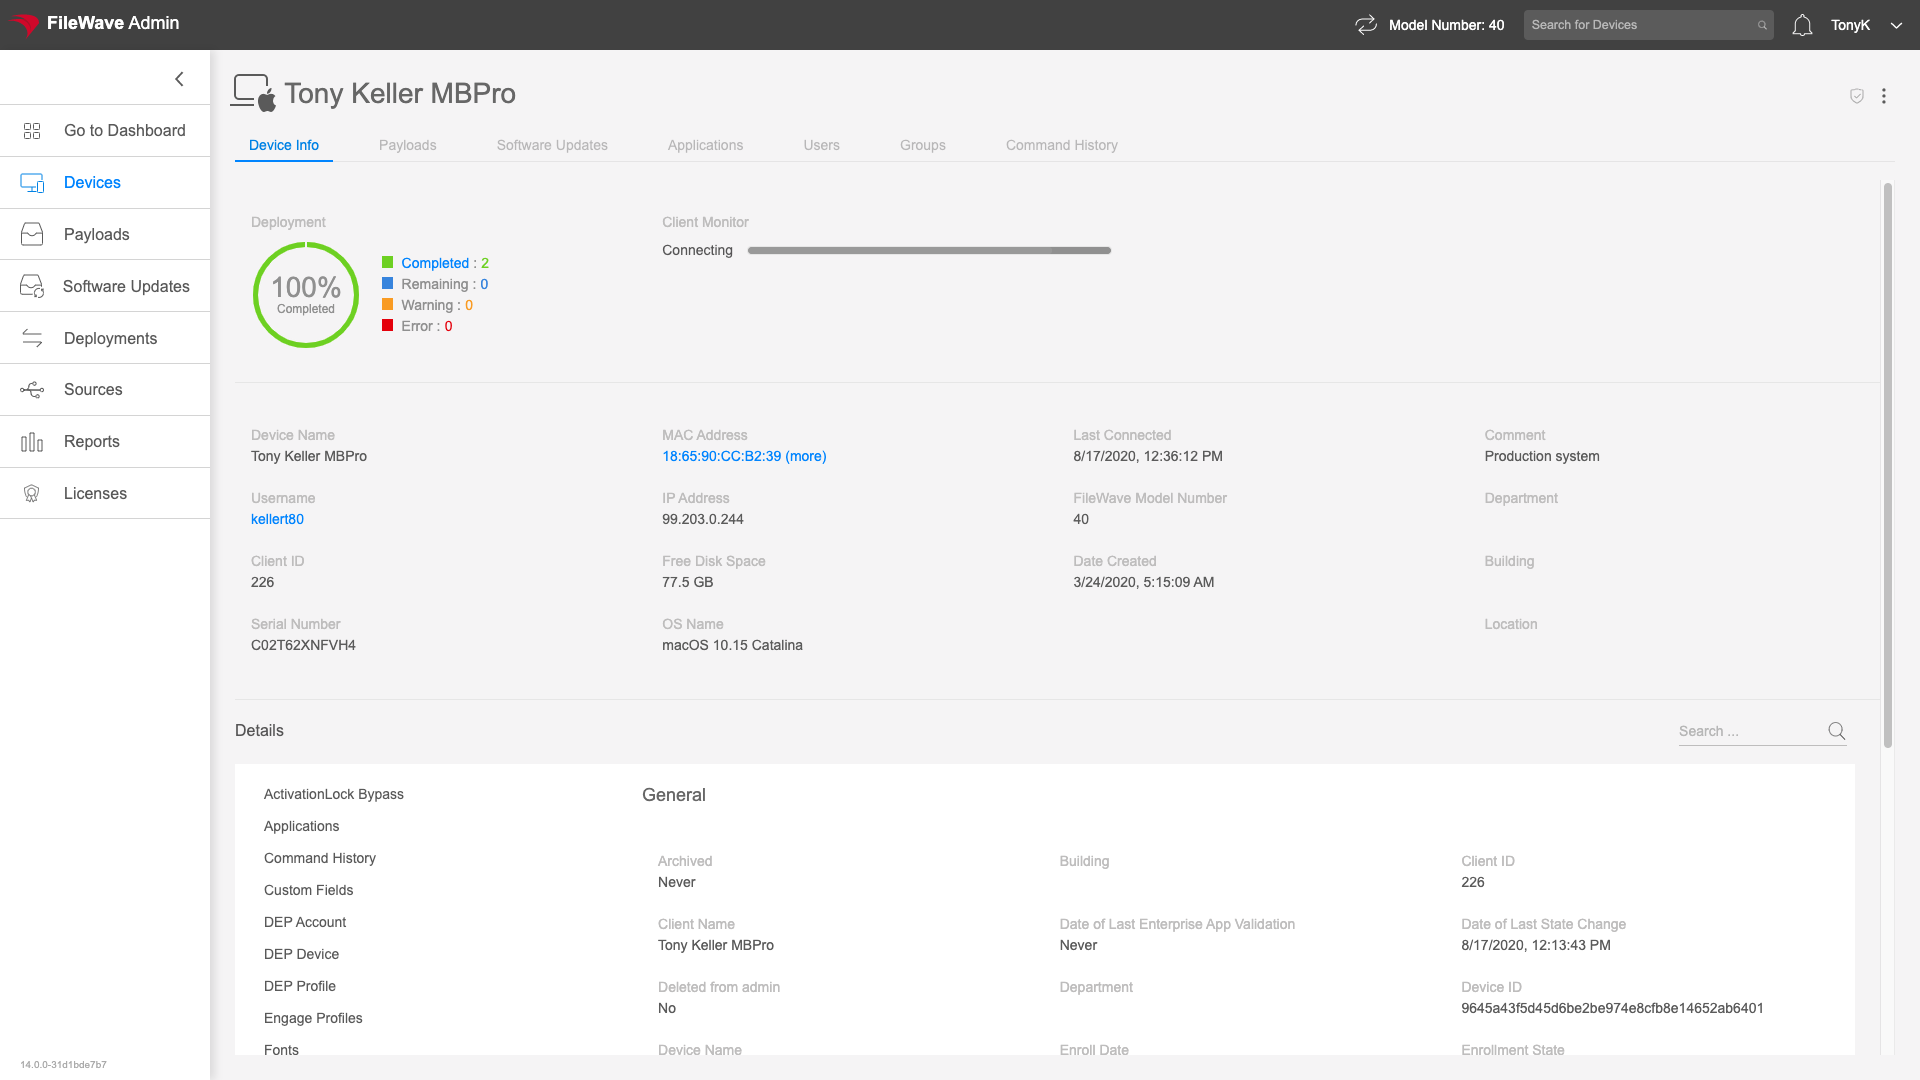You can send pertinent action commands to a device in the device details view from the vertical ellipsis (top-right):
 ### Applications The Applications tab in the Device Detail view gives you a list of applications installed on the particular endpoint. The details provided differ by platform and type of enrollment. The view is directly linkable via https://my.server.address/devices/<fw\_device\_id>/apps This view will gives us details on installed applications, which allows us to quickly look and see information such as what version of a particular application is installed. Note that the data that shows on this tab is only as accurate up until the last time the device reported inventory. Assume that you have a device that has been offline for 3 months in a desk drawer while you are rolling out a new version of Chrome. This view for that device is going to show an old version, as we would expect. #### How We access the Applications tab just by clicking on the tab at the top of the view. This view can be controlled by sorting and pinning columns. The filtering option for this table makes it really easy to isolate records. 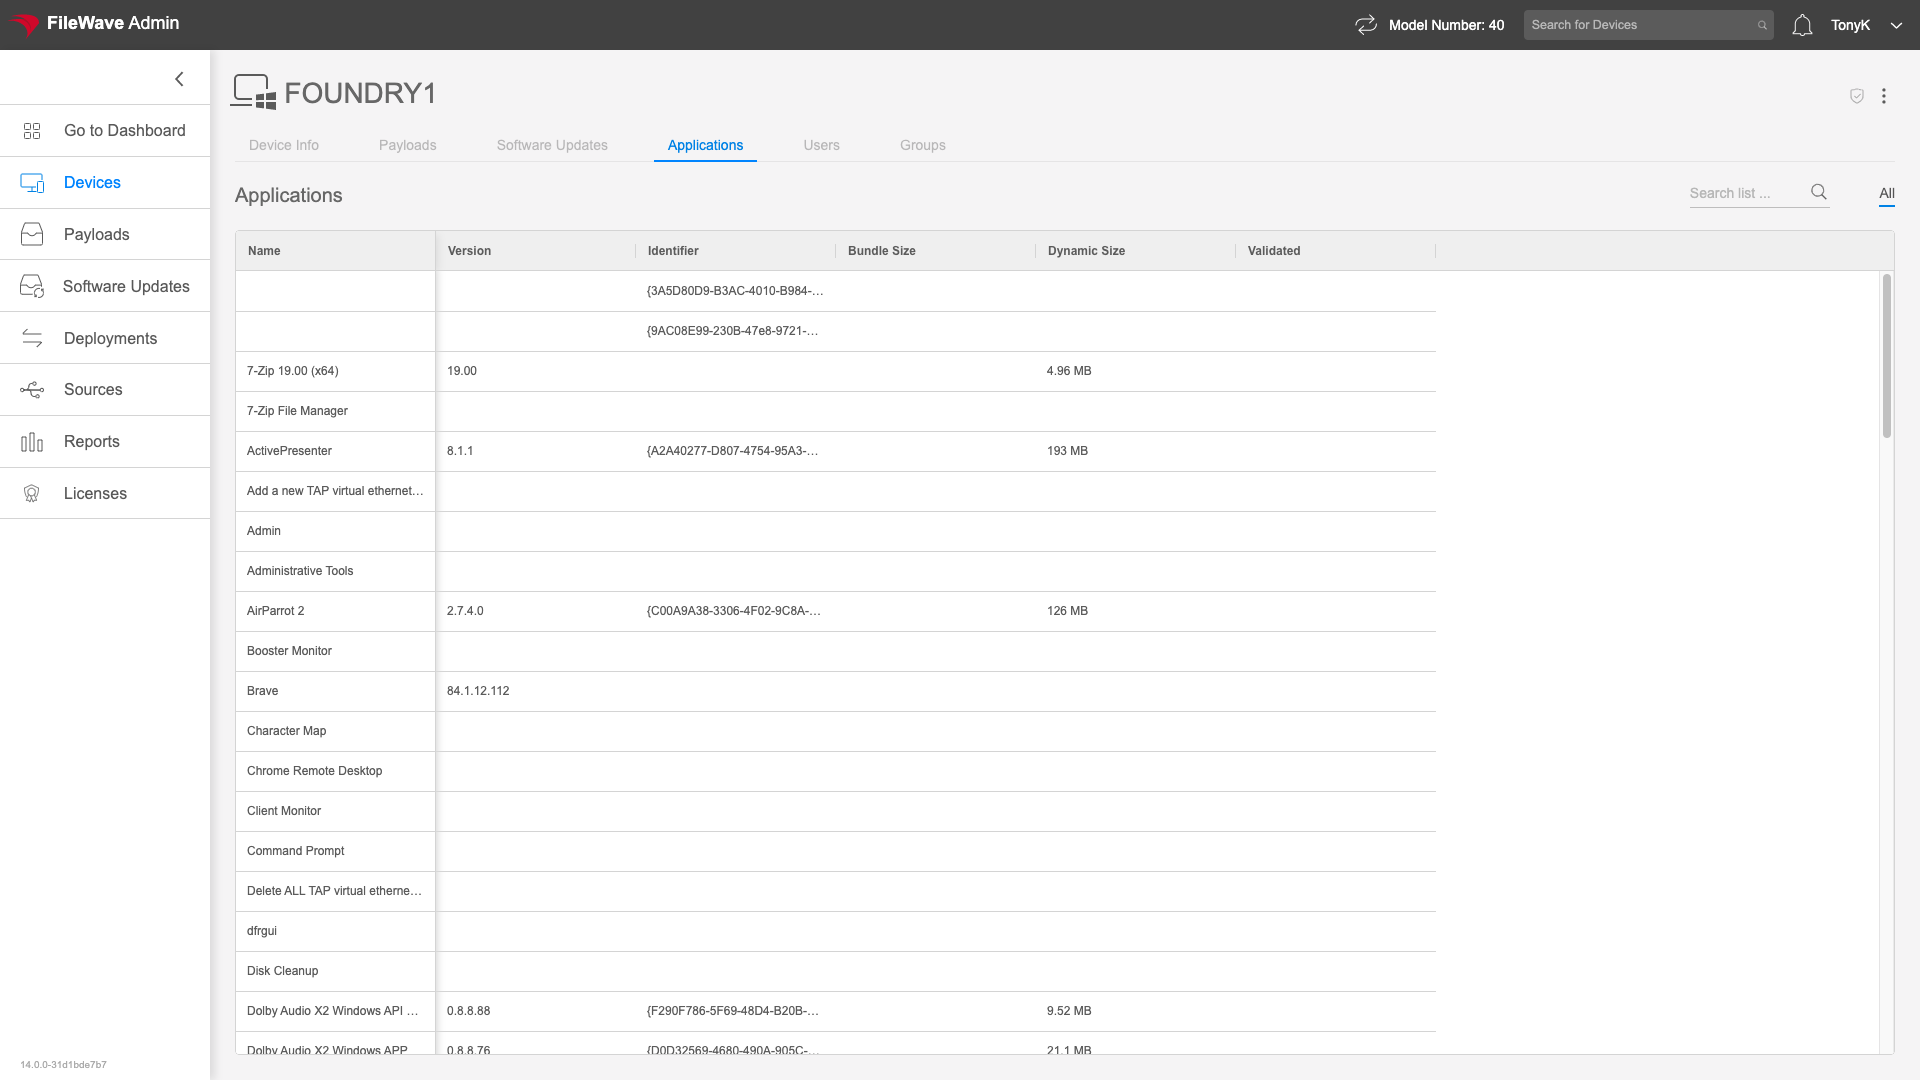 Certain enrollment types (like iOS BYOD enrollment) prevent the inventory of applications beyond the applications that are "managed". That is, with those devices, you can only see what has been installed by FileWave. ### Command History The Command History tab is only shown for devices that are Apple MDM enrolled. This tab shows the recent history of MDM commands that have been sent to this device. Command History is reached at https://my.server.address/devices/<fw\_device\_id>/commands This view is used very heavily whenever troubleshooting anything related to an Apple MDM device. For instance, if a device seems to not be getting a profile installed correctly, one might go to the Command History view to see the status of the latest Install Profile command. #### How Simply click on the Command History tab to see the latest info:  Note that the default view is ordered showing most recent commands at the top. We hope to see "Acknowledged" as the state for any good command, but sometimes you might see errors as well, and this view gives good detail on what the issue may be as you can see below: 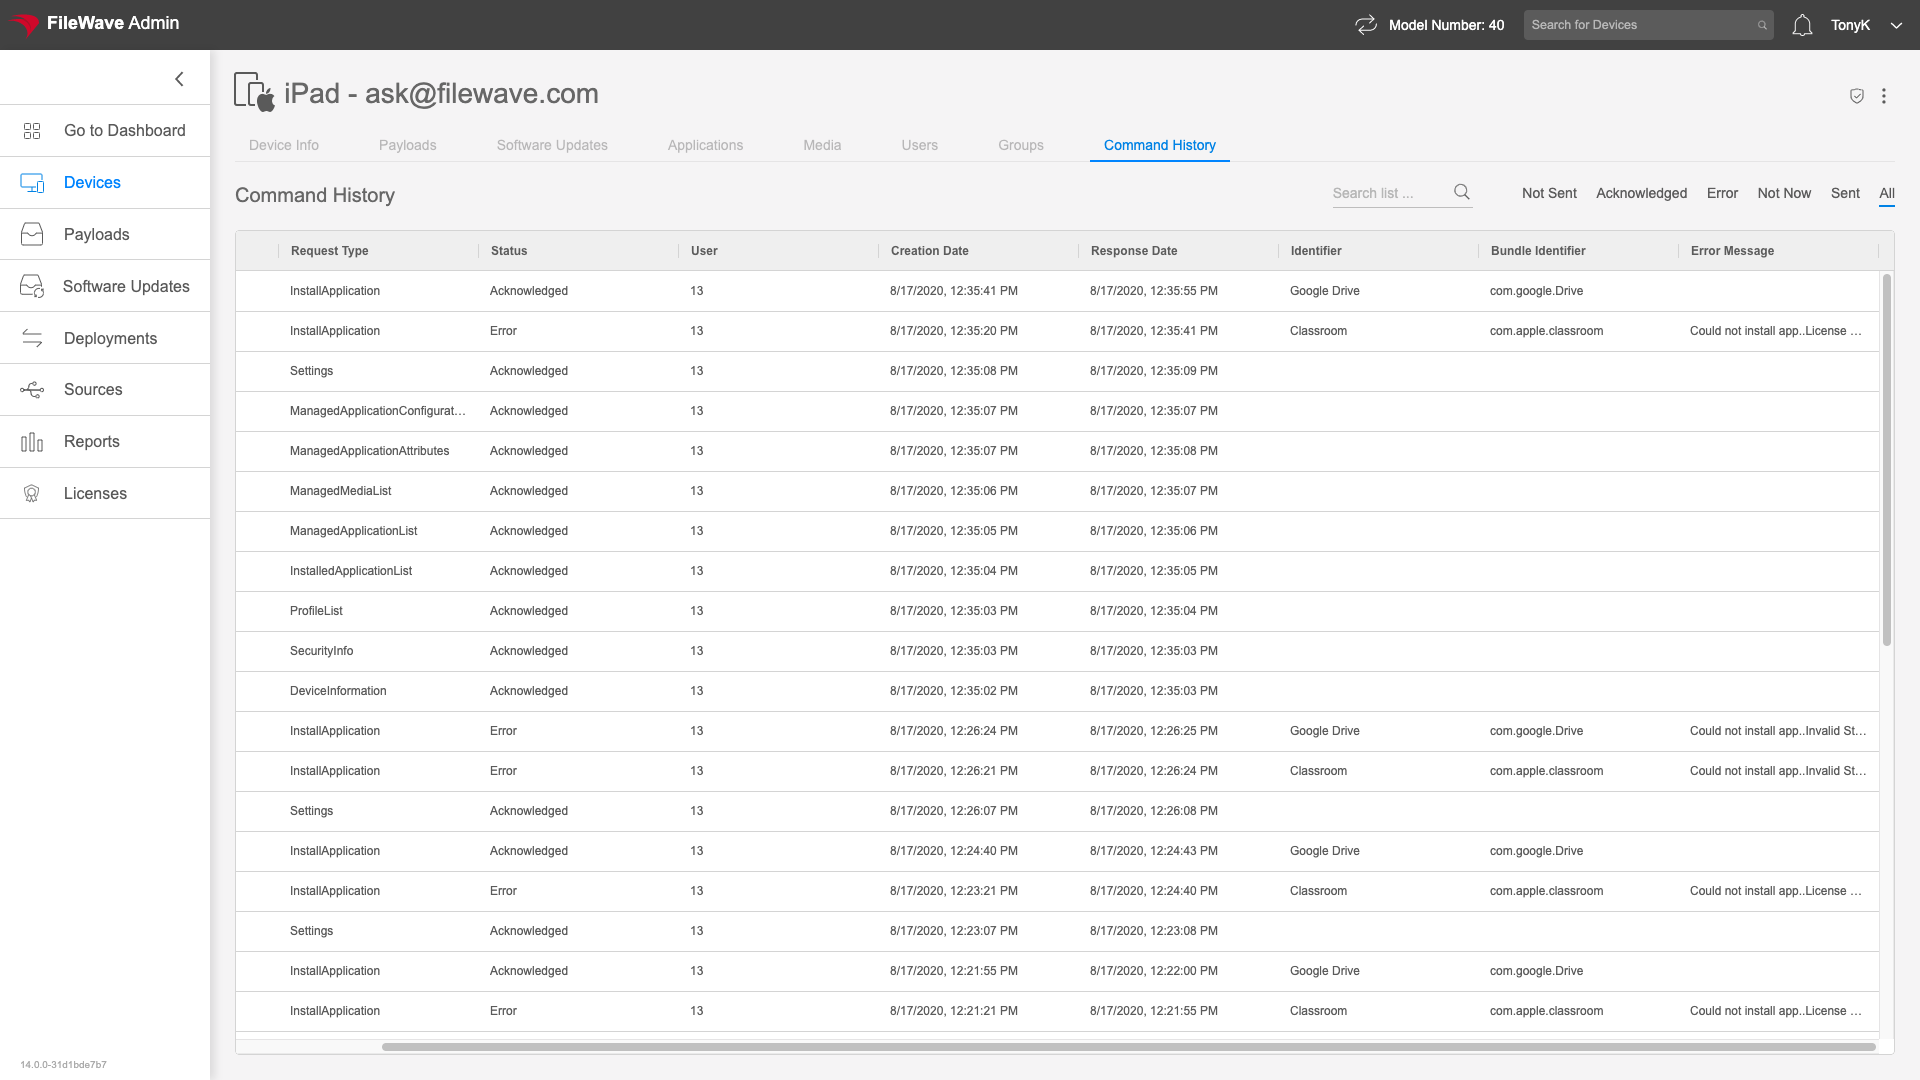The Command History view has a special filter in the top-right of the view to filter by command states.
 ### Device Info The Device Info tab of the Device Detail view allows you to see the most pertinent inventory details about any particular device. In this view, you will see an overall deployment status, you can see how much memory a device has all the way to how many, and what type of Network cards are installed. The Device Info tab is addressable here: https://my.server.address/devices/<fw\_device\_id>/info We'll use this view whenever we want to see device specific information. We could create a report to do the same thing of course, but this view is much simpler and quicker. #### How The Device Info tab is the default tab when you click on a particular device in the Devices view. You'll see some of the most used summary information at the top of the view: 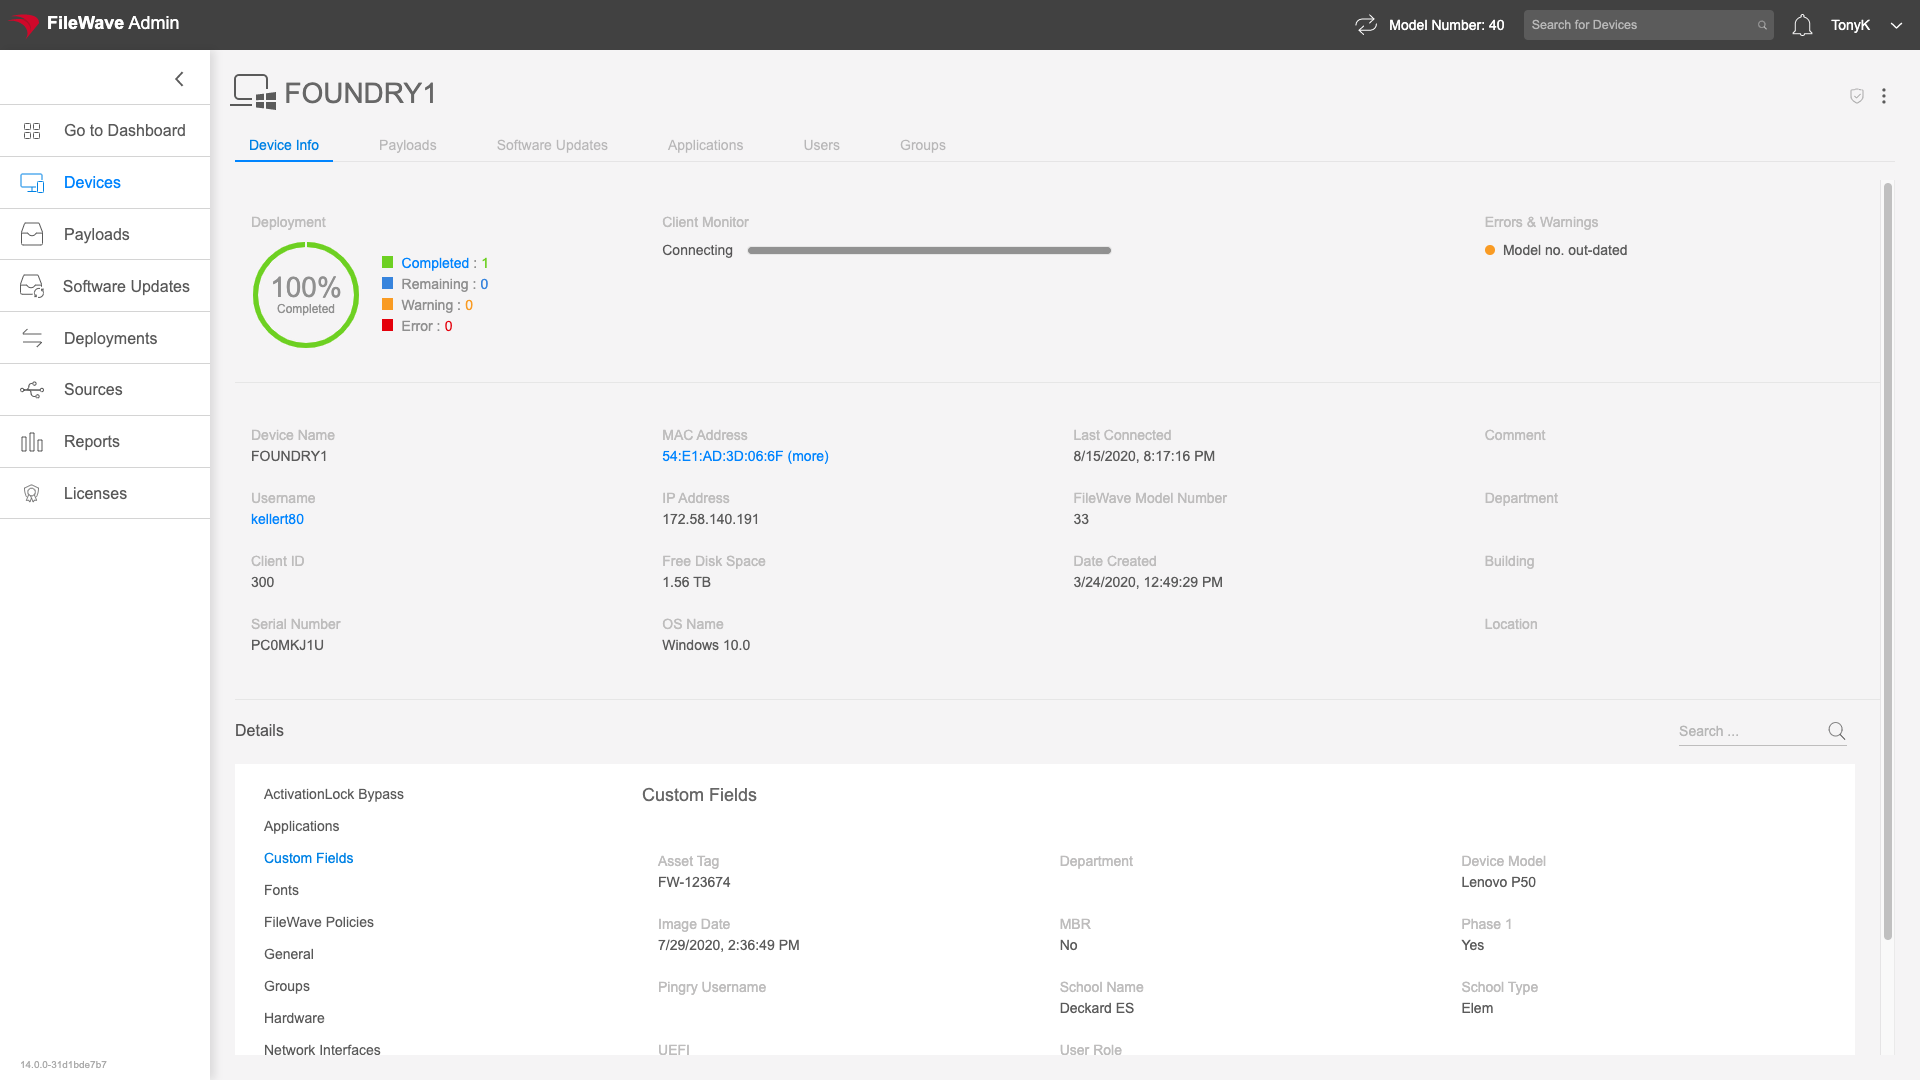 With detailed tables below broken out into data categories. Here we are looking at network details for a Windows device: 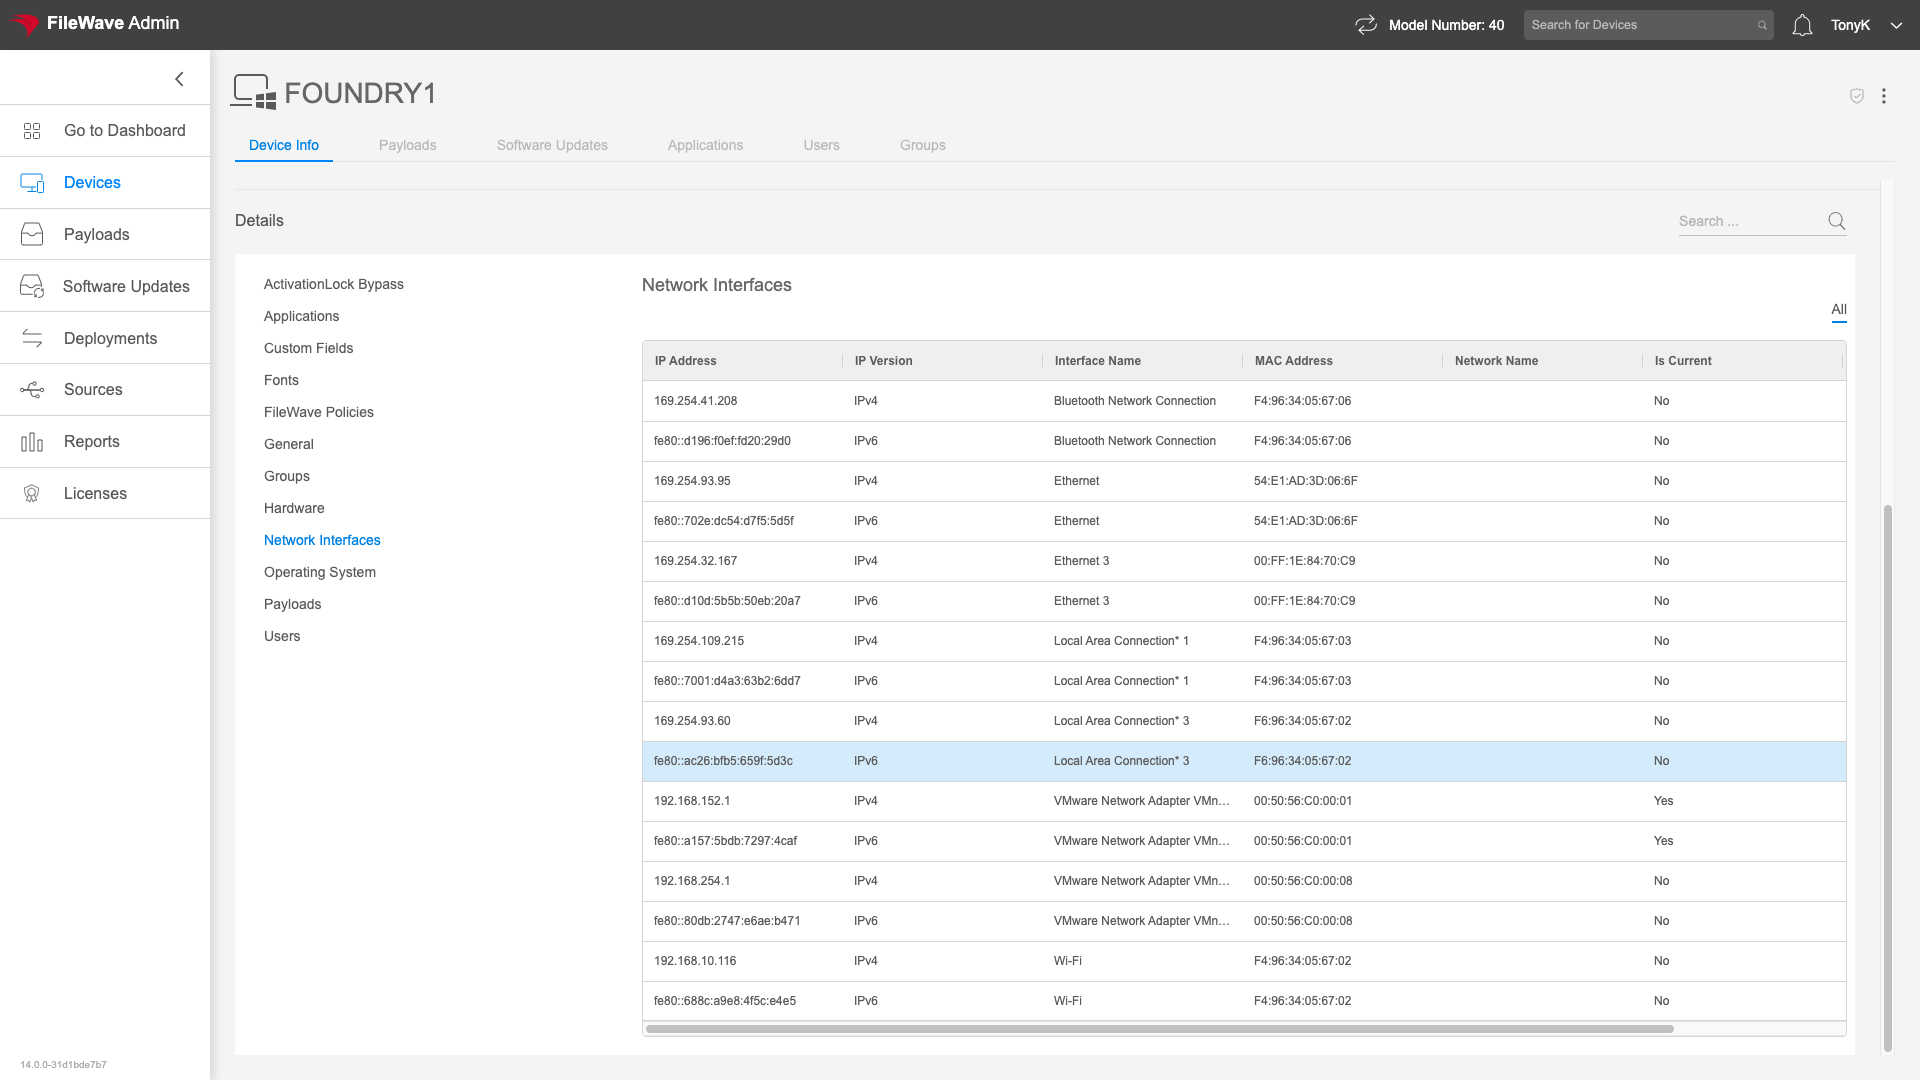 The sub-tables in this view do have their own filter. Filtering for search terms will highlight the content in the view: 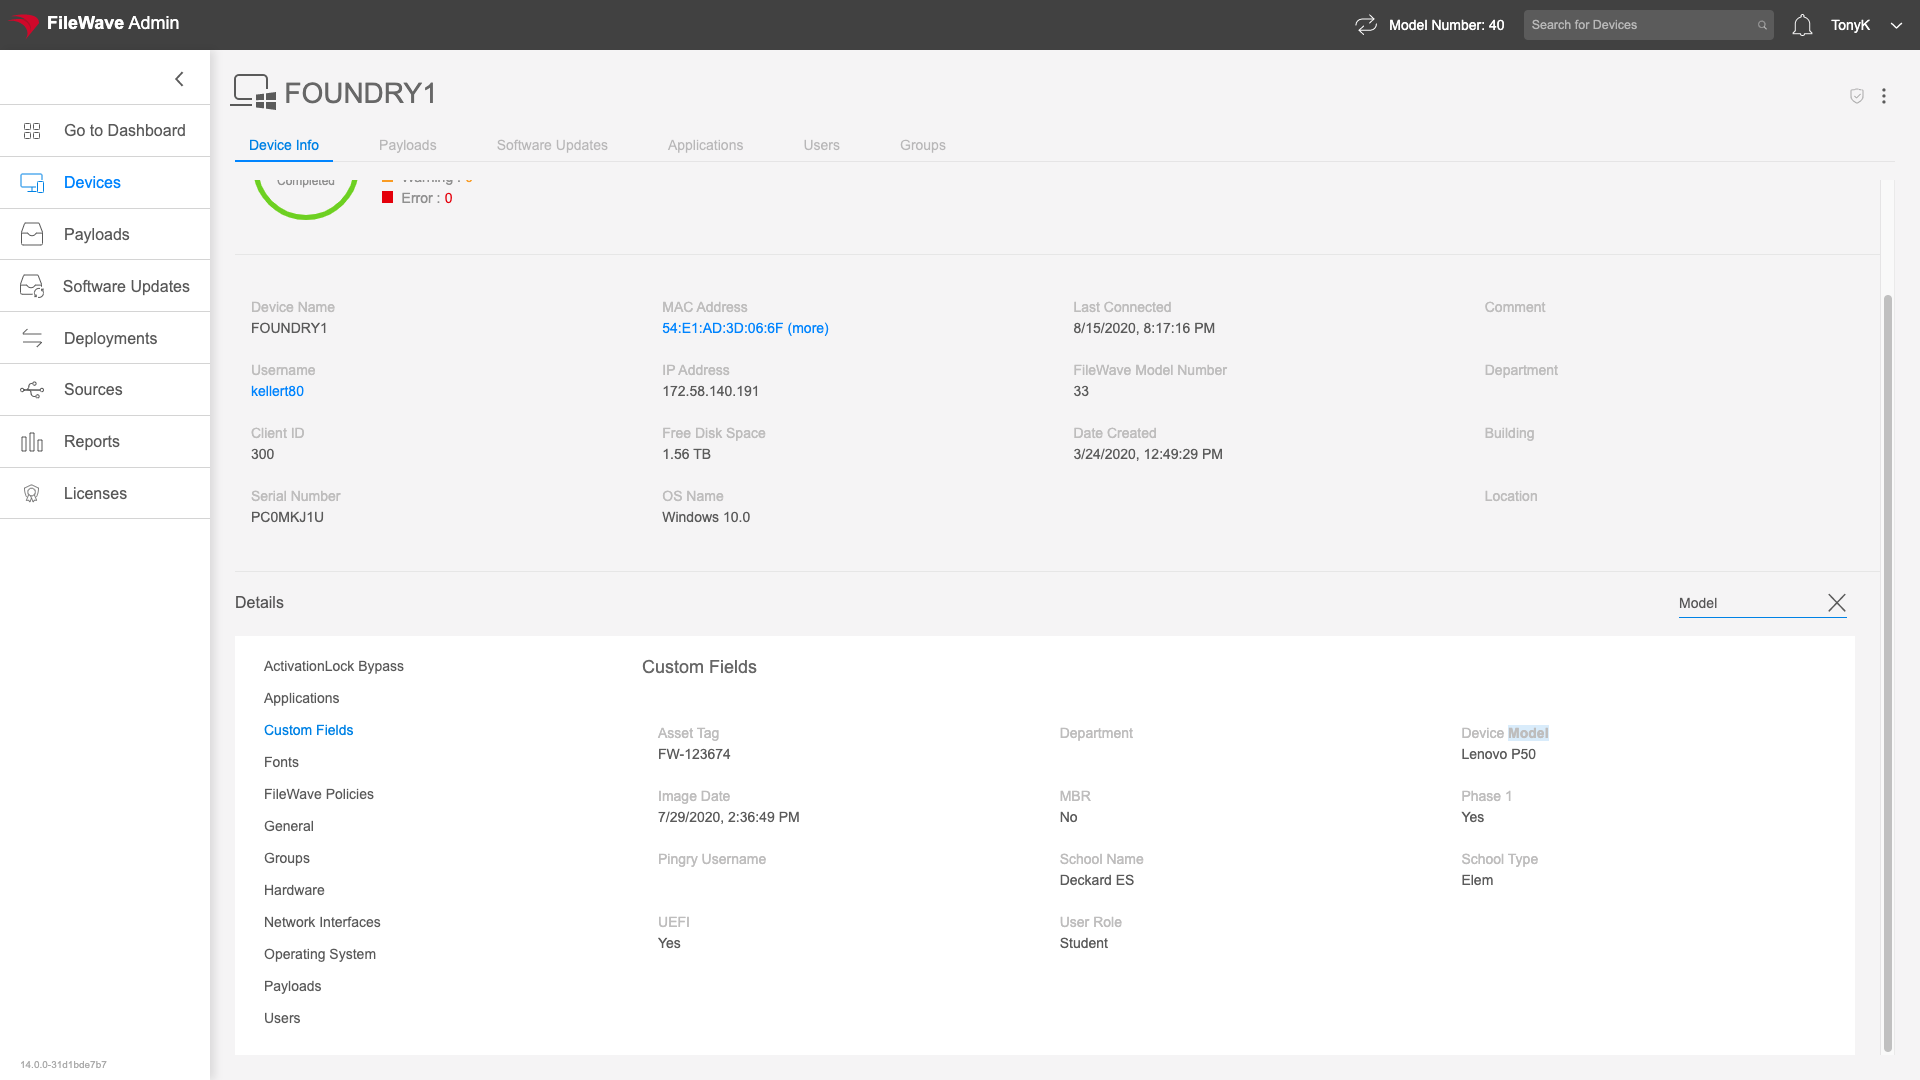 ### Groups The Groups tab of the Device Details view gives information about in which FileWave Groups a device is located. This view is addressable at: https://my.server.address/devices/<fw\_device\_id>/groups This group information is generally not actionable content, but sometimes can let you see that you have "surprise" group membership. That is, the device is in a group you didn't expect it to be in...perhaps from a custom field wrongly set, or a mistaken criteria on a smart group. #### How Just click on the Groups tab to see what FileWave groups the device is in as we have done on the Windows device below: 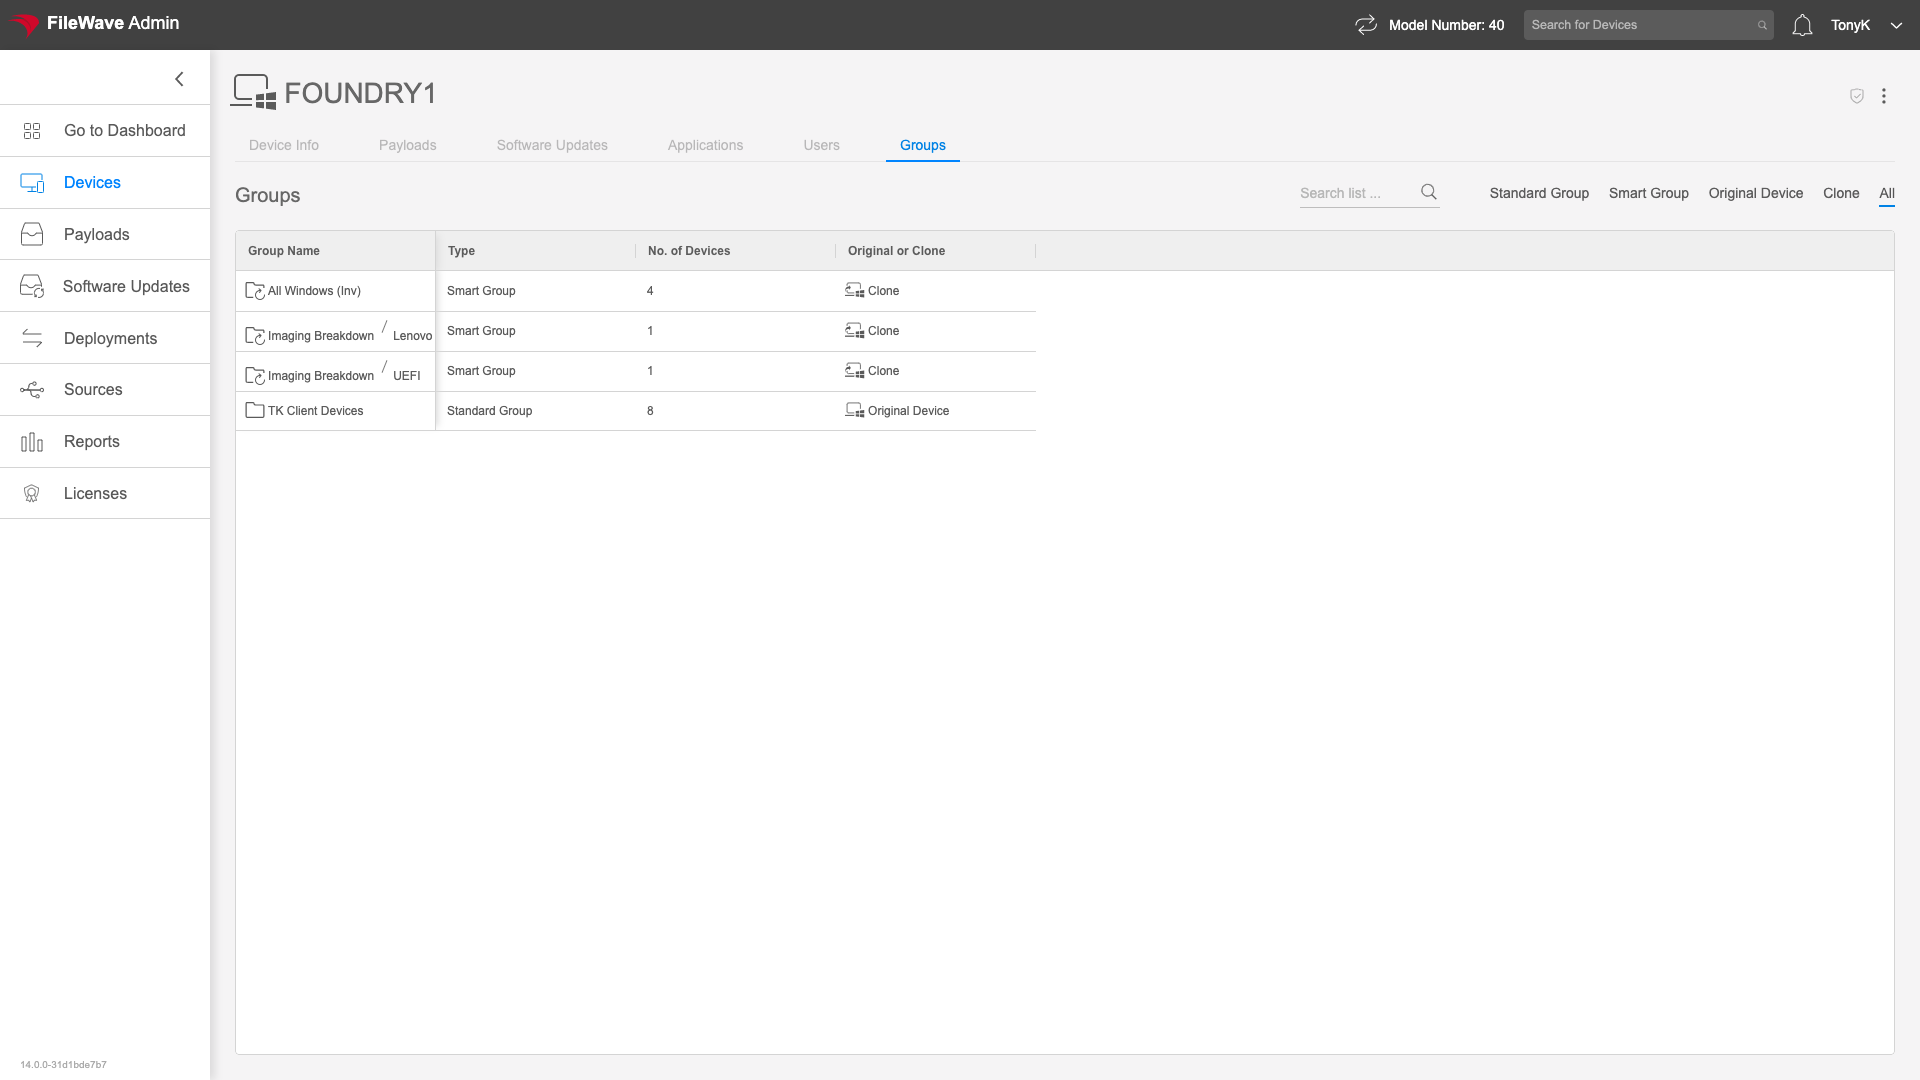 ### Location The Location tab of the Device Detail view gives information about the reported last location of a device. This tab is only shown if location data has been submitted for the particular device. The url for this tab is: https://my.server.address/devices/<fw\_device\_id>/location Seeing this data is very helpful for either a lost or stolen device. #### How Simply click on the Location tab to see the map (if available): 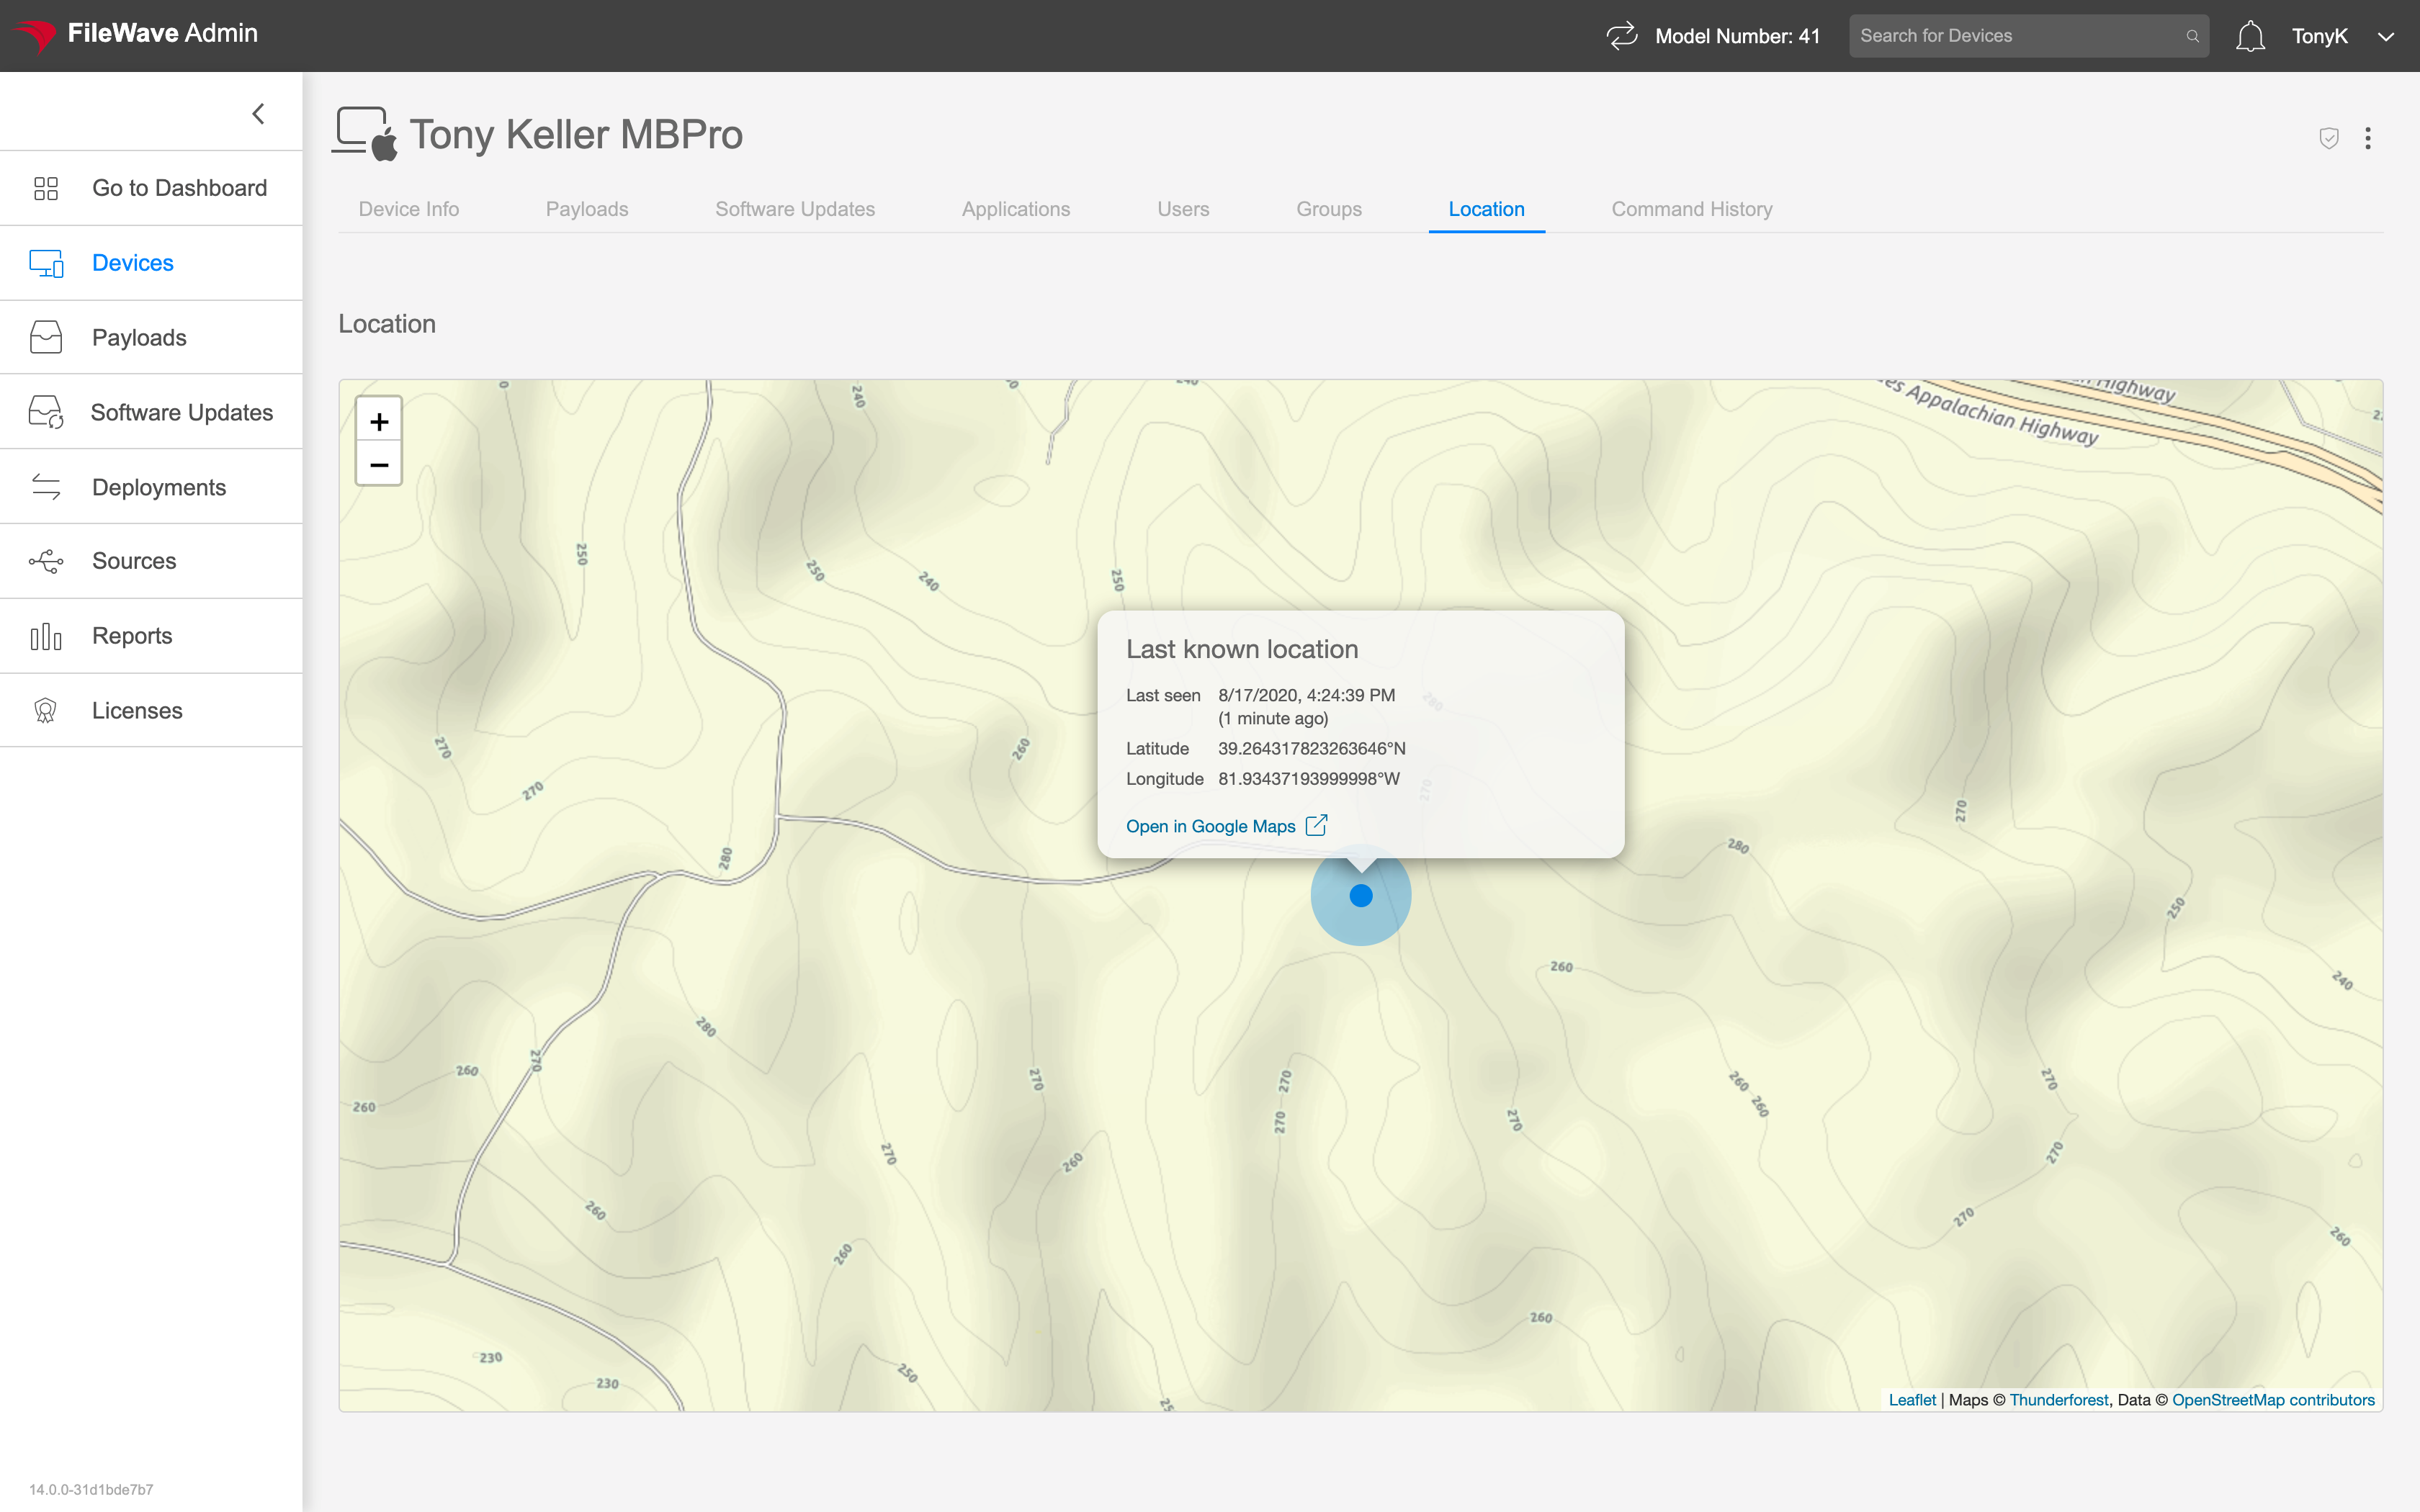 ### Media The Media tab of the Device Details view shows documents that are managed on the endpoint through FIleWave. This tab will only show for iOS device types. PDFs are the most common type of media delivered to endpoints, and the PDFs (once installed) will show in the Books app. You can get to the Media tab at the following url: https://my.server.address/devices/<fw\_device\_id>/media #### How Just click on the Media tab to access the data reported from the endpoint. As with all inventory, the data shown is accurate as of the last data submission from the device. 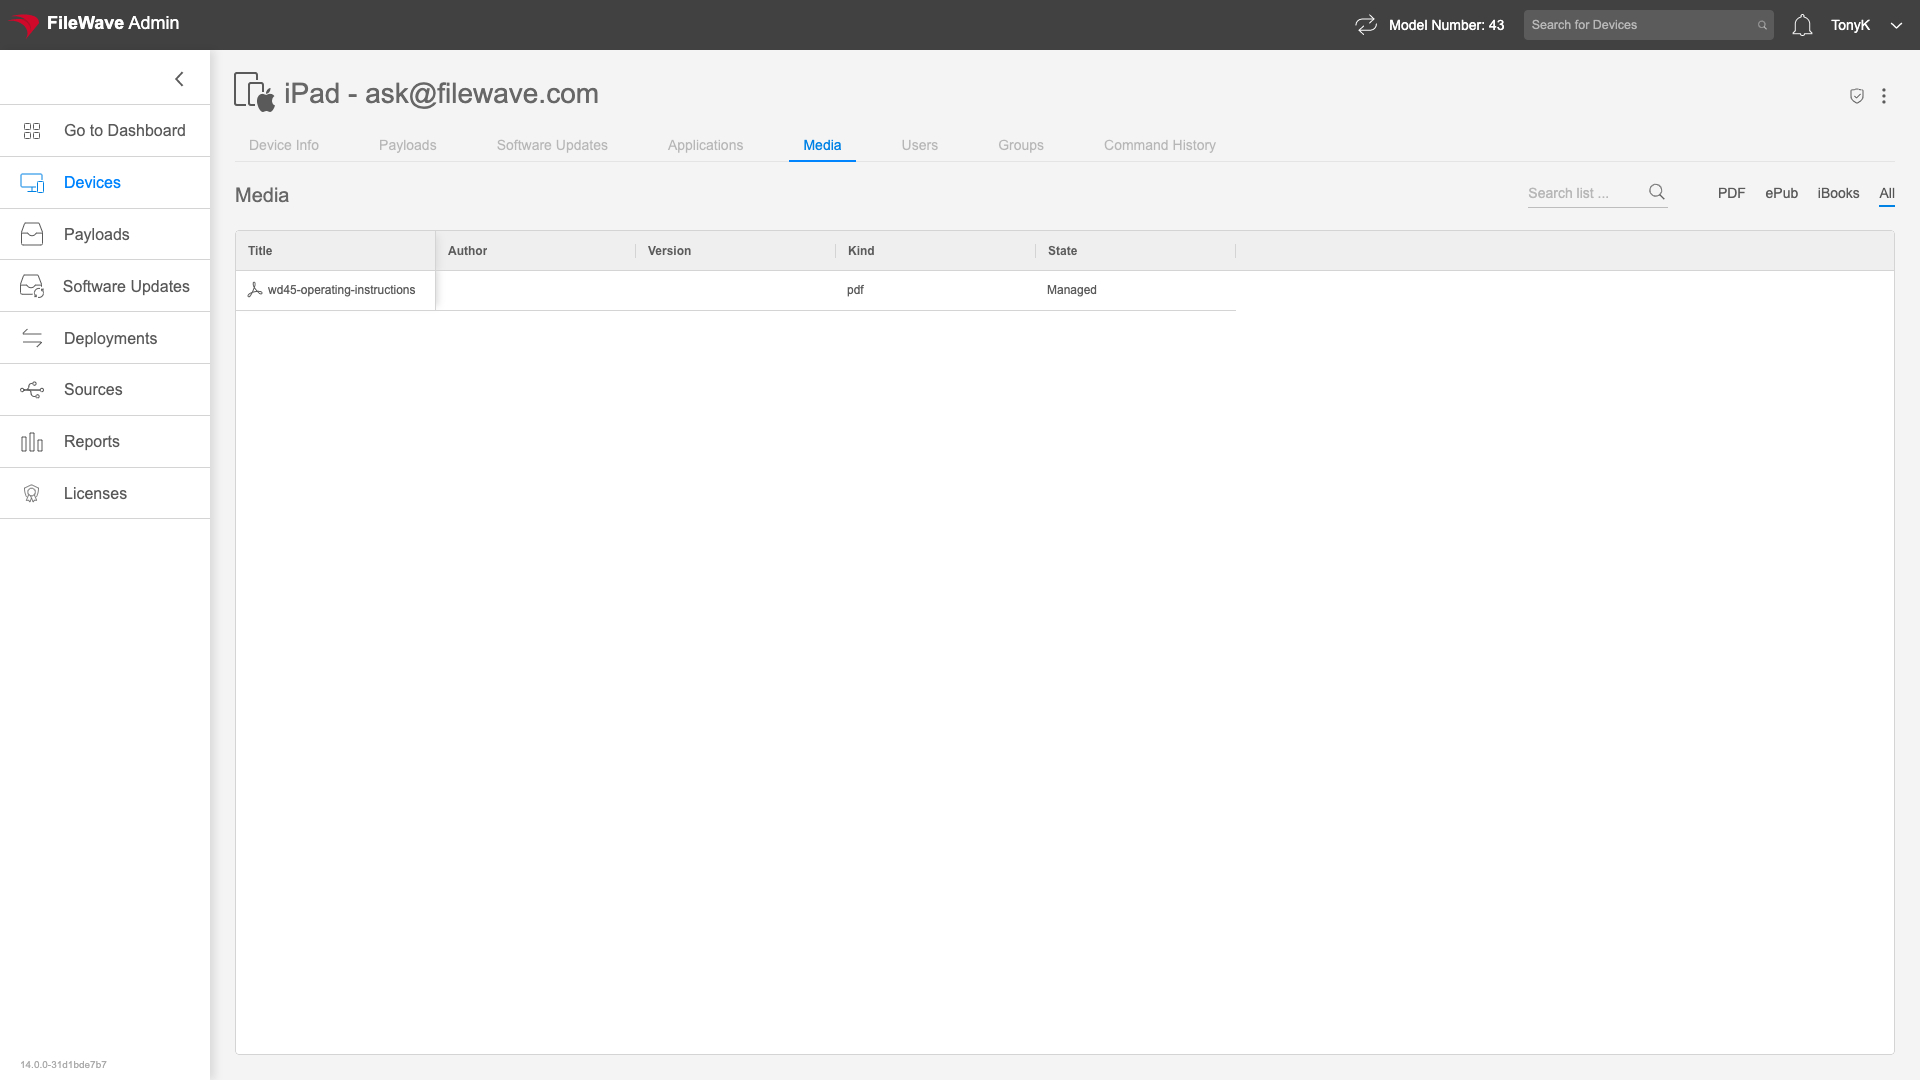 ### Payloads The Payloads view is one of the most important tabs in the Device Details view. This table shows you all content assigned to the chosen endpoint and is accessable at: https://my.server.address/devices/<fw\_device\_id>/payloads We will typically use the payloads tab to get summary information on payloads sent to (or pending) to an endpoint. This information can tell us where we have potential issues with deployments. It also can be very useful simply to backtrack how something is associated...that is, how that particular payload is assigned to this device. #### How Note that the Associations column shows how the individual payload is assigned. In this case, three individual associations and one association to a smart group: 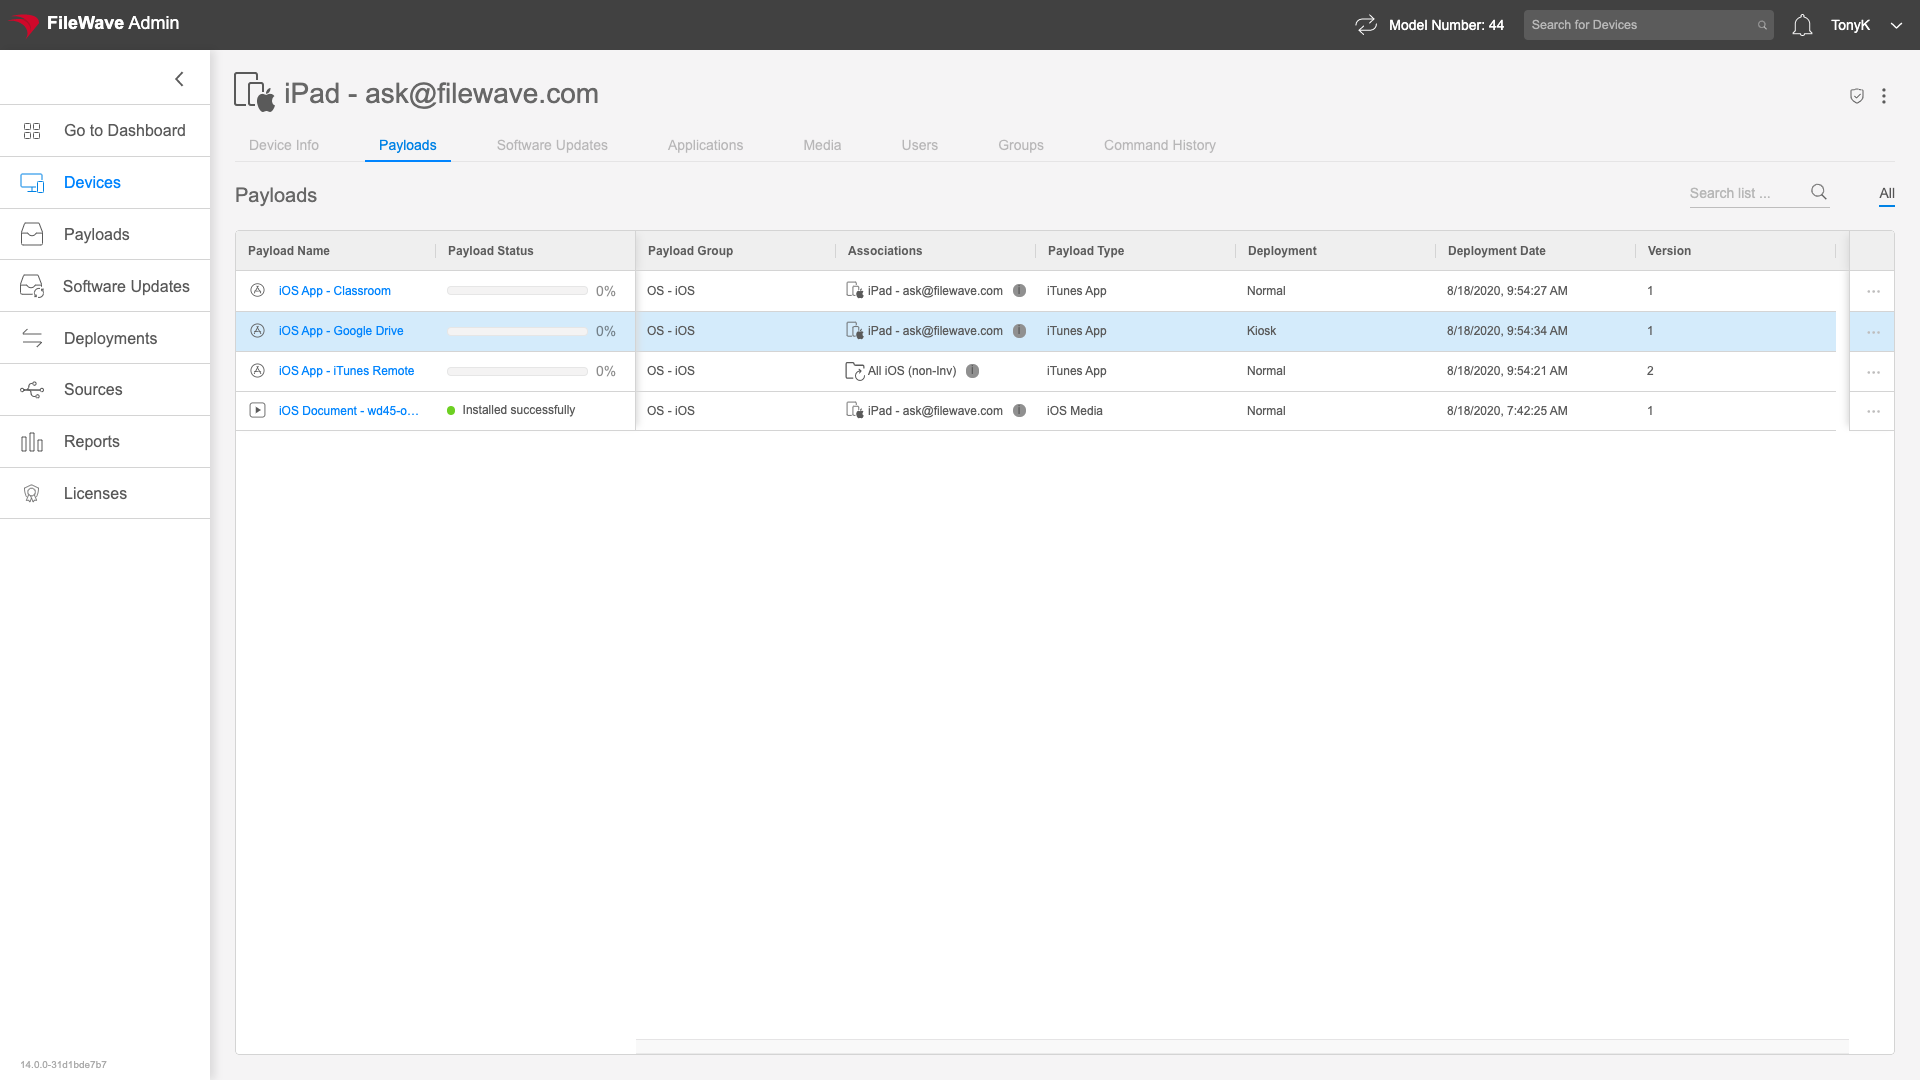From the ellipsis to the right of any payload, you can choose to Reinstall if you have an error as you see below:
 ### Software Updates The Software Update tab shows all pertinent software updates for the particular device. The URL for this tab is: https://my.server.address/devices/<fw\_device\_id>/updates Using this tab is an excellent way to see any missing patches for a particular device, which gives us a sense of the device's relative health. #### How Note that the updates that are shown will be any updates not yet applied, as well as updates deployed through FileWave that still have an association remaining. Examples shown below for macOS, Windows, and iPadOS respectively. 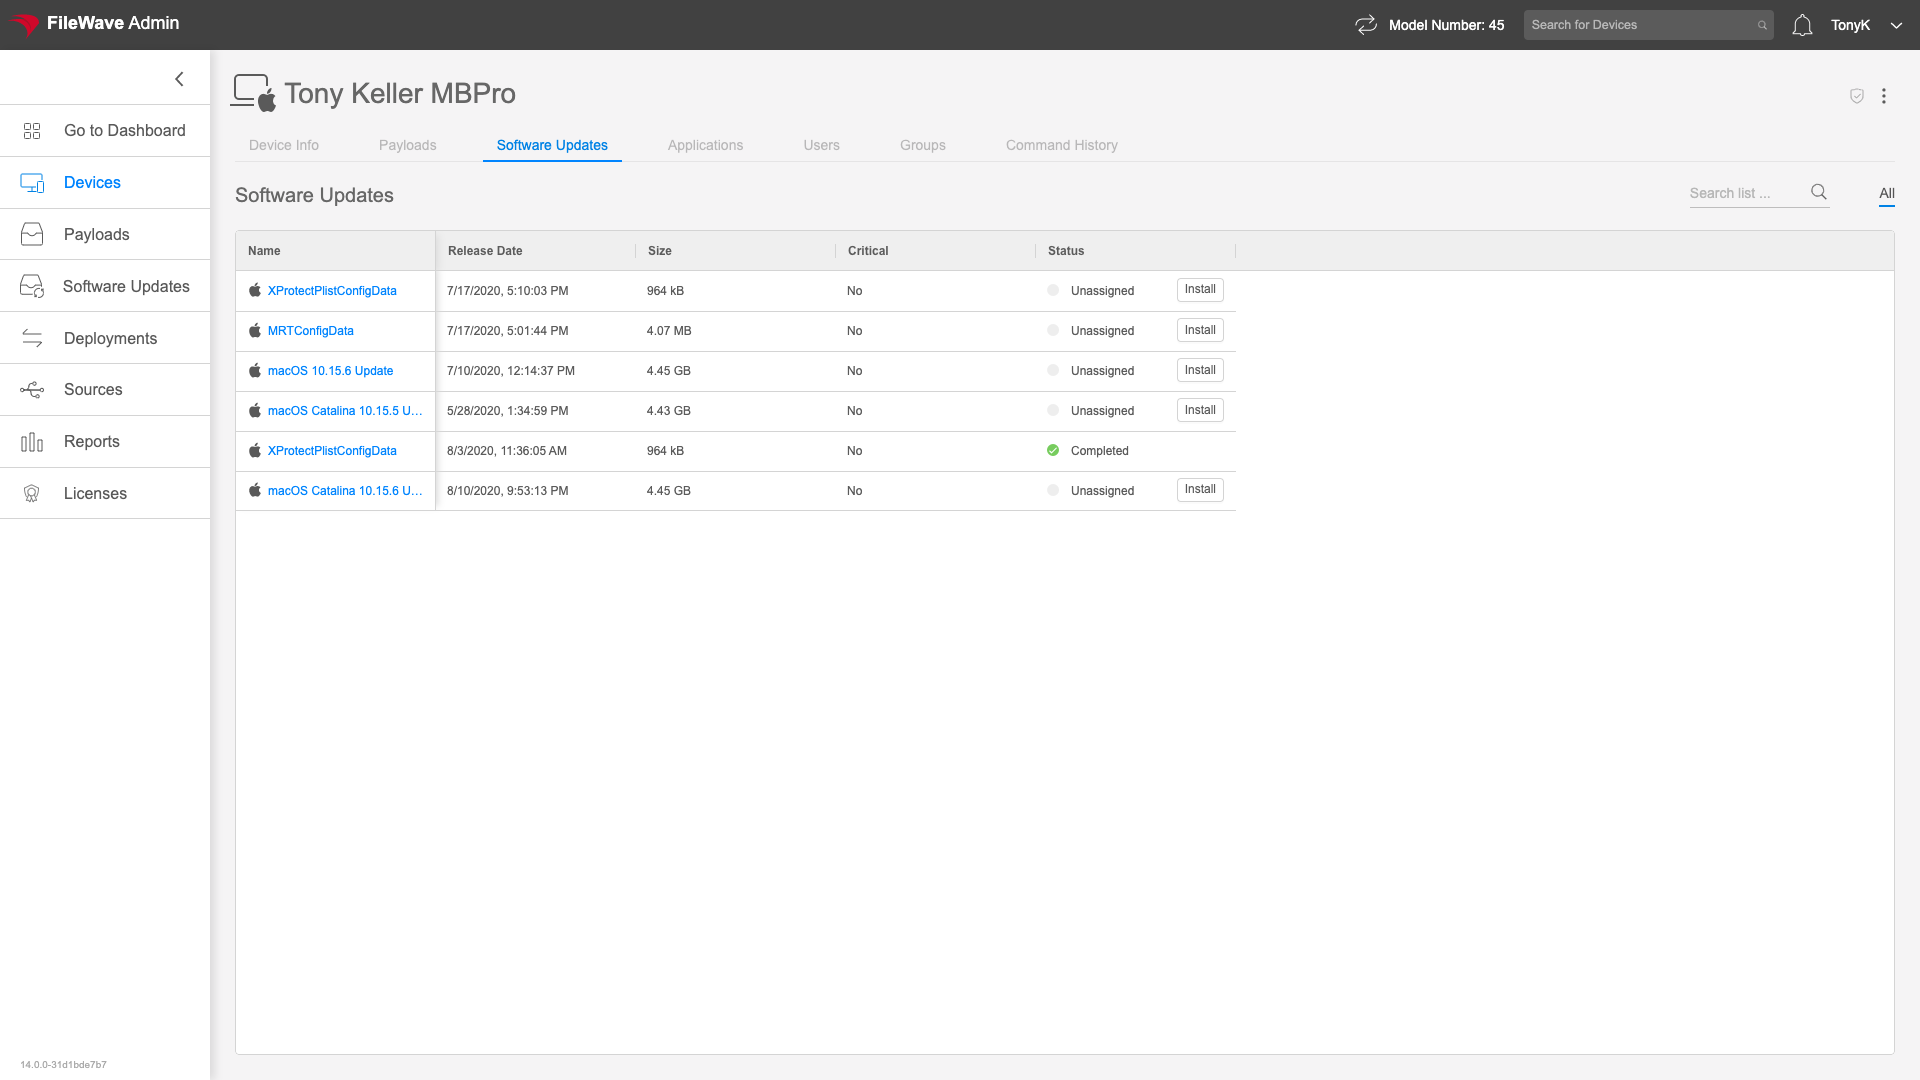. 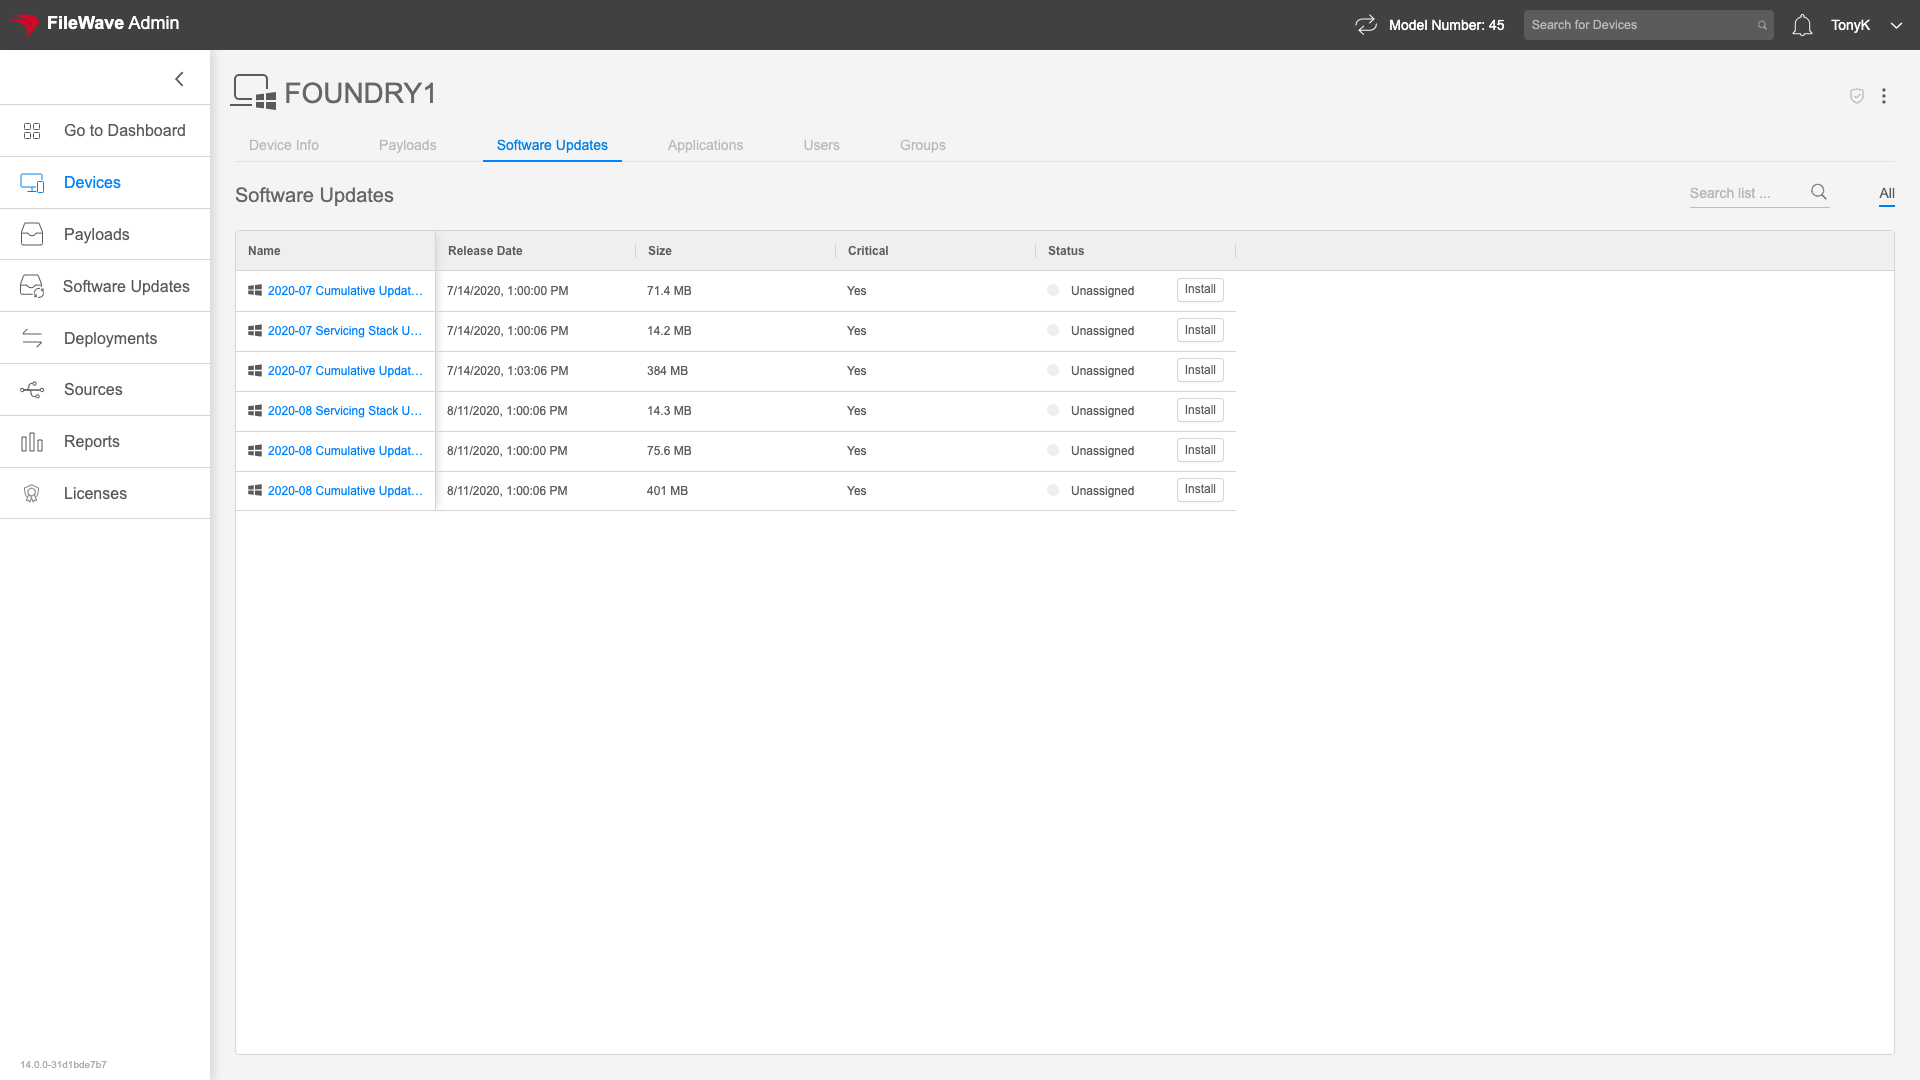. 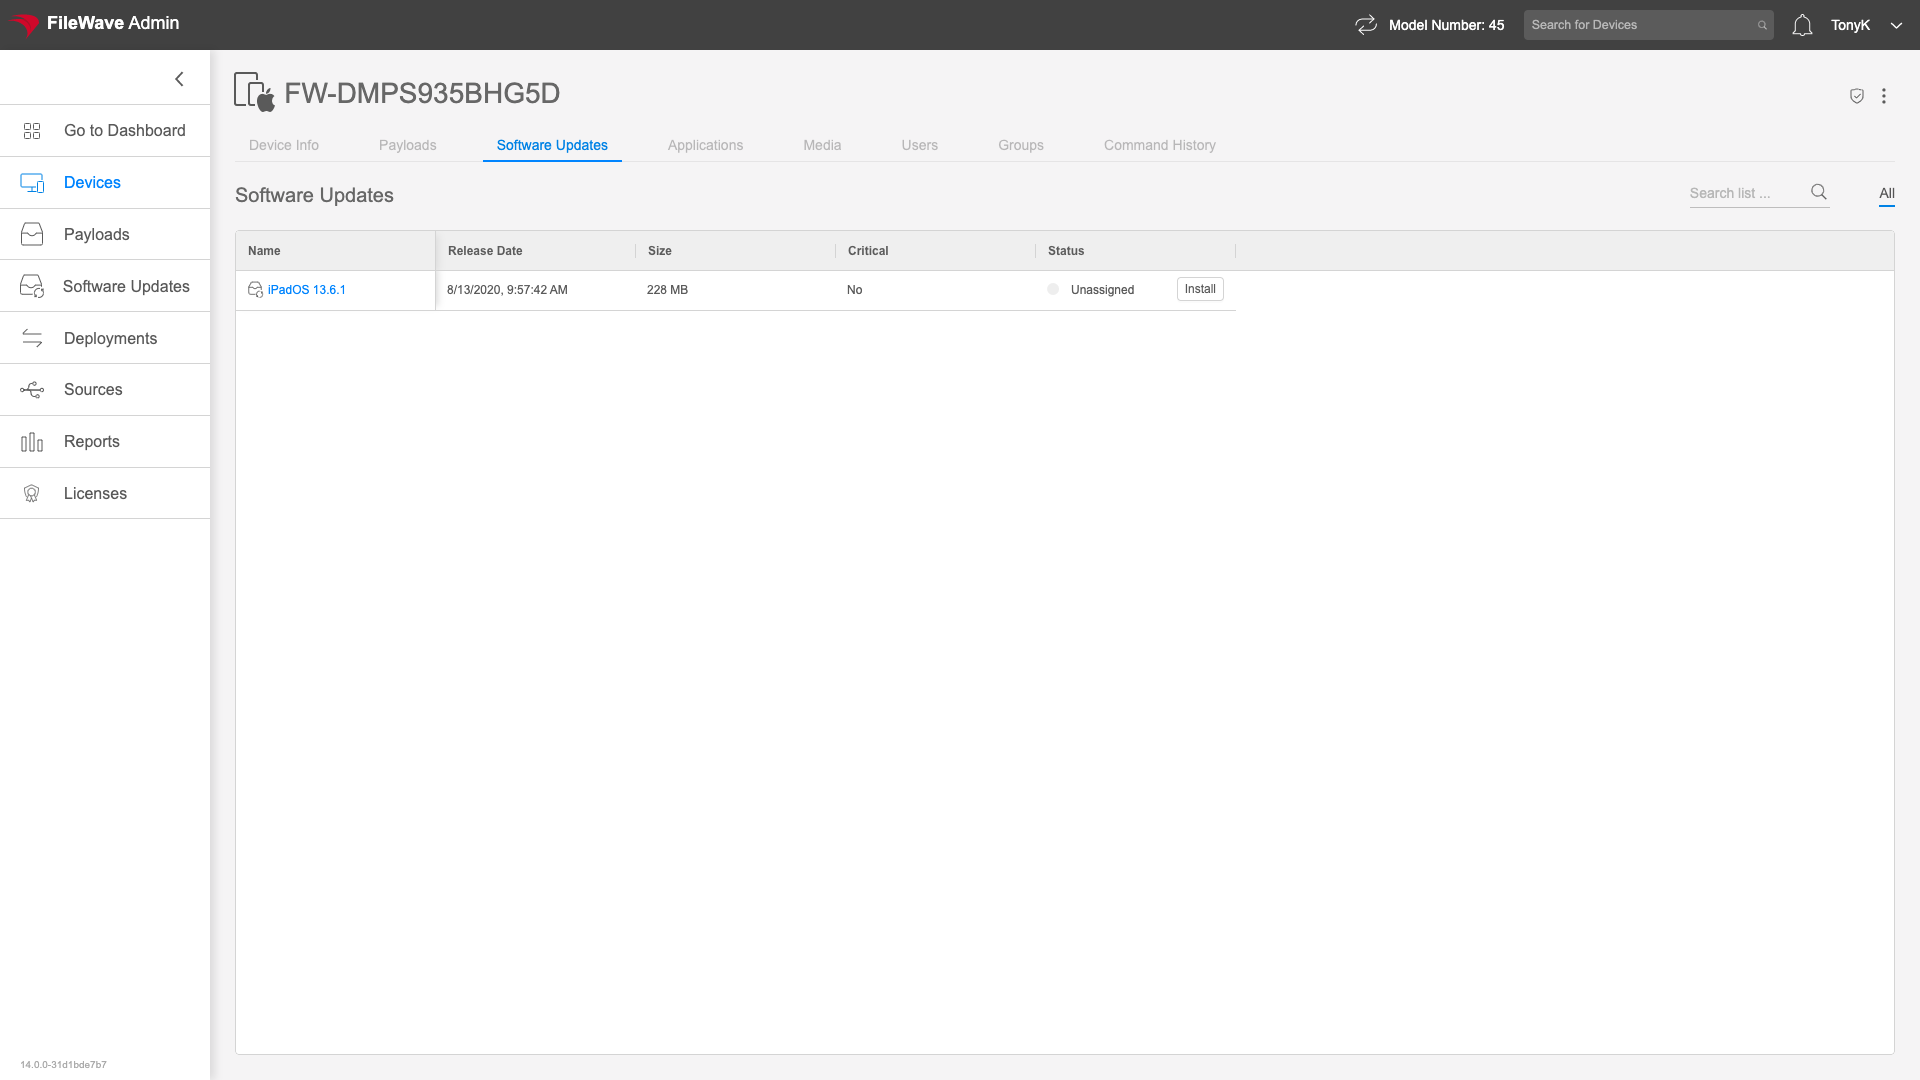 Clicking on the "Install" button to the right of any update will associate that update to this particular device. A subsequent model update will make that change effective. While that association exists, you'll see a status for the particular update. ### Users The Users tab in Device Details gives information about users who have logged into the endpoint. You can reach this tab at: https://my.server.address/devices/<fw\_device\_id>/users Normally, we are going to use the users tab to get information about who has logged onto a device. Login count gives a pretty good indication of whom the primary user is (assuming of course that folks do logout/login occasionally). #### How Note that data will only show where it makes sense for the OS flavor. Below is an example of a simple Windows device: 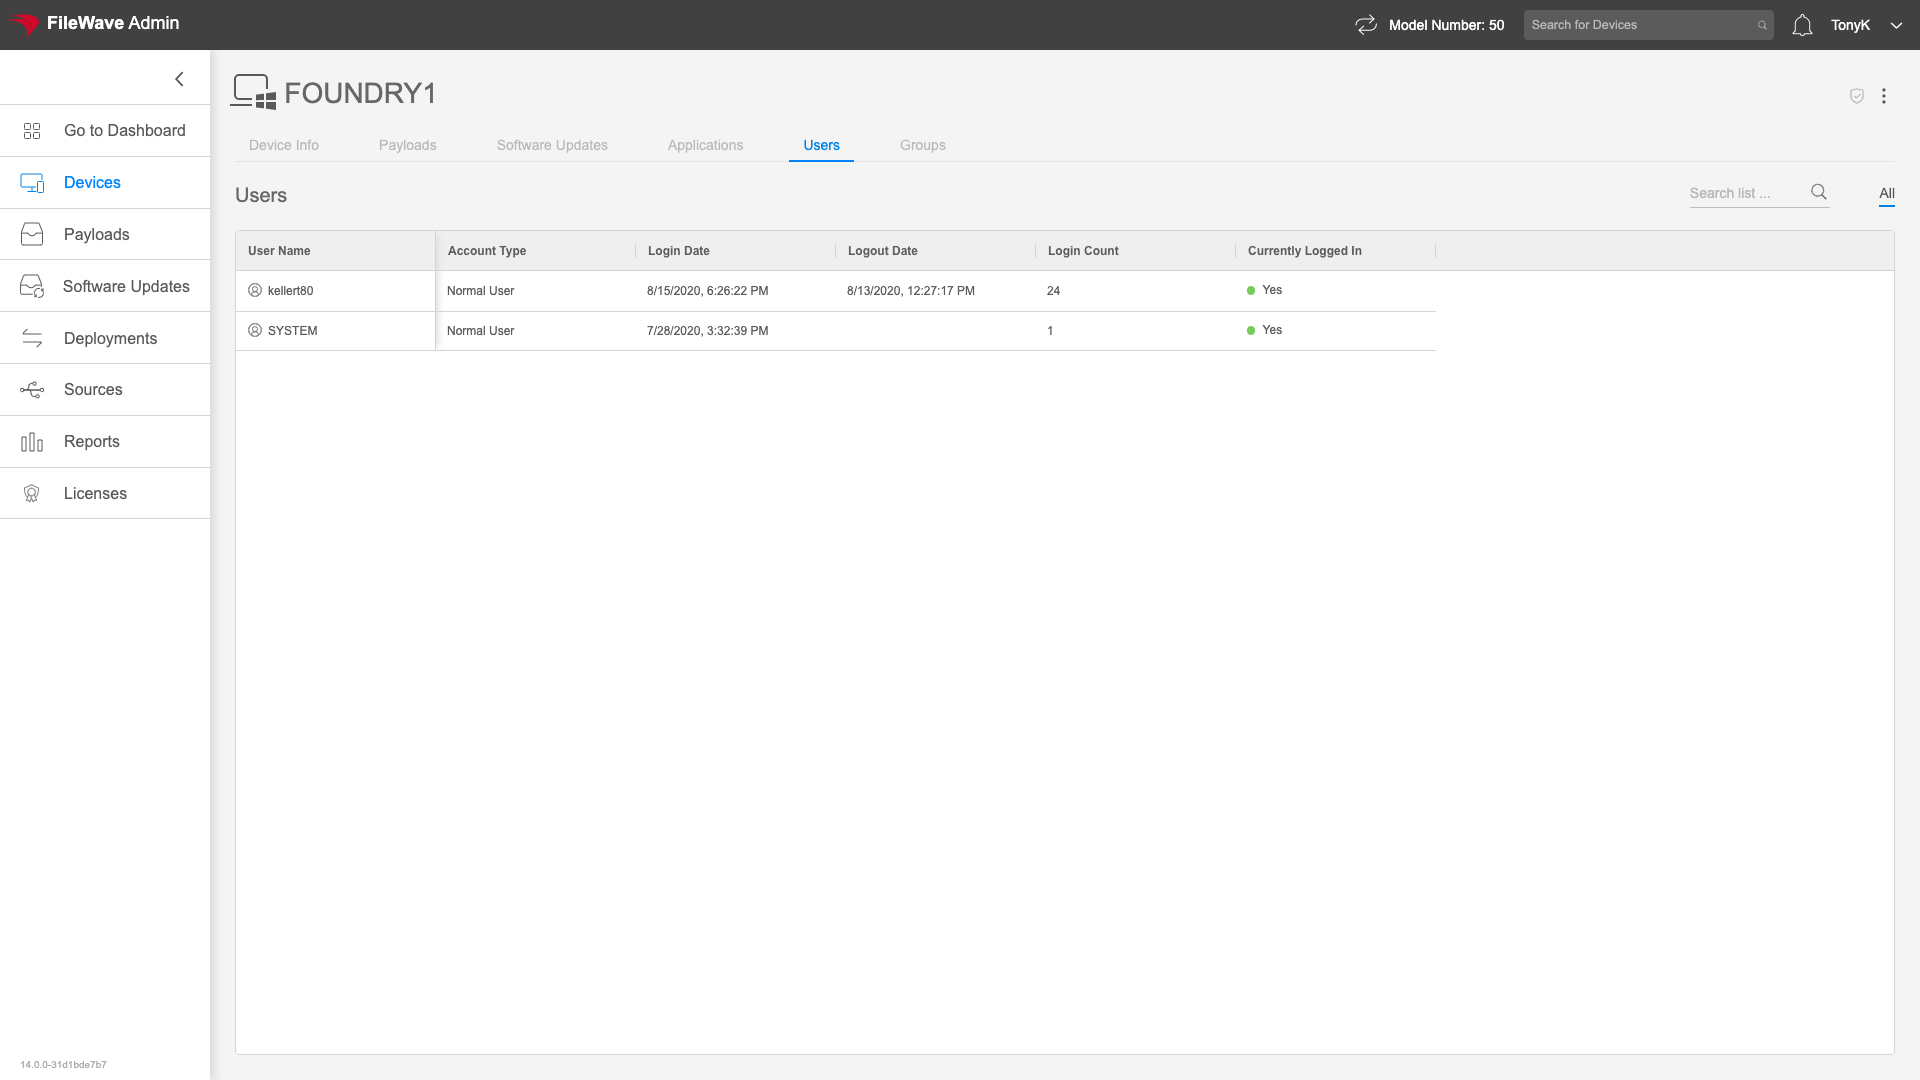 # Tree / List View Toggle ## What The Tree/List View option in the Devices view changes how FileWave Anywhere displays the selected group. Tree view shows the selected group and its immediate contents, while List view flattens the selection so you can focus on devices in the selected group and its downstream groups. ## When/Why Tree view is useful when you are browsing or managing the group structure itself. List view is useful when you want to work with the devices contained by a group and its child groups without seeing the nested group objects. ## How Use the Tree/List View toggle in the Devices view to switch between the two layouts. The example below shows the same location in both views so you can compare the difference: # Working with Groups and Smart Groups ## What Groups and Smart Groups are core organizational tools in FileWave. They let you work with devices by purpose, department, location, platform, deployment need, or any other structure that matters in your environment instead of managing everything one device at a time. ## When/Why Use groups when membership should be deliberate and administrator-controlled. Use Smart Groups when membership can be described by criteria and should update automatically as inventory, device details, or other matching data changes. Good group design makes deployments, reporting, and day-to-day administration easier to understand. It also reduces one-off work because FileWave can target meaningful sets of devices instead of individual endpoints. ## How ### Groups A group is a static container. You can place devices, other groups, and Smart Groups into it. Think of it like a folder: it is useful when you need a simple, intentional structure. Manual groups are a good fit when the reason for membership is not something FileWave can reliably calculate. For example, if ten unrelated users purchased a licensed application, a manual group may be cleaner than forcing an artificial Smart Group rule. To create a group, use the new group/folder control, give the group a unique name, and place devices or child groups where they belong. The video below shows the basic manual group creation flow. #### Related content - [Move to Group](https://kb.filewave.com/books/filewave-anywhere-help-menus/page/move-to-group) - [Copy to Group](https://kb.filewave.com/books/filewave-anywhere-help-menus/page/copy-to-group) ### Smart Groups A Smart Group is criteria-based. Devices become members automatically when they match the rules you define. Smart Groups are usually the better choice when you can describe the target set clearly and want FileWave to keep that membership current. Common examples: - Deploy an MSI to all Windows devices in the Accounting department. - Deploy a VPP app to all third grade iPads. - Deploy a PKG to all macOS devices. - Deploy Photoshop to ten unrelated people across the environment — this is probably better as a manual group unless those users share reliable criteria. The video below shows a simple Smart Group that matches Windows devices. Smart Groups are powerful, but the criteria should describe a stable target. Avoid rules based only on state that the associated deployment immediately changes, because that can create policy loops where a device repeatedly moves in and out of scope. ### Reports and condition groups FileWave Central and FileWave Anywhere use Reports (formerly Queries) to return result sets. Smart Groups use similar criteria logic, but with a different purpose: Reports show information, while Smart Groups target devices for action. Condition groups let you isolate logic when you need to combine **AND** and **OR** rules. If you know SQL, condition groups serve the same basic purpose as parentheses. A simple report for Windows or macOS devices may not need a condition group; a rule such as *(macOS or Windows) and Microsoft Office is installed* does. The video below shows a condition-group example. ### Conditions Conditions define which devices or other objects appear in the result. Most Smart Groups and Reports use at least one condition so the result is narrowed from “everything” to the exact set you need. Examples include platform, operating system version, installed application name, FileWave Client version, department, location, enrollment state, or custom fields. The video below shows criteria being added to match example conditions. ### Preview fields When you build a Smart Group or Report, use the preview to validate the result before trusting it. If you are targeting devices by FileWave Client version, add the FileWave Client Version field to the preview so you can see whether the criteria are returning the devices you expect. That quick check is often better than assuming the rule is correct just because it saved successfully. The video below shows removing default preview fields and adding FileWave Client Version. ### Finding fields for condition statements If you know the field name, start typing and use type-ahead. If you do not know the exact field name, browse the field list and use field descriptions to confirm the right data source.When you need context, open the Device Details page for a representative client. Seeing the field name and real data together makes it easier to choose the right condition.
The video below shows using type-ahead and the field browser to find application fields. ### Example conditions Advanced Smart Group criteria are easier to build when you first write the requirement as a sentence, then translate that sentence into conditions. - **Upgrade Windows clients below the target FileWave Client version:** OS Type is Windows, and FileWave Client Version does not begin with the target version prefix. - **Find devices with Microsoft Office installed:** use condition groups to match Office application names and version patterns across Word, Excel, PowerPoint, Outlook, and other relevant Office applications. - **Find Windows devices missing 7-Zip:** match Windows devices and use a **NOT** condition against the 7-Zip application name so the result returns devices where the application is absent. ### Related content - [Understanding FileWave Clients, Groups, and Smart Groups](https://kb.filewave.com/books/filewave-central-anywhere/page/understanding-filewave-clients-groups-and-smart-groups) - [Fast Smart Group Evaluation](https://kb.filewave.com/books/filewave-central-anywhere/page/fast-smart-group-evaluation) - [Create a Smart Group from an Inventory Query (Report)](https://kb.filewave.com/books/filewave-central-anywhere/page/create-a-smart-group-from-an-inventory-query-report) - [Duplicating Smart Groups](https://kb.filewave.com/books/filewave-central-anywhere/page/duplicating-smart-groups) - [View - Reports Overview](https://kb.filewave.com/books/filewave-anywhere-help-menus/page/view-reports-overview) - [Fields in Reports (Preview)](https://kb.filewave.com/books/filewave-anywhere-help-menus/page/preview-fields-in-reports)