Common search terms for this workflow include column filter, table search, data filter, find a device by asset tag, and filter the Devices view.
# Columns Adding and Removing (Customizing) ## What The Edit Fields tool lets you show or hide inventory columns beyond the default fields in FileWave Anywhere views. ## When/Why Use it when a value such as asset tag, location, owner, or a custom inventory field needs to be visible in the table. Once the column is shown, you can search or filter by that value.**FileWave 16.4 Deployment view:** Central and Anywhere share the predefined **Installation Type**, **License Assignment**, **Creation Date**, and **Tags** columns. Show the columns relevant to the review, then sort or filter the list. See [Deployments in FileWave Central](https://kb.filewave.com/books/filesets-payloads/page/deployments-in-filewave-central) for the meaning of each Deployment column.
## How You can Edit the fields in a view wherever you see the () icon on the right of the table (it is shown here horizontally, but is vertical in the web admin). In this example, the custom field *Asset Tag* is added to the Devices view. If a user reports an issue and gives the asset tag, the admin can filter the device list by that value instead of searching by name or serial number. 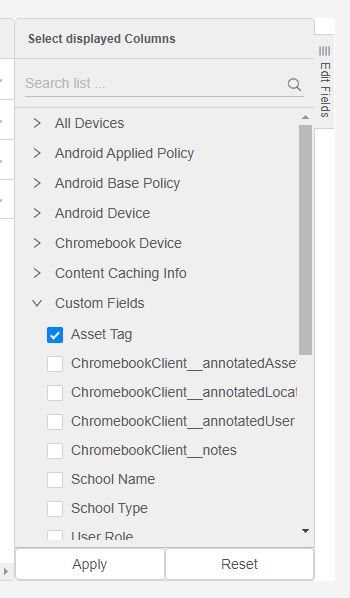 To remove a field from the view, clear its checkbox and save the view. # Columns Pinning ## What Pinning columns allows you to make sure that a particular column is always where you want it. ## When/Why Most of the time that we pin a column it is because that column is really important and we want to see it all of the time. For instance, if I constantly refer to Asset Tag, then I may want to pin that to the left side of the devices view along with device name. That way, if I scroll right within the window, those two fields will always be shown. ## How Below you will see an example of pinning the Device Name column to the left, and then removing the pin. Note that you access the pinning menu by clicking on the hamburger icon () in the column header: # Columns Sorting & Moving ## What FileWave Anywhere tables can be sorted by column, and the columns themselves can be moved into the order that works best for the task. ## When/Why Use column sorting and moving when a table has the right data but the default order is not the most useful view. For example, sorting by **FileWave Client Version** can help you find older clients first, while moving that column closer to device name or status makes the table easier to scan. 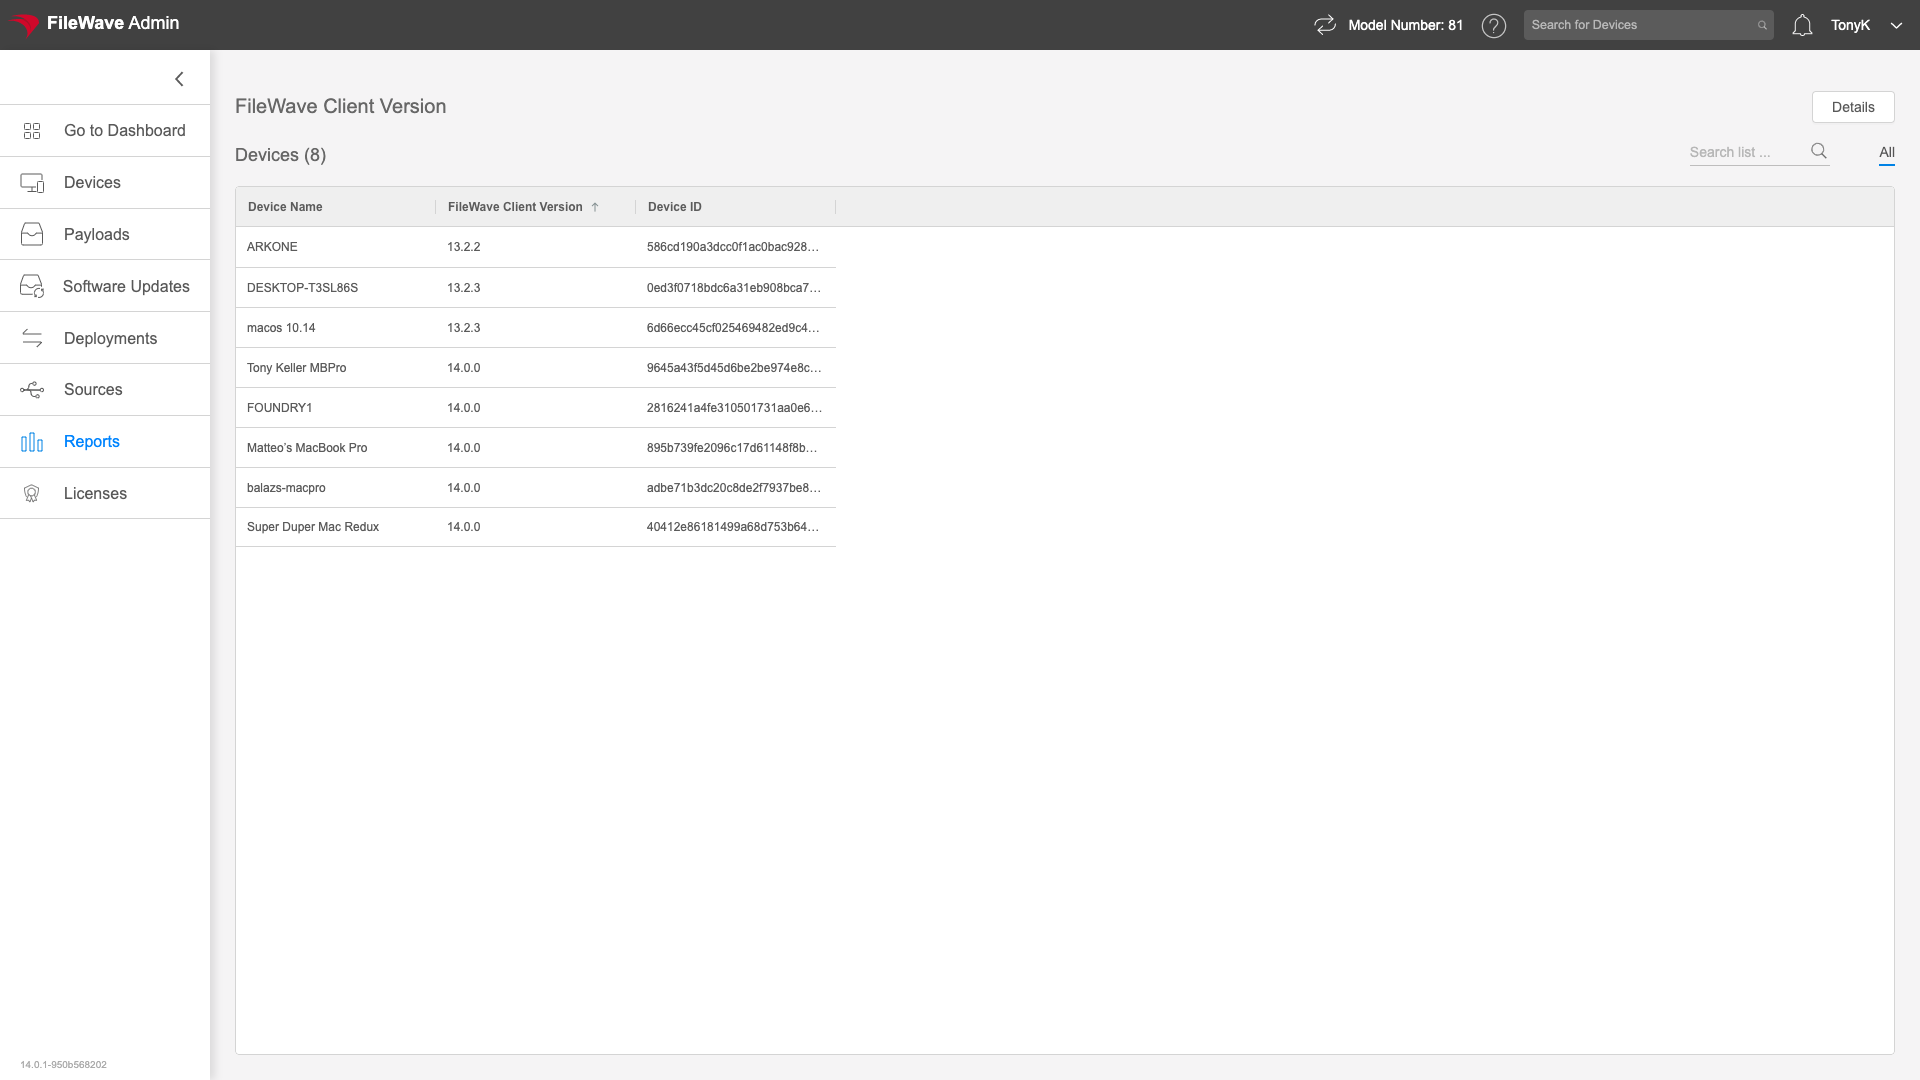 ## How To sort a table, click the column header. The arrow on the column shows whether the sort is ascending or descending. To move a column, drag the column header to the position you want. # Exporting Data ## What From almost any table or list in FileWave Anywhere, you can export the data in the current view as a CSV file. ## When/Why Use export when you need to work with the current FileWave Anywhere view in a spreadsheet, share a filtered list, or save a point-in-time report outside FileWave. ## How Right-click in the current view and choose "Export to CSV". The export reflects the data and columns available in that view, so apply filters or column choices before exporting when you need a specific result. # Search Criteria ## What Use the upper-right **Search for Devices** field () in FileWave Anywhere/WebAdmin to quickly find devices from any view. ## When/Why This search is useful for quick, one-off support lookups when you already know part of a device name, operating system name, or current username and want to jump straight to the device record. ## How 1. Click the **Search for Devices** field in the upper-right corner. 2. Enter the value you want to search for, such as a device name, operating system name, or current username. 3. Review the matching devices and select the device name to open the device detail view. This search is meant for fast device lookup. If you need to search custom fields or build a reusable device list, use the relevant device view filters or an inventory query/report instead. # Update Model ## What In FileWave Anywhere, the Update Model icon () appears near the Model Number (). Updating the model commits pending deployment and configuration changes. The Model Number increments after each update, and managed devices compare their local model number to the server model number to know whether new work is available. ## When/Why Update the model after you create or change a deployment, payload, profile, or other setting that should take effect on devices. For example, after you create a VPP payload and assign it through a deployment, the assignment does not apply until the model is updated. Model Update permission does not need to be granted to every FileWave administrator; control it per administrative user.A model update commits all pending changes from all FileWave administrators. In shared environments, coordinate model updates so one admin does not publish another admin's unfinished work.
## How To update the model, click the  icon. The video below shows the workflow.FileWave shows the Update Model dialog whenever anyone updates the model in the environment.
# View - Deployments The Deployments view allows you to see and create Deployments. Deployments are not Associations, but they are similar. Deployments connect payloads to endpoints like Associations, but deployments have more advanced capabilities than their earlier cousins. We'll use the Deployments view whenever we want to create new, or edit/delete existing deployments. In each case a deployment will define a relationship between payload(s) (the things to install) and the endpoint(s) (the thing to install to). # Create Deployment ## What Create a deployment when you need FileWave Anywhere to connect one or more payloads with devices or groups. Deployments can also include exclusions for devices or groups that should not receive the payload. ## When/Why For a simple deployment, target a manual group or individual devices, such as every device that owns an Adobe Photoshop license. For a scoped rollout, target a broader group such as Production, then add an exclusion for the Managers Smart Group. Deployments can also target LDAP OUs. ## How To create a new deployment, select the plus ( ) in the top right. Give the deployment a clear name in the top left. Good names make deployments easier to filter and audit later. The related deployment articles cover each tab in this view. # Deployment Targets ## What The Targets of a deployment are the endpoints that we'll define for deploying to. Targets allows us to choose individual devices, groups, smart groups and LDAP sources for our deployment. Targets also allows us to avoid deploying to certain devices or groups as well. ## When/Why We'll want to define here the targets and exclusions:| **Targets** - What you want to receive **Groups** - Static, Smart Groups, and LDAP OUs to include **Devices** - Specific devices to include | 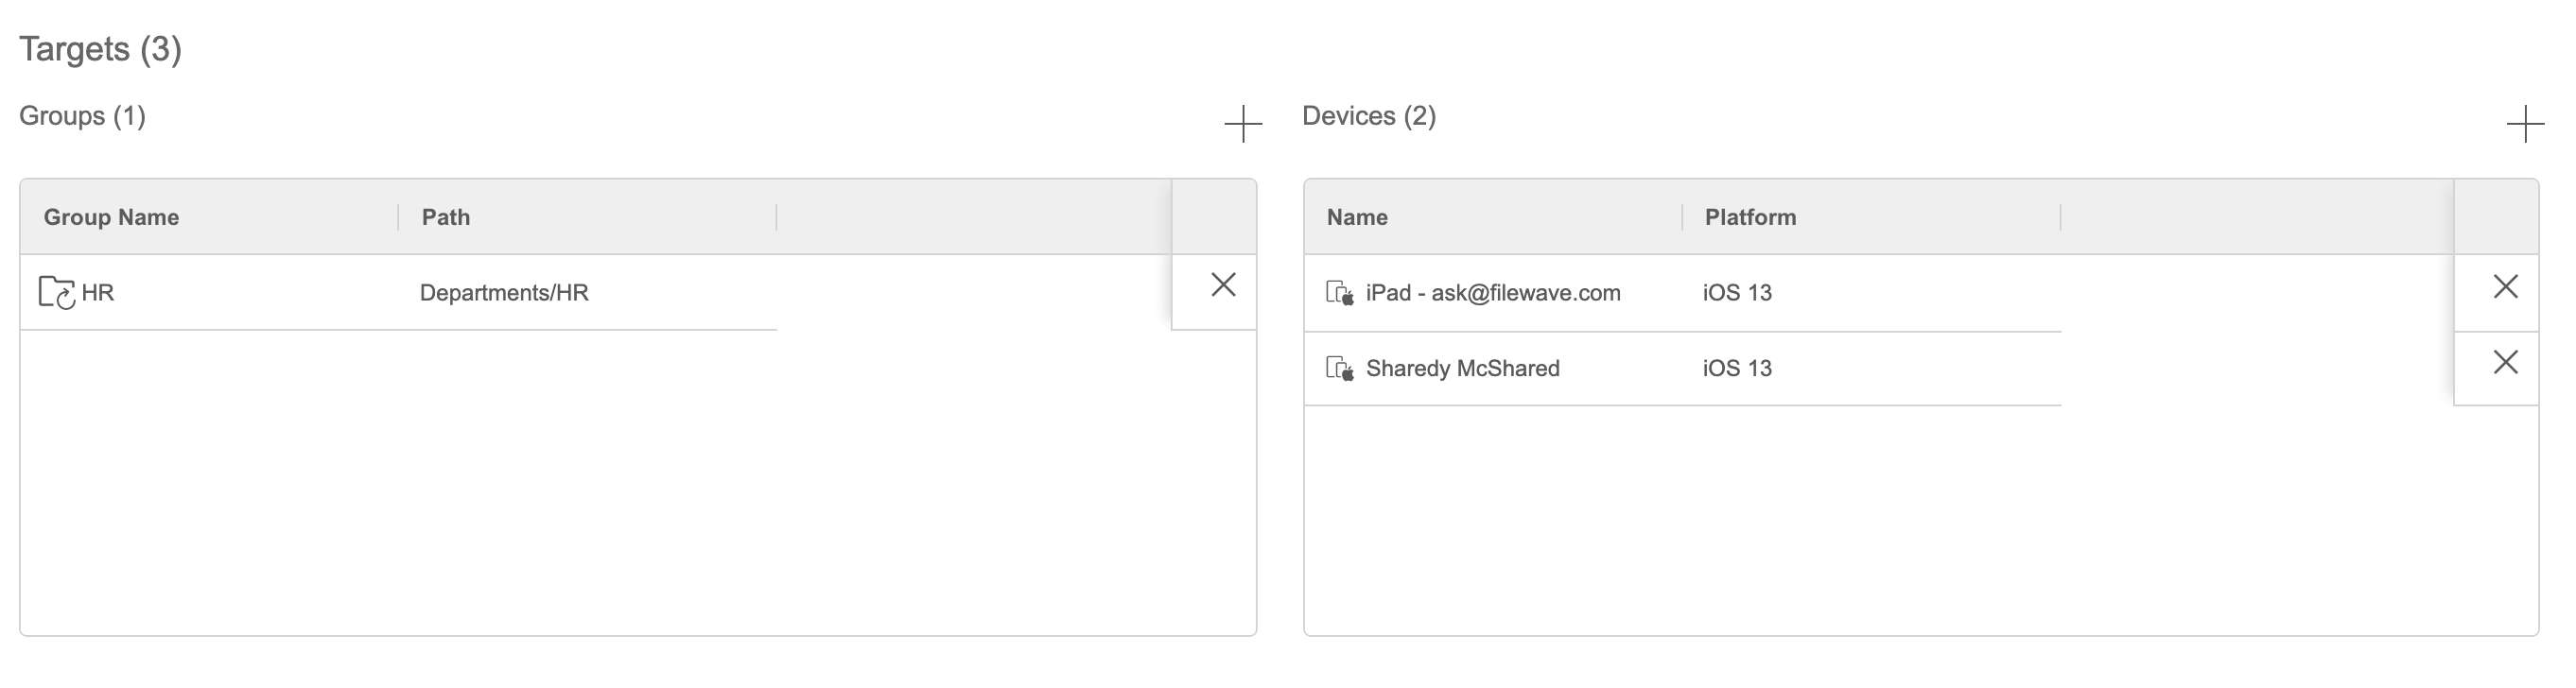 |
| **Exclusions** - What you don't want to receive **Groups** - Static, Smart Groups and LDAP OUs to exclude **Devices** - Specific devices to exclude | 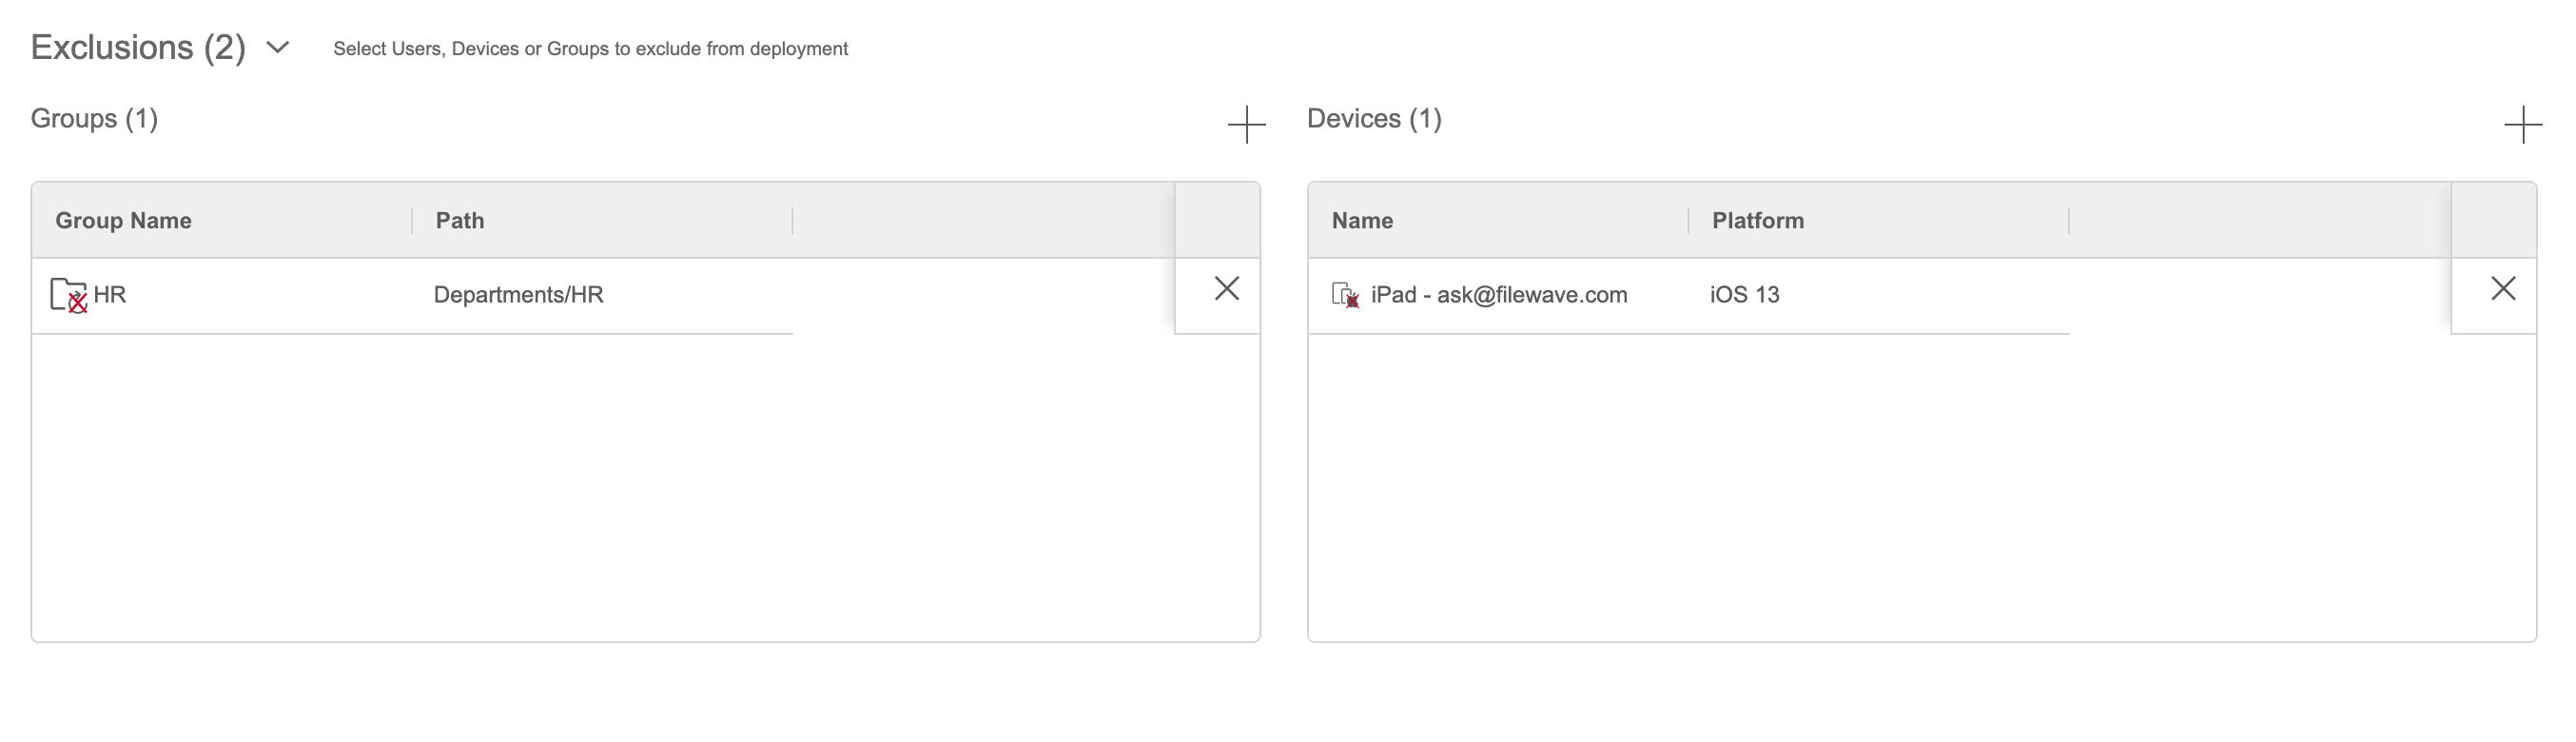 |
If left blank, the deployment can be saved, but without targets it won't send payloads anywhere. This may be nice for archival purposes.
## How 1. From the Targets tab. 2. Select devices you want to get a payload(s). Either groups or individual devices 3. (optional) Select exceptions, groups or devices you do not want to receive any payload(s) 4. Save your work to finish later or next to finish creating your deployment # Deployment Payloads ## What In the Payloads tab, we'll choose all of the payload(s) we want to include in this deployment. That is, items, such as software you want to deploy. This can be one item, many items, or even nothing. ## When/Why Of course the point of a deployment is to deploy something, so we'll pick payloads we want in this view. Note that the list of payloads can always be amended. Additions will be installations, and removals of payloads will be uninstalls (based on verification settings). ## How 1. Press the plus () in the top right or "Add Payloads" button in the center 2. Select one or many payloads 3. You may delete them with the x () 4. Select Save to continue later or next to finish the deployment # Deployment Options ## What The Options tab controls deployment behavior, including install type, timing, and VPP license assignment when the payload supports those settings. The available options depend on the payload type. ## When/Why For simple payloads, such as an iOS VPP app, you might leave the defaults alone. For a Windows MSI deployment that should install after 5 PM on Friday, you can use the timing options to control when FileWave offers or installs it. ## How 1. Select the install type: 1. **Direct**: installs automatically. 2. **Kiosk**: appears in the Kiosk for the user to install. 2. Optionally set timing. If no timing is selected, FileWave downloads and installs as soon as the deployment can run. 3. For VPP apps, optionally select license distribution: 1. Device 2. User # Deployment Summary ## What The Deployments Summary tab shows you the effective action that your deployment will perform. ## When/Why It is very important to review this tab to make sure that at minimum the number of devices being impacted makes sense. This is your opportunity to sanity-check your settings before you update the model and commit your changes. ## How Note that no actions can be taken directly on the summary tab, but it gives you to overview to evaluate your deployment: 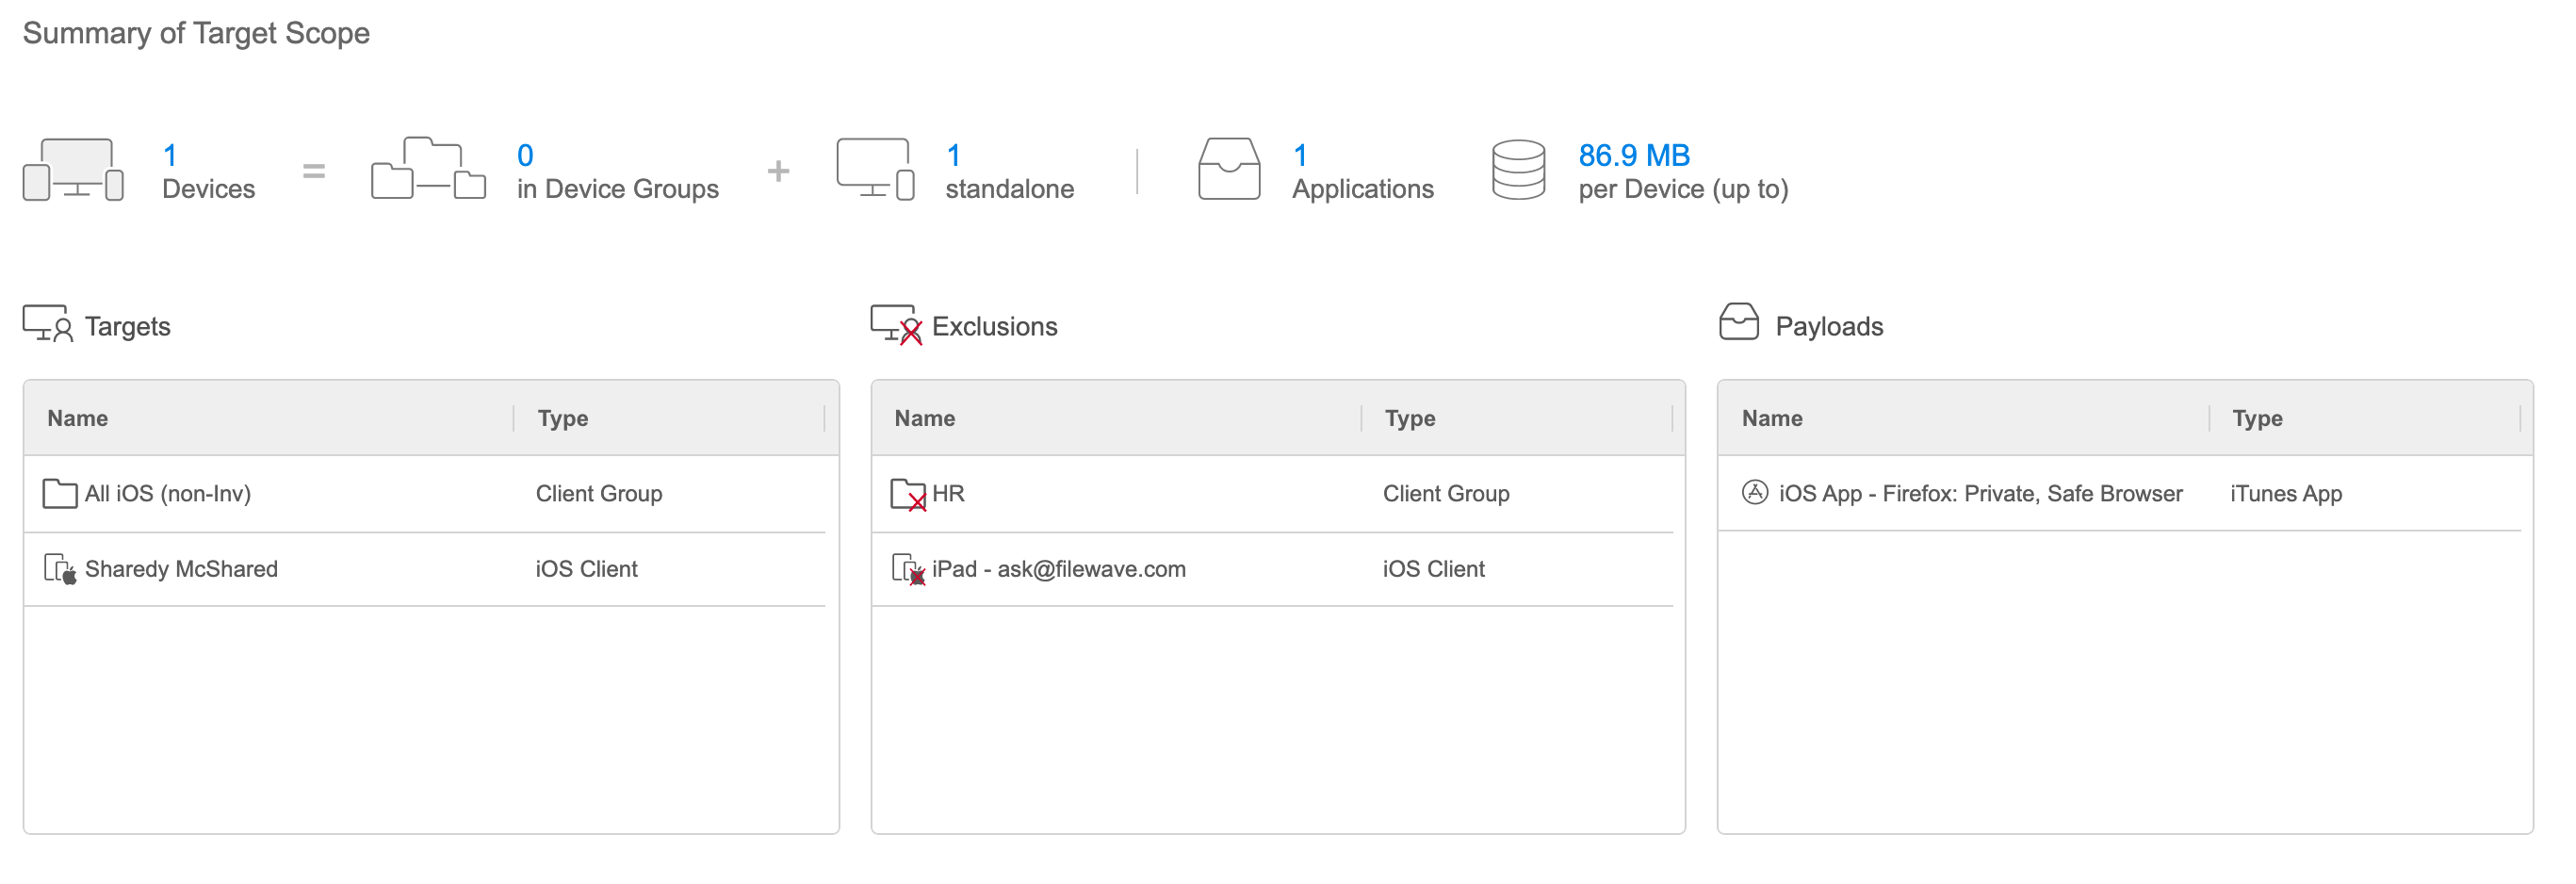 The tab shows the number of endpoints impacted, and the overall size of the deployment. Note that an explicit exclusion wins over an inclusion. (e.g. a device is in a group that has a payload assigned, but that device is also explicitly exluded means that that endpoint will NOT have the payload(s) installed.) # Deployment Drafts ## What When you create a deployment in FileWave Anywhere, an unfinished deployment may appear as a **Deployment draft** on the Deployments page. ## When/Why Deployment drafts protect work that you have started but not finished. If you close the browser, move to another task, or leave the deployment before saving it, FileWave Anywhere can keep the draft so you can return to it later. Drafts are stored for the user and browser that created them. For example, a draft created in Chrome will not appear if the same administrator signs in from Firefox. ## How Deployment drafts appear on the Deployments page. To continue a draft, click its name or use the **...** menu and choose **Edit**. To discard it, use the same menu and choose **Delete**.  If you click **Cancel** while editing a draft, FileWave Anywhere asks whether to keep the draft for later or delete it now.  # Deployments Targeting LDAP Groups ## What FileWave Anywhere can target LDAP organizational units (OUs) directly when defining a deployment. That means you can deploy to directory-based groups without first building a separate Smart Group just to mirror the OU. ## When/Why Use this when the LDAP OU is the source of truth for the devices you want to include or exclude. Directory-based targeting works well when the directory data is reliable; if device membership in LDAP is stale, the deployment target will be stale too. ## How Target or exclude an LDAP OU in a deployment the same way you would target another deployment source. The example below shows the workflow: # View - Devices # View - Devices Overview ## What The Devices view () is the main FileWave Anywhere area for enrolled devices. Use it to open device details and start supported enrollment workflows. ## When/Why Use this view when you need device status, inventory details, group or Smart Group membership, or a starting point for troubleshooting a specific device. ## How From the top-level Devices view, use the related Devices pages in this section for deeper steps on device details, fields, groups, and actions. # Basic Filtering ## What In FileWave Anywhere, the Devices view has OS filters and manual column filters. Use them to narrow the device list to a platform, group, or specific value such as an asset tag. ## When/Why Use these filters when you need to find one device quickly or work with a subset of devices, such as Windows devices in one group. The screenshot below shows a manual filter for an asset tag. 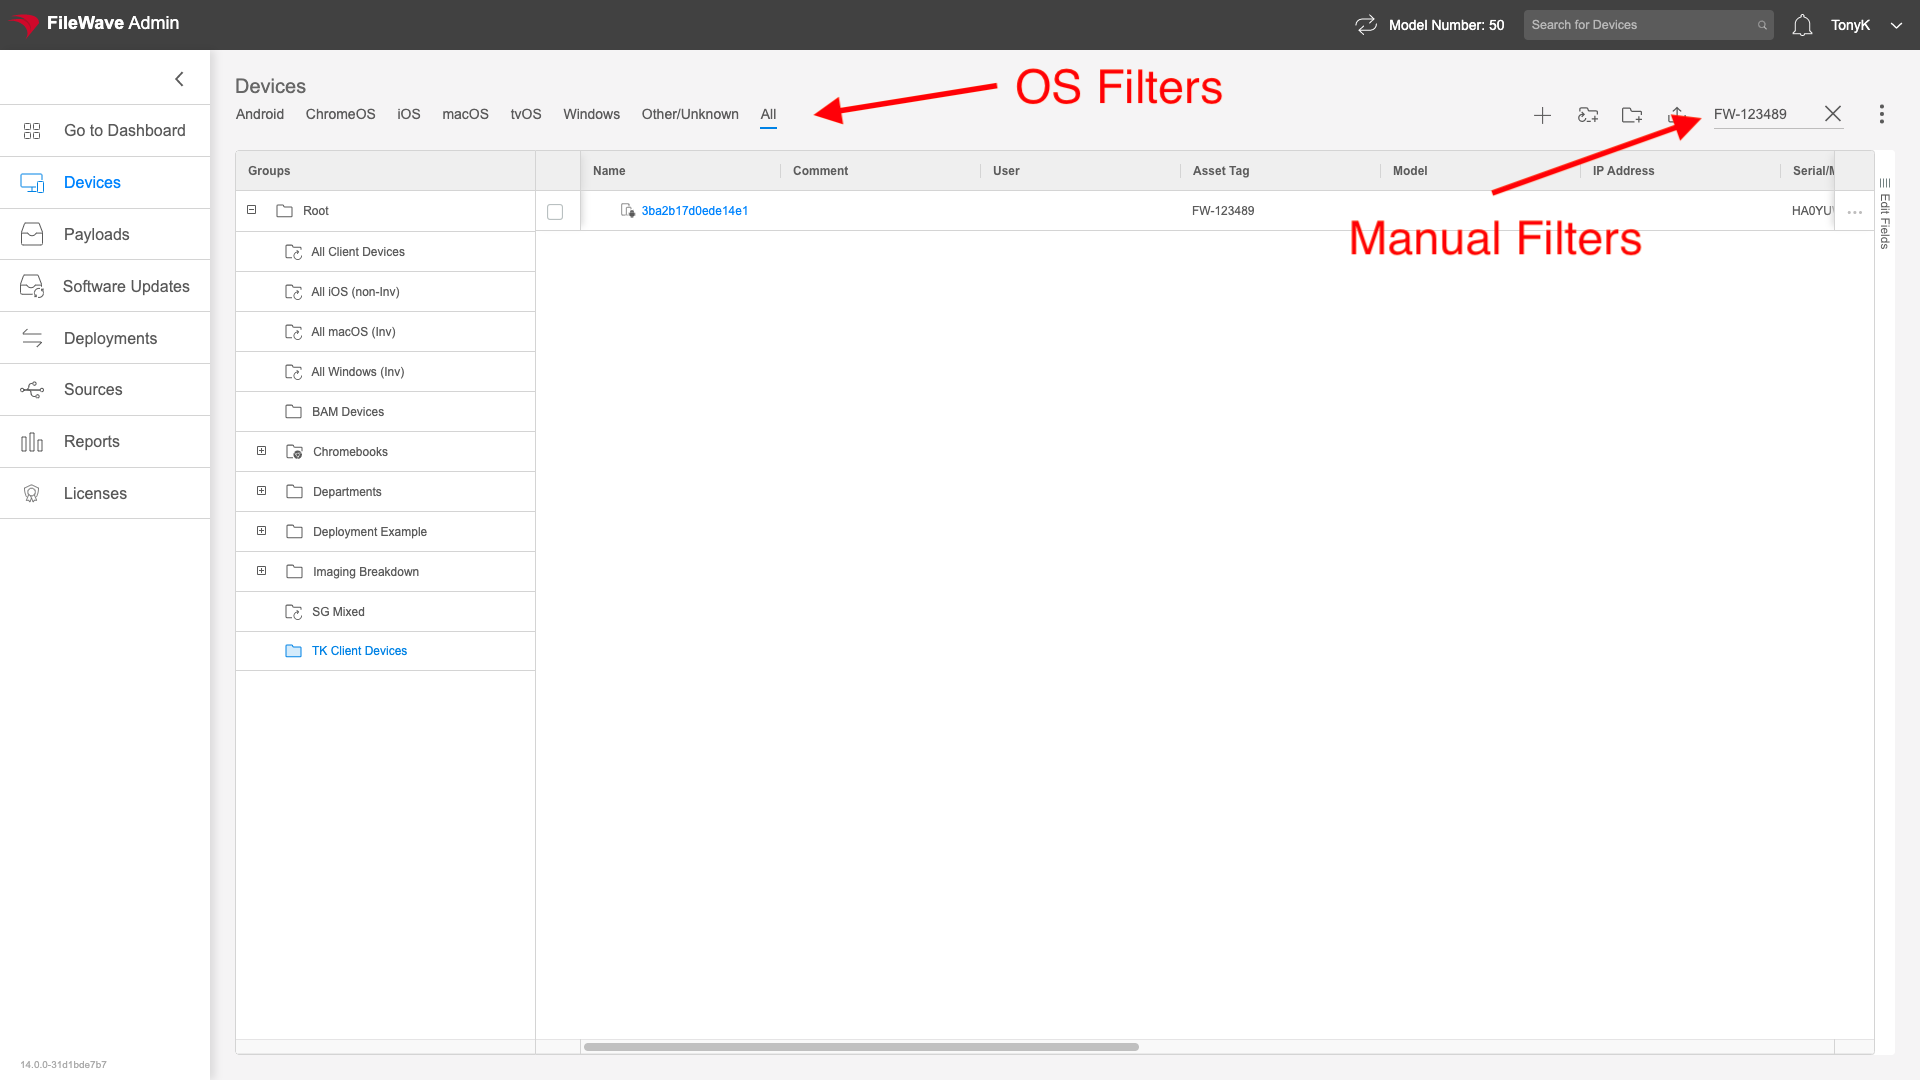 A manual filter only searches fields visible in the current view. If you want to filter by Asset Tag, add the Asset Tag column to the view first. Manual filters are sticky. If you leave the Devices view and come back, FileWave Anywhere keeps the filter until you clear it.OS filters, group selection, and manual filters combine. If the results look too narrow, check all three places before assuming a device is missing.
## How Select a group on the left to show only items in that group. Add an OS filter to narrow by platform, then use a manual filter to narrow the visible results further. # Adding Devices ## What This page shows devices awaiting enrollment and lets you create placeholders. You can also specify [Actions](#bkmrk-actions), such as which group to add devices to, which fields to set, and what should happen after import. ## When/Why Use this dialog when automatic import is not enabled for new clients, or when you want to create placeholders for devices that do not exist in FileWave yet. For example, you can create a placeholder for a Windows device before imaging it, or assign content ahead of enrollment so the device receives it as soon as it checks in. Use the Plus and Upload icons in the Devices view to add devices:  ## How From the devices view press the plus () to enter the UI on the [Selected Devices](#bkmrk-selected-devices) screen. See articles listed below to get details on the individual tabs within the dialog. ### ActionsFields, destinations, and other actions to take once a devices is brought in
"Actions" is where you can set data for inventory fields, manually assign a DEP profile, and set destinations for the imported devices/copies (aka "clones") after a device has been enrolled. You would use the import actions listed above typically only when you don't have "automatic" import turned on. These actions are only preformed after everything has been saved. #### How 1. Select the action dropdown and choose one of the following: 1. Assign Field Value - *Allows you to set inventory values fields* 1. Then select a Device Field (like "Comment") 2. Then Select a Value for that field (like "Front Desk Checkin Station") 3. (Optional for string/text fields) Select "Replace" (overwrite any value the device currently has), or "Append" (add your text to the end of the value) 2. Import/Move to group - *Specify the group where the original device will go* 1. Then select the group you want the original sent to 3. Create Copies in Group(s) - *Specify where clones/alias/copies of the original will be created* 1. Then select **any** groups you want copies created in 4. Copy in the same group - *Copy your incoming devices to that of an already existing device (i.e. mirror its groups)* 1. Then select an existing placeholder or device 5. Associate DEP Profile - *Manually assign a specific DEP profile for this device* 1. Then select the specific DEP profile 2. If you need more than one action taken, press "Add Action" and start from 1 againAssign Field Value can be added many times. The other Actions can only be selected once.
If you select "Import/Move to group" you can't also select "Copy in the Same Group". Similarly, if you select "Copy in the Same Group" you can't select "Import/Move to group"
### Add Placeholder A placeholder is a temporary item that represents a device you intend to enroll at a later date. You can use placeholders for a device that you will be adding eventually. Placeholders allow you to specify the connections from payloads to the device through deployments so that when a device is ultimately enrolled, it will immediately get all assigned content. #### How 1. From the [Selected Devices](#bkmrk-selected-devices) interface, press the "Add placeholder" button 2. Enter text into the fields - Name (required) - Comment (optional) - Platform (required) - Serial / MAC (Serial number for Apple devices, MAC address for Windows devices) 3. Press "Add Placeholder" #### Related Content - [Upload Devices and/or Data](https://kb.filewave.com/books/filewave-anywhere-help-menus/page/upload-devices-andor-data "Upload Devices and/or Data") - [Importing Computer Clients from a File](https://kb.filewave.com/books/filewave-client/page/importing-computer-clients-from-a-file "Importing Computer Clients from a File") #### Digging Deeper - Keep in mind that you can also create a clone by doing a [Copy to Group](https://kb.filewave.com/books/filewave-anywhere-help-menus/page/copy-to-group "Copy to Group") thereby creating many instances of your original. These groups can also have associations/deployments on them. Use this to create a layered structure. ### Selected DevicesThese are devices pending enrollment. They can be devices checking-in with a client already installed or from a service such as Apple DEP/ Android EMM
Shows a list of pending devices that are either clients checking-in or devices in your pending DEP/EMM list. You will select devices from the list for import whenever you are ready for them to be a part of the managed environment. You do not have to import all devices that show in this list (you can pick and choose individuals). #### How Once you have started the Adding Devices process, Select Devices is the first tab showing what can be added. 1. From the **Pending Requests** section you can select devices or DEP/EMM placeholders for import 2. Select the checkbox to the left of each device you wish to include 3. Press the Move to Selected Devices button 4. (Observe) that device moves to the lower list 5. (Optional) [Add Placeholder](#bkmrk-add-placeholder) devices 6. Select "Next" to move onto [Actions](#bkmrk-actions) ### SummaryPreview the results of your changes
The summary tab view will show a preview of the action you are about to perform.Some views, Like the Summary in Mass import [Upload Devices and/or Data](https://kb.filewave.com/books/filewave-anywhere-help-menus/page/upload-devices-andor-data "Upload Devices and/or Data") will have check boxes for confirmation of changes.
Use this view to verify what you want to happen. #### How - If everything look correct, hit "Save" - If there are issues select "Back" and change them - If you want to stop the process, or perhaps start over, select "Cancel" 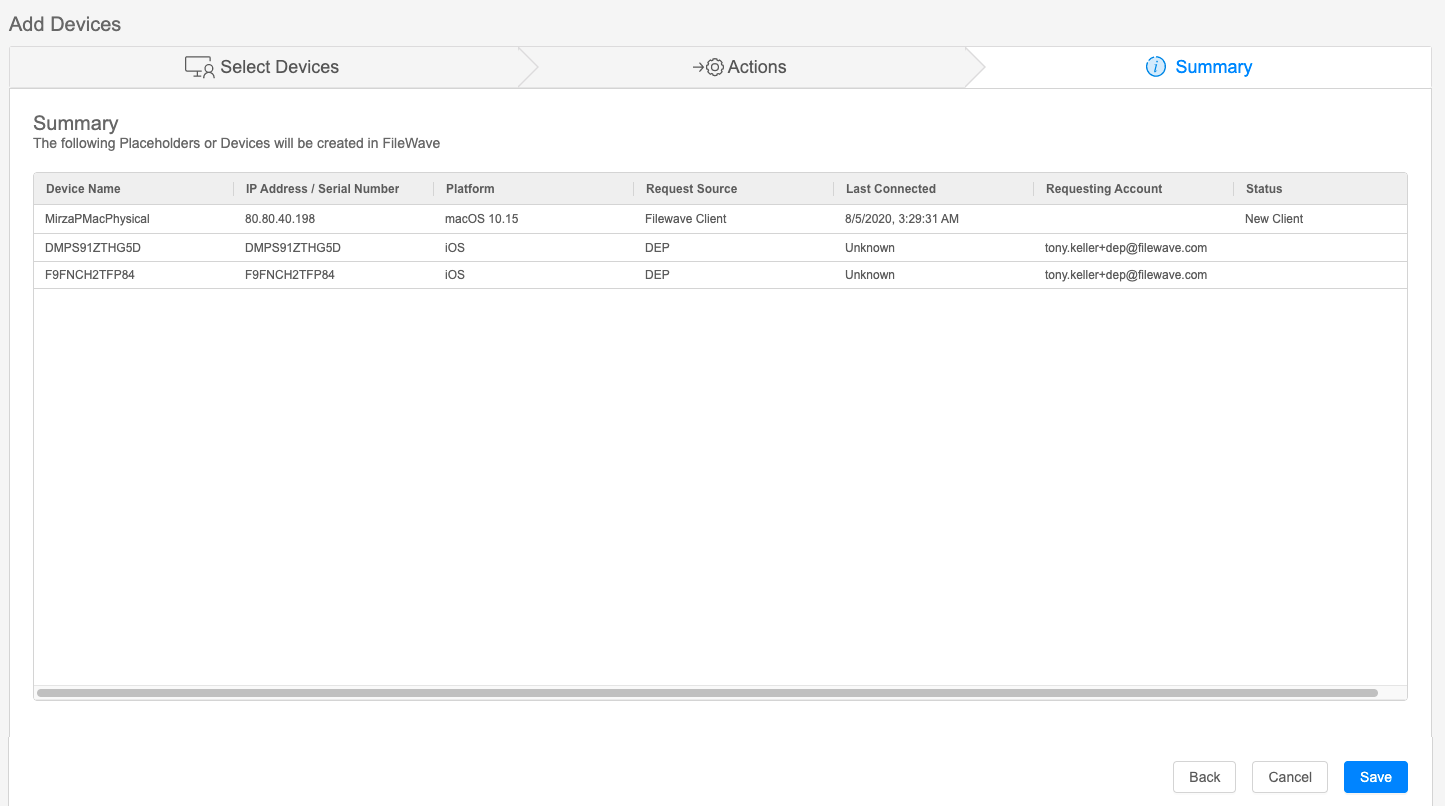 # Upload Devices and/or Data ## WhatMass import devices or inventory data from a CSV or TXT file
The upload option () lets you import device placeholders or update inventory fields for many devices at once. During import, FileWave Anywhere lets you map columns from the uploaded file to FileWave fields and choose additional import actions. ## When/Why Use this workflow when you need to create many placeholders at once or update field data across many devices. For example, if an asset-management export maps device serial numbers to physical asset tags, you can import that data into FileWave instead of updating each device manually. ## How 1. Open [View - Devices](https://kb.filewave.com/books/filewave-anywhere-help-menus/chapter/view-devices "View - Devices"). 2. Click the upload icon.  1. The [Import File](#bkmrk-import-file-tool) tool opens. 2. Select your TXT or CSV file and continue to [Map Fields](#bkmrk-map-fields). 3. In **Map Fields**, match the columns from your file to FileWave fields. 4. In **Actions**, choose any additional import options that apply. ### Import File tool The Import File tool imports a large amount of data from a CSV or TXT source. - A hardware vendor might provide a spreadsheet for 100 incoming laptops with MAC addresses and asset-tag values. Importing placeholders lets you prepare those devices before they arrive. - Your property-management team might provide a spreadsheet that links existing device serial numbers to physical asset tags. Importing that file updates the matching FileWave inventory fields for quick reference. #### How To import a file: - Create a CSV or TXT file with a header row followed by one row for each device. ``` "Serial Number","OS Type","Device Name",comment,location,asset_tag C02WP0hgHTDF,macOS,"HR-John-MBP","John's laptop","north site","123456" ABC456123DEF,iOS,"ThatsABeautClark","no comment","Normal, IL","651241" 215487958754,Windows,"PR-Sal-1258","that other device","south site","654321" ```The columns can be in any order, but a placeholder import must include at least a device name and OS Type. When updating existing devices, include a reliable matching field such as serial number.
- Browse for the file with the Browse button (). - Preview your upload and continue to [Map Fields](#bkmrk-map-fields). ### Map FieldsConnect CSV columns with FileWave inventory fields
Map Fields is where you match each uploaded column heading with the correct FileWave inventory field. #### How 1. Open the field dropdown for a column. 2. Choose the FileWave inventory field that matches the column heading. 3. Continue to the **Actions** tab. # Group Navigation (Devices View) ## What Use the Groups pane on the left side of Devices to move around the device tree and change which devices appear in the list. ## When/Why You will use group navigation constantly in Devices. It is the quickest way to move between locations, departments, smart groups, and other parts of your tree. ## How The group tree reflects however you have organized groups and smart groups in FileWave. Each level is sorted alphabetically, just as it is in FileWave Central. Expand or collapse groups as needed, then select a group to show only that group's devices in the list on the right.Group selection is additive with the other Devices filters. For example, if you first filter for macOS and then select a specific group, the list shows only macOS devices inside that group. The filters do not change the group tree itself, so the pane on the left remains available for navigation.
# Individual Device View ## What The individual device view is a detailed level view of all pertinent details about any individual device. The URL for this view is always going to be in the form of https://my.server.address/devices/<fw\_device\_id>/info. This deep url allows you to easily share a link to this specific device with any other administrator. ## When/Why We'll use this view extensively for general data browsing purposes, but especially when we are looking to troubleshoot the behavior of any particular device. ## How The Device Detail view is accessed primarily by clicking on the name of any device showing in the Devices View:  Once you are in the detail view, you'll see tabs that break out all of the data. We'll cover each of the tabs in the articles linked to below 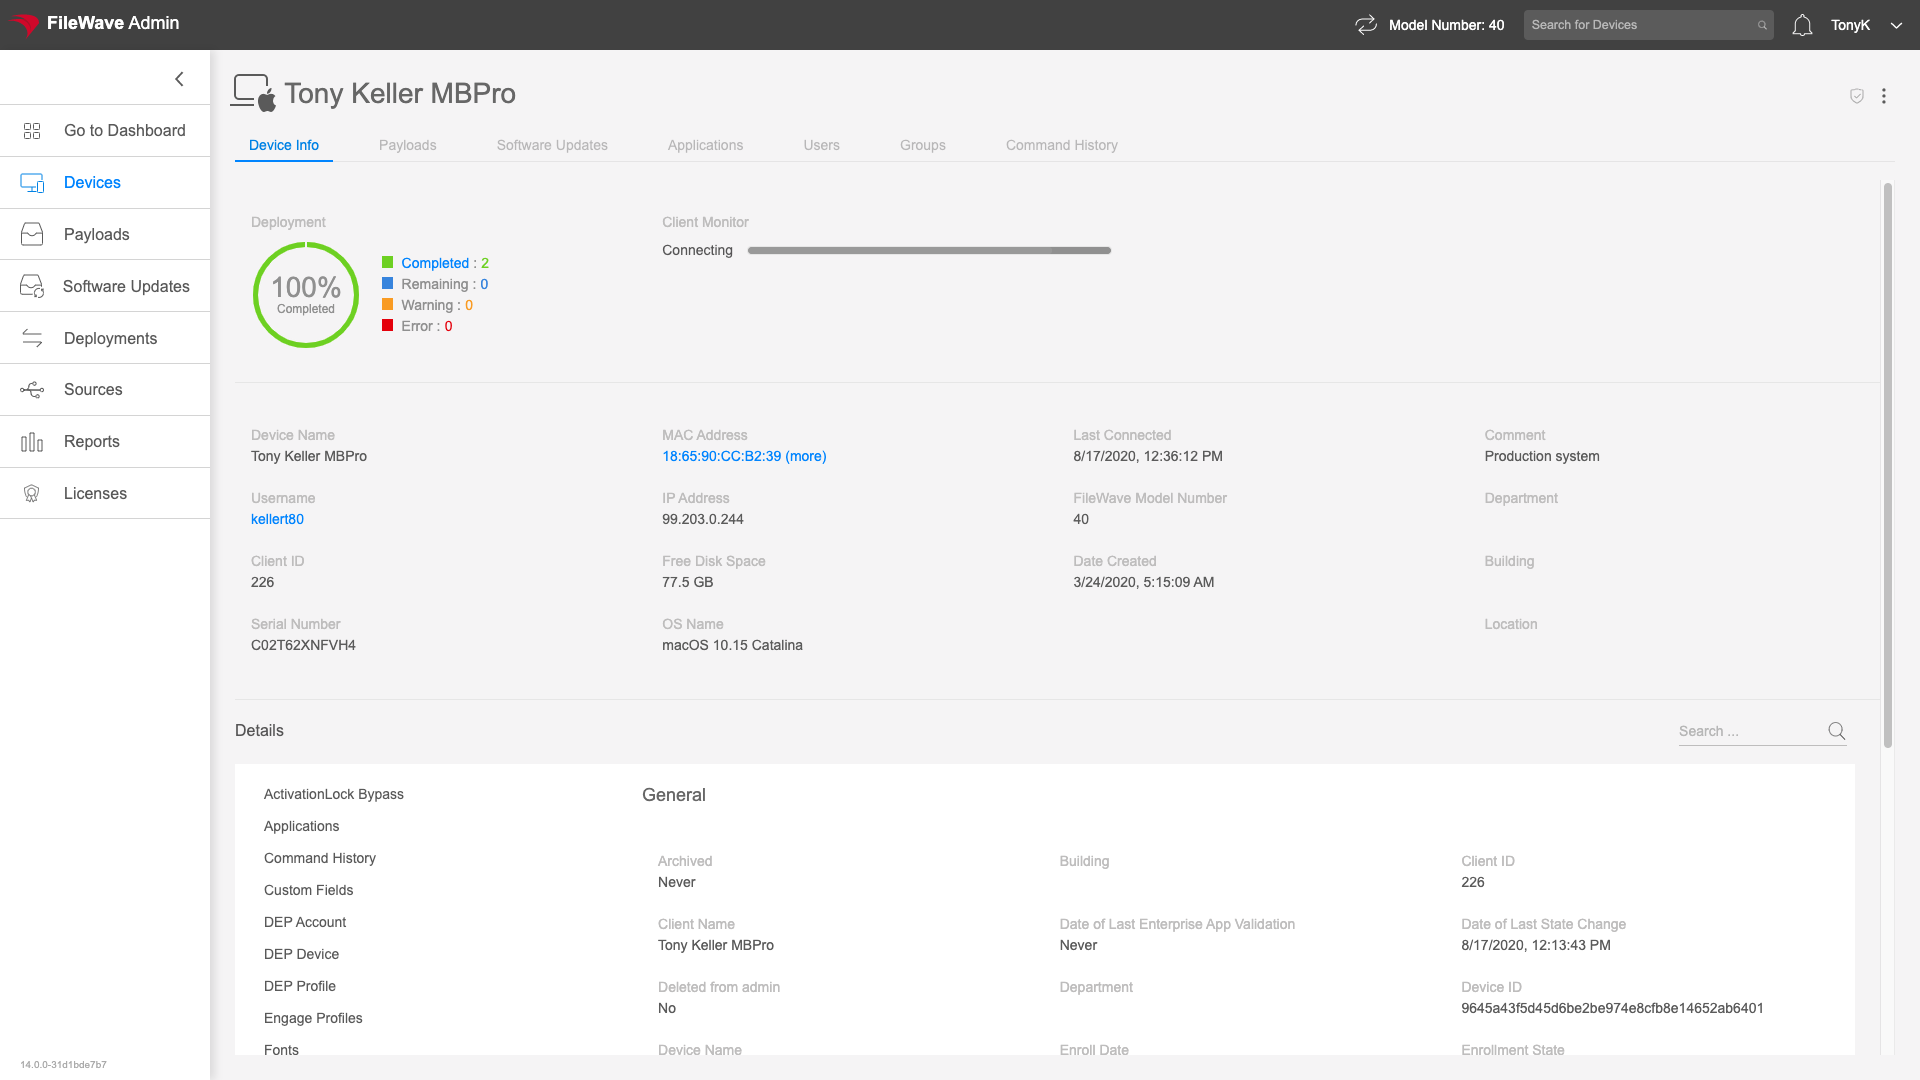You can send pertinent action commands to a device in the device details view from the vertical ellipsis (top-right):
 ### Applications The Applications tab in the Device Detail view gives you a list of applications installed on the particular endpoint. The details provided differ by platform and type of enrollment. The view is directly linkable via https://my.server.address/devices/<fw\_device\_id>/apps This view will gives us details on installed applications, which allows us to quickly look and see information such as what version of a particular application is installed. Note that the data that shows on this tab is only as accurate up until the last time the device reported inventory. Assume that you have a device that has been offline for 3 months in a desk drawer while you are rolling out a new version of Chrome. This view for that device is going to show an old version, as we would expect. #### How We access the Applications tab just by clicking on the tab at the top of the view. This view can be controlled by sorting and pinning columns. The filtering option for this table makes it really easy to isolate records. 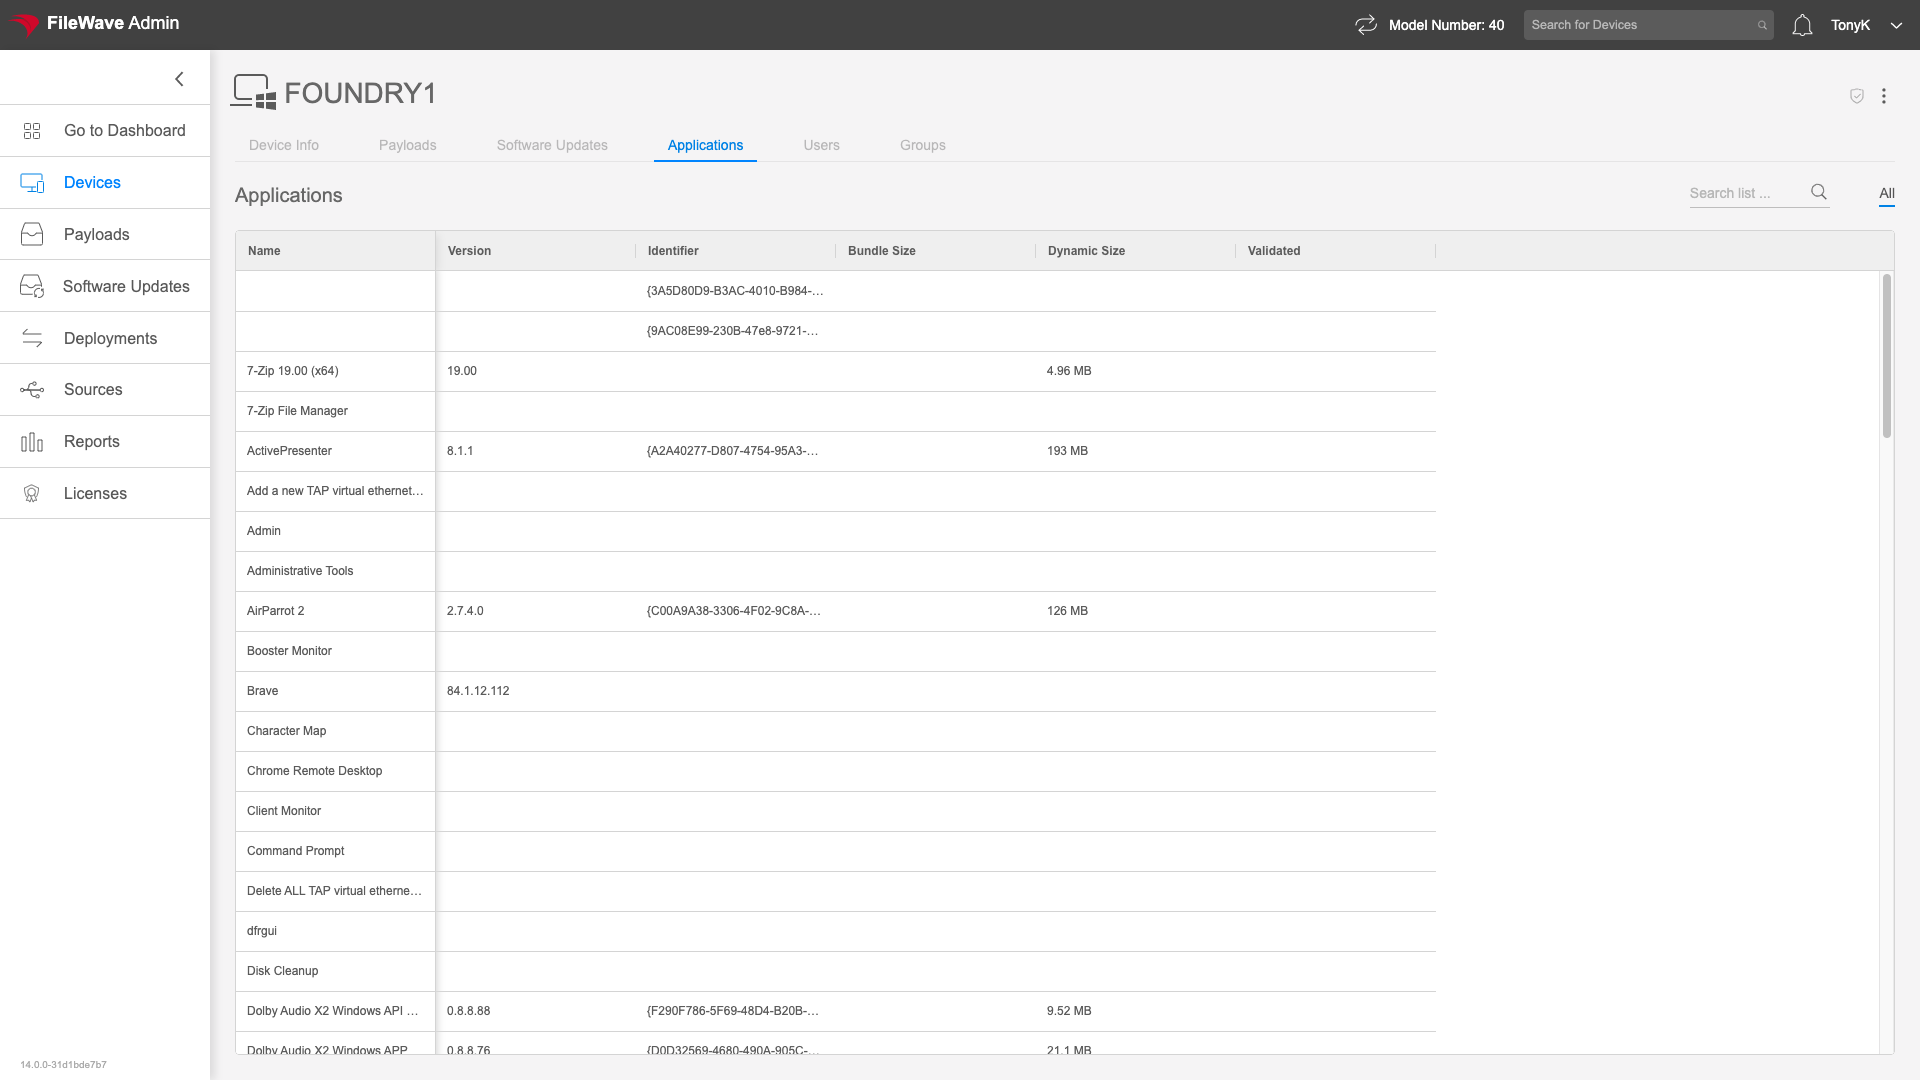 Certain enrollment types (like iOS BYOD enrollment) prevent the inventory of applications beyond the applications that are "managed". That is, with those devices, you can only see what has been installed by FileWave. ### Command History The Command History tab is only shown for devices that are Apple MDM enrolled. This tab shows the recent history of MDM commands that have been sent to this device. Command History is reached at https://my.server.address/devices/<fw\_device\_id>/commands This view is used very heavily whenever troubleshooting anything related to an Apple MDM device. For instance, if a device seems to not be getting a profile installed correctly, one might go to the Command History view to see the status of the latest Install Profile command. #### How Simply click on the Command History tab to see the latest info:  Note that the default view is ordered showing most recent commands at the top. We hope to see "Acknowledged" as the state for any good command, but sometimes you might see errors as well, and this view gives good detail on what the issue may be as you can see below: 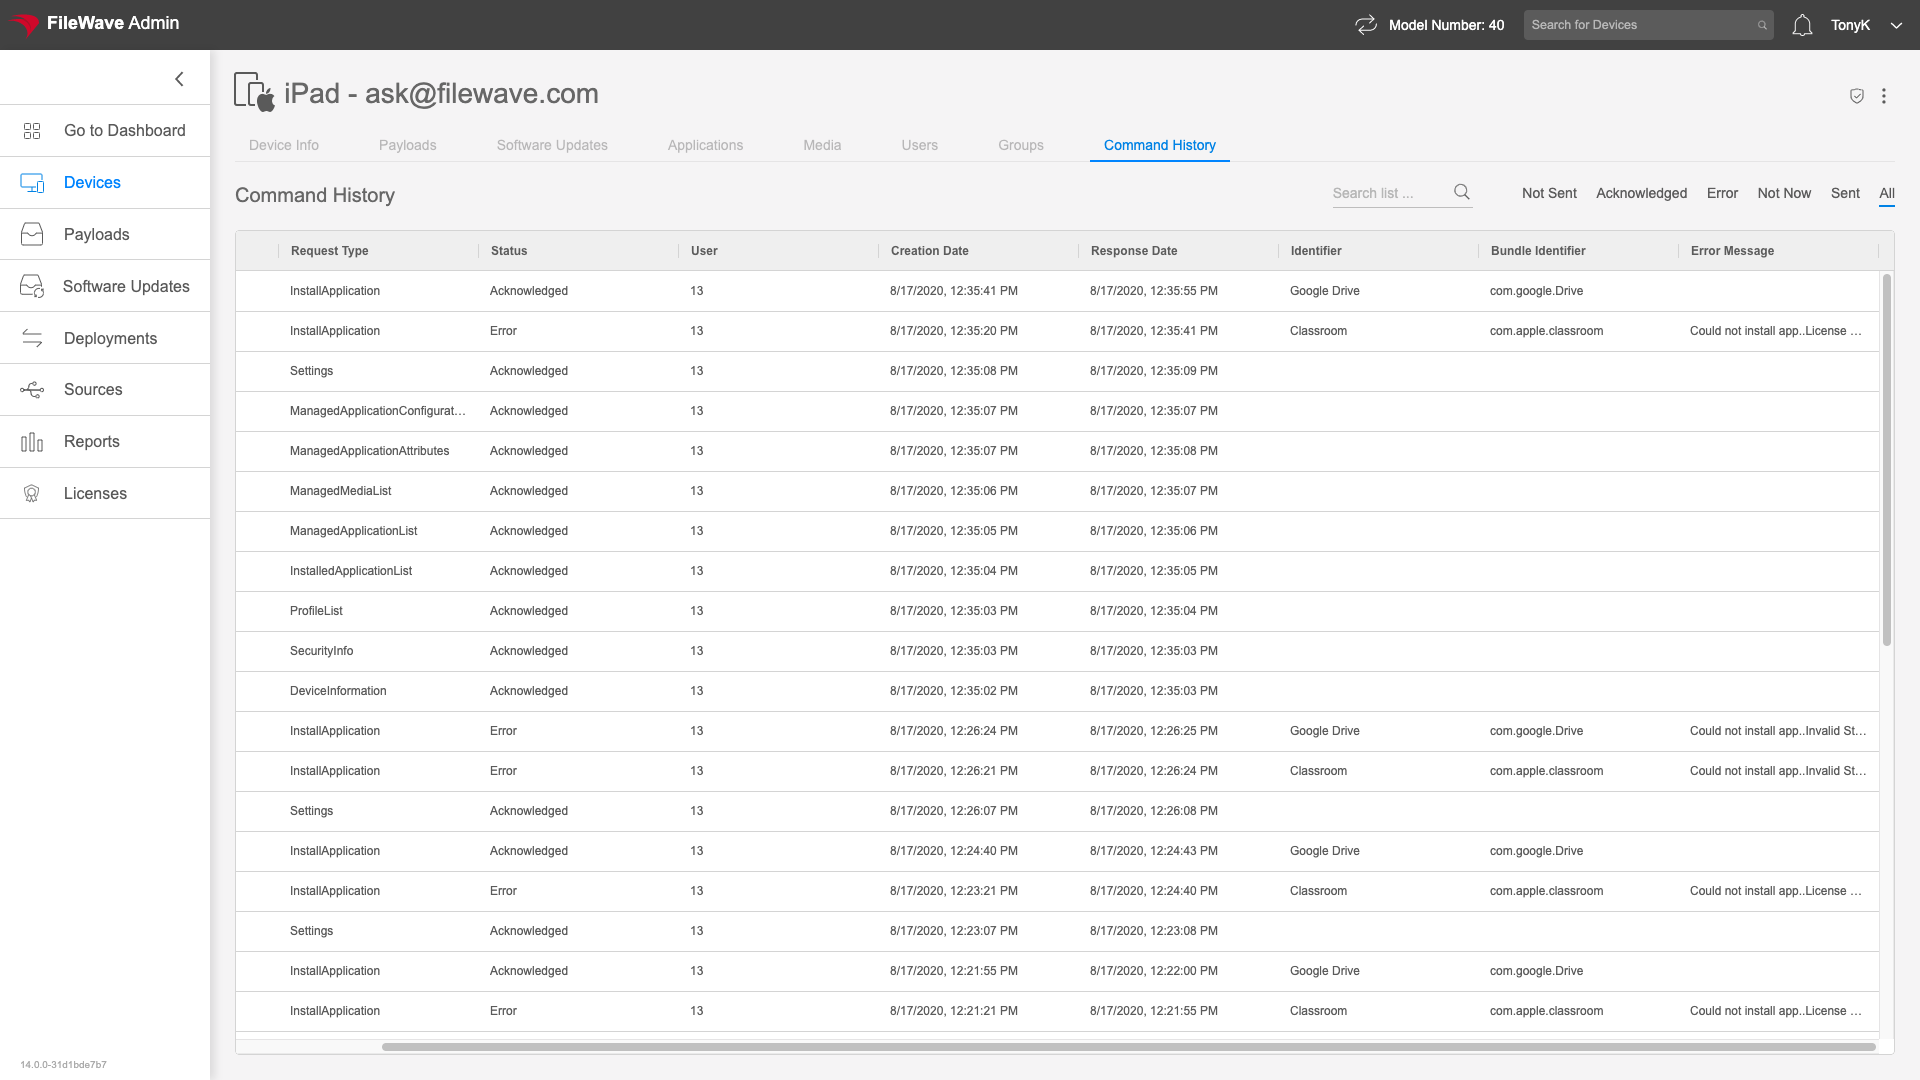The Command History view has a special filter in the top-right of the view to filter by command states.
 ### Device Info The Device Info tab of the Device Detail view allows you to see the most pertinent inventory details about any particular device. In this view, you will see an overall deployment status, you can see how much memory a device has all the way to how many, and what type of Network cards are installed. The Device Info tab is addressable here: https://my.server.address/devices/<fw\_device\_id>/info We'll use this view whenever we want to see device specific information. We could create a report to do the same thing of course, but this view is much simpler and quicker. #### How The Device Info tab is the default tab when you click on a particular device in the Devices view. You'll see some of the most used summary information at the top of the view: 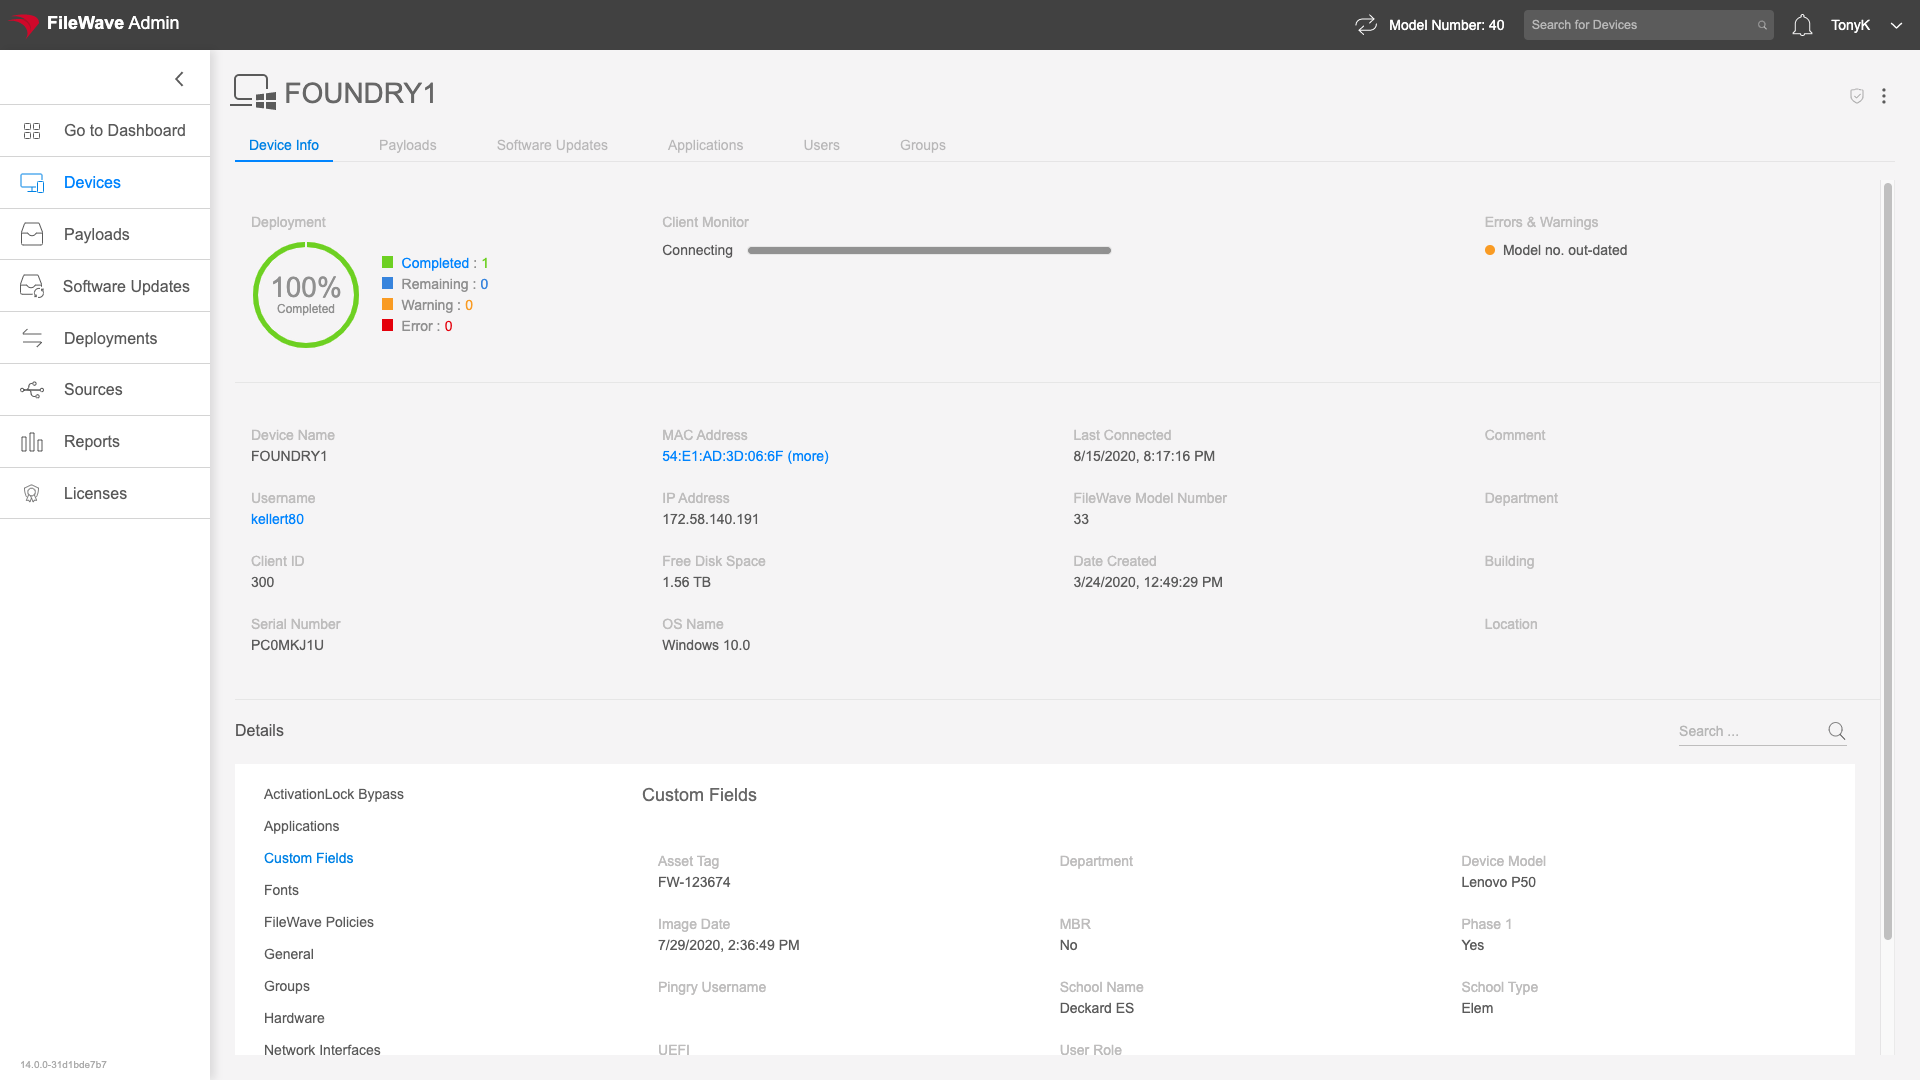 With detailed tables below broken out into data categories. Here we are looking at network details for a Windows device: 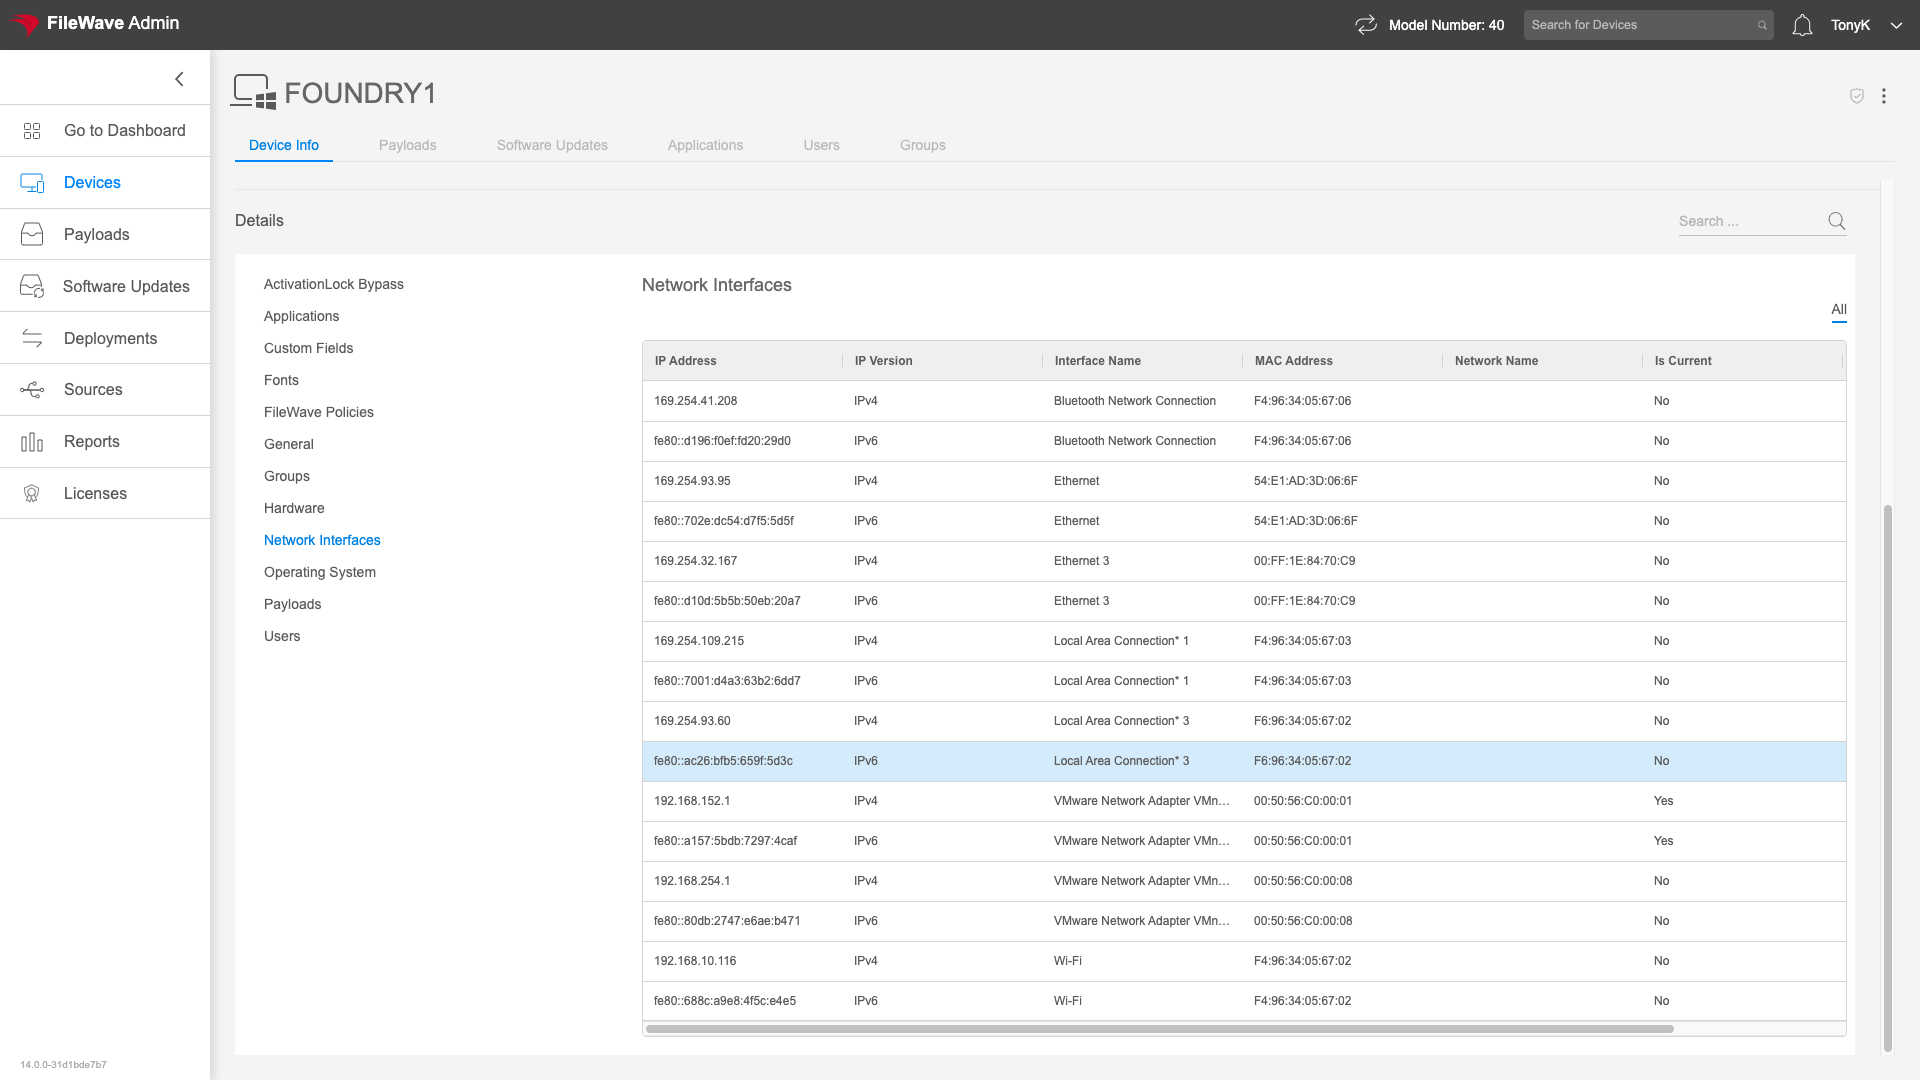 The sub-tables in this view do have their own filter. Filtering for search terms will highlight the content in the view: 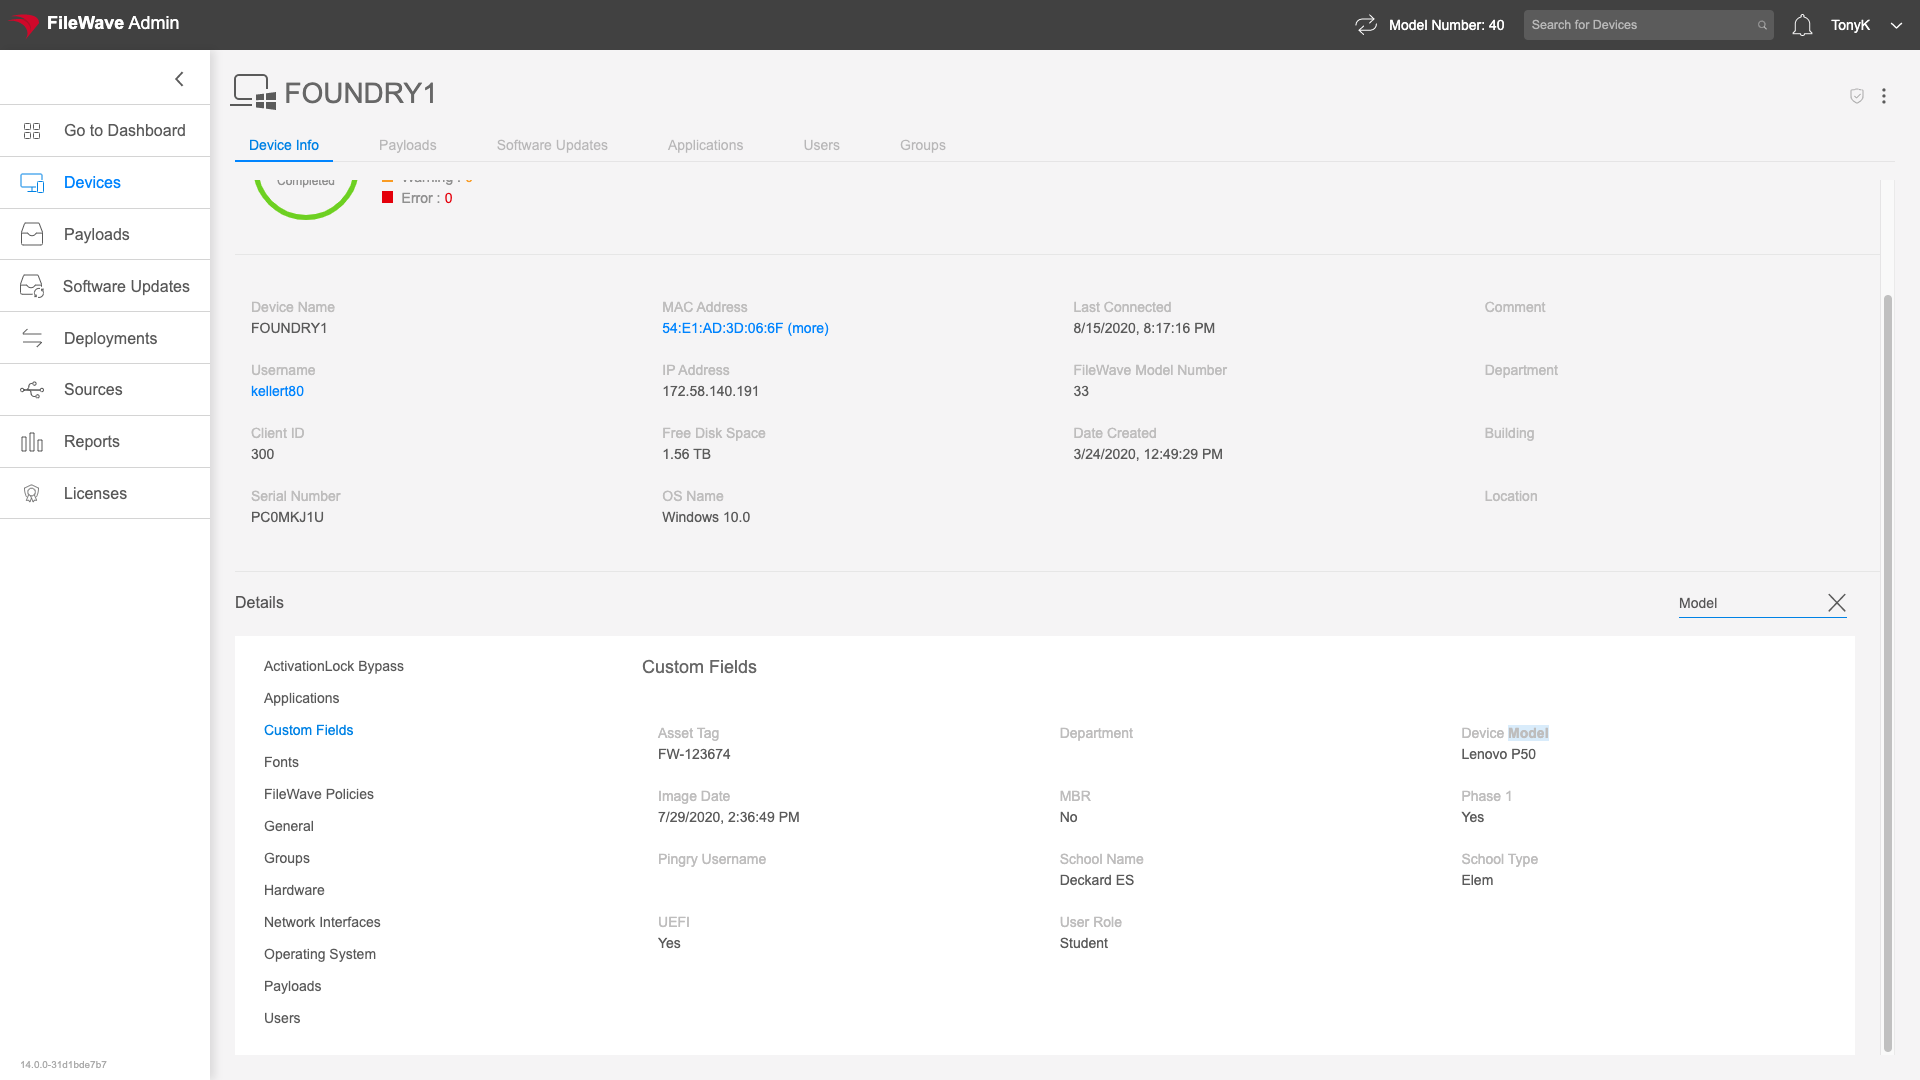 ### Groups The Groups tab of the Device Details view gives information about in which FileWave Groups a device is located. This view is addressable at: https://my.server.address/devices/<fw\_device\_id>/groups This group information is generally not actionable content, but sometimes can let you see that you have "surprise" group membership. That is, the device is in a group you didn't expect it to be in...perhaps from a custom field wrongly set, or a mistaken criteria on a smart group. #### How Just click on the Groups tab to see what FileWave groups the device is in as we have done on the Windows device below: 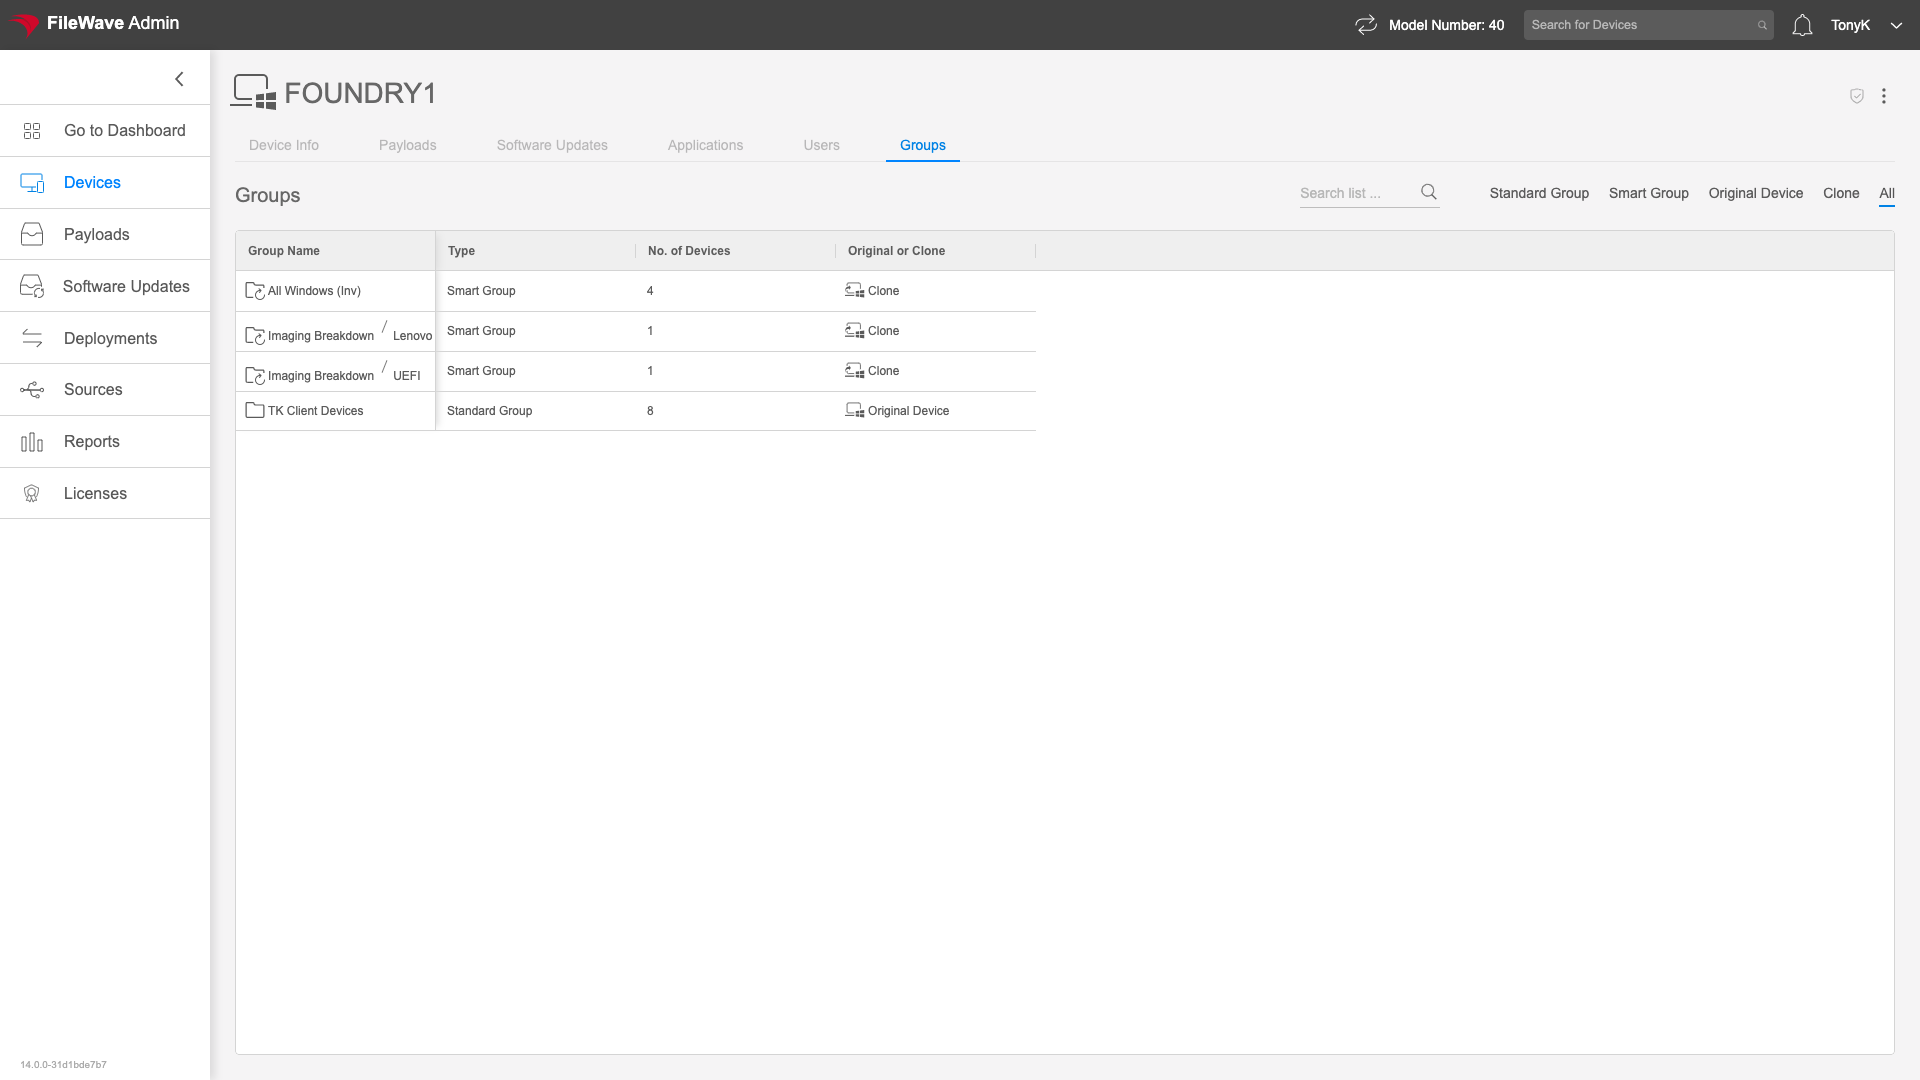 ### Location The Location tab of the Device Detail view gives information about the reported last location of a device. This tab is only shown if location data has been submitted for the particular device. The url for this tab is: https://my.server.address/devices/<fw\_device\_id>/location Seeing this data is very helpful for either a lost or stolen device. #### How Simply click on the Location tab to see the map (if available): 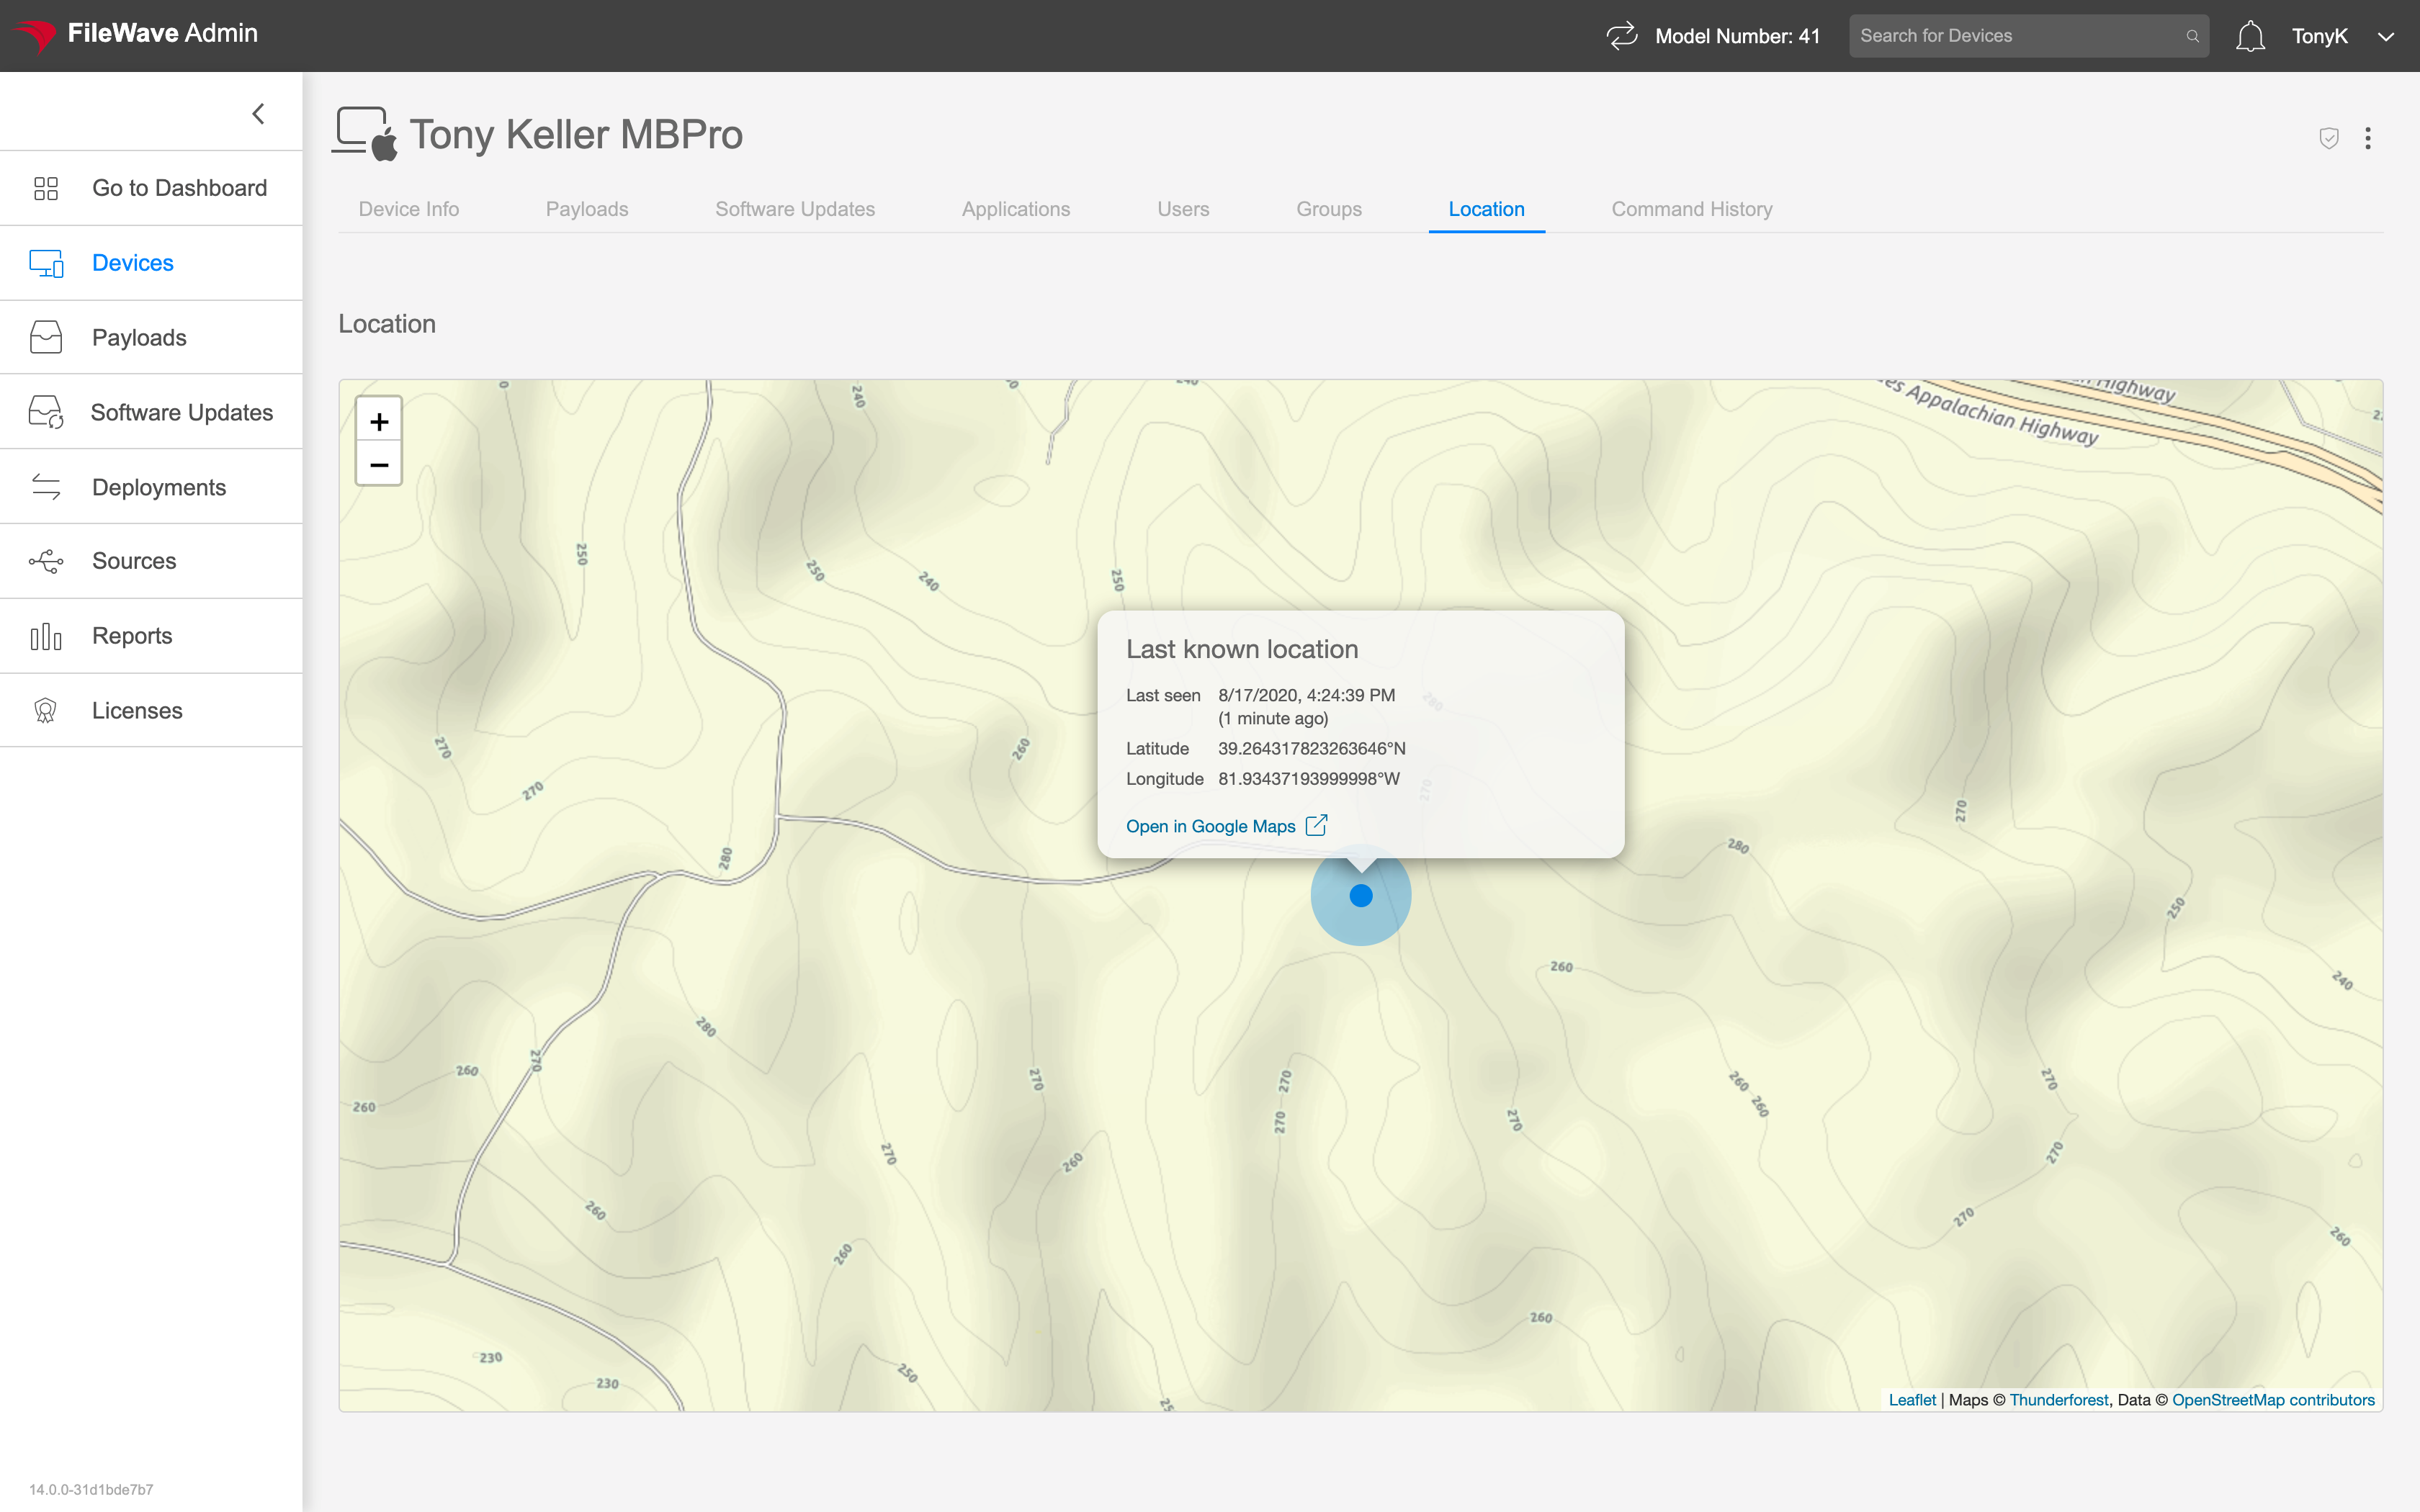 ### Media The Media tab of the Device Details view shows documents that are managed on the endpoint through FIleWave. This tab will only show for iOS device types. PDFs are the most common type of media delivered to endpoints, and the PDFs (once installed) will show in the Books app. You can get to the Media tab at the following url: https://my.server.address/devices/<fw\_device\_id>/media #### How Just click on the Media tab to access the data reported from the endpoint. As with all inventory, the data shown is accurate as of the last data submission from the device. 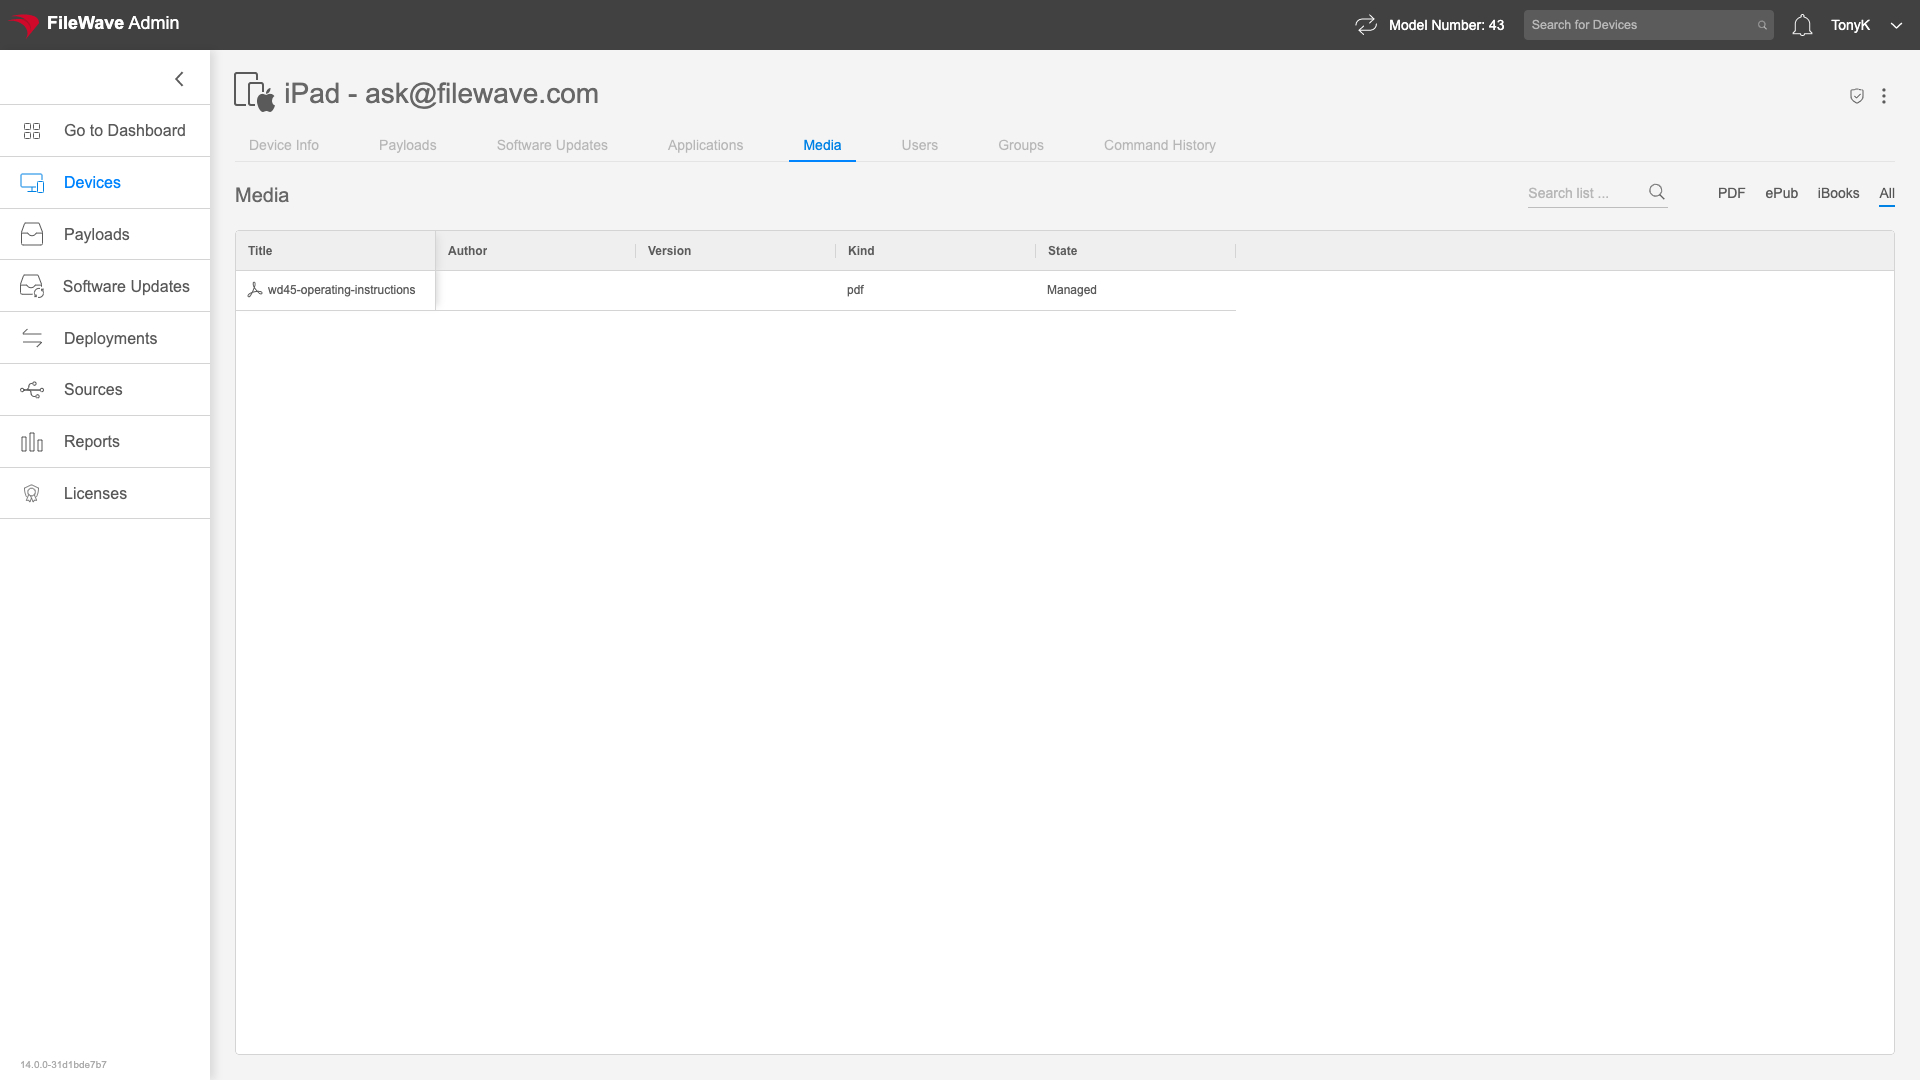 ### Payloads The Payloads view is one of the most important tabs in the Device Details view. This table shows you all content assigned to the chosen endpoint and is accessable at: https://my.server.address/devices/<fw\_device\_id>/payloads We will typically use the payloads tab to get summary information on payloads sent to (or pending) to an endpoint. This information can tell us where we have potential issues with deployments. It also can be very useful simply to backtrack how something is associated...that is, how that particular payload is assigned to this device. #### How Note that the Associations column shows how the individual payload is assigned. In this case, three individual associations and one association to a smart group: 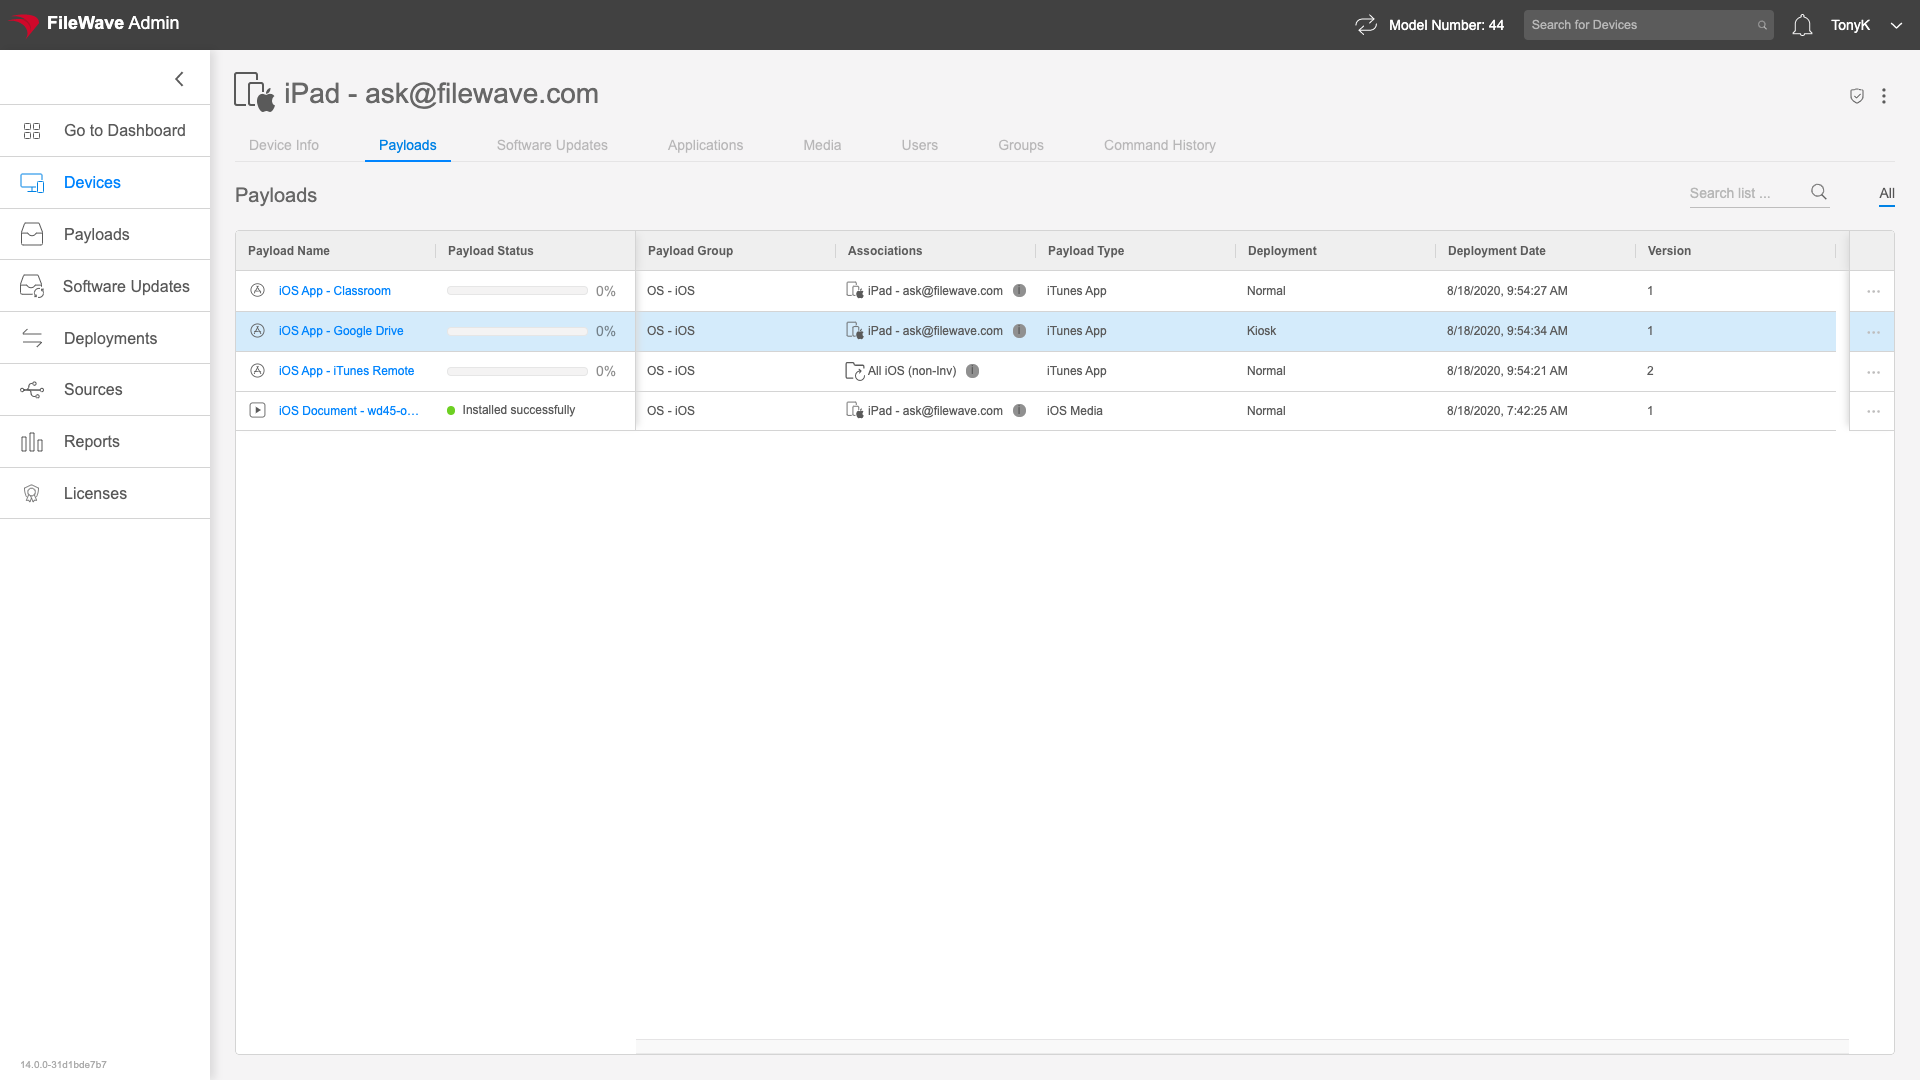From the ellipsis to the right of any payload, you can choose to Reinstall if you have an error as you see below:
 ### Software Updates The Software Update tab shows all pertinent software updates for the particular device. The URL for this tab is: https://my.server.address/devices/<fw\_device\_id>/updates Using this tab is an excellent way to see any missing patches for a particular device, which gives us a sense of the device's relative health. #### How Note that the updates that are shown will be any updates not yet applied, as well as updates deployed through FileWave that still have an association remaining. Examples shown below for macOS, Windows, and iPadOS respectively. 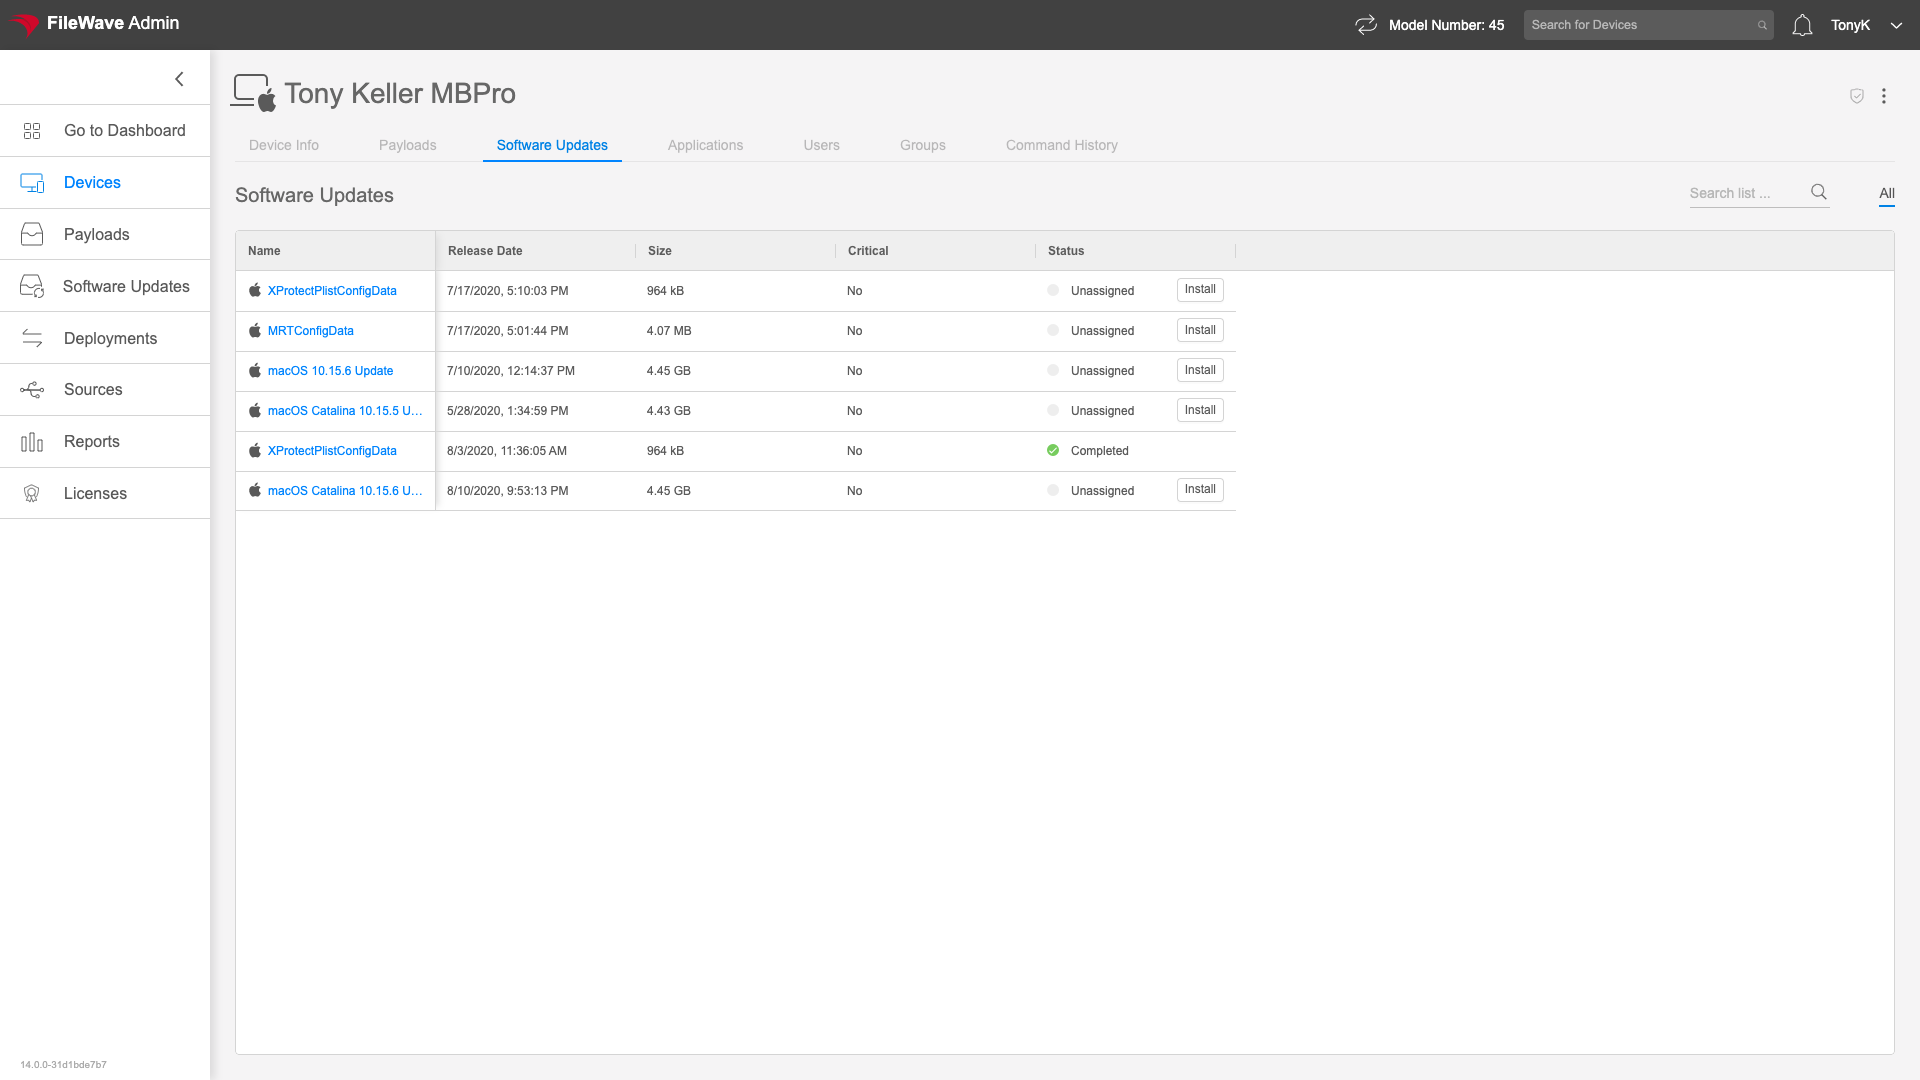. 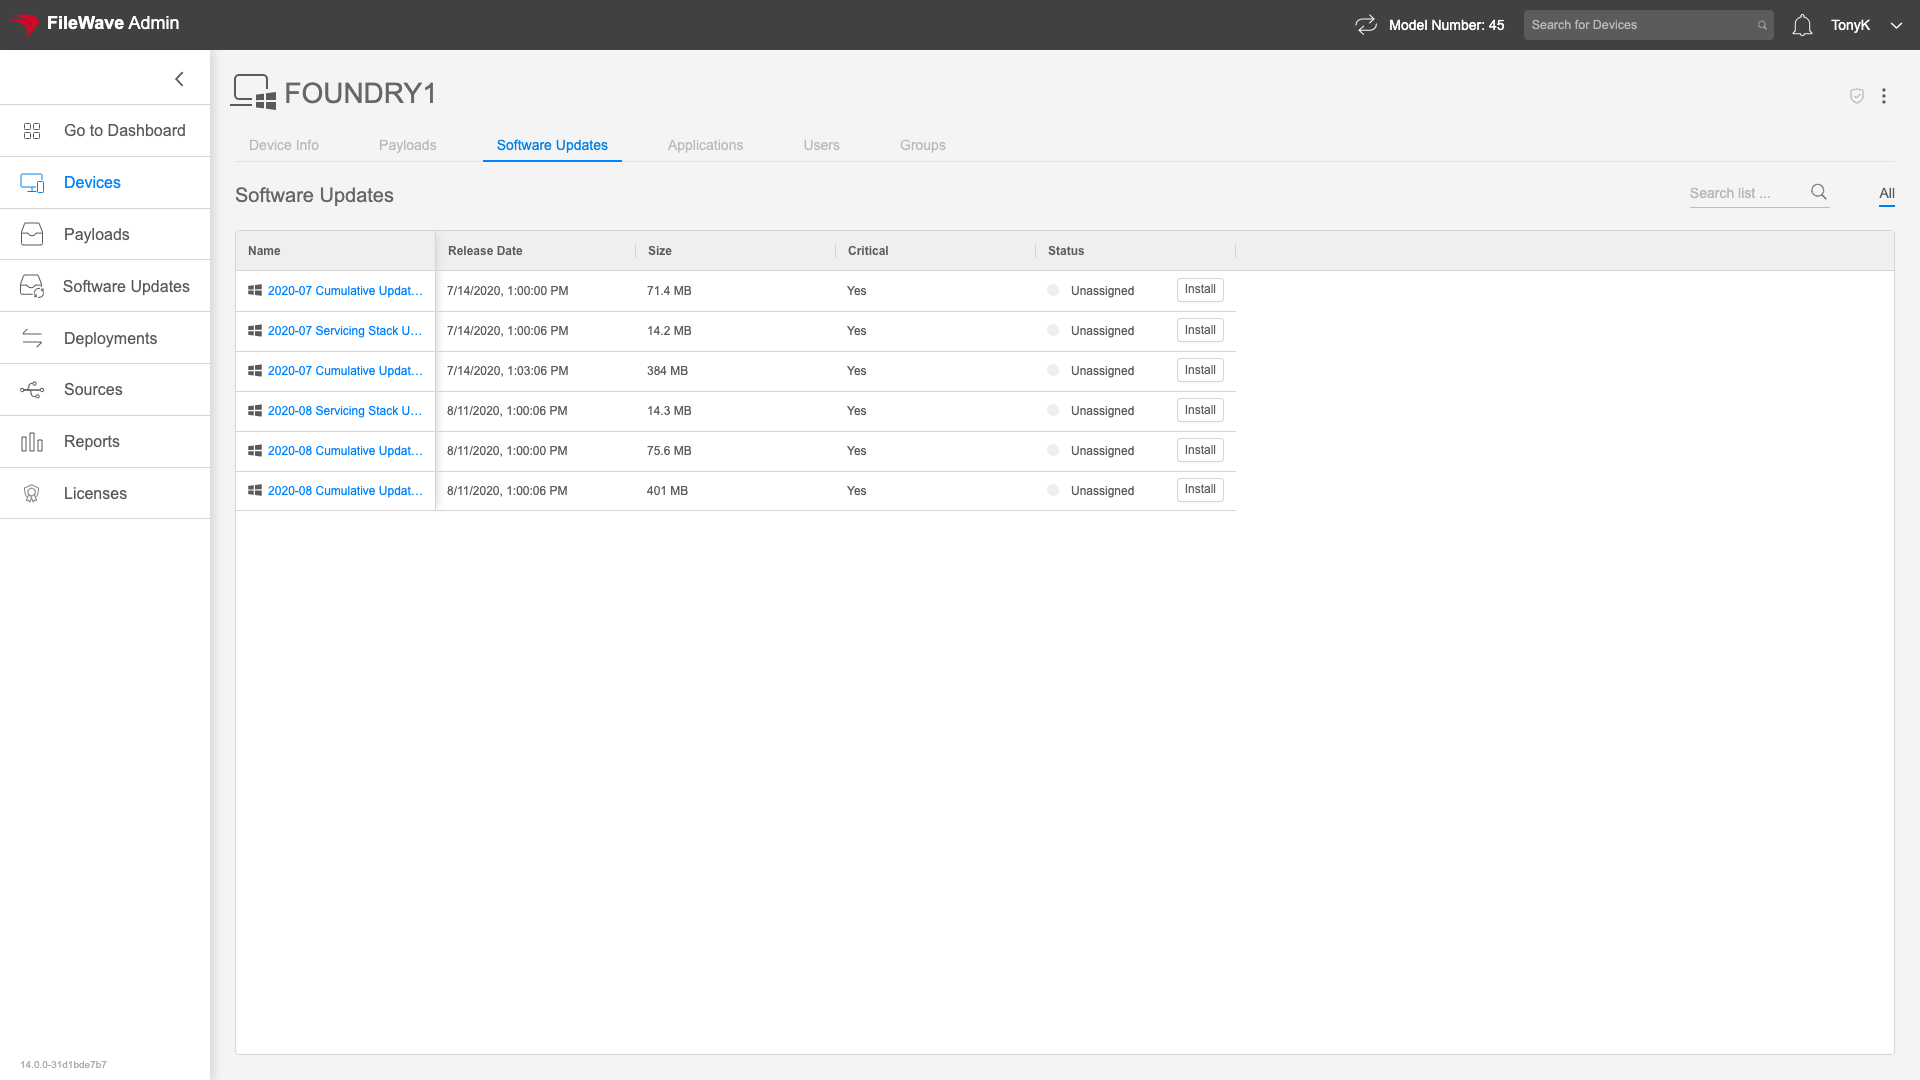. 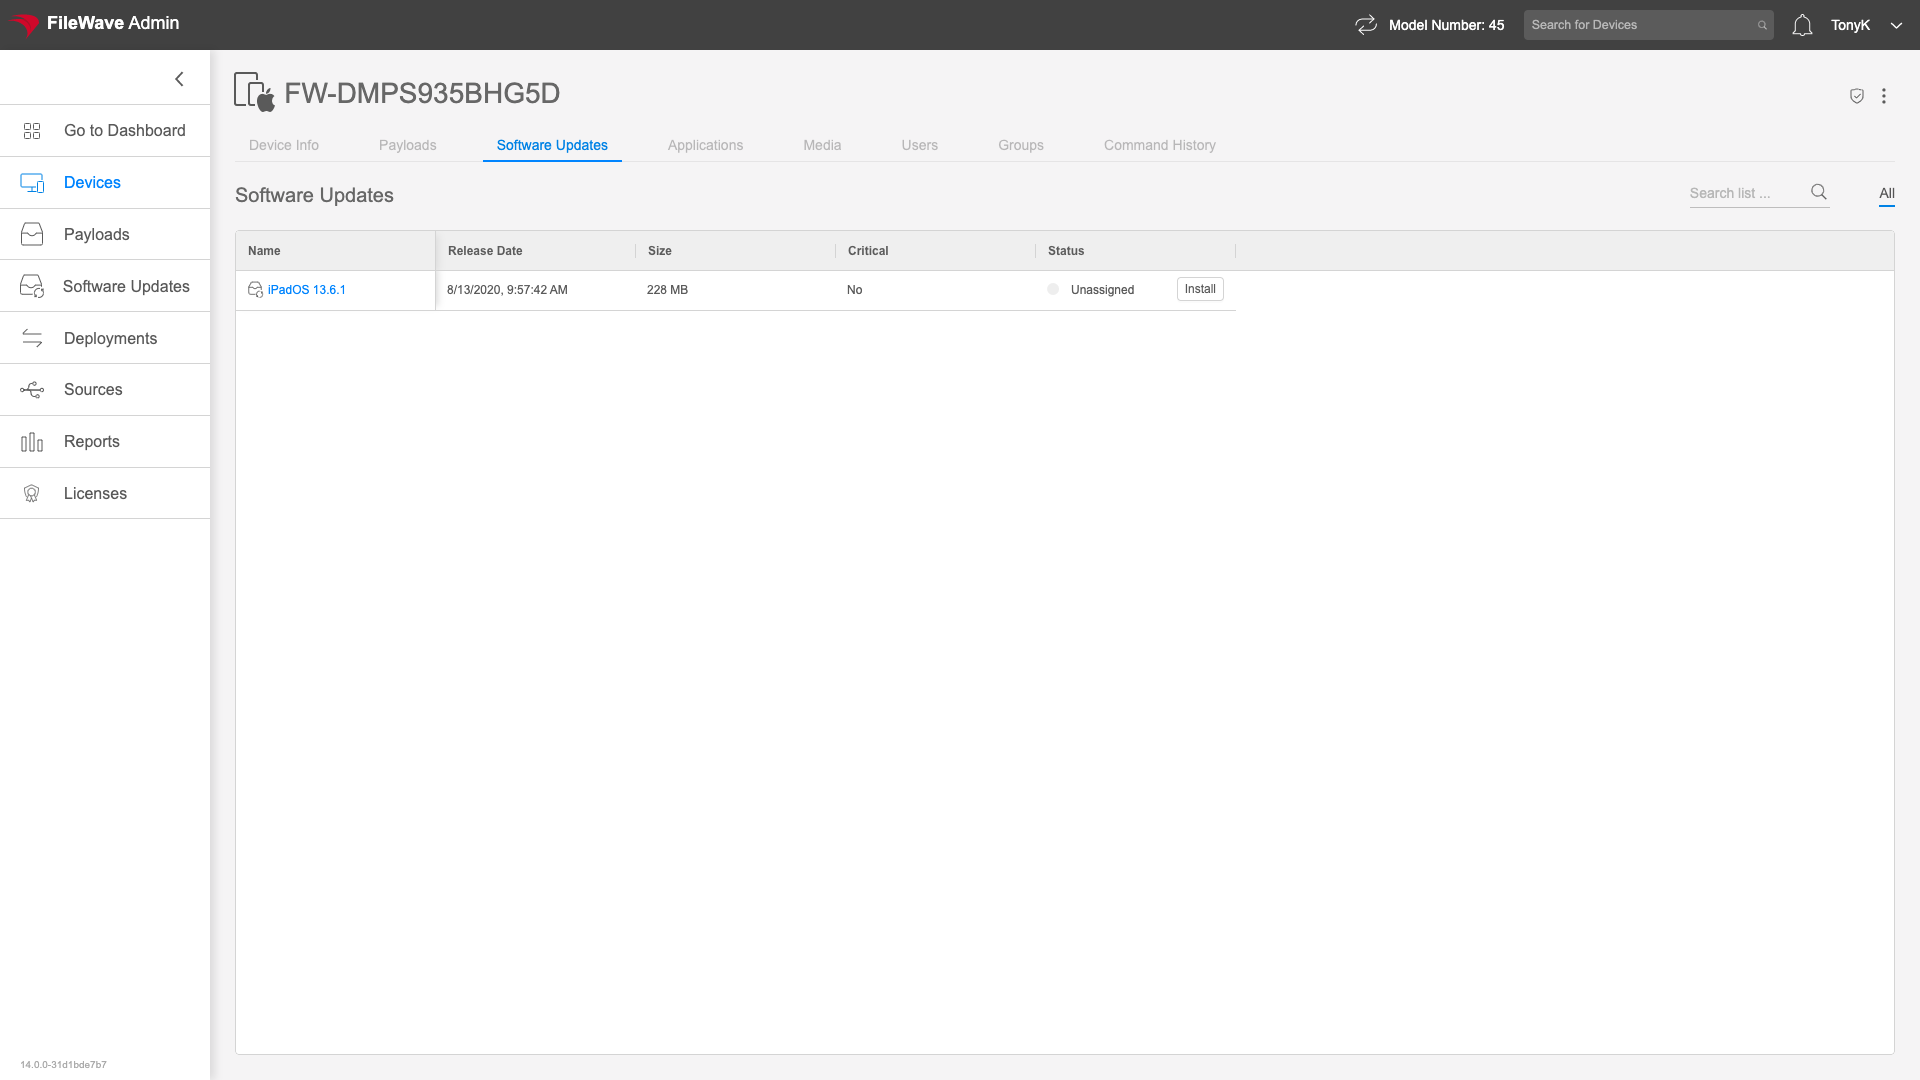 Clicking on the "Install" button to the right of any update will associate that update to this particular device. A subsequent model update will make that change effective. While that association exists, you'll see a status for the particular update. ### Users The Users tab in Device Details gives information about users who have logged into the endpoint. You can reach this tab at: https://my.server.address/devices/<fw\_device\_id>/users Normally, we are going to use the users tab to get information about who has logged onto a device. Login count gives a pretty good indication of whom the primary user is (assuming of course that folks do logout/login occasionally). #### How Note that data will only show where it makes sense for the OS flavor. Below is an example of a simple Windows device: 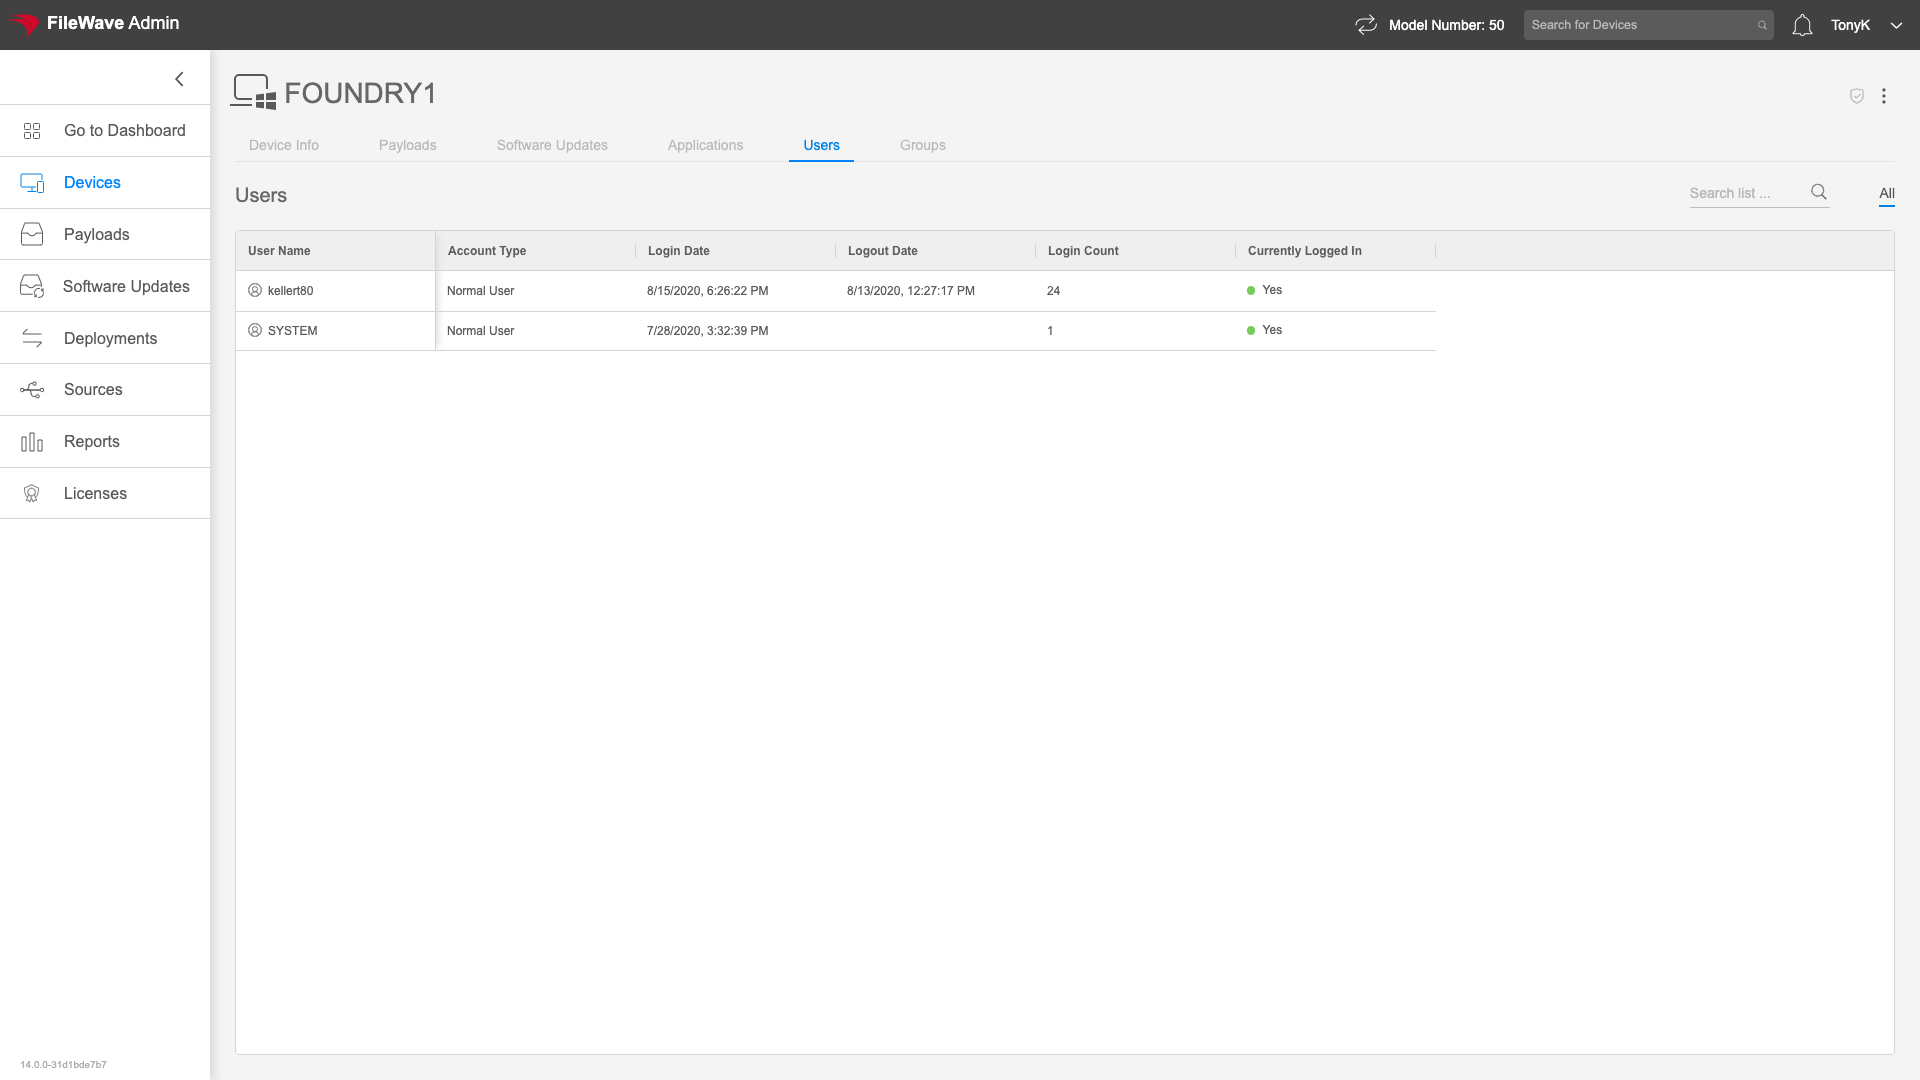 # Tree / List View Toggle ## What The Tree/List View option in the Devices view changes how FileWave Anywhere displays the selected group. Tree view shows the selected group and its immediate contents, while List view flattens the selection so you can focus on devices in the selected group and its downstream groups. ## When/Why Tree view is useful when you are browsing or managing the group structure itself. List view is useful when you want to work with the devices contained by a group and its child groups without seeing the nested group objects. ## How Use the Tree/List View toggle in the Devices view to switch between the two layouts. The example below shows the same location in both views so you can compare the difference: # Working with Groups and Smart Groups ## What Groups and Smart Groups are core organizational tools in FileWave. They let you work with devices by purpose, department, location, platform, deployment need, or any other structure that matters in your environment instead of managing everything one device at a time. ## When/Why Use groups when membership should be deliberate and administrator-controlled. Use Smart Groups when membership can be described by criteria and should update automatically as inventory, device details, or other matching data changes. Good group design makes deployments, reporting, and day-to-day administration easier to understand. It also reduces one-off work because FileWave can target meaningful sets of devices instead of individual endpoints. ## How ### Groups A group is a static container. You can place devices, other groups, and Smart Groups into it. Think of it like a folder: it is useful when you need a simple, intentional structure. Manual groups are a good fit when the reason for membership is not something FileWave can reliably calculate. For example, if ten unrelated users purchased a licensed application, a manual group may be cleaner than forcing an artificial Smart Group rule. To create a group, use the new group/folder control, give the group a unique name, and place devices or child groups where they belong. The video below shows the basic manual group creation flow. #### Related content - [Move to Group](https://kb.filewave.com/books/filewave-anywhere-help-menus/page/move-to-group) - [Copy to Group](https://kb.filewave.com/books/filewave-anywhere-help-menus/page/copy-to-group) ### Smart Groups A Smart Group is criteria-based. Devices become members automatically when they match the rules you define. Smart Groups are usually the better choice when you can describe the target set clearly and want FileWave to keep that membership current. Common examples: - Deploy an MSI to all Windows devices in the Accounting department. - Deploy a VPP app to all third grade iPads. - Deploy a PKG to all macOS devices. - Deploy Photoshop to ten unrelated people across the environment — this is probably better as a manual group unless those users share reliable criteria. The video below shows a simple Smart Group that matches Windows devices. Smart Groups are powerful, but the criteria should describe a stable target. Avoid rules based only on state that the associated deployment immediately changes, because that can create policy loops where a device repeatedly moves in and out of scope. ### Reports and condition groups FileWave Central and FileWave Anywhere use Reports (formerly Queries) to return result sets. Smart Groups use similar criteria logic, but with a different purpose: Reports show information, while Smart Groups target devices for action. Condition groups let you isolate logic when you need to combine **AND** and **OR** rules. If you know SQL, condition groups serve the same basic purpose as parentheses. A simple report for Windows or macOS devices may not need a condition group; a rule such as *(macOS or Windows) and Microsoft Office is installed* does. The video below shows a condition-group example. ### Conditions Conditions define which devices or other objects appear in the result. Most Smart Groups and Reports use at least one condition so the result is narrowed from “everything” to the exact set you need. Examples include platform, operating system version, installed application name, FileWave Client version, department, location, enrollment state, or custom fields. The video below shows criteria being added to match example conditions. ### Preview fields When you build a Smart Group or Report, use the preview to validate the result before trusting it. If you are targeting devices by FileWave Client version, add the FileWave Client Version field to the preview so you can see whether the criteria are returning the devices you expect. That quick check is often better than assuming the rule is correct just because it saved successfully. The video below shows removing default preview fields and adding FileWave Client Version. ### Finding fields for condition statements If you know the field name, start typing and use type-ahead. If you do not know the exact field name, browse the field list and use field descriptions to confirm the right data source.When you need context, open the Device Details page for a representative client. Seeing the field name and real data together makes it easier to choose the right condition.
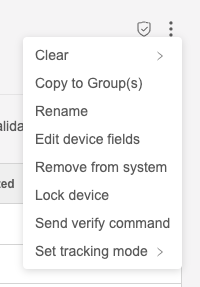
The video below shows using type-ahead and the field browser to find application fields. ### Example conditions Advanced Smart Group criteria are easier to build when you first write the requirement as a sentence, then translate that sentence into conditions. - **Upgrade Windows clients below the target FileWave Client version:** OS Type is Windows, and FileWave Client Version does not begin with the target version prefix. - **Find devices with Microsoft Office installed:** use condition groups to match Office application names and version patterns across Word, Excel, PowerPoint, Outlook, and other relevant Office applications. - **Find Windows devices missing 7-Zip:** match Windows devices and use a **NOT** condition against the 7-Zip application name so the result returns devices where the application is absent. ### Related content - [Understanding FileWave Clients, Groups, and Smart Groups](https://kb.filewave.com/books/filewave-central-anywhere/page/understanding-filewave-clients-groups-and-smart-groups) - [Fast Smart Group Evaluation](https://kb.filewave.com/books/filewave-central-anywhere/page/fast-smart-group-evaluation) - [Create a Smart Group from an Inventory Query (Report)](https://kb.filewave.com/books/filewave-central-anywhere/page/create-a-smart-group-from-an-inventory-query-report) - [Duplicating Smart Groups](https://kb.filewave.com/books/filewave-central-anywhere/page/duplicating-smart-groups) - [View - Reports Overview](https://kb.filewave.com/books/filewave-anywhere-help-menus/page/view-reports-overview) - [Fields in Reports (Preview)](https://kb.filewave.com/books/filewave-anywhere-help-menus/page/preview-fields-in-reports) # Device Actions Device Actions are all of the "actions" or "commands" that you can execute against an endpoint from the FileWave WebAdmin. Actions are taken from the (...) button in the Devices view, or from the detail view of any particular device. Having inventory devices is never quite enough. We will frequently want to do something to the devices in the field immediately, and the Actions list is a way to do that. Note that all actions have some degree of pre-requisite...i.e the device might need to be supervised, or a certain command can't work if the device is BYOD user enrolled for instance. Some pre-requisites are accounted for in the UI and those commands won't show if not applicable. For instance, Wipe Device won't show if the device happens to be user enrolled. # Device Actions Overview ## What Device Actions are the commands you can send to a device from FileWave WebAdmin. Open the three-dot menu in the Devices view, or open the device details page, to see the actions available for that device. ## When/Why Use Device Actions when you need to do something on a managed device right away, such as locking it, sending Verify, or clearing supported settings. The available actions depend on the device and its management state. For example, some actions require supervision, and others are hidden when they do not apply. A user-enrolled device, for example, will not show Wipe Device. ## How In Devices, click the three-dot menu next to the device, or open the device details page and use the same menu. 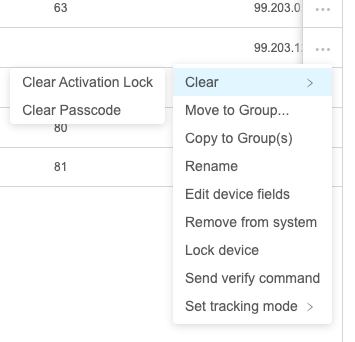 # Clear Activation Lock ## What The Clear Activation Lock command removes Apple Activation Lock from an eligible managed Apple device. Activation Lock is tied to Apple ID and Find My, so this command is the admin recovery path when a locked device needs to be erased, reassigned, or returned to service. ## When/Why Use Clear Activation Lock when Activation Lock would otherwise block setup or reuse. In FileWave Anywhere, Clear Activation Lock is available as an option in Wipe Device and as a direct command from the device actions menu: 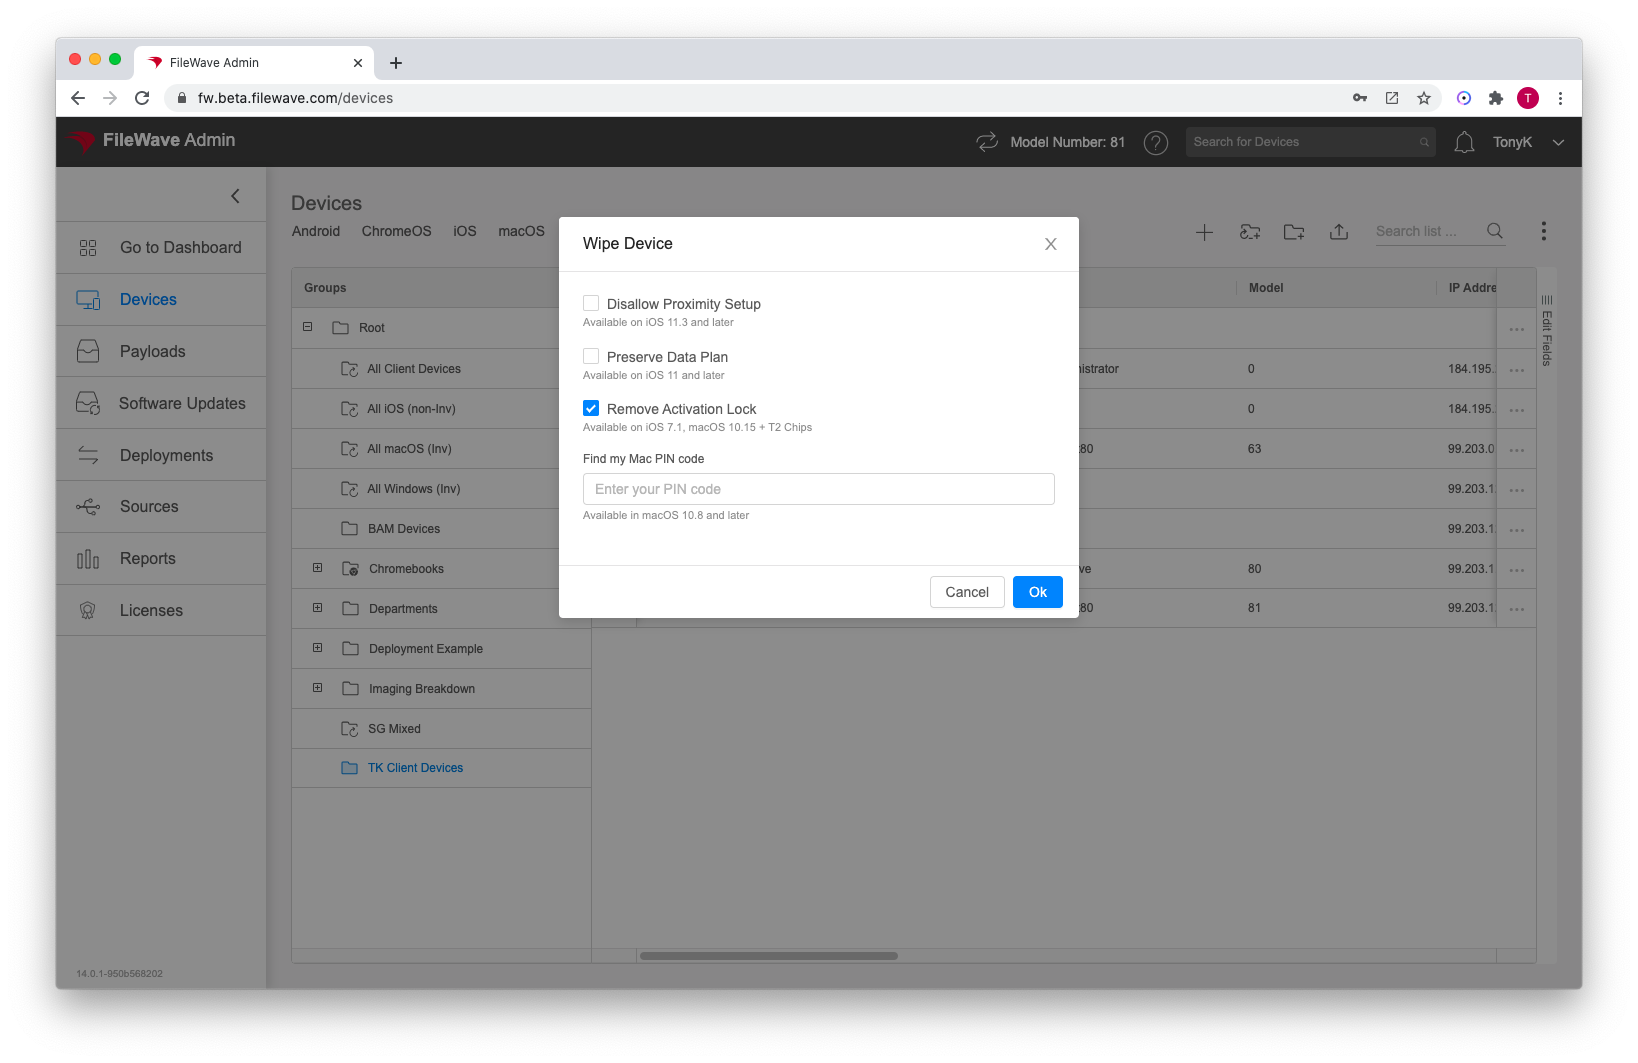 ## How To send the direct command, select the device, open **Clear**, and choose **Clear Activation Lock**. 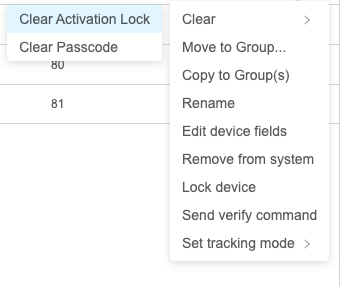You can also configure Activation Lock behavior in the DEP/ADE profile.
# Clear Passcode ## What The Clear Passcode command is used to remove the current passcode that is assigned to a device. (Will not show unless a passcode is set on the device in question) ## When/Why You can use this command clear that passcode (if set). Particularly useful when the user "forgot" the passcode. ## How Use the ellipsis () to the right of the device in the [View - Devices](https://kb.filewave.com/books/filewave-anywhere-help-menus/chapter/view-devices "View - Devices") and select "Clear Passcode" # Clear Restrictions Passcode ## What The Clear Restrictions Passcode command removes a passcode that was set to prevent restrictions from being changed. A restrictions passcode must already be set on the device for this command to appear in FileWave Anywhere.You can also deploy an Apple Profile that prevents a restrictions passcode from being set.
## When/Why Use this command when a restrictions passcode was set and is unknown or forgotten. The device must be managed in a way that supports this command; for example, it cannot be sent to a User Enrollment BYOD device. ## How In FileWave Anywhere, go to [View - Devices](https://kb.filewave.com/books/filewave-anywhere-help-menus/chapter/view-devices "View - Devices"), open the ellipsis (...) menu to the right of the device, and select Clear Restrictions Passcode. # Copy to Group ## What Copy to Group creates another group membership for the same device in FileWave Anywhere. It does not create a new device record, erase inventory, or remove the device from its existing groups. ## When/Why Use this action when a device should appear in more than one group. For example, you might keep a device in its normal location group and also copy it into a temporary testing, repair, or rollout group without moving it out of the original group. ## How 1. Open the [Devices view](https://kb.filewave.com/books/filewave-anywhere-help-menus/chapter/view-devices "View - Devices") in FileWave Anywhere. 2. Find the device, open the ellipsis menu (...) to the right of the row, and choose **Copy to Group(s)**. 3. Select the destination group or groups, then confirm the copy. # Edit Device Fields ## What A device record can include both built-in inventory fields and custom fields. ## When/Why Use this option when you need to update fields for one device. For bulk changes, use the Upload Devices and/or Data workflow instead. For changing many devices at once, see [Upload Devices and/or Data](https://kb.filewave.com/books/filewave-anywhere-help-menus/page/upload-devices-andor-data "Upload Devices and/or Data"). ## How 1. In [View - Devices](https://kb.filewave.com/books/filewave-anywhere-help-menus/chapter/view-devices "View - Devices"), use the ellipsis () to the right of the device and select "Edit Device Fields". 2. In the Edit Device Fields window, add, edit, or delete field values as needed. 3. Select "Save" when you are done. 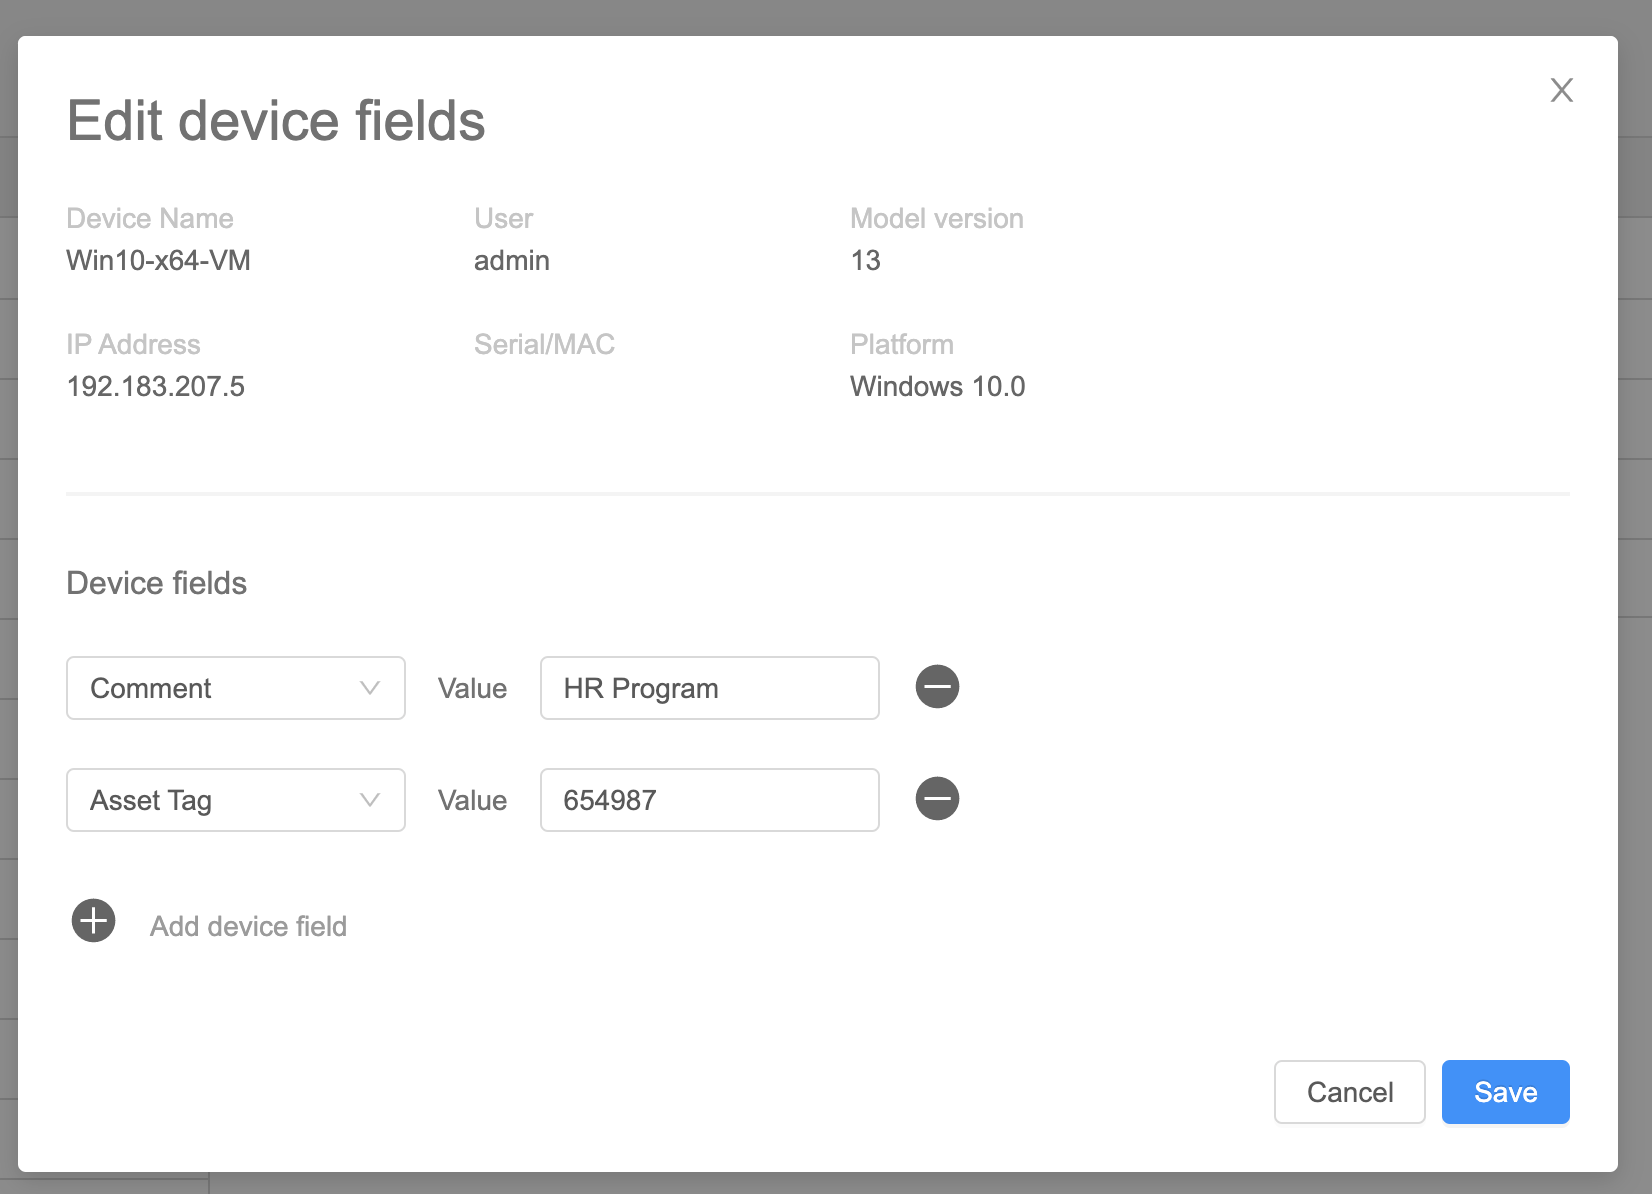 # Lock Device ## What You can use Lock device in FileWave Anywhere to remotely lock a managed iOS device. If the device already has a passcode, that same passcode is still required to unlock it. If no passcode exists, the device can be unlocked without one. ## When/Why Use this action when you need to lock a device immediately or confirm that the device can receive MDM commands. ## How In [View - Devices](https://kb.filewave.com/books/filewave-anywhere-help-menus/chapter/view-devices "View - Devices"), click the three-dot menu to the right of the device and select "Lock device". 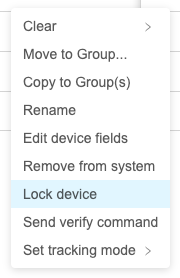 # Move to Group ## What The **Move to Group** command moves a selected device or group to another group. It is related to **Copy to Group**, but it changes the object's current group placement instead of adding another membership. Objects that come from Smart Groups can be copied, but not moved, because Smart Group membership is controlled by criteria. ## When/Why Use this command when you are reorganizing static groups or moving device records into a different location. Check assignments first: moving a device can change which Filesets, profiles, or deployments it receives when those items are assigned through group membership.**Quick answer:** Move to Group changes the selected object's group location. If you only need the device to appear in an additional group while keeping its current placement, use **Copy to Group** instead.
## How Use the ellipsis () to the right of the device in [View - Devices](https://kb.filewave.com/books/filewave-anywhere-help-menus/chapter/view-devices "View - Devices"), then select **Move to Group...** and choose the destination group. 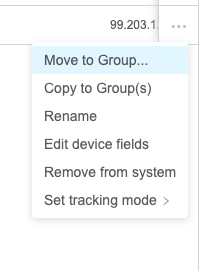 # Performing Actions on Multiple Devices ## What FileWave Anywhere can run one supported device action against several selected devices at once. ## When/Why Use bulk actions for work such as restarting or wiping a set of iPads, or updating the same Custom Field on several devices. Check the selected device list carefully before confirming an action that erases data or interrupts users. ## How In the **Devices** view, select the checkboxes beside the devices you want to manage: 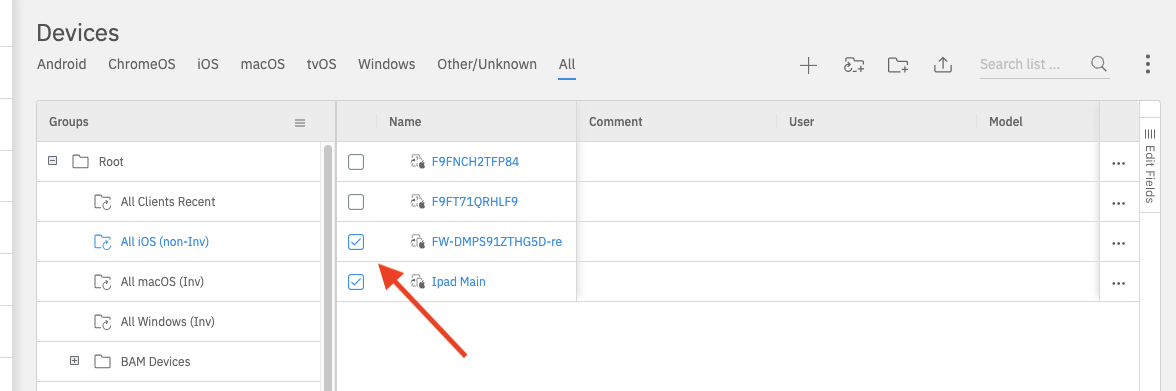 Open the **Action** menu to see the actions available for the full selection: 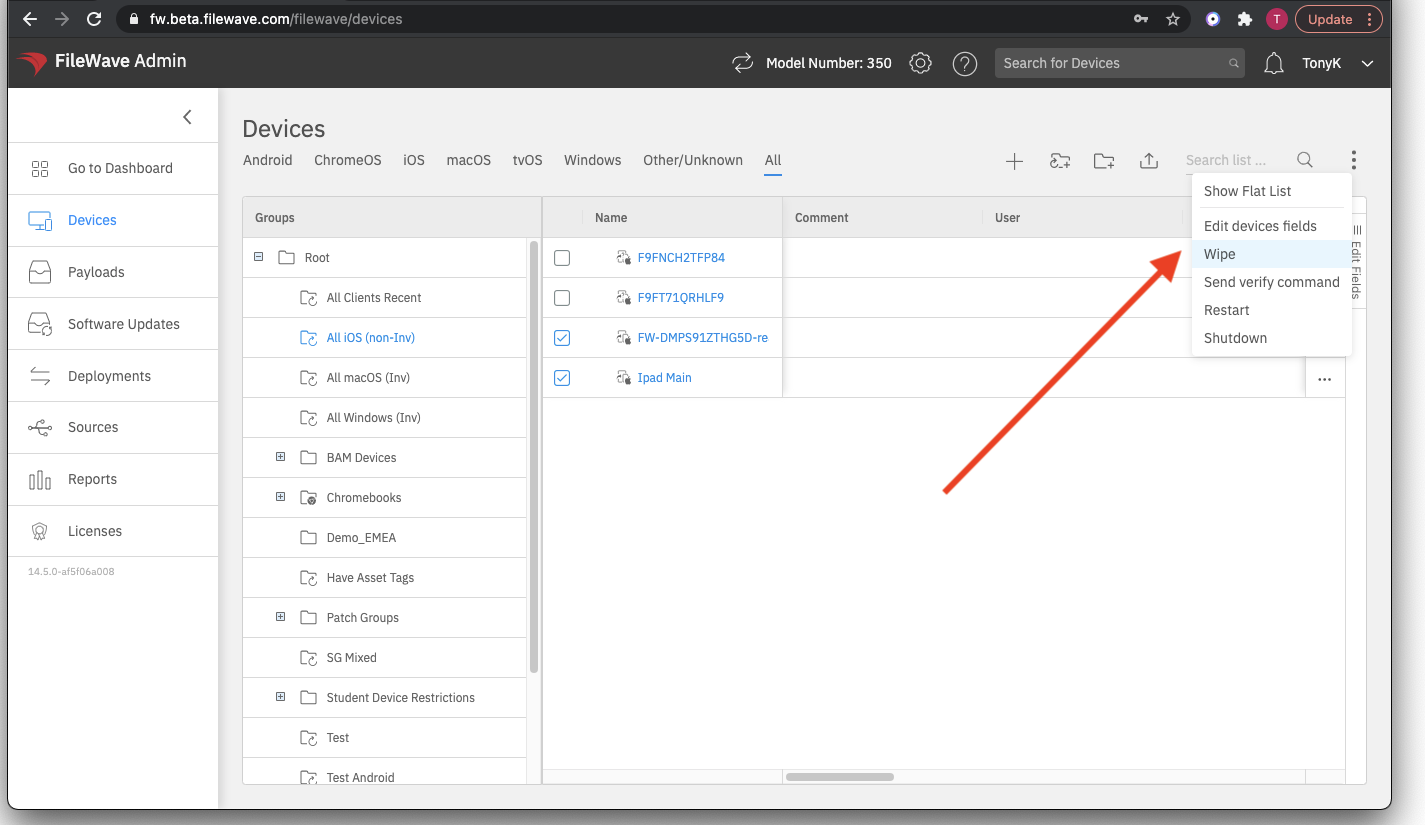FileWave Anywhere shows only actions supported by every selected device. For example, selecting two iPads can show **Wipe** and **Restart**. If the selection also includes a Windows device, iPad-only actions are omitted.
# Remove from Group ## What Use "Remove from Group" when you want to remove one copy of a device from a manual group without deleting the device from FileWave. ## When/Why This is useful when a device no longer belongs in a specific manual group, or when that group should stop applying deployments to that copy. The device record remains in FileWave, other copies of the same device remain unchanged, and inventory data is preserved. If the group copy was receiving content through a deployment, removing the copy from the group also removes that group-based deployment path for the device. Use "Remove from system" only when you intend to delete the device record from FileWave. ## How Select a device copy in a manual group, open the (...) action menu, and choose "Remove from Group":  # Remove from System ## What The "Remove from System" command is what you might remember from the native FileWave admin as "Delete", and it has the same consequences. But, in the native admin Delete was the same for the original object and the copies, even though the result was different. The WebAdmin has split this into two commands to help clarify. ## When/Why The "Remove from System" command entirely (and destructively) removes a device and all of its copies from the system. Any payloads through deployments will be lost, and all inventory from this object will be removed from the system. In the case of an MDM-enrolled device, the deletion acts as an unenroll and can not be reversed. The model has to be updated in order to fully remove the device from the system.An un-enrol will be triggered, only if the following FileWave Central preference is enabled: Preferences > Mobile > 'Remove MDM profile from devices removed from FileWave model' This preference will send a command to remove the enrolment profile, which should be honored by devices, even if the enrolment profile is configured to be non-removable in DEP settings.
For client devices, they will check in again as long as a client remains installed but has to be onboarded again.Note; Remove from System is a destructive command, and should only be done when you are certain.
## How To perform this action, choose "Remove from System" from the Device action menu (...) and Update Model when finished. 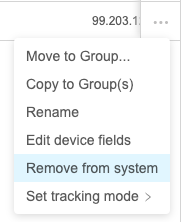 # Rename ## What Use the **Rename** device action when you need to update a device name from FileWave Anywhere. The result depends on the device platform, MDM restrictions, and whether FileWave can rename the device itself or only the FileWave record. ## When/Why For supported iOS/iPadOS devices, FileWave sends an MDM command to rename the device and also updates the FileWave device record. If the target is a computer client or an iOS/iPadOS device where renaming is restricted, FileWave updates only the record name. Use that record-only path carefully because a FileWave name that differs from the device's actual name can confuse troubleshooting.Plan bulk rename work before you run it. Test with a small set first, especially when device names are used for groups, reporting, certificates, or support workflows.
## How To send the command, choose **Rename** from the device action menu (...): 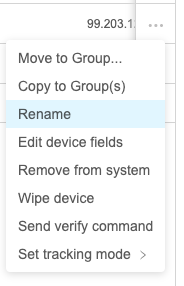 FileWave then prompts you for the device name to apply: 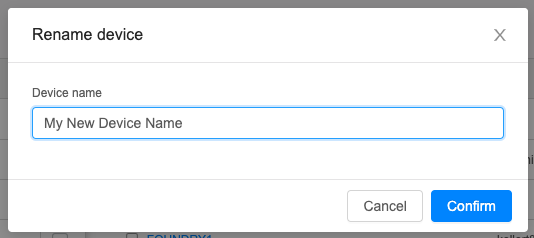 # Restart (Windows) ## What Use **Restart Windows Devices** when you need FileWave to remotely reboot one or more managed Windows computers from FileWave Central or FileWave Anywhere. ## When/Why A remote restart is useful when a Windows device needs to finish an installation, recover from a known issue, or complete an admin-approved maintenance task. ## How The action is available in both FileWave Central and FileWave Anywhere.There is no confirmation dialog when you issue the restart command. Choosing the command immediately starts the restart workflow.
### FileWave Central In FileWave Central, right-click one or more devices and choose **Restart Windows Devices**: 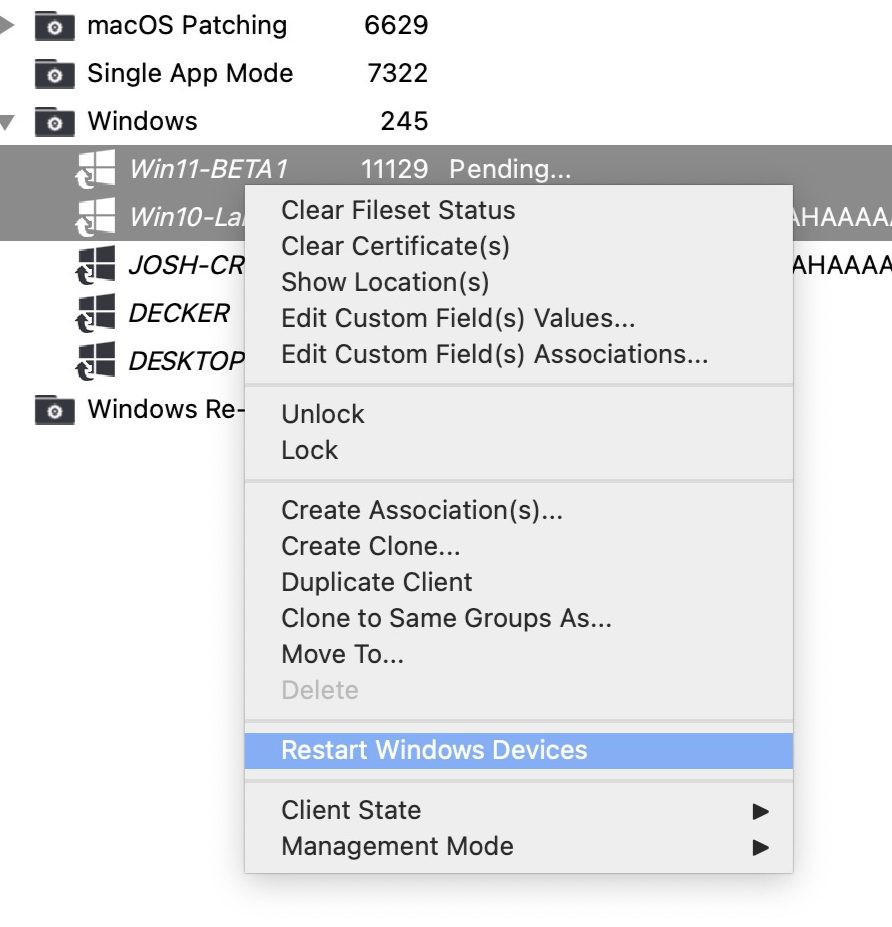 ### FileWave Anywhere In FileWave Anywhere, the same restart action is available from the device details action menu: 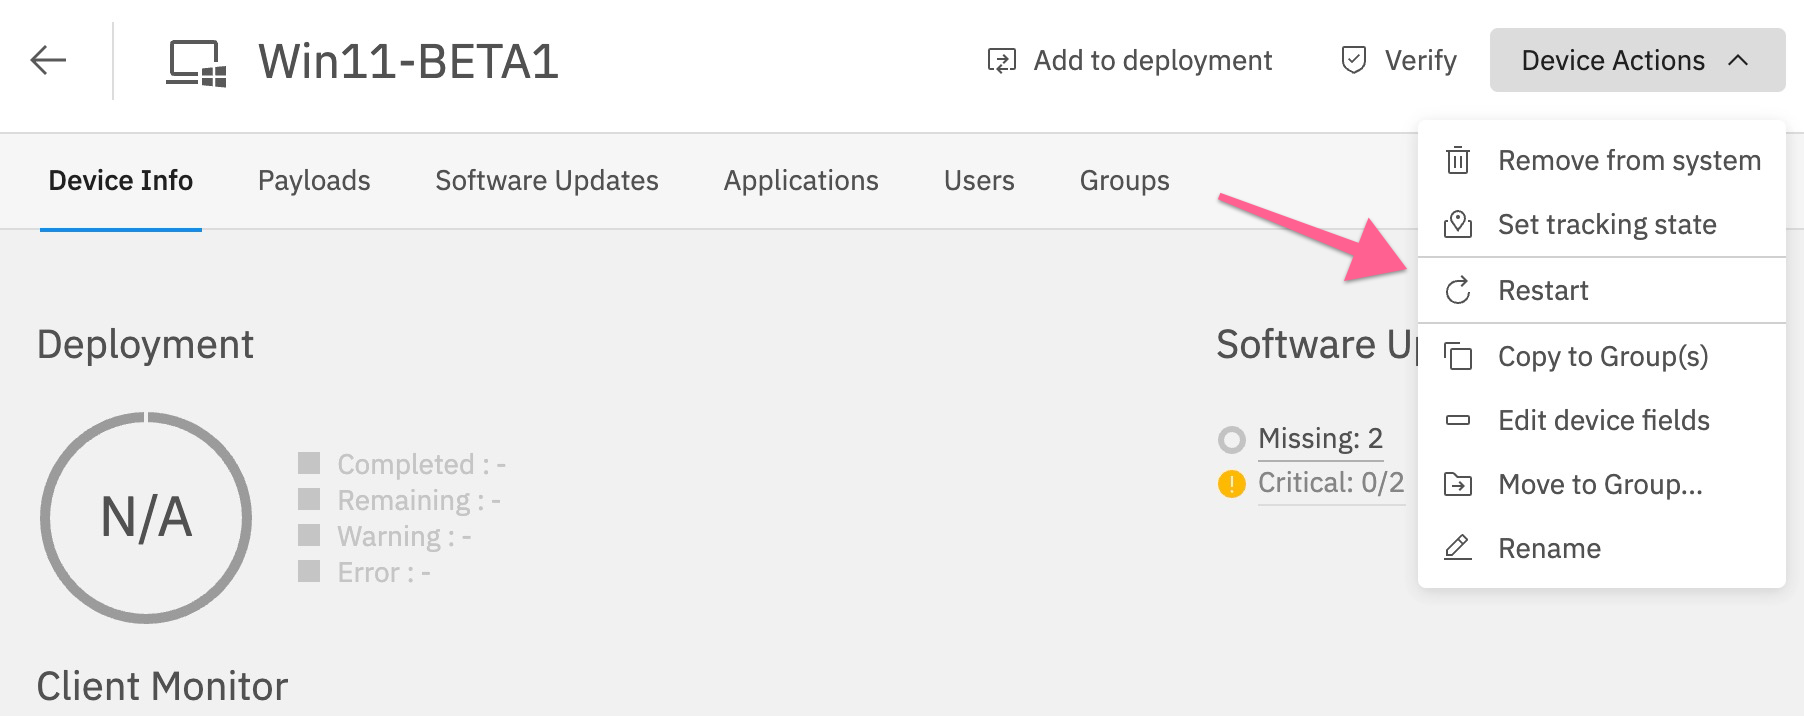 From the Devices view, select multiple Windows devices to restart them in one action:  After FileWave issues the restart command, any logged-in user sees a warning dialog similar to the first example below. The screenshots are from Windows 11, so the prompt may look slightly different on Windows 10. 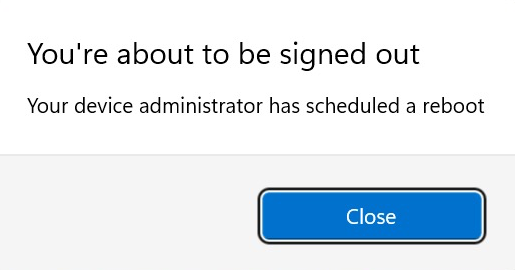 Three minutes after the first warning appears, FileWave shows a second warning. That second warning tells the user the Windows device will restart in 2 minutes. 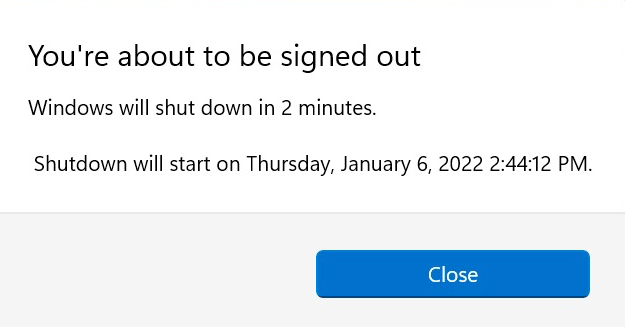 # Send Verify Command ## What Use Send Verify when you want a managed device to check in, refresh inventory, and process the inventory or MDM requests FileWave sends for that platform. ## When/Why Send Verify asks the selected device to report current inventory and process the relevant verify commands. The exact requests depend on device type and enrollment method, so a macOS client, a Windows client, and an MDM-enrolled mobile device will not all receive the same sequence. ## How Run **Send Verify** from the Device action menu (...) or from the device detail views (): 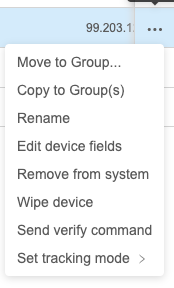 Note that we can watch the progress of this (and other) MDM commands from the Device Detail View Command History tab. ## Related Content - [NAT Support for Client Monitor/Verify](https://kb.filewave.com/books/filewave-anywhere-help-menus/page/nat-support-for-client-monitorverify "NAT Support for Client Monitor/Verify") # NAT Support for Client Monitor/Verify ## What FileWave can send a **Verify** command to managed devices even when the admin workstation does not have direct network line-of-sight to the client. This is useful for remote devices behind NAT, at home, or on networks where the admin console cannot directly reach the device. ## When/Why Use Verify when testing a new payload or Fileset, troubleshooting check-in behavior, or prompting a remote client to re-evaluate assigned content. Historically, Client Monitor workflows depended on direct network reachability. Current FileWave workflows provide a remote-friendly path from FileWave Anywhere, and the 16.0+ Client Monitor adds broader NAT-compatible monitoring. ## How From the **Devices** pane in FileWave Anywhere, open the device action menu and choose **Send verify command** for a single device: [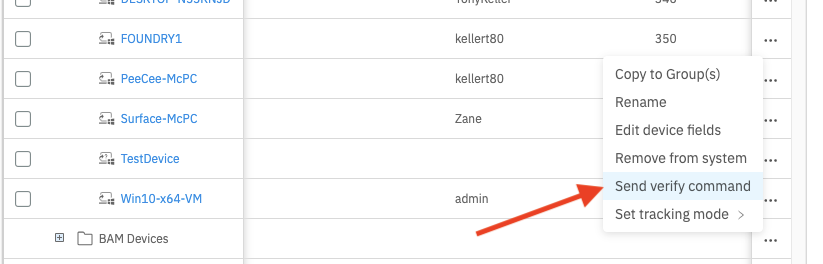](https://kb.filewave.com/uploads/images/gallery/2023-07/Fy44ZCJLrf47zpxN-image.png) You can also select multiple devices and send the same Verify command to the selected devices: [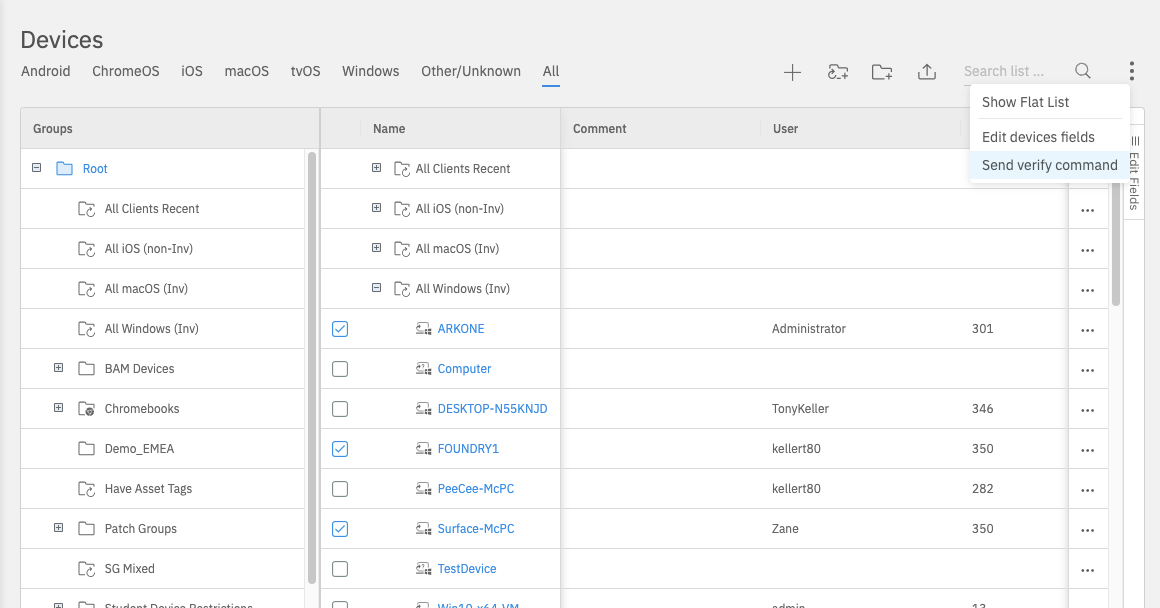](https://kb.filewave.com/uploads/images/gallery/2023-07/wiDFqxND8igMwAKQ-image.png) From an individual device page, use the **Verify** action in the device toolbar: [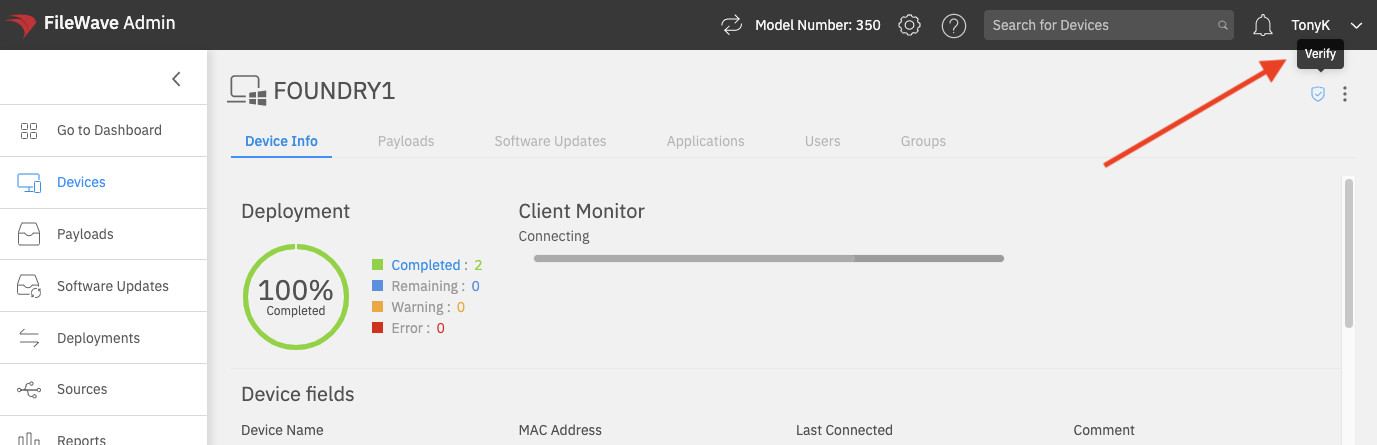](https://kb.filewave.com/uploads/images/gallery/2023-07/VjQTLrrizDTsYlJ8-image.png) Client Monitor includes additional troubleshooting tools beyond the Verify workflow shown here. For the current 16.0+ Client Monitor behavior, including NAT-compatible monitoring through the newer connection model, see the related Client Monitor article. ## Related Content - [Performing Actions on Multiple Devices](https://kb.filewave.com/books/filewave-anywhere-help-menus/page/performing-actions-on-multiple-devices "Performing Actions on Multiple Devices") - [Client Monitor (16.0+)](https://kb.filewave.com/books/filewave-central-anywhere/page/client-monitor-160 "Client Monitor (16.0+)") # Set Tracking Mode ## What Tracking Mode controls whether FileWave requests location information from a managed device. Location availability depends on the device platform, enrollment type, operating-system privacy controls, and user choices on the device, so results can vary. ## When/Why Some organizations use tracking for ongoing device-location visibility, but the most common practical use is **Missing** mode for supervised iOS and iPadOS devices that have been misplaced. FileWave Missing mode uses Apple's Lost Mode functionality to lock the device and help locate it. ## How From the device actions menu, choose **Set tracking mode**, then select one of these modes: - **Untracked:** The default mode. FileWave does not request ongoing location data. - **Tracked:** FileWave performs occasional location lookups when the platform and device settings allow it. - **Missing:** FileWave places supported supervised Apple devices into Missing/Lost Mode. 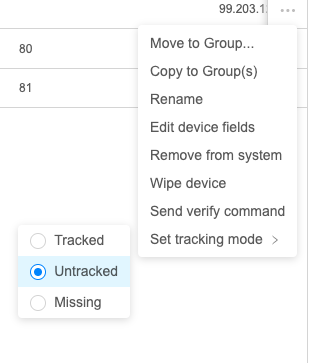Location data is treated as personally identifying information by operating systems and may require specific permissions, supervision, enrollment types, and end-user consent. Review [Location Tracking Setup](https://kb.filewave.com/books/filewave-client/page/location-tracking-setup) before relying on tracking for a workflow.
When FileWave receives location data from the device, the device appears on the map in the **Location** tab of Device Detail. # Wipe a Device in FileWave Anywhere ## What **Wipe Device** sends a destructive erase command to the selected managed device. On iPhone and iPad, it is the remote equivalent of **Erase All Content and Settings**. ## When/Why Use this action when a device must be erased before reassignment, return, or re-enrollment. Confirm that any required data is backed up and that you selected the correct device before sending the command.Wipe permanently erases the device. Review the target and every option in the confirmation dialog before selecting **OK**.
## How Open the device action menu (**...**) and choose **Wipe device**: 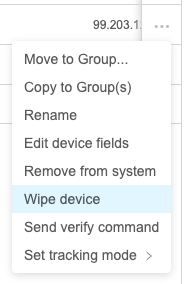 FileWave then shows the available wipe options. The list varies by platform and OS version: 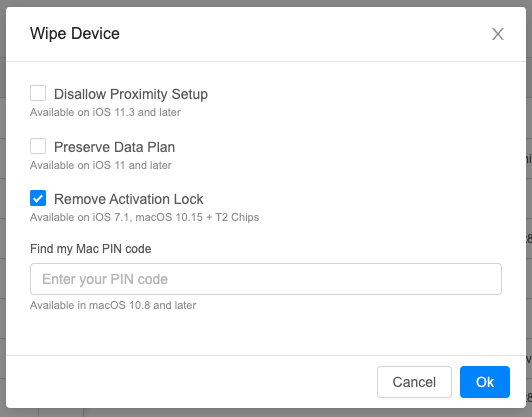 When **Remove Activation Lock** is available, select it if the device should return ready for reassignment. Otherwise, the device may still request the previous user's Apple Account (Apple ID) during activation.Activation Lock behavior can also be controlled in Automated Device Enrollment (ADE, formerly DEP) profiles.
## Related Content - [Apple ID prompt still appears even when Activation Lock Bypass Code is used during Remote Wipe](https://kb.filewave.com/books/ios-ipados/page/apple-id-prompt-still-appears-even-when-activation-lock-bypass-code-is-used-during-remote-wipe "Apple ID prompt still appears even when Activation Lock Bypass Code is used during Remote Wipe") # Windows MDM Wipe Command ## What FileWave Anywhere can send a Wipe command to Windows devices that are enrolled through Windows MDM. Windows MDM is separate from a standard FileWave Client (`fwcld`) enrollment; for enrollment context, see [Manually enrolling a device into FileWave Windows MDM](https://kb.filewave.com/link/177). ## When/Why Use the device action menu when you need to wipe an MDM-enrolled Windows device.The Wipe option is visible only for Windows devices that are enrolled through Windows MDM.
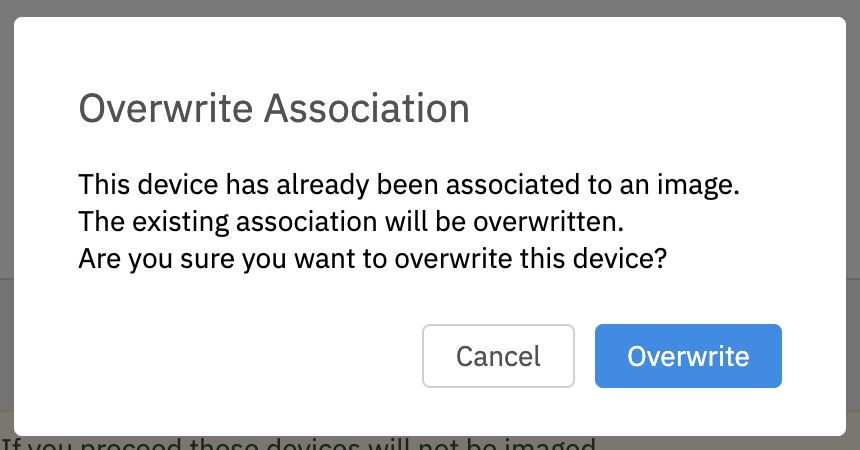
## How - Select the Windows device. - Open the ellipsis action menu. - Choose **Wipe**. 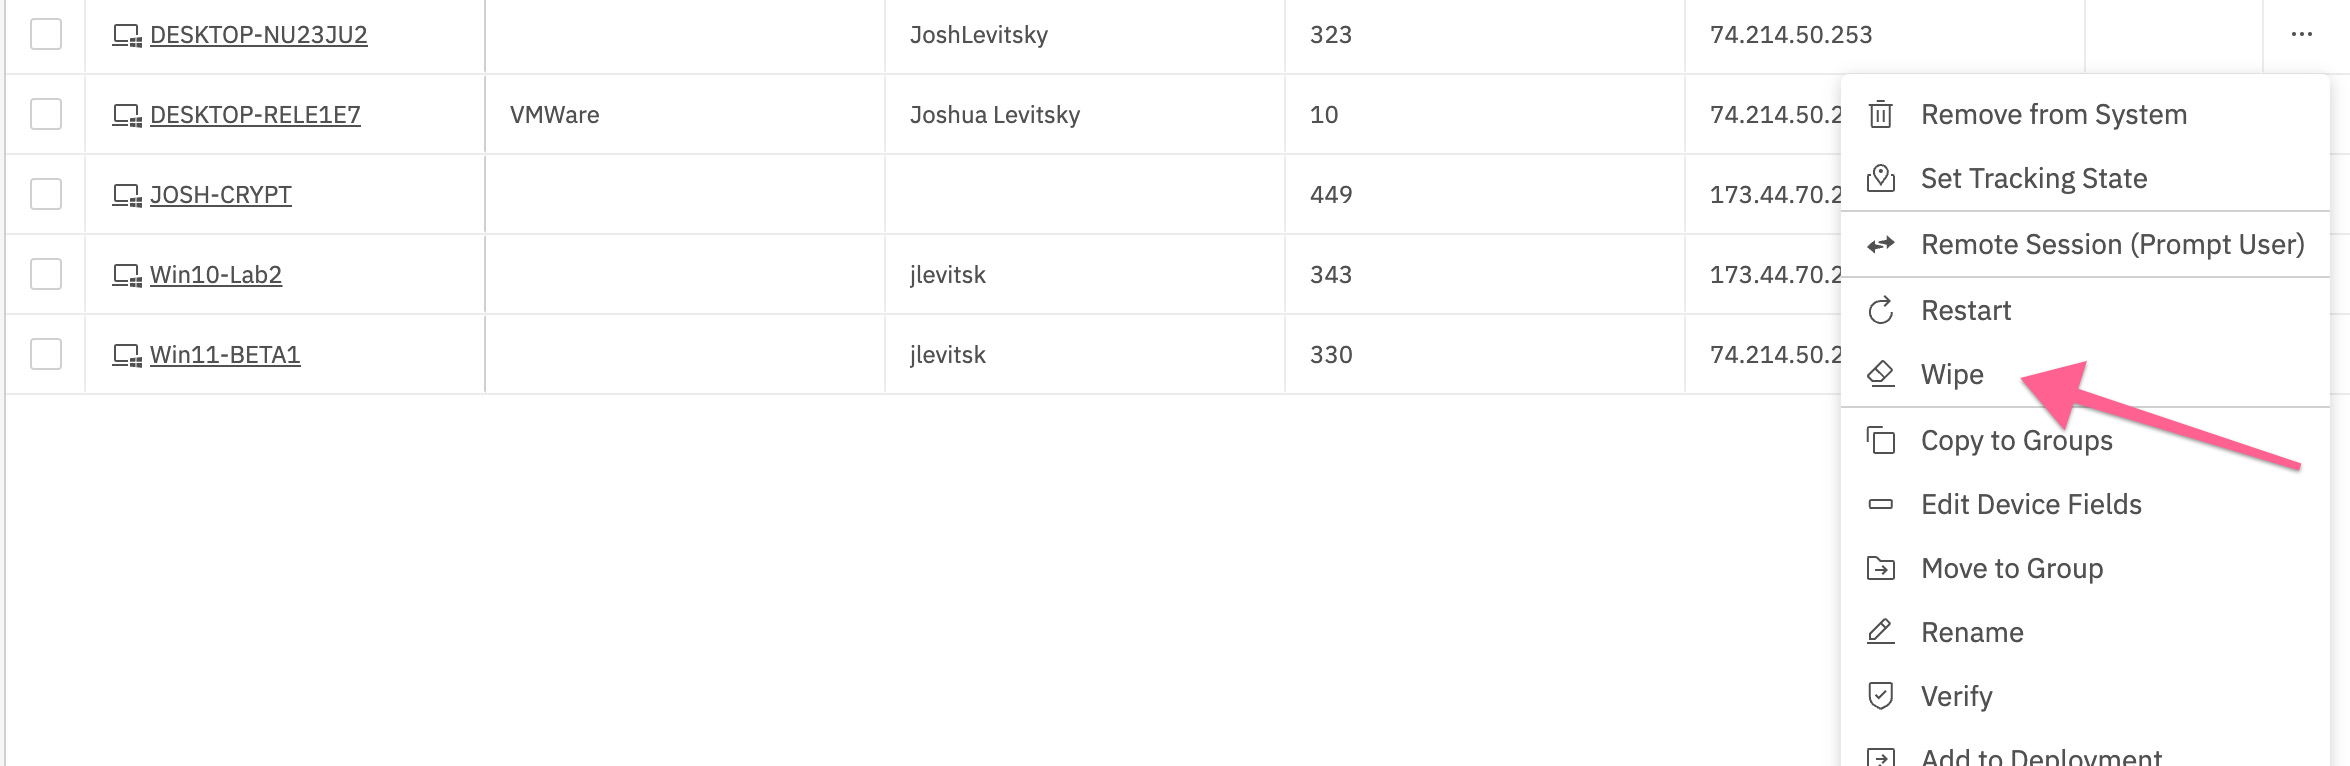 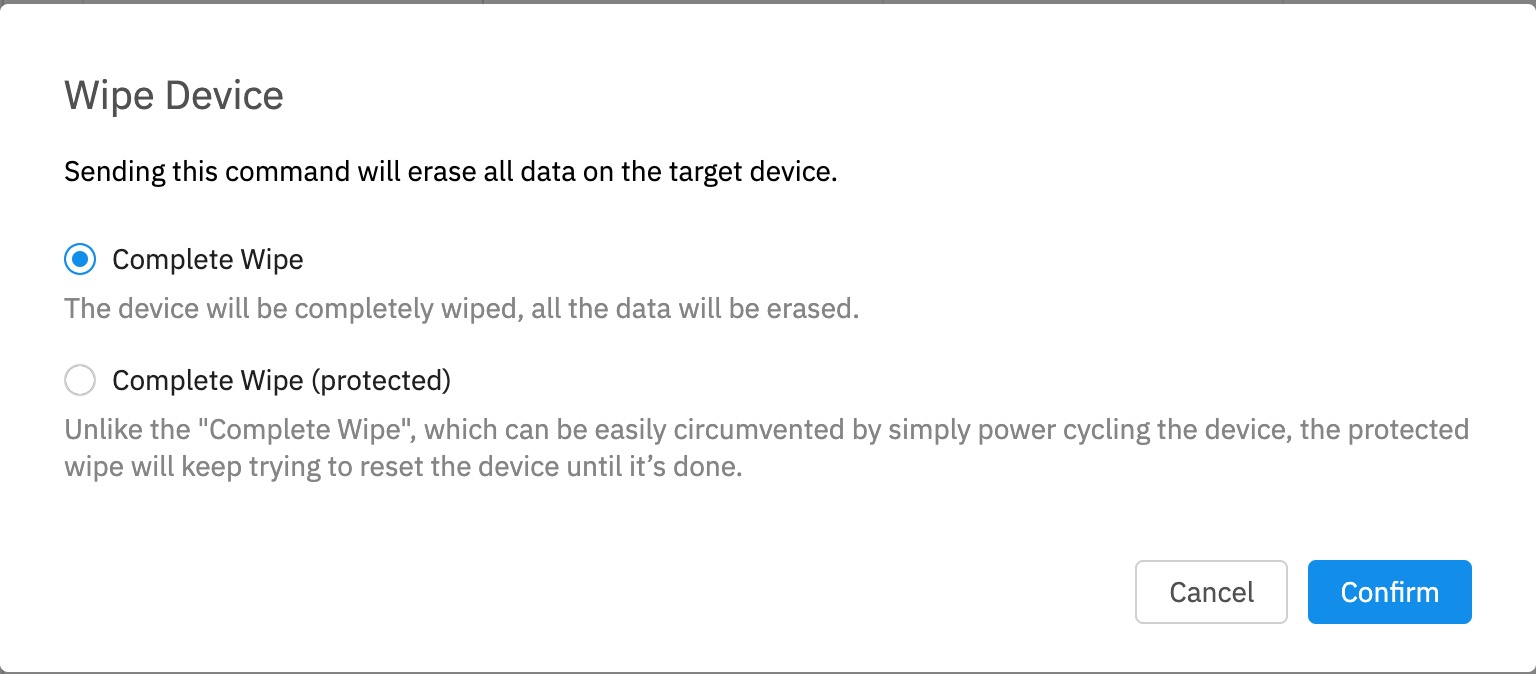 # View - Imaging (Windows) # View - Imaging Overview ## What The Imaging View shows us information for Windows imaging related associations, and allows us to create new. ## When/Why We are going to use this view whenever we want to check that a device has an imaging assignment, if we want to assign an image to a device for future imaging purposes, or if we want to change current association settings. ## How Creating, deleting and editing associations are available in this view and are covered further in the articles linked below. Having an image associated is the only way the IVS (Imaging appliance) knows what Windows image to assign to a device. 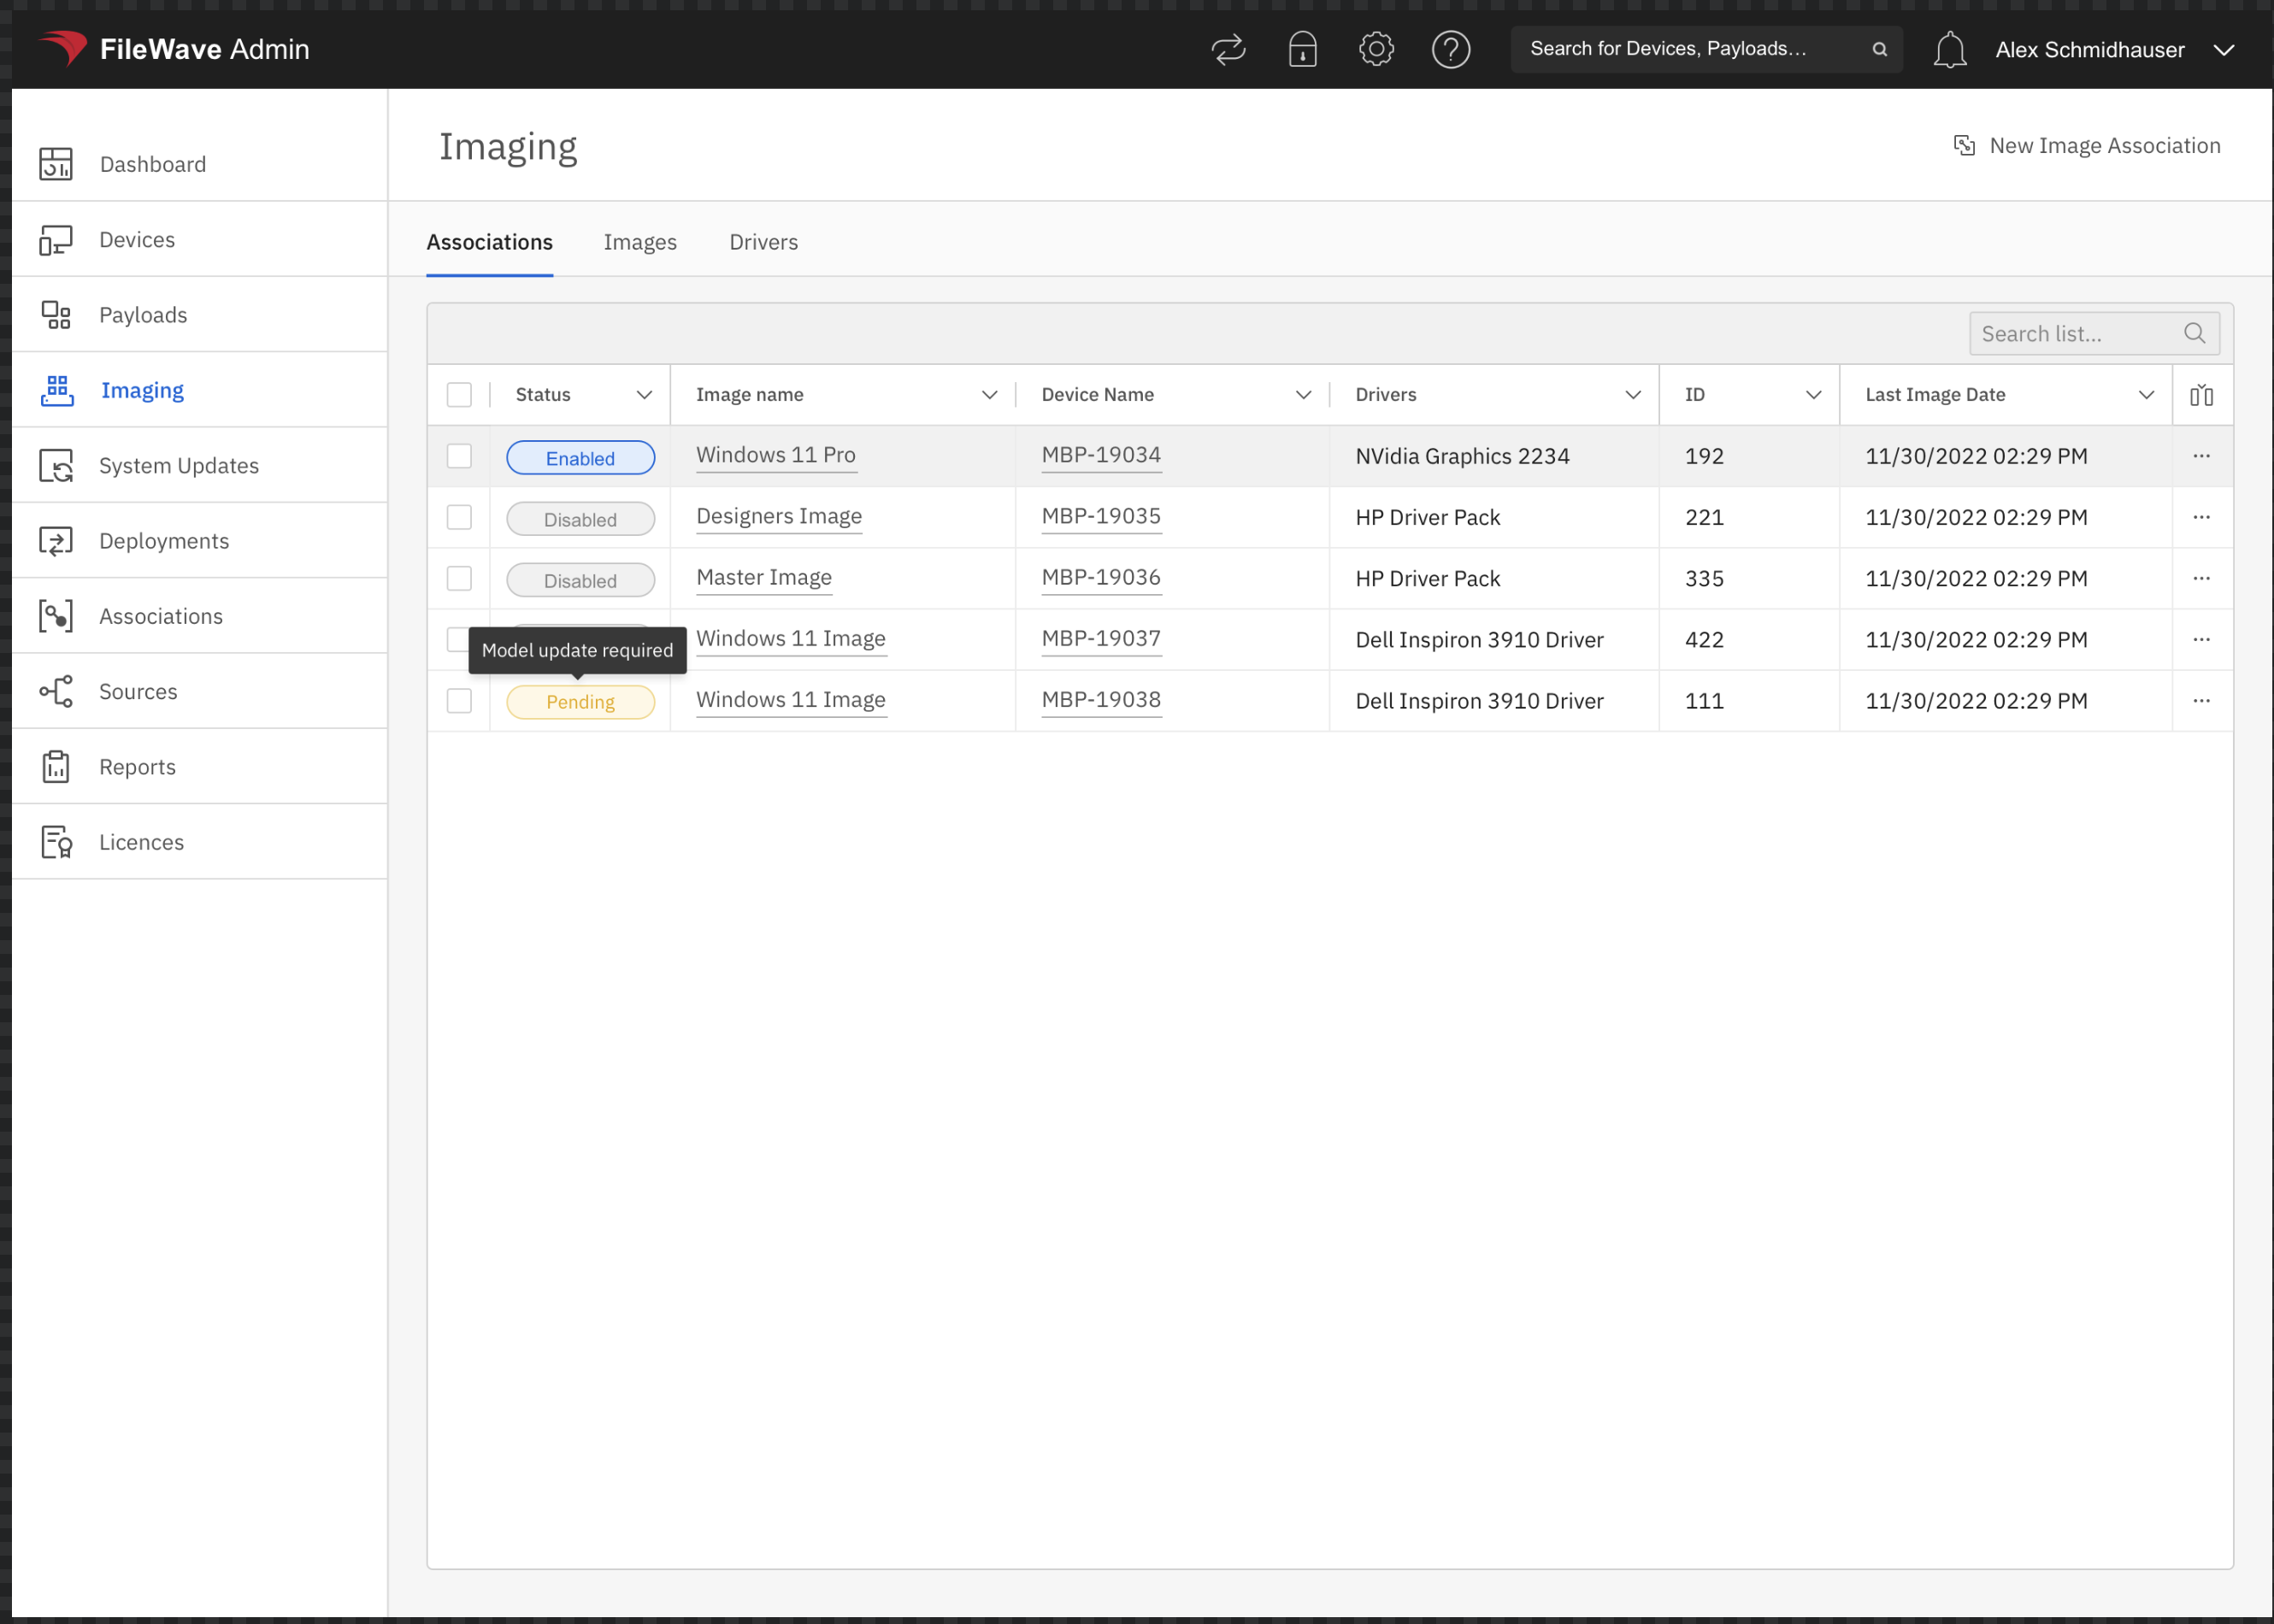 # Imaging Association Deletion, Enable and Disable ## What Existing imaging associations can be deleted, enabled, or disabled, depending on their current state. ## When/Why Deleting an association removes the link between an image and a device. Use it when you no longer want that device associated with the image, which helps prevent accidental imaging. Enable and Disable toggle whether the association can be used. IVS automatically disables an association during imaging to help avoid re-imaging a device that was just imaged. You can manually enable the association again when you are ready to reuse it. ## How Select one or more associations in the Imaging view, then use the bottom action bar to delete, enable, or disable them: 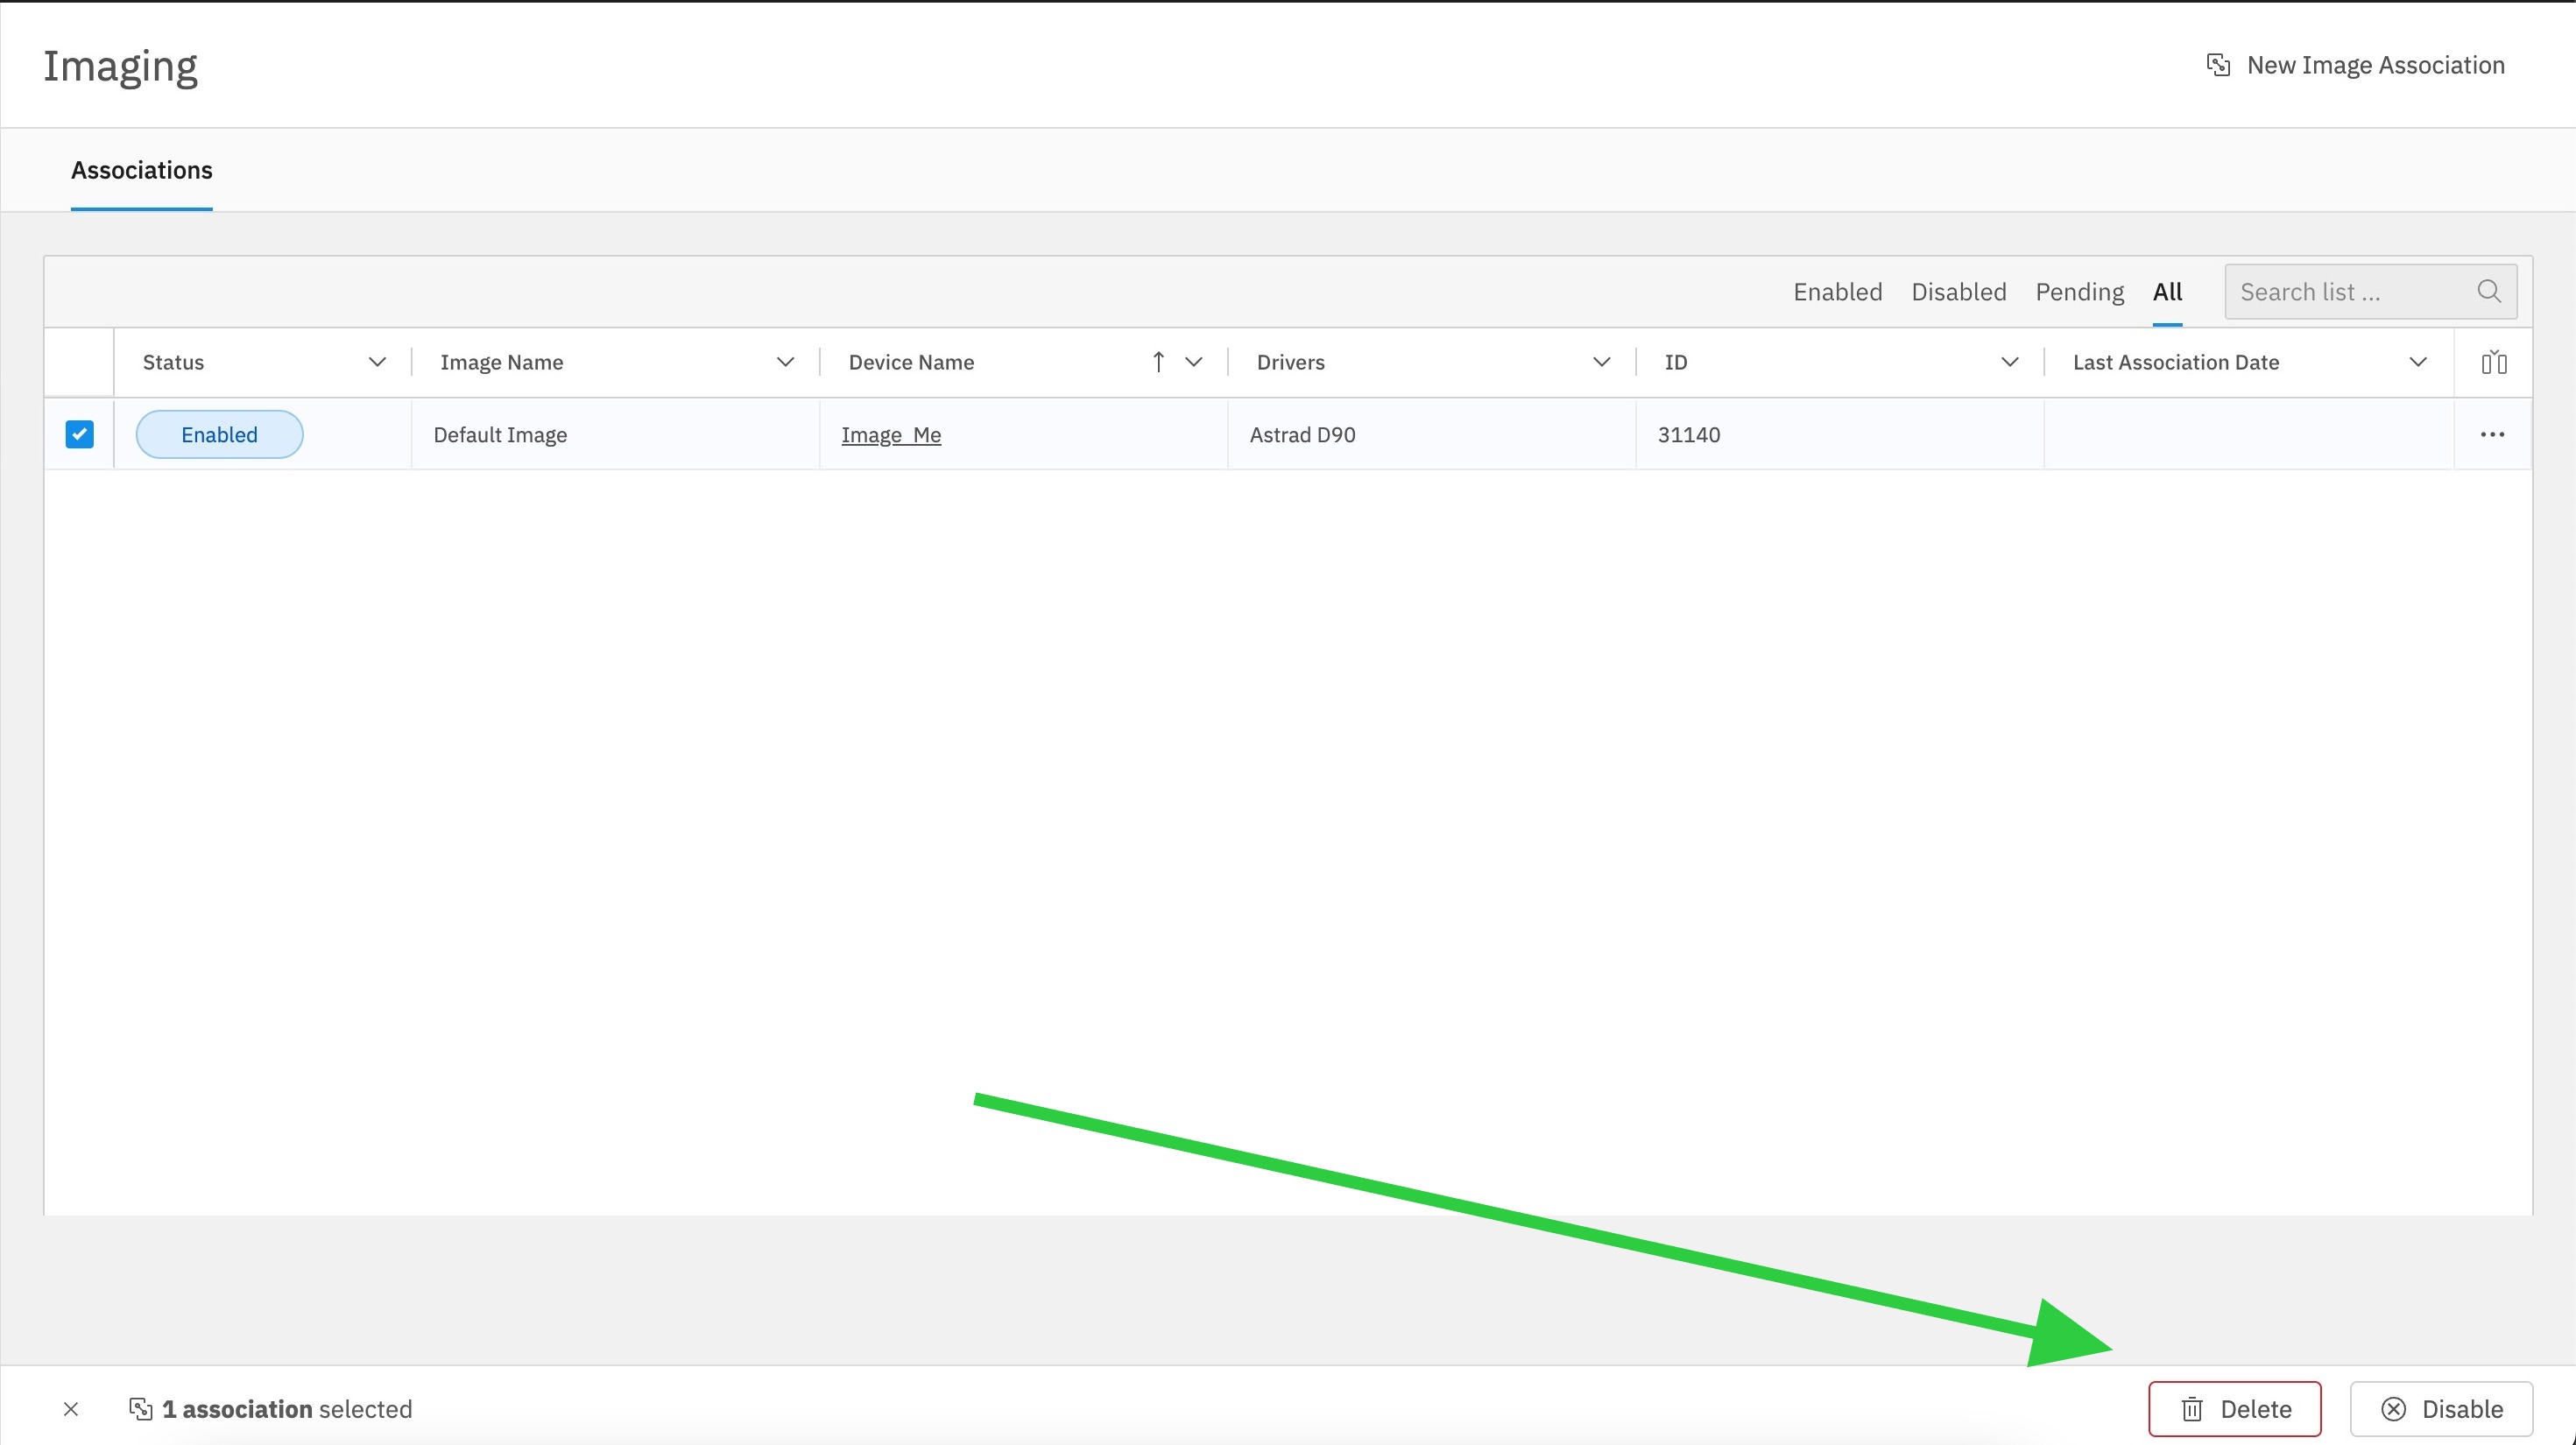 # Configure Windows Imaging Associations ## What A Windows imaging association links a captured image, any required driver packs, and the devices or groups that should receive that image. ## When/Why Review these properties when you create an association and whenever you change its image, drivers, or targets. ## How Choose from images already created in FileWave Central. Keep separate images when your Windows release, hardware, or boot mode (UEFI or legacy MBR) requires different content. Add a driver pack when the target hardware needs model-specific drivers. The example below pairs a Windows 11 image with a Dell driver pack. You can add multiple devices or groups while creating the association. FileWave then stores the resulting targets as individual imaging associations. 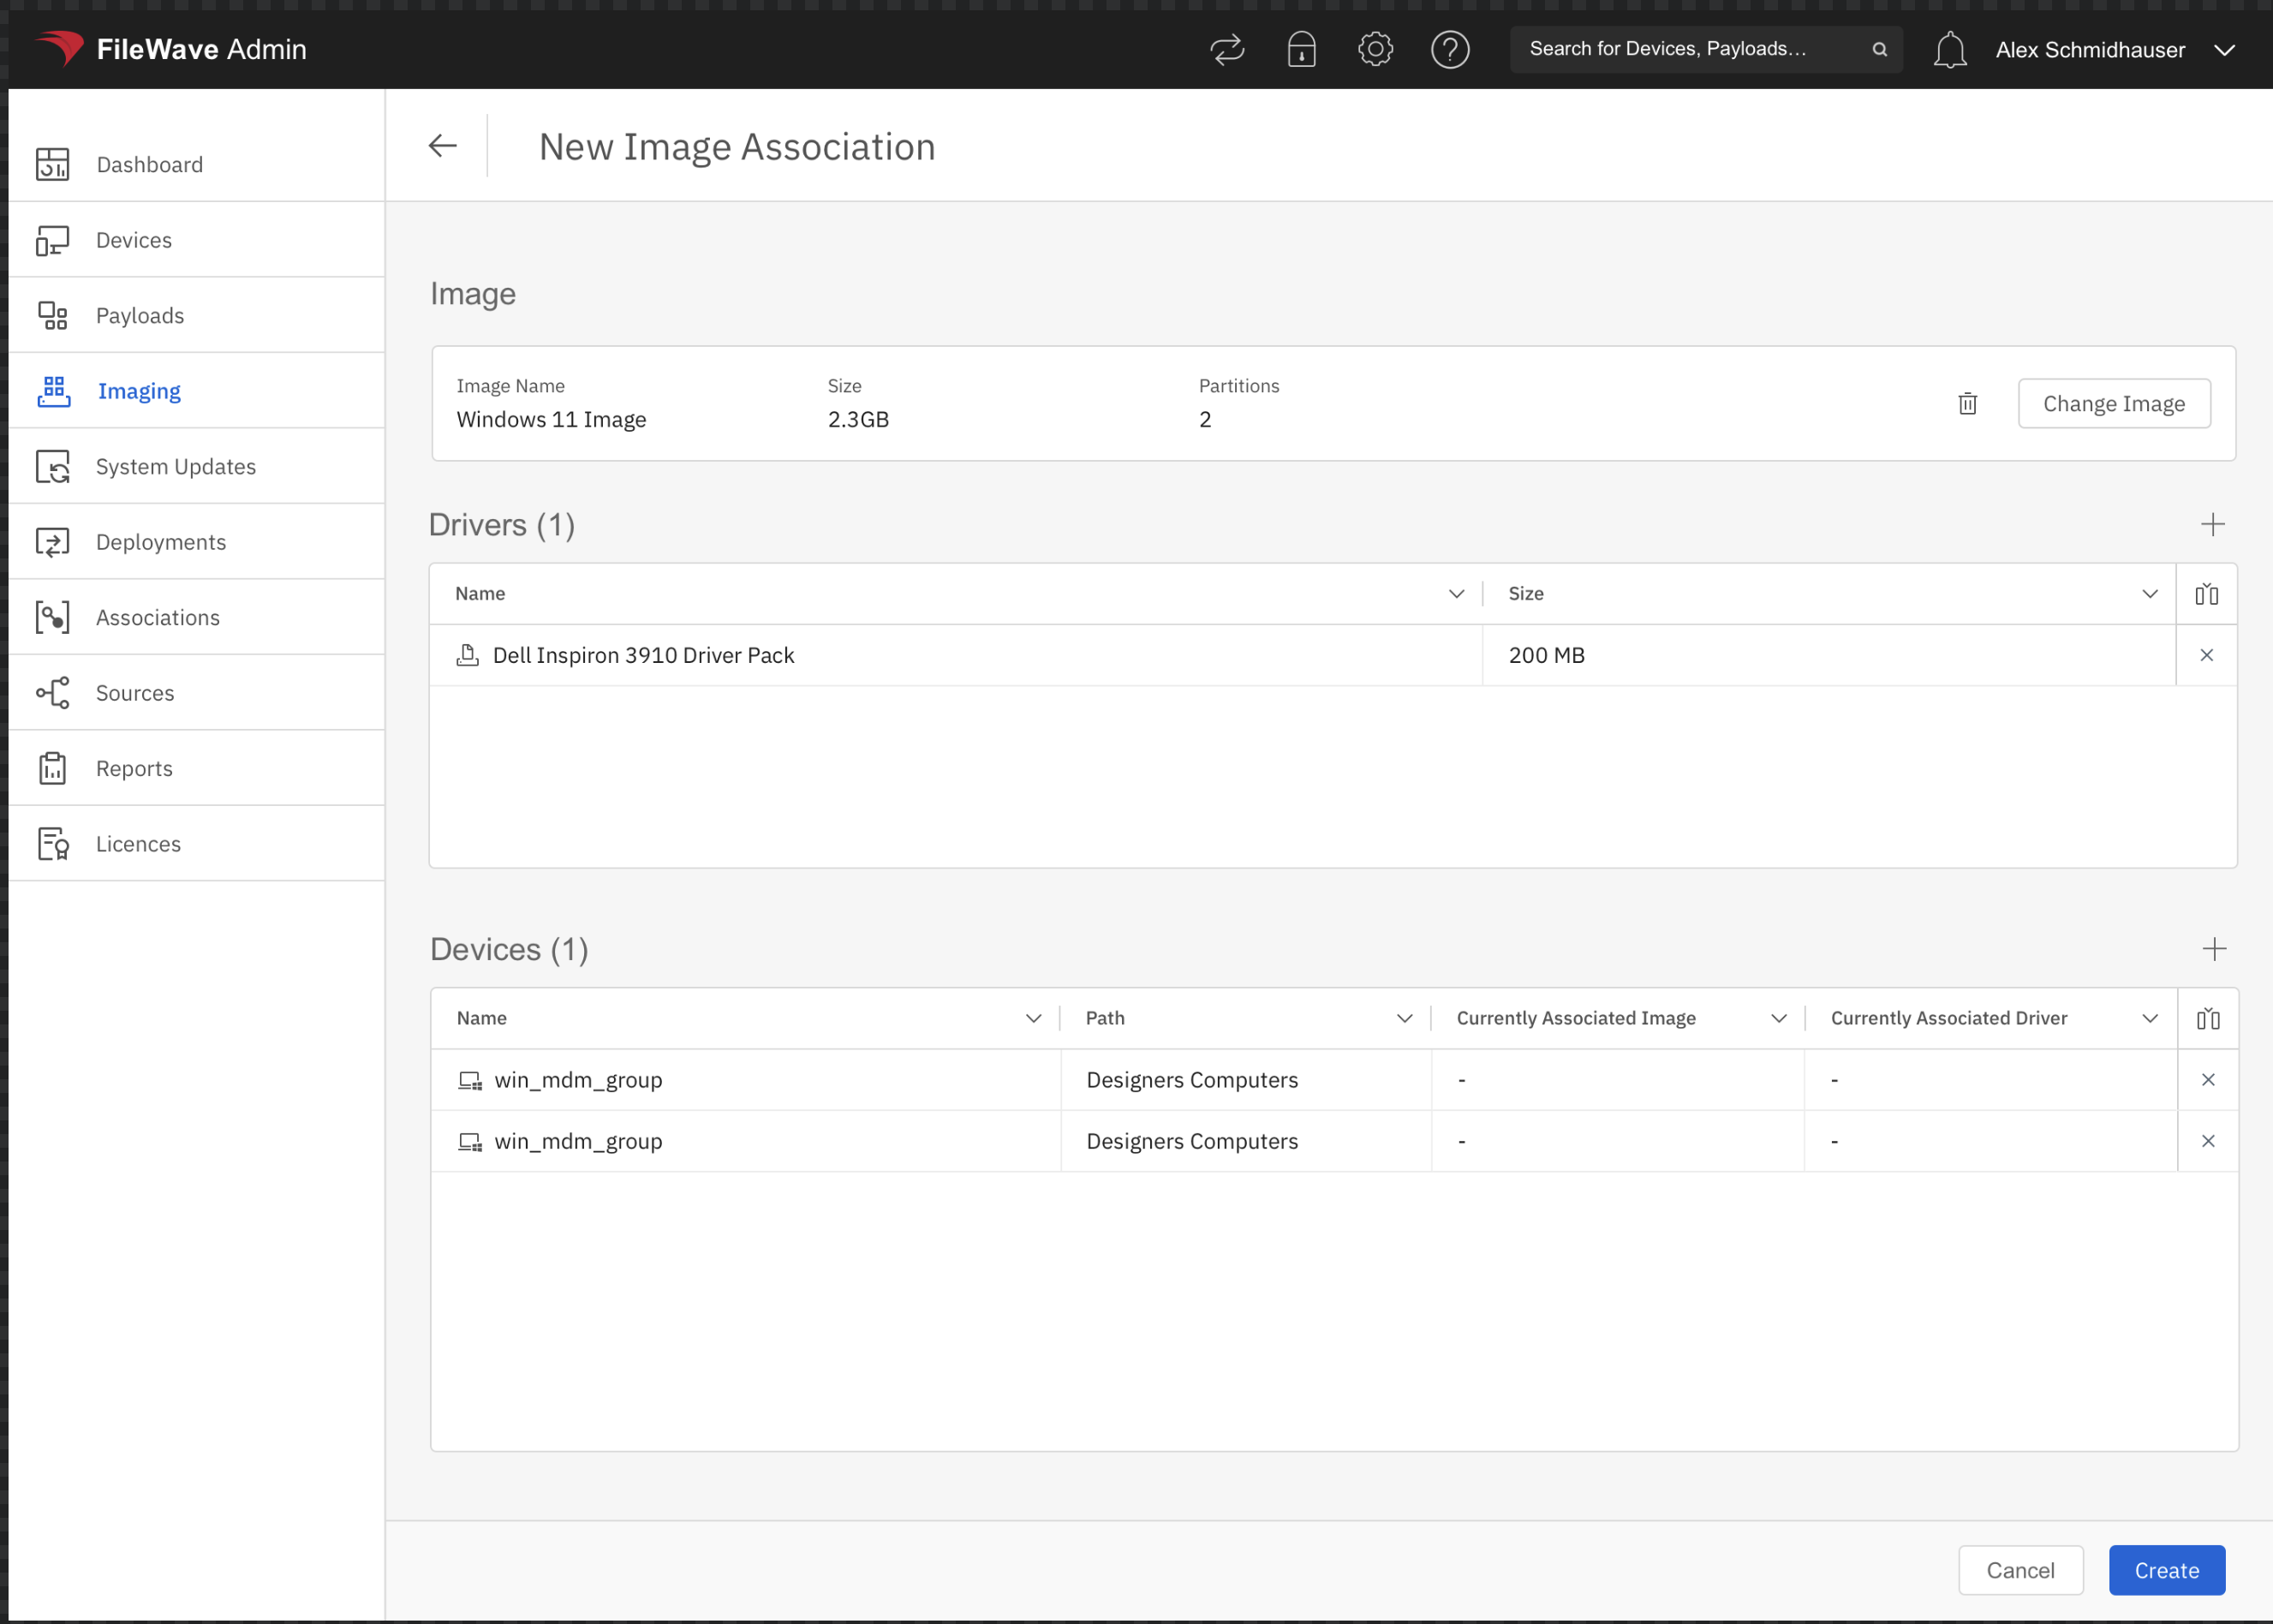 # Create Imaging Association ## What Use the **New Image Association** button in the imaging association view to assign a Windows image to one or more devices. A driver pack can also be selected when the device model requires one.  ## When/Why Create an imaging association when a Windows device needs to be linked to the image it should receive during imaging. Each device can have only one active imaging association at a time. 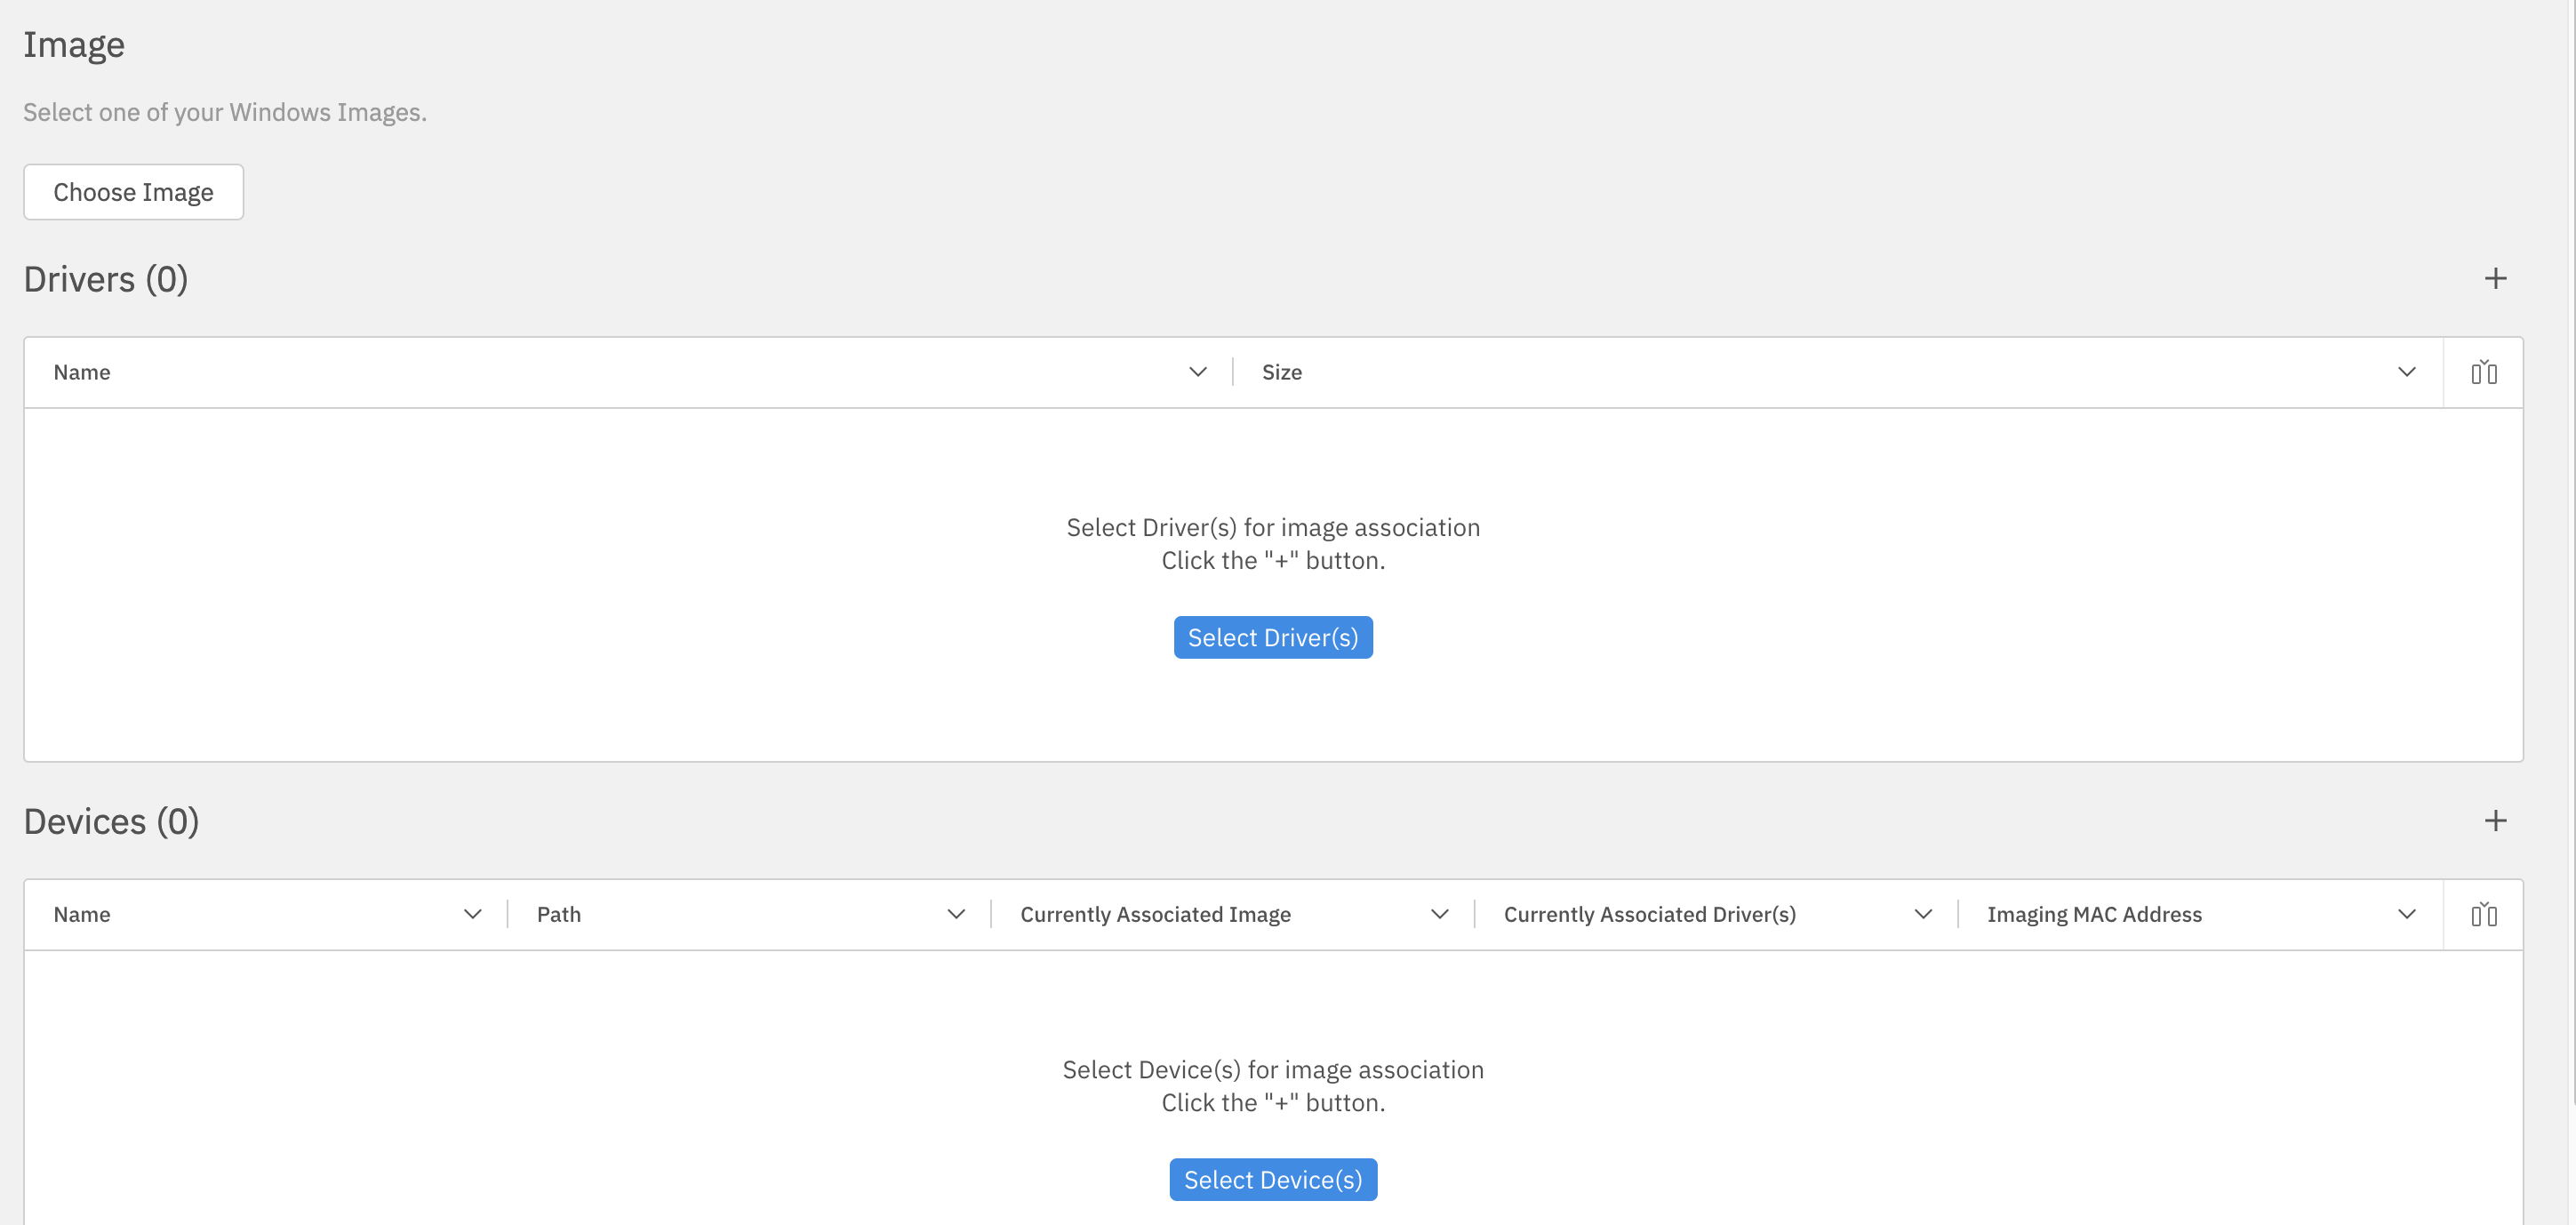 ## How Choose the image with **Choose Image**, add an optional driver pack with **Select Driver(s)**, and choose the target device or devices with **Select Device(s)**. Save the association after the required image and device selections are complete.If you add an association for a device that already has one, FileWave prompts you to either overwrite the existing association or cancel.
 # View - Licenses The Licenses View shows us licensing information for VPP related apps. This is a great view within the WebAdmin to take the temperature of the environment as far as licensing availability for VPP. Policing this view occasionally can help us avoid some of those "surprises" that pop up from time to time. Note that this view gives us excellent summary information on available licenses: # View - Licenses Overview ## What The Licenses view in FileWave Anywhere shows license availability for VPP/App Store apps and other managed licenses. ## When/Why Use this view when you need to check whether enough app licenses are available before or during a deployment. A quick review can catch low-license conditions before users start seeing install failures. ## How This view summarizes the available and used license counts:  # View - Payloads Profiles allow you to control settings, features, and capabilities for Apple devices; iOS, macOS, iPadOS, TvOS. Devices may need profiles for initial configuration (like to allow them to join a network), in reaction to a request (like please disable the camera on the devices), or to configure settings at anytime. # Profiles and Policies in FileWave Anywhere ## What In FileWave Anywhere, profiles and policies are configuration payloads that apply managed settings to devices. The name and available settings depend on the target platform. ## When/Why Open **Payloads** and choose **Create Configuration** to create an Apple profile, Windows MDM policy, Google policy, or FileWave policy. ## Configuration types **Apple profiles** apply supported Apple configuration payloads to managed devices. **Windows MDM policies** configure enrolled Windows devices. See [Windows MDM Policies (aka Profiles)](https://kb.filewave.com/books/microsoft-windows-mdm/page/windows-mdm-policies-aka-profiles "Windows MDM Policies (aka Profiles)"). **Google policies** configure supported ChromeOS settings. **FileWave policies** configure FileWave-specific device behavior. ## Basic workflow 1. Open **Payloads** and select **Create Configuration**. 2. Choose the platform and configuration type that matches the target devices. 3. Configure the required settings and save the payload. 4. Assign it to a small test group, verify the result, and then expand the deployment. # Add Profile ## What Apple profiles let you control settings, features, and restrictions for iOS, iPadOS, macOS, and tvOS devices. ## When/Why Use profiles for initial setup, requested restrictions, and ongoing configuration changes. Common examples include Wi-Fi settings, camera restrictions, wallpaper settings, certificates, privacy controls, and other managed-device behavior. ## How Select the plus () in the top right to open the profile editor for a new profile. ### Basic Profile Properties Every configuration profile needs a few basic properties before it can be saved. At minimum, set a profile name and add at least one payload category. #### How The three most common elements to set, or change from the default value, are highlighted below: 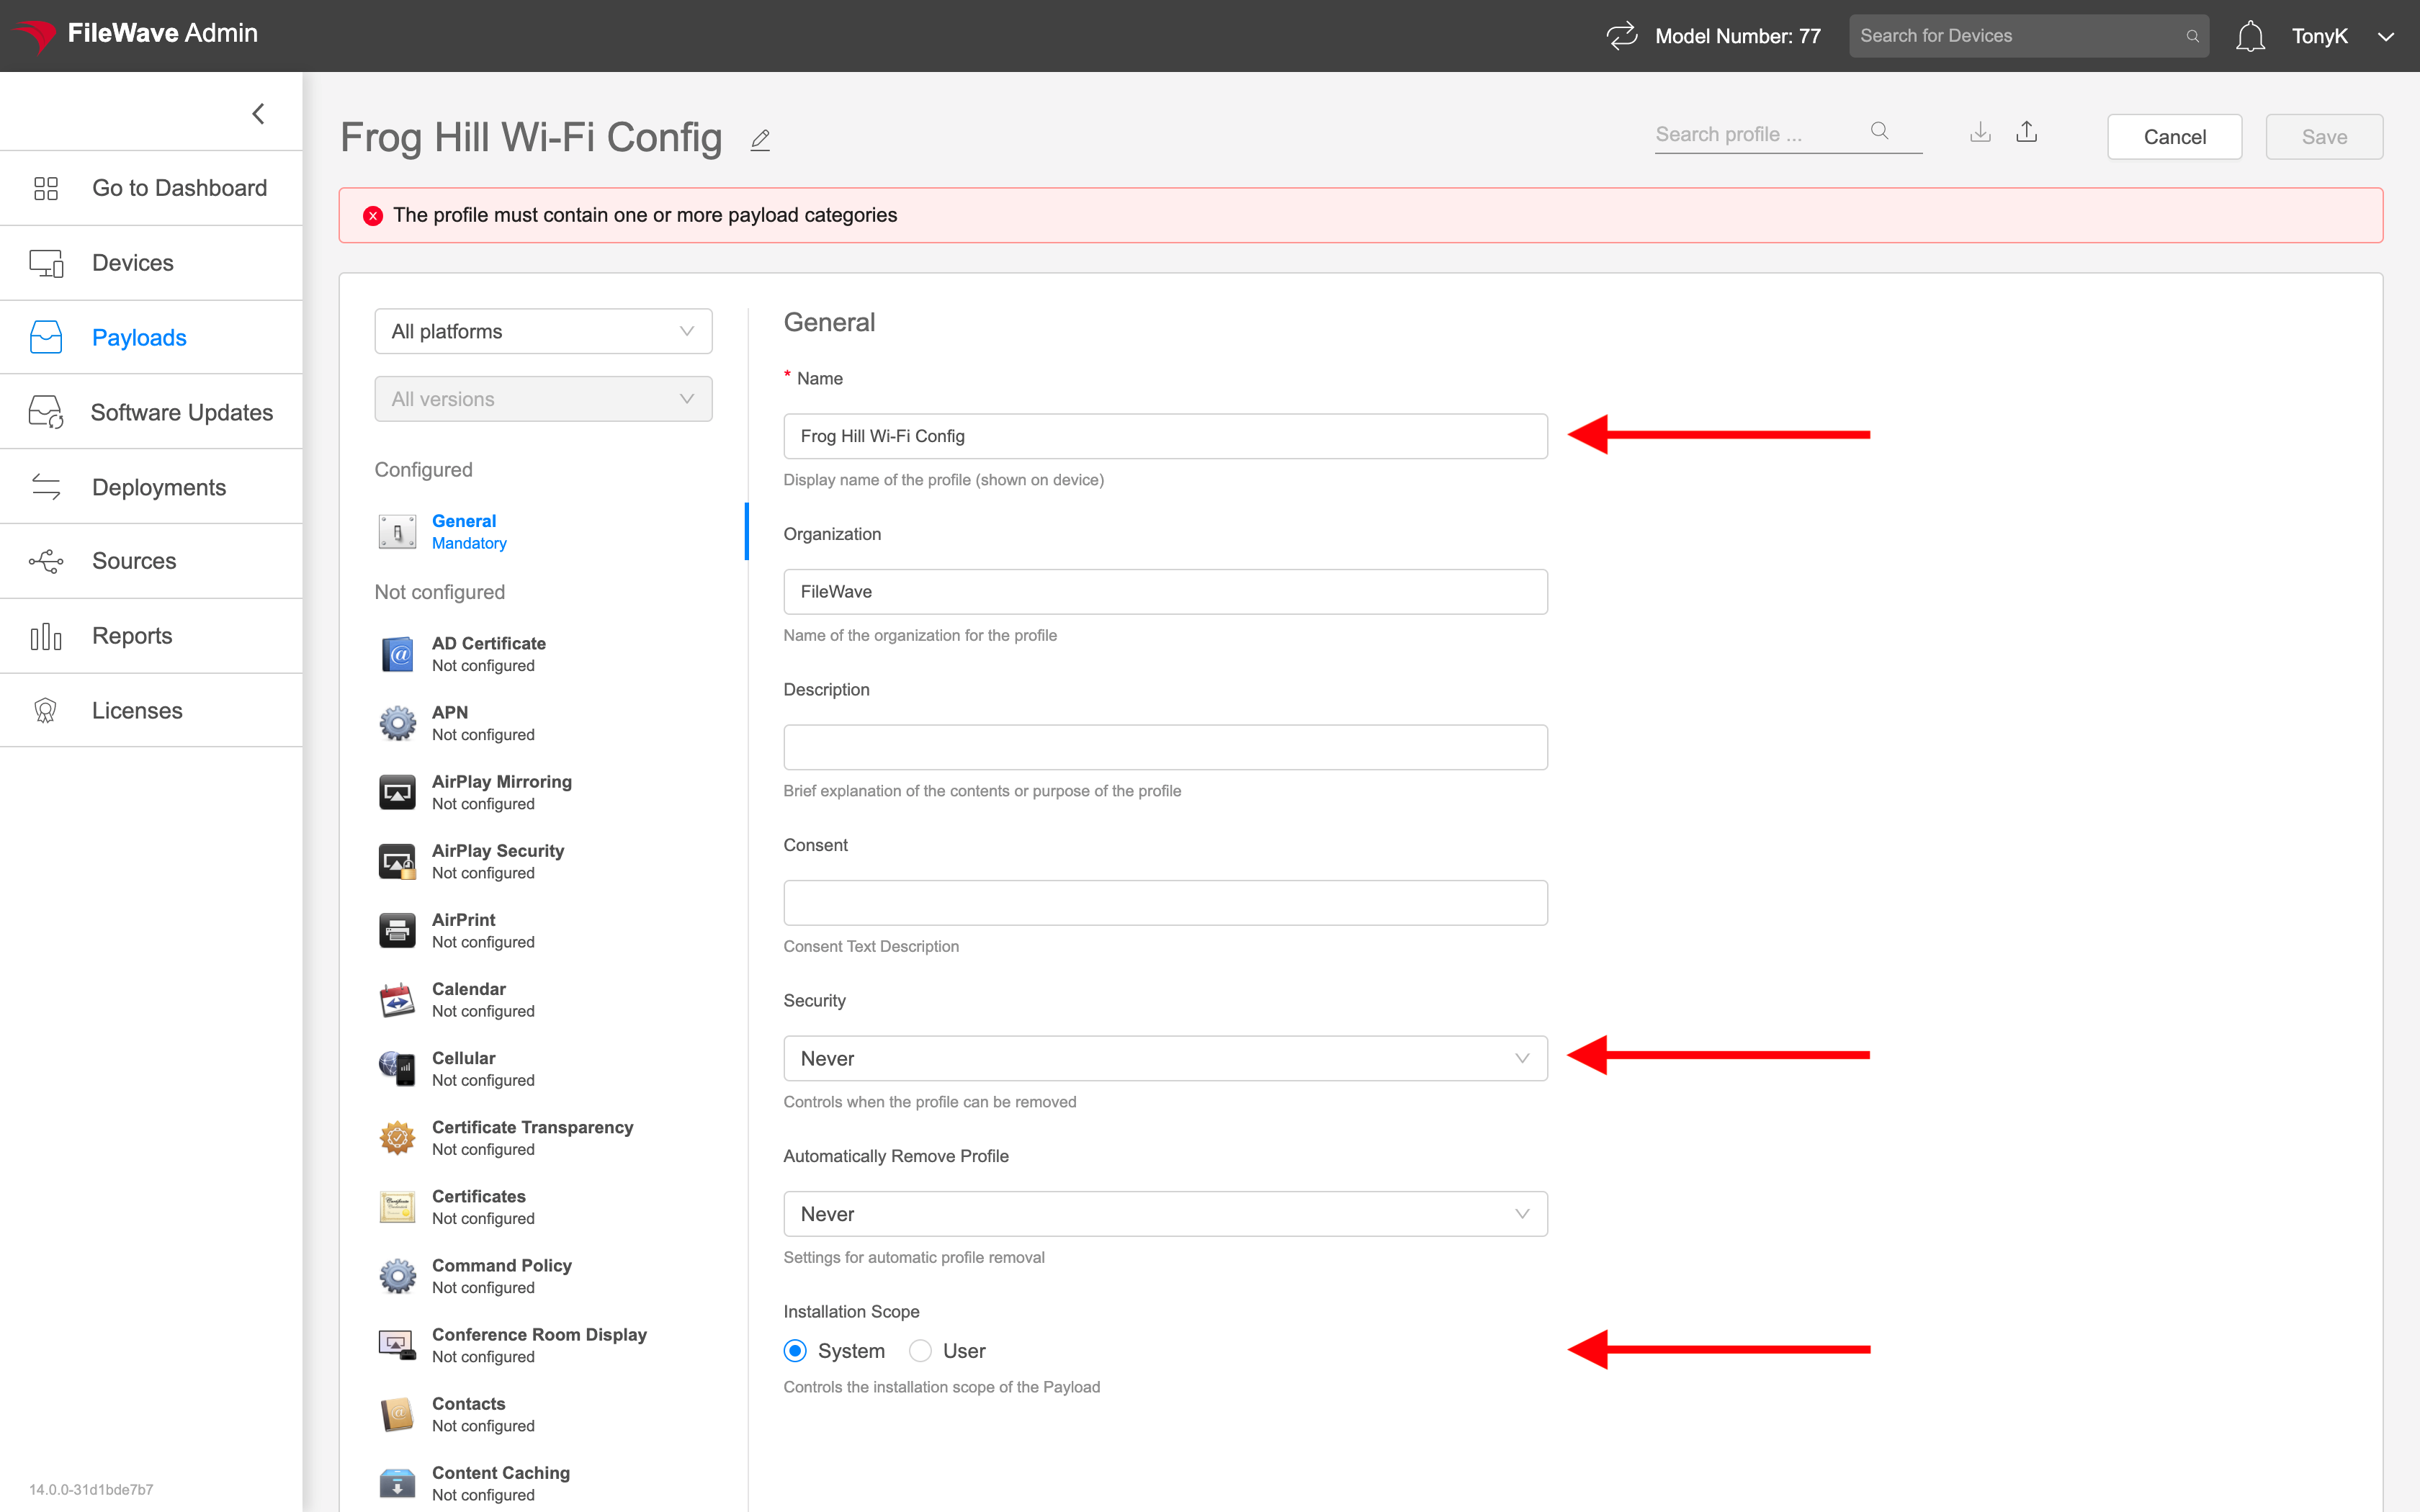 In order, those elements are: - **Name:** Must be unique, should be descriptive, and cannot be left blank. - **Security:** Specifies when this profile can be removed by the user. - **Installation scope:** Defines whether the profile installs for the system or for the user of the device. The highlighted warning in the screenshot is a reminder that the profile must contain at least one payload category before it can be saved. ### Navigating an Apple Profile Configuration profiles are straightforward, but finding the right setting can take a minute. Use the platform, OS version, and search filters in the profile editor to narrow the list of available payload items. #### How For example, assume you want to set the wallpaper for an iOS device. Start by choosing the platform in the upper left: 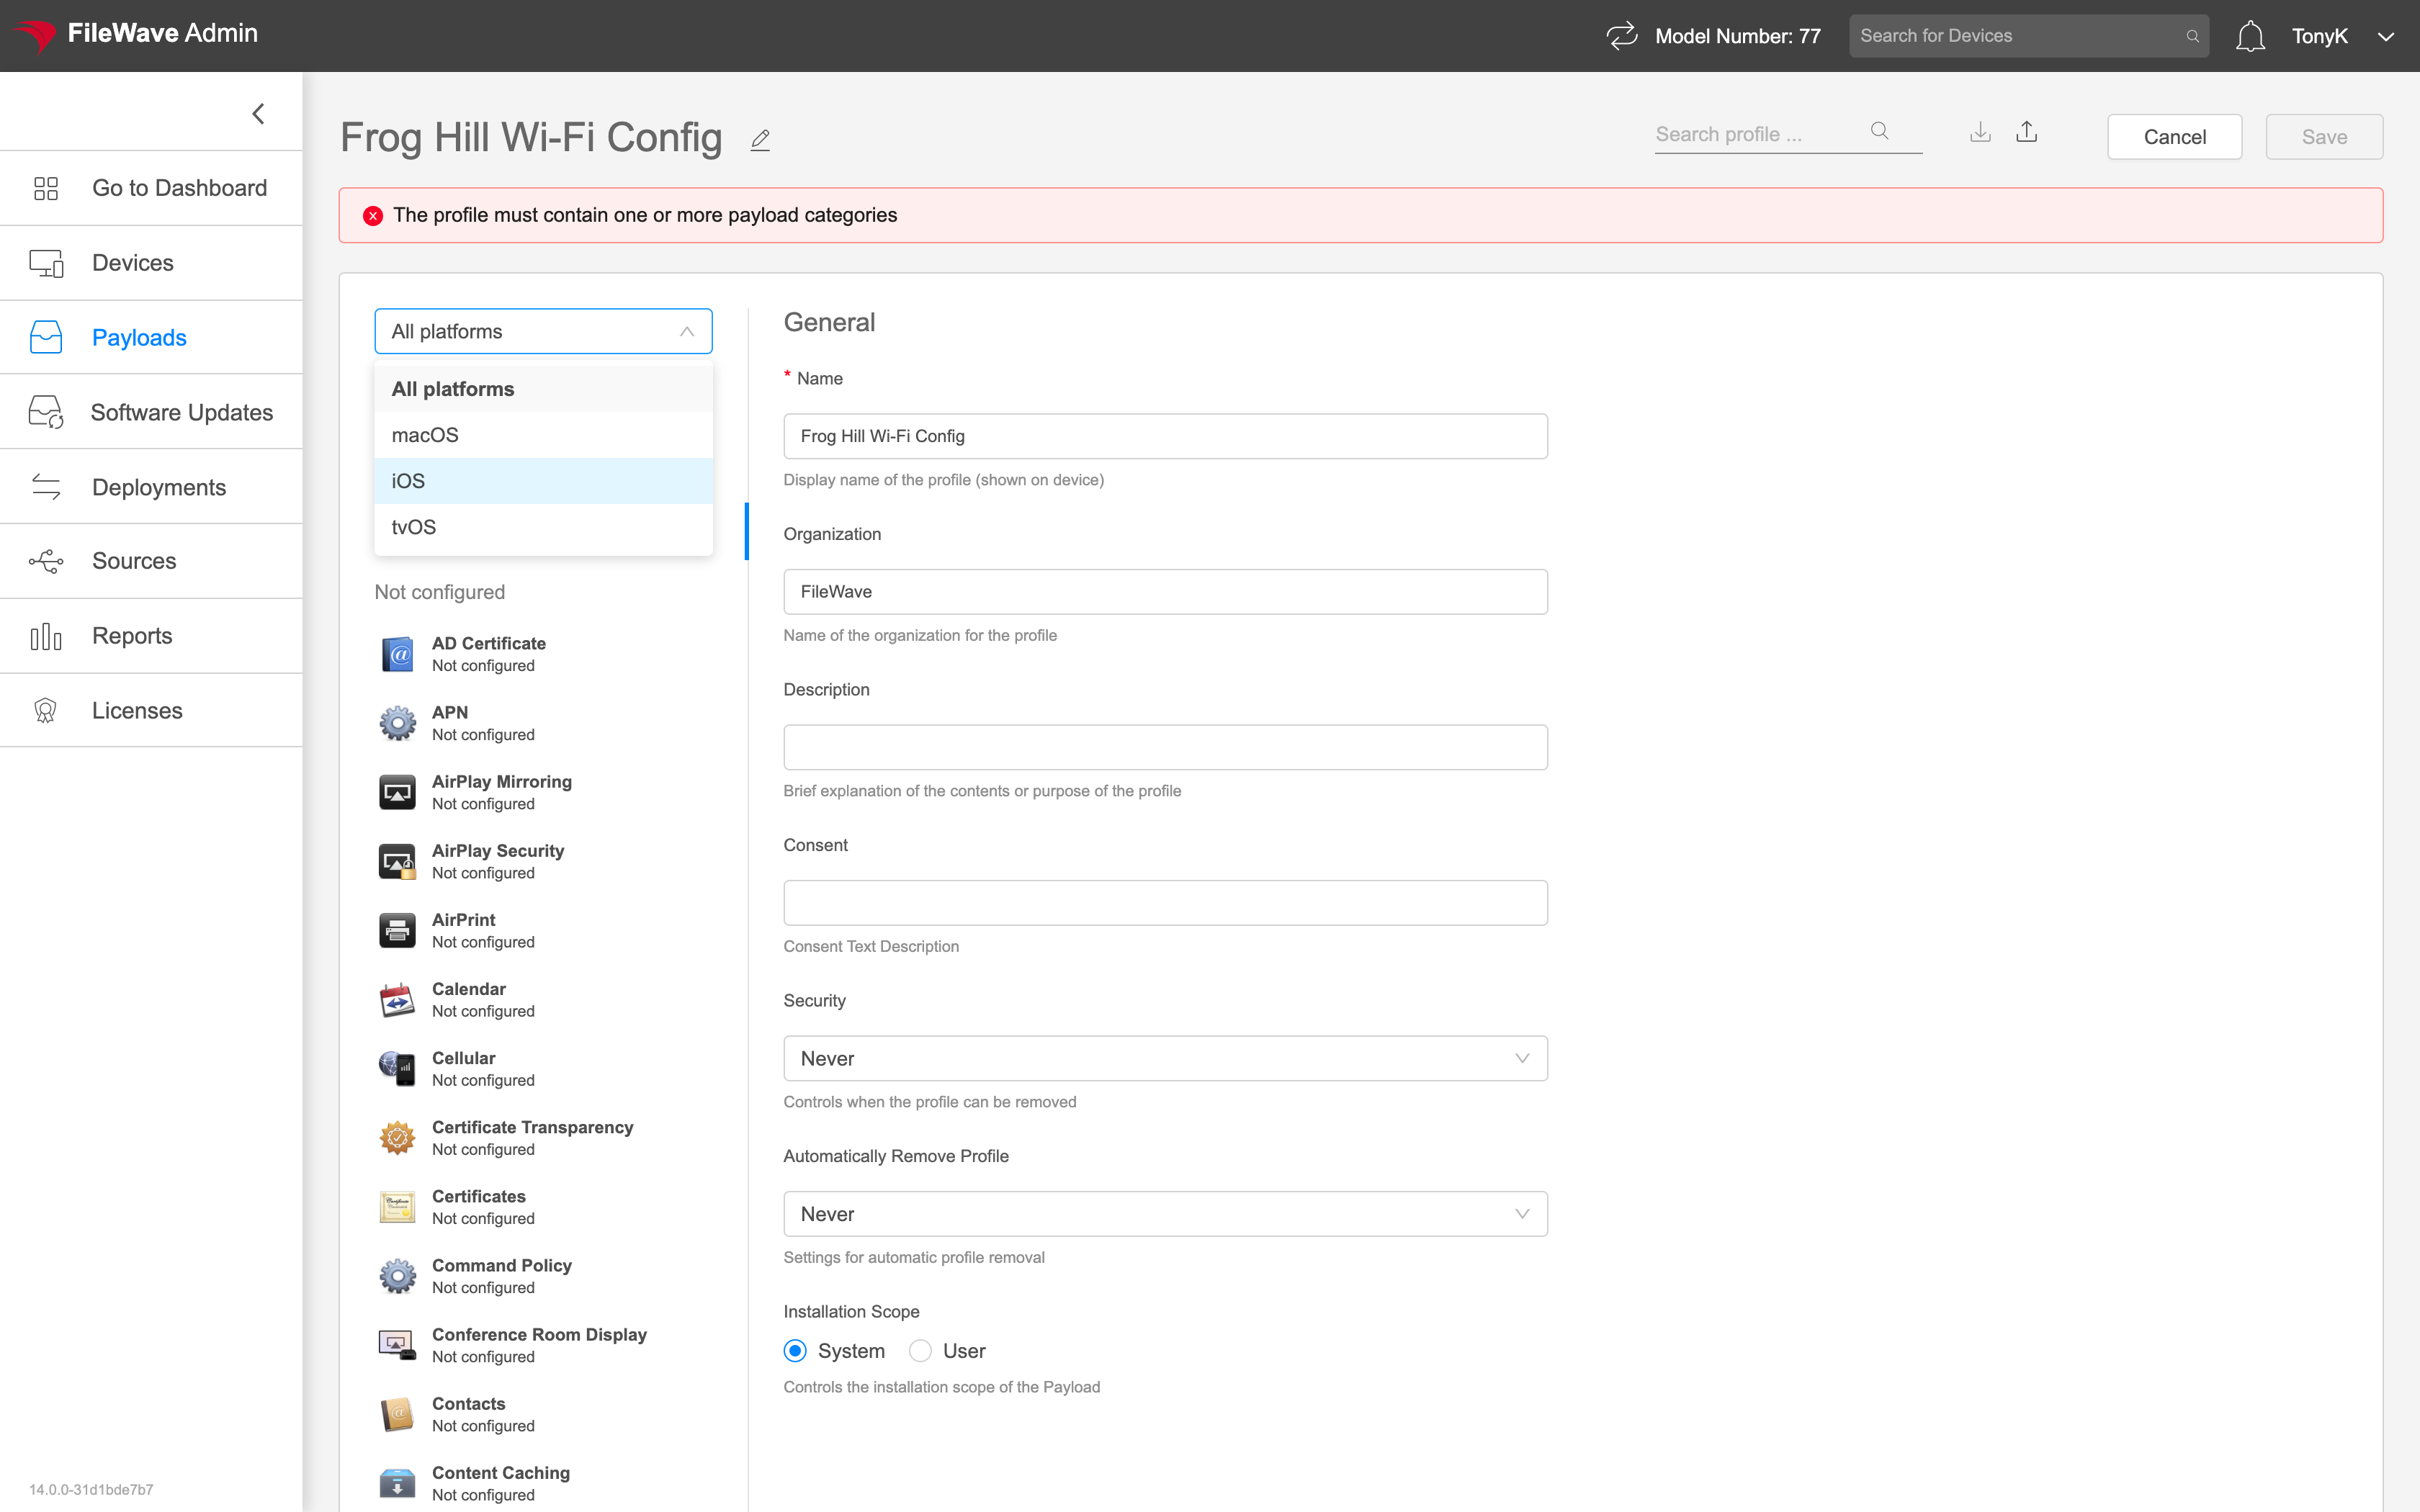 Once the platform is set, the list of profile categories becomes smaller. If you know a setting is tied to a specific OS version, you can also use the version filter, though most profile builds do not need it. With the platform filter in place, search for `wallpaper` to narrow the payload list further. The matching payload names are highlighted in the editor:  ### Setting Profile Payloads The purpose of a configuration profile is to change endpoint configuration. The exact settings, and how they behave, depend on the payload you choose. Profile work usually falls into two categories: - Settings you have already built and tested before. - New settings you have not worked with yet. The first category is usually routine. For example, if you have already created Wi-Fi profiles for 41 locations, building the 42nd profile should be familiar. For new settings, use both testing and documentation: 1. Experiment and test on a device you can inspect directly. 2. Use Apple's current device-management documentation: - [Intro to device management profiles](https://support.apple.com/guide/deployment/intro-to-device-management-profiles-depc0aadd3fe/web) - [Intro to device management payloads](https://support.apple.com/guide/deployment/intro-to-device-management-payloads-depd73c1b83c/web) 3. For third-party payloads or settings, use the vendor's documentation. FileWave, like other MDM providers, exposes settings defined by Apple or the relevant vendor. Those references are the authoritative source for what a payload key means and which OS versions support it. #### How Defining every MDM payload is outside the scope of this Knowledge Base, but these practices will keep profile work safer: - Build profiles, especially restrictions, as small and focused as possible. Avoid mixing unrelated settings in one profile when you can. - This makes exceptions easier later because you do not have to split a large mixed profile apart. - Test, test, and then test again against a device you control. - Never create and deploy a profile directly to production without testing. - Be especially careful when editing profiles that are already assigned, particularly Wi-Fi profiles or anything else where a mistake could disconnect devices or break management. Here is a simple example that sets a wallpaper and prevents it from being changed. Notice that it uses two related payloads: 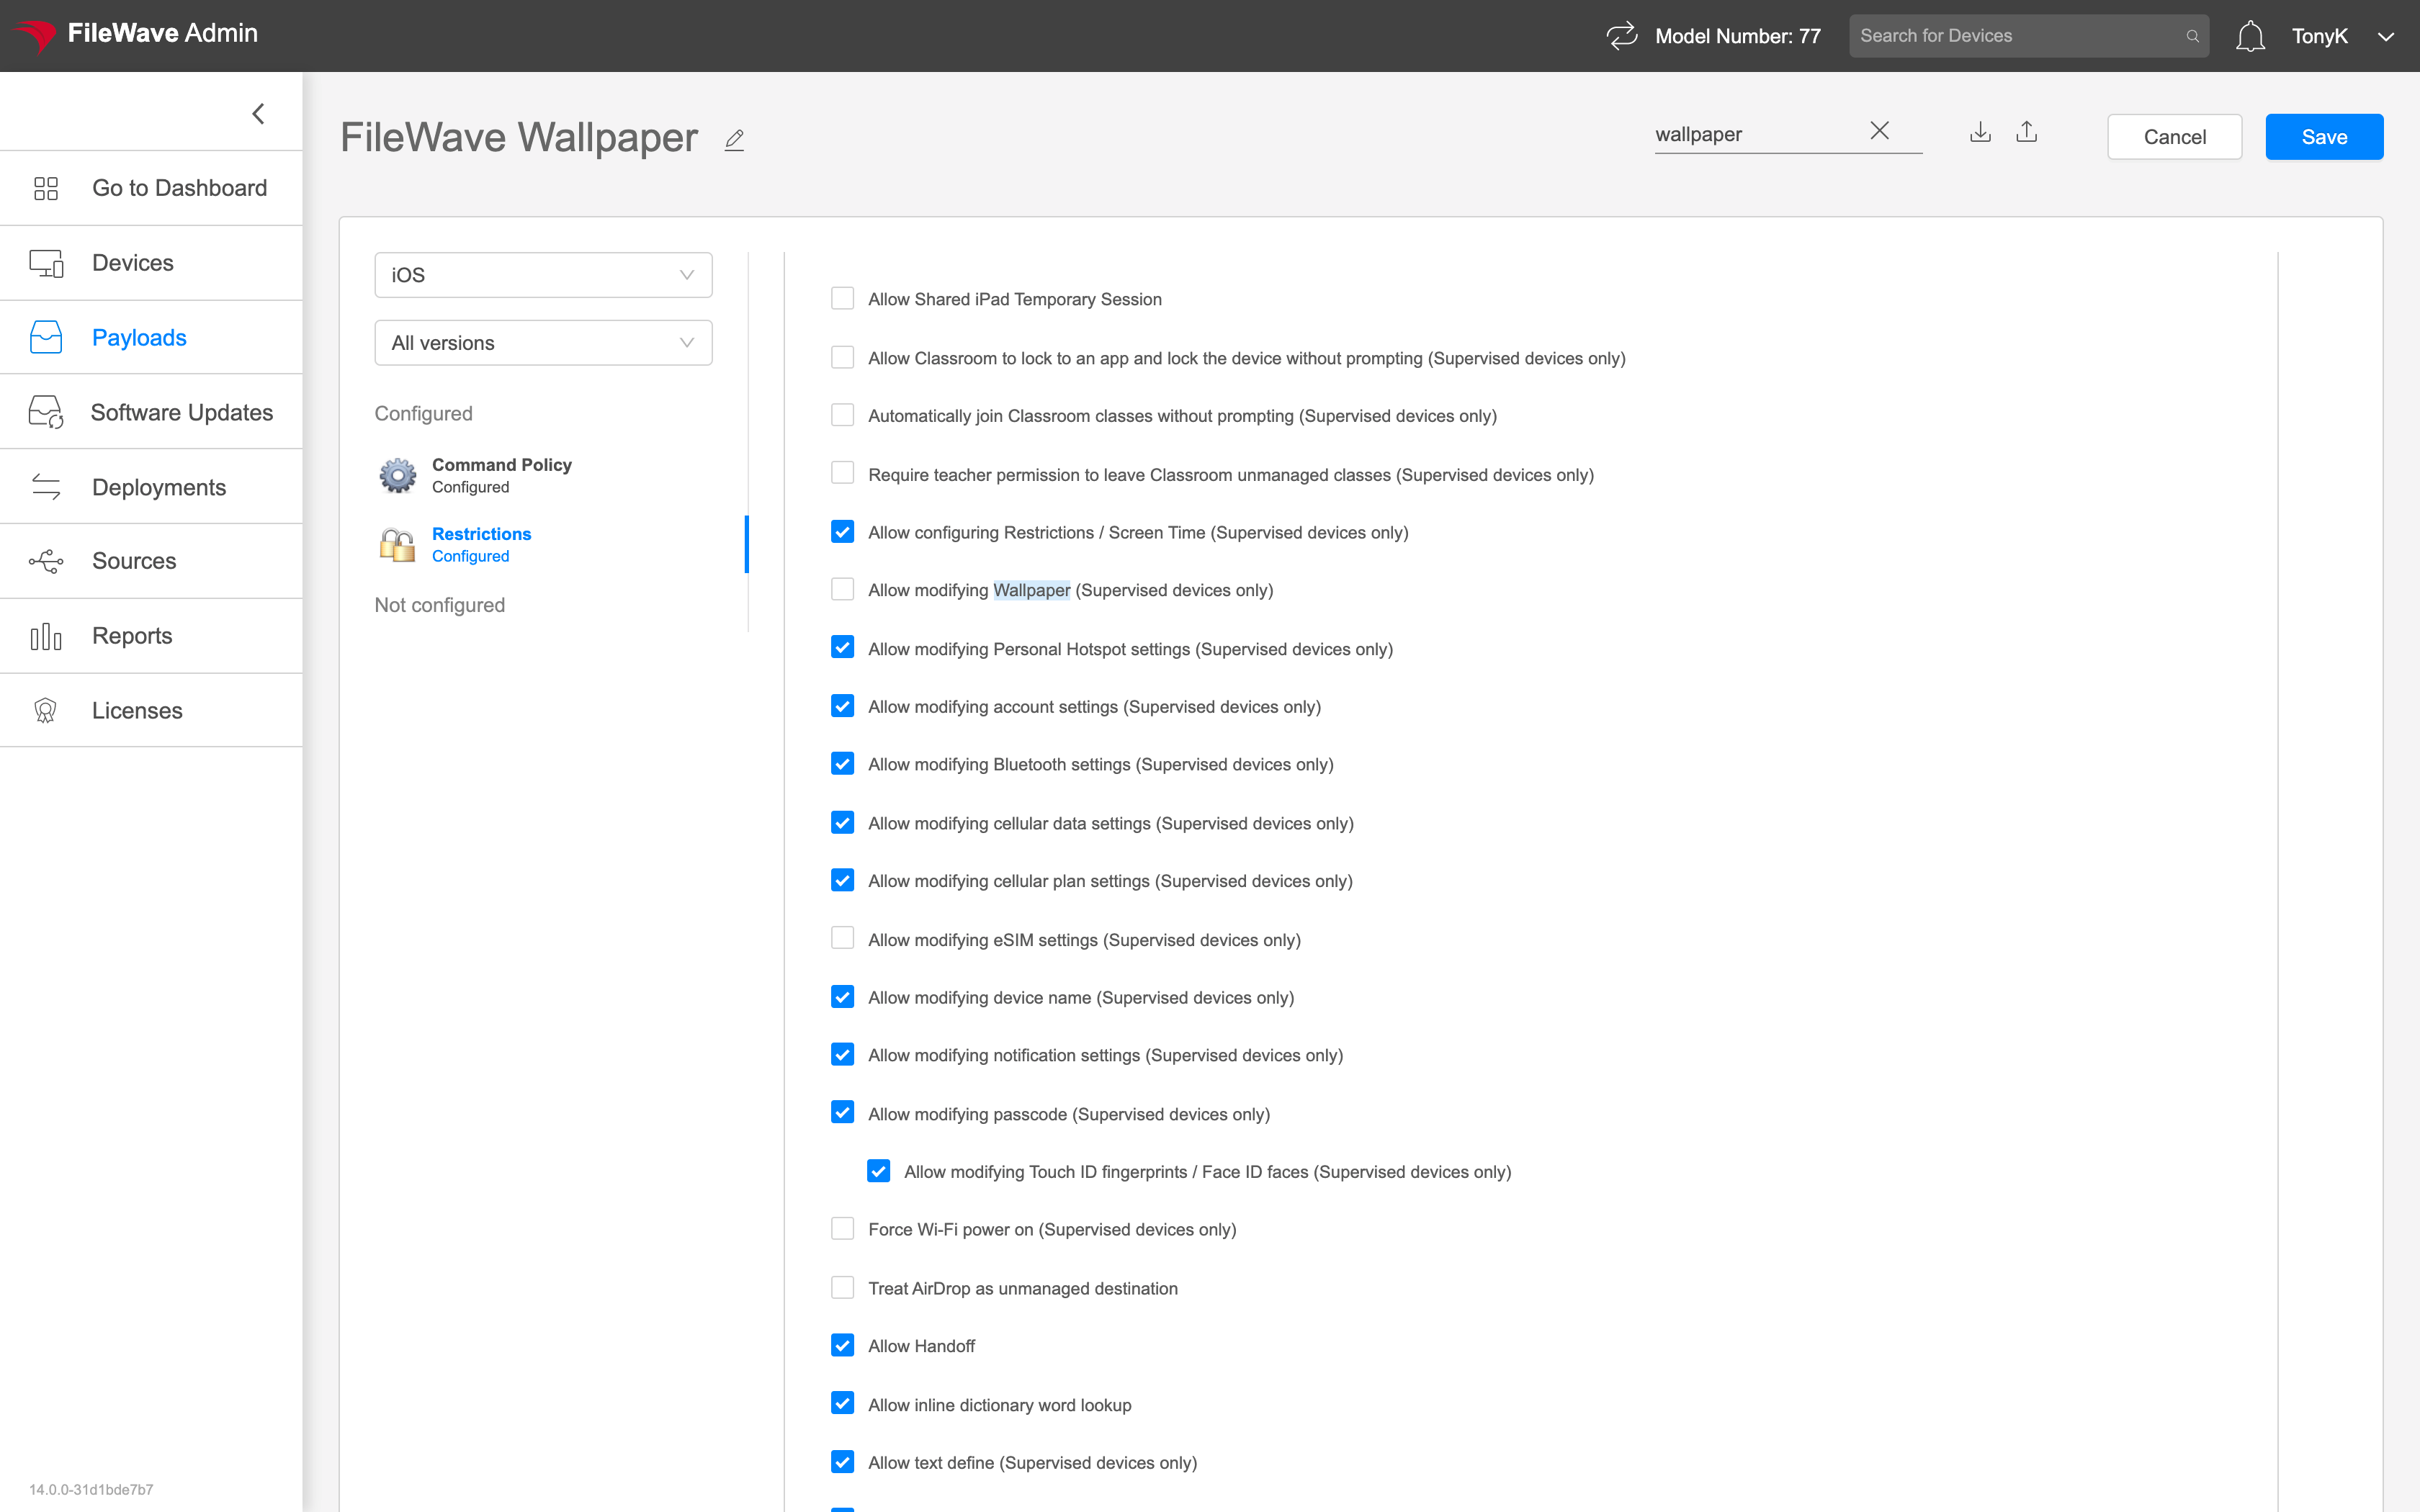 # Editing Payloads / Payload Properties ## What In FileWave Anywhere, you can edit profile payloads, change properties for other payload types, and review basic payload deployment information. ## When/Why Use the Payload view when you need to inspect a payload, check deployment status, or adjust payload properties. ## How Select a payload to open its detail view: 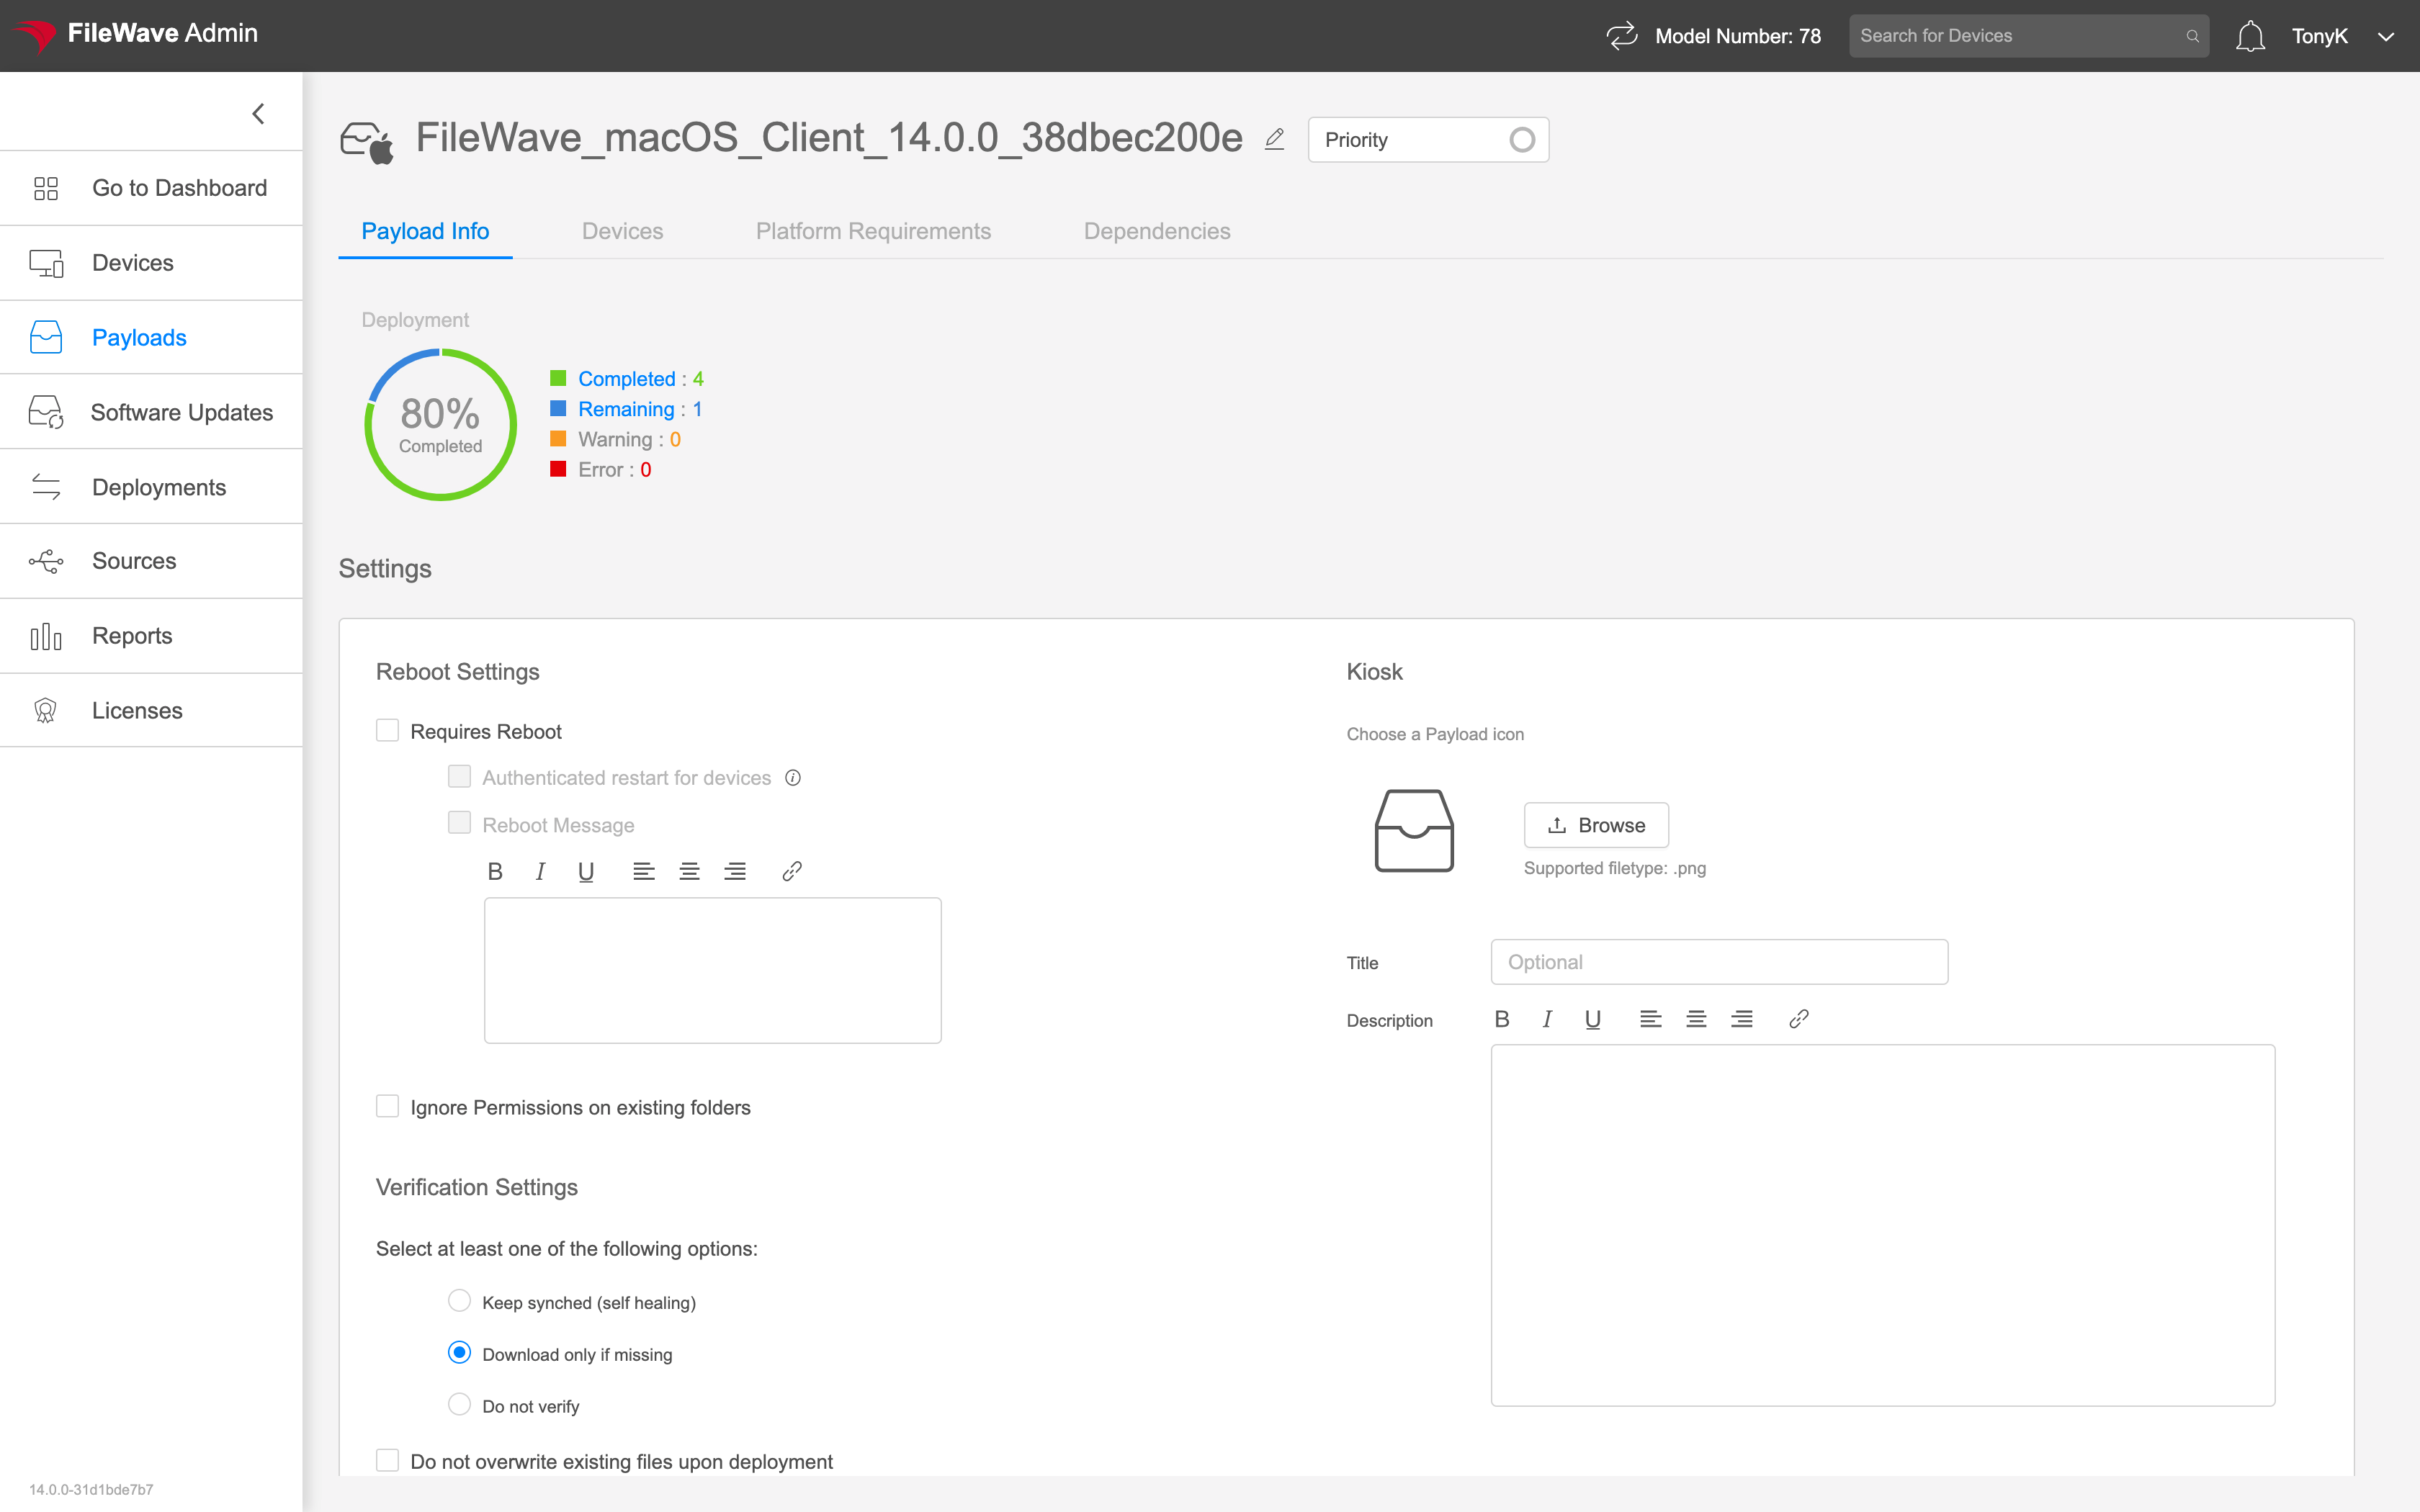 The available tabs depend on the payload type. For example, a VPP payload shows licensing information that does not appear for other Fileset types: Payload properties do not have a separate Save button. Changes such as platform requirements are saved immediately and take effect after the next model update.
| Payload Tab | Example |
| The Payload Info Tab shows: - Summary information on deployment - Verification Settings - Kiosk Icon - Reboot flag |  |
| The Devices Tab shows the devices that have this payload assigned, and their current status. | 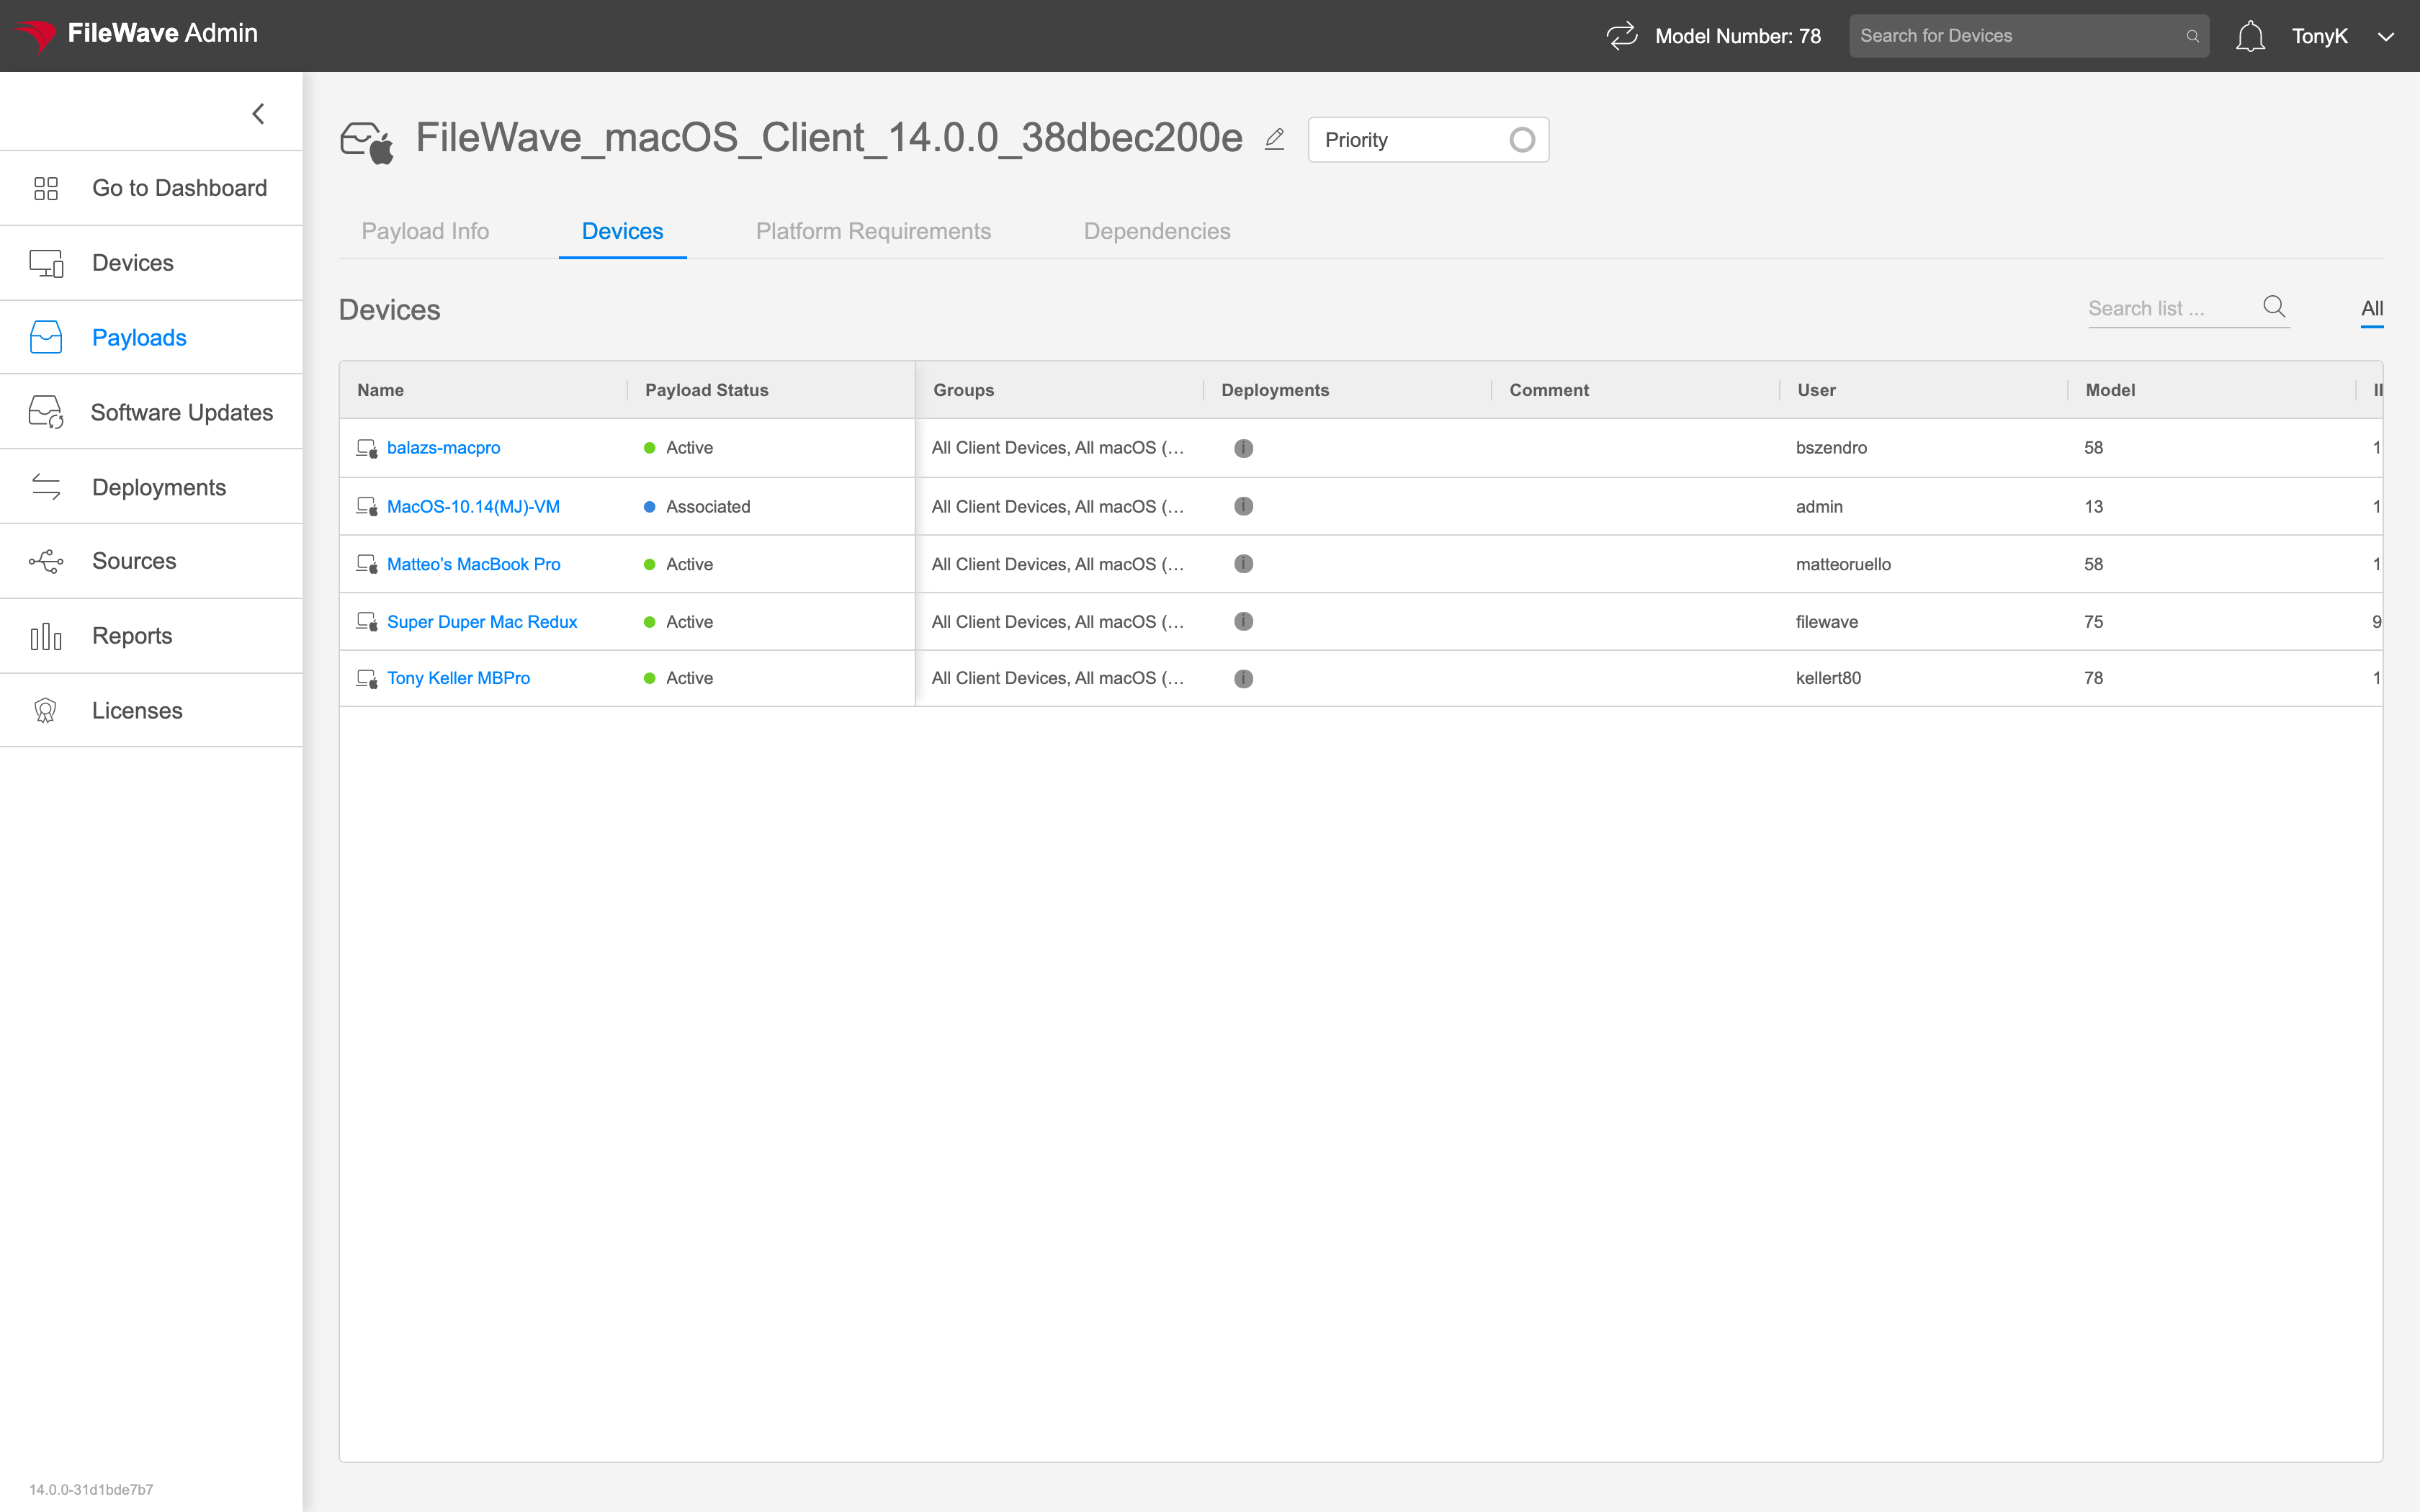 |
| The Platform Requirements tab controls which platforms can receive the payload. | 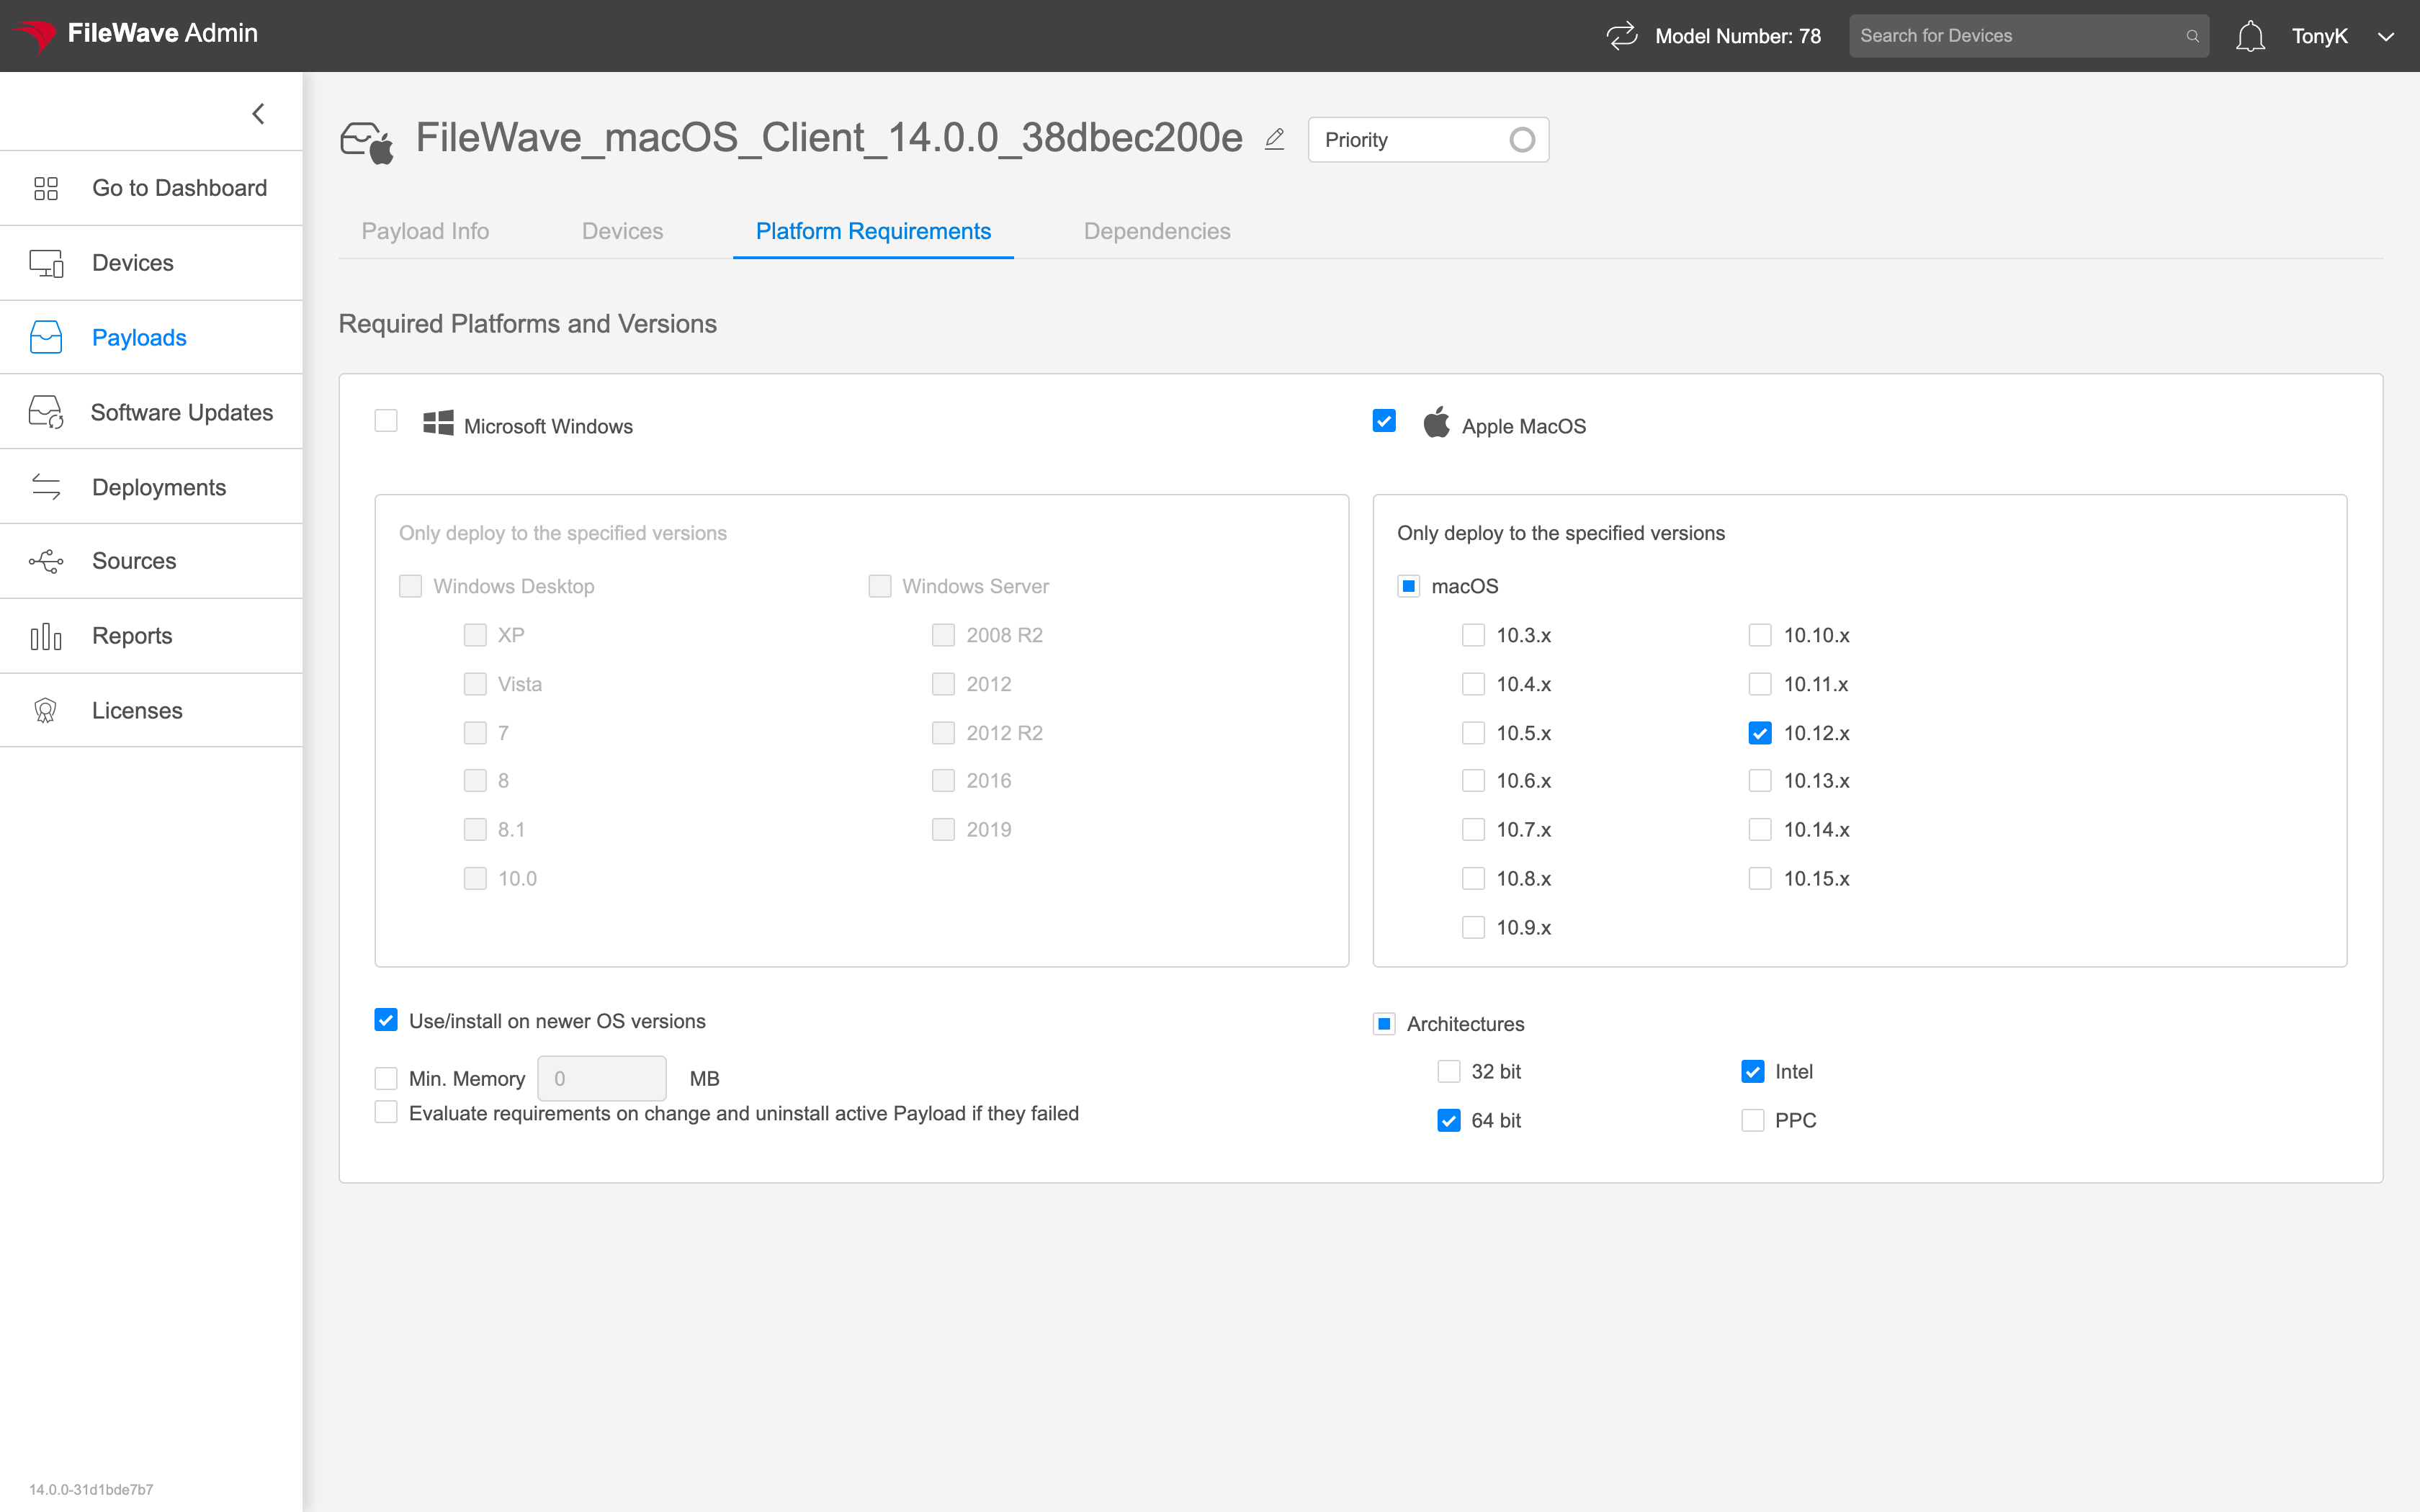 |
| The Dependencies tab is where we specify relationships between payloads for simpler deployment. | 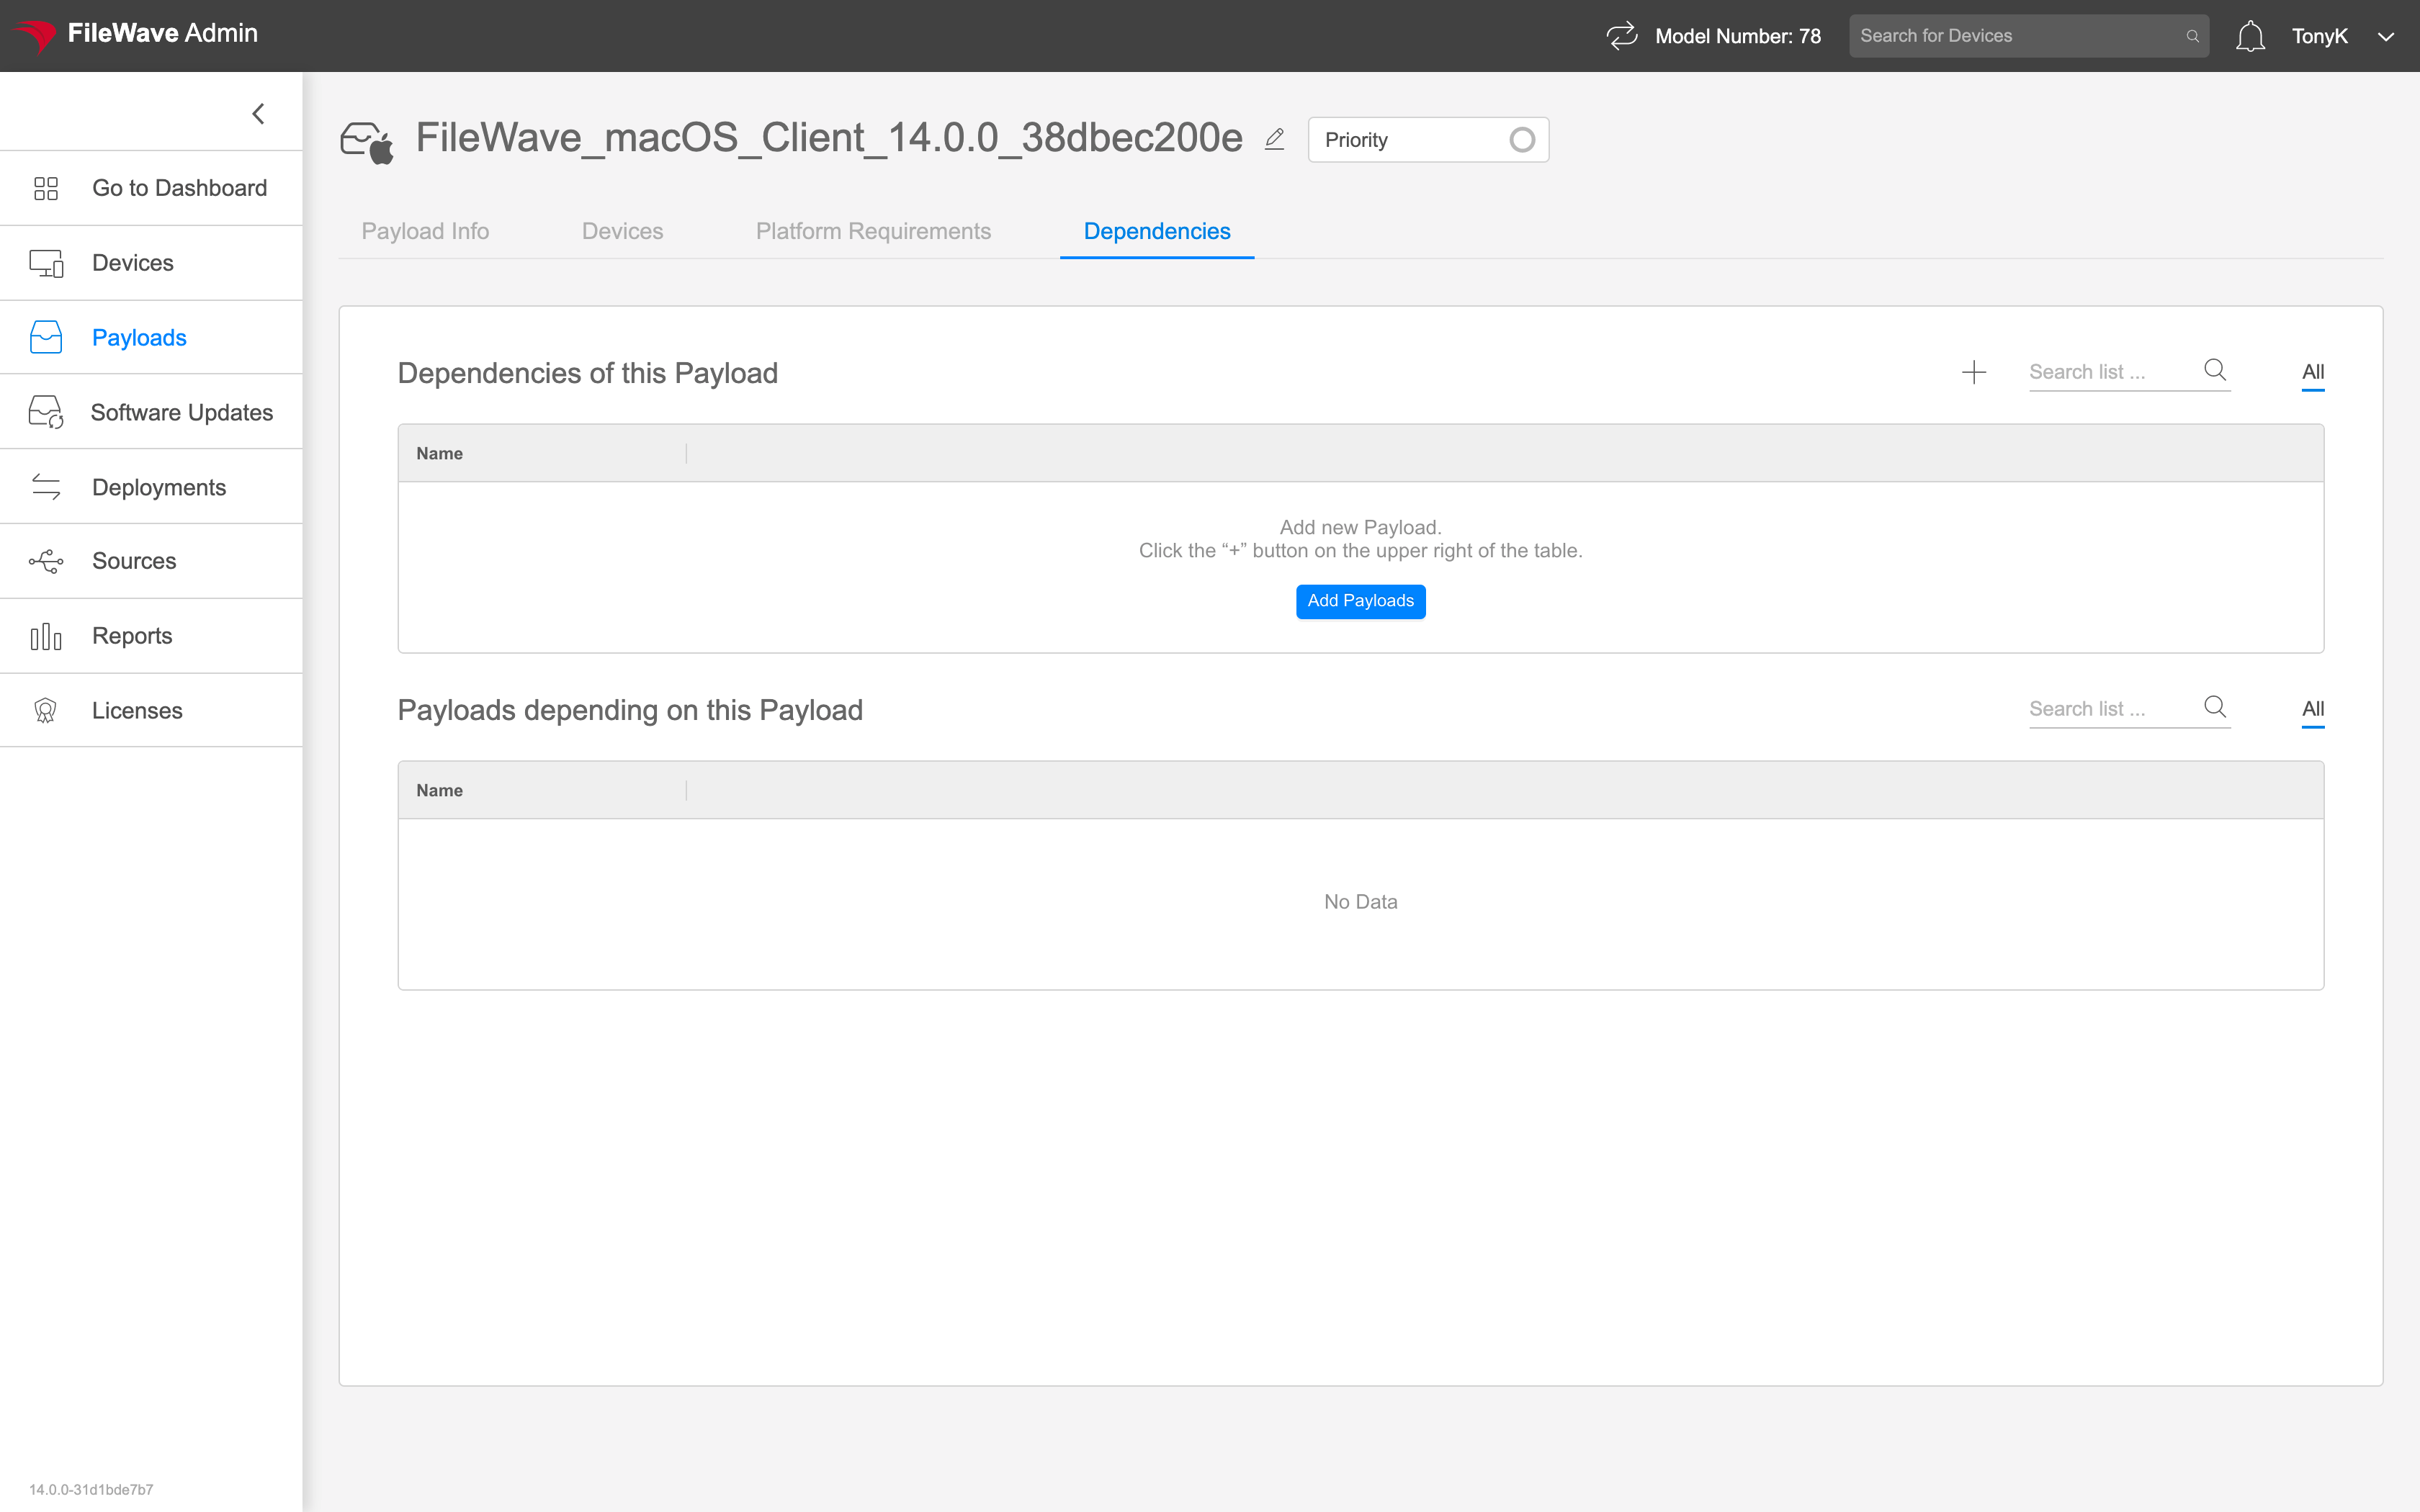 |
| VPP payloads include a licensing details tab. | 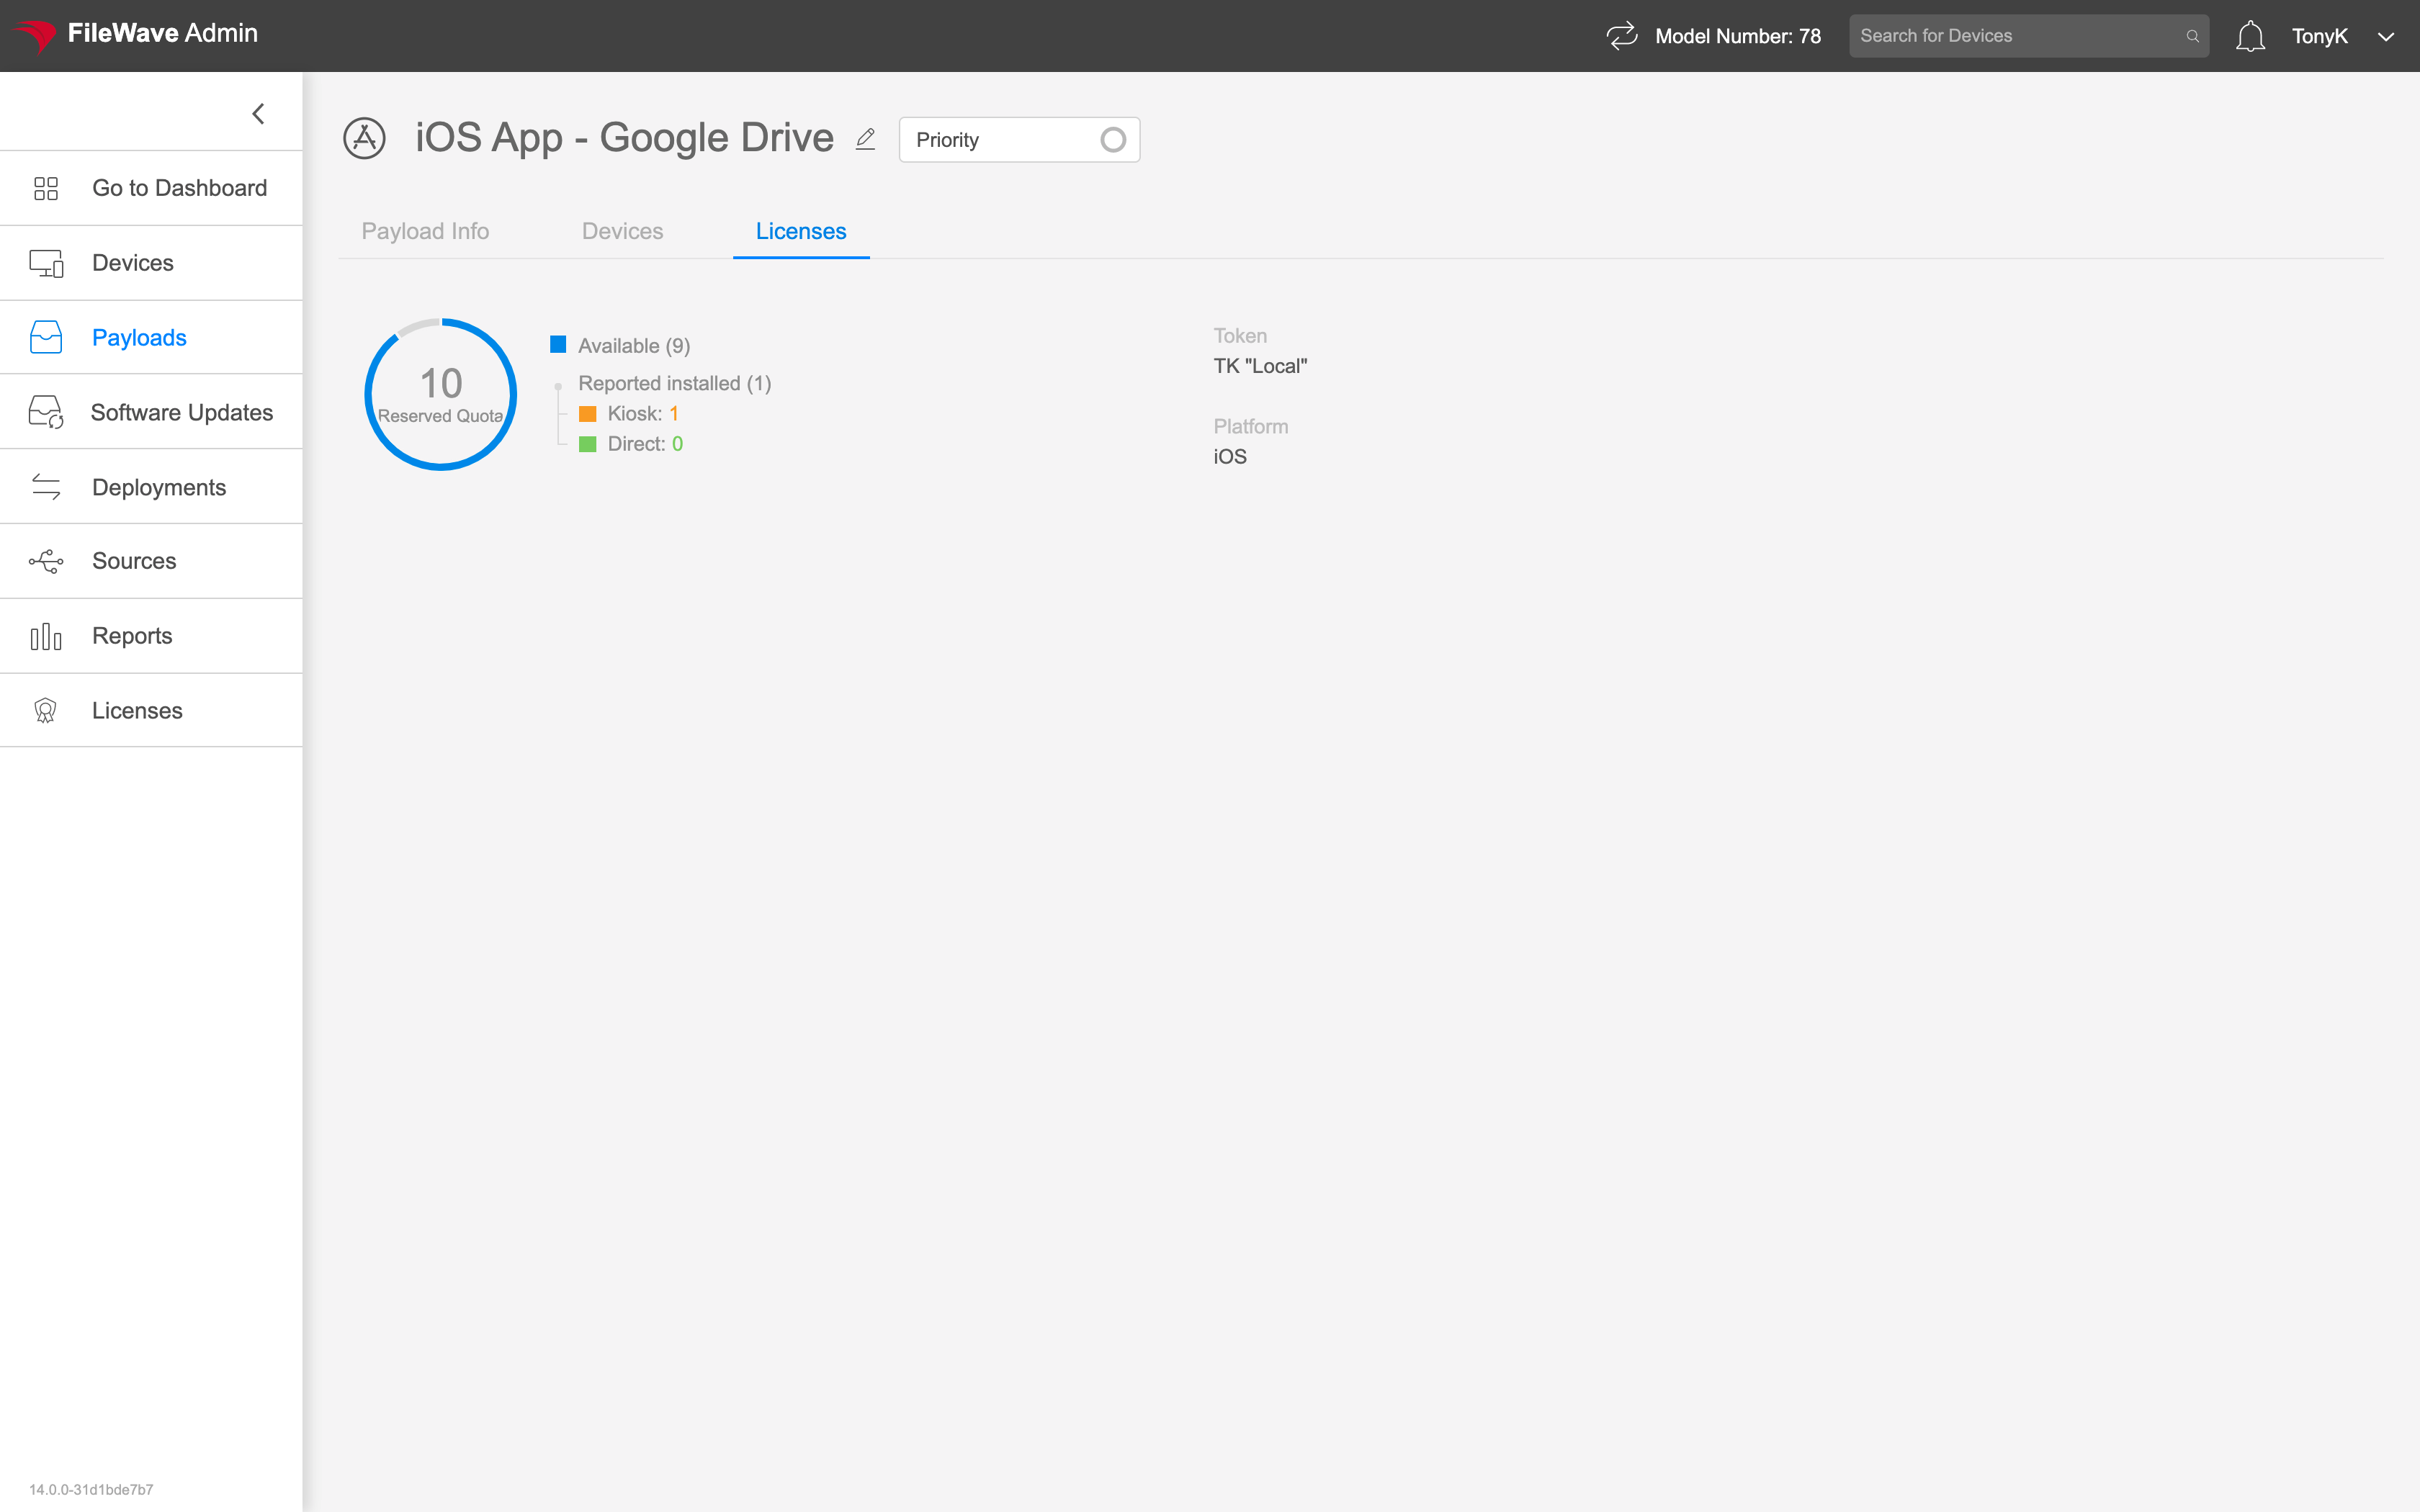 |
**Quick answer:** In FileWave Anywhere, open **Payloads**, create a new Payload, add the MSI or PKG file, and let the upload finish. The upload can continue while you leave the page or start another upload.
## When/Why MSI and PKG installers are the normal package formats for Windows and macOS software deployment. FileWave Anywhere lets you upload those installer files directly from the web console, which is useful for simple app Payloads and remote admin work. ## How In the **Payloads** view, click the [](https://kb.filewave.com/uploads/images/gallery/2023-07/4wF3y2p6XtCU9Ia8-image.png) icon, name the new Payload, and choose one of the **Add File** options. The example below creates a Payload for the FileWave Central installer for Windows. [](https://kb.filewave.com/uploads/images/gallery/2023-07/tzarfL7G81UCnYu1-image.png) After you select the file, the upload starts immediately: [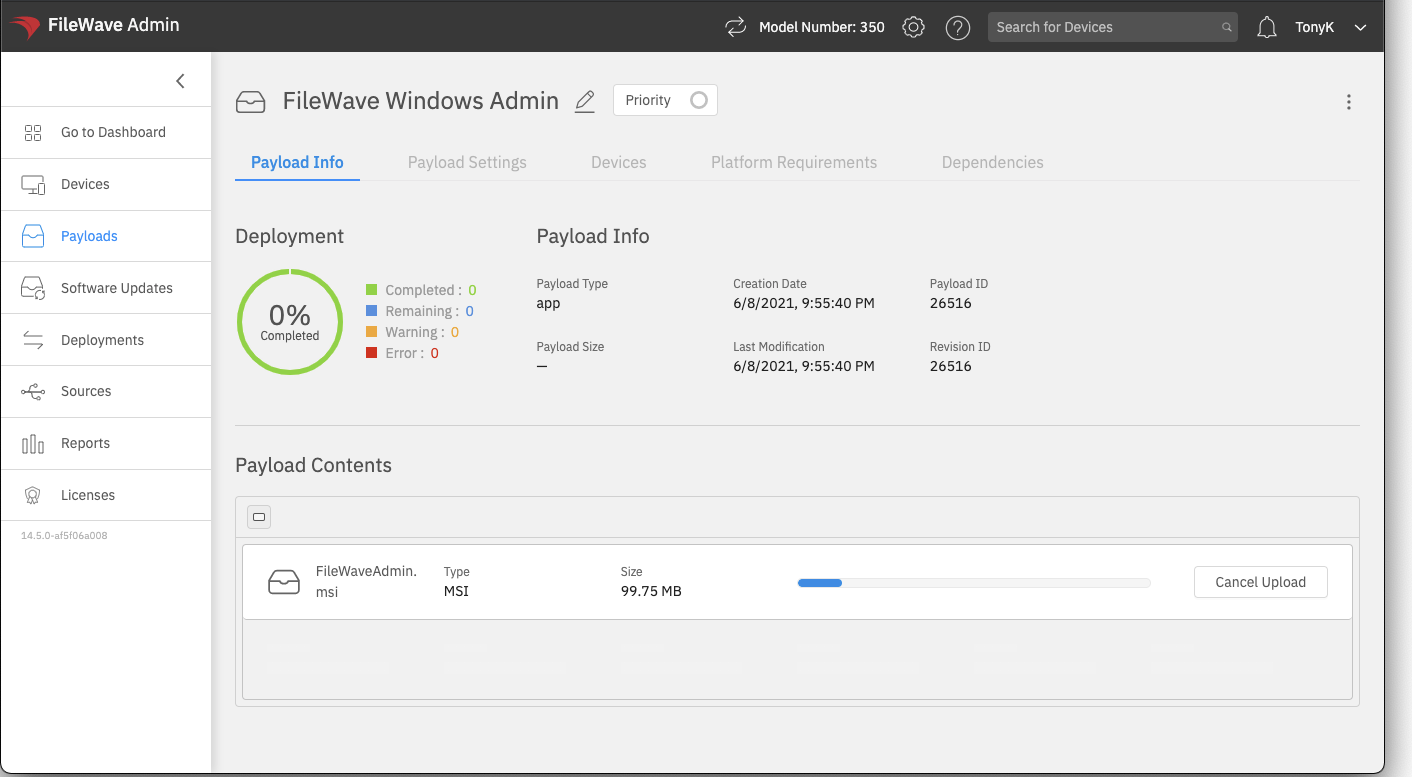](https://kb.filewave.com/uploads/images/gallery/2023-07/f2lYJq5O7dfiBdtr-image.png) Uploads created this way have two practical advantages: 1. The upload can recover from a temporary network interruption. 2. You do not need to stay on the upload screen. You can move to another area of FileWave Anywhere or start another Payload upload while the first one continues. After the Payload uploads, you can make simple changes such as removing or replacing a file and setting installer properties: [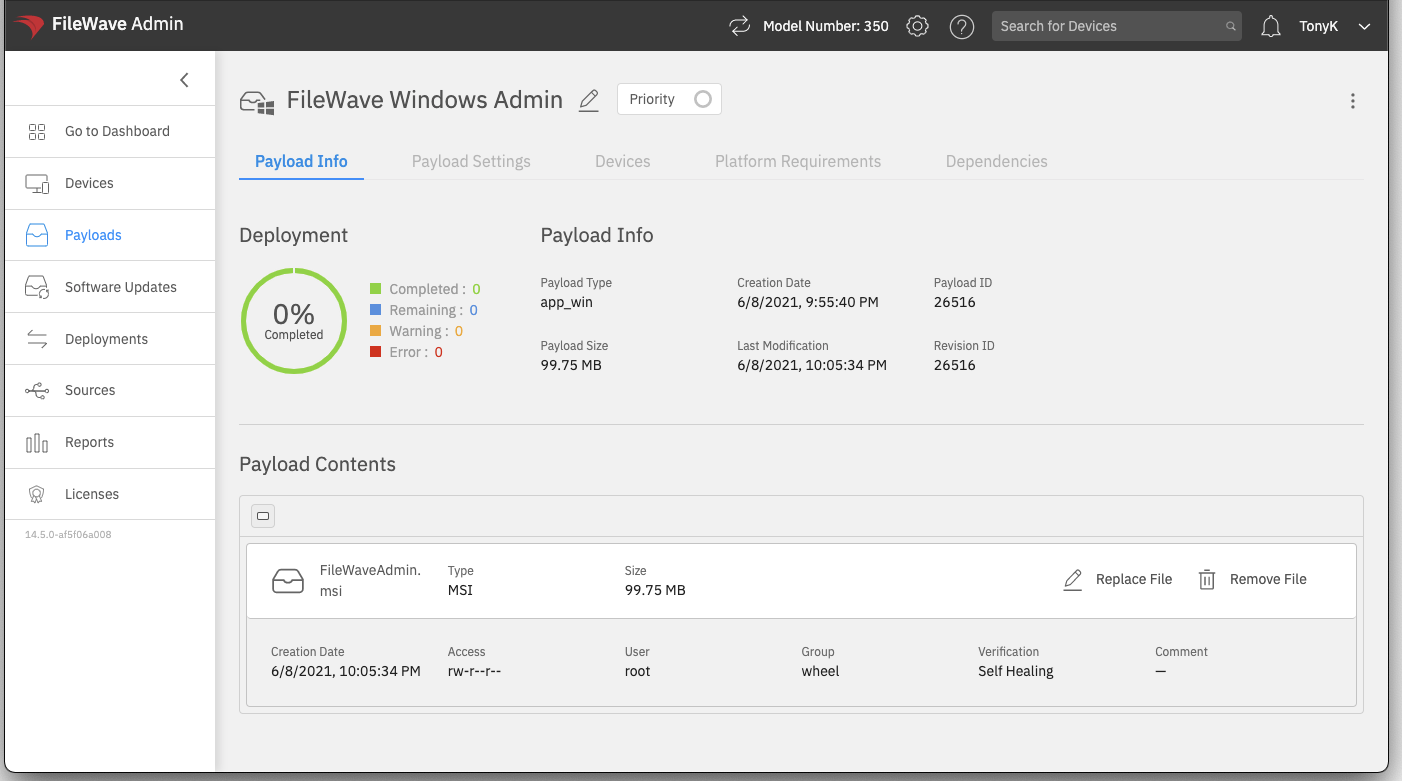](https://kb.filewave.com/uploads/images/gallery/2023-07/W6CbxzlhvR5i8vP5-image.png) For Payloads that need scripts, revisions, or more advanced file-level control, use FileWave Central. FileWave Anywhere is best for direct MSI and PKG installer Payloads.**Need revisions for MSI or PKG installers?** Use FileWave Central and follow [Desktop PKG and MSI Filesets](https://kb.filewave.com/books/filesets-payloads/page/desktop-pkg-and-msi-filesets). For a PKG or MSI Fileset that only contains the installer, drag the new installer onto the existing Fileset and choose to add a revision. If you duplicate a revision because the Fileset also contains other files or scripts, keep the replacement installer filename the same as the original when you manually replace it.
Edits made to Payloads in FileWave Anywhere take effect immediately. There is no separate Save button for these modifications, so review the Payload before assigning it to devices. # View - Reports # View - Reports Overview ## What Reports and Smart Groups both use conditions to identify devices. Use a Smart Group when the matching devices should receive an action, such as a deployment. Use a Report when you need to view or track matching devices, such as software rollout progress. ## When/Why Use Reports to find problem areas, track ongoing projects, and feed aggregate dashboard widgets. ## How The video below shows a quick example of creating a Report to find Firefox across the environment. Reports support several actions:  You can open a Report to view matching devices, edit it to change conditions, remove it, or move it into a group for organization. # Report Creation/Editing ## What Creation of a new report is used for the intent of reporting on some condition, like the version of an application or how much free space devices have. ## When/Why We will typically use reports both for ourselves (to get a feel for the state of the environment), and they are also very useful for communicating "status" to senior management. ## How We'll go into the details of building reports in the articles linked below, but we'll simply start with creation of the report and giving it a name. Each report we create has the ability to report on one of the following: - Devices (Lists devices based on a criteria) - Applications (Useful for seeing what is installed) - Licenses (For reporting on License utilization) - Payloads (For showing information on items you are deploying) - Boosters (For information about boosters) # Preview Fields in Reports ## What When you build a Smart Group or Report in FileWave Anywhere, the preview area shows live results from the current criteria. Preview fields are the columns shown in that preview, and the default columns are not always the device fields you need to verify the result. ## When/Why Change the Report or Smart Group preview columns before you trust the criteria. For example, if a Report should find devices by FileWave Client version, show the **FileWave Client Version** field in the preview so you can verify the returned devices match the condition. This is faster and safer than assuming the filter is correct. ## How The video below shows how to remove default preview fields and add **FileWave Client Version** to the preview. # Report Condition Groups ## What Condition Groups within Reports and Smart Groups are a method of isolating specific logic for data queries. ## When/Why Condition groups are always used when you need to combine AND with OR logic within the same report. If you are familiar with SQL, Condition Groups in FileWave are the equivalent of parentheses in SQL. If you wanted a report that looked at all Windows or macOS devices, you wouldn't need a condition group, but as soon as we look for something like macOS or Windows ***AND*** Office is installed, then we need a condition group, because we need to combine AND with OR. ## How Following our example from above, watch below as we create the more complex smart group/report using condition groups: ## Digging Deeper Note that you'll find some quite complex examples of advanced condition groups in the Reports view under Sample Queries:  # Report Conditions ## What Report conditions define which devices, users, or other inventory items appear in a FileWave Anywhere Report or Smart Group result. ## When/Why Most Reports and Smart Groups need at least one condition unless you intentionally want every device. Conditions narrow the result from everything in inventory to the exact set you care about, such as Windows devices running an older FileWave Client. ## How The video below shows how to add criteria that match that example. # Report Groups ## What Report Groups are used for basic report organization. ## When/Why Over time, you'll find that hundreds of reports will clutter up your Reports view. Report groups give you a way to organize reports into logical groups and enable us to navigate the user interface more easily. Report groups server no purpose other than organization, unlike payload groups which have dual purpose. Report groups can not be nested, and must all have a unique name. ## How Creation of a report group is quite simple as you'll see below, where we both create a group and then Move a report into it: # Viewing Reports ## What Opening a report lets you view the report results. ## When/Why Use this view when you need to inspect the report's line items and decide what action to take. For example, a software report might show that Firefox payloads need updates for both Windows and macOS devices. 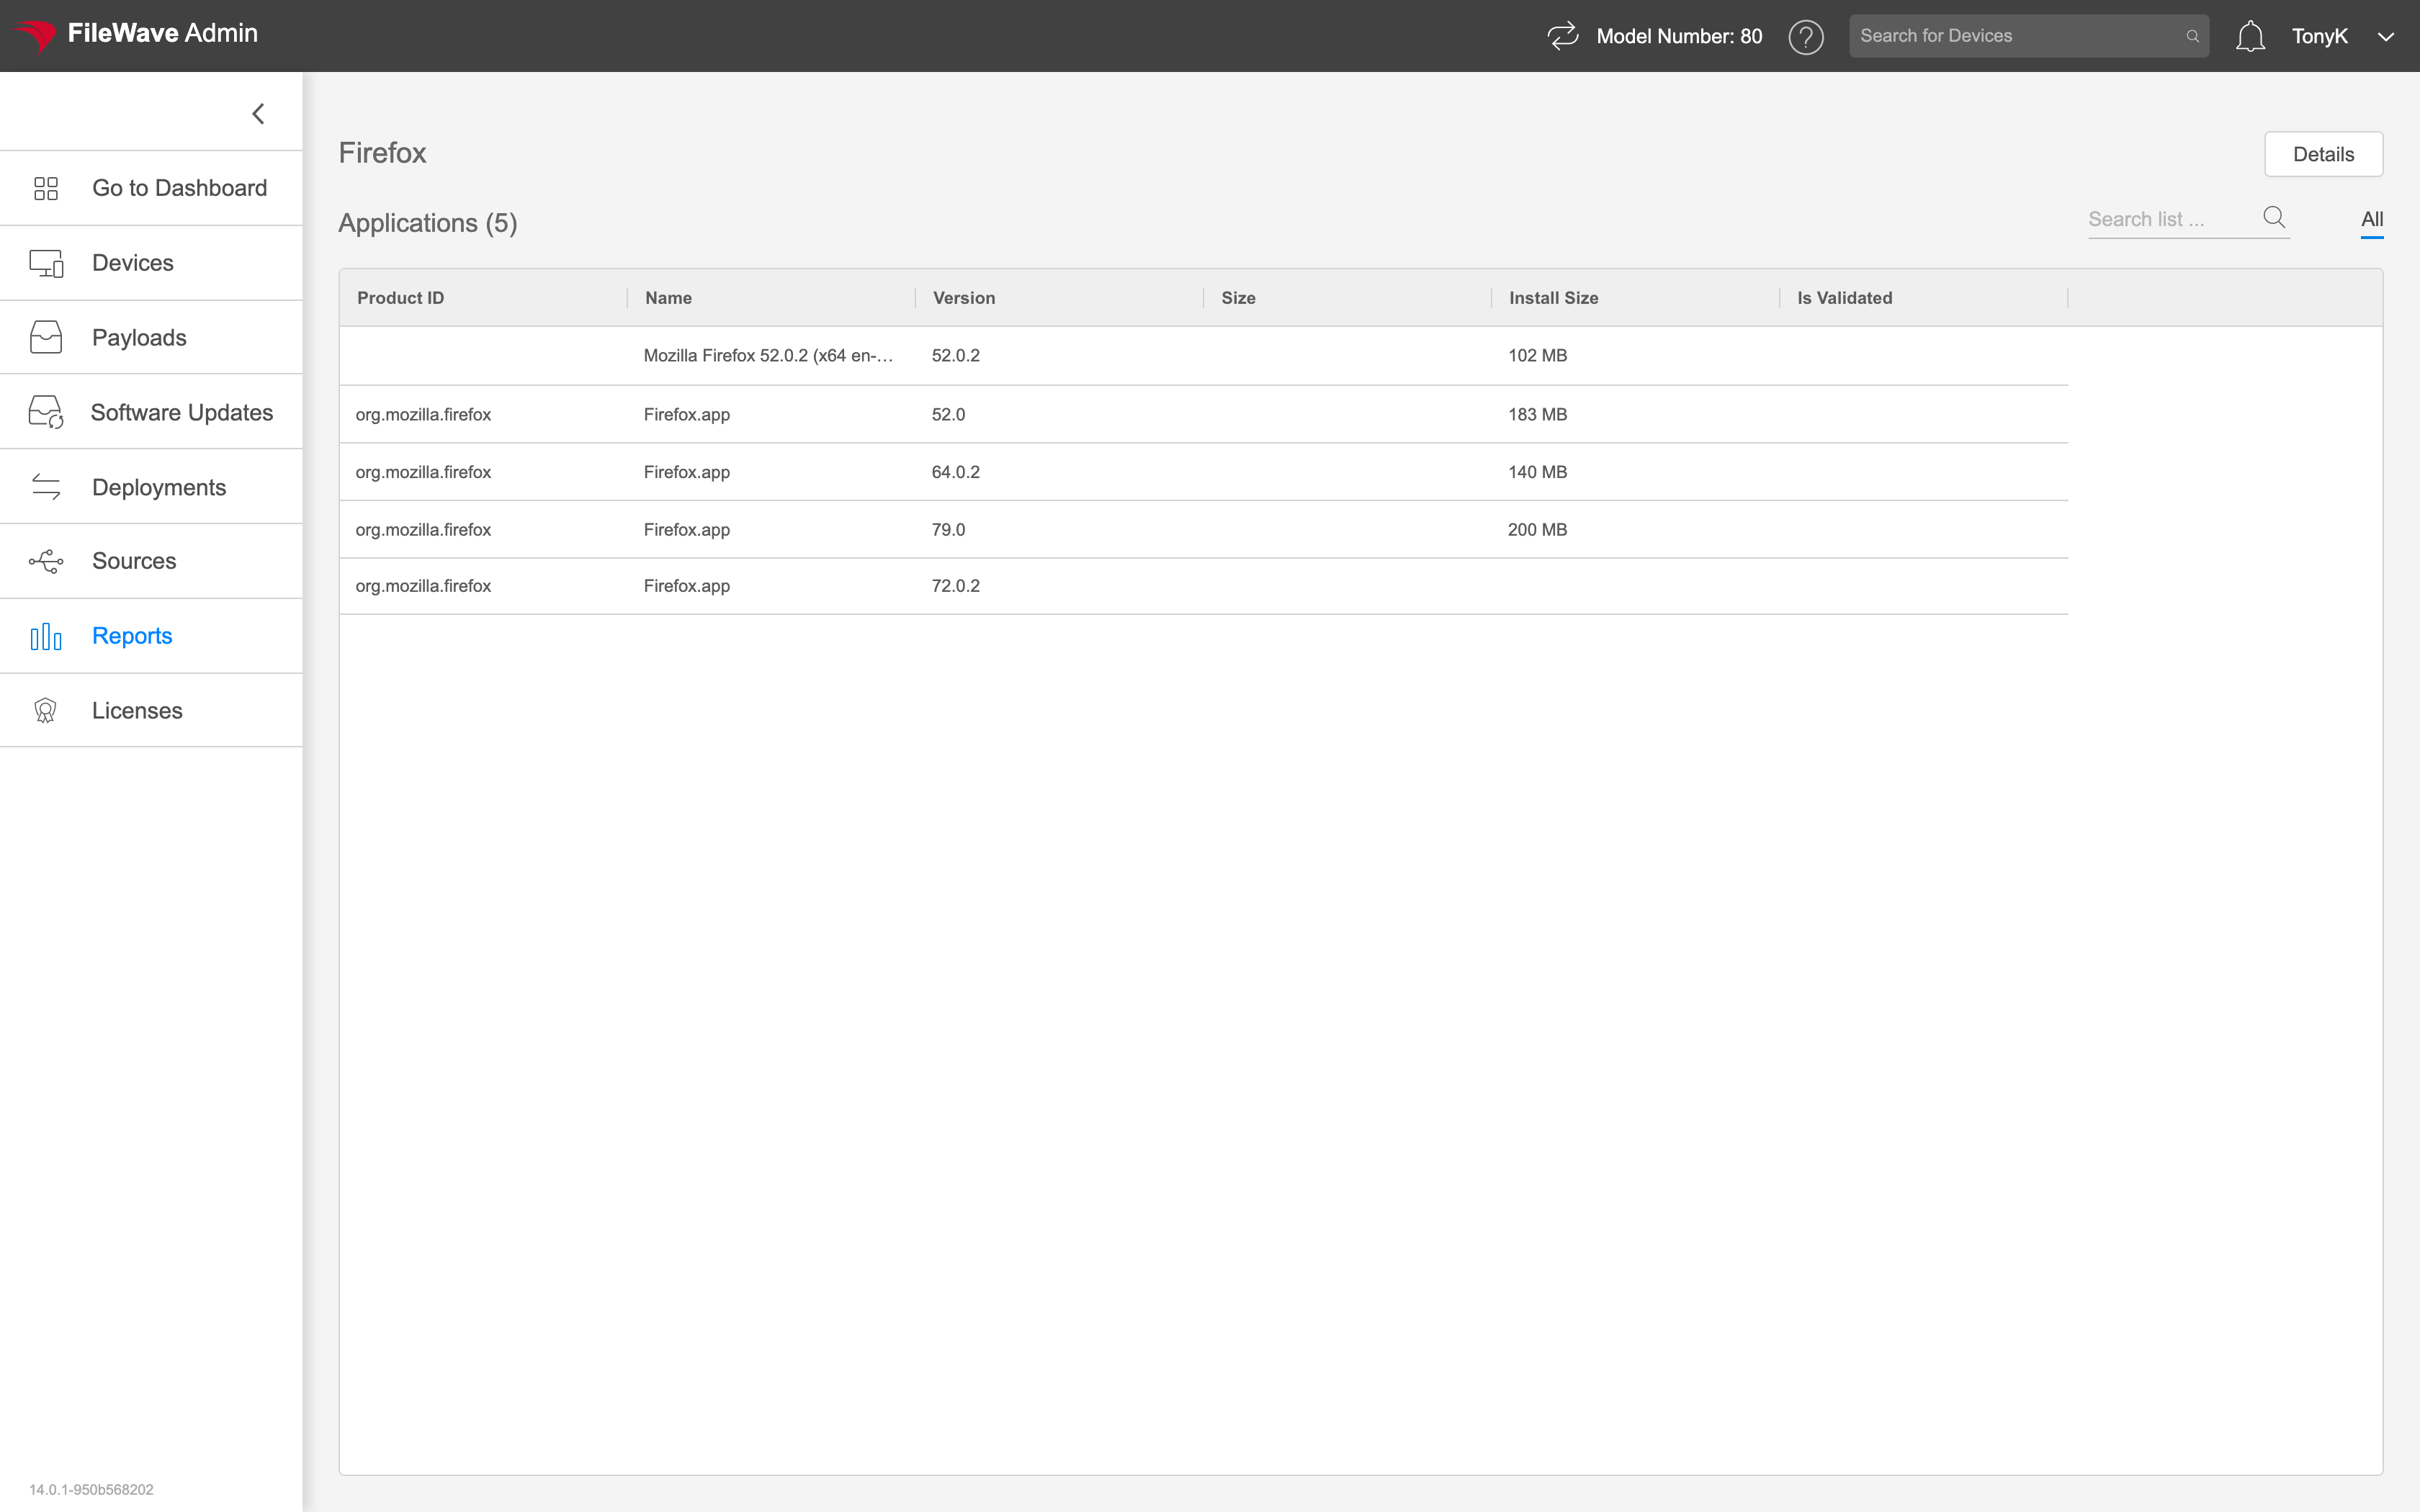 ## How Click the report name in the list to open it. You can also select the report and choose **Open Report** from the action menu. While viewing a report, click **Details** to open the report definition and edit it. 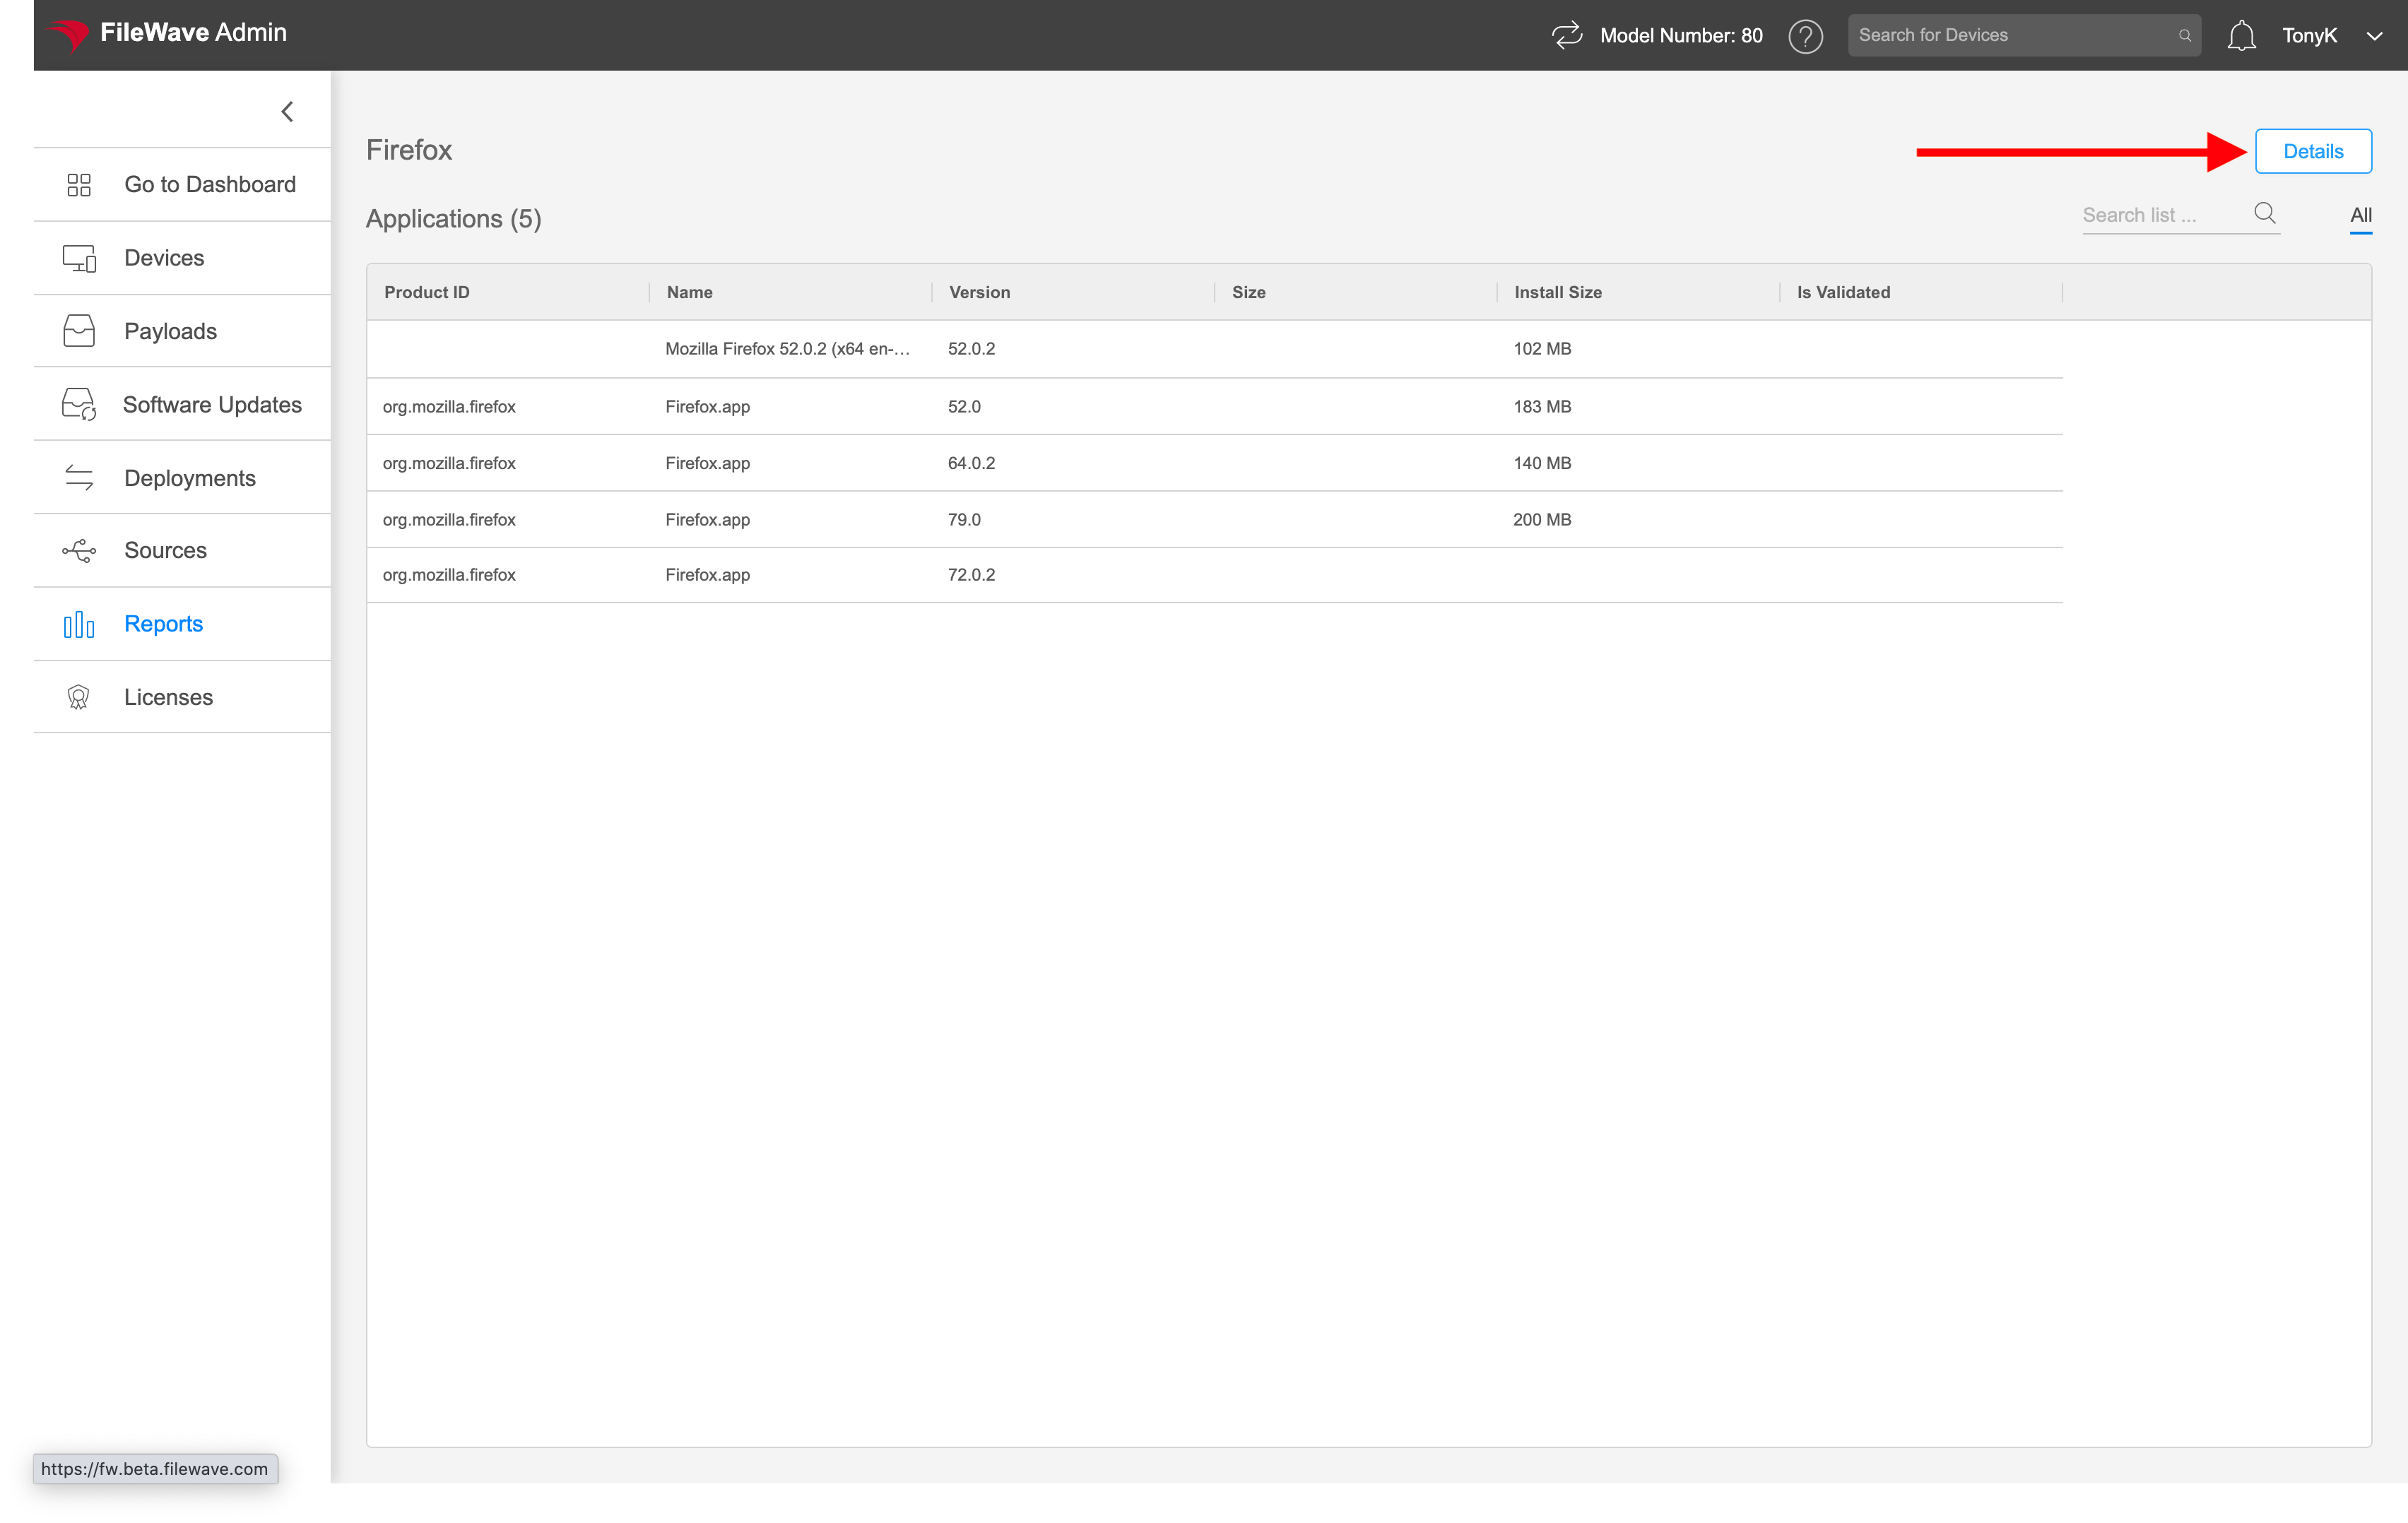 # View - Software Updates The Software Updates view shows us all patches that have been discovered as "needed" in the environment. An important part of device lifecycle management is patching and updating systems. This view will allow you to see the available software updates that Microsoft, Apple, and others have provided. As your environment lives and breathes over time, this list will continue to change # View - Software Updates Overview ## What The Software Updates view shows us all patches that have been discovered as "needed" in the environment. ## When/Why An important part of device lifecycle management is patching and updating systems. This view will allow you to see the available software updates that Microsoft, Apple, and others have provided ## How As your environment lives and breathes over time, this list will continue to change, example below: 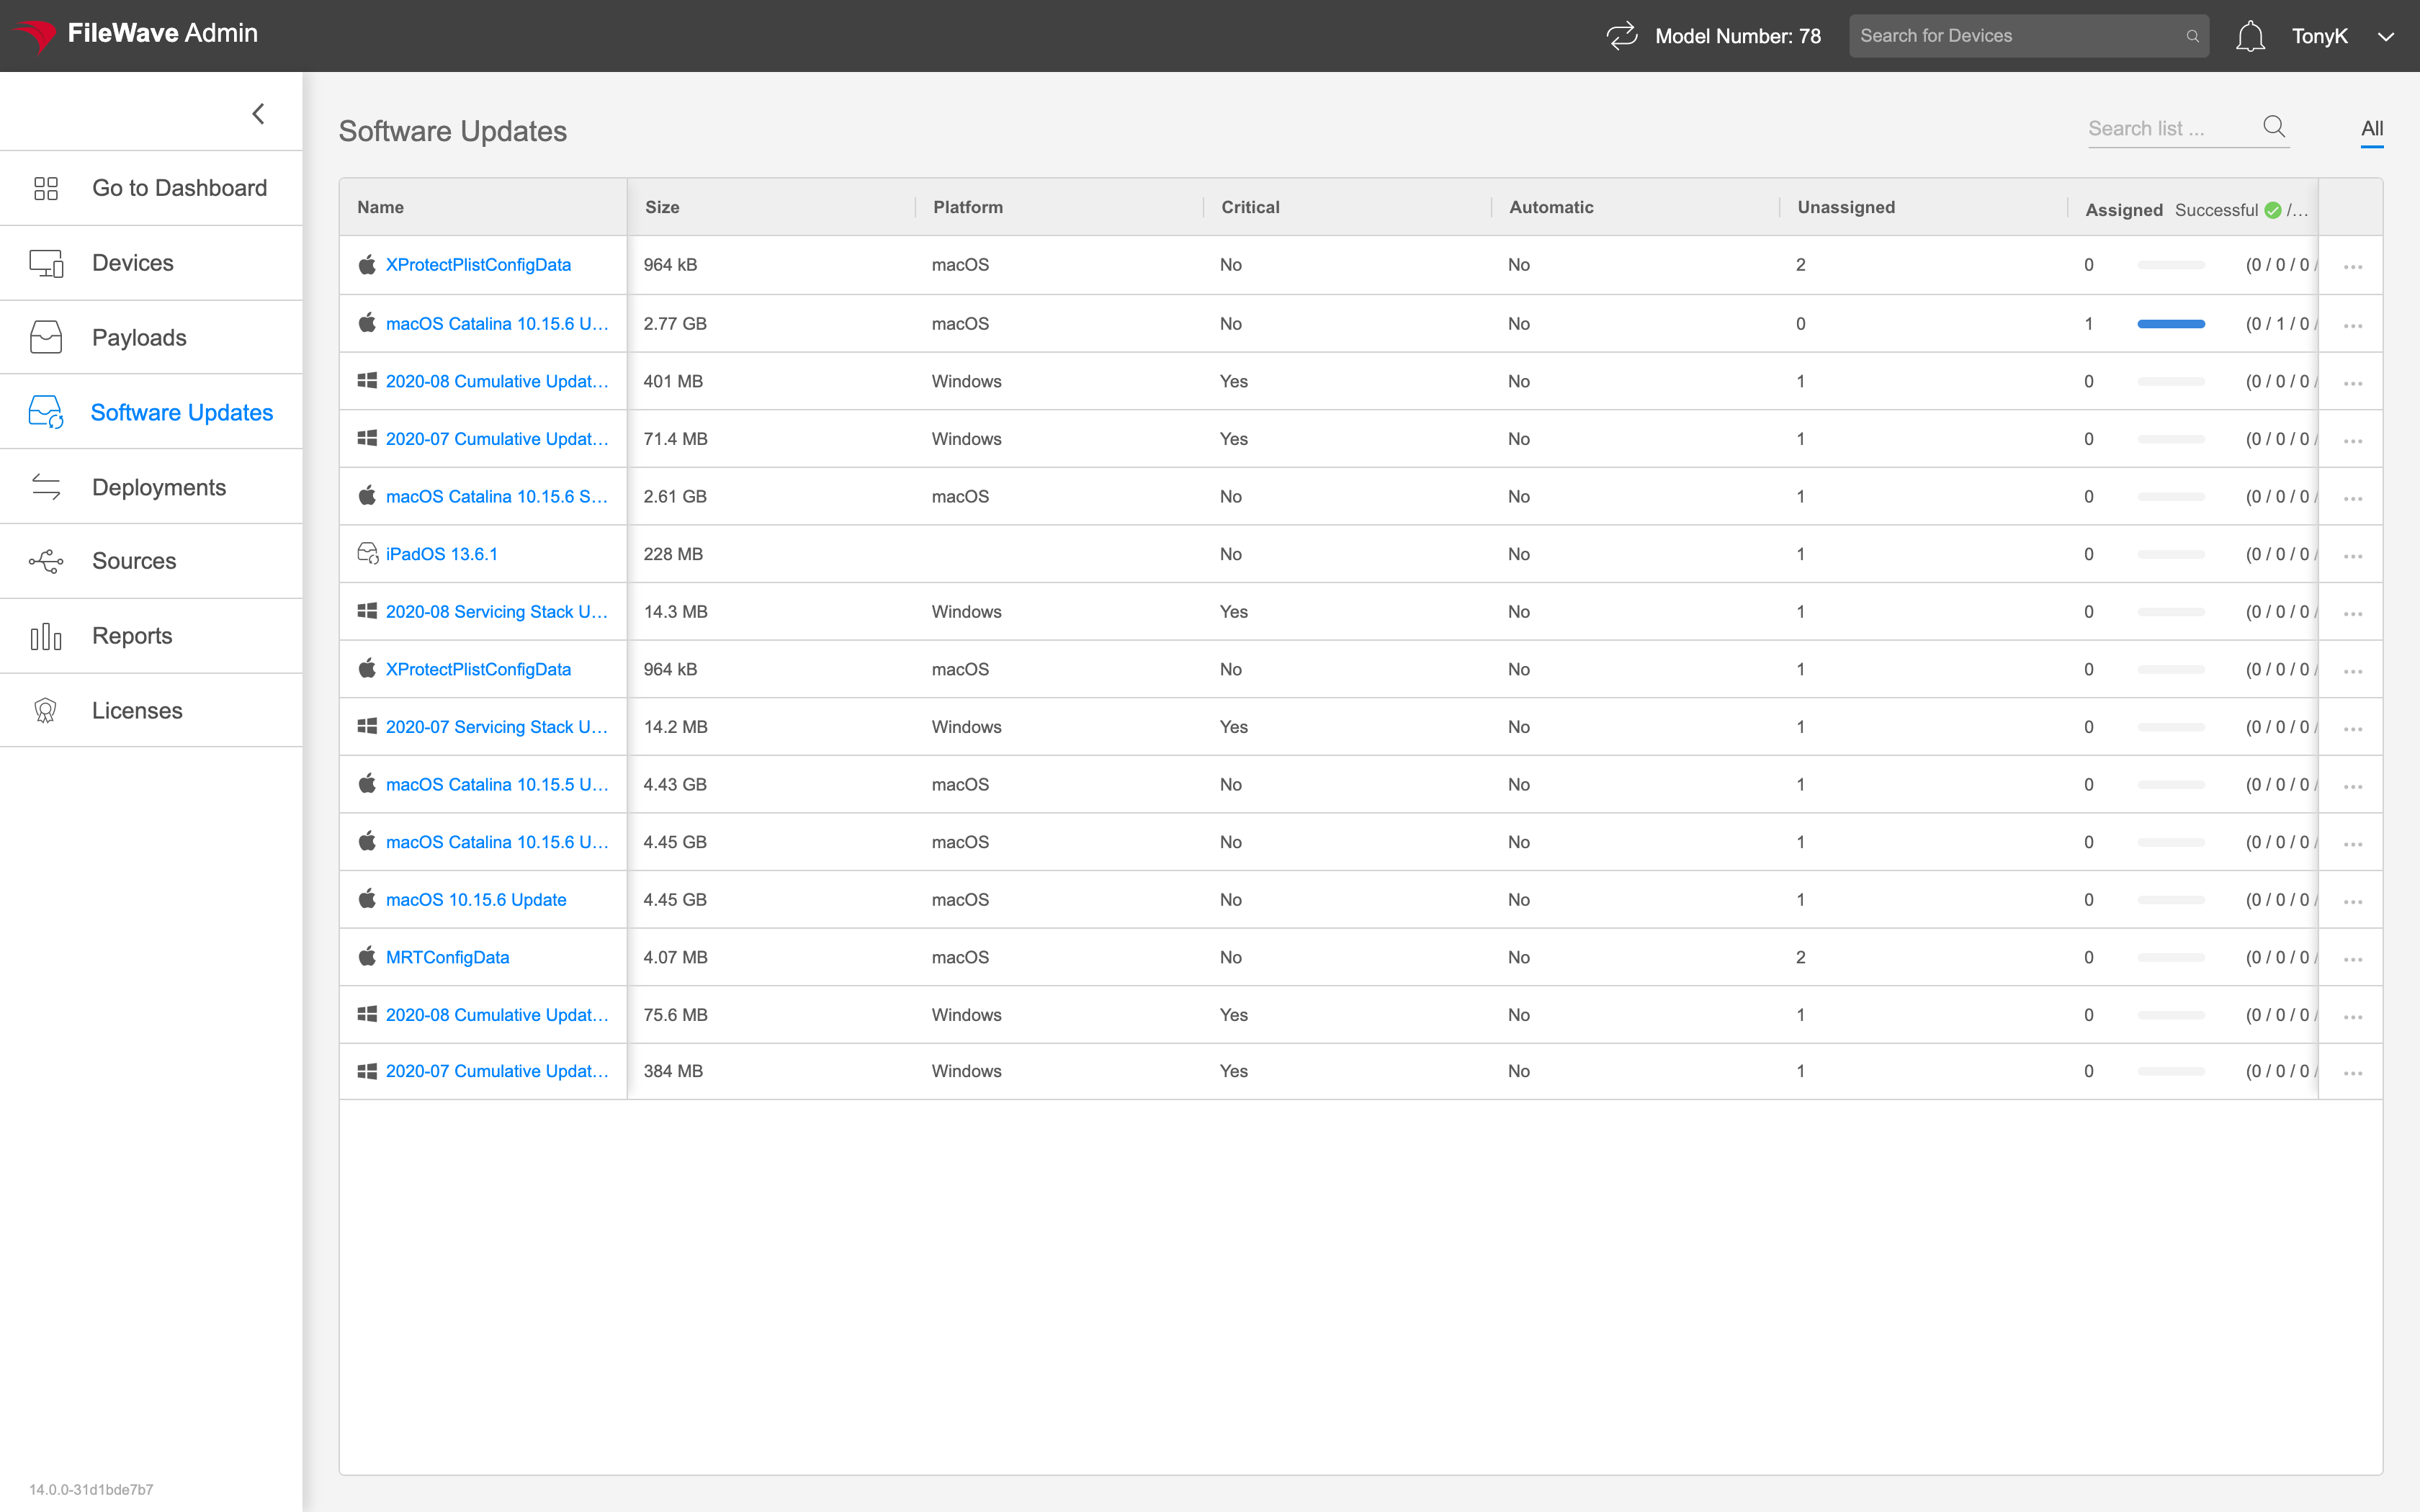 Click on an any update's name to see status and manually install on individual devices click on the ellipsis () to auto deploy for all devices. # Software Update Detail View ## What The Software Update detail view shows specific information about any particular patch needed in the environment. You get to this view by clicking on any particular update link from the Software Update view. ## When/Why There are two things this view really gives us: a view of all devices missing this patch, and the ability to assign the patch to all present (and future) devices that may need it. ## How The reporting aspect of this view is really helpful. "Deploy to all requesting devices" will automatically set this patch to be installed on any device that needs it now, and any device that ever asks for it in future.  # Software Updates: Deploying to Groups ## What With Version 14.5+ of the FileWave WebAdmin, you can now deploy Software Updates to groups of devices. ## When/Why This feature is very helpful for us when it comes to deploying patches to groups of devices. Typical uses would be for assigning patches to Patch Testing groups. or department-based devices. ## How To utilize group deployments, go to Software Updates→ Any individual update and you'll notice the Groups on the bottom left: [](https://kb.filewave.com/uploads/images/gallery/2023-07/bDyxpks0nShFprUC-image.png) Groups are only used once you add them (future iterations will most likely include the ability to set favorite groups). But, to add any pre-existing manual or smart groups, just click the Add Group Button and select group(s): [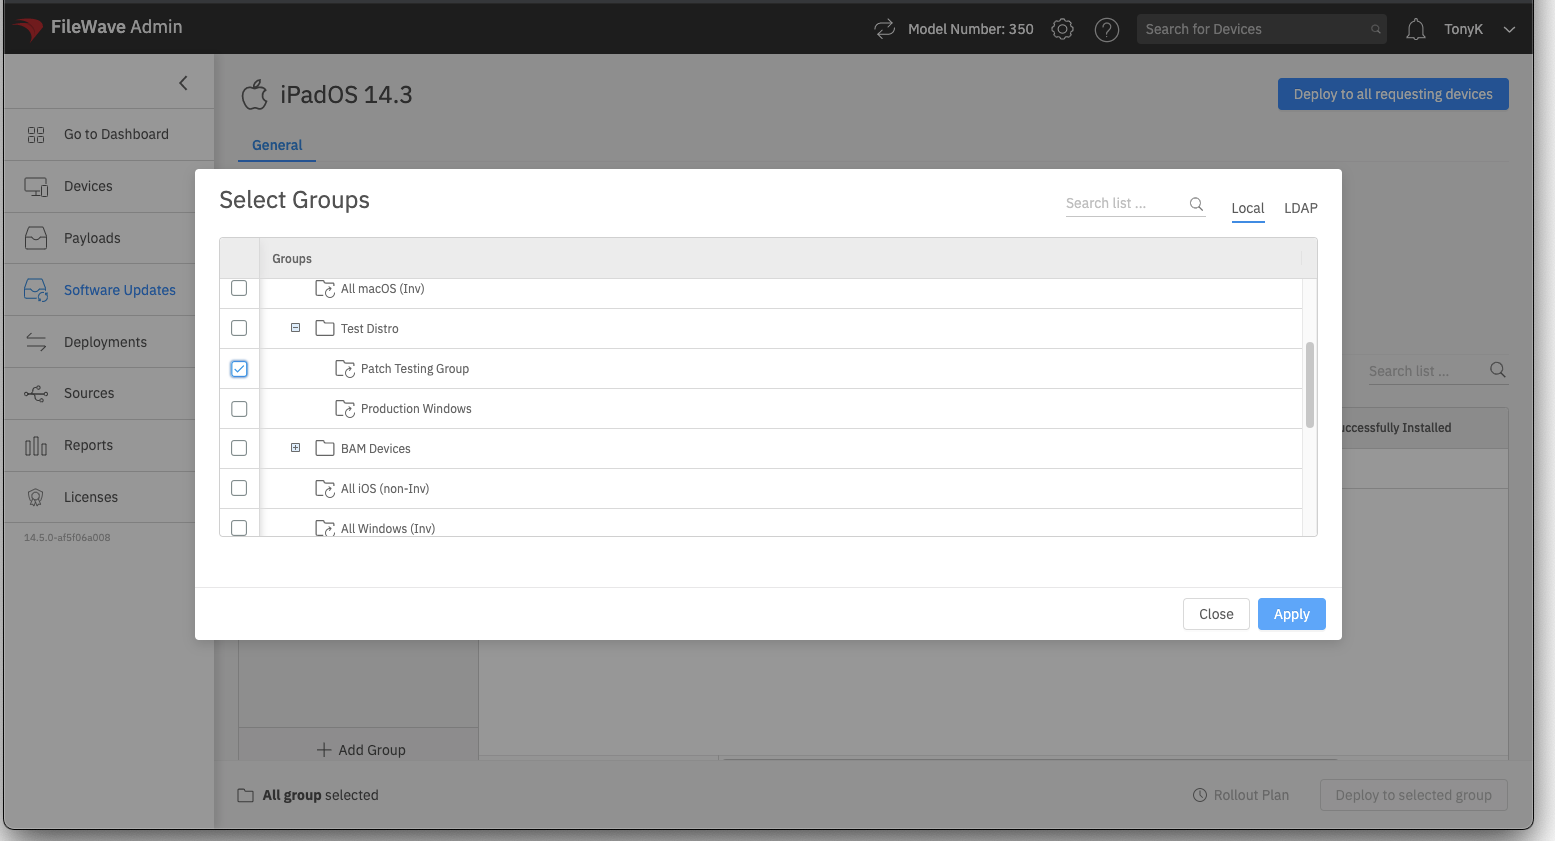](https://kb.filewave.com/uploads/images/gallery/2023-07/ZXgIyMamJp3S2gB9-image.png) Once your group(s) are added, you can select the group, and then click the Deploy to Selected Group option to deploy to that specific group of devices: [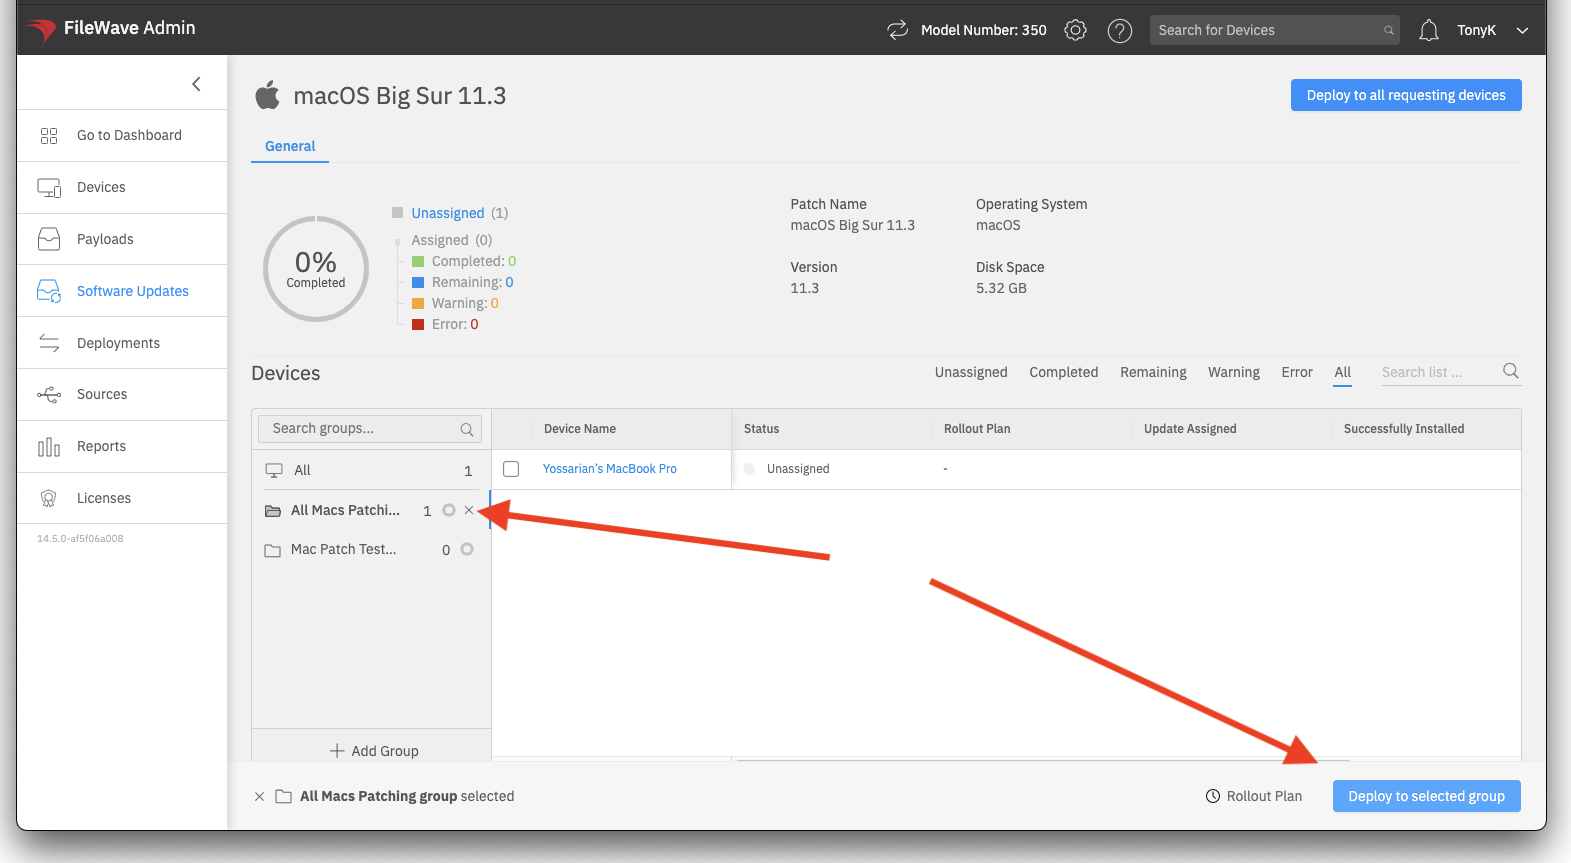](https://kb.filewave.com/uploads/images/gallery/2023-07/dvUls61AeROP9LqP-image.png) You can also deploy to specific devices within a group by manually selecting them and choosing the same deploy option. ## Related Content - [Software Updates: Rollout Plans](https://kb.filewave.com/books/filewave-anywhere-help-menus/page/software-updates-rollout-plans "Software Updates: Rollout Plans") # Software Updates: Rollout PlansIn FileWave version 16+ this feature is currently disabled and being re-designed due to the changes with Software Updates.
## What FileWave Version 14.5+ now adds the capability to deploy Software Updates during specified hours of the day/week. We are quite excited for this feature as it expands to more options in future FileWave versions. ## When/Why Software Updates can be bothersome in a production environment because they so often require a reboot of the endpoints, and no one wants that interruption during a production day. Rollout Plans allow you to specify what time of day, or time of week these installations can happen. At current, the installation windows are hard-coded, but future iterations will allow customization of these time windows, and will expand to more than just Software Update deployments. ## How Using Rollout Plans is rather simple...with any Software Update selected, just select group(s) and device(s), then click on Rollout Plan in the lower right: [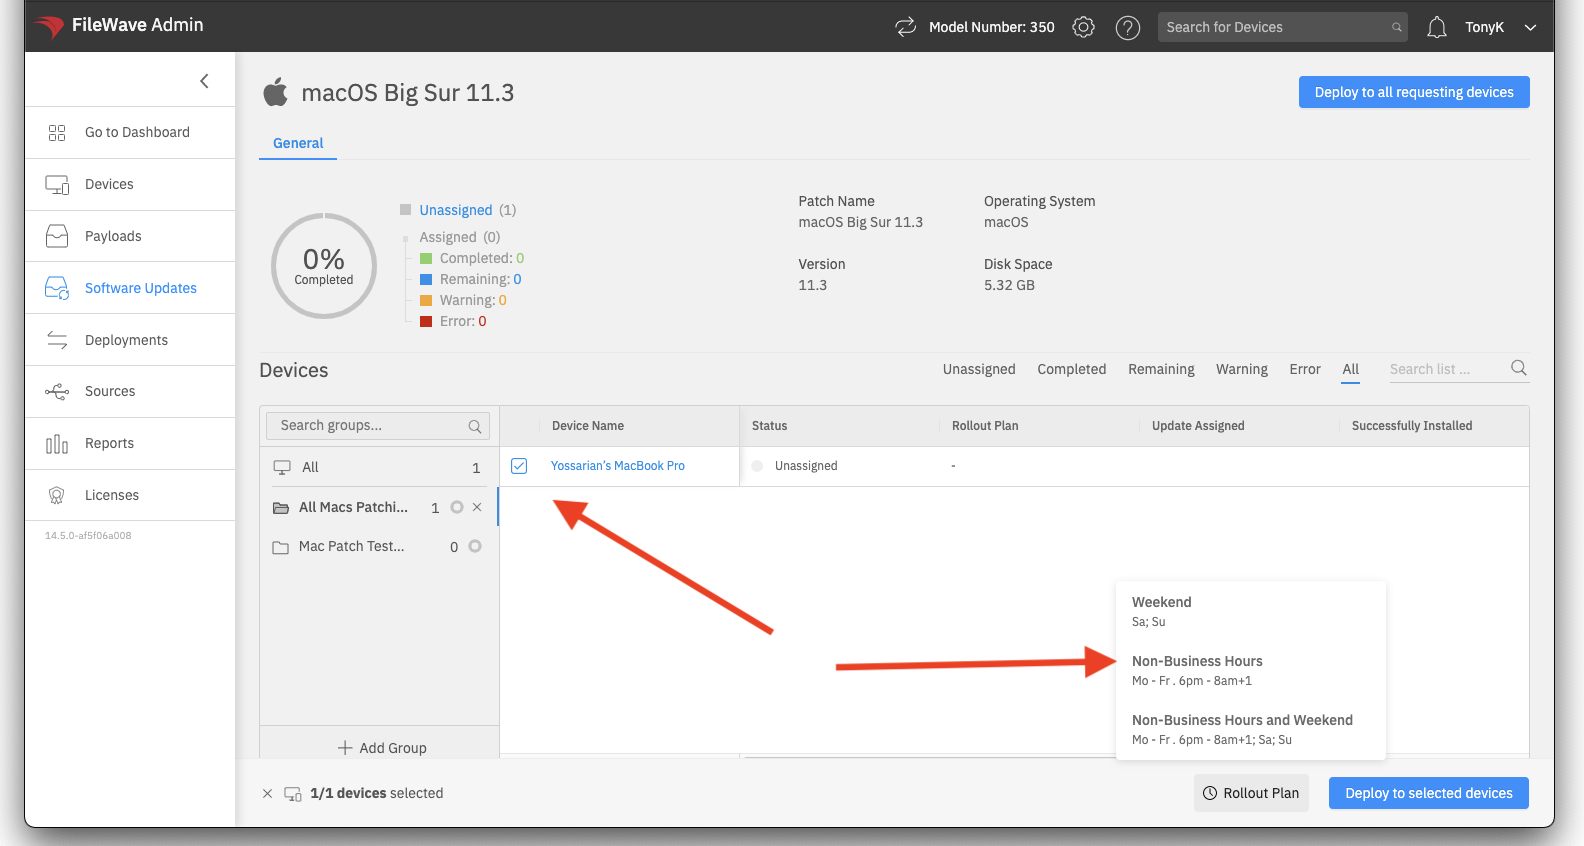](https://kb.filewave.com/uploads/images/gallery/2023-07/aDwEQXgeI68AaGTU-image.png) Once you have made you selection, you will see it reflected in the admin, like: [](https://kb.filewave.com/uploads/images/gallery/2023-07/LJBJGeso6IxJnSSU-image.png) When you then click on "Deploy to Selected devices" (and update model), the updates will download immediately, but won't actually install until the effective time window. ## Related Content - [Software Updates: Deploying to Groups](https://kb.filewave.com/books/filewave-anywhere-help-menus/page/software-updates-deploying-to-groups "Software Updates: Deploying to Groups") # View - Sources The Sources View of the FileWave Anywhere can be thought of as a configuration view for the FileWave system. Today it is limited to Apple configuration elements, but before too long we'll see Google and Microsoft settings in here as well. We will use this view whenever we need to do something like renew an APNS certificate, DEP, or VPP token. # Apple General Settings (APN) ## What At the very top of the Sources View for Apple services, you will find some overall settings related to Apple in general. ## When/Why We will need to specify these settings when our FileWave server is first setup, and will need to revisit this section at least annually to renew our APN (Apple Push Notification) certificate. **How** We'll discuss APN renewal in a moment, but let's talk about the other two preferences first:  - MDM Profile Removal (if on) forces removal of the MDM enrollment profile from the device if we remove the device from FileWave - Payload Importer (recommended in most circumstances) will ensure that any newly purchased VPP apps will automatically show up as payloads in your FileWave system without you having to do anything APNS renewal (the first item in the above) must be done at least annually. The APN cert is the certificate that allows your MDM server to talk to Apple, which in turn then talks to devices on our behalf. If the certificate expires, then all communication to devices is cut off from the FileWave server. So yes, a relatively important certificate! The only piece of the renewal that is done in the WebAdmin is the upload of the new certificate, but you'll want to reference the below documentation on APN renewal for all of the detailed steps for creating that certificate (dependent on platform of your admin workstation). ## Related Content - [APNs Certificate Creation & Renewal on macOS Computers](https://kb.filewave.com/books/certificates/page/apns-certificate-creation-renewal-on-macos-computers-keychain "APNs Certificate Creation & Renewal on macOS Computers") # ADE Accounts (Tokens) ## What ADE Token(s) allow your FileWave server to talk to Apple's ADE (Device Enrollment) services. This service is critical in supporting automated enrollment workflows, and is also critical in making sure your devices are able to be managed at the enterprise level. ## When/Why We are going to use the ADE Accounts section of the Sources view whenever we want to add, remove or update a ADE token. Only through valid token(s) can the FileWave server talk to Apple to get device based information. This same method of communication is used to send our ADE profile information back to Apple for installation on the endpoint during the Setup Assistant phase. So, yes, it is critical! ## How Edit and Deletion of Tokens are done from the actions menu for any particular token as shown below. Obviously one needs to take care before deleting a token, so you will be prompted for confirmation. 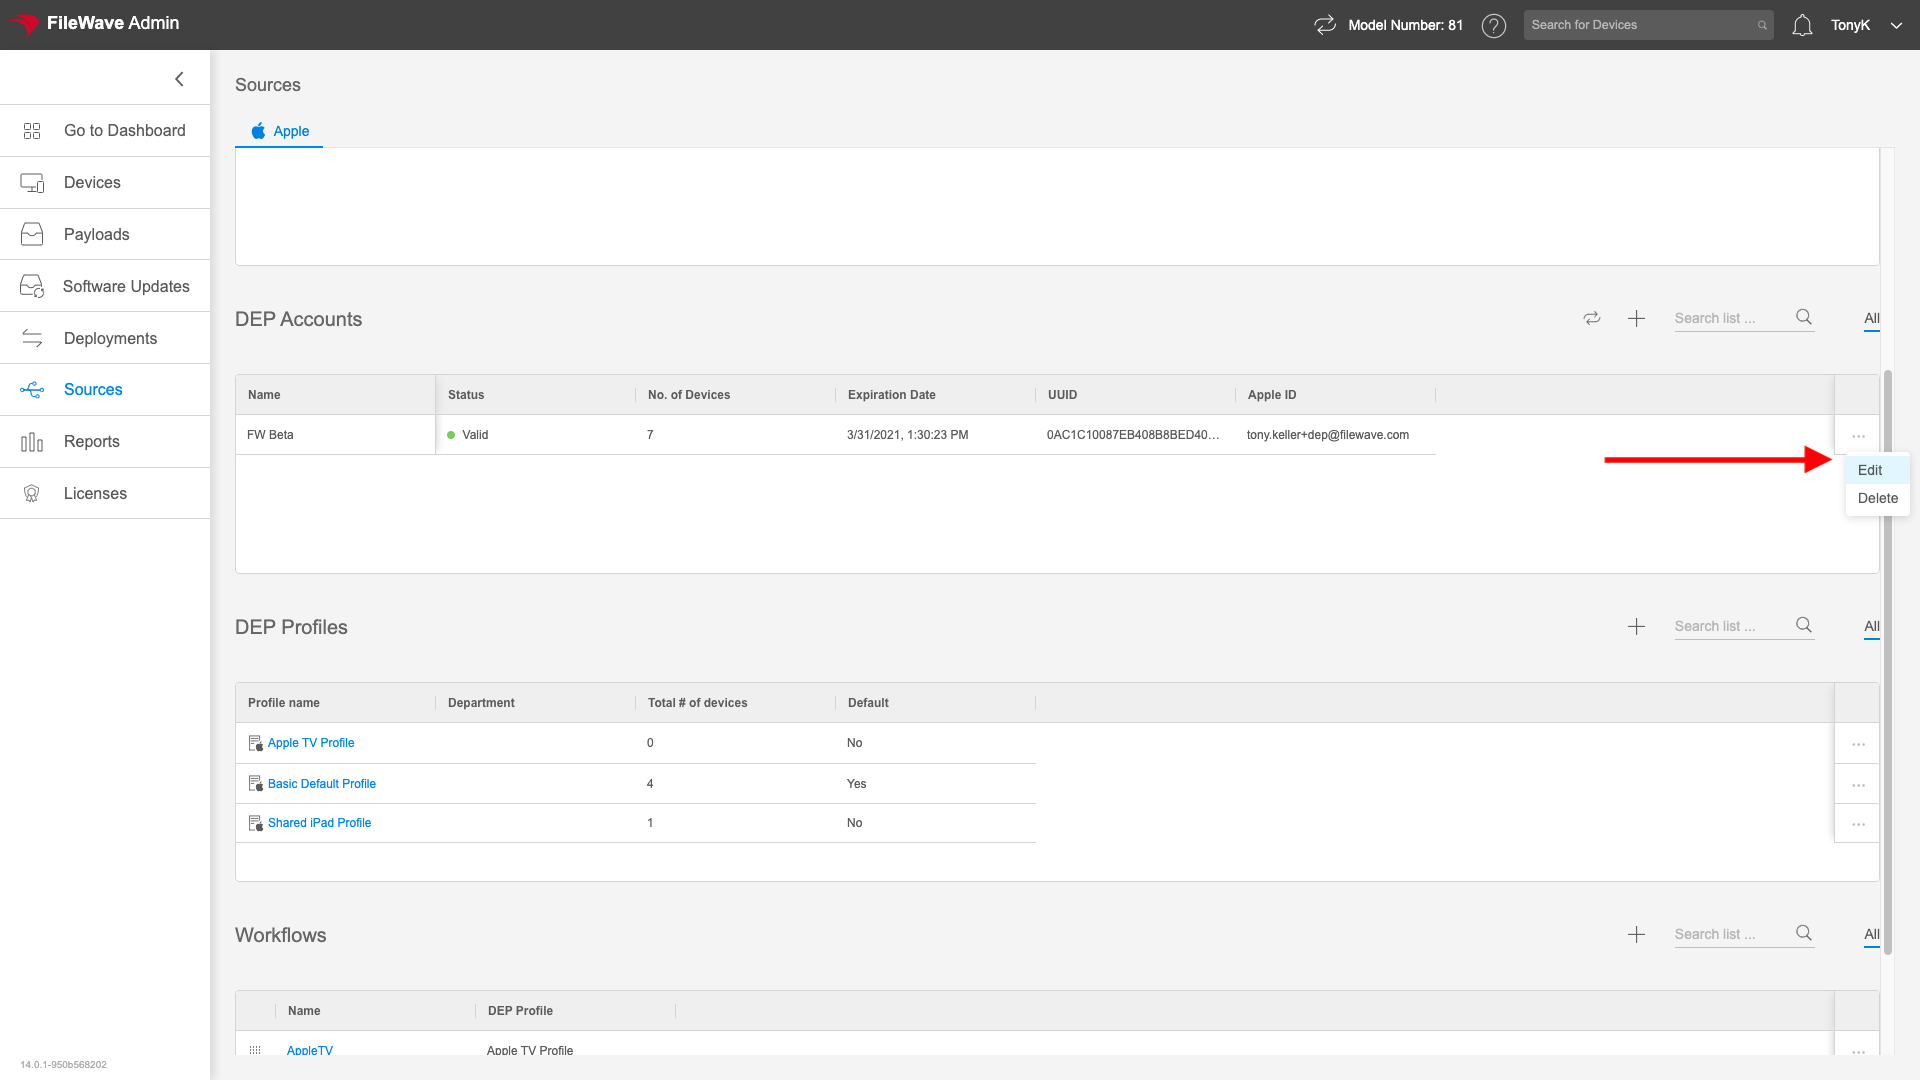 Editing (aka renewing) or adding a token consists of the following 3 steps: 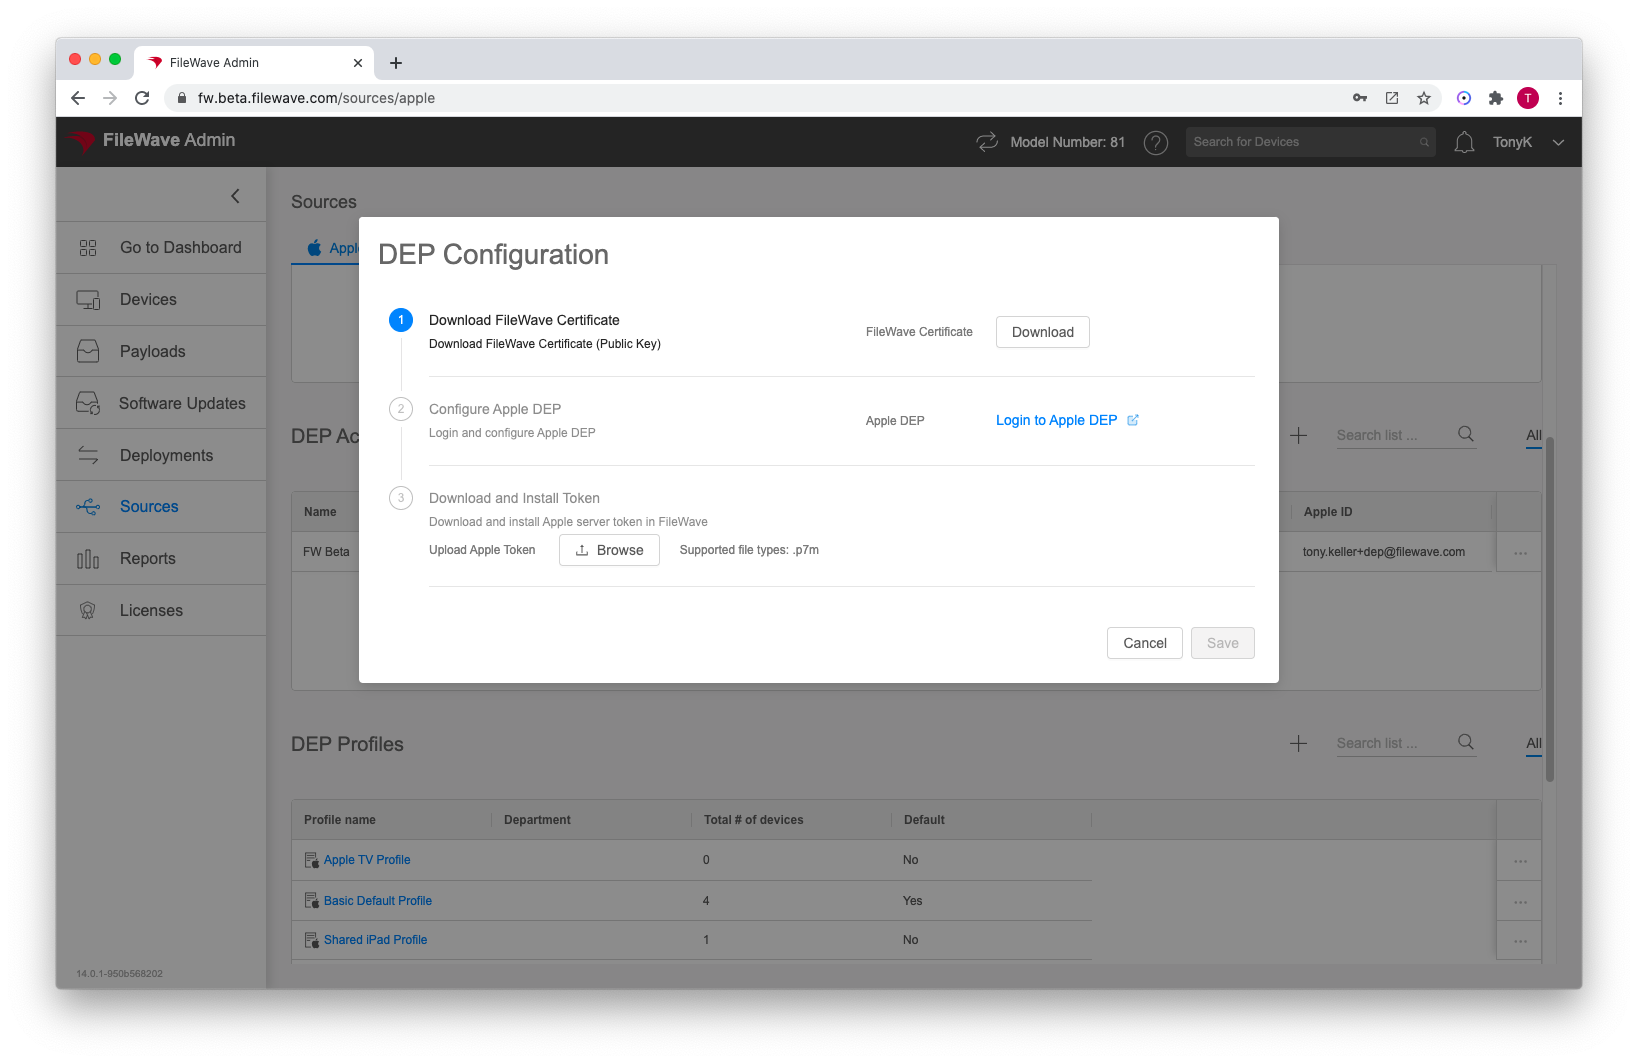 1. Download the FileWave server's public Key and save it locally (this identifies the server to Apple) 2. Login to either ASM or ABM and add or update MDM server as appropriate with above public key, and then download the generated ADE token 3. Upload the ADE Token back into FileWaveApple's ADE servers prevent communication when your external IP changes, and traffic will be blocked until you renew your token. This most often happens in the instance of your network doing some type of disaster recovery failover.
## ADE Synchronization Your FileWave server synchronizes nightly with Apple ADE servers automatically. However, if you need to sync manually in the mean time you can do so from this view by clicking the () icon. You'll be prompted for either a Sync (recommended) or a Full Sync (use only under special circumstances) as shown below: 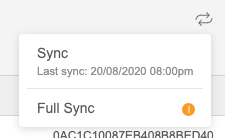 # ADE Profile Workflows ## What Having ADE (formerly known as DEP) Profiles defined is one thing, but having them assigned to devices is another...and critical. ADE Profile workflows allow us to automatically assign ADE profiles based on programmatic criteria. ## When/Why As much as possible we always want to use automatic profile assigning rules. Automatic assignment saves us time from having to manually assign profiles, and ensures that even brand new devices that are still in shrink wrap will have a ADE profile assigned correctly.Reminder: ADE profile assignment, or changes in assignment impact nothing on the device's current state. Those changes are only pertinent the NEXT time the device goes through the setup assistant.
You might find you only need one workflow, or you may find you need many...it tends to be driven by the number of ADE profiles you have. In general, fewer ADE profiles is better (to reduce complexity). ## How Creating a new profile workflow is very similar to creating a smart group or a report. However, you'll notice in the below that we use the Operating System field from the ADE Devices table to assign our AppleTV profile to all AppleTV devices. We explicitly use that field because it comes directly from the ADE sync with Apple, and will always be populated, where FileWave normal inventory fields will only be populated AFTER enrollment. Watch below as we assign all AppleTVs to the AppleTV profile we created earlier: # ADE Profiles ## What The ADE (formerly known as DEP) Profile section allows us to create, edit and remove ADE (Apple Device Enrollment) profiles. ## When/Why There are a lot of different reasons for creating and editing ADE profiles, but in general ADE profiles control device setup behavior for Apple devices. With these profiles we can control what dialogs users see during device setup, force devices to enroll in our MDM environment, and even control device naming. ADE profiles are a critical part of setting up automated device enrollment and setup.Starting in FileWave 16.3.x, ADE profiles also support `do_not_use_profile_from_backup`, which lets a restored device ignore the ADE profile embedded in a backup and pull the current ADE assignment instead. FileWave 16.3.x also adds the **Age Based Safety Settings** skip key, while still keeping `AdditionalPrivacySettings` available because Apple's documentation is not yet fully consistent on whether the newer key fully replaces it.
## Managed Migration Assistant for macOS in FileWave 16.4 FileWave 16.4 adds Managed Migration Assistant settings to macOS ADE profiles. These settings let an organization control Mac-to-Mac data migration during Setup Assistant instead of leaving every migration choice to the user. - Enable managed migration for the ADE enrollment workflow. - Control transfer of Security & Privacy settings. - Exclude user accounts that should not be migrated. - Define files and directories that should be included or excluded. - Use the reported migration progress and completion state when validating the enrollment. The same Apple capability is available through a FileWave DDM Migration Assistant configuration. Use the ADE profile integration for the initial Setup Assistant experience and review [DDM Configurations](https://kb.filewave.com/books/ddm-apple/page/apple-device-management-ddm-configurations) for the declaration-based controls and conflict-avoidance guidance.Test the complete migration on representative source and destination Macs. A successful ADE enrollment does not prove that every selected account, file, privacy setting, or third-party application migrated as intended.
## How The below is a quick run-through of creating (and editing) a new ADE Profile targeting AppleTV devices. See the link below for more information on automatically assigning ADE profiles to devices. ## Related Content - [ADE Profile Workflows](https://kb.filewave.com/books/filewave-anywhere-help-menus/page/ade-profile-workflows "ADE Profile Workflows") # VPP Tokens ## What VPP (Volume Purchase Program) Tokens from Apple allow us to utilize licenses purchased for App store resources on our FileWave server. You may have one or many VPP tokens. ## When/Why In ABM/ASM (Apple Business Manager / Apple School Manager) terminology tokens are created and allow access to licenses purchased within a location. The VPP tokens section of the Sources View allows you to Add, Edit and Remove VPP tokens. ## How Adding a new token is done by simply clicking the plus icon (). Editing and removal are done through the actions menu, and removal is only possible if all payloads are removed beforehand. Whether adding a new, or refreshing an existing, token, the steps are the same, and and require the token from Apple: 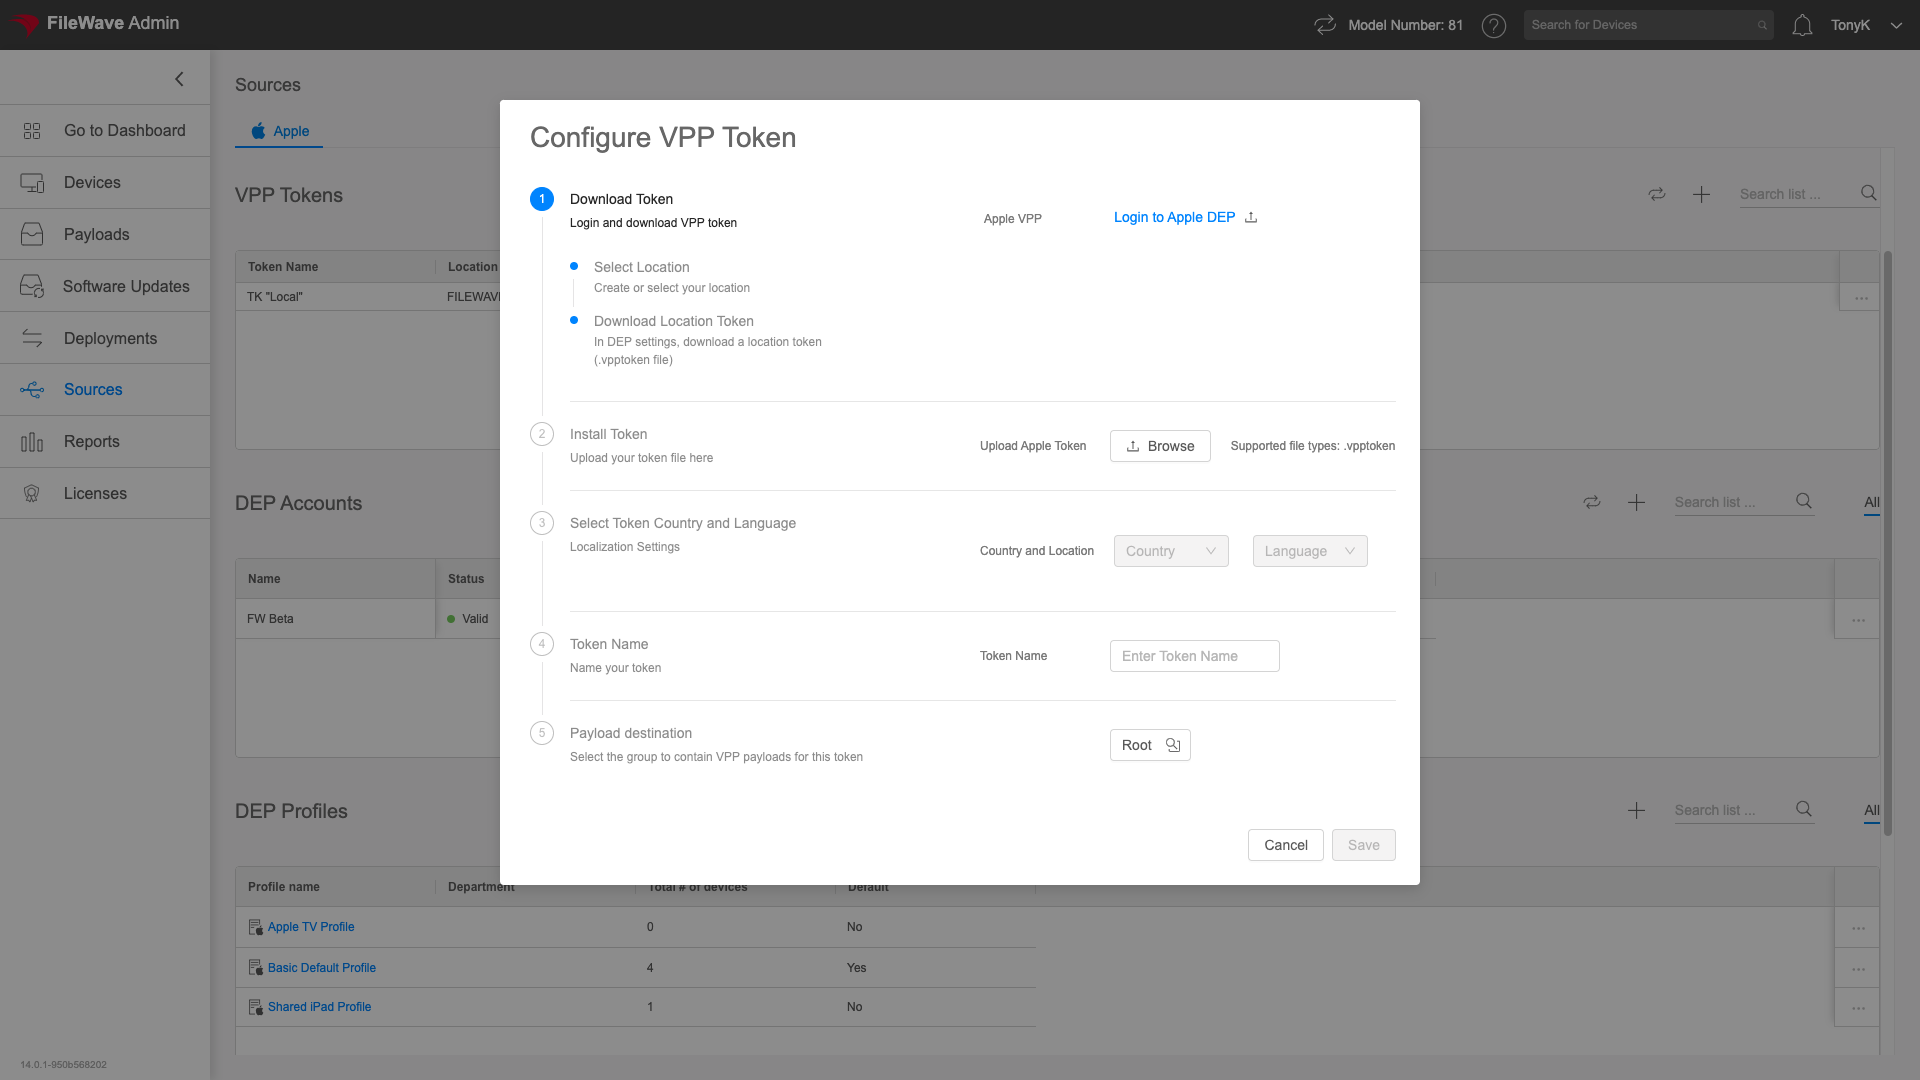 1. Download the appropriate location based token from ABM/ASM 2. Upload the Token to FileWave 3. Set the Country/Language as needed 4. Provide a local descriptive name for the Token 5. Specify where you would like VPP payloads to be created (default is root)| Be aware that if you attempt to import a VPP token already in use on another system, FileWave will warn you as shown:  Only import a token in this circumstance if you are certain it will not interfere with another MDM server. |