Inventory Queries (Reports)
- Creating and Editing a query
- Demystifying Inventory Queries
- What are Sample Reports?
- How do I export the results of an Inventory query?
- Generating scheduled reports
- Sending Scheduled Reports to More Than One Address
- Filtering in Inventory Reports
- Exporting & Importing Inventory Reports
- Inventory of IP Addresses
Creating and Editing a query
This will discuss how to create and edit a query.

When you create a new query, you start by giving it a name and choosing a starting criteria - in this case, we want to have all of our clients report back if they have an application containing the name "chrome". Next, we decide what fields will be displayed when the query executes.

As you drag and drop component fields into the display window, FileWave immediately begins filling in the blanks with data from your Clients. You can re-order those fields by dragging them back and forth until you are satisfied with the results. You should choose a Main Component, which is the index field for the query. For example, in this query, if the main component was the application, then you would get a report that showed every instance of "chrome" that existed in the database. The results would display every instance of the Chrome application, even if it was stored away from the Applications folder and not being used.

By choosing the correct component, and the right criteria, you can create queries that will tell you exactly what you want to know. In the main Inventory window, you can select your query so that it will display just by clicking on it.

Components
Key to being able to create a useful query is understanding the components you have access to. Here is a sampling of those items:


One of the most important new component types is the custom field. There are four different sets: Boolean; DateTime; Integer; and, String. You can create custom fields to go beyond the basic information provided by the Clients to look for unique combinations that include searching for files created prior to a certain date, or add marker files to clients that include a filename or text that meets custom criteria. You do this by passing arguments to the fwcld command.
The general format used to set any custom.ini value (including new keys) follows this format:
$ fwcld -custom_write -key <key_name> [-value <value_to_save] [-silent]Examples
Setting "custom_bool_13" to a false:
$ fwcld -custom_write -key custom_bool_13 -value 0
$ fwcld -custom_write -key custom_bool_13 -value falseSetting "custom_bool_13" to true:
$ fwcld -custom_write -key custom_bool_13 -value 1
$ fwcld -custom_write -key custom_bool_13 -value true
$ fwcld -custom_write -key custom_bool_13 -value somethingSetting "custom_date_02" to a date:
$ fwcld -custom_write -key custom_date_02 -value 2014-02-20T15:22:43To remove any key value, just leave off the -value parameter - so to reset the "custom_date_02" value back to it's default.
$ fwcld -custom_write -key custom_date_02 Notes
- When a provided key name matches integer, date or boolean custom field names - the program will validate the provided input. If this validation fails, an error message is printed and the program will exit without setting the custom.ini value.
- When any failure to set a custom.ini value occurs, the program will exit with code 1, if setting the value succeeds the exit code is 0.
Add FileWave Custom Inventory fields remotely using a Fileset
Expressions
When you add an expression, the logic generally revolves around "is this thing true or not?" What you actually get to work with is a list of possibilities, such as "this is exactly what I am asking for", "this contains the thing I am asking for somewhere in the field I am looking", "this begins/ends with the thing I am looking for", or the all time favorite "is null" - which means the field I am looking at has no value set at all. Of course, you also have the opposite of all these with not - is not, does not, etc.
In this example, we are looking for any instance of an application where the name contains the text "minecraft" -

Field values
The whole purpose behind the query is to get useful information out of inventory. You do this by adding fields to display the results of answers to your query. In Inventory, you access the same components you use as criteria for the search as the display fields. In our example, we are looking for "minecraft" but if we left it at that, all we would get back from the FileWave database is "yup, I found it. Now what?"

Here's the result without us asking for a more detailed result. This is the database telling us that it found "minecraft" with no clue as to where it is on any of the clients. So now, we are going to clean up the view and add the component "device name" so that our query will tell us what device this is on.

You can see how a simple query can be constructed, and that it can prove quite useful to just look for some simple answers. Next, we are going to look at some more powerful examples of queries that you can put to use.
Example - Tracking application usage
A powerful tool in the Inventory / License Management is the ability to track application usage. You can create queries that display the amount of time any managed device is using any installed application. An easy example here would be to look at who is using a specific browser and how often.
The query is built based on locating an application - in this case, Google's Chrome web browser. However, instead of just locating the application as we did in the first example, we are going to find out how often that item gets used. FileWave provides application usage components for this purpose. Here's the query with its display fields:


You can see that adding the proper fields, as well as choosing the proper index or Main Component for the display, you get a good bit of information from this query.
Example - Identifying VPP applications that support device assignment
With the functionality in Apple's VPP of directly assigning applications to FileWave client devices, you have the challenge of finding out which of your many applications support that feature. Here is a query you can set up to determine which of your deployed Filesets support device assignment.

The Fields include the product name and, most importantly, the Device assignable flag. The results don't show every VPP application and its status, only the ones that are already active.
Demystifying Inventory Queries
Description
Inventory queries are fundamental, both for reporting and Fileset deployment. For basic details for queries, please take a look at Creating and Editing a query
However, if the query isn't correct, then you could end up with incorrect reports or worse still incorrect Fileset deployments or removals.
Information
So as well as the above section of the guide, additionally there are some example queries built into the Admin console: What are Sample Queries?
Sometimes though, you need something that is a little more complex or you can't quite get the right results. Some considerations when making queries:
- Do you need the query
- Does the criteria match the desired expectation
- What Main Component should be used
- What Fields do you need present
Following are some examples to demonstrate this.
- Devices that do not have an application installed
- Unexpected Entries
- None and Not
1) Devices that do not have an application installed
Do you need the query?
This seems like an odd question, but why is this required? If Filesets are associated they should be installed, if not already, at the next check-in from the device. If the software has failed, then this is already available through the Report window. Perhaps they aren't in the right groups to be associated though or maybe the device hasn't checked in for a long time. Creating a Smart Group based upon an application that is not installed though, will not change the installation status if there is already an association and the App has failed to install.
Does the criteria match the desired expectation?
In this case, we want the devices that do not have an application installed. Using Firefox on macOS as an Example.
Drag in 'Application' > 'Name' to the criteria and set the following:
- Application/Name
- Is
- Firefox.App
Note we have 'Is' selected. Selecting 'Is Not', 'Does Not Contain', etc will not yield the desired results. Selecting 'Is Not' for instance, will list all devices that have any application on those devices that are not called Firefox.app. In essence, this will be all devices, those with and those without Firefox. Instead, we tick the Not box.
By using the Not box, it gives the reverse of the query. List all the devices that have Firefox and then give the opposite result (based on the Main Component, which will be covered next).
Since this is a MacOS query, then additionally the OS Type can be added:
- OS Type
- Is
- macOS

What Main Component should be used?
The main component is the key ingredient that the criteria will be based upon. Imagine two fields: FileWave Client Name and Application > Name
With the main component set to Application, the query will be:
- Show all Applications that are not Firefox.app
A query set up this way will therefore show all devices, as any App that is not Firefox.app will be a successful hit on this search

With the main component set to macOS/Windows Device, then the query will be:
- Show all devices that do not have Firefox.app
This will be a different set of results, as now any device that has Firefox installed will no longer show. This is the desired result.

What Fields do you really need present?
The above has given the desired result, but there are multiple entries per device. From a Smart Group association point of view, strictly speaking, this should not matter. There is only one of each device in reality, but it makes it hard to read and does not work well as an Inventory Query for reporting. As such, removing any relationship that will create a 1:many relationship would be ideal, such that there is only one result per device.

2) Unexpected Entries
Sometimes some entries seem unexpected. This is usually related to one of the query items in the last example not being set as expected. From the last example, changing the Main Component to Application will still have an undesired result, as this will be searching the criteria against Application entries in the database even though that Field is not shown. There will still only be one entry visible per device, but the search is now listing all Applications that are not Firefox, so every device.

It is possible though, that with an incorrect Main Component and certain fields added, the output can appear confusing. Start with a fresh Inventory query and by setting the following, many entries can be seen with no FileWave Client Name:
- No Criteria
- Add FileWave Client Name as a Field
- Add Operating System as a Field (by dragging this in, all sub-inventory items for Operating System will be added to the Fields view).
With the Main Component set as Operating System, there will be many entries with no FileWave Client Name.

This will be because entries have been made into the database from machines running these OS versions that are no longer appropriate for any of the active devices. Changing the Main Component can provide a true representation of the current installed OS versions.

Saving the above with the Main Component set as Operating System these entries can be seen to have no client. Right-click on an entry. As well as Copy, is there the option to Reveal Client:


If there is no Client to Reveal, then there is no representable entry in the database. If you have a FileWave Client Name that shows but does not have the option to Reveal Client, it may be an old static record that will require manual removal. In this instance, you could contact support and they would be able to assist in tidying this up.
Inventory Only and Archived Clients
When attempting to Reveal Clients, if the client is either Inventory Only or Archived, the relevant option to view these would need to be set through the contextual Menu Item
3) None and Not
Not can in many instances be more useful. A question was posed:
"We would like an Inventory query to show devices that have multiple specific Filesets installed. The issue I am seeing is that if you try to enter multiple Fileset IDs to an inventory query it will show no results because I am guessing it is trying to look for every Fileset to have multiple IDs. So basically I want to find a device that has Fileset 1, 2, and 3, installed and they must have all 3 to go into the query."
Taking from the information above, the negative logic will be seen to be the approach. Trying to search for each of these using positive logic will again not yield the correct results. Instead, Not can be used with desired results when mixed with None.

Take some time to think about how this works. Understanding this will make Inventory Query building in general more successful and ensure you don't have unexpected results.
What are Sample Reports?
Admins often ask where the old Sample Queries went and how to get the sample report examples in current FileWave versions.
Purpose
Sample reports are best treated as starting points. Some are ready to use, and others are examples you can duplicate and adapt when building your own reports.
Where to find them
Starting with FileWave 16.3.0, Sample Queries are no longer included directly in FileWave Central. The current workflow is to import the Example Reports Content Pack from the Reports area.
In FileWave Central, open Reports and choose Import Reports.

The Import Reports button opens the FileWave Content Packs window. Select Example Reports, choose the platform components you want, and click Import.

Older FileWave versions may still show Sample Queries or Inventory Queries in Central and in older screenshots. In FileWave 16.3.0 and newer, use the Example Reports Content Pack instead.
Resolution
Example reports are provided for two main reasons:
- They provide prebuilt common reports so you can get started quickly, such as reports for device operating systems across Android, ChromeOS, iOS, macOS, and Windows.
- They give you examples for building more complex inventory reports that use FileWave inventory, hardware, software, and custom field data.
Additional Information
For best results, duplicate an imported report before modifying it so the original remains available as a reference. If you re-import the Example Reports Content Pack later, be aware that reports included in the pack may be overwritten.
How do I export the results of an Inventory query?
Description
Results of Inventory Queries are viewable though the FileWave Central App. However, if other members of staff require these details, then those results may need exporting.
Requirements
- Mainly, just the FileWave Central App
- Optionally (for Scheduled Reports), Email configured in FileWave Central > Preferences
- Optionally (for API method), API token
Steps
Export View
With any Inventory Query actively being viewed in FileWave Central, use the Drop Down menu option 'Export Current View':
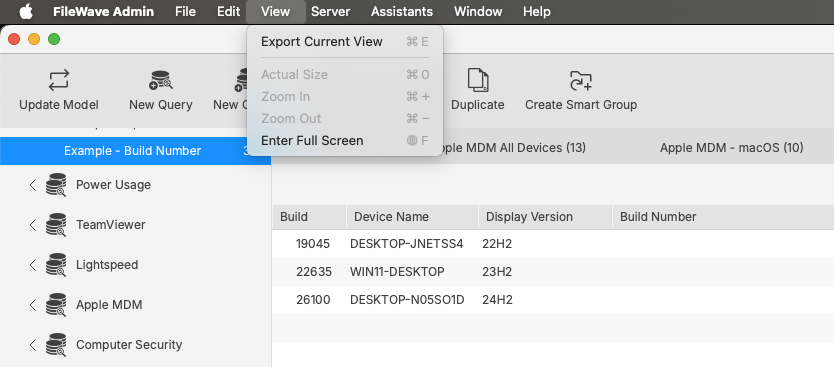
On export, a Text file should be generated, consisting of a header line, including all included columns and preceding lines with the respective results:

Scheduled Reports
From the Assistants drop down menu, is an option Show Scheduled Reports:

This method should periodically send emails to chosen recipients, for any included query set within the schedule definition.
Details of building out such a thing can be found in our KB: Generating Scheduled Reports
API Queries
As demonstrated in our KB pages for FileWave API, it is possible to build out queries using the API as well as reporting on them. Please view the KB pages for extensive details.
Generating scheduled reports
Scheduled Reports send FileWave report results to one or more email addresses on a schedule, so an admin does not have to sign in and run the same report manually. They can be used for license reports or inventory Queries.
How to create Scheduled Reports
- In FileWave Central, select Assistants → Scheduled Reports… from the menu bar.

- Click the "+" in the lower left of the window to create a new scheduled report. Existing reports appear in this same list.


- Choose a Report Type:
- Licenses: sends the information listed in License Management, including VPP licenses and manually created licenses from Filesets or inventory.
- Query: sends the results of a selected inventory Query.

- Enter the email address that should receive the scheduled report.
|
Multiple Email Addresses To send to multiple email addresses, separate the addresses with a semicolon. |

- Enter a Mail Subject and the Email content/body so recipients know what the scheduled report is for.
- If you are signed in to FileWave Central as the Superuser, the Owner section is visible. The selected owner affects scheduled-report results because the report runs with that user's permissions.
Example: If Greg Stevens owns a report for all devices but does not have permission to view iOS devices, iOS devices will not appear in that report.
|
If you are not the Superuser you will NOT see the Owner section at all; as you can see in the screenshots below, only the Superuser can assign a user to reports. |


- After you select an Owner, set when the report should be sent:
- Every day
- skip weekends
- Every week on
- Every month on
- Every day
- Optional: if the Report Type is set to Query, select which inventory Query should be sent.

- Click OK to save the scheduled report. You can then view existing reports or send the report immediately.

Scheduled Reports Results
Scheduled reports are sent as tab-delimited text files that you can open or import into spreadsheet and text-editing tools.
Query Results


License Results


Sending Scheduled Reports to More Than One Address
If you want a scheduled report to go to more than one recipient, enter all email addresses in the recipient field and separate them with semicolons.
Problem
Scheduled report results often need to go to more than one person. A shared mailbox can work, but sometimes you need to send the same report directly to several recipients.
Environment
This applies to scheduled reports created from inventory queries and license reports.
Resolution
In the recipient field, enter the addresses as a semicolon-delimited list, matching the format shown below.
user1@mail.com;user2@mail.com;user3@mail.com;user4@mail.com
Additional Information
Scheduled reports are sent on their normal schedule, but you can also use Send Now in the Scheduled Report Assistant to confirm the report is delivered to all recipients before relying on the schedule.

Filtering in Inventory Reports
What
Inventory Reports (formerly Queries) in FileWave can be filtered for specific values, similar to filtering in the Clients view.
When/Why
Use filtering when you need to get to a specific inventory result quickly. For example, if a user gives you an asset tag during a support call, filtering can take you straight to the matching record.
How
Open the Inventory Report, then enter search text in the filter field in the upper-right corner. Filters in FileWave Central are sticky, so they remain in place when you leave the view and return to it. See the example below:
Exporting & Importing Inventory Reports
Description
FileWave can export and import Reports (formerly Queries) definitions, which makes it easier to share reporting work between FileWave Servers.
If a Report uses Custom Fields, export and share those Custom Fields with the Report definition.
Importing & Exporting Custom Fields
Each Custom Field has a unique name: 'Internal Name'. When uploading a Custom Field, if another Custom Field already exists with the same Internal Name, the newly imported Custom Field Internal Name will be altered to prevent conflict.
Imported Reports reference Custom Fields by Internal Name. If FileWave changes an imported Custom Field Internal Name to avoid a conflict, update the Report to reference the new Internal Name.
Information
Earlier workflows used API commands to copy Inventory Query definitions between FileWave Servers. Current FileWave versions provide export and import actions in the right-click contextual menu in FileWave Central.
Directions
From FileWave Central > Reports:
Export Report
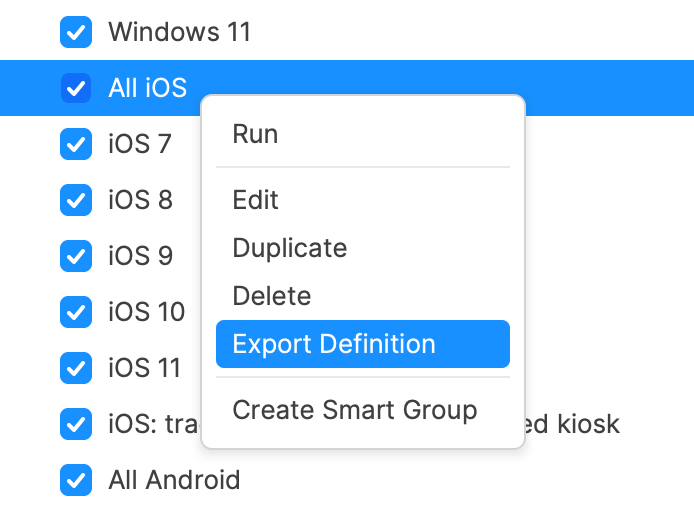
- Select a Report from the main window.
- Right click
- Choose Export.
Import Report
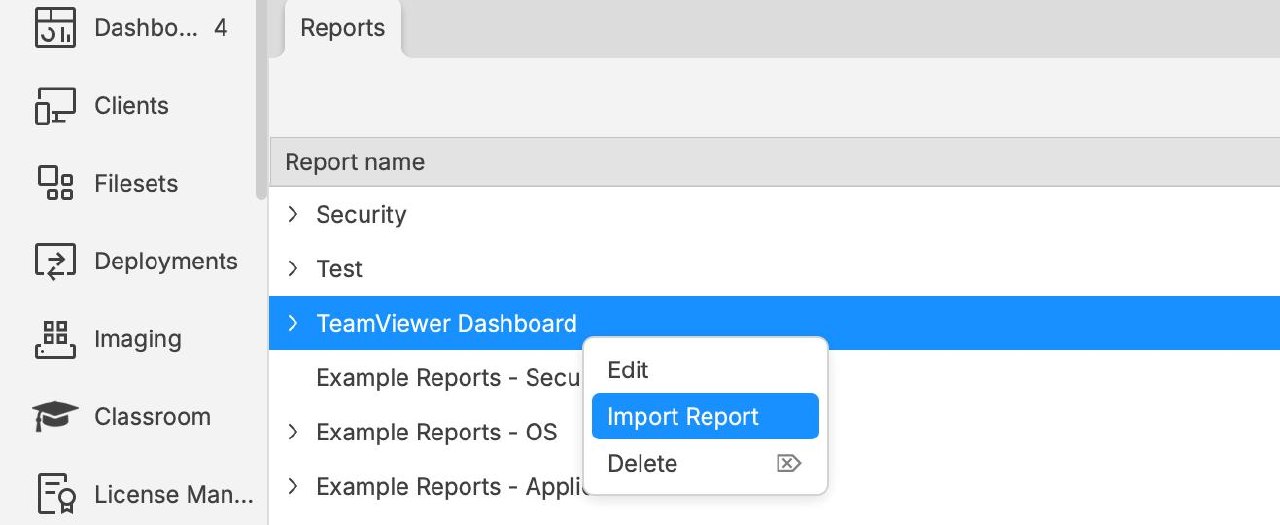
- Select the category where the imported Report should be added.
- Right click
- Choose Import Report.
Inventory of IP Addresses
Description
Out of the many Inventory Items collected, IP addresses are included in those automatically provided. However, what does that mean. For device communication, many IPs exist for communication and there is more than one address obtained from some devices.
Information
There are two distinct IP Inventory entries:
- All Devices > IP Address
- Network IP Address > IP Address
All Devices IP
This IP is how the server sees the incoming traffic. As such, it isn't as much device inventory, but inventory of live traffic to the server.
Network IP
The value reported as the Network IP Address, however, is inventory. Each network adapter will be included in the report back to the FileWave Server during the inventory phase; thus multiple entries per device.
Apple mobile devices will have a blank value, since this IP is provided by the FileWave Client
Considerations
All Devices IP
Since the IP for All Devices is actually the IP of incoming traffic, in reality it is the last leg of the communication between devices and the FileWave server.
What does this mean for this inventory field. In many setups, not much and is really useful. By reporting the last leg of traffic, it immediately provides some information about the device. For example, if this was a company NAT address, the device is clearly talking back to the server from an alternate location. Yet, there are some other examples where this may not be the best.
Hosted
Where servers are cloud hosted, the last leg of traffic is from the Load Balancer to the FileWave Server. Since all traffic will be through the Load Balancer, then the reported IP will be the local IP of that Load Balancer.
Booster Routing
This has a similar consequence with Hosted. Since FileWave Client communication is through the Booster, the last leg of traffic (as viewed by the FileWave Server) will be the Booster (the last Booster if cascaded). On face value, this would appear initially as useful as first described. Immediately, it is clear that a client is either reporting directly to the server or through a Booster. In the latter case, which Booster if multiple exist. However, there is an additional complication.
Due to requests, the software was altered to provide the local client IP of devices routing through Boosters, with the intention of improving the experience of the Client Monitor.
When a device using Booster Routing first checks in, the IP actually reported will initially be that of the Booster. From this communication, after a period of time, the value will be updated to reflect the Client IP instead. However, it may be likely that the communication will be re-established at a later date, causing the Booster IP to be reported again. As such, there will be a duration of time where the Booster address will be seen, before the Client local IP is shown instead.
Custom Fields
Scripted Custom Fields can return any value that is programatically obtainable. If a different value was desired, it may be possible for a Client Script or Client Command Line Custom Field to report an alternate chosen value.
Scripted Custom Fields are only available for computer devices: macOS & Windows.