Settings
- Configuring and using the Dashboard
- Mobile Preferences - iOS / Android
- LDAP Preferences
- VPP and ADE Preferences
- Managing FileWave Administrators
- Brute Force Protection and Login Lockouts
- Embracing the Dark Side: Dark Mode for FileWave Central (15.3+)
- FileWave Central - Additional Settings Menu Items
- Configuring Inventory preferences
- FileWave Anywhere Saved View Preferences
Configuring and using the Dashboard
In FileWave Central, the Dashboard is the first view an administrator gets of their FileWave environment. The Dashboard is designed to give the FileWave administrators a quick view of their server and be able to focus in on a missing setting, or a possible service interruption. There are seven major sections on the Dashboard.
Primary Services
This section shows the major services - DEP, VPP, Email, etc with last update and, if there is an error, a direct link to the settings that can address that error.
Sync Status
This section shows the latest 'check-in' times for certain services, such as VPP, DEP, LDAP, and Smart Groups. These services all have preferences requiring synchronization between a remote service, for example your LDAP server, and the FileWave server.

Server Performance Status
This section is an active chart of the status of the primary FileWave server's storage space, CPU usage, and RAM utilization.
Distribution of clients
This section displays a graph showing the breakdown of FileWave clients based on operating system.

Mail Queue
This section displays a running graph of the status of emails sent from the FileWave server. The focus will be on the VPP / MDM invitation emails. This will help you see situations where your local email server may be getting overwhelmed by the large number of MDM invitations going out at the same time.

Enterprise IPA URL Check
This section shows the validity of your institutionally created iOS apps as well as the enterprise apps provided by FileWave (iOS App Portal / Kiosk).
Server Licenses
This section shows the current status of your FileWave server license.

Alert Settings
The Dashboard provides FileWave Central with the ability send notifications out to individuals at status changes on the server. You toggle between the Alert Settings and the Dashboard in order to configure the types of alerts sent out and who they are sent to.

The result is an email when an event is triggered being sent to the designated email account.
"Detachable" Dashboard
The Dashboard is part of the FileWave Central application; but it can also be dragged off to be viewed as a separate window on the administrator's computer, opened in a browser, or provided as a URL to other interested parties to view on their own computers or devices.
Dashboard Alert details
A table with explanations of all of the available alert items from the Dashboard is available in the Dashboard Warning levels and Descriptions KB.
Related Content
- FileWave Server Mail test receives Bad Request with Google Accounts
- Dashboard Warning levels and Descriptions
Mobile Preferences - iOS / Android
The Mobile preferences are designed around Mobile Device Management for Apple's iOS/macOS and Google's Android/Chromebooks. This section discusses setting up the basic components in FileWave Central/Preferences.
Configure MDM Server
- MDM Server Address - Enter your MDM server's FQDN or routable IP address.
- Port - The default port for FileWave MDM is 20445.
- Shared Key - This is used to create a secure connection between the MDM Server and the FileWave Server. Generate a new key on Save only needs to be done once and is applied when the preferences are closed with the OK button.
Mobile Certificate Management (HTTPS Certificate Management)
This section shows the information used by FileWave to create a valid certificate that will be used to authenticate the FileWave MDM server with your clients and with Apple's Push Notification System.
- Details – Shows the details of the current certificate uploaded.
- Upload PKCS12 Certificate - This is used to upload a SSL certificate issues by a Certificate Authority.
- Get Current Certificate - Once you have a valid certificate, you can download a copy to be used with Apple Configurator.
Note: Self-signed certificates are no longer able to be generated in FileWave. A certificate signed by a CA is required for iOS, MDM enrolled Macs, and Chromebooks.
Apple Push Notification Certificate (APN) for iOS
The APN certificate is required to allow the application developers to send notifications to their applications, such as the Weather app getting current storm alerts. In order to allow the applications you deploy to your mobile devices to get these notifications, you request a secure certificate from Apple. The process for getting the certificate is detailed in the Appendix for FileWave administrators running either OS X or Windows.
Once you have received your APN Certificate from Apple, you will add it by clicking on the Upload APN Certificate/Key Pair button. This will configure your FileWave MDM server to support secure communications with Apple's Push Notification service.
Android/Chromebooks MDM Configuration
If you are deploying Android clients, then you will need to configure the Android/Chromebooks section of the Mobile preferences. You will need to get a Project Number and API key from Google. Instructions on how to accomplish that task are in the Appendix. Once you have those two items, go to the FileWave Preferences / Mobile pane and select the Android/Chromebooks tab.
Select the Configure GCM button, authenticate as the FileWave super administrator, then enter the Project Number and the Server API key you were given.
Click on Save and you should immediately see that GCM is correctly configured.
Override FileWave Server configuration
The Android client is a composite of the computer and iOS client. It must connect to both the FileWave Server and the FileWave MDM server. Enrollment is done the "iOS" way through the MDM portal; but the client must also connect to the main FileWave server for additional functionality. In most cases, this is not an issue because the FileWave Server and the FileWave MDM server are on the same system. However, it is possible for you to configure the two services to run on different systems with differing external IP addresses.
If you are hosting the MDM service on a different system, then you will need to check the Override FileWave server configuration checkbox and enter the FQDN name of your main FileWave server. Do not enter anything in this section if you are running your FileWave MDM services on the same system as your primary FileWave server.

macOS MDM configuration
For macOS devices, you will need to request a custom FileWave Client installation package (.pkg) and upload it to your FileWave server. This allows FileWave to provide the package for all MDM enrolled devices. When a MDM macOS device is added to your FileWave server, it will automatically receive the client installer package and will be configured as one of your client devices.
macOS Client Package Installation Triggers
The FileWave macOS client package will install on newly enrolled DEP and Profile MDM enrolled macOS devices. The macOS client package will also get pushed out to ALL existing enrolled MDM clients if you upload a new macOS client package into the FileWave Preferences. Be sure not to accidently upload the non-custom client pkg or upload a custom client pkg with the wrong FileWave server address, if you do then all exsisting MDM enrolled macOS devices will install the newly uploaded client and then in turn lose connection to your FileWave server.
The first step is to go to the FileWave Support site and request a custom installer: https://custom.filewave.com
Download the zip file and then expand it to have the PKG. When you have the package, you will upload it to your FileWave Server using the button in the macOS MDM preferences pane:

Authenticate as the FileWave Central superuser (fwadmin), then locate the newly downloaded package. Note: You must unpack/unzip the package before being able to upload it to your server!
Ignore status notifications
In the lower left corner of the main FileWave Central window is the status box for your key external services - Apple Push Notification (APN), Google Cloud Messaging (GCM), Apple Device Enrollment Program (DEP), and Inventory. You have the option of installing the MDM services on a different system, or not needing APN, DEP, or GCM at all - assuming you aren't using any iOS devices, macOS systems with VPP, or Android devices. If any of these services are not running, the status indicators will show that there is a problem. You can disable status notifications and FileWave Central will report only the services you are using.

LDAP Preferences
FileWave supports connecting an LDAP directory, such as Active Directory, Open Directory, or eDirectory, to your FileWave Server. FileWave can use that directory information in Smart Groups and parameterized profiles. LDAP can also be used for enrollment authentication, which lets you track which LDAP user enrolled a device.
Creating an LDAP server entry in Preferences

- Name - a reference name you use to tell LDAP servers apart
- Host / IP - the FQDN or IP address of the LDAP server
- Port - the TCP port FileWave should use to reach the LDAP server; check with your network team if you are not sure
- Protocol – select LDAP, LDAPS, or STARTSSL.
- For LDAPS and STARTSSL, the Check Server Certificate option controls whether FileWave checks the LDAP server certificate against the computer's trust store.
|
For LDAPS or STARTSSL, use a trusted LDAP certificate whenever possible. |
- Server Type - choose Active Directory, Open Directory, or eDirectory
- Base DN - the primary distinguished name (DN) for the LDAP server, using domain components separated by commas. If the LDAP server is on the same system as the FileWave Server, the Base DN may be as simple as dc=home,dc=local. If the LDAP server is on another system, it may use a more specific value such as dc=tanner,dc=filewave,dc=net.
- LDAP User DN - for authenticated binds, enter a user account that is allowed to bind to the LDAP server. Leave this blank for anonymous binds.
- LDAP User Password - the password for the LDAP bind account; not needed for anonymous binds
- Refresh Interval (sec) - how often, in seconds, the FileWave Server is eligible to contact the LDAP server and refresh available data. During setup and testing, a short interval such as 120 seconds can be useful. In production, a 24-hour interval is usually safer: 86,400 seconds.
- Change Limit (%) - a safety limit for accepted LDAP extractions. If more than this percentage of LDAP entries are detected as missing or orphaned during extraction, FileWave treats the sync as failed and does not commit the results. This protects FileWave from large unintended removals caused by a bad LDAP configuration.
- Remove Missing items after - the number of successful LDAP extractions an LDAP-backed item must be missing from before FileWave removes the item or clone. A value of 0 means missing items are removed immediately after a successful accepted sync.
How these settings work together for removal
These settings are separate controls, but removing missing LDAP-backed items depends on all three:
- Refresh Interval controls cadence only. Changing it makes LDAP extractions eligible to run more or less often, but it does not by itself approve removals.
- Change Limit decides whether an extraction with missing/orphaned entries is accepted. If the missing entries exceed the configured percentage, the sync is rejected and those results are not committed.
- Remove Missing items after decides how many accepted syncs an item must be missing from before FileWave removes it. If the value is 0, removal can happen on the first accepted sync where the item is missing.
For example, if a missing OU represents 25% of the LDAP directory, FileWave will not accept those removals when Change Limit (%) is set from 1% through 25%. If Change Limit (%) is set to 26%, FileWave can accept that extraction; the actual removal still follows the Remove Missing items after threshold.
Watch the Change Limit value: A very low setting, such as 1%, can cause otherwise valid LDAP changes to be treated as invalid whenever more than that percentage of entries changes or disappears. In that case, shortening the refresh interval will only make FileWave retry more often; it will not make the rejected changes commit.
Remove Missing items after timing: For safety, set this to a value equivalent to roughly 24 hours.
(Refresh Interval / 60 seconds / 60 minutes) * x = 24 hours
For a refresh interval of 1800 seconds, or 30 minutes, set this value to 48.
Enable Automatic Group updates for this LDAP creates visible Smart Groups in the Clients pane under an LDAP designator. FileWave updates these Smart Groups at the configured refresh interval.
The LDAP information shown in the Clients pane is a one-way view of the directory server. Changes made on the LDAP server are reflected in FileWave, but changes made in FileWave Central do not change the LDAP directory.
|
Automatic Group updates can put heavy load on the LDAP server in environments with more than a few hundred records. Enable it deliberately and watch LDAP server performance after the first sync. |
The Test Connection button checks whether the server is online, but it does not verify every LDAP setting. Use an LDAP browser tool to verify the directory path and bind account before relying on the configuration.
You can create entries for multiple LDAP servers. An LDAP server can also run on the same device or VM as the FileWave Server.
An LDAP server can be chosen as the Authentication server. In that case, FileWave uses that directory for profiles that support parameterized settings. Selecting use it for extraction adds the directory information to the FileWave database. You can view LDAP settings in Assistants > LDAP Browser in FileWave Central.
The Synchronize Now option at the bottom-right of the LDAP server pane lets you synchronize all LDAP servers, one LDAP server, or only LDAP Custom Fields.

VPP and ADE Preferences
What
FileWave Central uses Preferences > VPP & ADE to configure and monitor Apple Apps and Books tokens, Automated Device Enrollment accounts, and the Apple School Manager or Apple Business Manager API integration.
Apple now calls the Volume Purchase Program Apps and Books. FileWave retains the VPP abbreviation in parts of the interface and documentation. Apple's Device Enrollment Program (DEP) is now Automated Device Enrollment (ADE).
Interface version: The screenshots and the Status/Configuration navigation in this article apply to FileWave 16.4.0 and later. Customers running an earlier FileWave version will see the legacy single-pane VPP and ADE interface.
Version differences
| FileWave version | Preferences layout |
|---|---|
| 16.4.0 and later | Separate Status and Configuration tabs, shared Advanced Settings, and the Apple School or Business Manager API configuration. |
| 16.3.x and earlier | Legacy single-pane VPP and ADE layout. Configure tokens and ADE accounts, synchronize with Apple, and manage ownership from the controls shown in that version. The Apple School or Business Manager API section introduced with 16.4.0 is not present. |
The token, account-ownership, synchronization, and ADE certificate concepts in this article still apply to earlier versions, but the control locations and labels differ. Do not replace a working Apple token merely because an older interface does not match the 16.4.0 screenshots.
Before you begin
- Set up the required locations, MDM Servers, and API credentials in Apple Business Manager or Apple School Manager.
- Use a separate Apps and Books token for each production, test, or migration MDM Server.
- Do not use the same token on multiple MDM Servers at the same time. Doing so can cause ownership conflicts, lost control of the token, or unexpected VPP user retirement.
- Have the primary FileWave administrator credentials available. FileWave may require fwadmin authentication when changing tokens, accounts, or certificates.
Apple's current platform instructions are available in the Apple Business Manager User Guide and Apple School Manager User Guide.
Open VPP & ADE Preferences
- Open FileWave Central.
- Select FileWave Central > Preferences.
- Select VPP & ADE.
- On FileWave 16.4.0 and later, use Status for health and synchronization information and Configuration for tokens, accounts, certificates, API credentials, and advanced behavior. On earlier versions, use the equivalent controls in the legacy VPP and ADE pane.

FileWave 16.4.0 and later separates VPP and ADE health information from configuration tasks.
Status
The Status tab provides a quick operational view without exposing detailed account configuration.
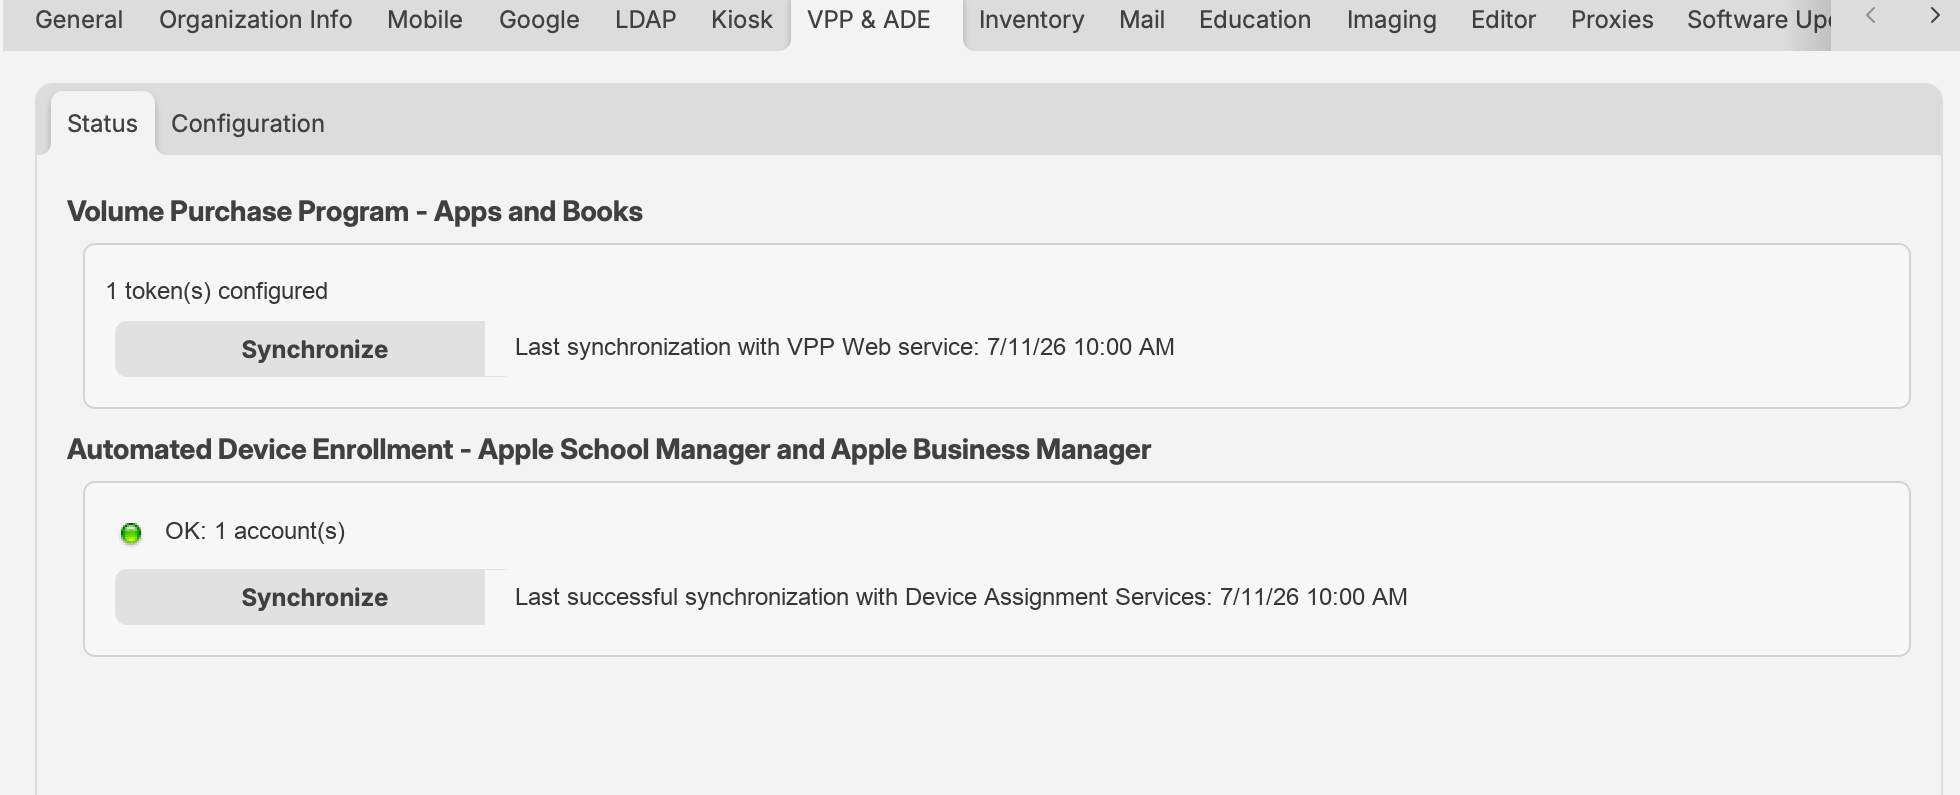
In FileWave 16.4.0 and later, the Status tab shows token and account health, synchronization controls, and the most recent synchronization times. Example counts and timestamps are shown.
Apps and Books status
- Displays the number of configured Apps and Books tokens.
- Shows the most recent VPP Web service synchronization.
- Synchronize requests an incremental synchronization.
- Hold Option on macOS while selecting Synchronize to request a full synchronization. Full synchronization is more expensive and should be used only when needed.
Automated Device Enrollment status
- Shows ADE account health and the number of configured accounts.
- Shows the last successful Device Assignment Services synchronization.
- Synchronize requests an ADE synchronization with Apple.
FileWave synchronizes Apple account data in the background. Use a manual synchronization when recent purchases, token changes, or device assignments cannot wait for the next scheduled synchronization.
Configuration
Volume Purchase Program—Apps and Books
Select Configure tokens to add, renew, remove, or inspect Apps and Books tokens. FileWave supports multiple location-based tokens.
- In Apple School Manager or Apple Business Manager, download the Apps and Books token for the required location.
- In FileWave Central, select Configure tokens.
- Add or replace the applicable token and save the configuration.
- Return to Status and synchronize.
- Confirm that the token is healthy and that purchased applications and books are available to FileWave.
After the initial synchronization, FileWave creates managed-license Filesets for eligible purchases according to the token configuration. Token-specific options can also control VPP users for newly enrolled devices and where automatically created Filesets are placed.
Never import the same Apps and Books token into two active MDM Servers. If FileWave reports that another server owns the token, use Take ownership only when the token has intentionally moved and the previous server or tool is no longer using it.
Apps and Books advanced settings
Select Show Advanced Settings to configure:
- The VPP email invitation template.
- The minimum delay between license assignment and application installation.
- The preferred license distribution model for new associations: Automatic, Device, or User. Automatic assignment uses Device when possible and otherwise uses User.
- VPP v2 notifications.
- LDAP synchronization, automatic email-address association, and invitation behavior for registered users.
Automated Device Enrollment
The ADE configuration connects FileWave to one or more MDM Server entries in Apple School Manager or Apple Business Manager.
- Select Download certificate and authenticate when prompted.
- In Apple School Manager or Apple Business Manager, create or open the FileWave MDM Server entry and upload the certificate.
- Download the resulting ADE server token from Apple.
- In FileWave Central, select Configure accounts and import the token.
- Save the configuration, return to Status, and synchronize.
Select Show Advanced Settings to choose the MDM certificate added to ADE profiles. Using an MDM certificate provides a more secure setup but requires ADE profiles to be updated when that certificate is renewed.
For complete token lifecycle instructions, see Add or Renewing your ADE (DEP) Account Token.
Apple School or Business Manager API
FileWave 16.4.0 and later can connect directly to the Apple School Manager or Apple Business Manager API. This integration provides current Apple device inventory, ADE assignment history, and AppleCare coverage information in FileWave.
Create the API account and private key by following Apple's instructions for Apple School Manager or Apple Business Manager.
- In FileWave Central, select Configure under Apple School or Business Manager API.
- Enter an Account Name for the connection.
- Next to Private Key, select Browse and choose the
.p8private-key file downloaded from Apple. - Enter the Key ID and Client ID supplied by Apple.
- Select OK and allow the initial synchronization to complete.

The API Account dialog requires an account name, the Apple .p8 private key, Key ID, and Client ID. The screenshot contains placeholder values only.
Review and assign Organization Devices
After the Apple School or Business Manager API account has synchronized, open the Organization Devices pane in the ADE Assistant. This view includes devices registered to the organization even when they are not currently assigned to a FileWave MDM server.
- Review or filter the organization-device list for devices that are not assigned to a configured MDM server account.
- Select the required device or devices and use the assignment action to choose the appropriate configured MDM server account.
- Allow the Apple assignment and FileWave synchronization to complete.
- Verify that the devices no longer appear as unassigned and that the expected ADE assignment is visible before beginning enrollment.
Organization Devices requires the Apple School or Business Manager API integration introduced in FileWave 16.4. Token-only ADE synchronization does not provide this organization-wide device and AppleCare view.
AppleCare synchronization can take time for a large fleet. Apple's coverage service supports single-device lookups and is subject to undocumented rate limits.
AppleCare smart refresh cycles and intervals
After the initial synchronization, FileWave automatically varies AppleCare refresh frequency according to the device's coverage state, such as renewable, active, or inactive/expired coverage. This reduces unnecessary single-device coverage requests while keeping time-sensitive coverage information fresher.
Select Show Advanced Settings under the API section to configure the separate refresh intervals used for renewable, active, and inactive AppleCare coverage. Shorter intervals keep coverage data more current but increase API load and can trigger throttling. Select Reset to Defaults to restore FileWave's standard smart-refresh intervals.
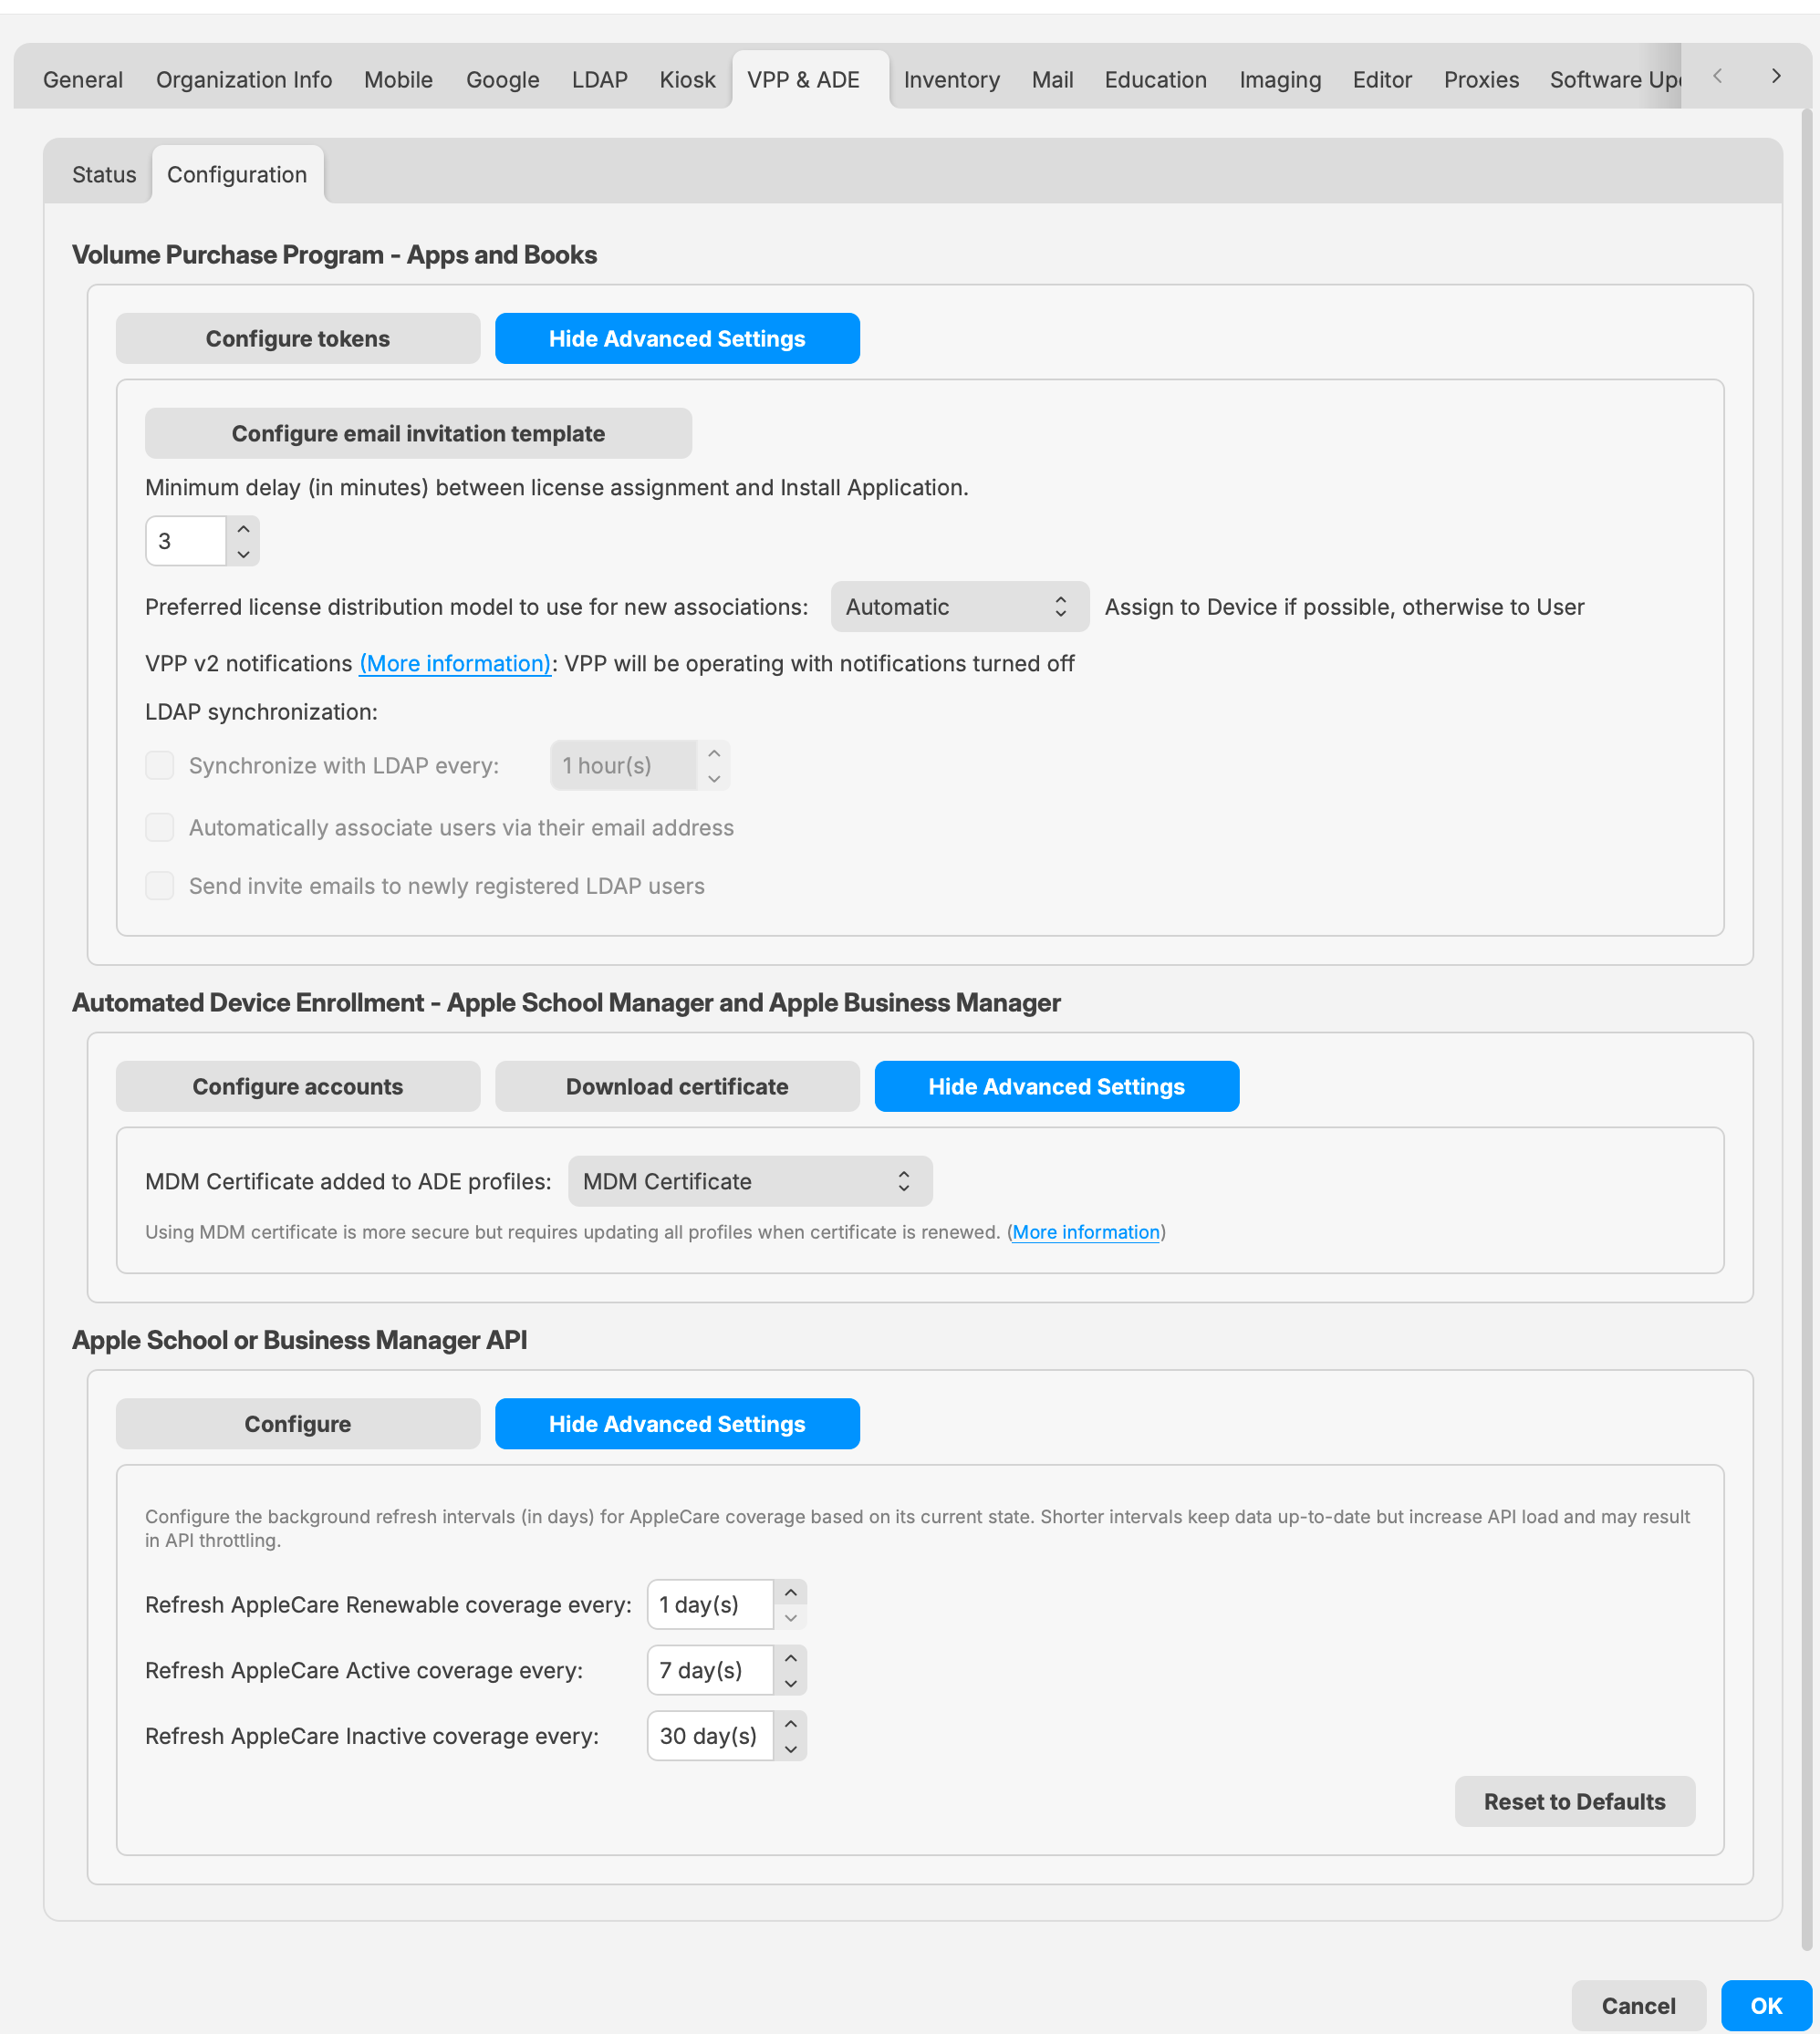
In FileWave 16.4.0 and later, Advanced Settings centralizes Apps and Books behavior, the ADE profile certificate, and AppleCare refresh intervals. Values shown are examples.
Related content
- Apple’s Volume Purchase Plan and License Management
- VPP Notifications (Apple VPP API v2)
- VPP Token Renewal
- Working with Apple’s Automated Device Enrollment (ADE)
- Add or Renewing your ADE (DEP) Account Token
- ADE Troubleshooting
Managing FileWave Administrators
FileWave supports tiered administration so you can create additional administrators in order to spread the workload, you are not limited to the amount of admins you can have in FileWave.
How to log into FileWave Admin
When you log into the FileWave Admin to access the FileWave Server you will be asked for the server address, and user credentials which can be a local account or an LDAP account.

FileWave supports multiple admin connections from the same or separate admin accounts. If you try to log in with the same account that is already connected somewhere else you will get prompted to either end that first connection, start a second connection, or cancel.

If you are currently using a self-signed certificate then you may also get a prompt that the Admin cannot verify the identity of the FileWave server. The recommend way to fix this is to, hit connect and then switch to a root trusted certificate. Please visit the KB linked here for instructions on how to do this.

You will also be able to see two active connections if you look in the Administrators Online... window located under the Assistants menu
|
The bolded entry is your current connection |

FileWave Administrators and Inventory
In the FileWave Admin console you have the ability to set read/write/delete permissions to specific objects which include devices, filesets, and groups. These permissions will follow the user all the way into inventory so that only what the current administrator has access too can be seen in the inventory results.
Example:
- Right click on an object (user, group, fileset) and select Set Permissions

- Select the permissions you would like for each administrator. Setting it to No Permissions will make that object no longer visible for the administrator.

|
You have to select Propagate to children if you are setting permissions on a group and want those permissions to be added to sub-objects. read/write/delete permissions are received from the original object and the clones will get the same permissions. If you modify these permissions on a clone, only this specific clone will get them not the original or other clones. |
- In this case the user greg has no permissions for the group selected which is for all macOS devices and these permissions have been propagated to all sub-objects. So as you can see below the first screenshot shows what the user with full permissions sees and the second screenshot shows inventory information with the new permissions.


Types of Administrator Accounts
FileWave has three different account types;
- Superuser - This will be the fwadmin account that came with FileWave by default, and is required for certain setup options in FileWave.
- Local User - A user name and password created directly from the FileWave Admin and saved on the server.
- LDAP Group User - Admin credentials are pulled from LDAP (Active and Open Directory)
Other than the Superuser, which has full rights by default, you have the ability set granular permissions for your Local and LDAP users.
Superuser
The default credentials for your Superuser account is fwadmin/filewave which FileWave highly recommends that you change so the password is something more secure!

There are areas and features in FileWave that can only be accessed with the FileWave Superuser account. Three of these sections won't even be visible to any other Admin account, one (Software Update) is grayed out for all but the Superuser, and the other features will trigger a dialog window requesting the Superuser credentials to be entered.
Only Visible from the Superuser logged in:
- Activation Lock Management (Assistants → Activation Lock Management)
- Force Logoff Admin (Assistants → Administrators Online...)
- Scheduled Reports Owner (Assistants → Scheduled Reports.. → "+" → Owner section)
- Software Update Sources Apple / Microsoft (Preferences → General)
All Admins will be prompted for Superuser credentials:
- VPP & DEP setup (Admin Preferences → VPP & DEP)
- Configure OAuth token (Admin Preferences → Chromebooks)
- Upload PKCS12 Certificate (Admin Preferences → Mobile → HTTPS Certificate Management)
- Configure GCM (Admin Preferences → Mobile → Android/Chromebooks)
- Upload macOS client package (Admin Preferences → Mobile → macOS)
- SIS - Edit Settings... (Admin Preferences → Education → SIS)
- Apple Classroom - Manage Certificates (Admin Preferences → Education → Apple Classroom)
- Force log off (Assistants → Administrators Online...)
- Manage VPP Tokens (Assistants → Manage Administrators → Manage VPP Tokens)

Local Account
Local Accounts can be created very simply and then given whatever permissions you wish them to have. Keep in mind even if a Local Administrator Account is given full rights they will still be prompted for Superuser credentials in the areas listed in the Superuser section above.
To create a Local Account for the FileWave Admin follow the steps below:
- Go to Assistants→ Manage Administrators
- Click on the the "+" sign at the bottom left
- Then select Local Account

- You will now be able to fill in the user information under the User details tab. Since this is a new user you will also have to set a default password by selecting Set Password or Generate and email password (this will only work if you provided an email for this user and you also have the Email settings completed in the Admin Preferences)

If you selected Set password you will get the following window to type in the user's password:

If you selected Generate and email password you will need to hit the Apply button at the bottom of the FileWave Administrators window and you will then get an email with the following information:

- Next you will need to give this user permissions in FileWave. You do this by selecting the user and going into the Permissions tab and checking which options you want this user to have. (There will be more information on what each of these options do at the end of this section)

LDAP Group Account
If you have a LDAP server configured within your FileWave Preferences, administrators can authenticate using credentials stored in the LDAP server, based on Group membership. If a user is a member of multiple Groups, the final permissions will be the UNION of the permissions of these Groups. Only Active Directory is able to detect recursive membership. FileWave will not be able to detect nested Groups in an Open Directory or eDirectory.
|
To setup LDAP please see: LDAP Preferences |
To create a LDAP Group Account for the FileWave Admin follow the steps below:
- Go to Assistants→ Manage Administrators
- Click on the the "+" sign at the bottom left
- Then select LDAP Group Account

- You will now be able to link this LDAP Group Account with a Group from your directory service. Click the Browse... button in the User details tab
From here you will search through your LDAP structure to find the group you would like to use:

- (OPTIONAL) After the group is selected you can hit the Test button, this is used mainly if you typed in the DN instead of searching for the group in the browser


- Next you will need to give this user permissions in FileWave, you do this by selecting the user and going into the Permissions tab and checking which options you want this user to have. (More information on what each of these options do at the end of this section)

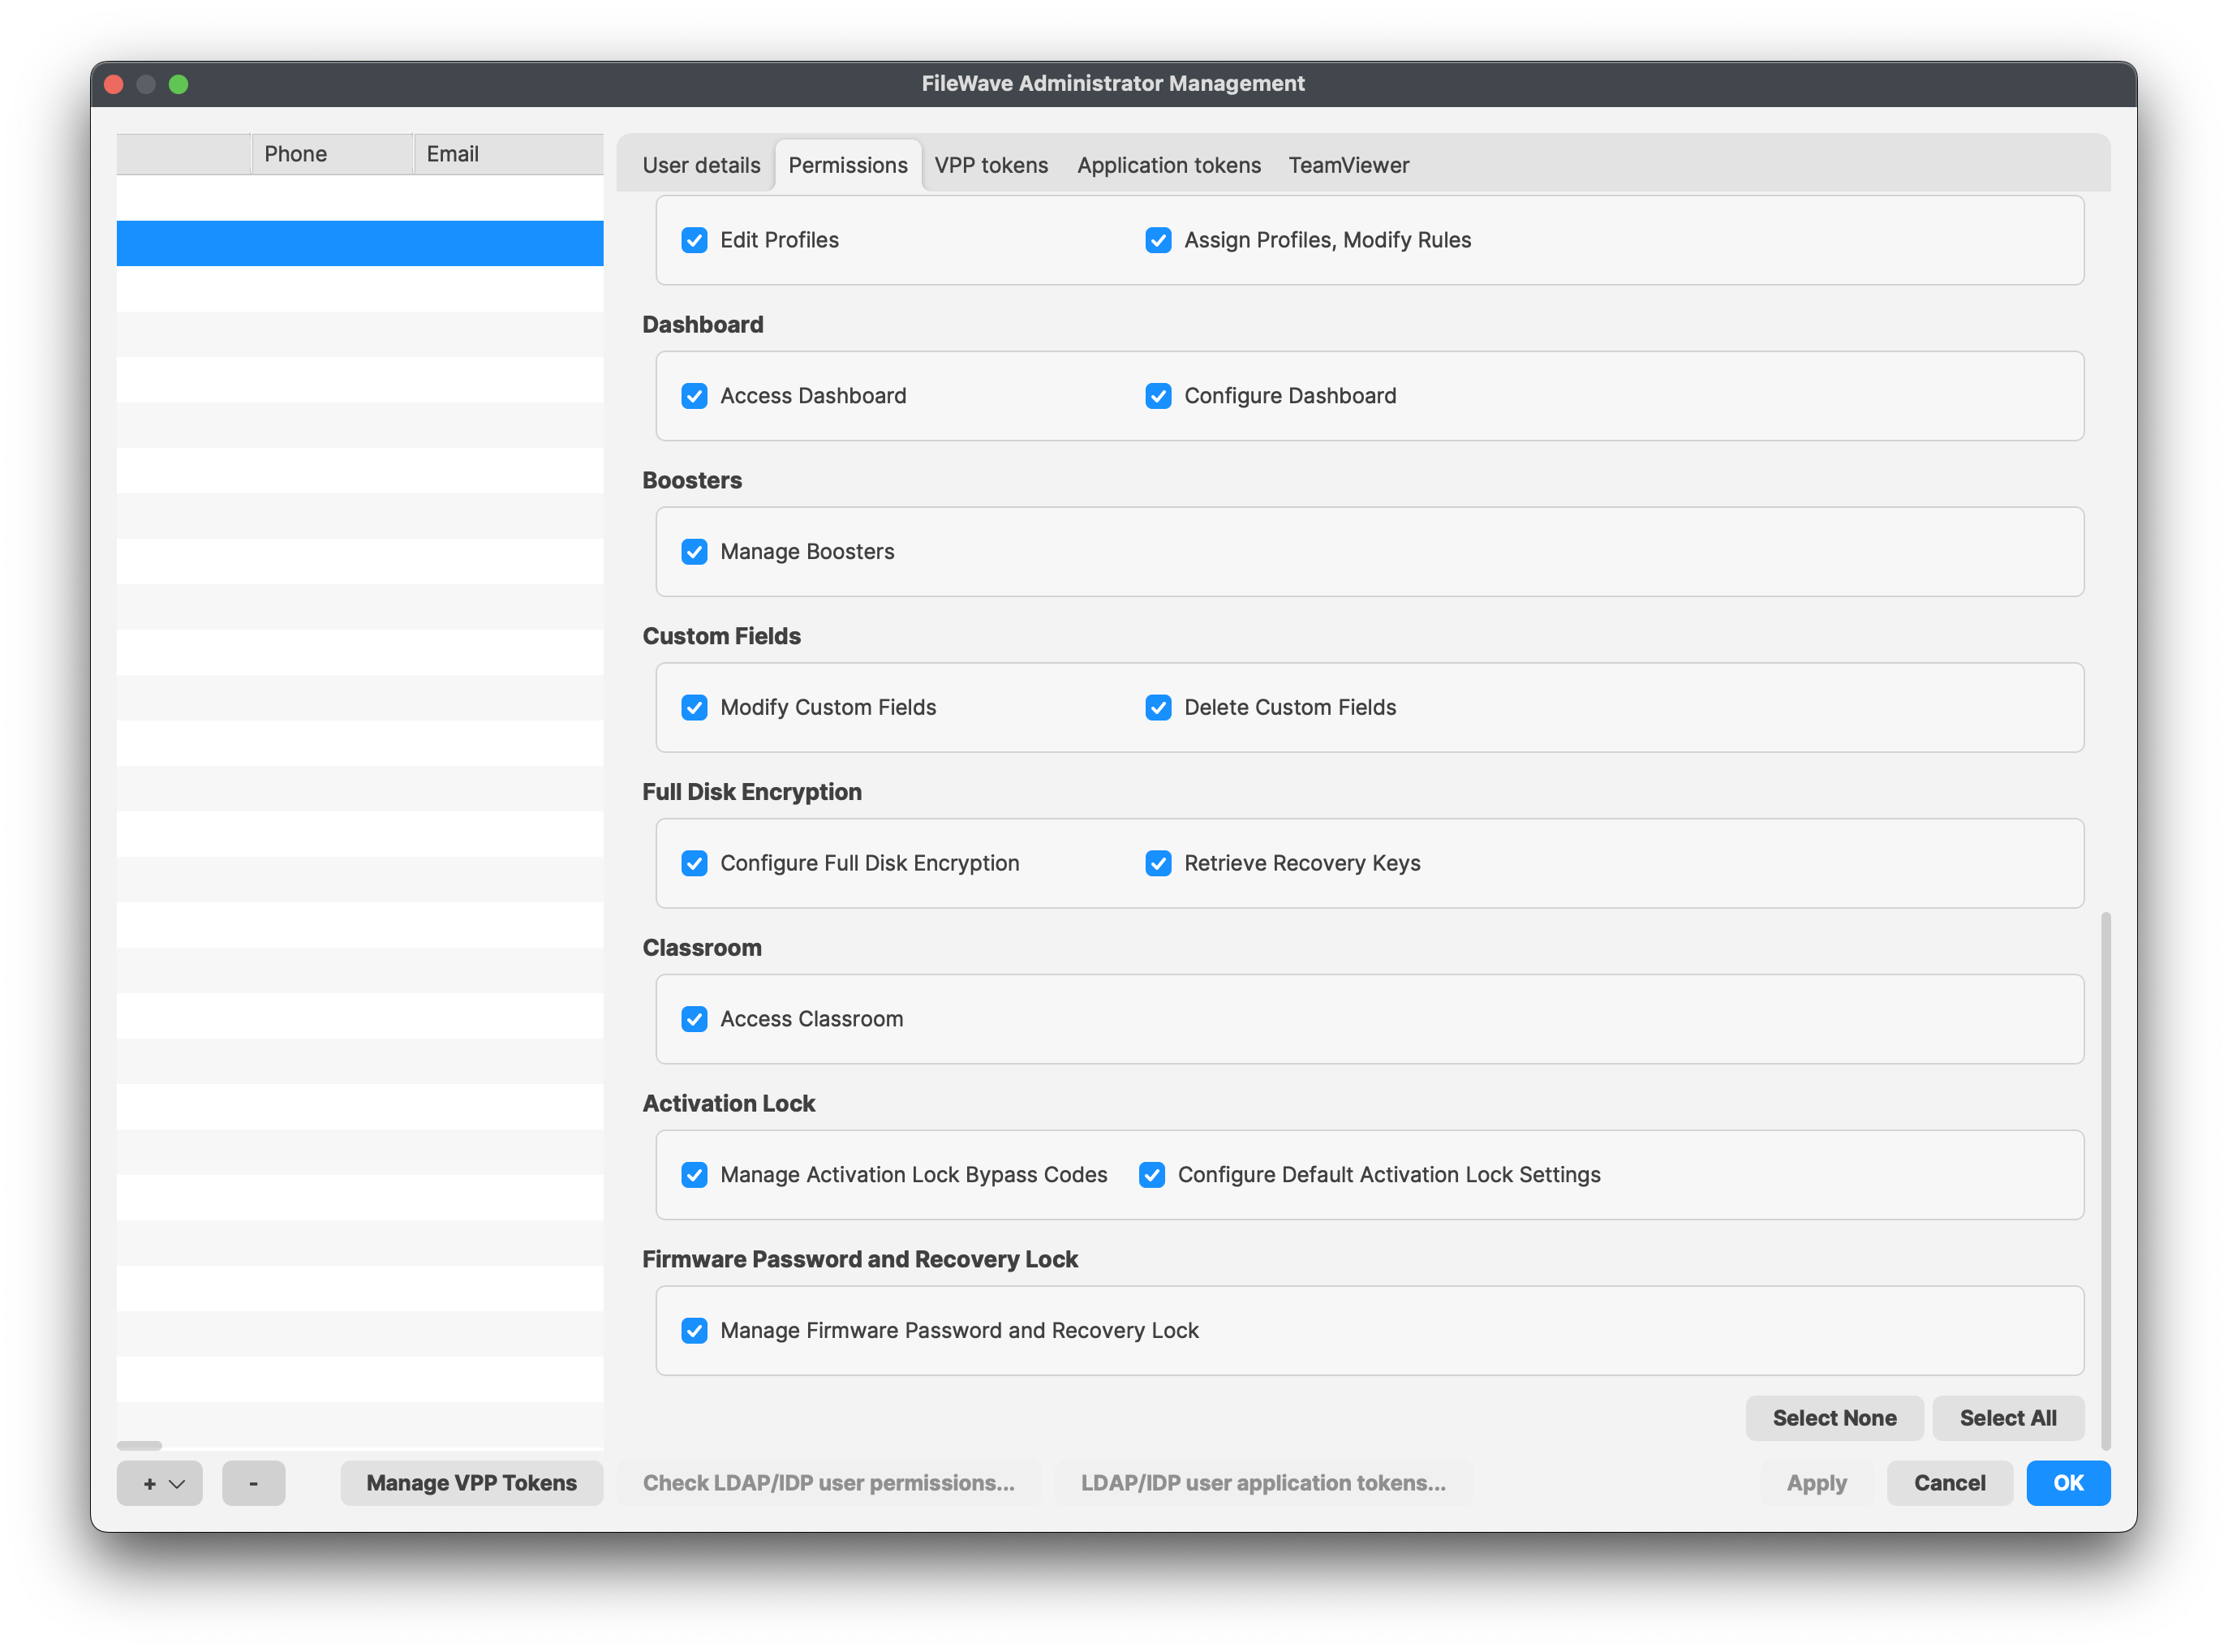
Permissions
Account permissions will determine what the Administrator can and cannot do in the FileWave Admin.
Selecting your Local Account or LDAP Group account and then going into the Permissions tab will give you all the permissions you can select for that user or group of users from LDAP.
LDAP Group Account Permissions
If you have a user in multiple LDAP Group Accounts the user will take the collective permissions from each group. You can check on what permissions a LDAP user will get by selecting the LDAP user application tokens... and searching for that user:


As you can see in the screenshots above the user Kamala Khan is in both the FW Admins and the iOS Admins LDAP Group which has fewer permissions than the FW Admins group does. So this user will use the permissions gathered from both of these groups which will give her full access as you can see in the screenshot below:

What are all the permissions you can choose from?
Server / Model
- Update Model - allows the administrator to approve changes to the server model. Updating the model sends notifications to all FW clients of any possible changes to any Filesets they have.
- Revert Model - allows the administrator to cancel changes made at the last model update and revert to the previous model version.
- Auditing - allows the administrator to view the Audit History of all actions logged by FileWave.
- Activation Keys - allows the administrator to enter, change, or update the activation keys for the FileWave server.
General
- Can Administer users - allows administrator to add, edit, or delete administrative users.
- Change Preferences - allows administrator to access the FileWave Admin Preferences
Clients and Groups
- Modify Clients / Groups - allows administrator the ability to add, edit, and delete FW clients and client Groups.
- Set Permissions - allows the administrator to assign clients and client Groups to specific administrators.
- View Location - Location map will be shown if the device is reporting location data.
- Clear Fileset Status - allows administrator the ability to remove all messages in the client info window for a designated client.
- Change Enrollment Username - this allows the administrator to change the enrollment username for MDM enrolled device, located in the client tools.
- Turn Tracking On/Off - gives the administrator the ability to switch the client state of a device for location tracking to Normal, Missing, or Not Tracked.
- Wipe Devices - this allows administrators the ability to wipe devices in the FileWave Admin.
Filesets and Groups
- Modify Filesets - allows administrator to edit Filesets , add or delete content within a Fileset.
- Export Fileset / Template - allows the user to export a specific Fileset or a template for use on another FileWave server, or for archival purposes.
- Set Permissions - allows the administrator to change the permissions within a Fileset or Fileset Group.
- Show Fileset Report - allows administrator to view the Fileset report showing the status of that Fileset.
- Manage VPP codes - with this unchecked and disallowed this will prevents administrators from accessing all VPP settings and menus, will also prevents the admins access to setup DEP tokens.
Note: If you do not allow an administrator to Manage VPP codes then they will not be able to see any of the VPP purchased applications or ebooks. This is especially important if you have multiple VPP token support.
Associations
- Modify Associations - allows the administrator to change the associations settings between a client or client Group and any Fileset or Fileset Group.
- Approve Software Updates - allows the administrator to designate specific software updates as pre-approved for association by other administrators.
- Modify Imaging Associations - allows the administrator to change which Imaging Filesets are associated with which devices
DEP
- Edit Profiles - allows the administrator to change the characteristics of DEP profiles, including naming conventions, setup assistant workflow, and certificate assignment.
- Assign Profiles - allows the administrator to designate specific client devices to be managed by certain DEP profiles.
Dashboard
- Access Dashboard - Which administrators can see the Dashboard in the FileWave Admin or via web browser.
- Configure Dashboard - This determines which administrators have access to Dashboard Alert settings.
Discovery Administration
- Configure, Run Scans, Delete Results - administrator can configure and control network scans and delete discovery results.
Custom Fields
- Modify Custom Fields - Allows administrators to create, modify, and assign custom fields to devices.
- Delete Custom Fields - This will allow the deletion of custom fields
Full Disk Encryption
- Configuration Full Disk Fields - allows the FileWave administrator to access and configure FDE Configure Management located in the Assistant menu
- Retrieve Recovery Keys - allows the FileWave administrator to access and configure FDE Recovery Key Management located in the Assistant menu
Classroom
- Access Classroom - allows the administrator to access the Classroom section in the FileWave Admin, this includes carts, cart clones, cart associations
|
Important Note: If you are upgrading from below FileWave 12.9 this Classroom option will be unchecked by default. So you will no longer able to view Classroom in FileWave until this is checked for selected administrators. |
Activation Lock
- Manage Activation Lock Bypass Codes - allows the administrator to access and manage Activation Lock bypass codes.
- Configure Default Activation Lock Settings - allows the administrator to configure the default Activation Lock behavior.
Firmware Password and Recovery Lock
- Manage Firmware Password and Recovery Lock - allows the administrator to manage Firmware Password and Recovery Lock settings.
Application tokens
FileWave security for inventory has been built on top of a shared secret, which is a long token generated randomly and shared between the server (inventory server) and clients (admin, FileWave server, client machines, scripts, etc)
Any script or 3rd party component that needs access to FileWave Inventory will need to have this token that has been assigned to a user. These tokens can be revoked, re-generated, and a user can have multiple tokens assigned to it.
Every Local account starts with a Default Token which can be used along with any news ones that are created.
|
The Default Token for your Superuser will be the same token that was originally in the Inventory tab in FileWave Preferences in versions 12.8.1 and below. If you upgraded from 12.8.1 or below then all communication with this token will stay intact unless you Regenerate the default token. |
Local Account New Application Token Setup:
- Select your Local Account and go into the Application tokens tab
- Once there hit the "+" at the bottom left of the tokens pane
- This will then allow you create a new token

- This will show
- The raw token
- base64 encoded token
- An example script you can copy and paste to test with
LDAP user application tokens
Just like Local Accounts it is possible to define application tokens for LDAP users as well. This will not be done at the group level but for the specific LDAP Users.
To setup the application tokens for LDAP users follow the steps bellow:
- In the FileWave Administrators window click on the LDAP user application tokens... button located at the bottom middle of the window
- You will then get the LDAP Users Application Tokens window, click the "+" at the bottom left of the token pane to create a new token

- Then you will need to type in the LDAP user you would like to use and click the Test button to confirm it

|
LDAP User TEST |
If you search for a user that is not in your directory service or it doesn't belong to an LDAP Group Account in FileWave it will fail.

- Once it has confirmed you are ready to use the token

Manage VPP Tokens
To allow specific FileWave Administrators to access and see VPP purchases they will need to be given access using this Manage VPP Tokens option in the Manage Administrators... section.
By default only the Superuser (fwadmin) has access to new VPP tokens imported in FileWave any other Administrators created needs to be given access.
- Click the Manage VPP Tokens button at the bottom

- You need to authenticate with the Superuser

- Now you will check which users you would like to manage which VPP Token

- Once you click OK you will be able to view which tokens a specific user has access to by looking in the VPP tokens tab

Brute Force Protection and Login Lockouts
Quick answer
FileWave 16.3.0 introduced login lockout behavior through brute force protection for FileWave Central and FileWave Anywhere sign-in attempts.
With the default settings, a FileWave user account, including an administrator account, is temporarily locked after 5 failed login attempts or wrong password attempts. The first lockout lasts 60 seconds, and later lockouts increase up to the configured maximum.
This is a FileWave account lockout feature. It is separate from Self-Service Password Reset (SSPR) or identity-provider password reset policies.
What
Starting in FileWave 16.3.0, FileWave Central and FileWave Anywhere include brute force protection for sign-in attempts.
When it is enabled, repeated failed logins place that user account on a temporary lockout timer. The lockout is tied to the username, not the source IP address, and the timer increases after additional failed attempts.
If one account is locked, other accounts are not affected unless they also hit the failed-attempt threshold. The lockout clears automatically when the timer expires.
This setting is enabled by default. You can find it in FileWave Central > Preferences > General, and it applies to sign-in attempts for both Central and Anywhere.
When/Why
Leave this enabled in most environments.
It matters most when FileWave Central or FileWave Anywhere can be reached from the internet or another network you do not fully trust. In that situation, it slows down password-guessing and dictionary attacks against exposed login pages.
You may also run into it during testing or troubleshooting if the wrong password is entered several times. That usually means the protection is working as designed, not that the server is broken.
Default values shown in FileWave 16.3.0:
- Allowed failed attempts / wrong password attempts: 5
- First lockout time: 60 seconds
- Lockout increase factor: 2.00
- Maximum lockout time: 900 seconds
With those settings, the first lockout lasts 1 minute. If the same user account has more failed login attempts after that lockout expires, the lockout time increases until it reaches the configured maximum.
If you disable the feature temporarily for troubleshooting, turn it back on afterward.
How
Configure brute force protection
- Open FileWave Central.
- Go to Preferences.
- On the General tab, scroll to the Brute Force Protection section.
- Review or change the settings.
- Click OK to save.
Available options
-
Enabled
- Turns brute force protection on or off.
- Enabled by default in 16.3.0.
-
Allowed Failed Attempts
- Sets how many failed logins are allowed before a lockout starts.
- Value shown in the 16.3.0 UI example: 5.
-
First Lockout Time
- Sets the length of the first lockout.
- Value shown in the 16.3.0 UI example: 60 seconds.
-
Lockout Increase Factor
- Multiplies the lockout time after later failed attempts.
- Value shown in the 16.3.0 UI example: 2.00.
-
Maximum Lockout Time
- Sets the longest lockout time that can be reached.
- Value shown in the 16.3.0 UI example: 900 seconds.

What users see when a lockout occurs
After the failed-attempt threshold is reached, the user sees a message that the account has been locked because of too many unsuccessful sign-in attempts.
The message also shows how long remains before the account unlocks. In the example below, the timer is 1 minute, which matches the default first lockout time.
Only that account is locked. Other users can still sign in unless they trigger their own lockout.

Recommended guidance
- Leave the setting enabled unless you have a specific reason to change it.
- If someone reports that a FileWave Admin, administrator, or other user account is locked, check whether that account had repeated failed password attempts.
- Remember that the lockout is per user and timer-based. It is not an IP-based block.
- If you change the defaults, record the new values so support and administrators know what to expect.
- When testing, keep in mind that lockout times increase after repeated failures.
Common questions
What version started locking accounts after too many wrong password attempts?
FileWave 16.3.0. If someone asks what version of FileWave, or FW, started locking an Admin or user account after the password was entered wrong too many times, this is the setting.
Does this apply to administrator accounts?
Yes. Brute force protection applies to FileWave sign-in attempts for user accounts, including FileWave administrator accounts.
How many failed login attempts are allowed before lockout?
The default is 5 failed login attempts or wrong password attempts before the account is temporarily locked.
How long does the lockout last?
With the default settings, the first lockout lasts 60 seconds. Later lockouts increase after additional failed attempts, up to the configured maximum. If your environment uses a different time, such as 120 seconds, the setting was likely changed from the default.
Does this affect FileWave Central and FileWave Anywhere?
Yes. The setting is configured in FileWave Central, and it applies to sign-in attempts for both FileWave Central and FileWave Anywhere.
Is the lockout based on username or source IP address?
The lockout is tied to the username or account, not the source IP address. Other users can still sign in unless they trigger their own lockout.
Is this the same as Self-Service Password Reset (SSPR)?
No. Brute force protection is FileWave login lockout behavior. SSPR is a separate password reset capability or identity-provider policy.
Where do I configure the failed-attempt and lockout settings?
In FileWave Central, go to Preferences > General > Brute Force Protection.
Where are failed login attempts and lockouts logged?
Failed login attempts and lockout events are written to /usr/local/filewave/log/audit.log on the FileWave Server.
Related Content
- Securing FileWave Server on the Internet for Remote Device Management
- TCP and UDP ports used by FileWave
- FileWave Security
Digging Deeper
This is a small setting, but it does real work when a FileWave server is reachable over public networks. It adds friction to repeated login attempts and gives you a safer default on exposed sign-in pages.
Public-facing error messages are also handled carefully. During normal failed logins, the response does not disclose whether an account exists. The one exception is an active lockout, because that state is intentionally tied to a specific account.
Failed login attempts and lockout events are written to the server audit log. Each entry includes the username, the client type, the source IP address when available on a best-effort basis, and the lockout expiry time.
Log file location:
/usr/local/filewave/log/audit.log
To watch the audit log in real time on the server:
tail -f /usr/local/filewave/log/audit.log
If you want to review or test the behavior through the API, you can use the authentication endpoints below.
Set the lockout parameters:
curl -s -X PUT \
-H "Authorization: ${APPTOKEN}" \
-H "Content-Type: application/json" \
https://${HOSTNAME}:20445/auth/admin-lockout-params \
-d '{"enabled":true,"threshold":6,"base":51,"multiplier":4,"maximum":900}'
Test a login attempt:
curl -s \
-H "Content-Type: application/json" \
https://${HOSTNAME}:20445/auth/login \
-d '{"username":"fwadmin","password":"test"}'
Embracing the Dark Side: Dark Mode for FileWave Central (15.3+)
What
Once upon a time, in a brightly lit world of screens, a shadowy figure emerged, promising salvation to our eyes: Dark Mode. As legends of its comfort and sleekness spread across the realms of software applications, we at FileWave decided it was time to embrace the dark side. Here's the tale of how Dark Mode came to FileWave Central, turning night into a friendlier place for all administrators.
Dark Mode, the knight in shining armor (or should we say, 'shimmering darkness'?), transforms the blinding lights of your screen into a soothing, shadowy oasis. It’s not just a fashion statement; it’s a guardian of your eyesight, a curator of concentration, and a promoter of power saving. By inverting the bright white backgrounds into deep, dark hues, Dark Mode makes nighttime work less of a nightmare.
When/Why
As the clock struck midnight on yet another session of late-night device management, it dawned on us: our users deserved the option to go dark. Following a cascade of requests and after noticing the shift towards dark themes across the tech landscape, we knew the time was right. Our decision was fueled by the desire to not only keep up with modern UI trends but to also offer our hardworking administrators a visually comfortable and customizable working environment, proving our commitment to not just meeting but exceeding user expectations.
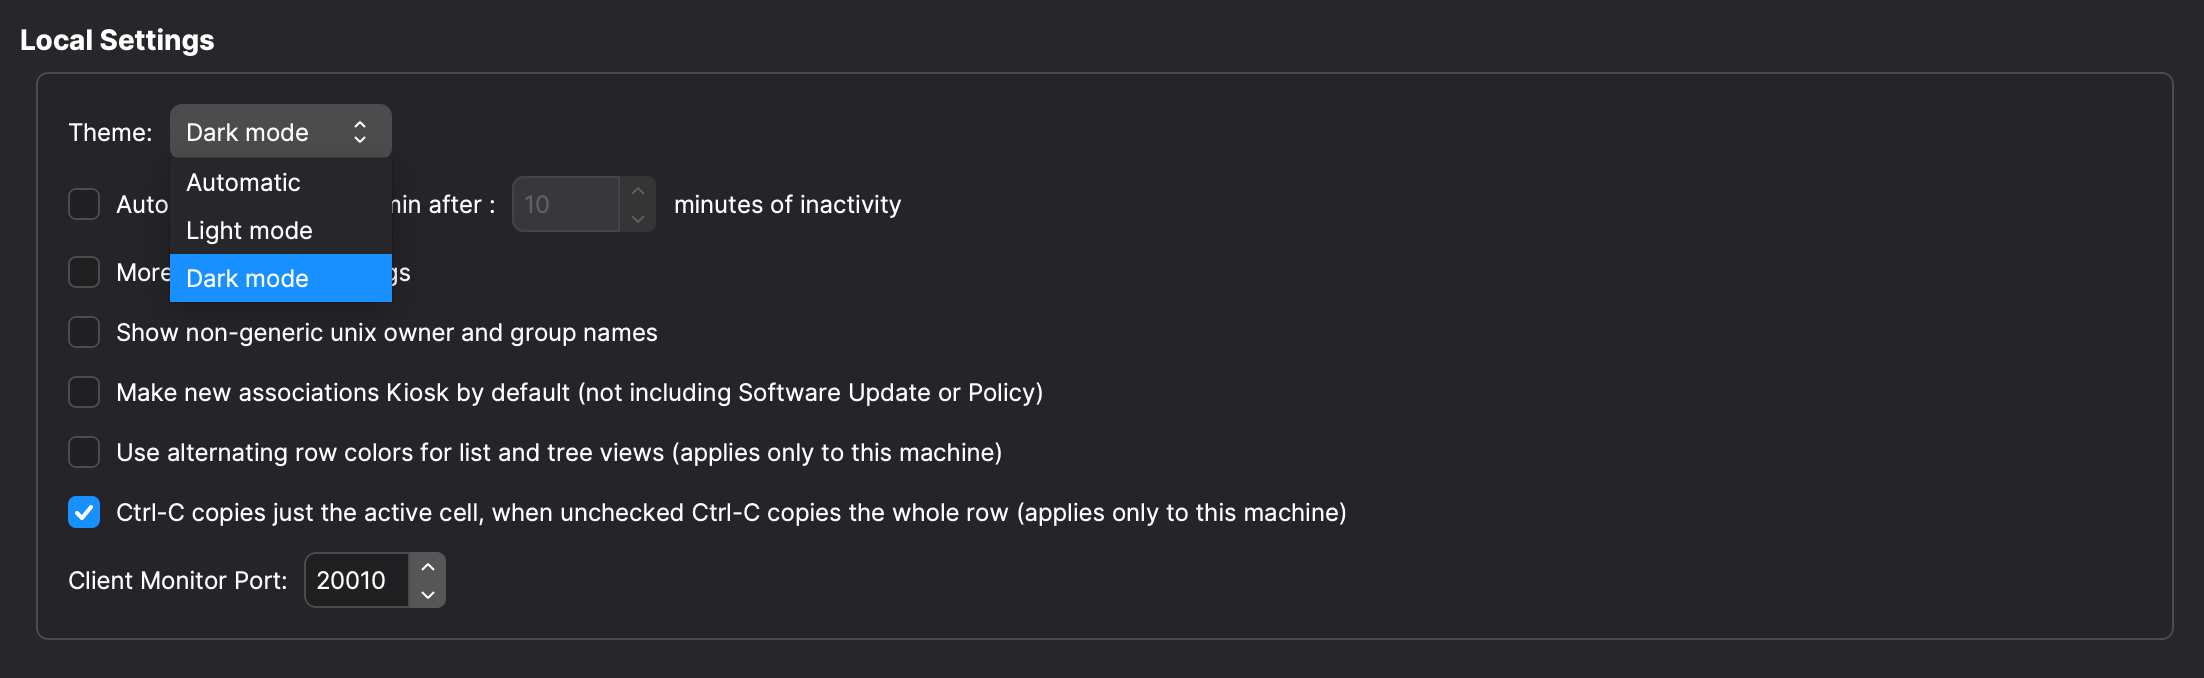
How
To embrace the dark side or bask in the light, journey to **Preferences -> General** in FileWave Central. There, under the Theme setting, select your allegiance: Automatic, Light Mode, or Dark Mode. Choose wisely, for each setting casts FileWave Central in a different aura, from the bright, welcoming light of day to the mysterious, serene shadows of night.
Related Content
FileWave Central - Additional Settings Menu Items
In the FileWave Admin application, there are several other settings and menu items that come into play as you manage and configure your devices. They appear in two menu sets (Server & Assistants) as shown:


Some of these items have already been covered, and others will be discussed in depth later in this manual. Here are basic descriptions of the function of these menu items.
Activation Code…
This is the access to the code you received when you purchased your FileWave license.
Update Model…
FileWave, at its core, is a SQL database. As such, it is constantly managing large amounts of data as you, and possibly other administrators, add new clients, create Filesets for new content distribution, and manage your devices. When you are performing many of these operations, the information is being written into RAM on the server. A Model is an instance in time for the FileWave database. When you choose the Update Model, you are telling the server to write the changes you have made into the database, and create a manifest for the Clients. This manifest is sent to each Client when it checks in, telling it what changes have been made. If there is a change that effects the Client, it will then request any new or updated Filesets and will then make the appropriate changes on the device. Whenever you make changes to device(s), edit Filesets, or do anything that may affect the relationship between a device and the server, you should update the model.
Revert to Last Model…
If you have made a change to the Model, then realize that you may have damaged a setting, or distributed a broken application, you can revert to the previous model within the FileWave database. In many cases, this can be done without any irreversible changes to the client devices.
Get Logfile…
Open Logfile Folder
Client Monitor
The Client Monitor is a tool used to observe the status of a specific device. It displays the current state of the device, the current Model number on the device, and you can see if the device is reacting to changes being made by clicking on the Verify button. Detailed information on Client Monitor is in the Chapter Clients.
Fileset Magic
Custom content can be created using the Fileset Magic tool. It allows you to take a snapshot of the current status of a device, install and configure new content, take a second snapshot, and build a distribution Fileset from those changes. More on Fileset magic in the Chapter on Filesets.
Find Software Updates…
Imaging…
This item opens the Imaging pane that allows you to associate disk images with OS X and Windows devices for re-imaging. This is covered in detail in Network Imaging / IVS.
Enroll iOS Device…
This item opens the pane with the various settings for enrolling iOS devices, and AppleTV, either manually or automatically.
Search App Store…
VPP Code Management… / VPP User Management…
DEP Association Management…
Activation Lock Management…
Manage Administrators…
Show Locked Items
In the meantime, any administrator trying to work on those areas, can use the Show Locked Items menu to view areas they cannot control.
If an administrator has left items locked too long, or walked away from their system with items still locked, you can force quit that administrator (see Administrators Online… below). You should also make sure your sub-administrators set a reasonable auto-logout time in the General preferences of their FileWave Admin application.
Audit History…
Administrators Online…
LDAP Browser…
File Search…
This item displays a search window that allows you to locate any item in a Fileset using a text string search.
Once you have located your item, you can click on Reveal in Fileset to display the contents of the Fileset with that specific item.
Unmanaged Devices…
Scheduled Reports…
Configuring Inventory preferences
The Inventory tab in FileWave Central Admin Preferences controls inventory polling for Apple MDM-enrolled devices, Smart Group refresh timing, LDAP Custom Field cleanup behavior, and IDP Custom Field synchronization. These settings affect how fresh inventory-based data appears and how much recurring work the server performs, so change them deliberately.

iOS Inventory
These settings apply to iOS, iPadOS, and tvOS devices enrolled through MDM. These devices appear in the normal Clients view as well as in the iOS Inventory section.
- Device Inventory Poll Interval – Controls how often enrolled devices report profile, application, security, and device-setting inventory. The default shown here is 24 hours. Sending a Verify command can prompt a device to report sooner.
- Device Not Checked-In Notification – Controls when a device is visually flagged for not checking in with the MDM server. When a device exceeds this value, FileWave changes the device color to alert the administrator.
Smart Groups
- Refresh every – Controls the normal refresh interval for Smart Groups. The default shown here is 10 minutes.
- Fast smart group refresh period – Controls the shorter refresh interval used only by Smart Groups that have Fast Smart Group Evaluation enabled. The default shown here is 1 minute.
- Refresh all Smart Groups now – Forces FileWave to refresh the data requested by existing Smart Groups immediately instead of waiting for the next scheduled refresh.
Use fast Smart Group evaluation only for time-sensitive workflows, such as enrollment or first-check-in groups where assignments need to happen quickly. FileWave allows up to 3 Smart Groups with fast evaluation enabled. This limit protects server performance; evaluating many Smart Groups more frequently would add unnecessary recurring load.
Fast Smart Group Evaluation is documented with Smart Group guidance.
Do not make Smart Group refresh intervals more frequent without a reason. In very large environments, longer intervals may reduce unnecessary server load.
LDAP Custom Fields
If this option is enabled, FileWave clears the value of an LDAP Custom Field when there is no longer a match between the client and the LDAP user or computer.
IDP Custom Fields
Schedule Sync queues an IDP Custom Fields extraction. Use it when custom field values populated from an identity provider should be refreshed outside the normal sync timing. The button requires an IDP Device Enrollment server to be configured.
Related Content
- Fast Smart Group Evaluation
- Using Queries to create Smart Groups
- FileWave Client Configuration Settings
FileWave Anywhere Saved View Preferences
What FileWave Anywhere remembers
FileWave Anywhere saves the layout of supported table views so administrators do not have to resize and rearrange the same columns after every sign-in. This account-level behavior was introduced in FileWave 14.8.0 and remains useful when moving between browsers or workstations.
Saved account settings and session settings
Column layout choices persist on the FileWave administrator account. Temporary result-state choices remain limited to the active browser session.
Saved on the user account
- Pinned columns
- Column widths
- Visible and hidden columns
- Column order
Saved for the active session
- Filters
- Quick filters
- Search terms
- Column sorting
For example, widening and pinning a device-name column should remain after the next sign-in, while a search term or temporary sort should not. If a saved layout appears wrong, first reset the visible columns and widths in that view rather than treating the current filter or search as an account-wide preference.
Related FileWave 14.8 interface improvement
FileWave 14.8 also improved Profile error messages and made required fields easier to identify. That change is separate from saved table preferences.