FileWave Central / Anywhere
FileWave Central is the native admin application and FileWave Anywhere is the web. You can do many of the same things in both tools.
- Installing the FileWave Central application
- Configuring FileWave Server License
- Configuring FileWave Server Basic Preferences
- FileWave Central Inventory Toolbar
- Configuring FileWave Server Mail Preferences
- FileWave Anywhere Overview
- FWAdmin CLI (Command Line Interface)
- Working with FileWave Clients
- Client Monitor (16.0+)
- Conflict Resolution
- Prevent Duplicates During Enrollment
- Automated Client Conflict Resolution
- Automatic Enrollment Permissions
- Manual Client Conflict Resolution (Multiple Devices)
- Understanding FileWave Clients, Groups, and Smart Groups
- Last Connect vs. Last Connected
- Inventory Queries (Reports)
- Creating and Editing a query
- Demystifying Inventory Queries
- What are Sample Reports?
- How do I export the results of an Inventory query?
- Generating scheduled reports
- Sending Scheduled Reports to More Than One Address
- Filtering in Inventory Reports
- Exporting & Importing Inventory Reports
- Inventory of IP Addresses
- Smart Groups
- Smart Groups, Inventory and Application Version Numbers
- Using Queries to create Smart Groups
- Fast Smart Group Evaluation
- Create a Smart Group from an Inventory Query (Report)
- Duplicating Smart Groups
- Smart Group Preview
- Filesets
- Move To... for Filesets
- OS Software Updates - Automation Rules
- OS Software Updates - Obsolete Filesets Cleanup
- Settings
- Configuring and using the Dashboard
- Mobile Preferences - iOS / Android
- LDAP Preferences
- VPP and ADE Preferences
- Managing FileWave Administrators
- Brute Force Protection and Login Lockouts
- Embracing the Dark Side: Dark Mode for FileWave Central (15.3+)
- FileWave Central - Additional Settings Menu Items
- Configuring Inventory preferences
- FileWave Anywhere persistent user preferences (14.8+)
- License Reporting
- Troubleshooting
- FileWave Server Mail test receives Bad Request with Google SMTP Accounts
- Change the FileWave Anywhere Idle Timeout
- Could not create the /Volumes/XYZ directory error when opening client info
- Dashboard Warning levels and Descriptions
- Change the Language in FileWave Central or Anywhere (macOS)
- Opening FileWave Central / Anywhere in a Specific Language (Windows)
- What is the difference between Revert and Restore?
Installing the FileWave Central application
Depending on deployment plans, the FileWave Admin application can be installed on two different types of systems; the systems administrator's primary workstation, and a desktop or portable being used for creation of Fileset Magic Filesets and/or primary images for the Imaging Appliance.
System Requirements for the FileWave Central application
The FileWave Admin application runs on both OS X and Windows computers supporting the following operating systems:
- macOS generally the most recent 4 major versions will work
- Windows 10 or 11
Installing the FW Admin application
Download and open the FileWave .pkg/.msi from the FileWave Software Downloads. Select the Admin Installer and double-click or open it. You will be required to authenticate as a local administrator on your target machine in order to complete the installation.

Once the FW Admin application is installed, you will launch it and begin the configuration.
Logging into FileWave server from the FW Admin application
When you launch the FileWave Admin application, you will be presented with a login window. You can search for FileWave Servers in your network with the Bonjour menu (OS X only). Recent server connections are saved in the Recent Servers Menu. In case your Server operates on another port than the default (20016), specify the port needed. Otherwise please leave the port on the default. Enter the IP address or domain name (FQDN) of the FileWave Server you are going to administer.
Note: The default administrator account is "fwadmin" and the default password is "filewave". You should change the primary admin password when you first set up the server (see the Security section on FileWave Server Installation).
Click on Connect to log into the server and you will be presented with the default layout.
Note: The Windows version of FileWave Admin has two additional buttons:
 - Client Monitor. Allows you to view the status of any FW client without logging into the FW Central application.
 - Fileset Magic. Allows you to open Fileset Magic to create custom Filesets without logging into FW Central.
Related Content
Configuring FileWave Server License
All of the settings that are used to establish the core configuration of FileWave server are performed within the Preferences panes located under the FileWave Admin menu item. However, before you can begin configuring your settings, you must activate your FileWave server with the license you purchased. This is a one-time task, unless you purchase a different number of licenses in the future.
Activating the FileWave server
FileWave Server requires an activation code if you are going to manage more than the Evaluation version (1 administrator user, 5 laptop/desktops, 5 mobile clients). Upon purchase of the FileWave solution, you are provided a custom activation code created specifically for the number of licensed devices you specified in your order. The activation code will also let you create additional FileWave administrators above and beyond the single "super-administrator" account provided by default (fwadmin). The license code will also specify the number of administrators who can be logged in simultaneously.
To activate your FileWave server, select Activation Code… from the Server menu.

Select the Enter or Update Code button, and paste the activation code you received from FileWave with your purchase. Only one code can be stored at a time. If you upgrade your server by adding more client or mobile licenses, then you can overwrite the existing activation code with a new one.
Security - change the primary password
Once you have the FileWave Server up and running, you should change the password from the default ("filewave") to something a little more secure. The default master administrator account is fwadmin. You change the administrator's password by selecting the Manage Administrators… command from the Assistants menu, then select the fwadmin account and replace the default password (filewave)
Prevent user data collection via license
If your institution or locality requires that you not track user data within the FileWave Inventory database, you must request a special "non-tracking" license. When this license is entered, the user data will not be collected by the FileWave Client for reporting to the Server. If, at some point, you desire to activate user data tracking, you may request a standard license. In order to activate the user tracking capabilities, you will enter the new license and reboot your server. By default, the full capabilities of FileWave inventory are enabled. This includes the ability to track application usage, install dates, launch times, current user and login dates. If an organization feels they don't need this information or that this information would be too sensitive to retain, they should contact support with a request to "Please change my FileWave inventory license to not retain user and app usage information."
The next series of tasks are to get the key FileWave Admin preferences configured.
Related Content
Configuring FileWave Server Basic Preferences
This section covers the basic FileWave preferences of General, Organization Info, Kiosk, Inventory, Mail, Editor and Proxies. The more complex preferences, including Mobile, LDAP, VPP&DEP, and Imaging, are covered in their own sections.
General preferences
FileWave General settings break down into four sections:
Local settings
These are settings for each computer the FileWave Admin application is installed on. These are items that effect the interaction of the FW Admin with the FW Server.
Server settings
The only setting here is your ability to limit the bandwidth for Fileset transfers from the Server to Boosters or Clients.
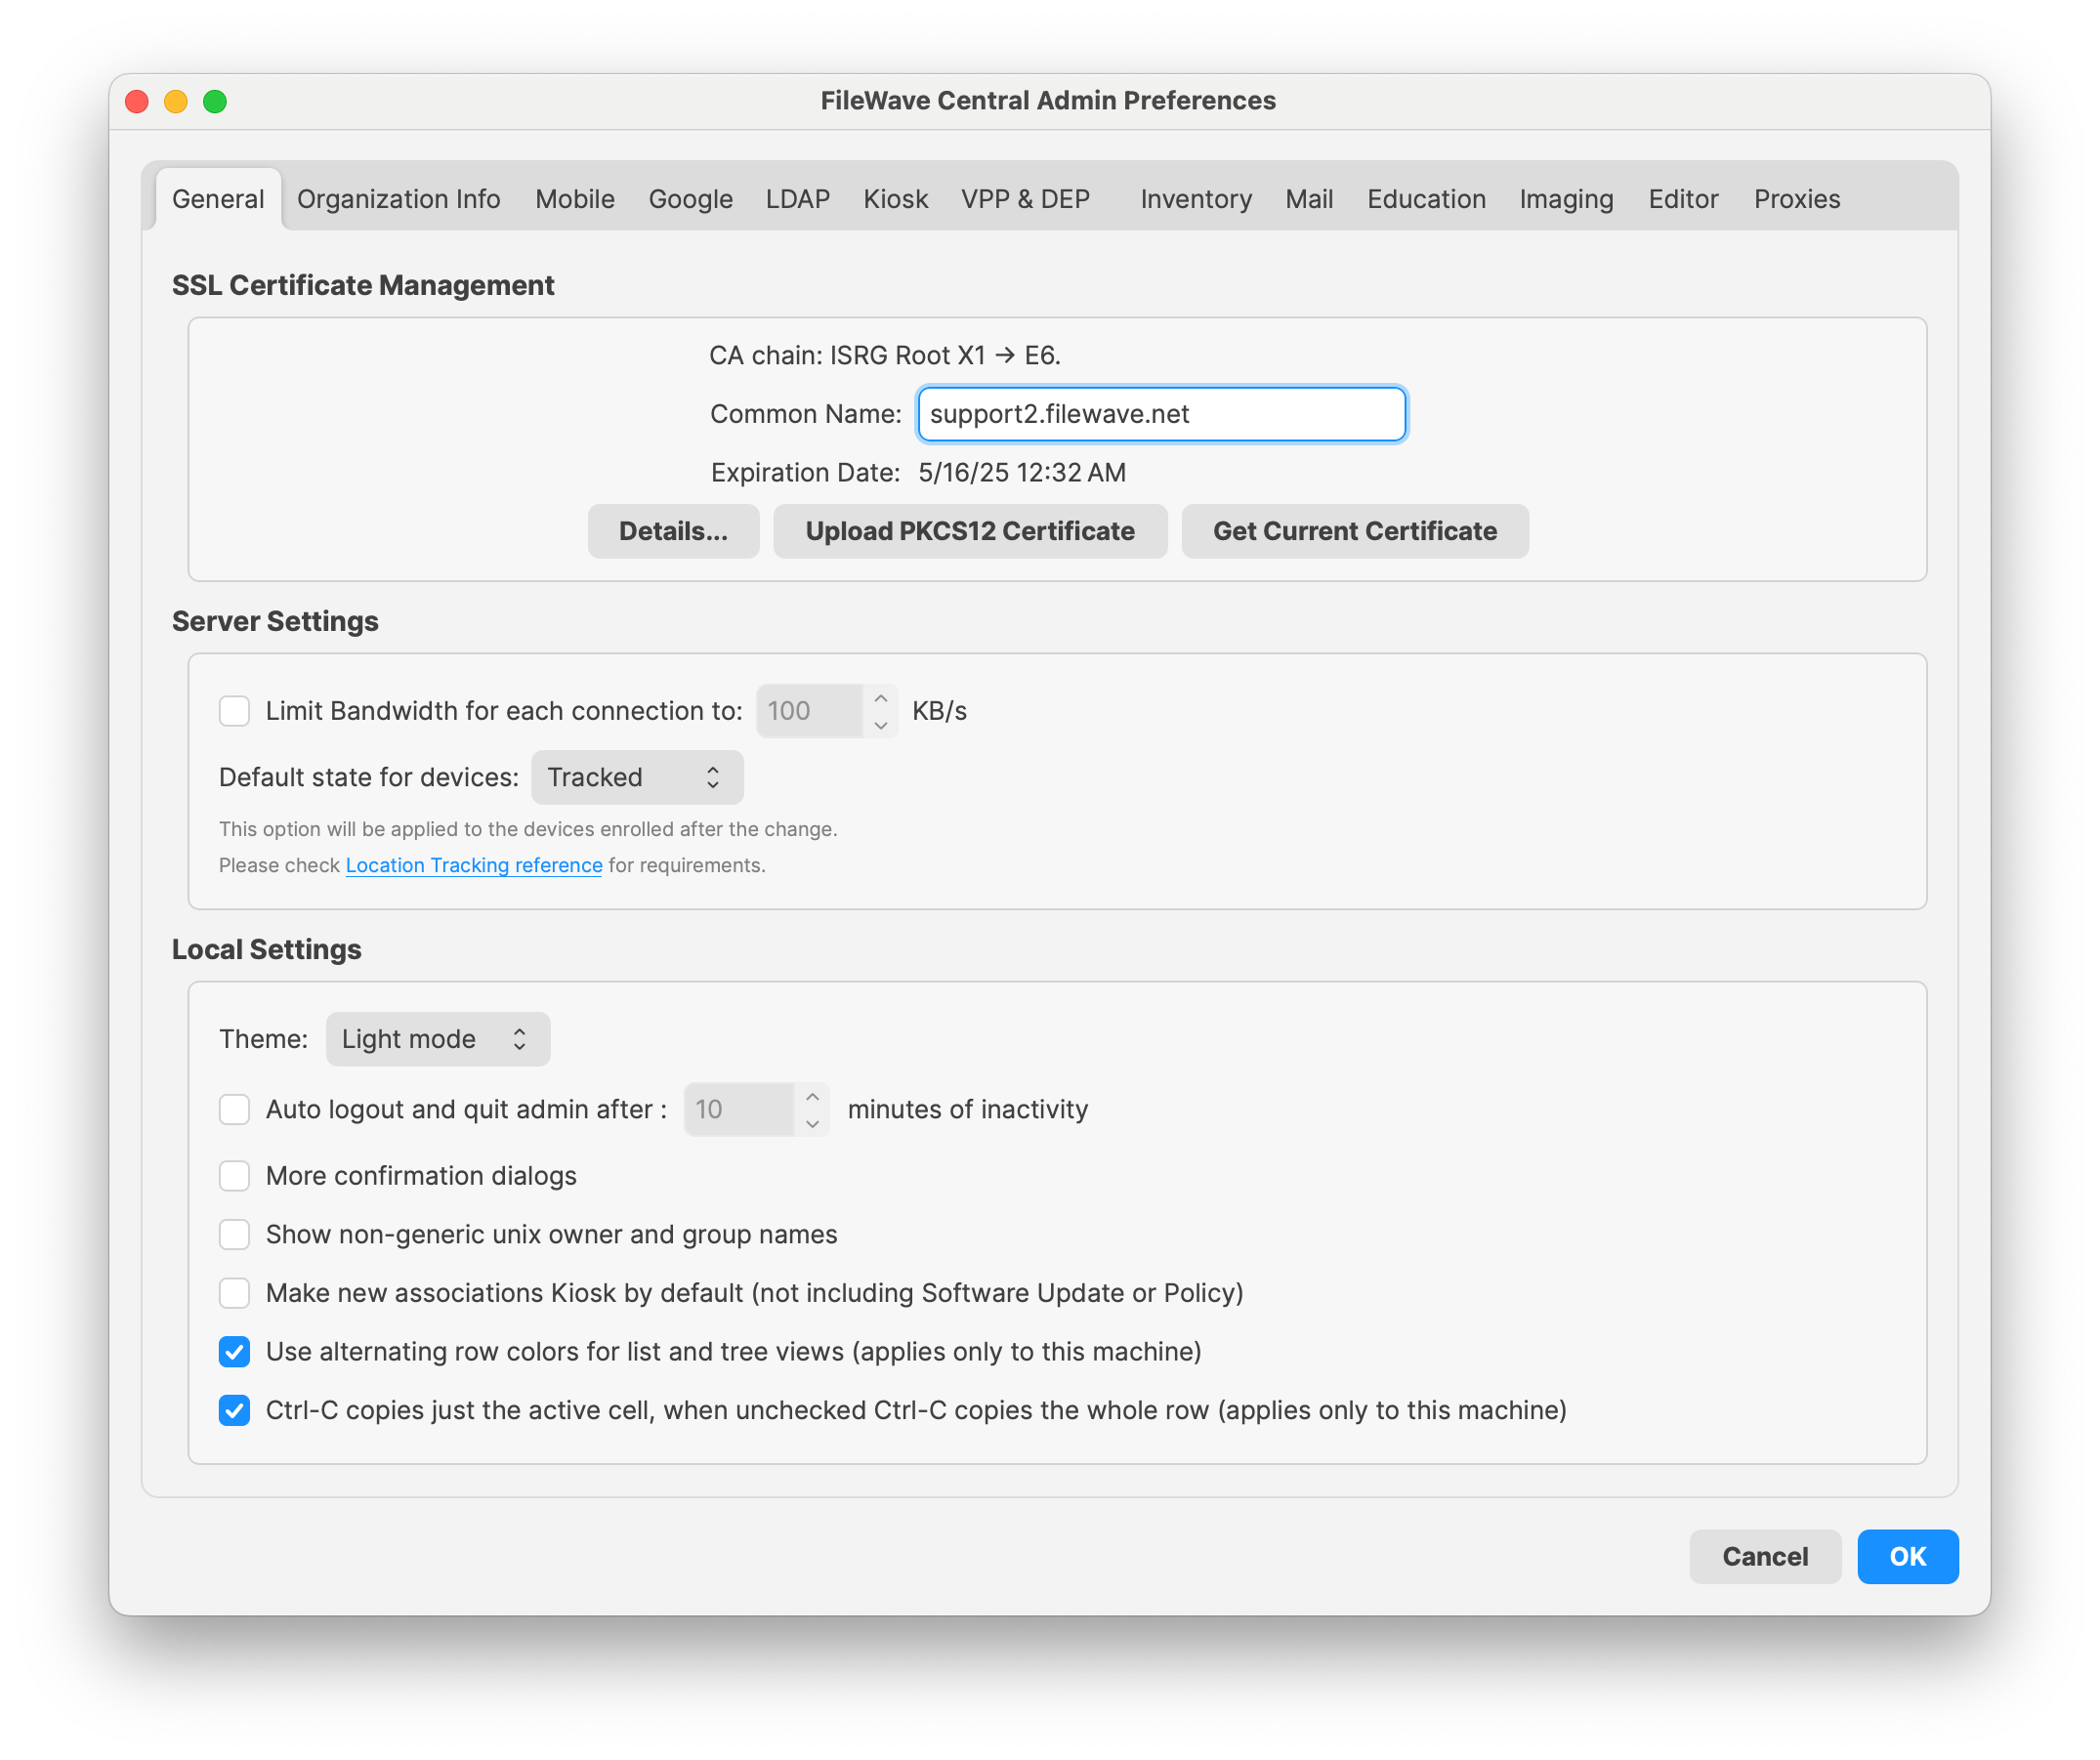
Local Settings
- Theme can be set to Light mode, Dark mode, or Automatic where Automatic will follow your OS' setting.
- FileWave Admin Auto Logout and Quit Time. Defines the longest interval the FW Admin application will sit idle before logging out the connected administrator and quitting.
- More Confirmation Dialogs. Enables extra confirmation dialog boxes when moving/deleting items.
- Show non-generic Unix owner and Group names. If enabled, Unix user IDs in Fileset contents windows will resolve to the local user account names.
- Make new associations Kiosk by default (not including Software Update). Sets all new Fileset/device associations to automatically use the self-service Kiosk as their distribution method. This does not apply to Filesets created from the software update pane.
- Use Alternating row colors…. Changes the view in the Admin panes to display a spreadsheet-like array of rows.

- Ctrl-C copies just the active cell…. Allows the administrator to copy cells or entire rows of data within the various panes.
Organizational Info preferences
This setting pane provides the basic information concerning the managing organization. The data provided here will be shown as part of the overall device information.

Kiosk preferences
The self-service Kiosk preferences allow you to create and edit the various categories of Kiosk items offered to end users. You can also change the icon for an existing Kiosk item.

Use the [] or [-] buttons to add or delete a Kiosk item. When you have selected an existing Kiosk item, clicking on the [] button allows you to create sub-categories. Double-clicking on the title of a category allows you to change the name of the category. The Change Icon button lets you select a new graphic to display as the icon for a category. Icons should be in .png, .tiff, or .jpg format. They should also be no larger than 512x512 pixels in size. This is to keep the file size reasonable.
If you want to clear out your category set and return the FileWave defaults, click on the Revert to Defaults button and you will return to the eight (8) entries you started with. The Kiosk can be further customized with background images and titling. See the FileWave Support site for more information and directions.
Inventory preferences
The current version of FileWave has the asset management process, Inventory, included in the main FileWave Server install. Earlier versions of FileWave supported an Inventory server that could run on a different computer. The settings for Inventory on the current version can be left at the defaults; but information on the provided settings is below:

Inventory Server
The FileWave Inventory server and MDM server are now running on the same server. The server address should be a valid FQDN (fully qualified domain name). The default TCP port is 20445. If you change the Shared Key in Inventory, it will break any RESTful API scripts or interfaces you are using, until they are updated to use the new key.
iOS Inventory
- Device Inventory Poll Interval - Default is 24hrs. This setting is how often all iOS devices will report their profiles, application, security and device settings.
- Device Not Checked-In Notification – (applies to all MDM-enrolled devices) Default is 30 days. When a device exceeds the timeframe set, the color changes in the Client and Inventory view to alert the administrator that that device has not checked in with the MDM server.
Smart Groups
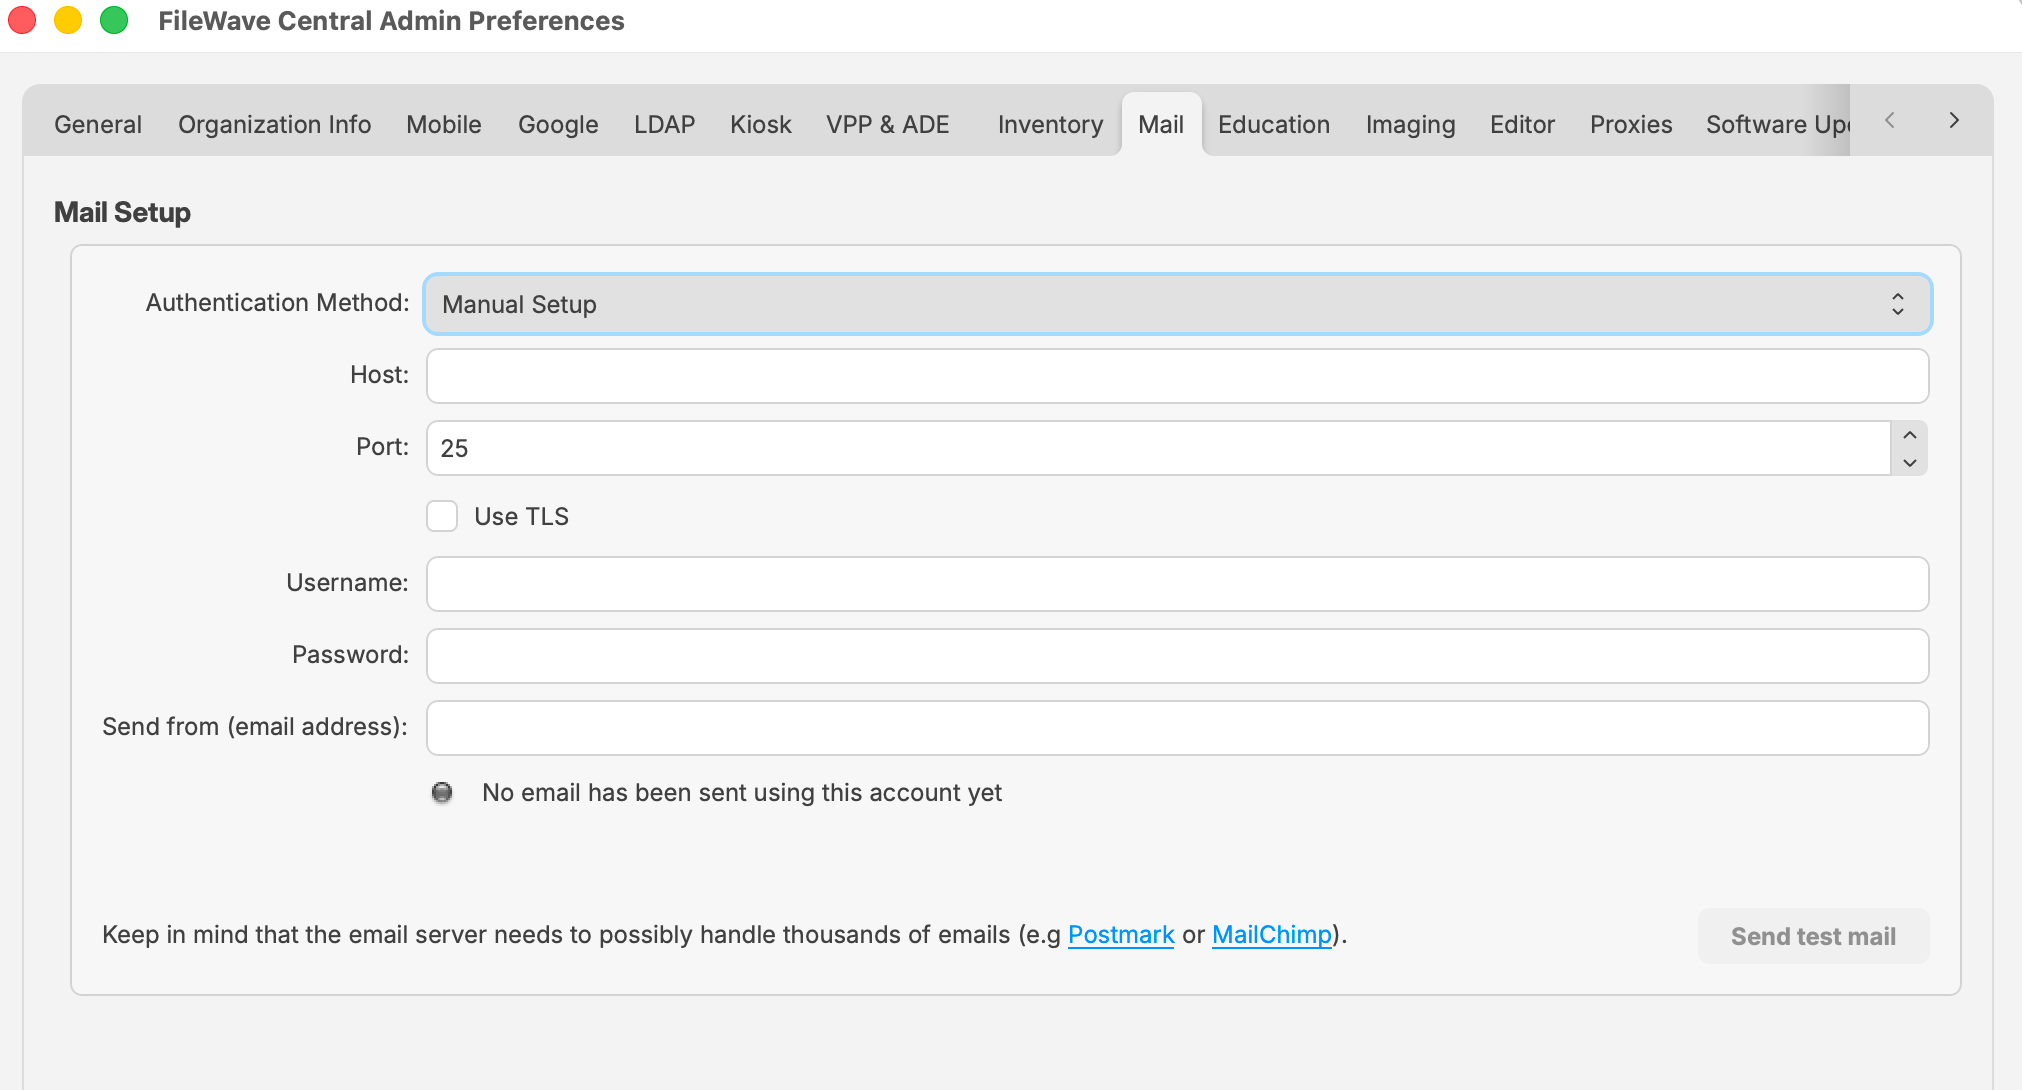
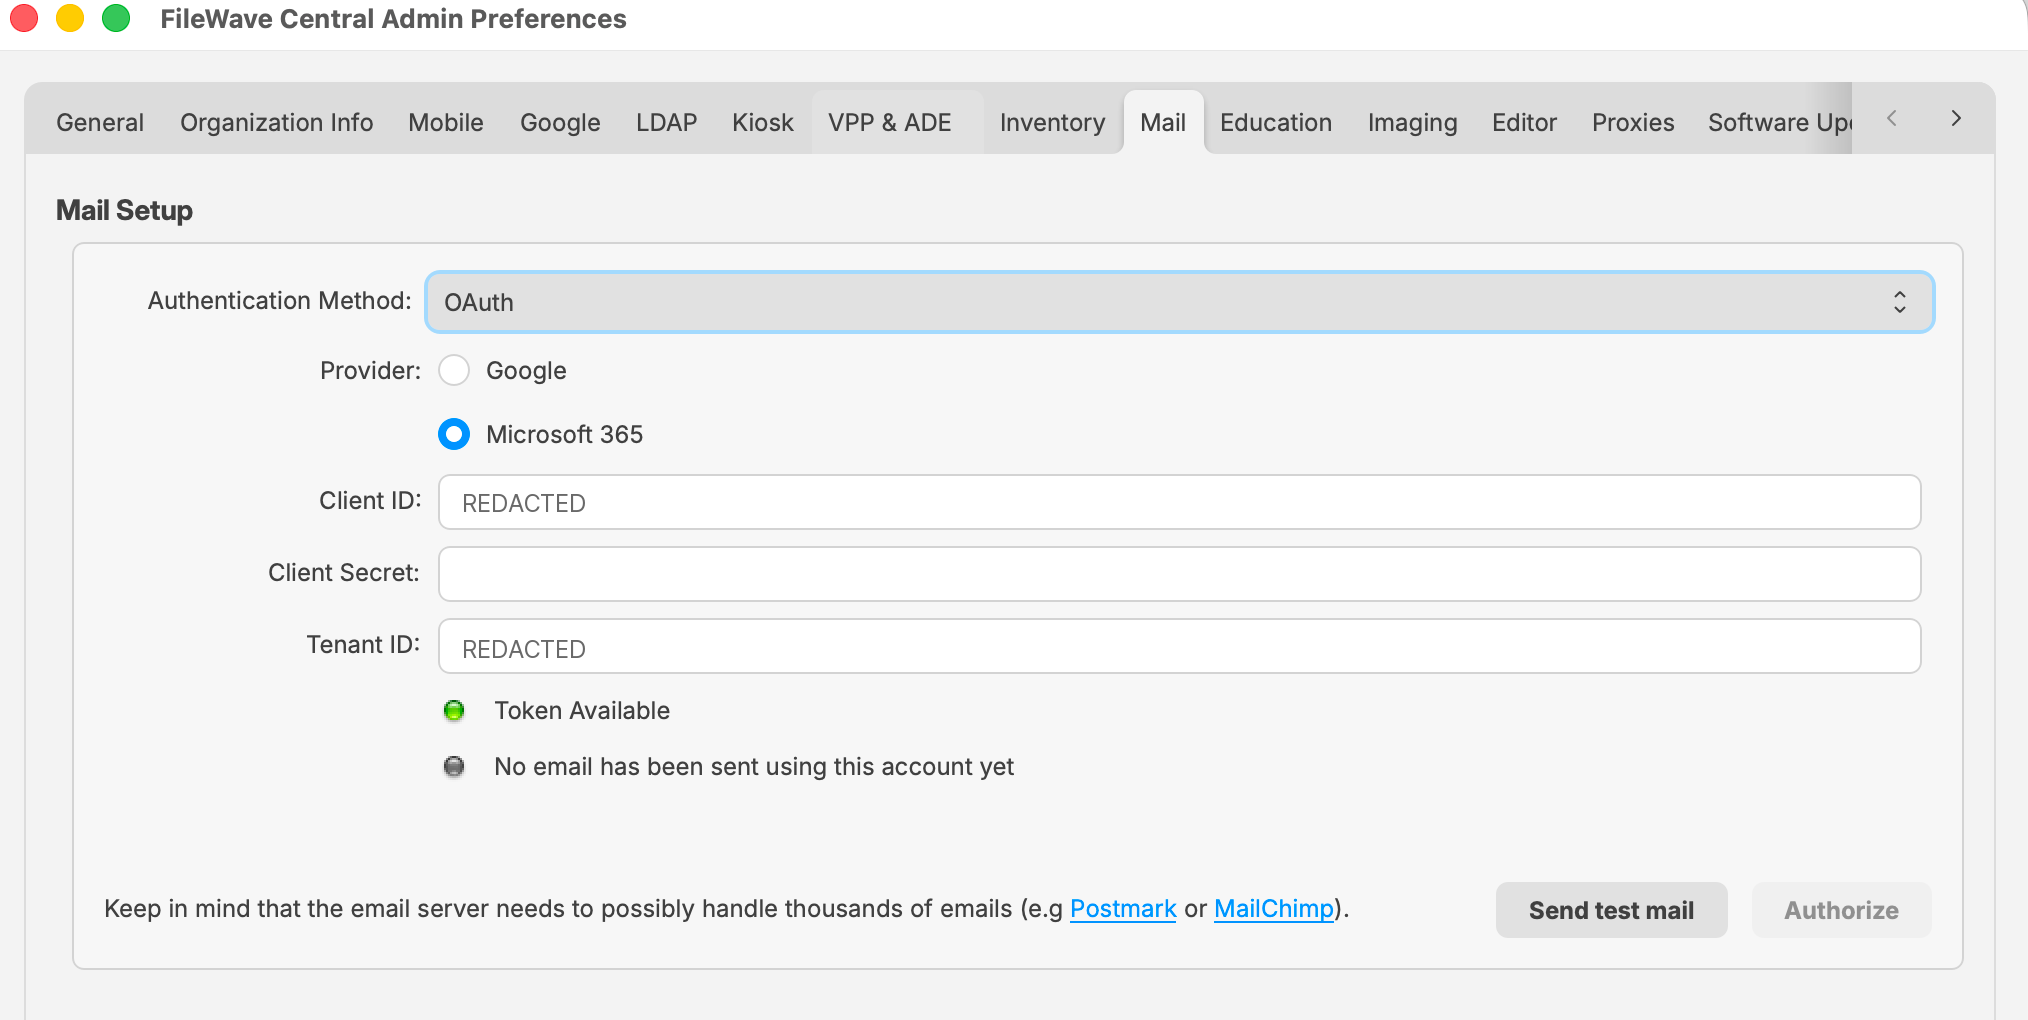
Mail preferences
FileWave Server Mail Preferences supplies outgoing email for scheduled reports and other server-generated messages. Manual SMTP configuration has been available in FileWave for many releases; OAuth support for Google and Microsoft 365 was added in FileWave 16.1.1.
- Manual Setup: Configure Host, Port, TLS, Send from address, and credentials only when the SMTP service requires them. Leave Username and Password empty for an intentional no-authentication relay. FileWave 16.4 fixes prior validation that could incorrectly require those fields.
- OAuth: Register a provider application, enter the Client ID and Client Secret—plus Tenant ID for Microsoft 365—authorize the mailbox, confirm Token Available, and send a test message.
For the complete 16.4 workflow, provider callback URL, Google and Microsoft 365 setup, screenshots, testing, and troubleshooting, see Configuring FileWave Server Mail Preferences.
Editor preferences
FileWave's Filesets can contain plain text files, such as batch (.bat), configuration (.conf), and property list (.plist). The Editor tab allows you to customize which extensions can be edited within the Fileset Contents Window's text editor. This capability allows you to make simple changes to a file, even a script, inside a Fileset.
You can add the extension of a specific type of file so that it can be edited within the FileWave editor. The below image shows adding .json to the list. (As of 15.4, .json will be included in the default list).
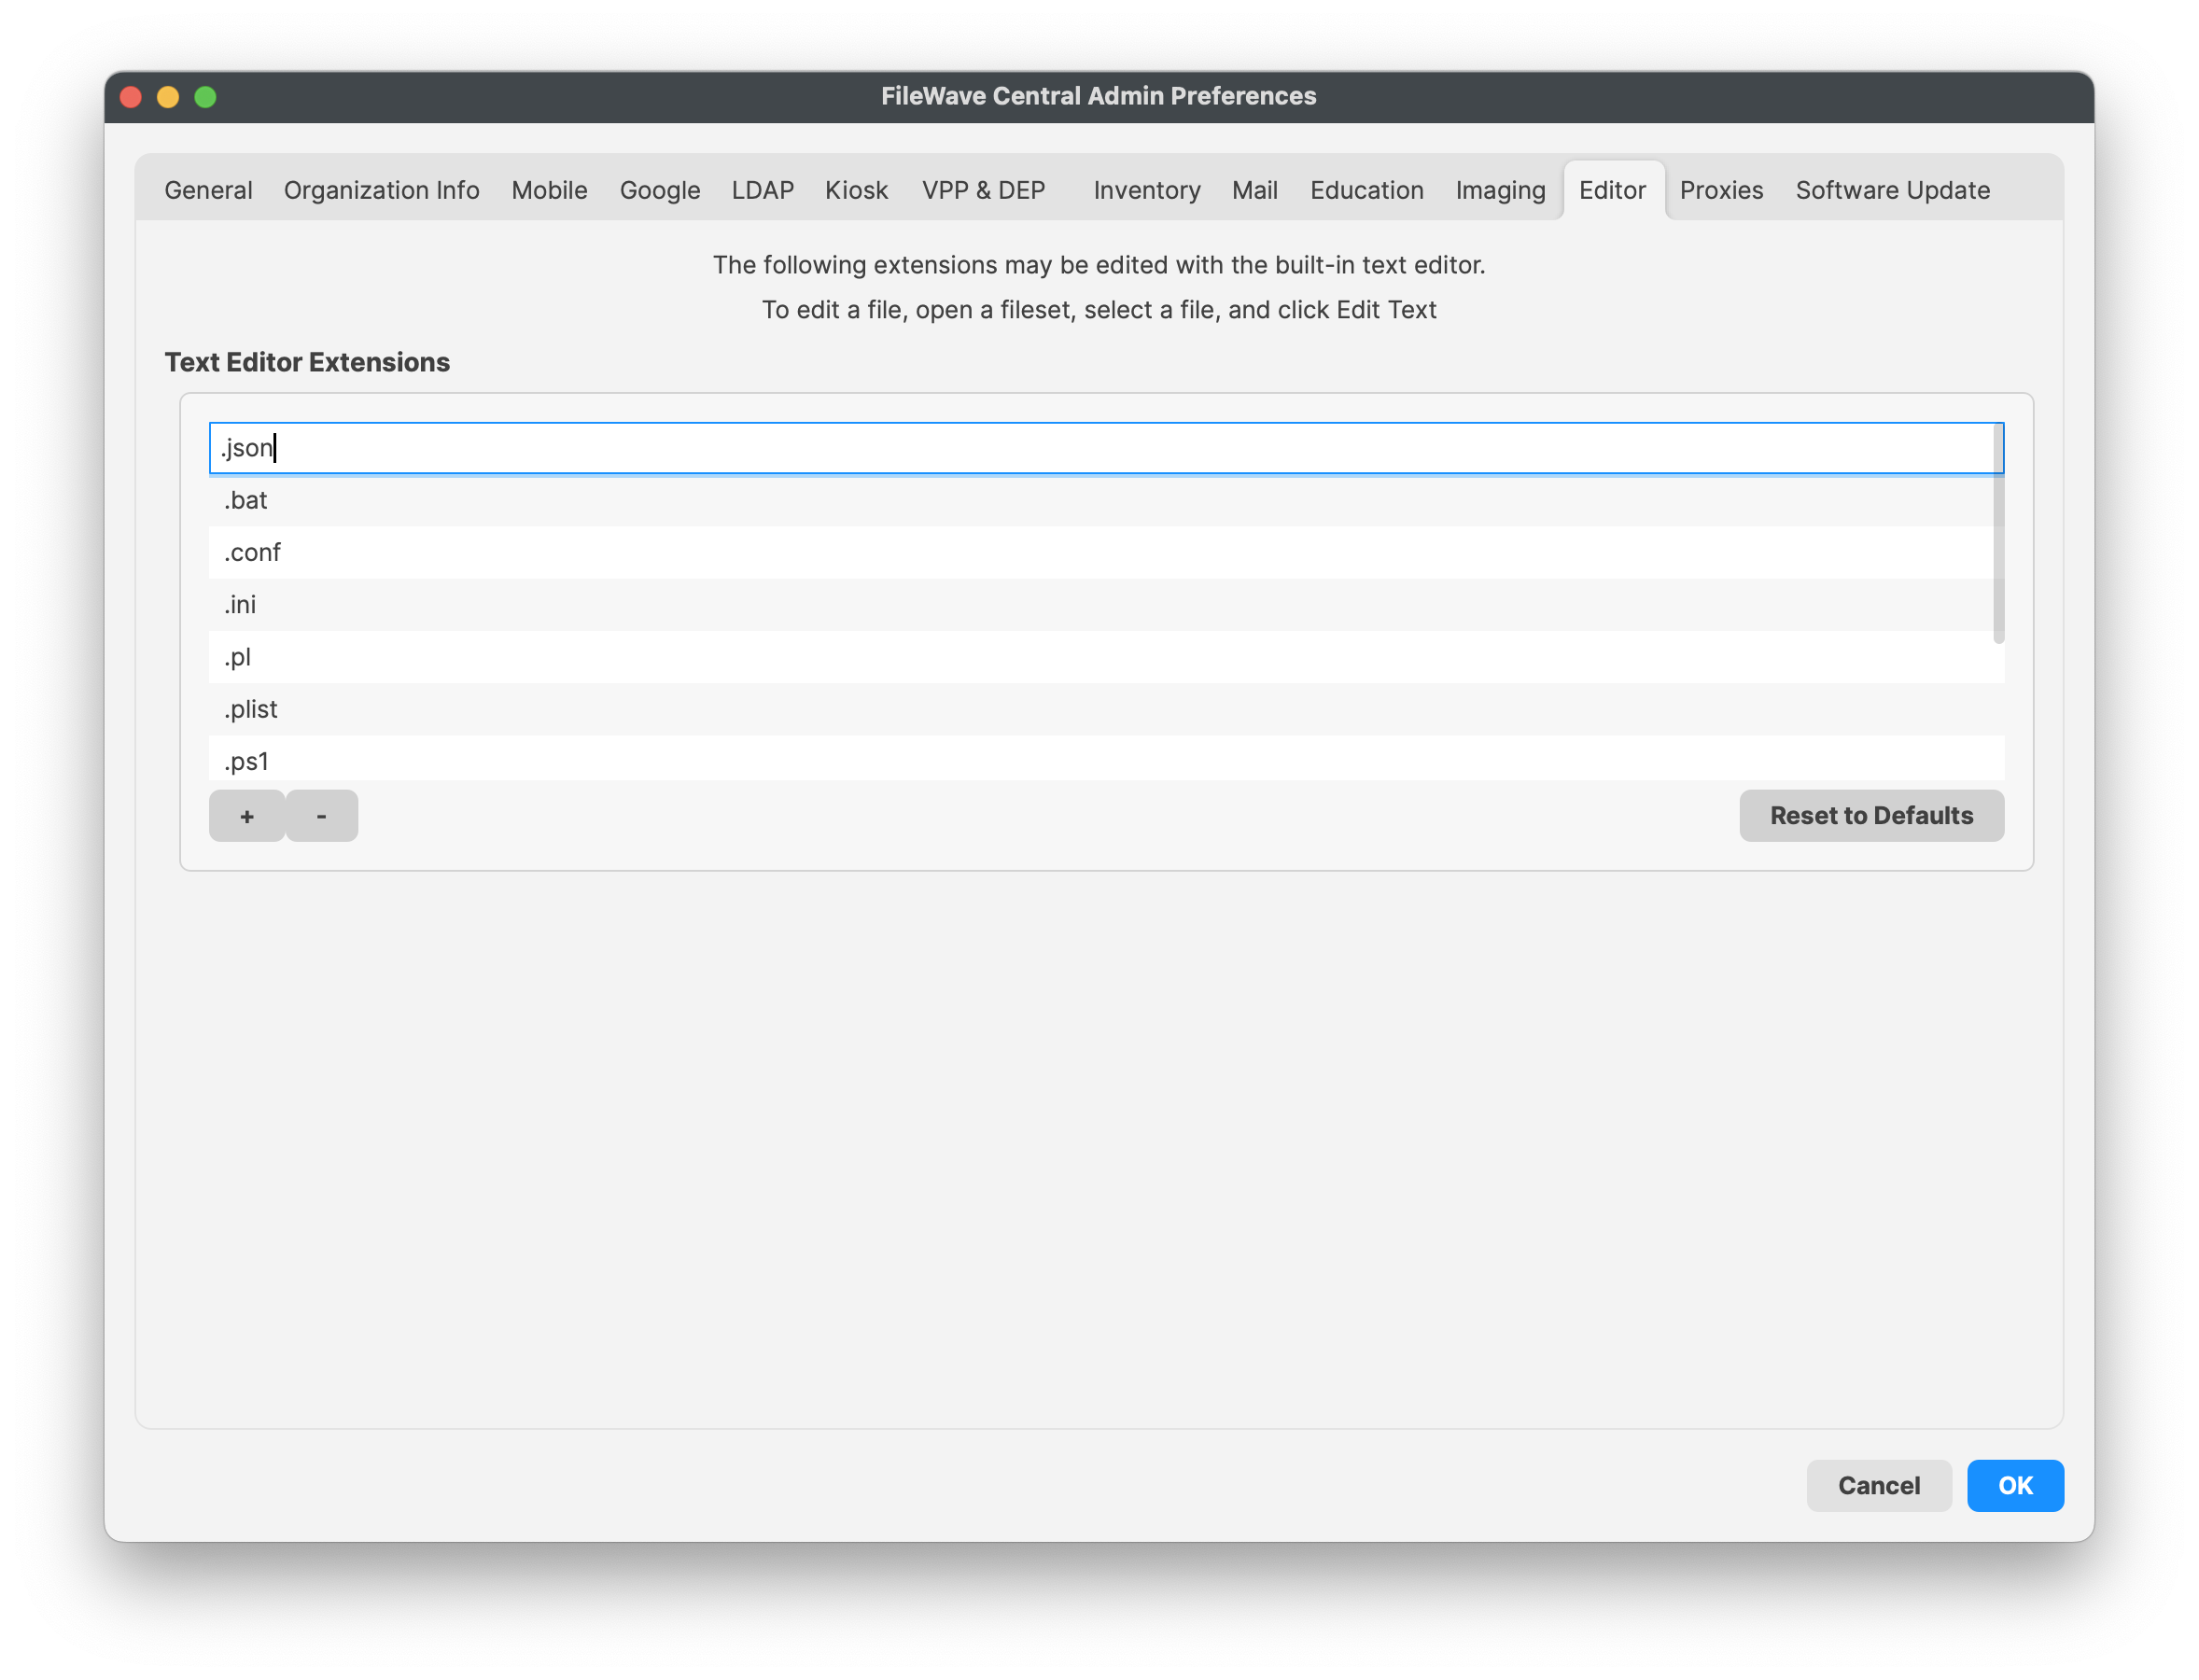
File types are usually limited to those that contain Unix or Windows line endings. You should test any file type that you plan on supporting before making that extension known to all of your FileWave administrators. More information on this capability and its use is in the Filesets / Payloads Chapter of this guide.
Proxies preferences
If you are using proxy servers in your environment, this preference pane will allow you to enter the credentials needed to let your FileWave Server authenticate with the proxy service. If your users' devices must go through a proxy server to access the FileWave server from outside your network, then you will need to add credentials here to allow your FileWave server to respond through that same proxy. You may also create unique override credentials for your FileWave Admin to use or bypass the proxy service, as needed.
- Server Proxy Credentials – HTTP and SOCKS5 are the two protocol options, followed by host name, port, username and password.
- Admin Proxy Credentials Override – HTTP and SOCKS5 are the two protocol options, followed by host name, port, username and password.
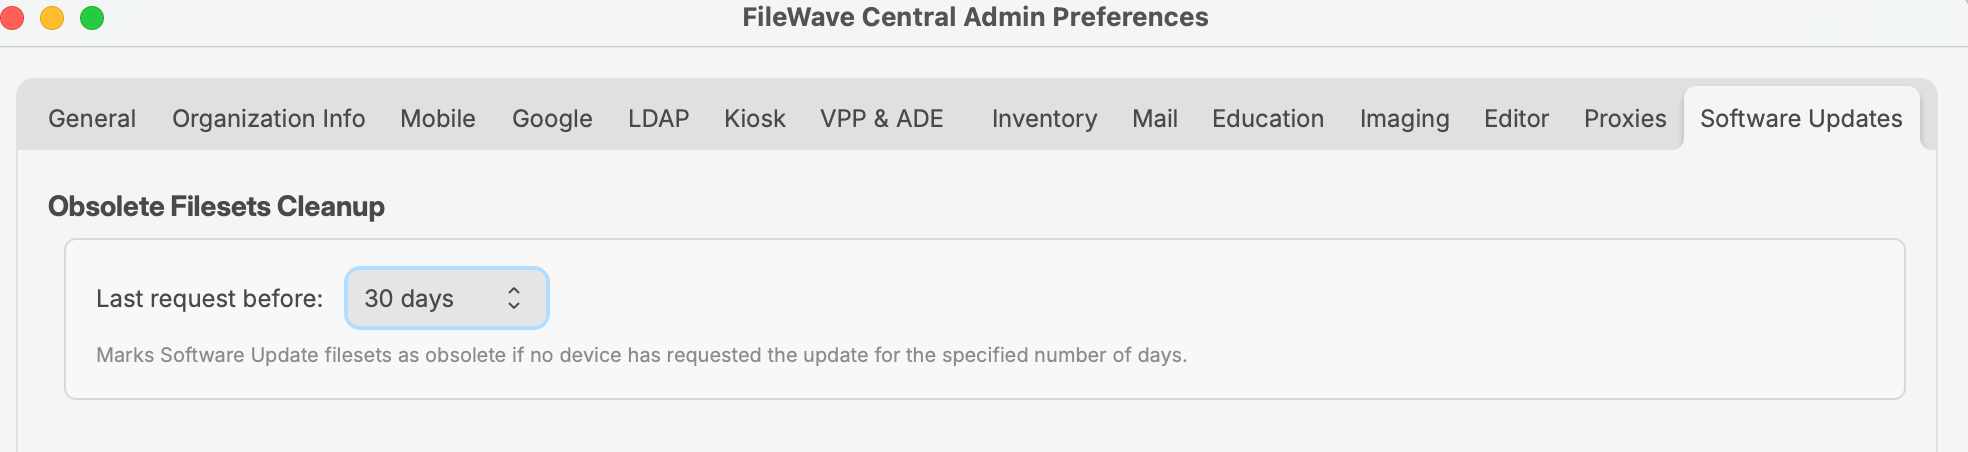
Sofware Updates
In FileWave 16.2.0 and higher the Software Updates tab is where you can define how OS updates are determined to be obsolete. This will allow you to use "Obsolete Filesets Cleanup" in the Software Updates area of Central to remove updates that haven't been requested by any device for a set period of time.
Related Content
FileWave Central Inventory Toolbar
The Inventory toolbar consists of six simple tools plus the Delete item:

- New Query – Creates a new blank query
- New Group – Creates a new query Group to contain queries specific to any criteria you choose
- Edit Query – Opens the designated query for alteration
- Refresh – Forces a rescan of the Inventory database to reload the data for that query
- Duplicate – Creates an identical copy of a query so you can edit the copy and not the original
- Refresh Samples – Restores the default sample set we provide to their original state
Configuring FileWave Server Mail Preferences
What
FileWave Server Mail Preferences controls outgoing email used for scheduled reports and other FileWave-generated messages. FileWave Central 16.4 provides two authentication methods under Preferences > Mail: Manual Setup for an SMTP server or relay, and OAuth for Google or Microsoft 365.
Version boundary: Manual SMTP configuration has been available in FileWave for many releases. OAuth mail authentication was introduced in FileWave 16.1.1. FileWave 16.4 fixes an issue where Username and Password could be required even when the SMTP server did not require authentication.
Choose an authentication method
| Method | Use it when | Required configuration |
|---|---|---|
| Manual Setup | The organization uses an SMTP relay, transactional-mail service, app password, or other direct SMTP configuration. | Host, port, TLS choice, sender address, and credentials only when the SMTP server requires them. |
| OAuth | Google or Microsoft 365 is the mail provider and organization policy permits a provider application to send mail. | Provider application, FileWave callback URL, client information, provider authorization, and a valid token. |
FileWave may generate a large volume of mail when scheduled reports or notifications are used broadly. Confirm the provider’s sending limits and whether a transactional-mail service or dedicated relay is more appropriate than a personal mailbox.
Manual Setup
- In FileWave Central, open Preferences > Mail.
- Set Authentication Method to Manual Setup.
- Enter the SMTP Host and Port supplied by the mail administrator or provider. The value initially displayed by Central is not a substitute for the provider’s documented port.
- Select Use TLS when required by the provider.
- Enter Username and Password when the SMTP server requires authentication. When the relay intentionally permits the FileWave Server to send without SMTP authentication, leave both fields empty. FileWave 16.4 corrects prior validation that could incorrectly require those fields.
- Enter the Send from (email address) value permitted by the mail system.
- Choose Send test mail and confirm that the message reaches the destination and is not rejected or quarantined.
Do not use a normal account password when the provider requires an app password or OAuth. For Google Manual Setup, see the related Google app-password troubleshooting article below.
OAuth
OAuth avoids storing a normal mailbox password in FileWave. Before selecting Authorize, create a provider application and configure this exact FileWave callback pattern as a Web redirect URI:
https://<filewave-server-fqdn>:20445/inv/notifications/configuration/auth-callbackReplace <filewave-server-fqdn> with the fully qualified domain name users and the provider can resolve for the FileWave Server. The scheme, port, and callback path must match the redirect URI registered with the provider.
Complete OAuth in FileWave Central
- Open Preferences > Mail and set Authentication Method to OAuth.
- Select Google or Microsoft 365.
- Enter the provider application’s Client ID and Client Secret. Microsoft 365 also requires the Tenant ID.
- Choose Authorize and complete the provider sign-in and consent process using the mailbox that FileWave should use.
- Return to FileWave Central and confirm that the status shows Token Available.
- Choose Send test mail and verify delivery.
Microsoft 365
- Open the Microsoft Entra admin center and create an App registration.
- Add the FileWave callback URL above as a Web redirect URI.
- Copy the application’s Client ID and directory Tenant ID.
- Create a client secret and record its value securely when Microsoft displays it.
- Ensure the account used during authorization has an Exchange Online license and is permitted to send mail under the organization’s policy.
- Enter the Client ID, Client Secret, and Tenant ID in FileWave Central, then select Authorize.
Record the client-secret expiration date. Rotate the secret in Entra and reauthorize FileWave before it expires.
- Open the Google Cloud Console and create or select a project dedicated to FileWave mail.
- Configure the Google Auth Platform for that project. Select the audience required by the organization; Internal is commonly appropriate for a single Google Workspace tenant.
- Create an OAuth client with Web application as the application type.
- Add the FileWave callback URL above under Authorized redirect URIs. An Authorized JavaScript origin is not required for this FileWave workflow.
- Enable the Gmail API for the same project.
- Copy the Client ID and Client Secret into FileWave Central, then select Authorize.
Verify and monitor mail
- Test immediately: A saved configuration is not proven until Send test mail succeeds and the message is received.
- Review status: OAuth should show Token Available. Manual Setup and OAuth also show whether mail has been sent successfully through the configured account.
- Exercise the real workflow: Send a scheduled report to a controlled recipient after the basic test passes.
- Monitor provider limits: Review rate limits, sender restrictions, spam handling, and mailbox or relay quotas.
- Protect credentials: Keep Client IDs, Tenant IDs, client secrets, SMTP credentials, and authorized mailbox details out of screenshots and unapproved support notes.
Troubleshooting
| Symptom | Check |
|---|---|
| Send test mail is unavailable or fails | Confirm required fields, provider host and port, TLS choice, DNS, firewall access, sender authorization, and provider quotas. |
| SMTP relay does not require authentication | Leave Username and Password empty and verify that the relay permits the FileWave Server’s address to send. FileWave 16.4 includes a correction for prior validation that could incorrectly require those fields. |
| OAuth authorization fails | Compare the registered Web redirect URI with the FileWave callback URL exactly, then verify provider application status, consent, license, API availability, Client ID, Tenant ID when applicable, and client secret. |
| Token is unavailable or later stops working | Reauthorize the provider and check whether the client secret, provider consent, mailbox license, or organization policy changed. |
| Google Manual Setup returns Bad Request | Use OAuth when appropriate, or verify Google 2-Step Verification and an app password for the Manual Setup workflow. |
Related content
FileWave Anywhere Overview
The FileWave Anywhere interface is an Inventory tool designed to help with quick FileWave inventory references for specific clients in your server. Within the Web console you will be able to view all devices currently enrolled, their Filesets, installed applications, users who have logged in, what groups they are apart of, and in the case of MDM enrolled Apple devices the command history.
To access this Web Console for the FileWave server you can use the following:
- Log into the FileWave Central Admin, select File at the top, then click Web Console

- Or Simply go to: https://FileWaveServerAddress
If your server address is tony.in.filewave.us then:
https://tony.in.filewave.us
This web console utilizes port 443 and the FileWave server must be accessible to connect. So if your FileWave server is not accessible outside your internal network then you cannot expect to connect with the Web Console outside your network.
If you currently have a service running on the FileWave server that is already using port 443 the initial installation and an upgrade will fail. To resolve this, you will need to shutdown that other 443 service.
|
The error message in the macOS install log and Windows/CentOS terminal appears as follows:
|
The inventory information visible in the Web Console will be determined by the permissions of the admin account that logs in. For more information on setting permissions for FileWave administrators please visit the manual page linked here.
The information you have access to from inventory under the Details section for each client is the following:
- Applications
- Device
- General
- Hardware
- Security Settings
- Filesets
- Fonts
- FileWave Policies
- Groups
- Network Interfaces
- Operating System
- Profiles
- Users
- VPP Users
Below are some examples of the data you have access to in the Web Console and corresponding screenshots:
You will initially see the Clients dashboard that lists out every device currently being managed in your FileWave server:

From there you will be able to select a client and view inventory and Fileset status information including being able to reinstall selected Filesets:

Client Information tabs:
Client Details:
FWAdmin CLI (Command Line Interface)
Using FileWave Admin CLI (Command Line Interface) for OS X and Windows
Admin CLI allowances include:
- Importing
- Folder
- Package
- Image
- Removing
- Associations
- Filesets
- Updating model
- Reporting
- Clients
- Filesets
- Associations
Default Location
macOS
/Applications/FileWave/FileWave\ Admin.app/Contents/MacOS/FileWave\ AdminWindows (FW v15.4.2 or lower)
"C:\Program Files (x86)\FileWave\FileWaveAdmin.exe"Windows (FW v15.5.0 or higher)
"C:\Program Files\FileWave\admin\FileWaveAdmin.exe"Just running the above commands with no arguments will launch the UI version of the Admin
Command Options
Running the command with --help will provide the full list of possible options:
macOS
/Applications/FileWave/FileWave\ Admin.app/Contents/MacOS/FileWave\ Admin --helpWindows (FW v15.4.2 or lower)
C:\Program Files (x86)\FileWave\FileWaveAdmin.exe --helpWindows (FW v15.5.0 or higher)
"C:\Program Files\FileWave\admin\FileWaveAdmin.exe" --helpHere is a list of some of the options available:
FileWave Command Line Tool
Options:
-h, --help Displays this help.
-v, --version Displays version information.
-u <user> The filewave admin username.
-p <password> The filewave admin password.
-H <host> The filewave server hostname.
-P <port> The filewave server port number
(defaults to 20016).
-k Allows connections to filewave server
without checking certificate.
--listClients Lists all the client client/clone/group
information.
--listFilesets Lists all the fileset information.
--createFileset <name> Creates a new empty fileset with the
specified name.
--importFolder <path> Imports a folder as a fileset (not as a
package).
--importPackage <path> Imports a package (pkg, flat, mpkg or
msi) as a fileset.
--importFileset <path> Imports a previously exported FileWave
fileset or template.
--exportFileset <path> Exports the given fileset name/id to
the specified path
--setRevisionAsDefault the imporing revision will be set as
default.
--addRequirementsScript <path> Adds requirements script (only valid
for --importFolder).
--addPreflightScript <path> Adds preflight script (only valid for
--importFolder).
--addActivationScript <path> Adds activation script (only valid for
--importFolder).
--addPostflightScript <path> Adds postflight script (only valid for
--importFolder).
--addVerificationScript <path> Adds verification script (only valid
for --importFolder).
--addPreuninstallationScript <path> Adds preuninstallation script (only
valid for --importFolder).
--addPostuninstallationScript <path> Adds postuninstallation script (only
valid for --importFolder).
--importImage <path> Imports an image as a fileset.
--deleteFileset <id> Deletes a fileset by ID/Name.
--listAssociations Lists all the associations held in the
system.
--createAssociation Create an association between a
client/clone/group ID/Name and a fileset
ID/Name. Use the --clientgroup and
--fileset options.
--deleteAssociation <id> Deletes an association between a
client/clone/group ID/Name and a fileset
ID/Name. Use the --clientgroup and
--fileset options.
--kiosk Make this a kiosk association.
--software_update Make this a software update
association.
--licenseDistribution <model> The license distribution model (only
for associations to VPP filesets). Can
be "user" or "device".
--updateModel Updates the FileWave model (as long as
no other admins have locked objects).
--setProperty Sets a fileset property value, use the
--fileset, --key and --value parameters
to determine for which fileset this is
done (Used solely by AutoPkg FileWave Importer)
--delProperty Removes a fileset property value, use
the --fileset and --key parameters (Used solely by AutoPkg FileWave Importer)
--setCriticalFlag Sets the critical flag value for a
fileset ; use the --fileset and --value
(0/1) parameters
--name <name> The name value which will be applied to
any newly created object.
--comment <comment> The comment value which will be applied
to any newly created object.
--filesetgroup <id> The ID/Name of the target fileset
container, if not specified all objects
are created in their respective root
container. If the Name of the container
does not exist then its assumed to be a
Fileset Container and will be created
automatically.
--fileset <id> The ID/Name value of a fileset object.
--revision <name> The name of a revision object.
--clientgroup <id> The ID/Name value of a client, clone or
group object.
--root <root> When importing, if you specify the root
then all the data that was imported will
be moved into this root folder. The
root folder will be created if required.
--key <key> The key used in the --setProperty call.
--value <value> The value which will be used in the
--setProperty call.
--listExitCodes Lists all exit codes and their
description.
** You are seeing this because the -h option was used ** Best Practices
You should use a separate FileWave Administrator account in order to protect other administrator passwords from accidentally being exposed in scripts. Along the same lines, if you run a command with an admin who is already logged in. It till auto-kick them off from wherever there are at, and from whatever they are doing.
Model update WILL update the model, no conformation
Know what the Exit Codes mean
$ FileWave\ Admin --listExitCodes
0: No Error
100: Unknown Error
101: The given fileset does not exist
102: The given client does not exist
103: The given group does not exist
104: The given target is not a group
105: Database internal error
106: Error while uploading fileset
107: Error while updating the model
108: Login Error
109: Error while importing a fileset
110: Package Type not supported for import
111: Command line parse failed
112: Can't create association with an imaging filesetExamples
Import Fileset:
$ FileWave\ Admin -u api -p <password> --importFolder /Applications/TextEdit.app --name "My New Application”Import Package:
$ FileWave\ Admin -u api -p <password> --importPackage ~/Downloads/MyExamplePackage.pkgImport Revision:
To add the above PKG to an existing Fileset with ID 537136 and define a revision name of Revision2.
$ FileWave\ Admin -u api -p <password> --importPackage ~/Downloads/MyExamplePackage.pkg --fileset 537136 --revision Revision2Since FileWave 13, it is not possible to add into a current Fileset.
Undocumented
FileWave Admin includes more than one language option. If unspecified, the Admin Application should open in a language to match the users chosen language if supported. Current supported languages are:
- English – en_GB or en_US
- German – de_DE
- Korean – ko_KR
- Japanese – ja_JP
- Chinese (Traditional and Simplified) – zh_TW or zh_CN
FileWave Admin will default to English otherwise.
Any of the supported languages may be launched, by use of the language command line option, overriding the current set language:
Windows Korean example
& 'C:\Program Files\FileWave\admin\FileWaveAdmin.exe' --lang ko_KRmacOS German example
/Applications/FileWave/FileWave\ Admin.app/Contents/MacOS/FileWave\ Admin --lang de_DE

Related Content
Working with FileWave Clients
Once the various devices have the FileWave Client installed, and they are enrolled with your FileWave Server, there are several options for configuring and working with these clients. This section will cover some of the common configurations and additional settings.
Upgrading macOS or Windows FileWave Clients? See Upgrading FileWave Clients for the 16.3.0 eligibility boundary, the Upgrade Fileset bridge for older clients, the misleading empty Client Upgrades state, and Early Access/Beta scheduling.
Clients View information
Within the Clients pane, you are presented with key information to help you track of the status of your devices:
- Name - The device or device Group name, or the Smart Group name
- ID - A unique ID created by FileWave to identify all devices, device Groups, or Smart Groups
- Model - the latest version of the FileWave model to have been loaded onto the device or Group
- IP - the IP address of the device as reported to FileWave (devices behind a firewall may all report using a NAT'd IP)
- Last Connect - the date time Group showing the last time the device reported to the FileWave server
- State - shows the condition of the device (Normal, Missing, Not Tracked, Archived)
- Free Space - shows the amount of free space reported by the device
- Platform - shows the reported operating system of the device
- Comment - custom comment entered by a FW administrator concerning that device or Group
- Lock - shows if the device has been locked down so that it cannot be affected by any model updates (see: Locking Devices)
When devices are enrolled in FileWave, you can start performing administrative and management tasks on them.
Search
At the top of the Clients view pane, you can see a Search: area that lets you quickly see one or four different views of all your devices (Everything, Clients, Mobile, and Groups) There is also a quick view of the total number of clients, Clones, Groups, and mobile devices. Finally, there is a global search field that allows you to type in a name or portion of a name, ID, database model number, or any other possible identifier to locate a specific device or Group. Any search you start can be cleared by clicking on the Clear all filters button just above the viewing window.

The next section discusses the types of tasks that you have access to from the Clients pane.
Client toolbar options

The toolbar that is active when the Client pane is selected gives you many options for performing various tasks on your devices. You can add new clients, create client Groups, create Smart Groups, associate devices with Filesets, monitor your clients, and perform several administrative tasks. First, we need to look at the global toolbar items; then we will explore the direct action tools for specific clients or client Groups.
Update Model
When you perform actions on your client devices, you should update the "Model." The Model is the current state of the FileWave database after changes have been committed by an administrator. When the Model is updated, all pending actions are written to the database and a new Manifest is generated for every device detailing any changes that have taken place.
New Client
This tool allows you to register with the database new clients for computers that have had the FileWave client installed and have checked-in initially, from mobile device that have enrolled with the FileWave MDM server, or by creating placeholders for devices or computers manually or using either text files or ADE.
|
See Enrolling Computer Clients in to FileWave |
New Group
The New Group tool allows you to create a named Group that will include individual Clients or Clones.
New Smart Group
This tool allows you to create a named Group of devices based upon inventory criteria.
New Association
The focal point of FileWave is being able to create and distribute Filesets to devices. This tool provides one approach for you to associate a Fileset or Fileset Group with a Client or Group.
Client Monitor
The Client Monitor lets you view the current status of your Client after selecting that Client from the list. It provides you with quick look at the current FileWave model running on that Client, as well as allowing you to send a command to the Client to verify its status with the FileWave Server, and allows you to view the Client's FileWave log file.
Customize Columns
You can edit the Client pane view by adding/subtracting data columns. You can remove all but three of the data fields (Name, ID, and Lock status).

Take Control
By "taking control" in FileWave Admin, your administrator locks out all other FW administrators from making any changes to the FileWave model. This level of control is global, in that any other administrators, no matter where they are, cannot push any Filesets or changes to client devices or Groups. This ability is very useful when you are making large, detailed changes to clients or Filesets and do not need those changes being preemptively sent to your managed devices before you are finished. When you have finished being in "control" remember to release the lock so other FW Admins can resume managing their assigned clients.
Tools
The Client tools are tasks that you can perform on a selected Client or Group. The specific tasks available vary between the different types of client devices or Groups. The next section will go into detail on each of the tools as they relate to the various types of clients and client Groups.
Delete
The Delete tool will remove the selected Client(s) or Group(s) from the database. If you delete a Group, then all nested items within that Group will also be deleted.
Client Tools
Here are the tools you have to directly impact a specific client. Depending on the client device, you will see differing settings.

When you right-click on a Client, or select a Client then select the Tools task bar item, you will see the listed tools that are available to interact with that type of Client. The same happens if you select a device Group or Smart Group, with a lesser number of options. Let's take a look at the various options available in the Tools:
Show Associated Filesets
When a Client or Group has had Filesets assigned, or associated, with them, you can view those with this tool. The view will come from the Associations pane in FileWave Admin.

Client Info…
The Client Info window shows the current condition of a Client through Device Details and Filesets Status. You can see the status of associated Filesets, open the Client Monitor, send a remote wipe command, view the current log file, and push a Verify command, which causes the Client to verify that it's current state matches what the current manifest says it should be. Depending on the device, you will get differing amounts of information.
As of FileWave 11, the list of Filesets is displayed as a tree, where dependencies appear as children of the Filesets that require them. When a dependency is required by more than one Fileset, the same dependency will appear more than once in the list, as a child of each of the Filesets that require it.
There is a selection box on the top-left corner that allows filtering Filesets. By default, it is set to "Show All. Other values are "Only successful" and "Only failed," that cause only Filesets without errors/with errors to be shown. "Filesets without errors" means any Fileset in any normal state, when nothing failed. Filesets that are associated but haven't been installed yet are considered "without errors
If the client version is 11.0 or later, it also supports reporting the results of the scripts that were executed. In this case, selecting a Fileset causes a list to appear on the right side, where the results of the last round of scripts is reported. Whenever a script fails, processing stops, and the exit code of the script can be seen in the Status column.

Client Monitor
The Client Monitor lets you view the current status of your Client after selecting that Client from the list. It provides you with quick look at the current FileWave model running on that Client, as well as allowing you to send a command to the Client to verify its status with the FileWave Server, and allows you to view the Client's FileWave log files. Note that Client Monitor leverages NATS to be able to interact with systems on any network as long as they are able to connect to the FileWave Server. More detailed information is here.
The Client Monitor also lets you change several of the preferences used by the FileWave client.
Many of these Preference settings can be configured during installation of the client; however, some of them exist only in the Client Monitor and in a Superprefs Fileset. The extras include settings such as the Debug level and the amount of free space that will trigger a disk full message.
Personal Data refers to device tracking . Tracking is covered in detail later in this Chapter.
TeamViewer refers to the remote screen sharing capability of FileWave. If you select Enable TeamViewer remote control, you will have access to observe / control that computer. If you select Prompt client for remote control access, you will present the end user on the computer with a dialog requesting permission to remotely control the device. If this dialog is not responded to with permission granted, it will time out in about 30 seconds and default to permission denied. There is a set of easy videos to learn how TeamViewer works in the Foundry here: https://go.filewave.com/foundry-teamviewer
Edit Custom Fields(s) Values
This option will allow you to change the values of Custom Fields that have been associated to this device or group of devices. For example if you manually change the value of a Custom Field that is syncing with LDAP with this option, then your change will remain until LDAP scans again at which point your change will be over written with whatever data is synced from LDAP.
Edit Custom Field(s) Associations
Here is where association between Customs Fields and devices are made. If you select one or multiple devices you can set which Custom Field(s) you would like those devices to have. If you select a group (smart or standard) then you will select which custom Fields you would like to set for the devices under this group. If new devices enter this group after you have the Custom Field associated, you would need reassign that Custom Field to the group or those new devices specifically. Custom Fields do not auto-associate to new additions in a group.
Lock / Unlock
When a client device is locked, it can no longer receive model updates from the FileWave server. You might use this setting if a device is being used for some operation that would be interrupted during a Fileset activation.
|
See |
Create Association(s)…
The primary function of FileWave Admin is to associate Clients and Groups with Filesets. This task will send you to the Associations pane and allow you to select Fileset(s) for association with the selected device. Detailed instructions on using Filesets and associations are in Chapter 5.
Create Clone…
Clones give you great flexibility with FileWave management. You create Clones of a device to add them to different Groups instead of dragging the device itself into a Group. This allows you to let a Client belong to several Groups based on organizational needs, geographies, or even just for application usage. A Client can belong to several Groups, and any associations made to any of those Groups will be reflected at the client.

Since a Clone is essentially an alias of the original Client, you can leave the actual Client sitting in the "root" Group of the Client directory, and do all of your Group assignments by way of Clones. This way, if you delete a Clone from a Group, you have not impacted the original Client record. You may also create a Clone of a Group if you are going to add several sub-Groups into a larger Group. The Create Clone… task presents you with a list of your Groups into which you can place a Clone.
Clone to Same Groups As…
This task lets you choose another Client device as the template to create Clones of the selected Client. If the template device has Clones in several Groups, then your Client will end up with Clones in those Groups.
Move To…
This task lets you move your Client into a designated Group. This does not create a Clone; but places the original Client record into that Group.
Delete
If you no longer need a specific Client or Group in the FileWave database, you can delete it with this command. If you delete a Group, then all Clones and original Clients situated inside that Group are also deleted. Original Clients outside the Group will not be deleted, even if their Clones were inside the Group. Make sure you update the Model when you delete Clients or Groups.
Rename
To rename your Client or Group, use this command. You can also click twice on your client (slower than a double-click) to edit the name.
Comment
This task allows you to add a comment to your Client or Group record.
Set Permissions…
This task lets you specify which FileWave Admin accounts can access a specified Client or Group. You use this assignment capability to manage large deployments with many sub-administrators. For example, you could have an administrator designated to manage and maintain only the Windows computers and another to manage only the iPad cart in a classroom. Some administrators could be assigned only read permissions in order to create reports.

Duplicate Client
This task lets you take a Client as a template and create a new Client that can be renamed to match an, as yet, un-enrolled device. When the new device enrolls, it will assume the identity of that duplicated Client, as well as automatically being part of every Clone used by that duplicated client. For example, Lab-WinPC07 belongs to two Groups - Beta Group and IT Shop; the client gets duplicated and its new name is Lab-WinPC07.1 When the duplicate is renamed, all of it's Clones get renamed also, and when you enroll the new device with the name Lab-WinPC08, the new client automatically belongs to all the correct Groups.

Add Client…
This task is for adding a Client into the selected Group. Selecting this task opens the New Client window.
Add Group…
This task adds a Group to the selected Group. Selecting this task opens the Create New Group window.
Edit Smart Group…
This task allows you change the settings and criteria for a Smart Group.
Request Check-in
This task sends a command to the mobile device to check in with the MDM server. Sending the Check-in command will send along every item in the command history that has not been received.
Lock Device
This task sends the command to the mobile device to return it to the lock screen (as if the power button had been pressed). It sets a message on the screen to say that this device is "lost," along with an optional message and phone number to call if found. This is not the same as the Lock command for non-mobile devices.
Clear Passcode
This task turns off any passcode set on the mobile device.
Refresh Inventory (Verify)
This task sends a request to the client to report back to the FileWave Server an inventory report. This is more inclusive than the Check-in command in that the client gets a push command to supply the following information:
- Managed Application list
- Security info
- Restrictions
- Installed Application list
- Profile list
- Device information
Plus perform any self-healing needed and install/remove any Filesets that have been modified.
Wipe Device…
This task sends a command to mobile devices to erase all content and settings. For mobile devices, the command is located in the right-click popup. For computers, it's located in the Client Info… window.
You must enter the FileWave "super administrator" (fwadmin) credentials in order to proceed with the device wipe.
Set Organization Info (iOS only)
This command appends the Organization Info that is configured in FileWave Admin/Preferences to the selected device. This information is sent to the device at enrollment; but if the information changes, it needs to be manually updated using this menu item.
Clear Restrictions Passcode (supervised iOS 8+)
This command will flush the restrictions passcode set on a supervised iOS device.
Archive Client
This command allows an administrator to remove a Client from active use in the FileWave database. All inventory data on the device is frozen and the device is no longer counted as a client for license purposes. A Model Update is required to complete this action.
In order to re-add the client to the active FileWave database, you must fully remove it from FileWave, update the Model, then re-add it through the New Client window.
Archiving MDM enrolled clients will send a command to the device to remove enrolment, for any MDM enrolment type, if configured to do so in the Mobile Preferences.
Removal of the MDM Enrolment Profile should cause managed Profiles to be remove. Managed Apps and as such App Data may also be removed.
Groups & Smart Groups
Putting Clients into Groups gives you tremendous flexibility in overall control and management of your deployment. With Groups, you can configure sets of Clients by type, function, location, and any other association that you can think of. Smart Groups go even further by letting you create criteria that will automatically assemble sets of clients. The real power of Groups in FileWave comes from being able to associate Filesets with Groups at the same time, instead of having to match individual Clients with specific Filesets.
You can also have nested Groups.
Creating a Group
You can use any criteria you desire to create a Group. Select the New Group tool from the toolbar and fill in the name of the Group and, if desired, a comment on the Group, such as its purpose.
Once the Group is created, you can assign Clients to it either with the pop-up menu (right-click on the Group, select Add Client…) or you can add a Clone of a Client to the Group by holding down the Alt-key (Windows) or the Option-key (macOS), selecting the Client, and dragging the Clone onto the Group icon. You can also use the Create Clone… command to build a Clone of a Client, then add the Clone to the Group. Finally, you can create Groups to be sub-Groups, then add those Groups to the "upper" Group. When you associate Filesets with the uppermost Group in a set, all of the clients assigned to that Group, or to Groups inside that Group, will all get those associations.
Setting permissions for a Group
Once you have created one or more Groups, you might want to distribute overall management and maintenance of those Groups. The "Super Admin" account (fwadmin) will always be able to edit or delete any Client or Group in FileWave Admin. What you might want to have is one or more "sub-administrators" who can take over maintenance of one or more specific Groups. This is where the permissions come in; right-click on a Group (or select the Tools item in the toolbar) and choose Set Permissions…
All of the FileWave Admin accounts will be available and you can choose which administrators have permission to work with the selected Group. Your choices are:
- read/write/delete)
- read/write
- read
- no permissions, which equals no access.
The permissions can also be set to Propagate to children, which then assign the same permissions to any Group or Groups nested within in that Group.
Creating Smart Groups
The Smart Group is a collection of Clones based on specific criteria. The options you can choose are extensive:

The specific criteria are defined as follows:
|
Search Type |
Qualifiers |
Criteria |
|
Client Name |
equals / contains / begins with / ends with / less than / greater than |
alphanumeric text of a client name or portion of a name |
|
Client Comment |
equals / contains / begins with / ends with / less than / greater than |
Any alphanumeric text comment or portion of a comment |
|
Client OS Platform |
equals |
OS X (Intel / PPC, 10.3 -10.9), Windows (XP, 2000, Vista, 7, 8) |
|
Client IP Address |
equals / contains / begins with / ends with |
Any logical numeric value that meets standard IP address format (xxx.xxx.xxx.xxx) |
|
Client IP Subnet |
equals / contains / begins with / ends with |
Any logical numeric value that meets standard IP address format (xxx.xxx.xxx.xxx) |
|
LDAP User |
in |
A user name in an associated LDAP directory server database |
|
LDAP Computer |
in |
A computer name in an associated LDAP directory server database |
|
Inventory Query |
in |
Any valid Inventory Query from the MySQL server (v.9.x) or from Inventory (FW v8.x) |
|
iOS Device Type |
equals |
iPad / iPod / iPhone / Any |
Once you have selected one or more search types and filled in the criteria, FileWave will automatically add a Clone of the qualified Clients to the Smart Group. You can use these types of Groups to track devices as they move around the institution, fall behind in updates, have their name changed, or any other combination of conditions you desire. Permissions for Smart Groups are set up with the same steps used to set permissions for regular Groups.
Using LDAP / Directory Services Groups
FileWave can create Smart Groups based on your LDAP server directories. If you have added LDAP server(s) to your preferences, then your Clients pane will be populated with an LDAP Smart Groups set. These Groups will be automatically populated with computers that are bound to the directory. You can associate Filesets and set permissions for any of these Groups. Devices registered by users with their LDAP credentials show up under Users in the LDAP Smart Groups listing. This links the user to the device for tracking purposes. To set up LDAP for authentication, see Chapter 2.
Client Monitor (16.0+)
What
The FileWave Client Monitor is a tool that provides administrators with real-time insights into device connectivity and status. It helps diagnose and resolve issues efficiently, ensuring seamless communication between clients and the FileWave server. FileWave 16.0 introduces a major upgrade with a streamlined interface, improved Network Address Translation (NAT) compatibility, and enhanced security features.
With these improvements, there is no longer a "Client Preferences" password used or needed to be able to use the new v.16+ Client Monitor with any FileWave managed devices that are running v.16+ of the FileWave Client.
When/Why
Use the Client Monitor to monitor and troubleshoot device connectivity, whether on local networks or remote environments. The enhancements in FileWave 16.0 improve:
-
NAT Compatibility – Visibility into devices across remote networks without additional configuration.
-
Security – Strengthened authentication and encryption for safer device management.
-
User Interface – A modernized layout for easier navigation and usability.
-
Troubleshooting – Detailed logs and insights for faster issue resolution.
Note that although the standalone Client Monitor app is included with 16.0.0+ Admin installs, it is only functional for monitoring macOS and Windows clients running less than FileWave Client 16.0.0, but it also still is used to monitor a FileWave IVS for Windows Imaging as of 16.0.x. The old Client Monitor app will eventually be removed in a future version.
How
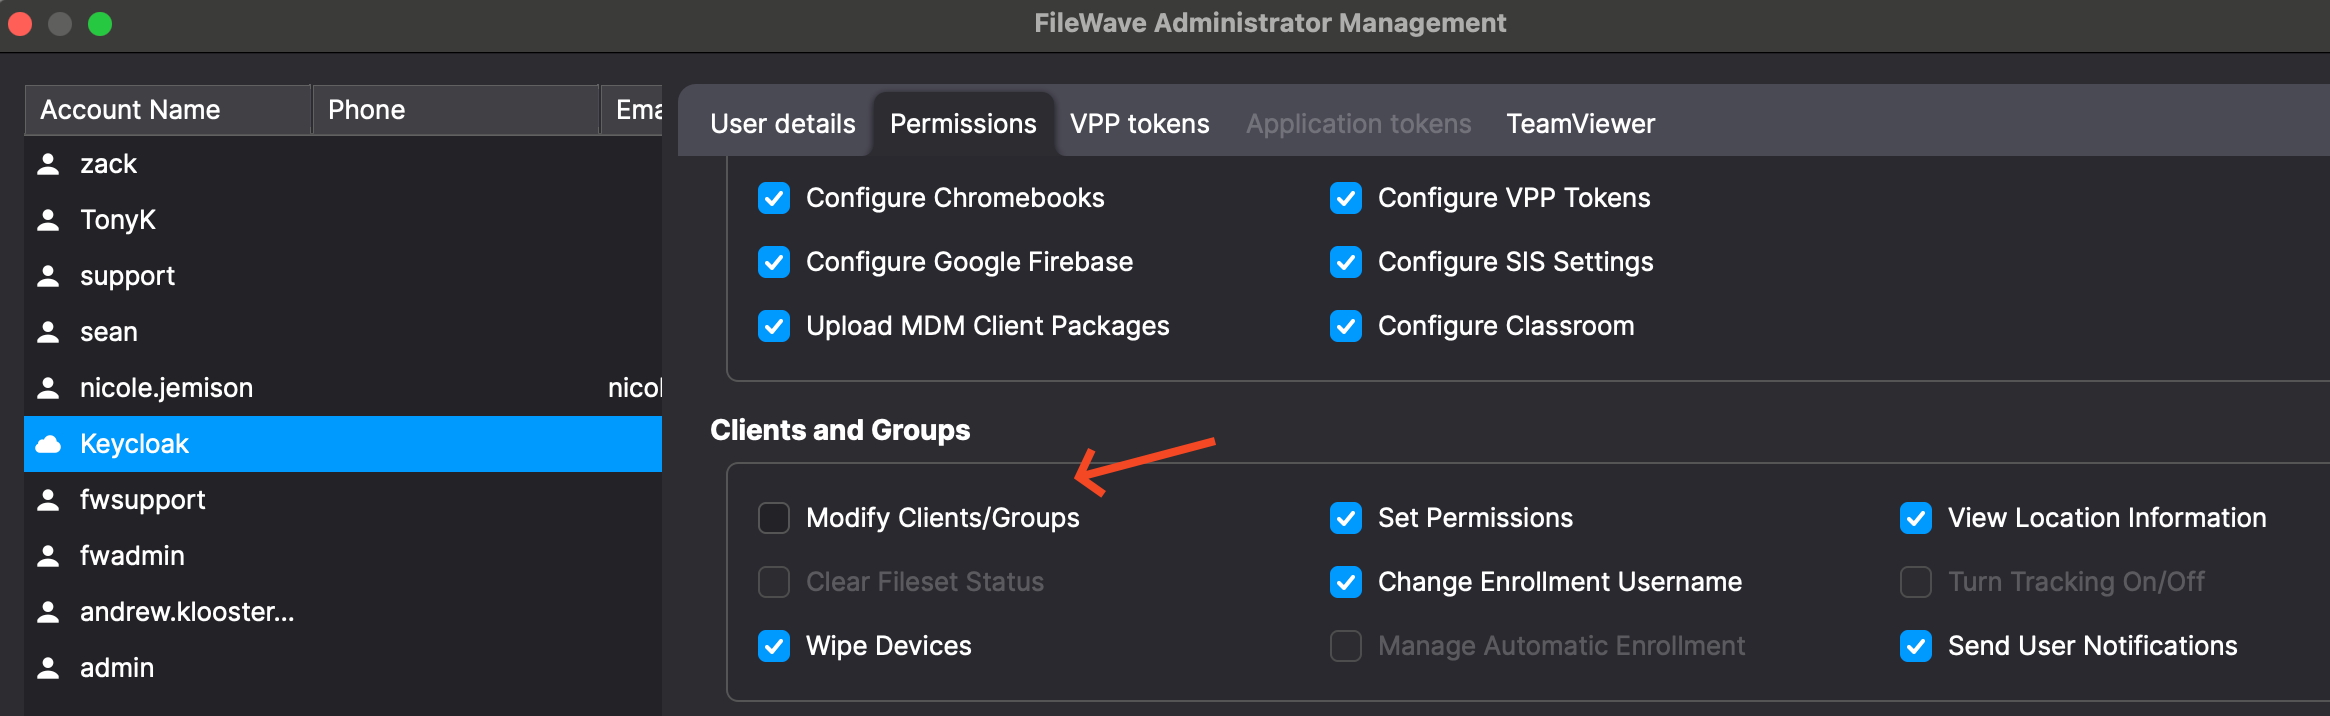
Before you try to use Client Monitor it's important to understand how access to it is controlled. Below is an image of the permissions in a FileWave Server. "Modify Clients/Groups" is the relevant permission. If you do not have this permission then you will only be able to monitor a client, and will not be able to make settings changes. If you do have this permission then you will be able to make settings changes.
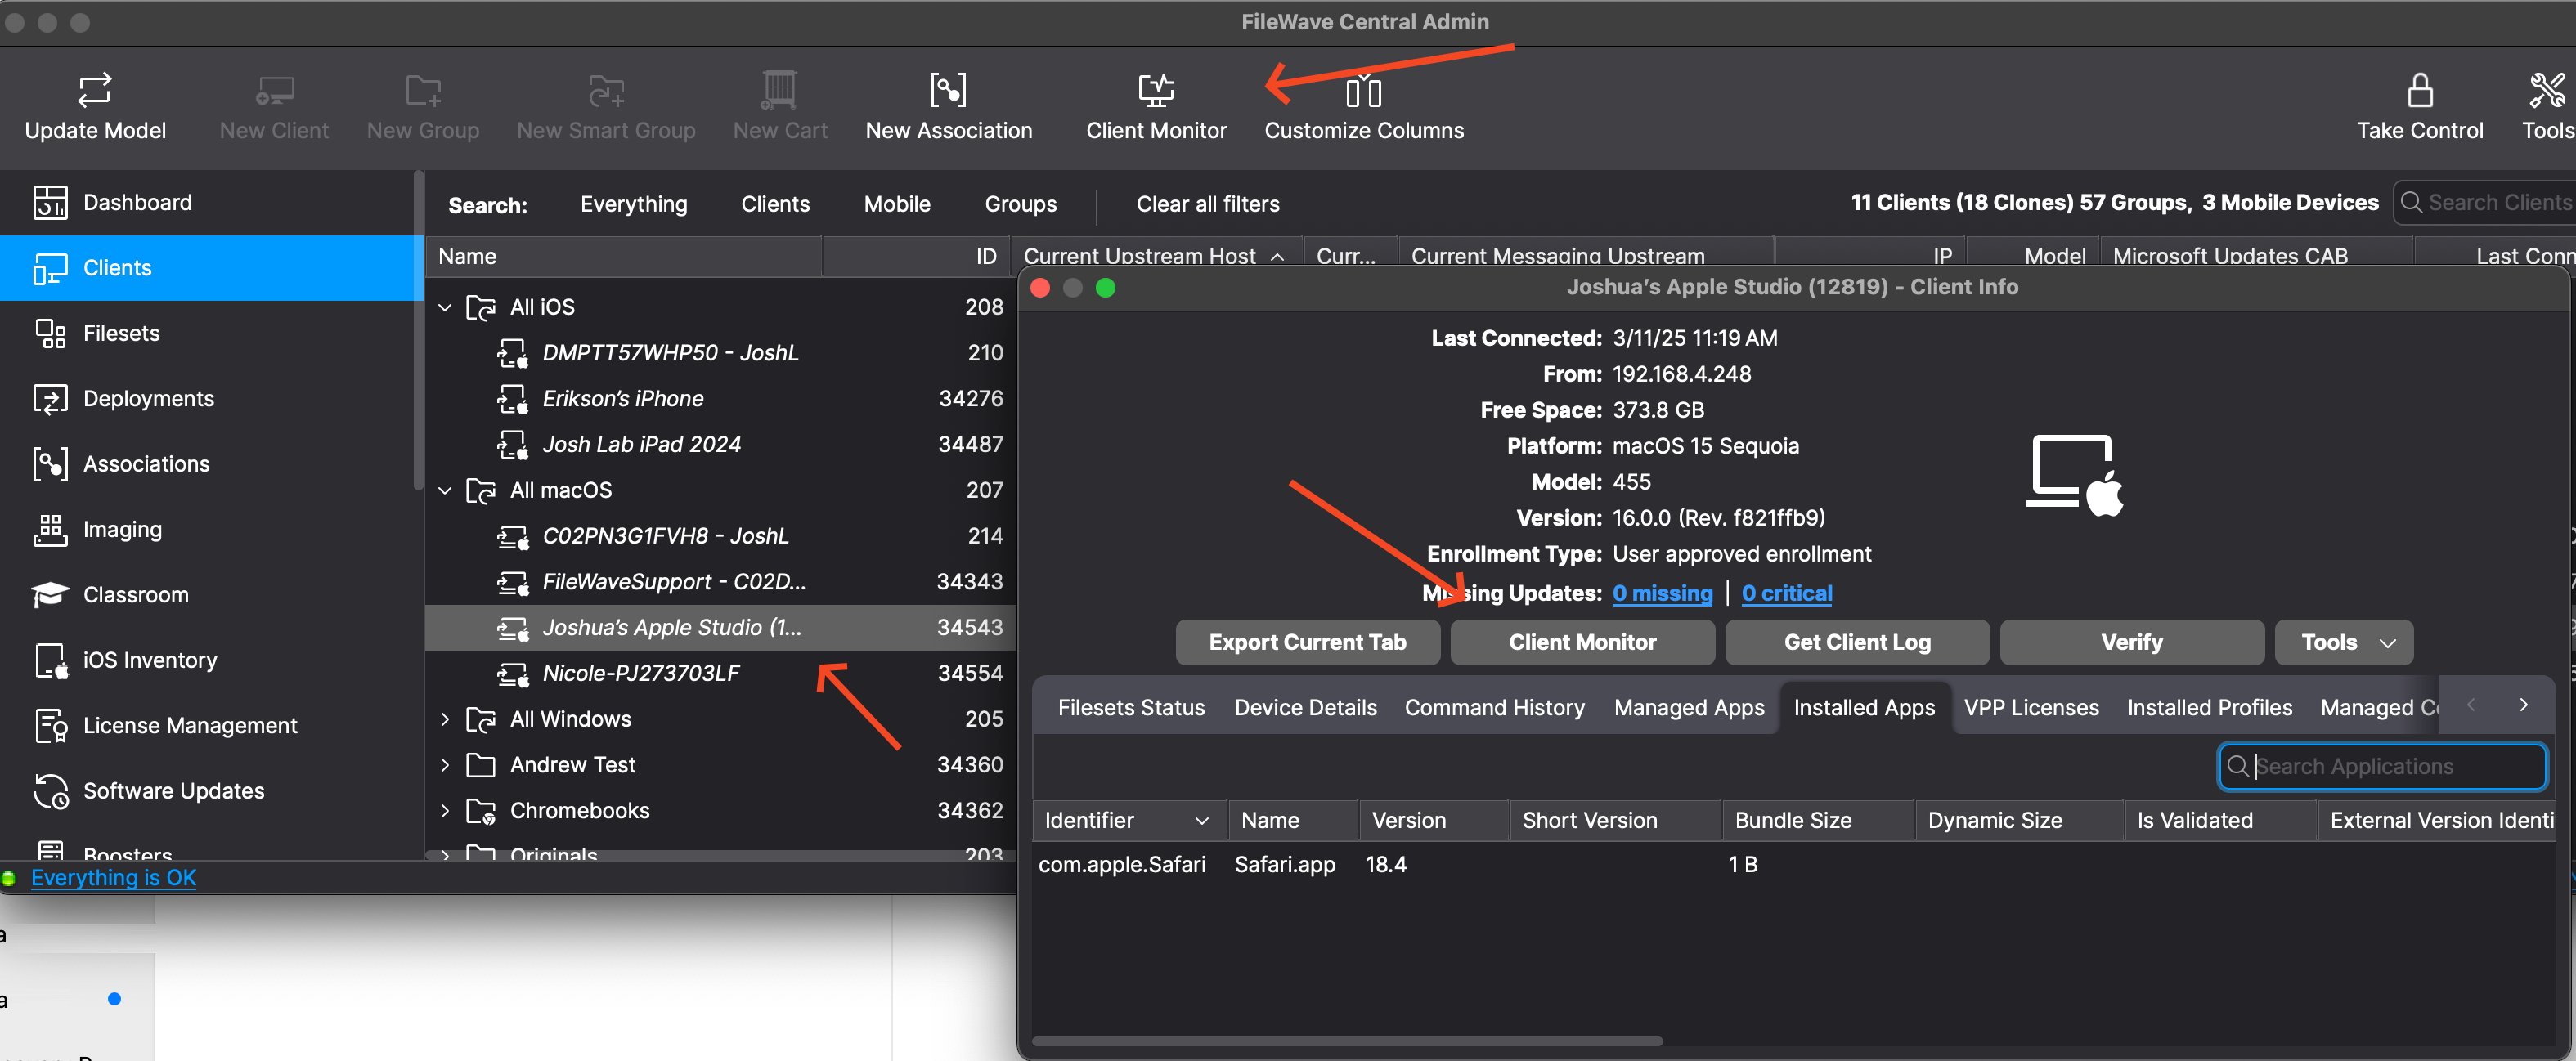
You can access Client Monitor from both FileWave Central as well as FileWave Anywhere. In FileWave Central you can either use the "Client Monitor" button in the toolbar or the button when looking at Client Info.
It should be noted that the new Client Monitor in 16.0+ can not monitor an earlier macOS or Windows client. For this reason we still include the standalone version of Client Monitor that is installed with FileWave Central. You can still use that to monitor an older client.
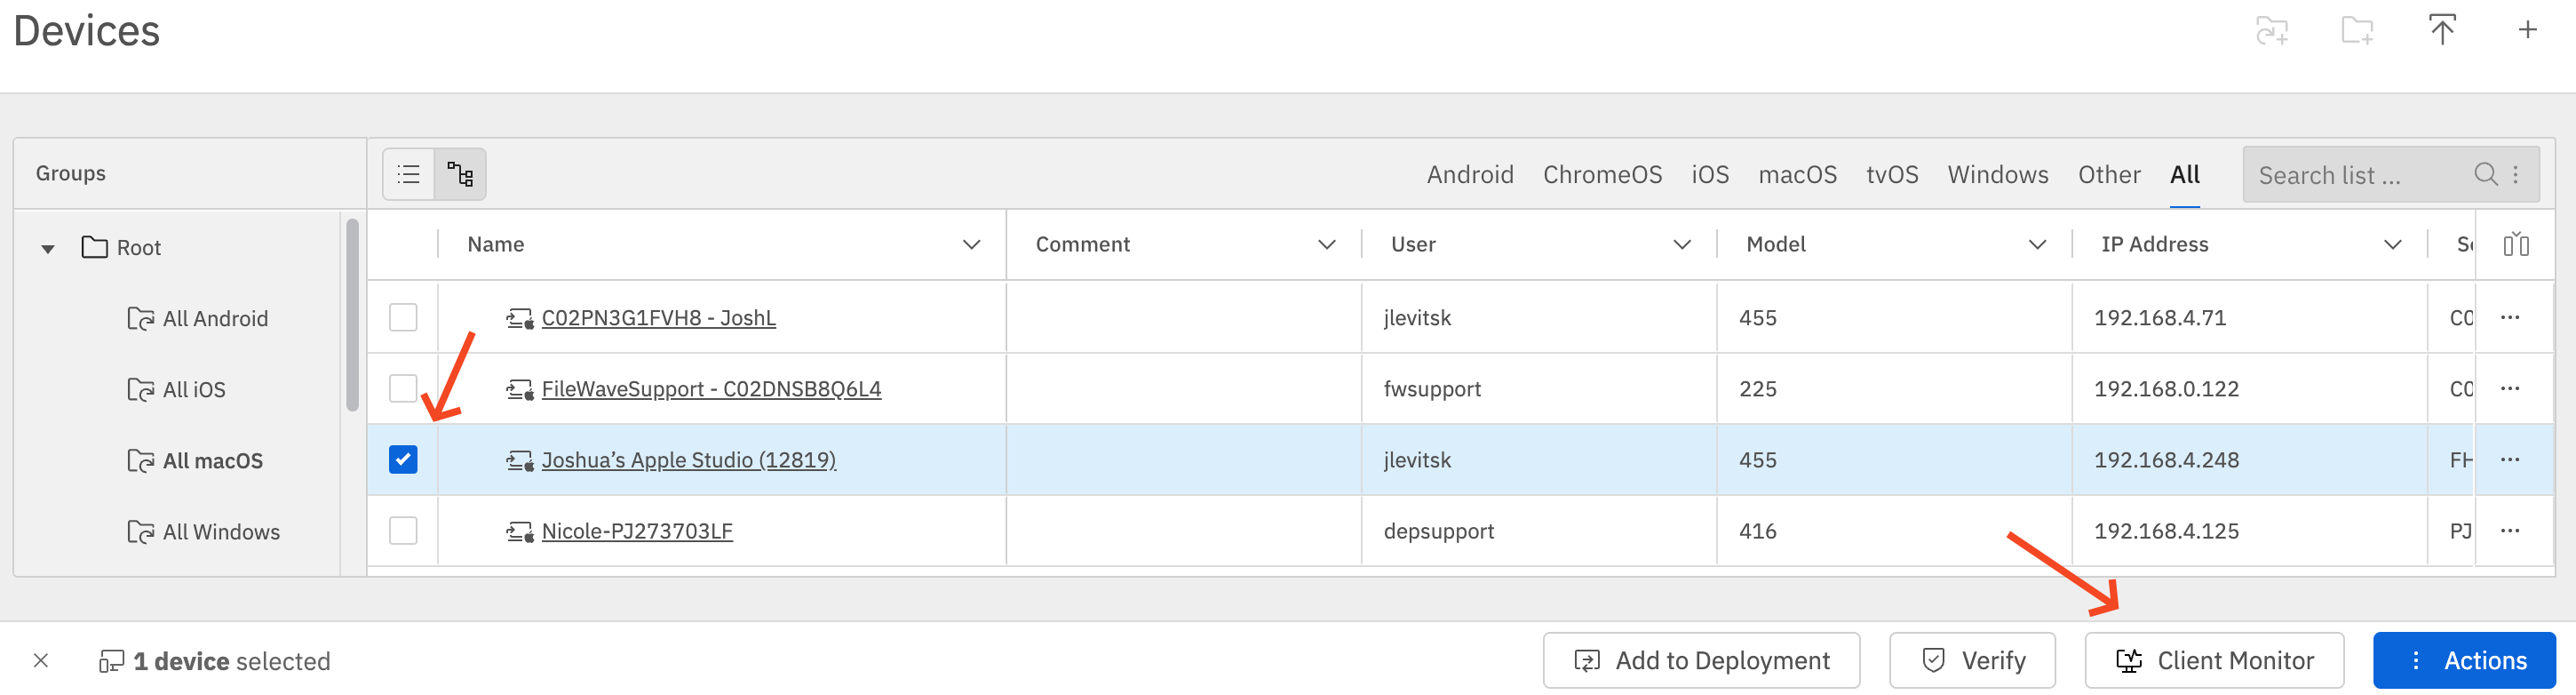
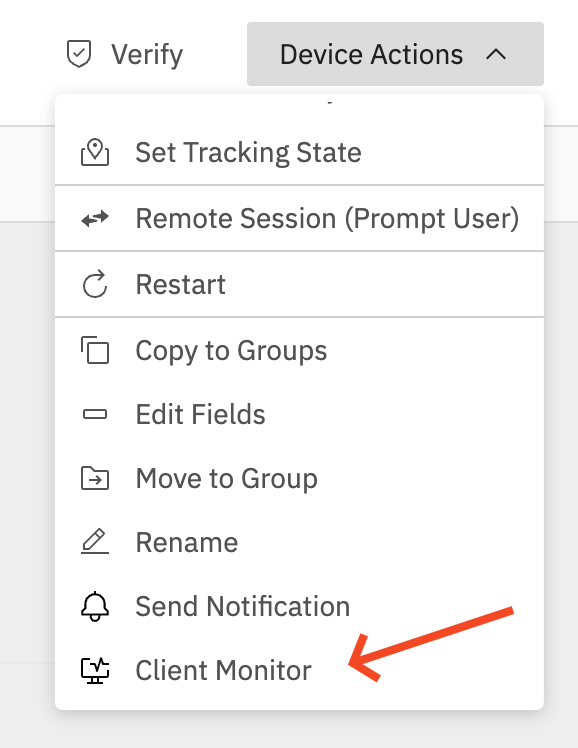 In FileWave Anywhere you can select a client and then pick the "Client Monitor" button. In FileWave Anywhere you can also use the Device Actions menu when viewing a device to launch it. Both methods provide quick access to the Client Monitor.
Now that the Client Monitor is open, you might be wondering how many computers you can monitor simultaneously. FileWave supports monitoring up to 50 devices at once, which should be more than enough for most use cases. However, if you regularly need to monitor more than 50 devices at the same time, let us know!
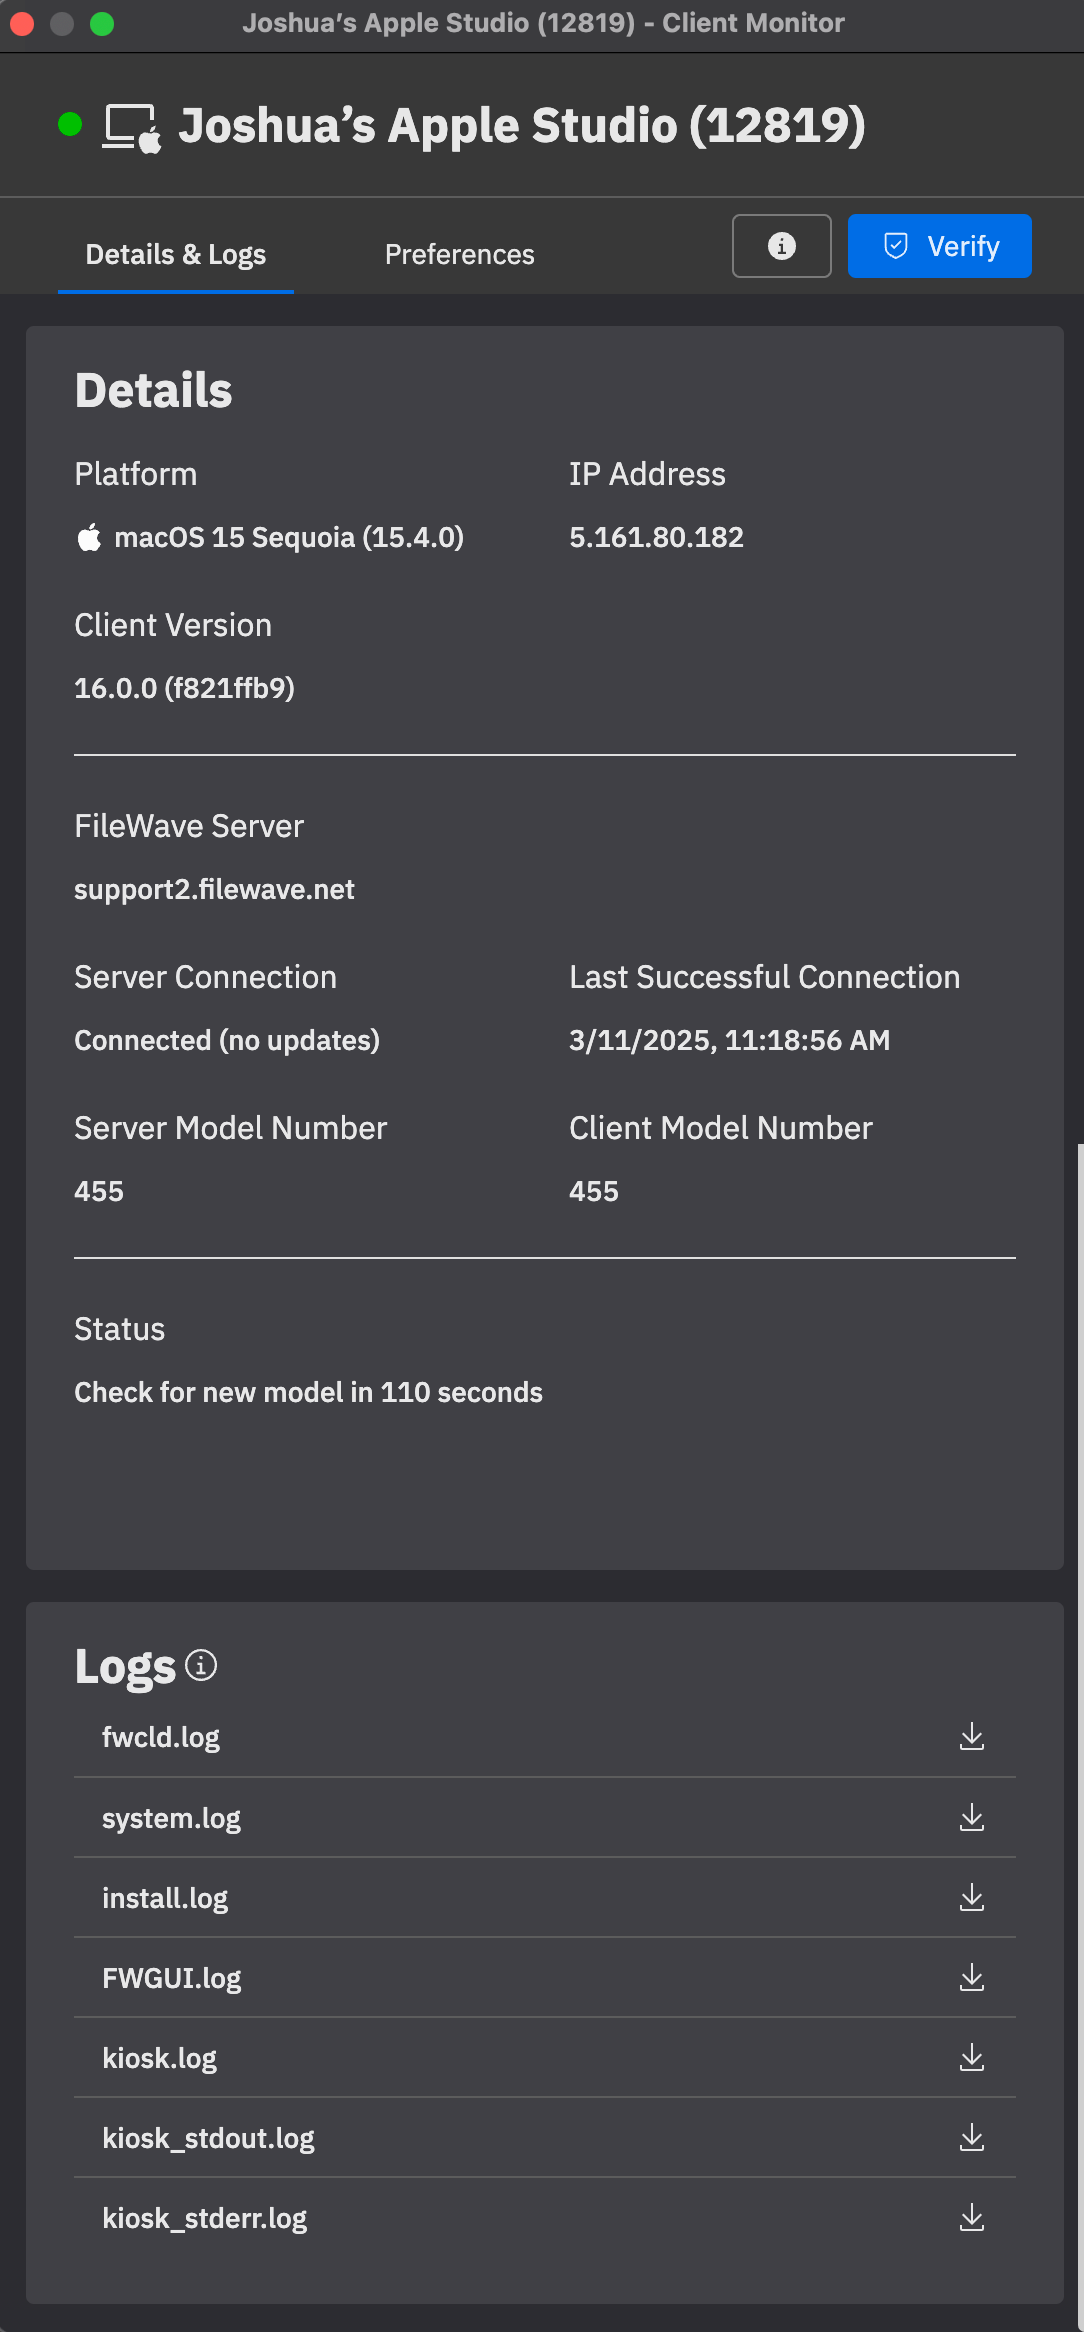
The Client Monitor has two main tabs—let’s take a closer look below.
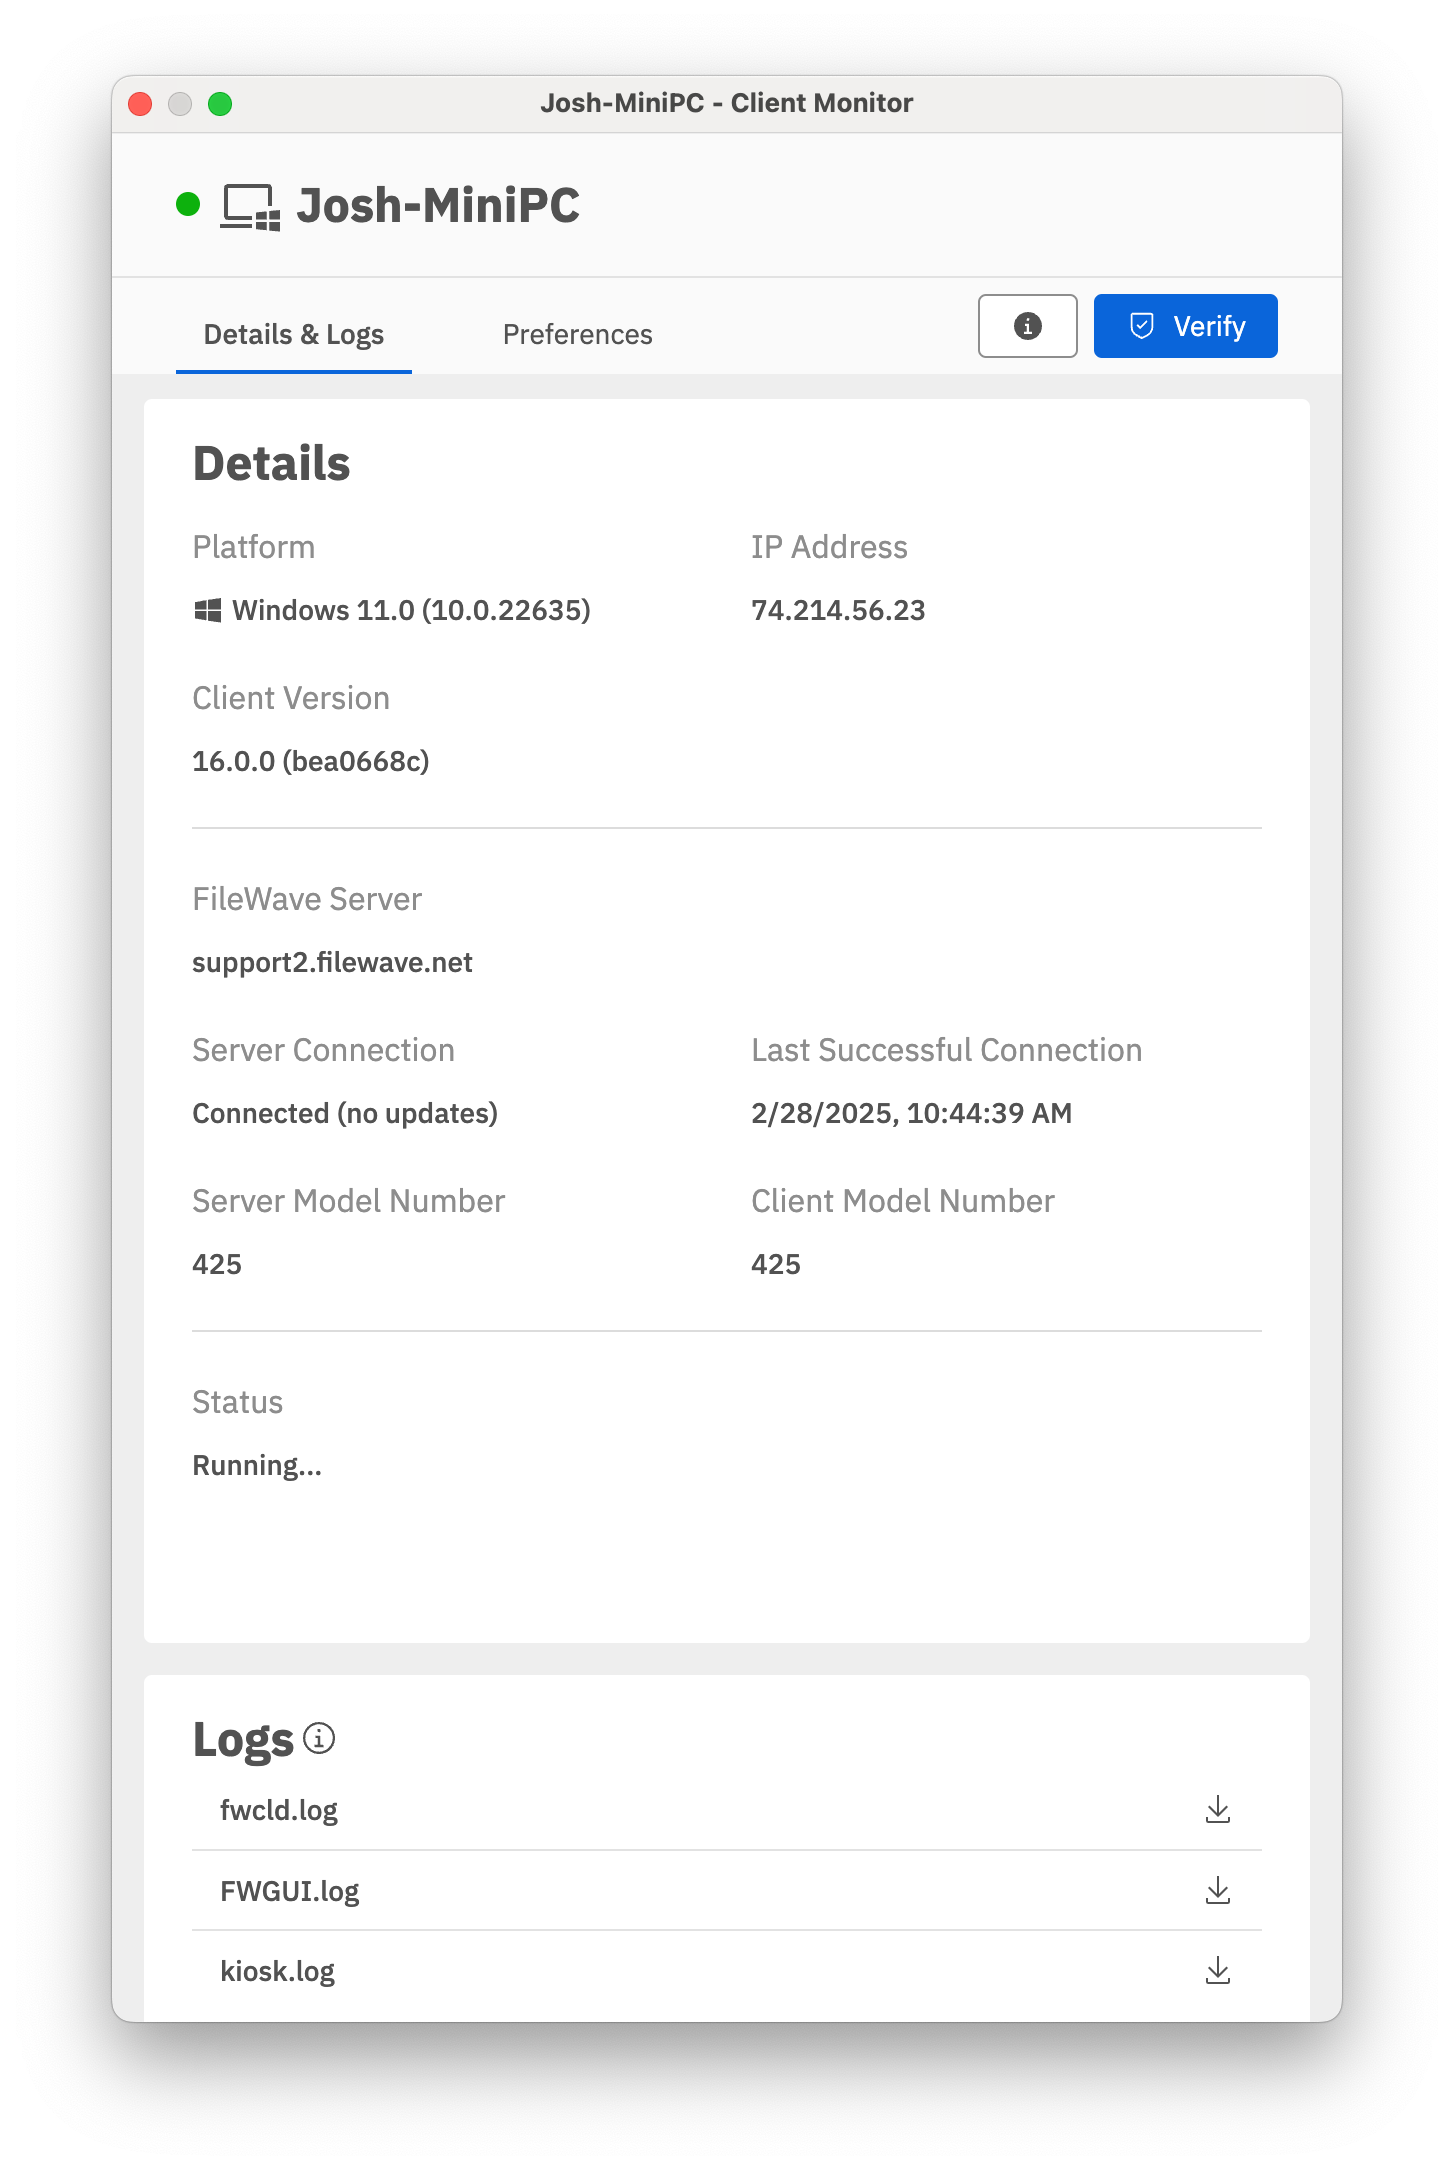
Details & LogsThis tab provides real-time information about how the FileWave Client is performing on macOS or Windows devices. One of the biggest improvements in the new Client Monitor is its use of a NATS connection, allowing you to monitor devices even if they are on a different network. This eliminates the need to manually enter an IP address and removes the limitation of only monitoring devices you can directly connect to within your local network.
Key features in this tab:
|
|
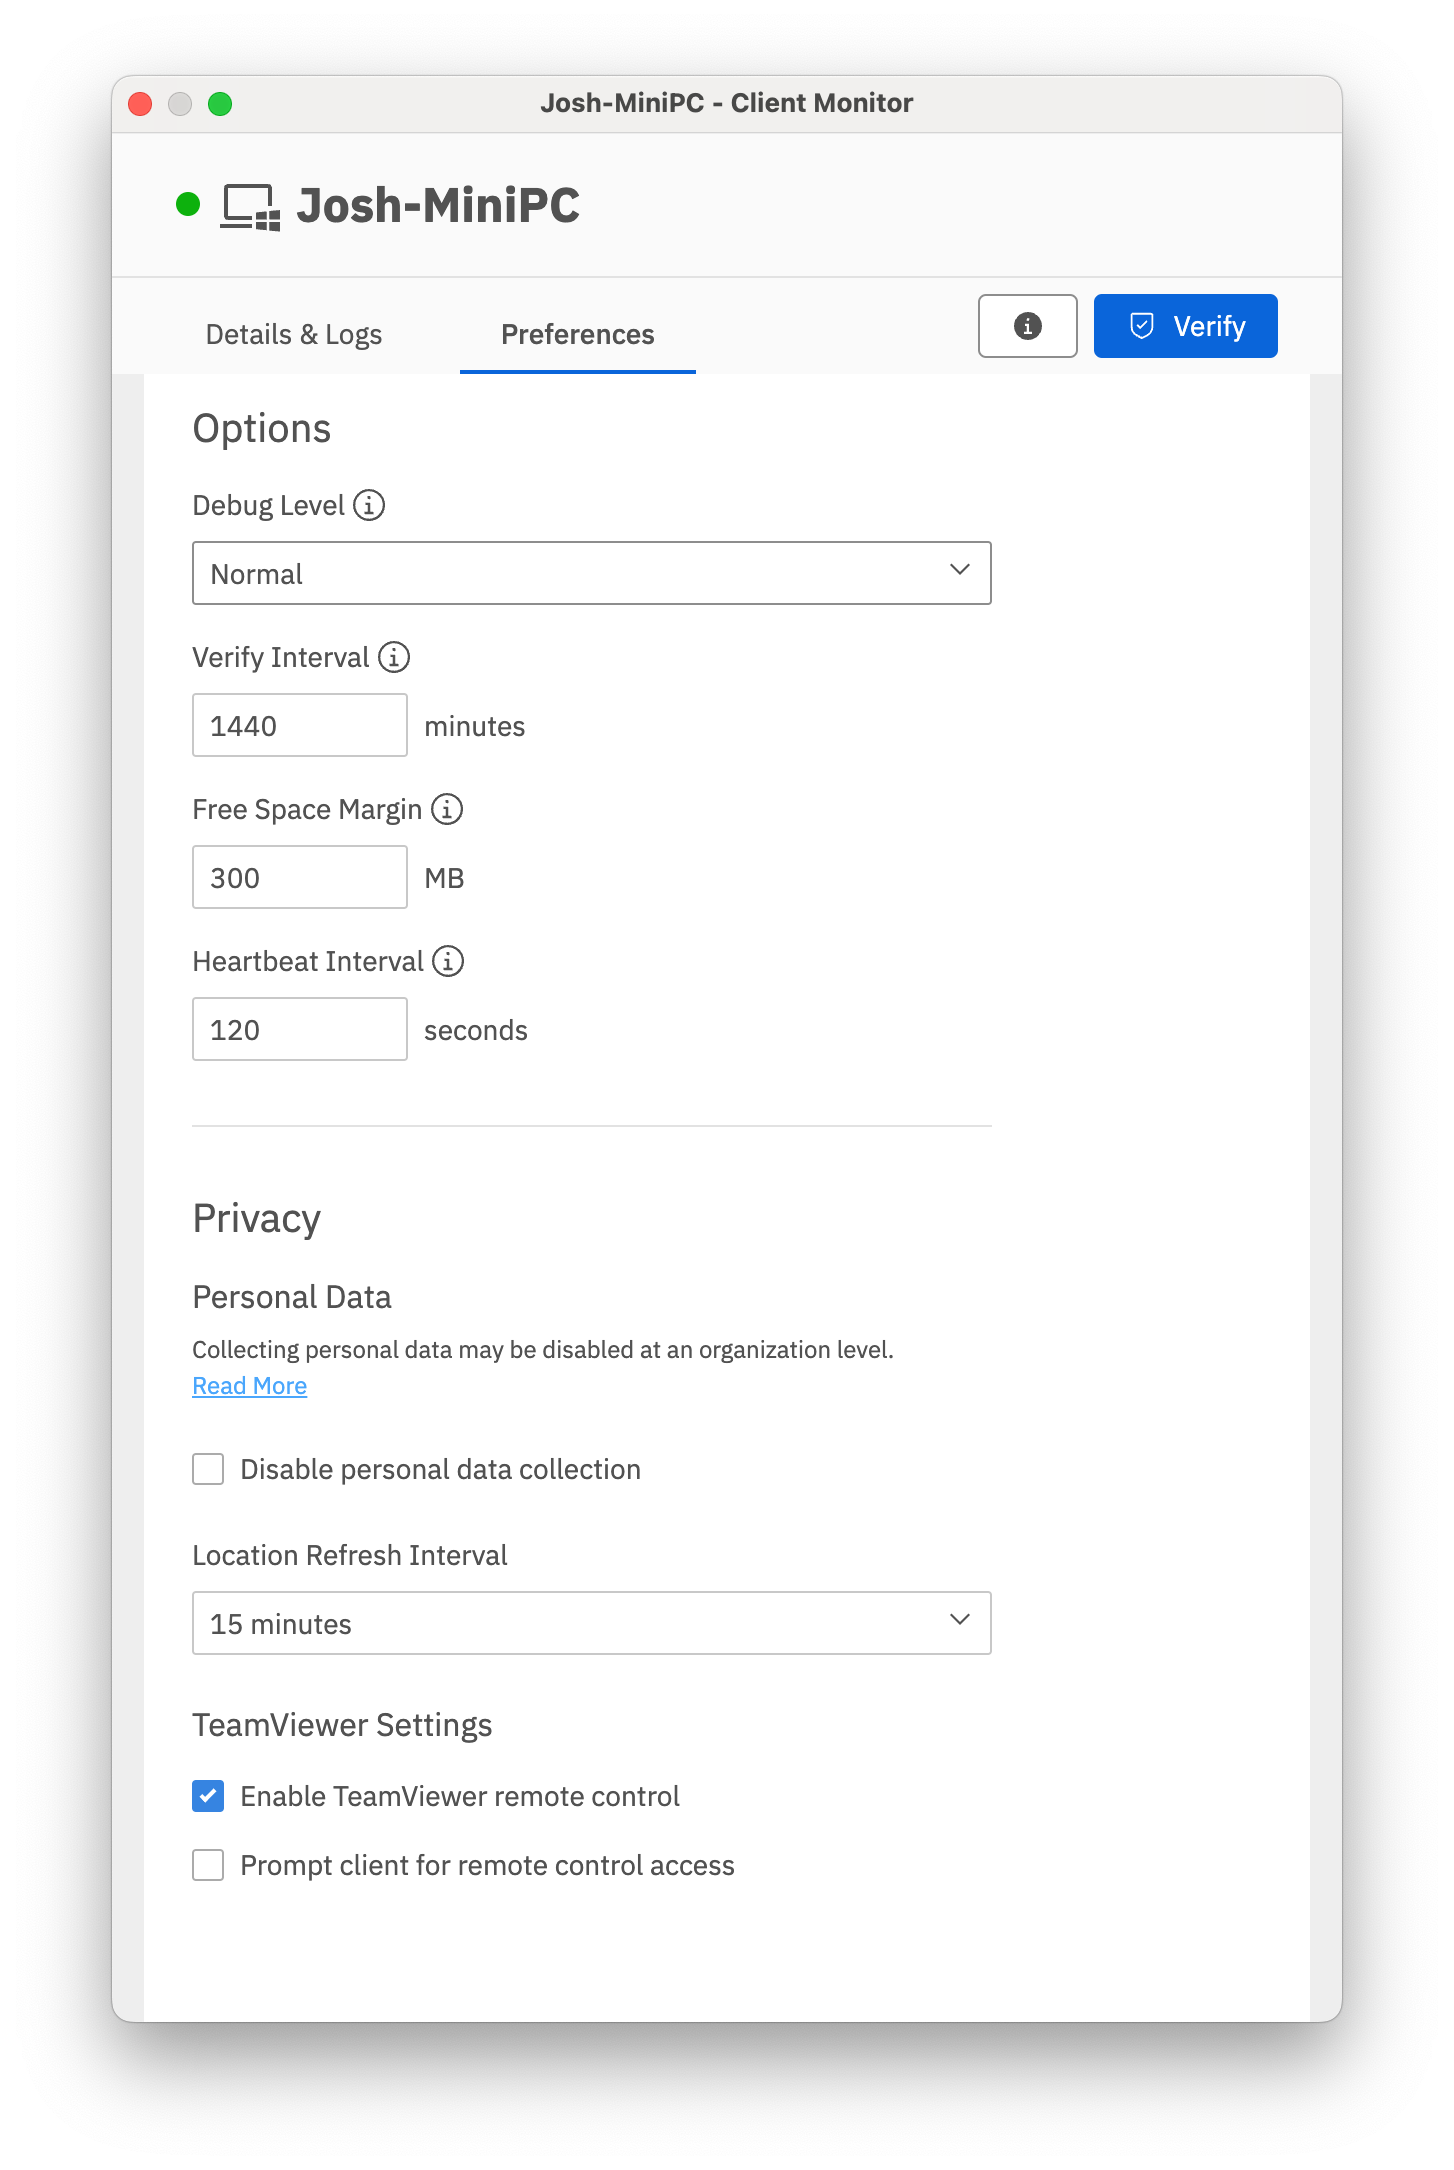
Preferences
This tab simplifies altering/setting the client settings. We’ve streamlined this section to make adjustments more intuitive and effective.
Key settings include:
|
|

Related Content
Conflict Resolution
Prevent Duplicates During Enrollment
A desktop device (FileWave Client) is identified in FileWave by its Client Name and Device Fingerprint. If a device is duplicated in FileWave, enrollment can stop, inventory can be wrong, and deployments may target the wrong record.
- Client Name - The name shown in FileWave Central. This is separate from the operating system device name.
- Mainly used for Fileset deployment and group or association placement.
- Device Fingerprint - An identifier based on the serial number on macOS or MAC addresses on Windows.
- Mainly used for inventory reporting and the client certificate identifier.
Quick answer: If enrollment is blocked by a duplicate client name, duplicate device fingerprint, or client conflict message, resolve the record in the New Client dialog before updating the model.
FileWave will not enroll multiple devices with the same client name or fingerprint. When FileWave detects a conflict, an administrator needs to choose how to handle the new and existing records.
There are three options:
-
Remove the new client
Select this option if you want to refuse the client for now. You can fix the device identifier and re-enroll it later. -
Remove the old client and enroll the new client
Select this option if the old entry is obsolete and can be safely removed. All clones associated with the old client record will be removed. -
Replace the old client with the new client
Select this option if the new client should take over the existing record, including its clones, associations, and group placement.
Resolve a duplicate enrollment conflict
Devices in conflict appear in the New Client dialog. To resolve the conflict, select the device and click Solve Conflict in the bottom-left corner.


Choose the option that matches the situation, then run Update Model.
Use "Replace the old client with the new client" when the device should keep the old record's associations and group placement. Use one of the remove options only when the old record is obsolete or the new enrollment should be refused.
Automated Client Conflict Resolution
What
FileWave can automatically resolve conflicting new desktop clients when they enroll.
When/Why
Client enrollment conflicts are common in production environments. Devices may be re-imaged, certificates may no longer match, or a device may return with a name or fingerprint that conflicts with an existing record. The conflict itself is not the problem; it simply means FileWave needs to know how to handle the incoming device.
Automatic conflict resolution can save time during large imaging or enrollment windows, but it also bypasses part of the protection provided by client-based certificates. Only enable it when the resolution behavior is understood and matches your enrollment process. In higher-security environments, or when you are unsure which action is safe, use manual or mass conflict resolution instead.
Prerequisites
- Automatic enrollment must be enabled. The automatic conflict resolution option is only available when auto-enrollment is enabled.
- The FileWave administrator must have permission to manage automatic enrollment and automatic conflict resolution.
- You should have already tested the conflict-resolution behavior on a small set of devices before relying on it during a large enrollment event.
How
- Open the New Clients/Desktop Clients dialog in FileWave Central.
- Confirm that automatic enrollment is enabled.
- Enable Automatically resolve conflicts.
- Choose the resolution behavior that matches your policy for conflicting clients:
- Ignore new conflicting clients leaves the existing client record alone and refuses the incoming conflicting client for now.
- Remove old clients and enroll new removes the old record and enrolls the incoming client as the new managed device.
- Replace old clients with new lets the incoming client take over the existing record, including its existing clones and associations.
- Click Save to confirm the preference.
Do not enable automatic conflict resolution just to clear a busy New Clients list. During re-imaging or back-to-school enrollment windows it can be useful, but a wrong automatic choice can replace or remove records faster than an administrator can review them.
Related Content
- Automatic Enrollment Permissions
- Manual Client Conflict Resolution (Multiple Devices)
- Prevent Duplicates During Enrollment
Automatic Enrollment Permissions
What
The Manage Automatic Enrollment permission controls whether an administrator can change automatic device enrollment and automatic conflict resolution settings.
When/Why
Give this permission to administrators who manage whether devices can auto-enroll and whether automatic client conflict resolution can be enabled. Without it, an administrator may be able to work with clients and groups but not change enrollment automation.
How
Enable Manage Automatic Enrollment for the administrator in the FileWave Administrators assistant under Permissions > Clients and Groups:

When this permission was introduced, existing administrators with Modify Clients/Groups automatically received it. For new or restricted administrator accounts, review this checkbox directly instead of assuming it is enabled.
Related Content
Manual Client Conflict Resolution (Multiple Devices)
What
Use manual conflict resolution when several newly enrolled clients need the same conflict decision. Resolving those conflicts together is faster than opening each device one at a time.
When/Why
Client conflicts are common during reimaging or refresh projects. For example, wiping a device and setting it up again with the same name can create a conflict because the new device certificate does not match the existing record. Use bulk resolution only when the selected conflicts should all be handled the same way.
Device enrollment conflicts based on name, fingerprint, certificate, or similar identity data help prevent duplicate records and protect device identity. Test the resolution on one device first, then use bulk resolution only for conflicts you have grouped and reviewed.
How
To resolve multiple conflicts at once, select the records in the New Clients window, then choose Solve Conflicts:

Sort by the status column to group similar conflicts before resolving them.
In the conflict window, click Show Details when you need to inspect why the selected devices are in conflict:

In the detail view, you can inspect any particular device:

In the resolution window, choose how to resolve the selected devices, then click OK. The example below replaces the existing records with the new clients.

Related Content
Understanding FileWave Clients, Groups, and Smart Groups
Client operations
The FileWave Client needs to be installed on computers that you want to manage with FileWave. The FileWave Client should to be given a unique name so that the FileWave Server can identify the FileWave Client. During startup, the FileWave Client reads its configuration file to initialize its settings. The most important setting (aside from Client Name) is the FileWave Server address. The Client uses this IP or DNS address to attempt to connect to the FileWave Server.
If the FileWave Server can't be accessed for some reason, the FileWave Client waits for a specified amount of time (Tickle Interval - default is 120sec, and can be altered as needed) before it tries to connect again. If the FileWave Server is available and the FileWave Client authenticated successfully, then the FileWave Client checks the model version on the FileWave Server. If the model version of the Server is greater than the last value found by the FileWave Client (stored in it's Catalog file), then the FileWave Client will request to download a manifest for the current model.
The manifest is a list of Filesets that are associated with this Client. The database model version is incremented each time an administrator updates the model. Following a model update, the Client reads the new manifest and executes any actions required. This includes downloading and activation of Filesets (adhering to any time attributes), deletion of Filesets, deactivating Filesets (but leaving the contents in place on the computer for possible future reactivation), and update commands for existing Filesets . When downloading Filesets, the Client attempts to download from the first Booster listed in its preferences, or the Server if no Boosters are set.
One other piece of the workflow that may be needed is Apple's Configurator tool. If you are deploying iOS devices and want to supervise those systems, you have to either use Apple's Automated Device Enrollment (ADE) or Apple Configurator, which requires 'tethering' the devices using a Lightning cable.
FileWave Client
The FileWave Client itself is a process (fwcld) that runs as a daemon on a Client. The visible effect of a client is usually the Kiosk, FileWave's self-service tool. On macOS and Windows computers, the FileWave Client is installed using a .pkg (macOS) or .msi (Win). On an Android device, the Client is downloaded and installed as a .apk directly from FileWave during the enrollment process. All FileWave Clients include the self-service Kiosk, which will be visible when content is assigned to the device for user-controlled install, and can be made permanently visible through a configuration setting.
FileWave Groups
FileWave Clients can be gathered into fixed Groups for convenience. The Groups can be named and populated as needed. The advantage of fixed Groups is the ability to associate content with Groups versus having to pick out individual clients. A FileWave Client can be assigned directly to a Group, or you can create a Clone of that Client to assign it to the Group.
Smart Groups
In FileWave, you can create dynamic Groups based upon selective inventory queries, such as "All devices with these fonts" or "Devices that are not running the latest security update." A Smart Group allows you to isolate specific devices and perform actions on them as part of your management workflow. The devices that show in Smart Groups are Clones, as distinguished by the italicized Client name as well as the upward hooking arrow on the lower-left side of the Client type symbol.


More ideas for Smart Groups are provided in the Inventory Chapter, such as using a Smart Group to track down and remove rogue software from devices.
For Smart Groups that need faster membership updates, see Fast Smart Group Evaluation.
Clones
Instead of assigning FileWave Clients to a single Group, you might want to have a Client assigned to several Groups - such as "Building 7" and "Admin Dept" at the same time. Creating Clones can make this possible. A Clone is essentially an alias of the Client. A device can have several Clones. All assigned to different Groups. Clones can have content (Filesets) associated with them, just as Clients can. The advantage of using Clones is that you can assign Clones of a client to many Groups; but you can assign a Client device itself to only one Group.
Last Connect vs. Last Connected
What
The similarly named Last Connect and Last Connected fields track different device activity. This article explains what each field means and when to use it.
When/Why
Use these fields when you need to understand when a device last communicated with the FileWave Server or last submitted inventory data.
How
The values can look inconsistent at first because they come from different data sources. The following image shows both fields:
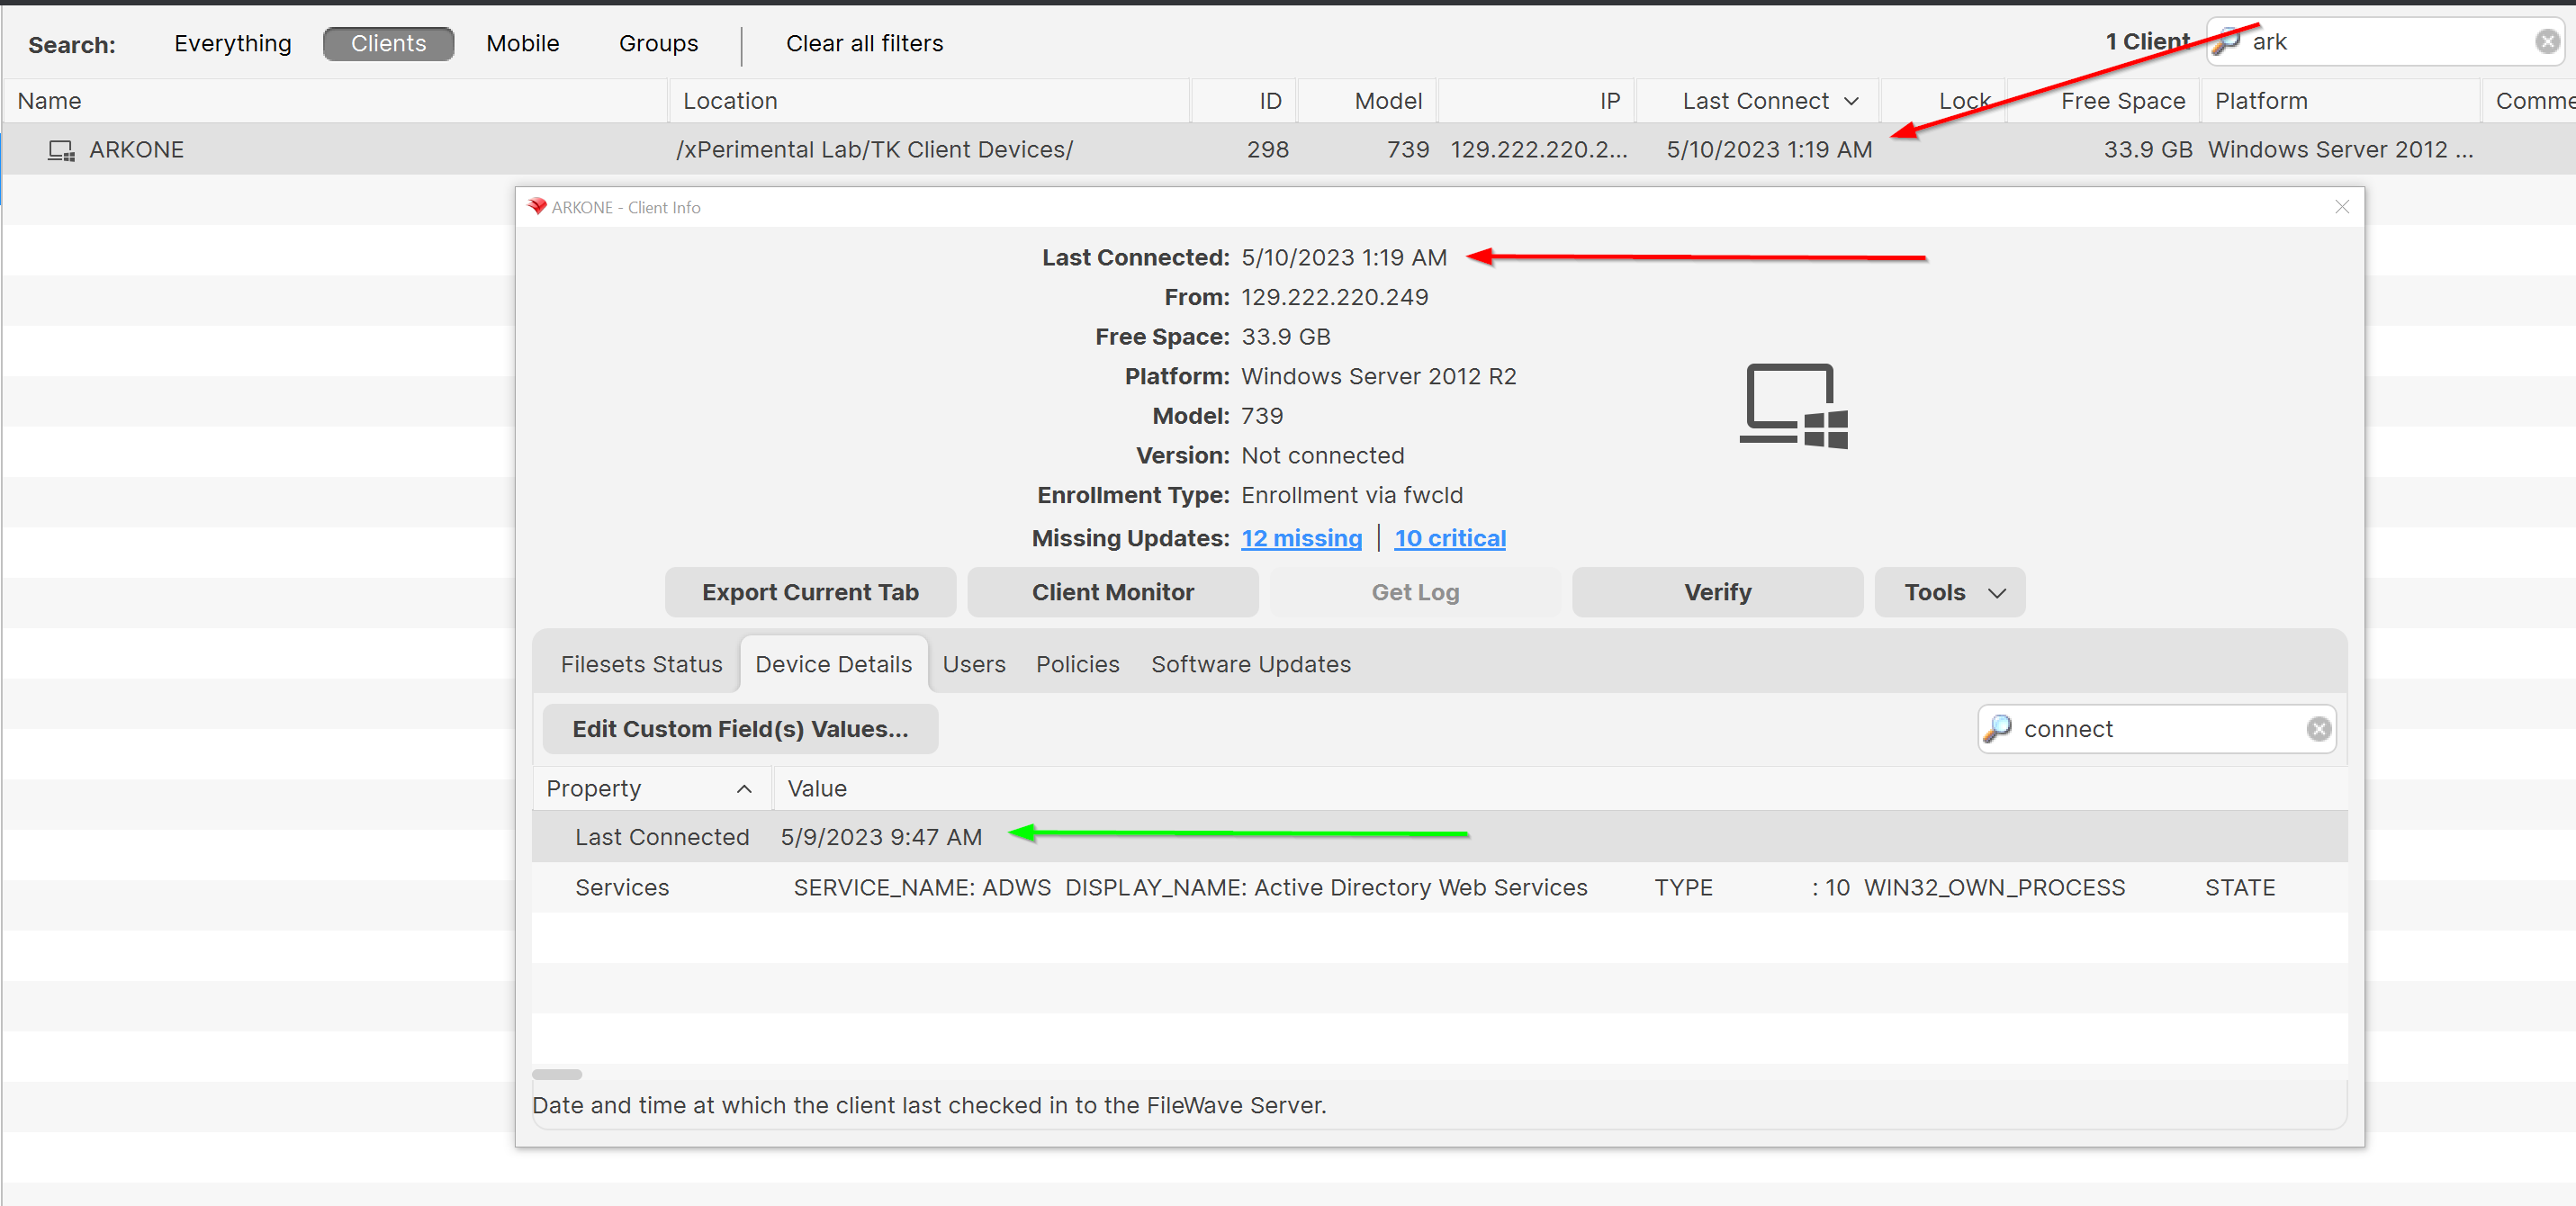
In the above diagram, the "Last Connect" you see highlighted by the red arrows is the last time the device spoke to the server at all. Devices reach out to the server differently depending on the operating system. The red arrowed fields are NOT included in inventory and are only meant to show "pings" from a client device. Basically, this value means that we "heard something" from the device. On macOS and Windows, the client will "tickle" every two minutes and update this value. No other platforms modify this field, so for iOS, Android, and Chrome, the only "Last Connected" time is the field that is in inventory.
For ALL platforms though, the field highlighted by the green arrow is the inventory field that is updated whenever the device sends inventory information to the server. That is, this date indicates the last time the device sent information about hardware, software, and custom fields. For macOS and Windows, this value will ALWAYS be different from the last tickle time. And the data in this field is important, because it tells you how old the "data" is about this client.
This field is useful for troubleshooting devices that may not be reporting inventory and for excluding stale inventory from Reports. For example, if you build a Report for devices that have not updated virus definitions in the last 3 days, also add criteria requiring inventory data from that same time frame. That prevents devices with stale inventory from appearing in a Report where they could not yet show updated definitions.
Inventory Queries (Reports)
Creating and Editing a query
This will discuss how to create and edit a query.

When you create a new query, you start by giving it a name and choosing a starting criteria - in this case, we want to have all of our clients report back if they have an application containing the name "chrome". Next, we decide what fields will be displayed when the query executes.

As you drag and drop component fields into the display window, FileWave immediately begins filling in the blanks with data from your Clients. You can re-order those fields by dragging them back and forth until you are satisfied with the results. You should choose a Main Component, which is the index field for the query. For example, in this query, if the main component was the application, then you would get a report that showed every instance of "chrome" that existed in the database. The results would display every instance of the Chrome application, even if it was stored away from the Applications folder and not being used.

By choosing the correct component, and the right criteria, you can create queries that will tell you exactly what you want to know. In the main Inventory window, you can select your query so that it will display just by clicking on it.

Components
Key to being able to create a useful query is understanding the components you have access to. Here is a sampling of those items:


One of the most important new component types is the custom field. There are four different sets: Boolean; DateTime; Integer; and, String. You can create custom fields to go beyond the basic information provided by the Clients to look for unique combinations that include searching for files created prior to a certain date, or add marker files to clients that include a filename or text that meets custom criteria. You do this by passing arguments to the fwcld command.
The general format used to set any custom.ini value (including new keys) follows this format:
$ fwcld -custom_write -key <key_name> [-value <value_to_save] [-silent]Examples
Setting "custom_bool_13" to a false:
$ fwcld -custom_write -key custom_bool_13 -value 0
$ fwcld -custom_write -key custom_bool_13 -value falseSetting "custom_bool_13" to true:
$ fwcld -custom_write -key custom_bool_13 -value 1
$ fwcld -custom_write -key custom_bool_13 -value true
$ fwcld -custom_write -key custom_bool_13 -value somethingSetting "custom_date_02" to a date:
$ fwcld -custom_write -key custom_date_02 -value 2014-02-20T15:22:43To remove any key value, just leave off the -value parameter - so to reset the "custom_date_02" value back to it's default.
$ fwcld -custom_write -key custom_date_02 Notes
- When a provided key name matches integer, date or boolean custom field names - the program will validate the provided input. If this validation fails, an error message is printed and the program will exit without setting the custom.ini value.
- When any failure to set a custom.ini value occurs, the program will exit with code 1, if setting the value succeeds the exit code is 0.
Add FileWave Custom Inventory fields remotely using a Fileset
Expressions
When you add an expression, the logic generally revolves around "is this thing true or not?" What you actually get to work with is a list of possibilities, such as "this is exactly what I am asking for", "this contains the thing I am asking for somewhere in the field I am looking", "this begins/ends with the thing I am looking for", or the all time favorite "is null" - which means the field I am looking at has no value set at all. Of course, you also have the opposite of all these with not - is not, does not, etc.
In this example, we are looking for any instance of an application where the name contains the text "minecraft" -

Field values
The whole purpose behind the query is to get useful information out of inventory. You do this by adding fields to display the results of answers to your query. In Inventory, you access the same components you use as criteria for the search as the display fields. In our example, we are looking for "minecraft" but if we left it at that, all we would get back from the FileWave database is "yup, I found it. Now what?"

Here's the result without us asking for a more detailed result. This is the database telling us that it found "minecraft" with no clue as to where it is on any of the clients. So now, we are going to clean up the view and add the component "device name" so that our query will tell us what device this is on.

You can see how a simple query can be constructed, and that it can prove quite useful to just look for some simple answers. Next, we are going to look at some more powerful examples of queries that you can put to use.
Example - Tracking application usage
A powerful tool in the Inventory / License Management is the ability to track application usage. You can create queries that display the amount of time any managed device is using any installed application. An easy example here would be to look at who is using a specific browser and how often.
The query is built based on locating an application - in this case, Google's Chrome web browser. However, instead of just locating the application as we did in the first example, we are going to find out how often that item gets used. FileWave provides application usage components for this purpose. Here's the query with its display fields:


You can see that adding the proper fields, as well as choosing the proper index or Main Component for the display, you get a good bit of information from this query.
Example - Identifying VPP applications that support device assignment
With the functionality in Apple's VPP of directly assigning applications to FileWave client devices, you have the challenge of finding out which of your many applications support that feature. Here is a query you can set up to determine which of your deployed Filesets support device assignment.

The Fields include the product name and, most importantly, the Device assignable flag. The results don't show every VPP application and its status, only the ones that are already active.
Demystifying Inventory Queries
Description
Inventory queries are fundamental, both for reporting and Fileset deployment. For basic details for queries, please take a look at Creating and Editing a query
However, if the query isn't correct, then you could end up with incorrect reports or worse still incorrect Fileset deployments or removals.
Information
So as well as the above section of the guide, additionally there are some example queries built into the Admin console: What are Sample Queries?
Sometimes though, you need something that is a little more complex or you can't quite get the right results. Some considerations when making queries:
- Do you need the query
- Does the criteria match the desired expectation
- What Main Component should be used
- What Fields do you need present
Following are some examples to demonstrate this.
- Devices that do not have an application installed
- Unexpected Entries
- None and Not
1) Devices that do not have an application installed
Do you need the query?
This seems like an odd question, but why is this required? If Filesets are associated they should be installed, if not already, at the next check-in from the device. If the software has failed, then this is already available through the Report window. Perhaps they aren't in the right groups to be associated though or maybe the device hasn't checked in for a long time. Creating a Smart Group based upon an application that is not installed though, will not change the installation status if there is already an association and the App has failed to install.
Does the criteria match the desired expectation?
In this case, we want the devices that do not have an application installed. Using Firefox on macOS as an Example.
Drag in 'Application' > 'Name' to the criteria and set the following:
- Application/Name
- Is
- Firefox.App
Note we have 'Is' selected. Selecting 'Is Not', 'Does Not Contain', etc will not yield the desired results. Selecting 'Is Not' for instance, will list all devices that have any application on those devices that are not called Firefox.app. In essence, this will be all devices, those with and those without Firefox. Instead, we tick the Not box.
By using the Not box, it gives the reverse of the query. List all the devices that have Firefox and then give the opposite result (based on the Main Component, which will be covered next).
Since this is a MacOS query, then additionally the OS Type can be added:
- OS Type
- Is
- macOS

What Main Component should be used?
The main component is the key ingredient that the criteria will be based upon. Imagine two fields: FileWave Client Name and Application > Name
With the main component set to Application, the query will be:
- Show all Applications that are not Firefox.app
A query set up this way will therefore show all devices, as any App that is not Firefox.app will be a successful hit on this search

With the main component set to macOS/Windows Device, then the query will be:
- Show all devices that do not have Firefox.app
This will be a different set of results, as now any device that has Firefox installed will no longer show. This is the desired result.

What Fields do you really need present?
The above has given the desired result, but there are multiple entries per device. From a Smart Group association point of view, strictly speaking, this should not matter. There is only one of each device in reality, but it makes it hard to read and does not work well as an Inventory Query for reporting. As such, removing any relationship that will create a 1:many relationship would be ideal, such that there is only one result per device.

2) Unexpected Entries
Sometimes some entries seem unexpected. This is usually related to one of the query items in the last example not being set as expected. From the last example, changing the Main Component to Application will still have an undesired result, as this will be searching the criteria against Application entries in the database even though that Field is not shown. There will still only be one entry visible per device, but the search is now listing all Applications that are not Firefox, so every device.

It is possible though, that with an incorrect Main Component and certain fields added, the output can appear confusing. Start with a fresh Inventory query and by setting the following, many entries can be seen with no FileWave Client Name:
- No Criteria
- Add FileWave Client Name as a Field
- Add Operating System as a Field (by dragging this in, all sub-inventory items for Operating System will be added to the Fields view).
With the Main Component set as Operating System, there will be many entries with no FileWave Client Name.

This will be because entries have been made into the database from machines running these OS versions that are no longer appropriate for any of the active devices. Changing the Main Component can provide a true representation of the current installed OS versions.

Saving the above with the Main Component set as Operating System these entries can be seen to have no client. Right-click on an entry. As well as Copy, is there the option to Reveal Client:


If there is no Client to Reveal, then there is no representable entry in the database. If you have a FileWave Client Name that shows but does not have the option to Reveal Client, it may be an old static record that will require manual removal. In this instance, you could contact support and they would be able to assist in tidying this up.
Inventory Only and Archived Clients
When attempting to Reveal Clients, if the client is either Inventory Only or Archived, the relevant option to view these would need to be set through the contextual Menu Item
3) None and Not
Not can in many instances be more useful. A question was posed:
"We would like an Inventory query to show devices that have multiple specific Filesets installed. The issue I am seeing is that if you try to enter multiple Fileset IDs to an inventory query it will show no results because I am guessing it is trying to look for every Fileset to have multiple IDs. So basically I want to find a device that has Fileset 1, 2, and 3, installed and they must have all 3 to go into the query."
Taking from the information above, the negative logic will be seen to be the approach. Trying to search for each of these using positive logic will again not yield the correct results. Instead, Not can be used with desired results when mixed with None.

Take some time to think about how this works. Understanding this will make Inventory Query building in general more successful and ensure you don't have unexpected results.
What are Sample Reports?
Admins often ask where the old Sample Queries went and how to get the sample report examples in current FileWave versions.
Purpose
Sample reports are best treated as starting points. Some are ready to use, and others are examples you can duplicate and adapt when building your own reports.
Where to find them
Starting with FileWave 16.3.0, Sample Queries are no longer included directly in FileWave Central. The current workflow is to import the Example Reports Content Pack from the Reports area.
In FileWave Central, open Reports and choose Import Reports.

The Import Reports button opens the FileWave Content Packs window. Select Example Reports, choose the platform components you want, and click Import.

Older FileWave versions may still show Sample Queries or Inventory Queries in Central and in older screenshots. In FileWave 16.3.0 and newer, use the Example Reports Content Pack instead.
Resolution
Example reports are provided for two main reasons:
- They provide prebuilt common reports so you can get started quickly, such as reports for device operating systems across Android, ChromeOS, iOS, macOS, and Windows.
- They give you examples for building more complex inventory reports that use FileWave inventory, hardware, software, and custom field data.
Additional Information
For best results, duplicate an imported report before modifying it so the original remains available as a reference. If you re-import the Example Reports Content Pack later, be aware that reports included in the pack may be overwritten.
How do I export the results of an Inventory query?
Description
Results of Inventory Queries are viewable though the FileWave Central App. However, if other members of staff require these details, then those results may need exporting.
Requirements
- Mainly, just the FileWave Central App
- Optionally (for Scheduled Reports), Email configured in FileWave Central > Preferences
- Optionally (for API method), API token
Steps
Export View
With any Inventory Query actively being viewed in FileWave Central, use the Drop Down menu option 'Export Current View':
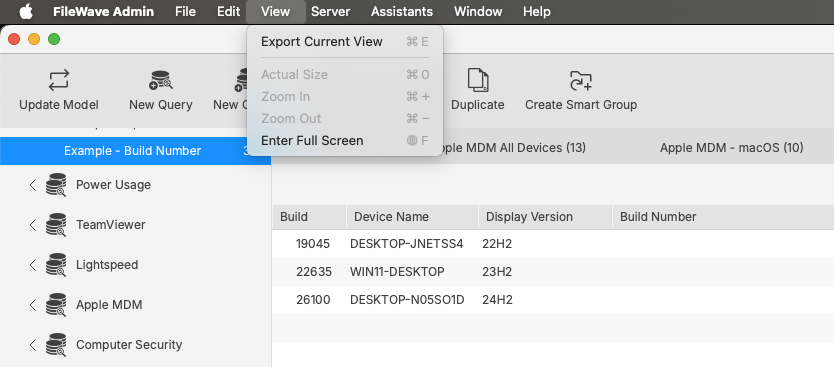
On export, a Text file should be generated, consisting of a header line, including all included columns and preceding lines with the respective results:

Scheduled Reports
From the Assistants drop down menu, is an option Show Scheduled Reports:

This method should periodically send emails to chosen recipients, for any included query set within the schedule definition.
Details of building out such a thing can be found in our KB: Generating Scheduled Reports
API Queries
As demonstrated in our KB pages for FileWave API, it is possible to build out queries using the API as well as reporting on them. Please view the KB pages for extensive details.
Generating scheduled reports
Scheduled Reports send FileWave report results to one or more email addresses on a schedule, so an admin does not have to sign in and run the same report manually. They can be used for license reports or inventory Queries.
How to create Scheduled Reports
- In FileWave Central, select Assistants → Scheduled Reports… from the menu bar.

- Click the "+" in the lower left of the window to create a new scheduled report. Existing reports appear in this same list.


- Choose a Report Type:
- Licenses: sends the information listed in License Management, including VPP licenses and manually created licenses from Filesets or inventory.
- Query: sends the results of a selected inventory Query.

- Enter the email address that should receive the scheduled report.
|
Multiple Email Addresses To send to multiple email addresses, separate the addresses with a semicolon. |

- Enter a Mail Subject and the Email content/body so recipients know what the scheduled report is for.
- If you are signed in to FileWave Central as the Superuser, the Owner section is visible. The selected owner affects scheduled-report results because the report runs with that user's permissions.
Example: If Greg Stevens owns a report for all devices but does not have permission to view iOS devices, iOS devices will not appear in that report.
|
If you are not the Superuser you will NOT see the Owner section at all; as you can see in the screenshots below, only the Superuser can assign a user to reports. |


- After you select an Owner, set when the report should be sent:
- Every day
- skip weekends
- Every week on
- Every month on
- Every day
- Optional: if the Report Type is set to Query, select which inventory Query should be sent.

- Click OK to save the scheduled report. You can then view existing reports or send the report immediately.

Scheduled Reports Results
Scheduled reports are sent as tab-delimited text files that you can open or import into spreadsheet and text-editing tools.
Query Results


License Results


Sending Scheduled Reports to More Than One Address
If you want a scheduled report to go to more than one recipient, enter all email addresses in the recipient field and separate them with semicolons.
Problem
Scheduled report results often need to go to more than one person. A shared mailbox can work, but sometimes you need to send the same report directly to several recipients.
Environment
This applies to scheduled reports created from inventory queries and license reports.
Resolution
In the recipient field, enter the addresses as a semicolon-delimited list, matching the format shown below.
user1@mail.com;user2@mail.com;user3@mail.com;user4@mail.com
Additional Information
Scheduled reports are sent on their normal schedule, but you can also use Send Now in the Scheduled Report Assistant to confirm the report is delivered to all recipients before relying on the schedule.

Filtering in Inventory Reports
What
Inventory Reports (formerly Queries) in FileWave can be filtered for specific values, similar to filtering in the Clients view.
When/Why
Use filtering when you need to get to a specific inventory result quickly. For example, if a user gives you an asset tag during a support call, filtering can take you straight to the matching record.
How
Open the Inventory Report, then enter search text in the filter field in the upper-right corner. Filters in FileWave Central are sticky, so they remain in place when you leave the view and return to it. See the example below:
Exporting & Importing Inventory Reports
Description
FileWave can export and import Reports (formerly Queries) definitions, which makes it easier to share reporting work between FileWave Servers.
If a Report uses Custom Fields, export and share those Custom Fields with the Report definition.
Importing & Exporting Custom Fields
Each Custom Field has a unique name: 'Internal Name'. When uploading a Custom Field, if another Custom Field already exists with the same Internal Name, the newly imported Custom Field Internal Name will be altered to prevent conflict.
Imported Reports reference Custom Fields by Internal Name. If FileWave changes an imported Custom Field Internal Name to avoid a conflict, update the Report to reference the new Internal Name.
Information
Earlier workflows used API commands to copy Inventory Query definitions between FileWave Servers. Current FileWave versions provide export and import actions in the right-click contextual menu in FileWave Central.
Directions
From FileWave Central > Reports:
Export Report
- Select a Report from the main window.
- Right click
- Choose Export.
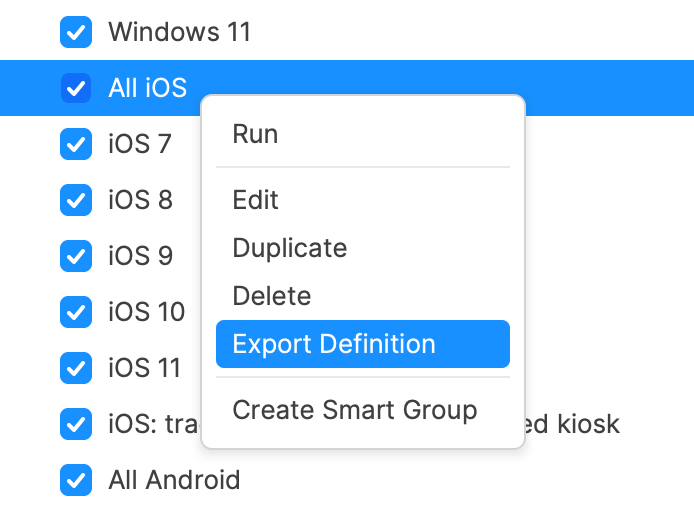
Import Report
- Select the category where the imported Report should be added.
- Right click
- Choose Import Report.
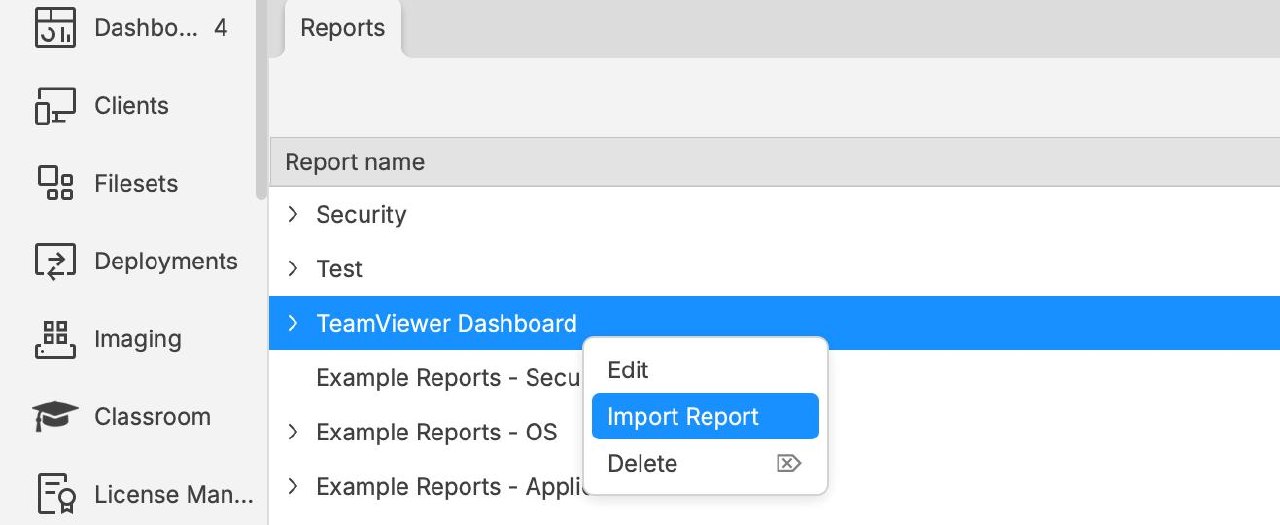
Inventory of IP Addresses
Description
Out of the many Inventory Items collected, IP addresses are included in those automatically provided. However, what does that mean. For device communication, many IPs exist for communication and there is more than one address obtained from some devices.
Information
There are two distinct IP Inventory entries:
- All Devices > IP Address
- Network IP Address > IP Address
All Devices IP
This IP is how the server sees the incoming traffic. As such, it isn't as much device inventory, but inventory of live traffic to the server.
Network IP
The value reported as the Network IP Address, however, is inventory. Each network adapter will be included in the report back to the FileWave Server during the inventory phase; thus multiple entries per device.
Apple mobile devices will have a blank value, since this IP is provided by the FileWave Client
Considerations
All Devices IP
Since the IP for All Devices is actually the IP of incoming traffic, in reality it is the last leg of the communication between devices and the FileWave server.
What does this mean for this inventory field. In many setups, not much and is really useful. By reporting the last leg of traffic, it immediately provides some information about the device. For example, if this was a company NAT address, the device is clearly talking back to the server from an alternate location. Yet, there are some other examples where this may not be the best.
Hosted
Where servers are cloud hosted, the last leg of traffic is from the Load Balancer to the FileWave Server. Since all traffic will be through the Load Balancer, then the reported IP will be the local IP of that Load Balancer.
Booster Routing
This has a similar consequence with Hosted. Since FileWave Client communication is through the Booster, the last leg of traffic (as viewed by the FileWave Server) will be the Booster (the last Booster if cascaded). On face value, this would appear initially as useful as first described. Immediately, it is clear that a client is either reporting directly to the server or through a Booster. In the latter case, which Booster if multiple exist. However, there is an additional complication.
Due to requests, the software was altered to provide the local client IP of devices routing through Boosters, with the intention of improving the experience of the Client Monitor.
When a device using Booster Routing first checks in, the IP actually reported will initially be that of the Booster. From this communication, after a period of time, the value will be updated to reflect the Client IP instead. However, it may be likely that the communication will be re-established at a later date, causing the Booster IP to be reported again. As such, there will be a duration of time where the Booster address will be seen, before the Client local IP is shown instead.
Custom Fields
Scripted Custom Fields can return any value that is programatically obtainable. If a different value was desired, it may be possible for a Client Script or Client Command Line Custom Field to report an alternate chosen value.
Scripted Custom Fields are only available for computer devices: macOS & Windows.
Smart Groups
Smart Groups, Inventory and Application Version Numbers
Description
FileWave stores software version values as text because vendors can include letters, build labels, or other non-numeric characters. If you need a Smart Group or inventory report to answer whether a macOS app is older than the approved version, use a Client Script Custom Field to normalize the comparison.
Information
The example script compares a supplied app version with the value read from the app's Info.plist. It returns one short status string for inventory and Smart Group criteria. If the installed version contains letters, the script exits with Uncomparable rather than guessing.
Output should be one of:
- Newer - version on device is newer than supplied version to compare
- Outdated - version on device is older than the supplied version to compare
- Current - version is the same as the supplied version to compare
- NA - Supplied Application path was not found on device
- Uncomparable - Non numerical characters were found
The script accepts three Launch Arguments:
- App path
- Version to compare
- Key/Value item to collect from Info.plist
Item 3, if not supplied, defaults to: CFBundleShortVersionString
Directions
Create a Custom Field.
- Name the script, e.g. Compare Chess Version
- Provided By: Client Script
- Data Type: String
- Client Script Type: macOS Shell
- Optional: Assign to all devices
Launch Arguments:
- /Applications/Chess.app
- 3.15
- CFBundleShortVersionString
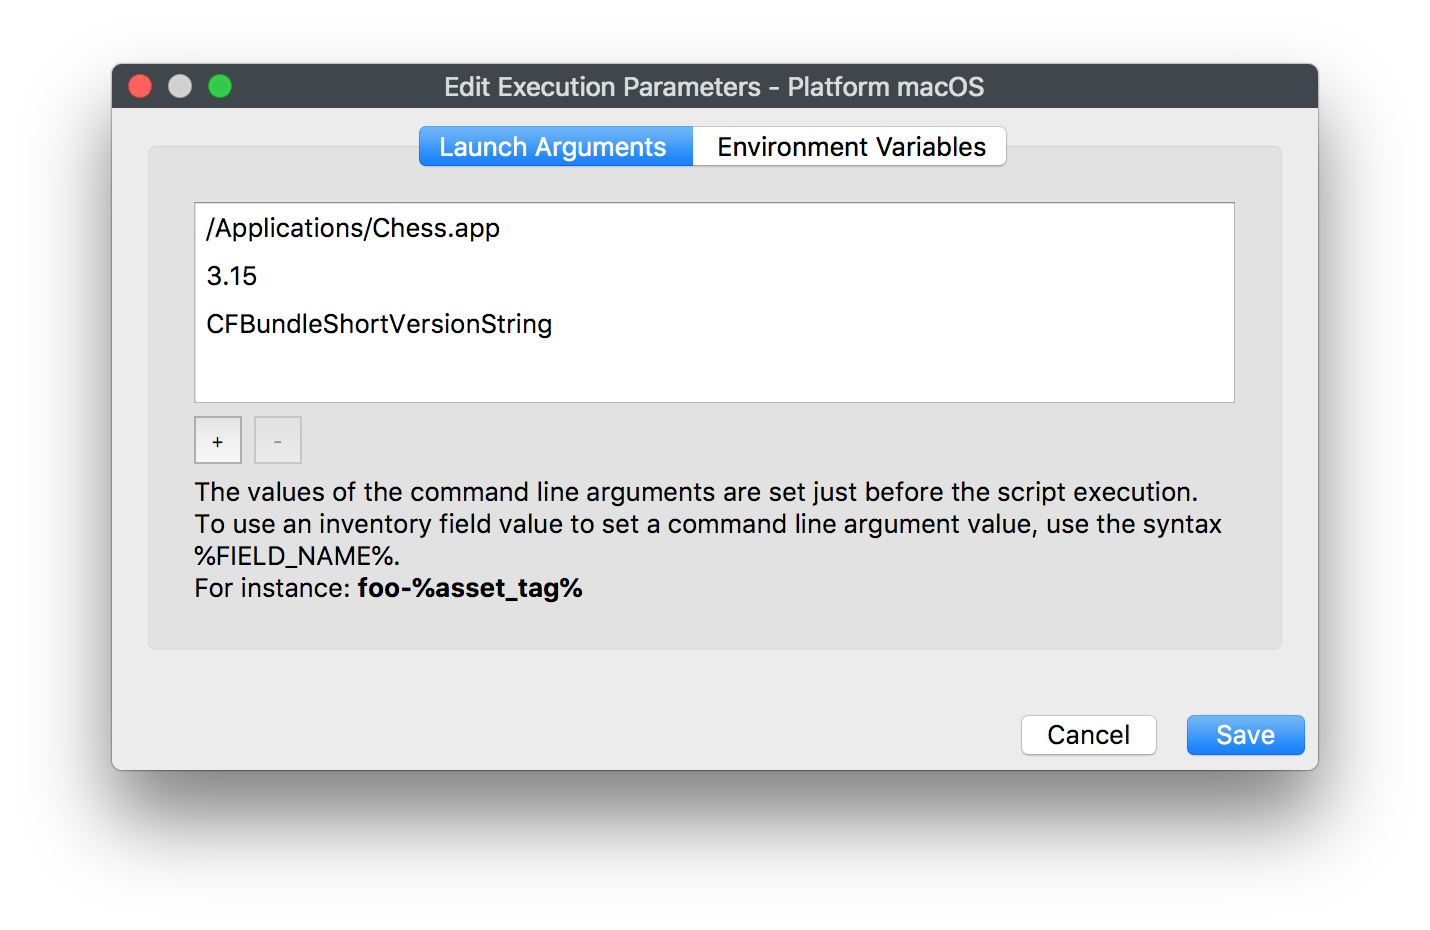
Paste the following into the script window:
#!/bin/bash
# Compare version numbers of apps for Inventory Reporting and Smart Groups
# V1.0 -May 2019, sean.holden@filewave.com
# $1 - Application path, e.g: /Applications/Chess.app
# $2 - Version to compare against
# $3 - Version string, e.g.: CFBundleVersion, CFBundleShortVersionString
# Return Newer, Outdated, Current, NA or if non-numerical characters are used Uncomparable.
app_path="$1"
if [ ! -x "$app_path" ]
then
echo NA
exit 0
fi
dotted_check_version=$2
if [[ "$3" == "" ]]
then
# Default if not supplied: CFBundleShortVersionString"
version_string="CFBundleShortVersionString"
else
version_string="$3"
fi
dotted_installed_version=$(defaults read "${app_path}/Contents/Info.plist" "$version_string" )
if [[ "$dotted_installed_version" =~ [A-Za-z] ]]
then
echo "Uncomparable"
exit 0
fi
function convertVersion {
OLDIFS=$IFS
IFS='.' read -r -a array_add <<< "$1"
IFS=$OLDIFS
}
function compareVersion {
array_counter=0
while [ $# -gt 0 ]
do
compare_to_me=${check_version[$array_counter]}
if [[ $compare_to_me == "" ]]
then
compare_to_me=0
fi
if [ $1 -lt $compare_to_me ]
then
echo "Outdated"
break
fi
if [ $1 -gt $compare_to_me ]
then
echo "Newer"
break
fi
array_counter=$((array_counter + 1))
shift
if [ $# -eq 0 ]
then
echo "Current"
fi
done
}
convertVersion "$dotted_installed_version"
declare -a installed_version=("${array_add[@]}")
convertVersion "$dotted_check_version"
declare -a check_version=("${array_add[@]}")
while [ ${#check_version[@]} -gt ${#installed_version[@]} ]
do
installed_version+=('0')
done
compareVersion ${installed_version[@]}
exit 0
Save the Custom Field, let inventory update, then create a Smart Group using the returned value.
Using Queries to create Smart Groups
Outside of creating queries for informational purposes, FileWave can help you create powerful, dynamic Smart Groups. The concept behind a Smart Group is to gather clients together who meet certain criteria. That would be, for example, all of the devices residing on a certain IP subnet. By adding Inventory queries to the criteria, then adding Filesets to the Group, you can create a Smart Group that will gather a Client device due to its meeting specified criteria, perform Fileset actions on that device, and as a result, the client no longer meets the criteria and drops out of the Group.
Note: If a Smart Group needs faster membership updates for an enrollment, first-check-in, or other time-sensitive assignment workflow, see Fast Smart Group Evaluation. This article focuses on building Smart Groups from inventory query criteria.
Example - Locating Filesets that contain SIP violations
Apple has released a security policy with OS X 10.11 called System Integrity Protection. In a nutshell, it says that no process will be able to have write access to any area of the OS that is protected. FileWave administrators may have scripts that violate this policy, and need to find out which are affected other than just seeing their Fileset(s) fail. There are two new fields in Inventory that identify whether or not a Mac has SIP active or not, and another field that identifies files that contain code that would violate the SIP rules. Here are the two query items:

If you use either one of these to create a Smart Group, you will be able to rapidly identify your Macs that have SIP active, or your Filesets that have incompatible code in them. As you repair the Filesets, they will drop from that Smart Group. If someone turns off the SIP settings (not an easy task), the affected Mac will drop off that Smart Group.
Example - Removing contraband software
For example, you need to scan your clients for contraband software. If the client meets the criteria of having the software you are looking for, then you will have a Fileset execute that will remove that software. Since the Group is dynamic, as soon as the device responds that it no longer has the software and it has that Fileset installed, it will no longer qualify for that Group, and will drop out. Here is the workflow for setting this up:


Once you have executed the Update Model command, the Fileset will execute and delete the software.
Fast Smart Group Evaluation
What
Fast Smart Group Evaluation lets selected Smart Groups evaluate on a shorter interval than normal Smart Groups. Use it when waiting for the normal Smart Group refresh would delay an important action, such as a newly enrolled device needing required assignments after its first check-in or inventory update.
When to use it
Use fast evaluation for a small number of time-sensitive Smart Groups that drive initial device setup, enrollment cleanup, urgent remediation, or another workflow where group membership needs to update quickly.
Do not enable it on broad reporting groups or every deployment group. Fast evaluation does not make clients submit inventory faster; it evaluates eligible Smart Group membership more frequently once the server has the data needed to evaluate the criteria.
Performance limit
Smart Group evaluation consumes server resources, especially in large environments or when criteria are complex. FileWave allows up to 3 Smart Groups with Fast Smart Group Evaluation enabled. This keeps fast evaluation useful for critical workflows without allowing many Smart Groups to add constant recurring load.
Configure it
The Fast Smart Group Evaluation checkbox is available when creating or modifying a Smart Group.
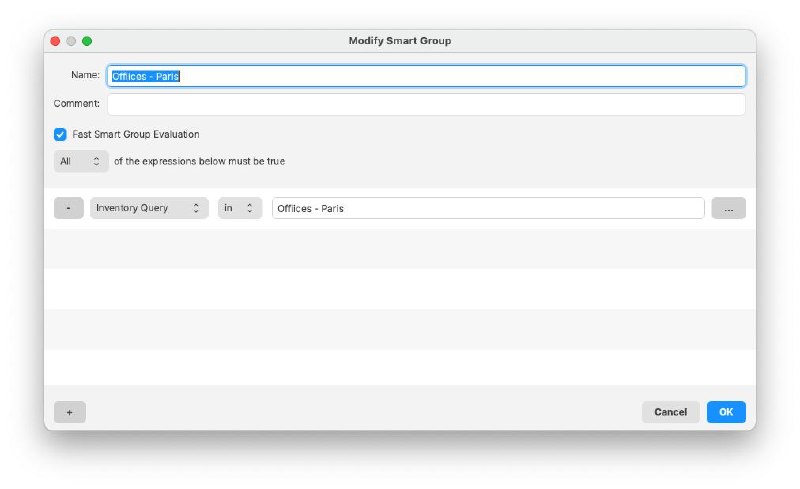
- Enable Fast Smart Group Evaluation on the Smart Group that needs faster membership updates.
- Set the server-wide fast interval in Inventory preferences using Fast smart group refresh period.
- If FileWave reports that the limit has been reached, review the existing fast-evaluation Smart Groups and disable it on a lower-priority group before enabling another one.
Related Content
Create a Smart Group from an Inventory Query (Report)
What
Smart group creation in FIleWave has always been a duplicated effort if you wanted a smart group that was identical to an inventory query (report) that already existed. This duplication of effort was inefficient.
When/Why
With version 14+ of FileWave, you can now directly create a new smart group from an existing inventory query. (and the crowds cheered!)
How
Creating the smart group is easy:
- Right-click the Inventory Query you want to "copy" to a smart group
- Choose "Create Smart Group"
- Pick the destination where you want your smart group created
The newly created smart group will have no direct associations (deployments) assigned to it, but if you place it underneath a group that does have associations, the smart group will inherit them.
See example below:
Related Content
Duplicating Smart Groups
What
Prior to version 14 of FileWave, creation of similar smart groups could be quite tedious. With version 14+, you can now duplicate a pre-existing smart group.
When/Why
We are going to want to use this function whenever we have a very similar smart group to create. This is VERY useful, especially when combined with custom fields.
Consider the following:
We have a smart group for "IT" based on a custom field called "Department":
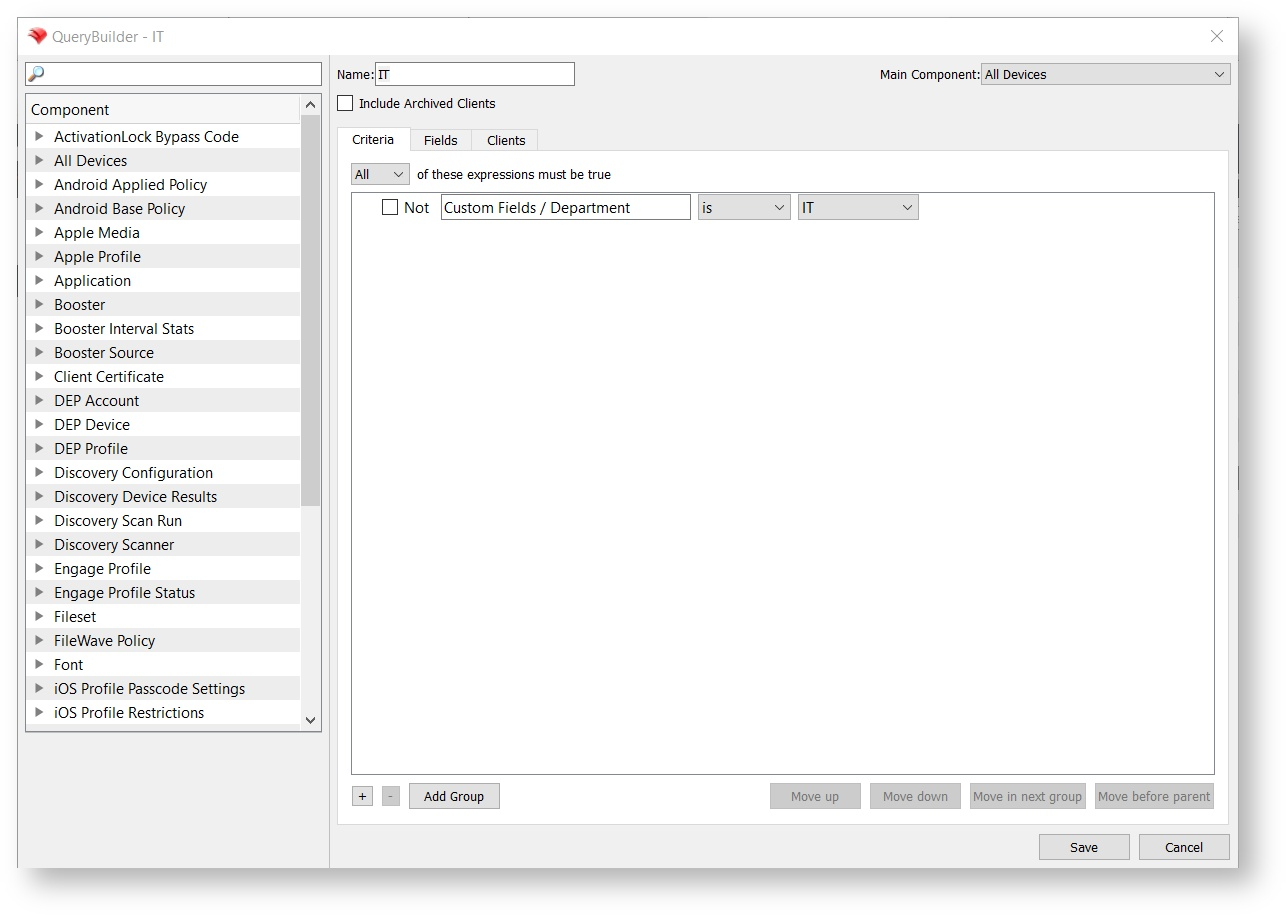
Prior to v14, if we wanted to duplicate this smart group, we had to build the entire smart group from scratch, including the inventory query the smart group was built upon. Now, we can duplicate it, and just change the name and the criteria in the inventory query to create a new smart group for "HR". (see example video below)
How
Duplicating the Smart Group is easy:
- Right-click the smart group you want to duplicate
- Choose "Duplicate Smart Group..." from the menu
- Change the name to be what you want
- Edit the now duplicated inventory query criteria
- Save
The new smart group is ONLY a copy of the original criteria. The new smart group will have nothing copied as far as associations or deployments to the original smart group are concerned.
See example below:
Related Content
Smart Group Preview
What
When creating a smart group based on an inventory query, the number of results in the query preview can potentially be different from what will actually be in the smart group once you save it. This can happen for a number of reasons: For example if a device has been deleted from inventory, but a model update has not yet happened, it would show in preview because the inventory exists--but not show in the smart group, because it has already been deleted. This can create some confusion.
When/Why
To address this in version 14(+) of FileWave, we have added an additional tab in the smart group editor, called "Clients" next to the "Fields" preview tab. This new tab previews only the clients that will be part of the smart group. The columns shown in this view are independent from those selected in the "Fields" tab and only include those relevant to identify a client.
How
Examples illustrate this best:
An Inventory Query is used in a Smart Group, criteria is "Device ID is not null". On the "Fields" tab enrolled clients, pre-enrolled clients, deleted clients and boosters are displayed (placeholders are filtered):
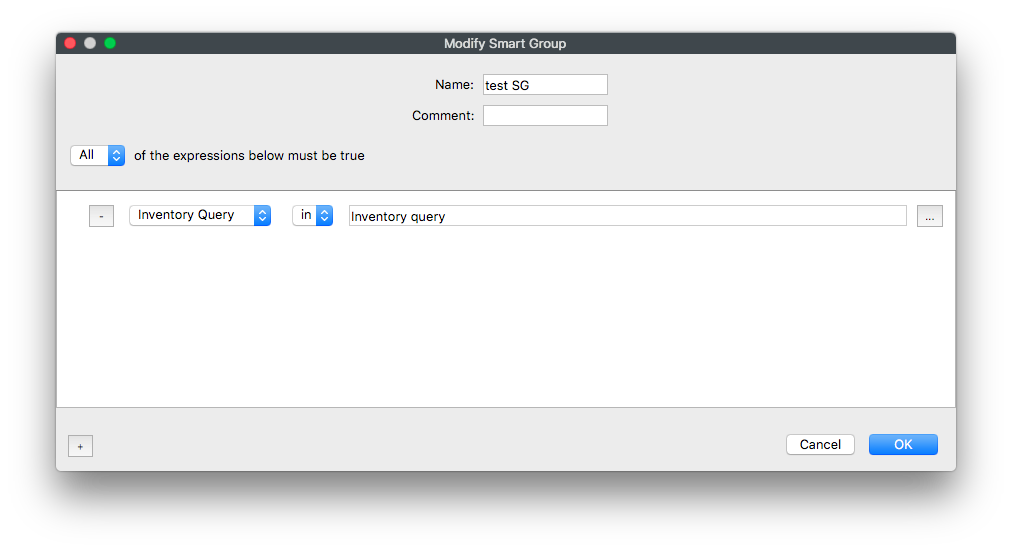
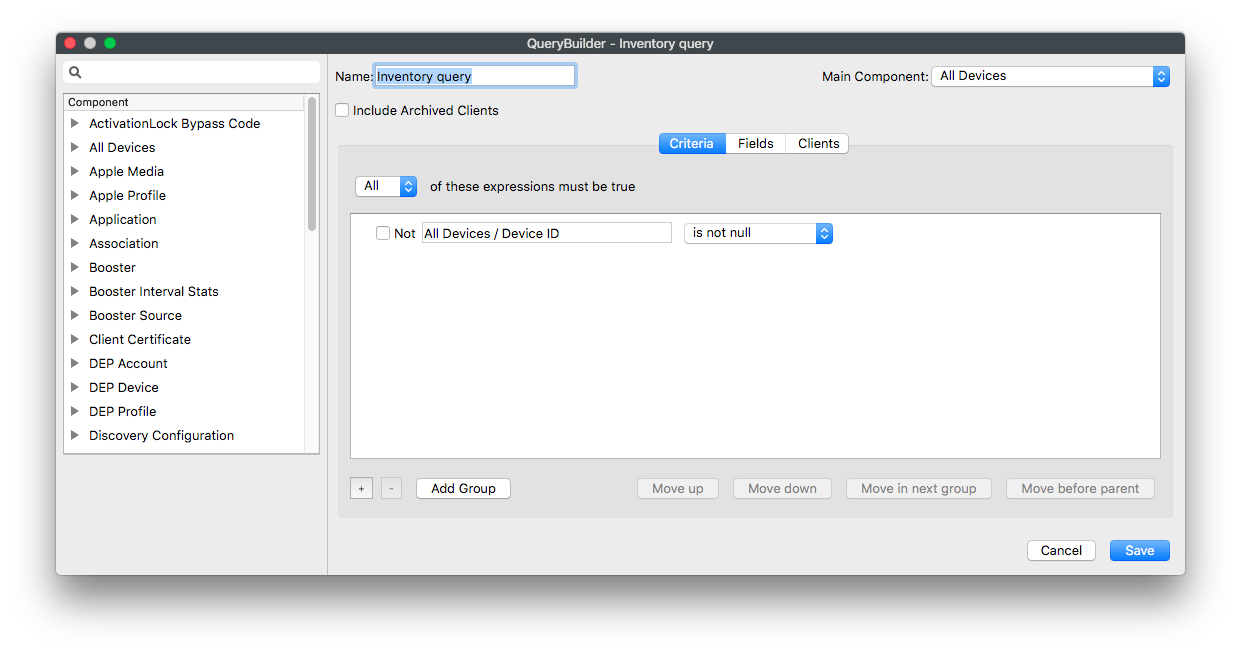
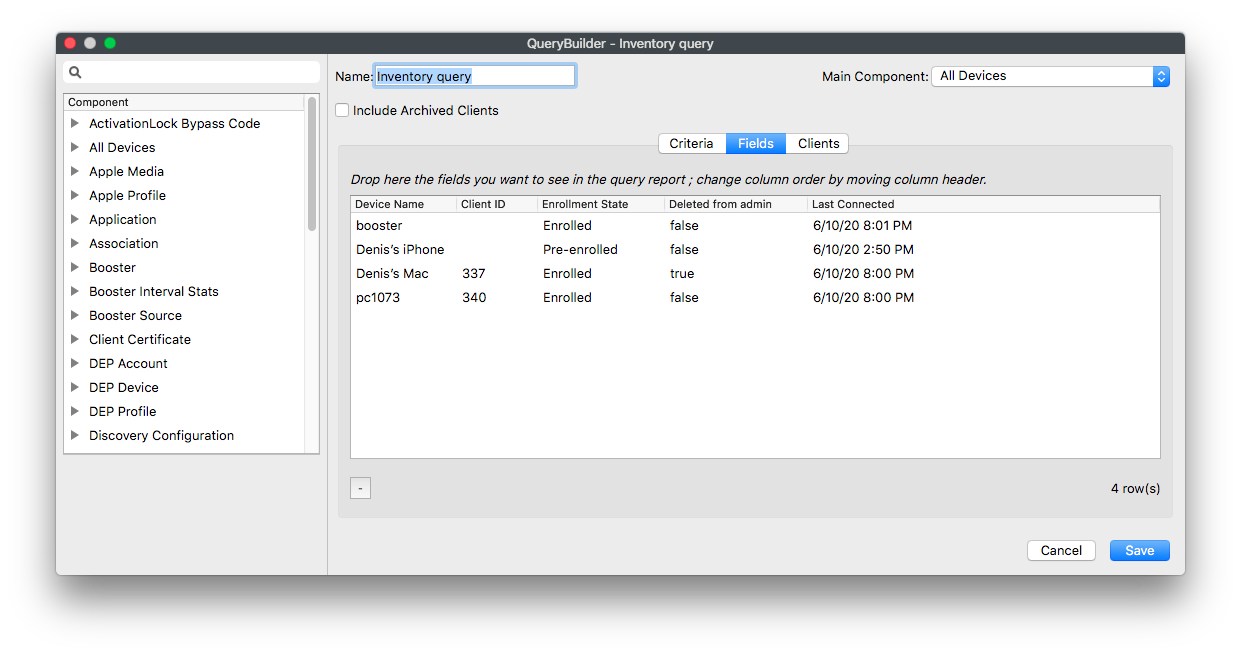
But see on the new "Clients" tab, only the enrolled client is displayed and this matches what will be in the Smart Group:
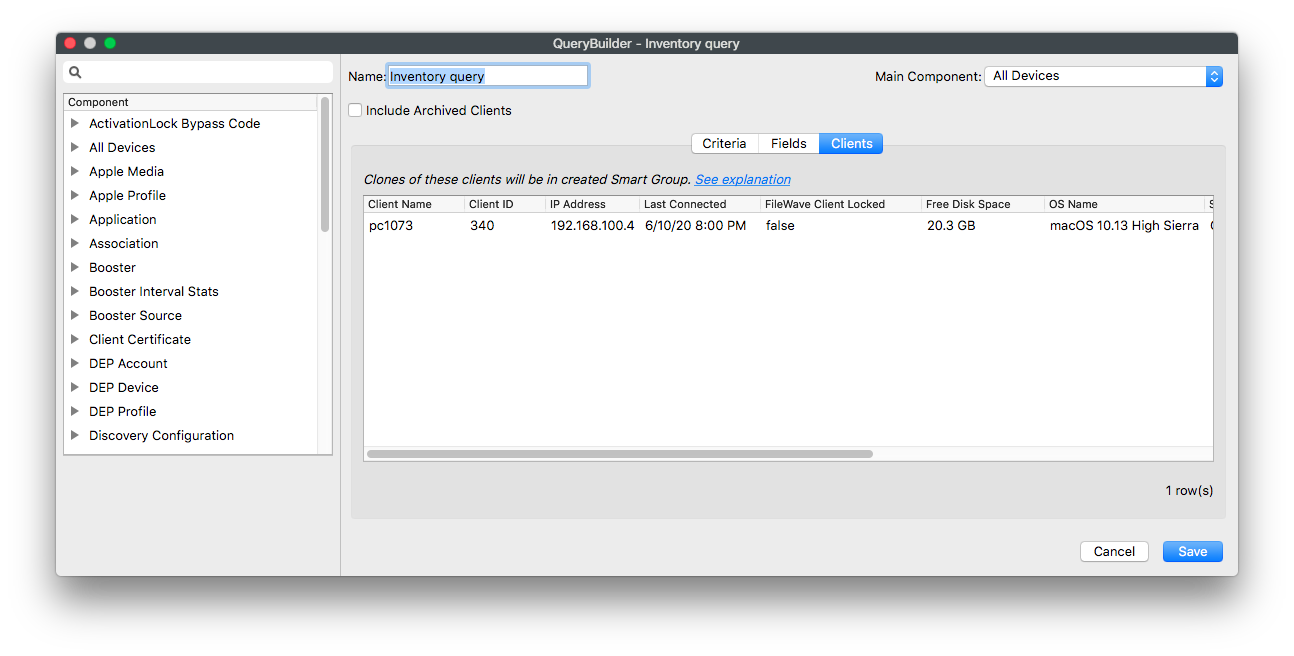
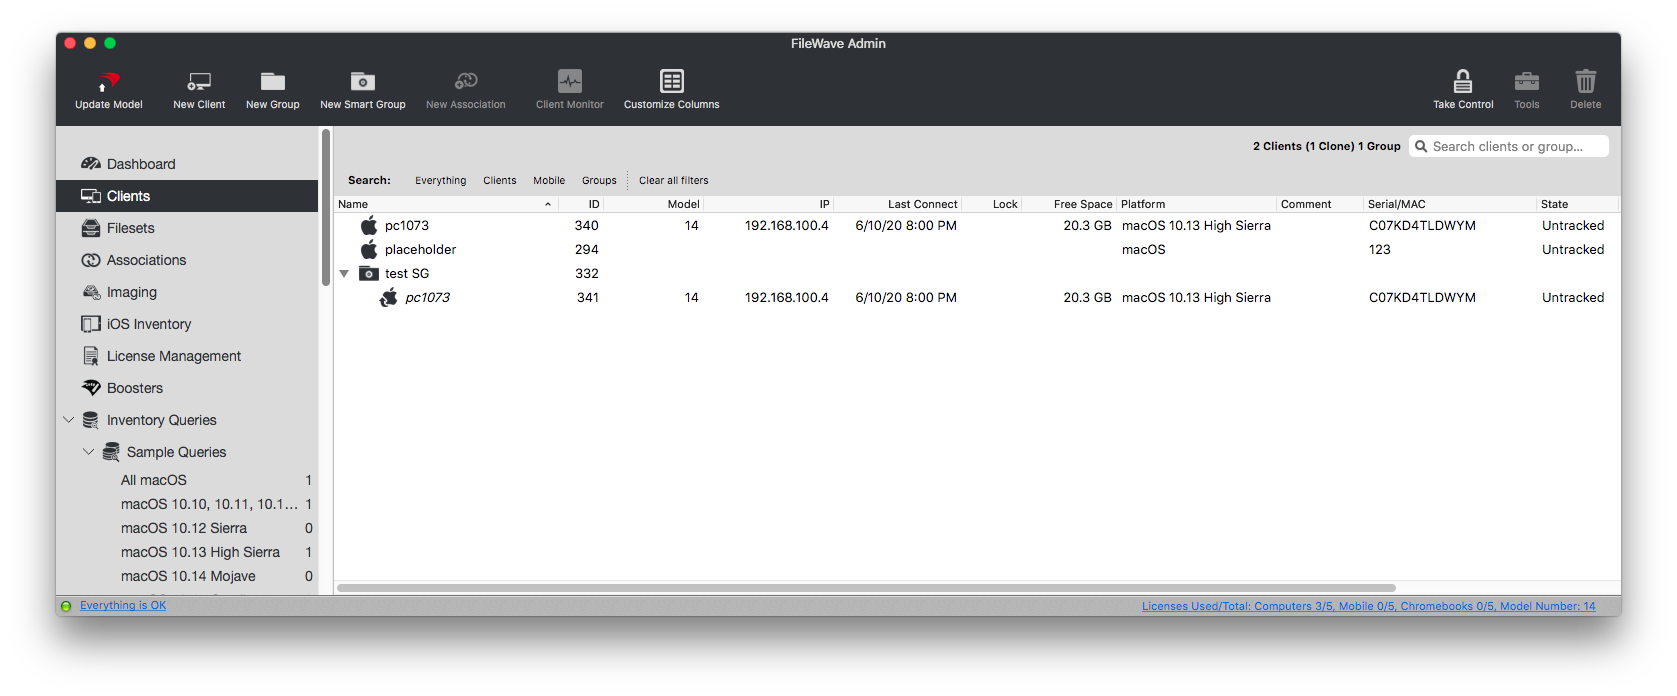
Known Issue: if there are 2 records with the same filewave_id, both of them will be displayed on new Clients tab today although only 1 client will be in created Smart Group. This will be addressed in a later update.
Filesets
Move To... for Filesets
What
FileWave has long had the ability to move client device records either by drag and drop, or by the "Move To..." command. Version 14 brings this same "Move To..." capability to filesets as well.
When/Why
Drag and drop is all well and good, but with thousands of filesets potentially, it could take a long time to drag and drop filesets around the fileset window. Plus, drag and drop also has the distinct possibility of accidentally dropping in the wrong place. For those reasons, we recommend you try the new "Move To..." option if moving filesets around.
How
Moving a fileset is in fact even easier now, just:
- Find the fileset you want to move and highlight it
- Right click on the fileset and choose "Move To..."
- From the dialog, choose the destination for the fileset (i.e. where you want to move it to)
Example follows:
OS Software Updates - Automation Rules
What
OS update management often means tracking frequent Apple and Microsoft updates, creating Filesets, and assigning them to the right groups. FileWave 16.2.0 introduced Automation Rules to generate update Filesets from updates reported by managed devices. FileWave 16.4 adds platform and category suggestions, richer policy previews, and a Windows preview option that can focus on updates currently requested by devices.
When/Why
Apple and Windows devices report relevant OS updates back to FileWave Server. Client Info for an individual device lists the updates that device has reported:

The Software Updates view in FileWave Central shows updates reported across Apple and Microsoft devices, with additional filter options. As devices report into FileWave, this view continues to update.
The 'Is New' value drives Automation Rules.

Freshly reported entries automatically have 'Is New' set to 'Yes'.
Automation Rules target updates marked as new and generate Filesets for the updates you include. Exclusion rules keep unwanted updates out of the automation flow, such as Windows driver packs you do not want to deploy automatically.
Automation Rules can also apply to updates that do not exist yet. When devices report matching updates later, the rules can pick them up.
When Automation Rules run, FileWave creates one Fileset per included update and ignores excluded updates. The 'Is New' flag changes to 'No' when a Fileset is generated, so excluded updates remain marked as new.
You can manually change the 'Is New' flag for one or more updates from the right-click contextual menu:

Resetting the 'Is New' flag to 'Yes' makes the update eligible the next time Automation Rules run. Setting it to 'No' keeps that update out of rule processing, regardless of matching rules.
Once rules are configured, run them with the Run Automation button. At the time of writing, this is a manual action.
The 'Is New' flag changes from 'Yes' to 'No' only when a rule causes a Fileset to be generated.
How
Only FileWave Administrators with necessary permissions may perform some or all of these actions, as set in:
Assistants -> Manage Administrators:
- Manage Updates
- Configure Automation Rules
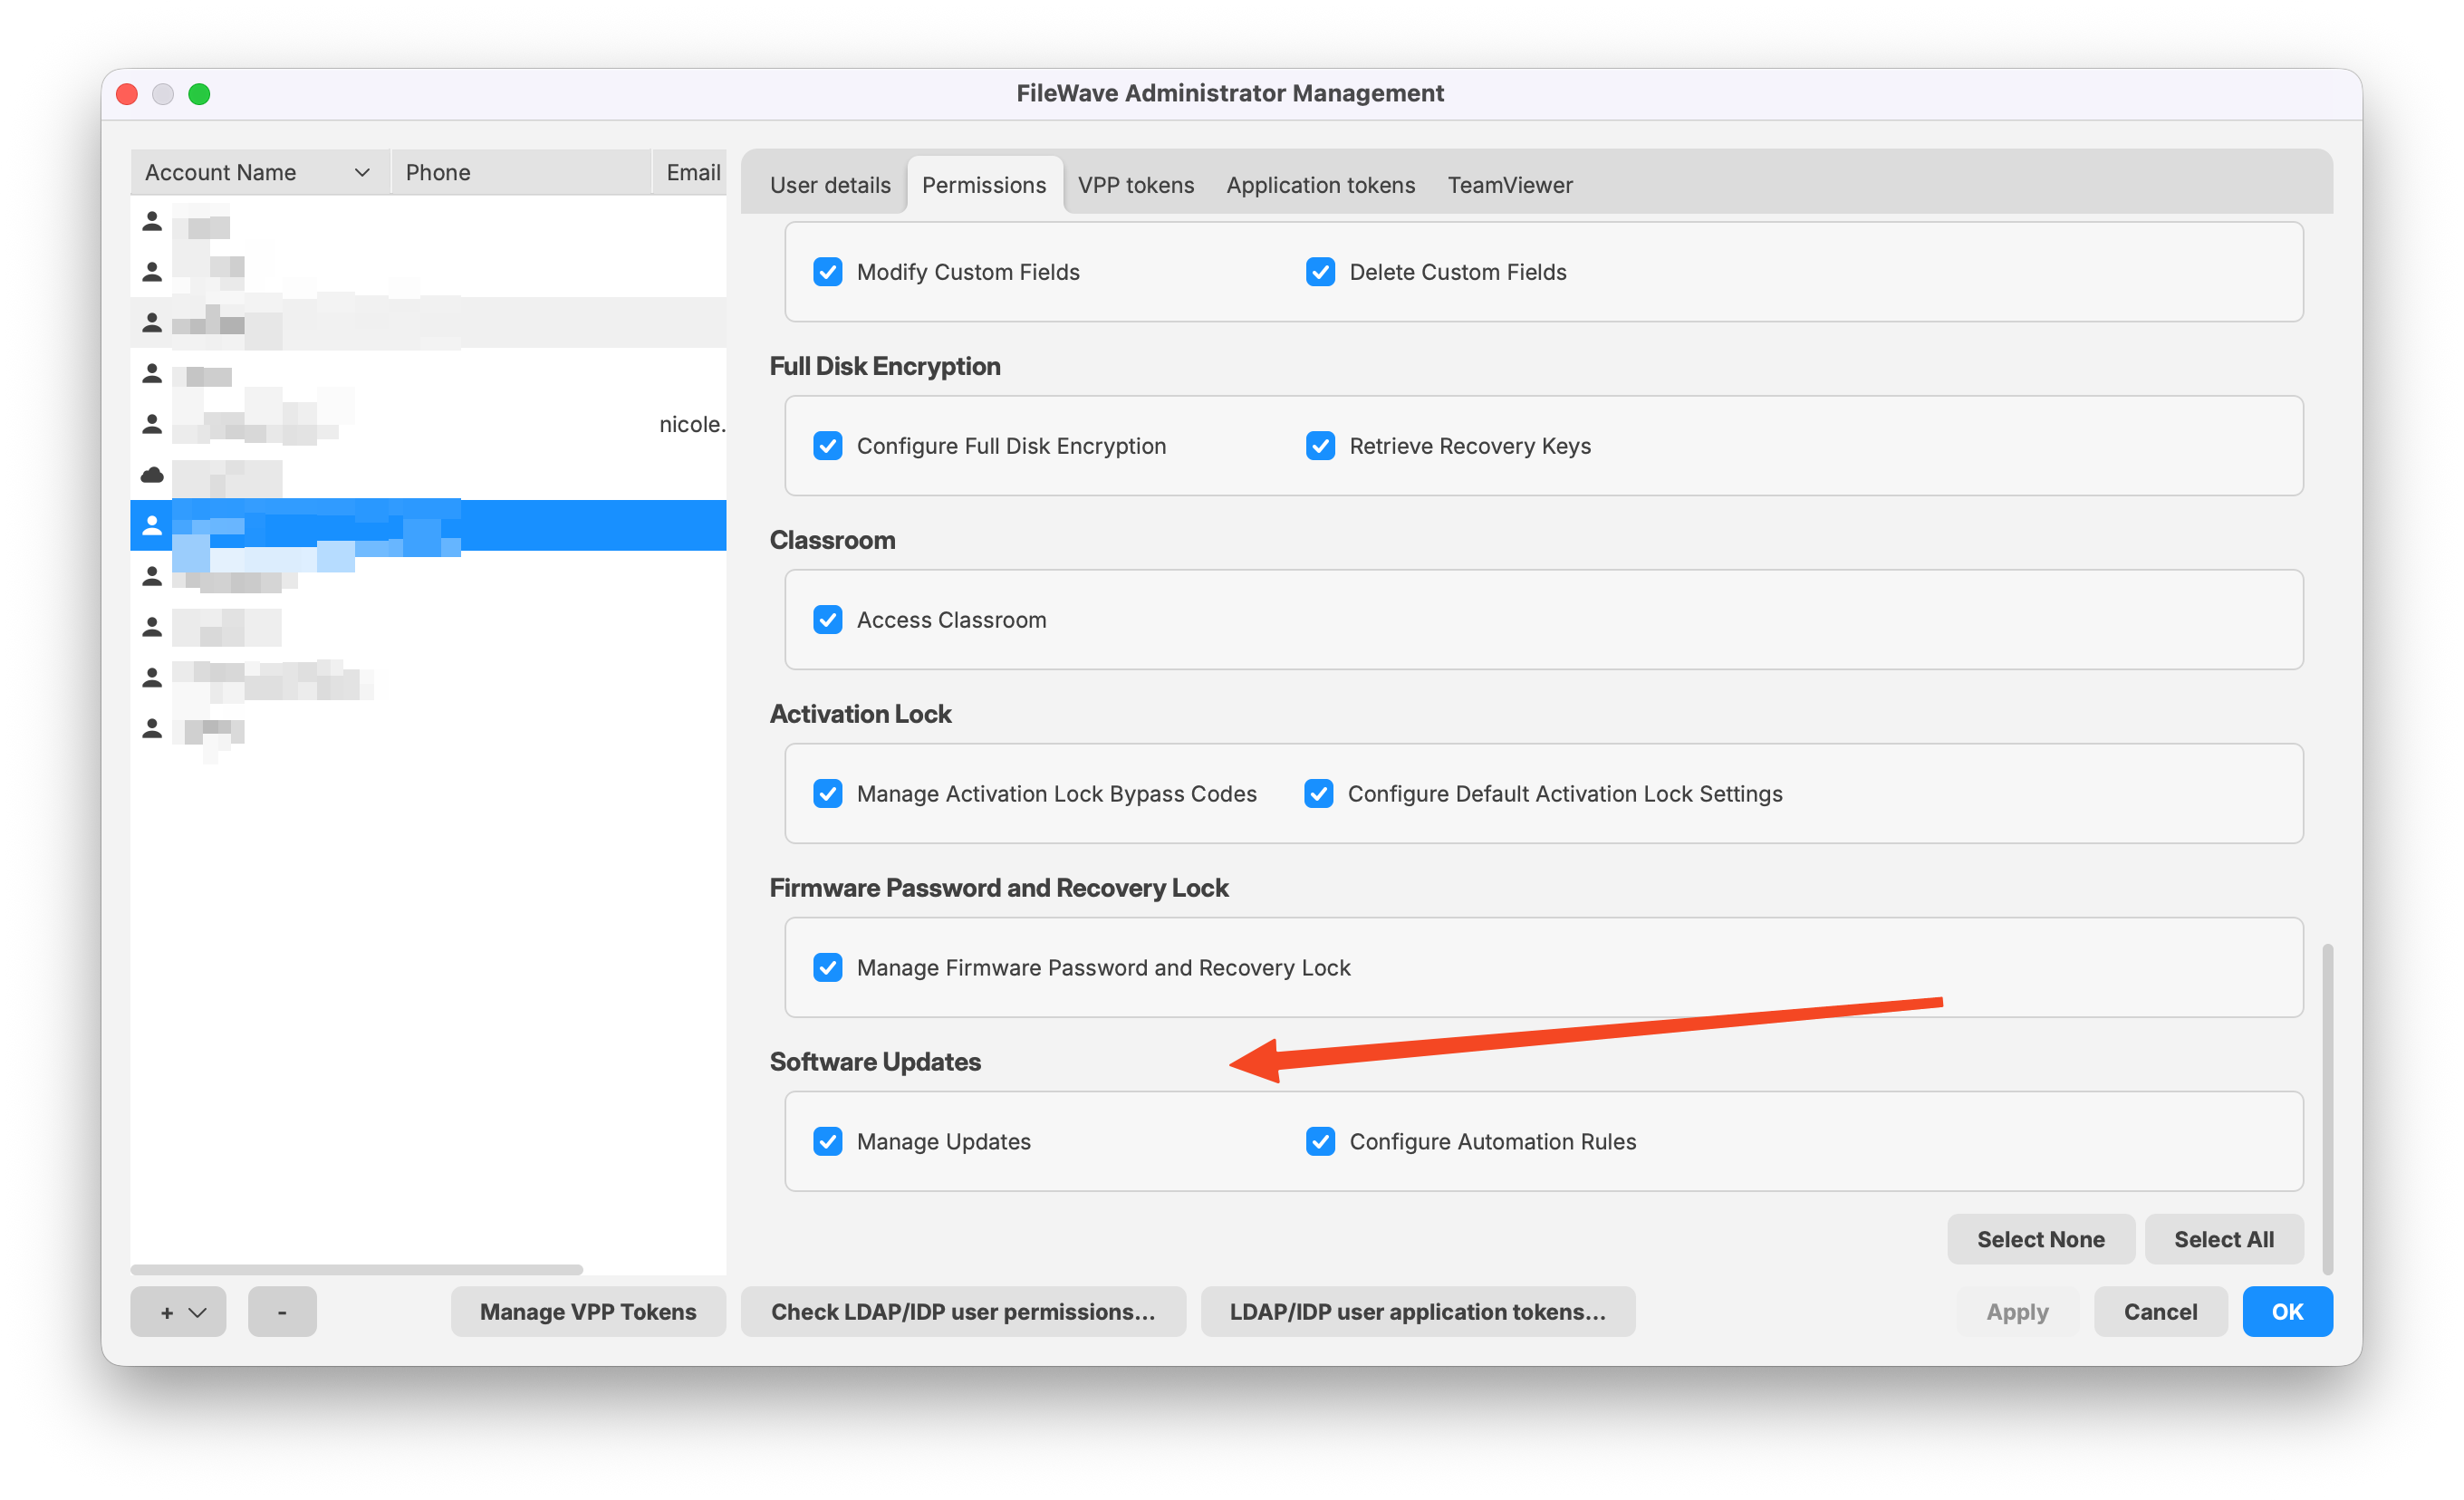
Select Automation Rules in the Software Updates toolbar to view existing rules or create new ones:
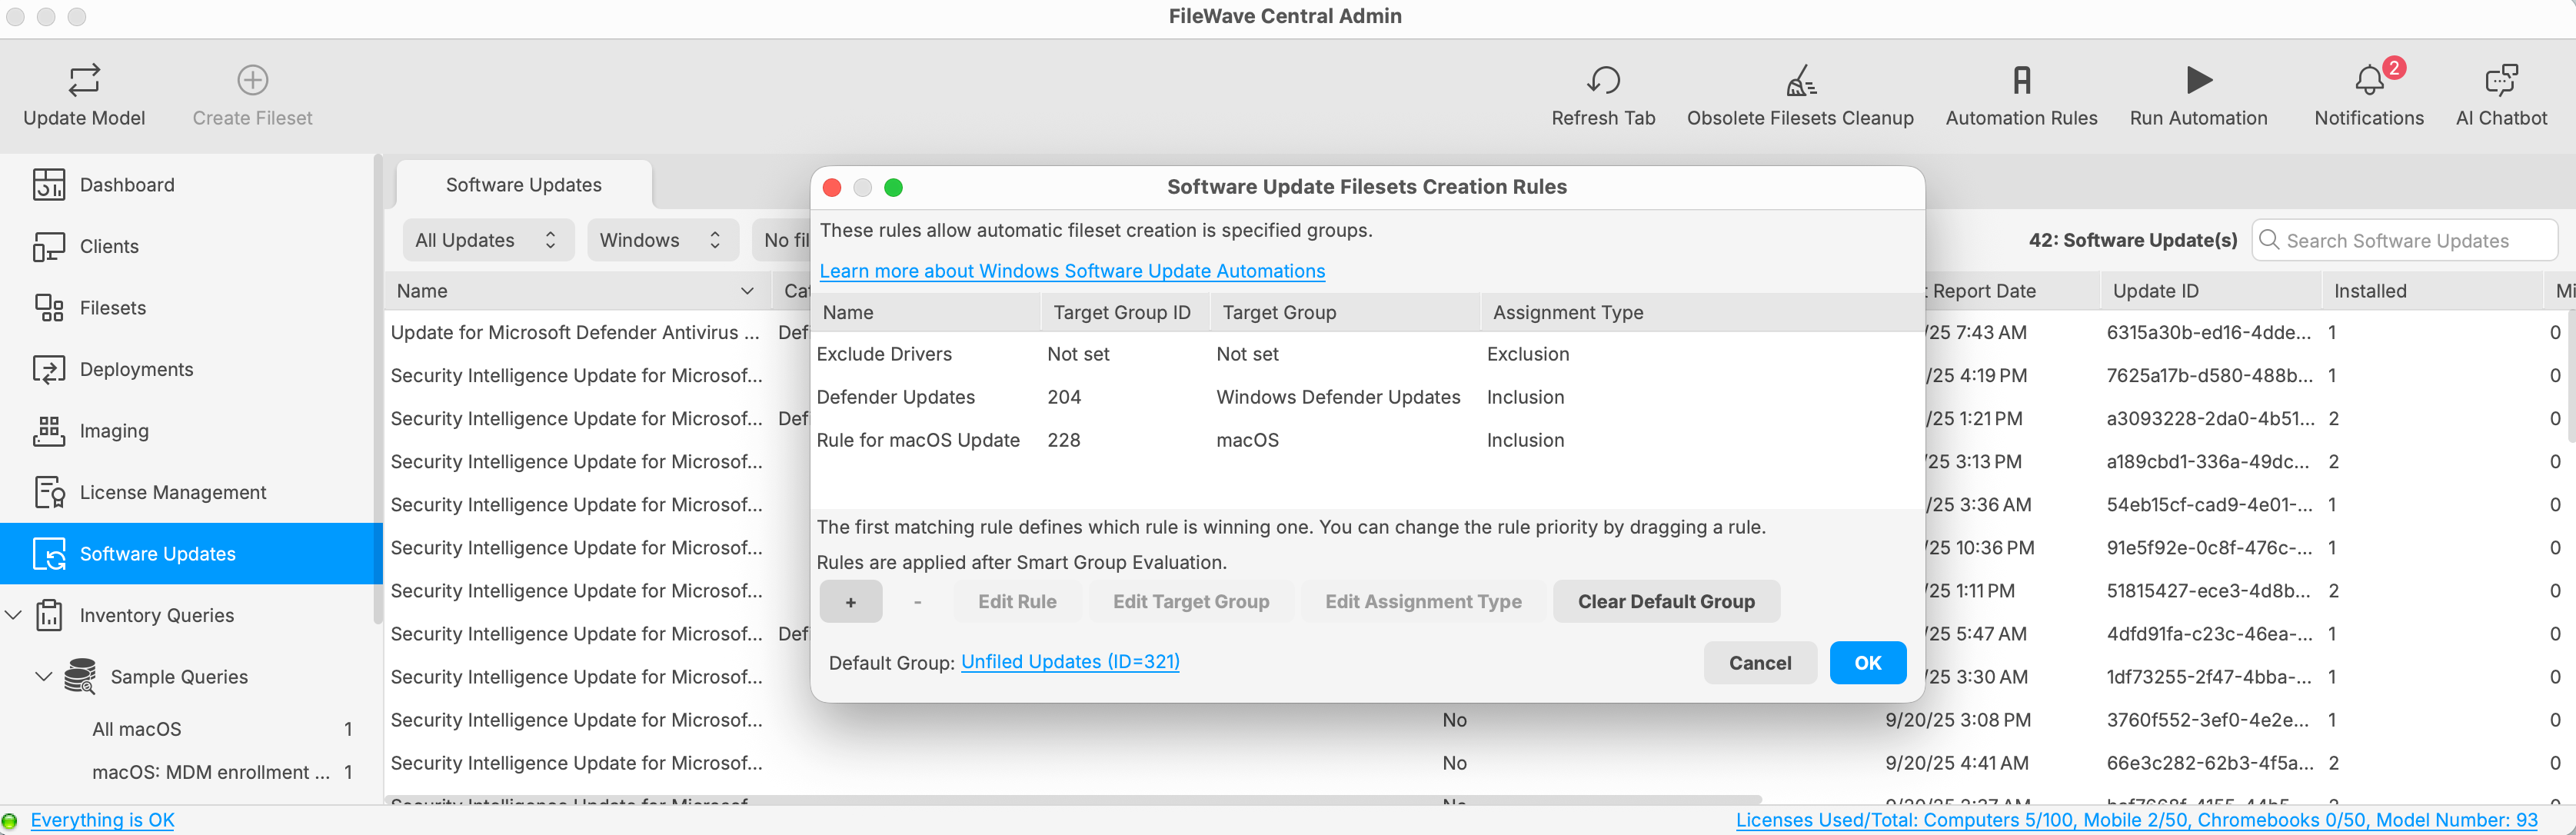
The example above has three rules: one exclusion rule, two inclusion rules, and a designated Default Group. Any updates marked as new that do not match the rules generate Filesets in the Default Group. This can help you identify new updates that were not handled by a specific rule.
If you do not set one, there is no Default Group.
Use the + and - buttons to add or remove rules. Select a rule to edit its target group or assignment type. If a Default Group is set, you can clear it.
If there is no Default Group, updates that do not match inclusion rules behave like exclusions: the 'Is New' flag stays set to 'Yes' and no Fileset is created.
Rules run from top to bottom. Exclusion rules prevent matching updates from being considered by later rules. The first matching inclusion rule generates a Fileset and sets the 'Is New' flag to 'No', so later rules no longer process that update. Only one Fileset is generated for each included update during a Run Automation pass.
Drag rules up or down to change the order.
Place exclusion rules at the top of the list to prevent Filesets from being created for updates that meet the exclusion criteria.
The rules view works like Reports (formerly Inventory Queries). Give each rule a clear name, then add criteria components to define which updates it should match:

The Fields tab lists updates caught by the rule definition:
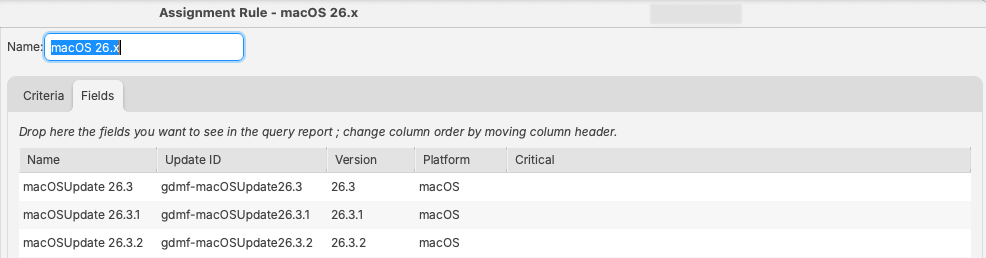
Validate Automation Rules in FileWave 16.4
FileWave 16.4 improves rule creation and previewing so administrators can test policy intent before generating Filesets.
- Platform and category suggestions: When defining rule criteria, use the suggested values based on Software Update data known to the Server. Suggestions reduce spelling and category mismatches.
- Policy-to-update preview: Preview a Software Update Policy to see which reported updates match its criteria.
- Update-to-policy preview: From an update, review which existing policy Filesets already cover it before creating another Fileset or rule.
- Windows requested-update scope: Restrict the Windows auto-install preview to updates currently requested by managed devices when you want to test criteria against the environment’s current deployment requirements.
A preview does not create Filesets or run Automation Rules. Review exclusions, rule order, target Fileset Groups, and the Default Group before selecting Run Automation.
- Define or edit the rule criteria and use the platform/category suggestions where applicable.
- Open the preview and confirm that the expected updates match.
- For Windows, limit the preview to currently requested updates when validating against active device demand.
- Check whether existing policy Filesets already cover the updates.
- Correct the rule order or criteria before running Automation.
Example
Consider the following rules:
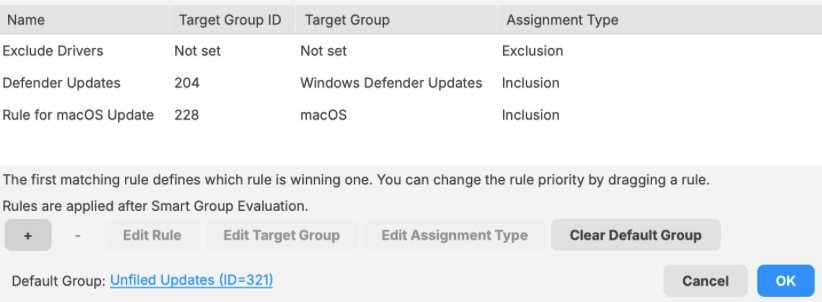
These rules run in the following order:
| Rule | Description | New |
| 1: Exclude Drivers | The criteria of this rule are set to ignore all Windows drivers. | Updates remain as 'New'. |
| 2: Defender Updates | This rule targets Windows Defender updates and places them in a similarly named Fileset Group for testing and assignment. | Updates altered to 'Not New' |
| 3: Rule for macOS Update | This rule adds all macOS updates to a Fileset Group named 'macOS'. | |
|
4: Default Group
|
Any updates that are still marked as new and do not match the rules above will have Filesets created in this group, 'Unfiled Updates'. This highlights updates that were new but did not match any rule criteria. |
Exclusion Example
As described above, excluded updates remain marked as new. Consider the following three rules:
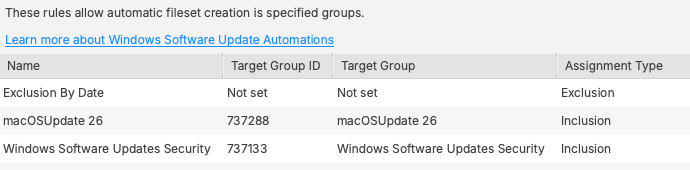
The macOSUpdate 26 rule includes all macOS 26 updates. The Windows Software Updates Security rule includes updates with the category 'Security Updates'.
The exclusion rule affects both of those later rules:
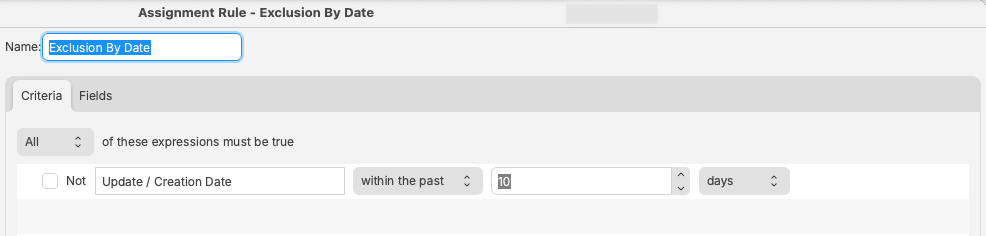
Only new updates older than 10 days are processed. Newer updates are ignored and remain marked as new. As time passes, those updates come into scope for the later rules and Filesets are generated.
This gives you a testing grace period, so brand-new updates are not processed even if you run Automation Rules.
Updates can be manually generated into a test Fileset Group.
Manual Fileset creation from the Software Update view also sets the 'Is New' flag as 'No'. Updates left untouched will remain as new and come into scope after the defined period of time.
Devices associated with the test group should receive the updates. After testing is approved, you can consider those updates for broader deployment.
For each approved update, manually reset the 'Is New' flag to 'Yes'. When the update comes into scope by date, Automation Rules can generate Filesets in the groups targeted by each rule. If an update is not approved, leave it set to 'No' so it is not included when the date scope is reached.
This method lets you pre-assign both test and production update groups, reducing follow-up manual work.
Related Content
- OS Software Updates – Obsolete Filesets Cleanup
- Automated Windows OS Updates Policy
- Best Practice Guide: Software Update Deployment (16.0+)
OS Software Updates - Obsolete Filesets Cleanup
What
In FileWave you can patch your Apple and Windows devices very easily but over time you will accumulate many Filesets related to OS patching. This feature that was added to FileWave 16.2.0 will allow you to perform a quick and easy cleanup.
When/Why
While the updates don't occupy much space at all on your FileWave Server, you may not want to have hundreds or thousands of OS update Filesets in your Filesets view. In the past you would have to manually figure out what patches were old enough to want to purge. Now you can simply purge updates that have not been requested in a set amount of time.
How
First it is important that your account has permissions to perform these actions. In Assistants -> Manage Administrators as shown in the below image notice if you have Manage Updates enabled. If you'll be using Automations then ensure you have that right as well.

The next thing is to determine what you consider to be old enough to purge. In Preferences within FileWave Central you can pick 30, 60, 180, or 365 days. For most people 60 or 180 days is the best value. It gives an update enough time that it hasn't been requested. You'll want to go in to Preferences and pick a value.
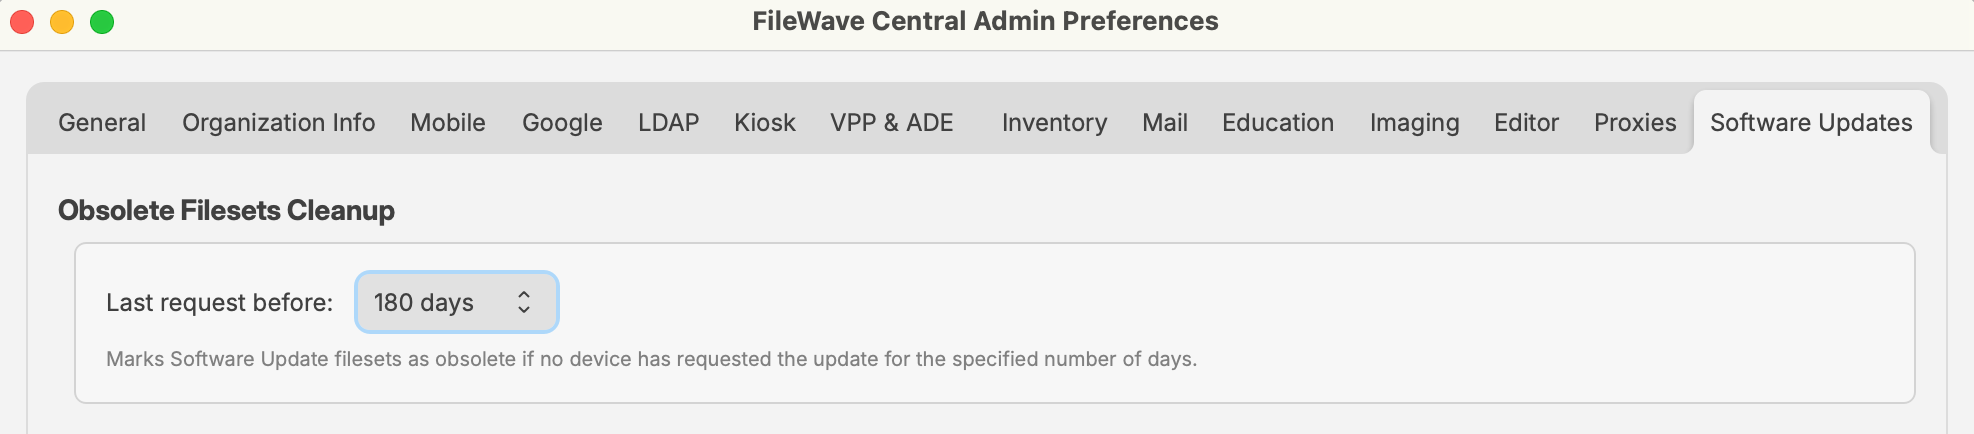
In the Software Updates section of Central, select Obsolete Filesets Cleanup in the toolbar. Review the candidates in the dialog. Use Select All only when every displayed candidate has been reviewed; otherwise select individual Filesets before choosing Delete Selected.
Note that this will only purge OS updates, but will purge both Apple as well as Windows OS patches. If a device later needs an update that was purged it will appear as New in the Software Updates section and you can make a Fileset for it again. For this reason it might be too aggressive to pick 30 days since you might find that updates are often purged and then need to be created again.
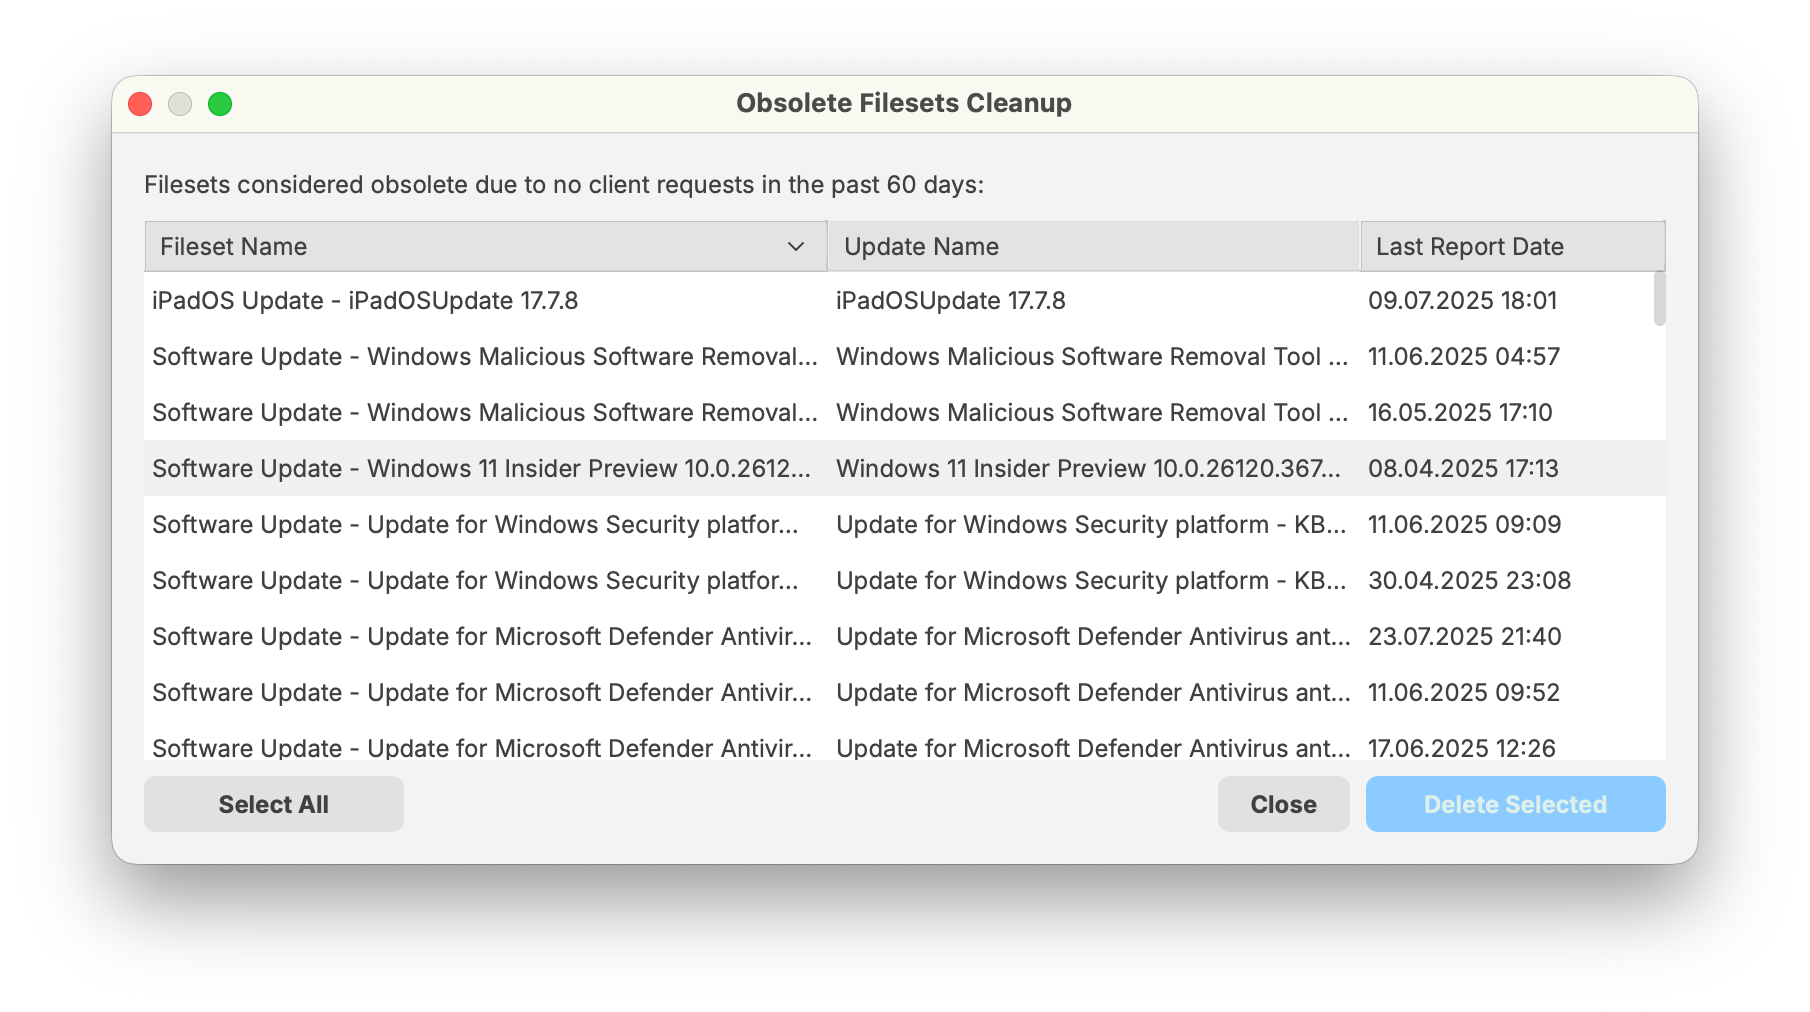
Review obsolete Filesets in FileWave 16.4
FileWave 16.4 adds better filtering and direct Fileset navigation from Software Update views. Use these tools to verify cleanup candidates before deleting them:
- Filter the Software Updates view to narrow the platform, request state, Fileset status, or other relevant update criteria.
- Locate the related Fileset or Fileset Group directly from the update view.
- Check whether a Software Update Policy Fileset already covers the update and whether devices still request it.
- Open Obsolete Filesets Cleanup and compare the candidates with the update view.
- Select and delete only the Filesets that are genuinely outside your retention and deployment requirements.
Do not treat “obsolete” as “never needed again.” If a managed device later requests a deleted update, it can return as a new Software Update and require a new Fileset.
Cleanup remains a deliberate administrator action. Review the filtered candidates before using Select All or Delete Selected.
Related Content
Settings
Configuring and using the Dashboard
In FileWave Central, the Dashboard is the first view an administrator gets of their FileWave environment. The Dashboard is designed to give the FileWave administrators a quick view of their server and be able to focus in on a missing setting, or a possible service interruption. There are seven major sections on the Dashboard.
Primary Services
This section shows the major services - DEP, VPP, Email, etc with last update and, if there is an error, a direct link to the settings that can address that error.
Sync Status
This section shows the latest 'check-in' times for certain services, such as VPP, DEP, LDAP, and Smart Groups. These services all have preferences requiring synchronization between a remote service, for example your LDAP server, and the FileWave server.

Server Performance Status
This section is an active chart of the status of the primary FileWave server's storage space, CPU usage, and RAM utilization.
Distribution of clients
This section displays a graph showing the breakdown of FileWave clients based on operating system.

Mail Queue
This section displays a running graph of the status of emails sent from the FileWave server. The focus will be on the VPP / MDM invitation emails. This will help you see situations where your local email server may be getting overwhelmed by the large number of MDM invitations going out at the same time.

Enterprise IPA URL Check
This section shows the validity of your institutionally created iOS apps as well as the enterprise apps provided by FileWave (iOS App Portal / Kiosk).
Server Licenses
This section shows the current status of your FileWave server license.

Alert Settings
The Dashboard provides FileWave Central with the ability send notifications out to individuals at status changes on the server. You toggle between the Alert Settings and the Dashboard in order to configure the types of alerts sent out and who they are sent to.

The result is an email when an event is triggered being sent to the designated email account.
"Detachable" Dashboard
The Dashboard is part of the FileWave Central application; but it can also be dragged off to be viewed as a separate window on the administrator's computer, opened in a browser, or provided as a URL to other interested parties to view on their own computers or devices.
Dashboard Alert details
A table with explanations of all of the available alert items from the Dashboard is available in the Dashboard Warning levels and Descriptions KB.
Related Content
- FileWave Server Mail test receives Bad Request with Google Accounts
- Dashboard Warning levels and Descriptions
Mobile Preferences - iOS / Android
The Mobile preferences are designed around Mobile Device Management for Apple's iOS/macOS and Google's Android/Chromebooks. This section discusses setting up the basic components in FileWave Central/Preferences.
Configure MDM Server
- MDM Server Address - Enter your MDM server's FQDN or routable IP address.
- Port - The default port for FileWave MDM is 20445.
- Shared Key - This is used to create a secure connection between the MDM Server and the FileWave Server. Generate a new key on Save only needs to be done once and is applied when the preferences are closed with the OK button.
Mobile Certificate Management (HTTPS Certificate Management)
This section shows the information used by FileWave to create a valid certificate that will be used to authenticate the FileWave MDM server with your clients and with Apple's Push Notification System.
- Details – Shows the details of the current certificate uploaded.
- Upload PKCS12 Certificate - This is used to upload a SSL certificate issues by a Certificate Authority.
- Get Current Certificate - Once you have a valid certificate, you can download a copy to be used with Apple Configurator.
Note: Self-signed certificates are no longer able to be generated in FileWave. A certificate signed by a CA is required for iOS, MDM enrolled Macs, and Chromebooks.
Apple Push Notification Certificate (APN) for iOS
The APN certificate is required to allow the application developers to send notifications to their applications, such as the Weather app getting current storm alerts. In order to allow the applications you deploy to your mobile devices to get these notifications, you request a secure certificate from Apple. The process for getting the certificate is detailed in the Appendix for FileWave administrators running either OS X or Windows.
Once you have received your APN Certificate from Apple, you will add it by clicking on the Upload APN Certificate/Key Pair button. This will configure your FileWave MDM server to support secure communications with Apple's Push Notification service.
Android/Chromebooks MDM Configuration
If you are deploying Android clients, then you will need to configure the Android/Chromebooks section of the Mobile preferences. You will need to get a Project Number and API key from Google. Instructions on how to accomplish that task are in the Appendix. Once you have those two items, go to the FileWave Preferences / Mobile pane and select the Android/Chromebooks tab.
Select the Configure GCM button, authenticate as the FileWave super administrator, then enter the Project Number and the Server API key you were given.
Click on Save and you should immediately see that GCM is correctly configured.
Override FileWave Server configuration
The Android client is a composite of the computer and iOS client. It must connect to both the FileWave Server and the FileWave MDM server. Enrollment is done the "iOS" way through the MDM portal; but the client must also connect to the main FileWave server for additional functionality. In most cases, this is not an issue because the FileWave Server and the FileWave MDM server are on the same system. However, it is possible for you to configure the two services to run on different systems with differing external IP addresses.
If you are hosting the MDM service on a different system, then you will need to check the Override FileWave server configuration checkbox and enter the FQDN name of your main FileWave server. Do not enter anything in this section if you are running your FileWave MDM services on the same system as your primary FileWave server.

macOS MDM configuration
For macOS devices, you will need to request a custom FileWave Client installation package (.pkg) and upload it to your FileWave server. This allows FileWave to provide the package for all MDM enrolled devices. When a MDM macOS device is added to your FileWave server, it will automatically receive the client installer package and will be configured as one of your client devices.
macOS Client Package Installation Triggers
The FileWave macOS client package will install on newly enrolled DEP and Profile MDM enrolled macOS devices. The macOS client package will also get pushed out to ALL existing enrolled MDM clients if you upload a new macOS client package into the FileWave Preferences. Be sure not to accidently upload the non-custom client pkg or upload a custom client pkg with the wrong FileWave server address, if you do then all exsisting MDM enrolled macOS devices will install the newly uploaded client and then in turn lose connection to your FileWave server.
The first step is to go to the FileWave Support site and request a custom installer: https://custom.filewave.com
Download the zip file and then expand it to have the PKG. When you have the package, you will upload it to your FileWave Server using the button in the macOS MDM preferences pane:

Authenticate as the FileWave Central superuser (fwadmin), then locate the newly downloaded package. Note: You must unpack/unzip the package before being able to upload it to your server!
Ignore status notifications
In the lower left corner of the main FileWave Central window is the status box for your key external services - Apple Push Notification (APN), Google Cloud Messaging (GCM), Apple Device Enrollment Program (DEP), and Inventory. You have the option of installing the MDM services on a different system, or not needing APN, DEP, or GCM at all - assuming you aren't using any iOS devices, macOS systems with VPP, or Android devices. If any of these services are not running, the status indicators will show that there is a problem. You can disable status notifications and FileWave Central will report only the services you are using.

LDAP Preferences
FileWave supports connecting an LDAP directory, such as Active Directory, Open Directory, or eDirectory, to your FileWave Server. FileWave can use that directory information in Smart Groups and parameterized profiles. LDAP can also be used for enrollment authentication, which lets you track which LDAP user enrolled a device.
Creating an LDAP server entry in Preferences

- Name - a reference name you use to tell LDAP servers apart
- Host / IP - the FQDN or IP address of the LDAP server
- Port - the TCP port FileWave should use to reach the LDAP server; check with your network team if you are not sure
- Protocol – select LDAP, LDAPS, or STARTSSL.
- For LDAPS and STARTSSL, the Check Server Certificate option controls whether FileWave checks the LDAP server certificate against the computer's trust store.
|
For LDAPS or STARTSSL, use a trusted LDAP certificate whenever possible. |
- Server Type - choose Active Directory, Open Directory, or eDirectory
- Base DN - the primary distinguished name (DN) for the LDAP server, using domain components separated by commas. If the LDAP server is on the same system as the FileWave Server, the Base DN may be as simple as dc=home,dc=local. If the LDAP server is on another system, it may use a more specific value such as dc=tanner,dc=filewave,dc=net.
- LDAP User DN - for authenticated binds, enter a user account that is allowed to bind to the LDAP server. Leave this blank for anonymous binds.
- LDAP User Password - the password for the LDAP bind account; not needed for anonymous binds
- Refresh Interval (sec) - how often, in seconds, the FileWave Server is eligible to contact the LDAP server and refresh available data. During setup and testing, a short interval such as 120 seconds can be useful. In production, a 24-hour interval is usually safer: 86,400 seconds.
- Change Limit (%) - a safety limit for accepted LDAP extractions. If more than this percentage of LDAP entries are detected as missing or orphaned during extraction, FileWave treats the sync as failed and does not commit the results. This protects FileWave from large unintended removals caused by a bad LDAP configuration.
- Remove Missing items after - the number of successful LDAP extractions an LDAP-backed item must be missing from before FileWave removes the item or clone. A value of 0 means missing items are removed immediately after a successful accepted sync.
How these settings work together for removal
These settings are separate controls, but removing missing LDAP-backed items depends on all three:
- Refresh Interval controls cadence only. Changing it makes LDAP extractions eligible to run more or less often, but it does not by itself approve removals.
- Change Limit decides whether an extraction with missing/orphaned entries is accepted. If the missing entries exceed the configured percentage, the sync is rejected and those results are not committed.
- Remove Missing items after decides how many accepted syncs an item must be missing from before FileWave removes it. If the value is 0, removal can happen on the first accepted sync where the item is missing.
For example, if a missing OU represents 25% of the LDAP directory, FileWave will not accept those removals when Change Limit (%) is set from 1% through 25%. If Change Limit (%) is set to 26%, FileWave can accept that extraction; the actual removal still follows the Remove Missing items after threshold.
Watch the Change Limit value: A very low setting, such as 1%, can cause otherwise valid LDAP changes to be treated as invalid whenever more than that percentage of entries changes or disappears. In that case, shortening the refresh interval will only make FileWave retry more often; it will not make the rejected changes commit.
Remove Missing items after timing: For safety, set this to a value equivalent to roughly 24 hours.
(Refresh Interval / 60 seconds / 60 minutes) * x = 24 hours
For a refresh interval of 1800 seconds, or 30 minutes, set this value to 48.
Enable Automatic Group updates for this LDAP creates visible Smart Groups in the Clients pane under an LDAP designator. FileWave updates these Smart Groups at the configured refresh interval.
The LDAP information shown in the Clients pane is a one-way view of the directory server. Changes made on the LDAP server are reflected in FileWave, but changes made in FileWave Central do not change the LDAP directory.
|
Automatic Group updates can put heavy load on the LDAP server in environments with more than a few hundred records. Enable it deliberately and watch LDAP server performance after the first sync. |
The Test Connection button checks whether the server is online, but it does not verify every LDAP setting. Use an LDAP browser tool to verify the directory path and bind account before relying on the configuration.
You can create entries for multiple LDAP servers. An LDAP server can also run on the same device or VM as the FileWave Server.
An LDAP server can be chosen as the Authentication server. In that case, FileWave uses that directory for profiles that support parameterized settings. Selecting use it for extraction adds the directory information to the FileWave database. You can view LDAP settings in Assistants > LDAP Browser in FileWave Central.
The Synchronize Now option at the bottom-right of the LDAP server pane lets you synchronize all LDAP servers, one LDAP server, or only LDAP Custom Fields.

VPP and ADE Preferences
What
FileWave Central uses Preferences > VPP & ADE to configure and monitor Apple Apps and Books tokens, Automated Device Enrollment accounts, and the Apple School Manager or Apple Business Manager API integration.
Apple now calls the Volume Purchase Program Apps and Books. FileWave retains the VPP abbreviation in parts of the interface and documentation. Apple's Device Enrollment Program (DEP) is now Automated Device Enrollment (ADE).
Interface version: The screenshots and the Status/Configuration navigation in this article apply to FileWave 16.4.0 and later. Customers running an earlier FileWave version will see the legacy single-pane VPP and ADE interface.
Version differences
| FileWave version | Preferences layout |
|---|---|
| 16.4.0 and later | Separate Status and Configuration tabs, shared Advanced Settings, and the Apple School or Business Manager API configuration. |
| 16.3.x and earlier | Legacy single-pane VPP and ADE layout. Configure tokens and ADE accounts, synchronize with Apple, and manage ownership from the controls shown in that version. The Apple School or Business Manager API section introduced with 16.4.0 is not present. |
The token, account-ownership, synchronization, and ADE certificate concepts in this article still apply to earlier versions, but the control locations and labels differ. Do not replace a working Apple token merely because an older interface does not match the 16.4.0 screenshots.
Before you begin
- Set up the required locations, MDM Servers, and API credentials in Apple Business Manager or Apple School Manager.
- Use a separate Apps and Books token for each production, test, or migration MDM Server.
- Do not use the same token on multiple MDM Servers at the same time. Doing so can cause ownership conflicts, lost control of the token, or unexpected VPP user retirement.
- Have the primary FileWave administrator credentials available. FileWave may require fwadmin authentication when changing tokens, accounts, or certificates.
Apple's current platform instructions are available in the Apple Business Manager User Guide and Apple School Manager User Guide.
Open VPP & ADE Preferences
- Open FileWave Central.
- Select FileWave Central > Preferences.
- Select VPP & ADE.
- On FileWave 16.4.0 and later, use Status for health and synchronization information and Configuration for tokens, accounts, certificates, API credentials, and advanced behavior. On earlier versions, use the equivalent controls in the legacy VPP and ADE pane.

FileWave 16.4.0 and later separates VPP and ADE health information from configuration tasks.
Status
The Status tab provides a quick operational view without exposing detailed account configuration.
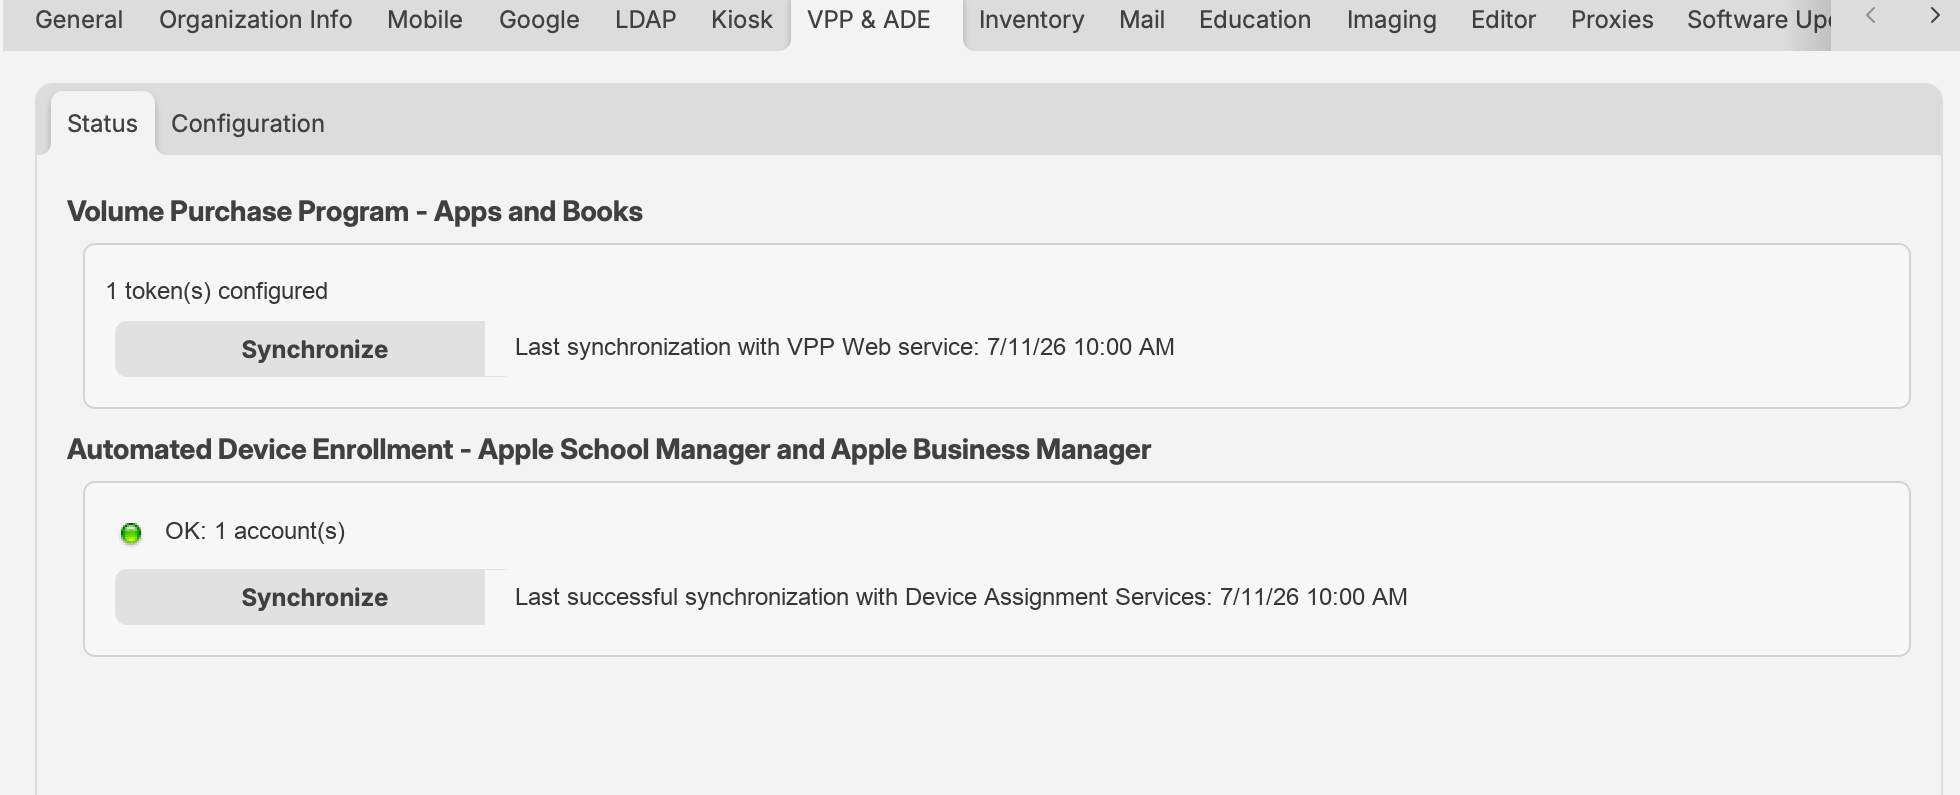
In FileWave 16.4.0 and later, the Status tab shows token and account health, synchronization controls, and the most recent synchronization times. Example counts and timestamps are shown.
Apps and Books status
- Displays the number of configured Apps and Books tokens.
- Shows the most recent VPP Web service synchronization.
- Synchronize requests an incremental synchronization.
- Hold Option on macOS while selecting Synchronize to request a full synchronization. Full synchronization is more expensive and should be used only when needed.
Automated Device Enrollment status
- Shows ADE account health and the number of configured accounts.
- Shows the last successful Device Assignment Services synchronization.
- Synchronize requests an ADE synchronization with Apple.
FileWave synchronizes Apple account data in the background. Use a manual synchronization when recent purchases, token changes, or device assignments cannot wait for the next scheduled synchronization.
Configuration
Volume Purchase Program—Apps and Books
Select Configure tokens to add, renew, remove, or inspect Apps and Books tokens. FileWave supports multiple location-based tokens.
- In Apple School Manager or Apple Business Manager, download the Apps and Books token for the required location.
- In FileWave Central, select Configure tokens.
- Add or replace the applicable token and save the configuration.
- Return to Status and synchronize.
- Confirm that the token is healthy and that purchased applications and books are available to FileWave.
After the initial synchronization, FileWave creates managed-license Filesets for eligible purchases according to the token configuration. Token-specific options can also control VPP users for newly enrolled devices and where automatically created Filesets are placed.
Never import the same Apps and Books token into two active MDM Servers. If FileWave reports that another server owns the token, use Take ownership only when the token has intentionally moved and the previous server or tool is no longer using it.
Apps and Books advanced settings
Select Show Advanced Settings to configure:
- The VPP email invitation template.
- The minimum delay between license assignment and application installation.
- The preferred license distribution model for new associations: Automatic, Device, or User. Automatic assignment uses Device when possible and otherwise uses User.
- VPP v2 notifications.
- LDAP synchronization, automatic email-address association, and invitation behavior for registered users.
Automated Device Enrollment
The ADE configuration connects FileWave to one or more MDM Server entries in Apple School Manager or Apple Business Manager.
- Select Download certificate and authenticate when prompted.
- In Apple School Manager or Apple Business Manager, create or open the FileWave MDM Server entry and upload the certificate.
- Download the resulting ADE server token from Apple.
- In FileWave Central, select Configure accounts and import the token.
- Save the configuration, return to Status, and synchronize.
Select Show Advanced Settings to choose the MDM certificate added to ADE profiles. Using an MDM certificate provides a more secure setup but requires ADE profiles to be updated when that certificate is renewed.
For complete token lifecycle instructions, see Add or Renewing your ADE (DEP) Account Token.
Apple School or Business Manager API
FileWave 16.4.0 and later can connect directly to the Apple School Manager or Apple Business Manager API. This integration provides current Apple device inventory, ADE assignment history, and AppleCare coverage information in FileWave.
Create the API account and private key by following Apple's instructions for Apple School Manager or Apple Business Manager.
- In FileWave Central, select Configure under Apple School or Business Manager API.
- Enter an Account Name for the connection.
- Next to Private Key, select Browse and choose the
.p8private-key file downloaded from Apple. - Enter the Key ID and Client ID supplied by Apple.
- Select OK and allow the initial synchronization to complete.

The API Account dialog requires an account name, the Apple .p8 private key, Key ID, and Client ID. The screenshot contains placeholder values only.
Review and assign Organization Devices
After the Apple School or Business Manager API account has synchronized, open the Organization Devices pane in the ADE Assistant. This view includes devices registered to the organization even when they are not currently assigned to a FileWave MDM server.
- Review or filter the organization-device list for devices that are not assigned to a configured MDM server account.
- Select the required device or devices and use the assignment action to choose the appropriate configured MDM server account.
- Allow the Apple assignment and FileWave synchronization to complete.
- Verify that the devices no longer appear as unassigned and that the expected ADE assignment is visible before beginning enrollment.
Organization Devices requires the Apple School or Business Manager API integration introduced in FileWave 16.4. Token-only ADE synchronization does not provide this organization-wide device and AppleCare view.
AppleCare synchronization can take time for a large fleet. Apple's coverage service supports single-device lookups and is subject to undocumented rate limits.
AppleCare smart refresh cycles and intervals
After the initial synchronization, FileWave automatically varies AppleCare refresh frequency according to the device's coverage state, such as renewable, active, or inactive/expired coverage. This reduces unnecessary single-device coverage requests while keeping time-sensitive coverage information fresher.
Select Show Advanced Settings under the API section to configure the separate refresh intervals used for renewable, active, and inactive AppleCare coverage. Shorter intervals keep coverage data more current but increase API load and can trigger throttling. Select Reset to Defaults to restore FileWave's standard smart-refresh intervals.
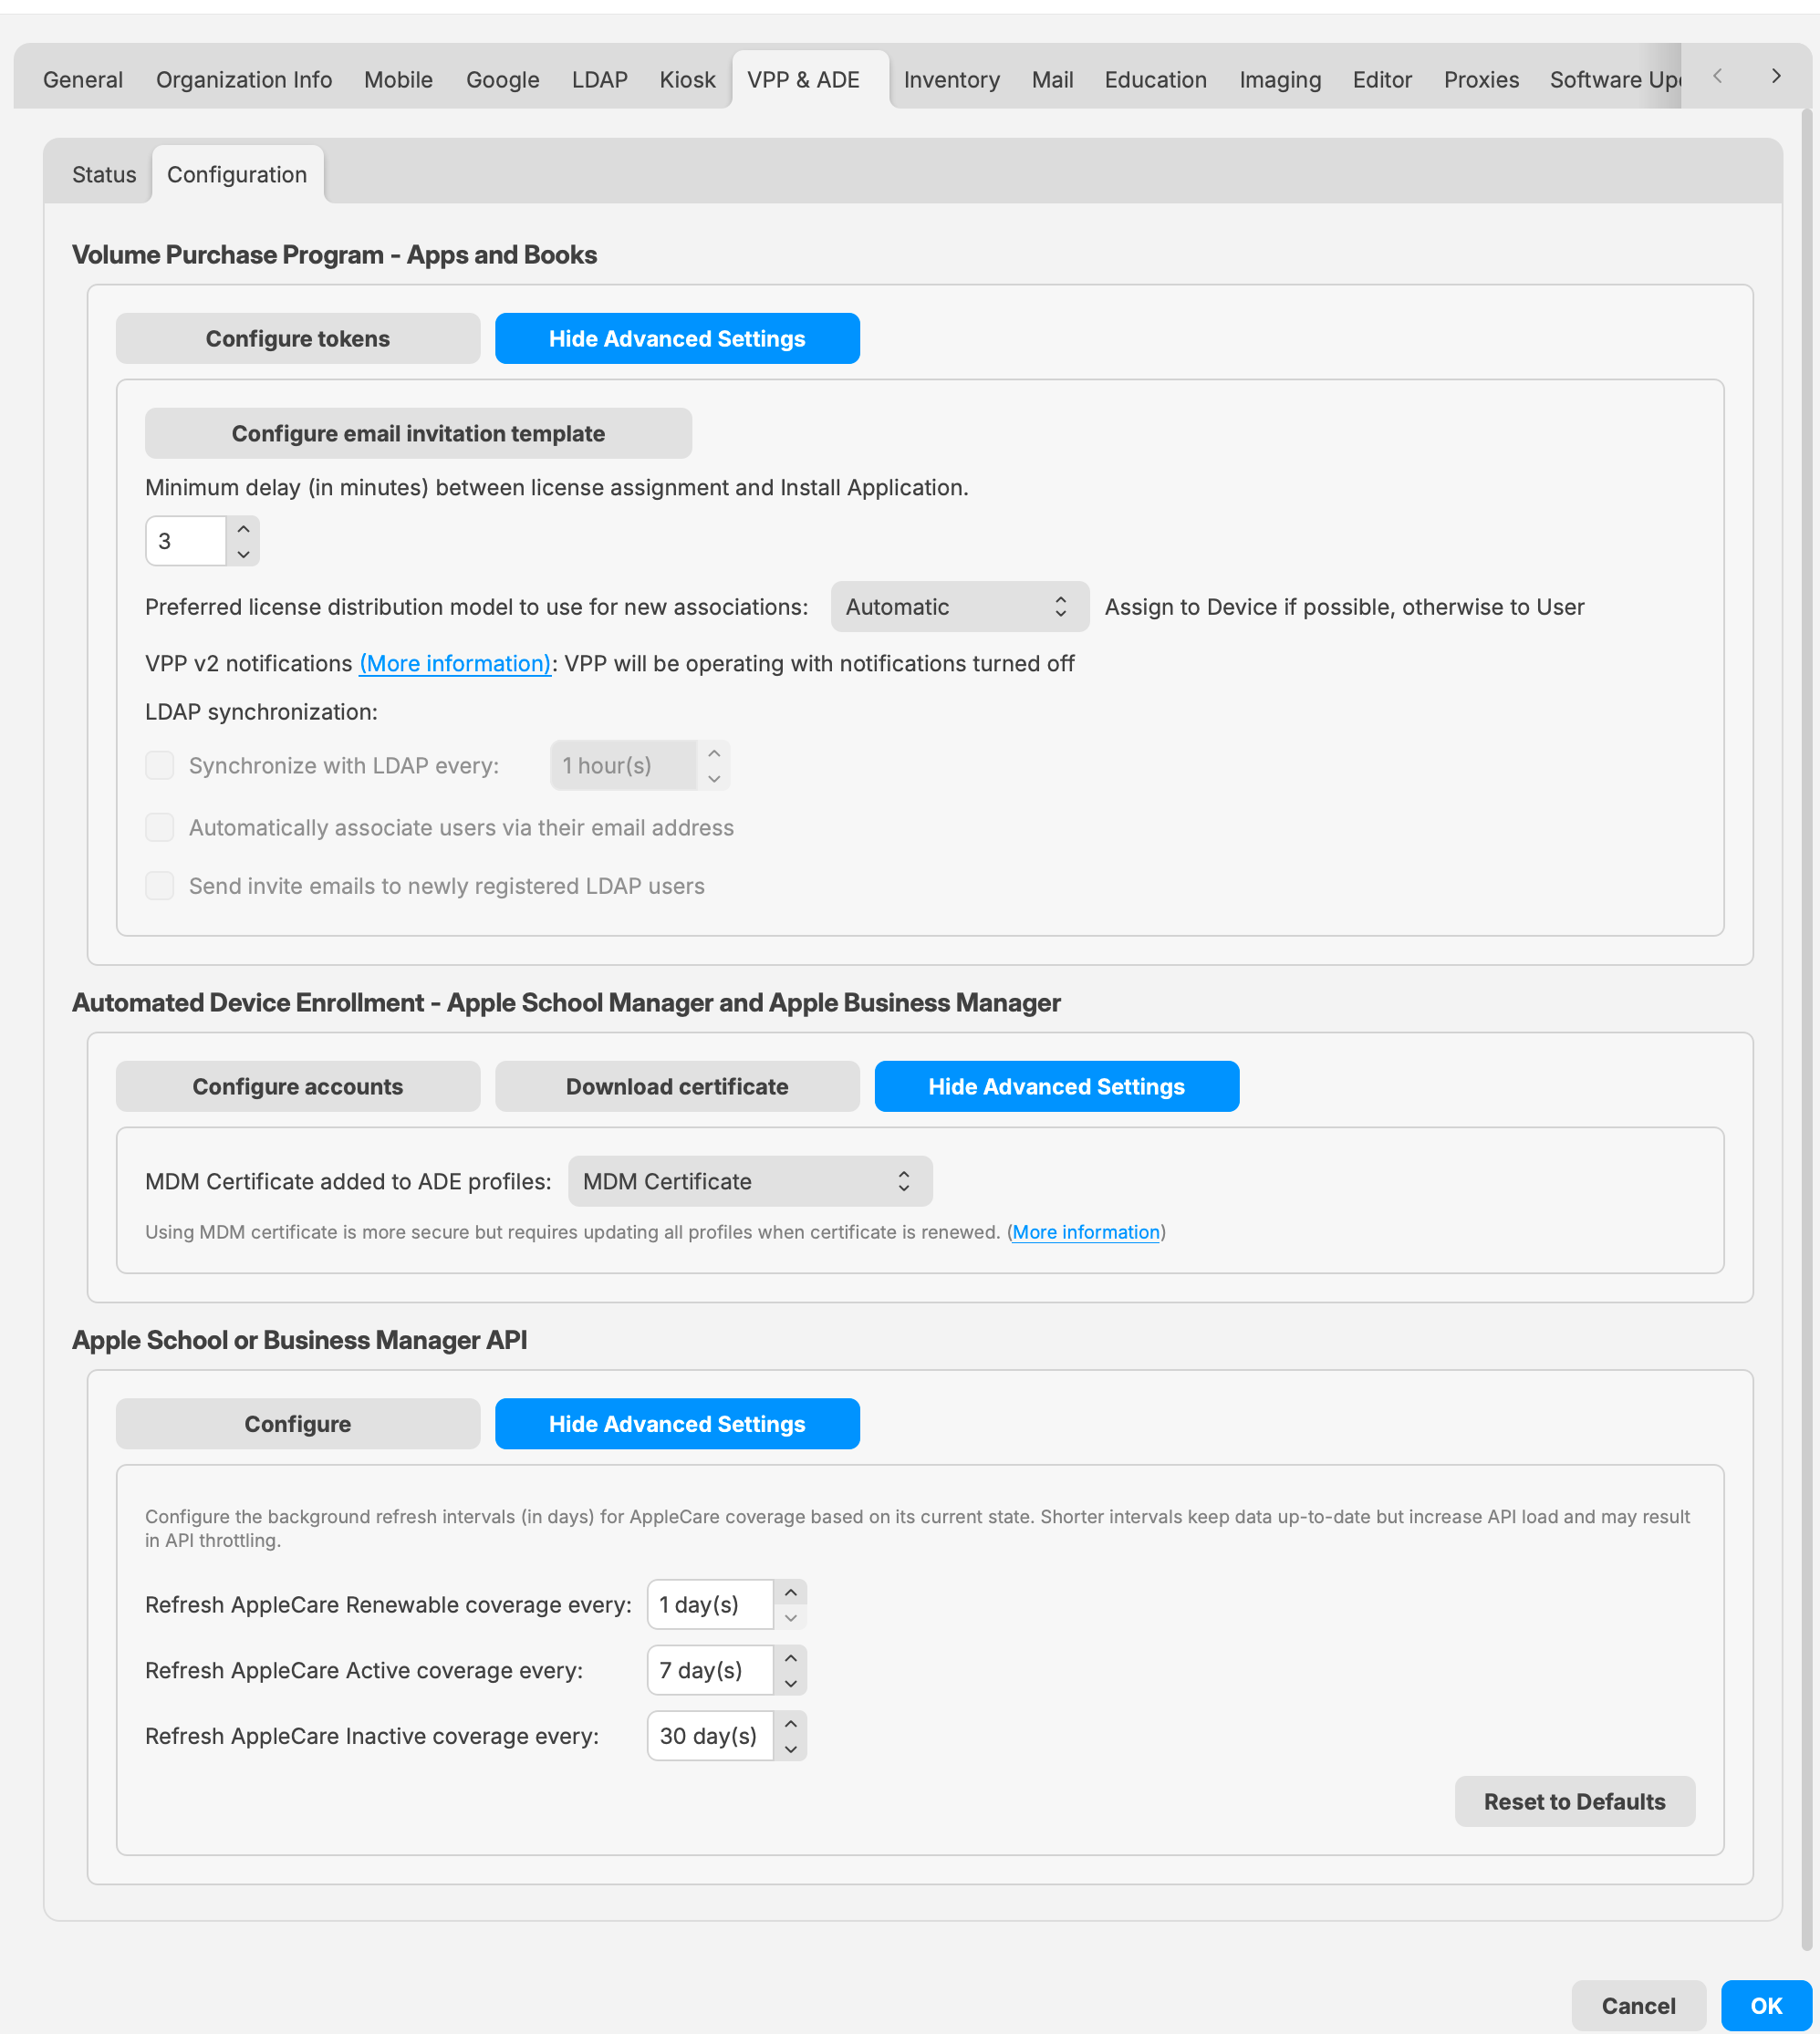
In FileWave 16.4.0 and later, Advanced Settings centralizes Apps and Books behavior, the ADE profile certificate, and AppleCare refresh intervals. Values shown are examples.
Related content
- Apple’s Volume Purchase Plan and License Management
- VPP Notifications (Apple VPP API v2)
- VPP Token Renewal
- Working with Apple’s Automated Device Enrollment (ADE)
- Add or Renewing your ADE (DEP) Account Token
- ADE Troubleshooting
Managing FileWave Administrators
FileWave supports tiered administration so you can create additional administrators in order to spread the workload, you are not limited to the amount of admins you can have in FileWave.
How to log into FileWave Admin
When you log into the FileWave Admin to access the FileWave Server you will be asked for the server address, and user credentials which can be a local account or an LDAP account.

FileWave supports multiple admin connections from the same or separate admin accounts. If you try to log in with the same account that is already connected somewhere else you will get prompted to either end that first connection, start a second connection, or cancel.

If you are currently using a self-signed certificate then you may also get a prompt that the Admin cannot verify the identity of the FileWave server. The recommend way to fix this is to, hit connect and then switch to a root trusted certificate. Please visit the KB linked here for instructions on how to do this.

You will also be able to see two active connections if you look in the Administrators Online... window located under the Assistants menu
|
The bolded entry is your current connection |

FileWave Administrators and Inventory
In the FileWave Admin console you have the ability to set read/write/delete permissions to specific objects which include devices, filesets, and groups. These permissions will follow the user all the way into inventory so that only what the current administrator has access too can be seen in the inventory results.
Example:
- Right click on an object (user, group, fileset) and select Set Permissions

- Select the permissions you would like for each administrator. Setting it to No Permissions will make that object no longer visible for the administrator.

|
You have to select Propagate to children if you are setting permissions on a group and want those permissions to be added to sub-objects. read/write/delete permissions are received from the original object and the clones will get the same permissions. If you modify these permissions on a clone, only this specific clone will get them not the original or other clones. |
- In this case the user greg has no permissions for the group selected which is for all macOS devices and these permissions have been propagated to all sub-objects. So as you can see below the first screenshot shows what the user with full permissions sees and the second screenshot shows inventory information with the new permissions.


Types of Administrator Accounts
FileWave has three different account types;
- Superuser - This will be the fwadmin account that came with FileWave by default, and is required for certain setup options in FileWave.
- Local User - A user name and password created directly from the FileWave Admin and saved on the server.
- LDAP Group User - Admin credentials are pulled from LDAP (Active and Open Directory)
Other than the Superuser, which has full rights by default, you have the ability set granular permissions for your Local and LDAP users.
Superuser
The default credentials for your Superuser account is fwadmin/filewave which FileWave highly recommends that you change so the password is something more secure!

There are areas and features in FileWave that can only be accessed with the FileWave Superuser account. Three of these sections won't even be visible to any other Admin account, one (Software Update) is grayed out for all but the Superuser, and the other features will trigger a dialog window requesting the Superuser credentials to be entered.
Only Visible from the Superuser logged in:
- Activation Lock Management (Assistants → Activation Lock Management)
- Force Logoff Admin (Assistants → Administrators Online...)
- Scheduled Reports Owner (Assistants → Scheduled Reports.. → "+" → Owner section)
- Software Update Sources Apple / Microsoft (Preferences → General)
All Admins will be prompted for Superuser credentials:
- VPP & DEP setup (Admin Preferences → VPP & DEP)
- Configure OAuth token (Admin Preferences → Chromebooks)
- Upload PKCS12 Certificate (Admin Preferences → Mobile → HTTPS Certificate Management)
- Configure GCM (Admin Preferences → Mobile → Android/Chromebooks)
- Upload macOS client package (Admin Preferences → Mobile → macOS)
- SIS - Edit Settings... (Admin Preferences → Education → SIS)
- Apple Classroom - Manage Certificates (Admin Preferences → Education → Apple Classroom)
- Force log off (Assistants → Administrators Online...)
- Manage VPP Tokens (Assistants → Manage Administrators → Manage VPP Tokens)

Local Account
Local Accounts can be created very simply and then given whatever permissions you wish them to have. Keep in mind even if a Local Administrator Account is given full rights they will still be prompted for Superuser credentials in the areas listed in the Superuser section above.
To create a Local Account for the FileWave Admin follow the steps below:
- Go to Assistants→ Manage Administrators
- Click on the the "+" sign at the bottom left
- Then select Local Account

- You will now be able to fill in the user information under the User details tab. Since this is a new user you will also have to set a default password by selecting Set Password or Generate and email password (this will only work if you provided an email for this user and you also have the Email settings completed in the Admin Preferences)

If you selected Set password you will get the following window to type in the user's password:

If you selected Generate and email password you will need to hit the Apply button at the bottom of the FileWave Administrators window and you will then get an email with the following information:

- Next you will need to give this user permissions in FileWave. You do this by selecting the user and going into the Permissions tab and checking which options you want this user to have. (There will be more information on what each of these options do at the end of this section)

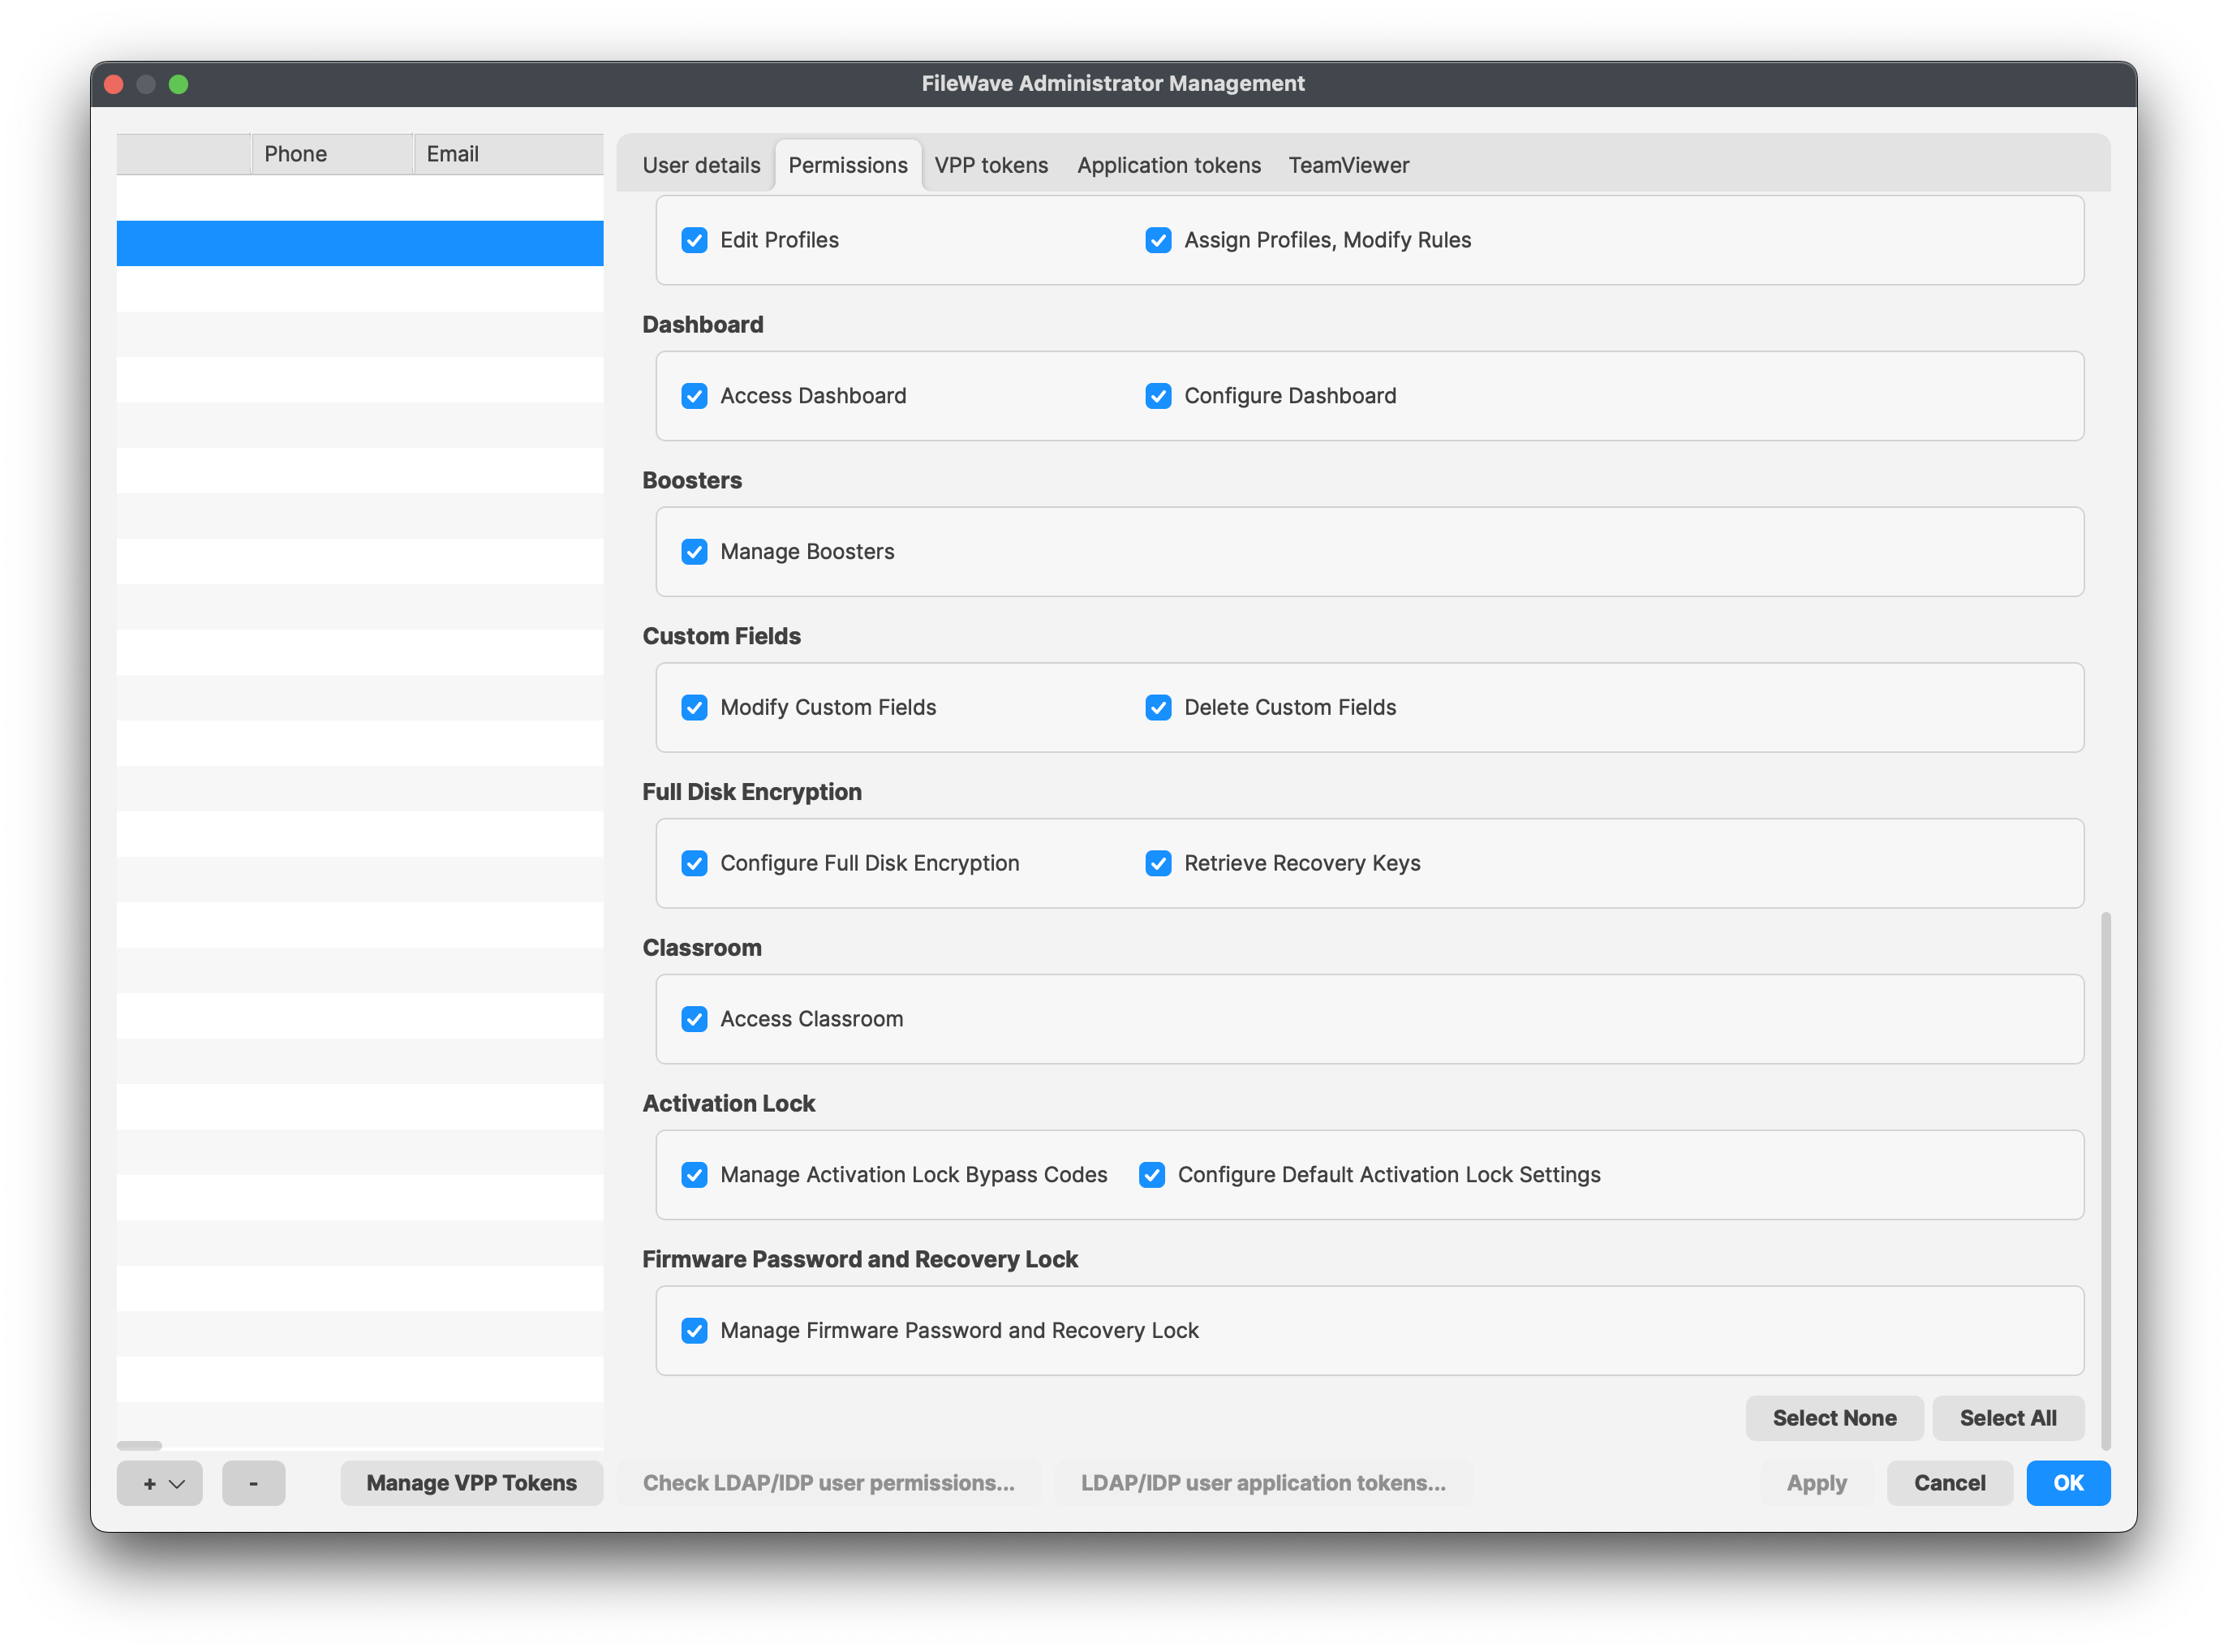
LDAP Group Account
If you have a LDAP server configured within your FileWave Preferences, administrators can authenticate using credentials stored in the LDAP server, based on Group membership. If a user is a member of multiple Groups, the final permissions will be the UNION of the permissions of these Groups. Only Active Directory is able to detect recursive membership. FileWave will not be able to detect nested Groups in an Open Directory or eDirectory.
|
To setup LDAP please see: LDAP Preferences |
To create a LDAP Group Account for the FileWave Admin follow the steps below:
- Go to Assistants→ Manage Administrators
- Click on the the "+" sign at the bottom left
- Then select LDAP Group Account

- You will now be able to link this LDAP Group Account with a Group from your directory service. Click the Browse... button in the User details tab
From here you will search through your LDAP structure to find the group you would like to use:

- (OPTIONAL) After the group is selected you can hit the Test button, this is used mainly if you typed in the DN instead of searching for the group in the browser


- Next you will need to give this user permissions in FileWave, you do this by selecting the user and going into the Permissions tab and checking which options you want this user to have. (More information on what each of these options do at the end of this section)

Permissions
Account permissions will determine what the Administrator can and cannot do in the FileWave Admin.
Selecting your Local Account or LDAP Group account and then going into the Permissions tab will give you all the permissions you can select for that user or group of users from LDAP.
LDAP Group Account Permissions
If you have a user in multiple LDAP Group Accounts the user will take the collective permissions from each group. You can check on what permissions a LDAP user will get by selecting the LDAP user application tokens... and searching for that user:


As you can see in the screenshots above the user Kamala Khan is in both the FW Admins and the iOS Admins LDAP Group which has fewer permissions than the FW Admins group does. So this user will use the permissions gathered from both of these groups which will give her full access as you can see in the screenshot below:

What are all the permissions you can choose from?
Server / Model
- Update Model - allows the administrator to approve changes to the server model. Updating the model sends notifications to all FW clients of any possible changes to any Filesets they have.
- Revert Model - allows the administrator to cancel changes made at the last model update and revert to the previous model version.
- Auditing - allows the administrator to view the Audit History of all actions logged by FileWave.
- Activation Keys - allows the administrator to enter, change, or update the activation keys for the FileWave server.
General
- Can Administer users - allows administrator to add, edit, or delete administrative users.
- Change Preferences - allows administrator to access the FileWave Admin Preferences
Clients and Groups
- Modify Clients / Groups - allows administrator the ability to add, edit, and delete FW clients and client Groups.
- Set Permissions - allows the administrator to assign clients and client Groups to specific administrators.
- View Location - Location map will be shown if the device is reporting location data.
- Clear Fileset Status - allows administrator the ability to remove all messages in the client info window for a designated client.
- Change Enrollment Username - this allows the administrator to change the enrollment username for MDM enrolled device, located in the client tools.
- Turn Tracking On/Off - gives the administrator the ability to switch the client state of a device for location tracking to Normal, Missing, or Not Tracked.
- Wipe Devices - this allows administrators the ability to wipe devices in the FileWave Admin.
Filesets and Groups
- Modify Filesets - allows administrator to edit Filesets , add or delete content within a Fileset.
- Export Fileset / Template - allows the user to export a specific Fileset or a template for use on another FileWave server, or for archival purposes.
- Set Permissions - allows the administrator to change the permissions within a Fileset or Fileset Group.
- Show Fileset Report - allows administrator to view the Fileset report showing the status of that Fileset.
- Manage VPP codes - with this unchecked and disallowed this will prevents administrators from accessing all VPP settings and menus, will also prevents the admins access to setup DEP tokens.
Note: If you do not allow an administrator to Manage VPP codes then they will not be able to see any of the VPP purchased applications or ebooks. This is especially important if you have multiple VPP token support.
Associations
- Modify Associations - allows the administrator to change the associations settings between a client or client Group and any Fileset or Fileset Group.
- Approve Software Updates - allows the administrator to designate specific software updates as pre-approved for association by other administrators.
- Modify Imaging Associations - allows the administrator to change which Imaging Filesets are associated with which devices
DEP
- Edit Profiles - allows the administrator to change the characteristics of DEP profiles, including naming conventions, setup assistant workflow, and certificate assignment.
- Assign Profiles - allows the administrator to designate specific client devices to be managed by certain DEP profiles.
Dashboard
- Access Dashboard - Which administrators can see the Dashboard in the FileWave Admin or via web browser.
- Configure Dashboard - This determines which administrators have access to Dashboard Alert settings.
Discovery Administration
- Configure, Run Scans, Delete Results - administrator can configure and control network scans and delete discovery results.
Custom Fields
- Modify Custom Fields - Allows administrators to create, modify, and assign custom fields to devices.
- Delete Custom Fields - This will allow the deletion of custom fields
Full Disk Encryption
- Configuration Full Disk Fields - allows the FileWave administrator to access and configure FDE Configure Management located in the Assistant menu
- Retrieve Recovery Keys - allows the FileWave administrator to access and configure FDE Recovery Key Management located in the Assistant menu
Classroom
- Access Classroom - allows the administrator to access the Classroom section in the FileWave Admin, this includes carts, cart clones, cart associations
|
Important Note: If you are upgrading from below FileWave 12.9 this Classroom option will be unchecked by default. So you will no longer able to view Classroom in FileWave until this is checked for selected administrators. |
Activation Lock
- Manage Activation Lock Bypass Codes - allows the administrator to access and manage Activation Lock bypass codes.
- Configure Default Activation Lock Settings - allows the administrator to configure the default Activation Lock behavior.
Firmware Password and Recovery Lock
- Manage Firmware Password and Recovery Lock - allows the administrator to manage Firmware Password and Recovery Lock settings.
Application tokens
FileWave security for inventory has been built on top of a shared secret, which is a long token generated randomly and shared between the server (inventory server) and clients (admin, FileWave server, client machines, scripts, etc)
Any script or 3rd party component that needs access to FileWave Inventory will need to have this token that has been assigned to a user. These tokens can be revoked, re-generated, and a user can have multiple tokens assigned to it.
Every Local account starts with a Default Token which can be used along with any news ones that are created.
|
The Default Token for your Superuser will be the same token that was originally in the Inventory tab in FileWave Preferences in versions 12.8.1 and below. If you upgraded from 12.8.1 or below then all communication with this token will stay intact unless you Regenerate the default token. |
Local Account New Application Token Setup:
- Select your Local Account and go into the Application tokens tab
- Once there hit the "+" at the bottom left of the tokens pane
- This will then allow you create a new token

- This will show
- The raw token
- base64 encoded token
- An example script you can copy and paste to test with
LDAP user application tokens
Just like Local Accounts it is possible to define application tokens for LDAP users as well. This will not be done at the group level but for the specific LDAP Users.
To setup the application tokens for LDAP users follow the steps bellow:
- In the FileWave Administrators window click on the LDAP user application tokens... button located at the bottom middle of the window
- You will then get the LDAP Users Application Tokens window, click the "+" at the bottom left of the token pane to create a new token

- Then you will need to type in the LDAP user you would like to use and click the Test button to confirm it

|
LDAP User TEST |
If you search for a user that is not in your directory service or it doesn't belong to an LDAP Group Account in FileWave it will fail.

- Once it has confirmed you are ready to use the token

Manage VPP Tokens
To allow specific FileWave Administrators to access and see VPP purchases they will need to be given access using this Manage VPP Tokens option in the Manage Administrators... section.
By default only the Superuser (fwadmin) has access to new VPP tokens imported in FileWave any other Administrators created needs to be given access.
- Click the Manage VPP Tokens button at the bottom

- You need to authenticate with the Superuser

- Now you will check which users you would like to manage which VPP Token

- Once you click OK you will be able to view which tokens a specific user has access to by looking in the VPP tokens tab

Brute Force Protection and Login Lockouts
Quick answer
FileWave 16.3.0 introduced login lockout behavior through brute force protection for FileWave Central and FileWave Anywhere sign-in attempts.
With the default settings, a FileWave user account, including an administrator account, is temporarily locked after 5 failed login attempts or wrong password attempts. The first lockout lasts 60 seconds, and later lockouts increase up to the configured maximum.
This is a FileWave account lockout feature. It is separate from Self-Service Password Reset (SSPR) or identity-provider password reset policies.
What
Starting in FileWave 16.3.0, FileWave Central and FileWave Anywhere include brute force protection for sign-in attempts.
When it is enabled, repeated failed logins place that user account on a temporary lockout timer. The lockout is tied to the username, not the source IP address, and the timer increases after additional failed attempts.
If one account is locked, other accounts are not affected unless they also hit the failed-attempt threshold. The lockout clears automatically when the timer expires.
This setting is enabled by default. You can find it in FileWave Central > Preferences > General, and it applies to sign-in attempts for both Central and Anywhere.
When/Why
Leave this enabled in most environments.
It matters most when FileWave Central or FileWave Anywhere can be reached from the internet or another network you do not fully trust. In that situation, it slows down password-guessing and dictionary attacks against exposed login pages.
You may also run into it during testing or troubleshooting if the wrong password is entered several times. That usually means the protection is working as designed, not that the server is broken.
Default values shown in FileWave 16.3.0:
- Allowed failed attempts / wrong password attempts: 5
- First lockout time: 60 seconds
- Lockout increase factor: 2.00
- Maximum lockout time: 900 seconds
With those settings, the first lockout lasts 1 minute. If the same user account has more failed login attempts after that lockout expires, the lockout time increases until it reaches the configured maximum.
If you disable the feature temporarily for troubleshooting, turn it back on afterward.
How
Configure brute force protection
- Open FileWave Central.
- Go to Preferences.
- On the General tab, scroll to the Brute Force Protection section.
- Review or change the settings.
- Click OK to save.
Available options
-
Enabled
- Turns brute force protection on or off.
- Enabled by default in 16.3.0.
-
Allowed Failed Attempts
- Sets how many failed logins are allowed before a lockout starts.
- Value shown in the 16.3.0 UI example: 5.
-
First Lockout Time
- Sets the length of the first lockout.
- Value shown in the 16.3.0 UI example: 60 seconds.
-
Lockout Increase Factor
- Multiplies the lockout time after later failed attempts.
- Value shown in the 16.3.0 UI example: 2.00.
-
Maximum Lockout Time
- Sets the longest lockout time that can be reached.
- Value shown in the 16.3.0 UI example: 900 seconds.

What users see when a lockout occurs
After the failed-attempt threshold is reached, the user sees a message that the account has been locked because of too many unsuccessful sign-in attempts.
The message also shows how long remains before the account unlocks. In the example below, the timer is 1 minute, which matches the default first lockout time.
Only that account is locked. Other users can still sign in unless they trigger their own lockout.

Recommended guidance
- Leave the setting enabled unless you have a specific reason to change it.
- If someone reports that a FileWave Admin, administrator, or other user account is locked, check whether that account had repeated failed password attempts.
- Remember that the lockout is per user and timer-based. It is not an IP-based block.
- If you change the defaults, record the new values so support and administrators know what to expect.
- When testing, keep in mind that lockout times increase after repeated failures.
Common questions
What version started locking accounts after too many wrong password attempts?
FileWave 16.3.0. If someone asks what version of FileWave, or FW, started locking an Admin or user account after the password was entered wrong too many times, this is the setting.
Does this apply to administrator accounts?
Yes. Brute force protection applies to FileWave sign-in attempts for user accounts, including FileWave administrator accounts.
How many failed login attempts are allowed before lockout?
The default is 5 failed login attempts or wrong password attempts before the account is temporarily locked.
How long does the lockout last?
With the default settings, the first lockout lasts 60 seconds. Later lockouts increase after additional failed attempts, up to the configured maximum. If your environment uses a different time, such as 120 seconds, the setting was likely changed from the default.
Does this affect FileWave Central and FileWave Anywhere?
Yes. The setting is configured in FileWave Central, and it applies to sign-in attempts for both FileWave Central and FileWave Anywhere.
Is the lockout based on username or source IP address?
The lockout is tied to the username or account, not the source IP address. Other users can still sign in unless they trigger their own lockout.
Is this the same as Self-Service Password Reset (SSPR)?
No. Brute force protection is FileWave login lockout behavior. SSPR is a separate password reset capability or identity-provider policy.
Where do I configure the failed-attempt and lockout settings?
In FileWave Central, go to Preferences > General > Brute Force Protection.
Where are failed login attempts and lockouts logged?
Failed login attempts and lockout events are written to /usr/local/filewave/log/audit.log on the FileWave Server.
Related Content
- Securing FileWave Server on the Internet for Remote Device Management
- TCP and UDP ports used by FileWave
- FileWave Security
Digging Deeper
This is a small setting, but it does real work when a FileWave server is reachable over public networks. It adds friction to repeated login attempts and gives you a safer default on exposed sign-in pages.
Public-facing error messages are also handled carefully. During normal failed logins, the response does not disclose whether an account exists. The one exception is an active lockout, because that state is intentionally tied to a specific account.
Failed login attempts and lockout events are written to the server audit log. Each entry includes the username, the client type, the source IP address when available on a best-effort basis, and the lockout expiry time.
Log file location:
/usr/local/filewave/log/audit.log
To watch the audit log in real time on the server:
tail -f /usr/local/filewave/log/audit.log
If you want to review or test the behavior through the API, you can use the authentication endpoints below.
Set the lockout parameters:
curl -s -X PUT \
-H "Authorization: ${APPTOKEN}" \
-H "Content-Type: application/json" \
https://${HOSTNAME}:20445/auth/admin-lockout-params \
-d '{"enabled":true,"threshold":6,"base":51,"multiplier":4,"maximum":900}'
Test a login attempt:
curl -s \
-H "Content-Type: application/json" \
https://${HOSTNAME}:20445/auth/login \
-d '{"username":"fwadmin","password":"test"}'
Embracing the Dark Side: Dark Mode for FileWave Central (15.3+)
What
Once upon a time, in a brightly lit world of screens, a shadowy figure emerged, promising salvation to our eyes: Dark Mode. As legends of its comfort and sleekness spread across the realms of software applications, we at FileWave decided it was time to embrace the dark side. Here's the tale of how Dark Mode came to FileWave Central, turning night into a friendlier place for all administrators.
Dark Mode, the knight in shining armor (or should we say, 'shimmering darkness'?), transforms the blinding lights of your screen into a soothing, shadowy oasis. It’s not just a fashion statement; it’s a guardian of your eyesight, a curator of concentration, and a promoter of power saving. By inverting the bright white backgrounds into deep, dark hues, Dark Mode makes nighttime work less of a nightmare.
When/Why
As the clock struck midnight on yet another session of late-night device management, it dawned on us: our users deserved the option to go dark. Following a cascade of requests and after noticing the shift towards dark themes across the tech landscape, we knew the time was right. Our decision was fueled by the desire to not only keep up with modern UI trends but to also offer our hardworking administrators a visually comfortable and customizable working environment, proving our commitment to not just meeting but exceeding user expectations.
How
To embrace the dark side or bask in the light, journey to **Preferences -> General** in FileWave Central. There, under the Theme setting, select your allegiance: Automatic, Light Mode, or Dark Mode. Choose wisely, for each setting casts FileWave Central in a different aura, from the bright, welcoming light of day to the mysterious, serene shadows of night.
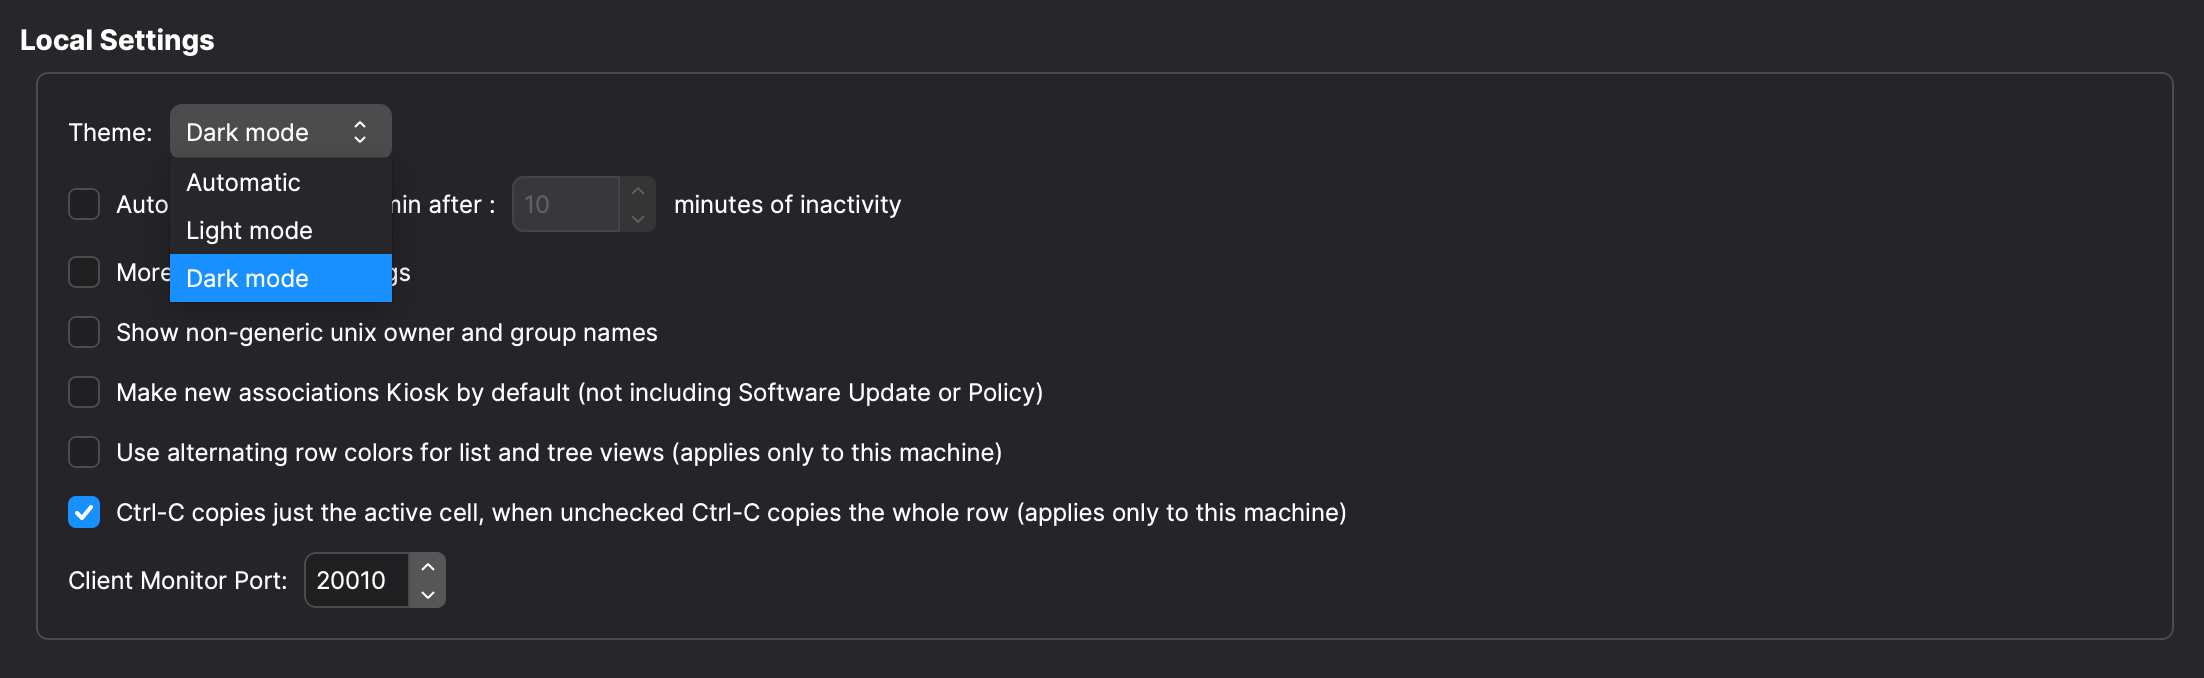
Related Content
FileWave Central - Additional Settings Menu Items
In the FileWave Admin application, there are several other settings and menu items that come into play as you manage and configure your devices. They appear in two menu sets (Server & Assistants) as shown:


Some of these items have already been covered, and others will be discussed in depth later in this manual. Here are basic descriptions of the function of these menu items.
Activation Code…
This is the access to the code you received when you purchased your FileWave license.
Update Model…
FileWave, at its core, is a SQL database. As such, it is constantly managing large amounts of data as you, and possibly other administrators, add new clients, create Filesets for new content distribution, and manage your devices. When you are performing many of these operations, the information is being written into RAM on the server. A Model is an instance in time for the FileWave database. When you choose the Update Model, you are telling the server to write the changes you have made into the database, and create a manifest for the Clients. This manifest is sent to each Client when it checks in, telling it what changes have been made. If there is a change that effects the Client, it will then request any new or updated Filesets and will then make the appropriate changes on the device. Whenever you make changes to device(s), edit Filesets, or do anything that may affect the relationship between a device and the server, you should update the model.
Revert to Last Model…
If you have made a change to the Model, then realize that you may have damaged a setting, or distributed a broken application, you can revert to the previous model within the FileWave database. In many cases, this can be done without any irreversible changes to the client devices.
Get Logfile…
Open Logfile Folder
Client Monitor
The Client Monitor is a tool used to observe the status of a specific device. It displays the current state of the device, the current Model number on the device, and you can see if the device is reacting to changes being made by clicking on the Verify button. Detailed information on Client Monitor is in the Chapter Clients.
Fileset Magic
Custom content can be created using the Fileset Magic tool. It allows you to take a snapshot of the current status of a device, install and configure new content, take a second snapshot, and build a distribution Fileset from those changes. More on Fileset magic in the Chapter on Filesets.
Find Software Updates…
Imaging…
This item opens the Imaging pane that allows you to associate disk images with OS X and Windows devices for re-imaging. This is covered in detail in Network Imaging / IVS.
Enroll iOS Device…
This item opens the pane with the various settings for enrolling iOS devices, and AppleTV, either manually or automatically.
Search App Store…
VPP Code Management… / VPP User Management…
DEP Association Management…
Activation Lock Management…
Manage Administrators…
Show Locked Items
In the meantime, any administrator trying to work on those areas, can use the Show Locked Items menu to view areas they cannot control.
If an administrator has left items locked too long, or walked away from their system with items still locked, you can force quit that administrator (see Administrators Online… below). You should also make sure your sub-administrators set a reasonable auto-logout time in the General preferences of their FileWave Admin application.
Audit History…
Administrators Online…
LDAP Browser…
File Search…
This item displays a search window that allows you to locate any item in a Fileset using a text string search.
Once you have located your item, you can click on Reveal in Fileset to display the contents of the Fileset with that specific item.
Unmanaged Devices…
Scheduled Reports…
Configuring Inventory preferences
The Inventory tab in FileWave Central Admin Preferences controls inventory polling for Apple MDM-enrolled devices, Smart Group refresh timing, LDAP Custom Field cleanup behavior, and IDP Custom Field synchronization. These settings affect how fresh inventory-based data appears and how much recurring work the server performs, so change them deliberately.

iOS Inventory
These settings apply to iOS, iPadOS, and tvOS devices enrolled through MDM. These devices appear in the normal Clients view as well as in the iOS Inventory section.
- Device Inventory Poll Interval – Controls how often enrolled devices report profile, application, security, and device-setting inventory. The default shown here is 24 hours. Sending a Verify command can prompt a device to report sooner.
- Device Not Checked-In Notification – Controls when a device is visually flagged for not checking in with the MDM server. When a device exceeds this value, FileWave changes the device color to alert the administrator.
Smart Groups
- Refresh every – Controls the normal refresh interval for Smart Groups. The default shown here is 10 minutes.
- Fast smart group refresh period – Controls the shorter refresh interval used only by Smart Groups that have Fast Smart Group Evaluation enabled. The default shown here is 1 minute.
- Refresh all Smart Groups now – Forces FileWave to refresh the data requested by existing Smart Groups immediately instead of waiting for the next scheduled refresh.
Use fast Smart Group evaluation only for time-sensitive workflows, such as enrollment or first-check-in groups where assignments need to happen quickly. FileWave allows up to 3 Smart Groups with fast evaluation enabled. This limit protects server performance; evaluating many Smart Groups more frequently would add unnecessary recurring load.
Fast Smart Group Evaluation is documented with Smart Group guidance.
Do not make Smart Group refresh intervals more frequent without a reason. In very large environments, longer intervals may reduce unnecessary server load.
LDAP Custom Fields
If this option is enabled, FileWave clears the value of an LDAP Custom Field when there is no longer a match between the client and the LDAP user or computer.
IDP Custom Fields
Schedule Sync queues an IDP Custom Fields extraction. Use it when custom field values populated from an identity provider should be refreshed outside the normal sync timing. The button requires an IDP Device Enrollment server to be configured.
Related Content
- Fast Smart Group Evaluation
- Using Queries to create Smart Groups
- FileWave Client Configuration Settings
FileWave Anywhere persistent user preferences (14.8+)
What
As a user of FileWave Anywhere, I frequently have to resize columns when I’m using it.
When/Why
In v14.8.0 we have introduced the ability to store preferences about column width so that when you login columns will retain their size as appropriate.
How
User preferences in main views will be stored on the user account:
- Pinned columns
- Width of the columns
- Visibility of the columns
- Order of the columns
User preferences in main views will be stored in the active session:
- Filters
- Quick filters
- Search
- Applied sorting on a column
Profiles section error handling improvements:
- Error handling in the profiles is more user friendly and the mandatory fields are better highlighted
License Reporting
Manual Licenses
You can manage software licenses manually by creating an inventory query. Select New License from the toolbar, give the license a name, and set the license expression to track either an application or a font.
Build the inventory search for the item you want to track, for example Chrome browser. FileWave can evaluate items installed across the operating systems it manages from the computer side. Android can also appear here because the FileWave client treats it as a hybrid of computer and mobile management.

Next, enter the licenses you actually own. You can use purchase order details if you have them, or any internal tracking method that gives you a reliable count. You can add multiple purchases to the same license record, which also gives you a simple history for that item.

Set a warning threshold so FileWave can alert you before you run out of available licenses.

That completes the manual license query. In the License Management pane you can review the current results and compliance state.

Double-click the license entry to view the query details and the device information behind the result.
Font Licenses
What
Use font licenses when you need FileWave to track commercially licensed fonts installed across managed computers, such as fonts used by design, graphics, or marketing teams.
How it works
The setup is similar to an application license. Create the license, give it a clear name, and build the license expression around font inventory values instead of application values.
Font licenses use the same License Management status indicators as application licenses. A green jelly means the license is in compliance, yellow means the watermark threshold has been crossed, and red means the license is out of compliance.
If you are looking for font compliance, licensed font tracking, or whether a font package is installed beyond its allowed count, this is the License Management workflow to use.
Creating Licenses from Filesets
Use license tracking from a Fileset when you want FileWave to count where a deployed application appears and alert you when usage exceeds the license watermark you set. FileWave Client inventory can scan managed computers for files that match the Fileset definition, and FileWave Central License Management can use that definition as the tracking criteria.

For example, if you deploy a trial application to a small pilot group, you can create a license from that application Fileset and watch for copies outside the expected device count.
You do not need to recreate the application criteria by hand. The Fileset definition becomes the basis for the license, and FileWave reports when that package appears on more devices than the configured license count.
Troubleshooting
FileWave Server Mail test receives Bad Request with Google SMTP Accounts
What
This troubleshooting article applies when Authentication Method is set to Manual Setup and a Google SMTP account returns a Bad Request error because the account is not ready for the app-password workflow below.
FileWave 16.4 also supports Google OAuth. Use OAuth when it matches the organization’s Google Workspace policy; use the app-password steps below only for a supported Manual Setup configuration. See Configuring FileWave Server Mail Preferences.
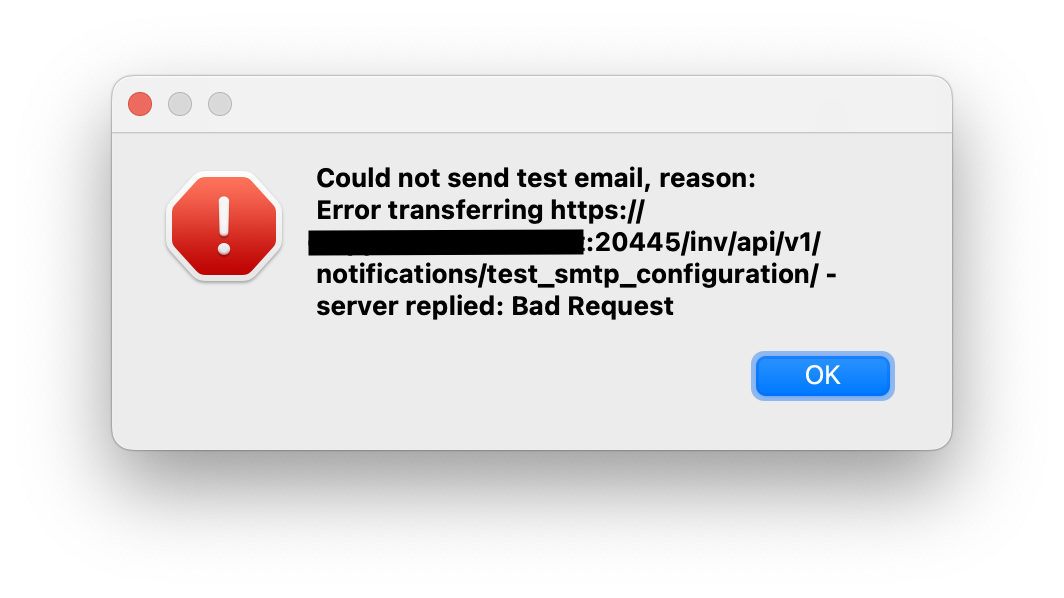
When/Why
For Google accounts, enable 2-Step Verification and create a Google App Password for FileWave. Use that generated app password in FileWave mail preferences instead of the user's normal Google password.
How
In the Google account, open the security settings, confirm that 2-Step Verification is enabled, then create an app password. Google's current instructions are here: Sign in with app passwords. Copy the generated password into FileWave email preferences and keep it stored securely with your other service-account credentials.
Send another test email from FileWave to confirm that the Google account and app password are accepted.

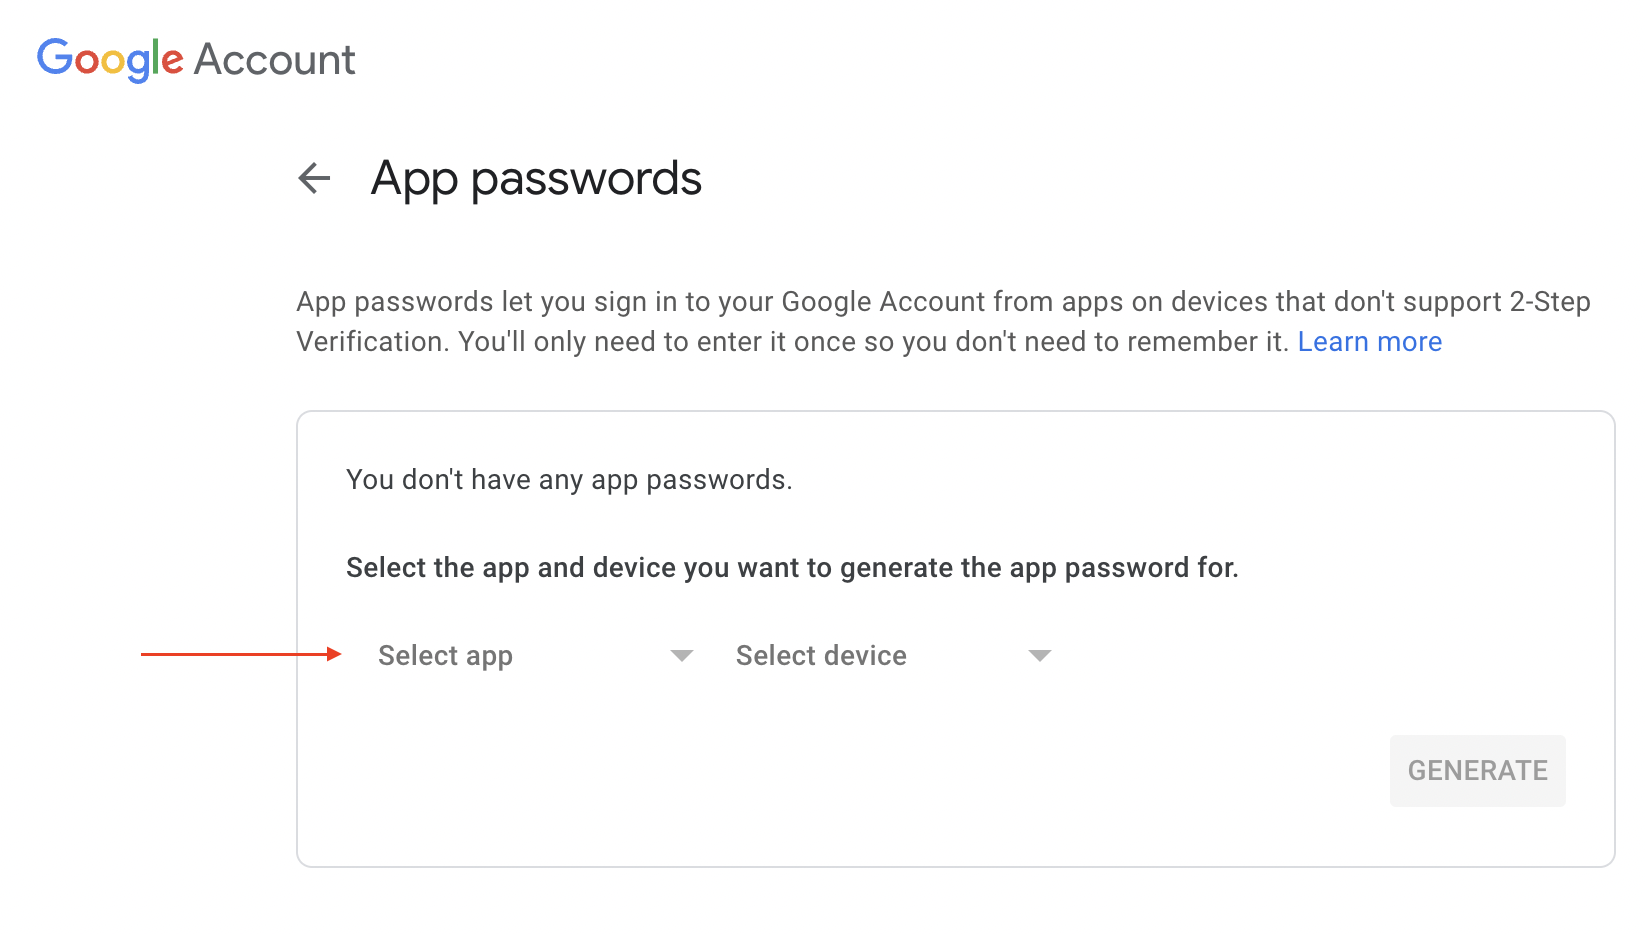

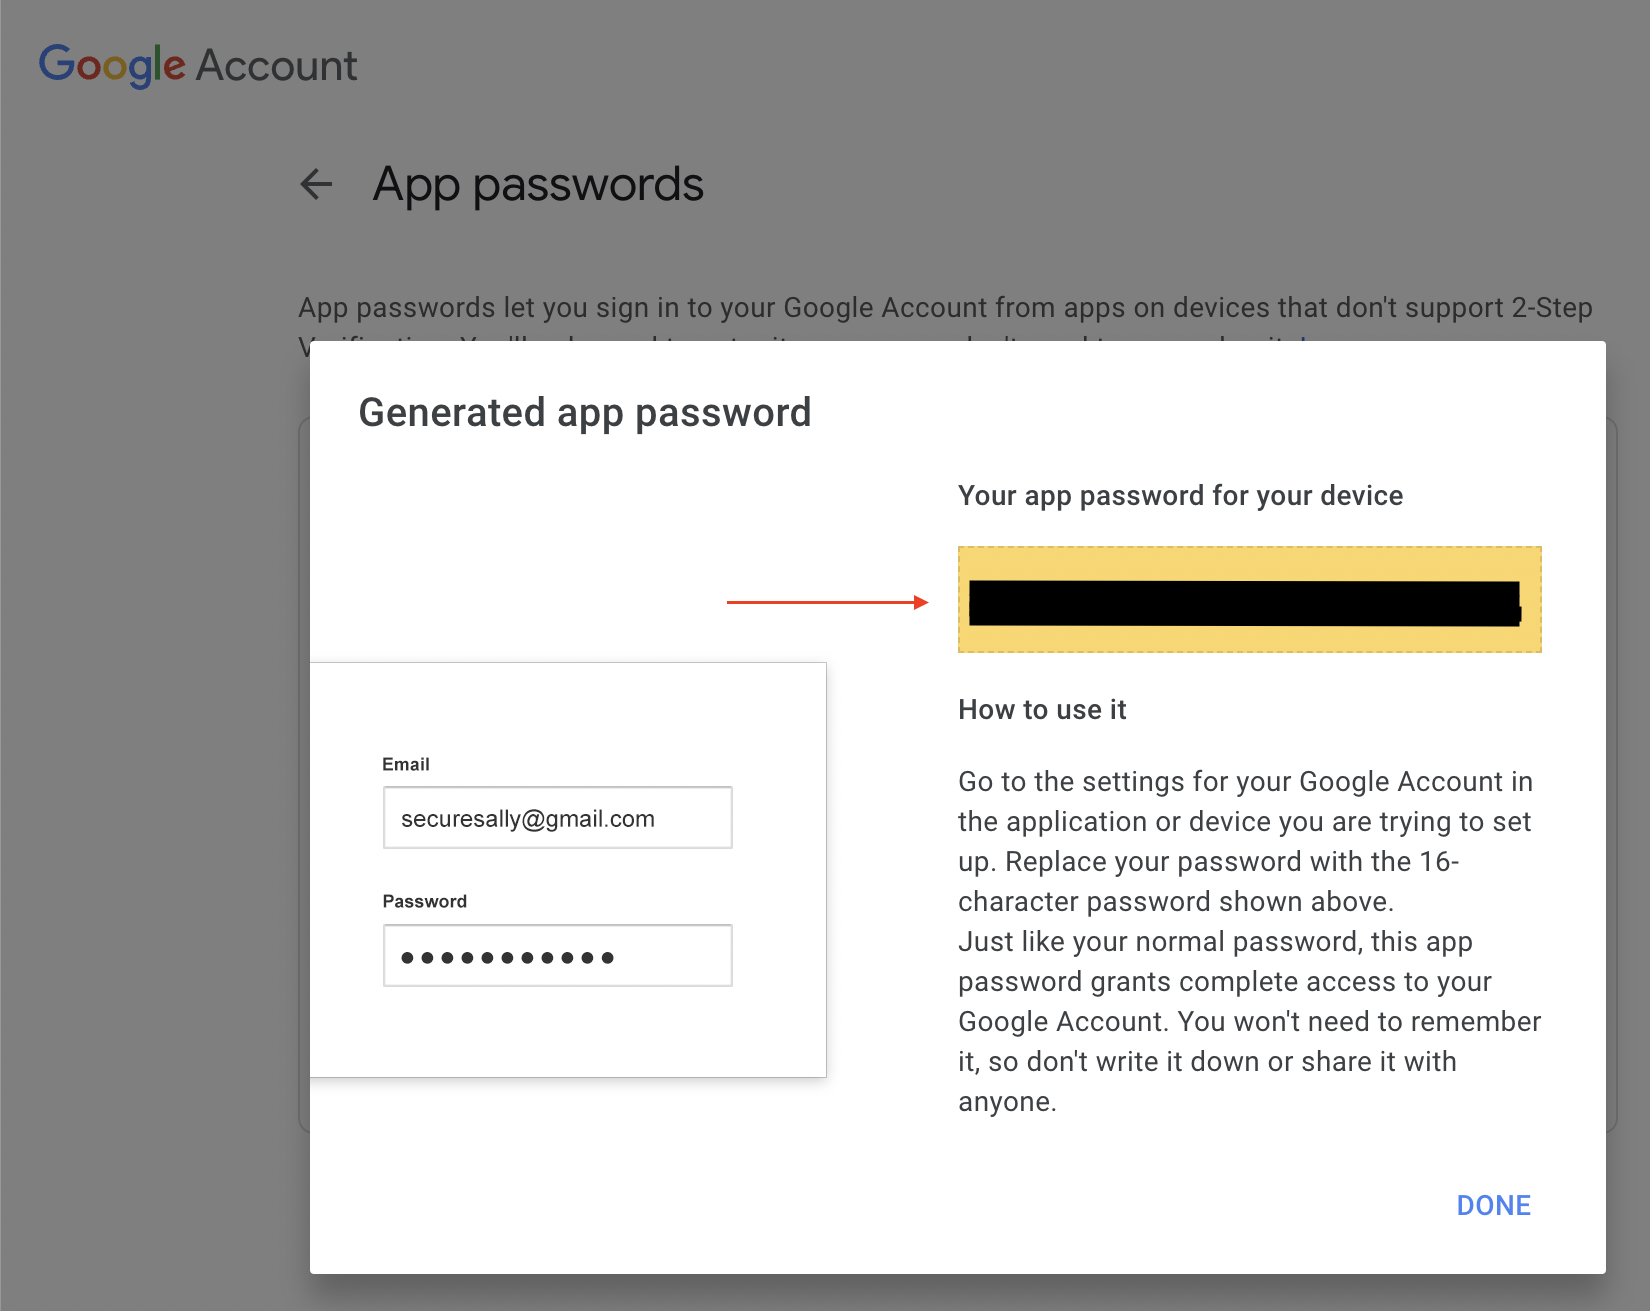
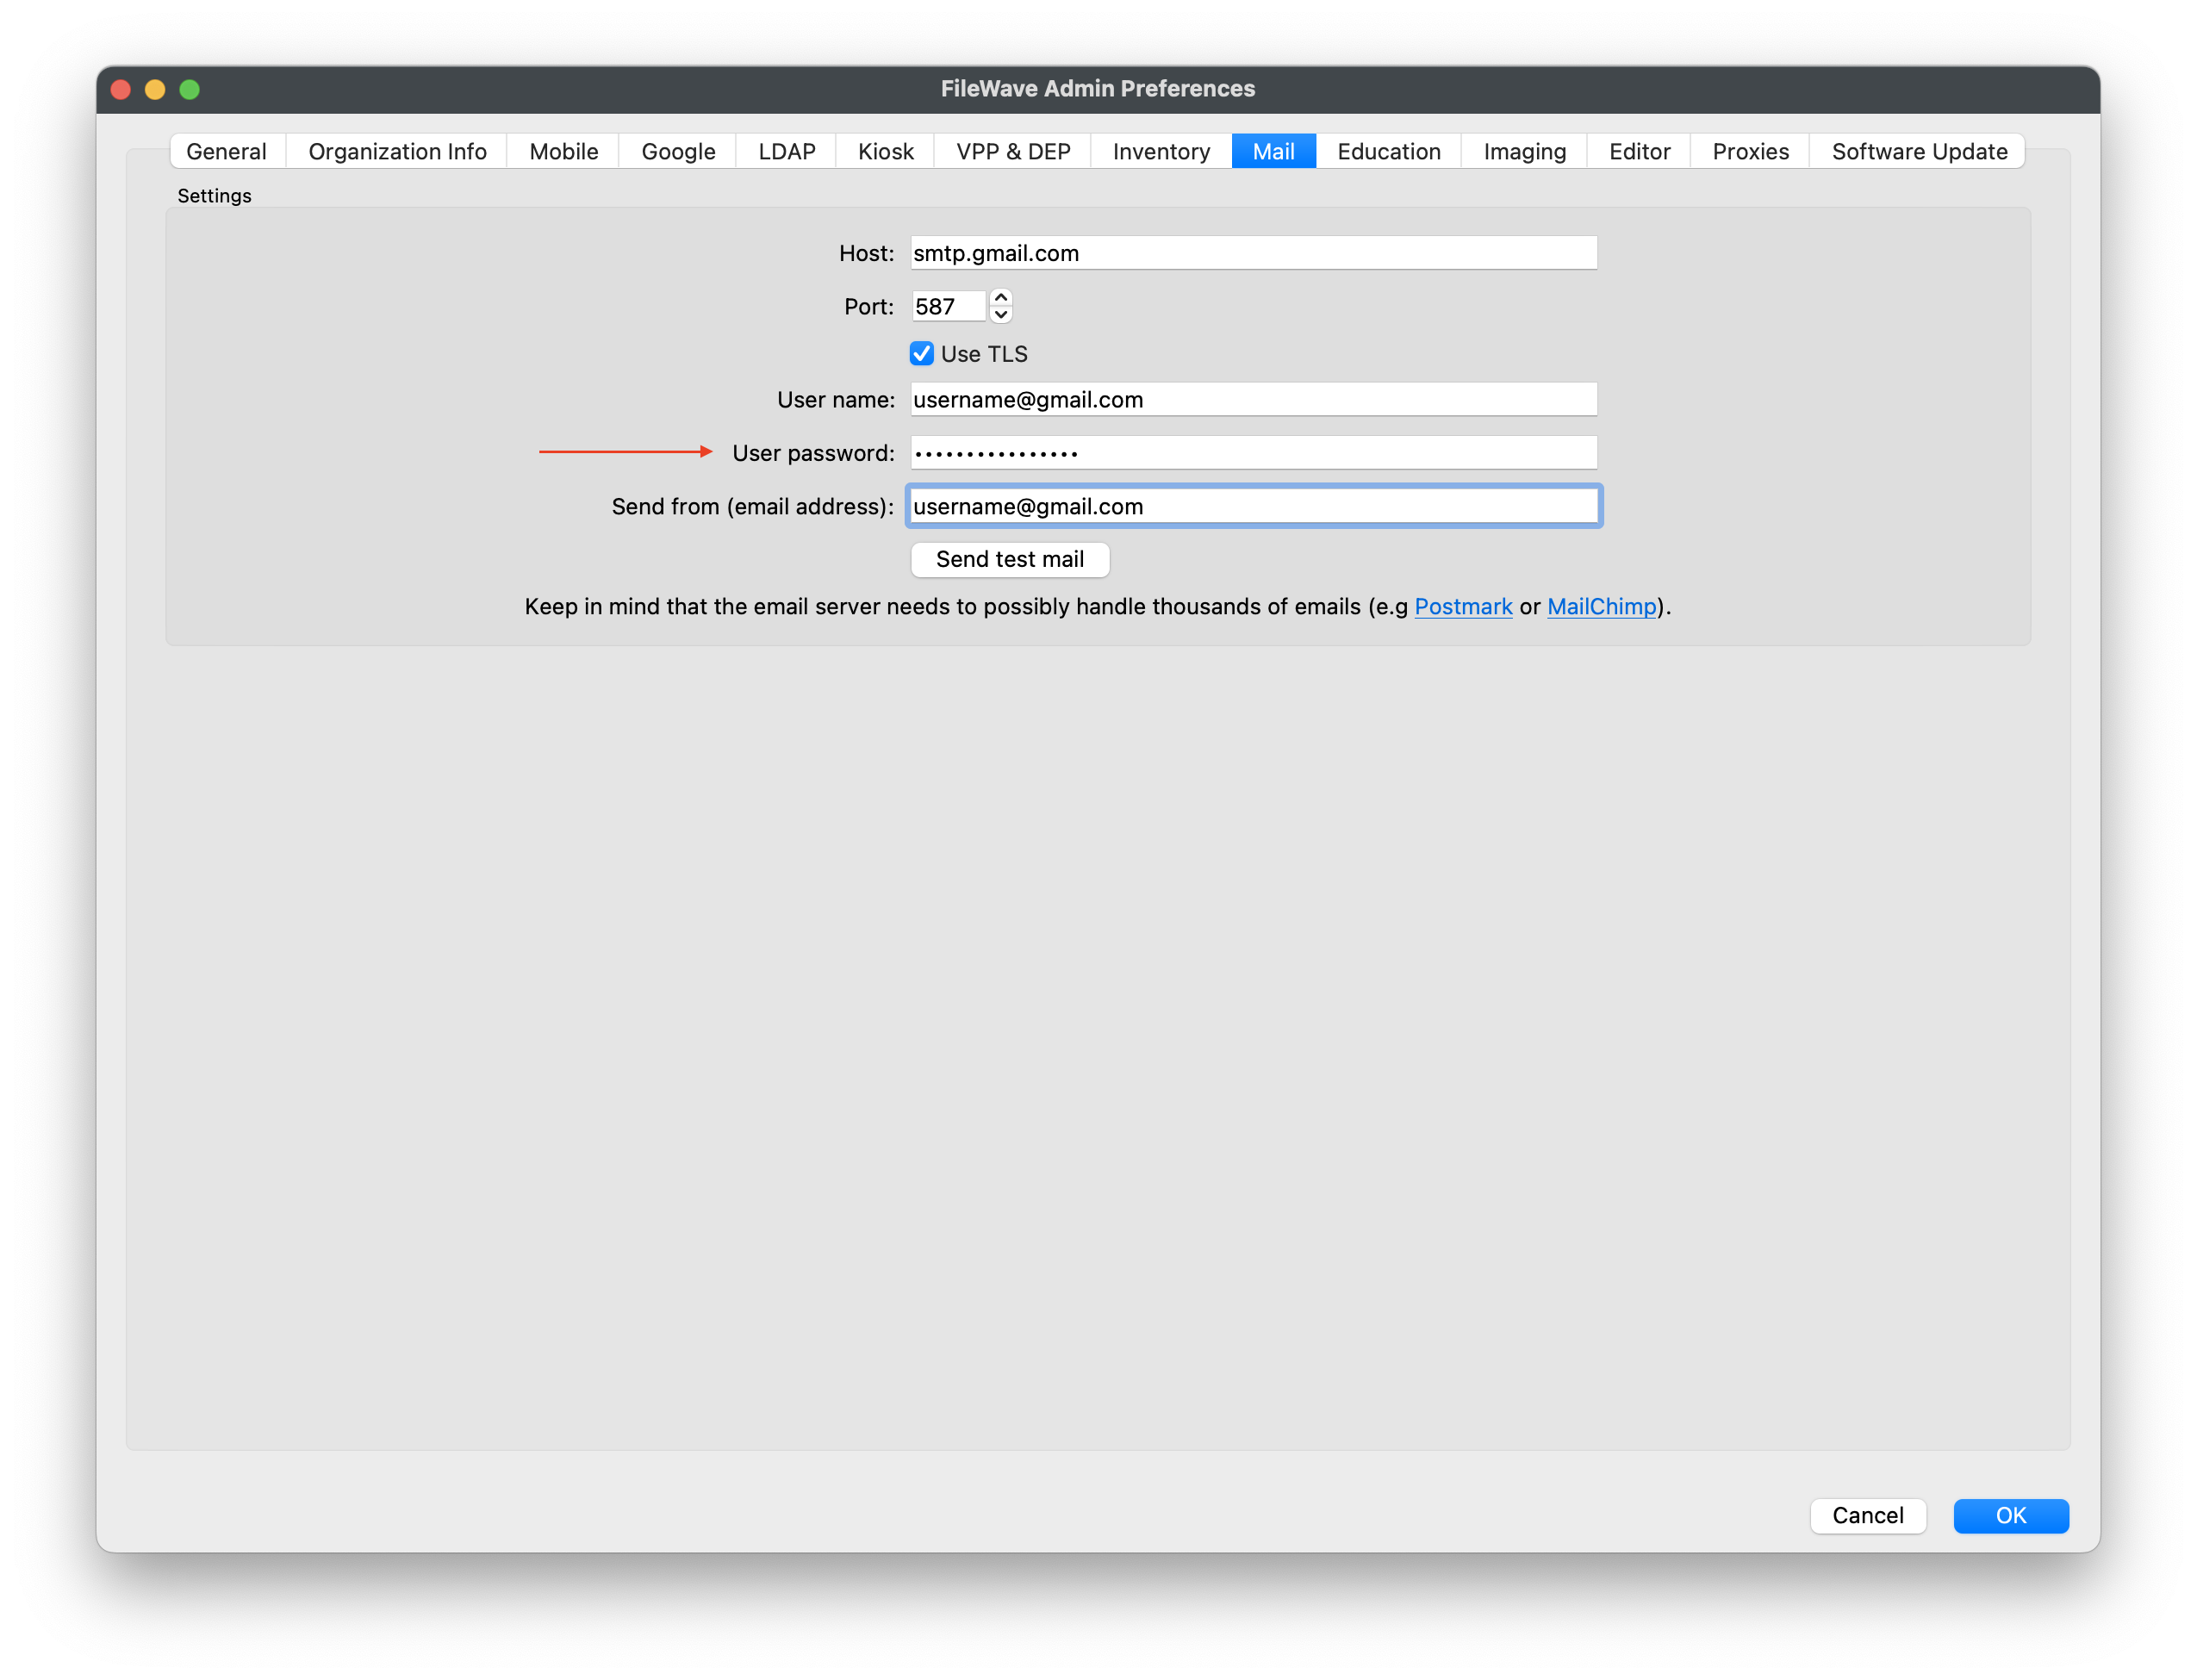
Related Links
- Generating scheduled reports
- Sending Scheduled Reports to More Than One Address
- Configuring FileWave Server Mail Preferences
Change the FileWave Anywhere Idle Timeout
What
FileWave Anywhere logs an inactive administrator out after 25 minutes by default. Self-managed customers can change that server-wide timeout in /usr/local/filewave/django/filewave/settings_custom.py.
When/Why
Increase the value when normal administrative work is being interrupted by automatic logouts, or reduce it when your security policy requires a shorter unattended session.
A longer timeout leaves unattended sessions active for longer. Match the value to your organization's session-security policy and continue to sign out when using a shared computer.
How
On a self-managed FileWave Server, edit /usr/local/filewave/django/filewave/settings_custom.py.
Hosted FileWave: Hosted customers do not have direct server access. Contact FileWave Technical Support to request this change on a Hosted FileWave Server.
For a self-managed server:
- Open
/usr/local/filewave/django/filewave/settings_custom.pyin a text editor. - Add or modify the following line:
UI_INACTIVITY_TIMEOUT = 25 * 60 # seconds the UI can stay inactive before auto logoff - Replace the
25in this line with the number of minutes you want for your idle timeout. For instance, if you want the timeout to be 60 minutes, the line should read:UI_INACTIVITY_TIMEOUT = 60 * 60. - Save and close the file.
- To activate the change, you need to restart the server. Do this by running the following command in the terminal:
fwcontrol server restart.
After the FileWave Server restarts, sign in to FileWave Anywhere and confirm that the new inactivity timeout takes effect.
Could not create the /Volumes/XYZ directory error when opening client info
Problem
Client Info may show a "Could not create the directory" error when its last Export Current Tab location no longer exists. This commonly happens after exporting to an external drive and then disconnecting that drive. The path in the message will usually be different from the example below.

Solution
Select a new export location to clear the error:
- Open Client Info for a macOS or Windows client.
- Select "Export Current Tab" on the left side of the Client Info window.
- Choose a local folder on the computer, such as your desktop.
- Select "Save".

- Close Client Info and open it again. The directory error should no longer appear.
Dashboard Warning levels and Descriptions
Problem
The table below provides an overview of the information that is returned by the Dashboard in the FileWave Admin console.
Environment
FileWave Central Console
Resolution
| Item | Description |
|---|---|
| Free Disk Space | Free disk space on fwxserver (db location). Warning if < 50GB or < 20% Total space, Error if < 25GB or < 10% total space. |
| CPU Load | CPU Load on fwxserver. Always OK. |
| Google Cloud Messaging | Returns Google Cloud Messaging status. Cached 1 minute. Error if configuration is not correct. |
| Total Disk Space | Total disk space on fwxserver (db location). |
| Client distribution | Returns client OS distribution (OSX, Windows, iOS, Android...). Cached 1 minute. |
| Free RAM | Free RAM on fwxserver. Always OK as some systems like OSX will free memory on demand only. |
| APN for MDM | Returns APN certificate status for MDM. Cached 1 minute. Warning if certificate expires in less than 30 days. Error if certificate is missing, expired, or Root certificate is missing. |
| VPP Tokens | Returns VPP tokens status. Cached 5 minutes. Warning if token expires in less than 30 days. Error if token is expired or incorrect. |
| FileWave Client/Mobile License | Returns License Status. Cached 1 minute. If you have more than 50 licenses: warning if available count goes below 10, error when 0. If you have less than 50 licenses: warning if available count goes below 4, error when 0. |
| Entreprise app file (ipa) | Check ipa status. Cached 1 hour. Warning if IPA file is local but does not have expected size. Error is IPA file is not on disk for local IPA, or not reachable for external IPAs. |
| DEP Accounts | Returns DEP Accounts status. Cached 5 minutes. Warning if access token expires in less than 30 days. Error if token is expired or incorrect. |
| Email sent | Returns Email sent status for the 7 past days. Cached 5 minutes. Warning if mails are still in the queue (not sent) Error if mails could not be sent (SMTP error). Note that we can't check if the POP/IMAP server rejected the mail. returns the following dict : 'success': , 'pending': , 'error': : , ... |
| Email settings | Returns email settings status. Cached 5 minutes. Error if can't connect to SMTP server. |
| LDAP Extraction status | LDAP Extraction status. Warning if one or more servers have not been contacted yet, Error if there was an error during extraction. |
| Total RAM | Total RAM on fwxserver. |
| Smart Group Count | Number of evaluated SmartGroups. Warning if last report occurred more than 1h ago, error if 2h ago. |
Related Content
Change the Language in FileWave Central or Anywhere (macOS)
What
FileWave Central and FileWave Anywhere can use the system or browser language, or you can select another supported language.
When/Why
Use this when an administrator needs FileWave in a different language from the Mac or browser, such as running Central in English on a Mac configured for German.
How
FileWave 16.2.0 and later
In FileWave Central, open Admin Preferences > General > Local Settings and choose a language. In FileWave Anywhere, select the globe on the login page, then choose Browser Default Language or a listed language. The Central control is also available on Windows.
 |
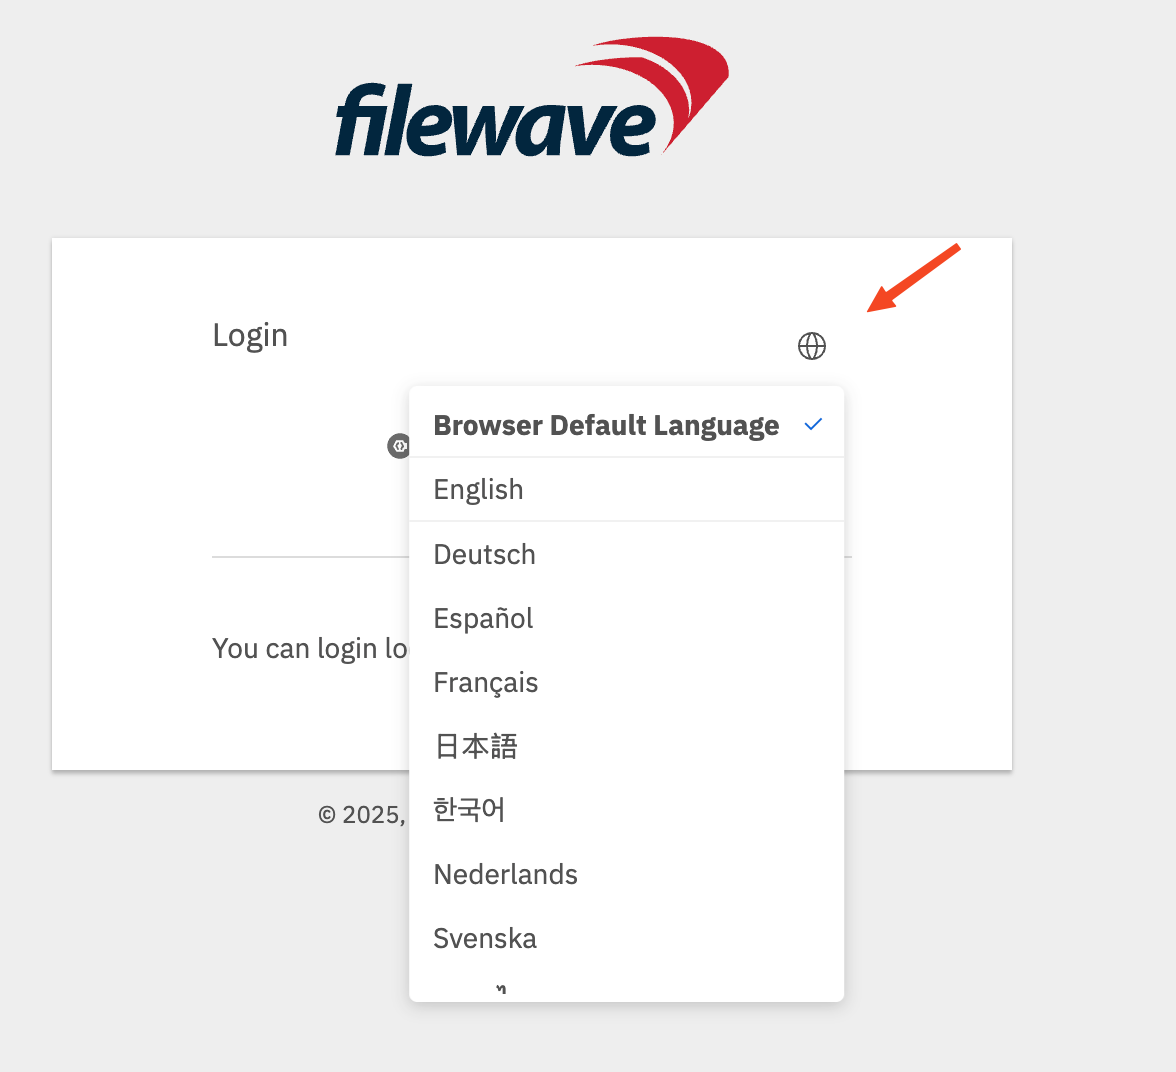 |
FileWave 16.1.x and earlier on macOS
For FileWave versions earlier than 16.2.0, launch Central with the command below to override its language. FileWave Anywhere uses the browser language.
This example starts Central in US English. Replace en_US with another locale code from the table.
/Applications/FileWave/FileWave\ Admin.app/Contents/MacOS/FileWave\ Admin --lang en_US &|
Language |
Locale Code |
Notes |
|---|---|---|
|
English (US) |
en_US |
Use for American English. |
|
German |
de_DE |
Standard locale for German in Germany. |
|
French |
fr_FR |
Standard locale for French in France. |
|
Korean |
ko_KR |
Korean for South Korea. |
|
Japanese |
ja_JP |
Japanese for Japan. |
|
Chinese (Simplified) |
zh_CN |
For Mainland China. |
|
Chinese (Traditional) |
zh_TW |
For Taiwan. |
Opening FileWave Central / Anywhere in a Specific Language (Windows)
What
When you install FileWave Admin, it will automatically use the language you have set on your workstation (if not available, it will default to English). If you want to change FileWave to run in another language, you have to launch Central/Admin with an argument that specifies the desired language.
When/Why
Sometimes even though your computer is running in a language like German you may wish to run Central in English.
How
Windows (FW 16.2.0 and higher)
You can now pick a language other than the system on in both Central and Anywhere as shown below in the images. Although the image of Central is from macOS, it looks the same on Windows.
|
|
|
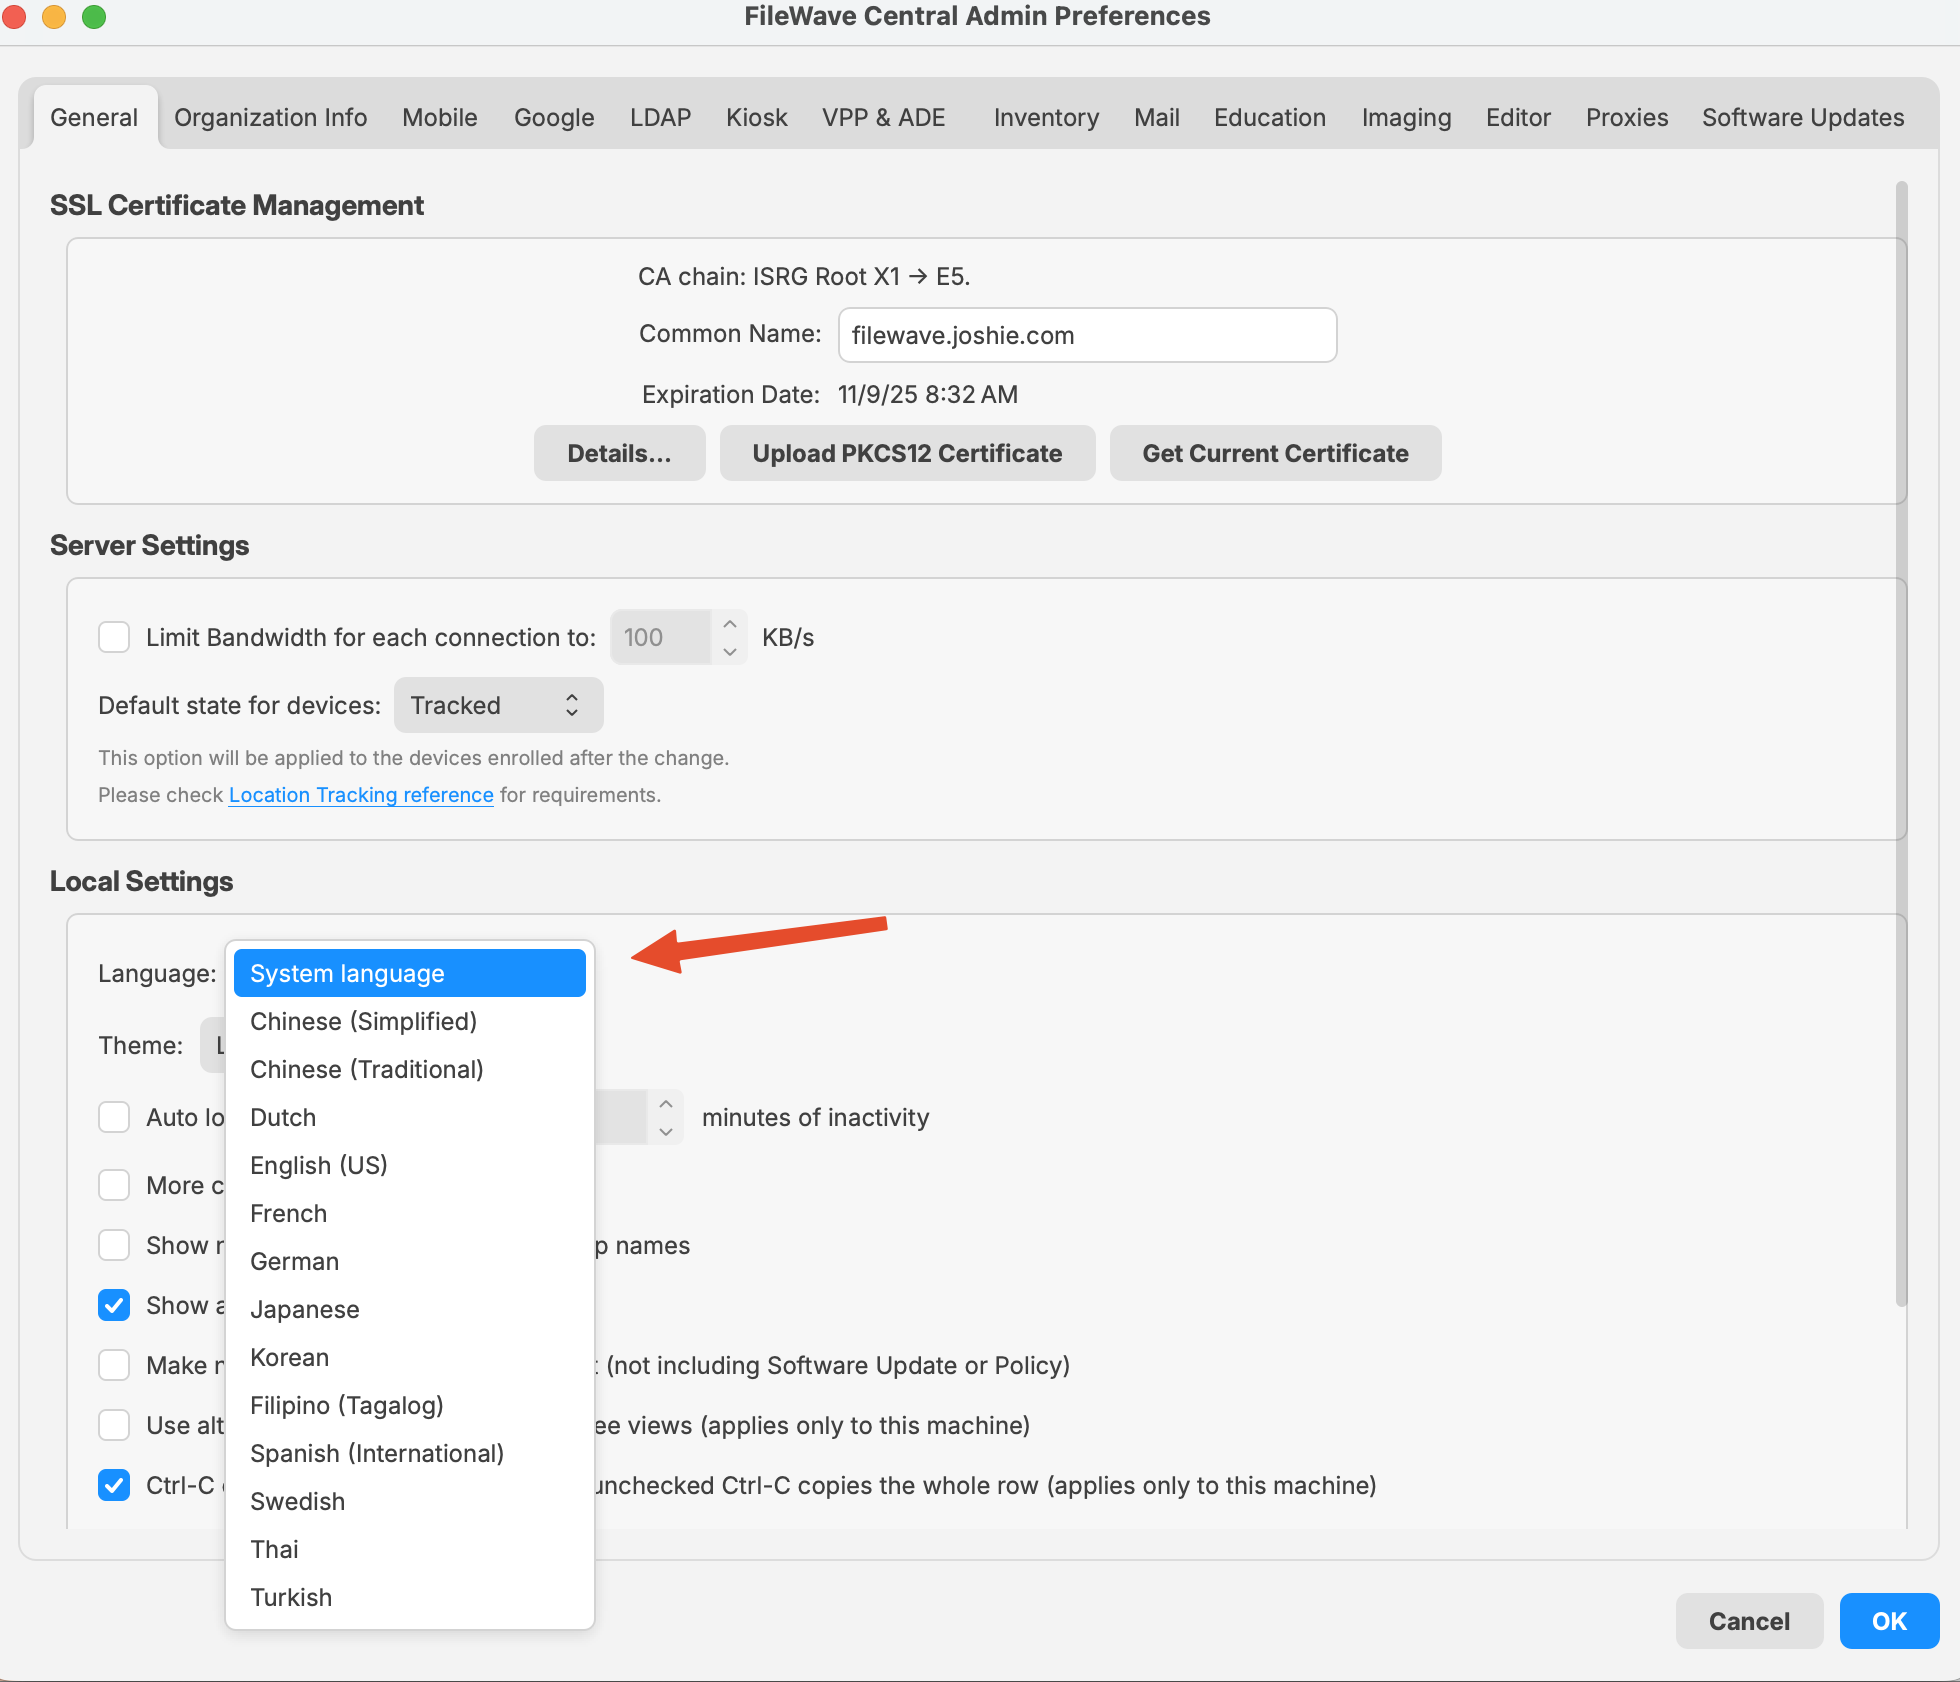

Windows (FW 15.4.2 and lower)
If you want to open the FileWave Central/Admin Application in a different Language, you would use the following command to launch. In this article, we’re going to automate the process so it opens with your preferred language every time using a Desktop Shortcut.
"C:\Program Files (x86)\FileWave\FileWaveAdmin.exe" --lang en_USWindows (FW v15.5.0 or higher until 16.2.0)
"C:\Program Files\FileWave\admin\FileWaveAdmin.exe" --lang en_USAvailable Language Options:
|
Language |
Locale Code |
Notes |
|---|---|---|
|
English (US) |
en_US |
Use for American English. |
|
German |
de_DE |
Standard locale for German in Germany. |
|
French |
fr_FR |
Standard locale for French in France. |
|
Korean |
ko_KR |
Korean for South Korea. |
|
Japanese |
ja_JP |
Japanese for Japan. |
|
Chinese (Simplified) |
zh_CN |
For Mainland China. |
|
Chinese (Traditional) |
zh_TW |
For Taiwan. |
What is the difference between Revert and Restore?
Problem
You need to undo FileWave model changes, but Revert to Last Model and fwcontrol server restore do different jobs.
Use revert when you want to discard changes that have not been published yet. Use restore when you need to make an older published model current again.
In FileWave Central, revert is available from Server > Revert to Last Model.

Restore is run from the command line:
sudo fwcontrol server restore [version]When you work in FileWave Central, your changes are made in the next model. They do not affect managed devices until you update the model.
Resolution
Revert
Revert discards unpublished model changes and returns FileWave Central to the currently deployed model.
For example, the deployed model is 10. You open FileWave Central and make changes that would become model 11 when published.
- You create a Fileset called My Fileset A.
- You delete a Fileset called Old Fileset B.
- You move the association for Fileset C from Group 1 to Group 2.
If you choose Revert to Last Model before updating the model, FileWave discards those unpublished changes and goes back to model 10.
If you already updated the model to 11, revert no longer helps because model 11 is now the current model.
Restore
Restore makes a previous published model current again.
Using the same example, if you published model 11 and then realized model 10 was the last good model, restore model 10:
sudo fwcontrol server restore 10The server keeps the last 20 models.
After the command finishes, quit FileWave Central and open it again. Model 10 is now restored. In this example:
- My Fileset A no longer appears in the Filesets view, although its uploaded data may still exist on the server.
- Old Fileset B appears again in the Filesets view, but its payload data is missing from the server.
- The association for Fileset C points back to Group 1.
Restoring a previous model does not restore deleted Fileset payload data. Use your backups for that.
Additional Information
If you need to recover from a major model mistake, contact FileWave Support before making more changes.