Enrolling Devices
Articles about the process to enroll devices in to FileWave.
- Desktop / Laptop Client Install and Configure
- Enrolling Computer Clients into FileWave
- Mass Deploy Windows FileWave Client
- Apple Notarisation and Custom PKG Installers
- Apple MDM Enrolment Methods
- User Approved MDM Enrollment (macOS)
- macOS MDM Enrollment State
- Enrolling Mobile Devices into FileWave
- Enrolling Apple TV into FileWave
- Importing Computer Clients from a File
Desktop / Laptop Client Install and Configure
Use this article to install the FileWave Client on macOS or Windows, or to build a custom installer for larger deployments.
Operating Systems Supported
- macOS
- Windows 10 & 11
For exact supported versions, check Downloads for the release you are deploying.
Downloading the FileWave client installer
The FileWave Client installer is available as part of the FileWave bundle for the specific operating system. The most current version, as well as selected older versions, of the installer are located on the FileWave KB in Downloads. For the computers mentioned under Legacy Support, you will need to install the most recent client supported on your OS.

You should download all installers you will need for your deployment at the same time. They can be stored on a file server, or on a flash drive in Windows format for cross-platform compatibility (macOS systems can read Windows-formatted drives without additional drivers).
Note: The installer instructions for the Linux server and Booster are also located on the same page of the web site. Server installation instructions are covered in FileWave Server Installation. There is no Linux client.
Installing the FileWave client
Client installers for both macOS and Windows use the same general dialogs. You will need to read and accept the license agreement, and you will be presented with a dialog window asking you for specific information to connect your client. Note: on some Windows computers, the FileWave Client Installer Assistant window is positioned directly behind the installer window, which you need to move to get to the Installer Assistant to complete the installation.

Installation Settings
- Server address / port - Enter the IP address or FQDN of your FileWave server. Enter the TCP port number for the client to communicate with the server (default is 20015)
- Booster address / port - If your client is going to get its Filesets from a Booster, enter the IP address or FQDN of the FileWave Booster. Enter the TCP port number for the client to communicate with the Booster (20013)
Note: More on working with FileWave Boosters in Boosters.
- Use Computer Name for Client Name - this box allows you to use the device's computer name as its FileWave client name.
- Client Name - enter a valid name based on any criteria you have for your deployment. It is recommended that you do not use special characters in the client name. Dashes, underscores, and slashes are ok.
- Client Password / Confirm… - enter a password used by FileWave administrative connections to the client. This does not need to be a local administrator password for that device. Note: You must provide a password in order for the Remote Control/VNC relay to function.
Edit Custom Data…

The custom fields consist of a series of optional Inventory data fields that can be used to provide more detailed information on any Client. This information cannot be set in the automated installer, and must be applied manually. The information provided will be displayed as part of Client Info in the Clients pane of FileWave Central by right-clicking any client and selecting Client Info…, and it can also appear in Inventory Reports (formerly Queries).

Automating installation with a custom client installer
Manual installation works for small deployments. For larger rollouts, build a customized client installer with the connection settings already filled in:
For macOS: https://custom.filewave.com/py/custom_client_mac.py
For Windows: https://custom.filewave.com/py/custom_client_win.py
The customized macOS client is required for MDM/ADE support and must be uploaded in FileWave Central under Mobile preferences.
The form is shown on the next page.

Many fields are required.
Note: The default port setting is 20015. However, SSL is now required, and the system will automatically use port 20017 instead when 20015 is entered. Do not manually set the port to 20017. Always enter 20015, and the system will handle the SSL port change for you.
Advanced Options

The custom installer does not ask the user for any device specific information, and can be distributed through several means:
- Apple's Automated Device Enrollment (ADE) uses the custom installer to enroll institutionally purchased devices automatically with your FileWave Server.
- Add the custom installer to an image set when doing direct or network mass imaging.
- Use a remote installation tool, such as Apple Remote Desktop, to distribute the custom installer to large numbers of existing devices.
- Use a 3rd party imaging tool, such as DeployStudio, to build a custom client set.
Note: FileWave provides "recipes" of possible deployment workflows for the custom installer in the KB.
Enrolling Computer Clients into FileWave
Click the New Client toolbar icon to open the Create New Client window. Click Desktop clients to open New Client From Server, where computer clients appear after the FileWave Client on the device checks in with the FileWave Server specified in the client settings. Those settings are either entered manually during client installation or included when a custom client installer is built from the FileWave Support webpage.

|
For Text File see Importing Computer Clients from a File |

|
Column Name |
Notes |
|
|
Name |
The Client Name the computer is attempting to connect with (see Sync Computer Name) |
|
|
Address |
The IP address the client is connecting from. This may be the device's internal address or a NAT address if the computer is connecting from the internet. |
|
|
Platform |
The OS of the client; macOS or Windows |
|
|
Last Connect |
The last time the FileWave Client attempted to check in with the server. The default check-in interval is every 2 minutes. |
|
|
Status |
You will see one of three options:
All three status states can be approved by selecting and adding the client. |
You can assign clients to a group during enrollment or leave them in the root group. You can also place clones of those clients into other groups later.
To pre-assign new clients to a specific group, select Automatically add all new clients to the selected Group. If you are enrolling clients in batches, you can change this selection between batches.
Related Content
Mass Deploy Windows FileWave Client
Summary
One of the most irritating bumps in the road towards the administrative freedom of FileWave is installing the FileWave Client on your computers for the first time. Now that we've started using MSI-based installers, you can easily deploy the FileWave WinClient via a domain server or log-on script. This post provides materials to aid in WinClient Mass Deployment.
You can follow this method or possibly a more simple method is outlined here Deploying FileWave Client with Group Policy (GPO) from the eval guide.
Download the latest Windows FileWave Client (it's an exe in version 5.7 and up ) and WinClient Prefs Writer (link at bottom). To convert the exe into an msi installer check the conversion script
generatefwwinclientmsi.vbs.zip
This is an example on how you would run it:
cscript C:\path\generatefwwinclientmsi.vbs C:\path\FileWaveClient.exe
Edit the preferences script to include your settings. I have put in example settings -- you must put your own in and then save the file.
Before:
| Code: |
| set serverName=no.server.set set serverAddress="no.server.address" set clientPassword="filewave" set booster1="no.booster.set" set booster1Port="0" ::: set clientName="" |
After:
| Code: |
| set serverAddress="fwserver.filewave.us" set clientPassword="jelly" set booster1IP="fwbooster.filewave.us" set booster1Port="20013" ::: set clientName="" |
Once the script is edited, these are both ready to execute on a computer, either by log-on script or some remote activation. Make sure that the MSI installs before the preferences script runs.
If you install the Client via the command line, add the "/quiet" argument to execute a silent installation. For a comprehensive list of the available arguments for MSI's, run the MSI using the "/?" argument.
FWClientPrefsWriter.zip |
668 B |
Apple Notarisation and Custom PKG Installers
Description
Apple has introduced notarisation as a requirement for installation of PKGs on macOS with macOS version 10.15. Notarisation status can be determined in two ways :
- Offline: cryptographically verifying a ticket stapled to the PKG at installer creation time
- Online: contacting apples servers to verify an app / installer has been notarised
Information
Custom installers for FileWave Client and Booster will be notarised starting from Version 13.2.2 and upwards, however, the notarisation ticket will not be stapled onto the PKG you download from https://custom.filewave.com at the current time, requiring 'Online' confirmation.
Provided your macOS machines can reach the required servers outlined in https://support.apple.com/en-us/HT210060 , you can expect everything to work as normal after 10-15 minutes of downloading the custom PKG.
| Hosts | Ports | Protocol | OS | Description | Supports proxies |
| 17.248.128.0/18 | 443 | TCP | macOS only | Ticket delivery | — |
| 17.250.64.0/18 | 443 | TCP | macOS only | Ticket delivery | — |
| 17.248.192.0/19 | 443 | TCP | macOS only | Ticket delivery | — |
Custom PKG Version 13.2.2
Version 13.2.2 Custom PKGs created prior to 4th March 2020 will not be notarised and will require re-creating if notarisation is required
Starting in FileWave 16.3, current FileWave binaries and applications are signed as FileWave (USA), Inc. (UWMR88SA8G) instead of FileWave (Europe) Gmbh (83S2TRZ3CS). The spctl examples below use an older FileWave Client 13.2.2 package, so they still show the previous signing identity. On current 16.3.x builds, expect the signer name and team identifier to reflect the newer FileWave (USA), Inc. identity.
Confirmation
The PKG may be tested for notarisation. On macOS 10.15.x you may observe the following:
Before notarisation has been completed by Apple:
Unnotarised
% spctl -a -vvv -t install FileWaveClient_13.2.2-fw.filewave.com-20-Feb-2020.pkg
FileWaveClient_13.2.2-fw.filewave.com-20-Feb-2020.pkg: rejected
source=Unnotarized Developer ID
origin=Developer ID Installer: FileWave (Europe) Gmbh (83S2TRZ3CS)
After notarisation has been completed by Apple:
Notarised
% spctl -a -vvv -t install FileWaveClient_13.2.2-fw.filewave.com-20-Feb-2020.pkg
FileWaveClient_13.2.2-fw.filewave.com-20-Feb-2020.pkg: accepted
source=Notarized Developer ID
origin=Developer ID Installer: FileWave (Europe) Gmbh (83S2TRZ3CS)
Apple MDM Enrolment Methods
Description
|
Enrolling Apple devices involves the installation of an MDM Enrolment Profile.
Installation may be initiated by either the user or the device. This same distinction also applies to the linking of the enrolment. |
|

Initiating Enrolment
This refers to the driving force of enrolment.
Consider Automated Device Enrolment (ADE), delivering the Profile before authentication (if configured). This is an example of profile-based enrolment.
Account-driven enrolment relies on the authentication of a user in advance.
User vs Device Enrolment
Automated Device Enrolment links enrolment with the identity of the device; providing the maximum management options available. The extreme opposite is Bring Your Own Device (BYOD) enrolment. This is an example of the user's identity linking enrolment and provides the minimum amount of control.
User enrolment cryptographically separates organisational data from user data and limits many features of MDM. Further details explained in Apple's KB:
Overview
Therefore, the key methods of enrolment can be categorised as:
- profile-based device enrolment
- account-driven device enrolment
- profile-based user enrolment
- account-driven user enrolment
Enrolment Methods
Automated Device Enrolment
On startup, the device reaches out to Apple and, where associated, the Enrolment Profile is delivered to the device and installed. The user is then prompted for authentication (if not configured for no authentication).
OTA Enrolment
This enrolment type potentially has two offerings:
- User authenticates to download the Enrolment Profile and then instals the Profile manually.
- An Enrolment Profile is provided to the user, for example by email, and the user manually instals the Profile.
BYOD
BYOD also could be described with two possible options:
- Enrolment Profile is downloaded and then the user authenticates (deprecated, see below note)
- User authenticates in Settings and then approves the subsequently downloaded Profile.
Deprecation
Although definitions exist for all enrolment methods above, as of iOS18 and macOS15 Apple will no longer support profile-based user enrolment. This impacts the first described BYOD enrolment method, meaning BYOD with personal devices must action account-driven user enrolment.
Account-Driven User Enrolment
Although these are personal devices, this enrolment method requires the user to add credentials into Settings which must be a Managed Apple ID. Federated Authentication links a supported IdP with Apple, matching Managed Apples IDs with IdP usernames and passwords.
Initial support for Account-driven user enrolment is currently targeted for FileWave 15.5. Confirmation of inclusion should be available closer to release.
Related Content
User Approved MDM Enrollment (macOS)
Description
Apple has introduced a new concept with macOS High Sierra, User Approved MDM Enrolment. This will only affect the management of settings that Apple deemed to be considered ‘security-sensitive. All other non-sensitive settings will continue to work, as previously, without User Approved Enrolment. This does not affect devices enrolled through DEP.
There are two aspects to this.
- User Approved MDM Enrolment
- Configuration Profile payloads that will require User Approved MDM Enrolment.
The first payload Apple has announced that will use these features is the Kernel Extensions payload.
https://support.apple.com/en-us/HT208019
Unlike other payloads, any ‘security-sensitive’ payload will be deliverable only by MDM and will rely on the MDM enrolment being User Approved.
User Approved MDM Enrolment
Currently, User Approved MDM Enrolment relies on the device being enrolled; the method of enrolment does not matter yet but will do in future releases. At this point, the enrolment must be either:
- DEP enrolment (user approval not required)
- User installing the enrolment profile manually
- User accepts the enrolment profile through System Preferences > Profiles:

You will notice this approval box in 10.13.2, if the method of enrolment was hidden from the user, e.g. scripted. Devices enrolled on earlier versions and then upgraded will automatically be MDM enrolled as User Approved.
Kernel Extensions
Apple introduced a halfway house with the release of 10.13. Apple has now released version 10.13.4 which has full implementation of this feature.
How does this affect kernel extensions?
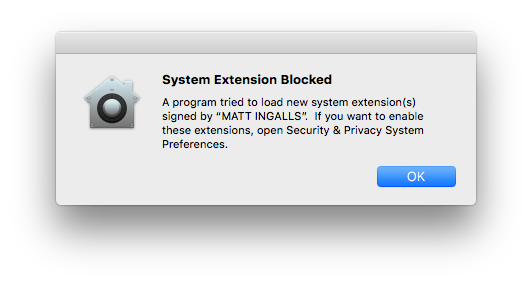
Attempts to install a Kernel Extension with a device that is not enrolled into MDM will be greeted with the following message:
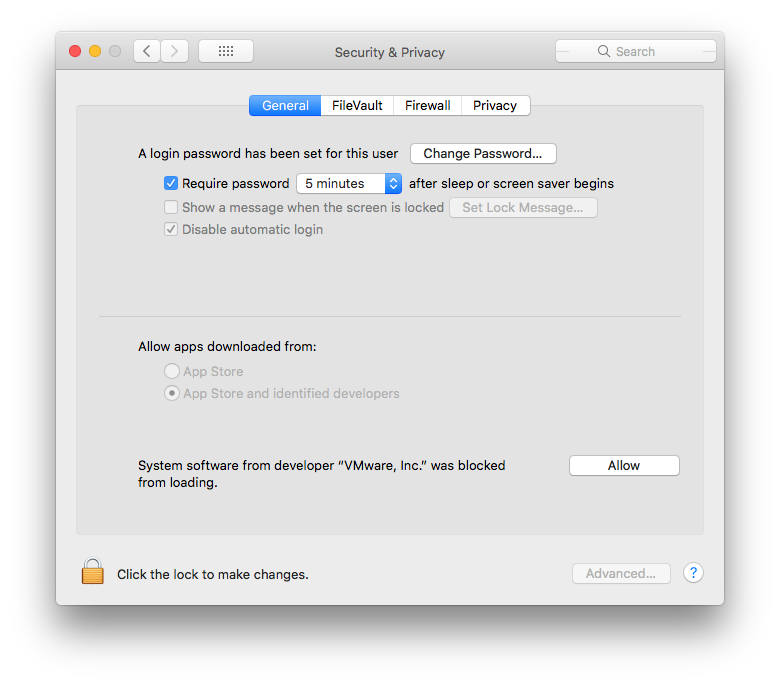
To approve the Kernel Extension will either require MDM enrolment or the user allowing the blocked Extension to run, via System Preferences > Security & Privacy > General:
What happens if I already have kernel extensions installed?
Any extension installed prior to upgrading to 10.13 High Sierra will continue to work, only newly installed kernel extensions will be affected.
Once a particular kernel extension is approved, subsequent upgrades to that kernel extension will automatically be user-approved.
Managing Kernel Extensions through MDM
Prior to version 10.13.4, there is no management beyond having the device enrolled into MDM. However, with 10.13.4, management is now available through the Kernel Extension Policy payload, allowing extension loading without user consent when enrolled appropriately; the payload can only be delivered with MDM, to devices that are User Approved MDM Enrolled. This could result in apps relying on kernel extensions to stop functioning properly (e.g. VPN clients, antivirus software).
As of FileWave version 12.7.0, the Kernel Extensions payload was introduced. To allow Kernel Extensions requires either:
- 'Team Identifier'
- Individually using the 'Kernel Extension bundle ID'.
These values are stored locally on a device after installation. Therefore, to find these values involves installing them on a device and then reading these values from a file, e.g., for a machine that has VMware Tools installed. One machine could have all Extensions installed prior to running the command to list all necessary Kernel Extensions.
$ sqlite3 /var/db/SystemPolicyConfiguration/KextPolicy 'select team_id,bundle_id from kext_policy;'
EG7KH642X6|com.vmware.kext.VMwareGfx
EG7KH642X6|com.vmware.kext.vmhgfs
This lists the Team Identifier followed by the Bundle ID for two Kernel Extensions that have been added with the installation of VMware Tools. Both have the same Team Identifier, but have differing Bundle IDs.
- To just use Team Identifier, add the returned Team Identifier from the command for the Kernel Extensions you wish to approve, to the 'Allowed Team Identifiers' whtielist. All Kernel Extensions with this Team Identifier will be whitelisted.
- To only allow certain Kernel Extensions, instead use the 'Allowed Kernel Extensions' whitelist and add both Team Identifier and Bundle ID. Note, legacy Extensions may not have a Team Identifier. For those that don't, just supply the Bundle ID and leave the Team Identifier empty.
There is also a community of users that are adding Identifiers and Bundle IDs which could save you having to instal in advance.
Community Kernel Extensions List
Data in this list is not checked in any way. As this is in place for security reasons and anyone can add information to this file, use with care:
Community Kernel Extensions List
Can I use User Approved Kernel Extension loading without MDM?
Yes. This however involves booting the computer into recovery mode and using the following command:
$ spctl
See the man page for required options:
https://developer.apple.com/legacy/library/documentation/Darwin/Reference/ManPages/man8/spctl.8.html
N.B. This is stored in NVRAM. If you reset the NVRAM, you will lose the ability to use User Approved Kernel Extension loading with this method until the steps are retraced. A firmware password could be set to prevent unauthorized NVRAM resets.
Extensions Payload
The Extensions payload should not be confused with the Kernel Extensions payload.
https://help.apple.com/profilemanager/mac/5.4/#/apd58550e429
The Extensions payload controls those extensions visible through the Extensions System Preferences and will not affect Kernel Extensions
macOS MDM Enrollment State
DESCRIPTION
macOS devices are unique, in as much as they may be managed by both the FileWave Client and Apple's MDM process. The MDM Enrollment State is an inventory item which shows the current state of MDM enrollment.
FileWave requires the FileWave Client for basic management of macOS devices. MDM is an additional extra to expand the management options, as provided by Apple. There is no MDM only option for macOS devices.
INFORMATION
MDM Enrollment State
The state is a live report of the current status of the device's enrollment; imagine if a device was initially MDM enrolled, but the enrollment profile has been subsequently removed from the device. Status values include:
- Full Enrolled – Device was MDM enrolled and all is good. This would be usual for DEP or OTA
- Server only – Devices was MDM enrolled, but the device no longer has an enrollment profile installed
- Device only – Device has an MDM enrollment profile installed, yet the database has no reference of this
- Undefined – Device is running a version of FileWave older than 14.3.0 or has not yet reported back its state
- Not Enrolled – Device has never been MDM enrolled and is managed purely by the FileWave Client
Preliminary troubleshooting
Before contacting FileWave Support, use the state value to narrow where the mismatch is happening:
- Server only: FileWave has a server-side MDM record, but the Mac no longer has the FileWave MDM enrollment profile. Check Profiles/System Settings on the Mac for the FileWave MDM profile and note whether the device was recently archived, retired, wiped, migrated, or manually modified. Removing the MDM profile normally requires an MDM command, such as when a device is archived.
- Device only: The Mac still has an MDM enrollment profile, but FileWave does not have the matching server-side record. This usually means enrollment did not complete or the server record no longer matches the device. Check the profile install date, APNs topic, and the custom fields below, then re-enroll the device if the server cannot match it.
- Logs: On the FileWave Server,
/usr/local/filewave/log/filewave_django.logincludes MDM communication that can help explain enrollment and profile-removal behavior. DEBUG logging only helps for future actions after it is enabled, so collect the existing server log, the profile install time from the Mac, and any recent archive/re-enrollment actions before escalating.
DIRECTIONS
A query may be used to identify devices that are not in an expected state, for example, identify devices that no longer have an Enrollment Profile installed
An example query could look something like:

Add, edit or remove criteria to meet desired reporting.
ADDITIONAL INFORMATION
To assist identifying why a device may show as 'Device Only', the following Custom Fields may be added, reporting the Server Root Cert Name and the APNs of the enrollment profile:
MDM Server Root Certificate Name
|
↓ macOS |
|
|

Enrollment Profile APNs Topic
|
↓ macOS |
|
|
Enrolling Mobile Devices into FileWave
Mobile devices can be imported or represented in FileWave before enrollment so administrators can prepare groups, Filesets, and Deployments in advance. Apple mobile devices—including iPhone, iPad, and Apple Vision Pro—can enroll through Automated Device Enrollment (ADE) or the supported manual mobile-enrollment workflow. Android devices use the applicable Android enrollment workflow. After enrollment, the device has the FileWave certificate and MDM profile required for management.
Web-based enrollment - Apple mobile devices
To enroll an iPhone, iPad, or Apple Vision Pro over the Internet, use the URL that points to the FileWave MDM server. In FileWave Central, the existing interface label remains Assistants > Enroll iOS Device; this mobile-enrollment workflow also applies to supported iPadOS and visionOS devices.
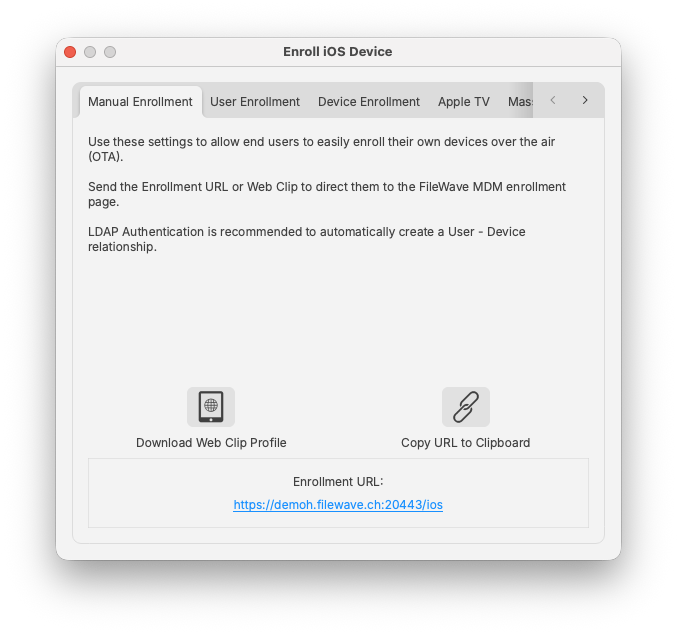
You can create a Web Clip with that URL embedded or copy the URL to the Clipboard and email it to your users. When they go to that URL on their mobile device, they will get instructions on how to properly enroll their device with your server. Having your FileWave server linked to your LDAP server allows the users to authenticate as themselves, instead of using a generic user account. This provides the benefit of having the user's LDAP record link its account information to the device. Another result of this is that the user can be automatically invited to link their Apple ID with your FileWave VPP service.

The user is presented with a dialog prompting to install a MDM server certificate, then enroll the device. The second step is when the user will be asked to authenticate - and this is where LDAP integration comes in handy. If not using LDAP, you need to inform users of the generic credential to use, or else they will not be able to proceed with step 2.

Once the user has completed these two steps, the device will display the new profiles that have been installed:

If the user's device is not yet a FileWave Client (no placeholder record previously created), it will need to be captured in FileWave Admin. You will go to the Clients pane, select New Client from the toolbar.

Select Enrolled Mobile Devices and you will get the list of all mobile devices that have performed an online enrollment, or have been activated by Apple Configurator:

The device(s) can be automatically added to an existing client Group, or you can manually add them to a Group, if desired. If you have devices set to be automatically added to a specific Group, then you will just see them appear as members in that Group.
Note: Unless you want all devices that enroll during a specific timeframe to end up in a designated Group, you should leave automatic placement off. You should also think about using Clones instead of the actual device client as members of any Groups.
Automatic or Forced Enrollment - iOS
Another option for enrollment is using an embedded enrollment profile as part of a mobile device configuration. Apple Configurator allows you to import a FileWave MDM enrollment profile, which will then be used to assign the device to your FileWave MDM server.
Instructions are included here for Apple Configurator v2.2.1.
Single device enrollment
In FileWave Admin, under /Assistants/Enroll iOS Device, you select Device Enrollment:

Apple Configurator v2.2.1
Apple Configurator 2's blueprints let you record actions that can be applied to devices. You add configuration profiles and apps to blueprints, just as you would add them to a physical device. You can prepare a blueprint so it has the MDM data and supervision identify attached. Once you have the blueprint the way you want, you can apply it to a device. For detailed info on how to use Apple Configurator 2, see: http://help.apple.com/configurator/mac/2.0/
To create a blueprint, click  in the toolbar, select Edit Blueprints, then click on New in the bottom left corner to create a new blueprint. Perform your edits. When you finish, click Done.

AC2 allows you to configure sets of devices, re-installing iOS, setting up profiles, and assigning to an MDM server.


Apple Configurator 2 supports using an Apple VPP account to assign purchases to attached devices. You should only set this up if you are not going to be using VPP from your FileWave server to associate licensed content, or if you are going to use a separate account to apply specific core content to your iOS devices outside of any FileWave workflows.
Note: You cannot use the same VPP account token you are using on your FileWave server to distribute content!

App Store account
You can sign in to the App Store using the following:
Volume Purchase Program (VPP) account: You log in with the Apple ID associated with your VPP account or the Apple ID associated with a purchaser you specify
Your personal account: This is the iTunes account you use to purchase personal apps
WARNING: If your VPP account is already associated with another instance of Apple Configurator 2 or an MDM solution, all app assignments from those previous associations will be revoked.

Once you have enrolled your mobile devices, and added them as clients in FileWave, you should see a set of installed profiles like the ones below.

Using AC2 for direct assignment of applications allows you to preload your iOS devices with core applications without requiring user interaction. The workflow would create a layer in your deployment model that lets you preconfigure devices that will become FileWave Clients for all day-to-day operations and management; but come equipped with a starting set of tools.
Mass Enrollment for iOS
You can set up Apple Configurator for bulk enrollment of preconfigured iOS devices by using this option in the Enroll iOS Device assistant. The device must be connected to Wi-Fi already before this process will work. If not, then make sure you add a Wi-Fi profile to your Apple Configurator setup. This process is built into AC2 using the steps above, since it already supports setting up multiple devices simultaneously.
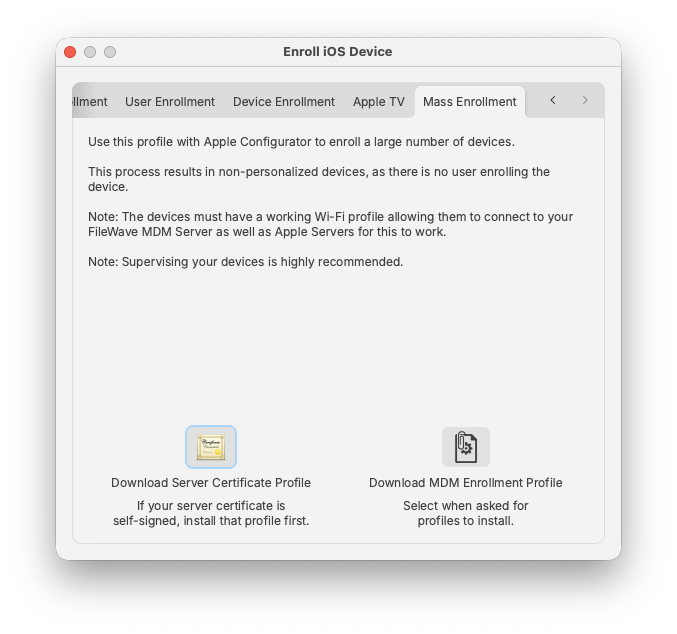
In this case, you would just download the MDM Enrollment profile, import it into Apple Configurator, and apply it to a set of iOS devices that were cloned with wireless settings, or a profile, already in place.
FileWave Enterprise App Portal for iOS
Starting with FileWave 8.5, iOS devices running iOS 7+ use a native iOS App Portal (Kiosk) instead of the web clip. iOS 8+ devices must use the App Portal. Instructions on how to deploy the App Portal are covered in Chapter 5 on mobile Filesets. When iOS devices are enrolled, they get the web clip version of the Kiosk. The new Enterprise App Portal automatically replaces the web clip and provides a more robust, responsive self-service tool.
Activation Lock Bypass
Since the introduction of iOS 7, device users have been able to enable a feature known as Activation Lock - which is linked to Find My iPhone. This feature ties a device to a specific Apple ID. In order to activate a device with an Activation Lock after a wipe or reset, the Apple ID credentials of the locking account are required. Where this can become problematical is having a 1:1 deployment where a user sets the Activation Lock on their device, then leaves without de-activating the lock. Prior to iOS 7.1, this issue was limited to unsupervised devices, since supervision inhibited the activation lock. Apple has provided a process now to supervise a device, yet still provide the activation lock - as well as a way to deactivate the lock when necessary.
FileWave Admin contains a new Assistant labeled Activation Lock Management. When an iOS device is enrolled in the FileWave MDM, its activation lock is stored in the FileWave Server.

If a device is sent a remote wipe command, the activation lock can be disabled at the same time.

These lock bypass codes are stored in the FileWave server, and remain even when the device has been un-enrolled. The information concerning devices with bypass codes is even provided in Inventory queries. Best practice is to maintain the codes for institutional devices, regardless of the device's enrollment status, as a safety measure. If the device is no longer used, or taken offline, do NOT delete the device from your FileWave database, just archive the device. Once the device has been deleted, the activation lock information is deleted also.
Note: In order to access the Activation Lock Bypass controls in FileWave Admin, you must login as the superuser (fwadmin).
|
You can also configure Activation lock in the ADE profile: Working with Apple’s Automated Device Enrollment (ADE) |
iOS/tvOS Device Placeholders

Text File (iOS Devices from CSV)
When importing from a CSV file, FileWave Admin will ask for the CSV file first. The following fields are supported:
- serial number of the iOS device;
- client name; and,
- comments (optional).
After opening the file, a dialog opens with the list of parsed devices, allowing you to select which devices to import. The dialog is the same as for importing text files.

Just select any devices and click Add X Clients. After doing that, the new devices will appear in the Clients view. However, there's almost no information provided for them.
It's possible to create associations and manage licenses (VPP for instance) on placeholder records the same way as if the devices had already enrolled. Update the model and any associated Filesets will be deployed automatically when the devices enroll.
iOS Devices from ADE
A ADE account must be configured in FileWave Admin before being able to pre-import from DEP.
When importing from ADE, FileWave Admin will show the list of ADE accounts and the number of devices associated to that account that are iOS devices and whose serial number are not already used with your FileWave Server.

You check the ADE accounts from which you want to import devices, then click OK. After doing so, placeholders for all devices from the selected account will be created. You can create associations as usual, update the model, and their corresponding Filesets will be deployed when the devices enroll.
Once the device is enrolled, its name in FileWave transitions from the serial number to the actual device name. If there is a ADE naming convention, that will automatically apply.
|
See Placeholders for what can be done with the imported devices |
Related Content
Enrolling Apple TV into FileWave
You can use Apple Configurator to enroll Apple TV devices into FileWave. The screenshots below show the blueprint-based workflow.
In Apple Configurator, create a new blueprint and set the target to Apple TV.
Newer Apple Configurator versions may change individual dialogs, but the overall process remains similar.

Click the Prepare icon.

The Prepare Devices dialog opens.

Click Next. Select New server... in the server selection box, then click Next.

Enter a server name and the URL for over-the-air enrollment, including the required port number at the end of the URL, then click Next. The server name is only for identification in Apple Configurator and does not need to match DNS.

If Apple Configurator can connect to the FileWave Server, it shows the trust profile and FileWave Root Certificate. For the required enrollment profile, use FileWave Admin's Enroll iOS Device assistant and download the profile from the Apple TV tab.

Click Choose... and select the enrollment profile you downloaded from FileWave Admin.


After the enrollment profile is selected, click Next. In FileWave, create a Wi-Fi profile with the SSID and password the Apple TV needs to join the wireless network. Add that Wi-Fi profile to the blueprint with Choose....

Click Next.

Select the language and diagnostic/usage-data options you want to use, then click Prepare.

The blueprint now has the required pieces and can be applied to a connected Apple TV.

Related Content
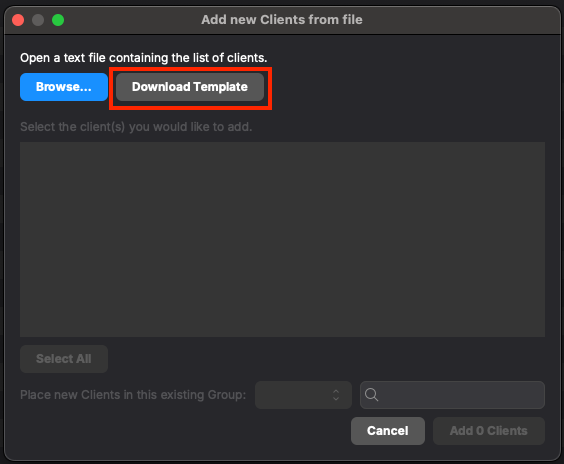
Importing Computer Clients from a File
You can import a "tab-delimited" text file (not a CSV file).
See Placeholders for more workflow information. Can be useful for
- Network Imaging Guide
- Automated Device Enrollment (ADE)
- Enrolling Mobile Devices into FileWave
- Working with FileWave Clients
The import location is in the Create New Client pane:

The new format looks like this:
Client Name <tab> Comment <tab> Serial or MAC- Name is mandatory
- Comment is optional
- Serial or MAC is optional if you are going to be adding clients that are already named later; otherwise, you must provide either a serial number or MAC address.
MAC address formats can have colons (:) between octets. For serial numbers, only capital letters (A-Z) and ordinal numbers (0-9) are allowed. Create the text file using a text editor that can save the file in plain text format with Unix or Windows line endings.
Please download the template for more details:
Windows imaging placeholder import example
For Windows imaging placeholders, put the MAC address in the Serial or MAC column. Do not use Imaging MAC Address as the column header in the import file; FileWave Central parses the placeholder identifier from Serial or MAC and then uses it where needed for imaging.
Example tab-delimited import file: filewave-central-placeholder-import-example.tsv
# Name Serial or MAC Comment
WIN11-0000 00:00:00:00:00:00 If the optional Comment field is blank, keep the trailing tab at the end of the row. Without that final delimiter, Central may not parse the last empty column as expected.
When creating your own file, remember to include a header row on the first line to define the column names, just like in the template.