Scripting
- Execute macOS scripts as Defined User
- Execute Powershell Scripts as Defined User
- macOS 10.15+ and zsh shell for scripting
- Referencing Launch Arguments in Scripts
- Script Best Practices
- Scripting Languages supported in FileWave
- Test PowerShell as SYSTEM with PsExec on Windows
- Run macOS Scripts as the Logged-In User with Outset
Execute macOS scripts as Defined User
Description
By default, FileWave Client runs scripts and tasks as root on macOS. Use this pattern when a script needs to run a command as the currently logged-in console user.
Ingredients
- Text editor
- FileWave Central
Directions
sudo -u sets the target user. launchctl asuser runs the command in that user's launchd context. Some commands need one or the other; using both is a practical pattern for commands that expect the logged-in user session.
The script below finds the current console user and runs whoami in that user's context.
#!/bin/zsh
current_user=$(stat -f%Su /dev/console)
current_user_id=$(id -u "$current_user")

whoami

launchctl asuser "$current_user_id" sudo -u "$current_user" whoami
When FileWave runs the script, the first whoami output shows the root user. The second output shows the active console user.
If the current logged-in user is sholden, the output should be:
root
sholden
Execute Powershell Scripts as Defined User
Description
By default, the FileWave Client executes scripts and tasks with elevated permissions (System on Windows). The below shows a method to launch a command as an alternate user.
Ingredients
- Text editor
- FileWave Central
Directions
This method requires the username and password of the user to run the command. Do not add usernames and passwords directly in scripts.
Credentials of a user may be passed to Invoke-Command.
Due to the above warning, add the username and password as Environment Variables to the Script in the Fileset.
For example, with a device named DESKTOP-N05SO1D:
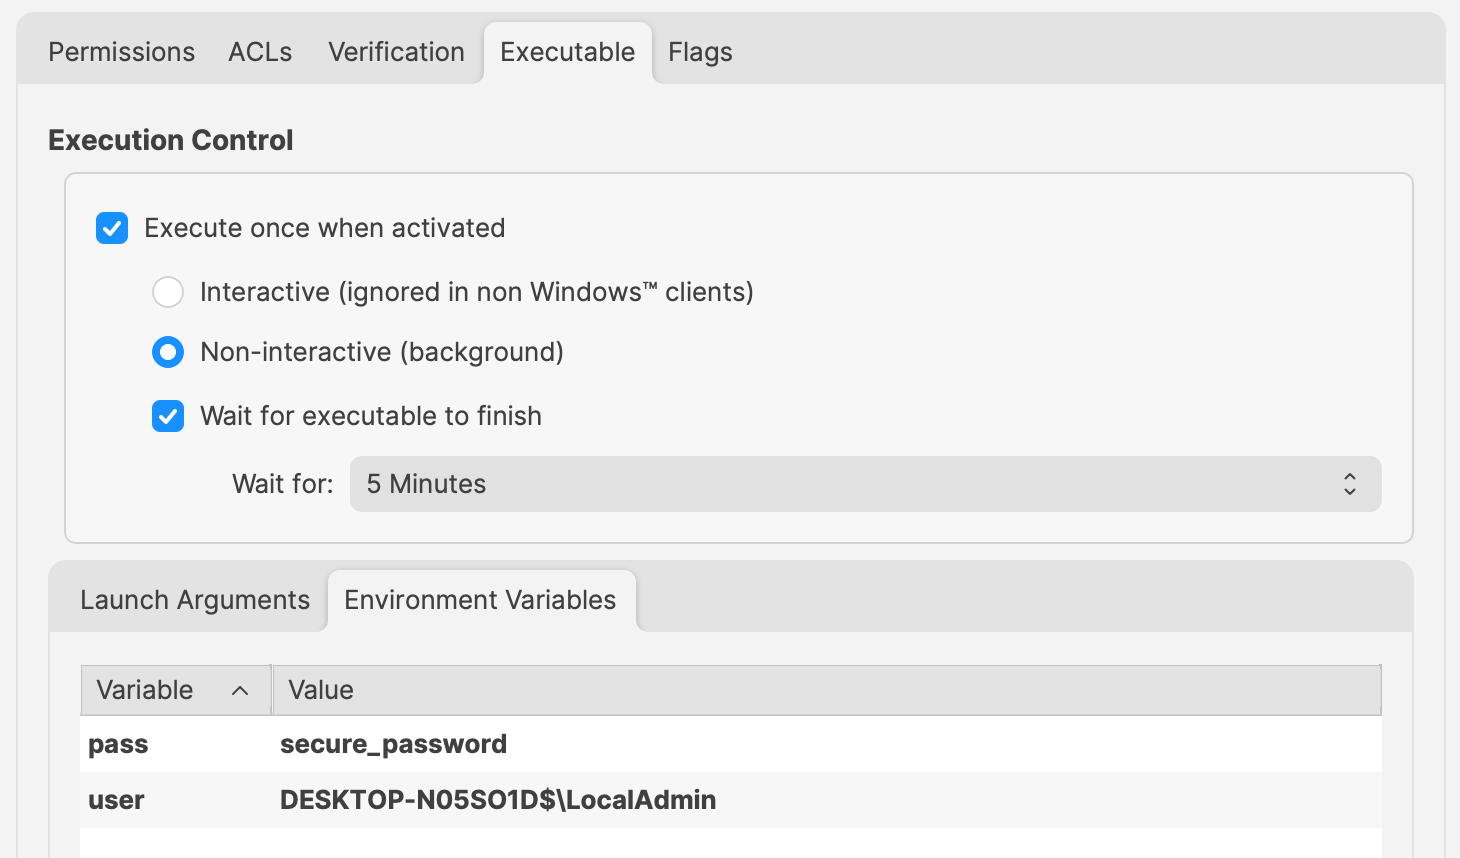
Change 'secure_password' and 'user' values to required entries.
These will be referenced in the Powershell Script as:
- $Env:pass
- $Env:user
For example:
$securePassword = ConvertTo-SecureString $Env:pass -AsPlainText -Force
$credential = New-Object System.Management.Automation.PSCredential ($Env:user, $securePassword)

echo "$Env:UserName"

Invoke-Command -ComputerName localhost -Credential $credential -ScriptBlock {
  # Code to action by the defined user should be added here
  echo "$Env:UserName"
}
The output of the above will show that the username has altered, by first echoing the System name and then the name of the user within the script block:
DESKTOP-N05SO1D$
LocalAdmin
The above relies upon 'winrm'. If there are any issues when running the command, winrm can be checked with the following command: winrm quickconfig
This method will not work if the defined network is 'Public', as winrm will not allow this.
macOS 10.15+ and zsh shell for scripting
Description
Apple announced changes to the default shell for macOS 10.15:
https://support.apple.com/HT208050
Information
For years now, Apple has appeared to avoid any tools that are covered by the GPL v3 Licence as well as remove any that were in use over time. Bash is one of these. In the early releases of 10.x Apple initially used tcsh shell as default, but soon moved to bash; so this is not the first time Apple has made a change of this kind.
In order to avoid newer versions of bash covered by GPL v3 licensing, it can be seen how old bash is on a macOS device:
$ bash -version
GNU bash, version 3.2.57(1)-release (x86_64-apple-darwin18)
Copyright (C) 2007 Free Software Foundation, Inc.
Run the same command on a modern Linux system, e.g. the FileWave Linux Server Appliance and you will see a much newer version:
$ bash -version
GNU bash, version 4.2.46(2)-release (x86_64-redhat-linux-gnu)
Copyright (C) 2011 Free Software Foundation, Inc.
License GPLv3+: GNU GPL version 3 or later <http://gnu.org/licenses/gpl.html>

This is free software; you are free to change and redistribute it.
There is NO WARRANTY, to the extent permitted by law.
GPL v3 license has implications for Apple. zsh is licensed under MIT, which does not involve these same implications.
Considerations
Specifying the shell
The first line of a script should indicate which shell is used when a script runs.
For example, for bash this could typically be either of the following (this is known as the 'shebang'):
#!/bin/bash
#!/usr/bin/env bash
By providing this, the script will run from a shell of the specified type. Any scripts created should have this set. If this is not set, then the script will run in the shell type that is currently set for that shell's session. Apple's changes will have an impact on any scripts not specified by default. The best practice is to always add the shebang at the beginning of any script to ensure expected behavior.
Bash vs zsh
Bash and zsh are very similar, but there are some differences that may interfere with scripts that were written for bash but are then run as zsh. Scripts should therefore be analyzed for behavior if the shell type of the script is changed.
Examples
Arrays
The first item of an array differs when being referenced:
- bash reference of the first item in an array: index 0
- zsh reference of the first item in an array: index 1
There is also a difference in deleting items from an array. The following produces the same output from the same original array, but note differences on the item being indexed and the method of removal:
bash arrays
#!/bin/bash


myarray=("one" "two" "three")
echo ${myarray[@]}
echo "First item in array: "${myarray[0]}

echo "Remove first item in array, item 0..."
unset myarray[0]
echo ${myarray[@]}

exit 0

# Script output:
one two three
First item in array: one
Remove first item in array, item 0...
two three
zsh arrays
#!/bin/zsh

myarray=("one" "two" "three")
echo ${myarray[@]}
echo "First item in array: "${myarray[1]}

echo "Remove first item in array, item 1..."
myarray[1]=()
echo ${myarray[@]}

exit 0

# Script output:
one two three
First item in array: one
Remove first item in array, item 1...
two three
Variable Expansion
Word splitting on variable expansion differs between bash and zsh. For example, bash will print the following, one line per word, whilst zsh will print the whole variable as one line. Note also, that bash, by default, will not expand aliases when the shell is not interactive, unlike zsh.
bash variable expansion
#!/bin/bash

# Expand aliases
shopt -s expand_aliases

alias printvar="printf '%s\n'"
myvar='one two'
printvar $myvar

exit 0

# Script output:
one
two
zsh variable expansion
#!/bin/zsh

alias printvar="printf '%s\n'"
myvar='one two'
printvar $myvar

exit 0

# Script output
one two
zsh does have the ability to set an option to change this behavior, but consider converting to an array instead.
Apple has chosen zsh over bash since the overlap on script compatibility is high. However, as seen there can be differences and so it is prudent to check all scripts for behavior. The above are just examples; other differences may be experienced and will require addressing appropriately.
Referencing Launch Arguments in Scripts
Description
Scripts run by FileWave can receive Launch Arguments. The arguments are supplied by FileWave and referenced by the script, but they are not written into the script body.
They may be supplied to any of the following:
- Fileset Scripts
- Custom Fields
- Policy Blocker Scripts
Admins sometimes assume FileWave is limited to 9 launch arguments. It is not; the shell you use determines how you reference arguments 10 and higher.
Information
Launch Arguments are positional parameters. They are referenced differently depending on the script type:
| macOS/Linux | Windows Powershell | Windows Bat | |
| First Argument | $1 | $args[0] |
%1 |
| Second Argument | $2 | $args[1] |
%2 |
| Third Argument | $3 | $args[2] |
%3 |
You can add more arguments and reference each one by its position.
Considerations
Shell behavior matters most when you reference the 10th argument or higher.
Although two solutions have been supplied, zsh is recommended to stay in line with Apple's policy: https://support.apple.com/en-gb/HT208050
bash and sh
The following bash example is intended to print the first 3 positional parameters, followed by the 10th and 11th.
bash_test.sh
#!/bin/bash

echo $1
echo $2
echo $3
echo $10
echo $11

exit 0
If you pass only one argument, 1, bash treats $10 and $11 differently than many admins expect:
bash_test.sh
./bash_test.sh 1
1


10
11
The bash and sh shells treat $10 as ${1}0, $11 as ${1}1, and so on. In this example, they return the value of $1 and append the extra character.
Additional references:
- https://www.oreilly.com/library/view/bash-cookbook/0596526784/ch05s07.html
- https://www.oreilly.com/library/view/bash-cookbook/0596526784/ch05s04.html
That output maps to:
| Description | Output | |
| $1 | Returns first argument | 1 |
| $2 | Returns second argument | 2 |
| $3 | Returns nothing, no third argument | |
| $10 | Returns first argument, followed by the '0' character | 10 |
| $11 | Returns first argument, followed by the '1' character | 11 |
For bash and sh, wrap two-digit positional parameters in braces so the script references the intended argument.
The corrected script uses braces for the 10th and 11th arguments.
bash_test.sh
#!/bin/bash

echo $1
echo $2
echo $3
echo ${10}
echo ${11}

exit 0
Now when executed with 11 positional parameters, the expected output is displayed:
bash_test.sh
./bash_test.sh var1a var2b var3c var4d var5e var6f var7g var8h var9i var10j var11k
var1a
var2b
var3c
var10j
var11k
zsh
zsh handles this differently. With the same example in zsh:
zsh_test.sh
#!/bin/zsh

echo $1
echo $2
echo $3
echo $10
echo ${11}

exit 0
Given the same 11 arguments, this would output:
zsh_test.sh
./zsh_test.sh var1a var2b var3c var4d var5e var6f var7g var8h var9i var10j var11k
var1a
var2b
var3c
var10j
var11k
Unlike bash and sh, zsh treats $10 as the 10th argument and $11 as the 11th argument. zsh can use either format.
Conclusion
If a script uses 10 or more launch arguments, check the shell before troubleshooting the FileWave side. In bash or sh, use ${10}, ${11}, and the same brace pattern for later arguments. In zsh, $10 and ${10} both refer to the 10th argument.
Related Content
Script Best Practices
Description
Tips and tricks for running Filesets with scripts
Don't put passwords in scripts
The scripts are stored locally on devices. For security reasons, usernames and passwords should not be included within the body of scripts.
For example:
Example: password in command
somecommand -u "USERNAME_HERE" -p "PASSSWORD_HERE"Additionally, DO NOT use Launch Arguments to provide passwords to scripts. Launch Arguments are visible in the process list during script execution. Instead supply the username and password as Environment Variables:


During script execution, the Launch Argument is seen:
Example: Visible Password
$ ps -ef | grep secure
    0 73010   155   0  9:51am ??         0:00.01 /bin/zsh /var/scripts/532417/unsecure_la.sh secure_password_leaked
Using the example Environment Variables from the image, they would be addressed as:
| OS | Script Type | Command |
| macOS | shell |
|
| Windows | Powershell |
|
| Batch |
|
|
| Batch |
In order to not transmit the password to a log file accessible on the device, add @echo off before the line containing %my_pass% and @echo on as the next line. Example:
@echo off %SystemRoot%\System32\Reg.exe ADD "HKLM\SOFTWARE\Microsoft\Windows NT\CurrentVersion\Winlogon" /v "DefaultPassword" /d "%my_pass%" /t REG_SZ /f @echo on |
|
| mac0S & Windows | Python |
|
Keep Requirements Scripts Small
Requirements scripts are pulled from a fileset and sent before the remainder of the fileset.
It behaves this way because if a requirements script fails, there is no point in downloading and installing the remainder of the fileset.
A fileset whose requirements have failed will not even show up in the kiosk.
Where possible, avoid piping commands. This increases overhead on the scripts. If pipes are required, try to reduce the quantity of pipes. If nothing else, this makes the scripts easier to read.
$ time system_profiler SPHardwareDataType | grep "Model Identifier" | awk '{print $NF}'
MacBookPro11,4


$ system_profiler SPHardwareDataType | awk '/Model Identifier/ {print $NF}'
MacBookPro11,4
And other commands may achieve the same result more efficiently without the need to pipe.
$ time system_profiler SPHardwareDataType | grep "Model Identifier" | awk '{print $NF}'
MacBookPro11,4

real	0m0.192s
user	0m0.071s
sys	0m0.049s


$ time sysctl -n hw.model
MacBookPro11,4

real	0m0.004s
user	0m0.001s
sys	0m0.002s
Consider this for all scripts beyond just requirement scripts.
Log Script Output
By default, Fileset scripts built through the Scripts button are logged. All output is redirected to a unique file per script.
If desired, additional information could be redirected to an alternate file.
Redirecting output to the FileWave Client log, allows the viewing of those details via the 'Get Log' feature
Redirecting to the FileWave Client log is not possible on windows, since the log file is locked by the client writing to the file.
Redirecting Output
Output may be redirected using one of the following:
macOS:
echo "hello" >> /tmp/tmp_log_file.logWindows:
echo "hello" | Out-File -Append -Encoding Ascii C:\Temp\my_temp_file.logBetter than just redirecting output, consider using the tee/Tee-Object command, such that the FileWave generated log and the redirected log both show the output.
macOS:
echo "hello" | tee -a /tmp/tmp_log_file.logWindows:
echo "hello" | Tee-Object -Variable out | Out-File -InputObject $out -append -encoding Ascii C:\Temp\my_temp_file.logOn macOS, all output can be redirected by using the following at the beginning of the file:
#!/bin/zsh
exec 1>>/var/log/fwcld.log
exec 2>>/var/log/fwcld.log


... rest of script
Testing Scripts
Scripts run by FileWave are run by root or System. As such, scripts should be tested using the same user context to prevent erroneous results. Many commands will yield the same result regardless, but this cannot be relied upon.
Windows
E.g. Running the following command will provide a different output, when ran on a 32bit Windows environment as opposed to a 64bit Windows environment:
(Get-ItemProperty "HKLM:\SOFTWARE\Microsoft\Windows NT\CurrentVersion").EditionId64bit:
 (Get-ItemProperty "HKLM:\SOFTWARE\Microsoft\Windows NT\CurrentVersion").EditionId
Professional
32bit:
 (Get-ItemProperty "HKLM:\SOFTWARE\Microsoft\Windows NT\CurrentVersion").EditionId
Enterprise
Similarly, the user executing a script can have an impact on the outcome. Username itself is a relatively obvious example:
$Env:UserNameWhen ran locally through a shell, it should report the name of the current user. However, when ran through FileWave, it should report the System name.
Prior to FileWave 15.5, the Windows client was 32bit, but since then, a 64bit client is supplied. Either way, the user executing any scripts is the System user. As such, all tests should be ran in that same context:
| Version | User | Bit |
| FileWave 15.5+ | System | 64 |
| FileWave 15.4.x- | System | 32 |
Current FileWave Windows components are 64-bit. For Fileset scripts, use the execution bitness option when you intentionally need 32-bit or 64-bit behavior.
For upgrade compatibility, scripts or fields created under older behavior may remain configured to run as 32-bit. Review the bitness setting before changing it, because switching an existing script to 64-bit can affect registry paths, filesystem redirection, and available PowerShell modules.
For current Windows Custom Fields, use On Windows, run as 64-bit when 64-bit PowerShell or native Windows components are required. Use 32-bit execution only when the script is written for that context or depends on 32-bit components. See Running Built-in PowerShell Commands with Custom Fields.
PsTools: This relies on downloading and installing, onto the test machine, PsTools.
Running Environment
Prior to FileWave 15.5
Take a look at Getting a CMD prompt as SYSTEM in Windows Vista and Windows Server 2008 for details about running scripts as System. Note, that by default, this will start an executable as 64-bit, for native 64-bit OS.
From a device with the PsTools installed, start by opening a Command Shell as an Administrator. From that shell, another command should be run to open yet another shell, but this time in the chosen environment.
The below example shows launching the 32bit version of PowerShell as the System user:
PSEXEC -i -s -d C:\Windows\SysWOW64\windowsPowerShell\v1.0\powershell.exeTo open a command shell in that same environment would use the following:
PSEXEC -i -s -d %windir%\SysWoW64\cmd.exeSimilarly, when attempting to run some commands, it may be necessary to ensure Windows is using the correct version of a binary with the 'sysnative' redirect. An example would be Bitlocker's 'manage-bde.exe'. To use this in a Fileset, try the following:
C:\Windows\sysnative\manage-bde.exe -statusIf you have a requirement to run a particular command through the 64-bit version of Powershell this can be achieved as follows:
If ( [IntPtr]::Size * 8 -ne 64 )
{
    C:\Windows\SysNative\WindowsPowerShell\v1.0\PowerShell.exe -File $MyInvocation.MyCommand.Path
}
Else
{
    # Add code here
}
Testing scripts designed to be ran with the 64bit FileWave Client, still requires the above actions, to ensure that the System account has been targeted, but this time with a 64bit application.
Opening a 64bit version of PowerShell as the System user:
PSEXEC -i -s -d C:\Windows\System32\windowsPowerShell\v1.0\powershell.exeExample 32bit to 64bit
The below demonstrates running a 64bit script, but from the 32bit FileWave Client, which will create a new administrator. Additionally, the FileSet > Get Info > Environment Variables are being used to supply the name and password to the script.
Two Fileset Environment Variables are being supplied, for the user 'rstephens' with a password of 'filewave'
| Variable | Value |
| username | rstephens |
| password | filewave |
Those Parameters may then be referenced from within the script and have them defined for the launching of the 64bit executable within this 32bit script.
Param (
    [string]$MyUsername = $Env:username,
    [string]$MyPassword = $Env:password
)


If ( [IntPtr]::Size * 8 -ne 64 )
{
    C:\Windows\SysNative\WindowsPowerShell\v1.0\PowerShell.exe -File $MyInvocation.MyCommand.Path -MyUsername $MyUsername -MyPassword $MyPassword
}
Else
{
    (New-LocalUser -AccountNeverExpires:$true -Password ( ConvertTo-SecureString -AsPlainText -Force $MyPassword) -Name $MyUsername | Add-LocalGroupMember -Group administrators)
}
Troubleshooting PowerShell scripts
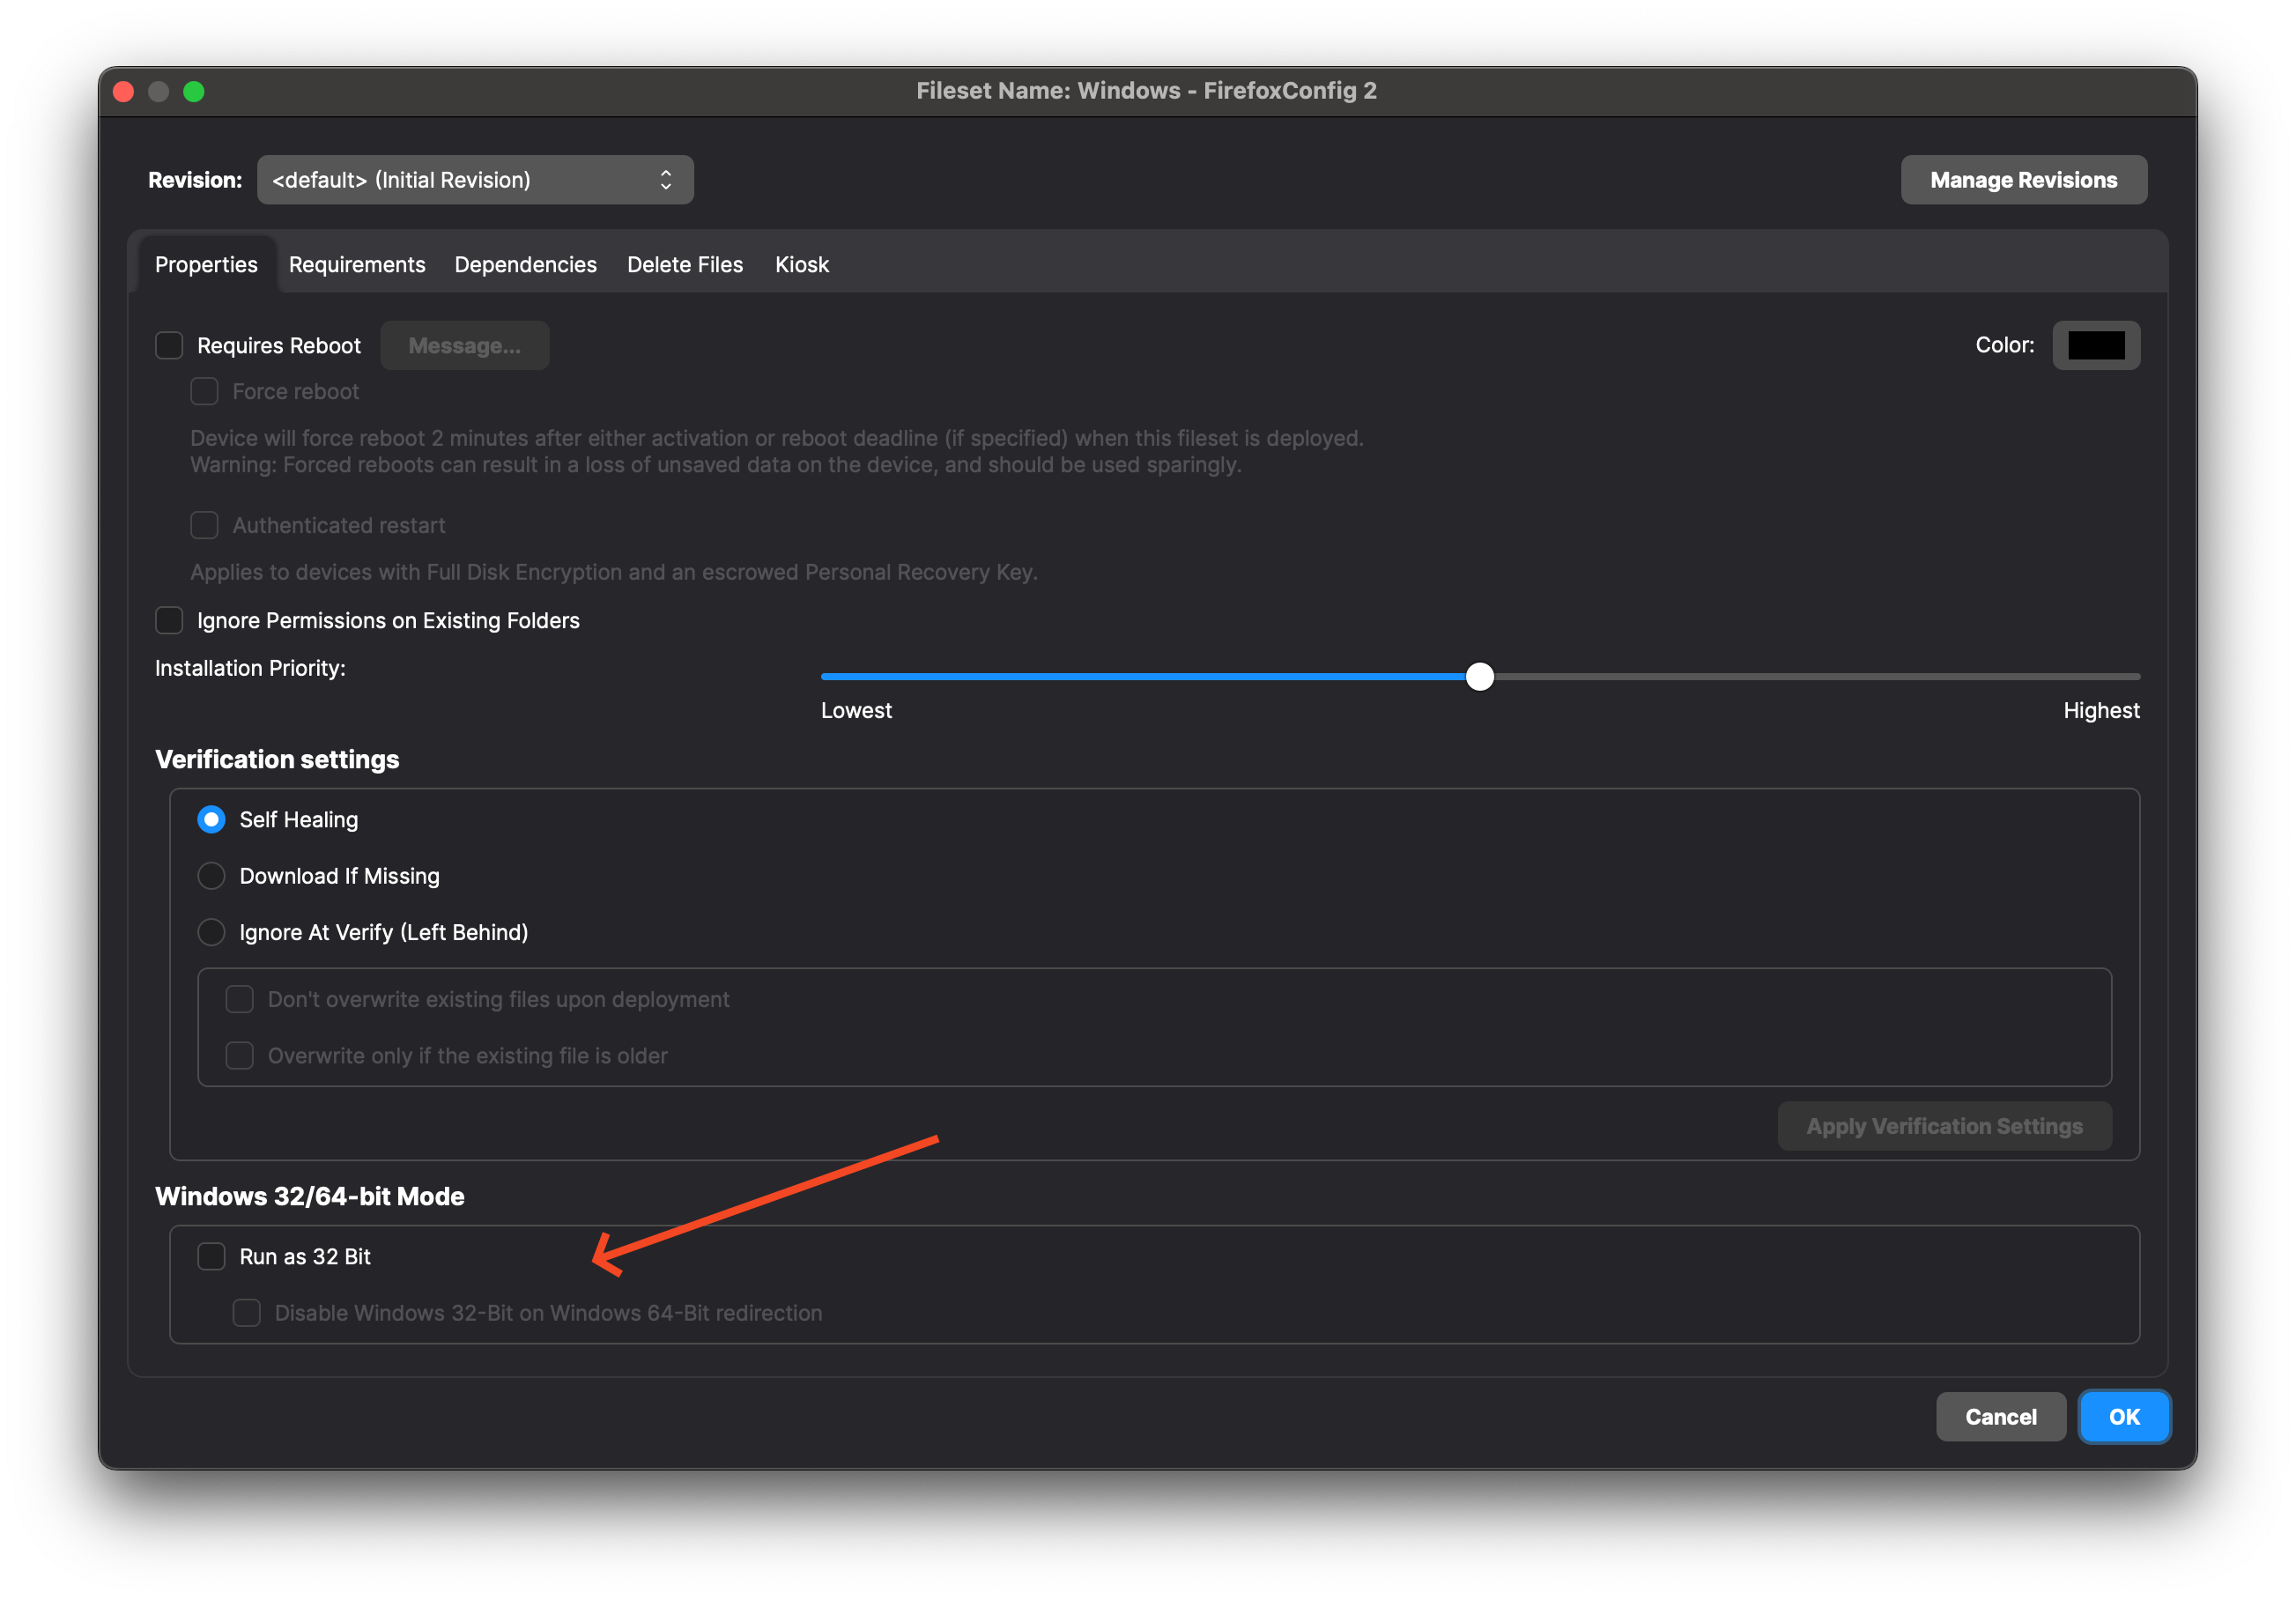
As a best practice, always check the "Disable Windows 32-bit on Windows 64-bit redirection" checkbox in the Properties tab for your fileset priot to FileWave 15.5.0. From 15.5.0 and beyond make sure to uncheck the new "Run as 32 Bit" checkbox so that the Fileset will be truely 64-bit. This ensures that any scripts in the fileset will be run in a 64-bit session and built-in Windows executables triggered by those scripts will call the 64-bit versions. A common reason for why your script might not be performing the expected results could be due to 64-bit Only Modules or Cmdlets: Some PowerShell modules or cmdlets are available only for the 64-bit version of PowerShell. If a script relies on these 64-bit modules, it must run in a 64-bit shell.
macOS
On macOS, running commands as sudo is not necessarily the same as actually becoming root.
Root vs As Root
E.g. Run the following commands to evaluate the local variable $HOME, once using sudo and once as root.
$ whoami
auser
$ sudo echo $HOME
/Users/auser
$ sudo su -
$ whoami
root
$ echo $HOME
/var/root
Paths
Similarly, the paths used to locate executable files will differ, since FileWave is a service ran as root and is not the root account. On an example device:
| User Account | Root Account | FileWave Client |
|
|
|
As such, consider always using the full path within a script to an executable, to be explicit, and ensure the executable is found.
For example, it can be seen from the above that homebrew is installed.
 % ls -al /usr/local/bin/brew
lrwxrwxrwx  1 root  _developer  28 Mar 23  2023 /usr/local/bin/brew -> /usr/local/homebrew/bin/brew
Running the following command would work as the user or root account, but would fail through FileWave, since the FileWave Client does not search /usr/local at all for executables:
brew -v
To ensure the script works and targets the correct brew, the full path should be entered:
/usr/local/bin/brew -v
Plist
It is common to see plist files edited with the 'defaults' command. However, this command is unique when it comes to ownership and permissions of files. The 'defaults' command will both take ownership and change permissions of files when used to write to plist files:
$ whoami
root
$ ls -al /tmp/example_plist.plist
-rw-r--r--  1 rstephens  staff  66 Feb 28 10:03 /tmp/example_plist.plist
$ defaults write /tmp/example_plist Label example_plist
$ ls -al /tmp/example_plist.plist
-rw-------  1 root  wheel  66 Feb 28 10:05 /tmp/example_plist.plist
As such, ensure to add a repair to scripts to reset permissions and ownership after the command has been used or consider using the following command instead (Note the full path is required if /usr/libexec is not in the paths list:
/usr/libexec/PlistBuddyRelated Content
Scripting Languages supported in FileWave
Description
FileWave provides the ability to leverage certain scripting languages on macOS and Windows. This includes:
| macOS | Windows | |
| Perl | ||
| Python | ||
| Shell | ||
| Bat | ||
| PowerShell |
FileWave does not include these languages, they are either installed by the OS vendor or will need to be installed separately.
Apple indicated they would be deprecating pre-installation of certain runtimes, for example:
https://developer.apple.com/documentation/macos-release-notes/macos-catalina-10_15-release-notes
When testing any scripts locally prior to deployment through FileWave, it is imperative that they are tested in the same context/environment as if they were being ran by FileWave, as indicated in our Script Best Practices KB.
Script Extensions
Fileset scripts are best added using the Script button from the Fileset view. Doing so, ensures the script will also log all output automatically, as well as setting a default shebang for macOS shell scripts.
Additionally, when defining the name of the script, the extension is required to match the language.
Only one of the following extensions will allow the editing of the Executable tab, regardless of how they the scripts are added.
| Language | Extension |
| Perl | .pl |
| Python |
.py |
| Shell | .sh |
| Batch | .bat or .cmd |
| PowerShell | .ps1 |
EXE files may also benefit from the Executables tab
Specify the type of Shell script, by way of the shebang. To keep in line with Apple, FileWave will automatically add ZSH as the default shebang: #!/bin/zsh
Example
The below provides examples of how to instal Python on endpoints. This is one way to achieve this goal, but by no means the only way. Professional Services requests can be raised for items beyond standard FileWave Support if desired.
Ingredients
- FileWave Central
- Windows EXE
Installers available from either:
Directions
macOS Python Installer
macOS Python
Apple used to provide a version of Python pre-installed, however as noted, this was an old version and is now deprecated. It is possible to download Python installers, however Apple provide Python in the Xcode Command Line Tools. The following method demonstrates how the softwareupdate mechanism may be used to list (and therefore instal) the command line tools:
# touch /tmp/.com.apple.dt.CommandLineTools.installondemand.in-progress
# softwareupdate -l
Software Update Tool

Finding available software
Software Update found the following new or updated software:
* Label: Command Line Tools for Xcode-12.4
    Title: Command Line Tools for Xcode, Version: 12.4, Size: 440392K, Recommended: YES,
* Label: Command Line Tools for Xcode-13.2
    Title: Command Line Tools for Xcode, Version: 13.2, Size: 577329K, Recommended: YES,
* Label: Command Line Tools for Xcode-12.5
    Title: Command Line Tools for Xcode, Version: 12.5, Size: 470966K, Recommended: YES,
* Label: Command Line Tools for Xcode-12.5
    Title: Command Line Tools for Xcode, Version: 12.5, Size: 470820K, Recommended: YES,
* Label: macOS Big Sur 11.6.2-20G314
Note that more than one version may be returned. If Xcode is installed a version may already be in place, so care should be taken if Xcode is already installed. After installing the chosen version, the temporary file created may then be removed.
Instal Python Packages
Python scripts import packages, not all of which will be installed by default. Any additional packages will require installation. PIP may achieve this and may be used in a Fileset script; PIP is also installed when installing the Command Line tools (or Xcode)
It is possible to check pip with the following command, note it may require upgrading, but again take careful consideration if Xcode is installed:
# pip3 list
Package    Version
---------- -------
pip        20.2.3
setuptools 49.2.1
six        1.15.0
wheel      0.33.1
WARNING: You are using pip version 20.2.3; however, version 23.1.2 is available.
You should consider upgrading via the '/Library/Developer/CommandLineTools/usr/bin/python3 -m pip install --upgrade pip' command.
For example, to instal pyobjc:
# Instal pyobjc
pip3 install pyobjc-core
pip3 install pyobjc-framework-Cocoa
pip3 install pyobjc-framework-Quartz
pip3 install pyobjc-framework-SystemConfiguration
In some instances, pip3 may fail. This can be due to the link created in:
/Library/Developer/CommandLineTools/SDKs
Remove and recreate the link to the correct installed version if need be.
The above could be packaged into a single script which could:
- Touch the temporary file
- Run Software Update
- Obtain the desired version from the list
- Instal that version
- Remove the temporary file
- Remove the link if incorrect
- Use PIP to instal other desired packages
- Recreate the link if removed above
Windows Python Installer
Windows Python
- Download the appropriate python installer EXE
- Create a new empty Fileset
- Choose a location to store the installer and drag the EXE into this location
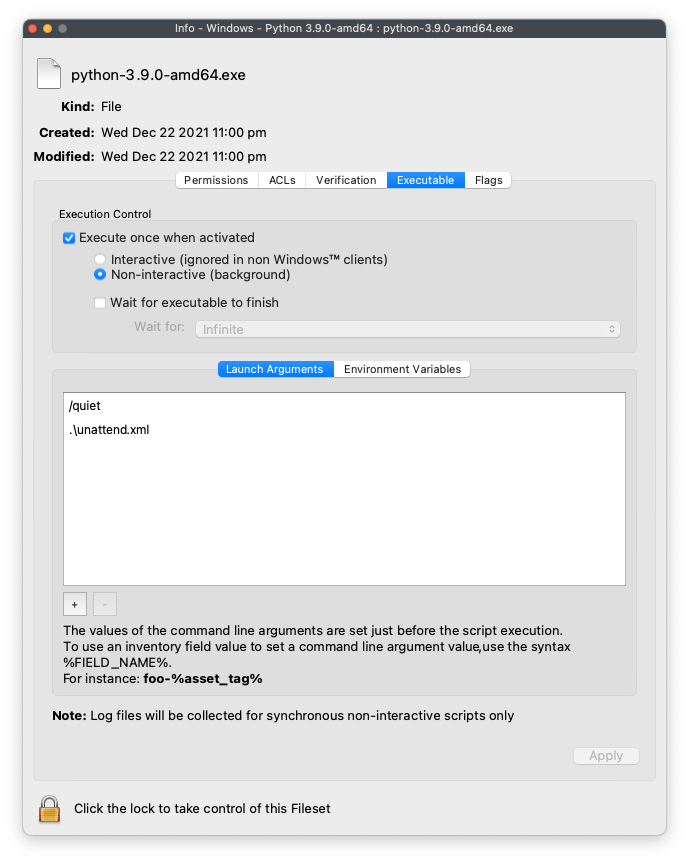
- Highlight this EXE and from the Get Info window choose Executable
- Tick the option to 'Execute once when activated'
- Set two Launch Arguments as per the screen shot: /quiet and .\unattend.xml
Supporting File
An unattend.xml file may be used to pre-determine aspects of the installation, e.g. instal PIP during installation or set Paths
- Use an editor to create a file called unattend.xml
- Edit this file with the below details, editing to meet desired needs
- Place this file in the Fileset within the same folder location as the EXE installer
An example could look as follows (see the Python documentation for a list and description of available options):
<Options>
<Option Name="InstallAllUsers" Value="1" />
<Option Name="TargetDir" Value="C:\Program Files\Python39" />
<Option Name="DefaultAllUsersTargetDir" Value="C:\Program Files\Python39" />
<Option Name="DefaultJustForMeTargetDir" Value="C:\Program Files\Python39" />
<Option Name="DefaultCustomTargetDir" Value="C:\Program Files\Python39" />
<Option Name="AssociateFiles" Value="1" />
<Option Name="CompileAll" Value="1" />
<Option Name="PrependPath" Value="1" />
<Option Name="Shortcuts" Value="1" />
<Option Name="Include_doc" Value="1" />
<Option Name="Include_debug" Value="1" />
<Option Name="Include_dev" Value="1" />
<Option Name="Include_exe" Value="1" />
<Option Name="Include_launcher" Value="1" />
<Option Name="InstallLauncherAllUsers" Value="1" />
<Option Name="Include_lib" Value="1" />
<Option Name="Include_pip" Value="1" />
<Option Name="Include_symbols" Value="1" />
<Option Name="Include_tcltk" Value="1" />
<Option Name="Include_test" Value="1" />
<Option Name="Include_tools" Value="1" />
<Option Name="LauncherOnly" Value="0" />
<Option Name="SimpleInstall" Value="0" />
<Option Name="SimpleInstallDescription"></Option>
</Options>
Edit the above example as desired, for example, set the target directory paths as desired.
Instal Python Packages
Python scripts import packages, not all of which will be installed by default. Any additional packages will require installation. PIP may achieve this and may be used in a post flight script, if the option above to include pip at installation was configured.
- Create a PostFlight script within the Fileset
- Edit the script to include any desired packages, e.g. to instal the 'requests' package:
python -m pip install requestsThe command 'pip list' may be used to list ALL additional packages installed.
The command 'pip freeze' may be used to list packages installed by PIP.
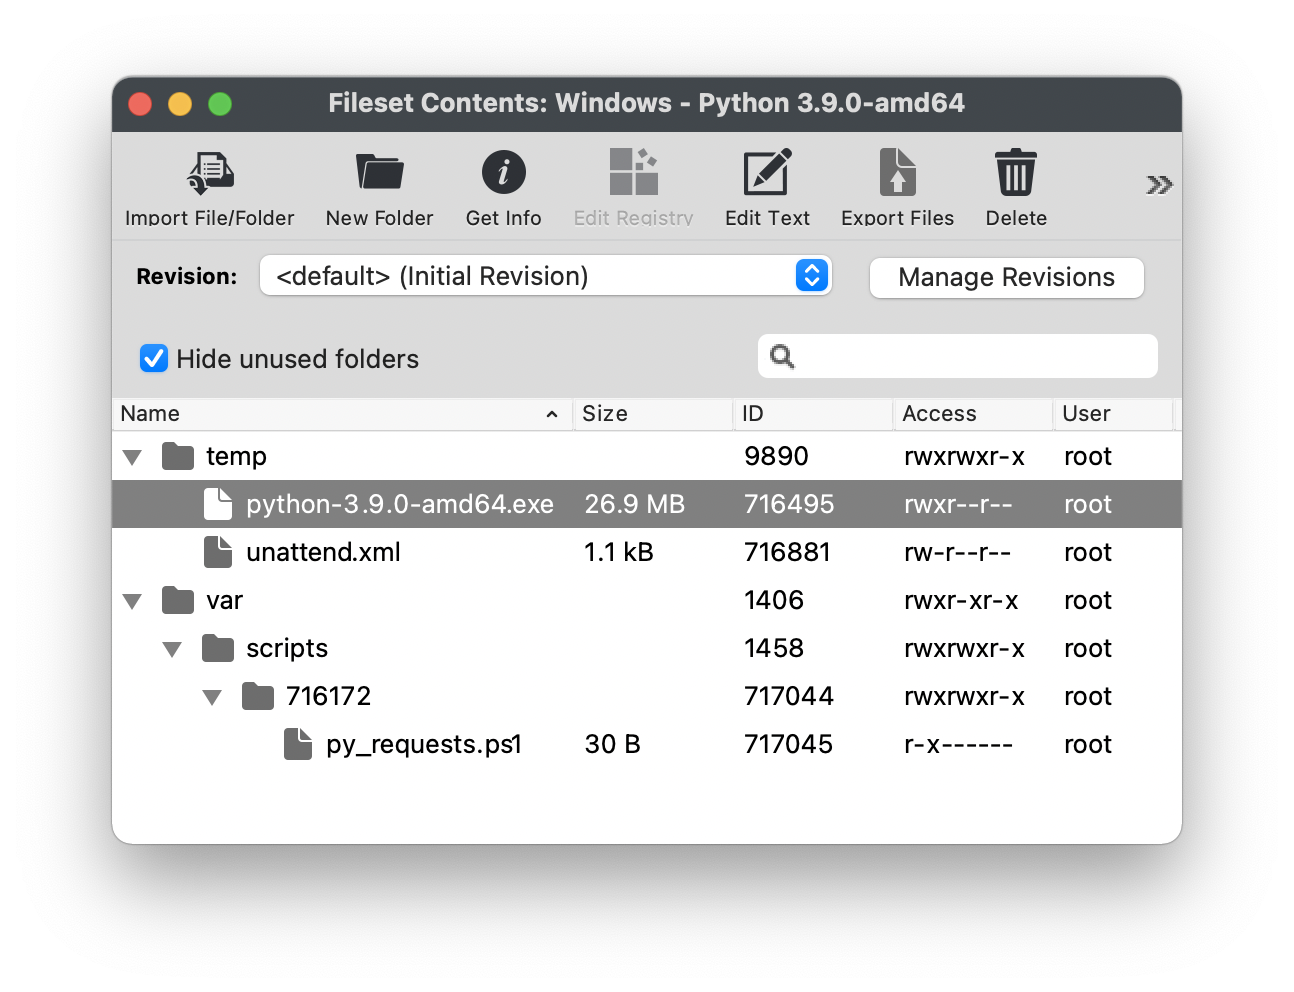
The final Fileset will may look something like:
Packages, including PIP itself, may require updating over time.
Testing
The following download is a simple Python Custom Field for both macOS and Windows. It should report the date when ran.
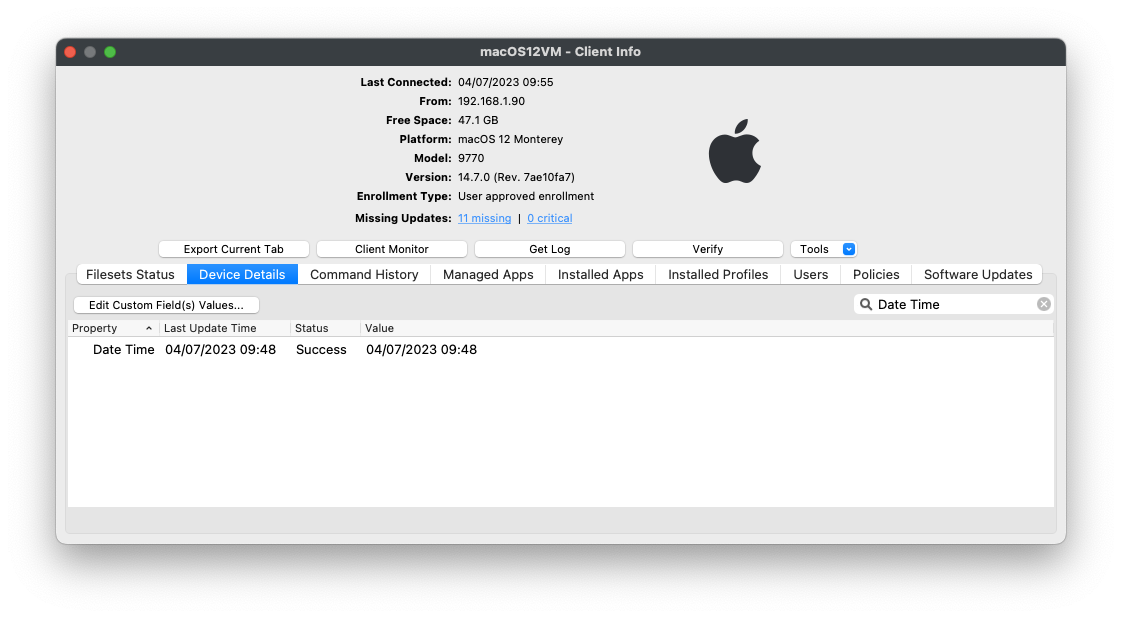
| ↓ macOS/Windows |
 |
If desired, use the Custom Field Assistant window to Import this unzipped, Custom Field example, called 'Date Time'
Test PowerShell as SYSTEM with PsExec on Windows
What
FileWave runs Windows deployment scripts as the local SYSTEM account. Microsoft PsExec lets you test a PowerShell script in that same security context before deploying it through a Fileset or Custom Field.
When/Why
Current FileWave Windows clients are 64-bit. Test with 64-bit PowerShell unless you are reproducing a legacy 32-bit execution path. For script-based Custom Fields, the On Windows, run as 64-bit setting controls the PowerShell architecture. Testing as SYSTEM catches differences in permissions, profile paths, mapped drives, registry hives, and user-specific environment variables.
How
-
Download PsExec from the Sysinternals Suite (https://docs.microsoft.com/en-us/sysinternals/downloads/psexec )
-
Open a Command Prompt or PowerShell window with Administrator privileges
-
Navigate to the folder where PsExec is located
-
Use the following command to run the script as SYSTEM with 64-bit Windows PowerShell:
PSEXEC -accepteula -i -s C:\Windows\System32\WindowsPowerShell\v1.0\powershell.exe -File "path\to\script.ps1"
Example:
PSEXEC -accepteula -i -s C:\Windows\System32\WindowsPowerShell\v1.0\powershell.exe -File "C:\test\testscript.ps1"To reproduce a known 32-bit execution path, use C:\Windows\SysWOW64\WindowsPowerShell\v1.0\powershell.exe instead.
Related Content
Digging Deeper
PsExec Switches
-
-i: runs the process interactively in the specified or current console session. -
-s: runs the process as the local SYSTEM account. -
-d: starts the process without waiting for it to finish. Omit this switch when you need to read script output during testing. -
-accepteula: accepts the PsExec license agreement for the test run.
Calling 64-bit PowerShell from a 32-bit process
Keep this compatibility pattern only for scripts that can still start in a 32-bit process and must relaunch themselves in 64-bit PowerShell. Sysnative bypasses Windows filesystem redirection from that 32-bit process.
If ( [IntPtr]::Size * 8 -ne 64 )
{
    C:\Windows\SysNative\WindowsPowerShell\v1.0\PowerShell.exe -File $MyInvocation.MyCommand.Path
}
Else
{
    # Add code here
}
The code checks the current process architecture. A 32-bit process relaunches the same script through Sysnative; a 64-bit process continues into the Else block.
Run the test on a representative Windows device, review the exit code and output, then pilot the FileWave deployment before expanding the association.
Run macOS Scripts as the Logged-In User with Outset
What
By default, FileWave Client scripts on macOS run as root. That is the right context for most device-level work, but it is not always the right context for settings that belong to the current user session.
Outset is a MacAdmins Open Source utility that can run scripts and packages during boot, at the login window, during user login, or on demand. A common FileWave workflow is to deploy Outset with FileWave, then deploy scripts into Outset's login folders so they run as the logged-in user at login.
This article covers macOS. Outset is not a Windows tool. For Windows user-context scripting, see Execute Powershell Scripts as Defined User.
When to use this
Use this approach when the script needs the logged-in user's context instead of the FileWave Client's root context. Common examples include per-user application preferences, Dock customization, user LaunchAgents, user keychain-aware tasks, or settings that write into the user's home folder.
Do not use this as a replacement for normal FileWave scripts that need root privileges. Software installation, system configuration, profile deployment, and device-level changes should usually remain in FileWave scripts, Fileset payloads, or MDM profiles.
Requirements
- macOS 10.15 or later, based on Outset's current project requirements.
- FileWave Central access to deploy the Outset package and your script Fileset.
- The Outset release package from the Outset releases page.
- For macOS 13 or later, a managed Login Items profile is recommended so users do not have to approve or enable Outset manually.
How it works
Outset watches specific folders under /usr/local/outset/. For user-context login scripts, the two most useful folders are:
/usr/local/outset/login-once/: runs a script once per user, then records that it has run in the user's Outset preferences./usr/local/outset/login-every/: runs a script at every user login.
When Outset processes login scripts, it runs them in the user context and passes the current console user as the first argument. In most scripts, $HOME and whoami should reflect the logged-in user instead of root.
If multiple scripts exist in the same folder, Outset processes them in alphanumeric order. Prefix filenames with numbers, such as 001-configure-dock.zsh, when ordering matters.
Basic FileWave workflow
- Download the current Outset release package from GitHub.
- Create a FileWave Fileset that installs the Outset package on target Macs.
- Create a separate Fileset for the script or scripts you want Outset to run.
- Place each script in the correct Outset folder in the Fileset payload, such as
/usr/local/outset/login-once/or/usr/local/outset/login-every/. - Ensure scripts are owned by
rootand have permissions755. Outset will not process scripts that fail its ownership or permission checks. - Associate the Outset Fileset first, then the script Fileset. Run a Model Update after making the deployment changes.
- Have the user log out and back in, or test during the next normal login.
Example script
The following example writes a small log entry in the current user's Library folder. It is intentionally simple; replace the example action with the per-user setting you need to apply.
#!/bin/zsh

outset_user="$1"
log_file="$HOME/Library/Logs/filewave-outset-example.log"

{
  echo "Outset ran at: $(/bin/date)"
  echo "Outset user argument: ${outset_user}"
  echo "whoami: $(/usr/bin/whoami)"
  echo "HOME: ${HOME}"
} >> "$log_file"

exit 0
To run this once for each user, deploy it to a path like:
/usr/local/outset/login-once/001-filewave-user-context-example.zshTo run it at every login, deploy it to:
/usr/local/outset/login-every/001-filewave-user-context-example.zshScript ownership and permissions
Outset enforces script ownership and permissions before it runs items from its processing folders. Scripts must be owned by root and have permissions 755.
If your Fileset does not already preserve the required ownership and mode, use a Fileset script or postflight action to correct them after installation:
#!/bin/zsh

script_path="/usr/local/outset/login-once/001-filewave-user-context-example.zsh"

/usr/sbin/chown root:wheel "$script_path"
/bin/chmod 755 "$script_path"

exit 0
macOS 13 and later: managed Login Items
On macOS 13 and later, background services appear in System Settings under Login Items. Outset recommends deploying a managed Login Items profile for io.macadmins.Outset so the service is treated as managed by the organization.
Apple documents the Managed Login Items payload in Apple Platform Deployment: Manage login items and background tasks on Mac.
Testing and troubleshooting
- Test with a small script that writes to
$HOME/Library/Logs/before deploying a script that changes user settings. - Confirm the script is in the intended folder:
login-oncefor one-time per-user work, orlogin-everyfor repeated login work. - Check that the file is executable and owned by
root. - Remember that
login-onceis tracked per user. If the same script has already run for that user, changing the script content may not make it run again. Use a new filename, use Outset's override feature, or uselogin-everywhen repeated runs are expected. - Review Outset logs in the Outset logs directory under
/usr/local/outset/.
Related options
If you need to run a command immediately as the current console user from a FileWave root-context script, see Execute macOS scripts as Defined User. That method is useful for targeted commands. Outset is better when the work naturally belongs at login or should run once per user across multiple users on the same Mac.
For general Fileset script behavior, see Fileset Scripts Overview.