FileWave General Info
- FileWave Components
- How does FileWave work?
- Default TCP and UDP Port Usage
- Networking - Assign static IP Address for a FileWave Appliance
- Troubleshoot DHCP and Static IPs on FileWave Debian Appliances
- Allow External Devices to Connect to the FileWave Server and Boosters
- Importing FileWave Virtual Appliance - Hyper-V
- Setting the Password on First Login to FileWave Appliances (15.5+)
- Using FileWave OVA appliances with older VMware ESXi versions
- Naming conventions and acronyms
- Scripting
- Execute macOS scripts as Defined User
- Execute Powershell Scripts as Defined User
- macOS 10.15+ and zsh shell for scripting
- Referencing Launch Arguments in Scripts
- Script Best Practices
- Scripting Languages supported in FileWave
- Test PowerShell as SYSTEM with PsExec on Windows
- Run macOS Scripts as the Logged-In User with Outset
- What languages does FileWave support?
- Troubleshooting
- Apple MDM Troubleshooting
- Backup Procedures for FileWave Hosted Servers
- FileWave Error Codes
- FileWave Log File Locations
- How to Restart FileWave Components
- Resolving Network Issues with FileWave Server or Boosters on macOS when using Carbon Black EDR Extension
- What is Compatibility Mode?
- FileWave Automation Scripts
- Rufus - Creating bootable USB drives
FileWave Components
In this section, we will describe the key FileWave components:
FileWave Server
The FileWave Server is the central repository hosting every file to be delivered to Clients. It consists of five processes and a web server. The first process interacts with logged-in Administrators. The second process services incoming requests from Clients and Boosters. The third process interacts with a directory server through LDAP. The fourth process communicates with Apple and Microsoft software update servers to download the current lists of available software updates. The fifth process is the Postgres database service for Inventory and MDM. Finally, the web server is the FileWave MDM Server; it handles Mobile Device Management (MDM) components. Detailed information on setting up the FileWave server is covered in Chapter 2 of this manual.
FileWave Central application
The FileWave Central application is the primary interface to the FileWave Server. The FileWave Admin displays different views that give a representation of the FileWave Server's database. These views are the Dashboard, Clients, Filesets, Associations, Imaging, optional Classroom, iOS Inventory, License Management, Boosters, and Inventory Queries views. FileWave Admin also acts as the unified management console for creating and administering FileWave administrator accounts; network imaging for the Imaging Appliance; managing Apple DEP and VPP associations; system software updates for iOS 9+, OS X (macOS) and Windows; and overall management of all devices and Filesets. Multiple instances of the FileWave Admin application can be in use at the same time with specific devices, Groups and Filesets assigned to various administrator accounts. Detailed information on configuring and using the FileWave Admin application is in Chapter 2 of this manual.
FileWave Anywhere
The FileWave Web Console is an Inventory tool designed to help with quick FileWave inventory references for specific clients in your server. Within the Web Console you will be able to view all devices currently enrolled, their Filesets, installed applications, users who have logged in, what groups they are apart of, and in the case of MDM enrolled Apple devices the command history. For more information please visit the page linked here.
FileWave Client (macOS and Windows)
The FileWave Client has two processes, fwcld and fwGUI. The first runs as a Launch Daemon on macOS and as a service on Windows. This means it runs in the background without any user interface. The client starts automatically after being installed and each time the computer boots. The fwcld process always runs with root (Mac) or local system (Win) privileges to allow for maximum access by any management operations. The second process, fwGUI, handles user interaction with the client, such as asking the client to quit open applications and informing them of the status when activating Filesets that require rebooting. The fwGUI process is what provides the Kiosk / self-service functionality. The Imaging Virtual Server (IVS) contains a modified version of the fwcld for reporting its status back to the FileWave Admin. Chapter 4 of this manual covers the installation and configuration of the FileWave client.
Filesets
FileWave's patented Fileset technology provides the ability to distribute applications, content, and management settings at the file level. While FileWave supports distribution of the standard .pkg and .msi packages, its capability to distribute individual files, application bundles, content, and management profiles allows for a level of granular control missing from other client management solutions. Filesets can be distributed to clients and cached for activation at a later date; a process that provides maximum scalability and control over the deployment cycle.
When a Fileset is distributed, it is protected from network outages. If there is an interruption in the transmission, FileWave will resume the distribution as soon as the network is restored. Filesets can also be modified after distribution. If any portion of the Fileset is modified by the administrator, only that specific portion of the Fileset is sent out to the associated clients. This process greatly reduces the network traffic. Another feature is the ability to deploy content and roll back to the previous version of that item if there is a problem with the deployed item. Self-healing functionality allows a Fileset to automatically repair itself if the end user deletes a portion of the payload. Chapter 5 of this manual covers the creation, configuration, distribution, and management of Filesets.
Self-service Kiosk
FileWave's self-service Kiosk provides the ability to allow end users access to content with their own device. In a BYOD deployment, you could post institutionally owned applications, documents, and updates for the end users to install at their convenience. In most of the deployment models, you can assign custom application sets to Groups as needed. Users do not need to be local administrators in order to install applications or content. End users can be provided with new applications, updates, documents, and other key content needed. The end user also has the option of un-installing that same content to free up space as needed. Use and configuration of the Kiosk is covered in Chapter 4.
Booster
The FileWave Booster is designed to act as a Fileset caching device for computer clients assigned to it as well as as to handle all Client-Server communications. Unlimited Boosters are allowed, regardless of license count or type. The FileWave Boosters allow administrators to increase the speed and scale of the Server's distribution of Filesets to Clients as well as offloading the overhead for constantly opening sockets for Client communications. When a set of Clients are connected to a Booster, their total network load on the Server will be roughly equivalent to a single Client connecting directly to the Server from that location. The use of Boosters can benefit remote sites with bandwidth constraints by providing a focused, local target for Clients as well as a single point of distribution from upstream.
Boosters are designed to work with Windows, OS X (macOS), and Android clients. iOS clients do not have the ability to use a Booster for cached Filesets, but they can utilize a Mac caching server, part of macOS that runs just fine on a Mac mini.
Imaging Virtual Server (IVS)
The FileWave Imaging Virtual Server is a standalone Linux container (Debian) that you can download from the Downloads page and run on any device that supports a Virtual Machine application, such as VMware™. The IVS provides NetBoot and PXEboot services. Storage for network images for Mac and Windows, as well as Windows Drivers images is now on the FileWave server. FileWave Admin provides the management console for associating network images with designated client computers.
Dashboard
FileWave provides an integrated Dashboard displaying a snapshot of the current status of the FileWave infrastructure. The Dashboard can be "torn off" to run on a separate display, and you can copy the URL of the Dashboard to provide to another systems administrator for viewing on their own device, including on a tablet. The information posted includes the status of all major services, such as DEP, VPP, and LDAP; account sync status; server performance status; and server licenses; plus much more.
How does FileWave work?
FileWave combines the tools and services you use to manage devices from a shared administrative interface. FileWave Central runs on macOS and Windows, so administrators are not tied to one platform for day-to-day lifecycle management. The basic workflow is a push-pull exchange between FileWave Central, the FileWave Server, and FileWave Clients.

A FileWave administrator creates a Fileset on the FileWave Server. Filesets can contain applications, images, profiles, books, settings, or other content that is assigned to client devices. The FileWave Client receives a Manifest that identifies the assigned Fileset, then requests that Fileset from the server. A FileWave Booster can cache Filesets closer to clients so large deployments put less load on the server and network.
A basic FileWave environment may have one administrator connecting to one FileWave Server to manage a set of clients. Larger environments often have multiple administrators and one or more Boosters. FileWave handles the normal client-server communication for management and content delivery; inventory data follows its own flow.
To learn more, review the Evaluation Guide or the video-based intro course FileWave Foundry: Onboarding Videos.
Default TCP and UDP Port Usage
FileWave software uses the below-listed TCP/IP ports. These are default settings and may be configured to listen on different ports if required. Consider FileWave Server should not have IPv6 enabled for the best experience.
Port Testing
Please consider downloading the FileWave Port Testing macOS/Windows utility to confirm communication of Google Cloud Messaging, Apple Push Notifications and connectivity between device network(s) and Server/Boosters.
The following may be run from the server to confirm Apple, Microsoft, and FileWave services:
Server Command Line
sudo /usr/local/filewave/python/bin/python /usr/local/filewave/django/manage.pyc check_connectionsTeamViewer Ports
TeamViewer has an additional set of ports to consider:
https://community.teamviewer.com/English/kb/articles/4139-ports-used-by-teamviewer
FileWave Server Ports
MDM default port is now 20445 as shown throughout this KB. On older versions of FileWave, this was 20443. To confirm the defined port, check the Port setting in FileWave Central > Preferences > Mobile > MDM Server > Port
The ports in this table are listed from the FileWave Server’s perspective, so the “Server In/Out” column indicates the direction of traffic relative to the Server.
| Server Ports | Service | Protocol | Server In/Out | Description |
| 80 | HTTP | TCP | Outgoing |
FileWave Software Updates (apple.com & microsoft.com) *** |
| 443 | HTTPS | TCP | Outgoing | * FileWave License Server (fwks.filewave.com & logstash.filewave.com)
* FileWave Software Updates (apple.com) *** * FileWave/TeamViewer Session Server (rcs.filewave.com) * FileWave/TeamViewer Push Notification Server (fwpn.filewave.com) * FileWave Kiosk ( *.filewave.cloud ) * FileWave AutoPkg integration (le7bqzikha.execute-api.us-east-1.amazonaws.com) |
| 443 | HTTPS | TCP | Incoming |
* API endpoints - Anywhere API (v2 API) * Device to Server (Enrollment URL) - Google/Azure/Okta |
| 20016 | SSL | TCP | Incoming | FileWave Central to Server |
| 20017 | SSL | TCP | Incoming |
FileWave Client to Server: Secure Set port 20015, not 20017, in Client Configuration |
| 20019 | SSL | TCP | Incoming | Booster to Server: Priority Traffic |
| 20022 | SSL | TCP | Incoming | FileWave Central to Server: NATS
FileWave Client to Server: NATS IVS to Server: NATS |
| 20023 | SSL | TCP | Incoming |
FileWave Booster to Server: NATS |
| 20124 | SSL | TCP | Incoming | FileWave Server JSON Websockets (JWT) Websocket connections for NATS SERVER used between FW Anywhere and Central to FW Server. |
| 20441 | Proprietary | TCP | Incoming | DO NOT OPEN FileWave Client to Server: Remote Client Monitor (Removed in FileWave 16.1+) Server no longer listens on this port. |
| 20443 | HTTPS | TCP | Incoming |
* FileWave Client to Server: Inventory * Apple Devices to Server: Inventory, Profiles, DDM, MDM * Android Devices to Server: Companion App * Chromebook to Server: Inventory * Booster to Server: Inventory/Discovery * App Portal to Server * FileWave Central and FileWave Anywhere to Dashboard |
| 20445 | HTTPS | TCP | Incoming |
NATS includes: Remote Control Publishing, Remote Control Routing, device renaming, revoking device certificates, push notifications
*** Also used by FileWave Central to vendor Software Update Servers.
Configuring port 20015 also automatically configures SSL port; 20017 [port entered +2]. 20015 is now deprecated and 20017 will be used where 20015 is set. Open port 20017 alone for Client communication.
FileWave Central Ports
The ports in this table are listed from FileWave Central's perspective, so the “In/Out” column indicates the direction of traffic relative to the macOS or Windows running Central there.
| Server Ports | Service | Protocol | In/Out | Description |
| 443 | HTTPS | TCP | Outgoing | * FileWave License Server (fwks.filewave.com & logstash.filewave.com)
* FileWave/TeamViewer Session Server (rcs.filewave.com) * FileWave/TeamViewer Push Notification Server (fwpn.filewave.com) * FileWave AutoPkg integration (le7bqzikha.execute-api.us-east-1.amazonaws.com) |
| 20016 | SSL | TCP | Outgoing | FileWave Central to Server |
| 20022 | SSL | TCP | Outgoing | FileWave Central to Server: NATS |
| 20443 | HTTPS | TCP | Outgoing |
* FileWave Central and FileWave Anywhere to Dashboard on Server |
| 20445 | HTTPS | TCP | Outgoing |
FileWave Kiosk Ports
The ports in this table are listed from the Kiosk on the Client's perspective, so the “In/Out” column indicates the direction of traffic relative to the macOS or Windows Kiosk running there.
| Kiosk Ports | Service | Protocol | In/Out | Description |
| 443 | HTTPS | TCP | Out | Devices to *.filewave.cloud (To download the Kiosk App) |
| 20443 | HTTPS | TCP | Out | Devices to FileWave Server |
| 20445 | HTTPS | TCP | Out | Devices to FileWave Server |
FileWave Client Ports
The ports in this table are listed from the FileWave Client's perspective, so the “In/Out” column indicates the direction of traffic relative to the macOS or Windows Client.
| Client Ports | Service | Protocol | In/Out | Description |
| 443 | HTTPS | TCP | Out | FileWave Software Updates (apple.com & microsoft.com) *** |
| 443 | HTTPS | TCP | Out |
For Hosted Customers Only. If blocked then a Booster can be used so that the configured Booster can reach these and a Client would not need to: Cloudflare host for Filesets in the Cloud - c7b0813948fe034d9fe3ca8c90faddab.r2.cloudflarestorage.com
Cloudflare IP addresses as listed on https://www.cloudflare.com/ips-v4 - 173.245.48.0/20 |
*** Also used by FileWave Central to vendor Software Update Servers.
FileWave Booster Ports
The ports in this table are listed from the Booster's perspective, so the “In/Out” column indicates the direction of traffic relative to the Booster.
| Booster Ports | Service | Protocol | In/Out | Description |
| 443 | HTTPS | TCP | Out | FileWave Software Updates (microsoft.com) *** |
| 20014 | SSL | TCP | Incoming |
FileWave Client to Booster: Secure (Booster Priority fallback) Set port 20013, not 20014, in Booster Configuration |
| 20018 | SSL | TCP | Incoming | Booster to Booster: Priority Traffic |
| 20026 | SSL | TCP | Incoming | FileWave Client to Booster connections using NATS Server |
| 20030 | SSL | TCP | Incoming | FileWave Client to Booster for Windows OS updates |
| 443 | HTTPS | TCP | Out |
For Hosted Customers Only: Cloudflare host for Filesets in the Cloud - c7b0813948fe034d9fe3ca8c90faddab.r2.cloudflarestorage.com
Cloudflare IP addresses as listed on https://www.cloudflare.com/ips-v4 - 173.245.48.0/20 |
NATS includes: Remote Control Publishing, Remote Control Routing, device renaming, revoking device certificates, push notifications
*** Also used by FileWave Central to vendor Software Update Servers.
Configuring port 20013 also automatically configures SSL ports; 20014 [port entered +1] and 20018 [port entered + 5]. 20013 is now deprecated and 20014 will be used where 20013 is set. Open port 20014 alone for Client to Booster communication. Open ports 20014 and 20018 for Booster to Booster communication.
Booster should be able to connect with Microsoft OS Updates URL, if using FileWave to manage Windows Software Updates.
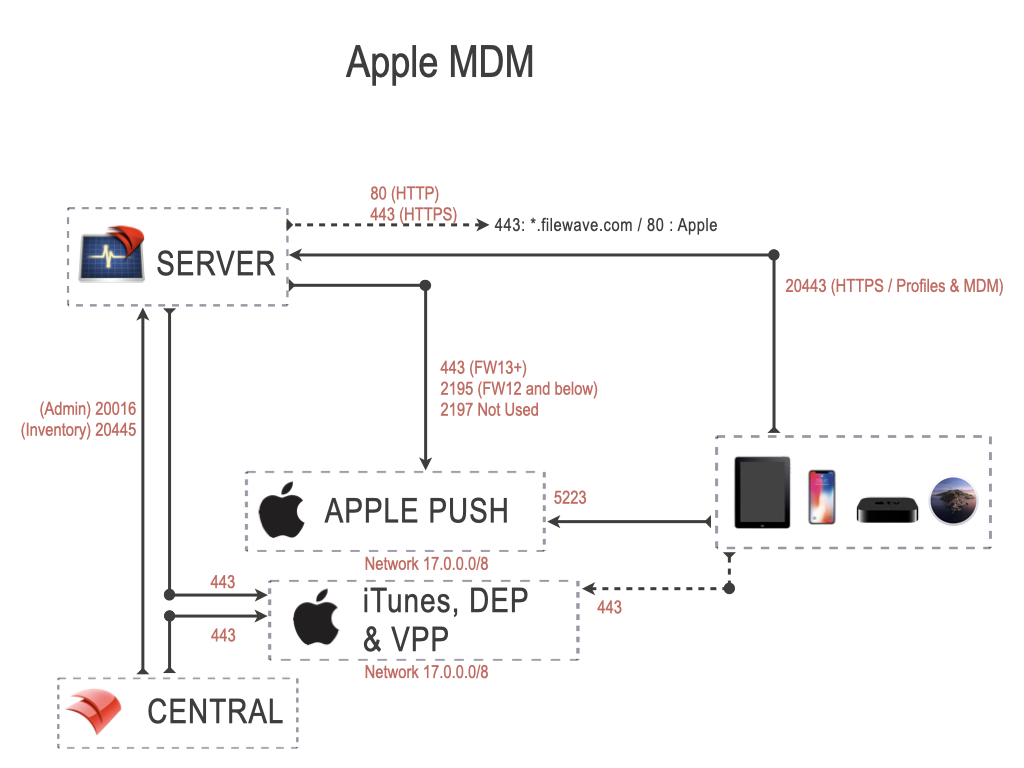
Apple MDM Ports
The ports in this table are listed from the FileWave Server’s perspective, so the “Server In/Out” column indicates the direction of traffic relative to the Server and these ports are specifically those needed to manage Apple devices. Apple devices will also need to reach the Apple servers on 17.0.0.0/8.
| Apple MDM Ports | Service | Protocol | Server In/Out | Description |
| 443 | HTTPS | TCP | Outgoing |
FileWave Server to Apple's servers (17.0.0.0/8) FileWave Admin to iTunes, DEP & VPP (17.0.0.0/8) Device to iTunes, DEP & VPP (17.0.0.0/8) |
| 443 | HTTPS | TCP | Incoming |
VPP v2 Notifications from Apple |
| 5223 | APNS | TCP | Outgoing | FileWave Server to Apple's servers (17.0.0.0/8) |
| 20443 | HTTPS | TCP | Incoming | Device to Server: Profiles & MDM |
| 20445 | HTTPS | TCP | Incoming | FileWave Central to Server |
Android EMM Ports
The ports in this table are listed from the FileWave Server’s perspective, so the “Server In/Out” column indicates the direction of traffic relative to the Server and these ports are specifically those needed to manage Android devices. Android devices will also need to reach the Google's servers.
| Android EMM Ports | Service | Protocol | Server In/Out | Description |
| 443 | HTTPS | TCP | Outgoing |
Server to EMM commands (androidmanagement.googleapis.com) Device to Activation servers (*.clients.google.com) Device to Play Store (play.google.com) EMM commands (androidmanagement.googleapis.com) FileWave Central to Play Store (play.google.com) |
| 20016 | SSL | TCP | Incoming | FileWave Central to Server |
| 20445 | HTTPS | TCP | Incoming | FileWave Central to Server: Inventory
Companion App to Server: Location Tracking |

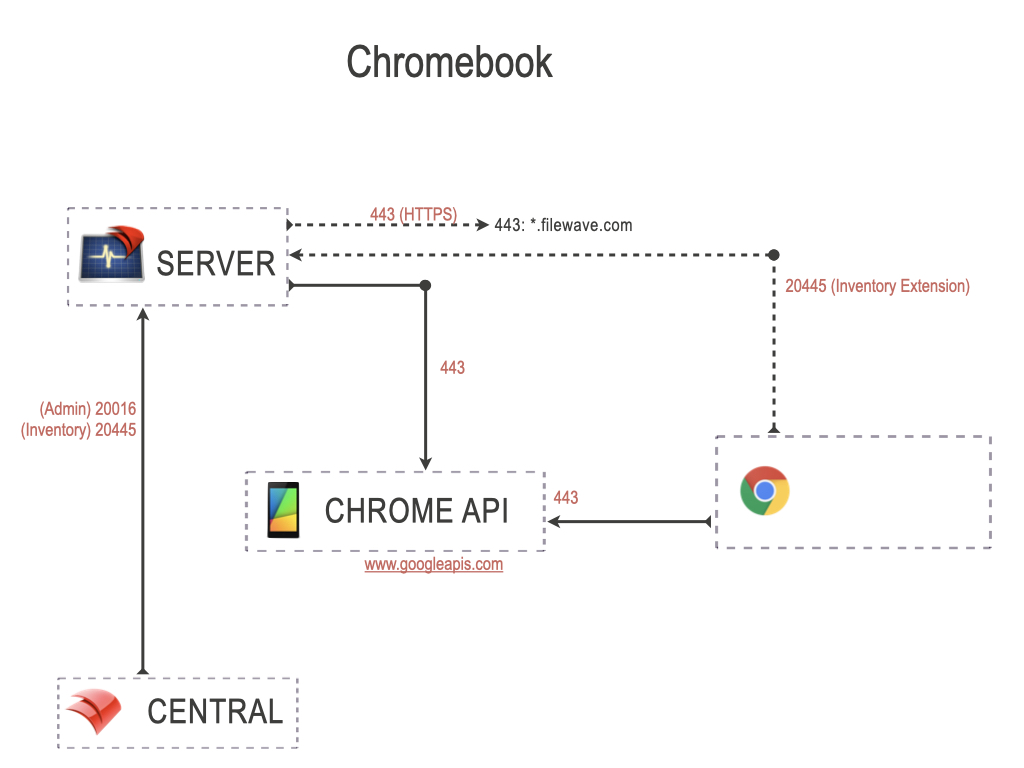
Chromebook Ports
The ports in this table are listed from the FileWave Server’s perspective, so the “Server In/Out” column indicates the direction of traffic relative to the Server and these ports are specifically those needed to manage Google Chromebook devices. Chromebook devices will also need to reach the Google's servers.
| Chromebook Ports | Service | Protocol | Server In/Out | Description |
| 443 | HTTPS | TCP | Outgoing |
Server to Chrome API Chromebook to Chrome API (www.googleapis.com) |
| 20016 | SSL | TCP | Incoming | FileWave Central to Server |
| 20445 | HTTPS | TCP | Incoming |
FileWave Central to Server Chromebook Inventory Extension to Server |
Windows MDM Ports
The ports in this table are listed from the FileWave Server’s perspective, so the “Server In/Out” column indicates the direction of traffic relative to the Server and these ports are specifically those needed to manage Windows MDM devices. Windows devices will also need to reach the Microsoft's servers.
| Windows MDM Ports | Service | Protocol | Server In/Out | Description |
| 443 | HTTPS | TCP | Incoming | Device to Server (Enrollment URL) |
| 443 | HTTPS | TCP | Outgoing |
Server to Windows MDM (*.azure.com) Device to Windows MDM (*.azure.com) |
NOTE: The FileWave client will also be installed and all previously listed FileWave client ports are required.
FileWave IVS Ports
| IVS Ports | Service | Protocol | From | To | Notes | Open port on... |
| 67 | DHCP | UDP | Client | IVS | ‡‡ | IVS |
| 69 | TFTP | UDP | Client | IVS | ‡‡ | IVS |
| 80 | HTTP | TCP |
Client |
IVS | IVS | |
| 111 | NFS | TCP/UDP | Client | IVS | ‡ | IVS |
| 4011 | DHCP | UDP | Client | IVS | UEFI PXE‡‡ | IVS |
| 2049 | NFS | TCP/UDP | Client | IVS | Client to IVS‡ when Secure Imaging is disabled. | IVS |
| 5201 | iperf3 | TCP | Client | IVS | For Performance testing | IVS |
| 20016 | SSL | TCP | IVS | Server | Server | |
| 20017 | SSL | TCP | IVS | Server | Server | |
| 20022 | SSL | TCP | IVS | Server | NATS | Server |
| 20443 | HTTPS | TCP | IVS | Server | Inventory | Server |
| 20444 |
HTTPS |
TCP |
Server | IVS |
Non Hosted Only |
IVS |
| Client | IVS |
|
||||
| IVS |
IVS Django |
|||||
| 20490 | VPN | TCP/UDP | Client | IVS | Client to IVS‡ when Secure Imaging is enabled. | IVS |
| 20445 | HTTPS | TCP | IVS | Server | Inventory | Server |
‡ TCP/IP & UDP
‡‡ UDP only
Networking - Assign static IP Address for a FileWave Appliance
For the Linux based FileWave Server, Booster, or IVS if you cannot use the port https://server:10000 to change network setting please follow the instructions below:
Debian Linux
Changing the IP address in Debian involves different steps compared to CentOS. The following guide is tailored for Debian servers using the interfaces file, but you could also use Webmin on your server assuming the server comes online initially with DHCP.
For Webmin know that you will need to go to Webmin -> Webmin Configuration -> Operating System and Environment and make sure it's set to Debian 12.4 (Or whatever version we are at when you set up your system. You can see this with cat /etc/debian_version on the server.
-
Locate Network Interface:
First, identify the network interface you wish to configure. You can list all network interfaces using:
networkctl list
- Edit the /etc/network/interfaces file: Using 'nano', edit the interfaces file to set the network configurations.
nano /etc/network/interfacesYour default interfaces file should look something like this (your interface name may be different):
# The loopback network interface auto lo eth0 iface lo inet loopback # The primary network interface iface eth0 inet dhcpChange the file to look like this, using your network preferences (note 'dhcp' has been changed to 'static' in line 6)
# The loopback network interface auto lo eth0 iface lo inet loopback # The primary network interface iface eth0 inet static address 192.168.10.33 netmask 255.255.255.0 broadcast 192.168.10.255 dns-nameservers 192.168.10.254 192.168.10.255 - Verify Resolv.conf, hosts and hostname files: Verify that these files in /etc/ are configured correctly for your network and server.
/etc/resolv.conf: This file should list your DNS servers
/etc/hosts: This file should point your FQDN to localhost (127.0.0.1)
/etc/hostname: Specifies the hostname for your server. This is filewave by default. - Disable IPv6 (For IVS): Edit the sysctl.config file by adding the following lines to the end of the file
nano /etc/sysctl.confignet.ipv6.conf.all.disable_ipv6 = 1 net.ipv6.conf.default.disable_ipv6 = 1 net.ipv6.conf.lo.disable_ipv6 = 1 net.ipv6.conf.tun0.disable_ipv6 = 1 - Restart/Check Network Status:
systemctl restart networking.service systemctl status networking.service - Verify IP:
ip a

Related Content
Troubleshoot DHCP and Static IPs on FileWave Debian Appliances
What
FileWave provides Debian appliances for these components:
- FileWave Server
- Booster
- IVS
FileWave Debian appliances use DHCP by default. The same networking principles apply to other Debian installations, but the commands and examples here focus on FileWave appliances.
Give each appliance a stable address by configuring a static IP on the appliance or creating a DHCP reservation.
Why
Every customer network has its own addressing plan. Assign a stable address during initial setup so the Server, Booster, or IVS does not unexpectedly move when a DHCP lease changes.
Information
The following articles offer details for configuring static addresses on FileWave Appliances:
- FileWave Server Setup
- Networking - Assign static IP Address for a FileWave Booster Appliance
- IVS Control Commands
A DHCP reservation assigns the chosen IP to the appliance MAC address on the DHCP server instead of configuring the address locally.
Troubleshooting
Example customer report to the FileWave Support Team:
Report
"Despite having a DHCP reservation, the Booster was not assigned the expected IP address."
Resolution
FileWave Technical Support found two DHCP servers offering addresses on the same subnet. Only one server contained the reservation for the expected IP.
Avoid overlapping DHCP assignments
When more than one DHCP server serves a subnet:
- Give each DHCP server a unique address pool. Do not let two servers offer the same addresses on one subnet.
- Configure a reserved IP for an appliance MAC address on only one DHCP server for that subnet.
- Place the reservation on the server that owns the desired IP range.
Overlapping address pools and relying on DHCP synchronisation is not recommended.
Use these Debian commands to inspect interfaces, leases, and neighboring devices:
| Command | Description |
|
Show network interfaces, IP addresses, and MAC addresses. |
|
List network interface names. |
|
Refresh the DHCP lease for the named interface. |
|
Display the network neighbor cache. |
Examples:
The following ip a output shows two interfaces. In this example, ens192 carries external traffic.
# ip a
1: lo: <LOOPBACK,UP,LOWER_UP> mtu 65536 qdisc noqueue state UNKNOWN group default qlen 1000
link/loopback 00:00:00:00:00:00 brd 00:00:00:00:00:00
inet 127.0.0.1/8 scope host lo
valid_lft forever preferred_lft forever
inet6 ::1/128 scope host noprefixroute
valid_lft forever preferred_lft forever
2: ens192: <BROADCAST,MULTICAST,UP,LOWER_UP> mtu 1500 qdisc mq state UP group default qlen 1000
link/ether 00:0c:29:1d:1c:75 brd ff:ff:ff:ff:ff:ff
altname enp11s0
inet 10.85.1.9/24 brd 10.85.1.255 scope global ens192
valid_lft forever preferred_lft forever'lo' is the local loopback address
Use the interface output to find the MAC address needed for a DHCP reservation.
To list interface names without the address details:
# ls /sys/class/net
ens192 loIf the appliance receives the wrong address, renew the DHCP lease for the active interface. Using ens192 from the example:
# dhclient ens192Run dhclient as root.
arp -a can help identify address conflicts. This example shows the DHCP/DNS server and two devices in the appliance's neighbor cache.
# arp -a
Linksys38496.home (10.85.1.1) at d8:9f:80:4c:24:67 [ether] on ens192
FW1063.home (10.85.1.230) at 5c:96:cf:db:62:3b [ether] on ens192
ml1063.home (10.85.1.136) at ac:d0:74:68:23:6d [ether] on ens192Related Content
Allow External Devices to Connect to the FileWave Server and Boosters
Now that most Organizations are supporting E-Learn and/or remote work environments, you may want to open up your firewall to allow devices outside of your network to connect to the FileWave Server and Boosters.
If you have multiple Boosters, not all have to be opened up externally. We recommend roughly one Booster for around every 2000 Clients. If you'd like to create additional Boosters and keep your existing Boosters internal, you can find information about setting up a new Booster here: Booster installation
DNS Settings
In order for devices to connect on an external network, the FileWave Server and Boosters will first need to be set up with a Fully Qualified Domain Name (FQDN) that can be resolved outside the network.
Server and booster hostnames using local domains (.local, .corp etc.) or IP addresses will not be able to allow devices to connect outside of its private network. And, changing the hostname can not be taken lightly because this change on the server will cause Clients and mobile devices to stop communicating with the server. See more: Root Trusted Certificate
You can confirm your internal DNS settings by running the following commands on a computer inside your network.
Replace 'myserver.domain' with your Server/Booster FQDN.
This will use your devices current DNS settings
nslookup myserver.domainThen run the command doing an external lookup (on a device outside of the network).
nslookup myserver.domain 8.8.8.8If nslookup doesn't resolve to the correct IP (or not at all), you will need to make DNS changes...best to contact your Network Administrator to get this set up.
Inside, then an Outside Example:
$ nslookup server.filewave.com
Server: 192.168.1.1
Address: 192.168.1.1#53
Non-authoritative answer:
Name: preview.filewave.com
Address: 10.1.10.45
$ nslookup server.filewave.com 8.8.8.8
Server: 8.8.8.8
Address: 8.8.8.8#53
Non-authoritative answer:
Name: preview.filewave.com
Address: 52.38.32.242See how inside we got a 10.1.10.45 address, and looking outside we got a 52.38.32.242 IP address? This server's FQDN is setup inside and outside properly.
Network Ports
Once DNS is correct, the next thing you'll need to do is configure your firewall to allow external incoming traffic to your Server and Booster(s) so you'll want to reference FileWave Booster Ports to see the ports that should be opened to the Boosters and for the Boosters to the Server.
Testing the Network for External Communication
Once the changes are in place on the network, you will want to test the connection to be sure devices can communicate with the server.
First, download our Port Tester on a computer connected to an external network. You can find the Port Tester here: https://supportresources.filewave.com.
Once it's installed, input the Server/Booster's FQDN in the Hostname field. You can toggle the switch next to the port numbers to autofill the ports for the Server or Booster or input them yourself.
Select 'Go' and if all the necessary ports come back successful, you're all set!
Connecting your Clients to the External Boosters
If you don't already have your Clients pointing to the Boosters you selected to make available outside the network, you will need to create a Superprefs Fileset to deploy these changes.
You can learn more about creating and deploying Superprefs here: Creating a Superprefs Fileset
Related Content
Importing FileWave Virtual Appliance - Hyper-V
FileWave's Hyper-V VMs are usually built using the latest version of Hyper-V, typically the same one that comes with the newest version of Windows Server. When importing the FileWave Server, IVS, or on older Windows OS'es, the Hyper-V Manager console may not be able to detect the VM due to changes in the formatting of the VM XML definition file. This doesn't mean you can't add them to Hyper-V though.
Instead of importing the Hyper-V VM, add a new VM and point it to the existing VHD for the FileWave Server, Booster or IVS. Then specify the following hardware configuration to replace the missing info that was lost by discarding the VM XML definition file.
FileWave Server/Booster - 8 CPUs, 16 GB RAM
IVS - 4 CPUs, 4 GB RAM
Step-by-step guide
Follow these steps for the FileWave server component you wish to add to Hyper-V
- Copy the .vhdx file for the desired FileWave server component to the same folder where the VHDs for all your other VMs reside. Rename it as desired so you know which server component it's for, e.g. IVS.vhdx.
- Go to Action > New > Virtual Machine.
- Select "Generation 2" for the firmware type.
- Assign either 8192 (FileWave Server/Booster) or 4096 (IVS) for Startup memory and check "Use Dynamic Memory" for this virtual machine.
- Connect the NIC to an external virtual switch where the server can pick up an IP address on your LAN.
- Pick "Use an existing virtual hard disk" and browse to the .vhdx file for your VM.
Note that the IVS has two virtual NICs although only one of them will pick up an IP address. There's already one present by default so you'll have to edit the settings for the VM and add a second one by picking Add Hardware at the top of the Hardware section on the left-hand pane. Choose Network Adapter on the right and click the Add button.
Connect this second adapter to your virtual switch and click the Apply button.

All FileWave server components should have a static IP rather than a dynamic one. You can either assign them a static IP outside of your DHCP pool or set a client reservation for them so they get the same IP address from the DHCP pool every time. For client reservations, you'll need to configure the virtual NICs with static MAC addresses since the MAC address is needed to set the client reservation. In the Advanced Features section for each virtual NIC change the MAC address to Static.

For the IVS you'll need to log in locally and run ifconfig to determine the MAC address for the virtual NIC that is pulling an IP address (usually eth1), as opposed to the other adapter that doesn't get an IP address.

Setting the Password on First Login to FileWave Appliances (15.5+)
What
Starting from FileWave version 15.5.0, there have been important changes to the default login process and security features of the FileWave Appliance:
- Disabled Root Login: The root user is now disabled from logging in directly to enhance security.
- New Default User - User: fwadmin (as of 15.4.0), default password: filewave.
- Mandatory Password Change: On the first login, fwadmin will be prompted to change the password. It’s crucial to choose a secure password and keep a record of it.
- Sudo Access: The fwadmin user has sudo privileges to perform administrative tasks that require root access.
- Enhanced Security with Fail2Ban: Fail2Ban has been added to protect against unauthorized access attempts. It will temporarily block IP addresses after a number of failed login attempts.
For security, the account for root is disabled as of version 15.5.0.
These changes apply to new Debian-based Appliances starting from version 15.5.0 and onward.
Existing Debian Appliances will not have these changes implemented unless you manually make the changes or migrate to a new Appliance.
When/Why
These changes have been implemented to strengthen the security of your FileWave Appliance:
Existing Appliances
To benefit from these changes either:
- Manually Implement the Changes: Adjust your current Appliance settings to match the new security configurations.
- Migrate to a New Appliance: Set up a new Appliance with version 15.5.0 or later and migrate your data accordingly.
How
First Login and Password Change
- Access the Appliance: Connect to your FileWave Appliance via SSH or console.
- Login as fwadmin: Use the username fwadmin and the default password filewave.
- Change Password: You will be prompted to change the password immediately.
- Enter New Password: Choose a strong, unique password.
- Confirm New Password: Re-enter the password to confirm.
- Note the Password: Keep the new password in a secure place.
Using Sudo for Administrative Tasks
Run Commands with Sudo: Prefix administrative commands with sudo.
sudo apt-get updateEnter Password When Prompted: You may be asked for your fwadmin password when executing sudo commands.
Fail2Ban Security Measures
- Automatic IP Blocking: After several failed login attempts, Fail2Ban will block the offending IP address temporarily.
- Check Ban Status:
sudo fail2ban-client status sshd -
Unban an IP (if necessary):
sudo fail2ban-client set sshd unbanip <IP_ADDRESS>
Best Practices
- Do Not Expose SSH to the Internet: Keep SSH access limited to trusted networks.
- Use Strong Passwords: Incorporate letters, numbers, and special characters.
- Regularly Update the Appliance: Keep your system updated to patch vulnerabilities.
- Monitor Access Logs: Regularly check logs for any unauthorized access attempts.
Related Content
Using FileWave OVA appliances with older VMware ESXi versions
FileWave download pages include OVA images for FileWave Server, Booster, and Imaging Virtual Server (IVS) appliances. An OVA is a packaged virtual appliance. It normally contains an OVF descriptor file, one or more virtual disks, and sometimes a manifest file used for checksum validation.
Each FileWave OVA is built with a VMware virtual hardware compatibility level. For example, the FileWave 16.3.0 download page states that the VMware OVA images require vmx-19 support, which means VMware vCenter/ESXi 7.0 Update 2 or newer. If you try to import that OVA on an older ESXi host, the import may fail before the appliance is even created.
Warning: Older VMware ESXi versions may be outside Broadcom support and may contain known security vulnerabilities. Do not treat this process as a recommendation to keep running unsupported ESXi in production. Use this only as a temporary workaround, lab/test option, or migration aid. For production systems, FileWave recommends using a supported hypervisor platform and keeping ESXi patched.
When to use this article
Use this article when all of the following are true:
- You downloaded a FileWave OVA appliance from a FileWave Downloads page.
- You are trying to import it into VMware ESXi or vCenter.
- The import fails because the OVA was created for a newer virtual hardware version than your ESXi host supports.
- You understand this is a best-effort compatibility change, not a guaranteed supported production configuration.
This article does not apply to Hyper-V VHD images, already-running appliances, or issues caused by the FileWave software inside the appliance.
What this changes, and what it does not change
This process changes the VMware virtual hardware version declared by the OVA package. That can allow an older ESXi host to accept the import.
It does not magically convert every virtual device inside the appliance. If the OVA uses a device that your ESXi host cannot emulate, such as a newer storage controller or another newer virtual hardware feature, the import or boot may still fail. In that case, the right answer is usually to use a newer ESXi host or create a new compatible VM and migrate/attach the disk with help from a VMware administrator.
Before you start
- Confirm your ESXi version. In the ESXi Host Client, select Host and check the ESXi version/build. In vCenter, check both the vCenter version and the ESXi host version. If vCenter manages the host, both vCenter and the ESXi host must support the virtual hardware version you choose.
- Download the FileWave OVA again if needed. Start from a clean copy of the OVA from the FileWave Downloads page for your FileWave release.
- Verify the download. FileWave download pages list an MD5 value for OVA files. Compare the downloaded file's MD5 value before modifying it.
- Work on a copy. Keep the original OVA unchanged so you can start over if needed.
- Use a test VM first. Do not try this directly with your only production recovery path.
Optional: check the original OVA MD5 value
On macOS:
md5 FileWave_Server_16.3.0.ovaOn Linux:
md5sum FileWave_Server_16.3.0.ovaOn Windows PowerShell:
Get-FileHash -Algorithm MD5 .\FileWave_Server_16.3.0.ovaCompare the result to the MD5 shown on the FileWave Downloads page. If it does not match, download the OVA again before continuing.
Choose the correct virtual hardware version
The value you are changing in the OVF file looks like vmx-19, vmx-17, vmx-13, and so on. Choose the newest version your ESXi/vCenter environment supports.
| VMware environment | Maximum virtual hardware version | OVF value to use |
|---|---|---|
| ESXi / vCenter 6.0 | Version 11 | vmx-11 |
| ESXi / vCenter 6.5 | Version 13 | vmx-13 |
| ESXi / vCenter 6.7 | Version 14 | vmx-14 |
| ESXi / vCenter 6.7 Update 2 or later | Version 15 | vmx-15 |
| ESXi / vCenter 7.0 | Version 17 | vmx-17 |
| ESXi / vCenter 7.0 Update 1 | Version 18 | vmx-18 |
| ESXi / vCenter 7.0 Update 2 or Update 3 | Version 19 | vmx-19 |
Example: if a FileWave OVA declares vmx-19 but your host is ESXi 6.0, you would try vmx-11. If your host is ESXi 7.0 Update 3, you should leave or use vmx-19.
Broadcom maintains the official compatibility list here: ESXi hosts and compatible virtual machine hardware versions.
Method 1: try VMware OVF Tool first
VMware OVF Tool is usually the cleaner way to rewrite an OVA for an older virtual hardware version. If you can use OVF Tool, try this method before manually editing the OVA.
- Download and install VMware OVF Tool from Broadcom: Open Virtualization Format (OVF) Tool.
- Open Terminal on macOS/Linux or PowerShell on Windows.
- Confirm OVF Tool runs:
ovftool --versionOn Windows, the full path may be needed:
& "C:\Program Files\VMware\VMware OVF Tool\ovftool.exe" --versionConvert the OVA to the maximum virtual hardware version your host supports.
Example for ESXi 6.0:
ovftool --lax --maxVirtualHardwareVersion=11 "FileWave_Server_16.3.0.ova" "FileWave_Server_16.3.0-esxi60.ova"Example for ESXi 6.5:
ovftool --lax --maxVirtualHardwareVersion=13 "FileWave_Server_16.3.0.ova" "FileWave_Server_16.3.0-esxi65.ova"Example for ESXi 7.0 Update 2 or Update 3:
ovftool --lax --maxVirtualHardwareVersion=19 "FileWave_Server_16.3.0.ova" "FileWave_Server_16.3.0-esxi70u2.ova"If this creates a new OVA successfully, import the new OVA into ESXi. If ESXi still complains about unsupported devices, the problem is deeper than the virtual hardware version string and the manual edit method probably will not be enough either.
Method 2: manually edit the OVA package
Use this method when OVF Tool is not available or does not create the package you need. The steps are simple, but accuracy matters. A one-character typo in the OVF or manifest can make the package fail to import.
Step 1: extract the OVA
On macOS or Linux:
mkdir FileWave-ova-work
cd FileWave-ova-work
tar -xvf ../FileWave_Server_16.3.0.ova
ls -lhOn Windows PowerShell:
mkdir C:\Temp\FileWave-ova-work\ncd C:\Temp\FileWave-ova-work\ntar -xf C:\Downloads\FileWave_Server_16.3.0.ova\nGet-ChildItemYou should see files similar to these:
FileWave_Server_16.3.0.ovf
FileWave_Server_16.3.0.mf
FileWave_Server_16.3.0-disk1.vmdkThe names may differ depending on whether you downloaded the Server, Booster, or IVS appliance. The important files are:
- .ovf - the descriptor file that describes the VM.
- .vmdk - the virtual disk file. Do not edit this file.
- .mf - the manifest file containing checksums. This must be updated or removed after editing the OVF.
- .cert - a signature file, if present. A manual edit invalidates the signature.
Step 2: find the virtual hardware version
On macOS or Linux:
grep -n "VirtualSystemType" *.ovfOn Windows PowerShell:
Select-String -Path *.ovf -Pattern "VirtualSystemType"You are looking for a line like this:
<vssd:VirtualSystemType>vmx-19</vssd:VirtualSystemType>Step 3: edit the OVF file
Open the .ovf file in a plain text editor. Do not use Microsoft Word or another rich-text editor.
Change the vmx-## value to the version your ESXi host supports.
Example: change this for a newer OVA:
<vssd:VirtualSystemType>vmx-19</vssd:VirtualSystemType>to this for ESXi 6.0:
<vssd:VirtualSystemType>vmx-11</vssd:VirtualSystemType>or this for ESXi 6.5:
<vssd:VirtualSystemType>vmx-13</vssd:VirtualSystemType>Save the file as plain text.
Step 4: check for virtual devices that may still be too new
Before rebuilding the OVA, search the OVF for devices that commonly cause older ESXi imports to fail.
On macOS or Linux:
grep -niE "nvme|tpm|secure|efi|sata|scsi|vmxnet|e1000|ResourceSubType|guest|VirtualSystemType" *.ovfOn Windows PowerShell:
Select-String -Path *.ovf -Pattern "nvme|tpm|secure|efi|sata|scsi|vmxnet|e1000|ResourceSubType|guest|VirtualSystemType"For ESXi 6.0, be especially cautious with:
- NVMe controllers - older ESXi versions may not support the virtual NVMe controller used by newer appliances.
- vTPM - virtual TPM support depends on newer VMware features and key provider configuration.
- Secure Boot - older ESXi or older VM compatibility levels may not support the same Secure Boot configuration.
- Newer guest OS identifiers - Debian 13 may not appear as a selectable guest OS on older ESXi. A generic 64-bit Debian/Linux guest type may be used after import.
If you see a clearly unsupported device, stop and use a newer ESXi host or ask a VMware administrator to create a compatible VM manually. Changing storage controllers by hand can make Linux fail to boot if the boot disk appears under a different controller than expected.
Step 5: update or remove the manifest
After editing the OVF file, the manifest checksum is no longer correct. If you skip this step, ESXi may report a checksum or file digest error.
Open the manifest file:
cat *.mfYou will see entries similar to one of these:
SHA1(FileWave_Server_16.3.0.ovf)= oldhashvalue
SHA256(FileWave_Server_16.3.0.ovf)= oldhashvalueIf the manifest uses SHA1, calculate a new SHA1 value for the OVF:
shasum -a 1 FileWave_Server_16.3.0.ovfIf the manifest uses SHA256, calculate a new SHA256 value for the OVF:
shasum -a 256 FileWave_Server_16.3.0.ovfOn Windows PowerShell, use one of these:
Get-FileHash -Algorithm SHA1 .\FileWave_Server_16.3.0.ovf
Get-FileHash -Algorithm SHA256 .\FileWave_Server_16.3.0.ovfCopy the new hash value into the matching .ovf line inside the .mf file. Do not change the VMDK hash unless you changed the VMDK file, which you should not do.
If a .cert file exists, the original signature will no longer be valid after a manual edit. In that case, the simplest option is usually to remove both the manifest and certificate files and import the OVA as unsigned:
rm -f *.mf *.certOn Windows PowerShell:
Remove-Item *.mf,*.cert -ErrorAction SilentlyContinueImporting an unsigned OVA may produce a warning. That warning is expected if you removed the manifest/signature files yourself.
Step 6: rebuild the OVA
An OVA is a TAR archive. Do not create a ZIP file and rename it to .ova.
If you kept and updated the manifest:
tar -cvf ../FileWave_Server_16.3.0-esxi60.ova FileWave_Server_16.3.0.ovf FileWave_Server_16.3.0.mf *.vmdkIf you removed the manifest and certificate:
tar -cvf ../FileWave_Server_16.3.0-esxi60.ova FileWave_Server_16.3.0.ovf *.vmdkOn Windows PowerShell, the same idea works with Windows' built-in tar command:
tar -cf ..\FileWave_Server_16.3.0-esxi60.ova .\FileWave_Server_16.3.0.ovf .\FileWave_Server_16.3.0.mf .\*.vmdkIf your appliance has more than one .vmdk file, include all of them.
Import the modified OVA into ESXi
- Log into the ESXi Host Client or vCenter.
- Select the host or cluster where the appliance should run.
- Choose Create/Register VM or Deploy OVF Template, depending on your VMware interface.
- Select Deploy a virtual machine from an OVF or OVA file.
- Choose the modified OVA file, not the original OVA.
- Choose the datastore, network, and disk provisioning option.
- If you removed the manifest/signature, accept the unsigned-package warning only if you are sure you are using the OVA you modified.
- Finish the import.
- Power on the VM and open the console.
- Confirm the appliance reaches the Linux login or FileWave appliance setup screen.
After the appliance boots, continue with the normal FileWave appliance setup steps for Server, Booster, or IVS. For 15.5 and newer appliances, also complete the first-login password change workflow.
Troubleshooting
| Symptom | Likely cause | What to do |
|---|---|---|
Unsupported hardware family vmx-## | The OVF still declares a virtual hardware version that is too new. | Re-check the VirtualSystemType line and confirm the ESXi/vCenter version supports the value you used. |
| Checksum, digest, or manifest error | The OVF was edited but the .mf file was not updated. | Update the manifest hash or remove the .mf and .cert files and import as unsigned. |
| Unsupported virtual device | The OVA uses a virtual device the older ESXi host does not support. | Use a newer ESXi host, or have a VMware administrator build a compatible VM and attach/convert the disk. |
| The VM imports but does not boot | The disk controller, firmware mode, or boot device changed enough that Linux cannot boot. | Do not keep hand-editing blindly. Use a newer host or rebuild a compatible VM with the correct disk/controller mapping. |
| Debian 13 is not listed as a guest OS | Older ESXi versions do not know about newer Debian releases. | Choose the closest generic 64-bit Debian/Linux guest type available. This only changes VMware's guest label/settings, not the OS inside the appliance. |
Safer alternatives
If this is for a production FileWave Server, Booster, or IVS, the safer options are:
- Upgrade ESXi/vCenter to a supported version that matches the OVA requirements on the FileWave Downloads page.
- Deploy the FileWave appliance on a newer supported virtualization platform.
- For FileWave Server or Booster deployments where appropriate, install FileWave on a customer-managed Debian system using the installer from the same FileWave release page instead of using the pre-built OVA.
- Contact FileWave Support or Professional Services if this is part of a migration or recovery plan.
The manual OVA edit is a useful escape hatch, but it should not become the long-term plan for running production infrastructure on an unsupported VMware platform.
Related content
- FileWave Version 16.3.0
- FileWave Server Setup
- Importing FileWave OVF (VMware ESXi)
- Setting the Password on First Login to FileWave Appliances (15.5+)
- Networking - Assign static IP Address for a FileWave Appliance
- Broadcom: ESXi hosts and compatible virtual machine hardware versions
Naming conventions and acronyms
What
FileWave Knowledge Base articles will sometimes use acronyms, and occasionally we may miss giving detail or context, but we try to always use the full name once or explain the term. This will be a list of terms you can refer to when unsure.
Alphabetical list of terms:
A
-
ABM - Apple Business Manager is a web-based portal designed for businesses and organizations to manage Apple devices and services. It provides tools for device deployment, app distribution, and configuration management. ABM allows businesses to streamline device procurement, deploy custom apps, enforce security policies, and centrally manage Apple devices for improved efficiency and productivity.
- ADE - Automated Device Enrollment is a program that simplifies the deployment and management of Apple devices within organizations. It allows for easy enrollment of devices into a mobile device management solution, automating configuration and saving time in the setup process. In the past this was DEP.
- Admin - When you see FileWave Admin used it is frequently referring to FileWave Central and FileWave Anywhere, but some older documentation may only be referring to FileWave Central.
- Administrator - A user that may log into the FileWave Server via the Admin application.
- Anywhere API (v2) - The second RESTful API that is used by FileWave Anywhere and usually commands are on TCP 443 unless you have changed the port that FileWave Anywhere operates on.
-
AppleSeed - AppleSeed is an invitation-only program offered by Apple that allows selected users to test pre-release software and provide feedback to Apple's engineering teams. Participants in the AppleSeed program get early access to upcoming software updates and can help identify and report bugs, ensuring a more stable and polished user experience before the software is released to the general public.
- Archive - To archive a device is to remove it from active monitoring. The device remains in the database with its last reporting information intact; but the device is no longer counted as an active Client. Archiving a Client frees up one Client license.
-
ASM - Apple School Manager is a web-based portal provided by Apple for educational institutions to manage Apple devices and services. It allows schools to easily deploy and manage Apple devices, distribute apps and books, create Apple IDs for students and staff, and configure settings for a seamless educational experience.
- Associations - An Association is made between a Fileset and a Client or Client Group and represents the link between the two objects. Time-based attributes can be assigned to the Association. Associations are how distributions are made. You can also make associations between images and clients, licenses and Filesets, and VPP users and devices.
- Attributes - Properties of files that specify how the files are treated once the FileWave Client activates them.
- Azure - Now called "Microsoft Entra". It is a Directory Service from Microsoft.
B
- Booster - A Linux, macOS, or Windows system running software that caches software deployments for macOS and Windows clients.
C
- Clients - A Client represents one computer with the FileWave Client software installed or a mobile device that has been enrolled.
- Client Group - A client Group is a container of like Clients and/or Client Groups.
- Client State - The current condition of a client device as reported to the Admin. The states are: Normal, Missing, Not Tracked, or Archive. A Normal device is fully accessible by the FW and the location is being tracked. A Missing device has been reported as stolen or not where it belongs and tracking is active. Not Tracked means that the device is monitored by FW Admin for all standard characteristics; but location tracking is disabled. An Archived device has been placed into stasis. It is no longer actively monitored by FW; but the last known device settings are available in Inventory.
- Clone - A Clone is an alias of a Client or Client Group that can exist in many Client Groups.
- Cloudv1 - Our original hosted server environment which is running in AWS with Linux based VMs.
- Cloudv2 - Our newer hosted server environment which is running in AWS with Docker/Kubernetes.
- Command Line API (v1) - The initial RESTful API for FileWave. Commands happen on TCP 20443 and 20445.
D
-
DEP - Device Enrollment Program (DEP) is a service provided by Apple that enables organizations to streamline the initial setup and configuration of Apple devices. DEP allows devices to be automatically enrolled in a mobile device management (MDM) solution during the activation process, ensuring that they are pre-configured with the necessary settings and policies defined by the organization. DEP simplifies device provisioning, enhances security, and enables seamless device management for organizations deploying a large number of Apple devices. This is now referred to as Automated Device Enrollment (ADE).
F
- File - A File in a Fileset represents a file that will be delivered to a specific location for a FileWave Client. Files have attributes and permissions.
- Folder - Files in a Fileset can be organized into Folders (directories). A file is activated in the corresponding folder on the boot volume of the FileWave Client. Folders do NOT have attributes; they only have permissions.
- Fileset - A set of common files and/or folders (directories) meant for delivery to a FileWave Client with a wrapper that contains a detailed listing of the Fileset contents, including permissions and a checksum for each part (to facilitate non-corrupt delivery to clients). In FileWave Central it is called Fileset and in FileWave Anywhere it is called a Payload. The two terms Fileset and Payload are really the same item type.
- FileWave Admin - Now called FileWave Central.
- FileWave Anywhere - The web-based administration tool.
- FileWave Central - The native administration tool that runs on macOS and Windows.
- FileWave WebAdmin - Now called FileWave Anywhere.
- FW - FileWave the company.
G
- Geofencing - A way to define a boundary that a device should not enter or exit. Geofencing is used with Location Tracking for Android devices.
- Geolocation Tracking - Another way of referring to Location Tracking.
H
- Hosted Customer - Any customer where FileWave runs the server itself in either our Cloudv1 or Cloudv2 infrastructure.
I
- IVS - Imaging Virtual Server - A Linux Linux-based used for Windows imaging. The server sits on your network to capture and deploy images.
K
- Kiosk - The self-service portal to the FileWave server for a specified device. The Kiosk contains an Install pane with associated applications and content for that device/Apple ID, and in the case of OS X (macOS)/Windows computers, an Info pane with device configuration information and a Verify button for the user to initiate a request to the Server to verify, update, and repair any associated Filesets.
L
- Location Tracking - Used to locate devices and works with macOS, AppleTV, iOS, iPadOS, Windows, Chromebook, and Android. This is also sometimes referred to as Geolocation or Geolocation Tracking.
M
- Management Mode - In FileWave 11, we added a new client flag (for computer clients). It has two values: Managed (normal mode) and Inventory only. The latter setting allows you to have your client reporting data to FileWave, but will not be affected by any Filesets except for upgrade Filesets. Inventory only does consume a client license.
- Manifest - This is the list of things that a FileWave Server tells a FileWave Client it should have installed, removed, or available in the Kiosk. When you update the Model in FileWave it creates an updated Manifest which is used to determine what a FileWave Client receives.
- Microsoft Entra - Entra (formerly named Azure) is a cloud computing platform and set of services provided by Microsoft. It offers a wide range of cloud-based services, including computing power, storage, networking, analytics, machine learning, and more. Microsoft Entra allows businesses to build, deploy, and manage applications and services using Microsoft-managed data centers spread across the globe. It provides scalability, reliability, and security, making it a popular choice for organizations seeking cloud-based solutions for their infrastructure, applications, and data storage needs.
- Model Update - The command that is issued to the FileWave Server to lock in all changes that have been made by an Administrator. During a model update, all modified Filesets are updated on the server, the Server model is incremented, and the automatic backup process stores the previous model. Filesets are activated based on their scheduled attributes the next time the Client checks in with the Server.
O
- On-Premise - The term used to refer to running a FileWave Server on your own network.
P
- Payload - A term for the item in FileWave that is a bundle of content that can contain files, policies, and profiles. In FileWave Central it is called Fileset and in FileWave Anywhere it is called a Payload. The two terms Fileset and Payload are really the same item type.
- Permissions - Properties of files and folders that specify the access rights of the files and folders. Permissions are set when the FileWave Client activates the files and folders in a Fileset. Self-healing also sets permissions during the verification phase.
R
- Release - Another name for version. If I say "release 15.3.1" with no other references to indicate what it is about then it would usually mean version 15.3.1 of FileWave.
- RESTful API - Another name for the Command Line API (v1) and you may hear it referred to as either name because originally there was a single API and it was RESTful. Now there are 2 different APIs and both are RESTful so it makes more sense to not call it the RESTful API.
T
- Time Attribute - A Time Attribute is a property of an Association that specifies the Time a FileWave Client executes an action.
V
-
VPP - Volume Purchase Program (VPP) is an Apple program that allows businesses and educational institutions to purchase apps and books in bulk for distribution to their employees or students. It provides a centralized platform for organizations to buy, manage, and distribute apps, simplifying the process of app procurement and licensing for multiple devices.
W
-
WinGet - A command-line tool and package manager for Windows operating systems. It allows users to discover, install, update, and uninstall software applications from the command line or through scripts. With Winget, users can search for available software packages from the Microsoft Store as well as third-party repositories. It simplifies the software management process by providing a centralized tool for handling installations and updates, making it easier to maintain a collection of software applications on Windows systems.
Scripting
Execute macOS scripts as Defined User
Description
By default, FileWave Client runs scripts and tasks as root on macOS. Use this pattern when a script needs to run a command as the currently logged-in console user.
Ingredients
- Text editor
- FileWave Central
Directions
sudo -u sets the target user. launchctl asuser runs the command in that user's launchd context. Some commands need one or the other; using both is a practical pattern for commands that expect the logged-in user session.
The script below finds the current console user and runs whoami in that user's context.
#!/bin/zsh
current_user=$(stat -f%Su /dev/console)
current_user_id=$(id -u "$current_user")
whoami
launchctl asuser "$current_user_id" sudo -u "$current_user" whoamiWhen FileWave runs the script, the first whoami output shows the root user. The second output shows the active console user.
If the current logged-in user is sholden, the output should be:
root
sholden
Execute Powershell Scripts as Defined User
Description
By default, the FileWave Client executes scripts and tasks with elevated permissions (System on Windows). The below shows a method to launch a command as an alternate user.
Ingredients
- Text editor
- FileWave Central
Directions
This method requires the username and password of the user to run the command. Do not add usernames and passwords directly in scripts.
Credentials of a user may be passed to Invoke-Command.
Due to the above warning, add the username and password as Environment Variables to the Script in the Fileset.
For example, with a device named DESKTOP-N05SO1D:
Change 'secure_password' and 'user' values to required entries.
These will be referenced in the Powershell Script as:
- $Env:pass
- $Env:user
For example:
$securePassword = ConvertTo-SecureString $Env:pass -AsPlainText -Force
$credential = New-Object System.Management.Automation.PSCredential ($Env:user, $securePassword)
echo "$Env:UserName"
Invoke-Command -ComputerName localhost -Credential $credential -ScriptBlock {
# Code to action by the defined user should be added here
echo "$Env:UserName"
}The output of the above will show that the username has altered, by first echoing the System name and then the name of the user within the script block:
DESKTOP-N05SO1D$
LocalAdminThe above relies upon 'winrm'. If there are any issues when running the command, winrm can be checked with the following command: winrm quickconfig
This method will not work if the defined network is 'Public', as winrm will not allow this.
macOS 10.15+ and zsh shell for scripting
Description
Apple announced changes to the default shell for macOS 10.15:
https://support.apple.com/HT208050
Information
For years now, Apple has appeared to avoid any tools that are covered by the GPL v3 Licence as well as remove any that were in use over time. Bash is one of these. In the early releases of 10.x Apple initially used tcsh shell as default, but soon moved to bash; so this is not the first time Apple has made a change of this kind.
In order to avoid newer versions of bash covered by GPL v3 licensing, it can be seen how old bash is on a macOS device:
$ bash -version
GNU bash, version 3.2.57(1)-release (x86_64-apple-darwin18)
Copyright (C) 2007 Free Software Foundation, Inc.
Run the same command on a modern Linux system, e.g. the FileWave Linux Server Appliance and you will see a much newer version:
$ bash -version
GNU bash, version 4.2.46(2)-release (x86_64-redhat-linux-gnu)
Copyright (C) 2011 Free Software Foundation, Inc.
License GPLv3+: GNU GPL version 3 or later <http://gnu.org/licenses/gpl.html>
This is free software; you are free to change and redistribute it.
There is NO WARRANTY, to the extent permitted by law.
GPL v3 license has implications for Apple. zsh is licensed under MIT, which does not involve these same implications.
Considerations
Specifying the shell
The first line of a script should indicate which shell is used when a script runs.
For example, for bash this could typically be either of the following (this is known as the 'shebang'):
#!/bin/bash
#!/usr/bin/env bash
By providing this, the script will run from a shell of the specified type. Any scripts created should have this set. If this is not set, then the script will run in the shell type that is currently set for that shell's session. Apple's changes will have an impact on any scripts not specified by default. The best practice is to always add the shebang at the beginning of any script to ensure expected behavior.
Bash vs zsh
Bash and zsh are very similar, but there are some differences that may interfere with scripts that were written for bash but are then run as zsh. Scripts should therefore be analyzed for behavior if the shell type of the script is changed.
Examples
Arrays
The first item of an array differs when being referenced:
- bash reference of the first item in an array: index 0
- zsh reference of the first item in an array: index 1
There is also a difference in deleting items from an array. The following produces the same output from the same original array, but note differences on the item being indexed and the method of removal:
bash arrays
#!/bin/bash
myarray=("one" "two" "three")
echo ${myarray[@]}
echo "First item in array: "${myarray[0]}
echo "Remove first item in array, item 0..."
unset myarray[0]
echo ${myarray[@]}
exit 0
# Script output:
one two three
First item in array: one
Remove first item in array, item 0...
two three
zsh arrays
#!/bin/zsh
myarray=("one" "two" "three")
echo ${myarray[@]}
echo "First item in array: "${myarray[1]}
echo "Remove first item in array, item 1..."
myarray[1]=()
echo ${myarray[@]}
exit 0
# Script output:
one two three
First item in array: one
Remove first item in array, item 1...
two three
Variable Expansion
Word splitting on variable expansion differs between bash and zsh. For example, bash will print the following, one line per word, whilst zsh will print the whole variable as one line. Note also, that bash, by default, will not expand aliases when the shell is not interactive, unlike zsh.
bash variable expansion
#!/bin/bash
# Expand aliases
shopt -s expand_aliases
alias printvar="printf '%s\n'"
myvar='one two'
printvar $myvar
exit 0
# Script output:
one
two
zsh variable expansion
#!/bin/zsh
alias printvar="printf '%s\n'"
myvar='one two'
printvar $myvar
exit 0
# Script output
one two
zsh does have the ability to set an option to change this behavior, but consider converting to an array instead.
Apple has chosen zsh over bash since the overlap on script compatibility is high. However, as seen there can be differences and so it is prudent to check all scripts for behavior. The above are just examples; other differences may be experienced and will require addressing appropriately.
Referencing Launch Arguments in Scripts
Description
Scripts run by FileWave can receive Launch Arguments. The arguments are supplied by FileWave and referenced by the script, but they are not written into the script body.
They may be supplied to any of the following:
- Fileset Scripts
- Custom Fields
- Policy Blocker Scripts
Admins sometimes assume FileWave is limited to 9 launch arguments. It is not; the shell you use determines how you reference arguments 10 and higher.
Information
Launch Arguments are positional parameters. They are referenced differently depending on the script type:
| macOS/Linux | Windows Powershell | Windows Bat | |
| First Argument | $1 | $args[0] |
%1 |
| Second Argument | $2 | $args[1] |
%2 |
| Third Argument | $3 | $args[2] |
%3 |
You can add more arguments and reference each one by its position.
Considerations
Shell behavior matters most when you reference the 10th argument or higher.
Although two solutions have been supplied, zsh is recommended to stay in line with Apple's policy: https://support.apple.com/en-gb/HT208050
bash and sh
The following bash example is intended to print the first 3 positional parameters, followed by the 10th and 11th.
bash_test.sh
#!/bin/bash
echo $1
echo $2
echo $3
echo $10
echo $11
exit 0If you pass only one argument, 1, bash treats $10 and $11 differently than many admins expect:
bash_test.sh
./bash_test.sh 1
1
10
11The bash and sh shells treat $10 as ${1}0, $11 as ${1}1, and so on. In this example, they return the value of $1 and append the extra character.
Additional references:
- https://www.oreilly.com/library/view/bash-cookbook/0596526784/ch05s07.html
- https://www.oreilly.com/library/view/bash-cookbook/0596526784/ch05s04.html
That output maps to:
| Description | Output | |
| $1 | Returns first argument | 1 |
| $2 | Returns second argument | 2 |
| $3 | Returns nothing, no third argument | |
| $10 | Returns first argument, followed by the '0' character | 10 |
| $11 | Returns first argument, followed by the '1' character | 11 |
For bash and sh, wrap two-digit positional parameters in braces so the script references the intended argument.
The corrected script uses braces for the 10th and 11th arguments.
bash_test.sh
#!/bin/bash
echo $1
echo $2
echo $3
echo ${10}
echo ${11}
exit 0Now when executed with 11 positional parameters, the expected output is displayed:
bash_test.sh
./bash_test.sh var1a var2b var3c var4d var5e var6f var7g var8h var9i var10j var11k
var1a
var2b
var3c
var10j
var11kzsh
zsh handles this differently. With the same example in zsh:
zsh_test.sh
#!/bin/zsh
echo $1
echo $2
echo $3
echo $10
echo ${11}
exit 0Given the same 11 arguments, this would output:
zsh_test.sh
./zsh_test.sh var1a var2b var3c var4d var5e var6f var7g var8h var9i var10j var11k
var1a
var2b
var3c
var10j
var11kUnlike bash and sh, zsh treats $10 as the 10th argument and $11 as the 11th argument. zsh can use either format.
Conclusion
If a script uses 10 or more launch arguments, check the shell before troubleshooting the FileWave side. In bash or sh, use ${10}, ${11}, and the same brace pattern for later arguments. In zsh, $10 and ${10} both refer to the 10th argument.
Related Content
Script Best Practices
Description
Tips and tricks for running Filesets with scripts
Don't put passwords in scripts
The scripts are stored locally on devices. For security reasons, usernames and passwords should not be included within the body of scripts.
For example:
Example: password in command
somecommand -u "USERNAME_HERE" -p "PASSSWORD_HERE"Additionally, DO NOT use Launch Arguments to provide passwords to scripts. Launch Arguments are visible in the process list during script execution. Instead supply the username and password as Environment Variables:


During script execution, the Launch Argument is seen:
Example: Visible Password
$ ps -ef | grep secure
0 73010 155 0 9:51am ?? 0:00.01 /bin/zsh /var/scripts/532417/unsecure_la.sh secure_password_leakedUsing the example Environment Variables from the image, they would be addressed as:
| OS | Script Type | Command |
| macOS | shell |
|
| Windows | Powershell |
|
| Batch |
|
|
| Batch |
In order to not transmit the password to a log file accessible on the device, add @echo off before the line containing %my_pass% and @echo on as the next line. Example:
@echo off %SystemRoot%\System32\Reg.exe ADD "HKLM\SOFTWARE\Microsoft\Windows NT\CurrentVersion\Winlogon" /v "DefaultPassword" /d "%my_pass%" /t REG_SZ /f @echo on |
|
| mac0S & Windows | Python |
|
Keep Requirements Scripts Small
Requirements scripts are pulled from a fileset and sent before the remainder of the fileset.
It behaves this way because if a requirements script fails, there is no point in downloading and installing the remainder of the fileset.
A fileset whose requirements have failed will not even show up in the kiosk.
Where possible, avoid piping commands. This increases overhead on the scripts. If pipes are required, try to reduce the quantity of pipes. If nothing else, this makes the scripts easier to read.
$ time system_profiler SPHardwareDataType | grep "Model Identifier" | awk '{print $NF}'
MacBookPro11,4
$ system_profiler SPHardwareDataType | awk '/Model Identifier/ {print $NF}'
MacBookPro11,4And other commands may achieve the same result more efficiently without the need to pipe.
$ time system_profiler SPHardwareDataType | grep "Model Identifier" | awk '{print $NF}'
MacBookPro11,4
real 0m0.192s
user 0m0.071s
sys 0m0.049s
$ time sysctl -n hw.model
MacBookPro11,4
real 0m0.004s
user 0m0.001s
sys 0m0.002sConsider this for all scripts beyond just requirement scripts.
Log Script Output
By default, Fileset scripts built through the Scripts button are logged. All output is redirected to a unique file per script.
If desired, additional information could be redirected to an alternate file.
Redirecting output to the FileWave Client log, allows the viewing of those details via the 'Get Log' feature
Redirecting to the FileWave Client log is not possible on windows, since the log file is locked by the client writing to the file.
Redirecting Output
Output may be redirected using one of the following:
macOS:
echo "hello" >> /tmp/tmp_log_file.logWindows:
echo "hello" | Out-File -Append -Encoding Ascii C:\Temp\my_temp_file.logBetter than just redirecting output, consider using the tee/Tee-Object command, such that the FileWave generated log and the redirected log both show the output.
macOS:
echo "hello" | tee -a /tmp/tmp_log_file.logWindows:
echo "hello" | Tee-Object -Variable out | Out-File -InputObject $out -append -encoding Ascii C:\Temp\my_temp_file.logOn macOS, all output can be redirected by using the following at the beginning of the file:
#!/bin/zsh
exec 1>>/var/log/fwcld.log
exec 2>>/var/log/fwcld.log
... rest of scriptTesting Scripts
Scripts run by FileWave are run by root or System. As such, scripts should be tested using the same user context to prevent erroneous results. Many commands will yield the same result regardless, but this cannot be relied upon.
Windows
E.g. Running the following command will provide a different output, when ran on a 32bit Windows environment as opposed to a 64bit Windows environment:
(Get-ItemProperty "HKLM:\SOFTWARE\Microsoft\Windows NT\CurrentVersion").EditionId64bit:
(Get-ItemProperty "HKLM:\SOFTWARE\Microsoft\Windows NT\CurrentVersion").EditionId
Professional32bit:
(Get-ItemProperty "HKLM:\SOFTWARE\Microsoft\Windows NT\CurrentVersion").EditionId
EnterpriseSimilarly, the user executing a script can have an impact on the outcome. Username itself is a relatively obvious example:
$Env:UserNameWhen ran locally through a shell, it should report the name of the current user. However, when ran through FileWave, it should report the System name.
Prior to FileWave 15.5, the Windows client was 32bit, but since then, a 64bit client is supplied. Either way, the user executing any scripts is the System user. As such, all tests should be ran in that same context:
| Version | User | Bit |
| FileWave 15.5+ | System | 64 |
| FileWave 15.4.x- | System | 32 |
Current FileWave Windows components are 64-bit. For Fileset scripts, use the execution bitness option when you intentionally need 32-bit or 64-bit behavior.
For upgrade compatibility, scripts or fields created under older behavior may remain configured to run as 32-bit. Review the bitness setting before changing it, because switching an existing script to 64-bit can affect registry paths, filesystem redirection, and available PowerShell modules.
For current Windows Custom Fields, use On Windows, run as 64-bit when 64-bit PowerShell or native Windows components are required. Use 32-bit execution only when the script is written for that context or depends on 32-bit components. See Running Built-in PowerShell Commands with Custom Fields.
PsTools: This relies on downloading and installing, onto the test machine, PsTools.
Running Environment
Prior to FileWave 15.5
Take a look at Getting a CMD prompt as SYSTEM in Windows Vista and Windows Server 2008 for details about running scripts as System. Note, that by default, this will start an executable as 64-bit, for native 64-bit OS.
From a device with the PsTools installed, start by opening a Command Shell as an Administrator. From that shell, another command should be run to open yet another shell, but this time in the chosen environment.
The below example shows launching the 32bit version of PowerShell as the System user:
PSEXEC -i -s -d C:\Windows\SysWOW64\windowsPowerShell\v1.0\powershell.exeTo open a command shell in that same environment would use the following:
PSEXEC -i -s -d %windir%\SysWoW64\cmd.exeSimilarly, when attempting to run some commands, it may be necessary to ensure Windows is using the correct version of a binary with the 'sysnative' redirect. An example would be Bitlocker's 'manage-bde.exe'. To use this in a Fileset, try the following:
C:\Windows\sysnative\manage-bde.exe -statusIf you have a requirement to run a particular command through the 64-bit version of Powershell this can be achieved as follows:
If ( [IntPtr]::Size * 8 -ne 64 )
{
C:\Windows\SysNative\WindowsPowerShell\v1.0\PowerShell.exe -File $MyInvocation.MyCommand.Path
}
Else
{
# Add code here
}Testing scripts designed to be ran with the 64bit FileWave Client, still requires the above actions, to ensure that the System account has been targeted, but this time with a 64bit application.
Opening a 64bit version of PowerShell as the System user:
PSEXEC -i -s -d C:\Windows\System32\windowsPowerShell\v1.0\powershell.exeExample 32bit to 64bit
The below demonstrates running a 64bit script, but from the 32bit FileWave Client, which will create a new administrator. Additionally, the FileSet > Get Info > Environment Variables are being used to supply the name and password to the script.
Two Fileset Environment Variables are being supplied, for the user 'rstephens' with a password of 'filewave'
| Variable | Value |
| username | rstephens |
| password | filewave |
Those Parameters may then be referenced from within the script and have them defined for the launching of the 64bit executable within this 32bit script.
Param (
[string]$MyUsername = $Env:username,
[string]$MyPassword = $Env:password
)
If ( [IntPtr]::Size * 8 -ne 64 )
{
C:\Windows\SysNative\WindowsPowerShell\v1.0\PowerShell.exe -File $MyInvocation.MyCommand.Path -MyUsername $MyUsername -MyPassword $MyPassword
}
Else
{
(New-LocalUser -AccountNeverExpires:$true -Password ( ConvertTo-SecureString -AsPlainText -Force $MyPassword) -Name $MyUsername | Add-LocalGroupMember -Group administrators)
}Troubleshooting PowerShell scripts
As a best practice, always check the "Disable Windows 32-bit on Windows 64-bit redirection" checkbox in the Properties tab for your fileset priot to FileWave 15.5.0. From 15.5.0 and beyond make sure to uncheck the new "Run as 32 Bit" checkbox so that the Fileset will be truely 64-bit. This ensures that any scripts in the fileset will be run in a 64-bit session and built-in Windows executables triggered by those scripts will call the 64-bit versions. A common reason for why your script might not be performing the expected results could be due to 64-bit Only Modules or Cmdlets: Some PowerShell modules or cmdlets are available only for the 64-bit version of PowerShell. If a script relies on these 64-bit modules, it must run in a 64-bit shell.
macOS
On macOS, running commands as sudo is not necessarily the same as actually becoming root.
Root vs As Root
E.g. Run the following commands to evaluate the local variable $HOME, once using sudo and once as root.
$ whoami
auser
$ sudo echo $HOME
/Users/auser
$ sudo su -
$ whoami
root
$ echo $HOME
/var/rootPaths
Similarly, the paths used to locate executable files will differ, since FileWave is a service ran as root and is not the root account. On an example device:
| User Account | Root Account | FileWave Client |
|
|
|
As such, consider always using the full path within a script to an executable, to be explicit, and ensure the executable is found.
For example, it can be seen from the above that homebrew is installed.
% ls -al /usr/local/bin/brew
lrwxrwxrwx 1 root _developer 28 Mar 23 2023 /usr/local/bin/brew -> /usr/local/homebrew/bin/brewRunning the following command would work as the user or root account, but would fail through FileWave, since the FileWave Client does not search /usr/local at all for executables:
brew -v
To ensure the script works and targets the correct brew, the full path should be entered:
/usr/local/bin/brew -v
Plist
It is common to see plist files edited with the 'defaults' command. However, this command is unique when it comes to ownership and permissions of files. The 'defaults' command will both take ownership and change permissions of files when used to write to plist files:
$ whoami
root
$ ls -al /tmp/example_plist.plist
-rw-r--r-- 1 rstephens staff 66 Feb 28 10:03 /tmp/example_plist.plist
$ defaults write /tmp/example_plist Label example_plist
$ ls -al /tmp/example_plist.plist
-rw------- 1 root wheel 66 Feb 28 10:05 /tmp/example_plist.plistAs such, ensure to add a repair to scripts to reset permissions and ownership after the command has been used or consider using the following command instead (Note the full path is required if /usr/libexec is not in the paths list:
/usr/libexec/PlistBuddyRelated Content
Scripting Languages supported in FileWave
Description
FileWave provides the ability to leverage certain scripting languages on macOS and Windows. This includes:
| macOS | Windows | |
| Perl | ||
| Python | ||
| Shell | ||
| Bat | ||
| PowerShell |
FileWave does not include these languages, they are either installed by the OS vendor or will need to be installed separately.
Apple indicated they would be deprecating pre-installation of certain runtimes, for example:
https://developer.apple.com/documentation/macos-release-notes/macos-catalina-10_15-release-notes
When testing any scripts locally prior to deployment through FileWave, it is imperative that they are tested in the same context/environment as if they were being ran by FileWave, as indicated in our Script Best Practices KB.
Script Extensions
Fileset scripts are best added using the Script button from the Fileset view. Doing so, ensures the script will also log all output automatically, as well as setting a default shebang for macOS shell scripts.
Additionally, when defining the name of the script, the extension is required to match the language.
Only one of the following extensions will allow the editing of the Executable tab, regardless of how they the scripts are added.
| Language | Extension |
| Perl | .pl |
| Python |
.py |
| Shell | .sh |
| Batch | .bat or .cmd |
| PowerShell | .ps1 |
EXE files may also benefit from the Executables tab
Specify the type of Shell script, by way of the shebang. To keep in line with Apple, FileWave will automatically add ZSH as the default shebang: #!/bin/zsh
Example
The below provides examples of how to instal Python on endpoints. This is one way to achieve this goal, but by no means the only way. Professional Services requests can be raised for items beyond standard FileWave Support if desired.
Ingredients
- FileWave Central
- Windows EXE
Installers available from either:
Directions
macOS Python Installer
macOS Python
Apple used to provide a version of Python pre-installed, however as noted, this was an old version and is now deprecated. It is possible to download Python installers, however Apple provide Python in the Xcode Command Line Tools. The following method demonstrates how the softwareupdate mechanism may be used to list (and therefore instal) the command line tools:
# touch /tmp/.com.apple.dt.CommandLineTools.installondemand.in-progress
# softwareupdate -l
Software Update Tool
Finding available software
Software Update found the following new or updated software:
* Label: Command Line Tools for Xcode-12.4
Title: Command Line Tools for Xcode, Version: 12.4, Size: 440392K, Recommended: YES,
* Label: Command Line Tools for Xcode-13.2
Title: Command Line Tools for Xcode, Version: 13.2, Size: 577329K, Recommended: YES,
* Label: Command Line Tools for Xcode-12.5
Title: Command Line Tools for Xcode, Version: 12.5, Size: 470966K, Recommended: YES,
* Label: Command Line Tools for Xcode-12.5
Title: Command Line Tools for Xcode, Version: 12.5, Size: 470820K, Recommended: YES,
* Label: macOS Big Sur 11.6.2-20G314Note that more than one version may be returned. If Xcode is installed a version may already be in place, so care should be taken if Xcode is already installed. After installing the chosen version, the temporary file created may then be removed.
Instal Python Packages
Python scripts import packages, not all of which will be installed by default. Any additional packages will require installation. PIP may achieve this and may be used in a Fileset script; PIP is also installed when installing the Command Line tools (or Xcode)
It is possible to check pip with the following command, note it may require upgrading, but again take careful consideration if Xcode is installed:
# pip3 list
Package Version
---------- -------
pip 20.2.3
setuptools 49.2.1
six 1.15.0
wheel 0.33.1
WARNING: You are using pip version 20.2.3; however, version 23.1.2 is available.
You should consider upgrading via the '/Library/Developer/CommandLineTools/usr/bin/python3 -m pip install --upgrade pip' command.For example, to instal pyobjc:
# Instal pyobjc
pip3 install pyobjc-core
pip3 install pyobjc-framework-Cocoa
pip3 install pyobjc-framework-Quartz
pip3 install pyobjc-framework-SystemConfigurationIn some instances, pip3 may fail. This can be due to the link created in:
/Library/Developer/CommandLineTools/SDKs
Remove and recreate the link to the correct installed version if need be.
The above could be packaged into a single script which could:
- Touch the temporary file
- Run Software Update
- Obtain the desired version from the list
- Instal that version
- Remove the temporary file
- Remove the link if incorrect
- Use PIP to instal other desired packages
- Recreate the link if removed above
Windows Python Installer
Windows Python
- Download the appropriate python installer EXE
- Create a new empty Fileset
- Choose a location to store the installer and drag the EXE into this location
- Highlight this EXE and from the Get Info window choose Executable
- Tick the option to 'Execute once when activated'
- Set two Launch Arguments as per the screen shot: /quiet and .\unattend.xml
Supporting File
An unattend.xml file may be used to pre-determine aspects of the installation, e.g. instal PIP during installation or set Paths
- Use an editor to create a file called unattend.xml
- Edit this file with the below details, editing to meet desired needs
- Place this file in the Fileset within the same folder location as the EXE installer
An example could look as follows (see the Python documentation for a list and description of available options):
<Options>
<Option Name="InstallAllUsers" Value="1" />
<Option Name="TargetDir" Value="C:\Program Files\Python39" />
<Option Name="DefaultAllUsersTargetDir" Value="C:\Program Files\Python39" />
<Option Name="DefaultJustForMeTargetDir" Value="C:\Program Files\Python39" />
<Option Name="DefaultCustomTargetDir" Value="C:\Program Files\Python39" />
<Option Name="AssociateFiles" Value="1" />
<Option Name="CompileAll" Value="1" />
<Option Name="PrependPath" Value="1" />
<Option Name="Shortcuts" Value="1" />
<Option Name="Include_doc" Value="1" />
<Option Name="Include_debug" Value="1" />
<Option Name="Include_dev" Value="1" />
<Option Name="Include_exe" Value="1" />
<Option Name="Include_launcher" Value="1" />
<Option Name="InstallLauncherAllUsers" Value="1" />
<Option Name="Include_lib" Value="1" />
<Option Name="Include_pip" Value="1" />
<Option Name="Include_symbols" Value="1" />
<Option Name="Include_tcltk" Value="1" />
<Option Name="Include_test" Value="1" />
<Option Name="Include_tools" Value="1" />
<Option Name="LauncherOnly" Value="0" />
<Option Name="SimpleInstall" Value="0" />
<Option Name="SimpleInstallDescription"></Option>
</Options>Edit the above example as desired, for example, set the target directory paths as desired.
Instal Python Packages
Python scripts import packages, not all of which will be installed by default. Any additional packages will require installation. PIP may achieve this and may be used in a post flight script, if the option above to include pip at installation was configured.
- Create a PostFlight script within the Fileset
- Edit the script to include any desired packages, e.g. to instal the 'requests' package:
python -m pip install requestsThe command 'pip list' may be used to list ALL additional packages installed.
The command 'pip freeze' may be used to list packages installed by PIP.
The final Fileset will may look something like:
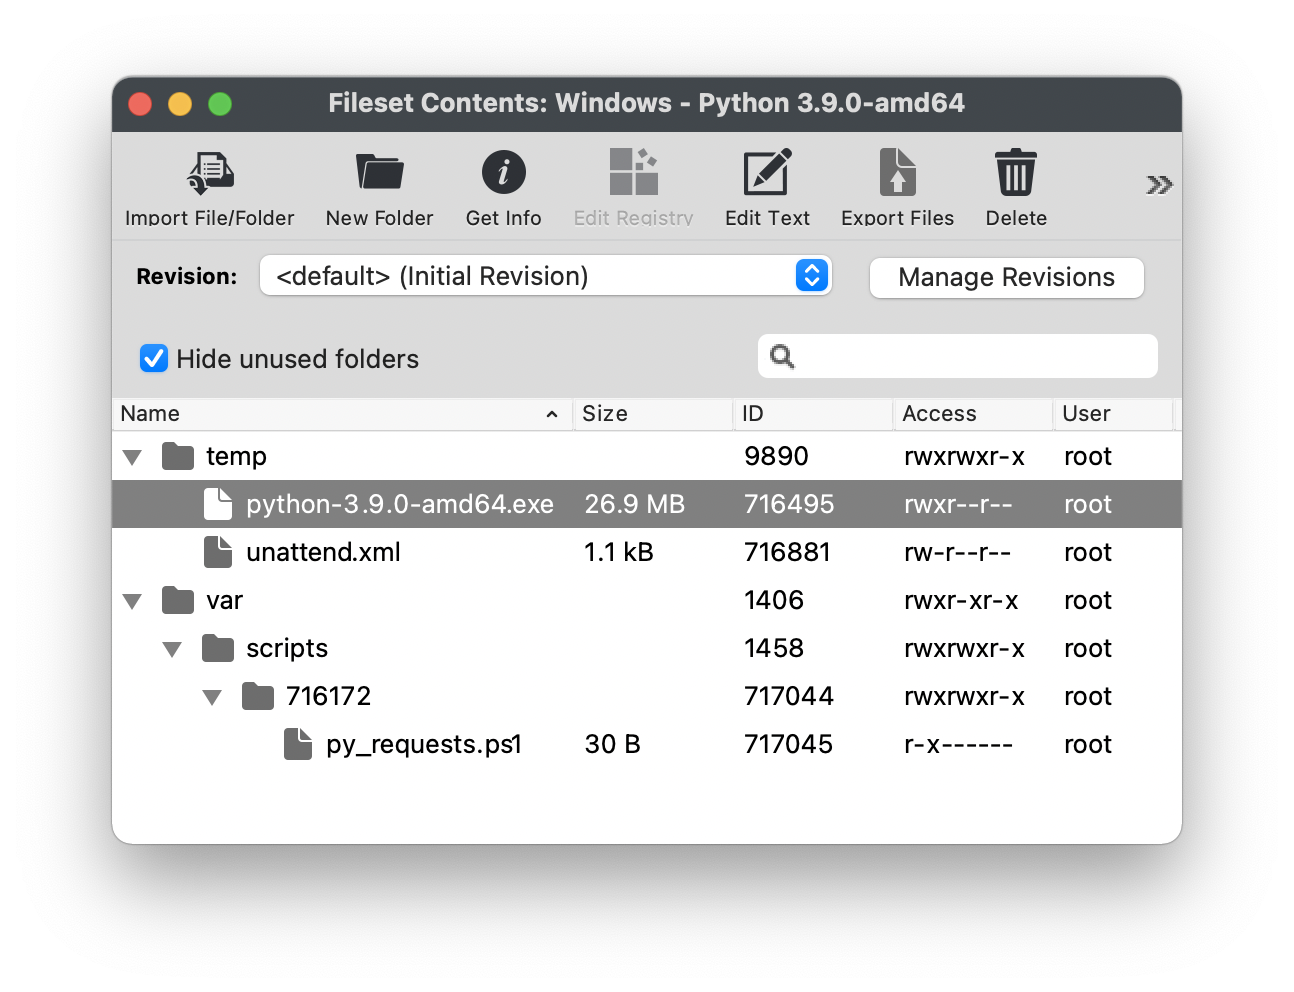
Packages, including PIP itself, may require updating over time.
Testing
The following download is a simple Python Custom Field for both macOS and Windows. It should report the date when ran.
| ↓ macOS/Windows |
 |
If desired, use the Custom Field Assistant window to Import this unzipped, Custom Field example, called 'Date Time'
Test PowerShell as SYSTEM with PsExec on Windows
What
FileWave runs Windows deployment scripts as the local SYSTEM account. Microsoft PsExec lets you test a PowerShell script in that same security context before deploying it through a Fileset or Custom Field.
When/Why
Current FileWave Windows clients are 64-bit. Test with 64-bit PowerShell unless you are reproducing a legacy 32-bit execution path. For script-based Custom Fields, the On Windows, run as 64-bit setting controls the PowerShell architecture. Testing as SYSTEM catches differences in permissions, profile paths, mapped drives, registry hives, and user-specific environment variables.
How
-
Download PsExec from the Sysinternals Suite (https://docs.microsoft.com/en-us/sysinternals/downloads/psexec )
-
Open a Command Prompt or PowerShell window with Administrator privileges
-
Navigate to the folder where PsExec is located
-
Use the following command to run the script as SYSTEM with 64-bit Windows PowerShell:
PSEXEC -accepteula -i -s C:\Windows\System32\WindowsPowerShell\v1.0\powershell.exe -File "path\to\script.ps1"
Example:
PSEXEC -accepteula -i -s C:\Windows\System32\WindowsPowerShell\v1.0\powershell.exe -File "C:\test\testscript.ps1"To reproduce a known 32-bit execution path, use C:\Windows\SysWOW64\WindowsPowerShell\v1.0\powershell.exe instead.
Related Content
Digging Deeper
PsExec Switches
-
-i: runs the process interactively in the specified or current console session. -
-s: runs the process as the local SYSTEM account. -
-d: starts the process without waiting for it to finish. Omit this switch when you need to read script output during testing. -
-accepteula: accepts the PsExec license agreement for the test run.
Calling 64-bit PowerShell from a 32-bit process
Keep this compatibility pattern only for scripts that can still start in a 32-bit process and must relaunch themselves in 64-bit PowerShell. Sysnative bypasses Windows filesystem redirection from that 32-bit process.
If ( [IntPtr]::Size * 8 -ne 64 )
{
C:\Windows\SysNative\WindowsPowerShell\v1.0\PowerShell.exe -File $MyInvocation.MyCommand.Path
}
Else
{
# Add code here
}The code checks the current process architecture. A 32-bit process relaunches the same script through Sysnative; a 64-bit process continues into the Else block.
Run the test on a representative Windows device, review the exit code and output, then pilot the FileWave deployment before expanding the association.
Run macOS Scripts as the Logged-In User with Outset
What
By default, FileWave Client scripts on macOS run as root. That is the right context for most device-level work, but it is not always the right context for settings that belong to the current user session.
Outset is a MacAdmins Open Source utility that can run scripts and packages during boot, at the login window, during user login, or on demand. A common FileWave workflow is to deploy Outset with FileWave, then deploy scripts into Outset's login folders so they run as the logged-in user at login.
This article covers macOS. Outset is not a Windows tool. For Windows user-context scripting, see Execute Powershell Scripts as Defined User.
When to use this
Use this approach when the script needs the logged-in user's context instead of the FileWave Client's root context. Common examples include per-user application preferences, Dock customization, user LaunchAgents, user keychain-aware tasks, or settings that write into the user's home folder.
Do not use this as a replacement for normal FileWave scripts that need root privileges. Software installation, system configuration, profile deployment, and device-level changes should usually remain in FileWave scripts, Fileset payloads, or MDM profiles.
Requirements
- macOS 10.15 or later, based on Outset's current project requirements.
- FileWave Central access to deploy the Outset package and your script Fileset.
- The Outset release package from the Outset releases page.
- For macOS 13 or later, a managed Login Items profile is recommended so users do not have to approve or enable Outset manually.
How it works
Outset watches specific folders under /usr/local/outset/. For user-context login scripts, the two most useful folders are:
/usr/local/outset/login-once/: runs a script once per user, then records that it has run in the user's Outset preferences./usr/local/outset/login-every/: runs a script at every user login.
When Outset processes login scripts, it runs them in the user context and passes the current console user as the first argument. In most scripts, $HOME and whoami should reflect the logged-in user instead of root.
If multiple scripts exist in the same folder, Outset processes them in alphanumeric order. Prefix filenames with numbers, such as 001-configure-dock.zsh, when ordering matters.
Basic FileWave workflow
- Download the current Outset release package from GitHub.
- Create a FileWave Fileset that installs the Outset package on target Macs.
- Create a separate Fileset for the script or scripts you want Outset to run.
- Place each script in the correct Outset folder in the Fileset payload, such as
/usr/local/outset/login-once/or/usr/local/outset/login-every/. - Ensure scripts are owned by
rootand have permissions755. Outset will not process scripts that fail its ownership or permission checks. - Associate the Outset Fileset first, then the script Fileset. Run a Model Update after making the deployment changes.
- Have the user log out and back in, or test during the next normal login.
Example script
The following example writes a small log entry in the current user's Library folder. It is intentionally simple; replace the example action with the per-user setting you need to apply.
#!/bin/zsh
outset_user="$1"
log_file="$HOME/Library/Logs/filewave-outset-example.log"
{
echo "Outset ran at: $(/bin/date)"
echo "Outset user argument: ${outset_user}"
echo "whoami: $(/usr/bin/whoami)"
echo "HOME: ${HOME}"
} >> "$log_file"
exit 0To run this once for each user, deploy it to a path like:
/usr/local/outset/login-once/001-filewave-user-context-example.zshTo run it at every login, deploy it to:
/usr/local/outset/login-every/001-filewave-user-context-example.zshScript ownership and permissions
Outset enforces script ownership and permissions before it runs items from its processing folders. Scripts must be owned by root and have permissions 755.
If your Fileset does not already preserve the required ownership and mode, use a Fileset script or postflight action to correct them after installation:
#!/bin/zsh
script_path="/usr/local/outset/login-once/001-filewave-user-context-example.zsh"
/usr/sbin/chown root:wheel "$script_path"
/bin/chmod 755 "$script_path"
exit 0macOS 13 and later: managed Login Items
On macOS 13 and later, background services appear in System Settings under Login Items. Outset recommends deploying a managed Login Items profile for io.macadmins.Outset so the service is treated as managed by the organization.
Apple documents the Managed Login Items payload in Apple Platform Deployment: Manage login items and background tasks on Mac.
Testing and troubleshooting
- Test with a small script that writes to
$HOME/Library/Logs/before deploying a script that changes user settings. - Confirm the script is in the intended folder:
login-oncefor one-time per-user work, orlogin-everyfor repeated login work. - Check that the file is executable and owned by
root. - Remember that
login-onceis tracked per user. If the same script has already run for that user, changing the script content may not make it run again. Use a new filename, use Outset's override feature, or uselogin-everywhen repeated runs are expected. - Review Outset logs in the Outset logs directory under
/usr/local/outset/.
Related options
If you need to run a command immediately as the current console user from a FileWave root-context script, see Execute macOS scripts as Defined User. That method is useful for targeted commands. Outset is better when the work naturally belongs at login or should run once per user across multiple users on the same Mac.
For general Fileset script behavior, see Fileset Scripts Overview.
References
- Outset GitHub repository
- Outset FAQ: how Outset works
- Outset deployment guidance
- Outset custom item packaging guidance
- Outset security, permissions, and ownership requirements
What languages does FileWave support?
What
FileWave includes native UI localization for several languages. The table below lists the language choices currently exposed by the FileWave Central/Admin language preference, including the locale code to use when launching Central/Admin with a specific language.
When/Why
This is useful when an administrator wants FileWave Central/Admin to use a language other than the workstation’s system language, or when an organization is checking whether a preferred admin UI language is available.
How
Language |
Locale Code |
Notes |
|---|---|---|
System language | blank / default | Uses the workstation language when FileWave has a matching translation; otherwise FileWave uses English. |
Chinese (Simplified) | zh_CN | Simplified Chinese. |
Chinese (Traditional) | zh_TW | Traditional Chinese. |
Dutch | nl_NL | Dutch locale used by FileWave Central/Admin. |
English (US) | en_US | American English. |
French | fr_FR | French for France. |
German | de_DE | German for Germany. |
Japanese | ja_JP | Japanese for Japan. |
Korean | ko_KR | Korean for South Korea. |
Filipino (Tagalog) | tl_TL | Filipino/Tagalog. |
Spanish (International) | es_ES | International Spanish. |
Swedish | sv_SE | Swedish. |
Thai | th_TH | Thai. |
Turkish | tr_TR | Turkish. |
To force FileWave Central/Admin to open in a specific language, use the matching locale code from this table with the platform-specific instructions below.
Related Content
- Opening FileWave Central / Anywhere in a Specific Language (Windows)
- Opening FileWave Central / Anywhere in a Specific Language (macOS)
Troubleshooting
Apple MDM Troubleshooting
Use this article to start troubleshooting Apple MDM enrollment and push-notification issues in FileWave.
Before digging into logs, confirm the basics first:
-
Your FileWave Server should use a fully qualified DNS name. This is the DNS name entered in FileWave Central under Preferences > Mobile.
-
If you changed the Server DNS Name in Preferences > Mobile, regenerate the certificate and trust the new certificate from the enrollment page, for example https://dns:20443/ios.
-
If the APNs certificate upload fails, confirm that the certificate was created from the matching FileWave Server DNS name and is not password protected.
-
If those checks are correct and the issue continues, create an admin user account for Django MDM debugging on the FileWave Server:
sudo fwcontrol mdm addadminuser -
Another important log file is "/usr/local/filewave/log/filewave_django.log"
-
Make sure FileWave Central shows "iOS/MDM Service OK" before expecting Apple devices to enroll or receive management commands.
The following are some of the problems encountered before:
Enrollment error: FileWave MDM Configuration is invalid
The profile "FileWave MDM Configuration" is invalid. The MDM payload
"Mobile Device Management" contains an invalid topic.
This usually points to an APNs certificate problem. Regenerate the APNs certificate and confirm it matches the current FileWave Server configuration.
Connection problems
If iOS or iPadOS devices fail to enroll, you may see an MDM check-in connection error in the server logs:
error
(61, 'Connection refused')
Request Method: PUT
Request URL: https://fwxserver.example.org:20443/ios/mdm_checkin
Exception Type: error
Exception Value:
(61, 'Connection refused')
Older APNs troubleshooting often referenced provider port 2195. Apple's current APNs network guidance uses TCP 443 or 2197 for sending notifications to APNs, and TCP 5223 for Apple devices to maintain their APNs connection.
Check current firewall requirements against Default TCP and UDP Port Usage and Apple's Apple Push Notification service network guidance.
Do not open legacy APNs ports from old notes without checking the current FileWave and Apple requirements for your environment.
TCP 5223: Apple devices to APNs
TCP port 5223 must be open so Apple devices can maintain their APNs connection and receive push notifications.
For the FileWave-side port list, see Default TCP and UDP Port Usage.
Backup Procedures for FileWave Hosted Servers
What
This article explains what FileWave backs up for Hosted FileWave Servers, how often those backups run, and when a restore request usually applies.
When/Why
FileWave performs daily backups for Hosted FileWave Servers and retains those backups for 30 days. These backups support recovery from hosted-server data loss, database or file corruption, and similar server-side recovery scenarios.
How
Backups run daily and are stored in highly available AWS S3 buckets. The backup set includes FileWave server data, configuration, certificates, logs, and related service paths, including:
- /usr/local/filewave/fwxserver/DB
- /private/var/log
- /usr/local/filewave/fwxserver/Data Folder
- /usr/local/filewave/instrumentation_data
- /usr/local/filewave/apache/conf
- /usr/local/filewave/apache/logs
- /usr/local/filewave/apache/passwd
- /usr/local/filewave/django/filewave
- /usr/local/filewave/conf
- /usr/local/filewave/certs
- /usr/local/filewave/fwcld
- /usr/local/filewave/ipa
- /usr/local/filewave/log
- /usr/local/filewave/media
- /usr/local/filewave/tmp
- /var/log
- /usr/local/filewave/scripts
- /usr/local/etc
- /tmp
- /usr/local/filewave/nats
- /install/docker-entrypoint.sh
- /usr/local/filewave/tls
- /etc/filewave_init
- /etc/filewave_setup
Hosted customers do not have direct access to these backup files. If a hosted restore is needed, contact FileWave Technical Support. Restore requests are generally handled for situations such as database corruption, file corruption, or hosted-infrastructure recovery after a major service incident.
Related Links
- FileWave Server Backup and Restore for self-managed/on-premises FileWave Servers
Digging Deeper
Self-managed FileWave Servers use the separate backup and restore process linked above. Hosted FileWave customers should work through FileWave Technical Support because hosted-server backup storage and restore operations are managed by FileWave.
FileWave Error Codes
Server
| Error | Context | Explanation | Solution |
| -8 | During Database Verification | There are some orphaned objects in the database | The first thing to do is to run a DB compact. You can run it from Xserver monitor which is in /Applications/FileWave. This should solve the issue. If the compact is not fixing it, then we must be missing a certain type of cleanup in that operation. Generally, this doesn't pose a problem. If you'd like, you can stop the server and zip up the /fwxserver/Data Folder/*dat and*idx files and post them to our ftp site. |
| -1 | While doing a Model Update you see a blank window | error creating Fileset File: XXXXXX, folderID: YYYYYYY not found, database damaged, call FileWave Tech Support 889|0xb0513000|FATAL|Error: -1 when updating filesets during model update |
This issue is fixed in FileWave version 4.1.1. If you are hitting this issue please upgrade Filewave Admin to 4.1.1. |
| 14 | Error 14 on file, found process: fwxserver/XXXXX exiting due to database error: 14 (Only Applicable to Server 3.7.4) | This is a soft database failure caused by a hard restart of the FileWave Server, it doesn't actually reflect a serious issue, but will cause the server to stop. | Upgrade to 3.7.5 to 4.0.X |
<br>fwxserver conflicts with fw-mdm-server-10.1.1-1.0.x86_64<br> |
upgrading to FileWave 11.x from a previous version | This is normally caused by upgrading from a system that originally installed filewave with two packages: fw-mdm-server fwxserver |
As of version 11, FileWave installs both servers with just the single fwxserver installer. To fix this simply remove the mdm component before updating the server. This will not remove any of your MDM data <br>sudo yum remove -y fw-mdm-server<br> |
Client / Admin
| Error | Context | Explanation | Solution |
| -150 | the file size downloaded to disk does not match the file size stored in the database of the FileWave Server | Delete this file from the Fileset and add a fresh copy from the Admin's hard disk | |
| -125 | Client downloading fileset | Booster does not have the file to serve to the client yet and so the client will try again later | Please wait |
| -13 | fwgui is not running | On the client fwgui process is not running | Restart the filewave client from terminal : macOS / Linux <br>sudo fwcontrol client restart<br> |
| -3 | During Admin File Upload | On slow networks an upload may timeout. | |
| -1 | Not in inventory | That comes from a client attempting to activate a fileset before it has downloaded it. After the model update, it adds the activation action back into the queue | Please wait for sometime as the client is still downloading the fileset and once it has finished downloading it will activate |
| 2 | reading file from disk | This error is due to a wrong offset request | Upgrade to 3.7.5 or 4.0.4 will solve this issue |
| 15 | This could happen if there is no or very less disk space left on the booster that the client is downloading the filesets from | Please check if the booster has enough free disk space. If the disk space is enough and still you are seeing this error contact support help.filewave.com | |
| 32 | while trying to send file data XXXXXD (Where XXXXX is the file ID) | Error 32 means broken pipe in the network. Generally this error should resolve by itself if everything in the network is fine. Troubleshooting : check to ping from the booster/server to client and vice versa and check if the problem doesn't exist in the network | 1. If you see this error for long time try to remove the association of this
fileset with the client and than associate again. This should solve the
problem. 2. Update to latest Filewave 3.7.X or 4.0.X |
| Failed CRC Validation | A CRC check is a form of a checksum which is used to make sure data in files is the same on the client as on the server. The error "failed CRC validation" means that files on the client for whatever reason are being altered compared to what is on the server. | Please send the client log file from the client exhibiting this issue to support help.filewave.com | |
| Kiosk Errors | See: VPP Kiosk Errors |
Booster
| Error | Context | Explanation | Solution |
| Failed CRC Validation | A CRC check is a form of a checksum which is used to make sure data in files is the same on the client as on the server. The error "failed CRC validation" means that files on the client for whatever reason are being altered compared to what is on the server | Please send the booster log file from the booster exhibiting this issue to help.filewave.com |
FileWave Log File Locations
The following lists the locations of log files, as well as some additional files used by FileWave across the FileWave family of products
How to read the tables: The File column lists the log filename or filename pattern, and the Location column lists where that file is stored. When sending logs to a collector, combine the directory and filename pattern. A trailing * means rotated log files may also exist, for example nats-booster.err.log, nats-booster.err.log.1, and nats-booster.err.log.2.
FileWave Admin
FileWave Admin Logs
| Details | File | Location |
| FileWave Admin Log Logs all FileWave Admin Connection Activity |
FileWaveAdmin.log, FileWaveAdmin.log.* | macOS~/Library/Application Support/FileWave/FileWaveAdmin.logWindows C:\ProgramData\FileWave\FileWaveAdmin.log |
| Client Logs Retrieved Client Logs |
ClientLog_$IP_$Port_$date.log | macOS~/Library/Application Support/FileWave/Client Logs/Windows C:\ProgramData\FileWave\Client Logs\ |
| Server Logs Retrieved Server Logs FileWave Admin > Server > Get Logfile |
fwxserver_$timestamp.log | macOS~/Library/Application Support/FileWave/Server Logs/Windows C:\ProgramData\FileWave\Server Logs\ |
FileWave Admin Files
| Details | File | Location |
| FileWave Admin Settings Settings for the local FileWave Admin App |
macOS
Windows
|
macOS~/Library/Preferences/Windows HKCU\Software\FileWave\FileWave Admin |
| Exported Views Views saved from FileWave Admin: * Views > Export Current View |
Filesets Export ($date).txt | macOS~/Library/Application Support/FileWave/ExportsWindows C:\ProgramData\FileWave\Exports |
FileWave Booster
Booster Logs
| Details | File | Location |
| Booster Log Global Booster activity |
fwbooster.log | macOS/Linux/private/var/log/fwbooster.logWindows C:\ProgramData\FileWave\FWBooster\fwbooster.log |
| NATS NATS Booster Logs |
macOS/Linux
Windows
|
macOS/Linux/private/var/log/Windows C:\ProgramData\FileWave\FWBooster\NATS\nats-booster.log |
| Discovery Log Only exists when discovery configured and run |
macOS/Linux
|
macOS/Linux/private/var/log/fwdiscovery.log |
|
NGINX
Only for Boosters connecting to Hosted FW Servers |
macOS/Windows/Linux
|
macOS/Linux
Windows
|
FileWave Client
FileWave Client Logs
| Details | File | Location |
| Client Logs Global Client activity |
fwcld.log | macOS/var/log/fwcld.logWindows C:\ProgramData\FileWave\FWClient\fwcld.log |
| Kiosk Logs Kiosk application activity |
Kiosk V1
|
macOS~/Library/Application\ Support/FileWave/FWGUI.logWindows C:\ProgramData\FileWave\FWGUI.log |
|
Kiosk V2
|
macOS
Windows
|
|
| Fileset Script Logs Logs generated by Fileset scripts |
macOS $Fileset_ID/$script_name_from_fileset.log Windows $Fileset_ID\$script_name_from_fileset.log |
macOS/var/log/fwcld/Windows C:\ProgramData\FileWave\log\fwcld\ |
| Custom Field Logs Logs generated by Custom Fields |
custom_field_script.$script_type.log
|
macOS/var/log/fwcld/1/Windows C:\ProgramData\FileWave\log\fwcld\1\ |
| Fileset Blocker Script Logs Logs generated by Blocker Scripts |
blocker_script.$script_type.log
|
macOS/var/log/fwcld/1/Windows C:\ProgramData\FileWave\log\fwcld\1\ |
| Installer (PKG / MSI) Logs Logs generated from PKG/MSI Filesets |
$Fileset_ID.log | macOS/usr/local/etc/FileWaveInstallerLogfiles/Windows C:\ProgramData\FileWave\FileWaveInstallerLogfiles\ |
|
Upgrade Logs
Windows Filewave Client Upgrade Log
|
upgradeClient.log
FileWaveClient.log |
For Upgrade Client log on Windows
For MSI log of FW Client Install
|
FileWave Client Files
| Details | File | Location |
| FileWave Client Settings Settings for the FileWave Client |
macOS
Windows
|
macOS/usr/local/etc/Windows HKLM\SOFTWARE\Wow6432Node\Filewave\WinClient |
| FileWave Client Preferences Preference file containing unique client details |
macOS
Windows
|
macOS/Library/Preferences/Windows C:\ProgramData\FileWave\ |
| FileWave Client Certificate Unique certificate & key per client |
|
macOS/var/FileWave/Windows C:\ProgramData\FileWave\FWClient\ |
| Trust Store Store for self-signed certificates |
*.crt | macOS/private/var/FileWave/trust_storeWindows C:\ProgramData\FileWave\FWClient\trust_store |
Cells highlighted in blue indicate files that are unique per client. These files should not be included when copying or migrating clients from one machine to another. To de-personalise a device, without removing the FileWave Client, some files would require editing, whilst others would need to be removed. If it was felt this was a requirement, consider contacting support to assist with this process.
FileWave Imaging Server (IVS)
IVS Logs
| Details | File | Location |
| Django Imaging Server Logs Django logs for requests regarding Serial numbers, names etc. made by netbooted clients |
filewave_imaging_server*.log | /imaging/logs/ |
| Windows Image Upload Logs Captured Windows image uploads |
fwadmin.log | /imaging/logs/fwadmin.log |
| Windows Image Upload Logs Captured Windows image uploads |
fwadmin-dlog.log | /var/log/fwadmin-dlog.log |
| Messages Logs Netboot/PXE Queries & Responses,TFTP transfers, NFS Mounts |
dnsmasq Log |
CentoS
Debian
|
| Apache Imaging Server Logs Apache logs for requests regarding Serial numbers, names etc. made by netbooted clients |
netboot_*.log | /imaging/logs/ |
| Client Imaging Logs Client logs - indicating progress of imaging operation of netbooted clients |
$Serial/$Mac-$Date | /imaging/logs/ |
| FileWave Client Log IVS FileWave Client Log |
fwcld.log | /var/log/fwcld.log |
FileWave Server
FileWave Server Logs
| Details | File | Location |
| Apache Logs Server Apache logs |
|
/usr/local/filewave/apache/logs/ |
| Apache Exporter Logs Server Apache Exporter Logs |
|
/usr/local/filewave/log/ |
| Alert Manager Logs Server Alert Manager logs |
|
/usr/local/filewave/log/ |
| FileWave Admin Audit Logs Audit logs from FileWave Admin |
audit.log | /usr/local/filewave/log/audit.log |
|
FileWave Admin Audit Logs Audit logs from FileWave Admin |
fwaaudit-[date].txt |
/private/var/log/FWAdmin Audit/ |
|
FileWave Dotenv file
Environment variable like configs across services. |
*.env | /usr/local/etc/filewave/.env |
| Django Logs Server Django logs, including FileWave Anywhere, MDM enrollment, VPP, and Classroom activity. For MDM enrollment failures such as enrolling with management server failed or secure-connection errors, start with filewave_django.log and its rotated files. |
|
/usr/local/filewave/log/ |
| LDAP Logs Logs from LDAP |
fwldap.log, fwldap.log.* | /private/var/log/ |
| Software Update Logs Software Update logs |
fwsu.log | /private/var/log/fwsu.log |
| FWX Process Logs Various fwx process logs |
|
/private/var/log/ |
| Model Update Service Log |
model_update_service.log |
/usr/local/filewave/log/ |
| Migration Logs Server migration logs |
fwxserver-migration-* | /var/log/fwxserver-migration-* |
| Grafana Logs |
|
/usr/local/filewave/log/ |
| Installer Logs Linux installer logs |
install.log | /private/var/log/install.log |
| mtail Logs Server mtail logs |
|
/usr/local/filewave/log/ |
| NATS Logs NATS logs |
|
/usr/local/filewave/log/ |
| Web Admin Logs |
|
/usr/local/filewave/log/ |
| Postgres Exporter Logs |
|
/usr/local/filewave/log/ |
| Postgres Database Logs | postgresql-$day.log | /usr/local/filewave/fwxserver/DB/pg_data/pg_log/*.log |
| Prometheus Logs |
|
/usr/local/filewave/log/ |
| FileWave Server Logs | request_errors.log | /usr/local/filewave/log/ |
| SQL Logs | sql.log | /usr/local/filewave/log/ |
| Update Controller Logs Removed in FileWave 14.10 |
|
/usr/local/filewave/log/ |
| Client Monitor | client_monitor.log | /usr/local/filewave/log/ |
| FileWave Log Messages | task_executor.log | /usr/local/filewave/log/ |
| Scheduler Log Messages | huey.log | /usr/local/filewave/log/ |
Additional Logging
All of the above will default to standard log level. There are 3 levels of logging available:
-
10 – Standard Log Level
-
99 – Debug Log Level
-
101 – Trace Log Level
The level of logging may be set as per our guide:
How to set FileWave Server components to debug mode
How to Restart FileWave Components
There may be times where you will need to restart all components within the FileWave server, or just a single component (postgres or apache). From your macOS or Linux server you can type "fwcontrol", which should give examples of fwcontrol usage.
macOS or Linux Server
You need to prefix commands with sudo to run them with elevated privileges.
Starting in FileWave 16.3 on macOS Server, fwcontrol uses supervisord under the hood for FileWave service control and status reporting. The commands below stay the same. The main change is that status and service detail output is clearer and no longer reflects the older LaunchDaemon-based behavior.
At a command prompt:
sudo fwcontrol server stop
sudo fwcontrol server startYou can also accomplish the same end goal by performing a single command:
sudo fwcontrol server restartIt is a matter of preference, but some admins will prefer to execute a stop, then a manual start so that they can see all processes are indeed stopped.
Subcomponents can be individually stopped as follows:
sudo fwcontrol apache start|stop|restart
sudo fwcontrol postgres start|stop|restart
sudo fwcontrol scheduler start|stop|restart
sudo fwcontrol client start|stop|restart
sudo fwcontrol booster start|stop|restartTroubleshooting
If you find that the fwcontrol control command is not found, you re-create the alias by inputting this command and then try the fwcontrol commands again:
alias fwcontrol='/usr/local/bin/fwcontrol'Resolving Network Issues with FileWave Server or Boosters on macOS when using Carbon Black EDR Extension
What
FileWave has observed network issues when the Carbon Black EDR (Endpoint Detection and Response) system extension and network filter are installed on a FileWave Server or Booster running on macOS. The most common symptom is that the Booster stops responding, which can interrupt device check-ins and content delivery.
When/Why
This is most likely to appear under high network traffic, where the Carbon Black network filter is inspecting traffic on the same macOS system that is serving FileWave clients. That combination can create performance or connectivity problems for FileWave services.
How
If FileWave network issues begin after Carbon Black EDR is installed on the same macOS Server or Booster, check whether the Carbon Black system extension and network filter are active. On macOS, use this command in Terminal.app:
systemextensionsctl listThe output will appear like this:
--- com.apple.system_extension.endpoint_security
enabled active teamID bundleID (version) name [state]
* * 7AGZNQ2S2T com.vmware.carbonblack.cloud.se-agent.extension (3.7.2fc81/3.7.2fc81) com.vmware.carbonblack.cloud.se-agent.extension [activated enabled]Check the output for the Carbon Black EDR extension or network filter. If removing or disabling the extension restores FileWave service responsiveness, work with your security team and Carbon Black/Broadcom support before redeploying it to the FileWave Server or Booster.
Related Content
- General Troubleshooting and Errors
- FileWave Log File Locations
- Booster Installation
- Broadcom Carbon Black EDR system extension and network filtering
Digging Deeper
Modern macOS security products often use System Extensions and Network Extensions instead of older kernel extensions. Carbon Black EDR uses this model on current macOS versions so it can inspect endpoint and network activity.
That inspection can still affect network-heavy systems. FileWave Servers and Boosters handle repeated client communication and content delivery, so they are more sensitive to anything inserted into the local network path.
The systemextensionsctl list command is a quick way to confirm whether the Carbon Black extension is active. Treat this as a troubleshooting signal, not a request to remove security tooling without approval.
If you need to exclude a FileWave Server or Booster from the Carbon Black network filter, coordinate that decision with the customer security owner and Carbon Black/Broadcom support.
What is Compatibility Mode?
FileWave 13.1 introduced new security options and a mode to allow older clients to connect.
Compatibility Mode was removed in FileWave 15.4.0 in favor of only using secure connections.
Problem
I don't know what compatibility mode is and what enable and disable do for me.

Environment
FileWave 13.1 introduces a new method of certificate-based security for communication between components (client, booster, server and IVS). Only 13.1 and greater components are able to generate and properly use certificates to communicate with other components using the new method. Therefore, if your server is running 13.1 but you have components that are older than 13.1 they can not generate the needed certificates to have the highest level of security, and will not be able to communicate together.
Resolution
Compatibility Mode Enabled
The server allows older clients, boosters, and IVS to communicate with the server with or without valid certificates
Compatibility Mode Disabled
The server will not allow any client, booster, or IVS to communicate with the server unless it has a valid and unique certificate. Boosters and clients are also checking peer certificates and will only communicate if the peer certificate is valid.
Additional Information
When you disable compatibility mode (uncheck the box in preferences) you will receive a warning of clients, boosters, and imaging appliances (AKA IVS), that may potentially be disconnected by you enabling this mode. If you get this warning, it is recommended that you cancel, and resolve the issue before compatibility mode is disabled.

Related Content
- For approving devices see: Enrolling Computer Clients
- For approving boosters see: Booster installation
FileWave Automation Scripts
This article contains the scripts used by the Downloads page. The scripts are here for documentation purposes. Note that you don't need to directly deal with this page aside from reference documentation. Each download page has the right 1-liner for upgrading to that version.
FileWave provides supported upgrade scripts to help you safely upgrade FileWave components on Debian-based systems. These scripts automate required checks, ensure compatibility, and guide you through the correct upgrade path for your environment.
The scripts have been used internally and by customers for many releases. This page explains what they do, how they behave, and what to expect during an upgrade.
What the Upgrade Scripts Do
At a high level, each upgrade script:
-
Detects the currently installed FileWave version (if present)
-
Validates system requirements and available disk space
-
Applies the requested FileWave upgrade
-
Applies recommended Debian OS updates when appropriate
-
Handles required service restarts and pre-upgrade checks
-
Writes a detailed log file to /var/log
-
Schedules a system reboot when required
The scripts are designed to be safe to re-run and will stop early if an unsupported upgrade or downgrade is detected.
Interactive and Unattended Use
The scripts support both interactive and unattended operation:
-
When run interactively, progress is displayed on screen and the script may pause briefly before rebooting.
-
You may press Enter to reboot immediately.
-
You may press Ctrl-C to cancel the reboot.
-
-
When run unattended, the script proceeds automatically and reboots without waiting for user input.
The scripts work correctly when run:
-
Over SSH
-
From a local console
-
Inside a screen session
-
Using wget | bash
Running upgrades inside a screen session is strongly recommended.
FileWave Server: Important Upgrade Behavior (16.3.0 and Later)
Starting with FileWave Server 16.3.0, significant changes were introduced, including:
-
An upgrade of the underlying operating system from Debian 12 to Debian 13
-
New PostgreSQL components used by FileWave Server
Because of these changes, the FileWave Server upgrade script includes additional safety logic.
Staged Upgrade Requirement (Older Versions)
If your system is running a very old FileWave Server version (prior to 16.0.0):
-
The script will first upgrade the server to FileWave Server 16.2.3
-
The upgrade will then stop and reboot
-
You must verify that FileWave Server 16.2.3 is working correctly
-
After verification, re-run the upgrade script to proceed to 16.3.0 or newer
This staged approach is required to ensure database compatibility and prevent data loss.
Why This Is Necessary
-
Older FileWave Server versions used older PostgreSQL components
-
FileWave Server 16.0–16.2 introduced newer PostgreSQL components while retaining compatibility for upgrades
-
FileWave Server 16.3.0 and later remove older PostgreSQL libraries and introduce newer database components
-
Attempting to skip directly from very old versions to 16.3.0 is not supported
The upgrade script automatically enforces this safe upgrade path and clearly explains what is happening when a staged upgrade is required.
Operating System Upgrades
-
FileWave Server versions prior to 16.3.0 run on Debian 12
-
FileWave Server 16.3.0 and later upgrade the system to Debian 13 as part of the process
The script will only perform a Debian OS upgrade when required by the target FileWave version.
Logging and Troubleshooting
Each script writes a detailed log file that can be used for troubleshooting or when opening a support case:
-
FileWave Server:
/var/log/filewave_server_update.log
-
FileWave IVS:
/var/log/filewave_ivs_update.log
-
FileWave Booster:
/var/log/filewave_booster_update.log
If you contact FileWave Support, include the relevant log file along with a brief description of what you were upgrading to.
Best Practices
-
Always ensure you have a current backup before upgrading
-
Run upgrades during a maintenance window
-
Use a screen session for long upgrades
-
Allow the system to reboot when prompted
-
Follow any on-screen instructions if a staged upgrade is required
Scripts
FileWave Server Upgrade
fwxserver_upgrade.sh - This script is used by the Download page fro FileWave Server upgrades on Debian. Some details;
To run this script, use the following 1-liner for example:
sudo DEBIAN_FRONTEND=noninteractive bash -c 'set -e; apt-get update -y; apt-get install -y -o Dpkg::Options::="--force-confdef" -o Dpkg::Options::="--force-confold" screen wget; ts=$(date +%Y%m%d%H%M%S); scr=fwxserver_upgrade_$ts; tmp=/tmp/fwxserver_upgrade_$ts.sh; wget -qO "$tmp" https://kb.filewave.com/attachments/411; chmod +x "$tmp"; echo "Starting upgrade in screen session: $scr"; echo "Detach with Ctrl-A then D, reattach with: sudo screen -r $scr"; exec screen -S "$scr" bash -lc "\"$tmp\" -v 16.3.0 -r 1 -p -y"'FileWave Booster Upgrade
fwbooster_upgrade.sh - This script is used by the Download page fro FileWave Booster upgrades on Debian. Some details;
To run this script, use the following 1-liner for example:
sudo DEBIAN_FRONTEND=noninteractive bash -c 'set -e; apt-get update -y; apt-get install -y -o Dpkg::Options::="--force-confdef" -o Dpkg::Options::="--force-confold" screen wget; ts=$(date +%Y%m%d%H%M%S); scr=fwbooster_upgrade_$ts; tmp=/tmp/fwbooster_upgrade_$ts.sh; wget -qO "$tmp" https://kb.filewave.com/attachments/412; chmod +x "$tmp"; echo "Starting upgrade in screen session: $scr"; echo "Detach with Ctrl-A then D, reattach with: sudo screen -r $scr"; exec screen -S "$scr" bash -lc "\"$tmp\" -v 16.3.0 -r 1 -p -y"'FileWave IVS Upgrade
ivs_upgrade.sh - This script is used by the Download page for IVS upgrades on Debian. Some details;
To run this script, use the following 1-liner for example:
sudo DEBIAN_FRONTEND=noninteractive bash -c 'set -e; apt-get update -y; apt-get install -y -o Dpkg::Options::="--force-confdef" -o Dpkg::Options::="--force-confold" screen wget; ts=$(date +%Y%m%d%H%M%S); scr=ivs_upgrade_$ts; tmp=/tmp/ivs_upgrade_$ts.sh; wget -qO "$tmp" https://kb.filewave.com/attachments/408; chmod +x "$tmp"; echo "Starting upgrade in screen session: $scr"; echo "Detach with Ctrl-A then D, reattach with: sudo screen -r $scr"; exec screen -S "$scr" bash -lc "\"$tmp\" -v 16.3.0 -r 1 -p -y"'Universal One Liner
You can also use this more universal one liner that doesn't hard code anything and you can just enter what you want to do.
sudo DEBIAN_FRONTEND=noninteractive bash -c 'set -e; read -p "Component (Server/Booster/IVS): " c; case "${c,,}" in server) att=411; name=fwxserver ;; booster) att=412; name=fwbooster ;; ivs) att=408; name=ivs ;; *) echo "Invalid component"; exit 1 ;; esac; read -p "Version (e.g. 16.3.0): " v; [[ "$v" =~ ^[0-9]+\.[0-9]+\.[0-9]+$ ]] || { echo "Invalid version format"; exit 1; }; read -p "Release (Prod/Dev/Beta): " r; case "${r,,}" in prod) f=-p ;; dev) f=-d ;; beta) f=-b ;; *) echo "Invalid release type"; exit 1 ;; esac; apt-get update -y; apt-get install -y -o Dpkg::Options::="--force-confdef" -o Dpkg::Options::="--force-confold" screen wget; ts=$(date +%Y%m%d%H%M%S); scr=${name}_upgrade_$ts; tmp=/tmp/${name}_upgrade_$ts.sh; wget -qO "$tmp" https://kb.filewave.com/attachments/$att; chmod +x "$tmp"; echo "Starting upgrade in screen session: $scr"; echo "Detach with Ctrl-A then D, reattach with: sudo screen -r $scr"; exec screen -S "$scr" bash -lc "\"$tmp\" -v $v -r 1 $f -y"'
Rufus - Creating bootable USB drives
What
In this article, we will explain how to use Rufus, a free and open-source utility that helps format and create bootable USB flash drives. Rufus is widely used for creating installation media from bootable ISOs, such as Windows, Linux, and other operating systems. It is an essential tool for anyone needing to install an OS from a USB drive. While this does not directly tie into FileWave UEM, we use it for making bootable USB flash drives and think you'll like it.

When/Why
You would use Rufus in scenarios where you need to:
- Create a bootable USB drive to install or repair an operating system.
- Perform system recovery or troubleshooting on a computer that won’t boot normally.
- Install various versions of Windows or Linux from a USB drive instead of a CD/DVD.
- Run a live version of an operating system for testing or recovery purposes.
How
Step-by-Step Guide to Using Rufus
-
Download Rufus:
- Visit the Rufus download page and download the latest version of the software.
- Rufus is a portable application, so no installation is required. Simply run the downloaded executable file.
-
Prepare Your USB Drive:
- Insert your USB flash drive into a USB port on your computer.
- Ensure that the drive has no important data, as it will be formatted during the process.

-
Launch Rufus:
- Open Rufus by double-clicking the executable file.
- Rufus will automatically detect your USB drive.
-
Select Bootable ISO:
- In the "Boot selection" section, click the "Select" button to choose the ISO file you want to use.
- Navigate to the location of your ISO file and select it.

-
Configure Rufus Settings:
- Partition Scheme: Choose "MBR" for BIOS or UEFI or "GPT" for UEFI only.
- File System: Generally, NTFS is recommended for Windows installations, while FAT32 is used for other operating systems.
- Rufus will adjust the settings automatically based on the selected ISO file.
-
Start the Process:
- Click the "Start" button to begin the creation of the bootable USB drive.
- Rufus will warn you that all data on the USB drive will be destroyed. Confirm to proceed.
- Wait for Rufus to complete the process. This may take several minutes.
-
Completion:
- Once Rufus has finished, you will see a "Ready" status.
- Safely eject the USB drive from your computer.

Your bootable USB drive is now ready to be used for installing or repairing your operating system.
Related Content
Digging Deeper
Rufus offers several advanced features that can be very useful:
- Persistent Storage: Rufus supports persistent storage for some Linux distributions, allowing you to save changes and data between sessions.
- Bad Block Check: Rufus can perform a bad block check on your USB drive to ensure its integrity before creating the bootable media.
- UEFI and BIOS Compatibility: Rufus can create bootable USB drives that are compatible with both UEFI and BIOS systems, ensuring broad compatibility.
For more detailed information, troubleshooting, and FAQs, you can visit the official Rufus Wiki.