For Webmin on Debian, go to **Webmin > Webmin Configuration > Operating System and Environment** and confirm that the operating system version matches the Debian version installed on the server. You can check the Debian version with `cat /etc/debian_version`.
1. At the login screen, note the URL used to remotely manage the server, for example **https://myorg.filewave.net:10000**. - If there is no IP address because DHCP is not available on the subnet for your FileWave Linux appliance, log in with username "**fwadmin**" and password "**filewave**". Older appliances used the username "**root**", but [FileWave 15.5.0 and later use fwadmin for first login](https://kb.filewave.com/books/filewave-general-info/page/setting-the-password-on-first-login-to-filewave-appliances-155 "Setting the Password on First Login to FileWave Appliances (15.5+)"). - Run `nmtui` at the command prompt to launch the NetworkManager text UI and configure networking for the FileWave VM appliance. Reload the IP stack with `service network restart`. If you configure networking this way, skip the network configuration steps later in Webmin. 2. Browse to the Webmin URL and log in with username "**fwadmin**" and password "**filewave**". You will change this password later. 3. Browse to *Hardware > System Time* on the left, select the *Change timezone* tab on the right, choose your time zone, and click *Save*. North American time zones start with "America". 4. FileWave appliances are normally pre-configured for time synchronization. Use the *Time server sync* tab only if you need to verify or adjust the time source for your environment. If your organization requires a specific NTP server, replace the existing value with the approved hostname or address, set *Synchronize on schedule?* to "Yes, at times below", and click *Sync and Apply*. 5. Go to *System > Change Passwords* on the left and select the "root" account on the right from the list of usernames. Enter a new root password, confirm it, and click *Change*. This changes the default root password from "filewave" to the value you choose, so use a secure password that your organization can recover when needed. 6. Choose *Networking > Network Configuration* on the left, then *Network Interfaces* on the right. Click the blue link labeled "ens160" or "ens32" for the Ethernet adapter. Change the *IPv4 address* setting to "Static configuration", enter the static IP and subnet mask, then click *Save and Apply* at the bottom. 7. You will no longer be able to access Webmin through the old DHCP IP address. Change your browser's address bar to the new static IP address for the FileWave server, then browse to *Networking > Network Configuration* on the left and *Hostname and DNS Client* on the right. Enter the IP address for your DNS server and click *Save*. 8. Select *Networking > Network Configuration* on the left, then *Routing and Gateways* on the right. Pick "ens160" or "ens32" from the *Default routes* menu, enter the default gateway address for the subnet hosting the FileWave server, and click *Save*. 9. Go to *System > Bootup and Shutdown* on the left, scroll to the bottom on the right, and click *Reboot System*. When Webmin asks you to confirm "shutdown -r now", click *Reboot System* again. 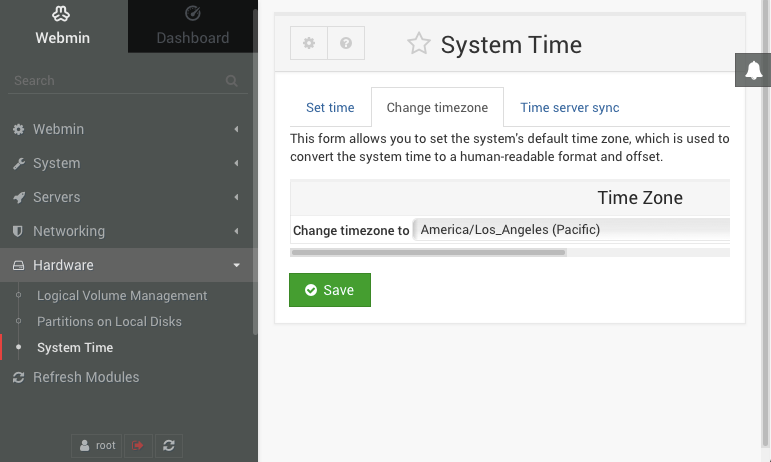 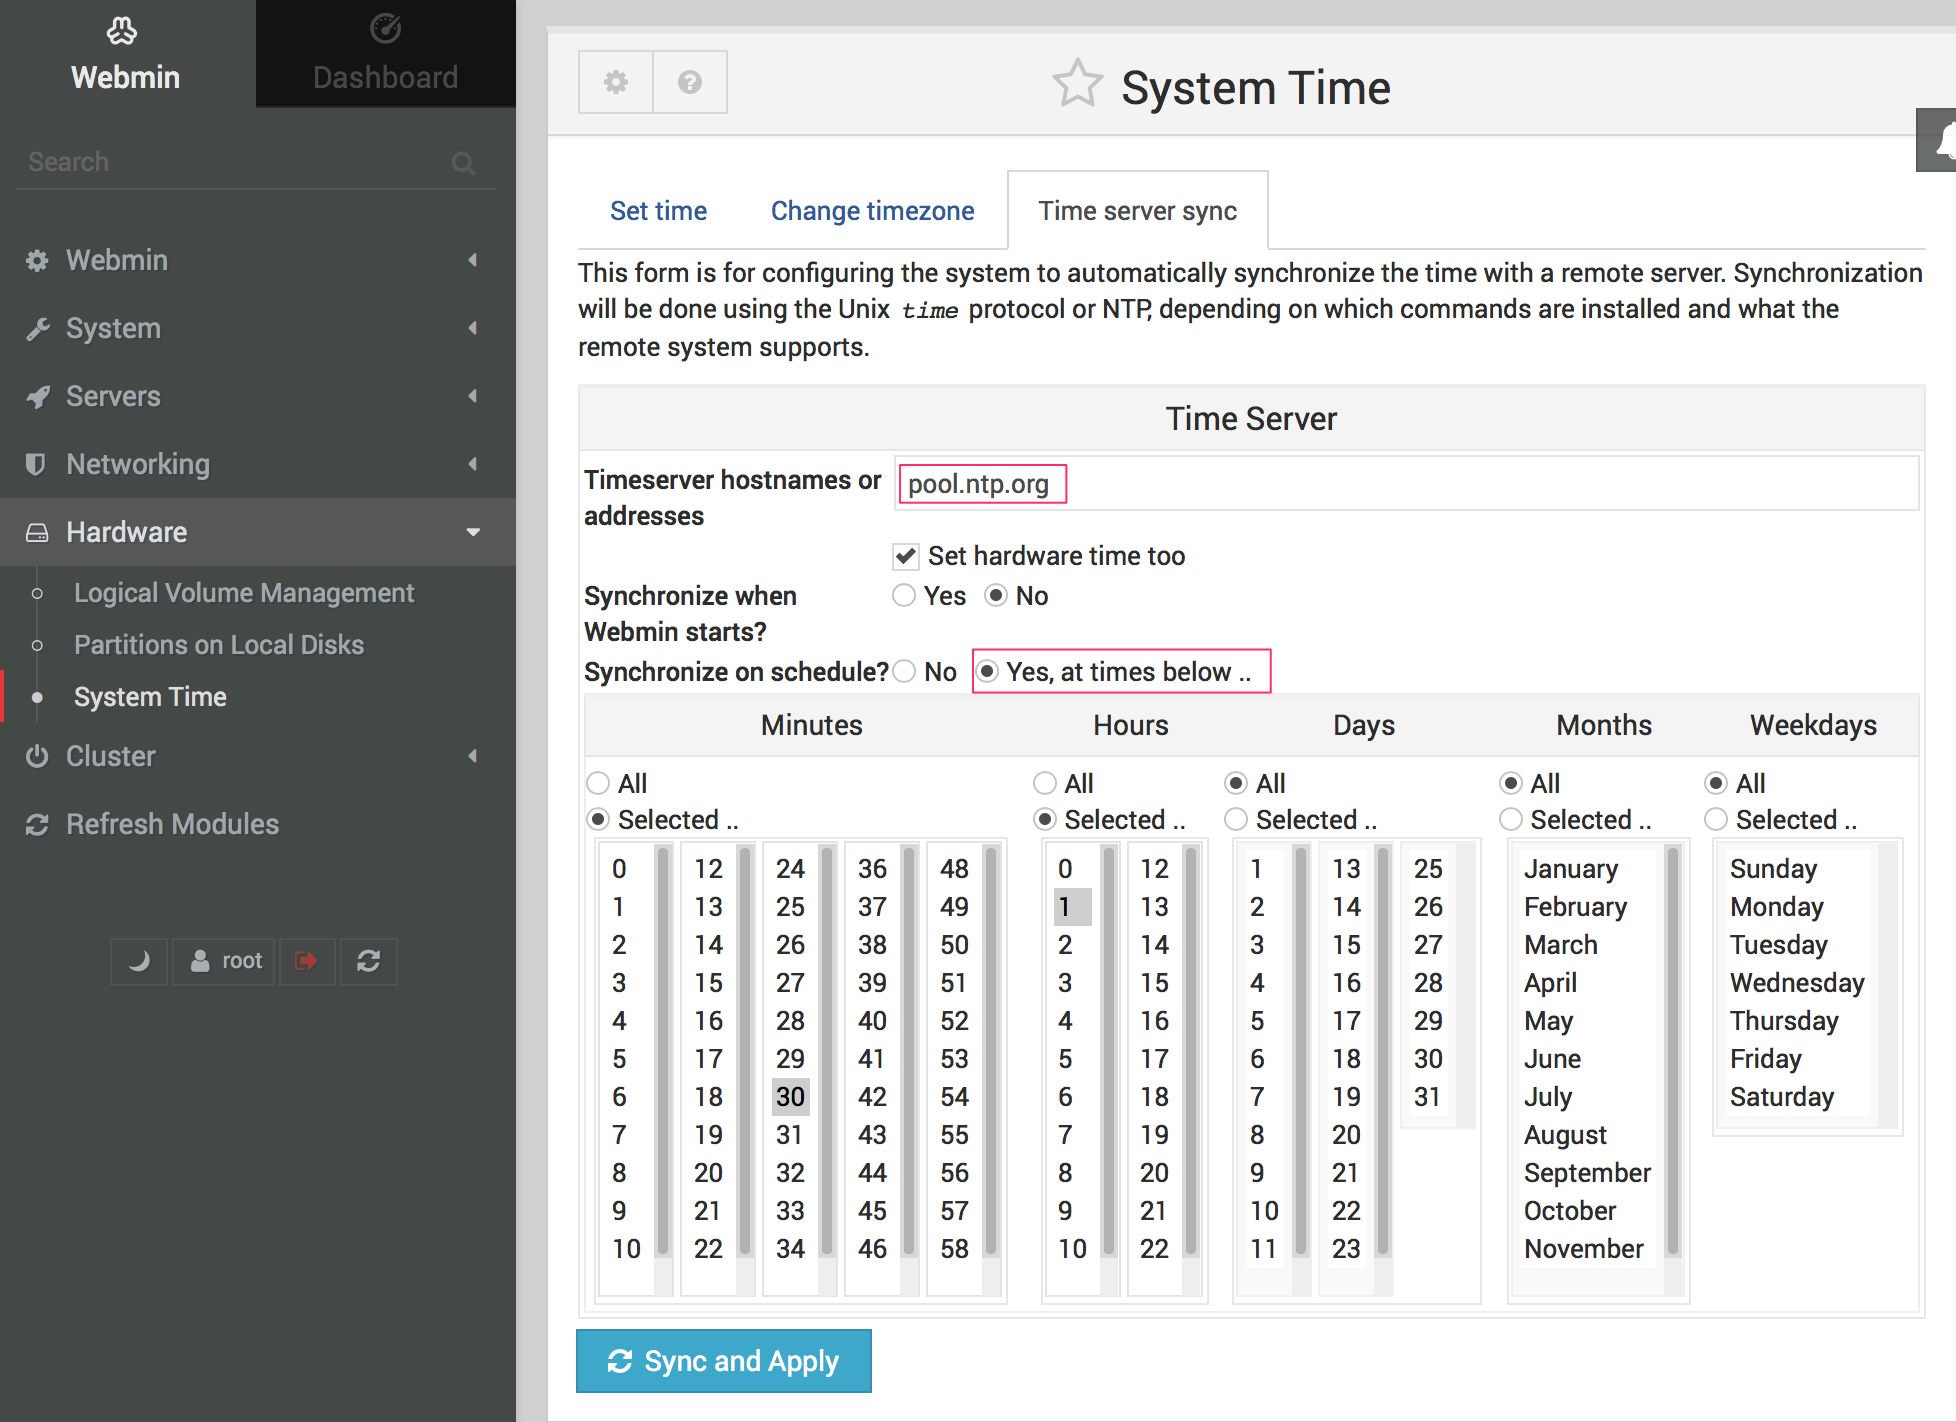 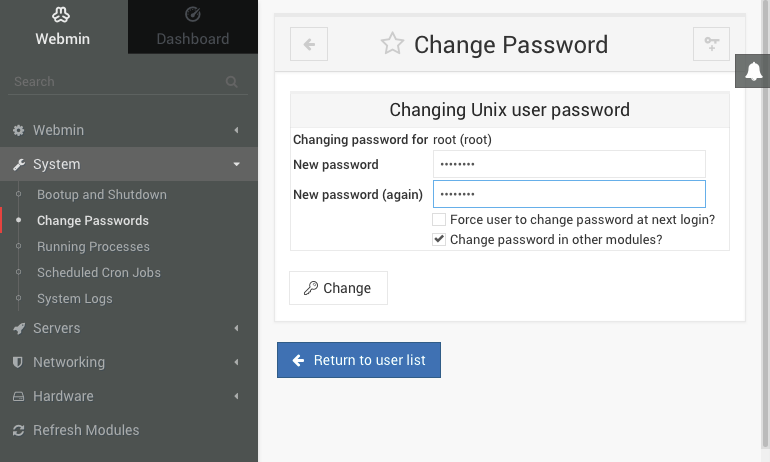     ## Related Content - [1. Installation and Setup](https://kb.filewave.com/books/evaluation-guide/chapter/1-installation-and-setup "1. Installation and Setup") # Webmin GUI - Changing the root password (On-Premise) ## What [Webmin](https://www.webmin.com/) is included with self-managed FileWave appliances for server-level configuration. This article applies only to self-managed or on-premises FileWave Server appliances. Hosted FileWave customers do not manage Webmin access on the hosted server. ## When/Why Restrict TCP 10000 to trusted admin networks only; do not expose Webmin directly to the Internet. Also change the appliance root password from the default before the server is used in production. [FileWave Server Setup](https://kb.filewave.com/books/evaluation-guide/page/filewave-server-setup "FileWave Server Setup") also calls out this step. ## How 1. At the login screen, note the URL used to remotely manage the server, for example: **https://myorg.filewave.net:10000** - If there is no IP address specified because DHCP is not available on the subnet for your FileWave Linux Appliance, log in with the username "**root**" with the password "**filewave**". - Run "nmtui" at the command prompt to launch the Network Manager Text UI so you can configure the networking for the FileWave VM appliance. You'll need to reload the IP stack with "service network restart". Skip the network configuration steps later in the Webmin. 2. Browse to this URL and log in with username "**root**" and password "**filewave**". 3. Go to *System > Change Passwords*, select the **root** account, enter a new root password, confirm it, and click *Change*. This replaces the default **filewave** password for root. Use a long, unique password and consider restricting SSH to certificate-based access where your security policy requires it. A FileWave Server appliance is still a Linux server and should be protected like one. ## Related Content - [Webmin GUI](https://kb.filewave.com/books/filewave-server/page/webmin-gui-on-premise "Webmin GUI") - [FileWave Server Setup](https://kb.filewave.com/books/evaluation-guide/page/filewave-server-setup "FileWave Server Setup") # Expanding the Disk on a FileWave Appliance - Debian ## Overview This guide explains how to use the **FileWave Smart Disk Expansion** script to automatically expand disk space on FileWave appliances. The script handles all the complexity of expanding LVM physical volumes, partitions, and filesystems with comprehensive logging and safety features. ### What This Script Does The script performs the following operations: - **Detects** your appliance's LVM configuration automatically - **Expands** physical volume (PV) backing devices - **Grows** partitions using cloud-guest-utils (`growpart`) - **Extends** the root logical volume (LV) to consume available space - **Grows** the root filesystem online (supports ext4, ext3, ext2, and XFS) - **Repairs** GPT partition tables if needed - **Logs** all actions for troubleshooting and support cases ### Prerequisites - **Root access** (via `sudo`) - **Debian-based appliance** (e.g., Debian 12/13) - **Disk already expanded** at the hypervisor/storage level (this script only expands the OS partitions and filesystem) - **Network access** (for automatic package installation, if needed) The script automatically installs required tools if missing: - `cloud-guest-utils` (growpart) - `lvm2` (LVM tools) - `util-linux` (disk utilities) - `gdisk` (GPT utilities) - `e2fsprogs` (ext filesystem tools) - `xfsprogs` (XFS filesystem tools) ## Step-by-Step Instructions ### Step 1: Download the Script Open a terminal on your FileWave appliance and download the script: ```bash cd /tmp wget https://kb.filewave.com/attachments/485 -O filewave-expand-disk.sh chmod +x filewave-expand-disk.sh ``` Alternatively, if `wget` is not available, use `curl`: ```bash cd /tmp curl -o filewave-expand-disk.sh https://kb.filewave.com/attachments/485 chmod +x filewave-expand-disk.sh ``` ### Step 2: Review the Script (Optional but Recommended) Before running any system-modifying script, it's good practice to review it: ```bash head -50 filewave-expand-disk.sh ``` This displays the first 50 lines, including the description and safety information. ### Step 3: Test with Dry-Run (Strongly Recommended) Always test the script in **dry-run mode first** to see what actions it would take: ```bash sudo ./filewave-expand-disk.sh --dry-run ``` **Expected output:** - Detects root LVM configuration (VG, LV, filesystem type) - Lists PV devices backing the root LV - Shows BEFORE state (VG free space, LV size, filesystem size) - Lists actions it WOULD take (but doesn't execute them) - Shows AFTER state (projected) **Example output snippet:** ``` == Detecting root LVM layout == Root LV: /dev/vg0/root VG: vg0 FS type: ext4 == Finding PV backing the root LV == PV(s): /dev/vda1 == BEFORE state == VG free: 10.0G LV size: 50.0G FS size (/): 50.0G FS avail (/): 45.0G == Expanding PV(s) and partition(s) (if needed) == Processing: /dev/vda1 - would run: growpart /dev/vda /dev/vda1 - pvresize /dev/vda1 DRY_RUN: command not executed ``` **Review the dry-run output carefully:** - ✅ Are the device names correct? - ✅ Is the VG/LV configuration what you expect? - ✅ Does the projected growth make sense? ### Step 4: Run the Script Once you're confident with the dry-run, run the script for real: ```bash sudo ./filewave-expand-disk.sh ``` The script will: 1. Install any missing prerequisite packages 2. Detect your LVM configuration 3. Expand PV/partitions if needed 4. Extend the LV 5. Grow the filesystem online 6. Create a support log in `/var/log/filewave-expand-disk-YYYYMMDD-HHMMSS.log` **Expected output:** ``` Log file: /var/log/filewave-expand-disk-20260127-094500.log If opening a support case, attach: /var/log/filewave-expand-disk-20260127-094500.log == Checking and installing prerequisites == ... == Detecting root LVM layout == Root LV: /dev/vg0/root VG: vg0 FS type: ext4 ... == AFTER state == VG free: 0B LV size: 60.0G FS size (/): 60.0G FS avail (/): 55.0G SUMMARY: Expansion performed. LV grew by 10.0G and filesystem grew by 10.0G. Support log file: /var/log/filewave-expand-disk-20260127-094500.log Reboot not requested (default). No reboot will be performed. ``` ### Step 5: Verify the Expansion Check that the filesystem was expanded: ```bash df -h / ``` You should see the new size reflected in the "Size" column. **Example:** ``` Filesystem Size Used Avail Use% Mounted on /dev/mapper/vg0-root 60G 5.0G 55G 9% / ``` Compare this to the BEFORE state in the log. ### Step 6: Reboot (If Recommended) In most cases, **no reboot is needed**. However, the script may recommend a reboot if: - GPT partition table repairs were necessary - Kernel partition table cache needs refresh If the script recommends a reboot: ```bash sudo reboot ``` The appliance will restart. FileWave services typically auto-start on boot. ## Usage Options The script supports several command-line options: ### Verbose Mode Show detailed command output in the terminal (in addition to logging): ```bash sudo ./filewave-expand-disk.sh --verbose ``` Use this for troubleshooting or when you want to see detailed progress. ### Reboot Option Automatically reboot at the end: ```bash sudo ./filewave-expand-disk.sh --reboot ``` This is useful for automation or when you want to ensure partition table changes are fully applied. ### Combined Options ```bash sudo ./filewave-expand-disk.sh --dry-run --verbose sudo ./filewave-expand-disk.sh --reboot --verbose ``` ## Support Log The script creates a detailed support log in `/var/log/`: **Log location:** `/var/log/filewave-expand-disk-YYYYMMDD-HHMMSS.log` **Why it's important:** - Contains all commands executed - Includes BEFORE/AFTER metrics - Helps FileWave Support diagnose issues - Is automatically world-readable for easy sharing **To view the log:** ```bash cat /var/log/filewave-expand-disk-*.log ``` **When opening a support case:** - Attach the support log: `filewave-expand-disk-YYYYMMDD-HHMMSS.log` - Include the BEFORE/AFTER sizes - Note any warnings or errors from the script ## Troubleshooting ### "ERROR: This script must be run as root" **Solution:** Use `sudo`: ```bash sudo ./filewave-expand-disk.sh ``` ### "ERROR: Root filesystem is not an LVM logical volume" **Cause:** Your appliance does not use LVM storage layout. **Solution:** This script only works with LVM-based appliances. Contact FileWave Support for non-LVM systems. ### "WARN: Unsupported/unknown filesystem type" **Cause:** The root filesystem is an uncommon type (not ext4, ext3, ext2, or XFS). **Solution:** Contact FileWave Support with the support log. ### Filesystem didn't grow (AFTER state shows same size as BEFORE) **Possible causes:** 1. **VG has no free space**: If `VG free` is 0 bytes in BEFORE state, there's nothing to expand. Verify the disk was actually expanded at the hypervisor level. 2. **Partition didn't grow**: Check the support log for growpart output. This typically means the underlying disk wasn't resized at the storage layer. 3. **No-op short-circuit triggered**: The script detected the disk was already fully expanded. **Solution:** Check the support log for details. If still unsure, contact FileWave Support. ### "Device or resource busy" warnings **Cause:** The system is actively using the disk (expected on live systems). **Solution:** These warnings are normal and safe to ignore. The script continues and typically succeeds anyway. ## Common Scenarios ### Scenario 1: Expand 50GB Appliance to 100GB 1. **At hypervisor level:** Resize the virtual disk from 50GB to 100GB 2. **On appliance:** Run dry-run to verify 3. **On appliance:** Run the script 4. **Verify:** Check with `df -h /` ```bash # Dry-run sudo ./filewave-expand-disk.sh --dry-run # Real run sudo ./filewave-expand-disk.sh # Verify df -h / ``` ### Scenario 2: Expand with Verbose Output for Troubleshooting ```bash sudo ./filewave-expand-disk.sh --verbose 2>&1 | tee ~/expansion.log ``` This captures all output to both terminal and a file for review. ### Scenario 3: Expand and Reboot Automatically ```bash sudo ./filewave-expand-disk.sh --reboot ``` Useful for scheduled maintenance windows. ## FAQ **Q: Will this downtime affect FileWave services?** A: No. The filesystem is expanded online with no downtime. Services continue running but you may be advised to reboot. **Q: Do I need to stop FileWave services?** A: No. The script works while services are running. **Q: What filesystems are supported?** A: ext4, ext3, ext2, and XFS. Others may work but are not officially tested. **Q: Can I run this script multiple times?** A: Yes. It's safe to run multiple times. It will detect if space was already expanded and skip unnecessary operations. **Q: Do I need to reboot after running this?** A: Usually not. Reboot is only recommended if partition table repairs were necessary (the script will tell you). **Q: How long does the expansion take?** A: Typically 1-5 minutes depending on appliance size and system load. **Q: Is the script reversible?** A: No. Once expanded, you cannot shrink the filesystem or LV. Plan accordingly. ## Support If you encounter issues or have questions: 1. **Review the support log:** `/var/log/filewave-expand-disk-YYYYMMDD-HHMMSS.log` 2. **Run with `--verbose`** to see detailed output 3. **Contact FileWave Support** with: - The support log attached - Description of the issue - Output from `df -h /`, `lvs`, `vgs`, `pvs` # Upgrading to FileWave 13+ from older Versions on Systems where Port 443 is used ## Description FileWave 13 introduced the Web Admin interface, which uses port 443 by default. If another service is already listening on port 443, the FileWave Server installer cannot complete until the conflict is resolved. To resolve the issue, either move the other service off port 443 or configure FileWave Web Admin to use a different port before upgrading. ## Directions Configure FileWave to use a different Web Admin port before the upgrade as follows: #### Mac / Linux Edit `/usr/local/filewave/apache/conf/httpd.conf` and add the following line: ``` # Putting the last character in brackets is a trick to prevent Apache from issuing a warning if the file does not exist. IncludeOptional conf/httpd_webadmi[n].conf ``` Create `/usr/local/filewave/apache/conf/httpd_webadmin.conf` with the following content: ``` Define WEB_ADMIN_PORT 20440 ``` Restart Apache: ``` sudo fwcontrol apache restart ``` Then run the FileWave Server 13+ installer as normal.