FileWave Server
- FileWave Server System Requirements
- FileWave Server Installation & Upgrade
- FileWave Server Installation
- FileWave Access - Passwords
- FileWave Server On-Premise
- FileWave Server Time
- FileWave Server Upgrades
- Securing FileWave Server on the Internet for Remote Device Management
- FileWave Server Backup and Restore
- Repair FileWave Server Permissions and Ownership
- Your Hosted FileWave Server Has Been Upgraded - What Are Your Next Steps?
- Upgrading your On-Premise FileWave Server
- Reset root password through Webmin (FileWave Appliances Only)
- Migrating your On-Premise FileWave Server to new Hardware
- FileWave Server Pre-Upgrade Backup
- Use 2FA or MFA with FileWave
- Configuring LDAP authentication
- Maintenance
- Webmin GUI (On-Premise)
- Webmin GUI - Changing the root password (On-Premise)
- Expanding the Disk on a FileWave Appliance - Debian
- Upgrading to FileWave 13+ from older Versions on Systems where Port 443 is used
- Privacy
- Details of Allowing / Disallowing Collection of Personal data on a License Level
- FileWave Server Analytics Reporting
- Deleting Old FileWave Client or Server Log Data
- Troubleshooting
- How to set FileWave Server components to debug mode
- fwxserver folder relocation in FileWave Server 13.1.4+ on macOS and Linux Platforms
- Disable IPv6 on FileWave Server Components
- Advisory: OS Age Attestation and FileWave Server Appliances (Debian Guidance)
FileWave Server System Requirements
As of August 2024 v15.4.1, the below are supported for running FileWave Server, but for updated information, always consult the specific release on the Downloads Page. The FileWave Server can also be installed on a Virtual Machine.
-
macOS 12, 13 (Intel and Apple Silicon)
-
Linux Debian 12.x x86_64
The minimum general guidance on CPU / RAM / Network / Storage is:
-
CPU: For physical hardware use, at least the equivalent of an Intel Core i5 or Apple M1. For virtual hardware, use at least 2 virtual processors.
-
RAM: Use a minimum of 8Gb of RAM with 16Gb recommended.
-
Network: At least 1Gb network connection.
-
Storage: 1Tb is a recommended minimum, but this will depend highly on OS updates and Filesets as well as if Windows Imaging is in use.
Make sure you have enough space on your hard disk to store the cached Filesets for your FileWave Clients.
Related Content
FileWave Server Installation & Upgrade
FileWave Server Installation
FileWave Server is the core service behind device management. Initial setup and ongoing administration still rely on FileWave Central (macOS or Windows), and some tasks are also available in FileWave Anywhere.
This overview does not cover Boosters or IVS.
Overall requirements
FileWave Server can be deployed as a hosted service or on-premise. For on-premise deployments, start from the current Downloads book. The current release page includes the installer, release-specific instructions, and any available virtual appliance images.
Manual installation
If you are not using a pre-built virtual appliance:
- Download the current FileWave Server installer from the appropriate release page.
- Copy the installer to the server you plan to use for FileWave Server.
- Open a shell session to that server as a privileged user (for example via SSH), and elevate to root as required.
- Extract the download.
- Run the installer and follow the instructions from that same release page.
FileWave Server networking
Before you finish the setup, review the Default TCP and UDP Port Usage article and FileWave Server should not have IPv6 enabled.
FileWave Access - Passwords
FileWave Administrator
FileWave installations provide an initial user which has full permissions. On initial launch, this password should be changed as a matter of security. The default account is:
- Name: fwadmin
- Password: filewave
The password may be changed in the FileWave Central software application Menus, through:
- Assistants > Manage Administrators
Select the 'fwadmin' account, followed by the 'Set Password' radial button. Enter the chosen secure password
SSH
SSH is initially enabled and the root account of the default setup has the same password as fwadmin, however, they are not aligned. Consider immediately changing the root users account password and disable the ability to access SSH to the server from the internet.
Log into a shell on the server as root and run the following command:
passwdA prompt will require input of the new password and secondary confirmation of this new password.
FileWave Server On-Premise
For on-premise FileWave Server installs, make the server name and certificate decisions early. These settings affect how clients and MDM-enrolled devices connect to the server, so changing them later can be disruptive.
Server Name
The FileWave Server name should be a fully qualified domain name (FQDN). Prefer a name that could also work externally later, even if the first deployment is internal only. Choosing the right name up front gives you room to publish services or change network layout later without touching every enrolled device.
Certificates
The server certificate must include the chosen server name as a Subject Alternative Name (SAN). See the certificate articles for the current certificate workflow:
https://kb.filewave.com/books/certificates
After the P12 certificate is generated, upload it to the FileWave Server through the FileWave Central/FileWave Admin preferences.
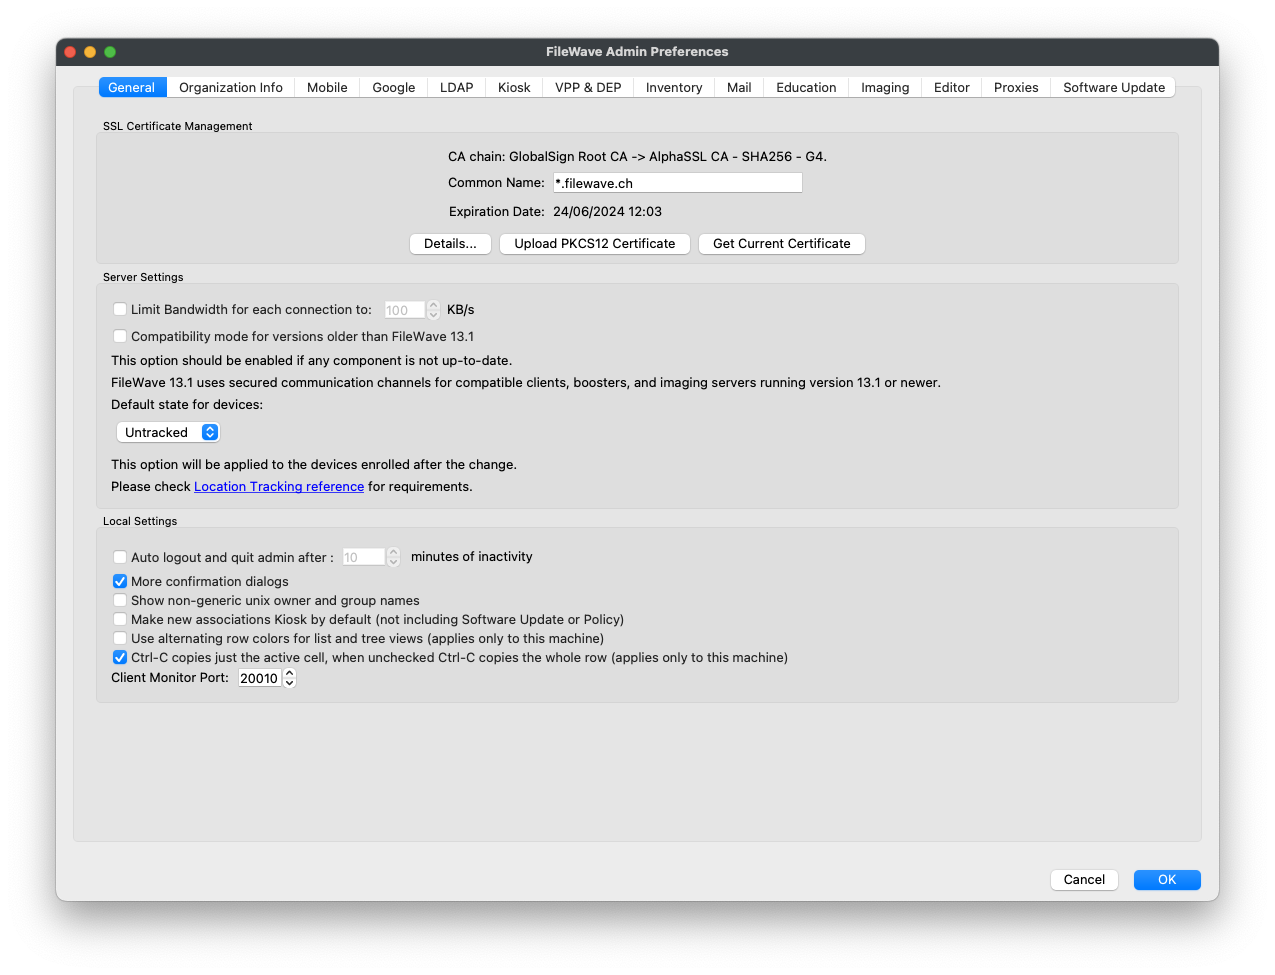
Naming the Server
Enter the same FQDN on the Mobile tab. For example, for a server called demo.filewave.ch:

Server Command Line Configuration
After the certificate and server name are configured in the admin application, make sure the FileWave Server itself can resolve that name locally.
Hosts File
Edit the server's hosts file so the FileWave Server name resolves to the local server. Starting with this simple hosts file:
127.0.0.1 localhost
::1 localhostUsing the example server name demo.filewave.ch, either of these approaches is acceptable:
127.0.0.1 localhost demo.filewave.ch
::1 localhost demo.filewave.chor:
127.0.0.1 localhost
127.0.0.1 demo.filewave.ch
::1 localhost
::1 demo.filewave.chThe entries can be space-separated on the same line or split onto separate lines. The goal is that a lookup for the FileWave Server FQDN from the server returns the local host.
Apache Conf File
This is only required if the server's local hostname does not match the FileWave Server name.
Edit the following file:
/usr/local/filewave/apache/conf/httpd_custom.conf
Add the following ServerName entry:
ServerName demo.filewave.chRestart Server Process
Restart the FileWave Server after the change. Run the command as root, or use sudo:
sudo fwcontrol server restartFileWave Server Time
Time is critical with servers and acceptance of certificates and communication. As such, it is imperative that time is kept in sync. It is possible to run one-off commands to achieve this, but better still, consider enabling automated time sync.
macOS
macOS devices may just have time configured through the System Preferences or Settings
Linux
For linux servers we include NTP sync as enabled in the appliance images. If you have your own install of Debian then make sure you enable NTP time sync.
FileWave Server Upgrades
Hosted server upgrades are coordinated through FileWave communication with hosted customers. If your server is hosted by FileWave, start with Your Hosted FileWave Server Has Been Upgraded - What Are Your Next Steps?.
For on-premise servers, use Upgrading your On-Premise FileWave Server as the detailed upgrade guide. This page is a quick planning checklist so the high-level sequence is easy to find.
Upgrade planning checklist
- Review the target release notes, Known Issues, and the FileWave Official Version Support Statement before choosing the upgrade path.
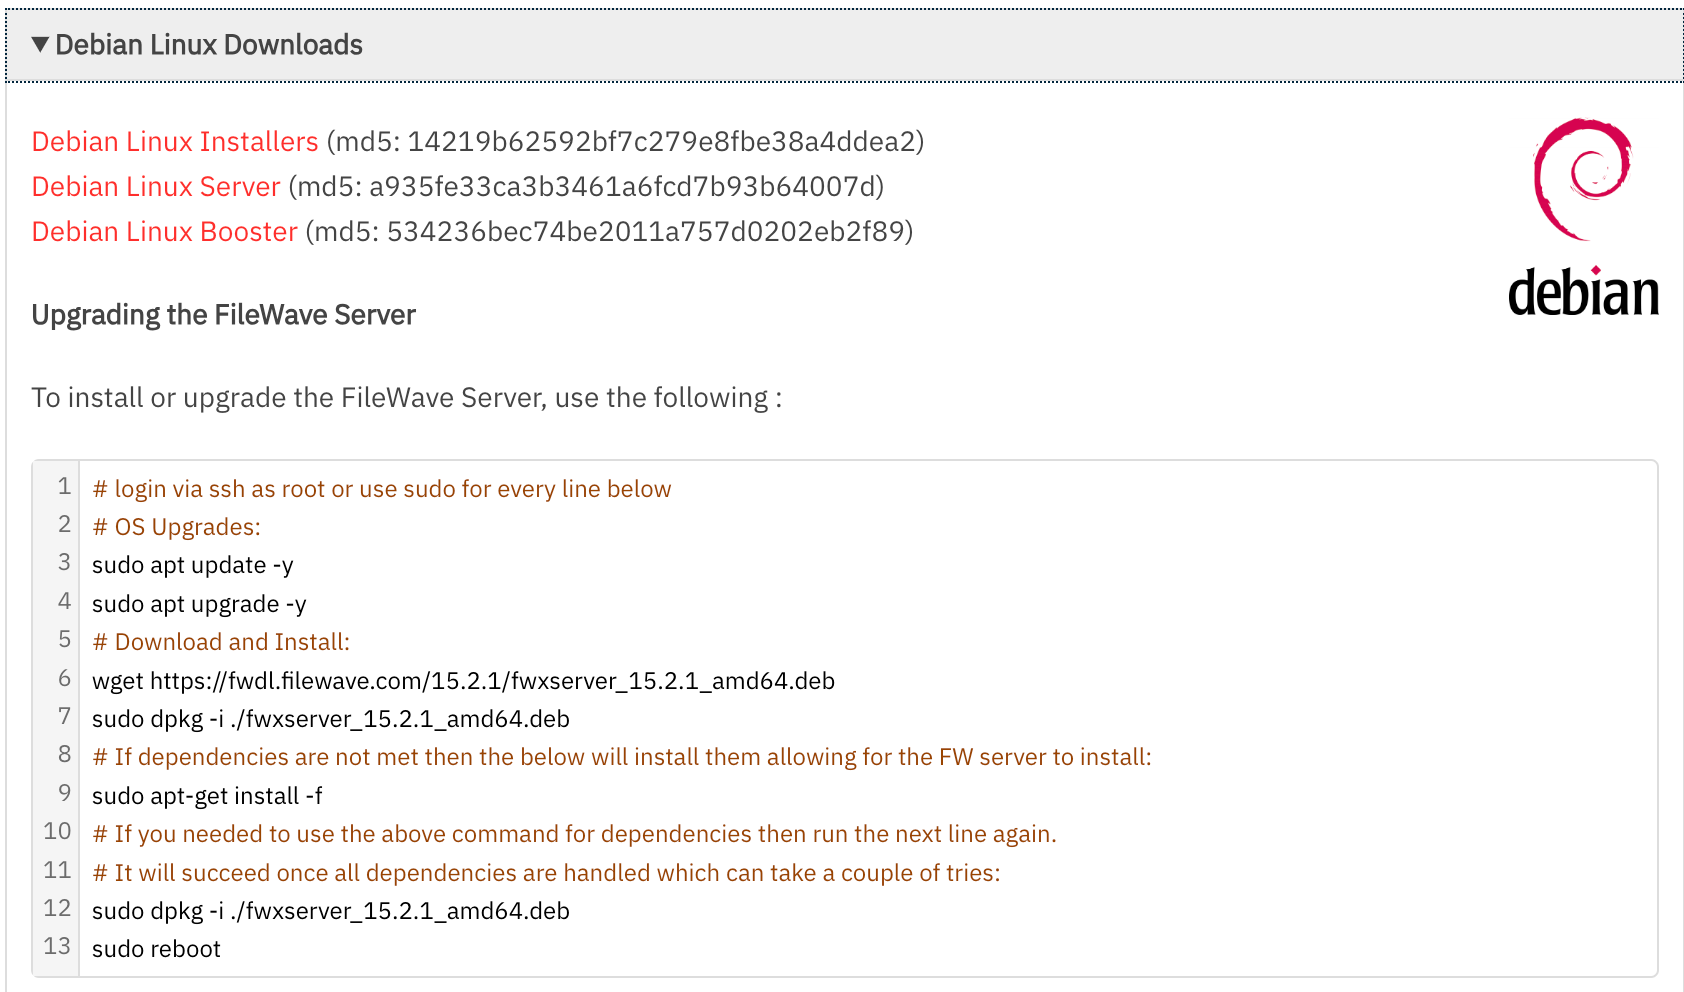
- Use the FileWave Downloads pages to prepare only what the target release actually requires. For macOS servers, download the FileWave Server installer. For Debian servers, use the one-line upgrade command on the download page, or download the
.debpackages if you prefer. FileWave Central auto-upgrades on login in FileWave 16.3.1 and later, so a separate Central download is not normally needed. For FileWave 16.4.0 and later, clients already running 16.3.0 or later use the integrated Client Upgrades workflow; earlier clients still require the Client Upgrade Fileset bridge. See Upgrading FileWave Clients. - Run the server upgrade from the appropriate server-side asset: copy the macOS FileWave Server installer to the server, or run the Debian upgrade script/package workflow from the server. Copy Central or client installers only when your target version and rollout workflow still require a manual application or client upgrade.
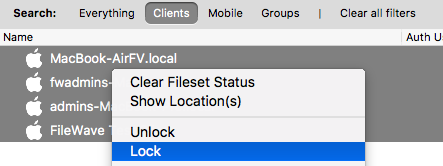
- Before locking devices, confirm they are not already locked for another reason. Lock the devices that should pause content changes during the maintenance window, then run an Update Model.
- Run a current FileWave Server backup. If the server is a virtual machine, also take a VM snapshot using the guidance in the full upgrade article; avoid a live snapshot while FileWave services are actively writing data.
- Upgrade the FileWave Server first, following the instructions for the target version's download page and the detailed upgrade guide. Include any required server OS updates in the maintenance plan.
- Log in with FileWave Central, allow Central to auto-upgrade if prompted, connect to the upgraded server, and verify that the health indicator and a Model Update are successful.
- Unlock one or two test devices, confirm they check in and behave as expected, then either continue testing or unlock the remaining devices that should resume normal management.
Do not treat an empty Client Upgrades view as proof that every client is current. Clients earlier than 16.3.0 are omitted from that view. Reconcile Client Upgrades against an inventory report and bridge legacy clients with the Upgrade Fileset.
When the maintenance window is complete, only unlock devices that were locked for the upgrade. Devices that were intentionally locked beforehand should remain locked.
Securing FileWave Server on the Internet for Remote Device Management
What
This article provides guidance on securely exposing and managing your FileWave server on the internet for remote device management.
When/Why
You might need to expose your FileWave server on the internet to manage devices anywhere they might be, including performing actions like remote wipes. However, this must be done carefully to ensure the security of your server.
How
-
Limit Exposed Services: Consider what services are exposed. For instance, on CentOS VM appliances, WebMin runs on port 10000. It's recommended not to expose this to the internet. Similarly, block SSH to prevent unauthorized access.
-
Allow Only Necessary Ports: Only allow the FileWave ports that are necessary. Refer to the TCP and UDP ports KB article for the list of ports used by FileWave.
-
Apply OS Patches Consistently: Ensure that operating system patches are applied consistently. For Debian, this means running
sudo apt updatefollowed bysudo apt upgrade. Reboot the server if a kernel update is applied. -
Use Complex Passwords: Make sure that the root password on Linux or any passwords for the operating system at all for both macOS and Linux for the FileWave server are complex. This makes it harder for unauthorized users to gain access.
-
Implement Two-Factor Authentication (2FA): Enable two-factor authentication for accessing the FileWave server. This provides an additional layer of security by requiring users to provide a second form of authentication, such as a unique verification code sent to their mobile device. FWAdmin is always present so set that user to an extremely long and complex password.
-
Enable Firewall and Intrusion Detection System (IDS): Configure a firewall to filter incoming and outgoing traffic, allowing only necessary connections. Additionally, set up an intrusion detection system to monitor and alert you about any suspicious activities on your server.
-
Regularly Monitor Server Logs: Continuously monitor the server logs for any signs of unauthorized access attempts or unusual activities. Implement a log management solution to centralize and analyze log data for better security monitoring. This is difficult to do manually, so look at security monitoring tools.
-
Apply FileWave Upgrades: Keep your FileWave server up to date by applying FileWave upgrades when they are released. These upgrades often contain security updates, especially for third-party open-source software like Apache and OpenSSL, which can include critical updates. Starting in FileWave 16.3.0, you should also review Brute Force Protection for Central and Anywhere sign-in protection.
Related Links
- TCP and UDP ports used by FileWave
- Allow External Devices to Connect to the FileWave Server and Boosters
- Brute Force Protection (FileWave 16.3.0 and later)
- How to Disable Apache Version Number Disclosure on FileWave Server
Note: As we move to the next Linux distribution, the guidance will remain the same. This article will be updated with additional recommendations as they are identified.
Remember, security is a continuous process. Always monitor your server for suspicious activity, keep your system up to date, and follow best practices to ensure the integrity and confidentiality of your FileWave server.
FileWave Server Backup and Restore
Summary
Backing up your FileWave server is always a good idea. Back in '97, a friend of mine spilled a pot of coffee on our server rack; you never know when bad things can happen to your hardware. Now, it's bad enough to lose the hardware, but think of all the hours represented by those perfected, irreplaceable FileWave Filesets! In order to prevent this disastrous loss, we have created a script to automatically back up your FileWave Server's database and data files, you can also run these scripts manually if you want.
Current Version
Download macOS / Linux - Version 4.5.6 (Jun 10, 2026)
| server-backup |
 |
If you ever want to see the changes that have been made to this script over time please check out the GitHub repo - jlevitsk/filewave-serverbackup: The script that can backup and restore a FileWave Server (github.com)
Due to the nature of the FileWave databases, using active-backup solutions, such as Time Machine or CrashPlan, can corrupt the FW DB.
Alternate File Systems - Windows and Unix systems treat permissions in completely different ways. If attempting to backup from, for example, a Linux server to a Windows share, data will be backed up successfully, however, permissions will not be preserved. Permissions can and will need to be reset on files after a restore is actioned, and the script to repair permissions is located in the FileWave Server Repair Permissions KB article.
Debian 13 and temporary backup storage
Debian 13 mounts /tmp as tmpfs by default, which means files written to /tmp use memory-backed storage instead of normal disk space. Older versions of this backup script used /tmp as the temporary staging location for the database and configuration archive, so large backups could fail on Debian 13 appliances.
Version 4.5.5 and later no longer use /tmp for large backup staging. The script defaults to /var/tmp/filewave-serverbackup on Linux and /private/var/tmp/filewave-serverbackup on macOS. These defaults can be changed with the FW_BACKUP_TEMP_ROOT environment variable or the temp_root variable near the top of the script.
Example using a custom disk-backed temporary location:
FW_BACKUP_TEMP_ROOT=/path/to/disk-backed-temp /path_to_script/backup_server_osx_linux.sh run "/Volumes/backupFolder" manualTo check whether /tmp is memory-backed on a Debian server, run:
findmnt -no SOURCE,FSTYPE,SIZE,USED,AVAIL,TARGET /tmpIf you must keep an older backup script in place temporarily, Debian 13 can be changed back to disk-backed /tmp by masking the systemd tmp.mount unit and rebooting. Treat this as a workaround, not the preferred backup-script fix.
sudo systemctl mask tmp.mount
sudo rebootTo revert that workaround later and return to Debian 13's default memory-backed /tmp behavior, unmask the unit and reboot:
sudo systemctl unmask tmp.mount
sudo rebootUpdating the backup script
If you already have a backup scheduled on macOS or Linux, replace the script you are already using with the new version shown. Debian 13 servers should use version 4.5.6 or later before relying on scheduled backups.
First, let's find out where your existing backup script is located:
sudo crontab -l|awk {'print $6'}The above shows you a line like :
/root/scripts/backup_server_osx_linux.shYou'll probably want to check if the script is newer than what you are using. Use the below command and replace /path/to/ with the path to your script you found in the prior step. You can see the version number of the latest script at the top of this article. Be aware that we only added the script version to the script in 2024 so if no version comes back or some weird text then you can be certain you need to update.
awk '/version=/' /path/to/backup_server_osx_linux.shNow that you are sure you want to update it, the below will show you where to place the file on your server. Please replace '/root/scripts/backup_server_osx_linux.sh' in the last two lines of the instructions below with what was returned to you by the last command before running the following:
wget https://kb.filewave.com/attachments/188 -O backup_server_osx_linux.sh.zip
unzip ./backup_server_osx_linux.sh.zip
# Remember the next 2 lines need to reflect where the script is going...
# Unzip command will place backup_server_osx_linux.sh in the directory named ≈ filewave-serverbackup-4.5.6
cd filewave-serverbackup-*
mv ./backup_server_osx_linux.sh /root/scripts/backup_server_osx_linux.sh
chmod a+x /root/scripts/backup_server_osx_linux.shNote: If you move the Data Folder to another network share, please make sure to update the path as well in the Backup Script.
On Mac OS X and Linux
Warning for macOS - With the added security of macOS Catalina (10.15) and beyond, you will need to give Full Disk Access to Cron, the utility used to run the automated backups. To do this drag and drop Cron (/usr/sbin/cron) into System Preferences > Security & Privacy > Privacy > Full Disk Access
Before you start, please ensure that the script has the execution permission (chmod 755).
The script is used to schedule backups or to run a backup manually. The first parameter passed to the script (required parameter) is "setup" or "run"
Automatic Backup
Use the "setup" parameter to schedule a backup task to run either weekly or daily. The second parameter options are [weekly | daily] and the third is the path to the back folder. For Big Sur servers, be sure the Terminal.app and /usr/sbin/cron have Full Disk Access to allow the cron job to complete successfully.
Examples: (Please use the full path to the script)
/path_to_script/backup_server.sh setup daily "/Volumes/backupFolder"
/path_to_script/backup_server.sh setup weekly "/Volumes/backupFolder"Manual Backup
Use the "run" parameter to run the backup manually right now. The second parameter is the backup folder, and the third parameter is the task mode "manual". The script has to know that it is running manually and not from a cron job.
Examples:
/path_to_script/backup_server.sh run "/Volumes/backupFolder" manualOptional: keep only the newest database/config archives
Each run writes a database/config archive into the backup destination's fw-backups folder using a filename like fwxserver-Config-DB-*.tar.gz. The backup script does not currently include a built-in retention option. If you want simple count-based retention, add the standalone cleanup command below as a second cron line after the backup job or run it manually. Replace the folder path and KEEP value for your environment.
BACKUP_DIR="/Volumes/backupFolder/fw-backups"
KEEP=14
ls -1t "$BACKUP_DIR"/fwxserver-Config-DB-*.tar.gz 2>/dev/null | tail -n +$((KEEP + 1)) | while IFS= read -r old_backup; do
rm -f -- "$old_backup"
doneTest before deleting: replace rm -f -- "$old_backup" with echo "$old_backup" first to confirm which files would be removed. This cleanup only targets old database/config archives. It does not prune the rsynced Data Folder, ipa, media, or fwcld directories because those are mirrored backup data rather than per-run archive files.
Backup log file
The log is saved by default to "/private/var/log/fw_backup.log"
If you want to change the path, edit the script and change the variable "log_file".
Checking Automatic Backups
Please make sure to check your Automated backups periodically to make sure they are still running successfully. The main thing to check is to unzip your most recent zip folder created by the backup and check that inside, you see a “certs” folder, “DB” folder, httpd.conf, httpd_custom.conf, mdm_auth.conf, and a passwords file. You would also want to make sure that inside the DB folder that is created, you see a “mdm-dump.sql” file, and the size of the file is not showing as 0 bytes.

Restoring from Backup
The day may come that you need to restore from backup. This is something you should probably include Technical Support on because if you are at that point then something bad has probably happened. Knowing where to put the files from the backup is easiest found in our Migrating your On-Premise FileWave Server to new Hardware article because it tells you where to move the backup files when restoring and how to bring the database back.
Legacy Backup Script Versions
| **FileWave Server Backup Script for version 3.x** | **FileWave Server Backup Script for version 4.x** | **FileWave Server Backup Script for version 5.6.x or older** |
|---|---|---|
| 999.backupFWXServer.sh.zip | 999.backupFWXServer_v4.sh.zip | 999.backupFWXServer_v5.sh |
| **FileWave Server Backup Script for versions 5.7 through 10.1.1**
(compatible with Mac and Linux) |
FileWave Server Backup Script for versions 5.7 through 10.1.1
( Windows ) |
FileWave Server Backup Script for 10.1.1 through 13.x
( Windows ) |
|---|---|---|
| backup_server_osx_linux.sh.zip | backupScript.zip | backupScriptv2.zip |
On Windows
Windows Server is no longer supported but the below is included for migration purposes. Use a legacy version of the backup script available above.
The Windows script takes two parameters, the path to the backup folder and then the frequency, which can one of these three options [ daily | weekly | now ]
Automatic Backup
Here is an example that shows how you can schedule a daily backup task. (Please use the full path to the script)
C:\_path_to_backup_\backup.bat "D:\MyFolder\FileWave Backups" dailyManual Backup
You can run the backup manually by providing the "now" parameter. This can be useful before you upgrade your FileWave server to a newer version.
Example: (Please use the full path to the script)
C:\_path_to_backup_\backup.bat "D:\MyFolder\FileWave Backups" nowRepair FileWave Server Permissions and Ownership
What
A FileWave Server migration, manual file move, or backup restore can leave server files with the wrong owner or permissions. Services may then fail to start, or the database may become inaccessible.
When to use it
Run the built-in repair command after a migration or restore when logs or service behavior point to incorrect FileWave Server ownership or permissions. Do not use it as a substitute for diagnosing unrelated startup failures.
Repair current FileWave Server releases
FileWave Server 15.5.0 and later include the following management command. Run it in an SSH or Terminal session:
sudo /usr/local/filewave/python/bin/python /usr/local/filewave/django/manage.pyc set_fwxserver_permissions_and_ownershipAfter the command completes successfully, restart the FileWave Server services:
sudo fwcontrol server restartUse the legacy scripts below only for a FileWave Server older than 15.5.0. They are retained for migration or recovery work involving unsupported releases.
Pre FileWave 15.5.0
Select the script that matches the server platform and FileWave release. FileWave 15.5.0 and later should use the built-in command above instead.
When you run this script you must stop the FileWave Server so that none of the files are locked. This is easily done with "sudo fwcontrol server stop" to make sure it is stopped.
You can copy the link to the file from below and do "wget https://kb.filewave.com/attachments/283" for instance for the Debian script and then just unzip it. "unzip ./283" to unzip the script.
Fix Permissions FileWave 15+ (Debian) | Fix Permissions FileWave 14+ (macOS/CentOS)
If you are on an older version of FileWave use of these instead:
Fix Permissions v13.1.5+ | Fix Permissions v13.1.4 or older
You can use wget to download the correct script and then rename it to anything.zip if it didn't get a .zip name and unzip it. You will need to give the script 755 permissions to run it. You will run the command to the path to the script. For the example it is in the current folder we are in so we use ./ before the name.
sudo chmod 755 ./fixfwxserverPermissions15.sh
Run the selected script from its downloaded location:
sudo ./fixfwxserverPermissions15Debian.sh
After the script completes, restart the FileWave Server:
fwcontrol server restart
Related content
Your Hosted FileWave Server Has Been Upgraded - What Are Your Next Steps?
What
The FileWave Operations Team has upgraded your hosted FileWave Server. Use this checklist to confirm the environment and update the administrator tools, Boosters, Imaging Virtual Servers, clients, Kiosk, and enrollment packages that remain under your control.
If your FileWave server is On-Premise and not hosted by FileWave, you may review the KB article here: Upgrading your On-Premise FileWave Server
When/Why
The FileWave Operations Team will email you with the scheduled upgrade date and time. After the hosted Server upgrade is complete, follow the steps below. FileWave maintains the hosted Server, but you remain responsible for FileWave Central, customer-managed Boosters and Imaging Virtual Servers, enrolled clients, and enrollment packages.
How
After you receive confirmation that the hosted Server upgrade is complete, begin by updating FileWave Central.
1. Upgrade FileWave Central (native administrator app)
FileWave Anywhere is updated automatically with the FileWave Server.
Beginning with FileWave 16.3.0, FileWave Central for macOS and Windows checks the Server version when connecting. If Central is older than the FileWave Server, it offers to upgrade to the matching version. You normally do not need to download and install FileWave Central manually.
- Launch FileWave Central and connect to the upgraded FileWave Server.
- When Central reports that a newer matching version is available, accept the upgrade.
- Follow the macOS or Windows installer prompts. The existing version does not need to be uninstalled first.
- Relaunch FileWave Central and reconnect to the Server.
FileWave Central should match the FileWave Server version unless the release notes explicitly state otherwise.
1.1 Manual FileWave Central upgrade
Use the manual fallback
Use this workflow only if the automatic upgrade is unavailable, you previously declined it, or FileWave Support or the release notes direct you to install Central manually.
- Open the FileWave Downloads page and select the FileWave version running on the Server.
- Expand macOS Downloads or Windows Downloads.
- Download macOS Admin or Windows Admin for your workstation.
- Run the PKG or MSI and follow the installer prompts. You do not need to uninstall the existing version first.
- Launch FileWave Central and reconnect to the upgraded Server.
2. Launch FileWave Central (FileWave Admin) to Confirm the Upgrade
Launch FileWave Central to Confirm the Upgrade
The next step once the FileWave Central/Admin application is upgraded is to launch the Central/Admin application to connect to the newly upgraded server. After an upgrade, you always want to connect to the server and verify everything is running and working correctly. This will allow you to spot any issues quickly and, if necessary, contact our FileWave Support Team for assistance.
Do not hesitate to contact our Support Team quickly if you think there may be an issue as that will help us get you back up and running as quickly as possible.
-
Check the warning light in the bottom left-hand corner. You are looking for it to say "Everything is OK" as shown below. If you see the light as yellow or red please select the message to view the error. If you’re unsure how to resolve an error, please contact Support.

-
Make sure Filesets are showing. Select the Filesets tab and make sure you see your Filesets and structure. If you are having issues contact our support team.
-
If you have iOS devices, Select "iOS Inventory" to make sure you see rows of iOS device information. Also, select "Refresh" from the top menu to make sure this information refreshes. While in this tab as well please select an iOS device you know is on to make sure it is trying to check in. If you receive any errors or information is not showing please contact our Support team.
-
Go to the Clients tab of the FileWave Admin and make sure you see your correct group structure and your Clients showing. Remember your FileWave Clients should still be locked so they will not be getting any changes yet.
-
Update the Model, If this fails please contact our Support team
-
Go back to the FileWave client tab and look at one or two clients that you know are on to make sure they are checking in correctly.
-
If everything looks good, move on to upgrading your Boosters and Clients if needed.
3. Upgrading your FileWave Boosters
Upgrading your FileWave Boosters
FileWave Server 16.4 automatically schedules eligible customer-managed Boosters for upgrade after the Server upgrade. The default delay is seven days.
In FileWave Central, open Preferences > Upgrades to review or change the delay. The same pane contains the client-upgrade batch size, error threshold, and report schedule.
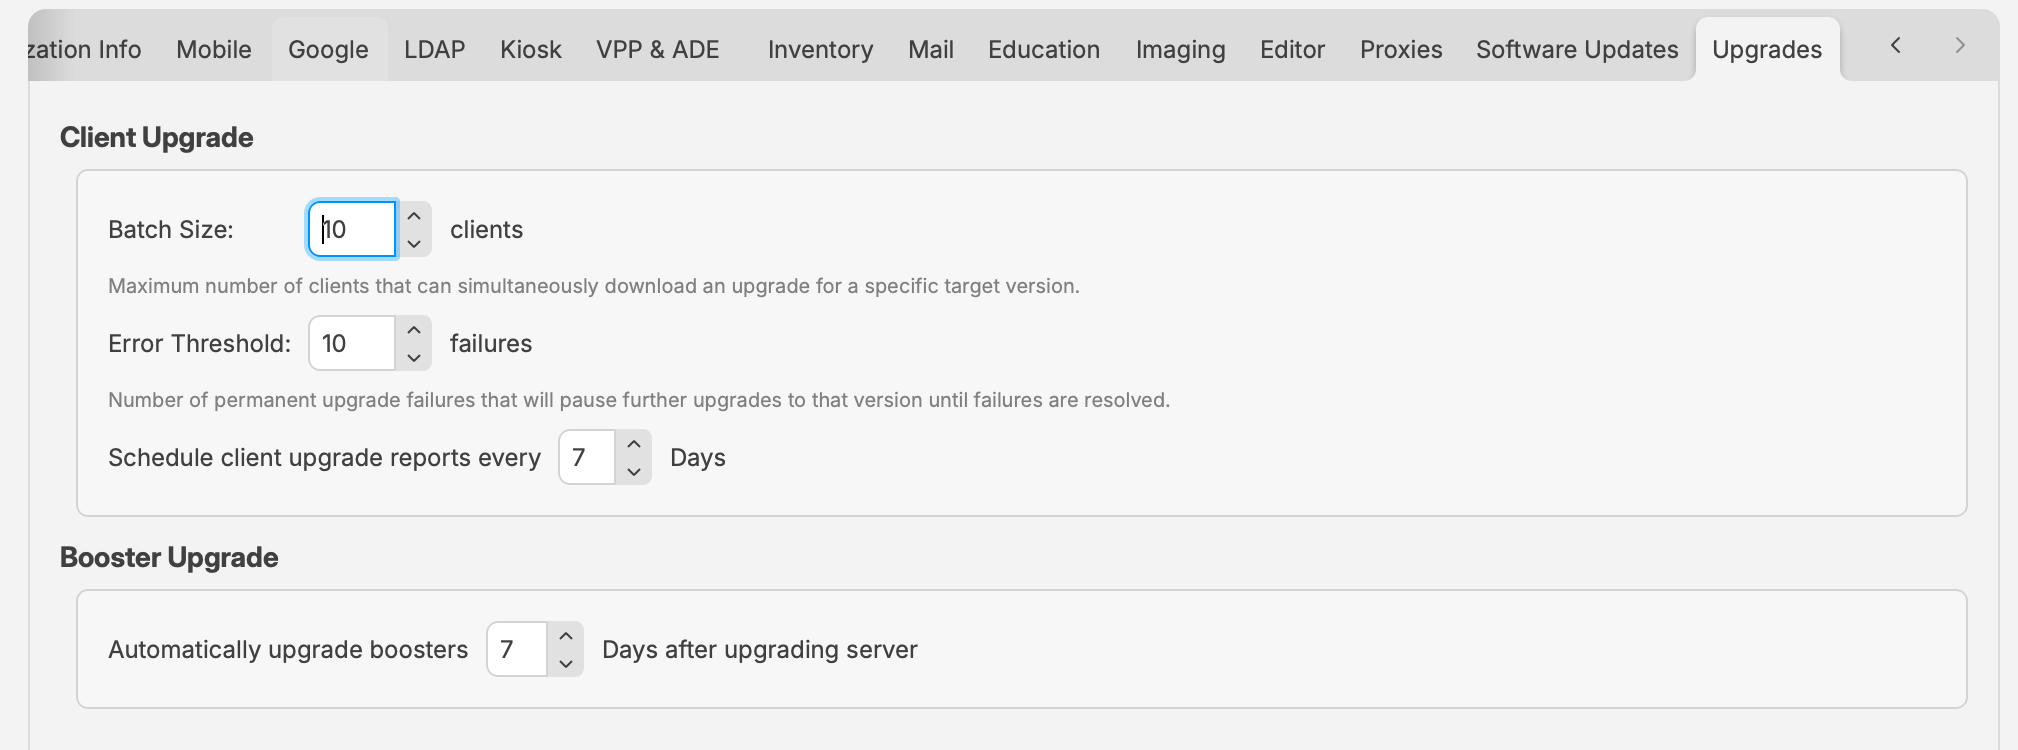
FileWave Central 16.4 centralizes client-upgrade controls and the automatic Booster-upgrade delay.
FileWave 16.4 validates both the reported upgrade state and the installed Booster version. Failed automatic upgrades are retried within defined limits, and one failed Booster does not cancel upgrades for the remaining Boosters.
- Use the Boosters view to monitor upgrade availability, scheduled work, and results.
- Investigate Boosters that remain below the target version or report repeated failures.
- Contact FileWave Support if a hosted upgrade leaves customer-managed Boosters unable to update.
FileWave Servers earlier than 16.4 continue to use their version-specific manual Booster upgrade workflow.
4. Review and upgrade Imaging Virtual Servers
Review and upgrade Imaging Virtual Servers (IVS)
If your environment uses FileWave Network Imaging, include each customer-managed Imaging Virtual Server in the post-upgrade review. The hosted FileWave Server upgrade does not upgrade the IVS appliance.
Do not use the IVS Upgrade action in FileWave Central for an IVS connected to a FileWave-hosted Server. Hosted customers must upgrade each IVS from the appliance console or a stable SSH session using the IVS one-line command on the matching FileWave Downloads page.
- Confirm that no image capture or deployment operation is running.
- Open the Downloads page for the version now running on the hosted FileWave Server. For FileWave 16.4.0, open FileWave Version 16.4.0 — Debian Linux Downloads.
- Expand Debian Linux Downloads and locate Upgrading a IVS. Use the IVS command—not the FileWave Server or Booster command.
- Open the IVS console or connect over SSH as
fwadmin, then run the published command withsudo. Keep the generatedscreensession running until the upgrade and any required Debian work finish. - After the IVS reboots, confirm that Central reports the intended IVS version and healthy Imaging status.
- Run a controlled imaging validation before returning the IVS to normal production use.
Do not begin an IVS upgrade while image capture or deployment is active. Allow those operations to finish before maintenance.
- FileWave IVS 16.3.0 and later require Debian 13. The current one-line upgrade command handles the supported Debian upgrade when needed.
- If a customer-managed IVS connected to a hosted FileWave Server cannot enroll or upgrade, contact FileWave Support.
See FileWave Network Imaging / IVS Overview for the hosted and on-premises workflow boundaries.
5. Upgrading FileWave Clients
Client upgrades do not have to begin immediately after the hosted Server upgrade, but keeping clients current is strongly recommended. The correct workflow depends on both the FileWave Server version and the client version.
Do not use a custom client PKG or MSI to upgrade an already enrolled device. Custom client packages are for new installations and enrollment. Use integrated client upgrades or the appropriate Upgrade Fileset.
5.1 Integrated upgrades for clients running 16.3 or later
Upgrade clients through Software Update
When the FileWave Server is running 16.4 or later, macOS and Windows clients already running FileWave Client 16.3 or later can be upgraded through Software Updates > Client Upgrades.
Only clients already running 16.3.0 or later appear in Client Upgrades. Clients earlier than 16.3.0 are absent and still require the Upgrade Fileset bridge. The message All Clients Up to Date means no eligible client has a pending integrated upgrade; it does not prove that every managed client is current.
Early Access/Beta: The toolbar scheduling action is for non-Beta upgrades. To install the Beta client, select the eligible client or group, right-click it, and choose Schedule Beta Upgrade.
The integrated workflow stages upgrades in controlled batches, monitors progress, retries transient failures, pauses a target version when the configured permanent-failure threshold is reached, and provides reporting.
- Review Preferences > Upgrades and confirm the batch size, error threshold, and report schedule.
- Open Software Updates > Client Upgrades and select the target client version.
- Start with a representative pilot group.
- Monitor download, installation, retry, and failure status before expanding the rollout.
Before declaring the fleet current, use an Inventory Report to find clients earlier than 16.3.0. See Upgrading FileWave Clients for the complete eligibility, empty-state, production, and Beta workflow.
5.2 Upgrade Fileset bridge for earlier clients
Bridge clients running versions earlier than 16.3
Clients running versions earlier than FileWave Client 16.3 must first use the macOS or Windows Upgrade Fileset from the FileWave Downloads page. The FileWave 16.4 Upgrade Filesets include a client-version requirement and are skipped on clients already running 16.3 or later.
- Open the FileWave Downloads page and download the macOS or Windows Upgrade Fileset for the target FileWave version.
- Import the downloaded
.filesetinto FileWave Central. - Deploy it to a small test group of clients running versions earlier than 16.3 and update the Model.
- Confirm that the test clients upgraded successfully before expanding the deployment.
- After the bridged clients reach 16.3 or later, manage future upgrades through the integrated Software Update workflow.
Each Upgrade Fileset also includes operating-system requirements. A client on an unsupported operating system remains on its original FileWave Client version.
Windows upgrade troubleshooting: If a Windows Client Upgrade Fileset does not complete, inventory does not show the new version, or the client service does not restart, see Troubleshooting Windows Client Upgrade Fileset Issues.
6. Confirm iOS/iPadOS Kiosk licensing
Confirm iOS/iPadOS Kiosk licensing
FileWave Kiosk for iOS and iPadOS is distributed through the Apple App Store as a VPP/Apps and Books application. Before upgrading, confirm that FileWave is synchronizing with Apple School Manager or Apple Business Manager and that enough free FileWave Kiosk licenses have been acquired.
See Automatic updating of iOS/iPadOS Kiosk for the complete workflow.
7. Prepare macOS and Windows client packages for new enrollments
Prepare client packages for new enrollments
FileWave uses custom macOS and Windows client packages for initial enrollment and new installations. These packages are not the upgrade mechanism for already enrolled clients.
FileWave Server 16.4 or later
- In FileWave Central, open Preferences > Mobile.
- Select macOS or Windows.
- Select Show settings and review the package configuration.
- Select Build macOS client package or Build Windows client package.
- After the build completes, use the corresponding Download button when you need the installer for a new deployment.
- Enable Keep the package up to date when FileWave should rebuild the package after future Server upgrades.
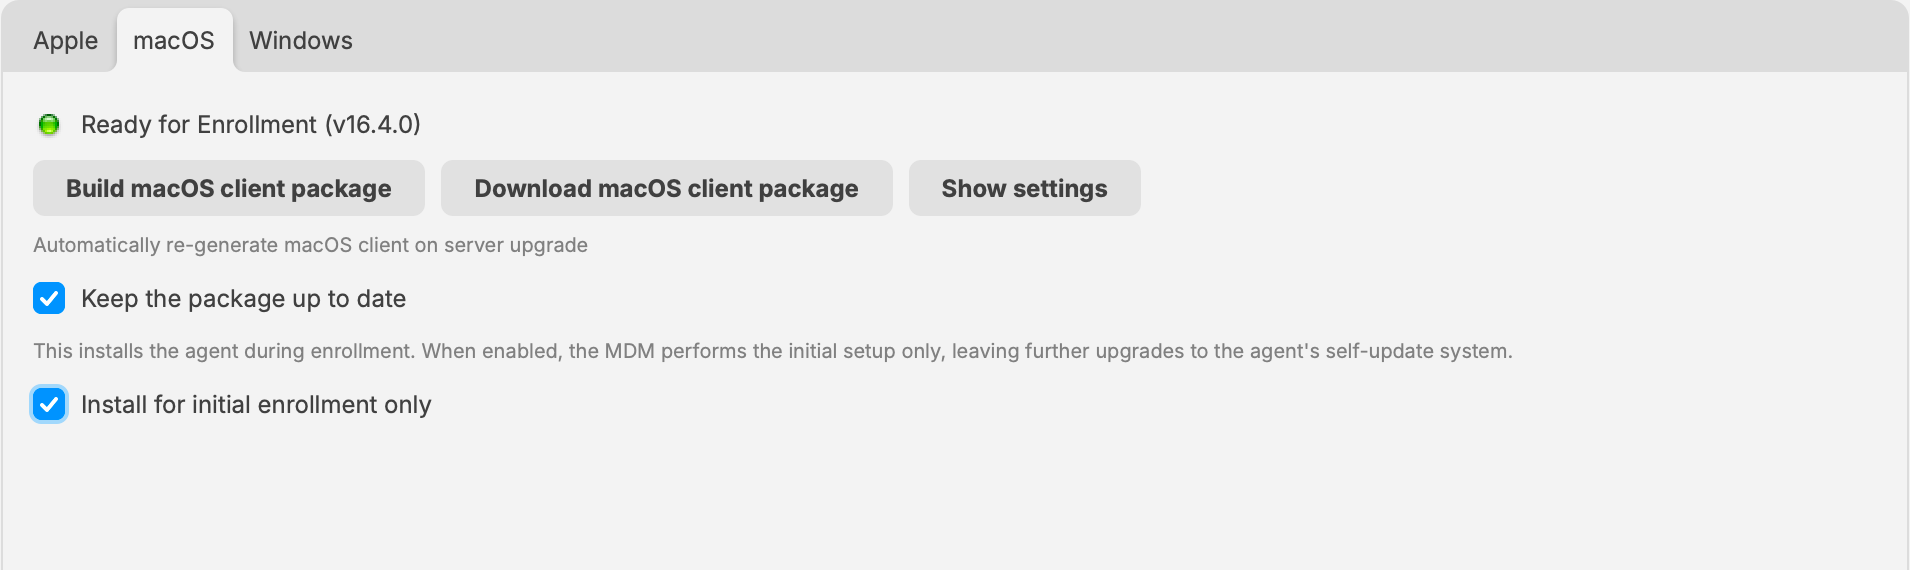
FileWave Server 16.4 manages the macOS enrollment package directly in FileWave Central.
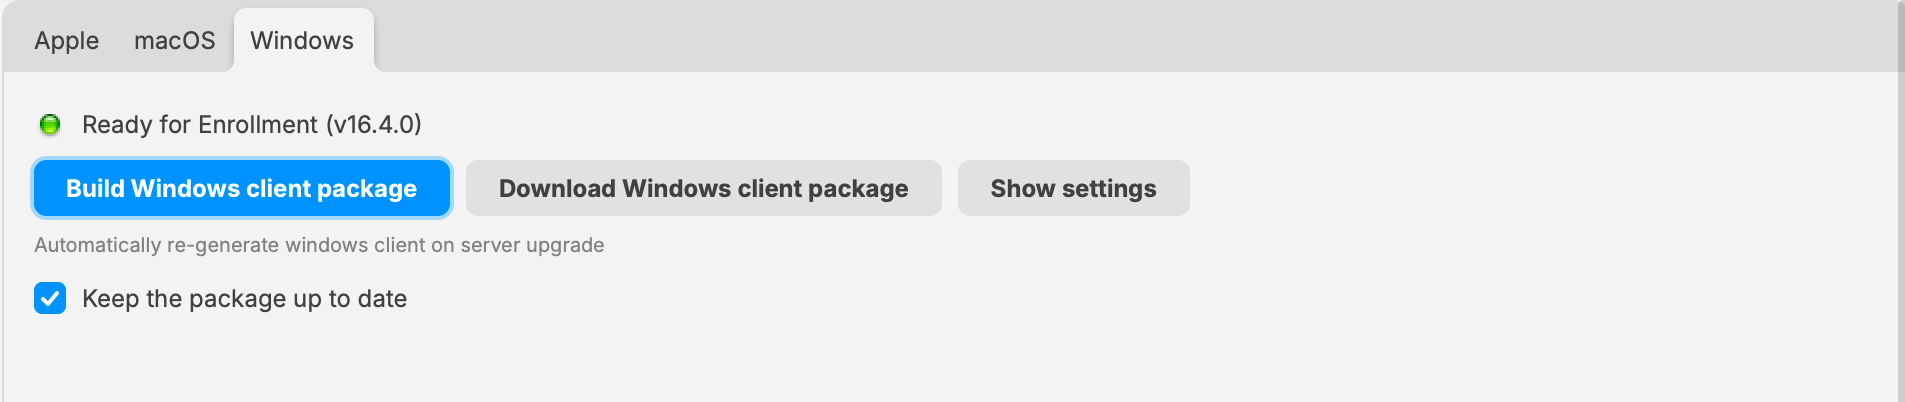
FileWave Server 16.4 manages the Windows enrollment package directly in FileWave Central.
FileWave Server earlier than 16.4
Earlier supported FileWave Server versions continue to use custom.filewave.com until the Server is upgraded to 16.4.
- Build the required custom PKG or MSI at custom.filewave.com.
- Download and unzip the package.
- In FileWave Central, open Preferences > Mobile and select the applicable macOS or Windows pane.
- Upload the unzipped installer, wait for the successful-upload message, then select OK.
- Update the Model when the change requires distribution.
Do not deploy either package to an already enrolled device as an upgrade. Use the client-upgrade workflow described in section 5.
Related Content
Upgrading your On-Premise FileWave Server
What
Use this guide to upgrade an on-premises FileWave Server and then update or verify the administrator tools, Boosters, Imaging Virtual Servers, clients, Kiosk, and enrollment packages that remain under your control.
If your FileWave server is hosted by FileWave, you may review the KB article here: Your Hosted FileWave Server Has Been Upgraded - What Are Your Next Steps?
When/Why
Follow the sequence below to protect the existing environment, complete the Server upgrade, verify service health, and move each managed component to the appropriate post-upgrade workflow.
How
The Server upgrade is completed first. FileWave Central, Boosters, Imaging Virtual Servers, clients, Kiosk, and enrollment packages are handled after the Server is confirmed healthy.
Before upgrading, please visit the Known Issues tab of the Known Issues.
Upgrade FileWave components in this order:
- Lock desktop and iOS/iPadOS clients.
- Back up the FileWave Server.
- Upgrade the FileWave Server software.
- Upgrade FileWave Central.
- Connect with FileWave Central and verify the environment.
- Upgrade FileWave Boosters.
- Review and upgrade Imaging Virtual Servers.
- Upgrade FileWave Clients.
- Confirm iOS/iPadOS Kiosk licensing.
- Prepare macOS and Windows client packages for new enrollments.
1. Lock Desktop and iOS Clients
It's always a good idea to lock all your client devices before upgrading your FileWave components. That way you can verify that the server is running correctly and not worry about your macOS and Windows clients getting any of the changes. Keep in mind that Chromebooks cannot be locked - you can sort by platform to skip Chromebooks and use shift-click to select all of your Windows and macOS devices.
-
Highlight all of your Desktop devices → right click → select "Lock".
-
Change the filter to mobile, highlight all iOS devices → right click → select "Lock"

What is a Lock?
See Locking Devices
2. Backup your FileWave server
There are two ways to do so depending on your server. If you are running a Linux or macOS server you need to use the backup script that we provide to backup your server. Please always run a manual backup with the script we offer before starting the upgrade. We offer this knowledge base article for this process and the commands you will need to run as well as a way to check the backup file.
If you are running a virtual machine for your FileWave server you are still able to use the backup script we offer but are also able to take a snapshot of the server in your virtual environment as a backup. Before taking the snapshot of the server please turn off the virtual machine so that FileWave server services are not running when you are backing up the Virtual Machine. This will prevent any issues with fragmented information in the backup.
If you do not want to stop the VM, you can use the below commands to stop the FileWave services and then take the backup.
Stop the FileWave Server Services (for VM Snapshot only)
sudo fwcontrol server stopAfter the backup is complete, please start the services again using the following command
sudo fwcontrol server start3. Upgrading the FileWave Server software
Once you have a backup of your FileWave server created you will first Upgrade the FileWave server software before upgrading your FileWave Central (FileWave Admin Native) app, FileWave boosters, or FileWave clients. If you upgrade your FileWave clients' software first before upgrading the server, for example, your clients may break the connection to the server. Upgrading the FileWave server is not as intimidating as it may seem as it is an in-place upgrade and you do not need to uninstall anything first or stop the FileWave server services. Below you will find sections for macOS, Linux, and Windows Server.
Beginning with FileWave 16.3, the Server upgrade performs extended database-integrity checks and migrates the embedded database to PostgreSQL 18. Upgrading to FileWave 16.4 is supported only from FileWave 16.0.0 or later. If the Server is older than 16.0.0, first upgrade to 16.0.0—16.2.x is recommended—and verify that intermediate upgrade before proceeding to 16.4. If the PostgreSQL 18 migration fails, FileWave falls back to PostgreSQL 17 and continues in degraded mode. Stop and contact FileWave Support before proceeding.
Example upgrade path: 13.3.1 → 14.7.2 (PostgreSQL 12) → 16.0/16.1/16.2.x (PostgreSQL 12 + 17) → 16.4.0 (PostgreSQL 17 + 18).
3.1 macOS Server Upgrade
macOS Server Upgrade
The macOS server upgrade is similar to installing any other pkg software on a macOS machine.
-
On your macOS FileWave server go to the Knowledge Base → Downloads → select the most recent version of FileWave
FileWave Downloads Page
-
You will then scroll down on the page until you see "macOS Installers" and select it. This will download all of the FileWave Installers for the version of FileWave you want to upgrade to in a .dmg file. If you only want to upgrade the server, select “macOS Server”.

-
Run the installer you just downloaded. If you downloaded the bundle, double-click on the FileWave Server installer after mounting the dmg.
-
The installer can take a while to run but when it is finished you will be presented with the window below and you are finished with upgrading the server. (If the upgrade reports a failure please contact our Support Team immediately and they can assist you with it)

-
You are now done upgrading the server and will then move to upgrade your FileWave Central (FileWave Admin Native) app.
3.2 Linux Server Upgrade
Linux Server Upgrade
The Linux server upgrade can be intimidating since it will all be done in Terminal but we try to make it as simple as possible for you.
-
Go to the Knowledge Base → Downloads → select the most recent version of FileWave
FileWave Downloads Page -
Scroll down on the page until you see "Linux Downloads". You can download the .deb and move it to the server or just run the one-liner command under Upgrading Linux Servers → Upgrading the FileWave Server to download and install all at once. There is also a one-liner command there for Boosters as well as IVS if you have them.
-
Connect to your FileWave Linux server and run the command to install. If you don’t have direct access to the server, you can connect using SSH in Terminal or Putty on Windows.
-
Once you have run the command on your server it can take a little while to finish and you will be presented with a similar message as below. If you see that the installation failed please contact our support team immediately and they can assist you with this. You will see more information on your session but this will show at the end of the messages.

-
Confirm your installed FileWave Version by running the following:
fwcontrol server versionYou are now done upgrading the server and will then move to upgrade FileWave Central (FileWave Admin Native App).
3.3 Windows Server Migration
Windows Server Migration
No longer compatible with FileWave Server 14+
Please contact Professional Services to migrate your server to Linux.
4. Upgrade FileWave Central
FileWave Anywhere is updated automatically with the FileWave Server.
Beginning with FileWave 16.3.0, FileWave Central for macOS and Windows checks the Server version when connecting. If Central is older than the FileWave Server, it offers to upgrade to the matching version. You normally do not need to download and install FileWave Central manually.
- Launch FileWave Central and connect to the upgraded FileWave Server.
- When Central reports that a newer matching version is available, accept the upgrade.
- Follow the macOS or Windows installer prompts. The existing version does not need to be uninstalled first.
- Relaunch FileWave Central and reconnect to the Server.
FileWave Central should match the FileWave Server version unless the release notes explicitly state otherwise.
4.1 Manual FileWave Central upgrade
Use the manual fallback
Use this workflow only if the automatic upgrade is unavailable, you previously declined it, or FileWave Support or the release notes direct you to install Central manually.
- Open the FileWave Downloads page and select the version running on the Server. If you downloaded the macOS Server bundle, the matching Central installer is also available in that bundle.
- Download macOS Admin or Windows Admin for the administrator workstation.
- Run the PKG or MSI and follow the installer prompts. You do not need to uninstall the existing version first.
- Launch FileWave Central and reconnect to the upgraded Server.
5. Launch FileWave Central (FileWave Admin) to Confirm the Upgrade
Launch FileWave Central (FileWave Admin) to Confirm the Upgrade
The next step once the FileWave Central/Admin application is upgraded is to launch the Central/Admin application to connect to the newly upgraded server. After an upgrade, you always want to connect to the server and verify everything is running and working correctly. This will allow you to spot any issues quickly and, if necessary, contact our FileWave Support Team for assistance.
Do not hesitate to contact our Support Team quickly if you think there may be an issue as that will help us get you back up and running as quickly as possible.
-
Check the warning light in the bottom left-hand corner. You are looking for it to say "Everything is OK" as shown below. If you see the light as yellow or red please select the message to view the error. If you’re unsure how to resolve an error, don't hesitate to get in touch with Support.
-
Make sure Filesets are showing. Select the Filesets tab and make sure you see your Filesets and structure. If you are having issues contact our support team.
-
If you have iOS devices, please navigate to Clients view, filter by Mobile devices and select an iOS device you know is on to make sure it is able to check in after being unlocked (it also helps to sort by the Last Connect column; if the most recent checkin is within the last minute or so, should be copacetic). If you receive any errors or information is not showing please contact our Support team.
-
Go to the Clients tab of the FileWave Admin and make sure you see your correct group structure and your Clients showing. Remember your FileWave Clients should still be locked so they will not be getting any changes yet.
-
Update the Model, If this fails please contact our Support team
-
Go back to the FileWave client tab and unlock one or two clients that you know are on to make sure they are checking in correctly. We suggest checking a couple of machines before unlocking all your clients.

-
After you’re confident these devices are working correctly, you can select all of your devices and unlock them.
-
If everything looks good, move on to upgrading your Boosters and Clients if needed.
6. Upgrade FileWave Boosters
Upgrade FileWave Boosters
FileWave Server 16.4 automatically schedules eligible Boosters for upgrade after the Server upgrade. The default delay is seven days.
In FileWave Central, open Preferences > Upgrades to review or change the delay. This pane also contains the client-upgrade batch size, error threshold, and report schedule.
FileWave Central 16.4 centralizes client-upgrade controls and the automatic Booster-upgrade delay.
FileWave 16.4 validates both the reported upgrade state and the installed Booster version. Failed automatic upgrades are retried within defined limits, and one failed Booster does not cancel upgrades for the remaining Boosters.
- Use the Boosters view to monitor upgrade availability, scheduled work, and results.
- Investigate Boosters that remain below the target version or report repeated failures.
- Contact FileWave Support if a Booster cannot complete the upgrade.
FileWave Servers earlier than 16.4 continue to use their version-specific manual Booster upgrade workflow.
7. Review and upgrade Imaging Virtual Servers
Review and upgrade Imaging Virtual Servers (IVS)
If your environment uses FileWave Network Imaging, include each Imaging Virtual Server in the upgrade plan. Upgrading the FileWave Server does not automatically make an IVS earlier than 16.4 eligible for Central-managed upgrades.
IVS 16.4.0 and later: In FileWave Central, open Preferences > Imaging to view available IVS updates, schedule an upgrade, and monitor its progress and outcome. FileWave handles the package download, installation, and required reboot.
Do not begin an IVS upgrade while image capture or deployment is active. FileWave blocks the upgrade during active imaging so those operations can finish safely.
IVS earlier than 16.4.0: Perform one final manual IVS upgrade using the version-specific package and instructions from FileWave Downloads. After the IVS reaches 16.4.0, future upgrades can be managed through Central.
- FileWave IVS 16.3.0 and later require Debian 13.
- After the reboot, confirm that Central reports the intended IVS version and healthy Imaging status.
- Resolve any enrollment, certificate, or connectivity issue before starting imaging work again.
See FileWave Network Imaging / IVS Overview for the complete version-aware upgrade workflow.
8. Upgrade FileWave Clients
Client upgrades do not have to begin immediately after the Server upgrade, but keeping clients current is strongly recommended. The correct workflow depends on both the FileWave Server version and the client version.
Do not use a custom client PKG or MSI to upgrade an already enrolled device. Custom client packages are for new installations and enrollment. Use integrated client upgrades or the appropriate Upgrade Fileset.
8.1 Integrated upgrades for clients running 16.3 or later
Upgrade clients through Software Update
When the FileWave Server is running 16.4 or later, macOS and Windows clients already running FileWave Client 16.3 or later can be upgraded through Software Updates > Client Upgrades.
Only clients already running 16.3.0 or later appear in Client Upgrades. Clients earlier than 16.3.0 are absent and still require the Upgrade Fileset bridge. The message All Clients Up to Date means no eligible client has a pending integrated upgrade; it does not prove that every managed client is current.
Early Access/Beta: The toolbar scheduling action is for non-Beta upgrades. To install the Beta client, select the eligible client or group, right-click it, and choose Schedule Beta Upgrade.
The integrated workflow stages upgrades in controlled batches, monitors progress, retries transient failures, pauses a target version when the configured permanent-failure threshold is reached, and provides reporting.
- Review Preferences > Upgrades and confirm the batch size, error threshold, and report schedule.
- Open Software Updates > Client Upgrades and select the target client version.
- Start with a representative pilot group.
- Monitor download, installation, retry, and failure status before expanding the rollout.
Before declaring the fleet current, use an Inventory Report to find clients earlier than 16.3.0. See Upgrading FileWave Clients for the complete eligibility, empty-state, production, and Beta workflow.
8.2 Upgrade Fileset bridge for earlier clients
Bridge clients running versions earlier than 16.3
Clients running versions earlier than FileWave Client 16.3 must first use the macOS or Windows Upgrade Fileset from the FileWave Downloads page. The FileWave 16.4 Upgrade Filesets include a client-version requirement and are skipped on clients already running 16.3 or later.
- Open the FileWave Downloads page and download the macOS or Windows Upgrade Fileset for the target FileWave version.
- Import the downloaded
.filesetinto FileWave Central. - Deploy it to a small test group of clients running versions earlier than 16.3 and update the Model.
- Confirm that the test clients upgraded successfully before expanding the deployment.
- After the bridged clients reach 16.3 or later, manage future upgrades through the integrated Software Update workflow.
Each Upgrade Fileset includes operating-system requirements. A client on an unsupported operating system remains on its original FileWave Client version.
Windows upgrade troubleshooting: If a Windows Client Upgrade Fileset does not complete, inventory does not show the new version, or the client service does not restart, see Troubleshooting Windows Client Upgrade Fileset Issues.
9. Confirm iOS/iPadOS Kiosk licensing
Confirm iOS/iPadOS Kiosk licensing
FileWave Kiosk for iOS and iPadOS is distributed through the Apple App Store as a VPP/Apps and Books application. Before upgrading, confirm that FileWave is synchronizing with Apple School Manager or Apple Business Manager and that enough free FileWave Kiosk licenses have been acquired.
See Automatic updating of iOS/iPadOS Kiosk for the complete workflow.
10. Prepare macOS and Windows client packages for new enrollments
Prepare client packages for new enrollments
FileWave uses custom macOS and Windows client packages for initial enrollment and new installations. These packages are not the upgrade mechanism for already enrolled clients.
FileWave Server 16.4 or later
- In FileWave Central, open Preferences > Mobile.
- Select macOS or Windows.
- Select Show settings and review the package configuration.
- Select Build macOS client package or Build Windows client package.
- After the build completes, use the corresponding Download button when you need the installer for a new deployment.
- Enable Keep the package up to date when FileWave should rebuild the package after future Server upgrades.
FileWave Server 16.4 manages the macOS enrollment package directly in FileWave Central.
FileWave Server 16.4 manages the Windows enrollment package directly in FileWave Central.
FileWave Server earlier than 16.4
Earlier supported FileWave Server versions continue to use custom.filewave.com until the Server is upgraded to 16.4.
- Build the required custom PKG or MSI at custom.filewave.com.
- Download and unzip the package.
- In FileWave Central, open Preferences > Mobile and select the applicable macOS or Windows pane.
- Upload the unzipped installer, wait for the successful-upload message, then select OK.
- Update the Model when the change requires distribution.
Do not deploy either package to an already enrolled device as an upgrade. Use the client-upgrade workflow described in section 8.
Related Content
Reset root password through Webmin (FileWave Appliances Only)
When you setup a new FileWave instance, you most certainly don't want to leave the password for the root user as filewave. This document walks you through changing the password using the included Webmin interface (on v 12.x and higher virtual appliances only). Note that in 15.5.0 we introduced a forced password change and moved away from logging in as root. On 15.5.0 and newer you'll login as "fwadmin" as the user and "filewave" as the password but it will force you to change the password on first login.
Step-by-step guide
- First, we simply need to login to the Webmin interface through your browser of choice. You'll be able to find the address to use from the VM window itself as shown below:

2. Now, take that address and place it in your browser. Note that you'll get a warning about the certificate...this is simply because it is a self-signed cert. You can ignore that warning and proceed to the site:

Note that the Webmin interface is on port 10000, so that port will have to be open from your workstation to the server for the website to work correctly.
3. When you first get to the site, you'll be presented with a login window. The user will be root, and the password will be filewave as the default (or a password you have already changed it to):

4. Once logged in, we'll go to the System section, and click on the link to Change Passwords:

5. Then, we'll choose the root user:

6. Just enter and confirm your new password, then click the Change button:

7. You'll get a confirmation that the password was successfully changed:

8. That's it! You have successfully reset/changed your FileWave appliance root password.
Migrating your On-Premise FileWave Server to new Hardware
Migration Process
When looking at migrating your FileWave server we recommend contacting our FileWave support team for an explanation of this process if any part of it doesn't make sense. Migrations are safe for you to do as long as you make sure you ensure that you Lock your clients and use the latest Backup script as mentioned in the next sections of this guide. If you'd like to hire Professional Services to do this entire process with you, we have a simple flat rate for migrations.
Your existing FileWave Server must be version 13.3.1 or higher before you can upgrade to FileWave 14.7.2 and then from 14.7.2 you can upgrade to 15.2.1. The minimum memory requirement for FileWave 14+ is 8GB and ensure you give at least the same amount of disk space to the new Server. Larger Servers can benefit from more RAM, CPU, and SSD storage.
If you need an older install of FileWave to complete this migration you should be able to find it in Downloads.
The below table gives you an example of the path to get to the latest FileWave running on Debian. Note that you can also run macOS for FileWave Server, and that is included in the steps of this article. As of December 2023, it is preferred to set up a new Server on Debian Linux, and the below table should help you understand how to get there. We are not planning on dropping macOS support for FileWave Server.
| Platform | Step 1 | Step 2 | Step 3 | Step 4 |
| Windows | Upgrade to 13.3.1 (Win) | Migrate to 14.7.2 (CentOS) | Upgrade to 15.2.1 (CentOS) | Migrate to 15.2.1 (Debian) |
| CentOS Linux | Upgrade to 15.2.1 (CentOS) | Migrate to 15.2.1 (Debian) | ||
| macOS | Upgrade to 15.2.1 (macOS) | Migrate to 15.2.1 (Debian) | ||
| Debian Linux | Nothing to do. |
1. Lock Desktop Clients
You must Lock all of your Desktop clients before migrating your FileWave server. That way, you can verify that the new server is running correctly and prevent issues with your macOS and Windows Clients if the migration is not successful. To Lock the clients, highlight all of your Desktop devices → right click on them → select "Lock" and then perform a Model Update so that the server database is 1 model ahead of clients.
Locking a device binds that client to the current model number. Meaning, that if something unexpected should happen during a migration or update, a connecting client ignores the new manifests from the server. See: Locking Devices
2. Backup your FileWave server for the migration
The backup you create for your FileWave server is what you will use to migrate your server to your new hardware. For this, you will need to use the backup script that we provide to backup your server. This is the only way to make sure you pull all of the necessary files to your new server and will not lose any information. We offer this knowledge base article for this process and the commands you will need to run as well as information on checking the backup file.
The backup script is changed. Even if you currently use the script, please check that you are using the latest version.
Ideally, you would download the script and make sure there is enough free space and then run a command like the below one to make a fresh backup folder that has all of your config files and data.
sudo ./backup_server_osx_linux.sh run /tmp manualOnce you have created the backup folder with the script we offer, shut down the FileWave server services so that you do not make any changes after running the backup that will be used to migrate servers. You would find "fw-backups" in /tmp if all went well. You can choose a different location if that makes sense for your storage setup. If you make changes on the old server after the backup, the changes will not move over during the migration. To stop the services, you can run the below commands. Do not shut off the old server completely, because this Backup file will need to be transferred in the next few steps.
Do not delete or wipe the old server yet! It is always best to keep the old server and just turn it off for a few weeks after the migration just in case you need any information from the server.
2.1. Stop the FileWave Server
macOS / Linux
sudo fwcontrol server stopWindows
In an Administrator Command Prompt, run the following command. You can also stop all FileWave Services using the Services tool.
fwcontrol server stop3. Migrating to the new Server
Once your backup is completed, it is time to start the migration process to your new FileWave server.
If you have any questions about the process or would like assistance on this, please contact our FileWave support team and they will be able to assist you with this. Also, during the process, if you run into any issues or errors, please contact our support team as soon as possible so they can assist you.
3.1. Download FileWave Server for your new hardware or VM
If you want to Migrate to a Linux Virtual Server, we offer a pre-built appliance that you are able to bring up in your Virtual Environment. You would go to the FileWave Management Suite Downloads page. Scroll to the bottom of the software downloads page for the version of FileWave you need, and you will see the links to download a Virtual Server appliance.
You need to migrate the server to the same version of FileWave that you are currently running. For example, if you are running FileWave 12.1 you must migrate to a FileWave 12.1 server. If you try to migrate from a FileWave 12.1 server to FileWave 12.3 the migration will fail.

If you feel more comfortable installing a clean Debian Linux instance you can also find the .deb installers and instructions on the same download pages. Note that you can run your Linux server in any environment that you like such as Linode or contact Customer Experience about our own hosting solution.
3.2. Setup of the new Server
Initially you will need to have the new Server on a new IP address so that the old Server and the new one can both be online to copy the data over. After the next migration steps there is a step that talks about having the old IP / DNS name on the new Server. For the moment don't make that change. When the replacement server takes on the IP address it should also then be ok for Firewall rules. As a reminder the needed ports are here: Default TCP and UDP Port Usage
For the setup steps of the new server follow this guidance: FileWave Server Setup to ensure that you change the root password and please keep in mind that SSH should not be exposed to the Internet. Once the server is installed on the new host you can continue with the next steps to copy the data and database over to the new host.
Name resolution check: Before continuing, confirm the new server can resolve DNS names and reach package/time sources. If NTP, package downloads, or other hostname-based checks fail, verify the DNS settings on the server itself. On a FileWave appliance, DNS can also be reviewed in Webmin under Networking → Network Configuration → Hostname and DNS Client.
If you find that you need more space in your Linux Appliance then see Expanding the Disk on a FileWave Appliance - CentOS / Debian for the commands to expand the volumes once you set VMWare/HyperV/VirtualBox/UTM to have a larger volume size set.
Also be aware that when you next run apt update and apt upgrade it will clear out /tmp so if you migrate your backup to /tmp on the new server just keep in mind you should not do an OS update until you have completed the migration or you will have to re-copy your data to the new server since /tmp would get emptied before you are ready.
3.3. macOS or Linux server → macOS or Linux Server
This will be the most common migration path moving from macOS or CentOS or even another Debian system to a new Debian Linux system. The folder structure and commands are the same no matter which way you are migrating with these OS. If coming from Windows there is a note on the Database step of restore, but you will almost certainly need help moving from Windows.
If you are using the Virtual Appliance that we offer for Linux you will not need to install the server as it comes pre-installed. Just remember that for a migration the original and new server must be on the same version. If you are migrating to Debian that means upgrading your CentOS or macOS Server to 15.2.0 or higher in order to have a Debian release that aligns with it. For macOS you'll want to consider if the version of FileWave that you are running on the old server is supported on the new one as well.
-
On your workstation go to FileWave Management Suite Downloads Page. (You will select the same release that you are running on your current server. For the screen shots I am migrating to a FileWave 15.2.1 server)
-
For Linux you will then scroll down on the page until you see "Virtual Appliance Downloads". Follow the steps in FileWave Server Setup to at least get an IP address and change the root password on the new appliance. You would want to use a different IP than your old server for now so that you can copy files from the old server to the new one. For macOS you can download the FileWave Server from the macOS Downloads section of the page.

-
Next step would be to connect to your FileWave server. For this there are a few options you are able to use depending on if you are running a macOS or Windows computer as your workstation or if you have direct keyboard/monitor access to the new server. Two options you are able to do is to use ssh to the server using Terminal on macOS or use putty on a Windows machine. For macOS keep in mind that SSH is not enabled by default so you may want to enable it so that you can scp files over or ssh in to it. You'll want to become root if you are not already:
sudo -s -
Once the new server is on your network and reachable, you will Stop the FileWave server services that are running on the new server so that you can restore the backup to it. At this point FileWave should not be running on either the old or the new server.
fwcontrol server stop -
Now we will copy the FileWave backup that you created previously on your old server to the new server. You are able to do this however you would like. Two ways that are most common is by copying the backup to a network share or using scp command on the server. You will need to copy all of the files created in the "/tmp/fw-backups" folder including the zipped folder, Data Folder, ipa folder and any other contents. We would suggest moving it to the /tmp directory on your new FileWave server to keep things simple. For all example commands we will show from that directory.
scp example copying to a new server 192.168.1.10 using root on the remote server. In this example this command is run from the original server and is copying file over to the new server. For macOS remember that root is not enabled by default so use your admin user:
scp -r /tmp/fw-backups root@192.168.1.10:/tmprsync example copying to a new server 192.168.1.10 using root on the remote server. In this example this command is run from the original server and is copying files over to the new server. For macOS remember that root is not enabled by default so use your admin user:
rsync -avz /tmp/fw-backups/ root@192.168.1.10:/tmp/fw-backups/All command examples will be shown as if the backup is in the /tmp directory
Compare Data Folders
After the files are transferred, compare the size of your Data Folder to the one on the original (old) server. You can see this by navigating to the backup files and running the following command. The Data Folder is located in /usr/local/filewave/fwxserver/ on the original server. They should be the same size. If the transferred Data Folder is considerably smaller than the original, redo the transfer.
Command on original server:du -hsx /usr/local/filewave/fwxserver/Data\ Folder/Command on the new server:
sudo -s du -hsx /tmp/fw-backups/Data\ Folder/ - Once the backup has been successfully copied to the new server the next step is to unzip the tar.gz file that is inside of the "/tmp/fw-backups" folder. This zip file contains the configuration and Database files that you will be using for the migration.
Run this command to become root if you didn't already on the last step because all of the next steps will need it.
Move to the location of the backup file. My backup is in the /tmp/ directory of the server.sudo -s
cd /tmp/fw-backups/Then unzip the tar.gz file. The file will be named based on the date it was made.
tar -xf *.tar.gz - The next step is to start moving files from your backup to locations on your new FileWave server. You will need to replace the files already in the location. For the commands below we will move the file that is at the location of the new server so that you are available to replace it easily with your backup. For the commands below the backup is located in the "/tmp/fw-backups" directory of the new server. The commands will be slightly different on your server depending on your file path and name of the backup folder since it is named by default with the day and time the backup was taken.
Move the default certs folder to be called certs.bak
Copy the "certs' folder from your backupmv /usr/local/filewave/certs /usr/local/filewave/certs.bak
Move the default media folder to be called media.bakcp -r /tmp/fw-backups/fwxserver-Config-DB-Jan-12-18--10-34/certs /usr/local/filewave/
Copy the "media" folder from your backup - Sometimes this will be emptymv /usr/local/filewave/media /usr/local/filewave/media.bak
cp -r /tmp/fw-backups/media /usr/local/filewave/Move the default ipa folder to be called ipa.bak
Copy the "ipa" folder from your backup - Sometimes this will be emptymv /usr/local/filewave/ipa /usr/local/filewave/ipa.bak
cp -r /tmp/fw-backups/ipa /usr/local/filewave/Copy the fwxcodes license file from your backup
cp /tmp/fw-backups/fwxserver-Config-DB*/fwxcodes /usr/local/etc/fwxcodesCopy the user_postgresql.conf from your backup
cp /tmp/fw-backups/fwxserver*/user_postgresql.conf /usr/local/filewave/conf/Review settings_custom.py if your old server used custom settings
The backup may include
/usr/local/filewave/django/filewave/settings_custom.py. Review this file before copying it to the new server, and only carry forward custom values that are still required for your environment.
Grafana# Review before copying; do not blindly overwrite the new server's settings. ls /tmp/fw-backups/fwxserver-Config-DB*/settings_custom.py
If you use Grafana then you will likely want to copy over your YML files and database. If you do not have any dashboards that you have setup then you can ignore this step.
fwcld Foldercp -f /tmp/fw-backups/fwxserver-Config-DB-*/grafana.db /usr/local/filewave/instrumentation_data/grafana/ cp -f /tmp/fw-backups/fwxserver-Config-DB-*/prometheus_http_jobs/* /usr/local/etc/filewave/prometheus/conf.d/jobs/http/ cp -f /tmp/fw-backups/fwxserver-Config-DB-*/prometheus_https_jobs/* /usr/local/etc/filewave/prometheus/conf.d/jobs/https/
Copy the custom MSI or PKG if they exist. If they are not in your backup then you can ignore this step.
Data Foldercp -f /tmp/fw-backups/fwcld/FileWaveClient.msi /usr/local/filewave/fwcld/ cp -f /tmp/fw-backups/fwcld/FileWaveClient.pkg /usr/local/filewave/fwcld/
If you are running FileWave server version 13.1.5 or higher, the fwxserver folder is located here: /usr/local/filewave/fwxserver. Please note the server version differences below:
Backup the default "Data Folder" folder to be called Data Folder.bak
Move the "Data Folder" from your backup. Note: In FileWave 13.1.5 and later, the fwxserver directory normally lives in /usr/local/filewave/fwxserver/. On older versions, it was located at /fwxserver/. During server migration, the fwxserver directory is moved, not copied, to prevent having two full copies consuming disk space on the new server.mv /usr/local/filewave/fwxserver/Data\ Folder /usr/local/filewave/fwxserver/Data\ Folder.bak
mv /tmp/fw-backups/Data\ Folder /usr/local/filewave/fwxserver/Apache files
Backup the "httpd_custom.conf" file on the new server.
mv /usr/local/filewave/apache/conf/httpd_custom.conf /usr/local/filewave/apache/conf/httpd_custom.conf.bakCopy the "httpd_custom.conf" file from your backup.
cp -r /tmp/fw-backups/fwxserver-Config-DB-Jan-12-18--10-34/httpd_custom.conf /usr/local/filewave/apache/conf/Backup the "mdm_auth.conf" file on the new server.
mv /usr/local/filewave/apache/conf/mdm_auth.conf /usr/local/filewave/apache/conf/mdm_auth.conf.bakCopy the "mdm_auth.conf" file from your backup.
cp -r /tmp/fw-backups/fwxserver-Config-DB-Jan-12-18--10-34/mdm_auth.conf /usr/local/filewave/apache/conf/Move the passwd files from the backup to the new server.
Move the "passwords" and "passwords.digest" file from the new server. (You may not have a passwords.digest file. If so you can skip without any issues).
mv /usr/local/filewave/apache/passwd/passwords /usr/local/filewave/apache/passwd/passwords.bak mv /usr/local/filewave/apache/passwd/passwords.digest /usr/local/filewave/apache/passwd/passwords.digest.bakCopy the "passwords" and "passwords.digest" file from the new server. (You may not have a passwords.digest file. If so you can skip without any issues).
cp -r /tmp/fw-backups/fwxserver-Config-DB-Jan-12-18--10-34/passwords /usr/local/filewave/apache/passwd/ cp -r /tmp/fw-backups/fwxserver-Config-DB-Jan-12-18--10-34/passwords.digest /usr/local/filewave/apache/passwd/ -
The next step is to get the database restored on the new server.
Database restore
Open a terminal session and give yourself root access for the next commands if you are not already root from the prior steps. After entering the command you will need to type in the admin credentials for the new server.sudo -sFirst, you need to start the postgres process on your new FileWave server. You can do so with the below command.
FileWave server 13.1.5 and newer:
sudo -u postgres /usr/local/filewave/postgresql/bin/pg_ctl start -w -D /usr/local/filewave/fwxserver/DB/pg_data -m fastFileWave server 13.1.3 and below only. Do not use the next command with anything newer:
sudo -u postgres /usr/local/filewave/postgresql/bin/pg_ctl start -w -D /fwxserver/DB/pg_data -m fastOnce postgres has been started you will now need to access the Database on the server using the below command.
/usr/local/filewave/postgresql/bin/psql postgres postgresThen you will need to drop the MDM table of the database
drop database mdm;Create a table you are then able to restore your mdm-dump.sql file to
create database mdm OWNER postgres ENCODING 'UTF8' TEMPLATE template0;Quit out of the Database with the below command:
\qNow you need to run the restore on the mdm-dump.sql file on your new server. You can do so with the below command. For my command the "mdm-dump.sql" file is located in the "/tmp/fw-backups" directory but the command you run will match the location of your backup. This command can take a little while to run. If you see any errors at the end of the output there is most likely an issue with the migration and please contact our FileWave support team for assistance. If you are migrating from FileWave Server on Windows please see 3.2.2. Windows Server → macOS or Linux before running the next command.
/usr/local/filewave/postgresql/bin/psql -U postgres mdm < /tmp/fw-backups/fwxserver-Config-DB-Jan-12-18--10-34/DB/mdm-dump.sqlOnce the command finishes we will now need to start running the migration for the Database manually. First migration you will run with the below command.
/usr/local/filewave/python/bin/python /usr/local/filewave/django/manage.pyc migrate --no-input --fake-initialThen we will need to do a server migration which can be done with the command below.
/usr/local/sbin/fwxserver -M -
Run the FileWave Server Repair Permissions script with sudo to fix the server's folder permissions and ownerships. If you do not do this step, then your server may not work correctly until you do.
-
After the permissions repair command finishes you are almost done with migrating the information for the server. The next step is to restart the FileWave services to start checking if the migration has completed successfully. This can be done with the below commands to stop and start the services.
Stop the FileWave services:
fwcontrol server stopStart the FileWave services:
fwcontrol server startIf you find that the fwcontrol control command is not found, you re-create the alias by inputting this command and then try the fwcontrol commands again:
alias fwcontrol='/usr/local/bin/fwcontrol' - With the FileWave server services started you are now done with migrating the Data on the FileWave server and Move on to Checking the migration in the FileWave Admin. Do not change your IP or DNS to match that of the old server yet. This will be one of the last things you do so you can make sure everything is correct before having your devices connect to the new server.

3.4. Windows Server → macOS or Linux
Because of the complexity of moving from Windows Server please connect with Professional Services & Training to get some assistance. The Windows version of FileWave Server is so old that this is a multi-step process involving the migration to CentOS followed by the migration to Debian.
Extra Database step for Windows
Additionally before importing the database from a FileWave on Windows Server in to a Linux or macOS Server you need to make an adjustment to the .sql export file.
- Run the following command to import your old database. Since you are coming from a Windows server you will need to modify the Administrator user for the Database. The below command will be able to modify the backup file mdm-dump.sql. For the example my file is in /tmp directory but the path would match the location of your backup.
vi /tmp/fw-backups/fwxserver-Config-DB-Jan-12-18--10-34/DB/mdm-dump.sql - Go to the end of the file and change where it says the user is "Administrator" and change it to "postgres". Change it to look like the below text.
Note: User"Administrator" will be the user you were logged in with when the backup was created.
REVOKE ALL ON SCHEMA public FROM PUBLIC; REVOKE ALL ON SCHEMA public FROM postgres; GRANT ALL ON SCHEMA public TO postgres; GRANT ALL ON SCHEMA public TO PUBLIC; - Save the mdm-dump.sql by hitting "esc" then entering in "
:wq" - Now you can continue on the import of the .sql file as discussed in Step 8 - Database in the prior section of this article.
4. Launch FileWave Central to confirm the Migration
The next step once the migration is complete is to Launch the FileWave Central admin application to connect to the newly migrated server. After a migration, you always want to connect to the server and verify everything is running and working correctly before you make any changes to the IP or DNS address.
If you change the IP address or DNS reservation first before confirming the migration was successful you run the chance of your devices losing Filesets and un-enrolling themselves. Do not hesitate to contact our Support Team quickly if you think there may be an issue so that we can help get you back up and running quickly.
4.1. Clear the Keys
When you try to log in you may get an error because the server is not at its original address. There is a simple command to clear the keys that would prevent login that you may need to do when first logging in and then later when you update the server to its final IP/Name which should match the original server.
To clear the keys you will connect via SSH or Terminal to the server and type;
sudo /usr/local/filewave/python/bin/python /usr/local/filewave/django/manage.pyc shell
Next enter the following;
from fwserver import name_value_pair
from filewave.fw_gpb.FWServerMessages_pb2 import MdmServerConfiguration
name_value_pair.set_mdm_server_configuration(MdmServerConfiguration())
from filewave.fw_gpb.FWInventoryMessages_pb2 import DjangoServerData
name_value_pair.set_inventory_server_configuration(DjangoServerData())
from ios.preferences_manager import PreferencesManager
PreferencesManager.set_shared_key('')And you should get another prompt where you can type quit() and press return to exit. Below is an image of what this should look like:

After clearing the keys, you will have to restart the FileWave services.
fwcontrol server restartNow you should have success logging in with FileWave Central.
4.2. Login to FileWave Central
-
Log in to the FileWave admin to your new server. You will need to enter the IP address of the new server as you have not changed any of the DNS or IP information yet.
-
Once you are logged in you will need to open and close Preferences to save the new keys that were cleared in the previous step. To do so go to FileWave Admin → Preferences → "Mobile" tab → select "OK" to close Preferences. This will save the new keys.
-
First thing to check in the FileWave admin is the warning light in the bottom left hand corner. You are looking for it to say "Everything is OK" as shown below. If you have any warning or errors this may be an issue with the migration but is not necessarily depending on what is giving the error. If you see the light as yellow or red please select the message to view the error. Messages and their severity are listed below the image.

Imaging after migration: If existing imaging workflows stop working after the migration, open FileWave Central → Preferences → Imaging, edit the imaging server, select Generate new key on save, and save the change. Allow a minute or two for the new key to propagate.
-
APN, If you are using iOS and this is anything but green please contact our Support Team
-
Inventory, if this is anything other then green contact our Support Team
-
GCM, if you are using Android or Chromebooks and this is not green contact our Support Team
-
DEP, if this is yellow or red please open FileWave Admin → Preferences → VPP & DEP tab → OK, to close preferences. If it is still giving an error contact our Support Team.
-
-
Second thing to check is to make sure Filesets are showing. The easiest way to do this is to select the Filesets tab of FileWave admin and make sure you see your Filesets and structure. If you are having issues contact our Support Team.
-
If you have iOS devices, Select "iOS Inventory" to make sure you see rows of iOS device information. Also select "Refresh" from the top menu to make sure this information refreshes. The devices will not check in yet since the IP/DNS information has not been changed but you should see rows of information. If you receive any errors or information is not showing please contact our Support team.
-
Go to the Clients tab of the FileWave Admin and make sure you see your correct group structure and your Clients showing. If you do not please contact our Support team. Remember your FileWave Clients will not check in yet since the IP/DNS information has not been changed on the new server

As long as everything is green and showing correctly you are now ready to move on to changing the IP and DNS information so your devices will see the new server.
5. Changing the IP / DNS to match that of the old FileWave Server
Now you are able to change the IP or DNS information on the new server to match that of the old FileWave server. You are able to change your IP address on the new server so that it matches the old server or Change your DNS record for your FileWave server to point to your new server's IP address. If your old server was only using IP and not a DNS name you will need to make sure the IP does not change.
5.1. Changing the IP address
5.1.1 macOS Server
5.1.1 macOS Server
-
Turn off the old server so that it is no longer using the IP address.
-
Change the Network Configuration of your new server in System Preferences → Network
5.1.2 Windows Server
5.1.2 Windows Server
-
Turn off the old server so that it is no longer using the IP address.
-
Change the Network Configuration of your new server in Start → Control Panel → Network and Internet → Network and Sharing Center → Local Area Connection Status → Properties → Internet Protocol Version 4 (TCP/IPv4) → Properties → select "Use the Following IP address" → Enter the correct information you are wanting to set → OK.
5.1.3 CentOS Linux Server
5.1.3 CentOS Linux Server
Depending if you are using the appliance we offer for a CentOS Linux virtual server or a Linux machine you built the steps may be slightly different. The steps shown below will be for the FileWave virtual appliance that we offer.
-
Turn off the old server so that it is no longer using the IP address.
-
Configure the "ifcfg-ens160" file on the server. (This file will be different if you are not using our Virtual Appliance and will have a different name like "ifcfg-eth1" for example)
vi /etc/sysconfig/network-scripts/ifcfg-ens160 -
Change/add the following values of the file.
-
Change BOOTPROTO=none
-
Add "IPADDR", "NETMASK", "GATEWAY", "DNS1" to the file with your network configurations. I attached a screen shot of a completed file below. (If you want to add more then one DNS server you can add DNS2, etc to the file)

-
Save the file using "esc" then ":wq"
-
-
Now you will need to restart the network services on the server.
/etc/init.d/network restart -
Now the IP address is changed for the new server.
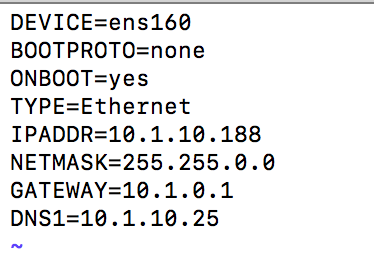
5.1.4 Debian Linux Server
5.1.4 Debian Linux Server
Changing the IP address in Debian 12 involves different steps compared to CentOS. The following guide is tailored for Debian servers using the interfaces file, but you could also use Webmin on your server assuming the server comes online initially with DHCP.
For Webmin know that you will need to go to Webmin -> Webmin Configuration -> Operating System and Environment and make sure it's set to Debian 12.4 (Or whatever version we are at when you set up your system. You can see this with cat /etc/debian_version on the server.
-
Disable the Old Server: Ensure the old server is turned off to free up the IP address.
-
Locate Network Interface:
First, identify the network interface you wish to configure. You can list all network interfaces using:
networkctl list
- Edit the /etc/network/interfaces file: Using 'nano', edit the interfaces file to set the network configurations.
nano /etc/network/interfacesYour default interfaces file should look something like this (your interface name may be different):
# The loopback network interface auto lo eth0 iface lo inet loopback # The primary network interface iface eth0 inet dhcpChange the file to look like this, using your network preferences (note 'dhcp' has been changed to 'static' in line 6)
# The loopback network interface auto lo eth0 iface lo inet loopback # The primary network interface iface eth0 inet static address 192.168.10.33 netmask 255.255.255.0 broadcast 192.168.10.255 dns-nameservers 192.168.10.254 192.168.10.255 - Verify Resolv.conf, hosts and hostname files: Verify that these files in /etc/ are configured correctly for your network and server.
/etc/resolv.conf: This file should list your DNS servers
/etc/hosts: This file should point your FQDN to localhost (127.0.0.1)
/etc/hostname: Specifies the hostname for your server. This is filewave by default. - Disable IPv6: Edit the sysctl.config file by adding the following lines to the end of the file
nano /etc/sysctl.confignet.ipv6.conf.all.disable_ipv6 = 1 net.ipv6.conf.default.disable_ipv6 = 1 net.ipv6.conf.lo.disable_ipv6 = 1 net.ipv6.conf.tun0.disable_ipv6 = 1 - Restart/Check Network Status:
systemctl restart networking.service systemctl status networking.service - Verify IP:
ip a

5.2. Changing the DNS record
For changing the DNS record to the new FileWave server you would change the DNS entry in your DNS servers and allow the new entry to propagate out to your computers. If you are using the same IP on the new server that you were previously using for your old one then there will be nothing to do here because the DNS record is already associated with that IP. It will also simplify any firewall changes because if you keep using the same IP then your firewall rules should remain the same as well.
6. Checking your FileWave server after the IP address/DNS entry is changed
Steps will be similar to what you checked previously, but now you will point the Admin to the DNS address and make sure your devices are checking in. Do not hesitate to contact our Support Team quickly if you think there may be an issue so that we can help get you back up and running quickly.
Unknown User Error?: Refer back to 4.1 Clear the Keys if you get an error when trying to login now that the migrated server is on a new address.
- Repeat the checks in 4.2. Login to FileWave Central to check that everything is still good.
- Now you will do an Update Model to ensure that it is functioning before taking the next steps to Unlock Clients.
7. Unlock Clients
-
Go back to the FileWave client tab and unlock one or two clients that you know are on to make sure they are checking in correctly. We suggest checking a couple machines first before unlocking all of your clients.

-
After you make sure the couple of test devices you unlocked first are working correctly you can select all of your devices and unlock them.

8. Completed
You are now done checking the Server after the migration. If you have any issues do not hesitate to contact our FileWave support team as soon as possible so that we are able to assist you. Please do not destroy your old server for 30 days after the migration in case a problem is discovered with the migration. Keep the old server shut down so that you don't find that it comes online again and conflicts with the IP address of the new server or that clients might reach it and become confused.
Please remember to set up FileWave Server Backup on the new server because you will need to configure the script to run automatically. When setting up backups you should have the destination be a volume that is not locally on the server, and does not share the same network storage location. If there is a failure of your disk storage solution you do not want to lose both your FileWave Server as well as the backup information.
Related Content
- Securing FileWave Server on the Internet for Remote Device Management
- Booster Overview
- Upgrading your On-Premise FileWave Server
FileWave Server Pre-Upgrade Backup
What
FileWave 14 and later create an automatic pre-upgrade backup of the database and key configuration files before the FileWave Server upgrade continues.
When/Why
This backup helps with recovery if an upgrade fails. It includes the database, required configuration files, and certificates. It does not back up Filesets or payload content, so it should not be treated as a complete server backup.
Keep a separate off-server backup of your FileWave installation, updated at least weekly. The automatic pre-upgrade backup is useful, but it is not a substitute for a full server backup. A disk failure without a current backup can require a rebuild and device re-enrollment.
How
The pre-upgrade backup runs automatically during the upgrade. You can find the generated backup files here:
/usr/local/filewave/fwxserver/Data Folder/backups
Related Content
Use 2FA or MFA with FileWave
Question
Can FileWave use two-factor authentication (2FA) or multi-factor authentication (MFA) for FileWave Central, FileWave Anywhere, and device enrollment?
Answer
Yes. FileWave can use the MFA policy from a supported single sign-on provider through FileWave Identity Provider (IdP) Integration. Enable Admin to use SSO and the provider's MFA for FileWave Central and FileWave Anywhere administrator sign-in. Enable Enrollment to use that provider for supported device enrollment flows. The screenshot below shows both options selected. The identity provider controls the available authentication factors and the MFA challenge; FileWave does not add a separate FileWave-managed second factor.
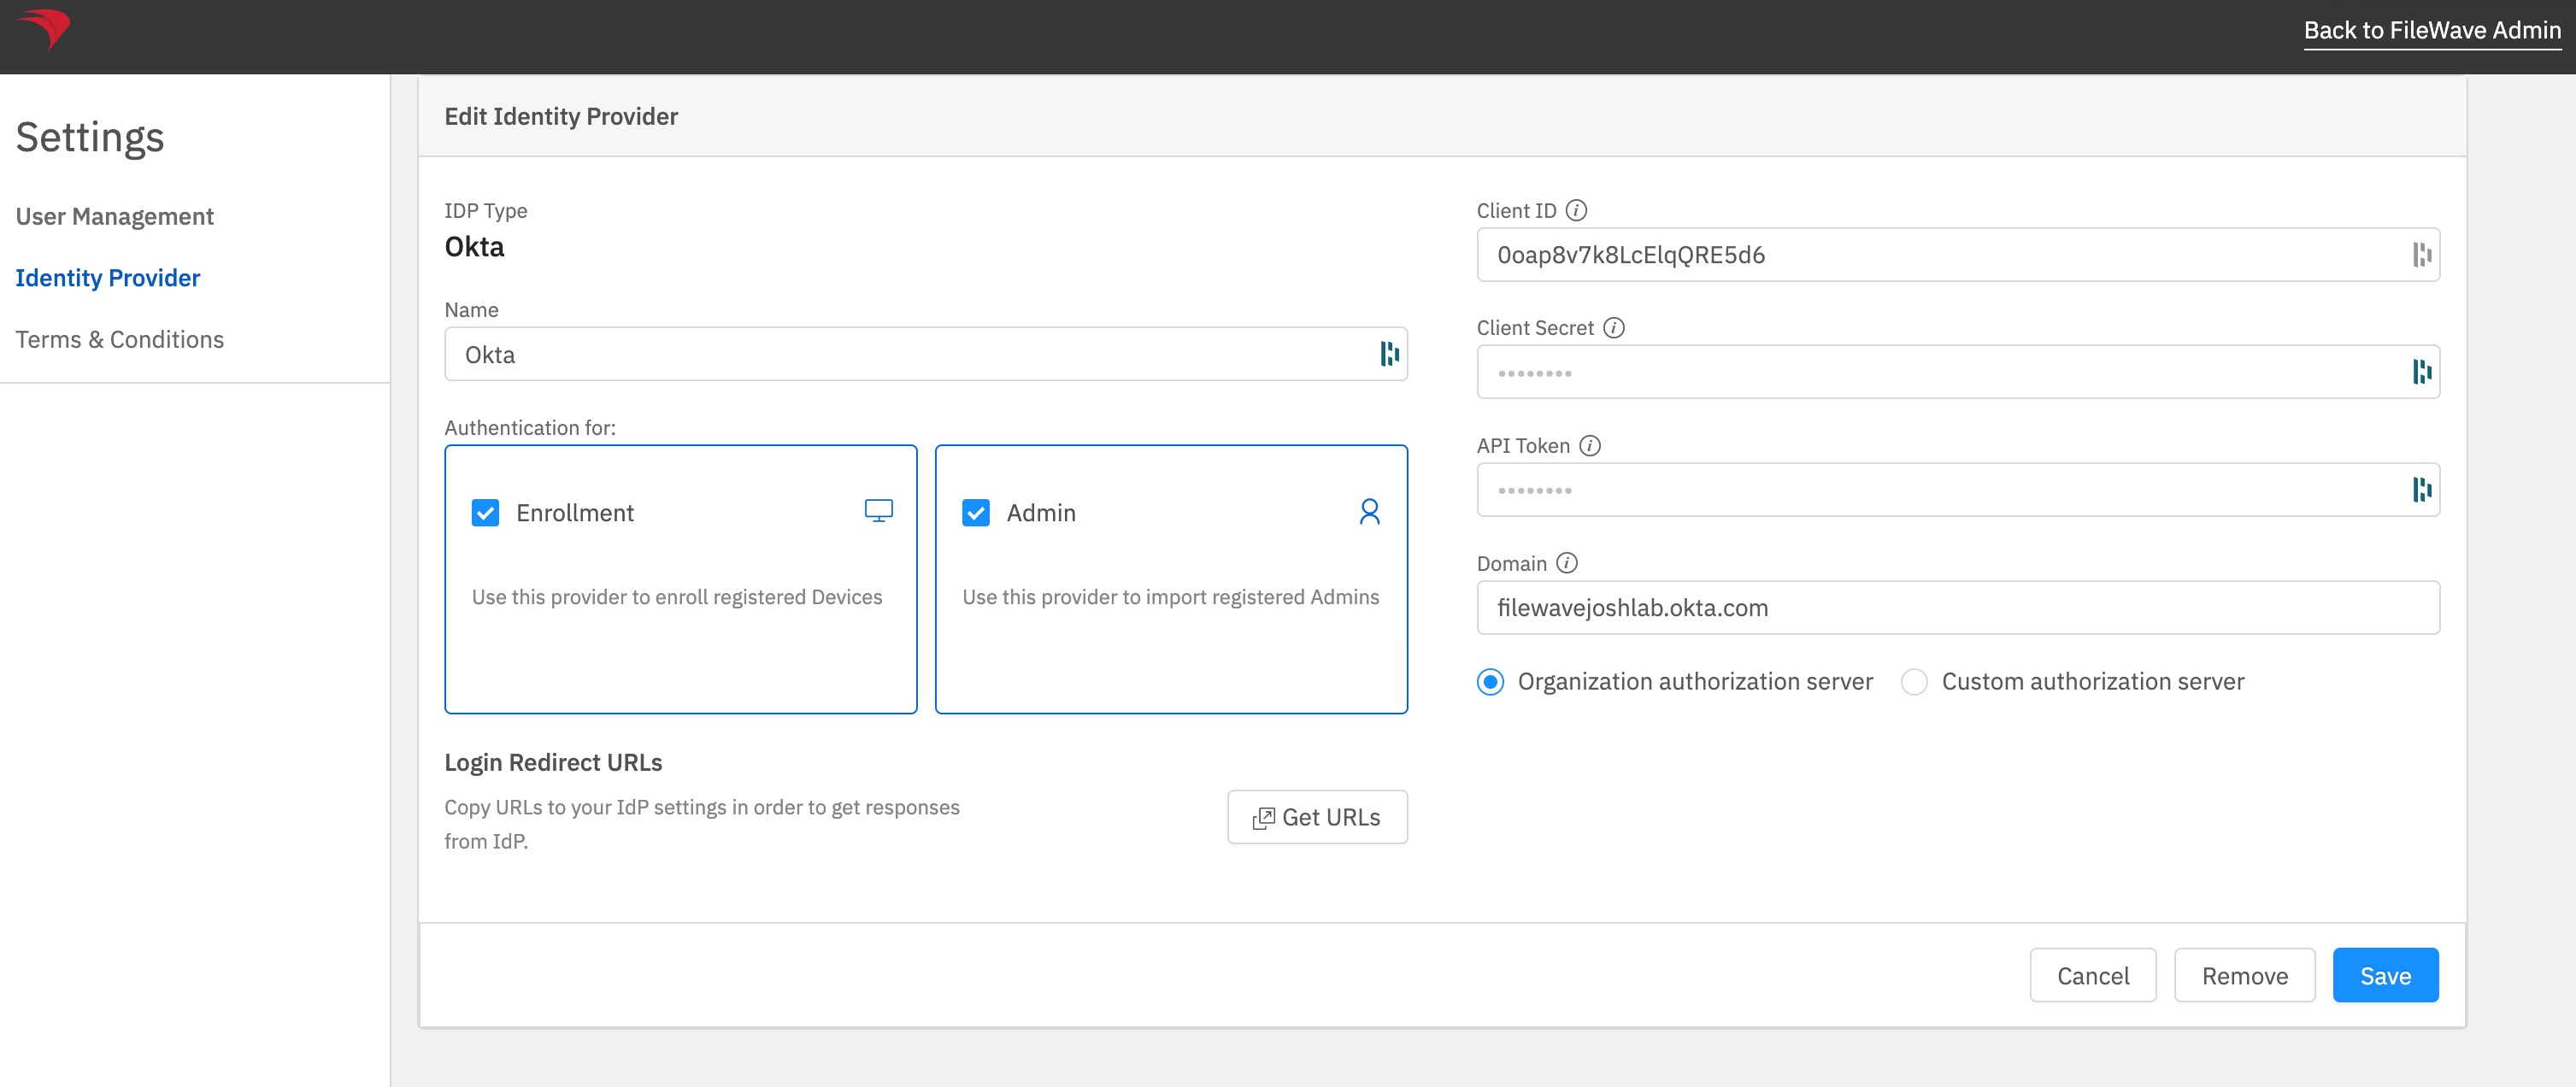
Related Content
Configuring LDAP authentication
You can use fixed enrollment accounts or an LDAP directory, such as Active Directory, eDirectory, or Open Directory, for MDM enrollment authentication. This setup edits /usr/local/filewave/apache/conf/mdm_auth.conf on the FileWave Server, so self-managed customers need server shell access. Hosted FileWave customers should work with FileWave Technical Support because they do not have direct server file access. Complete this before enrolling MDM clients.
The process has three parts:
-
- Back up the current config file;
- Edit a new config file so it can read the LDAP structure; and
- Restart the Apache process so it reads the new config file.
Getting the files ready
- Open a Terminal window or use SSH to access the computer running FileWave Server
- Gain root credentials
sudo -s- Enter your login password
- Navigate to the FileWave Apache configurations folder:
cd /usr/local/filewave/apache/conf/- Back up your current mdm_auth.conf by making a copy
cp mdm_auth.conf mdm_auth.conf.bac- Make a copy of the LDAP example and rename it
cp mdm_auth.conf.example_ldap_auth mdm_auth.conf- Make the changes
- Open mdm_auth.conf in your preferred text editor, such as nano mdm_auth.conf or vi mdm_auth.conf. The sample file is commented; update it for your LDAP structure, then save the .conf file.
If you edit the file outside the server shell, copy it back to /usr/local/filewave/apache/conf/mdm_auth.conf with the correct filename before restarting Apache.
Note: Active Directory (AD) normally requires a bind account before FileWave can read the directory. Many organizations create a read-only directory account for this purpose.
- Once saved, restart the FileWave Apache process/service:
/usr/local/filewave/apache/bin/apachectl gracefulNow, when a user attempts to enroll a device in your MDM server, they can use their LDAP credentials to authenticate.
Related Content
- LDAP Preferences
- Using LDAP to enroll macOS/iOS/Android devices
- LDAP Admin Integration
- Deployments Targeting LDAP Groups
Maintenance
Webmin GUI (On-Premise)
Webmin GUI
For an on-premise FileWave Server, the Webmin GUI can help you review or adjust Debian OS-level settings such as time, networking, DNS, routing, and passwords. FileWave-hosted servers do not expose this Webmin interface. Set the root password during appliance setup and store it in your organization's approved credential system.
For Webmin on Debian, go to Webmin > Webmin Configuration > Operating System and Environment and confirm that the operating system version matches the Debian version installed on the server. You can check the Debian version with cat /etc/debian_version.
-
At the login screen, note the URL used to remotely manage the server, for example https://myorg.filewave.net:10000.
-
If there is no IP address because DHCP is not available on the subnet for your FileWave Linux appliance, log in with username "fwadmin" and password "filewave". Older appliances used the username "root", but FileWave 15.5.0 and later use fwadmin for first login.
-
Run
nmtuiat the command prompt to launch the NetworkManager text UI and configure networking for the FileWave VM appliance. Reload the IP stack withservice network restart. If you configure networking this way, skip the network configuration steps later in Webmin.
-
-
Browse to the Webmin URL and log in with username "fwadmin" and password "filewave". You will change this password later.
-
Browse to Hardware > System Time on the left, select the Change timezone tab on the right, choose your time zone, and click Save. North American time zones start with "America".
-
FileWave appliances are normally pre-configured for time synchronization. Use the Time server sync tab only if you need to verify or adjust the time source for your environment. If your organization requires a specific NTP server, replace the existing value with the approved hostname or address, set Synchronize on schedule? to "Yes, at times below", and click Sync and Apply.
-
Go to System > Change Passwords on the left and select the "root" account on the right from the list of usernames. Enter a new root password, confirm it, and click Change. This changes the default root password from "filewave" to the value you choose, so use a secure password that your organization can recover when needed.
-
Choose Networking > Network Configuration on the left, then Network Interfaces on the right. Click the blue link labeled "ens160" or "ens32" for the Ethernet adapter. Change the IPv4 address setting to "Static configuration", enter the static IP and subnet mask, then click Save and Apply at the bottom.
-
You will no longer be able to access Webmin through the old DHCP IP address. Change your browser's address bar to the new static IP address for the FileWave server, then browse to Networking > Network Configuration on the left and Hostname and DNS Client on the right. Enter the IP address for your DNS server and click Save.
-
Select Networking > Network Configuration on the left, then Routing and Gateways on the right. Pick "ens160" or "ens32" from the Default routes menu, enter the default gateway address for the subnet hosting the FileWave server, and click Save.
-
Go to System > Bootup and Shutdown on the left, scroll to the bottom on the right, and click Reboot System. When Webmin asks you to confirm "shutdown -r now", click Reboot System again.


Related Content
Webmin GUI - Changing the root password (On-Premise)
What
Webmin is included with self-managed FileWave appliances for server-level configuration. This article applies only to self-managed or on-premises FileWave Server appliances. Hosted FileWave customers do not manage Webmin access on the hosted server.
When/Why
Restrict TCP 10000 to trusted admin networks only; do not expose Webmin directly to the Internet. Also change the appliance root password from the default before the server is used in production. FileWave Server Setup also calls out this step.
How
-
At the login screen, note the URL used to remotely manage the server, for example: https://myorg.filewave.net:10000
-
If there is no IP address specified because DHCP is not available on the subnet for your FileWave Linux Appliance, log in with the username "root" with the password "filewave".
-
Run "nmtui" at the command prompt to launch the Network Manager Text UI so you can configure the networking for the FileWave VM appliance. You'll need to reload the IP stack with "service network restart". Skip the network configuration steps later in the Webmin.
-
-
Browse to this URL and log in with username "root" and password "filewave".
-
Go to System > Change Passwords, select the root account, enter a new root password, confirm it, and click Change. This replaces the default filewave password for root. Use a long, unique password and consider restricting SSH to certificate-based access where your security policy requires it. A FileWave Server appliance is still a Linux server and should be protected like one.
Related Content
Expanding the Disk on a FileWave Appliance - Debian
Overview
This guide explains how to use the FileWave Smart Disk Expansion script to automatically expand disk space on FileWave appliances. The script handles all the complexity of expanding LVM physical volumes, partitions, and filesystems with comprehensive logging and safety features.
What This Script Does
The script performs the following operations:
- Detects your appliance's LVM configuration automatically
- Expands physical volume (PV) backing devices
- Grows partitions using cloud-guest-utils (
growpart) - Extends the root logical volume (LV) to consume available space
- Grows the root filesystem online (supports ext4, ext3, ext2, and XFS)
- Repairs GPT partition tables if needed
- Logs all actions for troubleshooting and support cases
Prerequisites
- Root access (via
sudo) - Debian-based appliance (e.g., Debian 12/13)
- Disk already expanded at the hypervisor/storage level (this script only expands the OS partitions and filesystem)
- Network access (for automatic package installation, if needed)
The script automatically installs required tools if missing:
cloud-guest-utils(growpart)lvm2(LVM tools)util-linux(disk utilities)gdisk(GPT utilities)e2fsprogs(ext filesystem tools)xfsprogs(XFS filesystem tools)
Step-by-Step Instructions
Step 1: Download the Script
Open a terminal on your FileWave appliance and download the script:
cd /tmp
wget https://kb.filewave.com/attachments/485 -O filewave-expand-disk.sh
chmod +x filewave-expand-disk.sh
Alternatively, if wget is not available, use curl:
cd /tmp
curl -o filewave-expand-disk.sh https://kb.filewave.com/attachments/485
chmod +x filewave-expand-disk.sh
Step 2: Review the Script (Optional but Recommended)
Before running any system-modifying script, it's good practice to review it:
head -50 filewave-expand-disk.sh
This displays the first 50 lines, including the description and safety information.
Step 3: Test with Dry-Run (Strongly Recommended)
Always test the script in dry-run mode first to see what actions it would take:
sudo ./filewave-expand-disk.sh --dry-run
Expected output:
- Detects root LVM configuration (VG, LV, filesystem type)
- Lists PV devices backing the root LV
- Shows BEFORE state (VG free space, LV size, filesystem size)
- Lists actions it WOULD take (but doesn't execute them)
- Shows AFTER state (projected)
Example output snippet:
== Detecting root LVM layout ==
Root LV: /dev/vg0/root
VG: vg0
FS type: ext4
== Finding PV backing the root LV ==
PV(s): /dev/vda1
== BEFORE state ==
VG free: 10.0G
LV size: 50.0G
FS size (/): 50.0G
FS avail (/): 45.0G
== Expanding PV(s) and partition(s) (if needed) ==
Processing: /dev/vda1
- would run: growpart /dev/vda /dev/vda1
- pvresize /dev/vda1
DRY_RUN: command not executed
Review the dry-run output carefully:
- ✅ Are the device names correct?
- ✅ Is the VG/LV configuration what you expect?
- ✅ Does the projected growth make sense?
Step 4: Run the Script
Once you're confident with the dry-run, run the script for real:
sudo ./filewave-expand-disk.sh
The script will:
- Install any missing prerequisite packages
- Detect your LVM configuration
- Expand PV/partitions if needed
- Extend the LV
- Grow the filesystem online
- Create a support log in
/var/log/filewave-expand-disk-YYYYMMDD-HHMMSS.log
Expected output:
Log file: /var/log/filewave-expand-disk-20260127-094500.log
If opening a support case, attach: /var/log/filewave-expand-disk-20260127-094500.log
== Checking and installing prerequisites ==
...
== Detecting root LVM layout ==
Root LV: /dev/vg0/root
VG: vg0
FS type: ext4
...
== AFTER state ==
VG free: 0B
LV size: 60.0G
FS size (/): 60.0G
FS avail (/): 55.0G
SUMMARY: Expansion performed. LV grew by 10.0G and filesystem grew by 10.0G.
Support log file: /var/log/filewave-expand-disk-20260127-094500.log
Reboot not requested (default). No reboot will be performed.
Step 5: Verify the Expansion
Check that the filesystem was expanded:
df -h /
You should see the new size reflected in the "Size" column.
Example:
Filesystem Size Used Avail Use% Mounted on
/dev/mapper/vg0-root 60G 5.0G 55G 9% /
Compare this to the BEFORE state in the log.
Step 6: Reboot (If Recommended)
In most cases, no reboot is needed. However, the script may recommend a reboot if:
- GPT partition table repairs were necessary
- Kernel partition table cache needs refresh
If the script recommends a reboot:
sudo reboot
The appliance will restart. FileWave services typically auto-start on boot.
Usage Options
The script supports several command-line options:
Verbose Mode
Show detailed command output in the terminal (in addition to logging):
sudo ./filewave-expand-disk.sh --verbose
Use this for troubleshooting or when you want to see detailed progress.
Reboot Option
Automatically reboot at the end:
sudo ./filewave-expand-disk.sh --reboot
This is useful for automation or when you want to ensure partition table changes are fully applied.
Combined Options
sudo ./filewave-expand-disk.sh --dry-run --verbose
sudo ./filewave-expand-disk.sh --reboot --verbose
Support Log
The script creates a detailed support log in /var/log/:
Log location: /var/log/filewave-expand-disk-YYYYMMDD-HHMMSS.log
Why it's important:
- Contains all commands executed
- Includes BEFORE/AFTER metrics
- Helps FileWave Support diagnose issues
- Is automatically world-readable for easy sharing
To view the log:
cat /var/log/filewave-expand-disk-*.log
When opening a support case:
- Attach the support log:
filewave-expand-disk-YYYYMMDD-HHMMSS.log - Include the BEFORE/AFTER sizes
- Note any warnings or errors from the script
Troubleshooting
"ERROR: This script must be run as root"
Solution: Use sudo:
sudo ./filewave-expand-disk.sh
"ERROR: Root filesystem is not an LVM logical volume"
Cause: Your appliance does not use LVM storage layout.
Solution: This script only works with LVM-based appliances. Contact FileWave Support for non-LVM systems.
"WARN: Unsupported/unknown filesystem type"
Cause: The root filesystem is an uncommon type (not ext4, ext3, ext2, or XFS).
Solution: Contact FileWave Support with the support log.
Filesystem didn't grow (AFTER state shows same size as BEFORE)
Possible causes:
- VG has no free space: If
VG freeis 0 bytes in BEFORE state, there's nothing to expand. Verify the disk was actually expanded at the hypervisor level. - Partition didn't grow: Check the support log for growpart output. This typically means the underlying disk wasn't resized at the storage layer.
- No-op short-circuit triggered: The script detected the disk was already fully expanded.
Solution: Check the support log for details. If still unsure, contact FileWave Support.
"Device or resource busy" warnings
Cause: The system is actively using the disk (expected on live systems).
Solution: These warnings are normal and safe to ignore. The script continues and typically succeeds anyway.
Common Scenarios
Scenario 1: Expand 50GB Appliance to 100GB
- At hypervisor level: Resize the virtual disk from 50GB to 100GB
- On appliance: Run dry-run to verify
- On appliance: Run the script
- Verify: Check with
df -h /
# Dry-run
sudo ./filewave-expand-disk.sh --dry-run
# Real run
sudo ./filewave-expand-disk.sh
# Verify
df -h /
Scenario 2: Expand with Verbose Output for Troubleshooting
sudo ./filewave-expand-disk.sh --verbose 2>&1 | tee ~/expansion.log
This captures all output to both terminal and a file for review.
Scenario 3: Expand and Reboot Automatically
sudo ./filewave-expand-disk.sh --reboot
Useful for scheduled maintenance windows.
FAQ
Q: Will this downtime affect FileWave services?
A: No. The filesystem is expanded online with no downtime. Services continue running but you may be advised to reboot.
Q: Do I need to stop FileWave services?
A: No. The script works while services are running.
Q: What filesystems are supported?
A: ext4, ext3, ext2, and XFS. Others may work but are not officially tested.
Q: Can I run this script multiple times?
A: Yes. It's safe to run multiple times. It will detect if space was already expanded and skip unnecessary operations.
Q: Do I need to reboot after running this?
A: Usually not. Reboot is only recommended if partition table repairs were necessary (the script will tell you).
Q: How long does the expansion take?
A: Typically 1-5 minutes depending on appliance size and system load.
Q: Is the script reversible?
A: No. Once expanded, you cannot shrink the filesystem or LV. Plan accordingly.
Support
If you encounter issues or have questions:
- Review the support log:
/var/log/filewave-expand-disk-YYYYMMDD-HHMMSS.log - Run with
--verboseto see detailed output - Contact FileWave Support with:
- The support log attached
- Description of the issue
- Output from
df -h /,lvs,vgs,pvs
Upgrading to FileWave 13+ from older Versions on Systems where Port 443 is used
Description
FileWave 13 introduced the Web Admin interface, which uses port 443 by default. If another service is already listening on port 443, the FileWave Server installer cannot complete until the conflict is resolved.
To resolve the issue, either move the other service off port 443 or configure FileWave Web Admin to use a different port before upgrading.
Directions
Configure FileWave to use a different Web Admin port before the upgrade as follows:
Mac / Linux
Edit /usr/local/filewave/apache/conf/httpd.conf and add the following line:
# Putting the last character in brackets is a trick to prevent Apache from issuing a warning if the file does not exist.
IncludeOptional conf/httpd_webadmi[n].confCreate /usr/local/filewave/apache/conf/httpd_webadmin.conf with the following content:
Define WEB_ADMIN_PORT 20440Restart Apache:
sudo fwcontrol apache restartThen run the FileWave Server 13+ installer as normal.
Windows (Legacy)
Windows
Edit C:\Program Files (x86)\FileWave\apache\conf\httpd.conf and add the following line:
# Putting the last character in brackets is a trick to prevent Apache from issuing a warning if the file does not exist.
IncludeOptional "C:\Program Files (x86)\FileWave\apache\conf\httpd_webadmi[n].conf"Create C:\Program Files (x86)\FileWave\apache\conf\httpd_webadmin.conf with the following content:
Define WEB_ADMIN_PORT 20440Restart Apache from Command Prompt or PowerShell running as Administrator:
fwcontrol apache restartThen run the FileWave Server 13+ installer as normal.
Privacy
Details of Allowing / Disallowing Collection of Personal data on a License Level
Collection of Personal Data
Use this article when you need personal data collection disabled at the FileWave license level. When this is disabled at the license level, FileWave Clients cannot collect those inventory fields because the option is no longer available in Client Preferences.
Environment
FileWave Server and Client
Changing Data Collection
By default, FileWave can collect personally identifiable inventory data.
FileWave can disable collection of this data globally through your FileWave license. To request that change, customers in North America should email the FileWave Business Office at usadmin@filewave.com or call 1-888-345-3928, Option 3. Customers in Europe should email admin@filewave.com or call +41 (0) 71-914-30-80.
When data collection is disabled, the following data is not captured, processed, sent to, or stored inside FileWave inventory:
-
geolocation data (the device's last reported location in latitude/longitude format)
-
application usage data (how long, how often, and when an application has been opened, used, or closed)
-
login data (who logged in to a client device and when)
After personal data collection is disabled, FileWave preserves the last submitted geolocation data set. To remove that saved location data, contact FileWave Support. Login data and application usage data are erased from the database after clients receive the new configuration and check in with the inventory server.
FileWave Server Analytics Reporting
With FileWave 13.1, server utilization aggregated analytics are sent to FileWave automatically to collect information on Licensing/Version of FileWave, Location Information (of the server), Numbers and Types of enrolled devices, Server Configuration information, and information on the Types and number of Filesets. This information is being gathered in an effort to help FileWave prioritize our future feature development and to better support our customers' working environments.
Here are some frequently asked questions about this Analytics collection:
Q. Is there any personally identifiable information being collected?
A. No, there is no personal information of any kind gathered
Q. How frequently does the server report this information?
A. The server reports the information only once per day, or on server restart.
Q. How big is the data transfer?
A. The data transfer is very small as it is primarily summary information and will be 1k (JSON) and under.
Q. What address and port are used for communication?
A. FileWave Analytics reporting travels outbound on port 443 to logstash.filewave.com.
Q. Can I see an example of the data and data definitions?
A. Yes, please see below:
Example
This is an example of the data reported by analytics:
{
"license_info": {
"activation_code": "34876786629e4276bf484a2dc8501ad3",
"company_name": "FileWave (Europe) GmbH",
"desktop_clients": {
"existing": 342,
"licenses": 1000,
"license_usage_percentage": 34.2
},
"mobile_clients": {
"existing": 1645,
"licenses": 5000,
"license_usage_percentage": 32.9
},
"chromebook_clients": {
"existing": 3,
"licenses": 20,
"license_usage_percentage": 15.0
}
},
"hostname": "victorf.filewave.ch",
"machine_fingerprint": "39ce7228a04f94eab57efbab042554cc66eded68",
"enrolled_devices": {
"OSX": 300,
"WIN": 42,
"IOS": 1645,
"LIN": 0,
"AND": 0,
"CHR": 3,
"TOS": 0
},
"active_devices": {
"OSX": 296,
"WIN": 41,
"IOS": 1476,
"LIN": 0,
"AND": 0,
"CHR": 0,
"TOS": 0
},
"placeholders": {
"OSX": 26,
"WIN": 0,
"IOS": 0,
"LIN": 0,
"AND": 0,
"CHR": 0,
"TOS": 0,
"unknown": 15
},
"mdm_enrolled_macs": 258,
"filesets": {
"app": 75,
"profile": 35,
"legacy_policy": 0,
"itunes_app": 21,
"ios_enterprise_app": 3,
"android_package": 0,
"ios_hosted_media": 1,
"osx_image": 0,
"win_image": 0,
"win_driver_image": 0,
"win_master_image": 0,
"ios_update": 6,
"policy": 0,
"google_policy_fragment": 0,
"play_store_fileset": 0
},
"server_version": "13.1.0",
"server_build": "0d367c15f2",
"server_os_type": "OSX",
"server_os_version": "10.14.4",
"is_ucs_installation": false,
"disk_space_in_megabytes": {
"total": 1000346,
"used": 868800,
"free": 125402
},
"boosters": [
{
"version": "13.1.0",
"build": "0d367c15f2",
"os_platform": "LIN",
"os_version": "3.10.0",
"active": true
},
{
"version": "13.1.0",
"build": "0d367c15f2",
"os_platform": "LIN",
"os_version": "3.10.0",
"active": true
}
],
"engage_configured": false,
"classroom": {
"enabled": false,
"image_service_enabled": null
},
"sis_source": null,
"imaging_ivs_count": 0,
"imaging_associations": 0,
"fileset_groups": 28,
"fileset_associations": 12,
"fileset_groups_associations": 81,
"clone_groups": 0,
"clone_groups_associations": 0,
"model_updates": 2,
"server_restarts": 1,
"server_ssl_certificate_type": "root_trusted",
"client_versions": {
"13.1.0": 312,
"13.0.2": 20,
"12.9.0": 7,
"12.8.0": 3
},
"logging_level": {
"fwxserver": 10,
"filewave_in_debug": false,
"fwone_in_debug": false
},
"webui_api_usage": {
"requests": 6,
"fileset_reinstalls": 0
},
"engage_api_usage": {
"requests": 4,
"/engage/gcm_project_number": 3,
"/engage/profiles": 1
}
}Field description
The following fields are reported by each customer's server instance:
| Field | Description | Subfields | Example value |
| license_info | Information about the license | * activation_code: Activation code used by the customer * company_name: Name of the organization * desktop_clients: Information about desktop client licenses * mobile_clients: Information about mobile client licenses * chromebook_clients: Information about Chromebook client licenses All subfields related to client licenses have the same information: * existing: Number of clients of this type in FileWave * licenses: Maximum number of clients allowed by the license * license_usage_percentage: Percentage of used client licenses, e.g. if all client licenses of this type are used then the value is 100. For example, if there are 4 clients and the license allows 10 clients, then the license_usage_percentage would be 40.0 (40%). |
|
| hostname | Hostname of the server | - | "filewave.acme.com" |
| machine_fingerprint | Unique identifier of the server | - | "39ce7228a04f94eab57efbab042554cc66eded68" |
| enrolled_devices | Number of devices enrolled, grouped by operating system type. In the example on the right side, there are 300 macOS, 42 Windows, 1645 iOS and 3 ChromeOS devices. |
One subfield for each operating system type. Consult the list of operating systems below. |
|
| active_devices | Number of devices that have checked-in at least once in the last 30 days, grouped by operating system type. | (see above) | (see above) |
| placeholders | Number of placeholders, grouped by operating system type. | One subfield for each operating system type. Placeholders where the operating system is unknown are in the "unknown" field. |
|
| mdm_enrolled_macs | Number of MDM-enrolled macOS devices. | - | 258 |
| filesets | Number of filesets, grouped by fileset type. | One subfield for each fileset type. Consult the list of filesettypes below. |
|
| server_version | FileWave server version | - | "13.1.0" |
| server_build | FileWave server build number (corresponds to the git commit hash) | - | "0d367c15f2" |
| server_os_type | Operating system under which the server is running (see list of operating systems below) | - | "OSX" |
| server_os_version | Version of the operating system | - | "10.14.4" |
| is_ucs_installation | Whether FileWave is installed under UCS or not (boolean) | - | false |
| disk_space_in_megabytes | Disk space in the server, measured in megabytes | * total: Total disk space on the main partition * used: Used disk space on the main partition * free: Free disk space on the main partition |
|
| boosters | List of all Boosters associated to this server, with one JSON object for each booster. For example, if a customer has 7 Boosters, the list will contain 7 items. |
For each Booster, the following subfields are reported: * version: Booster version * build: Booster build * os_platform: Operating system where the Booster is running (see the list of operating systems below) * os_version: Version of the operating system * active: Whether the booster has checked-in at least once in the last 10 minutes. |
|
| engage_configured | Whether an Engage appliance is configured on the server (boolean) | - | false |
| classroom | Information about Apple Classroom settings | * enabled: Whether Apple Classroom is enabled or not (boolean) * image_service_enabled: Whether a custom image URL is being used (boolean). If Classroom is disabled, this will be null. |
|
| sis_source | Configured SIS source. Possible values are: * null: No SIS source is configured, or a CSV is used. * "asm": Apple School Manager * "clever": Clever |
- | "asm" |
| imaging_ivs_count | Number of configured Imaging Virtual Servers | - | 1 |
| imaging_associations | Number of Imaging associations | - | 7 |
| fileset_groups | Total number of fileset groups (regardless of hierarchy) | - | 28 |
| fileset_associations | Number of associations between any type of device and filesets (excluding fileset groups) | - | 12 |
| fileset_groups_associations | Number of associations between any type of device and fileset groups | - | 81 |
| clone_groups | Number of group clones | - | 0 |
| clone_groups_associations | Number of associations between group clones and filesets/fileset groups | - | 0 |
| model_updates | Number of model updates performed within the last 24 hours | - | 2 |
| server_restarts | Number of times the server was restarted within the last 24 hours | - | 1 |
| server_ssl_certificate_trusted | Status of the MDM server certificate. Possible values: * "root_trusted": The certificate is signed by a trusted CA. * "self_signed": the certificate is self-signed. * null: Certificate not found/error |
- | "root_trusted" |
| client_versions | Number of desktop clients grouped by the version of fwcld they are running | One subfield for each FileWave version. |
|
| logging_level | Configured log level. This field was requested by support to find out whether they forgot to disable debug log level on some customer. |
* fwxserver: Log level configured for fwxserver in server.lvl * filewave_in_debug: Whether DEBUG = True is defined for MDM * fwone_in_debug: Whether DEBUG = True is defined for the web backend. Note: This will disappear in 13.2. |
|
| webui_api_usage | Information about API usage of the web UI in the last 24 hours. This information is extracted from the Apache access.log. |
* requests: Total number of requests to the web backend * fileset_reinstalled: Number of times a fileset reinstallation was triggered from the web UI. |
|
| engage_api_usage | Information about Engage API usage in the last 24 hours. This information is extracted from the Apache access.log. |
* requests: Total number of requests related to Engage API endpoints Besides the subfield above, there is one subfield for each API endpoint containing the number of requests to that endpoint. |
|
These additional fields are added by our cloud (logstash):
| Field | Description | Subfields | Example value |
@timestamp |
Date/time when the event was sent | - |
|
| geoip | GeoIP information, computed based on the public IP address of the server | Some of the subfield names are obvious, so please check the example value. * longitude: Longitude in degrees. Positive values are in the eastern hemisphere. Negative values are in the western hemisphere. * latitude: Latitude in degrees. Positive values are in the northern hemisphere. Negative values are in the southern hemisphere. * ip: public IP address of the customer's server instance |
|
| is_dev | Whether the license is a developer license or a regular license. Possible values: * 0: regular license * 1: developer license |
- | 1 |
List of operating systems
| Key | Operating system |
| OSX | macOS |
| WIN | Windows |
| IOS | iOS |
| LIN | Linux |
| AND | Android |
| CHR | ChromeOS |
| TOS | tvOS (for Apple TVs) |
List of fileset types
| Key | Fileset type |
| app | Regular desktop fileset |
| profile | Apple profile |
| legacy_policy | Legacy policy (deprecated) |
| itunes_app | iTunes app |
| ios_enterprise_app | iOS enterprise app |
| android_package | Android APK |
| ios_hosted_media | iOS media |
| osx_image | macOS image (Imaging) |
| win_image | Windows image (Imaging) |
| win_driver_image | Windows driver image (Imaging) |
| win_master_image | Windows master image (Imaging) |
| ios_update | iOS operating system update |
| policy | FileWave policy fileset |
| google_policy_fragment | Google Policy Fragment |
| play_store_fileset | Google Play Store app |
Deleting Old FileWave Client or Server Log Data
Description
FileWave stores many different types of logs. Many of these logs are designed to roll over, either to new files or by removing older entries. In most cases, FileWave logs do not store GDPR-sensitive data, but some environments or scripts can write information that should be retained only as long as needed.
Many log files rotate automatically, but they can still become large or exceed your retention policy. In those cases, archive and clear older log data deliberately.
The attached scripts archive log data on a defined schedule and keep only the newest archive by default.
Information
The scripts provided will archive the current log files into a locally stored zip file. On completion the active log files will be emptied. This will occur on a regular basis as defined by a variable. On each subsequent execution, a new zip of the current logs will be created and the old zip will be removed.
Log duration should not be too short. When the logs are archived and the active logs emptied, the archive is the only backup of those original logs. Since only the latest zip is kept, all old log entries (as intended) will no longer be available.
The zip file could be copied to a more secure location for a greater amount of history. Consider copying the archive on the same cadence as the number of days you keep.
If the chosen amount of time is 10 days, this will provide up to a maximum of 19 to 20 days worth of logs. 10 days within the zip and the next 9 to 10 days of active logs before the script re-runs.
Directions
FileWave Server
By default, the following script will run in a 'Dry Run' mode, only showing the files that would be zipped. No files will actually be zipped and the original files will remain untouched.
Download: server_log_archiver.sh.zip
The script has the following flags:
Usage
Optional:
-d Integer specifying the amount of log days to keep (default 10 days)]
-c [Add the script to cron]
-a [Action the script. Dry run if this option is not specified. Dry run will echo only]Options
'-d'
If this option is not supplied, the amount of days to keep will be set as 10. Use this option to specify an alternative amount of days to keep. For example, to set this as 7 days:
sudo ./server_log_archiver.sh -a -d 7
'-a'
This option will overrule the Dry Run mode and all files will be zipped and all defined, active logs emptied.
'-c'
This option will add the script to the cronjobs list. There is no need to specify '-a' when using this option, this will automatically occur. However, '-d' may still be used to specify the desired amount of days to keep. Place the script at a desirable location and then run the script with this option.
For example, to add this as a cron job with a 14-day retention period and the script located in /root/, run:
sudo /root/server_log_archiver.sh -d 14 -c
The zipped archive 'filewave_logs.zip' will be stored in the following directory:
/private/var/log/fwxserver_log_archive/
If this script is used on a FileWave Server and FileWave team members request logs, it may be necessary to provide the zip along with any requested log files, for completeness.
macOS Client
The macOS Script potentially handles both the FileWave Client logs and FileWave Central logs.
Download: client_log_archiver.sh.zip
By default, the following script will run in a 'Dry Run' mode, only showing the files that would be zipped. No files will actually be zipped and the original files will remain untouched. The script has the following flags:
Usage
Files included in the archive will be zipped, and the original log files will be emptied.
Optional:
-a [Action the script. Action a dry run if this option is not specified. Dry run will echo only]
-d [Integer specifying the amount of log days to keep (default 10 days)]
-e [Start from the beginning. The zip will be erased and the script will run as if first ran]
-f [Archive Fileset logs from the client as well as generic FileWave Client logs. -g is unnecessary when running this option]
-g [Archive generic FileWave Client logs (not including Fileset logs). Fileset logs will remain as is.]
-r [Rerun the script, but keep the zip archive. Current zip will be preserved and only additional logs included from the above options will be added to the archive if not already zipped]
-s [Archive FileWave Central logs from computer]
-x [This options will zip all client logs (same as running -f) and also action the script]Options
'-a'
This option will overrule the Dry Run mode and all files will be zipped and all defined, active logs emptied.
'-d'
If this option is not supplied, the amount of days to keep will be set as 10. Use this option to specify an alternate amount of days to keep. For example, to set this as 7 days:
sudo ./client_log_archiver.sh -a -d 7
'-e'
This option will remove the current zip and act as if this is the first time the script ran. If this option is not set, any re-running of the script will add or update the current contents of the zip.
If the script is run again shortly after the first run, the archive will only contain logs created since the previous zip.
'-r'
It may be desirable to re-run the script to add logs not previously included, whilst preserving the current zip. The '-r' option allows for just that situation.
'-x'
Running '-x' is the same as setting both '-a' and '-f' simultaneously.
The next options determine which logs are archived. '-f' and '-g' should not be used at the same time, since '-f' will overrule '-g'.
'-f'
Zip and replace all FileWave Client Logs. This will include all generated log files from Filesets, e.g. script logs.
'-g'
The '-g' option zips and replaces all FileWave Client Logs, excluding Fileset logs. Since Fileset scripts are written by the administrator of FileWave, the contents of those scripts can be controlled and contents known. As such, it may be desirable to keep these logs.
'-s'
This last option will zip and replace any logs generated by the FileWave Central application. This option need only be set on computers which run this application.
Examples
To archive only FileWave Central logs:
sudo ./client_log_archiver.sh -a -s
Zip FileWave Client, excluding Fileset logs:
sudo ./client_log_archiver.sh -a -g
If after running the above command the following were to be actioned, the zip would be updated to include Fileset logs, but the other, already zipped Client logs would be left as is:
sudo ./client_log_archiver.sh -a -r -f
Fileset Contents
The script needs to run while the client is stopped, so it cannot be run directly through FileWave. Instead, the Fileset includes the script and a LaunchDaemon to run it periodically.
If this script is used on FileWave Clients and FileWave team members request logs, it may be necessary to provide the zip along with any requested log files, for completeness.
Windows Client
Troubleshooting
How to set FileWave Server components to debug mode
For troubleshooting, you can temporarily increase FileWave Server logging. Debug logging can help with server, Booster, LDAP collection/syncing, and Software Update catalog issues by adding detail that you or FileWave Support can use during investigation.
Step-by-step guide
To set debug logging for fwxserver.log, fwldap.log, and fwsu.log:
- On a Linux or macOS server, use
/usr/local/etc/server.lvl. - On Linux or macOS, set the debug level with
echo 99 > /usr/local/etc/server.lvl. Theserver.lvlfile may be empty if the debug level has not been set before.
If server.lvl does not exist, create it with a text editor or with echo 99 > /usr/local/etc/server.lvl.
If you only need fwxserver.log in debug mode, no restart is required after changing server.lvl. For LDAP, Software Update, or Booster troubleshooting, restart the relevant FileWave Server services or processes after changing the level.
Set logging back to the standard level after troubleshooting so debug logs do not keep growing unnecessarily.
The logging levels are as follows:
10 : Standard Log Level
99 : Debug Log Level
101: Trace Log Level
To set debug logging for the Django component (filewave_django.log):
- On a Linux or macOS server, go to
/usr/local/filewave/django/filewave/. - Edit
settings_custom.pywithsudo nano settings_custom.py. - Remove the
#beforeDEBUG = True. - Save the file.
- Restart Apache with
sudo fwcontrol apache restart. - Restart Scheduler with
sudo fwcontrol scheduler restart. - Restart client_monitor with
sudo fwcontrol client_monitor restart. - Restart model_update_service with
sudo fwcontrol model_update_service restart.
After troubleshooting, return Django logging to normal by adding the # back before DEBUG = True, then restart the services again.
fwxserver folder relocation in FileWave Server 13.1.4+ on macOS and Linux Platforms
Does this affect my installation?
If you are on FileWave Server 13.1.4 or higher this article will not apply to you.
To determine whether action is required from you immediately prior to the upgrade to FileWave 13.1.4, please run the following command as root on your FileWave server :
if [ ! -z "`mount | grep /fwxserver`" ]; then echo 'Action required' ; else echo 'You are good to go' ; fiIf this command returns "Action required" on your server, you will have to read on and take action right before upgrading to 13.1.4 - if "You are good to go" is returned, please make sure your Backup Script is up to date via Automated Backup, and you're well prepared to continue with the usual upgrade instructions.
Background Information
On macOS and Linux, FileWave Server up until Version 13.1.3 stores both DB ( postgres Database ) and Data Folder ( FileSet Repository ) in the /fwxserver folder on the root of the filesystem.
Architectural changes in macOS Catalina make it necessary to move this data to /usr/local/filewave/fwxserver , since the root filesystem will be read-only from macOS Catalina onwards.
For most installations, the only change that is required is an update to the newest version of the Backup Script to make sure that the new locations are taken into account. Please refer to Automated Backup for an up to date download.
FileWave fwxserver 13.1.4 contains an automatic routine to do this migration for you, and if you have not relocated your Data Folder or /fwxserver folder to another volume, this will work without admin intervention.
If you have followed the following article: Store the FileWave Server/Booster Data on a Separate Volume , meaning you have moved the Data Folder to another Volume, and then created a Symlink to your alternative Datastore to /fwxserver/Data Folder, all that is going to happen is that the symlink itself is going to be moved, and none of the data is moved. No admin intervention is necessary.
Manual Intervention in case of Mount Point Utilization
Please note that FileWave support is happy to assist you with this should you feel uncomfortable doing this yourself. Please contact us using https://help.filewave.com in this case, or by calling us.
Please note that the changes outlined below will make your FileWave Server inoperable with any version below FileWave 13.1.4. If you do not have the FileWave 13.1.4 installer ready to go, please come back to this article when you do.
Please also note that during the time you implement these changes, your FileWave Server services will be offline. The total duration of the change should be less than 10 minutes - after which you can start the usual upgrade procedures.
Step 1 - Server shutdown
sudo fwcontrol server stopStep 2 - Determining mountpoint(s) related to /fwxserver, and unmounting them
mount | grep /fwxserver|sed -e 's/.*on \(.*\) type.*/\1/'|xargs -t umountStep 3 - Moving the mountpoints to their new location in /usr/local/filewave/fwxserver
Linux: Open the /etc/fstab file in a text editor of your choice.
For each of the lines in the output of Step 2, replace - in the second column - /fwxserver with /usr/local/filewave/fwxserver, i.e. :
/dev/mapper/centos-fwxserver /fwxserver ext4 defaults 1 1Would Become :
/dev/mapper/centos-fwxserver /usr/local/filewave/fwxserver ext4 defaults 1 1macOS : run 'sudo vifs'
For each of the lines in the output of Step 2, replace - in the second column - /fwxserver with /usr/local/filewave/fwxserver, i.e. :
UUID=DF000C7E-AE0C-3B15-B730-DFD2EF15CB91 /fwxserver apfs rw 1 0would become :
UUID=DF000C7E-AE0C-3B15-B730-DFD2EF15CB91 /usr/local/filewave/fwxserver apfs rw 1 0Step 4 - create the mountpoint, remount the volumes, and verify things are where they should be
for each of the lines modified, remount the volumes by running "mount", and appending the new path for the mount, for instance:
mkdir /usr/local/filewave/fwxserver
mount /usr/local/filewave/fwxserverPlease verify the presence of your data by running :
ls -la /usr/local/filewave/fwxserverand checking if your DB and "Data Folder" folders show.
Step 5 - You're clear to run the upgrade!
Please don't attempt to start your server until the upgrade; FileWave Versions lower than 13.1.4 will not be able to run in this state .
You're now well prepared to continue with the usual upgrade instructions.
Disable IPv6 on FileWave Server Components
What
FileWave Server, Booster, and Imaging Virtual Server (IVS) components should use IPv4. Enabling IPv6 on these server components can cause unexpected communication or service-discovery problems.
When/Why
Use this guidance when installing or troubleshooting a FileWave Server, Booster, or IVS. FileWave clients can operate on networks that use IPv6, but IPv6 should remain disabled on the FileWave server components themselves.
How
For macOS
Run the following command in Terminal, replacing en0 if the active network service uses a different interface:
# Disable IPv6 for a specific network interface (e.g., "en0")
networksetup -setv6off en0
For Linux
Current FileWave appliance images handle this configuration. Check custom Debian installations and older appliances before applying the steps below.
On a custom Debian installation, disable IPv6 with the following steps:
- Edit the
/etc/sysctl.conffile:
sudo nano /etc/sysctl.conf
- Add the following lines to the file:
# Disable IPv6
net.ipv6.conf.all.disable_ipv6 = 1
net.ipv6.conf.default.disable_ipv6 = 1
net.ipv6.conf.lo.disable_ipv6 = 1
net.ipv6.conf.tun0.disable_ipv6 = 1-
Save and close the file.
-
Reload the sysctl settings:
sudo sysctl -p
Verify the configuration
After applying the change, confirm that the FileWave server component no longer has an active IPv6 address:
- macOS: Open Terminal and run
ifconfigto check the network interfaces. - Linux: Execute
ip aorifconfigto inspect the network configurations.
Related Links
- FileWave Server Setup
- IPv6 Wikipedia - Background information on IPv6
Advisory: OS Age Attestation and FileWave Server Appliances (Debian Guidance)
What
We are monitoring OS-level age-attestation legislation (including California AB1043) to determine whether it creates any required changes for FileWave appliances.
Current FileWave appliance scope:
- FileWave Server (Debian)
- FileWave Booster (Debian)
- FileWave IVS (Debian)
If technical changes are required, FileWave will publish Debian-focused guidance.
Scope note for admins
Based on current California law text, primary direct duties are written for OS providers, covered app stores, and app developers. For most FileWave appliance customers, this is currently a monitor-and-prepare topic, not a confirmed immediate appliance action item.
Practical takeaway: maintain clear visibility into your environment (appliance platform status + endpoint OS inventory).
I am not a lawyer, and none of this is legal advice. Work with your legal team on organization-specific interpretation.
When/Why
- California AB1043 has a defined effective date (January 1, 2027).
- Colorado has a similar proposal in progress.
- New York has similar proposal activity in progress (S8102/S8102A and A8893).
- Vendor implementation details are still evolving.
- Law and guidance may evolve over time (v1 now, possible v2 changes later), so staying aware matters.
CentOS note
FileWave Server on CentOS is end-of-life and not a forward platform; if you are still on CentOS, migrate to Debian as soon as possible. Reference: FileWave Server on CentOS EOL
How
Current recommended actions:
- Confirm FileWave Server/Booster/IVS are running on Debian.
- Keep Debian appliances on supported/current FileWave versions.
- Watch FileWave release notes and KB updates for official guidance.
- Use FileWave inventory to track endpoint OS versions so you can react quickly if vendor changes require admin action (for example, if required behavior lands only on newer OS versions or if app-store managed deployment flows change).
- If you need FileWave to inventory Linux endpoints beyond current support, vote/comment here: