Identity Provider (IdP) Integration
Identity Provider (IdP) integration can be key to meeting security requirements from your InfoSec team, and ease-of-use requirements for your customers. IdP solutions allow your customer to have only one set of credentials, and to use them anywhere.
- FileWave Identity Provider (IdP) Integration Overview
- IdP Setup: Microsoft Entra ID (Azure)
- IdP Setup: Okta
- IdP Setup: Google
- IdP Setup: Keycloak
- Adding IdP Groups for FileWave Authentication
- Configuring DEP Profiles for IdP Authentication
- Admin Login Using an IdP Provider
- IdP for Deployments and Smart Groups
- Use LDAP Groups for FileWave Central Administrator Access
- Troubleshooting
- Directory data syncronization between IdP and FW is not supported
- IdP redirect URL port 20443
- Enrolling Apple devices why am I prompted for IdP login?
- Renaming Azure Active Directory (Azure AD) to Microsoft Entra ID
- IdP Custom Fields
FileWave Identity Provider (IdP) Integration Overview
What
Identity Provider (IdP) integration helps FileWave use your organization's existing identity system for supported authentication and enrollment workflows. This can reduce separate credentials for administrators and users while keeping access aligned with your identity provider.
FileWave supports Microsoft Entra ID, Okta, Google, and Keycloak IdP integrations.
FileWave Central 16.4 opens IdP authentication in the computer’s system browser instead of an embedded frame. This requires no additional configuration and allows the provider to use browser-managed credentials and an existing browser session when organization policy permits it. See Admin Login Using an IdP Provider.
Only one configuration for each IdP provider can be active in FileWave.
When/Why
Start here when you already use an IdP provider and need to understand which FileWave workflows can use it, which provider-specific setup article to follow, and where related authentication or attribute-sync behavior is documented.
How
Use the provider-specific setup article first, then review the related articles for groups, enrollment, admin login, deployments, Smart Groups, and custom fields as needed:
- IdP Setup: Microsoft Entra AD
- IdP Setup: Okta
- IdP Setup: Google
- IdP Setup: Keycloak
- Adding IdP Groups for FileWave Authentication
- Configuring DEP Profiles for IDP Authentication
- Admin Login in Using an IdP Provider
- IdP for Deployments and Smart Groups
- IdP Custom Fields
- LDAP Admin Integration
Known limits
IdP integration does not replace every LDAP workflow. Use the linked IdP Custom Fields and LDAP Admin Integration articles to decide whether a requirement should be handled through IdP attributes, LDAP(S), or both.
IdP Setup: Microsoft Entra ID (Azure)
What
Before we can use AzureAD for authentication from FileWave, we must create a new application in the Azure Portal and give FileWave access to it. The whole purpose of this configuration is to give FileWave permissions to talk to your Microsoft Entra ID environment.
When/Why
This configuration is required if you want to use AzureAD for authentication during device enrollment or during login to the FileWave Web and Native administrator consoles.
How
The configuration for access is all driven through an Microsoft Entra ID application, so we need to start with:
Part 1: Login to Microsoft Entra ID Portal
First, we'll login to Microsoft Entra ID at portal.azure.com with an administrator's account and click on Microsoft Entra ID as shown:

And make note of the domain info shown below:

It is a good idea to take all of these elements and label/paste them into a document you store securely. Although we'll use them to configure FileWave, you can't access many of them from FileWave once they are stored.
Part 2: Create an App
Now we have to create an app for FileWave to talk to, and assign some right to it. First go to the app registrations menu, then click "new registration":

Specify a name for your app that is meaningful to you, and Register the app (we'll set the login URIs later).

Part 3: Add a Platform and URI Addresses
Within the app configuration, we'll choose Authentication, then Add a Platform, of type Web:

And for the web configuration, we'll need to copy some address from your FileWave server. You'll get them from the WebAdmin, Settings:, New AzureAD IDP, and then Get URLs as shown

Then choose an Microsoft Entra ID IDP Provider

You can add a name now (or later), but you'll get the URLs from the "Get URLs" button:


So now we'll enter one of the redirects, and click configure:

And then add the other two from here:

Make sure to hit Save at the top after you have entered all three.
Part 4: Cert & Secrets
Now we are going to go to Certificates & Secrets to provide a way for FileWave to authentication to our new application. Click on New client secret

Then we give it a descriptive name:

And then we'll want to get a copy of the Client Secret, and this is the ONLY time you can copy it. The one we need is under the 'Value' column.

Lastly, we get the The Client ID, you get from the overview page:

Each of the relevant values then gets copied into the FileWave config below:

You'll check the checkbox for "Admin" if you want to be able to use AzureAD for login to the FileWave admin with AzureAD, and "Enrollment" if you want to use it for Apple device enrollment authentication. Note that multiple IDPs can be used for admin login, but only one for device enrollment.
Part 5: App Permissions
Now we have to give our app permissions to read the directory so that it can pull group information into FileWave for browsing and rights assignment.
So, we'll go to the App Permissions section and start Adding Permissions

Our permissions are going to be for Microsoft Graph

We'll start with an application permission:

For Group Read All AND User Read All (not shown, but you can pick two at once):

Then we'll add more permissions, but "delegated permissions" for open id and profile as shown:

Our permissions then should look like this when we have them all

And then we just need to click Grant Consent to finish with the permissions

When they show as green, we are all done!

Part 6: App Registration Renewal
At some point the Certificate of the App will expire and a new certificate should be generated. The maximum you can set before expiry is 2 years.
From the App Registration view, expired certificates may be observed

For renewal, click on the Display Name of the App, followed by 'Create a new one ->'

Then generate a 'New client secret' similar to part 4 of this KB.
- Add a description
- Copy the secret from the 'Value' column, not the 'Secret ID'. Be sure to copy it just after creating your new secret, otherwise it will appear obfuscated the next time you attempt to view it.
This time though, you will only need to ddit the current IdP in FileWave Anywhere:
- Open Settings in the FileWave Admin
- Choose Edit from the selected IdP
- Paste in the new secret value and 'Save'
The old, expired certificate may be deleted from within the Azure portal.
Related Content
- Adding IdP Groups for FileWave Authentication
- Configuring DEP Profiles for IDP Authentication
- Admin Login in Using an IdP Provider
IdP Setup: Okta
What
Starting with FileWave Version 14.2.0, we can use Okta for authentication from FileWave. We must create a new application in the Okta Portal and give FileWave access to it.
When/Why
This configuration is required if you want to use Okta for authentication during device enrollment or during login to the FileWave Web and Native administrator consoles.
How
Okta Admin UI
The UI may look different depending on if you are using a Trial Okta organization or the regular, non-Trial version of the Okta.
Part 1: Login to the Okta Admin Portal
Okta Admin Portal
Begin by logging in to the Okta Admin Portal with an administrator's account. (https://example-admin.okta.com/admin)
Part 2: Create an Okta Application in the Okta Admin Portal
Create an Okta Application Integration in Okta Admin Portal
Now we are going to create an Okta application for FileWave to talk to and assign some rights to it.
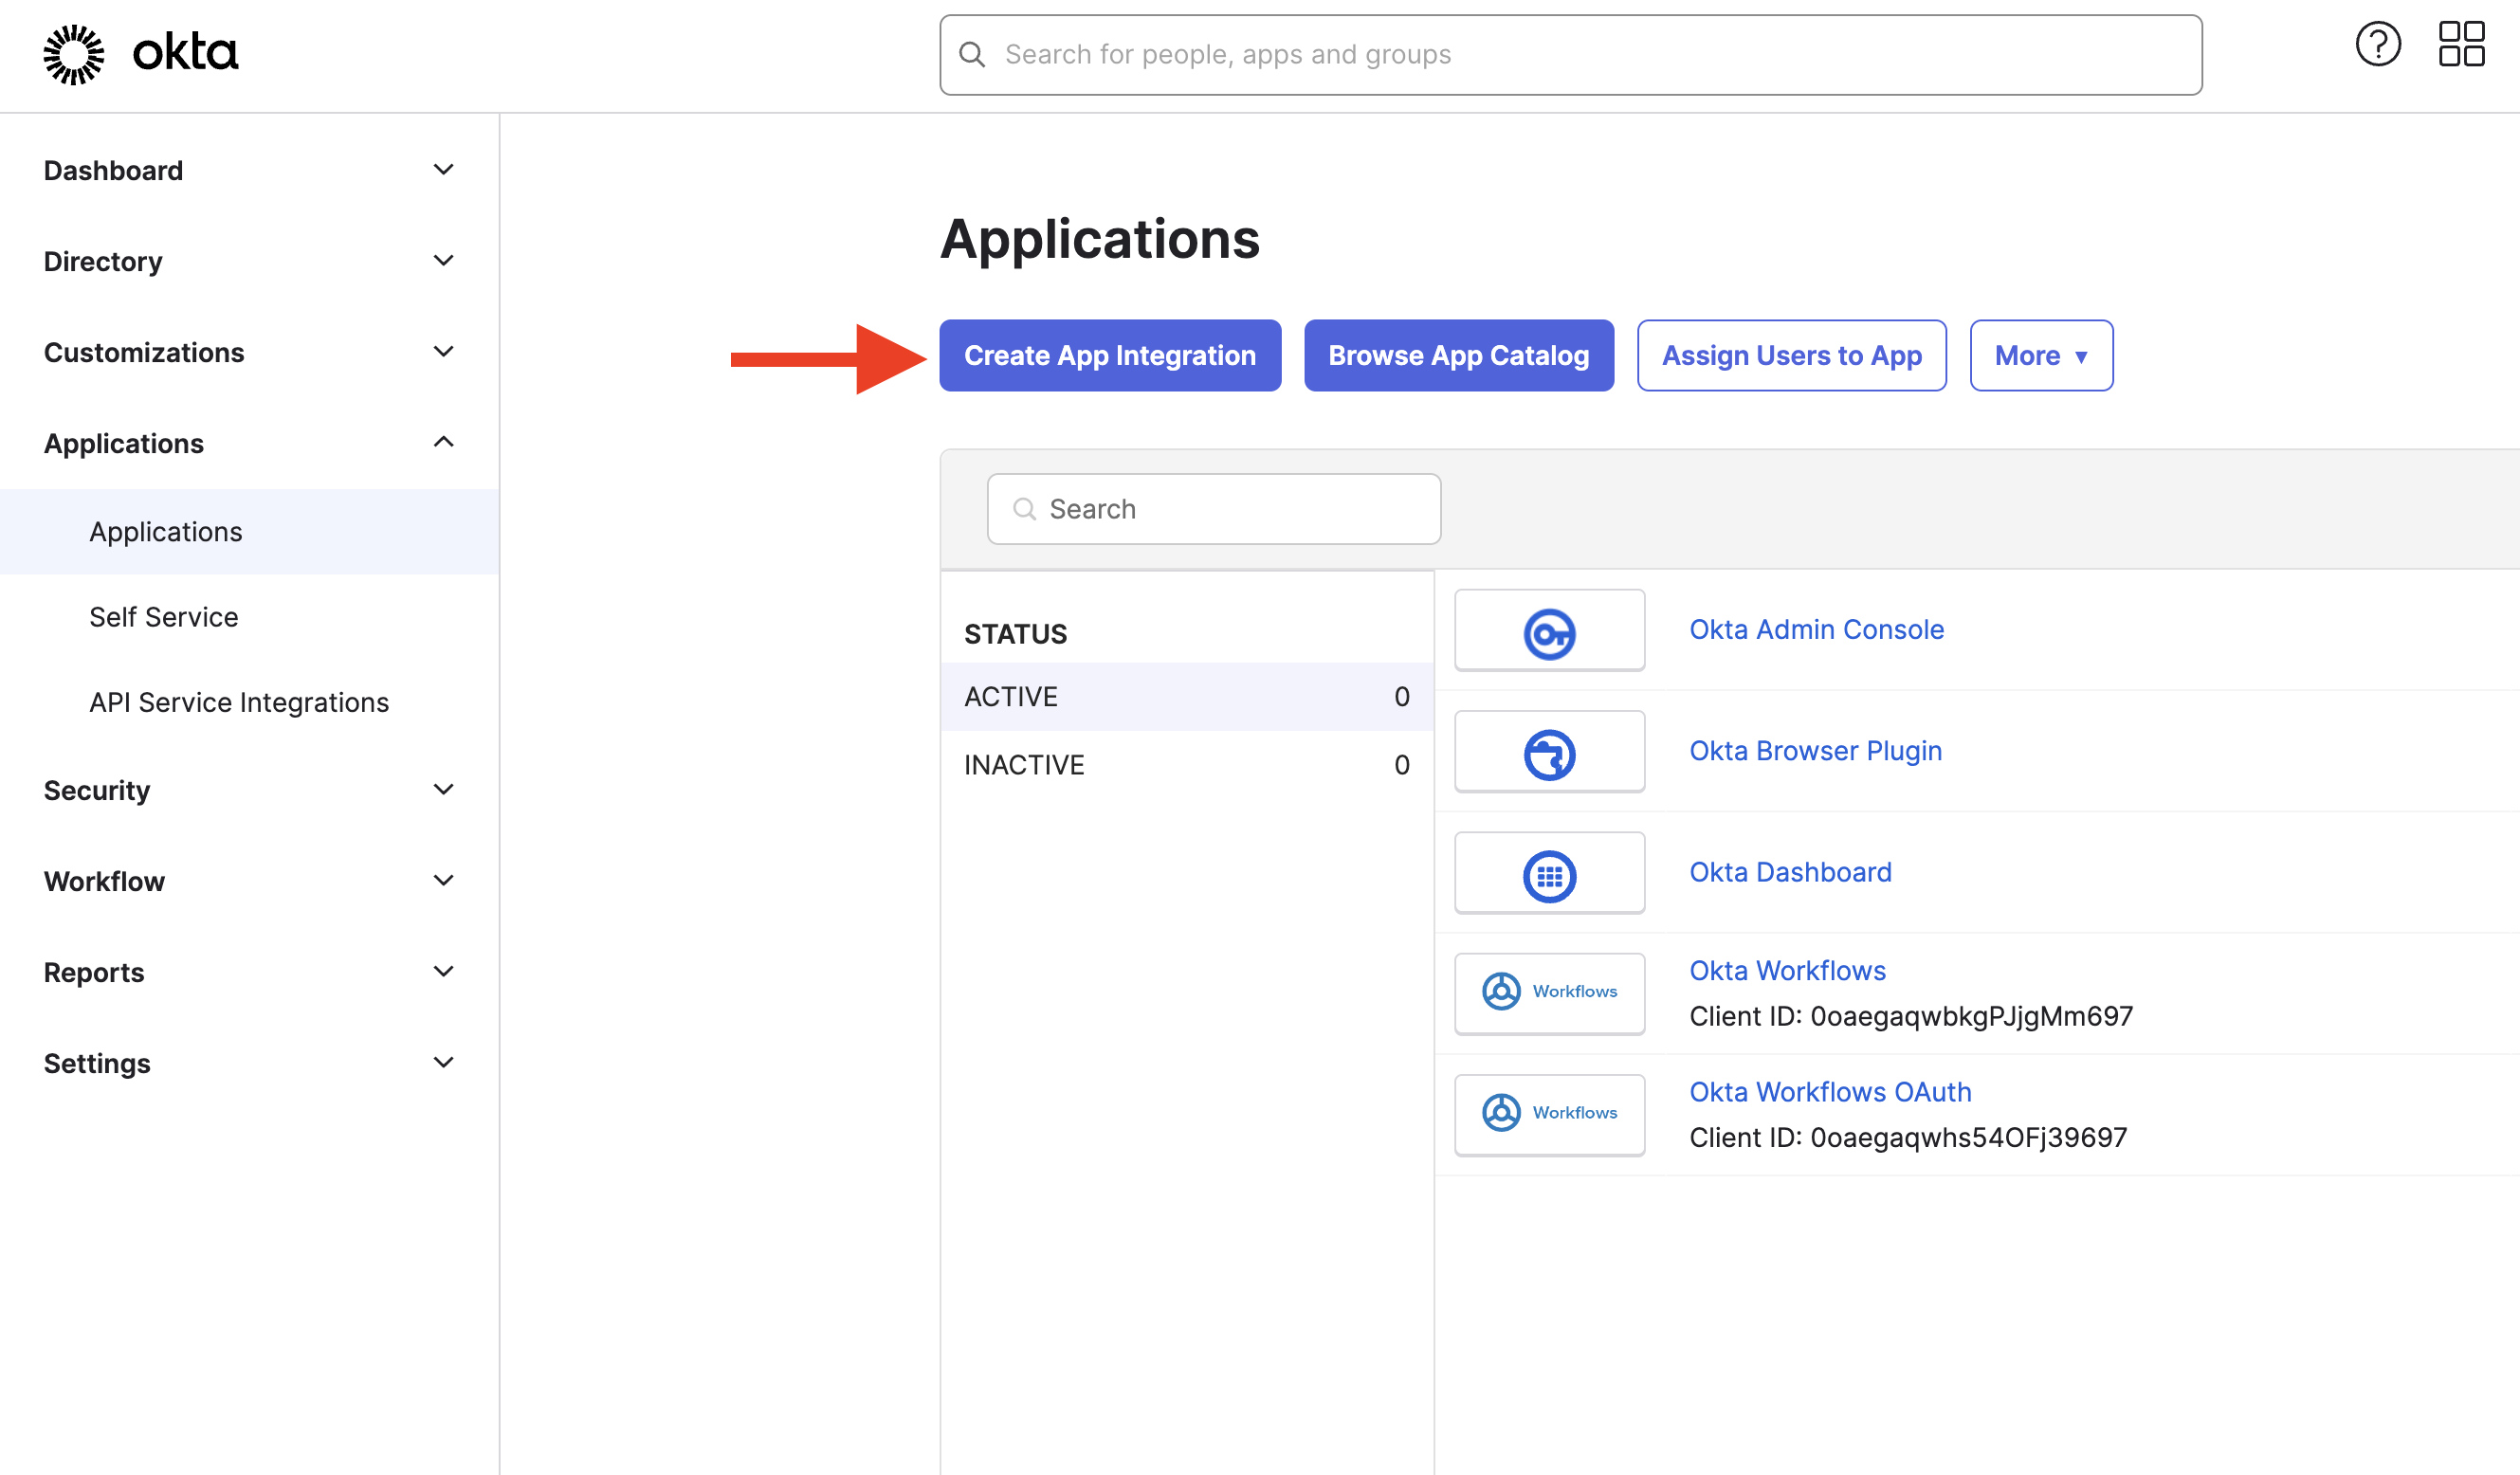
- First, open the Okta Admin > Menu > Applications > Applications menu and click the Create App Integration button.

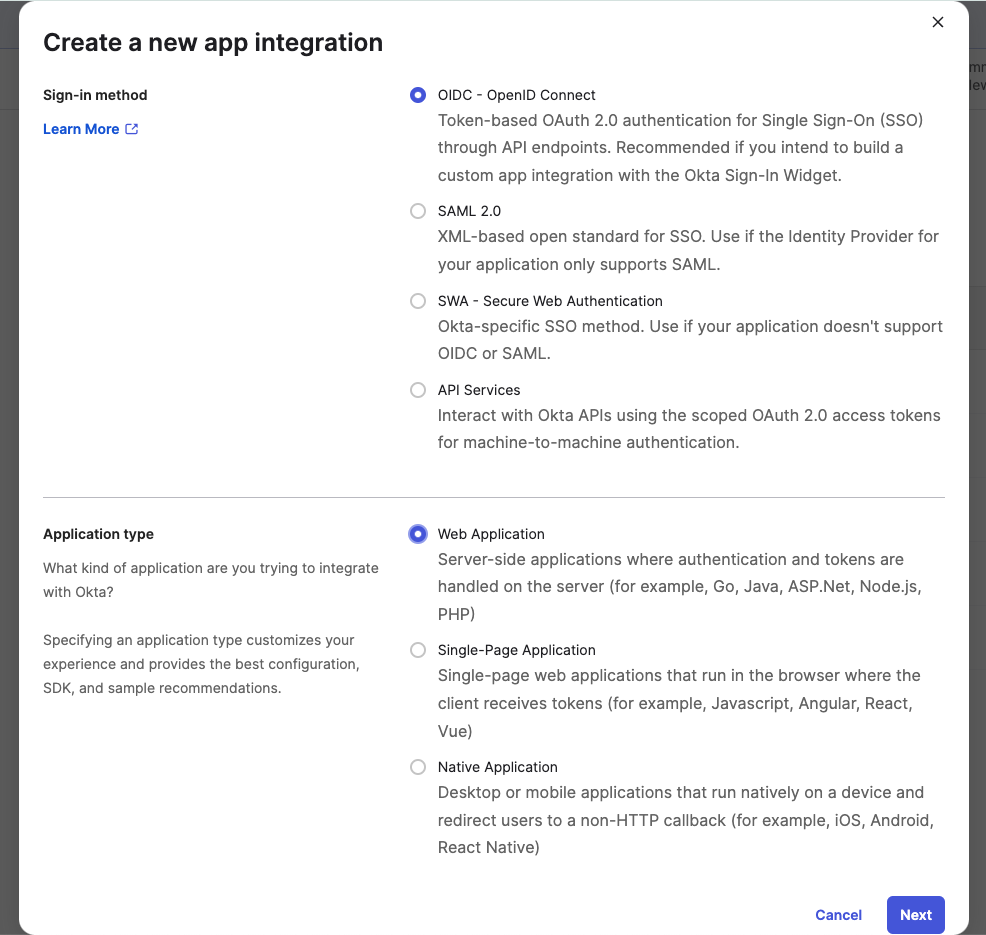
- Next, select OIDC - OpenID Connect for the Sign-in method.
- Select Web Application for the Application Type.
- Click the Next button.

- Select Web Application for the Application Type.
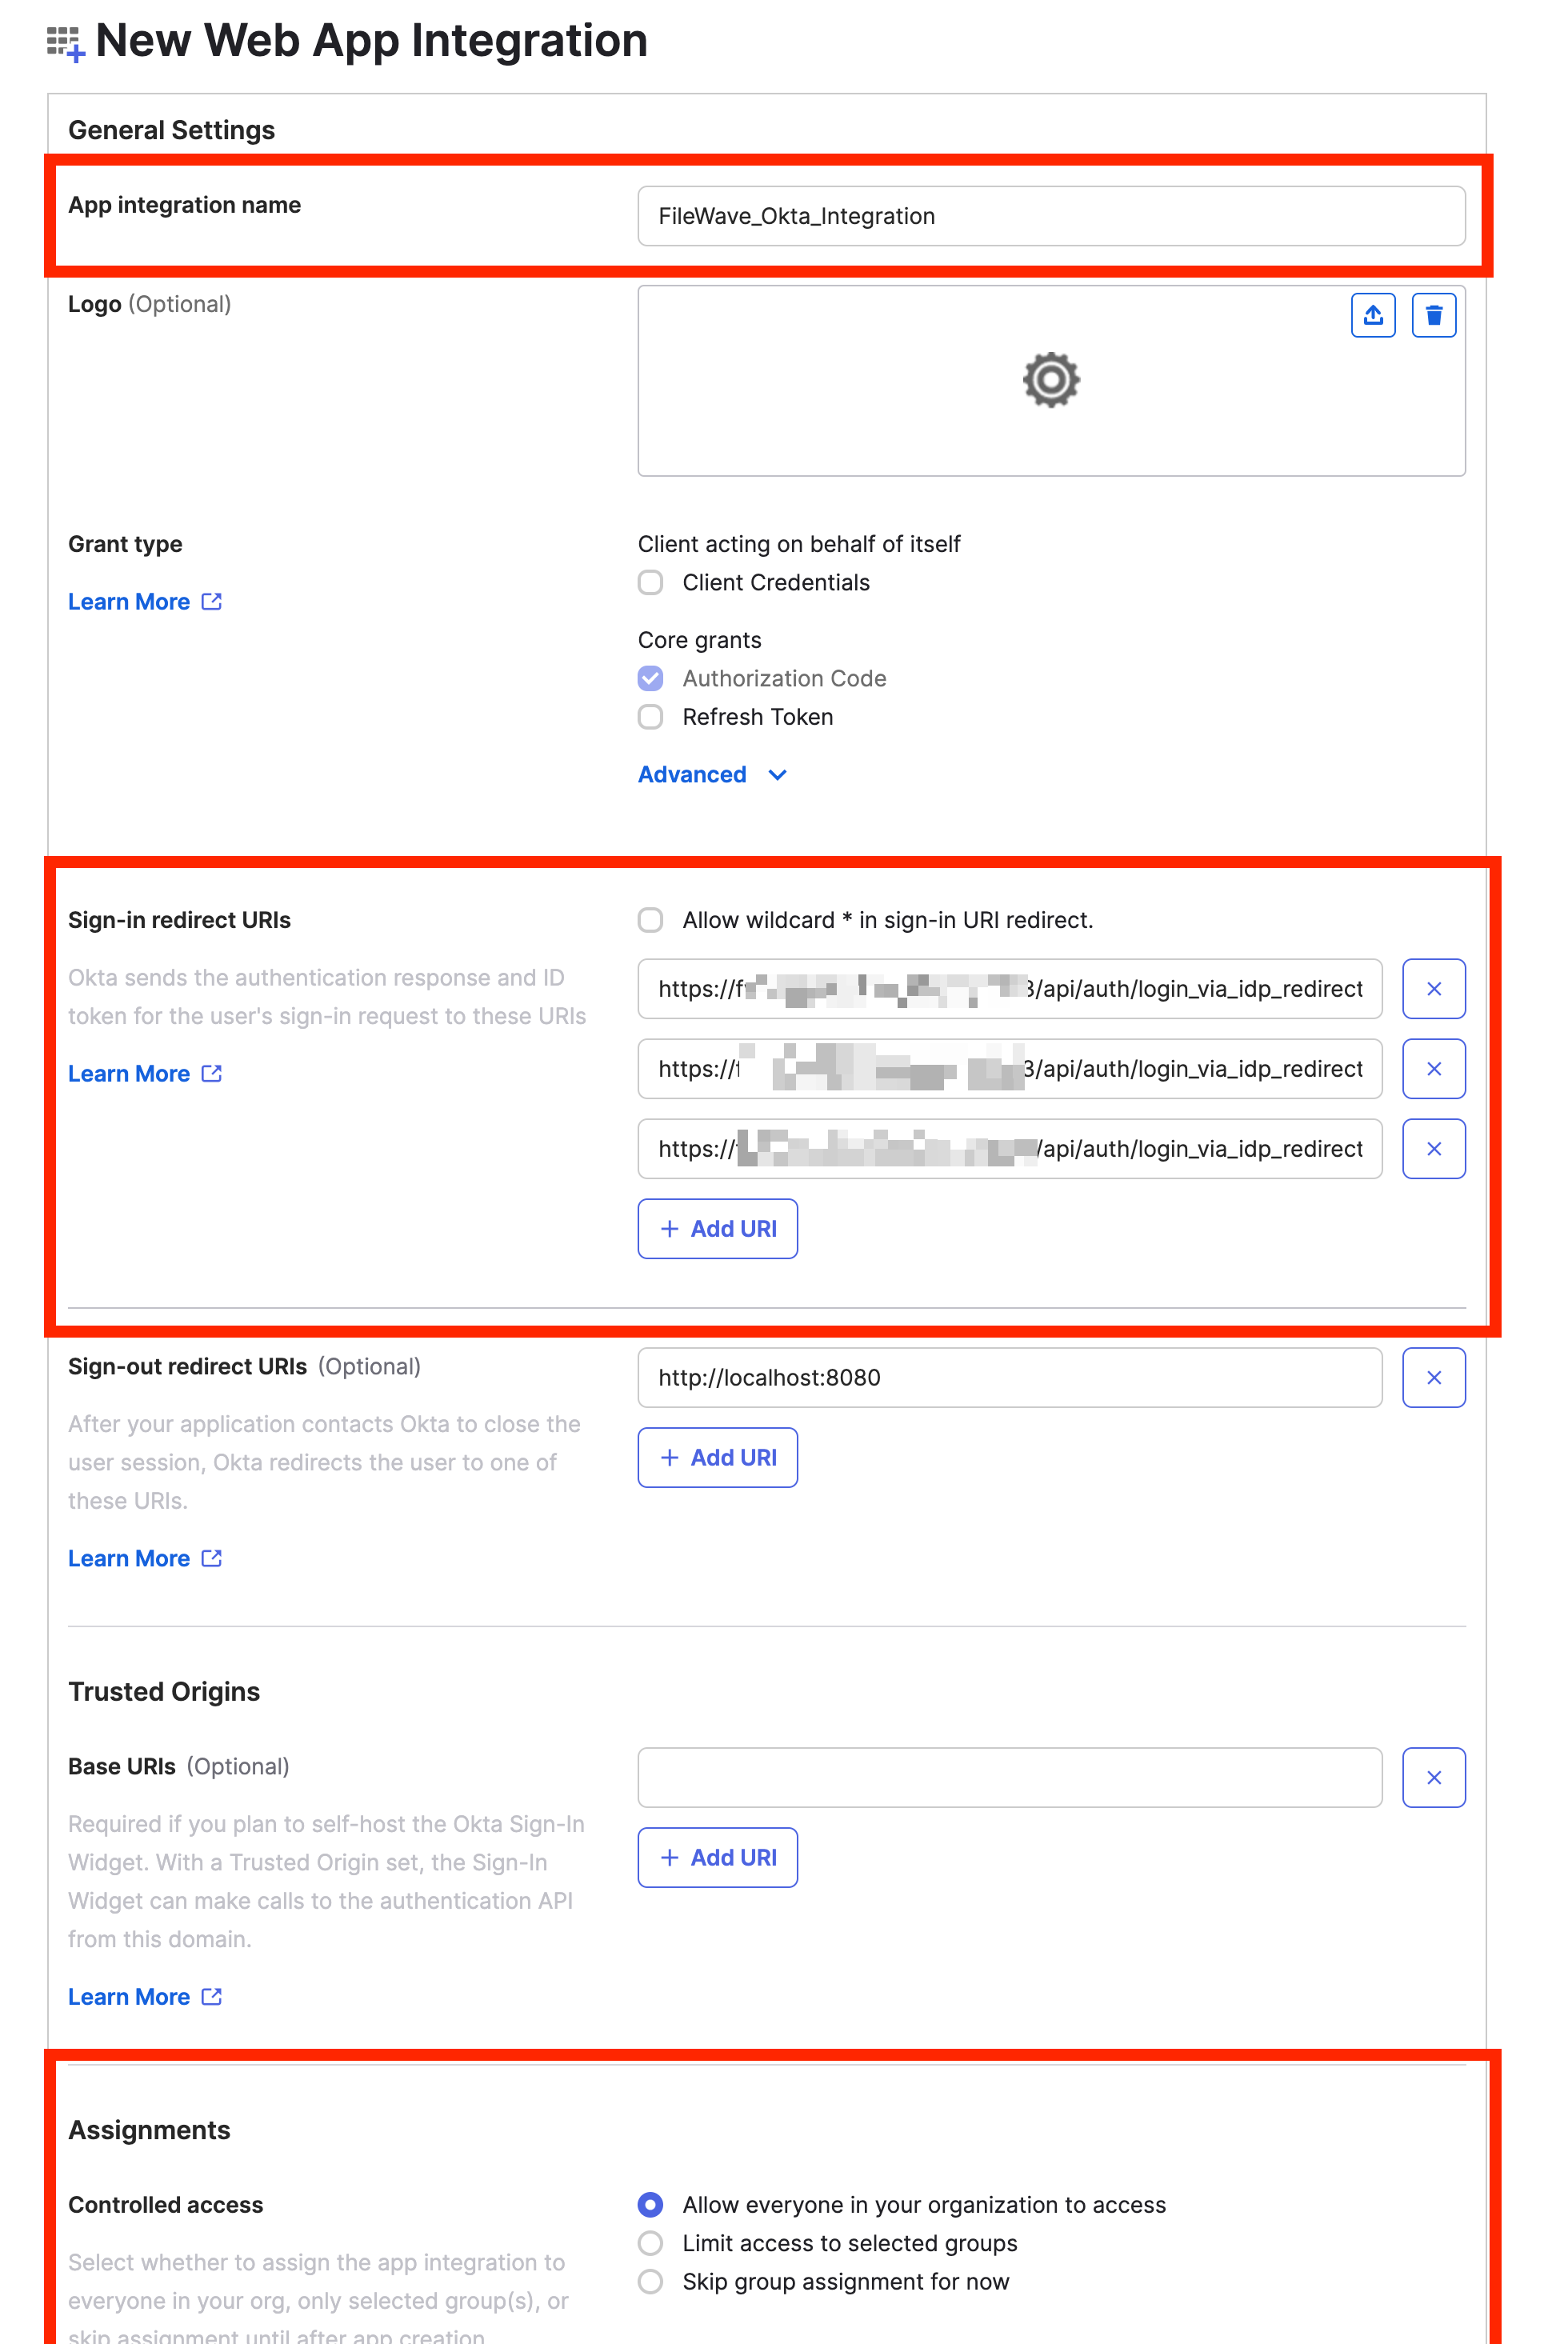
- Next, configure your Application on the New Web App Integration page you've been redirected to.
- Input a meaningful name in the App integration name field.
- Click the Add URI button for the Sign-in redirect URIs setting.
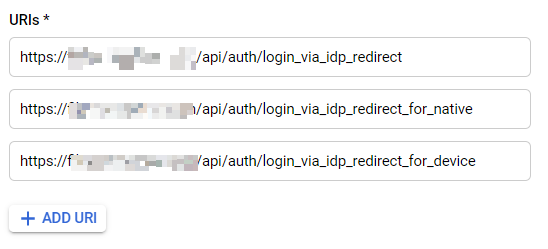
- Input all of your FileWave Server's redirect URIs in the Sign-in redirect URIs setting.
Login Redirect URIs for FileWave are displayed in the FileWave Web Admin Settings. (Login to Web Admin > Select "⚙' [Gear/Settings Icon] in top right > Identity Provider > Setup Okta > Get URLs)
Login Redirect URIs are unique to your server, but will look something like the following:
https://fwxserver.example.com:443/api/auth/login_via_idp_redirect
https://fwxserver.example.com:443/api/auth/login_via_idp_redirect_for_native
https://fwxserver.example.com:20443/api/auth/login_via_idp_redirect_for_device
- Input all of your FileWave Server's redirect URIs in the Sign-in redirect URIs setting.
- Under Assignments, choose whether you want to limit access to specific groups or integrate all users in the organization.
- Click the Save button to create the Okta App integration.

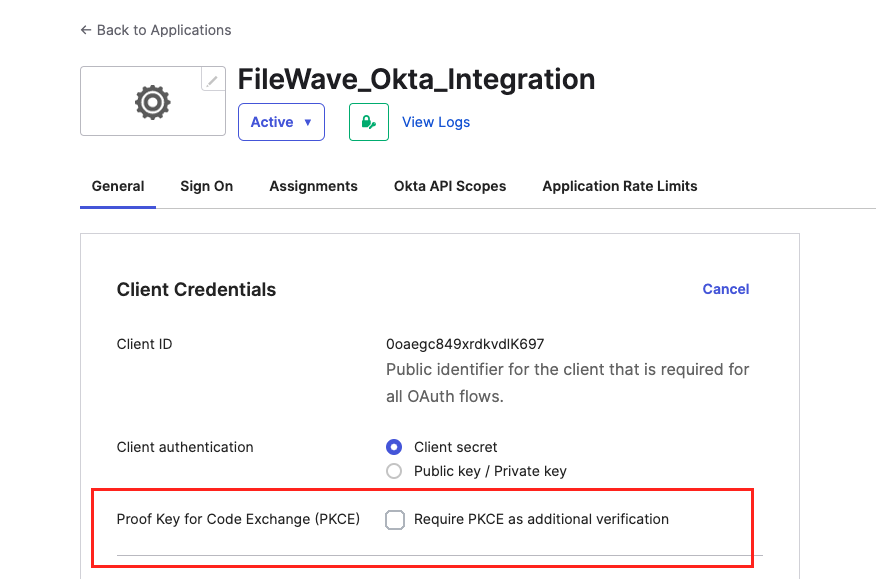
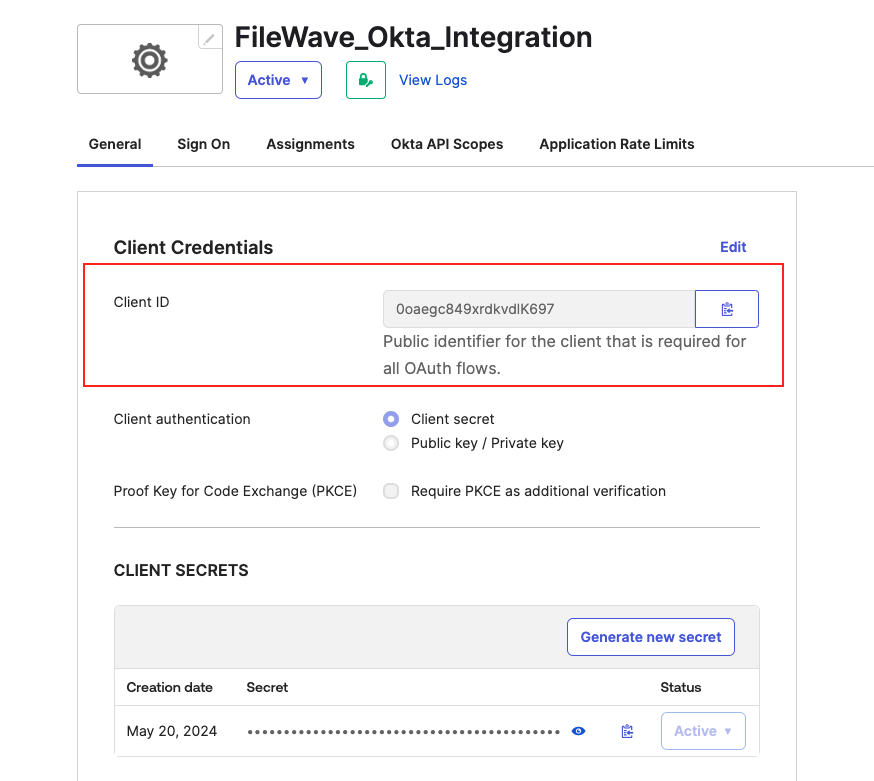
5. After saving, you will be redirected to the application General Settings page. Next to Client Credentials, select Edit. Leave Proof Key for Code Exchange (PKCE) unchecked, then select Save.
Do not enable PKCE for this FileWave integration. Enabling Proof Key for Code Exchange (PKCE) can cause FileWave authentication to fail with Authentication failed: Insufficient IdP permissions.
Part 3: Configure the Okta App in FileWave
Configure an Okta App in the FileWave Web Admin Console
In order for FileWave to communicate with Okta for authentication the Okta App will need to be configured with FileWave.
- Begin by logging into the FileWave Web Admin and open the Settings button ('⚙'/gear icon in the header).
- Open the Identity Provider menu in the FileWave Web Admin Settings
- On the Identity Provider menu, click the Setup Okta button or New Identity Provider button in the top right if one has already been configured.
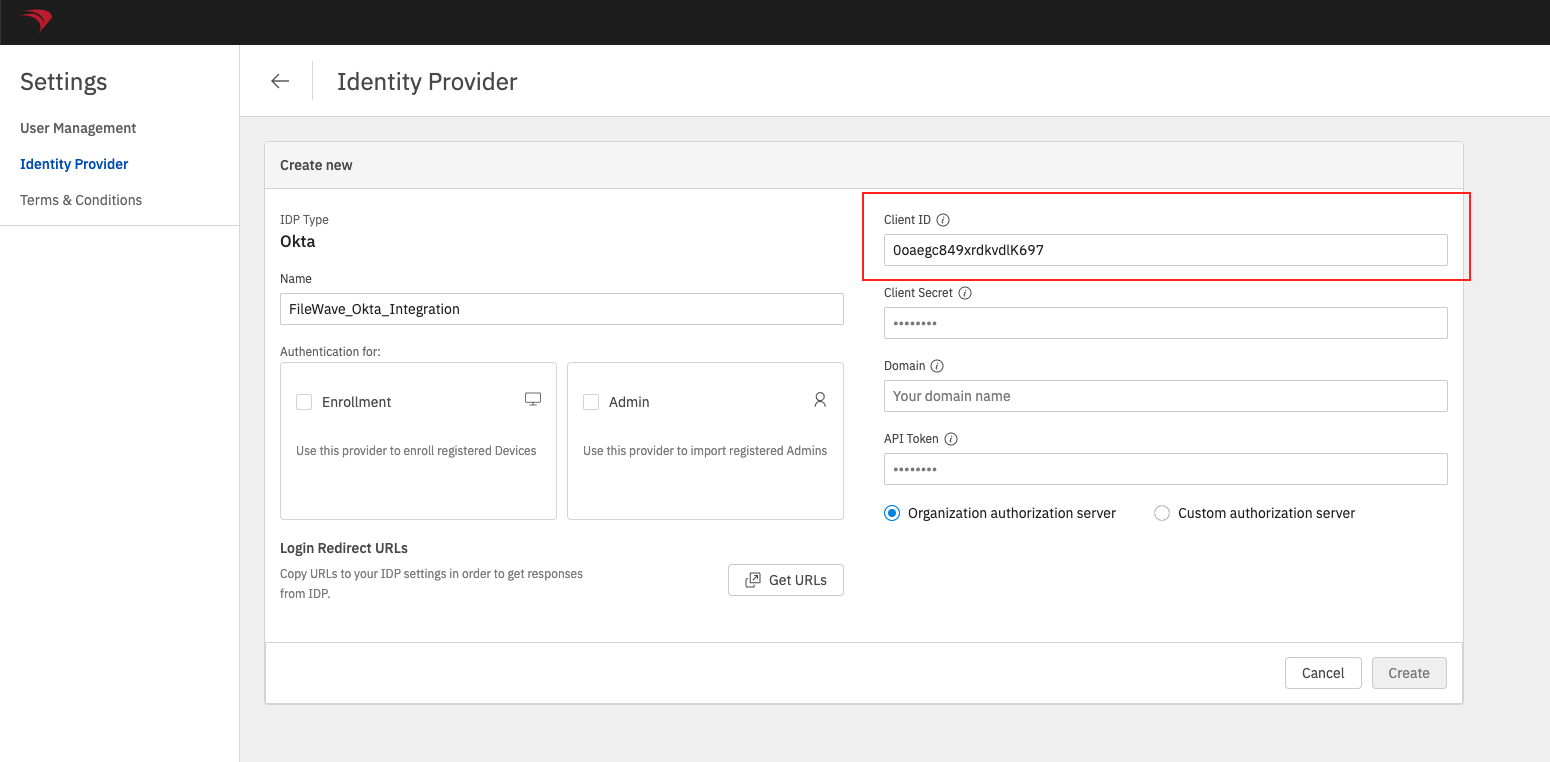
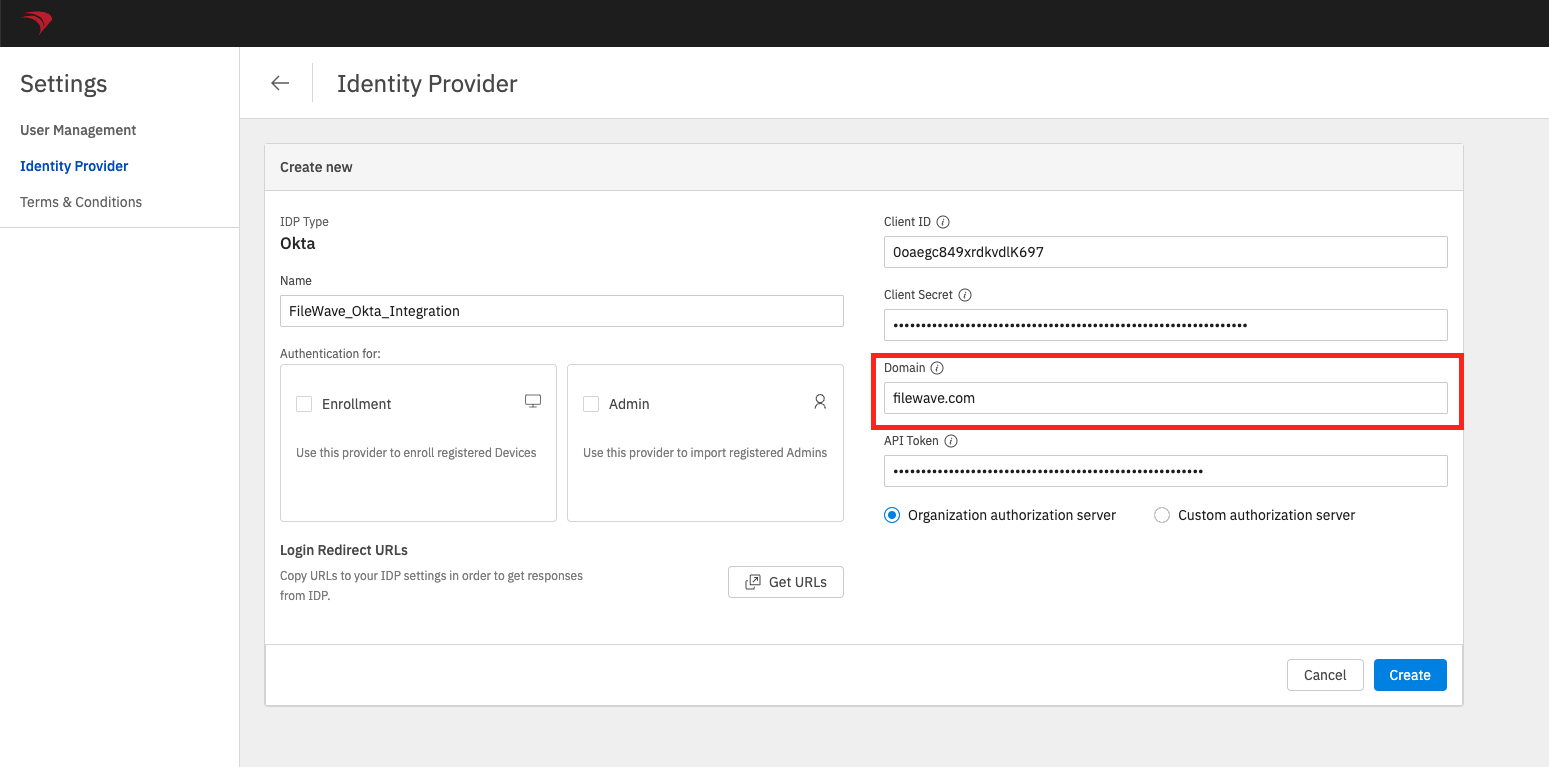
- Input a meaningful name in the Name field.
- Copy the Okta Client ID value found in the Okta page you were redirected to and paste in the Client ID field.


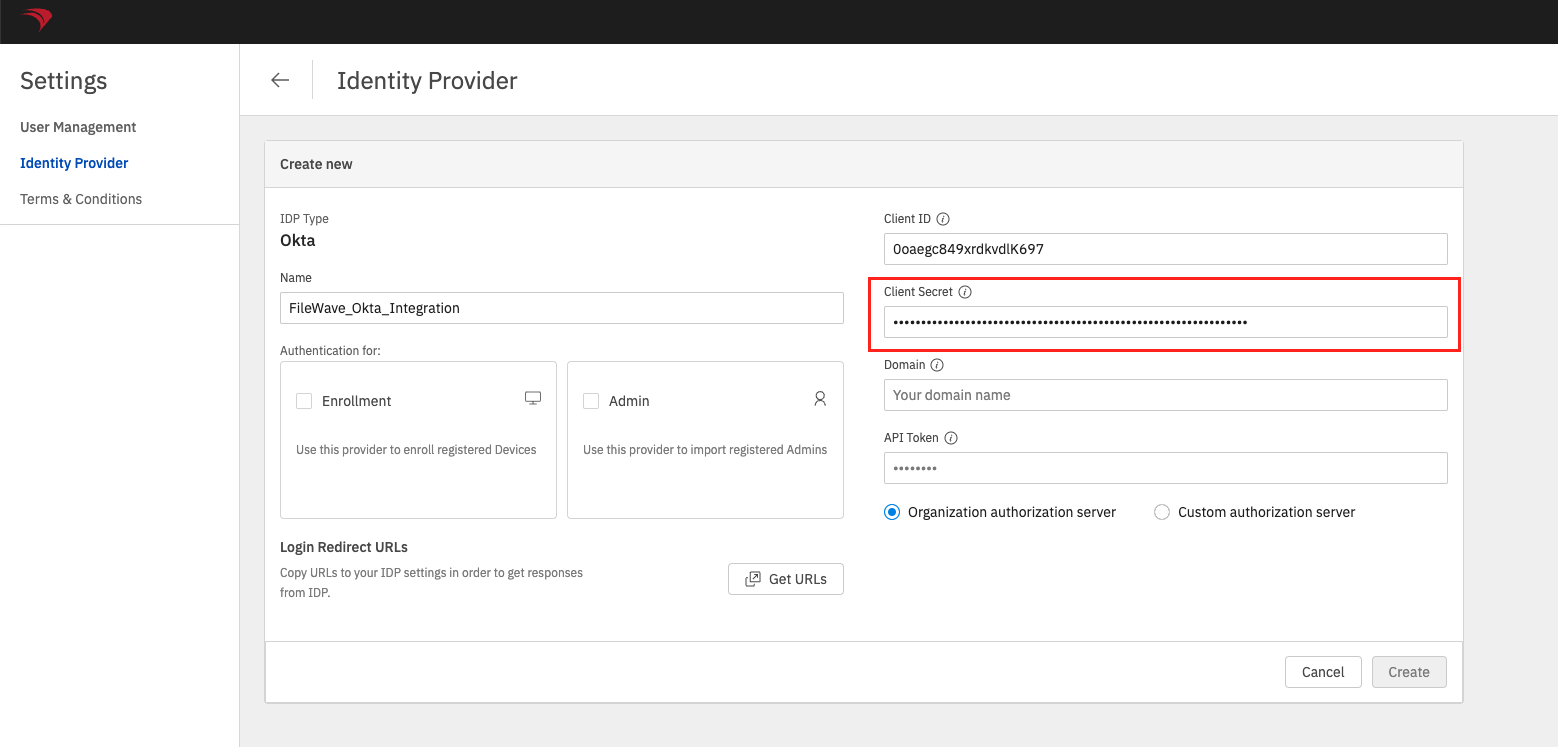
- Input the Okta Client Secret value in the Client Secret field.


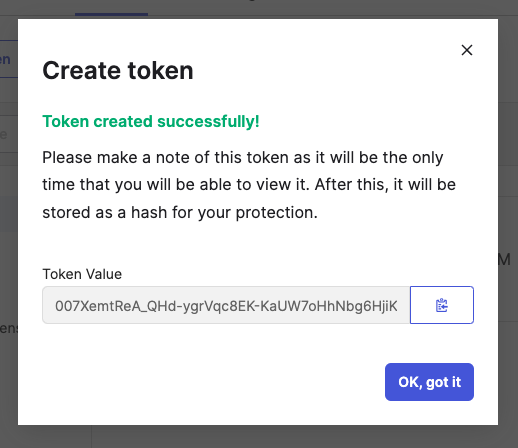
API Token
|

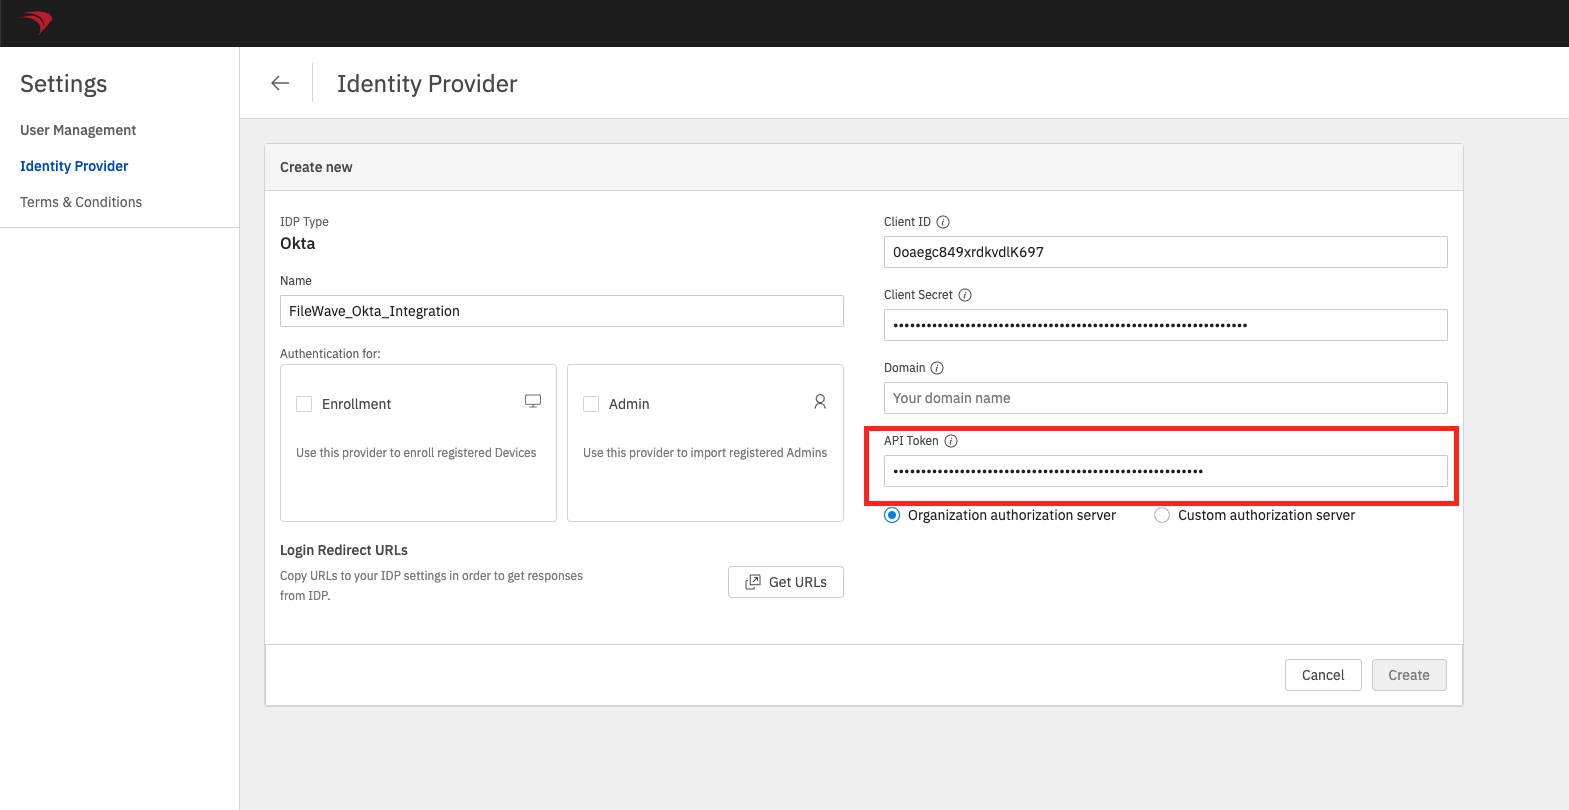
Okta Domain
|

Part 4: Configuring and Authenticating with Okta Users
Configure an Okta Identity Provider for Authentication
An Okta App will need to be configured in the FileWave Identity Provider settings for use with FileWave Device enrollment and/or FileWave Admin authentication.
- Begin by logging into the FileWave Web Admin and open the Settings button (gear icon in the header).
- Click the Edit button on the Okta App card that will be used for authentication.
- Check the Enrollment checkbox if you want to use this Okta App authentication for FileWave Device enrollment.
- Check the Admin checkbox if you want to use this Okta App for FileWave Central and FileWave Anywhere console authentication.
|
ℹ️ Only one Identity Provider App instance (Okta, Azure AD, etc.) can be configured with the Admin authentication for each type of Identity Provider.
ℹ️ Only one Identity Provider can be configured for FileWave Device Enrollment authentication. |

5. Click the Save button on the Okta App to confirm any authentication changes.
Configure FileWave Admin IdP Groups
- FileWave Admin IDP Groups will need to be created in order to use the Okta App for authentication with the FileWave Native or Web Admin console.
- See: Adding IdP Groups for FileWave Authentication
Authenticate with Okta during FileWave Device Enrollment
- Once the Enrollment checkbox is set for an IDP configuration then the Okta App can be used for authentication during FileWave Device enrollment.
- See: Configuring DEP Profiles for IDP Authentication
Login with Okta for FileWave Native or Web Admin Console
- Once FileWave Admin IDP Groups are created for an Okta App the Login with Okta option can be used with the FileWave Native or Web Admin console for authentication.
- See: Admin Login in Using an IdP Provider


Related Content
- IdP Setup: Azure AD
- Adding IdP Groups for FileWave Authentication
- Adding IdP Groups for FileWave Authentication
- Admin Login in Using an IdP Provider
IdP Setup: Google
What
Before we can use Google for authentication from FileWave, we must configure Google Workspace and give FileWave access to it. The whole purpose of this configuration is to give FileWave permissions to talk to your Google environment.
When/Why
This configuration is required if you want to use Google for authentication during device enrollment or during login to the FileWave Web and Native administrator consoles.
How
The configuration for access is all driven through Google Workspace.
Introduction
Setting up Google as IdP in Filewave means that we want to support users to log in with their Google account. We also want to allow Filewave services to query Google Workspace account users and groups.
In order to use Google as IdP and configure it inside Filewave, one has to obtain the following credentials from Google.
- Client ID
- Client secret
- Service key (JSON file)
- Service account
The process on how to obtain these is described below.
|
To complete the steps below, one has to be logged in to a Google account and be a super administrator of the Google Workspace domain (more info) |
Required Items
- Google Domain
- Admin rights within the Google Domain
- Pre-existing Google Organizational Unit structure (RECOMMENDED)
- Running FileWave Server
- GCM Setup - Google Cloud Messaging (GCM/Firebase) Setup
- FileWave HTTPS Root Trusted Certificate setup.
|
NOTE: CANNOT be IP Address or self-signed cert. Must be FQDN - Instructions Linked Here |
Domain verification
Google's API access to user's data may need to be reviewed and verified once setup is complete. For information please review, Google's OAuth API verification documentation.
Client ID and client secret (Google)
Below is an excerpt on how to obtain a Client ID and client secret. For a more detailed tutorial and additional information, check the documentation.
|
Step |
Example screenshot |
|
(Step 1) - Navigate to https://console.cloud.google.com/apis/credentials |
/ |
|
(Step 2) - Click on "Create credentials" |
|
|
(Step 3) - Choose "OAuth client ID" |
|
|
(Step 4) - In the next screen, choose "Web application" |
|
|
(Step 5) - In the configuration screen we need to name our OAuth client name and input correct Authorized redirect URIs.
PLEASE NOTE: Replace "filewave.server.com" with the correct URL of your server instance.
URL 1: URL 2: URL 3:
|
|
|
(Step 6) - Click CREATE, and your Client ID and Client secret will be generated. Please save them for later, as they are needed when configuring the FileWave server later on. Please note the message in grey about the OAuth access being restricted. You may also see a different message indicating that the consent screen needs to be verified. Click on the link in that grey text and ensure that the publishing status is In Production and that the User Type is External. |
|


Creating a service account (Google)
To support server-to-server interactions, first create a service account for your project in the API Console. - Google documentation
|
Step |
Example screenshot |
|
(Step 7) - Navigate to https://console.cloud.google.com/apis/credentials |
/ |
|
(Step 8) - Click on "Create credentials" |
|
|
(Step 9) - Choose "Service account" |
|
|
(Step 10) - Input required details and click "DONE". NOTE Skip optional steps 2 and 3, we will take care of it later. |
|
|
(Step 11) - Newly created service account should now be visible in the list of service accounts. (it might take few minutes) |
|
|
(Step 12) - To create a service key under a newly created service account, click on the service account name (step above), select the 'KEYS' tab, and click on "Add key". |
|
|
(Step 13) - Click on "Create new key", select JSON type and click "Create". |
|
|
(Step 14) - Service key is now downloading to your computer. Save it, as it's needed in further configuration. |
|


Configure Domain-Wide Delegation
If you want to access user data for users in your Google Workspace account, then delegate domain-wide access to the service account. - Google documentation
|
Step |
Screenshot |
|
(Step 15) - Navigate to https://console.cloud.google.com/apis/credentials |
|
|
(Step 16) - Open newly created service account details, by clicking on the service account name. Click SHOW ADVANCED SETTINGS. Save Client ID as it will be used later on.. |
|
|
(Step 17) - Navigate to https://admin.google.com/ac/owl/domainwidedelegation |
|
|
(Step 18) - Click on "Add New" to create a new domain delegation. NOTE You will need super administrator permissions for this step. |
|
|
(Step 19) - In the Client ID, put in the Client ID from step 16. In the OAuth scopes, put in the following. https://www.googleapis.com/auth/admin.directory.user.readonly, |
|


Service account and permissions
|
Step |
Screenshot |
|
(Step 20) - The next to last piece is setting up a service account. A service account is a user, that is going to be used in order to access resources. In order to add a user to a service account, navigate to https://console.cloud.google.com/apis/credentials and then click the service account you created, click on the Permissions tab, and add a user you'd like to use for accessing Google Workspace resources. NOTE Make sure the user has at least read access to the User and Group resource. |
|
|
The selected user's email becomes your service account token. |
Example "josh.levitsky@fwx.io" |

Configure Filewave server to use Google as IdP (Filewave)
|
Step |
Screenshot |
|
(Step 21) - The last piece of the puzzle is setting up Filewave to talk to Google. Navigate to https://filewave.server.com replacing the address with your FileWave server. Login as fwadmin to be sure you will have proper permissions to make the next changes. |
|
|
(Step 22) - Edit the Terms & Conditions to have appropriate text for your organization. This text is displayed when using an IdP to enroll devices. |
|
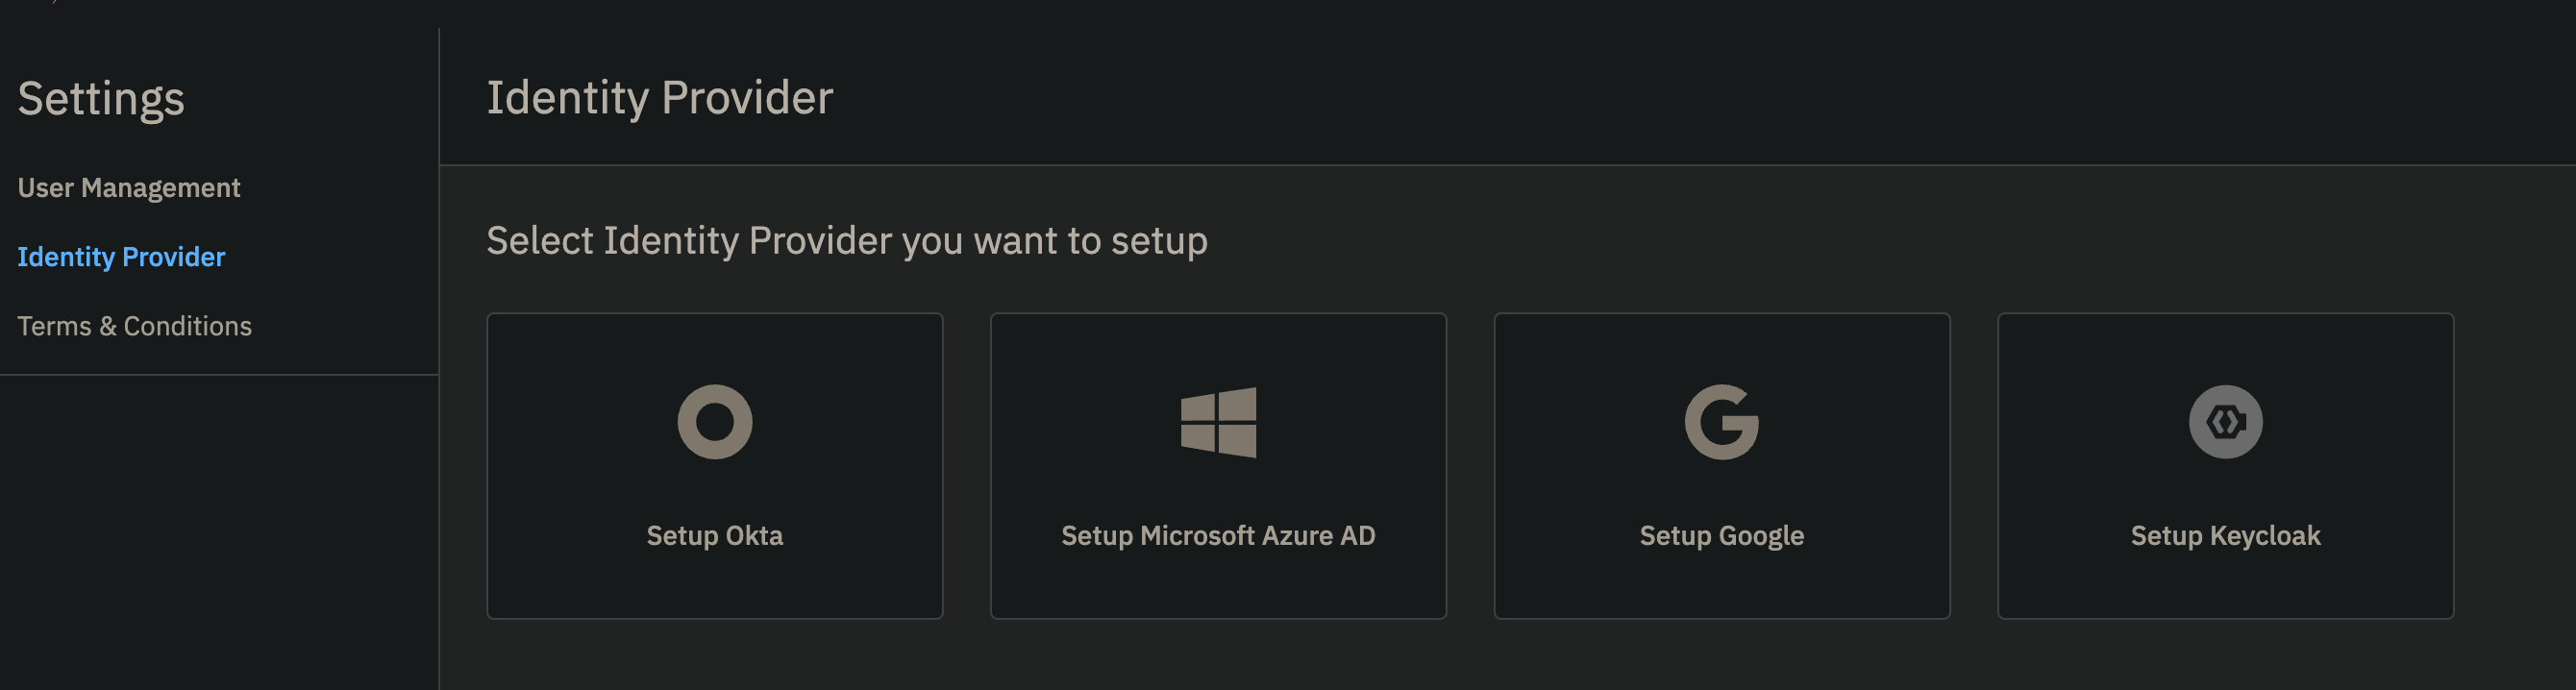
|
(Step 23) - Click Setup Google or if you already have another IdP setup then click New Identity Provider on the top right because this screen will look different. |
|
|
(Step 24) - This is where everything comes together. The Name is whatever you want to call this connection. Select if you want to use this for enrollment or for adding administrators or both.
Enrollment here if selected will be to prompt a user on macOS or iOS/iPadOS to enter credentials so that you know who has the device.
Insert the Client ID and Secret that you saved from step 6. (Not the Client ID from later on) The Domain is your domain. The Service Account was the user you granted access to the project in step 20. The Service Key is the contents of the JSON file you downloaded in step 14. Click Create once you have entered all of this information. |
|


Enable Admin SDK API for your Firebase Project(Only needed if you haven't already setup Chromebooks in Filewave)
|
Step |
Screenshot |
|
(Step 25) - Now we need to enable the Admin SDK API for your project. Navigate to https://console.developers.google.com/apis/api/admin.googleapis.com/overview?project=<project-number> Fill in <project-number> is from Firebase/Project settings/General/Project number If you are unsure what this is you can find it via logging into http://console.firebase.google.com/ > click your Firebase Project > Click the gear icon at the top left to the right of "Project Overview" > Project Settings |
|
|
(Step 26) Copy the Project number and add that to the link. E.G https://console.developers.google.com/apis/api/admin.googleapis.com/overview?project=600195963358 |
|
|
(Step 27) Click the Enable button |
|


Configure Filewave to allow Admins to use Google as IdP (Filewave)
|
Step |
Screenshot |
|
(Step 28) - Now that you have configured FileWave to talk to Google for Admin you need to go into the Native Admin to enable admins to actually log in and set their permissions. |
|
|
(Step 29) - Click the + on the lower-left corner and pick IdP Group Account. On this screen, it is important to clarify that you are not defining a user here but a group of users. The Login Name is misleading here, and should be thought of as the name of the group of users so you might put something like Google - Desktop Techs and then for Identity Provider make sure your Google connection is selected that you set up in the prior steps. For Group click the Browse button and select the group that includes all of the users who will have access. If you will give all of your users the same level of permissions then you can use one group for all of your FileWave admins, but if you will use different levels of access then make an IdP Group Account on this window to define each of your groups of FileWave admins. In the image, you see a single entry for Google which might be appropriate if all of the FileWave admins are in a single group on the Google side. |
|
|
If everything was done correctly then your Web Admin login should look like the image shown. Click to Login with Google and try to log in. If you can not log in then the user may not be in a group that was given access in step 20 so go and check on the Google side to be sure. If the user can log in but can not perform tasks then ensure they are in the right group, and that you have configured the Permissions tab seen on step 20 to be sure they have the right permissions granted. |
|


Troubleshooting
If you try to login on via a browser, and get the error: "login-idp?Error=HTTPError" and "Error Authorization via IDP not carried out." or in the Django log you see [ERROR] 2023-08-29 09:23:42,063 (views): Authentication through IDP failed. Exception: (HTTPError) 403 Client Error: Forbidden for url: https://www.googleapis.com/oauth2/v3/certs then you may want to review FileWave Server should not have IPv6 enabled.
If you receive a generic error when attempting to iDP login, "iDP Authorization Failed", you may need to enable the Admin SDK API(steps 25-27 of guide) for the project by visiting the following sample URL (replace <project_ID> with your project ID) and clicking "Enable":
https://console.developers.google.com/apis/api/admin.googleapis.com/overview?project=<project_ID>
If you have access to the Django log for the server, it will give you the full details and direct link, so you can copy/paste/enable:
cat /usr/local/filewave/log/filewave_django.logSample Error:
"googleapiclient.errors.HttpError: <HttpError 403 when requesting https://admin.googleapis.com/admin/directory/v1/groups?domain=<domain>&alt=json returned "Admin SDK API has not been used in project <project_ID> before or it is disabled. Enable it by visiting https://console.developers.google.com/apis/api/admin.googleapis.com/overview?project=<project_ID> then retry. If you enabled this API recently, wait a few minutes for the action to propagate to our systems and retry.". Details: "[{'message': 'Admin SDK API has not been used in project <project_ID> before or it is disabled. Enable it by visiting https://console.developers.google.com/apis/api/admin.googleapis.com/overview?project=<project_ID> then retry. If you enabled this API recently, wait a few minutes for the action to propagate to our systems and retry.', 'domain': 'usageLimits', 'reason': 'accessNotConfigured', 'extendedHelp': 'https://console.developers.google.com'}]">"
- Adding IdP Groups for FileWave Authentication
- Configuring DEP Profiles for IDP Authentication
- Admin Login in Using an IdP Provider
IdP Setup: Keycloak
What
Before we can use Keycloak for authentication from FileWave, we must configure Keycloak and give FileWave access to it. The whole purpose of this configuration is to give FileWave permissions to talk to your Keycloak environment.
When/Why
This configuration is required if you want to use Keycloak for authentication during device enrollment or during login to the FileWave Anywhere and Central administrator consoles.
How
Setting up Keycloak as IdP in Filewave means that we want to support users to log in with their Keycloak account. We also want to allow Filewave services to query Keycloak account users and groups.
In order to use Keycloak as IdP and configure it inside Filewave, one has to obtain the following credentials from Keycloak.
- Client ID
- Client Secret
- Realm URL
- Realm admin API URL
The process on how to obtain these is described below.
|
To complete the steps below, one has to be logged in to a Keycloak instance and be an administrator of the instance to complete all aspects of setting up Keycloak. |
Required Items
- Keycloak instance
- Admin rights within the instance
- Users and Groups which you will want to use to grant access to FileWave Central or Anywhere
- Running FileWave v15.5+ Server
- FileWave HTTPS Root Trusted Certificate setup.
|
NOTE: The FileWave Server CANNOT use only the IP Address or self-signed cert. Must use a FQDN - Instructions Linked Here |
Configuring Keycloak
To begin you must have a Keycloak instance setup and have a Realm that you will be using with FileWave. If you already use Keycloak then this will be the case. A Realm is a container that will store all of your Keycloak things for an organization like Users, Groups and SSO Clients.
The steps to create a Realm, Users, and Groups is more of a Keycloak function than a FileWave one. The steps outlined here will work as long as you are already using Keycloak.
Creating a Client App in Keycloak
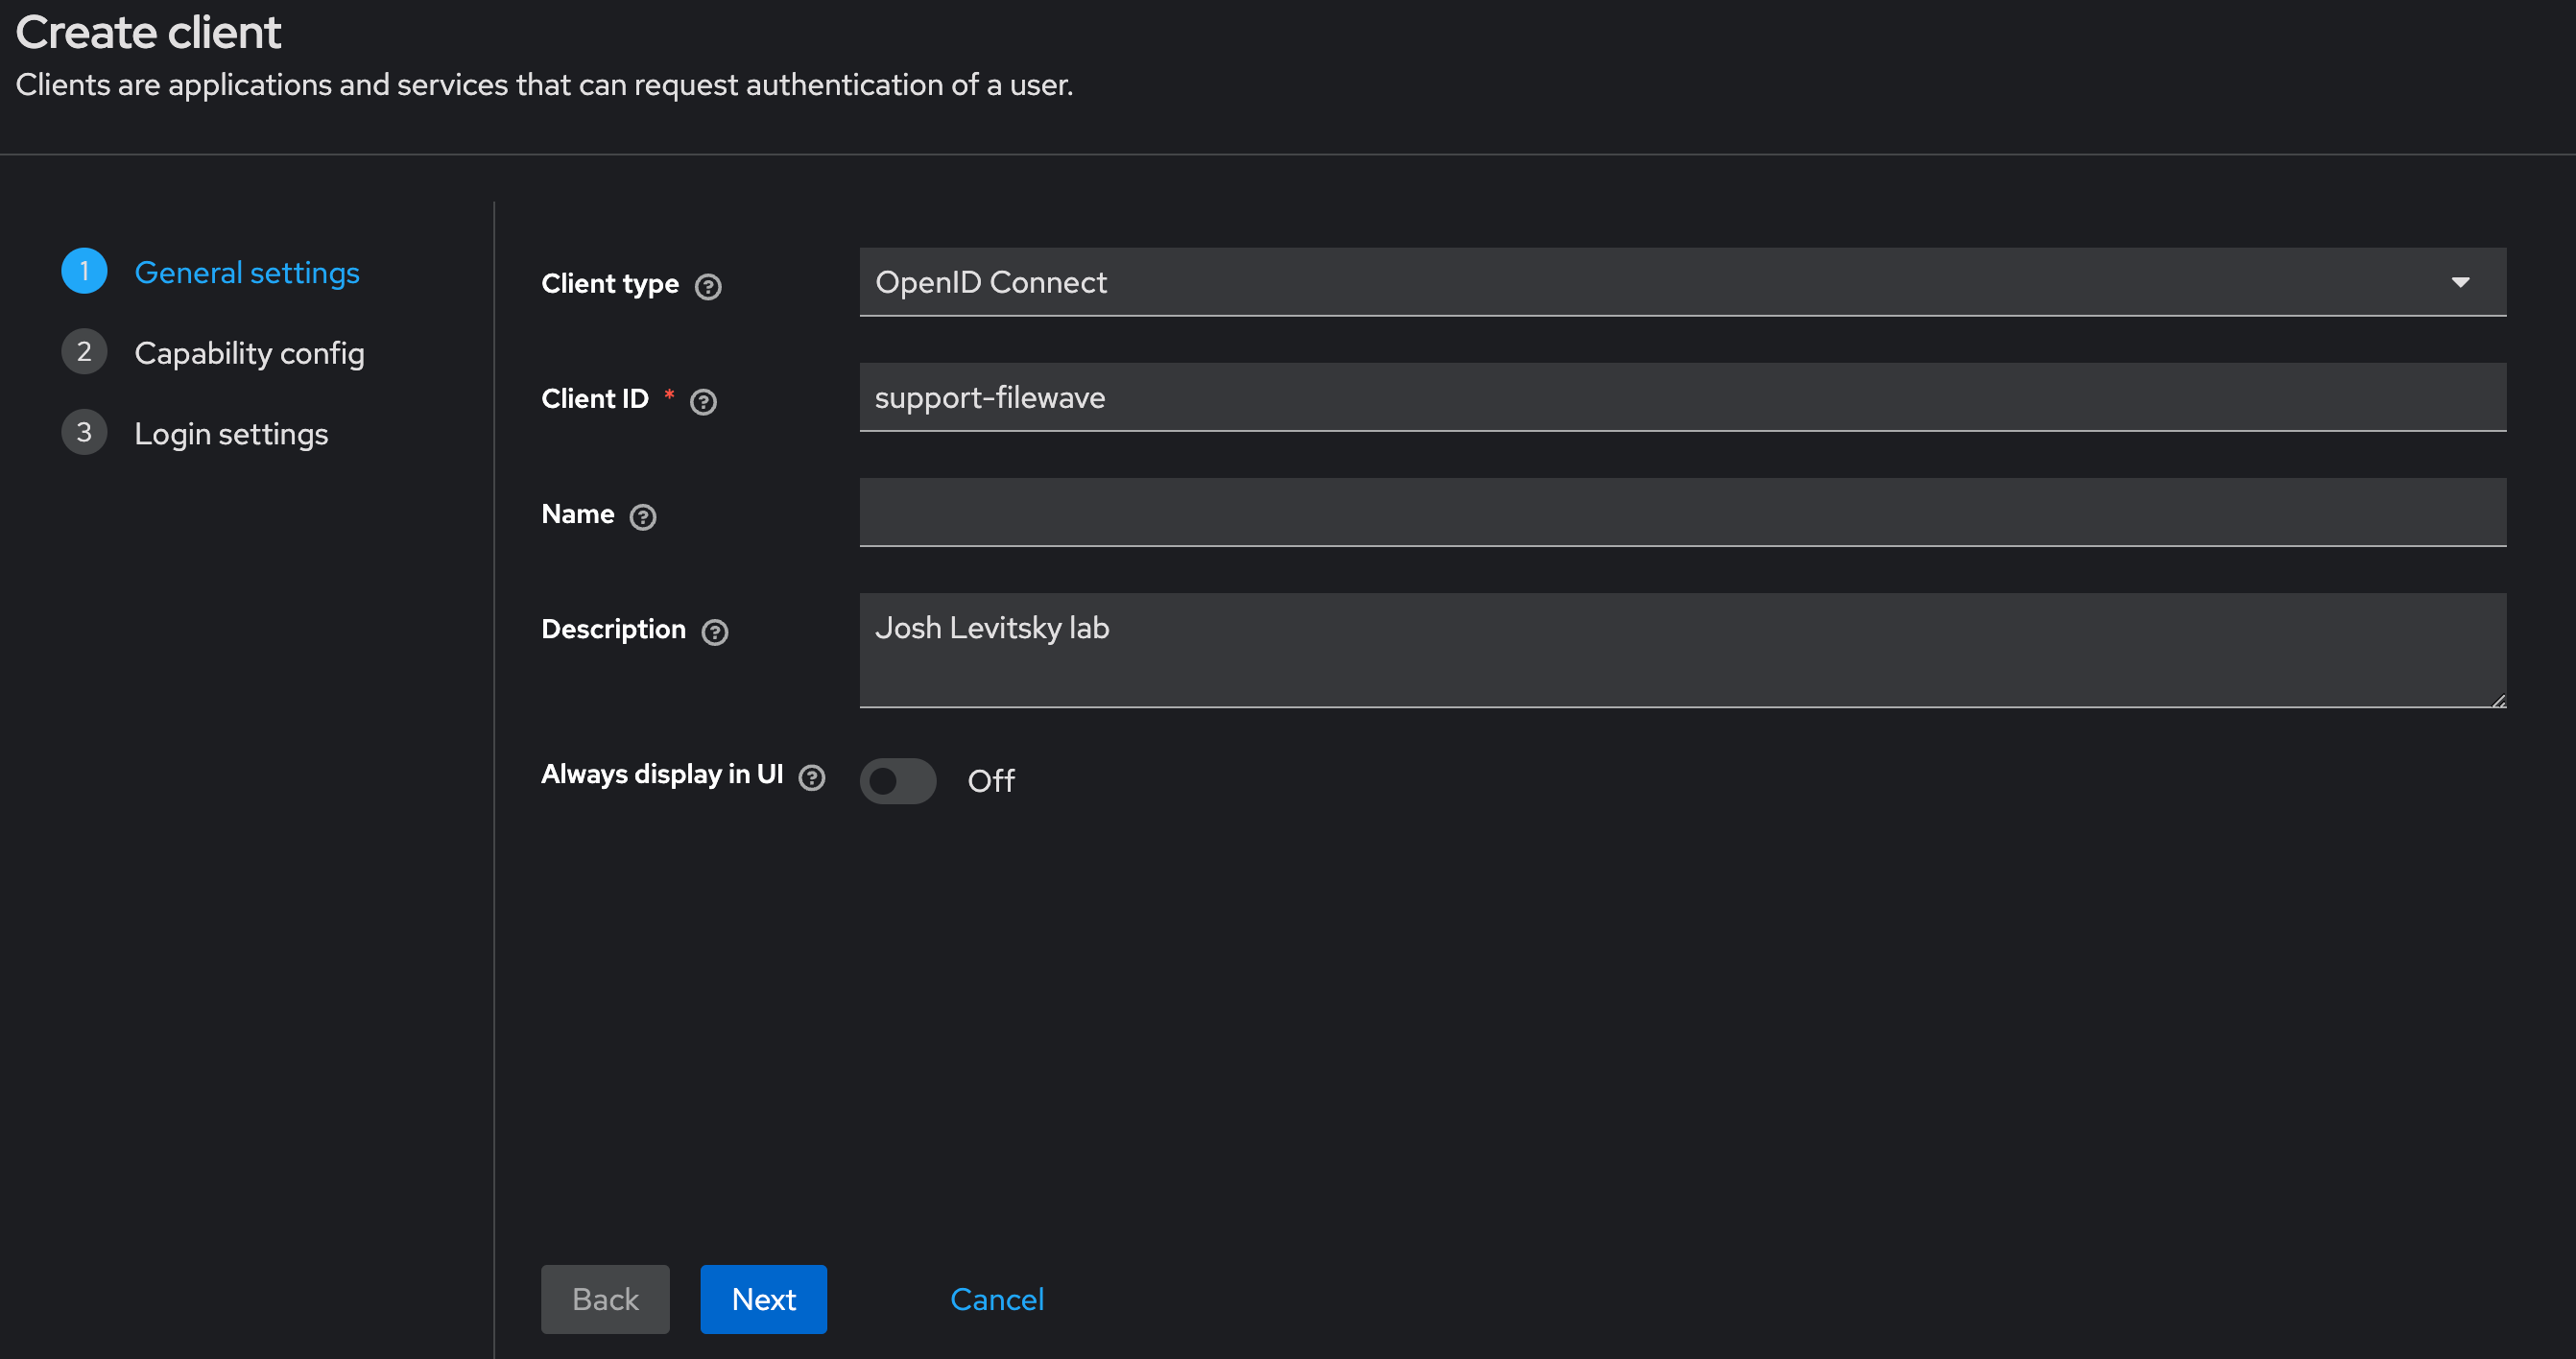
Select “Clients” in left menu bar and select “Create client” button
- Client type should be "OpenID Connect"
-
Input Client ID in the “Client ID” label like "filewave" for example
- Name and Description can be blank or it is recommended to put something so you will remember why you created this like "FileWave Server" and some information about the server.
- Click "Next" to continue
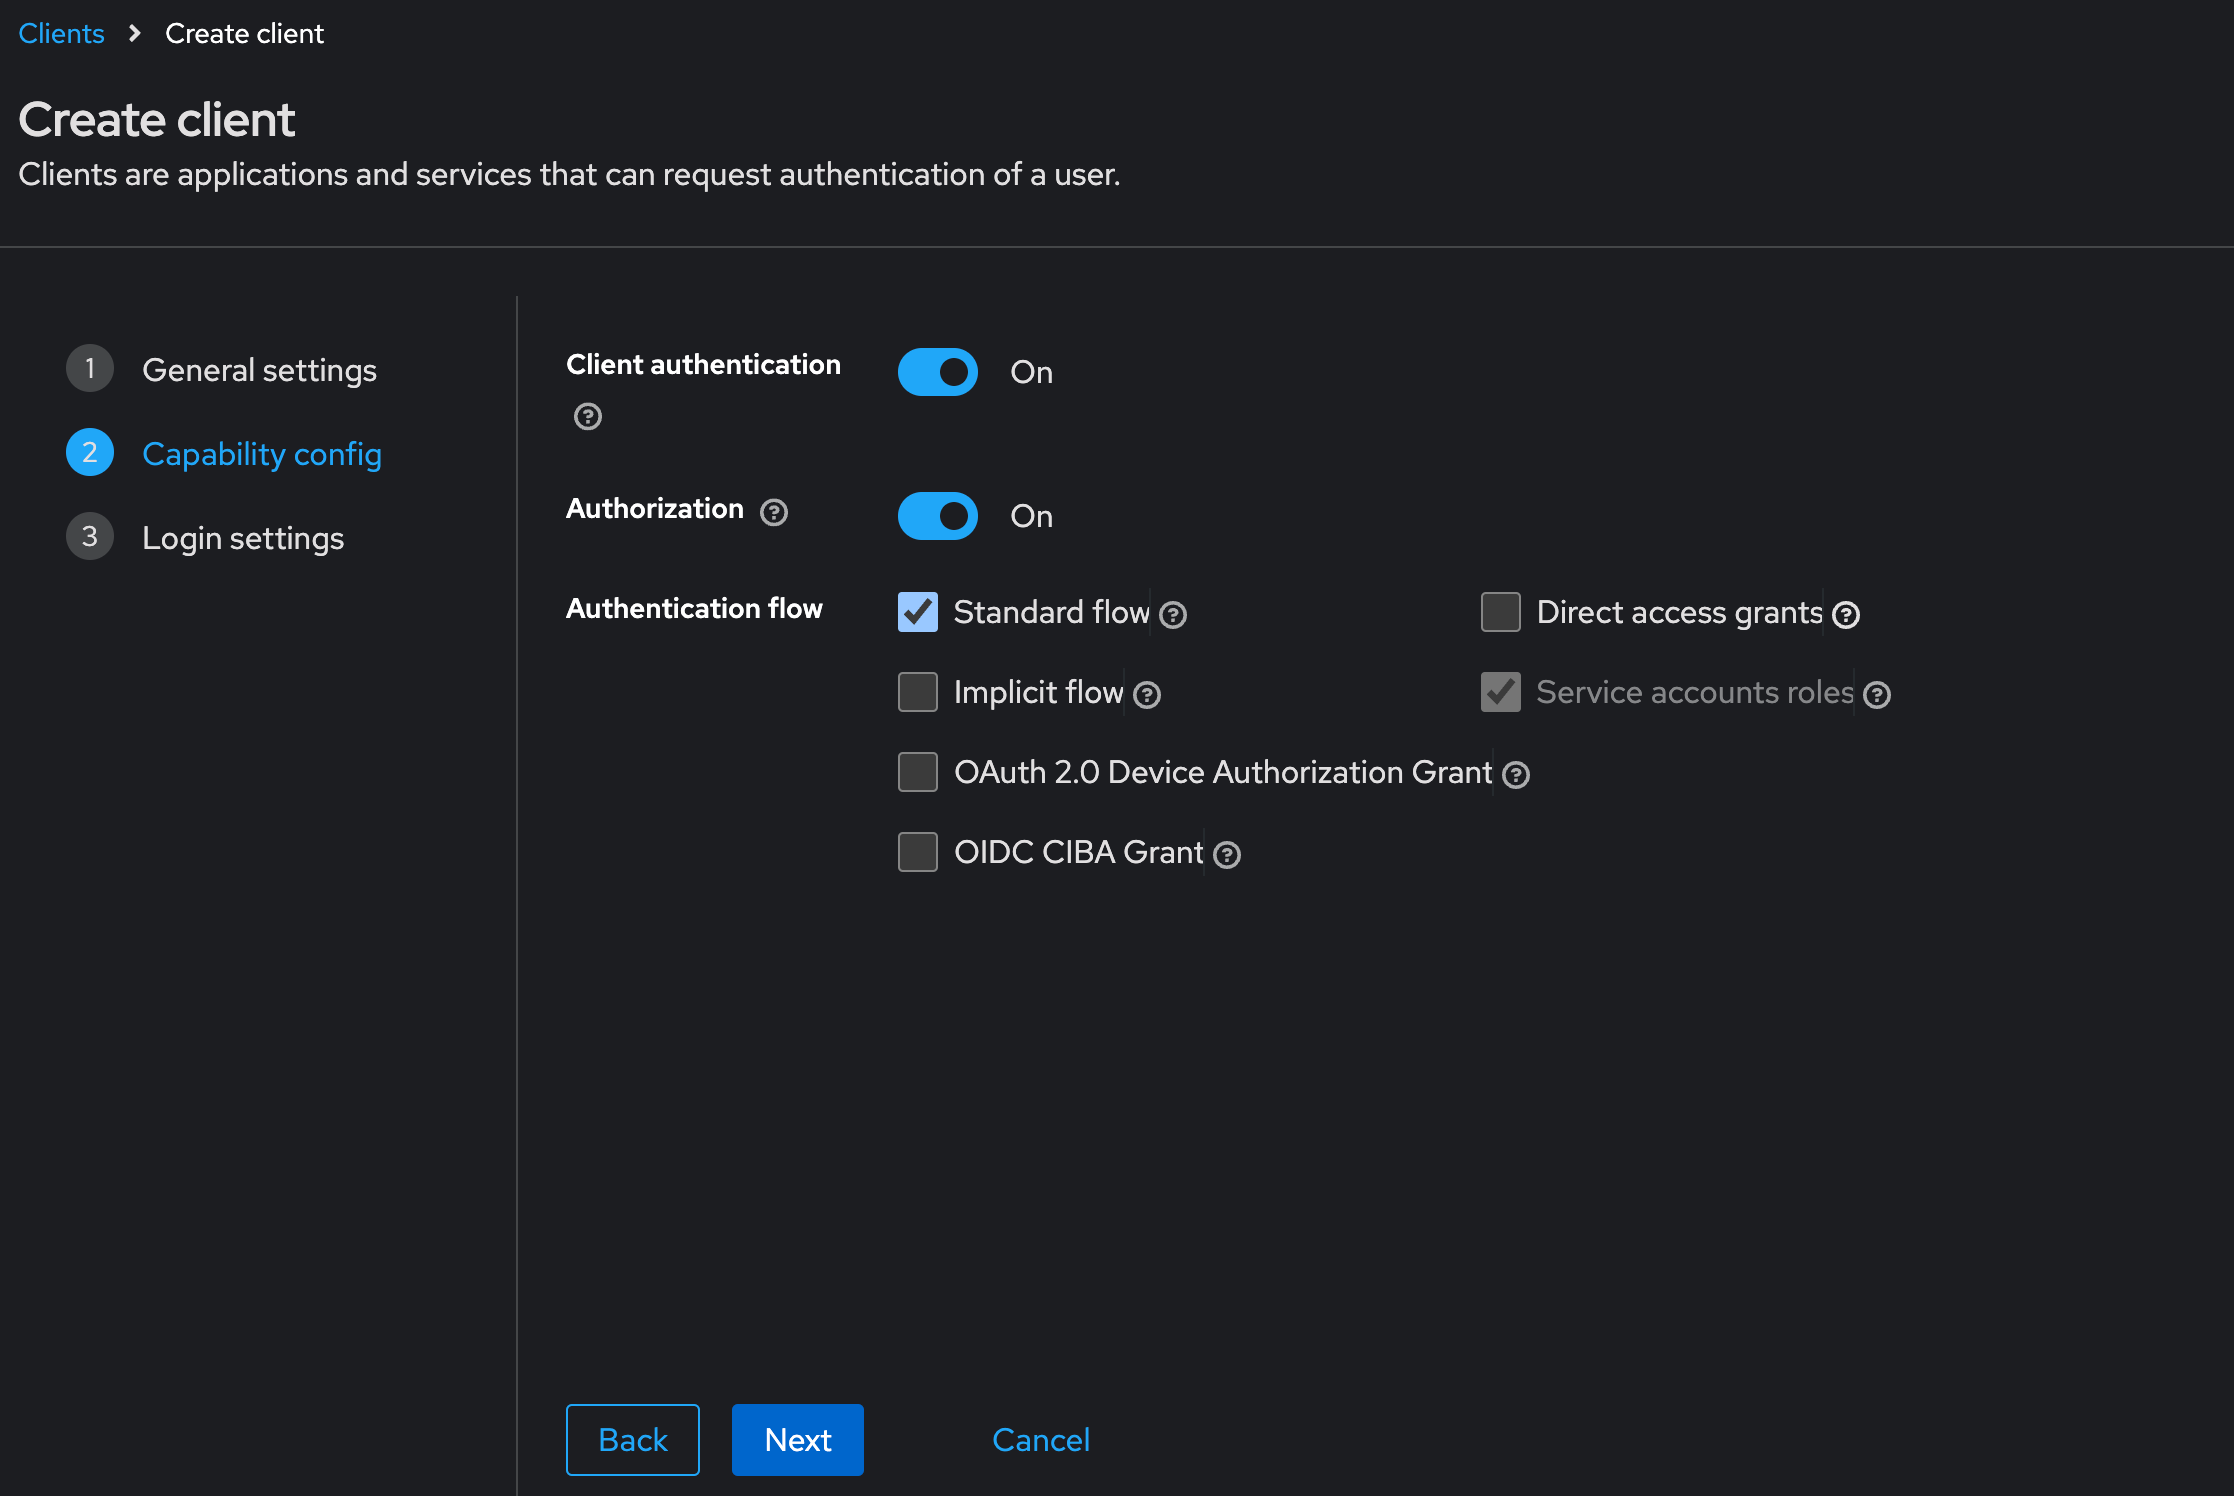
On the Capability config page:
-
Turn on “Client authentication” and "Authorization"
-
For Authentication flow check “Standard flow and Service accounts roles”
In this next step you are going to login to FileWave Anywhere and get the URLs needed for this page. Open a new browser tab and go to https://filewave.your_filewave_server.com replacing the host in the URL with your FileWave Server. This step is fairly quick and easy. Click the gear icon on the top right of Anywhere and then click "Setup Keycloak"
On the next page click "Get URLs" and get the 3 URLs which will look like the following but be for your FileWave instance:
https://support2.filewave.net:443/api/auth/login_via_idp_redirect
https://support2.filewave.net:443/api/auth/login_via_idp_redirect_for_native
https://support2.filewave.net:20443/auth/login_via_idp_redirect_for_deviceNow return to your Keycloak tab of your browser and continue:
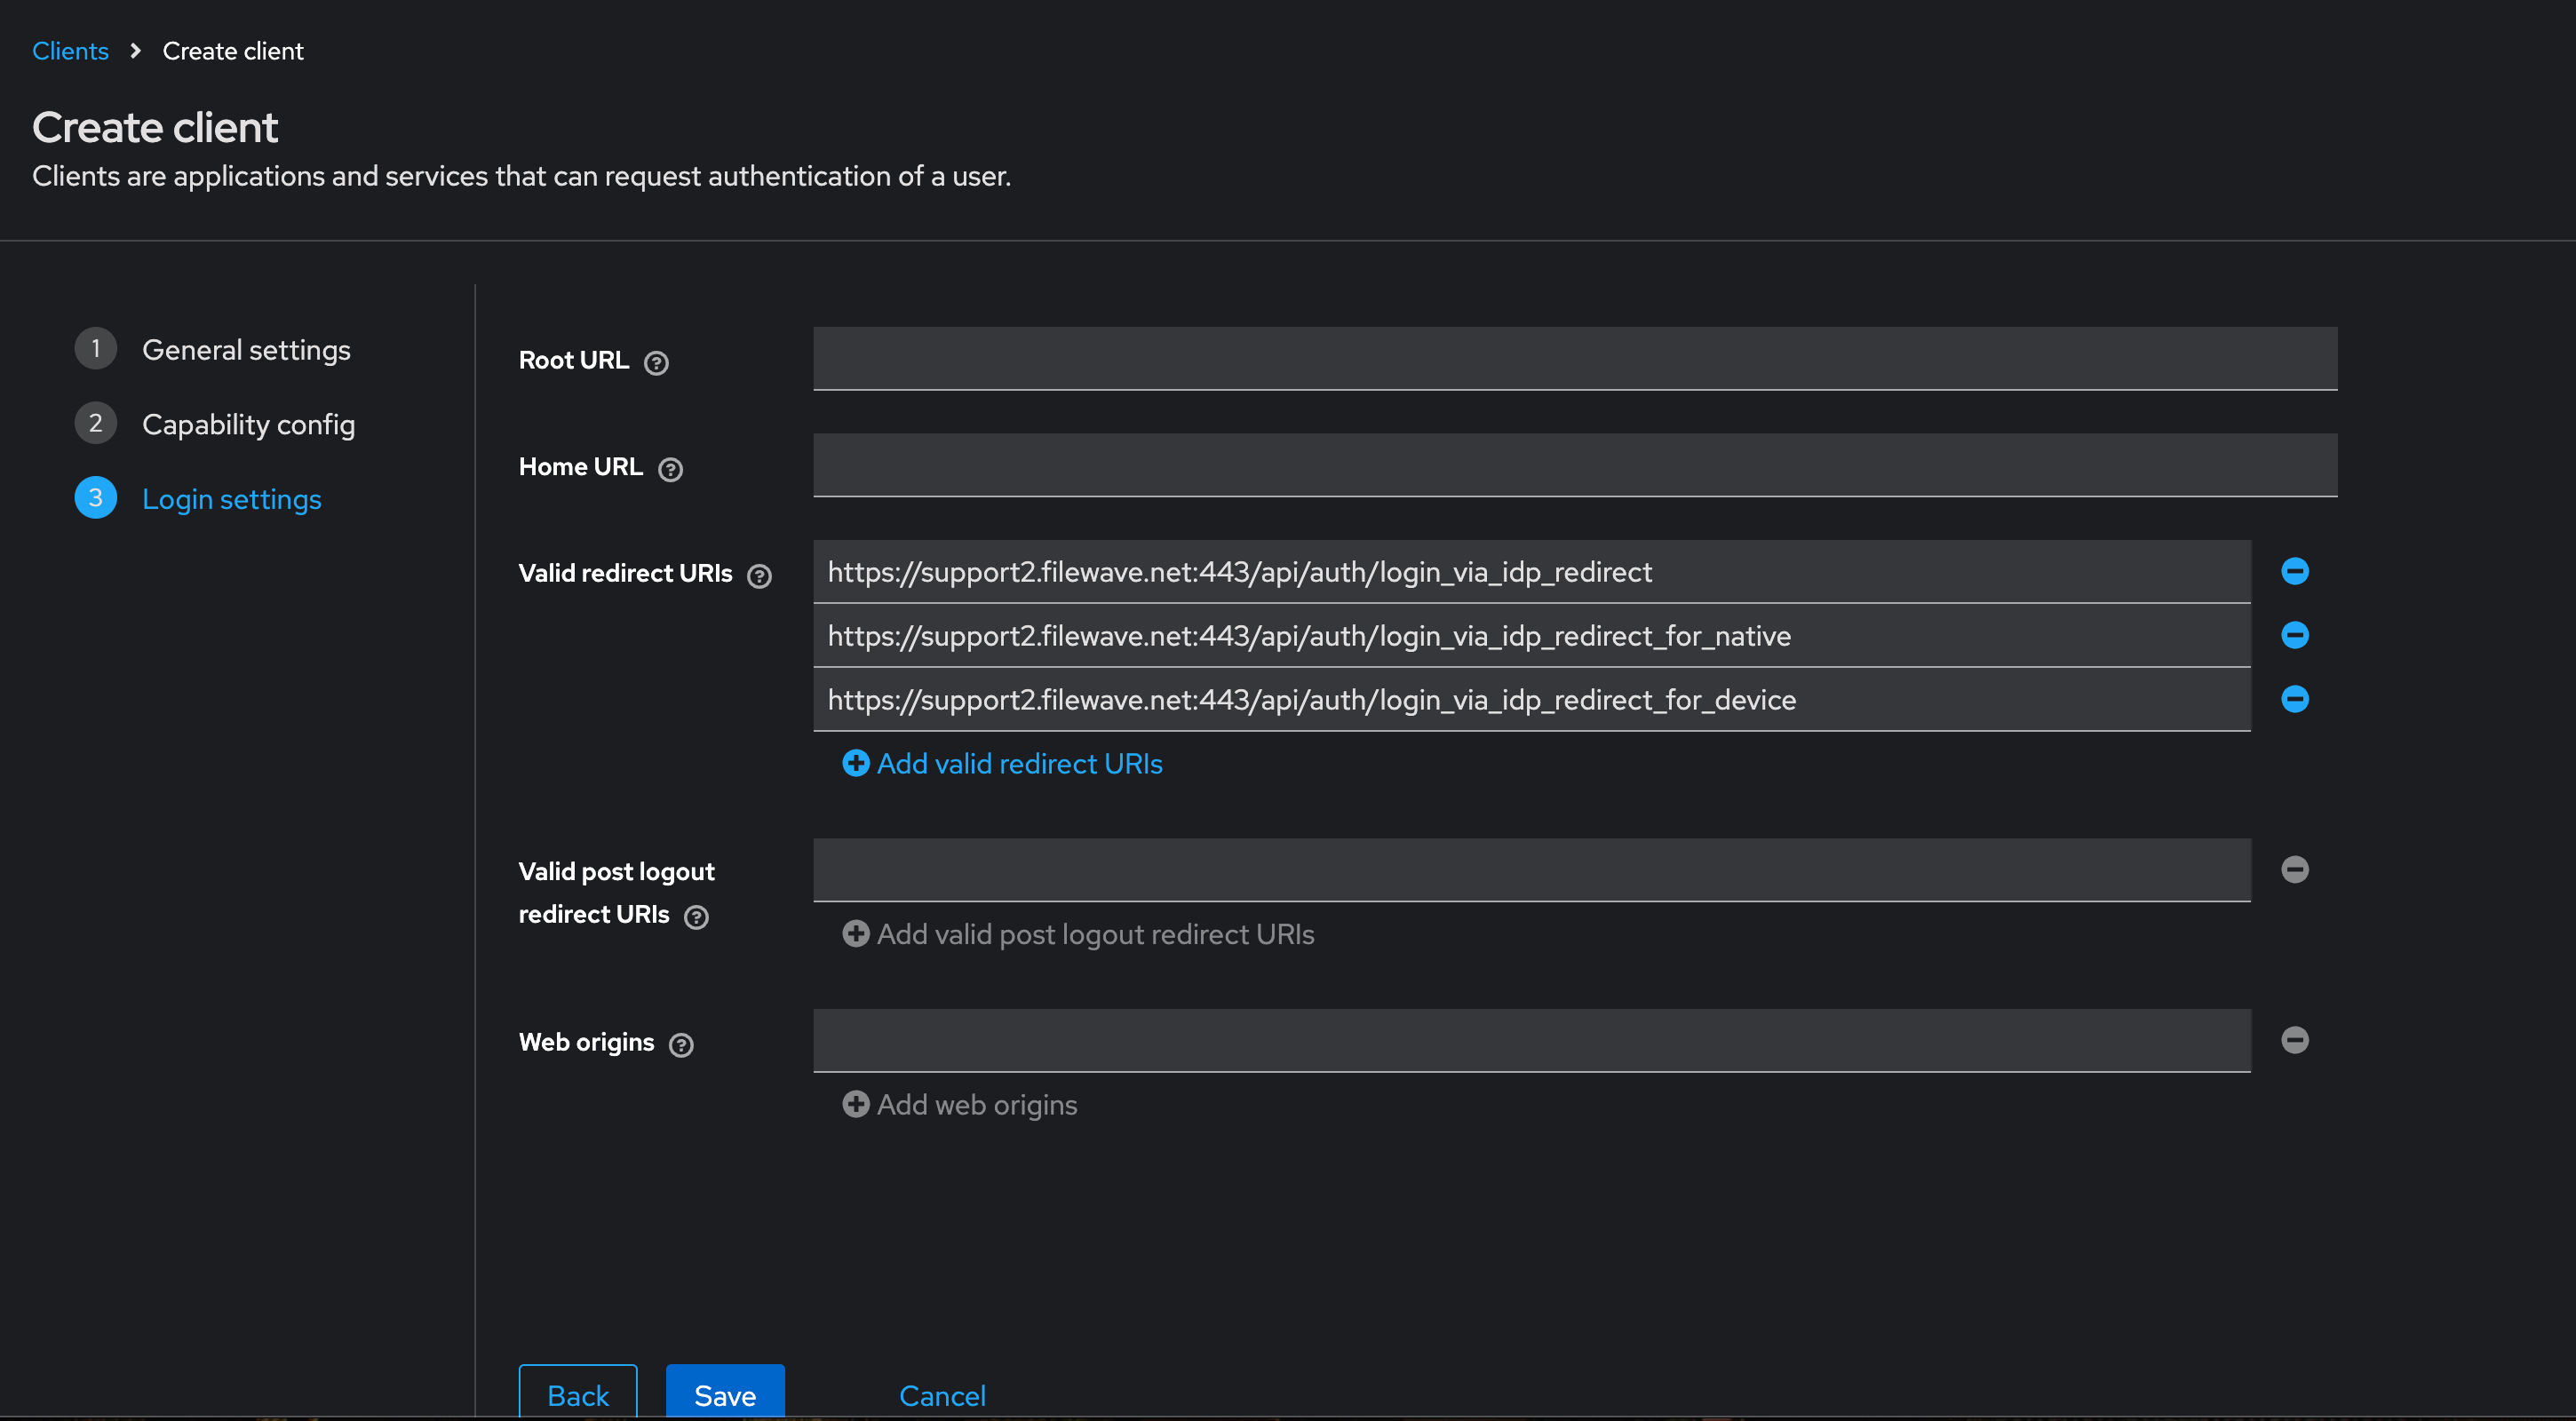
On the Login settings page:
-
Add Valid redirect URLs in “Valid redirect URLs” one at a time clicking the + button to add the next one and pasting in each of the 3 URLs you obtained from FileWave Anywhere.
-
Click the “Save” button
At this stage you should be looking at the details for the Client you just created in Keycloak but if it isn't you can:
-
Select “Clients” in left menu bar
-
Select the client you created.
Now on the details for the Client you created click “Service account roles” tab on the top of the details page.
-
Use the "Assign Role" button to assign a few needed Roles. Assign these roles to the client using the search box to find them:
-
query-groups
-
query-users
-
view-users
-
view-events
-

Obtaining the client ID and client secret
At this stage you should be looking at the details for the Client you just created in Keycloak but if it isn't you can:
-
Select “Clients” in left menu bar
-
Select the client you created.
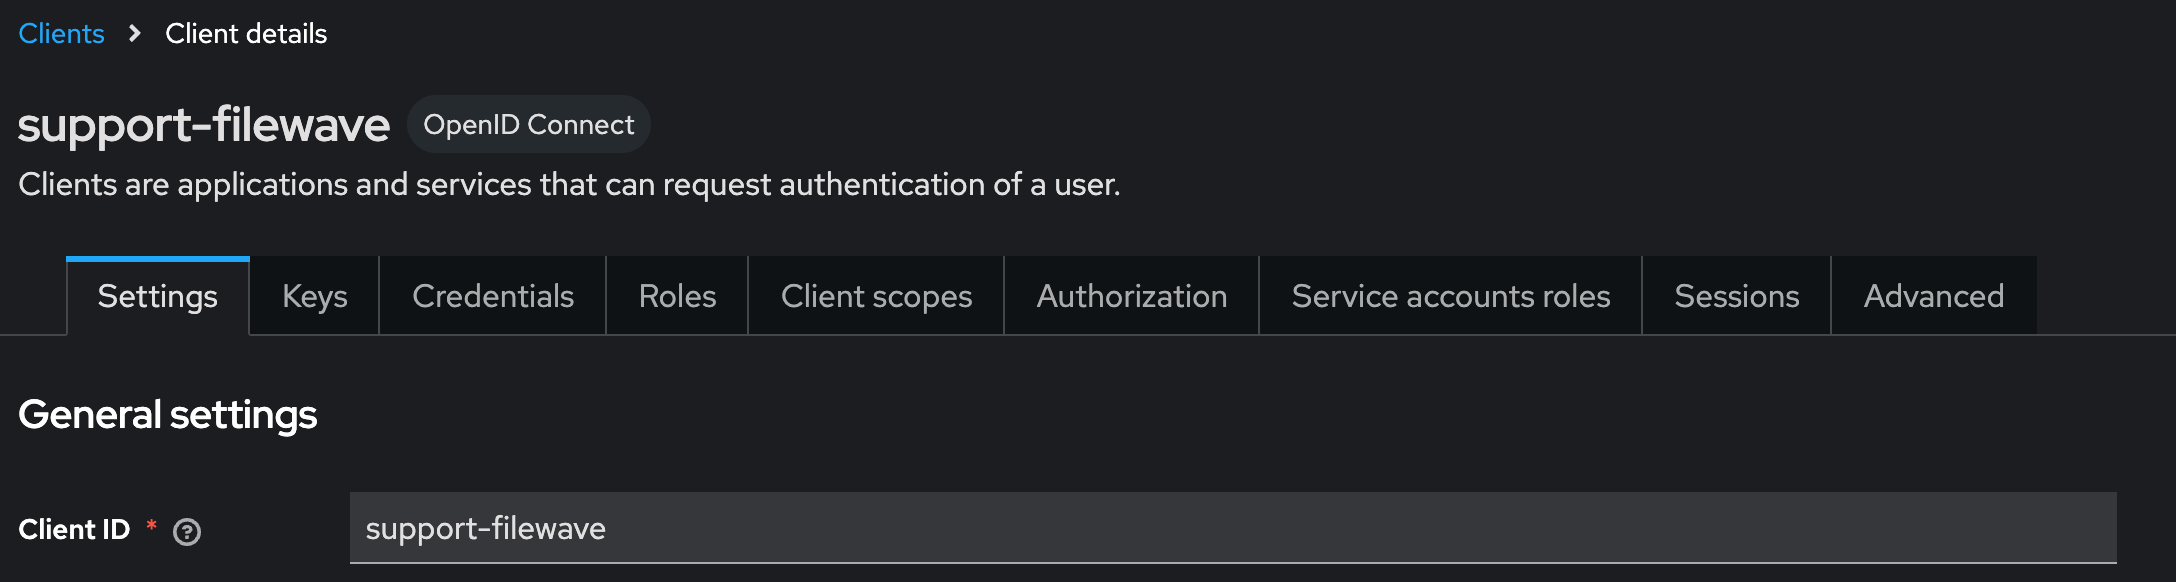
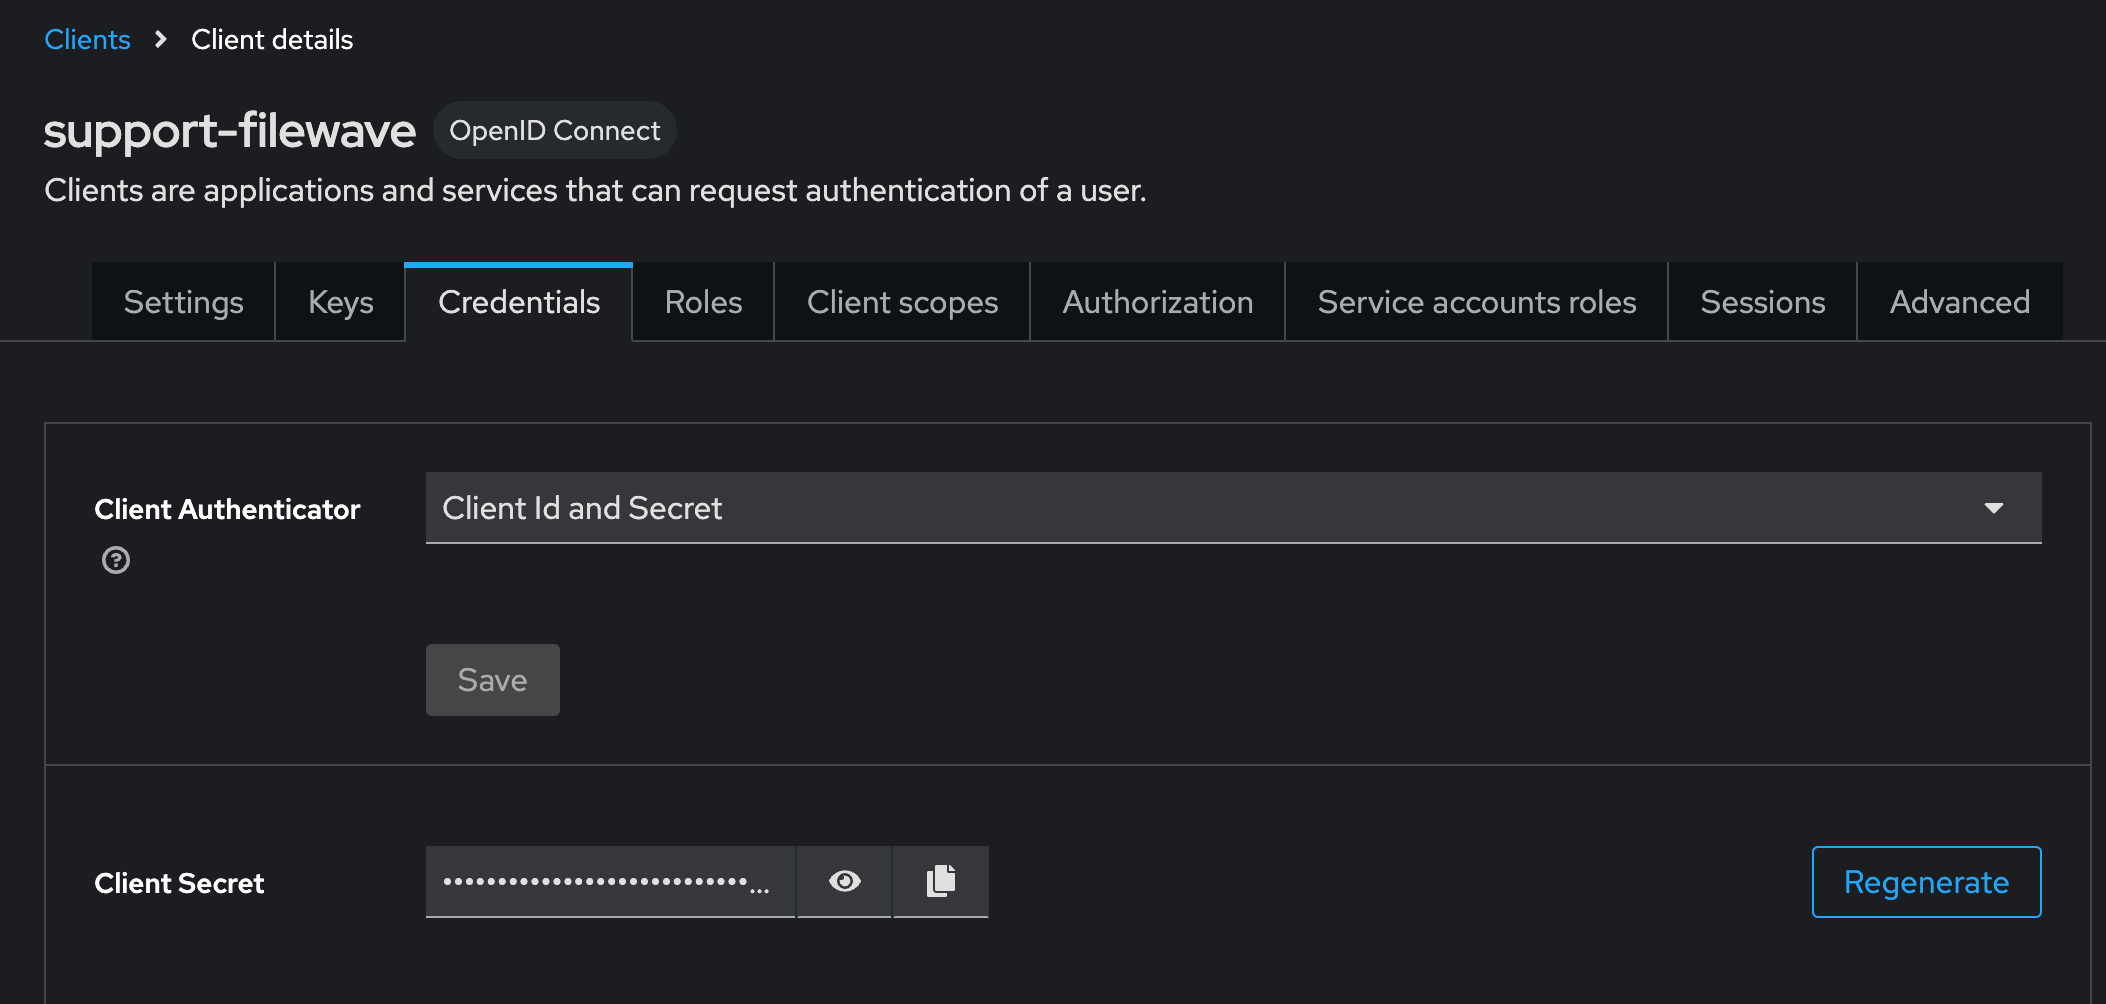
Now on the details for the Client you created click “Settings” tab on the top of the details page.
- Note the “Client ID”
Now on the details for the Client you created click “Credentials” tab on the top of the details page.
-
Note the “Client Secret”
In this next step you are going to login to FileWave Anywhere again. Go back to the tab where you went to https://filewave.your_filewave_server.com replacing the host in the URL with your FileWave Server. If your prior session timed out then once logged in just click the gear icon on the top right of Anywhere and then click "Setup Keycloak" Otherwise you will be back on the setup page where you were before.
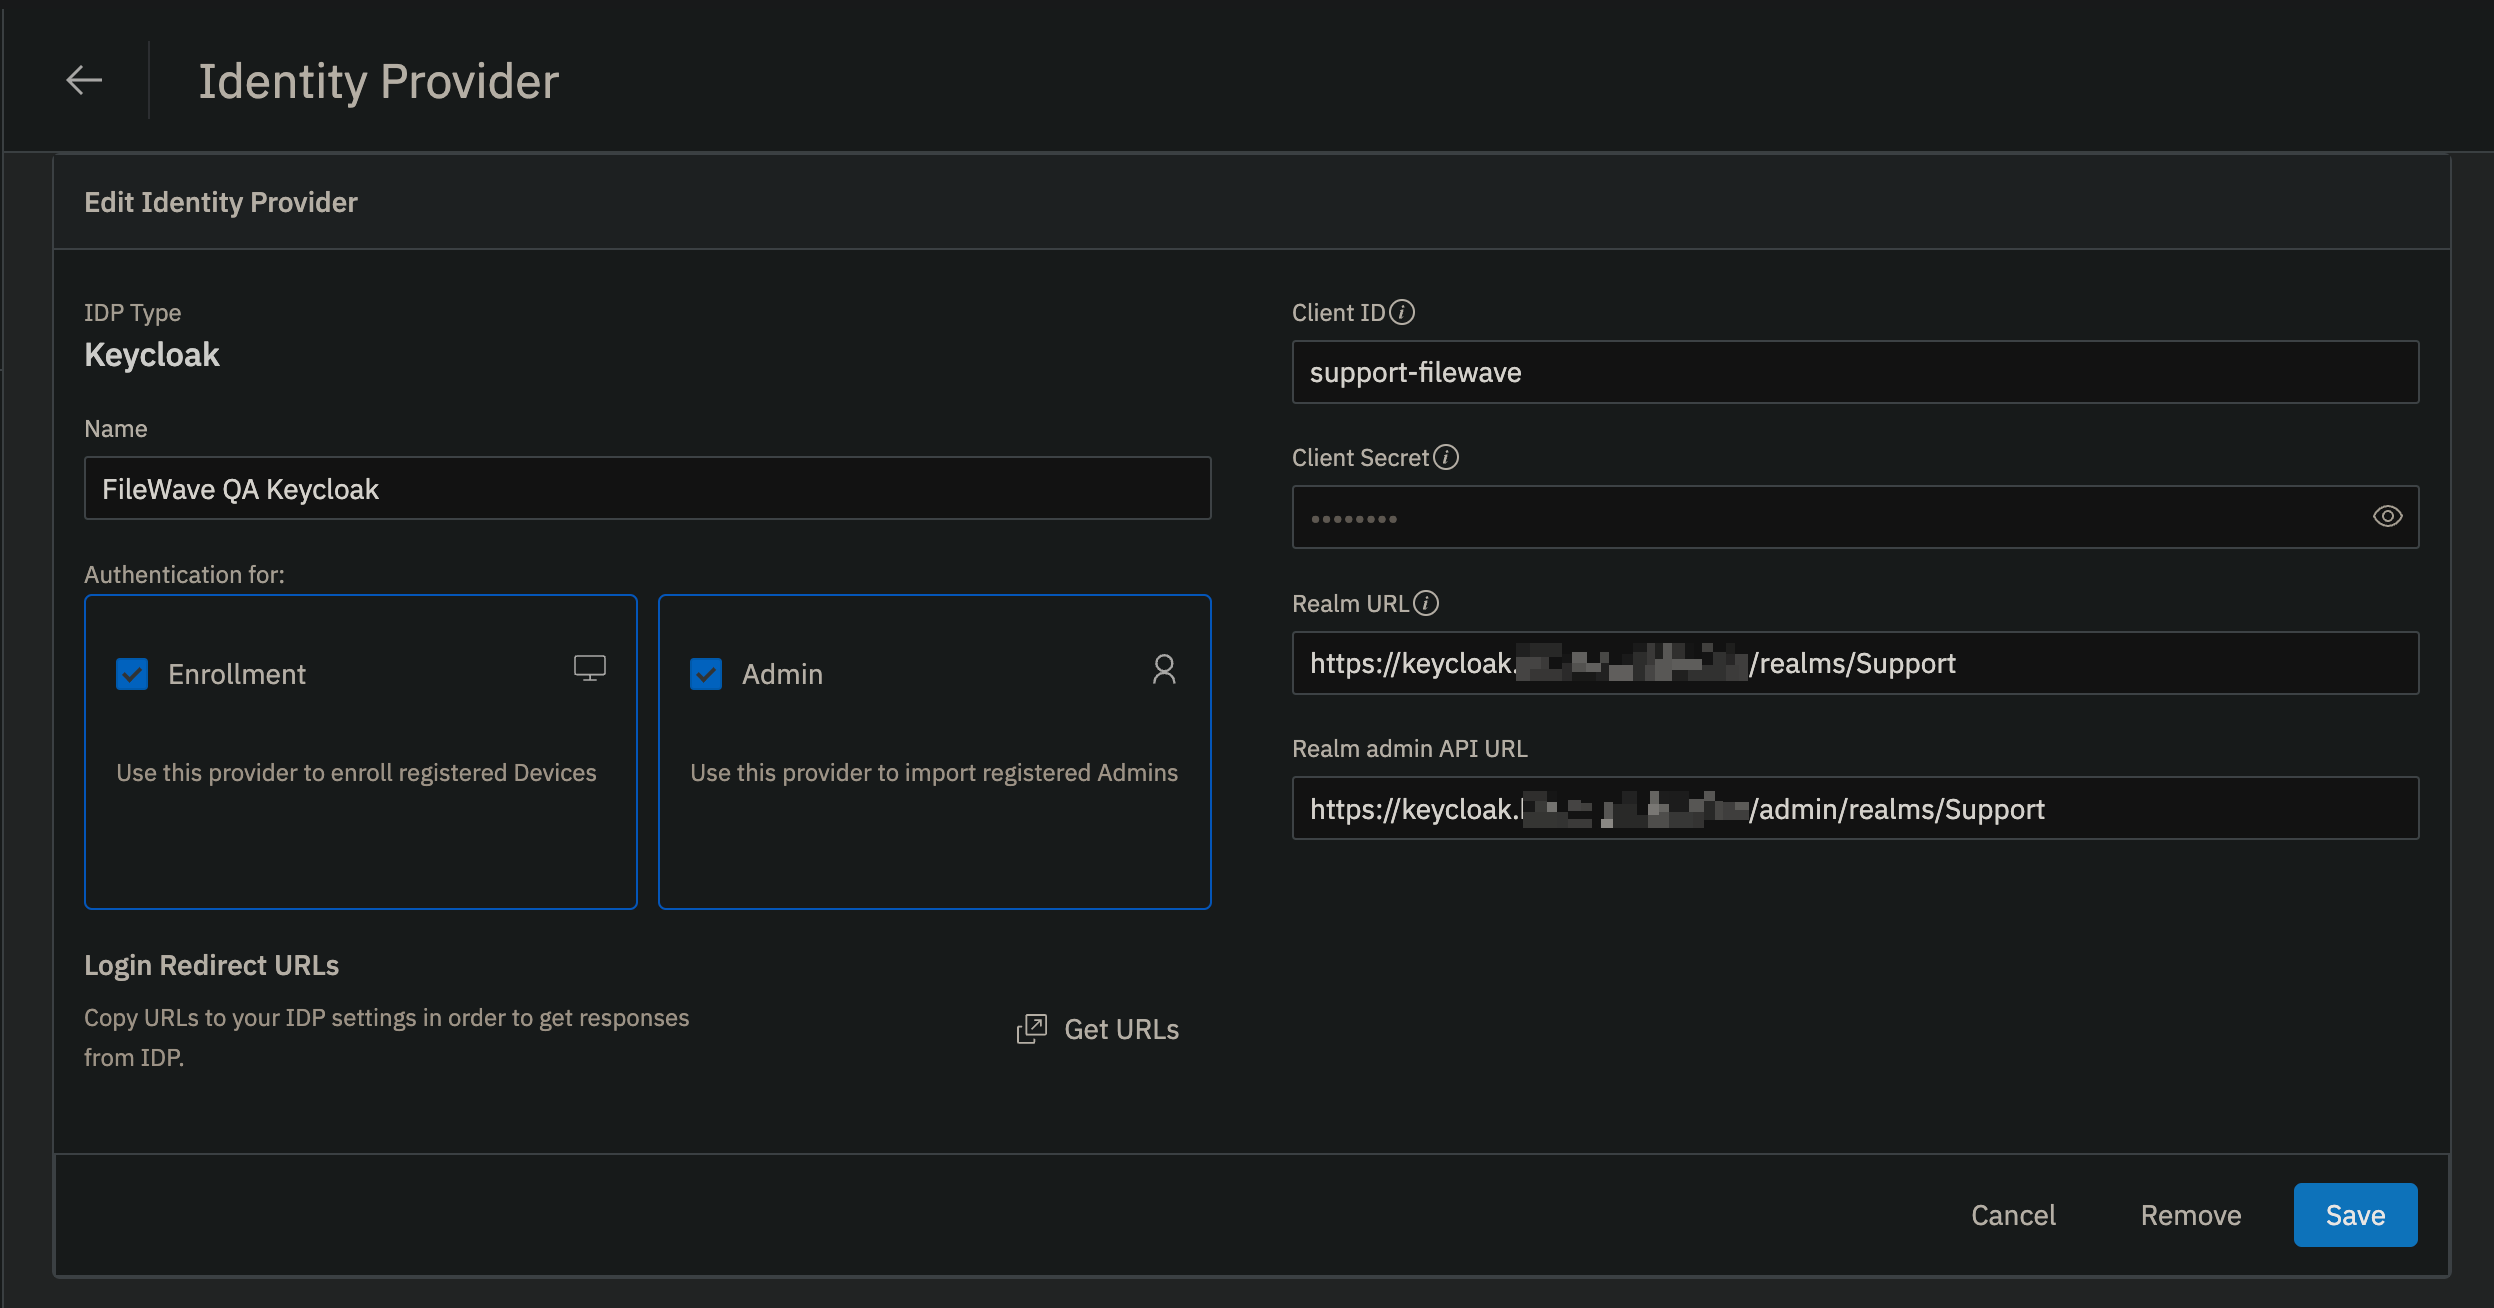
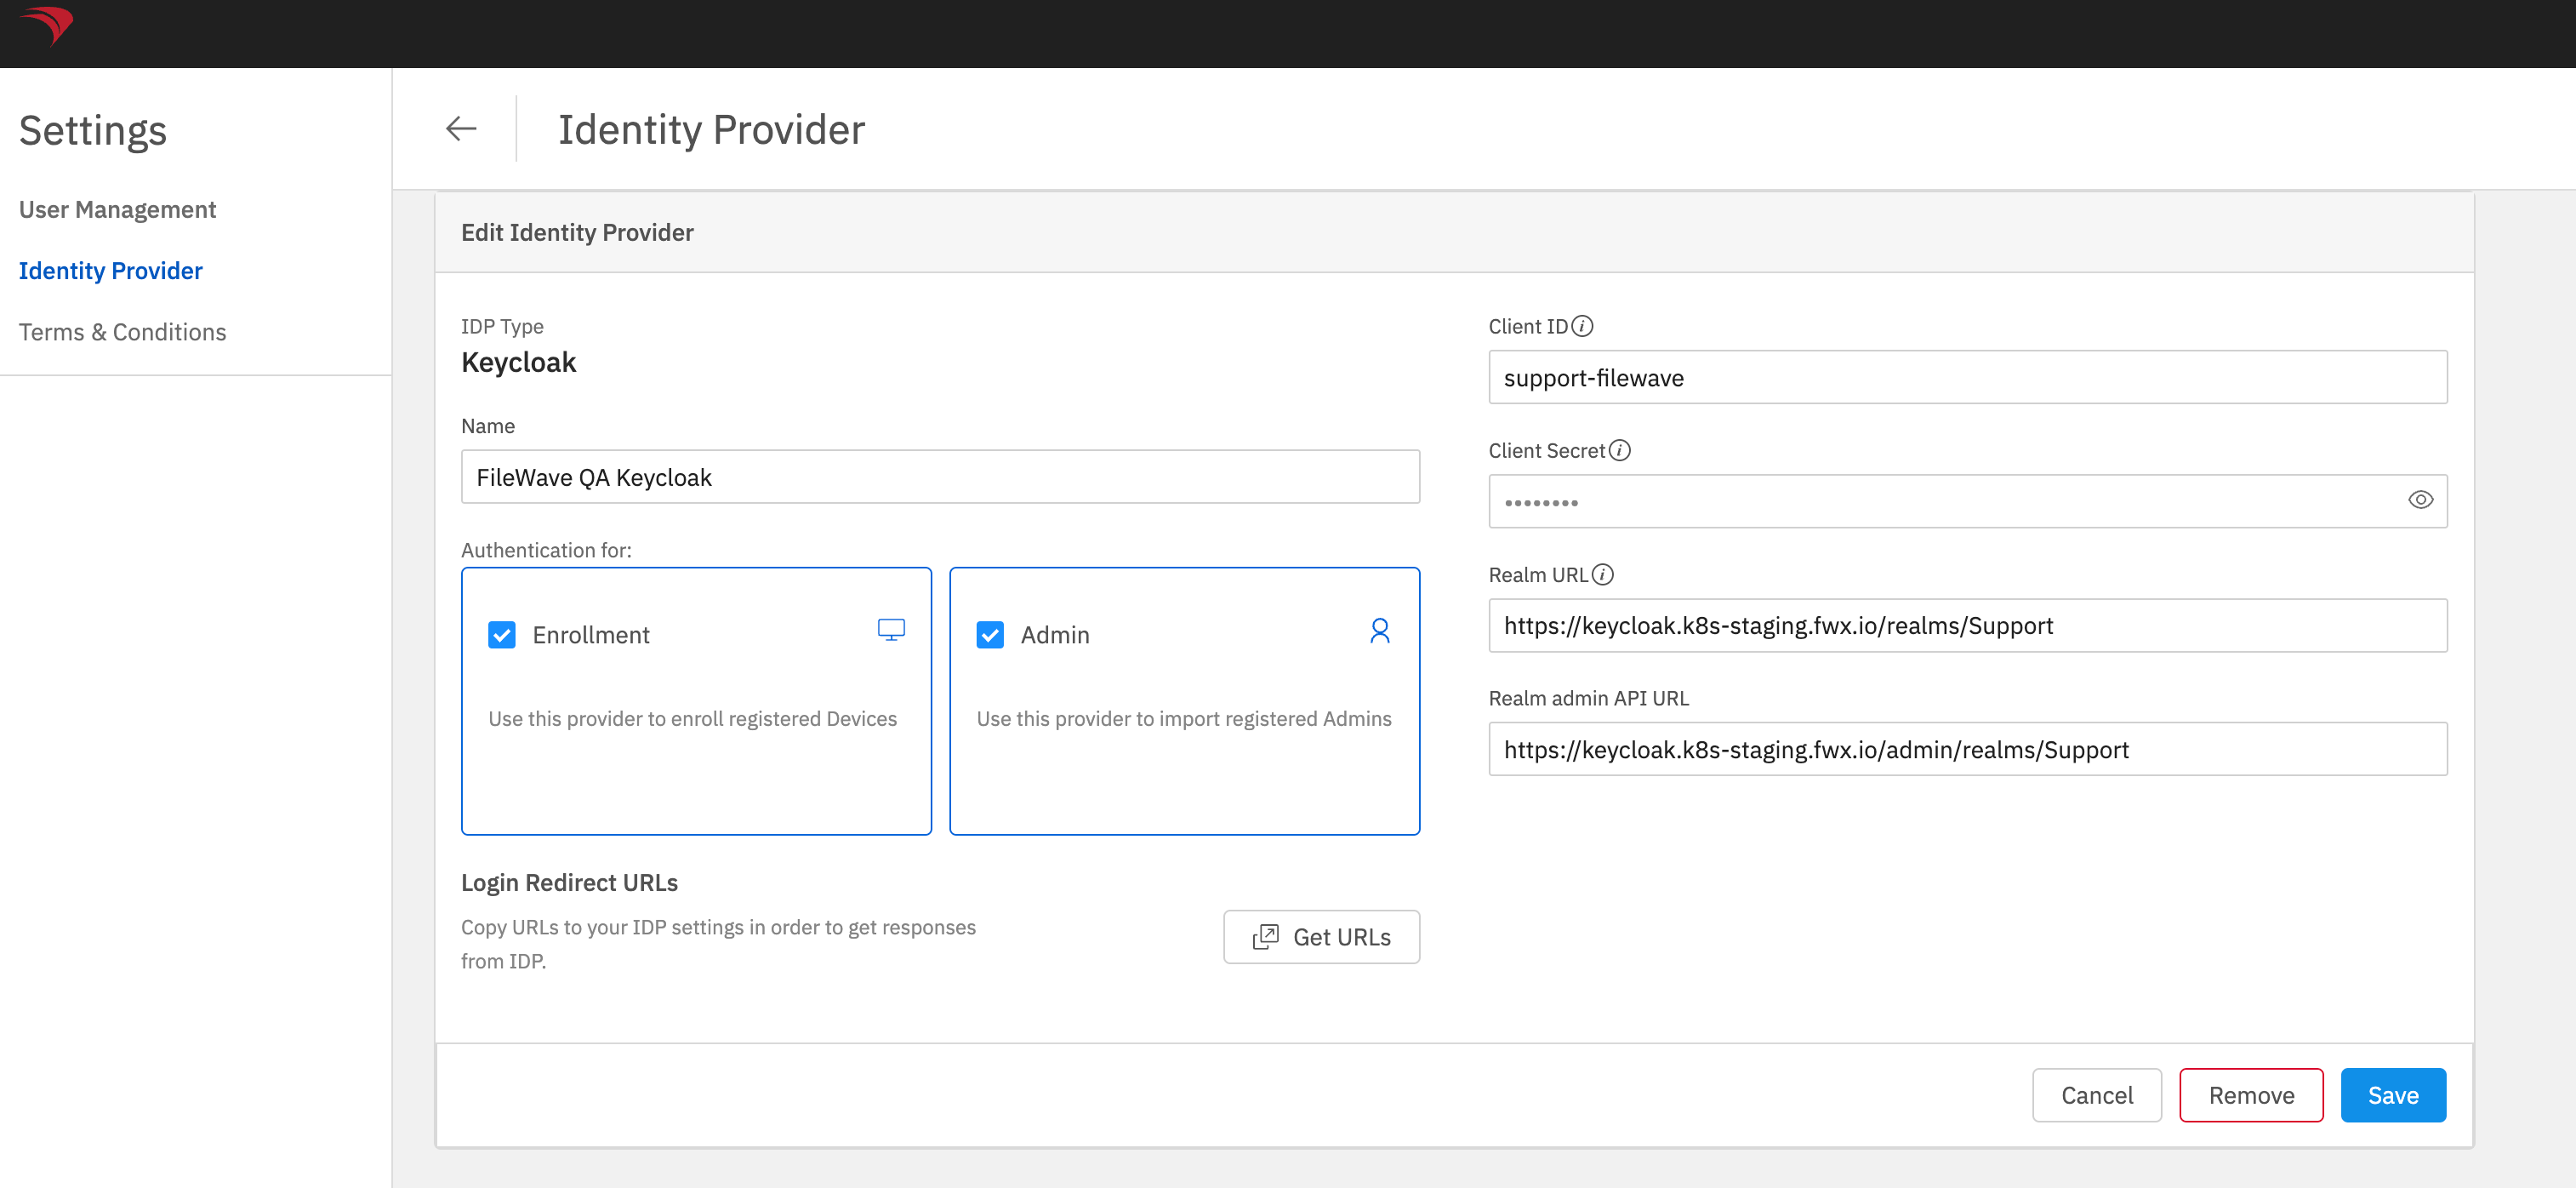
Here you will enter the "Client ID" and "Client Secret" that you copied from Keycloak. You'll want to put something in the "Name" field like which Keycloak you are pointing at if you have multiple in your organzation. You'll want to select "Enrollment" and or "Admin" for how you want to use the IdP.
Enrollment here if selected will be to prompt a user on macOS or iOS/iPadOS to enter credentials so that you know who has the device.
Admin here is to allow you to have technicians login to FileWave Central or Anywhere using the IdP.
For the "Realm URL" and "Realm admin API URL" these will be for your Keycloak instance for your Realm you are using. In the image you'll see Realm URL = https://keycloak.mycompany.com/realms/Support and Realm admin API URL = https://keycloak.mycompany.com/admin/realms/Support where the Realm name was Support.
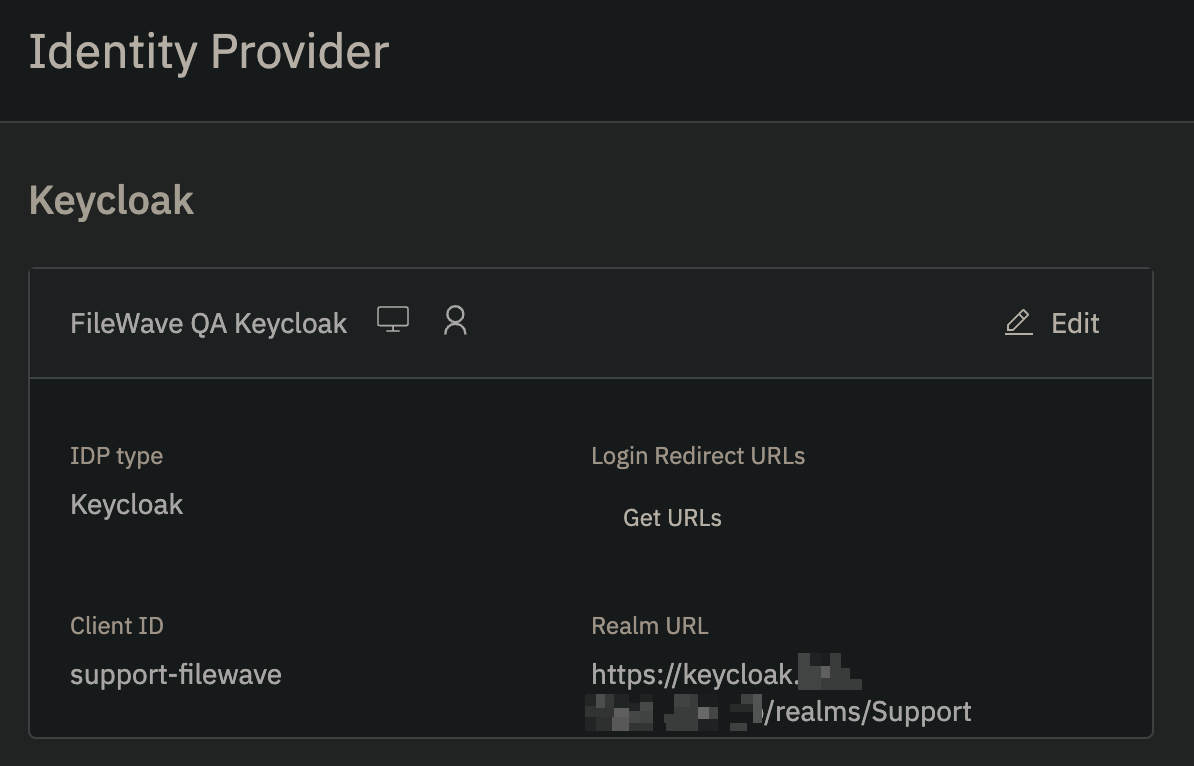
After clicking Create you should see the following if it was able to successfully reach Keycloak.
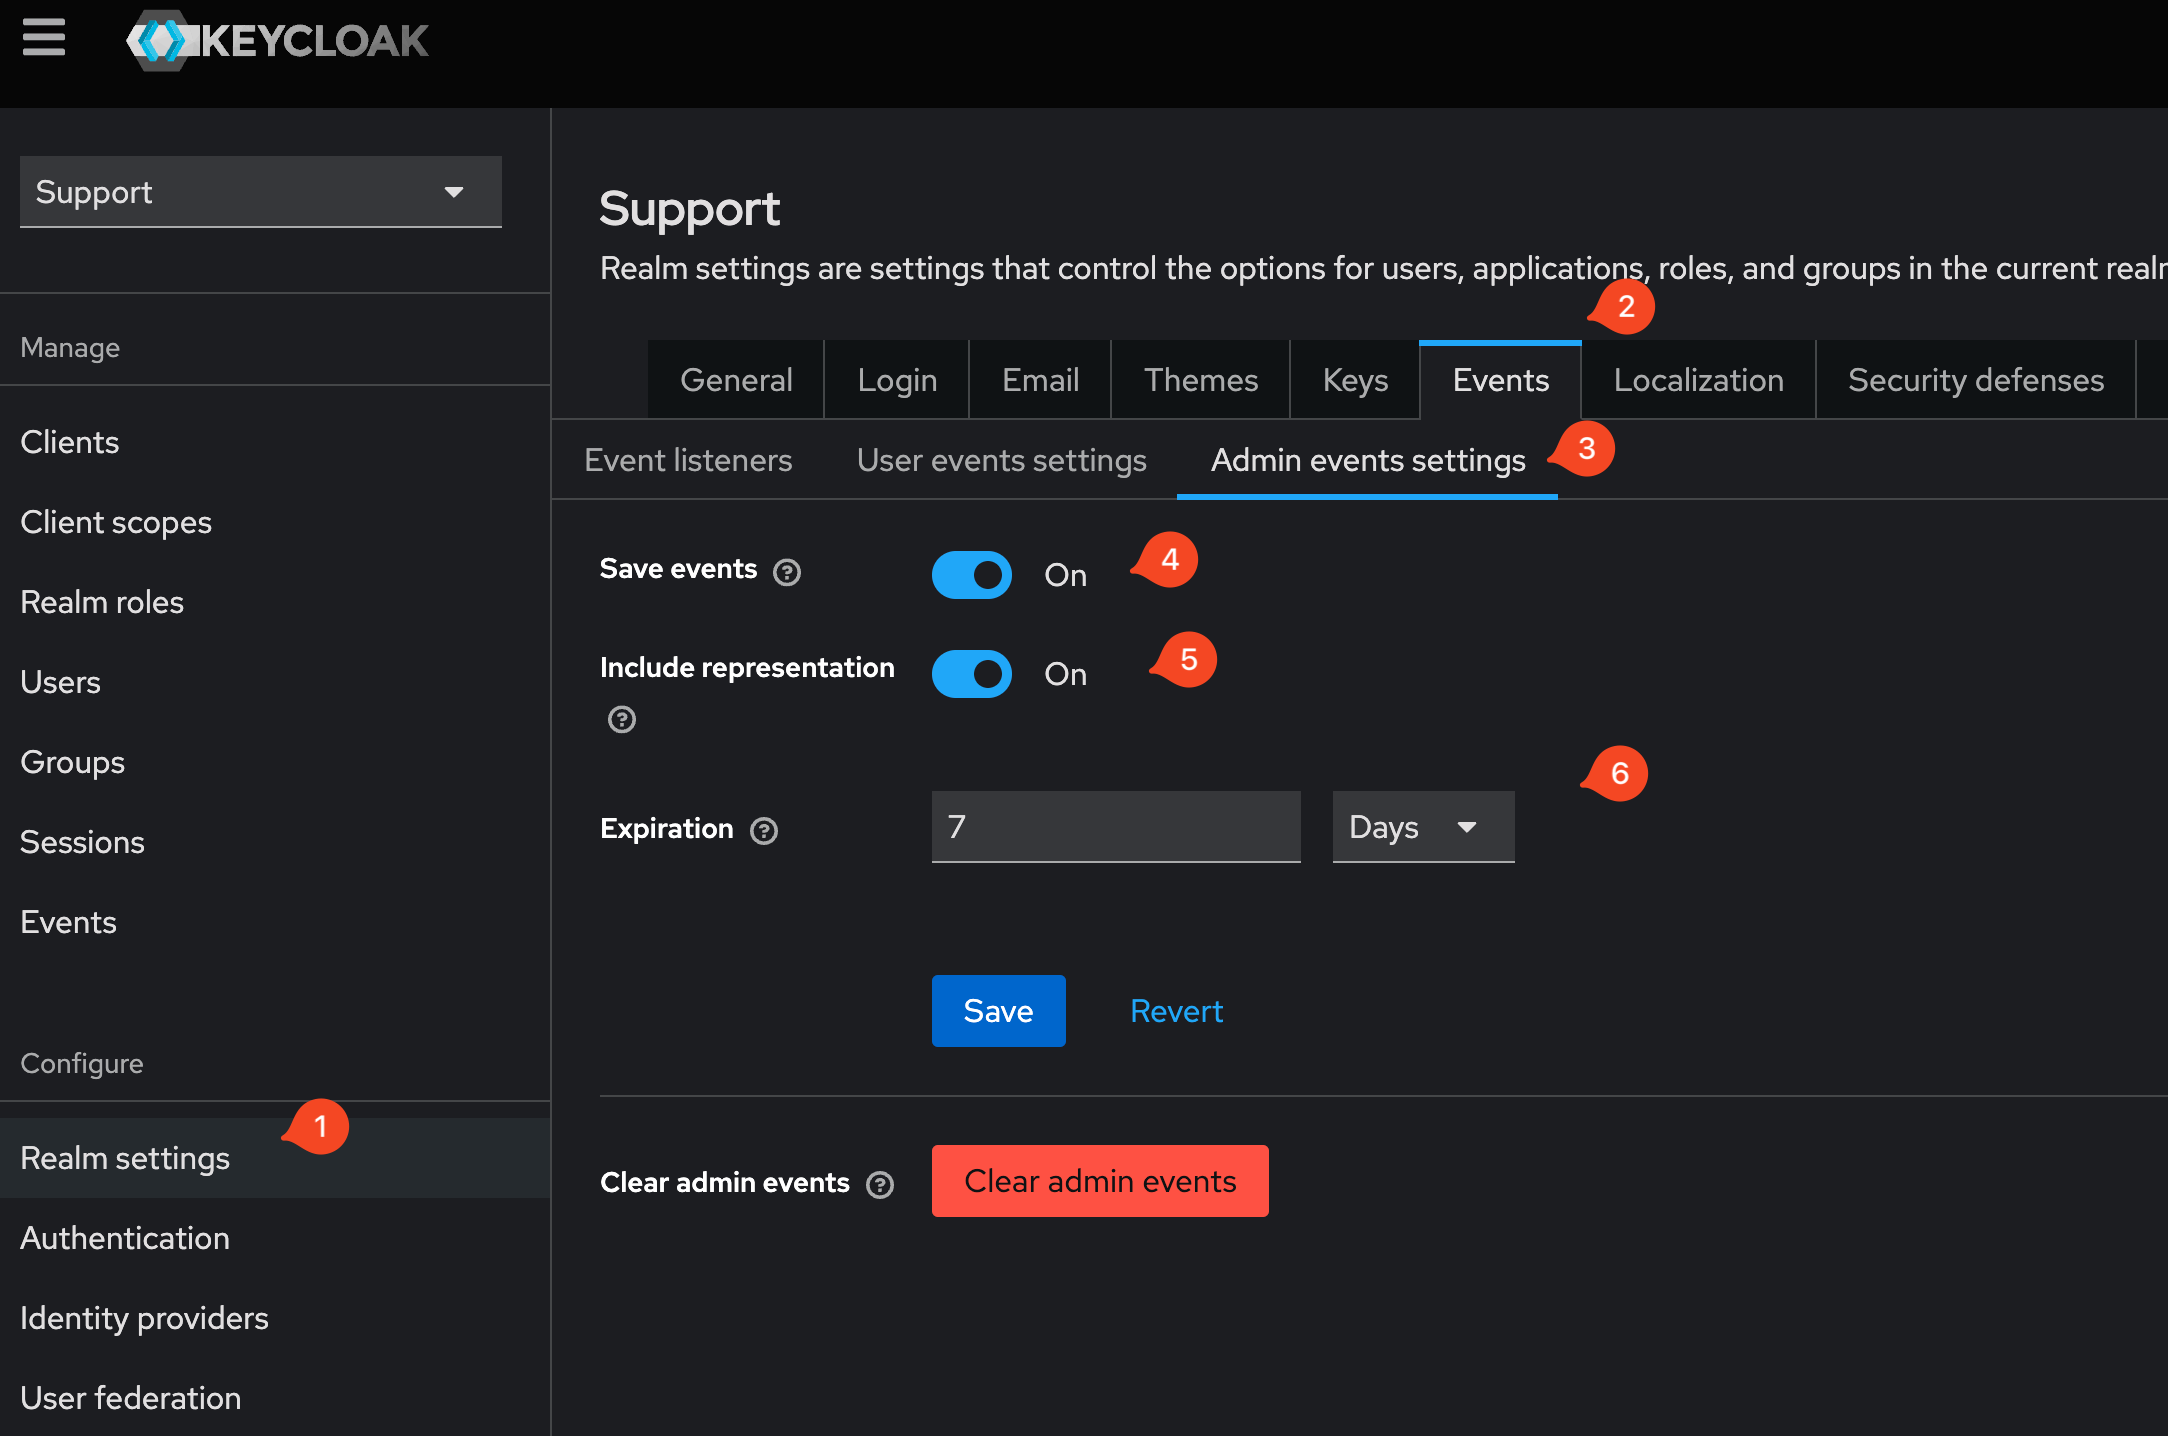
Configure Keycloak Realm Settings
In Keycloak go to Realm settings for the Realm you are configuring and configure the Events -> Admin events settings as follows;
- Save events: ON
- Include representation: ON
- Expiration: 7 days
Configure Filewave to allow Admins to use Keycloak as IdP (Filewave)
|
Step |
Screenshot |
|
Now that you have configured FileWave to talk to Keycloak for Admin you need to go into the Native Admin to enable admins to actually log in and set their permissions. |
|
|
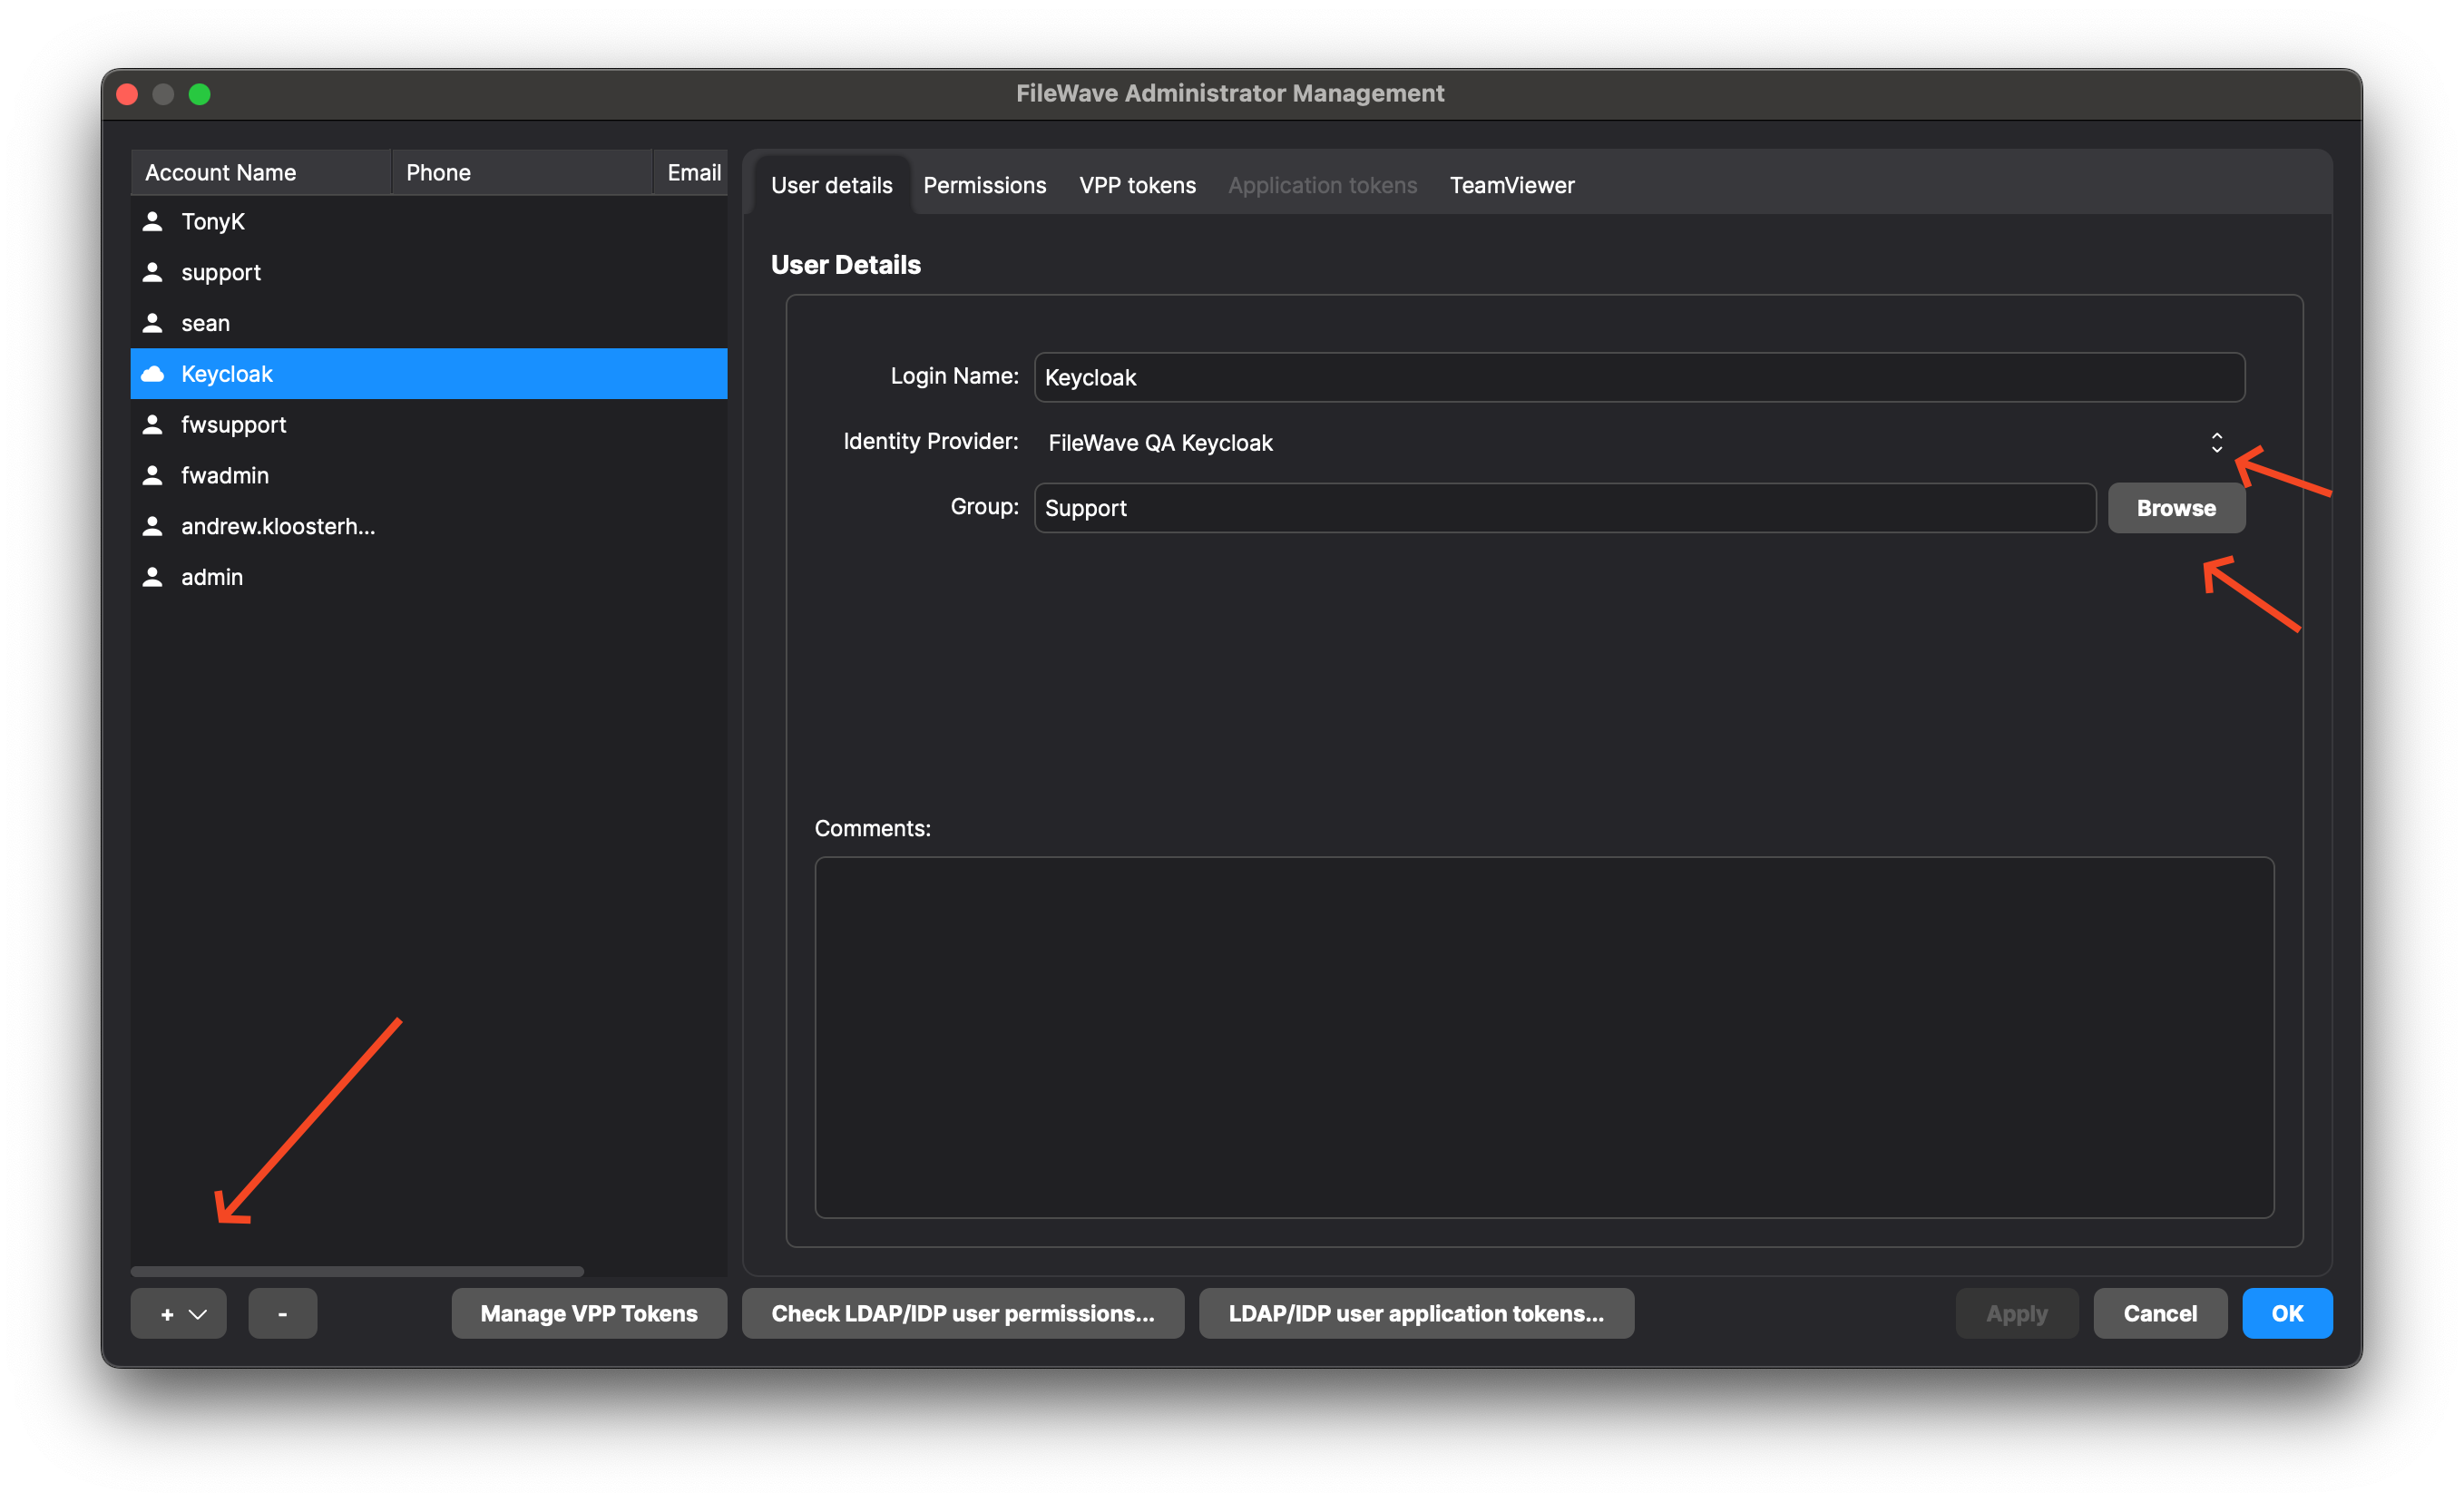
(Step 29) - Click the + on the lower-left corner and pick IdP Group Account. On this screen, it is important to clarify that you are not defining a user here but a group of users. The Login Name is misleading here, and should be thought of as the name of the group of users so you might put something like Keycloak - Desktop Techs and then for Identity Provider make sure your Keycloak connection is selected that you set up in the prior steps. For Group click the Browse button and select the group that includes all of the users who will have access.
If you will give all of your users the same level of permissions then you can use one group for all of your FileWave admins, but if you will use different levels of access then make an IdP Group Account on this window to define each of your groups of FileWave admins. In the image, you see a single entry for Keycloak which might be appropriate if all of the FileWave admins are in a single group on the Keycloak side. |
|
|
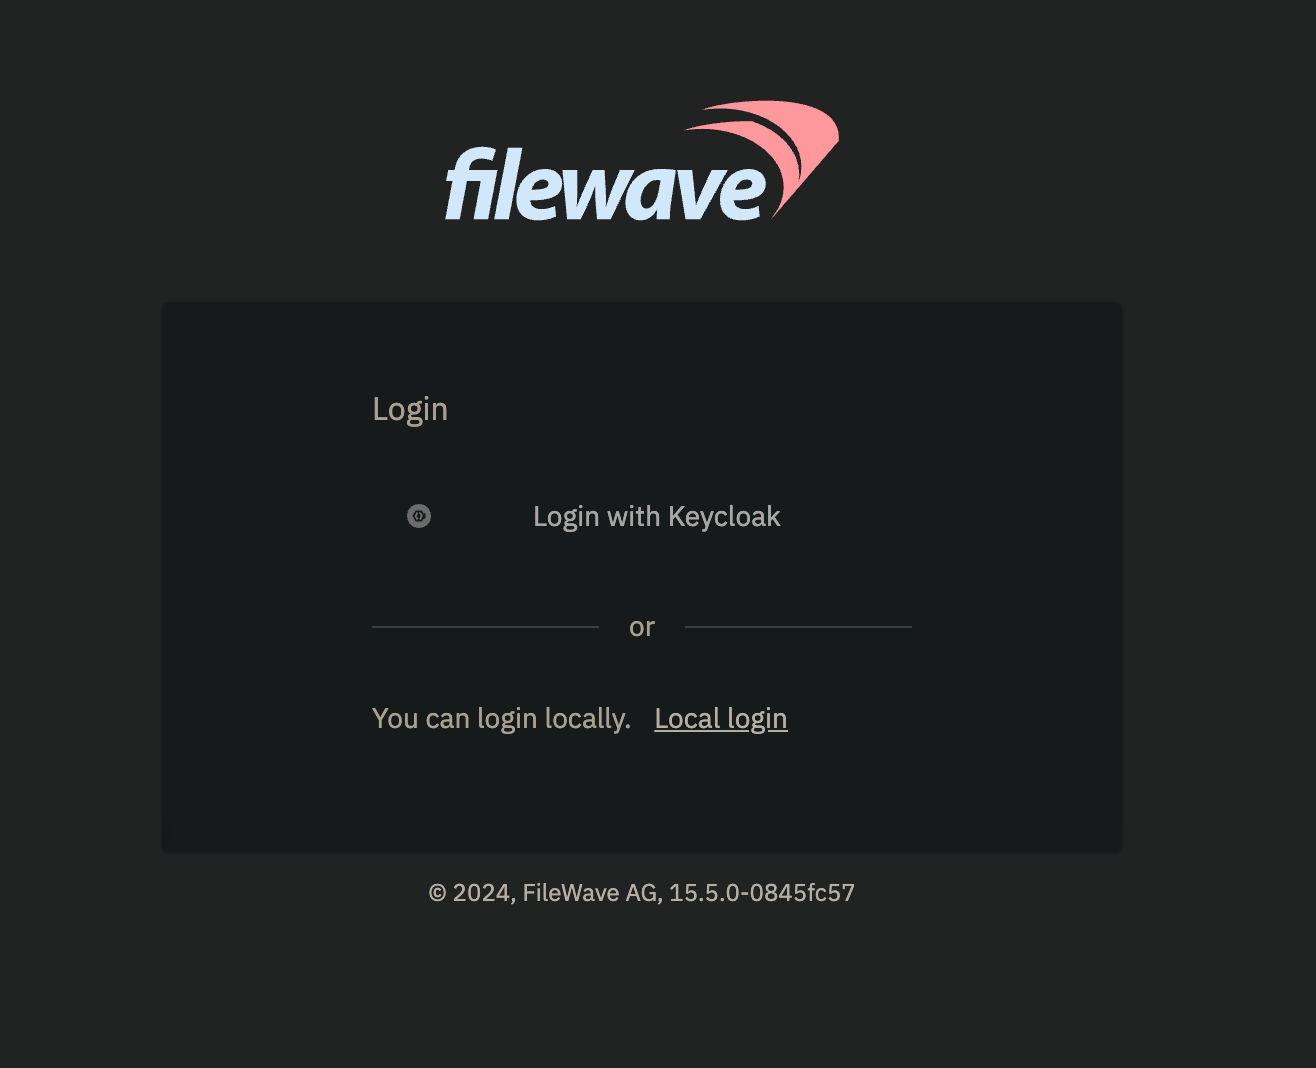
If everything was done correctly then your Web Admin login should look like the image shown. Click to Login with Keycloak and try to log in. If you can not log in then the user may not be in a group that was given access to the Keycloak Client in Keycloak so go and check on the Keycloak side to be sure. If the user can log in but can not perform tasks then ensure they are in the right group, and that you have configured the Permissions tab in FileWave Central to be sure they have the right permissions granted. |
|
Troubleshooting
If you try to login on via a browser, and gets the error: "login-idp?Error=HTTPError" and "Error Authorization via IDP not carried out." or in the Django log you see [ERROR] 2023-08-29 09:23:42,063 (views): Authentication through IDP failed. Exception: (HTTPError) 403 Client Error: Forbidden for url: then you may want to review FileWave Server should not have IPv6 enabled.
- Adding IdP Groups for FileWave Authentication
- Configuring DEP Profiles for IDP Authentication
- Admin Login in Using an IdP Provider
Adding IdP Groups for FileWave Authentication
What
After you configure an IdP as an authentication source, you can allow members of selected directory groups to sign in to FileWave.
When/Why
Use IdP groups to grant administrator access and assign permissions from your identity provider. This is the usual path when administrators sign in with multi-factor authentication or other IdP-based security controls.
How
Set up the group in FileWave Central:
Assistants → Manage Administrators
Add an IdP Group Account. The option is in the lower-left area of the Manage Administrators window and behaves similarly to an LDAP group account.

Give the group a name and assign permissions as you would for a local or LDAP-based administrator account.
Specify your IdP provider, then click Browse to find the IdP group.

This test environment has one group, but your security groups would appear here:

Click OK, then Apply. Members of that IdP group can sign in to FileWave Central or FileWave Anywhere with their IdP credentials. Remember to assign VPP Token rights if the group needs to manage VPP tokens.
Related Content
- IdP Setup: Google
- IdP Setup: Azure AD
- IdP Setup: Okta
- Configuring DEP Profiles for IDP Authentication
- Admin Login in Using an IdP Provider
Configuring DEP Profiles for IdP Authentication
What
Configuring Apple Devices DEP Profiles to use IdP authentication.
When/Why
We'll need to configure each DEP profile with which we would like to use IdP authentication (but it is simple to do)
How
You'll simply notice there is a new checkbox in the DEP profile for "Custom Enrollment". If that checkbox is checked in a profile, IdP enrollment will be used (if configured of course):


Once configured, you'll notice your devices will begin prompting for IdP authentication at enrollment time.
Known Issue
With Okta integration for macOS ADE enrollment there is a known issue with the initial load of the login window. You will see that window appear with what looks like a bad page load, which is basically correct. If you right-click, reload this page, it will load correctly. (See below). Note that this issue will be resolved in an upcoming revision.


Related Content
Admin Login Using an IdP Provider
What
After an identity provider (IdP) and administrator group access are configured, FileWave Central and FileWave Anywhere show an IdP sign-in option. Administrators can authenticate through Microsoft Entra ID, Okta, Google, or Keycloak instead of using a local FileWave account.
FileWave Central 16.4 uses the computer’s system browser for IdP authentication instead of an embedded sign-in frame. The change is automatic and requires no additional FileWave setting. FileWave Central 16.3.x and earlier use the embedded flow.
When/Why
Use IdP administrator login when access should follow the organization’s identity-provider policies, including provider-managed multi-factor authentication, conditional access, saved browser credentials, and SSO session behavior.
Local FileWave administrator accounts remain available through the local-login option. Keep a secured local administrative path for recovery and IdP troubleshooting.
FileWave Central 16.4
- Start FileWave Central and select the intended FileWave Server.
- Select Login via IdP.
- FileWave Central opens the configured default system browser instead of displaying the provider inside Central.
- Select the provider when more than one IdP is available, then complete the provider’s sign-in, multi-factor authentication, and consent or policy checks.
- After successful authorization, FileWave Central completes the connection using the permissions assigned to the matching IdP Group Account.
Because the provider runs in the system browser, it can use browser-managed credentials and an existing provider session when the IdP and organization policy permit it. No FileWave preference switches the 16.4 desktop application back to the embedded frame.
FileWave Anywhere
- Open FileWave Anywhere in a supported browser.
- Select the configured provider on the login page.
- Complete the provider sign-in and return to FileWave Anywhere.
FileWave Anywhere already operates in a browser, so the FileWave Central 16.4 system-browser change does not create a separate Anywhere login model.
Browser sessions and sign-out
Signing out of FileWave ends the FileWave session; it does not necessarily end the identity-provider session stored by the browser. If the system browser still has an active IdP session, the next FileWave login may authenticate automatically. Sign out from the provider or use the intended browser profile when a complete SSO sign-out or account change is required.
- Verify the displayed provider account before approving access, especially on shared administrator workstations.
- Apply browser and device security controls appropriate for privileged administration.
- Test IdP login with a non-emergency administrator before relying on it as the only routine access path.
- Keep IdP group membership and FileWave permissions aligned with least privilege.
Troubleshooting
| Symptom | Check |
|---|---|
| Login via IdP is not available | Confirm that an IdP is configured for administrator use and that the required IdP Group Account exists in Assistants > Manage Administrators. |
| FileWave Central does not open a browser | Confirm that the operating system has a working default browser and can open HTTPS links, then restart Central and retry. |
| The provider signs in, but Central does not complete the connection | Review the provider configuration, group membership, FileWave permissions, redirect/authorization result, and FileWave Server logs. Retry without closing the browser before the provider finishes. |
| The wrong provider account is reused automatically | Sign out from the IdP in the system browser or switch to the browser profile containing the intended administrator account, then start the FileWave login again. |
| The user authenticates but lacks access | Confirm membership in the mapped IdP group and review the permissions assigned to that IdP Group Account in FileWave Central. |
Related Content
IdP for Deployments and Smart Groups
What
Use IdP group data from enrolled devices to target FileWave Deployments and build Inventory Reports or Smart Groups based on the groups a device belongs to.
When/Why
This is useful when group membership already lives in Google, Microsoft Entra ID, or another identity provider. FileWave stores the device's IdP group information so you can reuse that membership in FileWave Anywhere Deployments and in Inventory Reports (formerly Queries) in FileWave Anywhere and FileWave Central.
How
When you create or edit a Deployment in FileWave Anywhere, use the IDP selector in the upper-right area to choose groups that come from the IdP connection.

In Inventory Reports and Smart Group criteria, use the IDP group id field when you need to filter devices by IdP group membership. Start typing the group name; if FileWave knows the group, it appears below the field. In this example, Josh Lab is a group in Google.

If you edit the Smart Group in FileWave Central, the saved value is the group ID, not just the display name. That matters when you troubleshoot a Smart Group that targets an IdP group or when a group name changes in the IdP.

Use LDAP Groups for FileWave Central Administrator Access
FileWave Central can grant administrator access to users through an LDAP group account. Use this to map an Active Directory, Open Directory, or eDirectory group to a defined set of FileWave permissions. Only Active Directory supports recursive group membership in this workflow; nested groups are not resolved for Open Directory or eDirectory.
Before starting, configure and test the LDAP connection in FileWave Server preferences. The steps below assume the directory connection is already working.
Steps for setup:
-
In FileWave Central, open Assistants > Manage Administrators. In the FileWave Administrators window, select the + button at the bottom-left.

-
Select LDAP Group Account

-
FileWave creates an account named Untitled-1. Rename it so administrators can identify the mapped LDAP group.

-
After naming the account, select Browse... beside the Base DN field.
-
In the LDAP browser, find the administrator group and select Select. FileWave associates users from that group with this LDAP Group Account. In Active Directory, recursive membership can also include users from nested groups.

-
Confirm that Base DN now contains the distinguished name of the selected group.

-
Select Test to confirm that FileWave can find the group on the LDAP server.

-
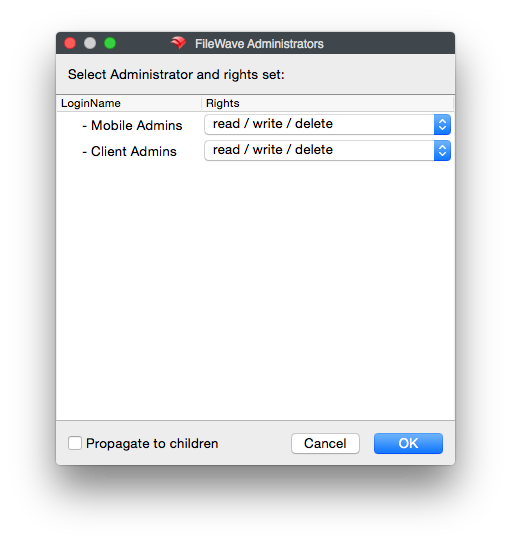
Assign the FileWave permissions that every user resolved through this LDAP Group Account should receive.

-
The final tab is called VPP Tokens. These will be the VPP Tokens that this group of users can manage in FileWave. To add or remove VPP token access for users and groups, click Manage VPP Tokens, and hit the check box for each token you want each user to manage.

-
Select Check LDAP Permissions... to look up a directory user and confirm which LDAP Group Account grants their access.
-
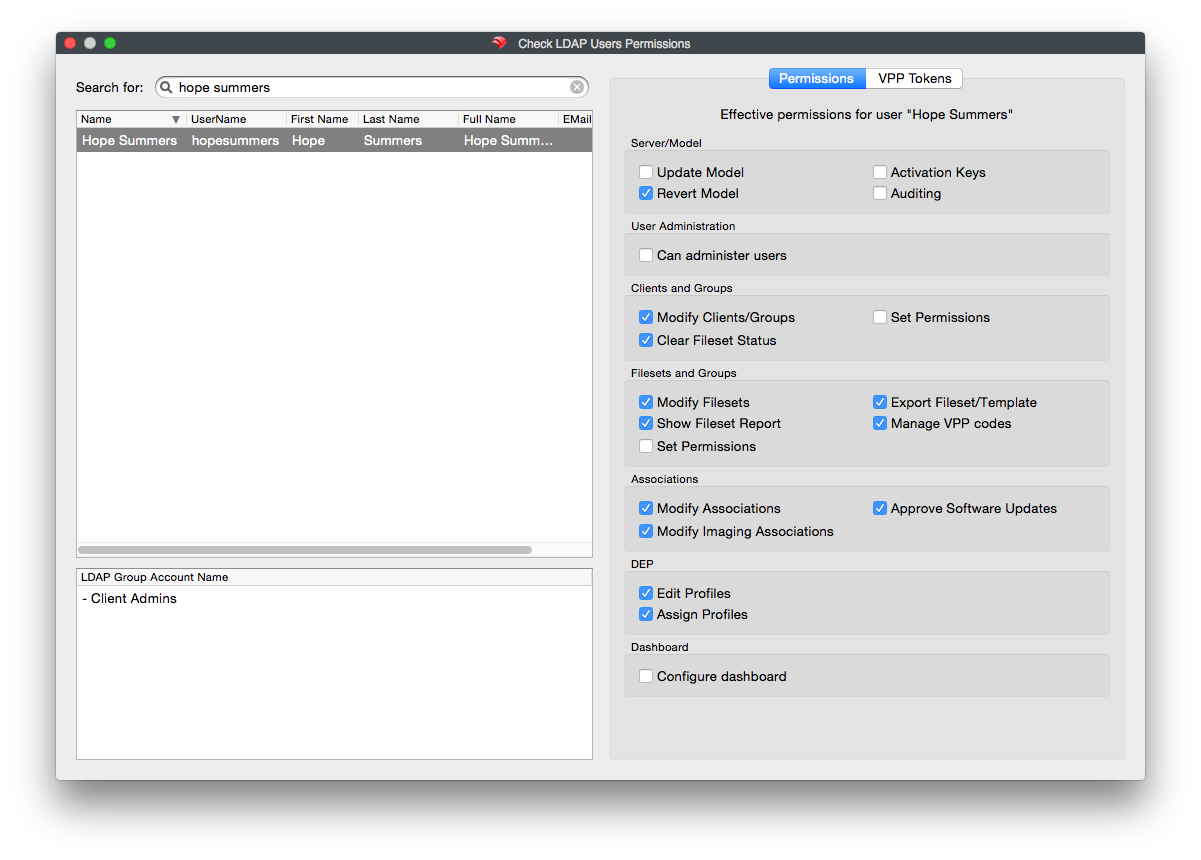
In the "Check LDAP User Permissions..." window, simply type the account you would like to find into the search bar in the top left of the window. Once you hit enter, locate the account you want, and select it. You will see the LDAP Group Account name in the bottom left hand pane, and the permissions the account has in FileWave on the right.
Please Note: If you have one account in multiple groups and it gets into more than one LDAP Group account in FileWave, they will receive the cumulative permissions of those groups.
- Now that you have completed the setup of these groups and accounts, you can now assign permissions throughout FileWave for what the accounts can manage regarding Filesets and Client, group and objects. Simply find your object or group (both standard or smart groups), right click then select Select Permissions.

Test with a member of the LDAP group and confirm that the account receives only the intended administrator permissions and VPP token access.
Troubleshooting
Directory data syncronization between IdP and FW is not supported
At this time, FileWave IDP integration is limited to only FileWave Admin authentication and Apple device enrollment. Directory data synchronization (and custom fields) between the IdP source and FileWave is not supported at this time, but will be added in a future release. In the meantime, current LDAP(S) synchronization can be used as a stop-gap to achieve the same result.
IdP redirect URL port 20443
What
FileWave IdP device-enrollment redirect URLs use port 20443 for the device redirect endpoint. Older IdP configurations may still have that redirect URL on port 443 or may omit the port.
When/Why
This changed in FileWave 15.5.1 to support environments where clients enroll through IdP but port 443 is not exposed for that redirect. If your IdP setup was created before that change, check the redirect URLs stored in your IdP.
How
Review the IdP setup article for your provider, then check the third redirect URL. It should use port 20443 for current FileWave configurations.
FileWave 15.5.1 and newer use this URL format for the device redirect:
https://FWXSERVER:20443/auth/login_via_idp_redirect_for_device
FileWave configurations created before 15.5.1 may have used the same URL without a port, or with port 443:
https://FWXSERVER:443/auth/login_via_idp_redirect_for_device
To confirm the correct values for your server, repeat the IdP setup step where FileWave Anywhere shows the URLs to copy. The other two redirect URLs remain on port 443.
Related Content
Enrolling Apple devices why am I prompted for IdP login?
What
When I enroll a macOS, iOS or iPadOS device a pop-up shows asking me to login to Google, Keycloak, Okta or Microsoft Entra ID (Azure) and I'm not sure why.
When/Why
This can happen if you setup an IdP in FileWave and enabled the "Enrollment" checkbox.
How
Login to FileWave Anywhere and go to Settings and edit your IdP configuration as seen in the image below. Uncheck Enrollment if you do not want this behavior. Conversely if you want to enable this behavior then go back and check the box.
Related Content
Renaming Azure Active Directory (Azure AD) to Microsoft Entra ID
What
Microsoft has announced the renaming of Azure Active Directory (Azure AD) to Microsoft Entra ID. This name change aims to unify the Microsoft Entra product family, reflect the progression to modern multicloud identity security, and simplify secure access experiences.
When/Why
The name change is part of Microsoft's effort to streamline its identity and access management offerings. By renaming Azure AD to Microsoft Entra ID, Microsoft intends to provide a consistent identity security experience across its product lineup. This change aligns with the company's strategy to enhance secure access for education organizations, corporations, state and local government, and other customers.
How
No action is required from users who are currently using Azure AD or deploying it in their organizations. The service will continue to function without interruption, and all existing deployments, configurations, and integrations will remain unaffected.
Users can still access the familiar capabilities of Azure AD through the Azure portal, Microsoft 365 admin center, and the Microsoft Entra admin center. All features, capabilities, licensing, terms, service-level agreements, product certifications, support, and pricing will remain the same.
The new name for standalone offers will be Microsoft Entra ID Free, Microsoft Entra ID P1, and Microsoft Entra ID P2. However, the capabilities included in the current Azure AD plans will not change. Microsoft Entra ID will continue to be included in Microsoft 365 licensing plans, such as Microsoft 365 E3 and Microsoft 365 E5. More details on pricing and inclusions can be found on the pricing and free trials page.
The renaming does not impact the following:
- Microsoft Authentication Library (MSAL)
- Microsoft Graph
- Microsoft Graph PowerShell
- Windows Server Active Directory
- Active Directory Federation Services (AD FS) and Active Directory Domain Services (AD DS)
- Azure Active Directory B2C
- Any deprecated or retired functionality, feature, or service of Azure AD
Related Content
IdP Custom Fields
What
FileWave 16.2 introduces IdP Custom Fields, allowing administrators to pull user and device-specific data directly from an Identity Provider (IdP) such as Okta, Google, Entra (Azure AD), or Keycloak into FileWave. These fields work just like other Custom Fields but are powered by your IdP attributes, enabling automation and personalization across devices.
When/Why
You would use IdP Custom Fields when you want to:
-
Dynamically populate user-specific values (e.g., email address, username, department).
-
Create Smart Groups based on IdP-sourced information.
-
Use variables in configuration profiles (e.g., pre-fill email profiles with the user’s email address).
-
Simplify large-scale deployments by automatically binding devices to users through IdP attributes.
This feature reduces manual data entry and ensures consistency between your IdP and FileWave.
⚠️ Platform Support: IdP Custom Fields are supported on macOS, iOS, and iPadOS. Windows devices currently do not leverage usernames for IdP-based fields in the same way they do with LDAP.
How
-
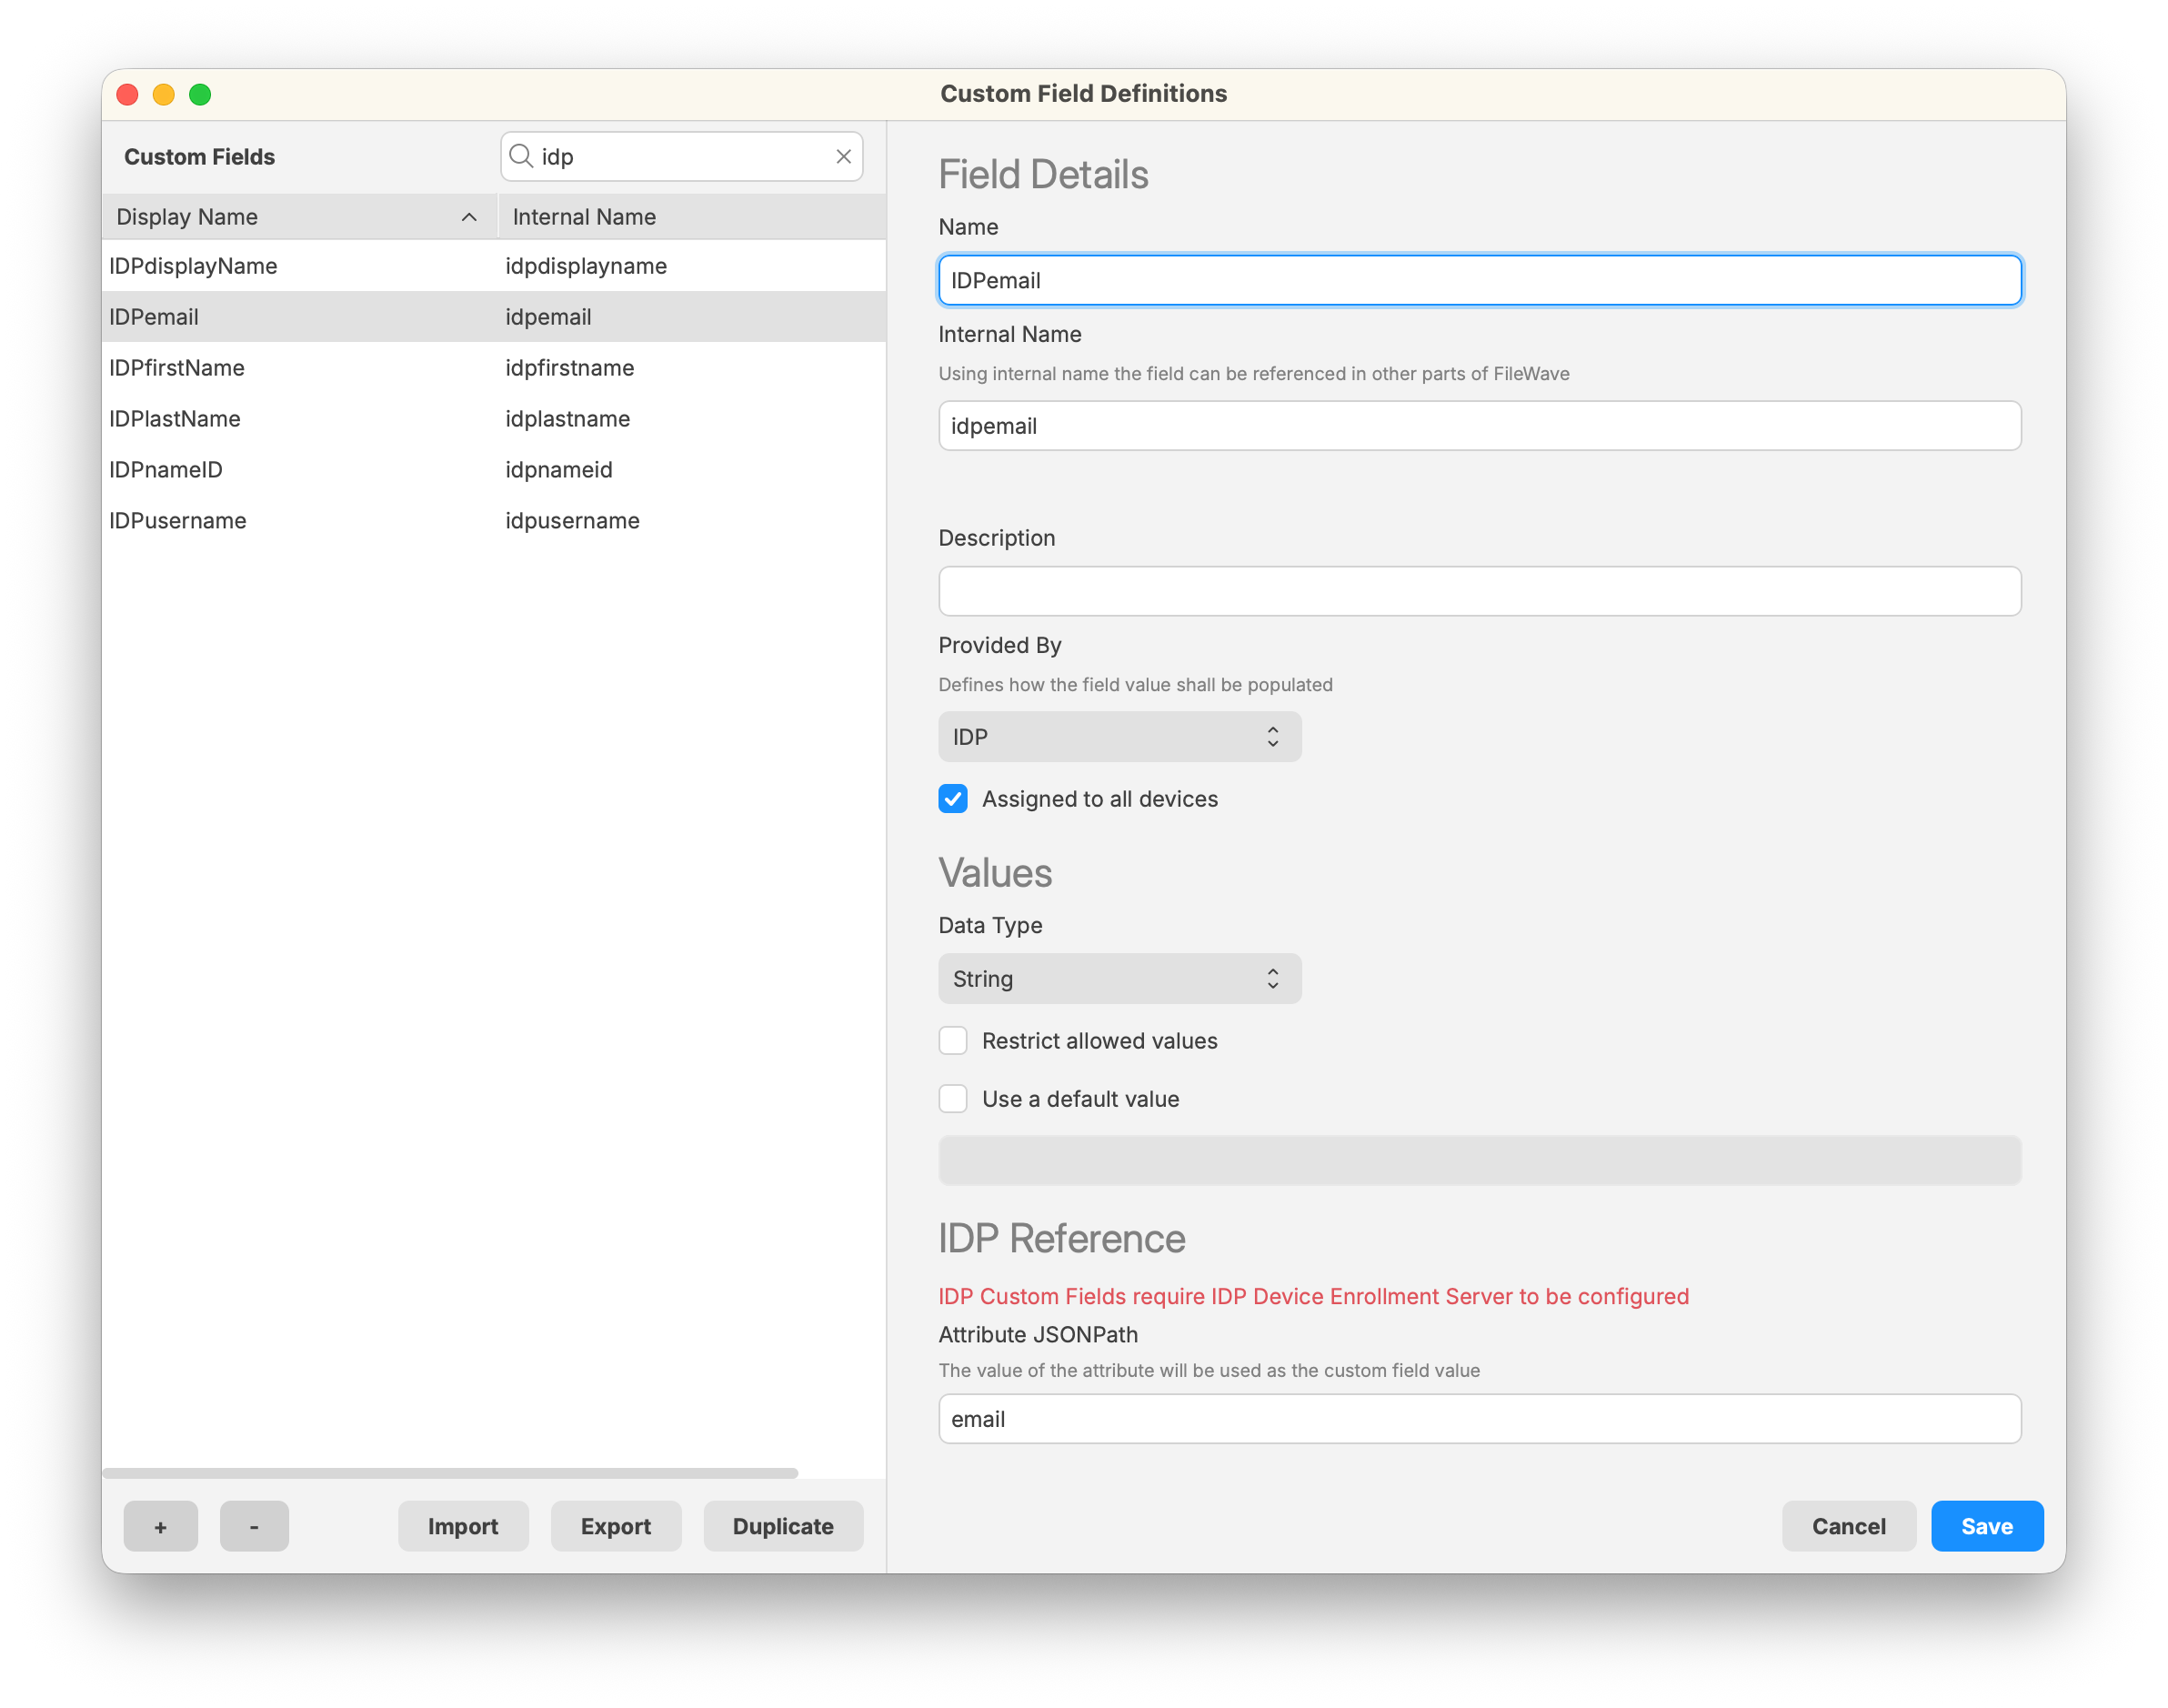
Navigate to Assistants > Custom Fields > Edit Custom Field Definitions in FileWave Central.
-
Create a new field:
-
Name/Internal Name: Define as with any other custom field.
-
Provided By: Select IdP.
-
Assigned to all devices: Usually check this to ensure the field applies across your environment.
-
-
Set the Data Type (commonly String).
-
In the IdP Reference section, specify the Attribute JSONPath — this should match the attribute name from your IdP (e.g., email, displayName, department).

-
Save the Custom Field.
-
Ensure that devices are linked to users:
-
FileWave uses the Enrollment Username field to associate IdP data with a device.
-
This can be set manually (right-click device > Set Enrollment Username), automatically via ADE enrollment, or through API/import methods.
-
Related Content