| To complete the steps below, one has to be **logged in** to a Keycloak instance and be an **administrator** of the instance to complete all aspects of setting up Keycloak. |
NOTE: The FileWave Server CANNOT use only the IP Address or self-signed cert. Must use a FQDN - [Instructions Linked Here](https://kb.filewave.com/books/certificates/page/root-trusted-ssl-certificate-using-and-renewing "Root Trusted SSL Certificate (Using and Renewing)") |
The steps to create a Realm, Users, and Groups is more of a Keycloak function than a FileWave one. The steps outlined here will work as long as you are already using Keycloak.
#### Creating a Client App in Keycloak Select “Clients” in left menu bar and select “Create client” button - Client type should be "**OpenID Connect"** - Input Client ID in the “Client ID” label like "**filewave"** for example - Name and Description can be blank or it is recommended to put something so you will remember why you created this like "**FileWave Server**" and some information about the server. - Click "**Next**" to continue [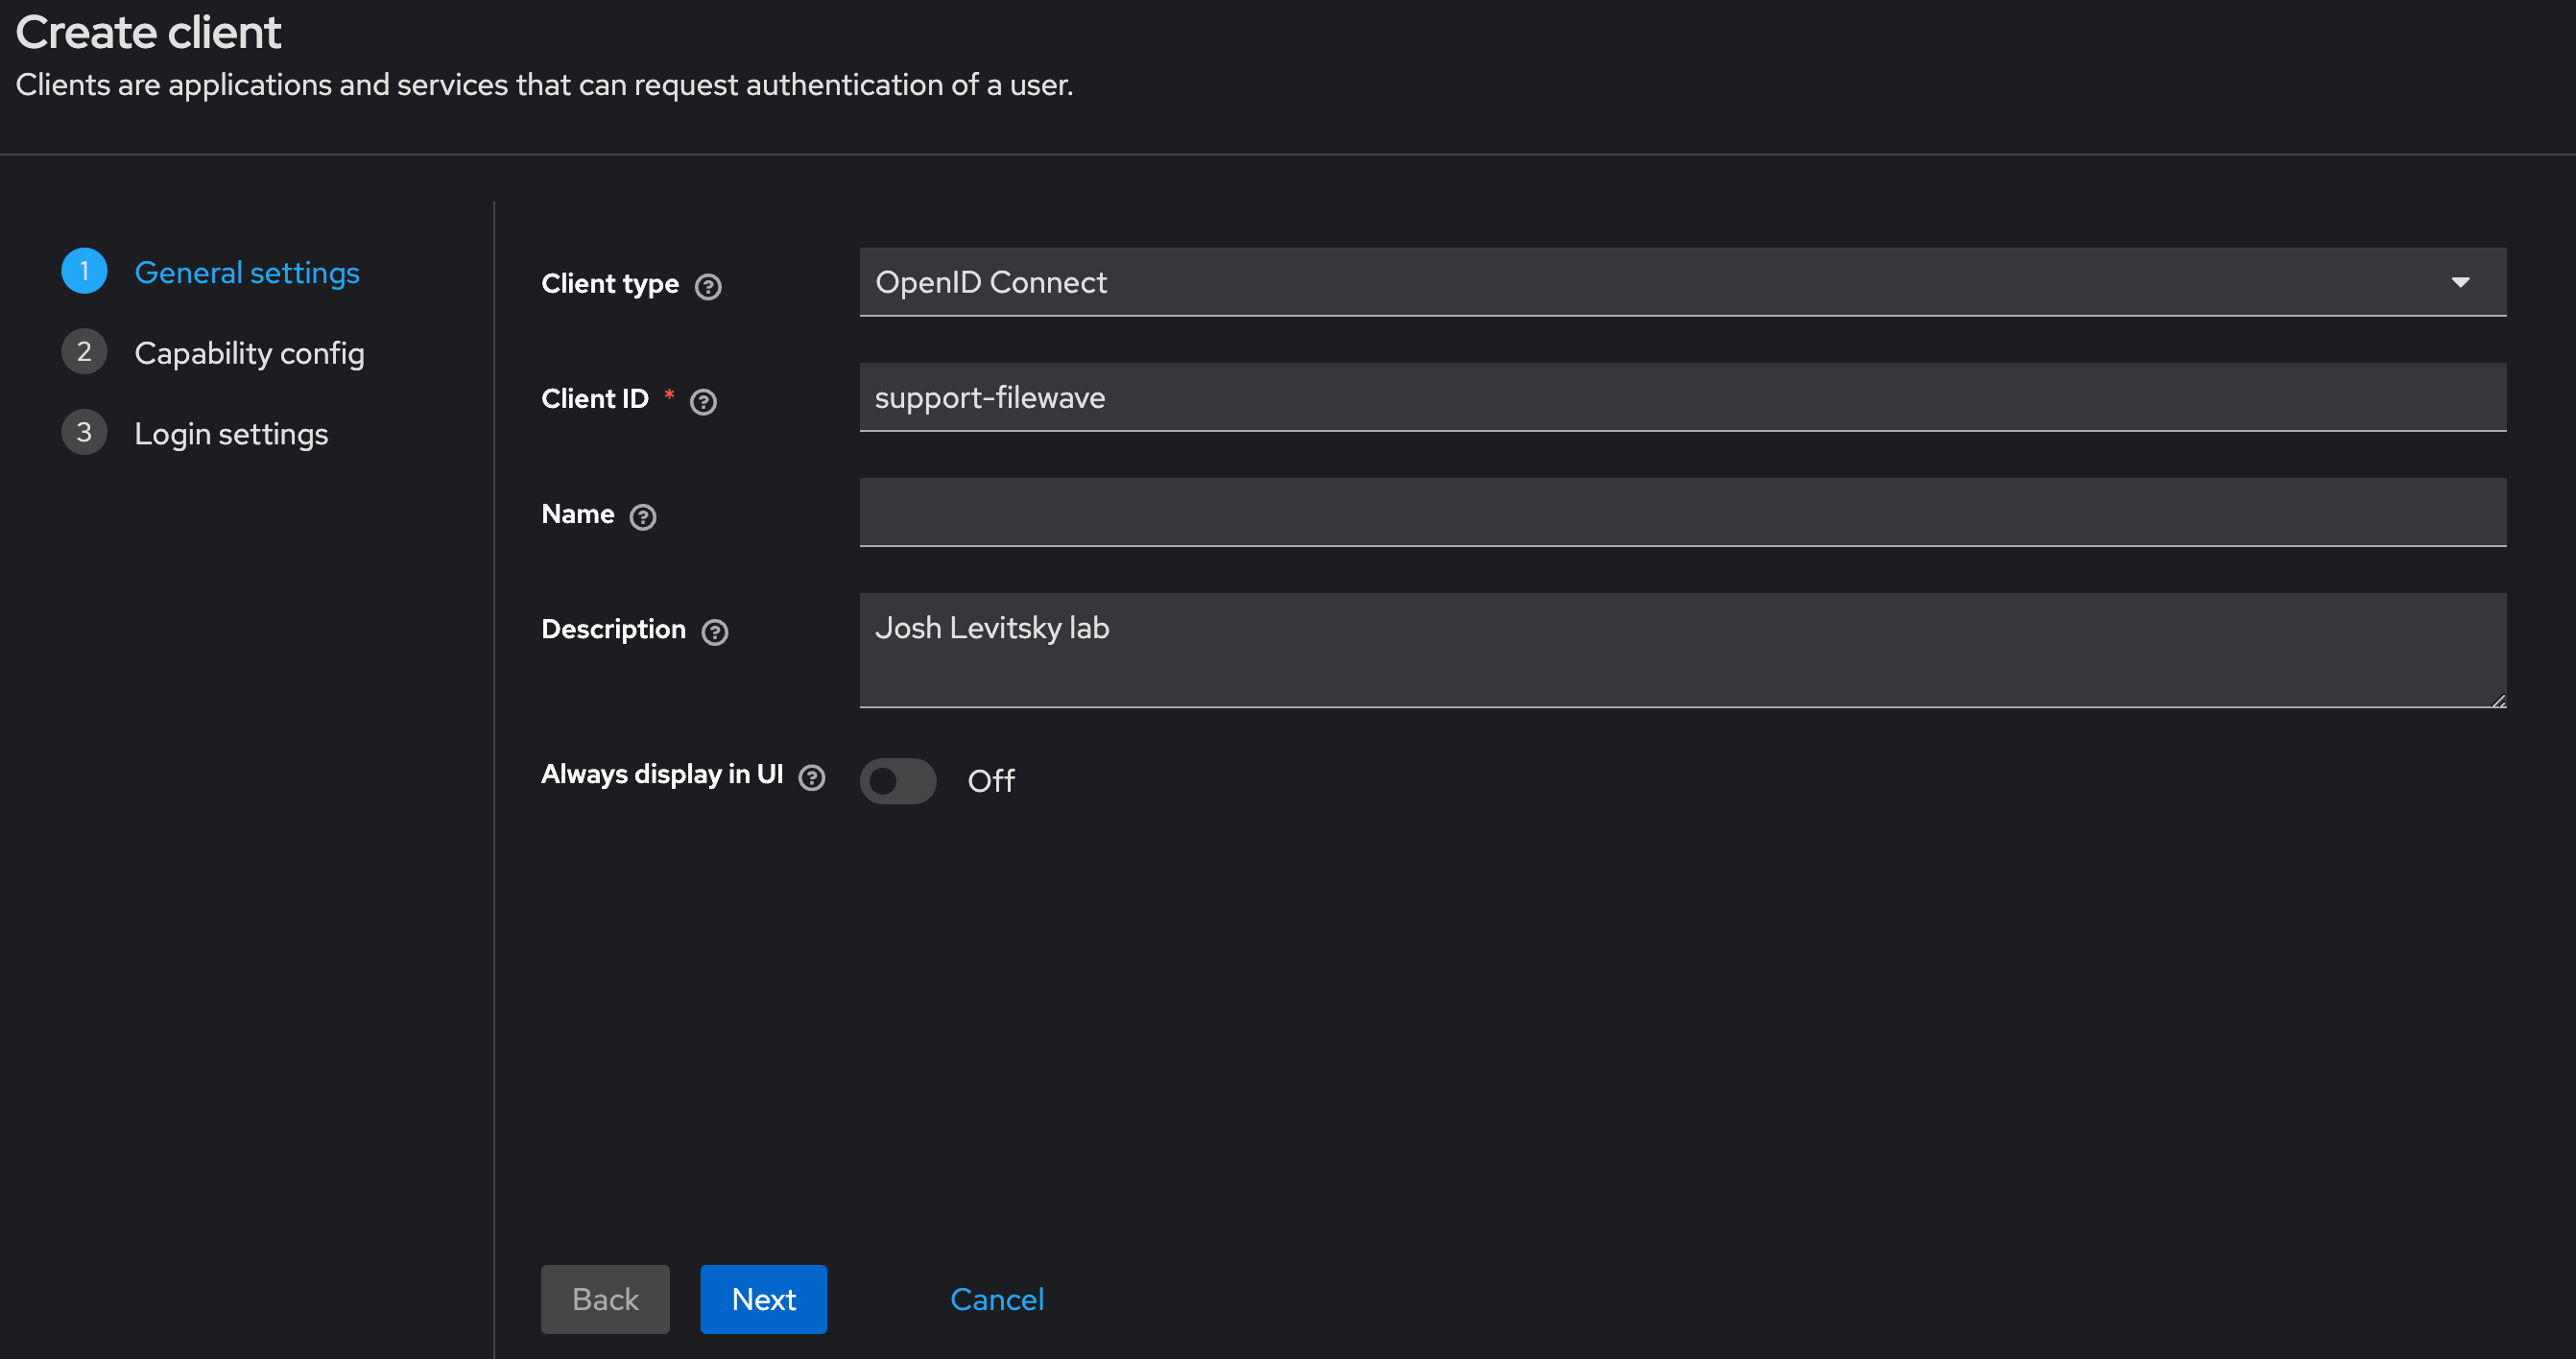](https://kb.filewave.com/uploads/images/gallery/2024-10/3ZoLatGGKGXsmK6O-image.png) On the Capability config page: - Turn on “**Client authentication**” and "**Authorization**" - For Authentication flow check “**Standard flow and Service accounts roles**” [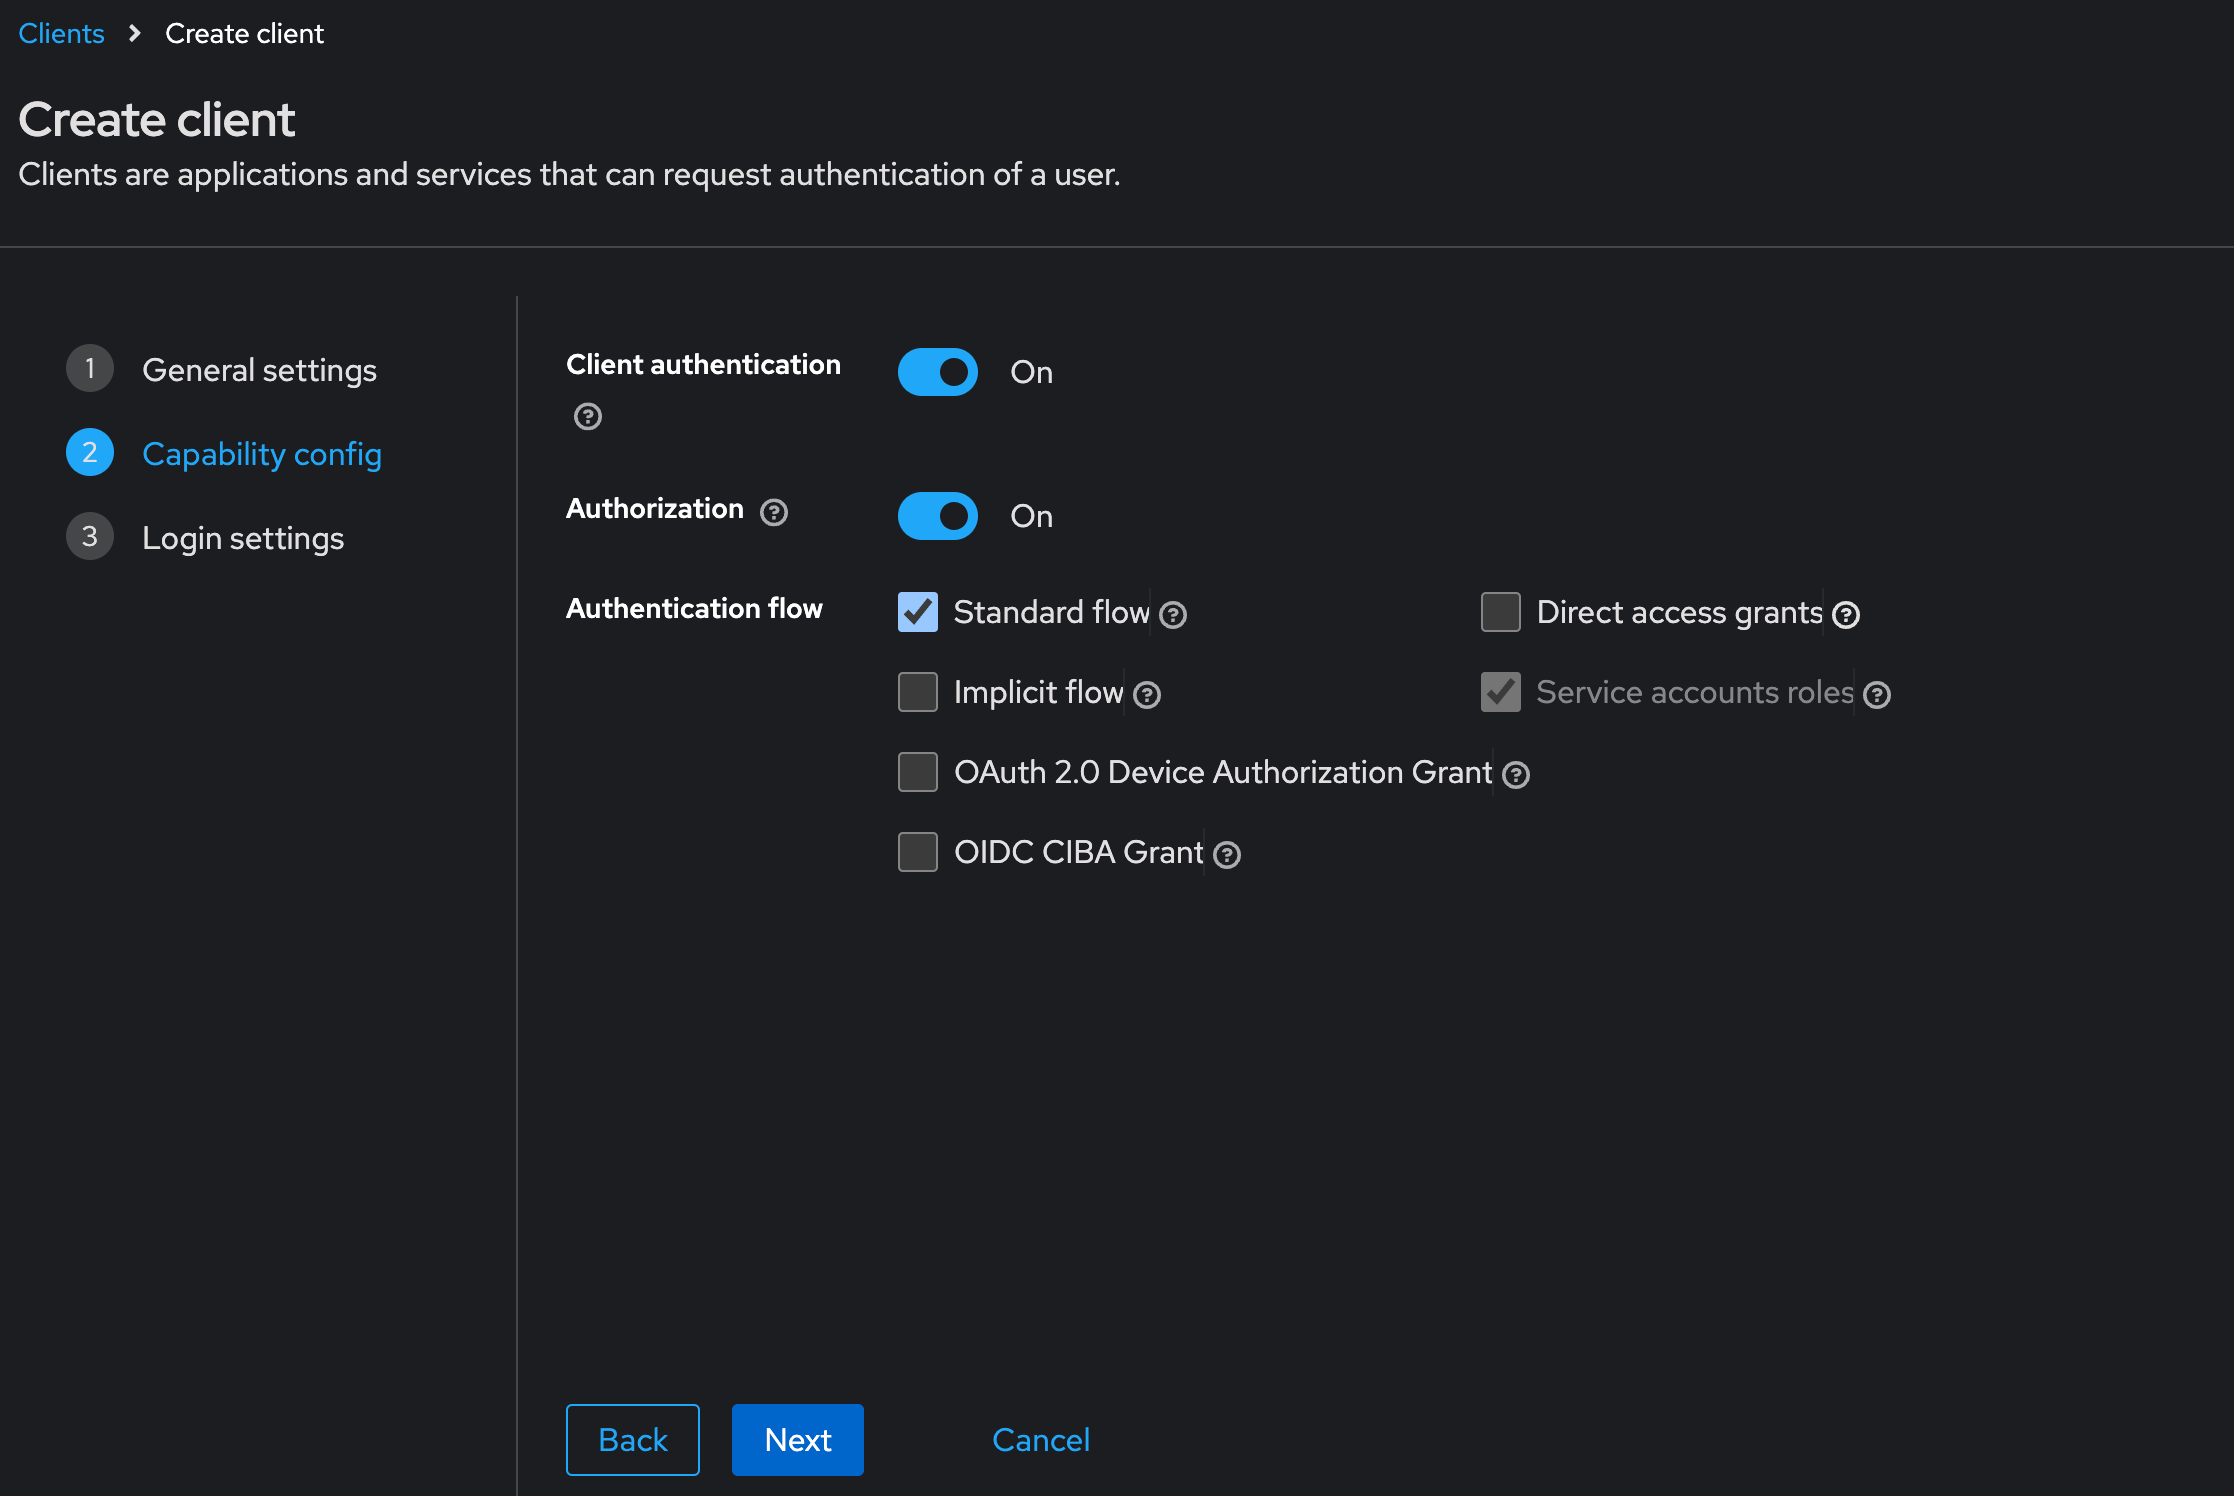](https://kb.filewave.com/uploads/images/gallery/2024-10/nEs9hv0F5XKQaHsi-image.png) In this next step you are going to login to FileWave Anywhere and get the URLs needed for this page. Open a new browser tab and go to https://filewave.your\_filewave\_server.com replacing the host in the URL with your FileWave Server. This step is fairly quick and easy. Click the gear icon on the top right of Anywhere and then click "**Setup Keycloak**" [](https://kb.filewave.com/uploads/images/gallery/2024-10/hGtwi5t9KwiL2Wbv-image.png) On the next page click "Get URLs" and get the 3 URLs which will look like the following but be for your FileWave instance: ``` https://support2.filewave.net:443/api/auth/login_via_idp_redirect https://support2.filewave.net:443/api/auth/login_via_idp_redirect_for_native https://support2.filewave.net:20443/auth/login_via_idp_redirect_for_device ``` Now return to your Keycloak tab of your browser and continue: On the Login settings page: - Add Valid redirect URLs in “**Valid redirect URLs**” one at a time clicking the + button to add the next one and pasting in each of the 3 URLs you obtained from FileWave Anywhere. - Click the “**Save**” button [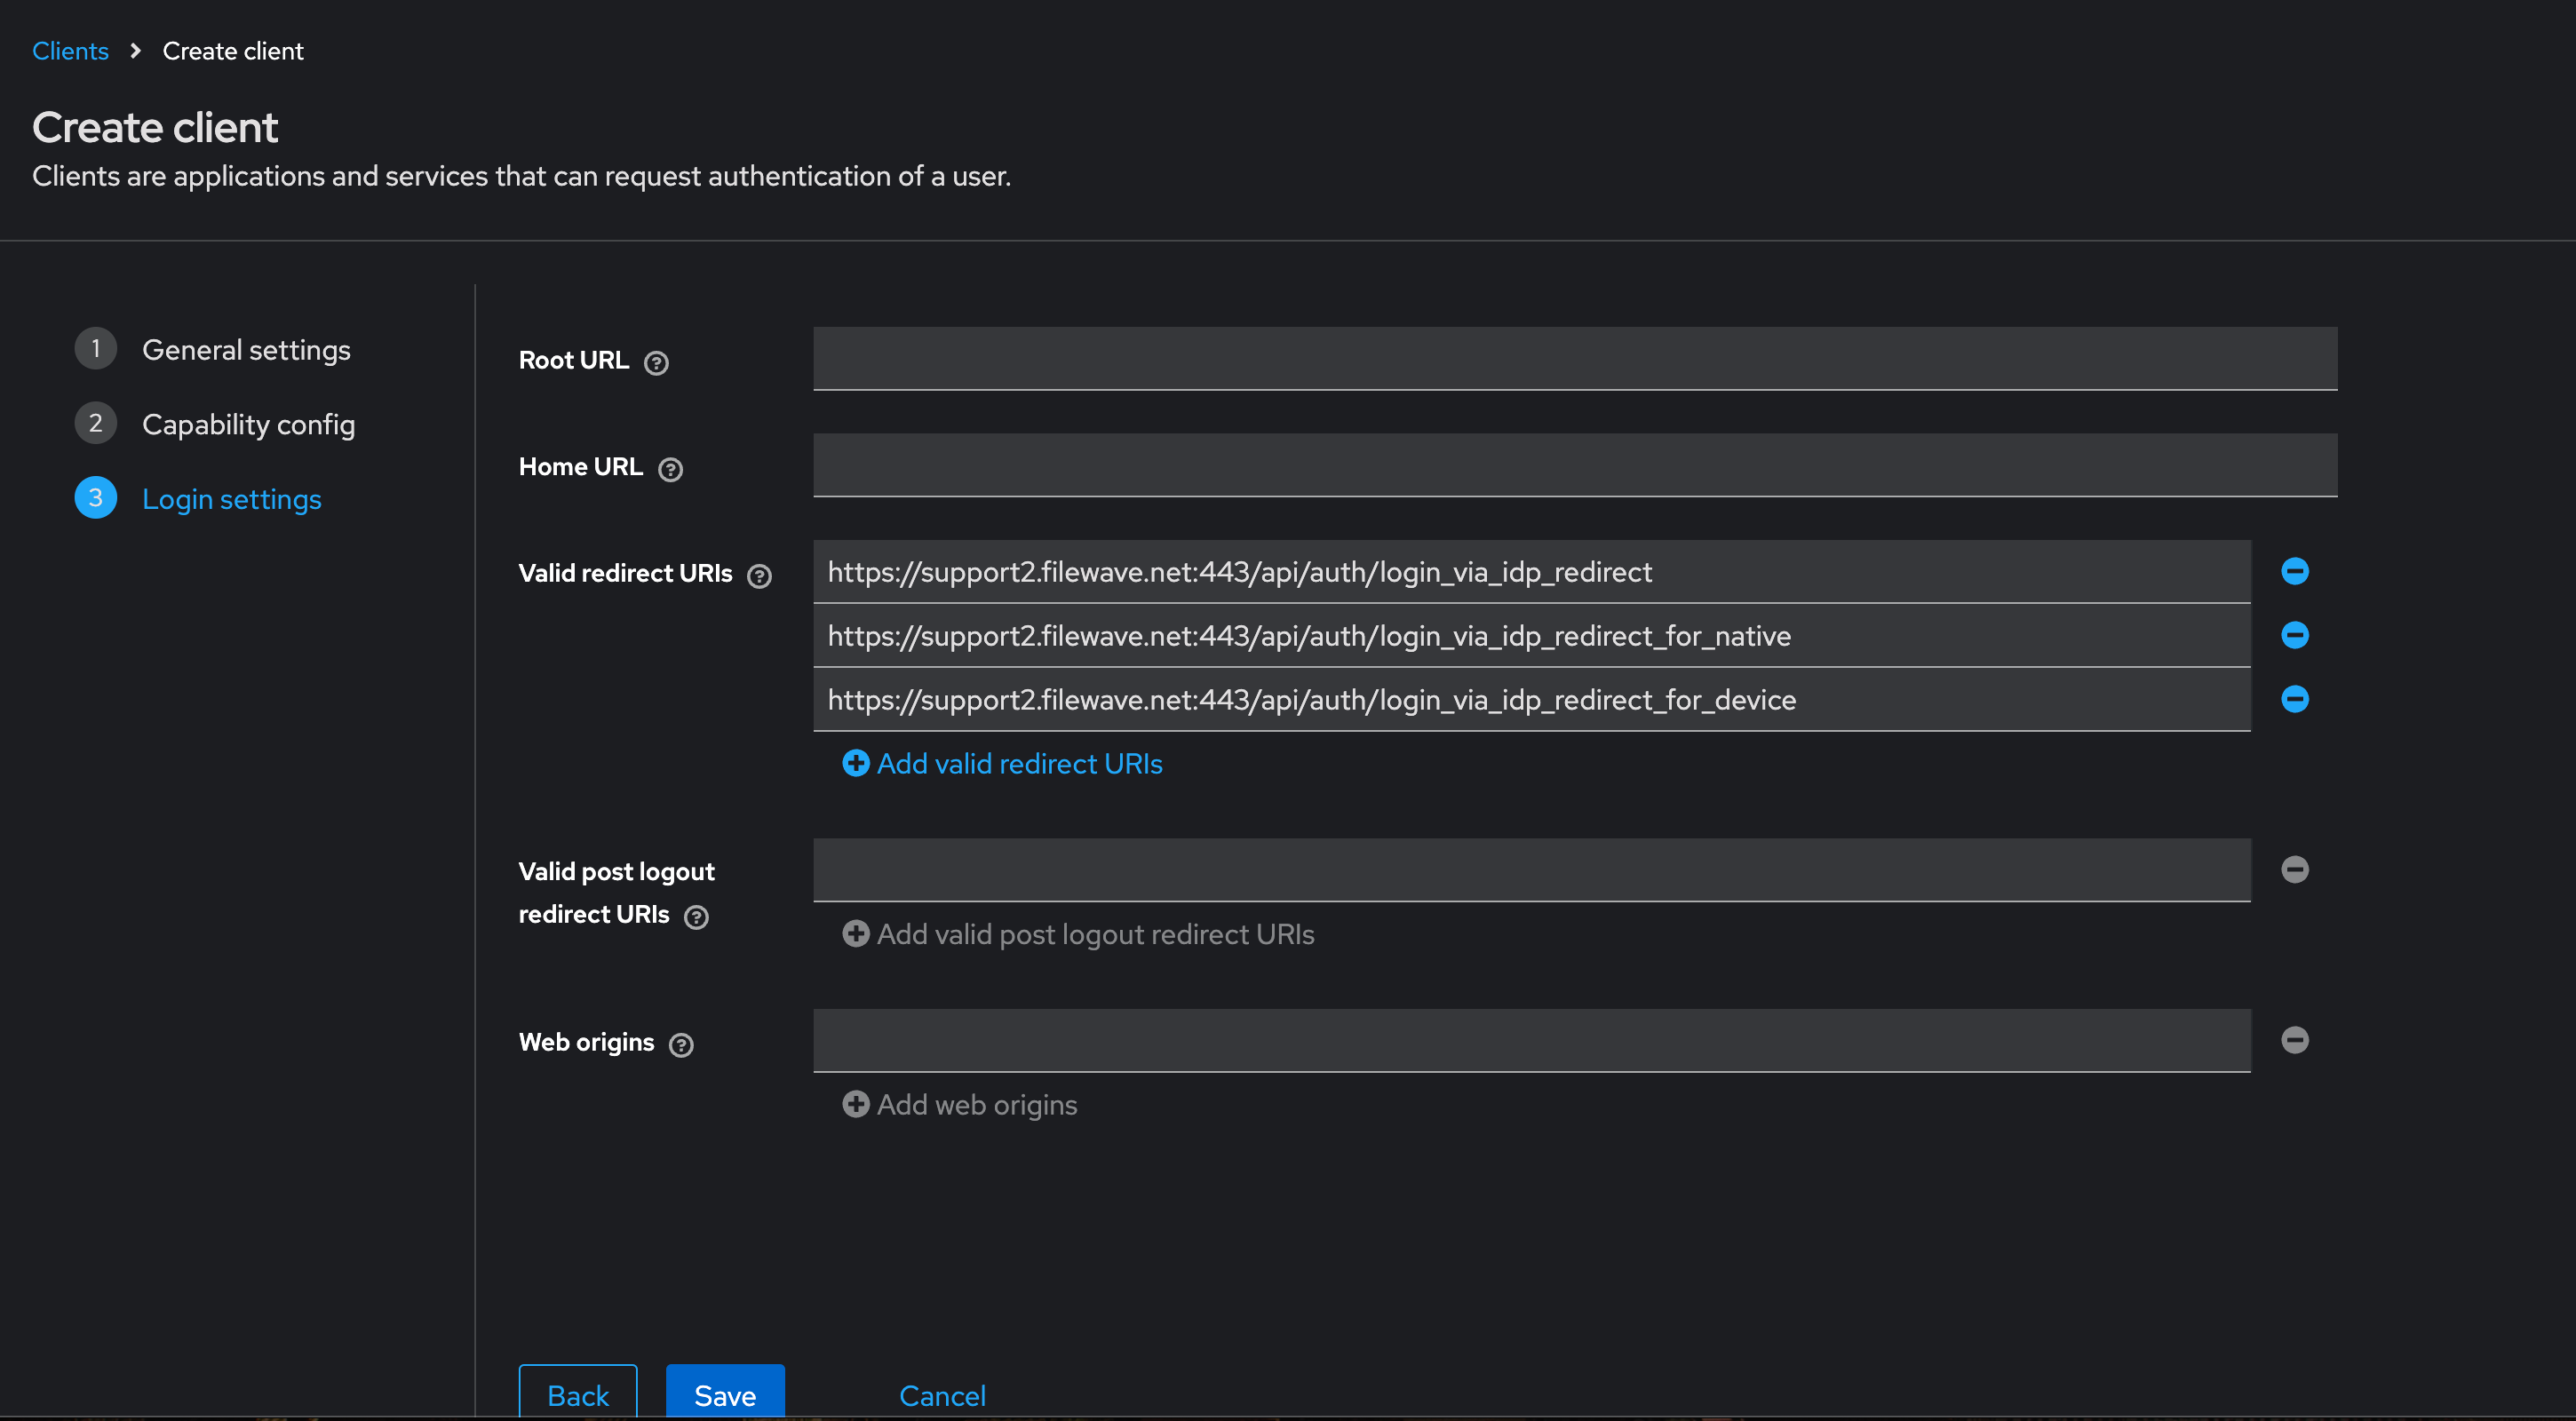](https://kb.filewave.com/uploads/images/gallery/2024-10/o7IZxssMZQBrlPus-image.png) At this stage you should be looking at the details for the Client you just created in Keycloak but if it isn't you can: - Select “**Clients**” in left menu bar - Select the client you created. Now on the details for the Client you created click “**Service account roles**” tab on the top of the details page. - Use the "**Assign Role**" button to assign a few needed Roles. Assign these roles to the client using the search box to find them: - query-groups - query-users - view-users - view-events [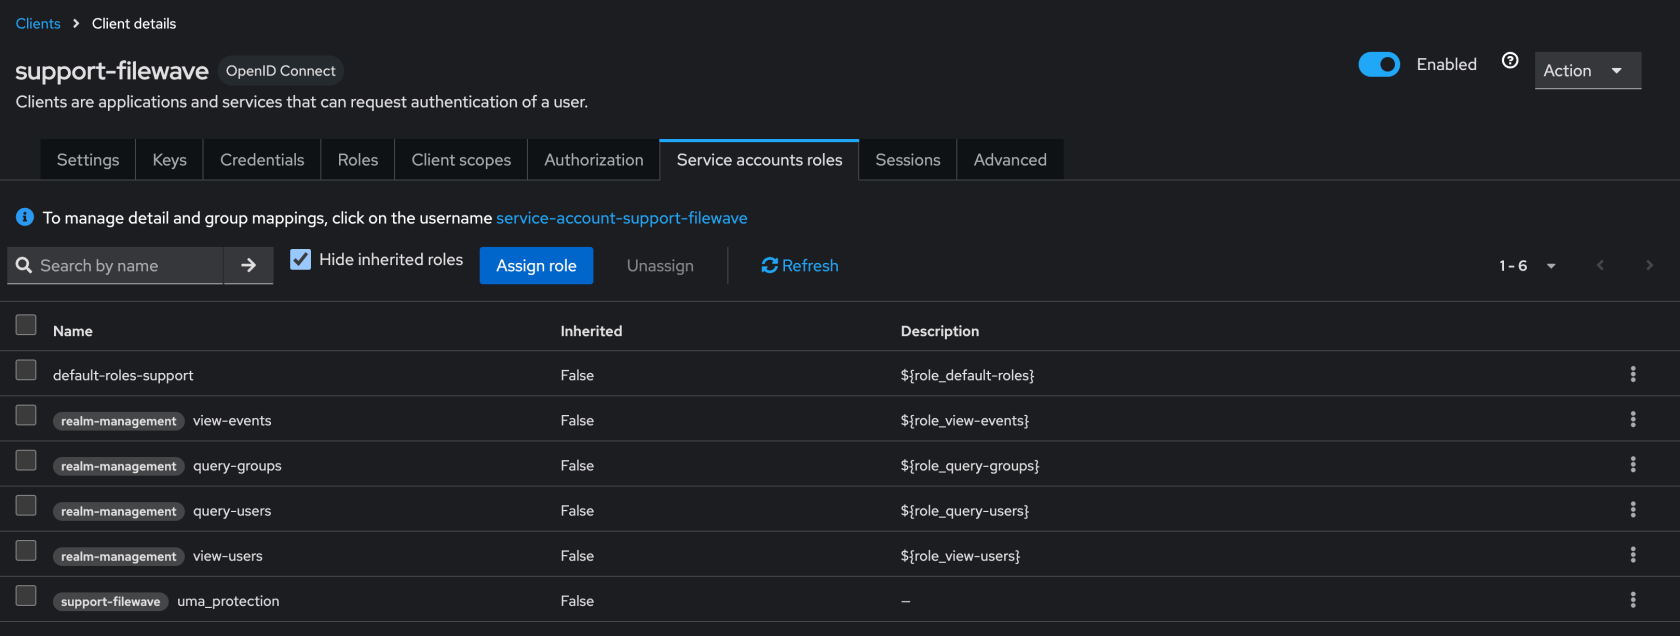](https://kb.filewave.com/uploads/images/gallery/2024-11/n6JgF9fKtiXcasL4-image.png) #### Obtaining the client ID and client secret At this stage you should be looking at the details for the Client you just created in Keycloak but if it isn't you can: - Select “**Clients**” in left menu bar - Select the client you created. Now on the details for the Client you created click “**Settings**” tab on the top of the details page. - Note the “Client ID” [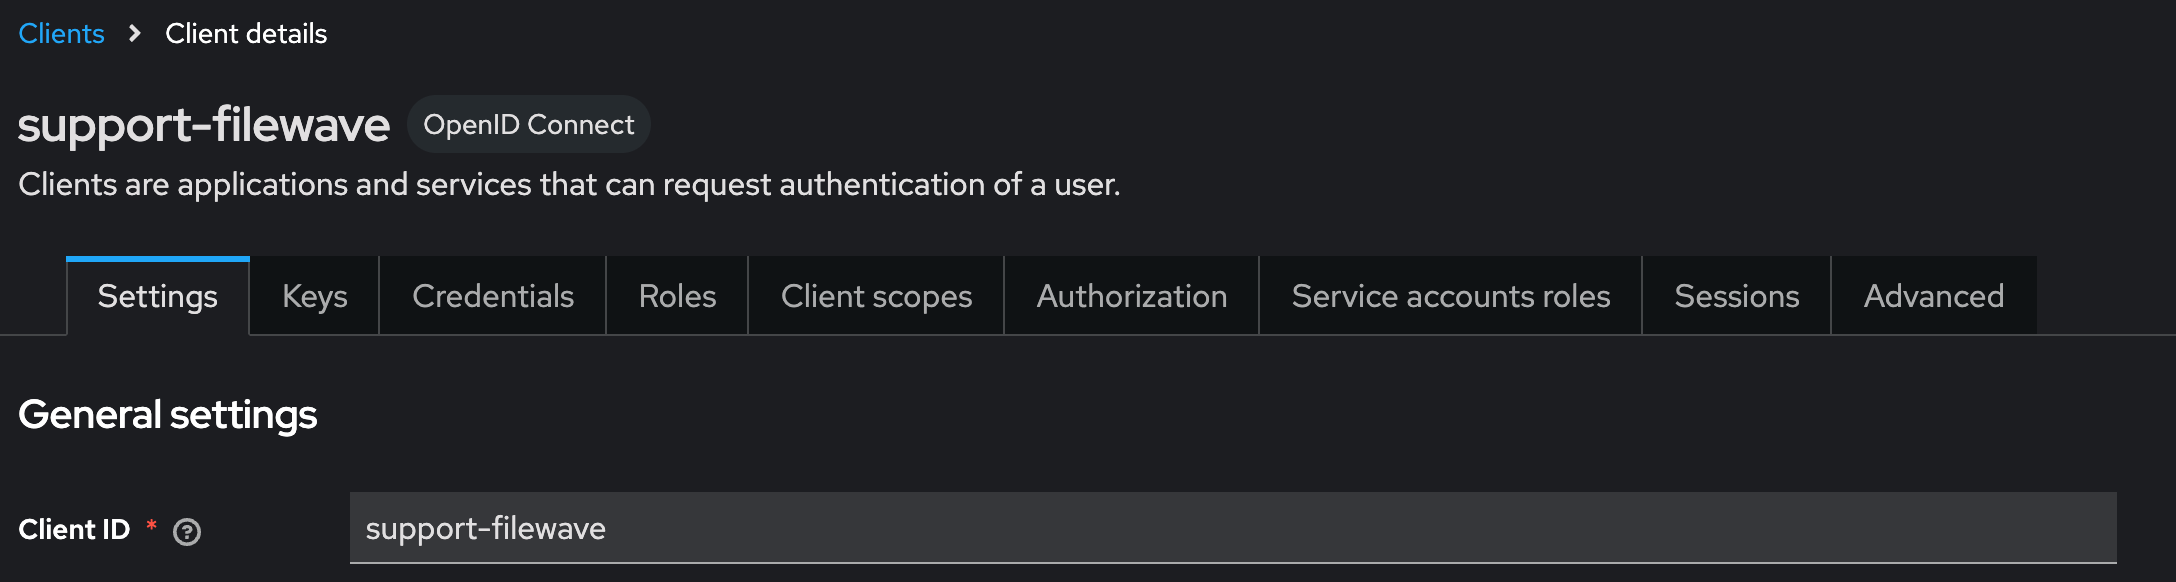](https://kb.filewave.com/uploads/images/gallery/2024-10/2gPUcAr2yb5SfEBa-image.png) Now on the details for the Client you created click “**Credentials**” tab on the top of the details page. - Note the “**Client Secret**” [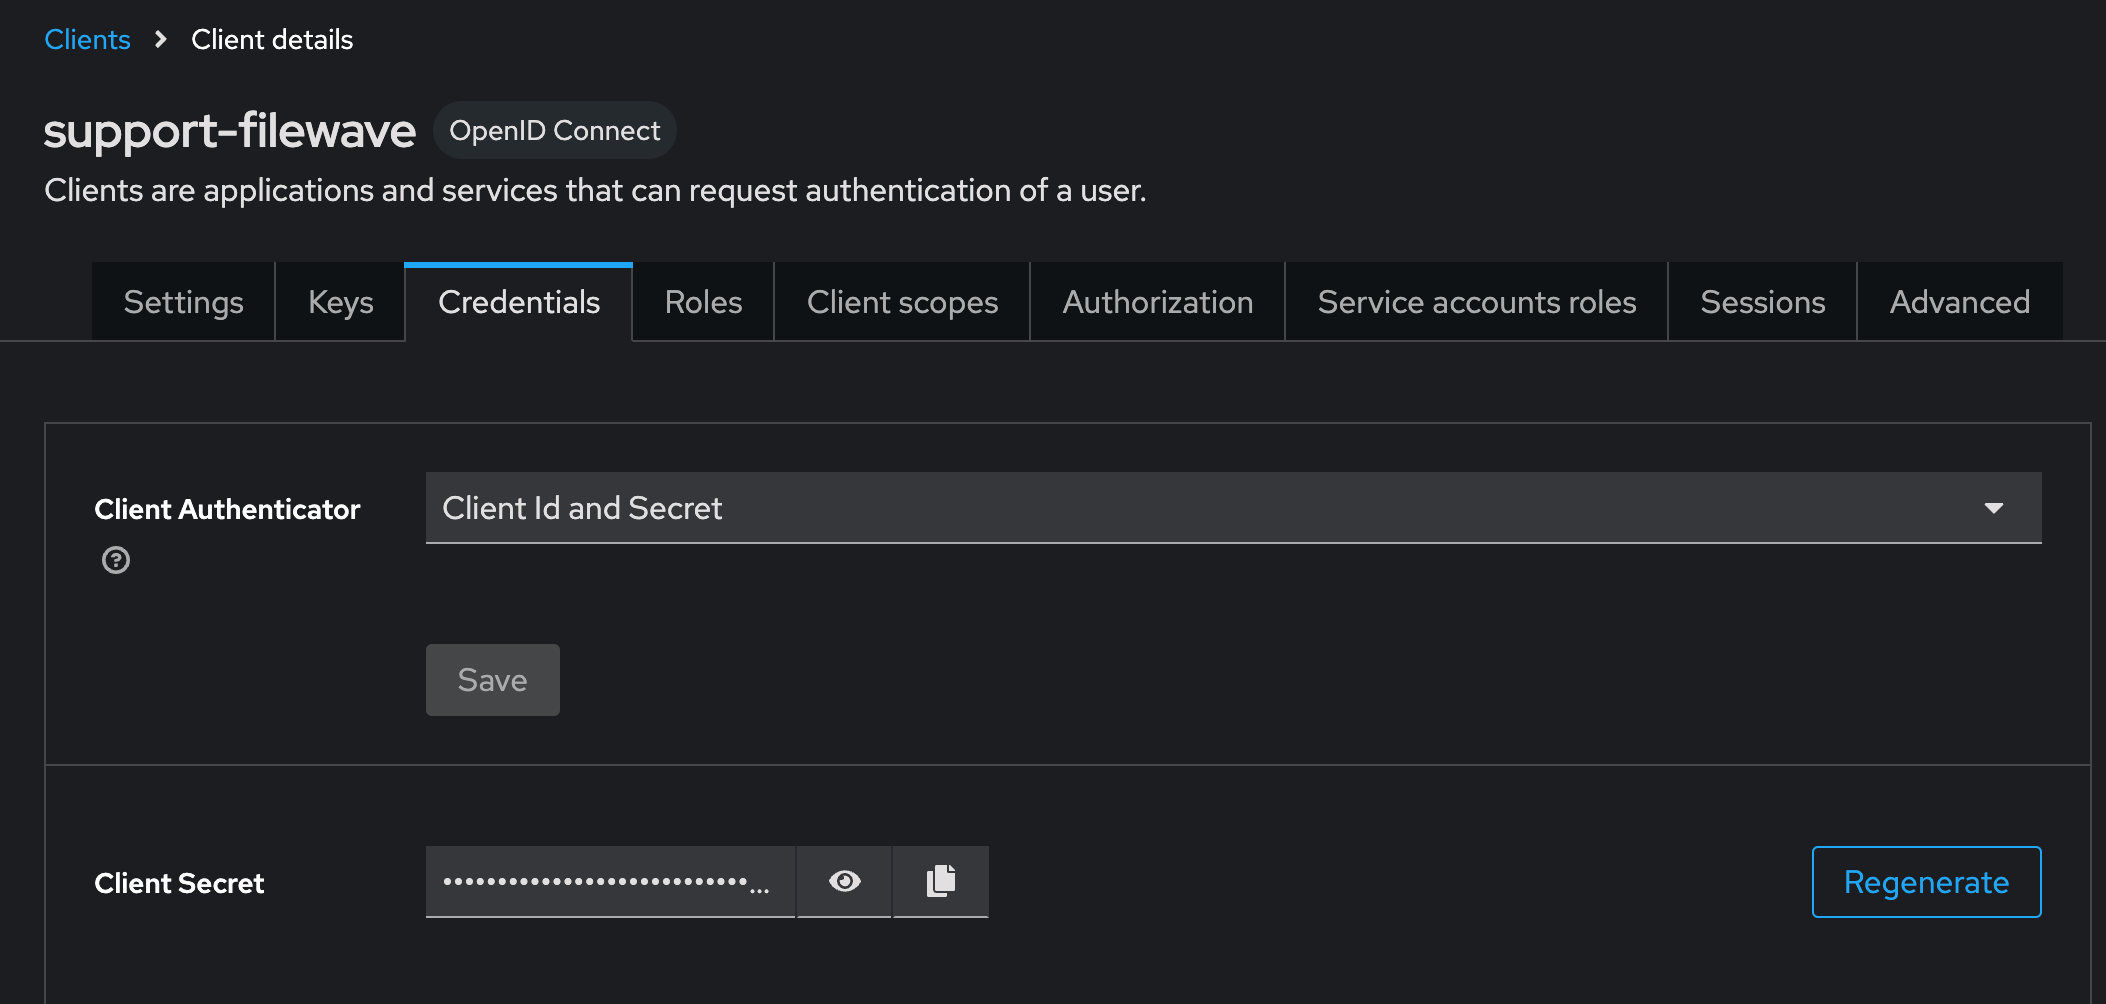](https://kb.filewave.com/uploads/images/gallery/2024-10/X4r2hQ5tVSaE7lmv-image.png) In this next step you are going to login to FileWave Anywhere again. Go back to the tab where you went to https://filewave.your\_filewave\_server.com replacing the host in the URL with your FileWave Server. If your prior session timed out then once logged in just click the gear icon on the top right of Anywhere and then click "**Setup Keycloak**" Otherwise you will be back on the setup page where you were before. Here you will enter the "**Client ID"** and "**Client Secret"** that you copied from Keycloak. You'll want to put something in the "**Name"** field like which Keycloak you are pointing at if you have multiple in your organzation. You'll want to select "**Enrollment**" and or "**Admin**" for how you want to use the IdP.**Enrollment** here if selected will be to prompt a user on macOS or iOS/iPadOS to enter credentials so that you know who has the device. **Admin** here is to allow you to have technicians login to FileWave Central or Anywhere using the IdP.
For the "**Realm URL**" and "**Realm admin API URL**" these will be for your Keycloak instance for your Realm you are using. In the image you'll see **Realm URL** = https://keycloak.mycompany.com/realms/Support and **Realm admin API URL** = https://keycloak.mycompany.com/admin/realms/Support where the Realm name was **Support**. [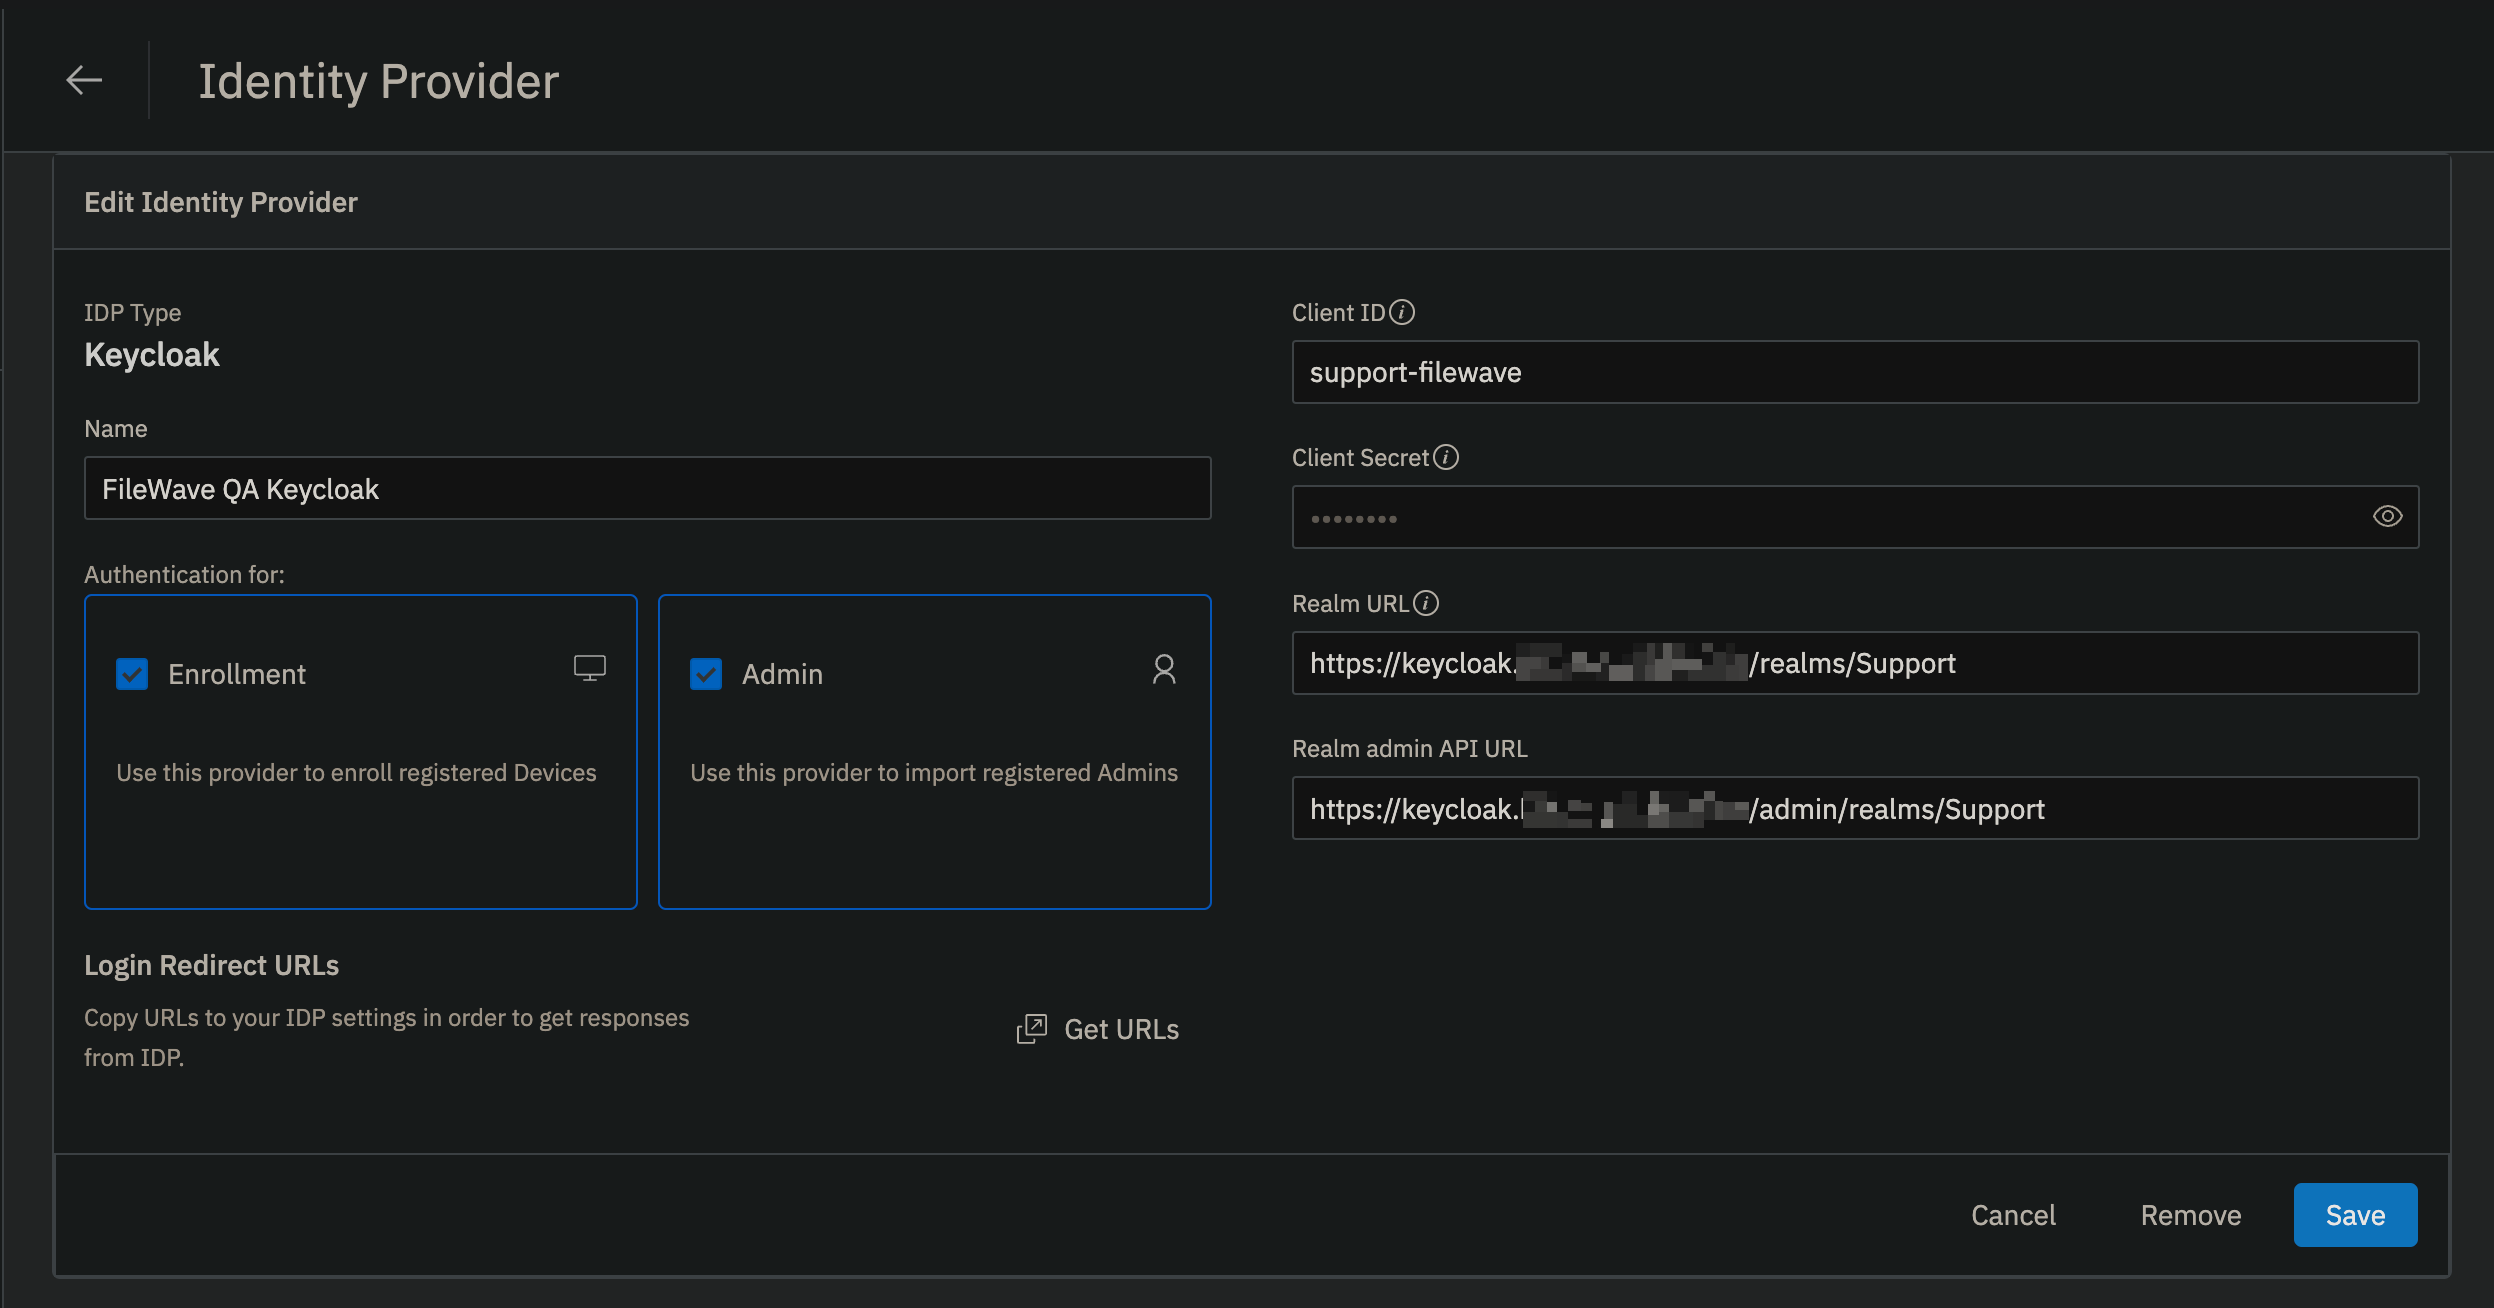](https://kb.filewave.com/uploads/images/gallery/2024-10/1Sdg0D0U3ahR5jH8-image.png) After clicking **Create** you should see the following if it was able to successfully reach Keycloak. [](https://kb.filewave.com/uploads/images/gallery/2024-10/ByuPzS56gL5xmINw-image.png) ### Configure Keycloak Realm Settings In Keycloak go to **Realm settings** for the Realm you are configuring and configure the Events -> Admin events settings as follows; - Save events: ON - Include representation: ON - Expiration: 7 days [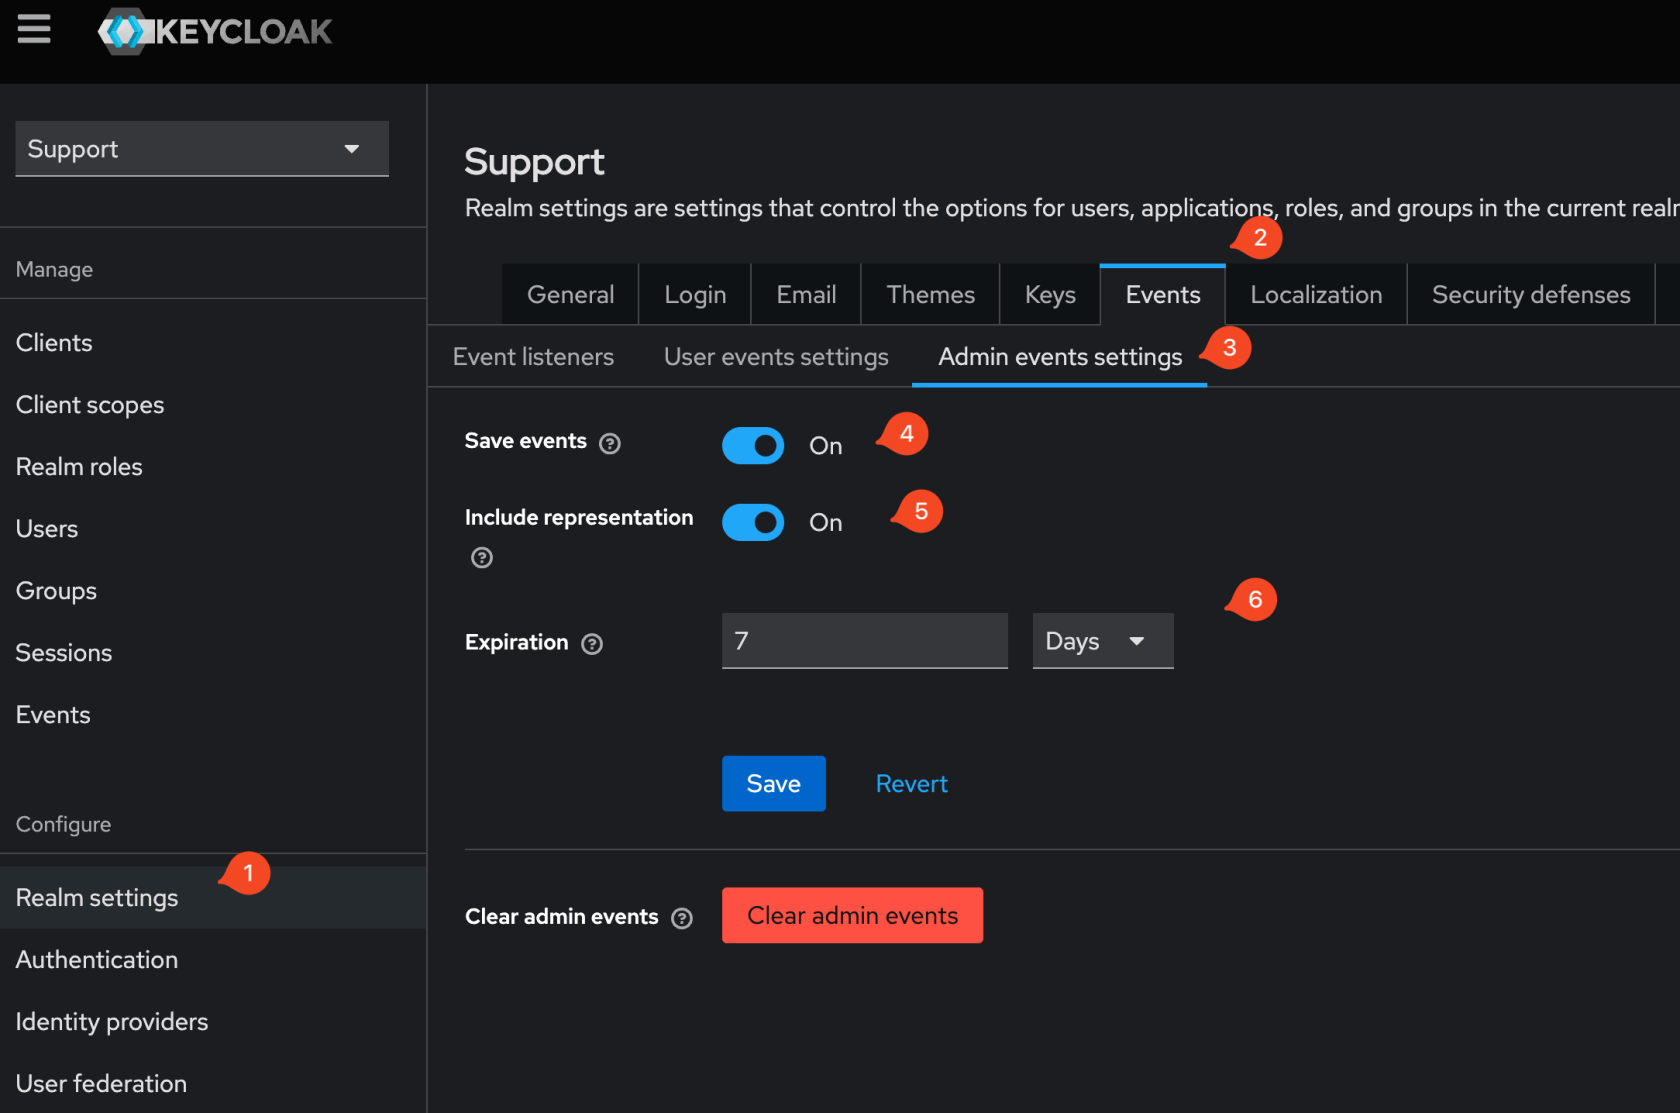](https://kb.filewave.com/uploads/images/gallery/2024-11/XVYaGiz3THauLQ6d-image.png) ### Configure Filewave to allow Admins to use Keycloak as IdP (Filewave)| Step | Screenshot |
| Now that you have configured FileWave to talk to Keycloak for Admin you need to go into the Native Admin to enable admins to actually log in and set their permissions. Launch the Native Admin and go to **Assistants** → **Manage Administrators**. | |
| (Step 29) - Click the **+** on the lower-left corner and pick IdP Group Account. On this screen, it is important to clarify that you are not defining a user here but a group of users. The **Login Name** is misleading here, and should be thought of as the name of the group of users so you might put something like **Keycloak - Desktop Techs** and then for **Identity Provider** make sure your Keycloak connection is selected that you set up in the prior steps. For **Group** click the **Browse** button and select the group that includes all of the users who will have access. If you will give all of your users the same level of permissions then you can use one group for all of your FileWave admins, but if you will use different levels of access then make an IdP Group Account on this window to define each of your groups of FileWave admins. In the image, you see a single entry for **Keycloak** which might be appropriate if all of the FileWave admins are in a single group on the Keycloak side. | [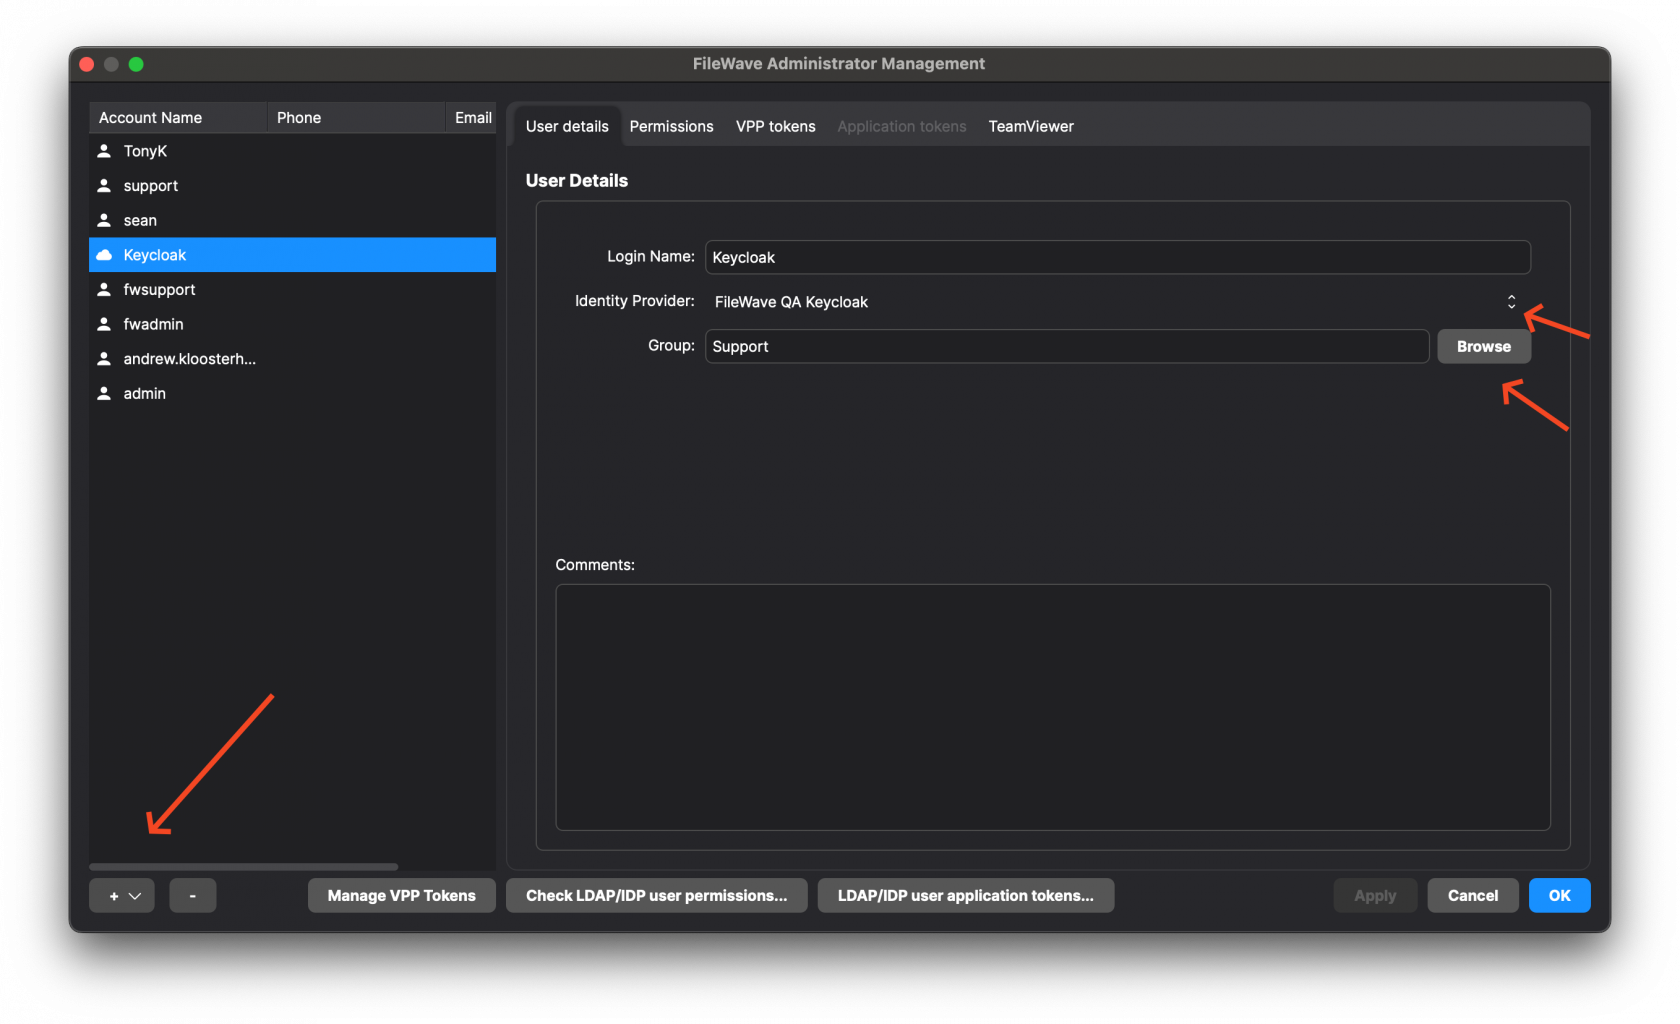](https://kb.filewave.com/uploads/images/gallery/2024-10/jzAFCycFNigT6Hz1-image.png) |
| If everything was done correctly then your Web Admin login should look like the image shown. Click to Login with Keycloak and try to log in. If you can not log in then the user may not be in a group that was given access to the Keycloak Client in Keycloak so go and check on the Keycloak side to be sure. If the user can log in but can not perform tasks then ensure they are in the right group, and that you have configured the **Permissions** tab in FileWave Central to be sure they have the right permissions granted. | [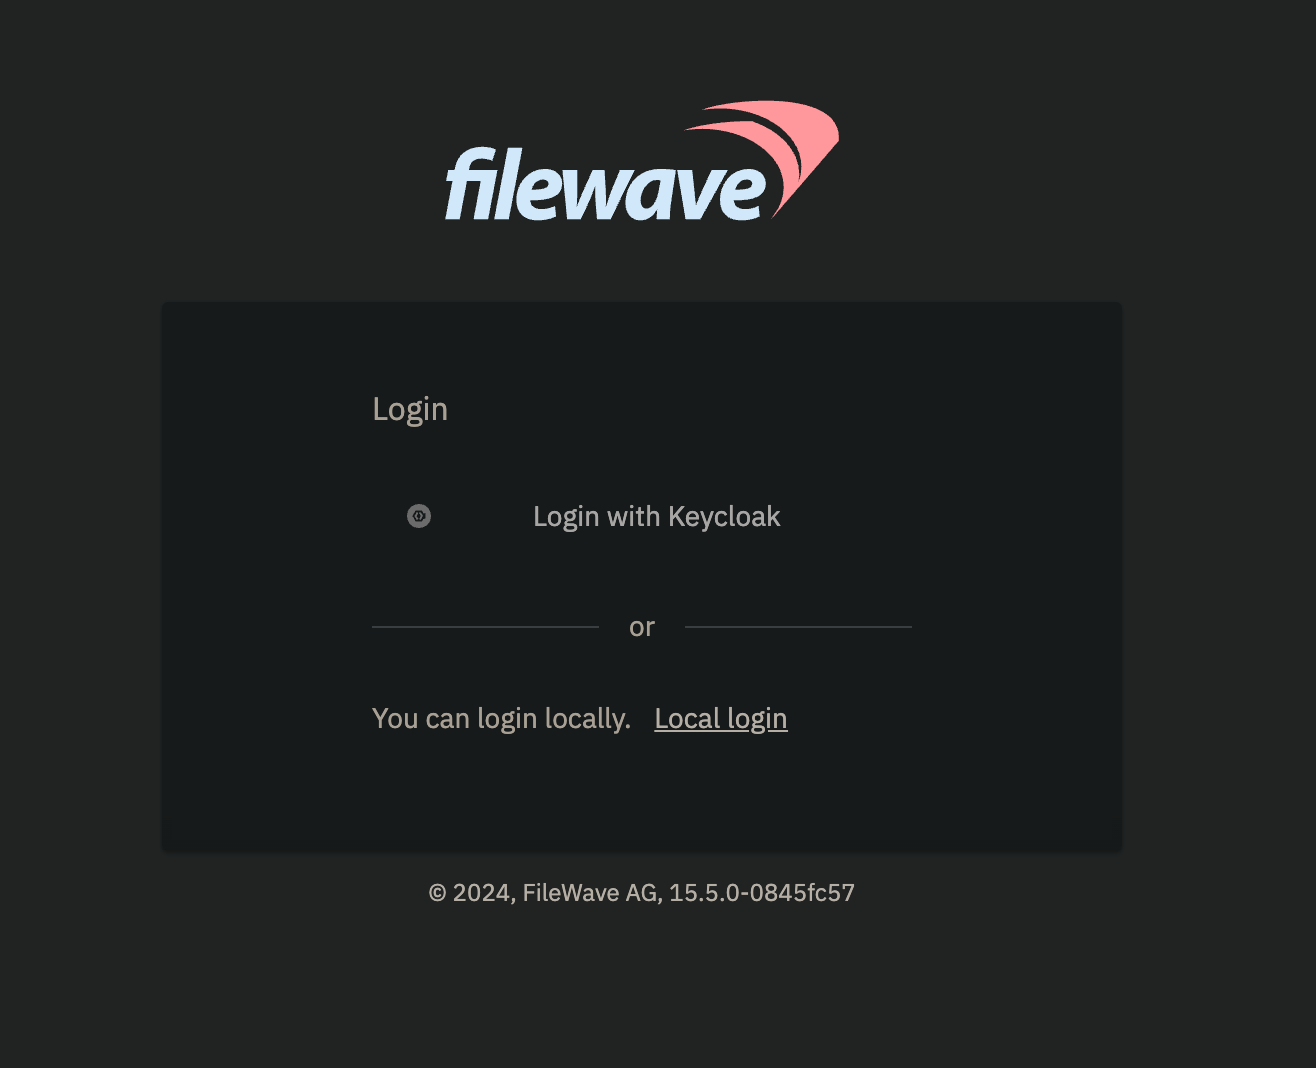](https://kb.filewave.com/uploads/images/gallery/2024-10/yE8NN77gbFx9HenH-image.png) |