# IdP Setup: Okta

## What

Starting with **FileWave Version 14.2.0**, we can use Okta for authentication from FileWave. We must create a new application in the Okta Portal and give FileWave access to it.

## When/Why

This configuration is required if you want to use Okta for authentication during device enrollment or during login to the FileWave Web and Native administrator consoles.

## How

<p class="callout warning">**Okta Admin UI** The UI may look different depending on if you are using a Trial Okta organization or the regular, non-Trial version of the Okta.</p>

### Part 1: Login to the Okta Admin Portal

#### Okta Admin Portal

Begin by logging in to the **Okta Admin Portal** with an administrator's account. (https://example-admin.okta.com/admin)

### Part 2: Create an Okta Application in the Okta Admin Portal

#### Create an Okta Application Integration in Okta Admin Portal

Now we are going to create an Okta application for FileWave to talk to and assign some rights to it.

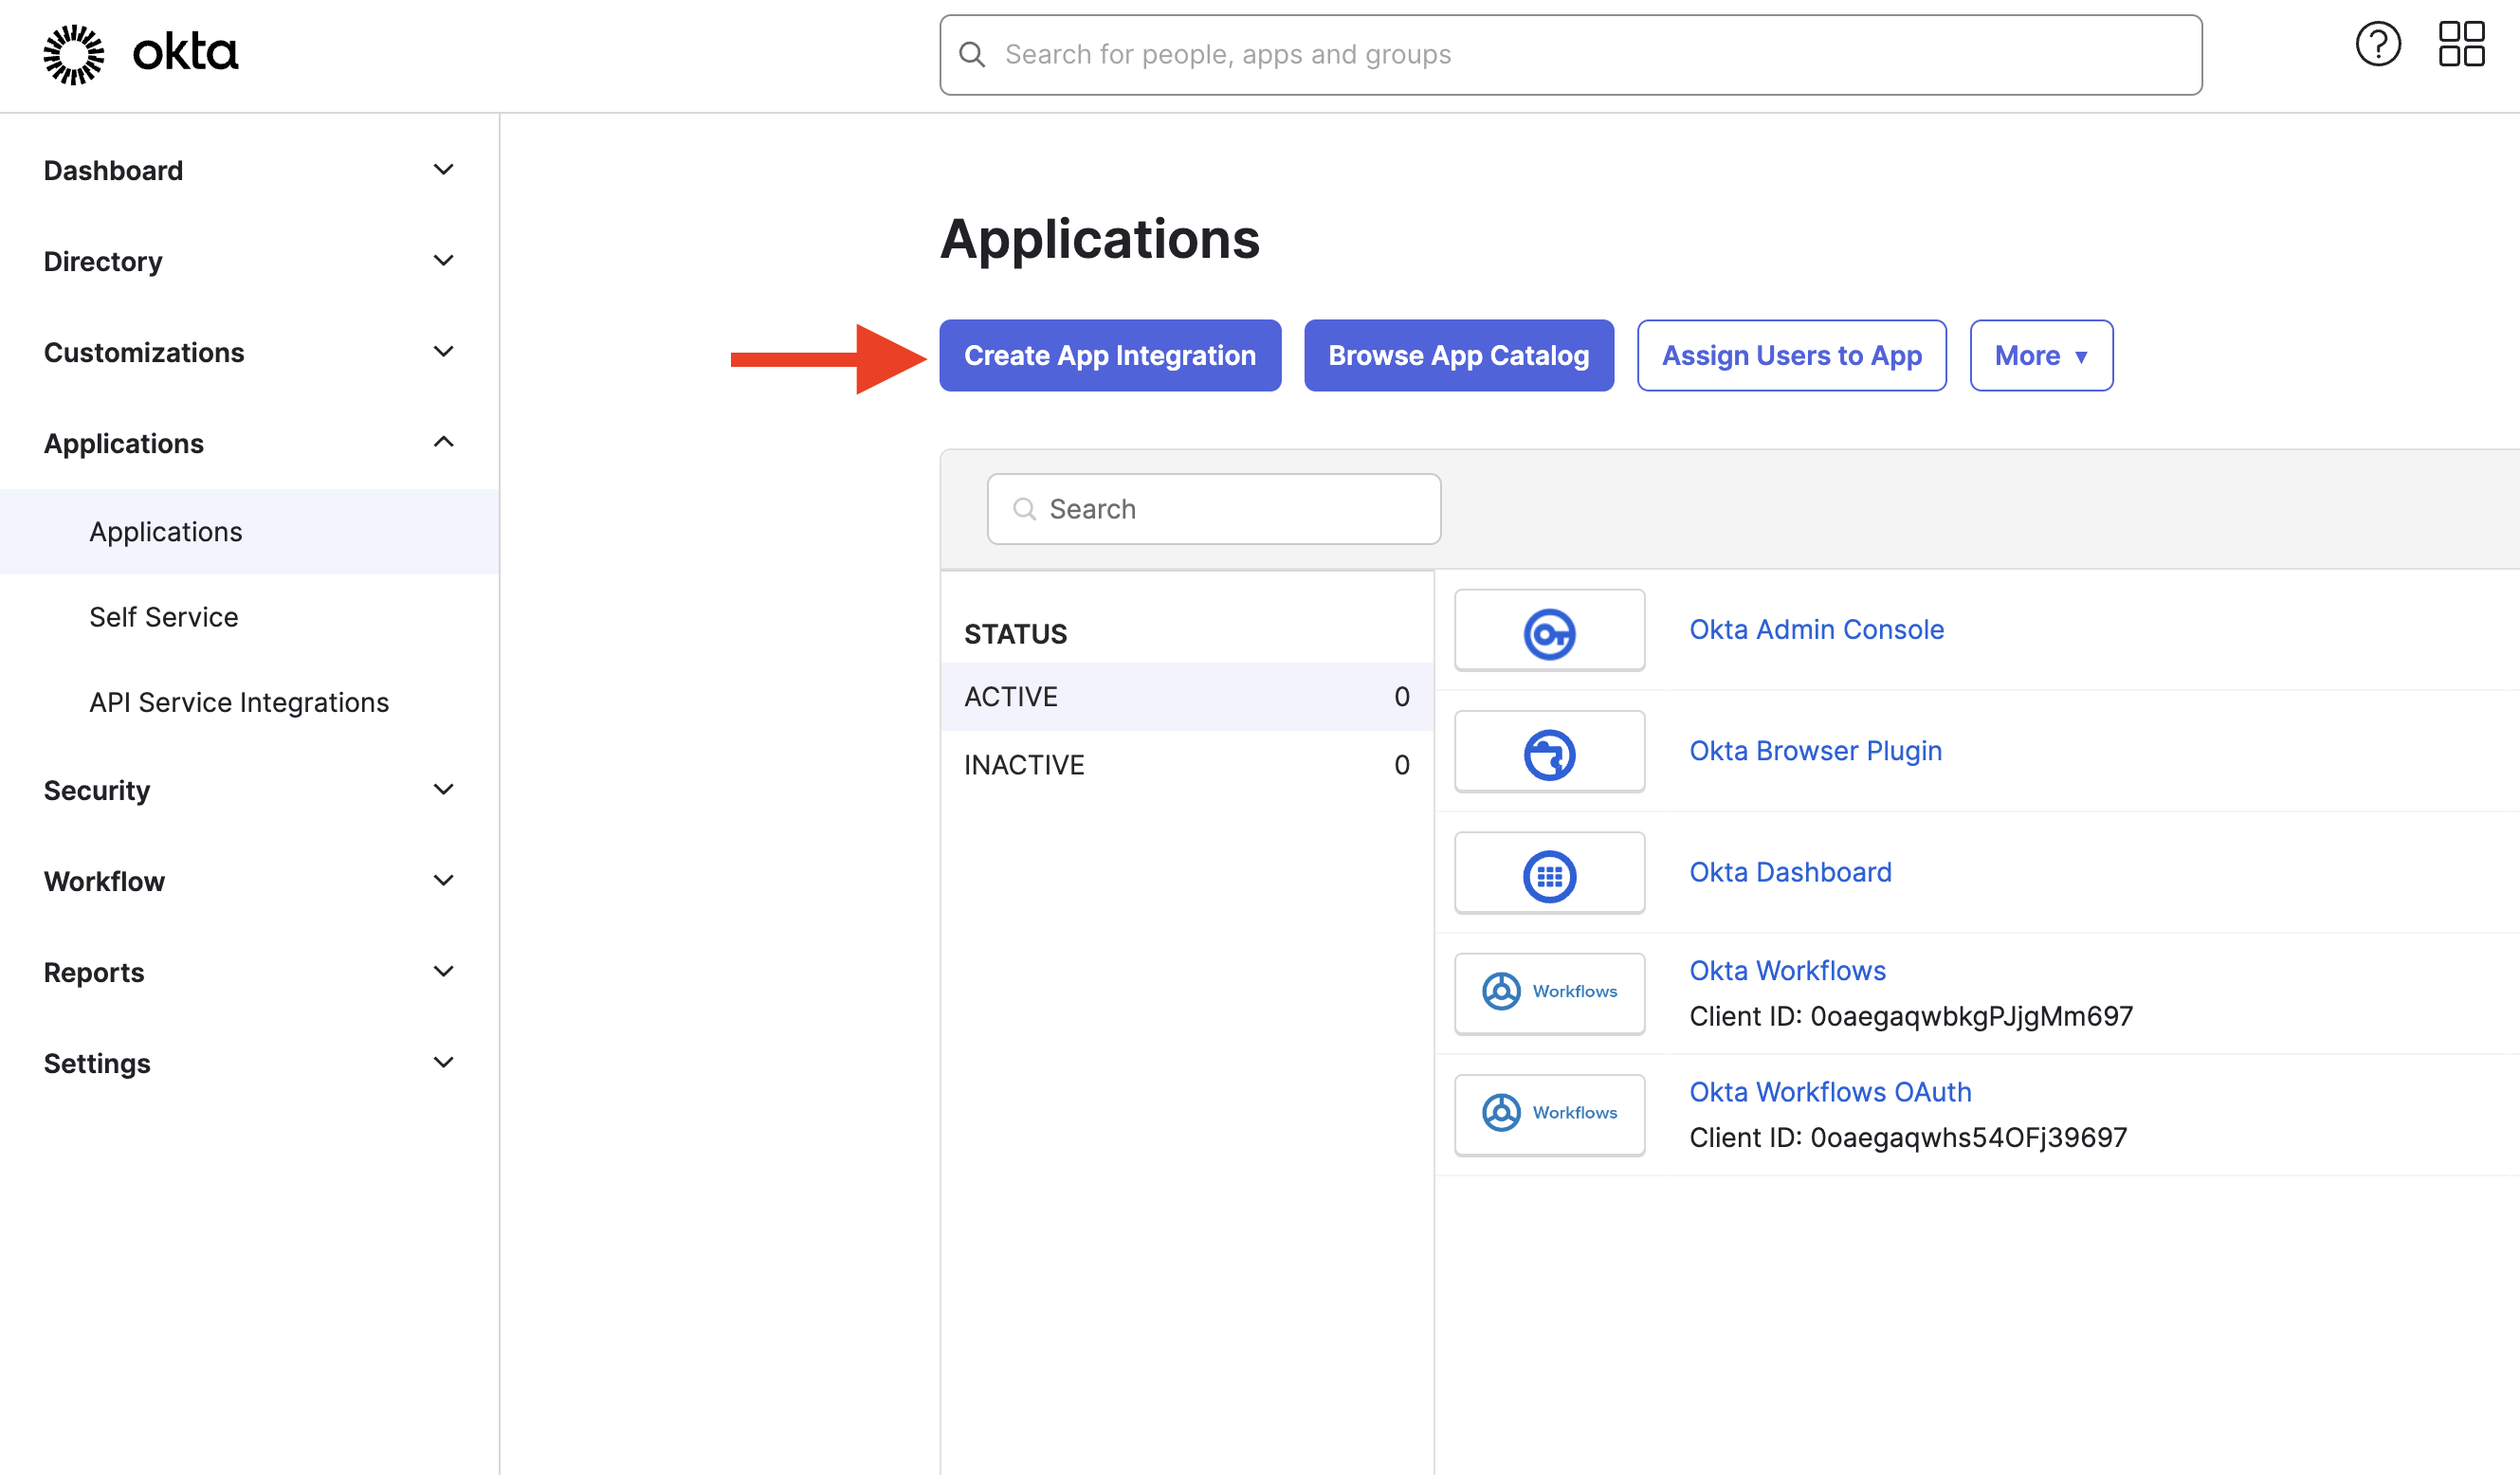
1. First, open the **Okta Admin &gt; Menu &gt; Applications &gt; Applications** menu and click the **Create App Integration** button.  
    [![Screenshot 2024-05-20 at 11.26.51 AM.png](https://kb.filewave.com/uploads/images/gallery/2024-05/scaled-1680-/JKUse0R6ozOY1SFG-screenshot-2024-05-20-at-11-26-51-am.png)](https://kb.filewave.com/uploads/images/gallery/2024-05/JKUse0R6ozOY1SFG-screenshot-2024-05-20-at-11-26-51-am.png)
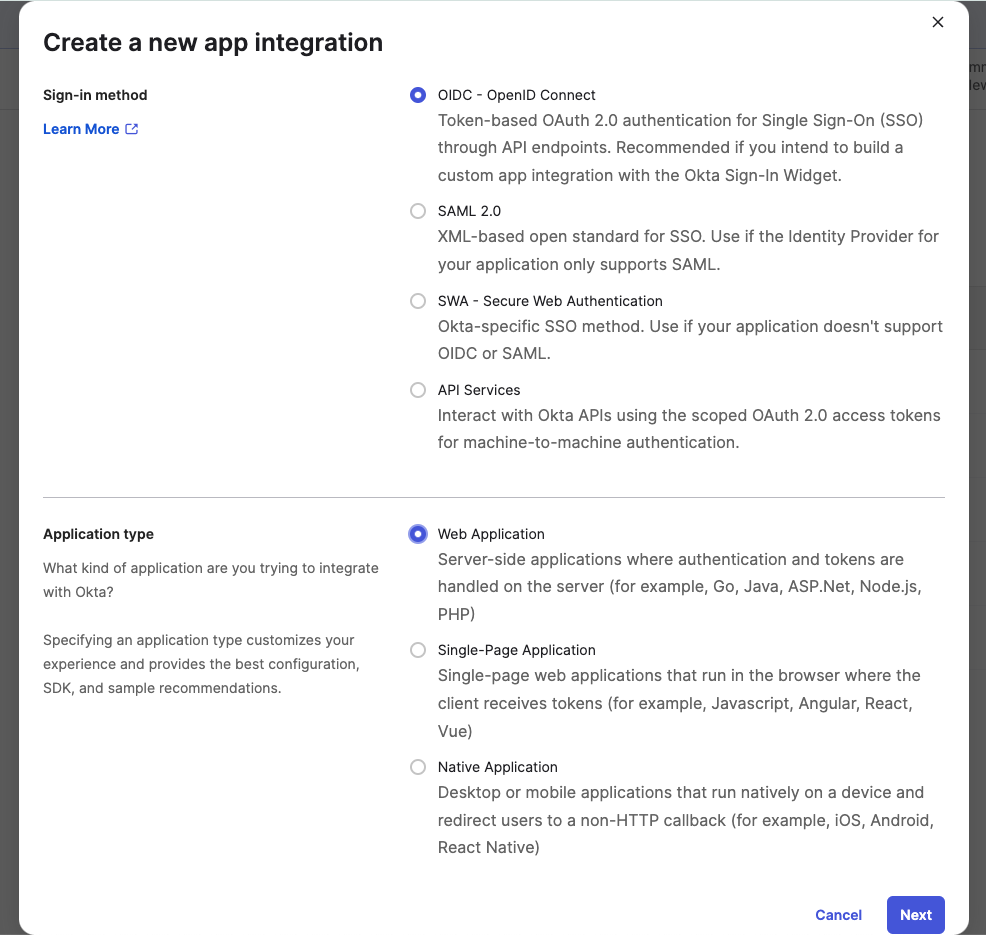
2. Next, select **OIDC - OpenID Connect** for the **Sign-in method**. 
    1. Select **Web Application** for the **Application Type**.
    2. Click the **Next** button.  
        [![Screenshot 2024-05-20 at 11.38.02 AM.png](https://kb.filewave.com/uploads/images/gallery/2024-05/scaled-1680-/gbyIB28m0eLvRWwQ-screenshot-2024-05-20-at-11-38-02-am.png)](https://kb.filewave.com/uploads/images/gallery/2024-05/gbyIB28m0eLvRWwQ-screenshot-2024-05-20-at-11-38-02-am.png)
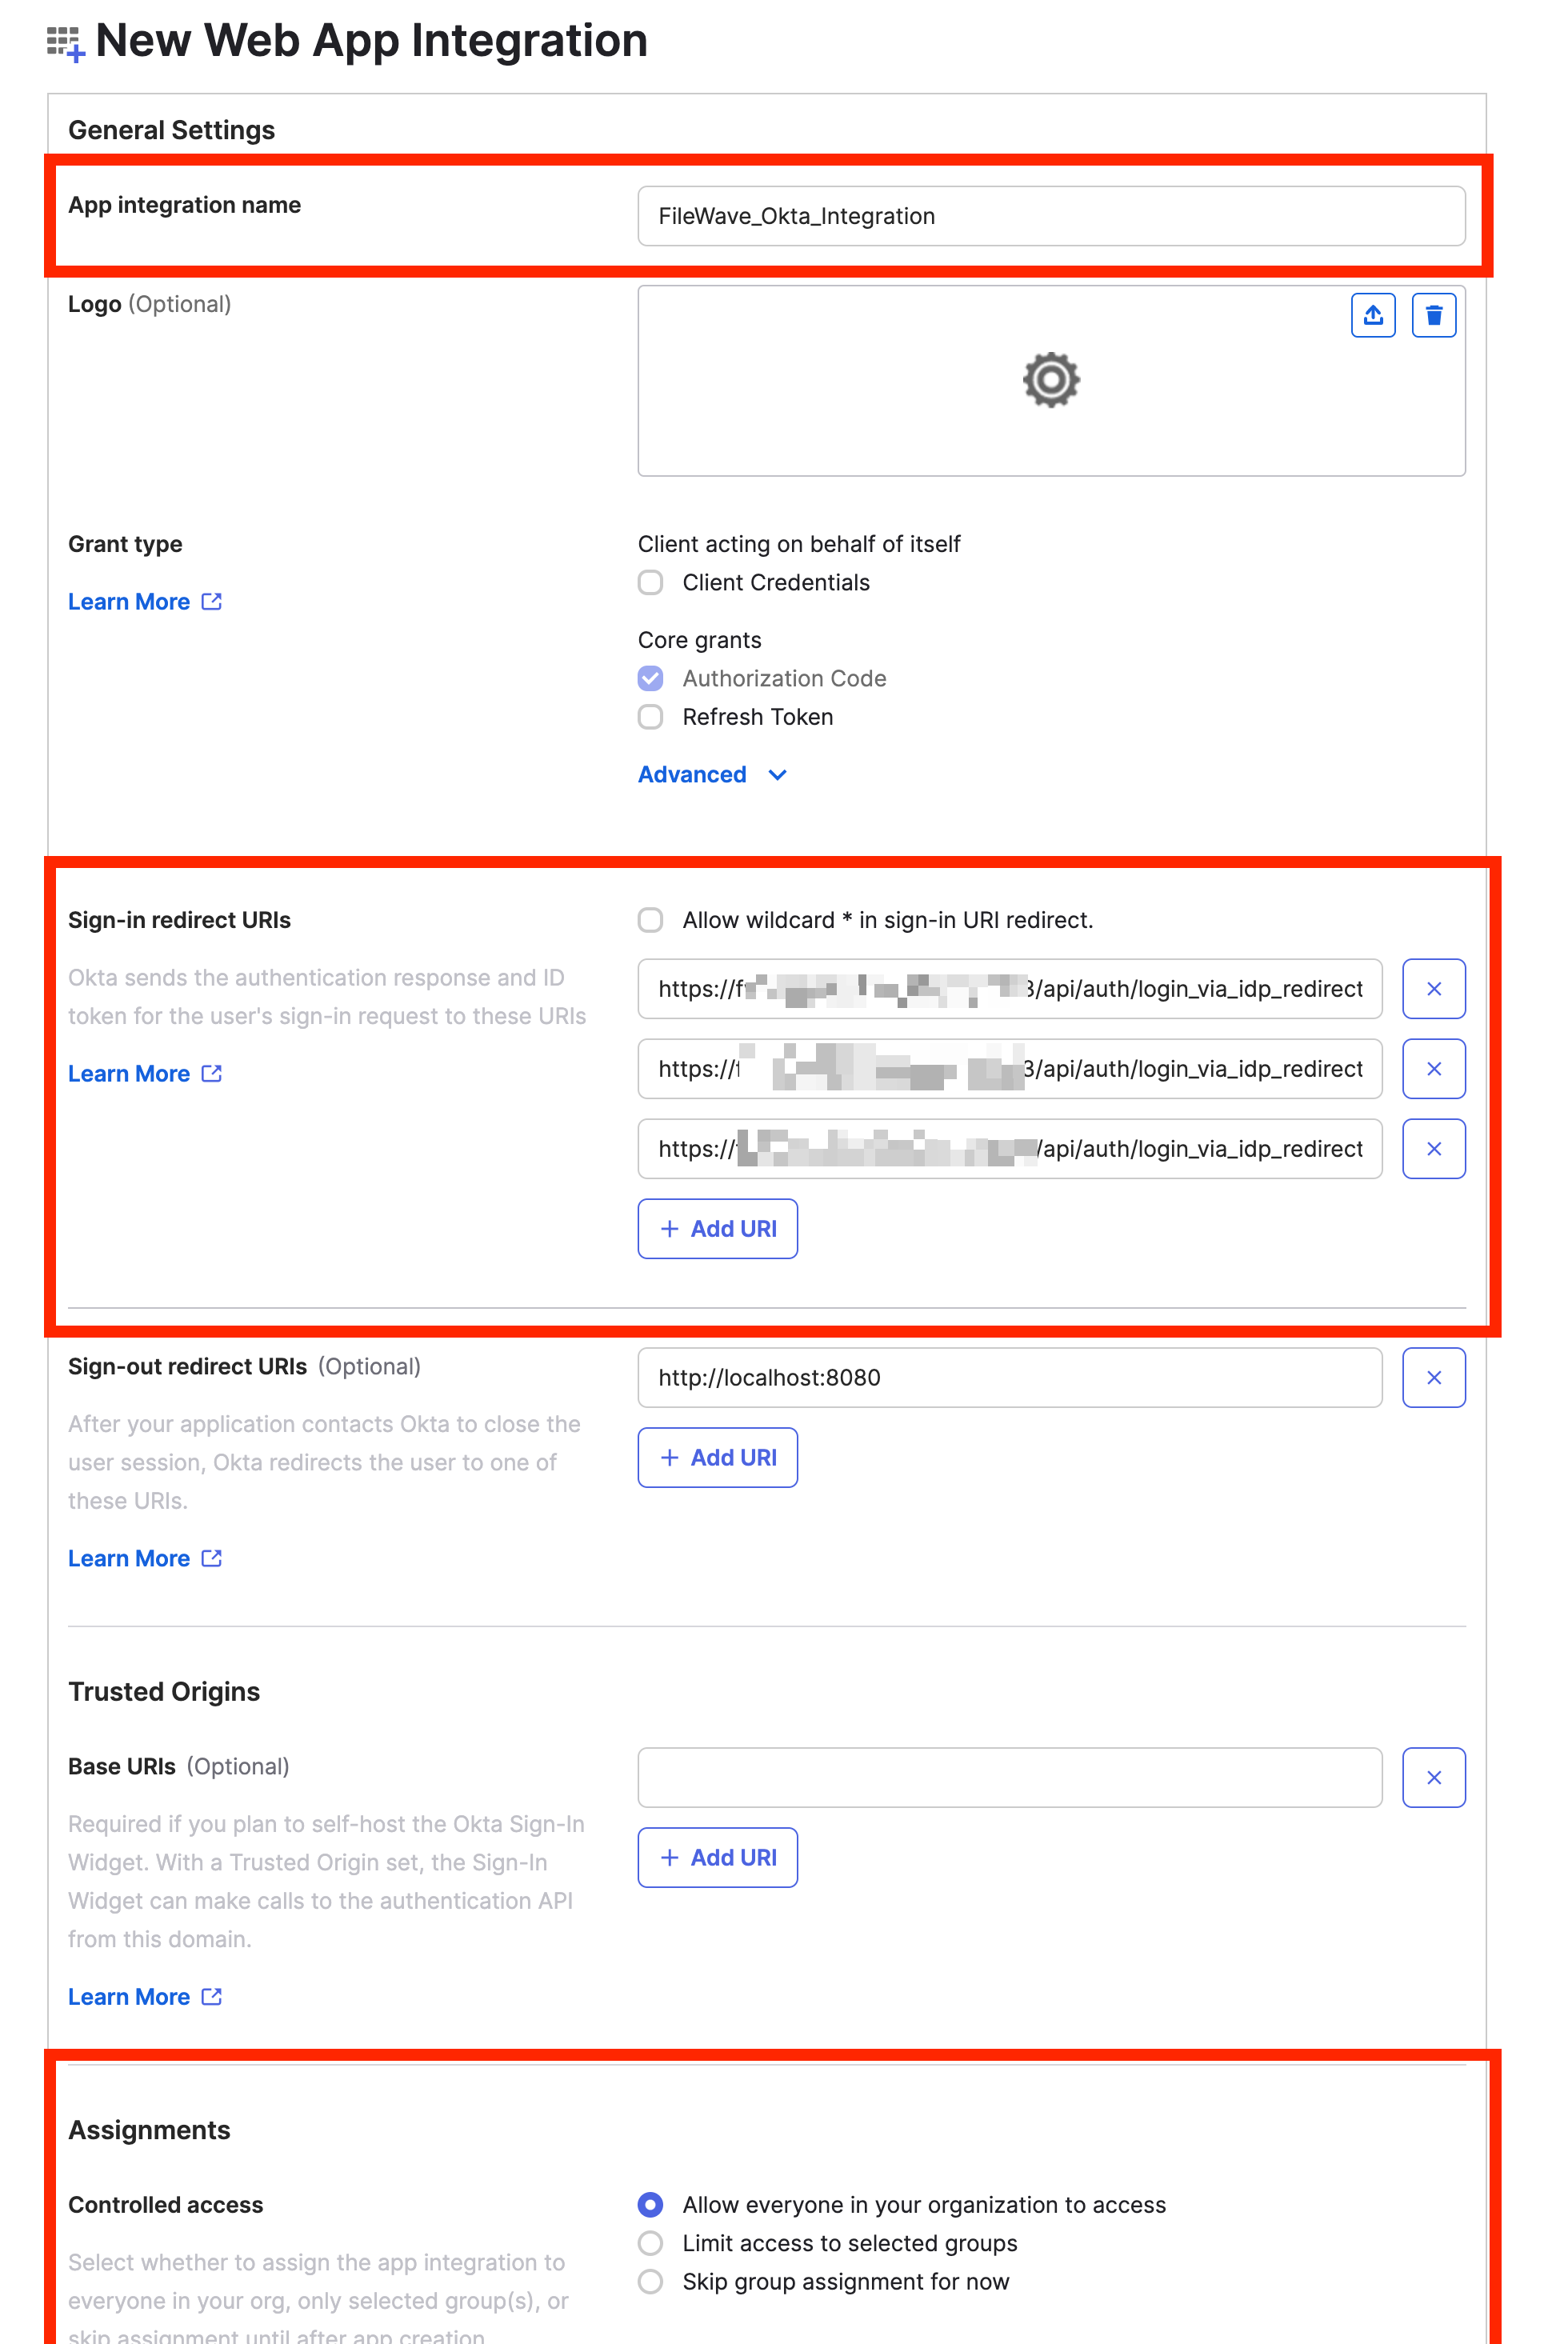
3. Next, configure your Application on the **New Web App Integration** page you've been redirected to. 
    1. Input a meaningful name in the **App integration name** field.
    2. Click the **Add URI** button for the **Sign-in redirect URIs** setting. 
        1. Input all of your FileWave Server's redirect URIs in the **Sign-in redirect URIs** setting.  
              
            <p class="callout info">Login Redirect URIs for FileWave are displayed in the FileWave Web Admin Settings. (Login to Web Admin &gt; Select "⚙' \[Gear/Settings Icon\] in top right &gt; Identity Provider &gt; Setup Okta &gt; Get URLs)  
              
            Login Redirect URIs are unique to your server, but will look something like the following:  
              
            https://fwxserver.example.com:443/api/auth/login\_via\_idp\_redirect  
            https://fwxserver.example.com:443/api/auth/login\_via\_idp\_redirect\_for\_native   
            https://fwxserver.example.com:20443/api/auth/login\_via\_idp\_redirect\_for\_device   
            </p>
    3. Under **Assignments**, choose whether you want to limit access to specific groups or integrate all users in the organization.
4. Click the **Save** button to create the Okta App integration.  
    [![image.png](https://kb.filewave.com/uploads/images/gallery/2025-01/scaled-1680-/bN7SkIzJxL7U813X-image.png)](https://kb.filewave.com/uploads/images/gallery/2025-01/bN7SkIzJxL7U813X-image.png)
    
      
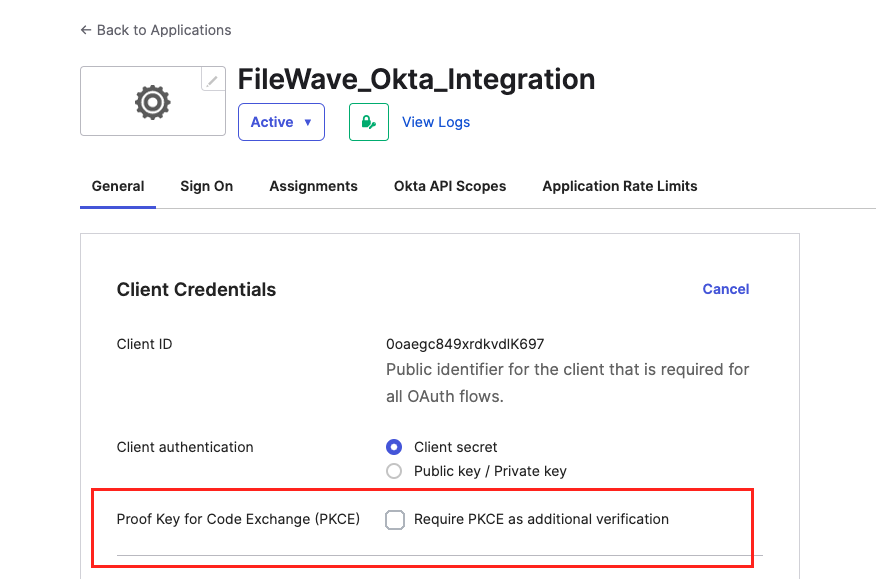
    5. After Saving, you'll be Redirected to the application General Settings page. Next to **Client Credentials,** select **Edit** and check the box next to **Proof Key for Code Exchange (PKCE)**  and **Save.**

[![Screenshot 2024-05-20 at 12.15.31 PM.png](https://kb.filewave.com/uploads/images/gallery/2024-05/scaled-1680-/FF3O5mVNLR1lTLRO-screenshot-2024-05-20-at-12-15-31-pm.png)](https://kb.filewave.com/uploads/images/gallery/2024-05/FF3O5mVNLR1lTLRO-screenshot-2024-05-20-at-12-15-31-pm.png)

### Part 3: Configure the Okta App in FileWave

#### Configure an Okta App in the FileWave Web Admin Console

In order for FileWave to communicate with Okta for authentication the **Okta App** will need to be configured with FileWave.

1. Begin by logging into the **FileWave Web Admin** and open the **Settings** button ('⚙'/gear icon in the header). 
    1. ![](https://kb.filewave.com/uploads/images/gallery/2023-07/BCCFBEr8nbB4dE2Z-embedded-image-pqhvke1k.png)

2. Open the **Identity Provider** menu in the **FileWave Web Admin Settings**
    1. ![](https://kb.filewave.com/uploads/images/gallery/2023-07/hE9zmd6eQhSjkeNq-embedded-image-v5rxe1br.png)
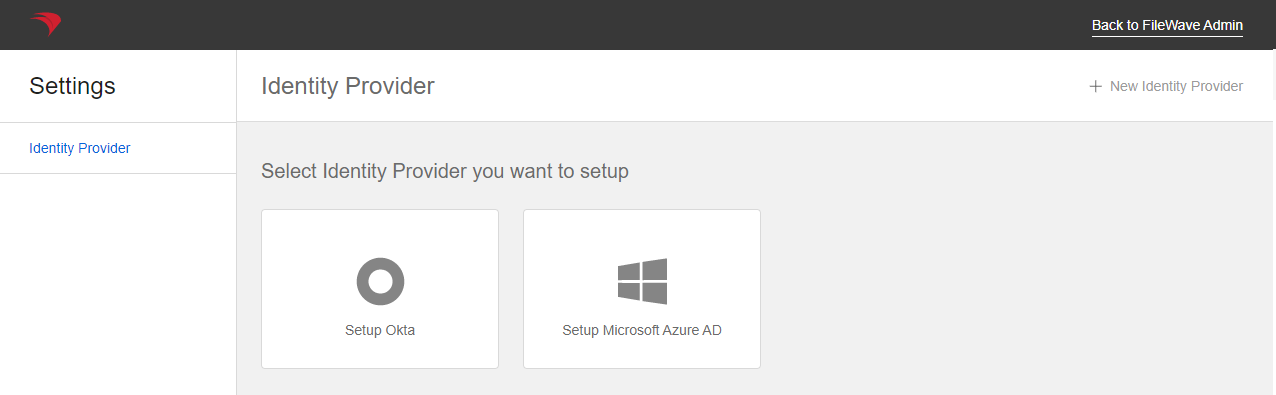
3. On the **Identity Provider** menu, click the **Setup** **Okta** button or **New Identity Provider** button in the top right if one has already been configured.  
    
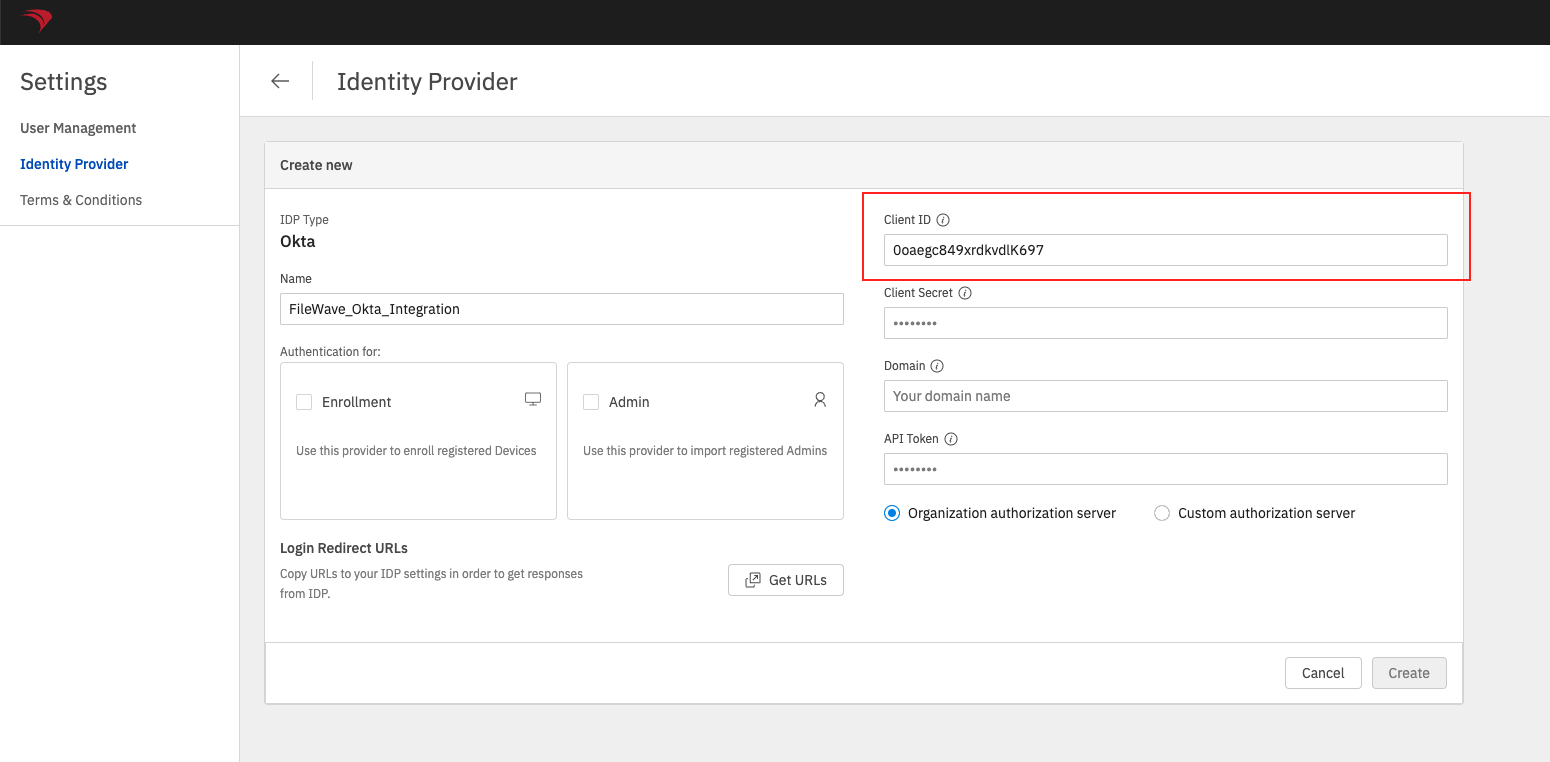
    1. Input a meaningful name in the **Name** field.
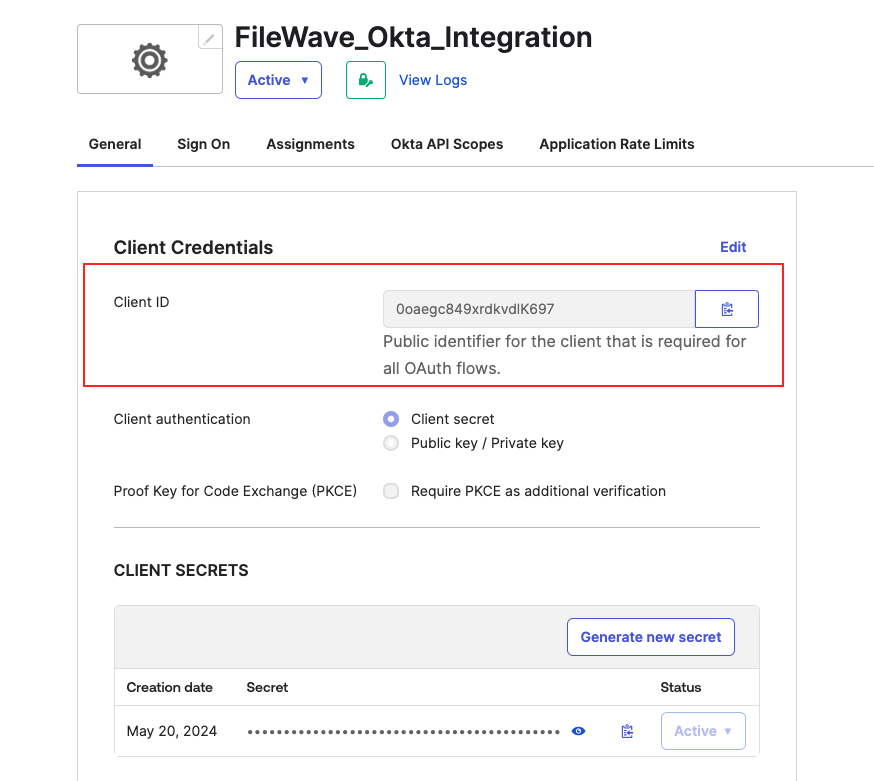
    2. Copy the **Okta Client ID** value found in the Okta page you were redirected to and paste in the **Client ID** field.  
        [![Screenshot 2024-05-20 at 12.04.57 PM.png](https://kb.filewave.com/uploads/images/gallery/2024-05/scaled-1680-/3ClO9gzUAS8KwH1o-screenshot-2024-05-20-at-12-04-57-pm.png)](https://kb.filewave.com/uploads/images/gallery/2024-05/3ClO9gzUAS8KwH1o-screenshot-2024-05-20-at-12-04-57-pm.png)
        
        [![Screenshot 2024-05-20 at 12.06.24 PM.png](https://kb.filewave.com/uploads/images/gallery/2024-05/scaled-1680-/Qxe6UNvFXoOANra5-screenshot-2024-05-20-at-12-06-24-pm.png)](https://kb.filewave.com/uploads/images/gallery/2024-05/Qxe6UNvFXoOANra5-screenshot-2024-05-20-at-12-06-24-pm.png)
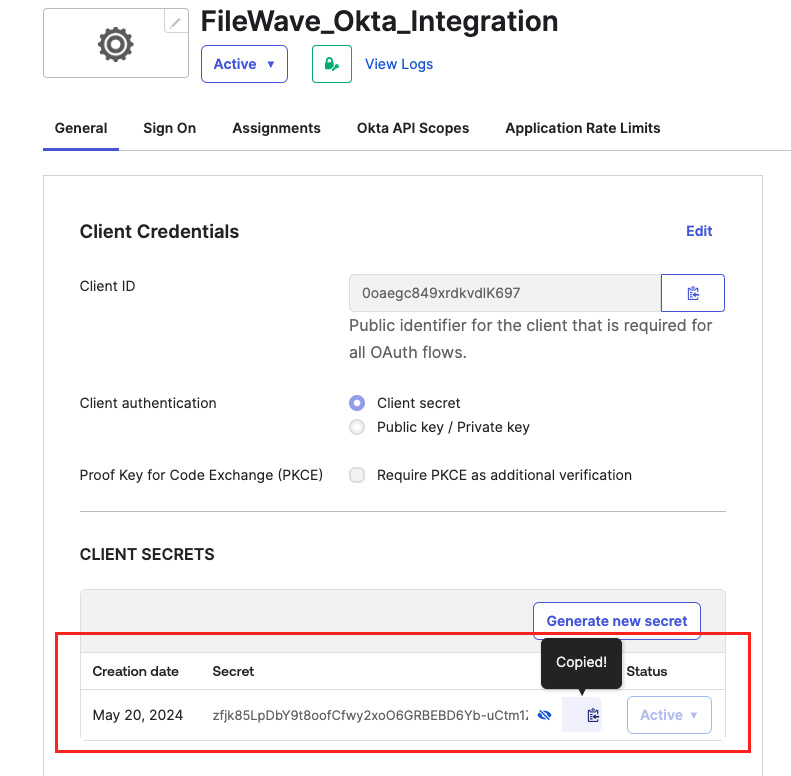
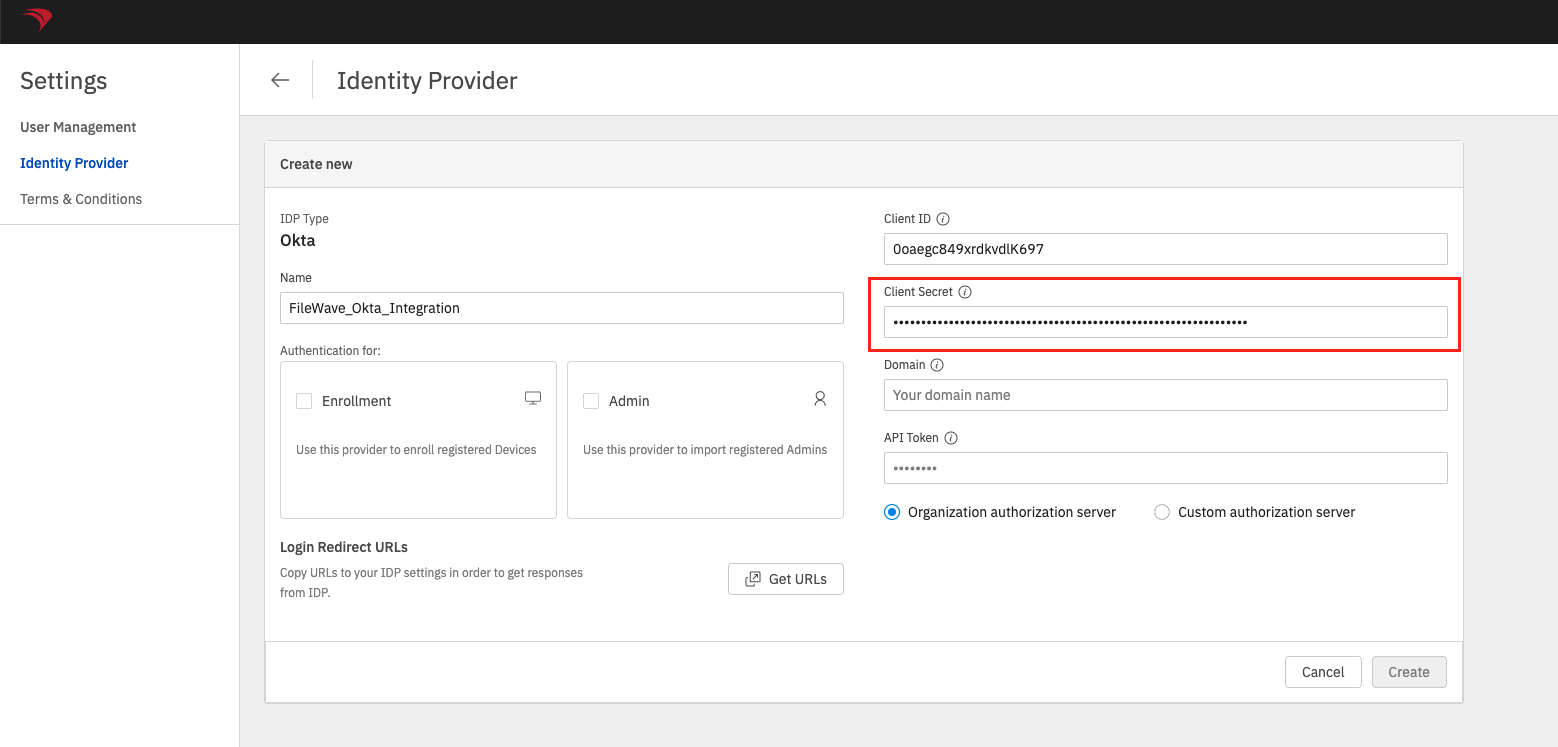
    3. Input the **Okta Client Secret** value in the **Client Secret** field.  
          
        [![Screenshot 2024-05-20 at 12.10.32 PM.png](https://kb.filewave.com/uploads/images/gallery/2024-05/scaled-1680-/X3EhYtXxALDS8Dpl-screenshot-2024-05-20-at-12-10-32-pm.png)](https://kb.filewave.com/uploads/images/gallery/2024-05/X3EhYtXxALDS8Dpl-screenshot-2024-05-20-at-12-10-32-pm.png)
[![Screenshot 2024-05-20 at 12.11.33 PM.png](https://kb.filewave.com/uploads/images/gallery/2024-05/scaled-1680-/gfFcv47XHllkQji6-screenshot-2024-05-20-at-12-11-33-pm.png)](https://kb.filewave.com/uploads/images/gallery/2024-05/gfFcv47XHllkQji6-screenshot-2024-05-20-at-12-11-33-pm.png)
<table id="bkmrk-okta-api-token-open-"><tbody><tr><td>##### **API Token**

1. In Okta, open the **Security &gt; API** menu and open the **Tokens** tab.  
    [![Screenshot 2024-05-20 at 12.22.44 PM.png](https://kb.filewave.com/uploads/images/gallery/2024-05/scaled-1680-/BK7wXkb8DrPhWtbU-screenshot-2024-05-20-at-12-22-44-pm.png)](https://kb.filewave.com/uploads/images/gallery/2024-05/BK7wXkb8DrPhWtbU-screenshot-2024-05-20-at-12-22-44-pm.png)
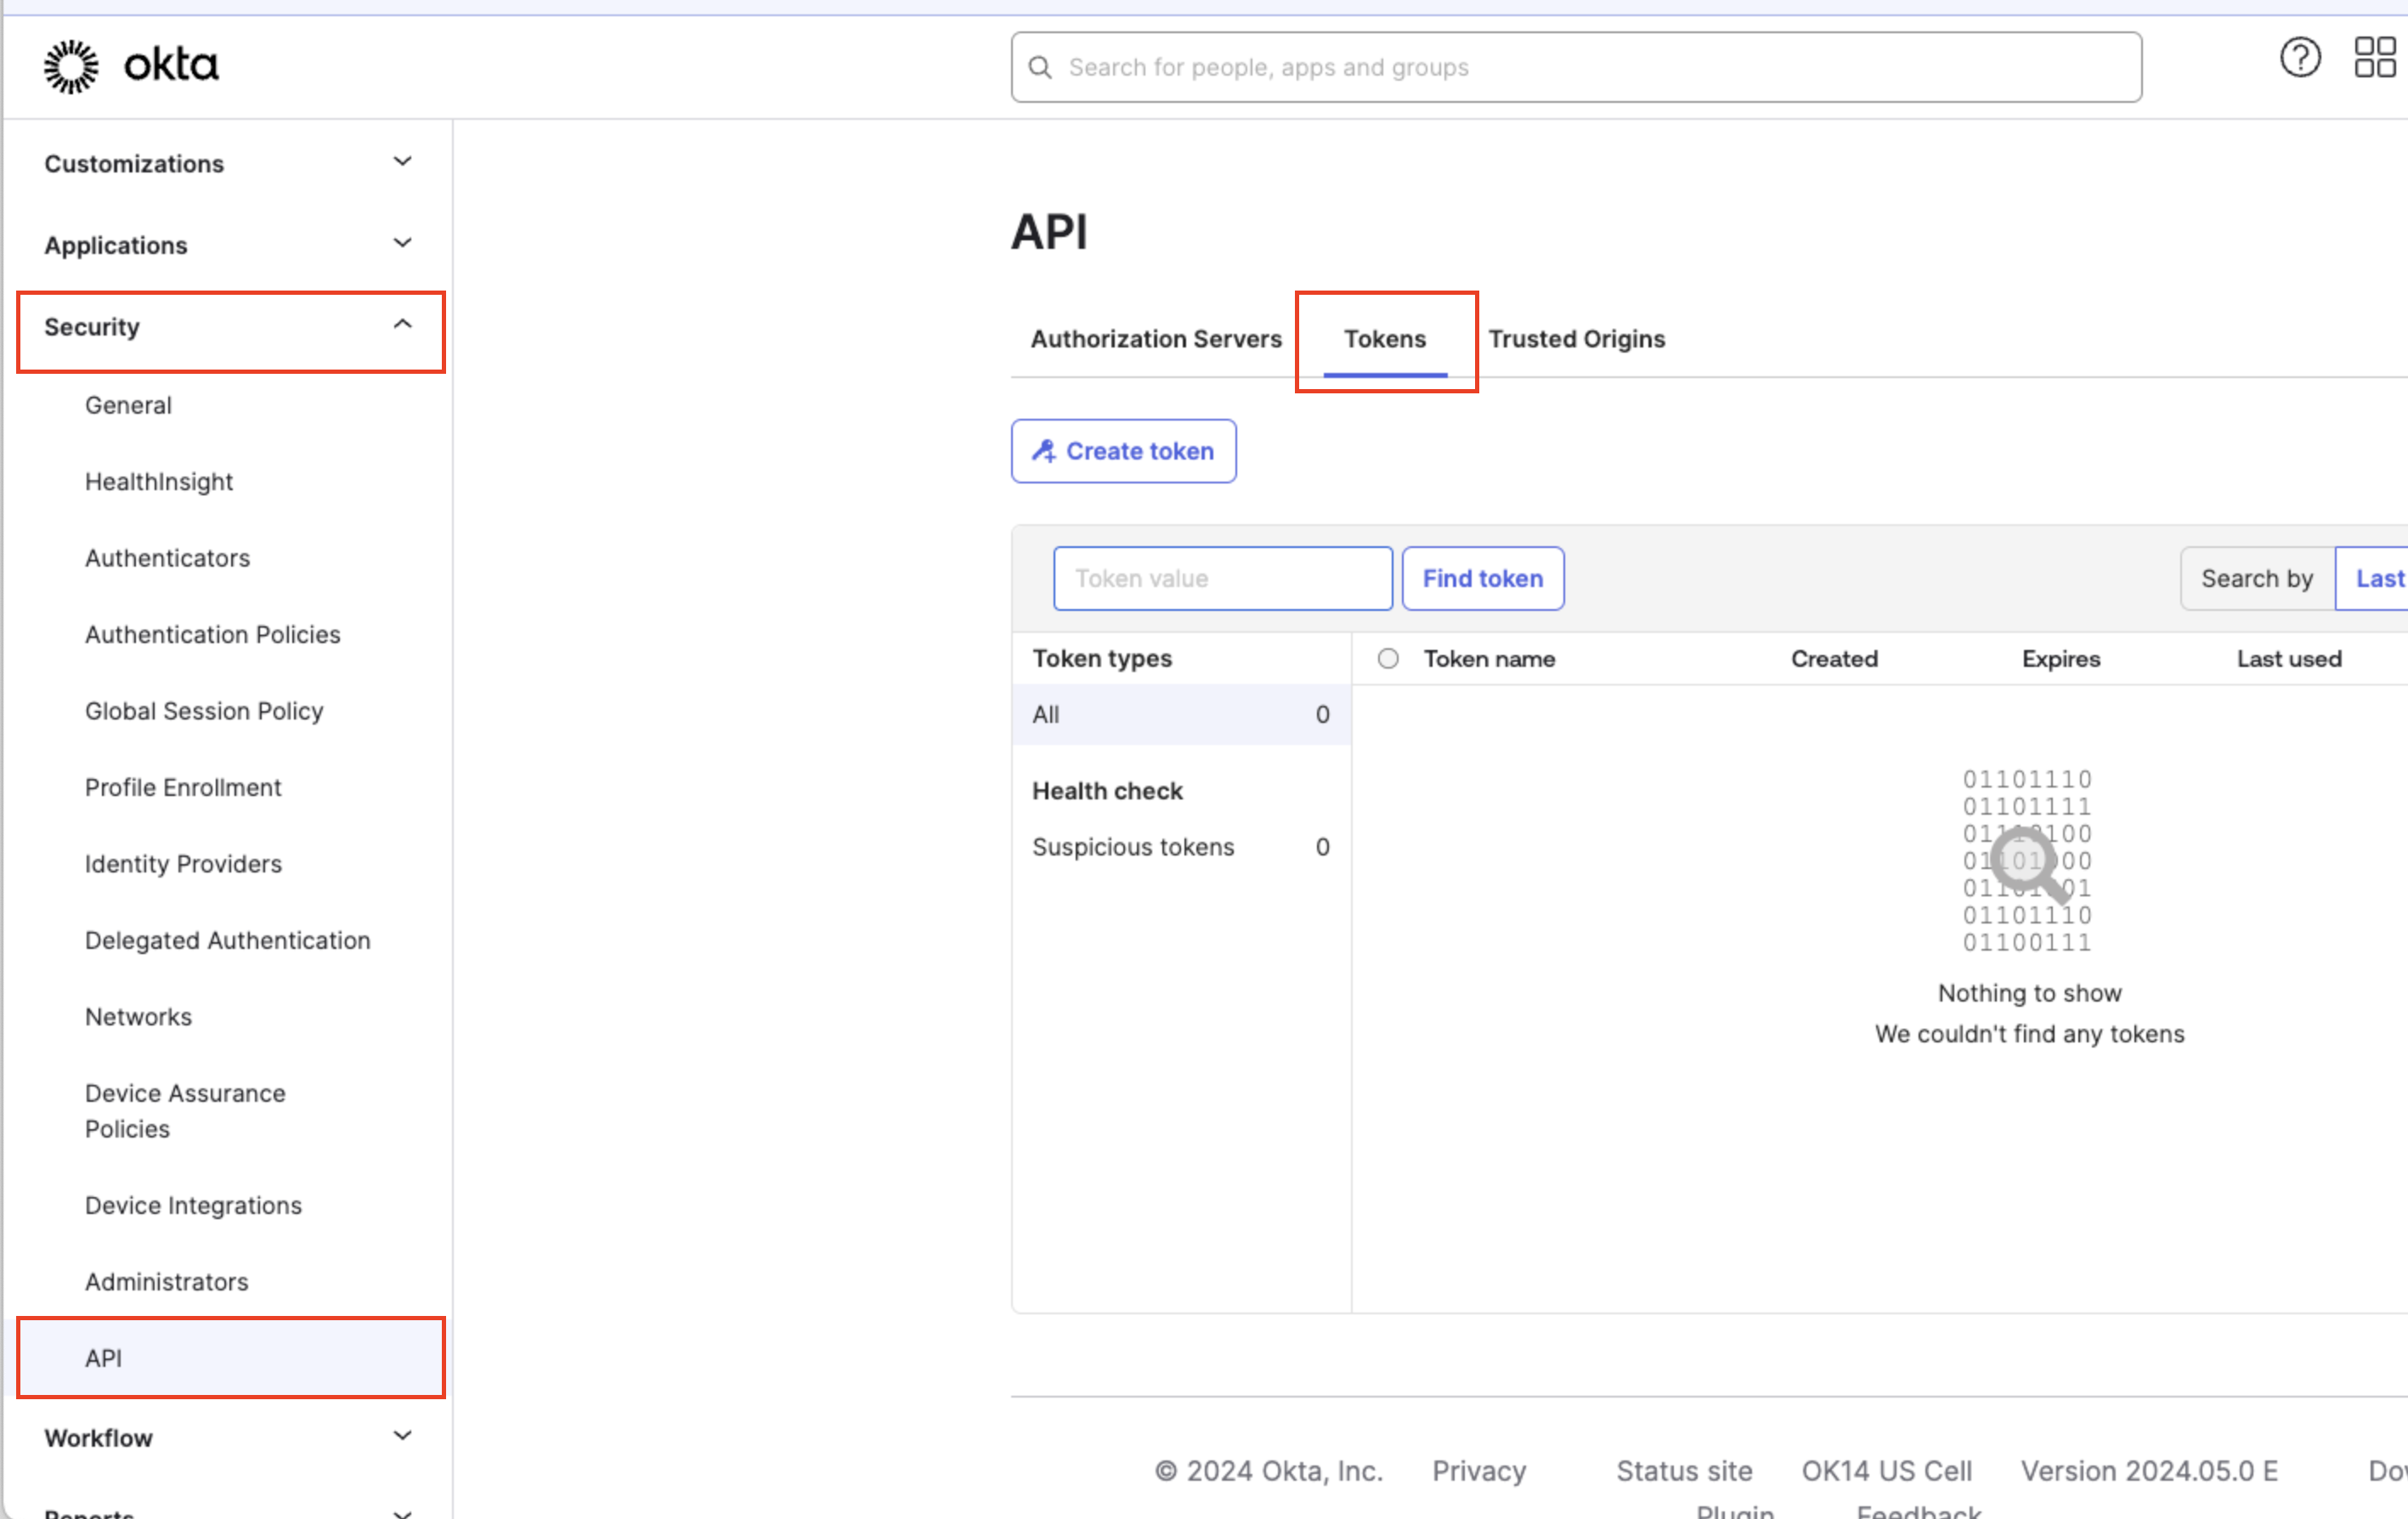
2. Click the **Create Token** button in the **Tokens** tab.
3. Input a meaningful name in the API token's **Name** field.
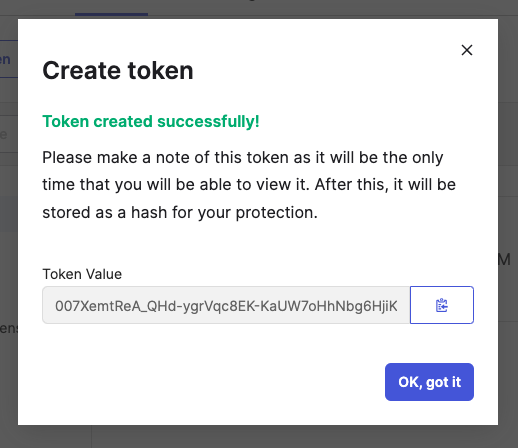
4. Click the **Create Token** button in the **Create Token** dialog and copy the API token and store it in a secure location. (Okta API tokens are only displayed to be copied once, make sure to store this token somewhere secure for use in the future.)[![Screenshot 2024-05-20 at 12.25.51 PM.png](https://kb.filewave.com/uploads/images/gallery/2024-05/scaled-1680-/N6KOkRmLnEljwRQ3-screenshot-2024-05-20-at-12-25-51-pm.png)](https://kb.filewave.com/uploads/images/gallery/2024-05/N6KOkRmLnEljwRQ3-screenshot-2024-05-20-at-12-25-51-pm.png)
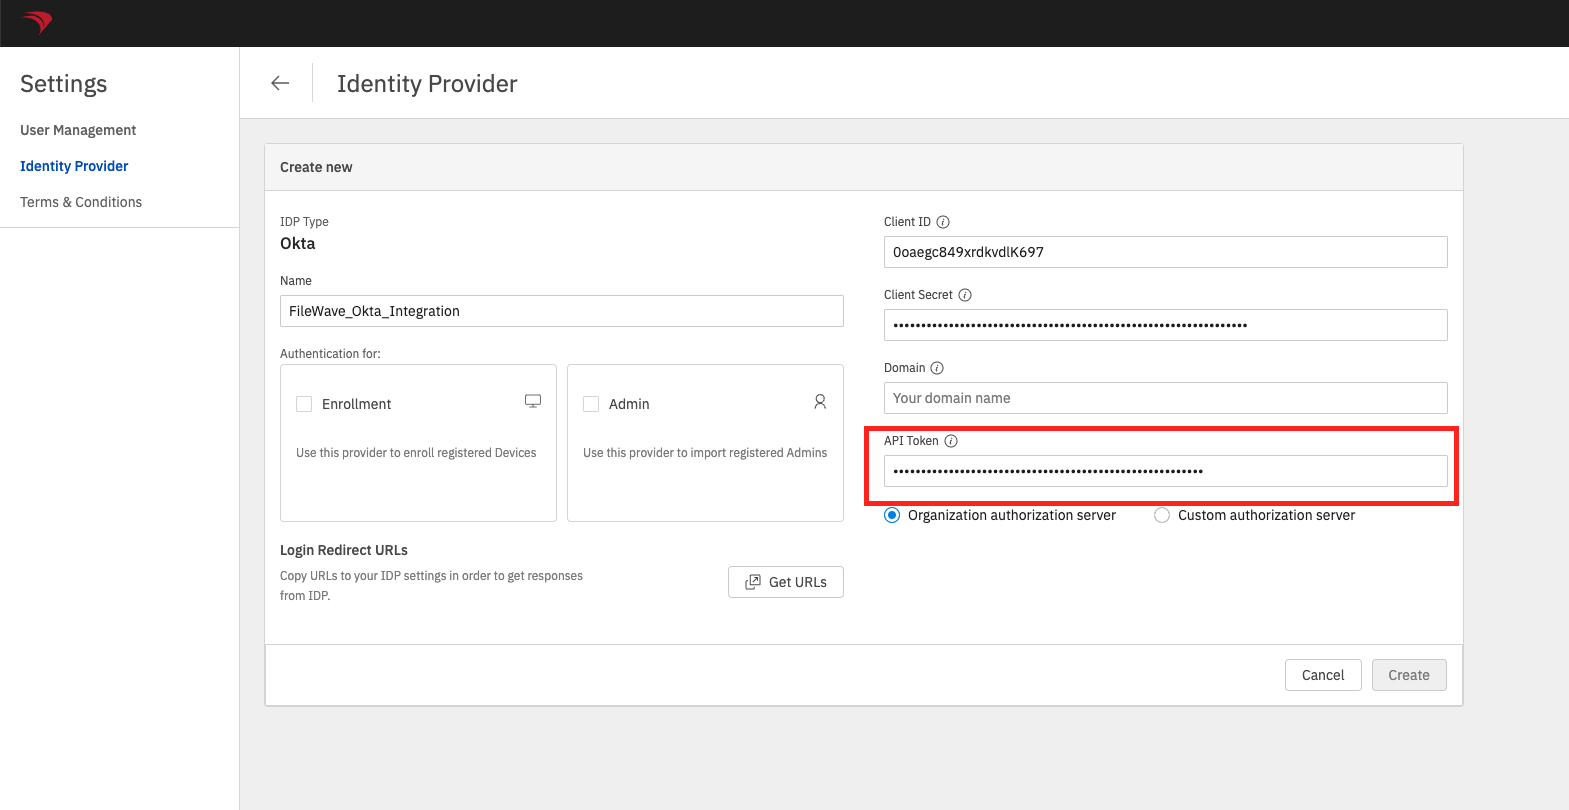
5. Copy and Paste the **Token Value** into the **API Token** field in the FileWave Admin Settings.  
    [![Screenshot 2024-05-20 at 12.33.35 PM.png](https://kb.filewave.com/uploads/images/gallery/2024-05/scaled-1680-/WFtaERnnxXPHqHla-screenshot-2024-05-20-at-12-33-35-pm.png)](https://kb.filewave.com/uploads/images/gallery/2024-05/WFtaERnnxXPHqHla-screenshot-2024-05-20-at-12-33-35-pm.png)
</td></tr></tbody></table>

<table id="bkmrk-okta-domain-open-the"><tbody><tr><td>##### **Okta Domain** 

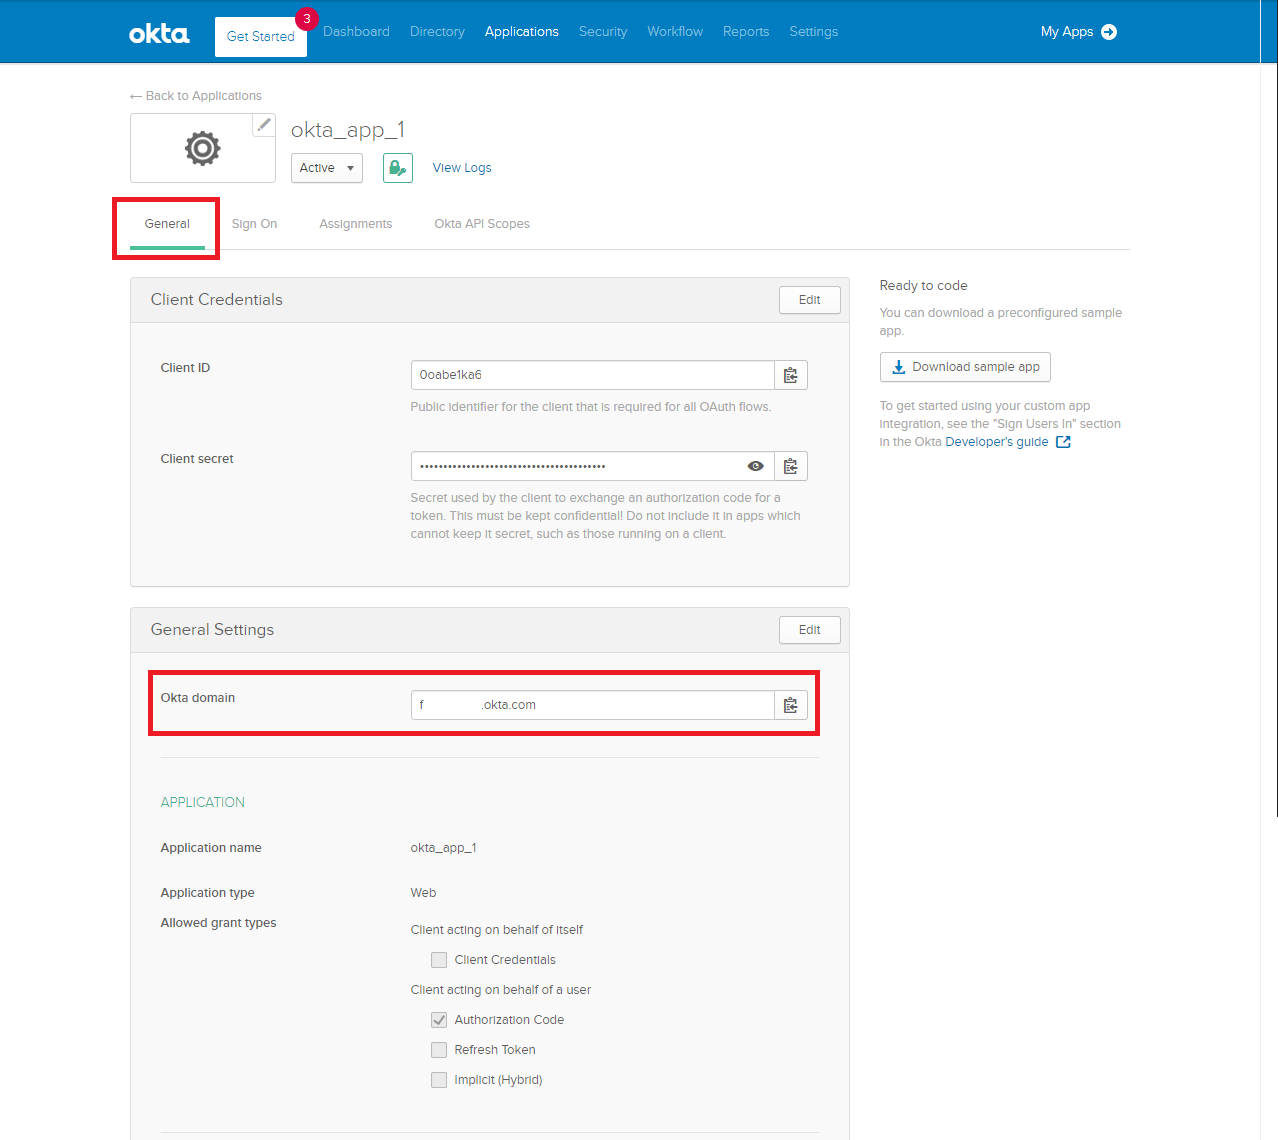
1. Open the **Okta Admin &gt; Menu &gt; Applications &gt; Okta App &gt; General** tab and copy the **Domain** value to a secure location.  
      
    (\*This is an older screenshot, the current trial Okta account that I am using at the time of this KB's creation doesn't have a domain)  
    ![](https://kb.filewave.com/uploads/images/gallery/2023-07/A4yrgeSUPQqHqUaZ-embedded-image-elclhk3v.png)
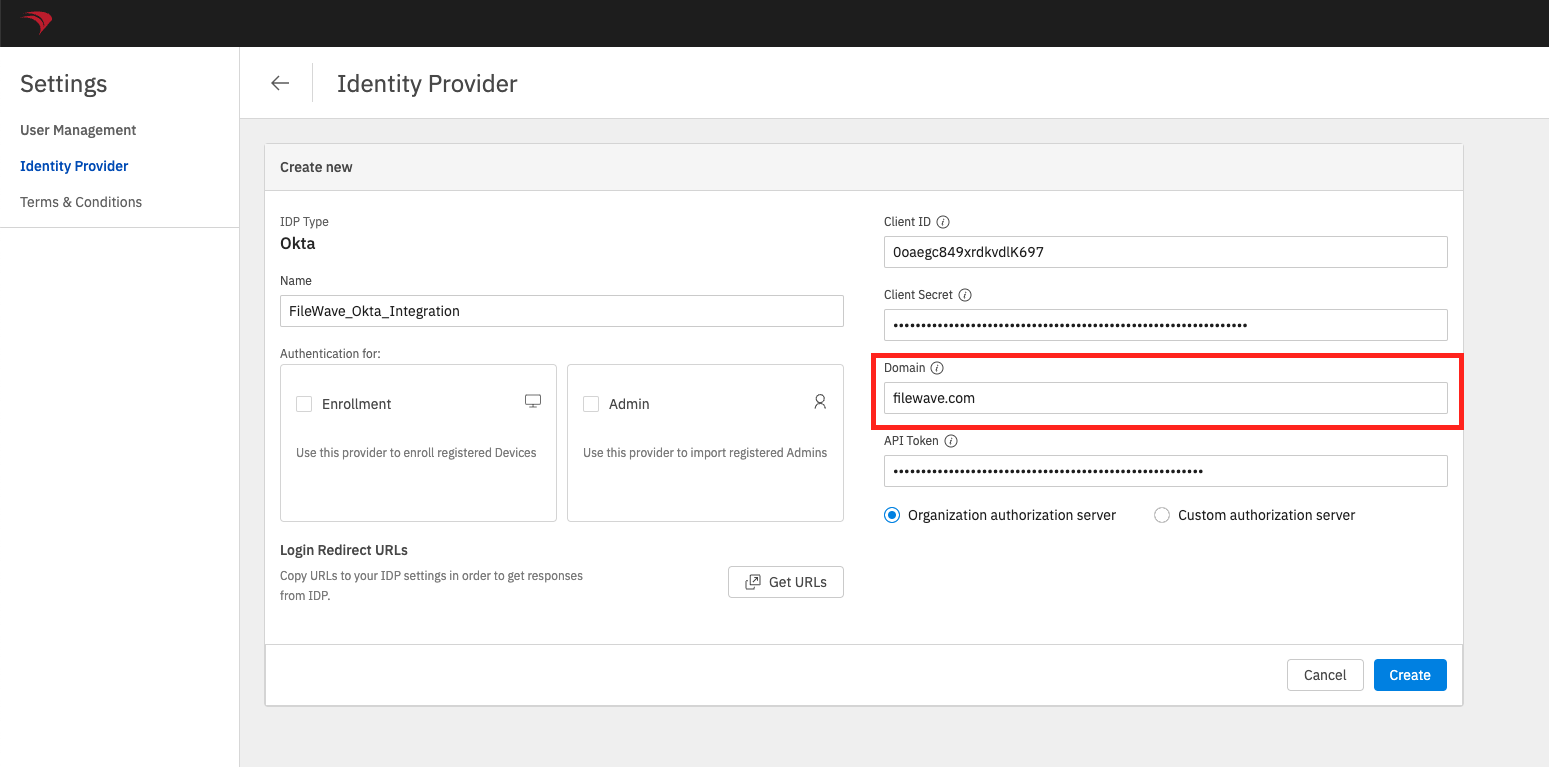
2. Input the **Okta Domain** in the **Domain** field. The value in FileWave should not be saved with the "https://" portion.

[![Screenshot 2024-05-20 at 12.39.15 PM.png](https://kb.filewave.com/uploads/images/gallery/2024-05/scaled-1680-/F54r954Tk5bwSjcy-screenshot-2024-05-20-at-12-39-15-pm.png)](https://kb.filewave.com/uploads/images/gallery/2024-05/F54r954Tk5bwSjcy-screenshot-2024-05-20-at-12-39-15-pm.png)
</td></tr></tbody></table>

### Part 4: Configuring and Authenticating with Okta Users

#### Configure an Okta Identity Provider for Authentication

An **Okta App** will need to be configured in the FileWave Identity Provider settings for use with FileWave Device enrollment and/or FileWave Admin authentication.

1. Begin by logging into the **FileWave Web Admin** and open the **Settings** button (gear icon in the header).
2. Click the **Edit** button on the **Okta App** card that will be used for authentication.
3. Check the **Enrollment** checkbox if you want to use this **Okta App** authentication for FileWave Device enrollment.
4. Check the **Admin** checkbox if you want to use this **Okta App** for FileWave Central and FileWave Anywhere console authentication.

<table id="bkmrk-only-one-identity-pr-3"><tbody><tr><td>ℹ️ Only one Identity Provider App instance (Okta, Azure AD, etc.) can be configured with the **Admin** authentication for each type of Identity Provider.

ℹ️ Only one Identity Provider can be configured for FileWave Device **Enrollment** authentication.

</td></tr></tbody></table>

![](https://kb.filewave.com/uploads/images/gallery/2023-07/bTIr6j9Qee2le6nN-embedded-image-jm4fzdl0.png)

5\. Click the **Save** button on the **Okta App** to confirm any authentication changes.

#### Configure FileWave Admin IdP Groups

- FileWave Admin IDP Groups will need to be created in order to use the **Okta App** for authentication with the FileWave Native or Web Admin console.
- See: [Adding IdP Groups for FileWave Authentication](https://kb.filewave.com/books/identity-provider-idp-integration/page/adding-idp-groups-for-filewave-authentication "Adding IdP Groups for FileWave Authentication")

#### Authenticate with Okta during FileWave Device Enrollment

- Once the **Enrollment** checkbox is set for an IDP configuration then the **Okta App** can be used for authentication during FileWave Device enrollment.
- See: [Configuring DEP Profiles for IDP Authentication](https://kb.filewave.com/books/identity-provider-idp-integration/page/configuring-dep-profiles-for-idp-authentication "Configuring DEP Profiles for IDP Authentication")

#### Login with Okta for FileWave Native or Web Admin Console

- Once FileWave Admin IDP Groups are created for an **Okta App** the **Login with Okta** option can be used with the FileWave Native or Web Admin console for authentication.
- See: [Admin Login in Using an IdP Provider](https://kb.filewave.com/books/identity-provider-idp-integration/page/admin-login-in-using-an-idp-provider "Admin Login in Using an IdP Provider")

![](https://kb.filewave.com/uploads/images/gallery/2023-07/BuV05cY7qpKOW0hP-embedded-image-sjsc6xwq.png)![](https://kb.filewave.com/uploads/images/gallery/2023-07/HxaAtRbhbowvve25-embedded-image-mehpji3h.png)

## Related Content

- [IdP Setup: Azure AD](https://kb.filewave.com/books/identity-provider-idp-integration/page/idp-setup-microsoft-entra-id-azure "IdP Setup: Azure AD")
- [Adding IdP Groups for FileWave Authentication](https://kb.filewave.com/books/identity-provider-idp-integration/page/adding-idp-groups-for-filewave-authentication "Adding IdP Groups for FileWave Authentication")
- [Admin Login in Using an IdP Provider](https://kb.filewave.com/books/identity-provider-idp-integration/page/admin-login-in-using-an-idp-provider "Admin Login in Using an IdP Provider")