Integrations
The Integrations section provides valuable information and resources on integrating FileWave with other essential systems and tools. Discover a range of integration possibilities to enhance the functionality and streamline the management of your FileWave environment. Explore documentation, guides, and best practices for seamless integration with popular platforms and services. By integrating FileWave with your existing systems, you can achieve enhanced automation, data synchronization, and streamlined workflows, optimizing your device management processes and simplifying administration tasks. Unlock the power of integrations to maximize the efficiency and effectiveness of your FileWave deployment.
- Agnosys
- Integrating EasyLAPS with FileWave
- Integrating MacOnboardingMate (MOM) with FileWave
- Integrating Telepod with FileWave
- AutoPkg with FileWave
- AutoPkg - FileWave Integrated (v15.5+)
- Using AutoPkgr with FileWave for Advanced macOS Software Deployment
- Autopkg(r) FAIL_RECIPES_WITHOUT_TRUST_INFO
- Cloudflare WARP integration with FileWave (macOS/iOS/Windows/Android)
- DeepFreeze (macOS/Windows)
- Hello-IT integration with FileWave (macOS)
- InvGate integration with FileWave
- ServiceNow integration with FileWave
- Slack integration with FileWave
- Incident IQ FileWave Asset Integration
Agnosys
Agnosys was founded on April 7, 1999. Agnosys is a Qualiopi Certified Authorized Training Center, a member of the Apple Consultants Network (ACN). Agnosys' core business is training on Apple technologies. They offer a range of trainings in support, integration, deployment and maintenance of Apple products, some of which are preparatory to obtaining official Apple certifications.
Integrating EasyLAPS with FileWave
What
This article focuses on EasyLAPS, a tool developed to routinely rotate the local administrator account password of a Mac and store it in a Mobile Device Management (MDM) solution, including FileWave. EasyLAPS main function is to maintain unique passwords across a Mac fleet, centralized in the MDM console.
When/Why
EasyLAPS is beneficial when the need arises to manage and rotate local administrator passwords across a number of Mac devices, ensuring unique passwords are utilized and safely stored within the MDM. This tool is particularly useful for enhancing the security of your network by preventing unauthorized access and reducing the risk of password-related security breaches.
How
EasyLAPS operates in two different functioning logics, both supported by FileWave:
Logic #1: In this mode, the password is stored in encrypted form both in the MDM and in the EasyLAPS Keychain. EasyLAPS manages the password rotation using the locally stored password, with the new generated password then stored in the MDM. The public key used for encryption is part of the EasyLAPS configuration file, while the private key is not present on the device and must be kept securely. This mode is most suitable when a large number of technicians have access to the MDM console, and only those possessing a copy of the EasyLAPS-Toolkit with the private key can access the rotated password.
Logic #2: Here, the password is stored in clear text in the MDM and not stored locally unless a password reversion fails. EasyLAPS uses the MDM-stored password to manage the rotation to the new generated one, which is then stored in the MDM. This logic is best when a limited number of technicians have access to the MDM console and can access a rotated password.
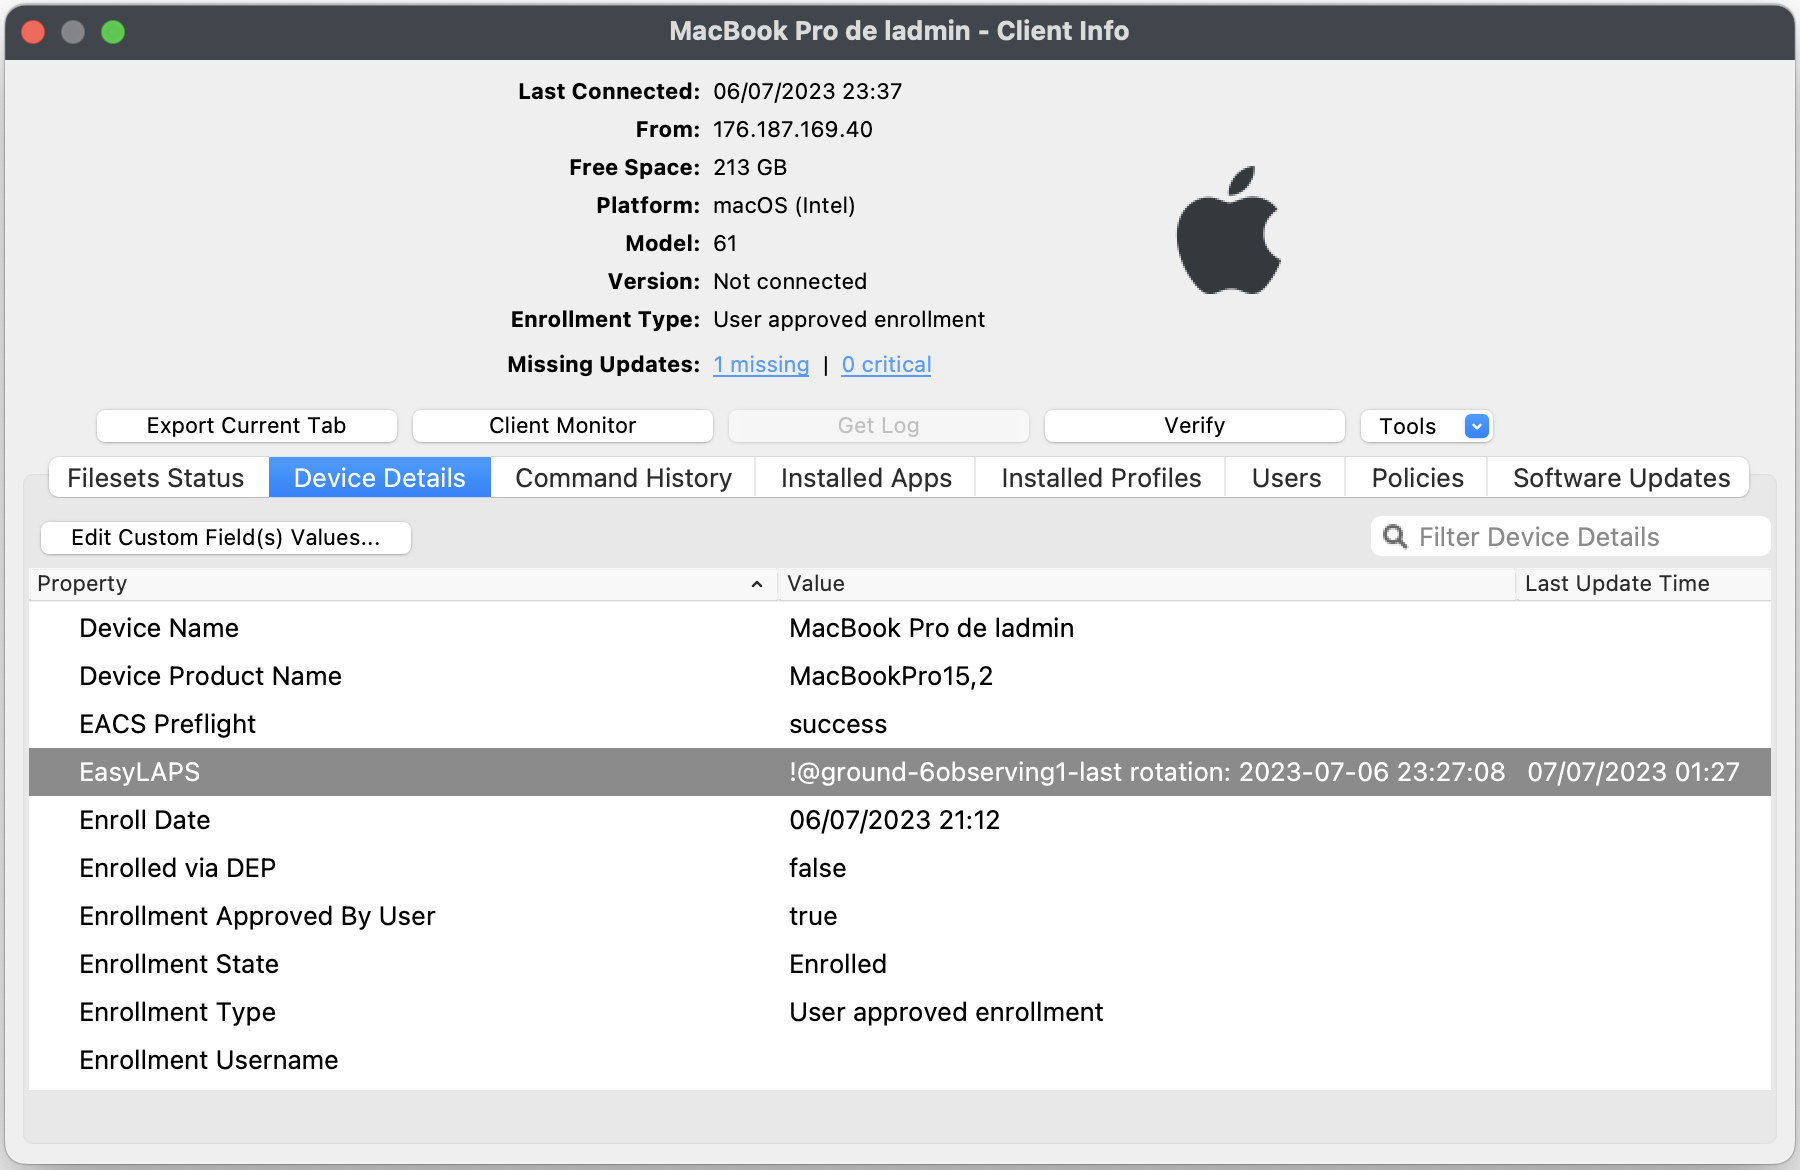
After the first successful rotation, the new password is visible in the device inventory record.
EasyLAPS operates a true rotation of the local administrator password, so the account keeps its cryptographic status. That means that once the password is changed, the account is still a Crypto user and Volume owner, able to unlock the device, install macOS updates, make changes to the startup security policy, initiate an Erase All Content and Settings, and more.
Complete documentation on how to use EasyLAPS with FileWave is provided upon purchase, offering detailed instructions and support. Please note that EasyLAPS supports a variety of MDM solutions with FileWave included.
Related Links
- EasyLAPS Official Website - Comprehensive information about EasyLAPS, its features, and support.
- EasyLAPS - Management solutions support - EN - Agnosys
- Integrating Telepod with FileWave
- Integrating MacOnboardingMate (MOM) with FileWave
Integrating MacOnboardingMate (MOM) with FileWave
What
MacOnboardingMate (MOM) helps onboard or migrate Macs between Mobile Device Management (MDM) solutions while preserving Automated Device Enrollment context. This page explains where MOM fits when FileWave is the destination MDM or part of the onboarding flow.
When/Why
Use MOM when a Mac needs to be onboarded into MDM or moved from one MDM platform to another. Common use cases include new-device provisioning, MDM migration projects, and device transfers where you want to preserve Automated Device Enrollment behavior.
How
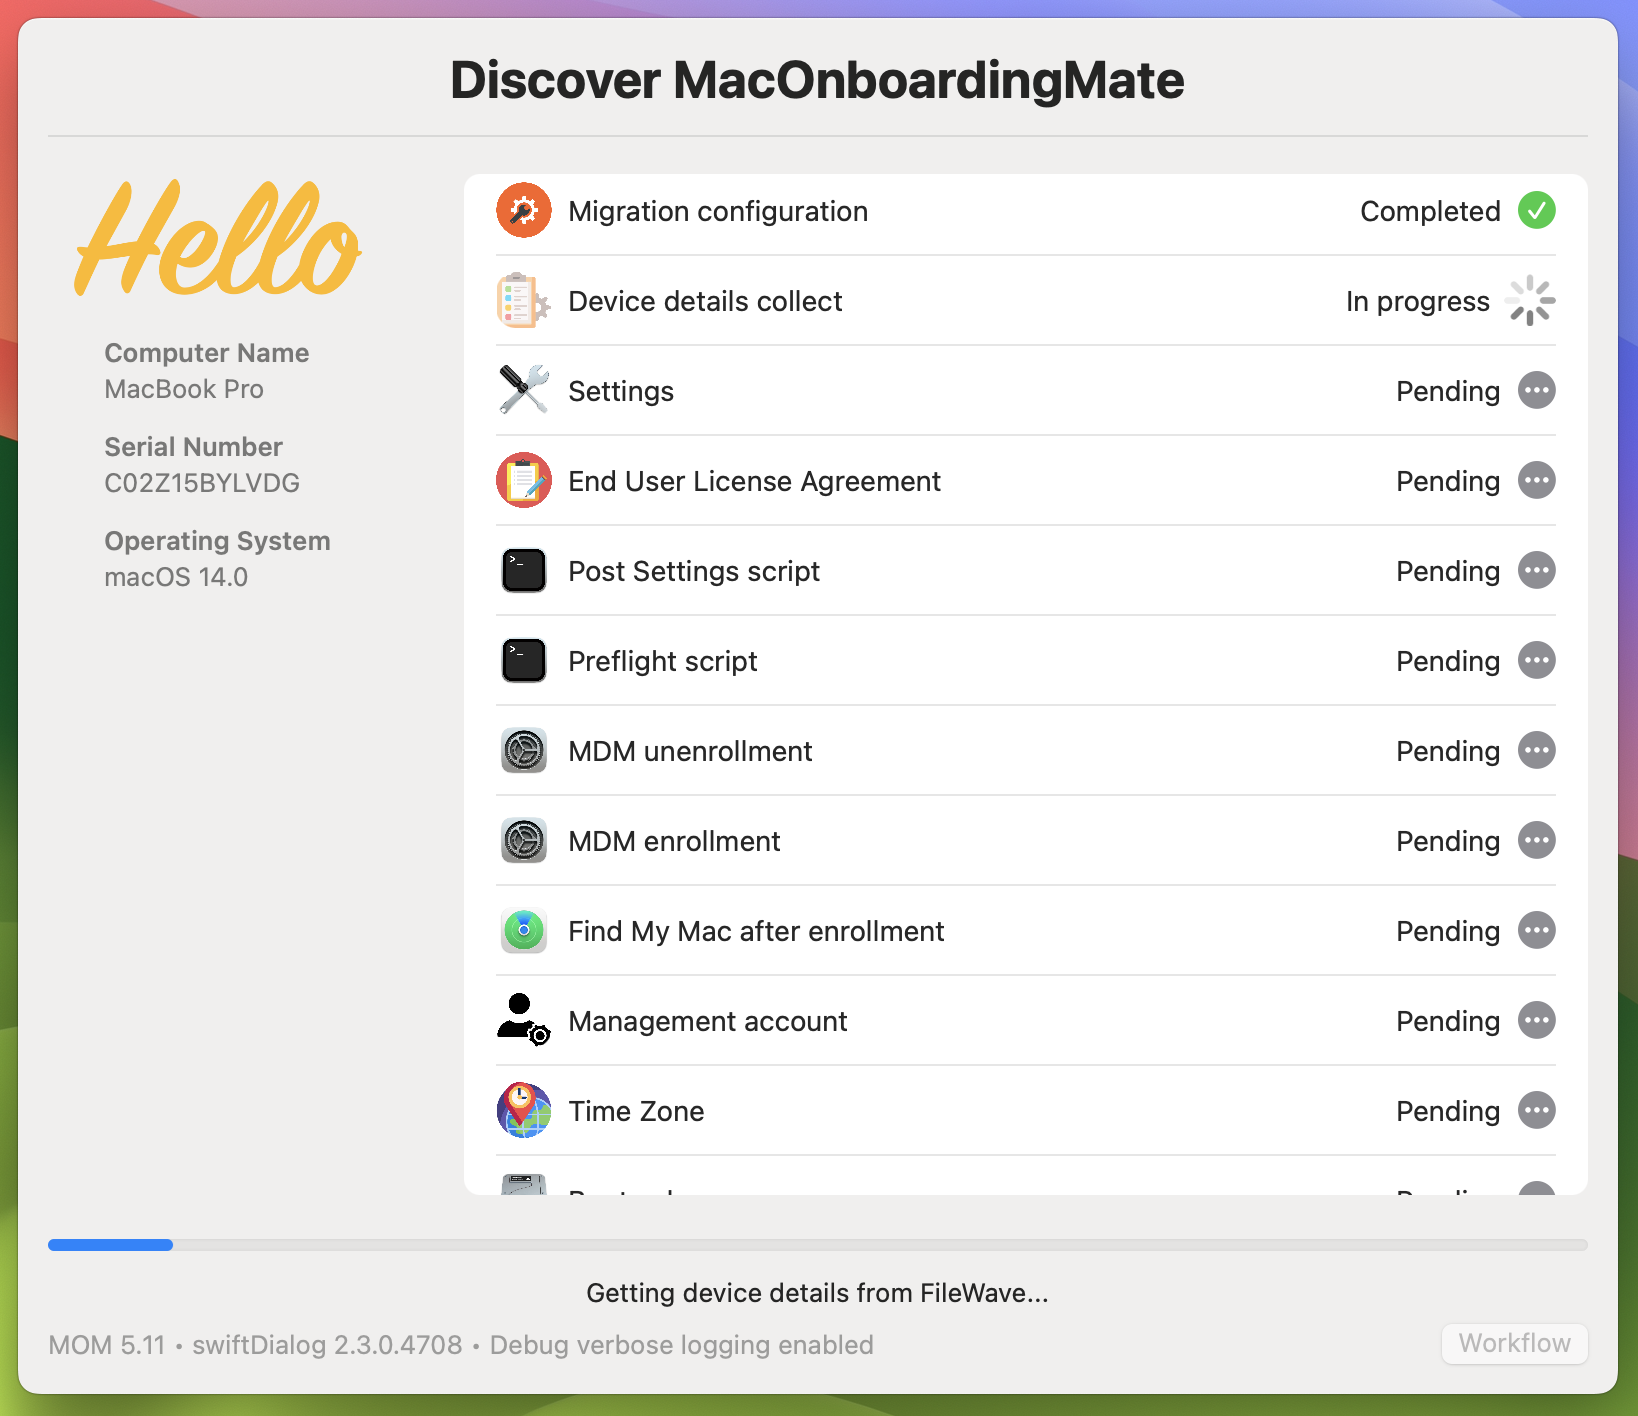
MOM has two execution modes: Launcher and AutoLauncher.
Launcher is used when MOM runs manually outside MDM. AutoLauncher is used when MOM runs from within an MDM, either automatically or through Self Service.
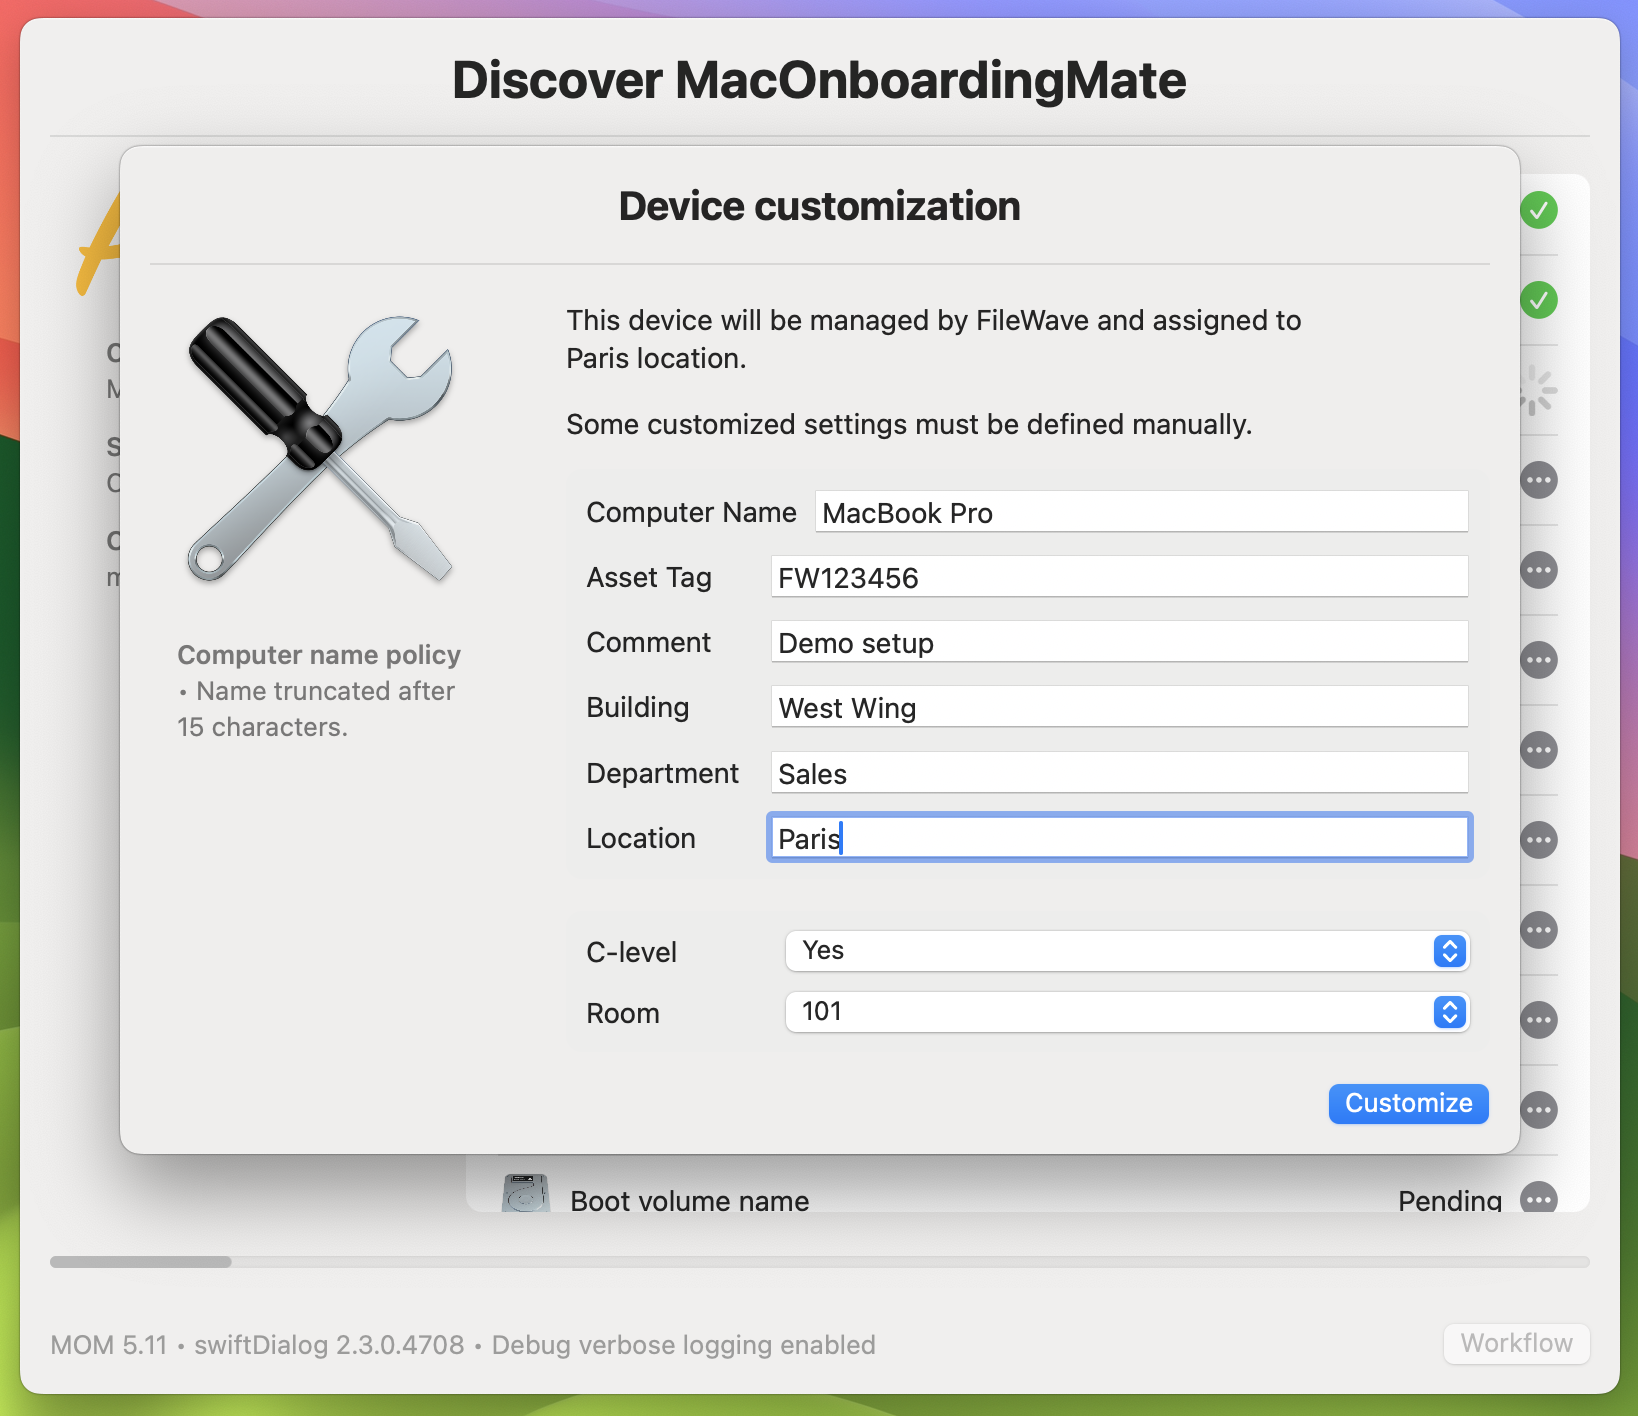
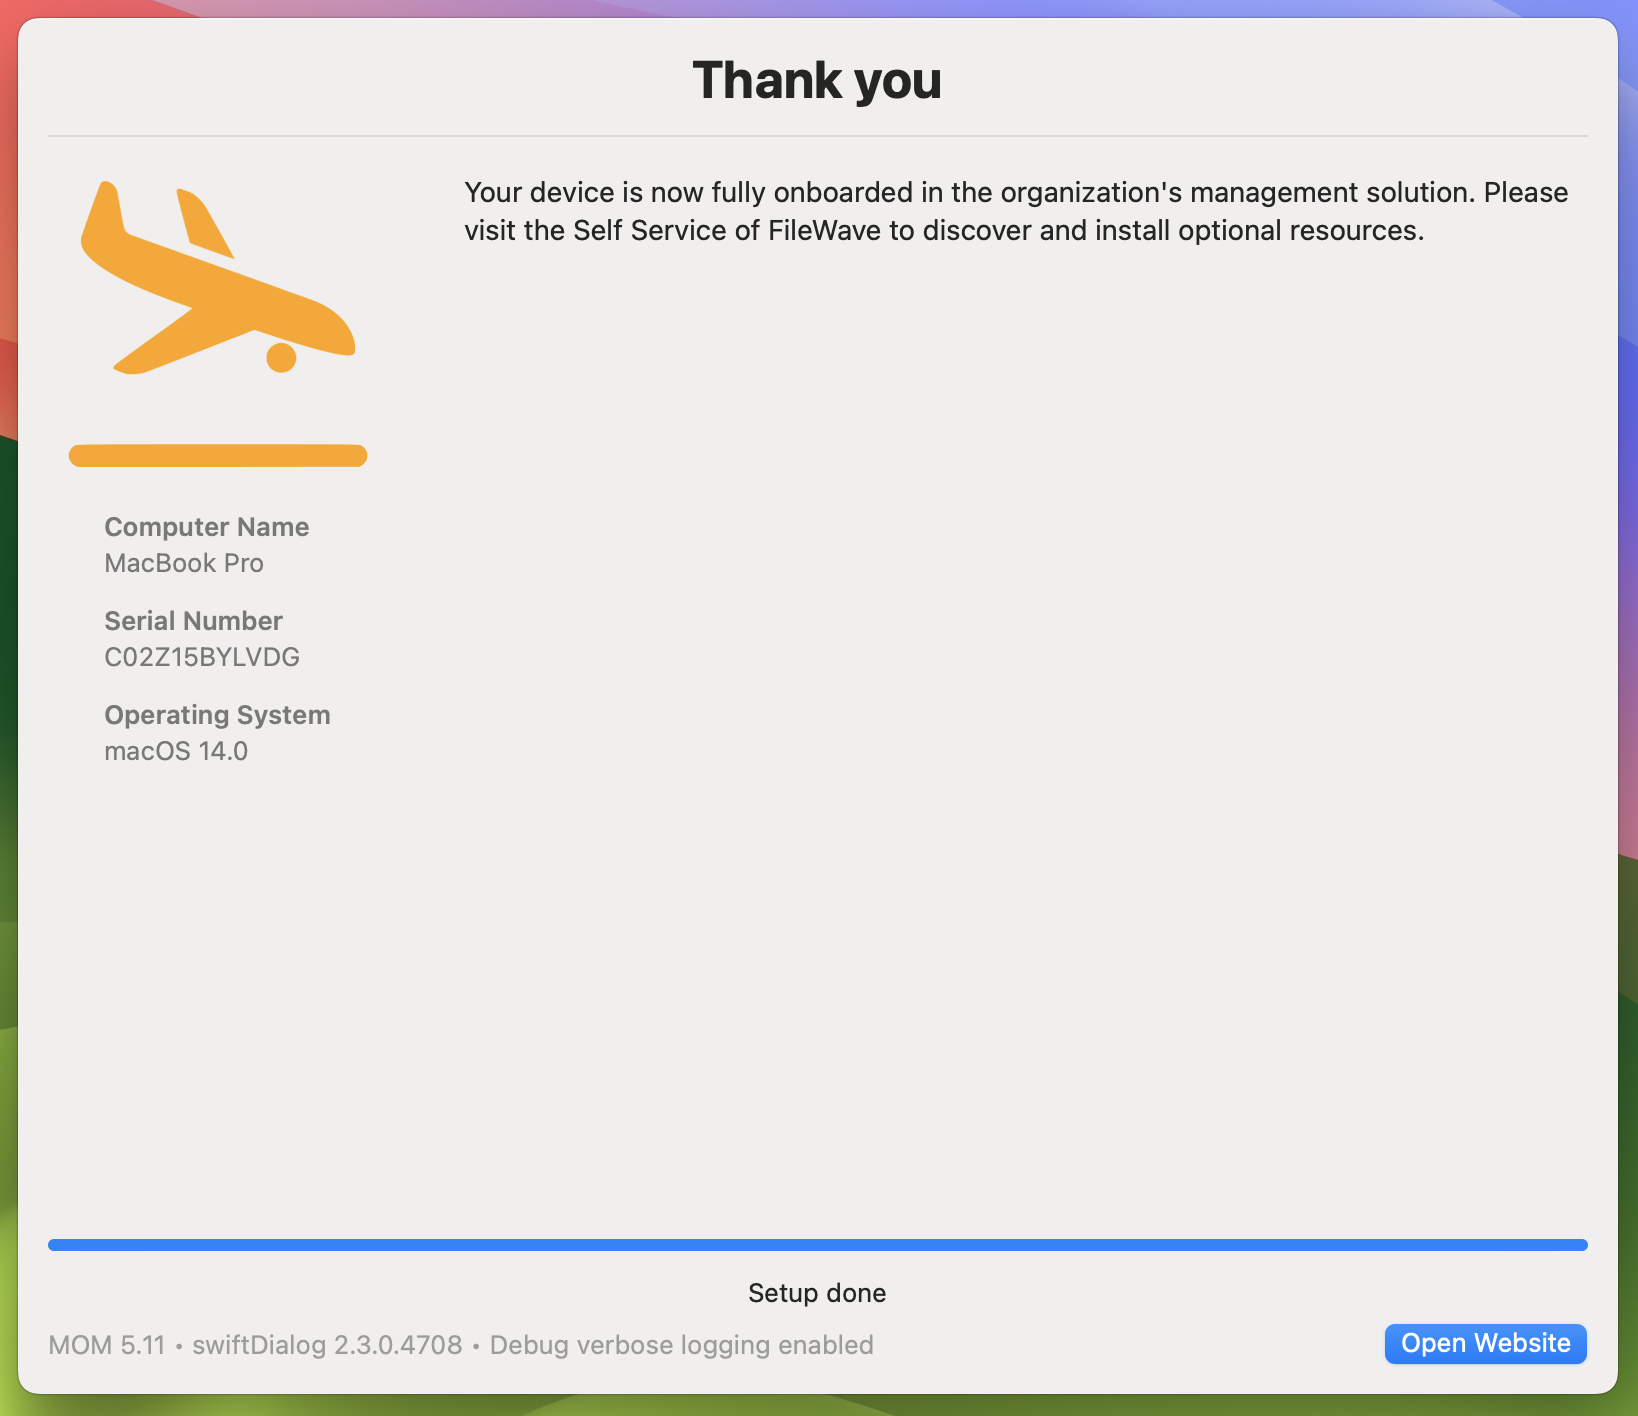
MOM handles the onboarding or migration workflow, including unenrollment from the previous MDM and enrollment into FileWave. For new onboarding, MOM runs from FileWave MDM during Setup Assistant. For migration to FileWave, MOM runs from the MDM the Mac is leaving.
MOM includes a swiftDialog-based interface, while the DEPNotify-based interface remains available for existing workflows. MOM white-glove provisioning combined with macOS Automated Device Enrollment can give Mac deployments a pre-provisioned experience similar to Windows Autopilot.
MOM supports English and French by default and can be localized for other languages. It is designed to work without custom scripting, but scripts can be added at key workflow steps when a deployment needs extra logic.
Agnosys provides complete MOM with FileWave documentation after purchase. MOM supports multiple MDM solutions, including FileWave.
 |
 |
 |
Demos
Demo : Migration of a Mac between two MDM (DEPNotify)
Demo : Onboarding of a Mac enrolled during the Setup Assistant (DEPNotify)
Demo : Onboarding of a Mac enrolled from an opened user’s session (DEPNotify)
Related Links
- MacOnboardingMate Official Website - Comprehensive information about MOM, its features, and support.
- MacOnboardingMate - Management solutions support - EN - Agnosys
- Integrating EasyLAPS with FileWave
- Integrating Telepod with FileWave
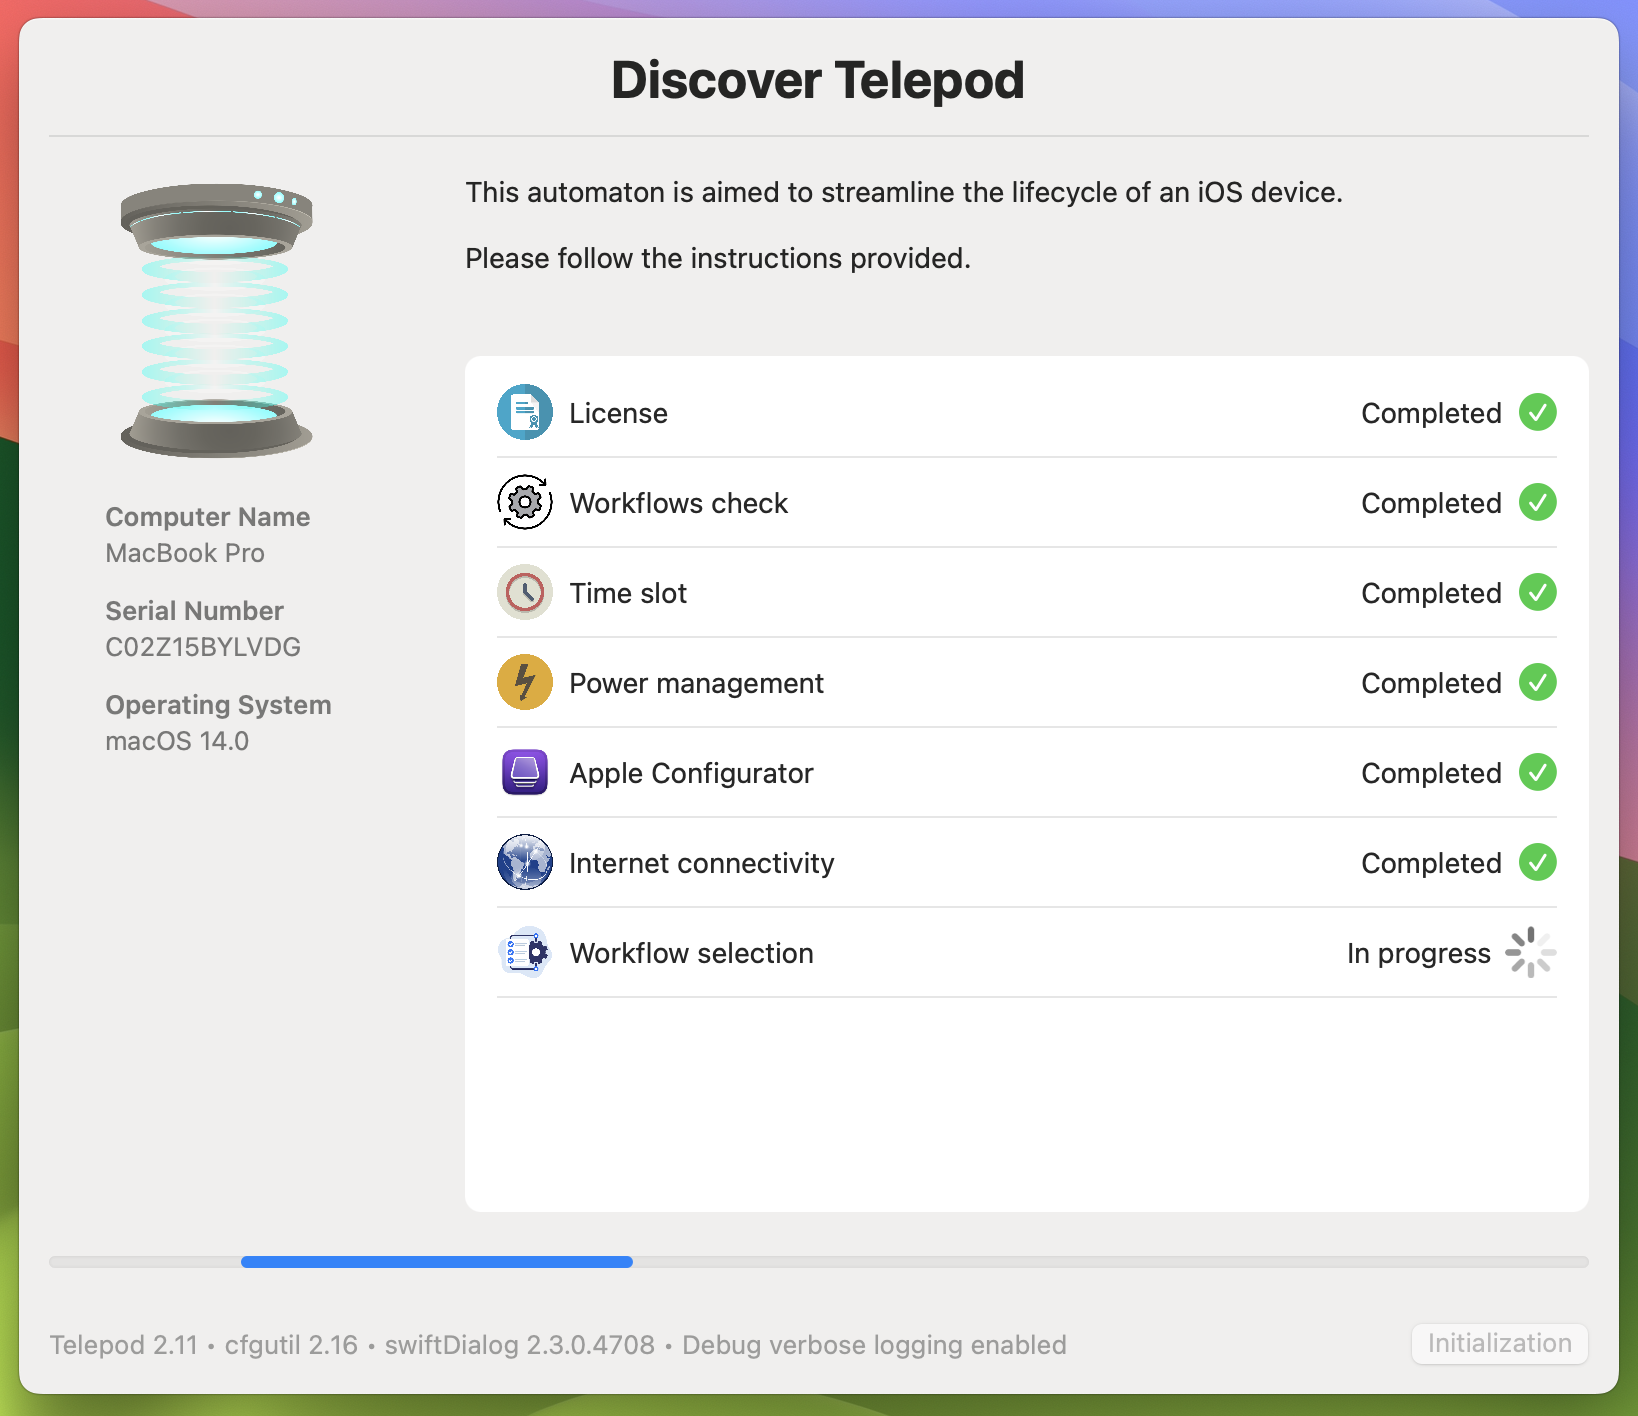
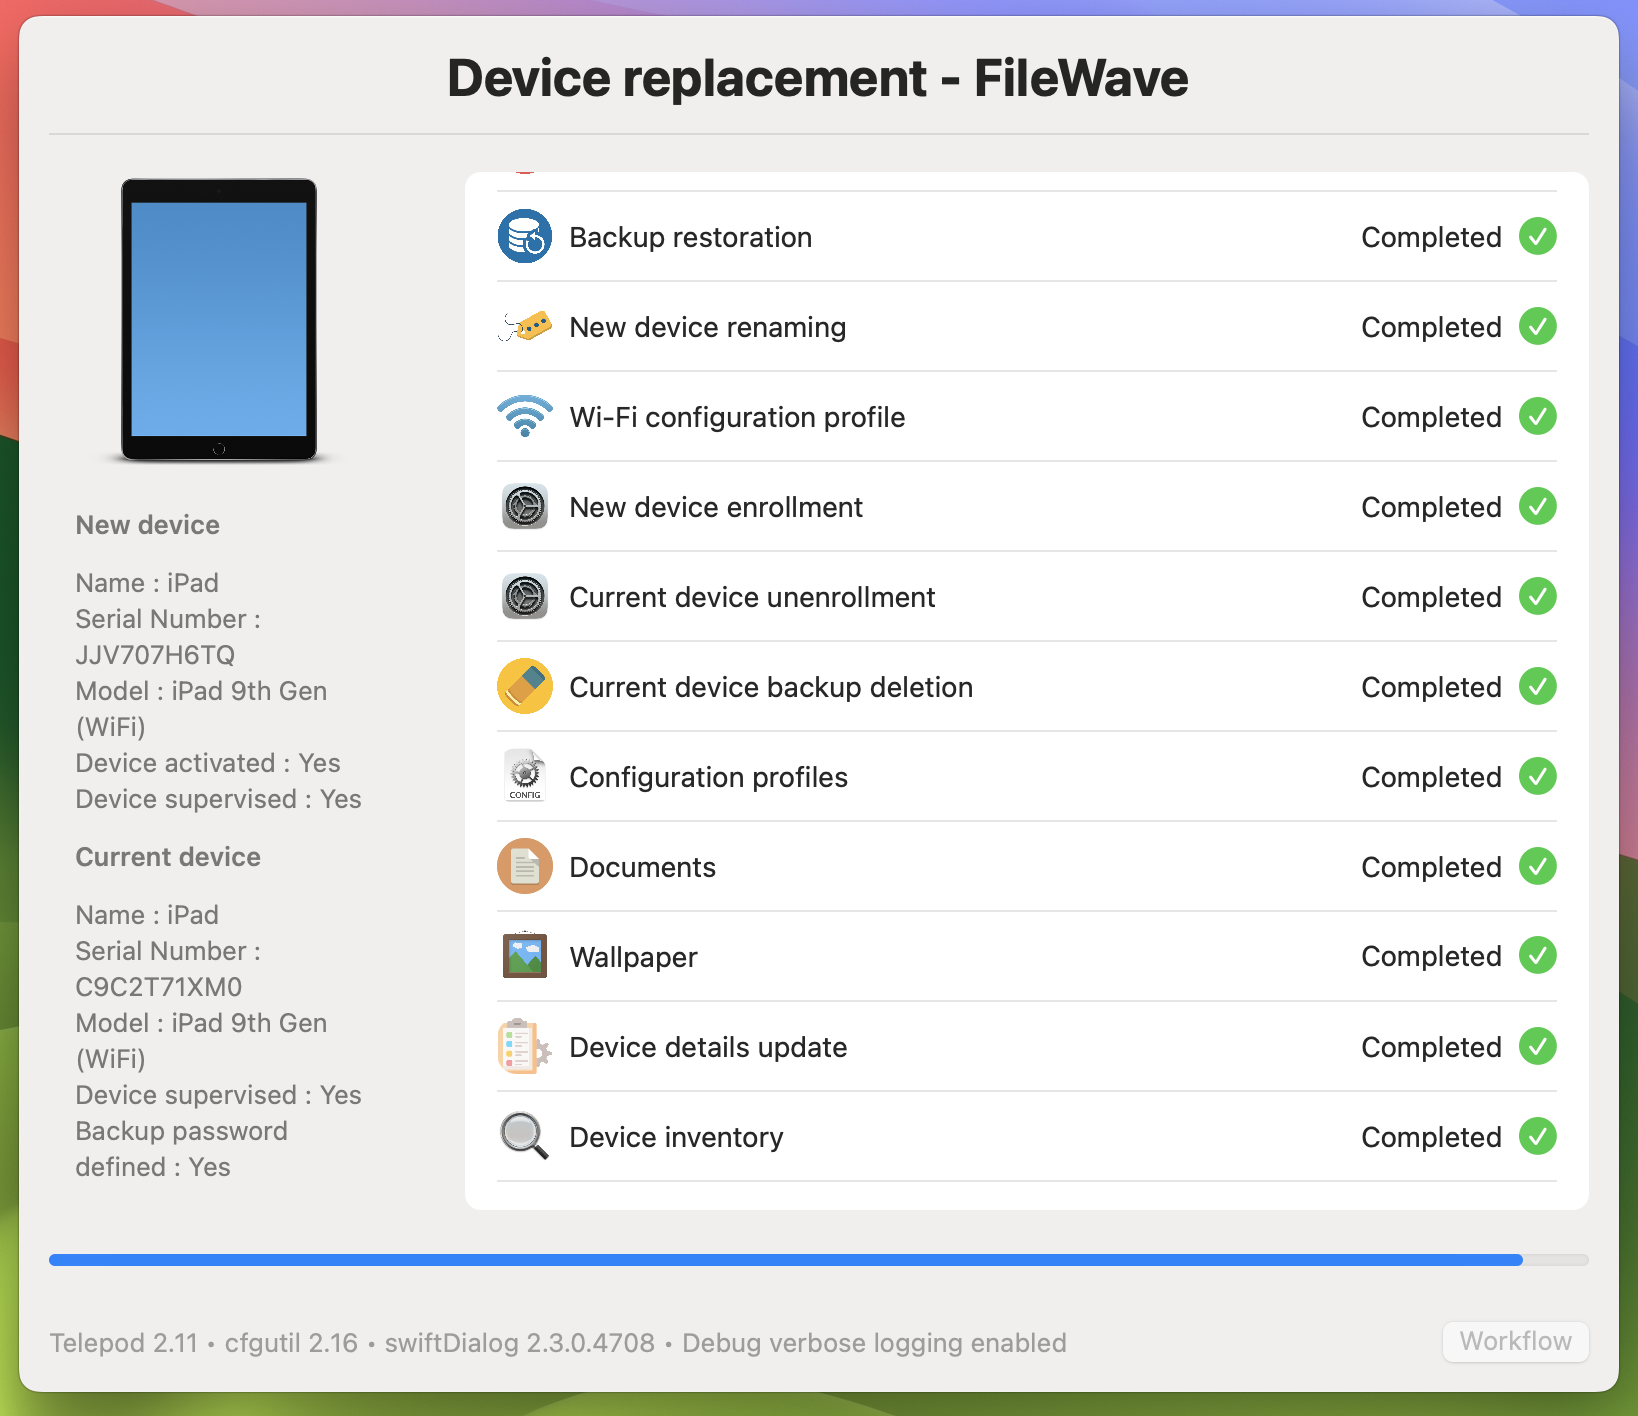
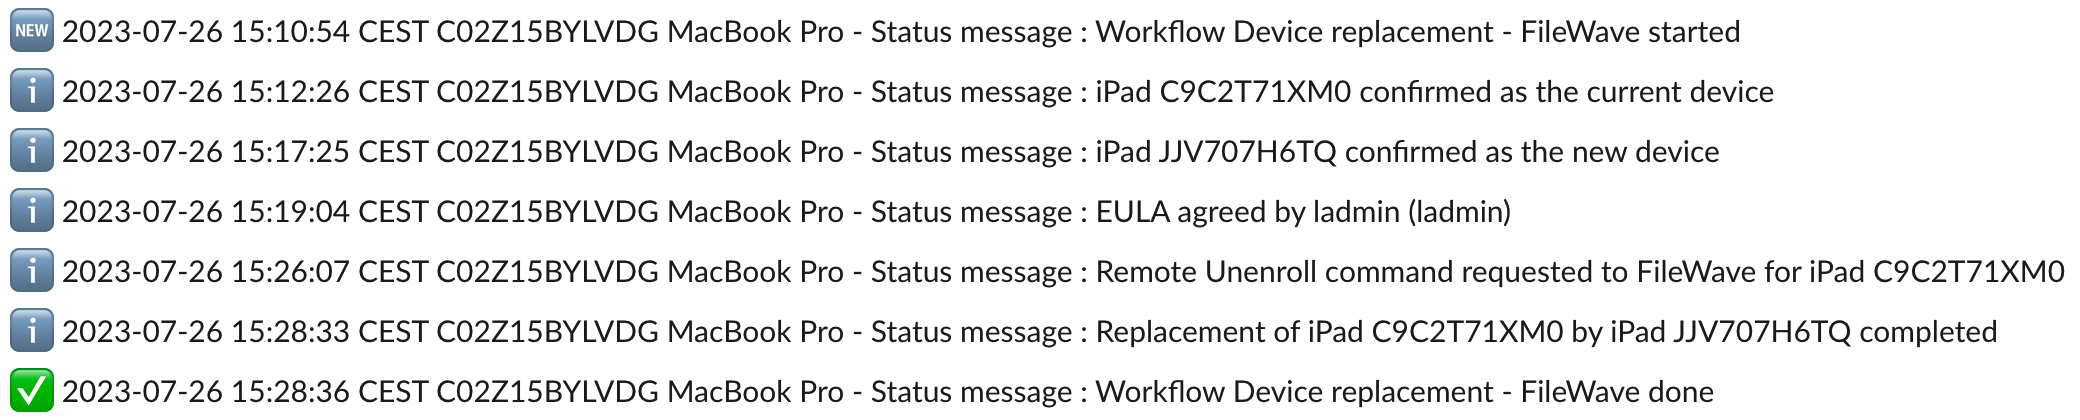
Integrating Telepod with FileWave
What
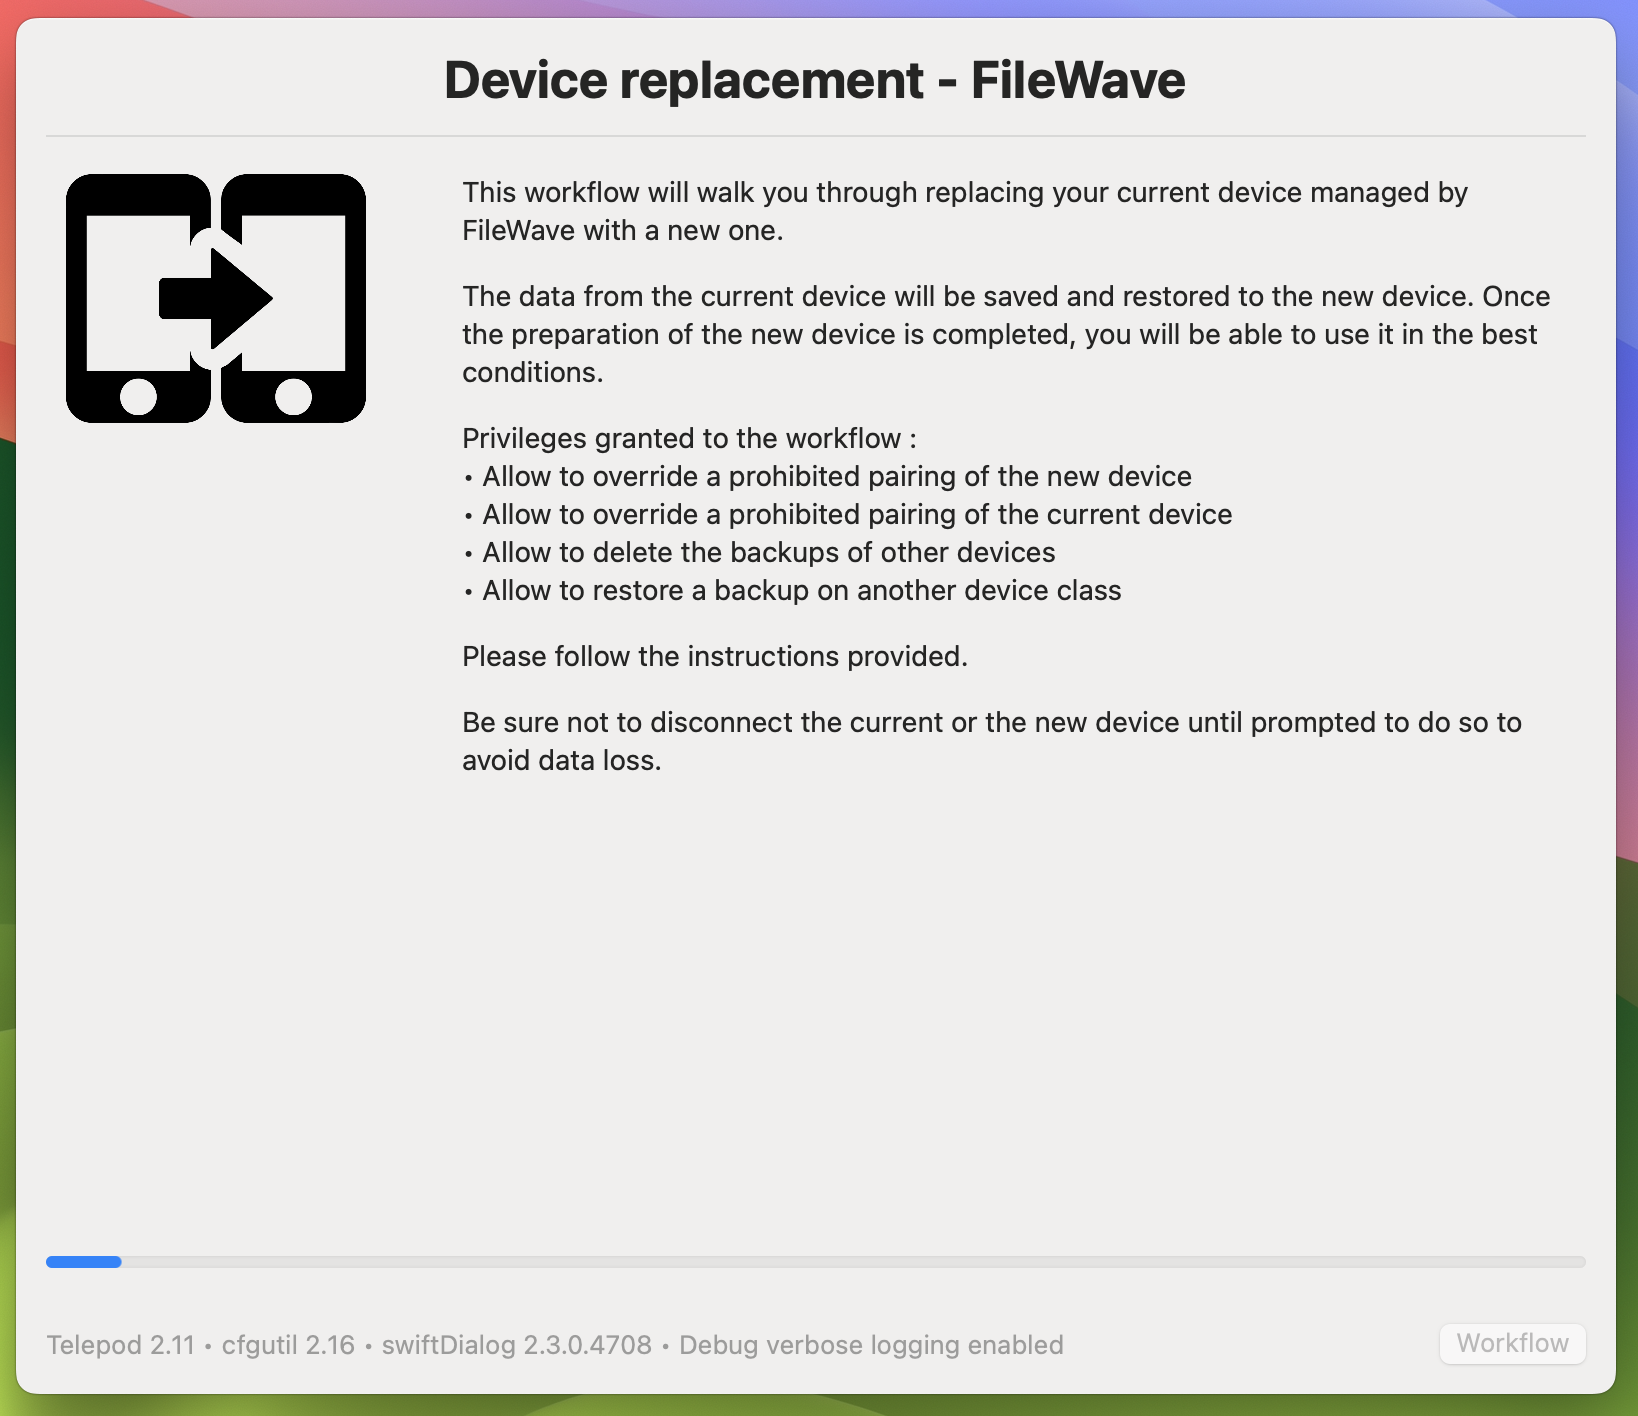
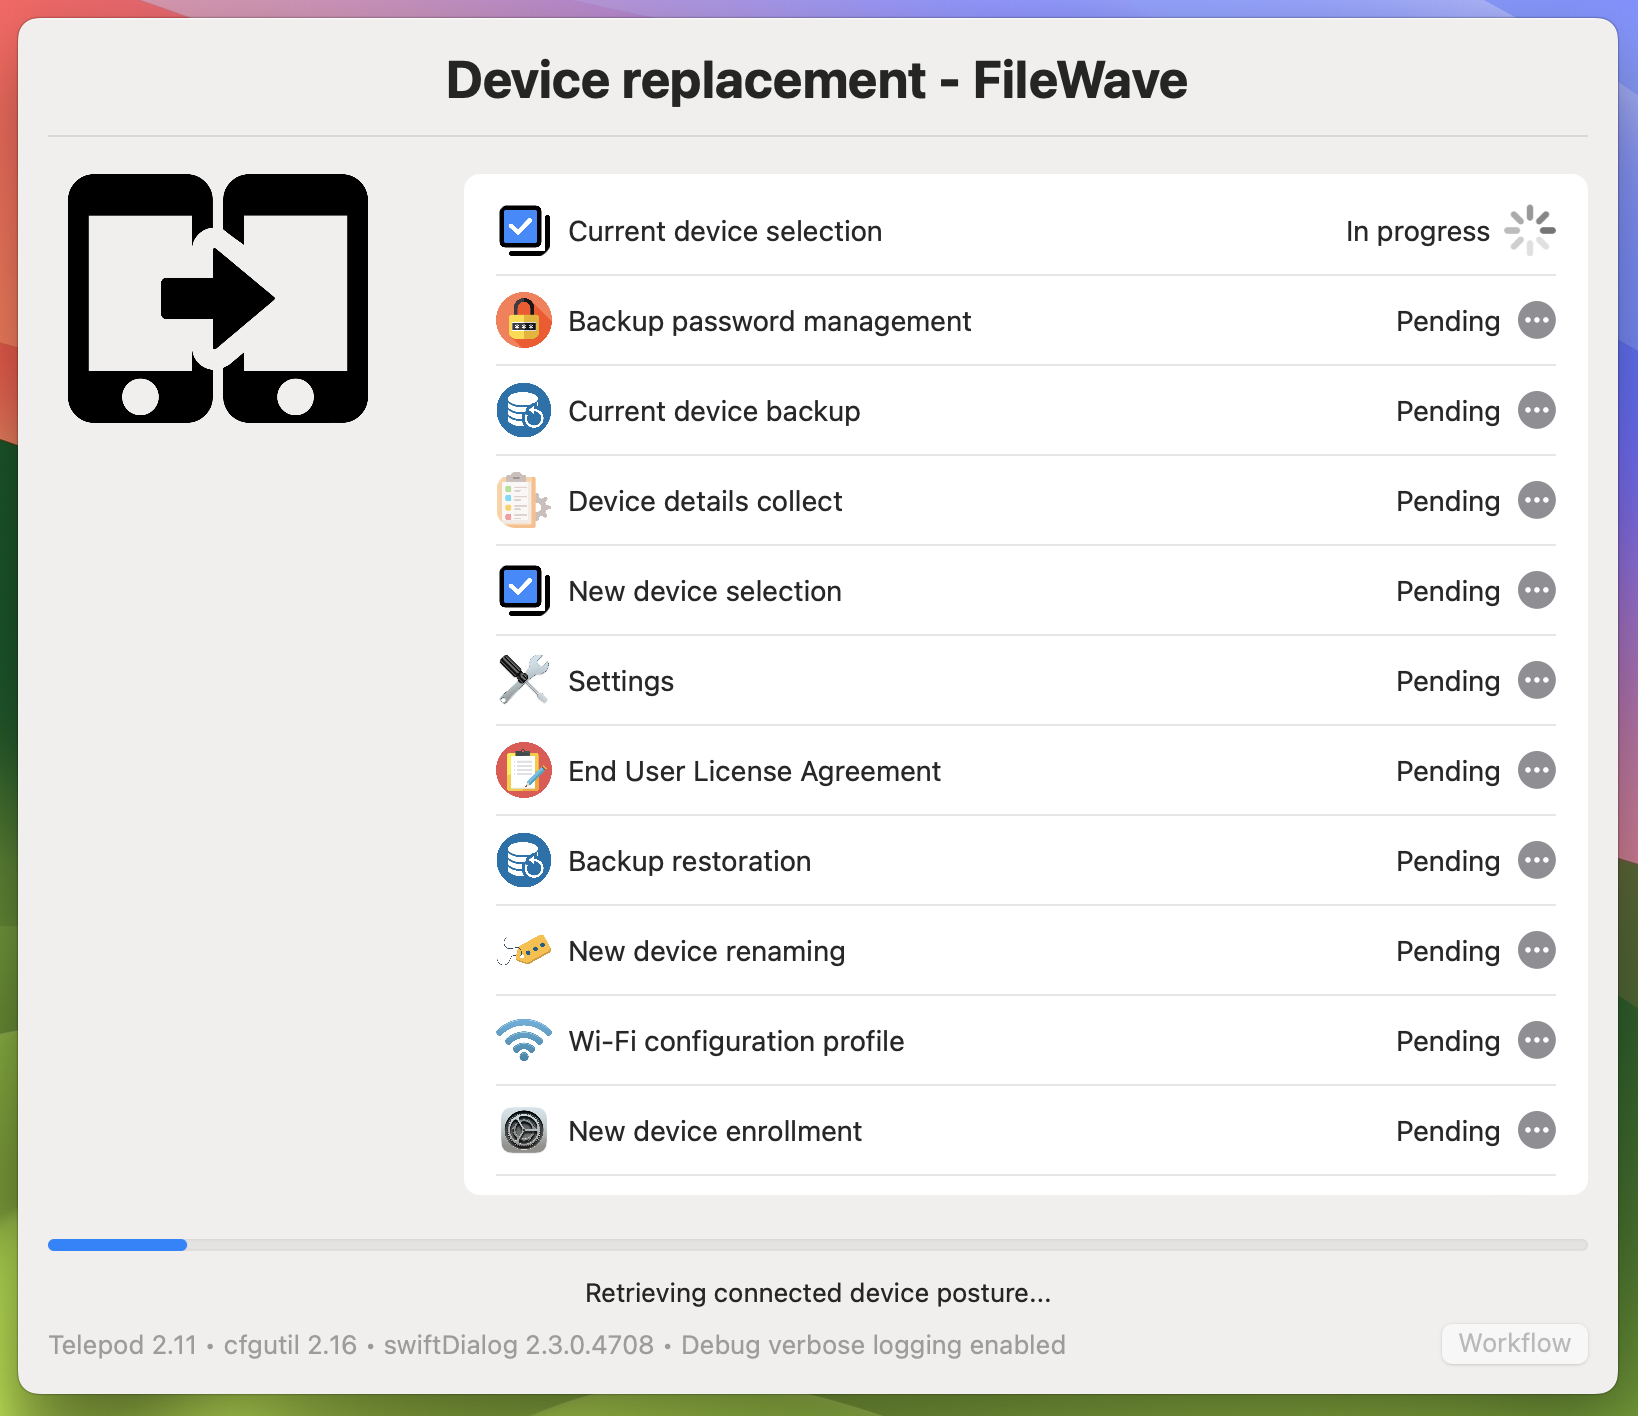
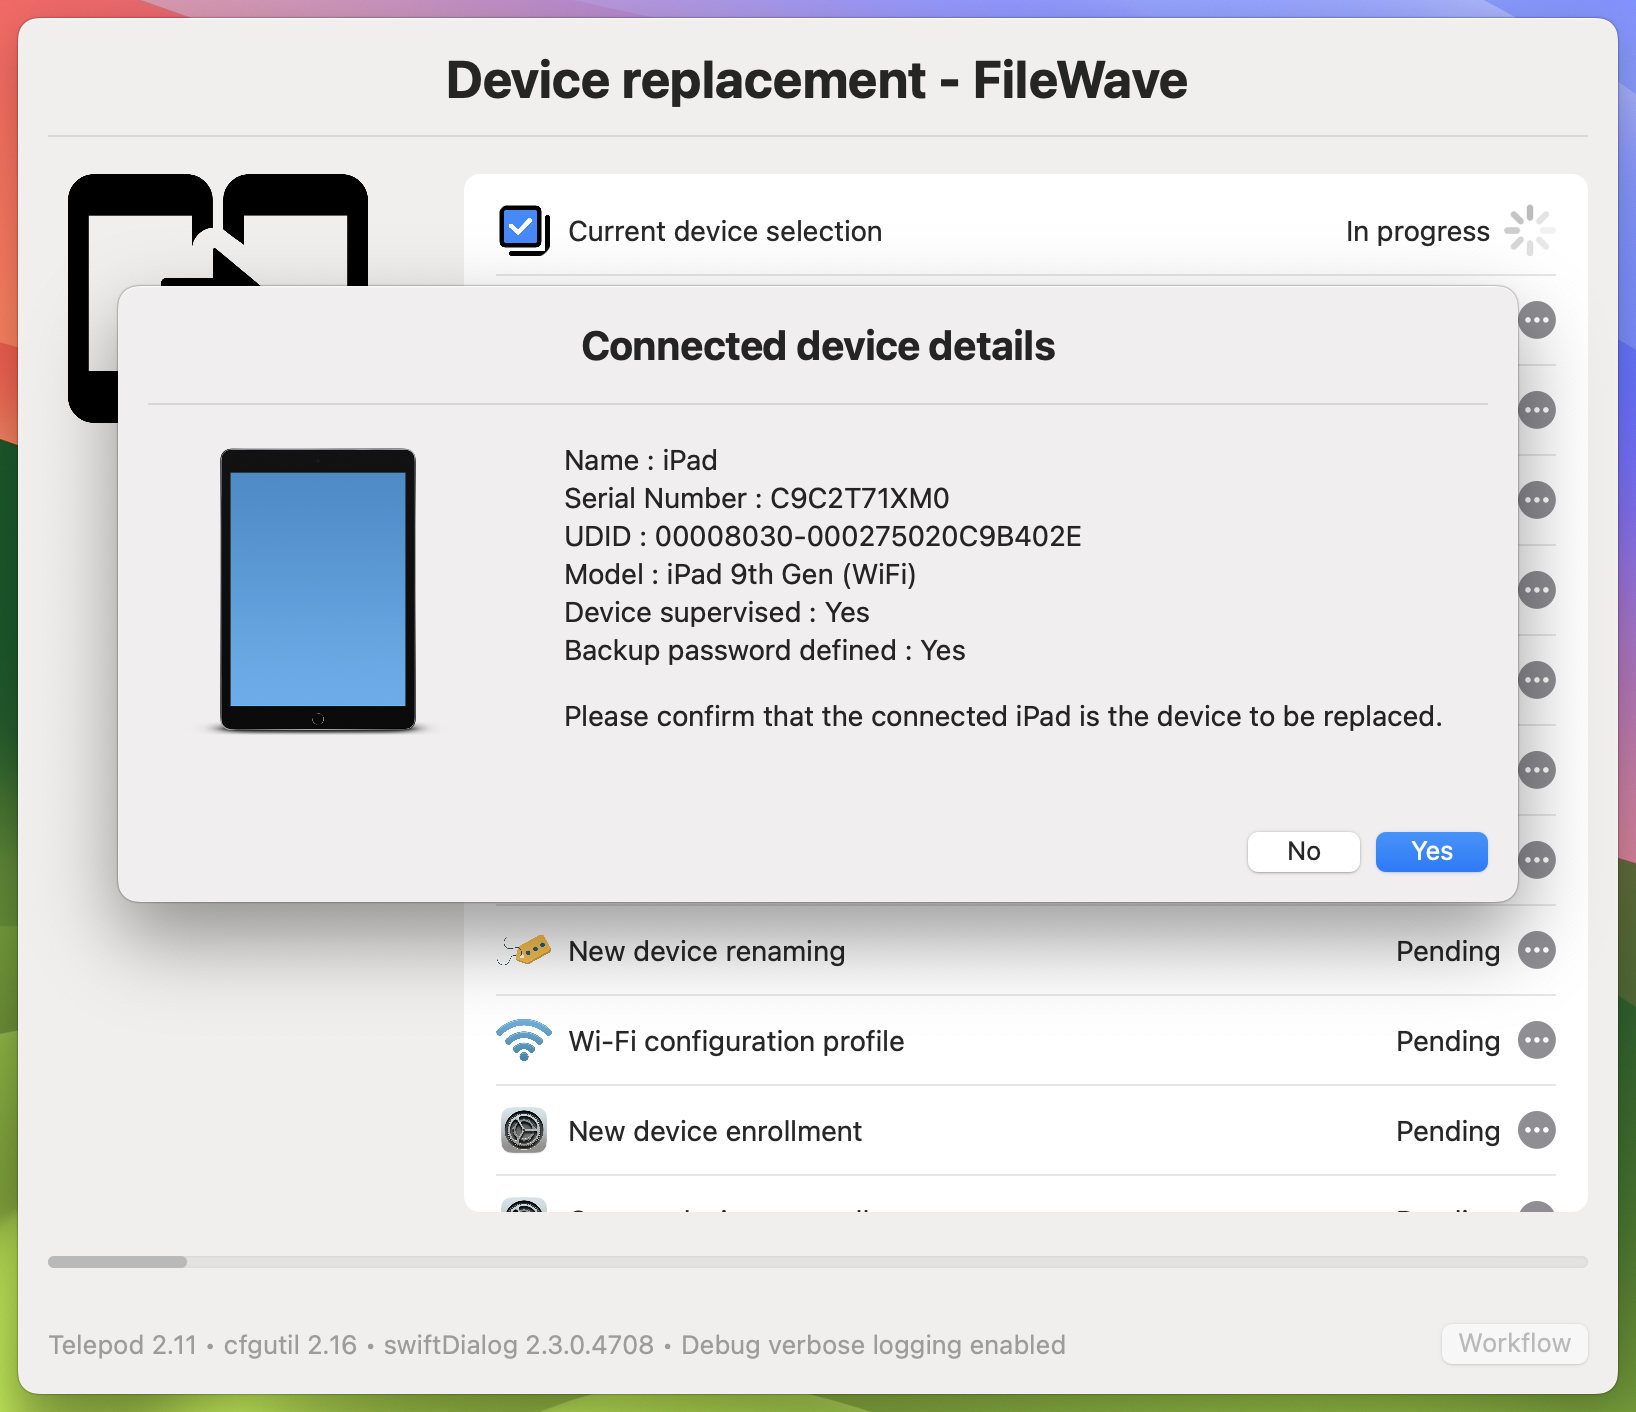
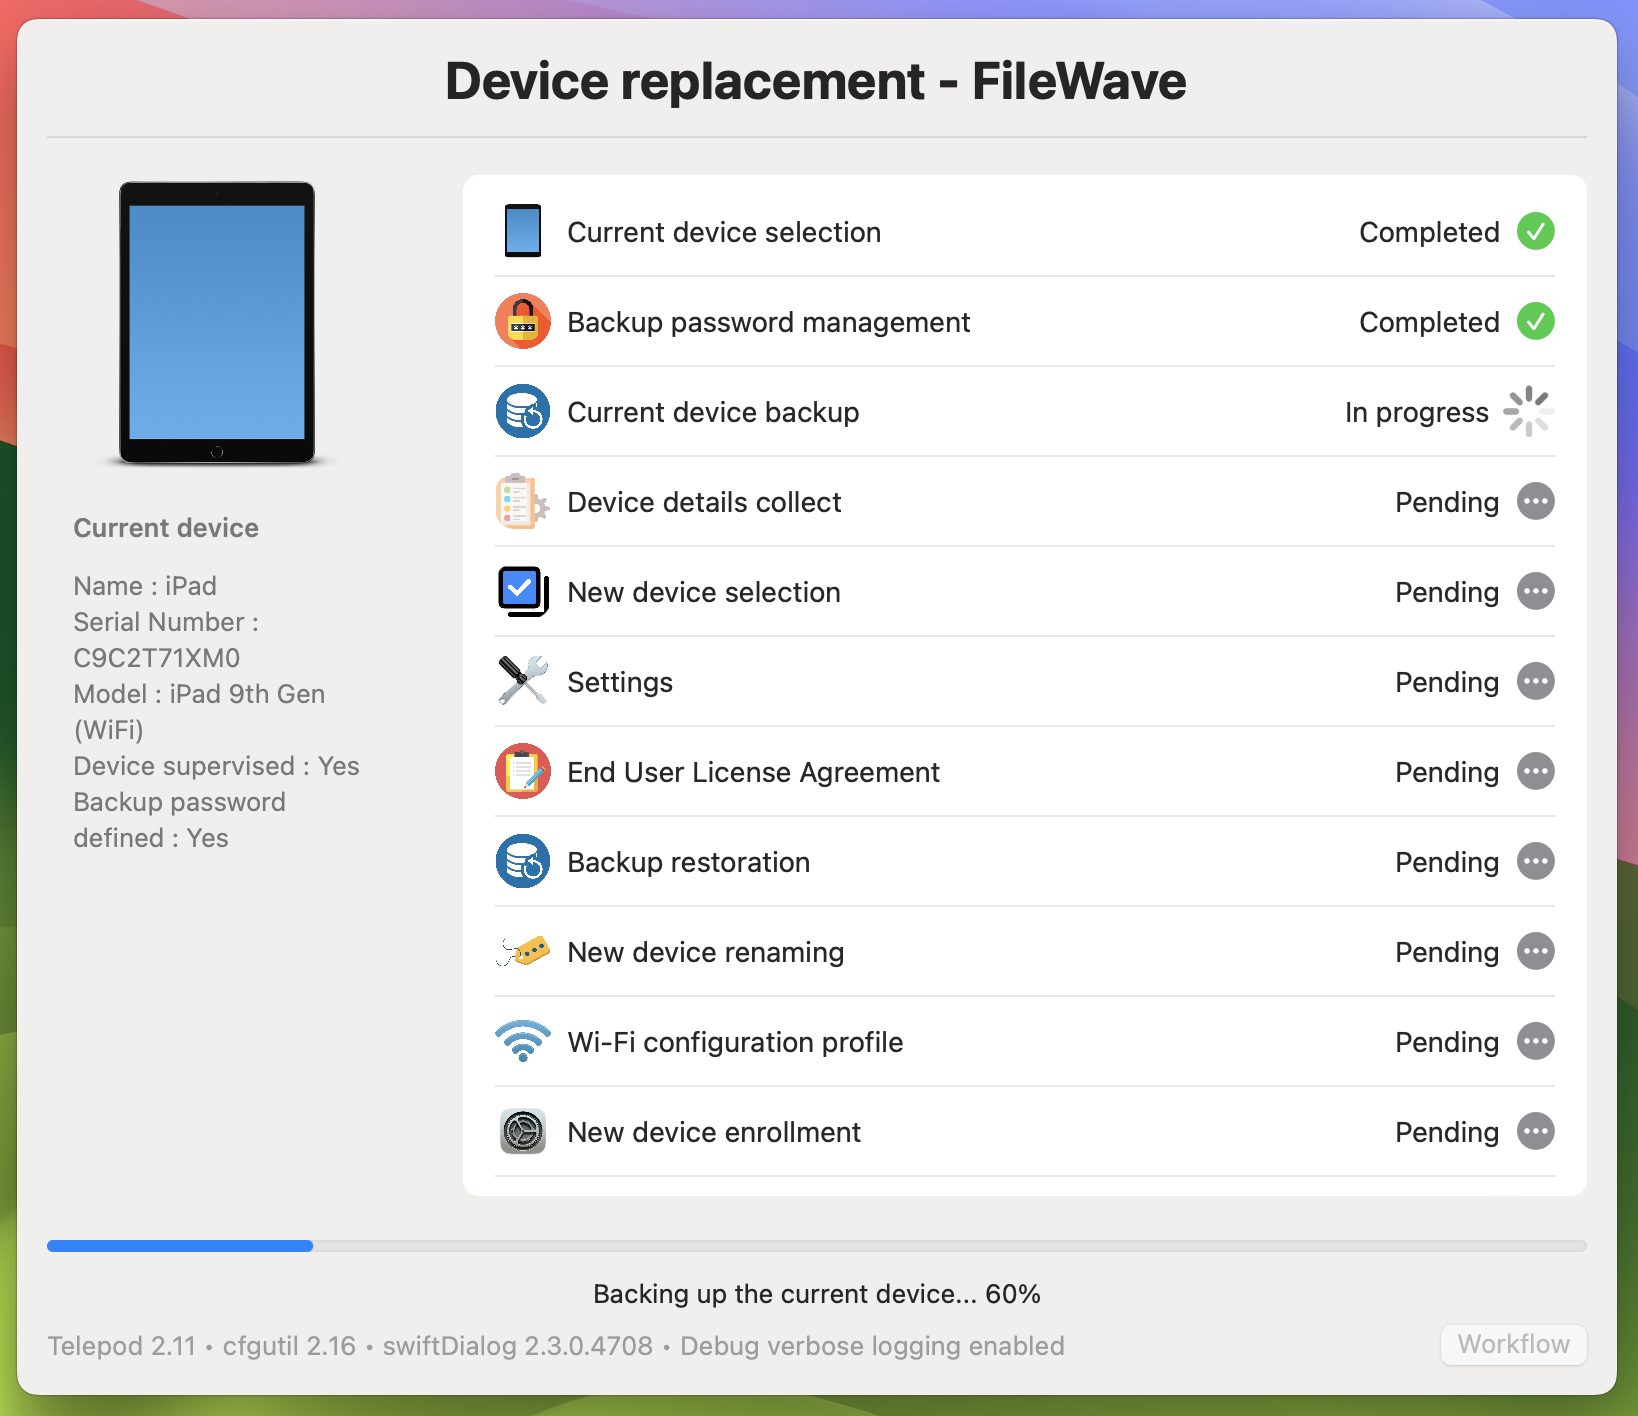
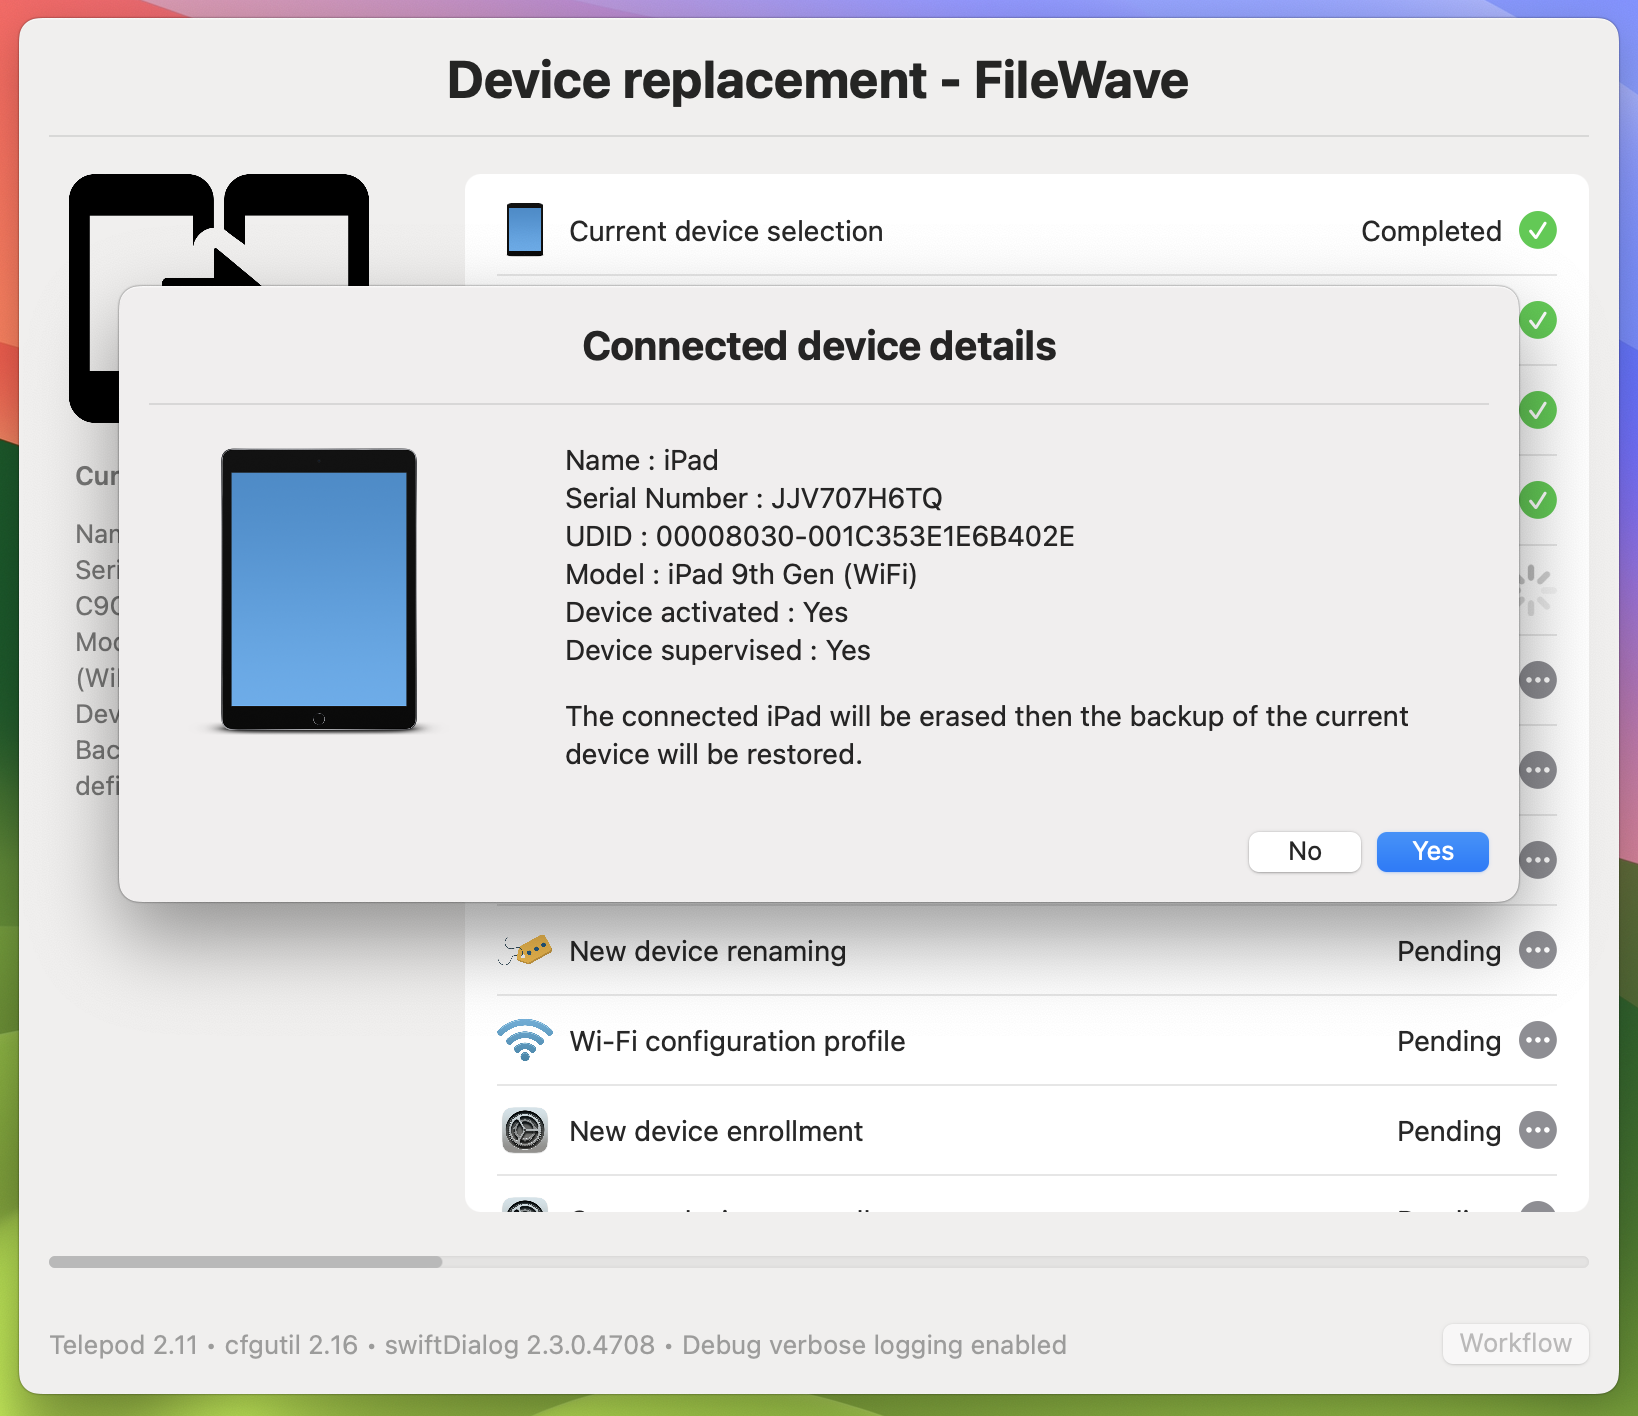
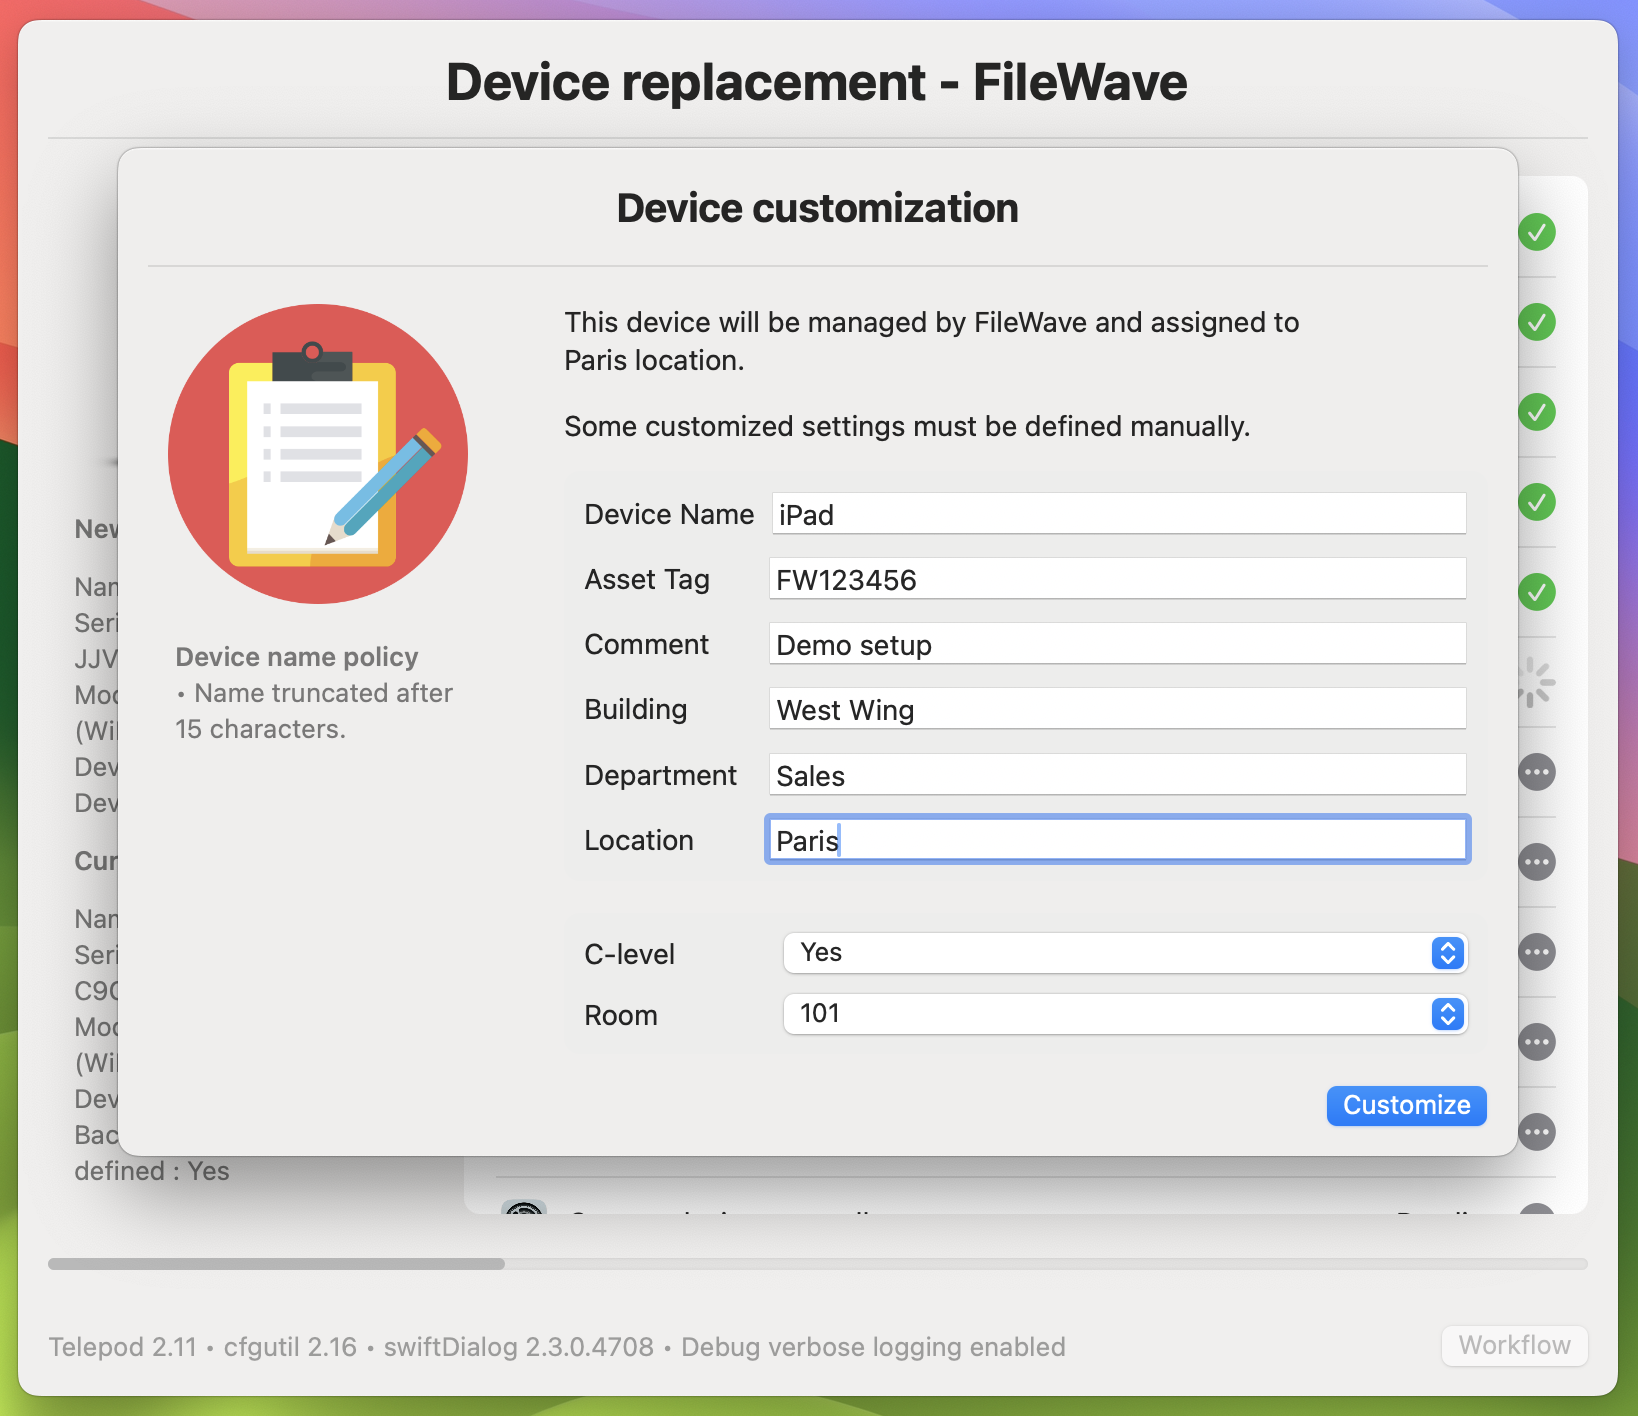
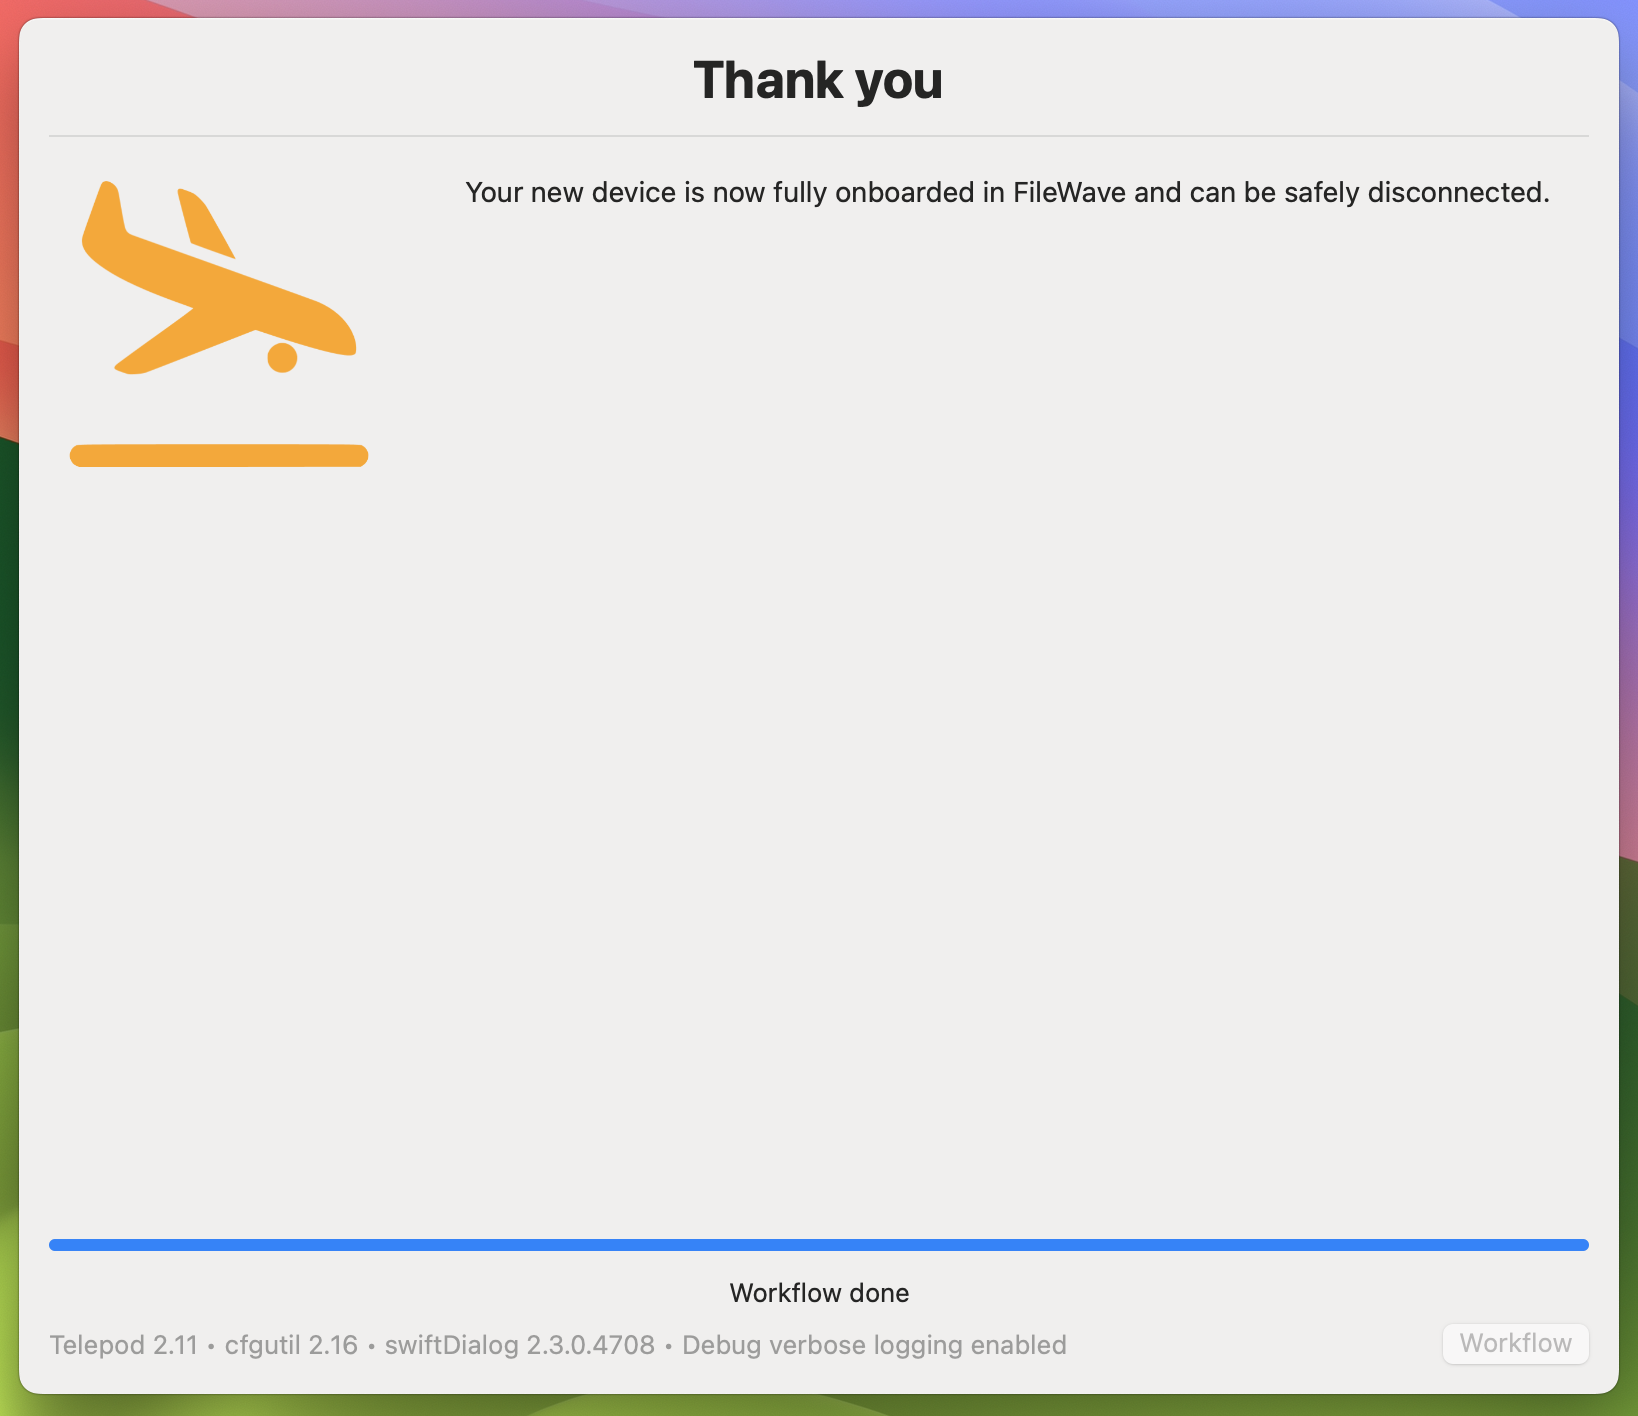
This article discusses Telepod, an automaton created to streamline the lifecycle of an iOS device. Telepod enables the backup and restoration of new iOS devices without iCloud, remotely monitored by IT support. It can work as part of a Mobile Device Management (MDM) solution, like FileWave, to retain the Automated Device Enrollment configuration during MDM migrations.
When/Why
Telepod is essential when setting up new iOS devices, replacing existing devices, or migrating devices between MDM solutions. It offers a streamlined and efficient method to manage iOS device lifecycles, which is particularly useful in large-scale environments where multiple devices need to be managed simultaneously.
How
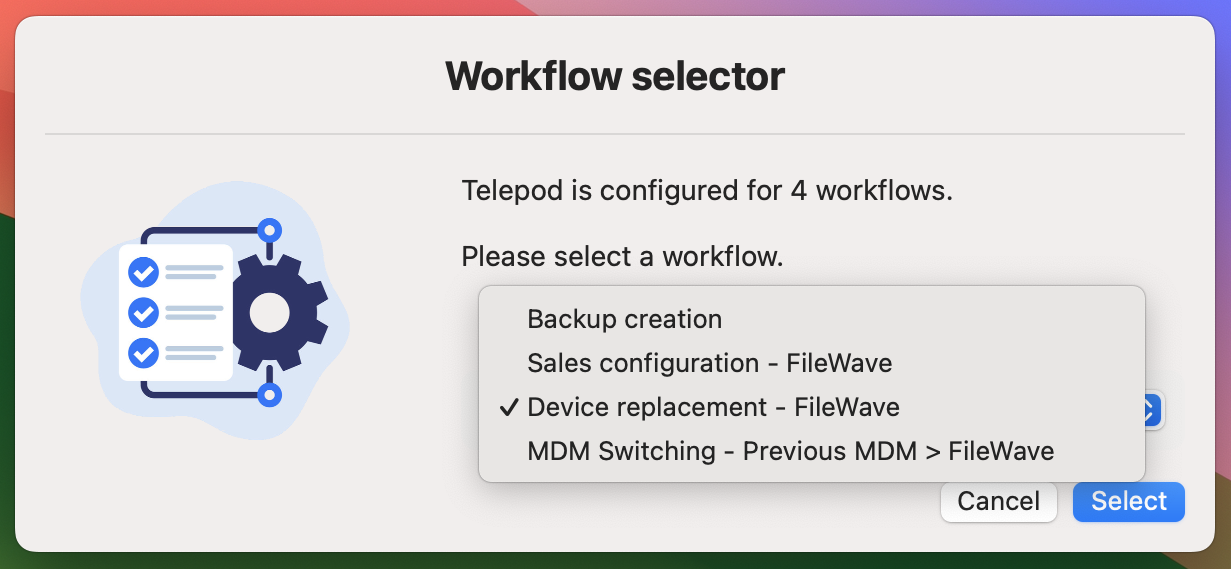
Telepod operates through highly customizable workflows, launched from an assistant available in the Self Service of a Mac enrolled in an MDM solution. Currently, there are four types of workflows:
-
Migration (MDM switching): This migrates a device from one MDM to another. No data transfer occurs, and devices are enrolled in the new MDM using Device Enrollment.
-
Replacement: This replaces a current device with a new one. It supports two main use cases: device switching under the current MDM and MDM switching to a new MDM.
-
Setup: This sets up a new device from the backup of another device acting as a model.
-
Backup: This creates a backup of a device acting as a model, allowing other new devices to be set up.
Data is transferred locally over a wired connection for Backup, Replacement, and Setup workflows, bypassing the need for iCloud. Backups can be stored centrally in a distribution point, making them available worldwide.
Telepod's latest version includes a new user interface based on swiftDialog. The previous interface, based on DEPNotify, is still available to ensure a smooth transition for existing users.
The tool supports multiple languages, currently available in English and French, and can be localized to other languages as required. Telepod is a "turnkey" software, meaning no scripting knowledge is required for implementation or upgrade.
Complete documentation on how to use Telepod with FileWave is provided upon purchase, offering detailed instructions and support. Please note that Telepod supports a variety of MDM solutions with FileWave included.
 |
 |
 |
 |
 |
 |
 |
 |
 |
 |
 |
 |
Demo
Demo : Replacement / Device switching (DEPNotify)
Related Links
- Telepod Official Website - Comprehensive information about Telepod, its features, and support.
- Management solutions support (agnosys.com)
- Telepod - Capacities - EN - Agnosys
- Integrating MacOnboardingMate (MOM) with FileWave
- Integrating EasyLAPS with FileWave
AutoPkg with FileWave
The AutoPkg chapter of our Knowledge Base provides comprehensive guidance on using AutoPkg and AutoPkgr with FileWave to streamline software deployment. It includes articles on the new integrated AutoPkg feature in FileWave 15.5 for easy package creation, as well as detailed instructions on leveraging the full AutoPkg and AutoPkgr tools for advanced package management and customization.
AutoPkg - FileWave Integrated (v15.5+)
What
In FileWave version 15.5.0, we have introduced direct integration with AutoPkg, significantly streamlining the process of creating and deploying software packages. Administrators can now create new Filesets by selecting AutoPkg, allowing them to search for a software package and generate the Fileset with a single click. This integration simplifies the deployment workflow by eliminating the need for external tools or complex configurations.
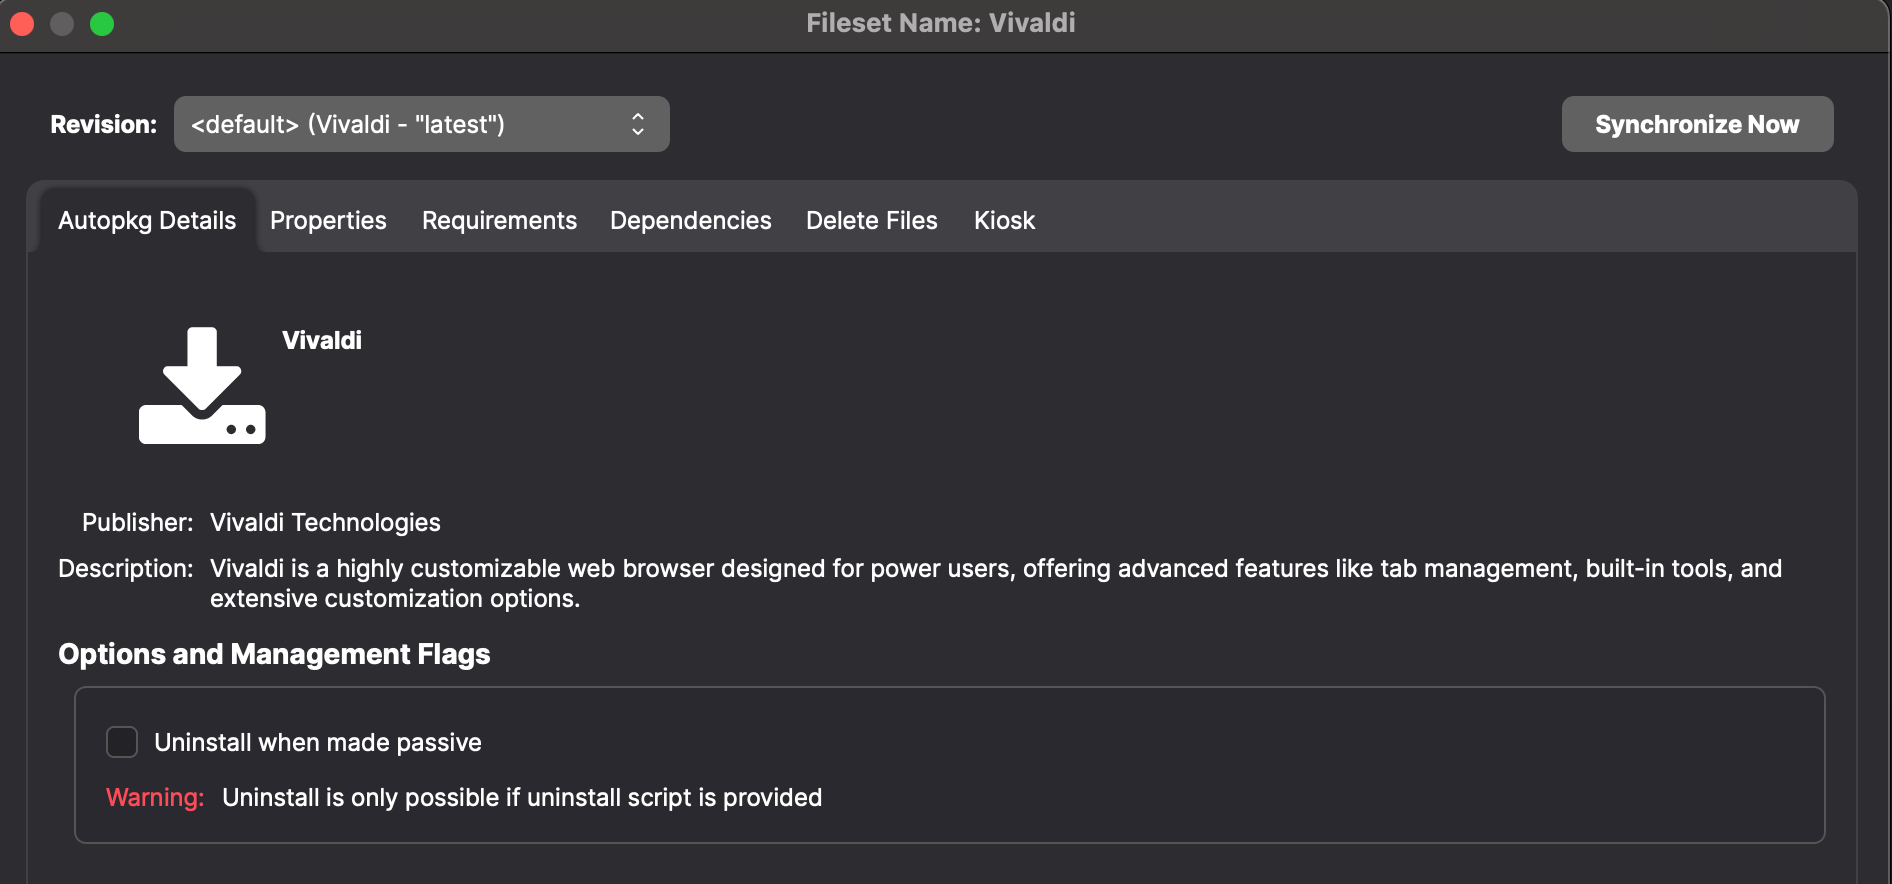
Within the Fileset properties, administrators have the option to select whether the Fileset should be uninstalled when the association between the Fileset and any clients is removed. Version management is also made more accessible. By managing revisions in the Fileset properties, you can choose to deploy the latest version of the software or select an older version as needed. For example, if you need to deploy a specific version of Google Chrome, such as 108.105.10.2, for a certain period, you can select that version and later update to a newer release when appropriate.
Unlike the traditional use of AutoPkg, which typically involves installing it on a macOS system and customizing recipes with various repositories, FileWave’s implementation focuses on simplicity and security. We have limited the integration to a curated set of known repositories to prevent the addition of potentially rogue repos. While this means that some software may not be available, we are open to considering requests for additional repositories to be added.
This streamlined approach is designed to make it easier for FileWave administrators who want a hassle-free method to find and deploy installers without dealing with complex configurations. For power users who require more advanced functionality, traditional use of AutoPkg remains available. They can continue to build custom recipes and add their PKGs to FileWave as PKG Filesets, just as before.
When/Why
When to Use
This feature is ideal when you need a quick and straightforward way to deploy common software packages to your devices. If you’re looking to reduce the time and complexity involved in creating Filesets, the AutoPkg integration provides a user-friendly solution. It is particularly useful for administrators who prefer not to delve into the intricacies of AutoPkg configurations but still want the benefits of automated package management.
Why This Feature Matters
The integration of AutoPkg directly into FileWave 15.5 enhances efficiency and simplifies the software deployment process. By offering a curated set of repositories and an intuitive interface, administrators can save time by quickly creating and deploying software packages without the need for external tools or manual configurations. This approach maintains control over software versions, allowing you to ensure that specific versions are deployed when necessary and updated on your schedule.
Security is also enhanced by using known repositories, preventing the introduction of unverified or malicious software into your environment. The reduced complexity lowers the learning curve associated with AutoPkg, making package deployment accessible to administrators with varying levels of experience. By focusing on ease of use, this feature empowers administrators to manage software deployments more effectively, without sacrificing control or security.
How
Creating an AutoPkg Fileset:
With the AutoPkg integration, creating a new Fileset is as simple as selecting the AutoPkg option when adding a new Fileset. You can then search for the desired software package and create it with a single click. The Fileset properties allow you to configure uninstallation behavior and manage software versions according to your deployment needs.
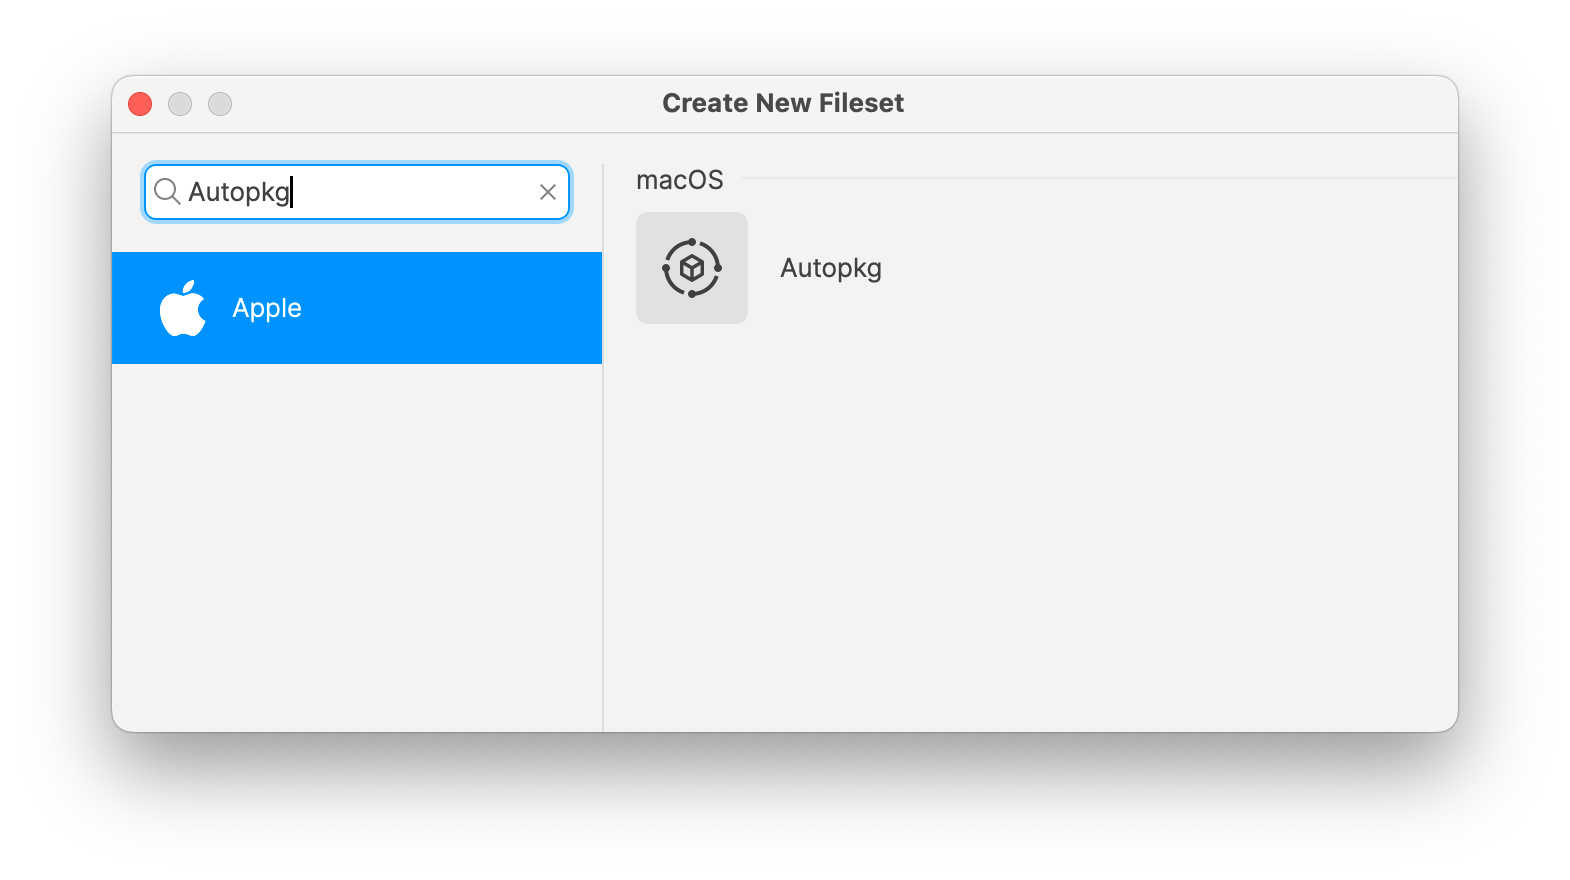
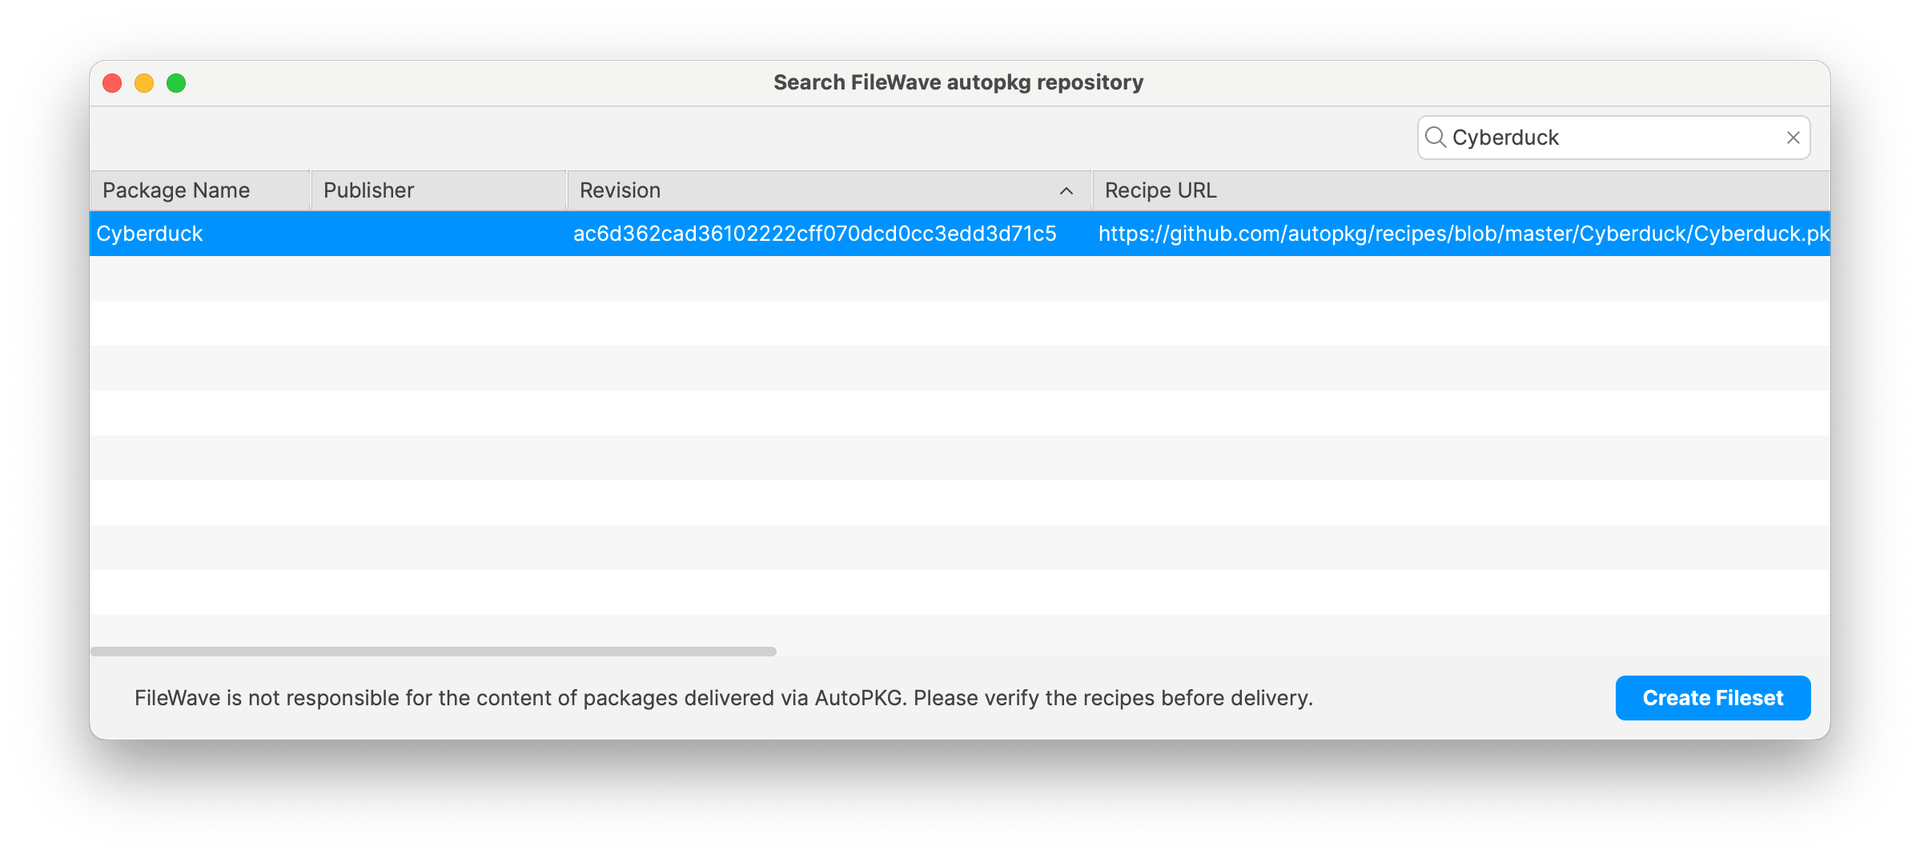
- Create a New Fileset, and select Apple so that you can pick Autopkg as the type:
- Search for software. Note that the feed of repos does not contain descriptions. We will be working on labeling things, but note that this process is manual and there are many items. The Recipe URL can be very helpful to understand where it comes from, in order to assess what it is and how to locate more detail.
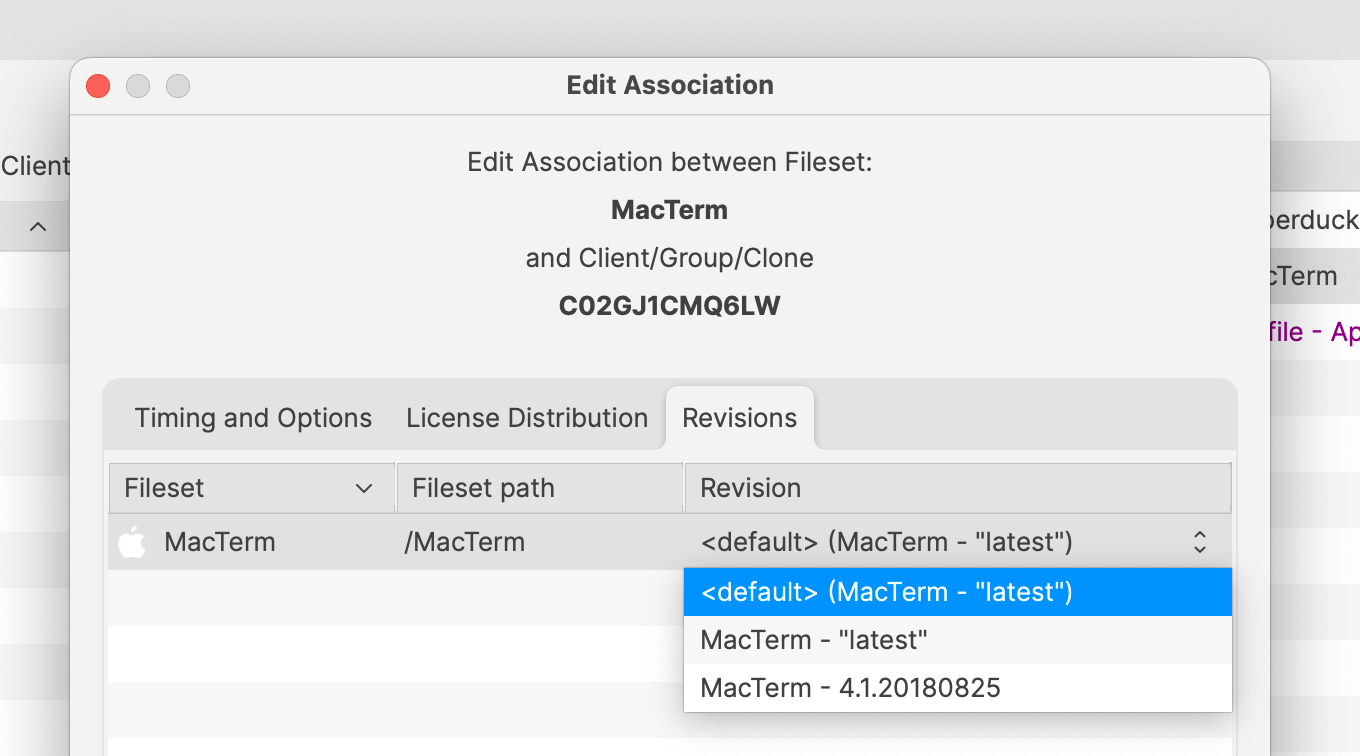
- Create an Association or Deployment. Selecting "latest" ensures upgrades can occur automatically. Otherwise, specify a specific version to stay at that version until later changed.
- Selecting Properties for the Fileset will allow you to select if "Uninstall when made passive" is enabled which will cause an uninstallation to occur when the Association or Deployment is removed.
Please note that only software that includes an uninstall script will act on this option. This is up to the person who created the recipe so it is recommended to test that removal can occur for any software where this is important to you.
Related Content
Digging Deeper
Your FileWave Server will make requests to le7bqzikha.execute-api.us-east-1.amazonaws.com in order to create Filesets with this integration. It is important that if you run your own FileWave Server that it be able to reach that host if you want to take advantage of the integrated AutoPkg functionality.
Using AutoPkgr with FileWave for Advanced macOS Software Deployment
Description
AutoPkg is an automation framework for macOS software packaging and distribution, oriented toward the tasks one would normally perform manually to prepare third-party software for mass deployment to managed clients. An important use in conjunction with FileWave is to provide a way to turn 3rd party software updates into Filesets on an automated basis.
AutoPkg is an automation framework for macOS software packaging and distribution, designed to automate the tasks one would normally perform manually to prepare third-party software for mass deployment to managed clients. While FileWave version 15.5 and later introduces an integrated AutoPkg feature for simplified package creation (as detailed in our new article “Integrated AutoPkg (v15.5+)”), power users seeking advanced functionality may prefer using the full AutoPkg and AutoPkgr tools. This article focuses on leveraging AutoPkgr with FileWave to automate the process of turning third-party software updates into Filesets on an automated basis, providing greater control and customization options for sophisticated deployment scenarios.
Ingredients
- FW Admin
- AutoPkgr Installer
- An 'always on' computer
Directions
Complementing the below setup, there is also a Foundry presentation about this and, additional configuration and typical stumbling blocks: FileWave and AutoPkg
Setup FileWave
- Go to FileWave Admin -> Assistants -> Manage Administrators

- Click on the + button to add a new Administrator
Select Local Account, (for example autopkg and the password autopkg as well) - Go to Permissions tab and click on Select None
- Allow the autopkg user to 'Modify Filesets' and 'Set Permissions' as per the above screenshot.
- Click Apply
- Confirm with OK
Setup AutoPkgr
- Go to https://github.com/lindegroup/autopkgr/releases/latest
- Download, install and launch AutoPkgr
- Launch AutoPkgr, Click on "Install AutoPkg" , and "Install Git"

- Go to Folders & Integration and click on Install FileWaveImporter:

- Click on Configure FileWaveImporter:

- Enter your FileWave Server Hostname

-
- FileWave Server Port is already set to 20016
- Username is e.g. autopkg
- Password is e.g. autopkg
- Click on Verify to validate the setup
- Click on Save and Close
- Go to Repos & Recipes and verify that https://github.com/autopkg/recipes.git and https://github.com/autopkg/filewave/git are checked


- Make sure that 'Active recipe list' has added com.github.autopkg.filewave:

- Now You can run a Recipe for example Java8. To find it quickly enter filewave on search bar and check the Java8 recipe:

Security and Trust Relationship
Running recipes directly from a cloned repo will bypass AutoPkg's security mechanism. As such an Override recipe should always be created and run. This builds a local recipe with a trust relationship between this and any linked 'parent' recipes, see below. For additional information on Override recipes and more, please view the Foundry video: FileWave and AutoPkg
- Congratulations ! Your AutoPkgr setup is now complete. Choose the recipes you would like to run on a regular basis , and then schedule AutoPkgr to run every 24 hours.

Recipe Updates
On occasion recipes that were working will fail to run. Typically this is because something has changed regarding the 3rd party's website or download. This will require the author of the relevant recipe to update their recipe to implement this change. In this instance of failed recipes, check for recipe updates 'Update Recipes Now'. For any updated recipe, changes should be observed and then the trust relationship will need to be updated too; see below.
Override recipes can additionally customise the Fileset, Fileset groups, etc.
Override Recipes & Trust Relationship
For security, a trust relationship was added between recipes. The idea is the child recipe is made to trust it's parent recipes. If an updated version of a parent recipe is pulled from a repository, then this parent will no longer be trusted by that child, until the trust relationship is manually updated. AutoPkgr does not offer the ability to change trust and so this must be done via the command line.
With no trust, when a recipe is run that relies on parent recipes you will see an error similar when running the recipe from Terminal:
$ autopkg run -v OracleJava8.filewave.local
Processing OracleJava8.filewave.local...
Failed local trust verification.
Receipt written to /tmp/receipts/OracleJava8.filewave-receipt-20180409-141621.plist
The following recipes failed:
OracleJava8.filewave.local
No trust information present.
Nothing downloaded, packaged or imported.In this example, Creating a Recipe Override will create a recipe that has trust added for us. Using the above Java8 example, first make an Override recipe. The Override recipe and initial trust can be created in either AutoPkgr or using the command line. The Java 8 override recipe will be called "Java8.filewave.override". The last entry is reference to the parent recipe to be overridden (this can be either be recipe name or it's identifier, recipe name used in this example):
$ autopkg make-override -n Java8.filewave.override Java8.filewaveBy making the override file in this way, the trust relationship has been added automatically to the Override recipe. Now there is a trust relationship, the override file can be used to run the recipe (either through Terminal or AutoPkgr):
$ autopkg run -v OracleJava8.filewave.override
Processing OracleJava8.filewave.override...
[lines removed]
The following fileset was imported:
Fw Fileset Id Fw Fileset Group Fw Fileset Name
------------- ---------------- ---------------
194266 Root Java - 1.8.161.12
The following packages were copied:
Pkg Path
--------
/Users/Shared/Autopkg/Cache/local.override.filewave.OracleJava8/Java-1.8.161.12.pkg
The following new items were downloaded:
Download Path
-------------
/Users/Shared/Autopkg/Cache/local.override.filewave.OracleJava8/downloads/Java.dmgIf after updating repos, the trust relationship error is flagged against any recipes, this indicates that a parent has been updated and trust is no longer in place. At this point, the parent should be reviewed to observe the changes made. Changes to a recipe can easily be viewed by navigating to the relevant recipe on GitHub and viewing the 'History'.
Once confirmation has been made that the changes are acceptable, a new trust relationship should be created. As an override file already exits, the trust will need to be updated for the Java 8 override recipe; as such re-trusting all parents:
$ autopkg update-trust-info Java8.filewave.overrideAlthough it is possible to disable trust relationship, this should not be recommended for security reasons. Current status can be seen by running the following and checking the value of 'FAIL_RECIPES_WITHOUT_TRUST_INFO':
$ autopkg infoIt is possible to temporarily override the trust relationship, such that it is ignored:
$ autopkg run --ignore-parent-trust-verification-errors [name of recipe]Important
FOR SECURITY REASONS, IT IS ALWAYS RECOMMENDED THAT RECIPES ARE CHECKED BEFORE INGESTING INTO YOUR FILEWAVE SERVER AND CREATED FILESETS ARE SUBSEQUENTLY CHECKED ON TEST MACHINES BEFORE DEPLOYING TO LARGER GROUPS OF MACHINES
Related Content
- Integrated AutoPkg (v15.5+)
- Autopkg(r) FAIL_RECIPES_WITHOUT_TRUST_INFO
- FileWave & AutoPkg Instructions - https://github.com/autopkg/filewave
- The primary site for AutoPkg - http://autopkg.github.io/autopkg
- Github Site for AutoPkg - https://github.com/autopkg/autopkg
- AutoPkgr website - http://www.lindegroup.com/autopkgr
- AutoPkg Trust - https://github.com/autopkg/autopkg/wiki/AutoPkg-and-recipe-parent-trust-info
Autopkg(r) FAIL_RECIPES_WITHOUT_TRUST_INFO
AutoPkg(r) FAIL_RECIPES_WITHOUT_TRUST_INFO
Description
Autopkg provides security through trust relationship. Each recipe is set to trust any parents. If those parents change, the trust will be broken until the recipe is informed to trust these updated parent recipes. Message may read as follows with no exit status error:
WARNING: com.github.autopkg.filewave.OracleJava8 is missing trust info and FAIL_RECIPES_WITHOUT_TRUST_INFO is not set.
Proceeding...This is a generic Autopkg(r) message and details on Trust Info configuration to address this may be found at AutoPkg and recipe parent trust info
Typical parent updates are due to URL changes in a download recipe.
FileWave 13
After to upgrading to FileWave 13, the following errors may be experienced:
Exit Status 108:
WARNING: com.github.autopkg.filewave.OracleJava8 is missing trust info and FAIL_RECIPES_WITHOUT_TRUST_INFO is not set. Proceeding...
Command '['/Applications/FileWave/FileWave Admin.app/Contents/MacOS/FileWave Admin', '-u', u'autopkg', '-p', u'autopkg', '-H', u'filewave.server.com', '-P', '20016', '--listFilesets']' returned non-zero exit status 108or
Exit Status 109:
WARNING: com.github.autopkg.filewave.Evernote is missing trust info and FAIL_RECIPES_WITHOUT_TRUST_INFO is not set. Proceeding...
Error in com.github.autopkg.filewave.Evernote: Processor: com.github.autopkg.filewave.FWTool/FileWaveImporter: Error: Error importing the folder '/Users/username/Library/AutoPkg/Cache/com.github.autopkg.filewave.Evernote/Evernote/Evernote.app' into FileWave as a fileset called 'Evernote - 7.7'. Reason: Command '['/Applications/FileWave/FileWave Admin.app/Contents/MacOS/FileWave Admin', '-u', u'autopkg', '-p', u'autopkg', '-H', u'filewave.server.com', '-P', '20016', '--importFolder', u'/Users/username/Library/AutoPkg/Cache/com.github.autopkg.filewave.Evernote/Evernote/Evernote.app', '--name', u'Evernote - 7.7', '--root', u'/Applications/Evernote.app']' returned non-zero exit status 109FileWave 13 has increased security and the server certificate is part of this security. There are also changes and additional options for FileWave Administrator Preferences. As such, some configuration changes will be necessary.
FileWave Admin
Additionally, if using a self-signed certificate, please observe the necessary steps for FileWave Admin in the following article to ensure you have a local copy of the certificate: Self-Signed SSL Certificates Going Forward
Directions
Exit Status 108
This is likely to be one of the following:
- Server Certificate
- Autopkg(r) setting - Server Name
- Autopkg(r) setting - User/Password
- An old expired certificate is in the Keychain
Server Certificate
Confirm that your server meets necessary requirements. For example:
- Server Common Name matches Server Name
- Certificate has not expired
Further details on certificates can be seen at: Root Trusted SSL Certificate (Using and Renewing)
Server Name
The following preference for server name, configured for Autopkg(r), needs to match the server address/common name and may not be, for example, IP or "localhost".
The following command may be use to confirm the current server settings of Autopkg(r). This should be run as the user and not root:
defaults read com.github.autopkg FW_SERVER_HOSTIf the response of the server does not match the server's address/common name, then the value will need to be amended to match. Using the example above, server address/common name "filewave.server.com", the command should be:
defaults write com.github.autopkg FW_SERVER_HOST filewave.server.comUser settings
Prior to FileWave 13, the settings for the user, e.g password, could be left blank and the default password would be used. They must now be filled in.
The following command may be used to set the user and password (example username and password of autopkg): This should be run as the user and not root:
defaults write com.github.autopkg FW_ADMIN_USER autopkg
defaults write com.github.autopkg FW_ADMIN_PASSWORD autopkgNote, both the above may be observed and set through Autopkgr: 'Folders & Integration' > 'Configure FileWaveImporter'

Expired Certificate
Remove old expired certificates from the keychain. Check to ensure they are removed from both:
- login
- System
Exit Status 109
Manage Administrators
FileWave 13 has additional options and amended default settings for Administrator Preferences. If exit status 109 is seen, this may indicate that the settings for the 'autopkg' Administrator account need addressing.
Ensure the 'autopkg' user has permissions to modify Filesets:

Test
Once any of the above have been amended, re-run the recipes.
Cloudflare WARP integration with FileWave (macOS/iOS/Windows/Android)
Description
Cloudflare WARP is a popular choice of software to deploy to devices. This process can be simplified with FileWave.
Third Party Software
Cloudflare WARP is a third party application. The details provided are for example only and are unsupported by FileWave.
Ingredients
- Software installer for macOS and/or Windows, PKG/MSI
- VPP for iOS
- EMM for Android
- Configuration files
Information and resources are provided via the Cloudflare Managed Deployment documentation and the Cloudflare WARP Download page.
Directions
Cloudflare WARP has options for macOS, Windows, iOS and Android.
macOS
Cloudflare WARP for macOS requires the PKG installer, plus a configuration profile.
- Create a Fileset Group and name as desired, e.g Cloudflare macOS
- Download the Cloudflare PKG
- Drag the PKG into the FileWave Admin Fileset Group created above
- Highlight the Fileset Group and choose to create a New Desktop Fileset
- Select Profile
- In the Profile Editor window choose the Custom Settings Payload and Configure
- The profile may be built from scratch of the Cloudflare example template could be downloaded, benefitting from the 'Upload file' option within the Profile Editor
- If building manually, the preference domain should be: com.cloudflare.warp
- Edit or add/remove keys and values as required. Details of Cloudflare Parameters below
- Associate the Cloudflare Fileset Group to one or more test devices and deploy once satisfied all is well
Example Fileset Group

Example Custom Settings Payload, edit details as required

Windows
Cloudflare WARP for Windows requires the MSI installer, plus an XML configuration file
- Download the Cloudflare MSI
- Drag the MSI into the FileWave Admin Fileset view, creating a new Fileset
- Download the mdm.xml template provided by Cloudflare or create one
- Create a folder called Cloudflare within the ProgramData folder of the Fileset
- Upload the XML file into this Cloudflare directory
- Edit or add/remove keys and values within the XML as required. Details of Cloudflare Parameters below
- Associate the Cloudflare Fileset to one or more test devices and deploy once satisfied all is well
Example Cloudflare Fileset

Example mdm.xml file, edit details as required
<dict>
<key>organization</key>
<string>exampleorg</string>
<key>service_mode</key>
<string>warp</string>
<key>gateway_unique_id</key>
<string>fmxk762nrj</string>
<key>support_url</key>
<string>http://support.example.com</string>
</dict>iOS
Cloudflare for iOS requires the 1.1.1.1: Faster Internet App, with additional configuration
- Purchase the free App Store App: 1.1.1.1: Faster Internet through either Apple Business or School Manager
- Associate the App to the relevant VPP licence and sync VPP in FileWave Preferences; accepting the creation of the new Fileset.
- Double click the newly created Fileset and choose the Configuration tab
- Manually create keys and values or upload the Cloudflare example template file
- Edit or add/remove keys and values within the xml as required. Details of Cloudflare Parameters below
- Associate the 1.1.1.1: Faster Internet Fileset to one or more test devices and deploy once satisfied all is well
Example Custom Settings Payload, edit details as required

Android
Cloudflare for Android requires the 1.1.1.1: Faster & Safer Internet App, with additional configuration
- Choose New Mobile Fileset
- Select Play Store
- Purchase the free Play Store App: 1.1.1.1: Faster & Safer Internet
- Double click the newly created Fileset and choose the Managed Properties tab
- Edit or add/remove values as required. Details of Cloudflare Parameters below
- Associate the 1.1.1.1: Faster & Safer Internet Fileset to one or more test devices and deploy once satisfied all is well
Example Managed Properties, edit values as required

Cloudflare Parameters
All the above example configurations will require adapting to include appropriate keys and values for each environment. Explanations of each key and its possible requirements and values can be found in the Cloudflare Parameters list.
DeepFreeze (macOS/Windows)
Description
DeepFreeze is a common pieces of software used by Administrators, many people have asked us how the two interact. Simply putting the two on one computer would cause the software to conflict, as FileWave would deploy software and DeepFreeze would remove it upon reboot. However, using a slightly modified deployment strategy, you can use FileWave to activate Deep Freeze's commands. In this article, I will describe the necessary steps for deploying a fileset to machines Frozen by DeepFreeze.
Third Party Software
DeepFreeze is a third party application. The details provided are for example only and are unsupported by FileWave.
You will invariably want to do this while users are not using the computers, since you do not want them to make modifications during its thawed boot. Therefore, this script will reboot the computer immediately. To make this script, you'll need to know the Deep Freeze administrator name and password. In your script, substitute your name/pass for 'your_admin' and 'your_password'
Ingredients
- FW Admin
Directions
- Create a new empty fileset (From the Fileset View : New Desktop Fileset > Empty : Type a Name > OK)
- With it selected: Click the Scripts item in the button bar
- Create a new Activation Script and name it.
- Paste the script below and edit
This is to Thaw macOS
#!/bin/sh
/Applications/Faronics/DFXControl.app/Contents/MacOS/DFXControl command your_admin your_password bootThawed
/sbin/rebootThis is to Thaw Windows
@echo off "%ProgramFiles%FaronicsDeep Freeze EnterpriseDFC.exe" yourPassword /BOOTTHAWED shutdown -r- Create a new Pre-Uninstallation Script and name it
- Paste the script below and edit
This is to Freeze macOS
!#bin/sh
/Applications/Faronics/DFXControl.app/Contents/MacOS/DFXControl command your_admin your_password bootFrozen
/sbin/rebootThis is to Freeze Windows
@echo off "%ProgramFiles%FaronicsDeep Freeze EnterpriseDFC.exe" yourPassword /BOOTFROZEN shutdown -rIt will reboot the machine in frozen mode after the fileset has been set to delete
Don't put passwords in scripts. See: Script Best Practices
- Associate and schedule the script
- Schedule the activation time for before you want to make changes
- Schedule the delete time for after you are done making changes

-
- Schedule the filesets you want to make changes to the computers

Hello-IT integration with FileWave (macOS)
Description
Hello-IT is a 3rd party tool for macOS designed as a Menu Item to launch scripts as a Self Service tool. The below is an example of how FileWave can deliver and integrate with the tool. Hello-IT has multiple options for the Menu Item list, including:
- Reporting on server status
- Links to Websites
- Reporting information in the Menu Item
- Additional Scripting for Self Service (Including Integration with Slack)
Instructions on Hello-IT may be found via the following link:
https://github.com/ygini/Hello-IT
Third Party Software
Slack is a third party application. The details provided are for example only and are unsupported by FileWave.
Requirements
- Hello-IT installer
- Hello-IT configuration file
Self-Signed Certificates
Although many features of Hello-IT will work fine, the option to report on server status relies upon the ability to pull data from a server. If the server is not trusted, then this will fail. As such, servers with self-signed certificates will always report a failure when using public.test.http (see below)
Some examples below implement Slack, based upon our KB:
Slack integration with FileWave
Directions
Configuration of Hello-IT can be via a Custom Settings payload profile, which may be delivered though FileWave to devices, the basic example of which can be uploaded into a Custom Settings payload and is located within the GitHub repository: https://github.com/ygini/Hello-IT/blob/master/example/Basic%20Example/com.github.ygini.Hello-IT.plist
public.open.resource
This function provides URLs that will launch in the default browser. Editing the provided Fileset, can allow for important websites, e.g. Intranet pages. In this example, FileWave Foundry and Website are offered:
public.open.resource
Dict {
settings = Dict {
title = FileWave Website
URL = https://www.filewave.com
}
functionIdentifier = public.open.resource
}
Dict {
settings = Dict {
title = FileWave Foundry
URL = https://foundry.filewave.com
}
functionIdentifier = public.open.resource
}public.test.http
This function tests for access to a Web server by running a download command and checking the output of the download. If successful all will be well, but if failed, the Menu Item text will become red and a red dot will be highlighted next to the text in the Drop Down.
An md5 checksum is required for the resource, and may be obtained using a curl command. For example, if using the URL: https://custom.filewave.com, the following would be run
Web Resource md5
curl https://custom.filewave.com | md5
% Total % Received % Xferd Average Speed Time Time Time Current
Dload Upload Total Spent Left Speed
100 1406 100 1406 0 0 11051 0 --:--:-- --:--:-- --:--:-- 11070
63e398fd52c3dc883d13401531339f51The payload would then be amended thus:
public.test.http
Dict {
settings = Dict {
repeat = 60
ignoreSystemState = true
mode = md5
originalString = 63e398fd52c3dc883d13401531339f51
title = FileWave Server
URL = https://custom.filewave.com
}
functionIdentifier = public.test.http
}Configuration could be set to point to your FileWave server for example, so users can see that a connection is established.
public.script.item
This function provides the ability to run scripts. In this example, consider the KB article that uses Slack as an IT reporting tool and further utilising this for the following requests:
- Printer ink replacement
- Call the user back
The format of this section of the file could look like:
public.script.item
Dict {
settings = Dict {
content = Array {
Dict {
settings = Dict {
script = slack_printer_ink.sh
title = Dict {
fr = Demander l'encre d'imprimante
en = Request Printer Ink
}
}
functionIdentifier = public.script.item
}
Dict {
settings = Dict {
script = slack_request_callback.sh
title = Dict {
fr = Demander un rappel
en = Request IT Callback
}
}
functionIdentifier = public.script.item
}
}
title = Dict {
fr = Libre-service
en = Self-Service
}
}
functionIdentifier = public.submenu
}First thing to note is that these have been wrapped in their own 'Self-Service' sub Menu Item 'public.submenu'. In the example two scripts have been referenced:
- slack_printer_ink.sh
- slack_request_callback.sh
Scripts should be located in the following directory:
CustomScripts
/Library/Application Support/com.github.ygini.hello-it/CustomScripts/The user may then use the drop down menu to trigger these items, where IT would then receive a Slack message.

Example Filesets
Based upon the above, the following example Filesets include not only the configuration file, but the example scripts that implement the Slack integration. Consider placing these along with the Hello-IT installer in a Fileset Group and associate the group with devices:

Please see the KB on FileWave and Slack with regards to creating the required Slack Webhook. Configuration of the scripts to set the Webhook are the same here, editing the Filesets, selecting the pre-installation script and then editing the 'Environment Variables' such that the 'slack_webhook' is set to the generated Webhook from Slack; replacing 'PLACE WEBHOOK HERE'.
Similarly, if using Legacy Webhooks, the slack_channel variable needs to be edited to match the name of the created channel; for App Webhooks it will be ignored. In the example, this channel is called 'fw_messages'
Profile - Hello-IT
Profile - Hello-IT.fileset.zip
Hello-IT Slack Request Callback
Hello-IT Slack Request Callback.fileset.zip
This script attempts to read the telephone number of the user based upon a directory service entry. If device is not bound or user is not a directory user, no number will be supplied.
Hello-IT Slack Printer Ink
Hello-IT Slack Printer Ink.fileset.zip
Example messages in Slack:


Conclusion
This is just an example of how FileWave can be used to deliver an additional tool to devices, empowering users to easily request resources and where communication may be hindered, allow the user to easily request IT assistance; particularly useful for users who may be remote.
InvGate integration with FileWave
InvGate provides IT Service Management and IT Asset Management tools for service desks and IT operations teams. FileWave can send computer and mobile asset information to InvGate ITSM, keyed by the FileWave "Last Logged in User" field.
This integration gives help desk teams device context while they work on requests, reduces manual lookup between systems, and helps keep user and asset information aligned. For more background, see InvGate's Service Management and Asset Management information.
Third Party Software
InvGate is a third-party application. The details provided are examples only and are unsupported by FileWave.
Step-by-step guide
Set up the integration on the InvGate side:
- Make sure you capture user data in both InvGate and FileWave. LDAP integration in both systems helps keep the user records aligned.
- In InvGate, go to "Admin" > "Integrations" and define the following fields:

- Click "Save"
- Wait for the data to synchronize from FileWave to InvGate.
- Create a new request using the asset information now populated in InvGate. The new assets appear in the left-hand column of the InvGate "New Request" dialog.

Related articles
ServiceNow integration with FileWave
ServiceNow can be provided with device inventory information from FileWave to make the ServiceNow experience much more accurate and rewarding. Previously, a ServiceNow portal app was required to supply this FileWave data, but as of version Orlando of ServiceNow that is no longer required, and the FileWave API can be used directly. This guide, provided as a courtesy for a non-FileWave related system, will show you how to bring the information gathered by FileWave inventory into ServiceNow using the API.
Third Party Software
ServiceNow is a third party application. The details provided are for example only and are unsupported by FileWave.
Step-by-Step Guide
Step 1: Create Data Source

Step 2: Create Request Action
(You should be redirected to the Flow Designer for GET FW REST...see Step 3) |
|

Step 3, Part 1: Create in Flow Designer
|
Create in FLOW DESIGNER, Select #1 “REST step”
-Request Content-
Request JSON -Retry Policy-
Close this browser window/tab to return to the “New Record | Data Source | ServiceNow” window/tab |
|


Step3, Part 2: Set Request Action
|
Under REQUEST ACTION, start typing the name of the Action we just created "GET FW REST" and select it from the drop-down. Submit Hitting 'Submit' will redirect you back to the Data Source list. Select the one we just made, FileWave REST API and select "Load All Records" under Related Links Once the test has completed, go back to FileWave REST API's Data Source page and continue to next step. |
|
Step 3, Part 3: Generate Data Transform
|
Generate Transform(s) — MAKING TRANSFORMS –– On the FileWave REST API page, scroll down to the “Transforms” tab and select “New”
|
|
||||||||||||||||||||||||
|
Select “Mapping Assist” under Related Links You should be able to map a lot of the client's information, for example...
|
|


You can make more maps, like this example for location data:
Scroll down to the “Transforms” tab and select “New”
- NAME: FW Location Map
- SOURCE TABLE: (should auto fill the u_fw_api table)
- ACTIVE: √
- RUN BUSINESS RULES: √
- ENFORCE MANDATORY FIELDS: No
- COPY EMPTY FIELDS: (unchecked)
- CREATE NEW RECORD ON EMPTY COALESCE FIELDS: √
- APPLICATION: Global (disabled)
- CREATED: (disabled)
- TARGET TABLE: Location [cmn_location]
- ORDER: 100
- RUN SCRIPT: (unchecked)
Select “Mapping Assist”
|
FileWave |
ServiceNow |
|
geolocation_latitude |
latitude |
|
geolocation_longitude |
longitude |
|
client_filewave_client_name |
Name |
Once you're finished, save your data, update the Table Transform Map form and continue to next steps.
Part 4: Schedule the Job
Schedule the job
Schedule the import task you just created...recommend at least daily.
System Import Sets > Administration > Scheduled Imports.
Slack integration with FileWave
Description
In some instances it is desirable to receive automated notifications from devices, perhaps based upon time or hardware conditions changing. The following is a practical example using Slack and is provided as an idea of how IT teams can retrieve information. This particular example is based upon devices reporting if the system drive is filling up, with two thresholds set.
Third Party Software
Slack is a third party application. The details provided are for example only and are unsupported by FileWave.
Requirements
- Slack Account and Webhook
- Provided Fileset - SlackDiskUsage.fileset.zip
The provided Fileset is for macOS, but similar could be applied to Windows.
Information
Slack updated their Webhooks. For full compatibility the Fileset includes configuration for Legacy Webhooks, which are ignored by the newer App Webhooks.
\"username\": \"Helpdesk\",
\"channel\": \"#fw_messages\",
\"icon_emoji\": \":computer:\",The App Webhooks are dedicated to a Channel and the name and icon are now set via Slacks's Website
Details on Legacy Webhooks:
https://api.slack.com/legacy/custom-integrations/incoming-webhooks
Directions
Slack Webhook
Slack is a useful tool for communication and the basic option is free. There is also provision for automated posting of messages to a Slack channel, which requires a generated Slack Webhook, as per their guide:
https://api.slack.com/incoming-webhooks
Once generated, the Fileset may be configured to implement this Webhook.
Fileset Configuration
The Fileset has the following components:
- The script to report back to Slack
- A pre-instal script to create a plist configuration file to provide details for the Webhook and desired thresholds for the script
- A LaunchDaemon to trigger the script
- An Activation and Pre-Uninstallation Script, to load/unload the daemon
Plist Configuration File
Once the Webhook has been generated, the Fileset should be edited to match the provided URL by replacing 'PLACE WEBHOOK HERE' with the created Webhook. This needs to be done by:
- Editing the Fileset
- Selecting 'slack_config_disk_usage.sh'
- Choose 'Get Info'
- Select 'Executable'
- Select 'Environment Variables' tab

Similarly, if using Legacy Webhooks, the slack_channel variable needs to be edited to match the name of the created channel; for App Webhooks it will be ignored. In the example, this channel is called 'fw_messages'
There are also two pairs of thresholds. One pair for percentage of disk used:
- space_danger
- space_warning
and a pair for the amount of disk space available (value in GB):
- space_danger_gb
- space_warning_gb
From the example Fileset, a warning message will be delivered if either:
- The percentage used exceeds 80%, the value for space_warning
- The amount of disk space is lower than 50GB, the value of space_warning_gb
However, a more stringent message will be delivered if either:
- The percentage used exceeds 90%, the value of space_danger
- The amount of disk space is lower then 30GB, the value of space_danger_gb
These values should be edited to match desired requirement. Since the script is loaded as a launchd process, once loaded, changes to the script will only be adhered to if the launchd process is stopped and restarted. Providing an additional file, allows for values to be updated in the Fileset which the script will act upon when next triggered; without the need to restart the launchd process.
LaunchDaemon
The LaunchDaemon 'com.filewave.slack_drive_space.plist' is set to run once a week, based upon a random day (Mon-Fri) and a random time (09:00- 18:00). The random nature of the daemon is configured by the Activation Script. Having a random day and time per device, prevents all devices attempting checking in at the same day and time. Default values have been configured, but will be overwritten during Fileset Activation.
Details around the configuration of launchd may be seen at the following resource, should different timings be desired. Note that this would involve editing the Activation Script as well.
Example messages
Warning - Percentage drive space outside of threshold range and available disk space between Thresholds of 20GB and 40GB:

Danger - Percentage drive space outside of threshold range and available disk space lower than Thresholds of 30GB and 50GB:

For self designing messages, the above main scripts were based upon Slack's Secondary Attachments. Although Slack have only deprecated some items, indication is that all 'attachments' should not be relied upon and to consider their new Block feature.
https://api.slack.com/reference/messaging/attachments
Block Kit
Block Kit is really no different to 'attachments' and where some features are already incompatible with App Webhooks, others have been included through Block Kit. A similar look may be achieved:

For example,
- The deprecated attachment 'icon_emoji' may no longer be updated by a message and the icon is set through the settings for the App Webhooks. However, it is possible to add an image via a URL. Images may be added to the thread and then referenced by their URL; as the above example. Alternatively, numerous App Webhooks could be created with differing icons and the relevant Webhook could be referenced in each script.
- The attachment 'footer' can be replaced with an 'elements' block
- The 'mrkdwn' for Block Quotes does not allow for colouring the vertical line
- A 'divider' line may now be included to more clearly separate messages
Further details on designing text within Blocks:
https://api.slack.com/reference/surfaces/formatting
To reference images uploaded to Slack, they must be made publicly available. A public link should be of the format:
https://slack-files.com/{team_id}-{file_id}-{pub_secret}The direct link to be referenced in a script has the format:
https://files.slack.com/files-pri/{team_id}-{file_id}/{filename}?pub_secret={pub_secret}An example link may look like:
https://files.slack.com/files-pri/ABU1BH39Z-F0117AF5RRB/exclamation.jpg?pub_secret=5c56df27a5Example json from the above. Variables have been replaced with values to allow for immediate testing:
json="{
\"blocks\": [
{
\"type\": \"section\",
\"text\": {
\"type\": \"mrkdwn\",
\"text\": \":red_circle:*1015VMDEP\tDisk Warning*\n*!!System Drive Space Low!!*\n>*Drive Space Used:* 32%\n>*Available:* 21GB\"
},
\"accessory\": {
\"type\": \"image\",
\"image_url\": \"https://api.slack.com/img/blocks/bkb_template_images/beagle.png\",
\"alt_text\": \"alt text for image\"
}
},
{
\"type\": \"context\",
\"elements\": [
{
\"type\": \"mrkdwn\",
\"text\": \"*model:* MacBook Pro (15-inch, 2019)\"
},
{
\"type\": \"mrkdwn\",
\"text\": \"*macOS*: 10.15.1\"
},
{
\"type\": \"mrkdwn\",
\"text\": \"*client:* 13.2.3\"
},
{
\"type\": \"mrkdwn\",
\"text\": \"*thresholds:* 90% 30GB\"
}
]
},
{
\"type\": \"divider\"
}
]
}"Conclusion
The above shows how a Fileset may be delivered to devices in tandem with 3rd party tools, such that they will automatically report disk space usage at timed intervals. However, this is just an example framework and the scope for use is endless.
Incident IQ FileWave Asset Integration

Quick answer: Incident IQ, often styled by Incident IQ as iiQ and sometimes searched for as IIQ or IncidentIQ, can use the FileWave MDM integration to sync FileWave asset data into Incident IQ. To configure the integration, provide Incident IQ with your FileWave Server Address URL and a base64 FileWave Application Token.
Incident IQ describes its FileWave integration as an Asset & MDM integration that can sync detailed asset data between FileWave and Incident IQ, show asset metadata, and support reporting with MDM data. This FileWave article covers the FileWave-side values needed for that setup.
Third Party Software
Incident IQ is a third-party application. Incident IQ’s UI, field labels, and integration behavior are controlled by Incident IQ. The steps below explain where to find the FileWave values that Incident IQ asks for.
Terminology
Use Incident IQ when referring to the company or platform. Incident IQ uses the iiQ style for products such as iiQ Ticketing and iiQ Assets. Because many districts also write the acronym as IIQ or write the name without a space as IncidentIQ, this article includes those forms for searchability while using Incident IQ as the main product name.
Before you begin
Make sure you have:
- Access to FileWave Central.
- Administrative permissions in FileWave.
- Access to configure apps or integrations in Incident IQ.
- The FileWave Server Address URL.
- A FileWave Application Token in base64 format.
Information required by Incident IQ
Incident IQ typically asks for these FileWave values when configuring the FileWave integration:
| Incident IQ field | FileWave value to provide |
|---|---|
| Server Address URL | The FileWave server address used by Incident IQ to connect to your FileWave environment. |
| Token | The FileWave Application Token in base64 format. |
| Token End Date, Token Expiration Date, or similar date field | FileWave application tokens do not expose an expiration date in the value you copy. Enter a customer-appropriate future review or rotation date according to your organization’s credential policy. |
Locate the FileWave Server Address URL
- Open FileWave Central.
- Go to Preferences.
- Select Mobile.
- Locate the Server Address URL field.
- Copy the server address URL.
Enter this value in Incident IQ as the FileWave server address.
Create or locate a FileWave Application Token
For security and auditing, use a dedicated FileWave administrator account for the Incident IQ integration instead of a personal administrator account. Grant only the permissions required for the integration to function.
- Open FileWave Central.
- Go to Assistants > Manage Administrators.
- Create or select the administrator account that will be used for the Incident IQ integration.
- Open the Application Tokens tab.
- Locate Token (base64).
- Copy the token value.
Enter this value in Incident IQ as the authentication token.
Configure the FileWave integration in Incident IQ
- Sign in to Incident IQ with an account that can manage apps or integrations.
- Open the FileWave integration settings in Incident IQ.
- Enter the FileWave Server Address URL copied from FileWave Central.
- Enter the FileWave Application Token copied from FileWave Central.
- If Incident IQ requires a token end date, expiration date, or similar validation date, enter a future date that aligns with your organization’s token review or credential rotation policy.
- Save the integration settings.
- Test or validate the connection, if Incident IQ provides that option.
After configuration
After the integration is active, confirm that FileWave asset data is appearing in Incident IQ. Incident IQ’s FileWave integration page says districts can sync detailed asset data, view asset metadata, generate reports using MDM data, and choose mapping options for FileWave fields.
If data is missing or does not appear as expected, review the FileWave token permissions, confirm the server URL is reachable by Incident IQ, and check the mapping options in Incident IQ.
Security notes
- Treat the FileWave Application Token as sensitive information because it grants API access through the integration.
- Do not share the token publicly or store it in unsecured locations.
- If the token is exposed or no longer needed, regenerate or replace it according to your organization’s security procedures.
- Review the dedicated administrator account and token periodically according to your organization’s credential rotation policy.