# ServiceNow integration with FileWave ServiceNow can be provided with device inventory information from FileWave to make the ServiceNow experience much more accurate and rewarding. Previously, a ServiceNow portal app was required to supply this FileWave data, but as of version Orlando of ServiceNow that is no longer required, and the FileWave API can be used directly. This guide, provided as a courtesy for a non-FileWave related system, will show you how to bring the information gathered by FileWave inventory into ServiceNow using the API.

**Third Party Software** ServiceNow is a third party application. The details provided are for example only and are unsupported by FileWave.

## Step-by-Step Guide ### Step 1: Create Data Source
**System Import Sets > Administration > Data Sources > New** 1. NAME: FileWave REST API 2. IMPORT SET LABEL: (empty) 3. IMPORT SET TABLE NAME: u\_fw\_api 4. TYPE: REST 5. FORMAT: JSON 6. PATH FOR EACH ROW: /values/values 7. DISCARD ARRAYS: √ 8. EXPAND: √ 9. DATA IN SINGLE COLUMN: (unchecked) 10. APP: Global 11. REQUEST ACTION: Hit the “click here” and create one (see Step 2) ![](https://kb.filewave.com/uploads/images/gallery/2023-07/eyf9O555DfXB4Qzk-embedded-image-xuthosas.png)
### Step 2: Create Request Action
1. NAME: GET FW REST 2. ACCESSIBLE FROM: All application scopes 3. CATEGORY: (empty) 4. PROTECTION: —None— 5. DESCRIPTION: (empty) 6. APPLICATION: Global 7. IN-FLOW ANNOTATION: (empty) 8. Then hit "Submit" (You should be redirected to the Flow Designer for GET FW REST...see Step 3) ![Request Action](https://kb.filewave.com/uploads/images/gallery/2023-07/w2gjuTJbcu0yhg65-embedded-image-pue4n47v.png)
### Step 3, Part 1: Create in Flow Designer
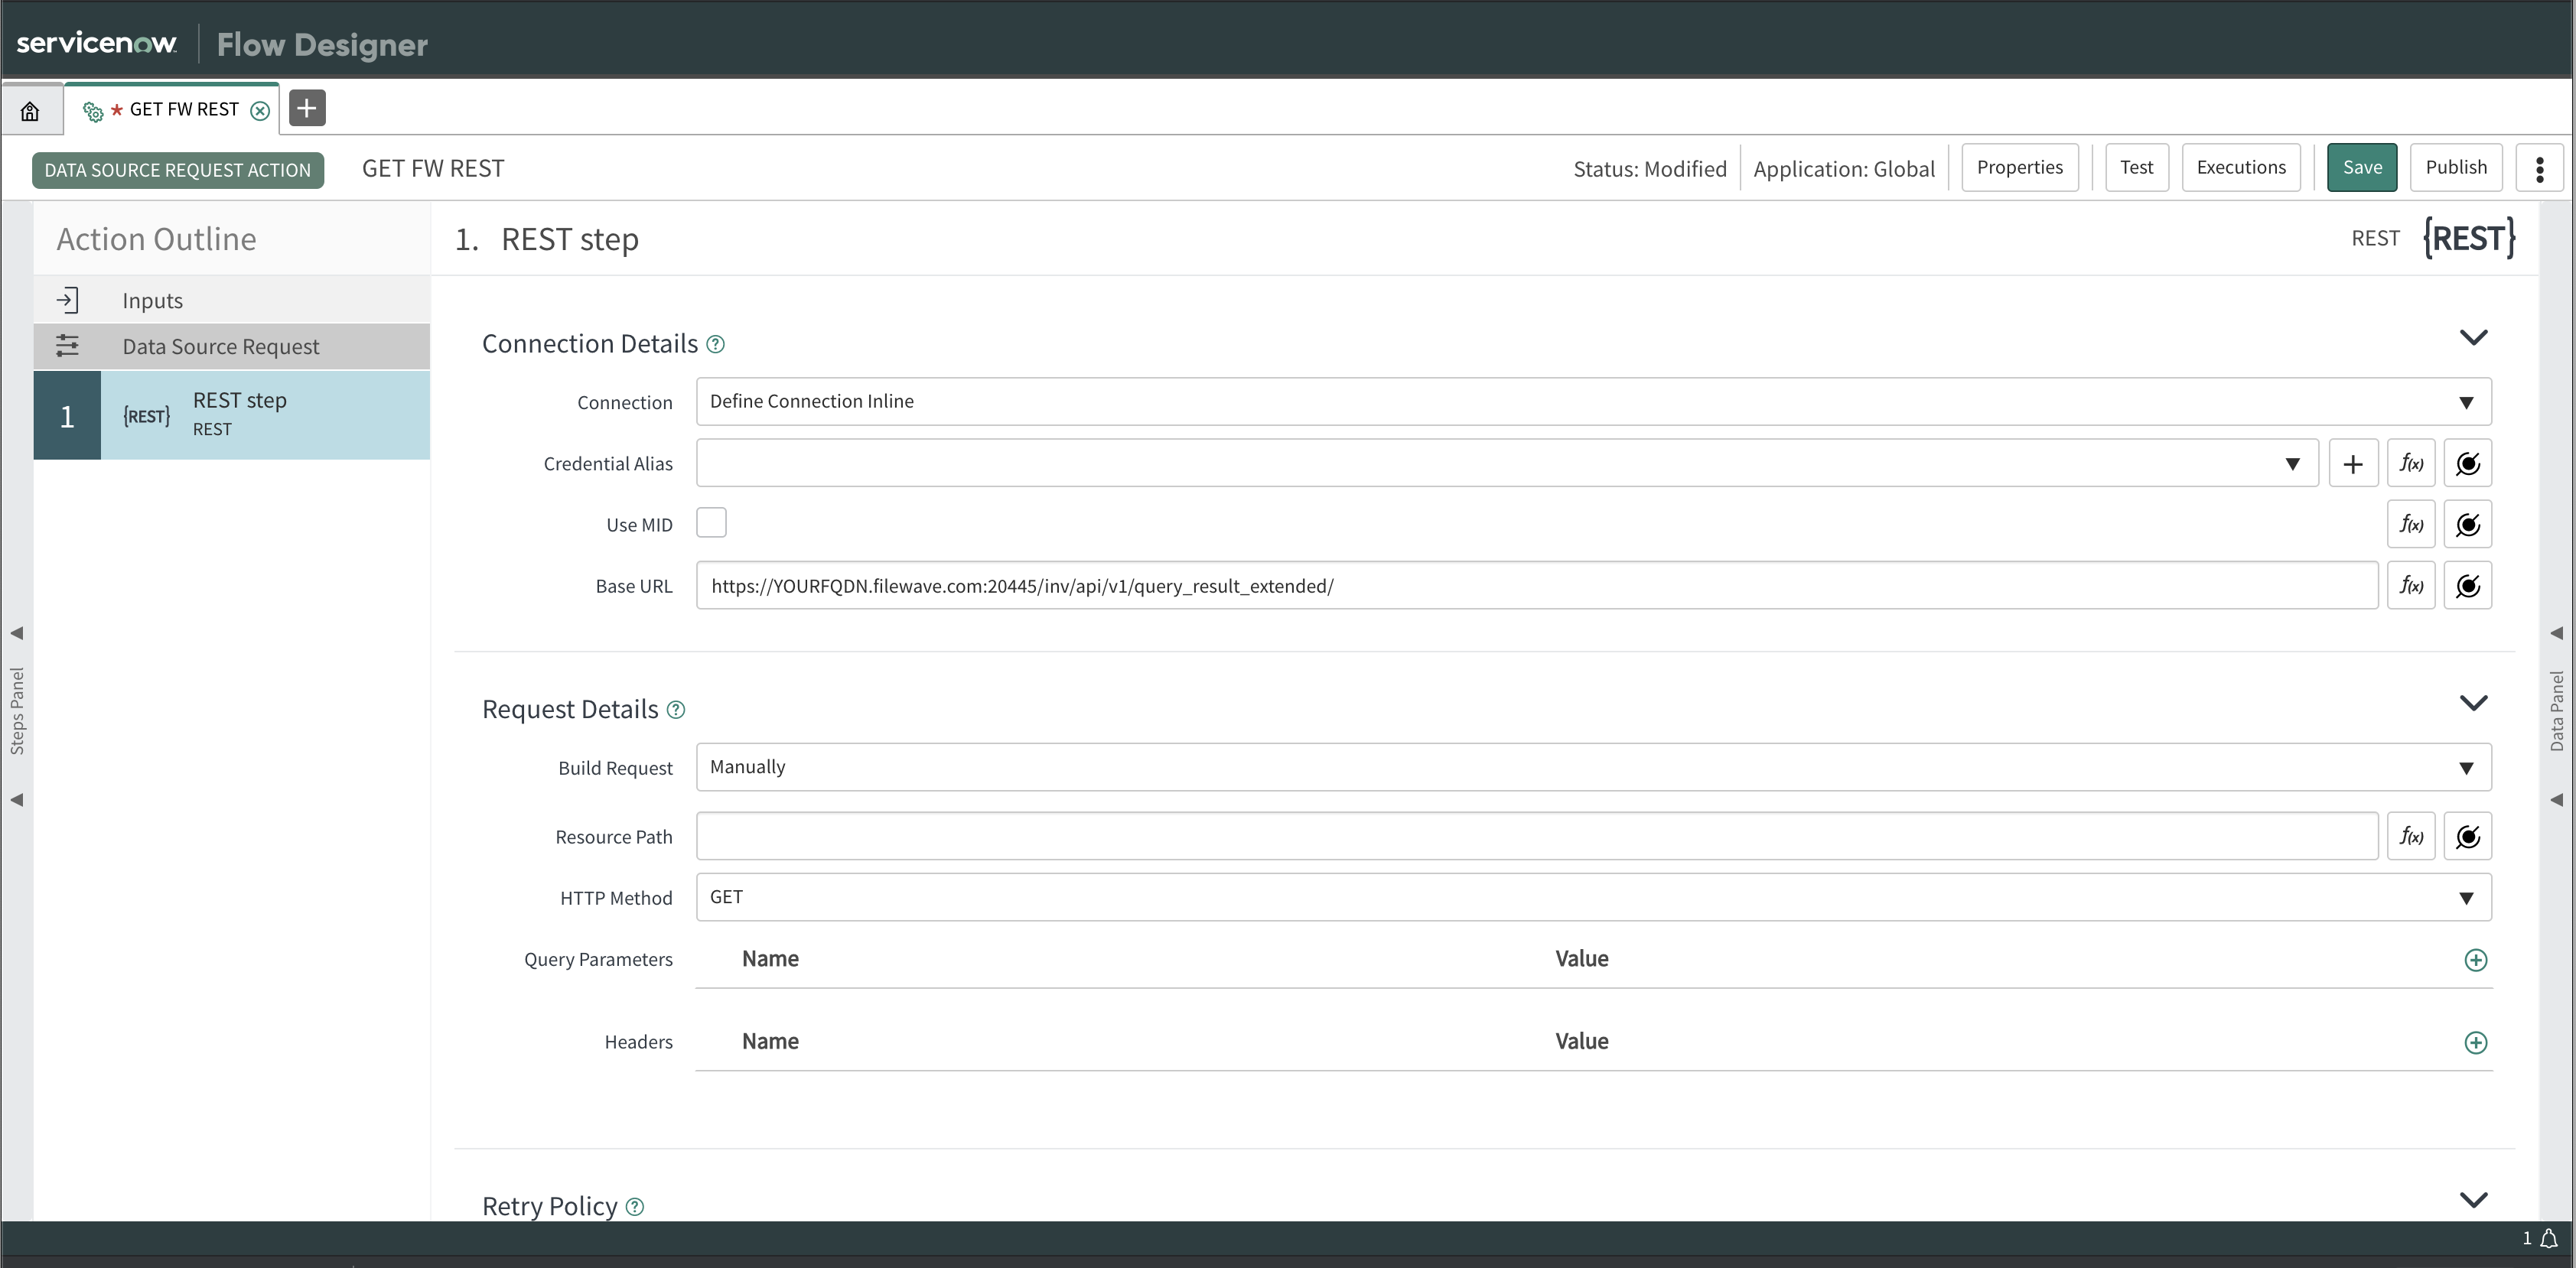
***Create in FLOW DESIGNER, Select #1 “REST step”*** **- Connection Details -** - CONNECTION: Define connection inline - CREDENTIAL ALIAS: (empty) - USE MID: (unchecked) - BASE URL: [https://YOUR.FILEWAVE.FQDN:20445/inv/api/v1/query\_result\_extended/](https://YOUR.FILEWAVE.FQDN:20445/inv/api/v1/query_result_extended/) **-Request Details-** - BUILD REQUEST: Manually - RESOURCES PATH: (empty) - HTTP METHOD: POST

The reason this is a POST is so we don't rely on an inventory query that might be changed. Customize the fields portion as needed. This is an example of custom fields. If the field named "asset\_tag" does not exist in your system, this will cause an error.

```json { "column": "asset_tag", "component": "CustomFields" } ```
- QUERY PARAMETERS: (empty) - HEADERS: 1. Name: Authorization Value: Your Users Application Token (FW Admin > Assistants > Manage Administrators > (select admin) > Application Tokens > (Copy the base64: e.g. aalkjdlAKJDlakjdALkdsjaldksja= ) 2. Name: Content-Type Value: application/json **-Request Content-** - REQUEST TYPE: Text - REQUEST BODY: - See "Request JSON" example below: **Request JSON** ```json { "criteria": { "expressions": [ { "column": "filewave_client_name", "component": "Client", "operator": "is_not", "qualifier": null }, { "column": "last_check_in", "component": "Client", "operator": "!=", "qualifier": null } ], "logic": "all" }, "fields": [ { "column": "filewave_id", "component": "Client" }, { "column": "filewave_client_name", "component": "Client" }, { "column": "current_ip_address", "component": "Client" }, { "column": "last_check_in", "component": "Client" }, { "column": "latitude", "component": "GeoLocation" }, { "column": "longitude", "component": "GeoLocation" }, { "column": "type", "component": "OperatingSystem" }, { "column": "version", "component": "OperatingSystem" }, { "column": "filewave_client_version", "component": "AndroidClient" }, { "column": "filewave_client_version", "component": "DesktopClient" }, { "column": "cpu_count", "component": "Client" }, { "column": "cpu_speed", "component": "Client" }, { "column": "ram_size", "component": "Client" }, { "column": "total_disk_space", "component": "Client" }, { "column": "free_disk_space", "component": "Client" }, { "column": "serial_number", "component": "Client" }, { "column": "asset_tag", "component": "CustomFields" } ], "main_component": "Client" } ``` -Retry Policy- - ENABLE RETRY POLICY: (unchecked) - Save - Test Connection - Test > Use “test” for “Attachment Name” > Run Test - Select the “Action has been executed. To view action, click here.” - Verify: status code of 200 (means success) - Select the “(gear) GET FW REST” flow designer tab - Close the “Test Action” window with the X - Select Publish Close this browser window/tab to return to the “New Record | Data Source | ServiceNow” window/tab
![](https://kb.filewave.com/uploads/images/gallery/2023-07/lSij7W8EB7aWx5r4-embedded-image-ihvhkquf.png)![](https://kb.filewave.com/uploads/images/gallery/2023-07/HbhzVJPvP3a5jSQw-embedded-image-dqov9w8z.png)
### Step3, Part 2: Set Request Action
Under REQUEST ACTION, start typing the name of the Action we just created "GET FW REST" and select it from the drop-down. Submit Hitting 'Submit' will redirect you back to the Data Source list. Select the one we just made, FileWave REST API and select "Load All Records" under Related Links Once the test has completed, go back to FileWave REST API's Data Source page and continue to next step. ![](https://kb.filewave.com/uploads/images/gallery/2023-07/WMmYZRRL84D1ntyT-embedded-image-zmqfmkoj.png)
### Step 3, Part 3: Generate Data Transform
**Generate Transform(s)** — MAKING TRANSFORMS –– On the FileWave REST API page, scroll down to the “Transforms” tab and select “New” - NAME: FW API Map - SOURCE TABLE: (should auto fill the u\_fw\_api table) - ACTIVE: √ - RUN BUSINESS RULES: √ - ENFORCE MANDATORY FIELDS: No - COPY EMPTY FIELDS: (unchecked) - CREATE NEW RECORD ON EMPTY COALESCE FIELDS: √ - APPLICATION: Global (input disabled) - CREATED: Will auto-generate with Date/Time stamp when saved (input disabled) - TARGET TABLE: Computer \[cmdb\_ci\_computer\] - ORDER: 100 - RUN SCRIPT: (unchecked) ![Table Transform Map](https://kb.filewave.com/uploads/images/gallery/2023-07/r0AxotNIawj1sEqR-embedded-image-bbpuvdn9.png)
Select “Mapping Assist” under Related Links You should be able to map a lot of the client's information, for example...
FileWave ServiceNow
operatingsystem\_type Operating System
client\_cpu\_count cpu\_count
client\_current\_ip\_address ip\_address
client\_ram\_size ram
customfields\_asset\_tag asset\_tag
client\_total\_disk\_space disk\_space
operatingsystem\_version os\_version
client\_cpu\_speed cpu\_speed
client\_filewave\_client\_name name
client\_serial\_number serial\_number
...
![Mapping Assist](https://kb.filewave.com/uploads/images/gallery/2023-07/YqOYjvh2xGqFIbiE-embedded-image-caarjom2.png)
You can make more maps, like this example for location data: Scroll down to the “Transforms” tab and select “New” - NAME: FW Location Map - SOURCE TABLE: (should auto fill the u\_fw\_api table) - ACTIVE: √ - RUN BUSINESS RULES: √ - ENFORCE MANDATORY FIELDS: No - COPY EMPTY FIELDS: (unchecked) - CREATE NEW RECORD ON EMPTY COALESCE FIELDS: √ - APPLICATION: Global (disabled) - CREATED: (disabled) - TARGET TABLE: Location \[cmn\_location\] - ORDER: 100 - RUN SCRIPT: (unchecked) Select “Mapping Assist”
FileWave ServiceNow
geolocation\_latitude latitude
geolocation\_longitude longitude
client\_filewave\_client\_name Name
Once you're finished, save your data, update the Table Transform Map form and continue to next steps. ### Part 4: Schedule the Job Schedule the job Schedule the import task you just created...recommend at least daily. System Import Sets > Administration > Scheduled Imports. [https://docs.servicenow.com/bundle/orlando-platform-administration/page/administer/import-sets/task/t\_ScheduleADataImport.html](https://docs.servicenow.com/bundle/orlando-platform-administration/page/administer/import-sets/task/t_ScheduleADataImport.html)