| **iOS** |
| Inventory Queries to list device compatibility |
| Compatible Query | Incompatible Query |
| [ios14\_compatible.json](https://kb.filewave.com/attachments/145) | [ios14\_incompatible.json](https://kb.filewave.com/attachments/146) |
| **iOS** |
| Inventory Queries to list device compatibility |
| Compatible Query | Incompatible Query |
| [ios17\_compatible.json](https://kb.filewave.com/attachments/228) | [ios17\_incompatible.json](https://kb.filewave.com/attachments/227) |
| **iOS** |
| Inventory Queries to list device compatibility |
| Compatible Query | Incompatible Query |
| [ios26\_compatible.json](https://kb.filewave.com/attachments/504) | [ios26\_incompatible.json](https://kb.filewave.com/attachments/505) |
Quick answer: if an iPad or iPhone is stuck in Guided Access and no one knows the passcode, use FileWave to send Single App Mode or Lost Mode through MDM so you can regain control without the local passcode.
## Related Content - [MDM Lost Mode (Apple)](https://kb.filewave.com/books/apple-general-info/page/apple-mdm-lost-mode "MDM Lost Mode (Apple)") # Unlock Token in iOS 13 FileWave's MDM solution has the ability to unlock devices which are passcode protected. This can be very useful to recover devices without knowing the passcode set by students or users. To achieve this, the device sends FileWave an *Unlock Token*, which is then sent back to the device with the *ClearPasscode* request. This ensures security as only the MDM solution where the device is enrolled can unlock the device - and access to user data. Moving forward with security, Apple changed how this token is sent to MDMs in iOS 13: the token is sent only once during enrollment ; therefore it's extremely important to keep this token safe. Apple recently clarified how this change would be effective: the device may still send a TokenUpdate message to the MDM server, but the message will not contain the token anymore. Until FileWave 13.1.3, such a message (TokenUpdate without UnlockToken) was considered to be a message clearing the token ; therefore managing iOS 13 devices with a previous version can lead FileWave to clear stored tokens and then not being able to clear the device passcode. It is therefore highly recommended to: - regularly backup your FileWave instance, to keep sensitive data like unlock tokens in a safe place - upgrade to FileWave 13.1.3 if you plan to upgrade your devices to iOS 13 - ensure iCloud backup is configured on iOS devices You also have the ability to defer software updates by deploying a restriction profile (more information in this [KB article](https://kb.filewave.com/books/software-updates-apple/page/deferring-software-updates "Deferring Software Updates")) # Return to Service feature for iOS/iPadOS ## What Even though devices can be erased remotely, getting them back into service is a manual process, as it requires someone to physically touch them and take them through Setup Assistant. Apple is removing the additional manual step with the introduction of Return to Service for iOS and iPadOS. This feature was added in [**FileWave version 15.1.0**](https://kb.filewave.com/books/downloads/page/filewave-version-1510-unsupported "FileWave Version 15.1.0") for **iOS 17.0 and iPadOS 17.0.** As for [FileWave version 15.5.0](https://kb.filewave.com/books/downloads/page/filewave-version-1550-unsupported "FileWave Version 15.5.0") this was also [added for tvOS](https://kb.filewave.com/books/tvos/page/return-to-service-feature-for-tvos "Return to Service feature for tvOS"). ## When/Why Return To Service is the following process. The MDM server sends an `EraseDevice` command to the device. The command includes additional information which allows the device to reset, securely erase all data, connect to Wi-Fi, enroll into MDM, and get back to the Home Screen, ready to be used. ## How With FileWave 15.1.0 support of Return To Service was added. To use Return To Service open Remote Wipe dialog for iOS or iPadOS device. Checkbox Return To Service allows to specify whether feature should be enabled or disabled. It can be checked only if Remove Activation Lock checkbox is checked as well. The feature can be used only if there is at least one configured Wi-Fi profile (fileset containing Network payload with Network Interface “Wi-Fi“). Available Wi-Fi profiles are displayed on combobox. [](https://kb.filewave.com/uploads/images/gallery/2023-09/i3zragnBnkhiBXQ7-image.png) ### What happens on the device? If Return To Service is enabled on FileWave side and then Wipe Device button is pressed, the device will be wiped and then connected to the Wi-Fi network specified in selected Wi-Fi profile without asking password. Also MDM profile will remain on the device, there will be no need for it to re-enroll in MDM. ## Related Content - [FileWave Version 15.1.0](https://kb.filewave.com/books/downloads/page/filewave-version-1510-unsupported "FileWave Version 15.1.0") - [Return to Service feature for tvOS](https://kb.filewave.com/books/tvos/page/return-to-service-feature-for-tvos "Return to Service feature for tvOS") ## Troubleshooting We have found that on the WiFi profile, setting Security to 'With Authorization' - even with the right password, will break Return to Service. What you will see is that the iPad will not be able to join the WiFi automatically when it boots up though you can manually join the WiFi. [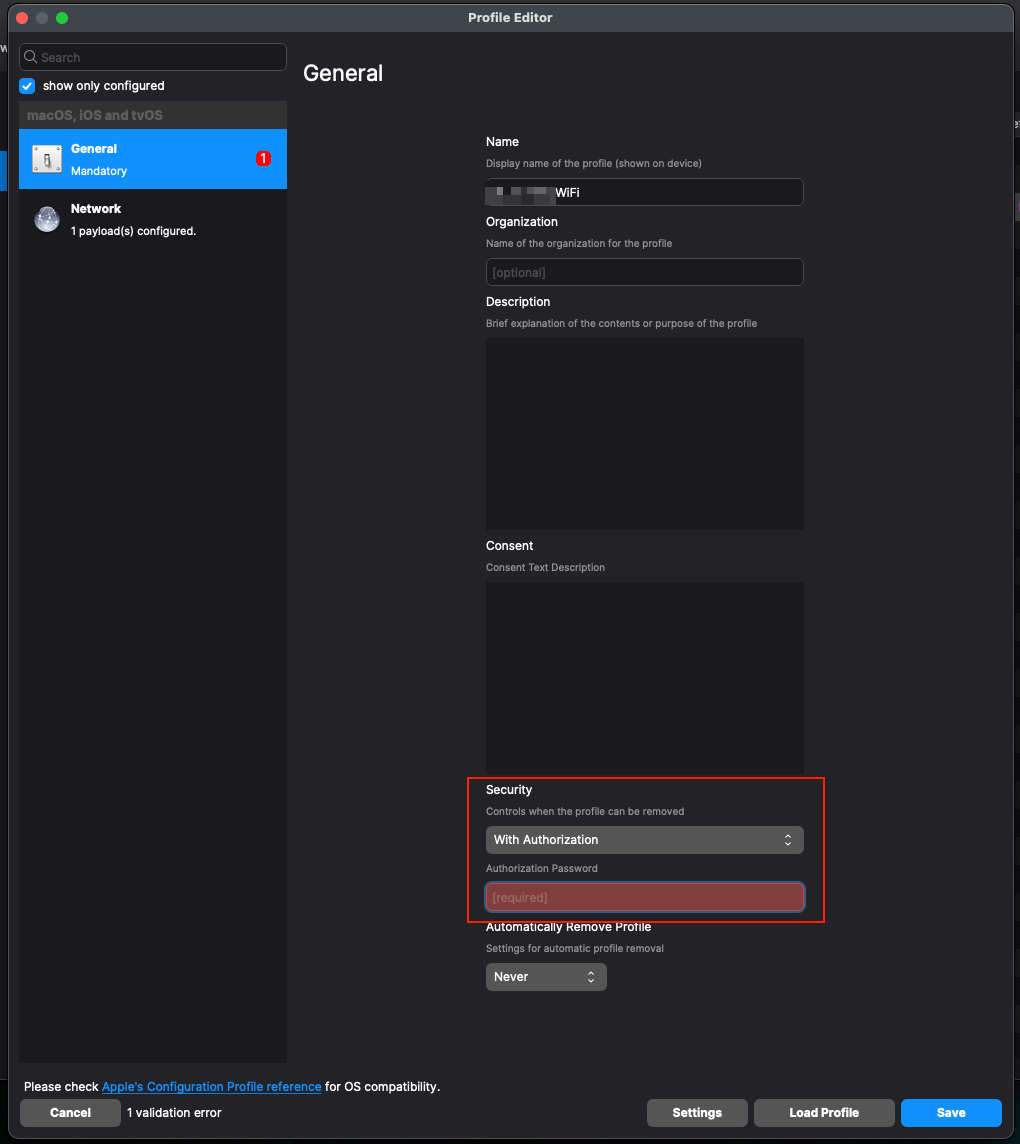](https://kb.filewave.com/uploads/images/gallery/2024-05/IjavuaZiY9Ii28qU-image.png) ## Digging Deeper When Remote Wipe dialog is opened the list of configured Wi-Fi profiles is loaded in format: ``` [(| Server FQDN from Preferences | demo.filewave.ch |
| Authorisation Token | e2E1OTU4ZmYyLTg4ZTYtNDEzNC1iZjdhLWE0ZmJmMTViNmI5OH0= |
| "Profile - WLTC wifi" \[File ID of Fileset: 'Profile - WLTC wifi'\] | 780638 |
| iPad001 \[FileWave Device ID\] | 3425 |
| iPad002 \[FileWave Device ID\] | 4342 |
| iPad003 \[FileWave Device ID\] | 3312 |
The above may mean you have hundreds of associations to change...if that is the case, remember that you can mass-edit associations in the Associations view.
# iOS BYOD User Enrollment Overview ## What With Version 14(+) of FileWave, you can now BYOD (bring-your-own-device) enroll a device without giving total management of the device to the system admin. ## When/Why Typically, this option works best if the device to be supported is not company owned. For instance, an employee with their own iPhone may want to BYOD enroll a device to allow distribution of company-owned app licenses, but without giving their company the ability to manage their phone in other ways. ## How BYOD enrollment is off by default in FileWave, and must be enabled on the Mobile tab in preferences as shown below: 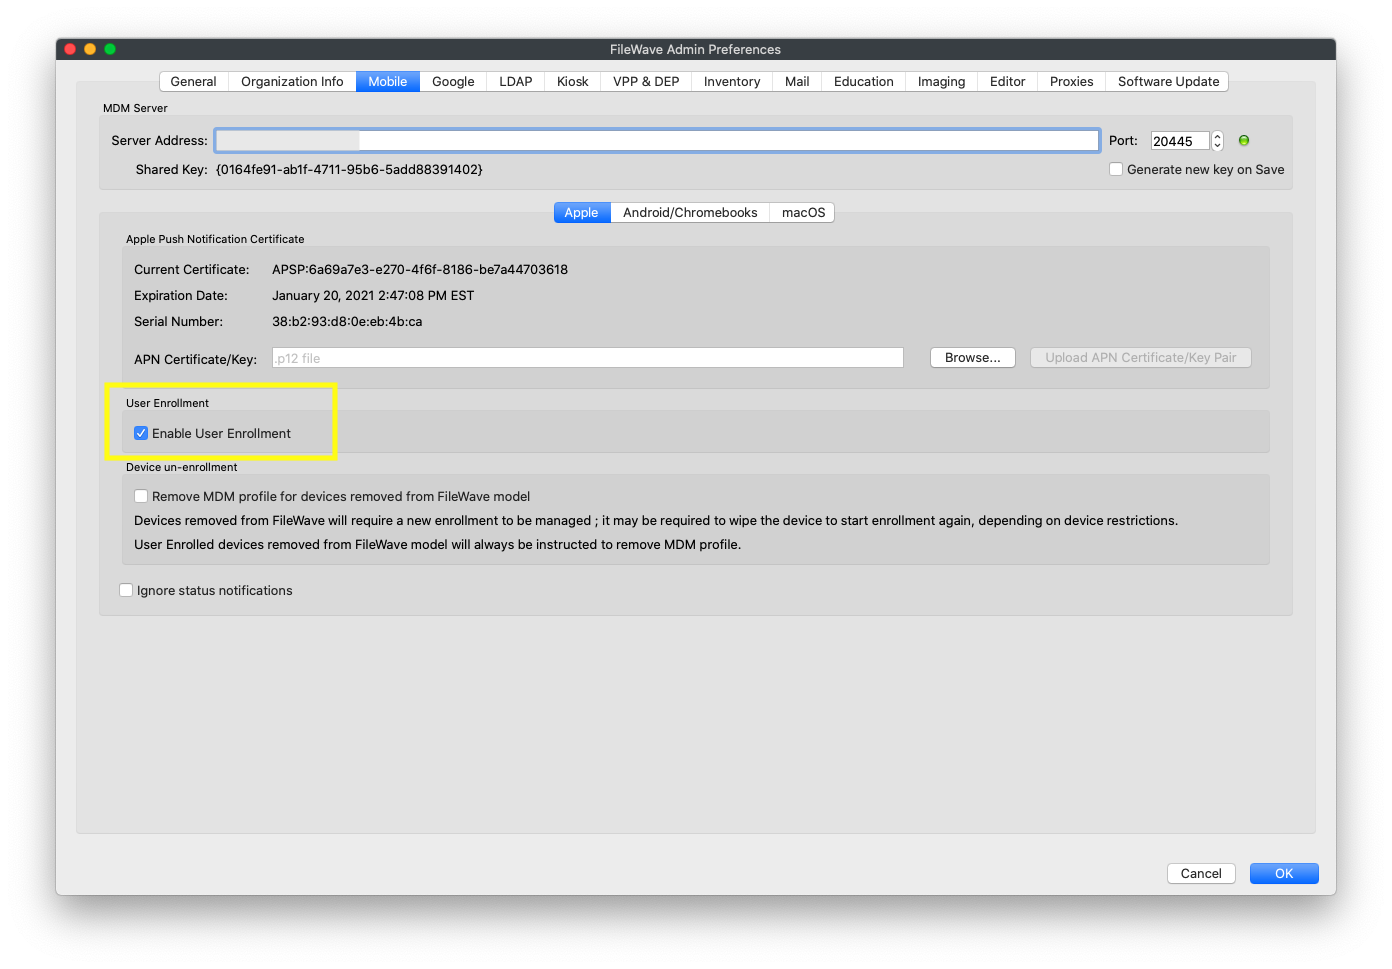 Once enabled, a new tab will be added to the "Enroll iOS Device..." Assistant: 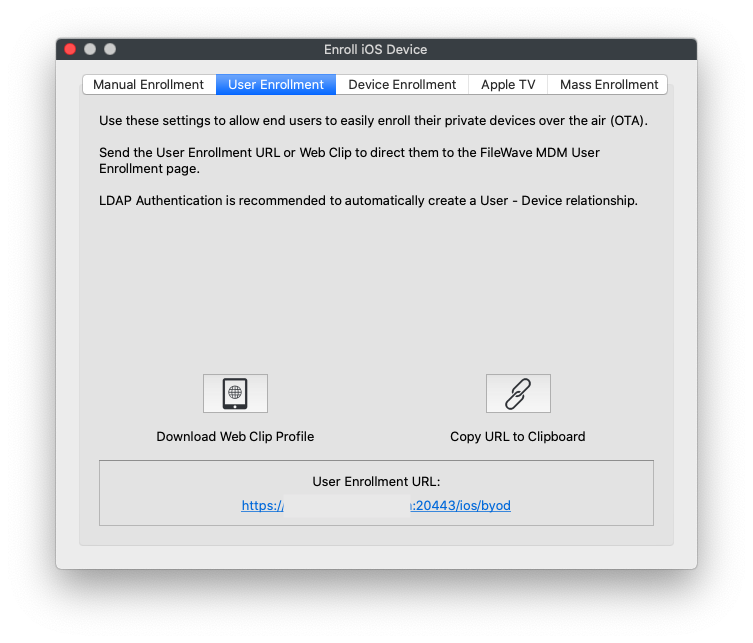 And, once user enrollment is enabled, you can go to [https://my.server.address:20443/ios/byod](https://my.server.address:20443/ios/byod) to see the user enrollment page: 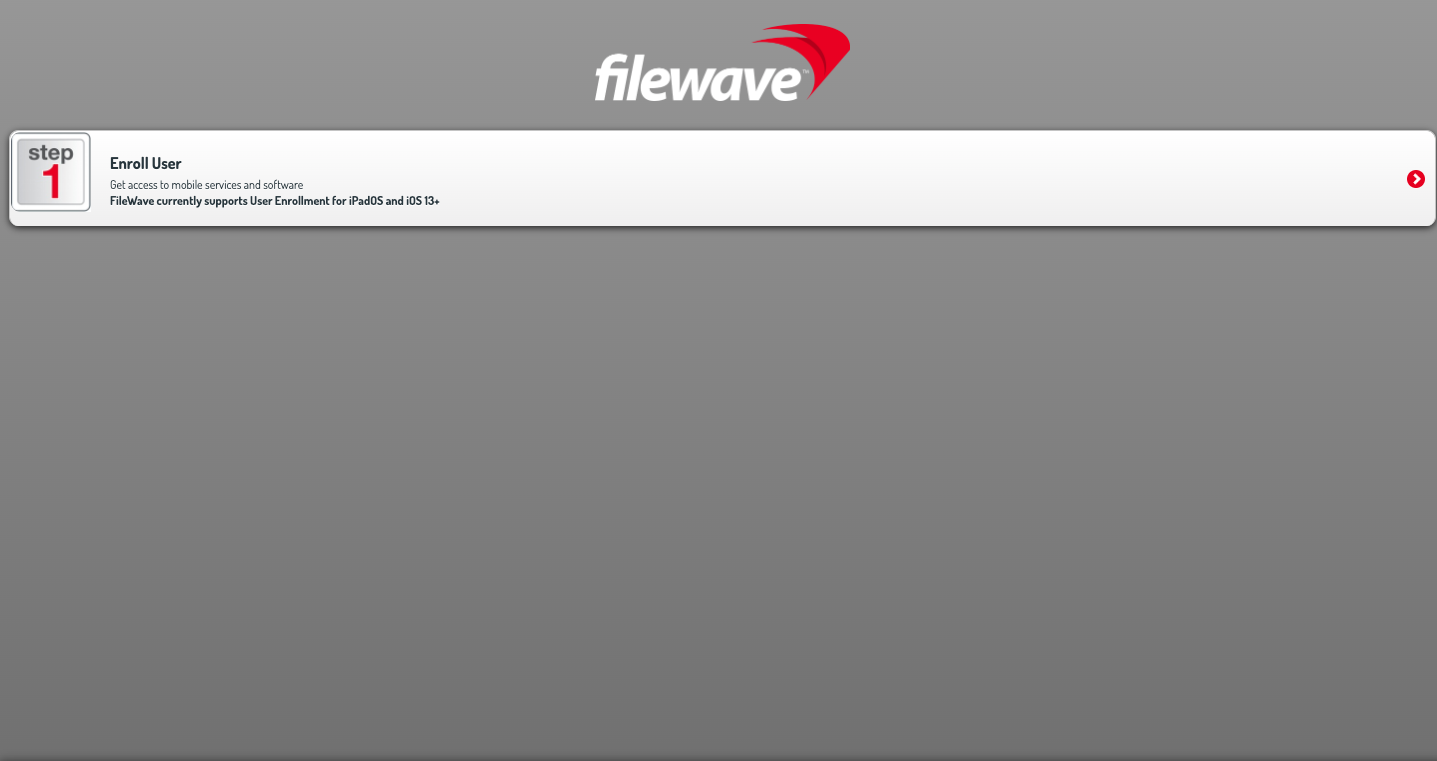 Note that by BYOD's very nature the only way you will enroll BYOD devices is through this page. (i.e. it won't be through ADE). BYOD enrollment **does** require the use of managed apple ids from either Apple School, or Apple Business, Manager. See below video of a BYOD device enrollment:Unlike a ADE enrollment, you don't have to wipe the device first to BYOD enroll it. However, trying to enroll a device with a managed Apple ID that is already logged into iCloud on the device will result in an error.
# Account-Driven User Enrollment for iOS/iPadOS BYOD Devices (v15.0+) ## What In 2021, Apple introduced [**Account-Driven User Enrollment**](https://support.apple.com/guide/deployment/user-enrollment-and-mdm-dep23db2037d/web), a new method for initiating Bring Your Own Device (BYOD) enrollments. With the releases of **iOS 17** and **iPadOS 17**, profile-based User Enrollment is deprecated, and starting with **iOS 18** and **iPadOS 18**, it is no longer supported. To align with these changes, **FileWave 15.5** now supports Account-Driven User Enrollment (ADUE), enabling organizations to securely enroll BYOD devices using this new workflow. ## When/Why #### **When to Use** - **BYOD Environments**: When employees use their personal iOS or iPadOS devices for work purposes and need access to corporate resources. - **Transitioning from Profile-Based Enrollment**: As profile-based User Enrollment is being phased out, organizations should begin migrating to Account-Driven User Enrollment to ensure compatibility with future iOS and iPadOS versions. #### **Why This Feature Matters** Apple aims to enhance the security and privacy of BYOD deployments. Account-Driven User Enrollment offers several benefits: - **Improved Security**: Separates personal and corporate data more effectively, protecting user privacy and corporate assets. - **Simplified Enrollment**: Users can enroll their devices by signing in with their Managed Apple ID, streamlining the enrollment process. - **Modern Authentication**: Utilizes OAuth 2.0 and OpenID Connect for authentication, providing a more secure and standardized method. - **Organizational Control**: Shifts the responsibility of secure enrollment to the organization, allowing for better compliance with internal policies. Account-Driven Enrollment relies on the [**Well-known URI**](https://en.wikipedia.org/wiki/Well-known_URI) mechanism for Mobile Device Management (MDM) discovery, ensuring that devices can locate the MDM server securely and efficiently. ## How #### **Enrolling a Device Using Account-Driven User Enrollment** To enroll an iOS or iPadOS device using Account-Driven User Enrollment with FileWave 15.5: - **On their iPhone or iPad, the user navigates to** Settings > General > VPN & Device Management **and taps** Sign In to Work or School Account. [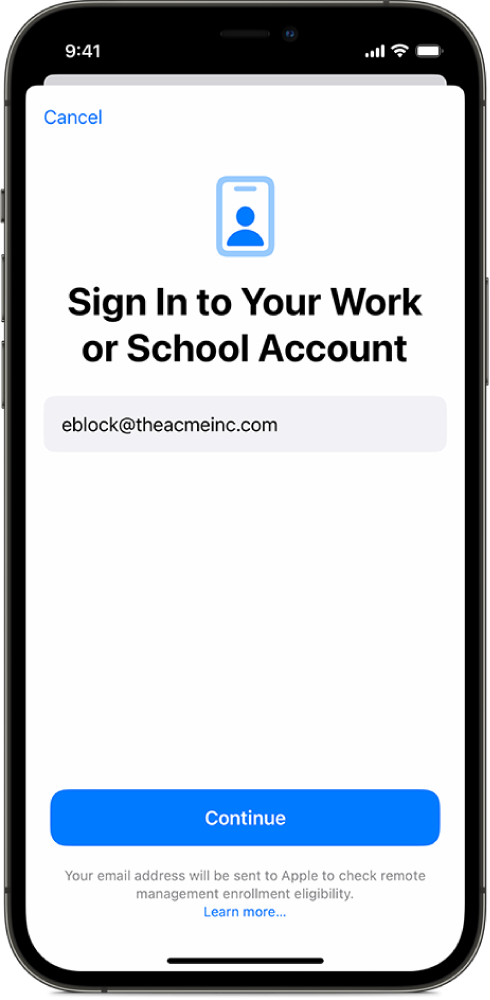](https://kb.filewave.com/uploads/images/gallery/2024-10/5oC3vsAbEKfDJLK9-image.png) The email entered is used by the device to discover the MDM server. For example, if you enter “pn@widget.ch”, the device queries the widget.ch domain, specifically at https://widget.ch/.well-known/com.apple.remotemanagement. This endpoint must return a specific JSON message containing all the information required to proceed with MDM BYOD enrollment. Therefore, organizations must have control over this URL, which could be an issue for those who completely outsource their website management (see below for potential workarounds). **FileWave Setup** The existing User Enrollment option in FileWave now enables both legacy BYOD and the new Account-Driven Enrollment (ADUE): [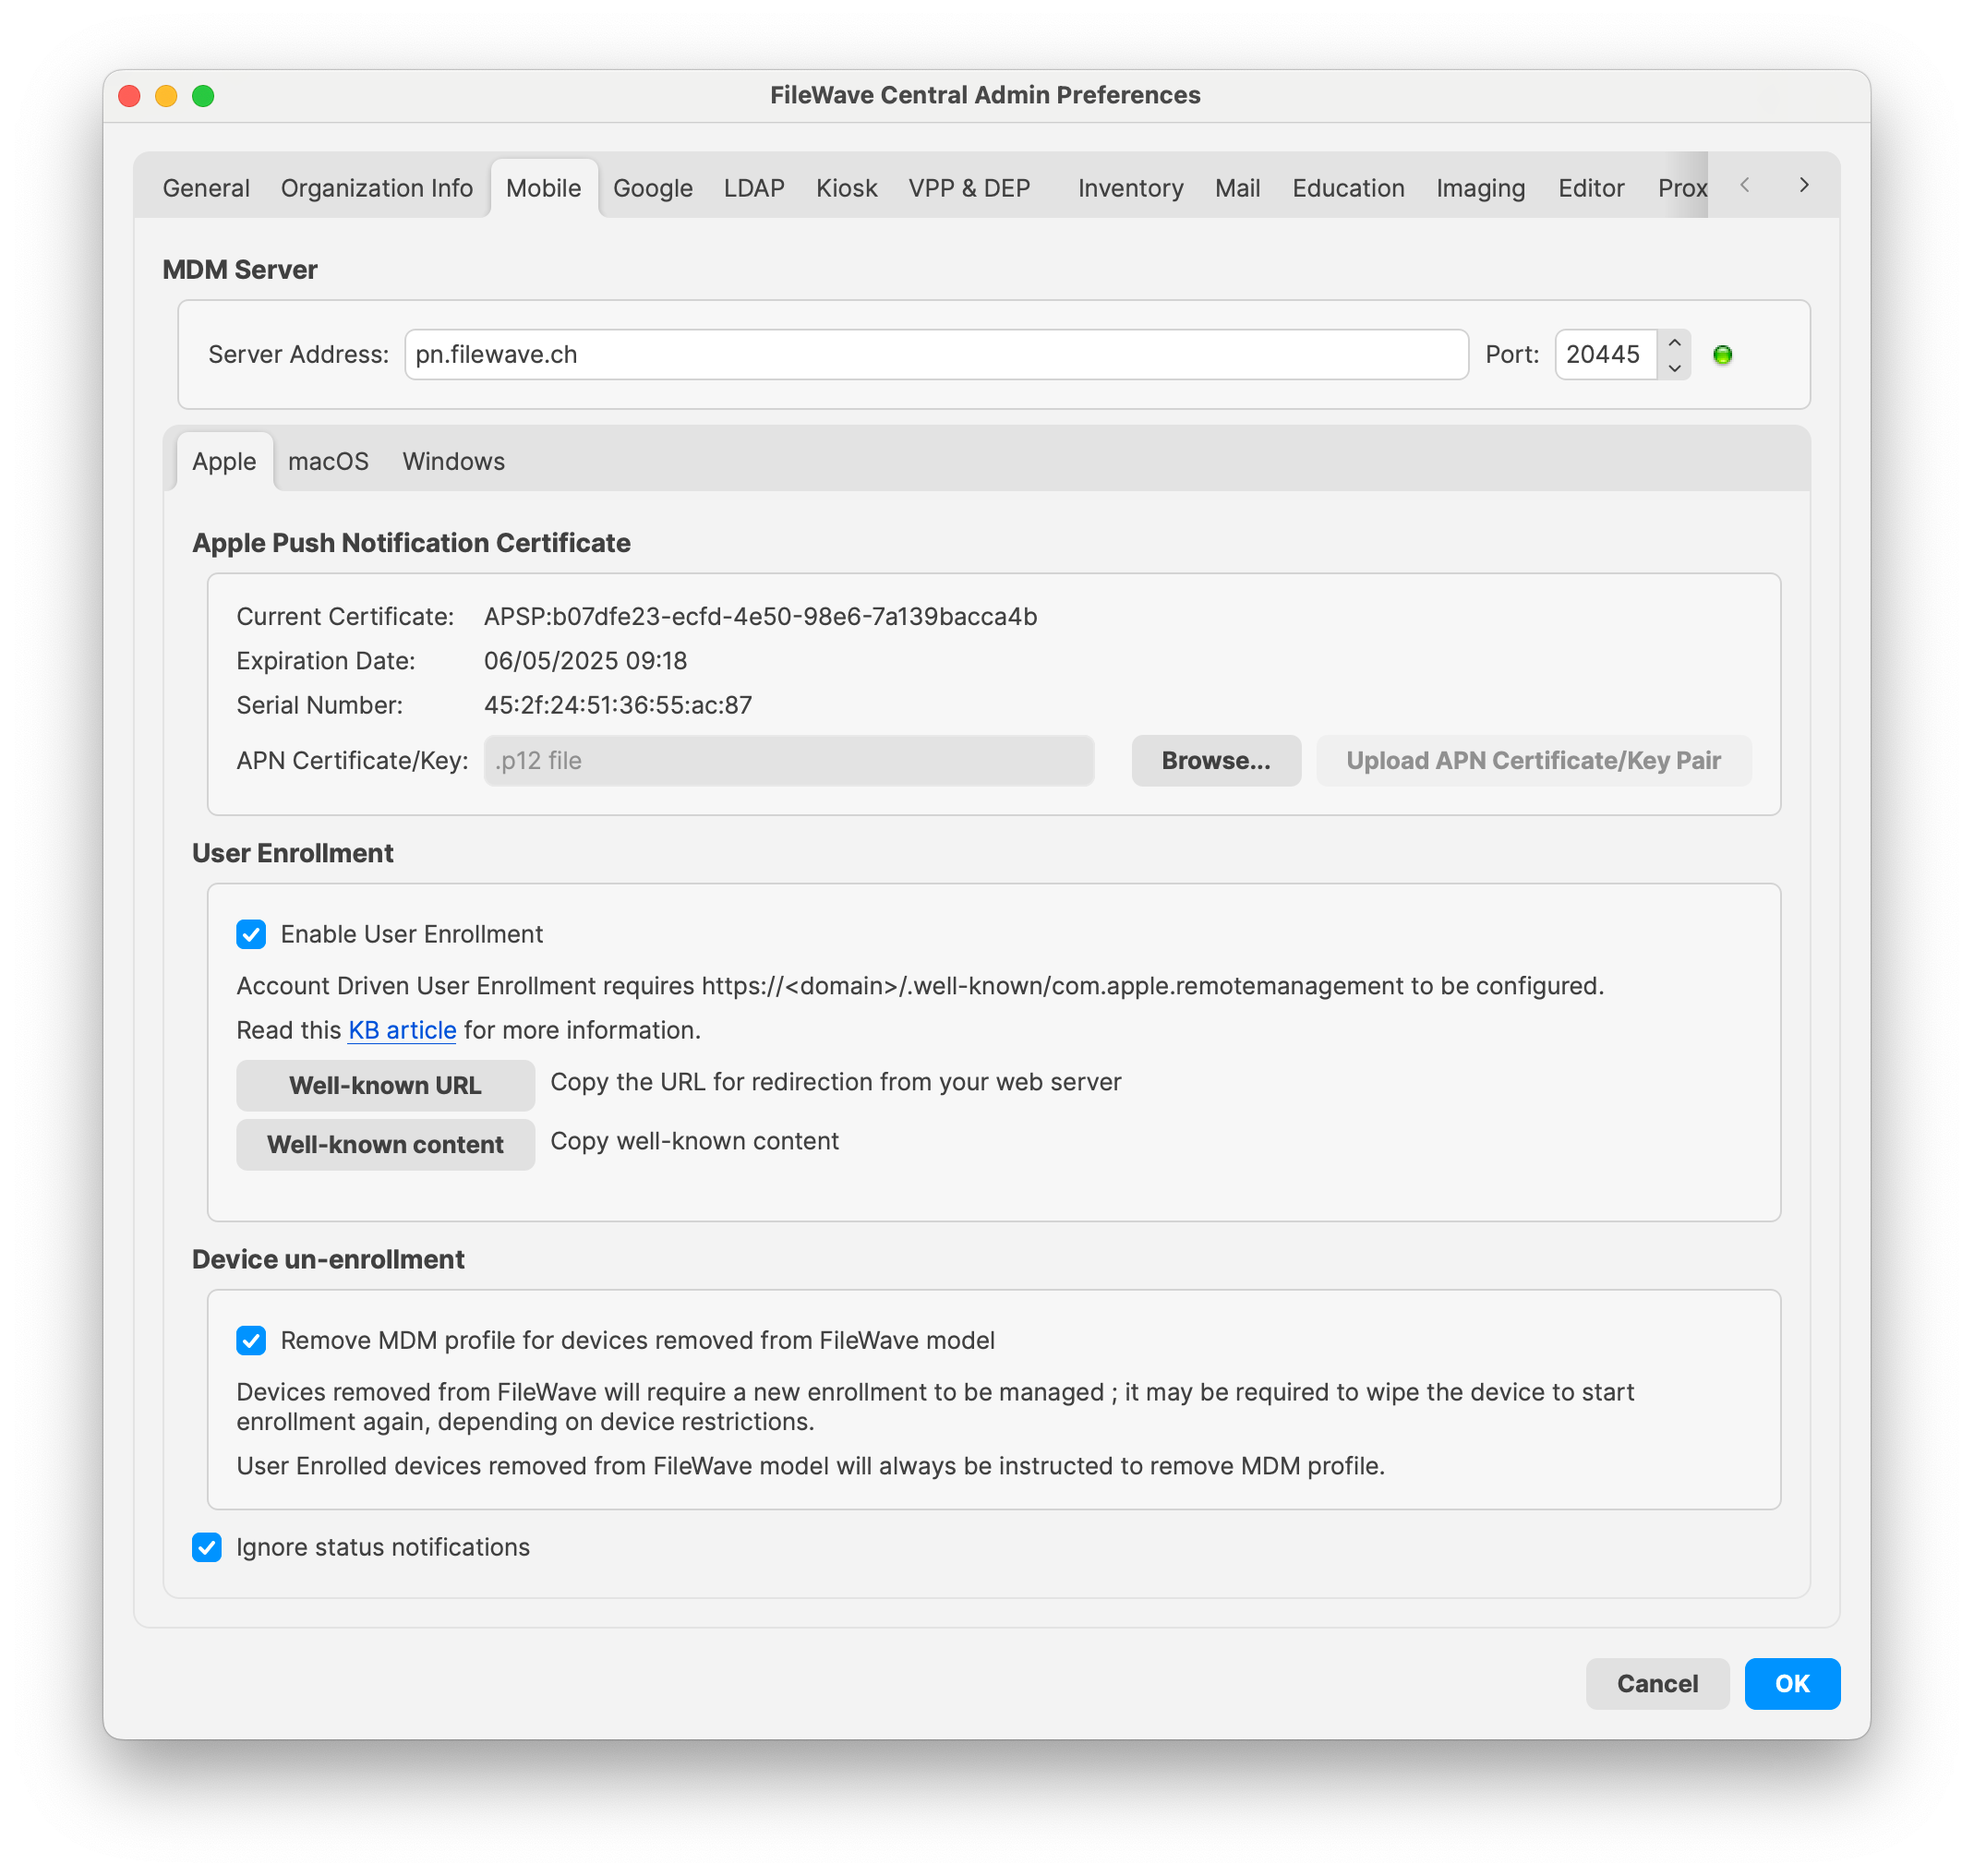](https://kb.filewave.com/uploads/images/gallery/2024-10/yGZsdBdXSA9XEO0r-image.png) FileWave cannot manage your domain but provides some helpful options: 1. **Retrieving the Well-Known Content (JSON):** - If you prefer to host the required file yourself, you can easily obtain the necessary JSON content from FileWave. - Click the **“Well-known content”** button in the FileWave interface. The following JSON will be copied to your clipboard: ```json {"Servers": [{"Version": "mdm-byod", "BaseURL": "https://pn.widget.ch:20445/ios/byod/enroll/"}]} ``` - Create a file containing this JSON and serve it from your web server at the appropriate URL (https://yourdomain/.well-known/com.apple.remotemanagement). 2. **Setting Up a Redirection to the FileWave Server Endpoint:** - Alternatively, you can configure your web server to redirect requests from https://yourdomain/.well-known/com.apple.remotemanagement to the FileWave server endpoint. - Retrieve the endpoint URL by clicking the **“Well-known URL”** button in FileWave. For example, the endpoint might be: ``` https://pn.widget.ch:20445/ios/byod/well-known/ ``` - Consult your web server documentation for details on setting up the redirection. For instance, to configure Apache, add the following directive inside the VirtualHost section: ``` RewriteRule ^/.well-known/com.apple.remotemanagement https://pn.widget.ch:20445/ios/byod/well-known/ [R=301,L] ``` ## Related Content - [Apple: User Enrollment and MDM](https://support.apple.com/guide/deployment/user-enrollment-and-mdm-dep23db2037d/web) - [Well-known URI](https://en.wikipedia.org/wiki/Well-known_URI) - [Apple MDM Enrolment Methods](https://kb.filewave.com/books/filewave-client/page/apple-mdm-enrolment-methods "Apple MDM Enrolment Methods") ## Digging Deeper #### **Device Enrollment Process Workflow**| Navigate to Settings, General | [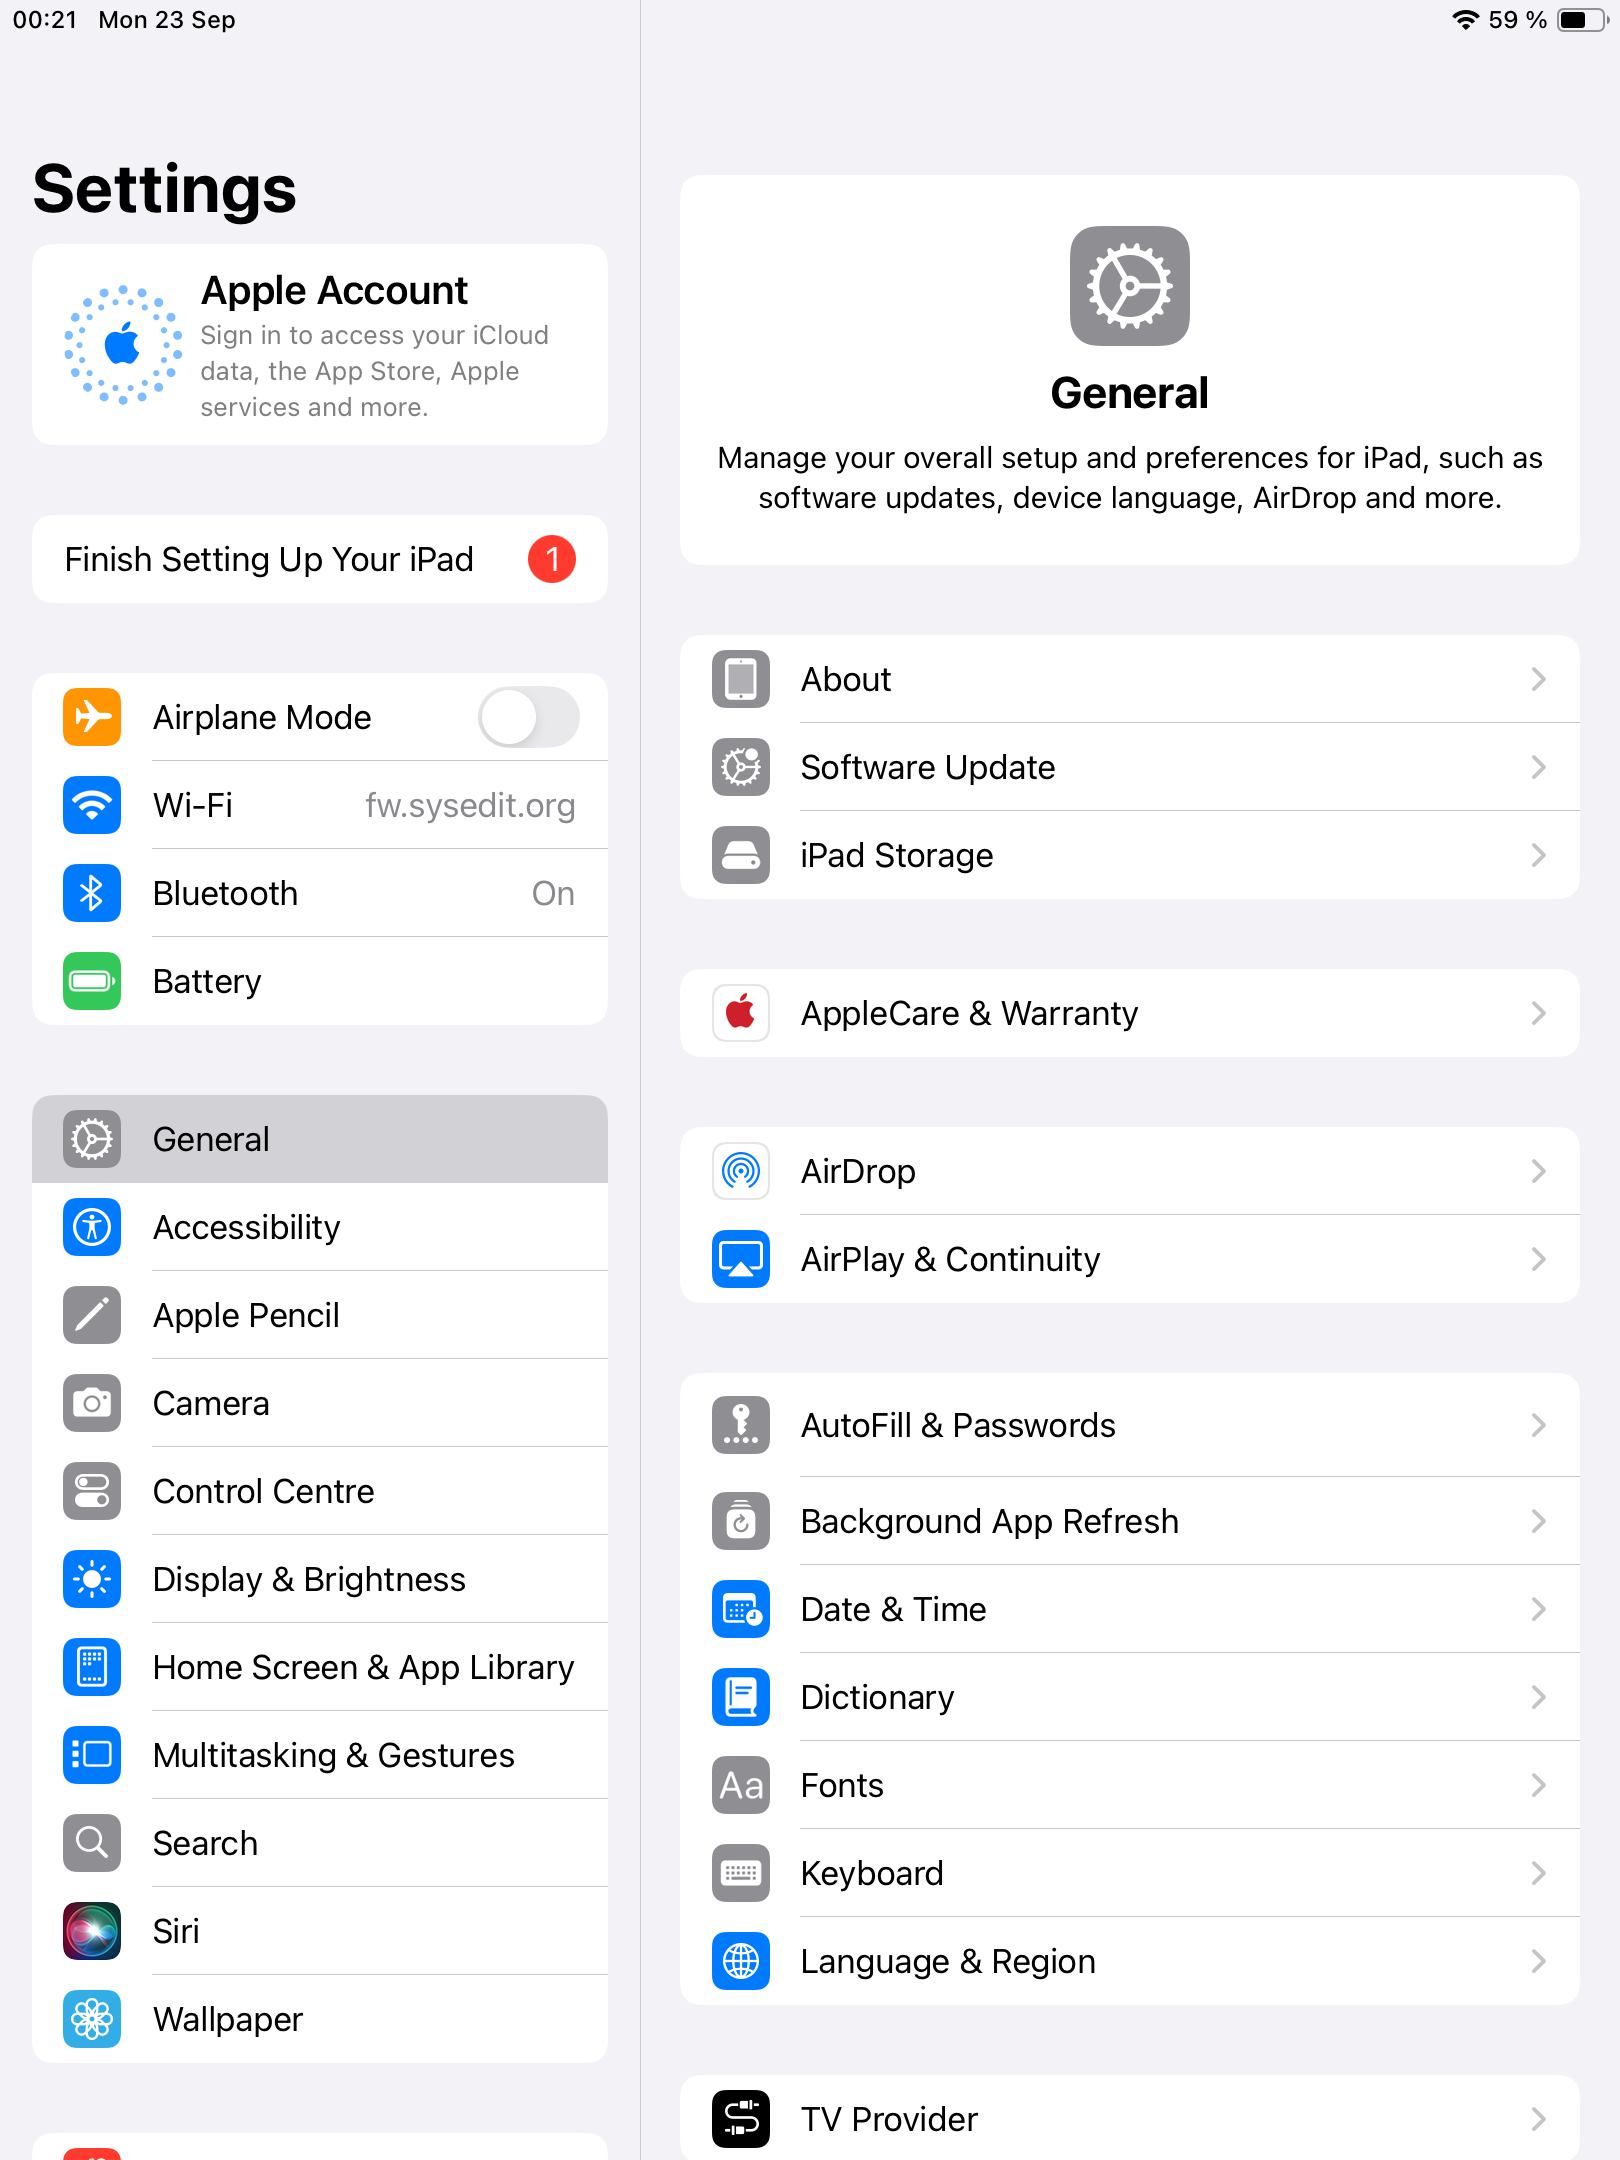](https://kb.filewave.com/uploads/images/gallery/2024-10/tq2PCb6gCuqRphTW-image.png) |
| Navigate to VPN & Device Management | [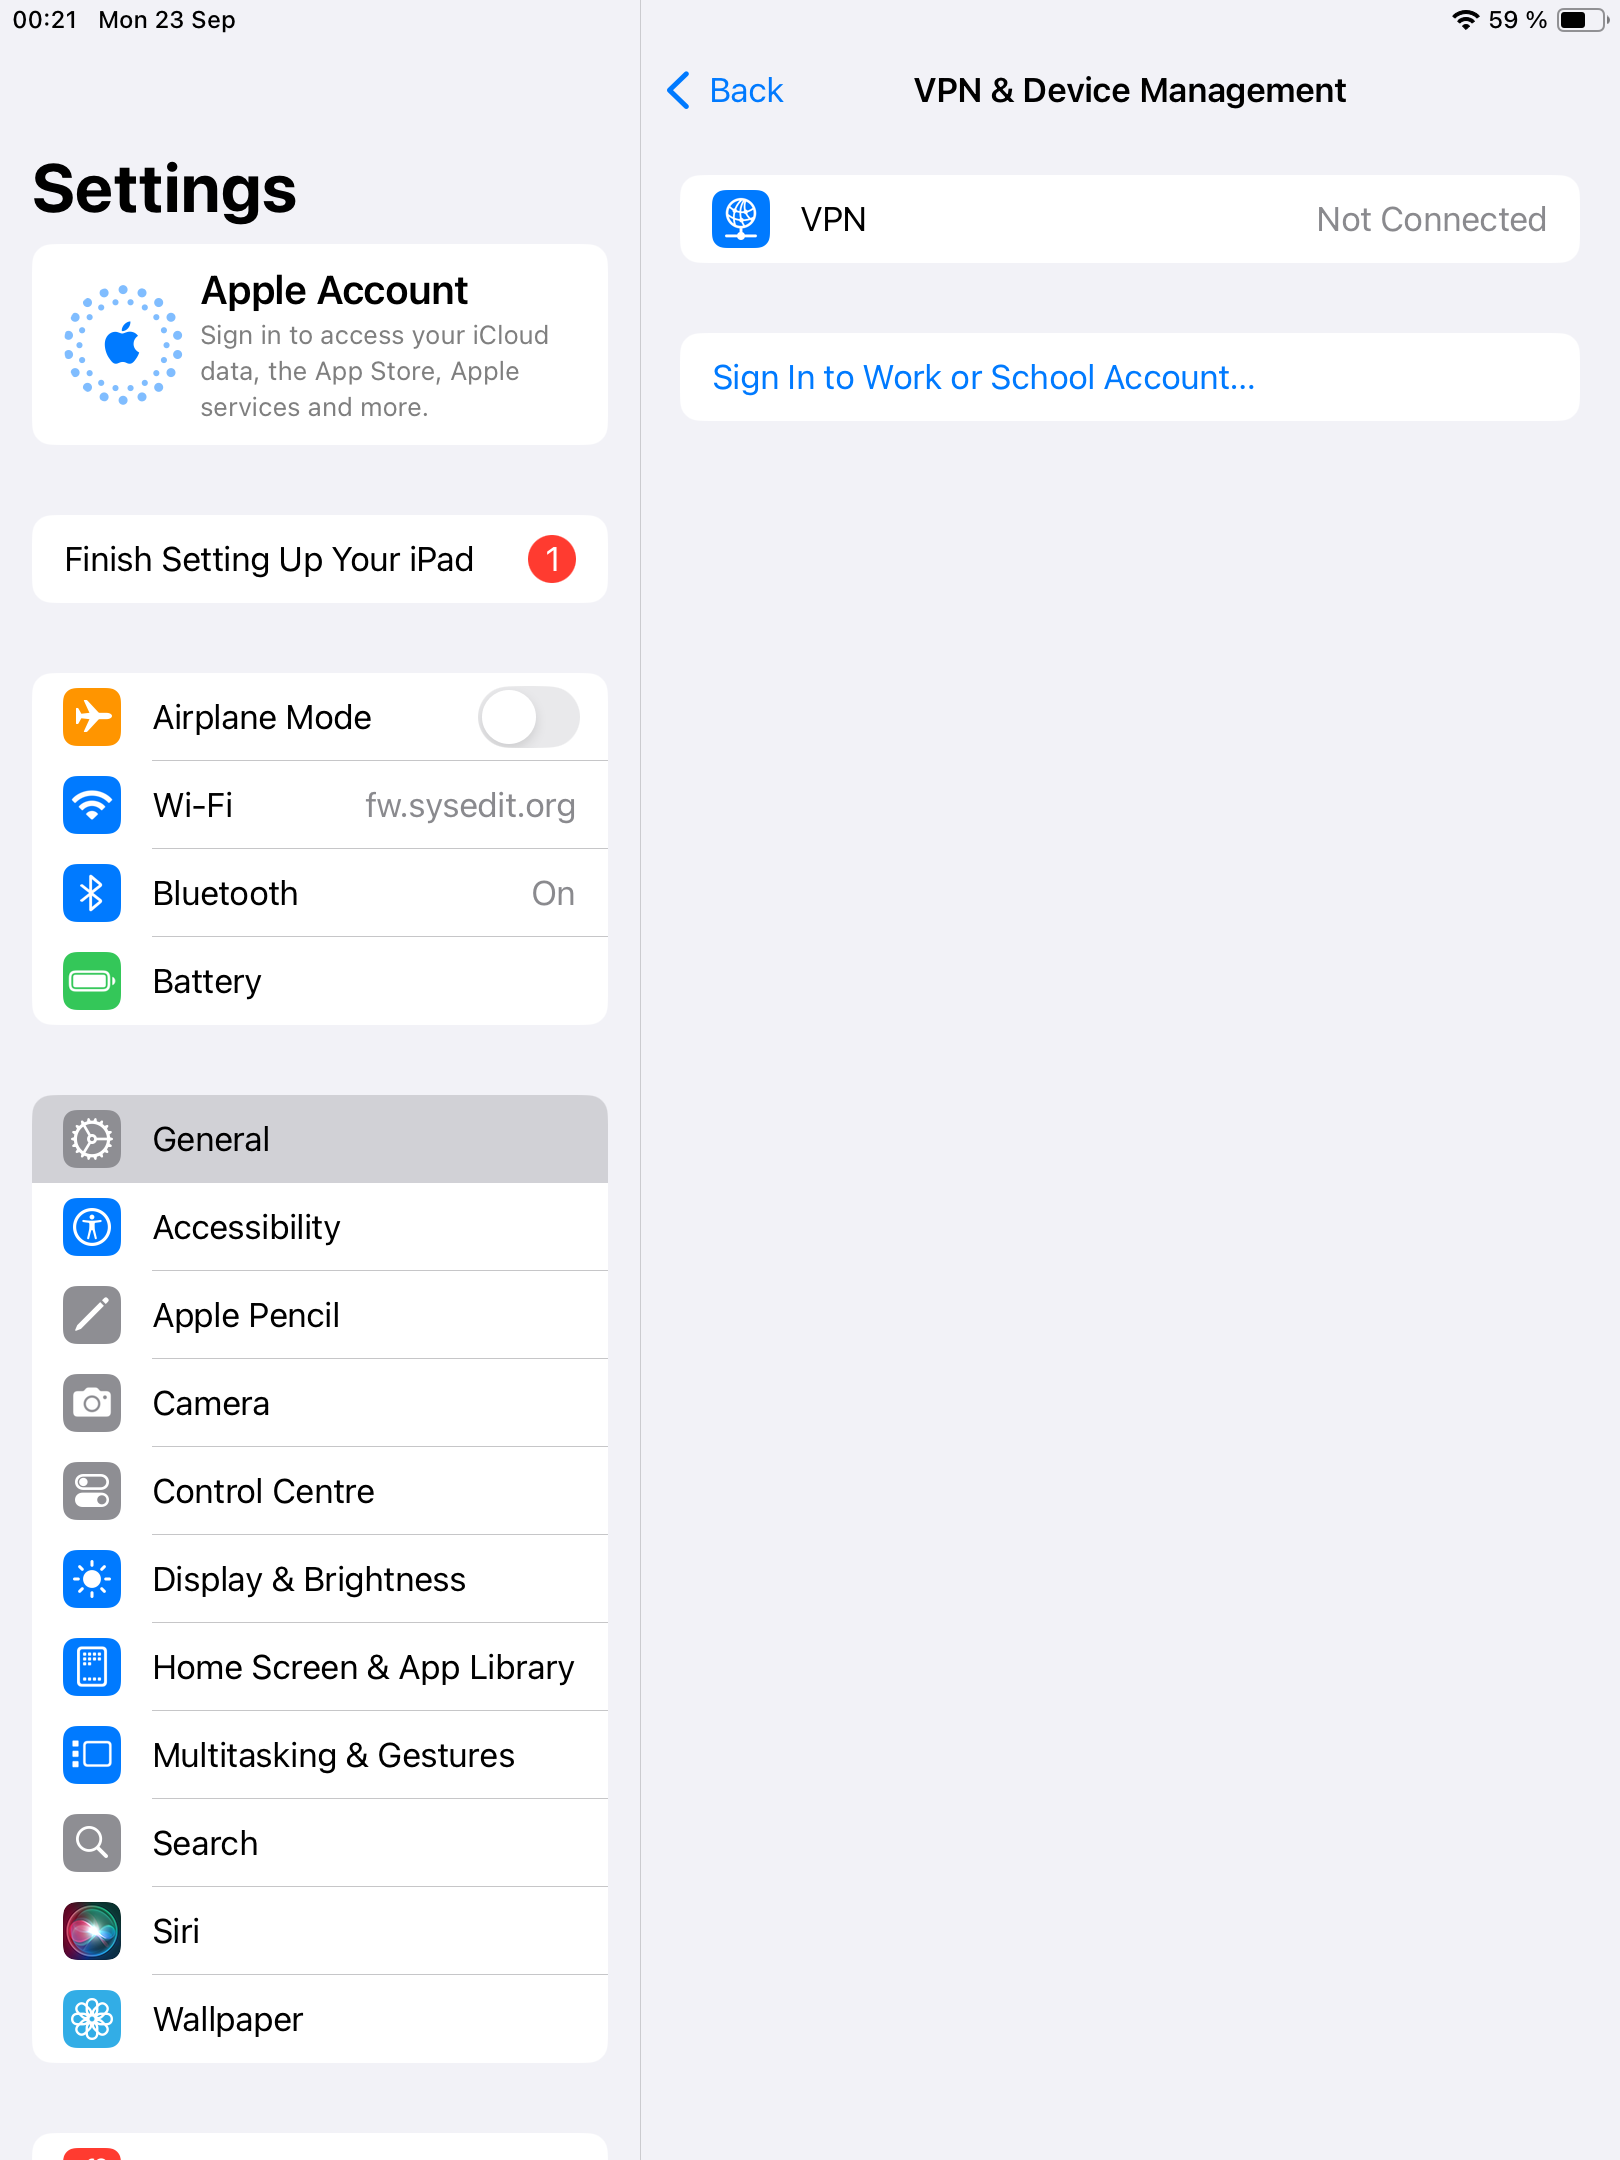](https://kb.filewave.com/uploads/images/gallery/2024-10/hyAItT9cxY7Kf4dO-image.png) |
| Tap Sign In to Work or School Account… | [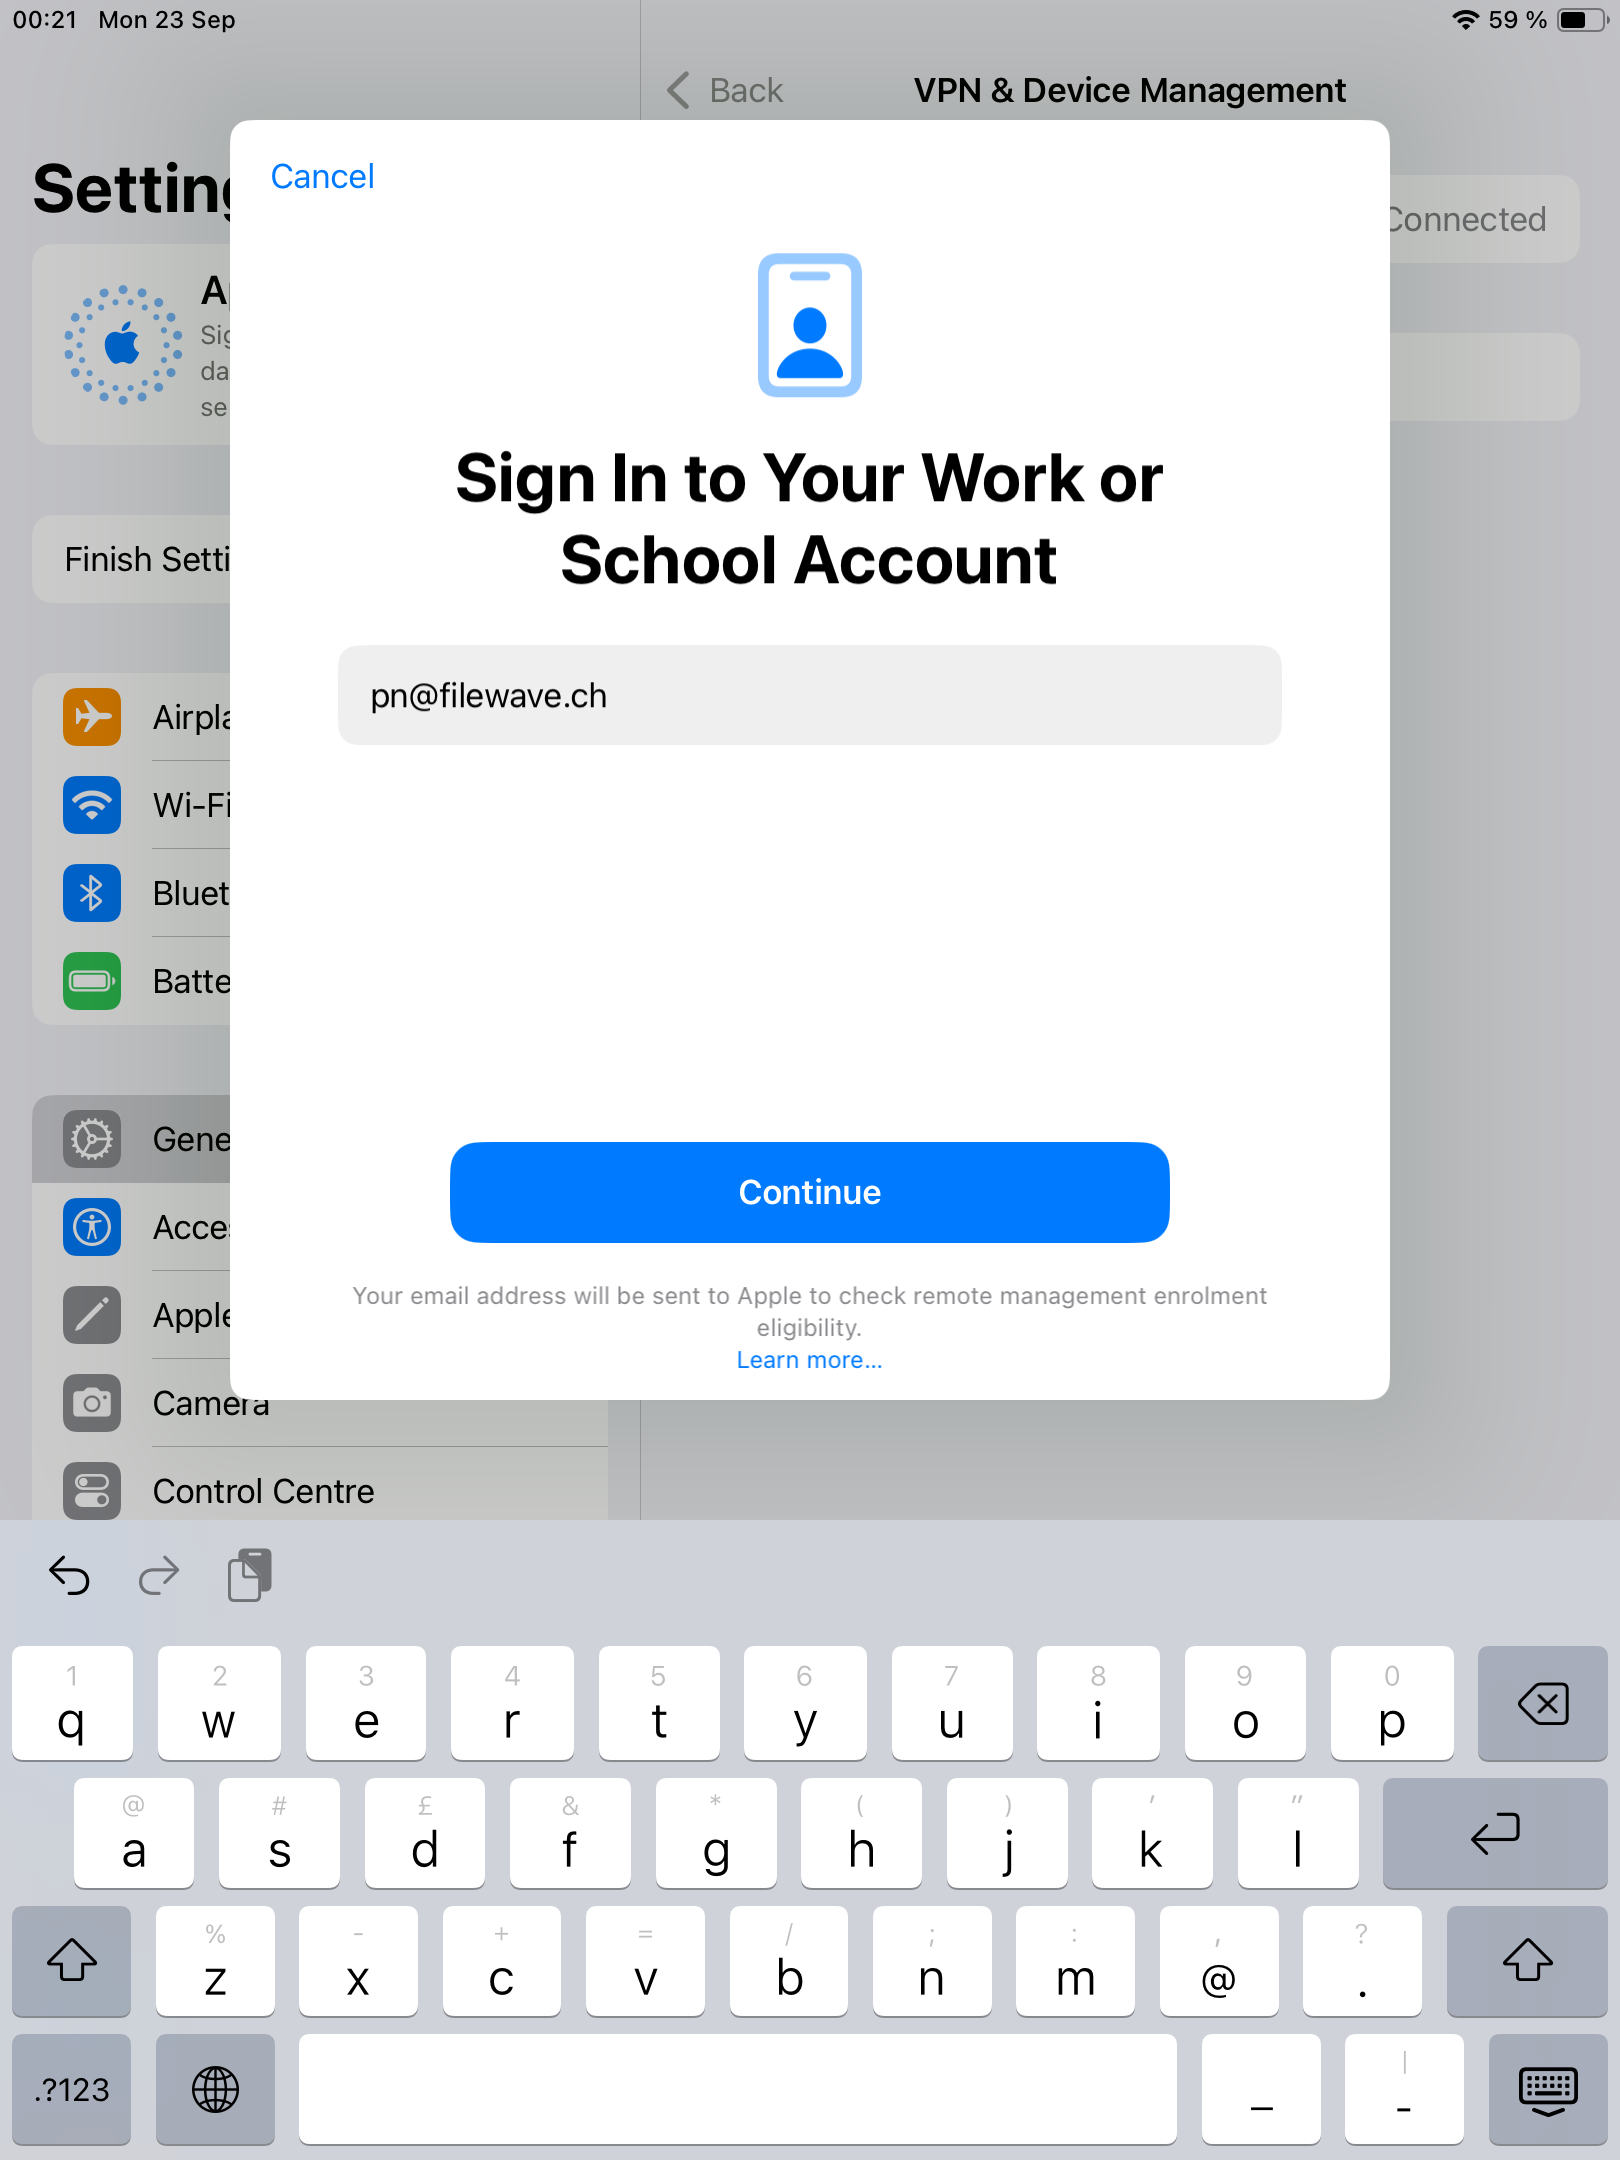](https://kb.filewave.com/uploads/images/gallery/2024-10/bBqsiNY4erlle5Is-image.png) |
| Enter your Managed Apple Account, press Continue. | [](https://kb.filewave.com/uploads/images/gallery/2024-10/kXiGF0wE1t4cdBMg-image.png) |
| The device will now display the standard authentication page if configured; IDP login is also supported. Enter your credentials and tap **Sign In**. | [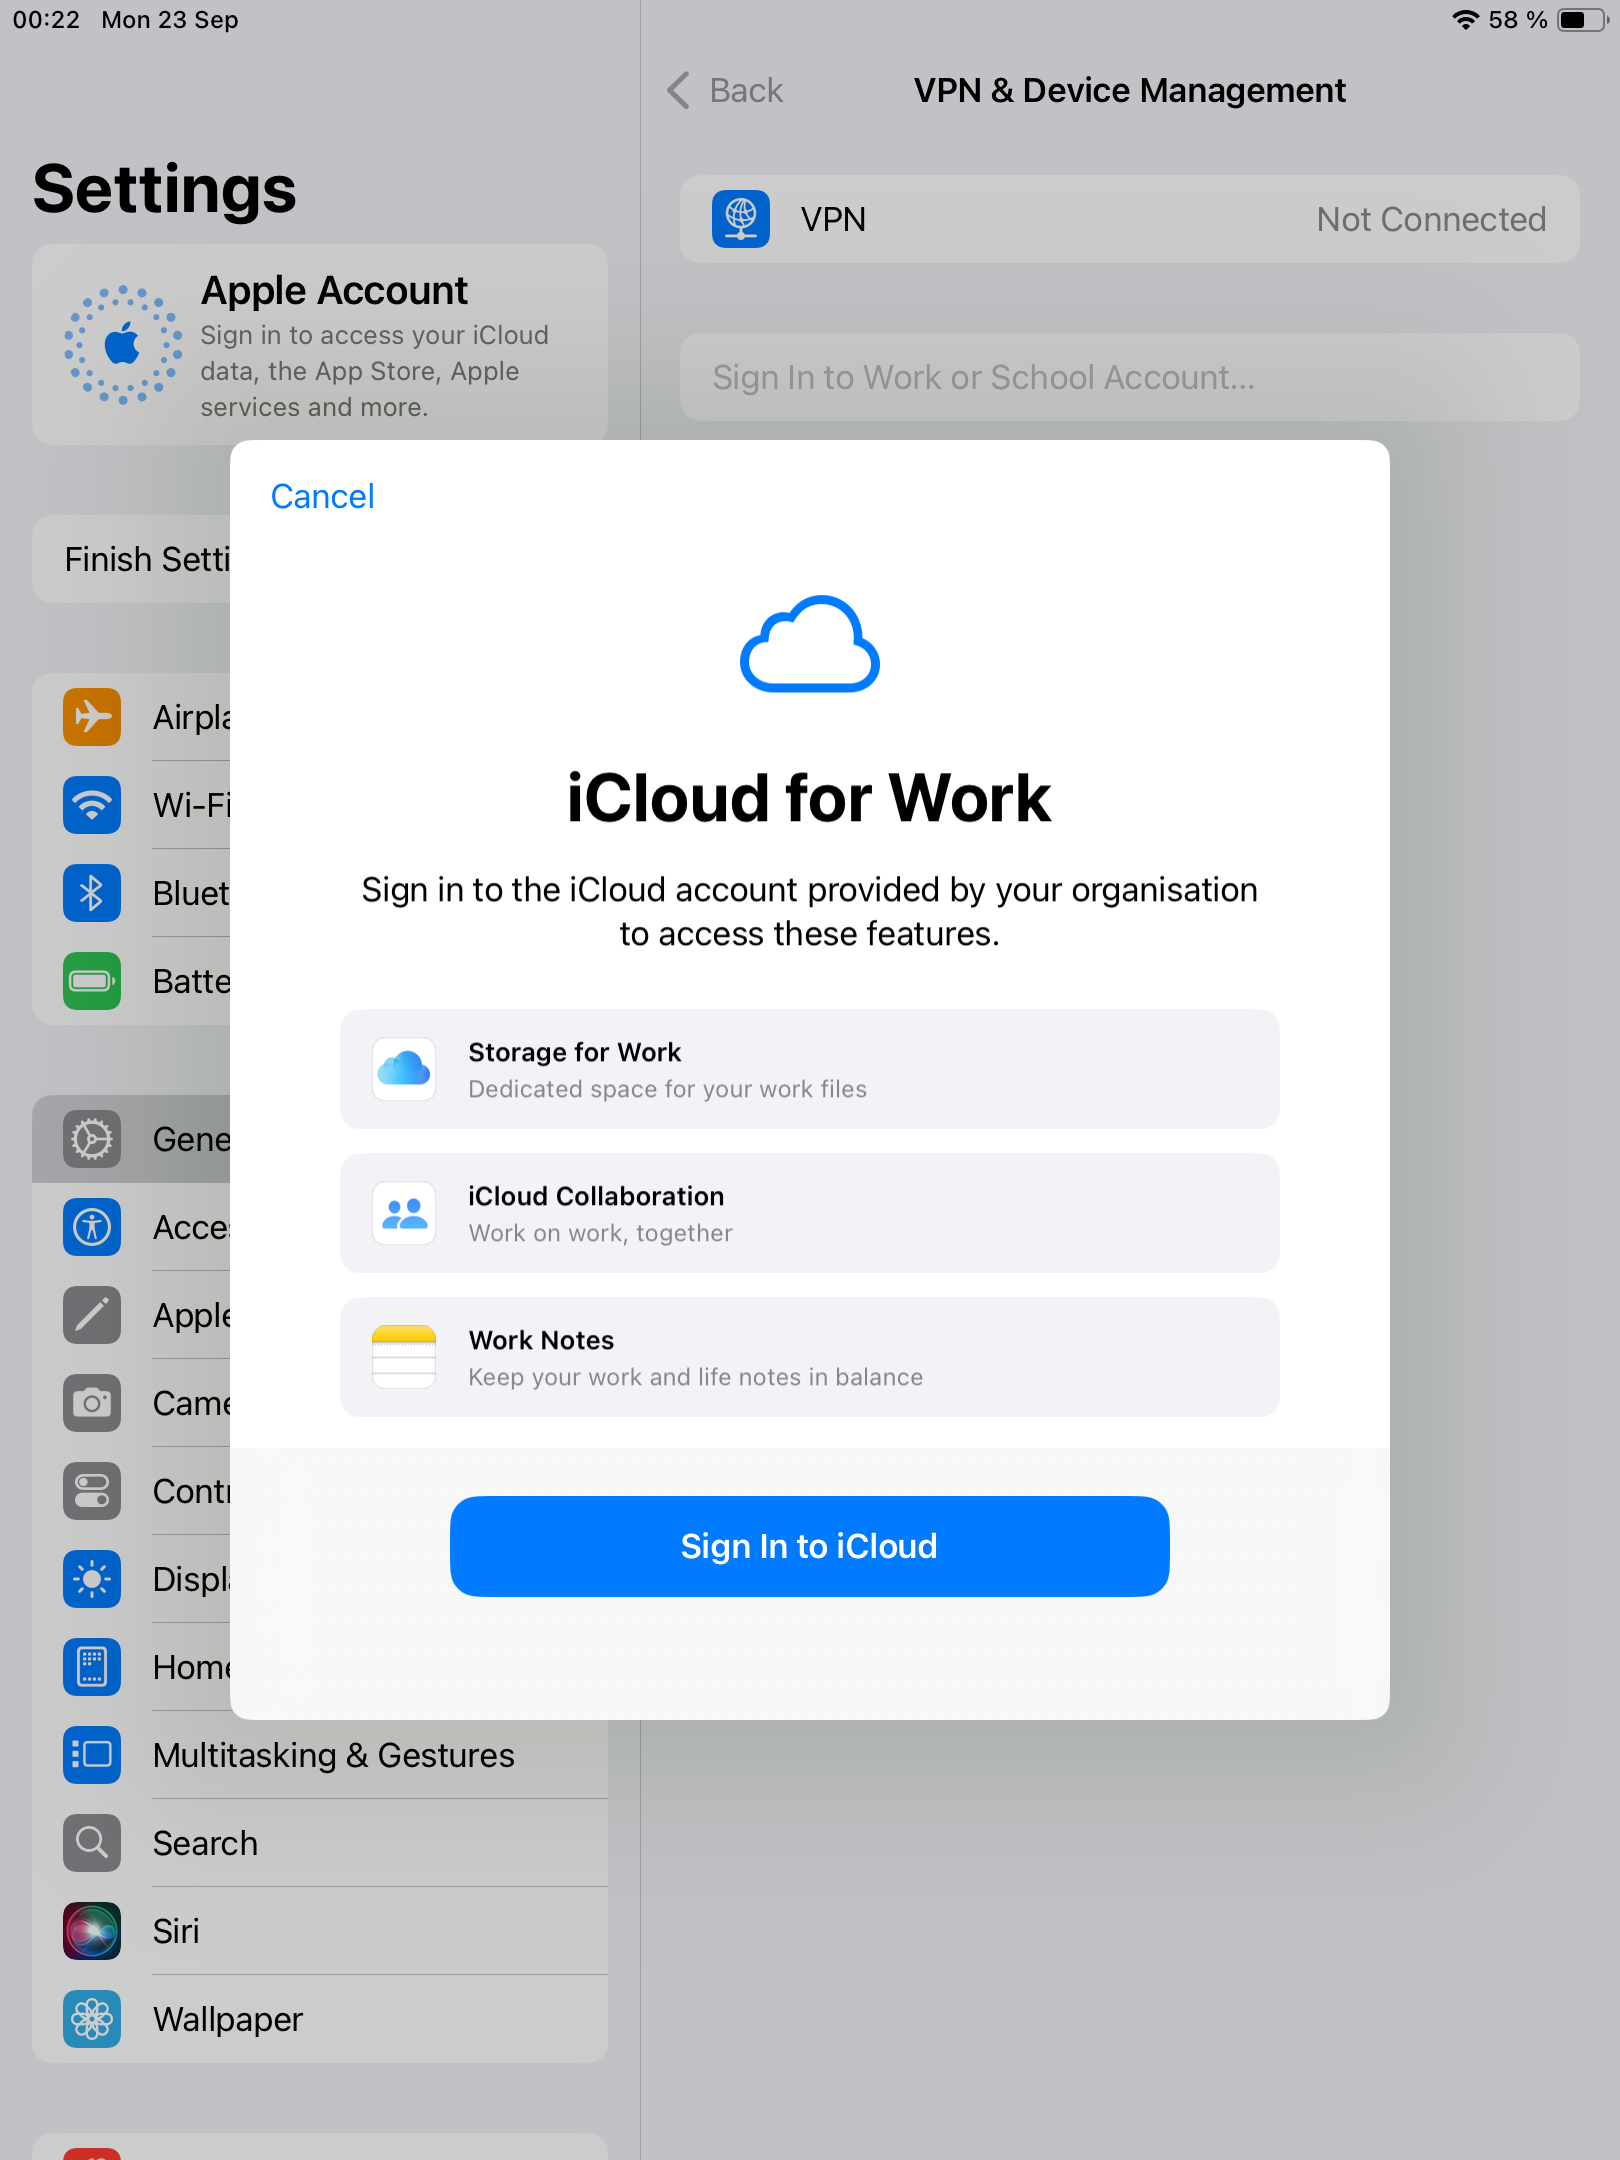](https://kb.filewave.com/uploads/images/gallery/2024-10/oa2AAiixc6YiMbsD-image.png) |
| After a few seconds, the device will prompt you to sign in to iCloud. Tap the button and enter your Managed Apple ID password. | [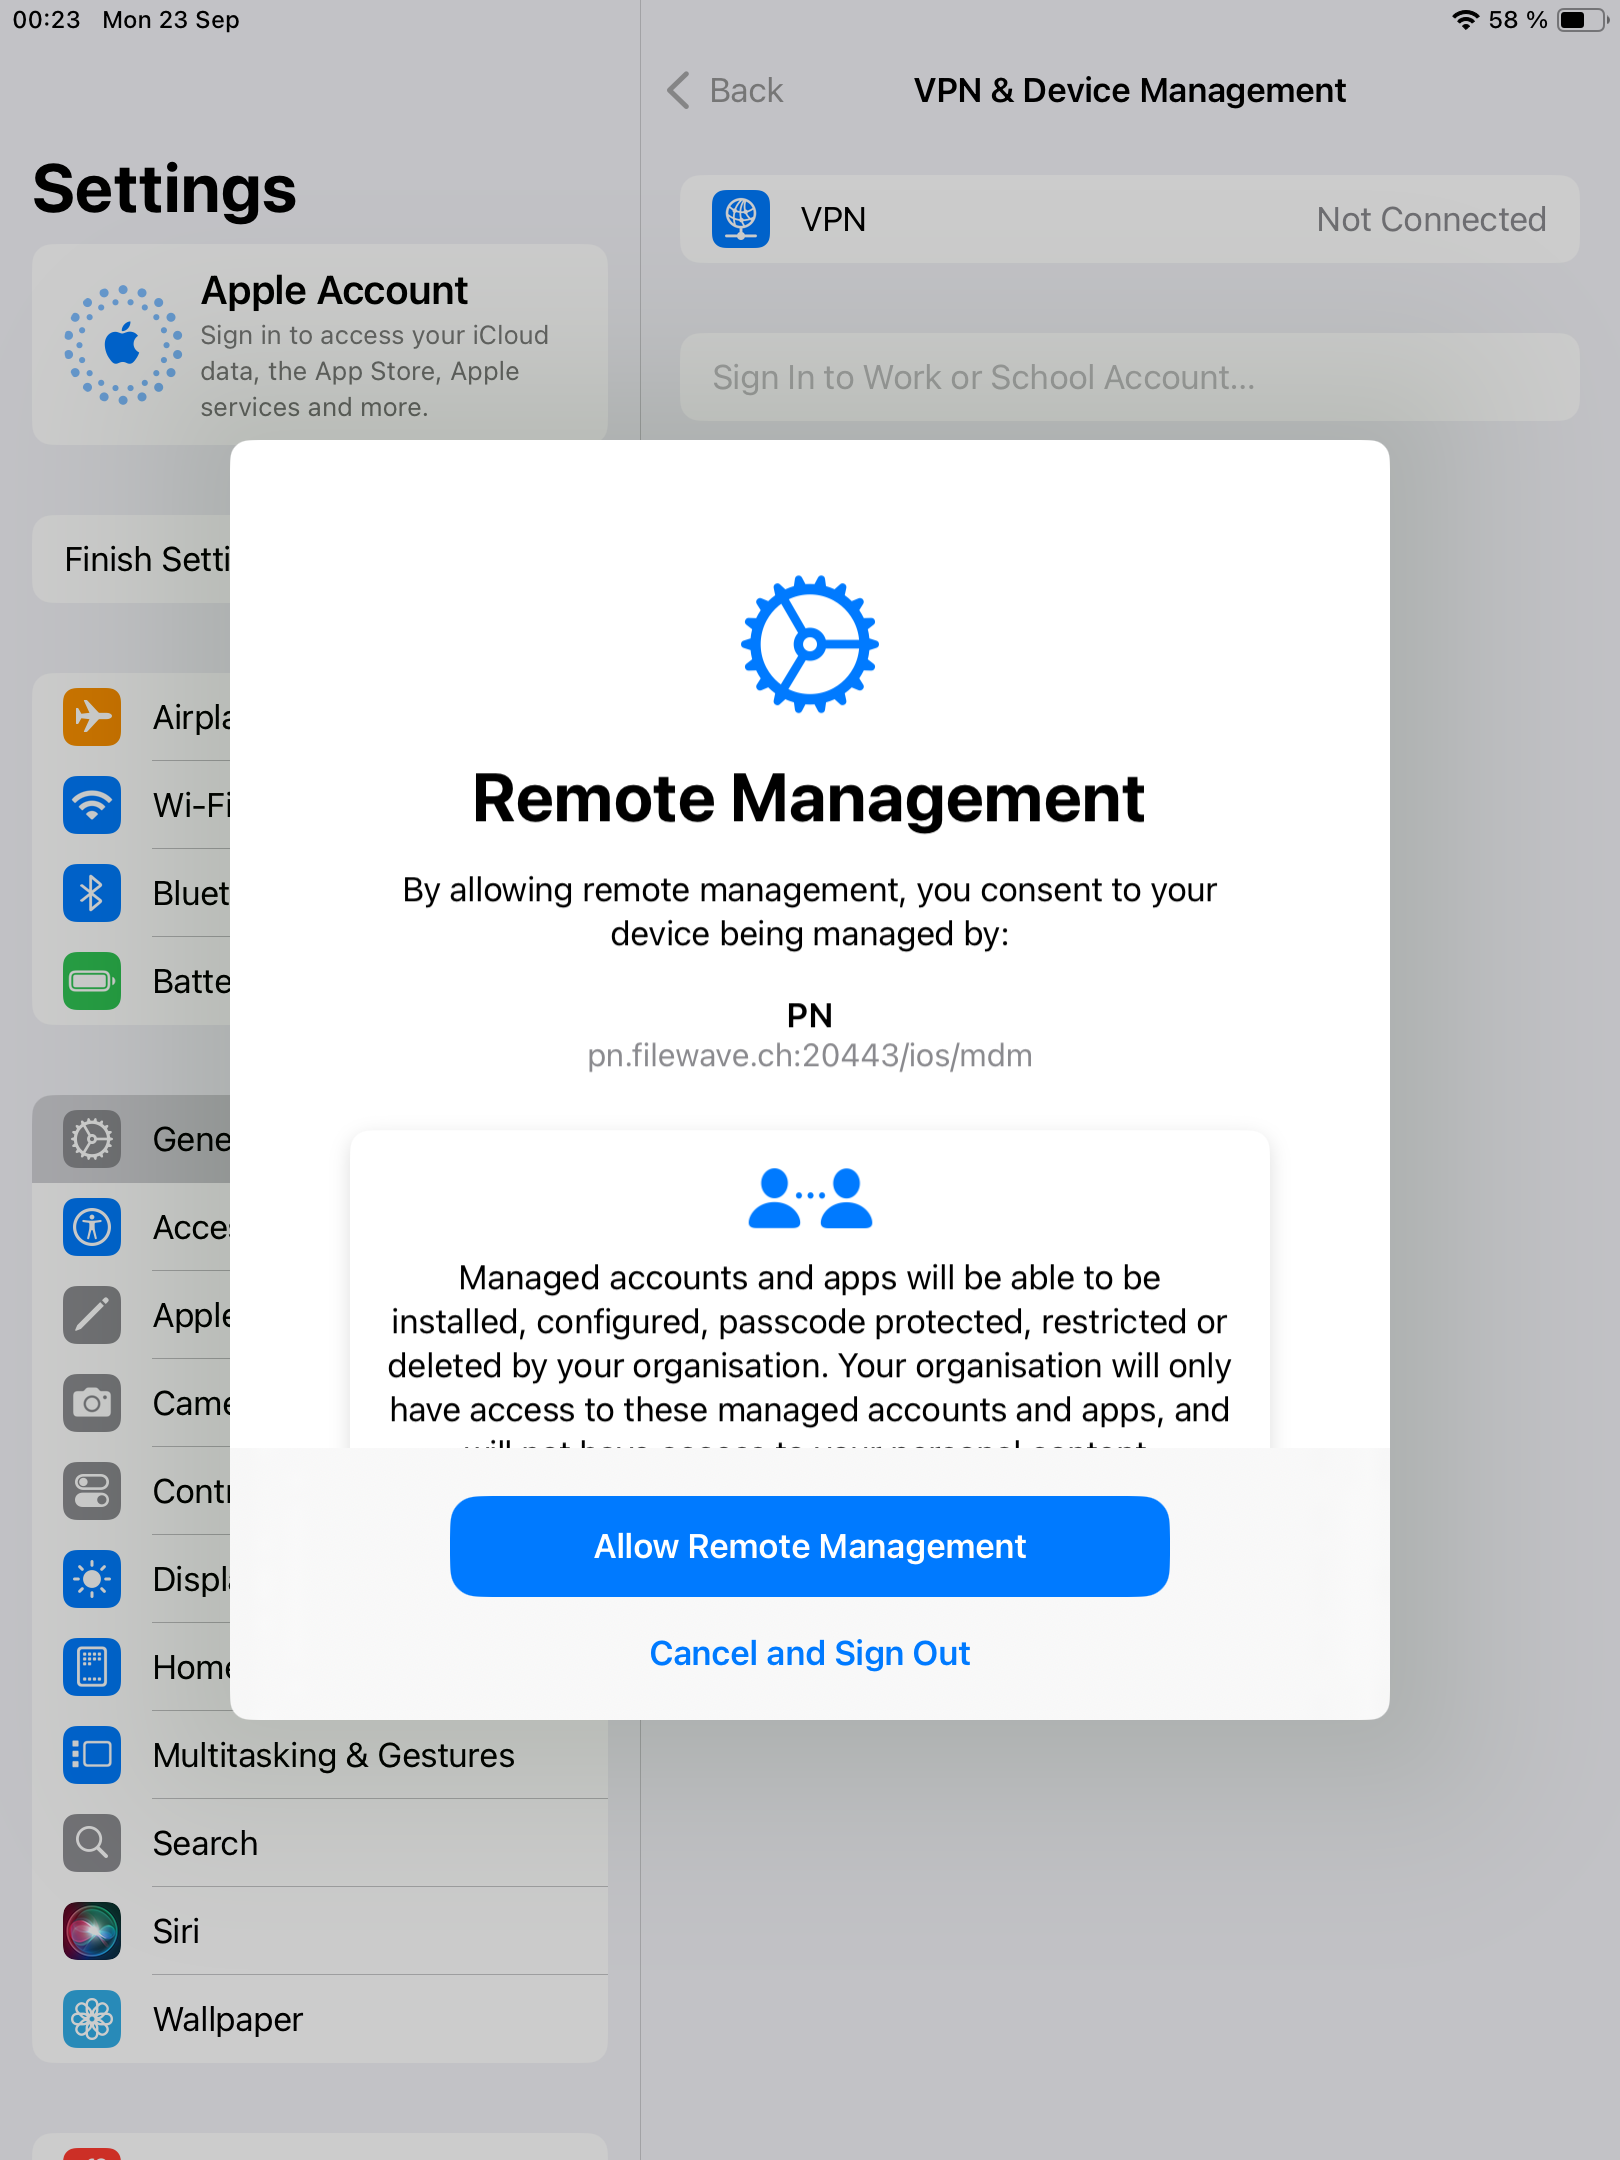](https://kb.filewave.com/uploads/images/gallery/2024-10/KHCgfQfrpAqvdT4y-image.png) |
| And then, press Allow Remote Management to start enrollment. | [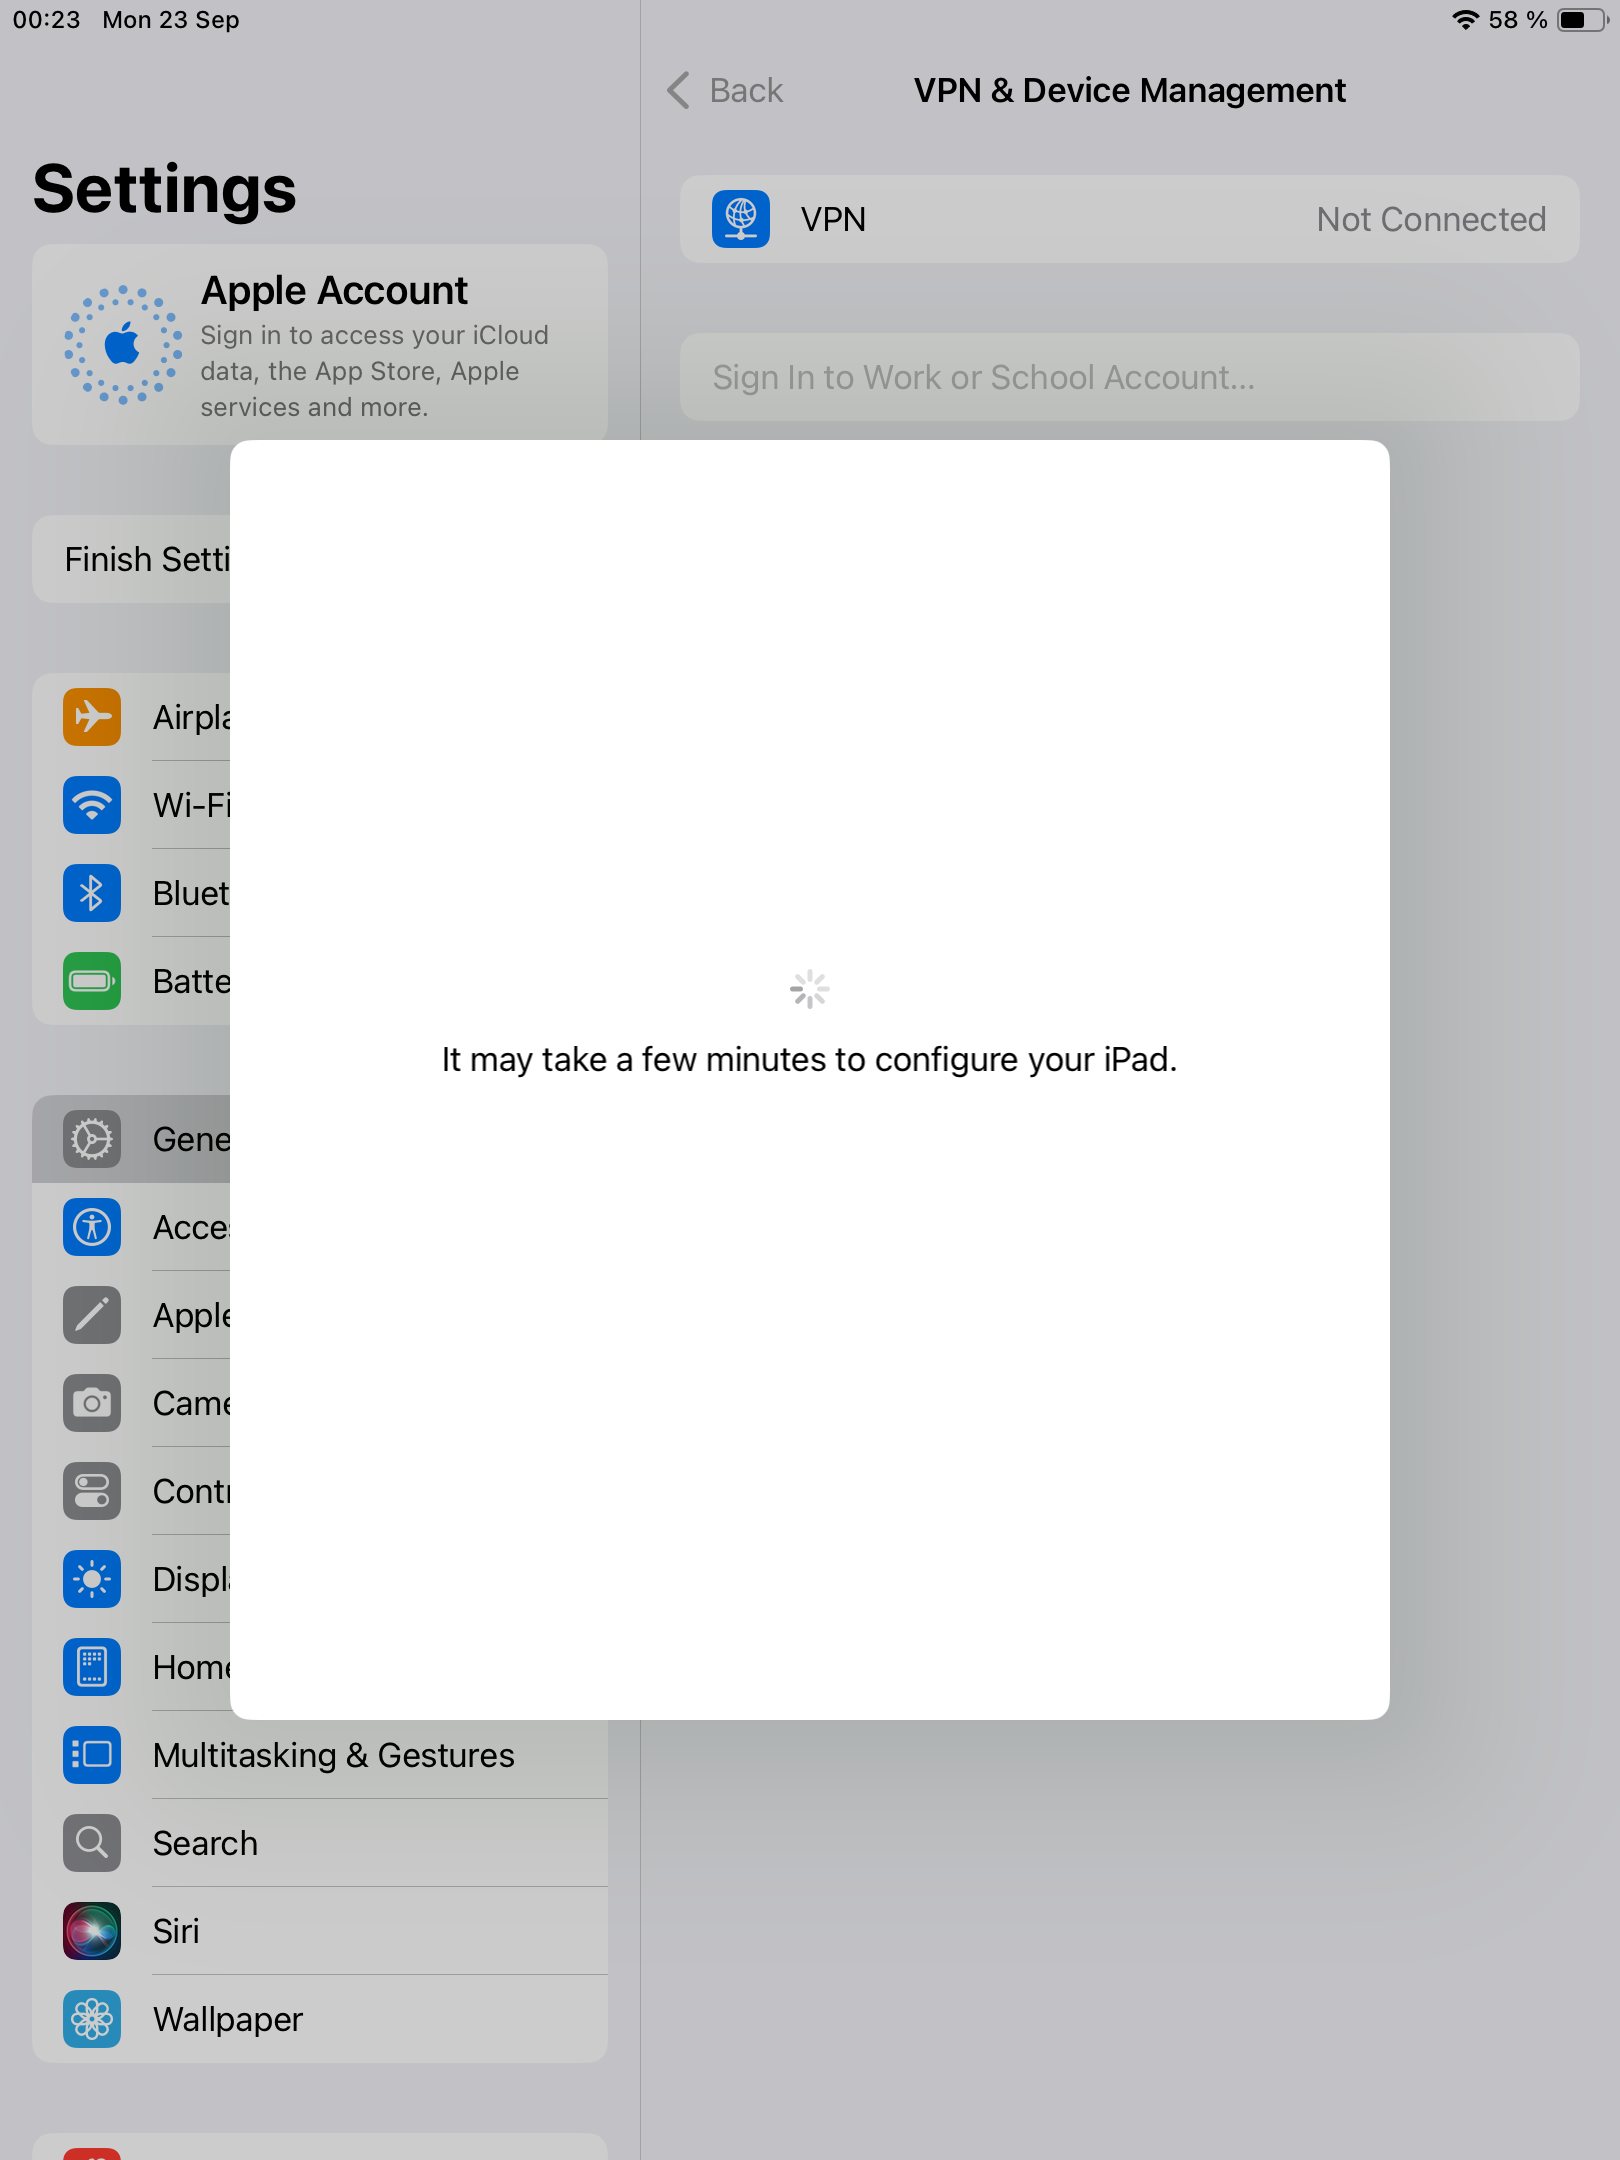](https://kb.filewave.com/uploads/images/gallery/2024-10/Aty7A0bIdtXDjgL4-image.png) [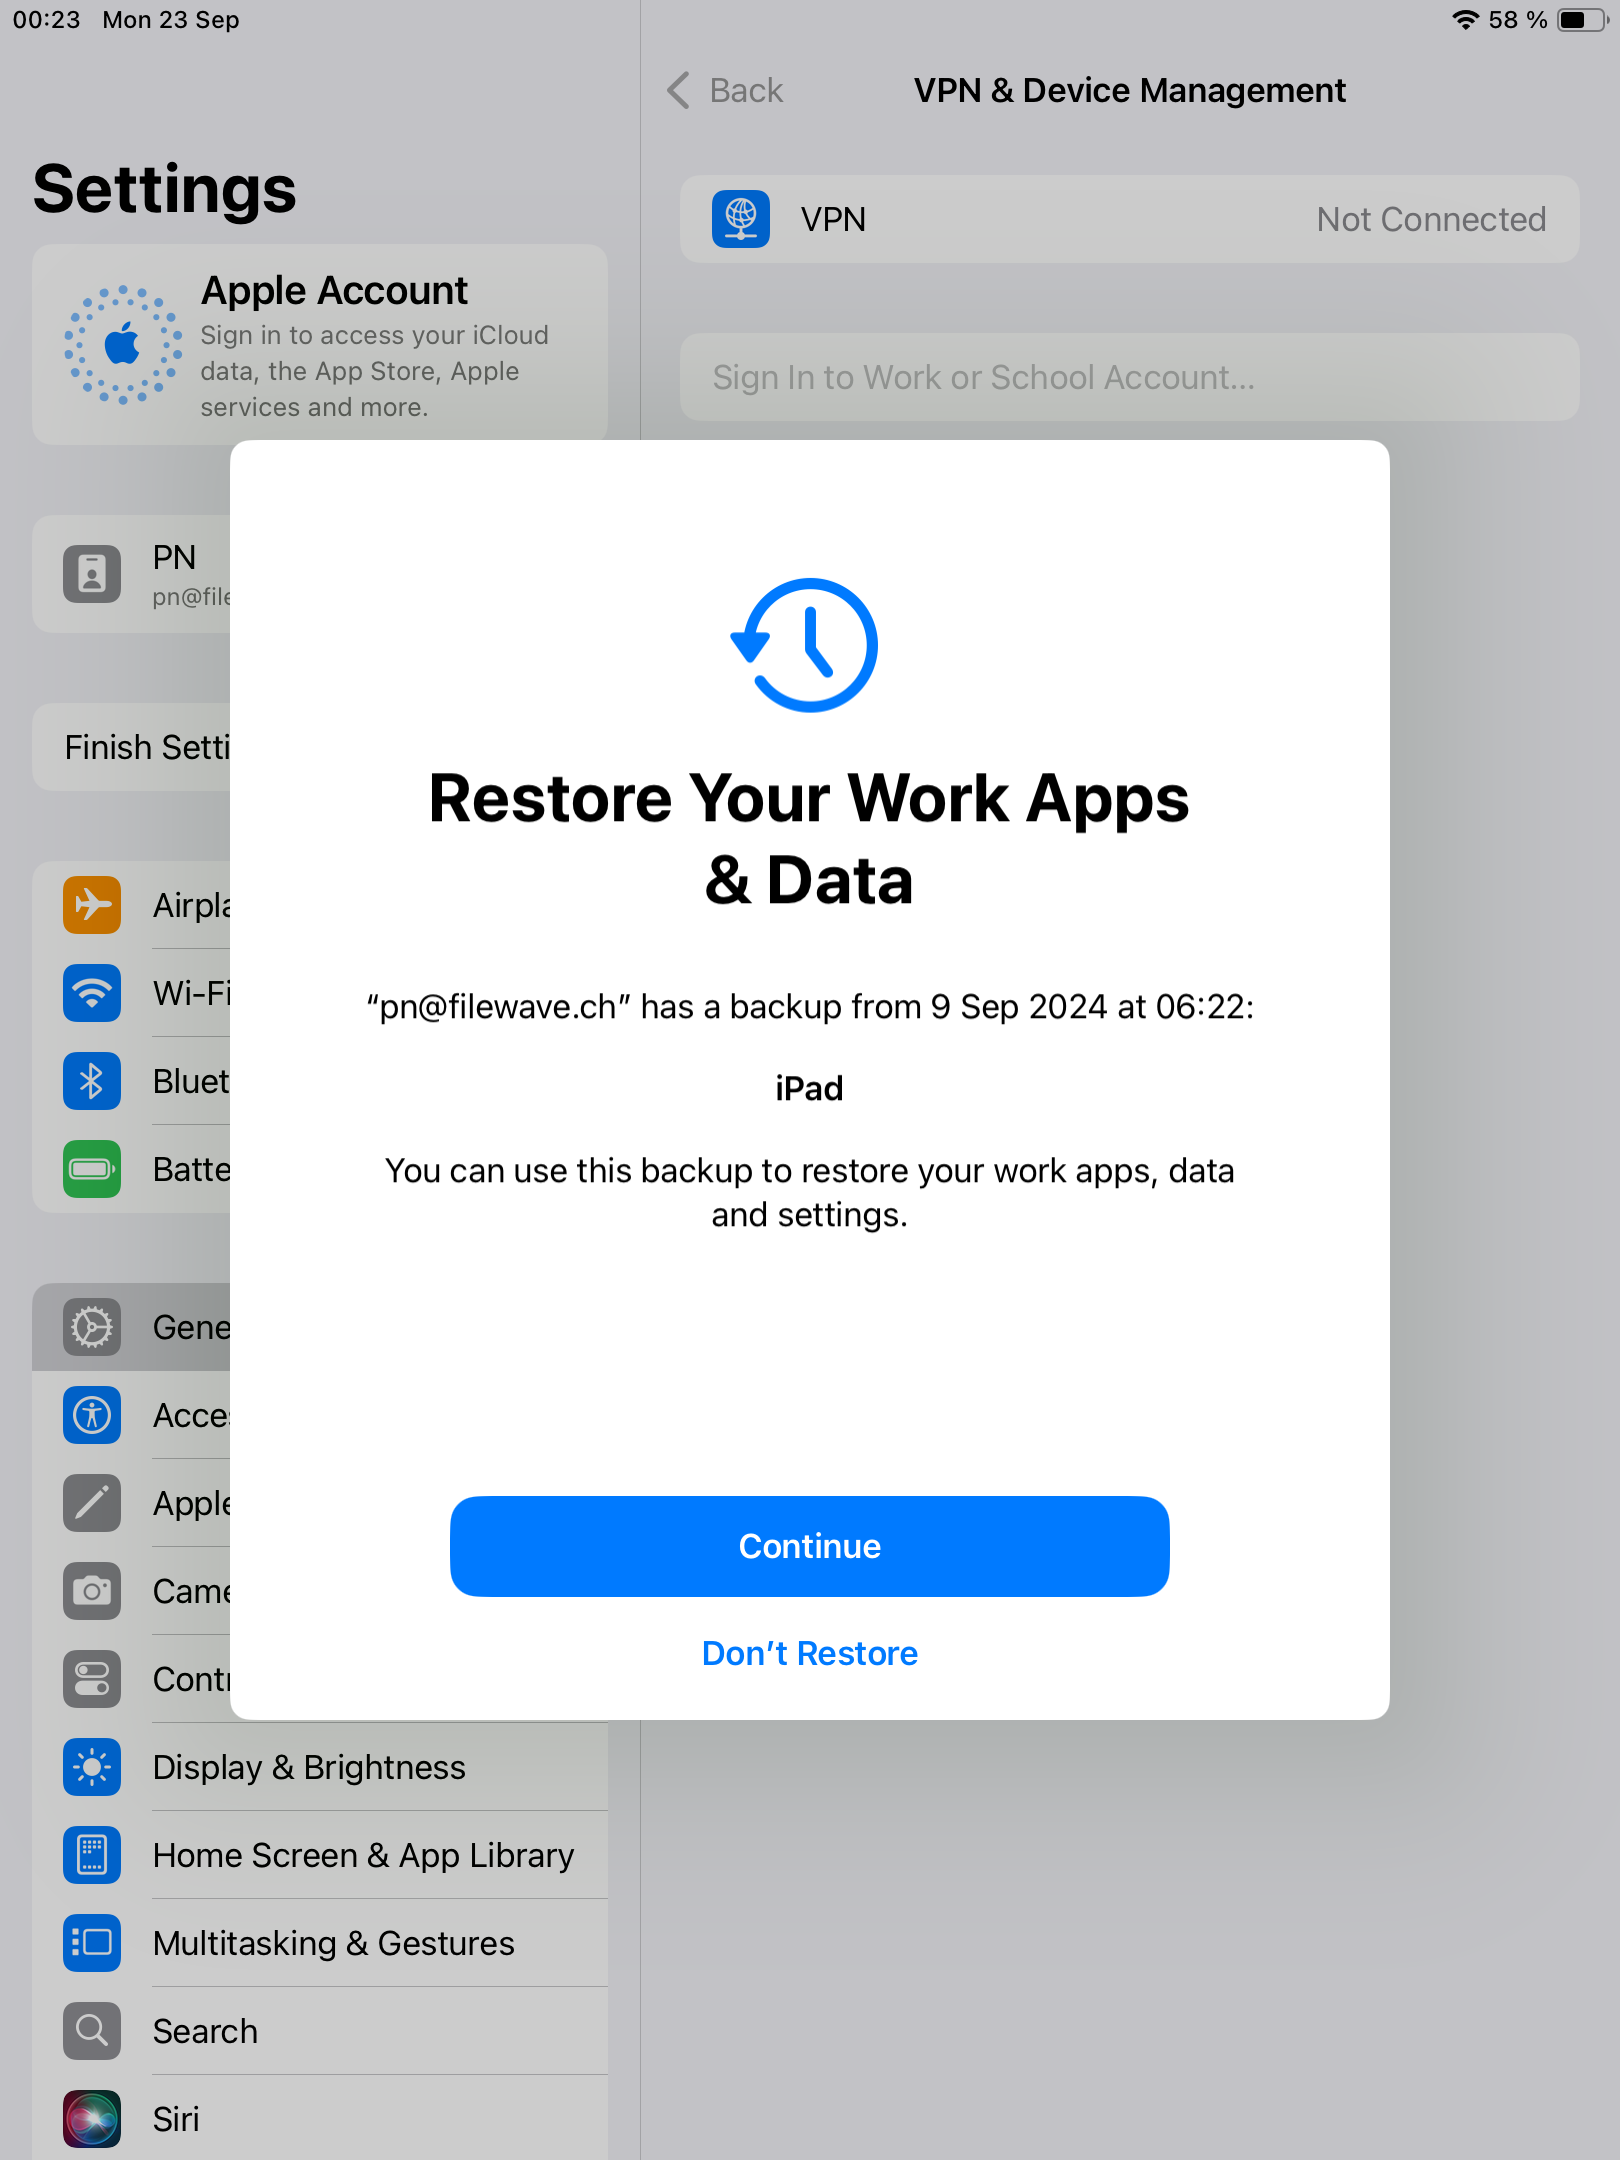](https://kb.filewave.com/uploads/images/gallery/2024-10/1hI6sInR8VIY54Ei-image.png) |
| After enrollment, device may prompt to restore iCloud data. | [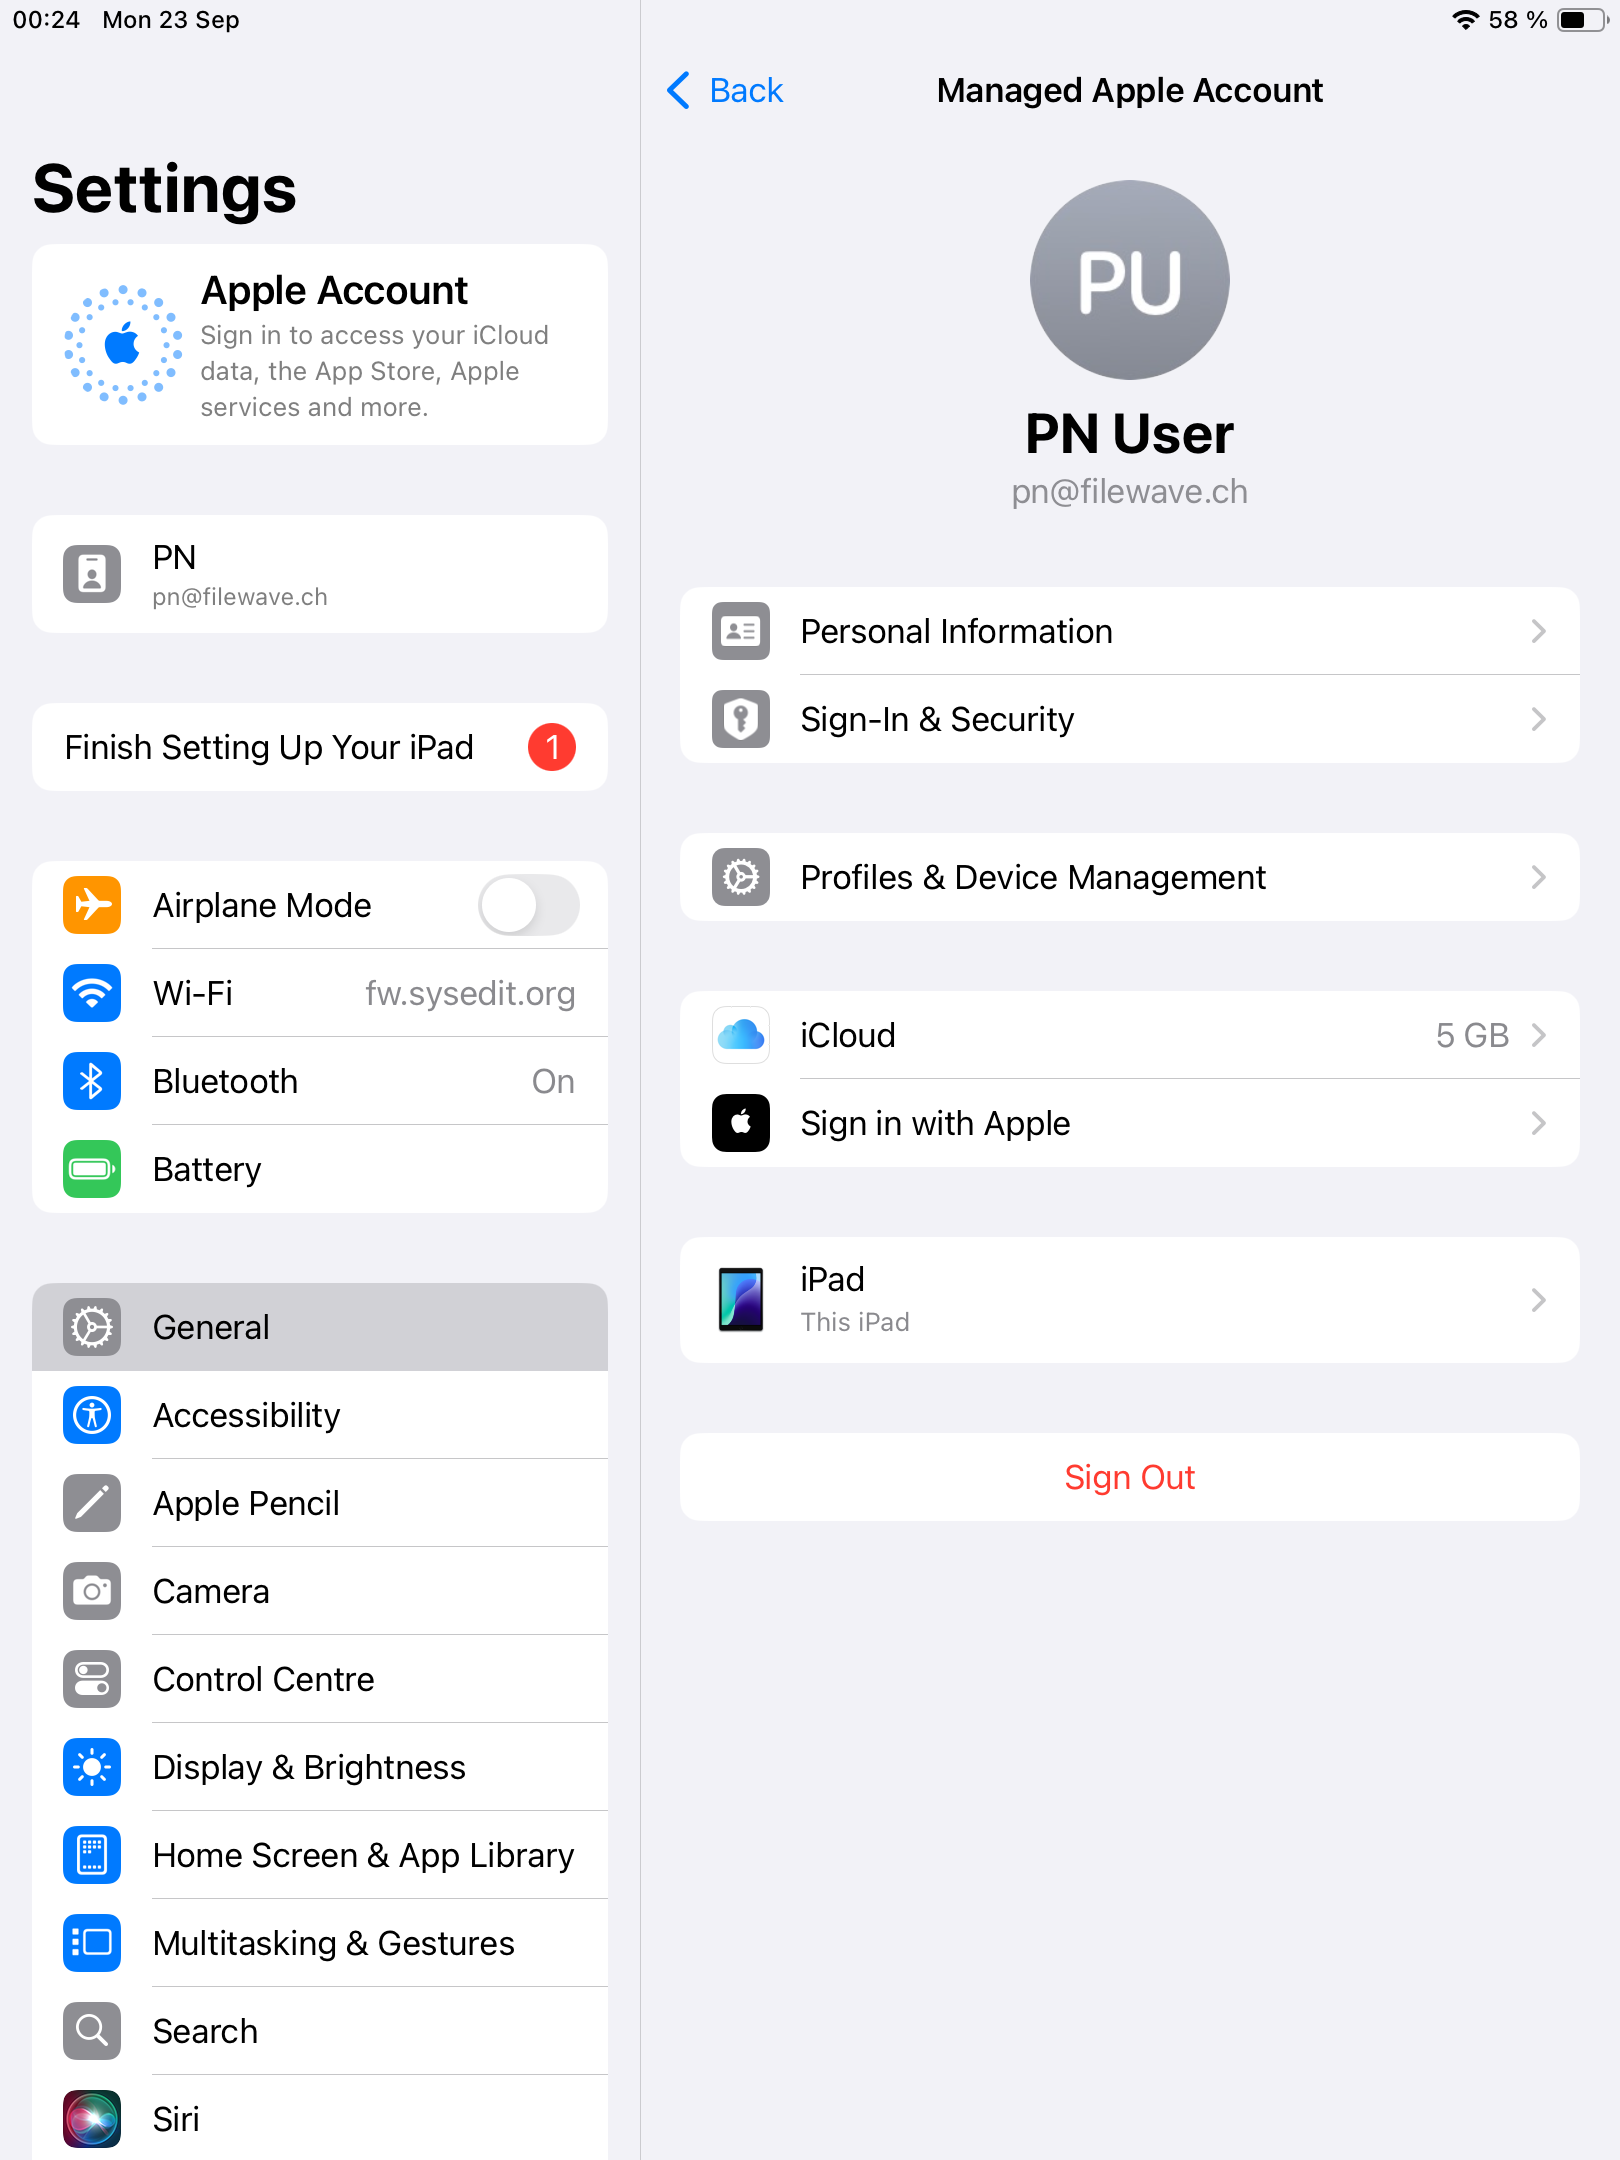](https://kb.filewave.com/uploads/images/gallery/2024-10/0Hra65EMqheLcVga-image.png) |
You may be saying to yourself: "If I have to assign these licenses to the user, doesn't that mean I'll have to create VPP users in FileWave and invite them?" And the answer to that is thankfully, no. For User Enrollment, FileWave will automatically register and associate VPP users for each associated VPP asset on demand.
# New Inventory Item -- Enrollment Type ## What There are now several methods of enrolling devices into FileWave and a new inventory field has been created to record the enrollment method. ## When/Why This field can be helpful when assigning content to devices. The field in question is called Enrollment Type as you'll see below:  ## How There is nothing special about access the item...you can do it in any query or smart group, but the following are the breakdown of the values for the field:| Displaying information | Number | Description |
| Enrollment via APK | 0 | Device was manually enrolled via installation of FileWave application |
| Enrollment via EMM\_API | 1 | Device was enrolled via the Android Management API (through NFC or a QRcode) |
| OTA Enrollment | 2 | Device was enrolled over-the-air |
| User Enrollment | 3 | Device was enrolled BYOD |
| DEP Enrollment | 4 | Device was enrolled via Apple DEP |
| Enrollment via fwcld | 5 | Device was enrolled via fwcld |
| Enrolled | 6 | Enrollment of Chromebook |
| User approved enrollment | 7 | Device was enrolled over-the-air and approved by user |
| Presumed DEP Enrollment | 9 | Device is supervised iOS client that was enrolled before v14. "Presumed DEP" because there is no absolute concrete criteria to determine if it is DEP or Apple Configurator. |
| Not available | 8 | Enrollment type is not determined |
**Self-Signed Certificate** As 3rd party suppliers have been supplying appropriate keys now for some time, this is likely to impact Self-Signed Certificates only.
## Directions The following command may be used to check the certificate RSA key size. macOS, Linux: ```bash openssl x509 -in /usr/local/filewave/certs/server.crt -text -noout | grep Public-Key ``` Windows ```bash C:\OpenSSL-Win64\bin\openssl.exe x509 -in C:\ProgramData\FileWave\FWServer\certs\server.crt -text -noout | FINDSTR Public-Key ``` Windows does not have openssl installed as standard so you will need to go to [https://slproweb.com/products/Win32OpenSSL.html](https://slproweb.com/products/Win32OpenSSL.html) and download the appropriate version of OpenSSL for your environment. If the output is anything less than 2048, then the server certificate will need to be updated. If you are using a Self-Signed Cert, you will need to either: - Re-use your process for generating the certificate to update to ensure it has a RSA key size of 2048 or larger - Consider moving to an official 3rd party certificate Please take into consideration the following KB when moving to a new certificate: [Root Trusted SSL Certificate (Using and Renewing)](https://kb.filewave.com/books/certificates/page/root-trusted-ssl-certificate-using-and-renewing "Root Trusted SSL Certificate (Using and Renewing)") # Customising iOS Wallpaper # Customizing iOS Device Wallpaper with Dynamic Text ## What FileWave v14.10.0 introduced a new feature that allows customisation of wallpaper on iOS devices. This feature enables the additions of wallpaper text and with FileWave's parameters within Profiles, a single generic profile can be used to display Serial Number, Department and Assigned User, simplistically on all devices. ## When/Why Some suggestions of using text with wallpaper include: - Personalizing the device for an organization, department or individual - Identifying a device with its unique Serial Number, which can be helpful in tracking and asset management - Providing additional information that may be useful for the end-user or technical support team - Displaying room names for wall mounted tablets outside meetings rooms, lecture theatres and hospital surgeries. ## How To utilise this feature in FileWave v14.10.0: - Log in to your FileWave console. - Create a new iOS Profile. - Select the **Command Policy** item from the left list of profile types. - In the **Command Policy**, add the desired text, e.g. Department, Telephone Number into the 'Text overlay' box. Note this example demonstrates the use of a parameter to supply the device's Serial Number. 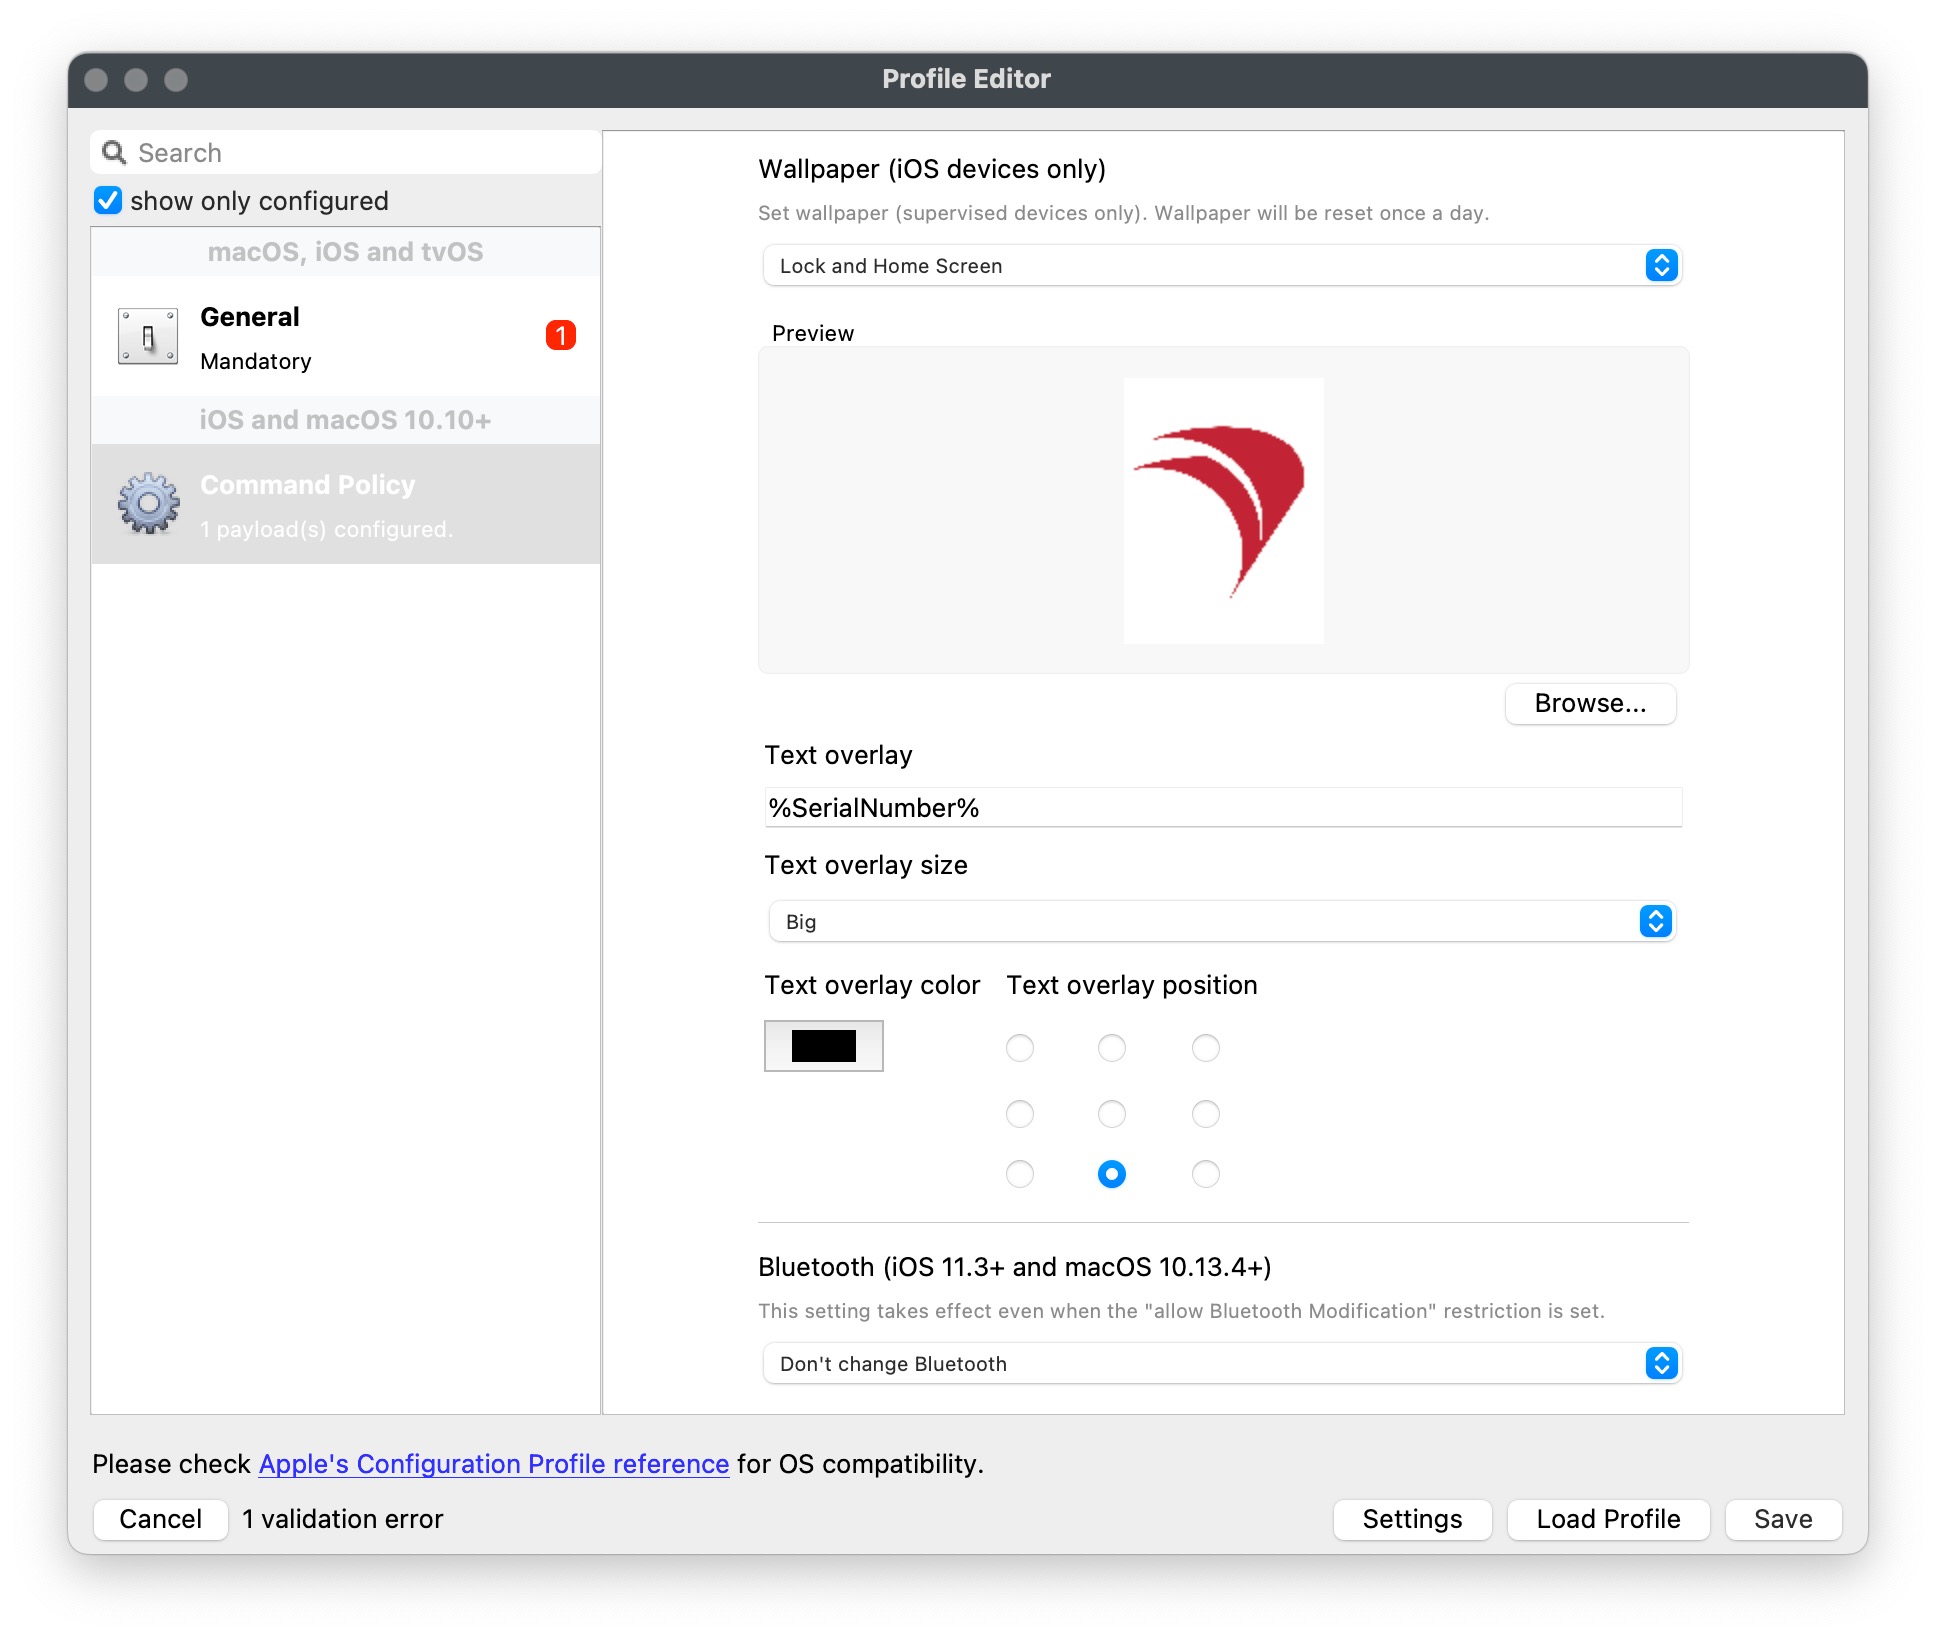 - Save the configuration and apply it to the chosen, targeted iOS devices. It's that simple! Now your iOS devices will have a customized wallpaper that displays the information configured.If the image's aspect ratio doesn't match the device's screen resolution, iOS or iPadOS will resize the image which may lead to portions of the image being cropped. Even where an images resolution matches the screen resolution in one orientation, when rotated between landscape and portrait, this can no longer be the case. The consequence is a resize of the image, also leading to cropped edges. The Text is burnt into the image and as such, if not placed with consideration, could also become cropped. Test the outcome of the image with text in both Portrait and Landscape.
## Digging Deeper Extensive details of image sizes with text placement and its impact is highlighted in: - [Custom iOS Wallpaper Dynamic Text Tips](https://kb.filewave.com/books/ios-ipados/page/custom-ios-wallpaper-dynamic-text-tips) Referencing parameters within all profiles (which can now be used to personalise the text on the wallpaper since FileWave v14.10.0) is also described in: - [Using parameters in iOS/macOS Profiles](https://kb.filewave.com/books/profiles-apple/page/using-variables-in-apple-iosmacos-profiles "Using variables in Apple iOS/macOS Profiles") # Custom iOS Wallpaper Dynamic Text Tips ## What Consideration of the size and where to place the text being added to an Apple mobile device's Wallpaper. ## When/Why When adding text, there are 3 Font size options, plus 9 possible locations for placing text. Note, the preview is portrait, but this is not necessarily how the image will appear on the device. [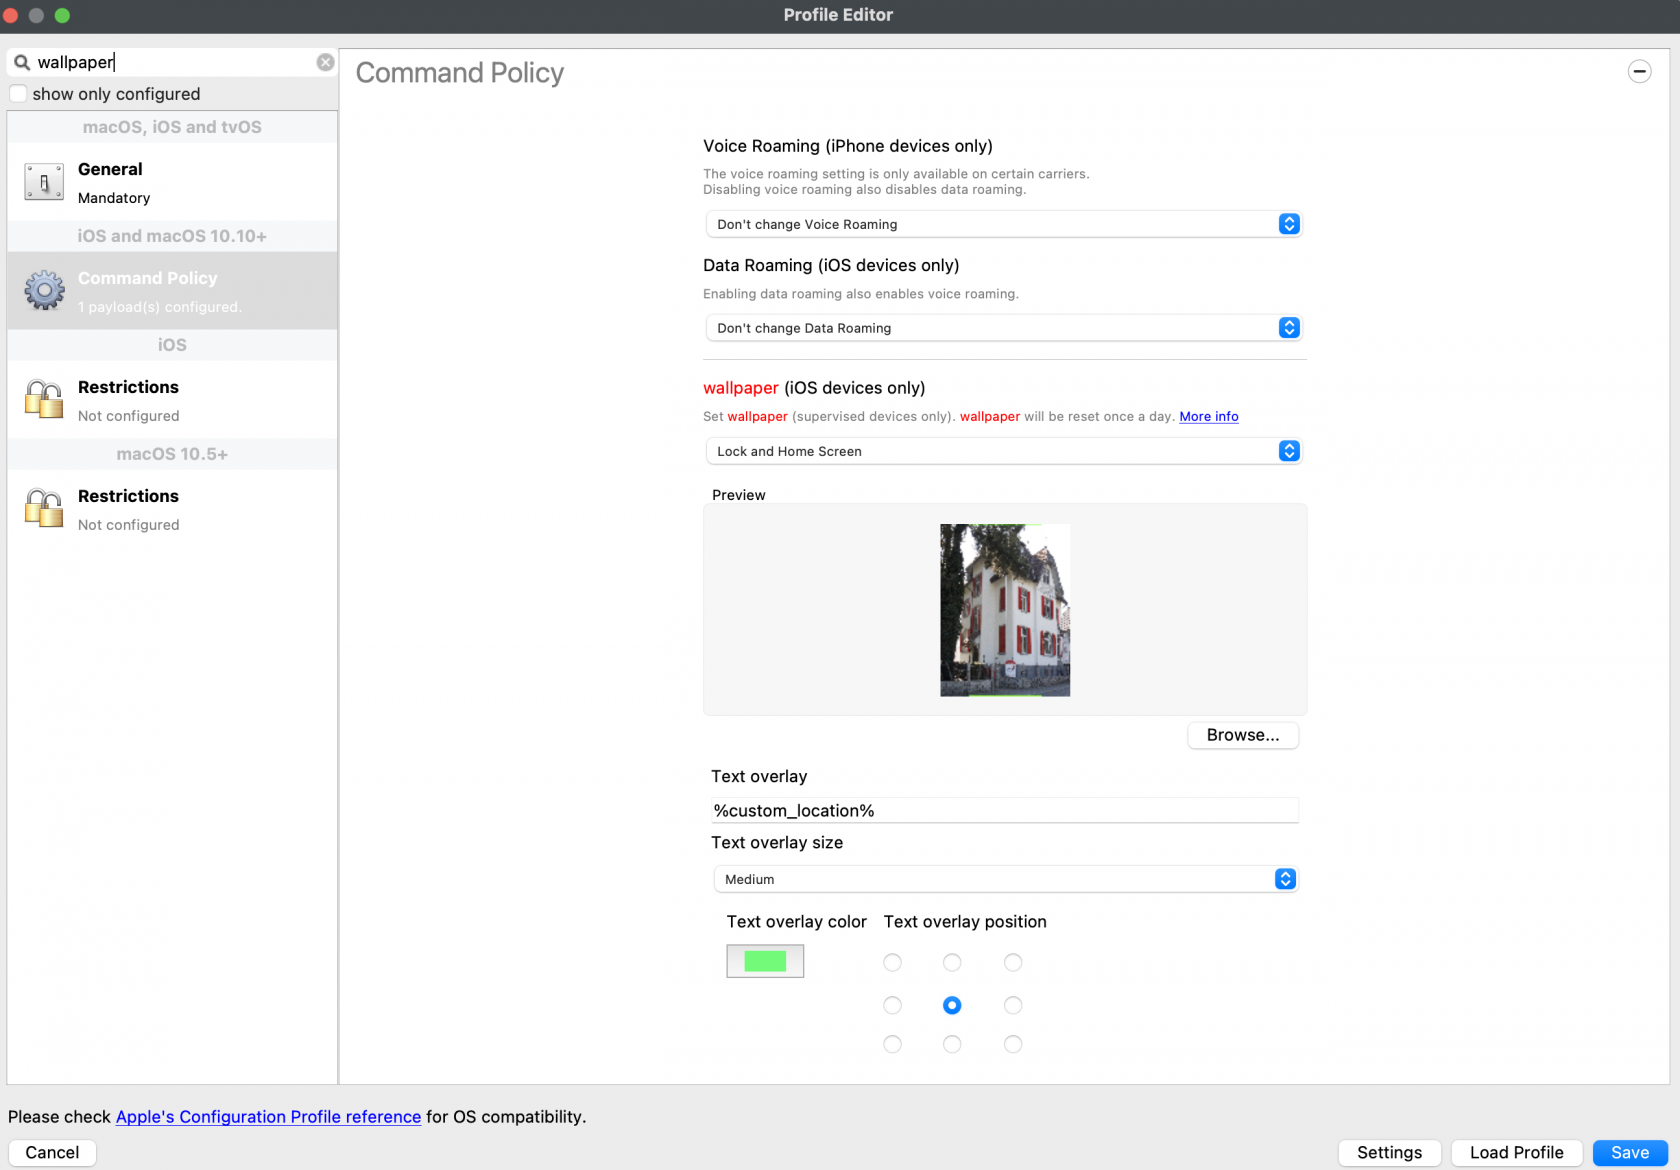](https://kb.filewave.com/uploads/images/gallery/2023-09/s7LQ6yFcn951Ptgi-image.png) The Font used is [GothicA1-Regular](https://fonts.google.com/specimen/Gothic+A1) and the sizes refer to:| SMALL | MEDIUM | BIG | |
| FONT SIZE | 65 | 80 | 95 |
Image uploaded to FileWave must be smaller than 2MB to add text, to help protect against undue heavy load on the server.
## How Consider the devices currently managed. An image of the correct size should be required for each different device screen aspect ratio. Unfortunately, MDM cannot retrieve screen resolution from devices, but each device type resolution can be observed at the following: [https://www.ios-resolution.com/](https://www.ios-resolution.com/) Alternatively, a tool like [Mactracker](https://mactracker.ca) lists details for all Apple device types. ### Smart Groups Since a Wallpaper Profile Command Policy will be required for each screen resolution, devices need to be targeted appropriately. Consider the following method: Obtain the Product Name for a device type to be managed (e.g. iPad6,11). Cross reference this with something like Mactracker to obtain details. - Create a New Smart Group - Type: Inventory Query - Criteria: Product Name > is > iPad6,11 - Group Name: (Something obvious)It may be sensible to include the screen resolution as part of the group name, but not use the Product Name. There is overlap with device types and resolution. E.g. both 'iPad 6th Gen' and 'iPad mini 5th Gen' have a resolution of 2048x1536, so one group could be used to target both device types. Example group name: iOS 2048x1536
Example of multiple device types for the Smart Group which all share the same resolution. Note the 'one or more expressions must be true' and the 'Main Component': [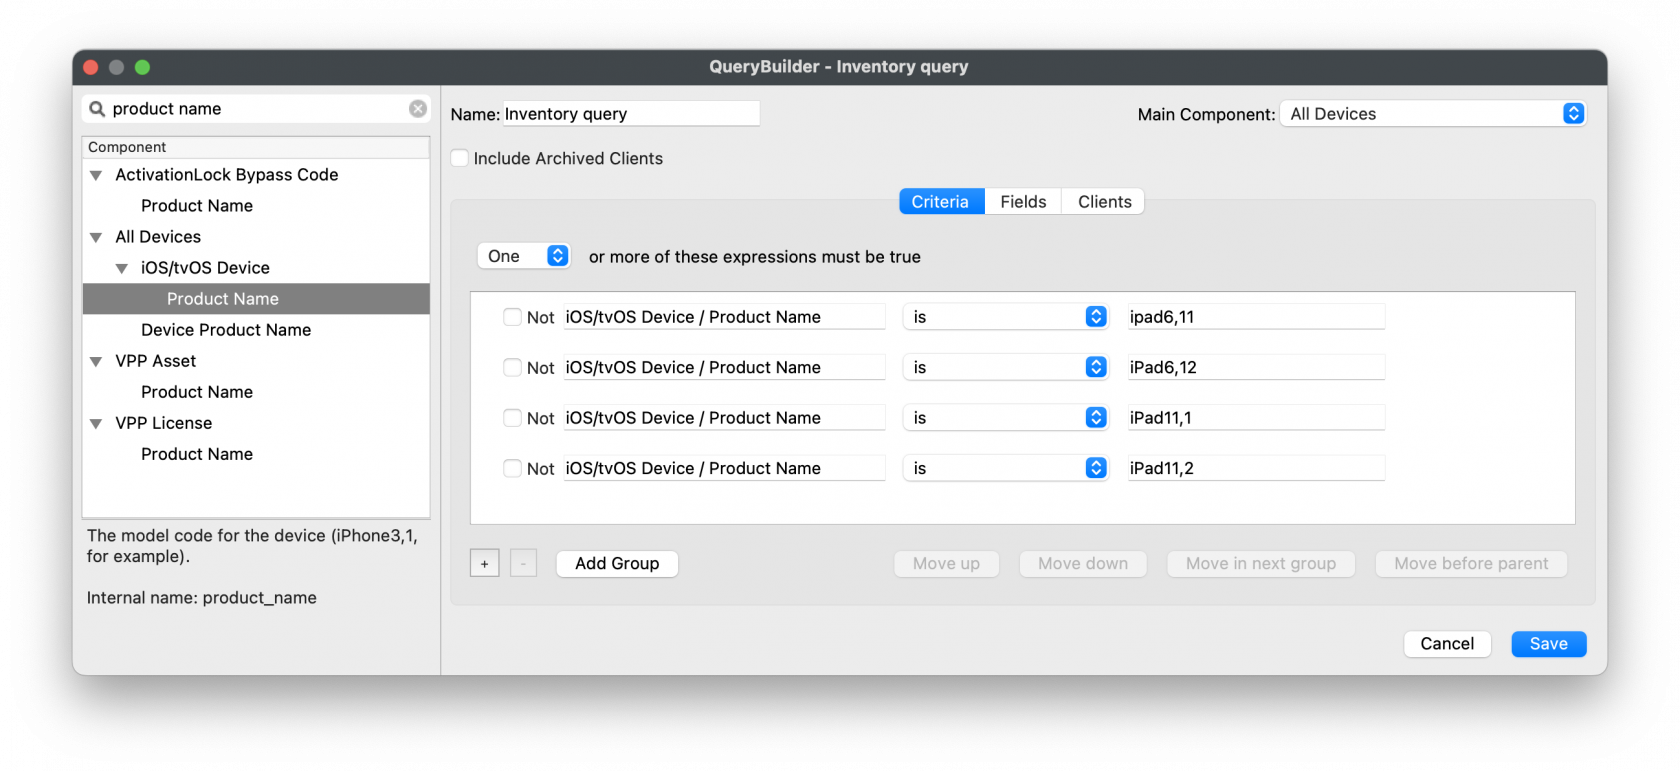](https://kb.filewave.com/uploads/images/gallery/2023-09/jUbJ4sjWFdtJEDN5-image.png) Copy the above process for each required resolution. ### Image Preparation Although there is an options to set the colour of text, complex images may hinder the visibility of the text. Image levels could be altered before uploading to FileWave. However, wouldn't it be better to test this first. Additionally, text position can be of consequence, since devices may be rotated between portrait and landscape and the image will adjust accordingly. This will have the appearance of a cropped image, either at the sides or top and bottom, which in turn could crop the text. Before commencing, download the Font and use [Font Book to add the Font.](https://support.apple.com/en-gb/guide/font-book/fntbk1000/mac) The following walkthrough should help assist with pre-planning the image and text visibility. Taking the above 2048x1536 as an example. The chosen starting image is: [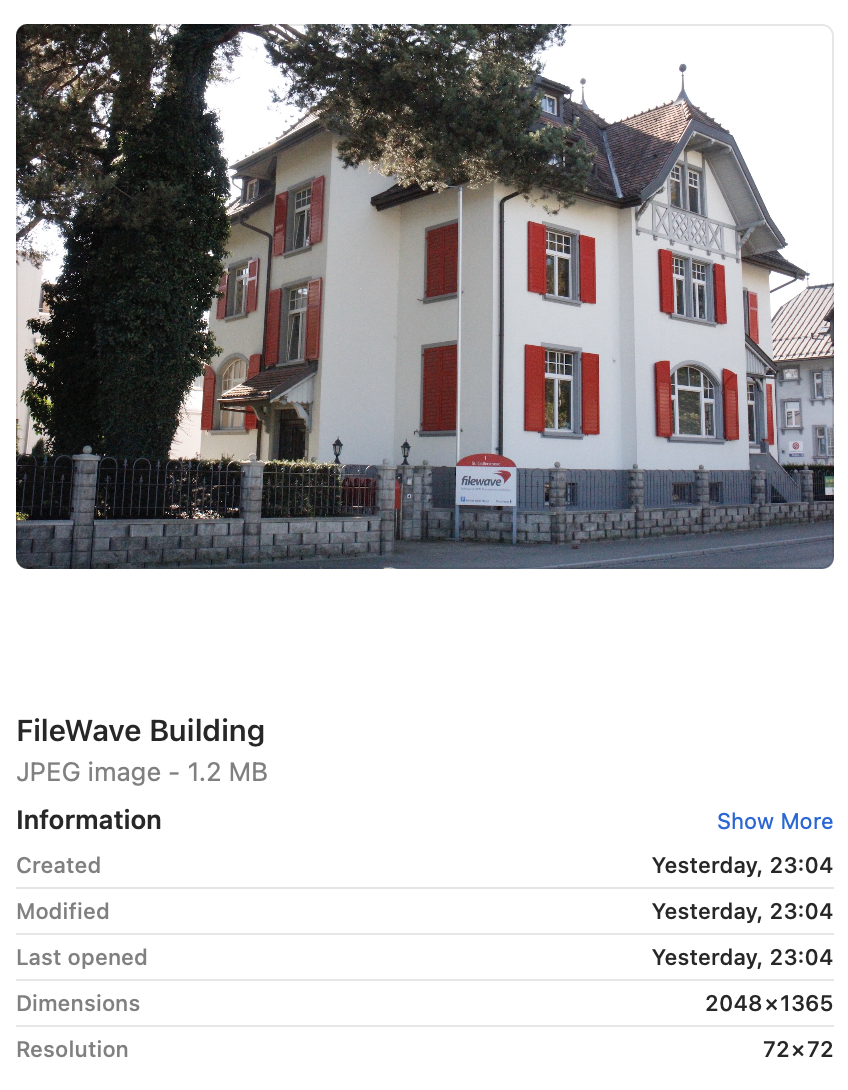](https://kb.filewave.com/uploads/images/gallery/2023-09/mMnuSnprOhfJkTWq-image.png) Note this image is currently the wrong resolution. Preview.app can be used to address this landscape image: 1. Open the image in Preview 2. Proportionally alter the height (which is currently too small) to match the height (y value in this example) of the device's screen resolution with the Adjust Size Tool. The image is now oversized, but will more than fill the entire screen in one axis and match in the other. (In this example, the height should now be 1536 and the width greater than 2048) 3. Zoom out so the entire image may be viewed 4. Select All 5. Move one of the sliders of the selection area, in this example left or right, until it reads 2048. 6. The selection can then be moved to the desired area [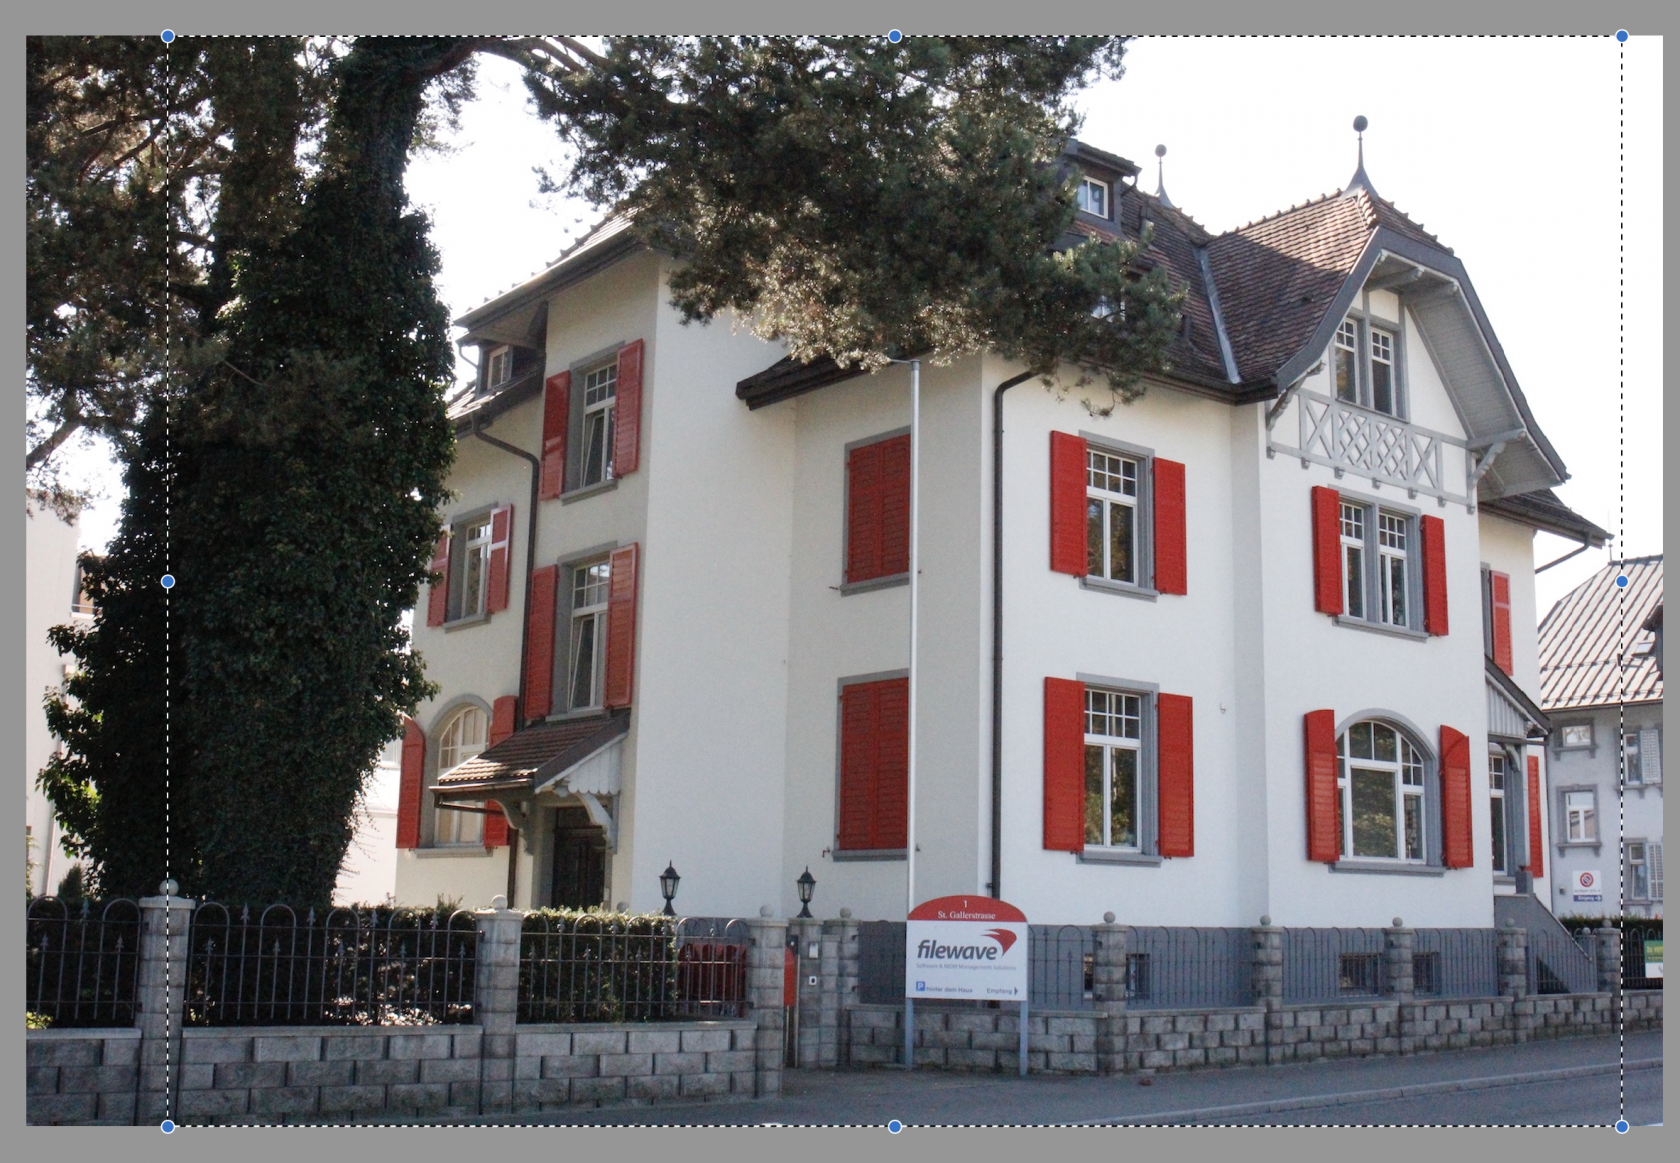](https://kb.filewave.com/uploads/images/gallery/2023-09/Szc4WNETJv298di5-image.png) Copy this selection, open into a new Preview window and save. Add an outline: 1. Alter the size of this new image, such that the smaller axis is set to match the larger. In this case alter 1536 to 2048 2. There will now be an image that is 2732x2048. Make a note of these values and undo. 3. Open Keynote 4. Select the Document button and alter the Document Slide Size to match this newly observed resolution: 2732x2048 5. From a blank slide, add a rectangle and remove the colour fill 6. Add a border line to the rectangle, choosing an obvious colour (for example bright green) and 5pt width should suffice 7. Alter the size of this rectangle, such that it matches the reverse dimensions of the device: 1536x2048 8. Centre the rectangle within the slide 9. Copy the rectangle 10. Alter the size of the new copied rectangle to match the resolution of the entire slide and centre: 2732x2048 11. [Edit the Master Slide](https://support.apple.com/en-gb/guide/keynote/tan7a2b69972/mac) so that it has no background 12. Export the slide as a PNG with transparent background 13. Open the exported image into Preview 14. Resize the image, matching the resolution back to the target resolution, in this case: 2048x1536 15. Select All from Preview and Copy 16. Back in Keynote, create a new document and alter the slide size to the desired screen resolution: 2048x1536 17. Add the desired matching sized image to the slide, in this case the 2048x1536 FileWave building image 18. Paste the copied green boxes from Preview over the top In Keynote there should now be an image, including the green inserted boxes, something like: [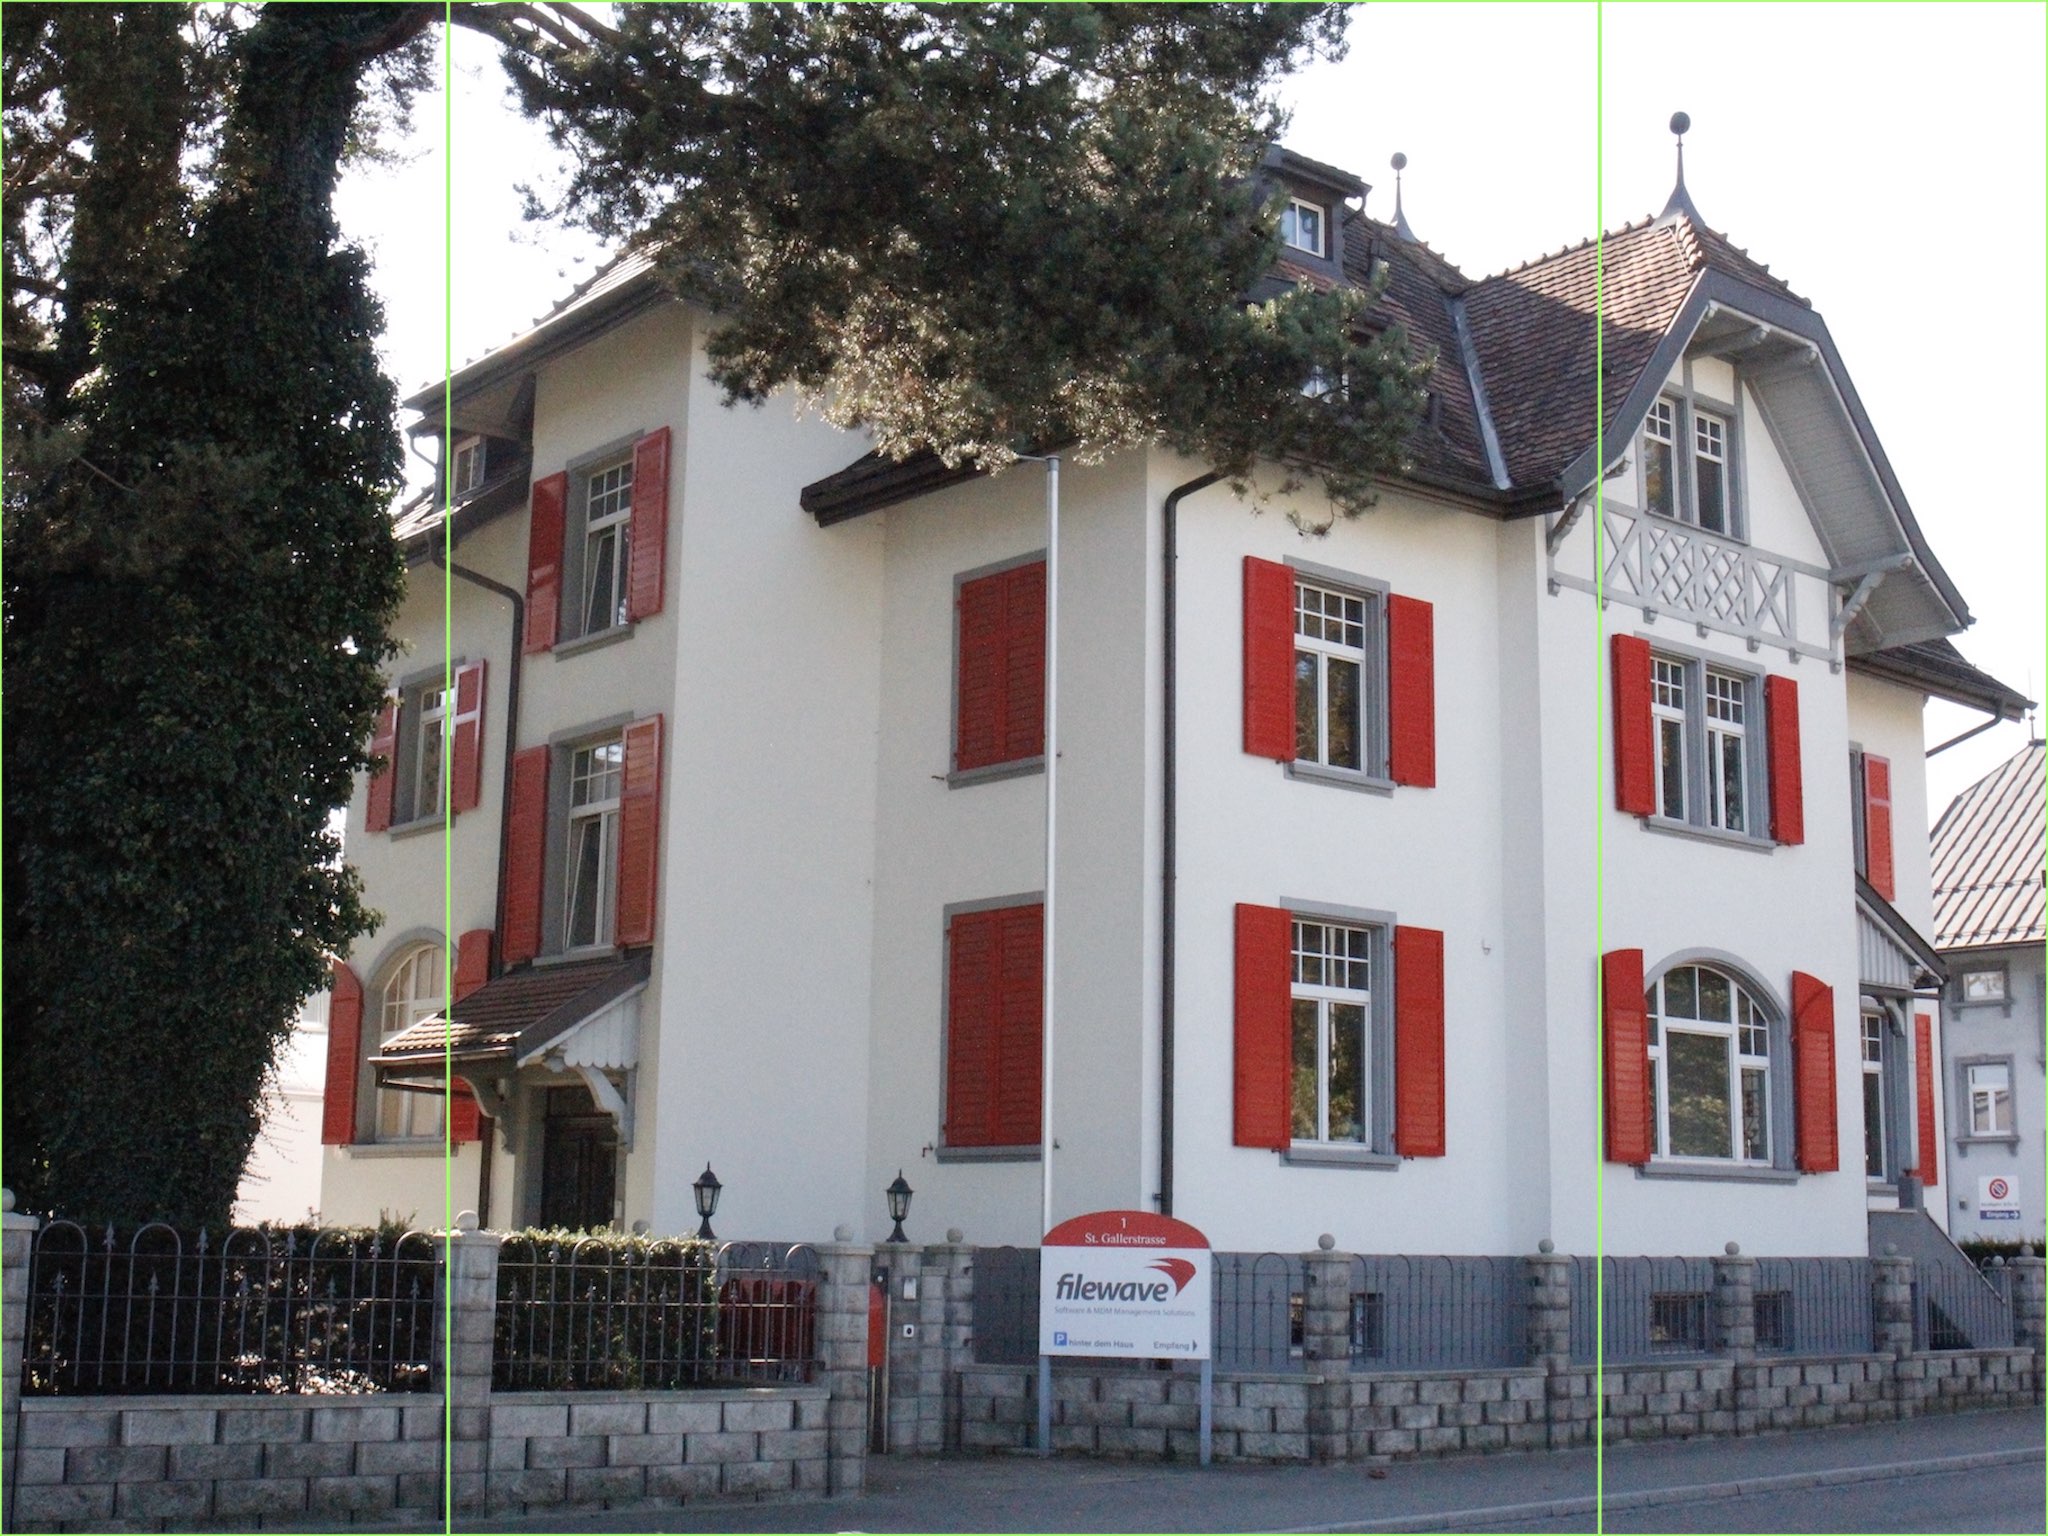](https://kb.filewave.com/uploads/images/gallery/2023-09/Qlmb68bV1kYEC90m-2048-2-green-boxes-002.jpeg)Since the green lines forming the boxes have a transparent background, the image behind may be altered, simplifying the testing of differing images.
Consider duplicating slides to test alternate images, in case the desire to revert is experienced!
### Test Text Keynote may now be used to test adding some text. - Add a text box - Set the Font as Gothic A1 Regular and a desired Font size, e.g. 80 - Select a colour for the Font - Add the chosen text, ensuring it does not cross over the lines when centred If the text does cross the lines, the smaller Font size of 65 could be chosen or reduce the amount of included characters.If using variables, confirm the longest value from FileWave and then test with that value as text in Keynote
From Keynote, if the text is unclear, it is easier to adjust the text colour or even make adjustments with the image itself, to enhance the appearance of the text.
Once happy, copy the line of text. ### Create Fileset Remove the text from the Keynote slide and save the slide as an image, using JPG (smaller size). Remember, the image to be uploaded needs to be less than 2MB. Open up the Profile Editor in FileWave and search for Wallpaper, it should be located in the Command Policy. As per the directions in the prior KB article, choose the image just saved as the Wallpaper and paste the desired text into the text box. Clearly, alter the text to include any parameters if necessary. Don't forget to set the Font colour. As per this example, the middle position is going to be chosen. Save the profile and consider including the screen resolution as part of the name: [](https://kb.filewave.com/uploads/images/gallery/2023-09/79bUT7dUS1Nbzs1X-image.png) ### Test Associate the Profile to a test device and Update Model, observing the Command History. The IntsallProfile command should appear and then disappear; this is not a permanent profile, but a one off command. However, the Settings command will persist. Further details in the following KB: [Profile Editor Command Policy](https://kb.filewave.com/books/profiles-apple/page/profile-editor-command-policy) Turn the screen to confirm the look for both Portrait and Landscape. ##### Portrait [](https://kb.filewave.com/uploads/images/gallery/2023-09/PGXtwASlyecVzKkN-portrait.jpg) ##### Landscape [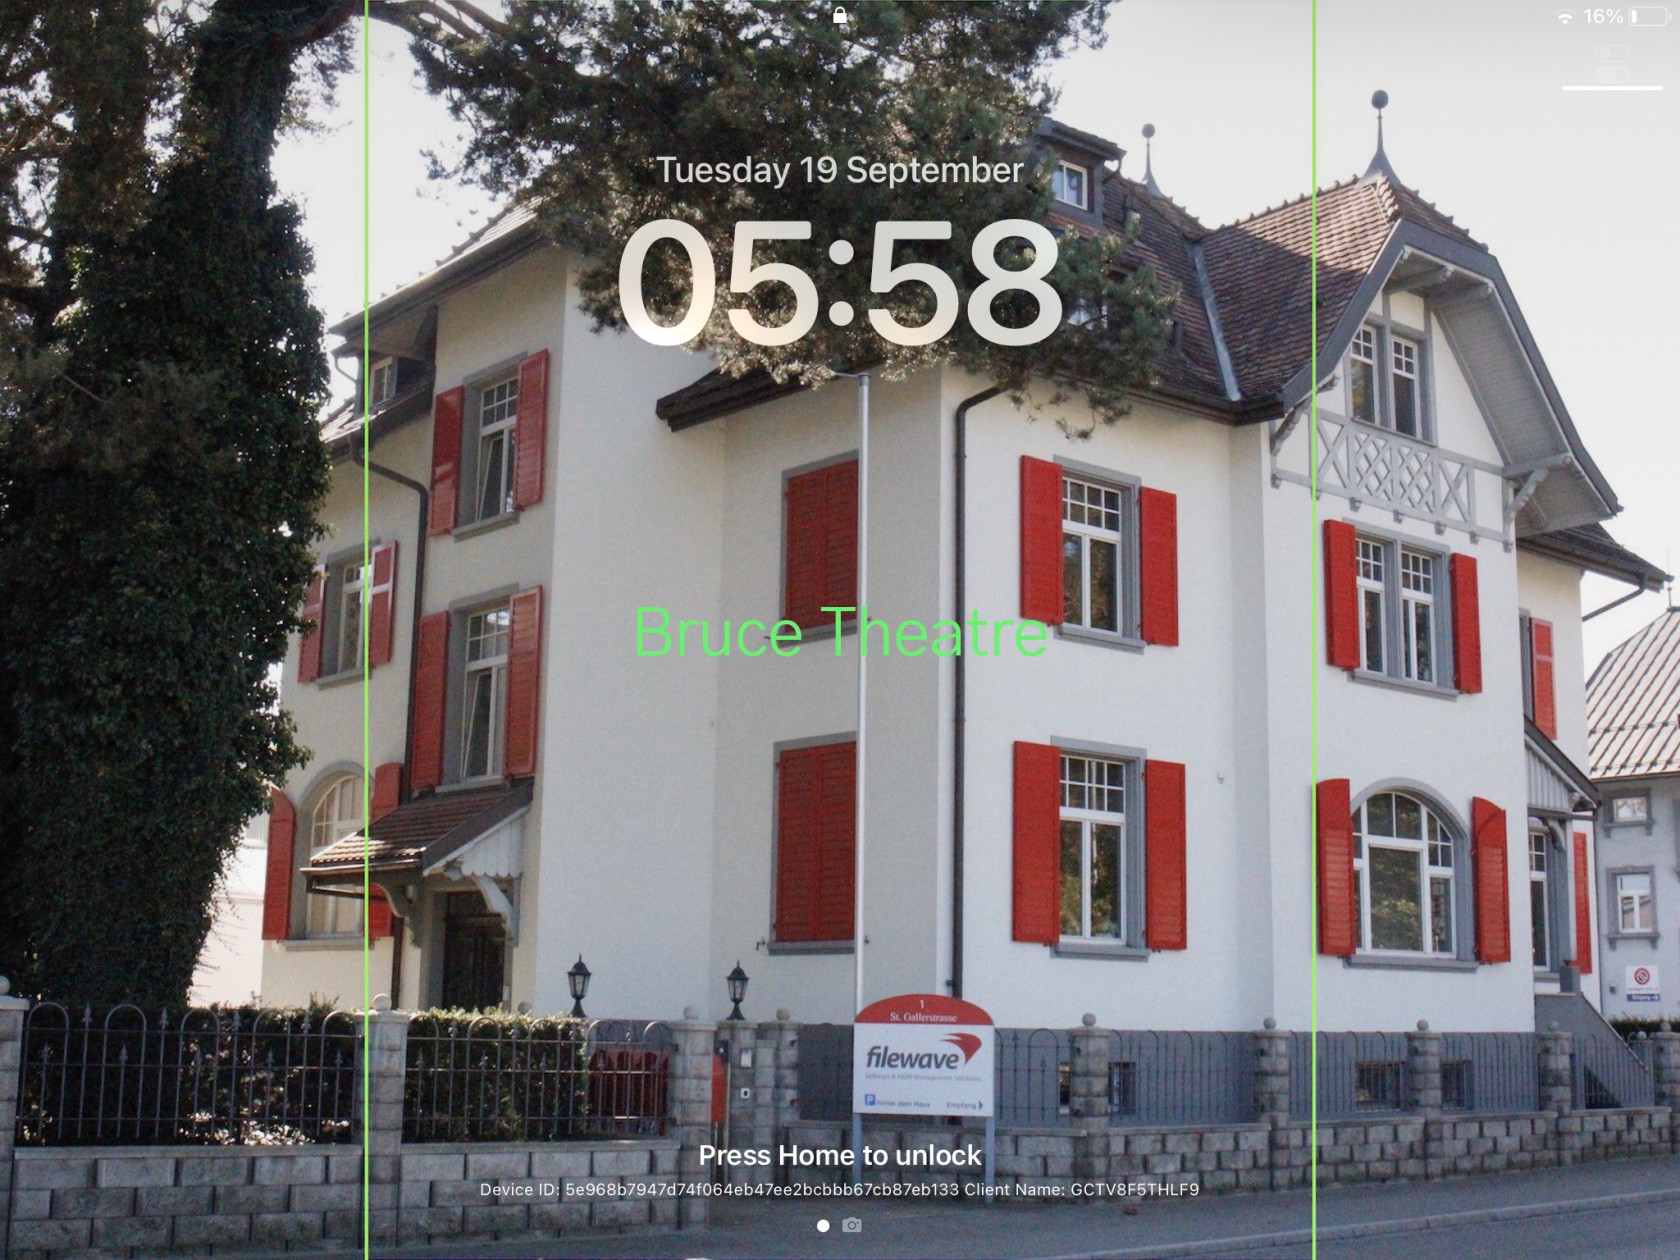](https://kb.filewave.com/uploads/images/gallery/2023-09/qATkxPmmoDp65SU1-landscape.jpg) ### Additional Info First, it is worth observing how Apple alter an image when the device is rotated between Landscape and Portrait. Apple avoid having black bars around the image. As such, to alter the image, as can be seen above, The smaller, un-matching aspect is resized to match the size of the device's resolution. The impact of this is that the large matching aspect is now oversized and the overall effect is the image appears cropped. The green lines from the image above show the crop position that will be seen in portrait when the device is turned from landscape. This has a consequence with the text. If the text position were bottom right instead, for example, the green box shows the text that would be lost: ##### Landscape [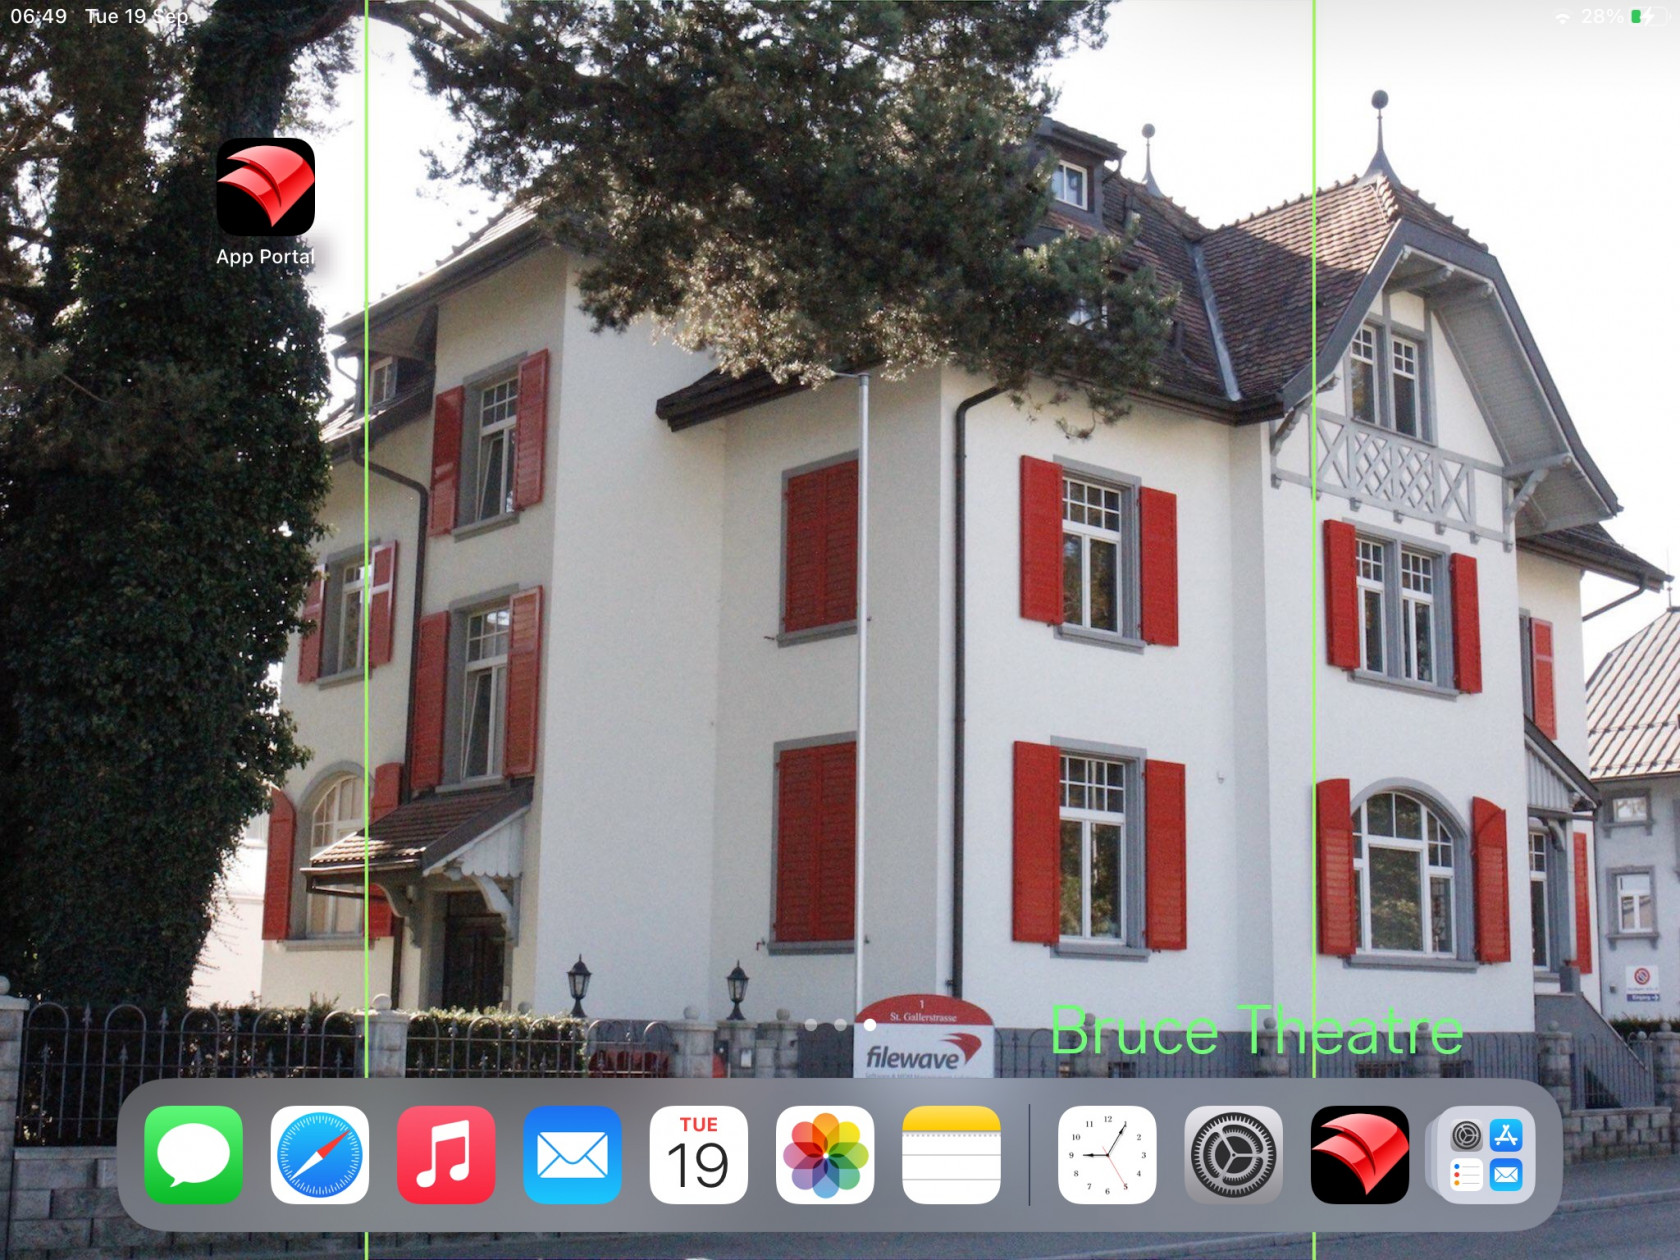](https://kb.filewave.com/uploads/images/gallery/2023-09/X1eQaHXdXPgcrYt9-landscape-br.jpg) ##### Portrait Indeed, rotating the device into portrait shows the loss of text: [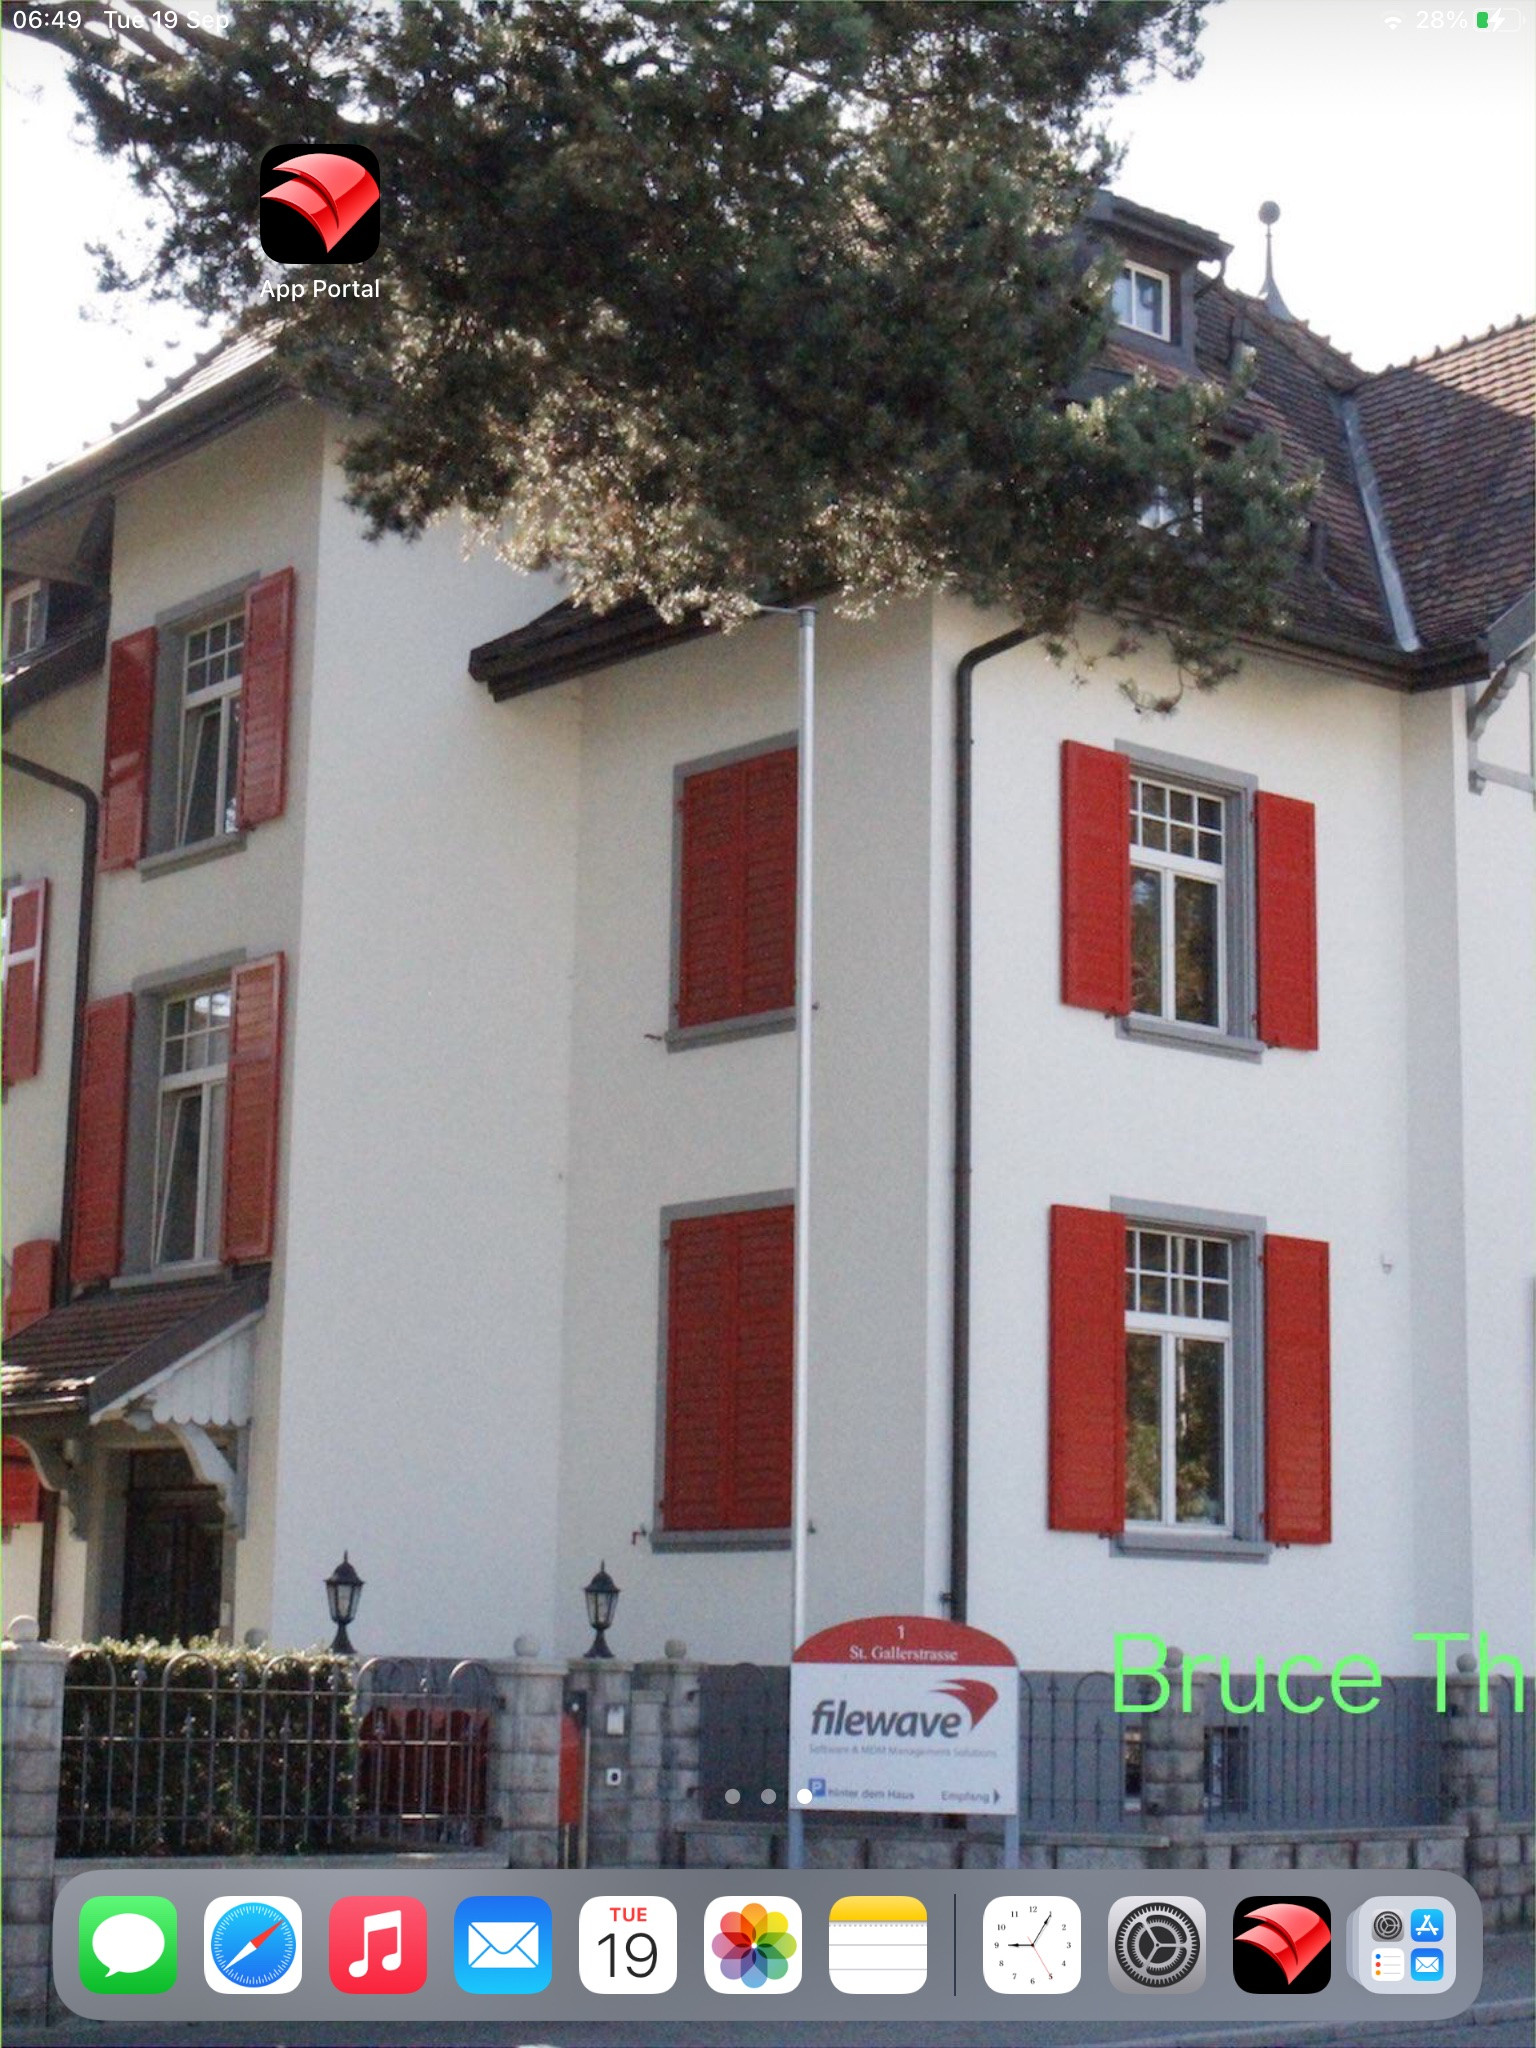](https://kb.filewave.com/uploads/images/gallery/2023-09/5a58961Mvpj8pLxf-portrait-br.jpg) With this in mind, best practice would be: - Where devices may be rotated - For a landscape image, only ever consider using Middle, Top Middle or Bottom Middle - For a portrait image, only ever consider using Middle, Left Middle or Right Middle - Where devices will not be rotated - Any position could be chosen Apple do not provide an option to prevent rotation, however, in some circumstances devices will not be rotated, e.g. wall mounted outside meeting rooms, lecture theatres, hospitals, etc. ### Conclusion Why use the profile, since the above has just made an image of the correct size and Keynote could have just added the text? This is indeed a good question and the above is to assist with a guide on building out the image, ensuring that the text will display clearly and not be cropped on the image size. Chances are once you have done this for one resolution, that you need not bother for others and will already be armed with a good approximate example. However, the Profile still comes into its own! The Profile can use parameters from FileWave, customising the text per device, based either upon built-in inventory or Custom Fields. This greatly exceeds the above method and is very much the beauty of this feature. # App Security on iOS ## Description Experienced being in a meeting and needing to pass an iOS device to someone else, but with the knowledge that there is sensitive data in some Apps or some Apps that not should be accessed at all? To prevent temporary users of devices from accessing certain Apps, Apple introduced two new concepts: Hide and Lock. - Allowance of Hiding Apps was introduced in iOS 18 - Allowance of Locking Apps was introduced in iOS 18.1 Hiding an App prevents the App from being visible, whilst Locking an App disallows the opening of a Locked App without an additional layer of security, e.g. Touch of Face ID. Hidden Apps are available from a visible folder called 'Hidden' within the App Library. Access to the Hidden folder and opening Locked Apps is by way of authentication. Further information may be viewed in Apple's KB: [Lock or hide an app on iPhone](https://support.apple.com/en-gb/guide/iphone/iph00f208d05/ios) FileWave 16 included management for this feature. ## Information ### App Configuration Each VPP App has two new options, one for Lock and one for Hide, allowing MDM to define Apps, on an individual basis, to be set as Locked or Locked and Hidden: [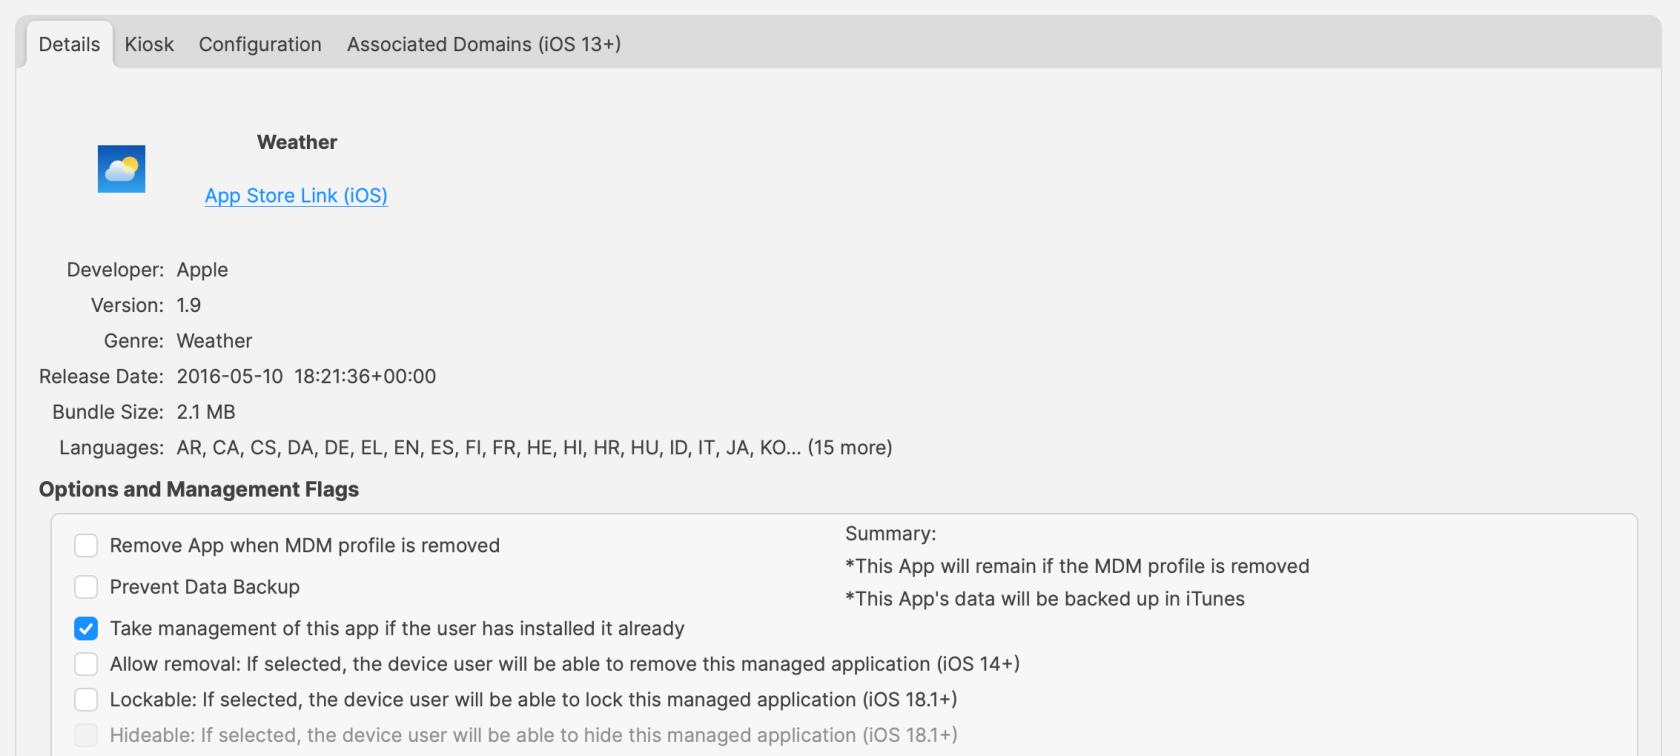](https://kb.filewave.com/uploads/images/gallery/2025-04/osYjn6MDJxEeCiXK-image.png)Hideable is only an option where Lockable is enabled.
As per Apple's above linked KB, not all Apps may be Locked or Hidden. Please review their KB for a list of Apps which may not be set.
### Profile Configuration As an addition to the VPP App setting, it is possible to allow/deny users from selecting Apps themselves to be either Locked or Locked and Hidden, by way of additional Profile options, within the iOS Restrictions Payload. [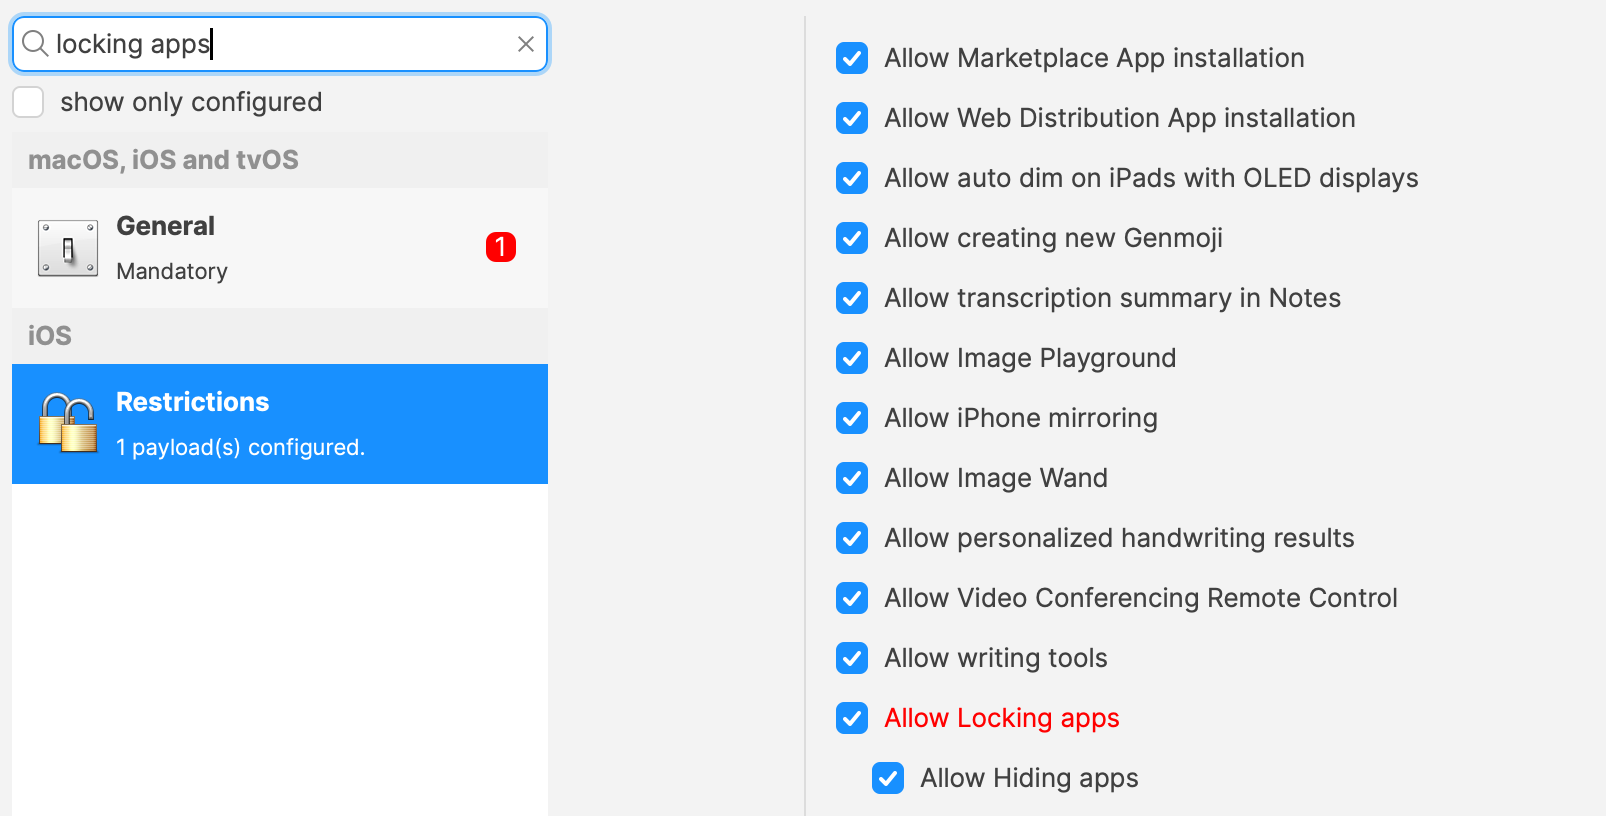](https://kb.filewave.com/uploads/images/gallery/2025-04/GM07oBC8X0uuiQfM-image.png)