Kiosk
- Self-Service Kiosk Overview
- FileWave Kiosk for macOS and Windows overview (15.3+)
- FileWave Kiosk for iOS/iPadOS overview (15.3+)
- App Portal and Kiosk 2 Transition History
- FileWave App Portal for iOS (IPA Install)
- Automatic updating of iOS/iPadOS Kiosk
- FileWave Kiosk Displays Company Information
- Kiosk Package Updates Category (macOS PKG)
- Control Which Apps Appear in Kiosk (15.3+)
- Setting the Primary Colour, Name and Logo in Kiosk/App Portal (16.0+)
- Missing Device Message in Kiosk for macOS and Windows (16.0+)
- App Portal on iOS/iPadOS devices that don't support the application (15.3+)
- Applications Preventing Reboot (macOS/Windows)
- Manual Trigger of FileWave Kiosk for macOS and Windows (15.3+)
- FileWave End-User Notifications
- FileWave End-User Notifications (15.5+)
- Force Enable Notifications on iOS and macOS for FileWave Kiosk
- Troubleshooting
Self-Service Kiosk Overview
FileWave Kiosk lets users install approved apps and content themselves while admins keep control of assignments, categories, and licensing.
Standard Assignment
With a Standard Assignment, the Fileset content installs automatically without user interaction.
Kiosk Assignment
With a Kiosk Assignment, the user chooses approved items from the self-service Kiosk and starts the installation themselves.
Since the FileWave process runs at root or system level on computers, the end user does not need to be a local administrator in order to install applications and content through the Kiosk.
Computer Clients
User access to the Kiosk is by way of a macOS Menu Bar or Windows System Tray icon.
The Kiosk is activated on computers by installing the FileWave client and having at least one Fileset configured as a Kiosk item associated with that Client.
If no Kiosk association exists, the macOS menu bar or Windows system tray will not include the Kiosk icon.
If an association exists and the icon still does not appear, check operating-system icon visibility rules. For example, macOS or Windows may hide extra menu bar or system tray icons when space is limited.
You can also open Kiosk from the command line, as described here: Manual Trigger of FileWave Kiosk for macOS and Windows
Mobile clients
On mobile devices, users access Kiosk through the automatically installed FileWave App Portal app.
The Kiosk is activated on a mobile device when that device enrolls with the FileWave MDM.
Associations
Any Fileset, including App Store apps, can be configured as a Kiosk item and placed into categories such as department, class, or application type.
Apple VPP
An Apple VPP Kiosk item contains the link to the store. The application or book is downloaded from Apple, directly to the device, when the user clicks Install.
VPP licenses can be returned for reuse only after all related standard or Kiosk associations/deployments are removed.
Mobile Kiosk versus Desktop Kiosk
- Mobile: FileWave Kiosk for iOS/iPadOS overview
- Desktop: FileWave Kiosk for macOS and Windows overview
Related Content
- Setting the Primary Colour, Name and Logo in Kiosk/App Portal (16.0+)
- Applications Preventing Reboot (macOS/Windows)
FileWave Kiosk for macOS and Windows overview (15.3+)
This article will explain the details of the refreshed Kiosk for macOS and Windows that is included in FileWave 15.3+.
Browse Payloads/Filesets
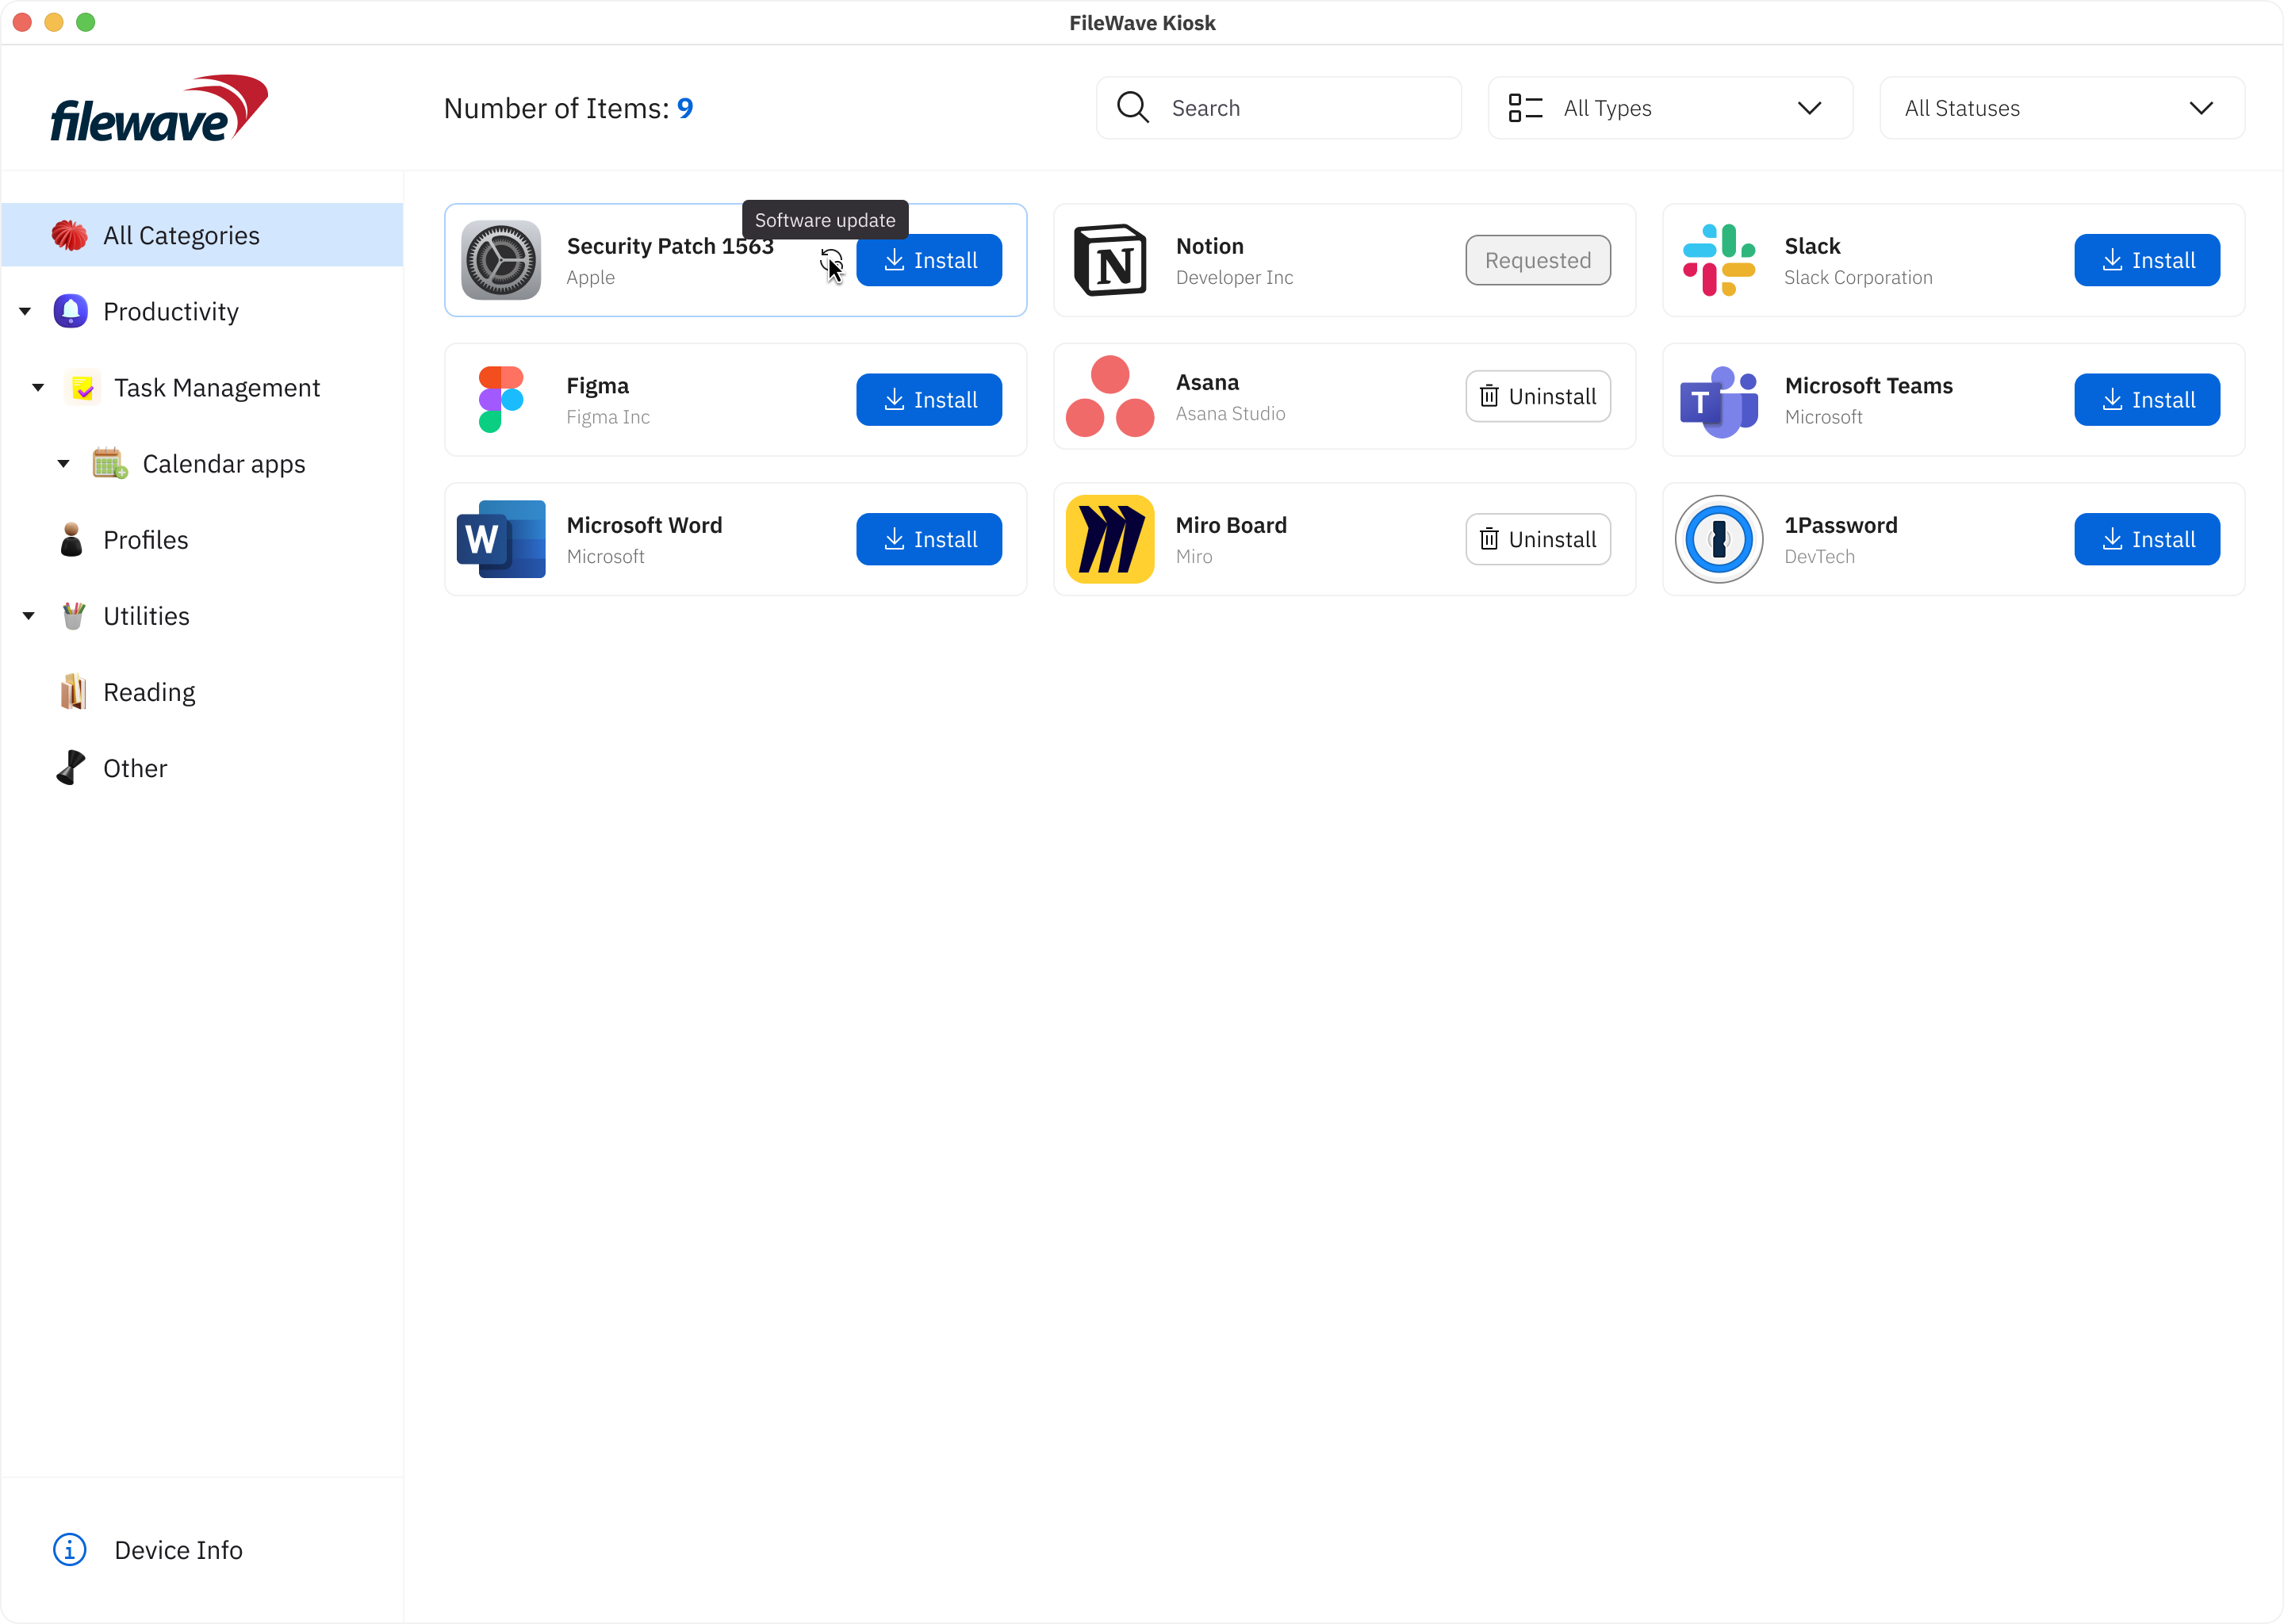
The "Browse Payloads/Filesets" screen is a central feature within the app that enables users to explore and discover a diverse array of payloads/filesets available for access or download. Much like the experience of browsing through the Android Play Store or the Apple App Store, this screen offers users an organized and visually appealing interface that showcases different payloads/filesets, each accompanied by relevant details and information.
Key components and elements commonly found on the "Browse Payloads/Filesets" screen include:
- Company Logo: The visual representation of the company's logo, reinforcing brand identity and providing a familiar visual reference.
- Device Info: A button leading to the "Device Information" page provides users with quick access to essential insights about specific devices, such as company details, enrollment information, verification status, and app version.
- Payload/Fileset icon: Each payload/fileset is represented by an icon that provides a visual cue of its content or purpose.
- Payload/Fileset Name: The name of the payload/fileset is displayed alongside the corresponding thumbnail. This gives users a quick understanding of the payload's/fileset's context.
- Install/Uninstall Button: This view includes an "Install"/”Uninstall” button that users can click to initiate the installation/uninstallation process of the selected payload/fileset, streamlining the user's interaction and providing a clear call to action.
- Reinstall Button: This button is visible in two cases (for non-VPP filesets):
- When the user tried to install fileset, and installation failed for some reason:
- When the fileset is already installed on the device.
- Button Behavior: The installation process is now accompanied by clear button states, reflecting the various stages:
- Install: Initiates the installation process.
- Requested: Indicates that an installation request is pending.
- Uninstall: Allows users to uninstall the selected payload/fileset.
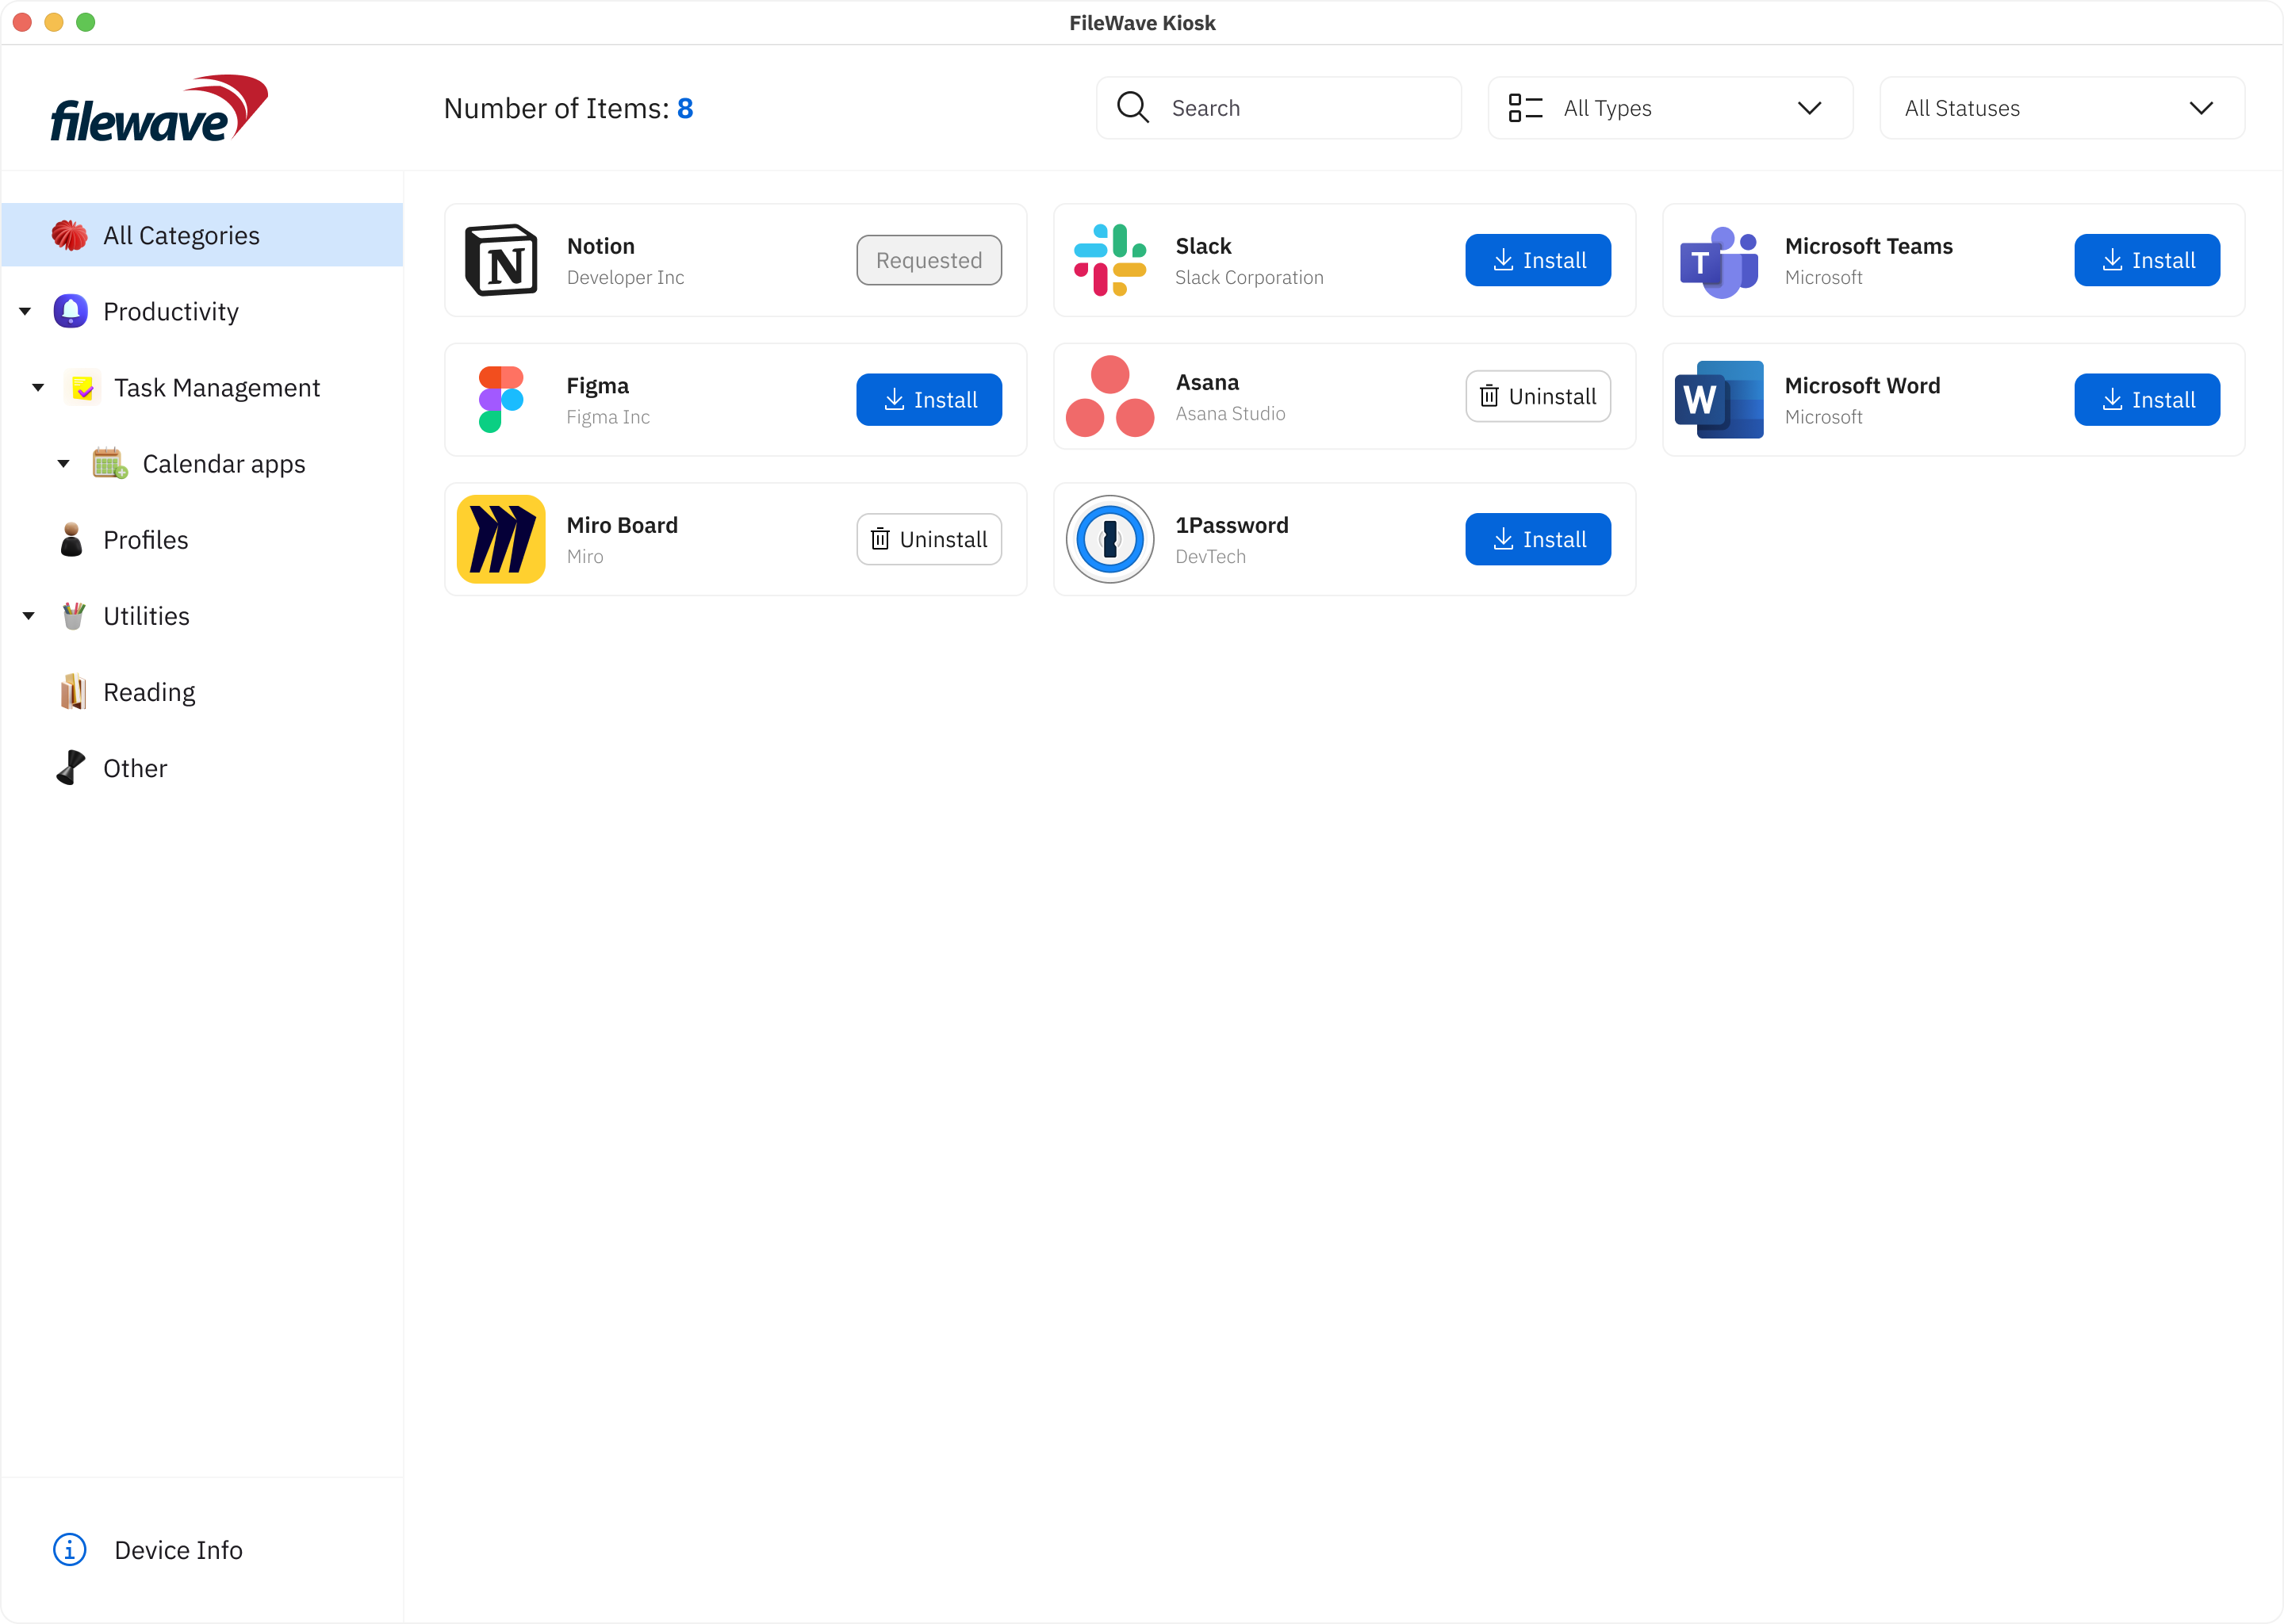
- Number of items: The number of items shows how many items are visible on the screen.
- Search Box: A search box is conveniently integrated, empowering users to quickly locate specific payloads/filesets based on keywords. This feature enhances precision and accelerates the search process.
- Scalable Left Sidebar: Responding to user preferences, the left sidebar is now scalable, allowing users to customize its width, expanding or minimizing it based on their preference. This flexibility enables users to optimize their workspace, with the left sidebar scalable up to 50% of the screen size.
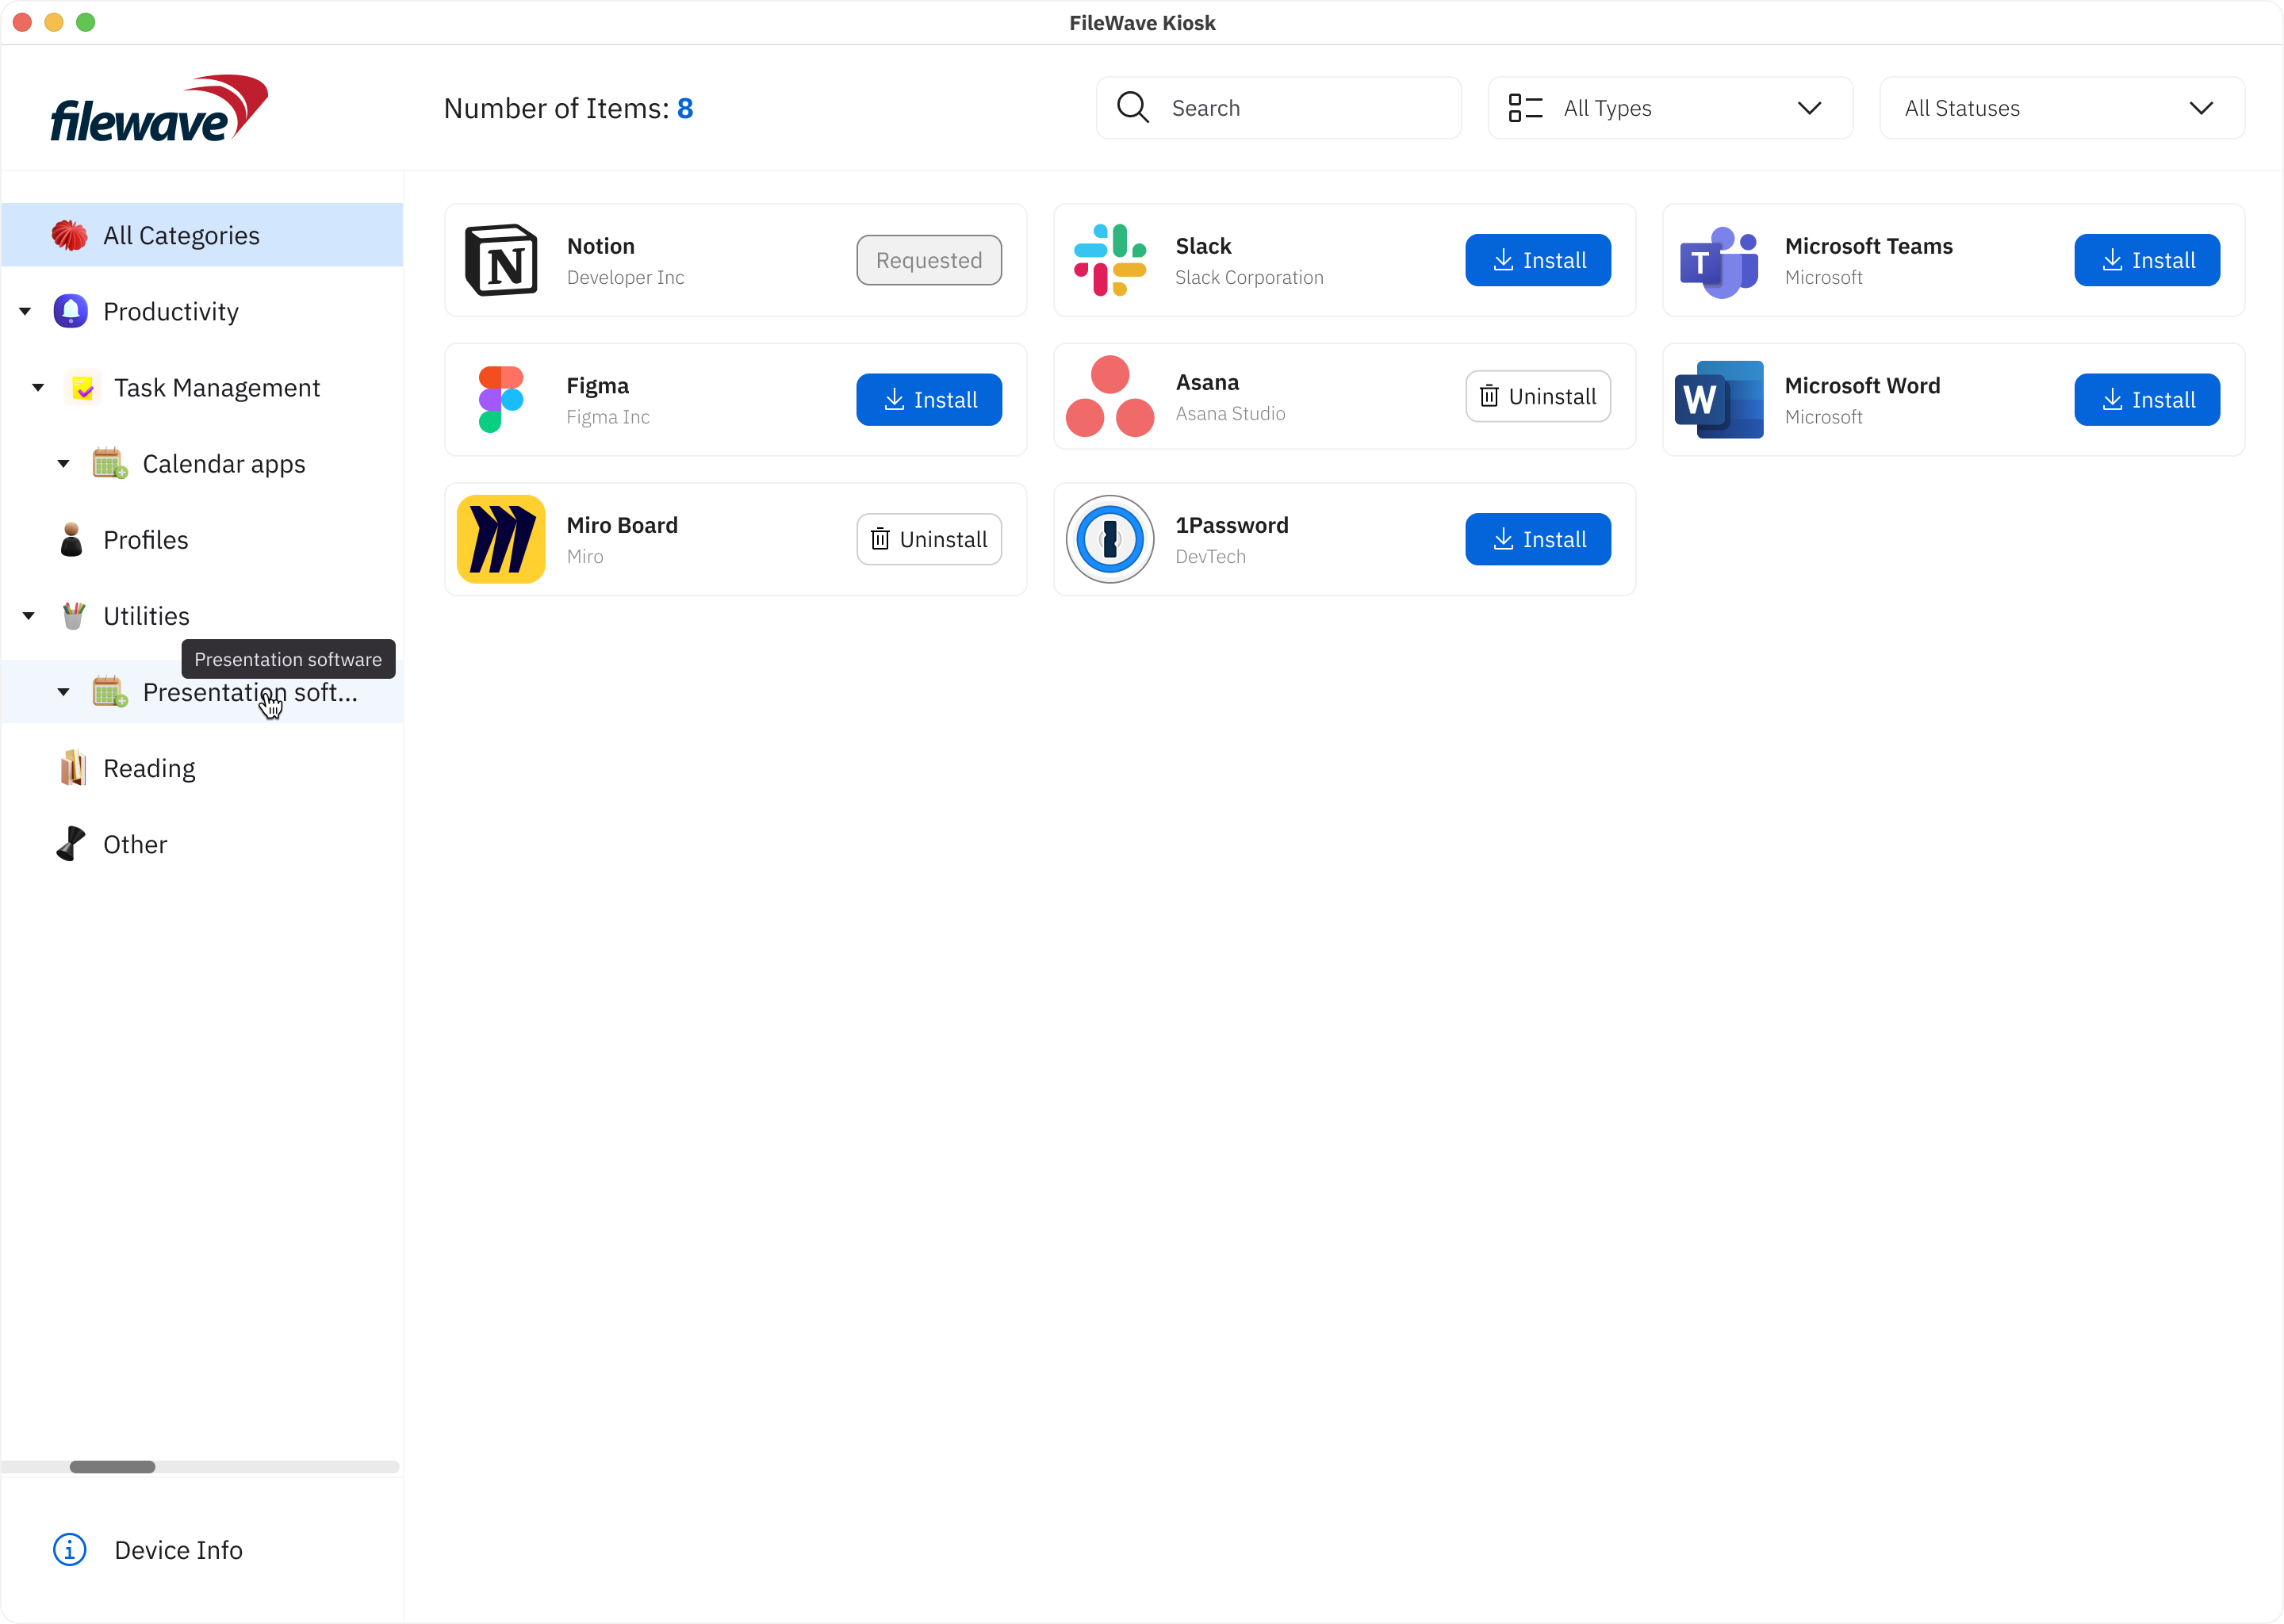
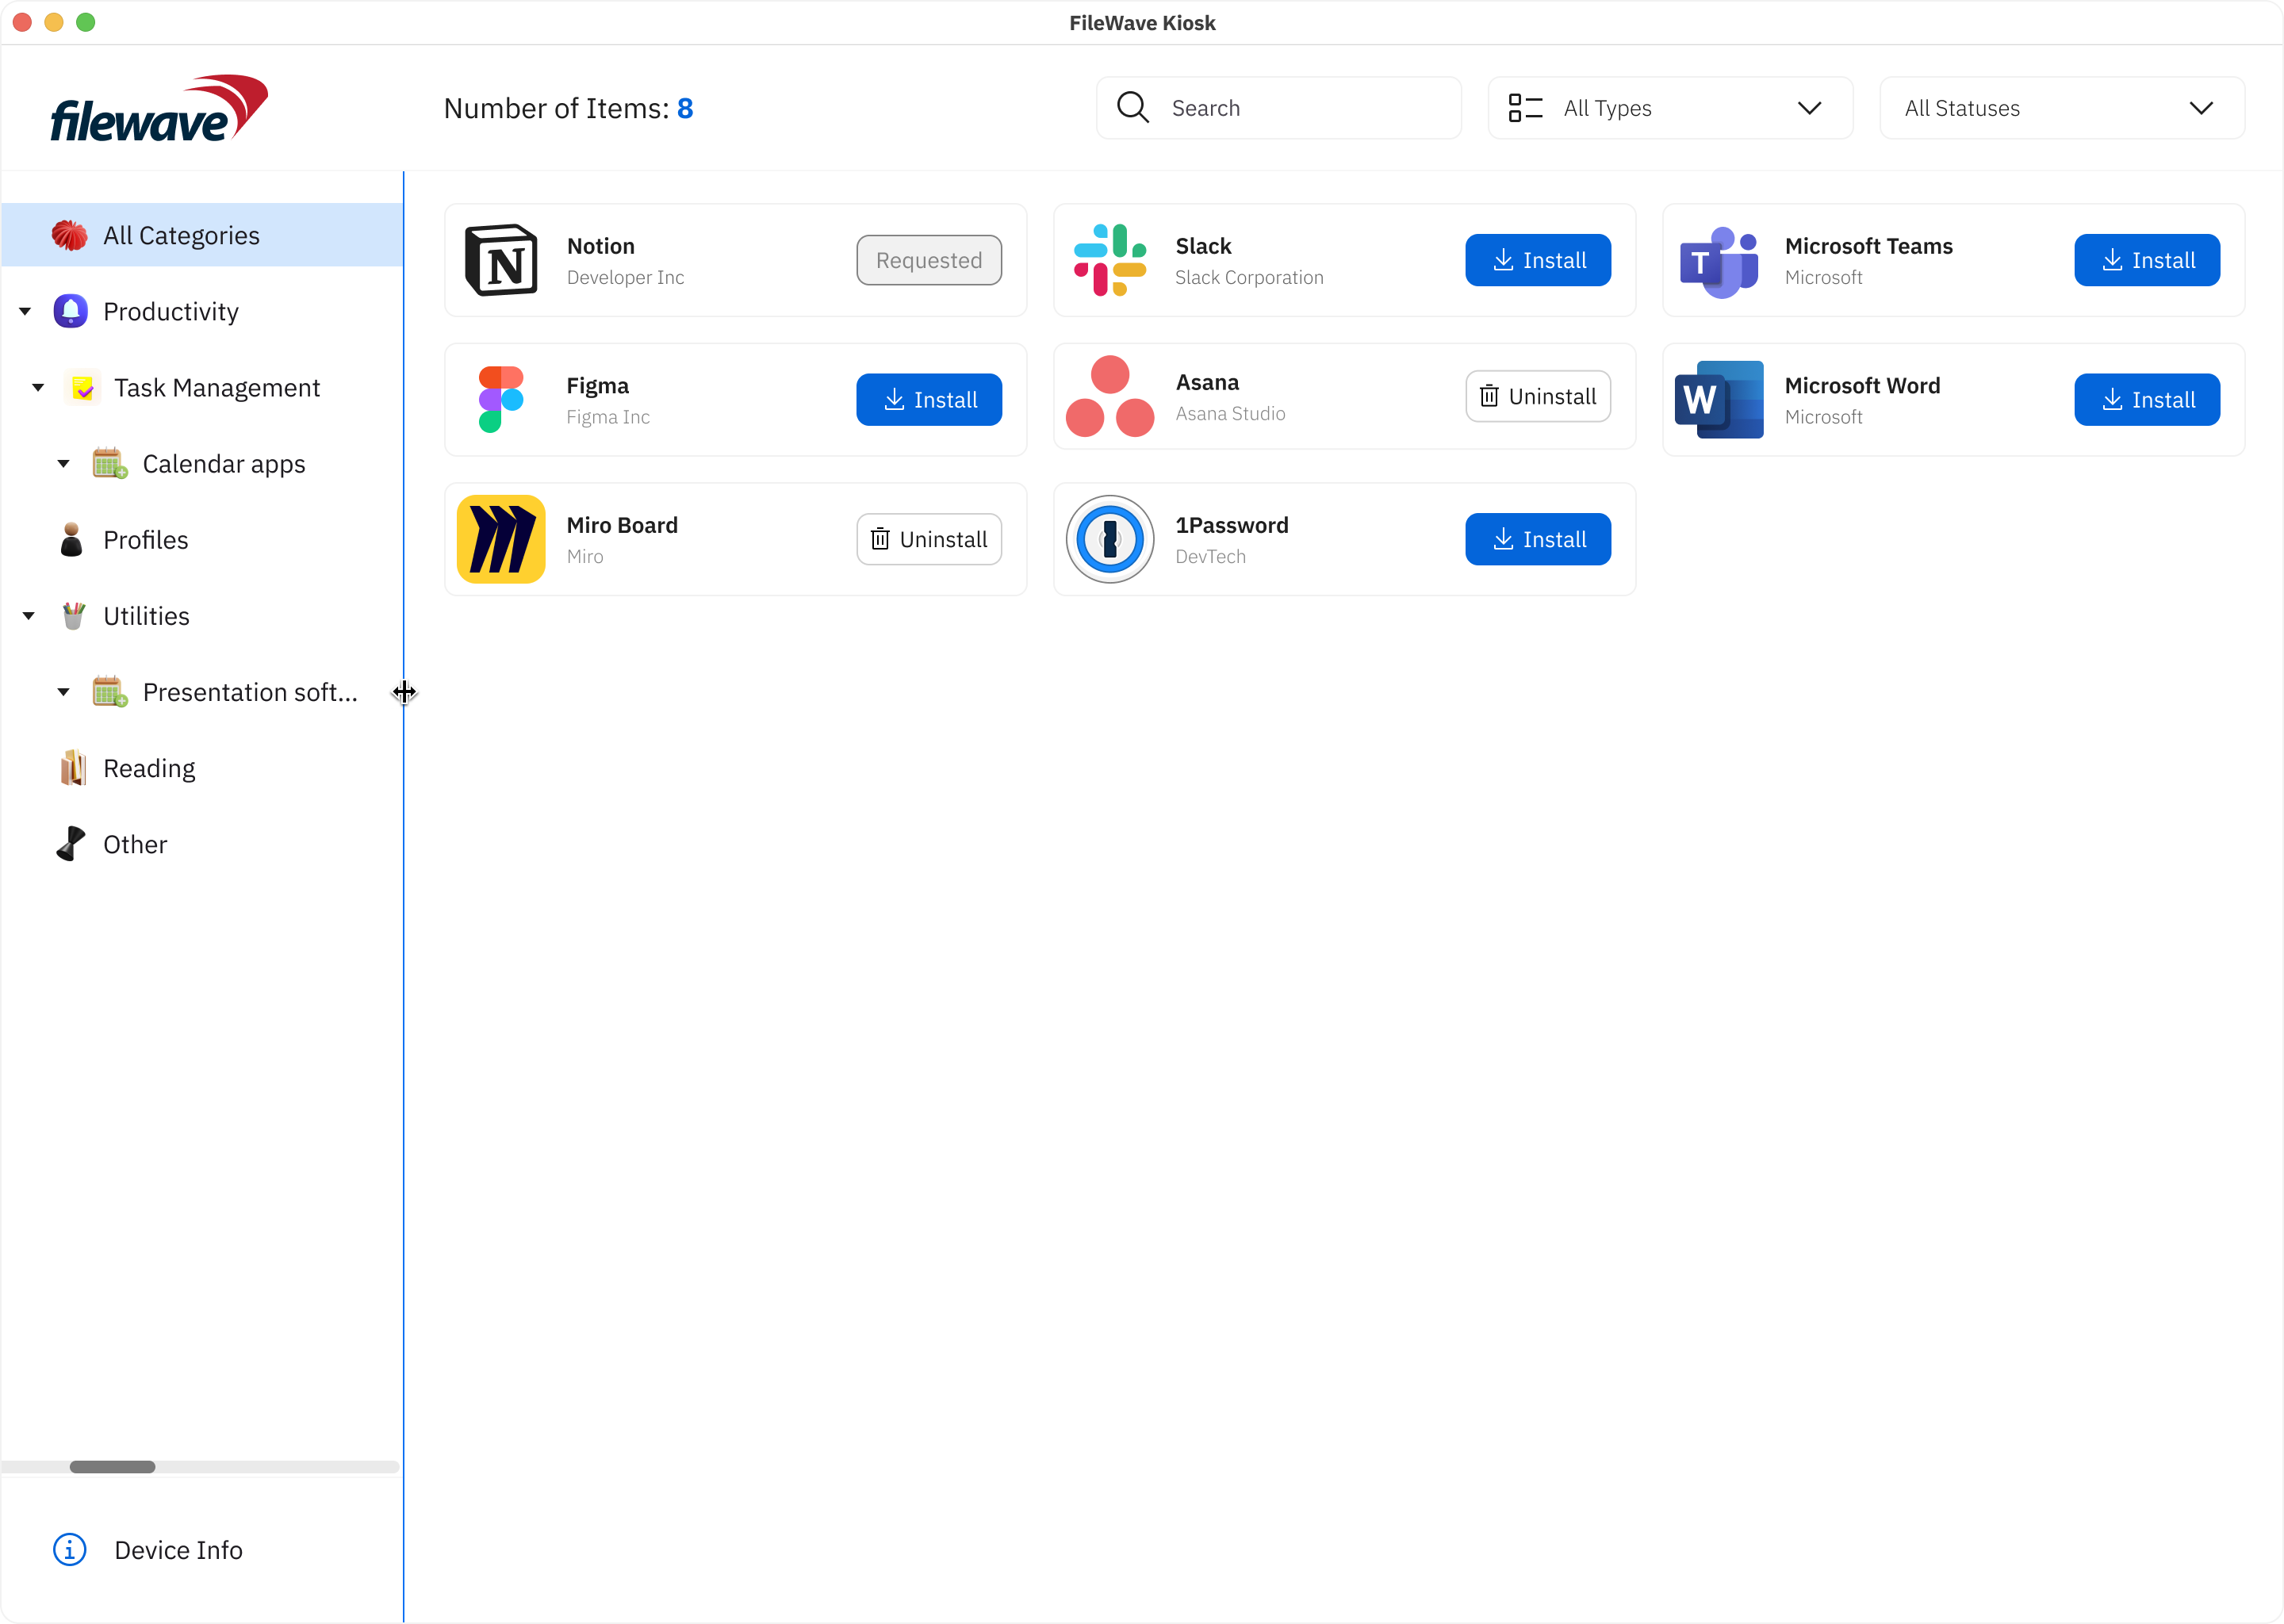
These enhancements not only simplify the user experience but also provide a comprehensive set of tools for effective payload/fileset management. By incorporating these features, we aim to empower users with a more personalized and efficient approach to navigating and managing their payloads/filesets within FileWave.
- Payload/Fileset Cards: Each payload/fileset is usually presented as a card containing its icon and name. Tapping on a card leads to a more detailed page for the payload/fileset.
- Pagination: If there are numerous payloads/filesets available, an infinite scrolling mechanism helps users navigate through multiple pages of listings.
- Scrolling Animations: Fluid scrolling animations and transitions contribute to a smooth browsing experience, enhancing users' engagement while exploring different payloads/filesets.
- Loading Animation: During data retrieval, a loading animation provides users with visual feedback, indicating that the app is actively fetching and populating the content.
- Error Handling: Robust error handling mechanisms ensure that clear and user-friendly error messages guide users in case of connectivity issues or technical glitches.
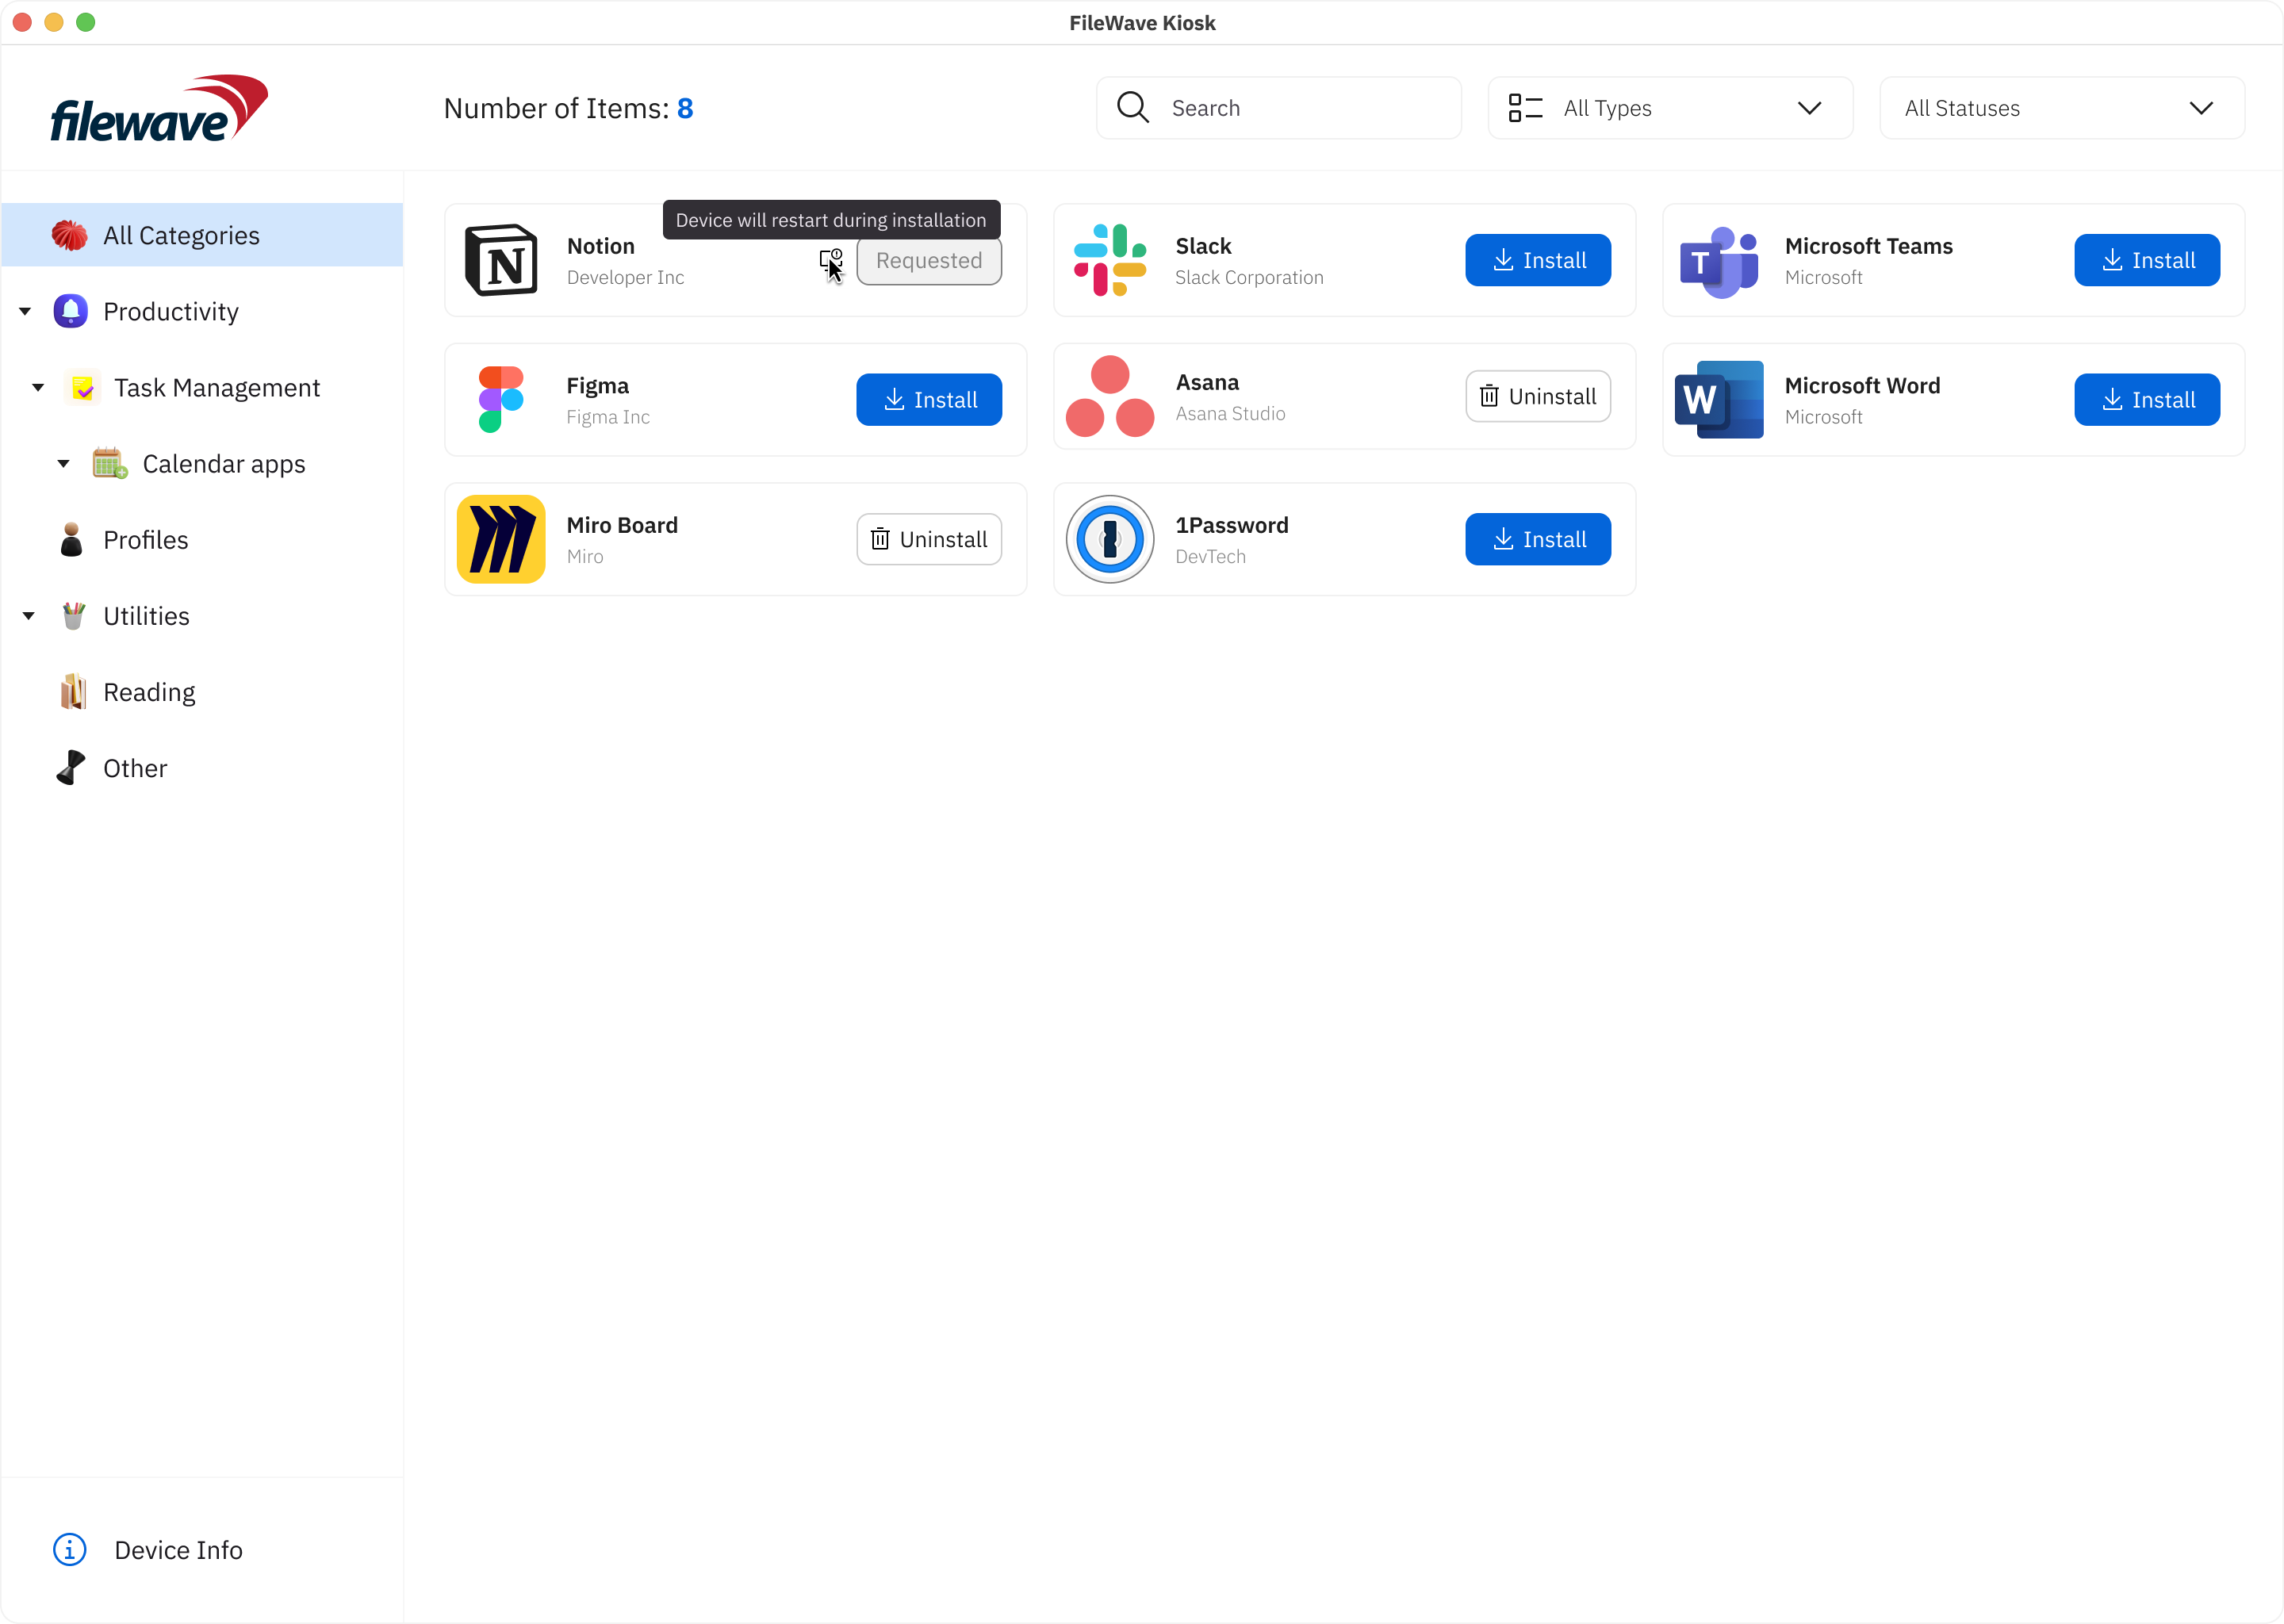
- Flags for Enhanced Communication: In the pursuit of transparent communication, we've introduced flags that offer clear insights into specific aspects of payloads/filesets. These flags include:
- Restart Needed: A flag signaling that the installation or update of a payload/fileset requires a system restart for the changes to take effect. This ensures users are promptly informed about necessary actions for seamless functionality.
- Software Update: This flag indicates that the payload/fileset represents a software update. Users will receive relevant messages, guiding them through the update process and ensuring they stay informed about crucial software enhancements.
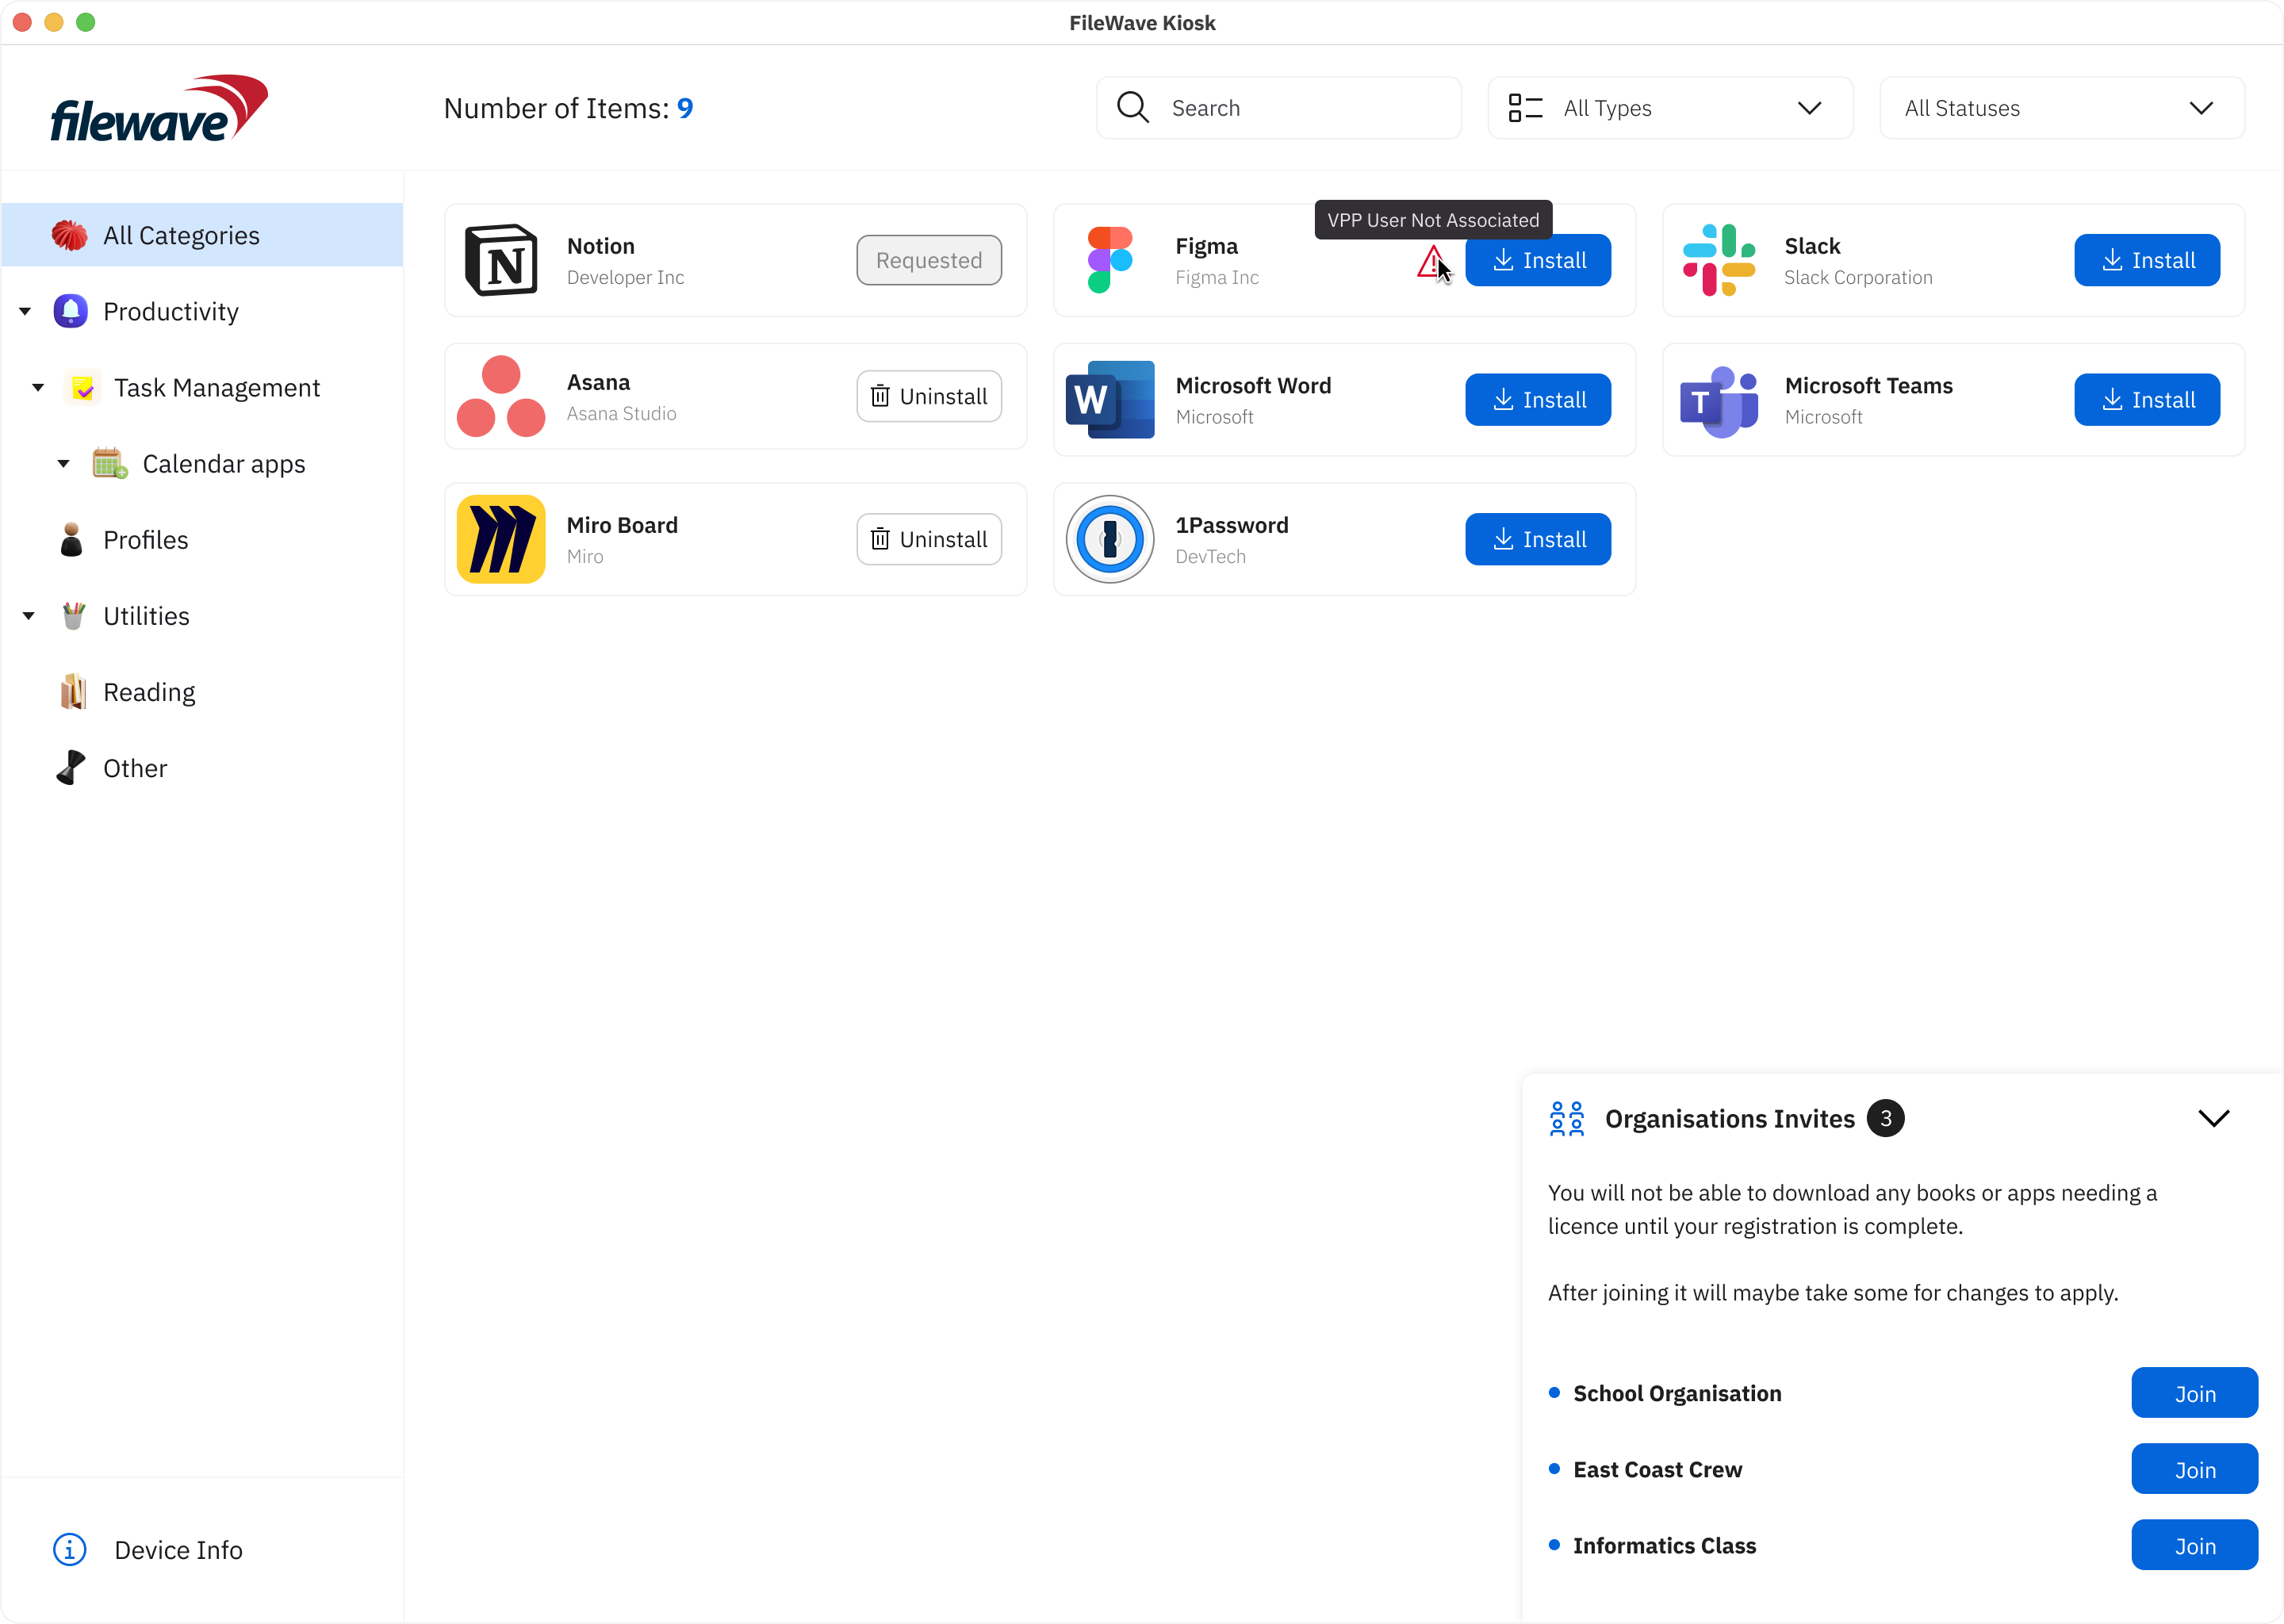
- VPP support (macOS):
- JOIN Modal for Organization Selection:
- macOS users accessing the JOIN section will encounter a modal displaying a comprehensive list of organizations available for joining. This intuitive interface simplifies organization selection and facilitates seamless integration with VPP.
- Streamlined Registration Process:
- Upon selecting the "Join" button, macOS users will seamlessly transition to the App Store app to complete the registration process. This streamlined workflow minimizes user effort and enhances efficiency in finalizing organization registration.
- Dynamic Organization Visibility:
- Upon successful registration with an organization, it will be automatically removed from the list of available organizations. This dynamic update ensures that macOS users are presented with accurate and relevant options, optimizing their selection process.
- User-Friendly Interface:
- If there are no more organizations available for joining, the list at the bottom right will intelligently hide, providing a cleaner interface for macOS users. This decluttered view enhances user experience and facilitates focused decision-making.
- Compatibility with VPP Versions:
- Registration functionality is fully compatible with both VPP v1 and VPP v2, ensuring seamless integration and operation across different VPP versions for macOS users.
- Error handling (in case installation failed):
- Icons with error text tooltips are shown in the Apps List page, providing users with quick access to error information.
- JOIN Modal for Organization Selection:
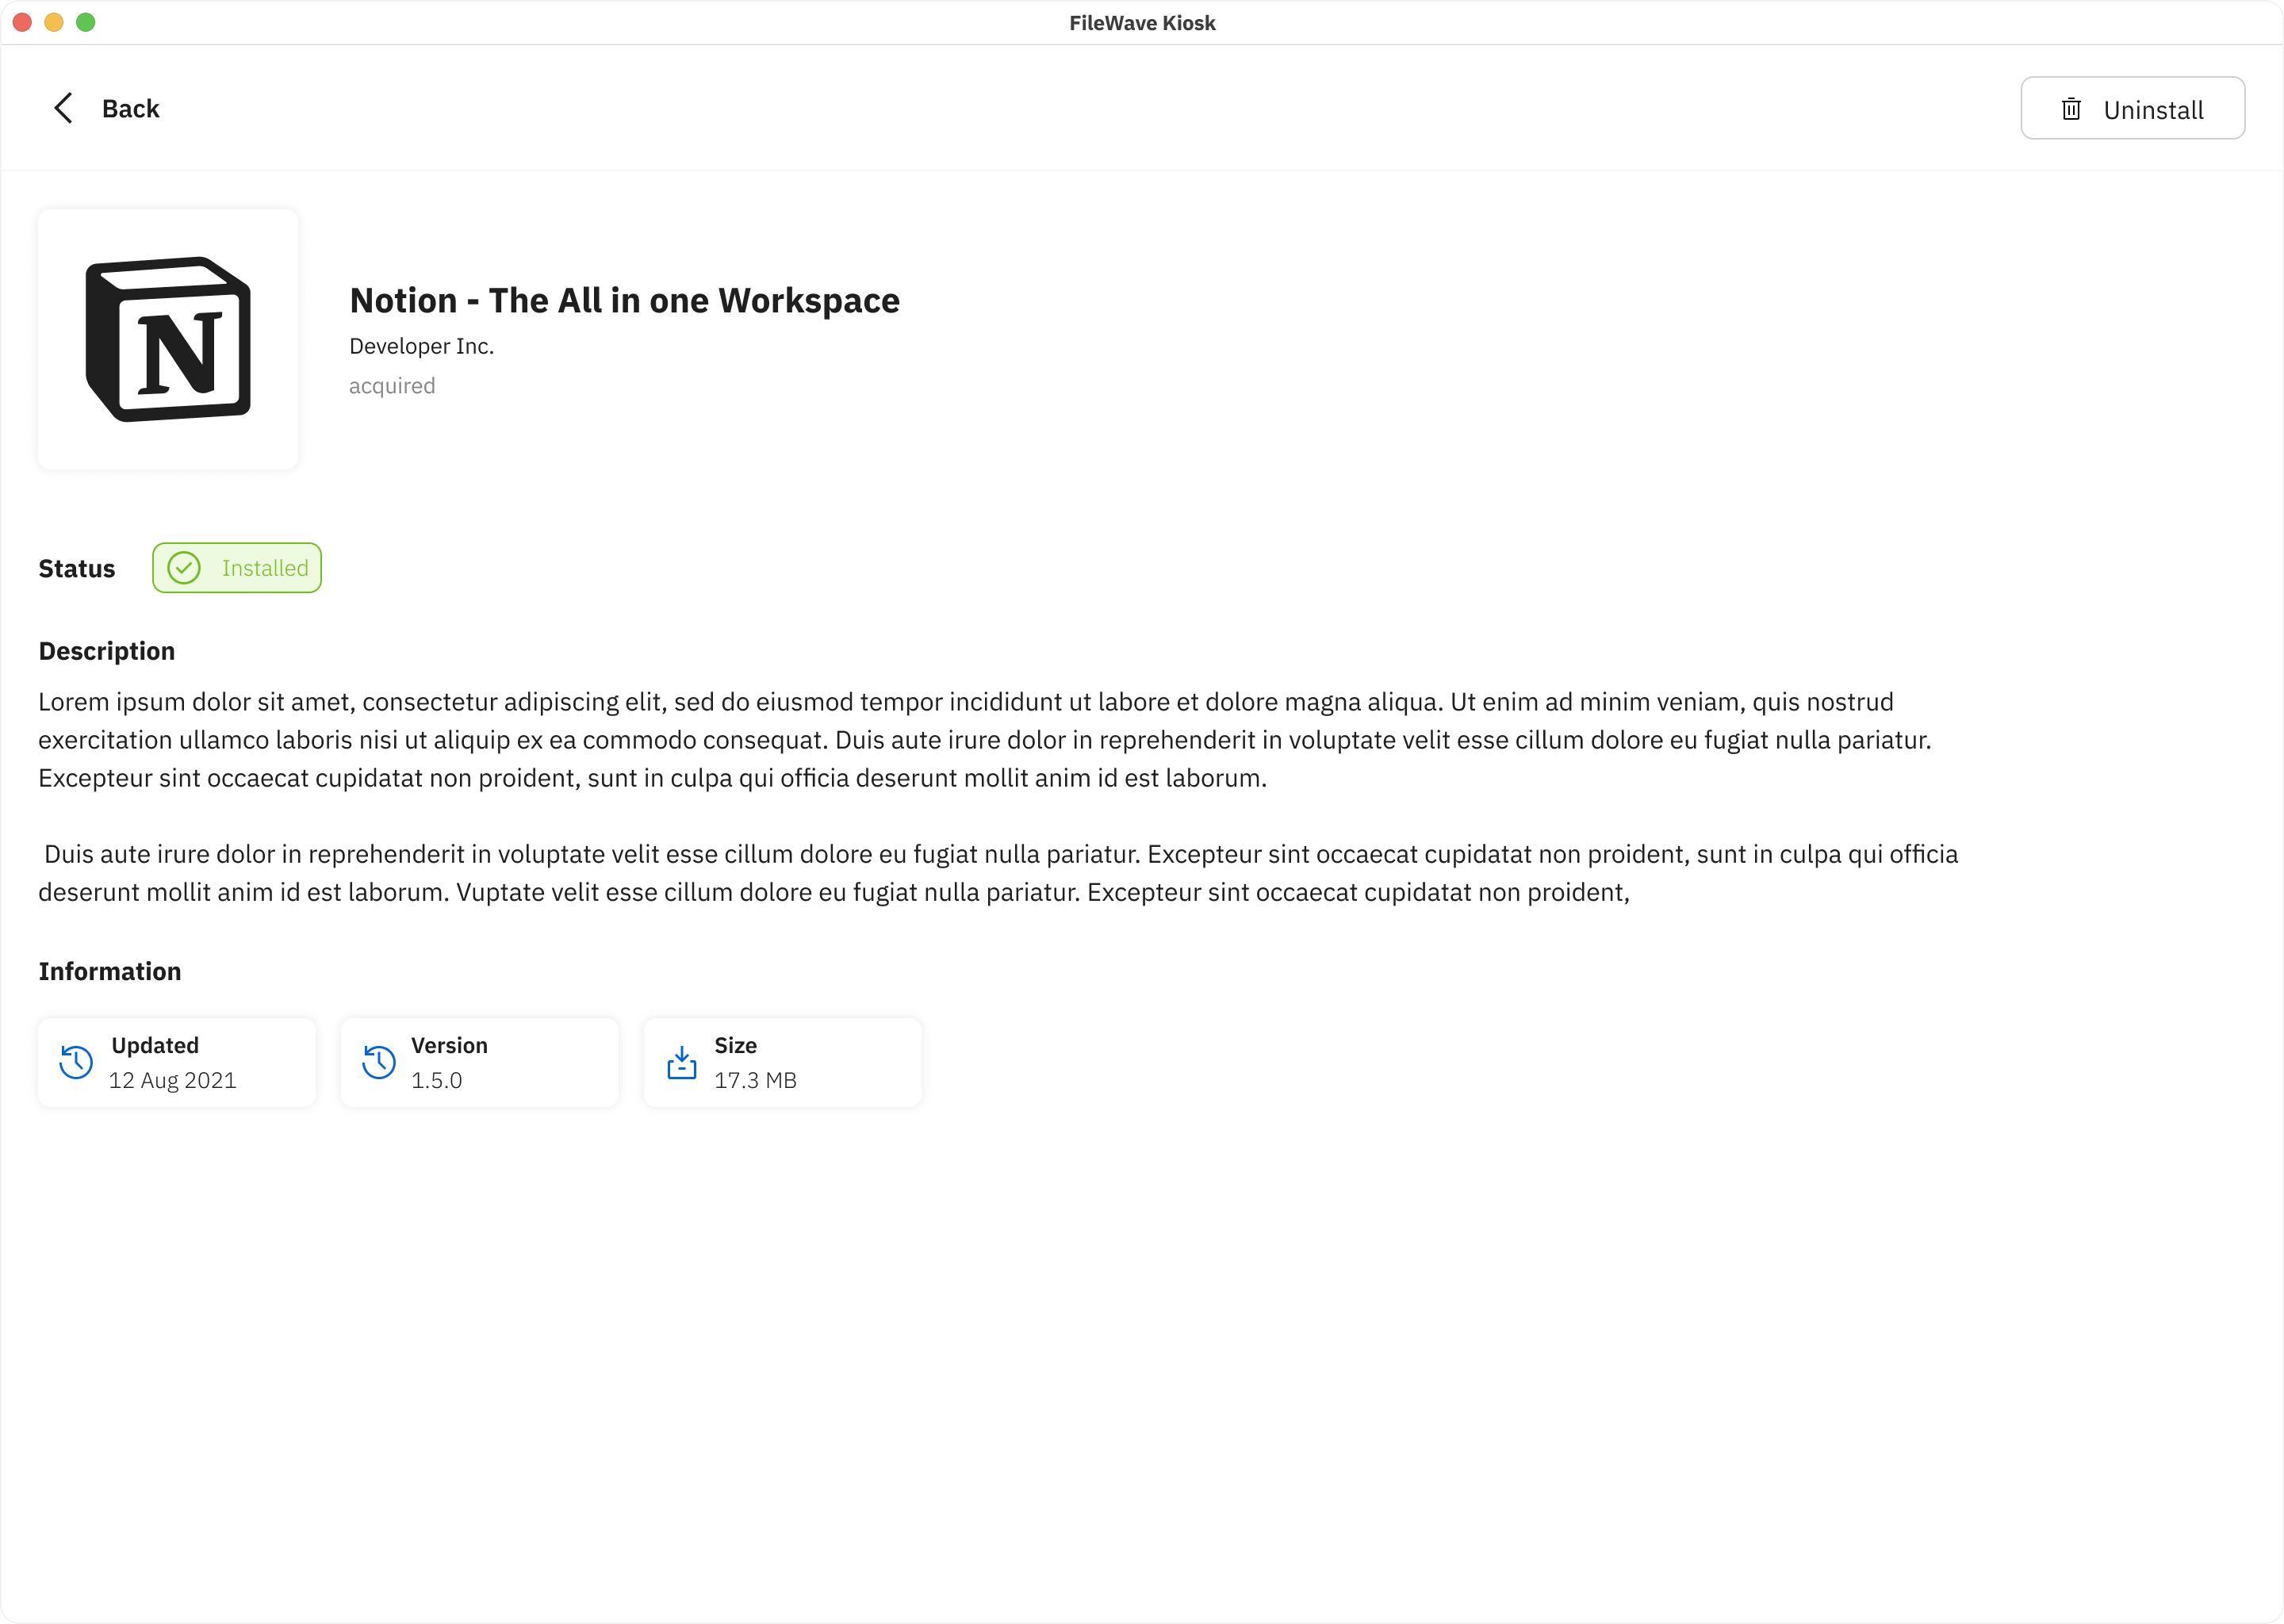
Payload/Fileset details view
We are excited to introduce significant enhancements to the Desktop Kiosk versions, mirroring the user-centric improvements made for iOS/iPadOS. With these updates, users can expect a more intuitive and informative experience when interacting with filesets and payloads on their desktop devices.
Key Features:
- Details View Redesign:
- The "Details View" on Desktop Kiosk now mirrors the comprehensive and informative interface seen on iOS/iPadOS. Users encounter a screen that offers in-depth information about selected filesets/payloads, empowering them to make informed decisions.
- Key Elements and Components:
- Fileset/Payload Icon: Visual identifiers help users quickly recognize the selected fileset/payload.
- Fileset/Payload Name: Clear titles provide clarity about the content or purpose.
- Creator Information: Details about the developer or source establish credibility and context.
- Description: Comprehensive descriptions outline functionality, features, and benefits.
- Information: Users can access details like the last update date, version, and size of the fileset.
- User Interaction Buttons: Interactive buttons allow users to initiate actions such as installation, with progress updates visible until completion.
- Return to Browse: A back button facilitates seamless navigation back to the previous browsing screen.
- Scrolling Animations: Fluid animations enhance the browsing experience, providing engaging transitions between content.
- Loading Animation: Visual feedback informs users of data retrieval processes, ensuring they are aware of ongoing operations.
- Error Handling: Robust error messages guide users through connectivity issues or technical glitches, maintaining a smooth user experience.
These enhancements aim to streamline the desktop browsing experience, aligning it closely with the intuitive interface seen on iOS/iPadOS. By providing users with comprehensive information and intuitive navigation, the Desktop Kiosk versions empower users to make informed decisions and maximize productivity.
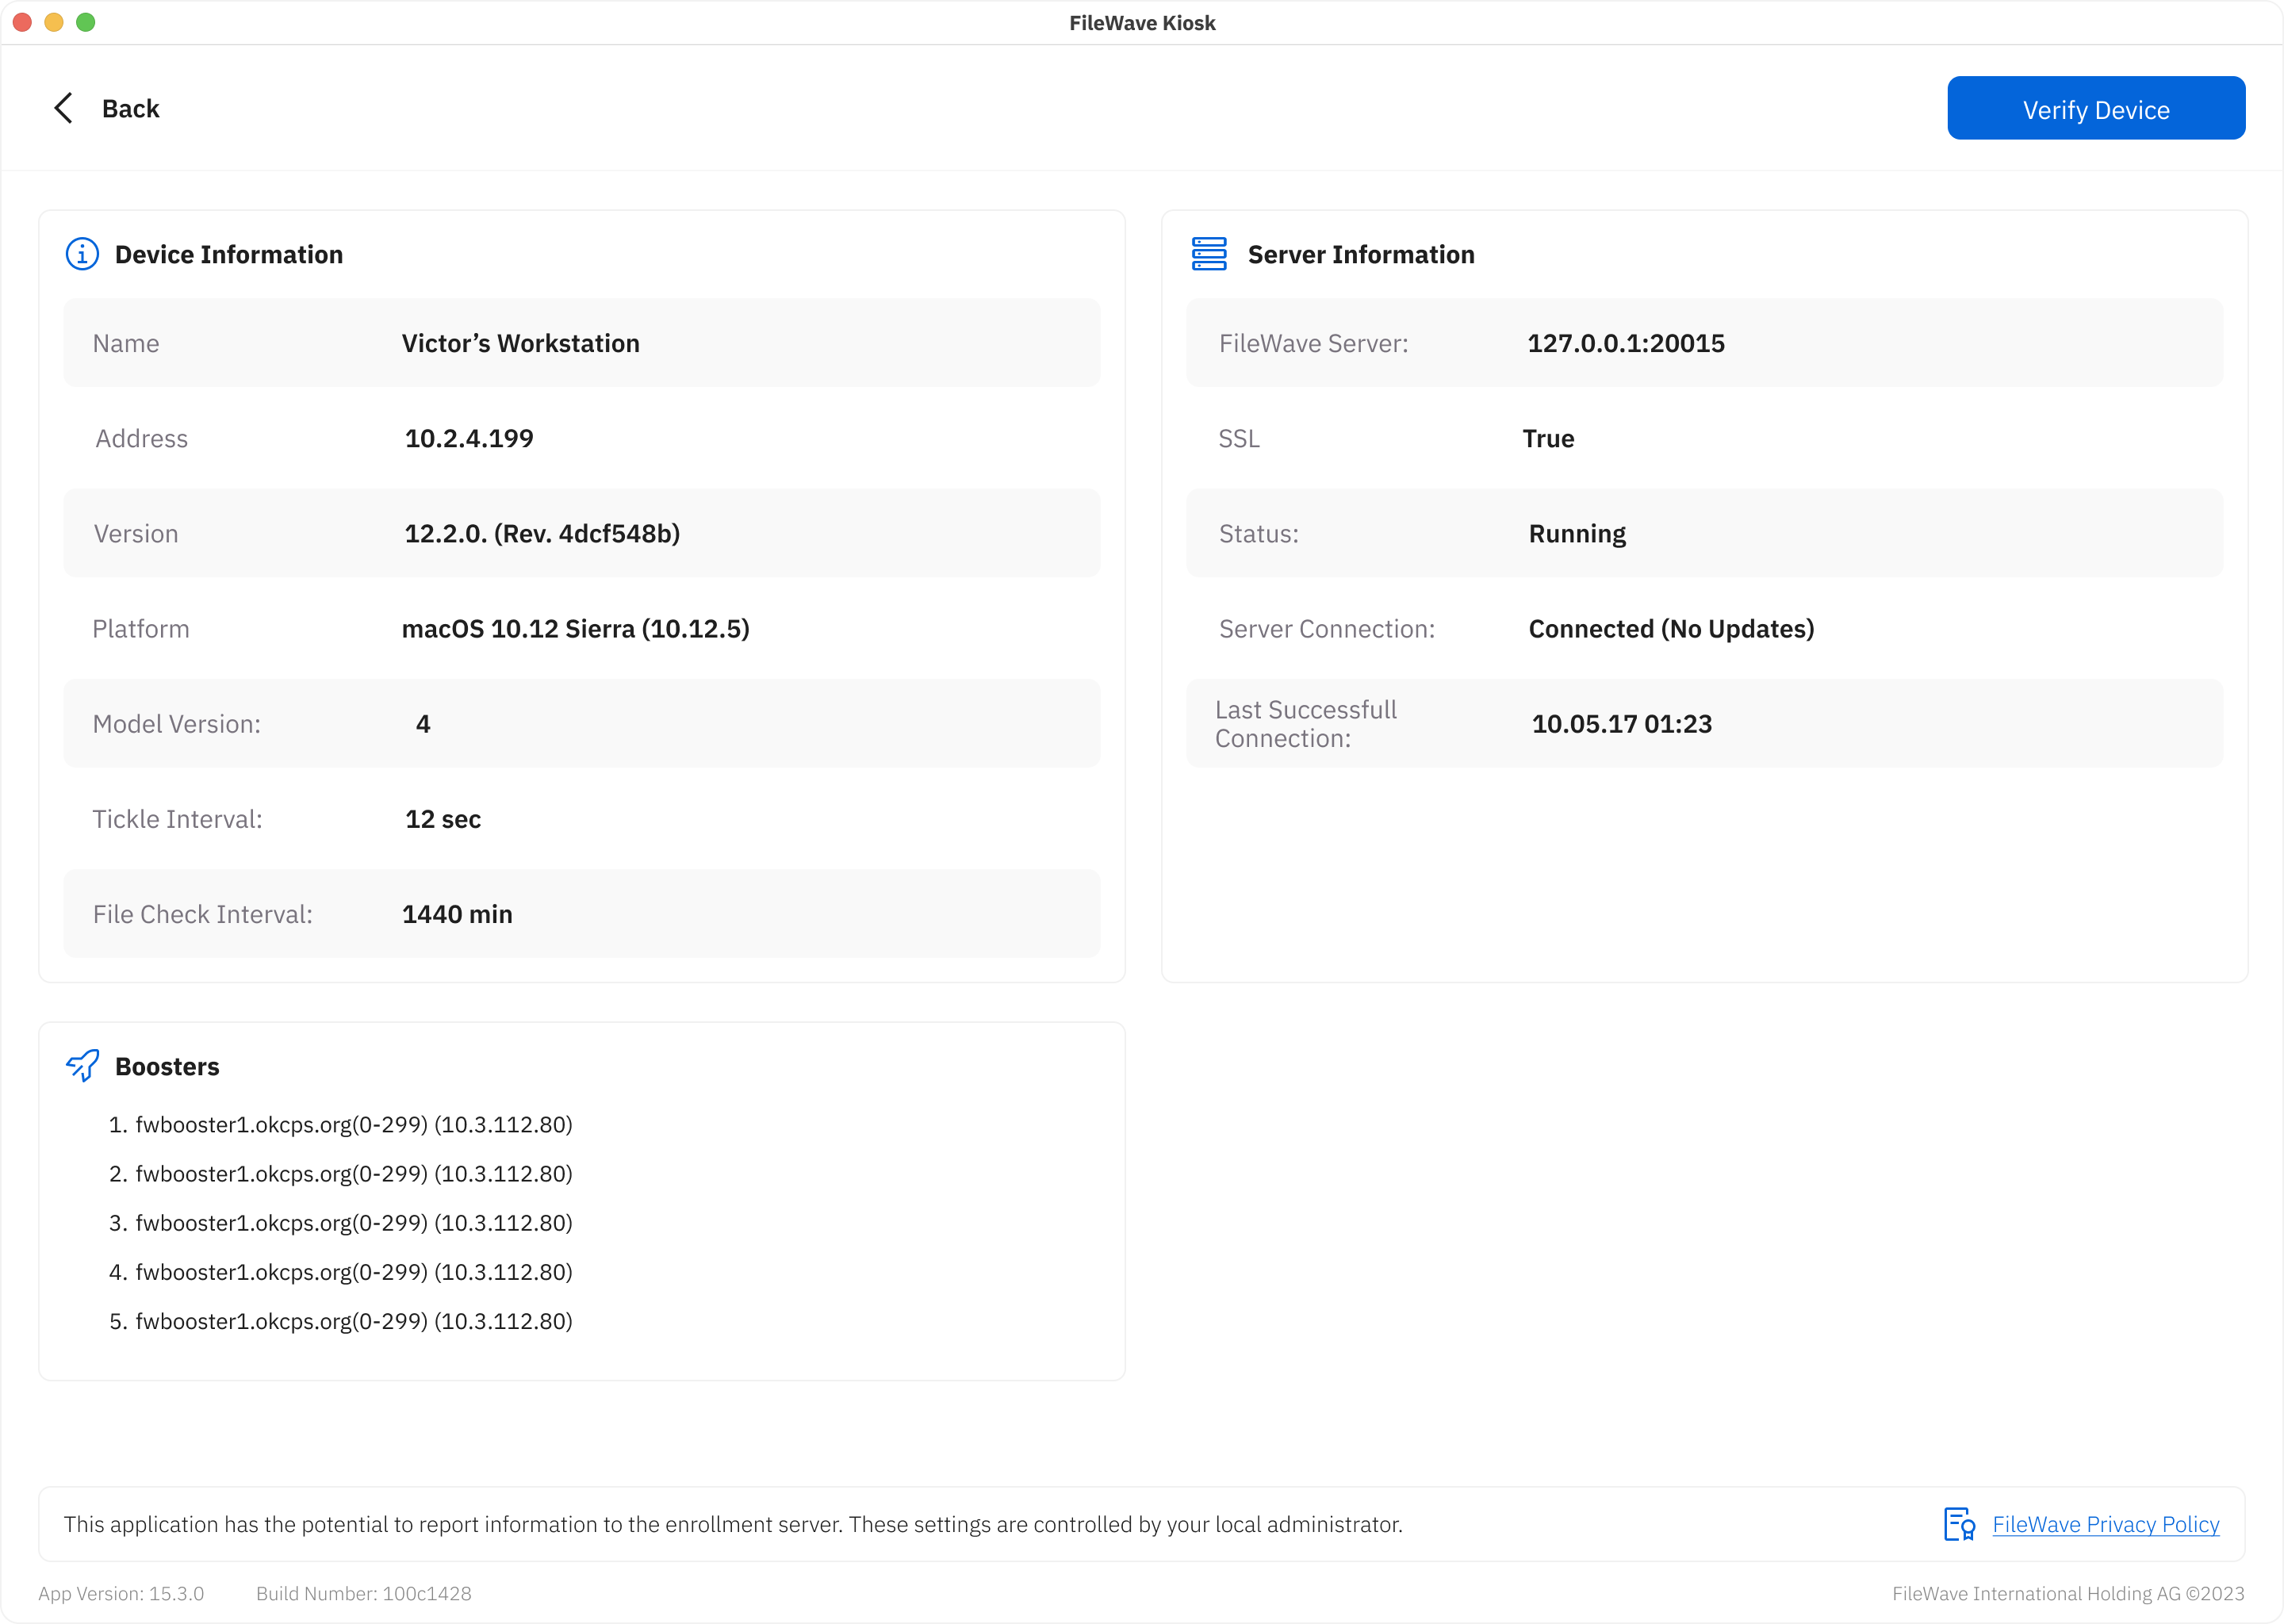
Device Information view
We're thrilled to unveil enhancements to the Device Information view on Desktop Kiosk, paralleling the user-centric improvements made for iOS/iPadOS. This revamped interface provides users with a comprehensive overview of vital device details, fostering transparency and effective management within the app's ecosystem.
Key Features:
These enhancements bolster transparency and facilitate efficient device management within the Desktop Kiosk environment. By providing users with a holistic overview of device and server information, coupled with booster management capabilities, the Desktop Kiosk version empowers users to make informed decisions and optimize their workflows with ease.
Logo and primary color selection
The Adding Logo and Primary Color Selection feature enhances customization within the app by enabling users to personalize the visual representation of their profiles or entities. This feature allows users to define their brand identity and establish a cohesive look and feel throughout the app. Here's how the feature works:
- Logo Upload: Users can upload their company or entity logo, which serves as a distinctive visual identifier. The logo could be in various formats, such as JPEG, PNG,... Once uploaded, the logo is displayed in relevant sections of the app where the user's profile or entity is showcased.
- Primary Color Selection: Users can choose a primary color that resonates with their brand's identity. This color becomes the dominant hue used for interface elements such as buttons, headers, and accents throughout the app. Users can select the color from a color palette or enter a custom color code.
- Visual Consistency: The uploaded logo and selected primary color are applied consistently across various sections of the app. This ensures a coherent and visually pleasing experience for users and anyone interacting with their profiles or entities within the app.
- Personalization: By allowing users to upload their logos and select a primary color, the app offers a personalized touch, making users' presence and contributions stand out within the app's environment.
- Branding Impact: The combination of a unique logo and primary color strengthens brand recognition and recall, creating a strong visual association with users' profiles or entities.
- User-Friendly Interface: The process of adding a logo and selecting a primary color is designed to be intuitive, with clear instructions and user-friendly controls that guide users through the customization process.
- Flexibility: Users can update or modify their logo and primary color selection at any time to reflect changes in their branding or preferences.
The "Add Logo and Primary Color Selection" feature empowers users to infuse their identity into the app's interface, enhancing recognition, and contributing to a personalized and engaging experience for both users and their audiences.
Related Content
- App Portal / Kiosk v2 transition
- Setting the Primary Colour, Name and Logo in Kiosk/App Portal (16.0+)
FileWave Kiosk for iOS/iPadOS overview (15.3+)
What
The Self-Service Kiosk is FileWave's self-service experience for iOS and iPadOS devices. It lets users browse Kiosk-associated applications, profiles, books, and other approved content without IT having to assign every item directly to each iPad or iPhone.
The newer iOS/iPadOS Kiosk experience started with FileWave 15.3, but the deployment method changed again in FileWave 16.3.0. On 16.3.0 and later, the iOS/iPadOS Kiosk is the Apple App Store version of FileWave Kiosk, deployed as a VPP / Apps and Books app.
This article focuses on the Kiosk interface and user experience after the app is installed. For deployment, upgrade behavior, and the required ASM/ABM app-license preparation for 16.3.0+, use Automatic updating of iOS/iPadOS Kiosk (15.3+) as the source of truth.
Important for FileWave 16.3.0 and later
- the iOS/iPadOS Kiosk is delivered from the Apple App Store as a VPP / Apps and Books app
- FileWave must be syncing with Apple School Manager (ASM) or Apple Business Manager (ABM)
- the FileWave Kiosk app must already be acquired there if you want the transition to happen promptly after upgrade
When/Why
The transition from Technical Preview version 15.1 to the Production version 15.3 of our app signifies a major leap forward in terms of user experience and visual appeal, much like the transformation seen when comparing the Android Play Store and the App Store. In this upgrade, the primary focus has been on completely revamping the user interface (UI) to provide a sleek, modern, and highly intuitive platform that caters to our users' evolving expectations.
With version 15.3.1, the app undergoes a stunning visual makeover, drawing inspiration from the aesthetic excellence of both the Android Play Store and the App Store:
-
Unified Design Paradigm: Our new UI design unifies elements from both the Android Play Store and the App Store, creating a harmonious blend of familiarity and innovation. This design consistency ensures that users across various platforms feel comfortable while navigating the app.
-
Intuitive Navigation: Introduces a reimagined navigation system. Users can effortlessly explore and discover content thanks to intuitive menus, recognizable icons, and seamless navigation flows, akin to the ease of navigation in both app marketplaces.
-
Visual Delight: The new UI is not just about functionality; it's a visual treat. Engaging animations, subtle transitions, and tastefully curated visuals combine to make every interaction with the app a delightful experience, echoing the immersive nature of the Android Play Store and the App Store.
-
Enhanced Customization: Introduces enhanced customization options, allowing users to personalize their interface just as they would within the Android Play Store and the App Store. Users can arrange and prioritize content according to their preferences, granting them a sense of ownership over their app experience.
-
Responsive Design: Much like the Android Play Store and the App Store's responsiveness across devices, our app now adapts seamlessly to various screen sizes and orientations. This ensures a consistent and optimized experience whether users are browsing on smartphones, tablets, or desktops.
By transitioning to the 15.3 release of the Kiosk, with a UI overhaul reminiscent of the Android Play Store and the App Store, our app solidifies its commitment to delivering an unparalleled user experience. This transformation isn't just about aesthetics; it's a testament to our dedication to meeting the evolving needs of our users in an engaging, intuitive, and visually striking manner. As we bridge the gap between the old and the new, version 15.3 sets the stage for a future where our app continues to evolve in tandem with user expectations and industry trends.
How
Browse Payloads/Filesets
The "Browse Payloads/Filesets" screen is a central feature within the app that enables users to explore and discover a diverse array of Payloads/Filesets available for access or download. Much like the experience of browsing through the Android Play Store or the Apple App Store, this screen offers users an organized and visually appealing interface that showcases different Payloads/Filesets, each accompanied by relevant details and information.
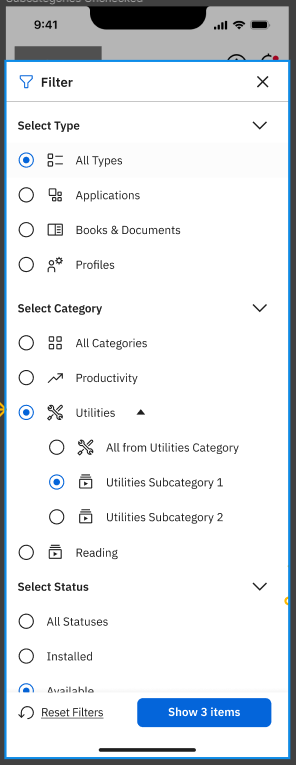
Key components and elements commonly found on the "Browse Payloads/Filesets" screen include:
-
Company Logo: The visual representation of the company's logo, reinforcing brand identity and providing a familiar visual reference.
-
Device Information: A button leading to the "Device Information" page provides users with quick access to essential insights about specific devices, such as company details, enrollment information, verification status, and app version.
-
Payload/Fileset icon: Each Payload/Fileset is represented by icon that provides a visual cue of its content or purpose.
-
Payload/Fileset Name: The name of the Payload/Fileset is displayed alongside the corresponding thumbnail. This gives users a quick understanding of the payload's/Fileset's context.
-
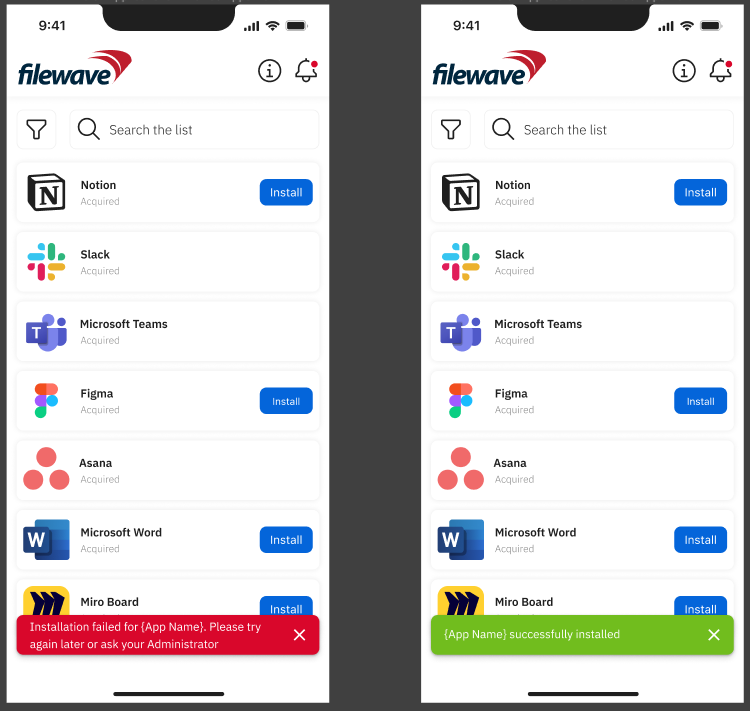
Install Button: This view includes an "Install" button that users can click to initiate the installation process of the selected Payload/Fileset, streamlining the user's interaction and providing a clear call to action. If the Payload/Filesets is already installed, button will not be visible.
-
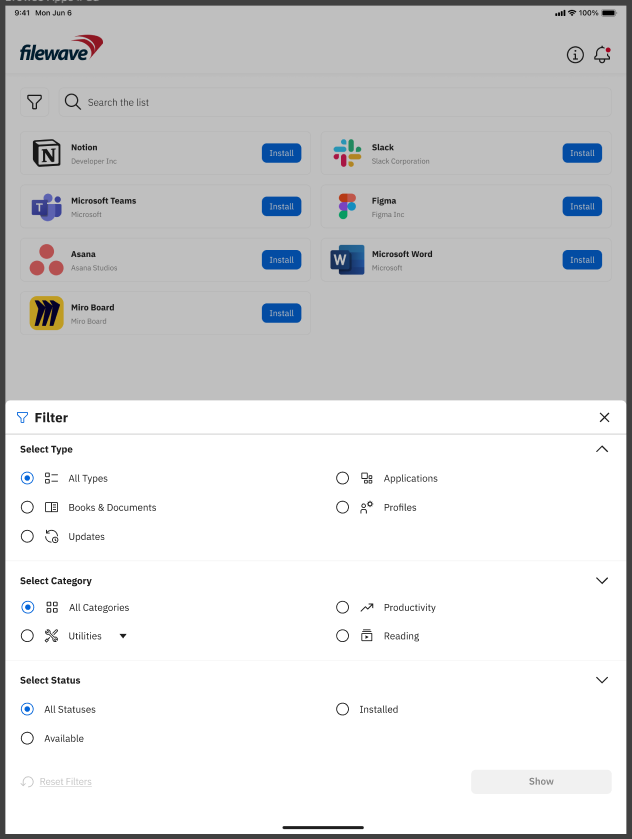
Category Filters: Users can typically filter Payloads/Filesets by Types such as "Applications," "Books," "Documents," and more. Filtering is possible by Categories (these should be configured in FileWave Central) and also by Status (Installed, Not Installed). This categorization helps users narrow down their search based on their specific interests.
| iPhone | iPad |
 |
|
- Search Bar: A search bar allows users to directly search for specific Payloads/Filesets by their name.
- Payload/Fileset Cards: Each Payload/Fileset is usually presented as a card containing its icon and name. Tapping on a card leads to a more detailed page for the Payload/Fileset.
- Pagination: If there are numerous Payloads/Filesets available, an infinite scrolling mechanism helps users navigate through multiple pages of listings.
- Access/Download Button: A clear button to access or download the Payload/Fileset is generally included on each card, allowing users to initiate the relevant action seamlessly.
- Scrolling Animations: Fluid scrolling animations and transitions contribute to a smooth browsing experience, enhancing users' engagement while exploring different Payloads/Filesets.
- Loading Animation: During data retrieval, a loading animation provides users with visual feedback, indicating that the app is actively fetching and populating the content.
- Error Handling: Robust error handling mechanisms ensure clear and user-friendly error messages guide users in case of connectivity issues or technical glitches.
- Landscape and Portrait Views: The screen seamlessly adapts to both landscape and portrait orientations for iPad, while for iPhone only portrait orientation is available, ensuring a consistent and optimal browsing experience across different device orientations.
| iPhone | iPad |
|
|
|

The "Browse Payloads/Filesets" screen serves as a gateway for users to immerse themselves in the app's content ecosystem, allowing them to discover and access various Payloads/Filesets that align with their needs and interests. Its design, layout, and functionality play a crucial role in delivering a user-friendly and enjoyable browsing experience, reminiscent of the fluid exploration on the Android Play Store and the Apple App Store.
Payload/Fileset details view
The "Details View" is the screen that users encounter after clicking on a specific Payload/Fileset they wish to install or access. This screen provides comprehensive information about the selected Fileset, offering a deeper understanding of its features, functionality, and relevance. Much like the detailed view of an app in the Android Play Store or the Apple App Store, this interface is designed to empower users to make informed decisions about their installation or usage.
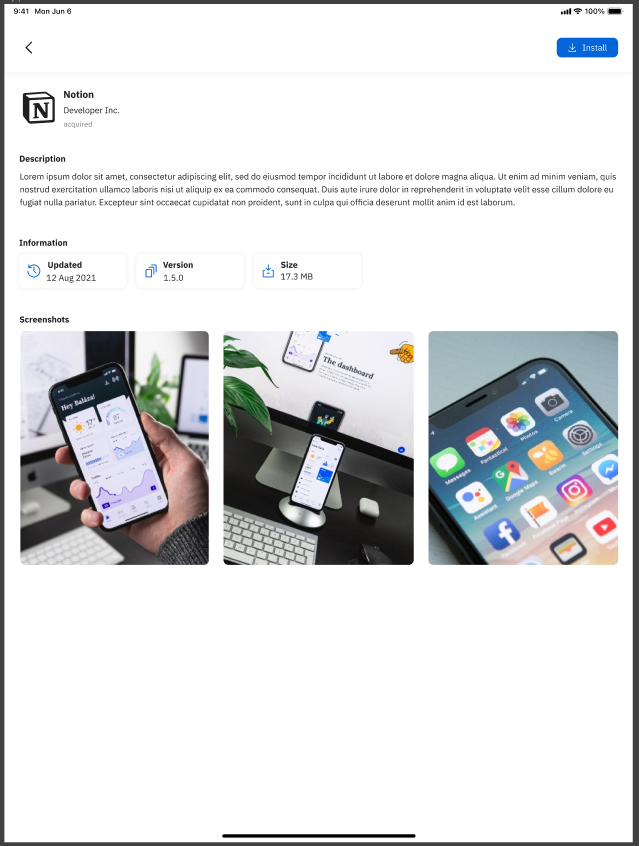
Key elements and components often present on the "Details View" include:
-
Fileset/Payload Icon: The icon representing the selected Payload/Fileset, serves as a visual identifier for users.
-
Fileset/Payload Name: The name or title of the Fileset, providing clarity about the content or purpose.
-
Creator Information: Details about the developer, creator, or source of the Fileset, establishing credibility and context.
-
Description: A comprehensive description of the Fileset's functionality, features, and benefits, outlining what users can expect.
-
Information: Provides information regarding when was Fileset last updated, and what is the version and size of the Fileset.
-
Screenshots or Previews: Visual representations of the Fileset's interface, content, or use cases through screenshots or short videos.
-
User Interaction Buttons: Buttons to perform actions - "Install" enabling users to initiate the desired action. Once the Install is triggered, the button will change state to show the progress of the installation. Once the installation is complete - the button will disappear, but a new field “Status” will be shown which will give final information about the status of the Fileset.
-
Return to Browse: A back button to return to the previous "Browse Payloads/Filesets" screen for further exploration.
-
Scrolling Animations: Fluid scrolling animations and transitions contribute to a smooth browsing experience, enhancing users' engagement while exploring different Payloads/Filesets.
-
Loading Animation: During data retrieval, a loading animation provides users with visual feedback, indicating that the app is actively fetching and populating the content.
-
Error Handling: Robust error handling mechanisms ensure that clear and user-friendly error messages guide users in case of connectivity issues or technical glitches.
| iPhone | iPad |
|
|
|

The "Details View" enriches the user's decision-making process by providing an in-depth look into the selected Fileset's attributes. By offering clear explanations, visuals, and relevant information, this interface ensures that users can confidently proceed with the installation or access of the chosen Fileset, enhancing their overall app experience.
Device Information view
The "Device Information" page provides a comprehensive overview of essential details about a specific device, enhancing transparency and management within the app's ecosystem. This page showcases crucial information related to the device and its integration, allowing users to make informed decisions and take necessary actions. The following information is displayed:
-
Company Logo: The visual representation of the company's logo, reinforcing brand identity and providing a familiar visual reference.
-
Company Name: The name of the company associated with the device, establishes a clear connection between the device and its ownership.
-
Address: The address of the company, providing users with a means to locate or contact the company physically.
-
Phone Number: The contact phone number of the company, offering users a direct channel for communication.
-
Email: The email address of the company, providing an electronic means of communication and support.
-
Enrollment Information: Details about where the device was enrolled, indicating the source or method through which the device became part of the app's ecosystem.
-
Last Verification Date: The date on which the device was last verified or confirmed as operational, enabling users to monitor the device's status.
-
Verify Device Button: A prominently displayed button that allows users to manually trigger a device verification process, ensuring real-time validation.
-
App Version and Build Number: Information about the version and build number of the app installed on the device, indicating the current state of the application.
| iPhone | iPad |
|
|
|
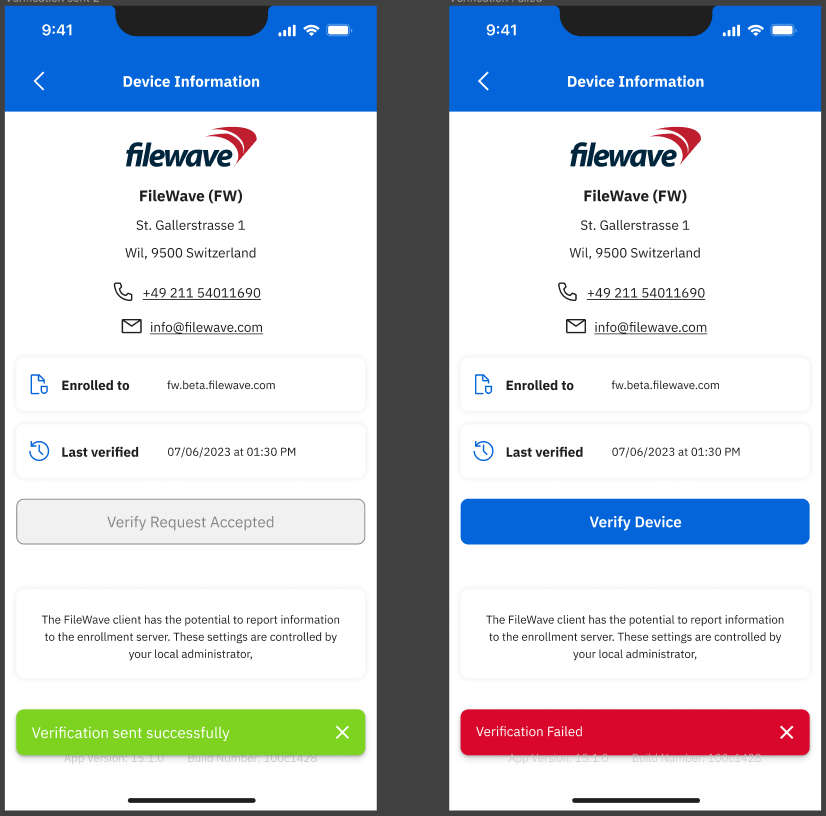

The "Device Information" page serves as a valuable tool for users to gain insights into the device's ownership, enrollment history, status, and app-related details. By presenting this information in a user-friendly manner, the page enhances user management and facilitates seamless interactions within the app's ecosystem.
Logo and primary color selection
The Adding Logo and Primary Color Selection feature enhances customization within the app by enabling users to personalize the visual representation of their profiles or entities. This feature allows users to define their brand identity and establish a cohesive look and feel throughout the app. Here's how the feature works:
-
Logo Upload: Users can upload their company or entity logo, which serves as a distinctive visual identifier. The logo could be in various formats, such as JPEG, PNG,... Once uploaded, the logo is displayed in relevant sections of the app where the user's profile or entity is showcased.
-
Primary Color Selection: Users can choose a primary color that resonates with their brand's identity. This color becomes the dominant hue used for interface elements such as buttons, headers, and accents throughout the app. Users can select the color from a color palette or enter a custom color code.
-
Visual Consistency: The uploaded logo and selected primary color are applied consistently across various sections of the app. This ensures a coherent and visually pleasing experience for users and anyone interacting with their profiles or entities within the app.
-
Personalization: By allowing users to upload their logos and select a primary color, the app offers a personalized touch, making users' presence and contributions stand out within the app's environment.
-
Branding Impact: The combination of a unique logo and primary color strengthens brand recognition and recall, creating a strong visual association with users' profiles or entities.
-
User-Friendly Interface: The process of adding a logo and selecting a primary color is designed to be intuitive, with clear instructions and user-friendly controls that guide users through the customization process.
-
Flexibility: Users can update or modify their logo and primary color selection at any time to reflect changes in their branding or preferences.
The "Add Logo and Primary Color Selection" feature empowers users to infuse their identity into the app's interface, enhancing recognition, and contributing to a personalized and engaging experience for both users and their audiences.


How do I change the logo and primary color? It's easy if you follow this guide: Setting the Primary Color, Name and Logo in Kiosk/App Portal (15.3+) but if you are a Hosted customer, you will need Customer Technical Support to help you because you'll need to change files on the server itself.
App Portal and Kiosk 2 Transition History
iOS/iPadOS App Portal
FileWave 15.3 moved the iOS/iPadOS App Portal out of technical preview and made it the supported self-service application. This page records that transition; use the current Kiosk articles for setup and deployment guidance.
FileWave 16 removed Kiosk 1 from macOS and Windows clients. Kiosk 2 is the current desktop self-service application, and Kiosk 1 is end of life.
What changed in FileWave 15.3
-
Supported iOS/iPadOS application: App Portal moved from technical preview to the supported self-service workflow.
-
Updated desktop interface: Kiosk 2 replaced the original macOS and Windows Kiosk design.
-
Reboot visibility: Kiosk can tell users when an assigned Fileset requires a restart.
Desktop Kiosk for macOS and Windows
Kiosk 2 introduced a redesigned desktop interface for browsing and installing administrator-approved content on macOS and Windows.
The transition affected interface behavior and older customization files:
-
Navigation: Kiosk 2 uses the current browsing and item-detail layout.
-
Screen sizes: The interface adapts to different window and device sizes.
-
Branding: Current color, name, and logo settings replace older desktop customization methods.
-
Legacy cleanup: Pre-15.3 Kiosk customization files may have no effect after the transition.
-
Duplicate Kiosk icons: One older customization can leave both Kiosk versions visible during a legacy transition; use the cleanup article below.
If an assigned Fileset requires a restart, Kiosk displays that requirement before installation so the user can plan for the interruption.
If you still maintain a pre-15.3 desktop Kiosk configuration, remove obsolete customization files before troubleshooting branding or duplicate Kiosk icons.
Related Content
- Removing pre-15.3 Kiosk Customizations (macOS/Windows)
- Setting the Primary Colour, Name and Logo in Kiosk/App Portal (16.0+)
- Applications Preventing Reboot (macOS/Windows)
FileWave App Portal for iOS (IPA Install)
This legacy IPA installation workflow is retired. Do not create new IPA-based FileWave Kiosk / App Portal filesets for iOS or iPadOS. For current guidance, see IPA-based FileWave Kiosk for iOS/iPadOS - EOL.
Current guidance
FileWave 16.3.0 and later deploy iOS/iPadOS Kiosk through the Apple App Store version of FileWave Kiosk, using Apps and Books / VPP licenses from Apple School Manager or Apple Business Manager.
- Upgrade to FileWave 16.3.x or later for iOS/iPadOS Kiosk deployments.
- Acquire the free FileWave Kiosk app in ASM/ABM Apps and Books.
- Delete the legacy
iOS App - FileWave Kioskfileset if it exists. - Remove any remaining associations to older IPA-based Kiosk/App Portal filesets.
- Run a Model Update, then run an Apps and Books / VPP sync.
Related Content
Automatic updating of iOS/iPadOS Kiosk
What
FileWave Kiosk on iOS and iPadOS is the self-service application that lets users open Kiosk, view Kiosk-associated content, install available items, and trigger actions such as Verify.
Starting with FileWave 16.3.0, the current delivery method for iOS/iPadOS Kiosk is the Apple App Store version of the app, deployed as a VPP / Apps and Books app. As long as FileWave is correctly syncing with Apple School Manager (ASM) or Apple Business Manager (ABM) and the required FileWave Kiosk licenses have already been acquired there, the FileWave server will push the App Store Kiosk to managed devices and replace the older Kiosk.
App Store listing: FileWave Kiosk on the Apple App Store
When/Why
This is the current and recommended behavior for FileWave 16.3.0 and later. The move to the App Store / VPP model aligns Kiosk deployment with Apple's current best practices and with the way other MDM and UEM platforms typically deliver managed iOS and iPadOS applications.
The most important operational change is that administrators should not treat the Kiosk upgrade as fully self-contained anymore. Before upgrading to FileWave 16.3.0 or later, make sure FileWave is connected to ASM/ABM for app-license sync and that enough free FileWave Kiosk licenses have already been obtained. If those preconditions are in place, the transition is straightforward. If they are not, Kiosk deployment can be delayed or fail to appear when expected.
The steps below describe the current behavior in FileWave 16.3.0 and later. If you are still running FileWave 15.3.0 through 16.2.x, or need to compare the older workflow, see the reference section later in this article.
How
Current behavior in FileWave 16.3.0 and later
Before upgrading to FileWave 16.3.0 or later:
- make sure FileWave is syncing Apps and Books / VPP licenses from ASM or ABM
- acquire free licenses for FileWave Kiosk in ASM/ABM before the upgrade
- obtain licenses for more devices than are currently managed so normal growth does not create an avoidable shortage
A practical example is to acquire about 1500 licenses if you currently manage 1000 devices.
If the licenses are already present before the upgrade and are not reserved by a legacy Kiosk fileset, devices remove the older enterprise Kiosk and install the new App Store Kiosk shortly afterward, typically within a few minutes.
Upgrade note for customers coming from 16.2.x: It is fine, and recommended, to acquire the free FileWave Kiosk licenses in ASM/ABM before upgrading to 16.3.0. The important part is making sure those licenses are not already reserved by the older Kiosk fileset workflow. If you acquire and sync the licenses while still on 16.2.x, FileWave may prompt you to create an iOS App - FileWave Kiosk fileset. That legacy fileset is not required for the 16.3.0+ App Store Kiosk workflow and can reserve the available VPP licenses.
- There is no fileset or fileset association required for normal iOS/iPadOS Kiosk deployment in 16.3.0 and later.
- If the old
iOS App - FileWave Kioskfileset exists, delete it before relying on the 16.3.0+ App Store Kiosk workflow. - After deleting the legacy Kiosk fileset, run a Model Update, then run an Apps and Books / VPP sync with Apple so FileWave recalculates the available licenses.
- Do not create a new association, or keep an existing one, just to make the 16.3.0+ workflow function.
Preventing or recovering from reserved Kiosk licenses
If the legacy Kiosk fileset exists before the 16.3.0 upgrade, the server may reserve the FileWave Kiosk VPP licenses against that fileset. After upgrading, the 16.3.0+ Kiosk deployment can then appear not to push because FileWave believes there are no free licenses available for the new workflow.
To prevent or recover from this state:
- Delete the legacy
iOS App - FileWave Kioskfileset if it exists. - Run a Model Update.
- Run an Apps and Books / VPP sync with Apple.
- Verify the affected devices, or allow them to check in during their normal verification cycle.
If the licenses are only acquired after the upgrade, the change is less immediate. In that case, purchase the licenses, run a Model Update, run an Apps and Books / VPP sync, and then Verify the affected devices. If some other model change is made and pushed, that should also trigger verification. Without that follow-up activity, devices may not receive the new Kiosk until their next normal verify cycle, which can be up to 24 hours later.
There is currently no in-product warning that tells administrators they upgraded without the needed Kiosk licenses. If VPP is configured but the app has not been acquired in ASM/ABM, one useful clue is in filewave_django.log, which can show:
No VPP organizations have the App Store Kiosk purchased.
Permissions and profile updates
Because the App Store Kiosk is a new app, iOS/iPadOS treats it as a different application even though it serves the same purpose. Administrators should expect permission prompts such as notifications or location services to appear again after the transition.
The new iOS/iPadOS Kiosk app uses this bundle identifier:
com.filewave.ios.app.kiosk3
If you deploy a configuration profile that forces notifications or uses any other app-specific payload for Kiosk, review and update that profile for the new bundle identifier before or during the FileWave 16.3.0 transition.
Reference: behavior in FileWave 15.3.0 through 16.2.x
From FileWave 15.3.0 through 16.2.x, FileWave automatically deployed the newer iOS/iPadOS Kiosk through the older built-in workflow rather than the App Store / VPP model used in 16.3.0 and later.
In that earlier behavior:
- FileWave automatically installed the new Kiosk on managed iOS/iPadOS devices
- the older App Portal web clip was removed from devices
- filesets of the previous native App Portal were not automatically removed, so administrators could remove those associations if they wanted only the newer Kiosk present
- newer Kiosk releases continued to be deployed automatically through that same pre-16.3.0 workflow
Related Content
- IPA-based FileWave Kiosk for iOS/iPadOS - EOL
- Setting the Primary Colour, Name and Logo in Kiosk/App Portal (16.0+)
- Resolving SSL and Manifest Validation Errors with FileWave Kiosk Installation (15.3+)
- Default TCP and UDP Port Usage
FileWave Kiosk Displays Company Information
What
FileWave Kiosk / App Portal can display Company Information configured in FileWave Central. Use this to give users a consistent place to find your organization name, support contact details, address, or other help desk information from macOS, Windows, iOS, and iPadOS devices.
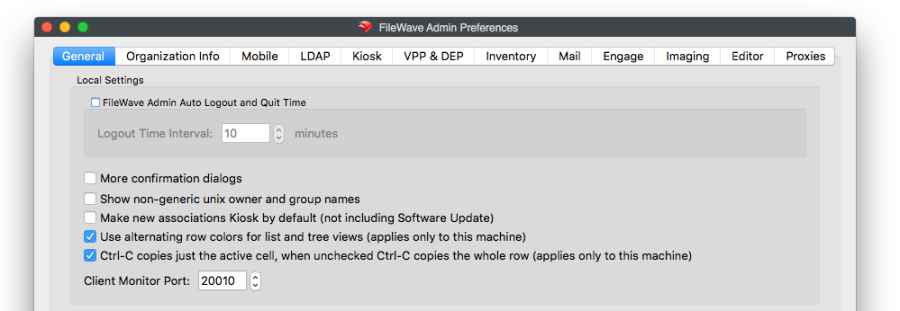
Where to configure it
In FileWave Central, open Preferences and select the Organization Info tab. Update the organization details you want users to see in Kiosk / App Portal.
What users see
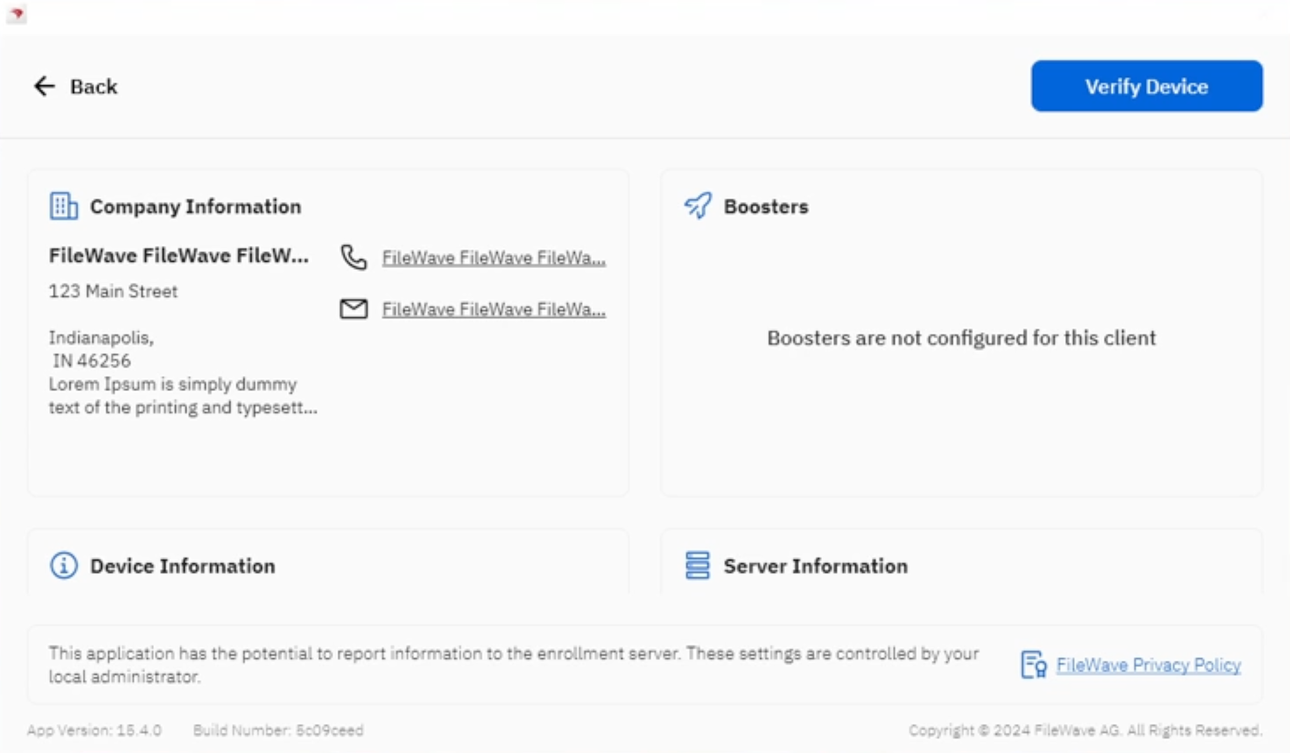
macOS and Windows
On macOS and Windows computers, the Company Information panel appears in the Kiosk / App Portal device information view.
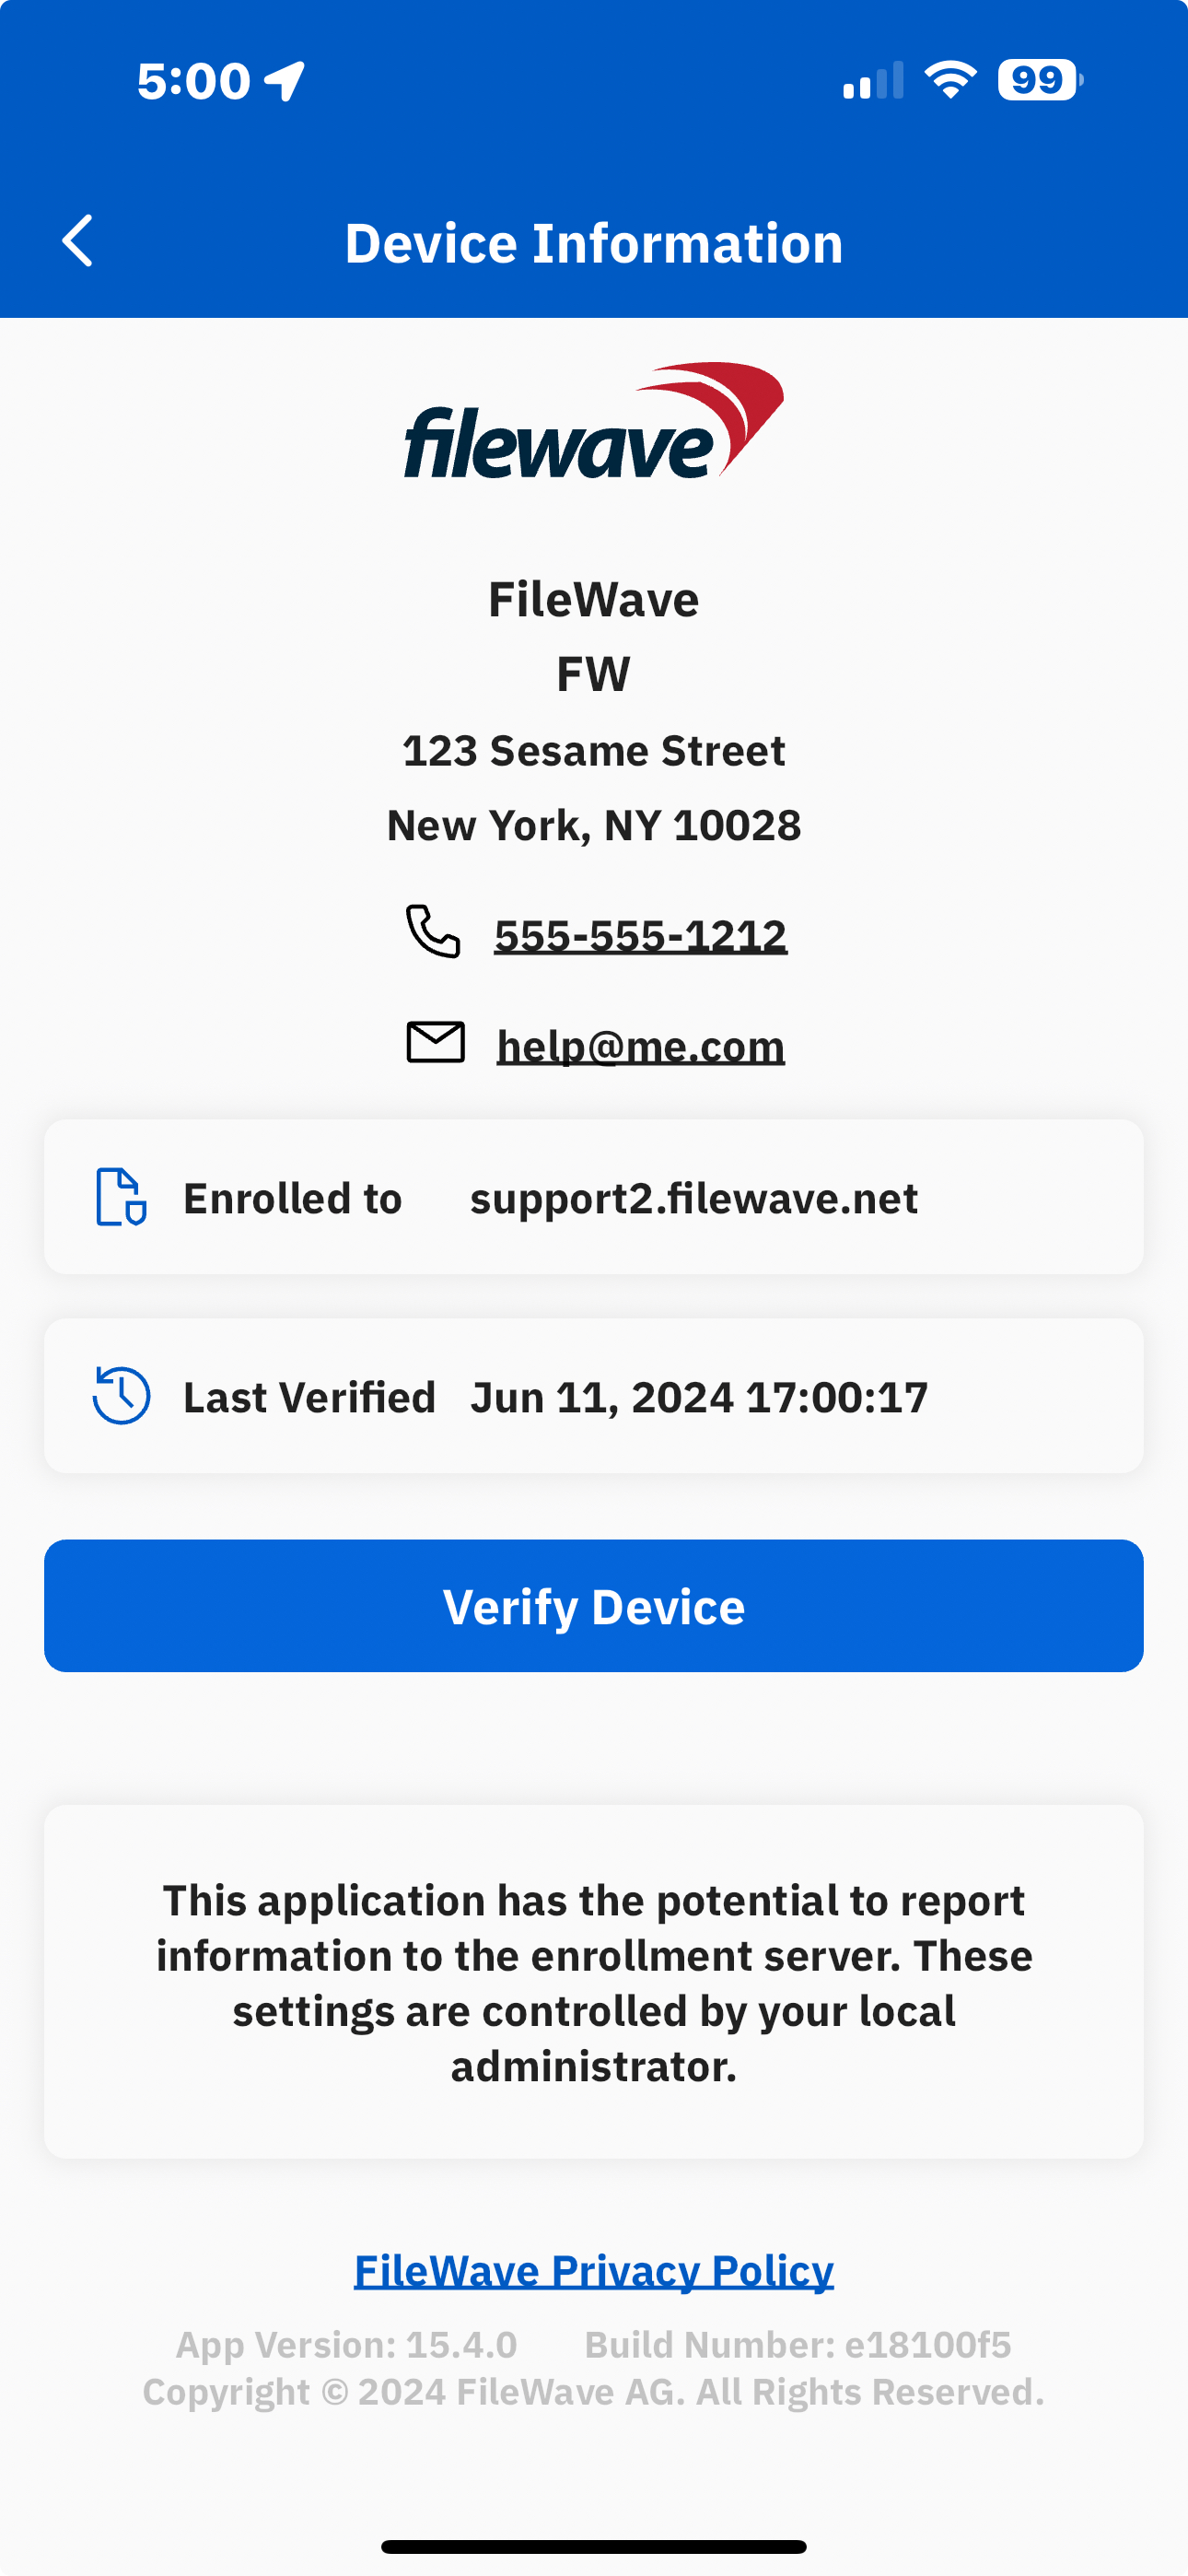
iOS and iPadOS
On iOS and iPadOS devices, the same organization details appear in the Device Information view along with enrollment and verification information.
Kiosk Package Updates Category (macOS PKG)
Description
Kiosk can show Package Updates for associated PKG Filesets when an older version of the same PKG is already installed on the device.

Information
When a PKG Fileset is associated to a device as a Kiosk item, the FileWave Client checks the PKG receipts on that device. If it finds a matching receipt and the installed version is older, Kiosk lists the newer item under Package Updates. This category is generated automatically, so it does not appear in either location below:
- FileWave Central > Preferences > Kiosk > Categories
- FileWave Central > Fileset > Properties > Kiosk > Category
For example, a device may already have version 1.0 of My Awesome App installed from a PKG.

Because the app was installed by PKG, the device should have a package receipt. If you know the PKG identifier, you can confirm the installed version in Terminal:
# pkgutil --pkg-info com.myawesomeapp.pkg.app
package-id: com.myawesomeapp.pkg.app
version: 1.0Upload the newer PKG and create a Kiosk association for it.

When the device receives the association, the Kiosk drop-down menu adds Available Updates:

Selecting that option opens the Kiosk Installer window and shows the Package Updates category.
The older PKG can have been installed through FileWave or locally. This is useful when users can install their own PKGs but you still want Kiosk to show that FileWave is offering a newer version.
PKG version is set inside the PKG by the package developer. If the developer does not increase the package version from the previous release, FileWave cannot show the newer Fileset as a Package Update.
PKG installers have their own version, and that version does not have to match the app version shown in Finder.
Control Which Apps Appear in Kiosk (15.3+)
FileWave Kiosk shows apps and other content assigned for self-service installation. A standard app assignment does not make the app appear in Kiosk, even when Allow removal is enabled.
What changed in FileWave 15.3
Before FileWave 15.3, an app with a standard assignment and Allow removal could also appear in Kiosk as a reinstall path after the user removed it. From FileWave 15.3 onward, that fallback listing is gone: only content with a Kiosk assignment appears in self-service.
Behavior in FileWave 15.3 and later
- An app with a Kiosk assignment appears as self-service content.
- An app with only a standard assignment does not appear in Kiosk.
- A standard assignment and a Kiosk assignment serve different purposes. If the standard assignment remains active and still requires the app, a successful Fileset Verify can reinstall the missing app; it does not add the app to Kiosk.
- Removing the Kiosk assignment removes the item from self-service after the model update reaches the device.
If an app is missing from Kiosk
- Confirm that the app has a Kiosk assignment to the intended device or group.
- Confirm that the assignment or Deployment is active.
- For Apple Apps and Books content, confirm that the correct token has available licenses.
- Update the model and allow the device to check in and refresh Kiosk.
Related Content
- Self-Service Kiosk Overview
- FileWave Kiosk for iOS/iPadOS Overview
- Automatic Updating of iOS/iPadOS Kiosk
Setting the Primary Colour, Name and Logo in Kiosk/App Portal (16.0+)
What
This article provides step-by-step instructions for configuring the new Kiosk2 and App Portal introduced in FileWave 16.0, including how to set a primary colour, name, and logo for the App Portal / Kiosk on FileWave v16.0+.
When/Why
For brand consistency, options exist (depending on device type) for configuring:
- Colour
- Name of Kiosk Window (Computers only)
- Shortcut icon in macOS Menu Bar or Windows System Tray
- Logo image shown in macOS/iOS/iPadOS/Windows Kiosk application
How
FileWave 16+ now offers a Policy Fileset for Kiosk customisation. Default configurations are applied when no custom Fileset is associated:
- Name the Kiosk
- Custom Logo, which appears in the App when launched, for all devices. (Default to FileWave Logo if no custom logo set)
- Theme Colour
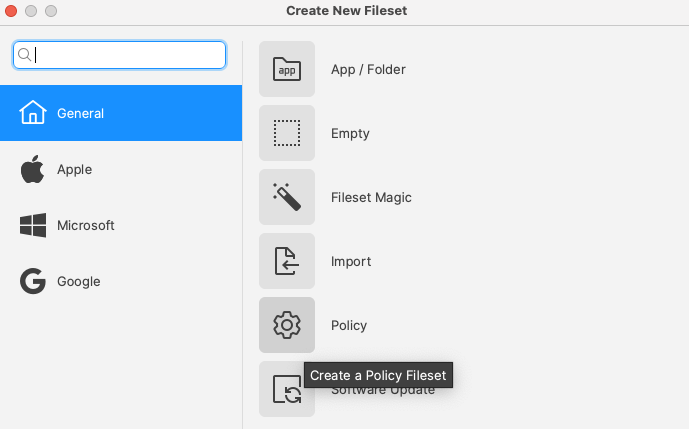
From the Create New Fileset option, select Policy:
Kiosk is the newly added feature: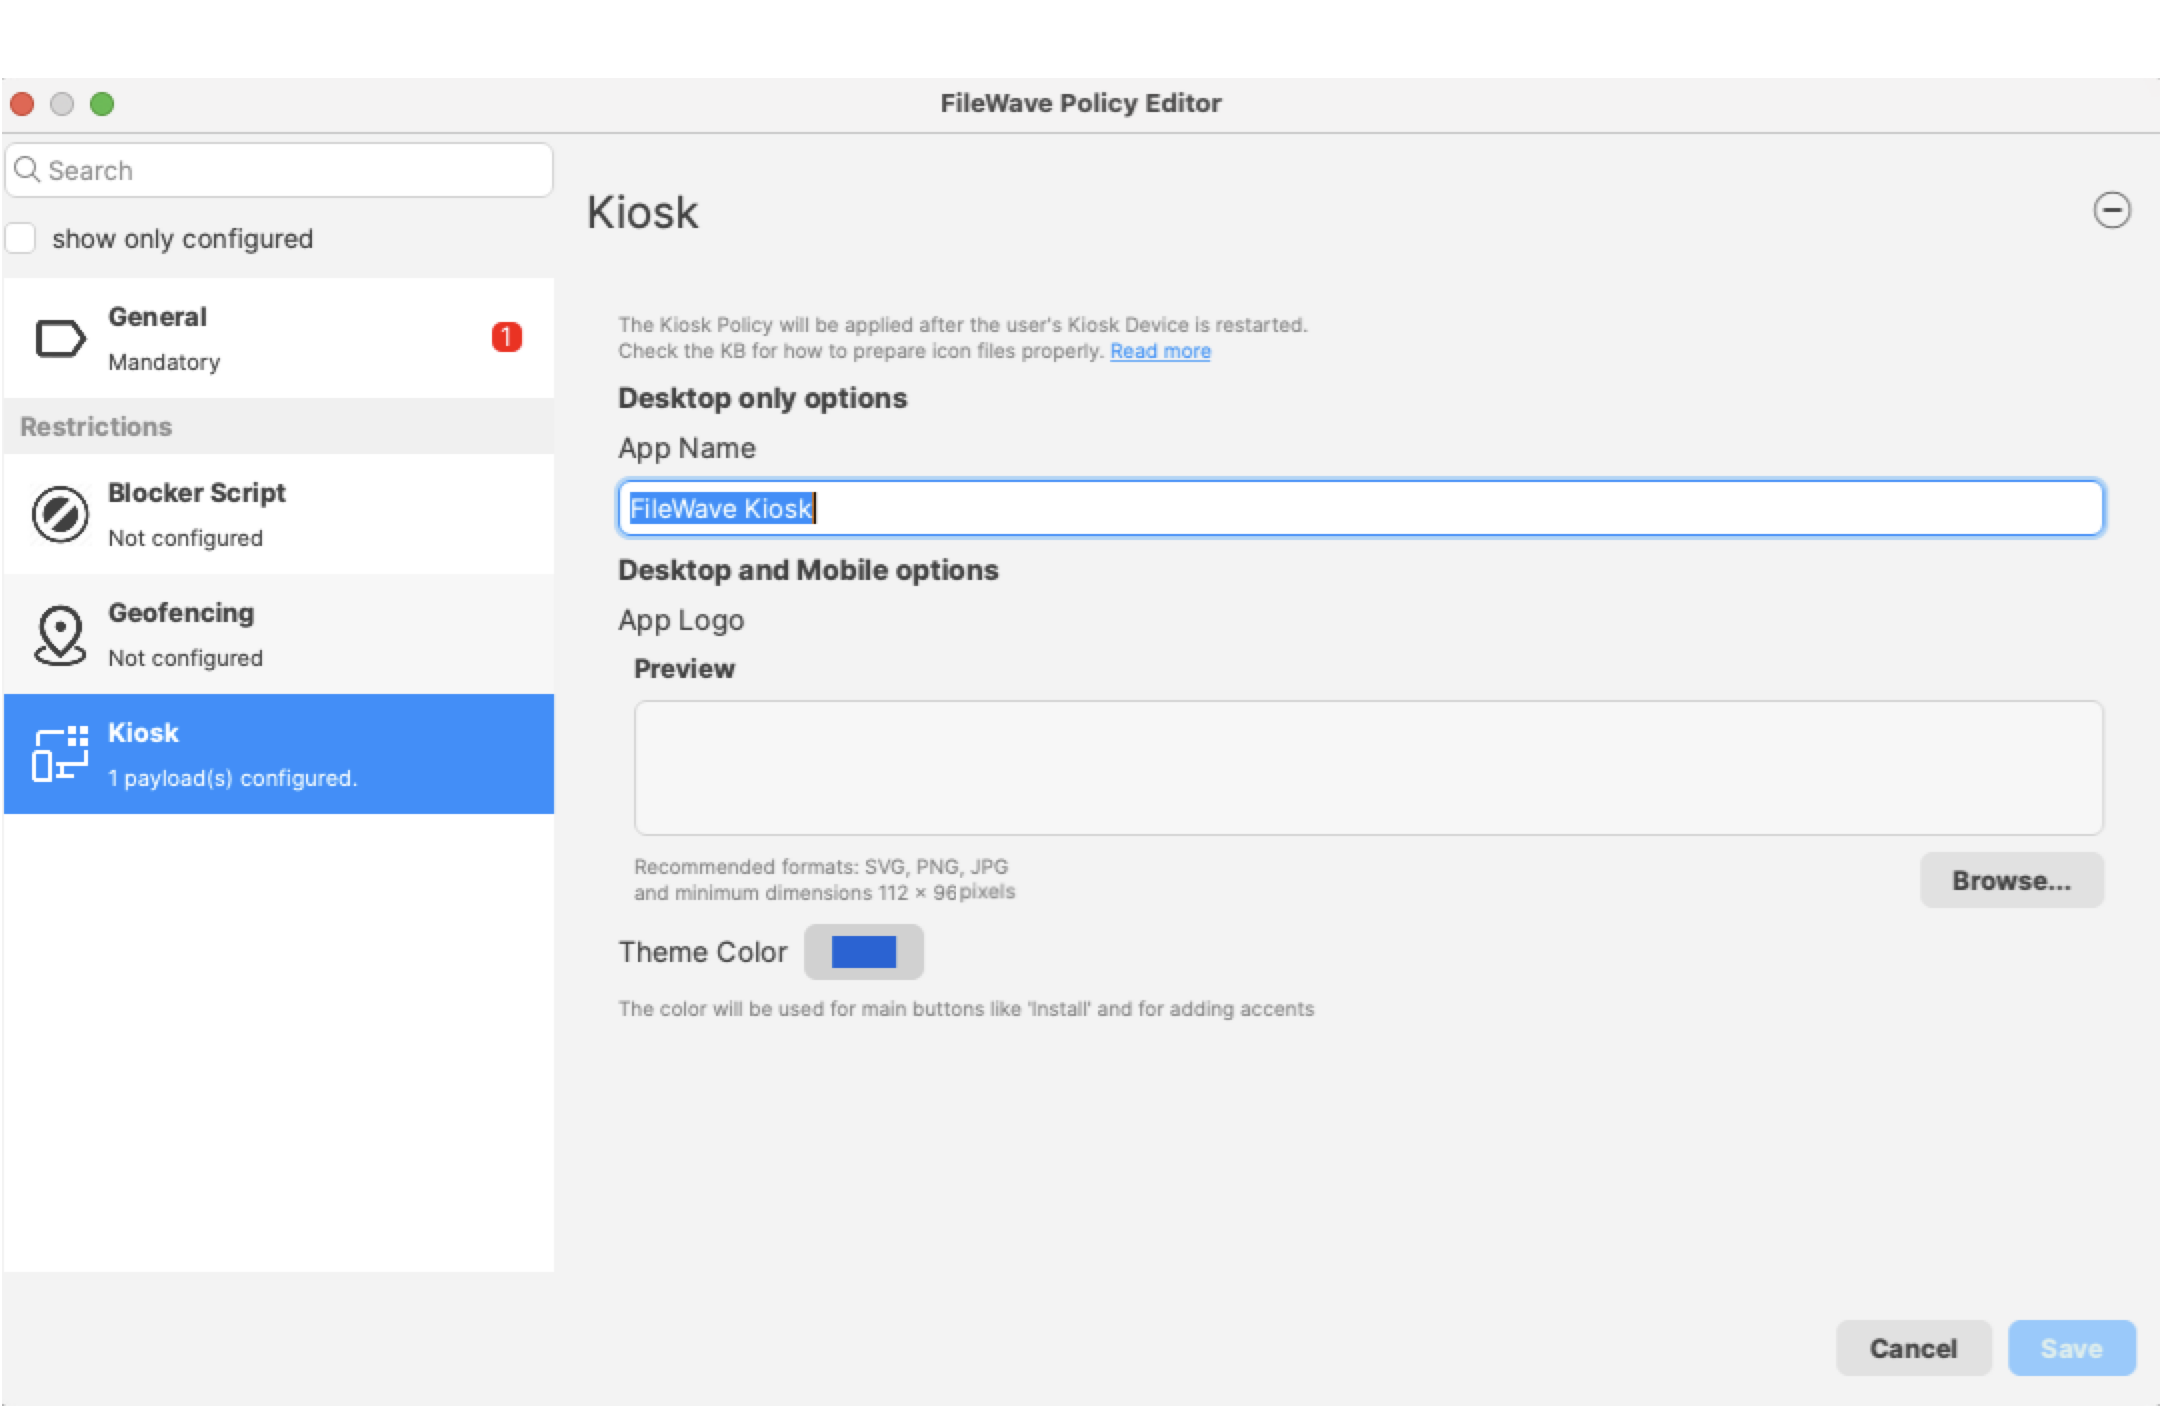
The expected minimum image size for custom logo is: 112 x 96, 8-bit/colour RGBA, non-interlaced.
File formats accepted are: SVG, PNG, JPG.
SVG, by their nature, should provide the best looking image, regardless of screen resolution: https://www.w3schools.com/graphics/svg_intro.asp
At this time, the macOS Menu Bar or Windows System Tray Icon requires an additional Fileset. Details included below.
iOS & iPadOS
App Portal is the name of the Kiosk on Apple mobile devices. As of FileWave 15.3, the App Portal IPA is not only automatically delivered to devices, but will also update automatically.
Example Customisation Options
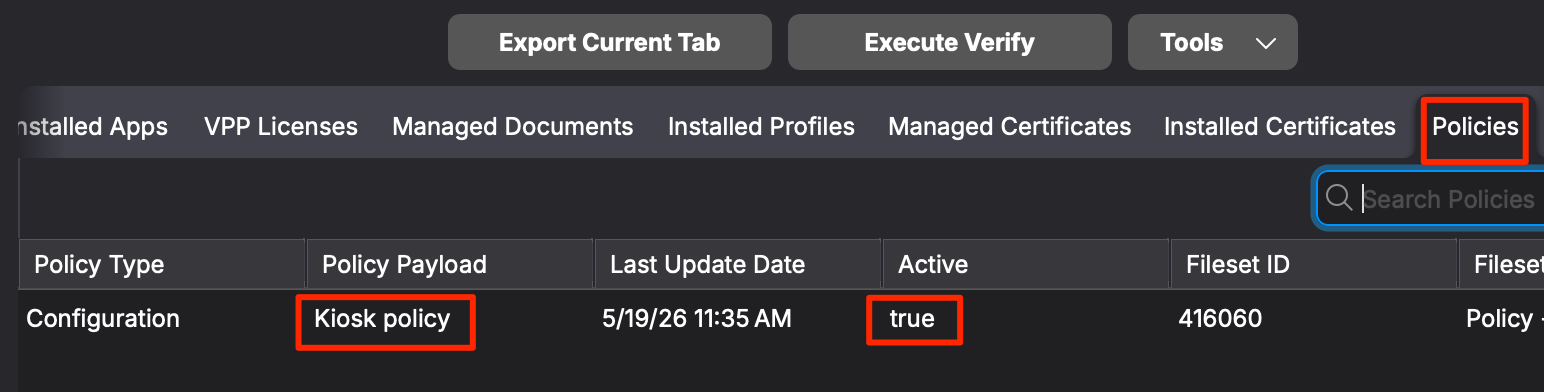
Note: For iOS/iPad, you will not see an entry in Fileset Status tab for the Kiosk Policy. After deployment, look under Client Info > Policies tab, and verify that the Kiosk Policy displays "true" in the Active column. If customizations do not display, force quit the Filewave Kiosk app and re-open to initiate the policy.
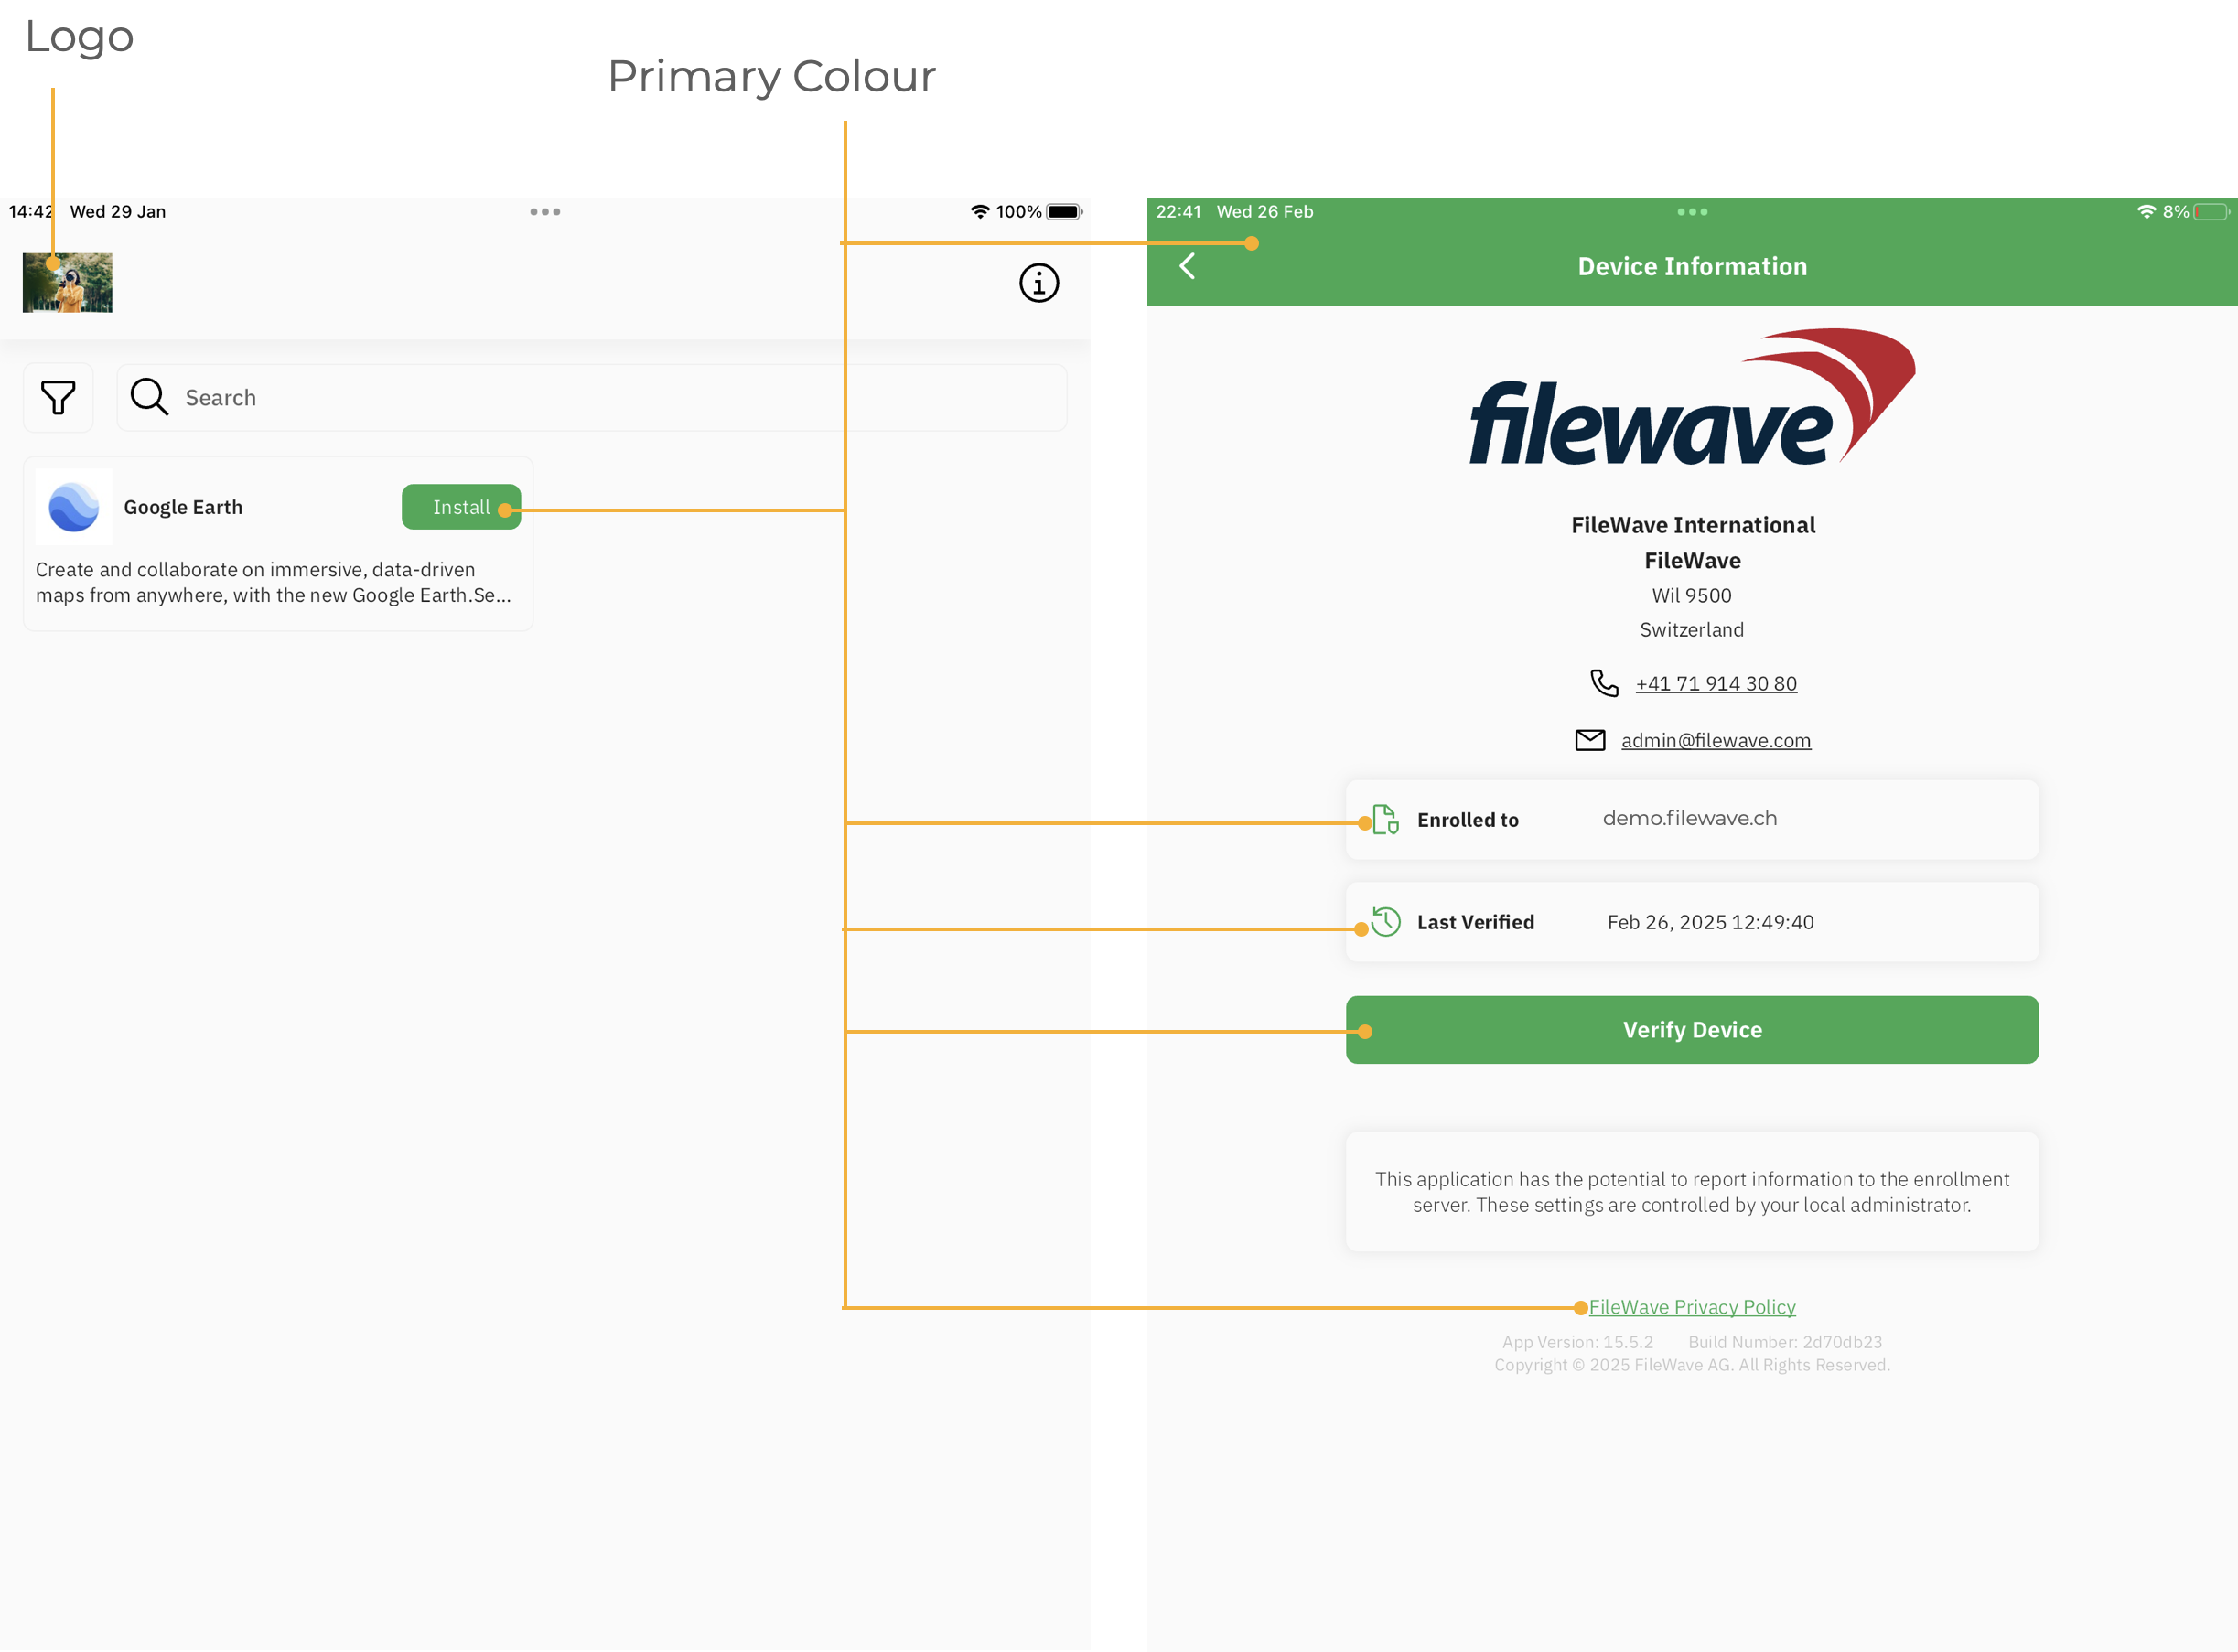
Example Customisation Options
Displayed in the below image:
- Logo

-
Primary Colour: Green

macOS
Kiosk access is via Menu Bar.
Example Customisation Options
Displayed in the below image:
- Logo
- Primary Colour: Blue
- Kiosk Name: Custom Kiosk Name
- Menu Bar Icon - Union Jack Flag
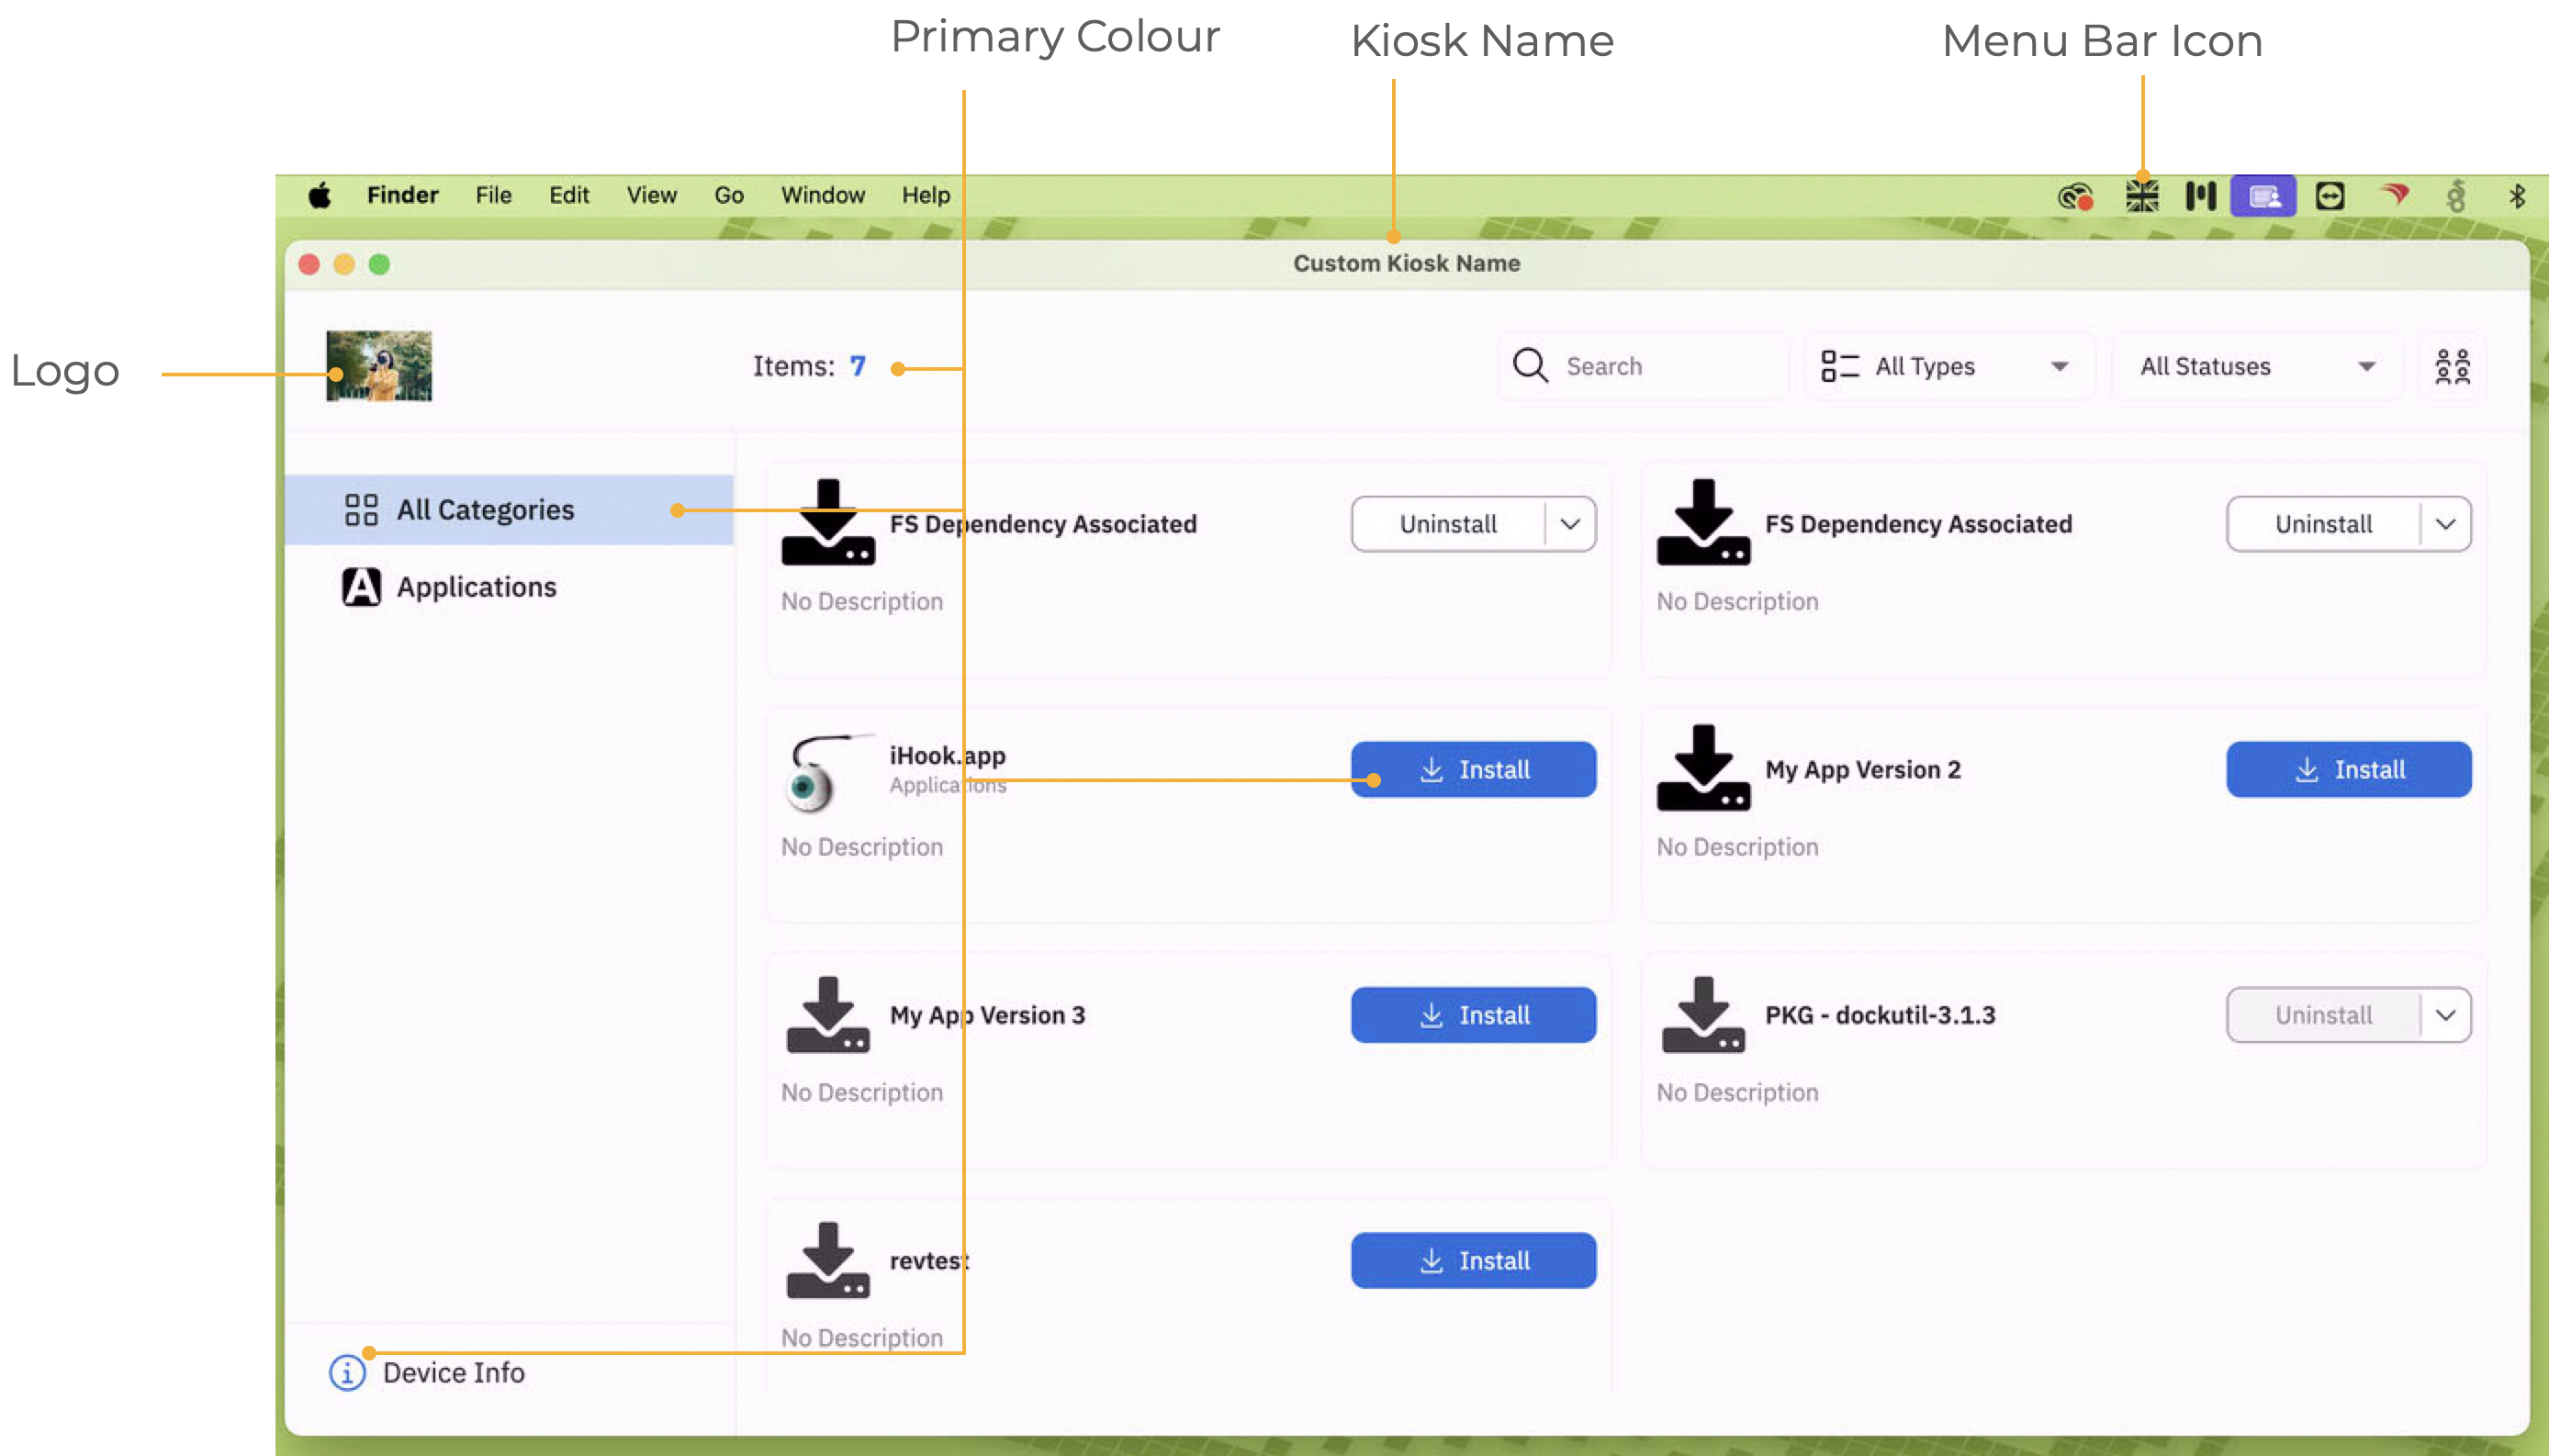
macOS Menu Bar Extra Icon
The following method provides a pre-configured Fileset for customising this icon with a local file.
The Menu Bar Extra Icon will show in black or white alone.
macOS may automatically hide one or more Menu Bar Extras to prevent crowding of the Menu Bar.
FileWave Kiosk2 Menu Bar Icon.fileset.zip
The Fileset needs to be edited prior to deployment. Out of the two files shown, the chosen custom image should be named to match the first png: 'tray-icon-macos.png'. Leave the other file in place.
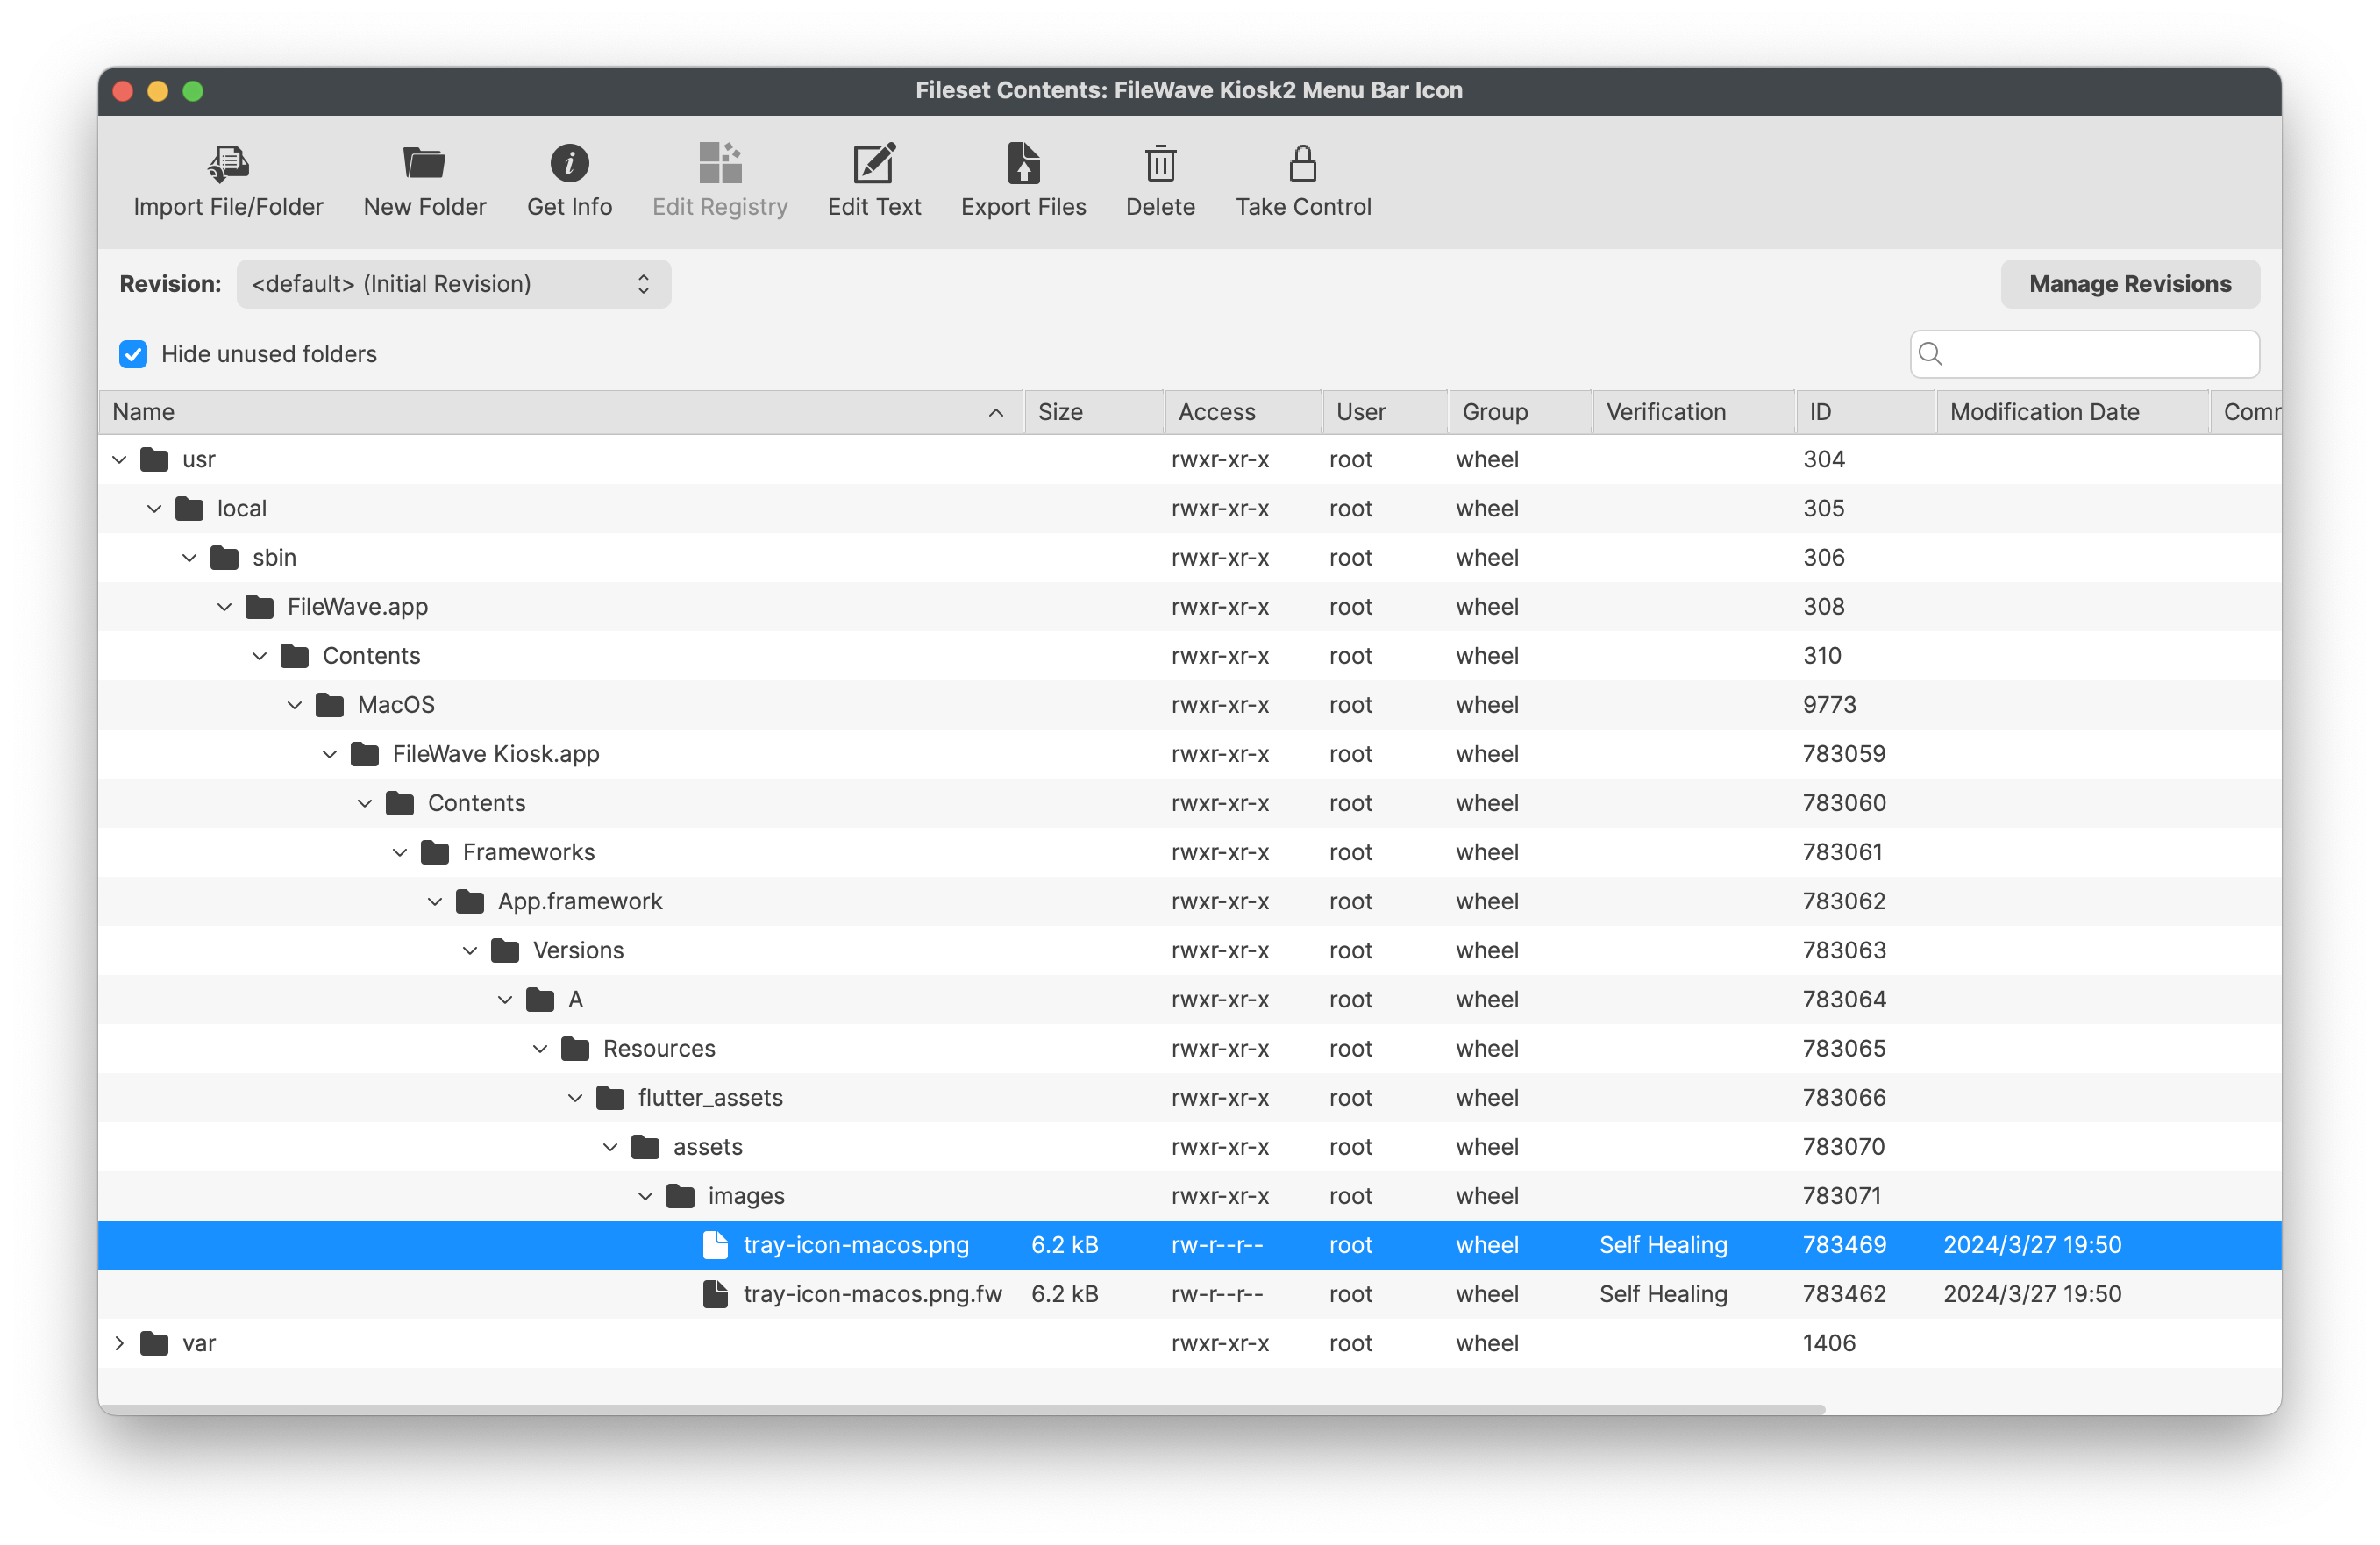
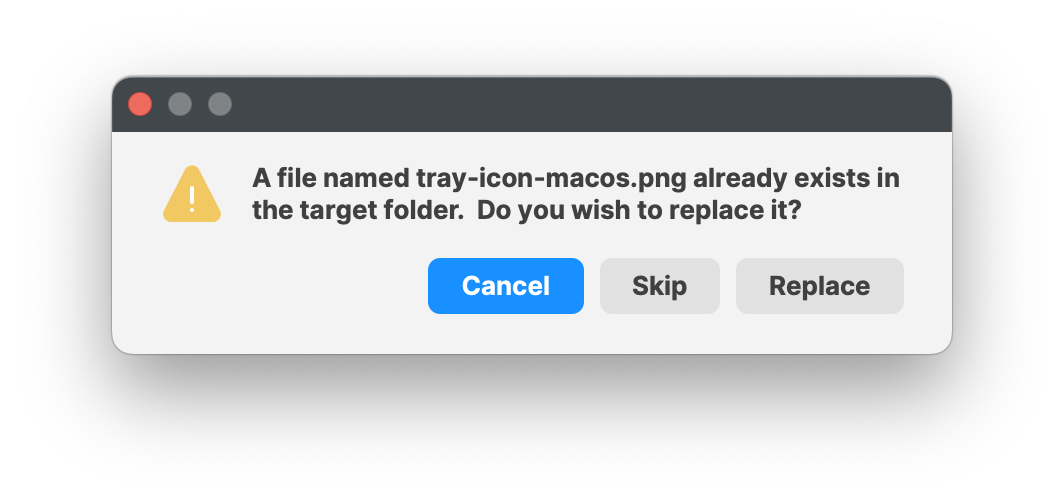
Dragging the custom icon over the shown file should prompt a message as below. Select Replace.
Associate with a test device, and once happy with the look, you can broaden the association.
The Fileset is designed to:
- Restart the Kiosk after activation, automatically ensuring the user is immediately presented with the new logo
- On de-activation, the '
tray-icon-macos.png.fw' file will be copied to replace the custom logo (resetting the default) and again restarting the Kiosk for immediate change.
Windows
Kiosk is accessed via the System Tray icon.
Example Customisation Options:
Displayed in the below image:
- Logo
-
Primary Colour: Green
-
Kiosk Name: Custom Kiosk Name
-
System Tray Icon - Union Jack flag
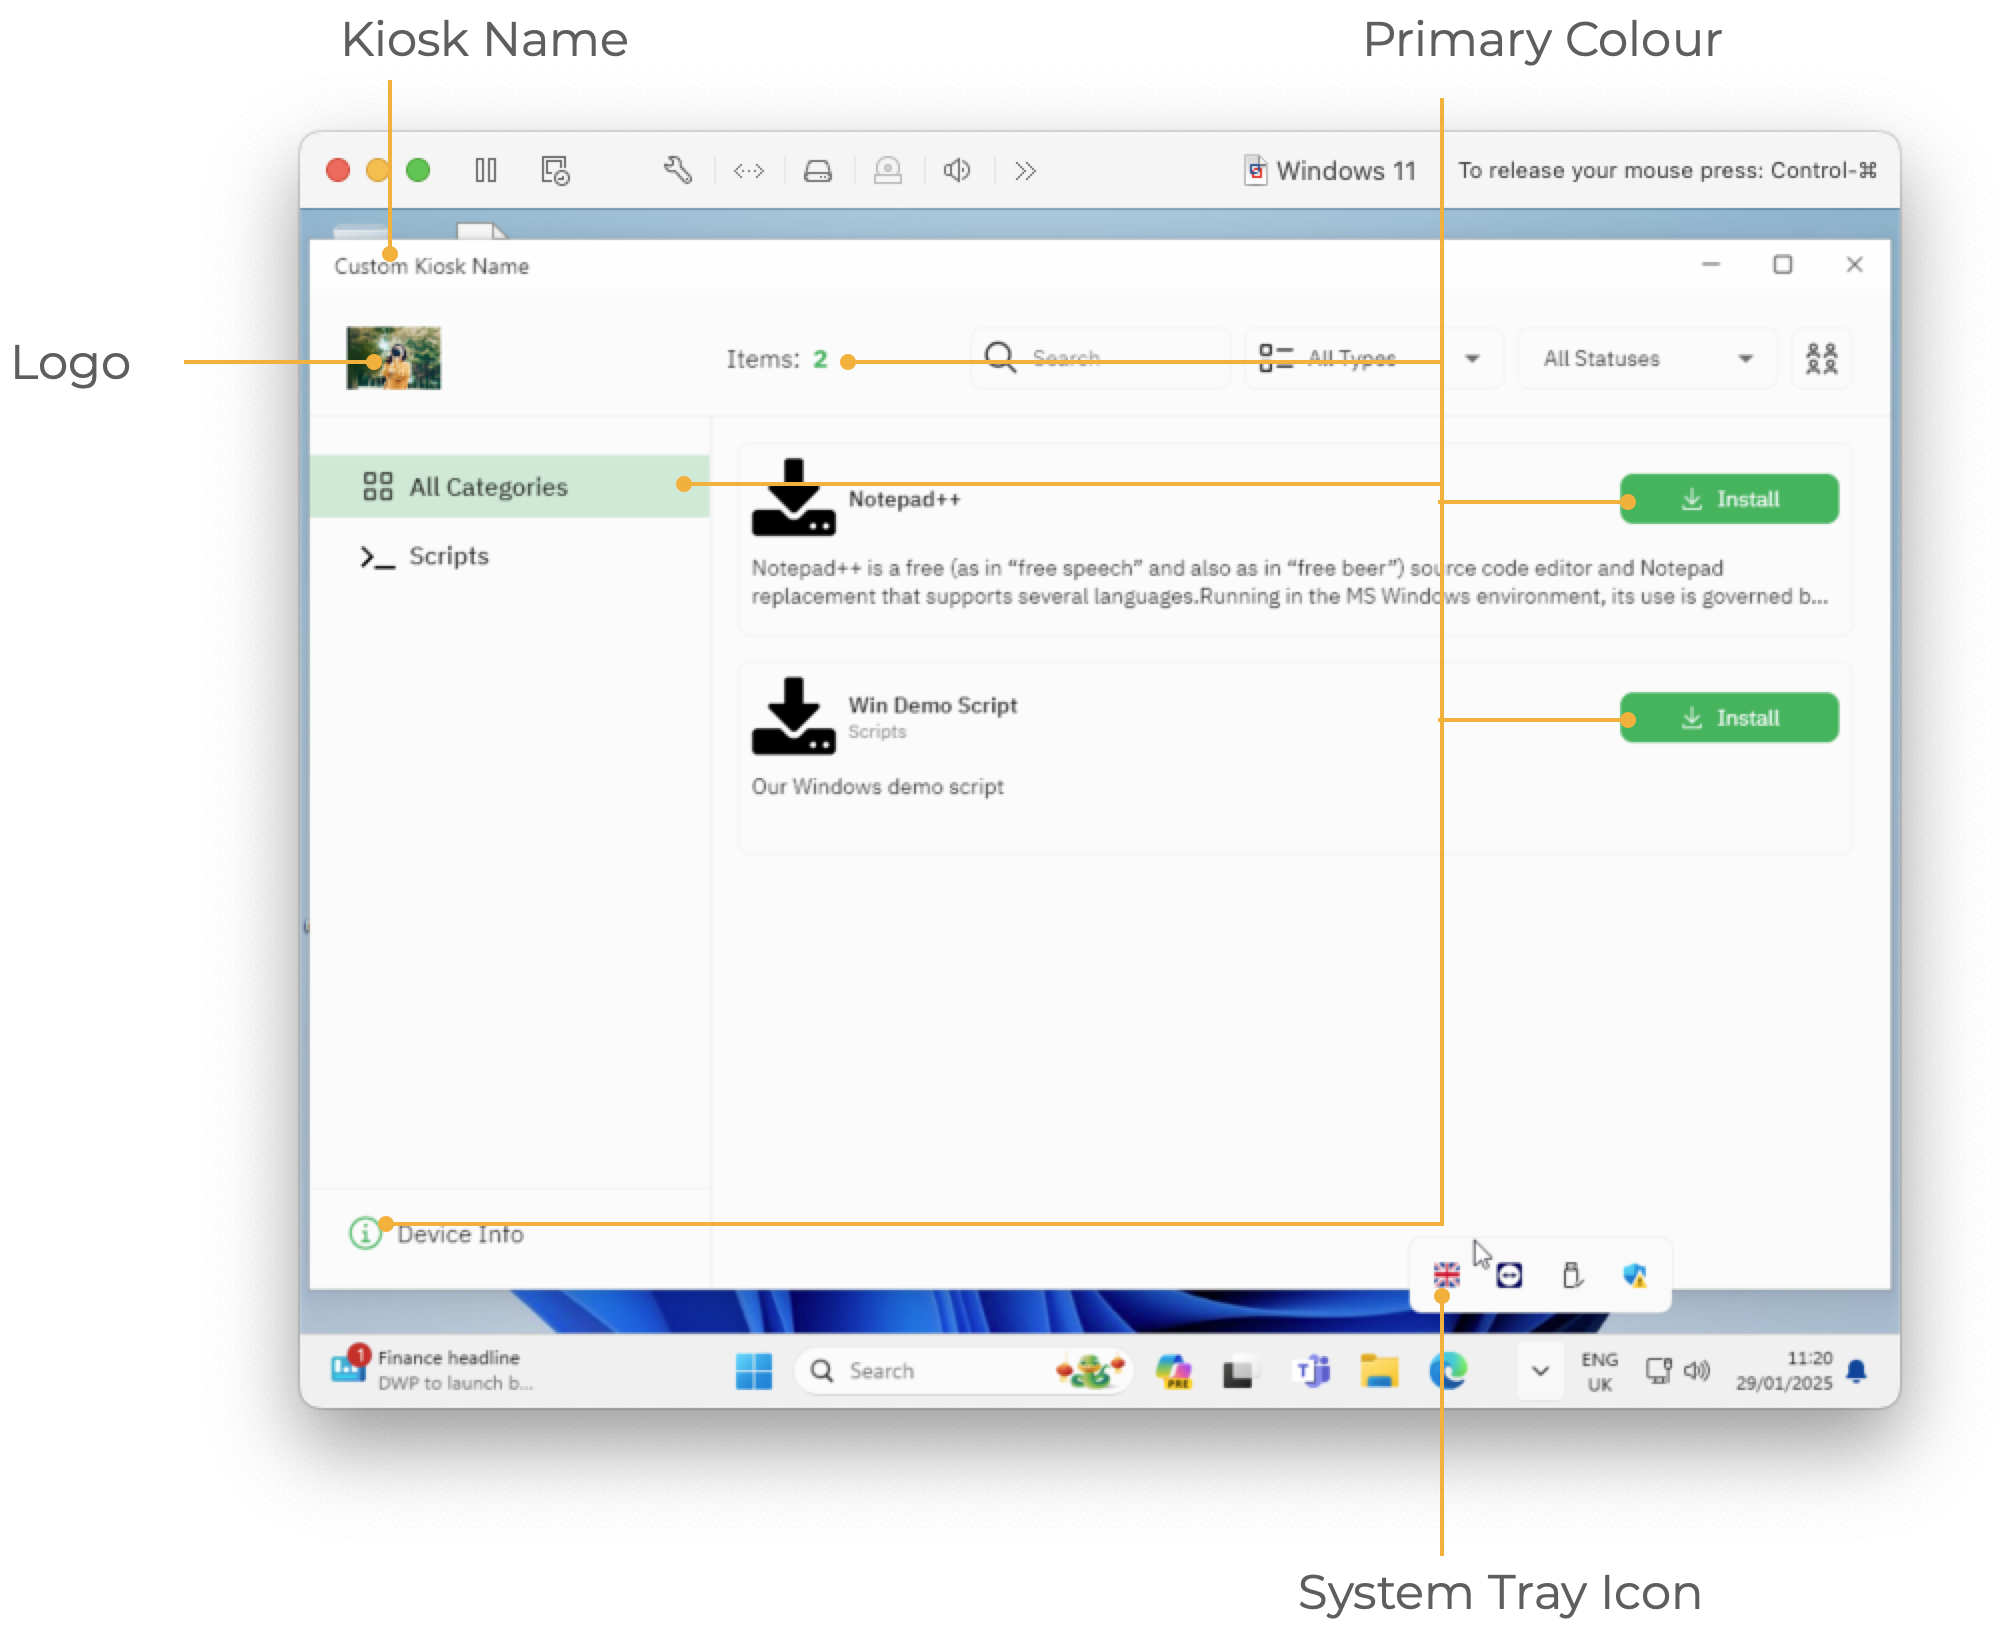
Windows System Tray Icon
The following method provides a pre-configured Fileset for customising this icon with a local file.
FileWave Kiosk2 Sytem Tray Icon.fileset.zip
The provided Fileset contains two revisions:
- FileWave Client version 15.4- (32bit FileWave Client)
- FileWave Client version 15.5+ (64bit FileWave Client)
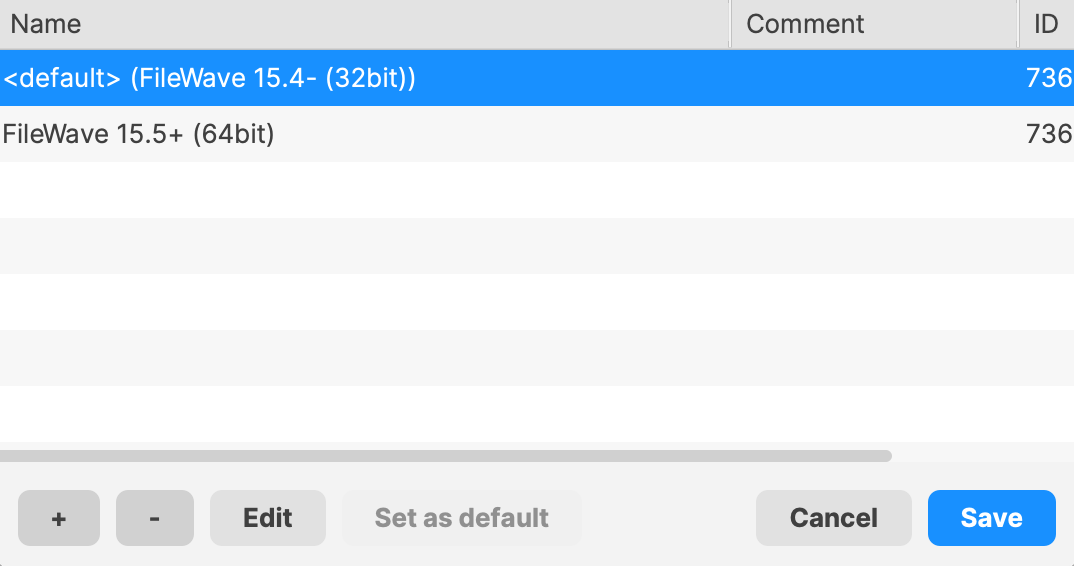
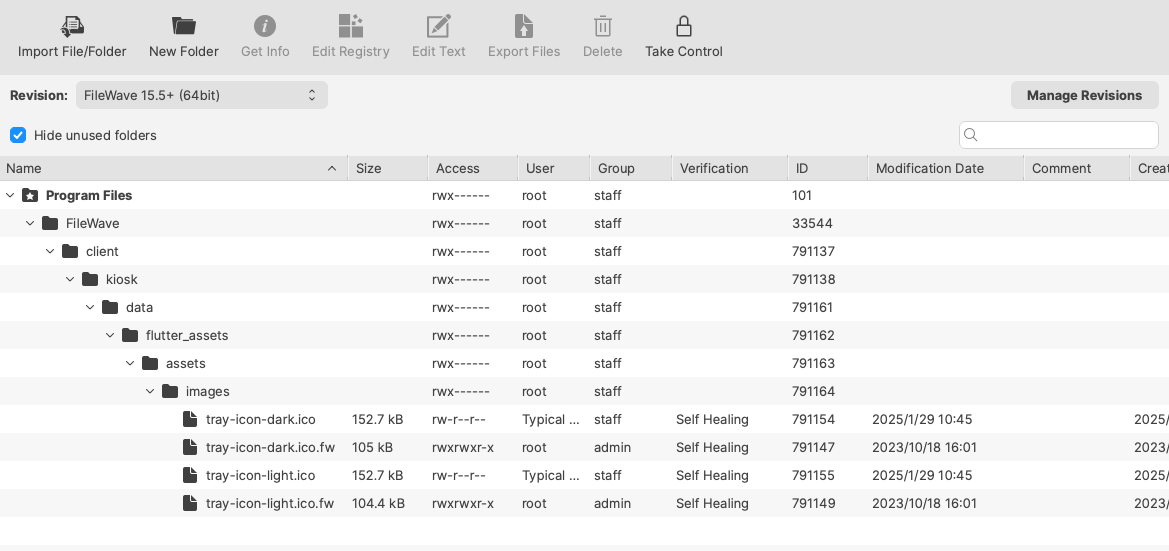
The Fileset needs to be edited prior to deployment. Out of the four files shown, the chosen custom icon should be named to match the two icon files: 'tray-icon-dark.ico' and 'tray-icon-light.ico'. Leave the other two files in place.
Unlike the other images, the Windows System Tray is using '.ico' files. These need to be of equal size, e.g. 256x256, 128x128, etc.
Consider exporting the current 'ico' files, editing them with the chosen logo and then upload, if unsure how to create '.ico' files.
FileWave 15.4- (FileWave Client 32bit)
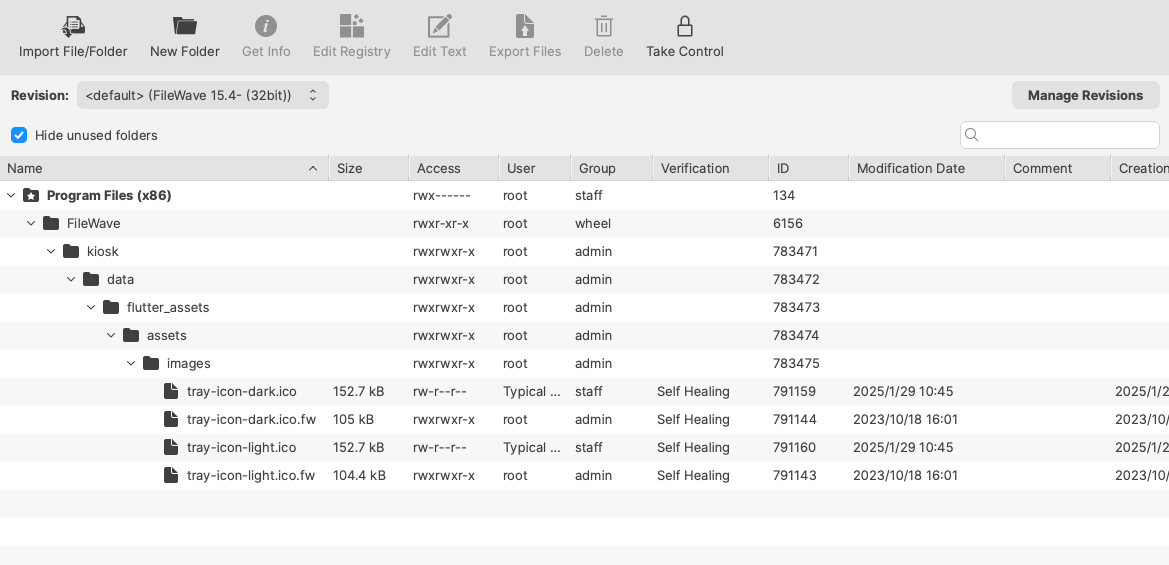
FileWave 15.5+ (FileWave Client 64bit)
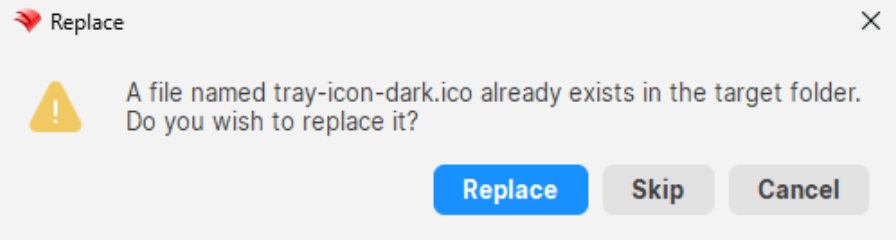
Dragging the custom icon over the shown files should prompt a message as below. Select Replace.
Associate the relevant revision with a test device and once happy broaden the association.
The new image will not show until the FileWave Client is restarted or the user logs out and back in.
FileWave 15.3 - Pre 16.0
The below was introduced in FileWave 15.3. For for FileWave 16+ please use the above information.
How
iOS & iPadOS
Devices of this nature use the App Portal. As of FileWave 15.3, the App Portal IPA is automatically delivered to devices and will automatically update.
Customisation Options:
- Logo (Default to FileWave Logo if no custom logo set)
- Colour
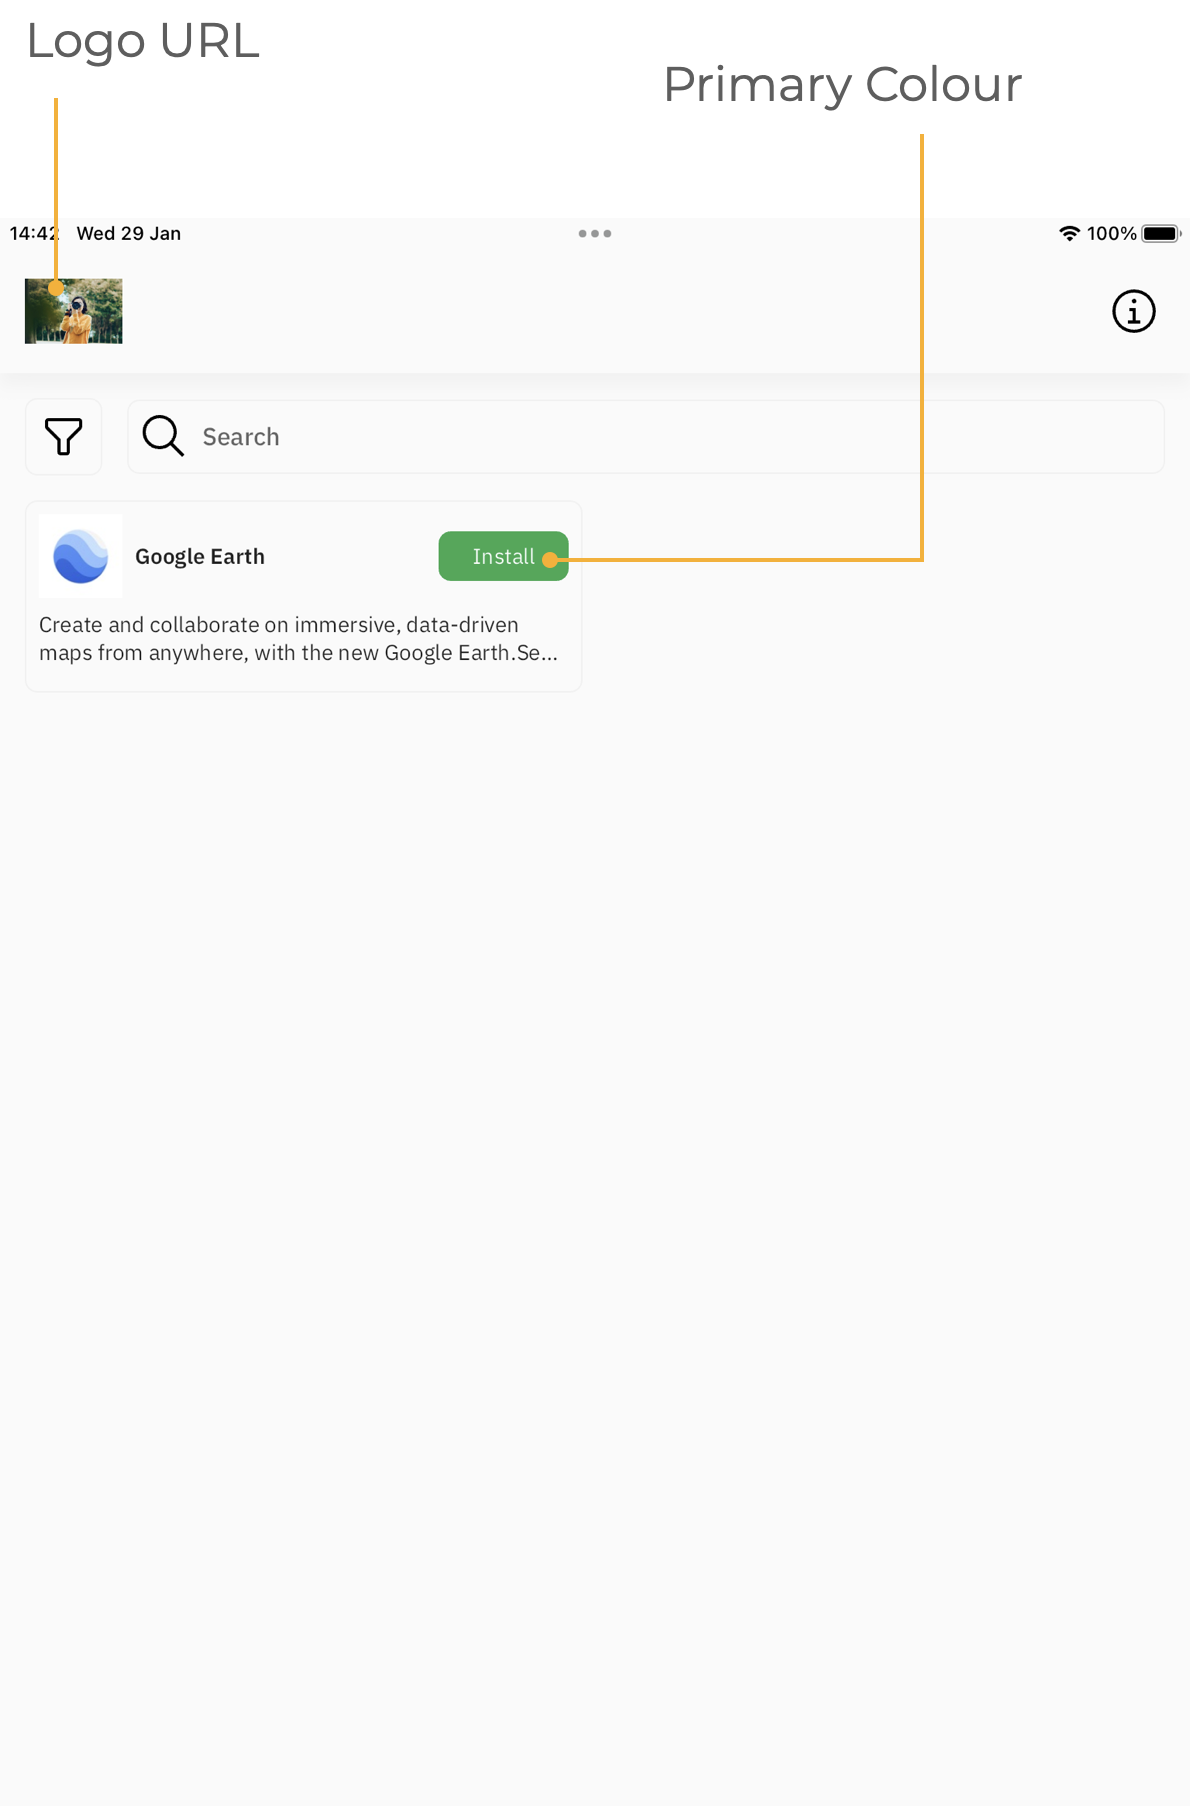
Logo Customisation
If you are a Hosted Customer then you will need Technical Support to assist with these changes for now.
Direct editing of the IPA is not feasible. As such, the logo needs to be hosted from the FileWave Server. The chosen image needs to be placed in the following location:
/usr/local/filewave/django/static/kiosk2/images/
For the IPA to utilise this image, edit the the following file:
/usr/local/filewave/django/filewave/settings_custom.py
The line may be added to the bottom of the custom settings file and needs to include the FQDN of the FileWave Server, along with the named image in the format:
KIOSK_LOGO_URL = 'https://[fully_qualified_domain_name]/filewave/static/kiosk2/images/[file name]'
For example, imagine those details are:
- image.svg
- demo.filewave.ch
The line added will then appear as:
KIOSK_LOGO_URL = 'https://demo.filewave.ch/filewave/static/kiosk2/images/image.svg'
Supported file formats are:
- SVG
- JPEG
- PNG
- GIF
- Animated GIF
- WebP
- Animated WebP
- BMP
- WBMPCustomise Colour
Colour may be customised by editing the same custom settings file. The colour should be presented in hex of either 6 or 8 characters. The line to add (again this may be added to the bottom of the custom settings file), should be of the format:
KIOSK_PRIMARY_COLOR = '[hex colour]'
For example:
KIOSK_PRIMARY_COLOR = '#e580ff'or
KIOSK_PRIMARY_COLOR = '#FF0000CC'The FileWave Server Service should be restarted after modification of the custom settings python file.
macOS
Kiosk access is via Menu Bar.
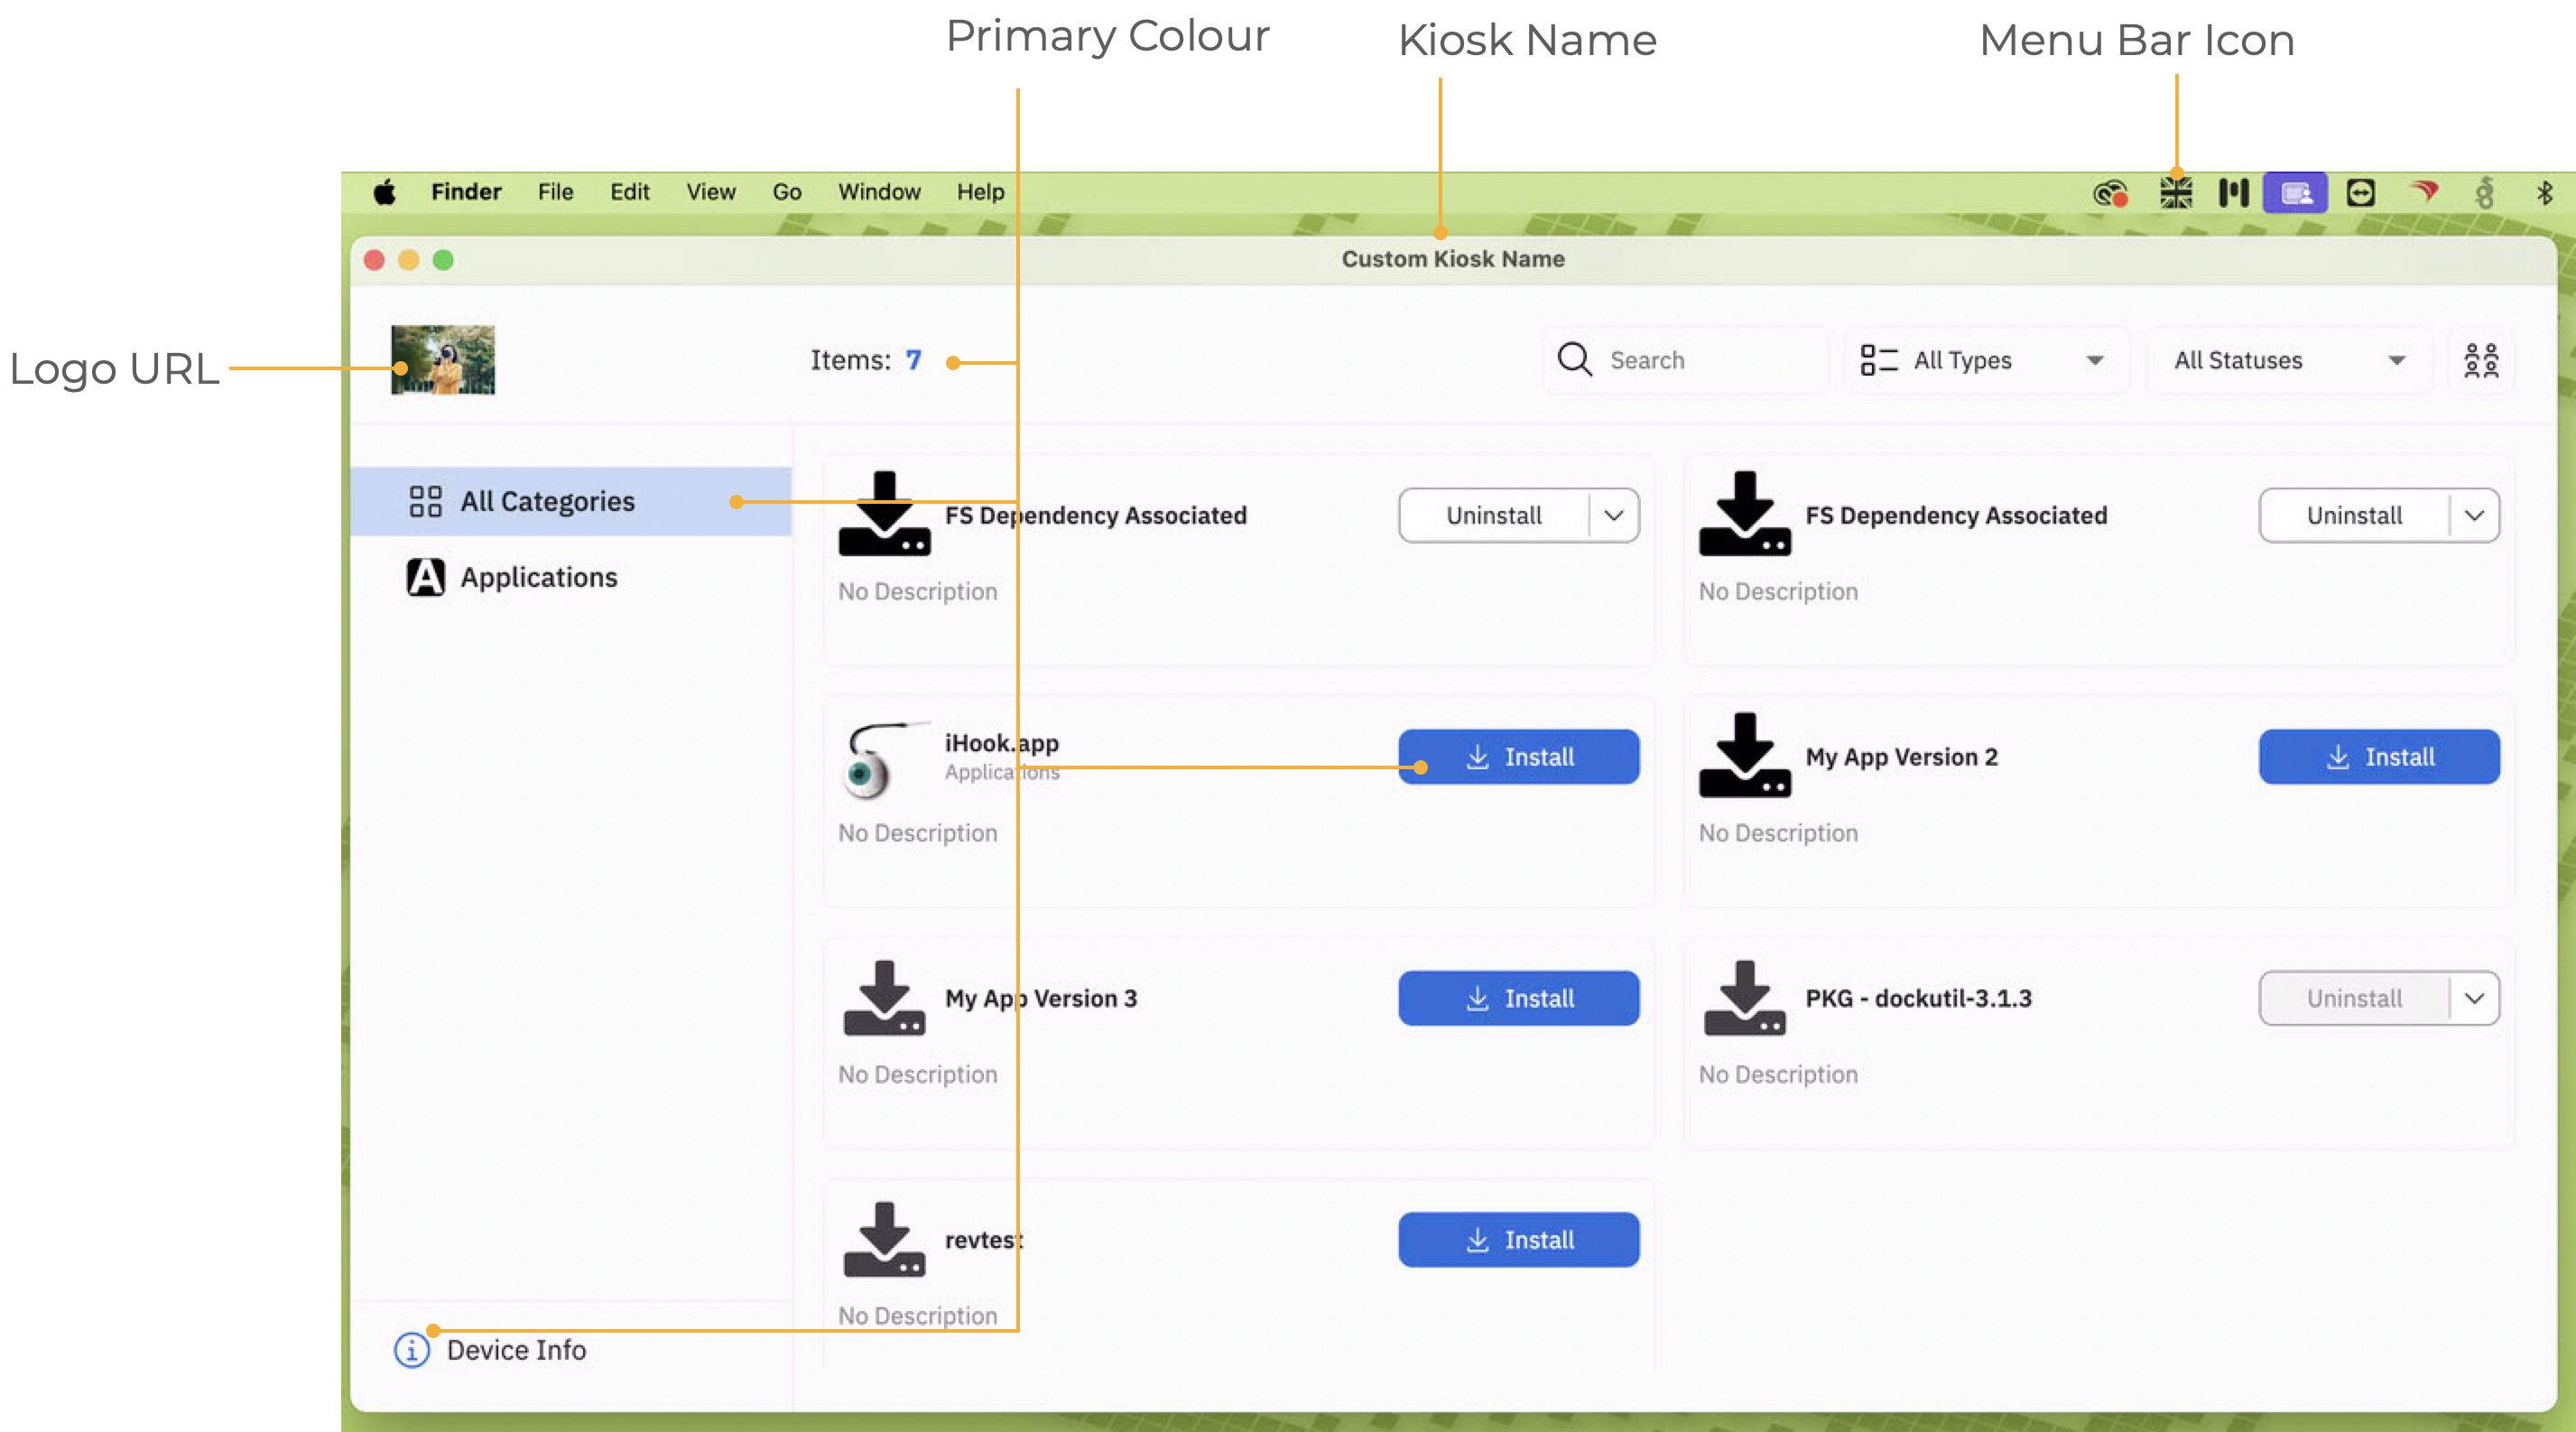
macOS Kiosk App
Customisation Options:
- Logo (Default to FileWave Logo if no custom logo set)
- Colour
- Kiosk App Name
- Menu Bar Icon - See below: Local macOS Logo
3 items can be specified through a single file:
macOS:
/usr/local/sbin/FileWave.app/Contents/MacOS/FileWave\ Kiosk.app/Contents/custom/settings.json
The contents should appear similar to:
{
"logo_url": "https://buffer.com/cdn-cgi/image/w=1000,fit=contain,q=90,f=auto/library/content/images/size/w1200/2023/10/free-images.jpg",
"primary_color": "#0465DA",
"kiosk_app_name": "Custom Kiosk Name"
}Defined as:
| Key Name | Key Value | Default |
| logo_url | URL path to hosted custom image | FileWave Logo |
| primary_color | Colour in hex format, e.g. #RRGGBB | #0465DA |
| kiosk_app_name | Text Name of opened Kiosk Window | FileWave Kiosk |
It may be necessary to reboot the computer or log out and back in, before changes take effect; particularly if customisation of the older Version 1 Kiosk was removed at the same time that the new Version 2 Kiosk and customisation is applied.
If the custom icon is added as per the instructions for i(Pad)OS devices, the same URL may be used in the above settings.
macOS Menu Bar Extra Icon
The following method provides a pre-configured Fileset for customising this icon with a local file.
The Menu Bar Extra Icon will show in black or white alone.
macOS will automatically hide one or more Menu Bar Extras to prevent crowding of the Menu Bar.
FileWave Kiosk2 Menu Bar Icon.fileset.zip
The Fileset needs to be edited prior to deployment. Out of the two files shown, the chosen custom image should be named to match the first png: 'tray-icon-macos.png'. Leave the other file in place.
Dragging the custom icon over the shown file should prompt a message as below. Select Replace.
Associate with a test device, and once happy with the look, you can broaden the association.
The Fileset is designed to:
- Restart the Kiosk after activation, automatically ensuring the user is immediately presented with the new logo
- On de-activation, the '
tray-icon-macos.png.fw' file will be copied to replace the custom logo (resetting the default) and again restarting the Kiosk for immediate change.
Windows
Kiosk is accessed via the System Tray icon.
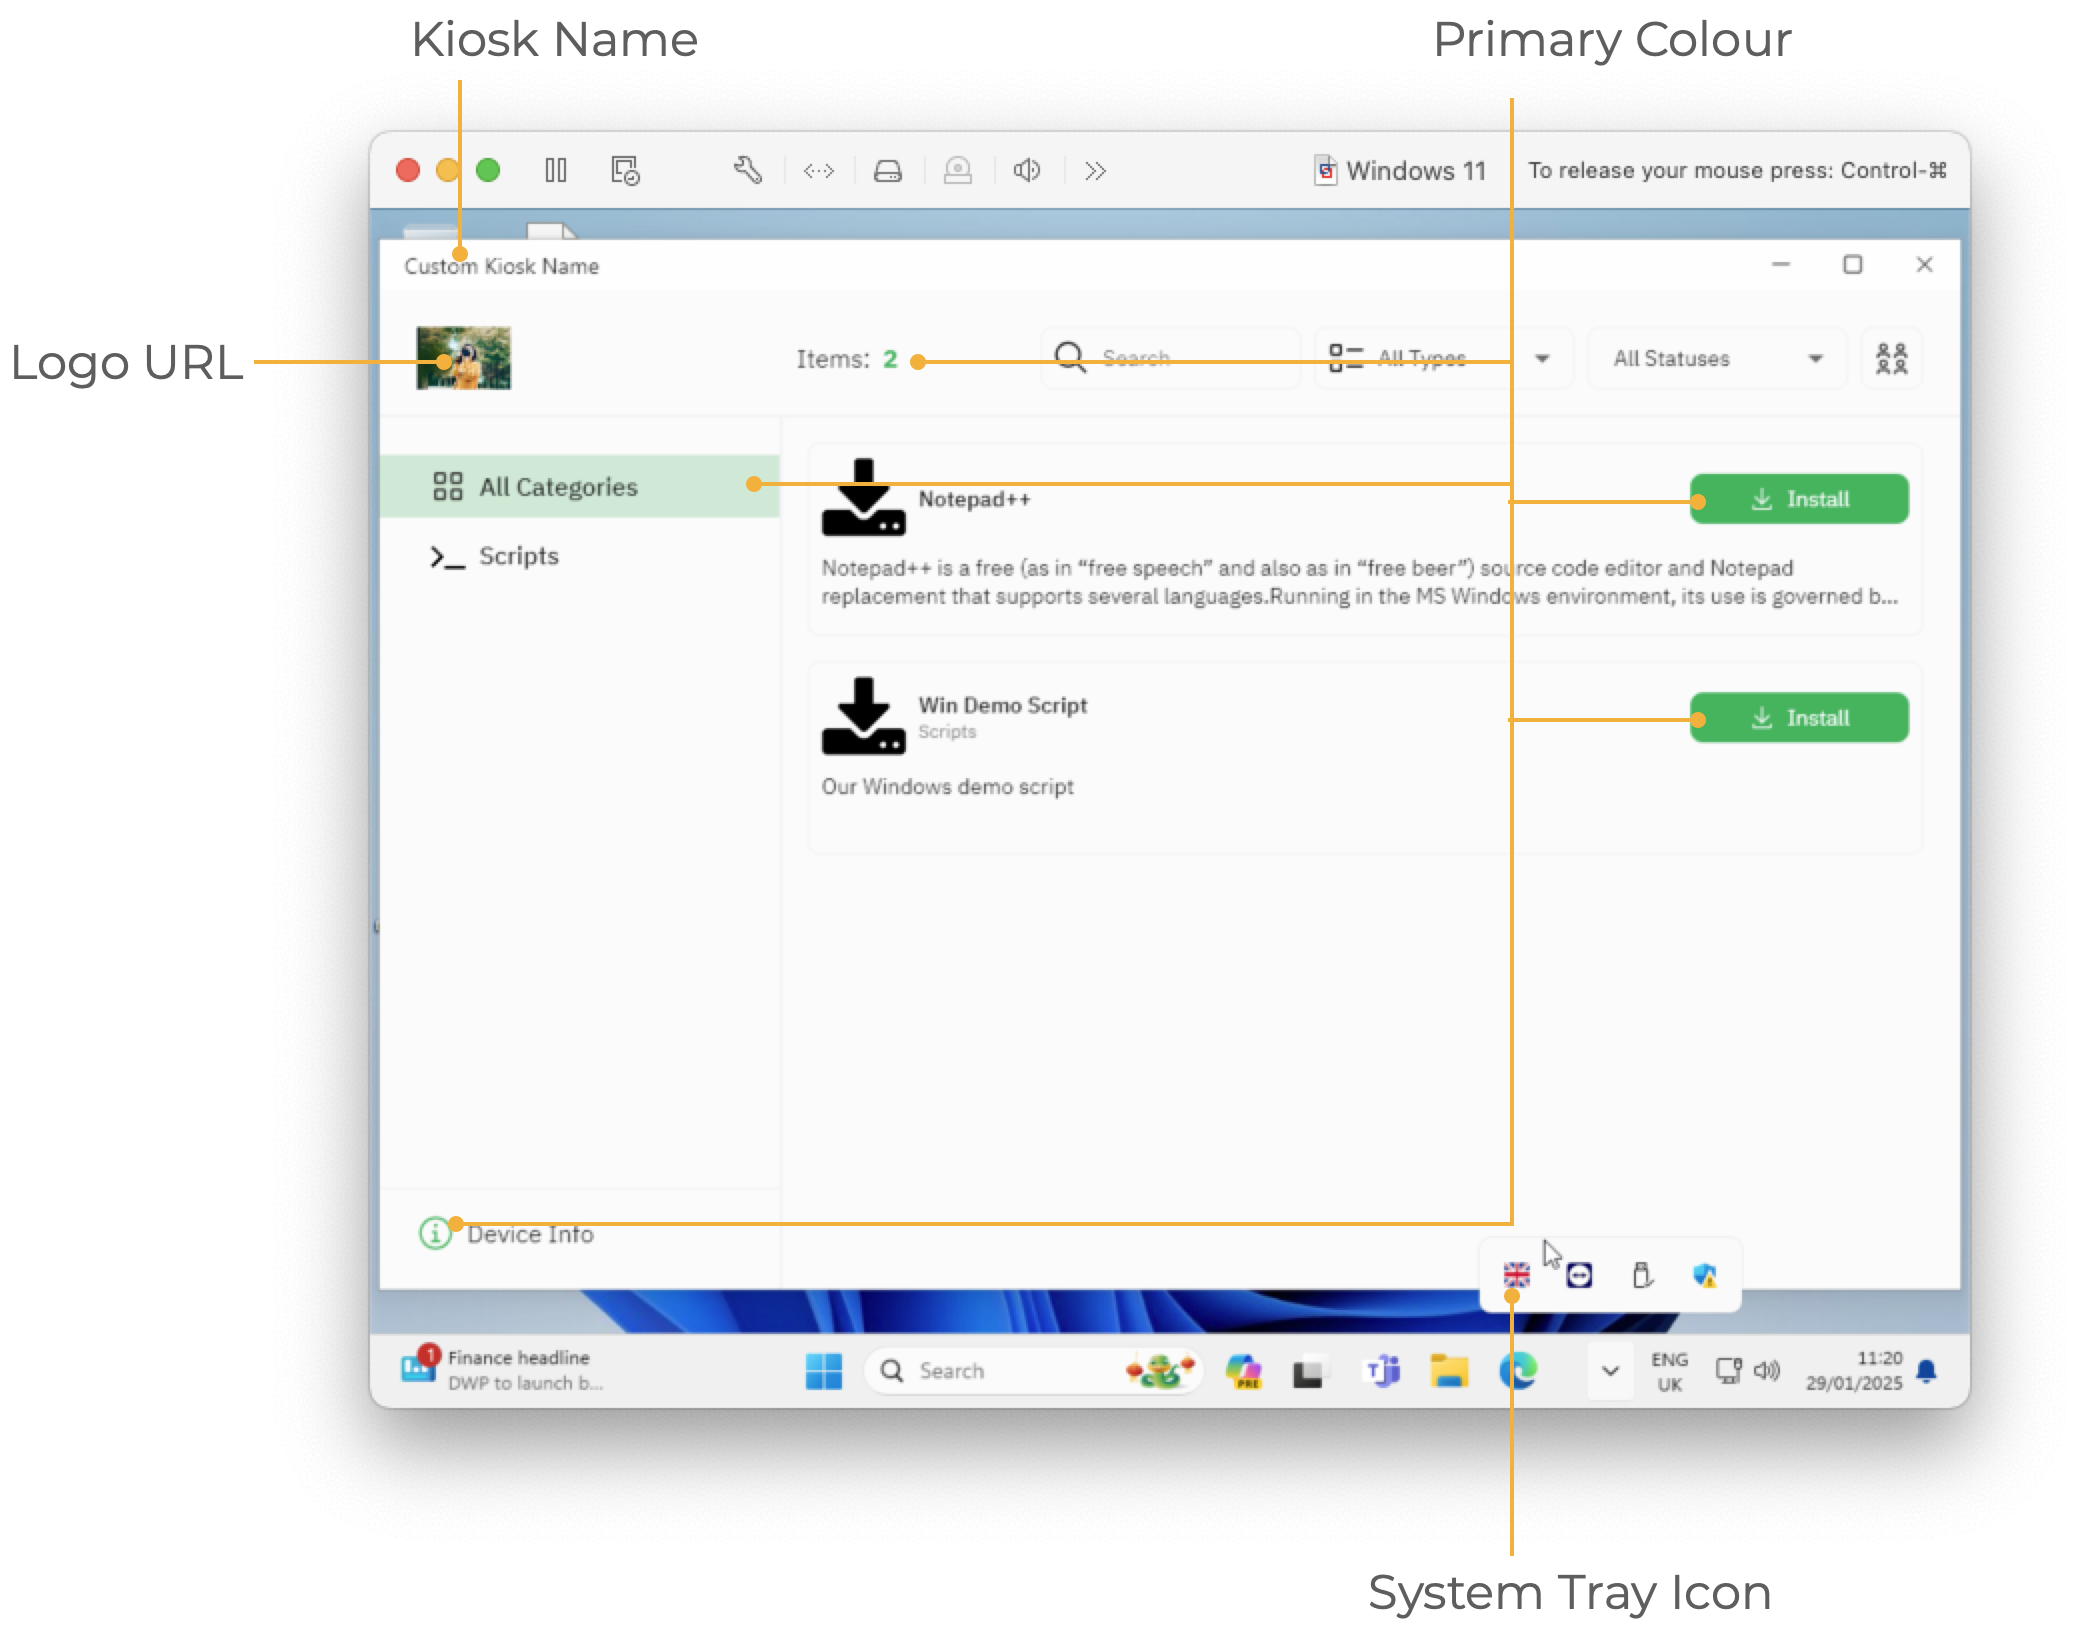
Windows Kiosk App
Customisation Options:
- Logo (Default to FileWave Logo if no custom logo set)
- Colour
- Kiosk App Name
- System Tray Icon - See Windows System Tray Icon
All 3 items can be specified through a single file:
Windows (32bit FileWave Client: 15.4-):
C:\Program Files (x86)\FileWave\kiosk\custom\settings.json
Windows (64bit FileWave Client: 15.5+):
C:\Program Files\FileWave\client\kiosk\custom\settings.json
The contents should appear similar to:
{
"logo_url": "https://my.company/logo.svg",
"primary_color": "#0465DA",
"kiosk_app_name": "My Kiosk"
}Defined as:
| Key Name | Key Value | Default |
| logo_url | URL path to hosted custom image | FileWave Logo |
| primary_color | Colour in hex format, e.g. #RRGGBB | #0465DA |
| kiosk_app_name | Text Name of opened Kiosk Window | FileWave Kiosk |
It may be necessary to reboot the computer before changes take effect; particularly if customisation of the older Kiosk was removed at the same time that the new Kiosk and customisation is added.
If the custom icon is added as per the instructions for i(Pad)OS devices, the same URL may be used in the above settings.
Windows System Tray Icon
The following method provides a pre-configured Fileset for customising this icon with a local file.
FileWave Kiosk2 Sytem Tray Icon.fileset.zip
The provided Fileset contains two revisions:
- FileWave Client version 15.4- (32bit FileWave Client)
- FileWave Client version 15.5+ (64bit FileWave Client)
The Fileset needs to be edited prior to deployment. Out of the four files shown, the chosen custom icon should be named to match the two icon files: 'tray-icon-dark.ico' and 'tray-icon-light.ico'. Leave the other two files in place.
Unlike the other images, the Windows System Tray is using '.ico' files. These need to be of equal size, e.g. 256x256, 128x128, etc.
Consider exporting the current 'ico' files, editing them with the chosen logo and then upload, if unsure how to create '.ico' files.
FileWave 15.4- (FileWave Client 32bit)
FileWave 15.5+ (FileWave Client 64bit)
Dragging the custom icon over the shown files should prompt a message as below. Select Replace.
Associate the relevant revision with a test device and once happy broaden the association.
The new image will not show until the FileWave Client is restarted or the user logs out and back in.
Related Links
- FileWave Kiosk for macOS and Windows overview (15.3+)
- Removing pre-15.3 Kiosk Customizations (macOS/Windows
Missing Device Message in Kiosk for macOS and Windows (16.0+)
What
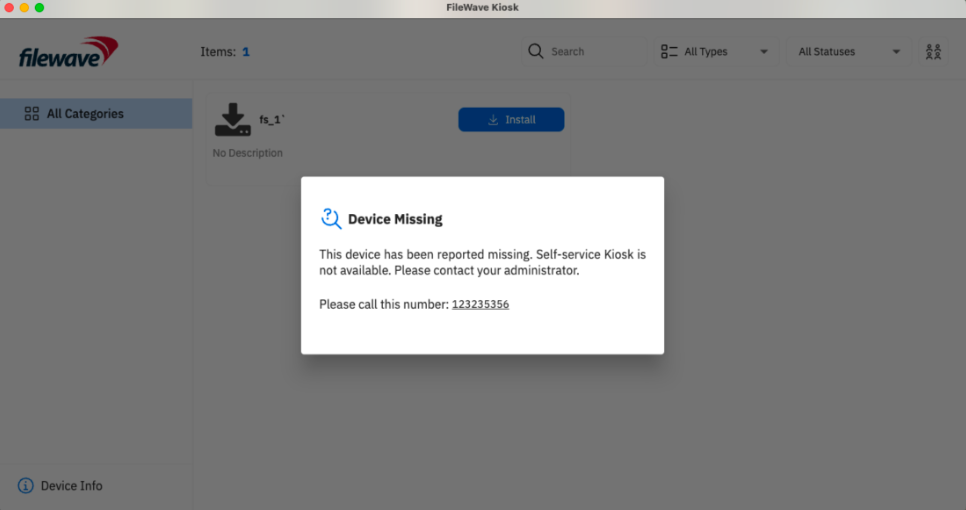
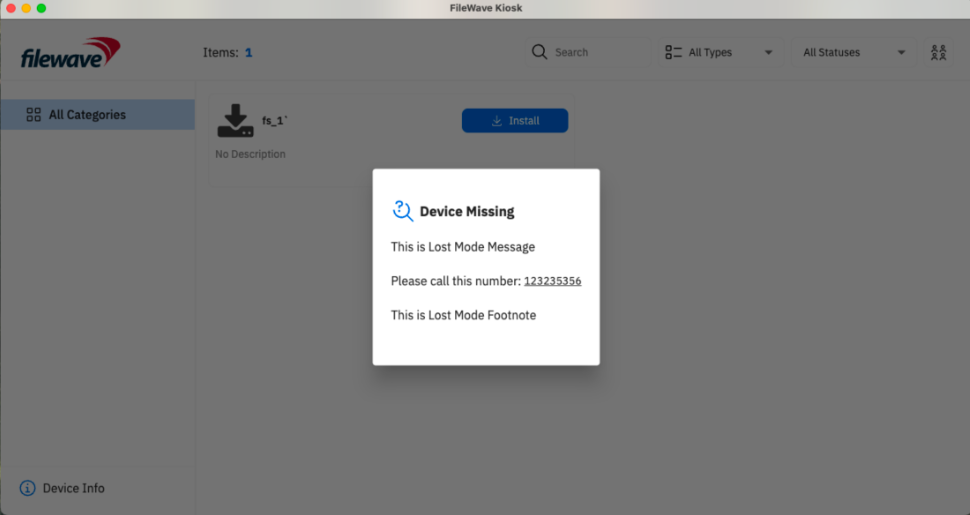
Use the Missing Device state when a macOS or Windows device should stop offering self-service Kiosk actions and show return or contact instructions instead. In FileWave Central, right-click the device, choose Client State > Missing, and run a Model Update. The next time FileWave Kiosk opens on the client, it shows the Missing Device message. The message can use the Lost Mode Message, Lost Mode Footnote, and organization contact number from Preferences > Organization Info. If no custom text is set, Kiosk shows: “This device is currently marked as missing. Self-service Kiosk is not available. Please contact your administrator.”
The Missing Device message appears only when the user opens Kiosk. If users need instructions before they open Kiosk, also send a FileWave End-User Notification.
When/Why
This is useful for end-of-year student device returns, overdue loaner laptops, leased-device turn-ins, or any managed device that should display clear return instructions when the user opens Kiosk.
For example, a school can set the message to “End of Year Reminder: Please return your device to the school’s IT office.” A corporate IT team can use the same state to tell an employee where to return a loaner or lease-replacement device.
How
In FileWave Central, right-click the macOS or Windows client, select Client State > Missing, and run a Model Update. The next time the user opens FileWave Kiosk, Kiosk shows the Missing Device message instead of normal self-service content.
For example, in an educational setting, the Kiosk might display a custom message like:
“End of Year Reminder: Please return your device to the school’s IT office. This device is needed for inventory and future student use.”
Configure this text in FileWave Central under Preferences > Organization Info. You can set the Lost Mode Message, add a Lost Mode Footnote, and include an organization contact number that appears as a clickable link.
Kiosk shows the Missing Device message only after Kiosk opens. If you need the user to see return instructions immediately, send a pop-up through FileWave End-User Notifications and include a link to your return form or internal instructions.
While the device remains in the Missing state, Kiosk blocks installation, uninstallation, and normal self-service access until the device is recovered, replaced, or moved out of the Missing state.
Notes on the Missing Device message
-
When a macOS or Windows client is marked as Missing in FileWave Central, a Missing Device message appears in Kiosk, similar to the Device Locked message.
-
The Missing Device message includes any custom Lost Mode Message and Lost Mode Footnote set in FileWave Central under Preferences > Organization Info.
-
By default, if no custom message is set, the following message appears: “This device is currently marked as missing. Self-service Kiosk is not available. Please contact your administrator.”
-
Kiosk restrictions: While in the Missing state, Kiosk prevents installation, uninstallation, and normal access to self-service options, similar to Device Lock behavior.
-
To set the displayed text, open FileWave Central and go to Preferences > Organization Info:
-
If only the Lost Mode Message is set, it will display alone.
-
If only the Lost Mode Footnote is set, the default lost mode message will appear with the custom footnote.
-
If an organization contact number is set, it will be displayed as a clickable link for easy access.
-
Related Content
App Portal on iOS/iPadOS devices that don't support the application (15.3+)
What
If you have an iOS/iPadOS device that is older than what is officially supported by FileWave and you are working ok but you can't get the Kiosk (App Portal) to install.
When/Why
You can revert for now to the old WebClip using the documented process here. This is a temporary workaround.
How
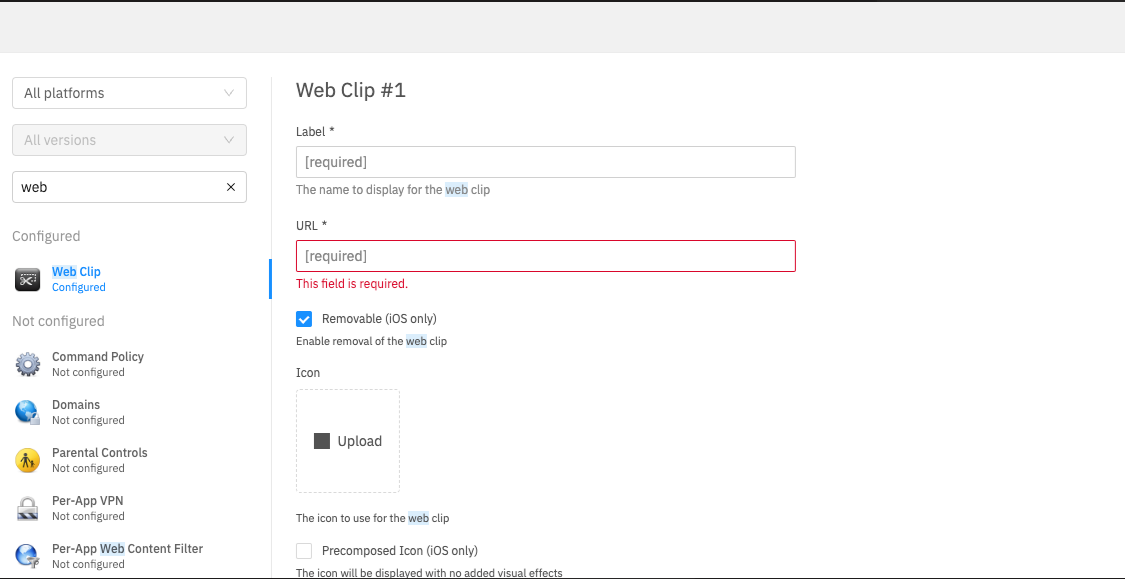
It is possible to activate Web Clip of an old App Portal on devices which don't support new App Portal.
-
Create new Apple Profile → Web Clip Profile (can be done in both FileWave Central and Anywhere)

- Fill in URL field with:
https://fqdn:20443/ios/recommended_apps/%device_id%#appsreplacing "fqdn" with your server's DNS name. -
Deploy profile to desired device(s).
Related Content
Applications Preventing Reboot (macOS/Windows)
Description
When a Fileset requires a reboot, the FileWave client can warn the user to "Quit All Running Processes" before the restart continues.
Some apps and background processes do not respond cleanly when FileWave Kiosk uses "Quit all" or "Quit Application". A process may restart immediately through LaunchDaemon, or it may ignore the signal FileWave sends. When that happens, users can be blocked from installing Filesets that have the Requires Reboot flag set.
Information
The warning itself is expected, but some listed processes can be surprising. For example:

A background service can appear even when the user is not actively using the related application.
Solution
Requirements to prevent this experience are:
- Customized Kiosk Fileset
- macOS client: bundle ID of the app or service to exclude
- Windows client: process name to exclude
You can configure settings.ini to ignore specific apps or processes. Create a Fileset containing settings.ini, then associate it with the target clients. The destination folder depends on the operating system:
macOS
/usr/local/sbin/FileWave.app/Contents/Resources/fwGUI.app/Contents/customWindows (FW v15.4.2 or lower)
C:\Program Files (x86)\FileWave\customWindows (FW v15.5.0 or higher)
C:\Program Files\FileWave\kiosk\customThe desktop Kiosk reads these changes after the user logs out and logs in again.
To stop an unexpected process from blocking the reboot, first identify the listed app's bundle ID on macOS or process name on Windows.
Obtain Bundle ID or Process Name
Windows
- Send any Fileset with Fileset Properties set to Requires Reboot to the test machine.
- Hover over the desired process to exclude

In this example, excluding Notepad requires notepad.exe.
macOS
- Change a test device's Debug Level to 99 through the Client Monitor
- Send any Fileset with Fileset Properties set to Requires Reboot to the test machine.
- When the device prompts the user to quit applications, open
FWGUI.login the user's Application Support directory.
~/Library/Application\ Support/FileWave/FWGUI.logThere should be lines similar to the following, for each process that has prevented the reboot:
|DEBUG|INSTALLER|[addProcessInfo] new process added /Applications/Utilities/Terminal.app pid 67345 bundleID com.apple.Terminal
|DEBUG|INSTALLER|[addProcessInfo] new process added /Applications/Preview.app pid 73400 bundleID com.apple.Preview
|DEBUG|INSTALLER|[addProcessInfo] new process added /Applications/TextEdit.app pid 73718 bundleID com.apple.TextEditConfigure 'settings.ini'
Configure settings.ini with the following format. Use a comma-separated list for bundle IDs or process names:
[General]
ignoredApplications=com.bar, com.fooFor the example of Windows Notepad, it should read:
[General]
ignoredApplications=notepad.exeFor common Windows shell processes that can appear during reboot prompts, consider ignoring the following:
[General]
ignoredApplications=StartMenuExperienceHost.exe,SearchApp.exe,TextInputHost.exeFor the example of macOS TextEdit, it should read:
[General]
ignoredApplications=com.apple.TextEditCombining this with current generic settings, it may look something like:
show_top_downloads=false
window_title="My Customized Kiosk"
hide_system_tray=false
[General]
ignoredApplications=com.adobe.acc.AdobeDesktopService,com.apple.TextEditDeployment
Deploy settings.ini to the following locations:
macOS
/usr/local/sbin/FileWave.app/Contents/Resources/fwGUI.app/Contents/customWindows (FW 15.4.2 and lower)
C:\Program Files (x86)\FileWave\customWindows (FW 15.5.0 and higher)
C:\Program Files\FileWave\kiosk\customManual Trigger of FileWave Kiosk for macOS and Windows (15.3+)
What
By default, the Kiosk icon is only shown when one or more assignments between Filesets and Devices are created; set as Kiosk installation.
It may be desirable to view the Kiosk even where Kiosk assignments do not exist, since the Kiosk also shows other details, which may be useful to the user, e.g. device information.
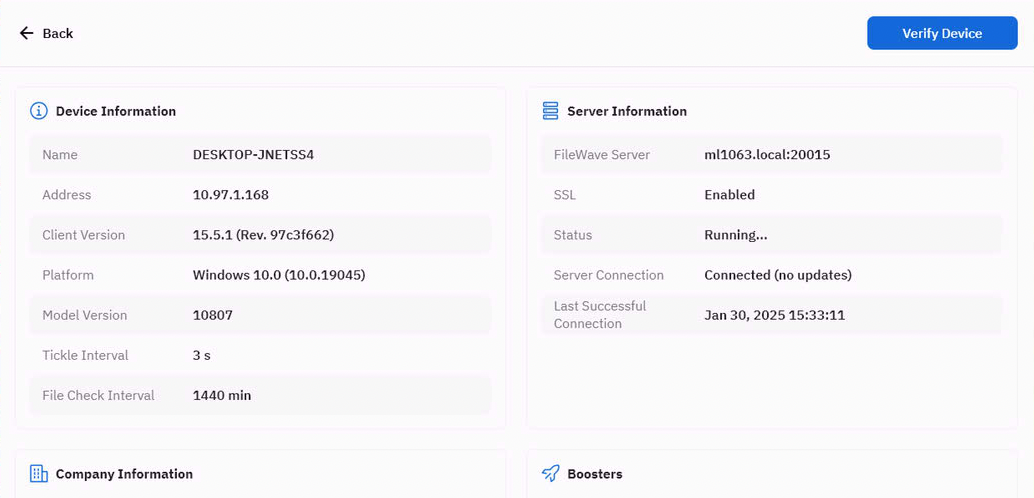
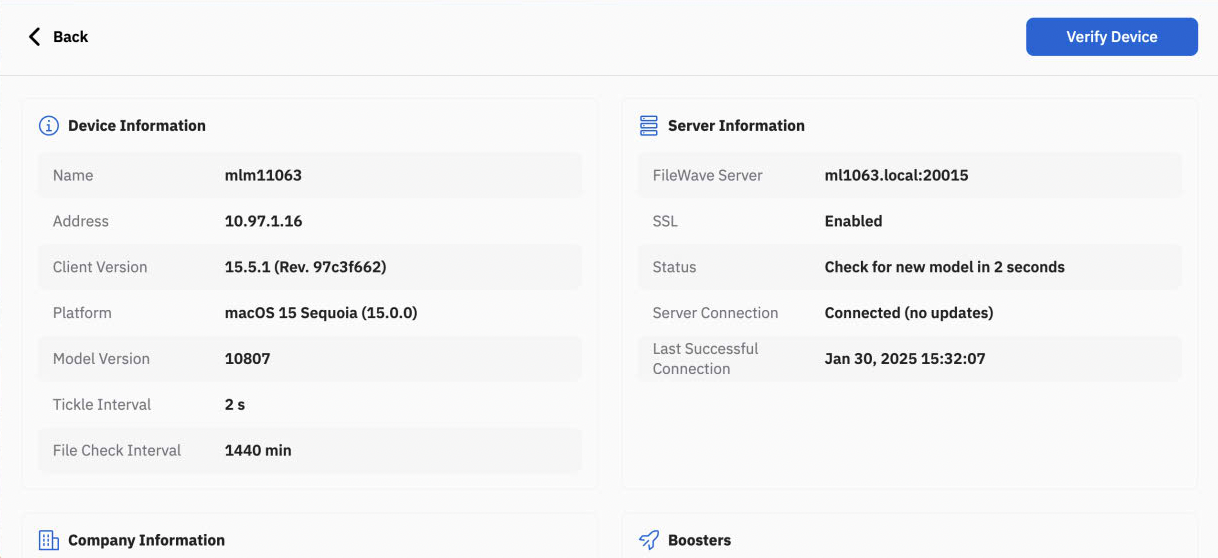
The following provides information for triggering the Kiosk manually.
When
Prior to Kiosk v2, it was possible to provide a custom file to show the Kiosk icon, regardless of assignments. Currently Kiosk v2 has no similar option.
How
For both macOS and Windows, the executable file may be targeted directly from a shell:
macOS (shell):
/usr/local/sbin/FileWave.app/Contents/MacOS/FileWave\ Kiosk.app/Contents/MacOS/FileWave\ KioskWindows (PowerShell):
& "C:\Program Files\FileWave\client\kiosk\FileWaveKiosk.exe"GUI
As a script line, this isn't the most user friendly method for users to execute and of course the obvious place to have something for users to self trigger would be in the FileWave Kiosk, but clearly that is nonsensical. There are alternatives though.
macOS
There is already a KB on integration of the amazing 3rd party tool: 'Hello-IT'
Through this tool, it could be possible to provide users with another method to open the Kiosk, where Kiosk assignments do not exist:
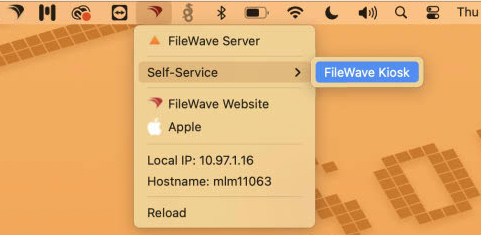
By following the provided guide on Hello-IT, the small one-liner script could be added as one of the sub menu items. When clicked, FileWave Kiosk would launch.
Windows
A similar trick could be used on Windows with another amazing 3rd party tool: 'About My Device'
Although it doesn't immediately offer the option to add scripts in the way Hello-IT does, it can be hijacked to do so. One of the features is an option to trigger a script to provide logs:
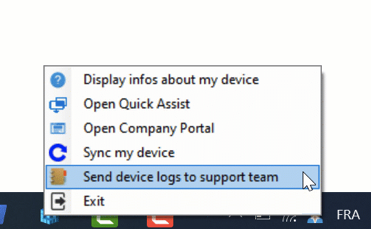
However, by editing the configuration and script files, this could be renamed and the script altered to include the PowerShell one-liner from above:
AboutMyDevice_Systray.ps1
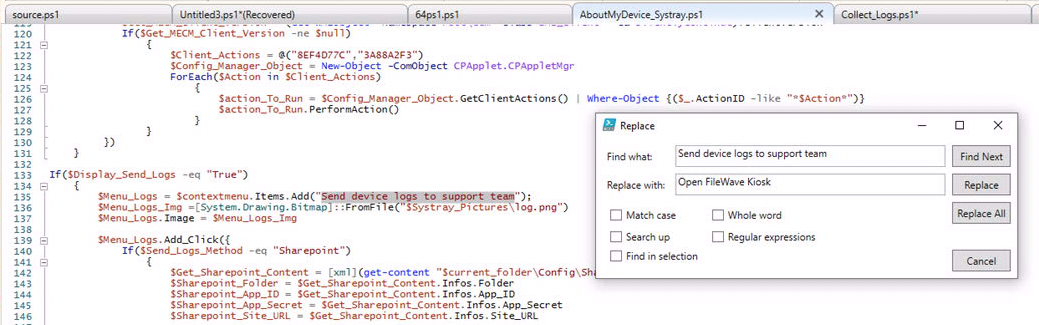
Collect_Logs.ps1

Example
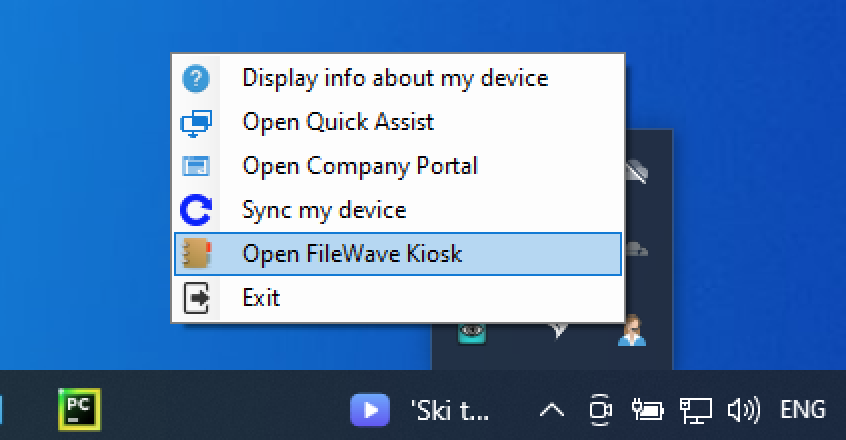
Of course, it might be desirable to keep the option to send logs, so choose the best method for adaption to suit requirements.
Additionally, there may be other 3rd party tools that could be of consideration. Do please let other FileWavers know if other tools could be considered as appropriate or better.
FileWave End-User Notifications
FileWave End-User Notifications (15.5+)
What
With the release of FileWave version 15.5.0 and onward, administrators can now send custom messages to enrolled devices directly from FileWave Anywhere, FileWave Central, or through API calls. These messages appear as system notifications on users’ devices, allowing administrators to communicate important information efficiently and effectively, thereby enhancing user engagement and experience.
Key Functionality
- User-Friendly Interface: Administrators can easily send notifications by selecting one or multiple devices or groups and accessing the “Send Notification” action.
- Customizable Content: Personalize notifications with a title, author, message content, and optional links to provide context and additional resources.
- Expiration Date: Set an expiration date and time for notifications to ensure they are timely and relevant.
- Platform Compatibility: Notifications are supported across multiple platforms, including macOS, Windows, iOS, iPadOS, ChromeOS, and Android devices.
- Client Compatibility: This feature requires devices to have the FileWave Client version 15.5.0 or newer installed.
- Audit History: Sent notifications are recorded and can be reviewed in the Audit History for compliance and tracking purposes.
- Validation and Error Handling: The system ensures that all mandatory fields are filled out and provides clear error messages if issues arise, such as invalid input or unsupported devices.
Send Notification requires Permissions granted within the Managed Administrator view. 'fwadmin' account will automatically be granted such permissions, but other accounts or groups should be enabled as desired.
When/Why
When to Use
- Urgent Announcements: Quickly inform users about critical updates, security alerts, or system maintenance.
- Company Communications: Share company news, policy changes, or reminders directly to users’ devices.
- Event Notifications: Notify users about upcoming events, meetings, or deadlines.
- Support and Guidance: Provide users with immediate assistance or instructions when issues are detected.
Why Use This Feature
- Direct Communication: Bypass email clutter and ensure important messages are seen by delivering them straight to the user’s device.
- Improved Engagement: Enhance user experience by keeping users informed and engaged with timely notifications.
- Cross-Platform Support: Reach users regardless of the device or platform they are using.
- Efficient Administration: Streamline the process of sending notifications to multiple devices or groups simultaneously.
How
Sending a Notification
- In FileWave Central right click on a Client, Group or Smart Group and pick Send Notification...
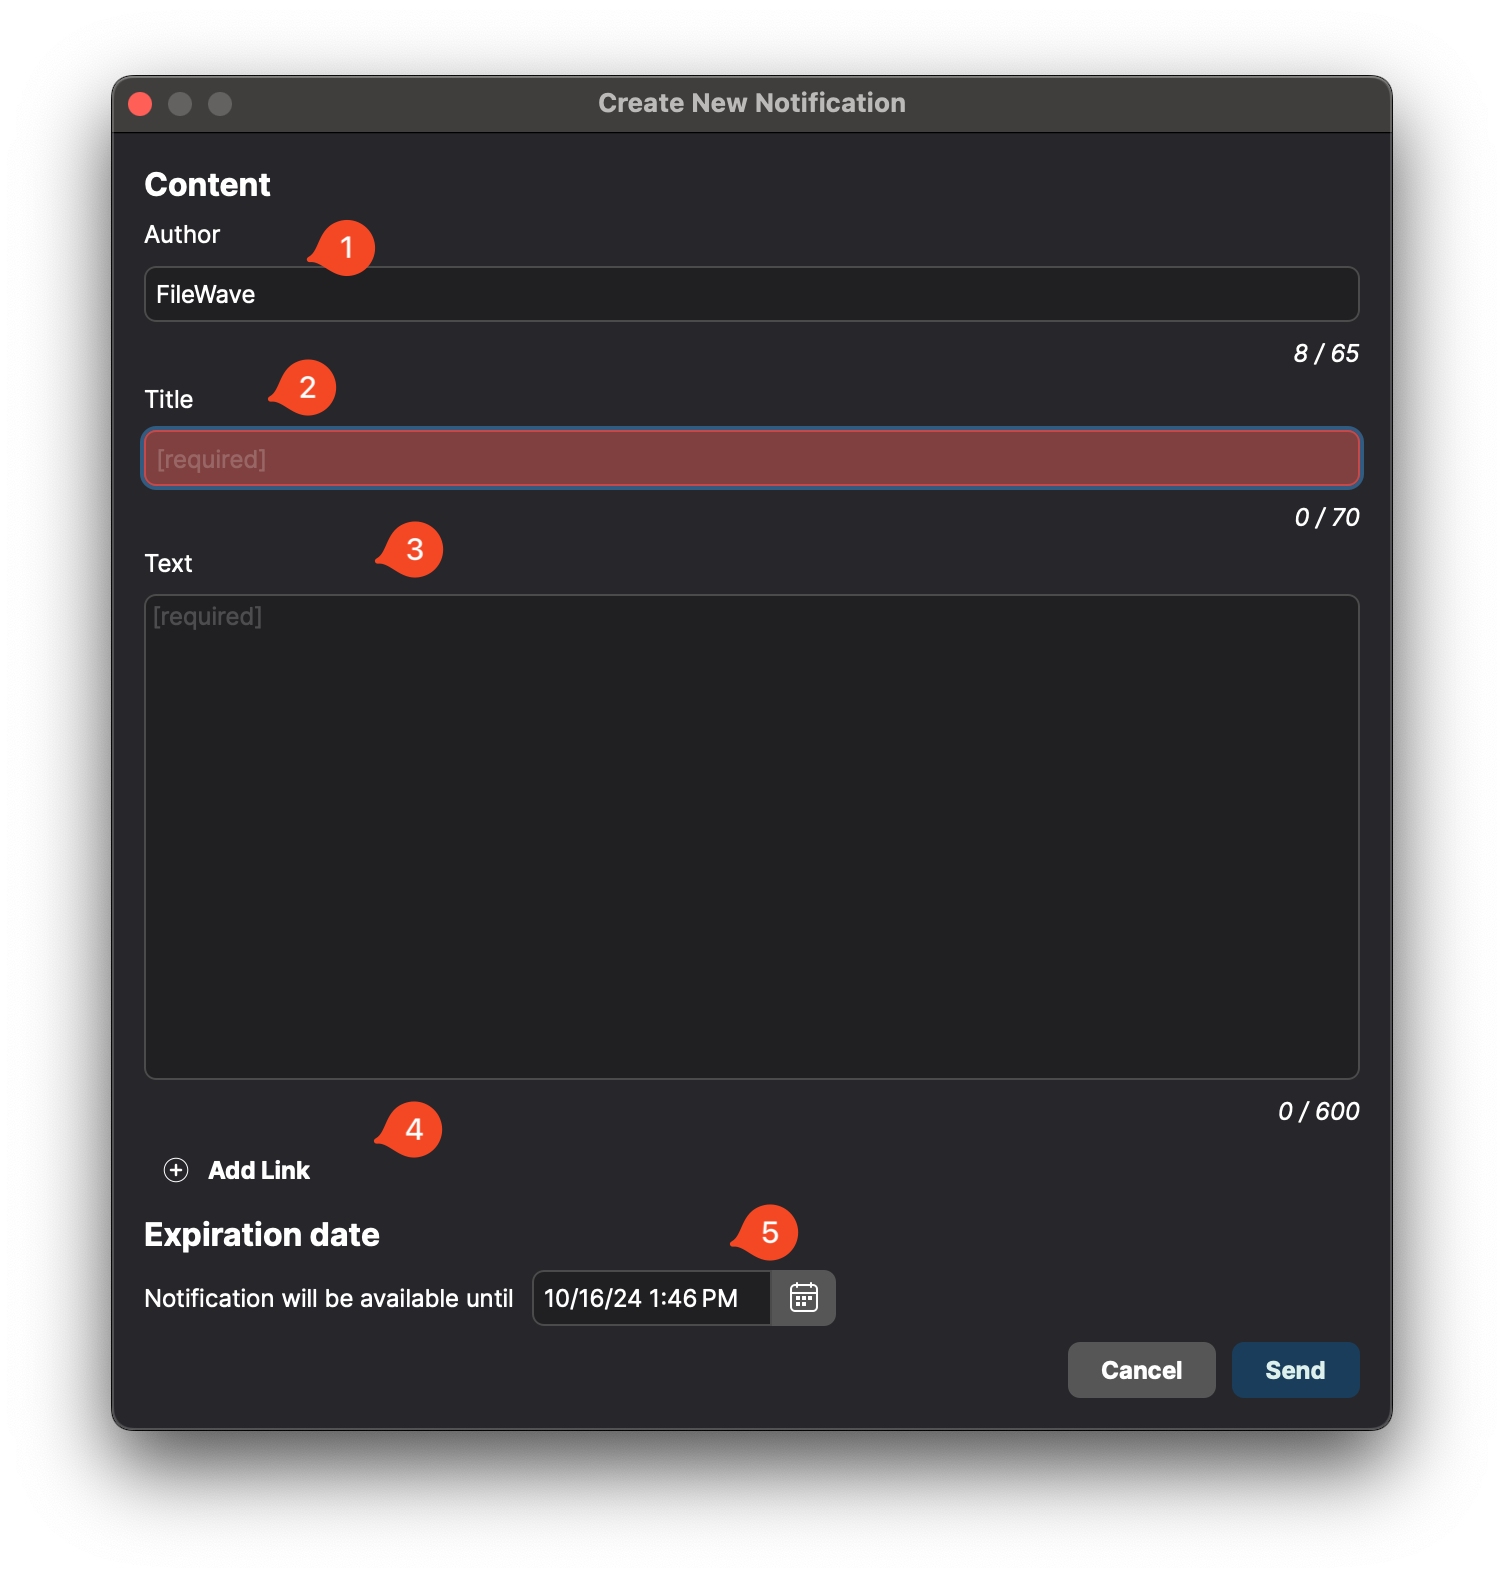
- Ensure that all of the options are set how you want.
Author: Your name
Title: The title of the notification dialog
Text: The detailed text to display
Add Link: This allows you to have a clickable link on the notification
Expiration date: After this date and time the system will not continue to try to get the notification to the selected devices.

- A confirmation dialog will ask you to confirm sending and tell you the number of devices being messaged. Check that the number reflects what you think it should be. If it says 500 but you meant to message 5 devices then click Back and then Cancel if you want to try to pick devices again. Once you click the final Send button on the confirmation dialog there is no canceling it.
If you selected a Group or Smart Group it is important to know that the targets will be the devices that were in that group at the time you sent the message. If a device enters the group tomorrow it will not get the message even if the message has not expired yet. Similarly if a device leaves the group after you already sent the message it will still receive the message when it comes online.
User Experience
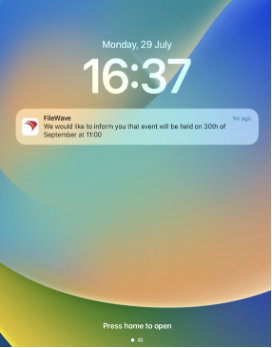
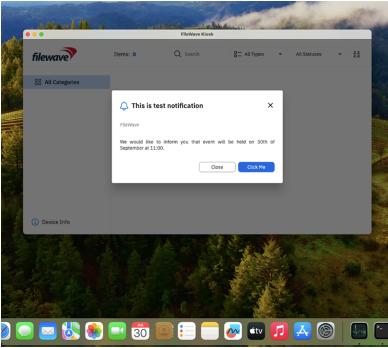
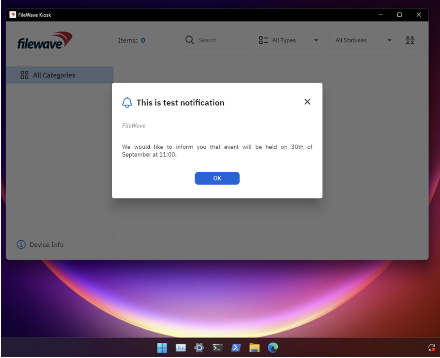
- System Notification: Users will receive the notification as a system alert on their devices.
- Notification Details: Clicking on the notification will display the full message and any included links.
- Confirmation Dialog: After sending, administrators receive a confirmation dialog confirming the notification was successfully sent.
- Timing of notification: It will display as soon as the device either gets an OS driven notification which should be within a few minutes of it coming online.
Examples of what is seen by users
| iPadOS / iOS |
|
| macOS |
|
| Android |
|
| Windows |
|
| ChromeOS |
|

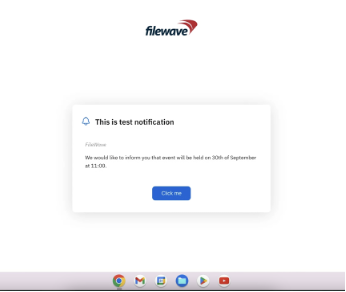
Related Content
Digging Deeper
Important Considerations
General (All Platforms)
- Time Zones and Expiration: Notifications expire exactly at the specified expiration time in UTC, regardless of the recipient’s local time zone. For example, if set to expire at 2:20 PM UTC, it will expire at that time globally. A user in Eastern Daylight Time (EDT) will see the notification expire at 7:20 AM EDT.
FileWave Central will show the local timezone of the computer running FileWave Central. FileWave Server will convert the set time as UTC instead and expire the notification at that UTC time.
Platform-Specific Behaviors
- iOS/iPadOS:
- Delivery to Active Users: Notifications are only delivered to the user currently logged in on the device on Shared iPad. 1:1 users can receive notifications at Lock Screen.
- Session-Specific: Notifications received by one user are not visible to other users who log in later.
- Expiration Handling: If a notification is valid on Apple’s servers but expired on the device, it will display, but clicking it will only open the App Portal without showing the full message.
- macOS:
- Logged-Out Users: Users who are logged out will not receive notifications sent during their absence.
-
Multiple Users: All users on a device will receive the notification individually.
-
Unread Notifications: Unread, valid notifications will reappear in the Notification Center if it is cleared or the device restarts, after a new notification arrives.
-
Expiration Cleanup: After the expiration time, macOS may take up to an hour to remove the notification from the Notification Center.
-
Kiosk Visibility: If the Kiosk is not normally visible, it will temporarily appear when displaying notification details and will be removed once closed.
-
Enabling Notifications: Administrators can enforce notifications using an Apple Profile, preventing users from disabling them.
-
Windows:
-
Multiple Users: Similar to macOS, all users on a device will receive the notification.
-
Notification Persistence: Unread notifications will reappear after the Notification Center is cleared or the device restarts, as long as they are still valid.
-
Kiosk Visibility: The Kiosk app behaves the same as on macOS regarding temporary visibility.
-
-
ChromeOS:
-
User Limitations: If one user reads a notification, it becomes unavailable to other users on the same device due to
2026-01-02 15:42:08.820 [P:60] <ip:10.5.154.176> user:fwadmin, session hash: 42671cb2a7fba03259b906ad1b72ed182095b73951695507a191b117f72e0e25 - Send user notification (title: Today's Treat, body: Doughnuts for all in the cafe!!!!, URL: None, expiration date: 2026-01-02T15:44:00+00:00) to 1 devices: {54561} - SUCCESStechnical limitations.
-
Delivery Issues: Notifications may not be received if there are issues with Firebase Cloud Messaging (FCM) or if the Chrome extension is not updated to the latest version.
-
-
Android:
-
Expired Notifications: Notifications that have expired are not automatically removed from the preview and can still be opened.
-
Device Offline: If a device is turned off and a notification expires during that time, it will not receive the notification upon powering on.
-
Troubleshooting: Requirements for Notifications
- General Requirements:
- Ensure the device is properly enrolled and connected to the FileWave server.
- iOS/iPadOS:
- App Portal: Users need to have opened the App Portal at least once since enrollment.
- App Portal: Must be greater than version 15.5.0 (Kiosk v2)
- Apple tvOS:
- Apple TV devices are not supported.
- macOS and Windows:
- Devices must have FileWave Client version 15.5.0 or newer.
- Kiosk Issues: Notifications rely on the Kiosk app. If the Kiosk is not functioning properly, notifications may not be received.
- ChromeOS:
- FCM Issues: Ensure FCM is functioning correctly.
- Extension Version: Confirm that the Chrome extension is updated and not pinned to an earlier version.
- Android:
- FCM Registration: Devices must be registered with FCM.
- Client Functionality: The FileWave Client must be running without issues.
Notification activity is logged in the Audit History, available through FileWave Central's Assistant drop down menu. Entries may appear as below
2026-01-02 15:42:08.820 [P:60] <ip:10.5.154.176> user:fwadmin, session hash: [a big number] - Send user notification (title: Today's Treat, body: Doughnuts for all in the cafe!!!!, URL: None, expiration date: 2026-01-02T15:44:00+00:00) to 1 devices: {54561} - SUCCESS
Force Enable Notifications on iOS and macOS for FileWave Kiosk
What
To ensure that notifications from the FileWave Kiosk and End User Notifications are consistently displayed on macOS and iOS/iPadOS devices, administrators can deploy an Apple Profile that forces notifications for the relevant Kiosk app bundle identifiers. This profile enforces the display of notifications and prevents end users from disabling them, ensuring important messages and alerts are always visible to users.
Bundle identifier note: the macOS Kiosk app remains com.filewave.kiosk2. For iOS/iPadOS, use com.filewave.ios.app.kiosk2 on FileWave 15.3.0 through 16.2.x, and use com.filewave.ios.app.kiosk3 on FileWave 16.3.0 and later.
When/Why
When to Use
- Critical Communications: When you need to guarantee that essential notifications, such as security alerts or mandatory updates, reach all macOS users without the risk of being muted or disabled.
- User Compliance: In environments where user interaction with notifications is crucial for compliance or operational reasons.
- Standardizing User Experience: To provide a consistent notification experience across all macOS devices in your organization.
Why Use This Feature
- Ensure Visibility: By forcing notifications, you eliminate the possibility of users missing important information due to disabled notifications.
- Prevent User Modification: Users will not have the ability to disable or modify notification settings for the FileWave Kiosk app, maintaining administrative control.
- Improve Compliance: Helps in meeting organizational policies that require certain notifications to be acknowledged by users.
- Enhance Support Efficiency: Reduces support tickets related to users not receiving critical notifications.
How
You can either use our premade Fileset: Profile - Apple FWKiosk Notifications.fileset.zip or you can create it yourself using the below steps. If you are on FileWave 16.3.0 or later, review the iOS/iPadOS entry in that profile and update it to com.filewave.ios.app.kiosk3 before deployment.
In FileWave Central or Anywhere you can create the profile. The images that follow are from Central, but the process is the same in Anywhere.
-
Filesets → New Fileset → Apple → Profile and then fill out the General information as below.
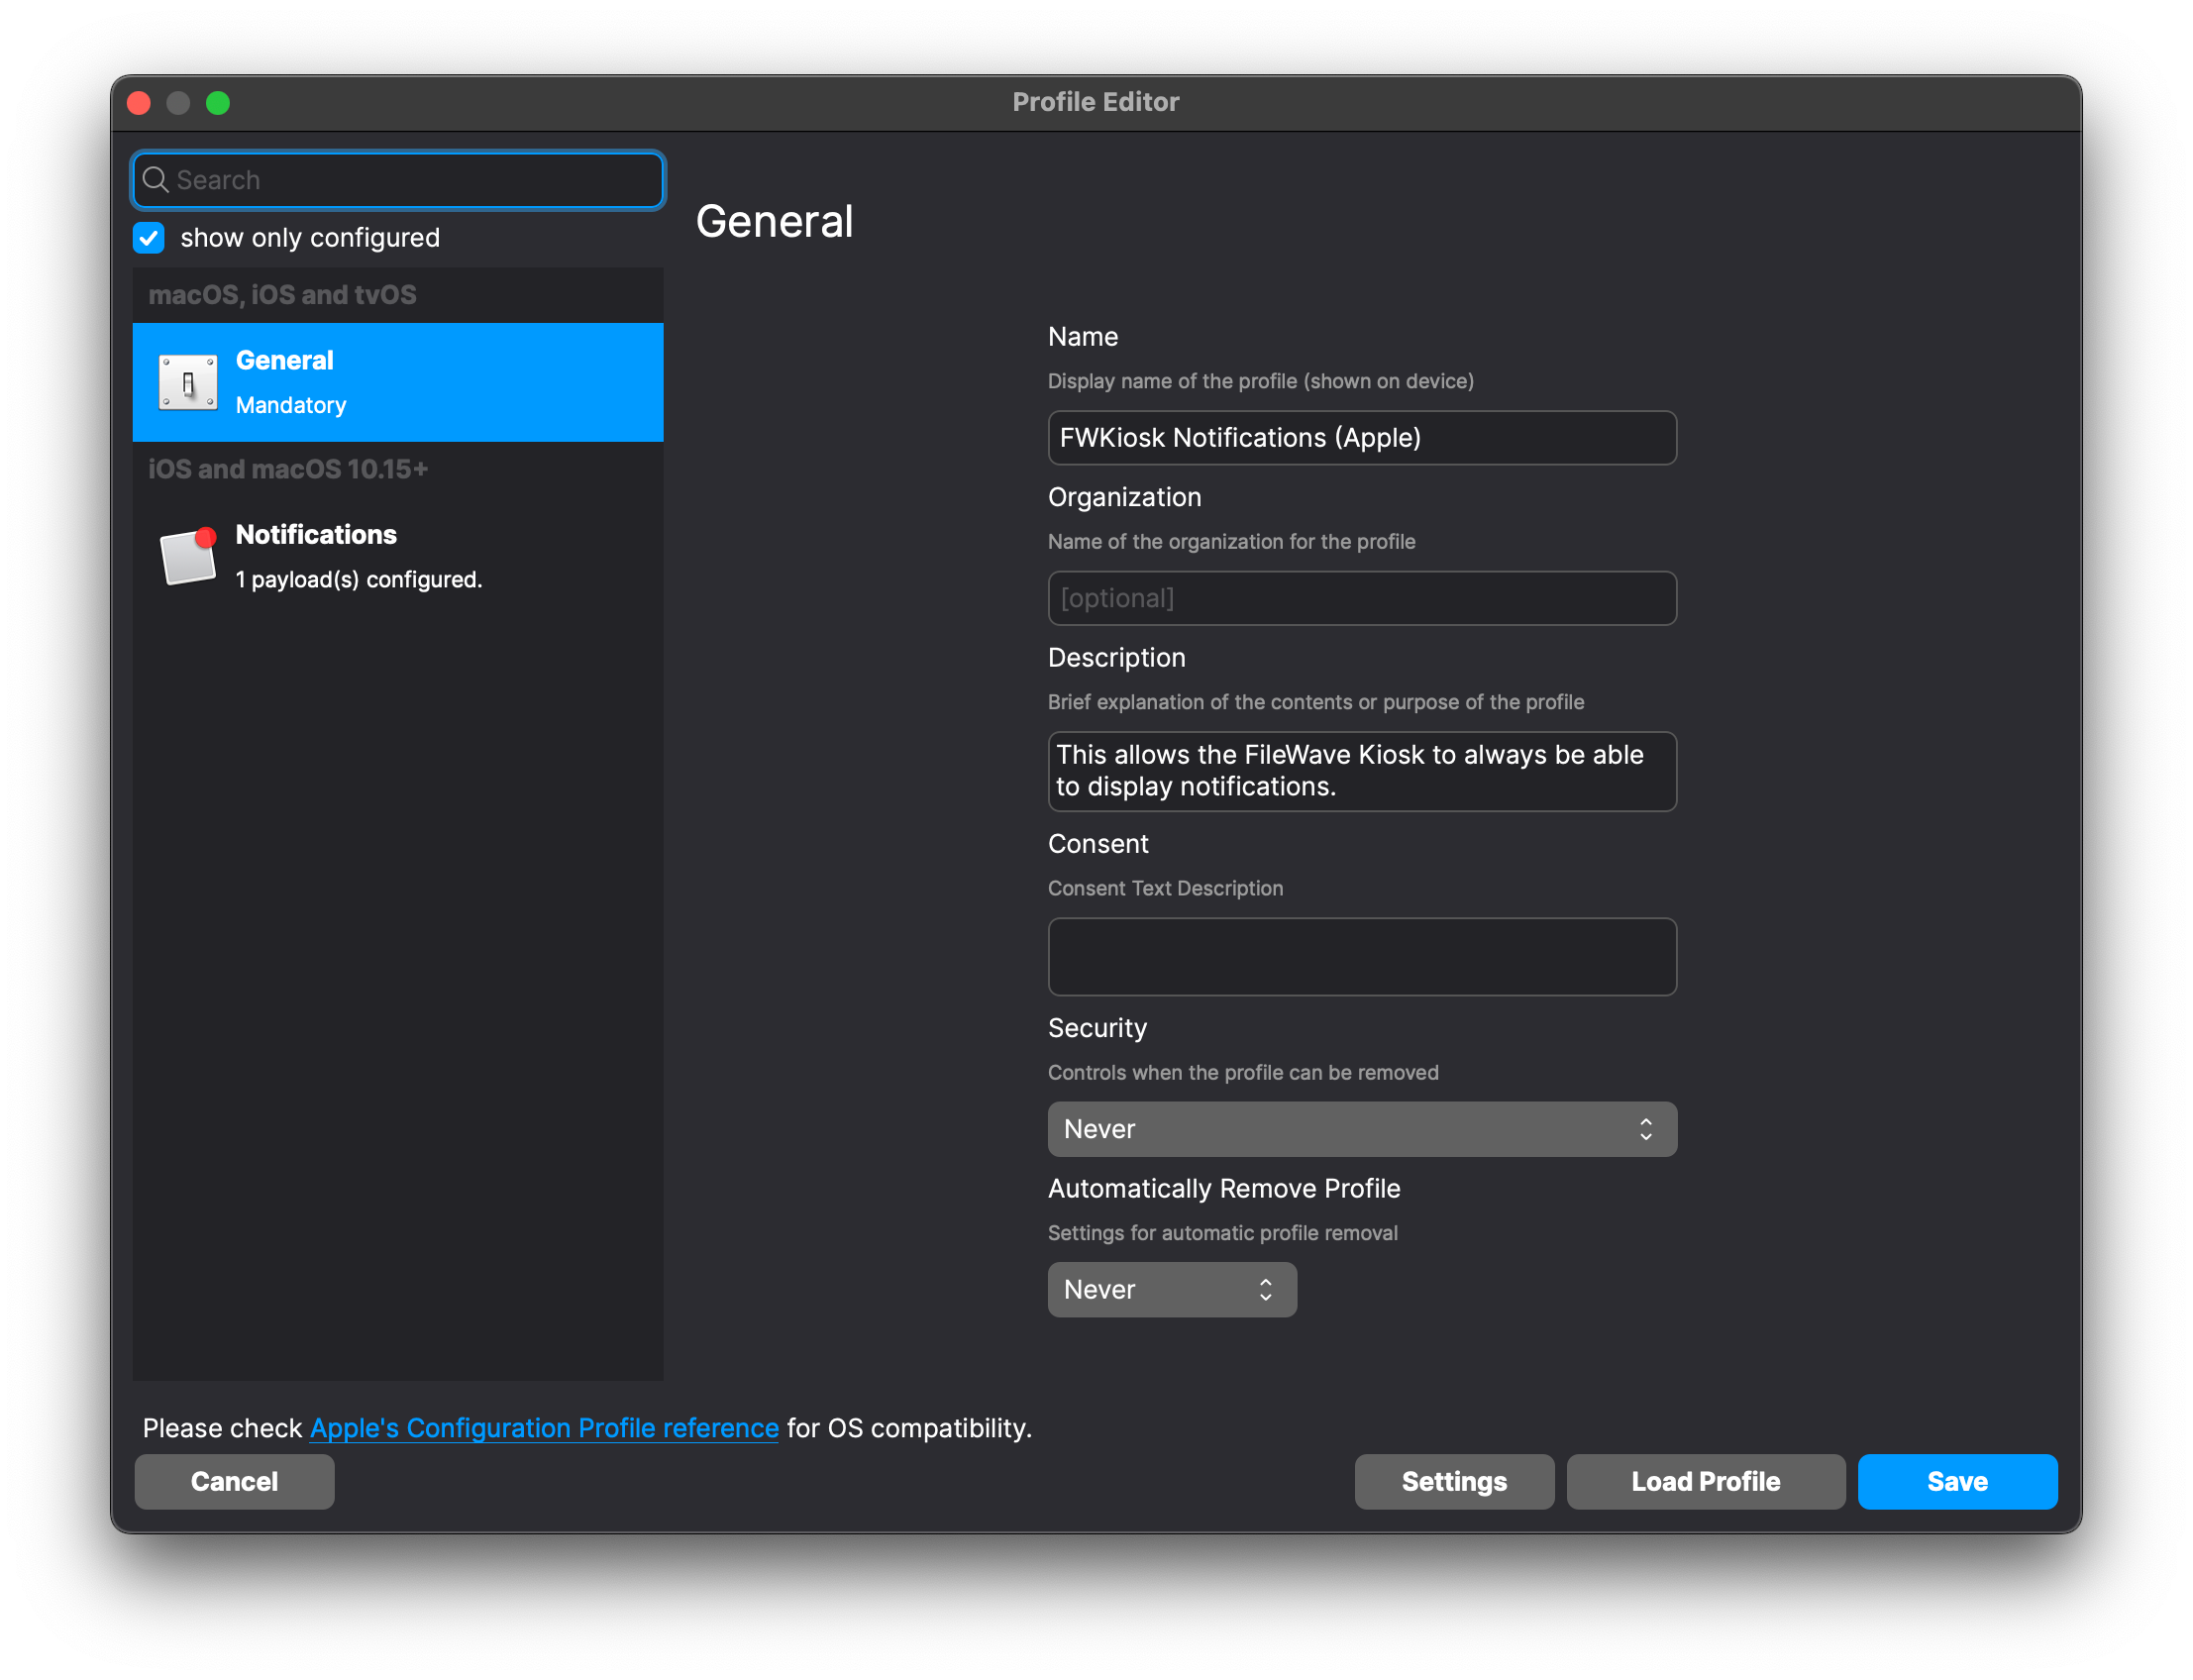
-
Search “Notifications” to easily find that and then add it as shown.
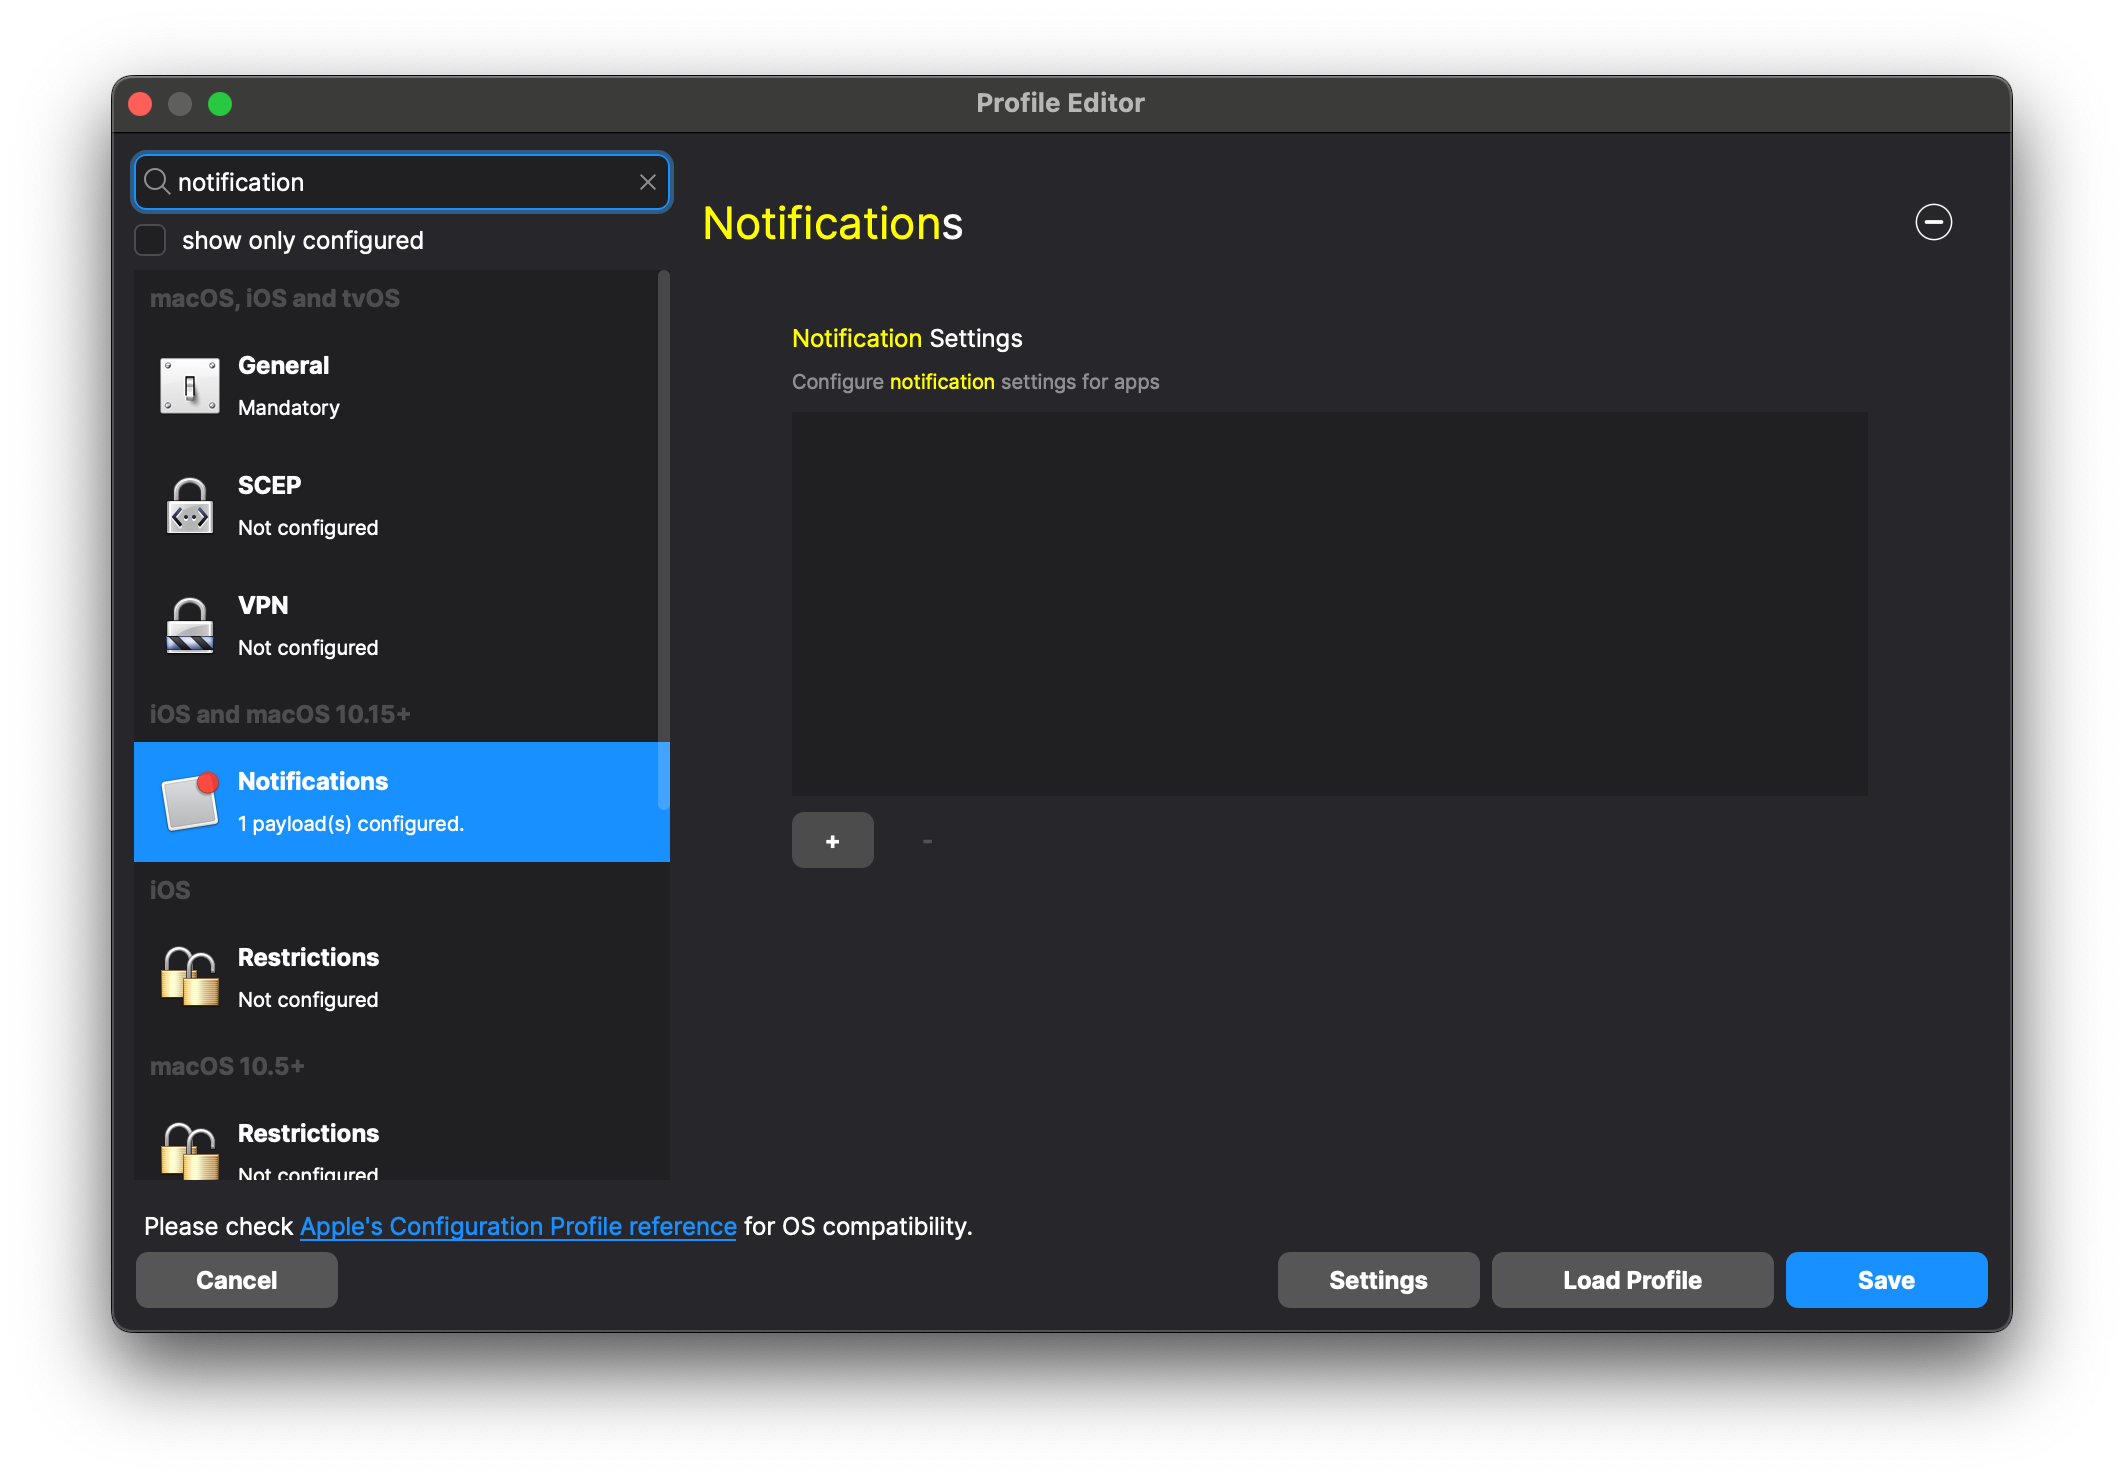
Type in the Bundle Identifier and then select it and click Next
Bundle Identifier for macOS Kiosk: com.filewave.kiosk2 and then repeat for iOS/iPadOS using com.filewave.ios.app.kiosk2 on FileWave 15.3.0 through 16.2.x or com.filewave.ios.app.kiosk3 on FileWave 16.3.0 and later
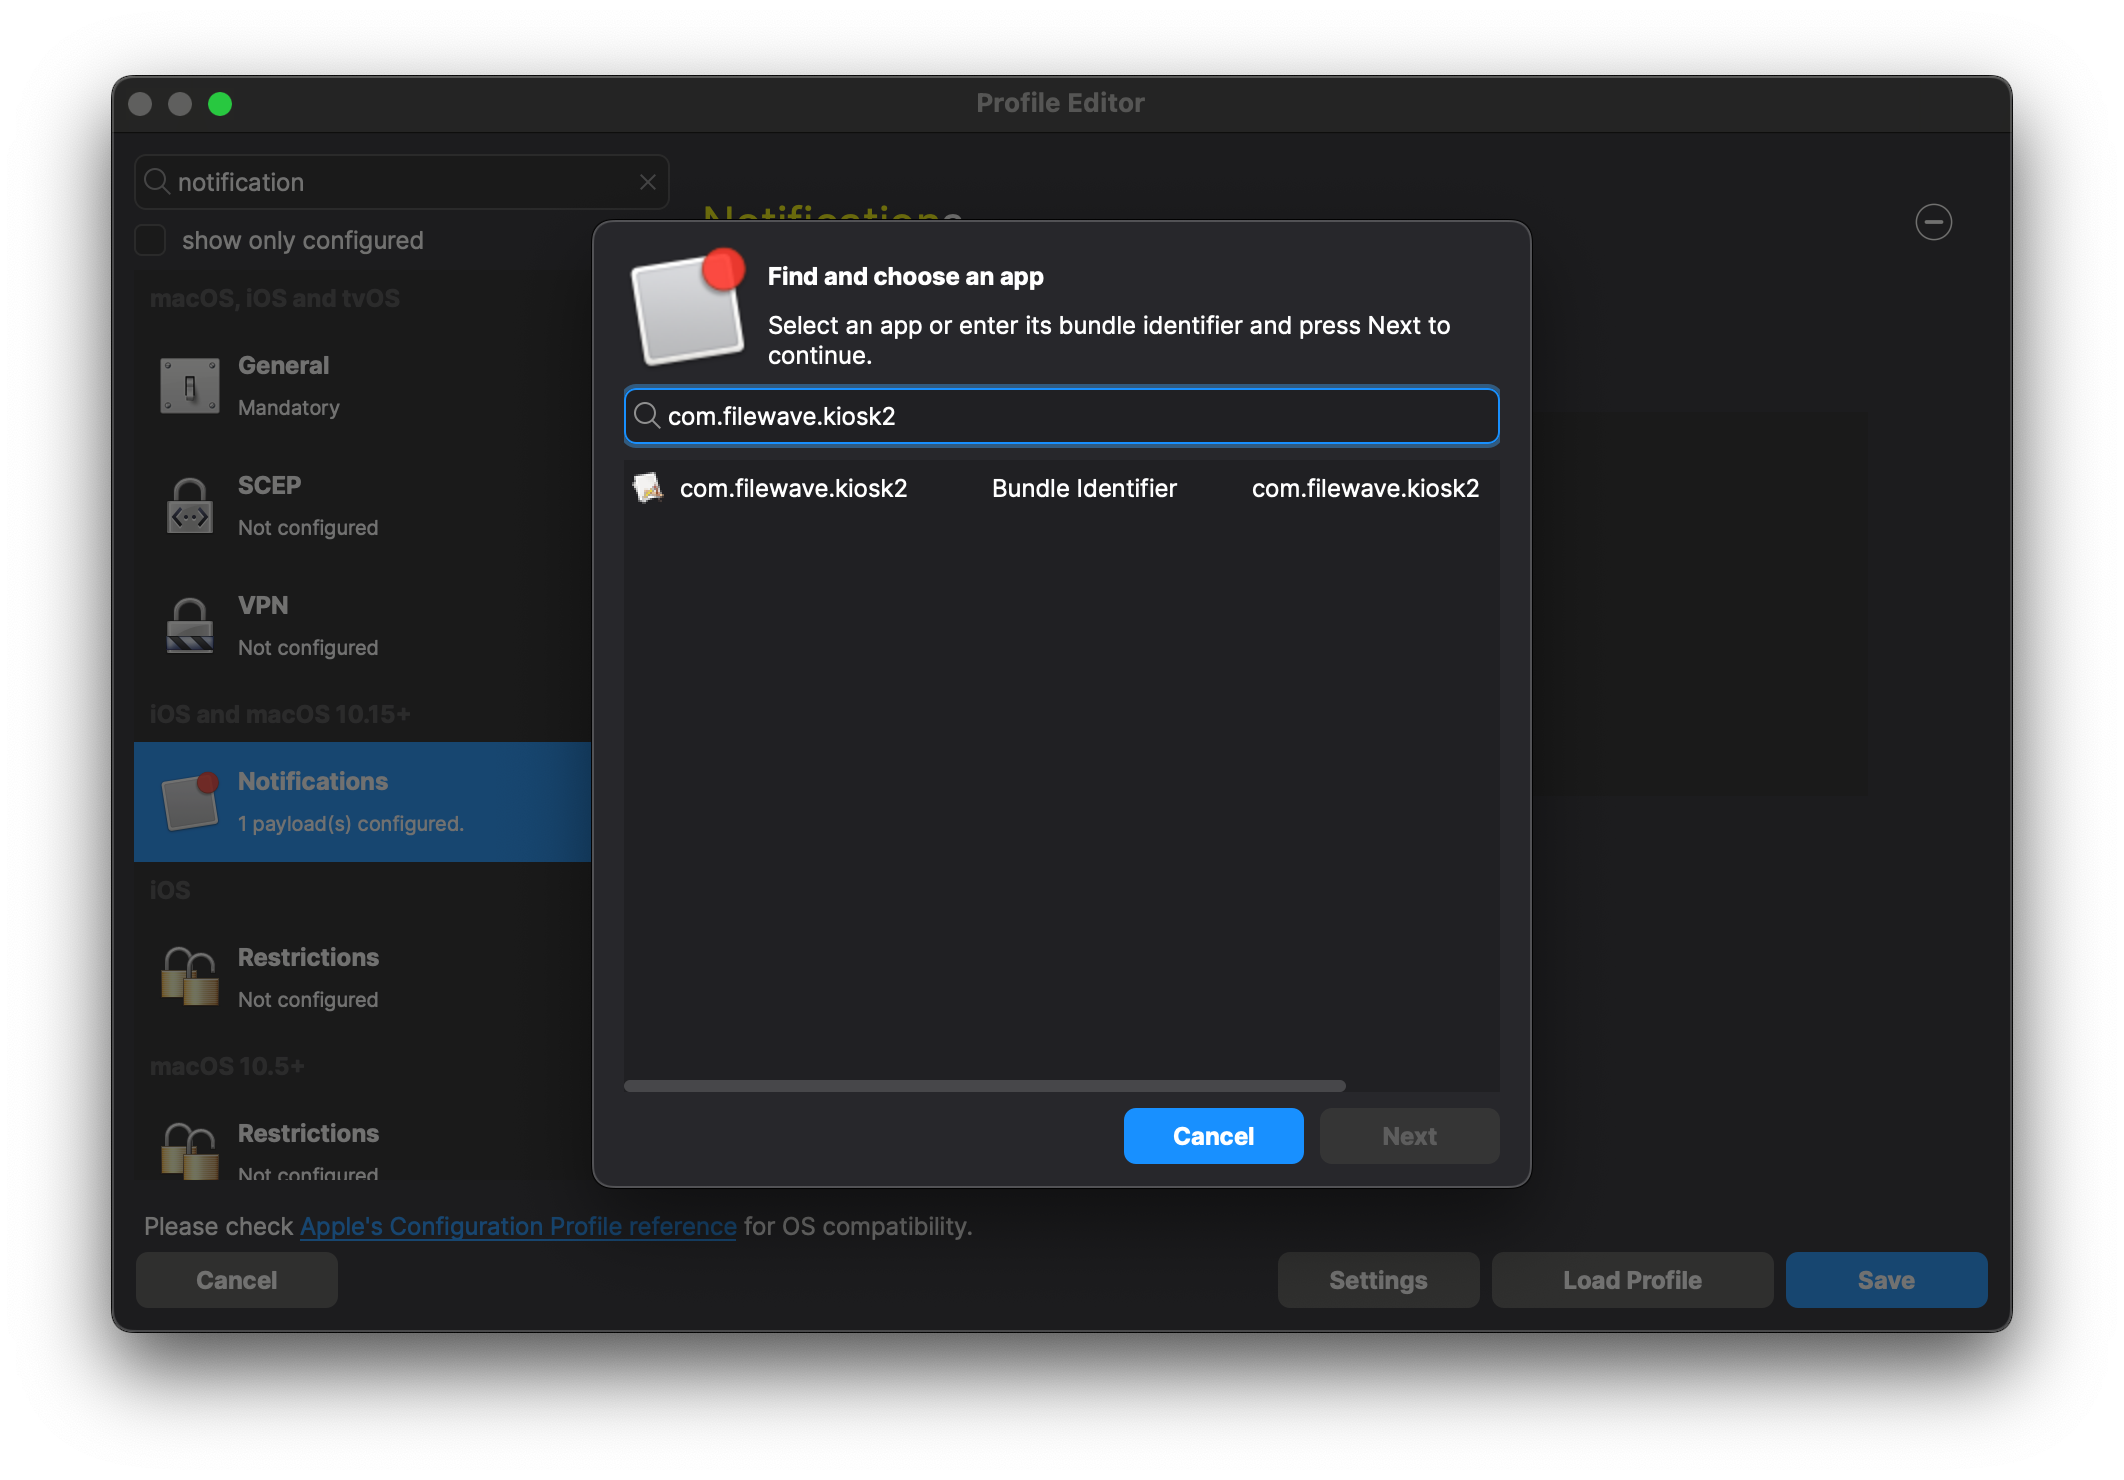
-
-
Set up behavior that you would like for the notifications and click Save
-
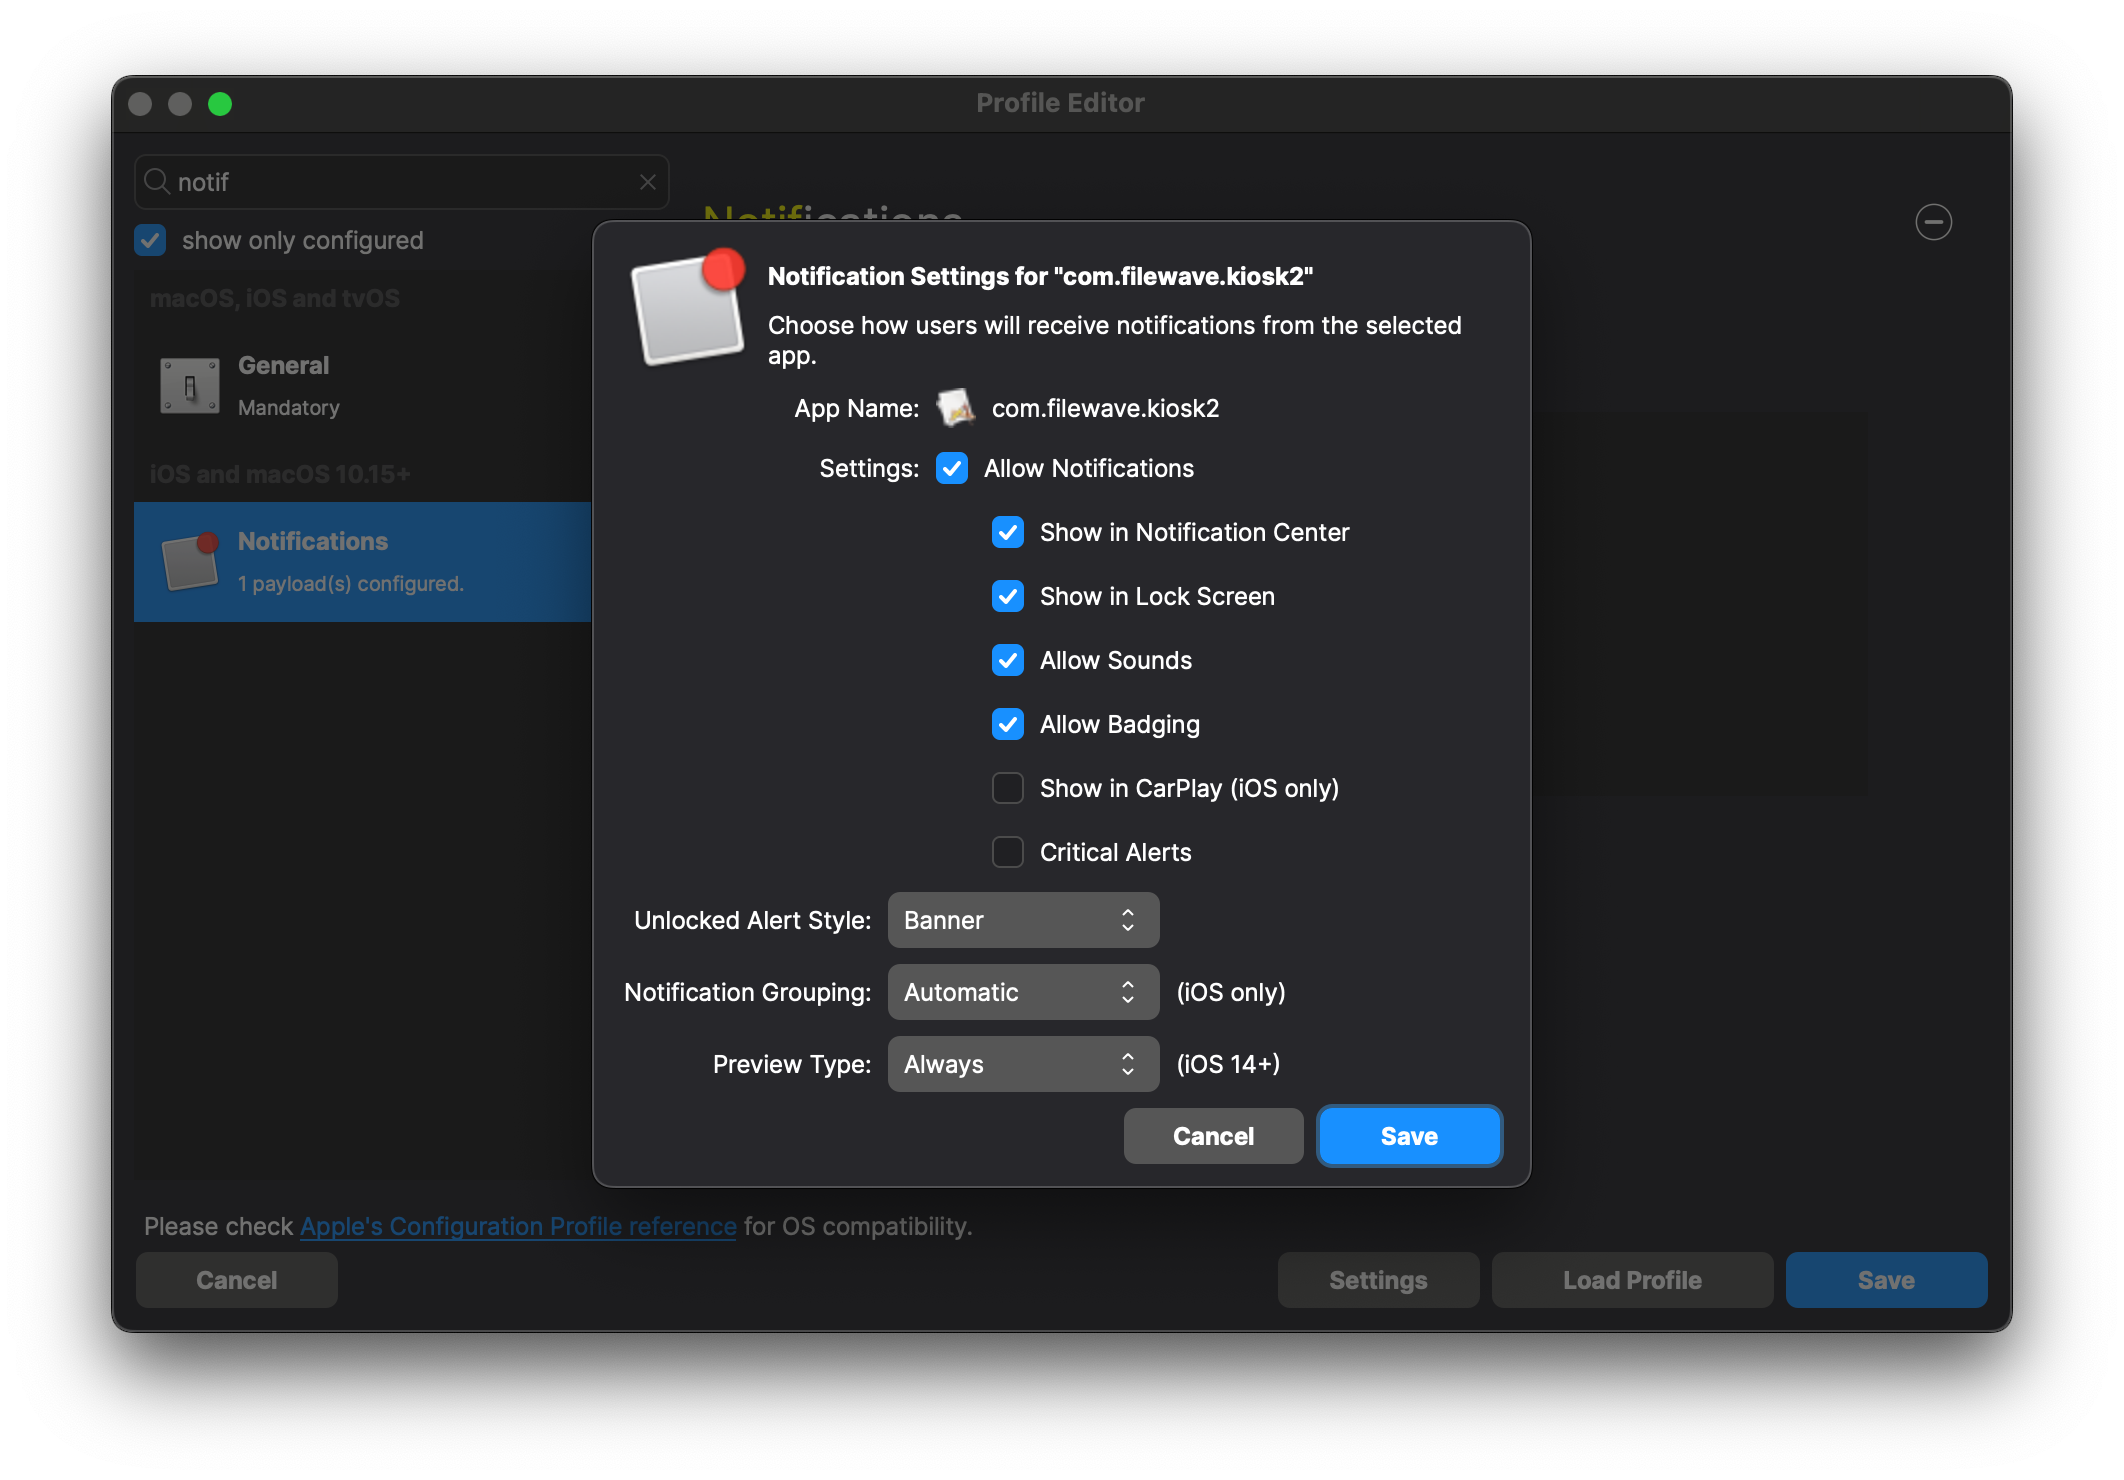
-
Save the profile and then deploy it to desired device(s).
Device Behavior
- Directly examining a macOS device will look as follows:

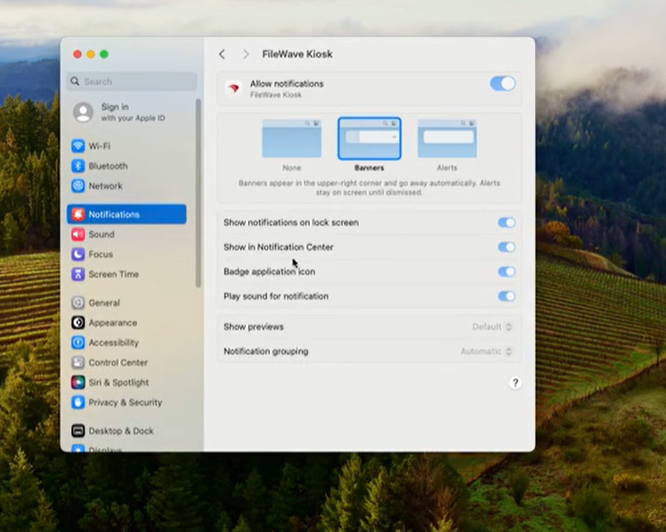
Related Content
Troubleshooting
Checking what version of iOS/iPadOS App Portal is being pushed out (15.3+)
What
How do I know what version of App Portal (Kiosk) is being pushed out to iOS/iPadOS devices?
When/Why
After a FileWave upgrade, there likely will be a new version of the iOS/iPadsOS IPA pushed out through the automatic upgrade process. Because this process is a bit invisible, verifying what the server believes is the version it is pushing out is sometimes necessary.
How
In FileWave Central, go to Assistants -> Manage Administrators and then pick your user account, though depending on permissions, you may want to use fwadmin. Grab the base64 token seen below in the image, including the = at the end of it.

Now you can ask the server. Replace ezk5ODxxxmE0OyyyyyyyOX0= below with your token, and replace support2.filewave.net with your server's DNS name.
Here is a command you can run in Terminal.app on a macOS system or any system that has curl installed:
curl -H "Authorization: ezk5ODxxxmE0OyyyyyyyOX0=" https://support2.filewave.net/filewave/api/kiosk/internal/kiosk-statusHere is a PowerShell example of the same command:
# Define the URL to make the request
$url = "https://support2.filewave.net/filewave/api/kiosk/internal/kiosk-status"
# Define the headers, including the Authorization token
$headers = @{
"Authorization" = "ezk5ODxxxmE0OyyyyyyyOX0="
}
# Use Invoke-WebRequest to make the GET request with headers
$response = Invoke-WebRequest -Uri $url -Headers $headers -Method Get
# Output the content of the response
$response.Content
The output of the command will be something like below.
{"installed":{"ipa_url":"https://fw-kiosk-v2-ipas.filewave.cloud/15.3.1/App_Portal_15.3.1.ipa","ipa_md5":"81628b83dad72e274ef93ea031db1484","build_date":"2024-03-27T20:08:49.192563Z","bundle_version":"15.3.1"},"latest":{"ipa_url":"https://fw-kiosk-v2-ipas.filewave.cloud/15.3.1/App_Portal_15.3.1.ipa","ipa_md5":"81628b83dad72e274ef93ea031db1484","build_date":"2024-03-27T20:08:49.192563Z","bundle_version":"15.3.1"},"available_versions":["15.3.1"]}% Related Content
Removing pre-15.3 Kiosk Customizations (macOS/Windows)
Prior to FileWave 15.3 you had a method of customizing the Kiosk that is not used in 15.3 and beyond. Some of the customizations will be ignored with 15.3, but there are things you'll want to potentially remove and you may want to stop pushing out customizations that are no longer enforced. This article is a paired down version of the old article and simply contains information on what customizations you might have had in the past so you can look to potentially remove the files/edits.
The look of the FileWave desktop Kiosk was customized using Qt Style Sheets. You would have had to create a file named fwGUI.qss and deploy it to clients in the right location. Several icons were also customizable by placing your custom icon in the right place with the right file name. All of this can be deployed via a Fileset.
Check out Setting the Primary Color, Name and Logo in Kiosk/App Portal (15.3+) and Applications Preventing Reboot (macOS/Windows) for the things that can be customized in FileWave 15.3 and beyond.
Deploy
fwGUI.qss -- You would have created a Fileset containing the fwGUI.qss and the icons, then associate it to the desired clients. The directory where these files was placed depends on the operating system. In 15.3 and beyond you don't want to push the qss file or icons out as they will have no effect on the Kiosk.
macOS
/usr/local/sbin/FileWave.app/Contents/Resources/fwGUI.app/Contents/customWindows
C:\Program Files\FileWave\custom (might be "Program Files (x86)", depending on the platform)The changes will only be visible in the desktop Kiosk after the user logs out and logs in again.
Menu Bar/System Tray Settings
settings.ini -- contained generic kiosk ui settings. Especially important is that if hide_system_tray = false that you will end up with 2 icons for the Kiosk where one is the old Kiosk if you are on FileWave 15.3.
Example
window_title = "Your New Window Title"
show_top_downloads = true
hide_system_tray = false-
The "window_title" attribute was displayed in the menu bar menu item - as well as in the kiosk window title area.
-
The "show_top_downloads" attribute was used to hide the top downloads UI on a per client basis.
-
"hide_system_tray" determined whether or not there will be an icon displayed in the system tray. Setting 'false' will force the Kiosk to show even with no current association.
Example Filesets that you might have used to push out these settings:
Windows (64) - Kiosk_Customizer_for_Windows64.fileset.zip
Windows (32) - Kiosk_Customizer_for_Windows32.fileset.zip
macOS - Kiosk_Customizer_for_macOS.fileset.zip
macOS/Windows - Applications Preventing Reboot
Customizable icons
You might have included icon files that you used to replace them in Kiosk before 15.3. These icons will not appear in 15.3 or newer.
| File name | Description | Example | Pixel Size |
| action_back.png | Icon for the "Back" action in the Software Installation dialog |  |
48x48 |
| action_forward.png | Icon for the "Forward" action in the Software Installation dialog |  |
48x48 |
| background_icon.png | Icon used for the watermark | (FileWave icon) | 512x512 |
| rating_star_half.png | Icon for half a rating star |  |
40x40 |
| rating_star_off.png | Icon for a rating star that is off |  |
40x40 |
| rating_star_on.png | Icon for a rating star that is on |  |
40x40 |
| tray_icon.png | System tray icon. If missing, the background_icon.png is used. | (FileWave icon) | 16x16 |
| warning.png | Warning icon, displayed when a fileset has problems (e.g. missing VPP user) |  |
64x64 |
Related Content
Kiosk with macOS in a VM: Enabling Metal support
Description
The FileWave Kiosk requires Metal support when it runs in macOS. VMware does not enable Metal support for macOS VMs by default. You can add the VMX settings below for testing, but treat this as a workaround: the VM may become unstable and the host Mac may kernel panic.
Use cautiously
Without Metal support, the Kiosk will not open and the user logs may show messages like these:
2024-05-13 10:40:15.324 FileWave Kiosk[1241:5674] Could not acquire Metal device.
2024-05-13 10:40:25.936 FileWave Kiosk[1241:5674] Unable to create FlutterView; no MTLDevice or MTLCommandQueue available.Configuration
Shut down the VM before editing its configuration. Do not edit the file while the VM is running or paused.
Open the folder that contains the VM and find its .vmx file. For example, if the VM folder is named macOS 12.vmwarevm, the VMX file may be named macOS 12.vmx:
/Users/sholden/Documents/Virtual\ Machines/macOS\ 12.vmwarevm/macOS\ 12.vmxAdd these two lines:
appleGPU0.present = "TRUE"
svga.present = "FALSE"Start the VM after saving the file. To undo the change, shut down the VM again and remove the same two entries.
You may also need to define the display size in the same file. This example uses 1920 x 1080:
appleGPU0.screenWidth="1920"
appleGPU0.screenHeight="1080"This workaround may let the Kiosk launch in a VMware test VM, but in practice the VM often crashed or became unusable. Because the host Mac may also kernel panic, avoid this configuration unless the test requires it. Remove the entries when the test is complete.
Resolve FileWave Kiosk SSL and Manifest Validation Errors (15.3+)
What
FileWave Kiosk installation can fail on macOS or Windows with a manifest validation error followed by an SSL error. The example below was first documented with Kiosk 15.3.1.
When/Why
This usually means the device cannot reach or trust the Kiosk package host. Common causes include a content filter that classifies the host as unknown, a proxy or firewall block, or SSL inspection that changes the certificate chain.
"InstallApplication command error 2024-04-22T07:36:38 2024-04-22T07:36:38 Could not validate manifest..An SSL error has occurred and a secure connection to the server cannot be made. com.filewave.ios.app.kiosk2 "How
Check the network path used by the affected device:
-
Check the proxy, firewall, and content filter: Confirm that they allow the Kiosk package host and do not replace its certificate with an untrusted chain.
-
Allow the required URLs: Add the following entries to the appropriate allowlist:
https://fw-kiosk-v2-ipas.filewave.cloud/*.filewave.cloud
The exact rule depends on your network security product. Apply the change to the same network path used by the affected devices.
-
Retry the installation: After the network rule is active, send the installation again and check the device command history.
# Example command to verify if the URL is accessible from your network
curl -Iv https://fw-kiosk-v2-ipas.filewave.cloud/Run the command from the same network path as an affected device when possible. If the host is reachable but certificate validation still fails, inspect SSL/TLS interception and the device's trusted certificate chain.
Related Links
Digging Deeper
The combined log message points to a network or trust failure while the device validates the Kiosk manifest. Fix reachability and certificate trust first, then retry the Kiosk command.