FileVault
FileVault - Getting Started
Please Note
Setting up FileVault 2 with FileWave is supported with MDM enrolled macOS devices only! MDM enrolled devices are such that went through DEP enrollment or had the MDM profile installed manually.
These advanced steps are for system administrators and others who are familiar with the command line and FileWave.
What you need to begin
- FileWave version 12.9+
- macOS 10.9+ MDM enrolled in FileWave
- macOS devices have to be MDM enrolled in FileWave
What is FileVault 2
FileVault full-disk encryption (FileVault 2) uses XTS-AES-128 encryption with a 256-bit key to help prevent unauthorized access to the information on your startup disk.
FileVault 2 has three different decrypting mechanisms:
- If a user is a part of "FileVault users", successful login unlocks FileVault
- A Personal Recovery Key (PRK) can be generated for each user and used to unlock FileVault
- An Institutional Recovery Key (IRK) - which is actually a cryptographic key pair - can be used to unlock FileVault
Setup
Full Disk Encryption Assistant
- Open the FileWave Admin
- Assistants → Full Disk Encryption Management → FDE Configuration Management...
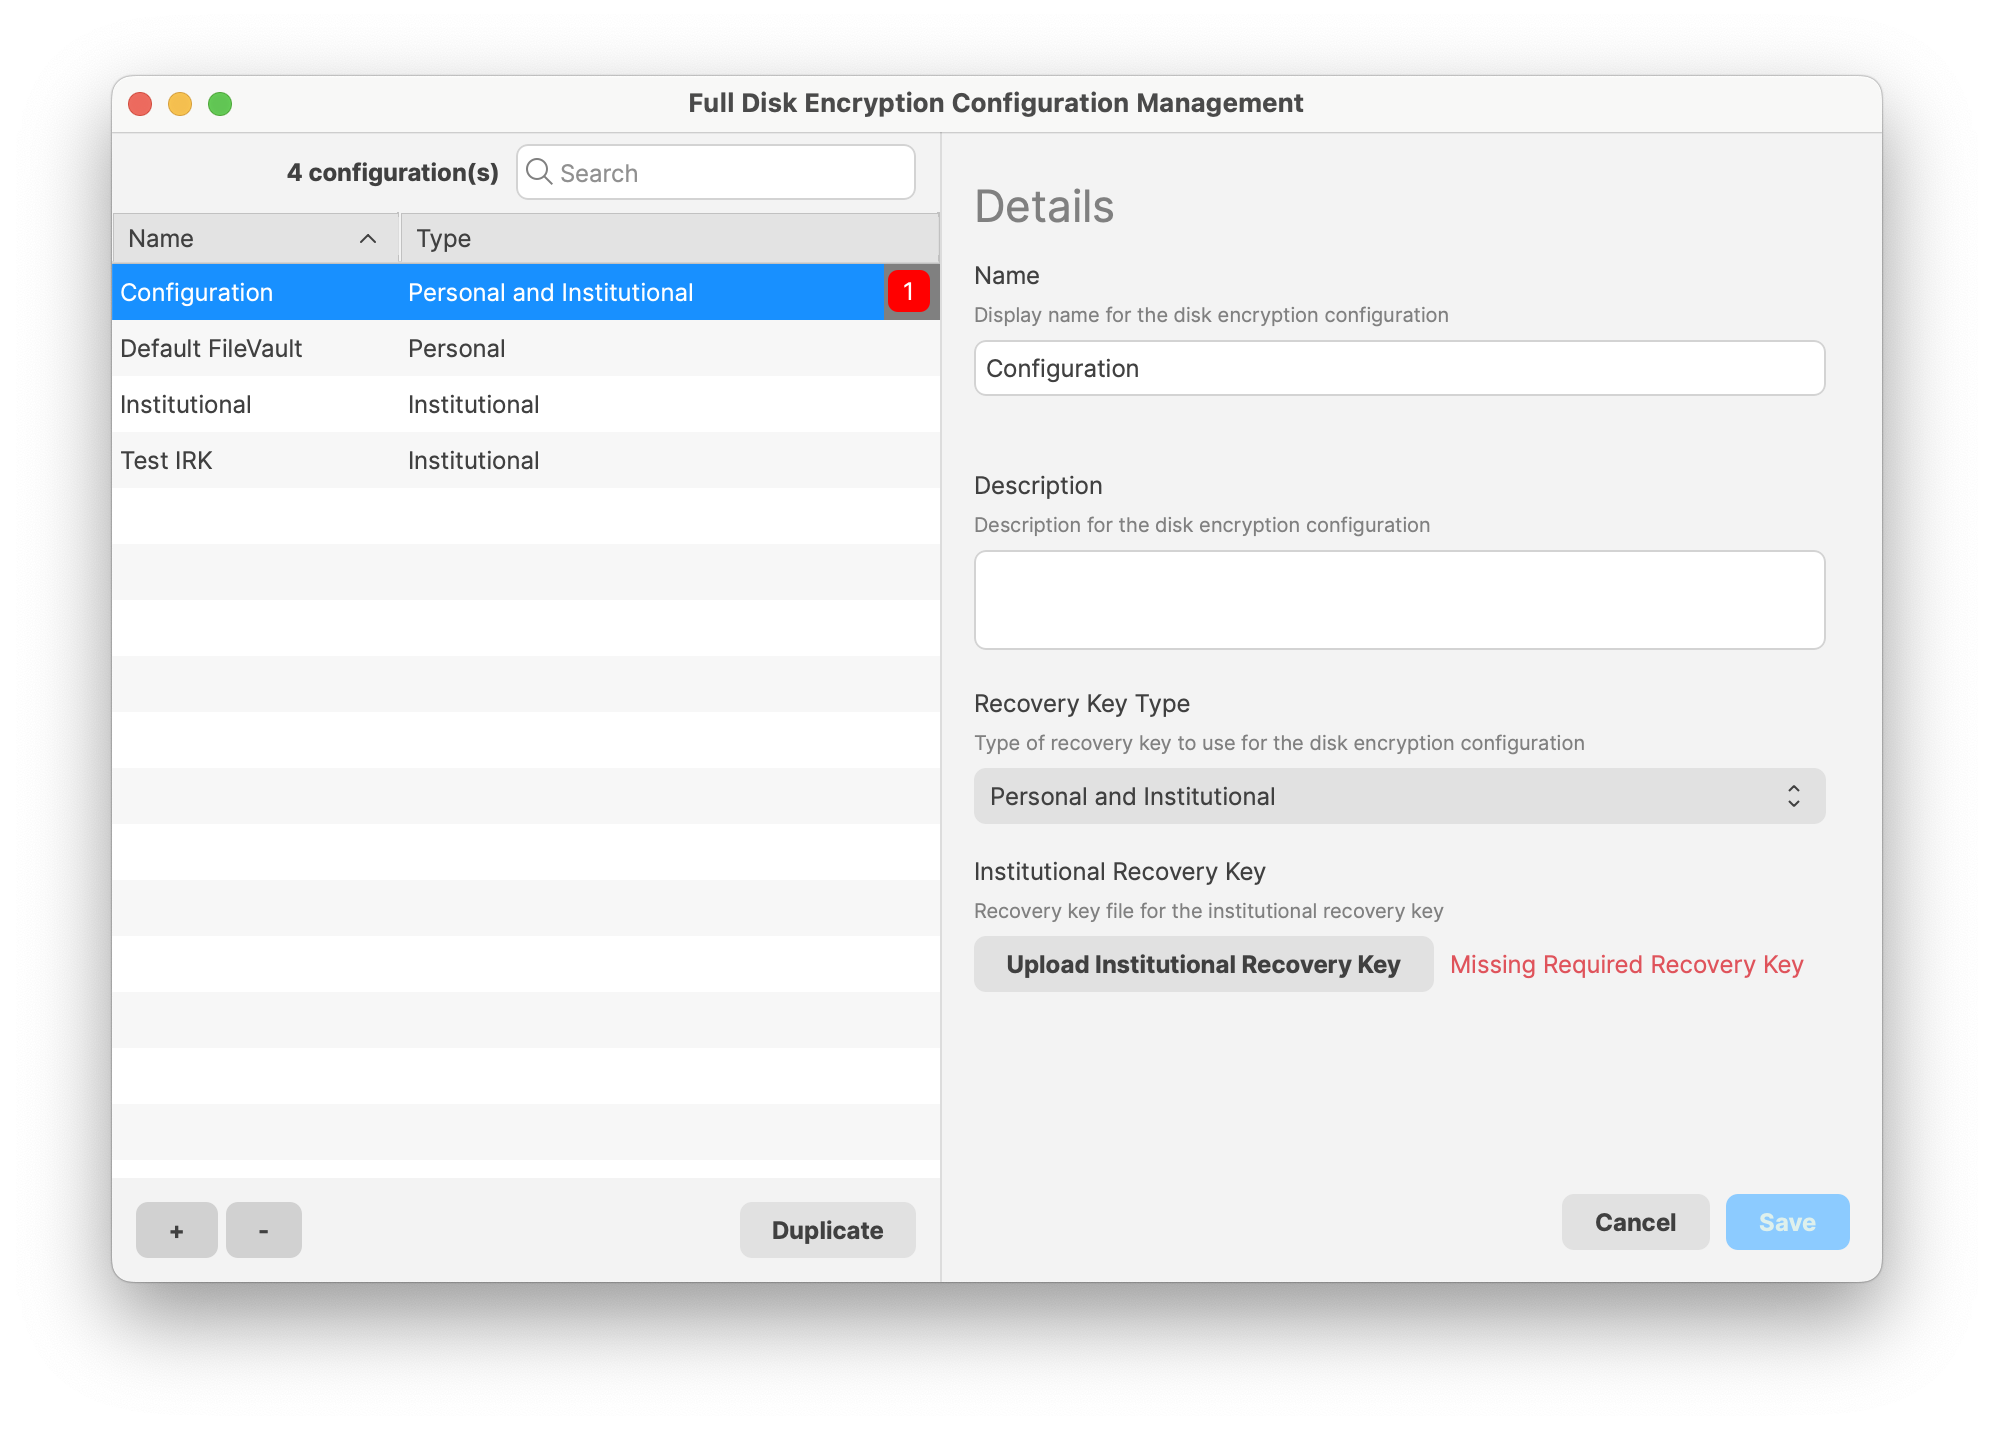
- Once you click the "+" on the bottom left you will then be able to select the recovery key type on the right
- Personal (PRK): This will prompt the user their "FileVault Recovery Key" that the end-user will need to keep for decryption (FileWave will be able to escrow this key later)
- Institutional (IRK): A key will need to be created on your macOS device and then imported into the Disk Encryption Configurations window. Please follow the steps below
Institutional Key Creation and Import
Create an IRK keychain using the following command
sudo security create-filevaultmaster-keychain ~/Desktop/FileVaultMaster.keychain- Unlock the keychain
security unlock-keychain ~/Desktop/FileVaultMaster.keychain- Open Keychain Access Utility and Add (File > Add) the keychain you just created above

- Select the keychain you just added - it should contain both certificate and private key; select both and export both as .p12 file - protect the file with a password

- Back in the Disk Encryption Configurations window upload the p12 key you just created.

-
- Personal and Institutional (IRK and PRK): Provides the end user a personal key and the institutional key can be used as well
- Save
Disk Encryption Profile
Next, we will need to set up the Apple Profile that will configure and set up FileVault 2. Again your devices need to be MDM enrolled for this payload.
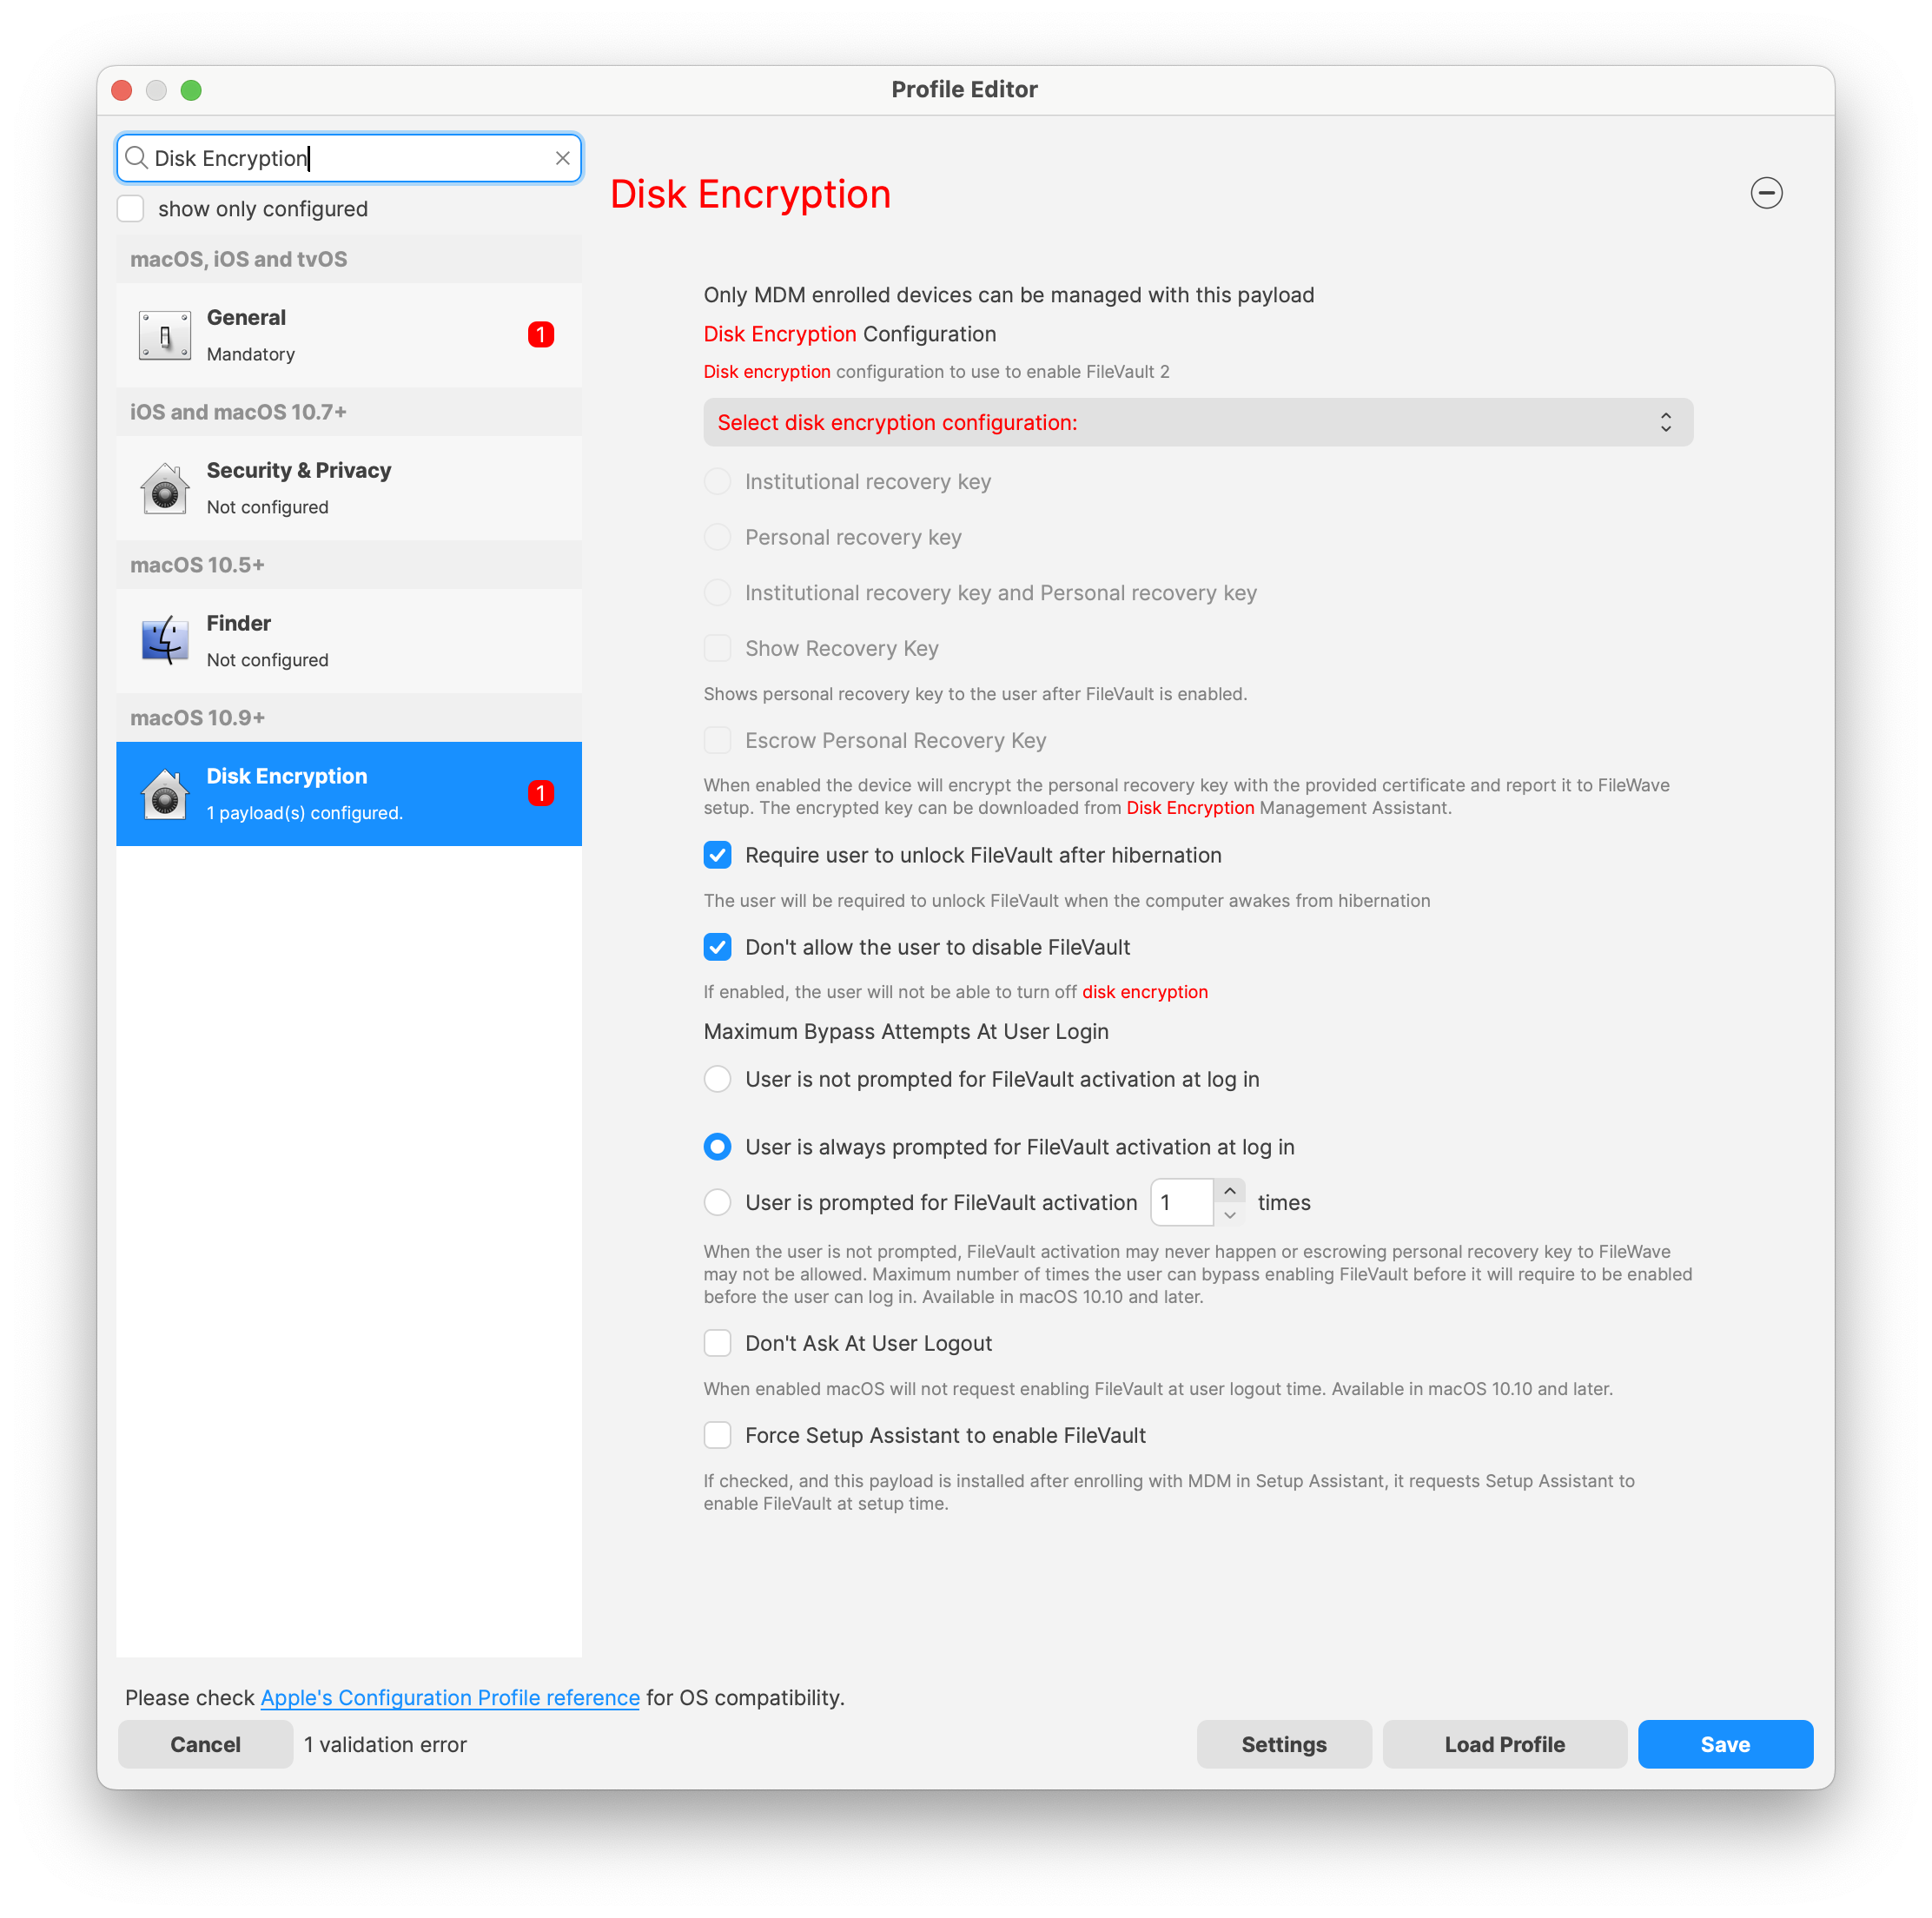
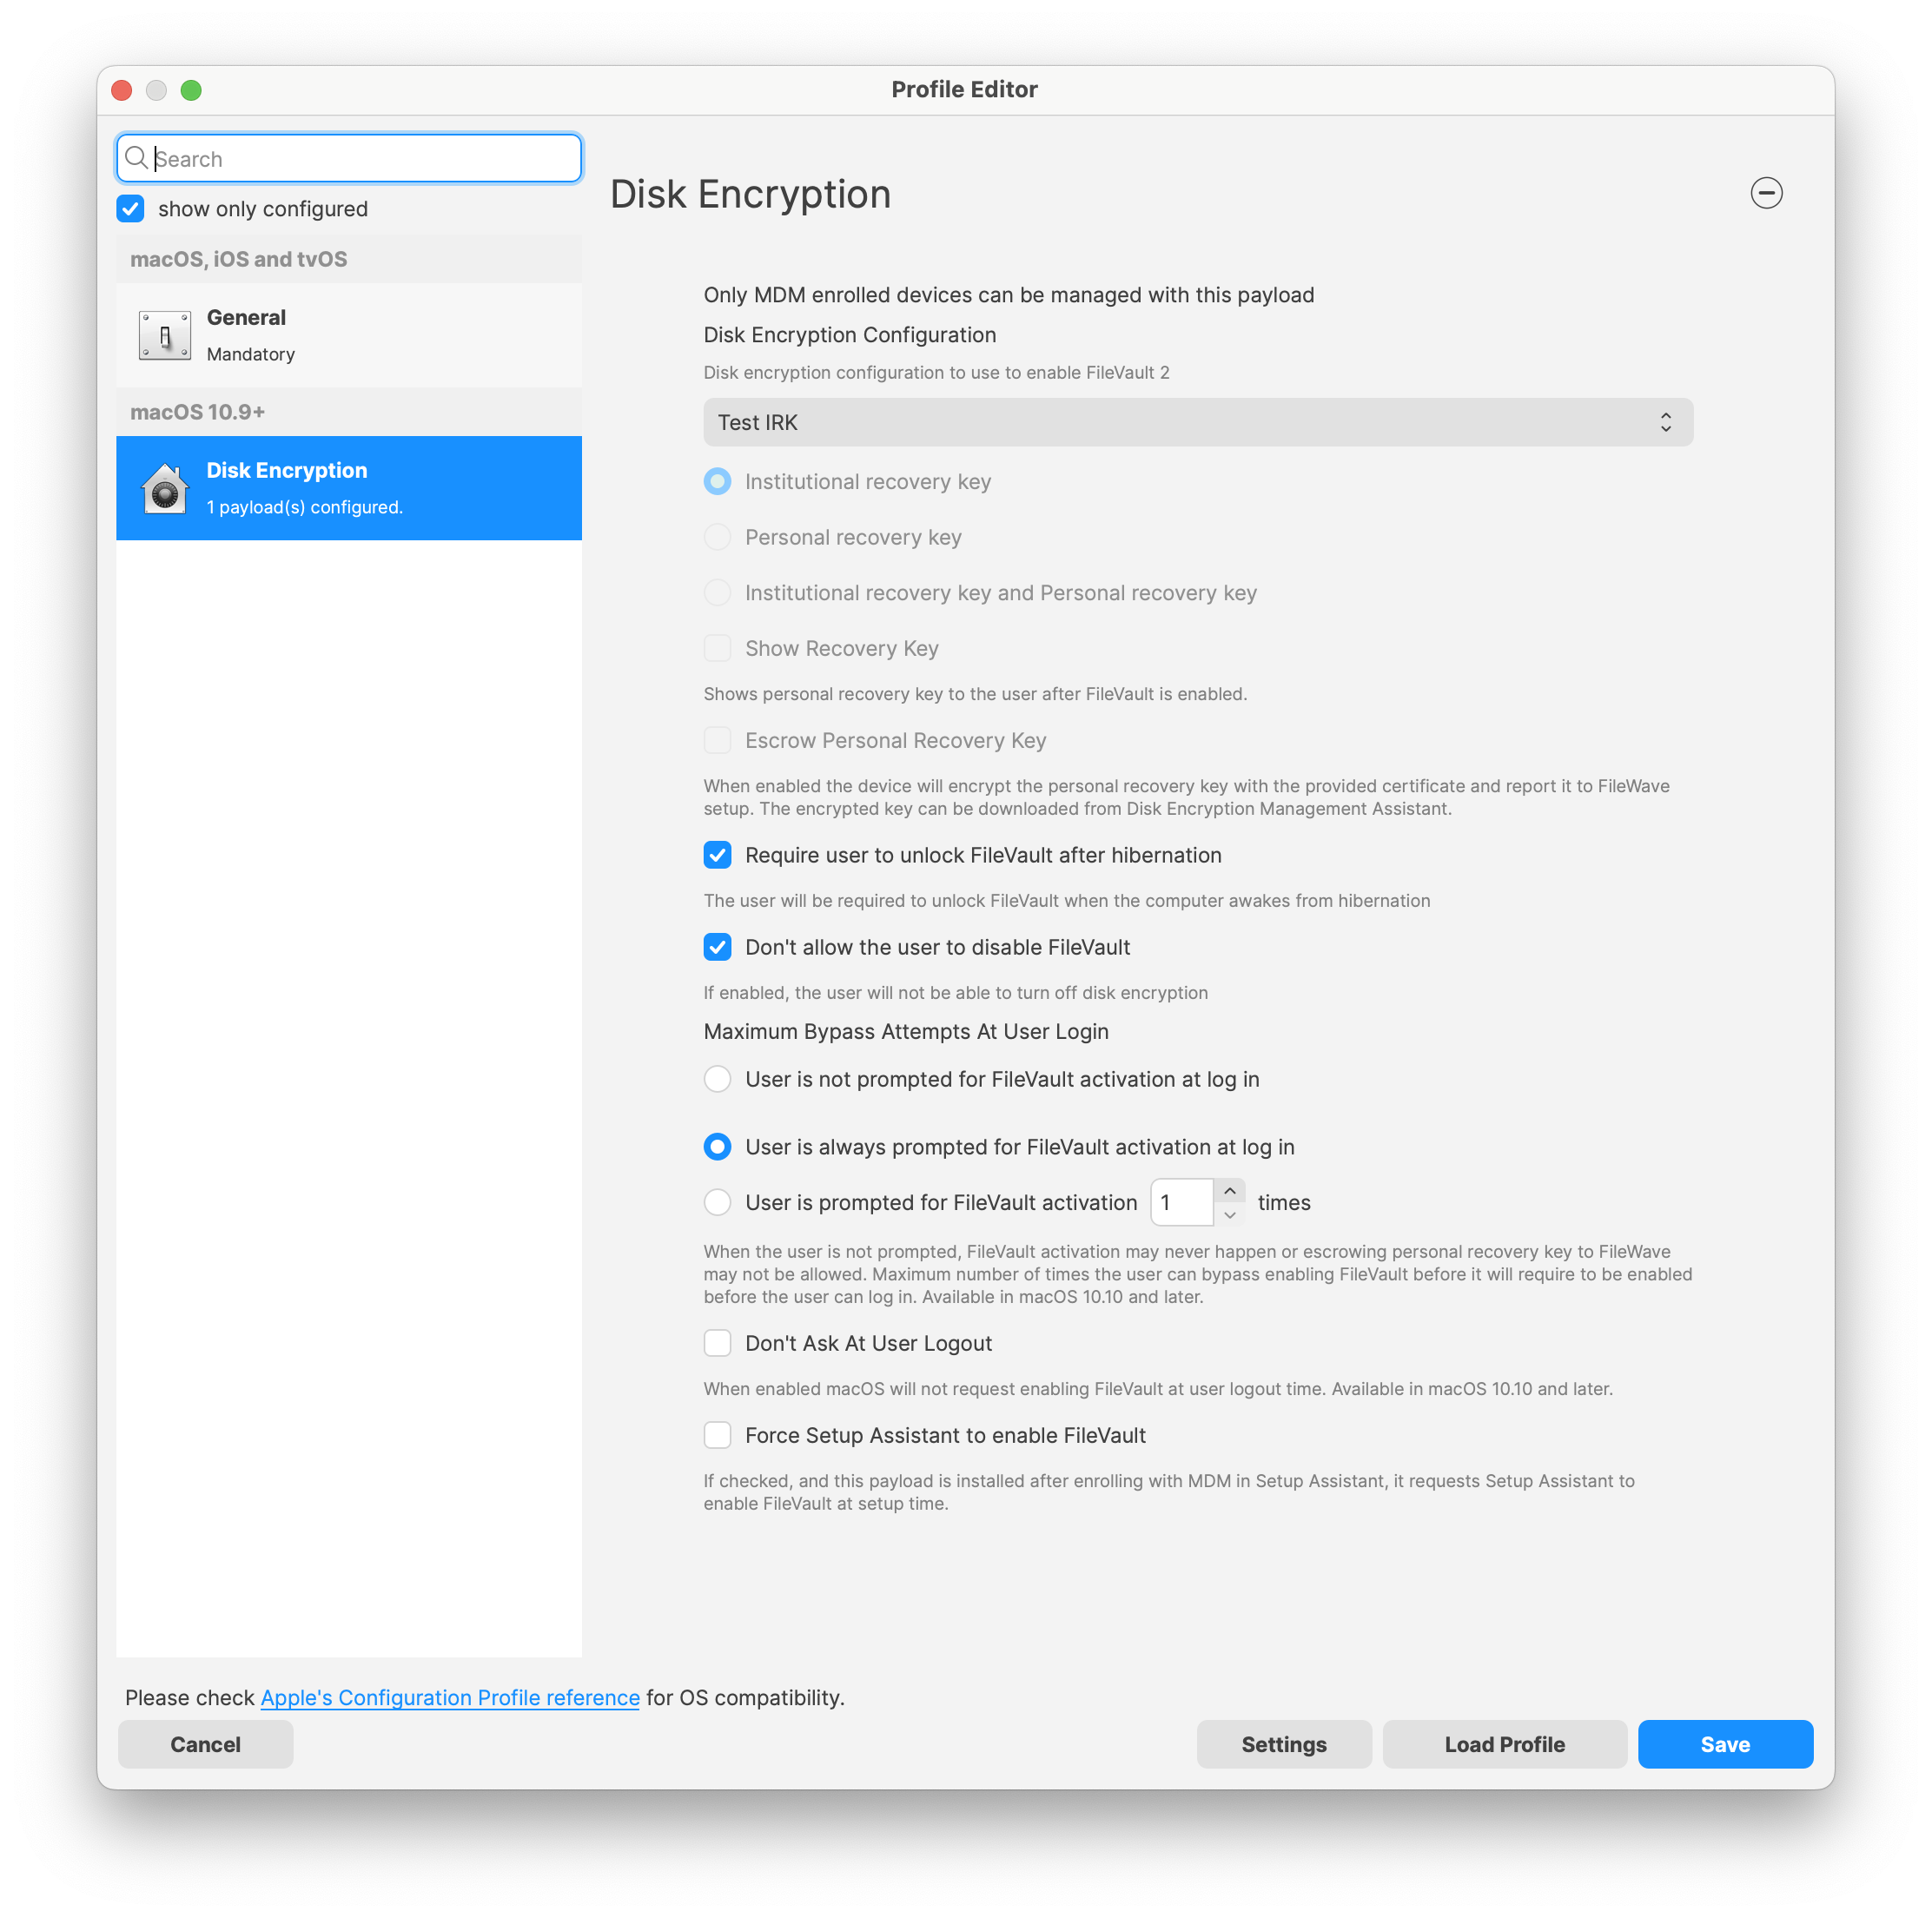
- Go to Filesets → New Desktop Filesets → Profile
- Once in the Profile Editor you will need to Fill out the General Payload then configure the Disk Encryption

- Now is the time to configure your FileVault 2 payload
If you are using the Escrow Personal Recovery Key you are required to put a description in the Escrow Location Description (macOS 10.13+) pane. This description can be informing the user where the key gets stored by default, which is /var/db/FileVaultPRK.dat. Or the description can be letting the user know to contact the technology department for more information.

IMPORTANT NOTE:
* If you use the option "User is not prompted for FileVault activation at login" There is a chance that FileVault may never fully activate. It is recommended you do not use this option.
* This payload can't be used in conjunction with other payloads in the same profile.
* Importing a profile with FileVault 2 options is not possible; FileVault 2 configuration must be created using the Assistant and Full * Disk Encryption payload; if you try to import such profile FileWave will have to remove FDE payloads before importing - FileWave can do it for you.
* If you had FDE payloads before upgrading to FileWave 12.9+, you won't be able to edit those profiles unless FileVault 2 options are removed - FileWave can do it for you.
* Escrow Personal Recovery Key is required for Authenticated Restart and being able to store the key in FileWave.
- From this point, you are ready to deploy this profile to your MDM enrolled macOS devices.
Disk Encryption Inventory Information
Now that you have FileVault 2 enabled on your device(s) you can view inventory pulled from the device(s) regarding the FileVault 2 settings:
- FDE Has Institutional Recovery Key
- FDE Has Personal Recovery Key
- FDE Is Enabled
- FDE Support
- Authenticated restart supported
- FDE Personal Recovery Key Hint Message
- Has FileWave recovery Key

Disk Encryption Recovery Key Escrow
When FileVault 2 is enabled FileWave will keep track of the configuration applied to the corresponding keys such as the Institutional Recovery Key (IRK) used to encrypt the disk and the Personal Recovery Key (PRK).
To manage these keys go to Assistants → FDE Recovery Key Management...
Once you select a device you will be able to Show Personal Recovery Key... or Download Institution Recovery Key... depending on what configuration was used to set up FileVault on that machine.
You can also delete outdated entries but keep in mind if a device has FDE managed by FileWave, it's not possible to remove FDE keys from the assistant. You have to disable FDE or remove the device from FileWave first.

Status can be:
- Disabled
- Enabled
- Pending - this is the state reported by a device between the profile installation and when FDE actually being enabled
PRK Status can be:
- Valid
- Cannot decrypt
- Invalid - no key or not a valid key
Authenticated Restart
macOS 10.13 NOT SUPPORTED
Authenticated restart using Personal Recovery Key does not work on macOS 10.13+ on APFS
This option is for Personal Recovery Key only; Institutional Keys are not supported with this option
When FileVault 2 is enabled, the device will be locked on startup. At this stage, FileWave does not connect to the device until the drive is unlocked. You need to be aware of this if you have FileVault 2 enabled on a device and then send out a Fileset that requires a reboot! After the reboot, the end-user will have to unlock the drive before the deployment can finish.
FileWave may be able to help with this using Authenticated Restart as a Fileset option. If you selected the option Escrow Personal Recovery Key when you created the Disk Encryption Profile to enable FileVault 2 then FileWave will be able to use the authenticated restart to unlock the drive without user interaction.
This option is located in the Fileset Properties for any Fileset you are requiring a reboot for.
Right-click on Fileset → Properties → Select Requires Reboot

Possible Security Risk
Keep in mind using this option can be seen as a security risk and should be used accordingly. The device will reboot unlocked so access to encrypted data is possible and until the device reboots, an escrow key is stored in memory but still encrypted.
Recent versions of macOS for FileVault IRKs
The use of Institutional FileVault keys, also known as Institutional Recovery Keys (IRK), is no longer recommended in recent versions of macOS, including macOS Ventura. The utility of IRKs for organizations has become limited, particularly on Macs with Apple Silicon, where IRKs provide no functional value. This is because IRKs can't be used to access recoveryOS, and because Target Disk Mode is no longer supported, the volume can't be unlocked by connecting it to another Mac.
Instead, the use of a Personal Recovery Key (PRK) is now recommended. A PRK provides an extremely robust recovery and operating system access mechanism, unique encryption per volume, escrow to MDM, and easy key rotation after use.
Moreover, there is only one PRK per encrypted volume. During FileVault enablement from MDM, the PRK can optionally be hidden from the user. When configured for escrow to MDM, MDM provides a public key in the form of a certificate, which is then used to asymmetrically encrypt the PRK in a CMS envelope format. The encrypted PRK is returned to MDM in the security information query, which can then be decrypted for viewing by an organization. Many MDM vendors provide the option to manage these keys to allow for viewing directly in their products. MDM can also optionally rotate PRKs as often as is required to help maintain a strong security posture—for example, after a PRK is used to unlock a volume
Additional information managing FileWave in macOS: Managing FileVault in macOS
Information regarding recent versions of macOS managing FileVault: Manage FileVault with mobile device management
Related Content
FileVault 2 enabled on macOS ADE enrollment
What
After you have configured FileVault management in FileVault - Getting Started, you can require FileVault during Automated Device Enrollment for supported macOS devices.
When/Why
FileVault protects data at rest on macOS devices. Requiring FileVault during enrollment helps ensure a Mac is encrypted before it is put into regular use, which is especially important for laptops assigned to staff who may handle sensitive data.
On macOS 14.0 or later, FileWave can enable Apple's Setup Assistant FileVault enforcement during ADE enrollment.
How
Before enabling this option, complete the FileVault configuration described in FileVault - Getting Started. Use a supported FileWave release, target devices running macOS 14.0 or later, and a FileVault disk encryption profile available for the enrollment workflow.
- In FileWave Central, go to Assistants > DEP Association Management.
- Create or edit the DEP/ADE enrollment profile you want to use.
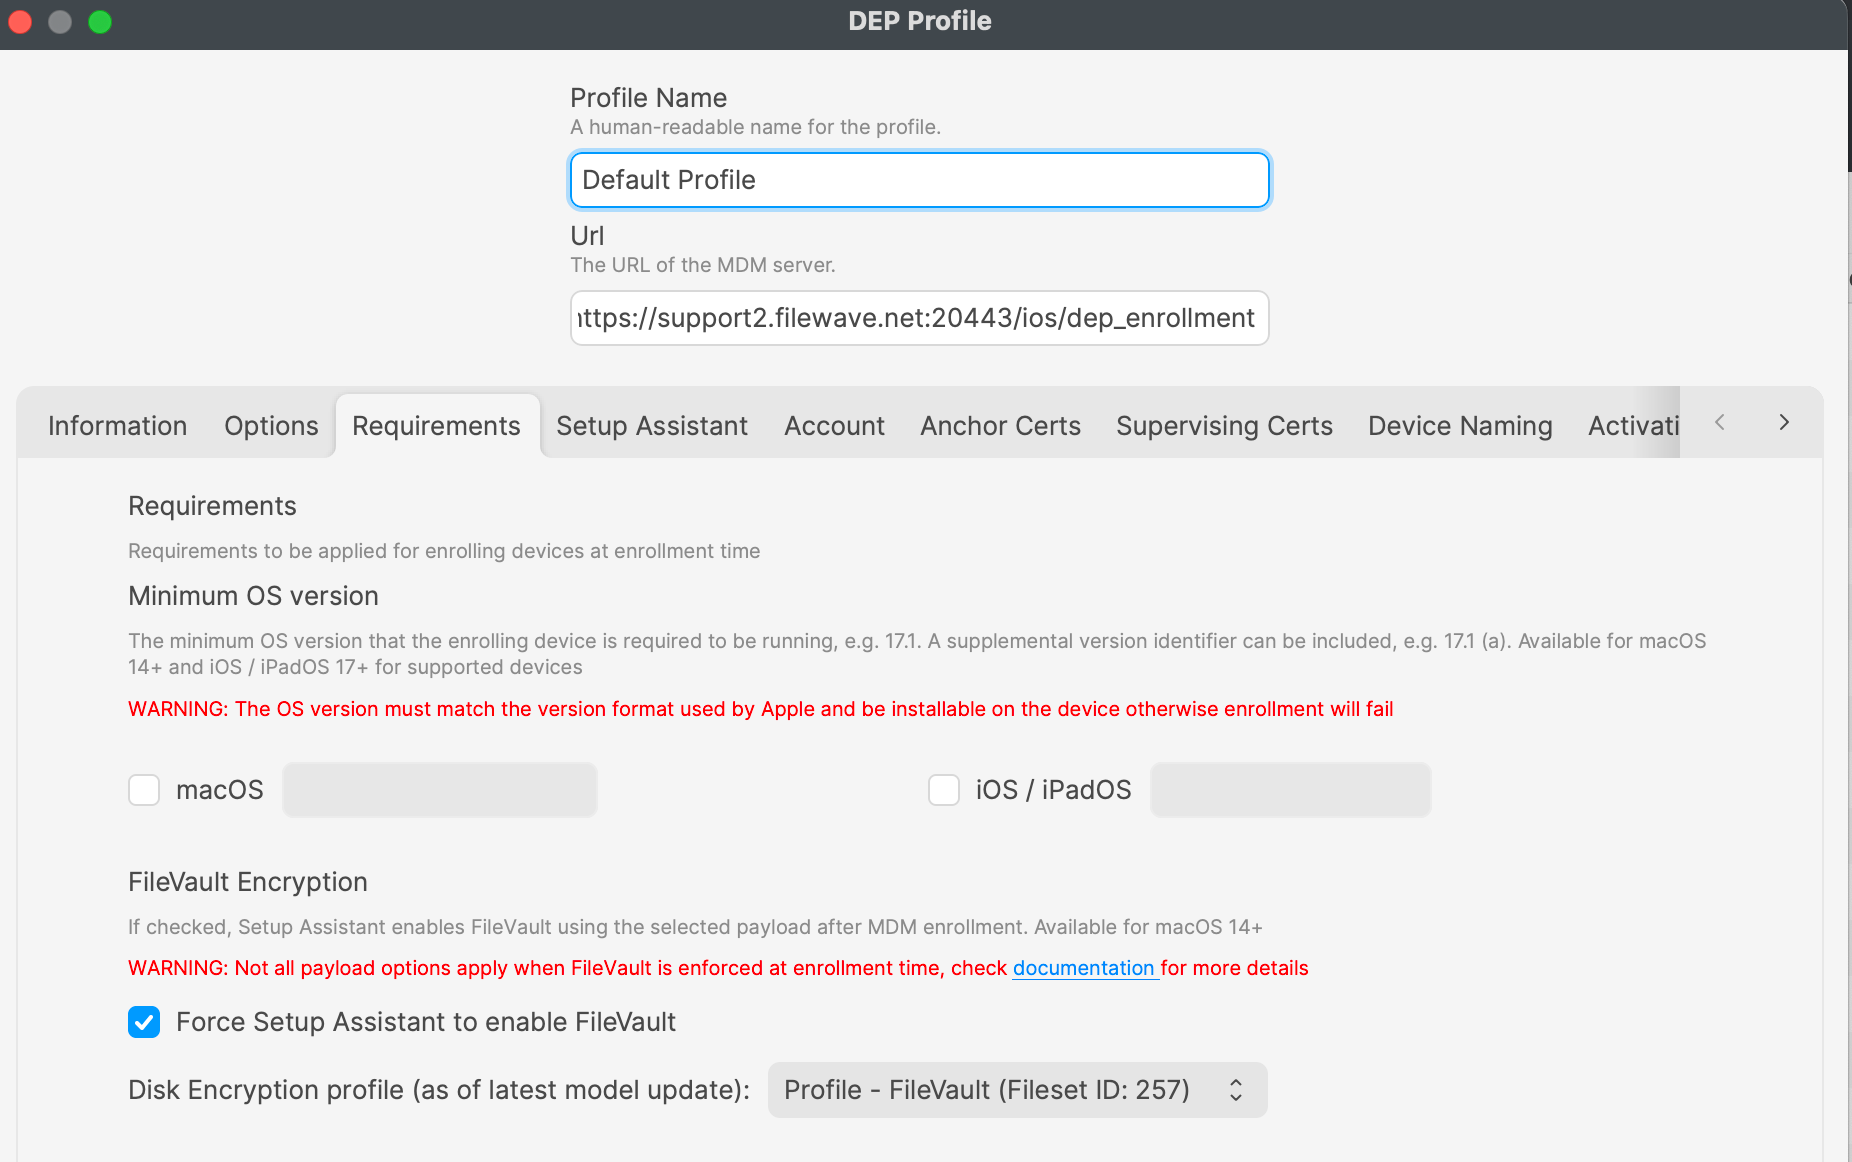
- On the profile's Requirements tab, enable Force Setup Assistant to enable FileVault.
- Select the FileVault disk encryption profile that should be used during enrollment.
- Assign the enrollment profile as the default profile or apply it only to the devices that should use this workflow.
Test with one device before wider rollout. Confirm that the FileVault prompt appears during Setup Assistant and verify that your recovery-key workflow works as expected before assigning the profile broadly.