macOS 26.4 will start to notify end users that Rosetta will be end of life in macOS 27. Source: [Apple EOL Advisory: Intel-Based Apps and Rosetta Dependencies on Apple Silicon](https://kb.filewave.com/books/end-of-life-statements/page/apple-eol-advisory-intel-based-apps-and-rosetta-dependencies-on-apple-silicon "Apple EOL Advisory: Intel-Based Apps and Rosetta Dependencies on Apple Silicon")
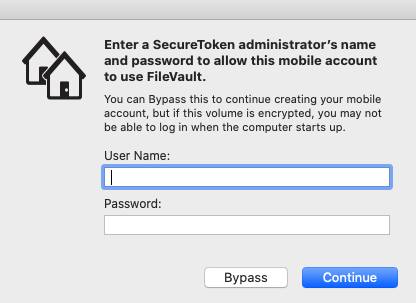
Prior FileWave client installers were for Intel only and relied on the PKG installer to install Rosetta 2 for M1 / M2 compatibility. Rosetta 2 will not be disabled on clients that already have Rosetta 2 enabled. Since newly enrolled clients, starting with 14.8.x+, will not install Rosetta 2, any other software requiring Rosetta 2 will require a Fileset to install Rosetta 2. Note that the Administrator app still requires Rosetta 2. ## When/Why This update is for Apple M1 / M2 devices only. The installer is now a universal binary for either processor type. ## How Both the standalone DMG installer and the Custom PKG will now support both Intel and M1 / M2 natively. Create a new 14.8+ FileWave client installer from our [Custom PKG Builder](https://custom.filewave.ch/py/custom_client_mac.py). The client upgrade Fileset will naturally be taken as native by macOS also. ### Enable Rosetta 2 Below is an example of a script that could be used to enable Rosetta 2 through FileWave if still required for other software like the FileWave Administrator app: ```bash #!/bin/zsh # Determine OS version osvers=$(sw_vers -productVersion) # Check to see if macOS is 11 or greater if [ ${osvers%%.*} -ge 11 ]; then # Check processor type processor=$(/usr/bin/uname -p) if [[ "$processor" != "arm" ]]; then echo "$(date) processor: ${processor}. No need to install Rosetta." else # Check if Rosetta process is running and instal if not found, # perform a non-interactive install of Rosetta. if [[ ! $(/usr/bin/pgrep -x oahd) ]]; then /usr/sbin/softwareupdate --install-rosetta --agree-to-license if [[ $? -eq 0 ]]; then echo "$(date) Rosetta has been successfully installed." else echo "$(date) Rosetta installation failed!" exitcode=1 fi else echo "$(date) Rosetta already installed. Nothing to do." fi fi else echo "$(date) Mac is running macOS $osvers" echo "$(date) No need to install Rosetta on this version of macOS." fi exit 0 ``` Here is a Fileset that uses the above example script: [Install Rosetta 2.fileset.zip](https://kb.filewave.com/attachments/345) # Bootstrap Token Management on macOS ## Introduction macOS 10.15 Catalina introduces a new method of SecureToken enablement called Bootstrap Token. This is an MDM-based management feature to automatically provide a [SecureToken](https://help.apple.com/deployment/macos/#/apd8faa99948) on all mobile account logins. This does not affect how local accounts get SecureTokens. ### What is SecureToken? Apple introduced Secure Token as a method of creating a “chain of trust” on a machine. The result was that only a trusted user could be created from another trusted user, and only those trusted users could leverage FileVault. This ensured that - from Apple’s perspective - the machine and users on it are secure. For many Mac admins, the Secure Token feature introduced with macOS High Sierra has been a cause for great consternation. It has forced IT teams to adjust their management workflows to be able to administer and manage devices differently, given that Secure Tokens are critical in order to safely create Mac users and manage their FileVault full disk encryption (FDE) credentials. ### Why the Consternation with SecureToken? The challenge presented by the introduction of Secure Token was that the chain of trust ultimately made user and FileVault management much more challenging. An organization’s mobile and network accounts with Apple devices did not have the ability to create users that would be granted Secure Tokens. Only the original user on the machine was granted a Secure Token and only that account could go on to create subsequent users that would properly be granted a Secure Token. This overhead severely impacted the ability of Mac admins to remotely manage their fleet of Mac systems. ### What is the Benefit of Bootstrap Token? Catalina can give the first mobile account to log in a SecureToken if no other accounts have a SecureToken yet, but the benefit of Bootstrap Token comes when multiple users log into an encrypted machine. All mobile accounts that log in automatically get a SecureToken without having to hand one off manually. ### What Happens Under the Hood? If support of Bootstrap Token management is implemented on the MDM server-side, during device enrollment command Settings / MDMOptions with flag AllowBootstrapToken = True should be sent to the device. In this case, the device will send SetBootstrapToken and GetBootstrapToken requests to the MDM server later at the appropriate time. To check the current status see "checking status" below There are two main communications for SecureToken: SetBootStrapToken and GetBootstrapToken. #### SetBootstrapToken request When the first admin account is created (see Figure 1.1), MDM request SetBootstrapToken (requires DEP enrolled client) is sent from the device to the FileWave MDM server. The MDM server handles this request by storing the Bootstrap Token for the device in the appropriate place (FileWave encrypts and stores this in the inventory database).| [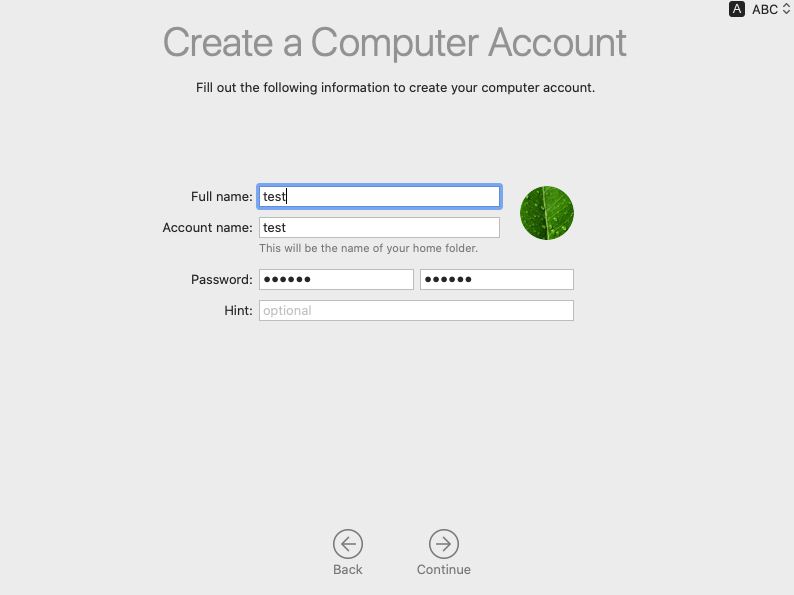](https://kb.filewave.com/uploads/images/gallery/2023-07/6BloxDYcNkOQ9vSN-image.png) |
| Figure 1.1 |
Warning: There is one limitation - If you automatically create an admin during enrollment, the SetBootstrapToken request will not be sent.
| [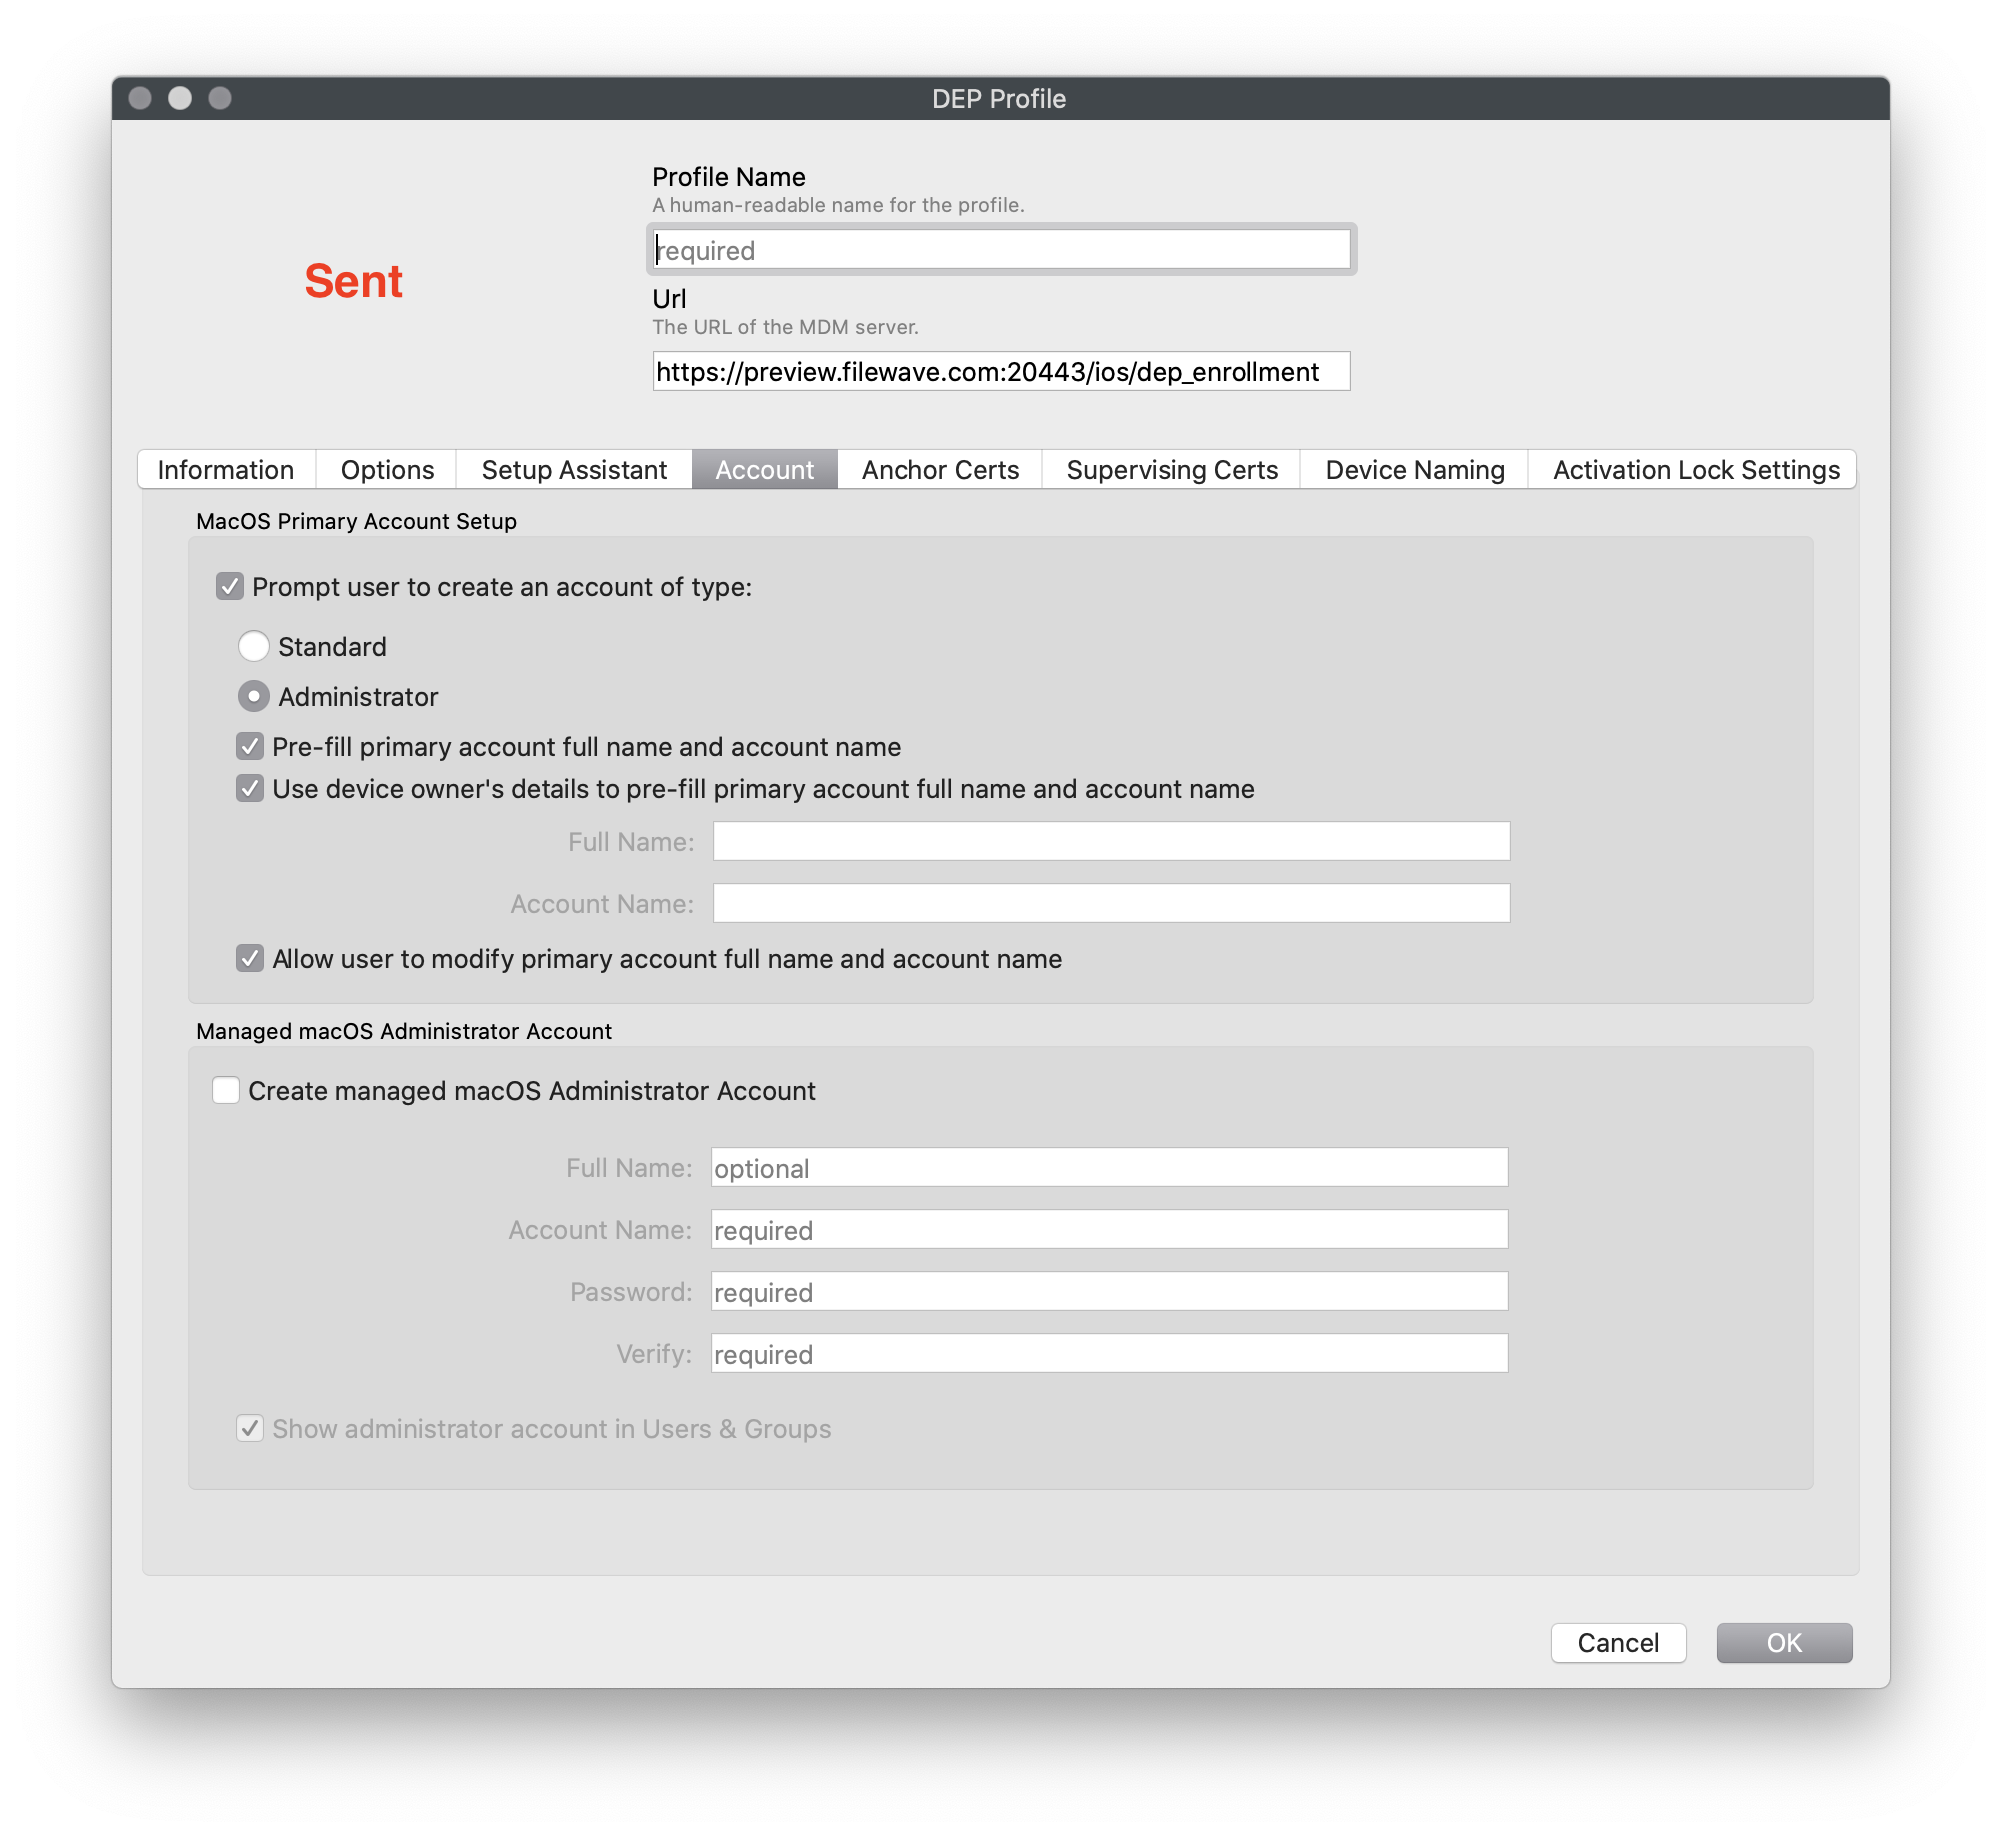](https://kb.filewave.com/uploads/images/gallery/2023-07/anySlZFZHcnpK59C-image.png) | [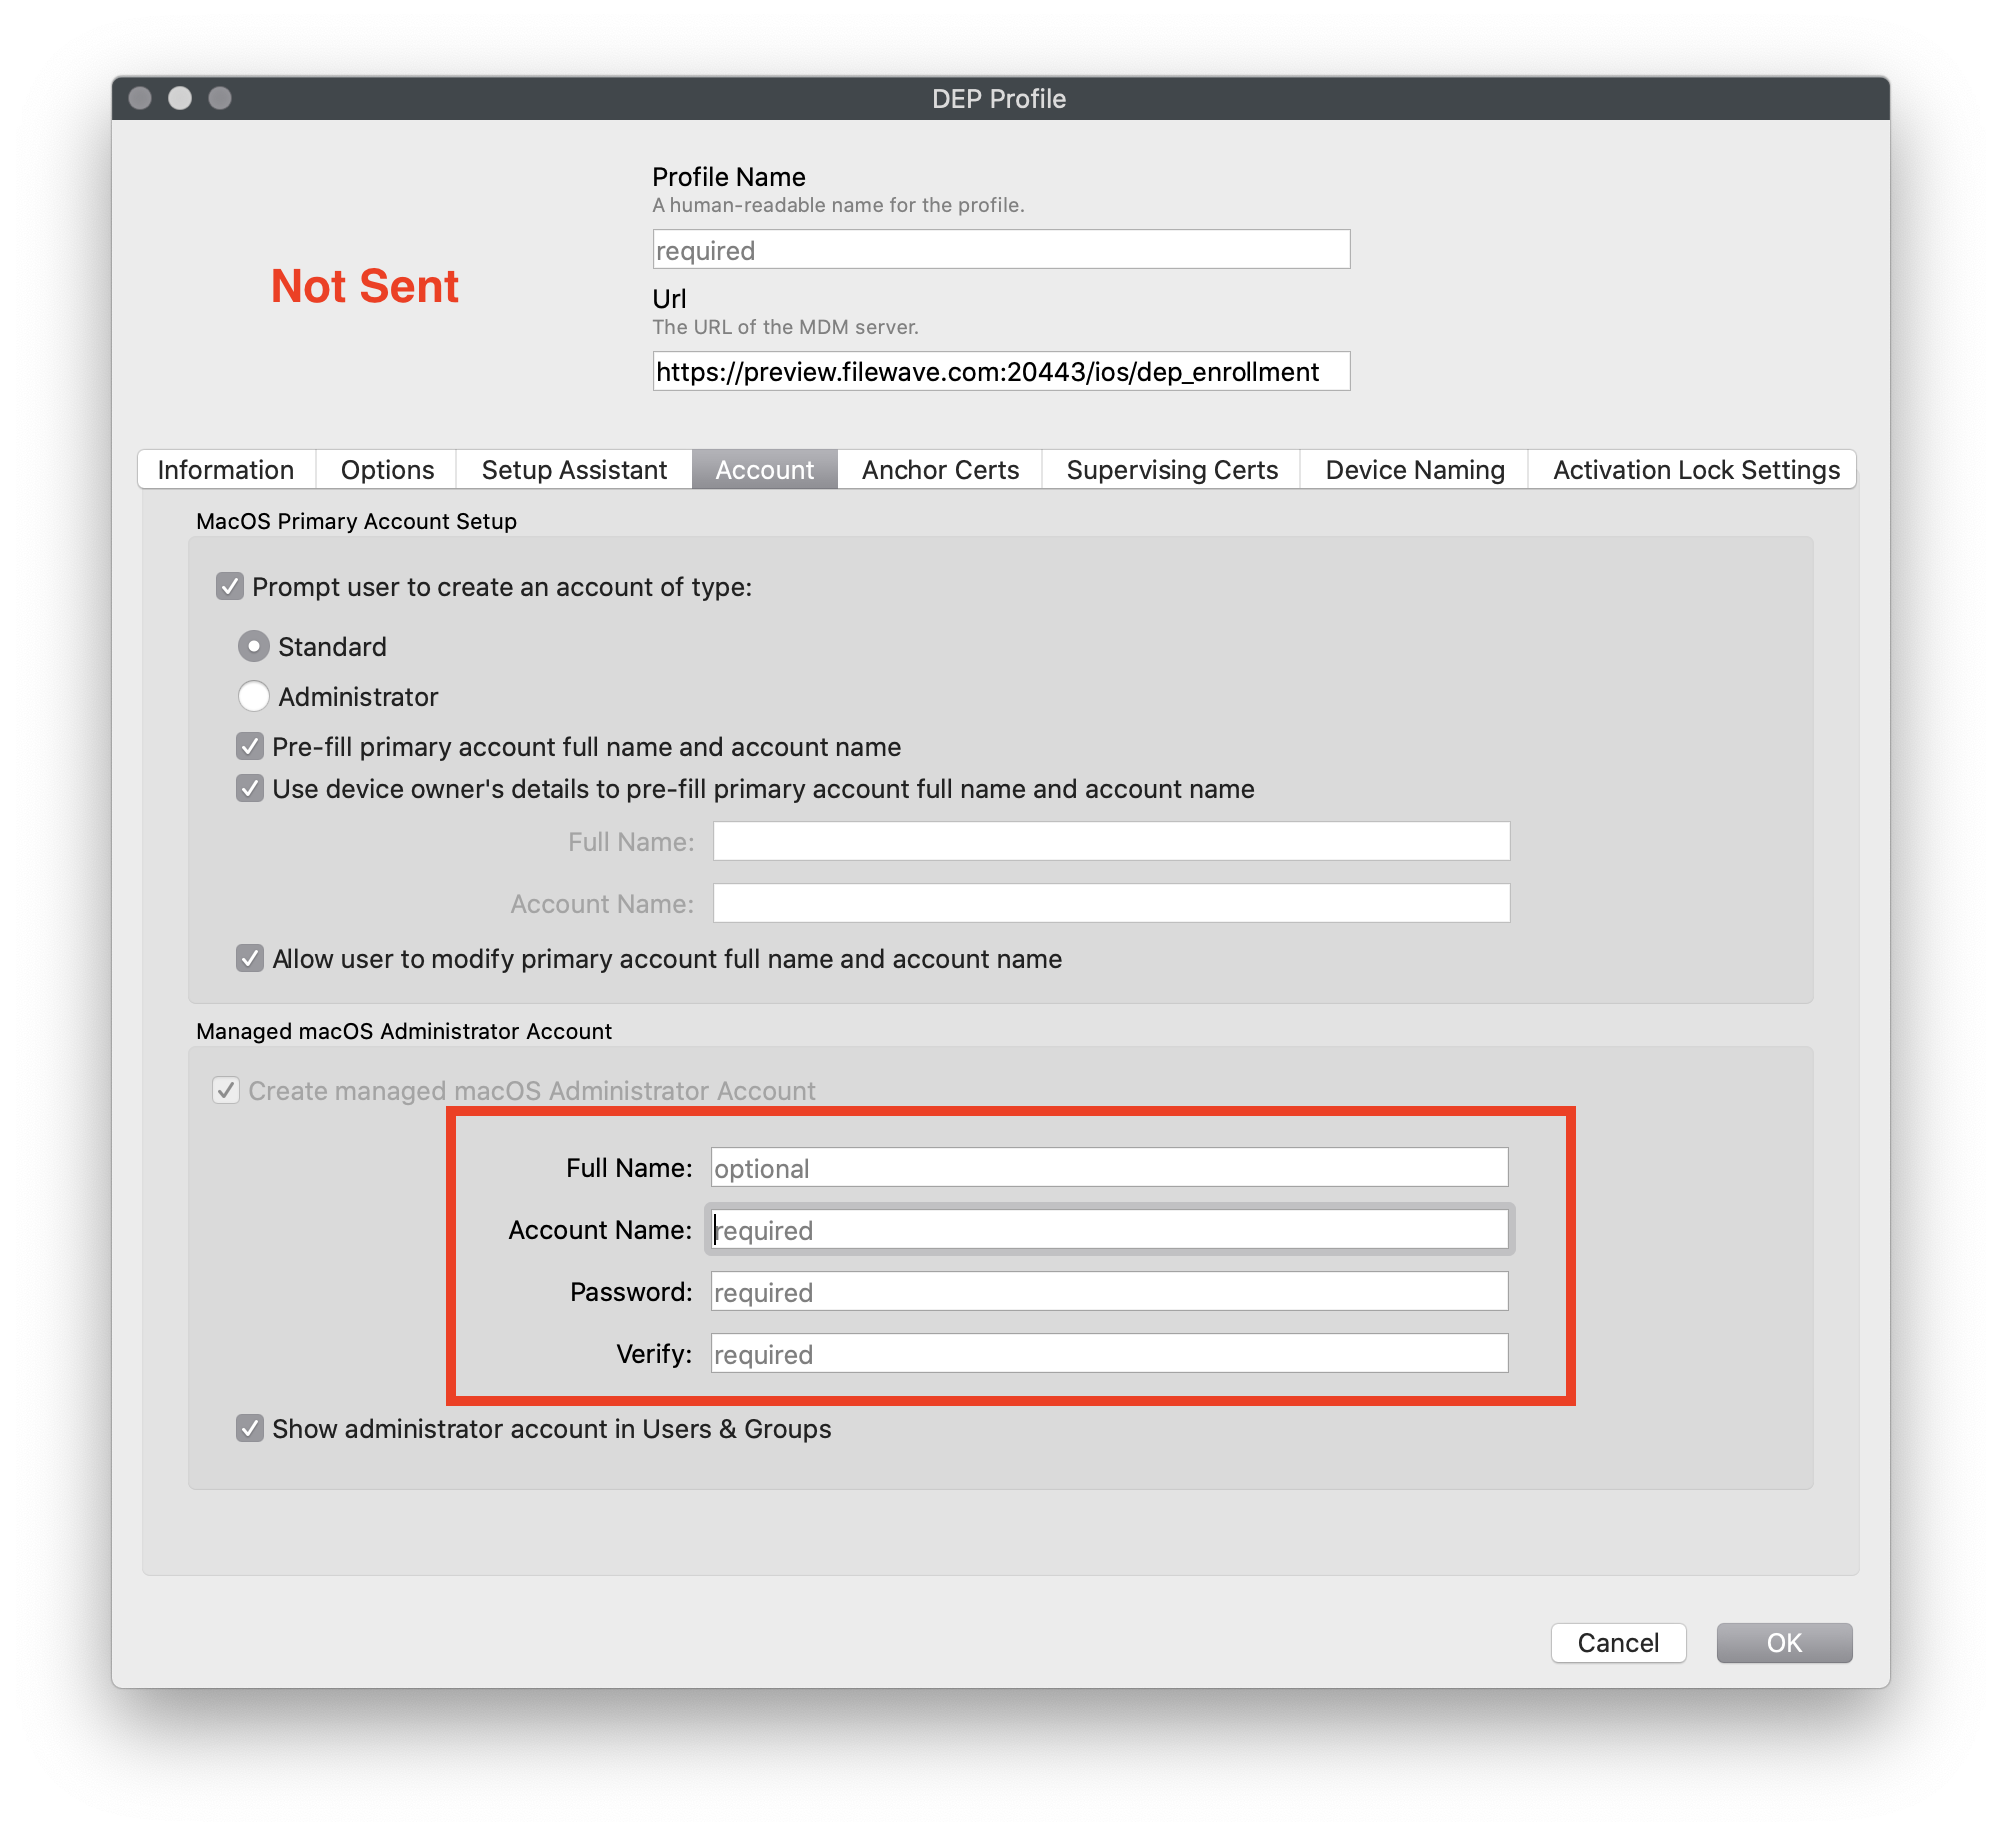](https://kb.filewave.com/uploads/images/gallery/2023-07/zfOSJJCc3VUEuliV-image.png) |
| Figure 1.2 - Not Suppressed (Token sent) This is Default DEP | Figure 1.3 - Suppressed (Token will not be sent) Setup assistant user is standard |
| [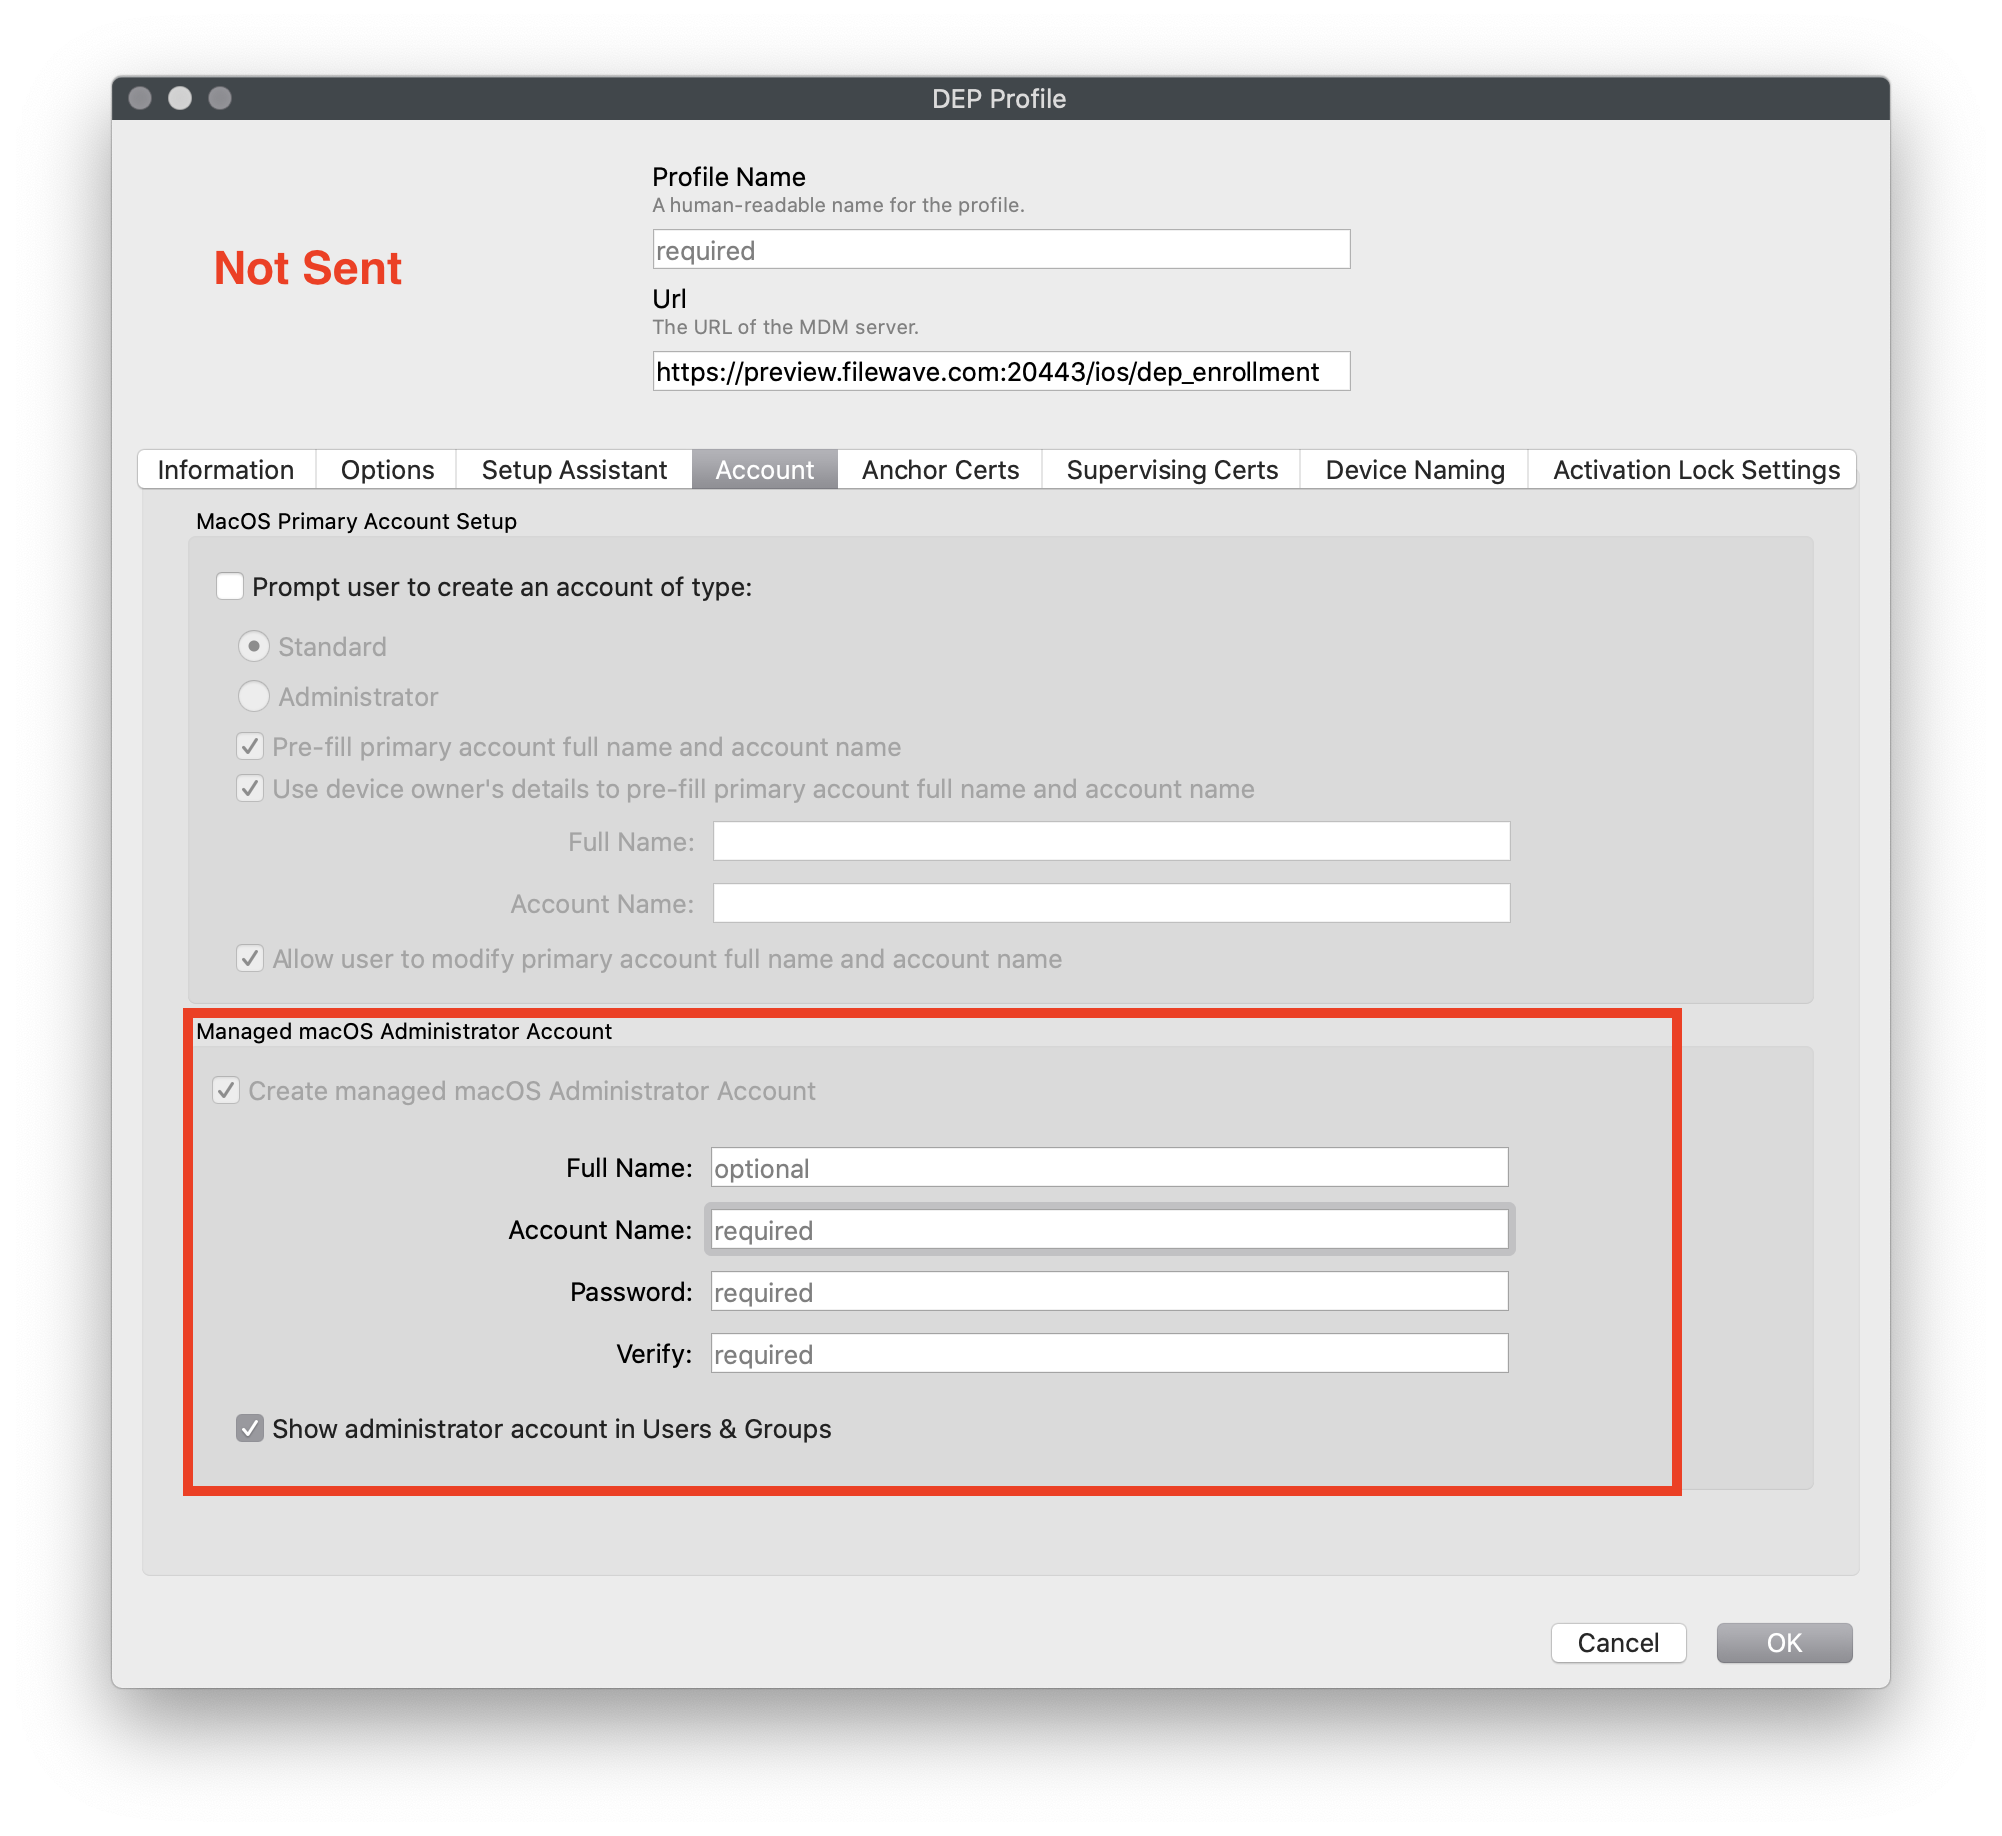](https://kb.filewave.com/uploads/images/gallery/2023-07/ny862Au0Y744AbL6-image.png) |
| Figure 1.4 - Suppressed (Token will not be sent) No user during setup assistant |
| Trigger Escrow |
| Escrowing of Bootstrap Token to server can be called with: ```shell profiles install -type bootstrap token ``` If the SetBootstrapToken request was properly sent to your MDM server, the output will be ``` profiles: Create Bootstrap Token created profiles: Bootstrap Token created profiles: Bootstrap Token escrowing to server... profiles: Bootstrap Token escrowed ``` If you got this error after the initial command: ```shell Error: The profile type option was not recognized. ``` The FileWave server may not be able to handle the request; make sure it is running 13.2 or greater |
| Server Supported | Server Does not support |
| ``` profiles: Bootstrap Token supported on server: YES ``` | ``` profiles: Bootstrap Token supported on server: NO ``` |
| Not Escrowed | Escrowed Done |
| If the Bootstrap Token was not escrowed on the server (SetBootstrapToken request was not sent to MDM server or was not handled by MDM server properly), the output will be: ``` profiles: Bootstrap Token escrowed on server: NO ``` You can manually trigger (see "Trigger Escrow") | If the Bootstrap Token is already on the server the output will be: ``` profiles: Bootstrap Token escrowed on server: YES ``` |
| [](https://kb.filewave.com/uploads/images/gallery/2023-07/pX0Q5tWa2NbnTBT7-image.png) |
| Figure 2.1 |
To disable SecureToken for an admin, use:
```bash sysadminctl -secureTokenOff ```To check if Secure Token is enabled or not, use:
```bash adminsysadminctl -secureTokenStatus ``` ### **Example 2** - mobile account is created automatically when profile Mobility is used With macOS 10.15 and FileVault turned on, profile Mobility was installed on the device with the option 'Create mobile account when user logs in to network account'.| [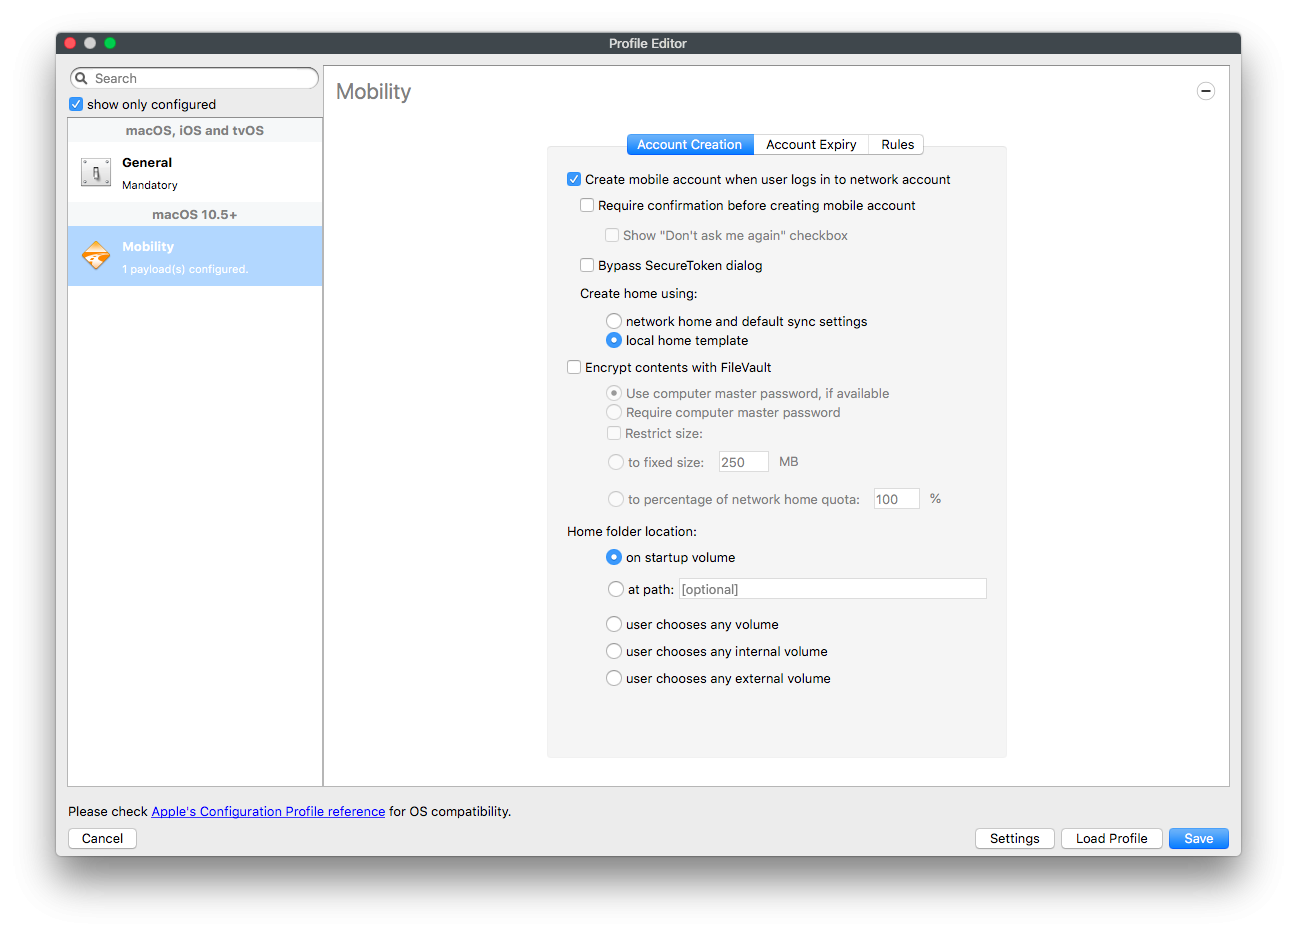](https://kb.filewave.com/uploads/images/gallery/2023-07/juvzsrriAlV9oZzS-image.png) |
| Figure 2.2 |
Tested on macOS Ventura and Sonoma (macOS 13+). The script should reflect a proper success or failure in Fileset Status if the AdminPassword or AdminUsername value is incorrect.
# Customised Screen Saver (macOS) ## Description Use this example Fileset to install a custom macOS screen saver (.saver) that displays a static image or custom HTML/JavaScript, then set it as the login window screen saver with a profile. ## Ingredients - FileWave Central - Example Fileset: [Example\_FileWave.saver.zip](https://kb.filewave.com/attachments/156) Taken from: [https://github.com/tlrobinson/WebSaver](https://github.com/tlrobinson/WebSaver) ## Directions ### Fileset Installation 1. Download and unzip the `Example_FileWave.saver.zip` attachment from this article. 2. Import the Fileset in FileWave Central. ### Customize the screen saver name (optional) - Open the Fileset contents. - Expand `/var/scripts/498452`. The number will differ in your Fileset. - Select `FileWaveExampleScreenSaver.sh`. 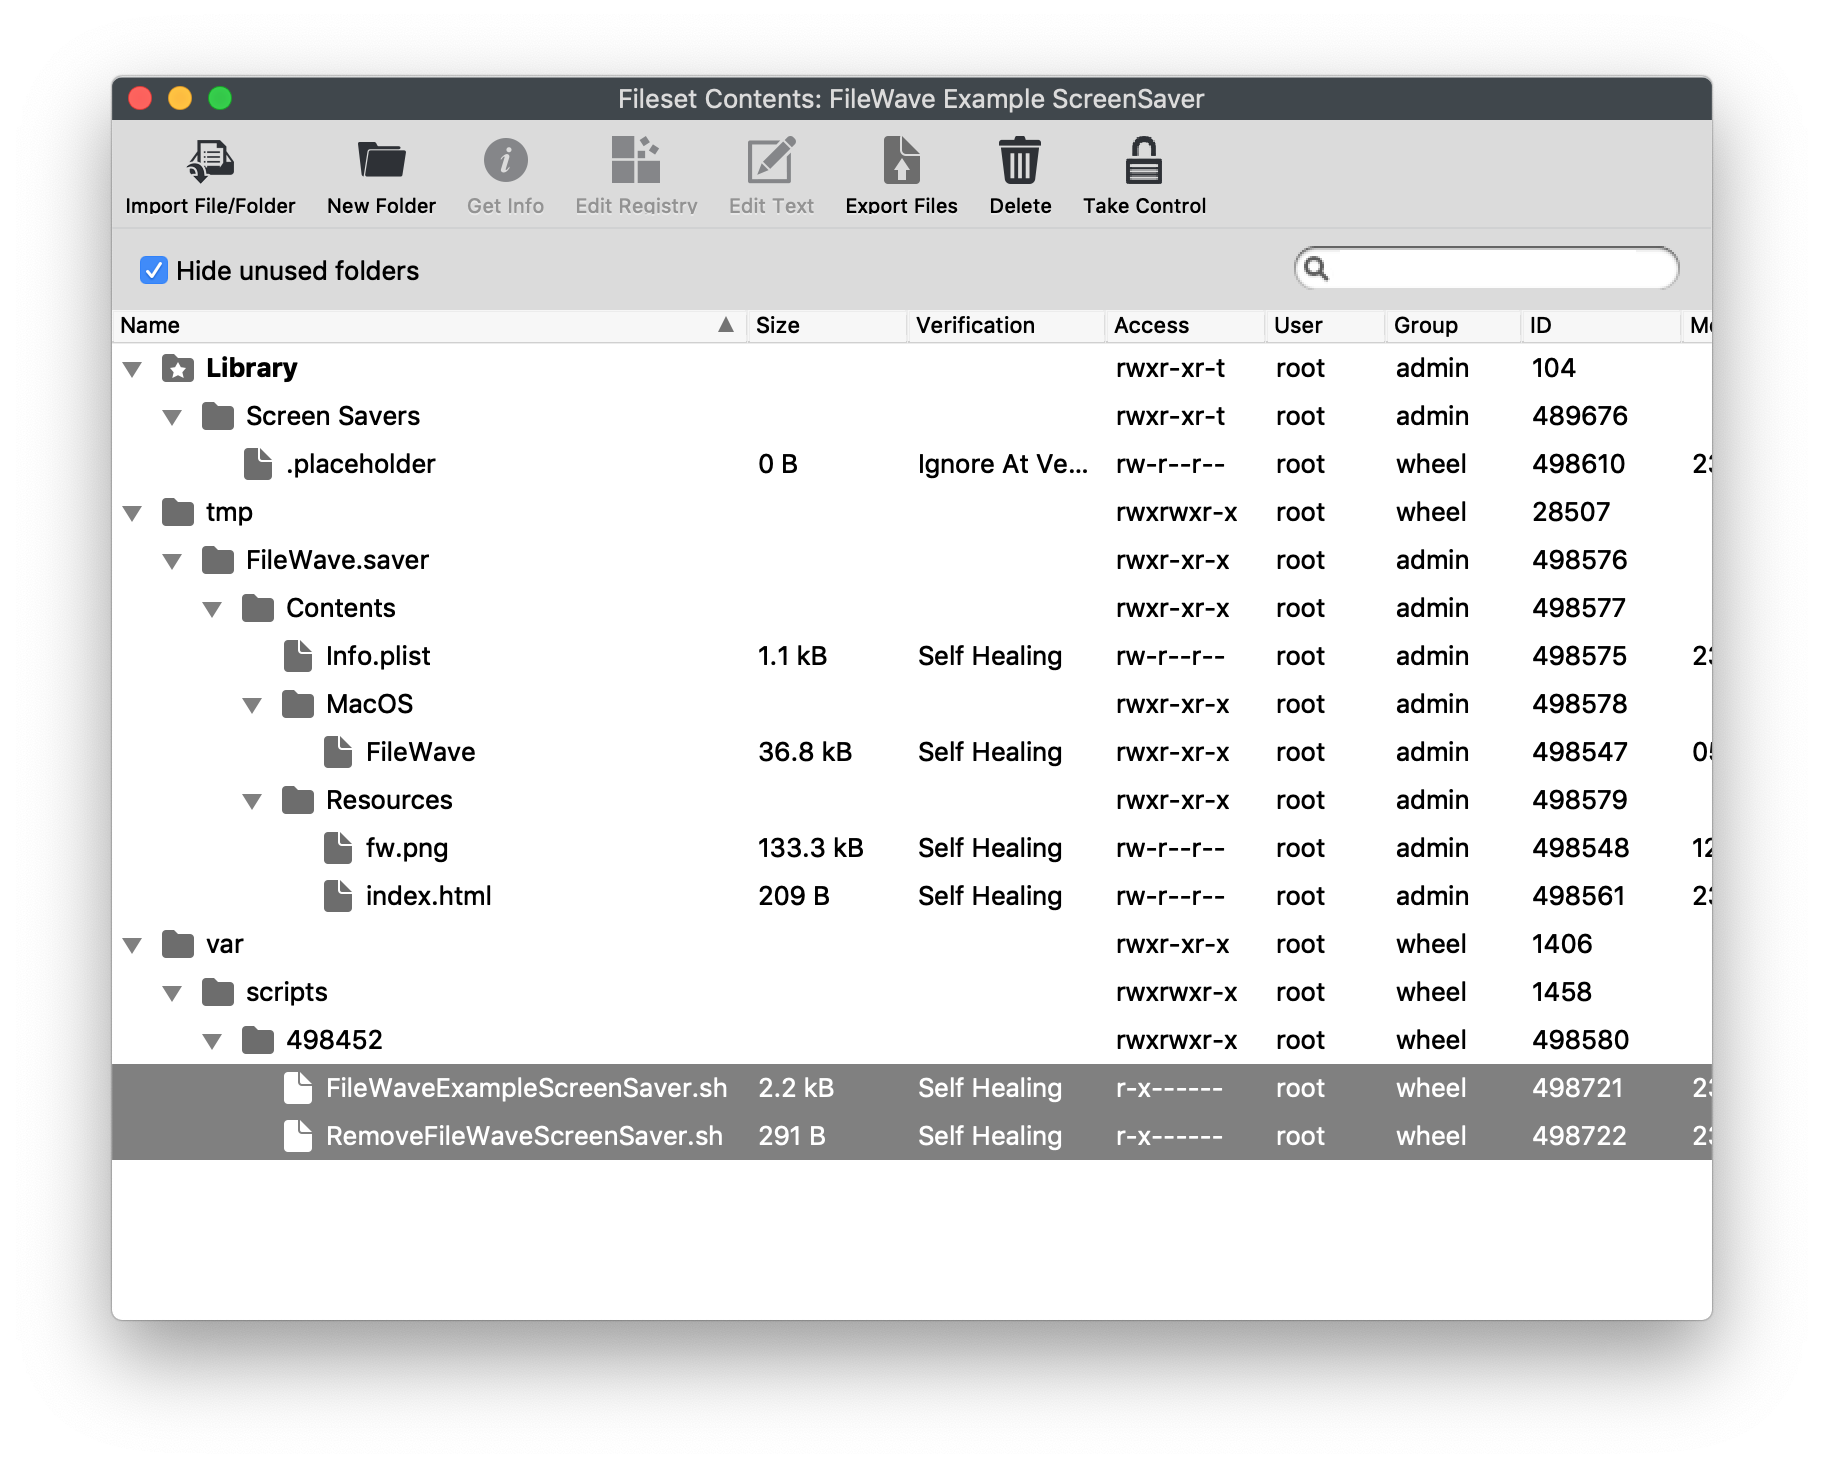 - Select **Get Info > Executable**. - Set **LaunchArgument 1** to the desired screen saver name, replacing `FileWave`. - Repeat the same LaunchArgument change for `RemoveFileWaveScreenSaver.sh`. 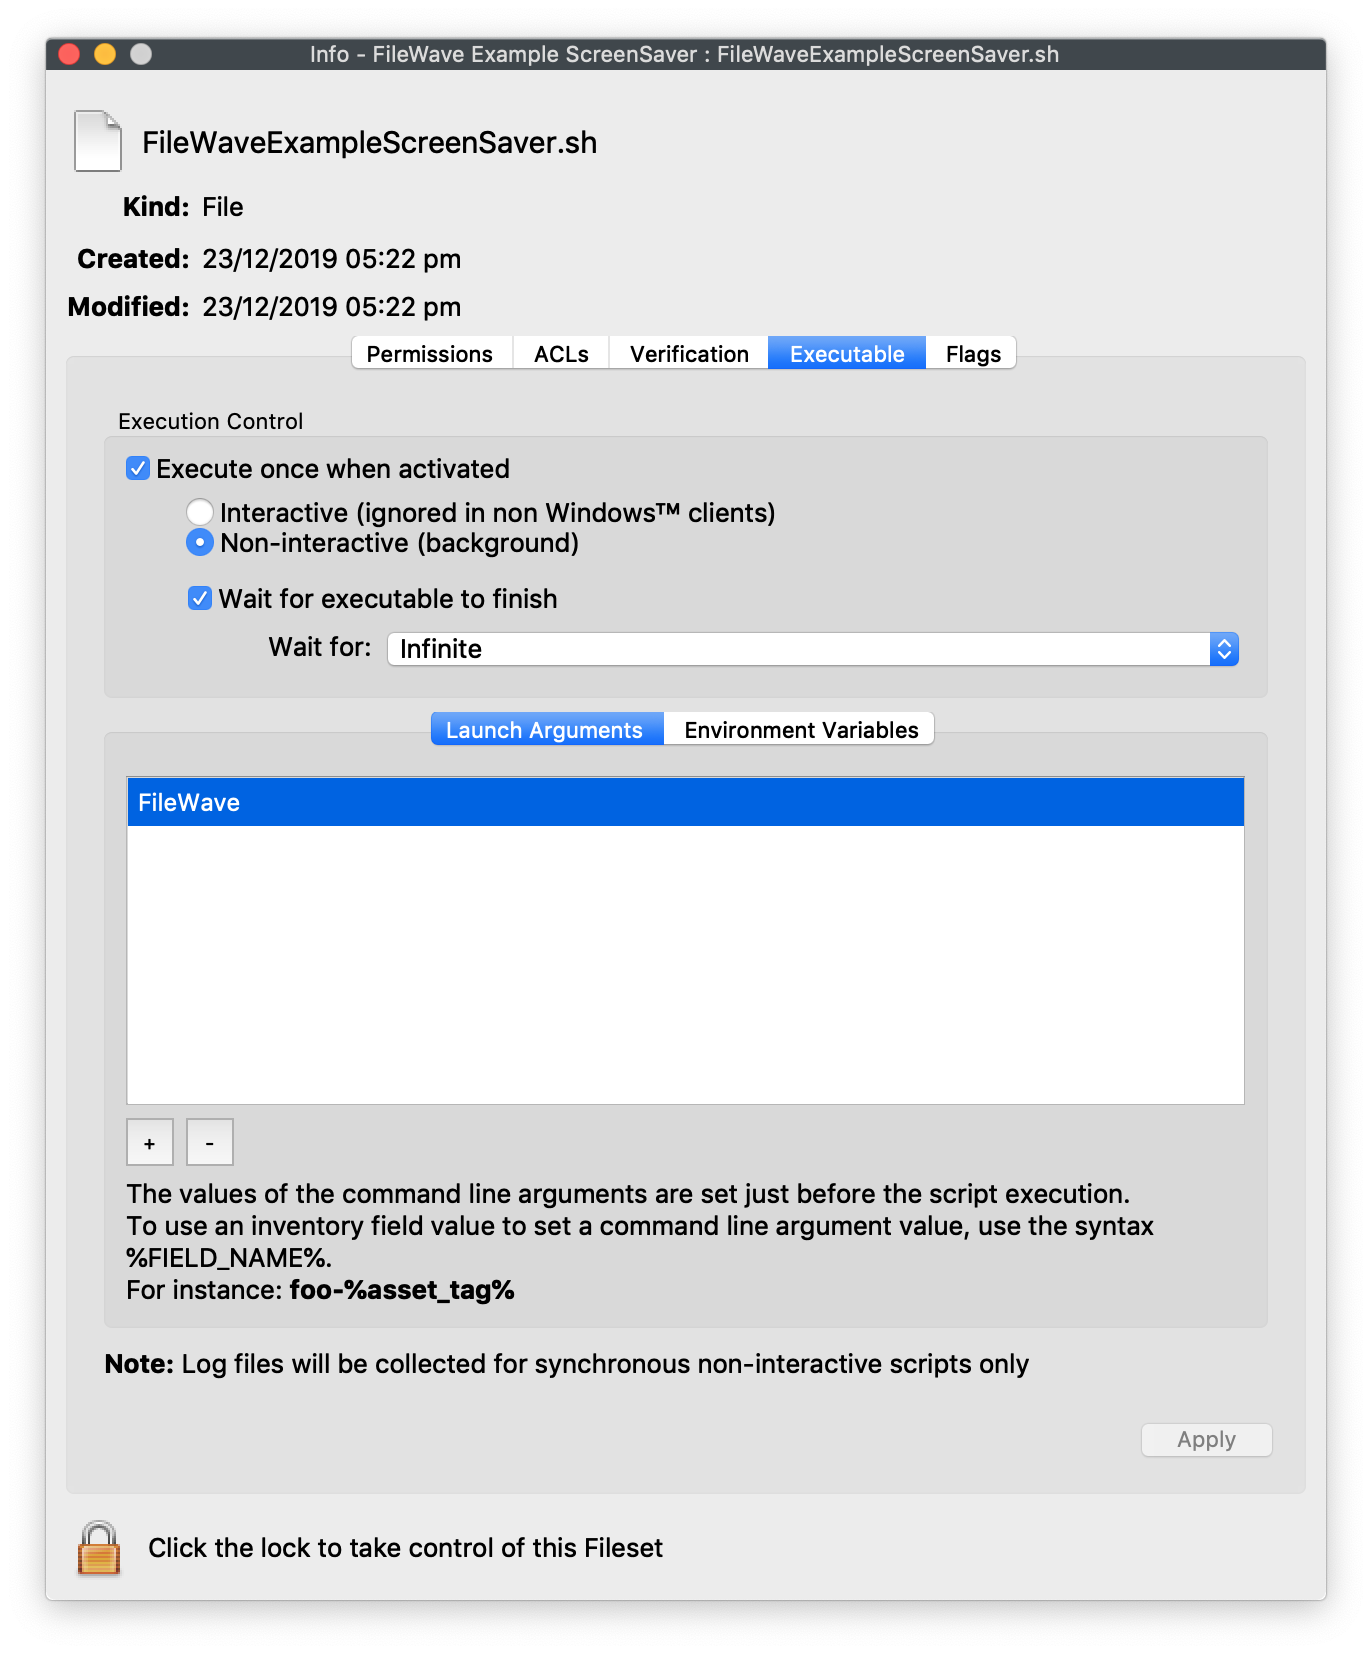 ### Customize the source file (optional) - Replace `/tmp/FileWave.saver/Contents/Resources/fw.png` with the image you want to display. - Edit `/tmp/FileWave.saver/Contents/Resources/index.html` and replace `fw.png` with the new image filename. 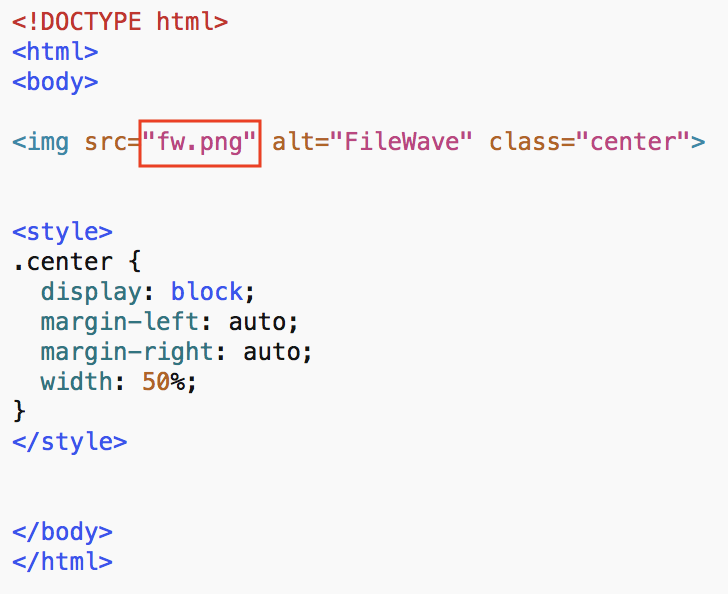**Optional** You can replace the entire contents of `index.html` with your own HTML/JavaScript if the screen saver should show more than a static image.
### Test Associate the Fileset to a test Mac first. After installation, the example screen saver should appear as shown below: 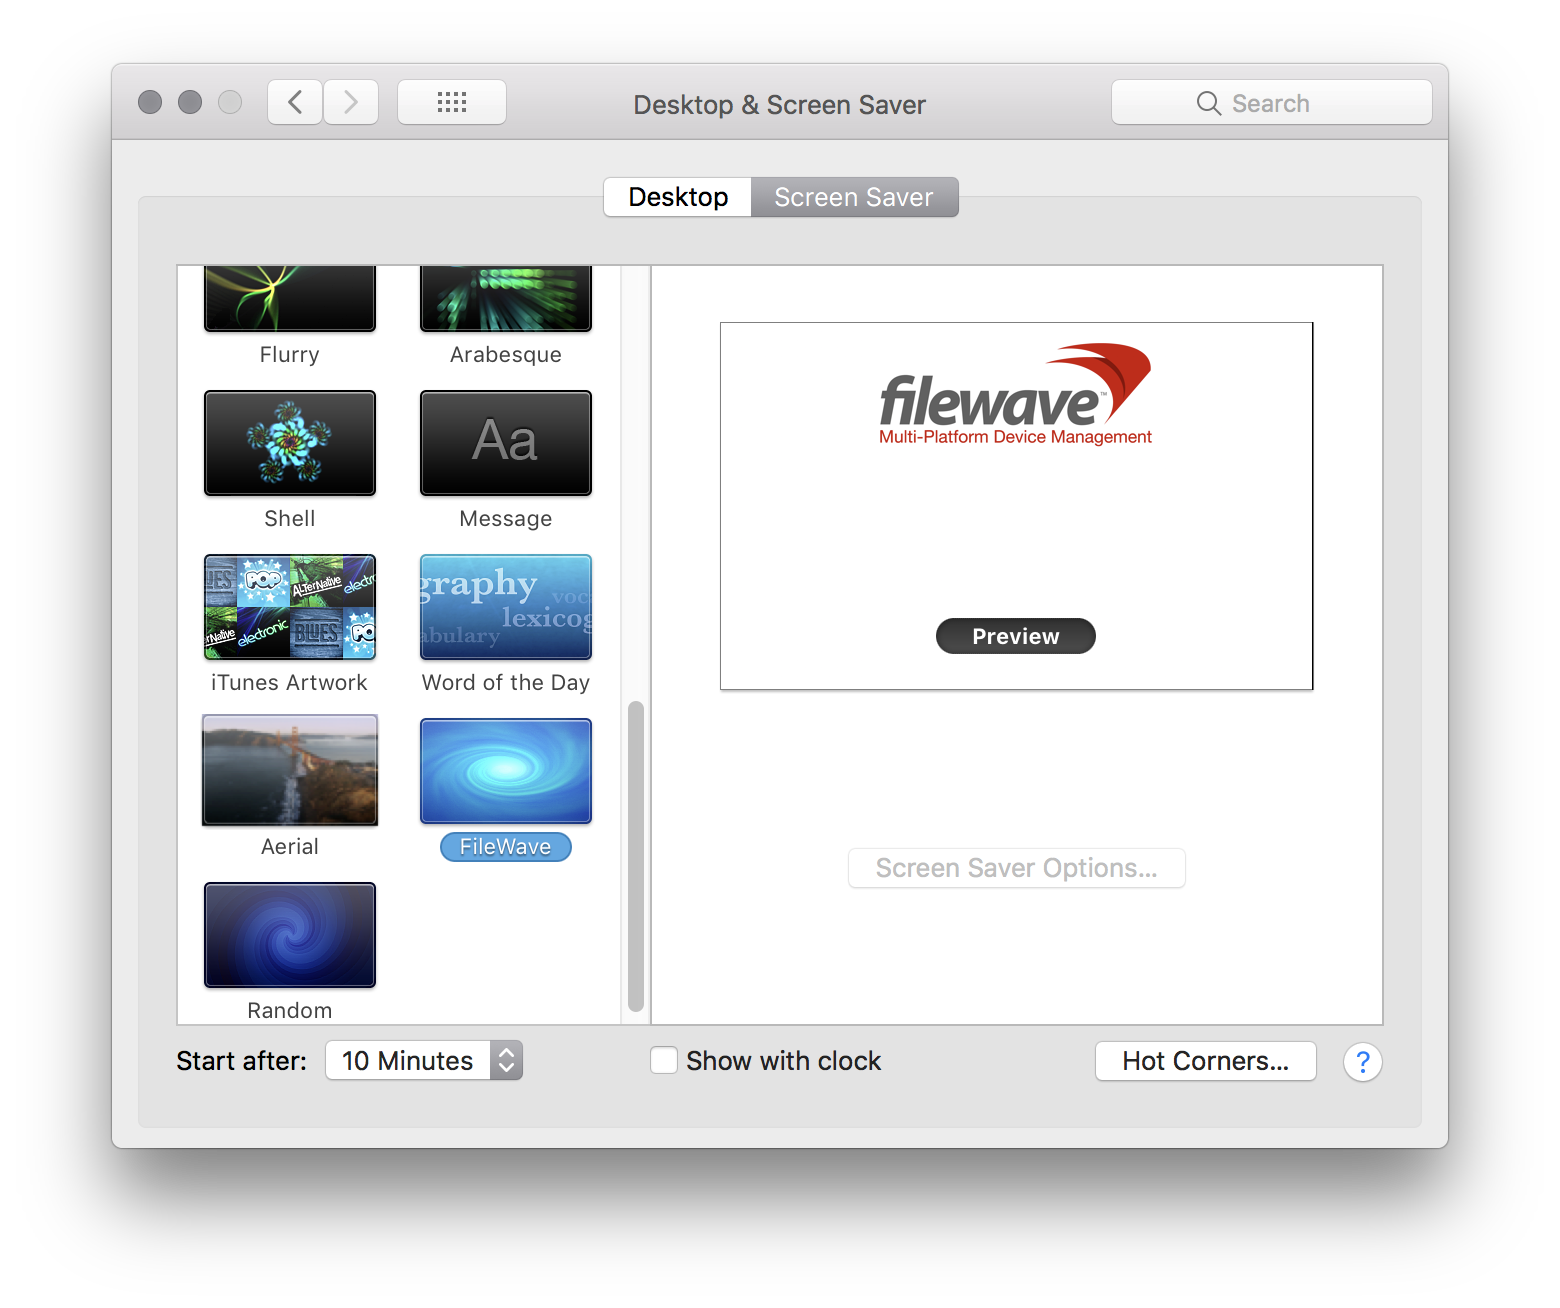 ### Set Screen Saver as Default - Open Profile Editor and select **Login Window**. - Set **Use screen saver module at path** to `/Library/Screen Savers/FileWave.saver`. Replace `FileWave.saver` with your custom name if you changed it above. 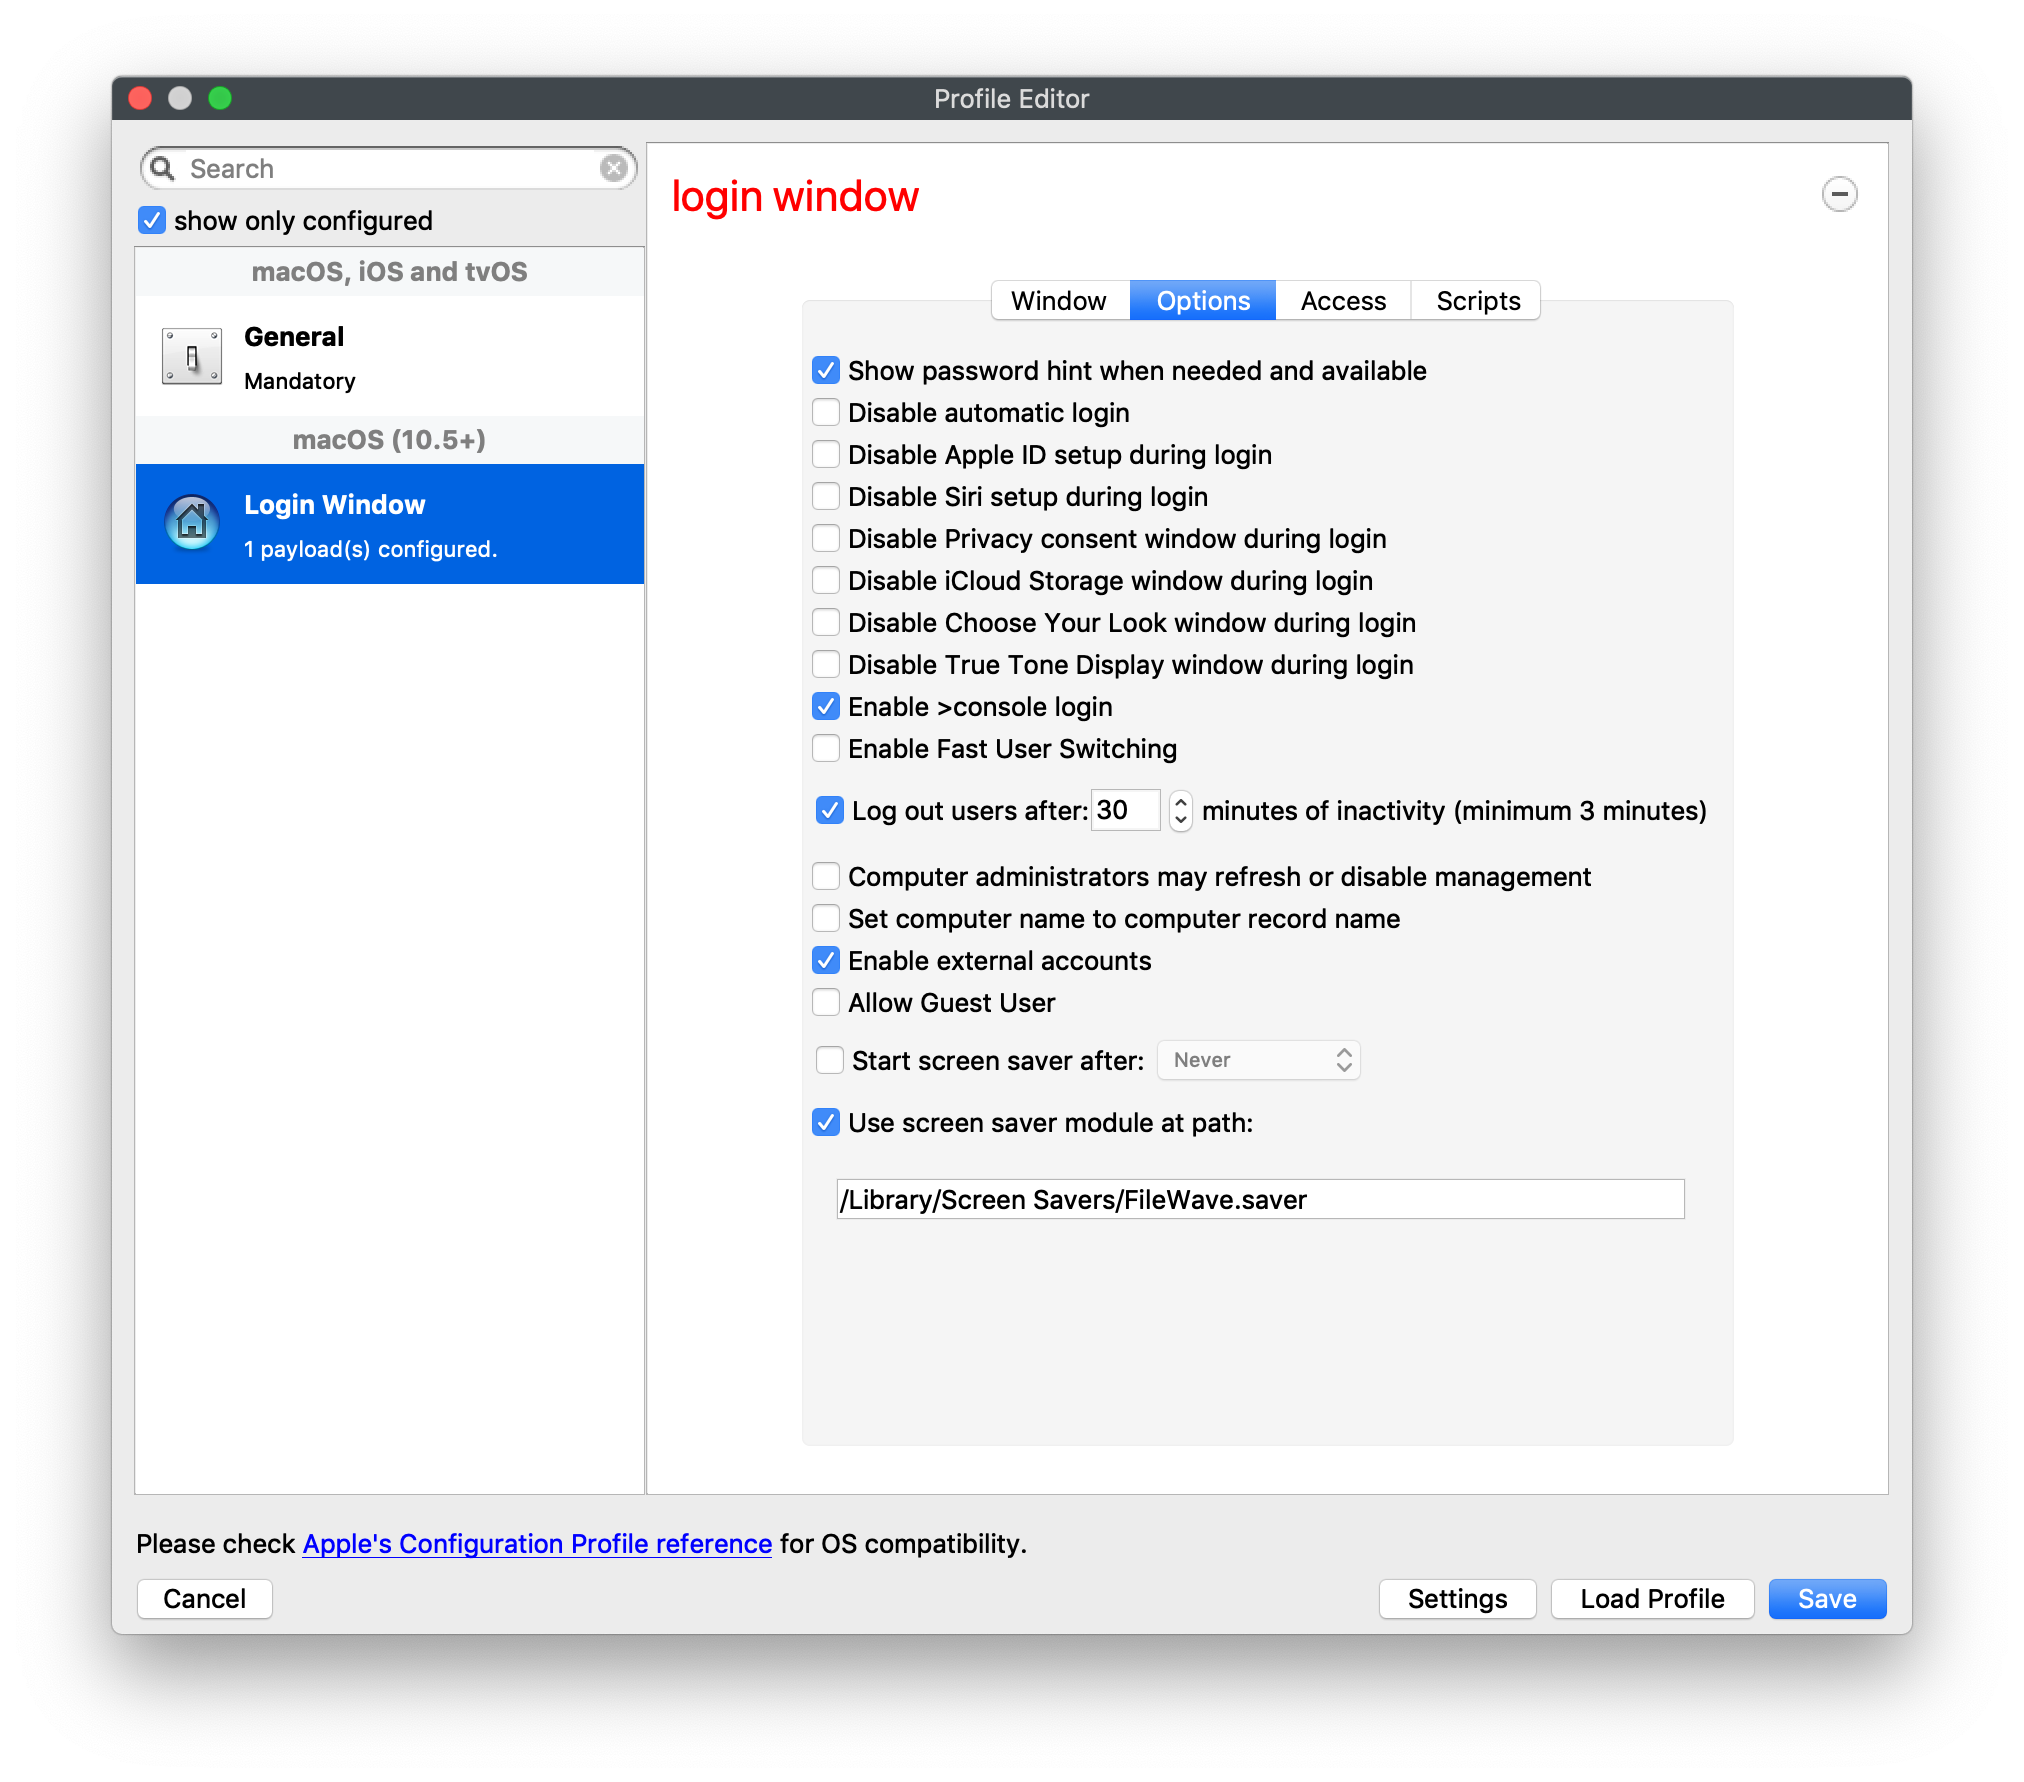**Login Window profile requirement** Edit an existing Login Window profile if you already use one. If this is your first Login Window payload, review the other profile settings before deploying it.
# Deploy Folder with Icons (macOS) ## Description This article shows how to deploy macOS folders or applications with custom icons. Apple changed how Finder stores some icon metadata, so older packaging methods may deploy the folder but miss the icon. ## Information This process has three parts: 1. Create a Fileset that includes the folders or applications with custom icons. 2. Create an activation script. 3. Set the script properties so FileWave passes the folder or application paths to the script. ## 1. Create the Fileset To build the Fileset, first apply a custom icon to the folder or application on macOS. Choose **Get Info** on the folder or application, then drag the icon or image file onto the icon at the top of the Get Info window: 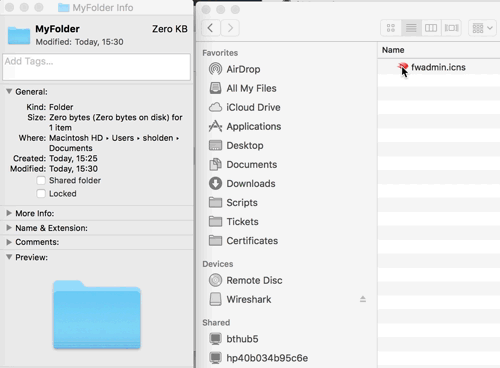 Create a standard Fileset from that folder or application. ## 2. Create an activation script Highlight the Fileset and choose the script icon.  In the window that opens, select **Activation Script**, then create a script. In this example, the script is called `add-xattr.sh`. The script should contain: ```shell #!/bin/bash { for directory in "$@" do xattr -wvx com.apple.FinderInfo '00 00 00 00 00 00 00 00 04 00 00 00 00 00 00 00 00 00 00 00 00 00 00 00 00 00 00 00 00 00 00 00' "$directory" done } ``` ## 3. Change the script properties After you create the script, highlight it and choose **Properties**. 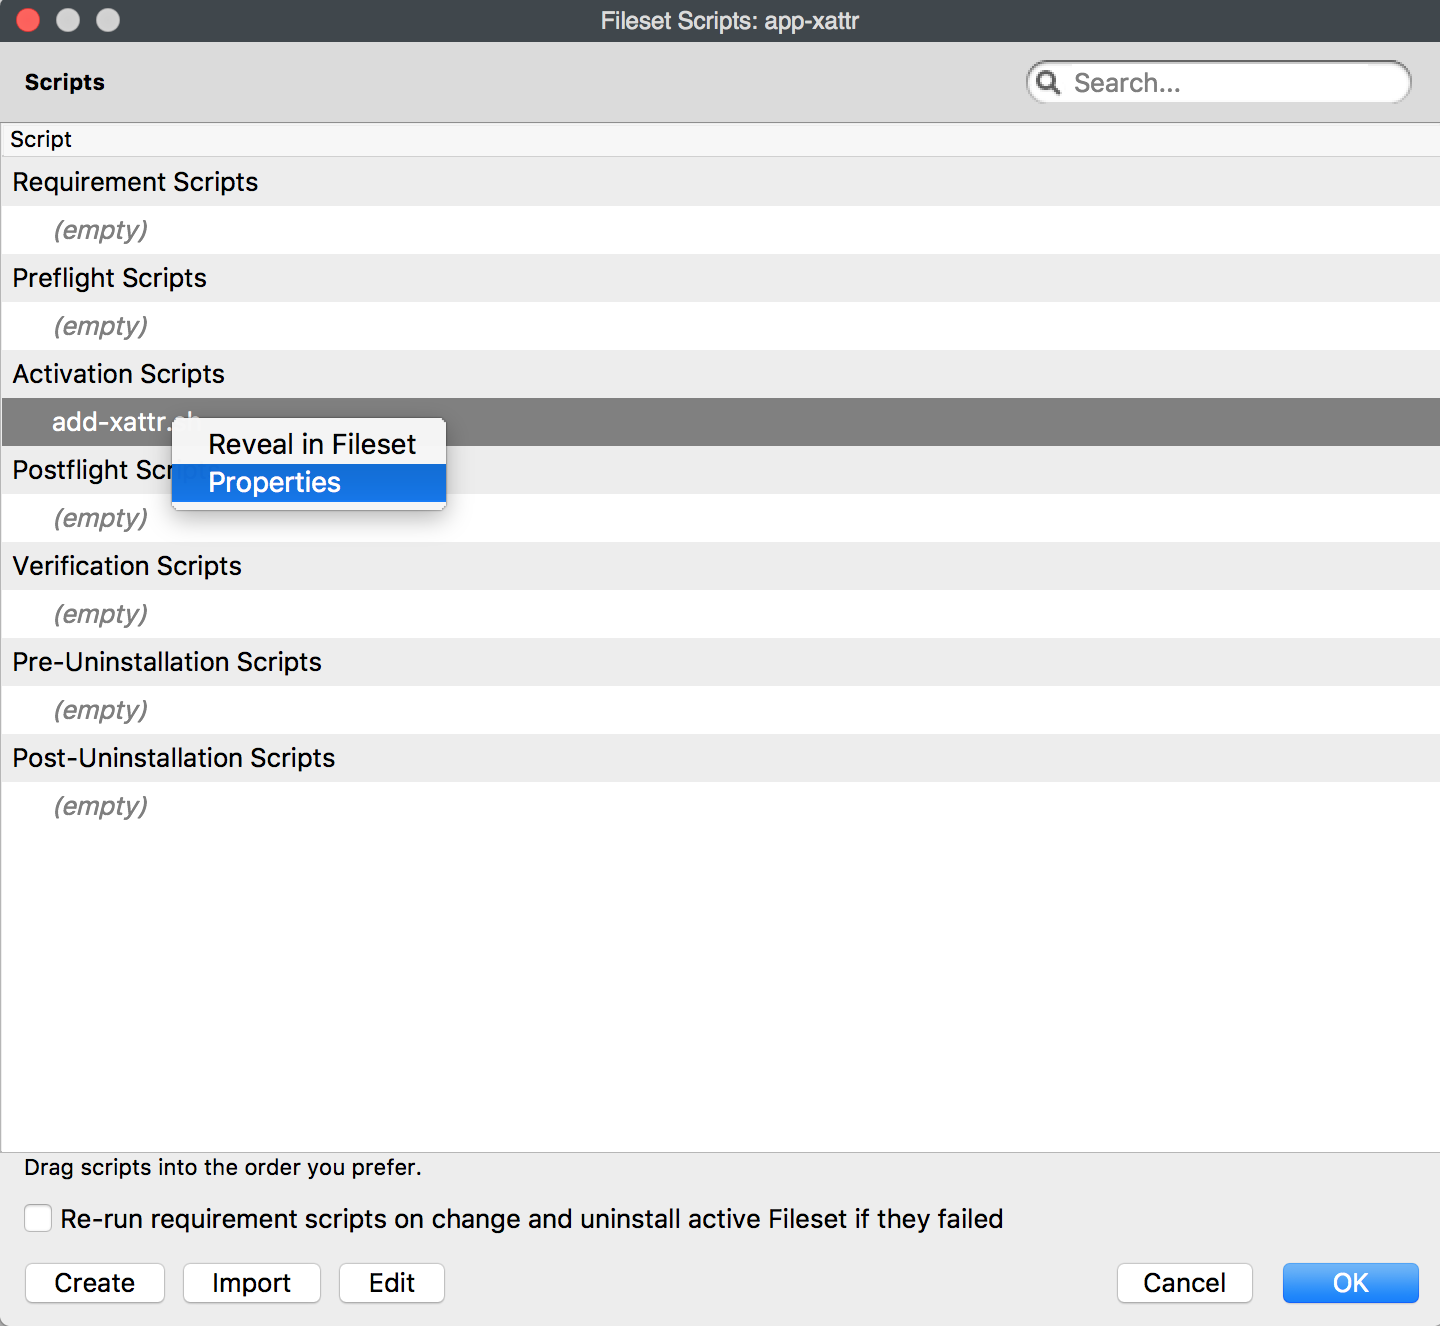 Edit the **Executable** tab so the launch argument matches the path to the folder or application that has the custom icon.  Associate the Fileset. When the Fileset deploys, the folder or application should keep the chosen icon.**Multiple folders with icons** The Fileset can contain multiple folders with custom icons. For each folder with a custom icon, add a matching launch argument in the Executable tab.
# Deploying CUPS printers (macOS) ## Before you begin We first need to setup the CUPS printers on a single test device. Once they are manually setup please test each individual printer and ensure they work as you'd like them to before proceeding. Note that you want to setup ONLY the printers you want to deploy via CUPS in this method. If possible have these as your only printers on the device to make things easier. ## Creating Fileset 1.) Create a new folder on your Desktop(or anywhere safe) titled cups 2.) Navigate to /etc/cups 3.) Copy the following files into your cups folder on the desktop: - printers.conf - printers.conf.O - the entire ppd folder The ppd folder should show the names of all the printers you manually setup. If you have other printers you don't want to deploy delete them from the ppd folder in the new location before proceeding.
4.) Open terminal and give full access to the config files via the below commands: ```shell $ sudo -s $ chmod 755 /Users/To make things easier you can type chmod 755 and then drag/drop the file into terminal to have it automatically fill in the appropriate path.
5.) Create a new empty fileset. Filesets > New Desktop Fileset > Empty 6.) Open your fileset by double-clicking on it and uncheck "Hide unused folders" 7.) Click on etc/ to highlight it and then click "Import File/Folder" - If asked to replace a folder go ahead. 8.) Import the cups folder that you created on your desktop. 9.) In the fileset click the arrow to the left of etc and then to the left of cups to show the contents of the folders. This should match the folder on your desktop with all files included 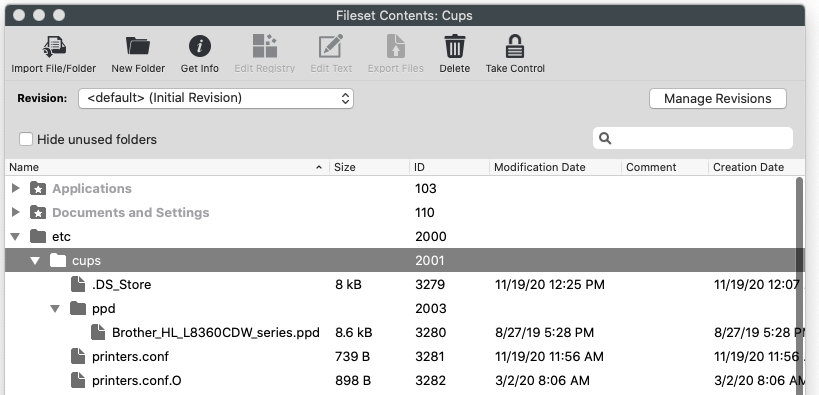 10.) Highlight printers.conf then click "Get Info" at the top, click the verification tab and select "Download if missing" then click Apply at the bottom right. 11.) Repeat step 8 for printers.conf.O as well. 12.) Test deploy by sending to a single machine and verify it works properly before deploying out to the rest of your clients.The reason we change the verification settings for only these two files is that the printers.conf and printers.conf.O files are dynamically changing when any changes are made regarding printers on the end computer. Filewave would detect the change and then try to overwrite the config with what's in this filset thus potentially breaking the printers on your devices.
# Deploying iOS Applications to macOS Devices Using FileWave ## What FileWave can associate iOS app Filesets with compatible macOS devices. If Apple allows the app to run on Mac and your organization has available licenses in Apple School Manager or Apple Business Manager, FileWave can install that app on eligible macOS devices. ## When/Why #### **When to Use** Use this when an iOS/iPadOS app is also available for Mac, often because the vendor ships it as a Universal app or Catalyst app. Associating the iOS app Fileset with macOS devices lets you: - **Expand app availability**: Provide a Mac-compatible iOS app to users on supported Macs. - **Reuse the existing assignment workflow**: Manage the app through the same iOS app Fileset instead of building a separate macOS package. - **Keep app access consistent**: Offer the same app to users who move between iPad and Mac workflows, when the vendor supports that use case. #### **Why This Feature Matters** Apple silicon Macs running macOS 11 Big Sur or later can run supported iPhone and iPad apps when the app developer allows Mac availability. In FileWave, this means organizations can: - **Use available app licenses**: Assign eligible app licenses to compatible Macs. - **Support mixed Apple fleets**: Make the same supported app available across iPad and Mac where the vendor permits it. - **Track deployment from FileWave**: Monitor installation through FileWave instead of treating the Mac install as a separate manual process. ## How #### **Prerequisites** Before deploying iOS applications to macOS devices, ensure the following conditions are met: - **Compatible macOS devices**: Devices must be running macOS 11 Big Sur or later on Apple silicon. - **Compatible applications**: The iOS/iPadOS app must be available for Mac. If the developer has disabled Mac availability, FileWave cannot force the app to install on macOS. - **Licenses**: Sufficient licenses must be available through Apple School Manager (ASM) or Apple Business Manager (ABM). #### **Monitoring and Troubleshooting** - **License availability**: Make sure enough licenses are available. If licenses are exhausted, the app will not install on additional devices. - **Deployment status**: Use FileWave Central to monitor deployment status and confirm installation. - **Compatibility issues**: If the app fails to install, confirm that the app is available for Mac and that the device meets Apple's requirements. If the app installs but will not open, the app vendor may need to update the app for macOS compatibility. [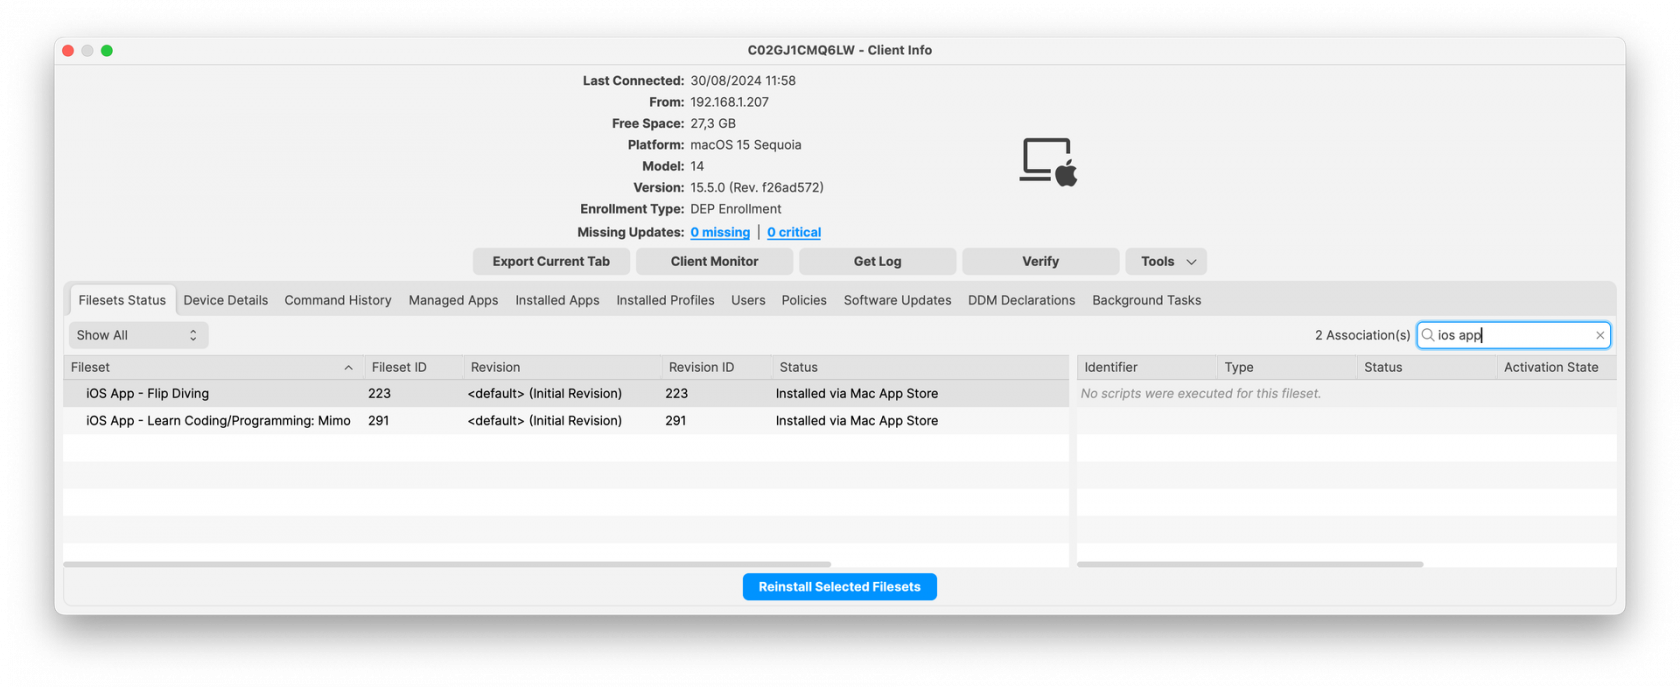](https://kb.filewave.com/uploads/images/gallery/2024-10/qyiyoitZnnDzhXEM-image.png) ## Related Content - [Desktop Filesets](https://kb.filewave.com/books/filesets-payloads/page/filewave-fileset-types "Desktop Filesets") # Microsoft Enterprise Platform Single Sign-on for macOS ## What Platform Single Sign-on (Platform SSO or PSSO) extends Apple's Extensible SSO framework to the macOS login and account experience. For Microsoft Entra ID deployments, this workflow builds on FileWave's [Microsoft Enterprise SSO plug-in for Apple devices](https://kb.filewave.com/books/apple-general-info/page/microsoft-enterprise-sso-plug-in-for-apple-devices) guidance and Apple's [Platform Single Sign-on for macOS](https://support.apple.com/guide/deployment/platform-sso-for-macos-dep7bbb05313/web) framework. With password authentication, Platform SSO can synchronize the user's local macOS account password with their Microsoft Entra ID password. Depending on the operating system version, identity provider support, and payload settings, Platform SSO can also support other authentication methods such as Secure Enclave-backed platform credentials or smart cards. After registration, Platform Single Sign-on status appears under the user's account in **System Settings > Users & Groups**: [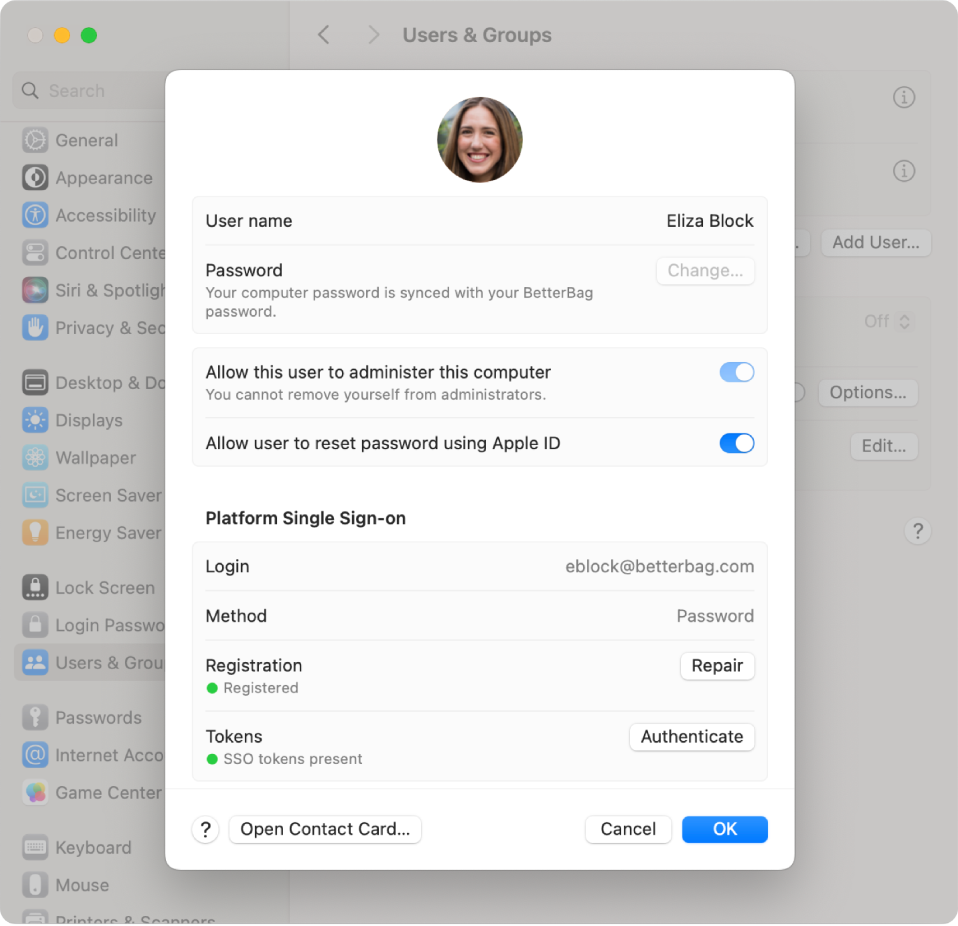](https://kb.filewave.com/uploads/images/gallery/2024-03/X0Q4ikE8xzCXIbg0-8a1b12f119682c525692a750d75d8f6f.png) ## When/Why Use Platform SSO when you manage Mac computers with FileWave and want users to sign in with their Microsoft Entra ID identity while reducing local password drift. This builds on the Microsoft Enterprise SSO plug-in by extending the SSO experience closer to the local Mac account and login workflow. ## How Below are the main requirements and deployment steps to review before using the example profile. ### FileWave 16.4 Single Sign-On Extension fields FileWave Anywhere 16.4 adds fields to the Apple **Single Sign-On Extensions** payload for the new-user authentication methods supported by the selected identity-provider extension: - **Password** - **Smart Card** - **Access Key** - **Synchronize profile picture** - **Temporary session quick login** Configure only methods supported by the identity-provider extension, the target macOS version, and the organization’s sign-in policy. Adding a method to the payload does not add support to an extension that does not implement it. #### Access Key Reader Issuer Certificate When Access Key authentication is used, FileWave 16.4 can associate an **Access Key Reader Issuer Certificate** from an existing certificate payload. The certificate validates the terminal identity of the access-key reader during authentication. - Select the certificate through the same existing-certificate selection workflow used by Network and VPN profile payloads. - The certificate must use an elliptic-curve key, as required by Apple’s platform. - The reader issuer must match the selected certificate. A mismatch causes authentication to fail. - Deploy and validate the certificate dependency before relying on Access Key sign-in for production users.Do not enable Password, Smart Card, and Access Key merely because all three fields are available. Choose the intended authentication method with the identity team, validate the provider prerequisites, and pilot registration, login, recovery, and device replacement.
### Platform SSO requirements - A Mac running macOS 13 or later. Microsoft currently recommends macOS 14 Sonoma or later for the best Entra Platform SSO experience, and some newer Apple Platform SSO features require later macOS versions. - A mobile device management (MDM) solution that supports the Extensible Single Sign-on payload with Platform SSO settings. In FileWave, this means an MDM-enrolled Mac, such as Automated Device Enrollment or User Approved MDM enrollment. - An identity provider and SSO extension that support the Platform SSO authentication method you plan to use. - For Microsoft Entra ID Platform SSO, Microsoft lists the Company Portal app version 5.2404.0 or later, Microsoft Authenticator, and user permissions to register or join devices to Microsoft Entra ID as requirements. - One of the supported authentication methods for your deployment. This example focuses on password authentication, where the user's local password and Entra ID password are synchronized. *Note:* If the Mac is unenrolled from MDM, Apple notes that the Mac is also unregistered from the identity provider. #### WS-Trust federation WS-Trust federation is supported in macOS 13.3 or later. This allows Platform SSO to authenticate users when their account is managed by an identity provider federated with Microsoft Entra ID. ### Deployment The example below uses a Profile Fileset with a default password-authentication Platform SSO configuration: - [Profile - Entra ID Platform SSO.fileset.zip](https://kb.filewave.com/attachments/316) - Install the Microsoft Company Portal app before targeting users for Platform SSO. You can deploy it through FileWave or have users install it manually. Microsoft provides the current Company Portal app here: [Company Portal app](https://go.microsoft.com/fwlink/?linkid=853070). [](https://kb.filewave.com/uploads/images/gallery/2024-03/WOnwqxRQkOGAFLEk-screenshot-2024-03-21-at-9-25-19-am.png)Please note: Company Portal is required for Microsoft's Platform SSO implementation because it contains the Microsoft SSO extension. Users generally do not need to configure Company Portal directly, but the app must be present and current enough before Platform SSO registration is expected to work.
### End-user interaction required After successful deployment, the user should see a **Registration Required** notification in macOS: [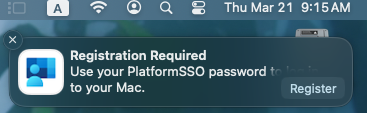](https://kb.filewave.com/uploads/images/gallery/2024-03/3mz1OCvzyw8mjnzH-screenshot-2024-03-21-at-9-15-56-am.png) When the user starts registration, macOS and Microsoft Entra ID will prompt the user to authenticate. Depending on the configuration, this can include entering the local or Platform SSO password and completing Microsoft Entra device registration: [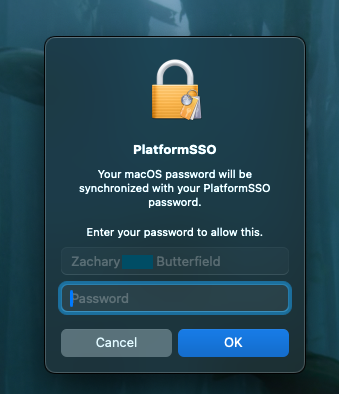](https://kb.filewave.com/uploads/images/gallery/2024-03/lFbzWcpbKHtmu7se-screenshot-2024-03-21-at-9-16-31-am.png) [](https://kb.filewave.com/uploads/images/gallery/2024-03/fu7zfwTVrKAlFjnQ-screenshot-2024-03-21-at-9-17-10-am.png) After registration, the user can confirm status in **System Settings > Users & Groups** by clicking the information button next to their account. The Platform Single Sign-on section should show the configured method, registration state, and token state. ## Notes and Observations - If multi-factor authentication is enabled in your environment, Microsoft app sign-in prompts depend on your Microsoft Entra ID and Conditional Access/security settings. - The downloadable example Fileset is a starting point. Review the payload, registration-token placeholder, authentication method, and tenant-specific settings before deploying it in production. ## Related Content - [Microsoft Enterprise SSO plug-in for Apple devices KB](https://kb.filewave.com/books/apple-general-info/page/microsoft-enterprise-sso-plug-in-for-apple-devices) - [Apple documentation: Platform Single Sign-on for macOS](https://support.apple.com/en-ca/guide/deployment/dep7bbb05313/web) - [Microsoft Learn: macOS Platform Single Sign-on overview](https://learn.microsoft.com/en-us/entra/identity/devices/macos-psso) # EUD Security Guidance: macOS 10.13+ ### Information The Nation Cyber Security Centre has various guides on security. This article covers a section of the End User Device Security Collection and how to use FileWave to monitor or follow the guidance as laid out: [https://www.ncsc.gov.uk/guidance/eud-security-guidance-macos-1013-high-sierra#recommendedpoliciesandsettings](https://www.ncsc.gov.uk/guidance/eud-security-guidance-macos-1013-high-sierra#recommendedpoliciesandsettings) From the document: > *This guidance was developed following testing performed on MacBook Pro and MacBook Air devices running macOS 10.13 (High Sierra)* > > *It's important to remember that this guidance has been conceived as a way to satisfy the 12 End User Device Security Principles. As such, it consists of recommendations and should not be seen as a set of mandatory instructions requiring no further thought.* > > *Risk owners and administrators should agree a configuration which balances business requirements, usability and security.* As set out from the list, here are some solutions. For descriptions of Configuration Profiles, please consult FileWave [Profile Editor](https://kb.filewave.com/books/profiles-apple/page/profile-editor-details-for-apple "Profile Editor details for Apple") section.**Custom Fields** Below are additionally some custom fields for reporting on the status of pertinent settings. These have been described as if using the [new Custom Fields introduced in 12.7+](https://kb.filewave.com/books/custom-fields/page/custom-fields "Custom Fields"). For using these Custom Fields with earlier versions of FileWave, these will need to be added as Filesets and edited to [write custom values to the client using fwcld](https://kb.filewave.com/books/custom-fields/page/add-filewave-custom-inventory-fields-remotely-using-a-fileset "Add FileWave Custom Inventory fields remotely using a Fileset"). The Custom Fields provided are examples using English. Where searching for text in response to a command is concerned, if the OS is running a different language, the script may need to be altered to match.
#### **Assured data-in-transit protection, VPN Profile** VPN may be configured using Configuration Profiles [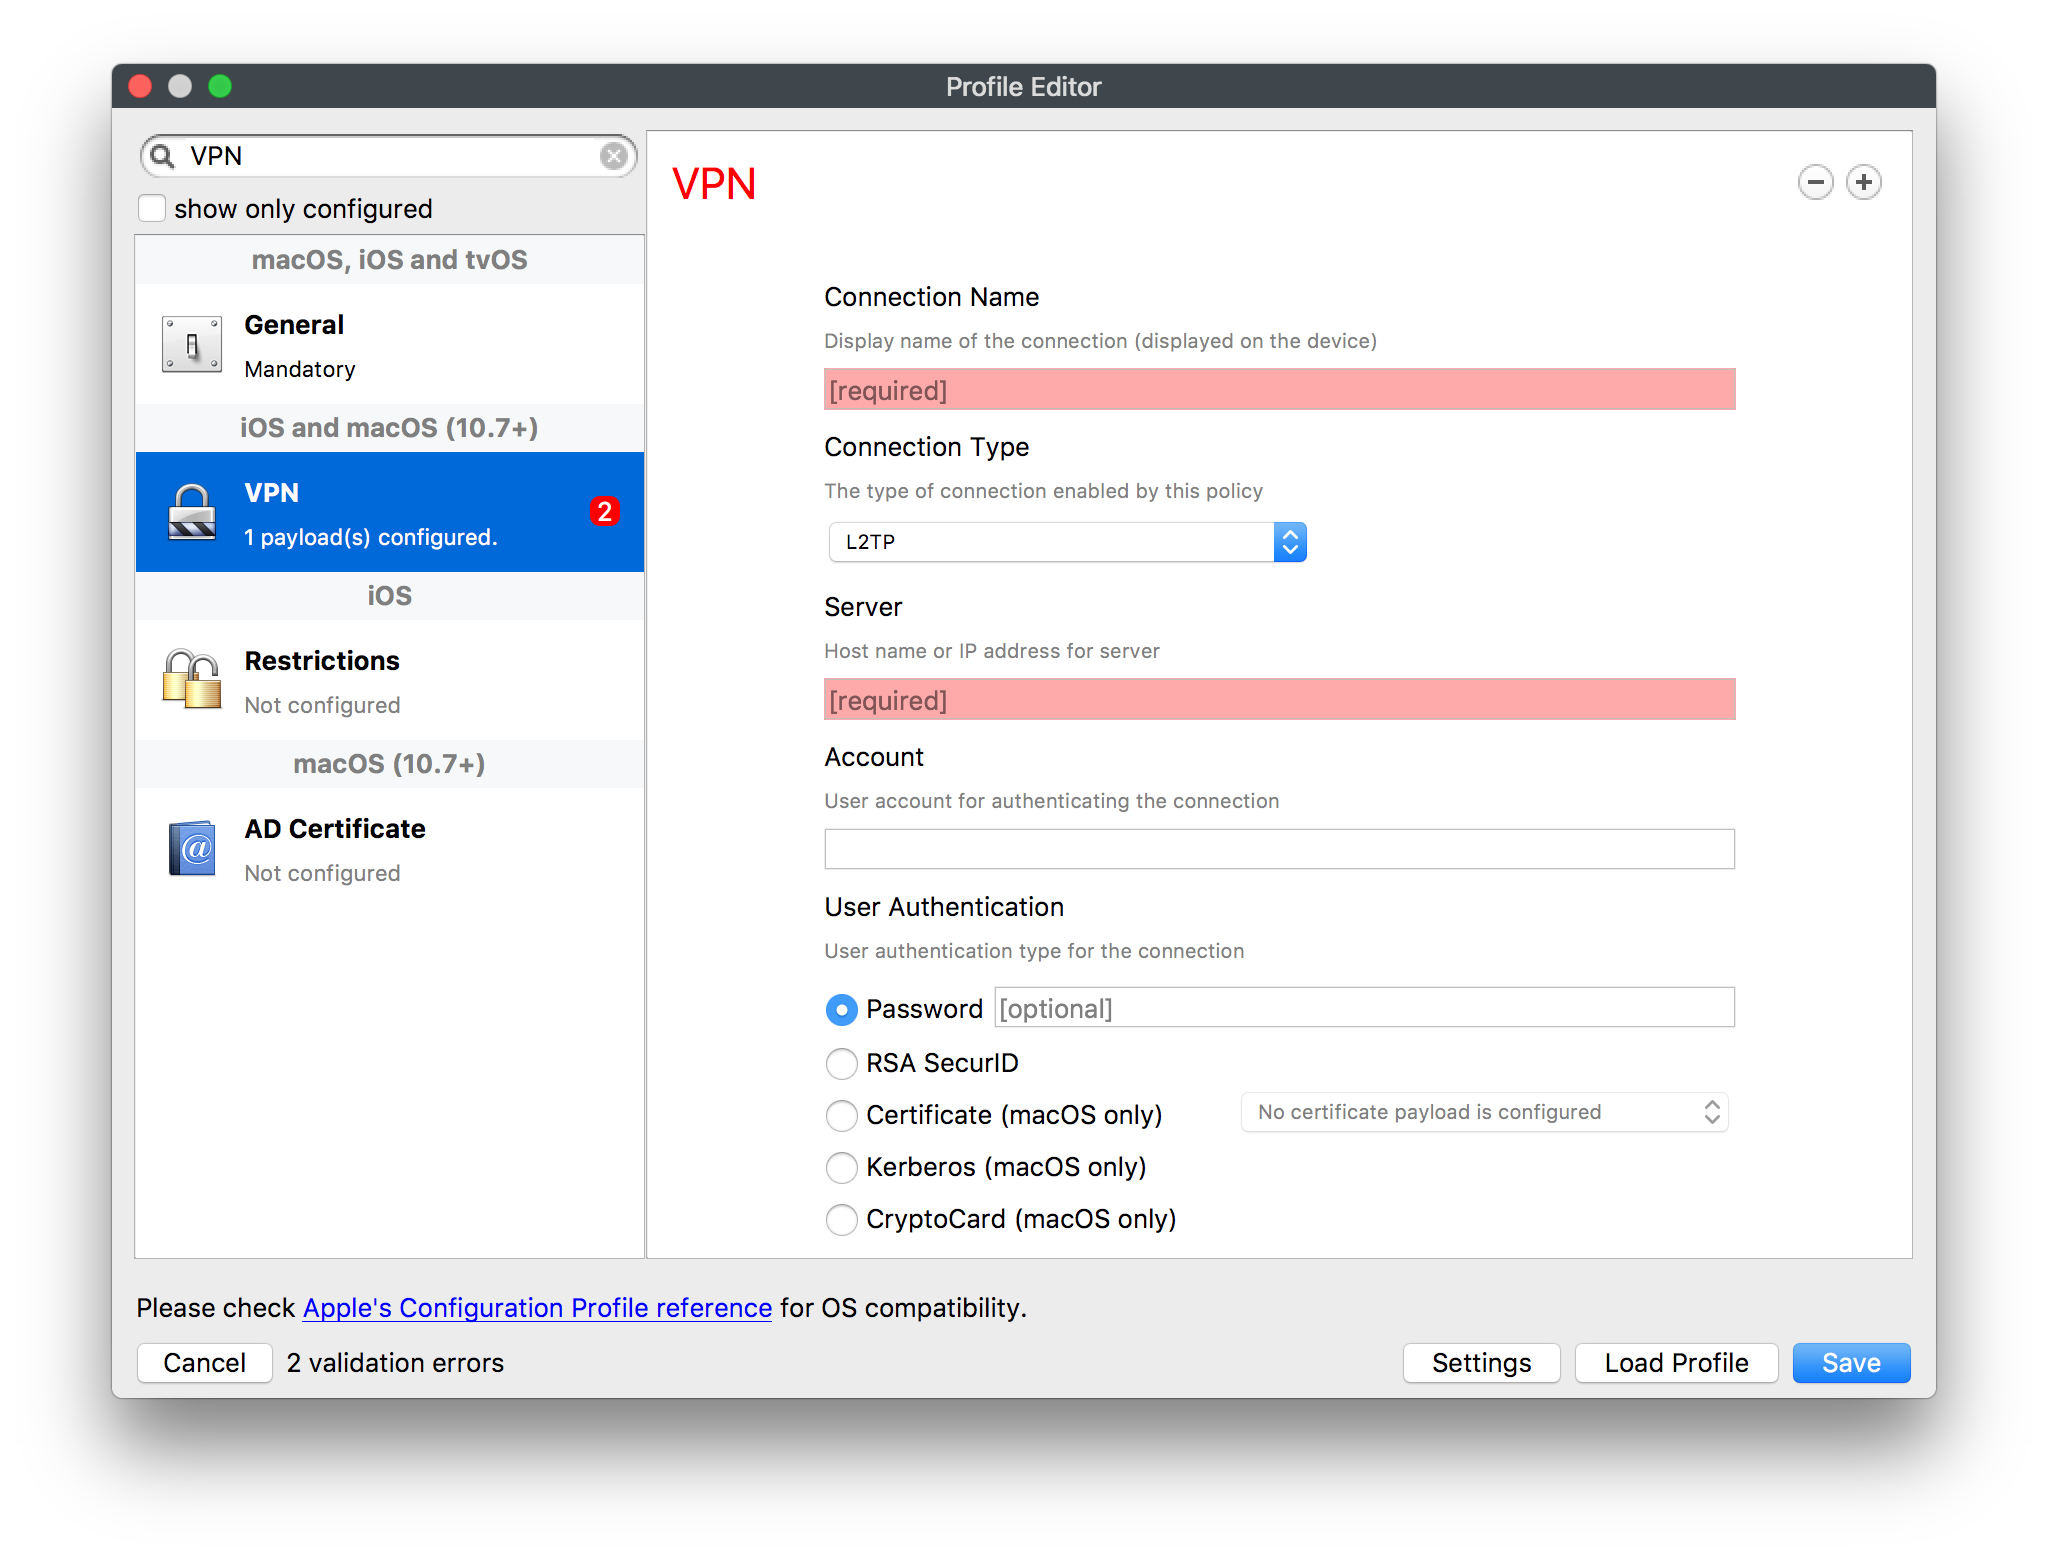](https://kb.filewave.com/uploads/images/gallery/2023-07/KlELX913ZmXK1qO7-image.png) #### Assured data-at-rest protection, FileVault FileVault may be configured using Configuration Profiles [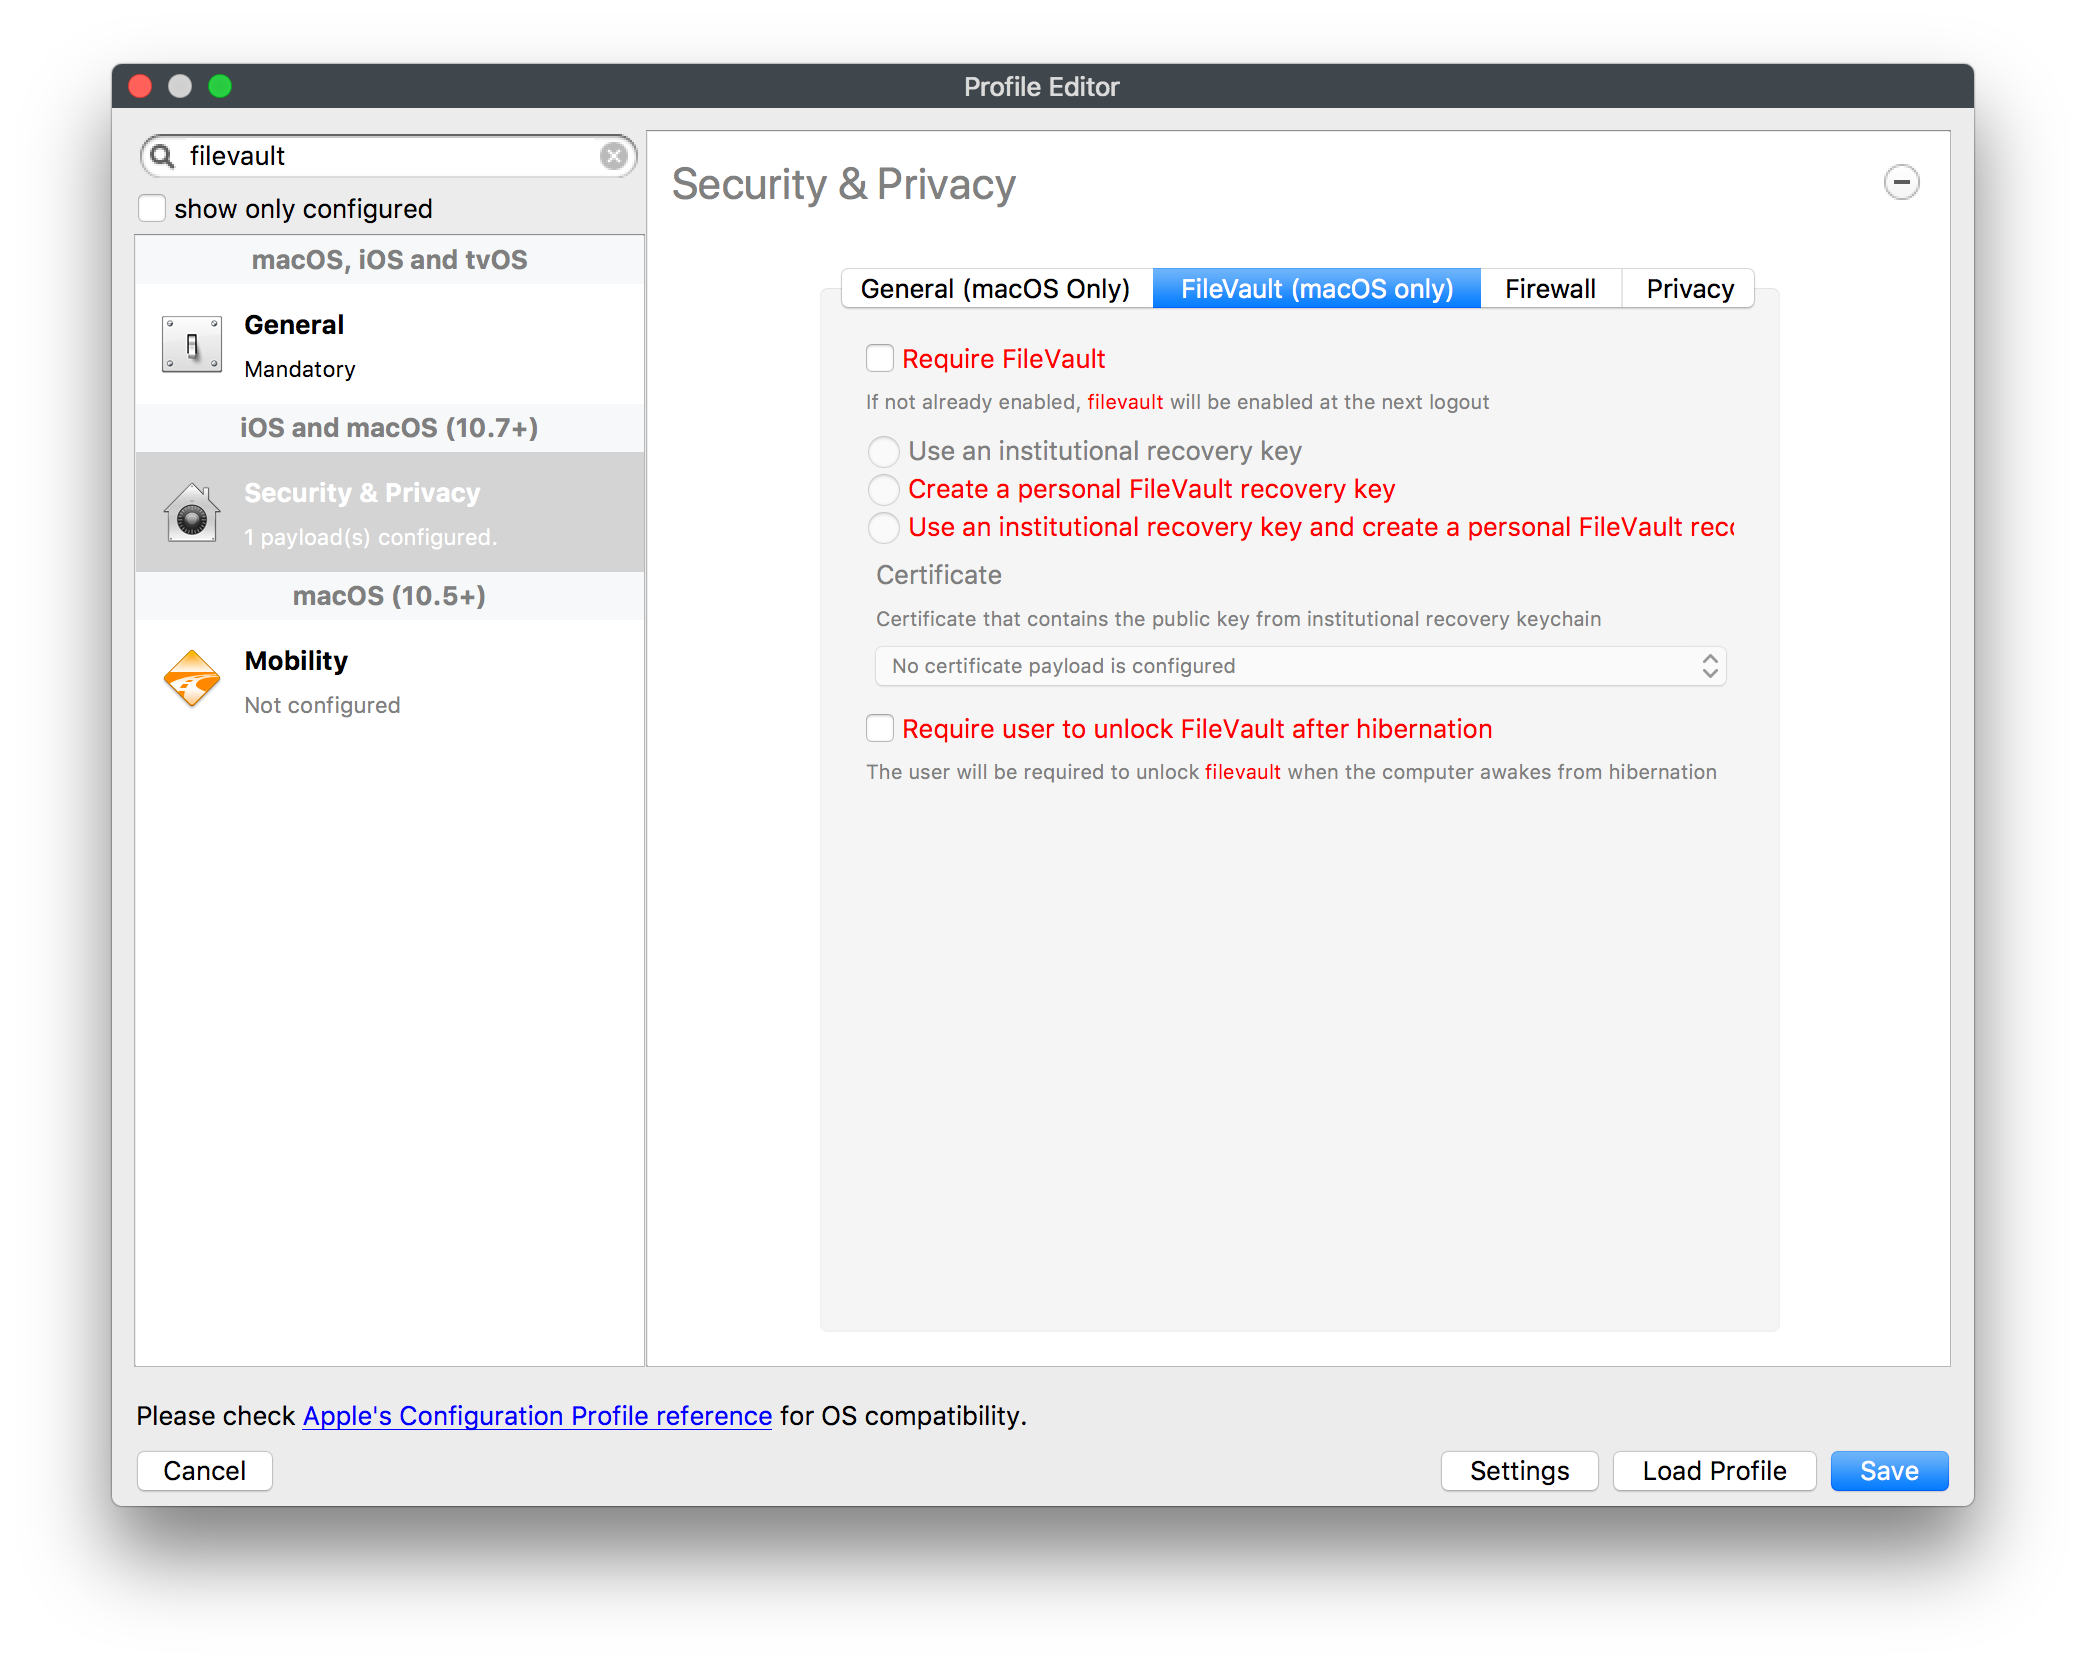](https://kb.filewave.com/uploads/images/gallery/2023-07/tqhGyZc2pLXIzGIK-image.png) Custom Field to show current FileVault status: ```bash #! /bin/bash # # FileWave client will execute this script. The output will be used as the value of the custom field. # # Below is an example of how to read the value of one ENVIRONMENT VARIABLE in your script: # my_var=${ENV_VAR_NAME} # fv_status=$(fdesetup status 2>/dev/null) error_code=$? if [ $error_code -ne 0 ] then echo "Error: "$error_code else case $fv_status in *"Off"*) echo "Off" ;; *"On"*) echo "FileVault" ;; *) echo "$fv_status" ;; esac fi exit 0 ``` Custom Field to show if device supports FileVault Authenticated Restart. N.B. This requires FileVault to be enabled to work. ```bash #! /bin/bash # # FileWave client will execute this script. The output will be used as the value of the custom field. # # Below is an example of how to read the value of one ENVIRONMENT VARIABLE in your script: # my_var=${ENV_VAR_NAME} # filevault_auth_bypass=$(fdesetup supportsauthrestart) 2>/dev/null if [ $? -ne 0 ] then echo Unsupported else echo $filevault_auth_bypass | sed -e 's/t/T/g' -e 's/f/F/g' fi exit 0 ``` #### Authentication > *Either: \* Users have two passwords – one for FileVault 2, and one to login and unlock their device (see Provisioning Steps for how to achieve this) \* Or users have one password which fulfils both requirements.* DEP Profile can include a local admin account to be created during enrolment, which could be hidden. [](https://kb.filewave.com/uploads/images/gallery/2023-07/W2eGjKIAi1mncqUQ-image.png) > *The user should be required to authenticate to the device in line with your organisation’s authentication policy (see Authentication Policy). This user’s login password derives a key which encrypts certificates and other credentials, giving access to organisational services.* #### Secure boot > *Set an EFI (firmware) password to make it more difficult for an attacker to modify the boot process. However, with physical access, the boot process can still be compromised.* Firmware password can be set using the provided recipe: [Firmware Password (macOS 10.14 Mojave+)](https://kb.filewave.com/books/macos/page/firmware-password-macos-1014-mojave "Firmware Password (macOS 10.14 Mojave+)") Custom Field to show Firmware Status: ```bash #! /bin/bash # # FileWave client will execute this script. The output will be used as the value of the custom field. # # Below is an example of how to read the value of one ENVIRONMENT VARIABLE in your script: # my_var=${ENV_VAR_NAME} # if [ -e /usr/sbin/firmwarepasswd ] then firmware_status=$(firmwarepasswd -check | awk '{print $NF}') error_code=$? if [ $error_code -ne 0 ] then echo "Error: "$error_code else echo "$firmware_status" fi else echo "N/A" fi exit 0 ``` #### Platform integrity and application sandboxing, SIPs SIPs is on by default and is unlikely to be disabled. However, FileWave has a default inventory item to check that SIP is enabled: [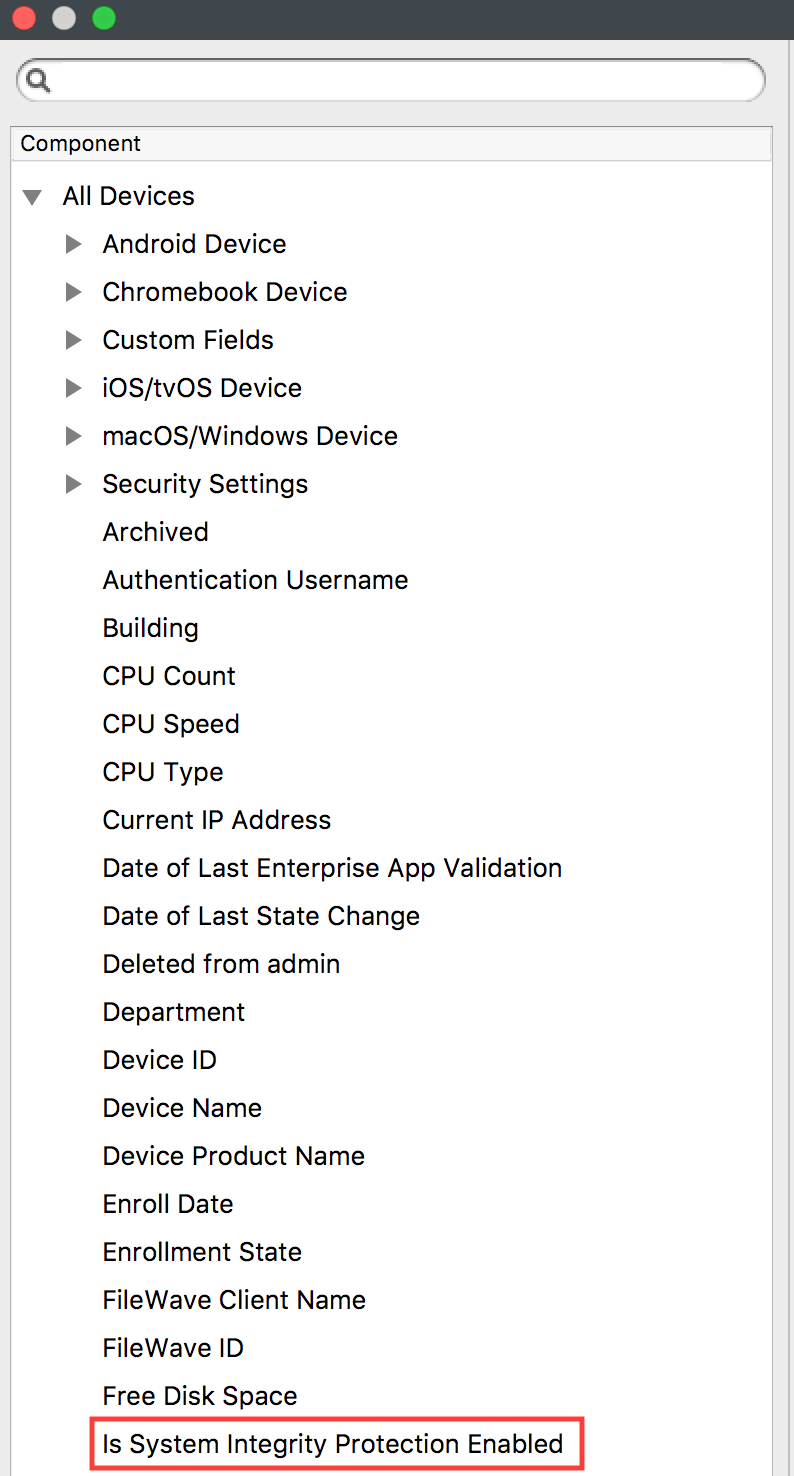](https://kb.filewave.com/uploads/images/gallery/2023-07/lH90pWosMgjg7iqE-image.png) Application whitelisting > *Use the MDM to whitelist default macOS applications. Use GateKeeper to prevent the installation and running of unsigned applications. An organisation application catalogue can also be used which only contains enterprise-approved or in-house applications.* [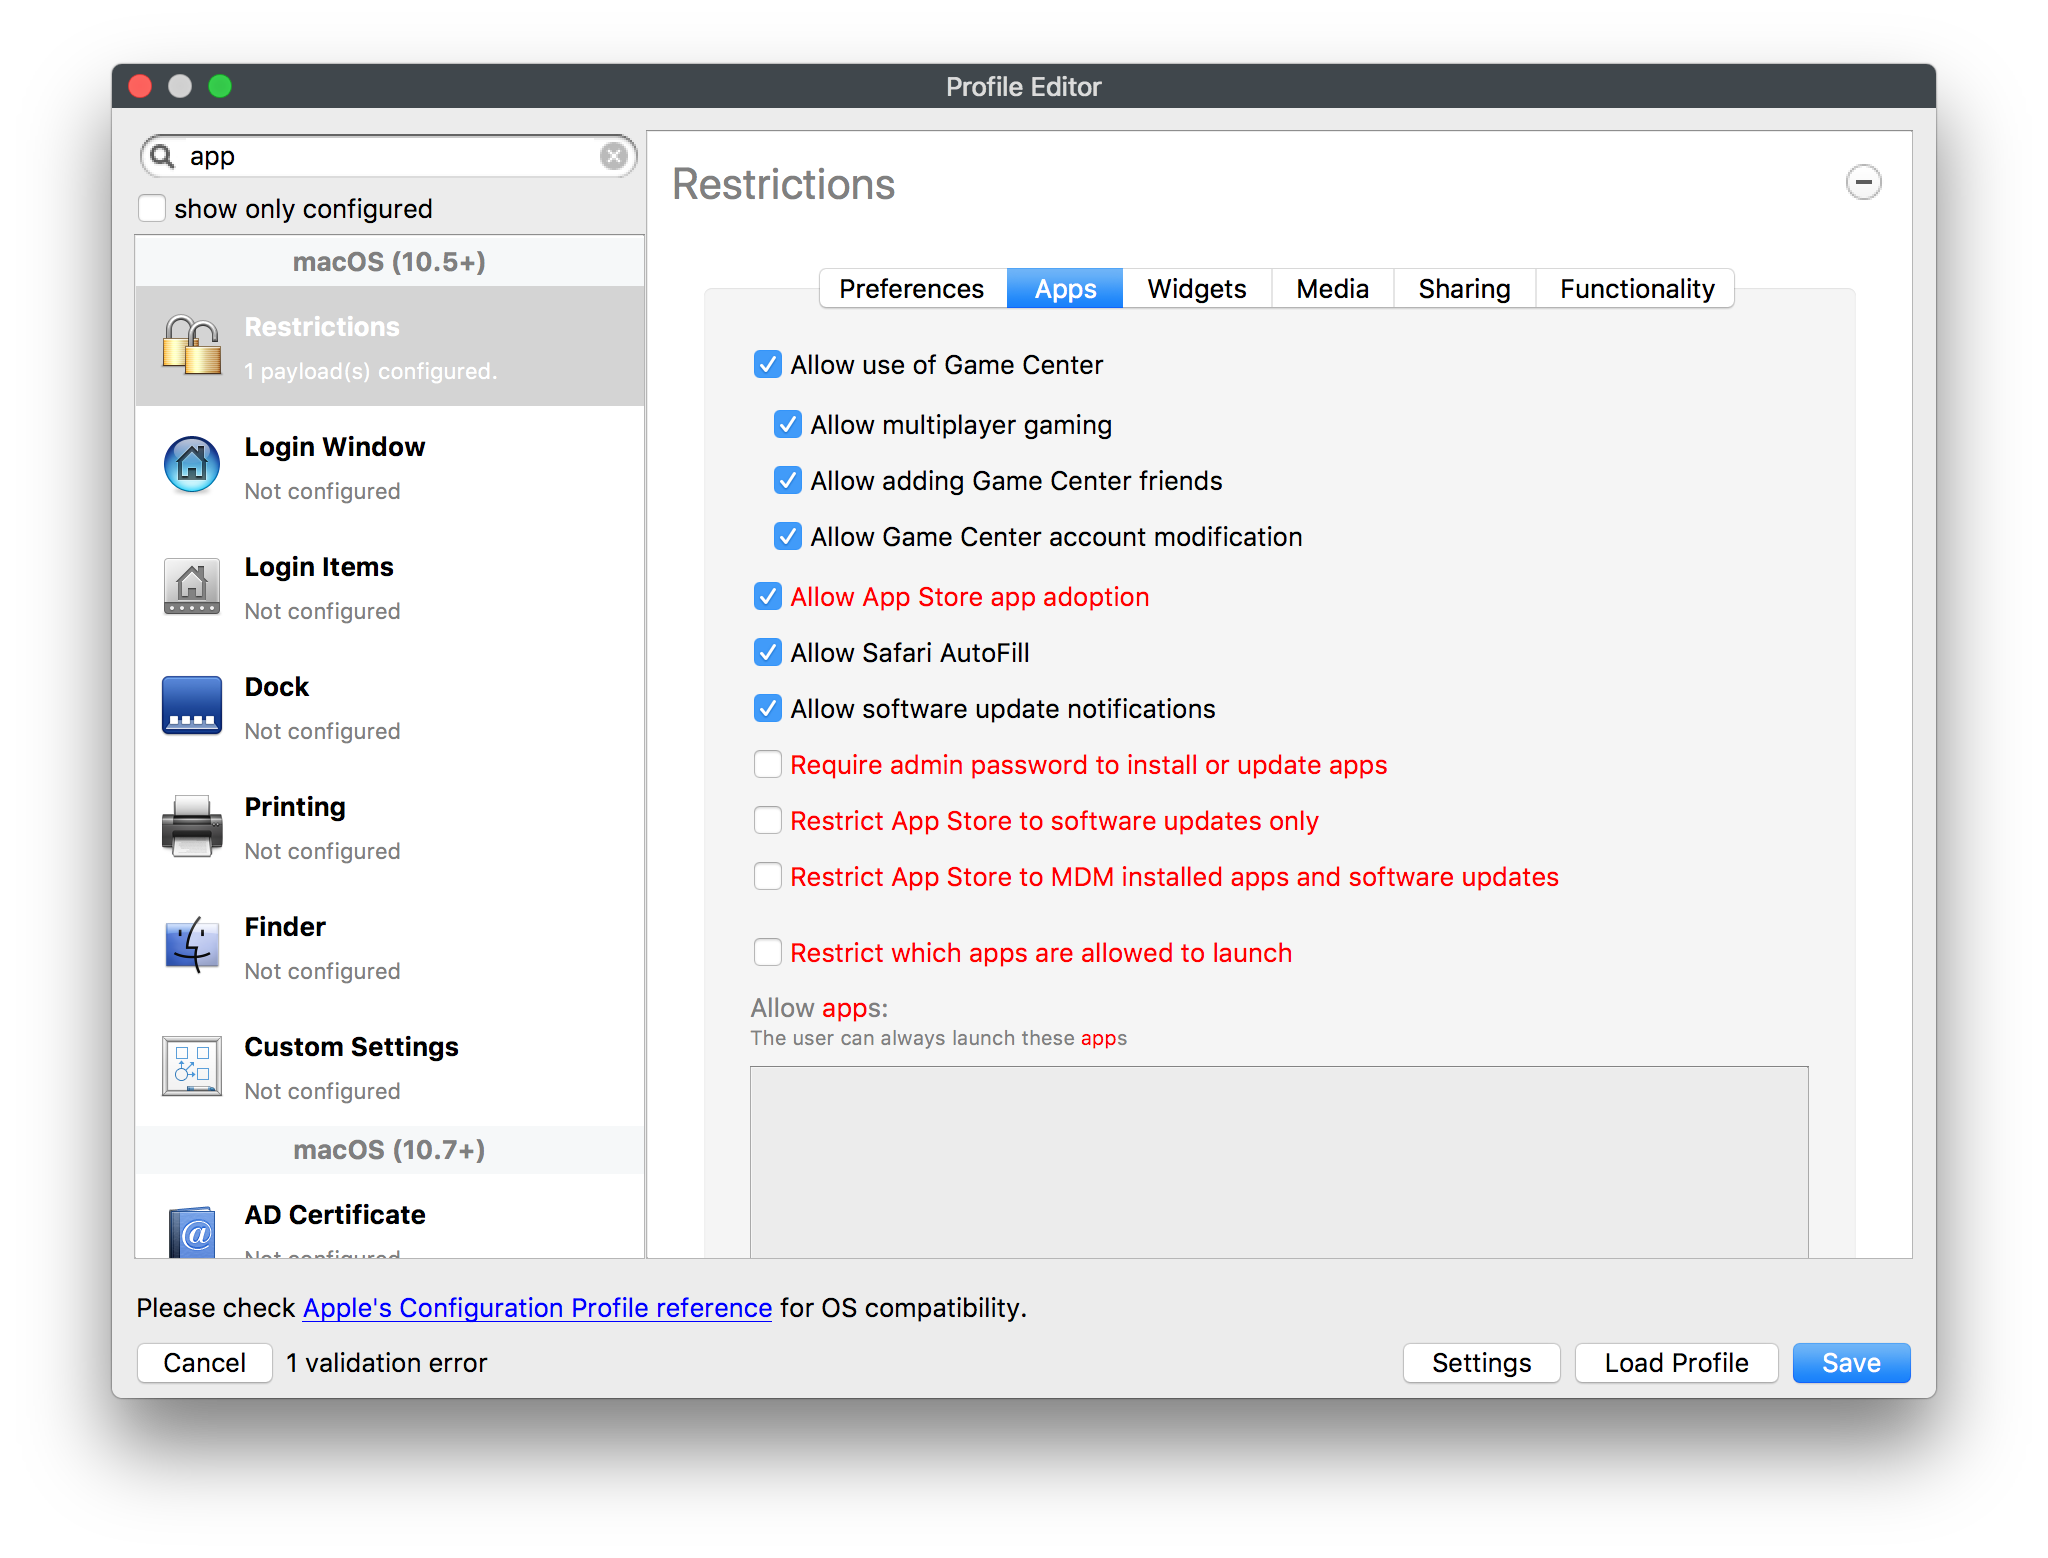](https://kb.filewave.com/uploads/images/gallery/2023-07/ro7P2gCh52t8RbOb-image.png) [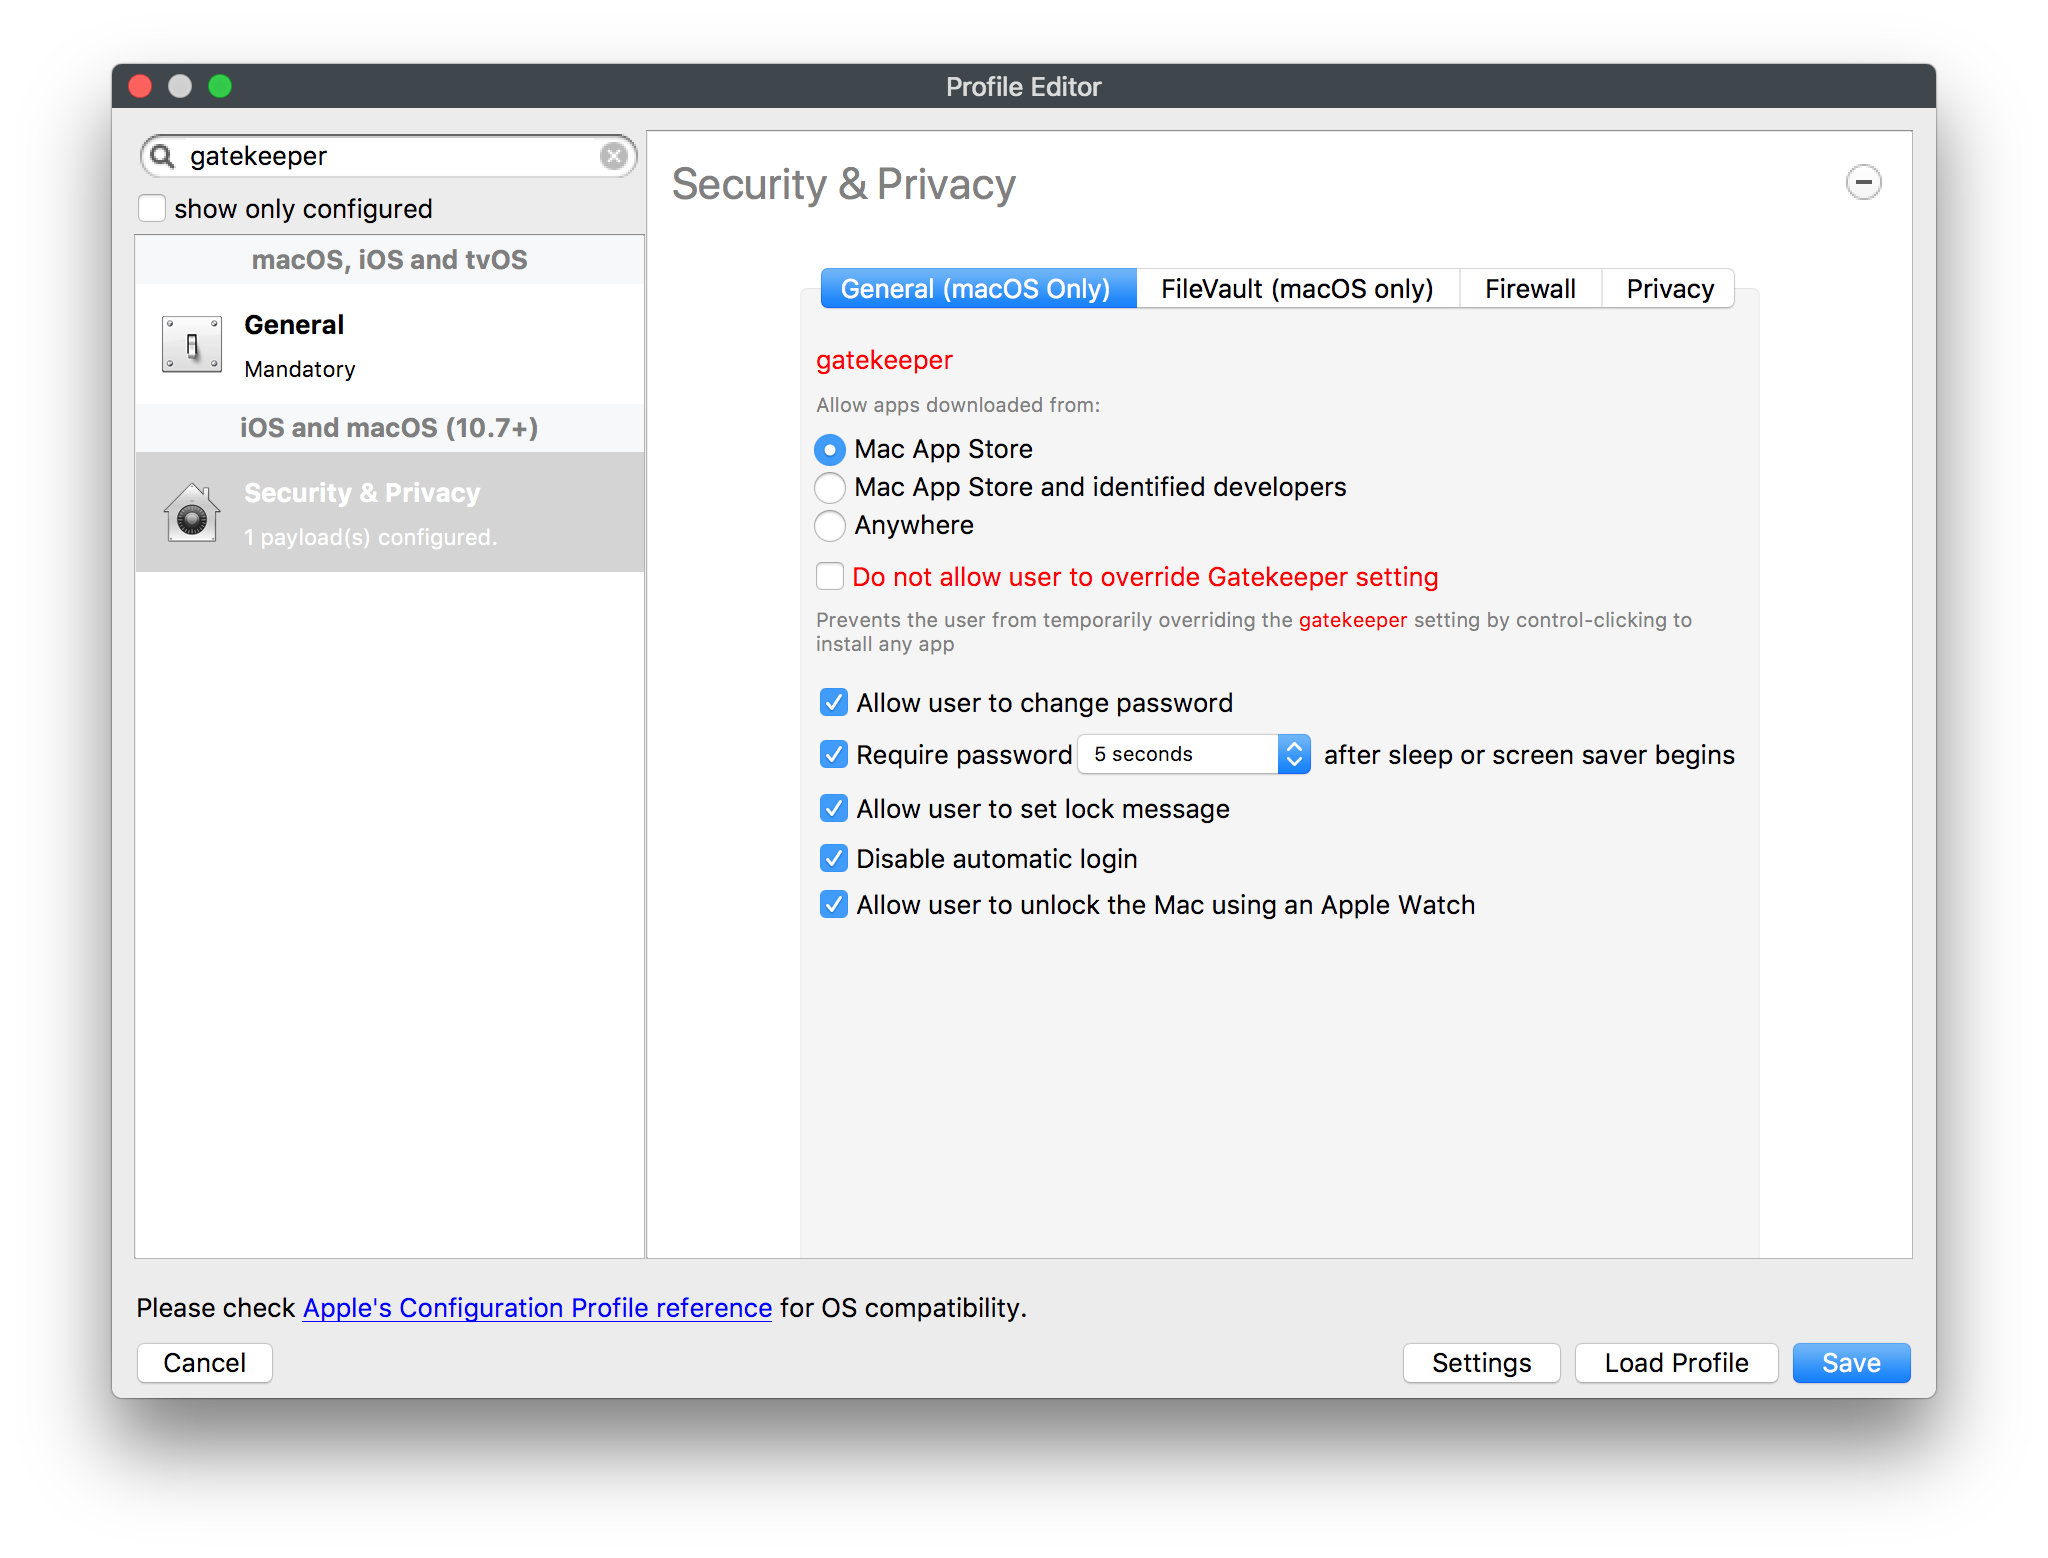](https://kb.filewave.com/uploads/images/gallery/2023-07/IHRTm8ZpU2SO6u5i-image.png) Custom Field to display Gatekeeper version: ```bash #! /bin/bash # # FileWave client will execute this script. The output will be used as the value of the custom field. # # Below is an example of how to read the value of one ENVIRONMENT VARIABLE in your script: # my_var=${ENV_VAR_NAME} # defaults read /var/db/gkopaque.bundle/Contents/Info.plist CFBundleShortVersionString exit 0 ``` Malicious code detection and prevention > *XProtect is built into macOS. It has a limited signature set which is maintained by Apple to detect widespread malware. XProtect will also restrict vulnerable plugin versions (such as Java) to limit exposure. Several third-party anti-malware products also exist which attempt to detect malicious code for this platform. Content-based attacks can be filtered by scanning capabilities in the organisation.* Custom Filed to display XProtect version: ```bash #! /bin/bash # # FileWave client will execute this script. The output will be used as the value of the custom field. # # Below is an example of how to read the value of one ENVIRONMENT VARIABLE in your script: # my_var=${ENV_VAR_NAME} # defaults read /System/Library/CoreServices/CoreTypes.bundle/Contents/Resources/XProtect.meta.plist Version exit 0 ``` Security policy enforcement > *Mark MDM profiles as non-removable so the user cannot remove them and alter their configuration.* General setting of each profile has an option to deny profile removal under the Security option. [](https://kb.filewave.com/uploads/images/gallery/2023-07/uw3qAKawReZbM0tu-image.png) #### External interface protection > *USB removable media can be blocked through MDM if required. If an EFI password is set, DMA is only possible when the device is booted and unlocked.* Restrictions profile may be used to control access to external media [](https://kb.filewave.com/uploads/images/gallery/2023-07/Rm66S1vv0ESgvYjG-image.png) #### Device update policy > *MDM can be used to audit which App Store software and OS versions are installed on a device. The attached script will turn on automatic updates, but this cannot be achieved remotely with MDM.* By default, this cannot be achieved over MDM. However, FileWave has the option for a Custom Settings profile that could control this over MDM [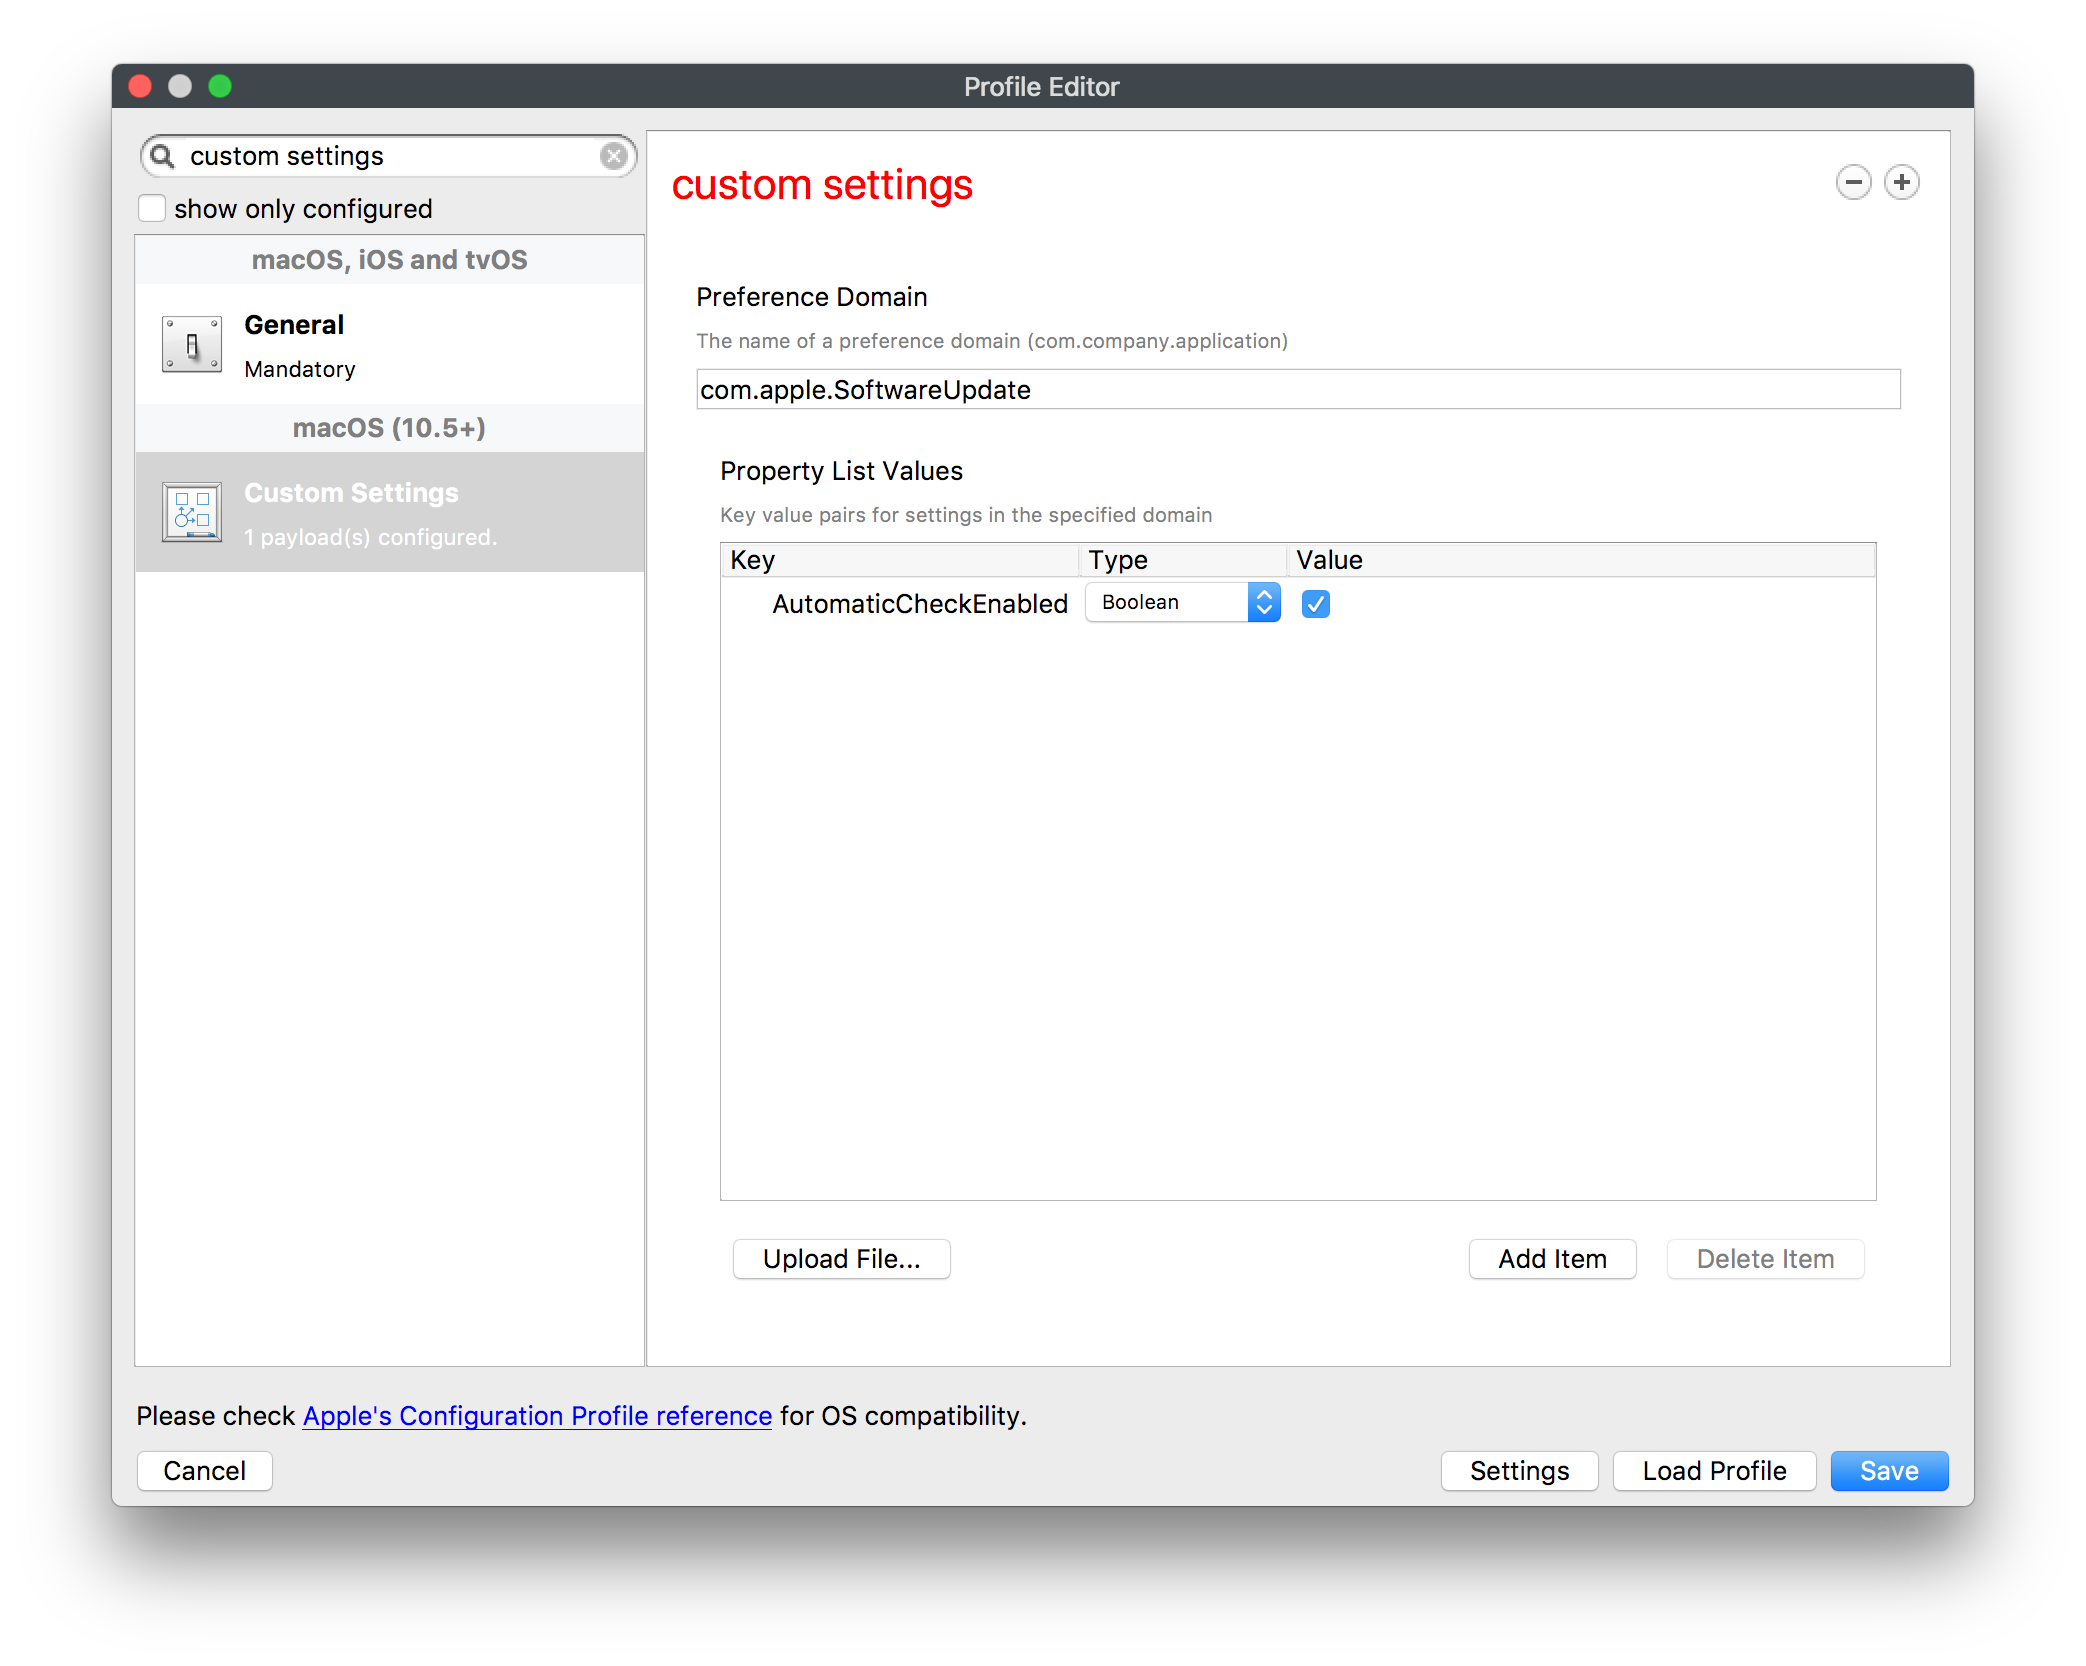](https://kb.filewave.com/uploads/images/gallery/2023-07/zo4cB9jeCjH8hKtc-image.png) #### **Event collection for enterprise analysis** > *macOS logs can be viewed by a local administrator on device, or from a distance using remote administration tools. Third-party software can also be used to automate log collection.* Client Info has an option to view Command History. Client Info and Client Monitor have the option to view FileWave logs by default. Viewing macOS logs would involve another method. Options could include: - Fileset Activation Script to read the file. Output of scripts can be viewed in the Fileset Status view; right click on Script and choose 'View Script Output'. - Remote Control of device - Fileset Script to upload these files to a secure share Example Activation Script: ```bash #!/bin/bash cat /private/var/log/system.log exit 0 ``` #### **Incident response** “*macOS devices can be locked, wiped, and configured remotely by their MDM.”* Device context menu has options to either Lock or Wipe a device. FileWave has extensive options for remotely configuring MDM enrolled devices. [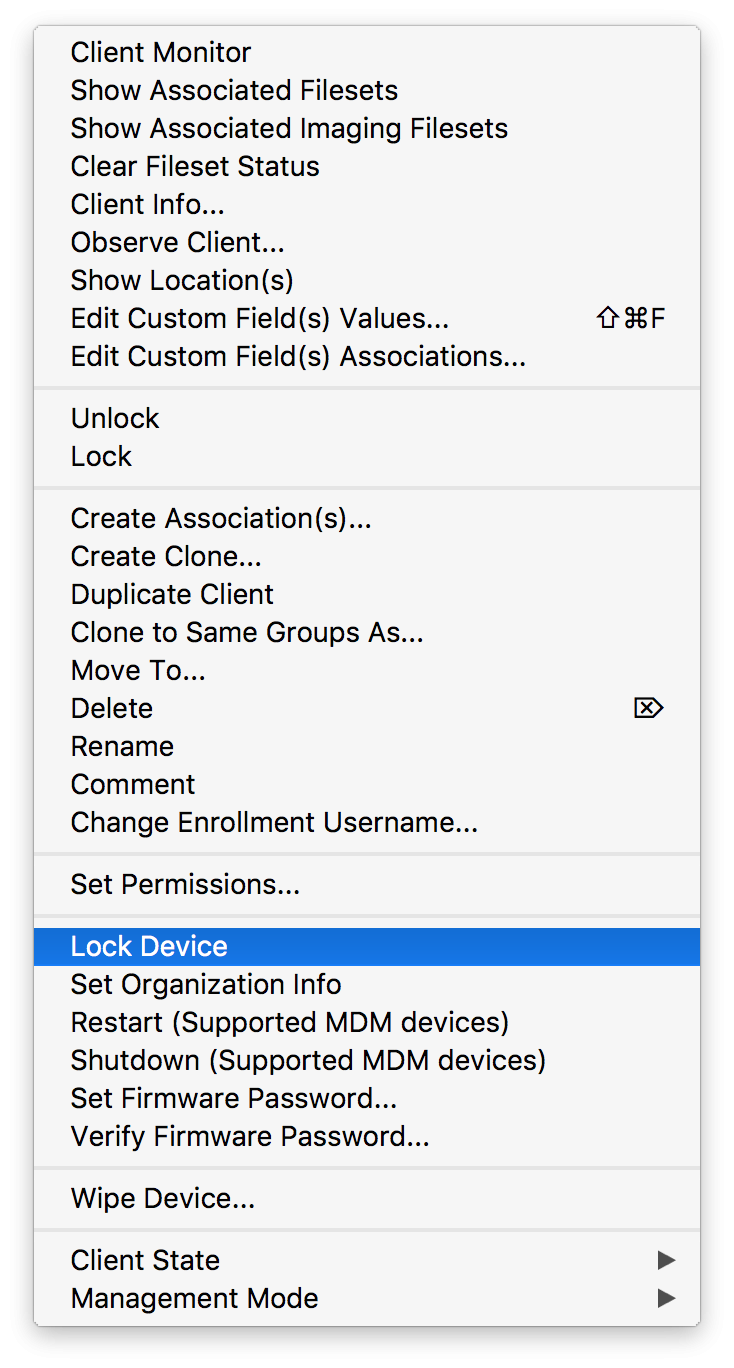](https://kb.filewave.com/uploads/images/gallery/2023-07/wVJG1euL2cbtVUB6-image.png) [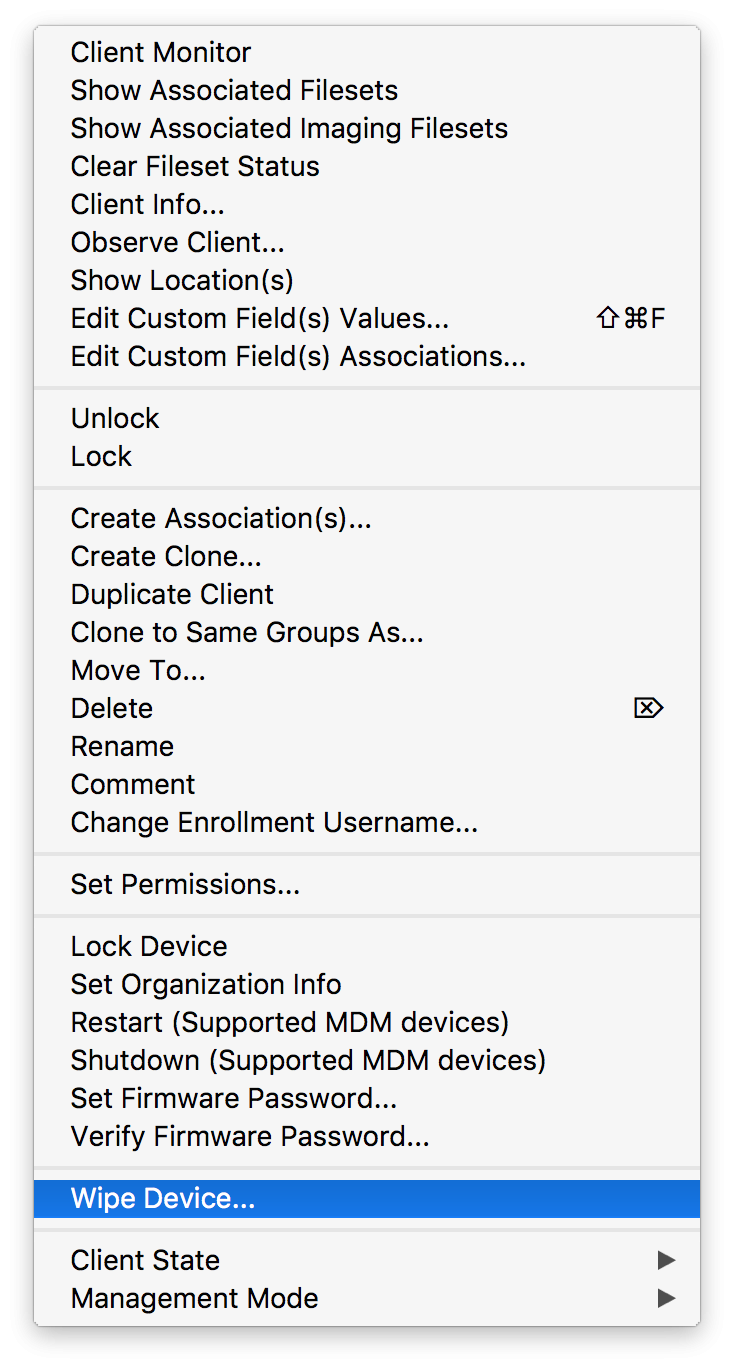](https://kb.filewave.com/uploads/images/gallery/2023-07/gzhA7l9h7qJEl73G-image.png) #### Additional Custom Fields Firewall Status: ```bash #! /bin/bash # # FileWave client will execute this script. The output will be used as the value of the custom field. # # Below is an example of how to read the value of one ENVIRONMENT VARIABLE in your script: # my_var=${ENV_VAR_NAME} # fw_status=$(/usr/libexec/ApplicationFirewall/socketfilterfw --getglobalstate 2>/dev/null) error_code=$? if [ $error_code -ne 0 ] then echo "Error: "$error_code else case $fw_status in *"disabled"*) echo "Off" ;; *"enabled"*) echo "Enabled" ;; *) echo "$fw_status" ;; esac fi exit 0 ``` Local Admins: ```bash #! /bin/bash # # FileWave client will execute this script. The output will be used as the value of the custom field. # # Below is an example of how to read the value of one ENVIRONMENT VARIABLE in your script: # my_var=${ENV_VAR_NAME} # /usr/bin/dscl . -read /Groups/admin GroupMembership | cut -d " " -f 3- | tr " " "," exit 0 ``` Hidden Admins: ```bash #! /bin/bash # # FileWave client will execute this script. The output will be used as the value of the custom field. # # Below is an example of how to read the value of one ENVIRONMENT VARIABLE in your script: # my_var=${ENV_VAR_NAME} # declare -a HiddenAdmins=() function check_hidden { while [ $# -gt 0 ] do IsHidden=$(dscl . read /Users/$1 IsHidden 2>/dev/null | awk '{print $NF}') if [[ $IsHidden -eq 1 ]] then HiddenAdmins+=($1) fi shift done } check_hidden $(/usr/bin/dscl . -read /Groups/admin GroupMembership | cut -d " " -f 3-) echo ${HiddenAdmins[@]} | tr " " "," exit 0 ``` Visible Admins: ```bash #! /bin/bash # # FileWave client will execute this script. The output will be used as the value of the custom field. # # Below is an example of how to read the value of one ENVIRONMENT VARIABLE in your script: # my_var=${ENV_VAR_NAME} # #!/bin/bash declare -a VisibleAdmins=() function check_hidden { while [ $# -gt 0 ] do IsHidden=$(dscl . read /Users/$1 IsHidden 2>/dev/null | awk '{print $NF}') if [[ ! $IsHidden -eq 1 ]] then VisibleAdmins+=($1) fi shift done } check_hidden $(/usr/bin/dscl . -read /Groups/admin GroupMembership | cut -d " " -f 3-) echo ${VisibleAdmins[@]} | tr " " "," exit 0 ``` Installed Security Updates: ```bash #!/bin/zsh declare -a output_array=() get_pkg_name=0 function check_duplicate { if [ ${#output_array[@]} -eq 0 ] then output_array+=($1) else array_counter=0 while [ $array_counter -lt ${#output_array[@]} ] do array_counter=$(( array_counter + 1 )) if [[ "$1" == "${output_array[${array_counter}]}" ]] then break fi if [ $array_counter -eq ${#output_array[@]} ] then output_array+=($1) fi done fi } /usr/libexec/PlistBuddy -c 'Print ' /Library/Receipts/InstallHistory.plist | while read line do case "$line" in *"Security Update") get_pkg_name=1 ;; *"Security Update"*) check_duplicate "${line##* }" ;; *"com.apple.pkg.update.os"*|*"com.apple.pkg.update.10"*) if [ $get_pkg_name -eq 1 ] then sec_number=$( echo "$line" | awk -F "." '{print $(NF-1)}' | sed 's/[A-Za-z]*//g') check_duplicate "${sec_number}" get_pkg_name=0 fi ;; esac done echo ","${output_array}"," | tr " " "," exit 0 ``` Firmware Unlock Seed (password recovery key). A new key is generated with each password change. Firmware password changes require a reboot before reporting correctly. Key may only be used by Apple. ```bash #! /bin/bash # # FileWave client will execute this script. The output will be used as the value of the custom field. # # Below is an example of how to read the value of one ENVIRONMENT VARIABLE in your script: # my_var=${ENV_VAR_NAME} # # Retrieve firmwarepassword unlockseed. Response may only be used by Apple to unlock the device. # Firmware status check_firmware=$(firmwarepasswd -check | awk '{print $NF}') if [[ "$check_firmware" != "No" ]] then unlock_seed=$(firmwarepasswd -unlockseed &>/dev/null) if [ $? -eq 0 ] then echo $unlock_seed else echo Error fi else echo Disabled fi exit 0 ``` ### Preparation for deployment > *The steps below should be followed to prepare your organisation's infrastructure for hosting a deployment of these devices: Set up an MDM server (e.g. Profile Manager on macOS Server). This may require setting up the Open Directory component of a macOS Server. Ensure all Configuration Profiles are signed to prevent modification in transit, or post install Create policies on Profile Manager for: \* Ensure 'Use SSL' is selected for all server settings \* VPN \* Passcode \* Disk encryption and key escrow \* Exchange/Mail/Calendar Settings. \* Disabling access to the Preference Panes in Restrictions (macOS) for iCloud and Network as access to these could be used to disable the VPN.”* FileWave can be used to mimic Profile Manager and much more. It is worth noting however, that FileWave does not have the option to sign Configuration Profiles. This is a current Feature Request: FW-19687. Recommendation in this case would be to use Profile Manager to sign the profile and then import this into FileWave. It is also possible to achieve this from the macOS command line: ```bash /usr/bin/security cms -S -N "Certificate Common Name" -I "/path/to/original.mobileconfig" -o "/path/to/create/signed.mobileconfig" ``` Signing certificates can be generated if you have a Apple developer account or if you already have a macOS Server running and then added to the keychain prior to signing. #### Policy Creations - YES - Use SSL in various Payloads - YES - VPN payloads - YES - Passcode payloads - YES - Disk Encryption with Personal and Institutional Recovery Key - Partly - Profile may be applied to enforce both/either Institutional and Personal Recover Key. Currently storing the Personal Recovery Key is not supported. There is a Feature Request for this: FW-20543 - YES - Exchange/Mail/Calendar Settings. - YES - Disabling access to the Preference Panes in Restrictions (macOS) for iCloud and Network as access to these could be used to disable the VPN. > *“Additional Consideration > > \* Whitelist applications to further reduce the risk of malicious code being execute > \* Tighten permissions on USB mass storage and optical devices to help prevent data loss through removable media > \* Use Restrictions to blacklist locations from which users should not run applications, or whitelist trusted applications that users are allowed to run > \* Include internal CA Certificates where appropriate to ensure users can authenticate network services > \* Include corporate network profiles (e.g. 802.1X or Wi-Fi) to ensure that network access credentials are distributed securely”* - YES - Whitelist applications to further reduce the risk of malicious code being execute - YES - Tighten permissions on USB mass storage and optical devices to help prevent data loss through removable media - YES - Use Restrictions to blacklist locations from which users should not run applications, or whitelist trusted applications that users are allowed to run - YES - Include internal CA Certificates where appropriate to ensure users can authenticate network services - YES - Include corporate network profiles (e.g. 802.1X or Wi-Fi) to ensure that network access credentials are distributed securelyFeature Requests Where Feature Requests have been noted, please view release notes for added features in future updates.
This KB Contains public sector information licensed under the Open Government Licence v3.0. [http://www.nationalarchives.gov.uk/doc/open-government-licence/version/3/](http://www.nationalarchives.gov.uk/doc/open-government-licence/version/3/) # FileVault # FileVault - Getting Started**Please Note** Setting up FileVault 2 with FileWave is supported with MDM enrolled macOS devices only! MDM enrolled devices are such that went through DEP enrollment or had the MDM profile installed manually.
These advanced steps are for system administrators and others who are familiar with the command line and FileWave. ## What you need to begin - FileWave version 12.9+ - macOS 10.9+ MDM enrolled in FileWave - **macOS devices have to be MDM enrolled in FileWave** ## What is FileVault 2 FileVault full-disk encryption (FileVault 2) uses XTS-AES-128 encryption with a 256-bit key to help prevent unauthorized access to the information on your startup disk. FileVault 2 has three different decrypting mechanisms: - If a user is a part of "FileVault users", successful login unlocks FileVault - A Personal Recovery Key (PRK) can be generated for each user and used to unlock FileVault - An Institutional Recovery Key (IRK) - which is actually a cryptographic key pair - can be used to unlock FileVault ## Setup ### Full Disk Encryption Assistant - Open the FileWave Admin - Assistants → Full Disk Encryption Management → FDE Configuration Management... [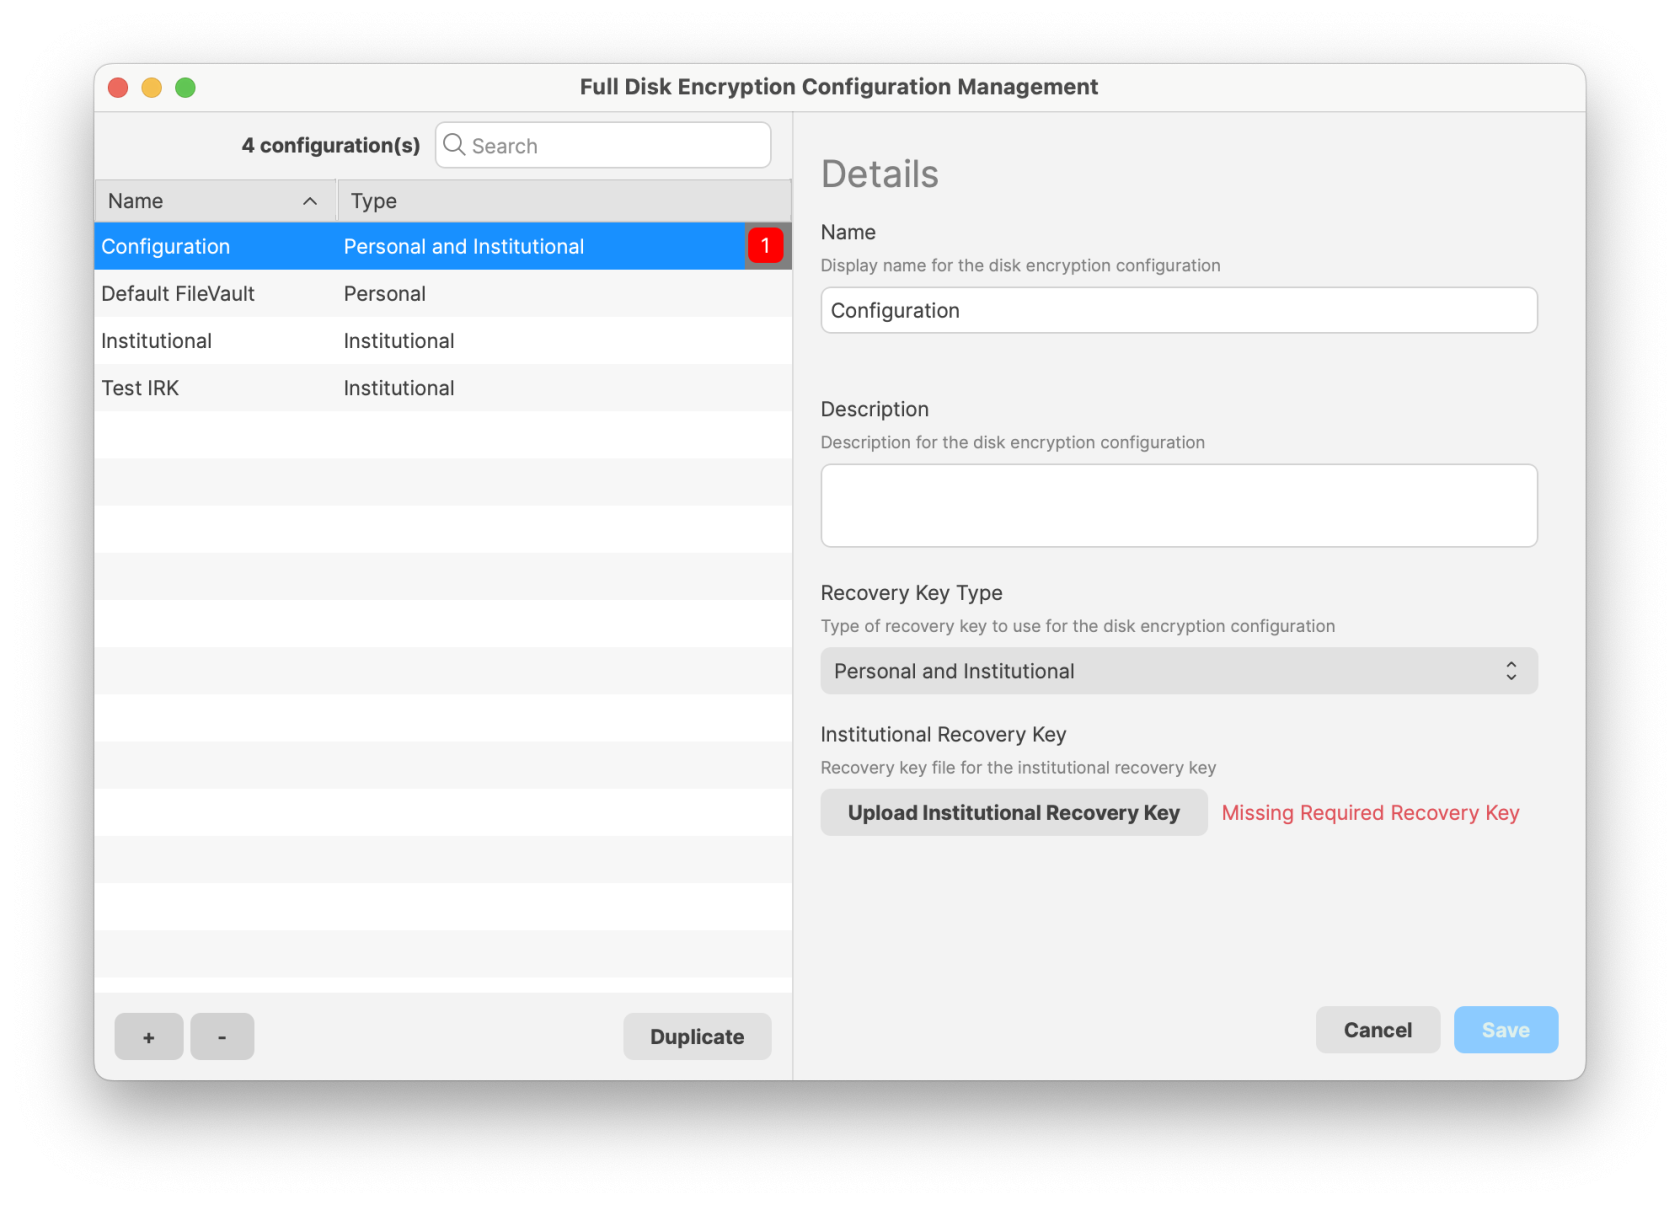](https://kb.filewave.com/uploads/images/gallery/2025-03/wOH0XRfYEFloqvsZ-updatedfilevault2-2.png) - Once you click the "+" on the bottom left you will then be able to select the recovery key type on the right - Personal (PRK): This will prompt the user their "FileVault Recovery Key" that the end-user will need to keep for decryption (FileWave will be able to escrow this key later) - Institutional (IRK): A key will need to be created on your macOS device and then imported into the Disk Encryption Configurations window. Please follow the steps below**IMPORTANT NOTE:** \* If you use the option "User is not prompted for FileVault activation at login" There is a chance that FileVault may never fully activate. It is recommended you do not use this option. \* This payload can't be used in conjunction with other payloads in the same profile. \* Importing a profile with FileVault 2 options is not possible; FileVault 2 configuration must be created using the Assistant and Full \* Disk Encryption payload; if you try to import such profile FileWave will have to remove FDE payloads before importing - FileWave can do it for you. \* If you had FDE payloads before upgrading to FileWave 12.9+, you won't be able to edit those profiles unless FileVault 2 options are removed - FileWave can do it for you. \* **Escrow Personal Recovery Key** is required for **Authenticated Restart** and being able to store the key in FileWave.
- From this point, you are ready to deploy this profile to your MDM enrolled macOS devices. ### Disk Encryption Inventory Information Now that you have FileVault 2 enabled on your device(s) you can view inventory pulled from the device(s) regarding the FileVault 2 settings: - FDE Has Institutional Recovery Key - FDE Has Personal Recovery Key - FDE Is Enabled - FDE Support - Authenticated restart supported - FDE Personal Recovery Key Hint Message - Has FileWave recovery Key  ### Disk Encryption Recovery Key Escrow When FileVault 2 is enabled FileWave will keep track of the configuration applied to the corresponding keys such as the Institutional Recovery Key (IRK) used to encrypt the disk and the Personal Recovery Key (PRK). To manage these keys go to **Assistants** → **FDE Recovery Key Management...** Once you select a device you will be able to **Show Personal Recovery Key...** or **Download Institution Recovery Key...** depending on what configuration was used to set up FileVault on that machine. You can also delete outdated entries but keep in mind if a device has FDE managed by FileWave, it's not possible to remove FDE keys from the assistant. You have to disable FDE or remove the device from FileWave first. **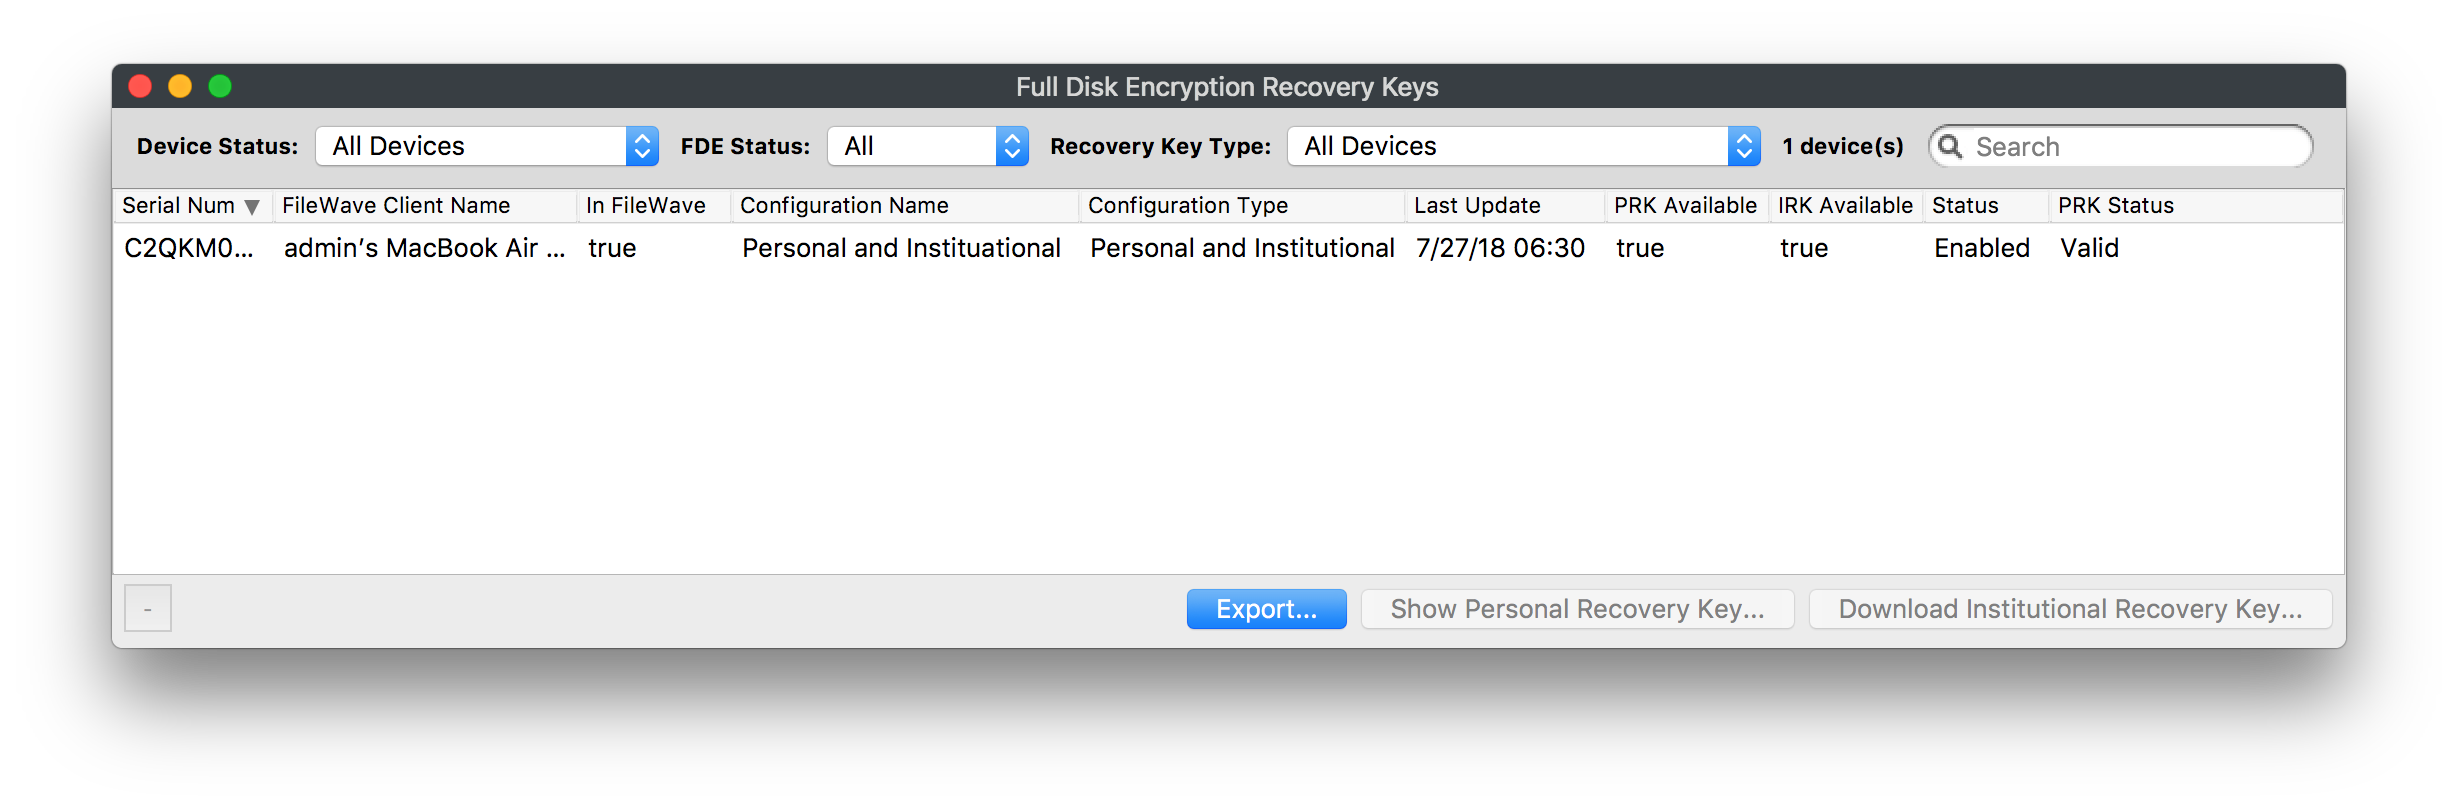** Status can be: - Disabled - Enabled - Pending - this is the state reported by a device between the profile installation and when FDE actually being enabled PRK Status can be: - Valid - Cannot decrypt - Invalid - no key or not a valid key ### Authenticated Restart**macOS 10.13 NOT SUPPORTED** Authenticated restart using Personal Recovery Key does not work on macOS 10.13+ on APFS This option is for Personal Recovery Key only; Institutional Keys are not supported with this option
When FileVault 2 is enabled, the device will be locked on startup. At this stage, FileWave does not connect to the device until the drive is unlocked. You need to be aware of this if you have FileVault 2 enabled on a device and then send out a Fileset that requires a reboot! After the reboot, the end-user will have to unlock the drive before the deployment can finish. FileWave may be able to help with this using **Authenticated Restart** as a Fileset option. If you selected the option **Escrow Personal Recovery Key** when you created the **Disk Encryption** Profile to enable FileVault 2 then FileWave will be able to use the authenticated restart to unlock the drive without user interaction. This option is located in the Fileset Properties for any Fileset you are requiring a reboot for. Right-click on **Fileset** → **Properties** → **Select Requires Reboot** 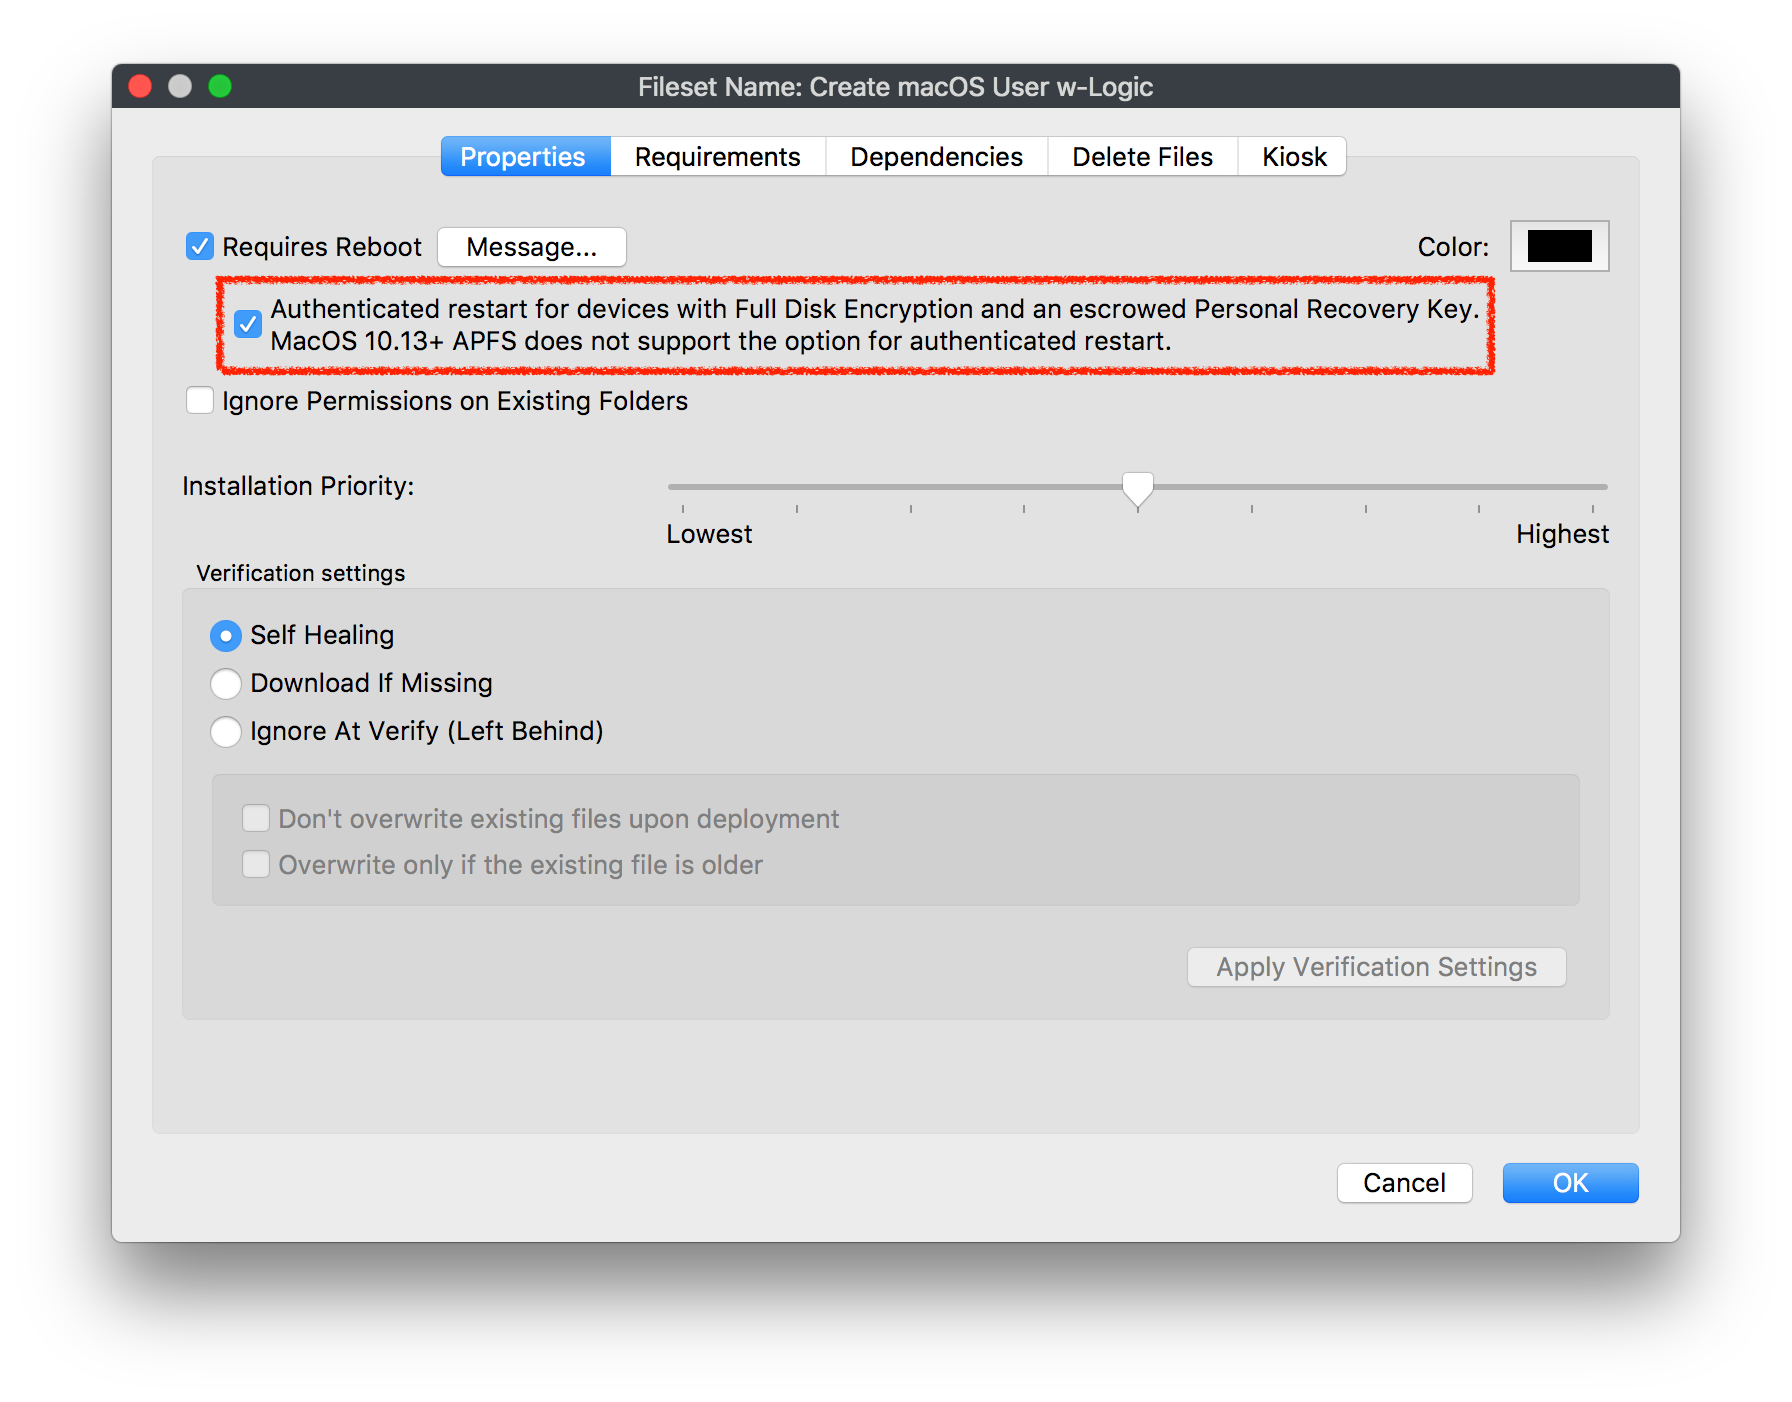**Possible Security Risk** Keep in mind using this option can be seen as a security risk and should be used accordingly. The device will reboot unlocked so access to encrypted data is possible and until the device reboots, an escrow key is stored in memory but still encrypted.
## Recent versions of macOS for FileVault IRKs The use of Institutional FileVault keys, also known as Institutional Recovery Keys (IRK), is no longer recommended in recent versions of macOS, including macOS Ventura. The utility of IRKs for organizations has become limited, particularly on Macs with Apple Silicon, where IRKs provide no functional value. This is because IRKs can't be used to access recoveryOS, and because Target Disk Mode is no longer supported, the volume can't be unlocked by connecting it to another Mac. Instead, the use of a Personal Recovery Key (PRK) is now recommended. A PRK provides an extremely robust recovery and operating system access mechanism, unique encryption per volume, escrow to MDM, and easy key rotation after use. Moreover, there is only one PRK per encrypted volume. During FileVault enablement from MDM, the PRK can optionally be hidden from the user. When configured for escrow to MDM, MDM provides a public key in the form of a certificate, which is then used to asymmetrically encrypt the PRK in a CMS envelope format. The encrypted PRK is returned to MDM in the security information query, which can then be decrypted for viewing by an organization. Many MDM vendors provide the option to manage these keys to allow for viewing directly in their products. MDM can also optionally rotate PRKs as often as is required to help maintain a strong security posture—for example, after a PRK is used to unlock a volumeAdditional information managing FileWave in macOS: [Managing FileVault in macOS](https://support.apple.com/guide/security/managing-filevault-sec8447f5049/web) Information regarding recent versions of macOS managing FileVault: [Manage FileVault with mobile device management](https://support.apple.com/guide/deployment/manage-filevault-with-mdm-dep0a2cb7686/web)
## Related Content - [Bootstrap Token Management on macOS](https://kb.filewave.com/books/macos/page/bootstrap-token-management-on-macos "Bootstrap Token Management on macOS") - [Deprecation of Institutional Recovery Keys](https://support.apple.com/en-gb/guide/deployment/dep0a2cb7686/web) # FileVault 2 enabled on macOS ADE enrollment ## What After you have configured FileVault management in [FileVault - Getting Started](https://kb.filewave.com/books/macos/page/filevault-getting-started "FileVault - Getting Started"), you can require FileVault during Automated Device Enrollment for supported macOS devices. ## When/Why FileVault protects data at rest on macOS devices. Requiring FileVault during enrollment helps ensure a Mac is encrypted before it is put into regular use, which is especially important for laptops assigned to staff who may handle sensitive data. On macOS 14.0 or later, FileWave can enable Apple's Setup Assistant FileVault enforcement during ADE enrollment. ## How Before enabling this option, complete the FileVault configuration described in [FileVault - Getting Started](https://kb.filewave.com/books/macos/page/filevault-getting-started "FileVault - Getting Started"). Use a supported FileWave release, target devices running macOS 14.0 or later, and a FileVault disk encryption profile available for the enrollment workflow. 1. In FileWave Central, go to **Assistants > DEP Association Management**. 2. Create or edit the DEP/ADE enrollment profile you want to use. 3. On the profile's **Requirements** tab, enable **Force Setup Assistant to enable FileVault**. 4. Select the FileVault disk encryption profile that should be used during enrollment. 5. Assign the enrollment profile as the default profile or apply it only to the devices that should use this workflow. [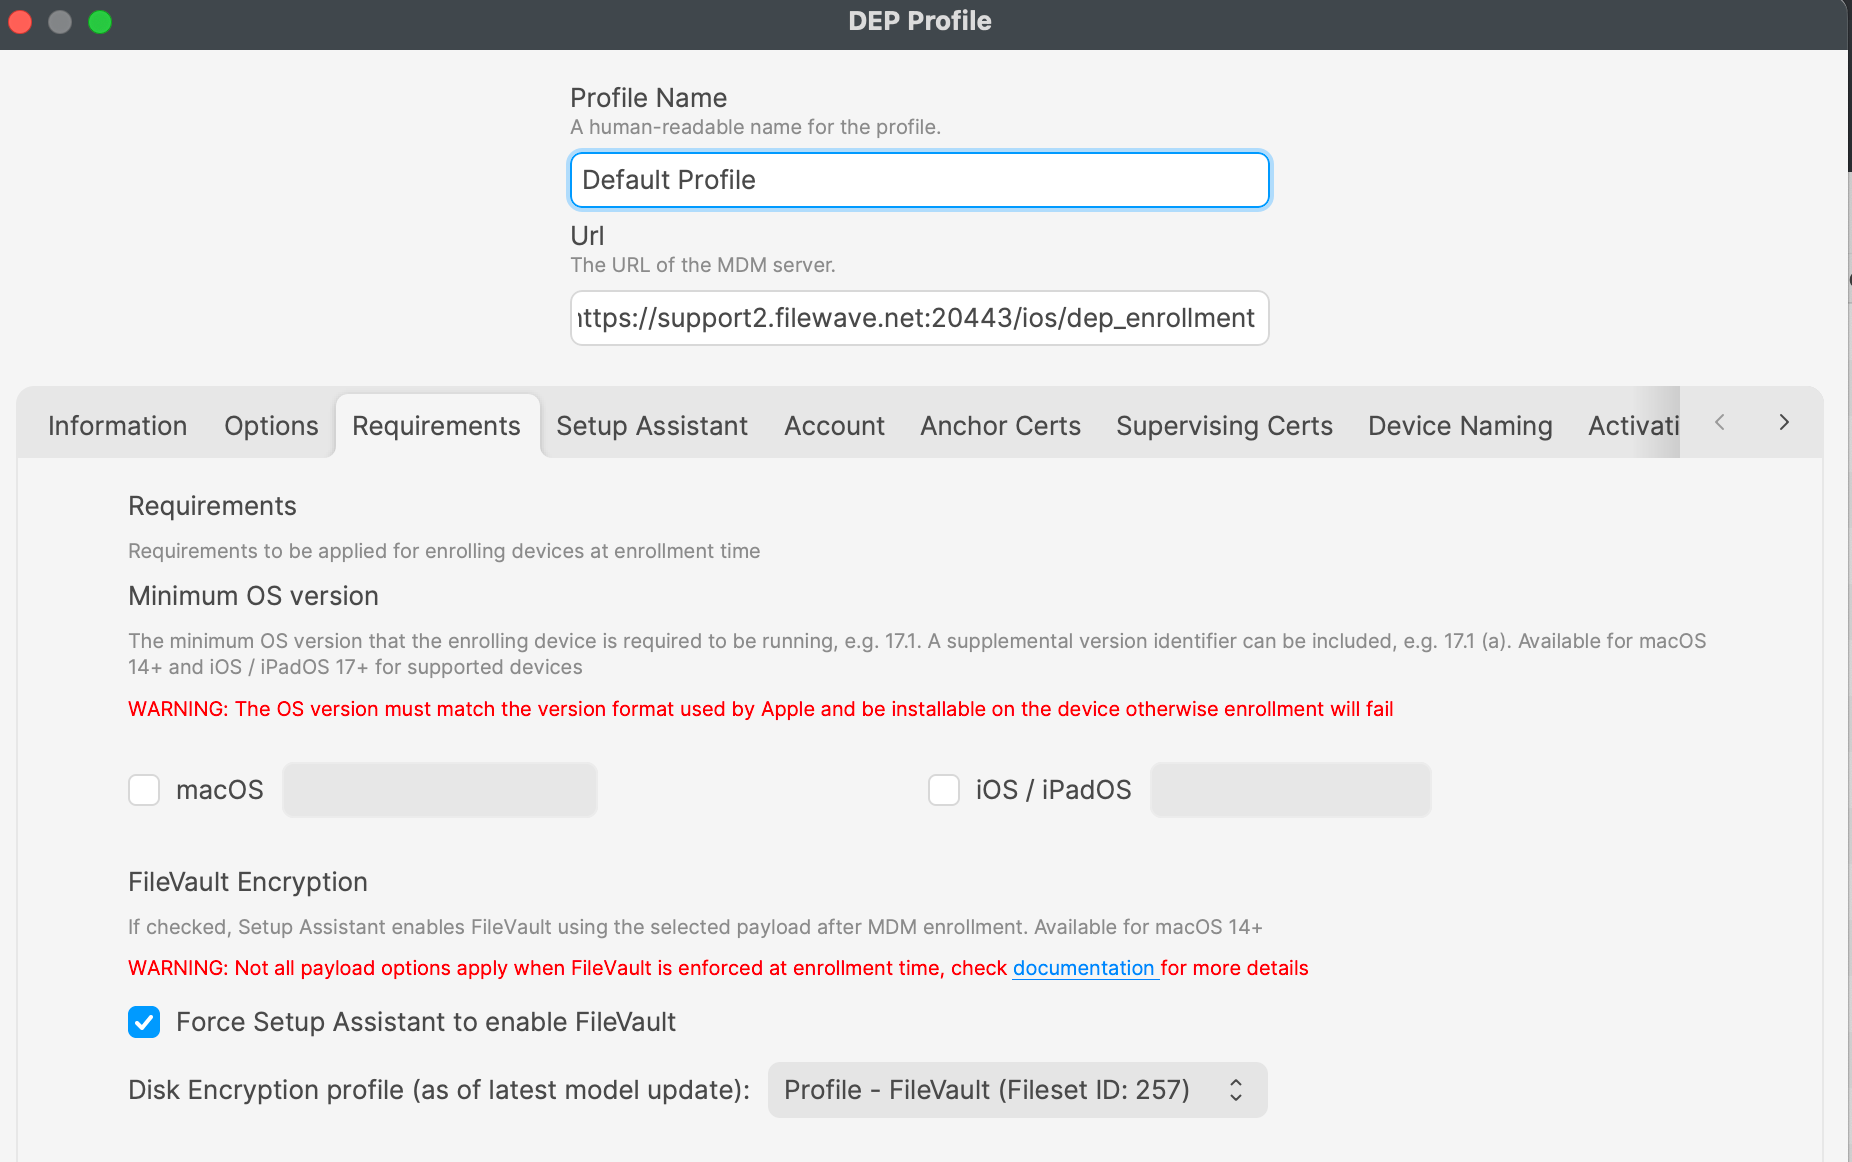](https://kb.filewave.com/uploads/images/gallery/2023-11/w2qs6akMHZ0G69kd-image.png) Test with one device before wider rollout. Confirm that the FileVault prompt appears during Setup Assistant and verify that your recovery-key workflow works as expected before assigning the profile broadly. ## Related Content - [FileVault - Getting Started](https://kb.filewave.com/books/macos/page/filevault-getting-started "FileVault - Getting Started") - [Apple: Manage FileVault with device management](https://support.apple.com/en-gb/guide/deployment/dep0a2cb7686/web) # Firmware Password (macOS 10.14 Mojave+) ## Description Apple have seen to make some changes regarding this over time, through versions of macOS. The following is a method that should work with macOS 10.10+ machines. This recipe allows for creating, changing or deleting the Firmware password.This script in this recipe is setting the Firmware password of macOS devices. If set incorrectly, you could become locked out of the device. FileWave offers this script as is, use of this script is at the user's understanding and risk and FileWave holds no responsibility for devices that become locked and un-usable. If concerned, please refrain from using this script.
**macOS Catalina** This script has been tested successfully on macOS Catalina (10.15.x)
## Ingredients - FileWave - macOS 10.11+ - Supplied Fileset - [Set Firmware Password V1.1.fileset.zip](https://kb.filewave.com/attachments/153)**macOS versions** This method uses the binary 'firmwarepasswd'. This was known to exist in all versions of macOS 10.10 and above. It is possible that this was introduced in later versions of 10.9. However, FileWave 13+ supports macOS 10.11+
## Directions 1. Download the above Fileset recipe and import into FileWave 2. Duplicate the Fileset and append the name appropriately: New, Change or Delete 3. Change the Launch Arguments to match the renamed duplicated Fileset based upon the below table 4. Edit the script if required for reboot options or set Fileset Properties Reboot 5. Associate, test and then deploy ### Launch Arguments To set the Launch Arguments - Open the Fileset - Select the script within the Fileset - Choose Get Info - Select Executable tab There are 3 options for this fileset: New, Change or Delete. The Launch Arguments should be set as required based upon these options as seen in the table below:| Launch Argument | New | Change | Delete |
| 1 | new | change | delete |
| 2 | new password | new password | old password |
| 3 | old password |
| Name as indicated by Apple's servers and About This Mac | Name as stored in local file |
| MacBook Pro (13-inch, M1, 2020) | MacBook Pro (13-inch, M1, 2020) |
| MacBook Pro (Retina, 15-inch, Mid 2015) | 15" MacBook Pro with Retina display (Mid 2015) |
| iMac (21.5-inch, Late 2009) | iMac Intel Core 2 Duo (widescreen, Late 2009) |
| Mac mini (Late 2012) | Mac mini (Late 2012) |
| static\_id | When set as 'static\_id', the value set in 'unique\_id' will be used as the users ID. If this value is already in use, the script will exit with an error. |
| next\_id | When set as 'next\_id', a range of values will be tested starting at 'unique\_id' and ending with 'end\_id'. The first available value found will be used. If none are found the script will exit with an error. |
Apple TextEdit works for this. On a default macOS installation, it is located at **Macintosh HD → Applications → TextEdit.app**.
- Add the agreement or notice text you want shown at the login window, then save the file with this base name:| `PolicyBanner` |
If you use the `.rtfd` format: 1. The file appears as a folder because it contains separate text and image files. 2. URLs and other hyperlinks do not work when macOS displays the banner at the login window. 3. You will not be able to export the RTFD later because of its folder format.
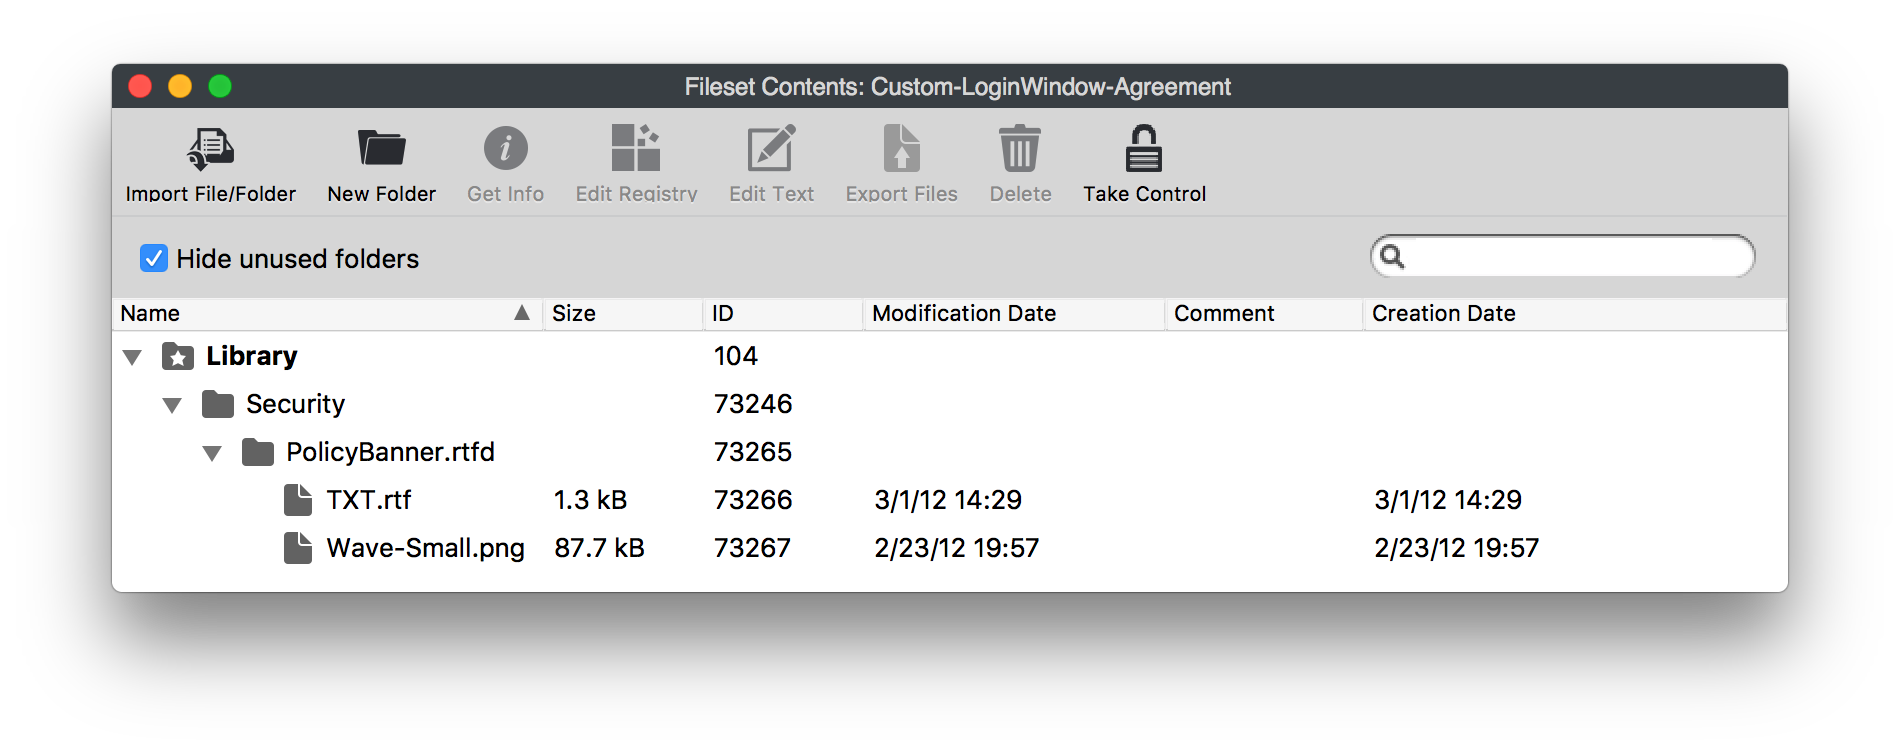 ## NotesApple's current policy banner guidance is available at [How to set up policy banners in macOS](https://support.apple.com/en-us/119845).
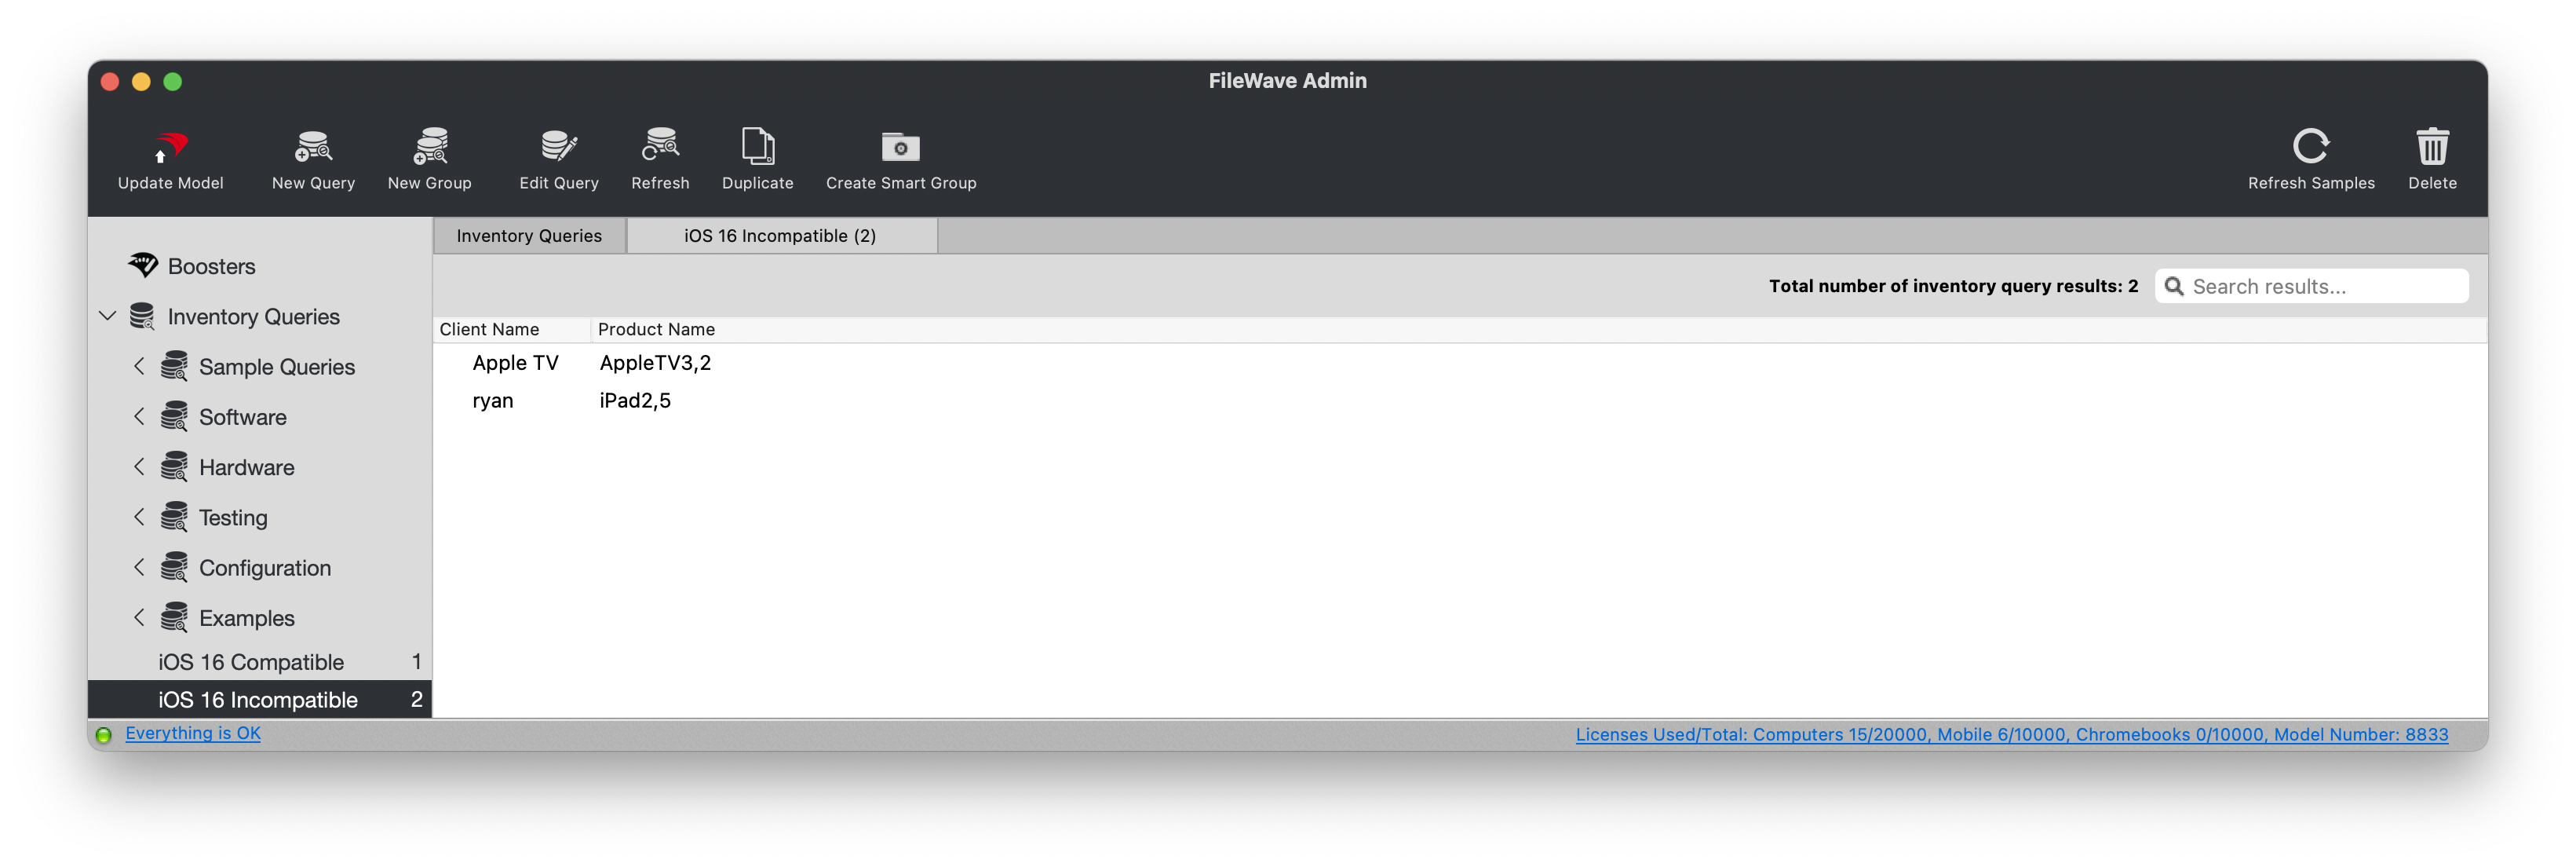
# Find Macs Compatible with macOS Big Sur Using a Custom Field ## Description Import the included Custom Field to identify Macs that are compatible or incompatible with macOS 11 Big Sur.| **macOS** |
| Custom Field, returns either: compatible or incompatible |
The screenshot below shows Reports (formerly Queries) in an older version of FileWave Central.
 ## Ingredients - macOS - Custom Field exported file: [Custom Big Sur Compatible Devices.customfields.zip](https://kb.filewave.com/attachments/140) ## Directions - Download the exported Custom Field file and unzip it. - In FileWave Central, choose **Assistants** > **Custom Fields**. - Choose **Import** and select the unzipped Custom Field file. - After importing, set **Assigned to all devices** as needed. - Save the Custom Field. See [Importing and Exporting Custom Field Files](https://kb.filewave.com/books/custom-fields/page/importing-and-exporting-custom-field-files "Importing and Exporting Custom Field Files") for the complete import workflow.You can assign this Custom Field to all devices because its Windows script returns **NA**.
# macOS 14 Compatible Devices (Custom Field) ## Description Details on identifying compatible devices for macOS 14 (Sonoma) using a Custom Field.| **macOS** |
| Custom Field, returns either: compatible or incompatible |
May be assigned to all devices, since Windows script is configured to return: NA
# Admin Password management (MDM Command - macOS) ## What The **Admin Password Management** command lets FileWave change the managed local admin password on eligible macOS devices through MDM. Use it for the admin account that FileWave created during Automated Device Enrollment (DEP/ADE), without needing physical access to the Mac. ## When/Why **When to use this:** - **Security rotation:** Change managed admin passwords on a schedule that matches your organization's policy. - **Suspected exposure:** Rotate the password if someone who should not know it may have had access. - **Staff changes:** Update the password when IT staff with admin access leave or change roles. - **Compliance:** Keep local admin credentials aligned with internal or regulatory password requirements. **Why use this feature:** - **Remote password reset:** Change the managed admin password across selected Macs from FileWave Central. - **Less hands-on work:** Avoid touching each device when the only required change is the local admin password. - **Controlled access:** Keep the managed admin credential current without changing unrelated user accounts. ## How **Prerequisites** - **Enrollment:** The Mac must be enrolled through Automated Device Enrollment (DEP/ADE). - **Apple OS/hardware:** The device must be an Apple silicon Mac running macOS 15.0 or later. - **Managed admin account:** The admin account must have been created during DEP/ADE enrollment using the profile options.If you create the admin account required for this feature, also review [Bootstrap Token Management on macOS](https://kb.filewave.com/books/macos/page/bootstrap-token-management-on-macos "Bootstrap Token Management on macOS").
**Prerelease information:** macOS 27 is currently in preview. Apple may change the supported-device list before the final release. Review [Apple’s macOS 27 compatibility page](https://www.apple.com/os/macos/) before making final upgrade or replacement decisions.
## Apple’s macOS 27 compatibility list Apple’s current list contains only Apple-silicon Macs: - MacBook Neo (2026) - MacBook Air with Apple silicon (2020 and later) - MacBook Pro with Apple silicon (2020 and later) - iMac with Apple silicon (2021 and later) - Mac mini with Apple silicon (2020 and later) - Mac Studio (2022 and later) - Mac Pro (2023 and later) The significant change from macOS 26 is that macOS 27 drops the remaining Intel-based Macs, including Intel MacBook Pro, iMac, and Mac Pro models that could run macOS 26. ## How the reports classify Macs Both definitions are limited to inventory records whose operating-system type is `OSX`. - **Compatible:** the Mac reports **Is Apple Silicon = true**, matches a known Apple-silicon model identifier, or is already running macOS 27. - **Incompatible:** the record is a Mac and none of the compatible checks match. The model-identifier fallback covers early Apple-silicon inventory such as `MacBookAir10,*`, `MacBookPro17,*`, `MacBookPro18,*`, `iMac21,*`, `Macmini9,*`, and `Mac13,*` through `Mac18,*`. It also includes the MacBook Neo identifier `Mac17,5`.**Scope:** These reports classify Apple’s published hardware compatibility only. They do not evaluate free disk space, application compatibility, backup readiness, or FileWave support for prerelease macOS builds.
## Ingredients - FileWave Central access with permission to manage Reports. - The compatible and incompatible JSON files below.| Report | Download | Purpose |
|---|---|---|
| macOS 27 Compatible | [macos27\_compatible.json](https://kb.filewave.com/attachments/537) | Find managed Macs matching Apple’s current macOS 27 hardware list. |
| macOS 27 Incompatible | [macos27\_incompatible.json](https://kb.filewave.com/attachments/538) | Find managed Macs that do not match the current list. |
**Historical reference:** The previous macOS 26 Custom Field remains in this page’s **Attachments** panel. Use the macOS 27 JSON files above for current compatibility planning.
## Directions ### Import in FileWave Central (recommended) 1. Download both JSON files from the table above. 2. Open **Reports** in FileWave Central. 3. Choose **Import Reports** in the toolbar, or right-click within the report list and choose **Import Report**. 4. Select `macos27_compatible.json` and complete the import. 5. Repeat the import with `macos27_incompatible.json`. 6. Open the imported reports and compare the results with your managed Mac inventory. 7. Validate representative Apple-silicon and Intel Macs before using the results for upgrade planning. [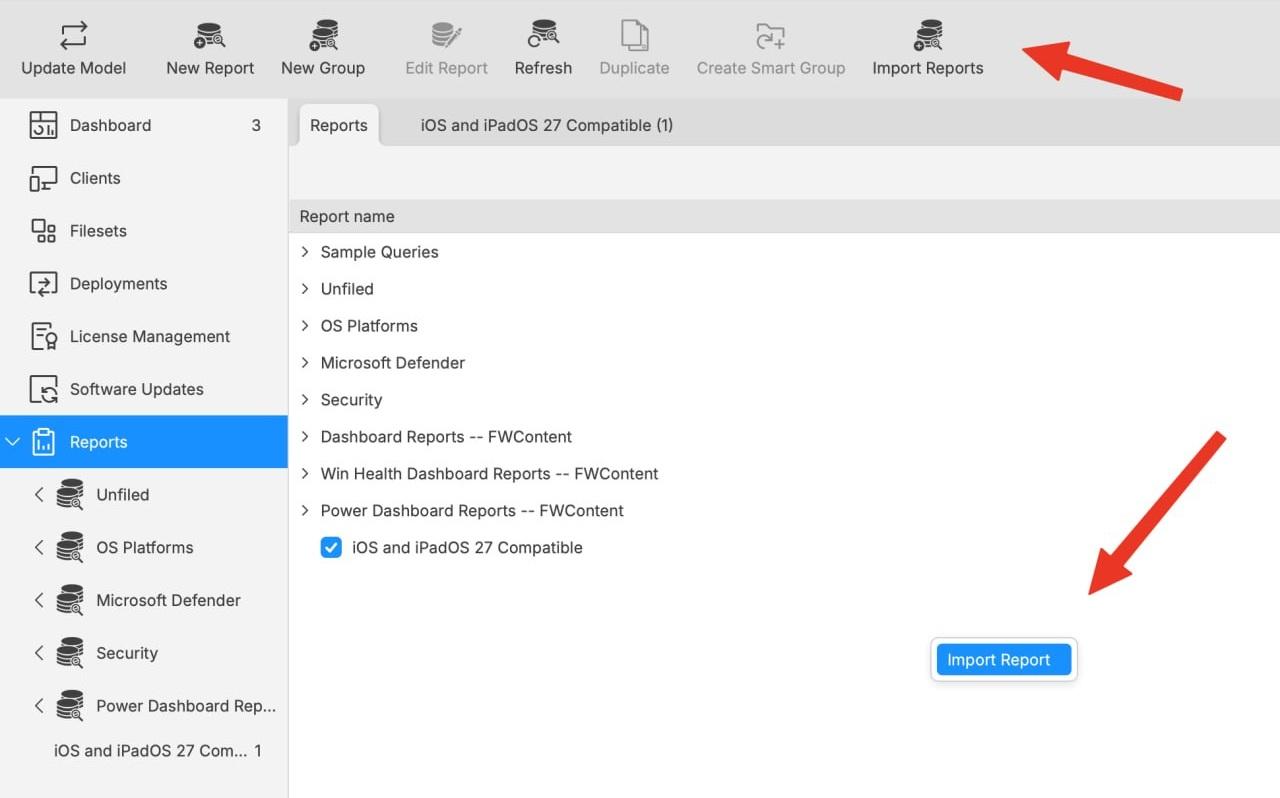](https://kb.filewave.com/uploads/images/gallery/2026-07/WpCp4ZmFTG1ZQaxl-filewave-central-import-reports-two-ways.jpg)Both controls open the report-import workflow. The toolbar uses the label **Import Reports**; the right-click action uses **Import Report**.
For general report import and export guidance, see [Exporting & Importing Inventory Reports](https://kb.filewave.com/books/filewave-central-anywhere/page/exporting-importing-inventory-reports). For automated JSON deployment, see [Command Line API (v1): Import an Inventory Report definition from JSON](https://kb.filewave.com/books/application-programming-interface-api/page/command-line-api-v1#bkmrk-import-report-json). ## Validation notes - Apple Silicon Macs should appear in the compatible report even when running macOS 26 or earlier. - Intel Macs should appear in the incompatible report. - A Mac already running macOS 27 remains compatible even if its model identifier is newer than the report’s fallback list. - Windows devices are excluded, including Windows installations running on Apple hardware. # Message to macOS User ## Description This Fileset recipe shows you how to send a Message via a dialog box to a User currently logged on to a Mac, using a fileset.This Fileset will make the FileWave Client wait with further deployments until the end user has acknowledged the dialog and closed it with "ok". If you want to change that behaviour so that it just displays a message and then deploys further filesets, refer to the last step of the recipe.
## Ingredients - FW Admin - [display-applescript-dialog.fileset.zip](https://kb.filewave.com/attachments/131) ## Directions 1. Download the attached zip file, uncompress it and import it into FileWave Admin via Drag & Drop , or by clicking "New Desktop Fileset" , "Import". 2. Double-Click the FileSet to display its contents, and drill down to the /usr/local/scripts folder. 3. Click once onto the message.txt and then the "Edit Text" button on the top of the FileSet Window to edit the file. Adjust the message to what you need it to say, and confirm with "OK". 4. Associate the FileSet to a Mac where somebody is currently logged in , update the model , and observe the message popup. 5. If you want to change the behaviour of this fileset so that it just displays a message, and then goes on deploying further filesets, do the following : - open the FileSet by double-clicking it - drill down to the /usr/local/scripts folder - click once onto the display-alert-on-current-users-desktop.sh , and then the "Get Info" button - Select the "Executable" tab - Uncheck the "Wait for exectuable to finish" checkbox - Confirm with ok - Test your fileset by associating it and running Model Update ## Related Content - [Notify Users with a dialog (macOS)](https://kb.filewave.com/books/macos/page/notify-users-with-a-dialog-macos "Notify Users with a dialog (macOS)") - [Notify Users with a dialog (Windows)](https://kb.filewave.com/books/windows-scripting/page/notify-users-with-a-dialog-windows "Notify Users with a dialog (Windows)") # Notify Users with a dialog (macOS) ## Description The provided Fileset is an example of notifying users, in particular, a message regarding the Fileset status when downloading and installing new Filesets.  The Fileset is designed to: - Create a continually running service that monitors Fileset changes - Where Fileset changes occur, begin monitoring the FileWave Client log file - If the preset text strings are found in the log file, send this to the Notification Centre - Lastly, where another preset text is found, stop monitoring the log file The service has been built to be actioned automatically by the user logging in. Where Filesets are disassociated, each has a pre-uninstallation script to ensure that the services are also removed. ## Ingredients - Provided Fileset:| ↓ macOS |
| [](https://kb.filewave.com/attachments/151) |
**Launch Services** Once a launch service is running, editing an already loaded script will have no impact on the current service; the service itself must be reloaded. If parts of the Fileset are edited after association, consideration should be taken into account to ensure those changes are made active.
## Notes The above provides an example of notifying users using a service. However, with some adaptation, messages could be sent in other ways at alternate times to users. ## Related Content - [Notify Users with a dialog (Windows)](https://kb.filewave.com/books/windows-scripting/page/notify-users-with-a-dialog-windows "Notify Users with a dialog (Windows)") # Remove Casper JSS Client Components ## Description To remove all Casper JAMF Software-related components from computers that have been managed by the JSS. ## Ingredients - FW Central - (Other tools, features, and applications that will be needed) ### Directions 1. Create a new empty Fileset (From the Fileset View : New Desktop Fileset > Empty : Type a Name > OK) 2. With it selected: Click the Scripts item in the button bar 3. Create a new activation script and name it. 4. Paste the script below and edit ```bash #!/usr/bin/env zsh # This will remove JAMF from macOS # Function to identify the location of the jamf binary CheckBinary() { # Identify location of jamf binary using modern command substitution jamf_binary=$(which jamf) # Evaluate conditions to identify the correct binary path if [[ -z "$jamf_binary" ]] && [[ -e "/usr/sbin/jamf" ]] && [[ ! -e "/usr/local/bin/jamf" ]]; then jamf_binary="/usr/sbin/jamf" elif [[ -z "$jamf_binary" ]] && [[ ! -e "/usr/sbin/jamf" ]] && [[ -e "/usr/local/bin/jamf" ]]; then jamf_binary="/usr/local/bin/jamf" elif [[ -z "$jamf_binary" ]] && [[ -e "/usr/sbin/jamf" ]] && [[ -e "/usr/local/bin/jamf" ]]; then jamf_binary="/usr/local/bin/jamf" fi # Error handling for missing jamf binary if [[ -z "$jamf_binary" ]] || [[ ! -x "$jamf_binary" ]]; then echo "Error: jamf binary not found or not executable." exit 1 fi } # Function to remove the JAMF framework RemoveJamf() { "$jamf_binary" removeFramework || { echo "Error: Failed to remove JAMF framework." exit 2 } } # Main script execution CheckBinary RemoveJamf # Exit with a success status exit 0 ``` 5. Associate as standard or scheduled # Understanding Free Space on APFS Volumes ## **What** This article explains why free space on APFS volumes can look different from free space on older file systems such as HFS+. ## **When/Why** APFS free-space values can move around because macOS accounts for snapshots, clones, sparse files, and shared container space. That matters when you are checking whether a Mac has enough usable storage for updates, deployments, or troubleshooting. ## **How** 1. **Traditional file systems such as HFS+:** Free space is usually calculated by subtracting occupied storage blocks from the total volume capacity. 2. **Snapshots:** APFS snapshots can hold blocks that look deleted from the live file system. Deleting a snapshot may free space, but the amount depends on what other snapshots still reference. 3. **Clones:** APFS cloned files can share storage blocks at first. As the files change, they use additional space. Finder may show the files separately while APFS still accounts for the shared blocks. 4. **Sparse files:** Sparse files reserve a logical size that can be much larger than the data they currently store. Copying or saving them without preserving the sparse format can expand them to their full size. 5. **Other volumes:** APFS containers share free space across volumes. macOS decides how much space volumes such as Data and VM use inside that shared container. 6. **Free-space estimates:** APFS and macOS report changing estimates for available space, including space that can be reclaimed from snapshots or other system-managed storage. Because APFS can reuse, share, or reclaim blocks, a single free-space number may not tell the whole story. Check the context before assuming a Mac is out of space or before using Finder-reported values as the only source of truth. For a second opinion, see the related links below. The linked `diskspace` tool can help return APFS-aware available-space values from the command line. ## **Related Links** 1. [Free space on an APFS volume is an illusion – The Eclectic Light Company](https://eclecticlight.co/2022/12/30/free-space-on-an-apfs-volume-is-an-illusion/) 2. [GitHub - scriptingosx/diskspace: macOS command line tool to return the available disk space on APFS volumes](https://github.com/scriptingosx/diskspace) # Wipe Device for macOS ## What Use **Wipe Device...** to send Apple's Erase Device MDM command to a managed Mac. On macOS 12 and later, supported Apple silicon and T2 Macs use Erase All Content and Settings (EACS) when preflight checks pass. If EACS cannot run, the Mac follows the selected obliteration fallback behavior. 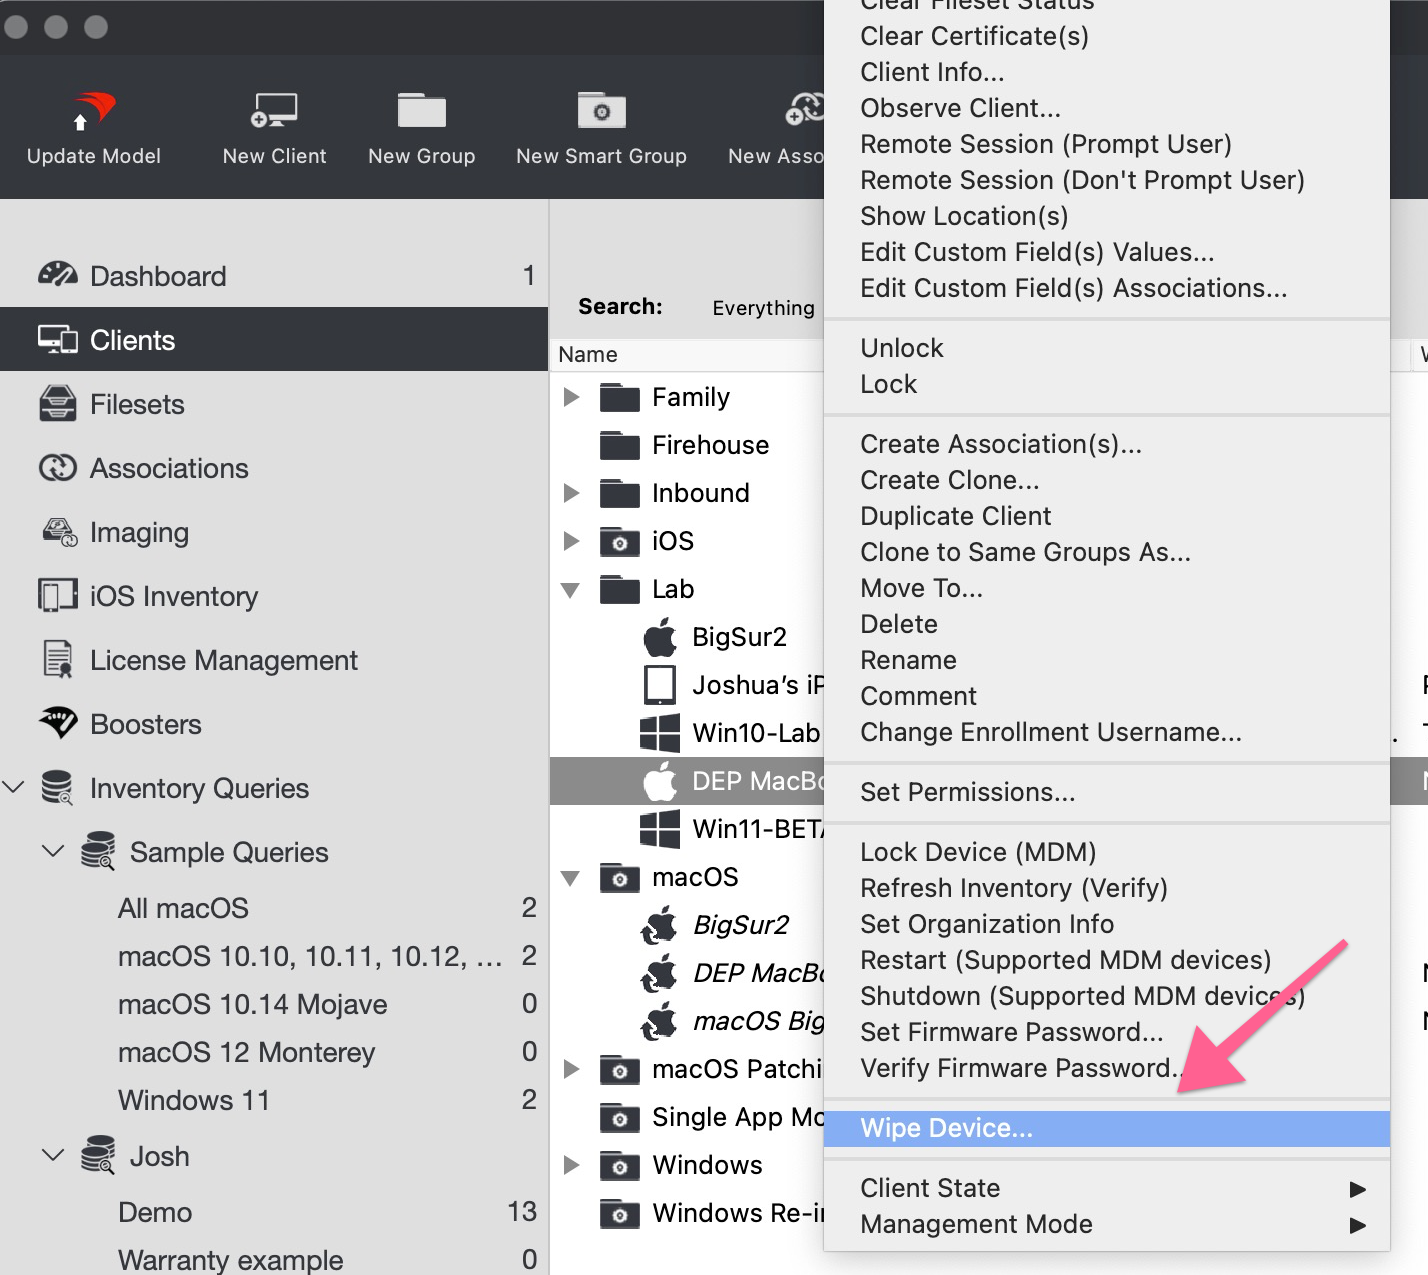 ## When/Why Use this command when a managed Mac needs to be erased for redeployment, recovery, or retirement. Older Macs and macOS 11.x behavior use obliteration, which removes critical files and data and leaves the Mac needing a reinstall or recovery workflow. ## HowRecord the Find My Mac PIN before sending a Wipe or Lock command. FileWave does not record this PIN in the logs, and you may need it for recovery.
Upon receiving this command, the device performs preflight checks to determine if the device is in a state that allows EACS. Choose the device's obliteration fallback behavior before sending the command: *Do Not Obliterate:* - If EACS preflight fails, the device responds to the server with an Error status and doesn’t attempt to erase itself. - If EACS preflight succeeds but EACS fails, then the device doesn’t attempt to erase itself. *Obliterate With Warning* - If EACS preflight fails, the device responds with an Acknowledged status and then attempts to erase itself. - If EACS preflight succeeds but EACS fails, then the device attempts to erase itself. *Default* - If EACS preflight fails, the device responds to the server with an Error status and then attempts to erase itself. - If EACS preflight succeeds but EACS fails, then the device attempts to erase itself. The Remote Wipe dialog lets you choose this behavior before sending the command:|  | 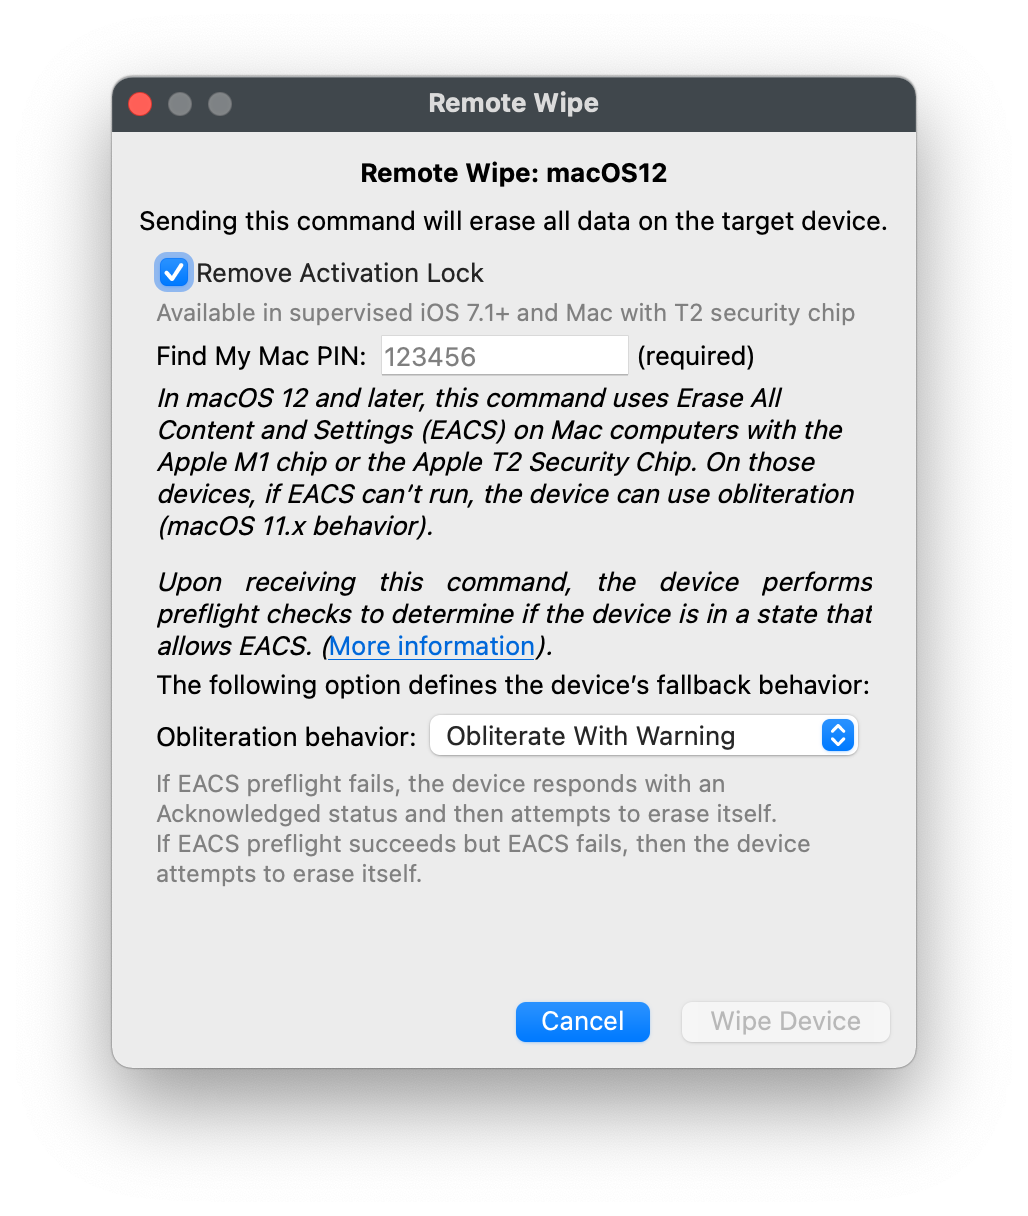 | 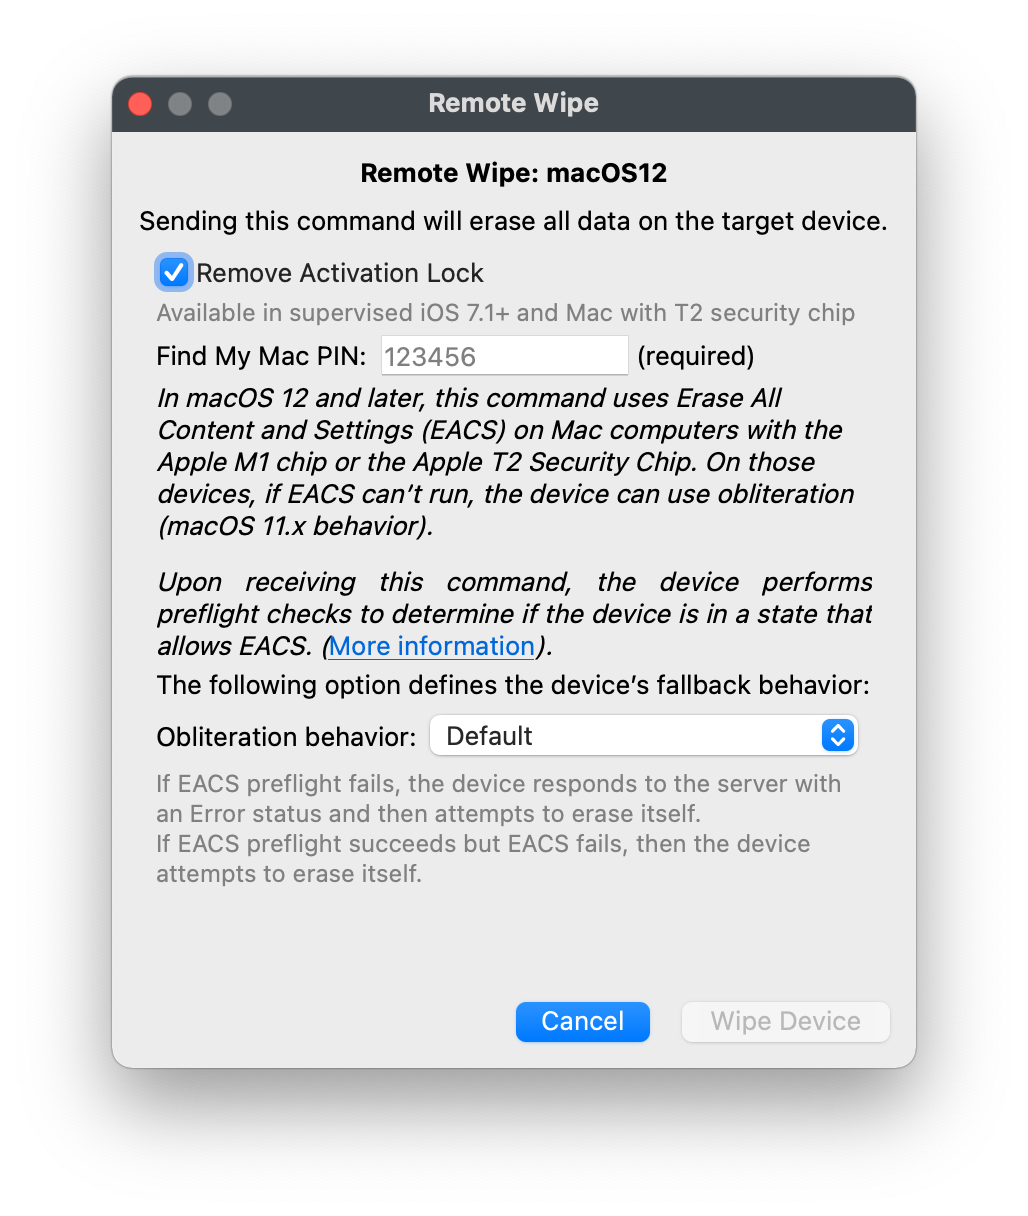 |
**Verification** To ensure the script is run again if Verification actions a repair or re-instatement of the App, a Verification Script will also be required with the same contents.
On installation, all applied customisation should appear as expected. This same process may be applied to any additional Metadata that may be lost during Fileset installation. ## Example Fileset This example Fileset includes: - Version 14 of Teamviewer FileWave QS - Postflight Script - Verification Script [FileWave TV QS Version 14.fileset.zip](https://kb.filewave.com/attachments/154) When updated versions of [Teamviewer FileWave QS](https://tv.filewave.com) are supplied, then the Fileset should be updated with this newer download, to replace the current application. # iOS 12 / macOS 10.14+ and self-signed certificates Starting with iOS 12 and macOS 10.14, Apple rejected server certificates that use RSA keys smaller than 2048 bits. In FileWave environments, this most often affects older self-signed certificates, especially on servers originally set up before FileWave 9.0. If your FileWave server uses a trusted CA-issued certificate, or a self-signed certificate generated by FileWave 9.0 or later, you are typically already meeting this specific 2048-bit key-size requirement. #### **How to check the certificate RSA key size** macOS, Linux: ``` openssl x509 -in /usr/local/filewave/certs/server.crt -text -noout | grep Public-Key ``` Windows: ``` C:\OpenSSL-Win64\bin\openssl.exe x509 -in C:\ProgramData\FileWave\FWServer\certs\server.crt -text -noout | FINDSTR Public-Key ``` Windows does not include OpenSSL by default, so you may need to install it first. One common source is [Win32/Win64 OpenSSL](https://slproweb.com/products/Win32OpenSSL.html). #### **Recommended solution** The best long-term fix is to use a root-trusted certificate from a Certificate Authority. If you already have a wildcard certificate, you may be able to use that for your FileWave server. For more guidance, see [Root Trusted SSL Certificate (Using and Renewing)](https://kb.filewave.com/books/certificates/page/root-trusted-ssl-certificate-using-and-renewing "Root Trusted SSL Certificate (Using and Renewing)"). #### **If you must stay self-signed** Renew the certificate with a 2048-bit RSA key or larger, then make sure devices trust the new certificate before you switch the server to it. The safest order is: - Create the new key and certificate. - Deploy the new certificate to devices so it is trusted before the cutover. - Switch the FileWave server to the new certificate after the trust profile is in place. - Recreate Automated Device Enrollment (ADE/DEP) profiles and associations if your workflow requires it. For the detailed renewal steps, see [Renew FileWave Server Self-signed Certificate](https://kb.filewave.com/books/certificates/page/renew-filewave-server-self-signed-certificate "Renew FileWave Server Self-signed Certificate"). If you are specifically working through iOS trust behavior for self-signed certificates, [Renew MDM self signed SSL certificate with iOS devices](https://kb.filewave.com/books/certificates/page/renew-mdm-self-signed-ssl-certificate-with-ios-devices "Renew MDM self signed SSL certificate with iOS devices") is also useful. If devices have already upgraded and no longer trust the old certificate, recovery may require manually installing and trusting the new certificate until normal communication is restored. Newer Apple releases introduced additional certificate requirements beyond key size. If you are troubleshooting iOS 13, macOS 10.15, or later, also review [SSL Server Certificates - iOS 13 and macOS 10.15](https://kb.filewave.com/books/certificates/page/ssl-server-certificates-ios-13-and-macos-1015 "SSL Server Certificates - iOS 13 and macOS 10.15"). ## Related Content - [iOS 12+ Profile Installation Failed](https://kb.filewave.com/books/ios-ipados/page/ios-12-profile-installation-failed) # M1 Silicon macOS and Recovery ## Description Apple silicon Mac computers use a different Recovery startup flow than Intel Mac computers, and Activation Lock can affect recovery after erase or restore workflows.FileWave has seen cases where Apple silicon Mac computers were no longer accessible after the first reboot following Automated Device Enrollment. This appears to be related to the managed admin account never completing a login before that reboot.
## Erasing M1 devices Apple Configurator can revive or restore Apple silicon Mac computers. This requires a second Mac and the requirements listed in Apple's guide: [https://support.apple.com/en-gb/guide/apple-configurator-2/apdd5f3c75ad/mac](https://support.apple.com/en-gb/guide/apple-configurator-2/apdd5f3c75ad/mac) - Up-to-date Apple Configurator app - Network access to Apple - USB-C to USB-C cable (supporting both power and data) Follow Apple's restore or revive workflow for the affected Mac. ## Activation Lock If Activation Lock was enabled, the Mac may ask for an Apple ID and password after restore. For organization-owned devices, use Recovery Assistant to enter the MDM Activation Lock bypass code instead. Activation Lock bypass codes are available from the FileWave Central Assistants menu: - Activation Lock Management ## Recovery Mode On Apple silicon Mac computers, hold the power button until the screen shows 'Loading startup options' to enter Recovery. [https://support.apple.com/en-gb/guide/mac-help/mchl82829c17/mac](https://support.apple.com/en-gb/guide/mac-help/mchl82829c17/mac) To enter the Activation Lock code: - Choose 'Recovery Assistant' from the menu bar - Select with MDM key - Use the key from the FileWave Central Activation Lock Management window for this device [https://support.apple.com/en-gb/guide/mdm/apd593fdd1c9/web](https://support.apple.com/en-gb/guide/mdm/apd593fdd1c9/web) At this point the device should be accessible again and can be enrolled again if needed. ## Failure to Personalize Apple also documents this restore-related error: - "An error occurred while preparing the update. Failed to personalize the software update. Please try again." Apple's article for this issue is here: [https://support.apple.com/en-us/HT211983](https://support.apple.com/en-us/HT211983)The previous startup keys combinations used for Intel macOS devices do not apply to M1 Silicon macOS devices: [https://support.apple.com/en-gb/HT201255](https://support.apple.com/en-gb/HT201255)