# Microsoft Windows MDM
FileWave MDM services can manage Windows 10 and 11 by using the MDM protocol. The built-in management client is able to communicate with a third-party server proxy that supports the protocols to perform enterprise management tasks.
# Microsoft Windows MDM Setup
Integration of FileWave with Microsoft Windows MDM requires some initial setup. This is likely a one-time configuration for your environment, depending on complexity.
On initial setup, we'll need to make sure we can satisfy the licensing pre-requisites, publish a custom FileWave client, set our acceptable use terms, and finally create and configure the AAD MDM application itself.
# Pre-Requisites of Windows MDM Setup
## What
FileWave can use Microsoft Windows MDM to enroll and manage Windows endpoints through Microsoft Entra ID. Microsoft licensing and tenant prerequisites are outside FileWave and must be in place before Windows MDM enrollment will work.
## When/Why
Confirm Microsoft licensing before you plan Windows MDM enrollment. FileWave still requires a FileWave Client license for each managed endpoint. On the Microsoft side, the key requirement is access to Microsoft Entra ID automatic MDM enrollment, typically through Microsoft Entra ID P1 or P2 or a Microsoft 365, Education, Enterprise Mobility + Security, or equivalent bundle that includes that capability.
Microsoft Intune is not required just because you are using Windows MDM with FileWave. Microsoft’s setup screens and documentation often live in the Intune or endpoint-management admin areas, but FileWave can be configured as the MDM service for the scoped users. If you also use Intune or another MDM, do not scope the same users or devices to both services for MDM enrollment; a Windows device should be enrolled in one MDM service at a time.
## How
Before configuring FileWave Windows MDM, confirm these Microsoft-side requirements:
- A Microsoft Entra ID tenant is available for the organization.
- The enrolling users have Microsoft Entra ID P1/P2, or a bundle that includes the required automatic MDM enrollment functionality. The older name was Azure Active Directory Premium P1/P2; Microsoft now uses Microsoft Entra ID P1/P2.
- The users who should enroll through FileWave are included in the FileWave MDM application’s **MDM user scope** in Microsoft Entra ID.
- The same users are not also scoped to Intune or another MDM service for MDM enrollment unless you are intentionally separating user groups by MDM provider.
- For Windows Autopilot workflows, the tenant and devices also meet Microsoft’s Autopilot software, networking, licensing, and configuration requirements.
### Microsoft Entra integration with MDM
[Microsoft Entra integration with MDM | Microsoft Learn](https://learn.microsoft.com/en-us/windows/client-management/azure-active-directory-integration-with-mdm)
Microsoft documents how Windows uses Microsoft Entra ID with third-party MDM providers. In FileWave’s setup, the FileWave MDM application provides the Terms of Use and MDM discovery/enrollment URLs.
### Windows Autopilot requirements
[Windows Autopilot requirements | Microsoft Learn](https://learn.microsoft.com/en-us/autopilot/requirements)
Windows Autopilot is the Microsoft framework that lets Windows devices enroll during initial setup. Microsoft’s Autopilot licensing requirements include Microsoft Entra ID and an MDM service such as Microsoft Intune or an alternative MDM service.
### Microsoft Intune and endpoint management
[Endpoint Management at Microsoft | Microsoft Learn](https://learn.microsoft.com/en-us/mem/endpoint-manager-overview)
Use Microsoft Intune documentation when the customer is also using Intune-managed workflows. Do not treat Intune as a required FileWave Windows MDM prerequisite.
Microsoft Store for Business and Microsoft Store for Education were retired by Microsoft. Do not treat Store for Business access as a current Windows MDM prerequisite.
# Configure the FileWave Client Package for Windows MDM
#### **What**
FileWave Windows MDM uses both Microsoft's MDM protocol and the native FileWave Client. MDM handles enrollment and policy commands, while the FileWave Client provides Filesets, inventory, and other client-based management.
#### **When/Why**
Configure the Windows Client enrollment package before enrolling Windows devices so the native FileWave Client can be installed automatically. FileWave Server 16.4.0 and later builds and stores the package directly in FileWave Central. FileWave Server 16.3.x and earlier requires a separately built custom MSI to be uploaded.
**Enrollment package:** This package is for new Client installations and Windows MDM enrollment. It is not the workflow for upgrading an already enrolled FileWave Client.
#### **How**
**Before you begin:** Confirm that the FileWave Server is healthy and backed up, uses a valid trusted certificate, has saved Preferences at least once, and has completed at least one Model Update. Saving Preferences creates required shared settings; Model Update creates the internal URLs used by this workflow.
| FileWave Server version | Windows Client package workflow |
|---|
| **16.4.0 and later** | Build the package on the **Mobile > Windows** settings page in FileWave Central. No separate upload is required. |
| **16.3.x and earlier** | Build the MSI with the [Customer Installer Builder](https://custom.filewave.com/py/custom_client_win.py), then upload it on the **Mobile > Windows** settings page. |
##### FileWave Server 16.4.0 and later: Build the package in Central
1. Open FileWave Central, then open **Preferences**.
2. Open **Mobile > Windows**.
3. Select **Show settings** and review the enrollment-package configuration.
4. Select **Build Windows client package**.
5. Wait for the page to show **Ready for Enrollment**. The package is now stored for Windows MDM enrollment; there is no separate upload step.
6. Use **Download Windows client package** only when you need a standalone copy of the generated installer.
7. Enable **Keep the package up to date** if FileWave should automatically regenerate the Windows Client package after a Server upgrade.
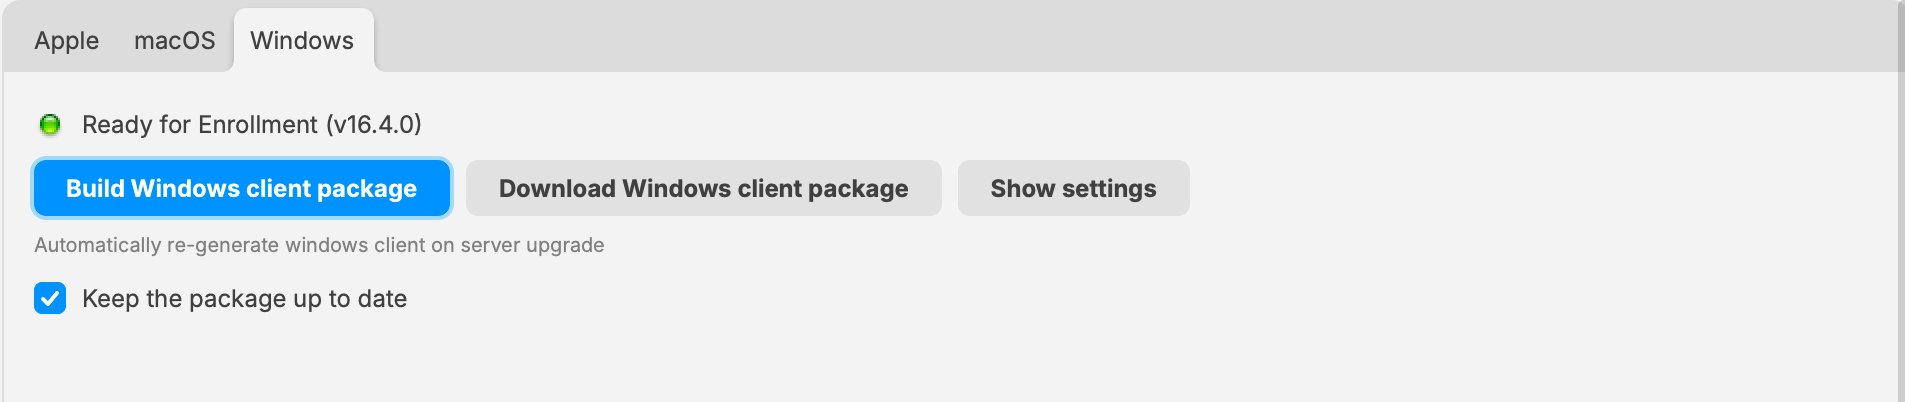
*FileWave 16.4.0 and later builds and stores the Windows Client package directly on Mobile > Windows.*
##### FileWave Server 16.3.x and earlier: Upload the custom MSI
1. Build the custom Windows Client MSI with the [Customer Installer Builder](https://custom.filewave.com/py/custom_client_win.py).
2. Open FileWave Central, then open **Preferences**.
3. Open **Mobile > Windows**.
4. Upload the custom Client MSI as shown below.
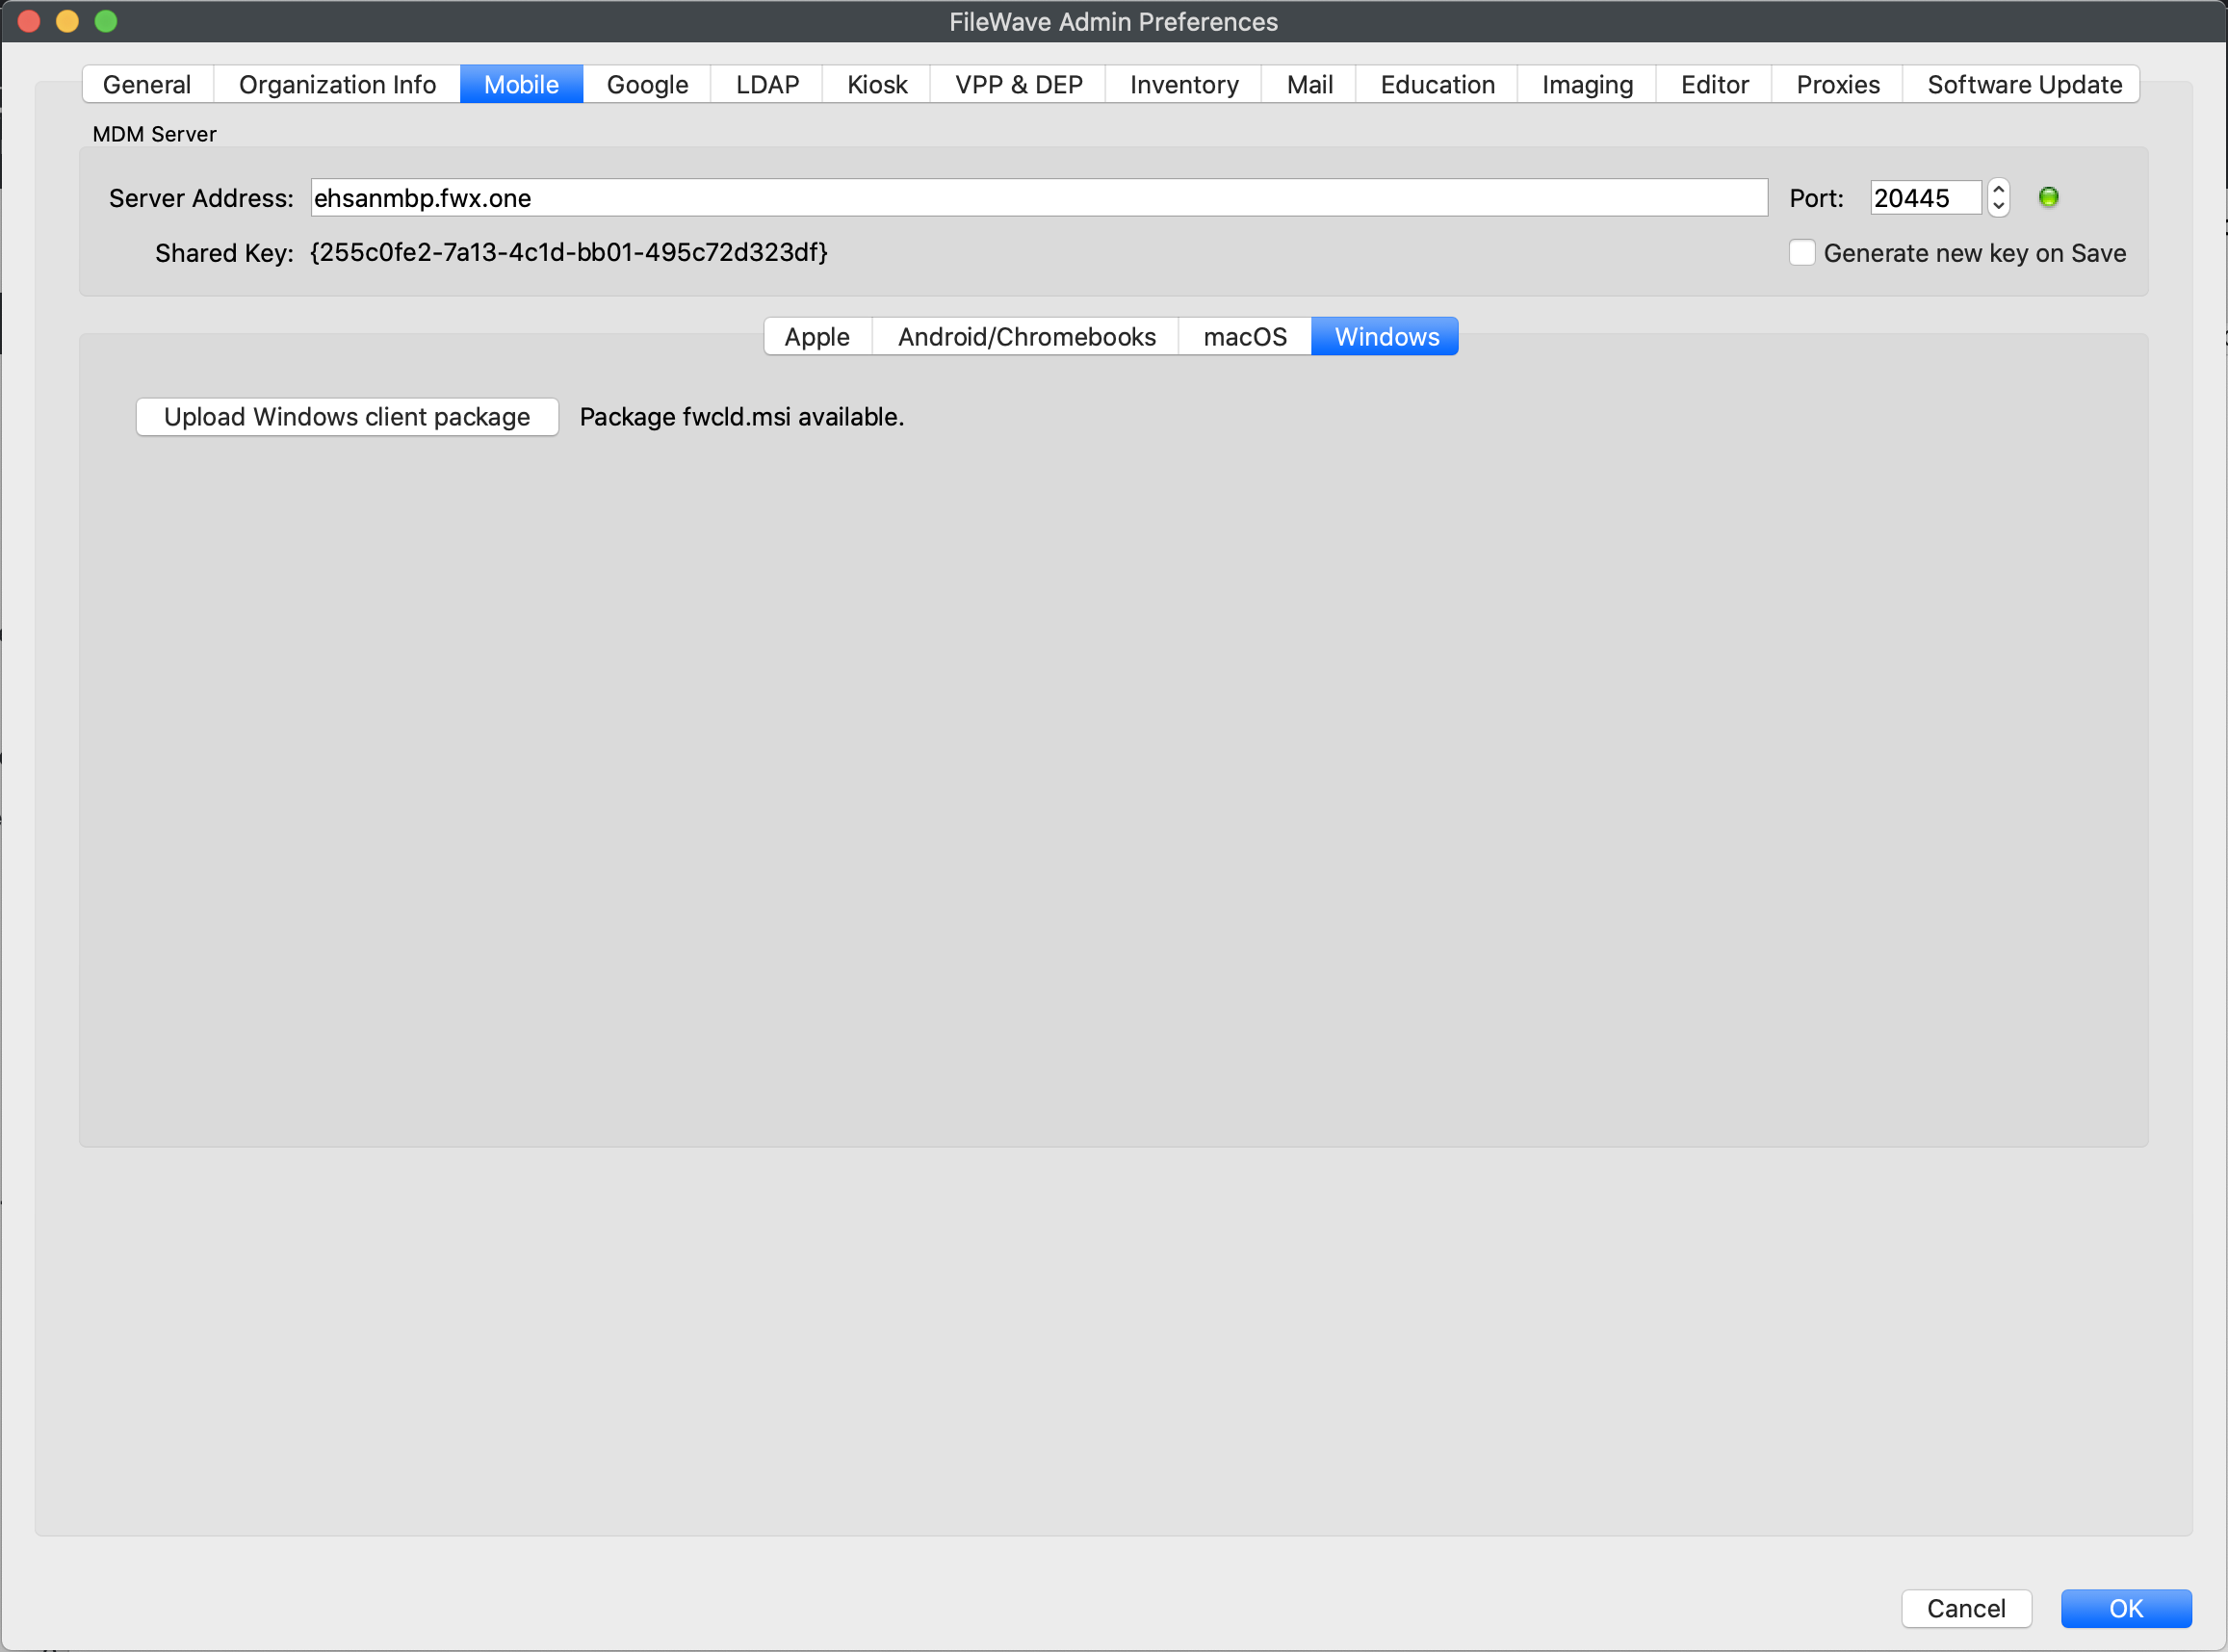
*FileWave 16.3.x and earlier uses the upload workflow shown in this older interface.*
# Part 2: Configure Windows MDM Terms and Conditions
#### **What**
Configure the Terms & Conditions page before users enroll Windows devices through FileWave Windows MDM. The enrollment flow displays the title and content you publish here.
#### **When/Why**
Use this page to explain what users are agreeing to and what management actions your organization may perform on an enrolled device. Have the final wording reviewed under your organization's policy before enrollment begins.
#### **How**
##### Edit the page in FileWave Anywhere
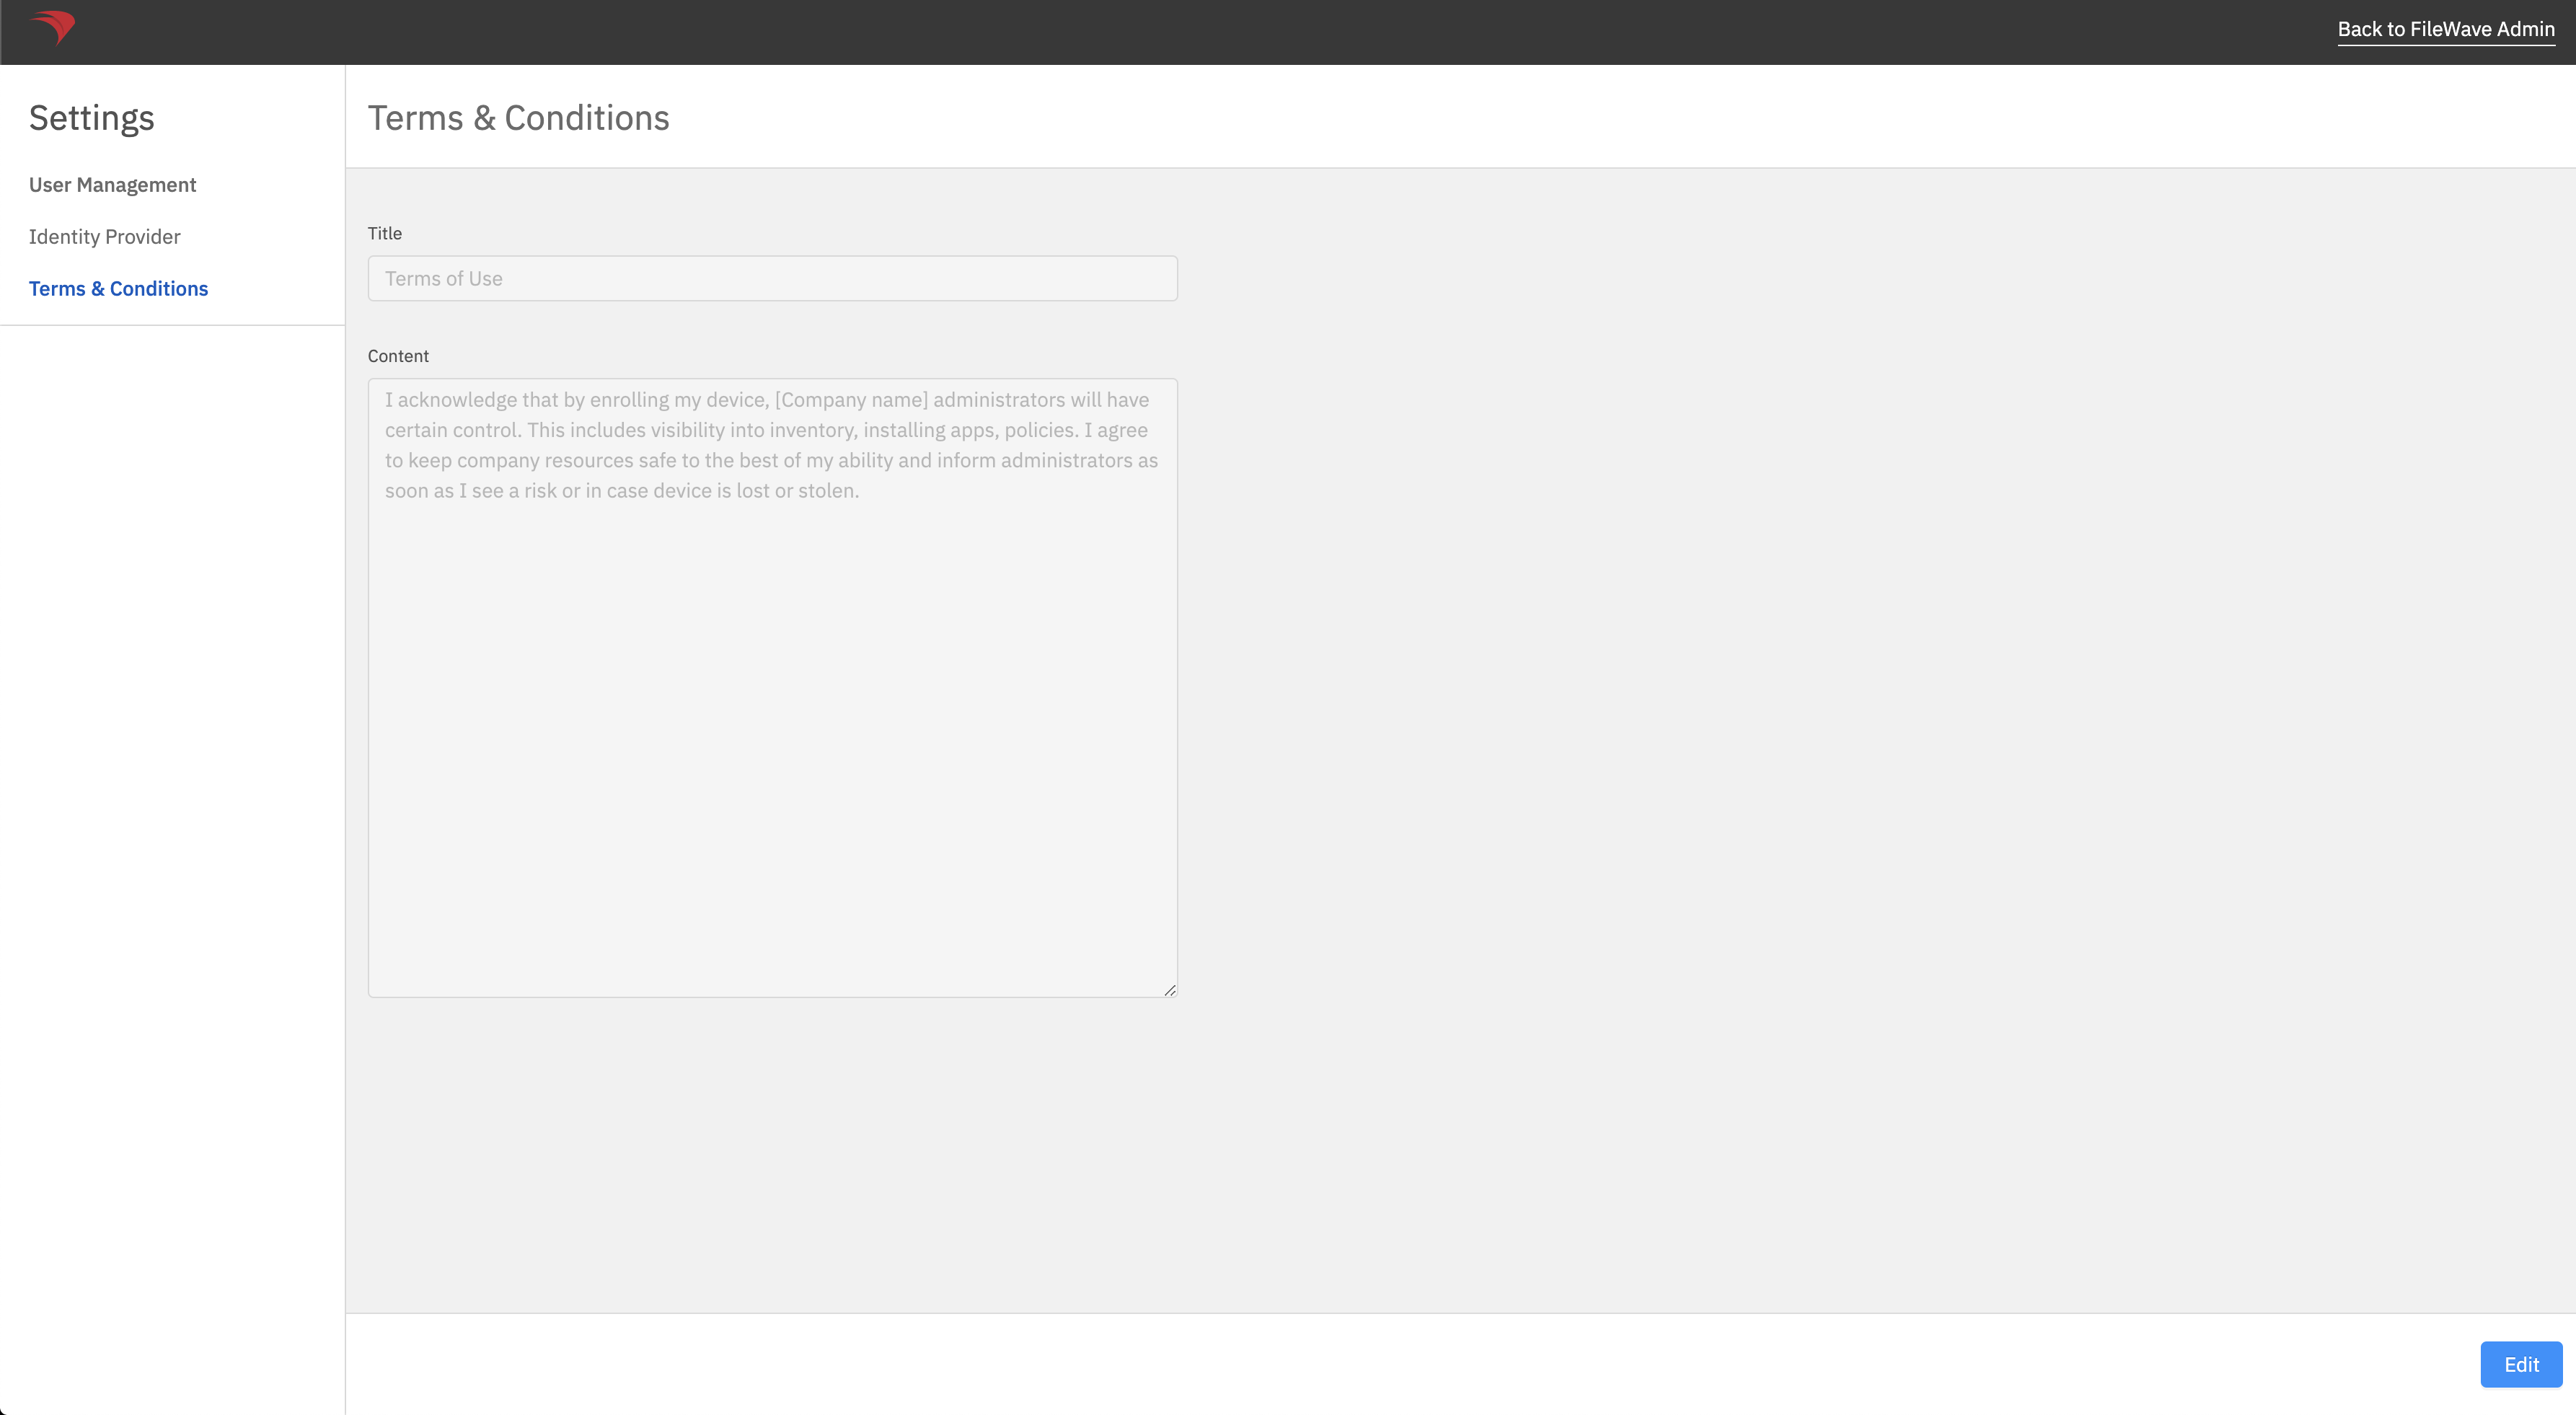
FileWave Anywhere provides separate **Title** and **Content** fields for the enrollment page.
1. In FileWave Anywhere, open **Settings**.
2. Select **Terms & Conditions**.
3. Select **Edit**, update the **Title** and **Content**, then save the page.
4. Test a Windows MDM enrollment and confirm that the final text is readable before inviting users to enroll.
# Part 3: Setting up the Portal App
#### **What**
Your Windows MDM integration uses an application that you create in the Microsoft Entra admin center.
#### **When/Why**
This application connects Windows Autopilot enrollment, the scoped Microsoft Entra users, and the MDM discovery redirection to your FileWave MDM server. Detailed setup steps follow.
#### **How**
##### Add the Entra ID account in FileWave
1. Open FileWave Anywhere (Web Admin) and navigate to **Sources*****.***
2. Click the **Microsoft** tab.
3. Click on **New account,** and you should see the following form:
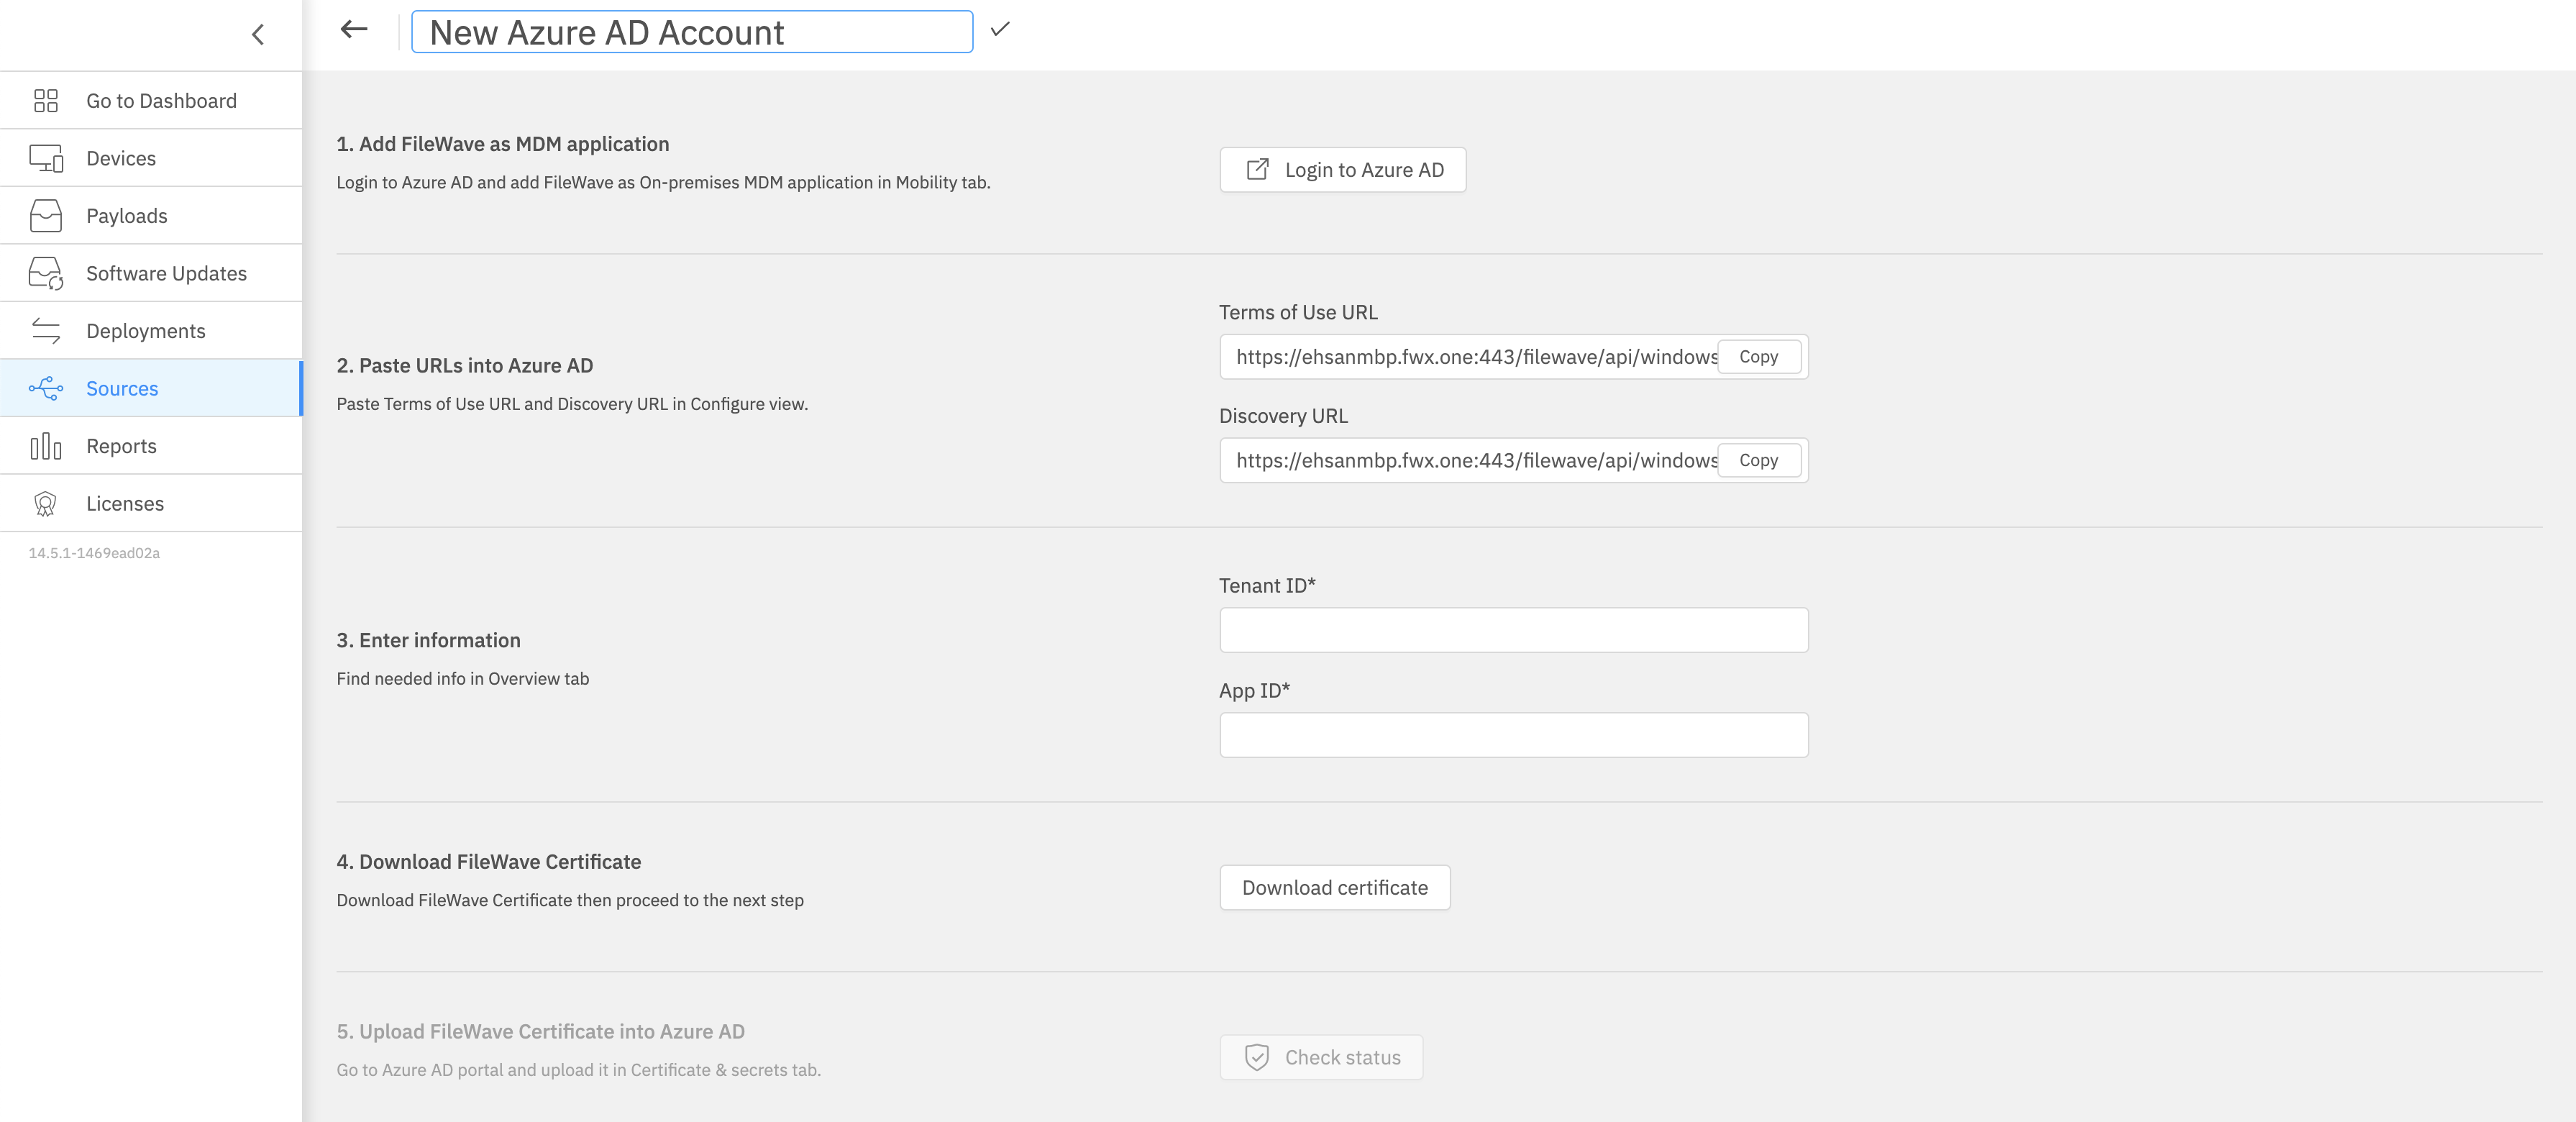
Keep this form open for completion in later steps.
#### Configuring Microsoft Entra ID
##### *Creating an MDM application*
To enable MDM enrollment, first, you need to configure your Microsoft Entra ID to recognize your FileWave server as your MDM.
1. Go to your Microsoft Entra ID portal: [https://entra.microsoft.com](https://entra.microsoft.com)
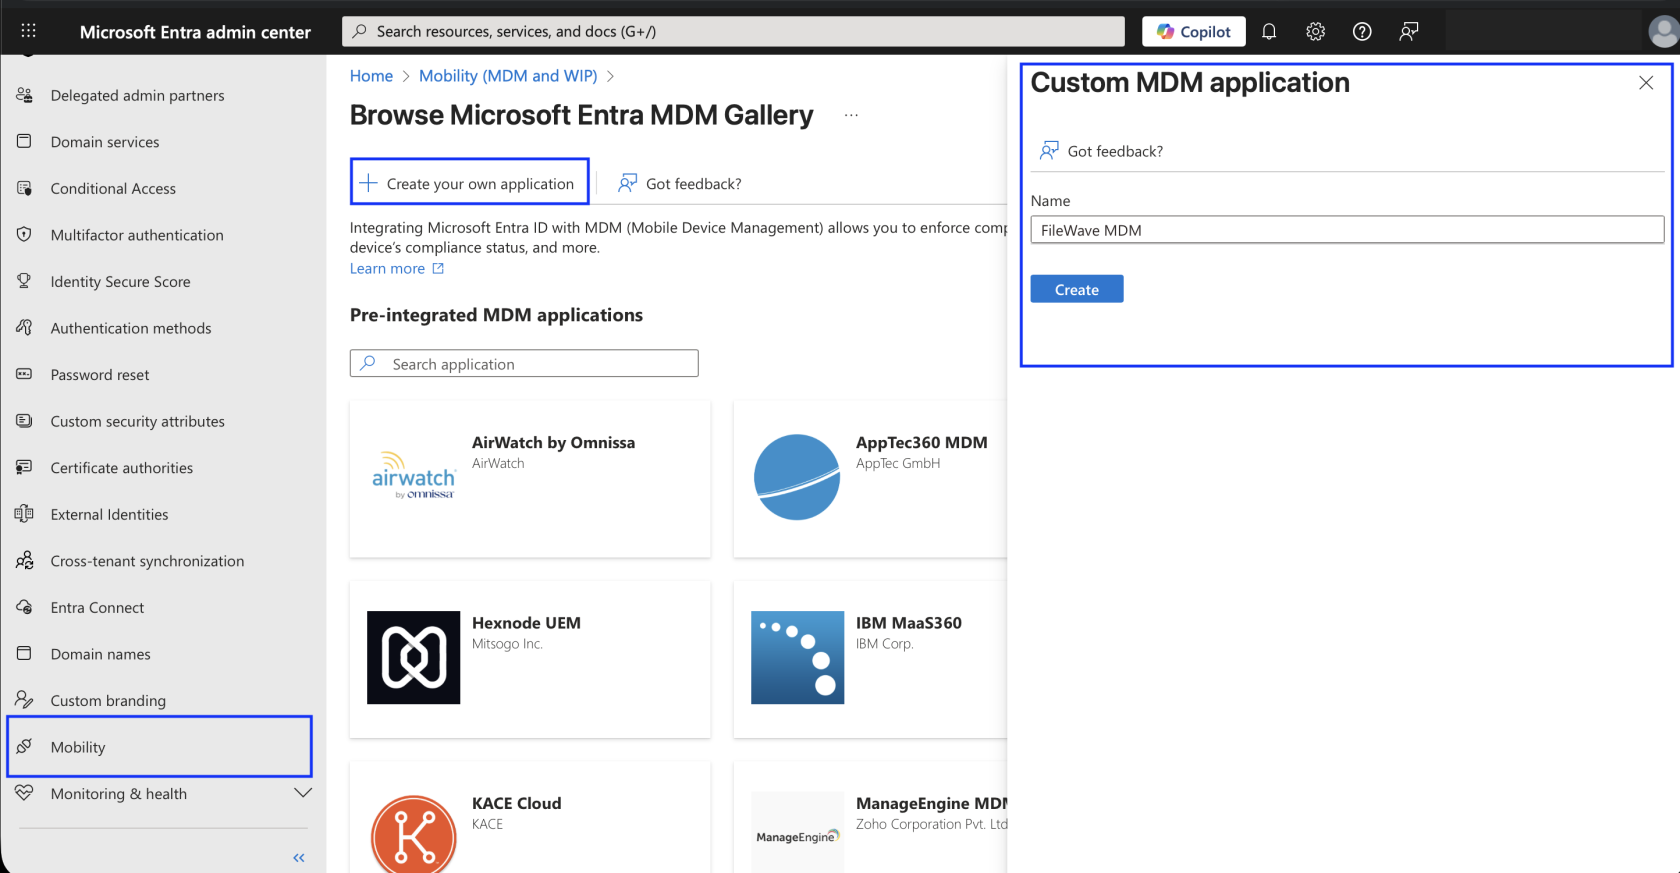
2. From Home, navigate to **Entra ID** → **Mobility** and then click **Add application**.
3. Select **Create your own application**, give it a name and logo if needed, and click **Create**.
[](https://kb.filewave.com/uploads/images/gallery/2025-09/a43YWb4CH6opNcMF-screenshot-2025-09-09-at-9-56-03-am.png)
##### *Configuring your MDM application*
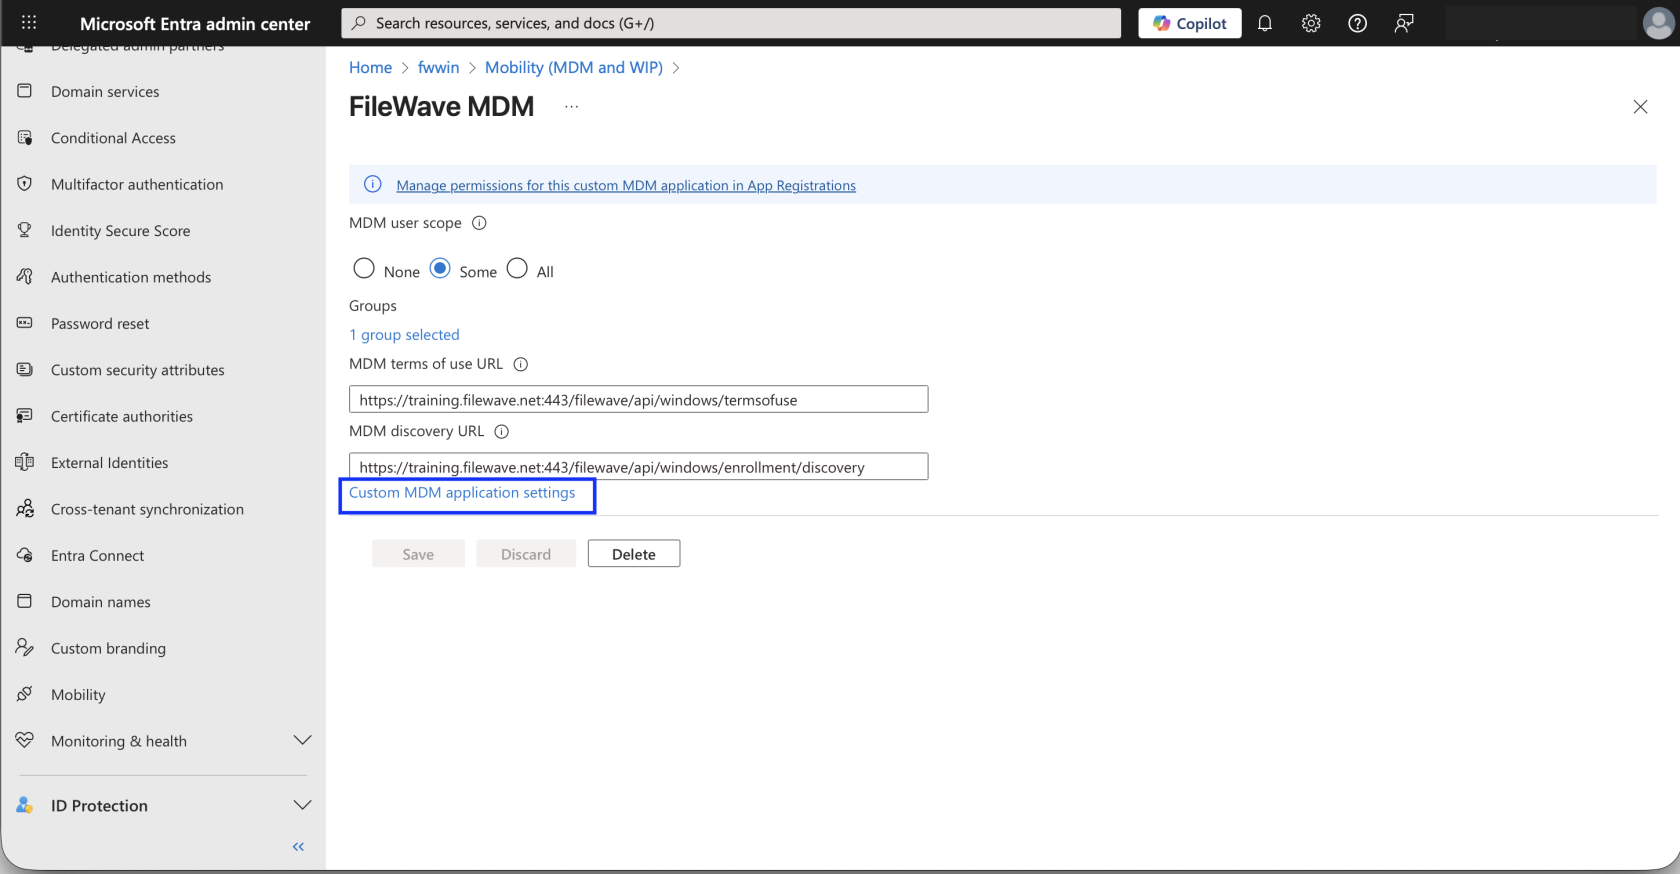
1. You will now be prompted to configure MDM user scope:
1. **MDM user scope**: This is where you indicate which users can enroll their devices using this MDM application. You can either choose:
1. **All***:* Force all users to use this MDM application. (Preferred)
2. **Some*****:*** You can select user groups that are allowed to use this MDM application to enroll their devices. If you do use this, then you will need to make sure that you make a Group to restrict this, and add all of the users who will have their devices managed by MDM in that same group.
2. **MDM terms of use URL:**
Copy the value from the form you opened up in FileWave Anywhere (Web Admin) earlier.
3. **MDM discovery URL:**
Copy the value from the form you opened up in FileWave Anywhere (Web Admin) earlier.
If another MDM service, such as Microsoft Intune, is also configured, do **not** scope the same users to both Intune MDM and FileWave Windows MDM. A device should only enroll into one Windows MDM service. If the same user is scoped to two MDM services, enrollment can fail with a permissions or enrollment error. To test FileWave enrollment, set the competing MDM user scope to **None** for the affected users, wait a few minutes, and retry enrollment.
You can still enroll a Windows device into Intune MDM and install the FileWave Client separately, but Windows MDM profiles would then come from Intune, not FileWave. Decide which MDM service owns Windows MDM enrollment for each user group before rollout.
##### *Integrating FileWave and Microsoft Entra*
After configuring your MDM application, on the same page, click on the small link that reads: **Create MDM application settings.**
[](https://kb.filewave.com/uploads/images/gallery/2025-09/9xyDtFacLKvAJaSw-screenshot-2025-09-09-at-10-12-26-am.png)
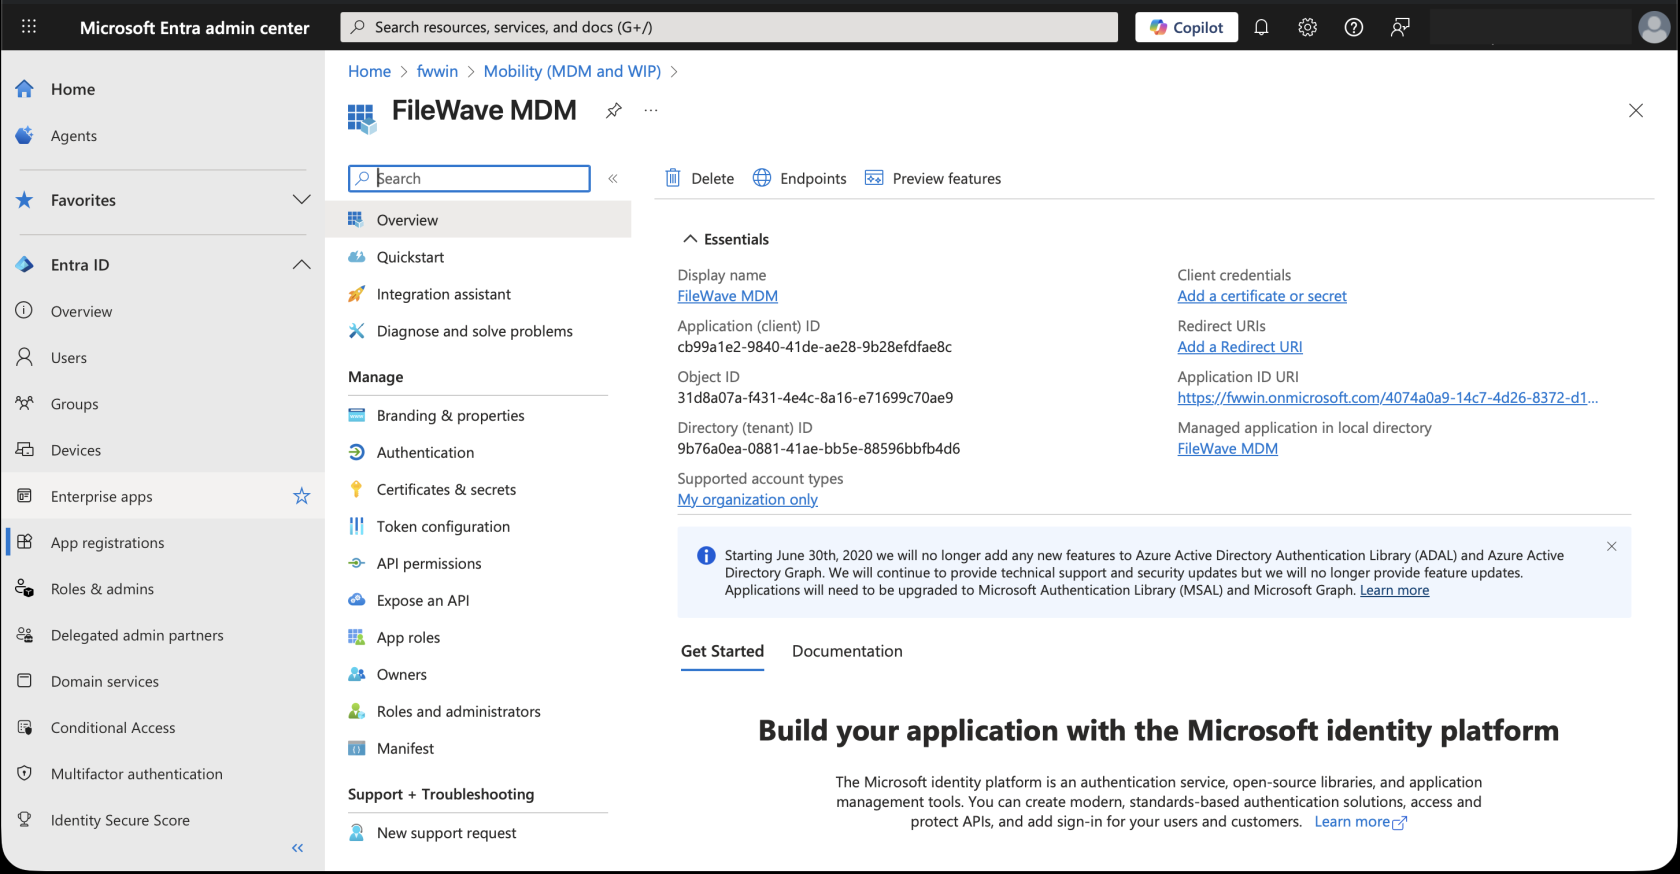
You should see the following page:
[](https://kb.filewave.com/uploads/images/gallery/2025-09/d4LMlMJNzdGuby5u-screenshot-2025-09-09-at-10-15-12-am.png)
From here there are only few steps left!
1. Copy the **Application (client) ID** and **Directory (tenant) ID** from this page and paste them into the Microsoft Entra Account form in FileWave Anywhere (Web Admin), which you kept open earlier.
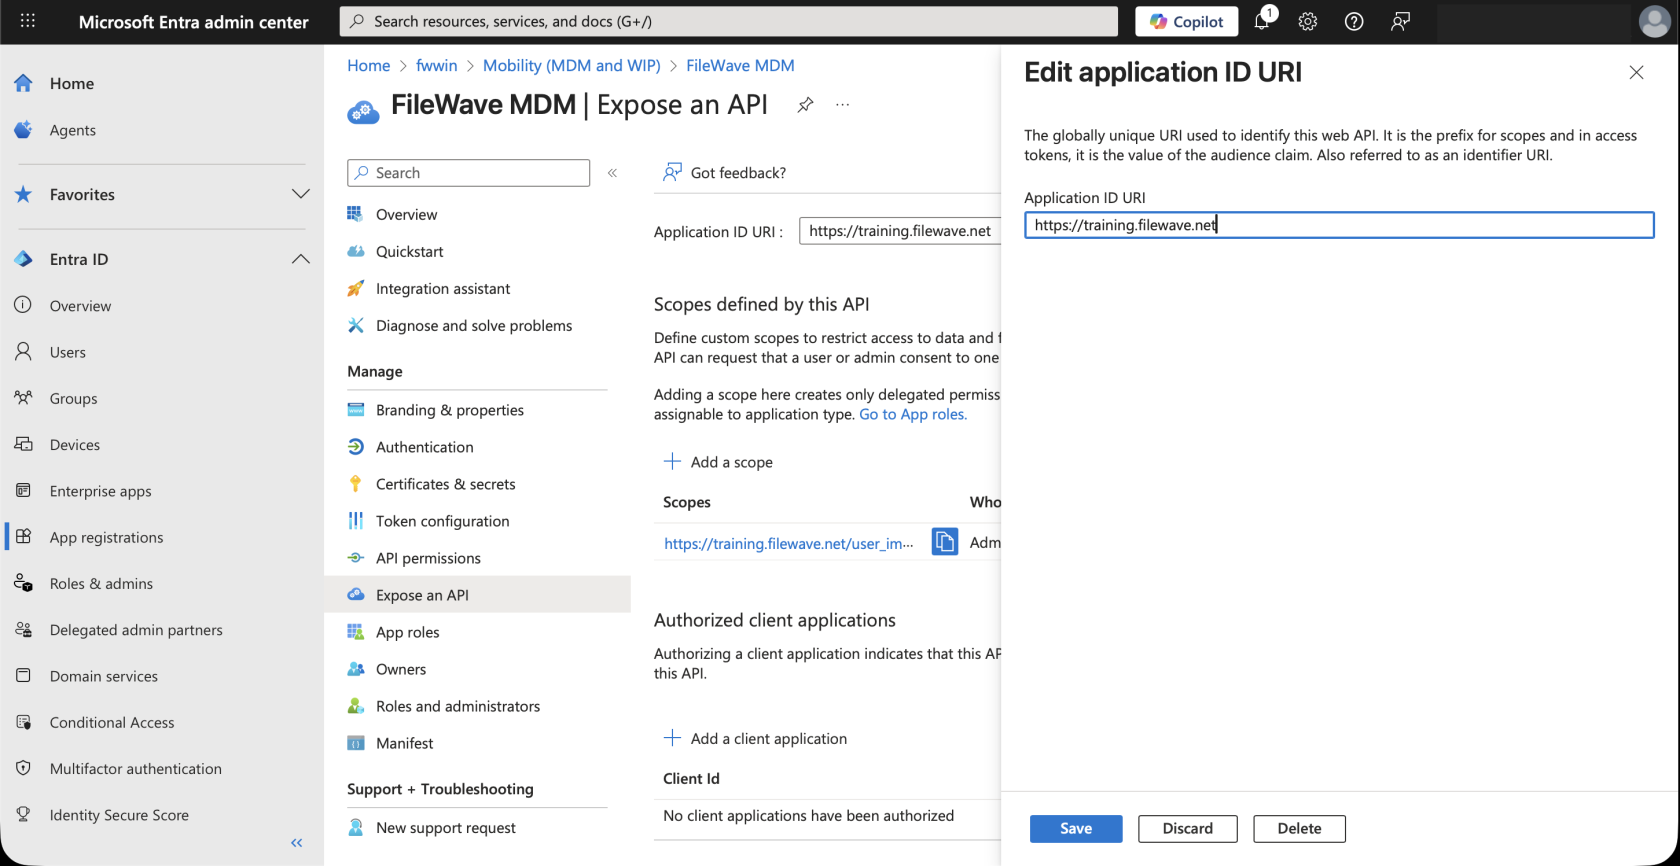
2. The **Application ID URI** value in your MDM app must match the FileWave server URL that Windows devices will use. In Microsoft Entra ID, go to **Expose an API** and edit the URI. Use your customer-owned FileWave server hostname, such as `https://mdm.example.org`, replacing it with your server's DNS name.
Microsoft requires the hostname used in a single-tenant Application ID URI to be in the tenant's initial `onmicrosoft.com` domain or in a verified custom domain. FileWave-hosted `filewave.net` hostnames are owned by FileWave and cannot be verified in the customer's Microsoft Entra tenant. Hosted customers should use a customer-owned custom hostname for Windows MDM and follow [FileWave-hosted custom-domain SSL guidance](https://kb.filewave.com/link/1061) if they need FileWave Support to configure the hosted-server certificate.
[](https://kb.filewave.com/uploads/images/gallery/2025-09/wAR10C2qAB6jTEq7-screenshot-2025-09-09-at-10-20-33-am.png)
3. Go back to the Microsoft Entra account form in FileWave Anywhere (Web Admin), and download the FileWave certificate.
4. Once you have the certificate, go back to the Microsoft Entra ID portal, navigate to **Certificates & secrets** **> Certificates** and upload your certificate to your Microsoft Entra MDM application there.
[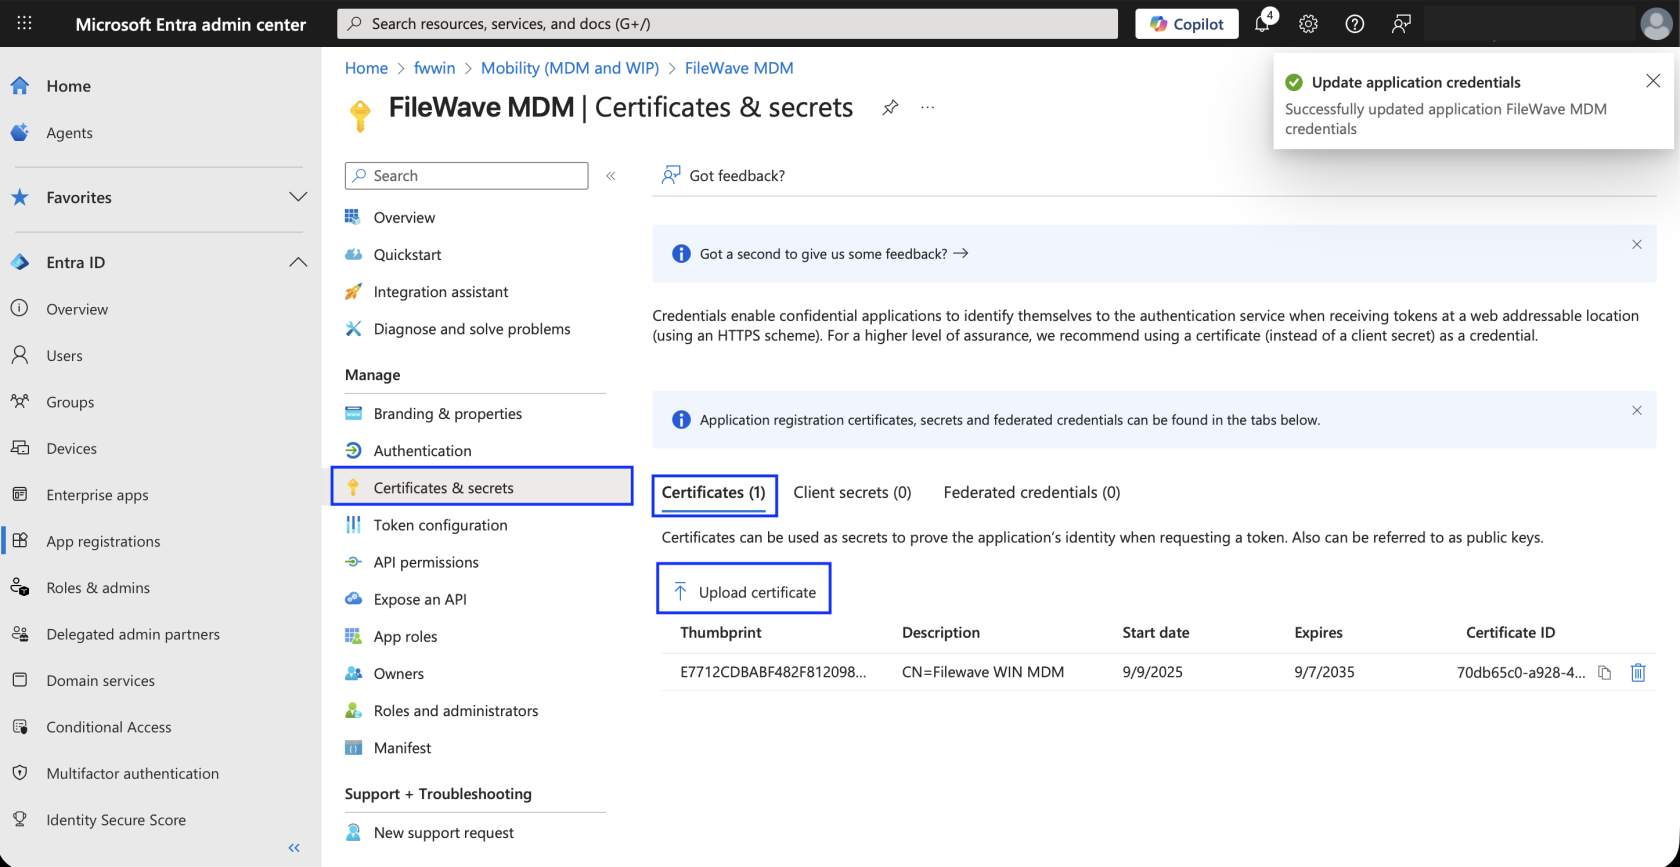](https://kb.filewave.com/uploads/images/gallery/2025-09/3Syfl2SrO3aC103b-screenshot-2025-09-09-at-10-22-41-am.png)
5. After the certificate is uploaded, wait a few seconds, then return to the open Microsoft Entra account form in FileWave Anywhere (Web Admin) and click **Check Status**.
6. As soon as you see the green light, go ahead and save your Microsoft Entra account.
[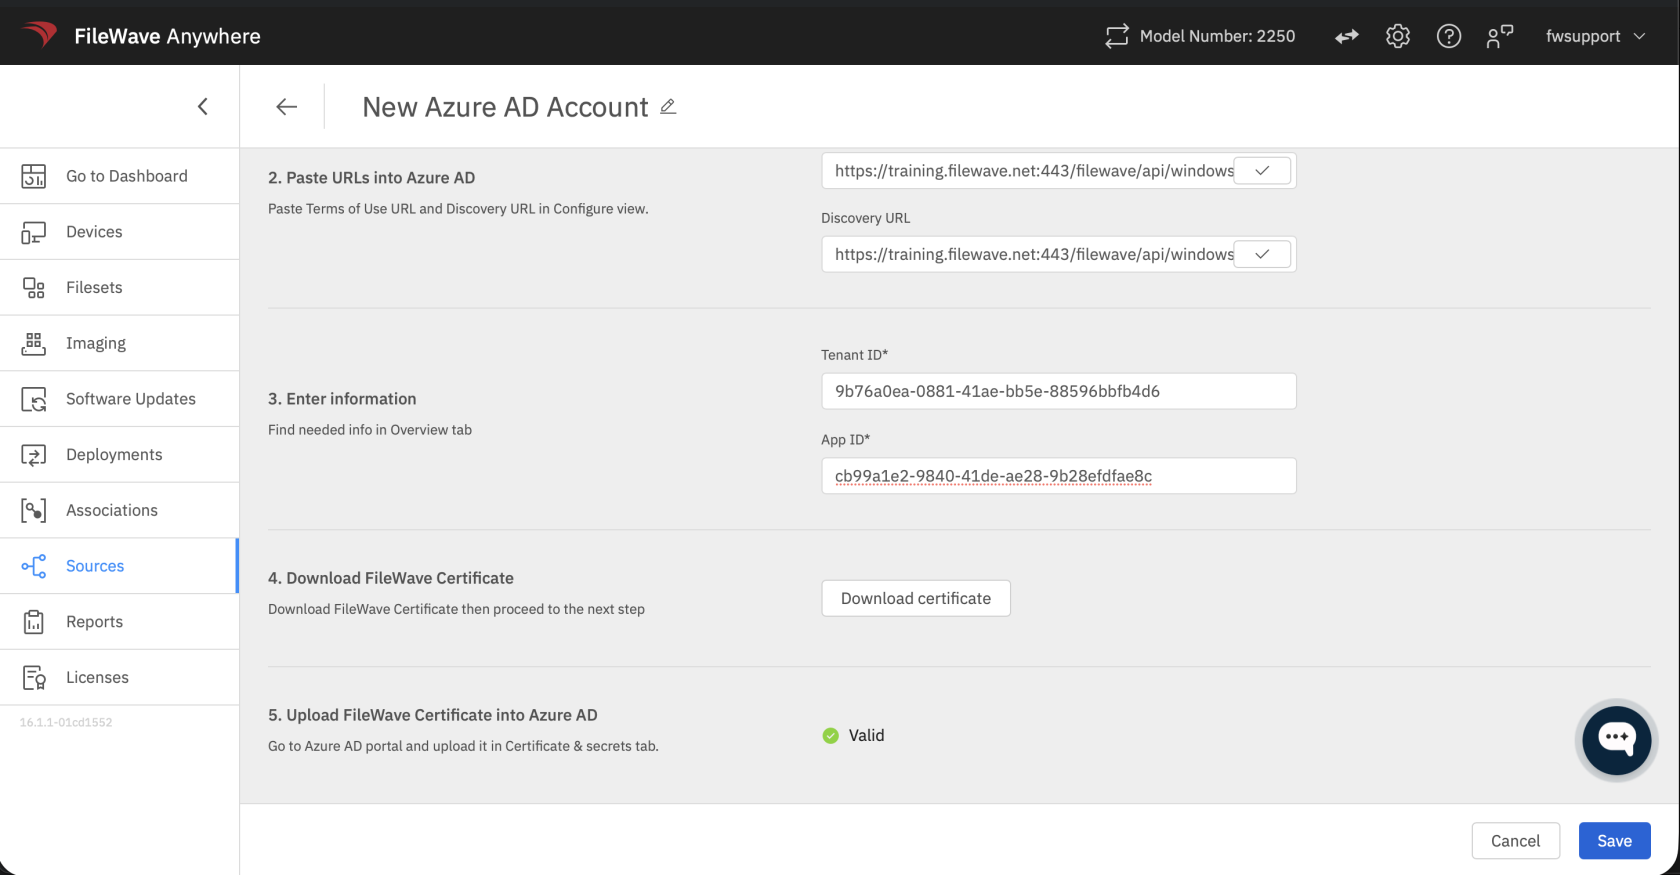](https://kb.filewave.com/uploads/images/gallery/2025-09/CII1Au1hxHCQn23i-screenshot-2025-09-09-at-10-24-47-am.png)
You are now ready to enroll a device into FileWave Windows MDM.
##### *Application tenant or consent messages*
You may see a message similar to below:
- *AADSTS500011 – The resource principal named \[URI\] was not found in the tenant named \[guid\]. This can happen if the application has not been installed by the administrator of the tenant or consented to by any user in the tenant. You might have sent your authentication request to the wrong tenant.*
If you’re trying to log in from an application that doesn’t support user consent flow or you’re unable to use it otherwise, you can use the same special login URL crafting trick that I proposed in my article for resolving consent-related issues when getting error AADSTS650001, and create a URL like this:
- [https://login.microsoftonline.com/\[tenant\_name\_in\_onmicrosoft.com-form\]/oauth2/authorize?client\_id=\[appId\]&response\_type=code&redirect\_uri=http://your-uri-here&nonce=1234&resource=https://graph.windows.net&prompt=consent](#bkmrk-if-the-application-r).
If the application requires admin consent, you may replace "consent" with "admin\_consent".
# Integrating with Windows Autopilot
## What
Windows Autopilot is Microsoft's cloud-based provisioning workflow for Windows devices. It registers a device's hardware identity with a Microsoft Entra tenant, applies a Windows Autopilot deployment profile during the Windows out-of-box experience (OOBE), and helps the device become ready for organizational use without maintaining a custom Windows image.
Autopilot is not the same thing as FileWave Windows MDM, and it is not traditional re-imaging. Autopilot controls the Microsoft provisioning experience. Microsoft Entra ID then determines which mobile device management (MDM) service should receive the enrollment. In a FileWave Windows MDM deployment, the intended flow is:
1. The device starts Windows OOBE and contacts the Windows Autopilot service.
2. Autopilot applies the assigned deployment profile.
3. The user signs in with Microsoft Entra credentials, or the device uses a supported userless deployment flow.
4. Windows joins Microsoft Entra ID, or Microsoft Entra hybrid join if that deployment type is intentionally configured.
5. Microsoft Entra automatic MDM enrollment sends the device to the scoped MDM service.
6. FileWave receives the Windows MDM enrollment and manages the device.
> **Important:** Microsoft often manages Autopilot records and profiles through the **Microsoft Intune admin center**. That portal name does not automatically mean Intune must be the MDM that manages the device. If FileWave is the intended MDM service, scope the FileWave MDM application for the appropriate users in Microsoft Entra ID and do not scope those same users to Intune or another MDM service for Windows MDM enrollment.
## When/Why
Use Windows Autopilot when you want new or reset Windows devices to enter the correct Microsoft Entra tenant and receive a controlled setup experience without building and deploying a custom Windows image. This is similar in goal to Apple Automated Device Enrollment, but the Microsoft pieces are different: device registration, Autopilot deployment profile assignment, Microsoft Entra automatic MDM enrollment, and the final MDM service are separate parts of the workflow.
Before adding Autopilot, first verify that normal FileWave Windows MDM enrollment works. Manual enrollment is still the fastest way to prove that the FileWave server URL, Microsoft Entra MDM application, discovery URL, terms URL, certificate, tenant ID, and user scope are configured correctly.
## Before you begin
- Review [Pre-Requisites of Windows MDM Setup](https://kb.filewave.com/link/175) and Microsoft's [Windows Autopilot requirements](https://learn.microsoft.com/en-us/autopilot/requirements).
- Complete the FileWave Microsoft Entra configuration in [Part 3: Setting up the Portal App](https://kb.filewave.com/link/174).
- Confirm that the FileWave MDM application in Microsoft Entra has the correct MDM user scope. Use **All** or a targeted user group, but avoid overlapping that same Windows MDM enrollment scope with Intune or another MDM provider.
- Use a supported Windows edition. Windows Home editions do not support the Entra join and MDM enrollment workflow used here.
- Make sure the device has internet access during OOBE so it can reach Microsoft Entra ID, the Windows Autopilot service, Windows activation, and the selected MDM service.
## How
### 1. Register devices with Windows Autopilot
Before a device can use Windows Autopilot, it must be registered with the Windows Autopilot deployment service and associated with the correct Microsoft Entra tenant. Microsoft recommends having the OEM, reseller, distributor, or CSP register new devices when possible. Manual hardware-hash collection is useful for testing, pilots, virtual machines, and existing devices, but it is not the preferred large-scale purchasing workflow.
For an existing Windows device, the hardware hash can be collected from Windows Management Instrumentation (WMI). Microsoft documents the current process here: [Manually register devices with Windows Autopilot](https://learn.microsoft.com/en-us/autopilot/add-devices). The PowerShell script [Get-WindowsAutopilotInfo.ps1](https://www.powershellgallery.com/packages/Get-WindowsAutoPilotInfo) can collect the device serial number and hardware hash. Use the current version of the script because Microsoft moved the script workflow to Microsoft Graph PowerShell modules.
To make this easier for existing FileWave-managed Windows devices, FileWave provides a Custom Field that can populate a field named **Windows Autopilot Hash**. Import the Custom Field in Native Admin from **Assistants → Manage Custom Fields**, then use the collected inventory value when preparing a CSV for Autopilot registration.
| **Windows Autopilot Hash Custom Field** |
| [](https://kb.filewave.com/attachments/24) |
### 2. Import device hashes into Windows Autopilot
After you have collected hardware hashes, import the CSV in the Microsoft Intune admin center:
1. Open [Microsoft Intune admin center](https://intune.microsoft.com/).
2. Go to **Devices → Windows → Enrollment**.
3. Under **Windows Autopilot**, select **Devices**.
4. Select **Import** and upload the CSV file.
5. After import, select **Sync** and refresh until the device appears.
[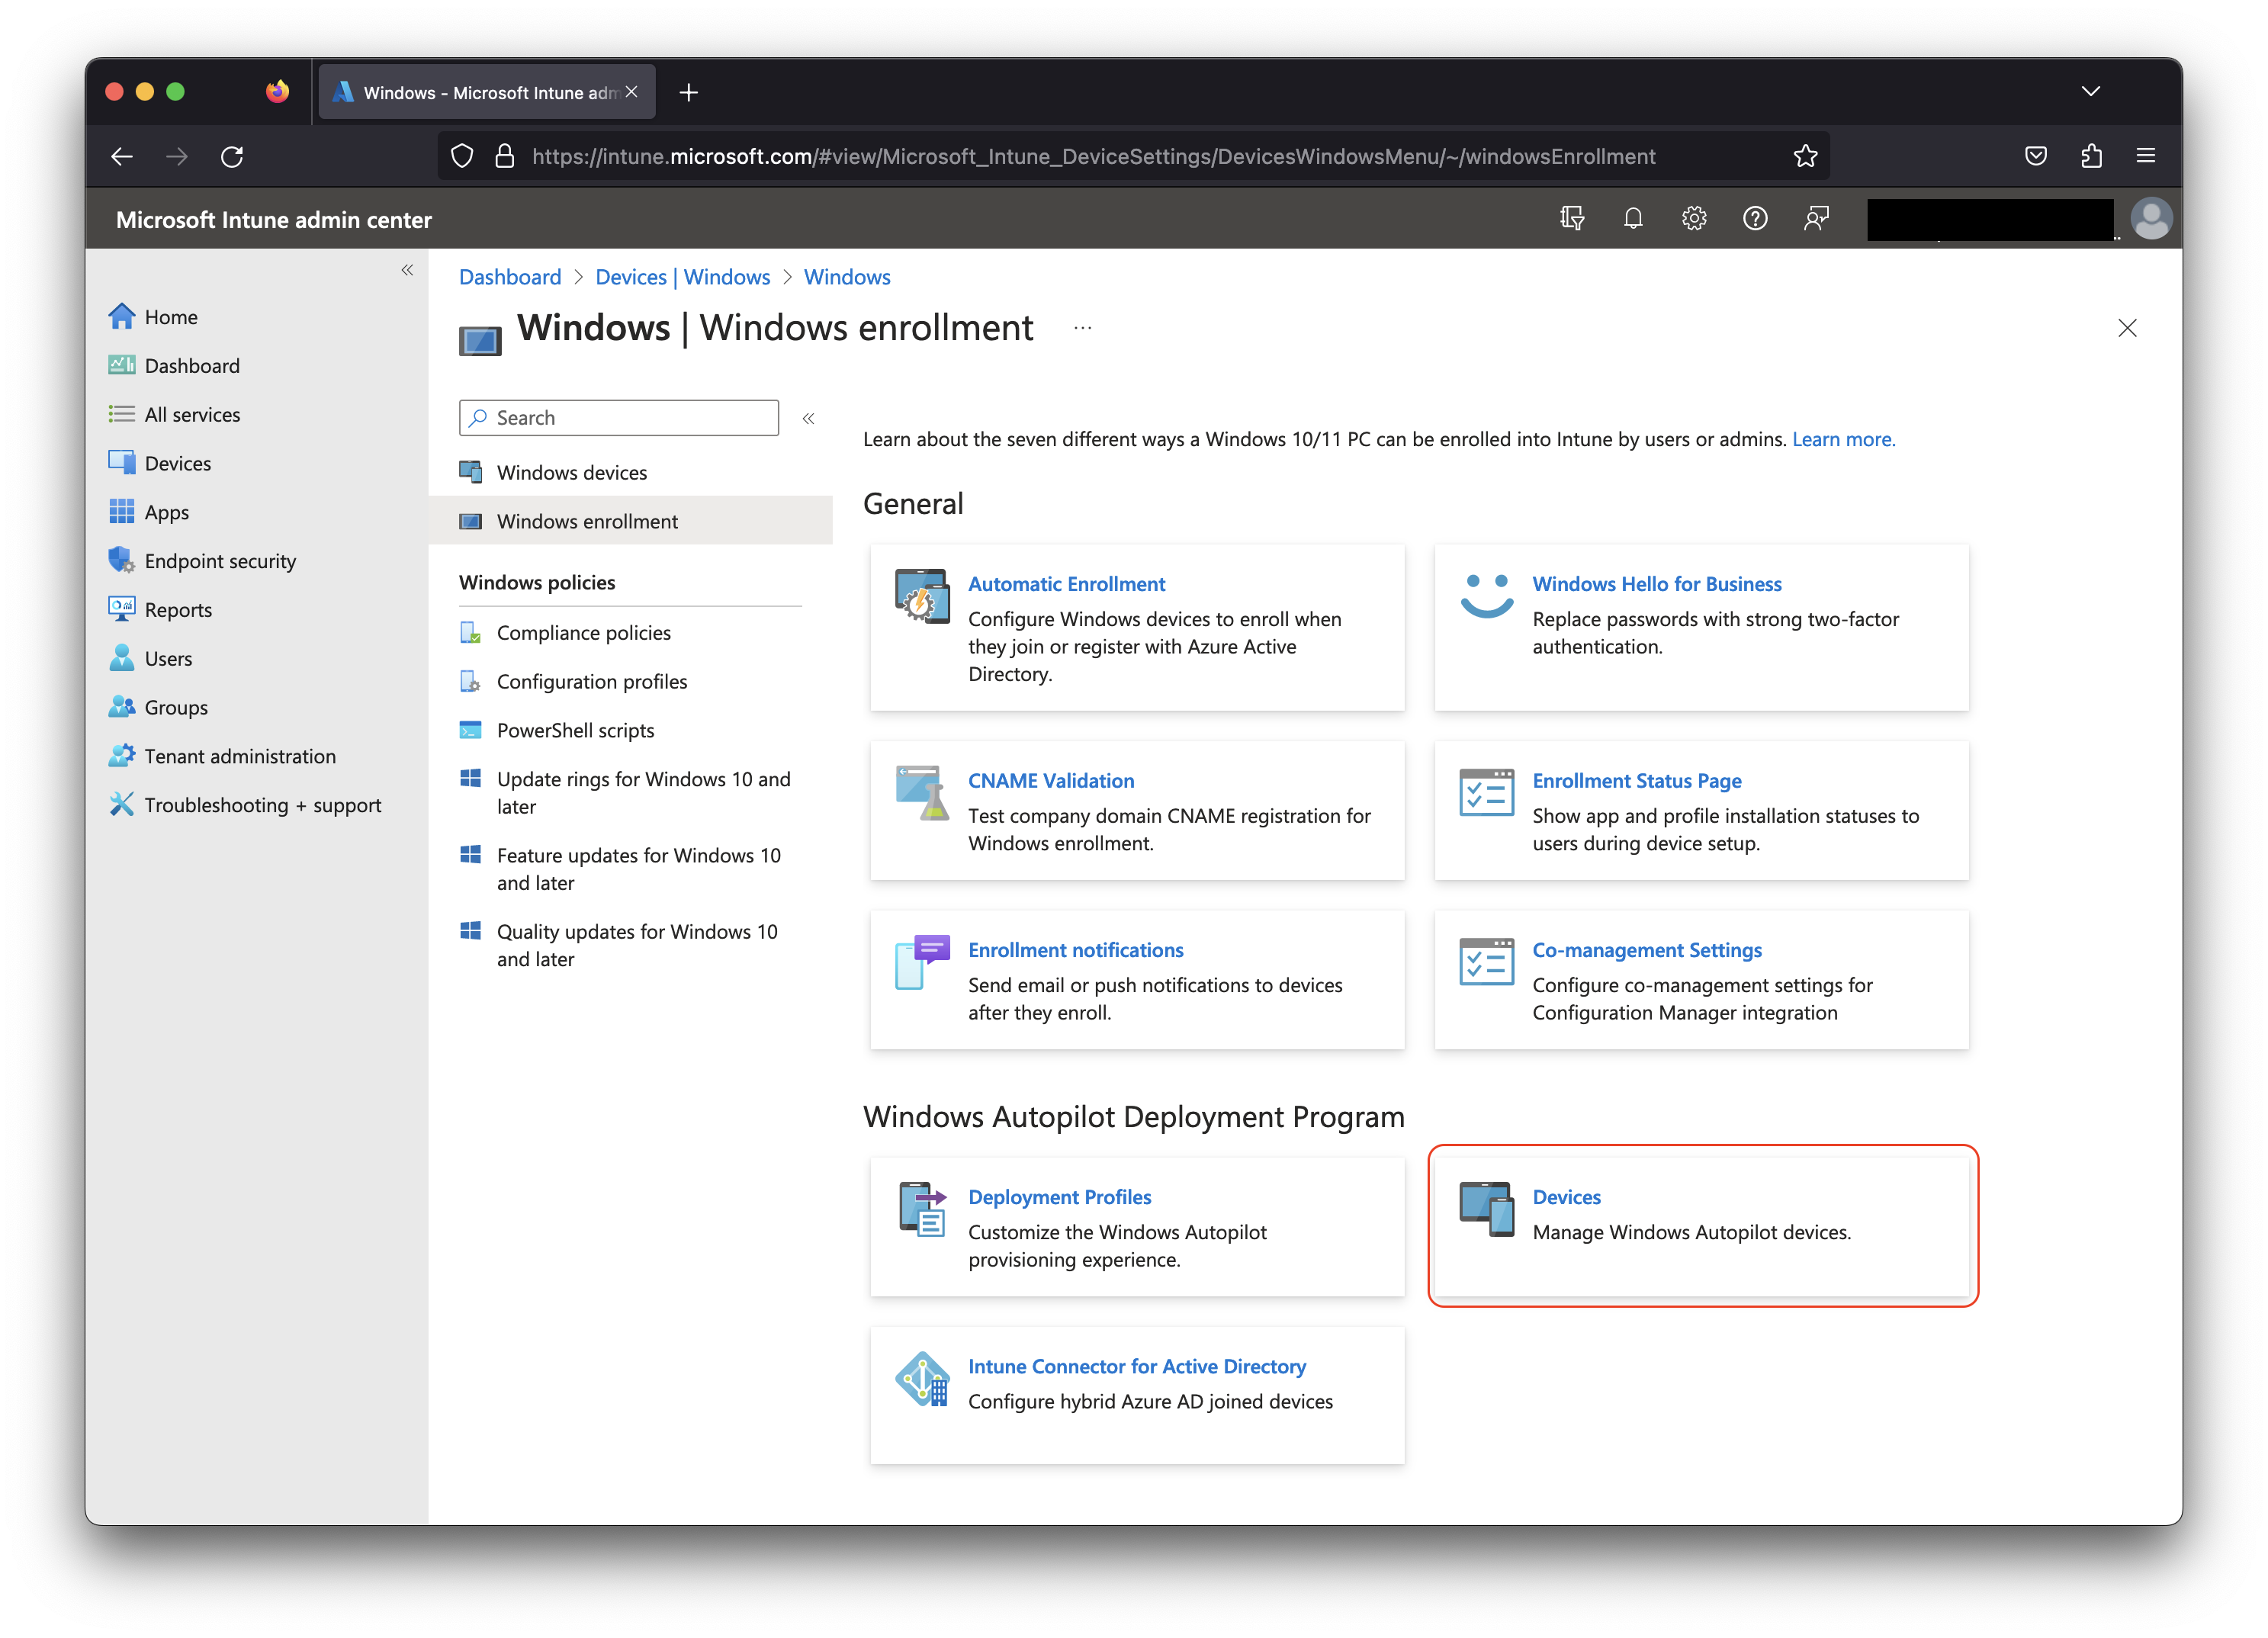](https://kb.filewave.com/uploads/images/gallery/2023-06/D4aZVeuwZIHTF1u3-intune-admin-center.png)
[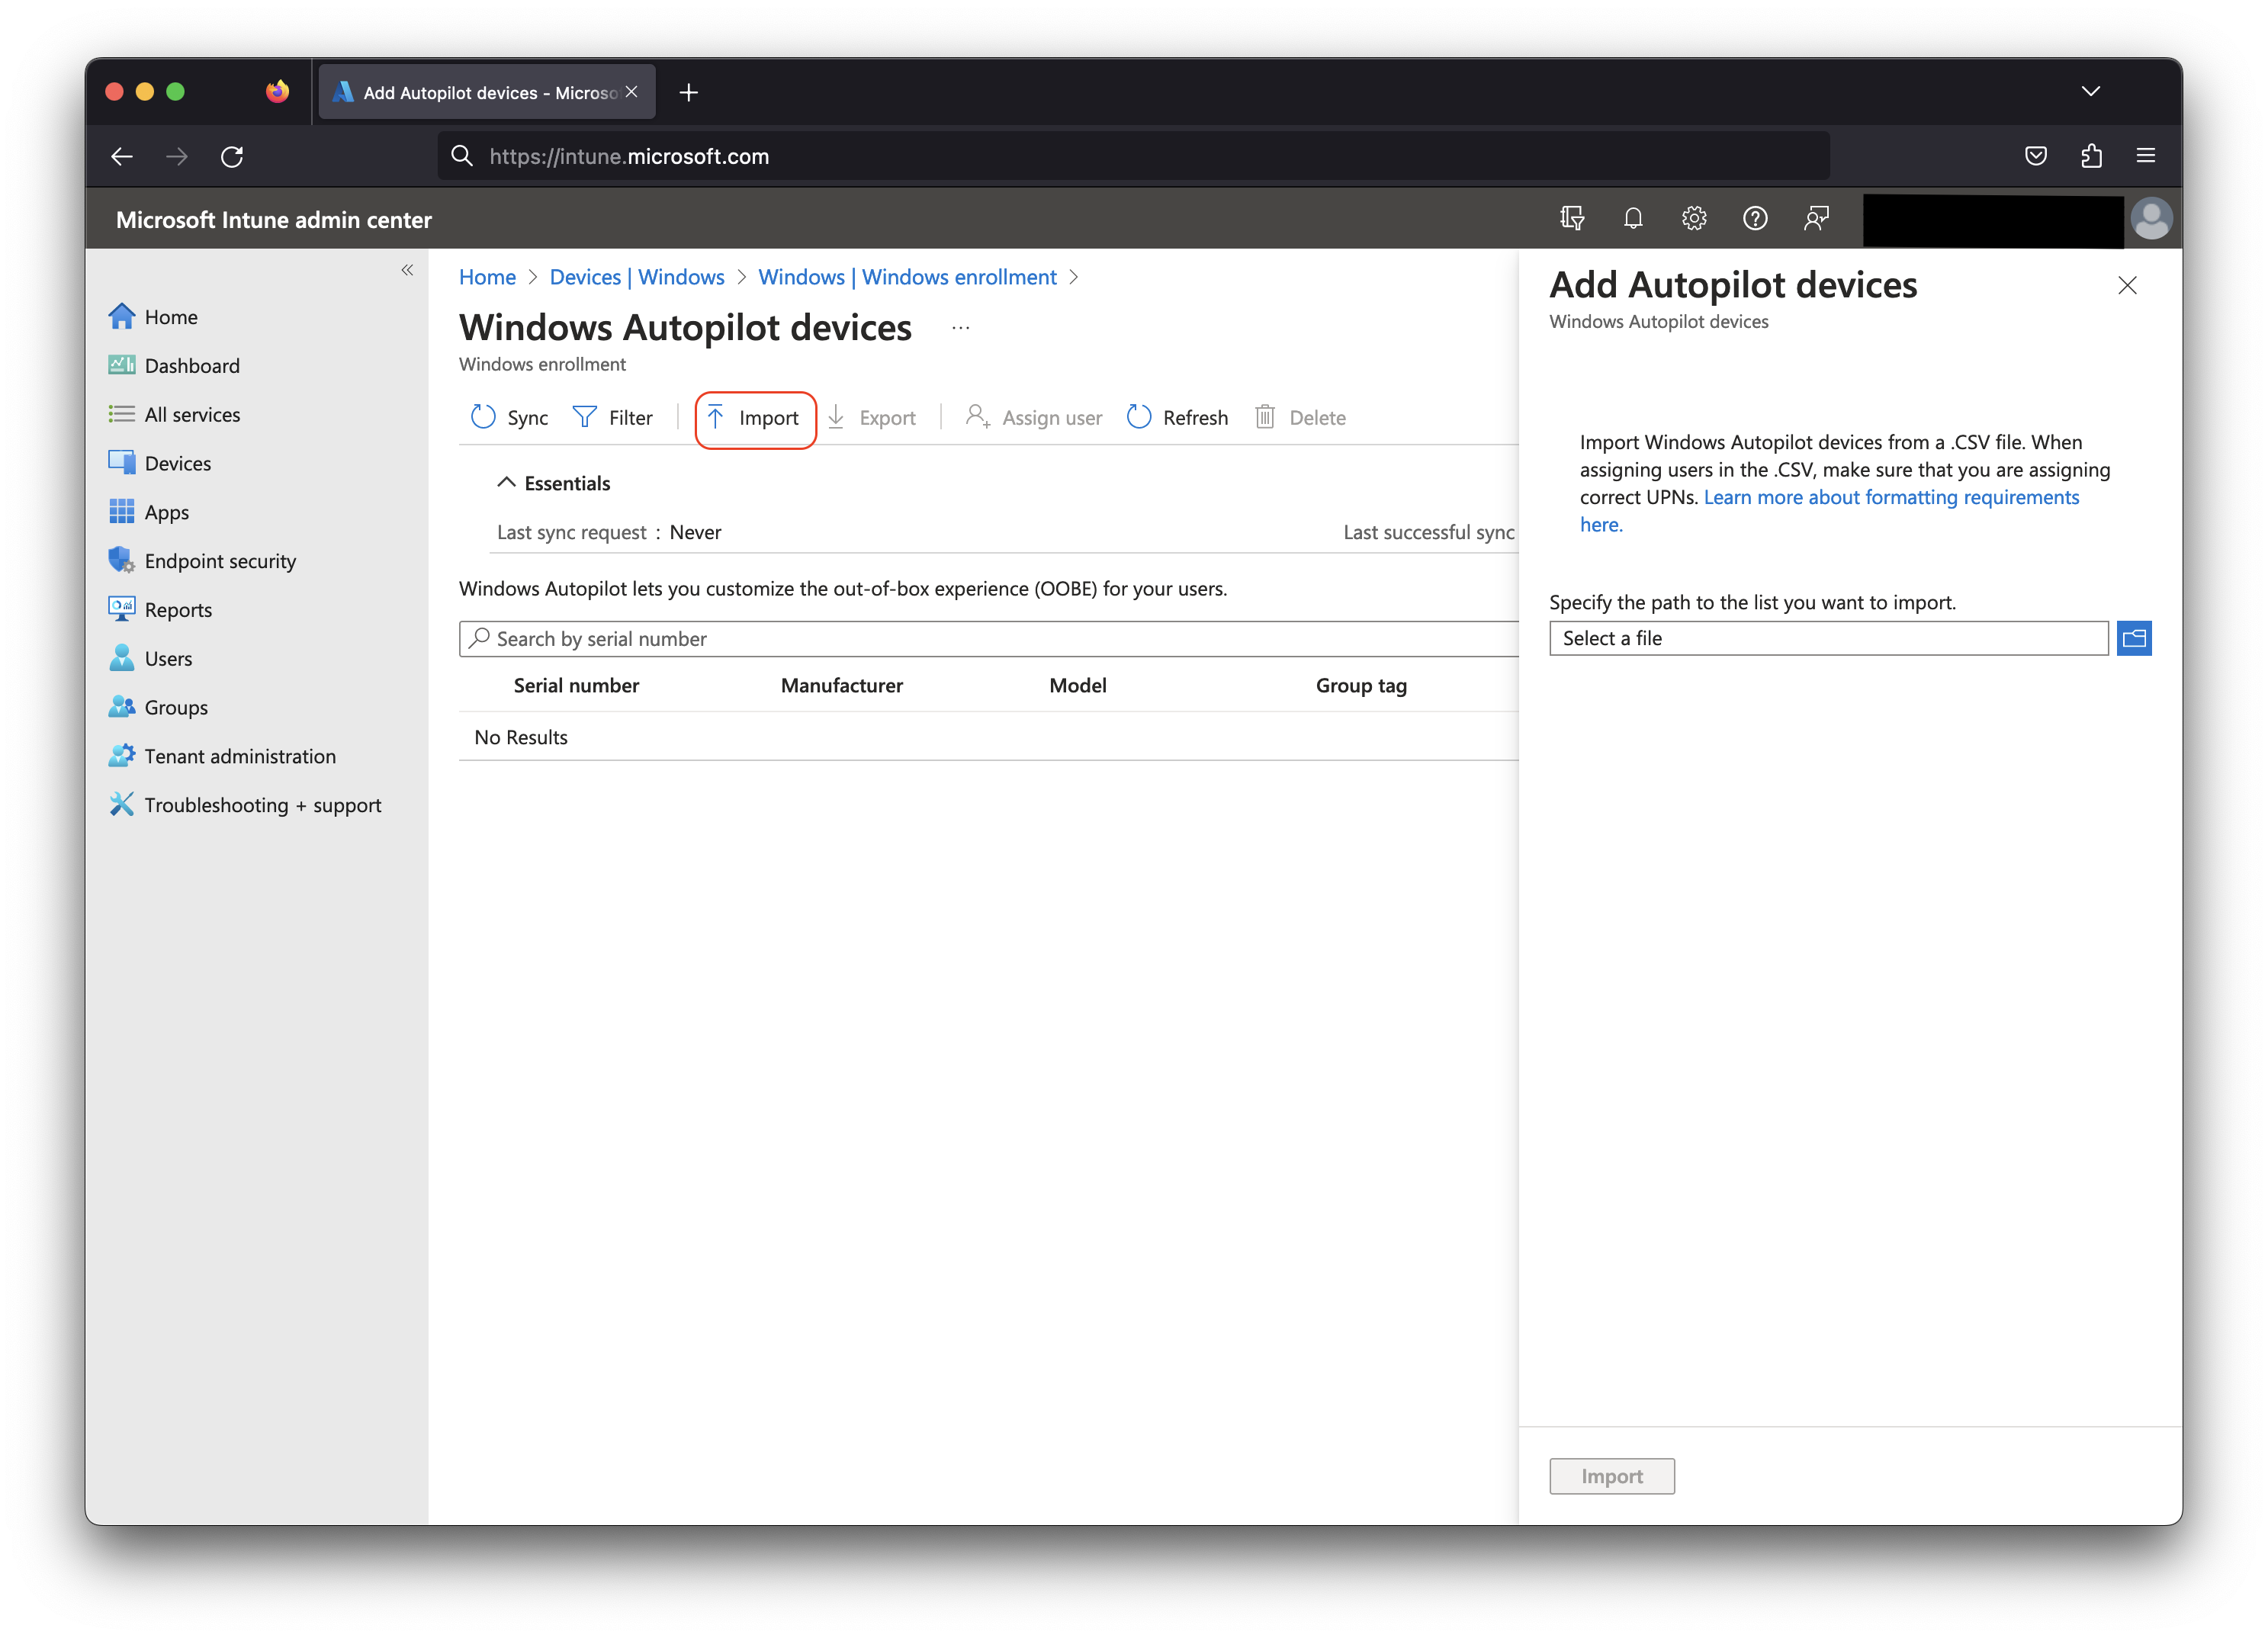](https://kb.filewave.com/uploads/images/gallery/2023-06/esEpeIhENfl6qepF-intune-admin-center-import.png)
Microsoft's current CSV header supports required and optional fields:
```
Device Serial Number,Windows Product ID,Hardware Hash,Group Tag,Assigned User
,,,,
```
- **Device Serial Number** and **Hardware Hash** are required.
- **Windows Product ID** is typically blank for admins uploading directly through Intune, but may be required for partner upload workflows.
- **Group Tag** and **Assigned User** are optional and can help with grouping, profile assignment, or pre-populating user information.
- CSV headers are case-sensitive. Extra columns are not allowed.
- Use a plain-text editor. Microsoft specifically warns against editing and saving the import CSV with Excel because it can produce a file that is not usable for Autopilot import.
- A single CSV upload supports up to 500 devices.
[](https://kb.filewave.com/uploads/images/gallery/2023-06/LK9NpGpaI3qJBaH6-msfb-autopilot-csv.png)
### 3. Create and assign a Windows Autopilot deployment profile
After the device is registered, assign a **Windows Autopilot deployment profile**. This is not a FileWave profile and should not be described as a generic MDM profile. The Autopilot deployment profile controls the Windows setup experience, including deployment mode, Microsoft Entra join type, privacy/EULA screens, user account type, language options, device name template, and related OOBE behavior.
In the Microsoft Intune admin center, go to **Devices → Windows → Enrollment → Windows Autopilot → Deployment profiles**. Create the profile, assign it to the appropriate device group, and wait for the device's profile status to show as assigned before shipping or resetting the device.
For most new cloud-native deployments, Microsoft recommends Microsoft Entra joined devices rather than Microsoft Entra hybrid joined devices. Hybrid join can still be used in specific environments, but it adds dependency on on-premises Active Directory and network reachability during provisioning.
### 4. Enroll the Windows device into FileWave Windows MDM
Autopilot is applied during Windows OOBE. If the device is already sitting at the Windows desktop, simply assigning an Autopilot profile will not replay OOBE. Use the path that matches the device state:
- **New device:** Register the device, assign the Autopilot deployment profile, then start the device at OOBE with network access.
- **Existing device test:** Use [Manually enrolling a device into FileWave Windows MDM](https://kb.filewave.com/link/177) first if you only need to validate the FileWave/Microsoft Entra MDM configuration.
- **Existing device Autopilot deployment:** Register the device, assign the profile, then reset or reinstall the device so it returns to OOBE. The [Reset Windows device through a script (FileWave Recipe)](https://kb.filewave.com/link/178) article can help with FileWave-triggered reset workflows.
When the user signs in during OOBE, Microsoft Entra automatic MDM enrollment should route the device to FileWave if the FileWave MDM application is scoped for that user. After enrollment completes, verify the device in FileWave. In Native Admin, the device details should show that the device is Windows MDM enrolled.
## Common issues
- **The device shows normal consumer Windows setup instead of Autopilot:** Confirm the device is registered with Windows Autopilot, has an assigned deployment profile, can reach the internet, and has been reset to OOBE after assignment.
- **The device enrolls into Intune or another MDM instead of FileWave:** Check Microsoft Entra **Mobility (MDM and WIP)** user scope. Do not scope the same users to multiple MDM services for Windows automatic MDM enrollment.
- **The device is already Microsoft Entra registered or MDM-only enrolled:** Those states are usually BYOD/workplace-join style records. Remove the existing Microsoft Entra/MDM record before registering the device as a corporate Windows Autopilot device.
- **The import says the device is assigned to another tenant:** The device is already registered with another organization's Windows Autopilot service. It must be deregistered from the previous tenant before it can be added here.
- **The device appears in Windows Autopilot but does not enroll into FileWave:** Confirm FileWave Windows MDM works through manual enrollment, then re-check the Microsoft Entra MDM application, discovery URL, terms URL, certificate, user scope, and user licensing.
## Related Microsoft documentation
- [Overview of Windows Autopilot](https://learn.microsoft.com/en-us/autopilot/overview)
- [Windows Autopilot requirements](https://learn.microsoft.com/en-us/autopilot/requirements)
- [Windows Autopilot registration overview](https://learn.microsoft.com/en-us/autopilot/registration-overview)
- [Manually register devices with Windows Autopilot](https://learn.microsoft.com/en-us/autopilot/add-devices)
- [Configure Windows Autopilot profiles](https://learn.microsoft.com/en-us/autopilot/profiles)
# Manually Enroll a Windows Device in FileWave MDM
## **What**
This workflow manually joins a supported Windows device to Microsoft Entra ID and triggers automatic MDM enrollment to FileWave for a user who is in the configured MDM scope.
## **When to use it**
Use manual enrollment for a pilot device or to verify the Microsoft Entra and FileWave Windows MDM configuration. For a larger rollout, use Windows Autopilot or another planned provisioning process. Autopilot provisioning and MDM enrollment are separate stages; this article covers the manual Microsoft Entra join and resulting FileWave enrollment.
## **Requirements**
Complete the FileWave Windows MDM and Microsoft Entra configuration first. The enrolling user must be included in the Microsoft Entra MDM user scope, and the device must be able to reach the FileWave Server over the required enrollment and management ports.
These steps apply to a new FileWave device record and to a Windows computer that already reports through the FileWave Client (`fwcld`).
Windows Home editions cannot join Microsoft Entra ID through this workflow. Use a supported Windows Pro, Enterprise, or Education edition.
## Join and enroll the device
1. Navigate to **Settings → Accounts → Access work or school**
2. Select **Connect**.
3. Under **Alternate actions**, select **Join this device to Microsoft Entra ID**. The layout varies by supported Windows release; the current and earlier layouts are shown below.
[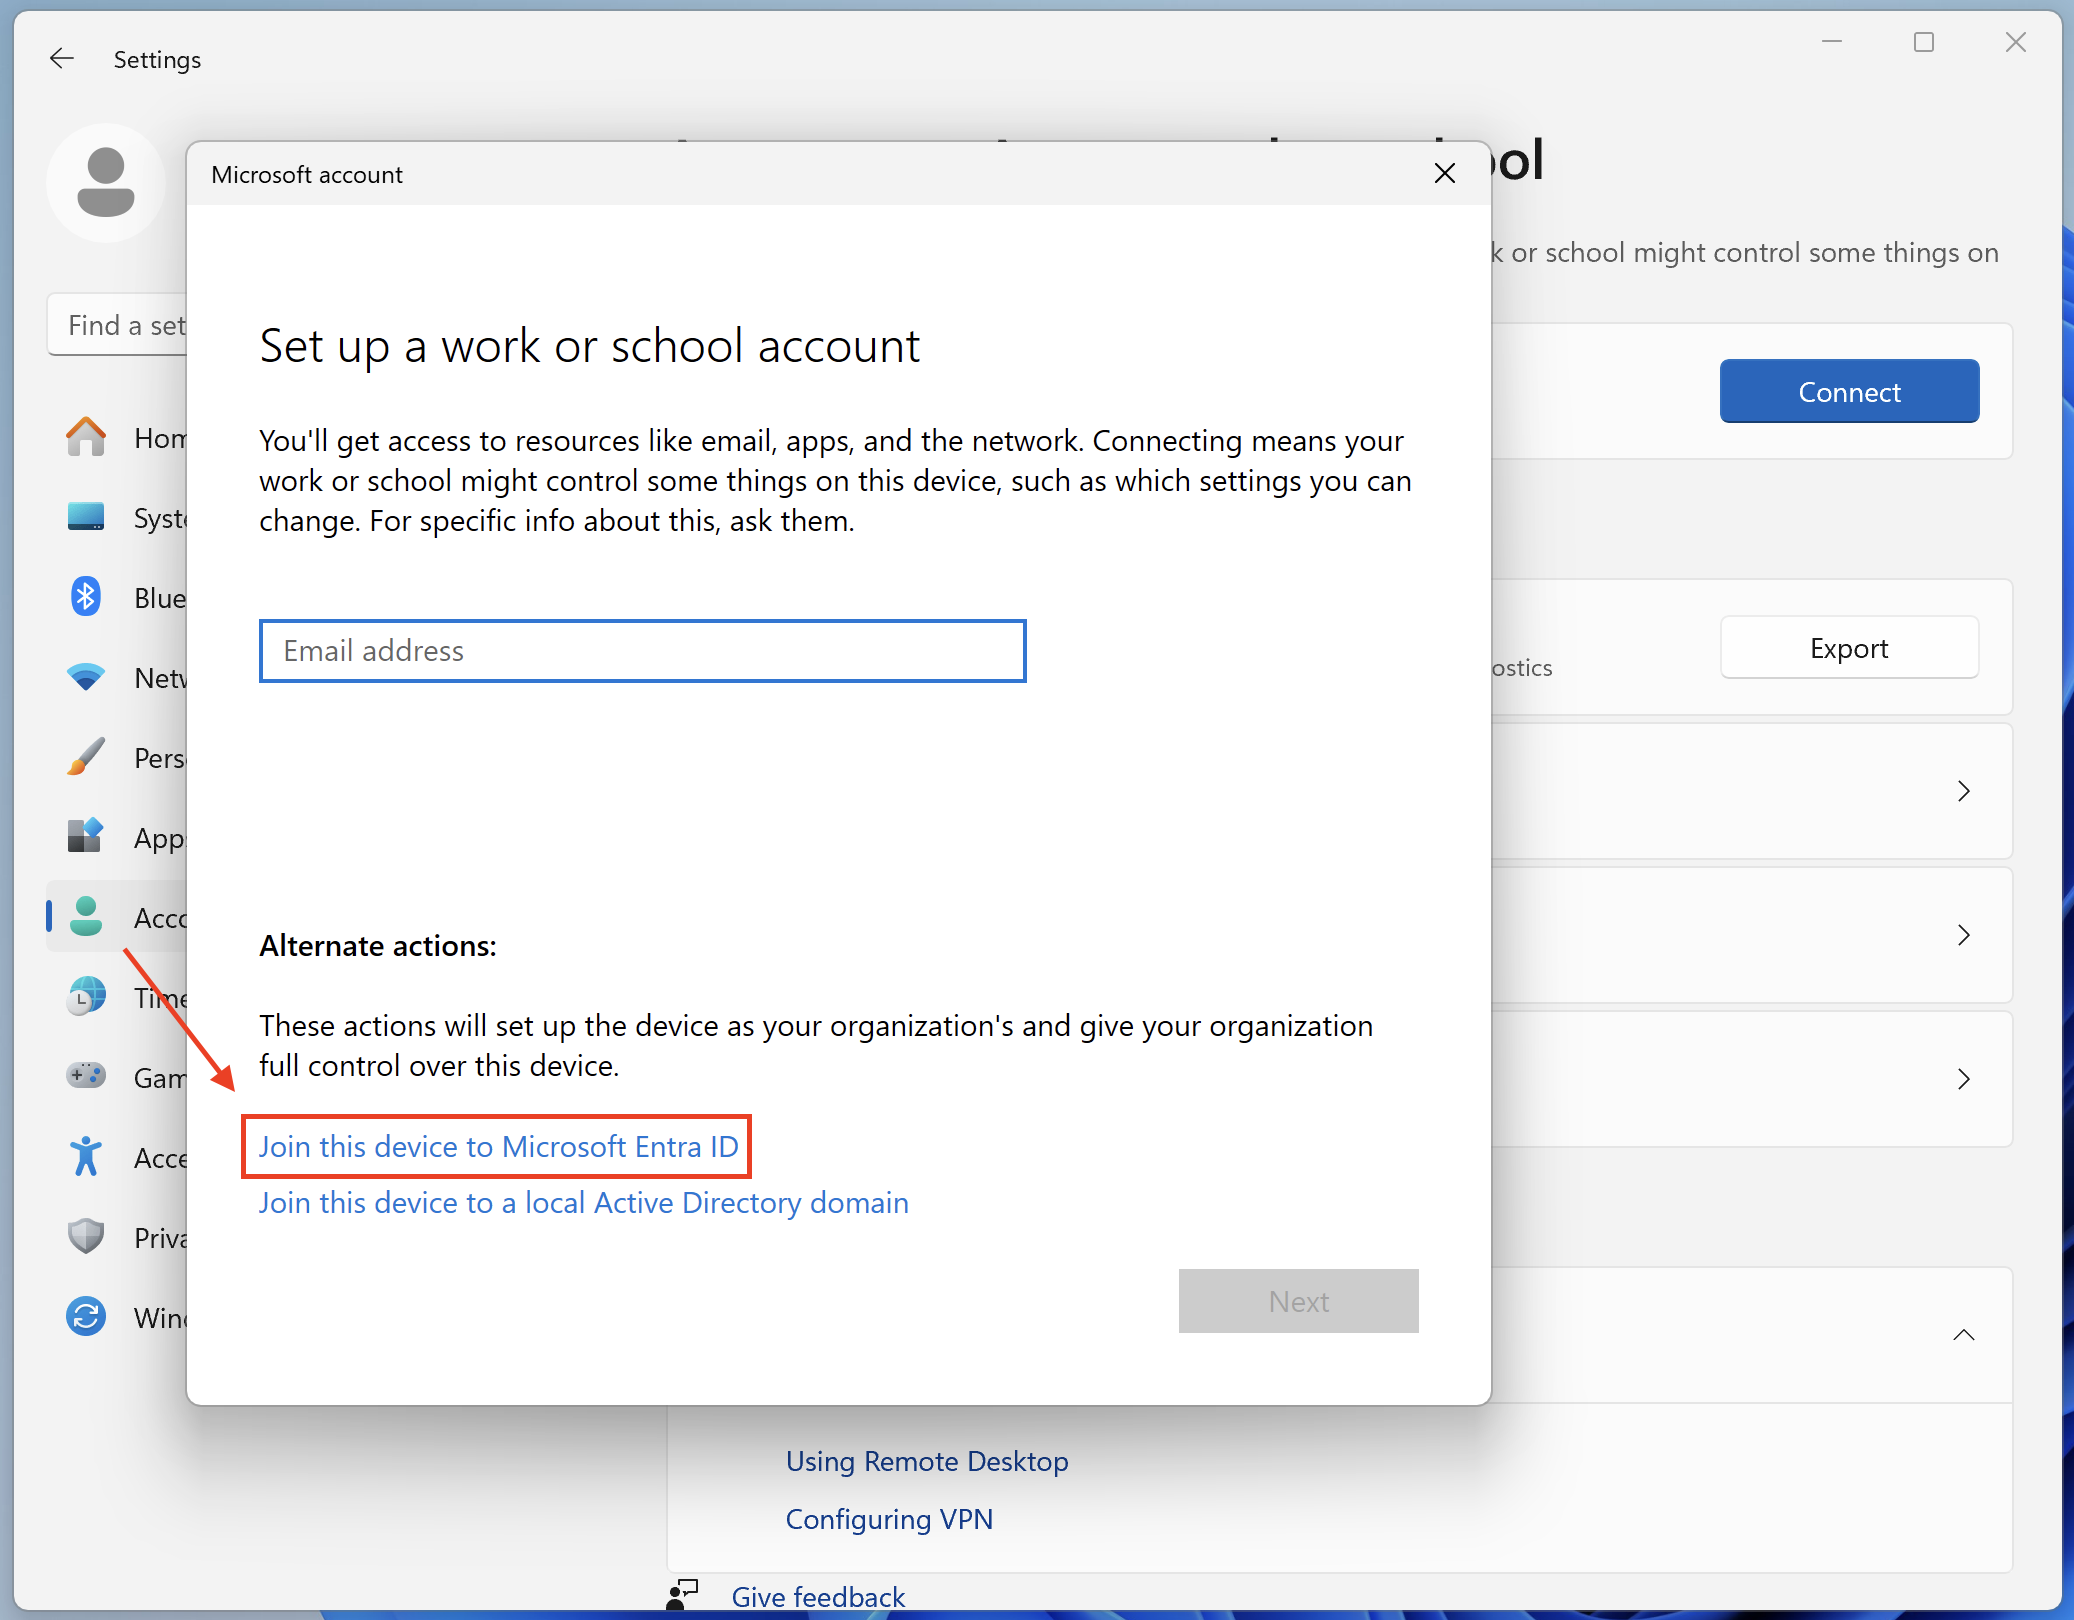](https://kb.filewave.com/uploads/images/gallery/2024-08/H5BlDh04UszOF1l9-entraid.png)
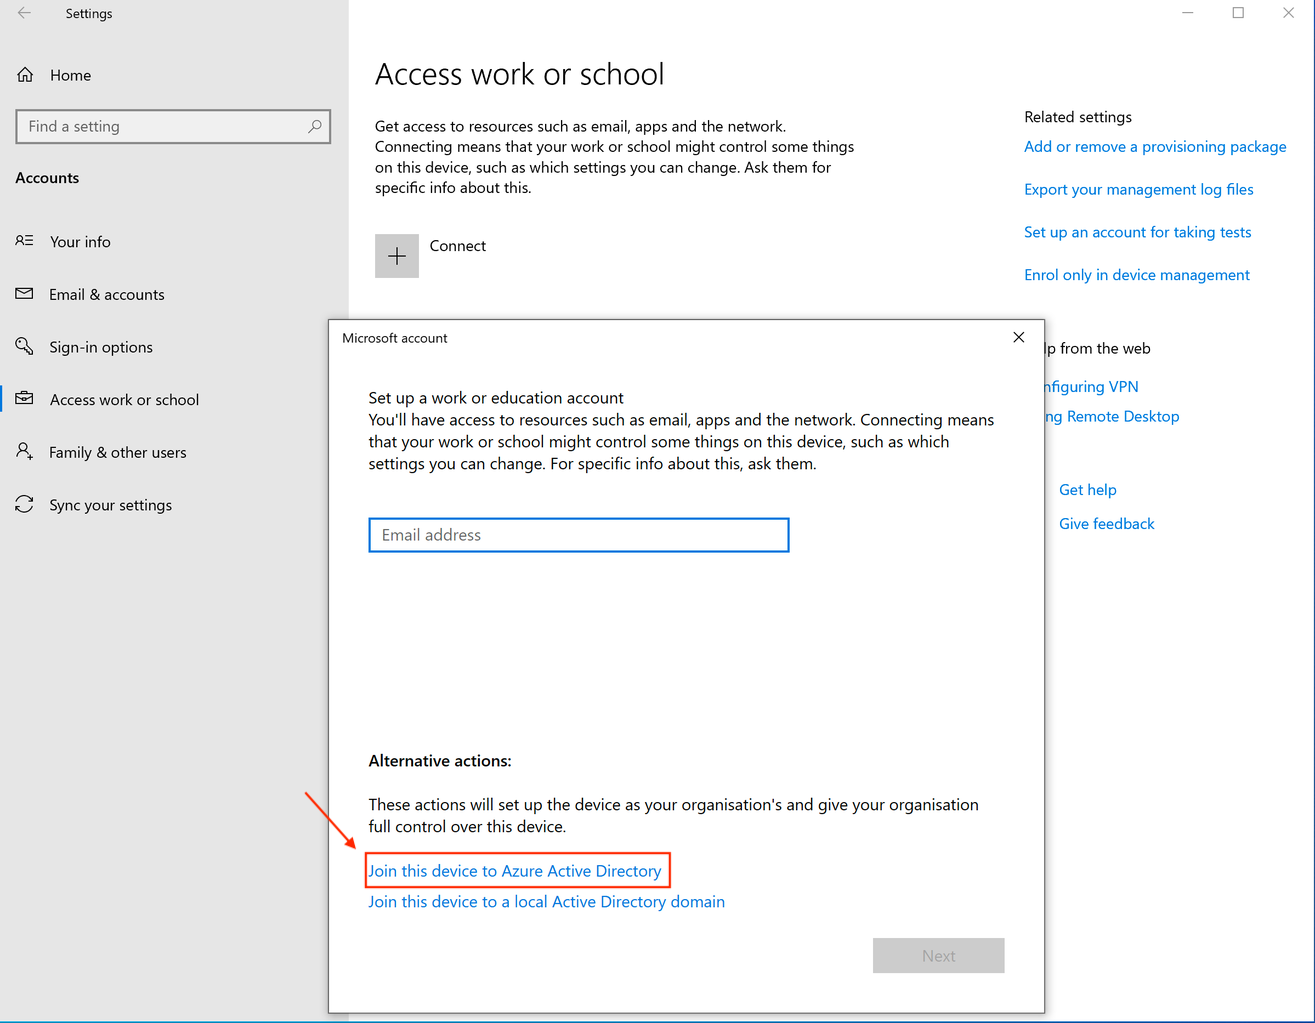
4. Enter the Microsoft Entra credentials for the user who will enroll the device, then complete the join wizard.
5. Back in **Access work or school**, select the connected account and open **Info** to review the MDM connection.
After a few minutes, a device without an existing FileWave record should appear as a new Client on the FileWave Server. Add it to the managed model.
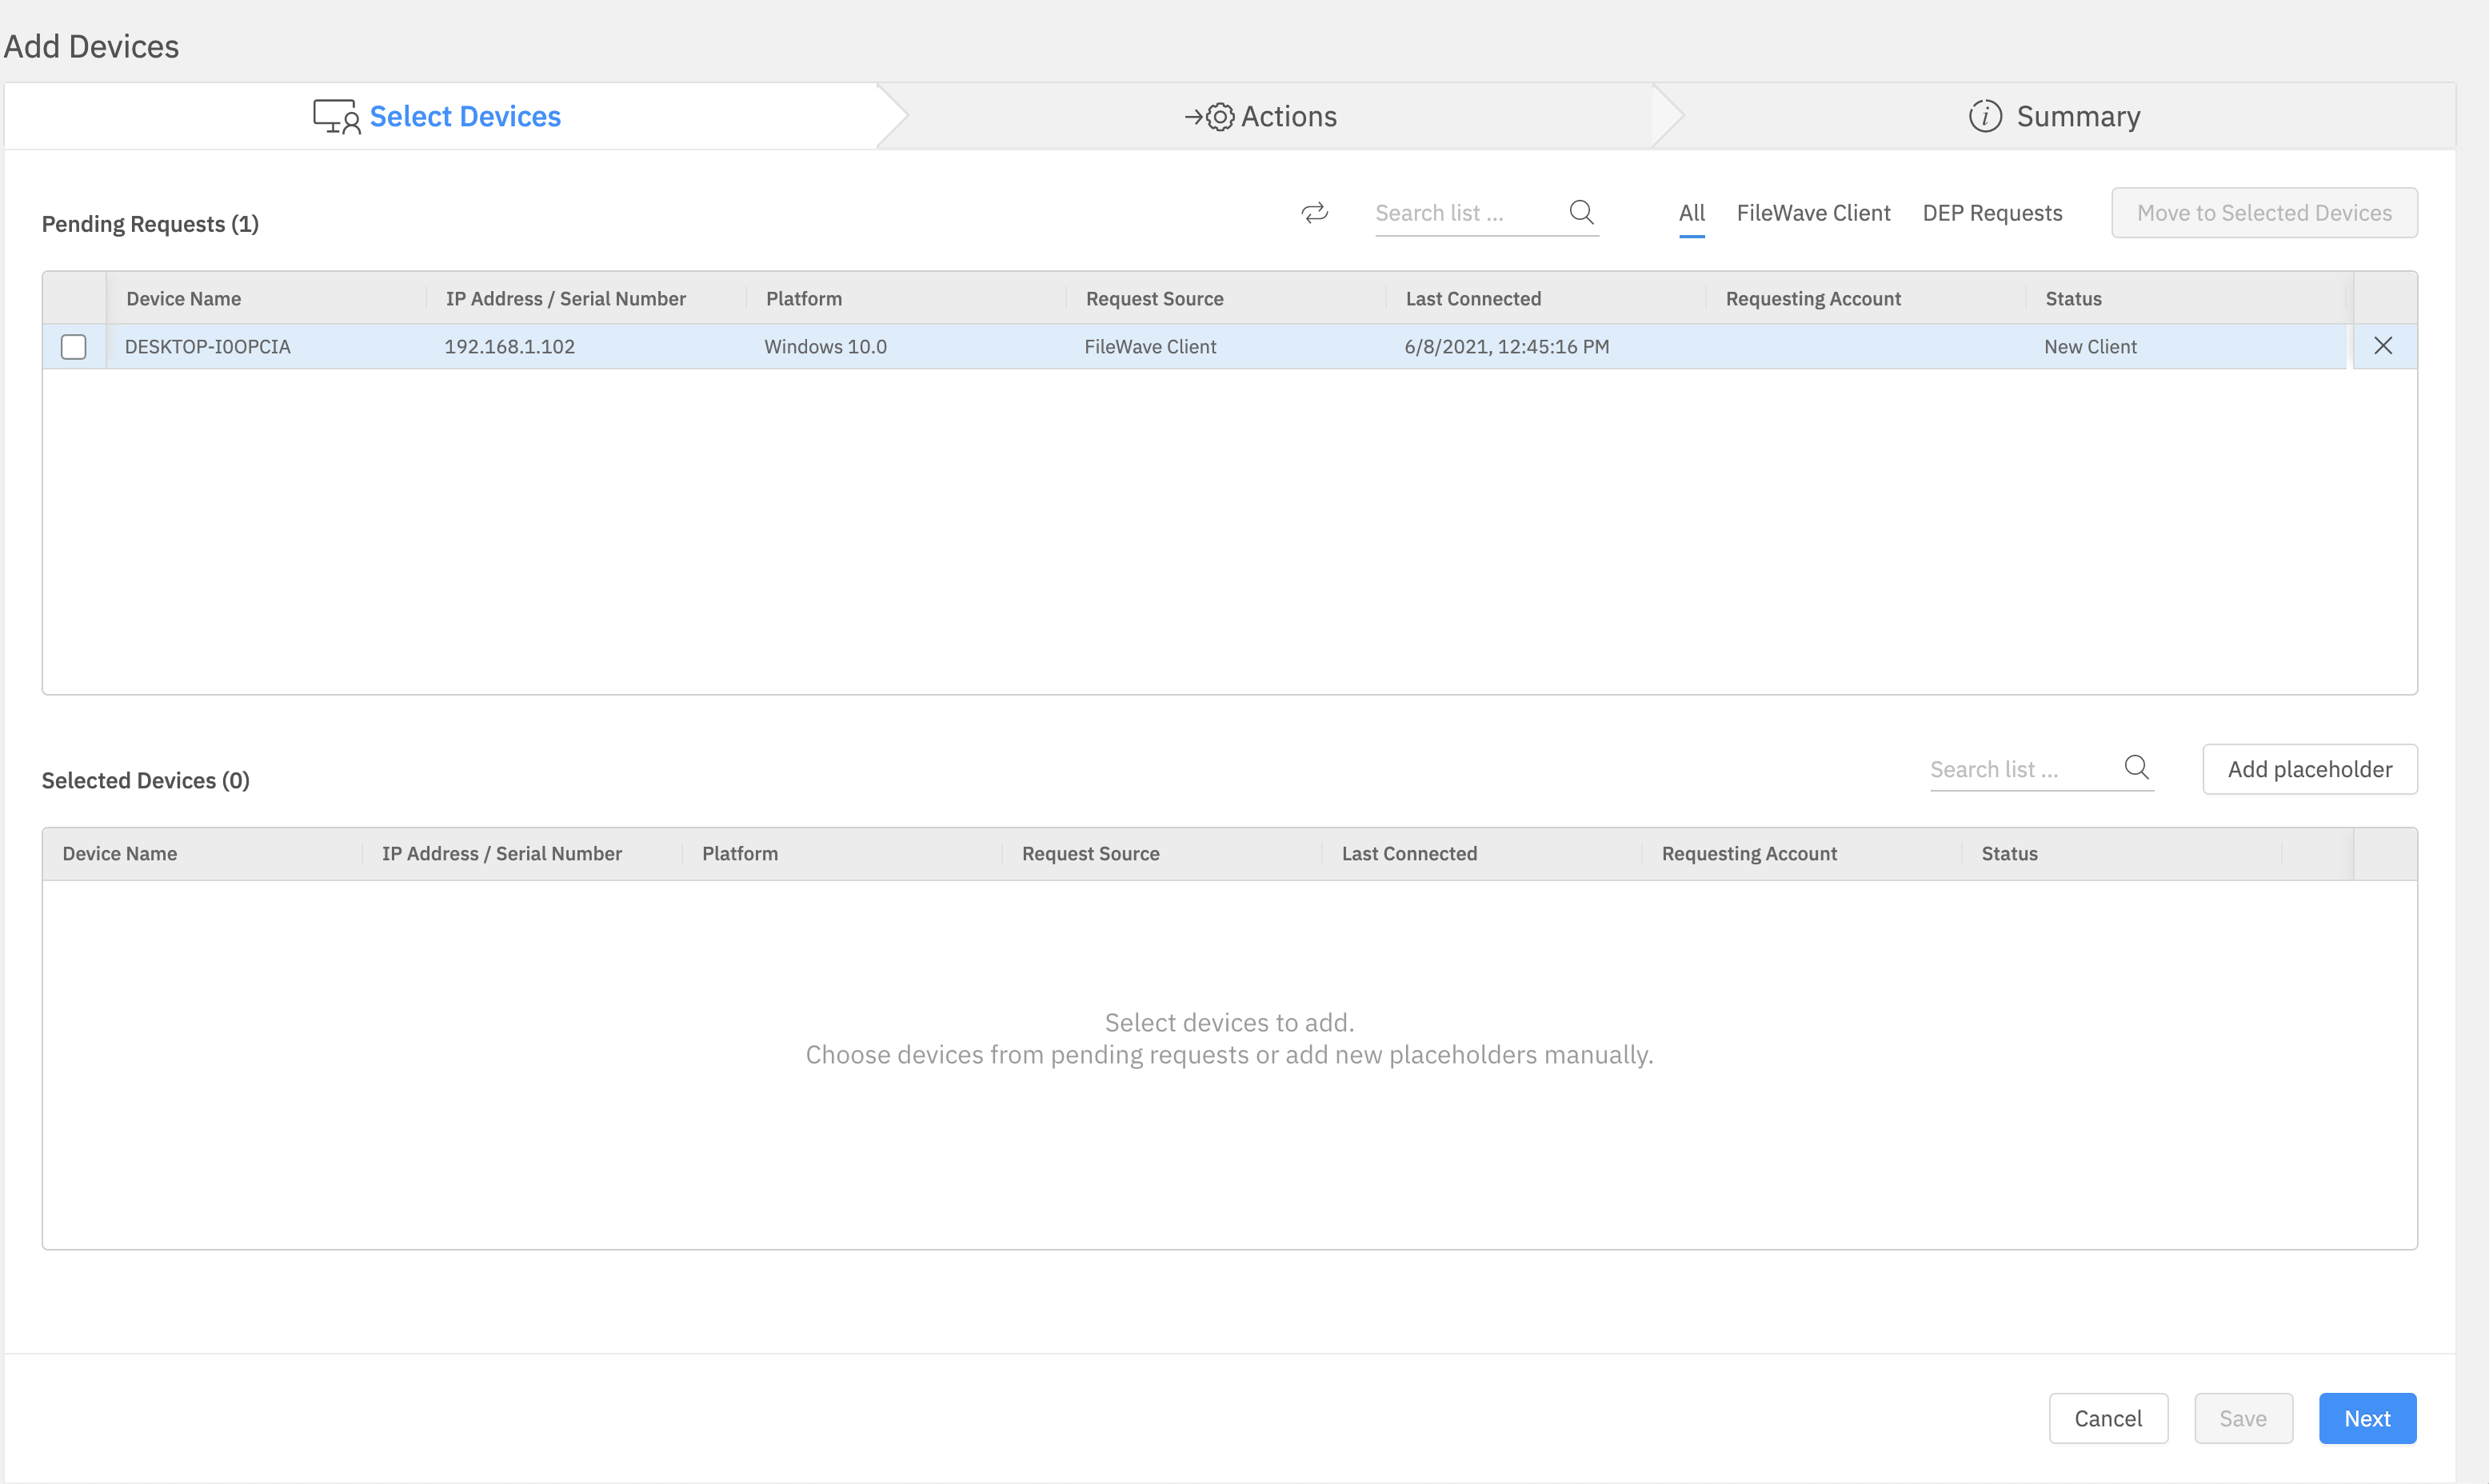
A computer that already reports through the FileWave Client does not appear as a second new Client. Its existing record is updated with the Windows MDM enrollment.
In FileWave Central, open the device details and confirm that the enrollment type reports Windows MDM:
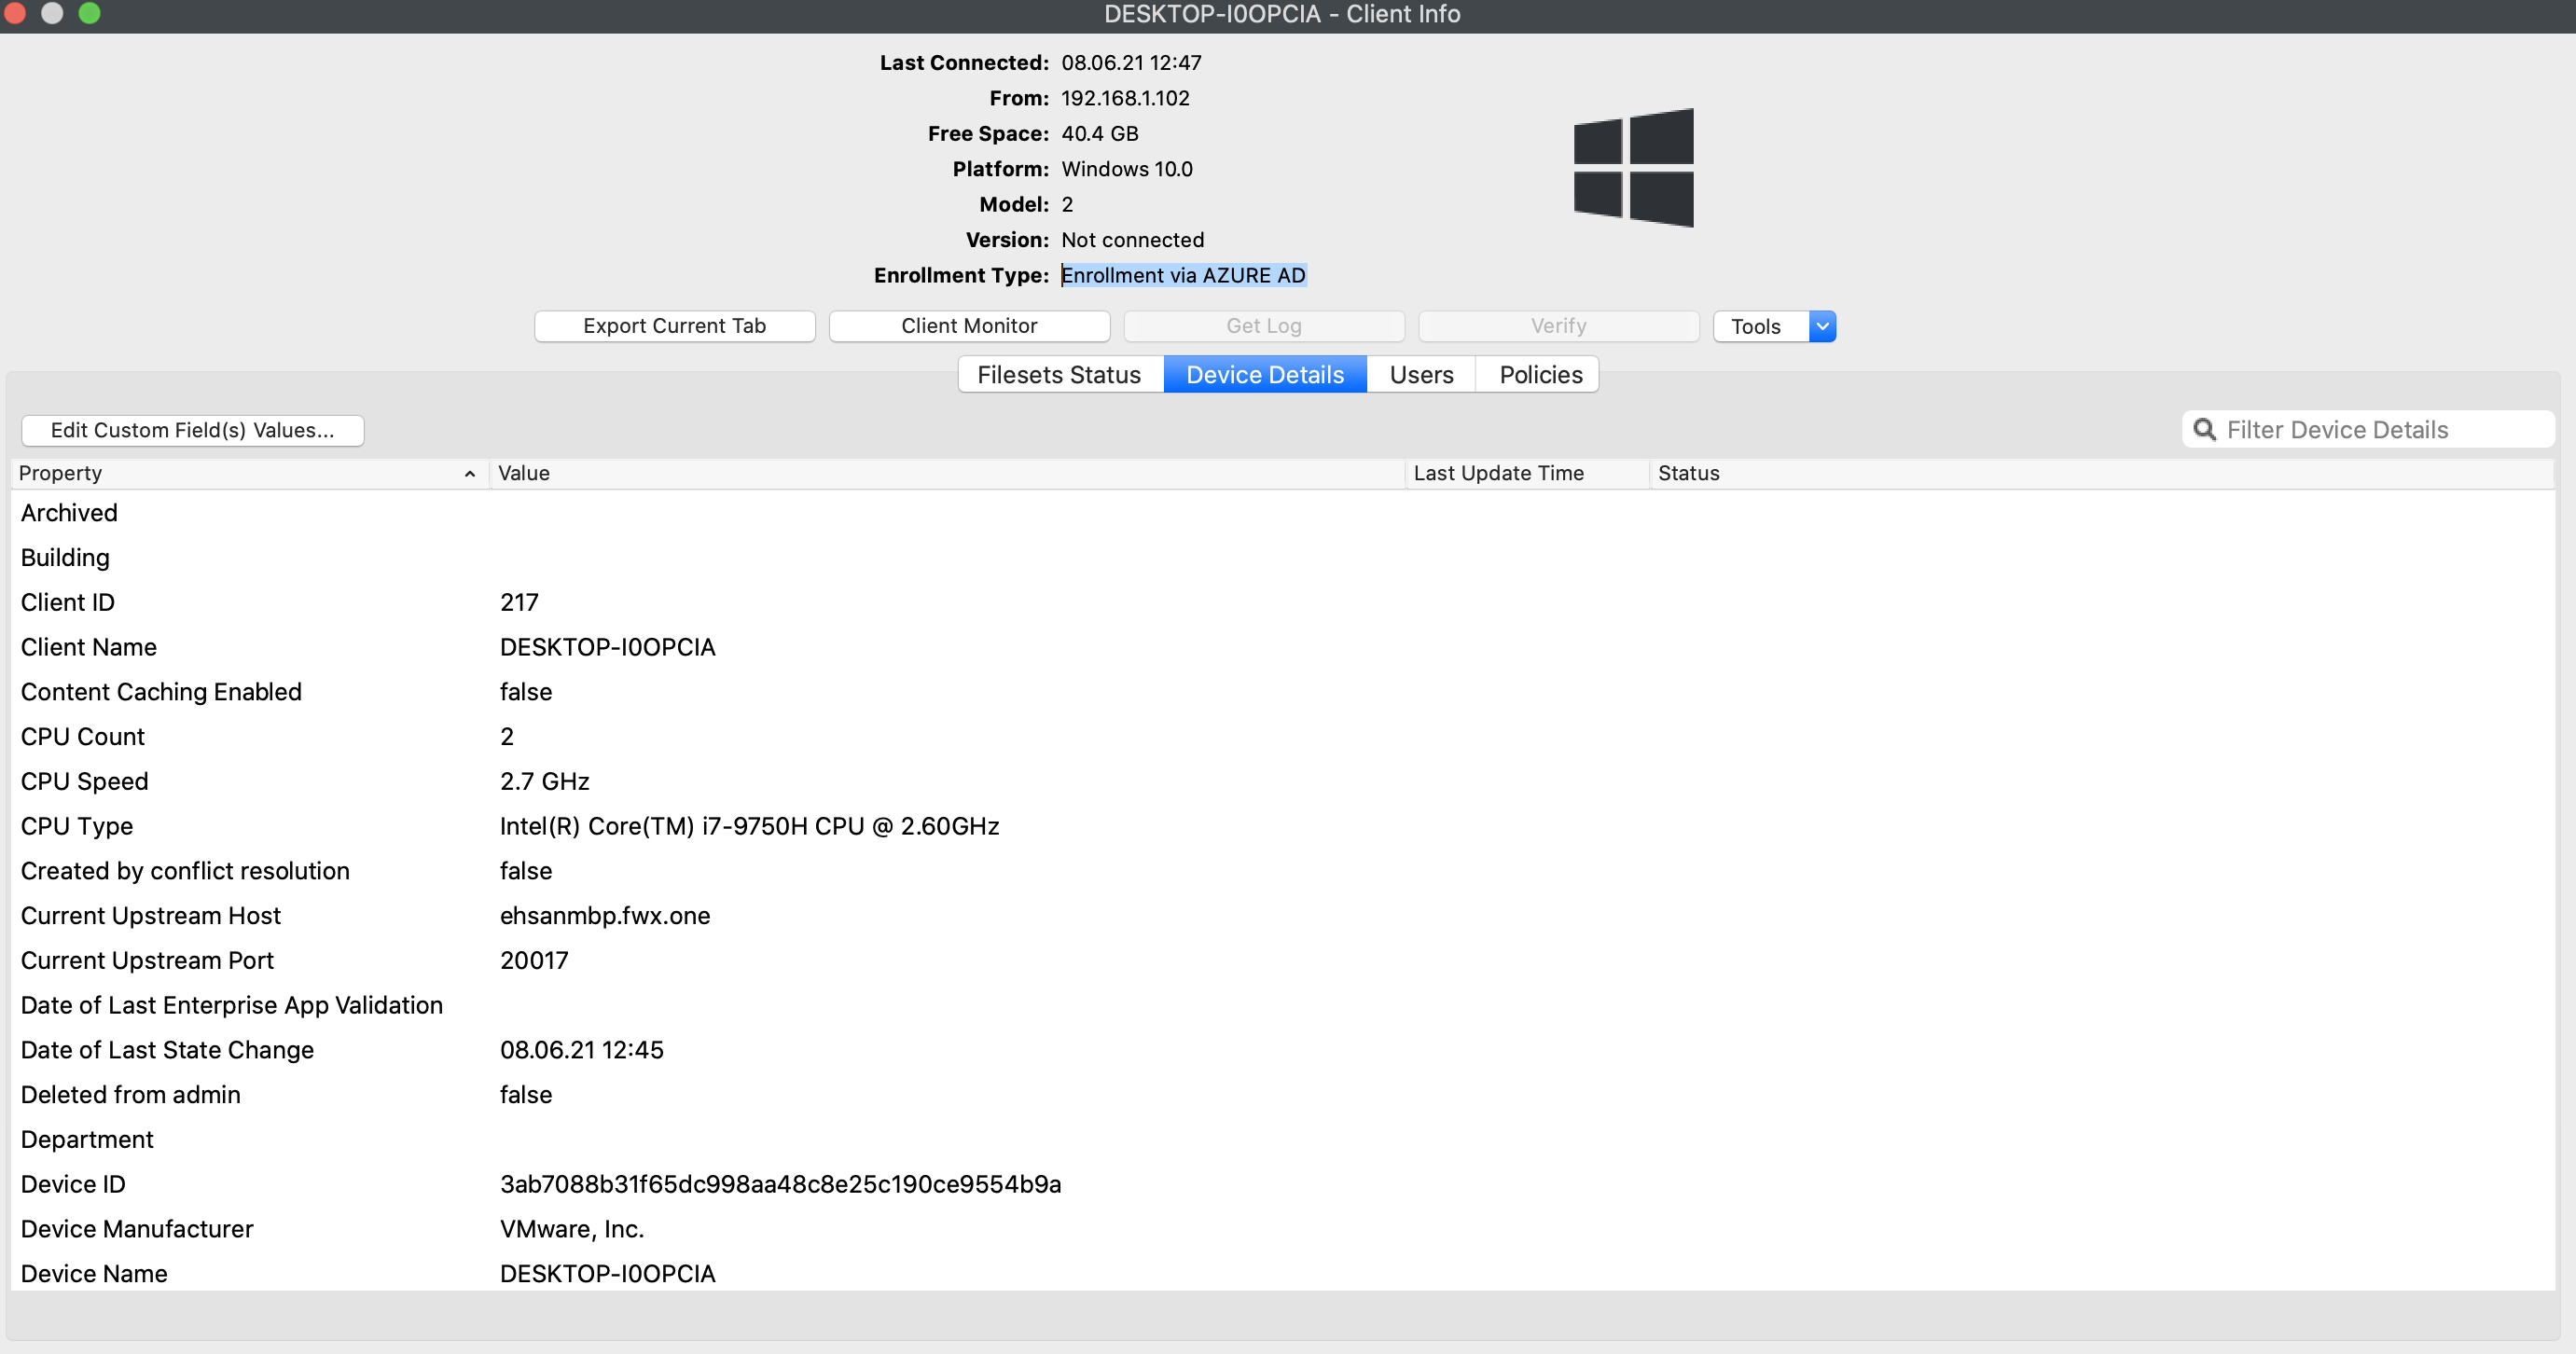
# Reset Windows device through a script (FileWave Recipe)
## What
AutoPilot assigns devices to your organization. This, coupled with the ability to "reset" a Windows 10 or 11, device allows you to be able to "re-image" a Windows device without necessarily wiping it out. What is described in this article is a method to wipe a device which could be used for Autopilot, but can also be used independently of Windows MDM.
## When/Why
As of FileWave v14.8.0, a [command to "reset" your Windows devices](https://kb.filewave.com/books/microsoft-windows-mdm/page/wipe-a-windows-mdm-device-from-filewave-anywhere "Windows MDM wipe command") will be included in FileWave itself, but that requires the device to be enrolled in MDM. In this Fileset in this article, we are providing you with a method of doing the device reset through a PowerShell command that does not require MDM. It goes without saying that this reset is destructive to data on the device, so appropriate caution should be utilized.
## How
##### Wiping a device to reset it in the field
Windows Autopilot Reset - [https://docs.microsoft.com/en-us/mem/autopilot/windows-autopilot-reset](https://docs.microsoft.com/en-us/mem/autopilot/windows-autopilot-reset) - takes the device back to a business-ready state, allowing the next user to sign in and get productive quickly and simply. Specifically, Windows Autopilot Reset:
- Removes personal files, apps, and settings.
- Reapplies a device’s original settings.
- Maintains the device's identity connection to Microsoft Entra ID.
- Maintains the device's management connection to Intune.
The Windows Autopilot Reset process automatically keeps information from the existing device:
- Set the region, language, and keyboard to the original values.
- Wi-Fi connection details.
- Provisioning packages previously applied to the device
- A provisioning package present on a USB drive when the reset process is started
- Microsoft Entra Active Directory device membership and MDM enrollment information.
Windows Autopilot Reset will block the user from accessing the desktop until this information is restored, including reapplying any provisioning packages. For devices enrolled in an MDM service, Windows Autopilot Reset will also block until an MDM sync is completed. When Autopilot reset is used on a device, the device's primary user will be removed. The next user who signs in after the reset will be set as the primary user.
Initially FileWave does not directly issue the Autopilot Reset via MDM, but there is still a way to accomplish Autopilot Reset for a FileWave enrolled device. The below fileset will execute the above PowerShell. It will also enable the Windows Recovery Environment so that this can be successful. If using Windows 10 1703 or newer you can change the methodname to doWipeProtected so that the wipe will continue even if a user reboots in the middle of it.
##### Directions
1. Ensure that you have your device in Autopilot as outlined here: [Integrating with AutoPilot](https://kb.filewave.com/books/microsoft-windows-mdm/page/integrating-with-windows-autopilot "Integrating with Windows AutoPilot")
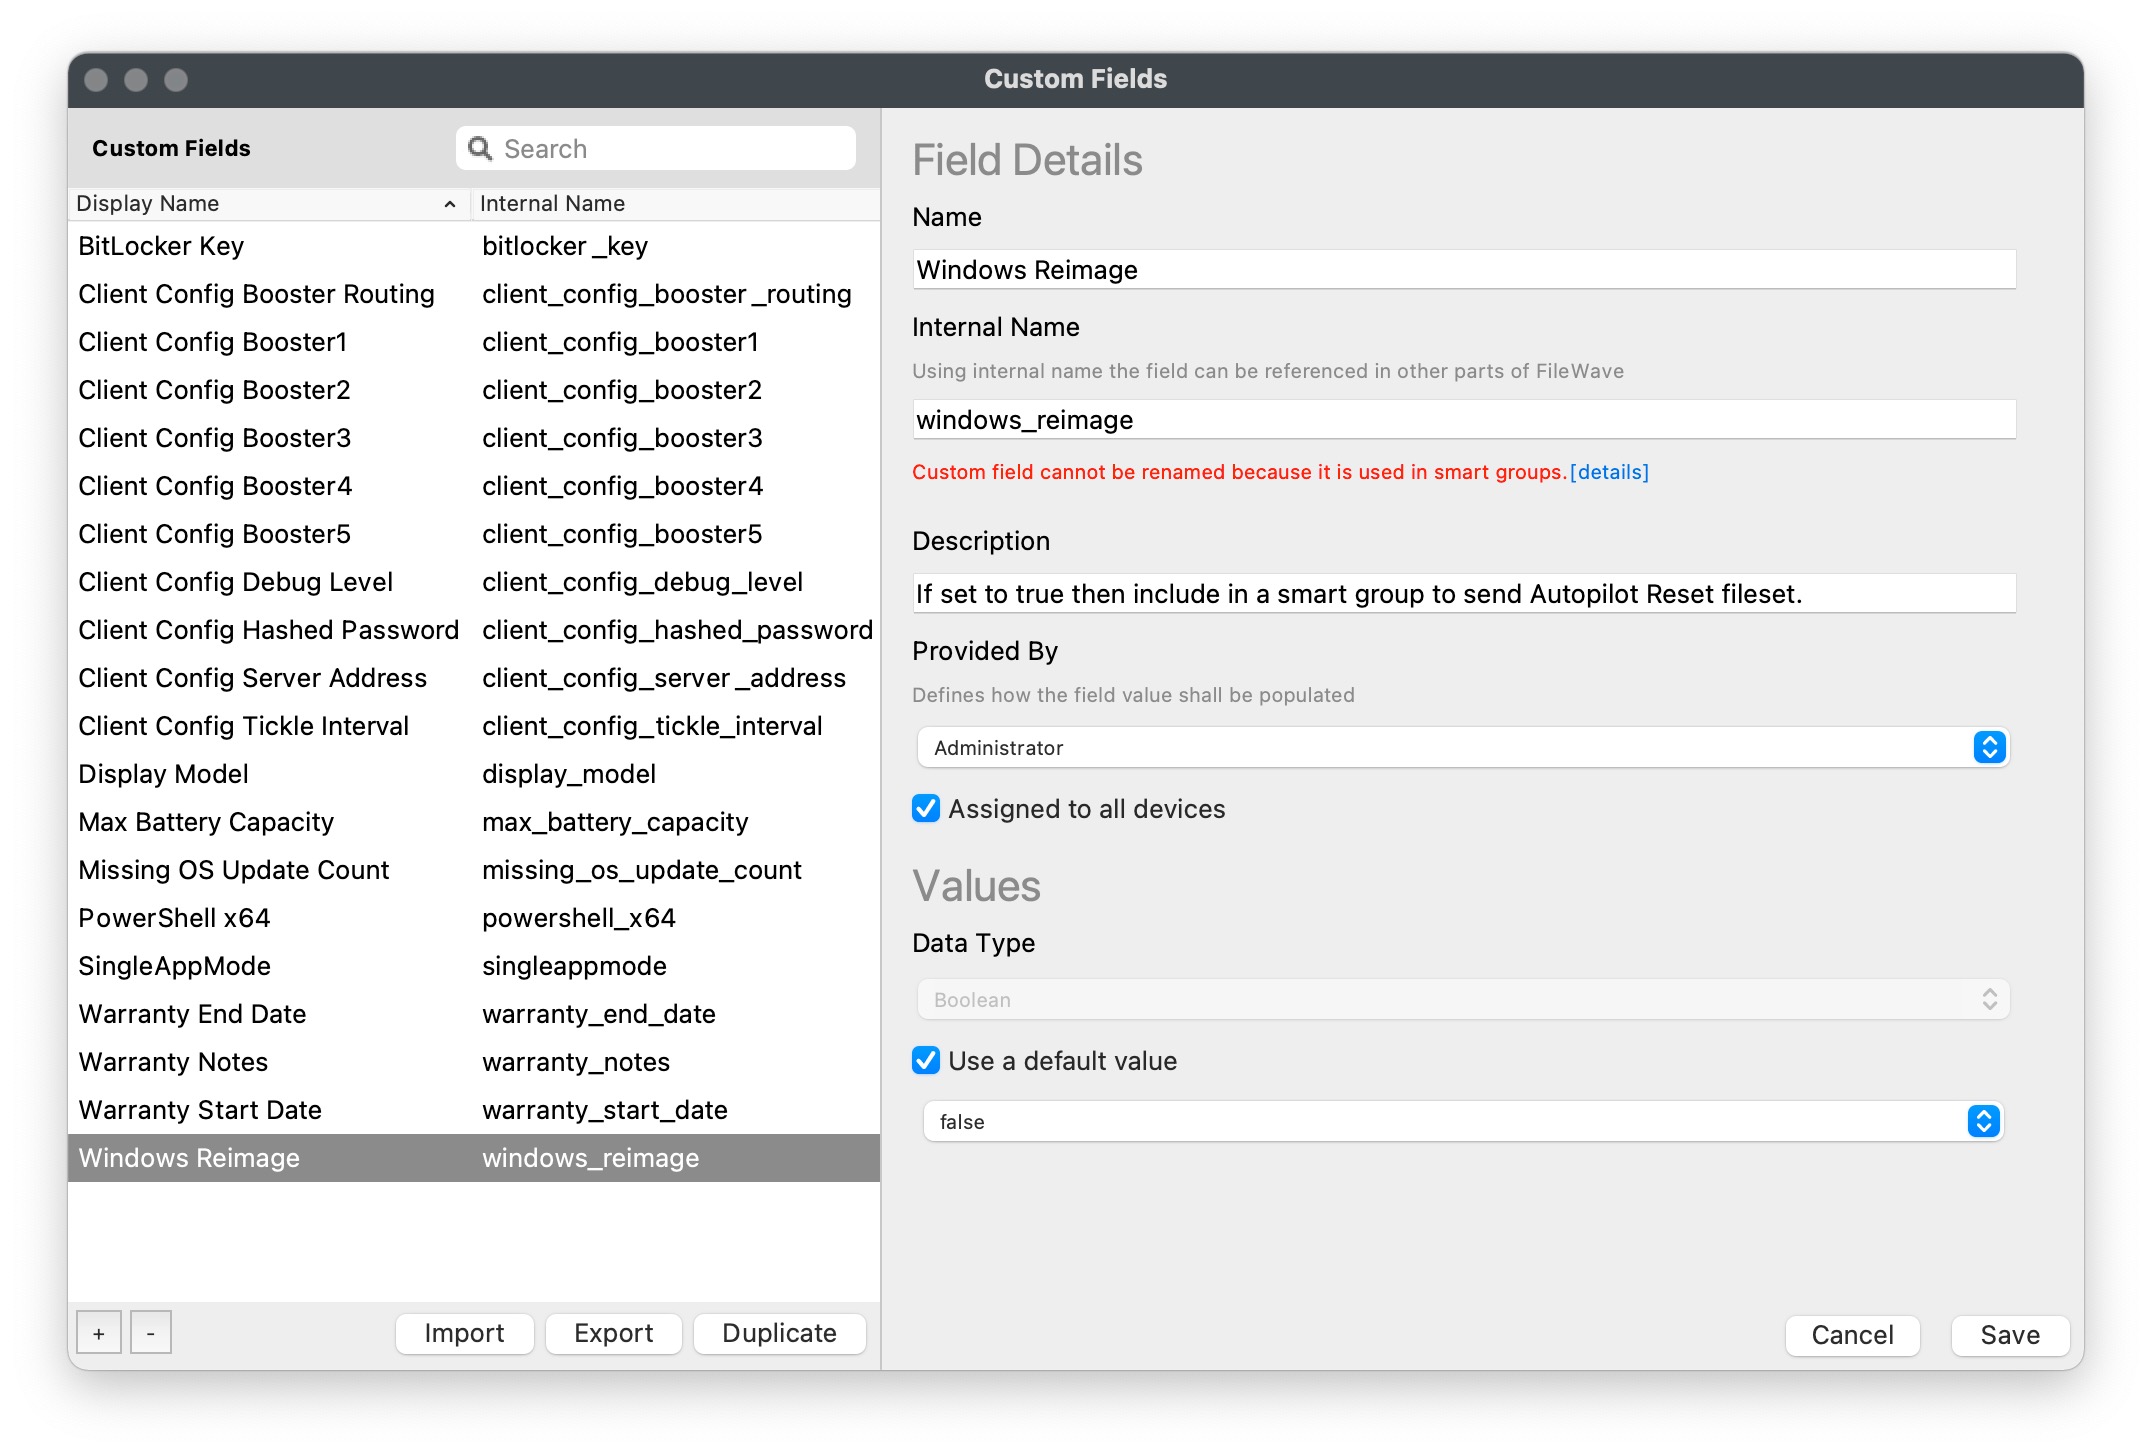
2. Create a custom field with the internal name of windows\_reimage as seen below. The field should be Boolean and have a default value of "false".
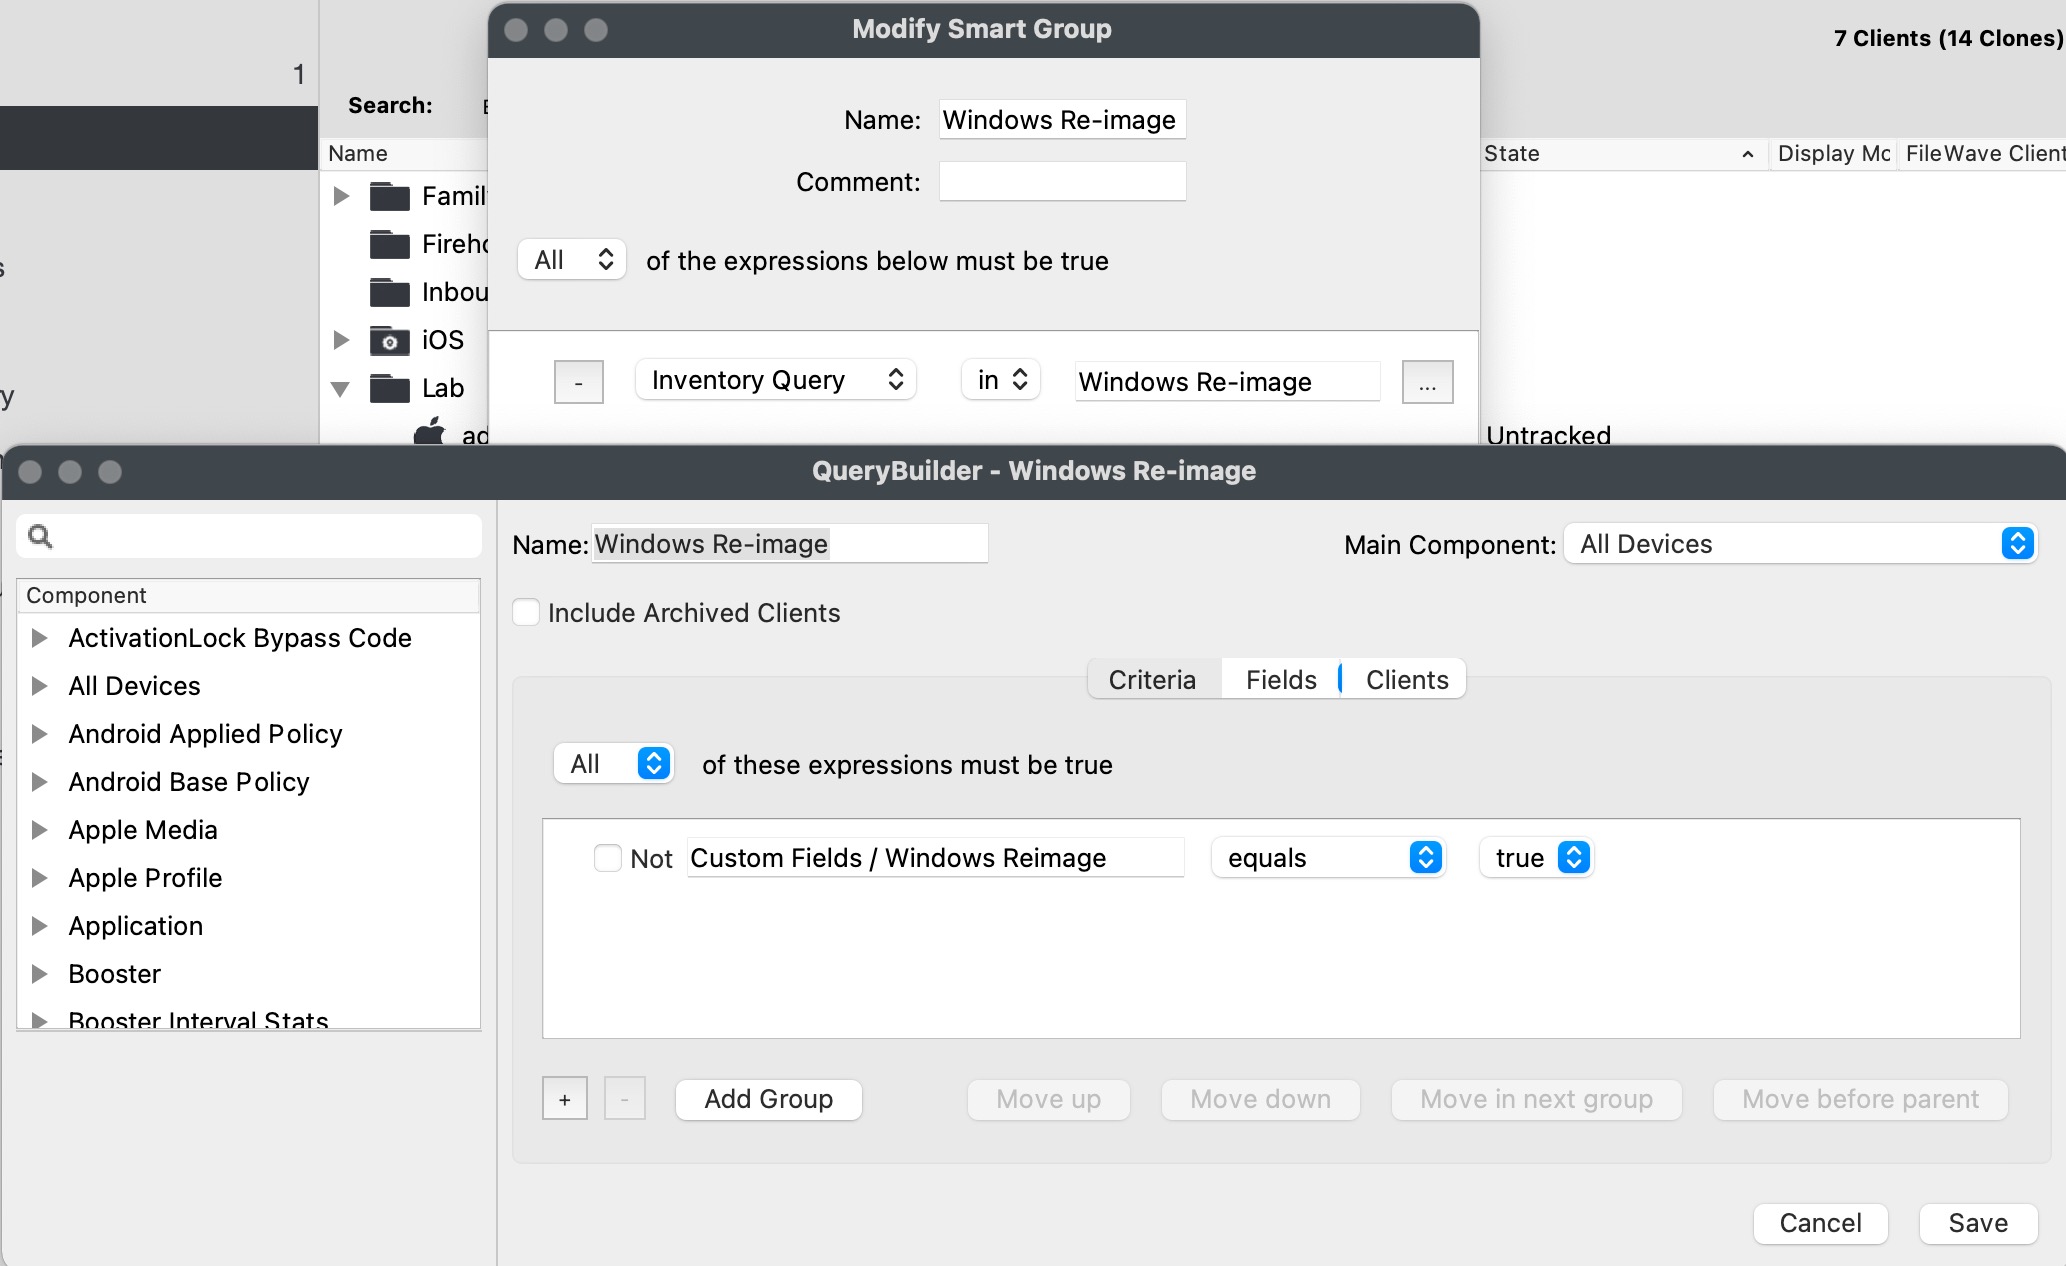
3. Create smart group that looks for windows\_reimage to be True as seen below.
4. Add this Fileset to your server. You can unzip it and then drag the Fileset into the Fileset window. Note that this Fileset uses the section of code below that can be edited to change "doWipeMethod" to "doWipeProtectedMethod" or to use any other method as outlined here but be sure to add "Method" to the one you want to use: [https://docs.microsoft.com/en-us/windows/client-management/mdm/remotewipe-csp](https://docs.microsoft.com/en-us/windows/client-management/mdm/remotewipe-csp)
```
# This part wipes the system
# https://docs.microsoft.com/en-us/windows/client-management/mdm/remotewipe-csp
# methodname can be doWipeMethod or doWipeProtected but the later needs Win 10 1703 or newer
$namespaceName = "root\cimv2\mdm\dmmap"
$className = "MDM_RemoteWipe"
$methodName = "doWipeMethod"
$session = New-CimSession
$params = New-Object Microsoft.Management.Infrastructure.CimMethodParametersCollection
$param = [Microsoft.Management.Infrastructure.CimMethodParameter]::Create("param", "", "String", "In")
$params.Add($param)
$instance = Get-CimInstance -Namespace $namespaceName -ClassName $className -Filter "ParentID='./Vendor/MSFT' and InstanceID='RemoteWipe'"
$session.InvokeMethod($namespaceName, $instance, $methodName, $params)
```
| AutoPilot Wipe Fileset |
| [](https://kb.filewave.com/attachments/25) |
5. Select the Fileset and click the Scripts button in the Native Admin. Right click on the Reset.ps1 script and pick Properties. You must change the first Environment Variable for that script to be the API token you want to use. You can get this from the Native Admin from Manage Administrators → Select an admin → Application Tokens. This token is used by the script to set the custom field for windows\_reimage to false. If you don't update this then your device will be stuck in a loop of wiping once you enable it.
6. Associate the Fileset with the Smart Group that you created.
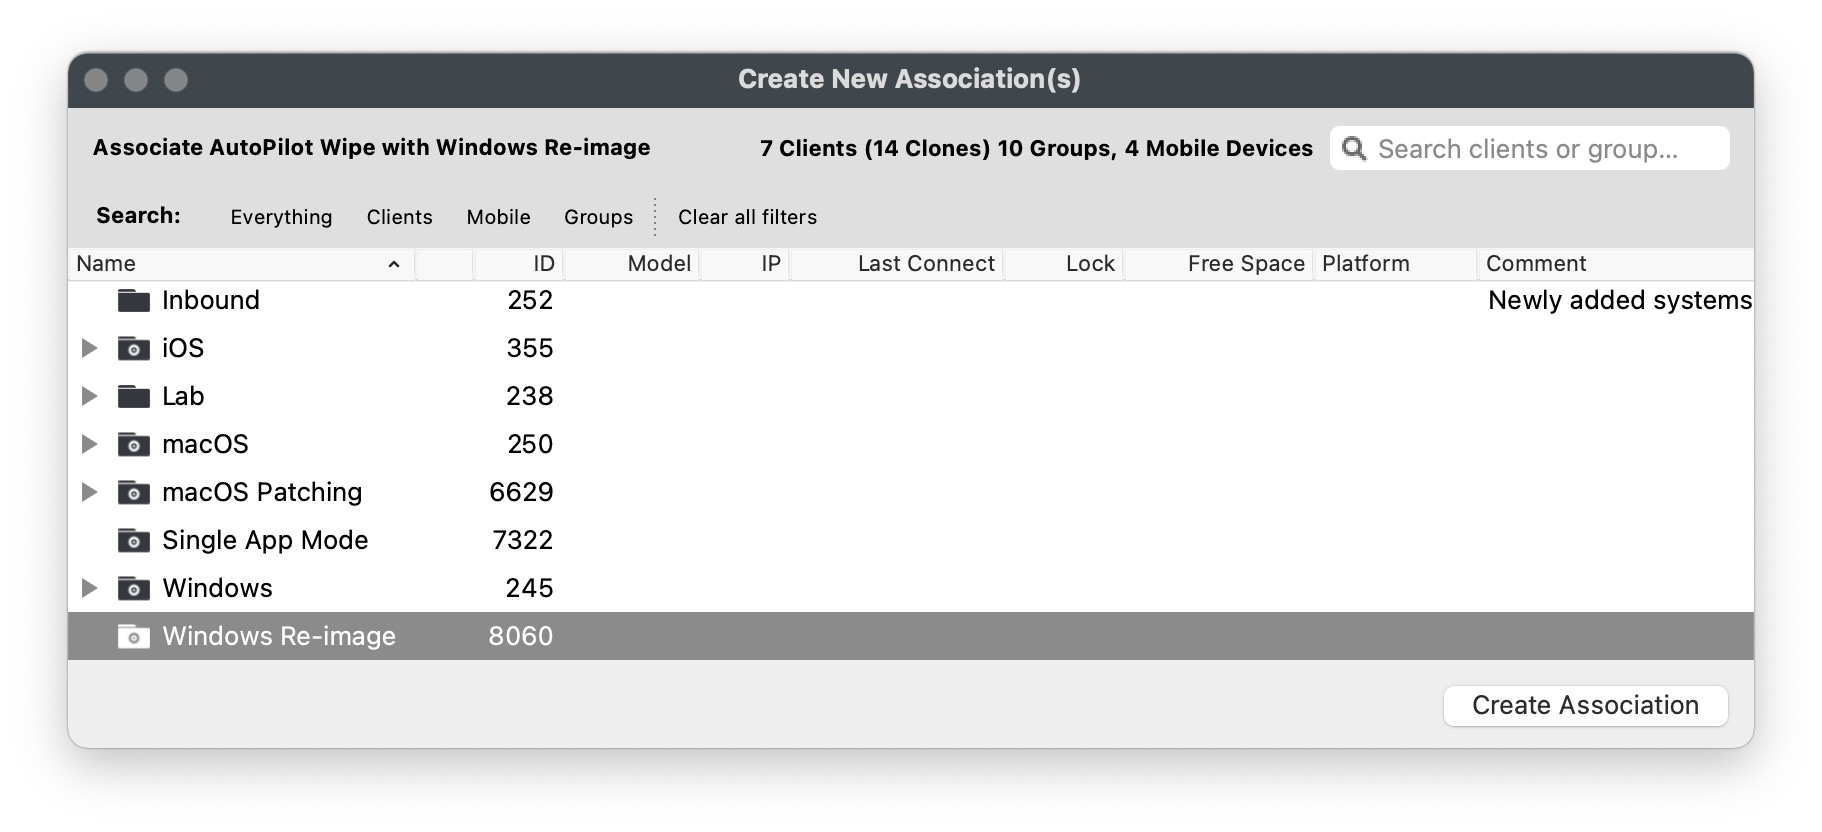
7. To wipe a device you will set the windows\_reimage custom field to True. This will cause the device to appear in the Smart Group, and will cause the Fileset to be applied. The Fileset will set windows\_reimage to be False while it runs, will enable Recovery Environment, and then will initiate a wipe.
8. Because the fileset sets windows\_reimage to False the device leaves the smart group that would cause the AuotPilot Wipe Fileset to apply to it so it won't be caught in a re-image loop.
# Wipe a Windows MDM Device from FileWave Anywhere
## **What**
FileWave Anywhere can send a remote wipe command to a Windows device enrolled through Windows MDM. The action is not available for a device that only has the FileWave Client and is not MDM-enrolled.
## **Before you wipe**
**Wipe is destructive.** It resets the Windows device and can remove local user data, settings, applications, and MDM policy. Confirm that you selected the correct device and that any required data is backed up before sending the command.
### Wipe choices
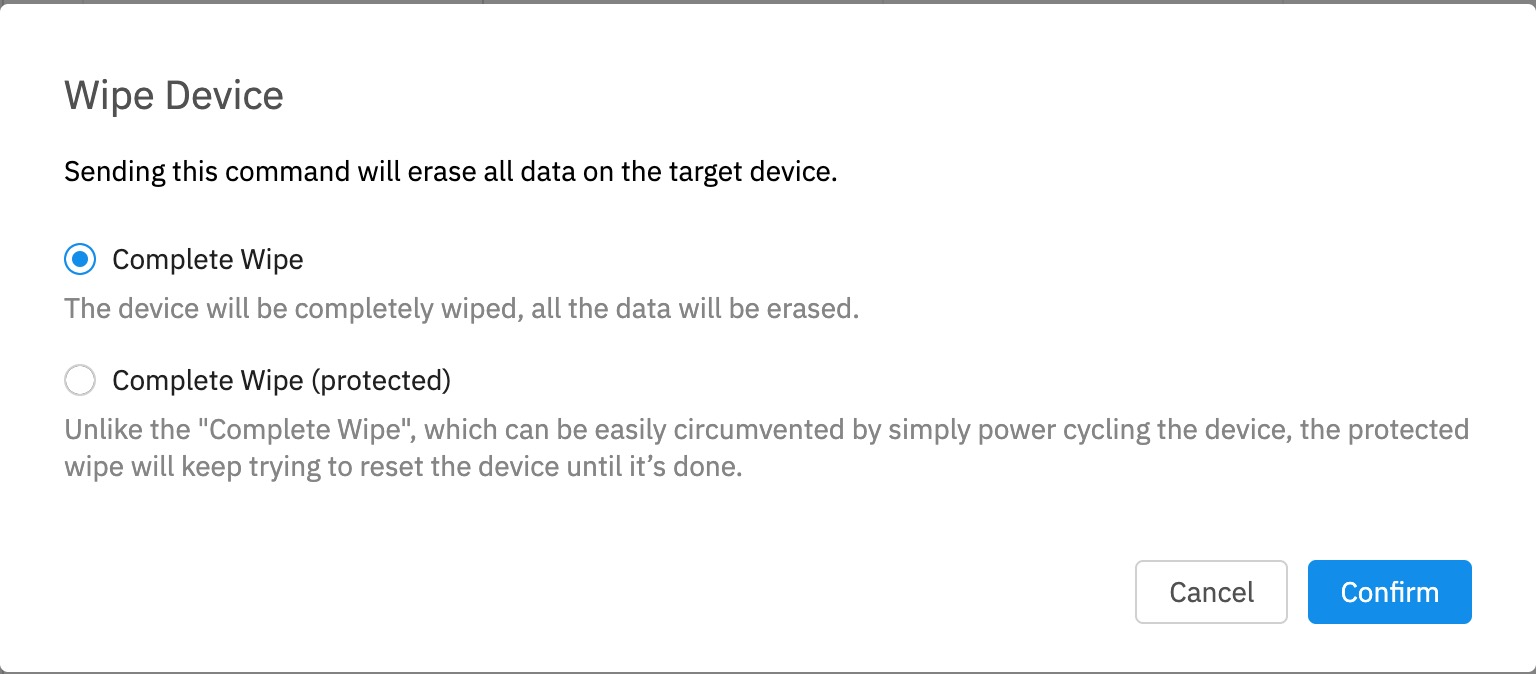
- **Complete Wipe** erases all data and resets the device.
- **Complete Wipe (protected)** keeps trying to reset the device if someone interrupts the wipe by power cycling it. Microsoft warns that a protected wipe can leave some devices unable to start. Use it only when persistent data destruction is required and you have a recovery plan.
The **Wipe** action appears only for Windows devices that are enrolled through MDM.
## **Send the command**
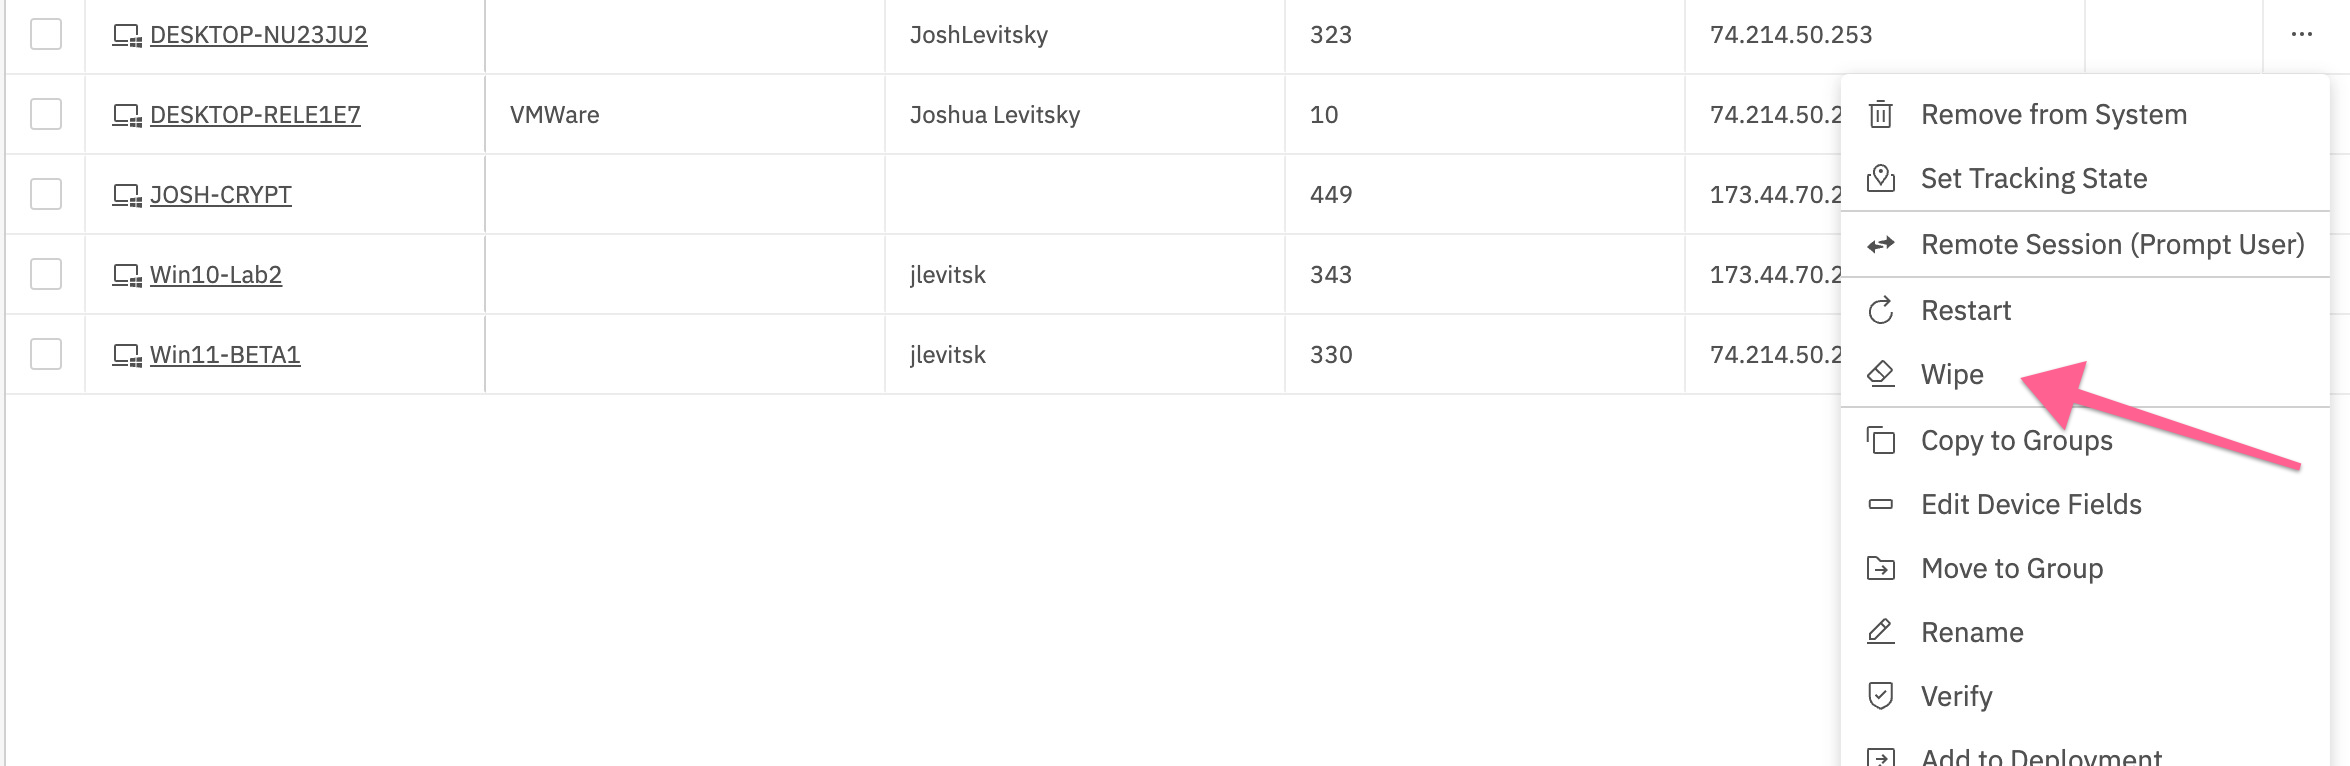
1. Open the device list in FileWave Anywhere and select the Windows device.
2. Open the ellipsis menu for that device.
3. Select **Wipe** and verify the device record in the confirmation dialog.
4. Choose **Complete Wipe** or **Complete Wipe (protected)**, then select **Confirm**.
## Related Content
- [Microsoft: RemoteWipe configuration service provider](https://learn.microsoft.com/windows/client-management/mdm/remotewipe-csp)
# Configuration Service Providers (Profiles)
Windows MDM uses CSPs which are profiles that configure Windows.
# Windows MDM Policies (aka Profiles)
#### **What**
Windows configuration policies let you define and enforce settings on Windows devices that are enrolled in MDM. They are the Windows equivalent of a profile and cover settings such as BitLocker, Bluetooth, connectivity, cloud and storage, and device restrictions.
#### **When/Why**
Use a Windows profile when you want to apply Windows policy settings through FileWave to MDM-enrolled devices. The available categories will continue to expand over time, but the workflow stays the same.
#### **How**
To create a Windows profile in the web admin:
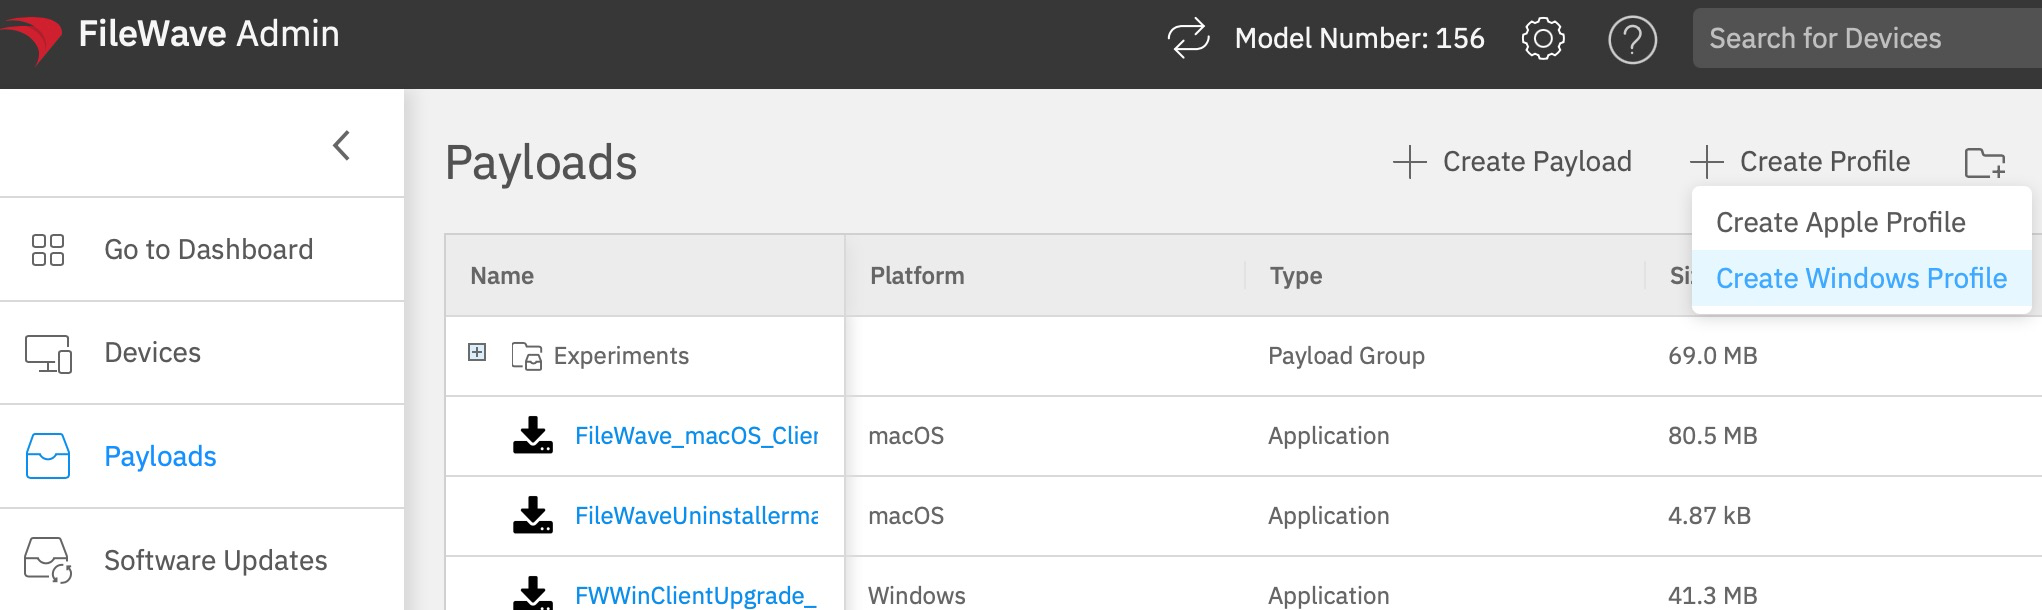
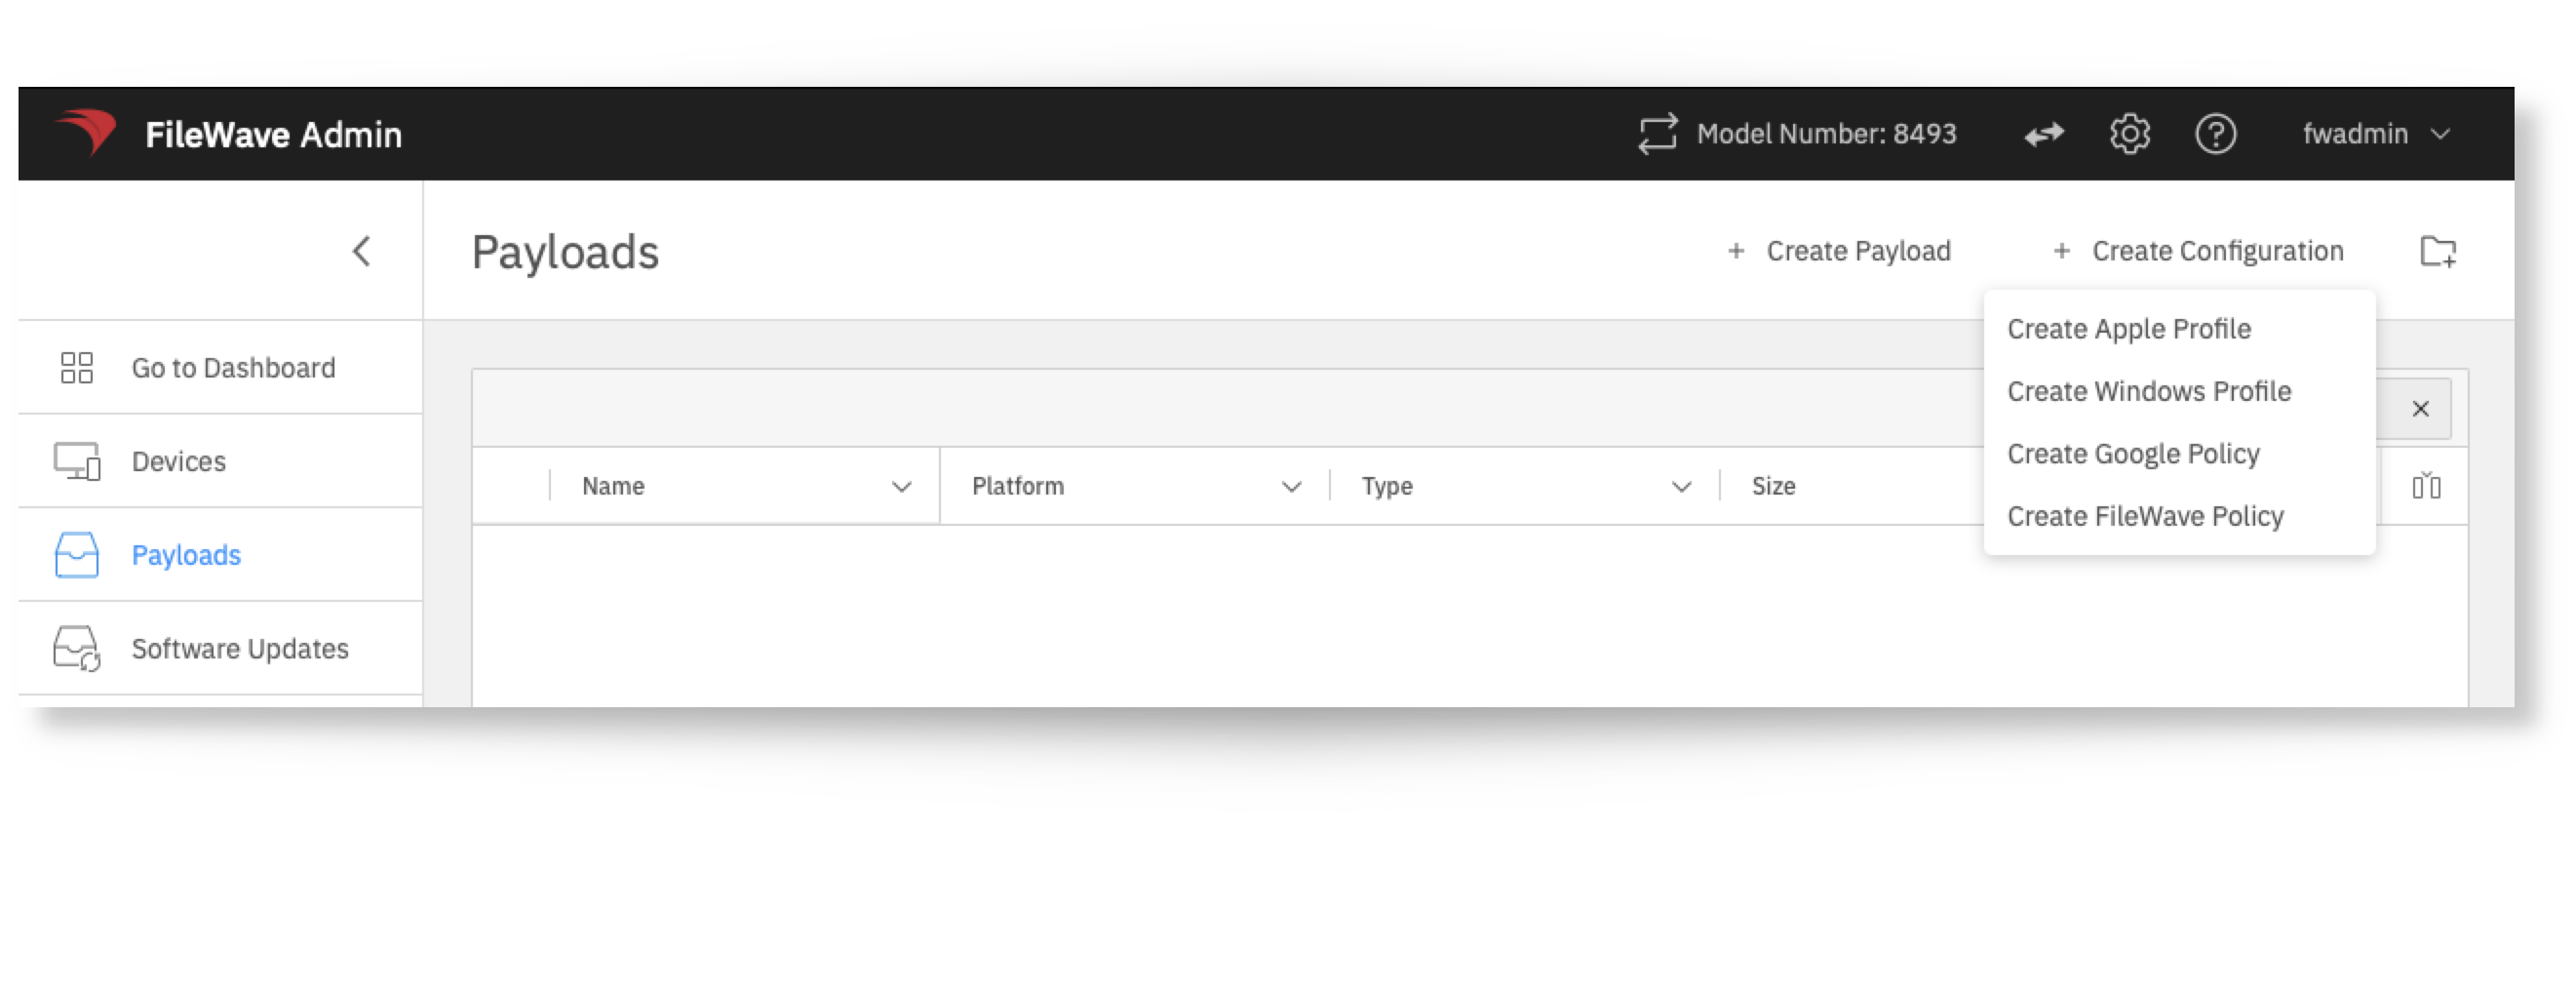
1. Open **Payloads** and click the **+** button.
2. Select **Create Profile**, then choose **Create Windows Profile**.
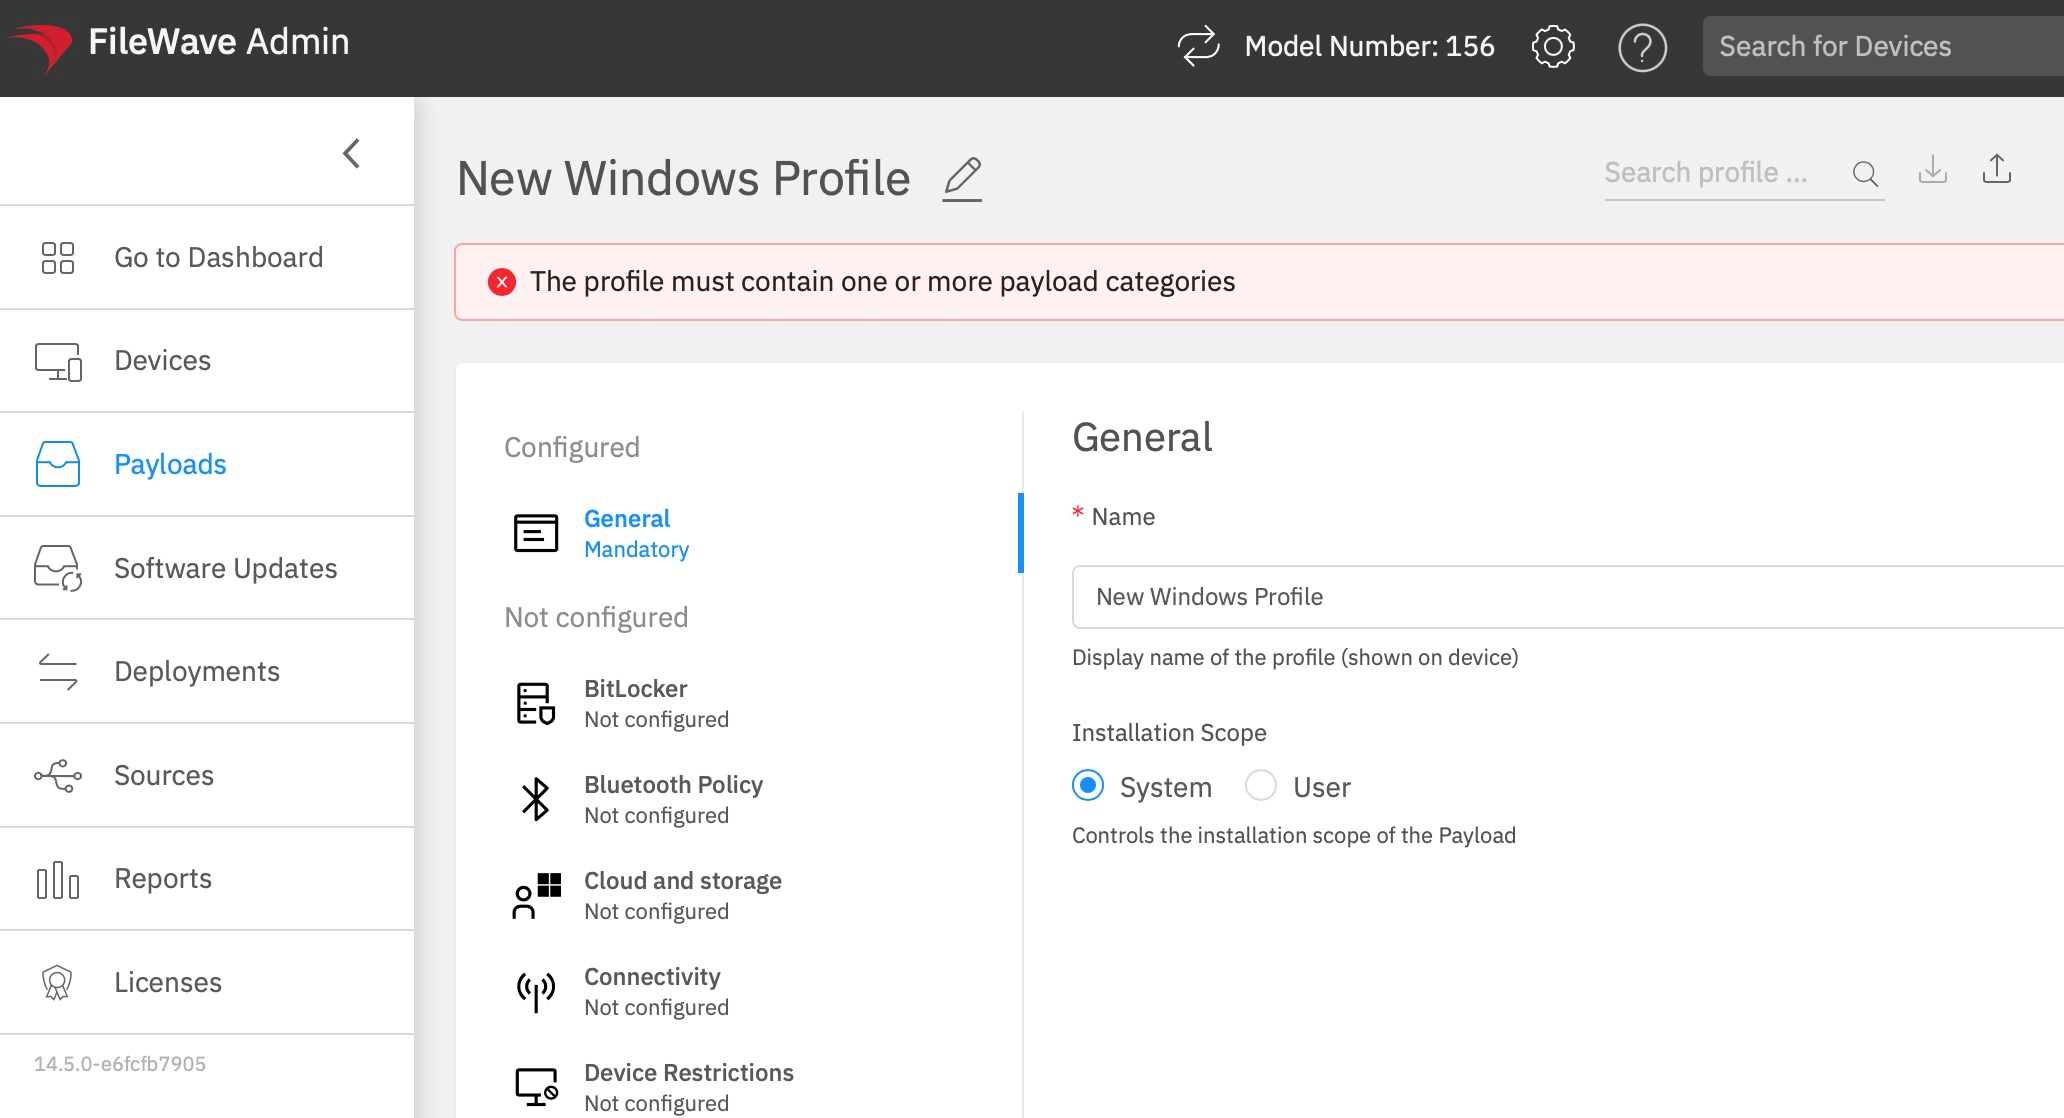
3. Configure the profile settings you want to enforce. The **General** category is mandatory, the profile must include at least one payload category before it can be saved, and the **Installation Scope** can be set to **System** or **User**.
4. Save the profile, then deploy it to the target device or device group from the deployment view.
5. Windows profiles require Windows devices that are enrolled through MDM.
You have now deployed a Windows profile.
FileWave does not currently show policy installation command history for Windows MDM profiles in the admin UI.
# Windows MDM Software Updates CSP
## What
Windows Software Updates in a Windows Profile uses Microsoft's Update Policy CSP to manage Windows Update behavior on enrolled Windows devices. The profile can control settings such as Microsoft product updates, driver updates, feature and quality update deferrals, Windows 10 to Windows 11 targeting, automatic update behavior, active hours, restart checks, user access to pause/check updates, notification level, and deadline/grace-period settings.
## When/Why
Use this payload when Windows 10 or Windows 11 devices are enrolled with Windows MDM and you want FileWave to deliver Windows Update policy through MDM instead of relying on local device settings. Windows Profiles are created and edited in FileWave Anywhere; if you open a Windows Profile from FileWave Central/Admin, editing is handed off to Anywhere Admin.
## How
1. In FileWave Anywhere, open **Payloads**.
2. Select **Create Windows Profile**.
3. Open the **Software Updates** section and configure the update settings that match your update policy.
4. Save the profile, then deploy it to the appropriate Windows MDM devices.
[](https://kb.filewave.com/uploads/images/gallery/2023-07/GbibBqBUV1j4czCV-image.png)
Each option in the Software Updates payload includes inline help in the UI. Review Microsoft’s Update Policy CSP documentation if you need the underlying CSP path or Windows behavior for a specific setting.
[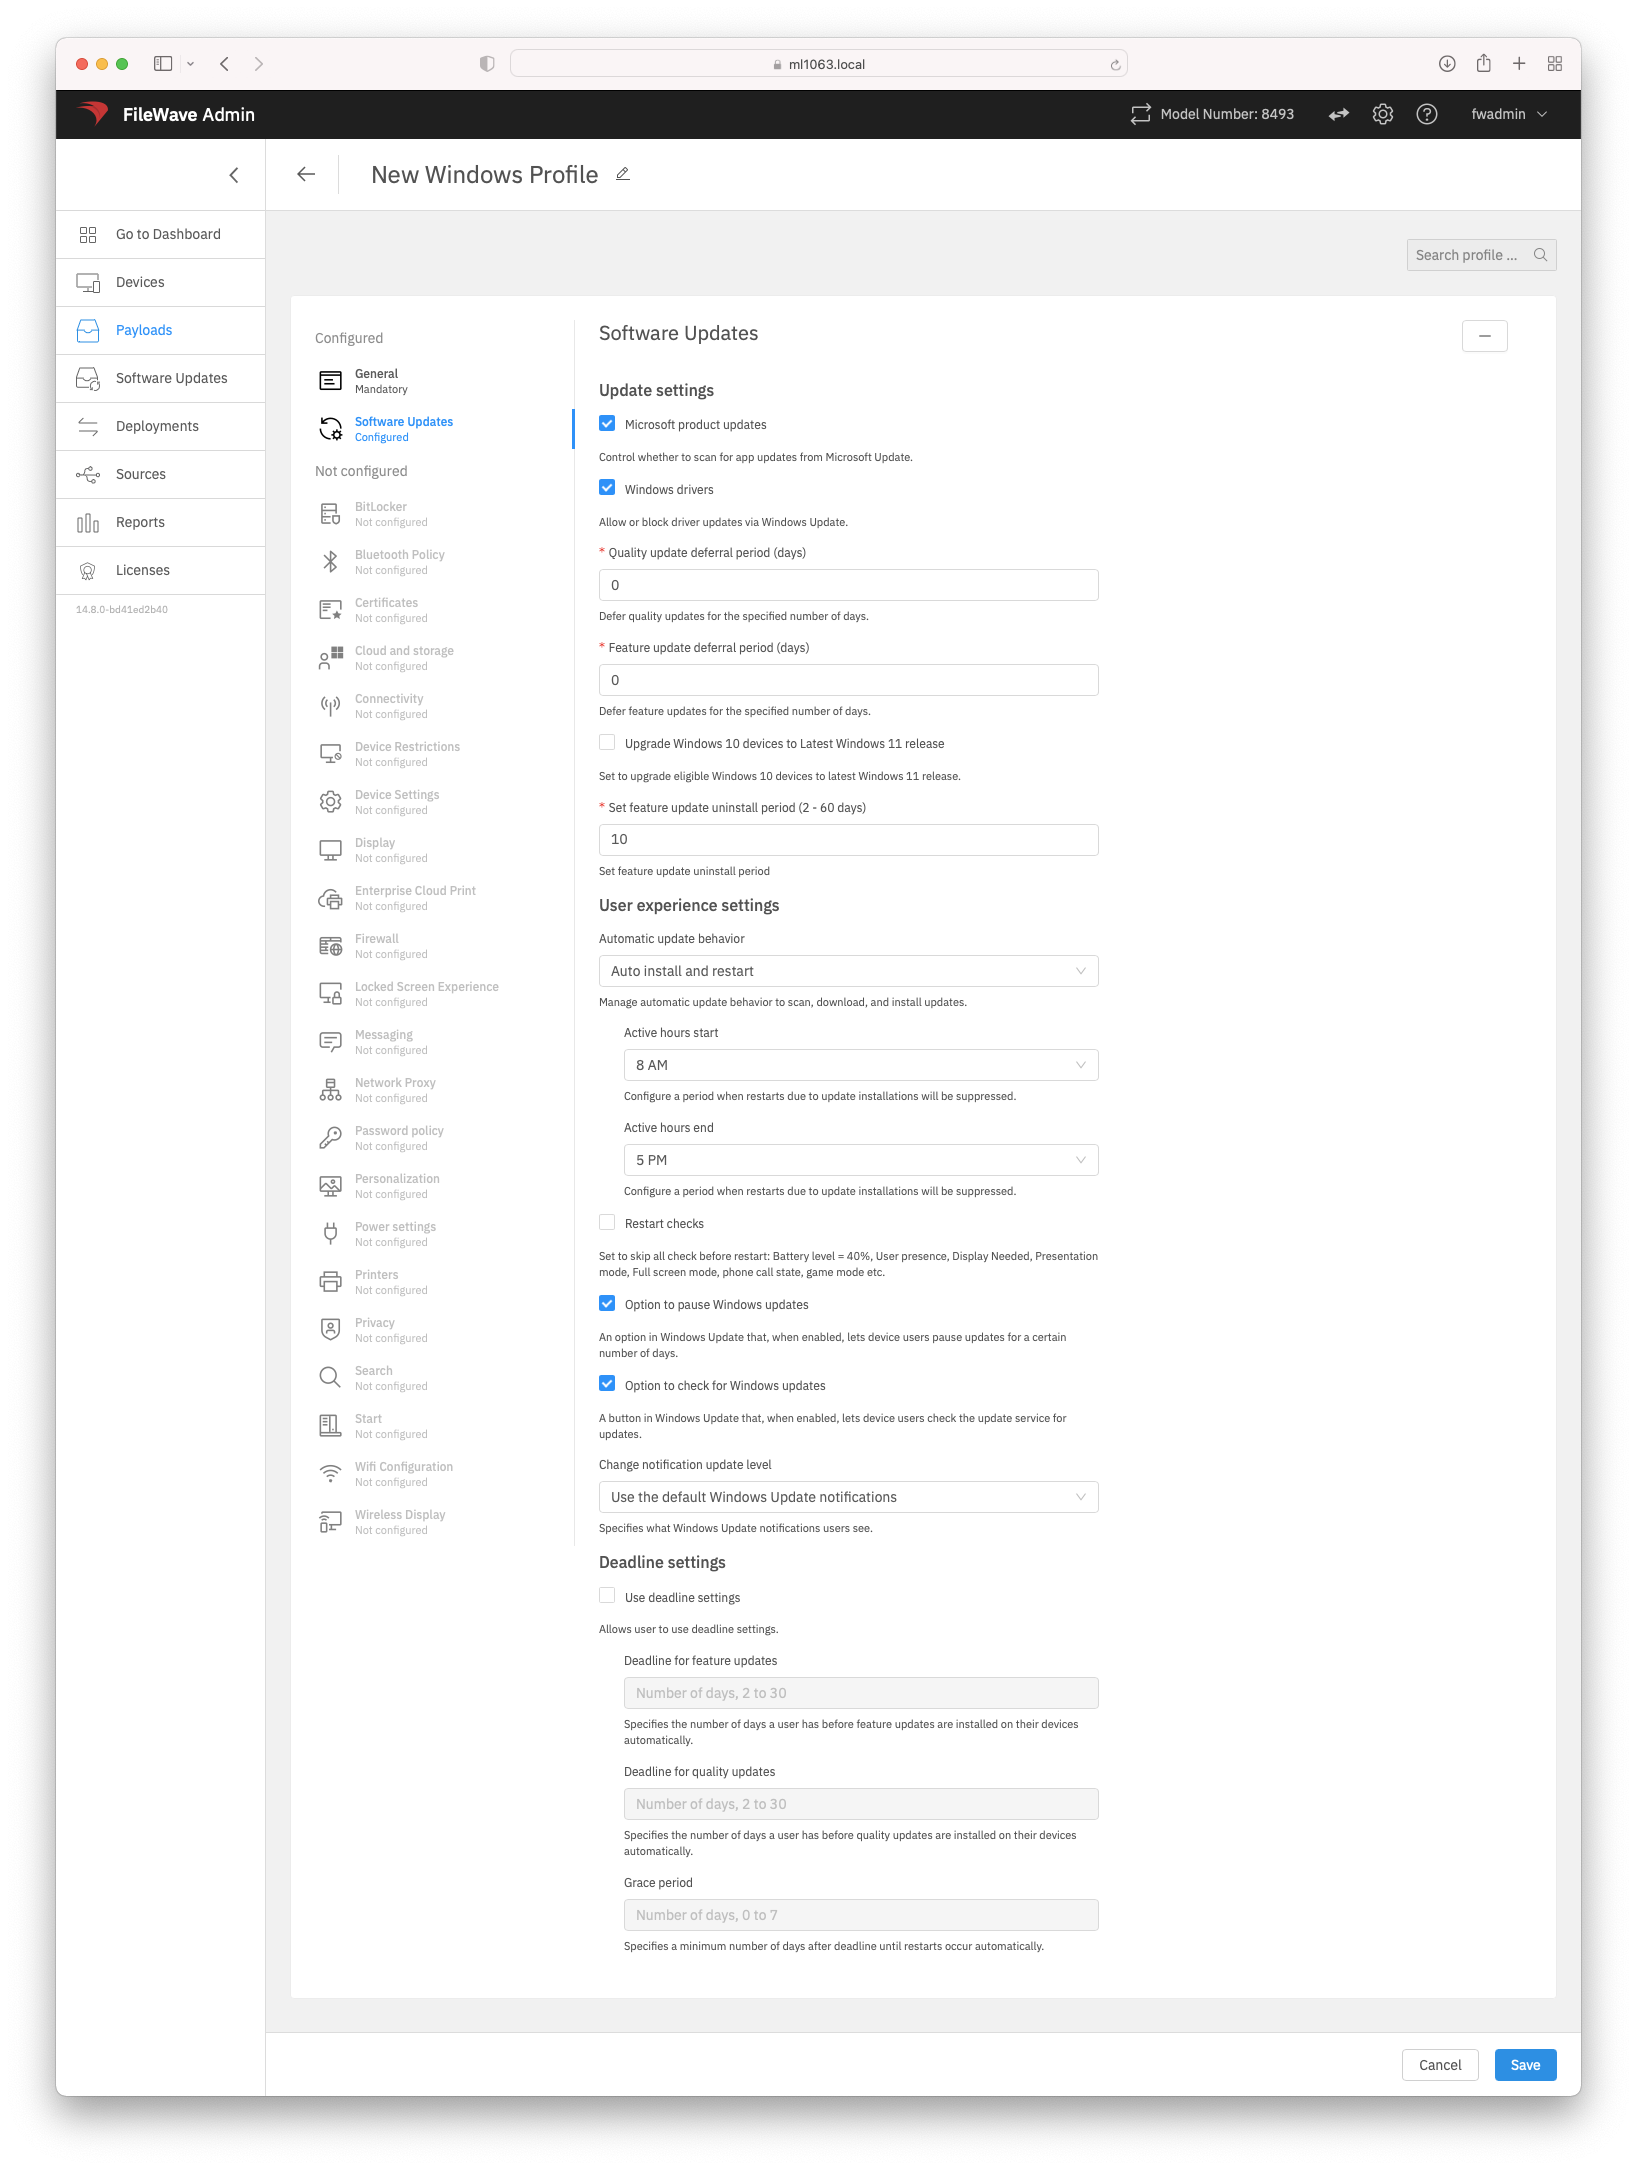](https://kb.filewave.com/uploads/images/gallery/2023-07/j2Ked2Fz8di7X1AK-image.png)
## Related Content
- [Windows MDM](https://kb.filewave.com/books/microsoft-windows-mdm "Windows MDM")
- [Microsoft Update Policy CSP](https://learn.microsoft.com/en-us/windows/client-management/mdm/policy-csp-update)
# Troubleshooting
# Windows MDM setup issue with custom domain
## What
When configuring FileWave Windows MDM with Microsoft Entra ID, the Microsoft **On-premises MDM** application may fail when you add the FileWave server URL in **Expose an API** as the Application ID URI.
> **Error:** Failed to update Application ID URI application property. Error detail: The Application ID URI must be from a verified domain within your organization’s directory.
This usually happens when the FileWave server URL uses a hostname that is not under a domain verified in the customer’s Microsoft Entra tenant, such as a FileWave-owned hosted hostname.
## Why this happens
Microsoft changed Application ID URI validation for single-tenant applications effective **October 15, 2021**. When a new Application ID URI is added, or an existing one is updated, Microsoft Entra validates that the host name in an HTTPS URI belongs to the tenant’s initial `onmicrosoft.com` domain or to a verified custom domain in that tenant.
The general Microsoft rule also allows supported `api://` Application ID URI formats. That exception does not solve this FileWave Windows MDM case because the Microsoft On-premises MDM app setup expects the FileWave server URL to be used in the configuration.
Configurations created before Microsoft enforced this rule can continue to work as long as the existing Application ID URI is not changed. New configurations, or edits to the URI on an existing app, are validated against the current rule.
## What this means for FileWave Windows MDM
- **Customer-owned domain:** If the FileWave server is available at a hostname under a domain the customer controls, such as `filewave.example.org`, verify that domain in Microsoft Entra and use that hostname for the Windows MDM configuration.
- **FileWave-hosted server on a FileWave-owned hostname:** A hostname such as a `filewave.net` address is owned by FileWave, not by the customer’s Microsoft Entra tenant. The customer cannot verify FileWave’s domain in their tenant, so that hostname cannot be used as the Application ID URI for a new Windows MDM setup.
- **Grandfathered setup:** If Windows MDM was configured before the October 2021 Microsoft change and is still working, avoid changing the Application ID URI until you are ready to move the FileWave server URL to a verified customer-owned domain.
## How to fix it
1. Choose a FileWave server hostname under a domain the customer owns or can verify in Microsoft Entra, for example `filewave.example.org`.
2. Add and verify the domain in Microsoft Entra: [Add your custom domain name to your tenant](https://learn.microsoft.com/en-us/entra/fundamentals/add-custom-domain).
3. If the server is FileWave-hosted, work with FileWave Support to configure the hosted server for the customer-owned custom hostname and SSL certificate handling. See [SSL Certificate Management for Custom Domains (FileWave-Hosted Servers)](https://kb.filewave.com/link/1061).
4. Use the verified custom-domain hostname when configuring the Microsoft On-premises MDM application for FileWave Windows MDM.
5. After the Microsoft Entra app configuration is saved, continue with the FileWave Windows MDM setup and verify enrollment with a test user/device before rolling it out broadly.
> **Important:** The DNS and SSL work for a FileWave-hosted custom hostname is separate from Microsoft Entra domain verification. FileWave can help route and secure the hosted server hostname, but the customer still needs to verify their own domain in Microsoft Entra so Microsoft accepts the Application ID URI.
## Related documentation
- [Microsoft identity platform breaking change: Application ID URI verified-domain requirement](https://learn.microsoft.com/en-us/entra/identity-platform/reference-breaking-changes#appid-uri-in-single-tenant-applications-will-require-use-of-default-scheme-or-verified-domains)
- [Microsoft Entra app manifest: identifierUris attribute](https://learn.microsoft.com/en-us/entra/identity-platform/reference-app-manifest#identifieruris-attribute)
- [Add your custom domain name to your Microsoft Entra tenant](https://learn.microsoft.com/en-us/entra/fundamentals/add-custom-domain)
- [Pre-Requisites of Windows MDM Setup](https://kb.filewave.com/link/175)
- [SSL Certificate Management for Custom Domains (FileWave-Hosted Servers)](https://kb.filewave.com/link/1061)