# Getting started with the Imaging Virtual Server
A guide starting out with FileWave's Imaging Virtual Server (IVS) appliance. Learning to import, expand the hard drive and setting up the IVS. Appliance's default: username: root / password: filewave
# Setting up the IVS (Imaging Virtual Server)
#### Guide for Networking Imaging with FileWave
The following steps will assist you in the setup and implementation of your Imaging Virtual Server (IVS)
If you already have your Imaging sever up and running please look at these guides for how to image [Windows](https://kb.filewave.com/books/network-imaging-ivs/page/windows-network-imaging-pxe-booting "Windows Network Imaging - PXE Booting") devices.
\*Please note: This document assumes you have already set up your FileWave Management Server.
Prepare and download all needed parts
Before starting be sure you have:
- Downloaded the latest **Imaging Virtual Server (IVS)** [linked here](https://kb.filewave.com/books/downloads "Downloads")
- A running FileWave server with clients enrolled (or with placeholders)
- FileWave Admin installed on your workstation
- Valid MAC Address for each Windows machine
- Virtual Environment (e.g. ESXI, Virtualbox, VMware Fusion)
- No Firewall between your VLANS or access to the Inter-VLAN Firewall to open Ports specified below
#### IVS capabilities:
- UEFI compatibility
- Multiple partitions per image
- GBT and MBR disks can be imaged
- Image a blank disk
- Windows 10 and 11 (including non-UEFI, UEFI with CSM and native UEFI machines)
- Check if the Windows partition is in hibernated or fast restart state before creating master image
- Imaging logs are copied to IVS in order to ease imaging issues troubleshooting
Network Considerations
#### Subnets
The FileWave Imaging appliance has to be configured as an “ip-helper” on your switches so it can receive and answer BOOTP requests from your clients.
The FileWave network imaging solution is unicast so there will need to be some preparation on your end if you intend to image across multiple subnets. The two options will be:
A. Install a separate FileWave Imaging Virtual Server (IVS) on each subnet you plan to image from and connect them all to the FileWave server by following the "Connecting IVS to FileWave Server" section in this document.
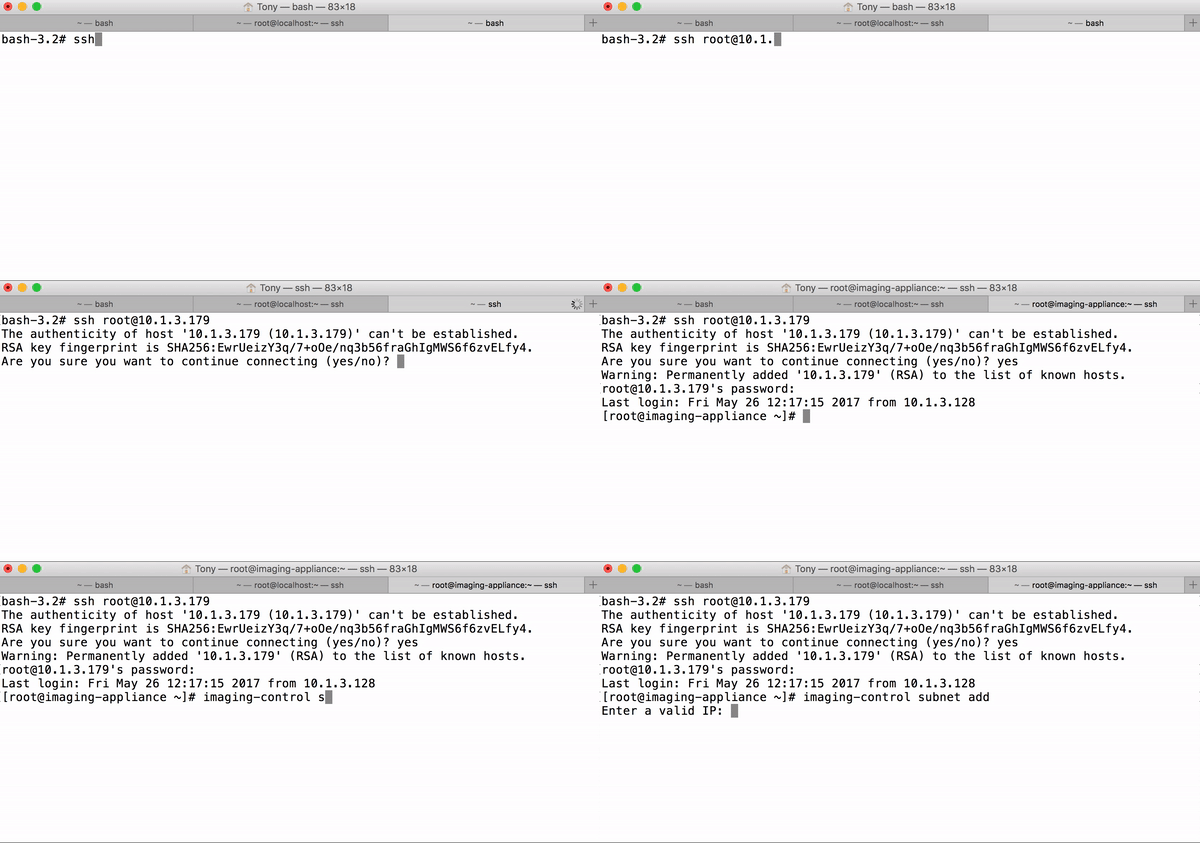
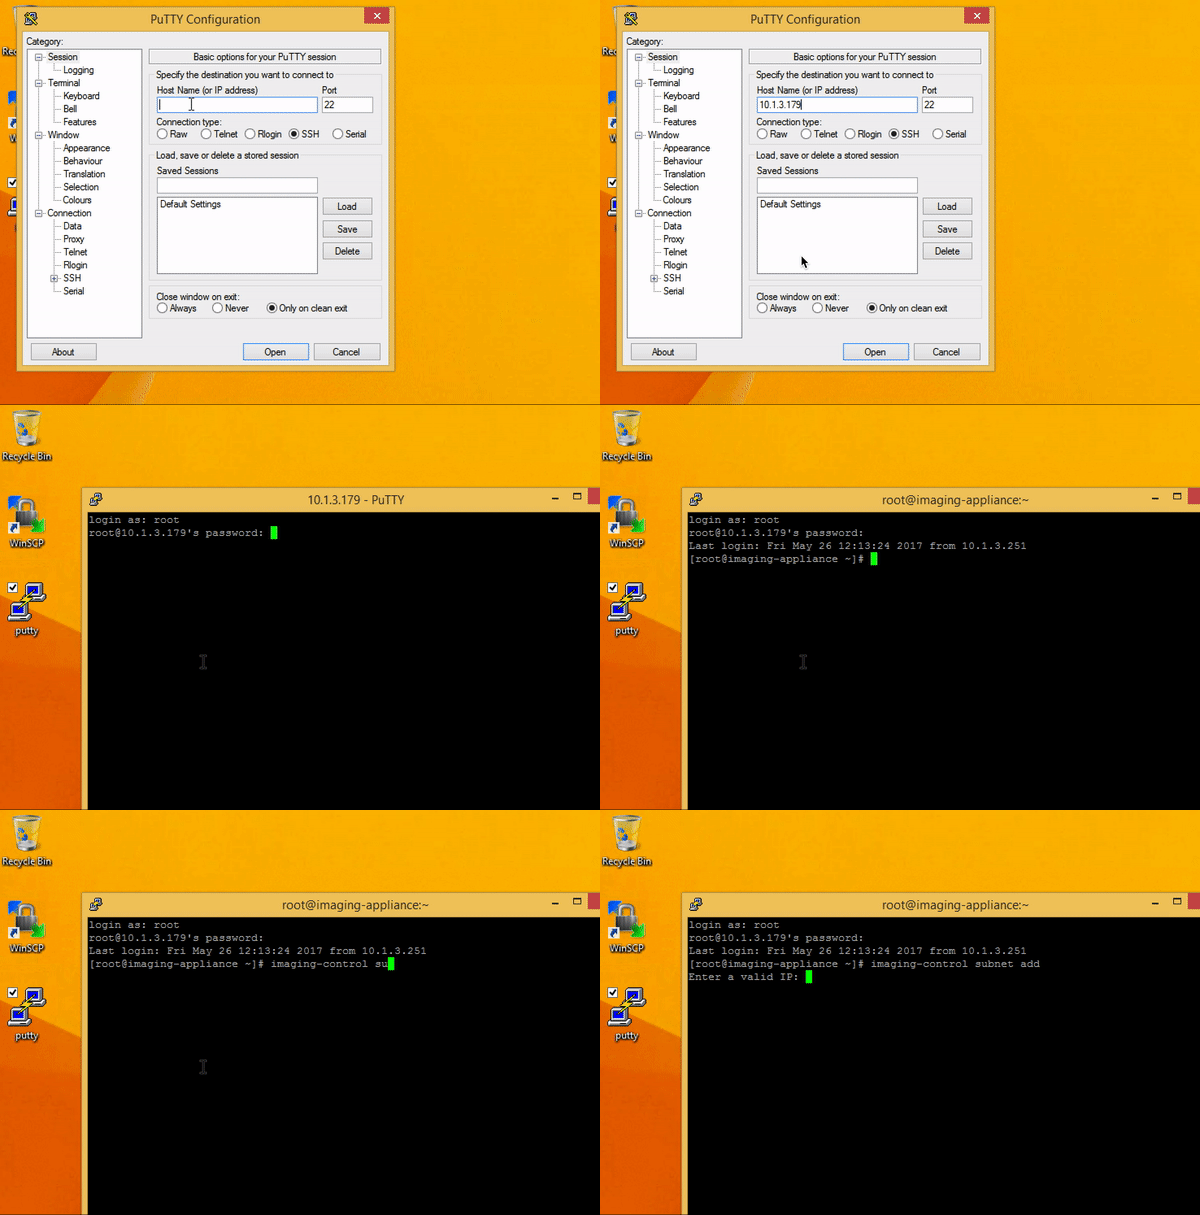
B. Setup "Helper IPs" on your layer 3 devices (e.g. routers, routing switches) that will point the broadcast requests for PXE and Netbooting to your single FileWave IVS. Once this has been completed you will need to make a change on the IVS. To do this either open the console for this server in your virtual environment or ssh into the server with Putty (Windows) or terminal (macOS):
1. 1. Open terminal (If on Windows you can use Putty [linked here](http://www.putty.org/) and use the credentials root/filewave (FileWave 15.4.2 and older) or fwadmin/filewave (FileWave 15.5.0 and beyond) then skip to step 3 below)
```
# replace IVS-IP-Address with your IP address
# replace fwadmin with root if your Appliance is pre-15.5.0
$ ssh fwadmin@IVS-IP-Address
```
2. Type the following command
3. ```
# enter in imaging-control subnet add to add your subnet addresses
$ imaging-control subnet add
```
4. This will prompt for a valid IP address from the subnet and subnet mask
Note: use command imaging-control subnet remove to remove a subnet
#### Firewall
The IVS needs to be able to connect to your FileWave Server on the following Ports
- 20017
- 20443
- 20445
Any client(s) subnets where imaging should work must be able to reach the following Ports on the IVS:
- 67 (DHCP), 69 (TFTP)
- 80 (HTTP)
- 20444 (HTTPS)
- 111 (TCP,UDP)
- 2049 (TCP,UDP) used by default (When VPN is not used for NFS)
- 20490 (TCP,UDP) used for [VPN to NFS access](https://kb.filewave.com/books/network-imaging-ivs/page/windows-imaging-in-filewave-secure-imaging-option-155 "Windows Imaging in FileWave: Secure Imaging Option (15.5+)")
Any machine running FileWave Central needs to be able to connect to your IVS on the following Ports:
- 20010 (Client Monitor), 20444 (Remote Configuration, Shared Keys)
The FileWave Server must be able to reach the IVS on port 20444 for On-Premise customers.
### Starting the Imaging Appliance for the first time:
1. Download the latest Imaging Virtual Server (IVS) [linked here](https://kb.filewave.com/books/downloads "Downloads")
2. Import the Imaging Virtual Appliance (IVS) into your virtual environment or use a player to start up the machine. If you need help with the virtual appliance import, use the [FileWave Virtual Appliances import guides](https://kb.filewave.com/books/filewave-virtual-appliances "FileWave Virtual Appliances").
(If you used one of those import guides to import the IVS, the following steps should already be complete and you can move on to the next section, **Connecting the IVS to the FileWave Server**)
3. When the server starts up it will display the IP address, be sure to make a note of this.
Note: Should the machine get stuck during boot, showing a white bar at the bottom please send a CTRL-ATL-DEL to the machine. The second boot should be much quicker.
4. If importing version 15.5+, you will be prompted at first boot to change the default password. Please see [Setting the Password on First Login to FileWave Appliances (15.5+)](https://kb.filewave.com/books/filewave-general-info/page/setting-the-password-on-first-login-to-filewave-appliances-155) for more details. If you're importing an older appliance, please see the first drop-down below to change the default password to something more secure.
5. Change the IP of the IVS to a static IP address using the second drop-down below.
Changing 'root' Password on Older IVS Versions (pre-15.5)
Login to the IVS (either console or SSH) and change the default password from what is currently ***filewave*** to your own.
1. Type in the following command, when prompted for a password use 'filewave':
```
# replace IVS-IP-Address with your IP address
$ ssh root@IVS-IP-Address
```
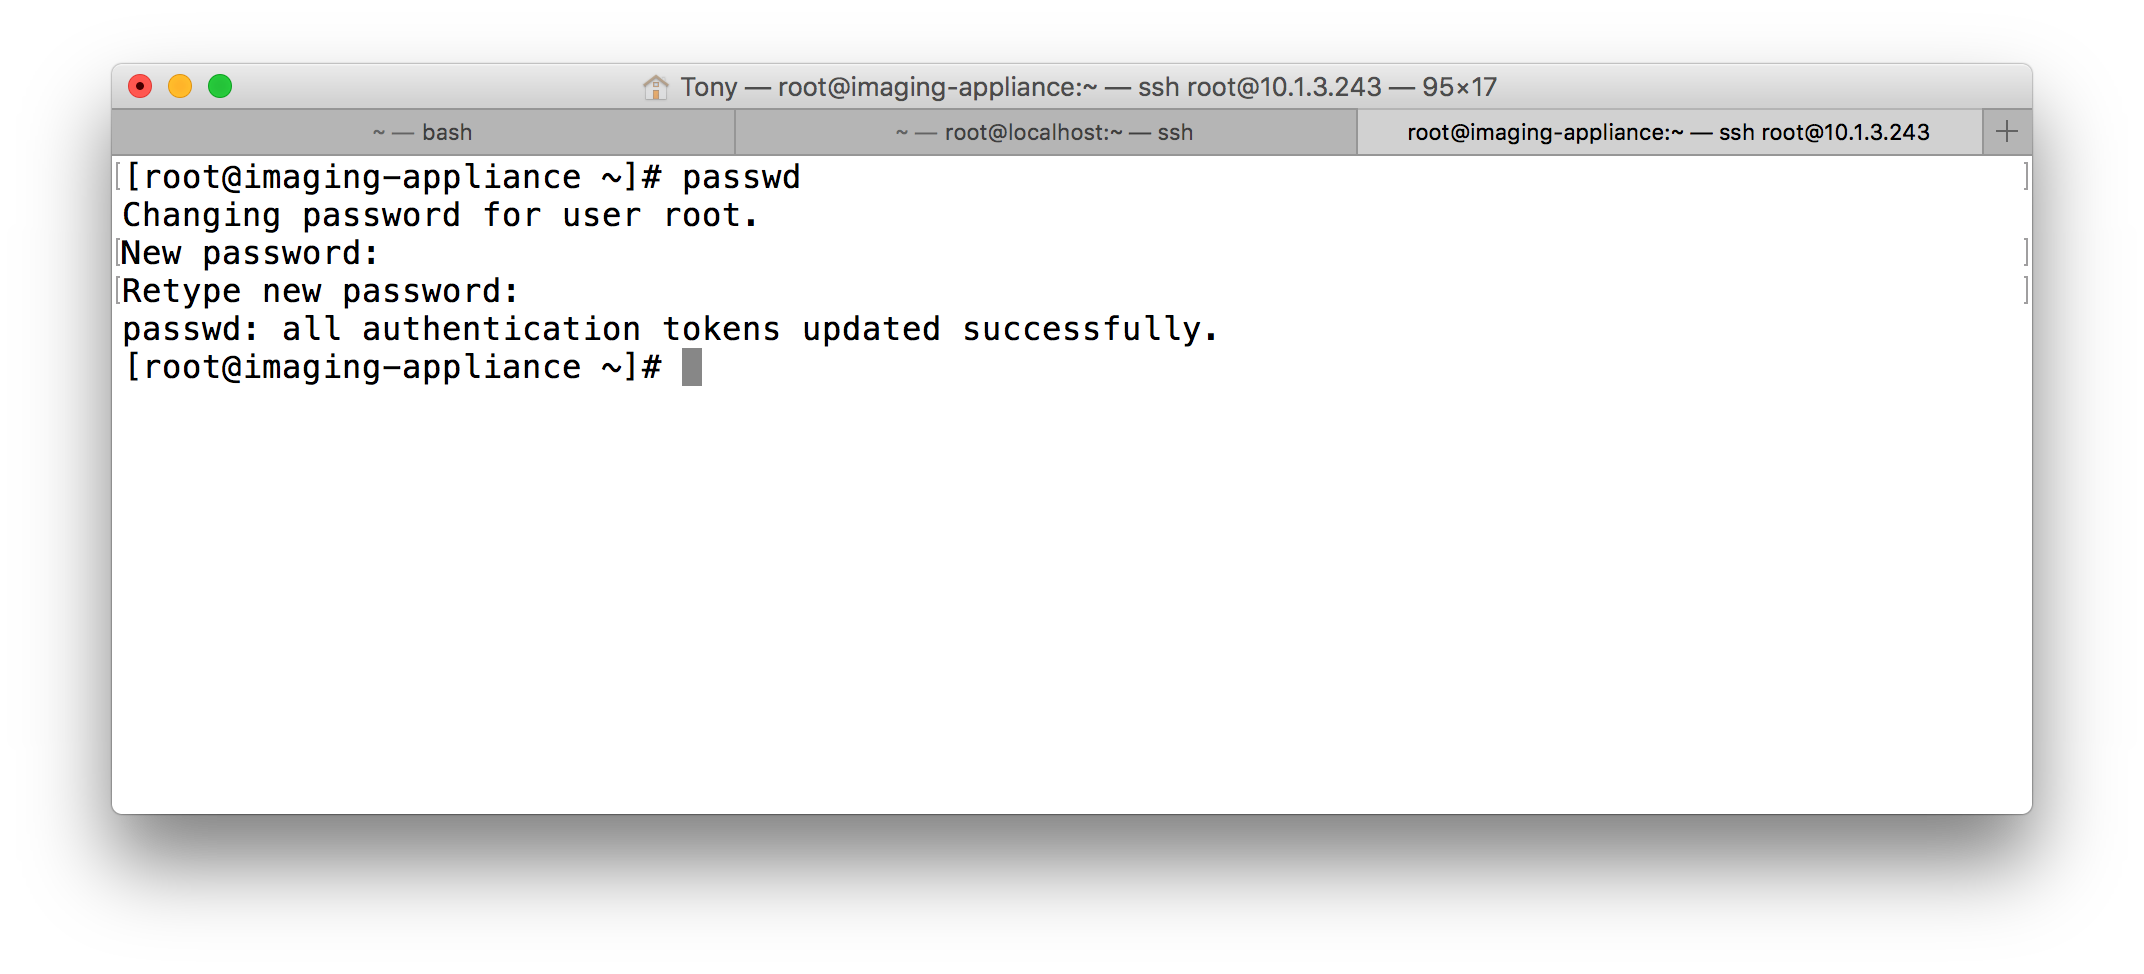
2. Then type the command below to enter your new password
```
$ passwd
```
3. Enter new password
Changing the IP of the IVS Server to Static
**1. Locate Network Interface**:
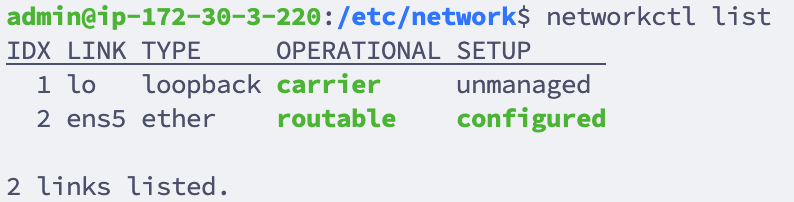
First, identify the network interface you wish to configure. You can list all network interfaces using:
```
networkctl list
```
[](https://kb.filewave.com/uploads/images/gallery/2024-01/1mWKjVXFvMUjRTH7-image.png)
**2. Edit the /etc/network/interfaces file:** Using 'nano', edit the interfaces file to set the network configurations.
```
nano /etc/network/interfaces
```
Your default interfaces file should look something like this (your interface name may be different):
```
# The loopback network interface
auto lo eth0
iface lo inet loopback
# The primary network interface
iface eth0 inet dhcp
```
Change the file to look like this, using your network preferences (note 'dhcp' has been changed to 'static' in line 6)
```
# The loopback network interface
auto lo eth0
iface lo inet loopback
# The primary network interface
iface eth0 inet static
address 192.168.10.33
netmask 255.255.255.0
gateway 192.168.10.255
dns-nameservers 192.168.10.254 192.168.10.255
```
**3. Verify Resolv.conf, hosts and hostname files:** Verify that these files in /etc/ are configured correctly for your network and server.
/etc/resolv.conf: This file should list your DNS servers
/etc/hosts: This file should point your FQDN to localhost (127.0.0.1) - Below is an example of what the file looks like on ivs1.filewave.net for example. Notice the 2 entries for loopback. Although IPv6 should be disabled, it is good to include the IPv6 loopback in case it is ever enabled.
```
127.0.0.1 localhost
::1 localhost ip6-localhost ip6-loopback
ff02::1 ip6-allnodes
ff02::2 ip6-allrouters
127.0.0.1 ivs1.filewave.net
::1 ivs1.filewave.net
```
/etc/hostname: Specifies the hostname for your server. This is **filewave** by default.
**4. Disable IPv6:** Edit the sysctl.conf file by adding the following lines to the end of the file:
```
nano /etc/sysctl.conf
```
```
net.ipv6.conf.all.disable_ipv6 = 1
net.ipv6.conf.default.disable_ipv6 = 1
net.ipv6.conf.lo.disable_ipv6 = 1
net.ipv6.conf.tun0.disable_ipv6 = 1
```
**5. Restart/Check Network Status:**
```
systemctl restart networking.service
systemctl status networking.service
```
**6. Verify IP:**
```
ip a
```
Connecting the IVS to the FileWave Server:
If you are a FileWave Hosted Customer, you need to review the following before connecting the IVS to the FileWave Server: [FileWave Hosted Servers and IVS Setup](https://kb.filewave.com/books/network-imaging-ivs/page/filewave-hosted-servers-and-ivs-setup "FileWave Hosted Servers and IVS Setup")
1. Open and connect your FileWave Admin to your FileWave server
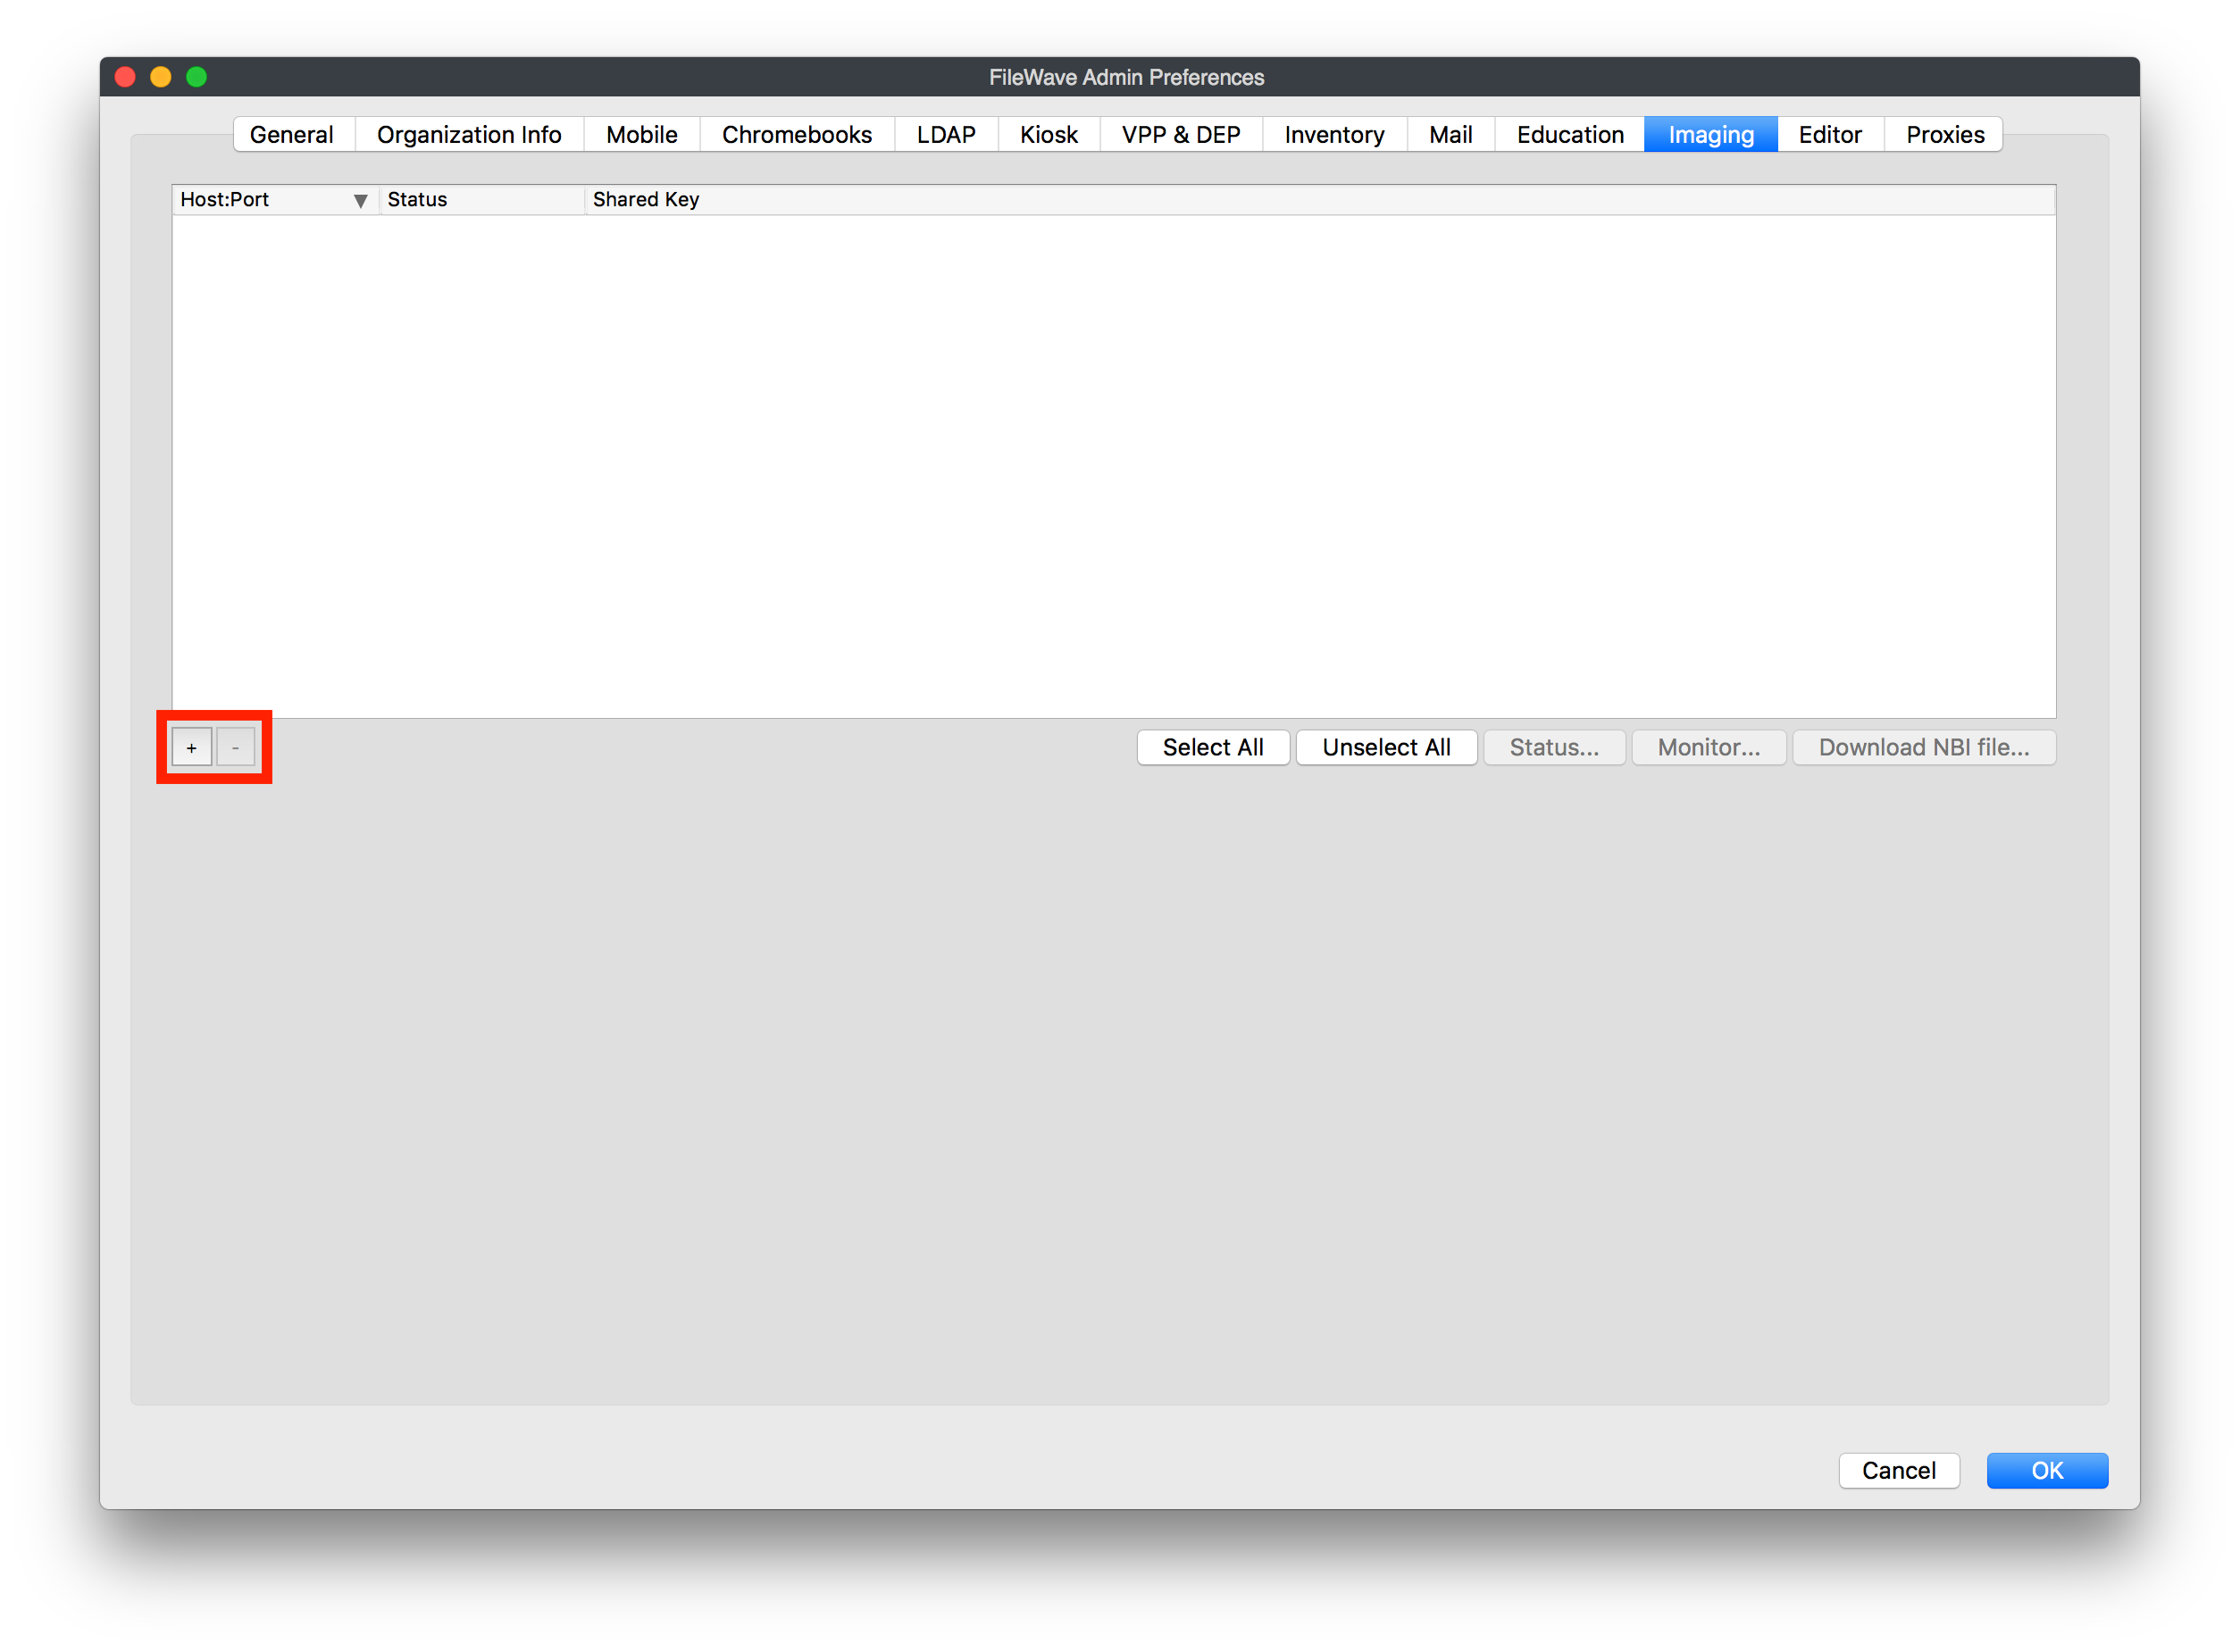
2. Open the preferences and go to the "Imaging" tab
3. Hit the "+" at the bottom left of the blank pane
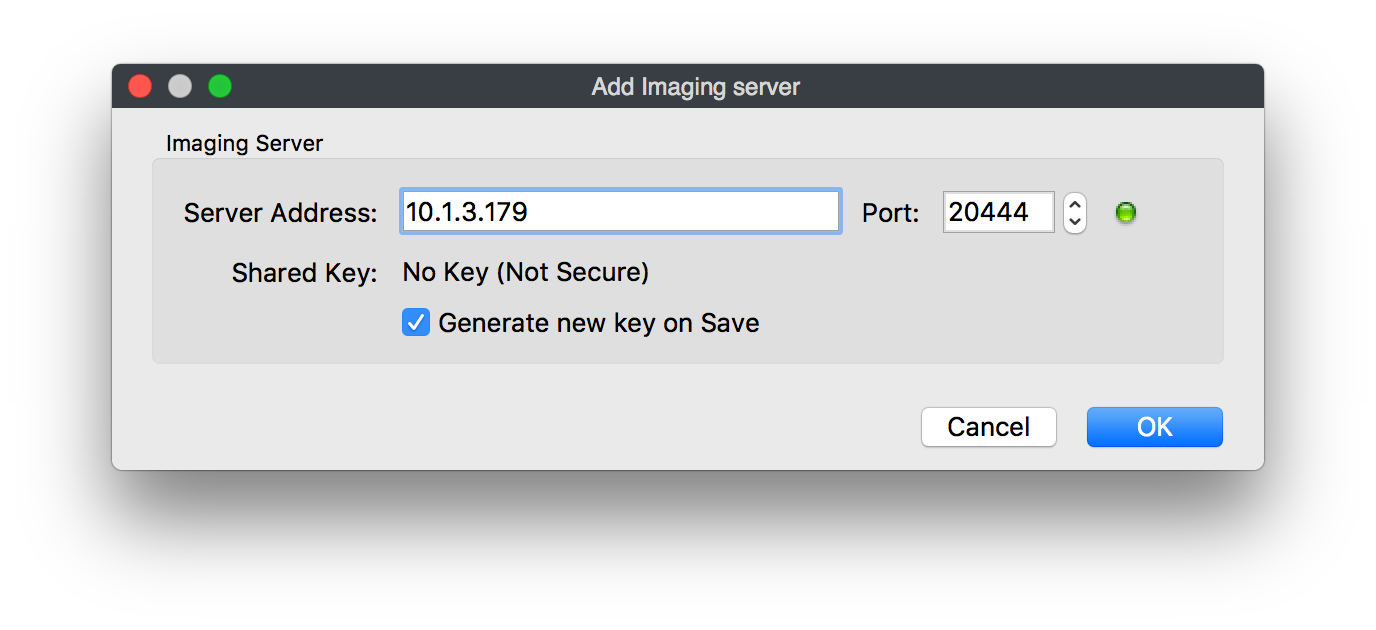
4. Enter the IP address of the IVS into "Preference for Imaging"
5. Make sure the box marked "generate new key" is now checked and click "OK"
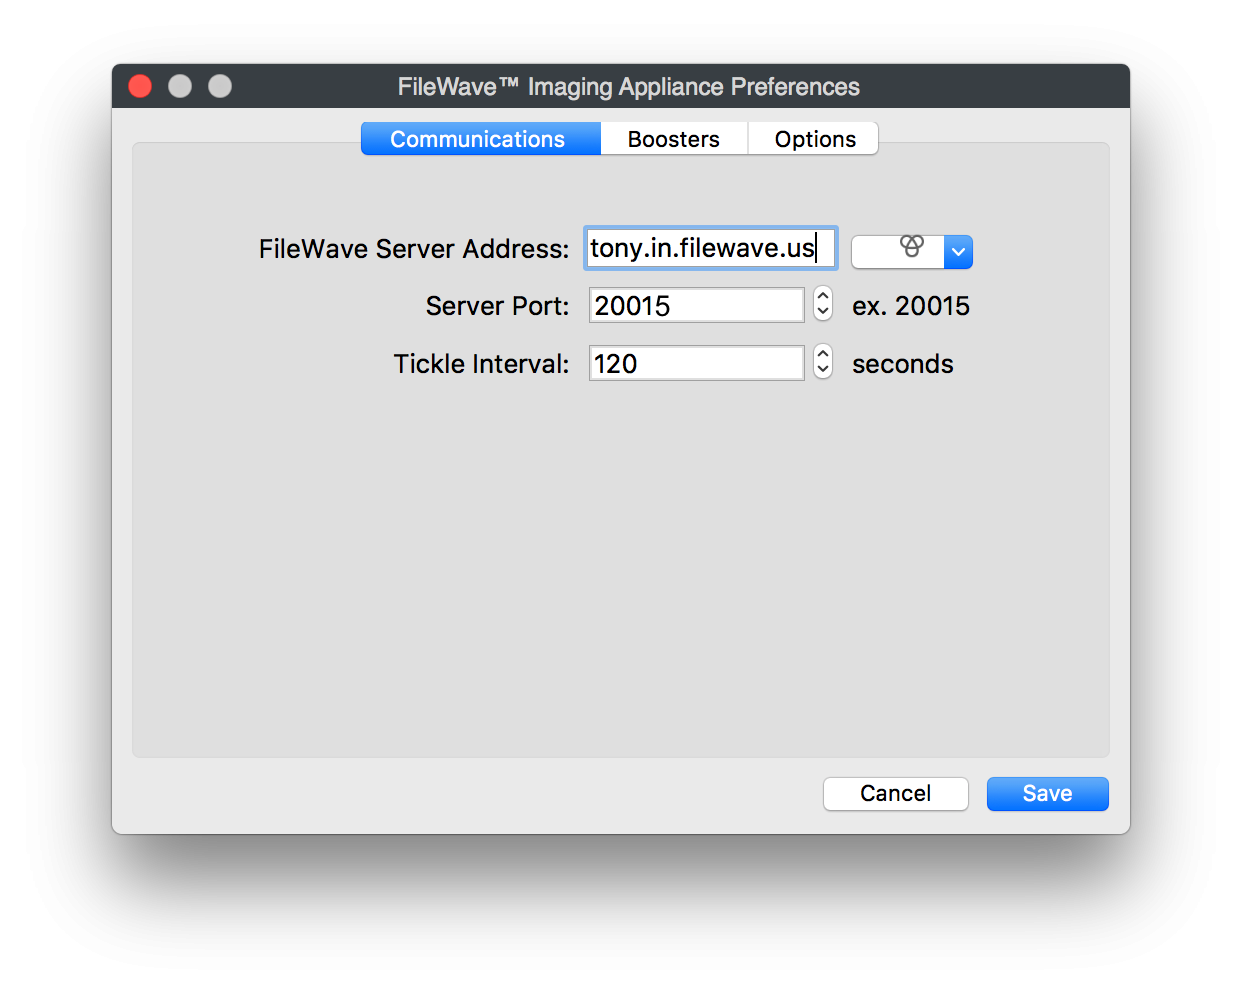
6. When the Imaging Monitor opens specify your FileWave Server Address and Port 20015. Confirm by clicking "Ok" to finish configuration of your IVS.
[](https://kb.filewave.com/uploads/images/gallery/2024-06/BUSHSKZQtrTLKL4M-ohwo7sl02agdbufd-ivssetup-ivsprefs.png)
7. Restart the Imaging Virtual Server (IVS)
8. Open the preferences and go to the "Imaging" tab again
9. Highlight your newly added Imaging server, click Enroll Imaging Server. This directs the FW Server to accept the IVS cerfificate request.
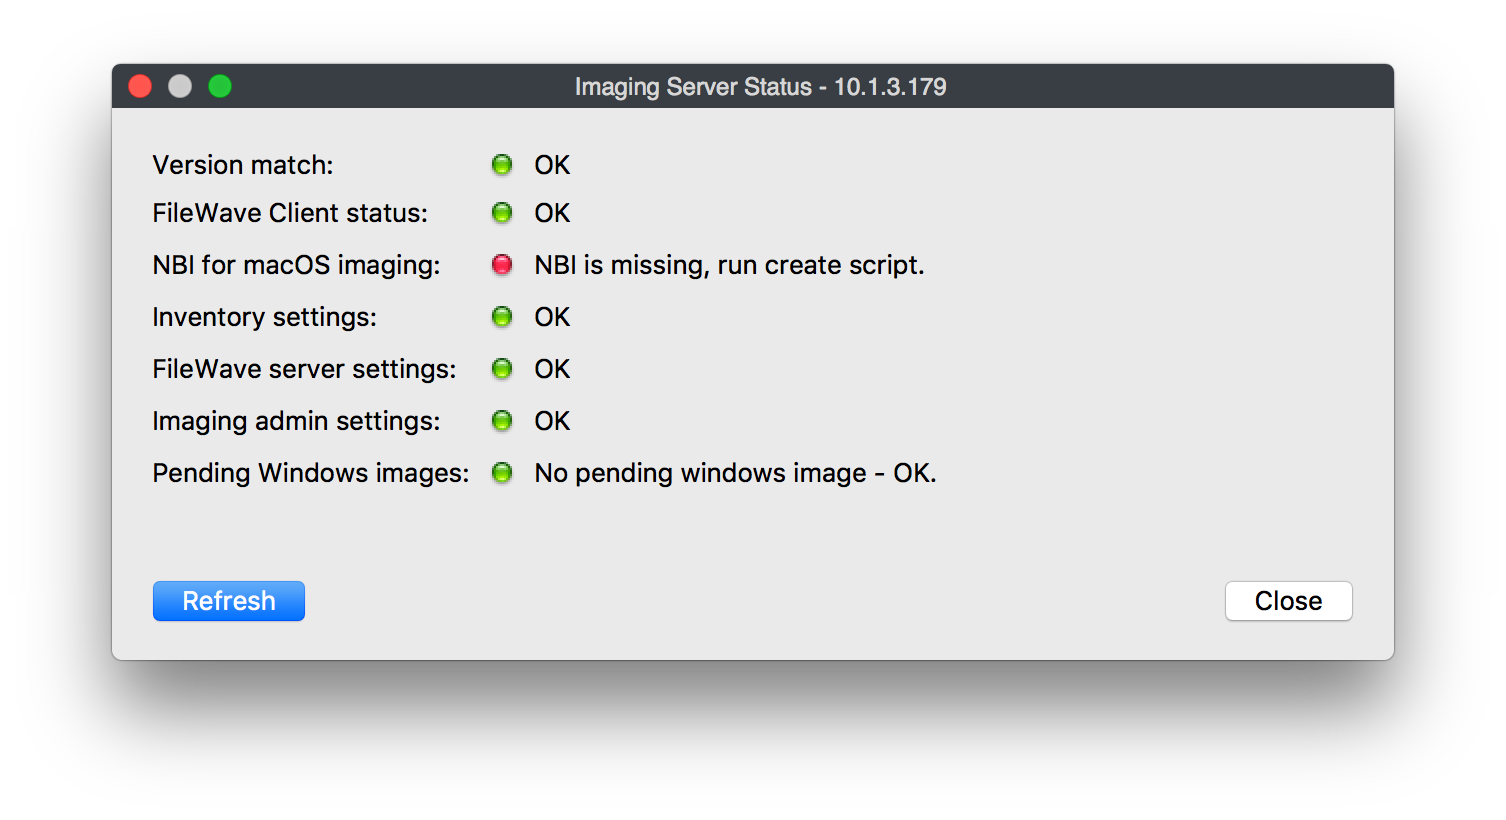
10. Select the server in the pane and click the status button below. Status lights should be all green with the exception of "NBI for macOS Imaging:" (If there are more red lights and clicking the refresh button doesn't help, please contact support)
Congratulations, you have successfully set up and configured your FileWave Imaging server! You are now ready to image Windows devices, [Windows Network Imaging - Capturing and Deploying Images](https://kb.filewave.com/books/network-imaging-ivs/page/windows-network-imaging-capturing-and-deploying-images "Windows Network Imaging - Capturing and Deploying Images")
## Related Content
- [FileWave Hosted Servers and IVS Setup](https://kb.filewave.com/books/network-imaging-ivs/page/filewave-hosted-servers-and-ivs-setup "FileWave Hosted Servers and IVS Setup")
# FileWave Hosted Servers and IVS Setup
Using IVS imaging for Windows for Hosted customers is supported but is different than an on-prem implementation. A Hosted customer is one where FileWave runs your FileWave Server in our cloud services. Notes below explain how to use IVS with a Hosted Server, but for you, as a customer, know that all the steps listed in this article that are on the FileWave Server must be completed with the assistance of [Customer Technical Support](https://kb.filewave.com/books/community-engagement/page/customer-technical-support "Customer Technical Support") because you won't have direct access to your FileWave Server. The article is here to explain what is needed and why it is needed.
## Setup Differences
When you set up an IVS, the first part of the configuration will work as [normal](https://kb.filewave.com/books/network-imaging-ivs/page/setting-up-the-ivs-imaging-virtual-server "Setting up the IVS (Imaging Virtual Server)"), because your admin is actually doing the communication to the IVS. You set it up, choose OK to save, relaunch preferences, and then choose the “Enroll Imaging Server” button. After this is done, and you relaunch preferences, you’ll notice that you have an “Admin credentials mismatch error”. This error is NOT meaningful. To check admin credentials, the FW server will attempt to talk to the IVS directly on port 20444, and this will not work ever for a Hosted customer.
However, if you look in the actual django interface on the IVS, you should see it has the proper shared key, etc. Here is an example:
[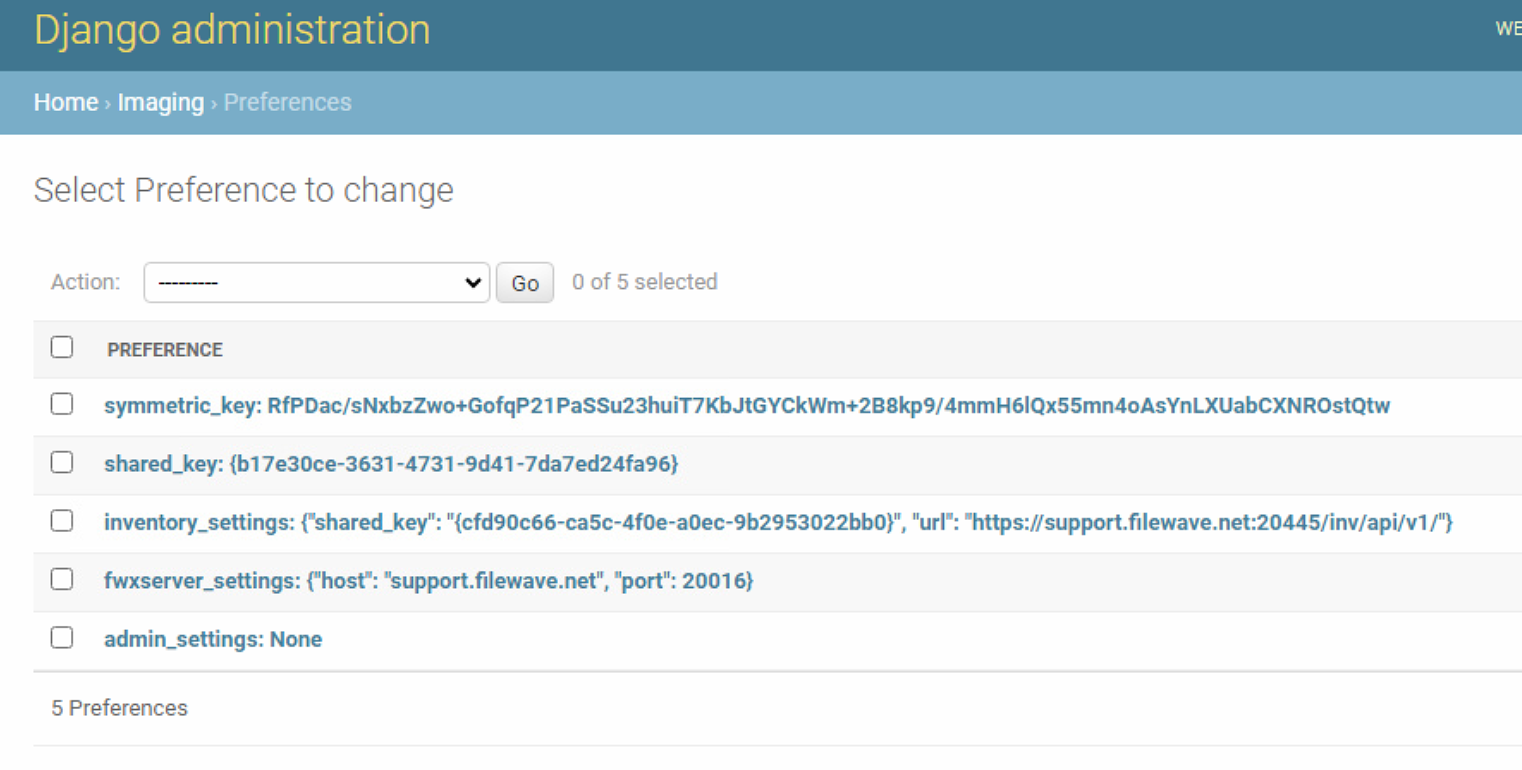](https://kb.filewave.com/uploads/images/gallery/2023-08/00DvAUDIw1bRDgT3-image.png)
## Extra First-Time Setup
We know that image capture will NOT work for a Hosted customer without these additional steps. The IVS simply can’t upload the image that is generated, so you’ll see it go immediately from “capture done” to “upload done” within one second if you don’t fix the admin settings entry you see above.
In the last step of the initial IVS setup, the FW server tells the IVS what credentials it should use for logging in to upload an image. But, in cloudV2, the FW server can NOT talk to the IVS directly, so it can’t do that last bit and the admin settings part in the local DB ends up empty. Never fear though, we can work around this problem.
To do so, we need to:
1. Find out the user that was created for imaging
2. Reset the password for that account to something we know
3. Enter the information from the above in the IVS Django admin
### Step 1, Find out the user (FileWave Support)
For this step, we need access to the server in a shell. FileWave Support will have to do this since a hosted customer can not access the server. Once logged in, we'll start an interactive python shell as:
```
sudo /usr/local/filewave/python/bin/python /usr/local/filewave/django/manage.pyc shell
```
And once we are in the shell, we’ll look up all usernames, but the one we are looking for will start with imagingadmin
```
from fwauth.models import User
User.objects.all().values_list("username")
```
This will give us a result like this:
> Out\[**2**\]: <QuerySet \[('tony.keller',), ('fwadmin',), ('noaccess',), ('filewave\_imaging\_uploader\_admin-3fcb9f455d5e062b',), ('alexdsl',), ('derekd',), ('brian.millbrook',), ('PS',), ('emma.ainsworth',), ('james.carter',), ('nicole.jemison',), ('fw',), ('shana.good',), ('filewave\_imaging\_uploader\_admin-e850f155825fadd5',), ('alexkdsl',), ('robert.daniel',), ('sean.holden',), ('joshua.heinz',), ('andrew.kloosterhuis',), ('andreas.rein',), '...(remaining elements truncated)...'\]>
Once you've received this information from Support, you can continue to the next step on the IVS.
### Step 2, Reset the Password
It is easy to see that filewave\_imaging\_uploader\_admin-e850f155825fadd5 is the user we need. But now, we need to set a password. And we’ll do that like this:
```
u=User.objects.get(username="filewave_imaging_uploader_admin-e850f155825fadd5")
```
That assigns **u** as a variable, and obviously you’ll use the right username from the first step, not the example one. Once we have that, we can set the password, and then save u:
```
u.set_password("let_me_image")
u.save()
```
The new password is now set, but we can confirm we did it right. You’ll see below how we can test a bad password, and a good one:
```
In [6]: u.check_password("dont_let_me_image")
Out[6]: False
In [7]: u.check_password("let_me_image")
Out[7]: True
```
### Step 3, Configure IVS Django Admin
Well, now we know the account and the password, we just need to set it on the IVS. To do so, login to the IVS admin at [https://ivsaddress:20444](https://ivsaddress:20444/ "https://ivsaddress:20444"), then click SIGN IN. Creds are *fwadmin*, *filewave*. Note that it likely won’t be a proper SSL cert on the server, so you’ll have to choose to bypass security in your browser to get to the web interface.
Once logged in, go to Admin, Preferences as shown at the top of the article. Then, click on admin\_settings, and you’ll get a screen like this (except yours won’t have a value in it):
[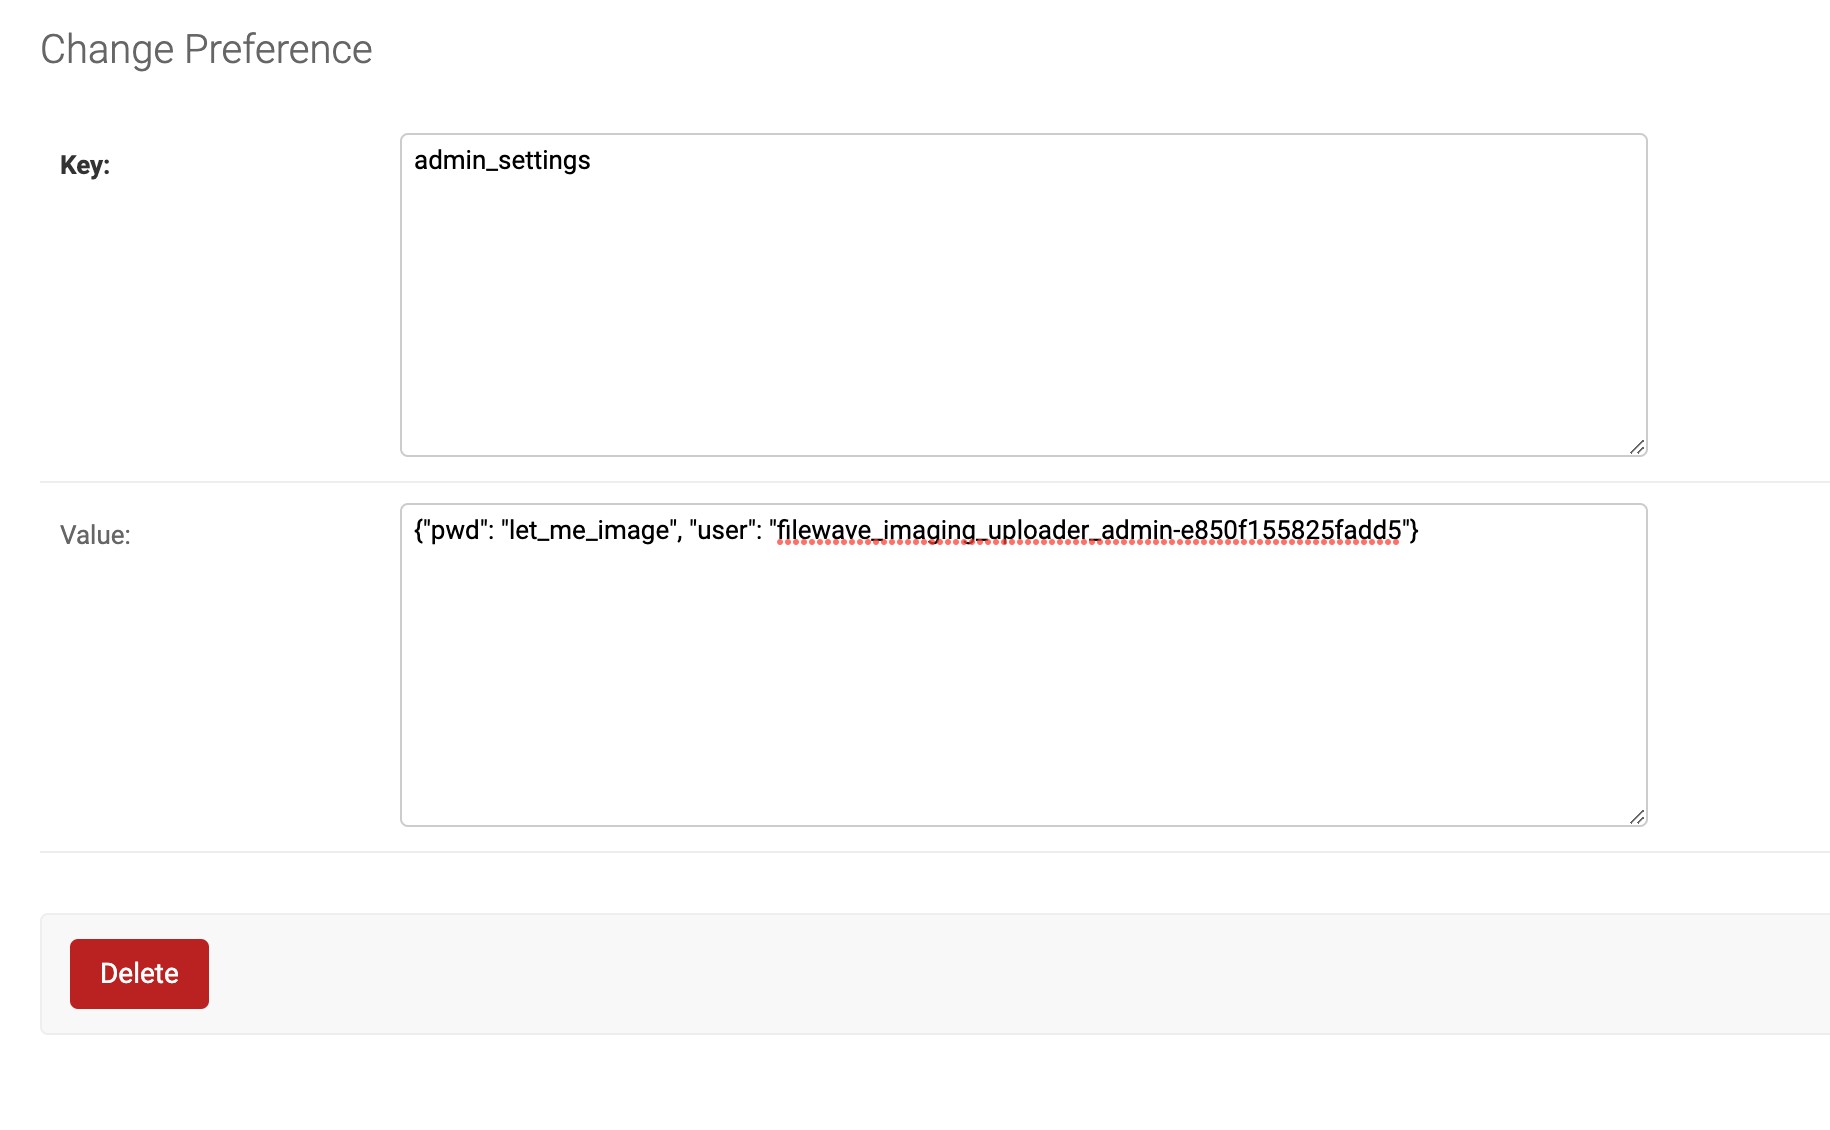](https://kb.filewave.com/uploads/images/gallery/2023-08/txAQ1T0q33TIR2Nt-image.png)
All you need to do now is paste in the following text, replacing your specific username and your password:
```
{"pwd": "let_me_image", "user": "filewave_imaging_uploader_admin-e850f155825fadd5"}
```
Once you **SAVE** this field, your IVS is ready for operation.
## Capture
Because IVS upload has no ability to retry the upload of an image built in, and transferring over the WAN is more sensitive than a local transfer, an image upload could get interrupted. Note that the image will have been captured to the IVS, it just had trouble uploading to the FW server. But you can use the FileWave Admin's command line to force the upload replacing the image name, a FileWave Admin username, password, and server address:
```
/usr/local/bin/FileWaveAdmin --importImage /imaging/images/windows/FS_-1 -u myfwusername -p mypassword -H support.filewave.net -P 20016
```
## Restore
Restoring images is fairly normal because once an image is assigned to any device, it is downloaded to the IVS appliance itself. The download does retry on failure because it is like any other Fileset. And, since image application to the actual “to be imaged” device happens locally to the network, the fact that the FileWave Server is Hosted is not in play here.
# Expanding the IVS Disk Drive - VirtualBox

Imaging Appliance - VirtualBox Resize HD
This guide will help you extend the Imaging Virtual Servers (IVS) hard drive space on Imaging for VirtualBox.
### For VirtualBox
The following steps will help you resize the virtual hard drive for the FileWave Imaging Appliance running on Oracle VirtualBox.
1\. Power off the virtual machine.
2\. Open a command command prompt or terminal and extend the vmdk using the following commands ( replace source.vmdk with the path to your vbox vmdk, and "NUMBER OF MEGABYTES" according to the FULL size that you want the hard drive to be ) :
```
"C:\Program Files\Oracle\VirtualBox\VBoxManage.exe" clonehd "source.vmdk" "cloned.vdi" --format vdi
"C:\Program Files\Oracle\VirtualBox\VBoxManage.exe" modifyhd "cloned.vdi" --resize (NUMBER OF MEGABYTES)
"C:\Program Files\Oracle\VirtualBox\VBoxManage.exe" clonehd "cloned.vdi" "resized.vmdk" --format vmdk
```
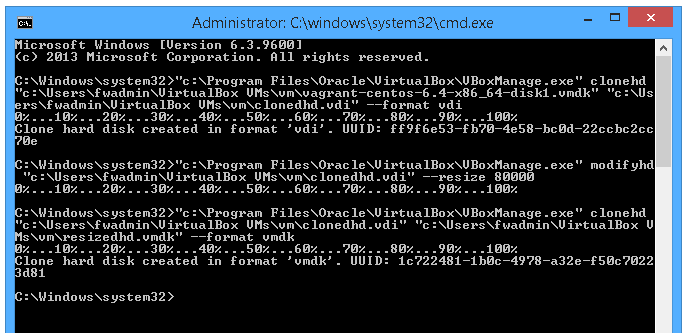
3\. Rename the original vmdk file to "vagrant-centos-6.4-x86\_64-disk1.OLD" and rename resized.vmdk to the original "vagrant-centos-6.4-x86\_64-disk1"
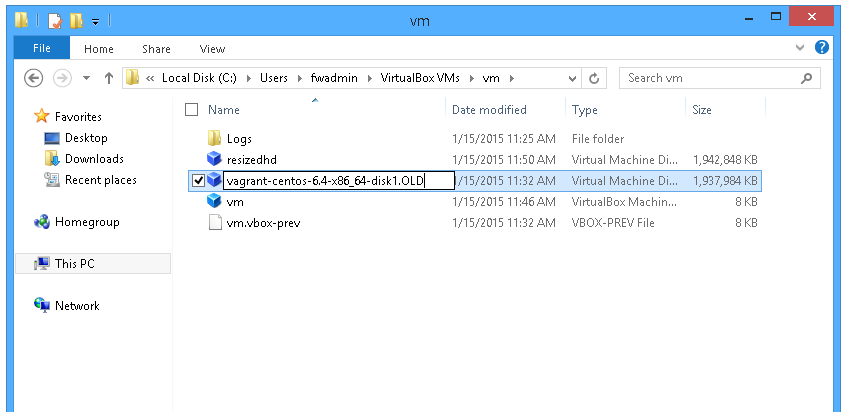
4\. In FileWave Imaging we created a imaging-control command for extending the virtual hard drive size. Power on the IVS and login.
5\. Run the below imaging-control command to increase the hard drive.
```
imaging-control increase harddrive
```
6\. You will be asked "Have you extended the hard drive in the VM settings?". Answer "y".
7\. You will then select "ENTER", and it will restart your IVS with the increased Hard Drive.
8\. After this you are done.
# Expanding the IVS Disk Drive - VMware

Imaging Appliance - VMware Resize HD
Use this workflow when a VMware-hosted FileWave Imaging Virtual Server (IVS) needs more disk space. First expand the virtual disk in VMware, then run `imaging-control increase harddrive` on the IVS so the appliance grows the filesystem.
### For VMware
The following steps will help you resize the virtual hard drive for the FileWave Imaging Appliance running on VMware.
1\. Power off the virtual machine.
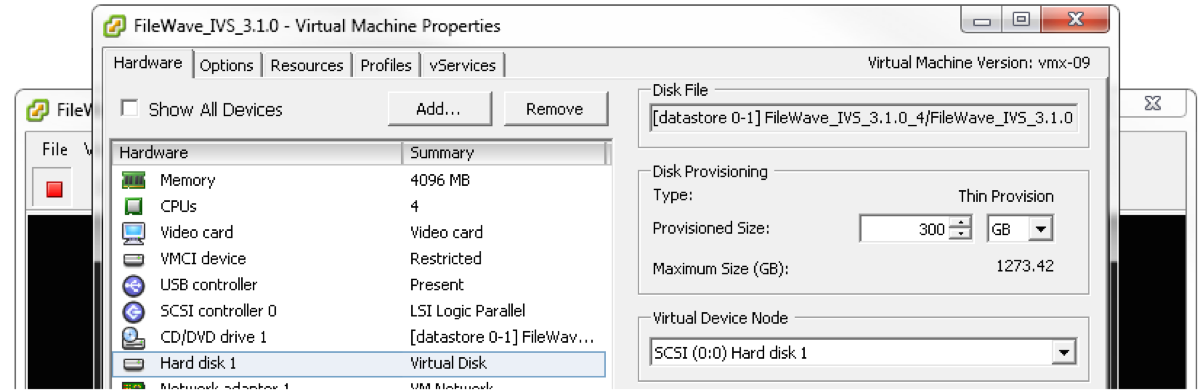
2\. Edit the virtual machine settings and extend the virtual disk size. The screenshots below show where to increase the available disk size in VMware.
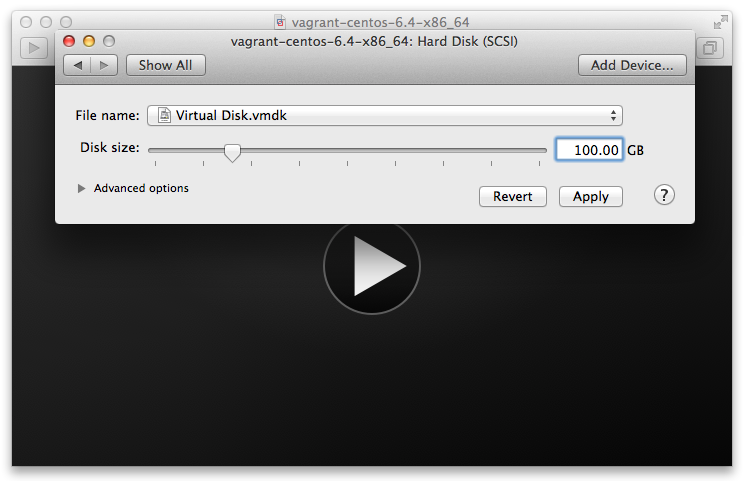 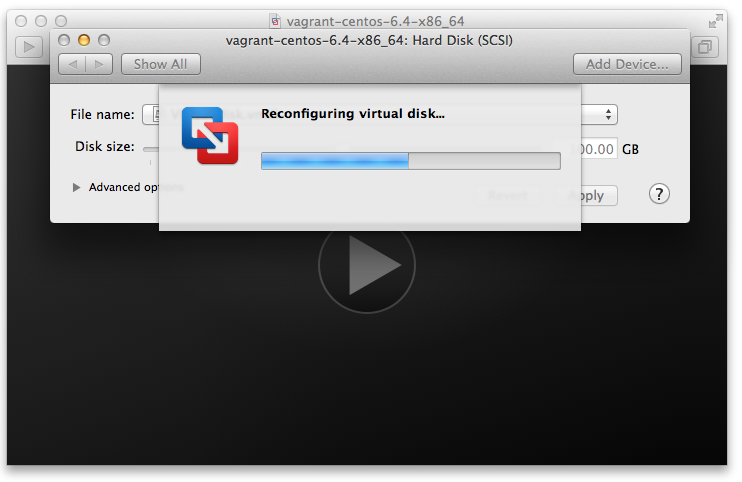 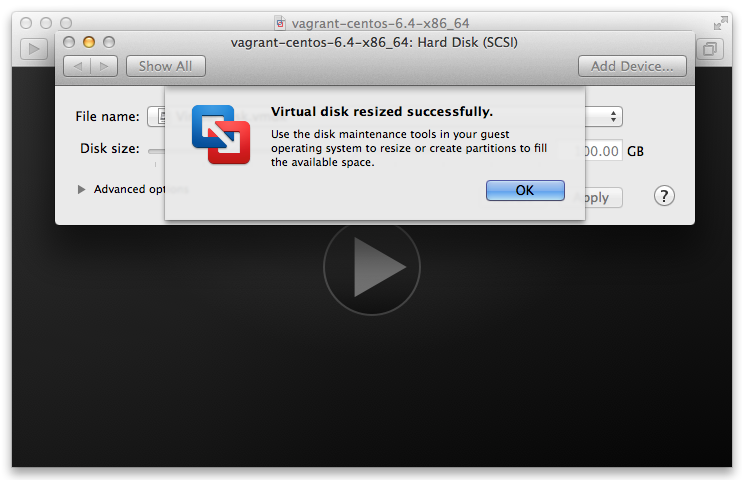
3\. Power on the IVS and log in. FileWave Imaging includes an `imaging-control` command to expand the appliance filesystem after the VMware disk is larger.
4\. Run the command below to increase the hard drive.
```
imaging-control increase harddrive
```
5\. When prompted with "Have you extended the hard drive in the VM settings?", answer "y".
6\. Press Enter when prompted. The IVS restarts with the larger hard drive available.
7\. After the IVS restarts, confirm the extra space is available before resuming imaging work.
# Changing the IP Address of your IVS (Static)
The following guide is tailored for Debian servers using the interfaces file, but you could also use [Webmin](https://kb.filewave.com/books/filewave-server/page/webmin-gui-on-premise "Webmin GUI (On-Premise)"), assuming the IVS comes online initially with DHCP.
For Webmin, know that you will need to go to Webmin -> Webmin Configuration -> Operating System and Environment and make sure it's set to Debian 12.4 (At the time of this KB's publishing, you can verify the version with `cat /etc/debian_version` on the server).
1. **Locate Network Interface**:
First, identify the network interface you wish to configure. You can list all network interfaces using:
```
networkctl list
```
[](https://kb.filewave.com/uploads/images/gallery/2024-01/1mWKjVXFvMUjRTH7-image.png)
2. **Edit the /etc/network/interfaces file:** Using 'nano', edit the interfaces file to set the network configurations.
```
nano /etc/network/interfaces
```
Your default interfaces file should look something like this (your interface name may be different):
```
# The loopback network interface
auto lo eth0
iface lo inet loopback
# The primary network interface
iface eth0 inet dhcp
```
3. Change the file to look like this, using your network preferences (note 'dhcp' has been changed to 'static' in line 6)
```
# The loopback network interface
auto lo eth0
iface lo inet loopback
# The primary network interface
iface eth0 inet static
address 192.168.10.33
netmask 255.255.255.0
broadcast 192.168.10.255
dns-nameservers 192.168.10.254 192.168.10.255
```
4. **Verify Resolv.conf and hostname files:** Verify that these files in /etc/ are configured correctly for your network and server.
**/etc/resolv.conf**: This file should list your DNS servers
**/etc/hostname**: Specifies the hostname for your IVS. This is **filewave-ivs** by default.
5. **Reboot & Verify Changes**
# IVS Control Commands
These commands allow modification of the settings on the FileWave IVS (Imaging Virtual Server). These **imaging-control** commands require root authorization.
#### **List of Imaging-Control *commands***
```
imaging-control networksetup static
imaging-control networksetup dhcp
imaging-control subnet add
imaging-control subnet remove
imaging-control increase harddrive
imaging-control list macimages
imaging-control list windowsimages
imaging-control disable macimaging
imaging-control disable windowsimaging
imaging-control enable macimaging
imaging-control enable windowsimaging
```
#### ***Configuring the IVS network interface***
The FileWave IVS network is configured to use dhcp by default. This command has 2 options:
```
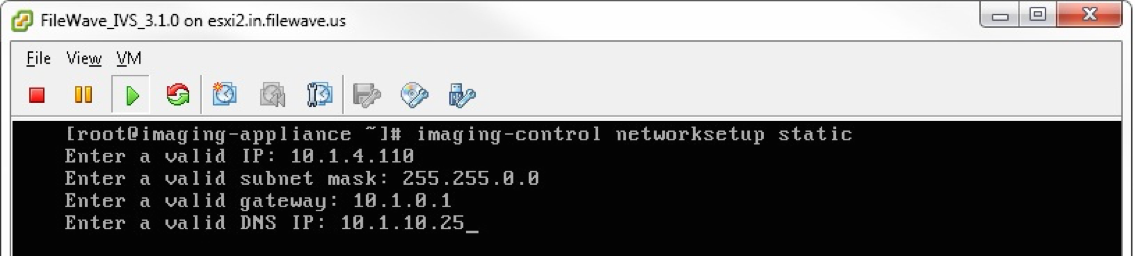
imaging-control networksetup static
```
This command will prompt for static ip information and configure the network interface to it
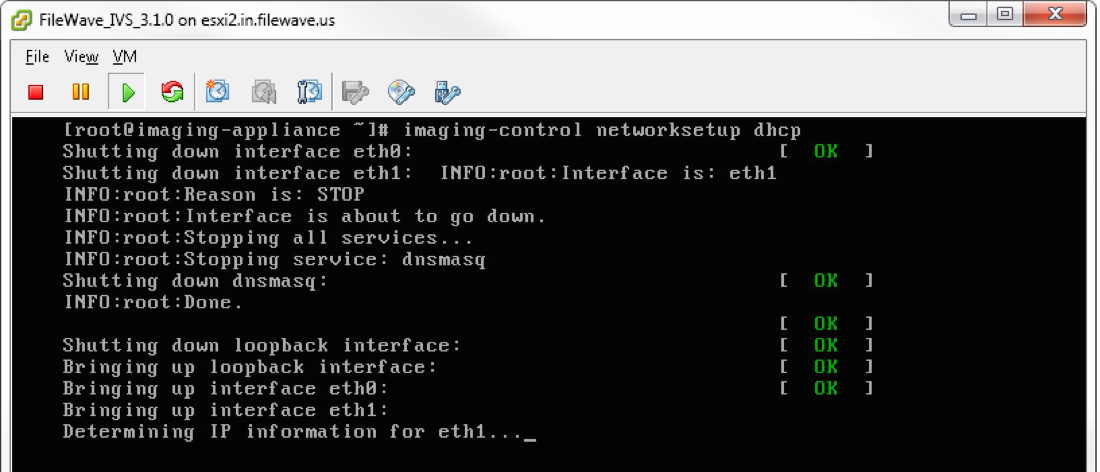
```
imaging-control networksetup dhcp
```
This command will switch the IVS networking interface back to dhcp
#### ***Configuring subnets on the IVS***
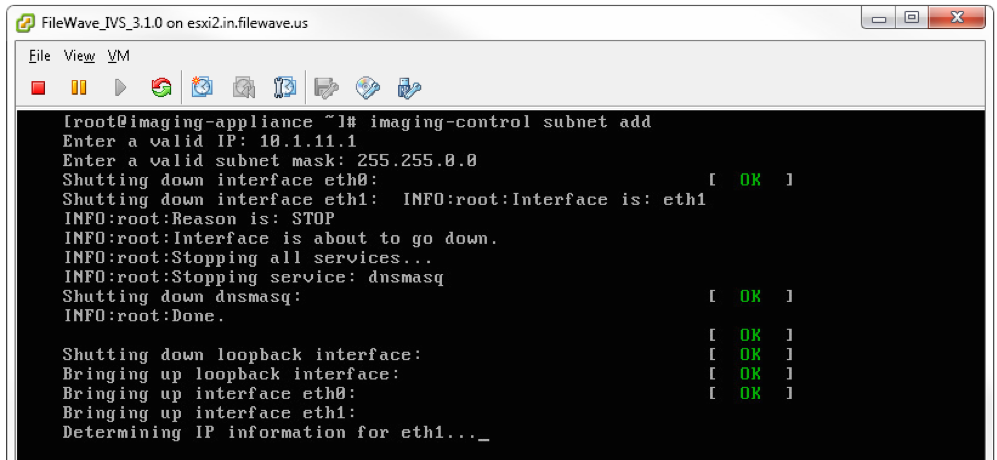
The FileWave IVS will default to listening only on the subnet that it’s ip address is from. This command can be used to add subnets for the IVS to listen to or remove subnets:
```
imaging-control subnet add
```
This command will prompt for a valid ip address from the subnet and the subnet mask
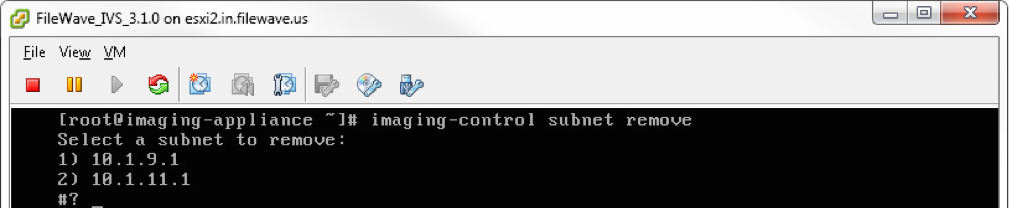
```
imaging-control subnet remove
```
This command will display the subnets that the IVS is currently listening to and allow removal
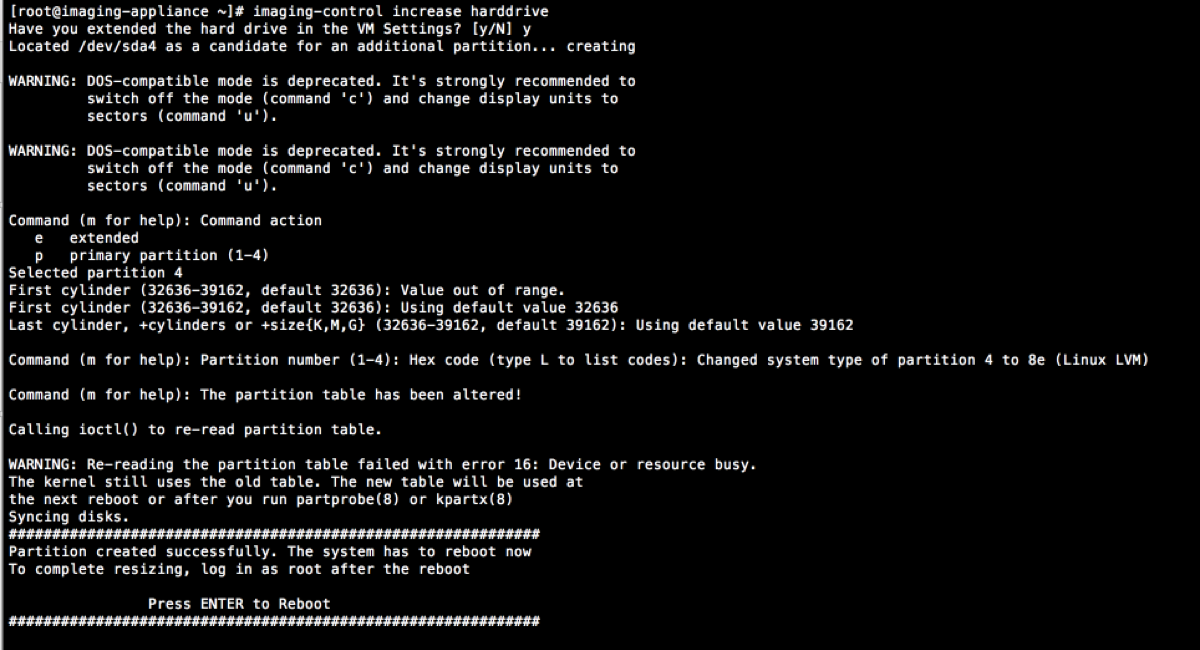
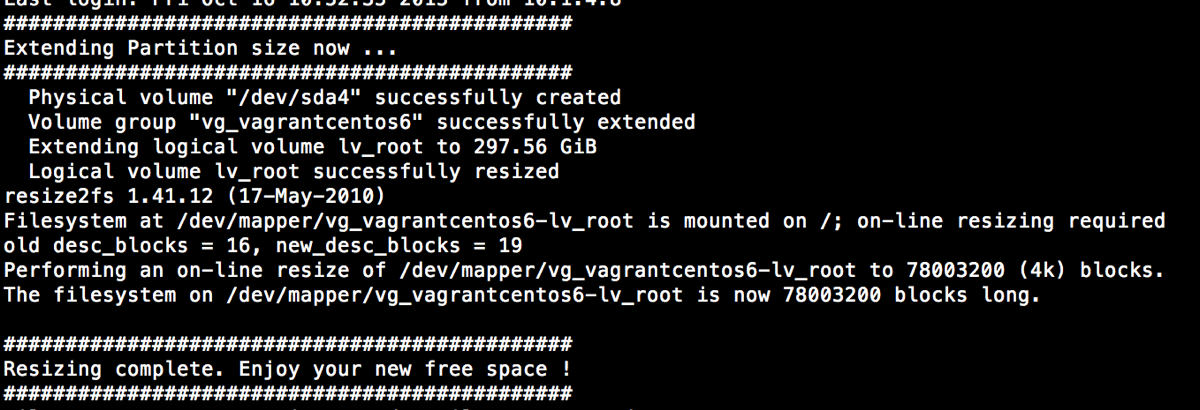
#### ***Increasing the IVS hard drive***
```
imaging-control increase harddrive
```
This command will allow the virtual disk on the IVS to be increased. The default size is 250gb. This command will require that the IVS is first shutdown and the hard drive is expanded in the vm settings.
#### ***Viewing list of images on IVS***
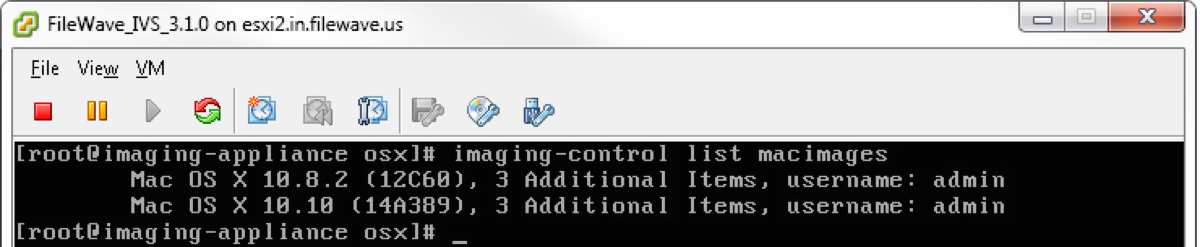
These commands will list Mac and Windows images being hosted on the IVS currently
```
imaging-control list macimages
```
```
imaging-control list windowsimages
```

#### ***Configuring the IVS for Mac or Windows***
The default settings on the IVS allow for Mac and Windows imaging. These commands will allow you to disable/enable Mac or Windows imaging on the IVS.
```
imaging-control disable macimaging
```
This command disables Mac imaging on the IVS.
```
imaging-control disable windowsimaging
```
This command disables Windows imaging on the IVS.
```
imaging-control enable macimaging
```
This command enables Mac imaging on the IVS. (default setting)
```
imaging-control enable windowsimaging
```
This command enables Windows imaging on the IVS. (default setting)