Components (PSImage)
PSImage is not supported by FileWave Support, so please do not submit support tickets for PSImage issues. The information provided here is for educational purposes only. If you would like to purchase professional services hours for consulting assistance setting up PSImage or customizing it, please contact professional.services@filewave.com with your request. If you have existing unused professional services hours you may be able to use them for this purpose. Any feedback on PSImage can also be sent to the same email address. Any PSImage work would be handled through Discord or in working with Professional Services. For the official Windows Imaging solution please see Network Imaging / IVS.
3 Phases of Disk Imaging
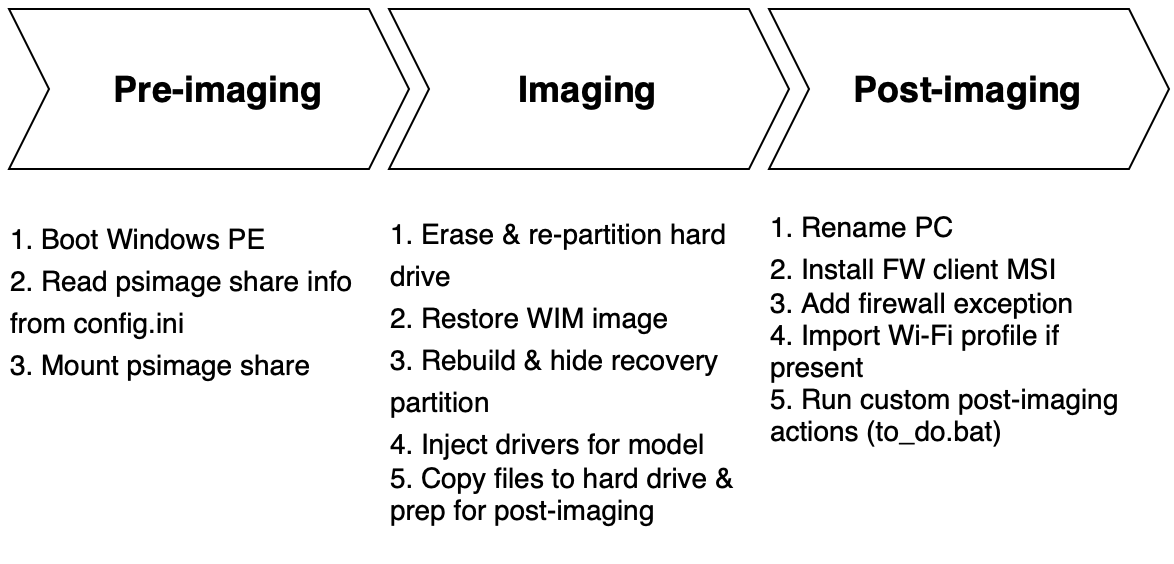
When imaging over the network from the PSImage network share, there are three phases. The diagram above shows what happens during each phase, and the list below identifies which script is responsible for the work in that phase.
- Pre-imaging (x:\imaging\go.ps1) - Gets connection information from config.ini automatically or prompts the user for the server hosting the SMB share, then connects to it
- Imaging (z:\scripts\PSImage.ps1) - Capture or restore disk image
- Post-imaging (z:\scripts\runonce.ps1) - Handles post-imaging actions such as setting the computer name, installing the FileWave Client, adding the client firewall exception, and importing a Wi-Fi profile. There are two reboots.
Pre-imaging Components in WinPE
boot.wim holds WinPE and is the imaging environment you're booting into to gain full access to the local hard drive. You'll learn how to build boot.wim later in Building Your Imaging Environment. You can also find boot.wim in the sources folder in the WinPE partition of the USB thumb stick, as well as in your reimaging fileset and the WDS server (if you decide to use PXE). To edit it you must mount the boot.wim WIM image, make your edits, and commit your changes to unmount it. While mounted the contents are mapped to a folder you designate on the local drive. The following files reside in the boot.wim file in the \imaging folder.
- config.ini file - controls pre-imaging and imaging configuration
- go.ps1 - handles the pre-imaging logic/work
- password.txt - if present, password stored here is used by go.ps1 to gate the disk imaging and prevent unauthorized users from using PSImage
Imaging/Post-imaging Components
The following folders are present on the PSImage share for network imaging or the secondary Imaging volume on the USB thumb drive for local imaging. These are used during the imaging and post-imaging process. When booted into the WinPE imaging environment the psimage share or 2ndary volume of your dual-partitioned USB thumb drive is mapped as the z: drive. WinPE itself is mounted as the x: drive.
-
config - Add trigger files below as necessary
-
image_mappings.txt => lets you associate disk image and computer name to PC based on serial number. There must be one blank line at the end of this file. You can also set custom fields for client devices here.
-
If debug.on exists then restore will drop to command prompt instead of rebooting for reviewing output and troubleshooting.
-
If mode.reimage exists then move straight to restore and skip PSImage main menu without asking user whether to capture or restore. The only exception is if the assigned disk image for a device entry in image_mappings.txt is set to the string "capture".
-
server.dns => holds FQDN for FileWave server that will be used to update custom field for imaging to false to block a reimaging loop
-
app.token => holds base64 app token used to flip custom field for imaging to false and to set custom fields specified in image_mappings.txt when imaging via fileset
-
edit_config.ps1 => utility to display current config and set many of the above configurable options (except for image_mappings.txt). Right click and pick "Run with PowerShell".
-
extra
-
All files/folders in this folder will be copied to c:\windows\temp\psimage on reimaged client device.
-
If Wi-Fi.xml profile exists it will be copied to c:\windows\temp\psimage on reimaged client device and applied immediately during first post-imaging pass.
-
fwclient
-
Holds custom FW client MSI. Upload client using upload_client.ps1. Right-click and "Run with PowerShell".
-
If kiosk "custom" folder is present contents will be copied to client installation folder during post-imaging to apply kiosk customizations.
-
images
-
Captured images are uploaded here.
-
image_list.txt holds list of disk images and description to be displayed to user if no disk imaging assignment is present for PC. If you delete a disk image remember to remove its entry from this file. There must be a single blank line at the end of this file.
-
logs
-
history.log => All reimaging operations from this share/USB drive are logged here. There must be one blank line at the end of this file.
-
Use search_history.ps1 to search log file for specific restore operations. Right-click and "Run with PowerShell".
-
restore => transcripts of each image restore operation are logged in this folder and named __
-
models
-
Contains driver packs for computer models
-
Use upload_driver_pack.ps1 to upload drivers for your computer models. Follow instructions in ReadMe.txt in the models folder for details.
-
scripts
-
The brains of PSImage. Do not modify any files here unless instructed to do so.
-
If to_do.bat exists it will be copied to c:\windows\temp\psimage. Will be run at end of the post-imaging process on client PC. Use this file to trigger any executables you may have included in the extra folder. These are run under the context of the fwadmin local administrator account. Note that psimage folder will be deleted at end of post-imaging along with the fwadmin account. In general try to deploy items as filesets if possible instead of using to_do.bat if you can help it. However, if it's a task that must be done on the reimaged client PC ASAP and cannot wait for the deployment of a fileset then use to_do.bat.
-
sysprep
-
unattend.xml sysprep answer file goes here
-
Run prep_ref_vm.ps1 to prep reference VM for image capture, including adding temp fwadmin account and sysprepping using unattend.xml. fwadmin account will be deleted at end of post-imaging. Follow instructions in ReadMe.txt for details.
-
import - contains importable filesets and custom fields used for imaging
Other Misc Items
There are 2 spots with hidden options for troubleshooting. Enter "z" to drop to command line in imaging phase in WinPE at
C:\Windows\Temp\restore.done created immediately before last reboot. Use this file in requirement scripts to postpone filesets until post-imaging is complete.
Beginning and ending imaging times are written to registry of reimaged client at HKLM\Software\PSImage. Name of image used to reimage PC is also written here. Custom field data specified in image_mappings.txt will also be written here if the client device is reimaged using any other method besides via fileset.
Post-imaging log is written to c:\windows\temp\psimage.log on client device. If you don't end up at login prompt then check here to see where it failed as post-imaging process did not complete.