Software Deployment Recipes (iOS/iPadOS)
The Software Deployment Recipes section for iOS/iPadOS provides a collection of practical guides and recipes to streamline the deployment of software and apps on your iOS and iPadOS devices. Discover step-by-step instructions for efficiently deploying apps, configuring settings, and managing updates across your device fleet. From choosing the right deployment method to customizing configurations and leveraging Mobile Device Management (MDM) solutions, these recipes empower you to seamlessly distribute software and ensure a consistent user experience on iOS and iPadOS devices. Unlock the full potential of your Apple mobile devices with these proven deployment strategies.
- DRC INSIGHT - Cross-Website Tracking Profile
- Google Chrome Managed (iOS)
- iboss iOS Zero Trust Connector (GEN2) Deployment
- Install iOS Apps to Devices Using Apple Configurator
- Lightspeed Smart Filter Deployment (iOS)
DRC INSIGHT - Cross-Website Tracking Profile
Description
The DRC INSIGHT™ Online Learning System (DRC INSIGHT) is a secure, web-based system that supports and enhances the testing experience for students and educators. It is a proven and extremely reliable online testing platform, having successfully delivered tens of millions of online assessments for large-scale state programs, including high-stakes summative assessments (grades 3–8 and high school, end-of-course, and English language learner); interim and formative assessments; classroom diagnostic assessments; and adult education assessments.
On January 2, 2025 DRC Corporation published a Tech Bulletin titled: Cross-Website Tracking and Device Supervision Update for DRC INSIGHT on iPads. In this bulletin they have the following details and the attached Profile - DRC INSIGHT - Cross-Site.fileset.zip is a profile that will allow you to easily implement their instructions.
Important: Sites using iPadOS 16.2 and higher no longer need to enable Cross-Website Tracking as long as the device is supervised, and the domains are relaxed following the instructions below. This can be done using Automated Device Enrollment and MDM software or by using Apple Configurator.
Note:
- Sites using iPadOS 16.1.2 and below must still enable Cross-Website Tracking.
- This is only applicable for WIDA testing content on iPadOS.
- Supervision must be enabled for all devices regardless of iPadOS version
Ingredients
-
FW Central / Anywhere
| DRC INSIGHT Profile |
 |
Directions
If you do not have a custom port value in DRC INSIGHT then simply download the profile and add it as a Fileset and deploy it.
If you do use a custom port that you defined during COS - SD installation you would need to change one of the entries in the Cross-Stite Tracking Prevention Relaxed Domains. To do this you would use iMazing Profile Editor to either create your profile with the Domains payload and configure it as outlined below or you can import the Fileset attached, and then export the profile and edit it and then bring that profile back into FileWave.
It's very important that you not edit the profile in FileWive Central or Anywhere because the Cross-Site Tracking Prevention Relaxed Apps section is not in the FileWave Profile Editor as of FileWave v15.5.1 so it would cause that field to be cleared, but FileWAve v16.0.0 in February 2025 will include it so that you do not need to do anything special. We discuss this in FileWave Apple Profile Editor Explained.
Details about the Profile
To implement this profile the device, enroll the iPad in your MDM, and do the following:
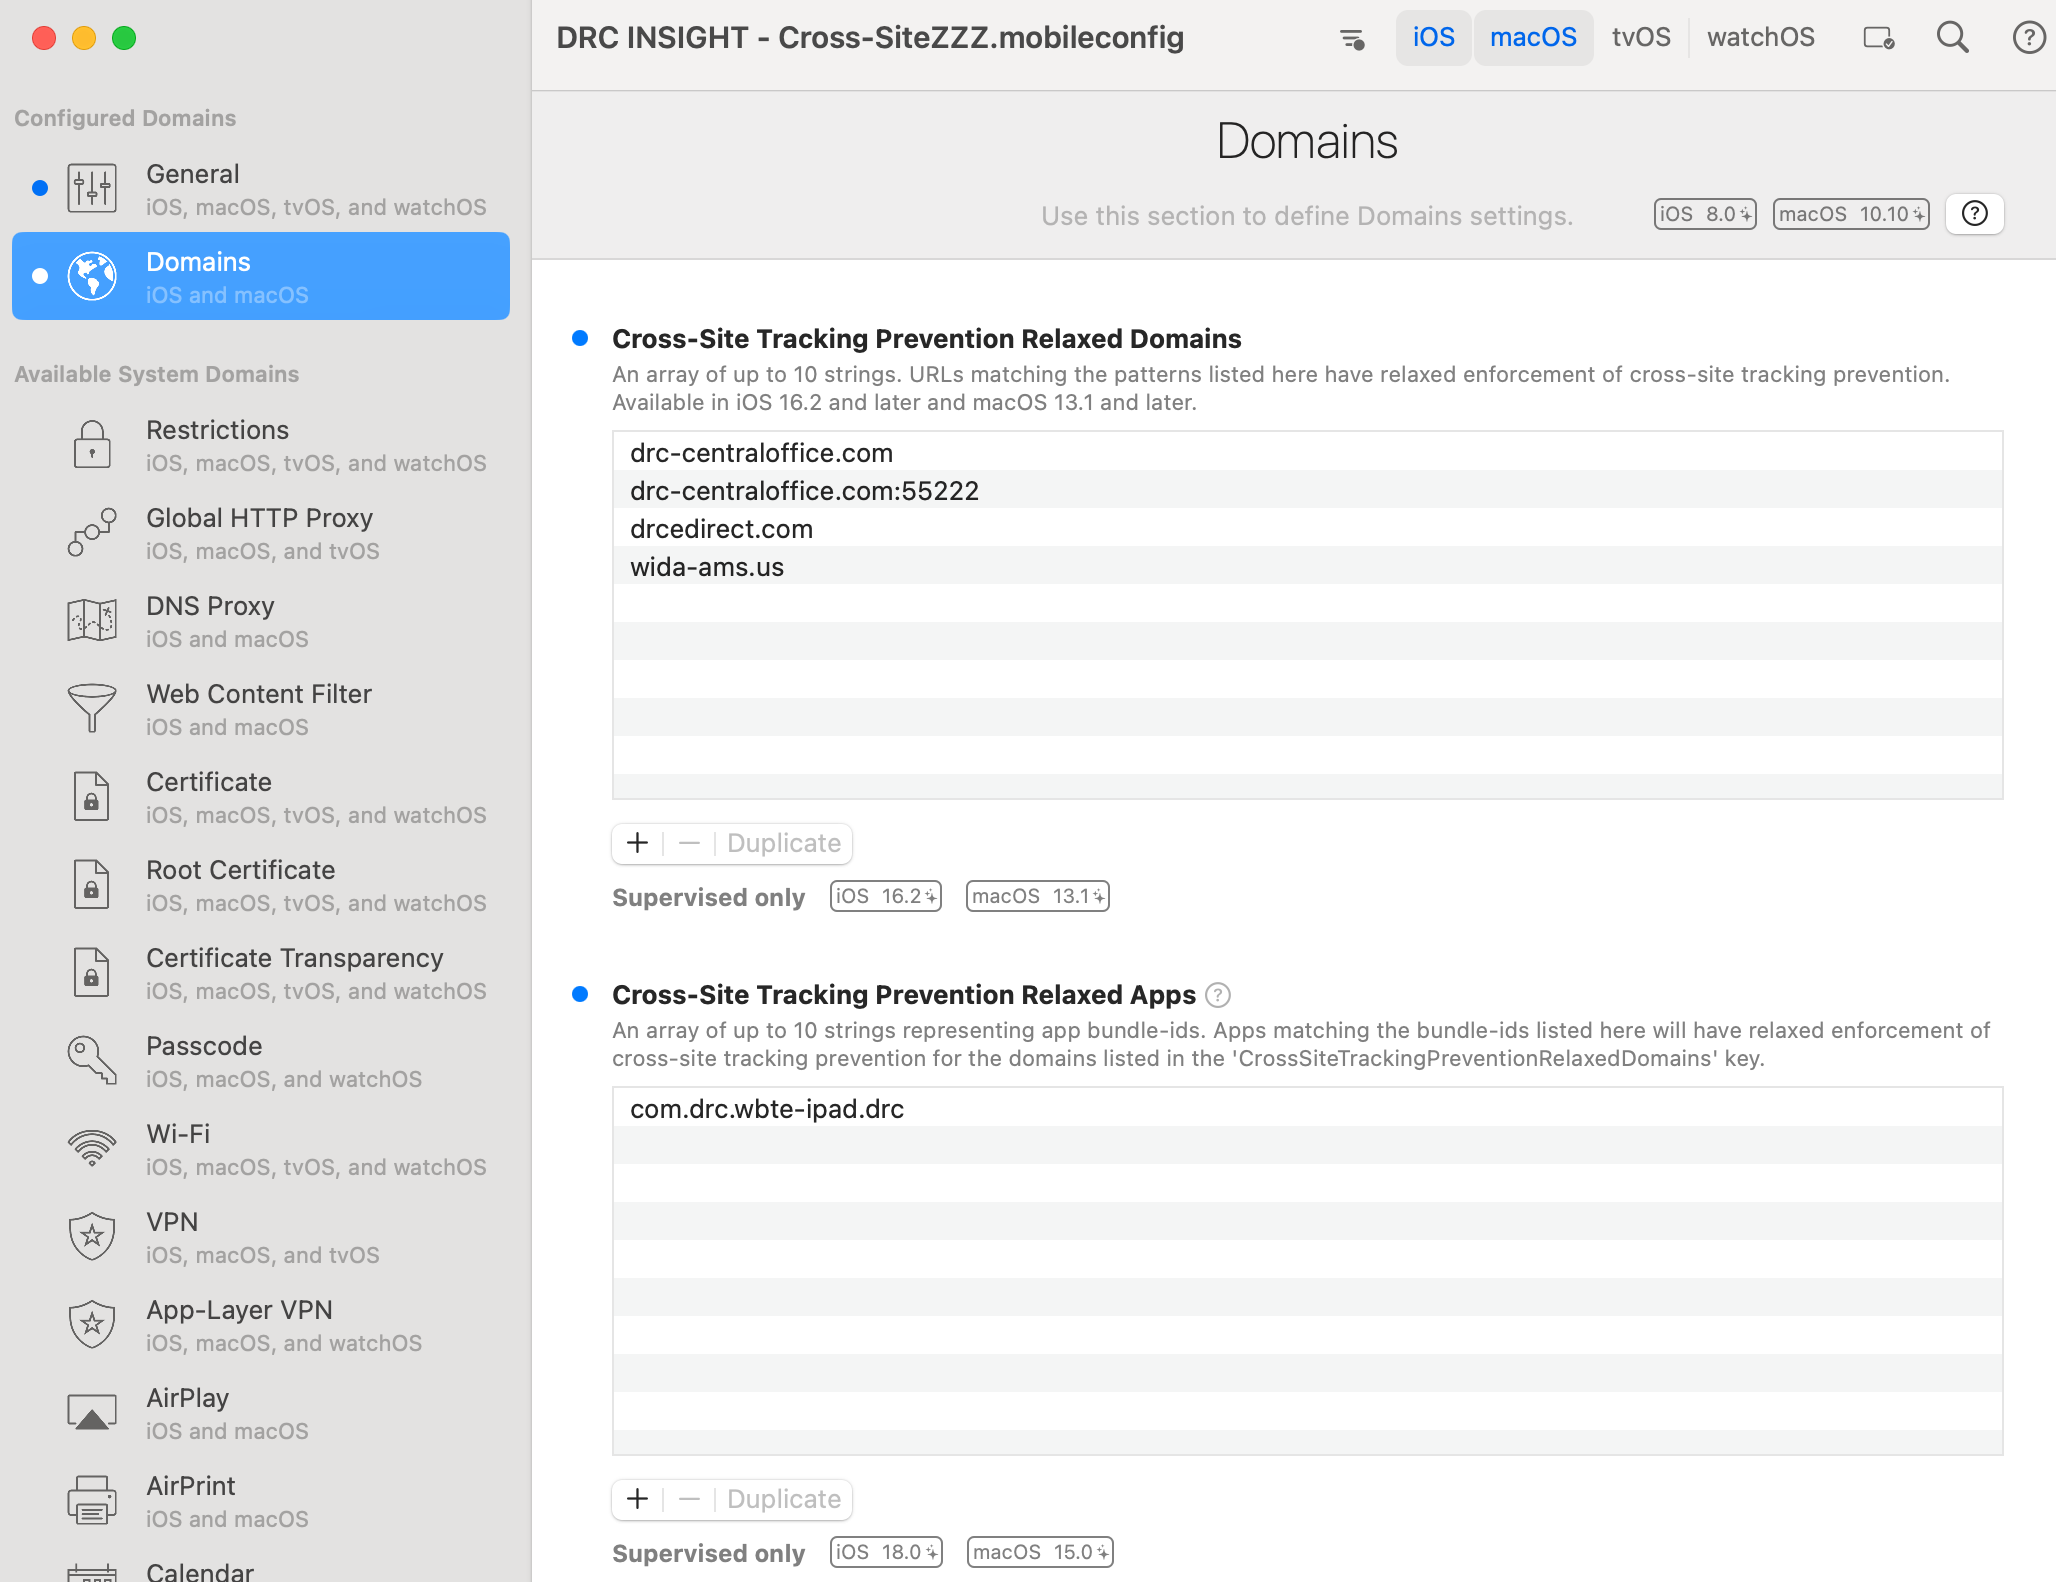
- In the Domains payload option within iMazing Profile Editor, locate the Cross-site tracking relaxed for domains field.
- Enter the following domains to be relaxed:
- drc-centraloffice.com
- drc-centraloffice.com:55222
- Note: 55222 is the default port value. Use the same port that you used during COS - SD installation if you used a custom port.
- drcedirect.com
- wida-ams.us
- In the Apps payload option within your MDM, locate the Cross-site tracking relaxed for apps field. If you do not see this field, you will have to create a custom profile and upload it to your MDM. Enter the following app id to be relaxed:
- com.drc.wbte-ipad.drc
You no longer need to enable Cross-Website Tracking for testing. However, if you receive a content retrieval error message when you begin a test and think the domains may not be relaxed, enable Cross-Website tracking in the iPad settings and are able to begin a test then the domains have not been relaxed. If you still receive a content retrieval error after enabling Cross-Website Tracking, reach out to DRC for assistance.
Below is what this profile looks like in iMazing Profile Editor so you can see the profile payload.
If you create the profile yourself then you can drag and drop it in to the Filesets section of FileWave Central or upload it in FileWave Anywhere and it will work fine. You cannot edit it in the FileWave Profile Editor or you will strip it of the Relaxed Apps.
Related Content
Google Chrome Managed (iOS)
Description
Chrome browser user experience may be managed on multiple device types by way of a Google Management Token available through the Google Admin Console.
Details on obtaining a token and Chrome management can be found in the following KB:
The directions below describe applying the token to iOS devices.
Ingredients
- Chrome VPP App Fileset (via Apple Business or School Manager)
- Chrome Browser Enrolment Token (only available via Google Admin Console)
Directions
Steps 1 and 2 may be skipped if an iOS Chrome VPP Fileset has already been created.
- If not created already, 'purchase' necessary quantities of Google Chrome from the Apple App Store via Apple School or Business Manager
- Assign the App to the FileWave server, with the Apple management account, then synchronise VPP through FileWave Preferences
- From the created VPP App Fileset, open the Fileset and edit the Configuration settings
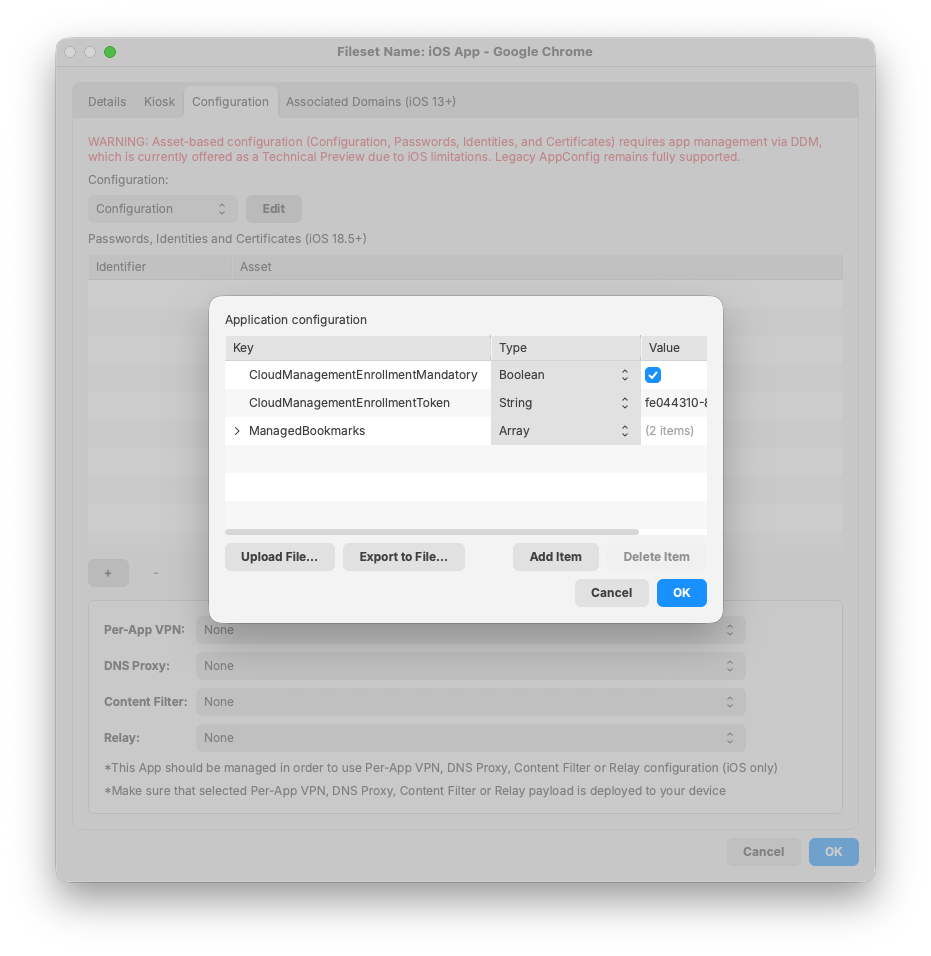
- From the Configuration Settings view, under the Configuration section, from the drop down, select Configuration then Edit.
A window will pop up. Add key/value pairs as required.
Google Managed Token:
- Key: CloudManagementEnrollmentToken
- Type: String
- Value: (Copied token value from the Google Admin Console)
Other keys and values could be applied as shown in the diagram below. However, once managed, Google Admin Console may then be used to set configuration.
With the Fileset configured, it may then be assigned with devices and managed through the Google Admin Console.
iboss iOS Zero Trust Connector (GEN2) Deployment
Description
Need to deploy iboss iOS Zero Trust Connector to your iOS/iPadOS devices? Here's an example deployment for completing this configuration in FileWave to block restricted sites in Safari and on a separate browser like Chrome using the Per-App VPN profile.
Ingredients
- Your completed configuration set up with iboss
- FileWave Anywhere/Central Profile Editor
Directions
- Bring in the iboss iOS Zero Trust Connector app into your FileWave server as you would for a usual VPP application: Adding licensed applications to your FileWave Server
-
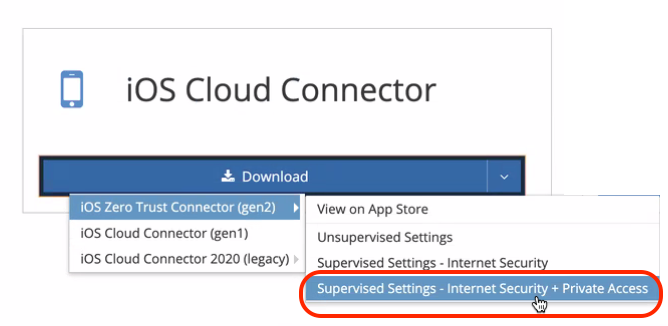
For this complete example that allows you to filter web traffic for both the built-in Safari browser as well as filtering an extra browser like Chrome, you should search for this profile, which is available for download in your iboss portal. We specifically need the 'Supervised Settings - Internet Security + Private Access' profile.

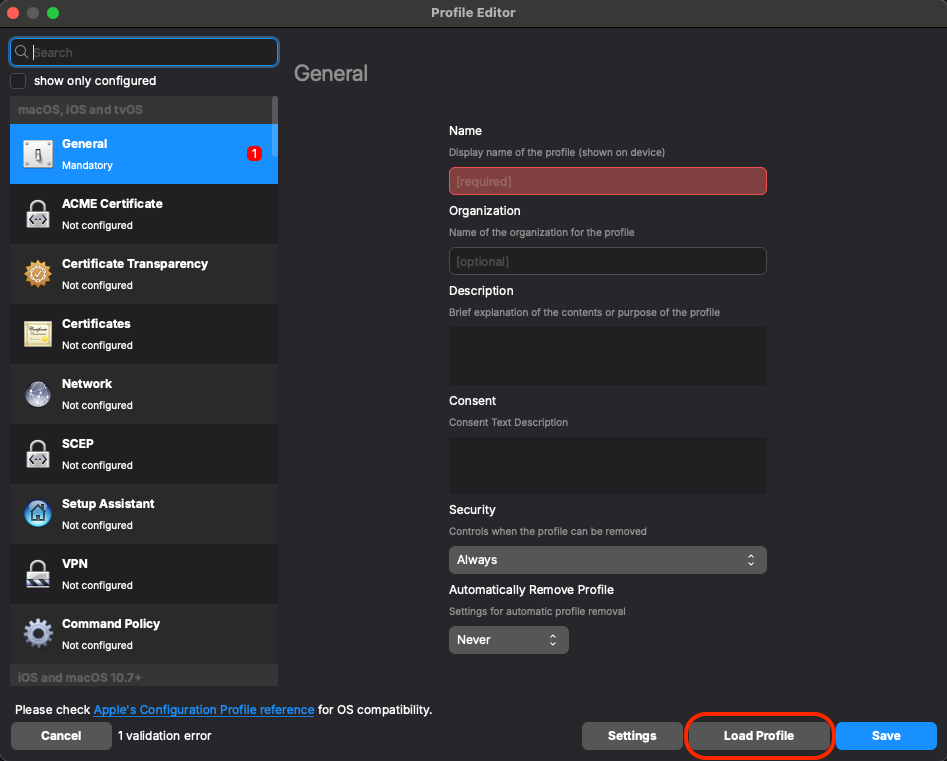
- Now that you have it downloaded, go back into FileWave Admin. In FileWave Central we'll find our next step in Filesets > New Fileset > Apple > Profile and we'll want to use the 'Load Profile' button to import the pre-configured .mobileconfig file:

- Confirm that you have a certificate and your DNS Proxy profile is correctly configured. To also add web filtering on a separate browser app like Chrome, you'll want to edit or just confirm the Per-App VPN payload configuration in your profile.
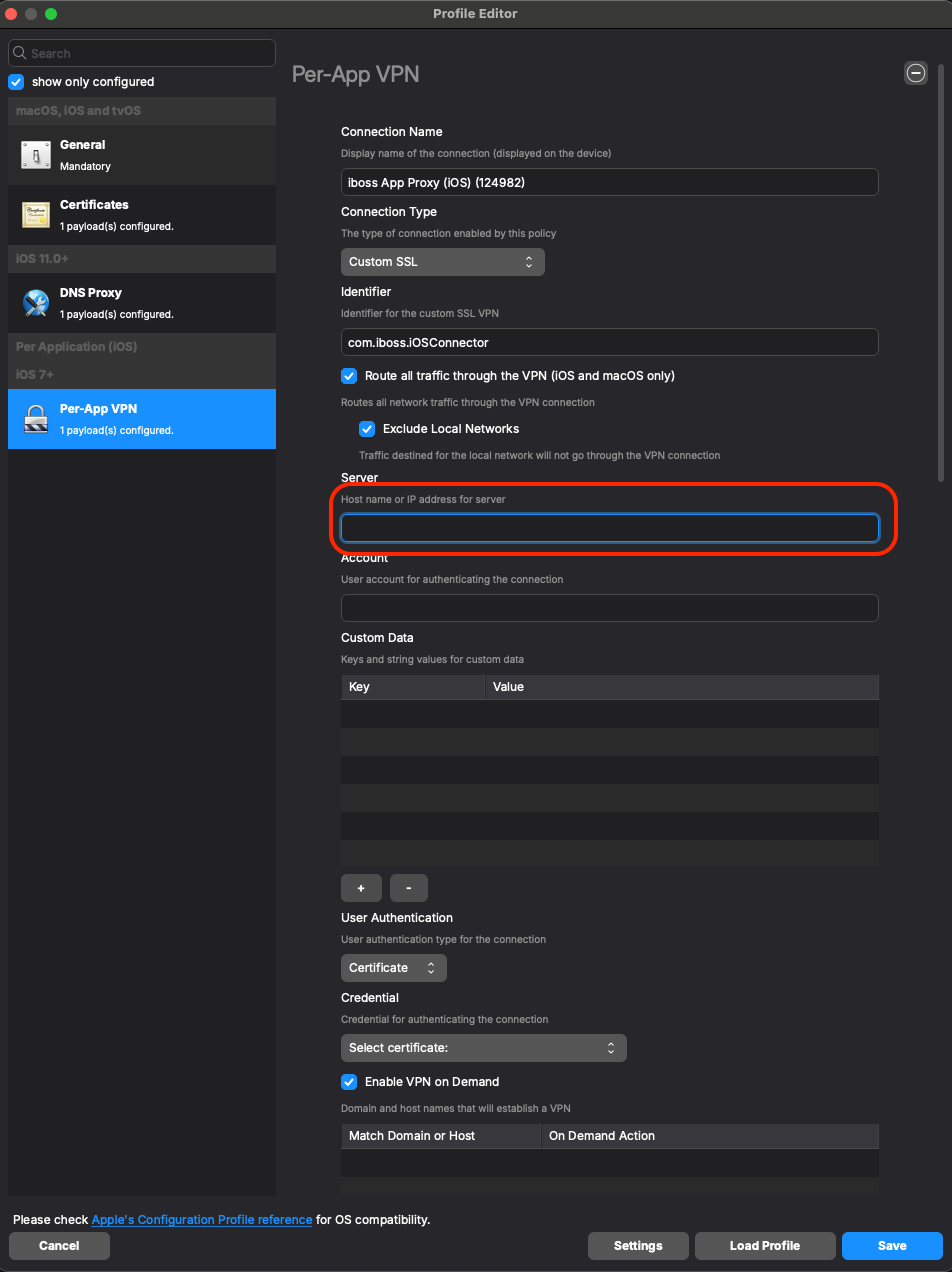
Here's an example of the configuration settings you'll want to use. Usually, iboss profiles will come with the required fields filled. But you'll want to check things like "Route all traffic through the VPN" and "Exclude Local Networks" if that is your intention:
- For the 'Server' field, you should leverage your specific “*.ibosscloud.com cluster FQDN” - it should come preloaded in there. If you need help finding it, please reach out to iboss.
- For the 'Account' field, depending on what you have configured in your DNS Proxy payload, you may want to utilize a parameter based on what you are using in your environment for authenticating. If there is no user account being used to authenticate the connection, you can leave the field blank.
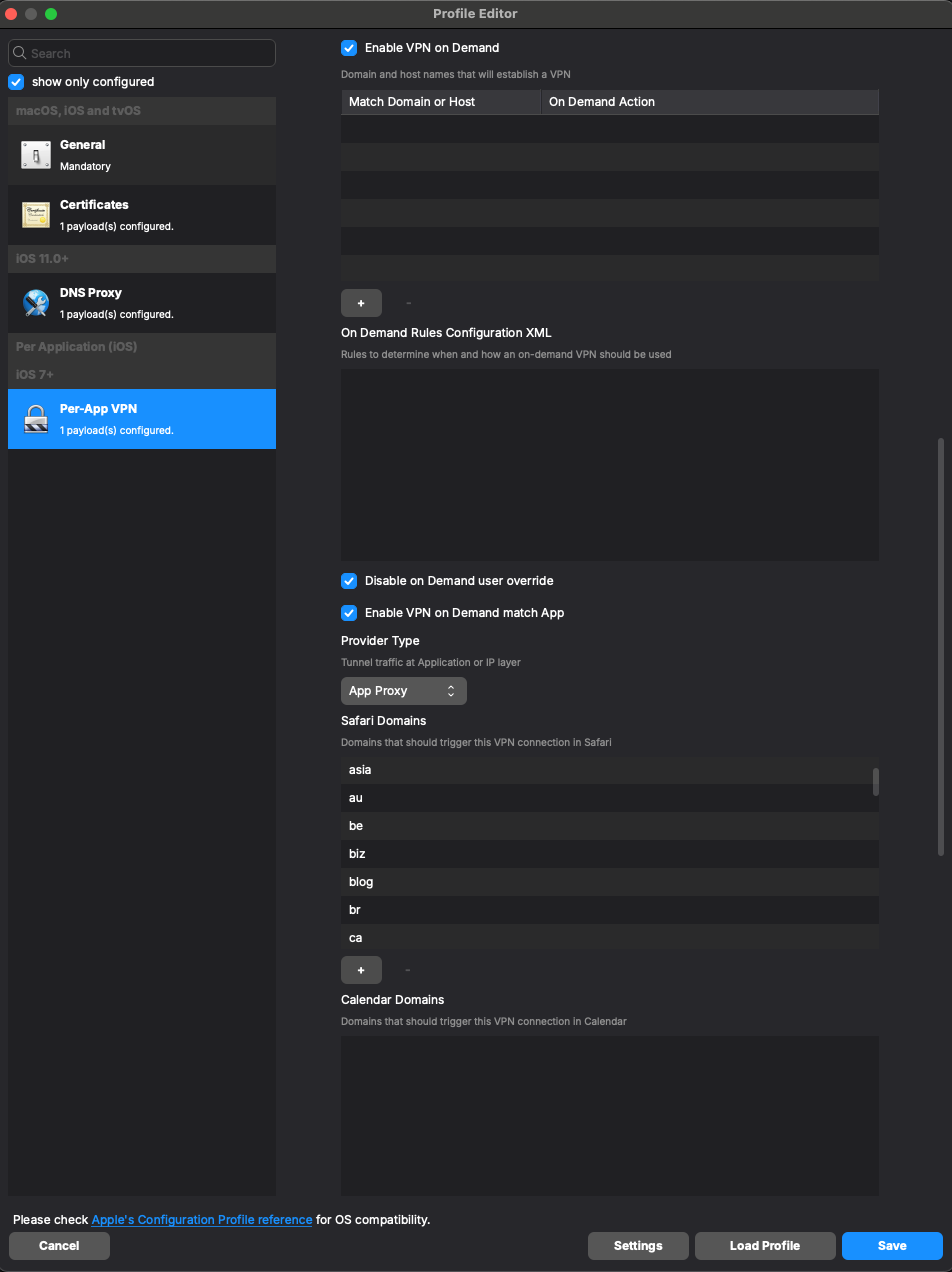
Please ensure your settings match the ones in the example here. However, your 'Safari Domains' may differ from the default depending on what your profile already includes from iboss. If it already includes a list of domains, just leave it as iboss configured it and move on:


- For the 'Server' field, you should leverage your specific “*.ibosscloud.com cluster FQDN” - it should come preloaded in there. If you need help finding it, please reach out to iboss.
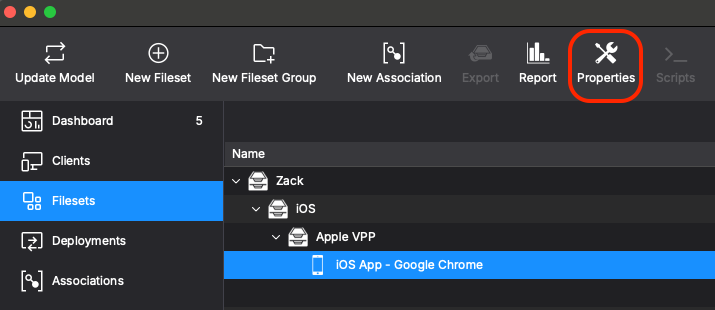
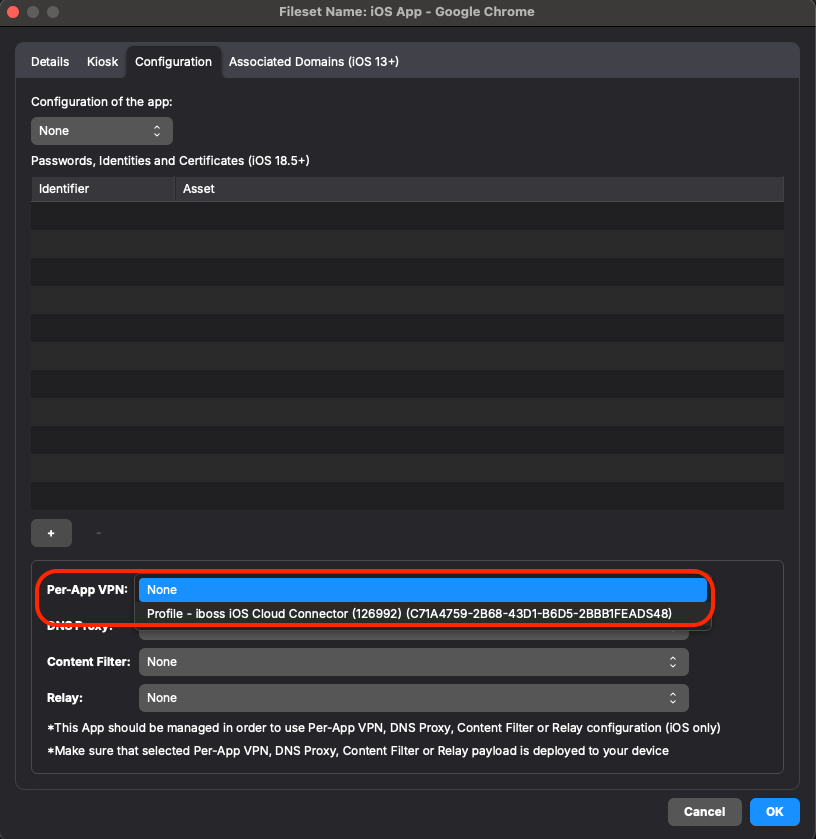
- Lastly, this all comes together by adding the configuration to your browser of choice. Once again, we are using Google Chrome as our example here. Find your VPP app for Google Chrome in your filesets. Select it and use the 'Properties' button or double-click the fileset to open up the fileset's Properties:

- Then in the 'Configuration' tab, under Per-App VPN, you should now be able to click it and see your configured profile. Select and choose your iboss cloud connector profile you just finished configuring in the earlier steps. Then, click OK to save:

Make sure you have the three things deployed to your test device - the iboss zero trust connector VPP app, the iboss profile you configured and the Google Chrome VPP app fileset with the proper "Per-App VPN" profile selected in it. Update Model to save your work and test with your device to confirm that sites from your blocked list are indeed blocked on the device.
Related Content
Install iOS Apps to Devices Using Apple Configurator
Description
Although installation of Apps on devices are usually managed using VPP, it is possible to push Apps using Apple Configurator, including VPP purchased Apps.
Ingredients
- Apple Configurator 2 on a macOS device
- Apple ID or ASM/ABM account
- Purchased Apps
If devices are ADE(DEP) enrolled with an enrolment profile configured to deny device pairing, unless a supervising certificate was provided at enrolment, devices cannot be connected to macOS devices to action any of this.
Directions
Apple have their own KB on this process:
Add apps to a device in Apple Configurator
On opening Apple Configurator, an Apple ID must be used to sign into an account which has purchased apps. This account could be either an Apple Business or School Management account or a personal ID, just use the menu drop down to choose to sign in:

After authenticating, a 2FA prompt should appear:
For Apple Business or School accounts, a prompt to select a location will be presented once authentication has been successful:

This is a VPP location as created within the Apple Business or School account.
Select the appropriate location (you may only have one).
On choosing to select Apps to push to devices, the window should now show Apps purchased by that account (location) and show how many copies are available:
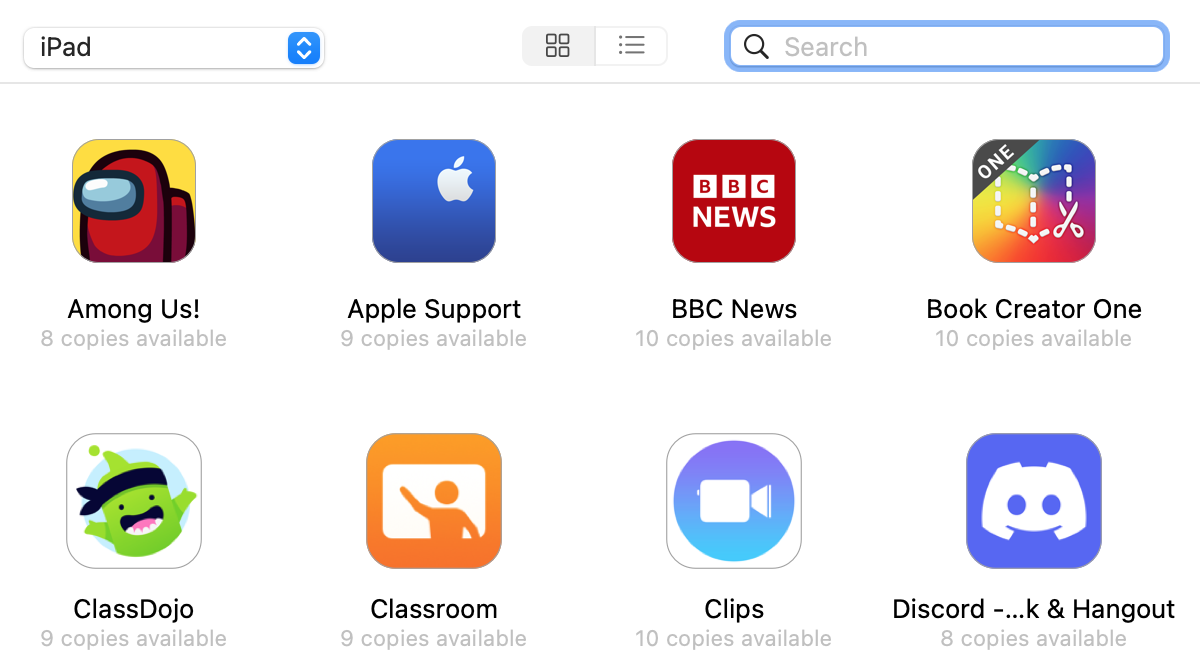
More than one App may be selected.
The differing steps should be reported through a pop-up window:
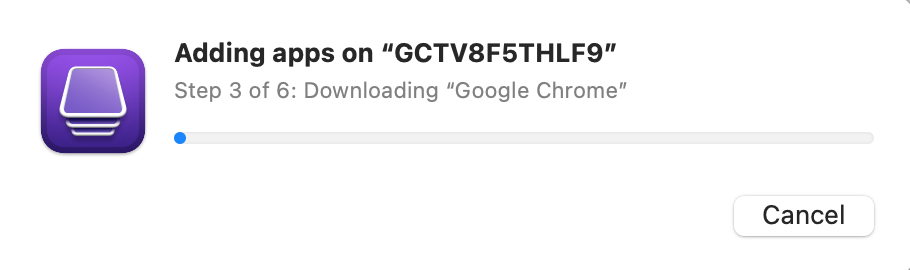
Note the download is to the macOS device and will be followed with a sync:
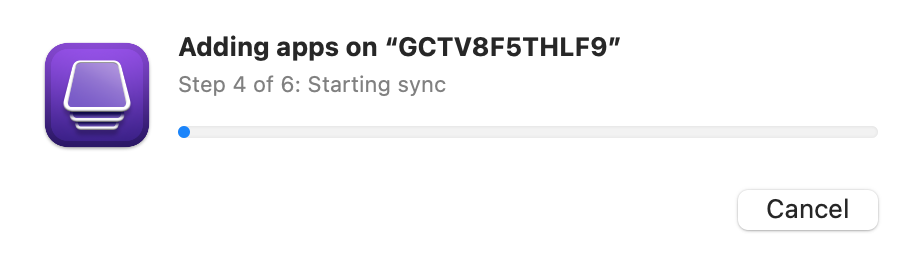
Shortly after, the App icons should appear showing the download process and then installation should be completed.
Lightspeed Smart Filter Deployment (iOS)
Description
Need to deploy Lightspeed Smart Filter along with your configurations. FileWave has got you covered in this step-by-step guide to creating the required Profile to deploy to your iOS devices.
Ingredients
-
FileWave Anywhere/Central Profile Editor
Web Content Filter - In creating a Web Content Filter within FileWave Central it changes the UDID and is unsuccessful in deployment. The issue can be resolved by re-creating the Web Content Filter in FileWave Anywhere as a workaround. The issue should be resolved in the next release. See Known Issues
Directions
-
Open FileWave Admin
-
Select Filesets
-
Create New Mobile Fileset
-
Select Profile
-
Enter the name of the Profile, i.e. Lightspeed Filter
-
Select Web Content Filter (Supervised Only) payload
-
Select and enter the following:
-
Filter Type: Plug-in
-
Filter Name: Lightspeed Filter
-
Identifier: com.lightspeedsystems.iosrelayfilter
-
User Name: %auth_username%@your.domain.org or %email%
-
Filter Webkit Traffic: enable
-
Filter Socket Traffic: enable
-
Custom Data:
-
Key: UDID - Type: String - Value: %device_id%
-
Key: customerID - Type: String - Value: your_lightspeed_ID

-
-
-
Click Save
-
Assign/associate to test device
-
Update Model
Always test web content filtering with one or two devices before mass deployment. This ensures the filter is working properly and has configurations set to allow your devices to communicate back to your FileWave services.
Lightspeed Smart Agent for macOS devices
Looking to deploy your Lightspeed Smart Agent for macOS devices? Review the KB article here: Lightspeed Smart Agent Deployment (macOS 2023).
Needing to deploy Lightspeed for macOS using Certificate Manager? Review the KB article here: Lightspeed Smart Filter Deployment (macOS v2.3.1+ using Certificate Manager)