| [](https://kb.filewave.com/uploads/images/gallery/2025-05/MqXaAI0Xp4FCBvU7-csctccprofile.png) | [](https://kb.filewave.com/uploads/images/gallery/2025-05/80PA0YUUqnXTnj4u-check-profileedit.png) | [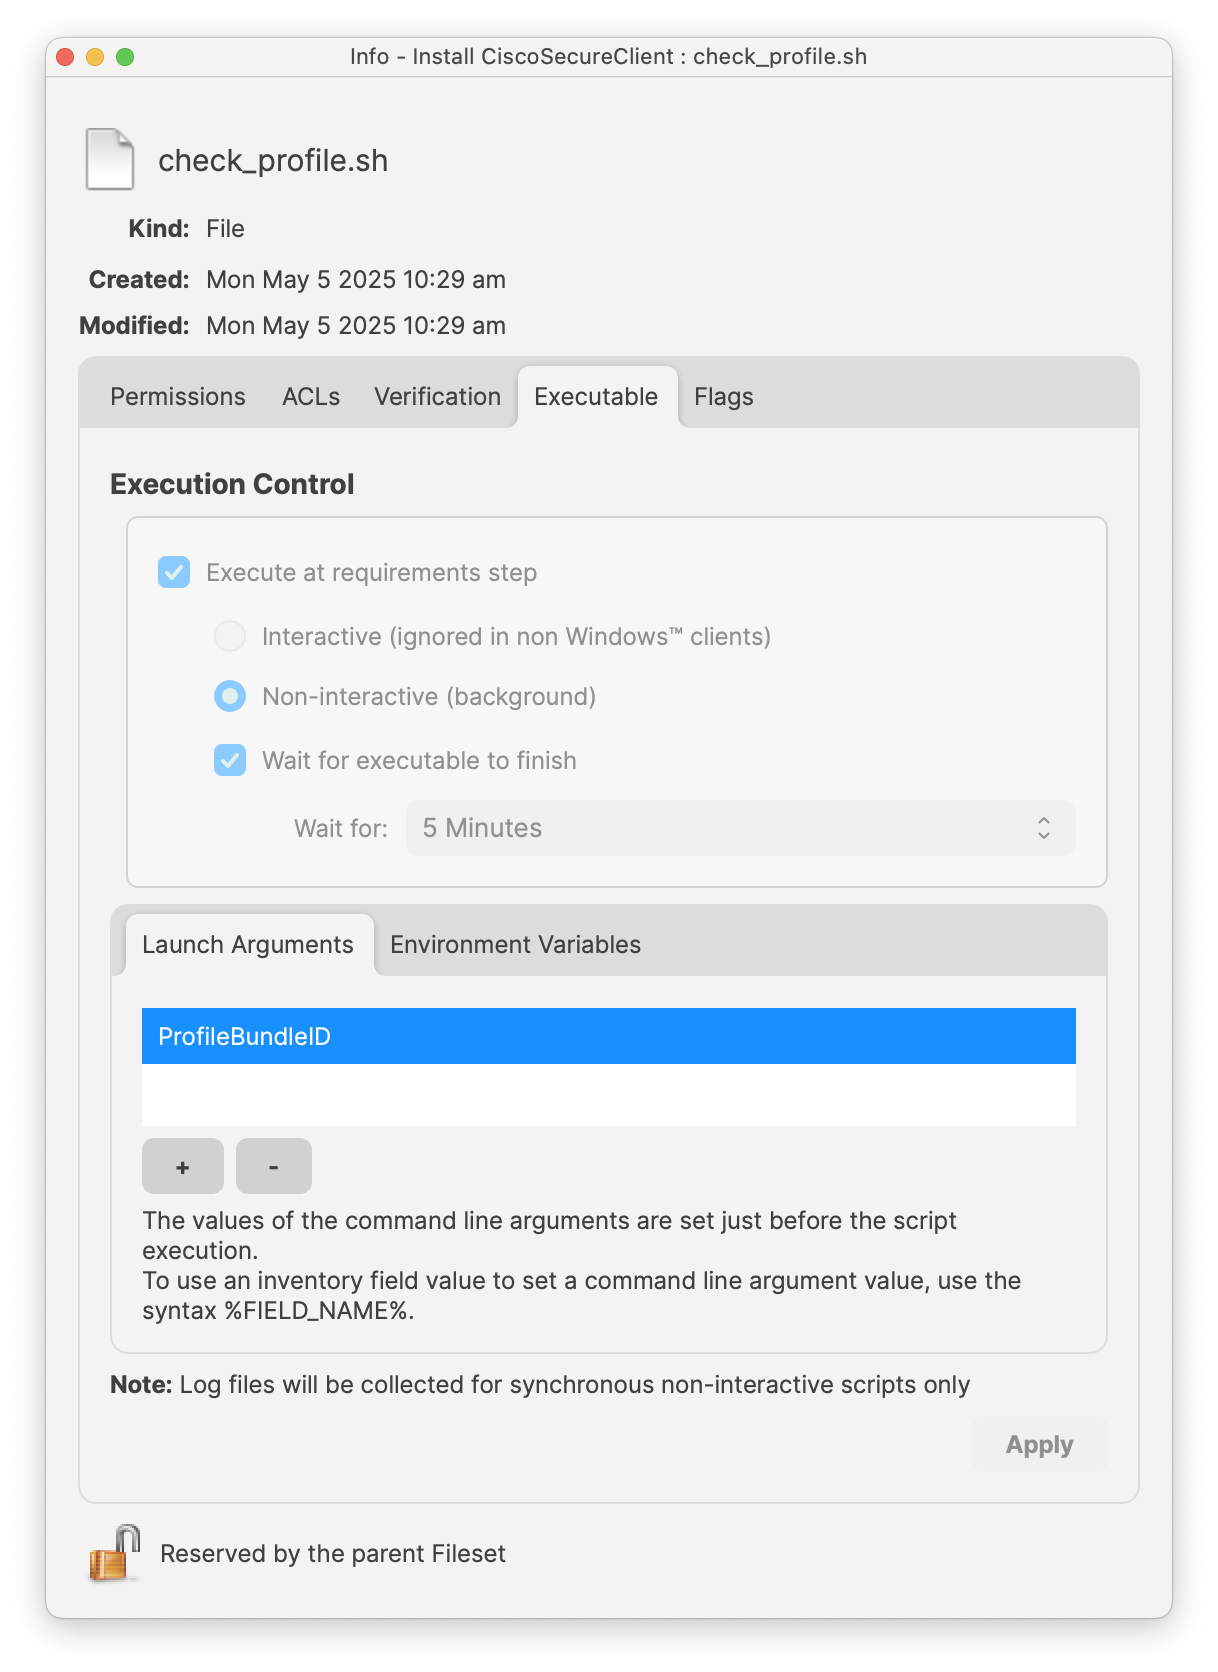](https://kb.filewave.com/uploads/images/gallery/2025-05/nz99LgHgmP1S9Fny-bundleid.png) |
Last tested with **ComicLife 3.5.8**
| ## Ingredients - FileWave Central / Fileset Magic - Comic Life app installer from plasq ([http://plasq.com/apps/comiclife/](http://plasq.com/apps/comiclife/)) ## Directions 1. Start the initial Fileset Magic capture. 2. Install Comic Life - Unzip the current installer. - Move Comic Life into the Applications folder. - Drag or import the app from the Applications folder into the Fileset. 3. Launch Comic Life. - Accept License - Select "Register" - Enter Org name - Enter Serial Number 4. Close Comic Life. 5. Open Comic Life again. - When prompted about automatic updates and staying in touch, choose the settings your organization wants deployed. 6. Close Comic Life again. 7. Run the second Fileset Magic scan to capture the changes. - Move registration and preference items to all users when they should apply to every user on the Mac. | [](https://kb.filewave.com/uploads/images/gallery/2023-07/UIrCxElAMnYo5EUJ-image.png)  [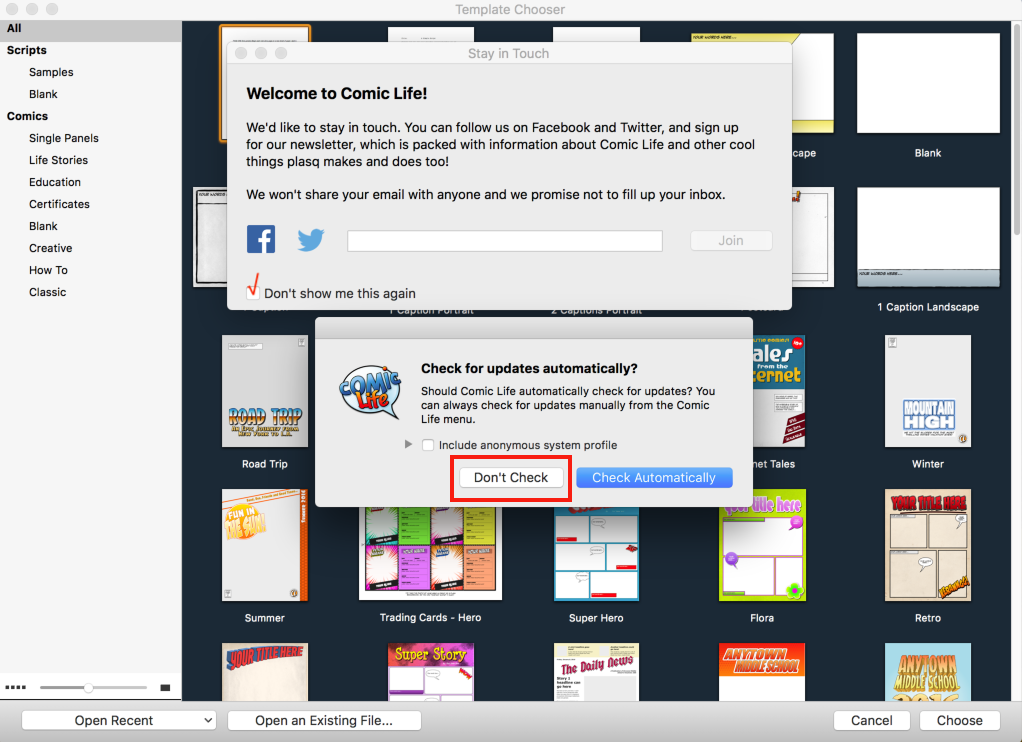](https://kb.filewave.com/uploads/images/gallery/2023-07/dAe0a3ib7koVBAvF-image.png) |
**Note:** Please log in to your CrowdStrike portal and download the latest TCC profiles. The screenshots below are provided for reference if you choose to create the TCC profiles manually.
Falcon Configuration Profile for Sonoma and earlier:Sonoma and later TCC Profile
| **Security & Privacy Payload:** - Bundle ID: - com.crowdstrike.falcon.Agent - com.crowdstrike.falcon.App - Code requirement: - identifier "com.crowdstrike.falcon.Agent" and anchor apple generic and certificate 1\[field.1.2.840.113635.100.6.2.6\] /\* exists \*/ and certificate leaf\[field.1.2.840.113635.100.6.1.13\] /\* exists \*/ and certificate leaf\[subject.OU\] = X9E956P446 - Access to service: - Full Disk Access | [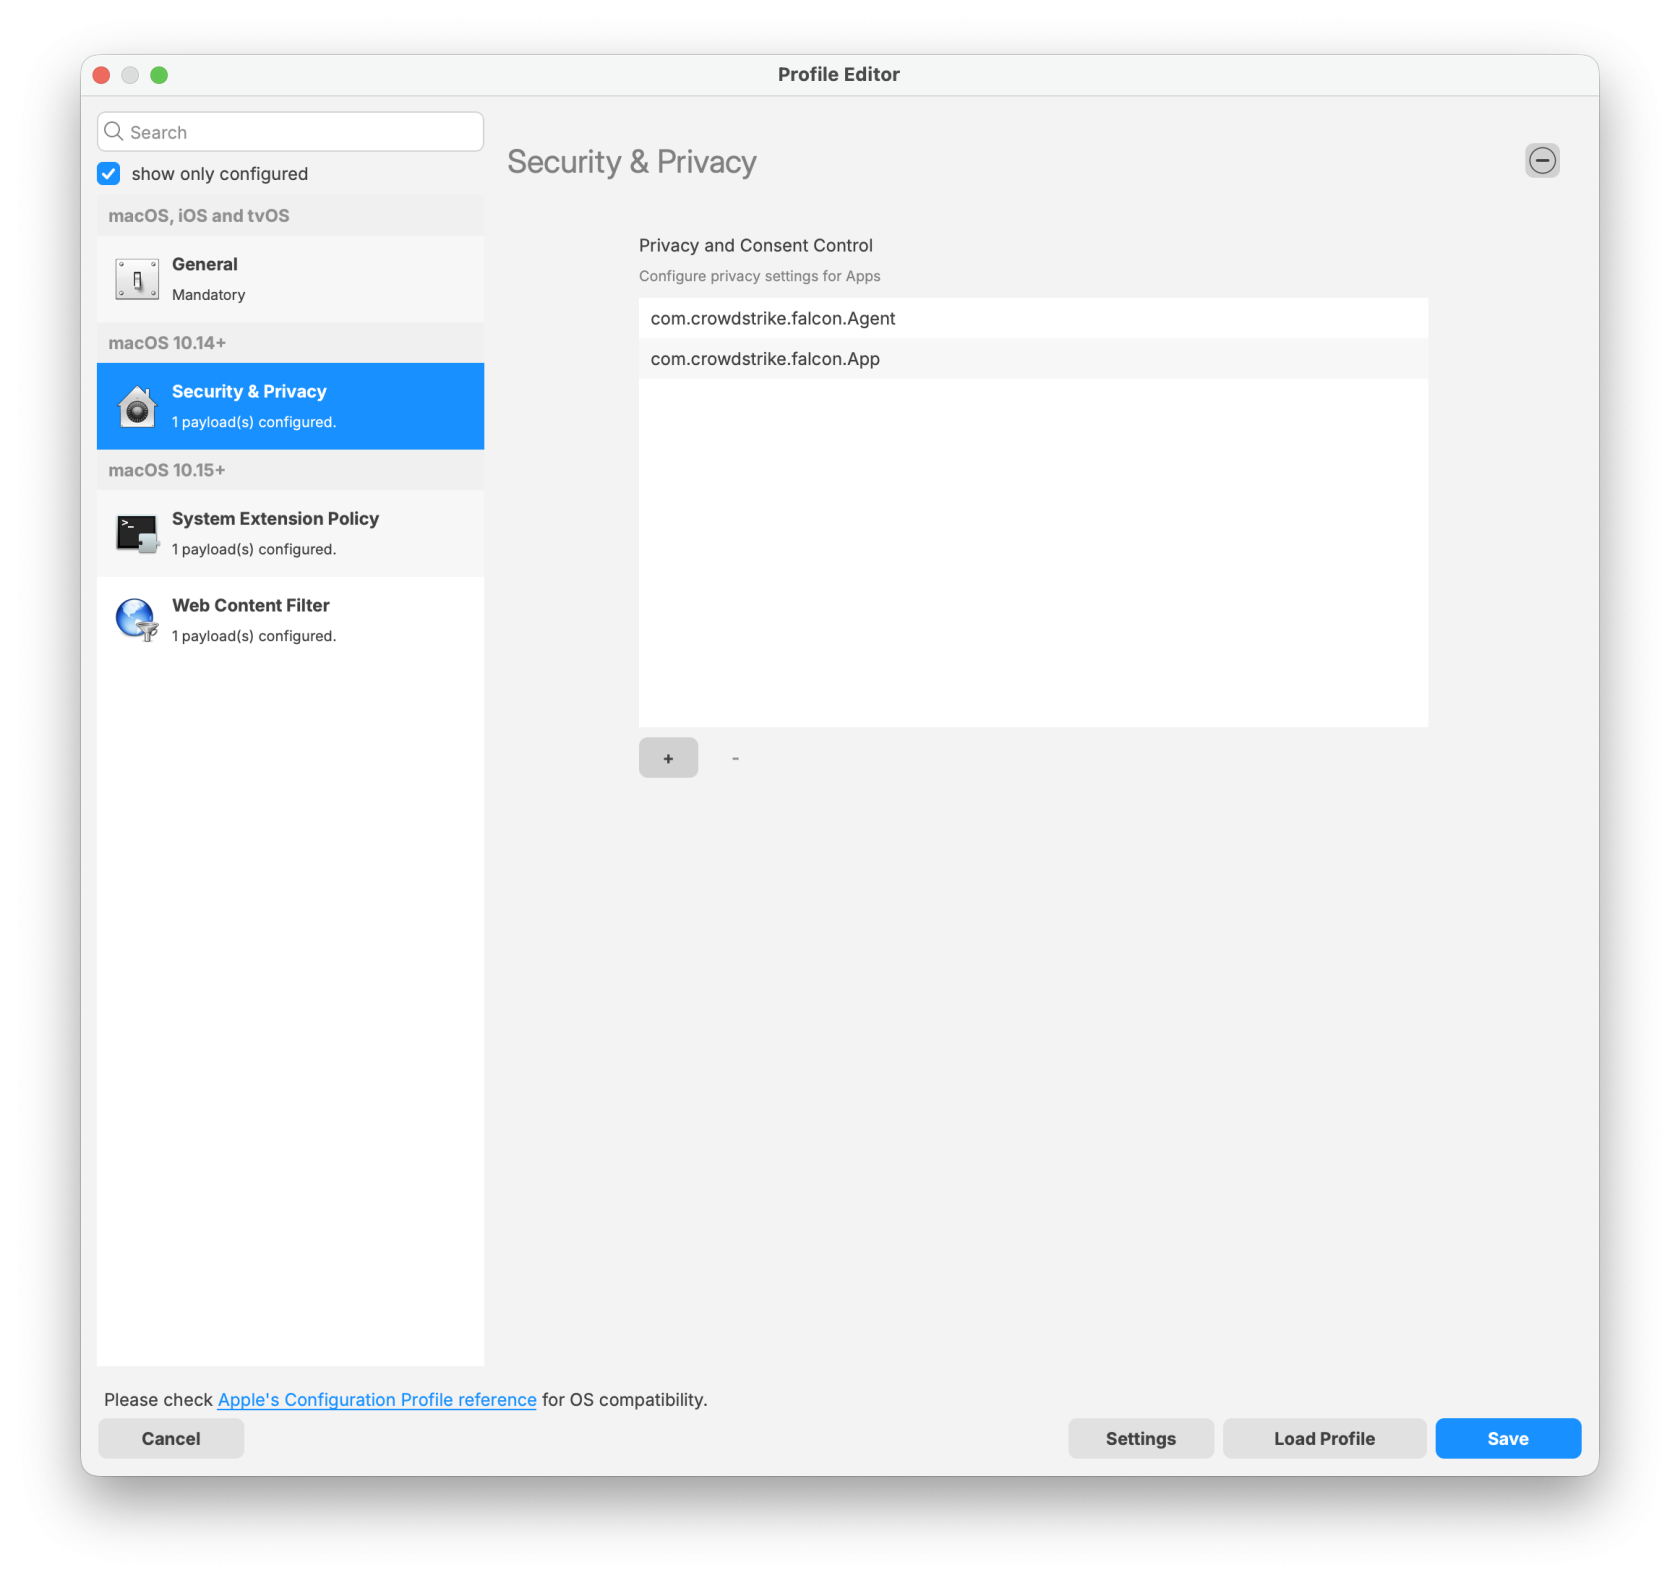](https://kb.filewave.com/uploads/images/gallery/2026-01/VeAguvwWKb3N5EDD-falcon-configuration-profile-for-sonoma-and-earlier0.png) |
| - Agent configuration | [](https://kb.filewave.com/uploads/images/gallery/2026-01/xira0rGVgXkX4fu3-agent.png) |
| - App configuration | [](https://kb.filewave.com/uploads/images/gallery/2026-01/CsEm4mpYjMi28rCq-app.png) |
| **System Extension Policy Payload:** - Check box 'Can approve additional system extensions' - Allowed Team Identifiers: - X9E956P446 - Allowed System Extensions - com.crowdstrike.falcon.Agent - Allowed System Extension Types: - Network - Endpoint security | [](https://kb.filewave.com/uploads/images/gallery/2026-01/svMgQ95jWKmAiTGm-falcon-configuration-profile-for-sonoma-and-earlier1.png) |
| **Web Content Filter Payload:** - Name: Falcon - Identifier: com.crowdstrike.falcon.App - Filter Network Traffic - Socket Filter Bundle Identifier: - com.crowdstrike.falcon.Agent - Socket Filter Designated Requirement: - identifier "com.crowdstrike.falcon.Agent" and anchor apple generic and certificate 1\[field.1.2.840.113635.100.6.2.6\] and certificate leaf\[field.1.2.840.113635.100.6.1.13\] and certificate leaf\[subject.OU\] = "X9E956P446" | [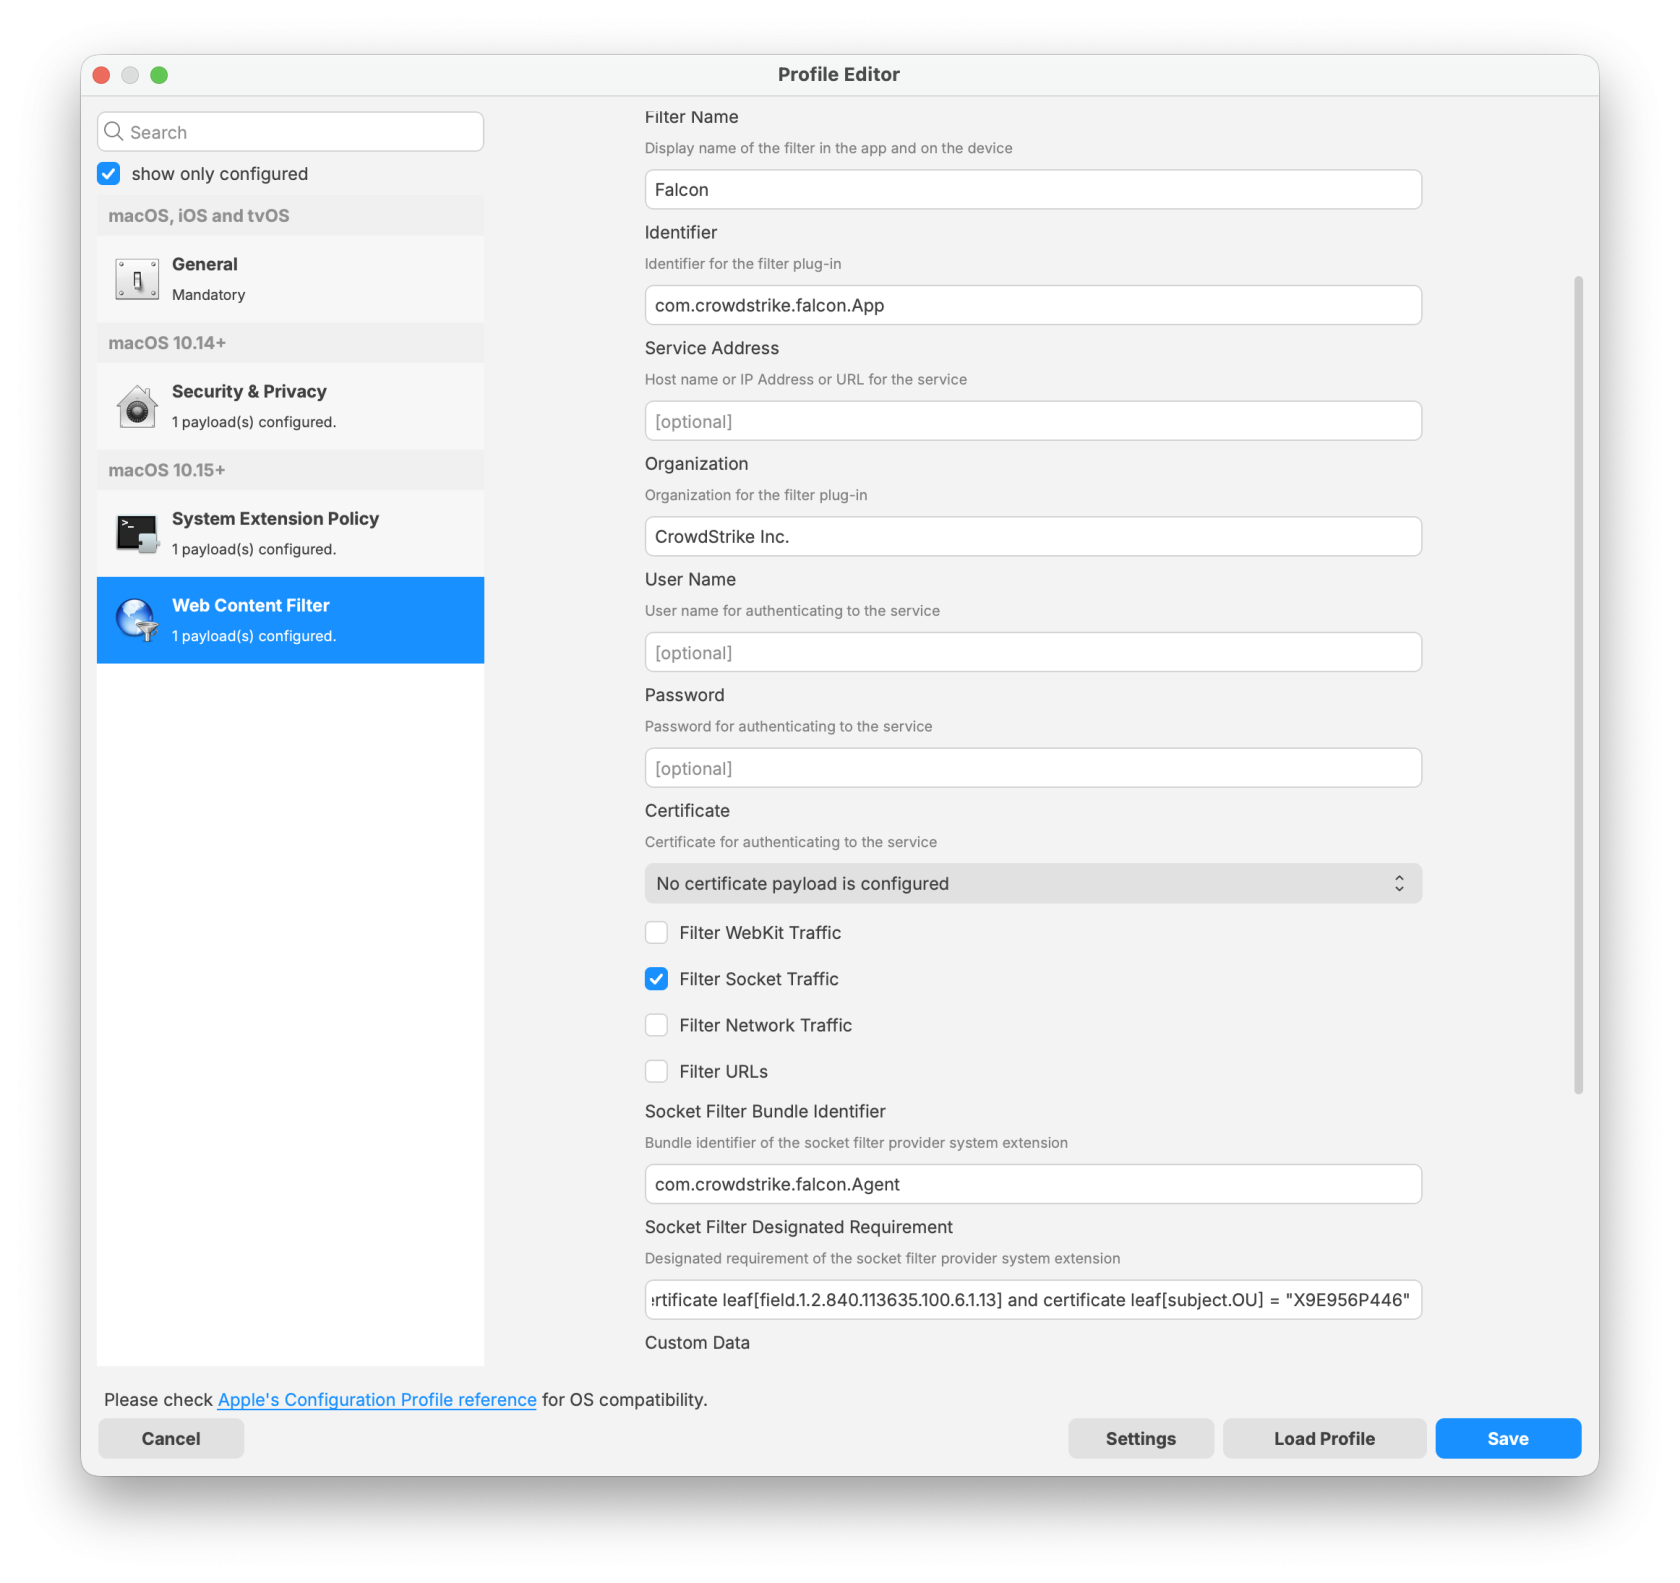](https://kb.filewave.com/uploads/images/gallery/2026-01/plA53wMwJbY0UA1x-falcon-configuration-profile-for-sonoma-and-earlier2.png) |
Sequoia and later TCC Profile
| **System Extension Policy Payload:** - Team Identifiers: - X9E956P446 - Non Removable From UI System Extensions: - com.crowdstrike.falcon.Agent | [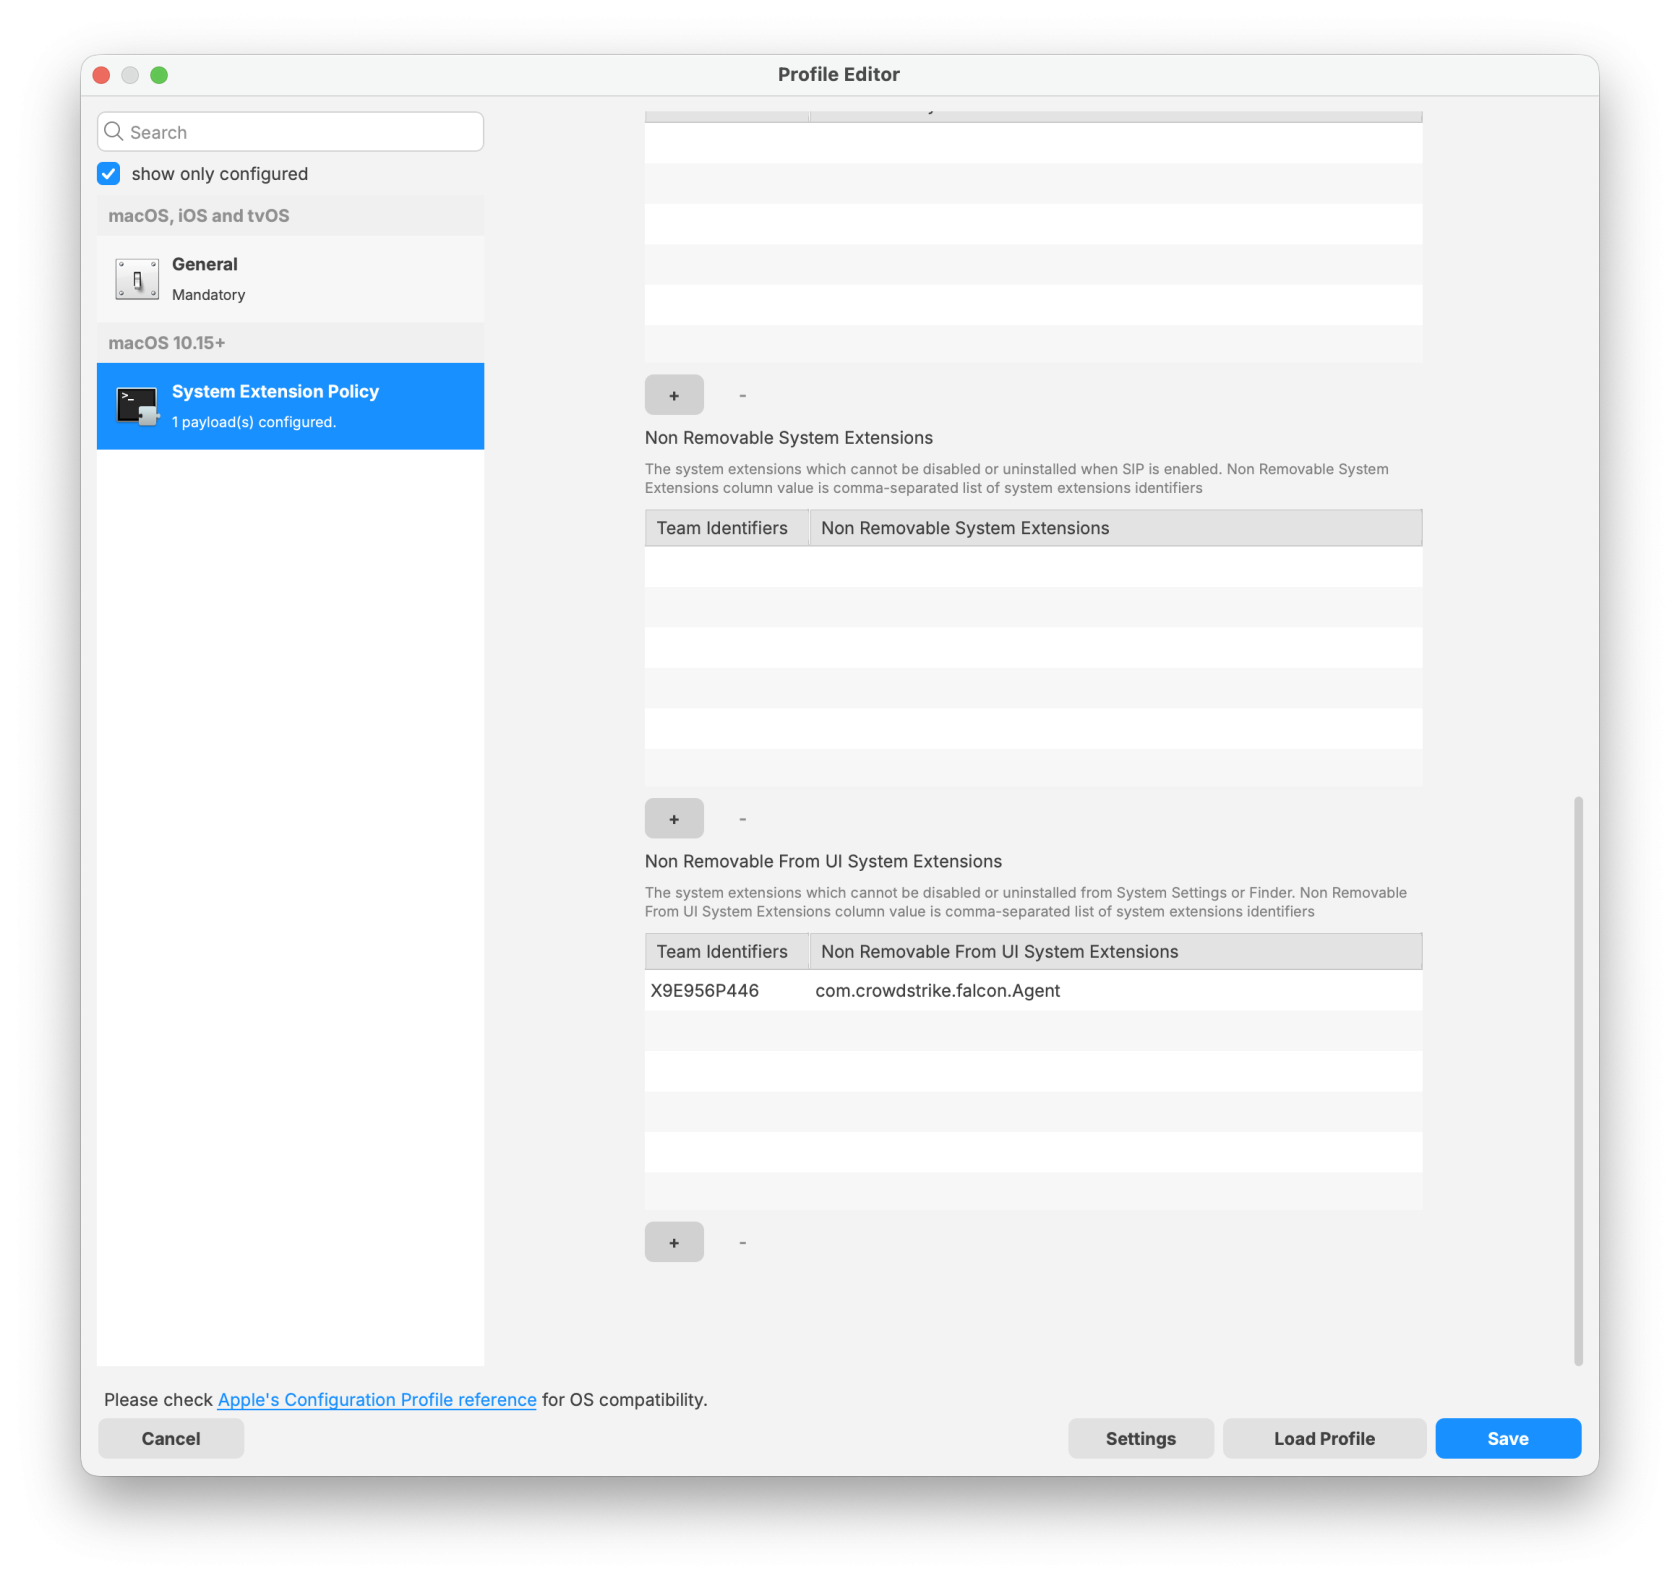](https://kb.filewave.com/uploads/images/gallery/2026-01/6PJA0gxFXERWCDAl-falcon-configuration-profile-update-for-sequoia-and-later0.png) |
**Note:** Please log in to your CrowdStrike portal and download the latest PKG installer to ensure a successful import and deployment. The PKG installer must be used along with the two required scripts: the Requirement script and the Activation script.
[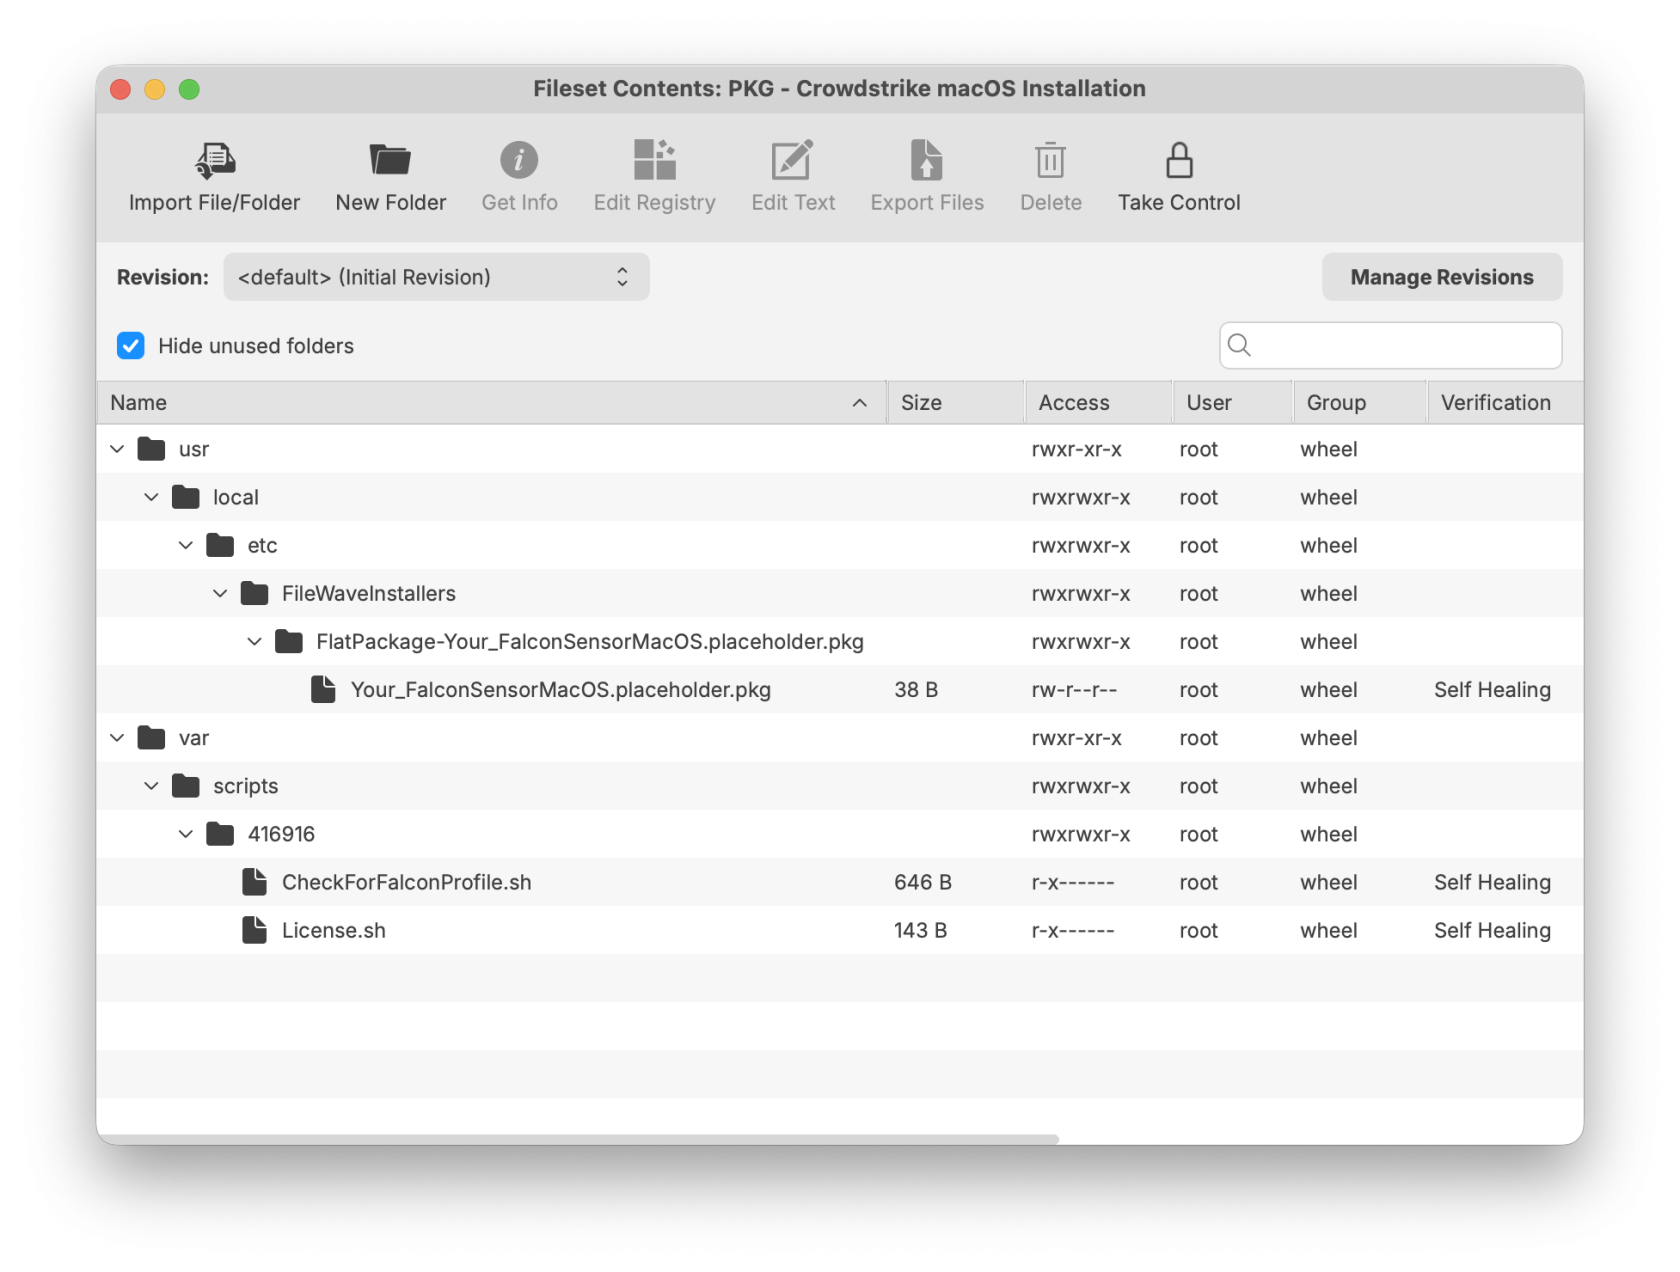](https://kb.filewave.com/uploads/images/gallery/2026-01/MsMkjJvzxFrLZa9z-updatedcrowdstrikemacosinstallation.png) ## CrowdStrike License Customizing the Fileset with your CrowdStrike license is required. The Fileset has a License.sh script to edit and enter in your license code.| #### Editing the License.sh script 1. Highlight your CrowdStrike PKG installer Fileset 2. Select Scripts to open the Script window. 3. Highlight License.sh 4. Click Edit | [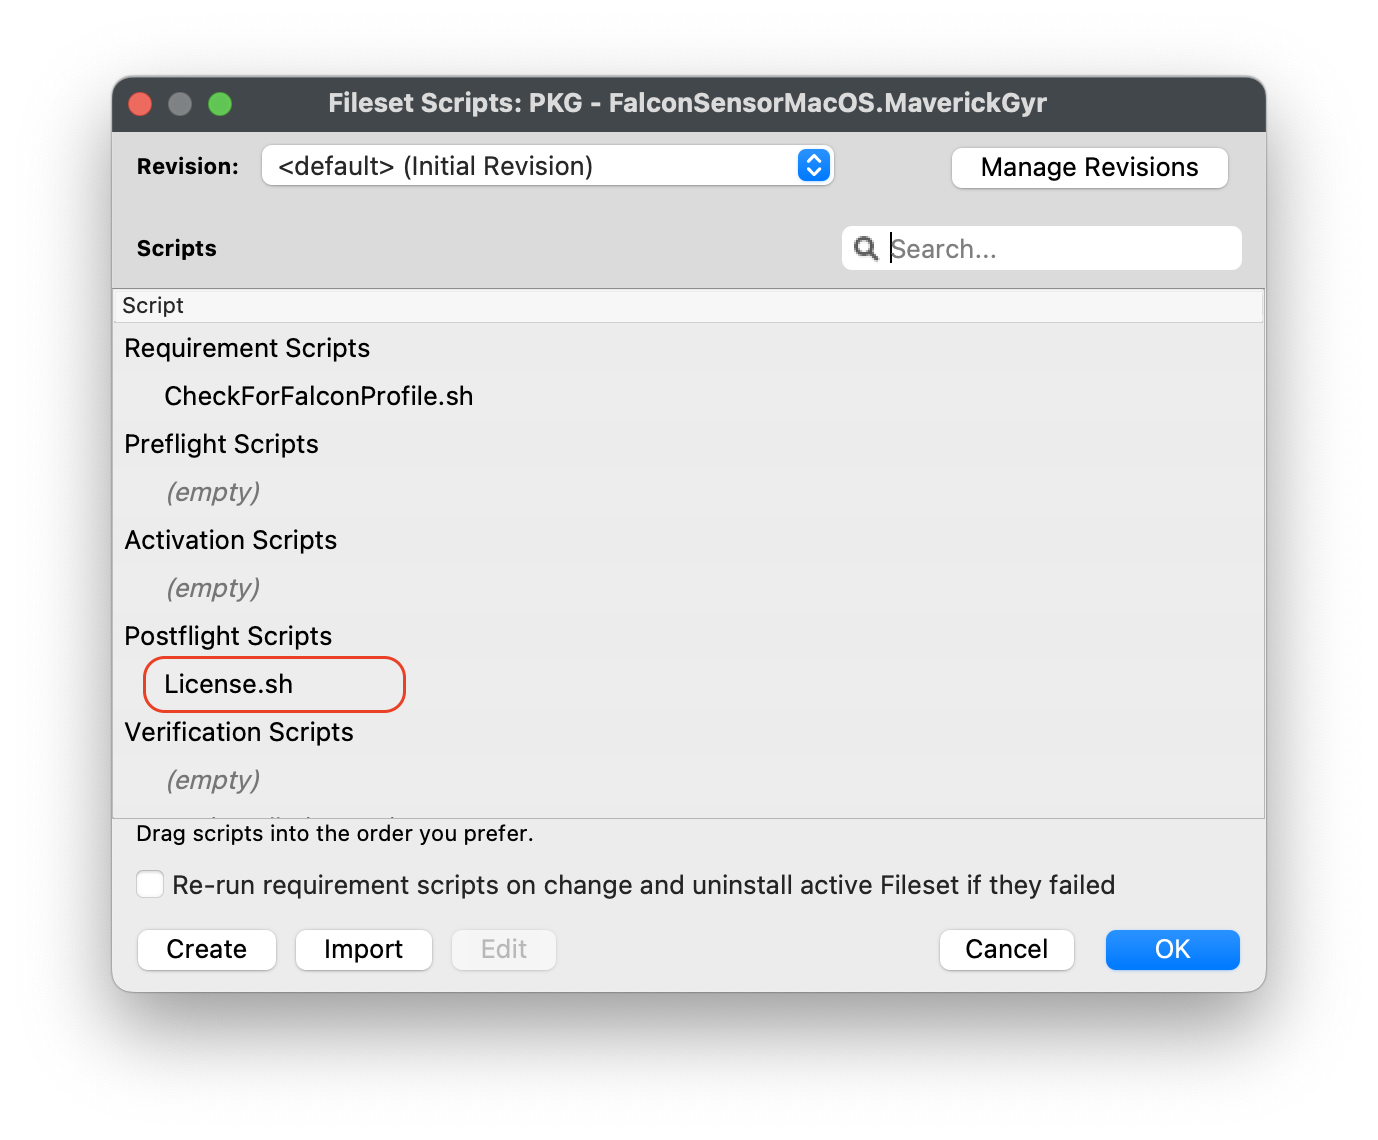](https://kb.filewave.com/uploads/images/gallery/2023-08/pf41UhyqVBanl9qu-crowdstrikescripts1.png) |
| #### Entering in your license code 1. Highlight the ####### string and enter in your CrowdStrike License code 2. Click OK to save 3. Click OK to save again to save your license code for the CrowdStrike Fileset | [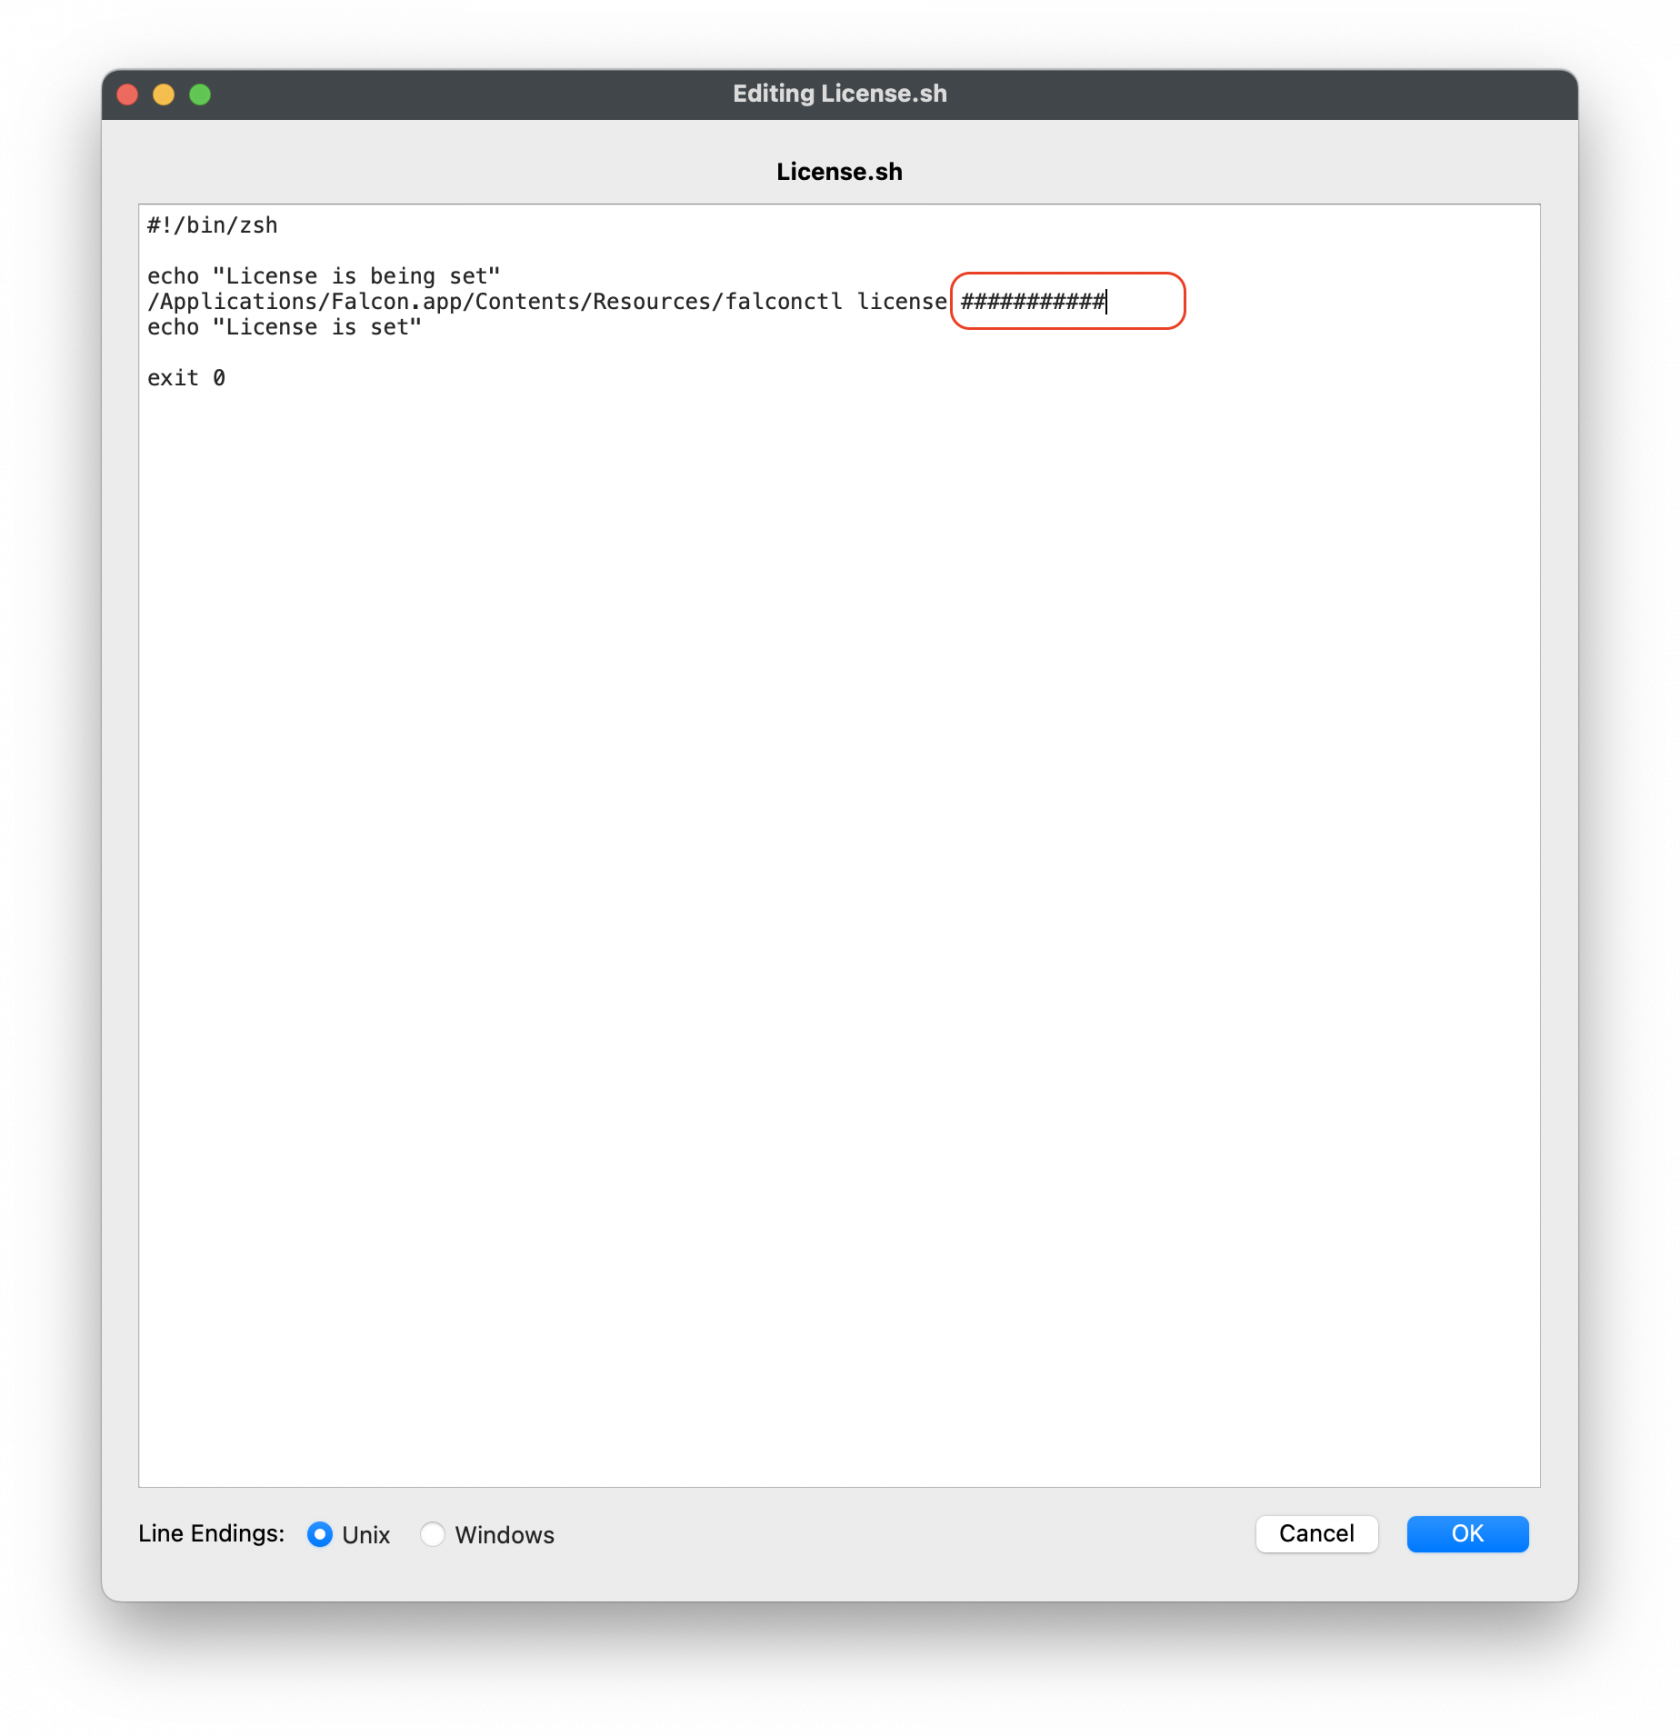](https://kb.filewave.com/uploads/images/gallery/2023-08/mX5Td89pE3hDJXMo-crowdstrikescripts2.png)
License code script``` #!/bin/zsh echo "License is being set" /Applications/Falcon.app/Contents/Resources/falconctl license ########## echo "License is set" exit 0 ``` |
**Note:** The Requirement script verifies that the CrowdStrike Falcon TCC profiles are installed successfully before the CrowdStrike installer runs. The script checks for both profiles and confirms they are installed before proceeding with the CrowdStrike deployment.
| #### Editing the CheckForFalconProfile.sh 1. Highlight your CrowdStrike PKG installer Fileset 2. Select Scripts to open the Scripts window 3. Highlight the CheckForFalconProfile.sh script 4. Click Edit | [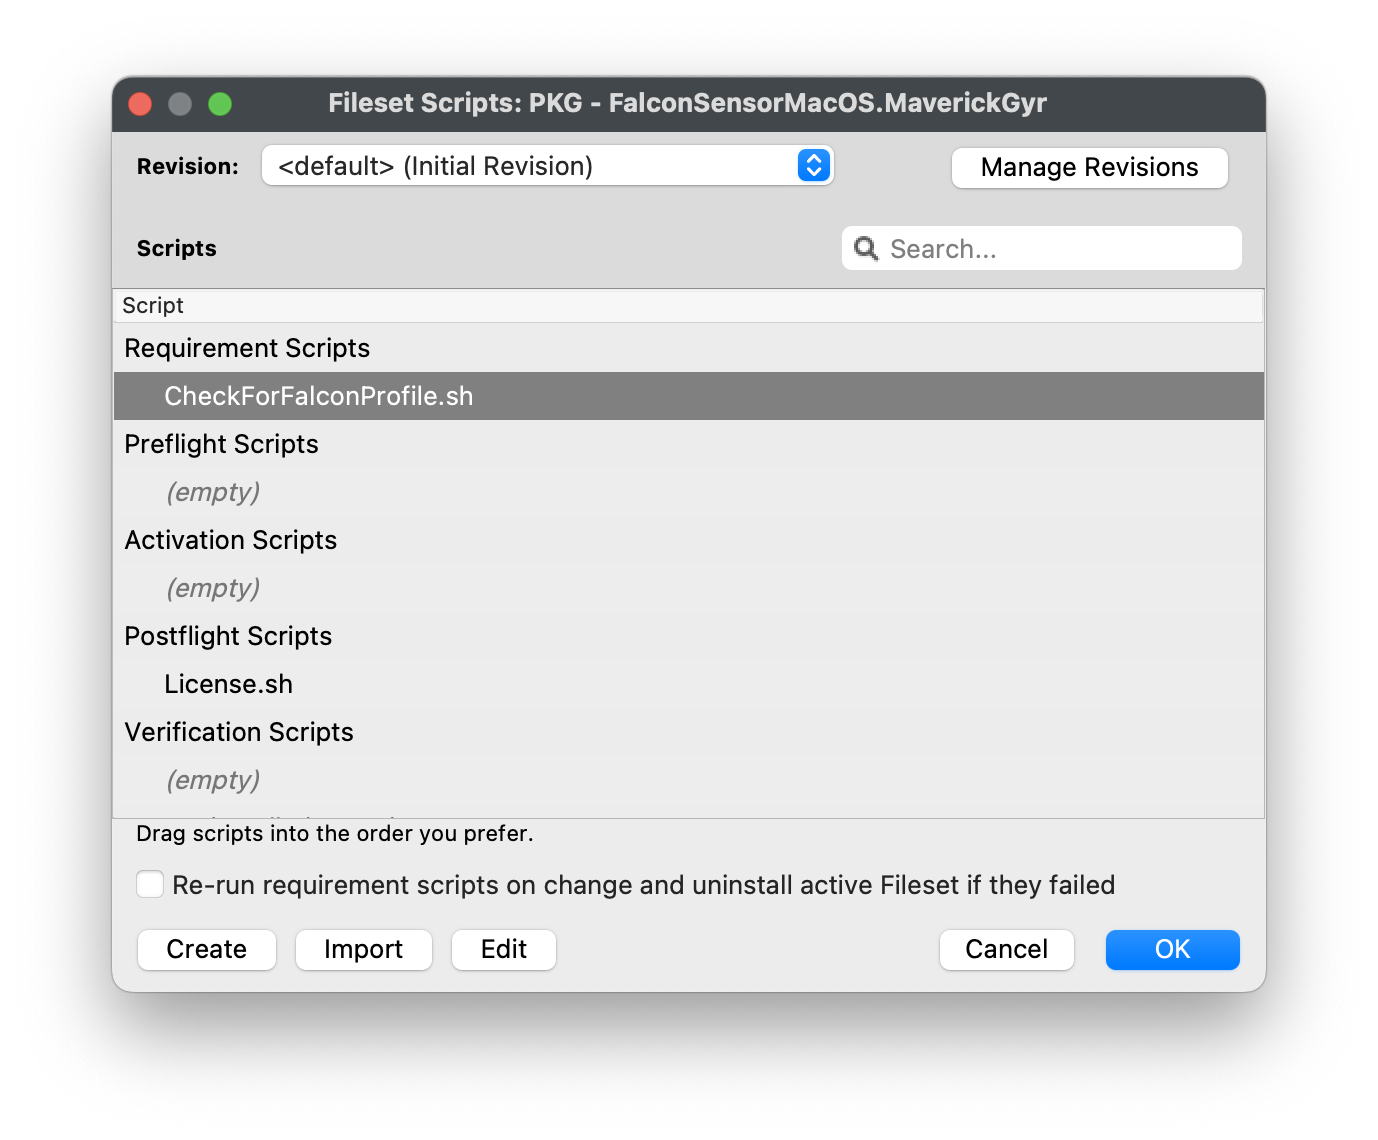](https://kb.filewave.com/uploads/images/gallery/2023-08/0gNEhaHHCGjdxqfl-checkforfalconprofile1.png) |
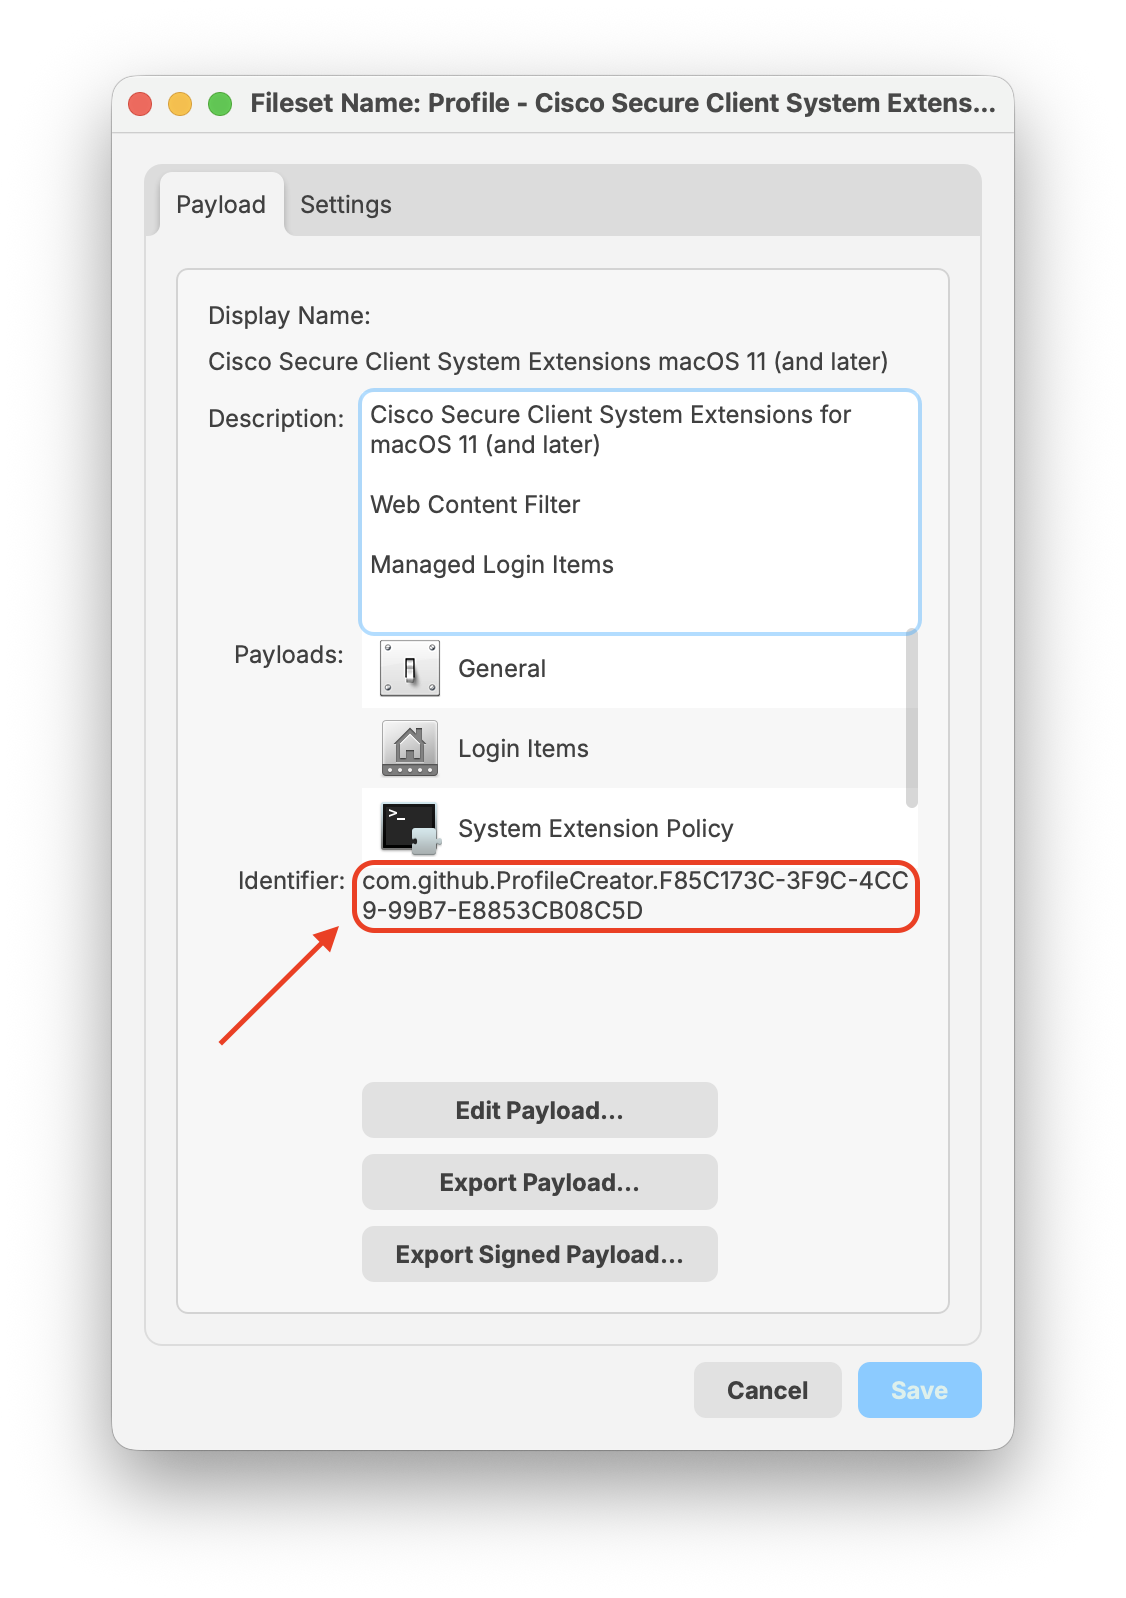
| #### Entering in your Payload Profile Identifiers 1. Highlight the string after profile\_id="#####" 2. Replace the ######, with your TCC profile Identifier. 3. If not sure, open your Profile and copy the Identifier. 4. Click OK to save 5. Click OK to save again to save your changes to the CrowdStrike Fileset | [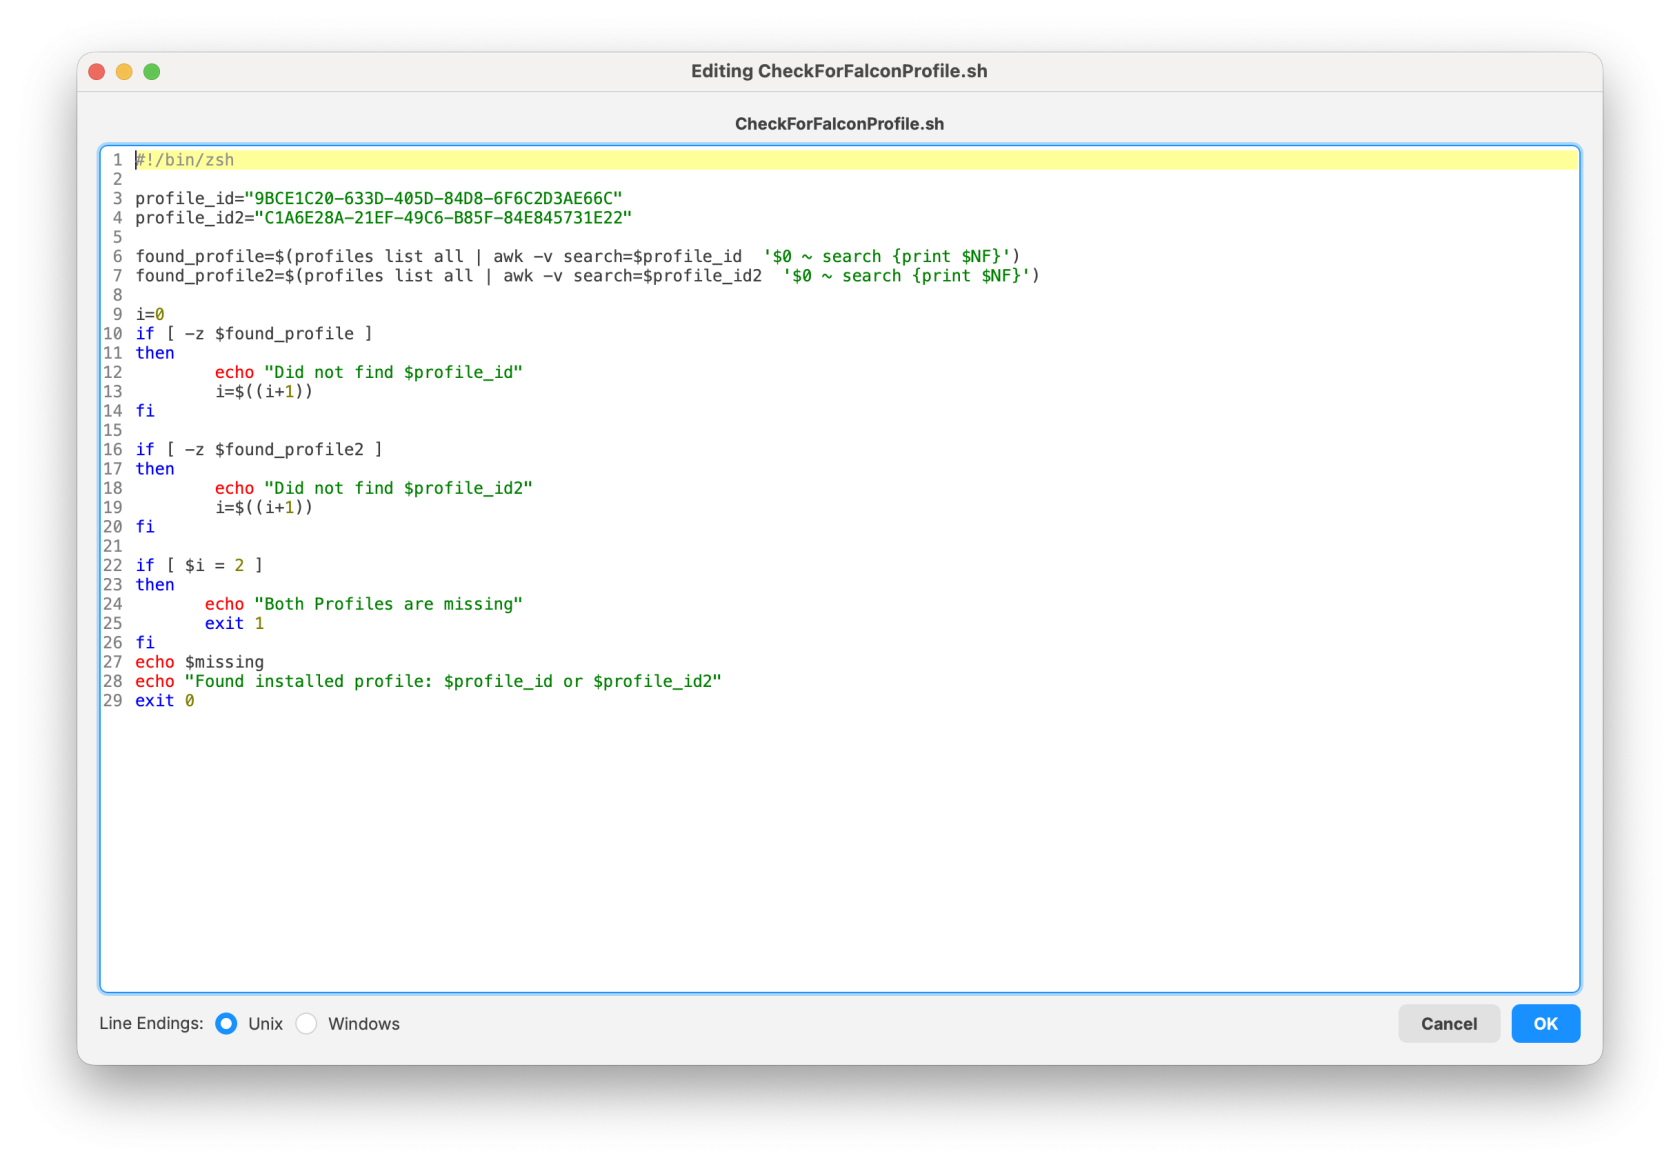](https://kb.filewave.com/uploads/images/gallery/2026-01/Xz4IRMby3JgnHeWn-screenshot-2026-01-30-at-17-46-23.png)
Check for Falcon profile script``` #!/bin/zsh profile_id="9BCE1C20-633D-405D-84D8-6F6C2D3AE66C" profile_id2="C1A6E28A-21EF-49C6-B85F-84E845731E22" found_profile=$(profiles list all | awk -v search=$profile_id '$0 ~ search {print $NF}') found_profile2=$(profiles list all | awk -v search=$profile_id2 '$0 ~ search {print $NF}') i=0 if [ -z $found_profile ] then echo "Did not find $profile_id" i=$((i+1)) fi if [ -z $found_profile2 ] then echo "Did not find $profile_id2" i=$((i+1)) fi if [ $i = 2 ] then echo "Both Profiles are missing" exit 1 fi echo $missing echo "Found installed profile: $profile_id or $profile_id2" exit 0 ``` |
| **Sensor State** | **Output Value** |
| Installed | Installed | version\_number |
| Not Installed | Not Installed |
**Reverting the block:** The example Filesets include removal logic that unloads the LaunchDaemon and removes the generated block script. To stop blocking an application, remove the device from the Association/Deployment or delete the Association/Deployment so the FileWave Client is told to remove the Fileset. The uninstall/removal script runs on the next client check-in. For emergency cleanup on a single Mac, an administrator can also run the removal script manually from the Fileset contents.
**Binary Names** To find the name of the binary to block, take a look at the application's contents. Every App has the same directory structure > ApplicationName.app/Contents/MacOS/ApplicationName, where ApplicationName is the binary to block, e.g. FaceTime /Applications/FaceTime.app/Contents/MacOS/FaceTime Terminal /Applications/Utilities/Terminal.app/Contents/MacOS/Terminal
If you are wanting to block an Application with a space in the name like Keychain Access, you will need to have quotes(") around the name. So you would add, "Keychain Access", to Executable > Launch Arguments.
## Blocking Install macOS Apps Install macOS Apps may be blocked by supplying the following Launch Argument in the Fileset: ``` osinstallersetupd ``` However, this will block all Install macOS Apps. If you wish to block one installer, e.g Catalina, but have workflows that require earlier versions to install, consider the following Fileset example: [macOS - Block Applications Including macOS Install App.fileset.zip](https://kb.filewave.com/attachments/290) Use this Fileset instead of the earlier one and supply all desired Apps to block as per below. Inside the install\_block\_applications.sh script you will find a 'case' block. This section should be edited to meet your requirements. Current settings within the Fileset below. This will only allow the macOS Ventura Installer.app to run. All other macOS Installer Apps will be prevented from running: ``` case \$process_details in *"Ventura"*) log_me "Found: \$process_details" log_me "Nothning to do" ;; *) block_me "osinstallersetupd" ;; esac ``` ### Examples #### Block Sonoma and Ventura, but allow any other installersAs well as allowing older installers than Ventura to run, this will also allow newer installers beyond Sonoma to run.
``` case \$process_details in *"Sonoma"*) block_me "osinstallersetupd" ;; *"Ventura"*) block_me "osinstallersetupd" ;; *) log_me "Found: \$process_details" log_me "Allowed. Nothing to do" ;; esac ``` #### Allow Ventura, block any other installersVentura and Monterey installers will be allowed to run, but all other installers, including newer ones, will be prevented.
``` case \$process_details in *"Ventura"*) log_me "Found: \$process_details" log_me "Allowed. Nothing to do" ;; *"Monterey"*) log_me "Found: \$process_details" log_me "Allowed. Nothing to do" ;; *) block_me "osinstallersetupd" ;; esac ``` ## Related Content The following KB, has an alternate method for blocking just macOS Installation Apps, with user interaction: [macOS - Block Apple Install macOS Application](https://kb.filewave.com/books/software-updates-apple/page/fileset-to-block-apple-install-macos-applications) # Firefox Configuration Recipe (macOS) ## Description After installing Firefox, some configuration may be desirable, examples may include: - Block auto updates - Set home page - Disable Mozilla First Run Pages**Firefox Documentation** The details of the Fileset are based upon: [Firefox Configuration](https://support.mozilla.org/en-US/kb/customizing-firefox-using-autoconfig) This is known to work with version 60, upwards. It may work with earlier versions, but testing on placement of files may vary with earlier versions. macOS may alternatively use a [Configuration Profile](#bkmrk-profile-with-macos) (Firefox 64+, ESR 60.4+)
## Ingredients - FW Admin - Firefox installer application already as a Fileset - The provided configuration Fileset:[FirefoxConfig.fileset.zip](https://kb.filewave.com/attachments/124) ## Directions - Download the Fileset zip file, expand and drag into FileWave > Filesets - Two files are present in the Fileset. 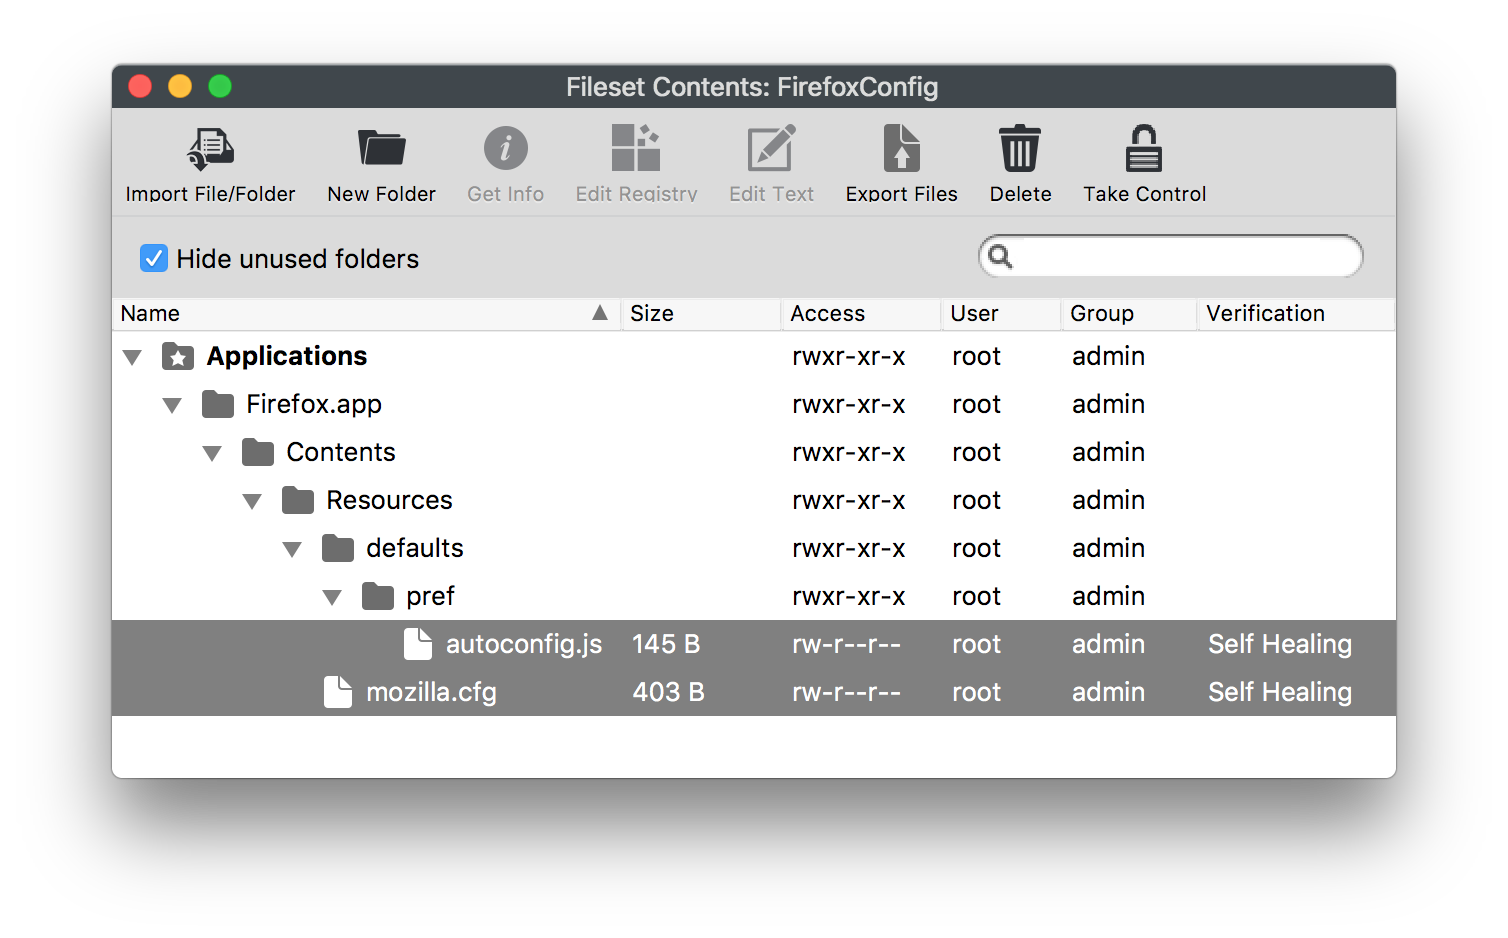 - The autoconfig.js file specifies the file to be used for configuration. In this Fileset the name of the file has been set to 'mozilla.cfg': ```javascript // Any comment. You must start the file with a comment! pref("general.config.filename", "mozilla.cfg"); pref("general.config.obscure_value", 0); ``` - To specify any desired settings, edit the mozilla.cfg file. The provided file is designed to prevent Firefox updates, disable privacy telemetry, disable the first run Mozilla home pages and set the user's homepage: ```javascript // Any comment. You must start the file with a comment! // Disable updater lockPref("app.update.enabled", false); lockPref("app.update.auto", false); lockPref("app.update.mode", 0); lockPref("app.update.service.enabled", false); // Set Homepage and stop Mozilla startup pages lockPref("browser.startup.firstrunSkipsHomepage", false); pref("browser.startup.homepage","http://www.filewave.com"); lockPref("browser.startup.homepage_override.mstone", "ignore"); // Disable Privacy telemetry lockPref("datareporting.policy.firstRunURL",); lockPref("datareporting.healthreport.service.enabled", false); lockPref("datareporting.healthreport.uploadEnabled", false); lockPref("datareporting.policy.dataSubmissionEnabled", false); lockPref("toolkit.telemetry.unified", false); ``` ## Preference Overview Preference types can include: pref, defaultPref, lockPref, amongst others. Details can be found at: [https://support.mozilla.org/en-US/kb/customizing-firefox-using-autoconfig](https://support.mozilla.org/en-US/kb/customizing-firefox-using-autoconfig) ### pref This is used to set a preference that can be overridden by the user, but on next launch of the application it will revert back to the setting within the configuration file ### lockPref A lockPref cannot be overridden by the user ### defaultPref This is used to set a preference that can be overridden by the user. The user's setting will persist until the user resets them, at which point the defaultPref will be used on next launch of the application| **Preference Names** Navigating to 'about:config' in the Firefox URL bar will list all possible preference names and their values and types. |
**Key Values** If EnterprisePoliciesEnabled is not set as true and a correct RequestedLocales is not included, management should not be expected.
If unsure which locale is in use, without management in place the 'about:config' URL may be used to view settings: 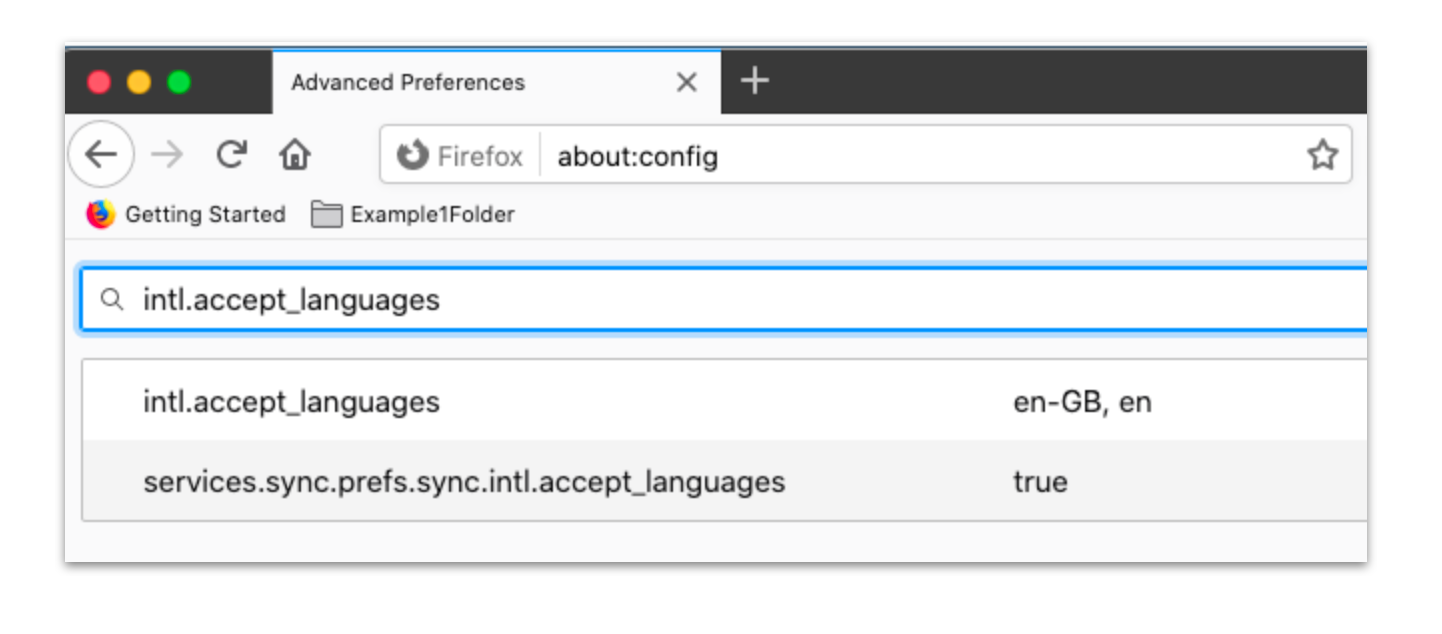 To ensure users may not circumvent management by changing the locale, enable 'BlockAboutConfig' (already set as TRUE in the template file) ## Related Content - [Firefox Configuration Recipe (Windows)](https://kb.filewave.com/books/software-deployment-recipes-microsoft/page/configure-firefox-on-windows-with-a-fileset "Firefox Configuration Recipe (Windows)") # Google Chrome (macOS) # Google Chrome Configuration recipe (macOS) ## Description After installing Chrome, some configuration may be desirable, examples may include: - Block auto updates - Set home page - Disable Welcome Page The below shows configuration for macOS. For Windows you may wish to consider GPO: [Manage Chrome updates (Windows)](https://support.google.com/chrome/a/answer/6350036) ## Ingredients - FW Central - [Chrome installer application](https://cloud.google.com/chrome-enterprise/browser/download) already as a Fileset - The provided configuration Fileset: ##### macOS [](https://kb.filewave.com/attachments/174) ## Directions 1. Download the Fileset zip file, expand and drag both the Fileset and Configuration Profile into FileWave > Filesets 2. The 'Google Chrome Ksadmin' contains 'ksadmin.sh' script which configures ksadmin to allow silently disabling Chrome updates 3. The Configuration Profile has example setups that may require editing, e.g Welcome and Home Page; replacing www.filewave.com**Preference Names** A list of policies can be found at: [Chrome Enterprise policy list](https://cloud.google.com/docs/chrome-enterprise/policies/#deviceUpdateSettings)
### Association When associating, to ensure the configuration is installed with the Application, consider creating a Fileset Group: [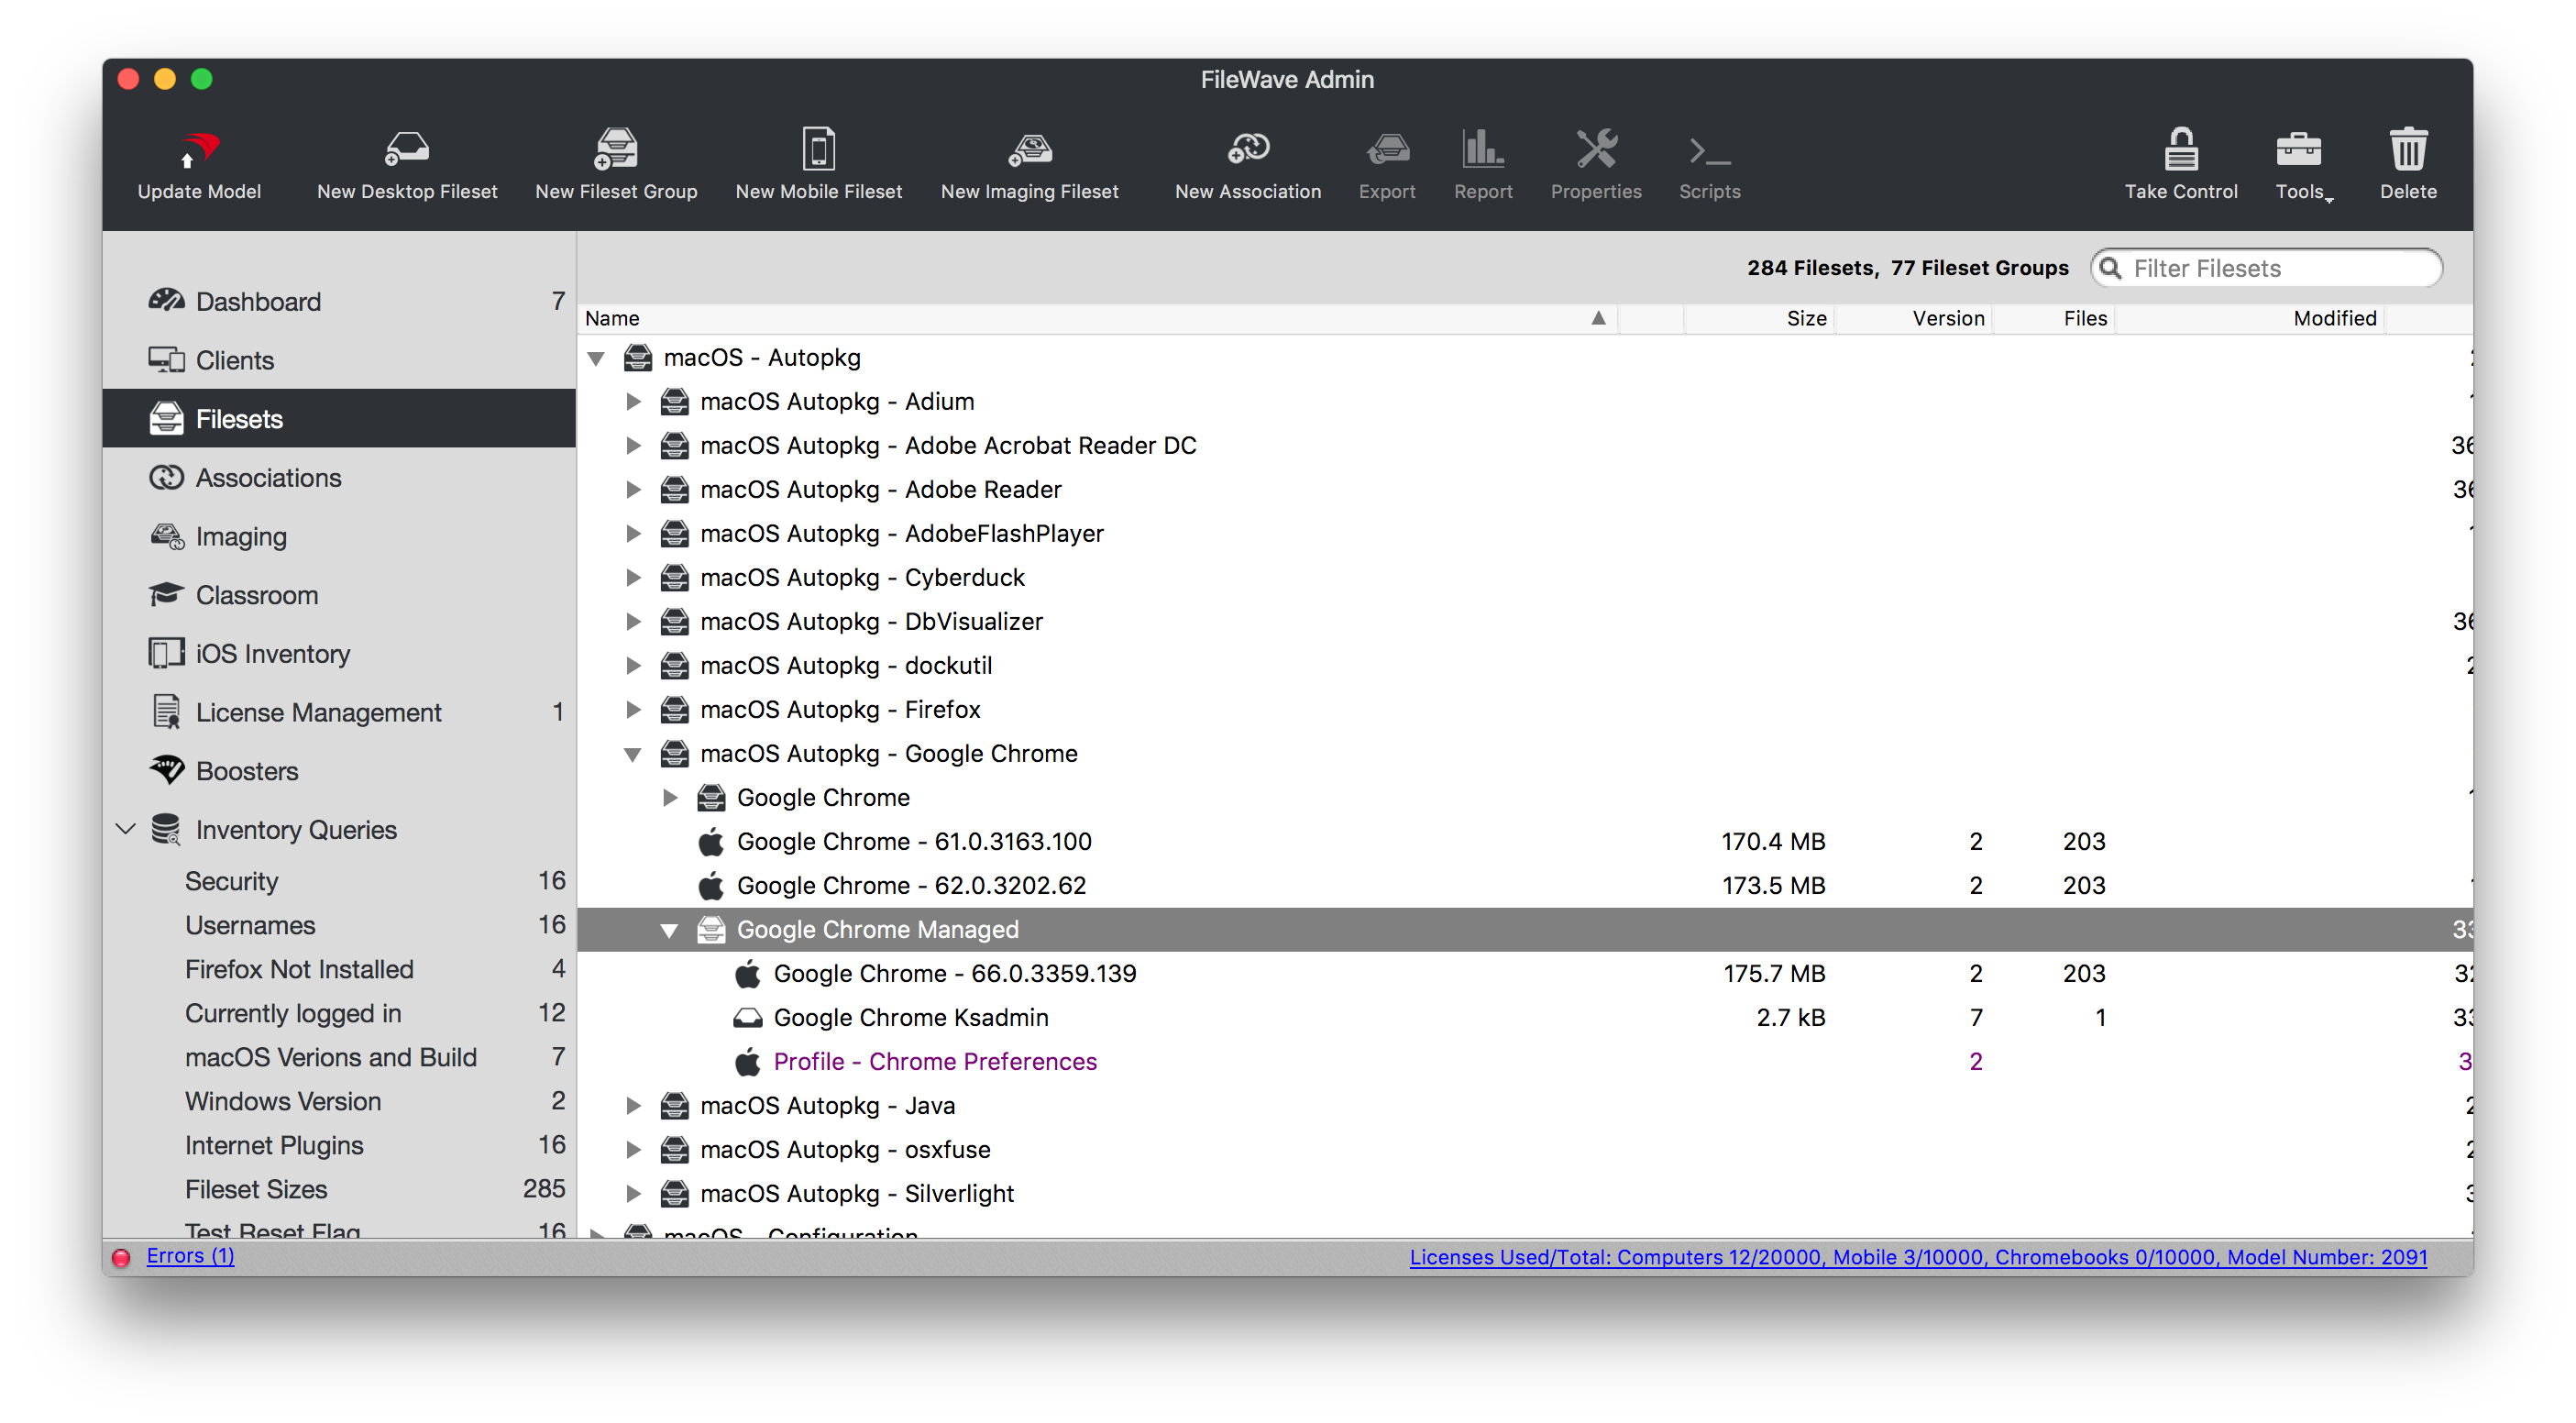](https://kb.filewave.com/uploads/images/gallery/2023-07/qaV6CB6bqLNHA1nH-image.png) Associating the 'Google Chrome Managed' Fileset Group will ensure Application and Configuration are associated to devices. [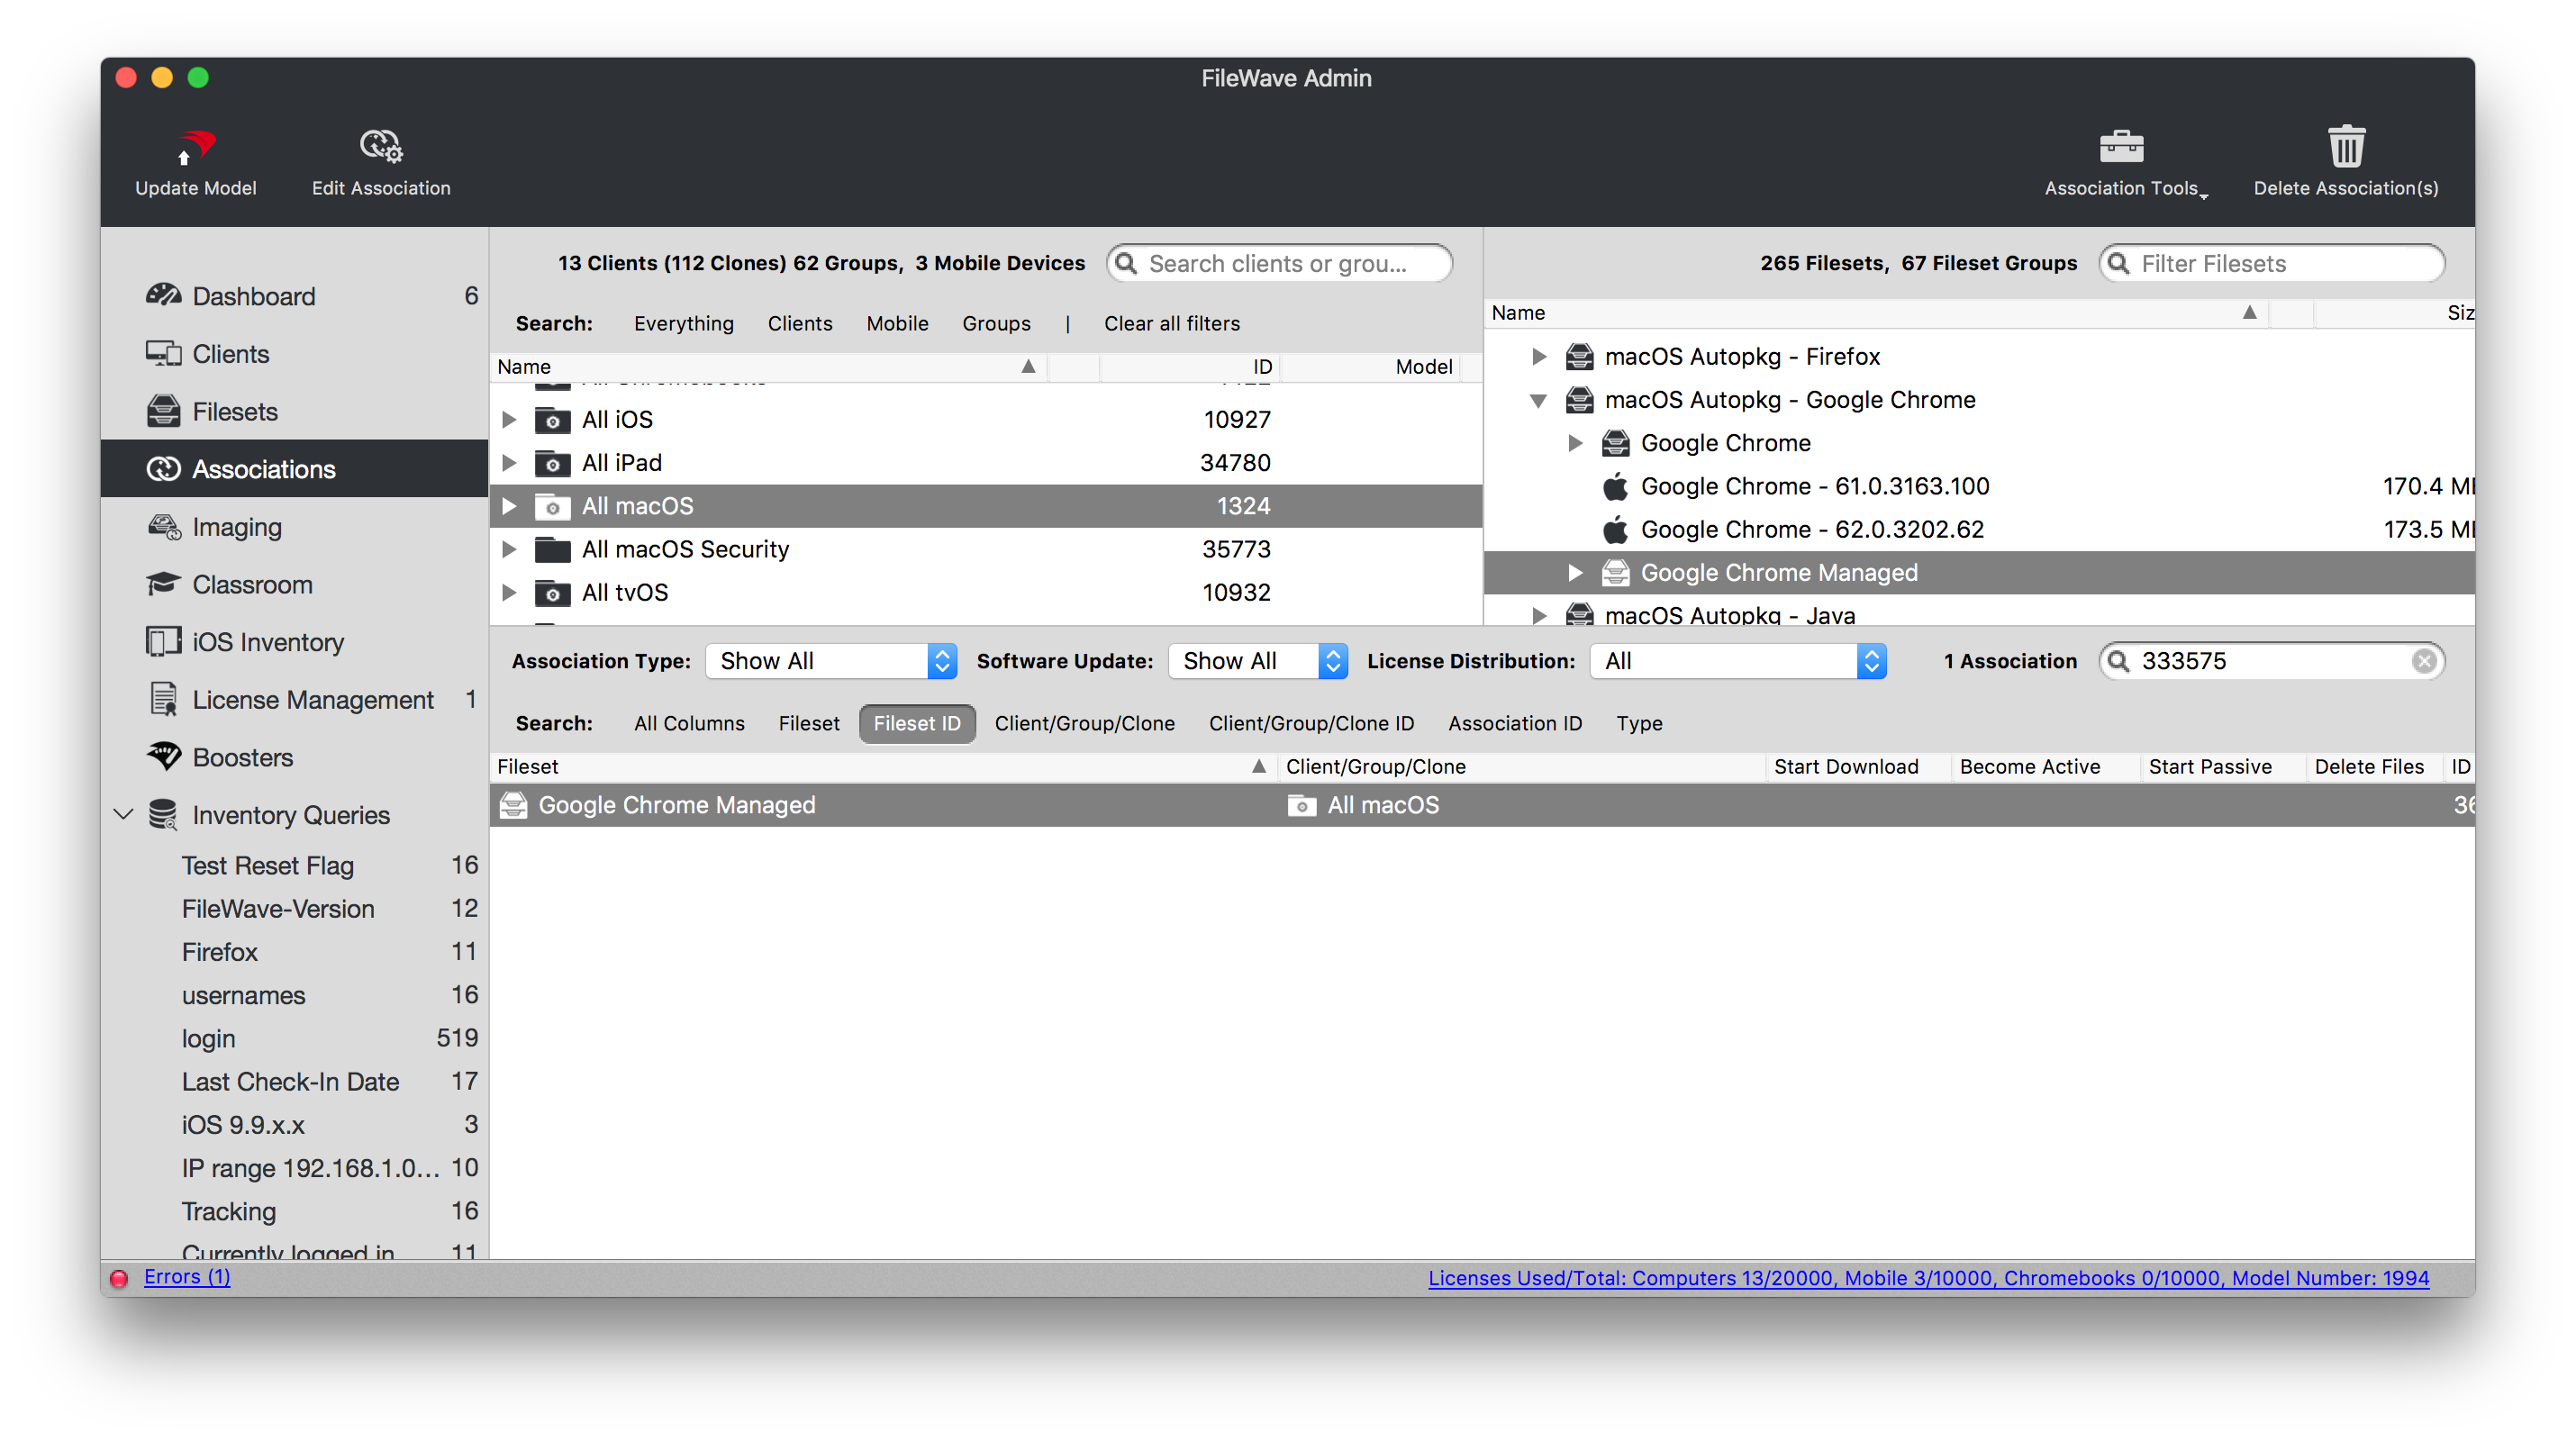](https://kb.filewave.com/uploads/images/gallery/2023-07/0DyNWFLAKd8QYNRD-image.png) When there is an update to Google Chrome, replace the version in the Fileset Group with the latest version, after testing, and re-instal Google Chrome Ksadmin ### Controlling Updates Updates may be managed with the use of additional configuration that may be added to the Fileset Group. The following profile contains: ```bash| Setting | Description |
| 0 | Turns on auto-updates. Updates are always applied when detected by Google Software Update. This is the default value. |
| 1 | Updates are installed only from the scheduled update checks. Manual update checks will not install updates. |
| 2 | Turns off auto-updates. This stops Google Software Update automatically updating all users to the latest stable version of Chrome. Updates are only applied when the user manually checks for updates. For example, on the [chrome://help page](#bkmrk-google-software-mana) or by running the CheckForUpdatesNow.command utility. |
| 3 | Updates are never applied. |
**Google Software Management** Other Google software may also be managed with this process. Please read [Manage Chrome updates (Mac)](https://support.google.com/chrome/a/answer/7591084?hl=en) for full details of management options.
# Google Chrome Managed (macOS) ## Description Chrome browser user experience may be managed on multiple device types by way of a Google Management Token available through the Google Admin Console. Details on obtaining a token and Chrome management can be found in the following KB: - [Managed Google Chrome](https://kb.filewave.com/books/google-general-info/page/managed-google-chrome) The directions below describe applying the token to macOS devices.If Google Admin Console is not available, consider viewing the FileWave KB: [Google Chrome Configuration Recipe (mac0S)](https://kb.filewave.com/books/google-general-info/page/managed-google-chrome)
## Ingredients - Chrome installer Fileset - Chrome Browser Enrolment Token (only available via Google Admin Console) - Profile to push out the token The below Fileset is a template with two suggested keys, one of which is the required Google Token ##### macOS [](https://kb.filewave.com/attachments/314) ## Directions 1. Download the above provided Fileset zip file, expand and drag into FileWave > Filesets 2. Open the Profile for editing and access the Custom Settings Payload 3. Edit the CloudManagementEnrollmentToken String, entering the copied token from the Google Admin console [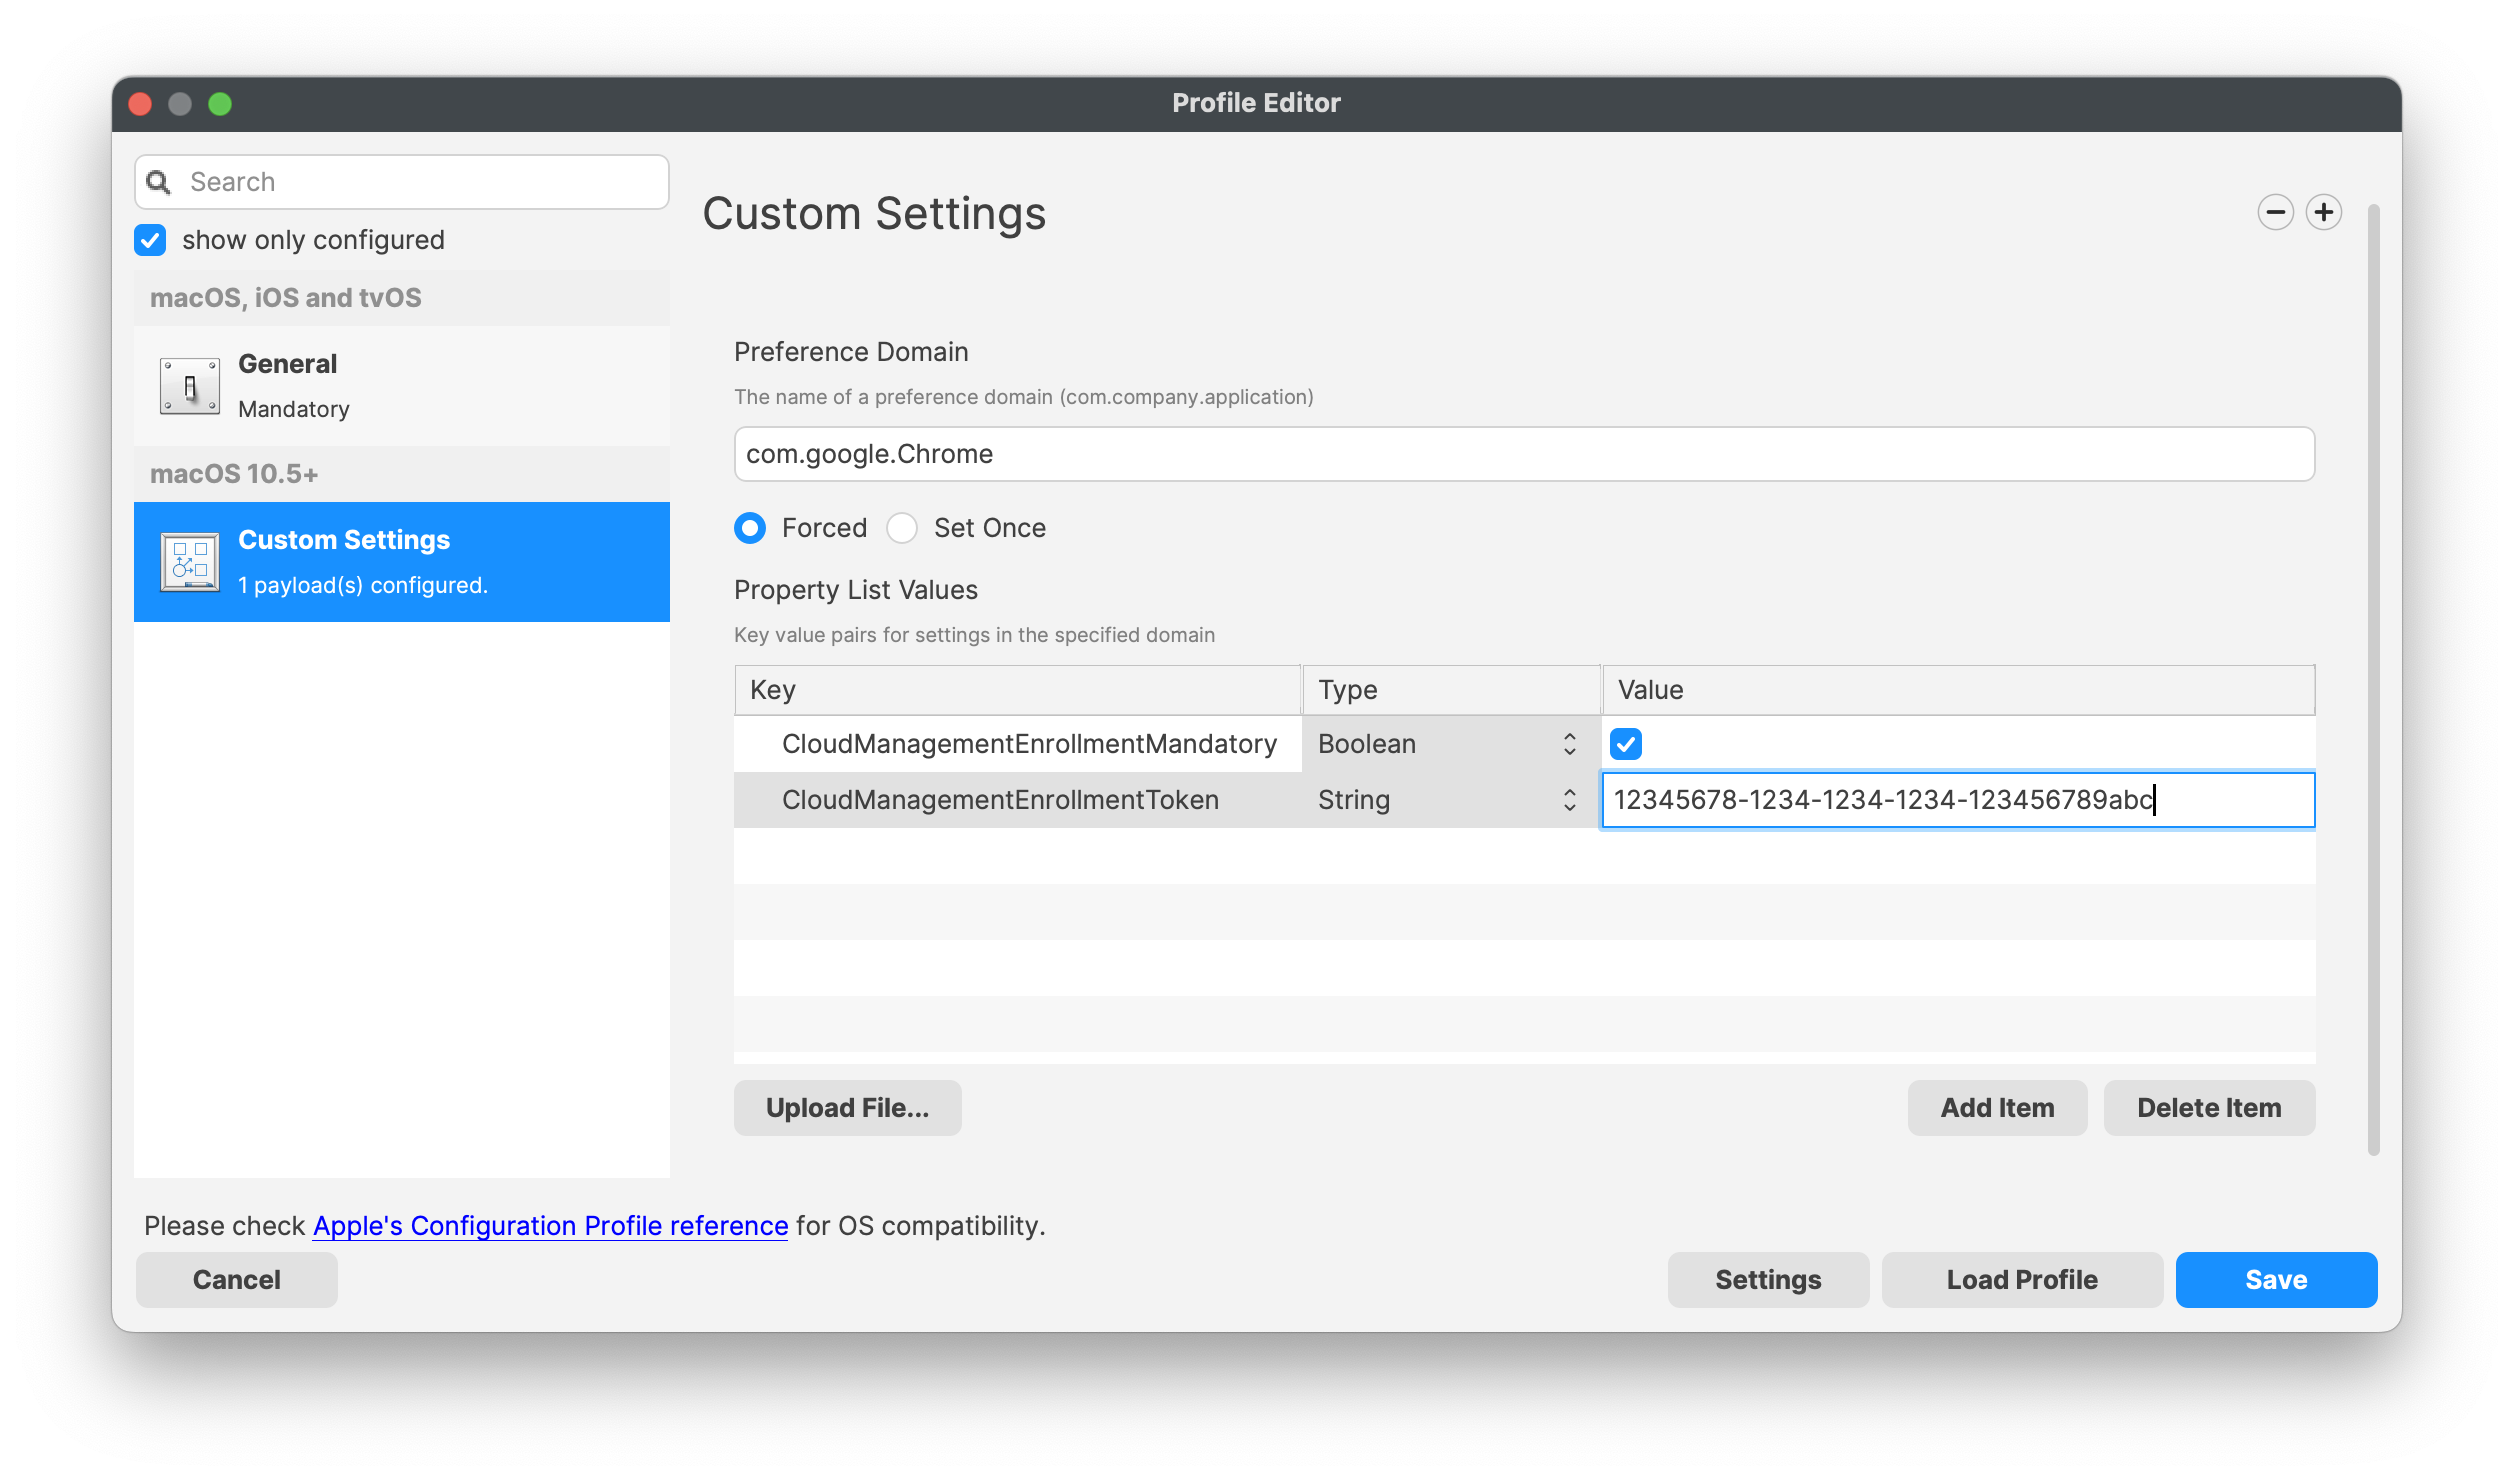](https://kb.filewave.com/uploads/images/gallery/2024-03/RpgF8dBVex3pmUWR-image.png) ### Association/Deployment When assigning with devices, to ensure the configuration is installed with the Application, consider creating a Fileset Group: [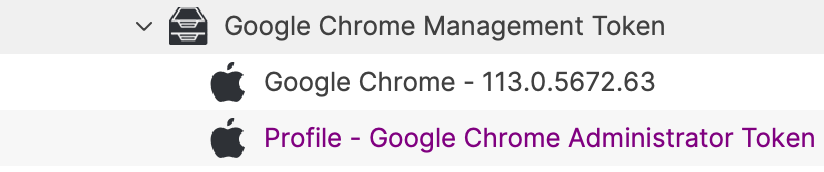](https://kb.filewave.com/uploads/images/gallery/2024-03/nm1kG4mjOY6PzMYC-image.png) Assigning the 'Google Chrome Management Token' Fileset Group will ensure Application and Configuration are associated to devices. Below is an example Deployment: [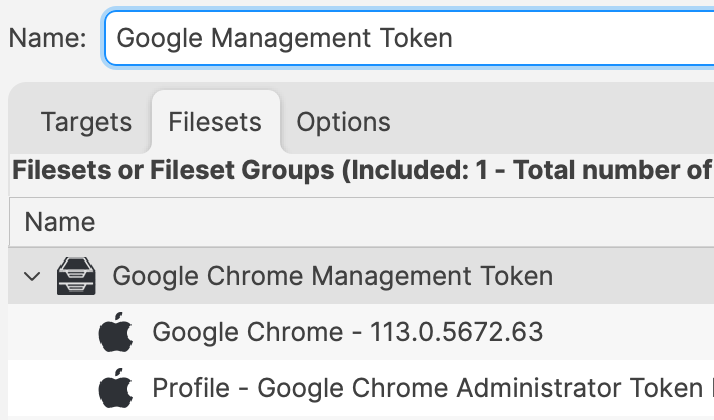](https://kb.filewave.com/uploads/images/gallery/2024-03/paRnHBB5Os9x3oVi-image.png) When there is an update to Google Chrome, replace the version in the Fileset Group with the latest version (after testing) or switch to a new Fileset Revision if desired. # Google Chrome Extension Management (macos) ## Description Chrome Extensions, like [ClassSpaces](https://www.classspaces.org), can be managed via FileWave on multiple device types. If the Chrome browser is already managed using Google Admin Console, then all management may be applied to devices via the Google Admin Console. It is though possible to apply the management of Chrome to macOS and Windows devices via FileWave also. ## Ingredients - Chrome installation - Provided downloads| ↓ macOS |
| [](https://kb.filewave.com/attachments/102) |
As part of the example, an additional key has been added to block all other extensions. Remove or edit as desired
If Chrome is already open, the settings will not be applied until after the browser has been restarted
## Related Content - [Google Chrome Extension Management (Windows)](https://kb.filewave.com/books/software-deployment-recipes-microsoft/page/google-chrome-extension-management-windows "Google Chrome Extension Management (Windows)") # Google Chrome Install Recipe (macOS) ## Description Installation of Chrome or any app that simply goes in /Applications can be fairly simple to do with a Fileset, but if the application is presented as a PKG that does other things besides simply copying a file to /Applications, then this can be a good example of how to accomplish the install. Note that this Fileset also will download the latest Google Chrome at install time, so depending on your use case, this may not be a good solution. An alternative would be to put the PKG inside of the FileSet and use the same script to install it or make a PKG-based FileSet in FileWave. There are many roads to success. This example will show several features of Filesets for teaching purposes. ## Ingredients - FW Central - Chrome already as a Fileset (below) [](https://kb.filewave.com/attachments/176) ## Directions 1. Download the Chrome Fileset zip file, expand and drag the Fileset into FileWave > Filesets 2. Create an Association between the Fileset and one or more macOS systems 3. See Chrome installed on them. ### What does this Fileset do? The Fileset is entirely 2 scripts. If you highlight the Fileset in the Native Admin and pick the Scripts button in the toolbar you can edit the 2 scripts. The first is the Activation Script. This will create a directory in /private/tmp/ and download Chrome to it. It will install and then delete the installer from that folder. Because of the way this works you may want to make this script a little fancier with error handling, but the below works and is a good starting point. You will also see that it logs what it is doing to /Library/Logs/GoogleChromeInstallScript.log so that you can review the date and time that events happened. **Note:** Google now documents the current Chrome macOS package URL in [Chrome Enterprise Help](https://support.google.com/chrome/a/answer/9915669?hl=en). The URL below includes Google's Terms of Service acknowledgement path. If you maintain your own copy of this Fileset, update the `url` value in the activation script. ```bash #!/bin/zsh pkgfile="GoogleChrome.pkg" logfile="/Library/Logs/GoogleChromeInstallScript.log" url='https://dl.google.com/chrome/mac/stable/accept_tos%3Dhttps%253A%252F%252Fwww.google.com%252Fintl%252Fen_ph%252Fchrome%252Fterms%252F%26_and_accept_tos%3Dhttps%253A%252F%252Fpolicies.google.com%252Fterms/googlechrome.pkg' /bin/echo "--" >> ${logfile} /bin/echo "`date`: Downloading latest version." >> ${logfile} mkdir /private/tmp/chrome_install/ /usr/bin/curl -s -o /private/tmp/chrome_install/${pkgfile} ${url} /bin/echo "`date`: Installing..." >> ${logfile} /usr/sbin/installer -pkg /private/tmp/chrome_install/GoogleChrome.pkg -target / /bin/sleep 5 /bin/echo "`date`: Deleting package installer." >> ${logfile} /bin/rm -rf /private/tmp/chrome_install exit 0 ``` Note that in these days of Intel vs. Apple Silicon you may want to add something to behave differently depending on which processor is present below is an easy way in scripting to do this; ```bash if [[ $(uname -p) == 'arm' ]]; then echo M1 else echo Intel fi ``` The second script is for when you remove the Association for the Fileset. It will kill Chrome if it is running and then delete it from /Applications. If you don’t want this behavior then just remove that script from the Fileset. ```bash #!/bin/zsh logfile="/Library/Logs/GoogleChromeInstallScript.log" /bin/echo "--" >> ${logfile} /bin/echo "`date`: Removing Google Chrome." >> ${logfile} killall Google\ Chrome rm -rf "/Applications/Google Chrome.app" exit 0 ``` For **Requirements**, I set it for macOS and only the most recent versions since (1) Anything below macOS 10.14.x is insecure to use, and (2) I don’t know that Chrome will work well on older macOS, but adjust this to your needs. [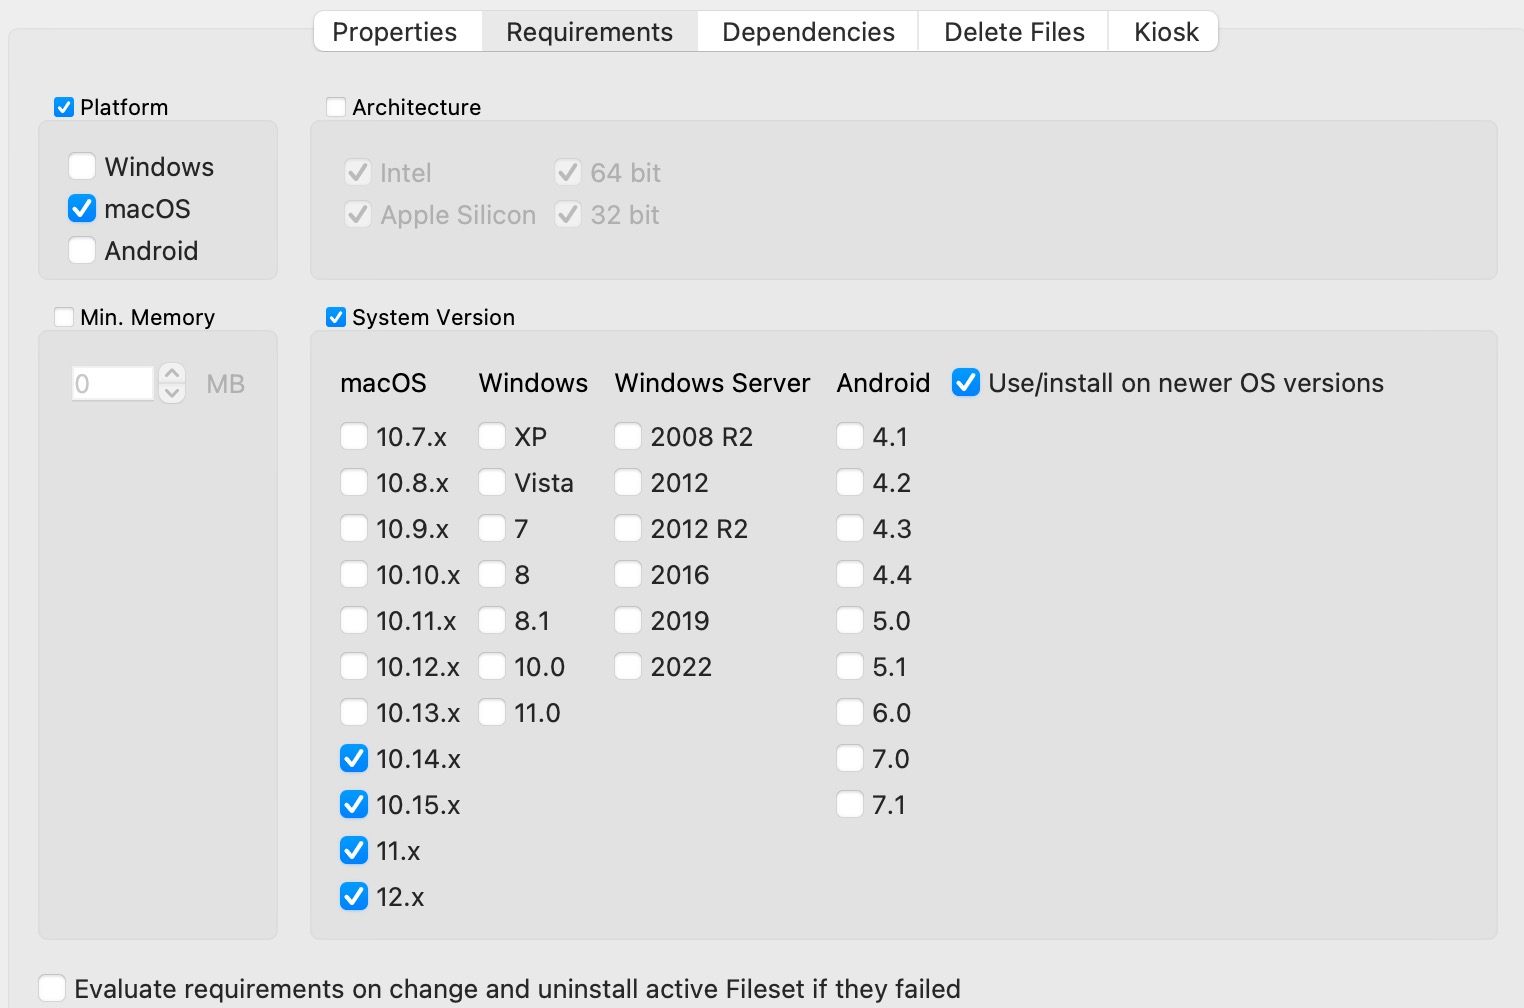](https://kb.filewave.com/uploads/images/gallery/2023-07/SguH5Id5DWh2TiTA-image.png) For **Delete Files,** I have it purging the download files so that when the Fileset activates, the folder is clear every time. [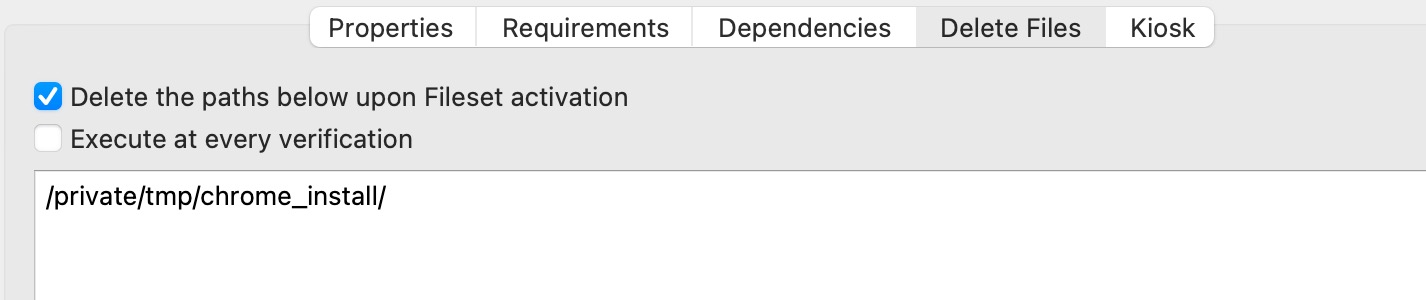](https://kb.filewave.com/uploads/images/gallery/2023-07/gmg3akZP9ptsCTOQ-image.png) On the **Kiosk** tab, I set this to **Applications** and put a description in. Using a Kiosk Association is a great way to make an application installable by non-admins and they can even uninstall it if they aren’t using it any more. [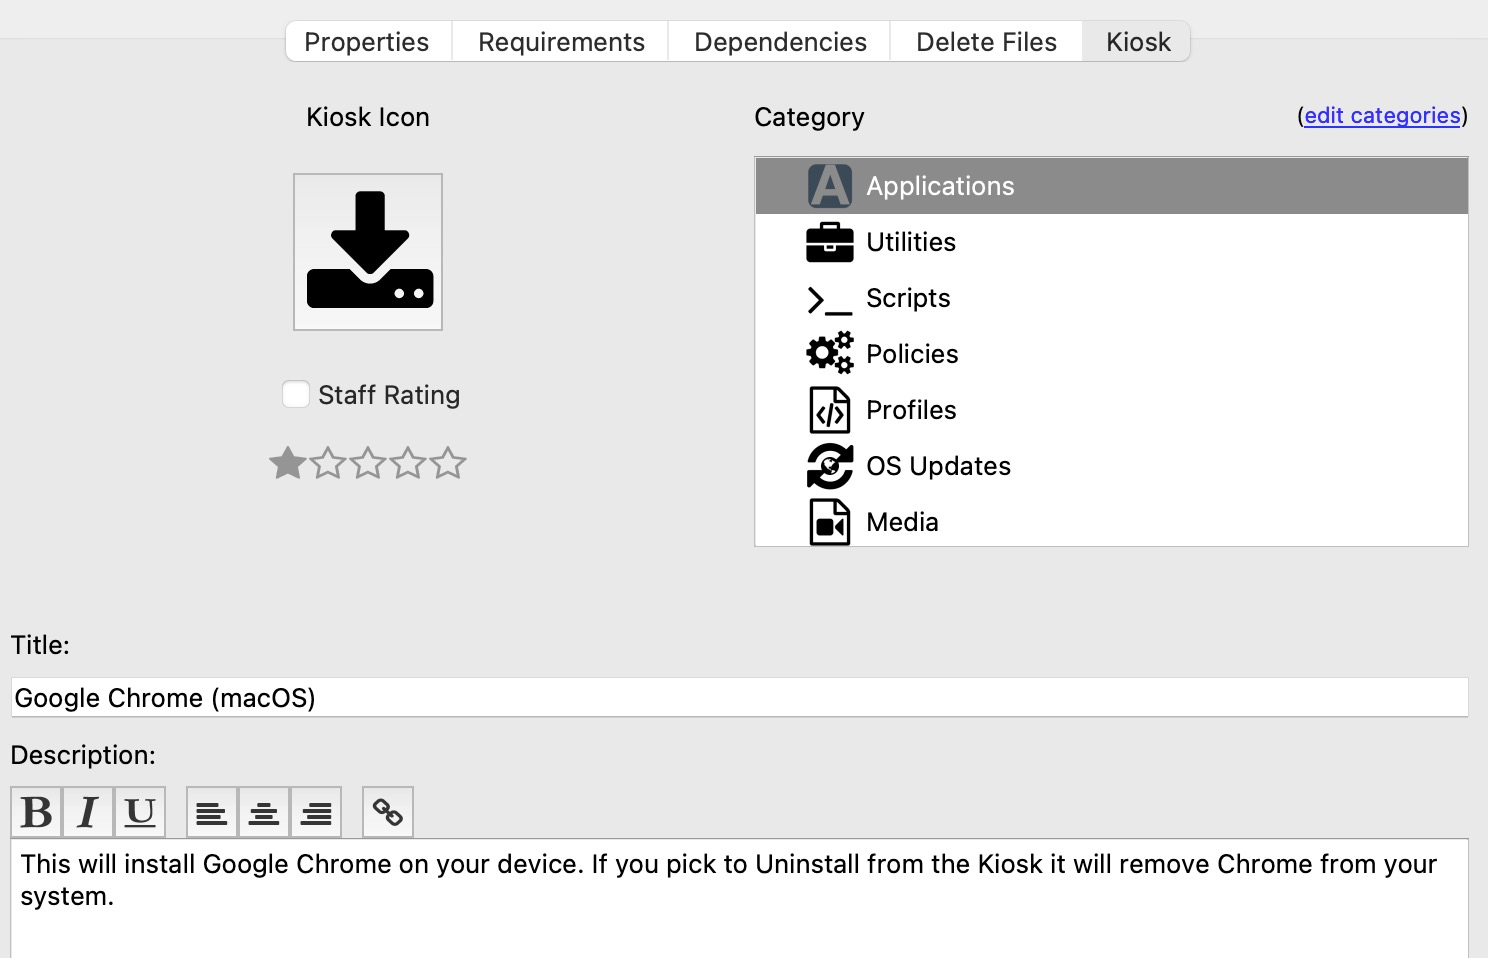](https://kb.filewave.com/uploads/images/gallery/2023-07/bYHx2UrSRv9vWnH0-image.png) So with this example, you can see how you might create a scripted install of an application and handle uninstall of it as well. Keep in mind you don’t have to do this exactly as I did, and these concepts can be applied to other applications.After installing Chrome, some configuration may be desirable, examples may include: \* Block auto updates \* Set home page \* Disable Welcome Page This article discusses configuration options: [Google Chrome Configuration Recipe](https://kb.filewave.com/books/software-deployment-recipes-macos/page/google-chrome-configuration-recipe-macos "Google Chrome Configuration recipe (macOS)")
## Related Content - [Google Chrome Configuration recipe (macOS)](https://kb.filewave.com/books/software-deployment-recipes-macos/page/google-chrome-configuration-recipe-macos "Google Chrome Configuration recipe (macOS)") - [Google Chrome Extension Management (macos)](https://kb.filewave.com/books/software-deployment-recipes-macos/page/google-chrome-extension-management-macos "Google Chrome Extension Management (macos)") # Homebrew Deployment (macOS Script) ## Description| **macOS Brew Fileset** |
| [](https://kb.filewave.com/attachments/54) |
Apple Command Line tools are a requirement and will be installed first.
The Activation Script will use the newest version of the Command Line tools found, when ran. It is possible to overrule this behaviour by supplying a desired version as a Launch Argument.
##### Example: To instal version 13.2 Command Line tools, select the Activation Script: 'instal\_apple\_cl.sh' from within the Fileset and from the 'Get Info' view, edit the Executable Launch Arguments, as below: [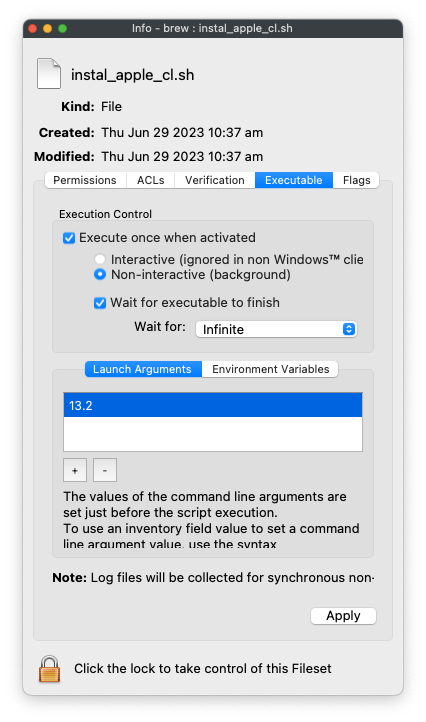](https://kb.filewave.com/uploads/images/gallery/2023-06/TqCkYK0PptBtyrgh-image.png)Software Updates may be large in size. This can slow down the installation as well as use high bandwidth. A 'Wait for' as 'Infinite' could easily be required.
##### Post Activation ScriptThe Fileset will attempt to instal Brew with the currently logged in user. If this current user does not have an ID greater than 500, the script will attempt to instal with an Admin user on the device. The script log should report the user that was configured for Brew. Consider altering the script if a different behaviour is desired. This user shall also be added to the macOS developer group.
Below are the sections of script that defines the user and also adds that user to the development group: ```shell current_user=$(stat -f%Su /dev/console) # .... # If user is below uid 500 should we abort or pick a user. Picking an admin user for now if [ $(id -u $current_user) -lt 501 ] then echo "No 500 user. Picking a local admin user" current_user=$(/usr/bin/dscl . -read /Groups/admin GroupMembership | awk '{print $NF}') fi echo "Configuring user ${current_user}..." # Add them as a developer is_developer=$(groups $current_user | awk '/ _developer / ') if [ ! $is_developer ] then echo "Adding user $current_user to _developer group" /usr/sbin/dseditgroup -o edit -a "$current_user" -t user _developer fi ```Brew/Cask installations may also be large in size. The same considerations as the Activation Script would therefore also be likely. Additionally, the Fileset will double check there are no further updates and if so, those shall also be installed.
### Uninstall If you want to remove Brew, the best way is likely these scripted methods because you are probably just fixing a single machine when you remove Brew, but you could also use curl to fetch the `unisntall.sh` and put it in the Fileset if you want to uninstall when you remove the Association to the Fileset. ``` /bin/bash -c "$(curl -fsSL https://raw.githubusercontent.com/Homebrew/install/HEAD/uninstall.sh)" ``` If you want to run the Homebrew uninstaller non-interactively, you can use: ``` NONINTERACTIVE=1 /bin/bash -c "$(curl -fsSL https://raw.githubusercontent.com/Homebrew/install/HEAD/uninstall.sh)" ``` Download the uninstall script and run `/bin/bash uninstall.sh --help` to view more uninstall options. # iBooks Author Deployment (macOS App) ## Description Member of iTunes U? Need to get iBooks Author out to your staff? We can do that. ## Ingredients - FW Central - 10.7 (Lion) or higher - iBooks Author.app already installed ## Directions 1. Log onto the FileWave server with FileWave Admin as an account that has permissions to create Filesets. 2. With FileWave Admin running, drag and drop the installed iBooks Author.app from the Application folder onto the FileWave Admin window while in the Filesets view is formost. 3. Now go to the Associations window to assign who gets the software. 4. Update the FileWave Server Model. ## Notes Other comments and details # Installomator - The one installer script to rule them all (macOS PKG) ## Description This article delves into the application of [Installomator](https://github.com/Installomator/Installomator), a shell script, in combination with FileWave for the maintenance of macOS applications. Installomator supports the downloading and installation of over 450 different applications, operating directly from the vendor's public URLs. This approach is compared with the use of AutoPkg, a tool that provides more stringent control over versioning, testing, and release management. Installomator can be a valuable tool when deploying the latest publicly available version of an application is the goal. It verifies the authenticity and validity of each download, though it's not a fully automated solution. For certain applications like Chrome, Zoom, and Microsoft Office, their update processes may be better managed via a config profile. Additionally, attention may be needed for built-in auto update prompts of other apps. A key characteristic of Installomator is its handling of versioning. Instead of installing only when the downloaded version is newer, Installomator initiates installation if the version numbers differ. This is due to the complexities in determining which version number is higher. For instance, if Installomator downloads version 4 after a vendor has released version 5 due to a URL change, it will attempt to install version 4 because the version numbers differ. ## Ingredients - FW Admin - swiftDialog - [Deploying swiftDialog via FileWave (macOS PKG)](https://kb.filewave.com/books/software-deployment-recipes-macos/page/swiftdialog-deployment-macos-pkg "Deploying swiftDialog via FileWave (macOS PKG)") - Installomator - [Releases · Installomator/Installomator (github.com)](https://github.com/Installomator/Installomator/releases) ## Directions ### Deploying Installomator on all your Macs Installomator operates by taking a 'label' parameter representing the application to be installed. It generally only installs an application if the latest version is newer than the installed version, though exceptions exist, emphasizing the importance of thorough testing. It's deployed via a single FileWave Fileset, with numerous configuration options to improve user experience and system stability. These include user notifications upon completion, the closing of the app prior to installation, prompts before closing the app, and the ability to re-launch the app post-update if it was initially open. Installomator does not interact with App Store applications except to replace them with non-App Store versions if desired. See [Configuration Options](#bkmrk-configuration-option) further down for how to customize the operation of the script. ### Installing Installomator 1. Download the PKG for [SwiftDialog](https://kb.filewave.com/books/software-deployment-recipes-macos/page/swiftdialog-deployment-macos-pkg "Deploying swiftDialog via FileWave (macOS PKG)") and install the PKG as a FileSet. 2. Before deploying the swiftDialog Fileset broadly, review its Fileset requirements and make sure current macOS versions used in your environment are included. If the requirements are too restrictive, update them or remove the restriction before association. 3. Download the PKG for Installomator from [Releases · Installomator/Installomator (github.com)](https://github.com/Installomator/Installomator/releases) install the PKG as a FileSet. This will place the script file to `/usr/local/Installomator/Installomator.sh`PKG Filesets are easy to make. You can start by dragging and dropping the PKG on the Filesets window in FileWave Central or use our example here: [PKG - Installomator.fileset.zip](https://kb.filewave.com/attachments/216)
### Identifying an App to install Run Installomator by itself in Terminal and get the full list of apps it can install: ```shell /usr/local/Installomator/Installomator.sh ``` This is the output of that command: [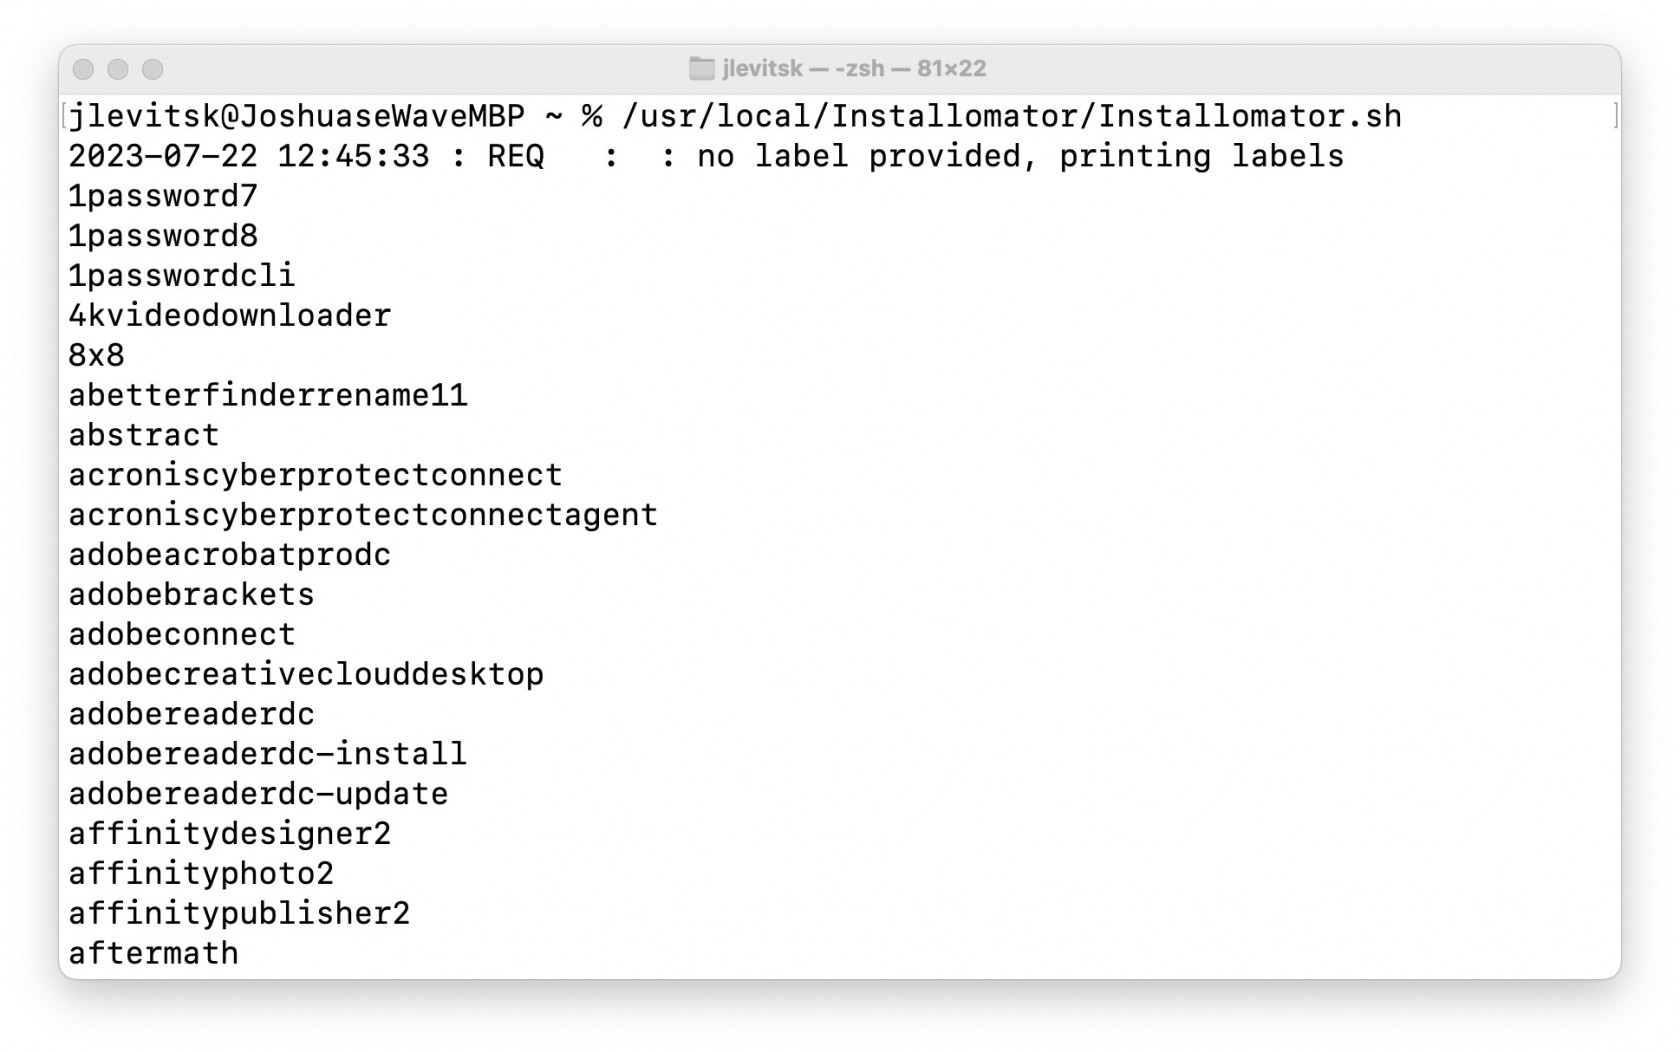](https://kb.filewave.com/uploads/images/gallery/2023-07/jZvwh18Lv00K4mlZ-jlevitsk-zsh-8122-2023-07-22-at-12-45-48-pm.jpg) Or run Installomator in Terminal with grep to filter the results: ```shell /usr/local/Installomator/Installomator.sh | grep -i bbedit ``` This is the output of that command: [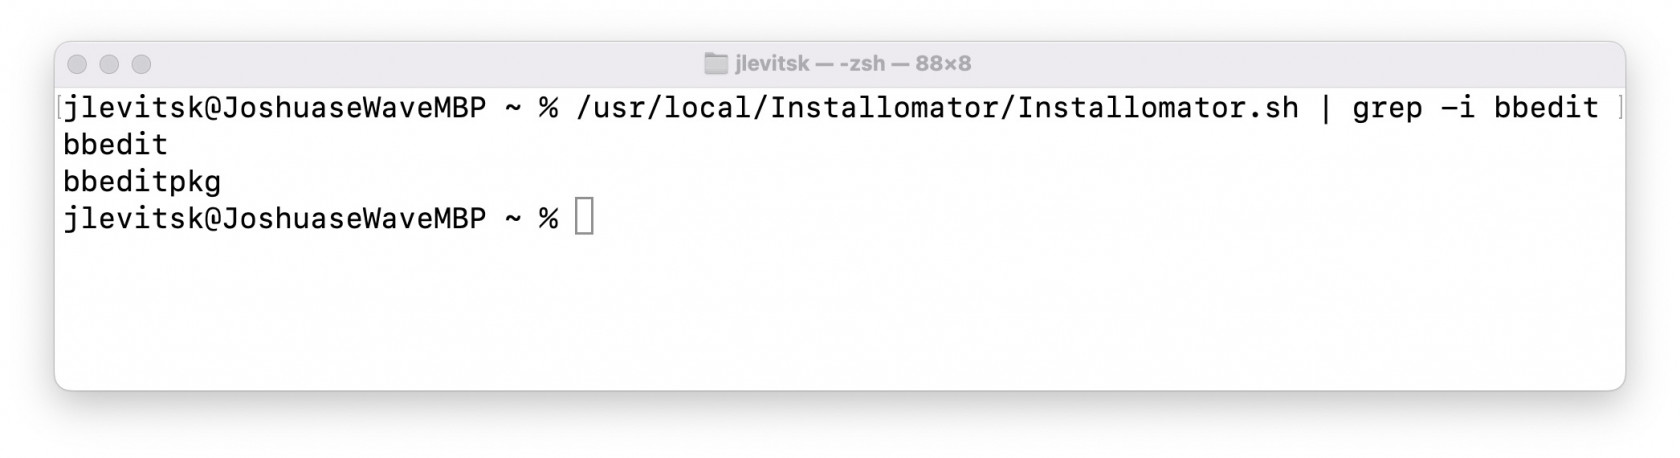](https://kb.filewave.com/uploads/images/gallery/2023-07/1JEiTQHtSCJ3iCD7-jlevitsk-zsh-888-2023-07-22-at-12-48-33-pm.jpg) ### Installing an App At this point you have installed both [swiftDialog](https://kb.filewave.com/books/software-deployment-recipes-macos/page/swiftdialog-deployment-macos-pkg "Deploying swiftDialog via FileWave (macOS PKG)") and Installomator. For the next steps here is an example [BBEdit - Installomator.fileset.zip](https://kb.filewave.com/attachments/200) to look at while you follow along. The BBEdit example is a very simple Fileset containing 3 scripts, and that's all.| The scripts are fairly simple and listed below: ##### check\_installomator.sh ```shell #!/bin/zsh # Checks every 2 minutes for Installomator to be present. # Add the contents of your script below: if [ -f "/usr/local/Installomator/Installomator.sh" ]; then exit 0 else echo "Could not find Installomator" exit 1 fi ``` ##### install.sh ```shell #!/bin/zsh # Remember to change the properties for both install.sh and verify.sh # to have the right app label since it is passed to the script from properties. /usr/local/Installomator/Installomator.sh $1 NOTIFY_DIALOG=1 NOTIFY=success LOGO=/usr/local/sbin/FileWave.app/Contents/Resources/fwGUI.app/Contents/Resources/kiosk.icns ``` ##### verify.sh ```shell #!/bin/zsh # Remember to change the properties for both install.sh and verify.sh # to have the right app label since it is passed to the script from properties. /usr/local/Installomator/Installomator.sh $1 NOTIFY_DIALOG=1 NOTIFY=success LOGO=/usr/local/sbin/FileWave.app/Contents/Resources/fwGUI.app/Contents/Resources/kiosk.icns ``` In our example both `install.sh` and `verify.sh` are identical but they don't have to be depending on your needs. | 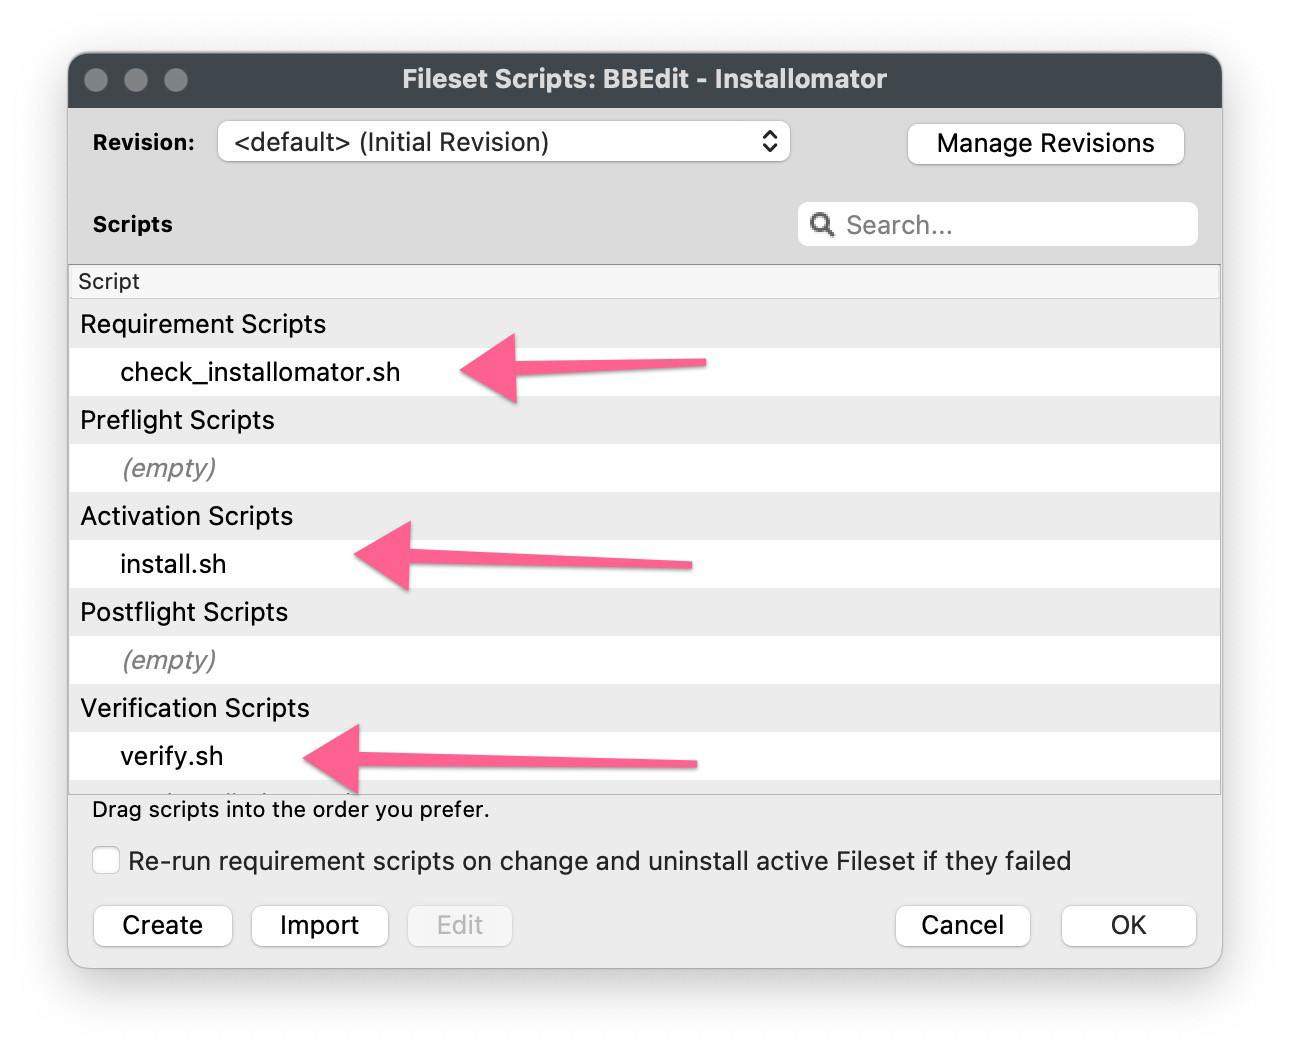 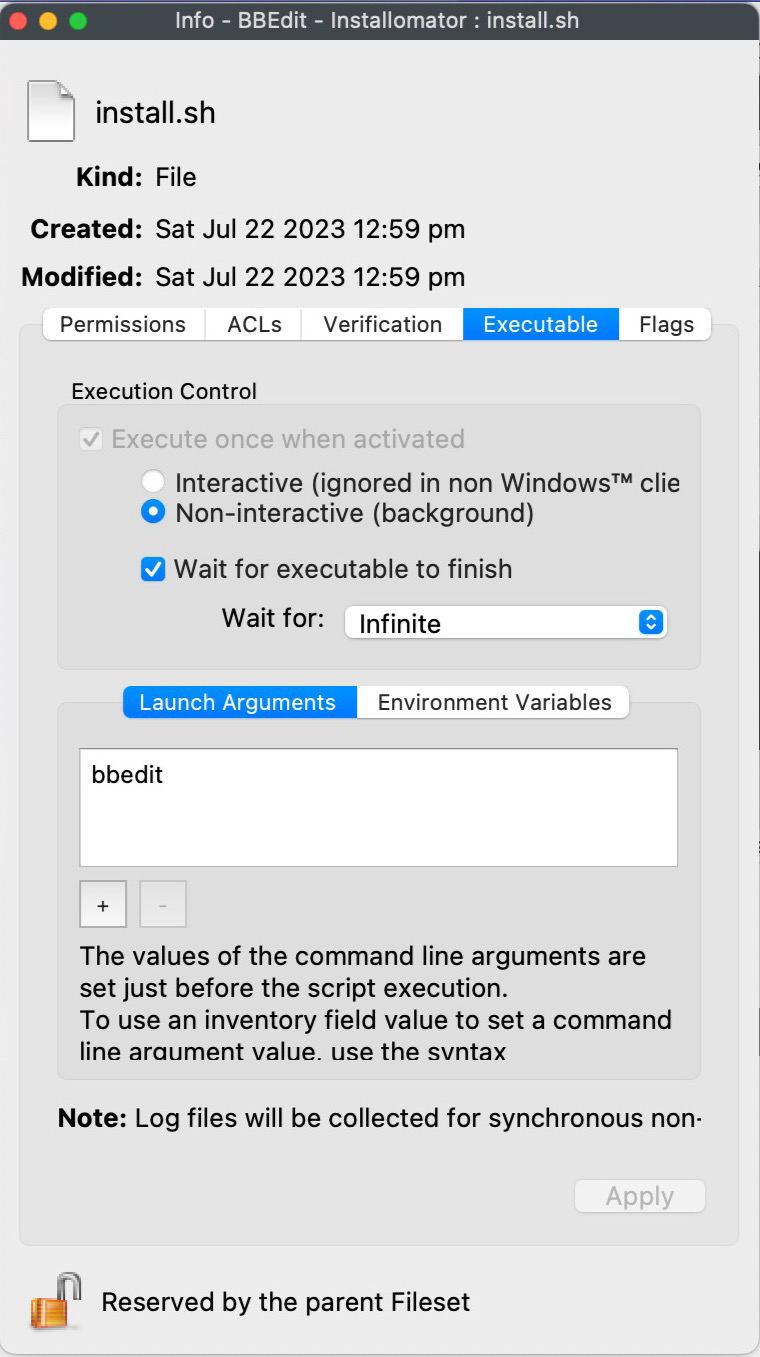 |
Be careful as some apps/labels may install even if the app is already on the latest version
Depending on what dialogs you have enabled you may show status messages like the below. We recommend not editing the Installomator script itself but rather pass the options as parameters in your Filesets. [](https://kb.filewave.com/uploads/images/gallery/2023-07/0P4NjHfL4nAOB966-using-installomator-to-support-3rd-party-apps-mac-2-pdf-2023-07-22-at-1-25-57-pm.jpg) [](https://kb.filewave.com/uploads/images/gallery/2023-07/Cy5CRZP3QVmKgC6x-using-installomator-to-support-3rd-party-apps-mac-2-pdf-2023-07-22-at-1-27-01-pm.jpg) You should now be able to deploy anything that Installomator supports. Just remember that this tool is designed to always keep things up to date which can be a good or bad thing for you depending on your use case. ## Troubleshooting You will be able to see what the Fileset is doing by leveraging the [Fileset logs](https://kb.filewave.com/books/filewave-general-info/page/filewave-log-file-locations "FileWave Log File Locations"). All 3 of the scripts will log to `/var/log/fwcld/If you are using the new method with Lightspeed Certificate Manager please review: [Lightspeed Smart Agent Deployment (macOS v2.3.1+ using Certificate Manager)](https://kb.filewave.com/books/software-deployment-recipes-macos/page/lightspeed-smart-agent-deployment-macos-v231-using-certificate-manager "Lightspeed Smart Agent Deployment (macOS v2.3.1+ using Certificate Manager)")
#### Ingredients - FileWave Central - Lightspeed Smart Agent DMG installer - Lightspeed Smart Agent PKG installer - Lightspeed mac deploy script - Lightspeed install script - Lightspeed certificate**Web Content Filter** - In creating a Web Content Filter within FileWave Central it changes the UDID and is unsuccessful in deployment. The issue can be resolved by re-creating the Web Content Filter in FileWave Anywhere as a workaround. The issue should be resolved in the next release. See [Known Issues](https://kb.filewave.com/books/downloads/page/filewave-known-issues "FileWave Known Issues")
#### Download Lightspeed Relay Filter Agent 1. Login to your Lightspeed Filter account at [relay.school.com](http://relay.school.com) 1. Navigate to Settings > Software 2. Choose Lightspeed Filter 3. Select the Mac tab 4. Select the version of the Relay Filter Agent by clicking on the download icon 5. Place the downloaded SmartAgent.dmg into your Downloads Folder #### Download the macOS deploy script 1. Download the mac\_deploy.sh script, found here: [mac\_deploy.sh](https://kb.filewave.com/attachments/40) 2. Place the downloaded mac\_deploy.sh script into your Downloads 3. Unzip the downloaded mac\_deploy.sh script 4. Open Terminal to run the script ``` # enter as root $ sudo -s # nagivate to your Downloads folder $ cd ~/Downloads # run the script to create three files on the Desktop $ ./mac_deploy.sh ``` 5. Once the script has been executed, it has created three files on your Desktop; ca.cer, deploymont.zip and SmartAgent.pkg **Note**: Be sure both SmartAgent.dmg and mac\_deploy.sh are in the same directory, i.e. Downloads folder for the mac\_deploy script to successfully create the deployment files and certificate. #### Create the Configuration Profile 1. Open FileWave Central or FileWave Anywhere 2. Navigate to Filesets > Select New Desktop Fileset > Click on Profile 3. Enter the name of the Profile: General > Name: Lightspeed Agent Profile 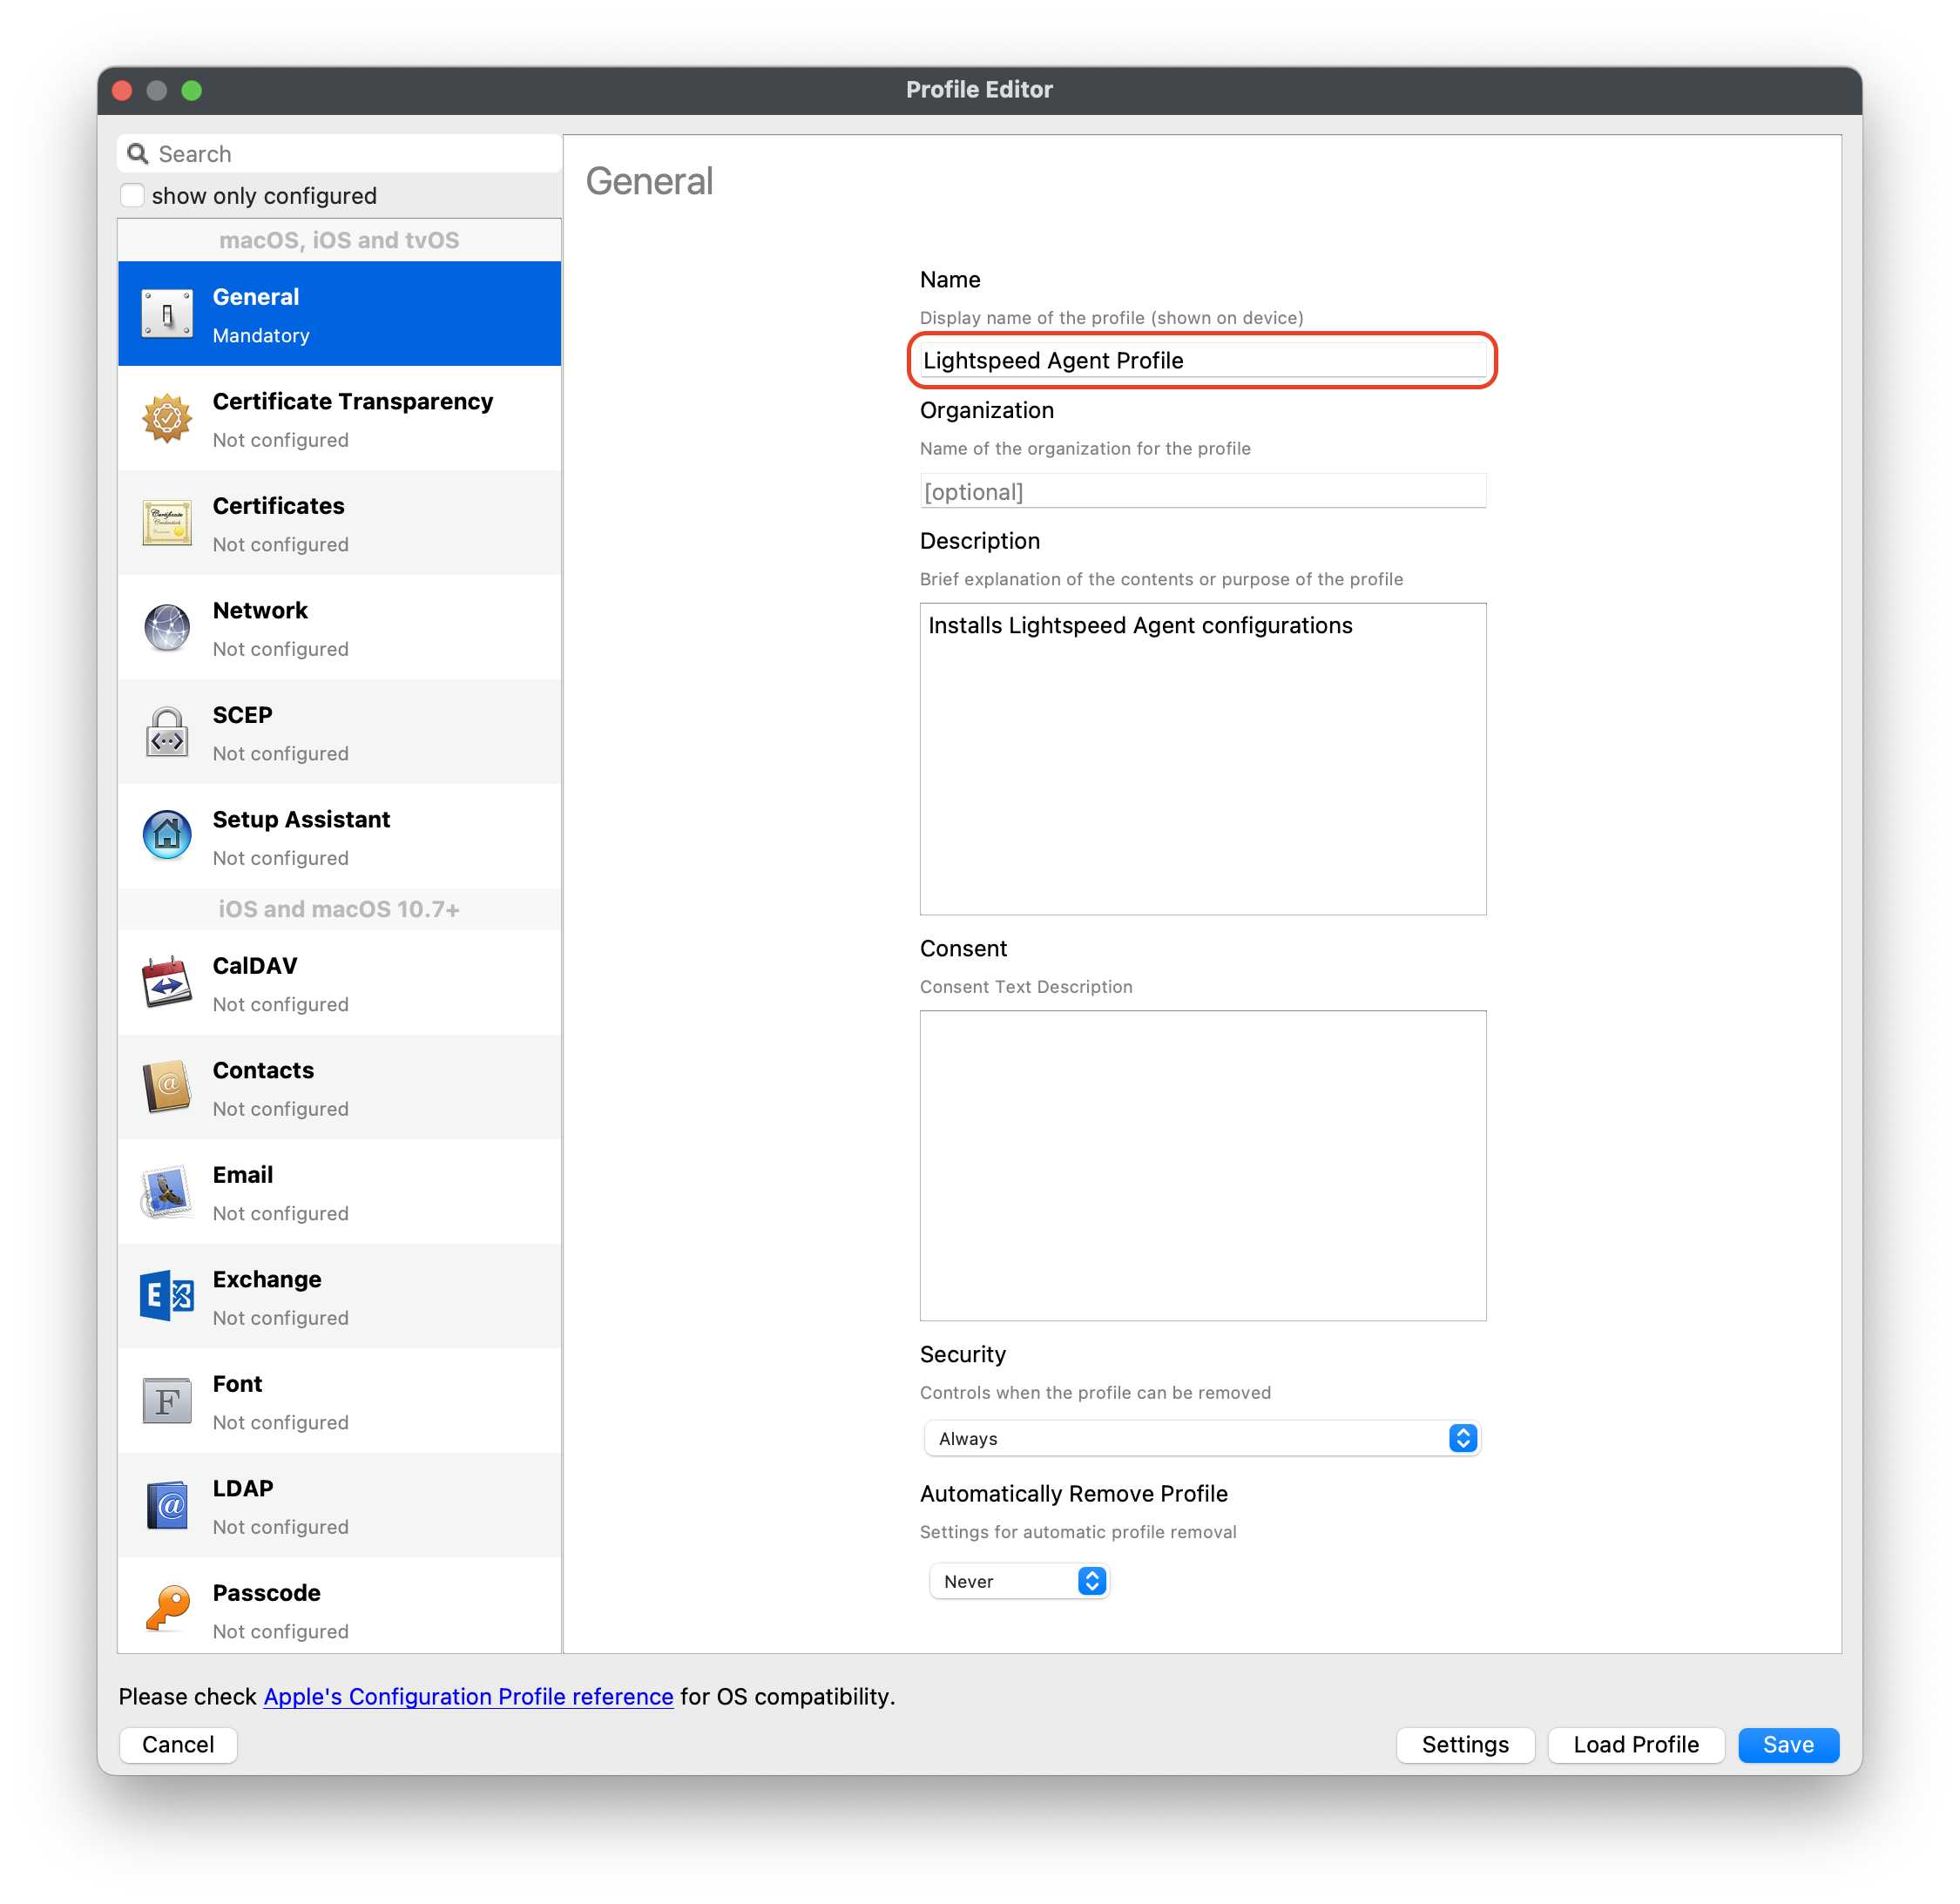 4. Select Certificates payload to add your ca.cer certificate 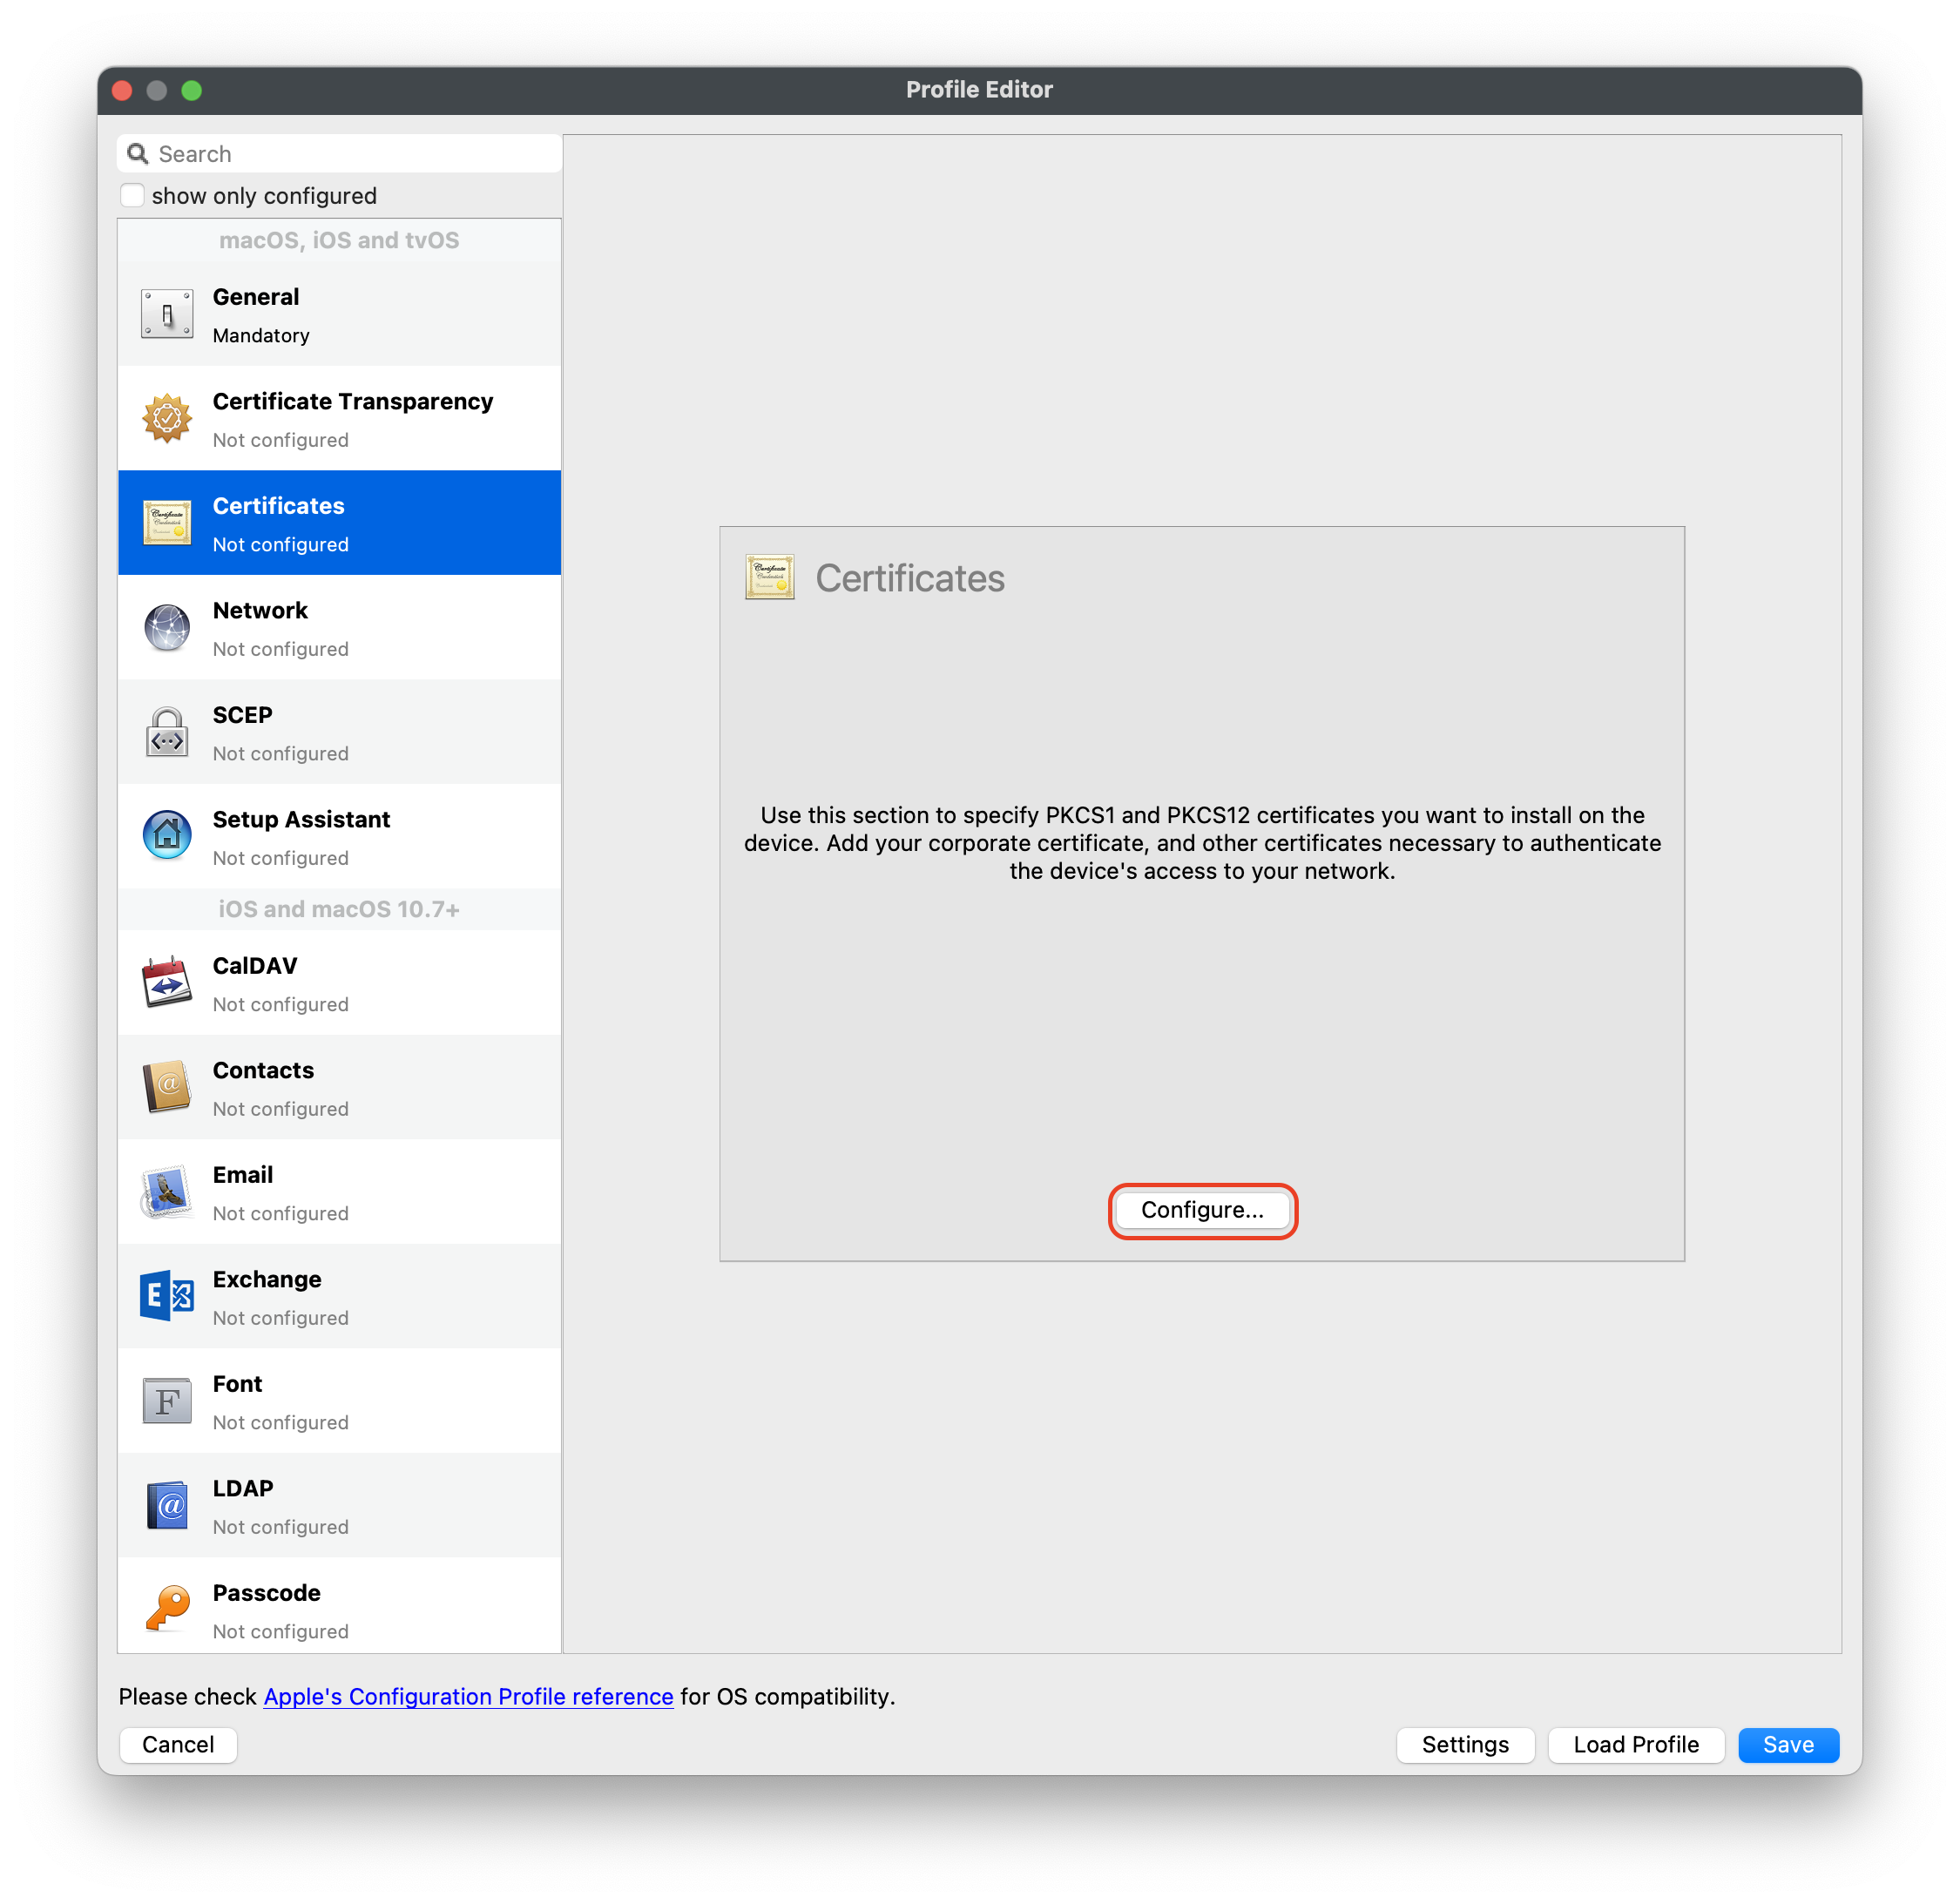 5. Navigate to System Extension Policy payload, add and enter in the following: 1. Click + to add Allowed Team Identifiers: **Team Identifier:** *ZAGTUU2342* 2. Click + to add Allowed System Extensions: **1st Allowed System Extensions:** *com.lightspeedsystems.network-agent* Enter add 2nd Allowed System Extensions with comma after 1st Allowed System Extensions **2nd Allowed System Extensions:** *com.lightspeedsystems.network-agent.network-extension* 3. Click + to add Allowed System Extension Types and check box for Network: **Team Identifier:** *ZAGTUU2342* 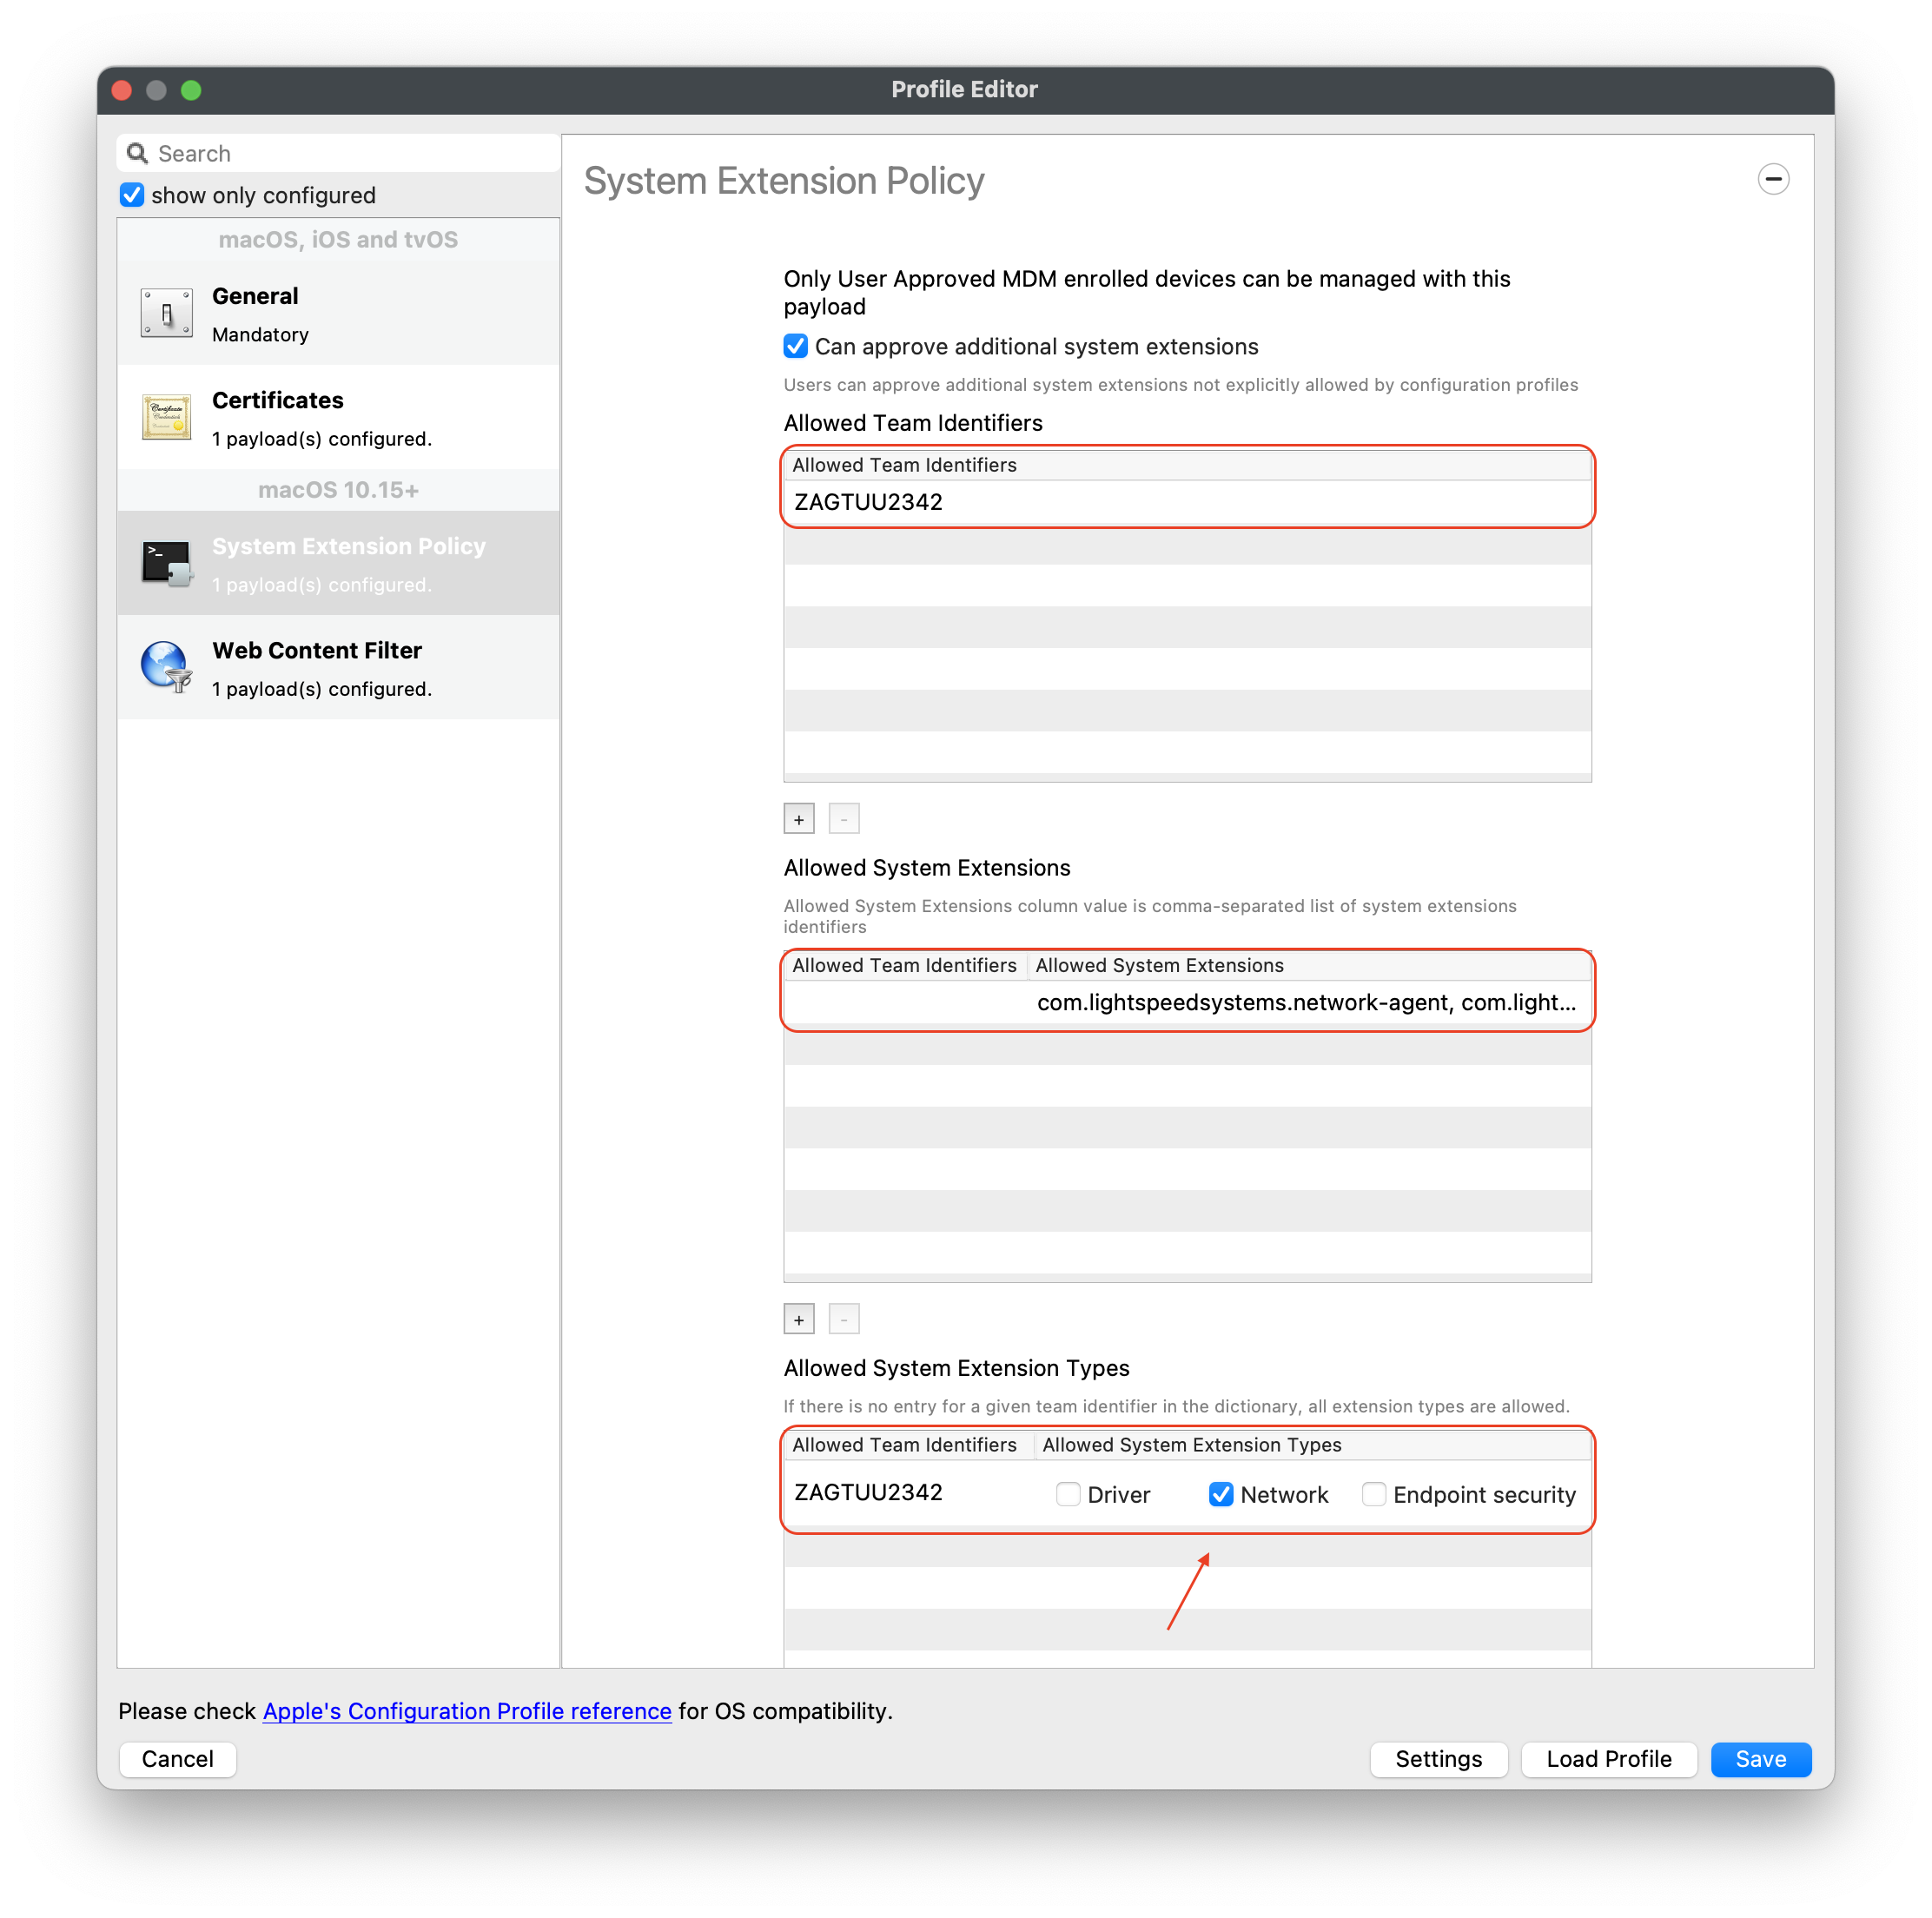 6. Navigate to Web Content Filter and enter in the following: 1. **Filter Name:** *Lightspeed Agent* 2. **Identifier:** *com.lightspeedsystems.network-agent* 3. **Filter Options:** *Socket Traffic Only* 4. **Socket Filter Bundle Identifier:** *com.lightspeedsystems.network-agent.network-extension* 5. **Socket Filter Designated Requirement:** *anchor apple generic and identifier "com.lightspeedsystems.network-agent.network-extension" and (certificate leaf\[field.1.2.840.113635.100.6.1.9\] /\* exists / or certificate 1\[field.1.2.840.113635.100.6.2.6\] / exists / and certificate leaf\[field.1.2.840.113635.100.6.1.13\] / exists \*/ and certificate leaf\[subject.OU\] = ZAGTUU2342)* 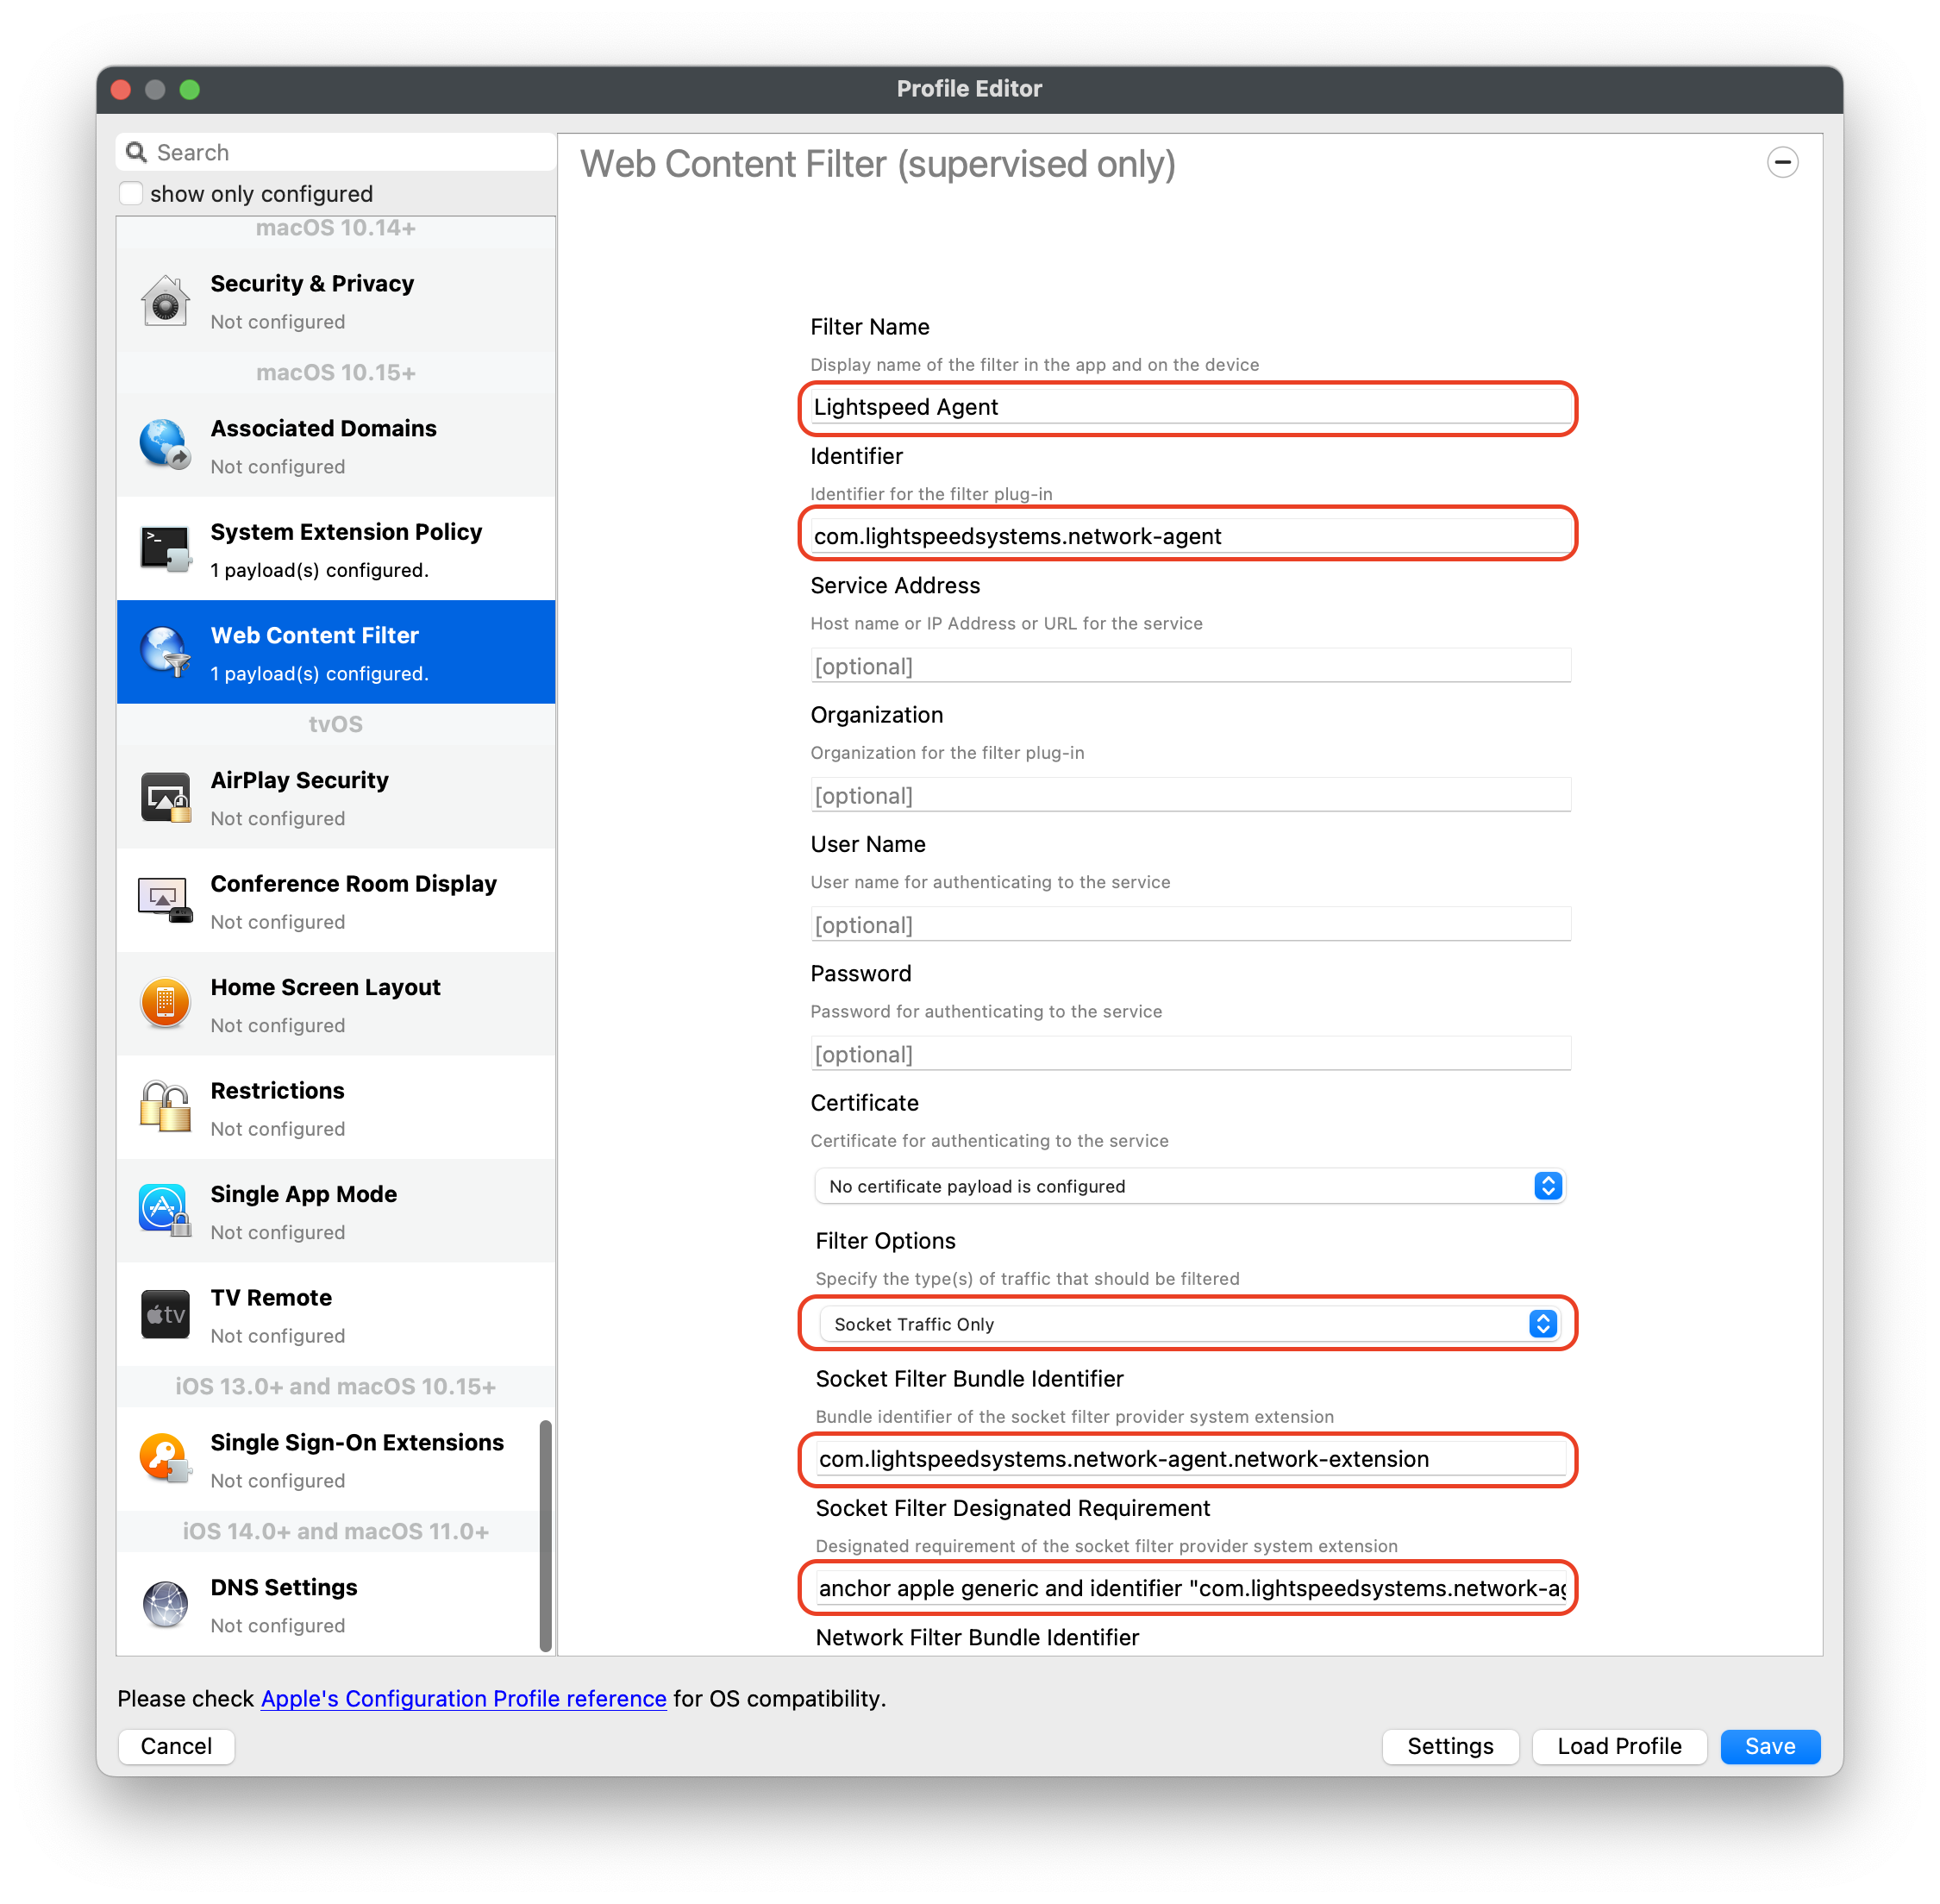 7. The completed configuration profile will have three payloads; these include: Certificates, System Extension Policy and Web Content Filter 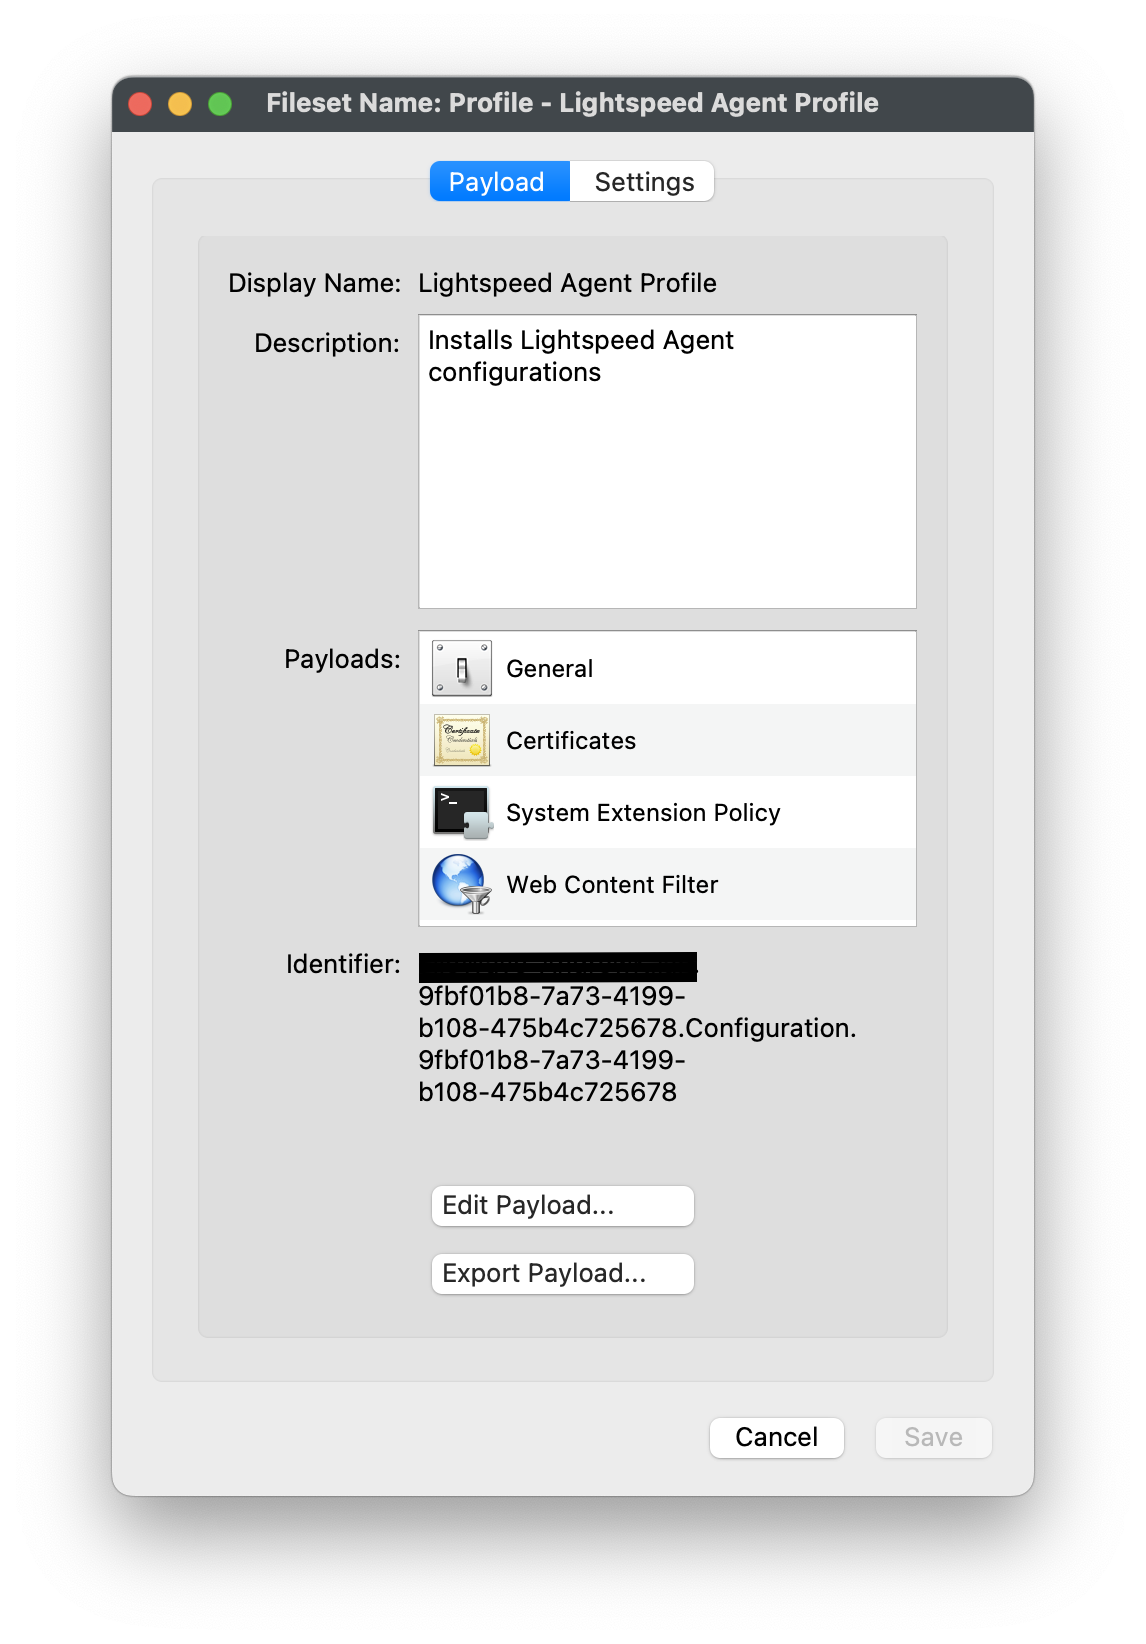 #### Editing the Install script 1. Download and unzip the Install script, found here: [install\_lightspeed.sh](https://kb.filewave.com/attachments/41) 2. Open the install.sh in TextEdit or compatible Text Editor, for example Sublime Text 3. Enter in your URL to the hosted file in line 3 of the Install Script; between the quotes, where it says, “Your FQHN HERE to the deployment.zip” 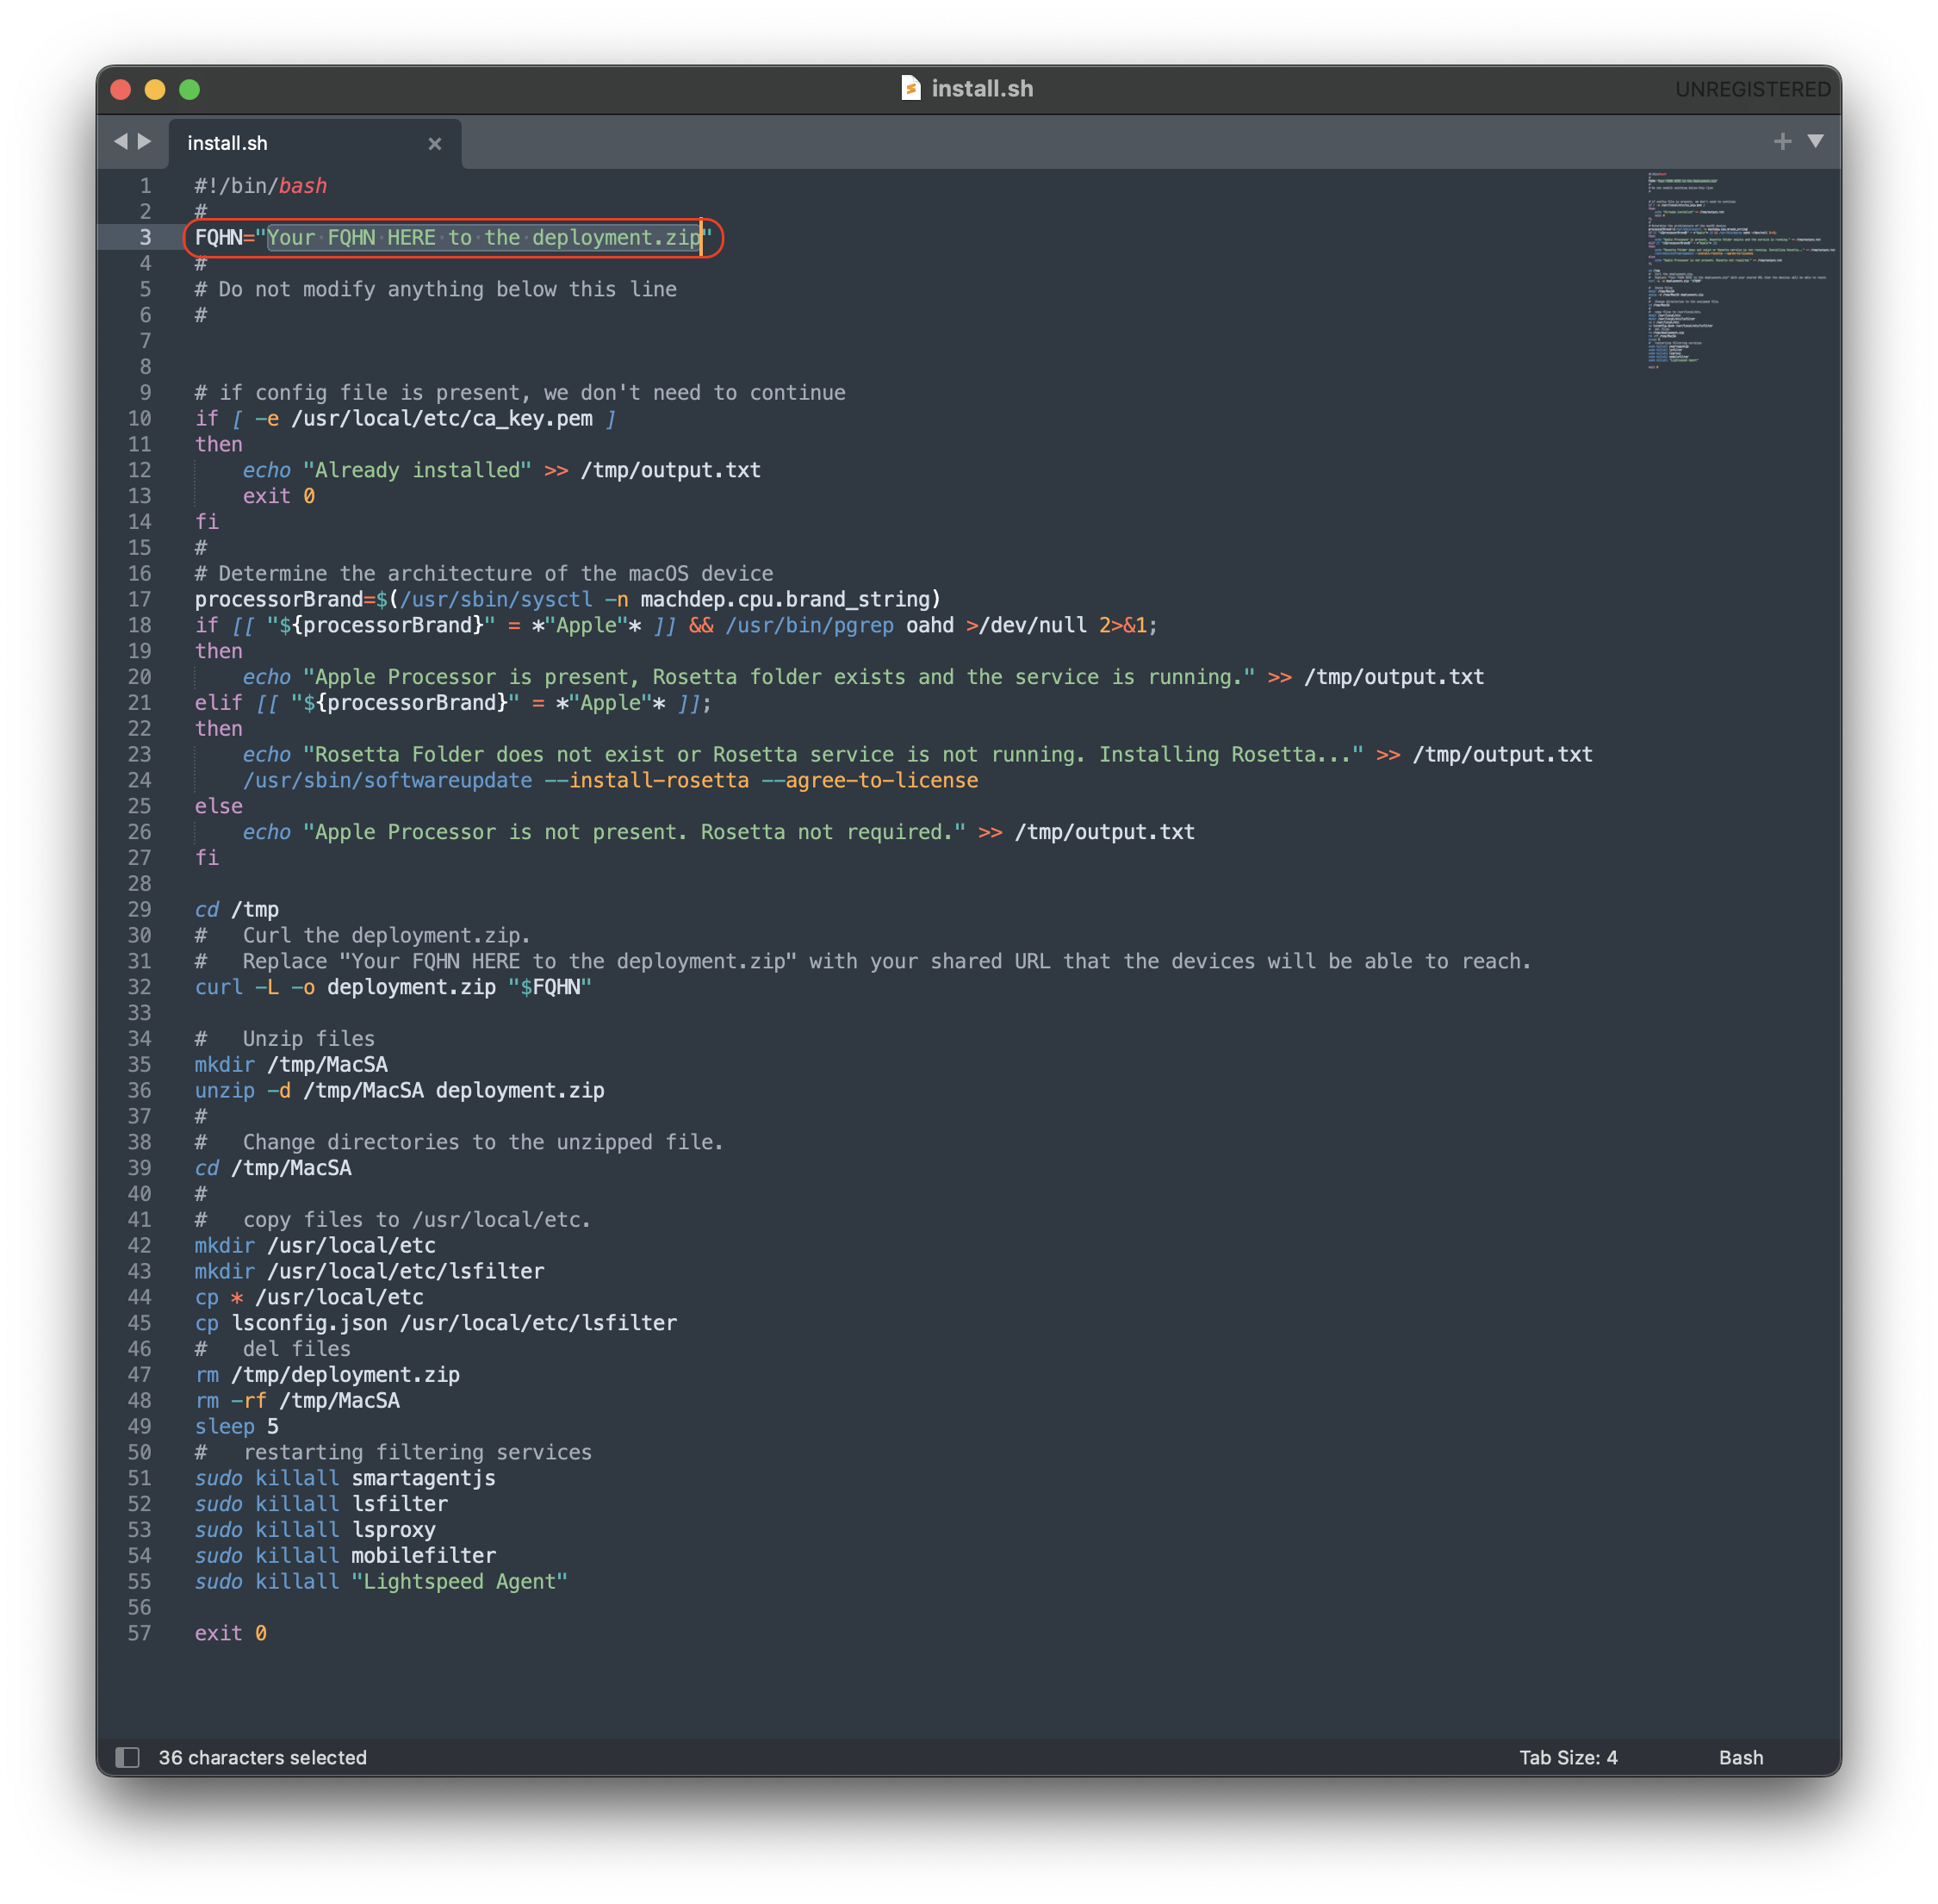 4. Save the changes to the install.sh script**Note**: The deployment.zip file created on the desktop must be hosted for the deployment to succeed. (This can be accomplished with Google Drive (may use [Google Drive Direct Link Generator](https://sites.google.com/site/gdocs2direct/)), Microsoft OneDrive, Amazon S3, etc.) Be sure the deployment.zip file is accessible for the install.sh script to downloaded successfully, otherwise this will not complete the installation of the Lightspeed Filter.
#### Import the Smart Agent PKG 1. Navigate to Filesets > Create New Desktop Fileset > Select MSI / PKG 2. Navigate to your downloaded SmartAgent.pkg to upload into the Fileset 3. Please wait a few moments for the PKG installer to upload into your FileWave server 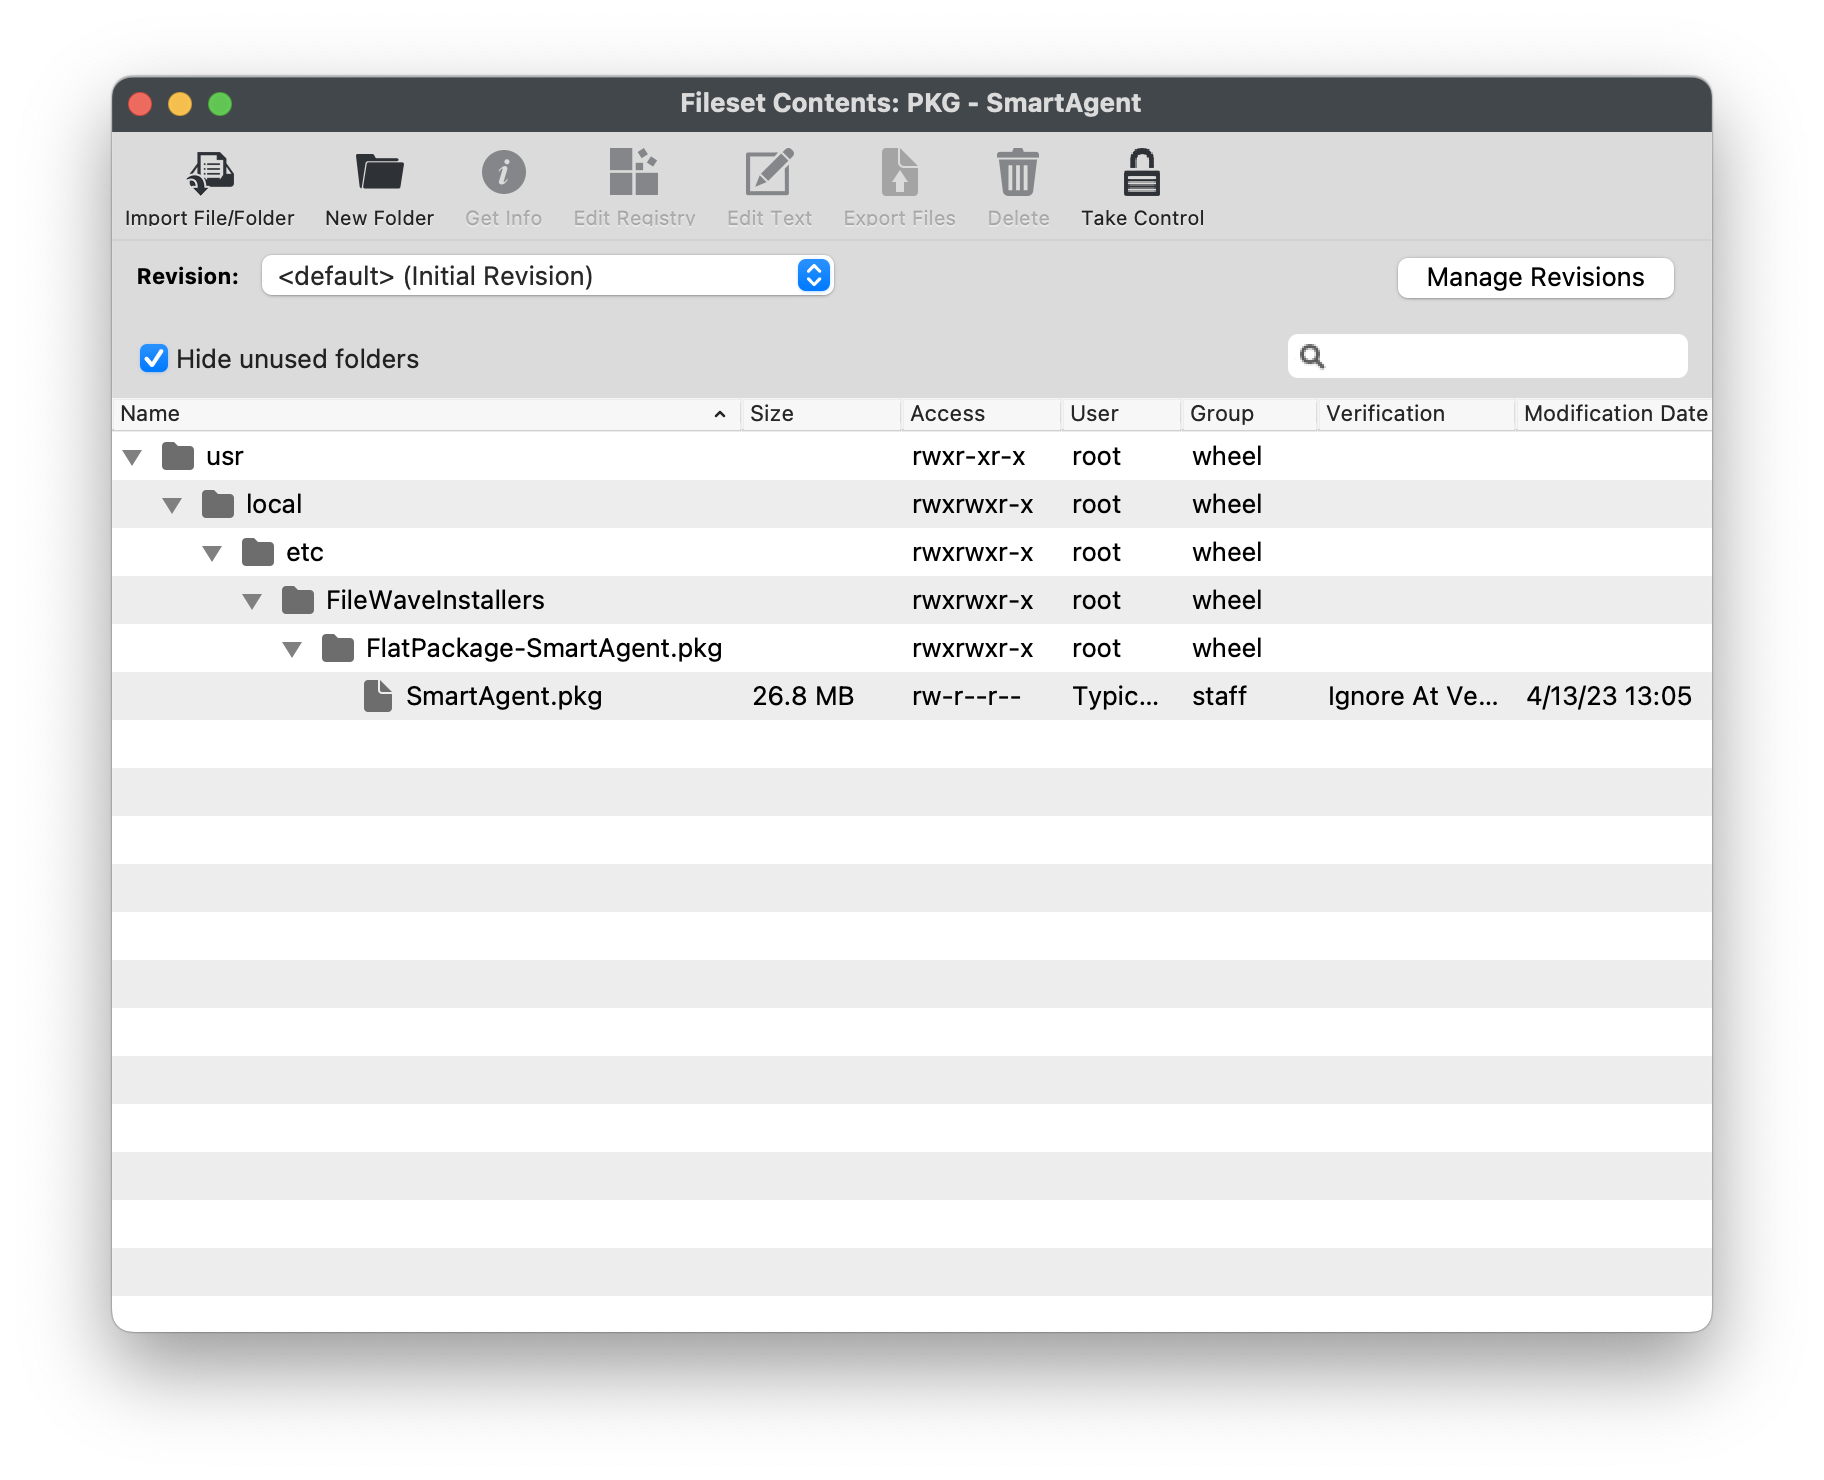 4. After successfully uploading, highlight the Fileset > Select Properties 5. Under the Requirements tab, check the box Platform and check macOS only, then under System Version and checkboxes only for macOS 12.x and 13.x 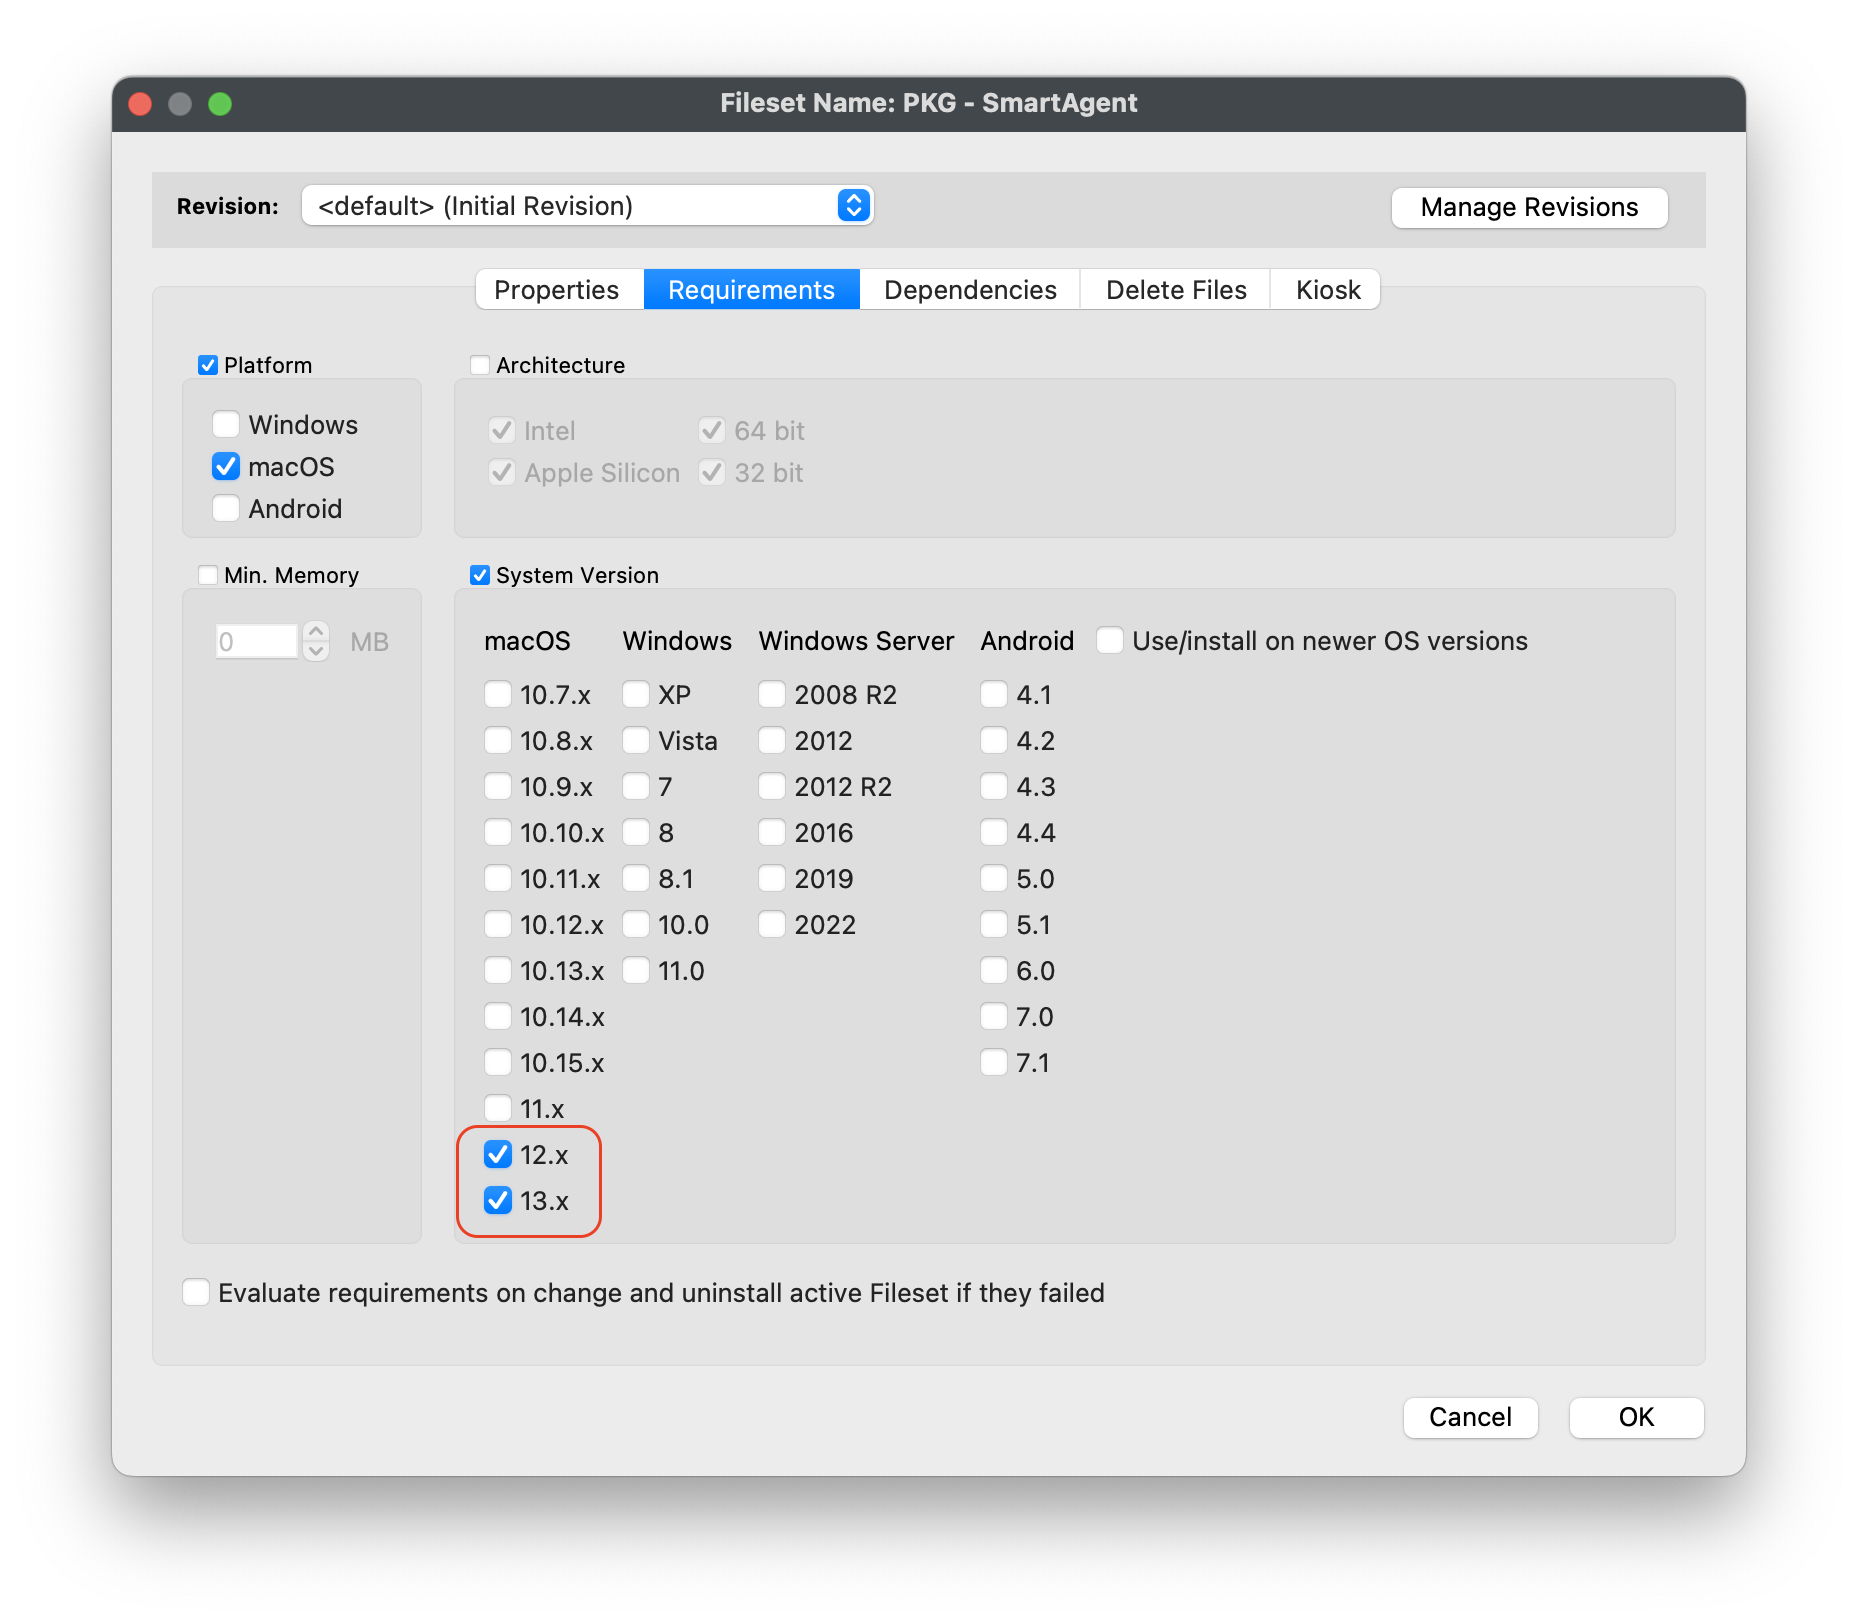 6. Click OK to save**Note**: If all of your devices are not on macOS 12 or greater, you will want to set the **Requirements** for the Fileset for macOS 12 and above
#### Editing the Smart Agent PKG Fileset 1. Highlight the newly created Fileset with your Smart Agent PKG 2. Click on Script in the menu to open Script dialogue window 3. Highlight **Requirement Scripts** and click on the Create button[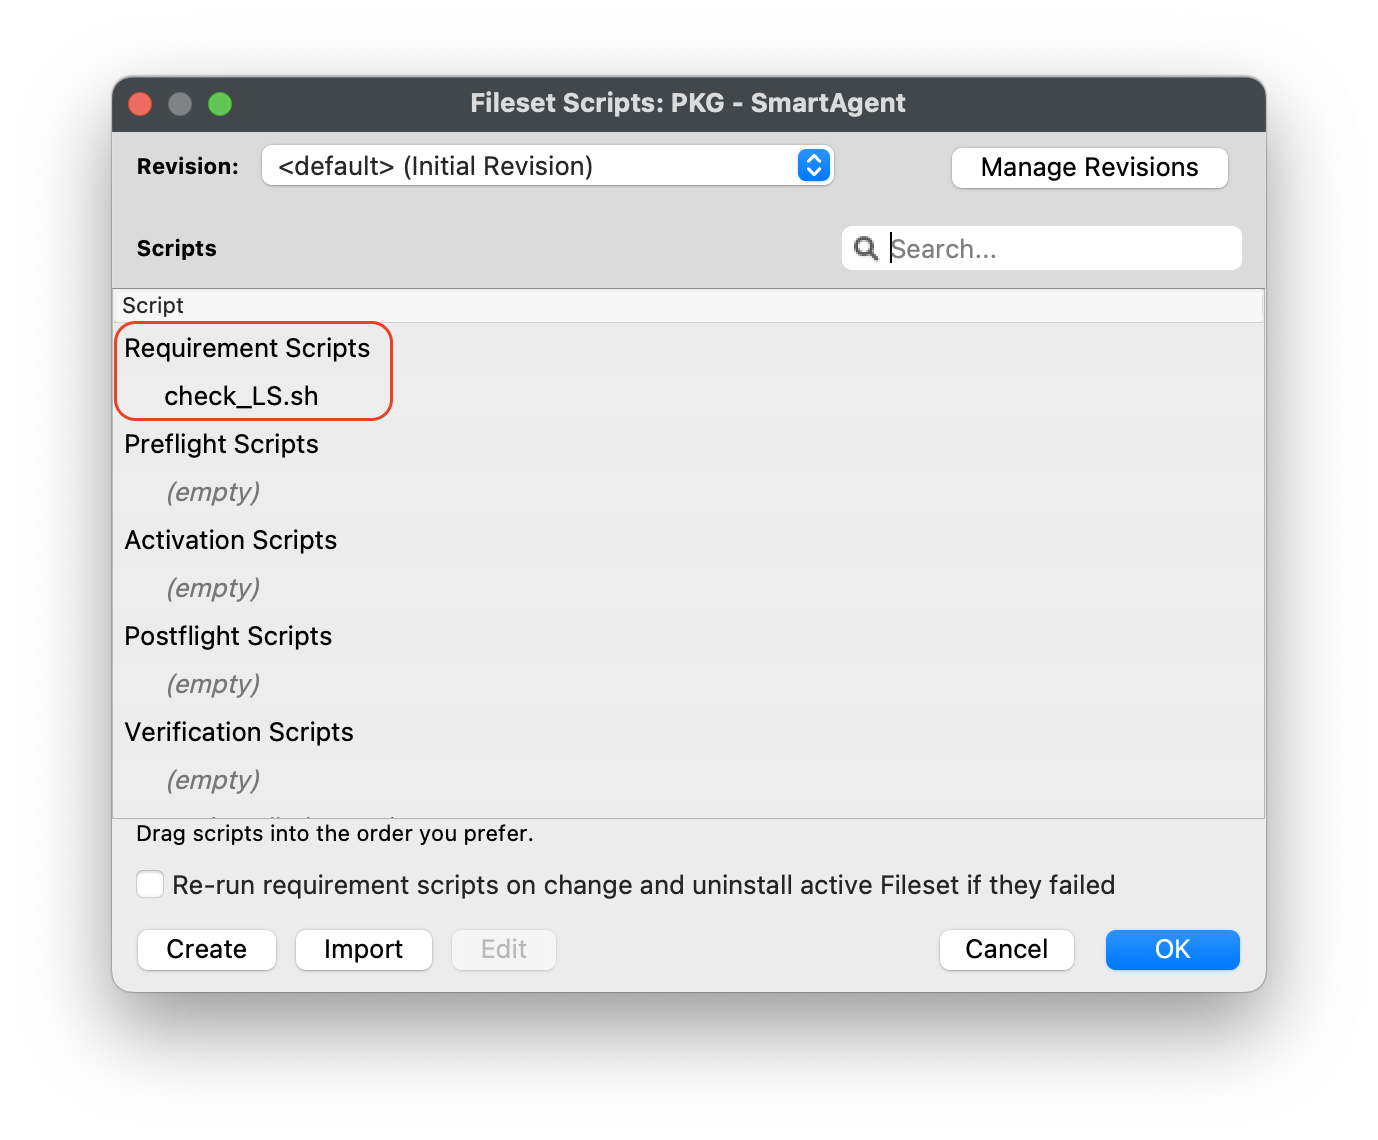](https://kb.filewave.com/uploads/images/gallery/2023-07/bhpW20C2AcqGB1LC-lightspeedsmartagentpkg.png) 4. Label script, check\_LS.sh 5. Copy and paste the entire check profile script below: ``` #!/bin/zsh found_profile="" while [ $# -gt 0 ] do found_profile=$(profiles list all | awk -v search=$1 '$0 ~ search {print $NF}') if [ ! -z $found_profile ] then echo "Found installed profile: $found_profile" exit 0 else echo "Did not find $1" fi shift done exit 1 ``` 6. Click OK to save the script 7. Highlight the check\_LS.sh and right-click to select **Properties [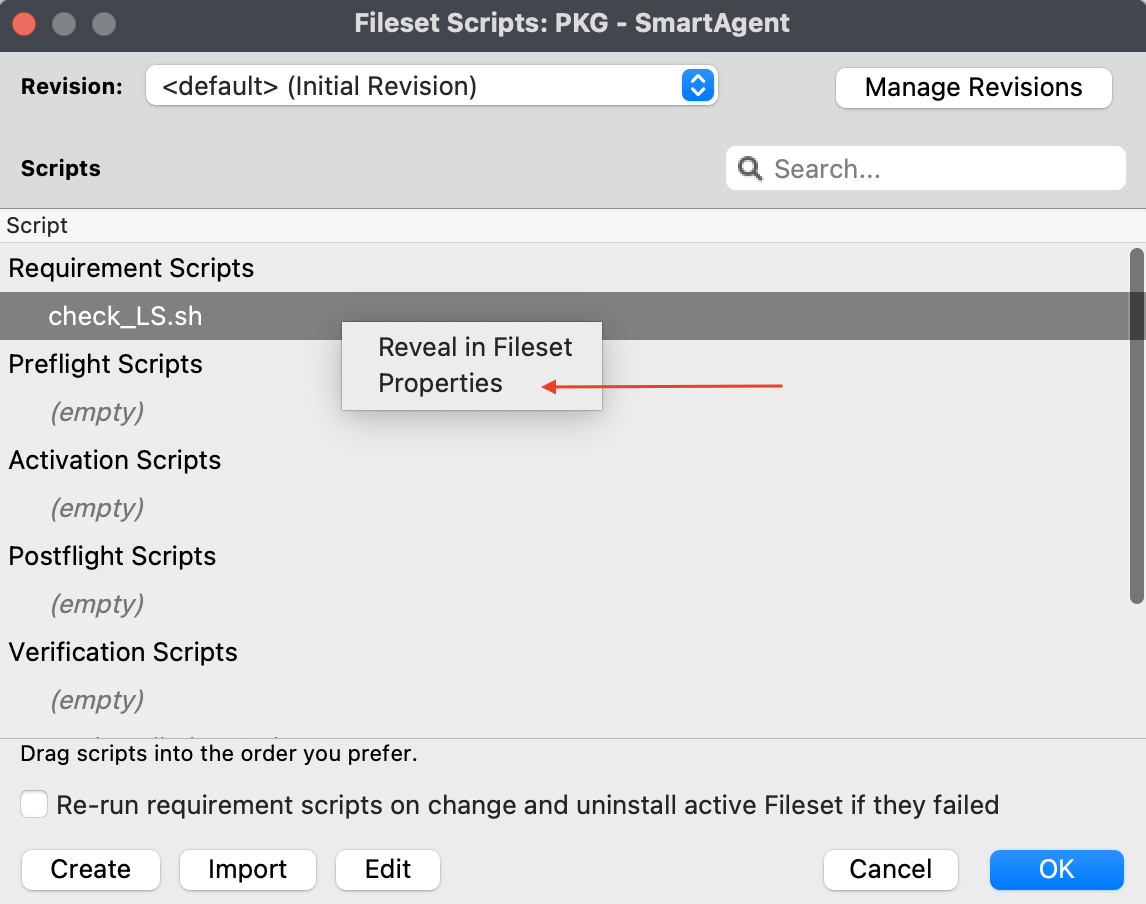](https://kb.filewave.com/uploads/images/gallery/2023-07/jPmy0N16EBdwoasp-lightspeedsmartagentpkg2.png)** 8. Select the Executable tab, under the **Launch Arguments** tab, click on the + button to add your Lightspeed Agent Profile’s Identifier (found by double-clicking on your Lightspeed Agent Profile)[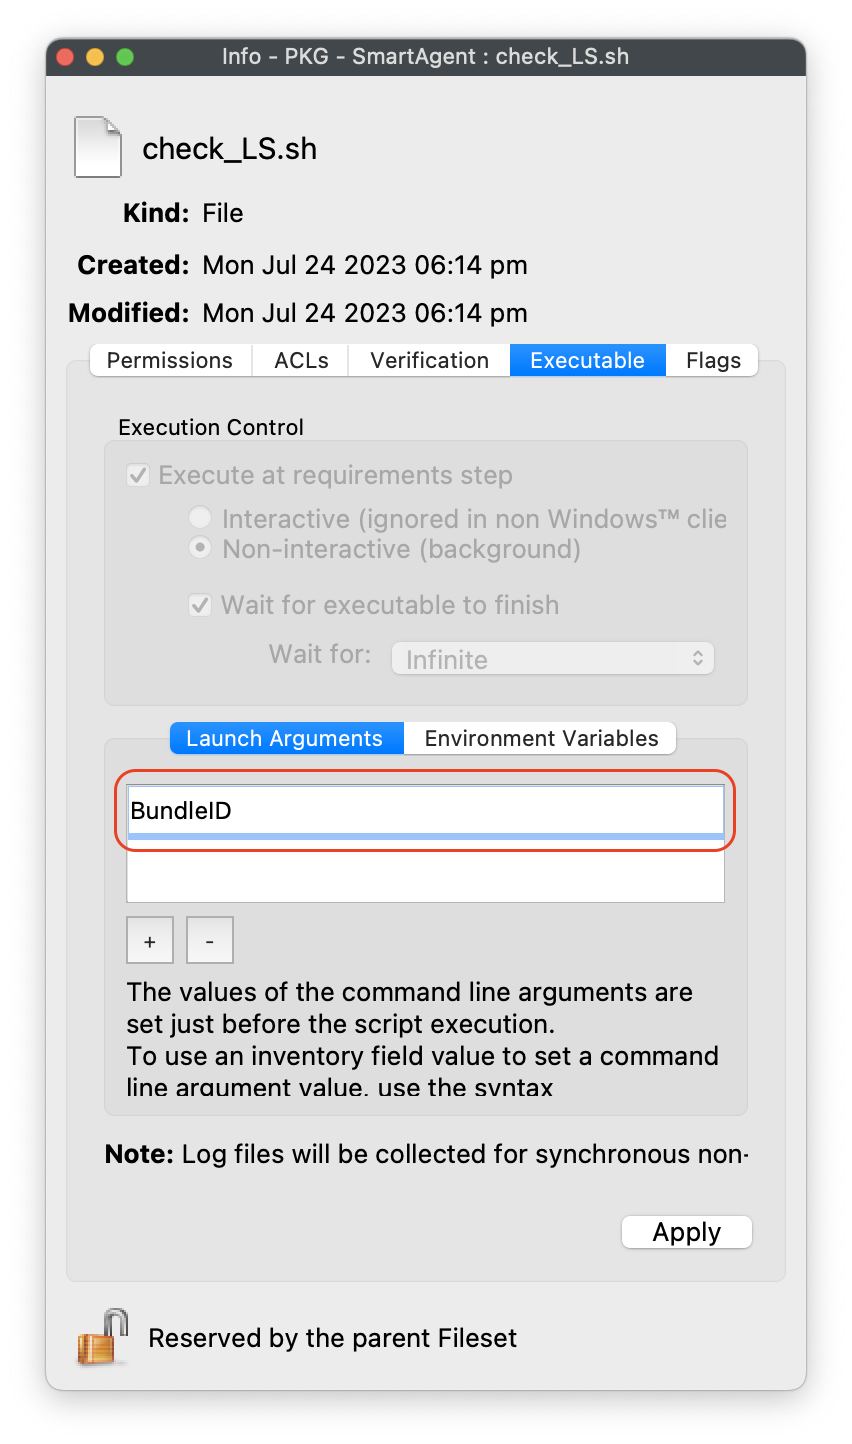](https://kb.filewave.com/uploads/images/gallery/2023-07/DGgbyCprBDdXOIqp-lightspeedsmartagentpkg3.png) 9. Click OK to Apply to save changes 10. Close out Properties of the Requirement Script 11. Click OK to save changes to Smart Agent PKG Fileset #### Creating the Installation Fileset 1. Navigate to Filesets > Create New Desktop Fileset > Empty Fileset > label Lightspeed Install Script 2. Click on Script in the menu to open the Script dialogue window 3. Highlight **Activation Scripts** and click on the Create button 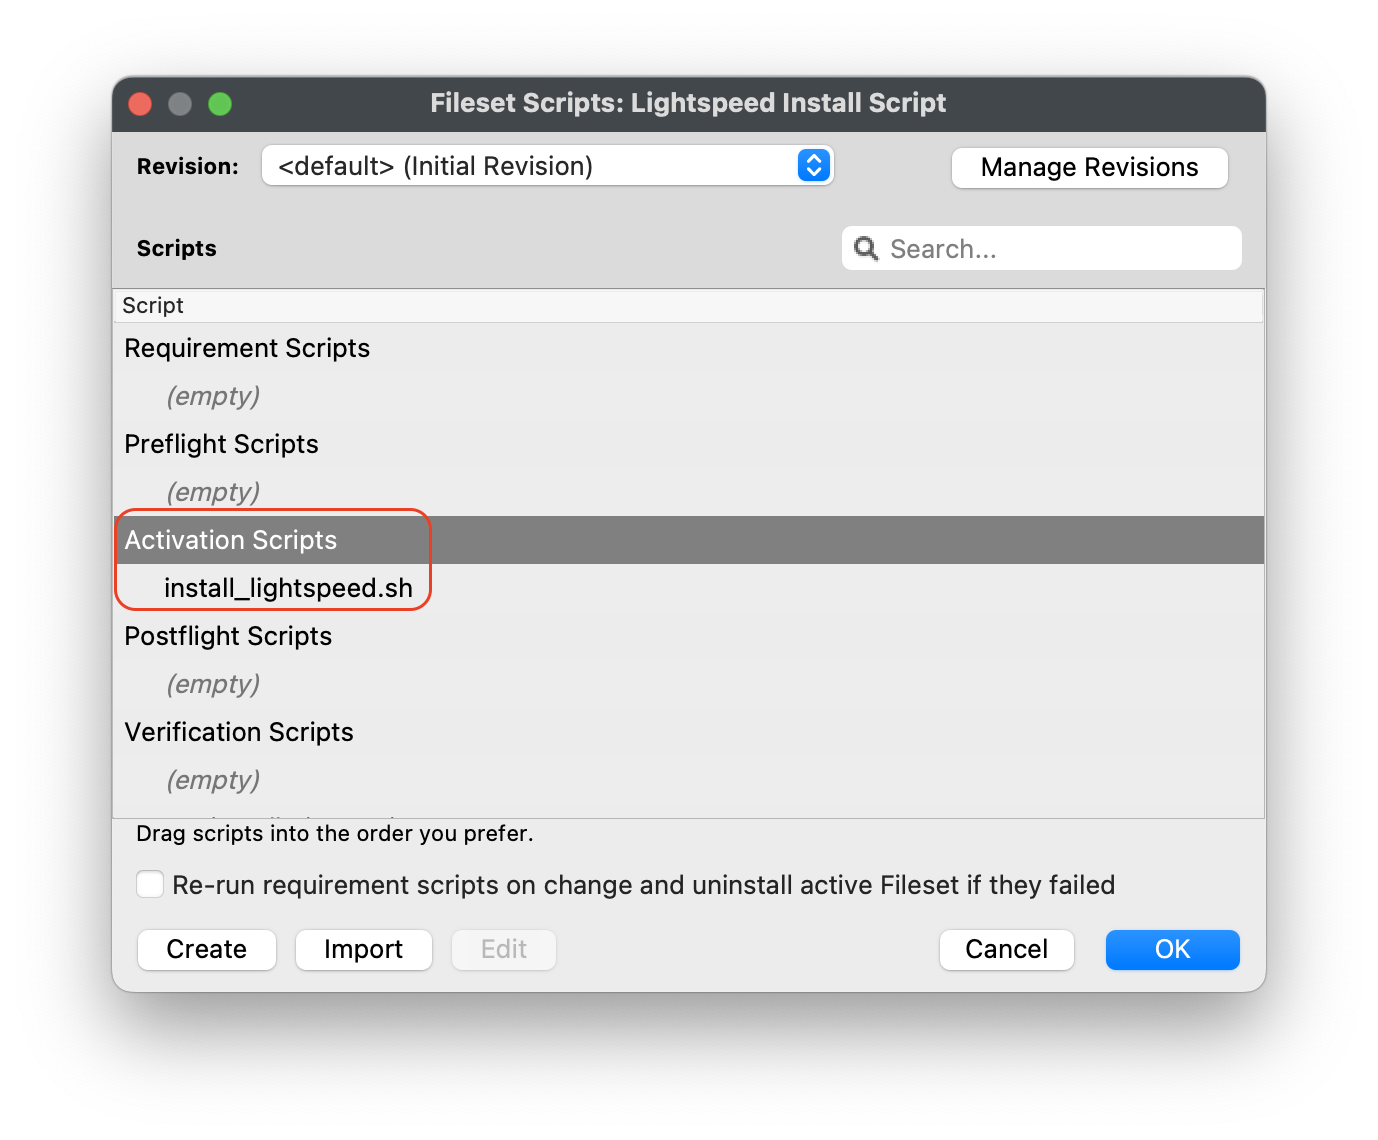 4. Label script, install\_lightspeed.sh 5. Copy and paste the entire install.sh script that you saved your URL to hosted file from previous step on Editing the Install Script. [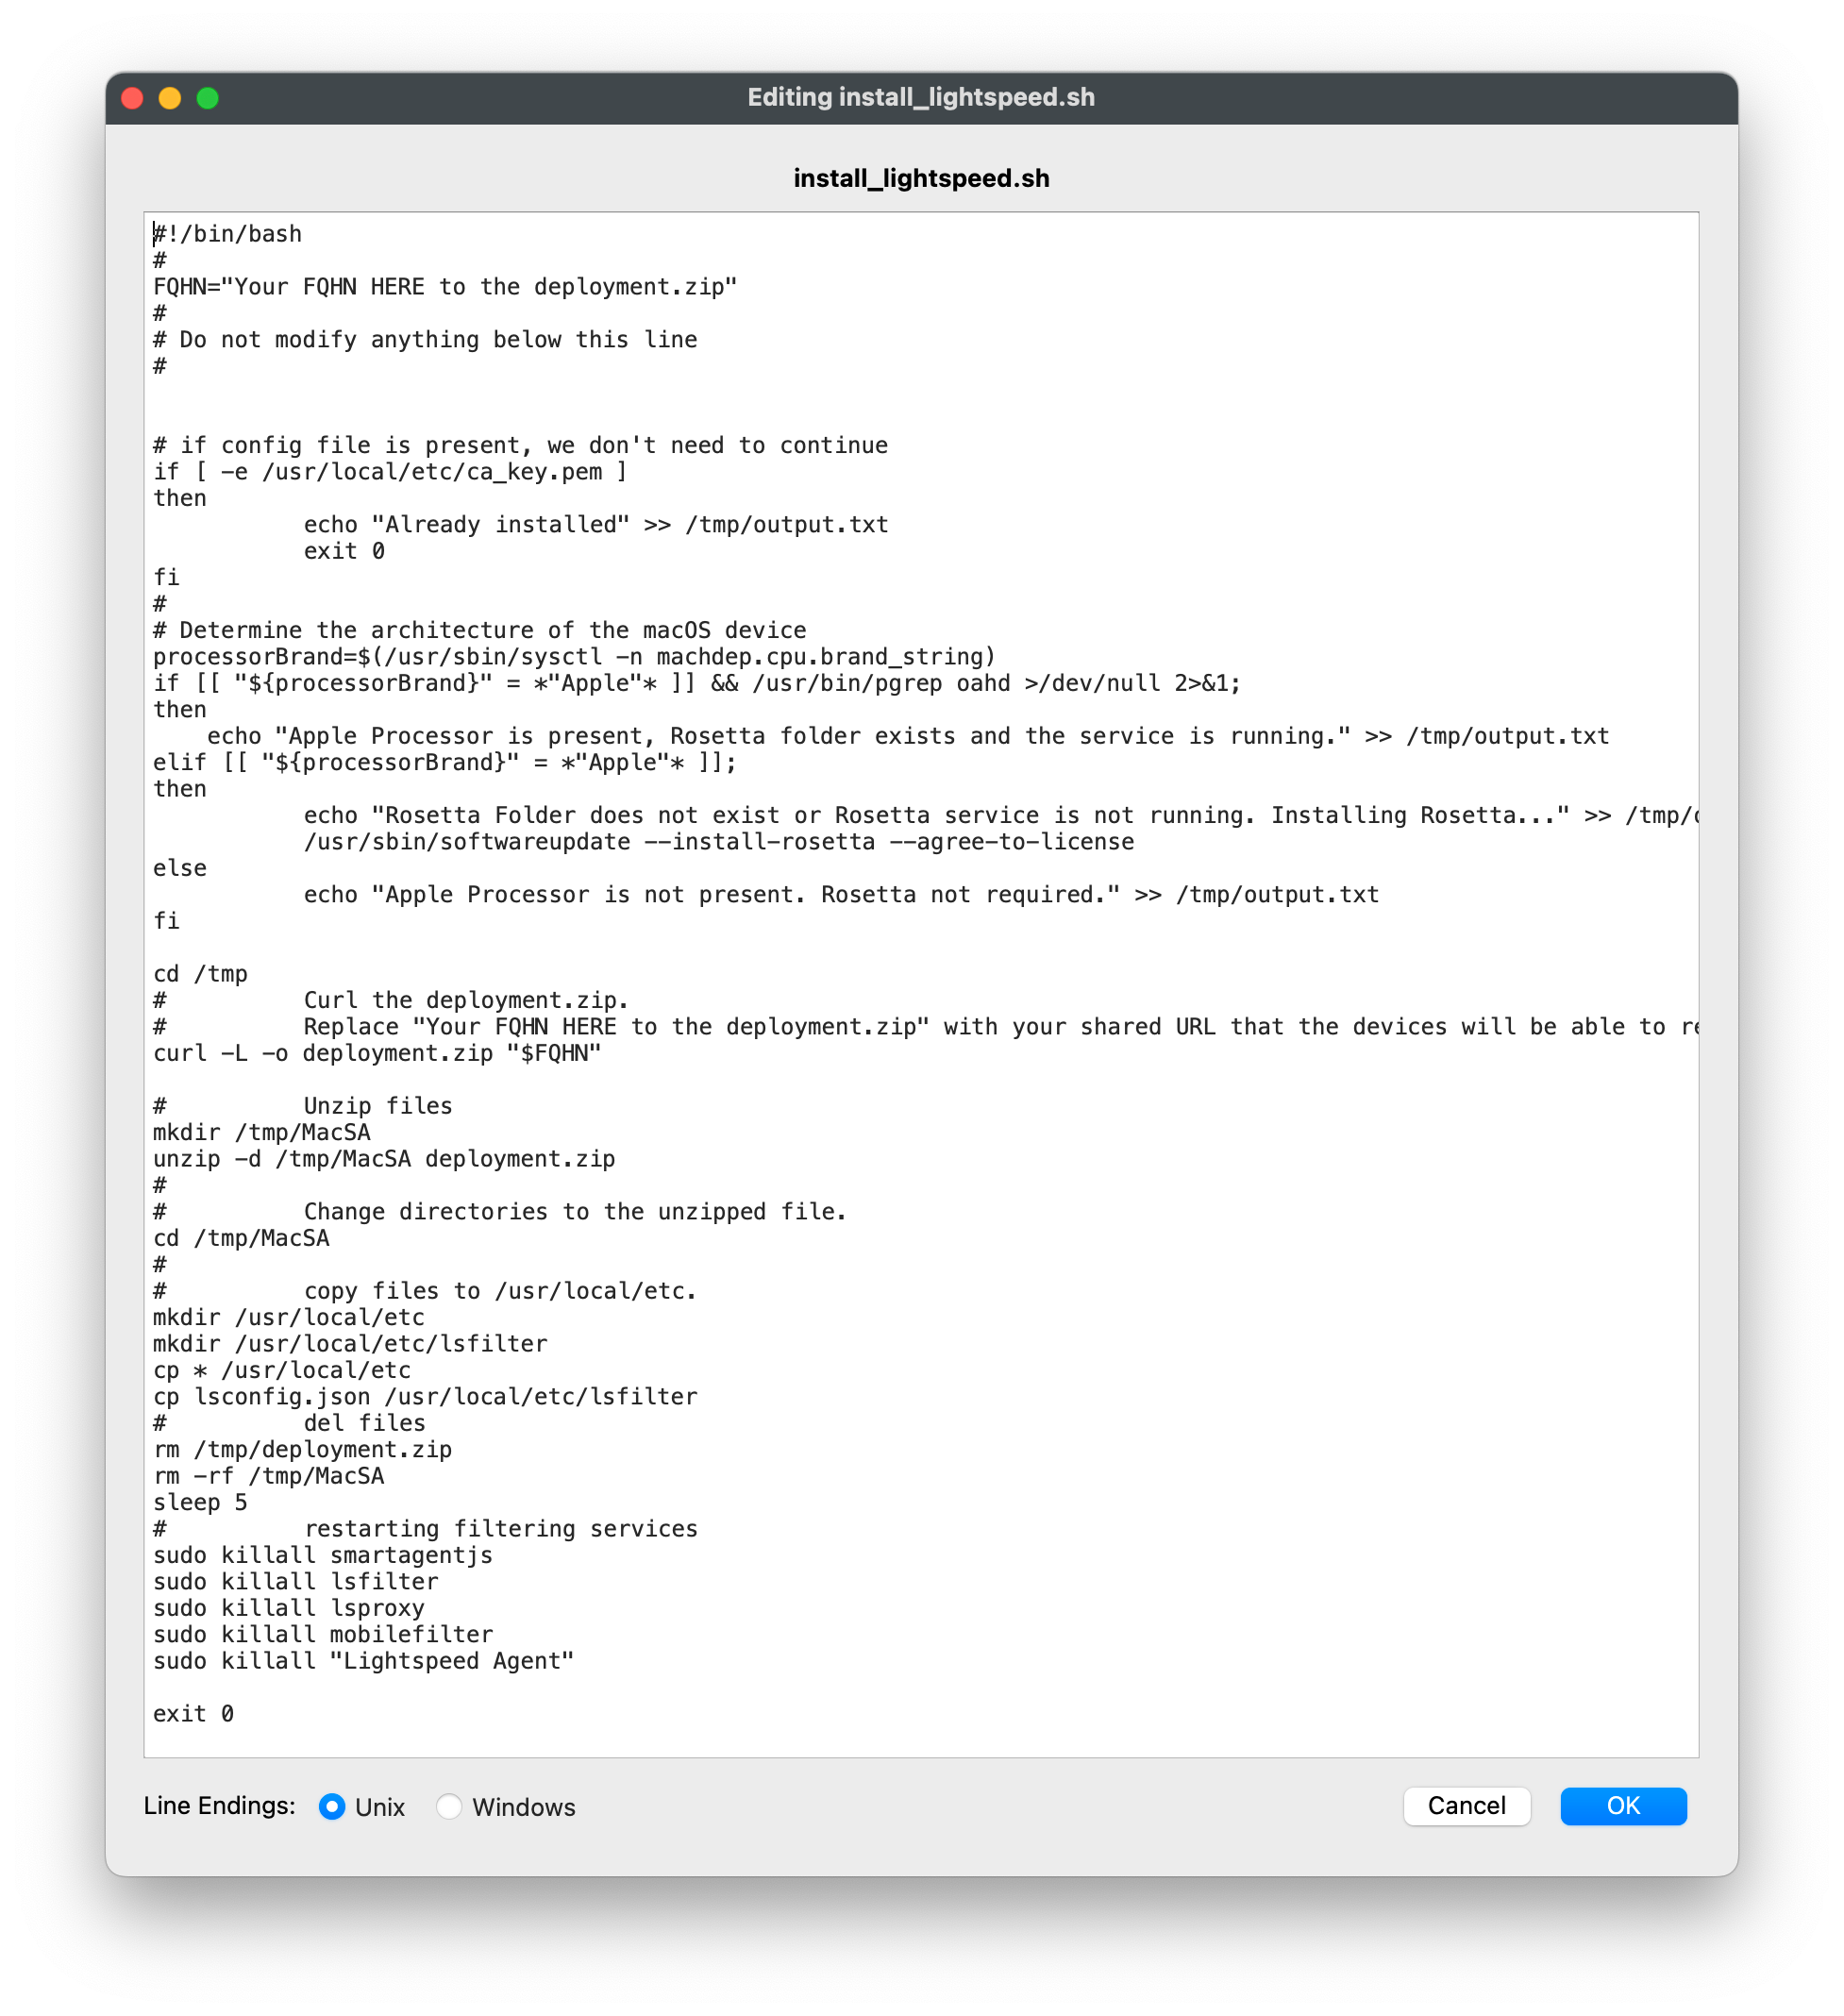](https://kb.filewave.com/uploads/images/gallery/2023-06/YFFvvYojzlQPabqO-filewavelightspeedscript3.png) 11. Click OK to save script 12. Highlight **Requirement Scripts** and click on Create button 13. Label script, check\_LS\_profile.sh 14. Copy and paste the entire check profile script below: ``` #!/bin/zsh found_profile="" while [ $# -gt 0 ] do found_profile=$(profiles list all | awk -v search=$1 '$0 ~ search {print $NF}') if [ ! -z $found_profile ] then echo "Found installed profile: $found_profile" exit 0 else echo "Did not find $1" fi shift done exit 1 ``` 15. Click OK to save the script 16. Highlight the check\_LS\_profile.sh and right-click to select **Properties [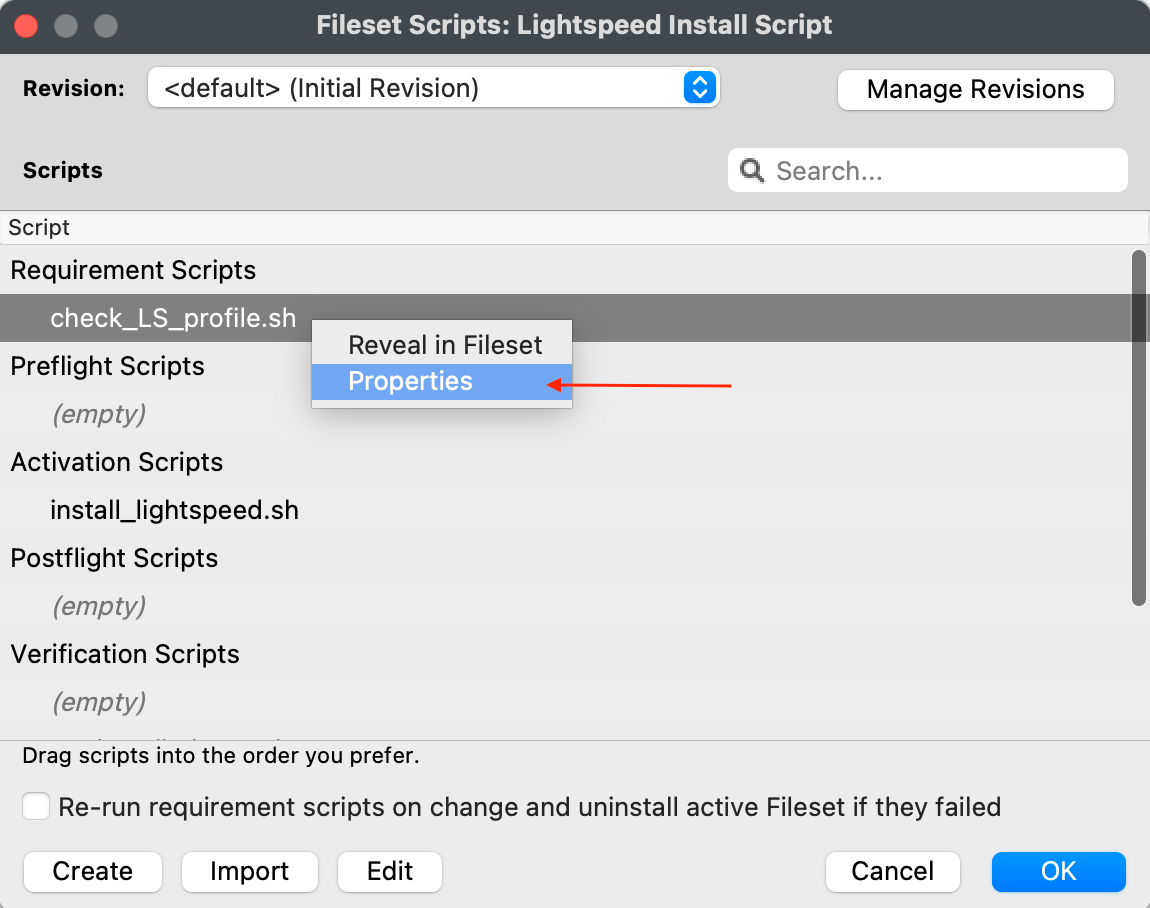](https://kb.filewave.com/uploads/images/gallery/2023-06/oepVawdpUa7GbWuK-filewavelightspeed10.png)** 17. Select the Executable tab, under the **Launch Arguments** tab, click on the + button to add your Lightspeed Agent Profile’s Identifier (found by double-clicking on your Lightspeed Agent Profile) [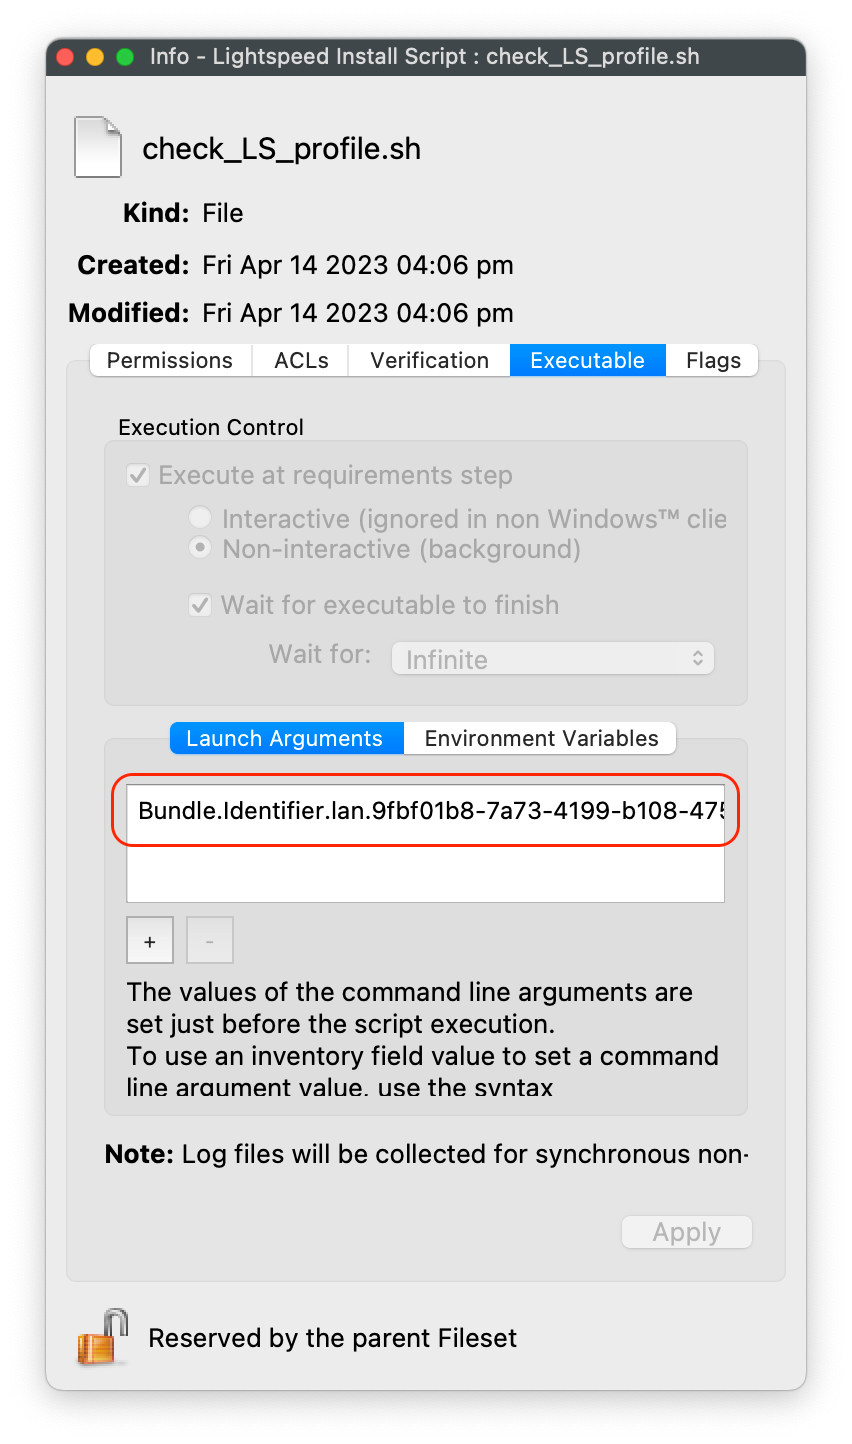](https://kb.filewave.com/uploads/images/gallery/2023-06/cHdwmEfJh93FQZuV-filewavelightspeed11.png) 18. Click Apply to save changes 19. Close out Properties of the Requirement Script 20. Click OK to save changes to Lightspeed Installation Fileset**Note**: This Requirement scripts verifies that the Lightspeed Agent Profile is installed successfully BEFORE running the installation of Lightspeed.
When all completed, the Fileset contents will include your Smart Agent PKG, Lightspeed Install and Profile.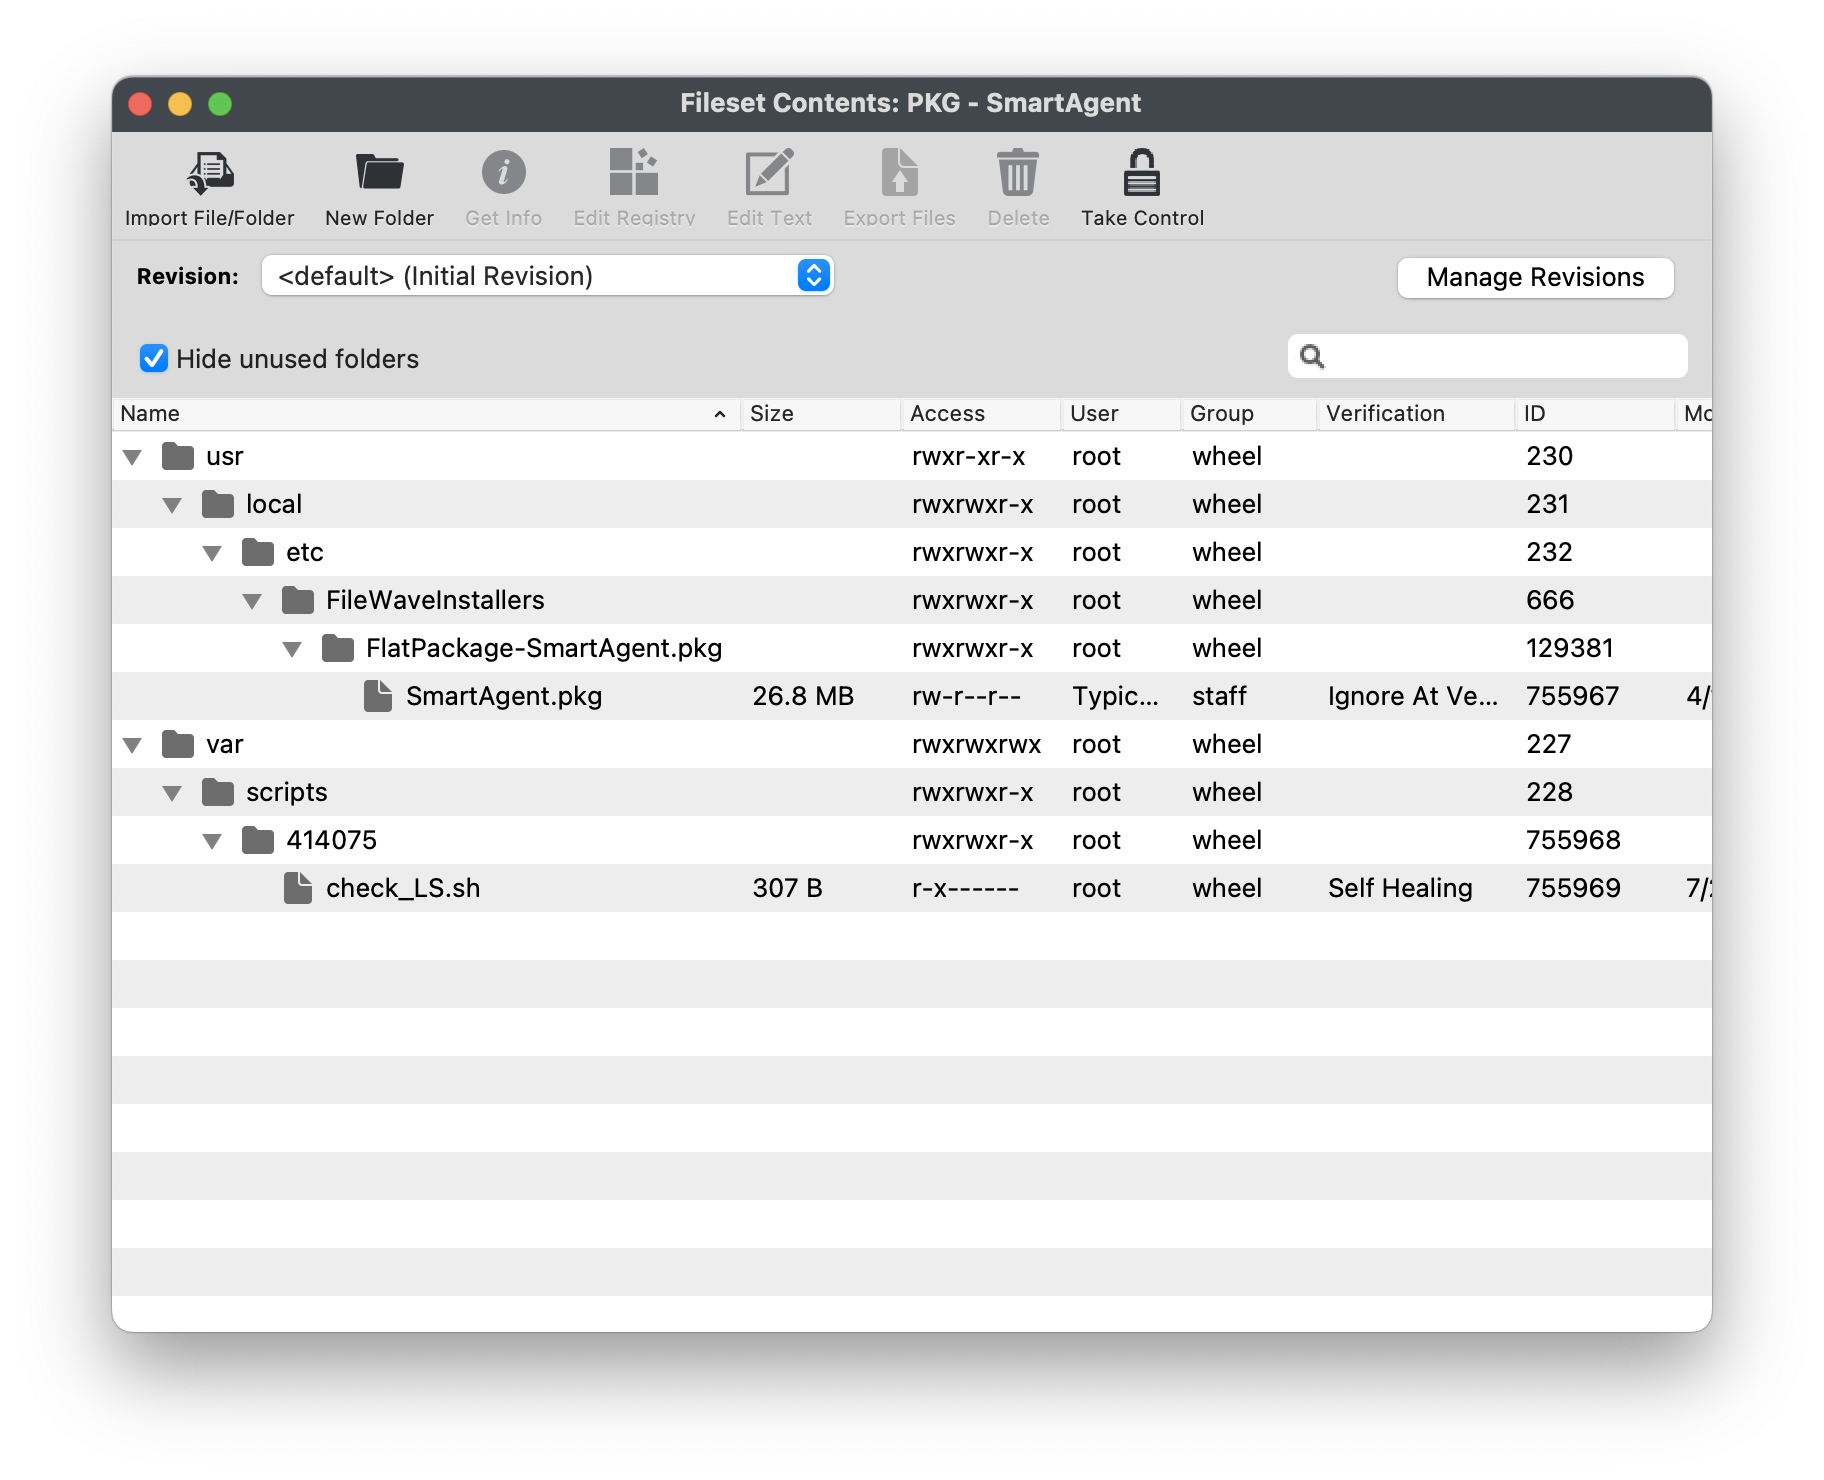 [](https://kb.filewave.com/uploads/images/gallery/2023-06/pzHCdACgHODDTYWu-filewavelightspeed16.png) #### Creating Fileset Group for your Lightspeed Filter Agent Filesets Keeping your Filesets organized is good practice, especially if there are multiple Filesets for software deployment. You may create a New Fileset Group, label it Lightspeed Filter Agent (macOS 2023), and move all the Filesets you created into that Fileset Group. Then you may associate the Fileset Group labeled Lightspeed Filter Agent (macOS 2023) to your devices versus individual Filesets.  Once all the Filesets and Profile have been created, you may associate the Fileset Group labeled Lightspeed Filter Agent macOS 2023 to a few devices as a test. This is to verify and confirm that the filter is installed and filtering properly based on your configurations. For best practice, always test a few devices before mass deployment. #### Lightspeed Smart Filter Deployment (iOS 2023) Needing to deploy Lightspeed for iOS devices? Review the KB article here: [Lightspeed Smart Filter Deployment (iOS 2023)](https://kb.filewave.com/books/software-deployment-recipes-iosipados/page/lightspeed-smart-filter-deployment-ios "Lightspeed Smart Filter Deployment (iOS 2023)"). #### Lightspeed Smart Filter Deployment (macOS v2.3.1+ using Certificate Manager) Needing to deploy Lightspeed for macOS using Certificate Manager? Review the KB article here: [Lightspeed Smart Filter Deployment using Certificate Manager](https://kb.filewave.com/books/software-deployment-recipes-macos/page/lightspeed-smart-agent-deployment-macos-v231-using-certificate-manager). # Lightspeed Smart Agent Deployment (macOS v2.3.1+ using Certificate Manager) ## Description Need to deploy the latest version of Lightspeed Smart Agent version 2.3.1 along with your configurations. FileWave has got you covered in this step-by-step guide to creating the required Filesets to deploy to your macOS devices. Be sure that you have access to your administrative account in Lightspeed Filter app.This KB article involves using the new Lightspeed Certificate Manager method. If using the version below v2.3.1 please review KB article here: [Lightspeed Smart Agent Deployment (macOS 2023)](https://kb.filewave.com/books/software-deployment-recipes-macos/page/lightspeed-smart-agent-deployment-macos-2023 "Lightspeed Smart Agent Deployment (macOS 2023)")
The new method involves using LightSpeed Certificate Manager. Certificate Manager leverages a cloud-based system to generate and monitor certificates and expiration, automatically pushing new certificate files to devices in the background (without disruption!) to ensure they always are current. In addition, Lightspeed is also leveraging root certificates for the trusting process, meaning that instead of repeatedly needing to re-trust the certificates every time they update - you now only need to trust the first time.Note: You must use the MacOS Filter Agent 2.3.1+ to use Certificate Manager
## Ingredients - FileWave Central - Lightspeed Relay Filter Agent PKG installer (version 2.3.1) - Lightspeed Root Certificate - Supplied Fileset and Profile**Web Content Filter** - A bug (FW-12629) exists which prevents the Filter Order being set.
### Download Lightspeed Relay Filter Agent for macOS 1. Login to your Lightspeed Filter account 1. Navigate to Settings > Software 2. Choose Lightspeed Filter 3. Select the Mac tab 4. Select the version of the Relay Filter Agent by clicking on the download icon 5. Place the downloaded Relay Filter Agent PKG into your Downloads Folder [](https://kb.filewave.com/uploads/images/gallery/2024-02/elgZW8xlqDAHfW9n-lightspeedmacosfilter.png) ### Generating the Certificate using Certificate Manager 1. Navigate to your Settings > Certificates within Lightspeed Filter account 2. Click Set Up to generate the certificate 3. Label your Organization name and enter in your number of active days for your certificate 4. Click Save to continue 5. Allow several minutes for the Certificate Manager to generate 6. Click to download and confirm trust certificate 7. Do not proceed with checking the two Acknowledgements boxes, until the certificate, content filter AND agent have been installed on your devicesLightspeed has noted the importance of order of operations; until you have downloaded and trusted the certificate AND installed the agent on your devices, then you may proceed to complete the two Acknowledgement boxes in the macOS Certificate Confirmation step.
### Filesets #### Fileset Group Create a Fileset Group to hold the Filesets to be included. At the end it will look something like the below image. [](https://kb.filewave.com/uploads/images/gallery/2024-02/lAEszNdwS8mlfF1H-image.png) #### Configuration Profiles ##### Network Settings The profile contains 2 payloads: System Extension Policy and Web Content Filter.System Extension Policy
1. Click + to add Allowed Team Identifiers: **Team Identifier:** *ZAGTUU2342* 2. Click + to add Allowed System Extensions: **1st Allowed System Extensions:** *com.lightspeedsystems.network-agent* Enter add 2nd Allowed System Extensions with a comma after the 1st Allowed System Extensions **2nd Allowed System Extensions:** *com.lightspeedsystems.network-agent.network-extension* 3. Click + to add Allowed System Extension Types and check box for Network: **Team Identifier:** *ZAGTUU2342* *[](https://kb.filewave.com/uploads/images/gallery/2024-05/8hvkUXdHhClYs5Uy-screenshot-2024-05-20-at-2-47-24-pm.png)*Web Content Filter
1. **Filter Name:** *Lightspeed Agent* 2. **Identifier:** *com.lightspeedsystems.network-agent* 3. **Filter Order:** Firewall (currently unable to be set as of FileWave 15.3.1) 4. **Socket Filter Bundle Identifier:** *com.lightspeedsystems.network-agent.network-extension* 5. **Socket Filter Designated Requirement:** *anchor apple generic and identifier "com.lightspeedsystems.network-agent.network-extension" and (certificate leaf\[field.1.2.840.113635.100.6.1.9\] /\* exists / or certificate 1\[field.1.2.840.113635.100.6.2.6\] / exists / and certificate leaf\[field.1.2.840.113635.100.6.1.13\] / exists \*/ and certificate leaf\[subject.OU\] = ZAGTUU2342)* 6. **Username/Password:** Sometimes the Username and Password fields are ‘included” automatically. Do not include them. [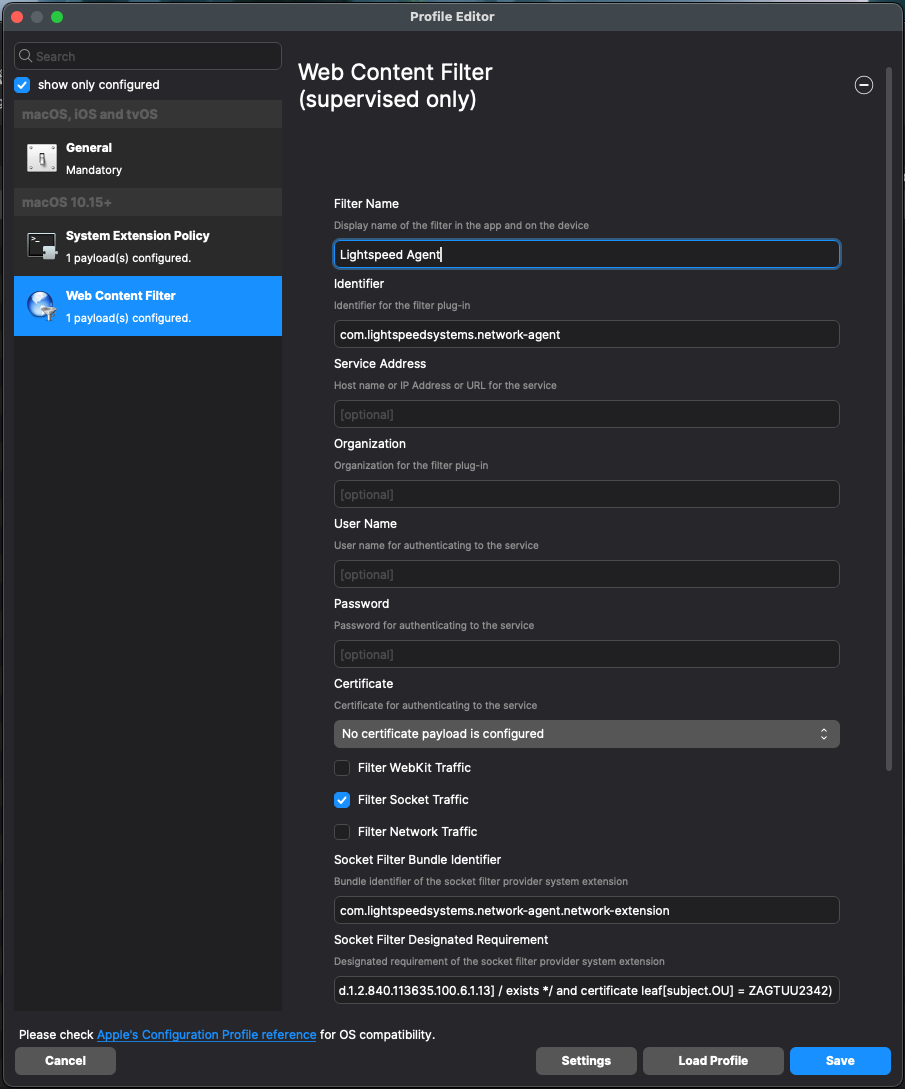](https://kb.filewave.com/uploads/images/gallery/2024-05/WSg8Y3JvGmAnL5e8-screenshot-2024-05-20-at-2-53-42-pm.png)**Web Content Filter** - A bug (FW-12629) exists which prevents the Filter Order being set.
##### Certificate Payload 1. Create a new Profile within the Fileset Group folder 2. Select Certificates and Configure 3. Upload the above generated certificate into this Profile ####  ### Lightspeed Agent Installer The provided Fileset includes a script to instal the above downloaded PKG file. [Lightspeed Agent Installer v2.3.1+.fileset.zip](https://kb.filewave.com/attachments/371) 1. Drag the Fileset into the FileWave Central Fileset Group Folder created above. 2. Edit the Fileset 3. Place the downloaded SmartAgent.pkg file into the same location as the .placeholder file 4. The .placeholder file may be deleted [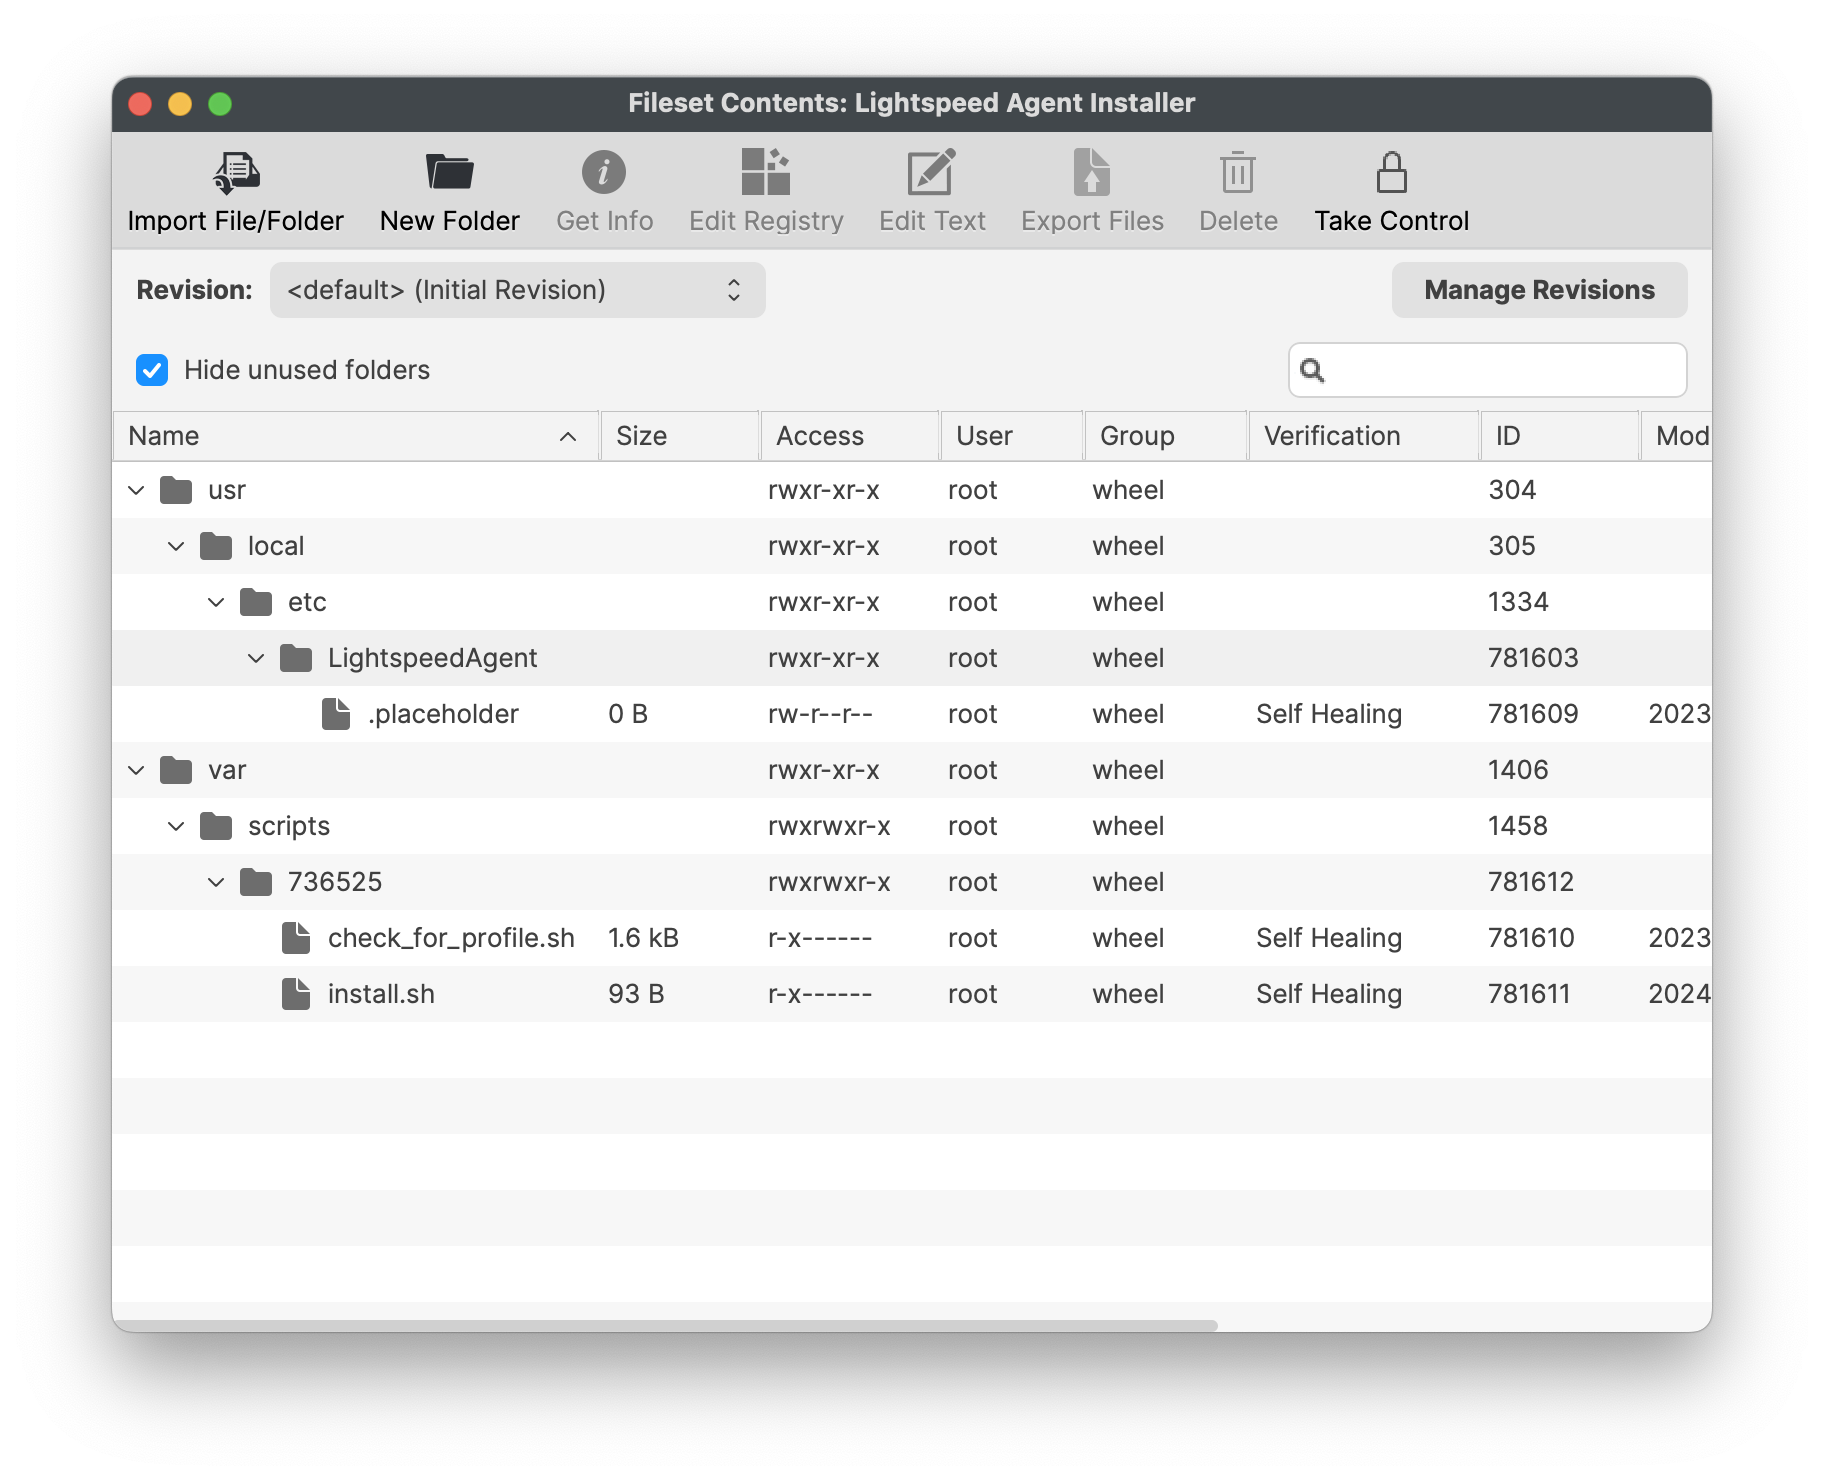](https://kb.filewave.com/uploads/images/gallery/2024-02/0xcWWGAMVZL0mYhl-image.png)The name of the PKG is important. The installation script is expecting a file called SmartAgent.pkg. Rename if required.
The check\_for\_profile.sh script ensures the Profile is installed before the PKG. This script relies upon the Profile ID of the supplied Profile.
The Fileset has a Reboot setting configured to allow the Filter Network Content applied.
### Assignment Assign the Fileset Group, either as a Deployment or an Association with one or more test devices. Once satisfied, consider assigning to all required devices.Once that you have installed the agent and trusted the root certificate on your devices, go back to your Lightspeed Account and navigate to Settings > Certificates. Check the two acknowledgement boxes and click Save.
### Requirement Script to check your Profile Identifier The Fileset Script is designed to check for the presence of Profiles prior to installing the PKG. The provided Profile ID is already of consideration, however the newly generated Certificate Profile cannot be, since the ID cannot be known in advance. Both Profiles should instal at the same time, it is therefore arguably not required to be included in this consideration. However, for completeness, the Generated ID of the Certificate Profile could also be added. #### Bundle ID First, the Bundle ID of the newly created Profile needs to be copied. 1. Open the Certificate Profile 2. Highlight the Bundle ID and choose to copy [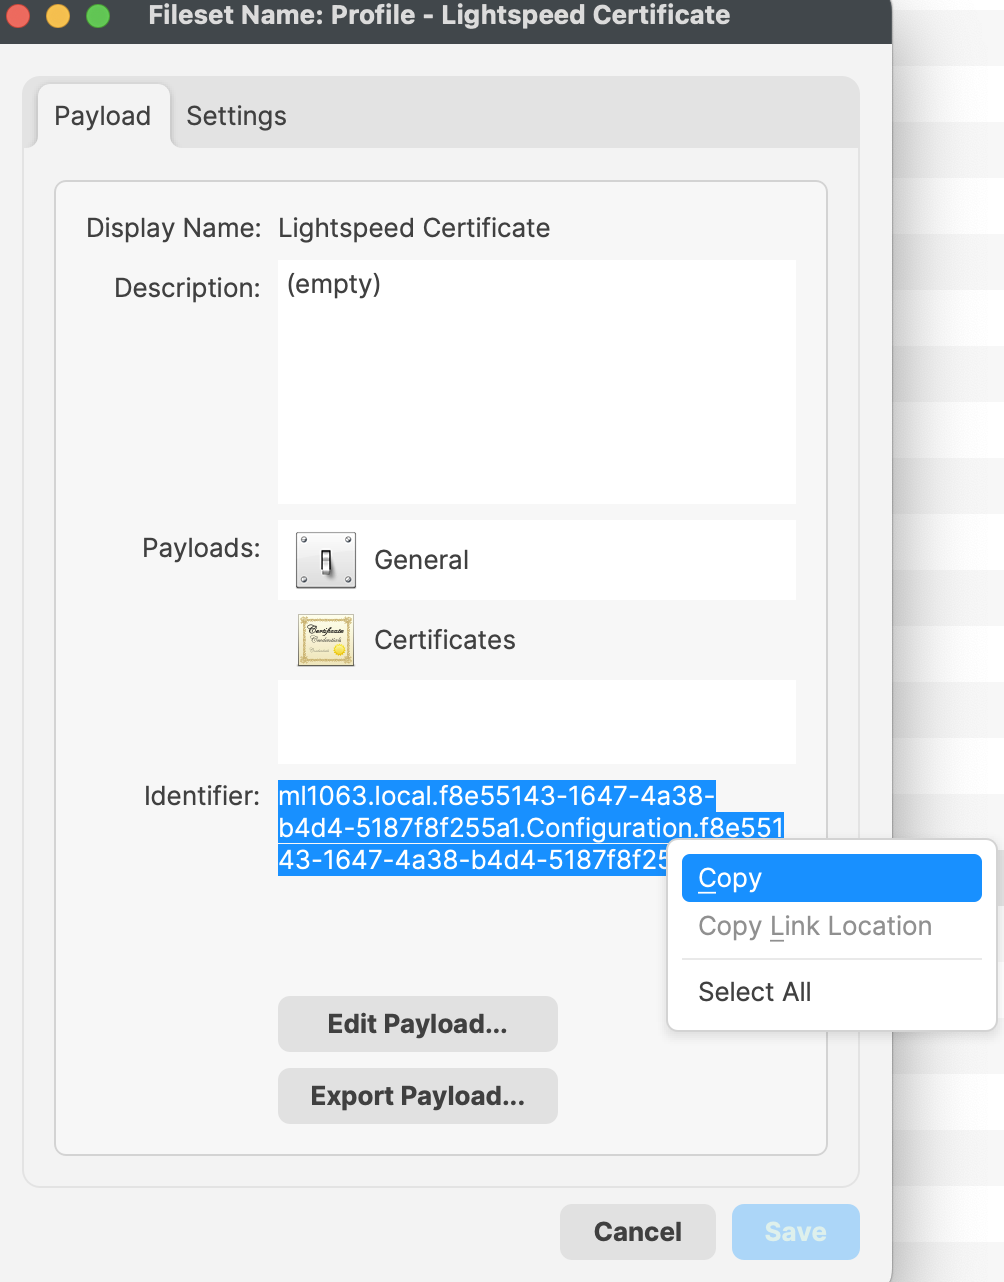](https://kb.filewave.com/uploads/images/gallery/2024-02/lpq4pDdWI3tzvhi6-image.png) #### Script Info 1. Open the Lightspeed Agent Installer Fileset 2. Select the 'check\_for\_profile.sh' and choose Get Info 3. Select the Executable tab 4. Add a Launch Argument and paste or replace the current Launch Arguments with your copied Bundle ID [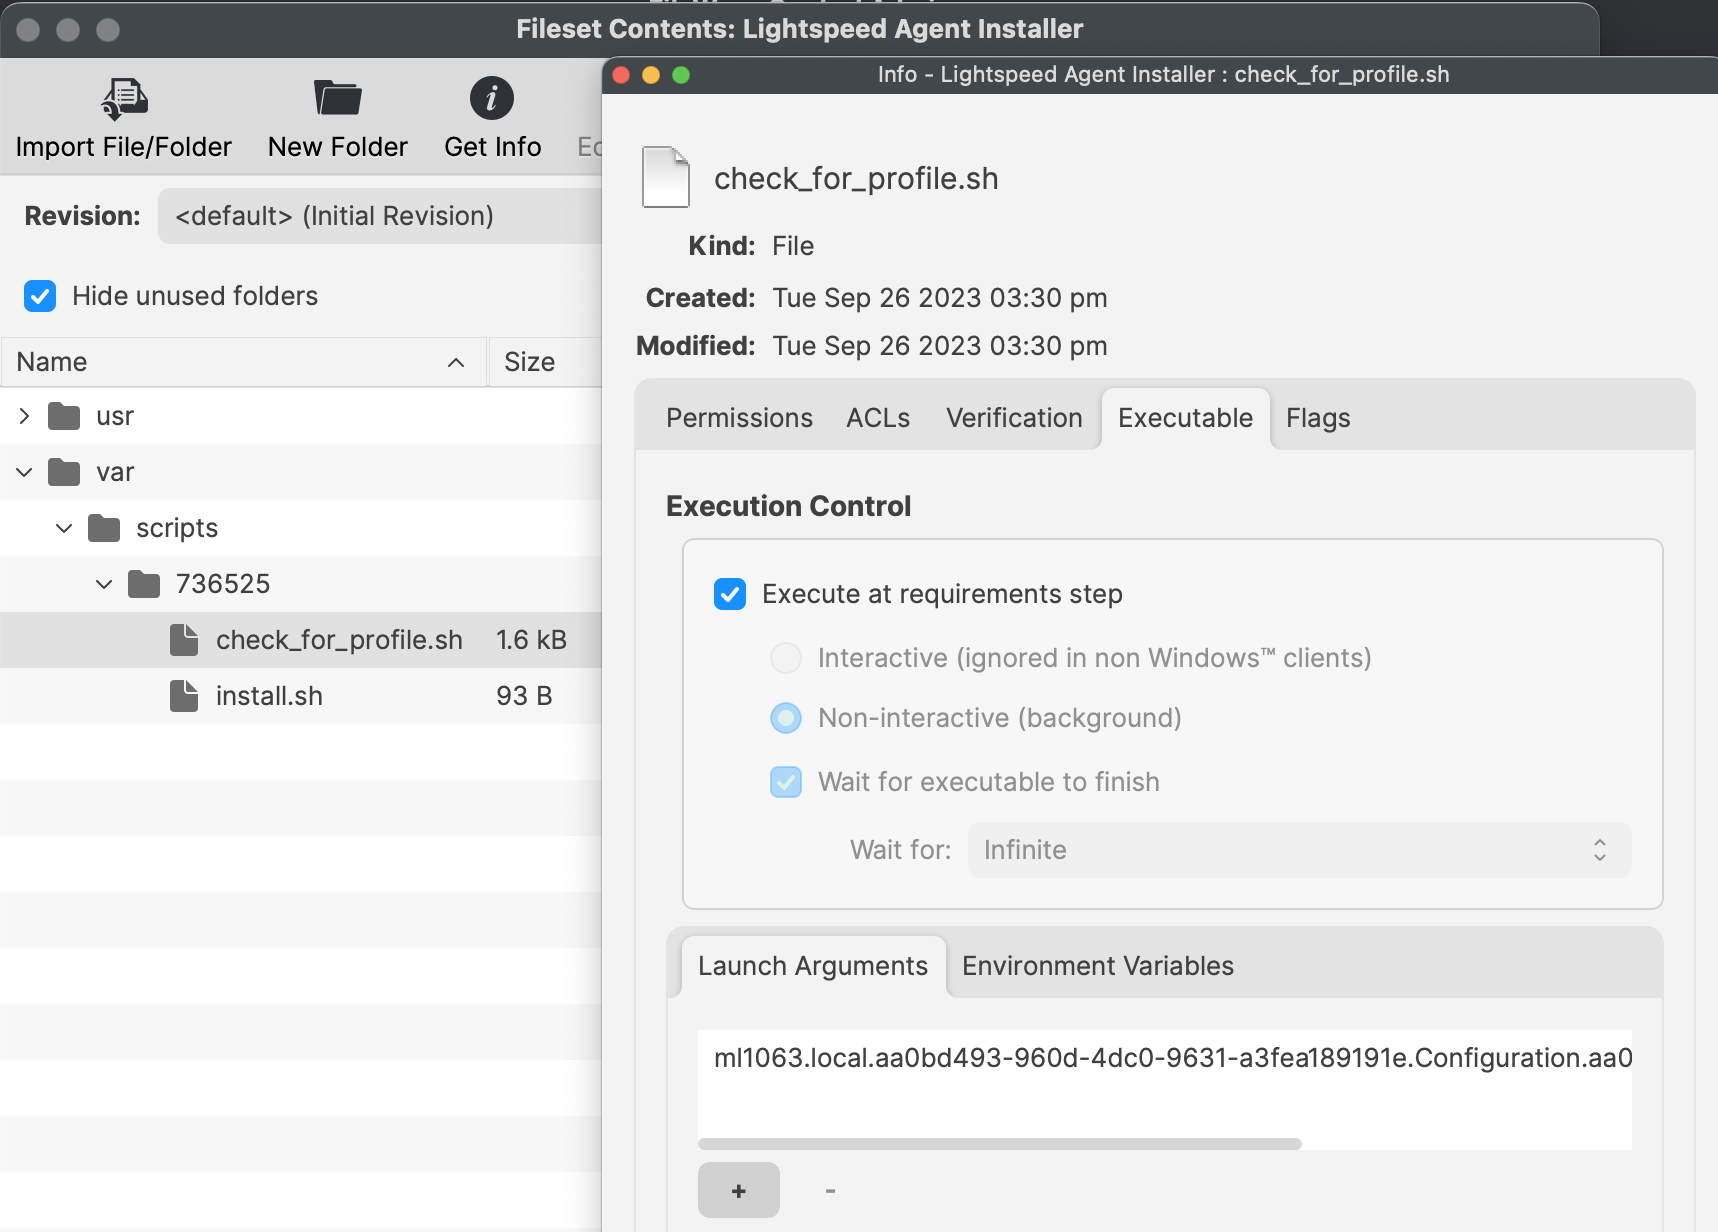](https://kb.filewave.com/uploads/images/gallery/2024-02/UhXNPclDhFs4E7bs-image.png) ### Uninstall Fileset The Fileset to uninstall Lightspeed Smart Agent v2.3.1+ from of your macOS devices. Included in the Fileset is a script that will execute and remove the LS Smart Agent. Please note this script only removes the Smart Agent, it does not remove the LS certificate or log files from the agent. [LightSpeed Agent Uninstaller v2.3.1+.fileset.zip](https://kb.filewave.com/attachments/372) You may download and import into FileWave. You may then create a Fileset Group and include the LightSpeed Agent Uninstaller. [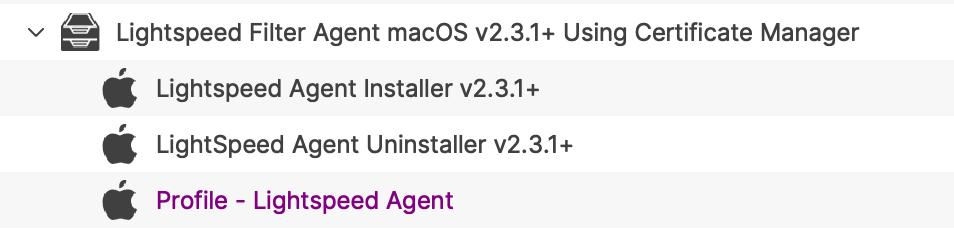](https://kb.filewave.com/uploads/images/gallery/2024-06/lmDTf8yEKQTt3FhC-lsagentv2-3-1group.png) ### Related Content Needing to deploy Lightspeed for iOS devices? Review the KB article here: [Lightspeed Smart Filter Deployment (iOS 2023)](https://kb.filewave.com/books/software-deployment-recipes-iosipados/page/lightspeed-smart-filter-deployment-ios "Lightspeed Smart Filter Deployment (iOS 2023)"). Needing to deploy Lightspeed for non-Certificate Manager? Review the KB article here: [Lightspeed Smart Filter Deployment (macOS 2023)](https://kb.filewave.com/books/software-deployment-recipes-macos/page/lightspeed-smart-agent-deployment-macos-2023 "Lightspeed Smart Agent Deployment (macOS)") # Microsoft Defender Recipe (macOS) ## Description This recipe deploys Microsoft Defender for Endpoint on macOS by combining Microsoft’s PKG and onboarding script with the required FileWave profiles and Filesets. ## Ingredients The deployment uses several payloads, so gather them before assigning the Fileset: - Microsoft Defender PKG - Deployment Script: MicrosoftDefenderATPOnboardingMacOs.sh - Provided Installer/Uninstaller Filesets from this article - Profiles for: - Web Content Filter - TCC allowances - Notifications - Data acceptance and Microsoft AutoUpdate - System extensions and legacy kernel extensions ##### Downloads: - [Microsoft Defender Installer/Uninstaller Filesets](https://kb.filewave.com/attachments/256) - [Microsoft Defender Profiles](https://kb.filewave.com/attachments/254)See below directions for deployment before associating with devices.
Microsoft Defender PKG and deployment script are available through the M365 Defender portal; [details in the Microsoft Deployment KB](https://learn.microsoft.com/en-us/microsoft-365/security/defender-endpoint/mac-install-manually?view=o365-worldwide): [](https://kb.filewave.com/uploads/images/gallery/2023-09/zvXWoRHqAgNz3XLE-image.png)The 'MicrosoftDefenderATPOnboardingMacOs.sh' is built by Microsoft with the appropriate licence code embedded into the script, such that the download is personal to the logged in account, when downloading.
```Install the profiles first. The Installer Fileset has a requirement script that checks for the profiles before downloading and activating the installer.
The requirement script is designed to confirm that all required profiles are installed before the installer runs, except for the legacy Kernel Extension profile. If your environment still needs the Kernel Extension profile, add its Profile ID to the list within the Fileset. If you are unsure, ask in the FileWave community channels linked from the Resources area of the [FileWave website](https://www.filewave.com).
### Installer: 'wdav.pkg' The 'Microsoft Defender Installer macOS' Fileset requires the downloaded PKG. Open the Fileset and drag the PKG into the same location as the '.placeholder' file; this placeholder file may be deleted. [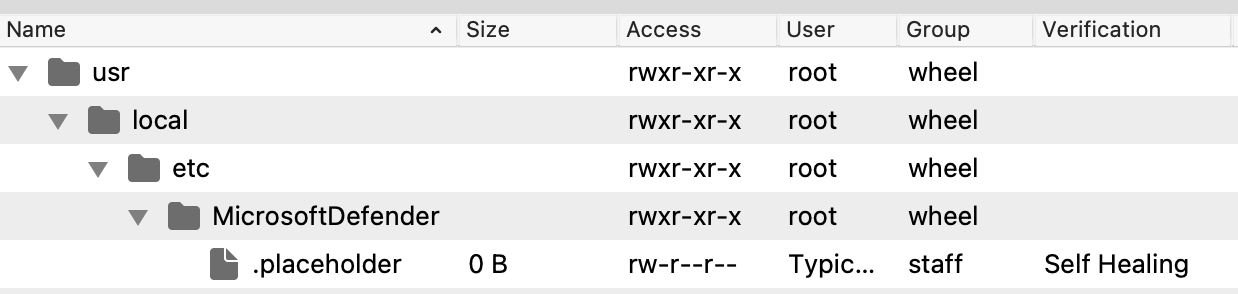](https://kb.filewave.com/uploads/images/gallery/2023-09/fhYqrs8eIAwsCHuN-image.png) [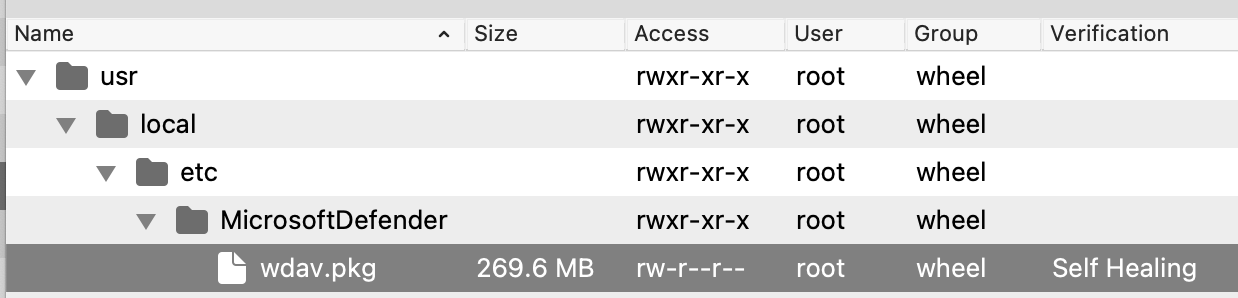](https://kb.filewave.com/uploads/images/gallery/2023-09/UhEvctPT15dqF1sD-image.png) ### Script: MicrosoftDefenderATPOnboardingMacOs.sh Edit the text of the provided 'MicrosoftDefenderATPOnboardingMacOs.sh' file within the Fileset and paste in a copy of the script contents downloaded from Microsoft: [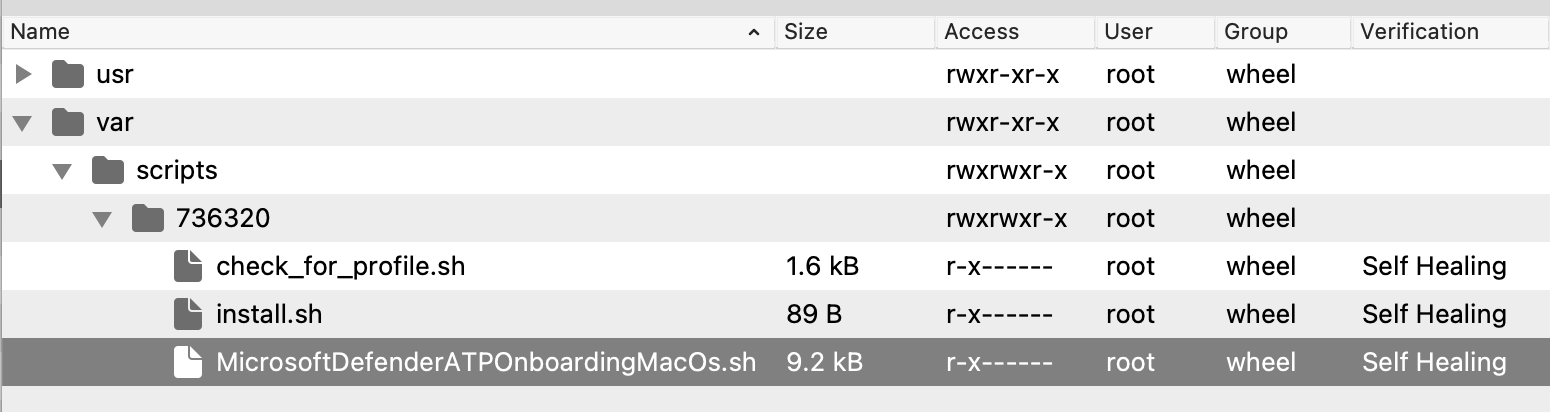](https://kb.filewave.com/uploads/images/gallery/2023-09/CbtJ35rPG7HtAkWX-image.png) [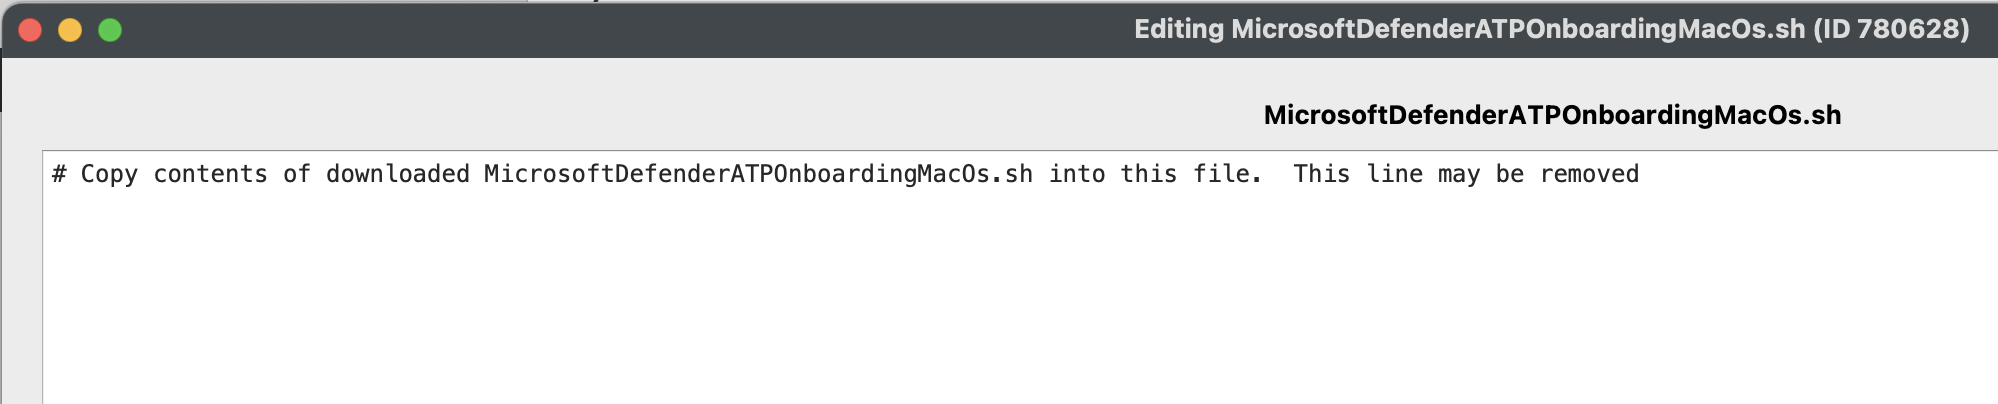](https://kb.filewave.com/uploads/images/gallery/2023-09/ovCgw0evCe4FVUi2-image.png) ### Profile Payload Values The profiles that manage Microsoft AutoUpdate and notifications are configured with default values. Confirm your internal process and adjust the values if needed.The 'AcknowledgedDataCollectionPolicy' key prevents a user notification pop-up from showing. Recommendation is to leave this value as set.
All other profile payload values should be correct at the time of writing, however, Microsoft may make changes over time which could require alteration of one or more of these. Details pertaining to the contents of the payloads may be viewed in [Microsoft's Defender Policies documentation](https://learn.microsoft.com/en-us/microsoft-365/security/defender-endpoint/mac-jamfpro-policies?view=o365-worldwide); scroll down past the initial unnecessary information until you reach Step 4. ### Assign to Devices Use a Deployment or Association in FileWave to assign the Fileset to one or more test devices. After validation, expand the assignment to additional devices. [](https://kb.filewave.com/uploads/images/gallery/2023-09/H2CS6JxWLF3MbupZ-image.png) ## Additional Information The requirement script within the Installer Fileset ensures the required profiles are installed before download and installation begin. Script output appears in **Client Info > Fileset Status**. #### Example: In this example, the first script run found that the profiles were not installed. On the next run, the profiles were installed and the requirement script exited with value 0. ##### Script Log: ``` ----------------------- HEADER - Date: (Mon Sep 25 2023) - Time: (13:36:40) ----------------------- Set to match all profile IDs Looking for profile: ml1063.local.5b1e7237-2773-4d3a-9627-361c4dd8a9b0.Configuration.5b1e7237-2773-4d3a-9627-361c4dd8a9b0 Profile found: FALSE Looking for profile: ml1063.local.bd9007c3-41d6-45bb-a2bf-774ec901e4c2.Configuration.bd9007c3-41d6-45bb-a2bf-774ec901e4c2 Profile found: FALSE Looking for profile: ml1063.local.7f249c3c-f79a-48cf-952c-dd178a00a5a6.Configuration.7f249c3c-f79a-48cf-952c-dd178a00a5a6 Profile found: FALSE Looking for profile: ml1063.local.f68916cf-c1e0-47e2-a73c-700678267fe8.Configuration.f68916cf-c1e0-47e2-a73c-700678267fe8 Profile found: FALSE Looking for profile: ml1063.local.4726b0a7-4f74-4369-8aeb-2450e4f0f935.Configuration.4726b0a7-4f74-4369-8aeb-2450e4f0f935 Profile found: FALSE Only found 0 profiles from the supplied list of 5 ----------------------- FOOTER - Date: (Mon Sep 25 2023) - Time: (13:36:41) - Exit code: (1) ----------------------- ----------------------- HEADER - Date: (Mon Sep 25 2023) - Time: (13:39:31) ----------------------- Set to match all profile IDs Looking for profile: ml1063.local.5b1e7237-2773-4d3a-9627-361c4dd8a9b0.Configuration.5b1e7237-2773-4d3a-9627-361c4dd8a9b0 Profile found: TRUE Looking for profile: ml1063.local.bd9007c3-41d6-45bb-a2bf-774ec901e4c2.Configuration.bd9007c3-41d6-45bb-a2bf-774ec901e4c2 Profile found: TRUE Looking for profile: ml1063.local.7f249c3c-f79a-48cf-952c-dd178a00a5a6.Configuration.7f249c3c-f79a-48cf-952c-dd178a00a5a6 Profile found: TRUE Looking for profile: ml1063.local.f68916cf-c1e0-47e2-a73c-700678267fe8.Configuration.f68916cf-c1e0-47e2-a73c-700678267fe8 Profile found: TRUE Looking for profile: ml1063.local.4726b0a7-4f74-4369-8aeb-2450e4f0f935.Configuration.4726b0a7-4f74-4369-8aeb-2450e4f0f935 Profile found: TRUE All profiles found. Exiting 0 ----------------------- FOOTER - Date: (Mon Sep 25 2023) - Time: (13:39:33) - Exit code: (0) ----------------------- ``` Subsequently, the Fileset downloaded and activated: ##### Client Log: ``` 2023-09-25 13:39:34.758|main|INFO|CLIENT|about to downloadAllFileset files for Fileset MicroSoft Defender Installer macOS Installer Included, ID 736320, revision ID 736320 2023-09-25 13:39:35.697|main|INFO|CLIENT|Downloading Fileset MicroSoft Defender Installer macOS Installer Included, ID 736320, revision ID 736320 2023-09-25 14:03:49.650|main|INFO|CLIENT|finished downloadFileset files for Fileset MicroSoft Defender Installer macOS Installer Included, ID 736320, revision ID 736320 2023-09-25 14:03:50.285|main|INFO|CLIENT|Create all folders of fileset ID Fileset MicroSoft Defender Installer macOS Installer Included, ID 736320, revision ID 736320, version 4 2023-09-25 14:03:50.289|main|INFO|CLIENT|Activate all files of Fileset MicroSoft Defender Installer macOS Installer Included, ID 736320, revision ID 736320, version 4 2023-09-25 14:03:50.465|main|INFO|CLIENT|Done activating all 4 files of Fileset MicroSoft Defender Installer macOS Installer Included, ID 736320, revision ID 736320, version 4 ``` # Microsoft Office Deployment (macOS) ## What Use FileWave to deploy Microsoft 365 apps and Office for Mac to managed macOS devices. In practice, that means installing Office for Mac with FileWave by pushing the current Office PKG, related configuration, and supporting settings to the right device groups instead of installing Office by hand on each Mac. ## When/Why This is the normal path when a lab, classroom, shared fleet, or staff Mac group needs Office installed consistently. It also gives you a repeatable workflow for rolling out replacement packages, updates, or Office preferences later without starting from scratch. ## Before you start - Review Microsoft's current [Deployment guide for Office for Mac](https://learn.microsoft.com/en-us/microsoft-365-apps/mac/deployment-guide-for-office-for-mac) and [deployment options](https://learn.microsoft.com/en-us/microsoft-365-apps/mac/deployment-options-for-office-for-mac) before building the Fileset. - Choose the installer package that matches your environment. Microsoft provides the Office suite installer, individual app installers, LTSC/volume-license options, and an Office installer package without Teams. - Confirm activation requirements. Microsoft 365 for Mac requires the user to have an assigned license and sign in with a work or school account. Volume-license/LTSC activation is handled differently. - Decide how updates should be handled. Office for Mac uses Microsoft AutoUpdate, but you can also deploy update packages with your software distribution process. Avoid configuring two update workflows that fight each other. - Do not modify the Office app bundles before or after deployment. Use configuration profiles or preference scripts for supported settings instead. ## How 1. Download the current Office for Mac installer package from Microsoft's Office CDN or your Microsoft volume-license source. 2. Create a FileWave Fileset for the Office installer package. 3. If needed, create separate Filesets, profiles, or user-context scripts for Office preferences, Microsoft AutoUpdate settings, or other supporting configuration. 4. Assign the Fileset to a small macOS test group first. 5. Verify that Office installs, launches, activates as expected, and follows the update behavior you intended. 6. Expand the deployment to the broader device group after the test group is clean. ## Related Microsoft documentation - [Deployment guide for Office for Mac](https://learn.microsoft.com/en-us/microsoft-365-apps/mac/deployment-guide-for-office-for-mac) - [Deployment options for admins for Office for Mac](https://learn.microsoft.com/en-us/microsoft-365-apps/mac/deployment-options-for-office-for-mac) - [Overview of activation for Office for Mac](https://learn.microsoft.com/en-us/microsoft-365-apps/mac/overview-of-activation-for-office-for-mac) - [Deploy updates for Office for Mac](https://learn.microsoft.com/en-us/microsoft-365-apps/mac/deploy-updates-for-office-for-mac) - [Deploy preferences for Office for Mac](https://learn.microsoft.com/en-us/microsoft-365-apps/mac/deploy-preferences-for-office-for-mac) # Microsoft Skype Deployment (macOS App) ## DescriptionMicrosoft retired Skype in May 2025. Do not use this recipe for new deployments. The old Skype download page now redirects to Microsoft Teams.
Historically, Skype for macOS was a self-contained application that could be deployed by copying **Skype.app** into **/Applications**. This page is retained for customers auditing or cleaning up older FileWave deployments. ## Ingredients - An existing archived Skype application, only if you have a legitimate need to audit or remove an older deployment. - For new deployments, use [Microsoft Teams](https://www.microsoft.com/en-us/microsoft-teams/download-app) instead of Skype. ## Directions 1. Do not download Skype from the old public Skype URL for new deployments; Microsoft redirects that path to Teams. 2. If you are reviewing an existing archived Skype Fileset, verify that it only places **Skype.app** in **/Applications**. 3. Remove or replace existing Skype associations as part of your Teams migration plan. ## Related information - [Microsoft: The next chapter: Moving from Skype to Microsoft Teams](https://www.microsoft.com/en-us/microsoft-365/blog/2025/02/28/the-next-chapter-moving-from-skype-to-microsoft-teams/) - [Download Microsoft Teams](https://www.microsoft.com/en-us/microsoft-teams/download-app) # PaperCut recipe (macOS) ## Description Needing to deploy the PaperCut Print Deploy client to a macOS client managed by FileWave? FileWave has you covered! ## Ingredients - FW Central - PaperCut PKG installer - .plist configuration file - MDM managed macOS clients ## Directions ### Converting the DMG to a PKG installer You will need access to your PaperCut NG/MG server configurations. 1. Log in to your PaperCut NG/MF server, for example, `https://print-server.example.net:9192/admin`. 2. Click **Enable Printing > Print Deploy**. The Print Deploy page is displayed. 3. Next to Download clients, click the macOS button at the bottom of the page. 4. Save the .dmg file to your Documents folder. 5. Look at the filename and check that the hostname between the square brackets is correct, for example, `pc-print-deploy-client[print-server.company.lan].dmg`. 6. Double-click the .dmg file and copy **PaperCut Print Deploy Client.pkg** to the Desktop. ### Creating .plist file to configure your MDM macOS clients The PaperCut Print Deploy Client can use a .plist file to set its server address. You can share and deploy these files in many different ways, such as with a .mobileconfig file, a file-copy command, or a scripted file creation on the client. For our recipe, we are just going to deploy the .plist to the proper directory along with our .pkg.Note: The .plist file needs to be in proper format. The PaperCut client will not function with your desired configurations if this is not saved in the correct format.
To create the .plist file: 1. Open a terminal and issue the following command: `defaults write ~/Documents/com.papercut.printdeploy.client server_host hostname` 2. Replace the word ‘hostname’ with the FQDN or IP address from the ‘.dmg’, for example, `print-server.company.lan` 3. Convert the .plist file with the following command: `/usr/bin/plutil -convert xml1 ~/Documents/com.papercut.printdeploy.client.plist` This will ensure that the file can be read correctly. 4. Verify the contents of the new `.plist` with the following command: `defaults read ~/Documents/com.papercut.printdeploy.client.plist` The output should be: ``` macOS:Documents localadmin$ defaults read ~/Documents/com.papercut.printdeploy.client.plist { "server_host" = "print-server.company.lan"; } macOS:Documents localadmin$ ``` ### Example .plist file ```Note: if no directory for /Library/Preferences/ is found, you may create the directory and upload the .plist file as shown above.
Be sure the .plist file has the proper formatting and that the .plist file is in the correct directory. If the .plist file is found, the PaperCut Print Deploy client should honor the file's settings. Always, test deployment to a few test machines. This ensures your configurations for PaperCut are correct and ready for your macOS production fleet. ## Related Content - [Generic steps for how to deploy PaperCut](https://www.papercut.com/help/manuals/print-deploy/roll-out-the-client/with-mdm/deploy-queues-using-another-apple-mdm/#configure-the-client-to-connect-to-the-print-deploy-server) # Parallels Desktop for Mac Business Edition Deployment (macOS) ## Description Creating a FileSet for Mass rollout of Parallels Desktop for Mac Business Edition Version 10 ## Ingredients - FW Central - Attached Script FileSet - [script - activate parallels desktop.fileset.zip](https://kb.filewave.com/attachments/175) - Resources available from [Parallels.com](http://Parallels.com) ### Directions 1. Follow the directions at [http://kb.parallels.com/en/120093](http://kb.parallels.com/en/120093) to create a pkg for mass deployment of parallels 2. Import the Parallels Desktop Autodeploy.pkg that you equipped with the Data in the first step into FileWave Admin 3. Import the attached file ( [script - activate parallels desktop.fileset.zip](https://kb.filewave.com/attachments/175) ) , open it and edit the content of the script within. In the line /usr/local/bin/prlsrvctl install-license -k XXXXXX-XXXXXX-XXXXXX-XXXXXX-XXXXXX replace XXXXXX-XXXXXX-XXXXXX-XXXXXX-XXXXXX with your license key , save your changes and close the fileset. 4. Deploy both the PKG fileset and the script fileset to your test client. Make sure the PKG fileset has a higher priority than the script fileset - the attached script fileset is preset to lowest priority per default. # Renew - A tool to get users to reboot periodically (macOS Script) ## Description For remote tools to work reliably, and for security patches to be properly installed, users need to restart their workstations regularly. But we all get focused on our day-to-day, and taking 10 minutes to restart our workstations just gets pushed to the back-burner. [SecondSonConsulting](https://www.secondsonconsulting.com/giving-back/) developed Renew to encourage users to restart their workstations on a regular basis, and the timing can be customized to the environment. This tool can be delivered via MDM, or other methods, but then is self-sustaining, running locally without any other tool controlling it. For the safety of their work, it will never restart the computer without the user’s consent. ## Ingredients - FW Central - [swiftDialog Deployment (macOS PKG)](https://kb.filewave.com/books/software-deployment-recipes-macos/page/swiftdialog-deployment-macos-pkg "swiftDialog Deployment (macOS PKG)") - Renew PKG - [https://github.com/SecondSonConsulting/Renew/releases](https://github.com/SecondSonConsulting/Renew/releases) ## Directions 1. Install SwiftDialog v2.0 or later: [swiftDialog Deployment (macOS PKG)](https://kb.filewave.com/books/software-deployment-recipes-macos/page/swiftdialog-deployment-macos-pkg "swiftDialog Deployment (macOS PKG)") 2. Install the latest Renew PKG from their [Releases](https://github.com/SecondSonConsulting/Renew/releases) page as a PKG Fileset. Here is an example: [PKG - Renew.fileset.zip](https://kb.filewave.com/attachments/212) 3. Deploy a config profile. This can be done most easily by using [iMazing Profile Editor (free)](https://imazing.com/profile-editor) which has a template for Renew's options. - Save the profile and then drag and drop it in FileWave Central to make a Profile Fileset. An Example Profile from iMazing is here: [Renew Configuration.mobileconfig](https://kb.filewave.com/attachments/214) and the Fileset made from it is here: [Profile - Renew Configuration.fileset.zip](https://kb.filewave.com/attachments/213)Note that you can not edit the profile in the FileWave profile editor. It will not display the custom payload.
[](https://kb.filewave.com/uploads/images/gallery/2023-07/XYb9mbJQqZp8ElvW-renew-configuration-2023-07-30-at-8-52-58-pm.jpg) ## Additional Recommended Steps 1. Use the [`OptionalArguments`](https://github.com/SecondSonConsulting/Renew/wiki/OptionalArguments) profile keys to make Renew look and function right for your environment. 2. For macOS Ventura+ compatibility, create a BackgroundItems MDM profile and enforce the LaunchAgent Label ID: `com.secondsonconsulting.renew`with an example here: [Profile - Renew LaunchAgent.fileset.zip](https://kb.filewave.com/attachments/215) ## Examples ### Notification Mode Default User Experience [](https://github.com/SecondSonConsulting/Renew/blob/main/Example%20Screenshots/Renew-NotificationDefault.png?raw=true#gh-light-mode-only) ### Normal Mode Default User Experience [](https://github.com/SecondSonConsulting/Renew/blob/main/Example%20Screenshots/Renew-NormalDefaultDialog.png?raw=true#gh-light-mode-only) ### Aggressive Mode Default User Experience [](https://github.com/SecondSonConsulting/Renew/blob/main/Example%20Screenshots/Renew-AggressiveDefaultDialog.png?raw=true#gh-light-mode-only) ### Custom Fields Design Example Image SwiftDialog allows a high degree of customization, and Renew allows you to continue to easily take advantage of that. This is an example of how you can customize the user experience to suit your branding and taste. This example uses a banner image tailored to the window size, and the following OptionalArgument in the configuration file. ```**Admin Only:** In this scenario, admins would update each device to ensure that students are unable to change this permission. This is labor-intensive but locked down. **Admin or Students:** In this scenario, teachers instruct students on how to enable this permission. Please note that in this configuration, students will then be able to remove this permission. Such matters should be handled by instructing students in your district’s Acceptable Use Policy. This scales more easily, but it requires coordination. **Please note:** Screen recording policy follows Apple's privacy policy. Any user can agree to allow screen recording for the application, disable screen recording services, and revoke FileWave's right to view the screen, as per [Apple Inc. policy.](https://www.apple.com/legal/privacy/en-ww/)
Ensure this profile is deployed before proceeding with the PKG installation. Securly Classroom macOS Fileset has a placeholder for the PKG installer and a requirement script to check TCC Profile is installed before the PKG installation. [Securly Classroom macOS.fileset.zip](https://kb.filewave.com/attachments/448) ##### Requirement Script: Where software is already installed and services are active, Privacy Settings Profiles installed subsequently require the service of that software to be restarted. This Fileset example includes a Requirement Script that checks for profile installation before activating Securly, preventing the need to restart the service. The 'check\_profile.sh' script is designed to recognise one of the two provided Profiles and, once installed, allow activation of the Fileset. If Profiles with a different Profile ID are used instead of those supplied, the script settings will require alteration. - Double-click the Fileset - Select the 'check\_profile.sh' (located in a numbered subfolder in /var/scripts/) - Choose Get Info > Executable view The Launch Arguments display the Payload ID of the TCC profile. Add in the correct Fileset Profile UDID.| Fileset Contents | Check Profile script | Enter the TCC Profile UDID |
| [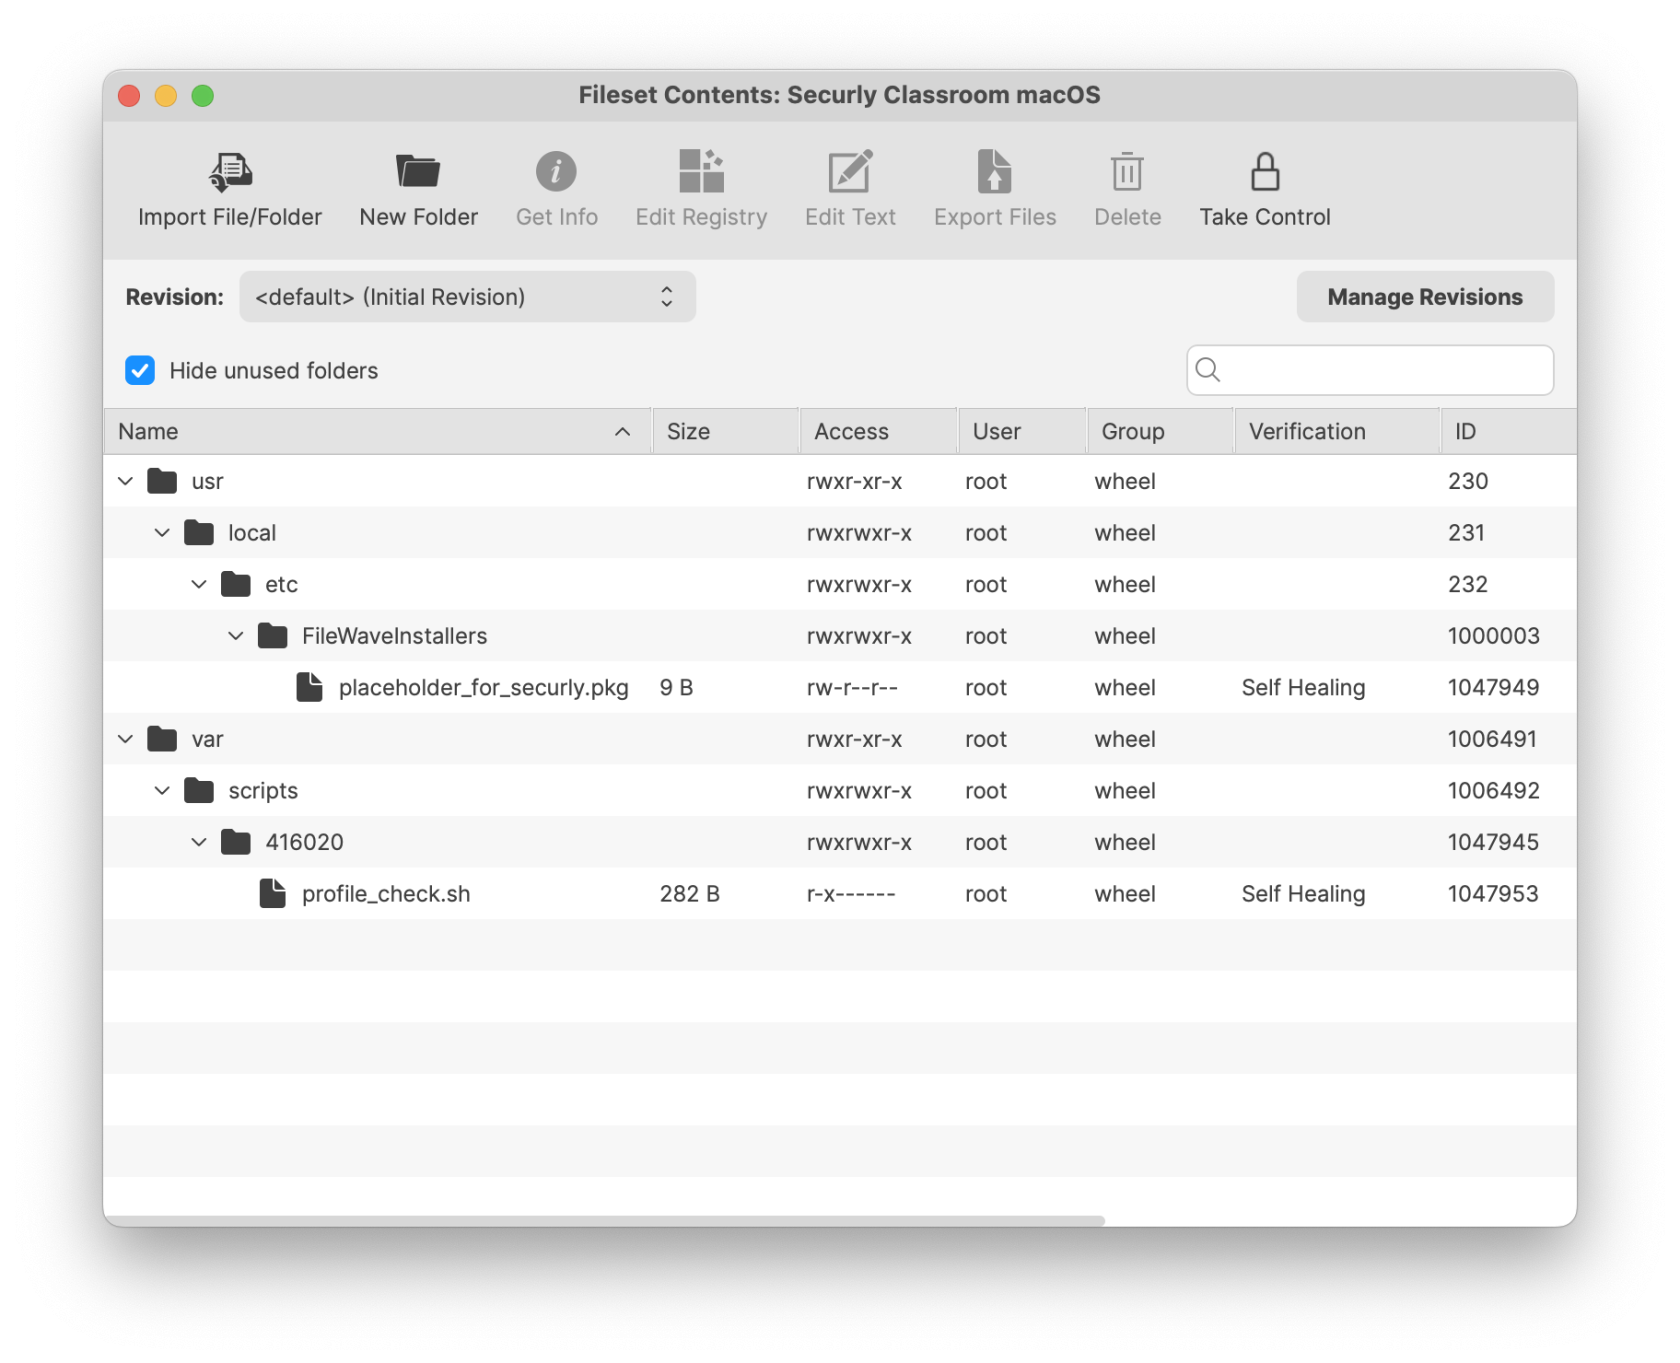](https://kb.filewave.com/uploads/images/gallery/2025-04/QXDVfIQklwWnVG13-securlyclassroommacos.png) | [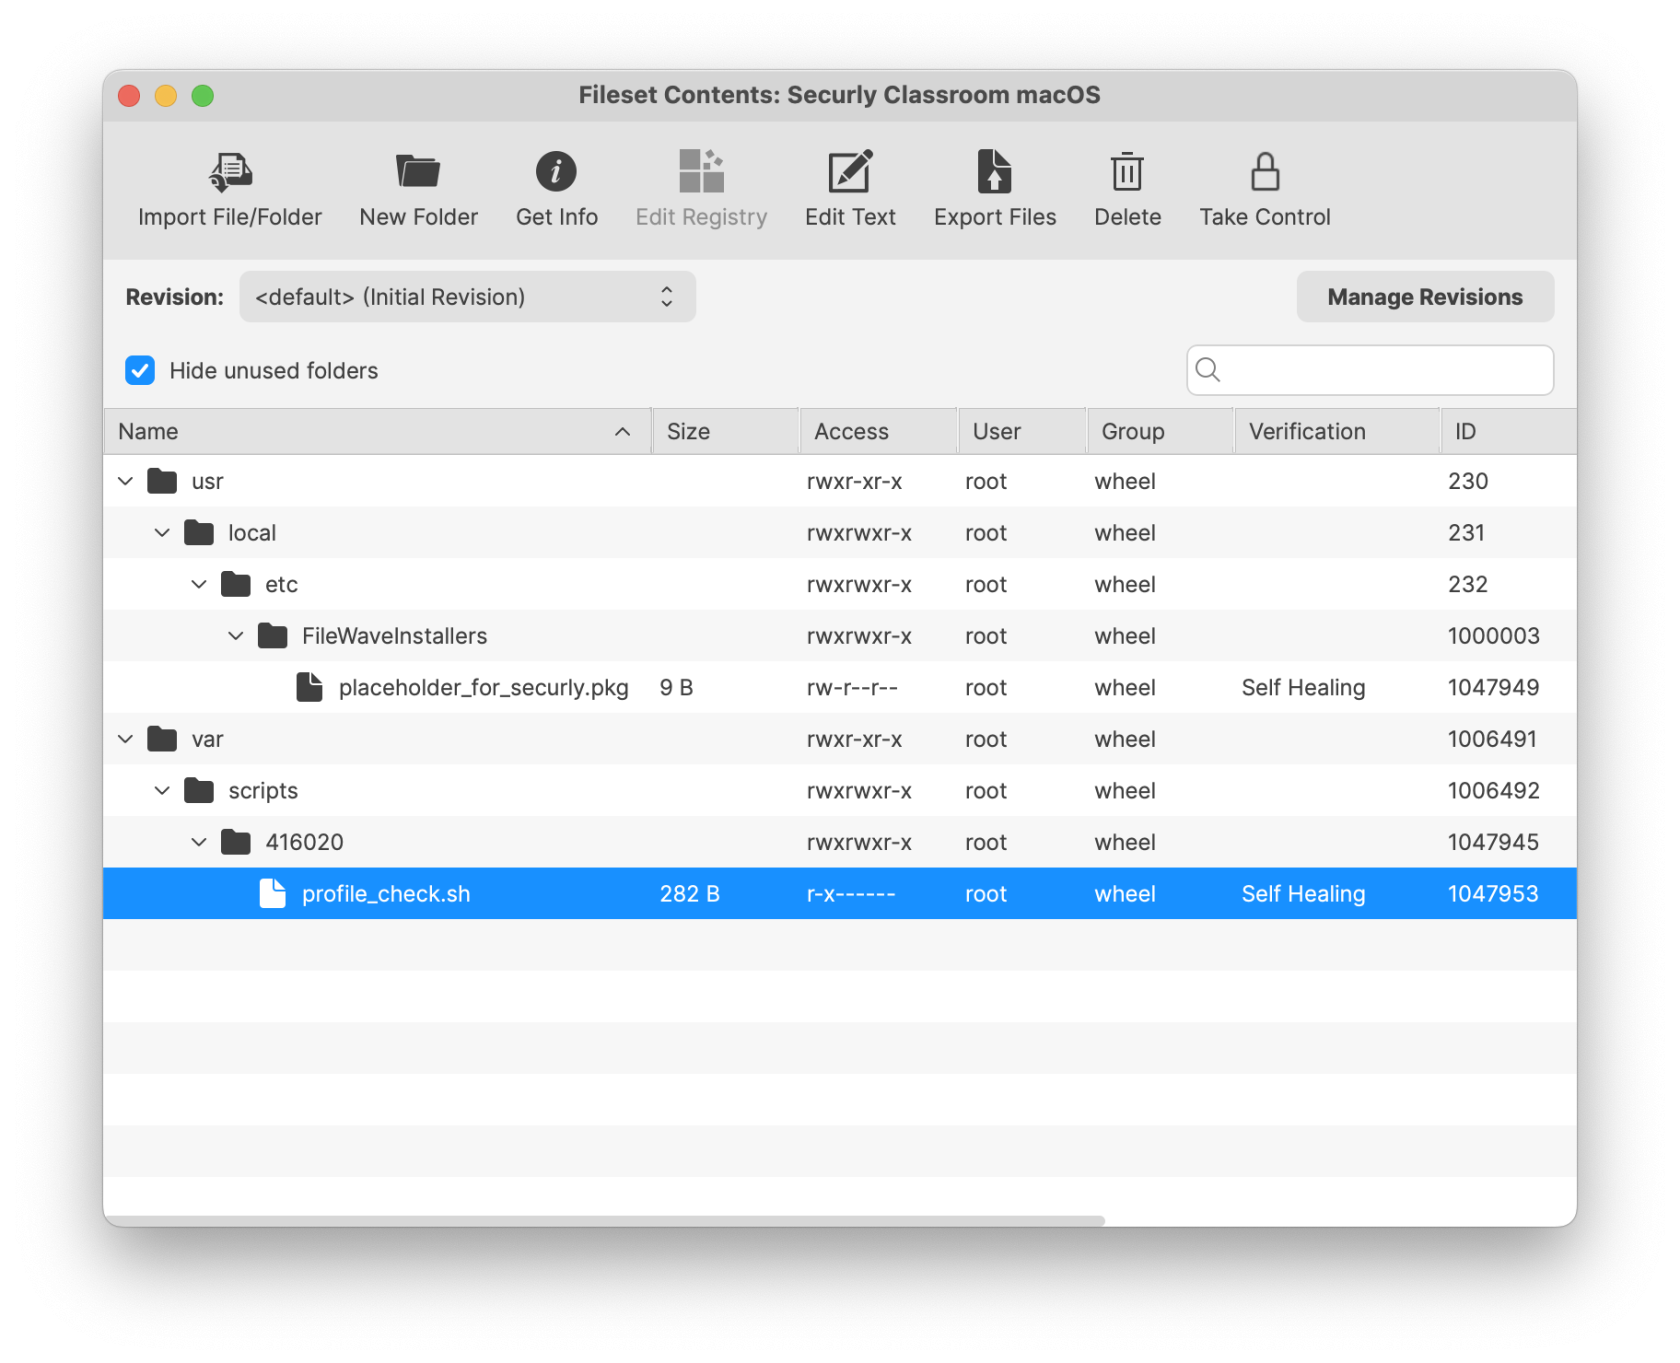](https://kb.filewave.com/uploads/images/gallery/2025-04/eGfMRTIHfGQ2oWkt-requirementtccprofile.png) | [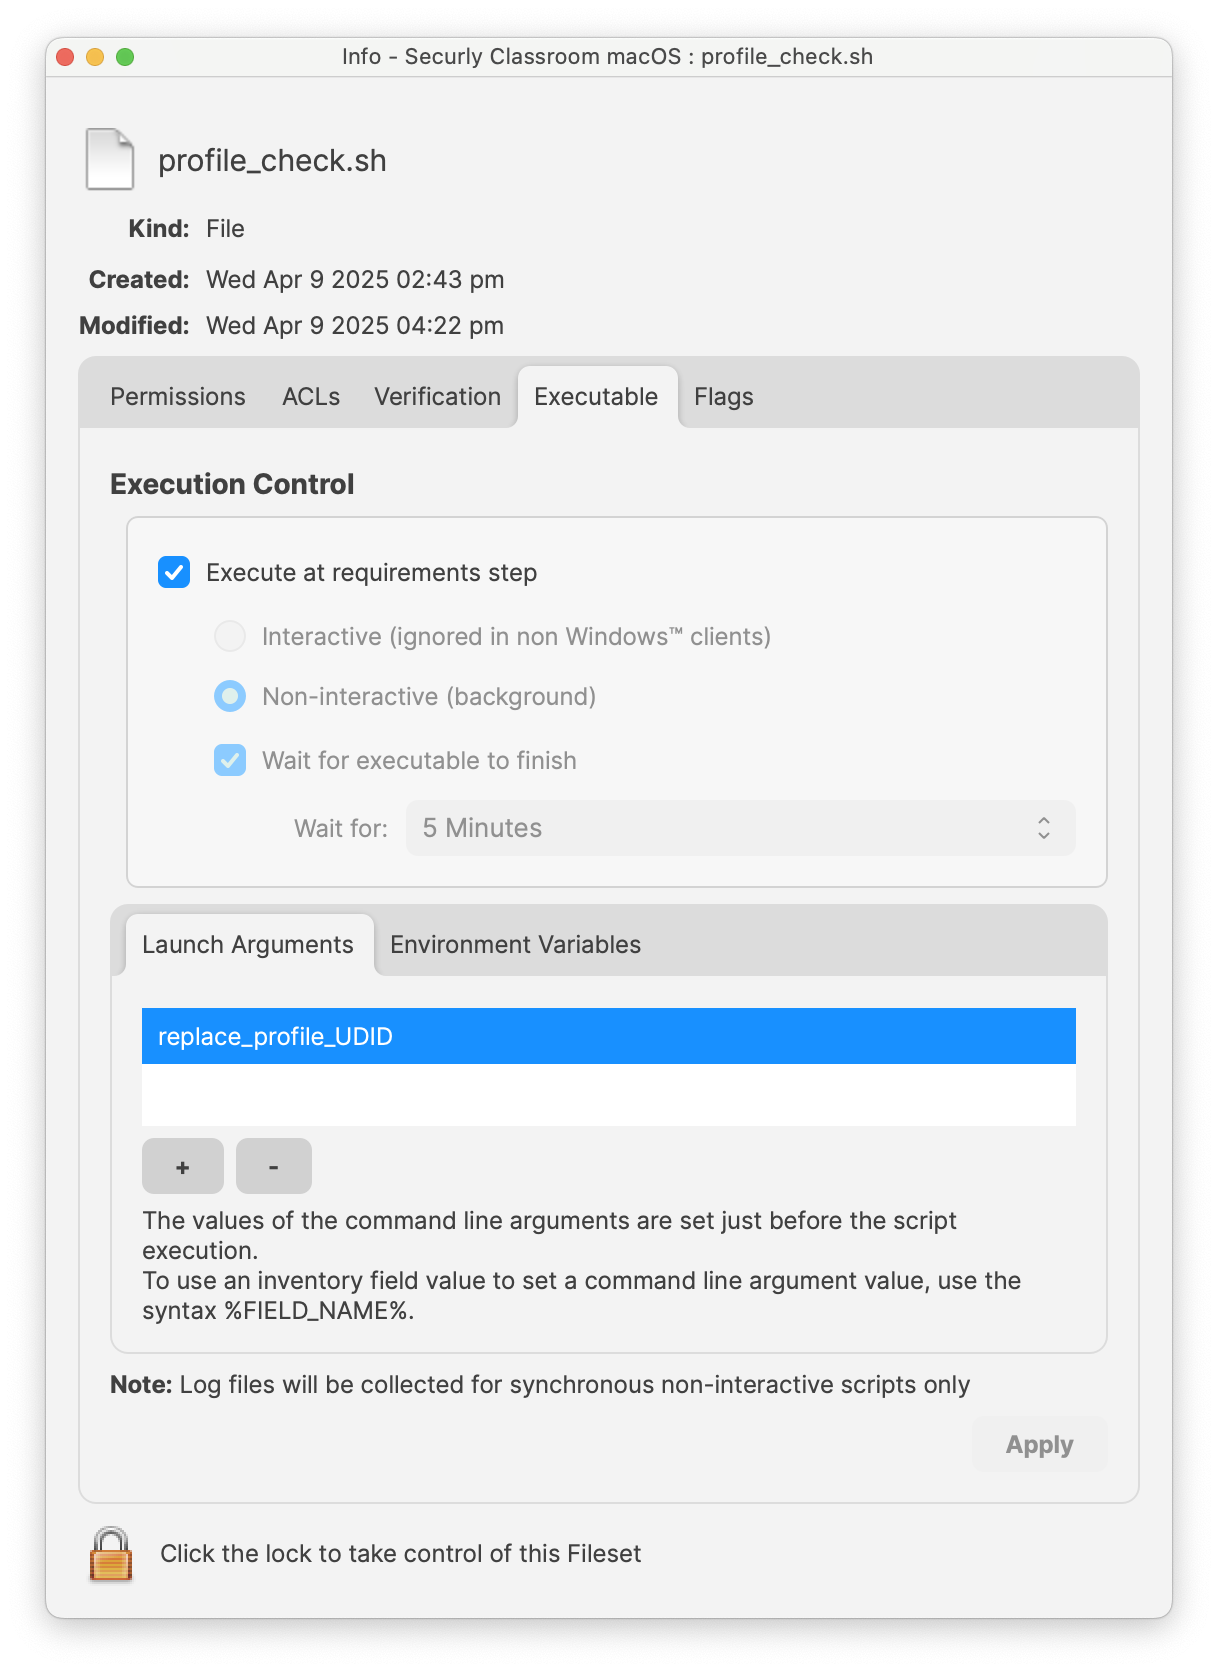](https://kb.filewave.com/uploads/images/gallery/2025-04/UO7GWatZDRtn6mjE-replaceudid.png) |
Upgrading SentinelOne on macOS Clients is not done the same way as it's initial deployment. We have edited the Installation script to identify if the client already has SentinelOne installed and run the following command to upgrade instead of going the normal install route: *sentinelctl upgrade-pkg PKG\_pathname* To deploy the upgraded SentinelOne Client to devices, simply create a new revision, upload the new PKG to the Fileset, and change the file name references in the install script.
## Ingredients - FileWave Central - [SentinelOne\_Fileset&Profiles.zip](https://kb.filewave.com/attachments/514) - SentinelOne PKG installer - SentinelOne Group/Site Token ## Directions #### Editing the Fileset: ``` sentinelctl upgrade-pkg PKG_pathname ``` 1. Download and import the SentinelOne Fileset into FileWave Central (we'll handle the Profiles later) 2. In a text editor, create a plain text file named com.sentinelone.registration-token that contains only your Site/Group Token [](https://kb.filewave.com/uploads/images/gallery/2025-01/zO0RfwdcsB8oM0mh-screenshot-2025-01-15-at-11-22-14-am.png) 3. Open the imported Fileset and replace the files under /usr/local/etc/FileWaveInstallers/SentinelOne with your registration token file and SentinelOne PKG.Make sure the token file ownership is set to root:staff. You can change the ownership by selecting the file > Get Info > Ownership
The "com.sentinelone.registration-token" plaintext file must also be extension-less in the fileset and will not work if the file has a .txt extension at the end of the file name. If your filename ends in a ".txt" this can be removed/edited by right-clicking on the file in the fileset > "Rename".
| Before: | After: |
| [](https://kb.filewave.com/uploads/images/gallery/2025-04/VCKEbybJ5HCdfPhw-screenshot-2025-04-09-at-3-15-42-pm.png) | [](https://kb.filewave.com/uploads/images/gallery/2025-04/UGAxPK1sBhSGnPz3-screenshot-2025-04-09-at-3-19-27-pm.png) |
| Before: | After: ***Your installer's name will be different*** |
| [](https://kb.filewave.com/uploads/images/gallery/2025-04/WnwvrDlfSnw2Yv3S-screenshot-2025-04-09-at-4-27-11-pm.png) | [](https://kb.filewave.com/uploads/images/gallery/2025-04/FsMGMPmftV7xTvJB-screenshot-2025-04-09-at-4-19-44-pm.png) |
Profile Metadata shown below
##### We're all set! Now create a Deployment with the Fileset and four Profiles. ##### The Fileset contains a script that will only allow the Installation once all four Profiles have been installed. It is normal to see a Fileset failure the first try. It will keep trying until profiles have installed.The check\_profile script logs each attempt and why it either failed or succeeded. You can see this log by right-clicking on the script in Client Info>Fileset Status. Select the Fileset in the list and the script status will show on the right. Right-click to see script output.[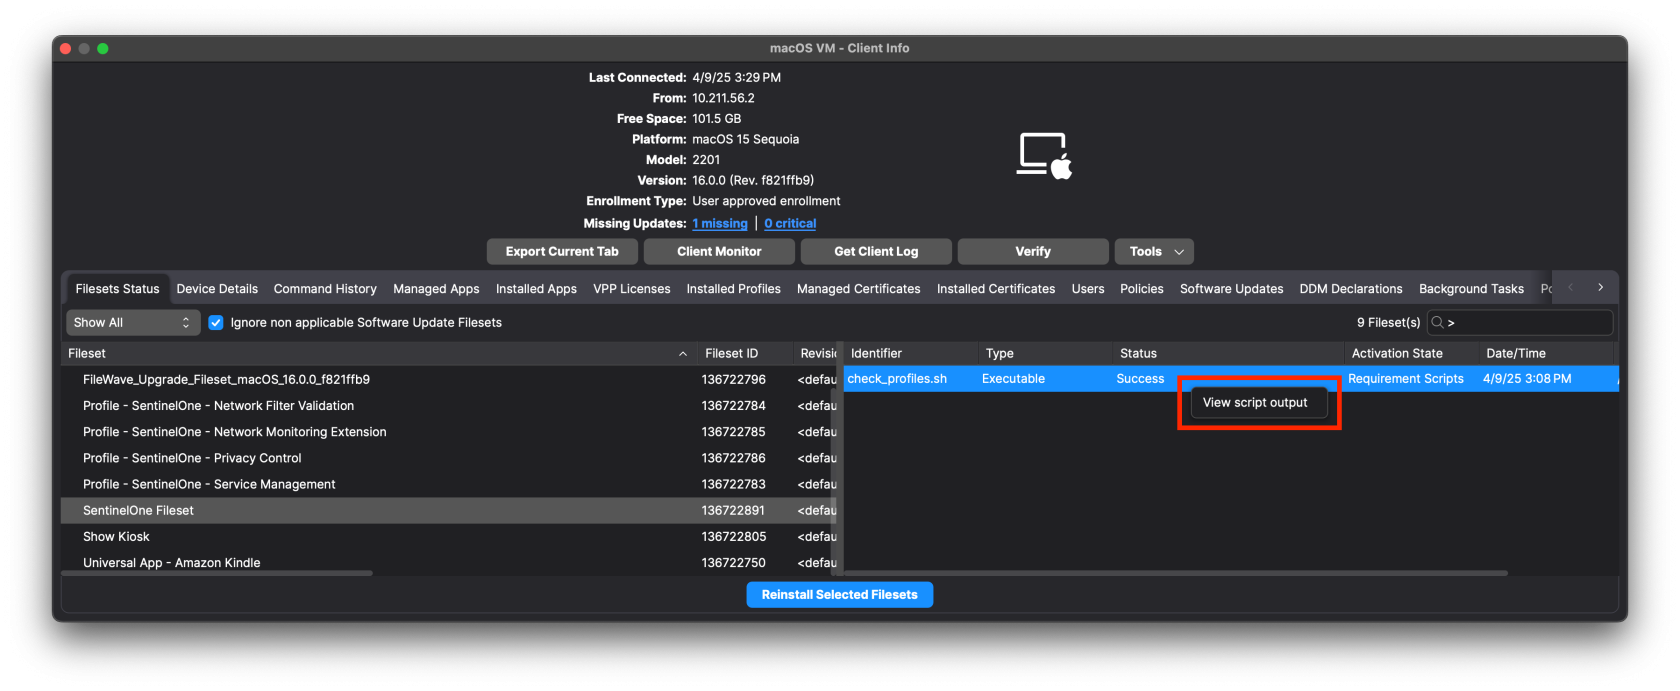](https://kb.filewave.com/uploads/images/gallery/2025-04/6ASwNv6RQjlHOx3g-screenshot-2025-04-09-at-3-30-03-pm.png) [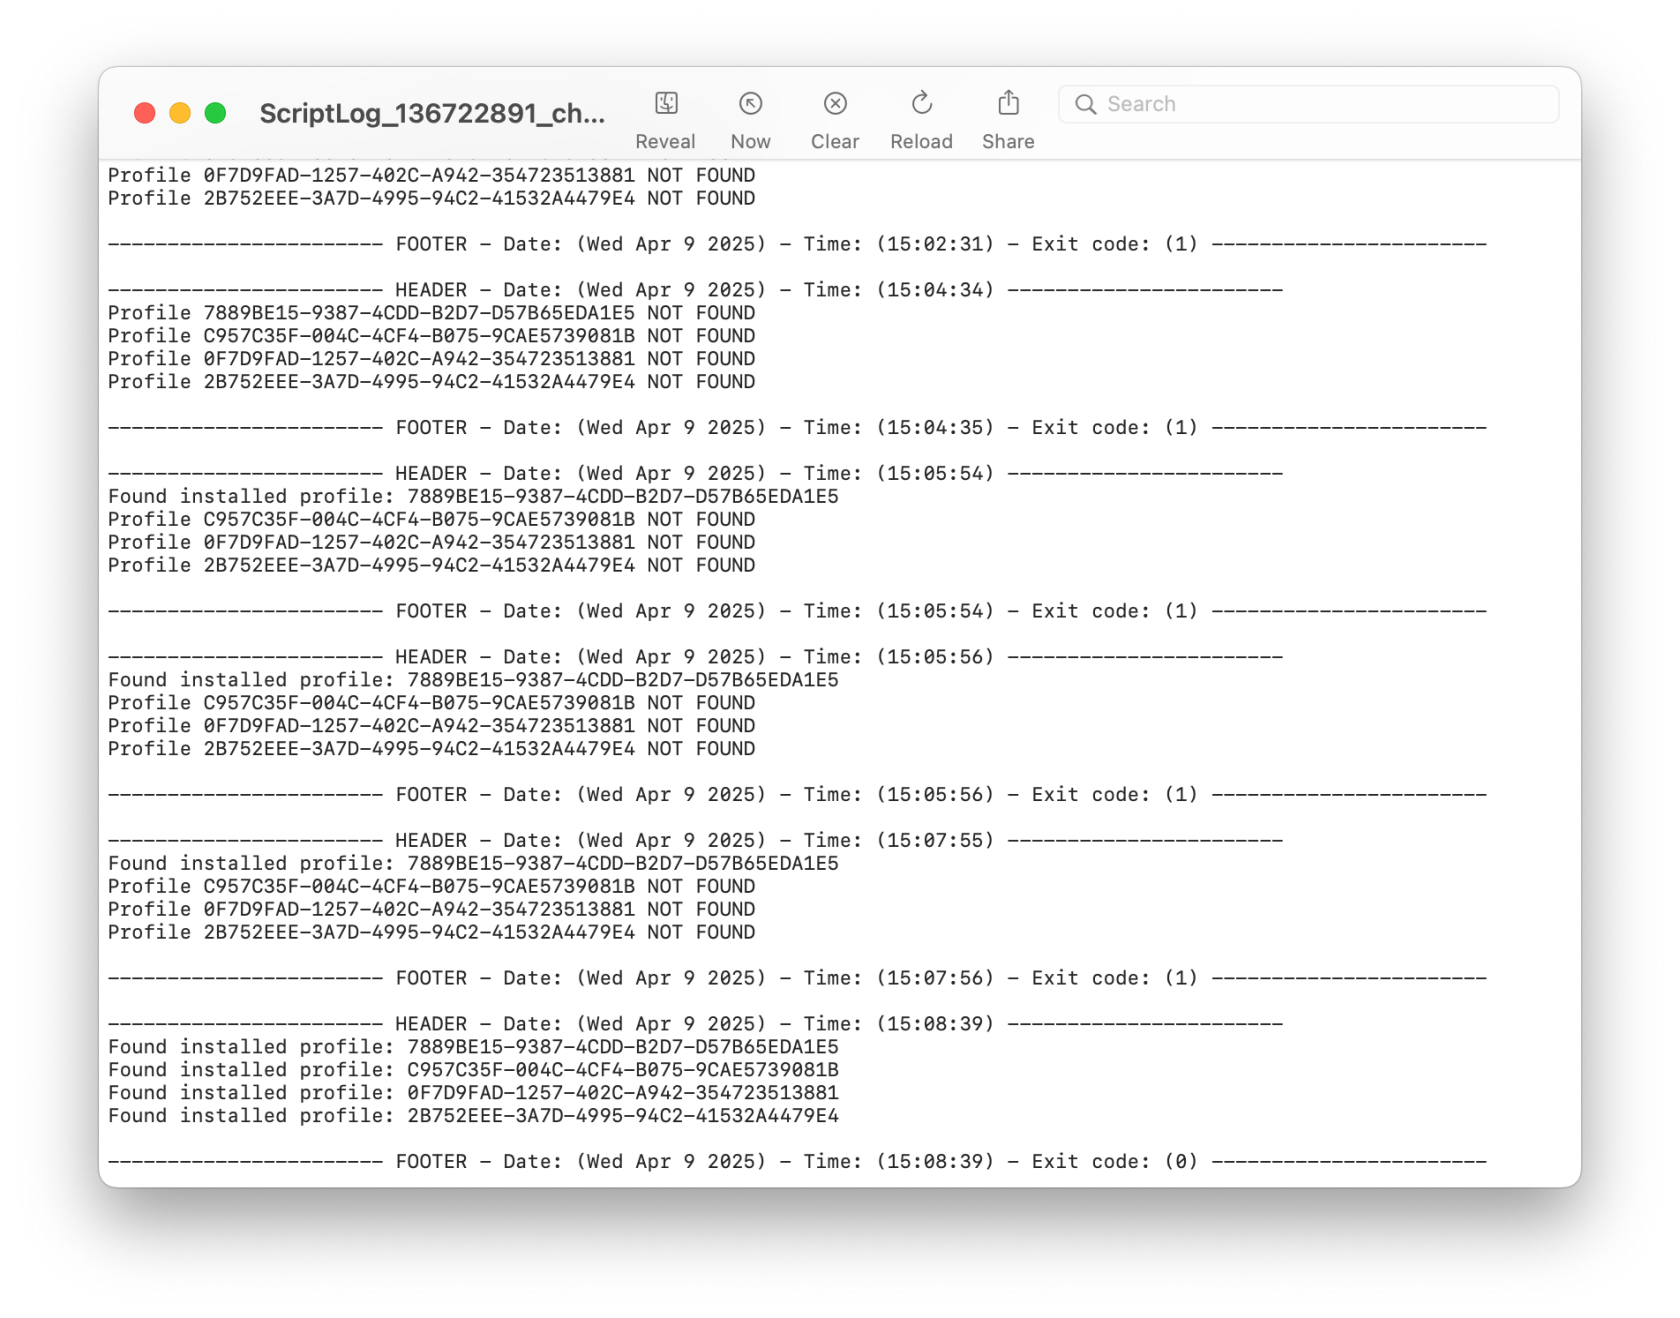](https://kb.filewave.com/uploads/images/gallery/2025-04/4IH618E3VdFuH2fs-screenshot-2025-04-09-at-3-34-09-pm.png) You'll notice that the script exited successfully (exit 0) once all the Profiles were found. The profiles are identified by their Profile ID. You can find this by double-clicking on the Profile in the Filesets view.
## Profile Metadata #### Service Management ProfileService Management Profile
[](https://kb.filewave.com/uploads/images/gallery/2023-11/7GVv7yAfsRLhDESf-sentinelone-servicemanagementprofile.png)TCC Profile
[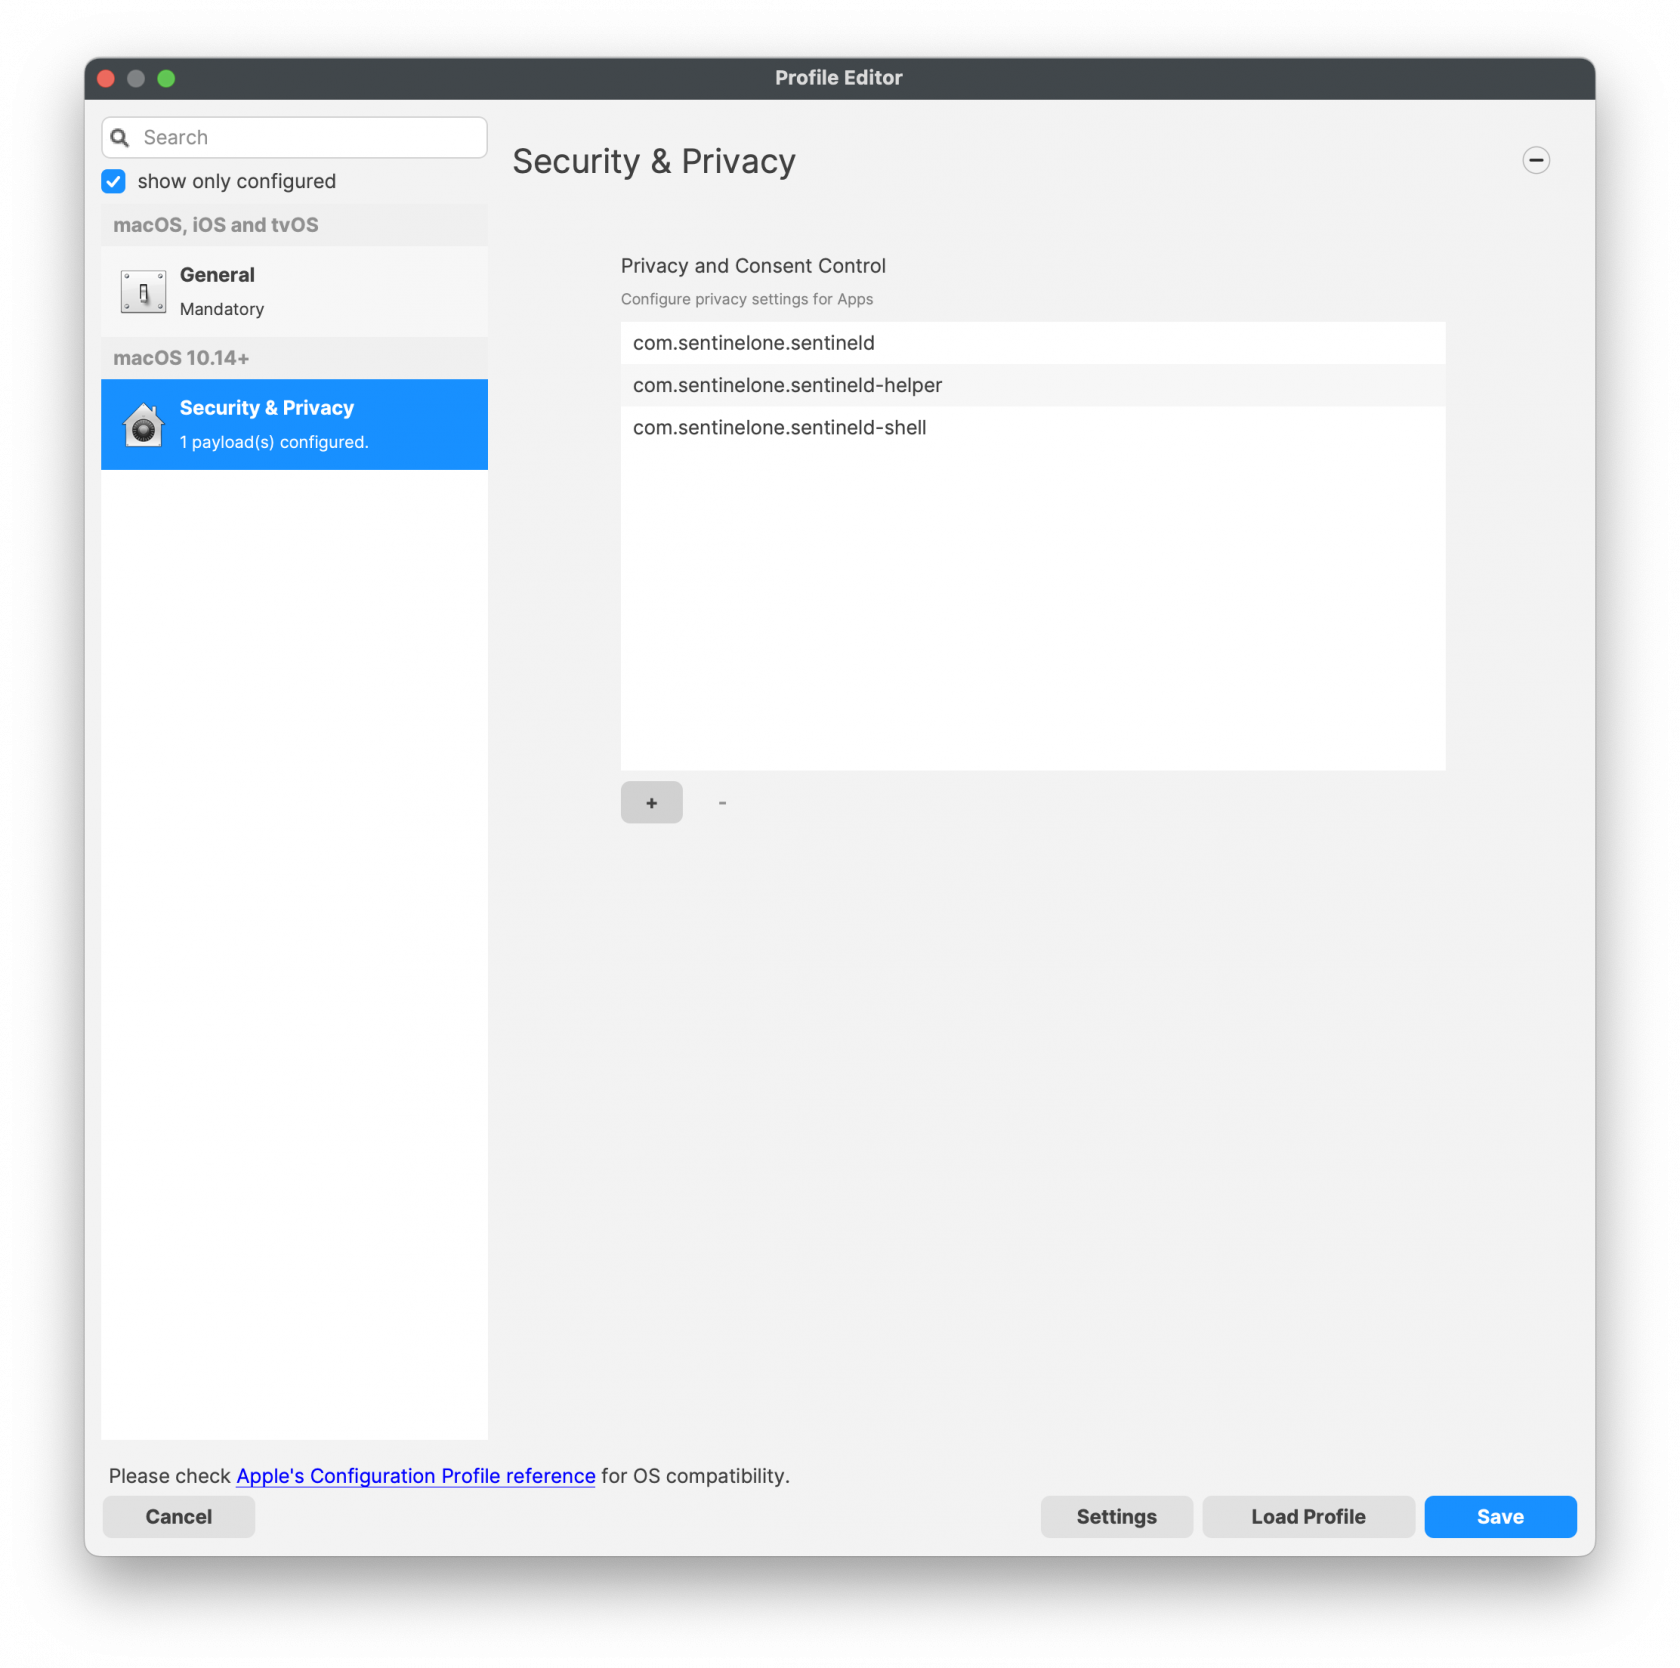](https://kb.filewave.com/uploads/images/gallery/2023-11/i2uTSpnL1eQgtjIe-sentinelone-tccprofile01.png)[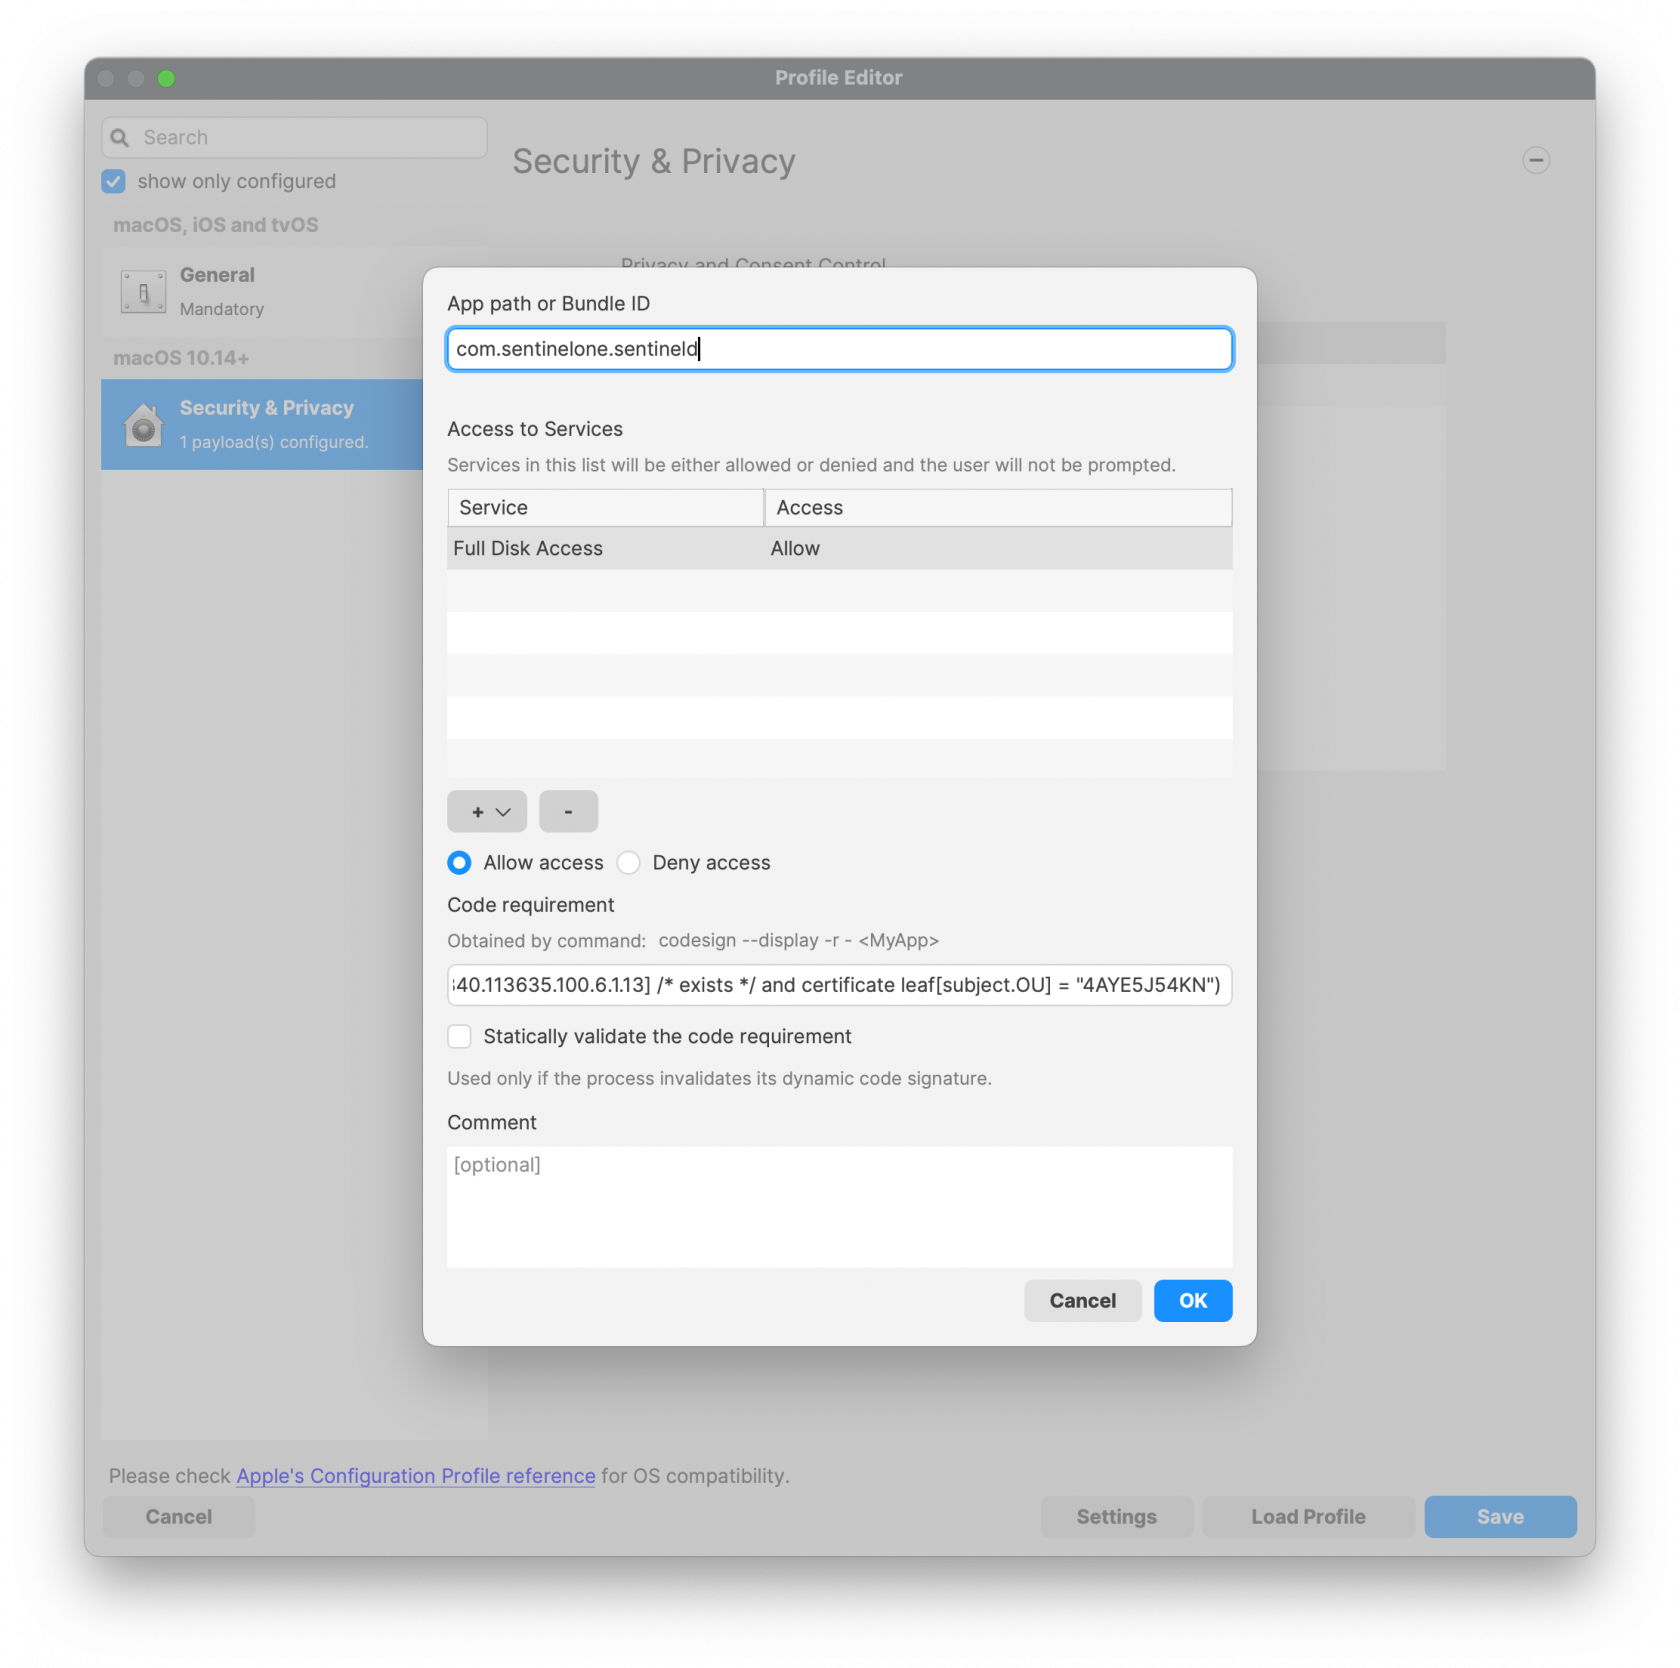](https://kb.filewave.com/uploads/images/gallery/2023-11/4aKFodVFdekHVzpH-sentinelone-tccprofile02.png)Notifications Settings
[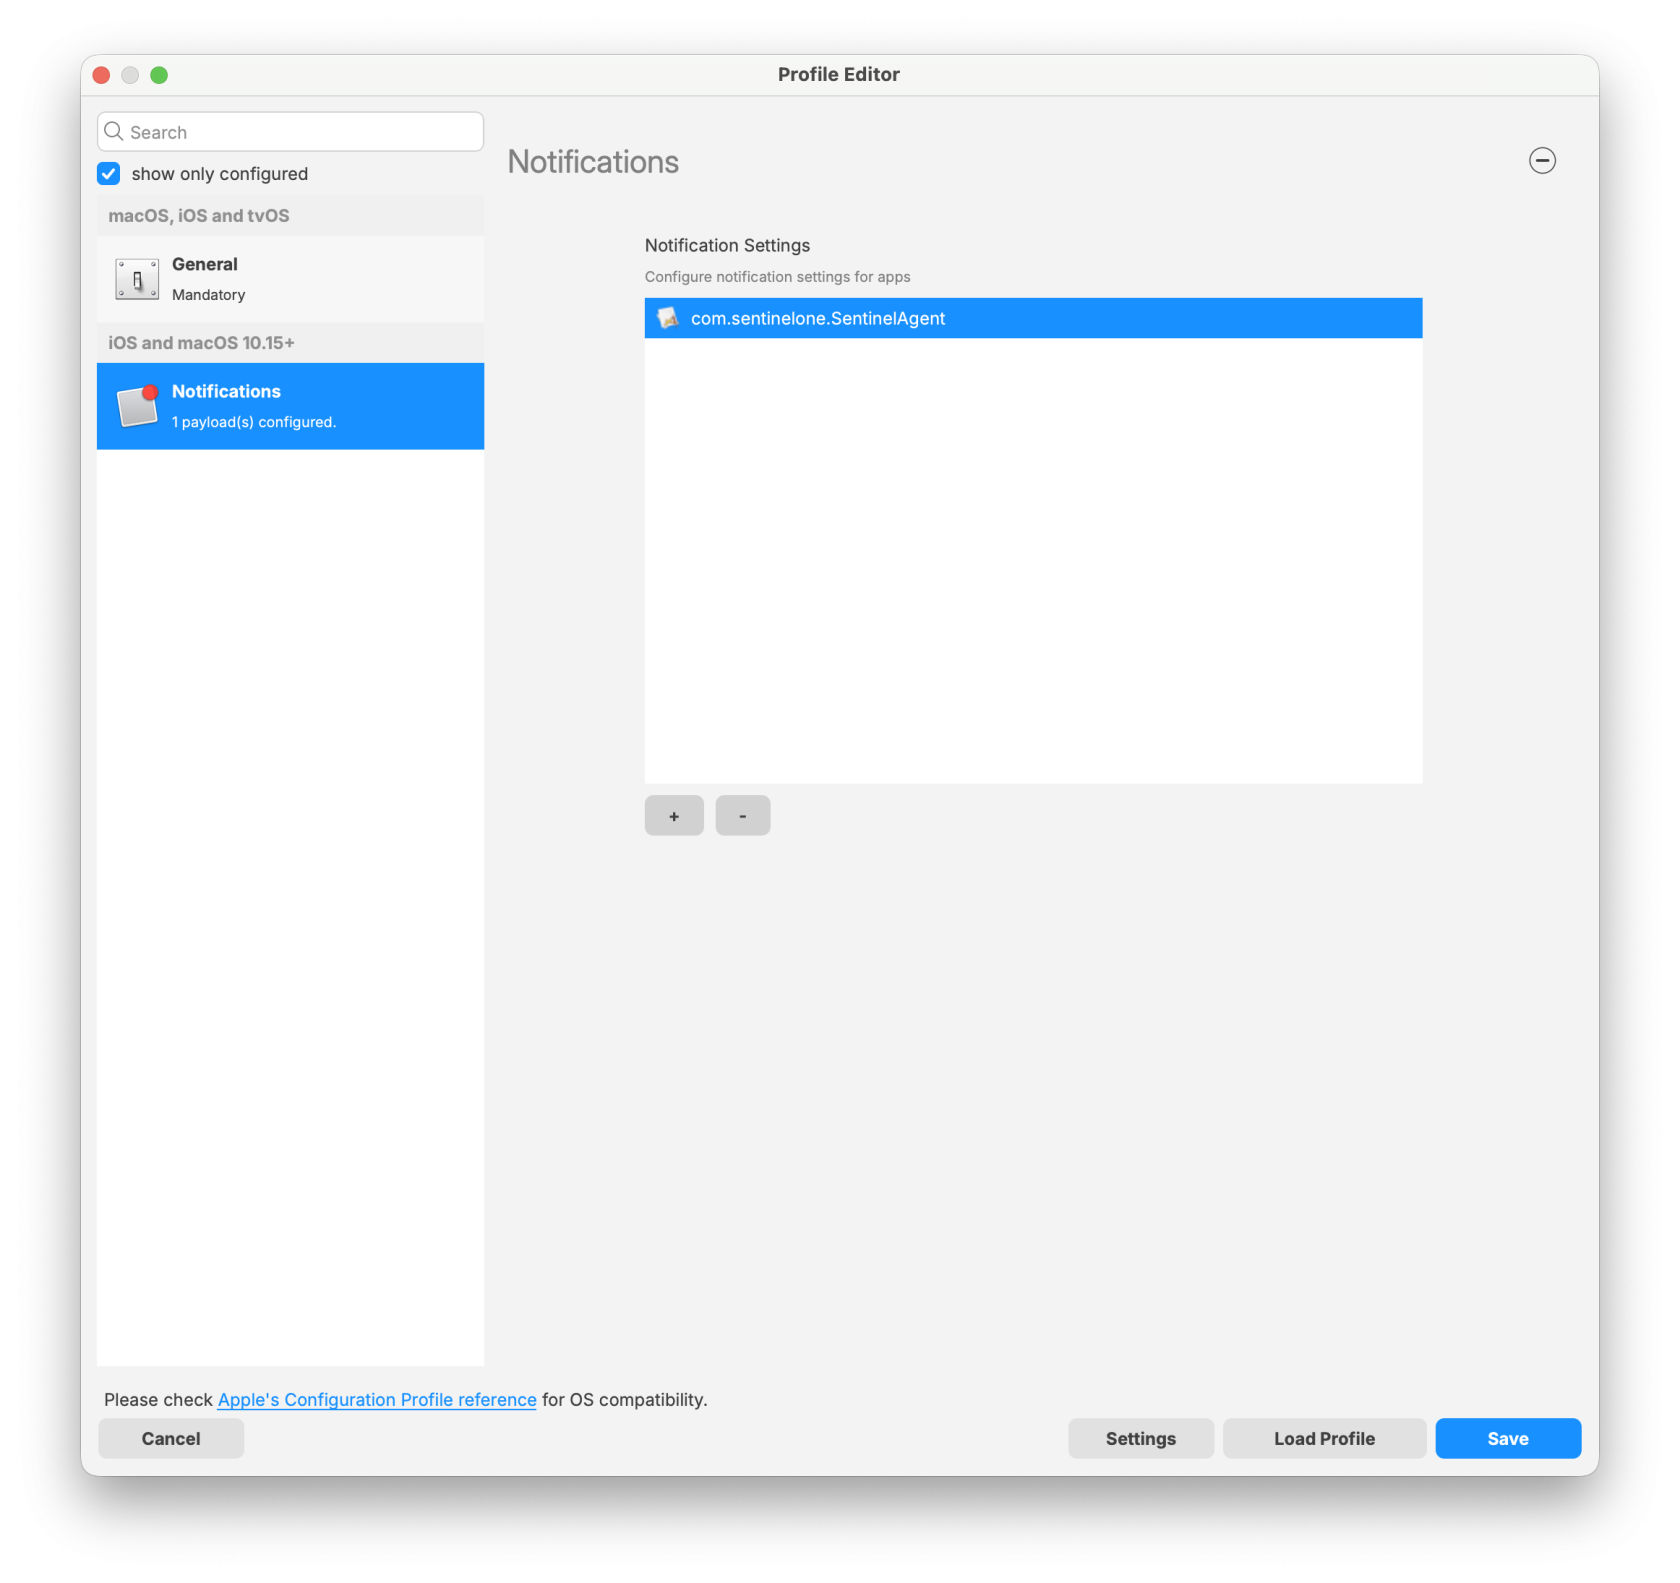](https://kb.filewave.com/uploads/images/gallery/2026-05/x9kuvrFICKoVwTKk-sentinelonenotifications.png)System Extension Profile
[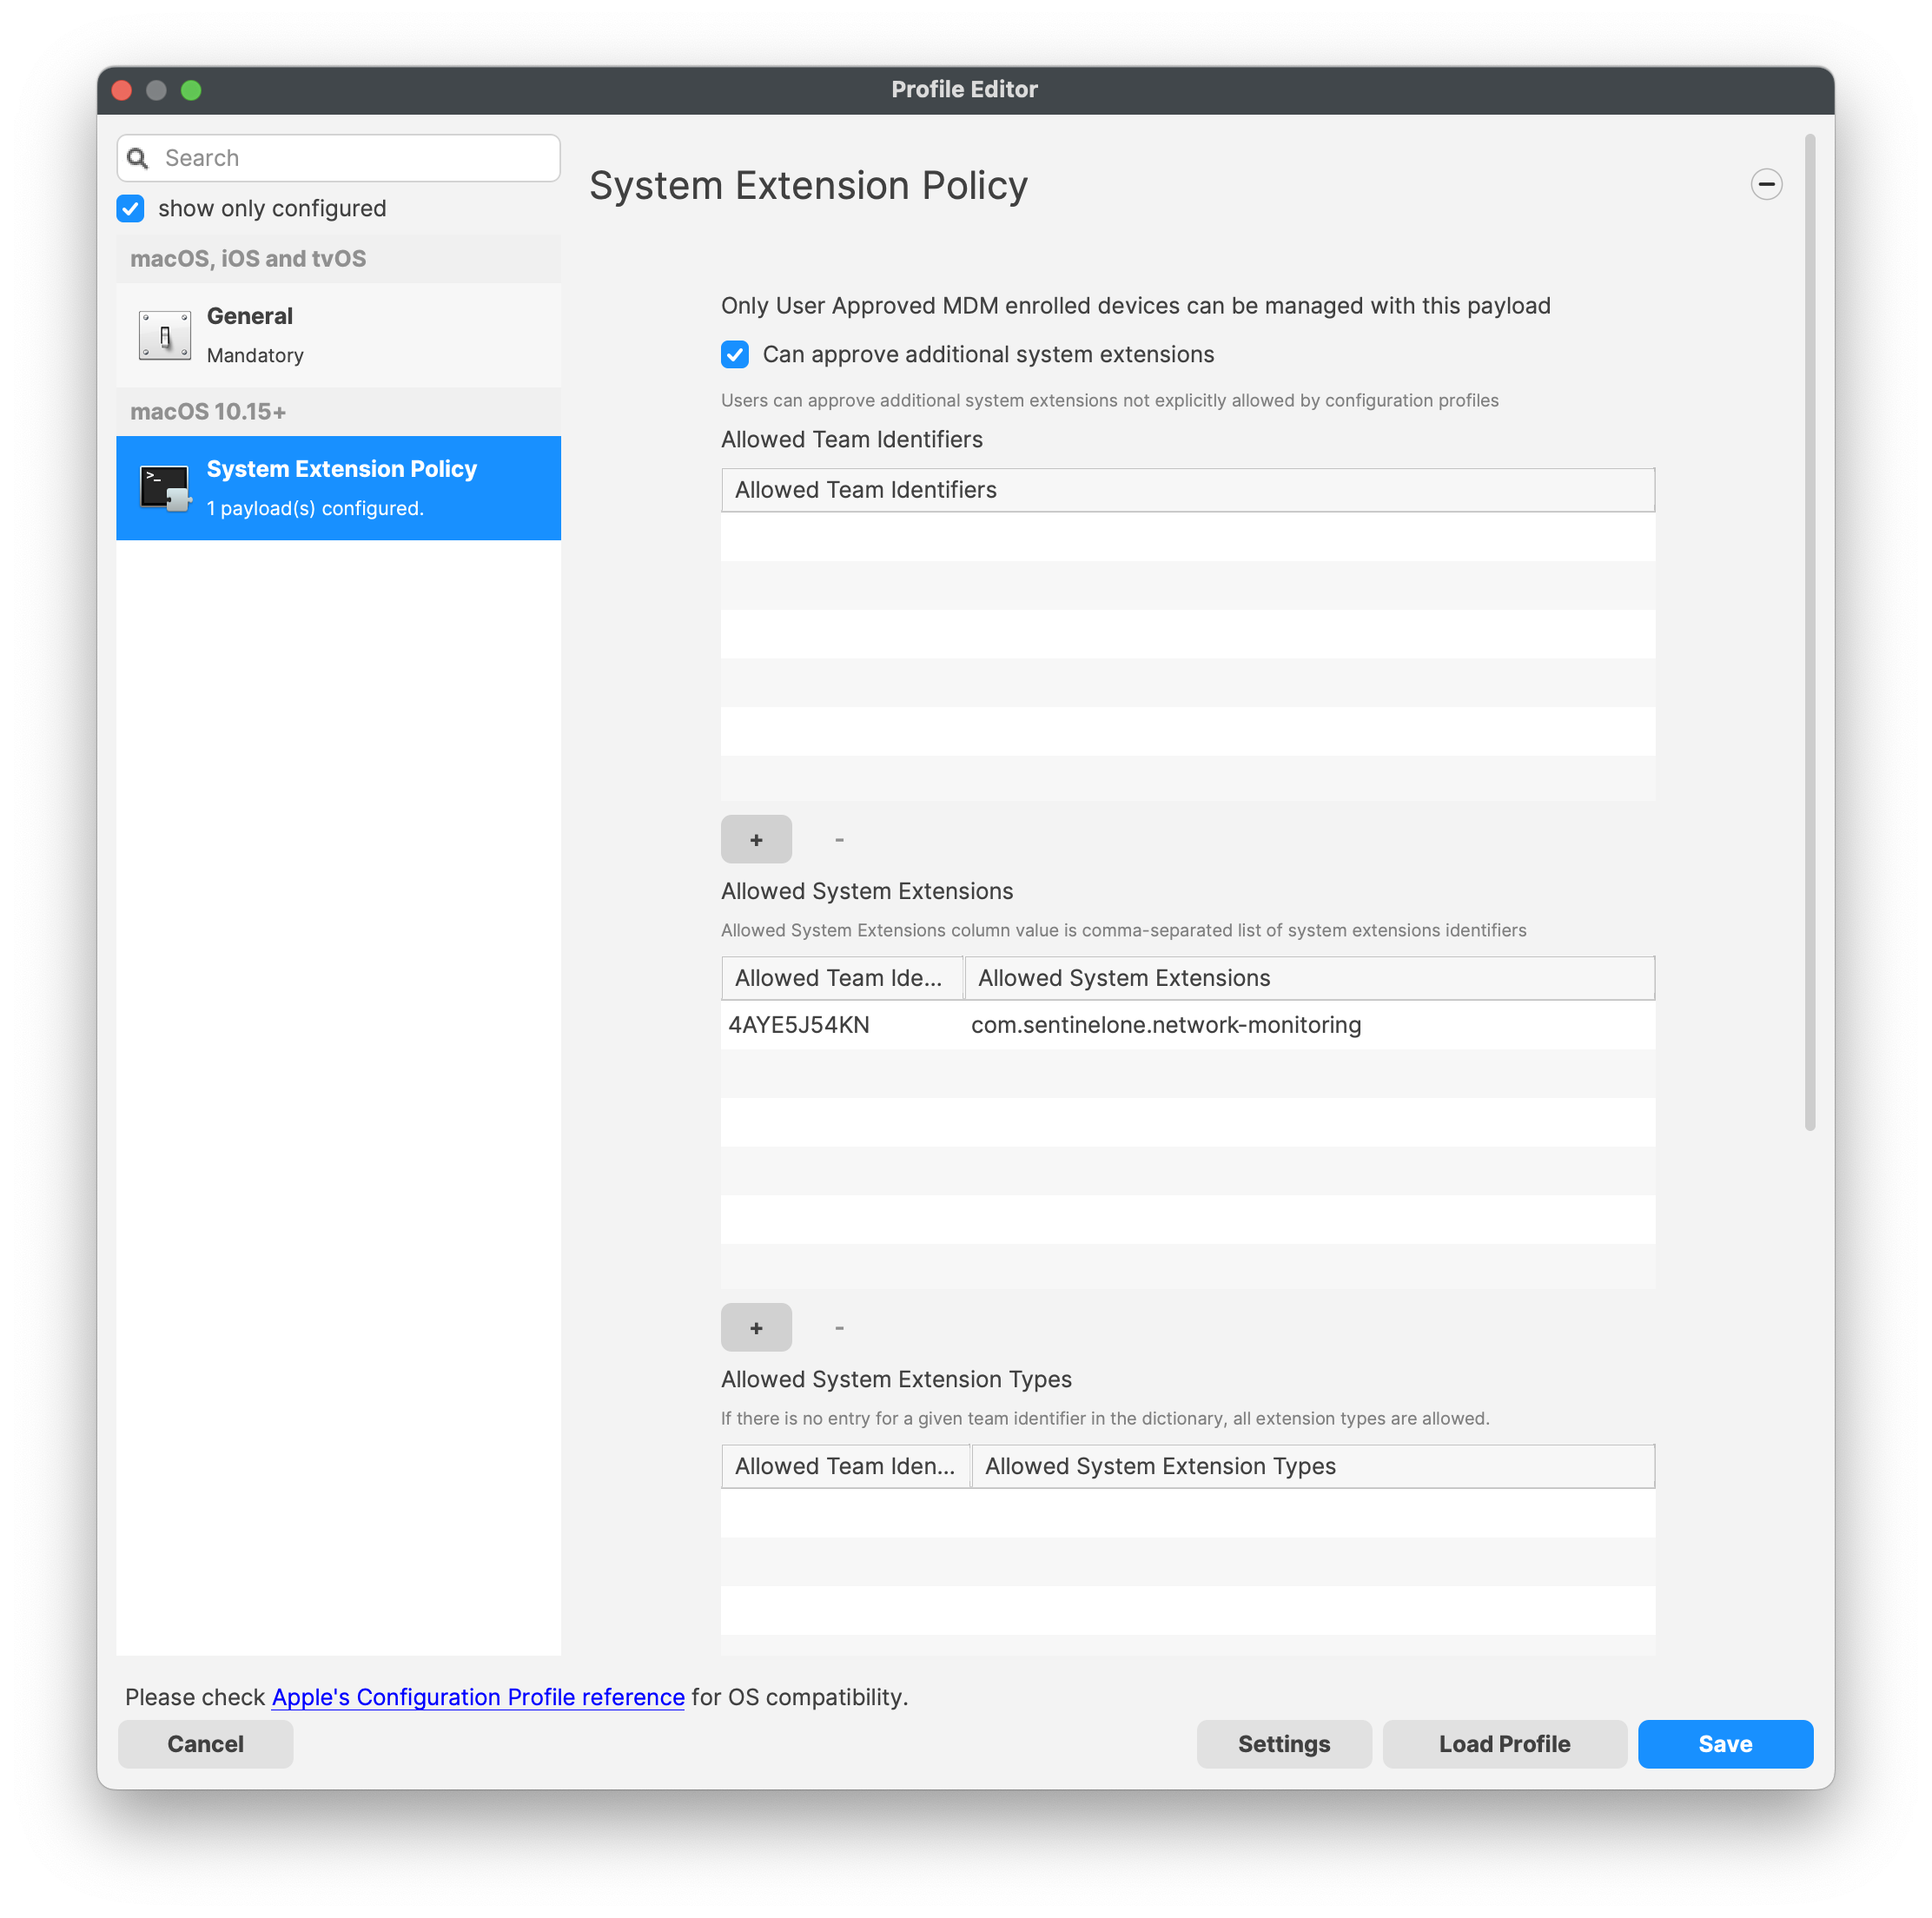](https://kb.filewave.com/uploads/images/gallery/2023-11/zg5n9qECenBUDeU5-sentinelone-systemextensionprofile.png)Network Filter Profile
[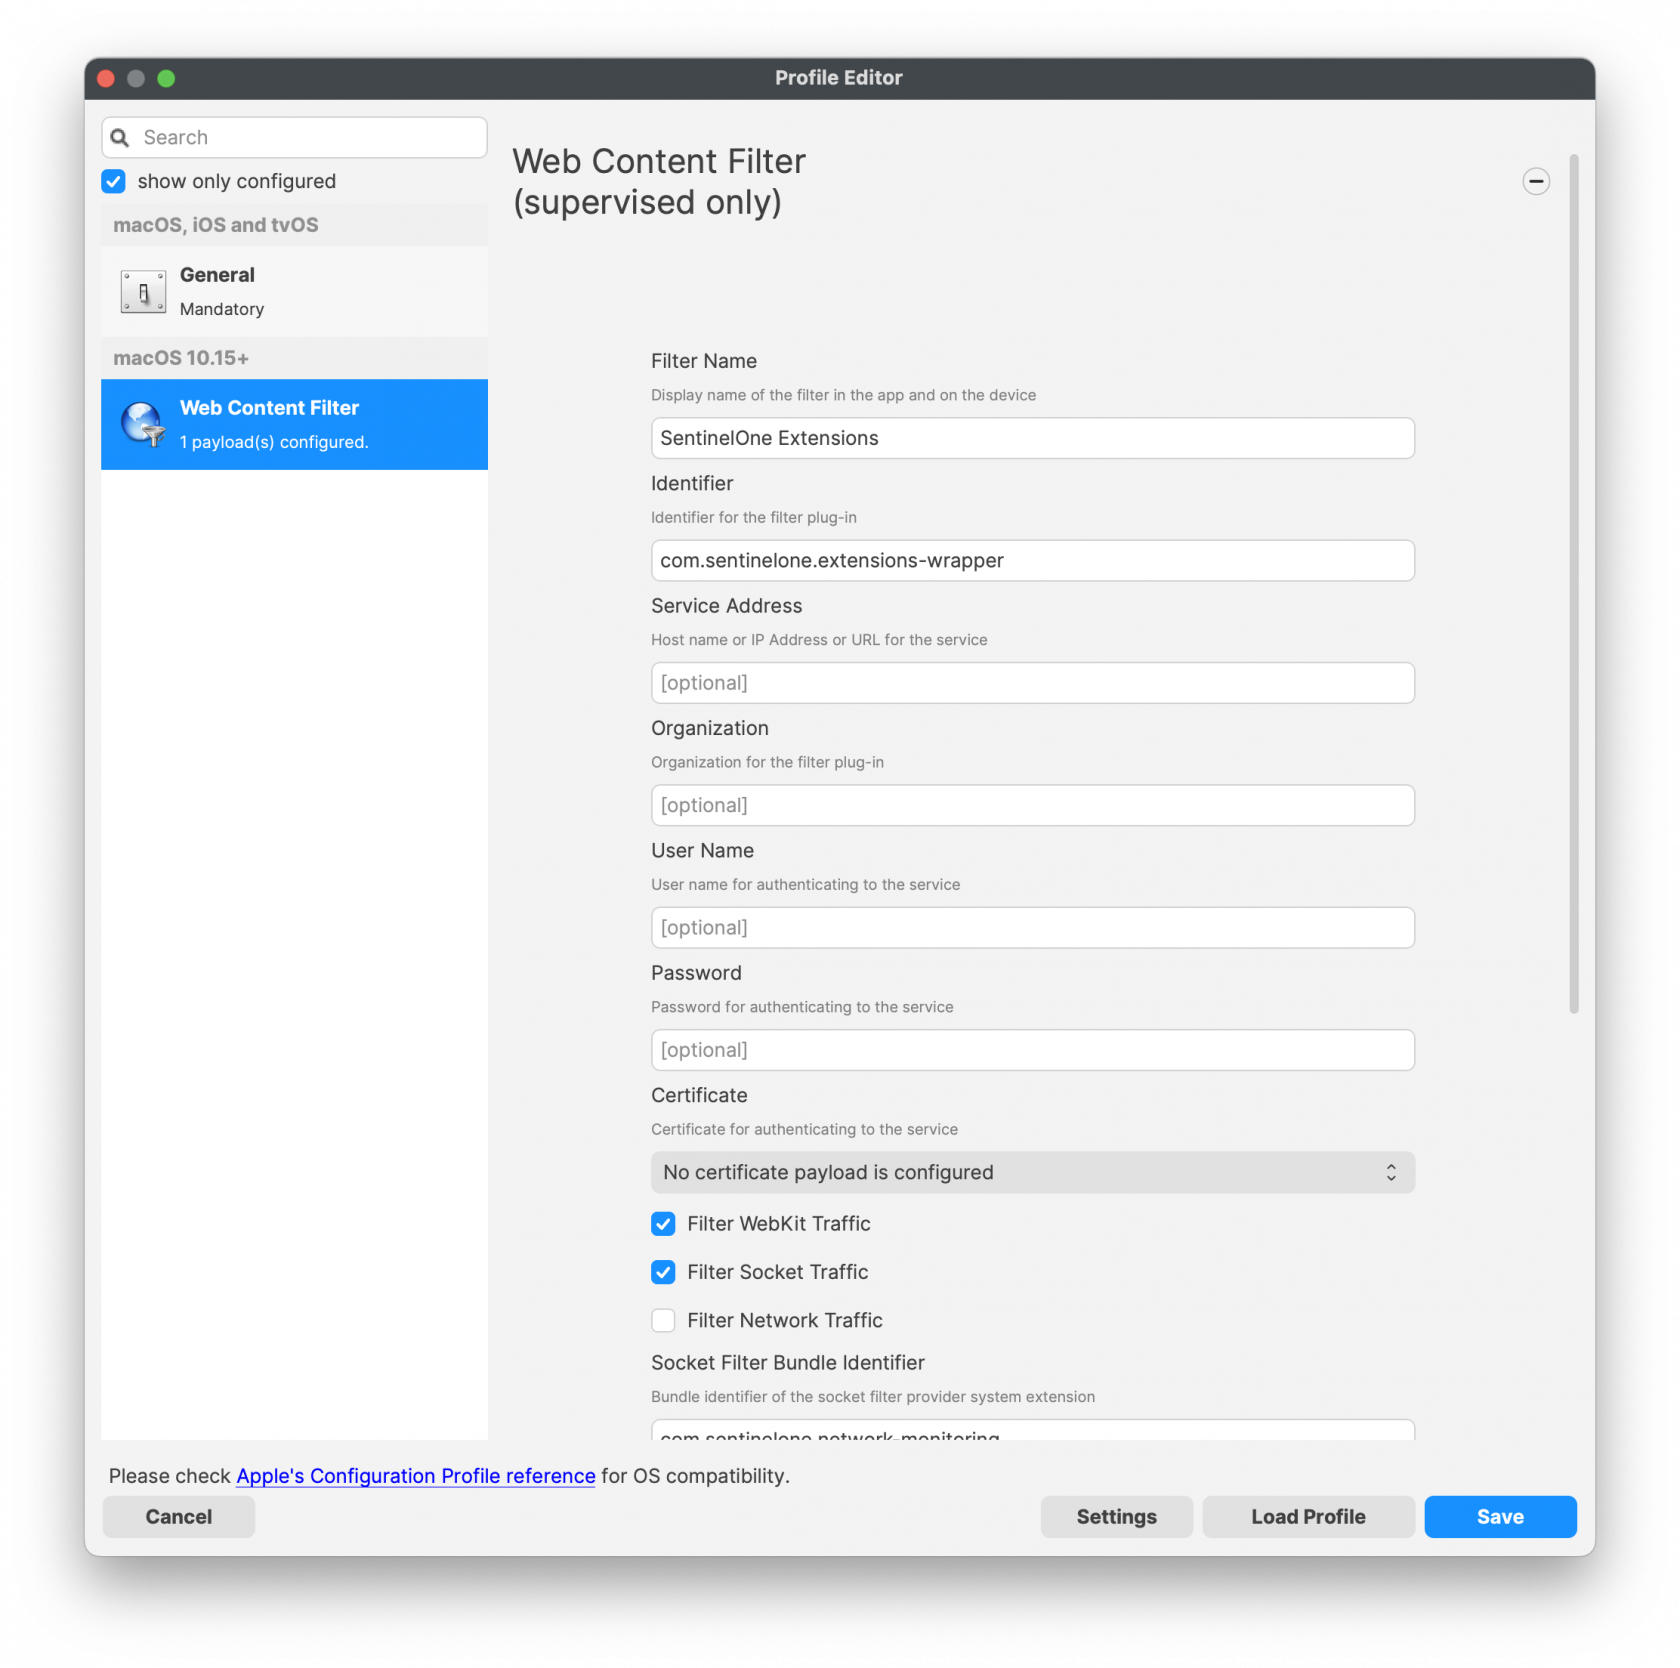](https://kb.filewave.com/uploads/images/gallery/2023-11/Sb99PXjS1p8aCz0Q-sentinelone-webcontentfilterprofile.png)Please note this recipe includes Carbon Black Cloud sensor (CB Defense) version 3.7.4.53. This version is supported on macOS 11.0 and newer. For current Carbon Black Cloud macOS sensors, check the vendor documentation and profiles bundled with your downloaded sensor package before deploying.
**Current macOS sensor deployments:** Carbon Black Cloud macOS sensor 3.5.1.19 and later installs System Extensions by default on macOS Big Sur 11.0 and later. For 3.8+ packages, deploy the System Extension, Network Extension/Web Content Filter, and TCC/Full Disk Access profiles before the installer. Use the Kernel Extension/KEXT approval and Rebuild Kernel Cache guidance below only for older sensor packages or a vendor-supported deployment path that still explicitly requires KEXT mode.
### Downloading and extracting the MDM profiles and installers You will first want to grab and download your VMware installations and profiles. The .dmg will need to be mounted first and then extract the necessary components from this file. Once the .dmg has been mounted you will see the contents listed. Below is the CBCloud Install.pkg and doc folder containing the required MDM profiles. [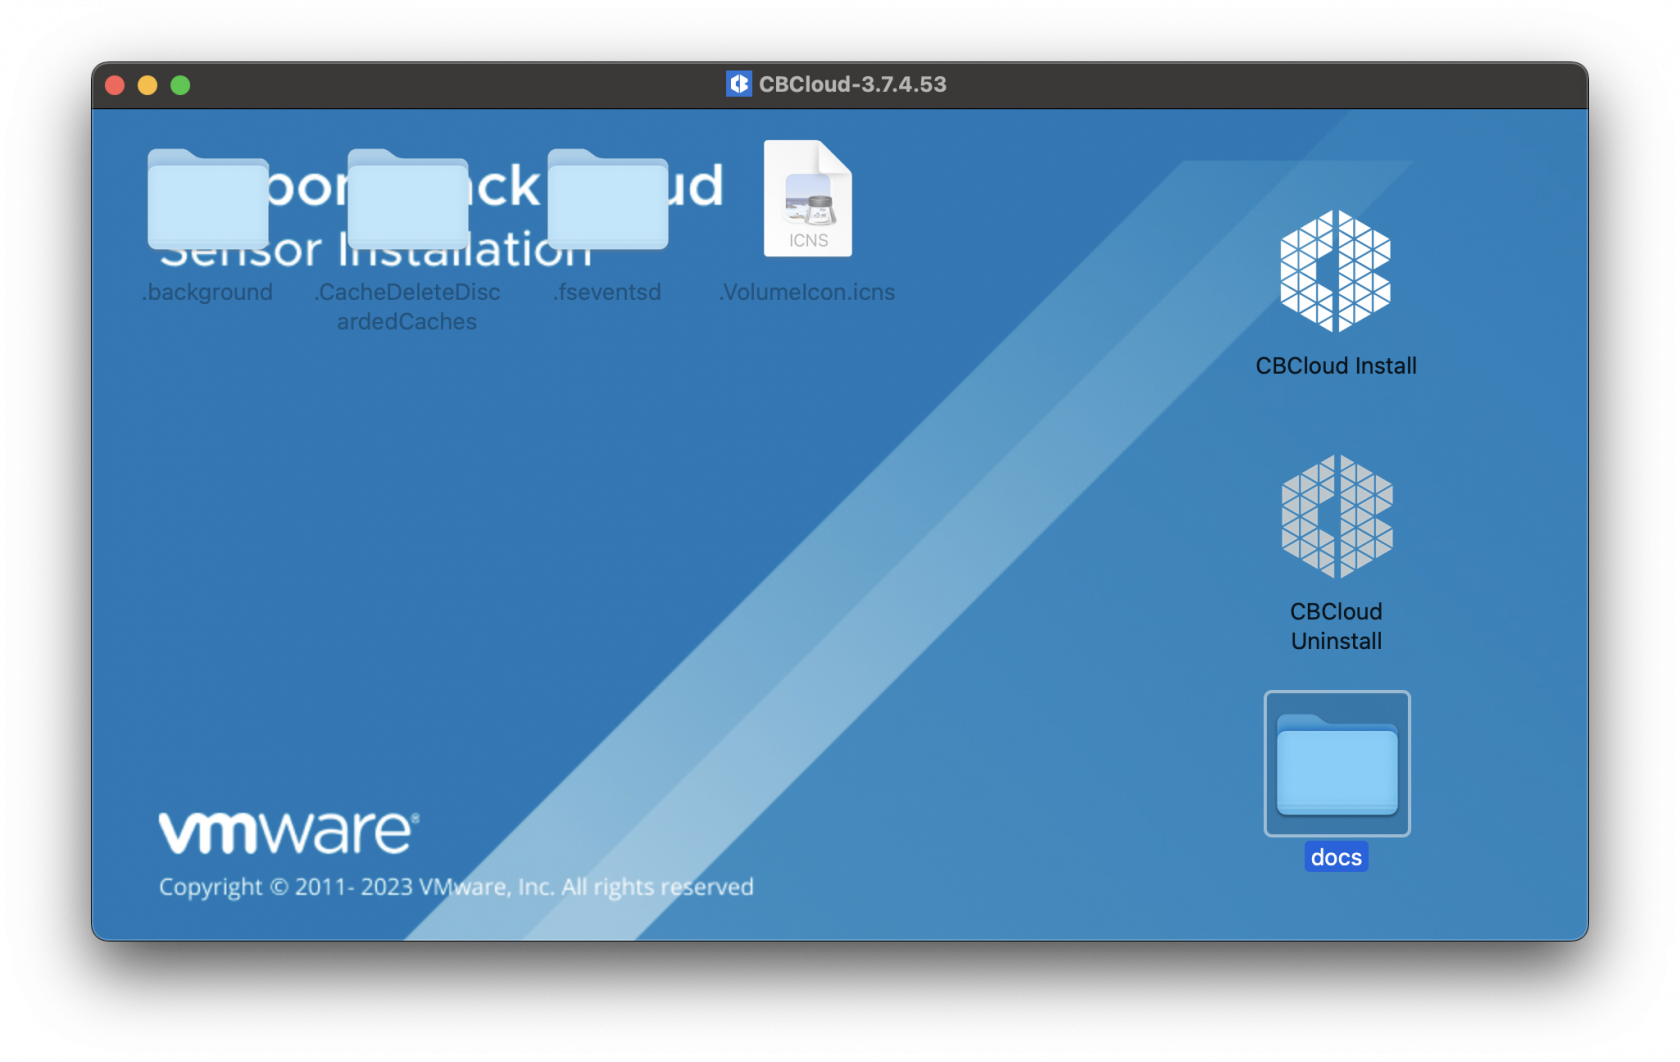](https://kb.filewave.com/uploads/images/gallery/2023-09/Zbpw5w6bm9xOeRCA-vmwarecbcsensor01.png) The required MDM profiles and unattended script for the Fileset deployed are found in the docs folder within the mounted .dmg. Extract the MDM profiles. These MDM profiles will be uploaded into FileWave Central. For current packages, expect to deploy the System Extension, Network Extension/Web Content Filter, and Privacy Preferences/TCC profiles. If you use the example downloads here, validate them against your Carbon Black Cloud sensor version before deploying broadly.Legacy Kernel Extension Policy (older sensors only)
[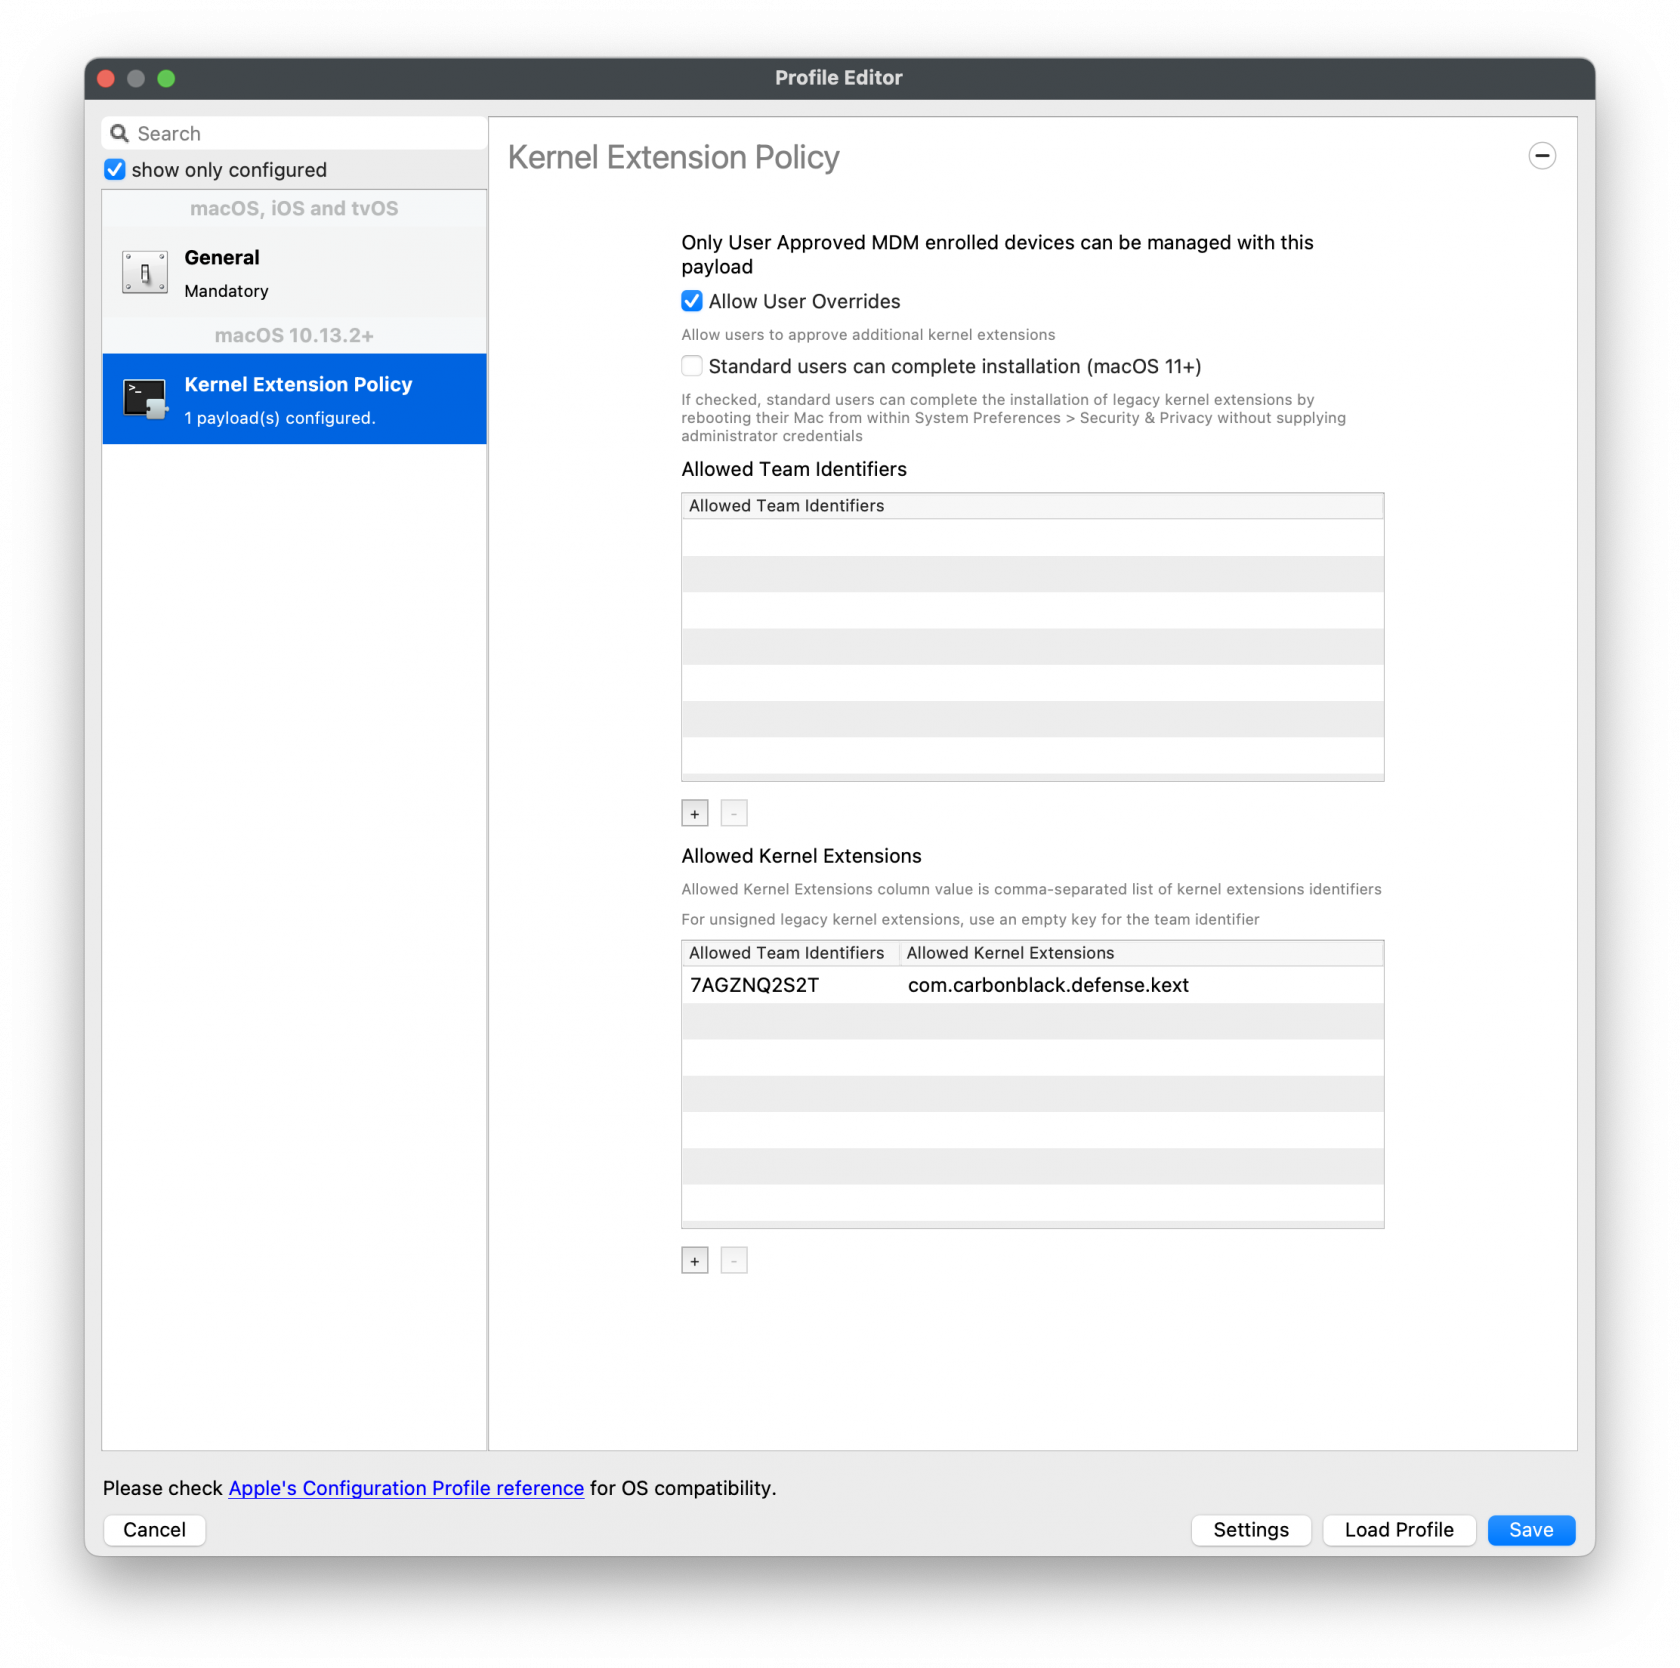](https://kb.filewave.com/uploads/images/gallery/2023-09/KwJSyfpQbIkg2VQP-vmwarecbcsensor02.png)Privacy and Consent Control (TCC) Policy
[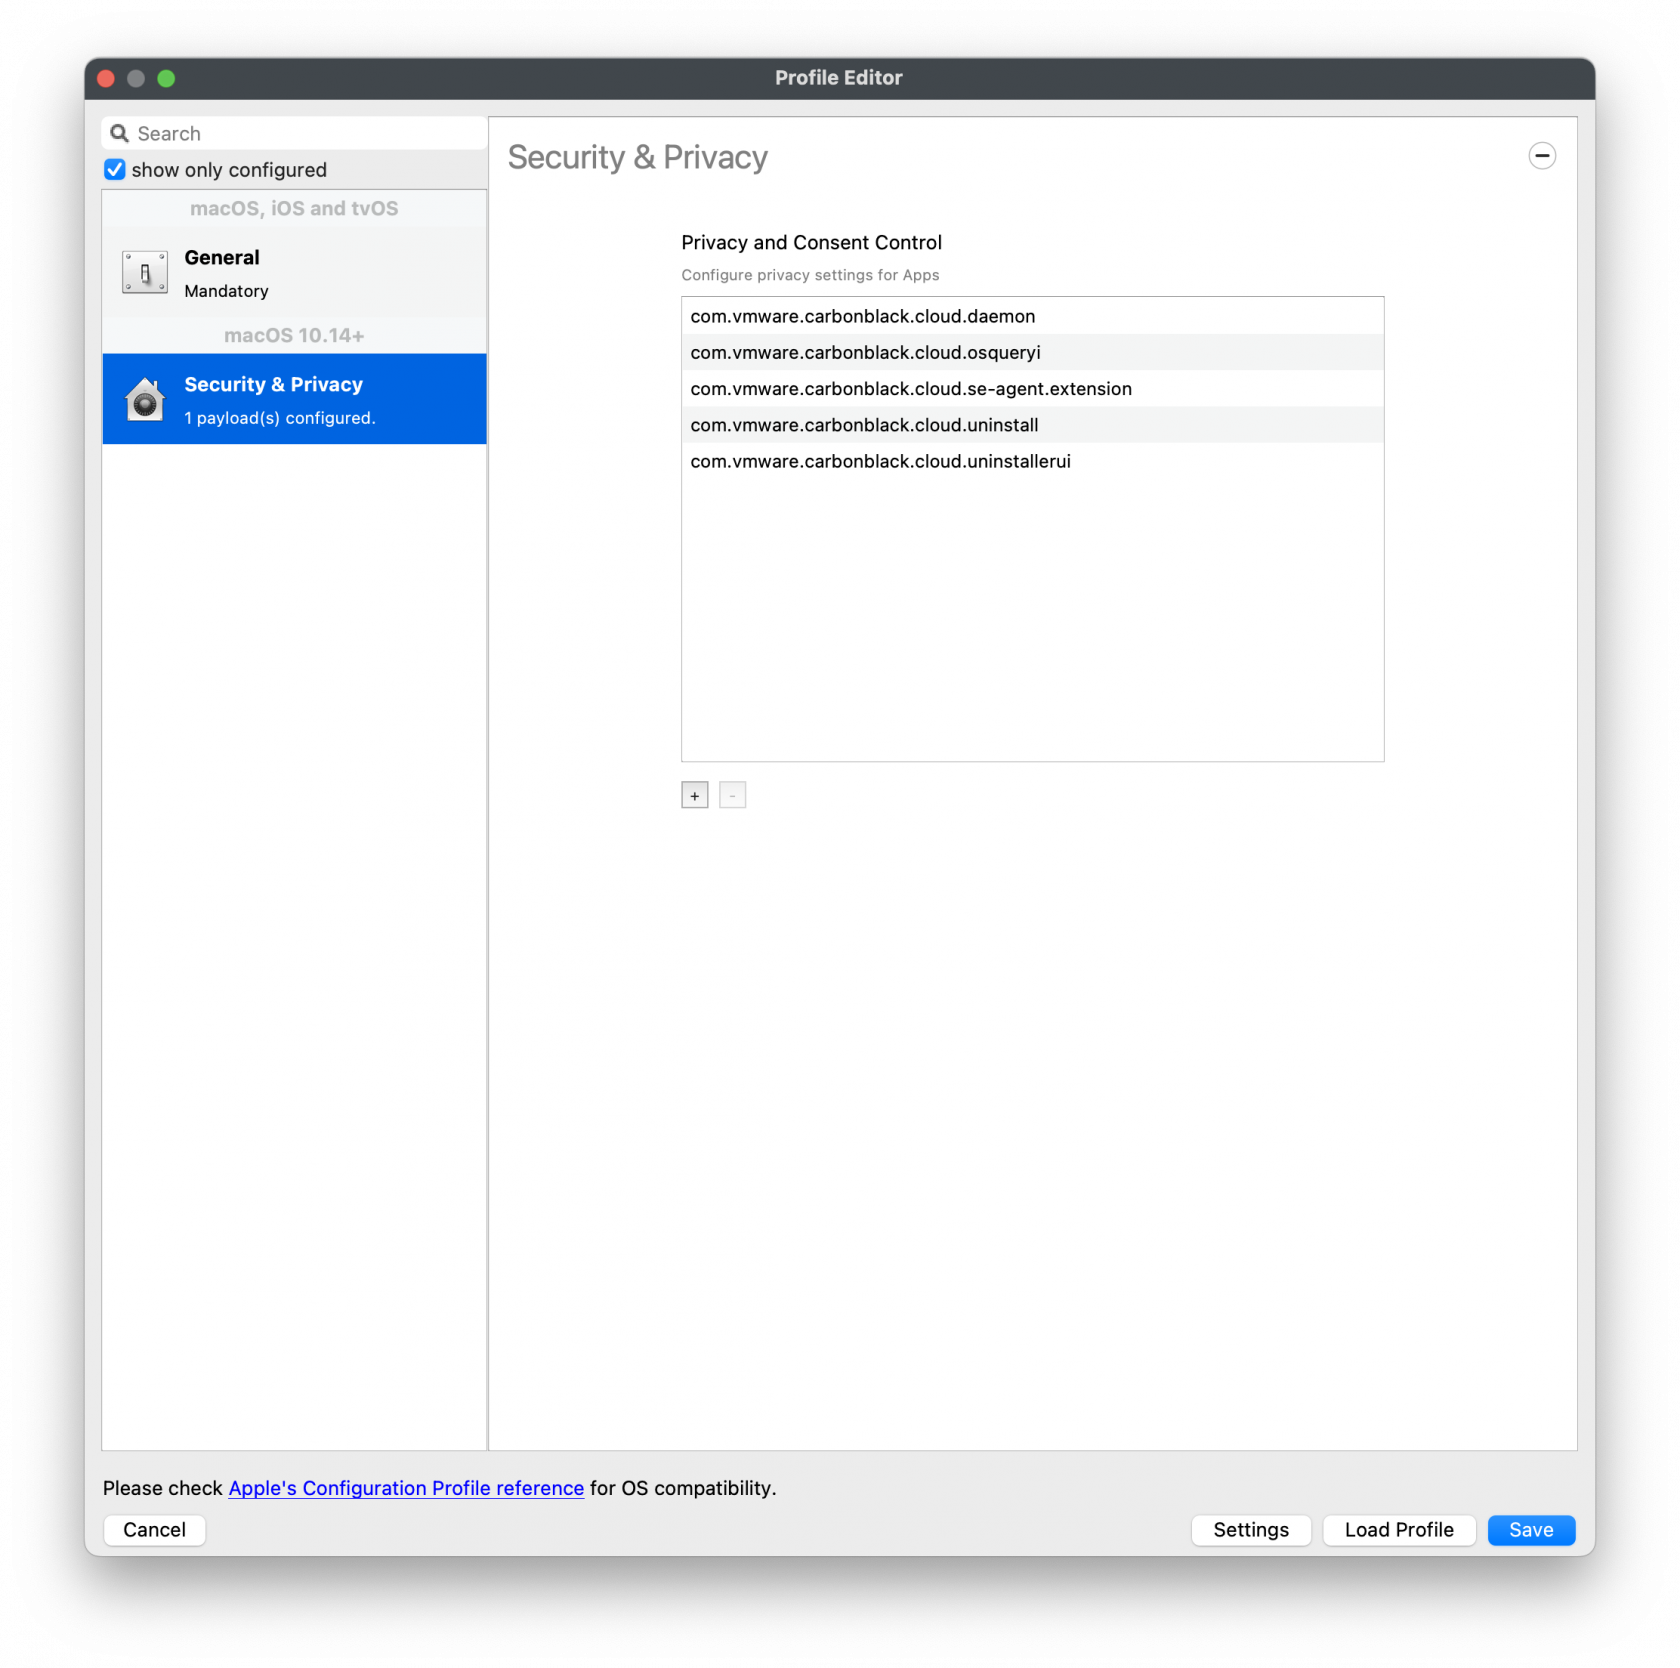](https://kb.filewave.com/uploads/images/gallery/2023-09/CbTMGXE99RhXaqV9-vmwarecbcsensor04.png)Web Content Filter Policy
[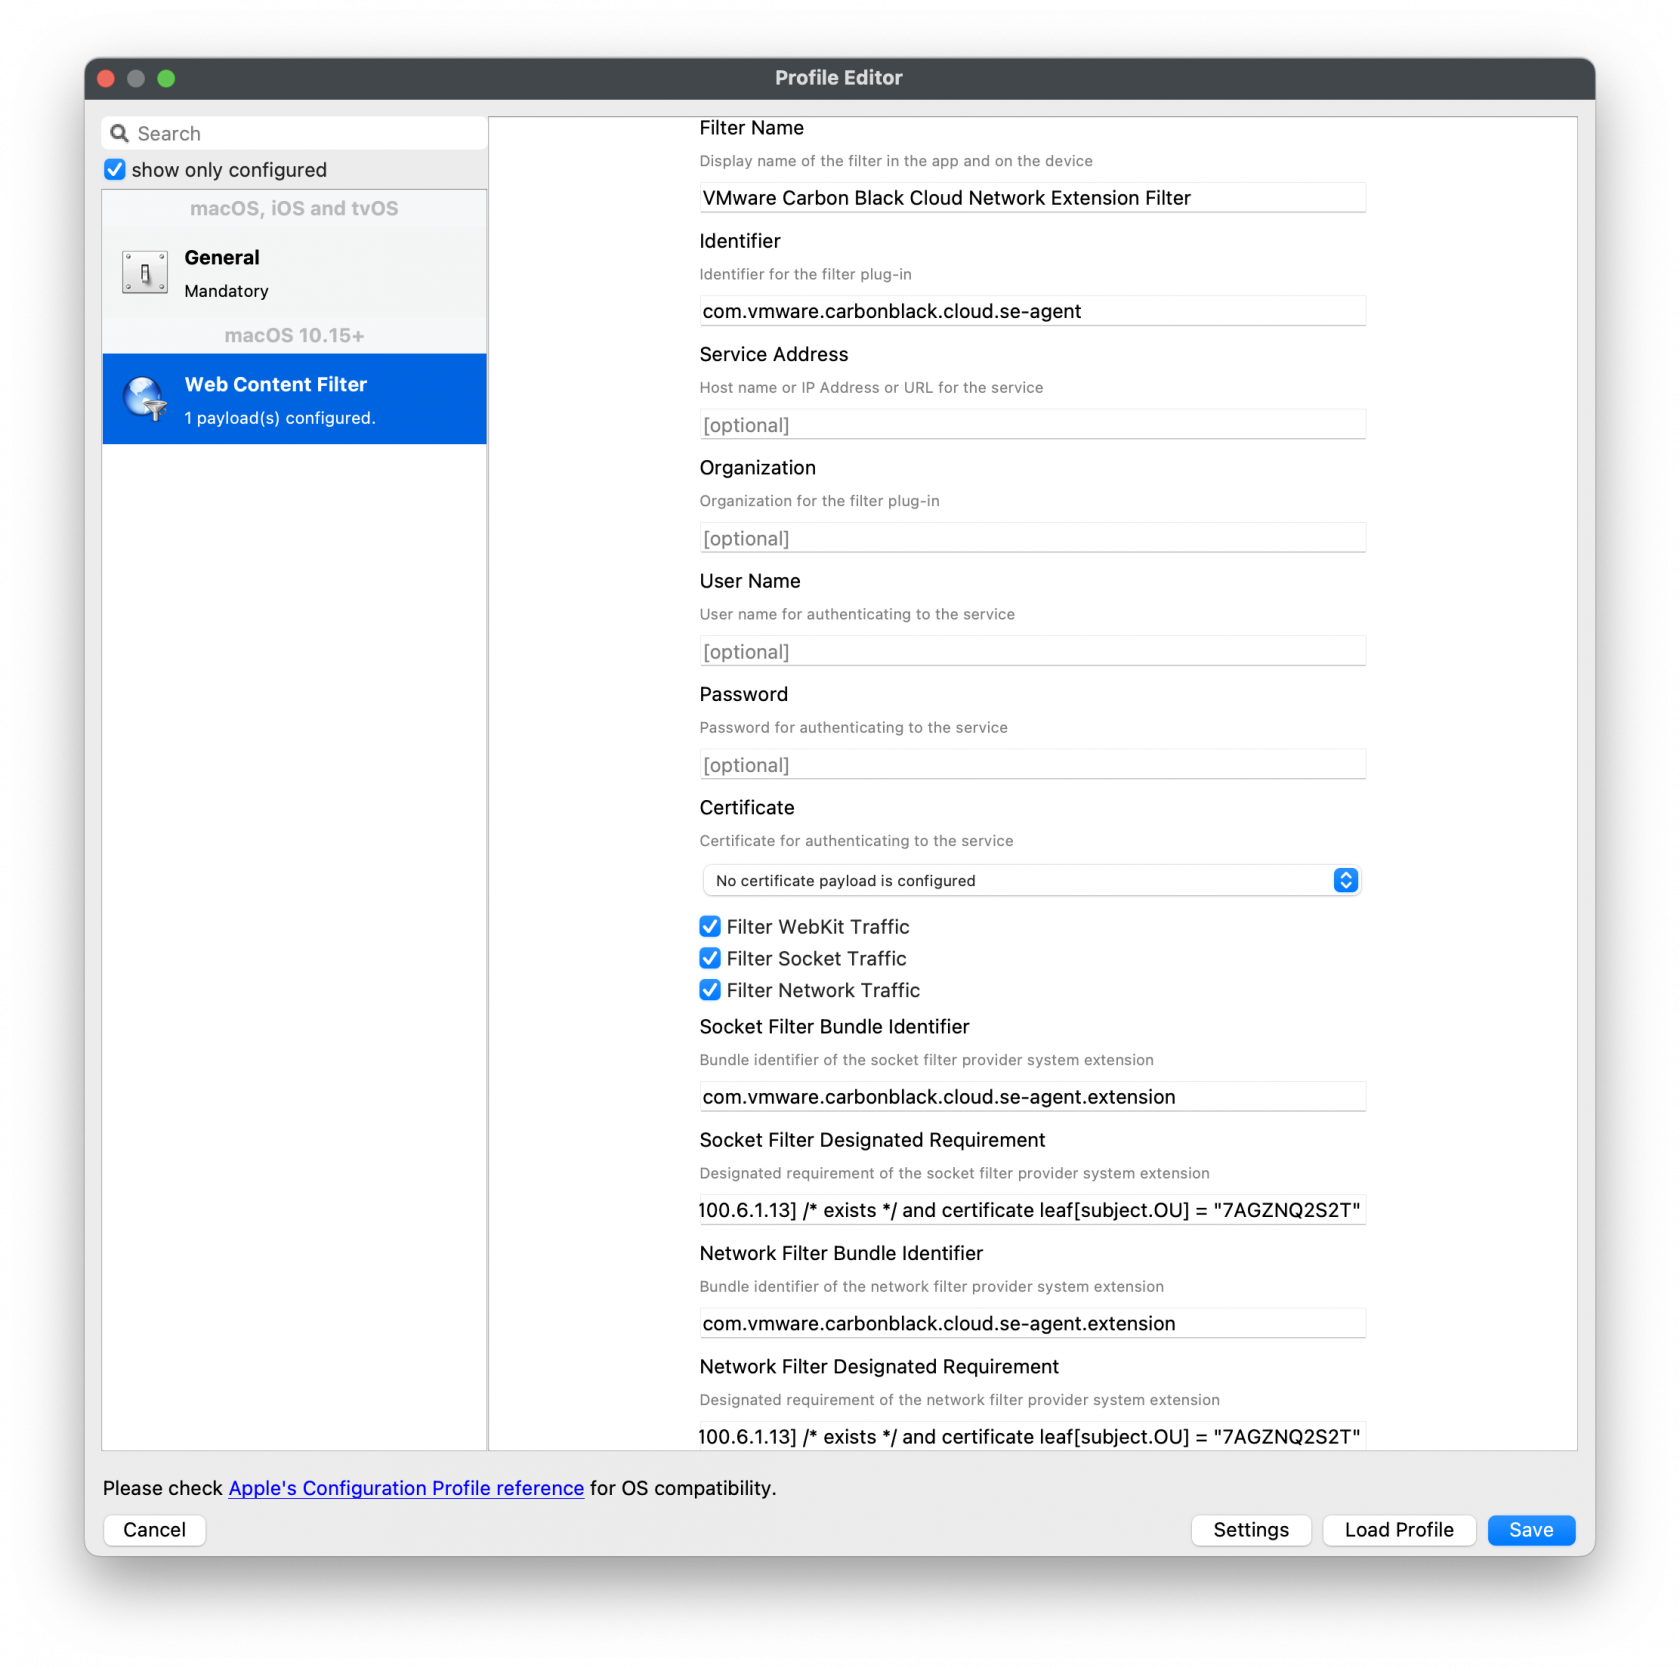](https://kb.filewave.com/uploads/images/gallery/2023-09/MsPb2pokgjeBxEN3-vmwarecbcsensor03.png)**Carbon Black Cloud macOS 3.8+:** Treat System Extension approval as the normal path. Approve the `com.vmware.carbonblack.cloud.se-agent.extension` system extension and the related Network Extension/Web Content Filter before installing the sensor.
#### Approve System Extension For the Allowed System Extension, please enter in the following:System Extension Policy
Specify the Apple Team ID and System Extension bundle Identifier in your Allowed System Extension configuration profile: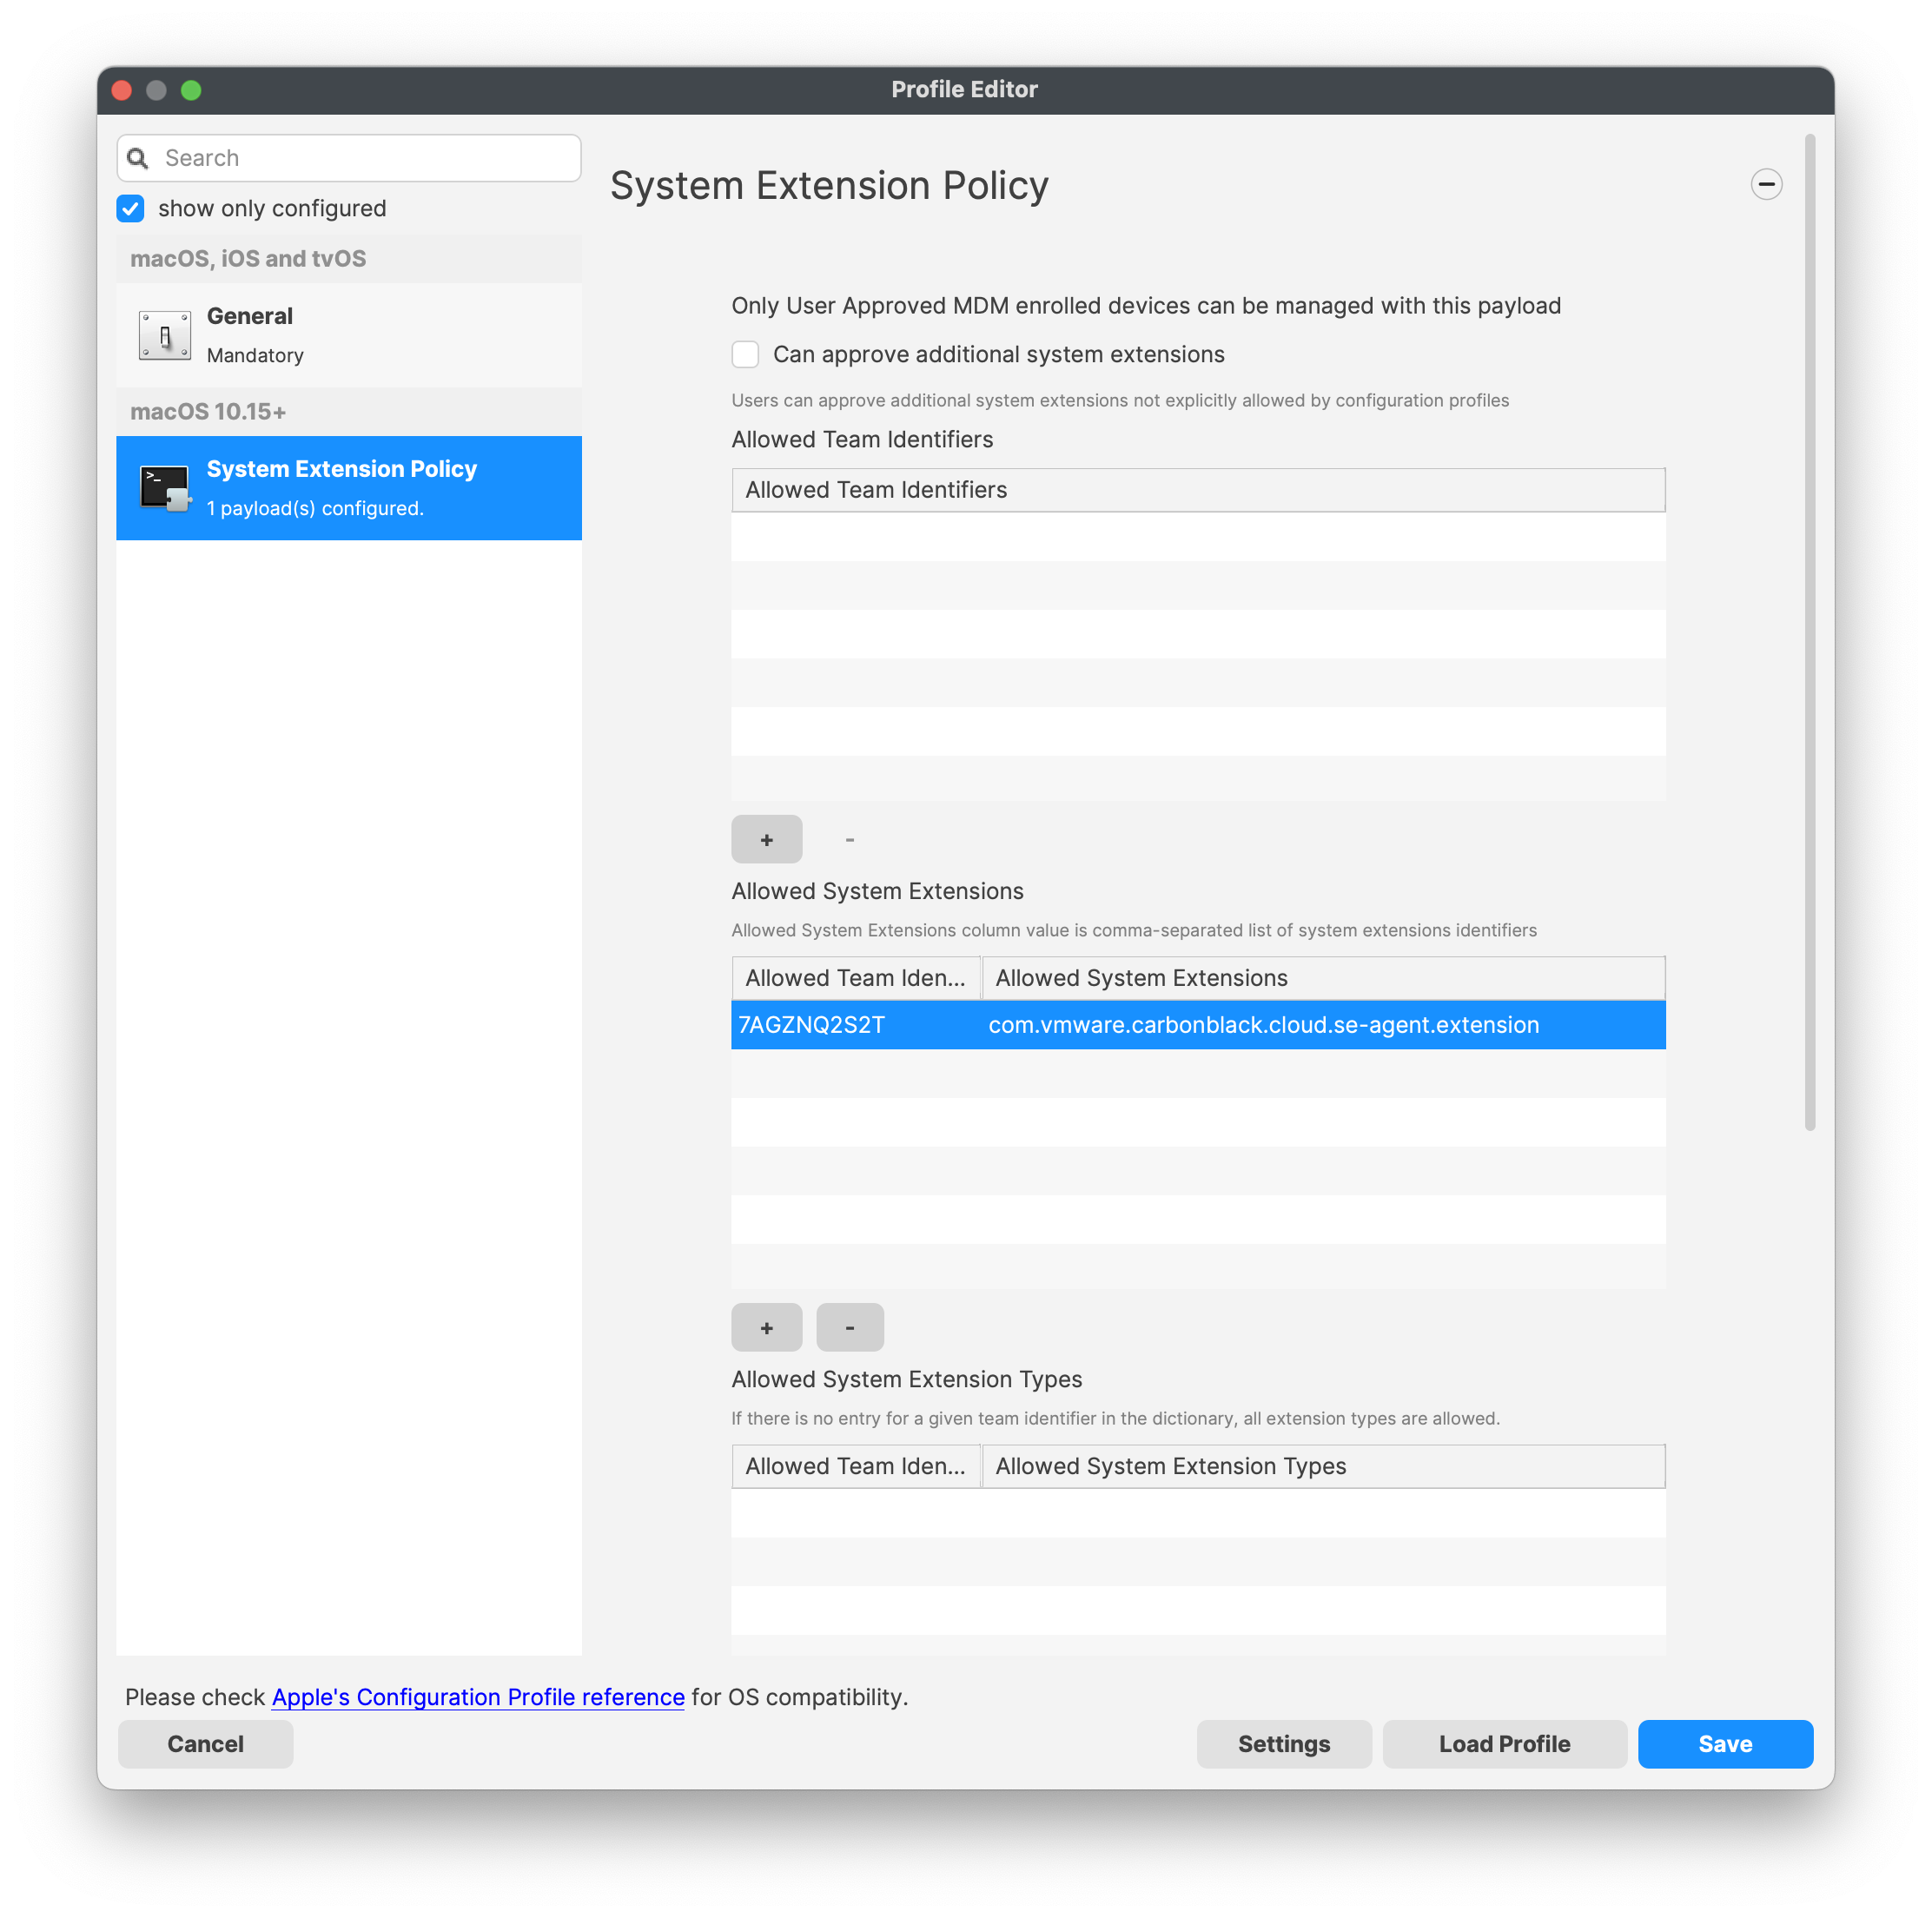 `
`
Do not use the KEXT payload as the default for current 3.8+ macOS sensor deployments. Keep this section only for older sensor packages or environments where Carbon Black/Broadcom documentation explicitly says to deploy in KEXT mode.
For a legacy Kernel Approval profile, enter the TeamID and BundleID: **Apple Team ID: 7AGZNQ2S2T** **KEXT Bundle ID: com.carbonblack.defense.kext**Kernel Extension Policy: The recommended way to deliver this configuration is through the provided [MDM-KEXT-reboot-command.xml](https://kb.filewave.com/attachments/261). FileWave has the Rebuild Kernel Cache command by highlighting the MDM client, right-clicking Restart (Supported MDM devices), checking the box for Rebuild Kernel Cache, and entering in the Kernel file path: */Library/Extensions/CbDefenceSensor.kext*
Kernel Rebuild Cache
[](https://kb.filewave.com/uploads/images/gallery/2023-10/hZHfZ5fioRAIFC1q-rebuildkernelcache.png)TCC metadata
The fields should be completed exactly as follows. Please copy and paste for accuracy. 1\] Identifier: **com.vmware.carbonblack.cloud.daemon** Identifier Type should be set to: Bundle ID Code Requirement: **identifier "com.vmware.carbonblack.cloud.daemon" and anchor apple generic and certificate 1\[field.1.2.840.113635.100.6.2.6\] /\* exists \*/ and certificate leaf\[field.1.2.840.113635.100.6.1.13\] /\* exists \*/ and certificate leaf\[subject.OU\] = "7AGZNQ2S2T"** App or Service should be set to: **SystemPolicyAllFiles** Access should be set to: **Allow** 2\] Identifier: **com.vmware.carbonblack.cloud.se-agent.extension** Identifier Type should be set to: Bundle ID Code Requirement: **identifier "com.vmware.carbonblack.cloud.se-agent.extension" and anchor apple generic and certificate 1\[field.1.2.840.113635.100.6.2.6\] /\* exists \*/ and certificate leaf\[field.1.2.840.113635.100.6.1.13\] /\* exists \*/ and certificate leaf\[subject.OU\] = "7AGZNQ2S2T** App or Service should be set to: **SystemPolicyAllFiles** Access should be set to: **Allow** 3\] Identifier: **com.vmware.carbonblack.cloud.osqueryi** Identifier Type should be set to: Bundle ID Code Requirement: **identifier "com.vmware.carbonblack.cloud.osqueryi" and anchor apple generic and certificate 1\[field.1.2.840.113635.100.6.2.6\] /\* exists \*/ and certificate leaf\[field.1.2.840.113635.100.6.1.13\] /\* exists \*/ and certificate leaf\[subject.OU\] = "7AGZNQ2S2T"** App or Service should be set to: **SystemPolicyAllFiles** Access should be set to: **Allow** 4\] Identifier: **com.vmware.carbonblack.cloud.uninstall** Identifier Type should be set to: Bundle ID Code Requirement: **identifier "com.vmware.carbonblack.cloud.uninstall" and anchor apple generic and certificate 1\[field.1.2.840.113635.100.6.2.6\] /\* exists \*/ and certificate leaf\[field.1.2.840.113635.100.6.1.13\] /\* exists \*/ and certificate leaf\[subject.OU\] = "7AGZNQ2S2T"** App or Service should be set to: **SystemPolicyAllFiles** Access should be set to: **Allow** 5\] Identifier: **com.vmware.carbonblack.cloud.uninstallerui** Identifier Type should be set to: Bundle ID Code Requirement: **identifier "com.vmware.carbonblack.cloud.uninstallerui" and anchor apple generic and certificate 1\[field.1.2.840.113635.100.6.2.6\] /\* exists \*/ and certificate leaf\[field.1.2.840.113635.100.6.1.13\] /\* exists \*/ and certificate leaf\[subject.OU\] = "7AGZNQ2S2T"** App or Service should be set to: **SystemPolicyAllFiles** Access should be set to: **Allow**Web Content Filter Policy
The fields should be completed exactly as follows. Please copy and paste for accuracy. In the General payload: Payload Scope should be set to: **System** In the Web Content Filter payload: Filter Type: **Plug-In** Plug-In Bundle ID: **com.vmware.carbonblack.cloud.se-agent** Check Enable Socket Filtering Filter Data Provider System Extension Bundle ID (macOS): **com.vmware.carbonblack.cloud.se-agent.extension** Filter Data Provider Designated Requirement (macOS): **identifier "com.vmware.carbonblack.cloud.se-agent.extension" and anchor apple generic and certificate 1\[field.1.2.840.113635.100.6.2.6\] /\* exists \*/ and certificate leaf\[field.1.2.840.113635.100.6.1.13\] /\* exists \*/ and certificate leaf\[subject.OU\] = "7AGZNQ2S2T"** Check Enable Packet Filtering (macOS) Filter Packet Provider System Extension Bundle ID (macOS): **com.vmware.carbonblack.cloud.se-agent.extension** Filter Packet Provider Designated Requirement (macOS): **identifier "com.vmware.carbonblack.cloud.se-agent.extension" and anchor apple generic and certificate 1\[field.1.2.840.113635.100.6.2.6\] /\* exists \*/ and certificate leaf\[field.1.2.840.113635.100.6.1.13\] /\* exists \*/ and certificate leaf\[subject.OU\] = "7AGZNQ2S2T"**Verification Settings: VMware CBCloud client will get updates from the CBCloud server. If your organization allows, be sure to change the verification settings from 'Self-Healing' to 'Ignore at Verify' for the Fileset.
[](https://kb.filewave.com/uploads/images/gallery/2023-10/q5CbcuI0c0v0jAEx-vmwarecbcloudfileset.png) ### VMware CBCloud install script You will need to modify and add your company code to the install\_VMware\_CBCloud.sh script. 1. Highlight the Fileset and click on Scripts (FW Central menu) 2. Highlight Activation Scripts, install\_VMware\_CBCloud.sh 3. Click on Edit to open the script 4. Enter your company code, i.e. ####### 5. Click OK to save 6. Click OK to save your changes| [](https://kb.filewave.com/uploads/images/gallery/2023-10/BeZriTCt64iWlZku-vmwarecompanycode01.png) | [](https://kb.filewave.com/uploads/images/gallery/2023-10/Nc7unhGpw8Mc8pT0-vmwarecompanycode02.png) |
| [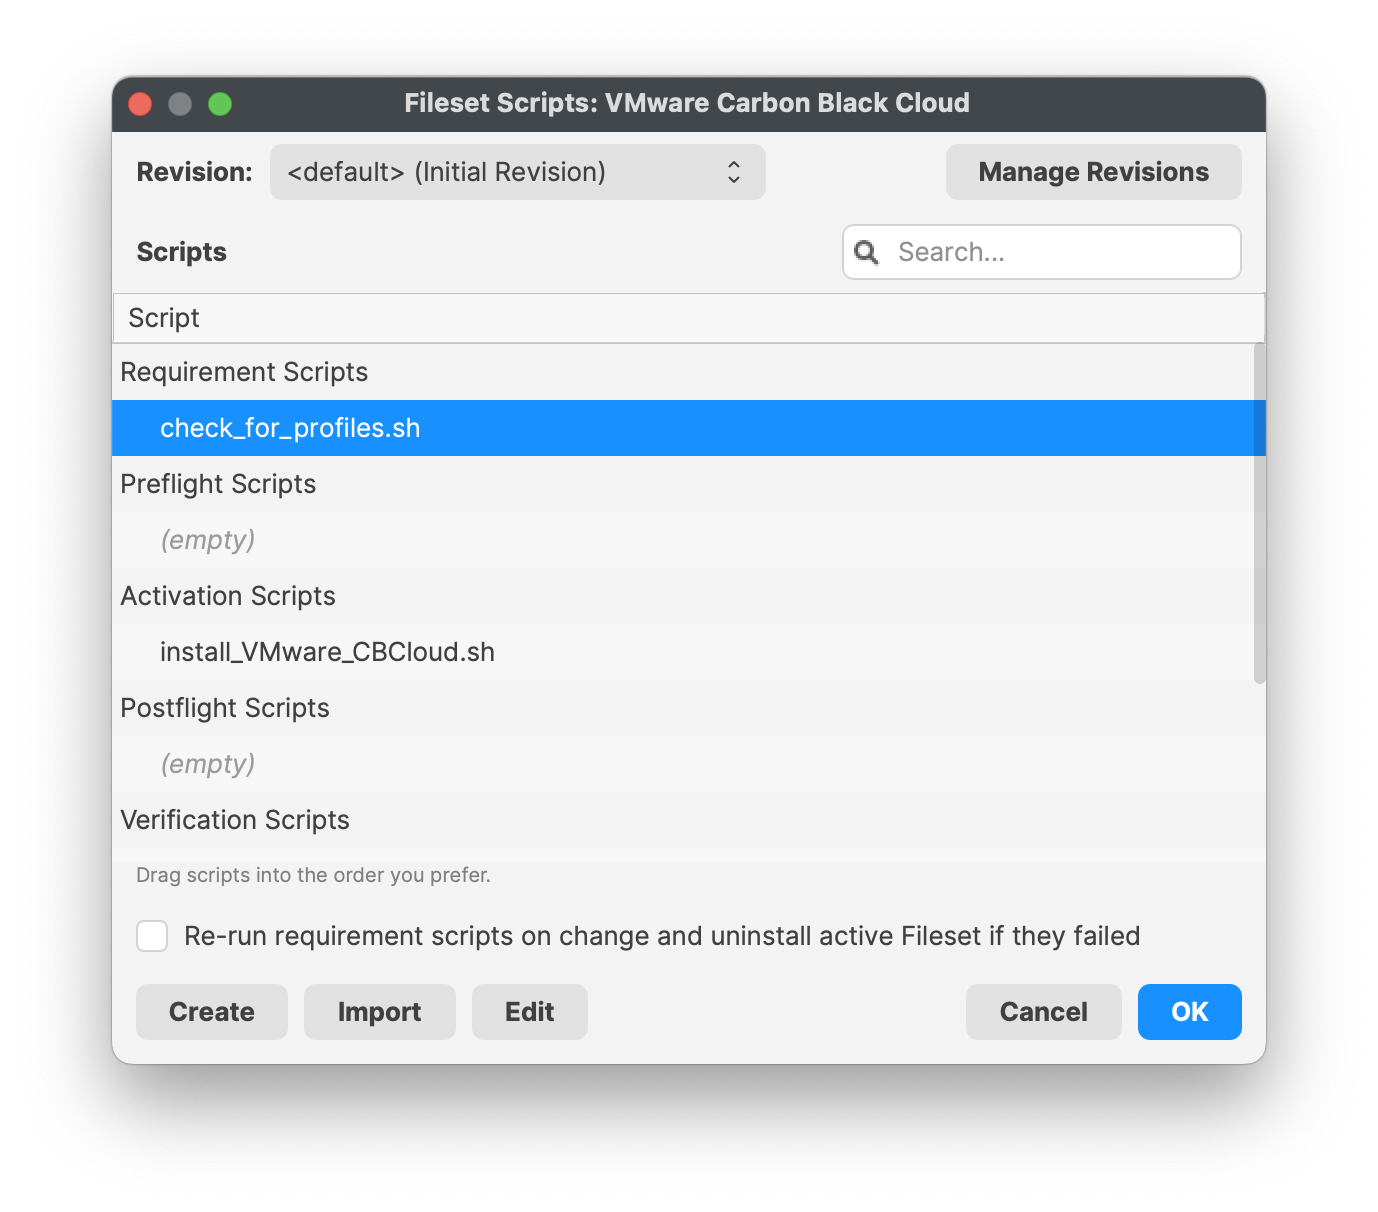](https://kb.filewave.com/uploads/images/gallery/2023-10/aW4OOQBm0fd8htAz-requirementscript.png) | [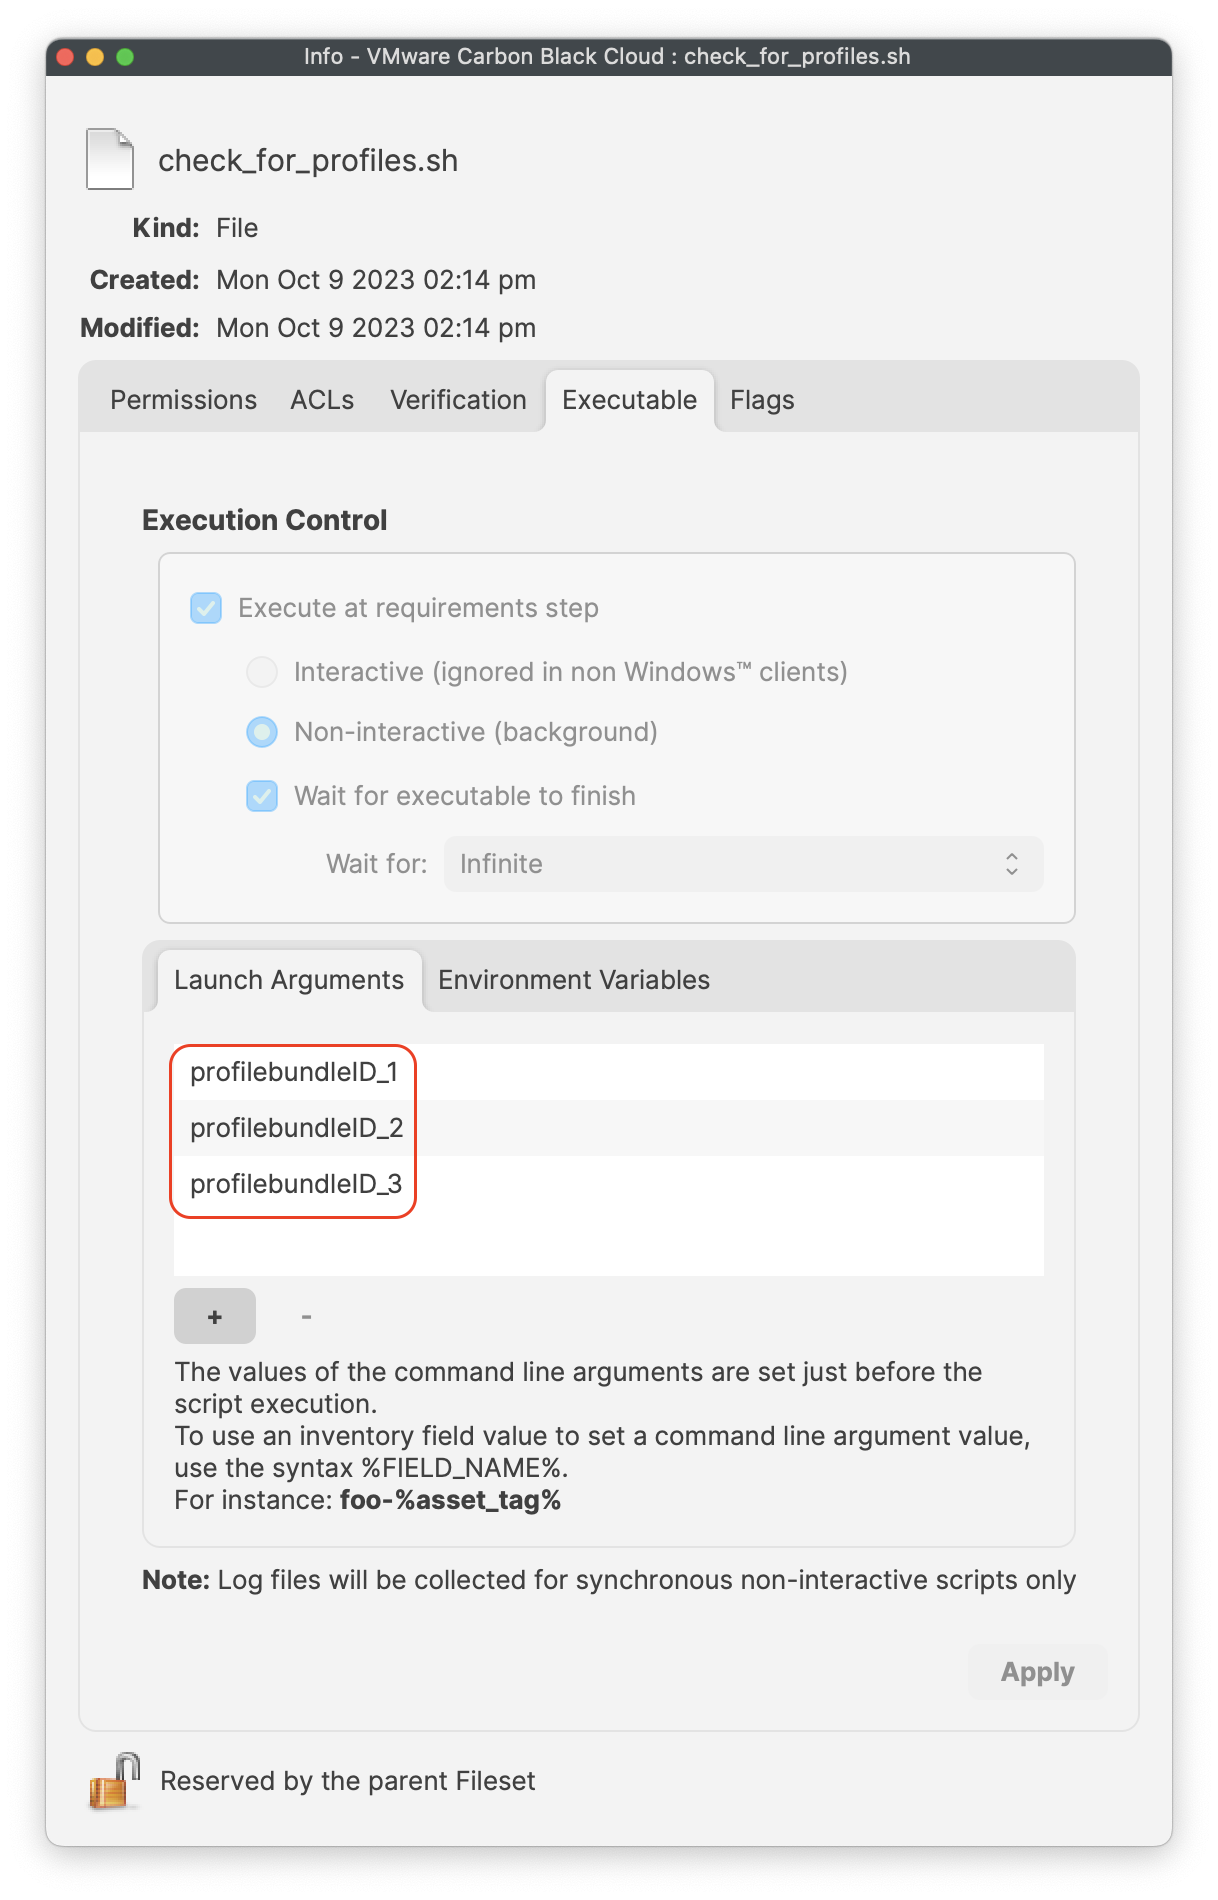](https://kb.filewave.com/uploads/images/gallery/2023-10/FPF8uCSrEqJh1GYc-launcharugments.png) | [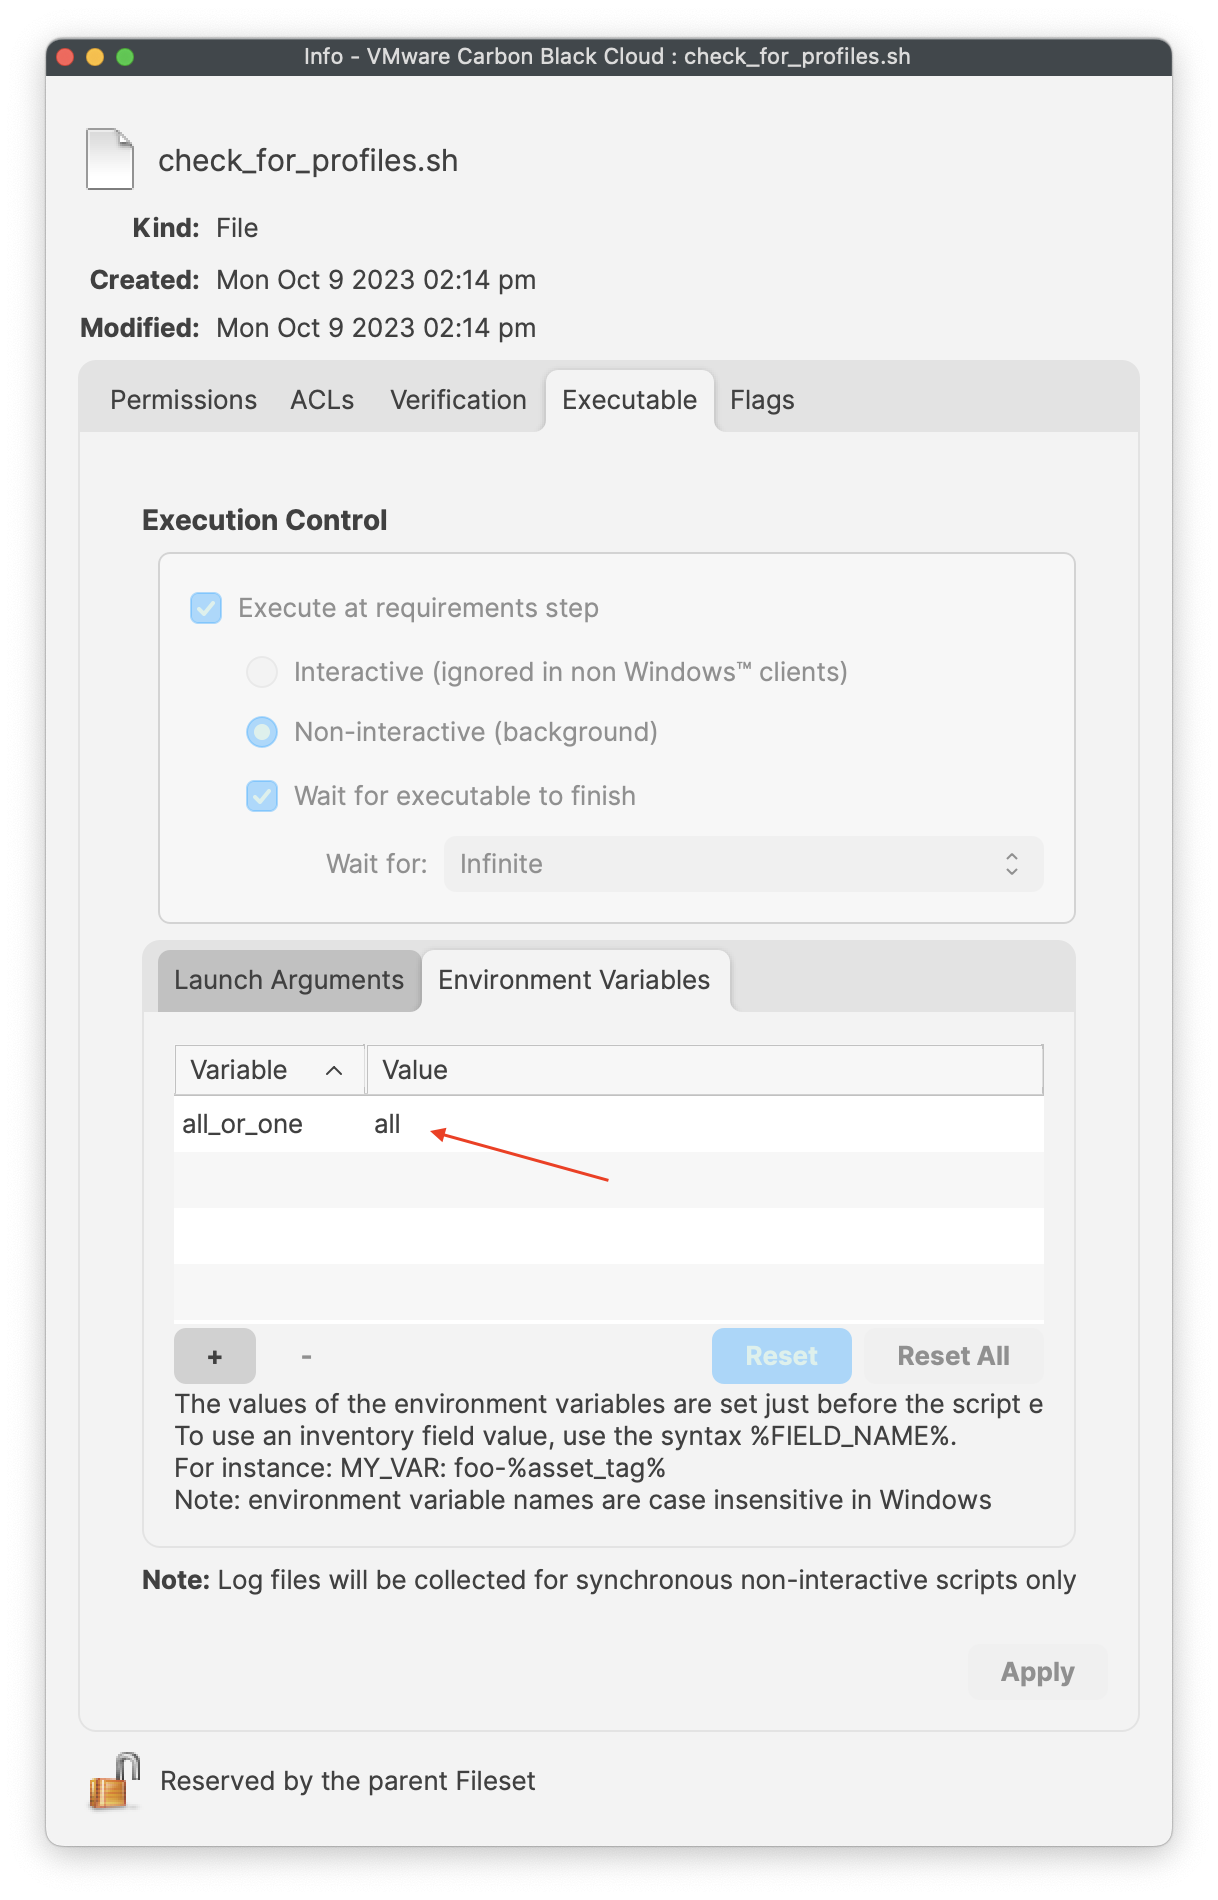](https://kb.filewave.com/uploads/images/gallery/2023-10/PIliyt0wE87MKISJ-environmentvariables.png) |
This is optional and not required!
If you have a company code to allow uninstallation of the VMware Carbon sensor, you may enter your code into the script under: - Line 12 **<CompanyCodeHere>**; replace with your code and remove the <>uninstall\_Vmware\_CBCloud.sh
``` #!/bin/bash #Logging uninstallation exec 1>>/var/log/fwcld.log exec 2>>/var/log/fwcld.log #Uninstalling VMware CBCloud sensor # There are two command line options: # -c If specified by the policy active on the endpoint, this option and uninstall code will be required.
# -y Skips the interactive prompt to confirm that uninstallation is desired. Recommended for unattended uninstall.
/Applications/VMware\ Carbon\ Black\ Cloud/uninstall.bundle/Contents/MacOS/uninstall -c -y
exit 0
```
| [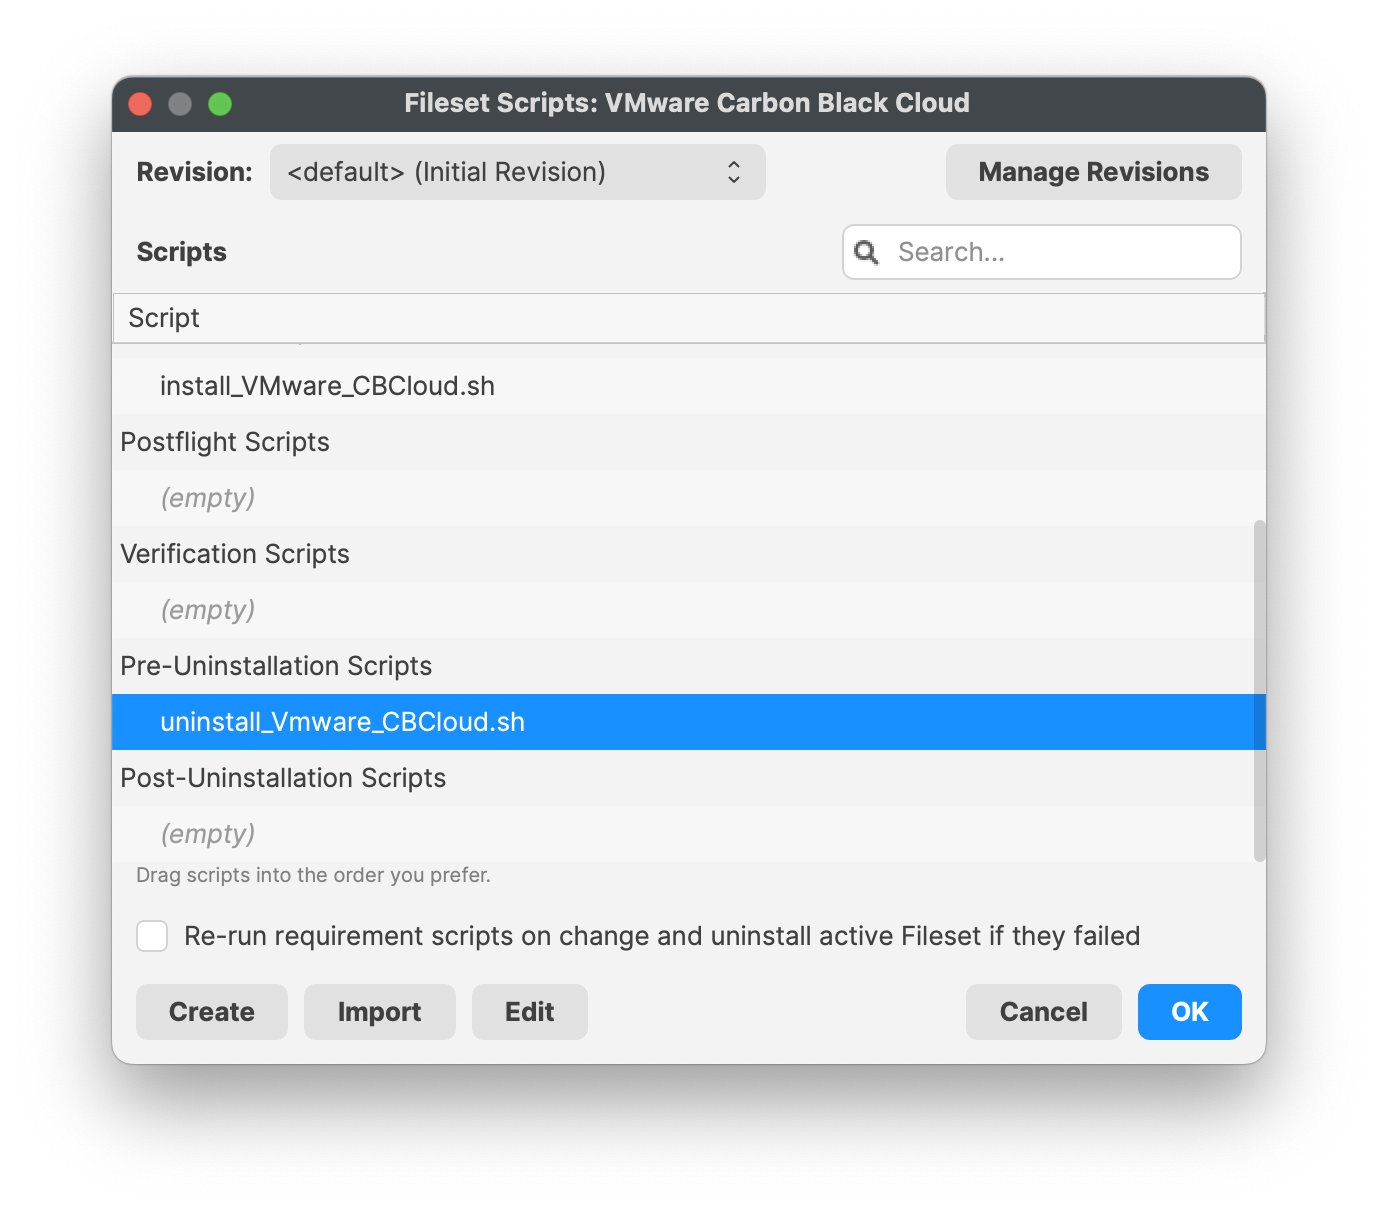](https://kb.filewave.com/uploads/images/gallery/2023-10/eBdJZDqYR4ybZUqN-uninstallscript.png) | [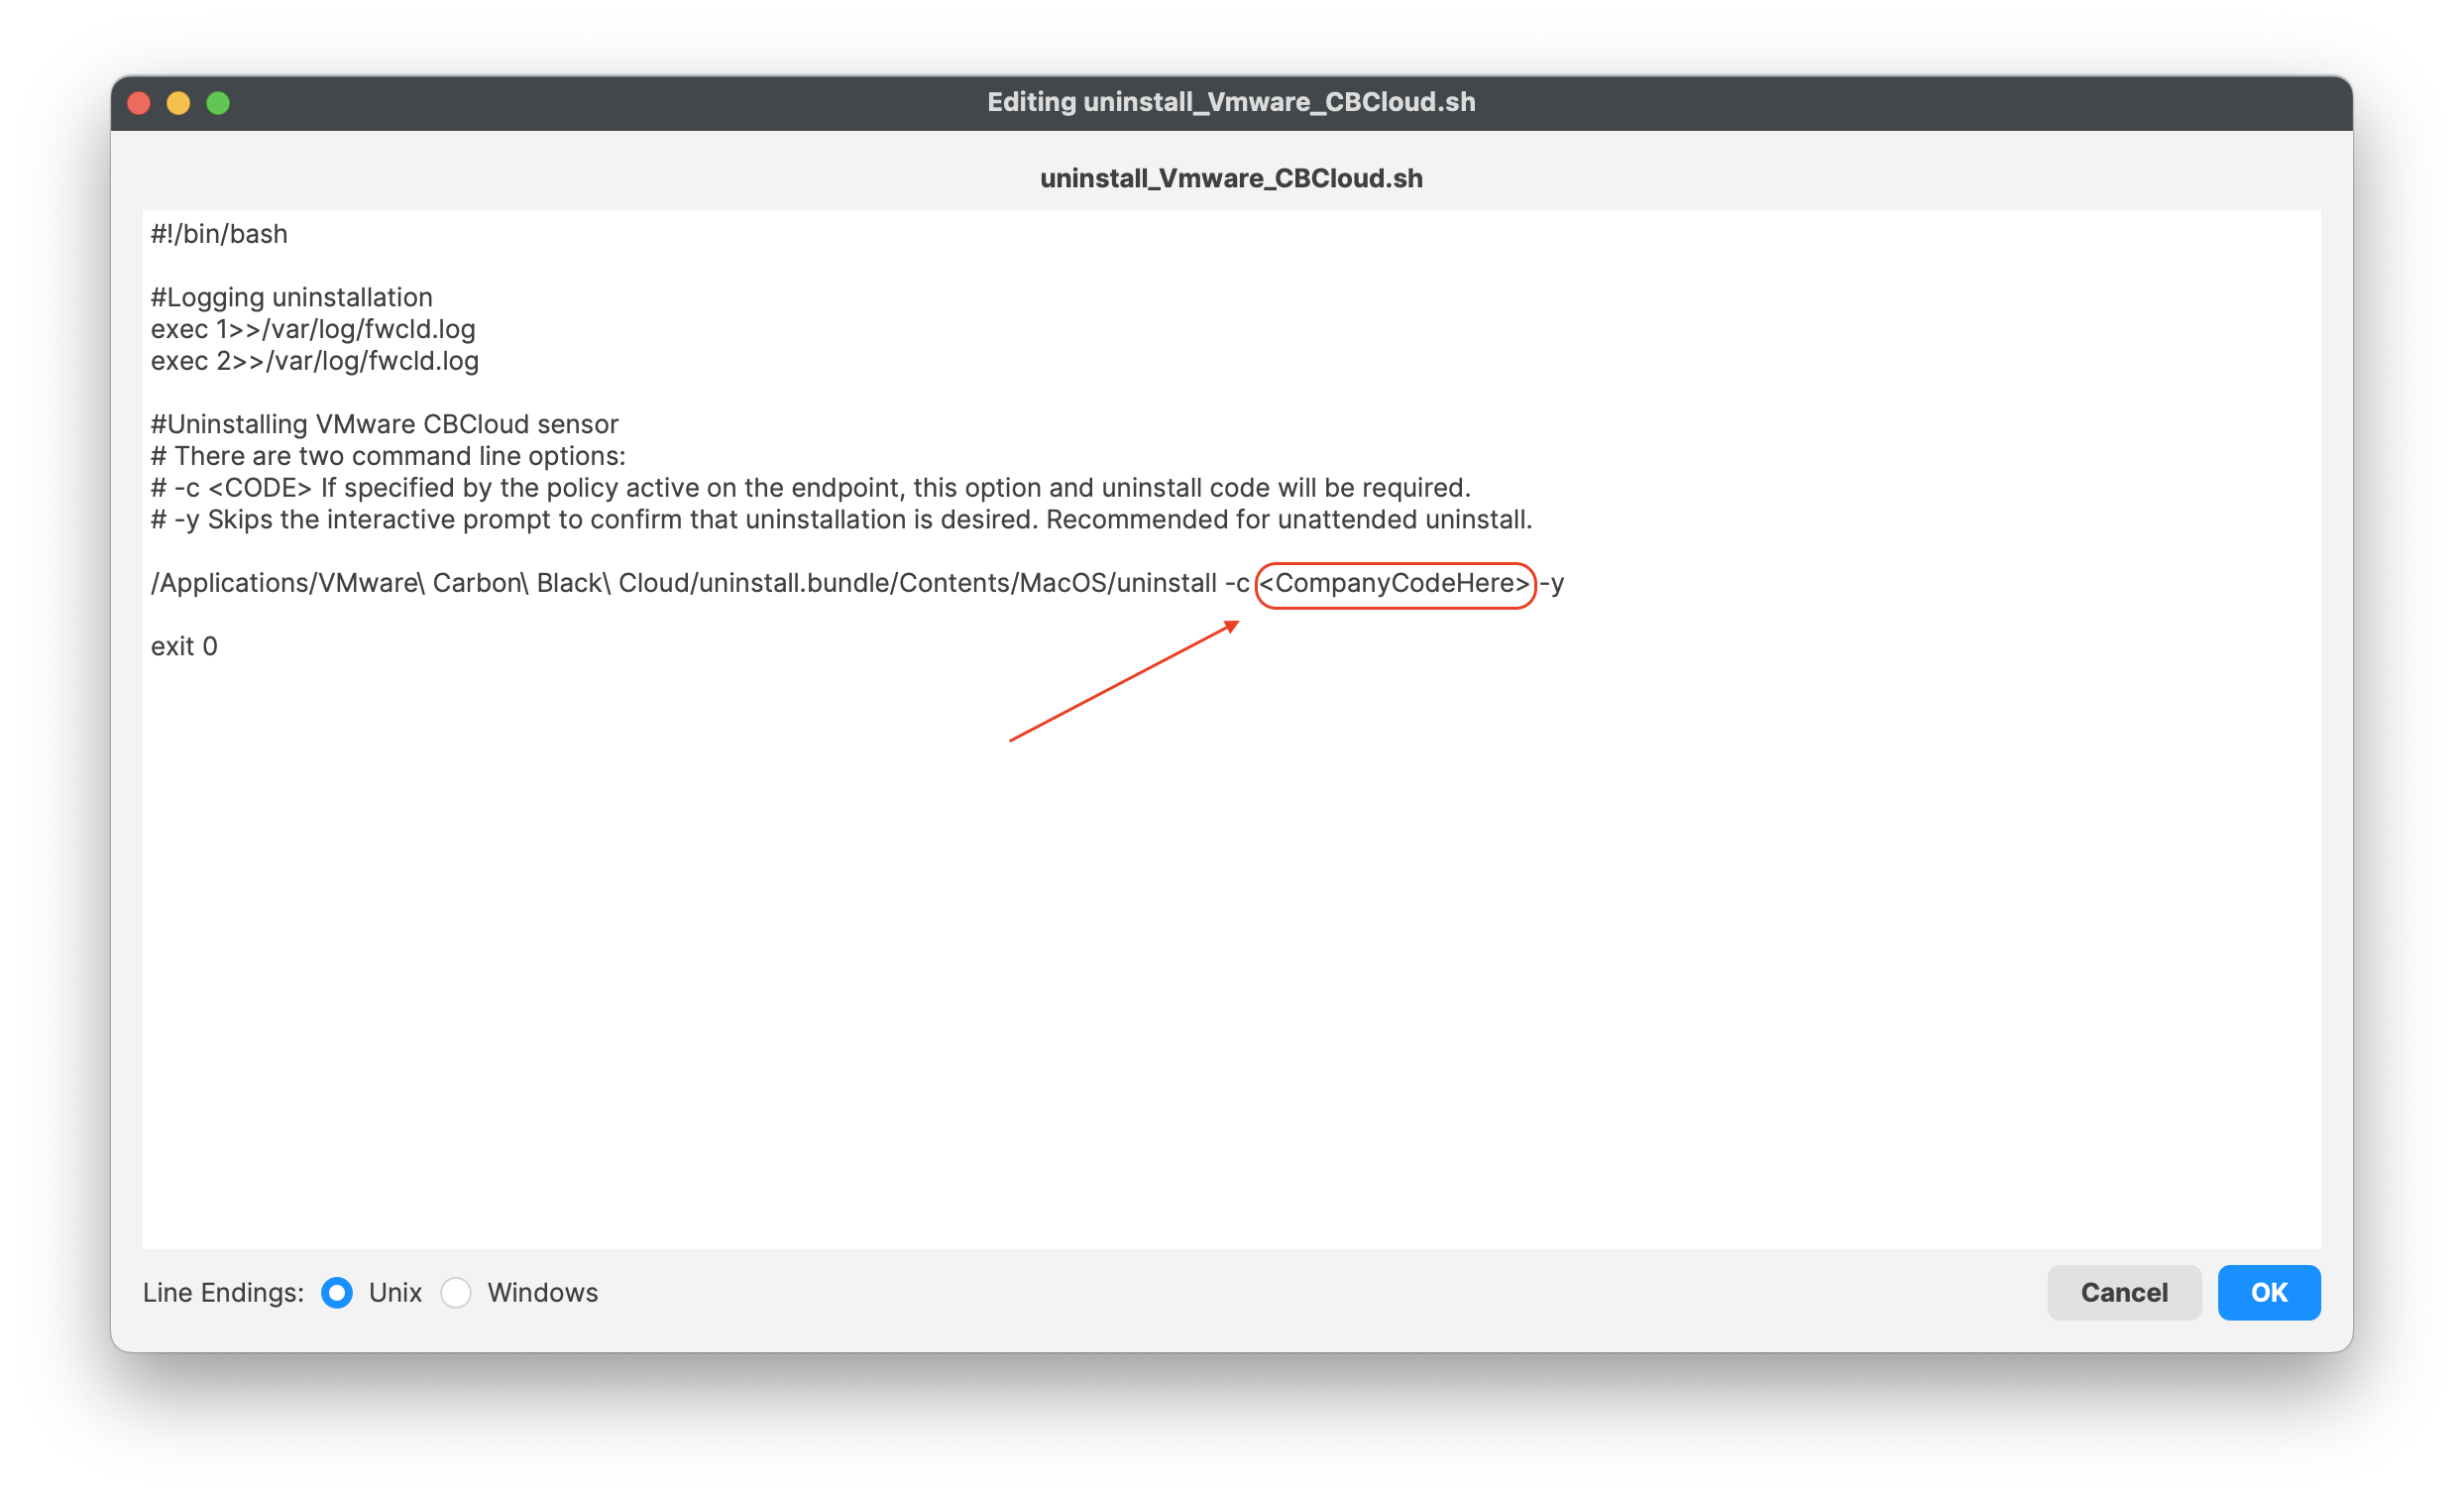](https://kb.filewave.com/uploads/images/gallery/2023-10/C3iHoyW3Pp78Ihek-uninstallscript02.png) |
Profiles should be installed first. The VMware Carbon Black Cloud Fileset has a requirement script to ensure profiles are installed, before commencing with download and activation of the Fileset.
[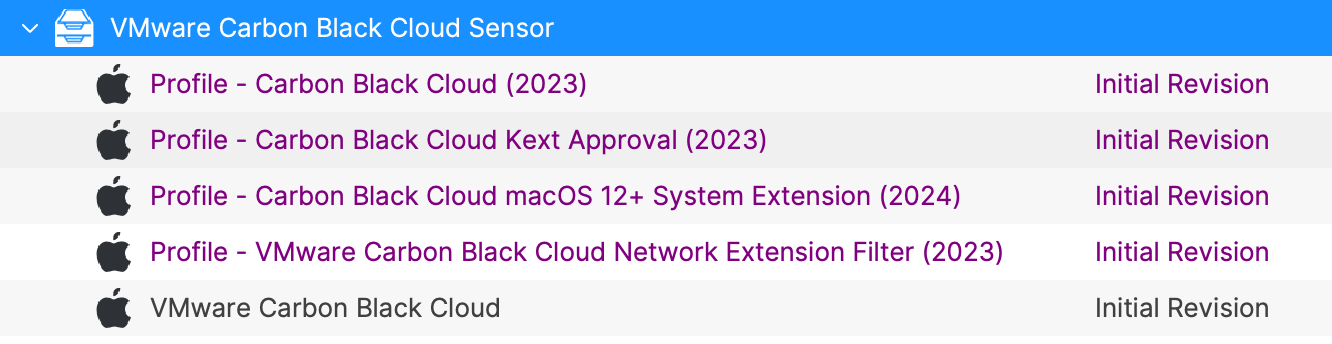](https://kb.filewave.com/uploads/images/gallery/2024-03/rsEOGRlovWPLJ4SI-vmware-ccb-fs-group.png) Remember to always test Fileset to a few devices before mass deployment. ## Related Content - [VMware Carbon Black Cloud release notes](https://docs.vmware.com/en/VMware-Carbon-Black-Cloud/3.7.4.53/rn/vmware-carbon-black-cloud-macos-sensor-37453-release-notes/index.html) # Wacom Tablet Deployment (macOS Fileset Magic) ## Description Installing the Wacom intuos driversLast tested with **WacomTablet 6.3.30**
## Ingredients - FW Central - Latest Wacom intuos Installer - [https://www.wacom.com/en/products/intuos](https://www.wacom.com/en/products/intuos) ### Directions 1. Do a Fileset Magic capture - In /priviate/var/ the only thing you need is the db/receipts folder 2. Select the fileset and add a script attribute - Create a post-flight script **macOS**```bash #!/bin/bash launchctl load /Library/LaunchAgents/com.wacom.wacomtablet.plist launchctl start com.wacom.wacomtablet launchctl load /Library/LaunchAgents/com.wacom.DataStoreMgr.plist launchctl start com.wacom.DataStoreMgr ``` 3. Save the fileset and deployIf 10.13 or greater you will also need to send a profile to allow the kernel extension: [User Approved MDM Enrollment (macOS)](https://kb.filewave.com/books/filewave-client/page/user-approved-mdm-enrollment-macos "User Approved MDM Enrollment (macOS)")
# XCreds - Log in to your Mac with your Cloud Password (macOS PKG) ## DescriptionThis article will give you as much detail as possible to help you get started, but this is incredibly easy software to deploy and configure and we'll show you how below.
Xcreds replaces the loginwindow and allows the connection with a directory providers that supports OIDC. Not all directory providers, however, support Apple's Platform SSO. At the time of writing, only Entra and Okta support Apple's Platform SSO.
## Ingredients - FW Admin - Example Fileset - [PKG - XCreds.fileset.zip](https://kb.filewave.com/attachments/474) - Configuration files - [Configuration + License](#bkmrk-software---download-) ## Directions XCreds has two components: - XCreds app -- runs in user space - XCreds Login Window -- security agent which runs when the user is logging in to macOS Example Login Window: [](https://kb.filewave.com/uploads/images/gallery/2023-07/MJPAjQvRJE8CqM8w-image.png) Both the security agent and the app share keychain items in the user’s keychain to keep track of the current local password and the tokens from the cloud provider. Both items prompt the user with a web view to authenticate to their cloud provider, verify login was successful and then update both the local password and user keychain passwords as needed. ### Features| - Login Window log in to OIDC provider - Support for Azure, Google Cloud, Okta and any OIDC provider - Initial account provisioning - WiFi Login Window configuration - Restart and shutdown from Login Window - Profile manifest available for easy configuration - Local password update with IdP password - Prompt for IdP password when changed - Login Keychain password updating - Customizable preferences - Easy deployment - Uses OpenID Connect | - Attractive and pleasing menu icon - Easy configuration with profile / MDM - [Profile Manifest](https://github.com/ProfileCreator/ProfileManifests) for [Profile Creator](https://github.com/ProfileCreator/ProfileCreator) Support - Two-Factor and Multi-Factor support - New username and password window - Able to create a user as an admin using group member preference - Kerberos ticket - Switch to login window at screensaver - Reset keychain - Most preferences are now able to be overridden - Added shake to the password field |
| IdP | Microsoft Entra (Azure) | Okta | |
| Vendor Specific Instructions | [Microsoft Setup](https://twocanoes.com/knowledge-base/xcreds-setup-with-azure-oidc/) | [Okta Setup](https://twocanoes.com/knowledge-base/xcreds-setup-with-okta/) | [Google Setup](https://twocanoes.com/knowledge-base/xcreds-setup-with-google-oidc/) |
| Example Plist | [Microsoft Plist](https://twocanoes-app-resources.s3.amazonaws.com/xcreds/xcreds_example_azure.mobileconfig) | [Okta Plist](https://twocanoes-app-resources.s3.amazonaws.com/xcreds/okta/XCredsOktaTest.mobileconfig) | [Google Setup](https://twocanoes-app-resources.s3.amazonaws.com/xcreds/xcreds_example_google.mobileconfig) |
If the second option is actioned, the provided uninstaller will not be included, but could be added, based upon the details shown below in the uninstaller section.
##### IdP Configuration Follow the related IdP twocanoes documentation to configure the IdP App. Details from this App will be required in the next step. ##### Profile Creation Download ProfileCreator App and the twocanoes manifest from the Profile Creator page: - [ProfileCreator App Releases Page](https://github.com/ProfileCreator/ProfileCreator/releases) - [twocanoes Profile Manifest](https://github.com/ProfileCreator/ProfileManifests/blob/master/Manifests/ManagedPreferencesApplications/com.twocanoes.xcreds.plist) On the computer running Profile Creator, add the manifest to the following user location: ``` ~/Library/Application\ Support/ProfilePayloads/Manifests/ManagedPreferencesApplications/com.twocanoes.xcreds.plist ``` Run Profile Creator and add any items required from the chosen IdP settings, for example: Client ID, DiscoveryURL, etc. and save. [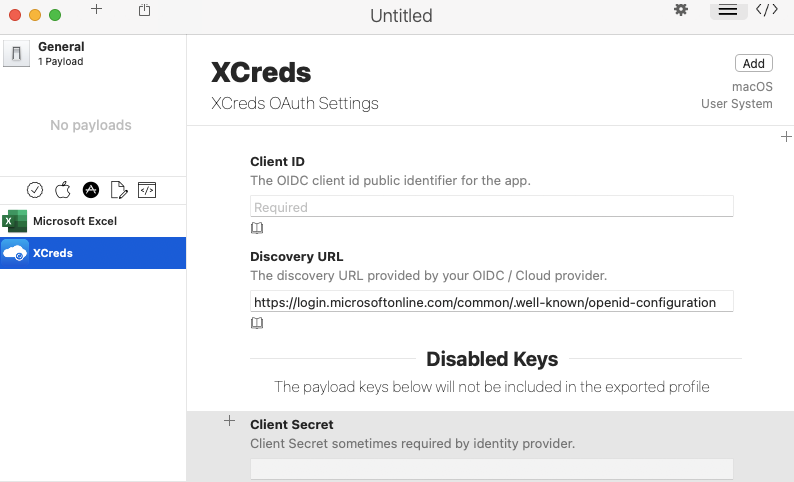](https://kb.filewave.com/uploads/images/gallery/2023-07/wy8603IOWVVXmmYr-image.png)For Microsoft DiscoveryURL, edit the plist, replacing 'common' with the Directory (Tenant) ID if available. For example: discoveryURL = https://login.microsoftonline.com/5c3864d2-38e9-5555-8888-621b9d17fd46/.well-known/openid-configuration
This Profile may now be used to create a Profile Fileset. Do so, by dragging this mobileconfig file to the same XCreds Fileset Group where the XCreds PKG Fileset resides. For example: [](https://kb.filewave.com/uploads/images/gallery/2023-07/uzlukxsVdfSGg5PF-image.png)The contents of the XCreds payload are beyond the scope of the FileWave interface. Once imported to FileWave, the Payload may not be edited directly within FileWave. Any attempt to view the Payload will fail to show the XCreds portion of the Payload; ensure to Cancel and not save if opened. For the same reason, it is not possible to duplicate this Fileset either. Any editing should be handled within Profile Creator and the Payload re-uploaded to FileWave.
##### Testing The Fileset Group may now be associated with one or more test devices, as seen fit. Use the above details for the licence file during testing. Once tested and all is good, the scope of association may be increased and once purchased, the licence details should be pushed as another Profile. This may also be added to the same XCreds Fileset Group