# CrowdStrike Falcon Protection (macOS)

## Description

Needing to deploy to CrowdStrike Falcon antivirus to your macOS fleet? FileWave has you covered.

CrowdStrike's flagship product is called Falcon, which is a cloud-native platform that combines next-generation antivirus, endpoint detection and response (EDR), threat intelligence, and proactive threat hunting. Falcon aims to provide real-time visibility into endpoint activity, rapid threat detection, and automated response to security incidents.

## Ingredients

- FileWave Admin Central
- CrowdStrike Falcon Profiles 
    - One for macOS Sonoma and later
    - One for macOS Sequoia and later
- CrowdStrike PKG installer
- CrowdStrike License code

## Directions

### Deploying the CrowdStrike Falcon to your devices

CrowdStrike deployment on macOS requires three filesets: two TCC profiles and the PKG installer. The required TCC profiles depend on the macOS version in your environment. Screenshot examples are included in this article as a reference if you choose to create the profiles manually.

The PKG installer should also include two scripts that apply your CrowdStrike Falcon license and verify that the appropriate TCC profile is installed before the CrowdStrike application is deployed.

## Download TCC profile

<p class="callout warning">**Note:** Please log in to your CrowdStrike portal and download the latest TCC profiles. The screenshots below are provided for reference if you choose to create the TCC profiles manually.</p>

Falcon Configuration Profile for Sonoma and earlier:

<details id="bkmrk-intel-based-tcc-prof"><summary>Sonoma and later TCC Profile</summary>

<table border="1" style="border-collapse: collapse; width: 100%;"><colgroup><col style="width: 50%;"></col><col style="width: 50%;"></col></colgroup><tbody><tr><td>**Security &amp; Privacy Payload:**

- Bundle ID: 
    - com.crowdstrike.falcon.Agent
    - com.crowdstrike.falcon.App
- Code requirement: 
    - identifier "com.crowdstrike.falcon.Agent" and anchor apple generic and certificate 1\[field.1.2.840.113635.100.6.2.6\] /\* exists \*/ and certificate leaf\[field.1.2.840.113635.100.6.1.13\] /\* exists \*/ and certificate leaf\[subject.OU\] = X9E956P446
- Access to service: 
    - Full Disk Access

</td><td>[![Falcon Configuration Profile for Sonoma and earlier0.png](https://kb.filewave.com/uploads/images/gallery/2026-01/scaled-1680-/VeAguvwWKb3N5EDD-falcon-configuration-profile-for-sonoma-and-earlier0.png)
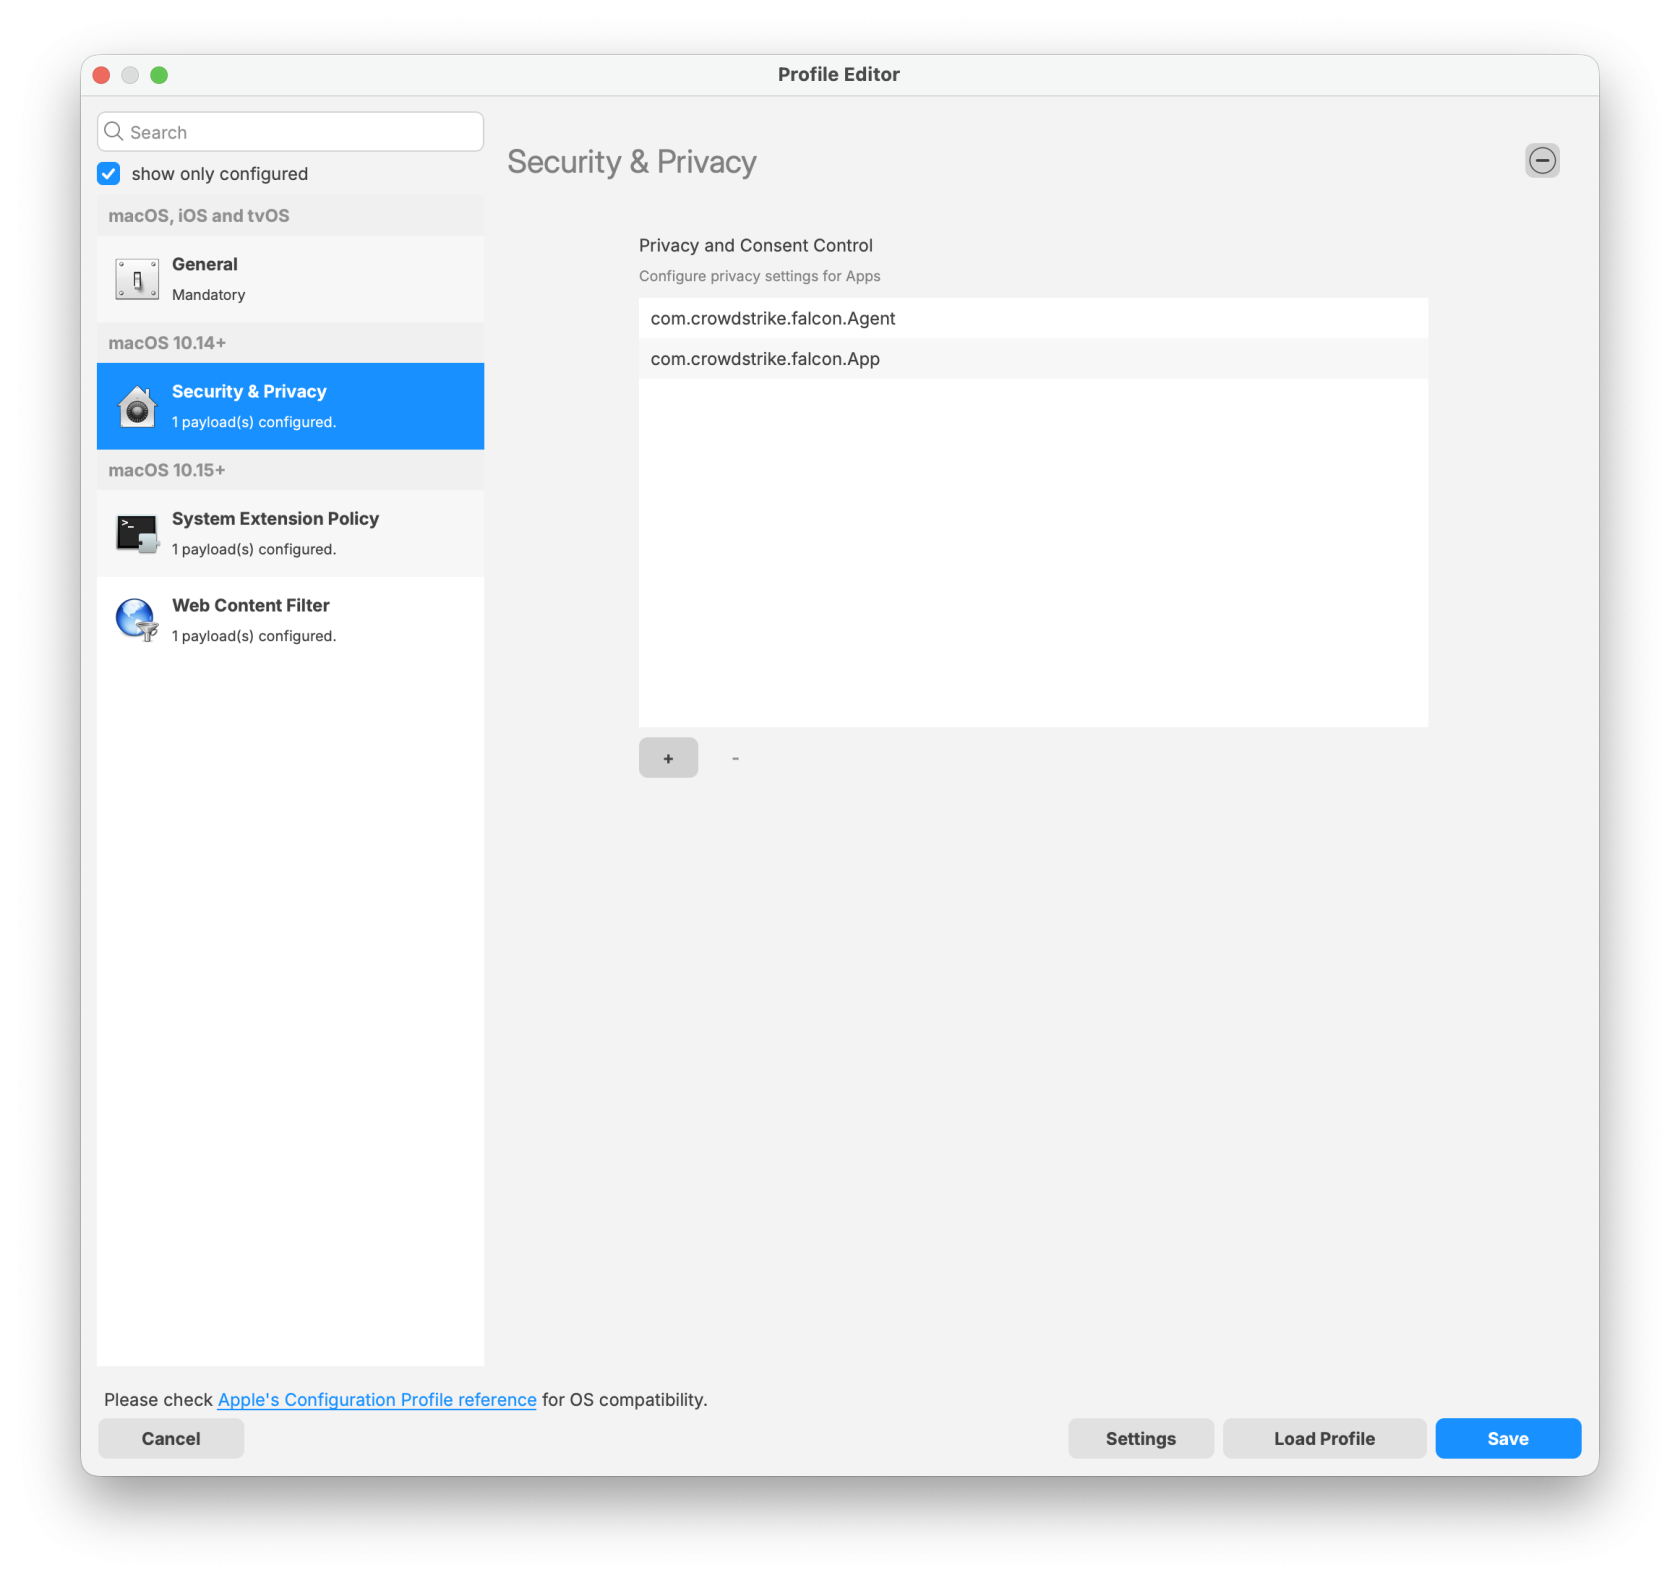
](https://kb.filewave.com/uploads/images/gallery/2026-01/VeAguvwWKb3N5EDD-falcon-configuration-profile-for-sonoma-and-earlier0.png)</td></tr><tr><td>- Agent configuration

</td><td>[![Agent.png](https://kb.filewave.com/uploads/images/gallery/2026-01/scaled-1680-/xira0rGVgXkX4fu3-agent.png)](https://kb.filewave.com/uploads/images/gallery/2026-01/xira0rGVgXkX4fu3-agent.png)</td></tr><tr><td>- App configuration

</td><td>[![App.png](https://kb.filewave.com/uploads/images/gallery/2026-01/scaled-1680-/CsEm4mpYjMi28rCq-app.png)](https://kb.filewave.com/uploads/images/gallery/2026-01/CsEm4mpYjMi28rCq-app.png)</td></tr><tr><td>**System Extension Policy Payload:**

- Check box 'Can approve additional system extensions'
- Allowed Team Identifiers: 
    - X9E956P446
- Allowed System Extensions 
    - com.crowdstrike.falcon.Agent
- Allowed System Extension Types: 
    - Network
    - Endpoint security

</td><td>[![Falcon Configuration Profile for Sonoma and earlier1.png](https://kb.filewave.com/uploads/images/gallery/2026-01/scaled-1680-/svMgQ95jWKmAiTGm-falcon-configuration-profile-for-sonoma-and-earlier1.png)](https://kb.filewave.com/uploads/images/gallery/2026-01/svMgQ95jWKmAiTGm-falcon-configuration-profile-for-sonoma-and-earlier1.png)</td></tr><tr><td>**Web Content Filter Payload:**

- Name: Falcon
- Identifier: com.crowdstrike.falcon.App
- Filter Network Traffic
- Socket Filter Bundle Identifier: 
    - com.crowdstrike.falcon.Agent
- Socket Filter Designated Requirement:
    
    
    - identifier "com.crowdstrike.falcon.Agent" and anchor apple generic and certificate 1\[field.1.2.840.113635.100.6.2.6\] and certificate leaf\[field.1.2.840.113635.100.6.1.13\] and certificate leaf\[subject.OU\] = "X9E956P446"

</td><td>[![Falcon Configuration Profile for Sonoma and earlier2.png](https://kb.filewave.com/uploads/images/gallery/2026-01/scaled-1680-/plA53wMwJbY0UA1x-falcon-configuration-profile-for-sonoma-and-earlier2.png)
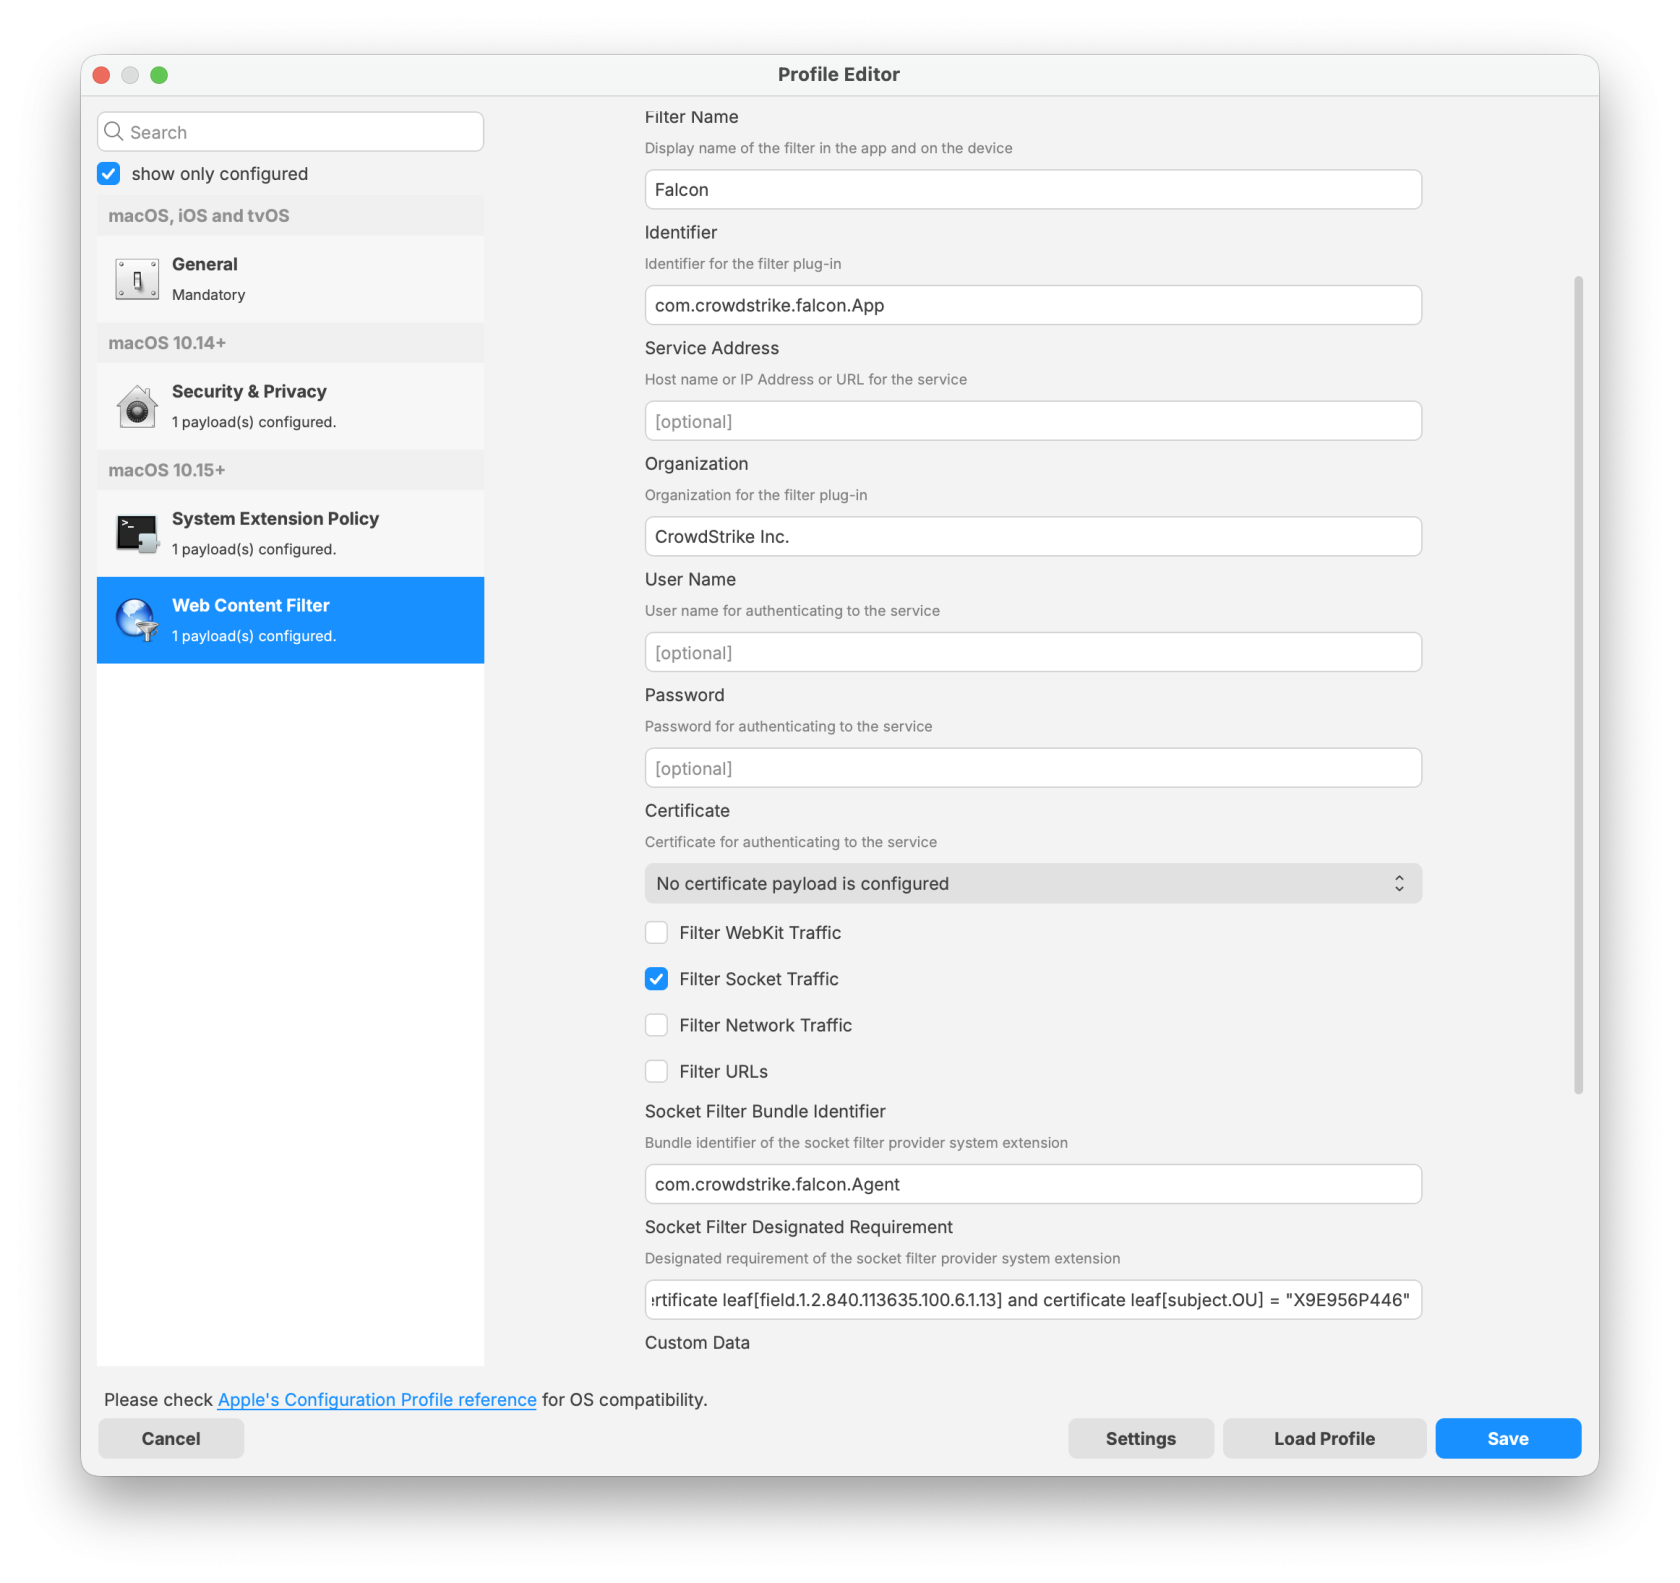
](https://kb.filewave.com/uploads/images/gallery/2026-01/plA53wMwJbY0UA1x-falcon-configuration-profile-for-sonoma-and-earlier2.png)</td></tr></tbody></table>

</details>Falcon Configuration Profile for Sequoia and later:

<details id="bkmrk-apple-silicon-based--1"><summary>Sequoia and later TCC Profile</summary>

<table border="1" style="border-collapse: collapse; width: 100%;"><colgroup><col style="width: 50%;"></col><col style="width: 50%;"></col></colgroup><tbody><tr><td>**System Extension Policy Payload:**

- Team Identifiers: 
    - X9E956P446
- Non Removable From UI System Extensions: 
    - com.crowdstrike.falcon.Agent

</td><td>[![Falcon Configuration Profile Update for Sequoia and later0.png](https://kb.filewave.com/uploads/images/gallery/2026-01/scaled-1680-/6PJA0gxFXERWCDAl-falcon-configuration-profile-update-for-sequoia-and-later0.png)
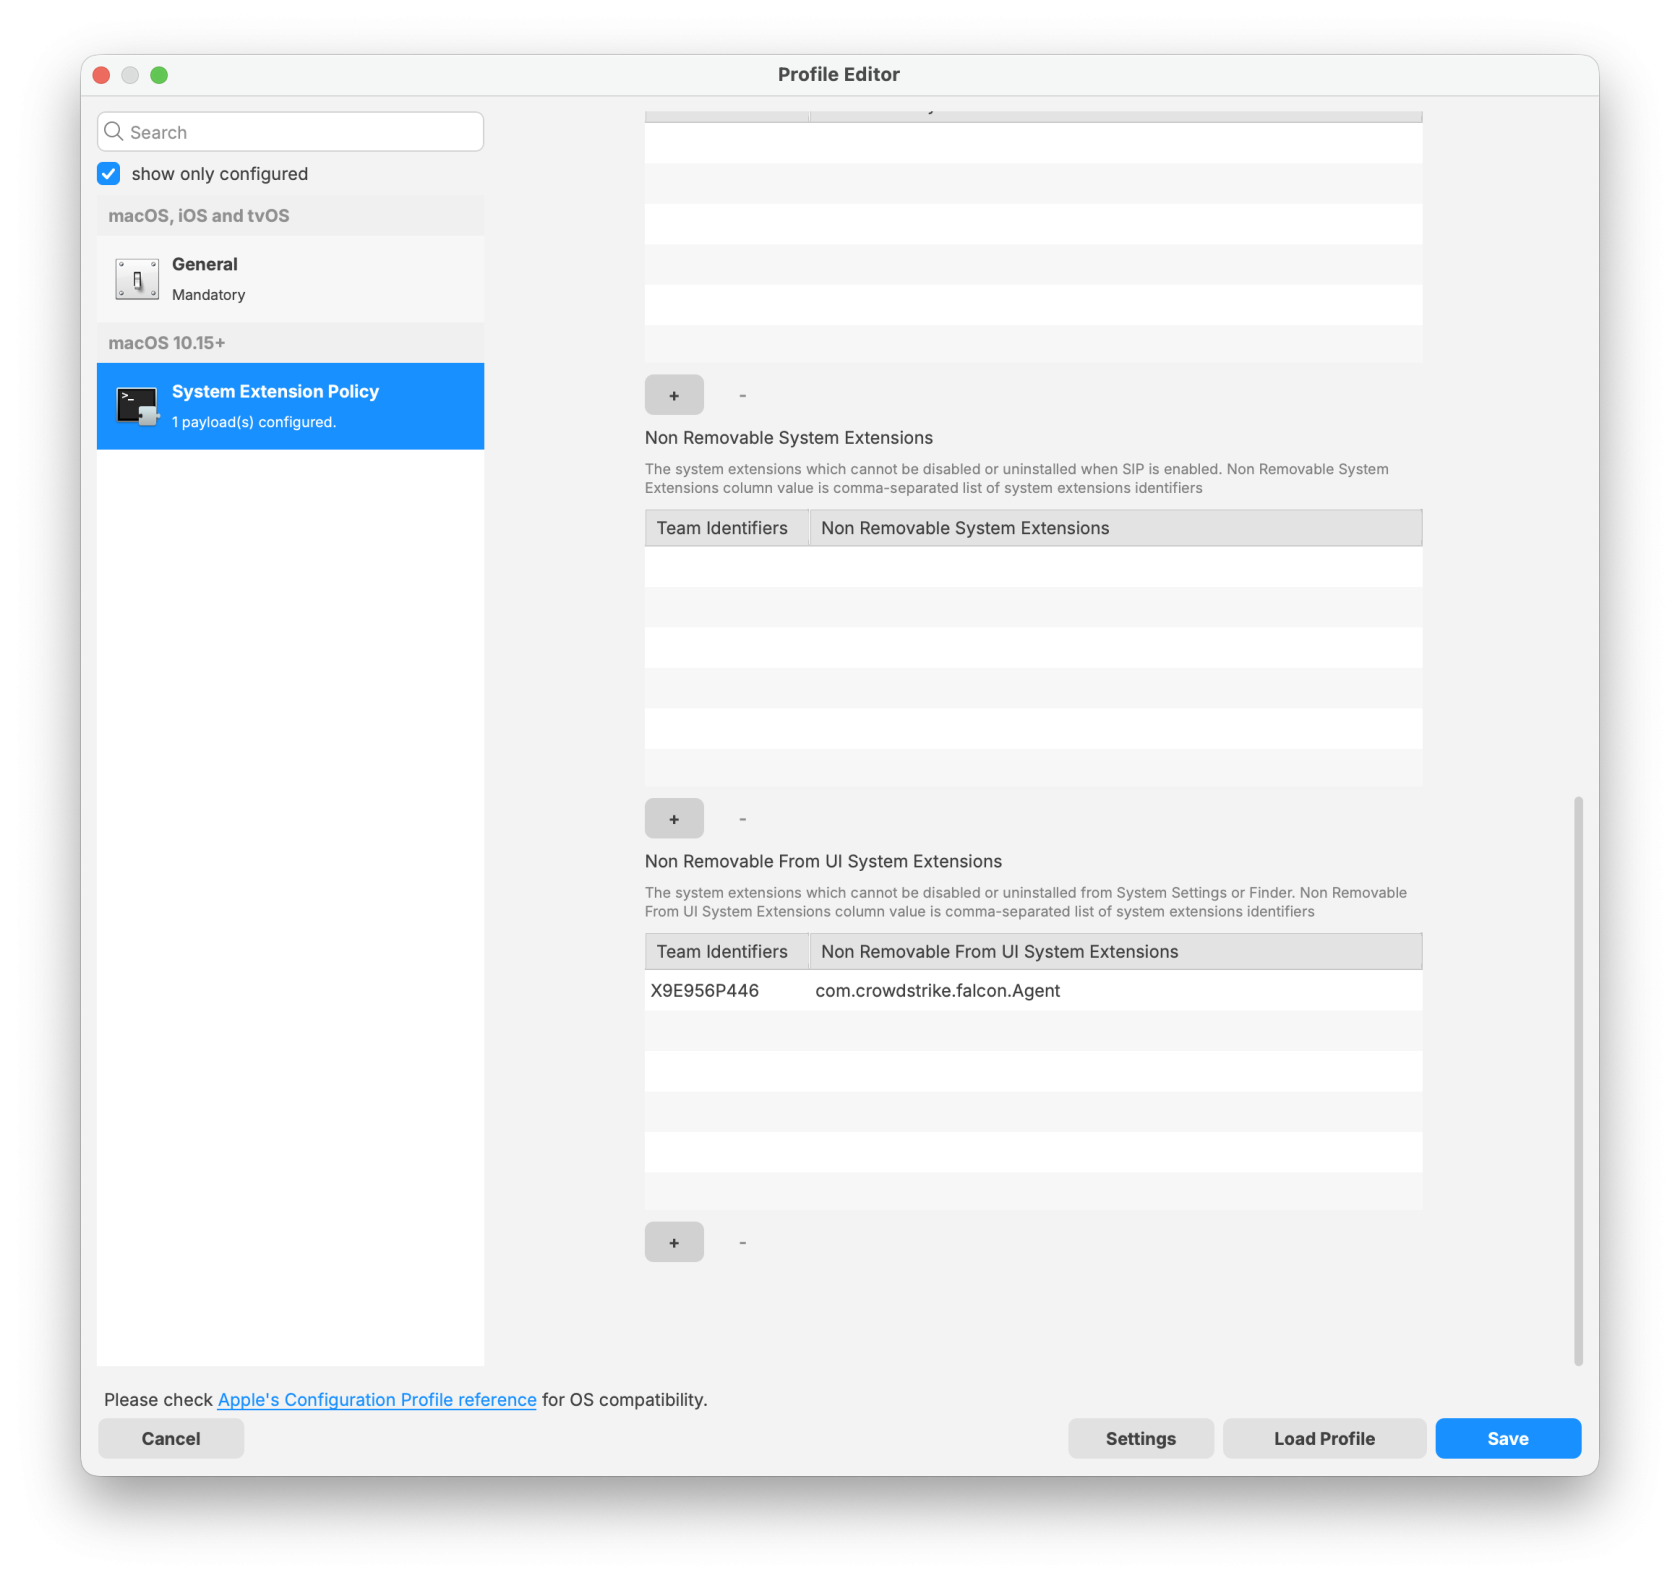
](https://kb.filewave.com/uploads/images/gallery/2026-01/6PJA0gxFXERWCDAl-falcon-configuration-profile-update-for-sequoia-and-later0.png)</td></tr></tbody></table>

</details>## Download the PKG installer

The PKG installer fileset includes three components. The template below can be used to upload your specific version of the CrowdStrike PKG installer. Ensure the installation folder and PKG file name are labeled correctly to support a successful deployment.

- [PKG - Crowdstrike macOS Installation.fileset.zip](https://kb.filewave.com/attachments/491)

<p class="callout warning">**Note:** Please log in to your CrowdStrike portal and download the latest PKG installer to ensure a successful import and deployment. The PKG installer must be used along with the two required scripts: the Requirement script and the Activation script.</p>

[![UpdatedCrowdstrikemacOSinstallation.png](https://kb.filewave.com/uploads/images/gallery/2026-01/scaled-1680-/MsMkjJvzxFrLZa9z-updatedcrowdstrikemacosinstallation.png)
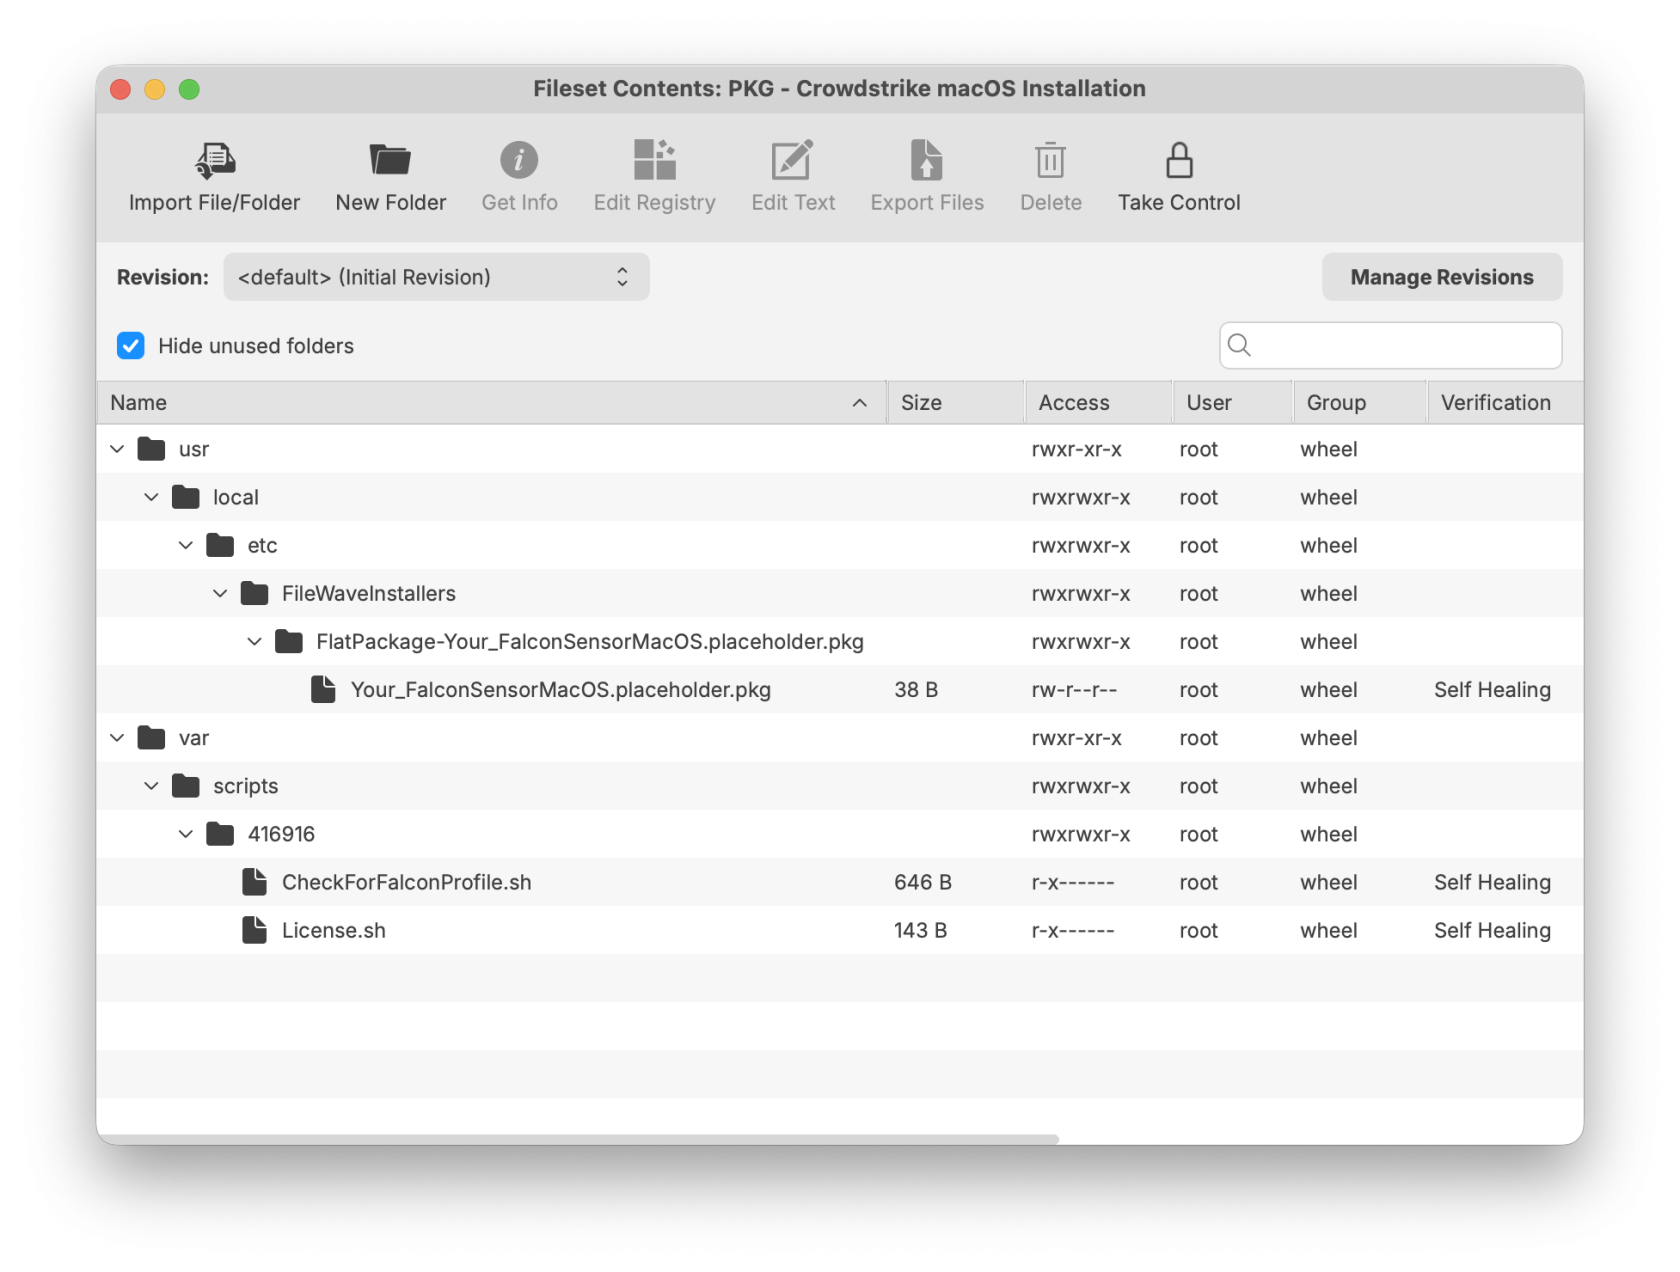
](https://kb.filewave.com/uploads/images/gallery/2026-01/MsMkjJvzxFrLZa9z-updatedcrowdstrikemacosinstallation.png)

## CrowdStrike License

Customizing the Fileset with your CrowdStrike license is required. The Fileset has a License.sh script to edit and enter in your license code.

<table border="1" id="bkmrk-editing-the-license." style="border-collapse: collapse; width: 100%;"><colgroup><col style="width: 50%;"></col><col style="width: 50%;"></col></colgroup><tbody><tr><td>#### Editing the License.sh script  


1. Highlight your CrowdStrike PKG installer Fileset
2. Select Scripts to open the Script window.
3. Highlight License.sh
4. Click Edit

</td><td>[![CrowdStrikeScripts1.png](https://kb.filewave.com/uploads/images/gallery/2023-08/scaled-1680-/pf41UhyqVBanl9qu-crowdstrikescripts1.png)
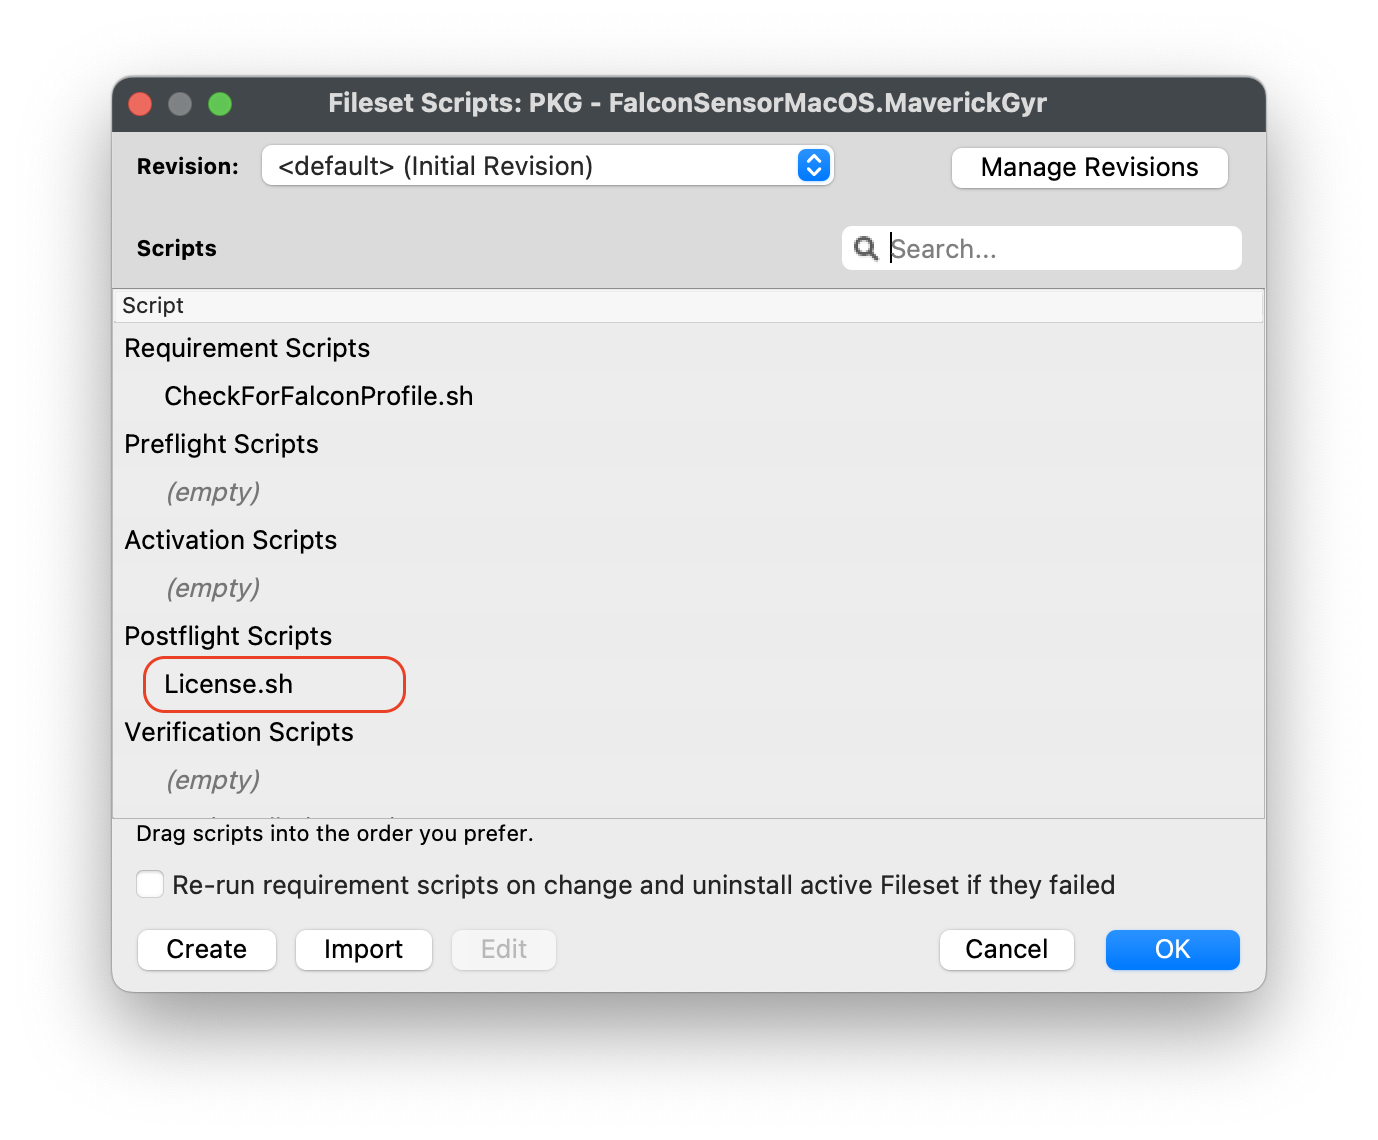
](https://kb.filewave.com/uploads/images/gallery/2023-08/pf41UhyqVBanl9qu-crowdstrikescripts1.png)</td></tr><tr><td>#### Entering in your license code  


1. Highlight the ####### string and enter in your CrowdStrike License code
2. Click OK to save
3. Click OK to save again to save your license code for the CrowdStrike Fileset

</td><td>[![CrowdStrikeScripts2.png](https://kb.filewave.com/uploads/images/gallery/2023-08/scaled-1680-/mX5Td89pE3hDJXMo-crowdstrikescripts2.png)
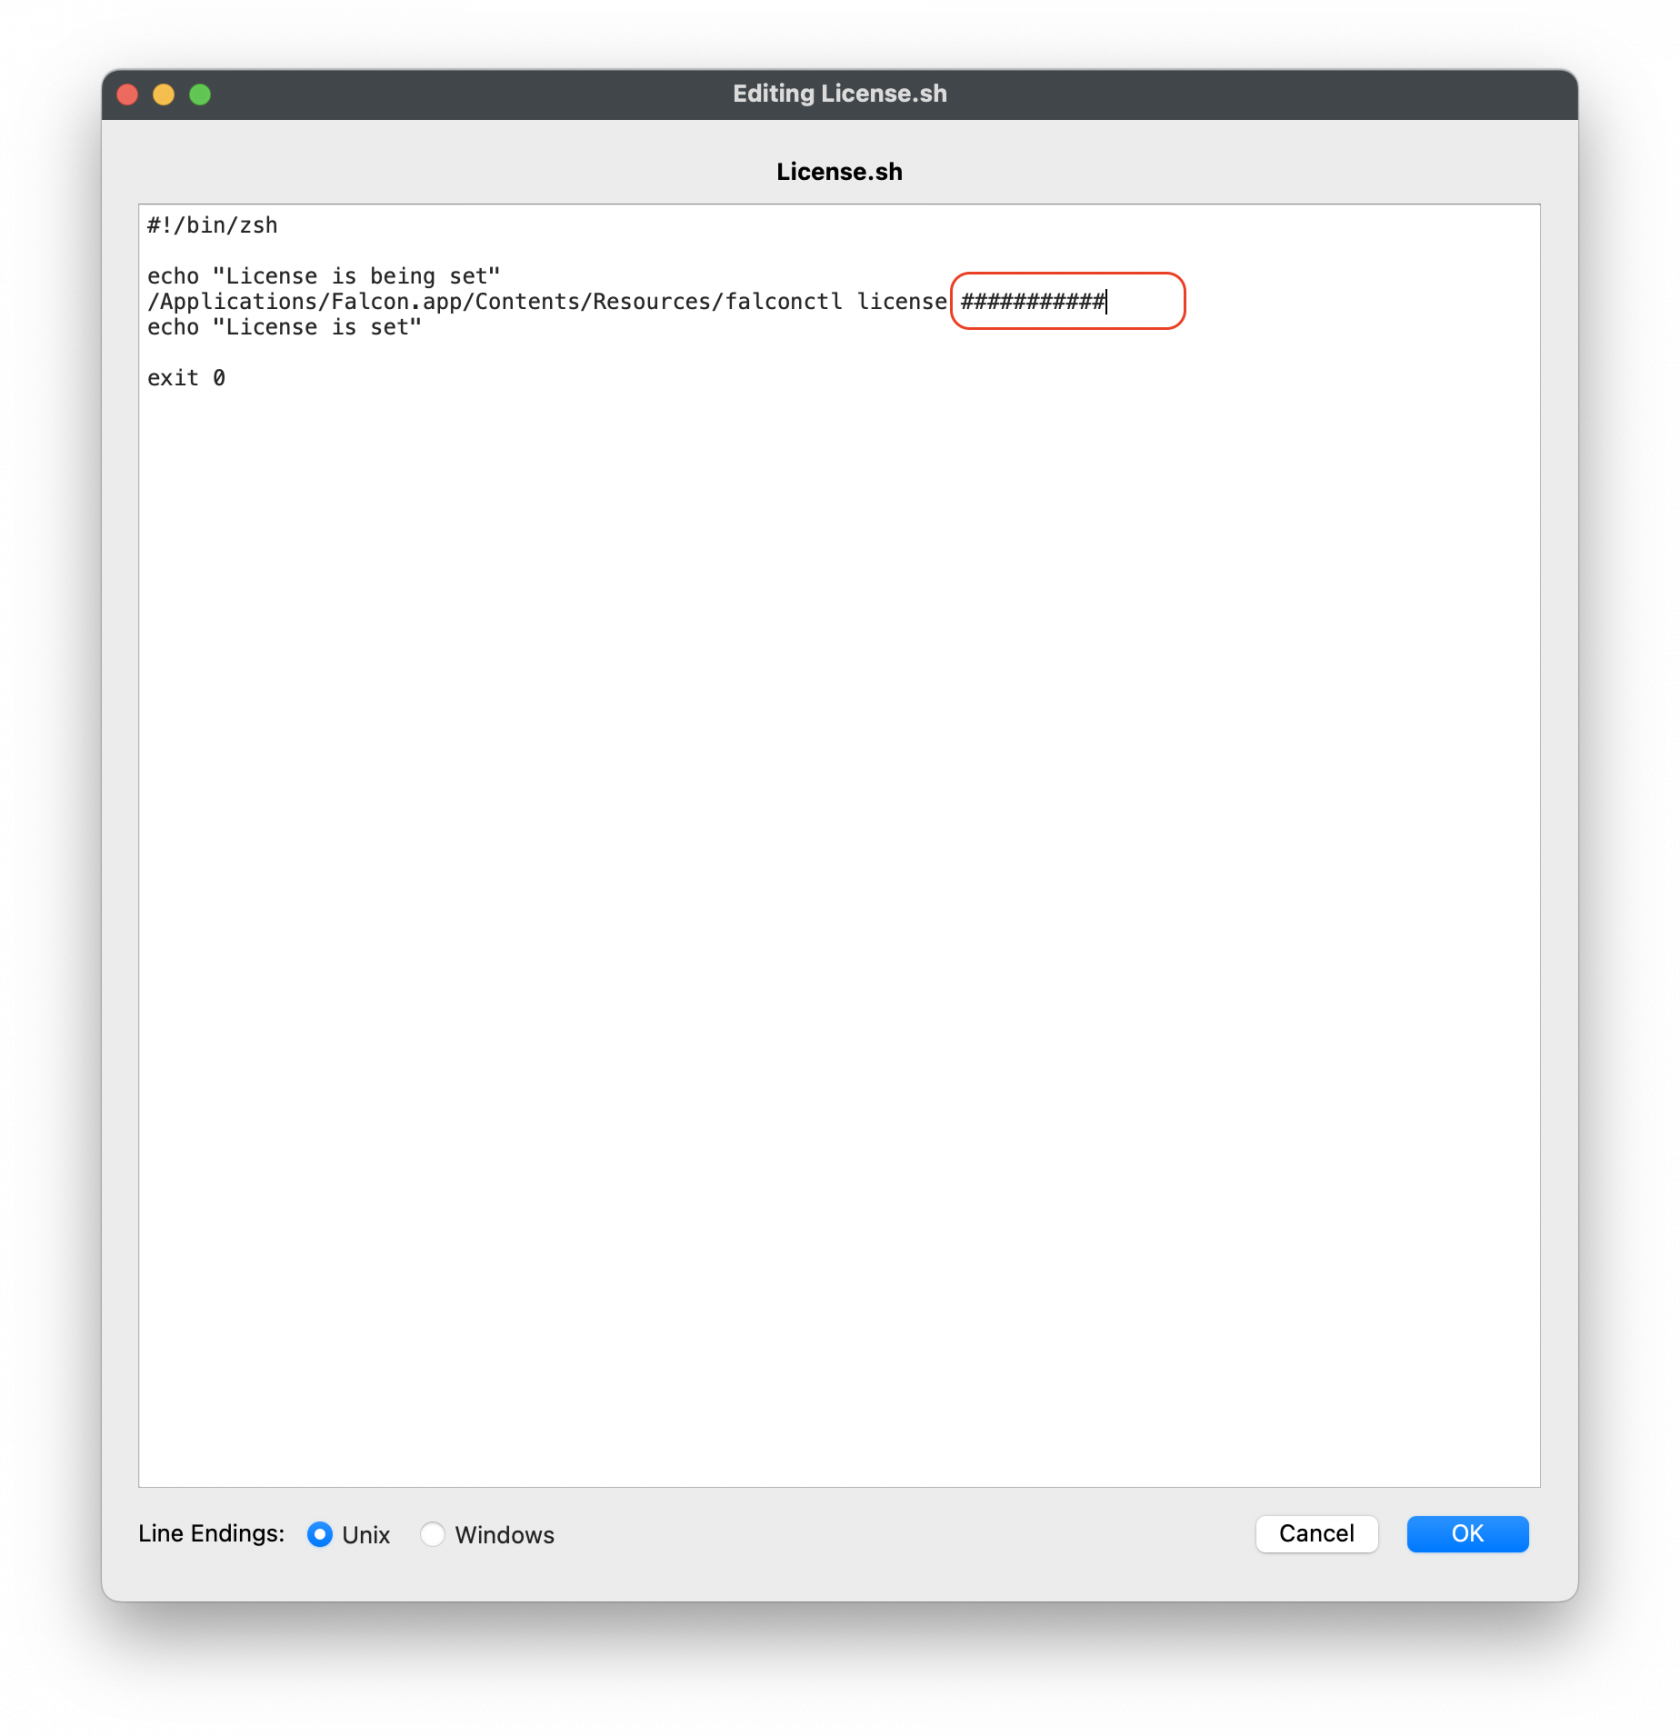
](https://kb.filewave.com/uploads/images/gallery/2023-08/mX5Td89pE3hDJXMo-crowdstrikescripts2.png)

<details><summary>License code script</summary>

```
#!/bin/zsh

echo "License is being set"
/Applications/Falcon.app/Contents/Resources/falconctl license ##########
echo "License is set"

exit 0
```

</details></td></tr></tbody></table>

## Check for Falcon Profiles

The payload identifiers are preconfigured in the provided template fileset. The steps below explain how to add your own Payload Bundle Identifier if needed.

<p class="callout warning">**Note:** The Requirement script verifies that the CrowdStrike Falcon TCC profiles are installed successfully before the CrowdStrike installer runs. The script checks for both profiles and confirms they are installed before proceeding with the CrowdStrike deployment.</p>

<table border="1" id="bkmrk-editing-the-checkfor" style="border-collapse: collapse; width: 100%; height: 369.766px;"><colgroup><col style="width: 50%;"></col><col style="width: 50%;"></col></colgroup><tbody><tr style="height: 339.969px;"><td style="height: 339.969px;">#### Editing the CheckForFalconProfile.sh

1. Highlight your CrowdStrike PKG installer Fileset
2. Select Scripts to open the Scripts window
3. Highlight the CheckForFalconProfile.sh script
4. Click Edit

</td><td style="height: 339.969px;">[![CheckForFalconProfile1.png](https://kb.filewave.com/uploads/images/gallery/2023-08/scaled-1680-/0gNEhaHHCGjdxqfl-checkforfalconprofile1.png)
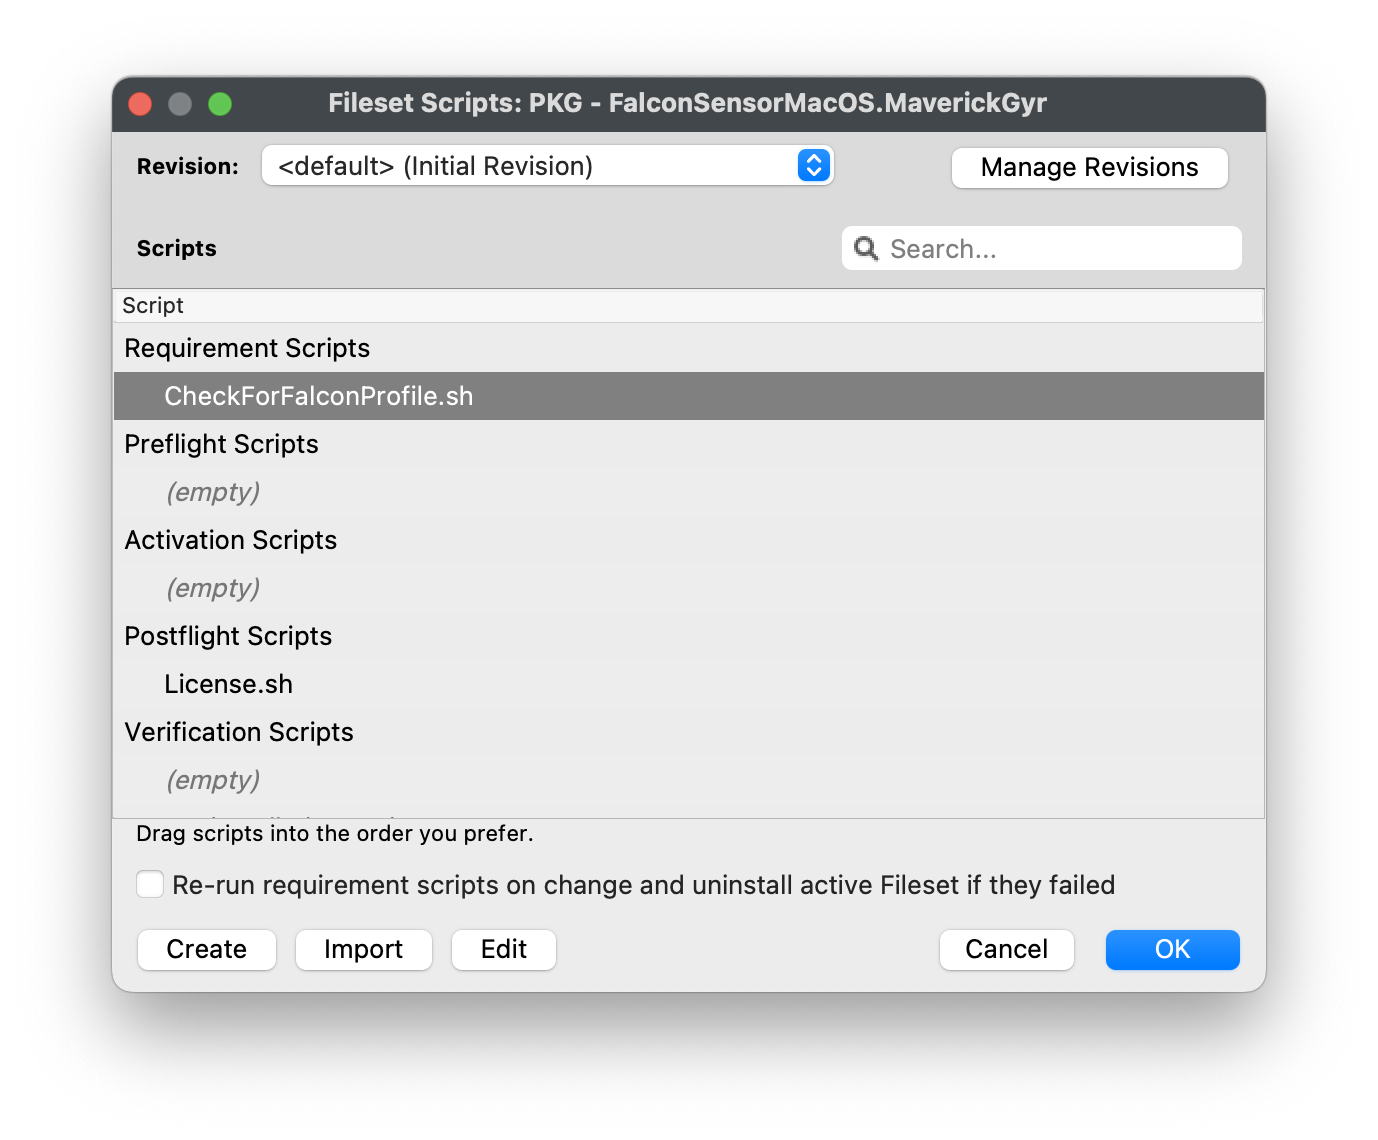
](https://kb.filewave.com/uploads/images/gallery/2023-08/0gNEhaHHCGjdxqfl-checkforfalconprofile1.png)</td></tr><tr style="height: 29.7969px;"><td style="height: 29.7969px;">#### Entering in your Payload Profile Identifiers

1. Highlight the string after profile\_id="#####"
2. Replace the ######, with your TCC profile Identifier.
3. If not sure, open your Profile and copy the Identifier.
4. Click OK to save
5. Click OK to save again to save your changes to the CrowdStrike Fileset

</td><td style="height: 29.7969px;">[![Screenshot 2026-01-30 at 17.46.23.png](https://kb.filewave.com/uploads/images/gallery/2026-01/scaled-1680-/Xz4IRMby3JgnHeWn-screenshot-2026-01-30-at-17-46-23.png)
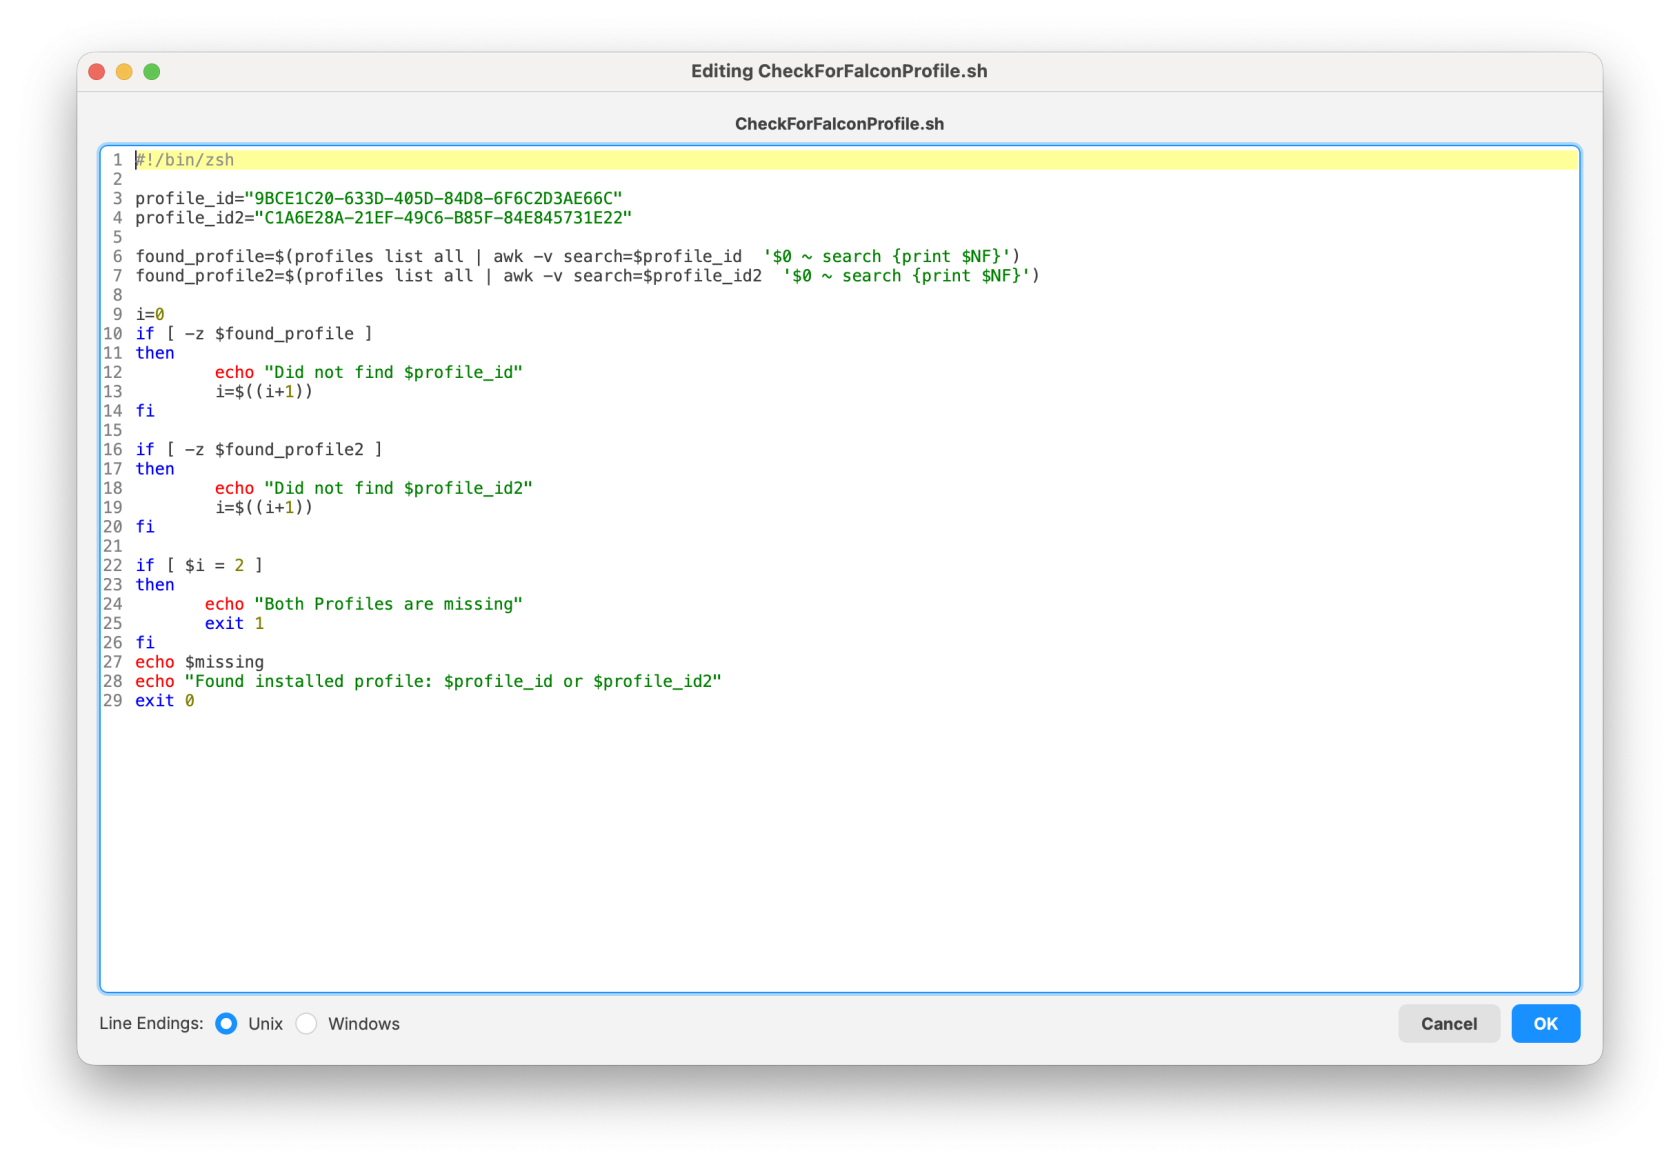
](https://kb.filewave.com/uploads/images/gallery/2026-01/Xz4IRMby3JgnHeWn-screenshot-2026-01-30-at-17-46-23.png)  
<details><summary>Check for Falcon profile script</summary>

```
#!/bin/zsh

profile_id="9BCE1C20-633D-405D-84D8-6F6C2D3AE66C"
profile_id2="C1A6E28A-21EF-49C6-B85F-84E845731E22"

found_profile=$(profiles list all | awk -v search=$profile_id  '$0 ~ search {print $NF}')
found_profile2=$(profiles list all | awk -v search=$profile_id2  '$0 ~ search {print $NF}')

i=0
if [ -z $found_profile ]
then
        echo "Did not find $profile_id" 
        i=$((i+1))
fi

if [ -z $found_profile2 ]
then
        echo "Did not find $profile_id2"
        i=$((i+1))
fi

if [ $i = 2 ]
then
       echo "Both Profiles are missing"
       exit 1
fi
echo $missing
echo "Found installed profile: $profile_id or $profile_id2"
exit 0
```

</details>[![Screenshot 2026-01-30 at 17.47.17.png](https://kb.filewave.com/uploads/images/gallery/2026-01/scaled-1680-/RIJZnlqedmJFjU7Q-screenshot-2026-01-30-at-17-47-17.png)](https://kb.filewave.com/uploads/images/gallery/2026-01/RIJZnlqedmJFjU7Q-screenshot-2026-01-30-at-17-47-17.png)  
</td></tr></tbody></table>

## Creating a Fileset Group

Keeping your filesets organized is a recommended best practice, especially when managing multiple software deployments. You may create a new Fileset Group (for example, CrowdStrike Falcon (macOS 2023)) and move all related filesets into that group. This allows you to associate the Fileset Group with your devices instead of assigning individual filesets separately.

Once the filesets and profiles have been created, you can assign the CrowdStrike Falcon (macOS 2023) Fileset Group to a few test devices. This helps verify that the software installs correctly and that the configured license code is applied successfully.

## FileWave Custom Fields to validate installation

Monitoring the CrowdStrike Falcon Sensor through FileWave custom fields helps ensure endpoint protection remains active and compliant. By validating that the Falcon service is running and reporting the installed sensor version, administrators can quickly detect inactive or outdated agents that may leave devices exposed. This custom fields includes both macOS and Windows.

- [FileWave Custom Fields for CrowdStrike.customfields.zip](https://kb.filewave.com/attachments/495)

Example Custom Field output:

[![ExampleCrowdStrikeCF.png](https://kb.filewave.com/uploads/images/gallery/2026-02/scaled-1680-/cSRJ8oolocnroquC-examplecrowdstrikecf.png)](https://kb.filewave.com/uploads/images/gallery/2026-02/cSRJ8oolocnroquC-examplecrowdstrikecf.png)

<table border="1" id="bkmrk-sensor-state-output-" style="font-family: 'IBM Plex Sans', sans-serif; font-size: 14px; width: 112.758%; height: 126px; border-collapse: collapse; border-width: 1px;"><thead><tr style="height: 29.7969px;"><td style="height: 29.7969px; width: 50.0645%;">**Sensor State**</td><td style="height: 29.7969px; width: 50.0645%;">**Output Value**</td></tr></thead><tbody><tr style="height: 29.7969px;"><td style="height: 29.7969px; width: 50.0645%;">Installed</td><td style="height: 29.7969px; width: 50.0645%;">Installed | version\_number</td></tr><tr style="height: 29.7969px;"><td style="height: 29.7969px; width: 50.0645%;">Not Installed</td><td style="height: 29.7969px; width: 50.0645%;">Not Installed</td></tr></tbody></table>


## Related Content

- [CrowdStrike Falcon Protection (Windows EXE)](https://kb.filewave.com/books/software-deployment-recipes-microsoft/page/crowdstrike-falcon-protection-windows-exe "CrowdStrike Falcon Protection (Windows EXE)")