# VMware Carbon Black Cloud sensor recipe (macOS)
## Description
VMware Carbon Black is a powerful endpoint protection solution that plays a critical role in an organization's cybersecurity strategy. Deploying Carbon Black via the installer package through the admin console is a strategic approach that ensures consistent, efficient, and effective endpoint security. By mastering this deployment process, organizations can enhance their cybersecurity posture, mitigate threats proactively, and protect their digital assets in an increasingly dangerous digital landscape.
This guide will help you create a Fileset and deploy the application along with the required profiles.
## Ingredients
- FileWave Central
- VMware Carbon Black Cloud dmg
- VMware CBC license code
- VMware CBC uninstaller code
- System Extension mobile configuration
- Network Extension Web Content Filter mobile configuration
- TCC Privacy Policy mobile configuration
## Downloads
[VMware CBCloud Profiles.zip](https://kb.filewave.com/attachments/265)
[VMware Carbon Black Cloud.fileset.zip](https://kb.filewave.com/attachments/267)
## Directions
Please note this recipe includes Carbon Black Cloud sensor (CB Defense) version 3.7.4.53. This version is supported on macOS 11.0 and newer. For current Carbon Black Cloud macOS sensors, check the vendor documentation and profiles bundled with your downloaded sensor package before deploying.
**Current macOS sensor deployments:** Carbon Black Cloud macOS sensor 3.5.1.19 and later installs System Extensions by default on macOS Big Sur 11.0 and later. For 3.8+ packages, deploy the System Extension, Network Extension/Web Content Filter, and TCC/Full Disk Access profiles before the installer. Use the Kernel Extension/KEXT approval and Rebuild Kernel Cache guidance below only for older sensor packages or a vendor-supported deployment path that still explicitly requires KEXT mode.
### Downloading and extracting the MDM profiles and installers
You will first want to grab and download your VMware installations and profiles. The .dmg will need to be mounted first and then extract the necessary components from this file.
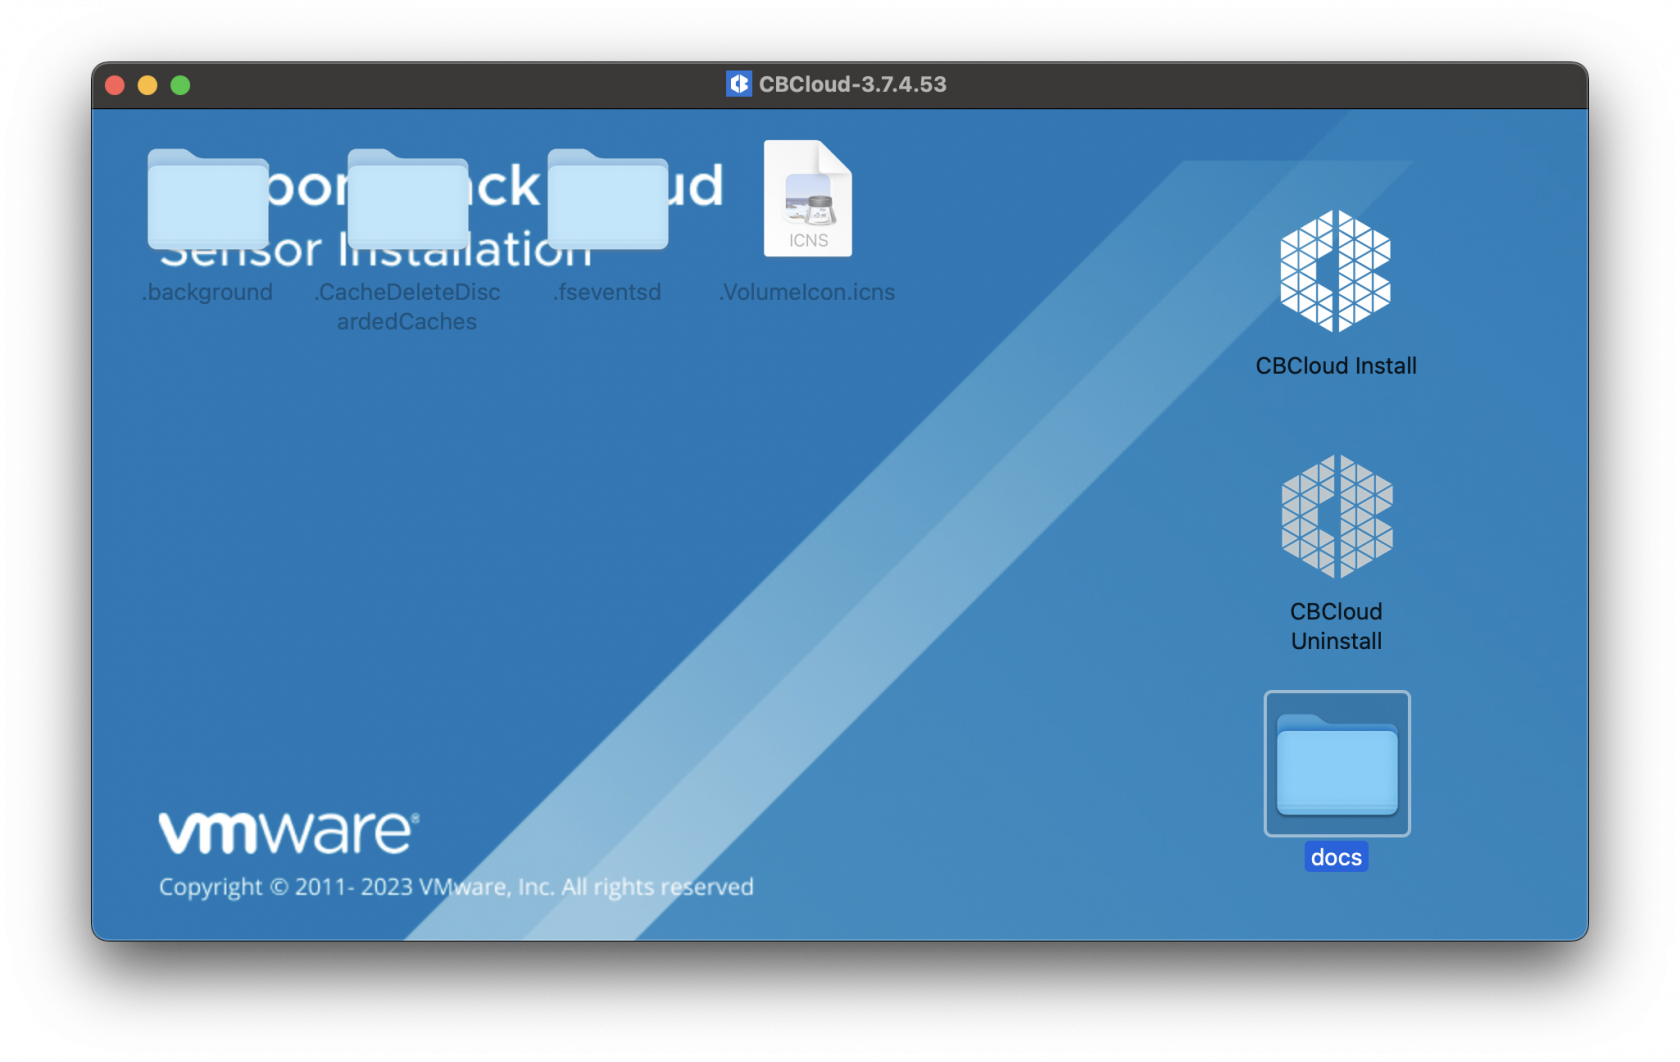
Once the .dmg has been mounted you will see the contents listed. Below is the CBCloud Install.pkg and doc folder containing the required MDM profiles.
[](https://kb.filewave.com/uploads/images/gallery/2023-09/Zbpw5w6bm9xOeRCA-vmwarecbcsensor01.png)
The required MDM profiles and unattended script for the Fileset deployed are found in the docs folder within the mounted .dmg.
Extract the MDM profiles. These MDM profiles will be uploaded into FileWave Central. For current packages, expect to deploy the System Extension, Network Extension/Web Content Filter, and Privacy Preferences/TCC profiles. If you use the example downloads here, validate them against your Carbon Black Cloud sensor version before deploying broadly.
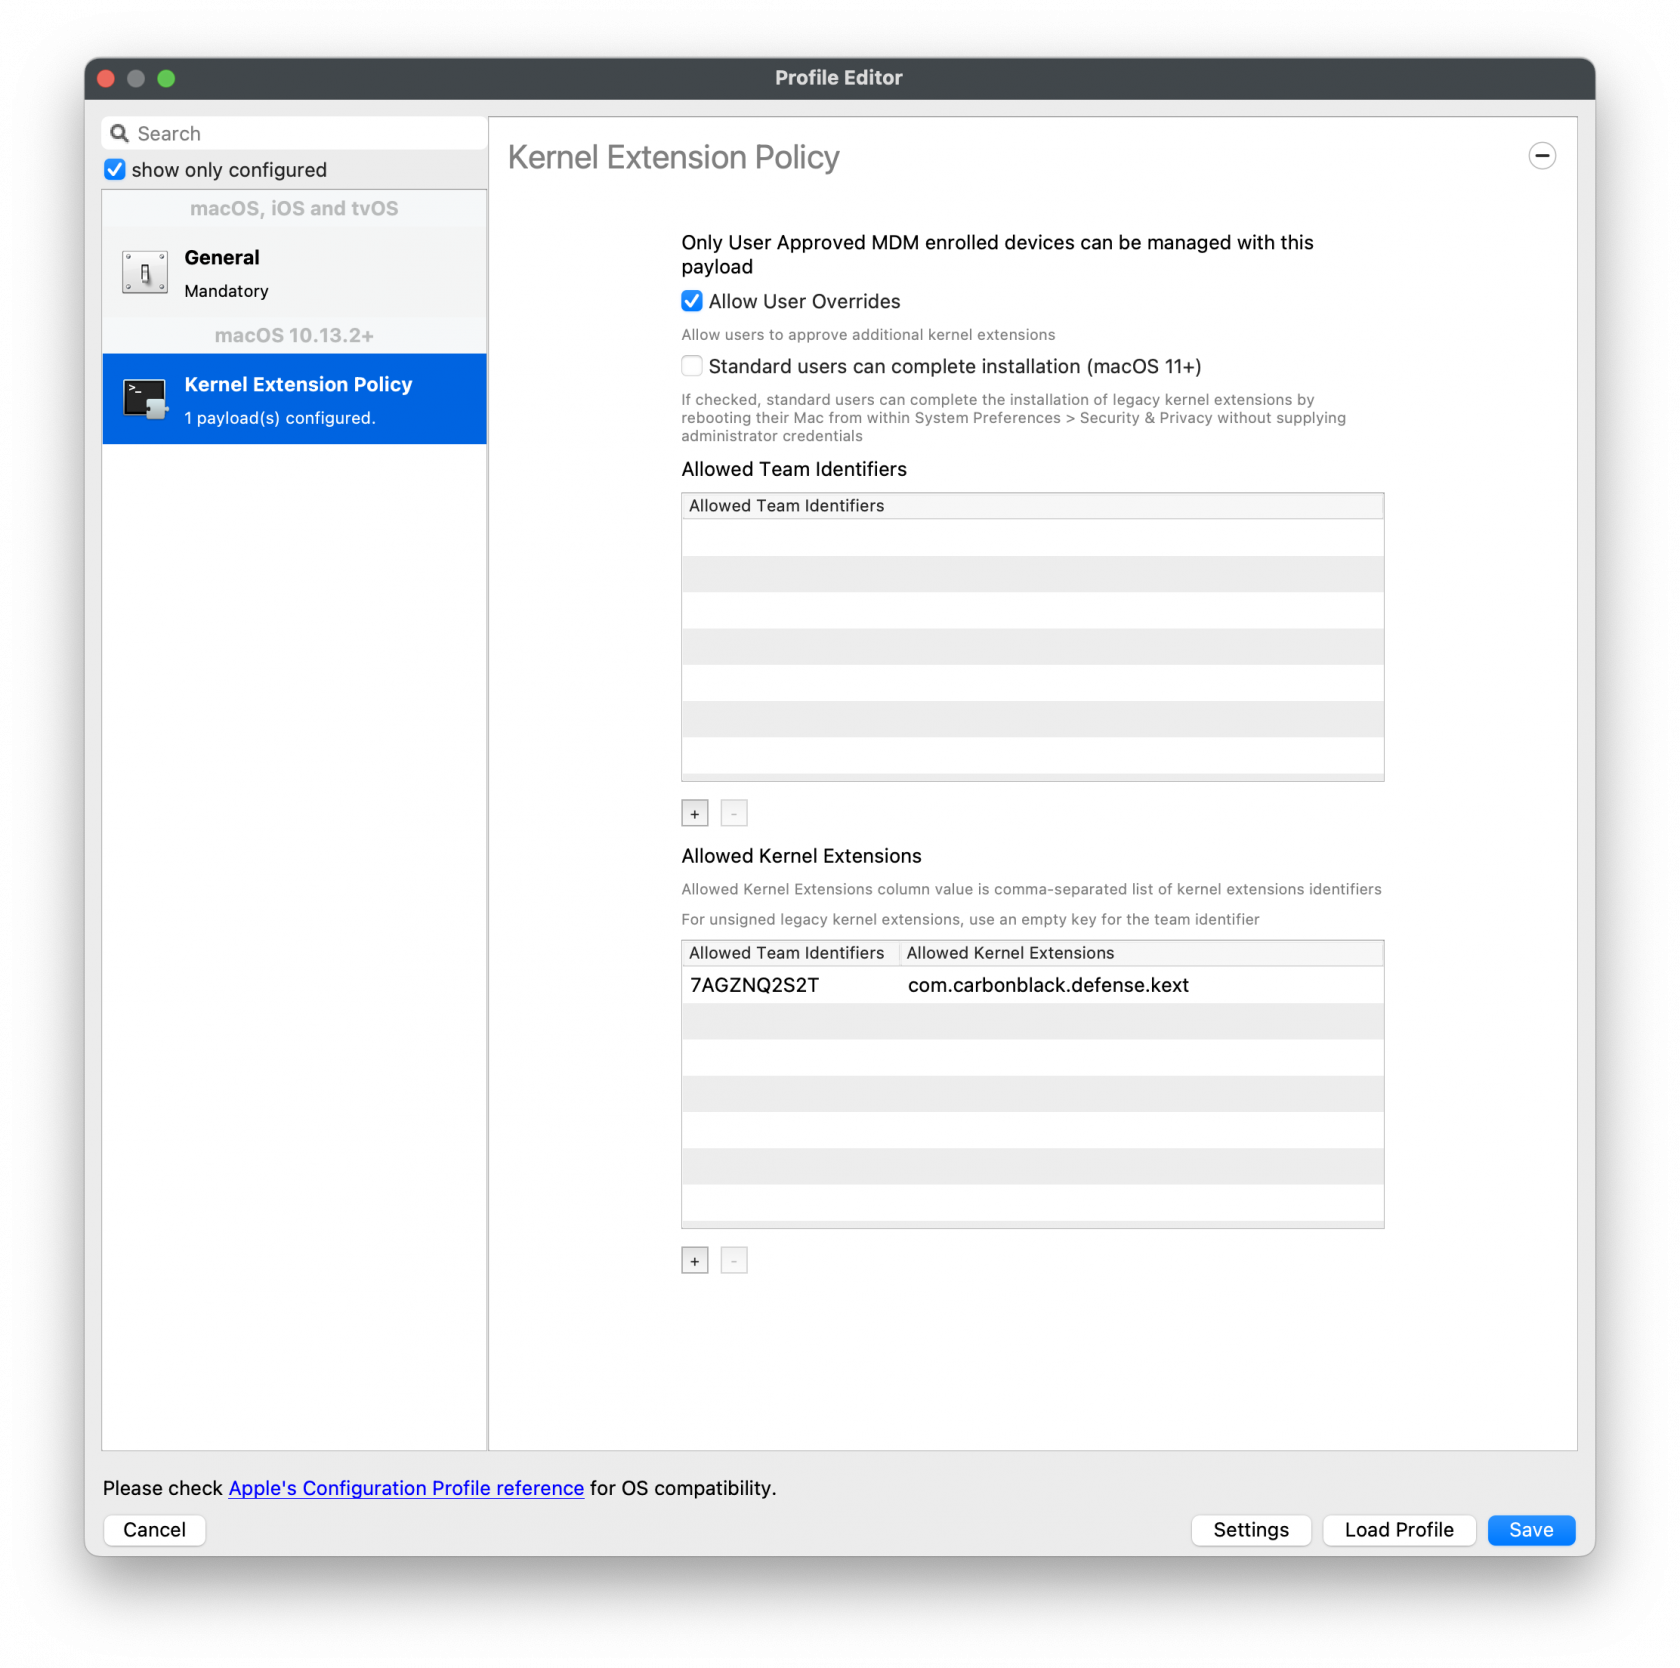
Legacy Kernel Extension Policy (older sensors only)
[](https://kb.filewave.com/uploads/images/gallery/2023-09/KwJSyfpQbIkg2VQP-vmwarecbcsensor02.png)
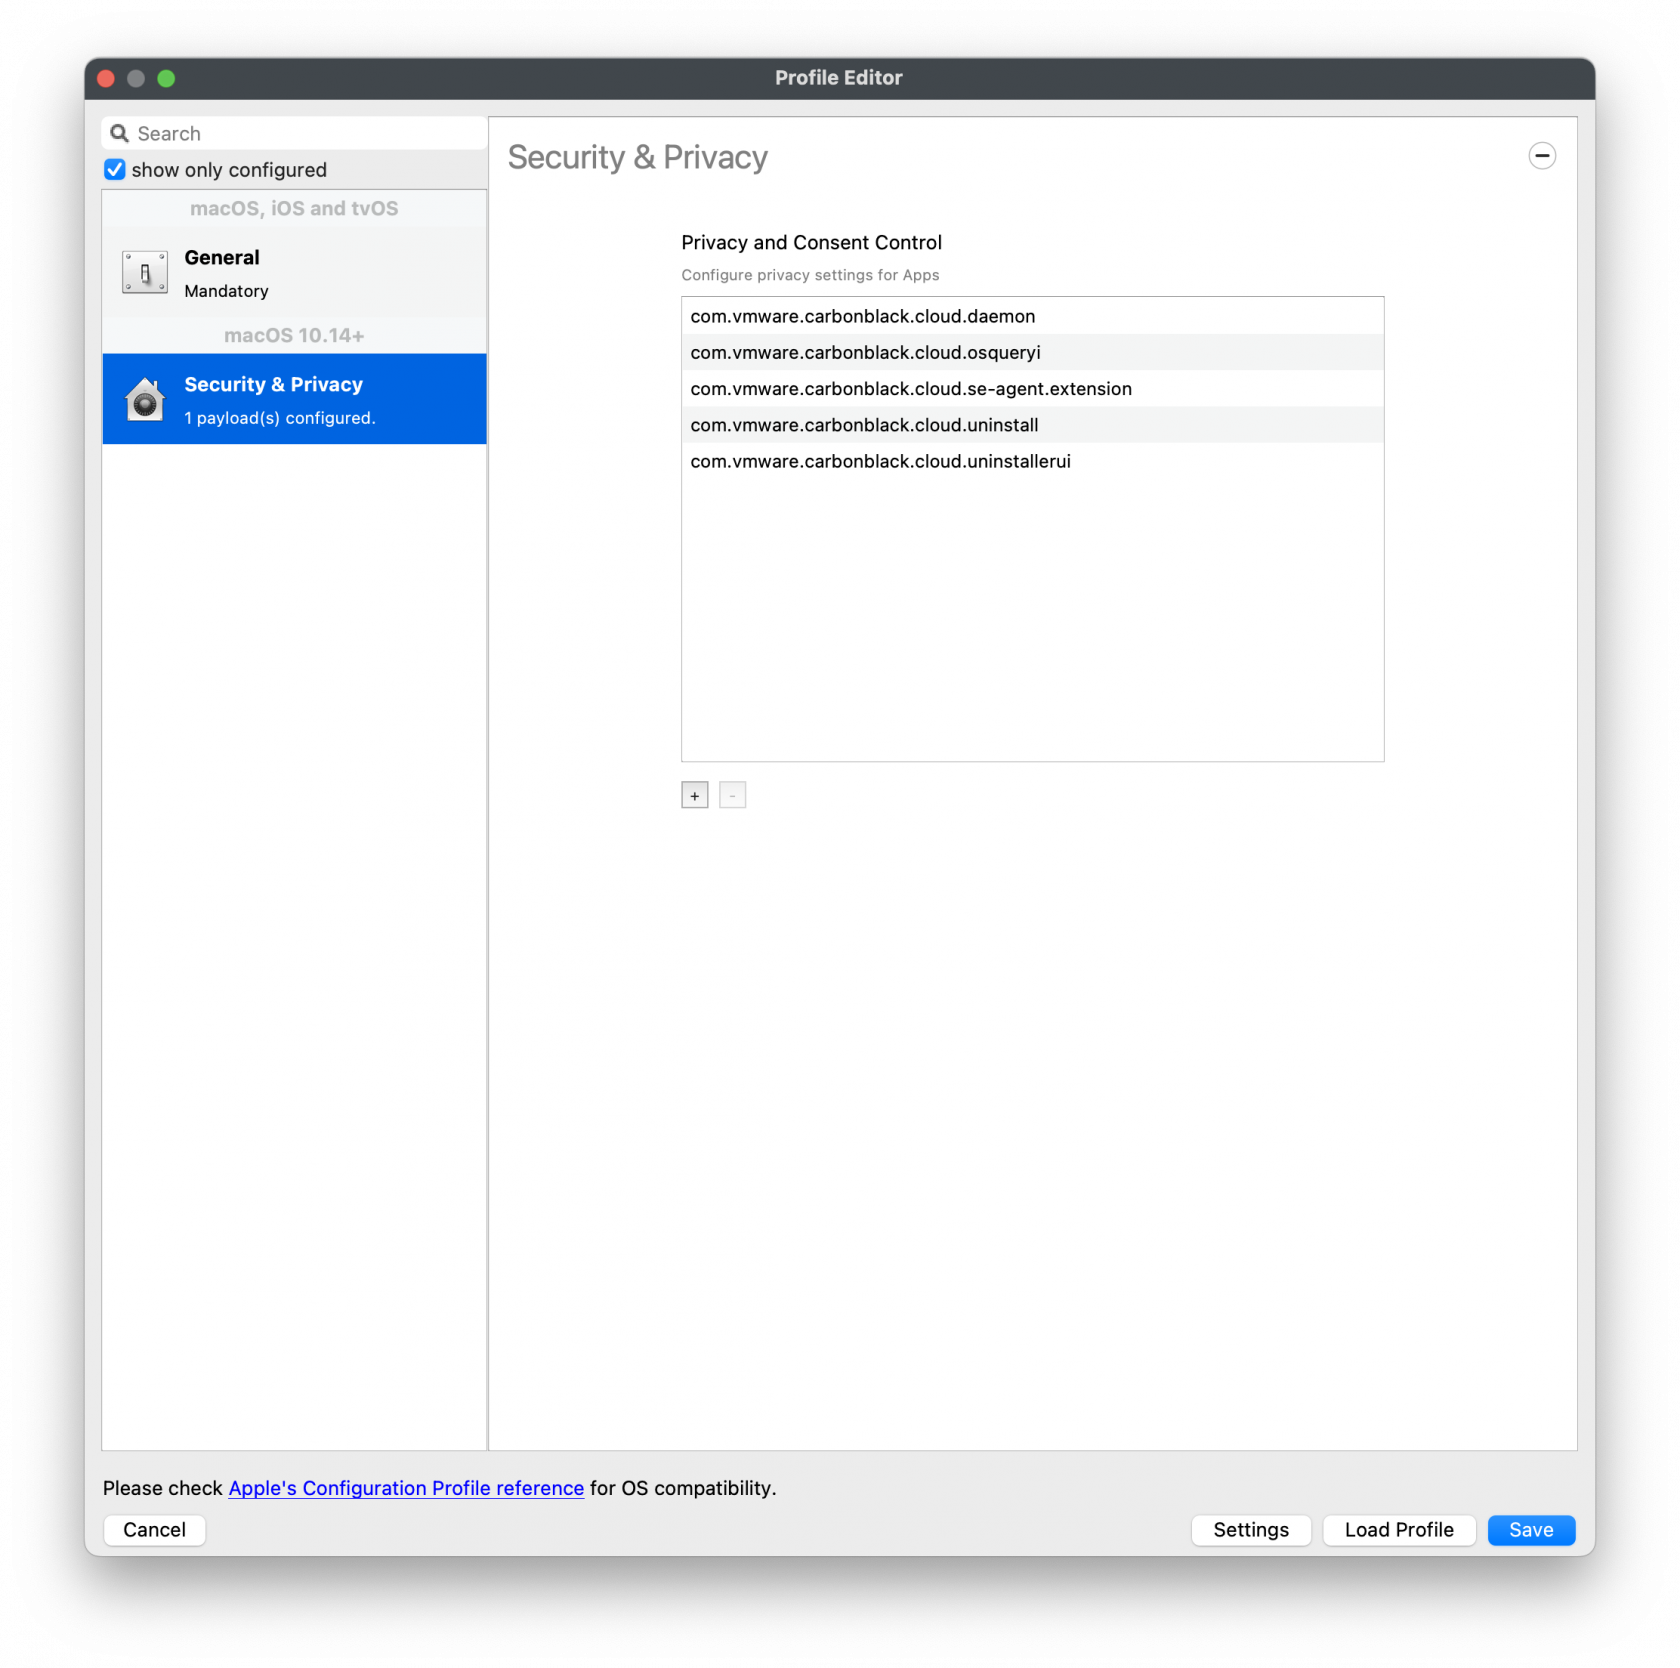
Privacy and Consent Control (TCC) Policy
[](https://kb.filewave.com/uploads/images/gallery/2023-09/CbTMGXE99RhXaqV9-vmwarecbcsensor04.png)
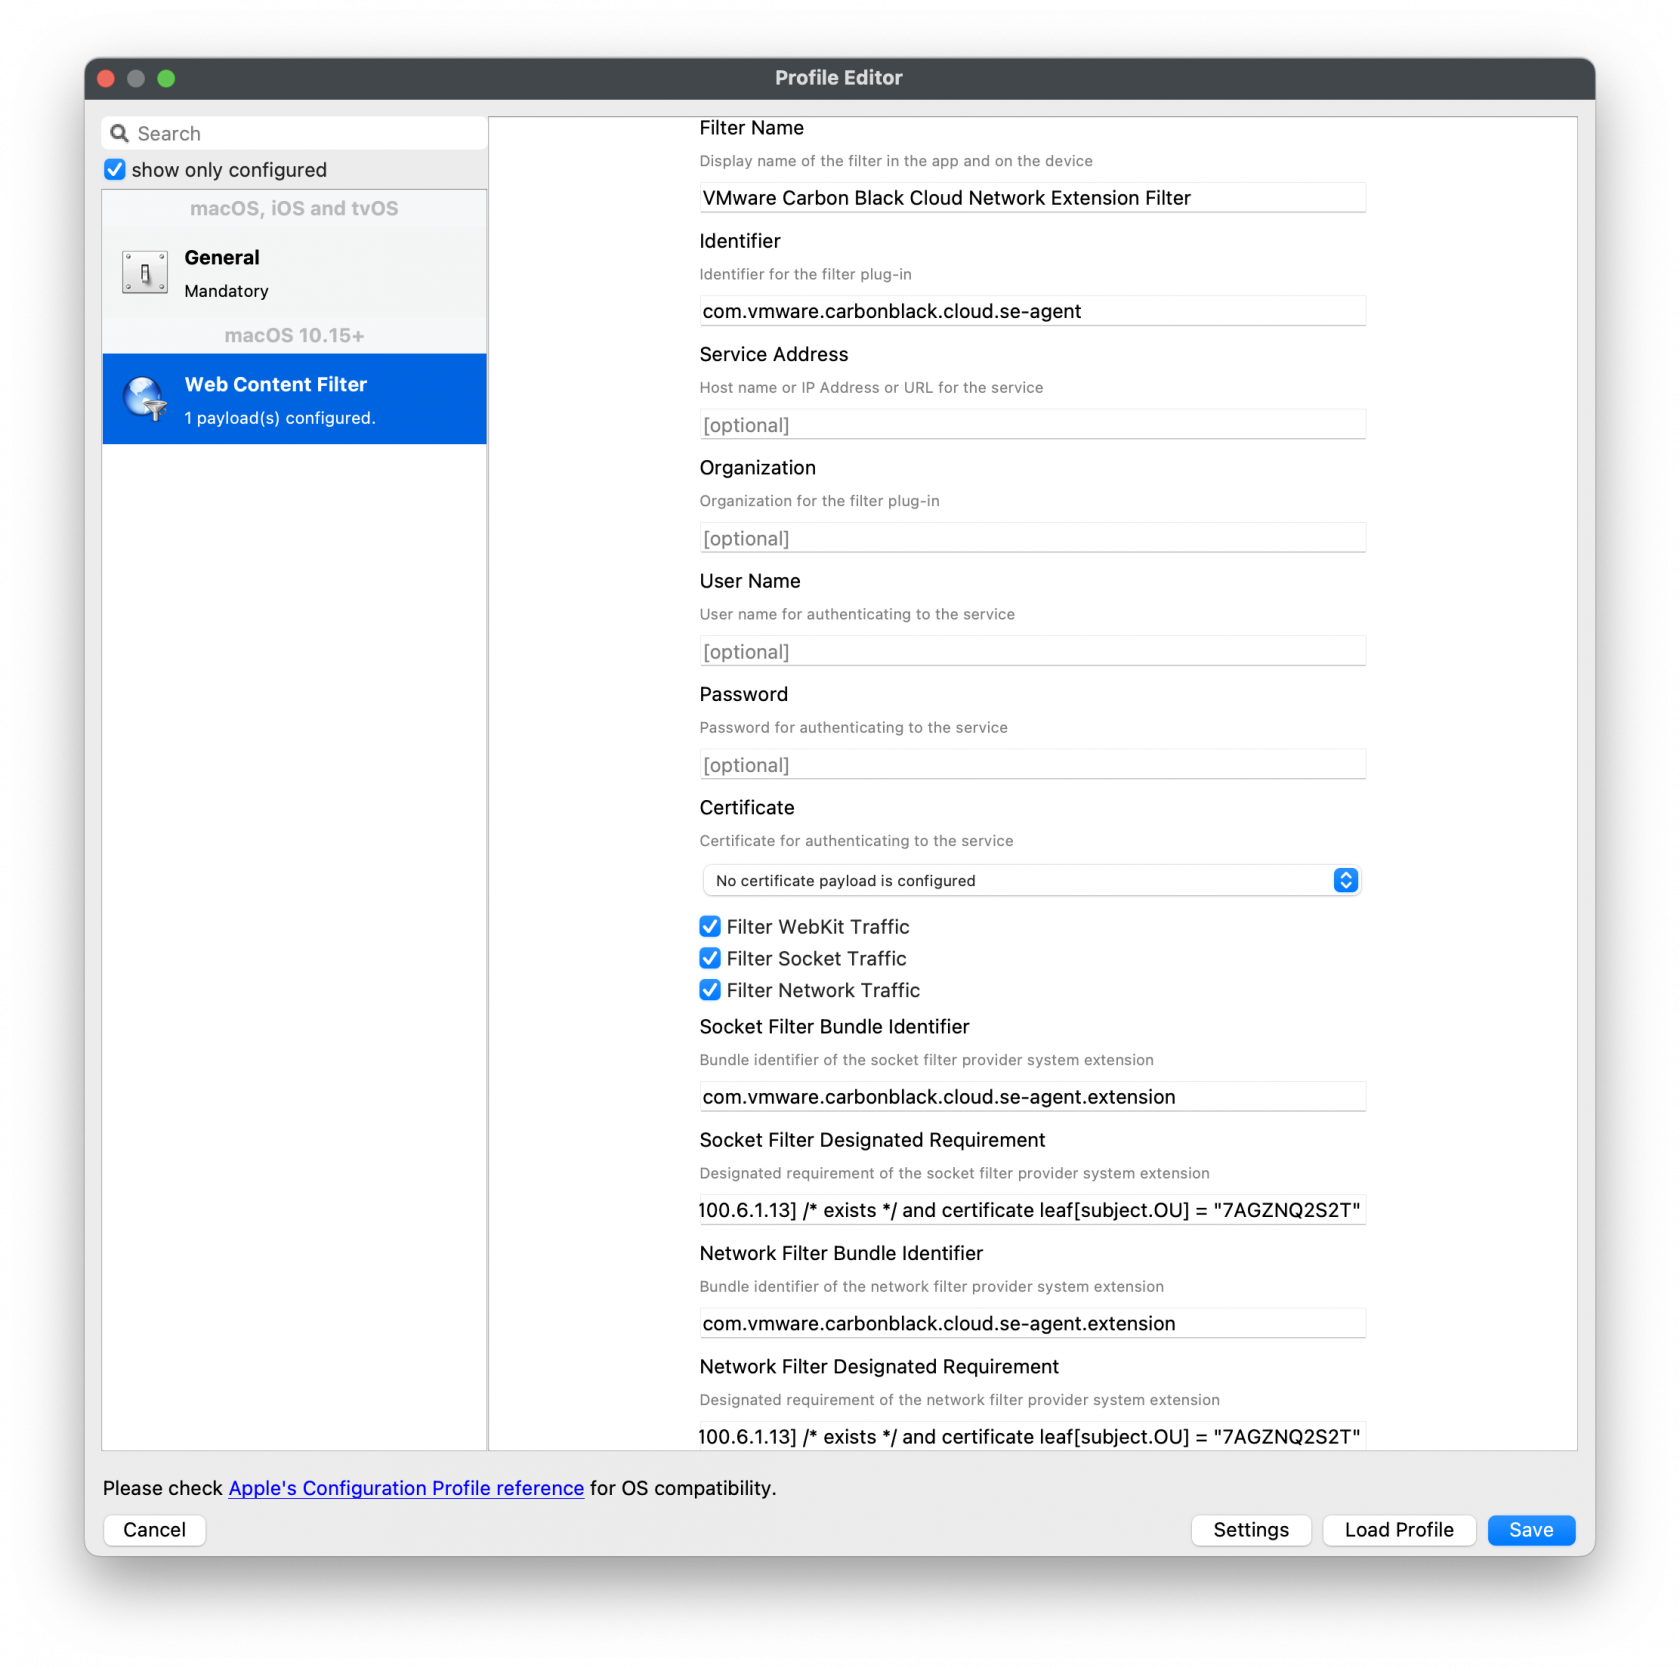
Web Content Filter Policy
[](https://kb.filewave.com/uploads/images/gallery/2023-09/MsPb2pokgjeBxEN3-vmwarecbcsensor03.png)
**Carbon Black Cloud macOS 3.8+:** Treat System Extension approval as the normal path. Approve the `com.vmware.carbonblack.cloud.se-agent.extension` system extension and the related Network Extension/Web Content Filter before installing the sensor.
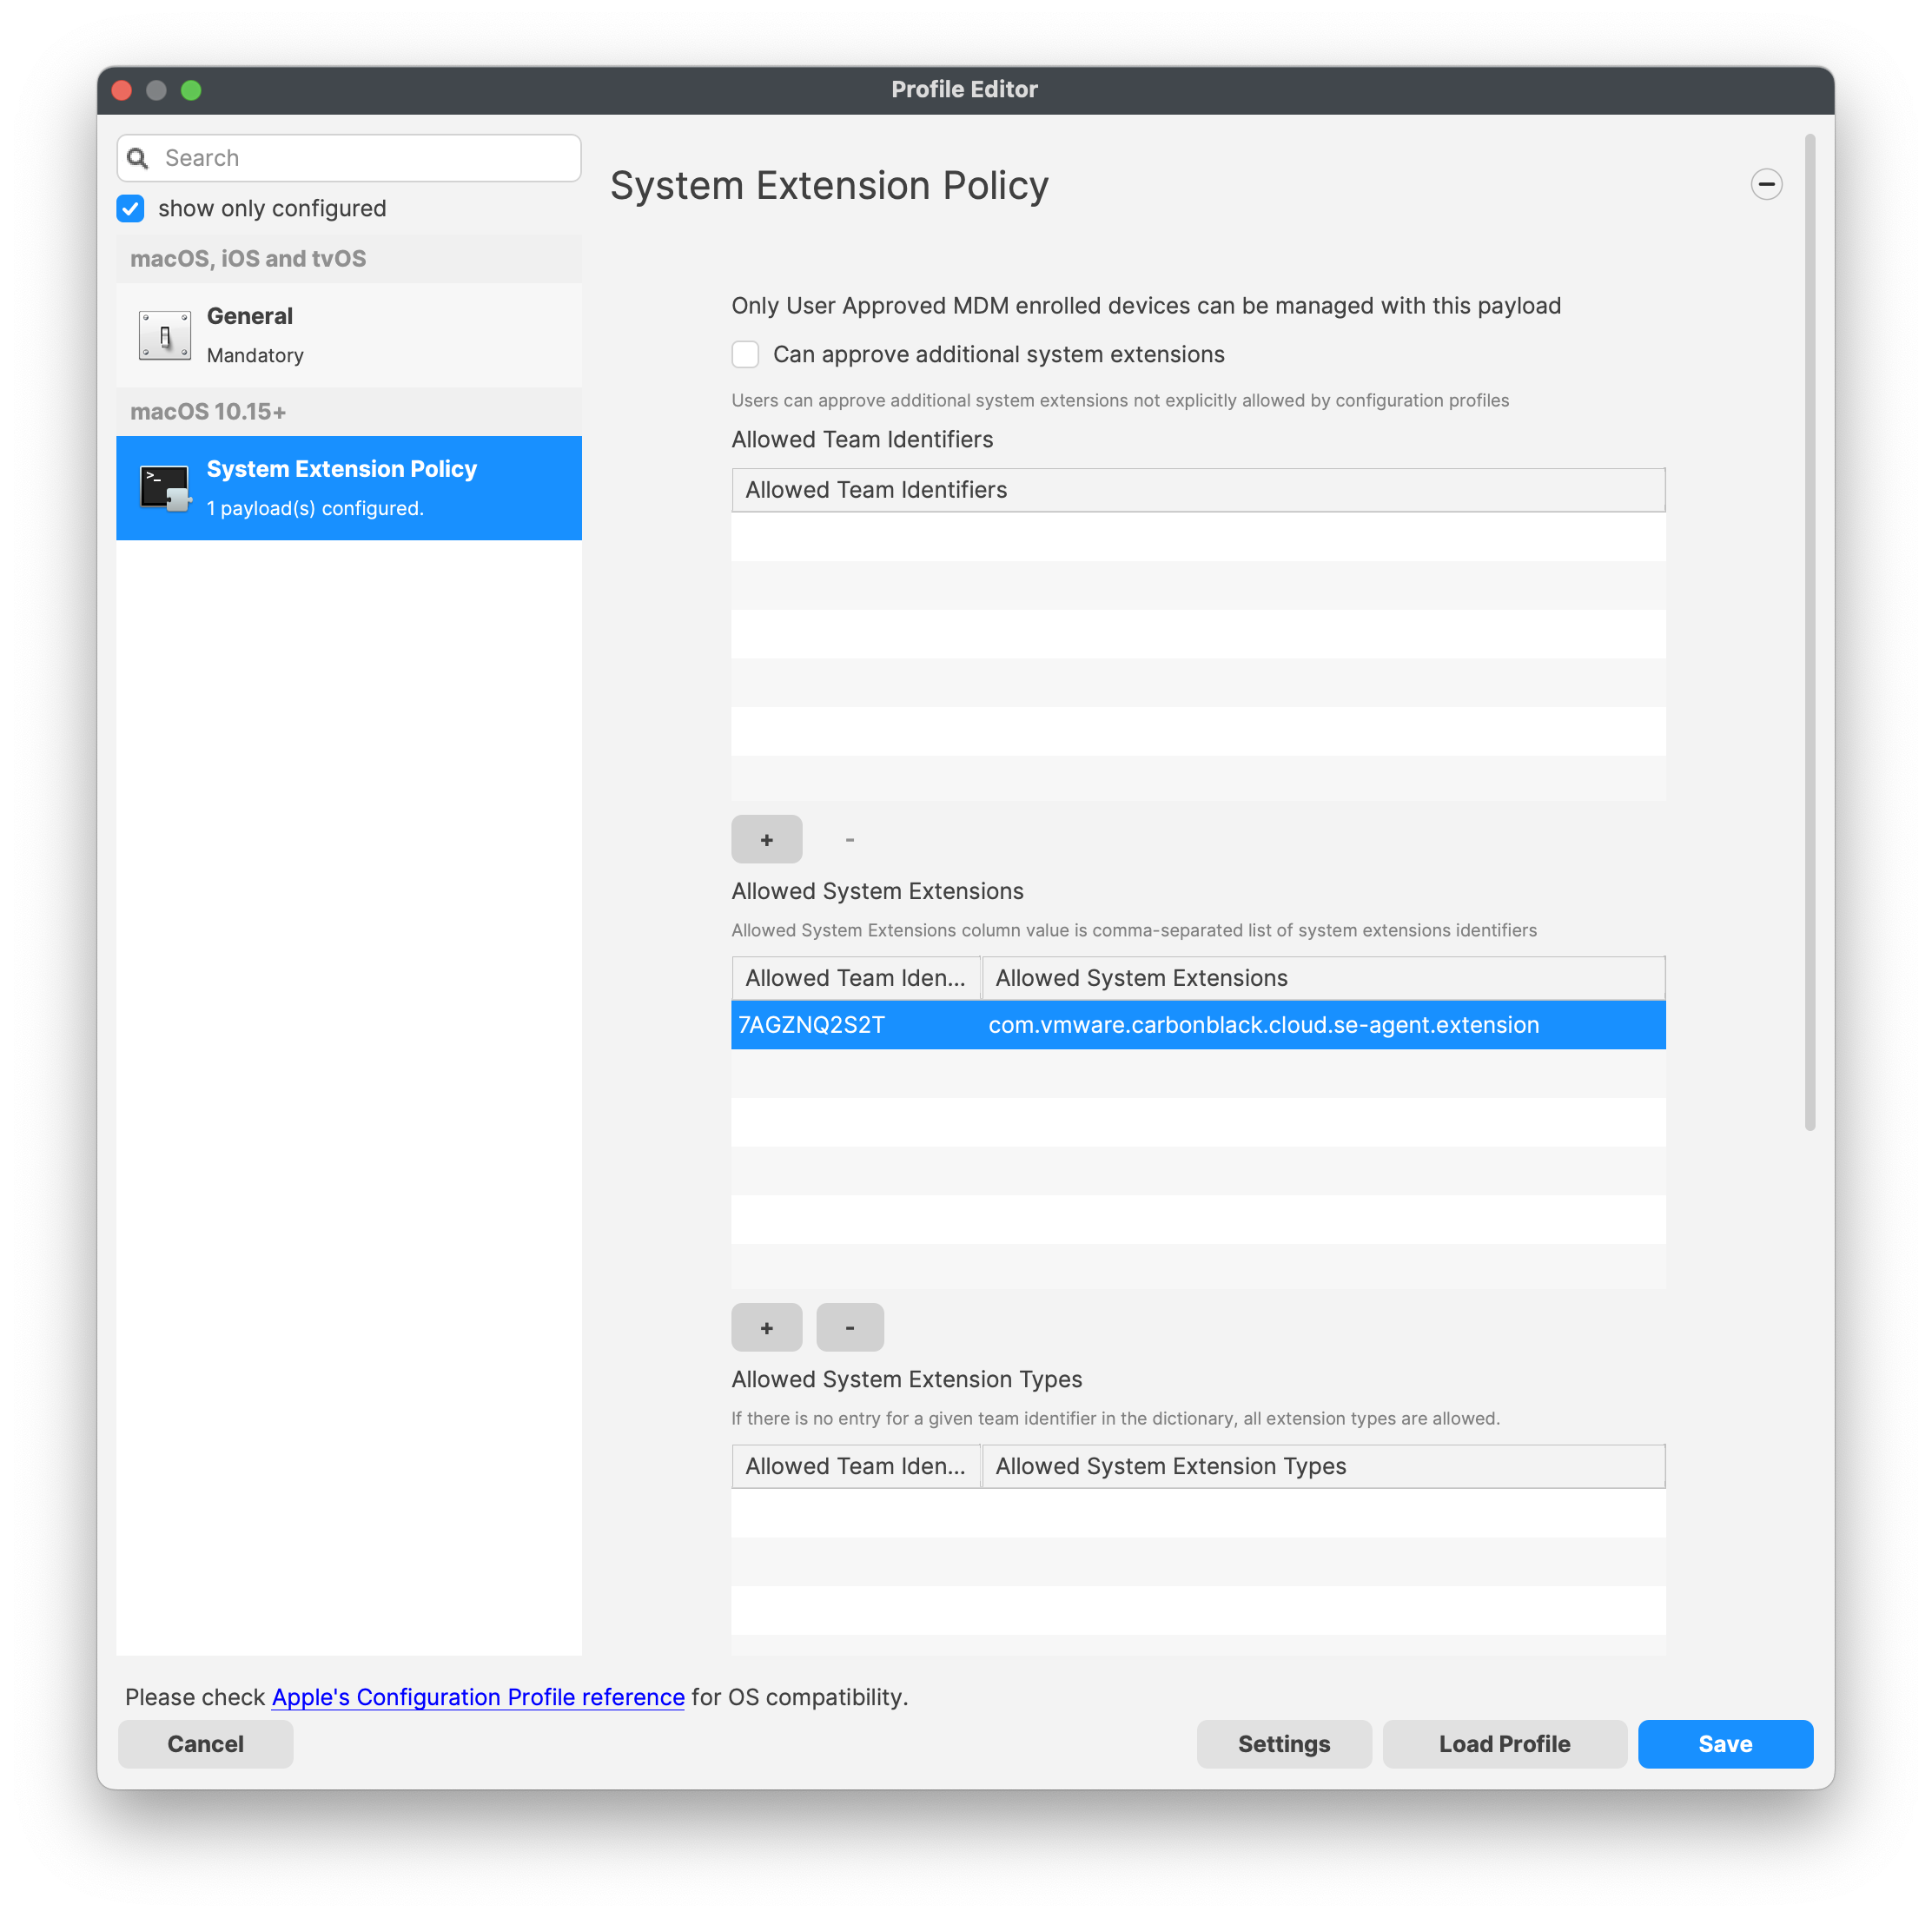
#### Approve System Extension
For the Allowed System Extension, please enter in the following:
System Extension Policy
Specify the Apple Team ID and System Extension bundle Identifier in your Allowed System Extension configuration profile:
- System Extension Types: **Allowed System Extensions**
- Apple Team ID: **7AGZNQ2S2T**
- System Extension Bundle ID: **com.vmware.carbonblack.cloud.se-agent.extension**`
`
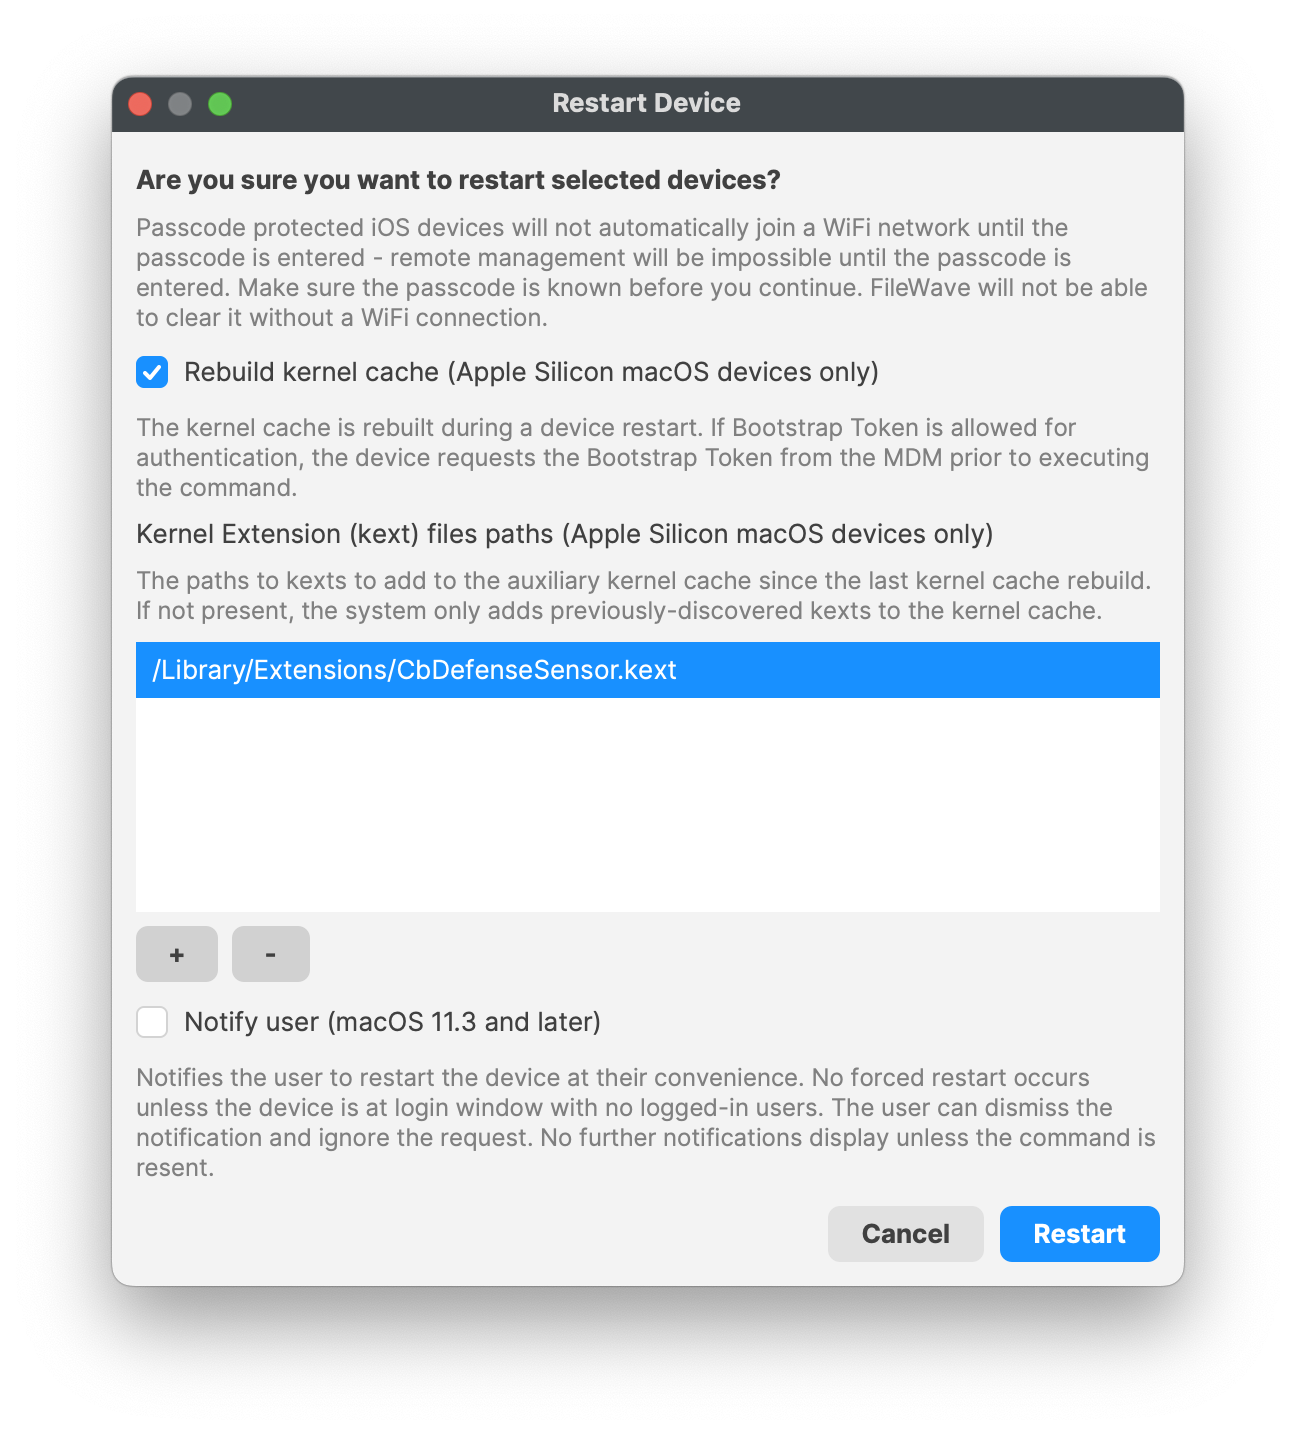
Do not use the KEXT payload as the default for current 3.8+ macOS sensor deployments. Keep this section only for older sensor packages or environments where Carbon Black/Broadcom documentation explicitly says to deploy in KEXT mode.
For a legacy Kernel Approval profile, enter the TeamID and BundleID:
**Apple Team ID: 7AGZNQ2S2T**
**KEXT Bundle ID: com.carbonblack.defense.kext**
Kernel Extension Policy: The recommended way to deliver this configuration is through
the provided [MDM-KEXT-reboot-command.xml](https://kb.filewave.com/attachments/261). FileWave has the Rebuild Kernel Cache command by highlighting the MDM client, right-clicking Restart (Supported MDM devices), checking the box for Rebuild Kernel Cache, and entering in the Kernel file path:
*/Library/Extensions/CbDefenceSensor.kext*
Kernel Rebuild Cache
[](https://kb.filewave.com/uploads/images/gallery/2023-10/hZHfZ5fioRAIFC1q-rebuildkernelcache.png)
TCC metadata
The fields should be completed exactly as follows. Please copy and paste for accuracy.
1\]
Identifier: **com.vmware.carbonblack.cloud.daemon**
Identifier Type should be set to: Bundle ID
Code Requirement: **identifier "com.vmware.carbonblack.cloud.daemon" and anchor apple generic and certificate 1\[field.1.2.840.113635.100.6.2.6\] /\* exists \*/ and certificate leaf\[field.1.2.840.113635.100.6.1.13\] /\* exists \*/ and certificate leaf\[subject.OU\] = "7AGZNQ2S2T"**
App or Service should be set to: **SystemPolicyAllFiles**
Access should be set to: **Allow**
2\]
Identifier: **com.vmware.carbonblack.cloud.se-agent.extension**
Identifier Type should be set to: Bundle ID
Code Requirement: **identifier "com.vmware.carbonblack.cloud.se-agent.extension" and anchor apple generic and certificate 1\[field.1.2.840.113635.100.6.2.6\] /\* exists \*/ and certificate leaf\[field.1.2.840.113635.100.6.1.13\] /\* exists \*/ and certificate leaf\[subject.OU\] = "7AGZNQ2S2T**
App or Service should be set to: **SystemPolicyAllFiles**
Access should be set to: **Allow**
3\]
Identifier: **com.vmware.carbonblack.cloud.osqueryi**
Identifier Type should be set to: Bundle ID
Code Requirement: **identifier "com.vmware.carbonblack.cloud.osqueryi" and anchor apple generic and certificate 1\[field.1.2.840.113635.100.6.2.6\] /\* exists \*/ and certificate leaf\[field.1.2.840.113635.100.6.1.13\] /\* exists \*/ and certificate leaf\[subject.OU\] = "7AGZNQ2S2T"**
App or Service should be set to: **SystemPolicyAllFiles**
Access should be set to: **Allow**
4\]
Identifier: **com.vmware.carbonblack.cloud.uninstall**
Identifier Type should be set to: Bundle ID
Code Requirement: **identifier "com.vmware.carbonblack.cloud.uninstall" and anchor apple generic and certificate 1\[field.1.2.840.113635.100.6.2.6\] /\* exists \*/ and certificate leaf\[field.1.2.840.113635.100.6.1.13\] /\* exists \*/ and certificate leaf\[subject.OU\] = "7AGZNQ2S2T"**
App or Service should be set to: **SystemPolicyAllFiles**
Access should be set to: **Allow**
5\]
Identifier: **com.vmware.carbonblack.cloud.uninstallerui**
Identifier Type should be set to: Bundle ID
Code Requirement: **identifier "com.vmware.carbonblack.cloud.uninstallerui" and anchor apple generic and certificate 1\[field.1.2.840.113635.100.6.2.6\] /\* exists \*/ and certificate leaf\[field.1.2.840.113635.100.6.1.13\] /\* exists \*/ and certificate leaf\[subject.OU\] = "7AGZNQ2S2T"**
App or Service should be set to: **SystemPolicyAllFiles**
Access should be set to: **Allow**
Web Content Filter Policy
The fields should be completed exactly as follows. Please copy and paste for accuracy.
In the General payload:
Payload Scope should be set to: **System**
In the Web Content Filter payload:
Filter Type: **Plug-In**
Plug-In Bundle ID: **com.vmware.carbonblack.cloud.se-agent**
Check Enable Socket Filtering
Filter Data Provider System Extension Bundle ID (macOS): **com.vmware.carbonblack.cloud.se-agent.extension**
Filter Data Provider Designated Requirement (macOS): **identifier "com.vmware.carbonblack.cloud.se-agent.extension" and anchor apple generic and certificate 1\[field.1.2.840.113635.100.6.2.6\] /\* exists \*/ and certificate leaf\[field.1.2.840.113635.100.6.1.13\] /\* exists \*/ and certificate leaf\[subject.OU\] = "7AGZNQ2S2T"**
Check Enable Packet Filtering (macOS)
Filter Packet Provider System Extension Bundle ID (macOS): **com.vmware.carbonblack.cloud.se-agent.extension**
Filter Packet Provider Designated Requirement (macOS): **identifier "com.vmware.carbonblack.cloud.se-agent.extension" and anchor apple generic and certificate 1\[field.1.2.840.113635.100.6.2.6\] /\* exists \*/ and certificate leaf\[field.1.2.840.113635.100.6.1.13\] /\* exists \*/ and certificate leaf\[subject.OU\] = "7AGZNQ2S2T"**
Verification Settings: VMware CBCloud client will get updates from the CBCloud server. If your organization allows, be sure to change the verification settings from 'Self-Healing' to 'Ignore at Verify' for the Fileset.
[](https://kb.filewave.com/uploads/images/gallery/2023-10/q5CbcuI0c0v0jAEx-vmwarecbcloudfileset.png)
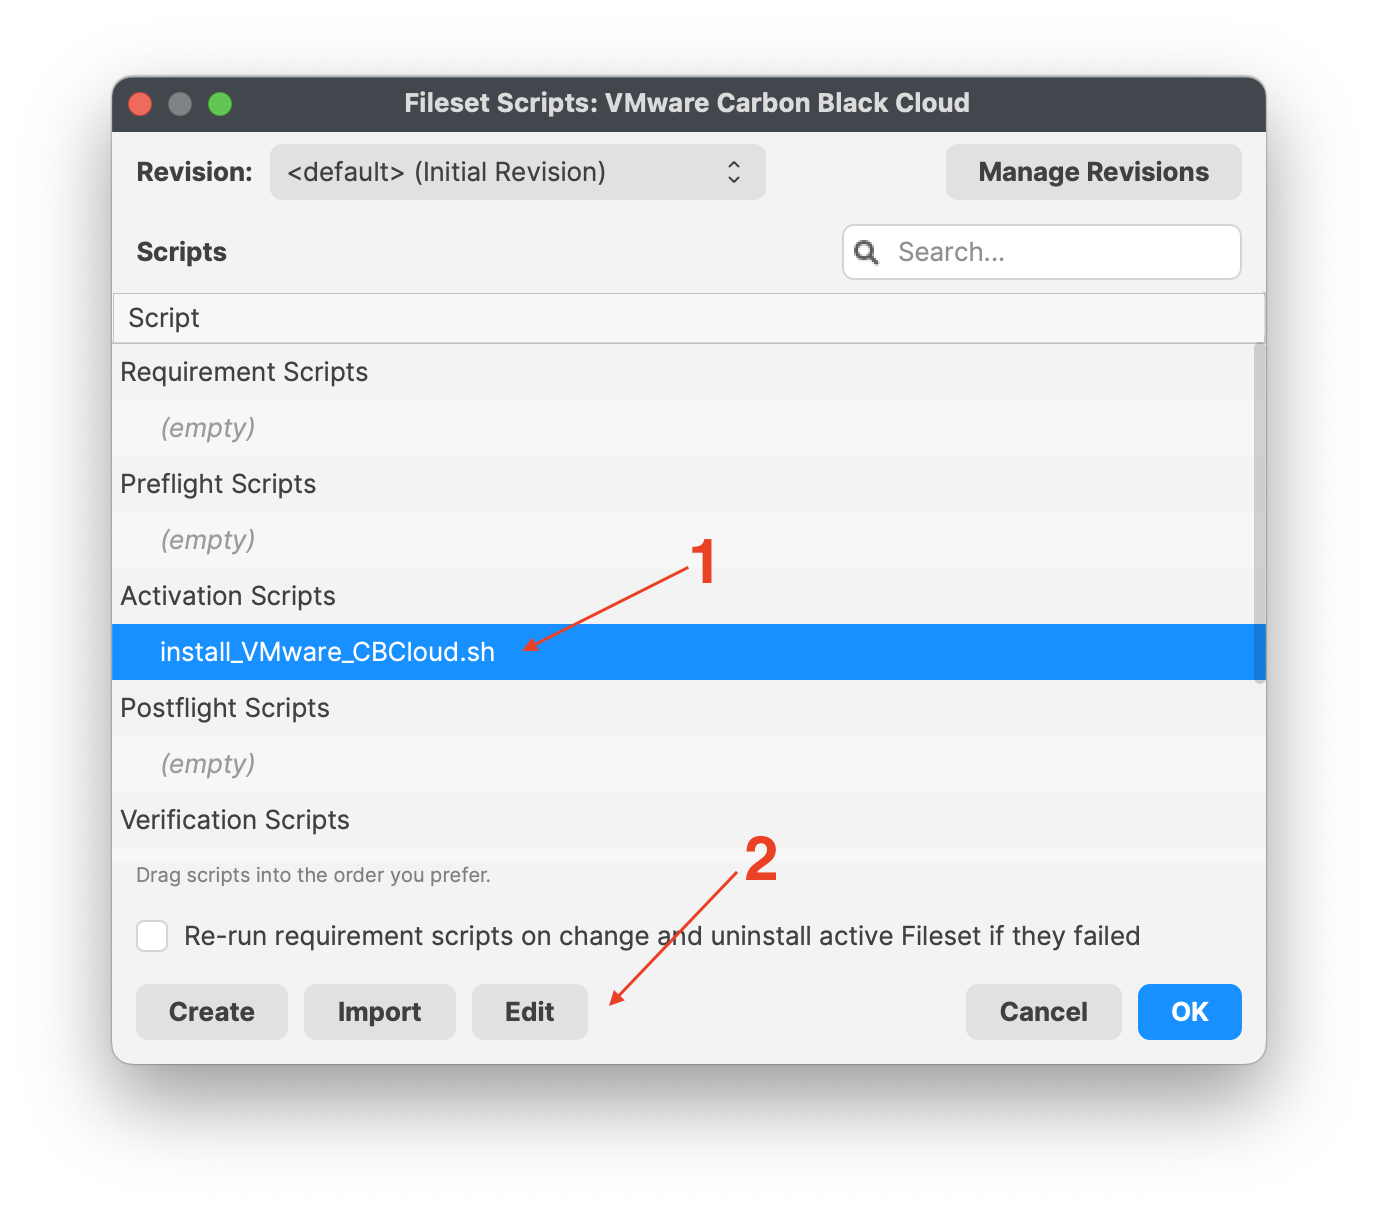
### VMware CBCloud install script
You will need to modify and add your company code to the install\_VMware\_CBCloud.sh script.
1. Highlight the Fileset and click on Scripts (FW Central menu)
2. Highlight Activation Scripts, install\_VMware\_CBCloud.sh
3. Click on Edit to open the script
4. Enter your company code, i.e. #######
5. Click OK to save
6. Click OK to save your changes
| [](https://kb.filewave.com/uploads/images/gallery/2023-10/BeZriTCt64iWlZku-vmwarecompanycode01.png)
| [](https://kb.filewave.com/uploads/images/gallery/2023-10/Nc7unhGpw8Mc8pT0-vmwarecompanycode02.png)
|
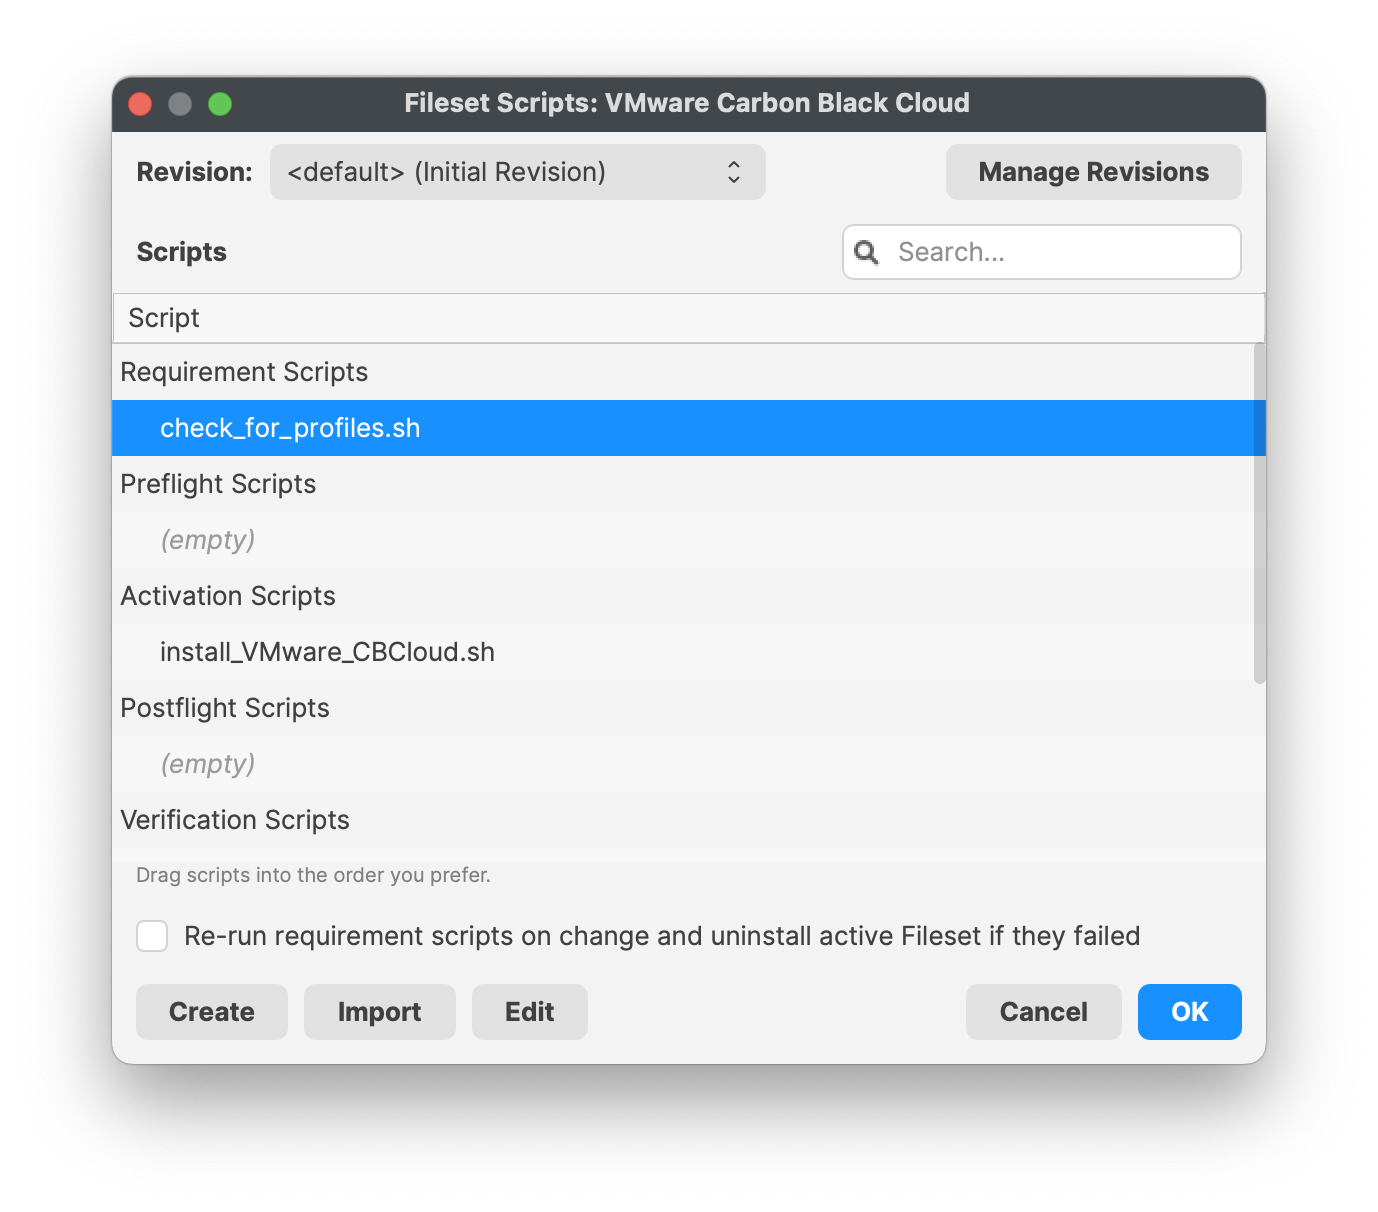
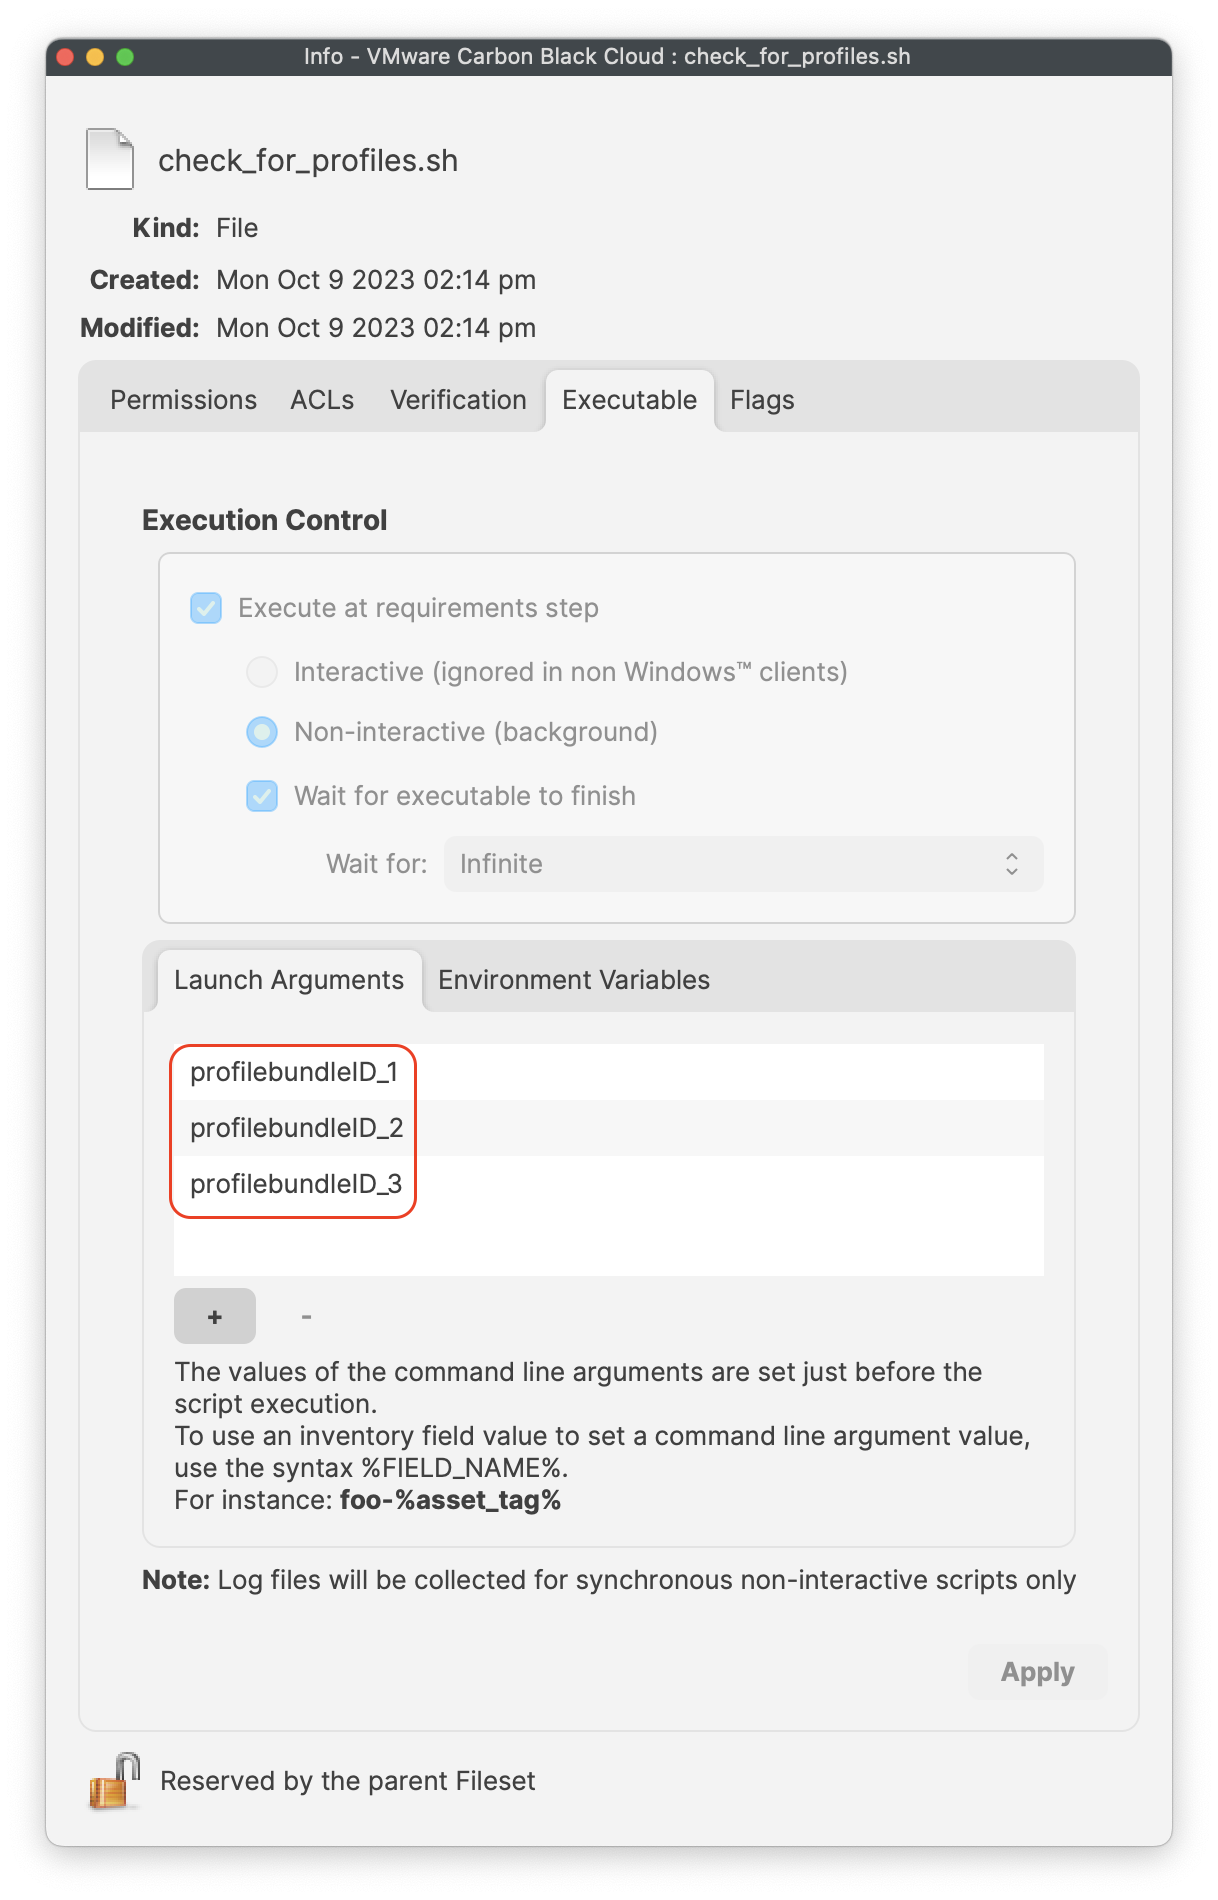
### Check for Profiles requirement script
You will need to modify and add your profile bundle IDs to the requirement script.
1. Highlight the Fileset and on Scripts (FW Central menu)
2. Highlight Requirement Scripts, check\_for\_profiles.sh
3. Right-click and select properties
4. Select and click on the Launch Arguments tab
5. Enter in your three profile bundle IDs
6. Click 'Apply' to save your changes
7. Select and click on the Environment Variables tab
8. Confirm the all\_or\_one variables string is set to 'all'
9. Click 'Apply' to save your changes, if not saved
10. Close the script properties window
11. Click OK to save your changes to the requirement script
| [](https://kb.filewave.com/uploads/images/gallery/2023-10/aW4OOQBm0fd8htAz-requirementscript.png)
| [](https://kb.filewave.com/uploads/images/gallery/2023-10/FPF8uCSrEqJh1GYc-launcharugments.png) | [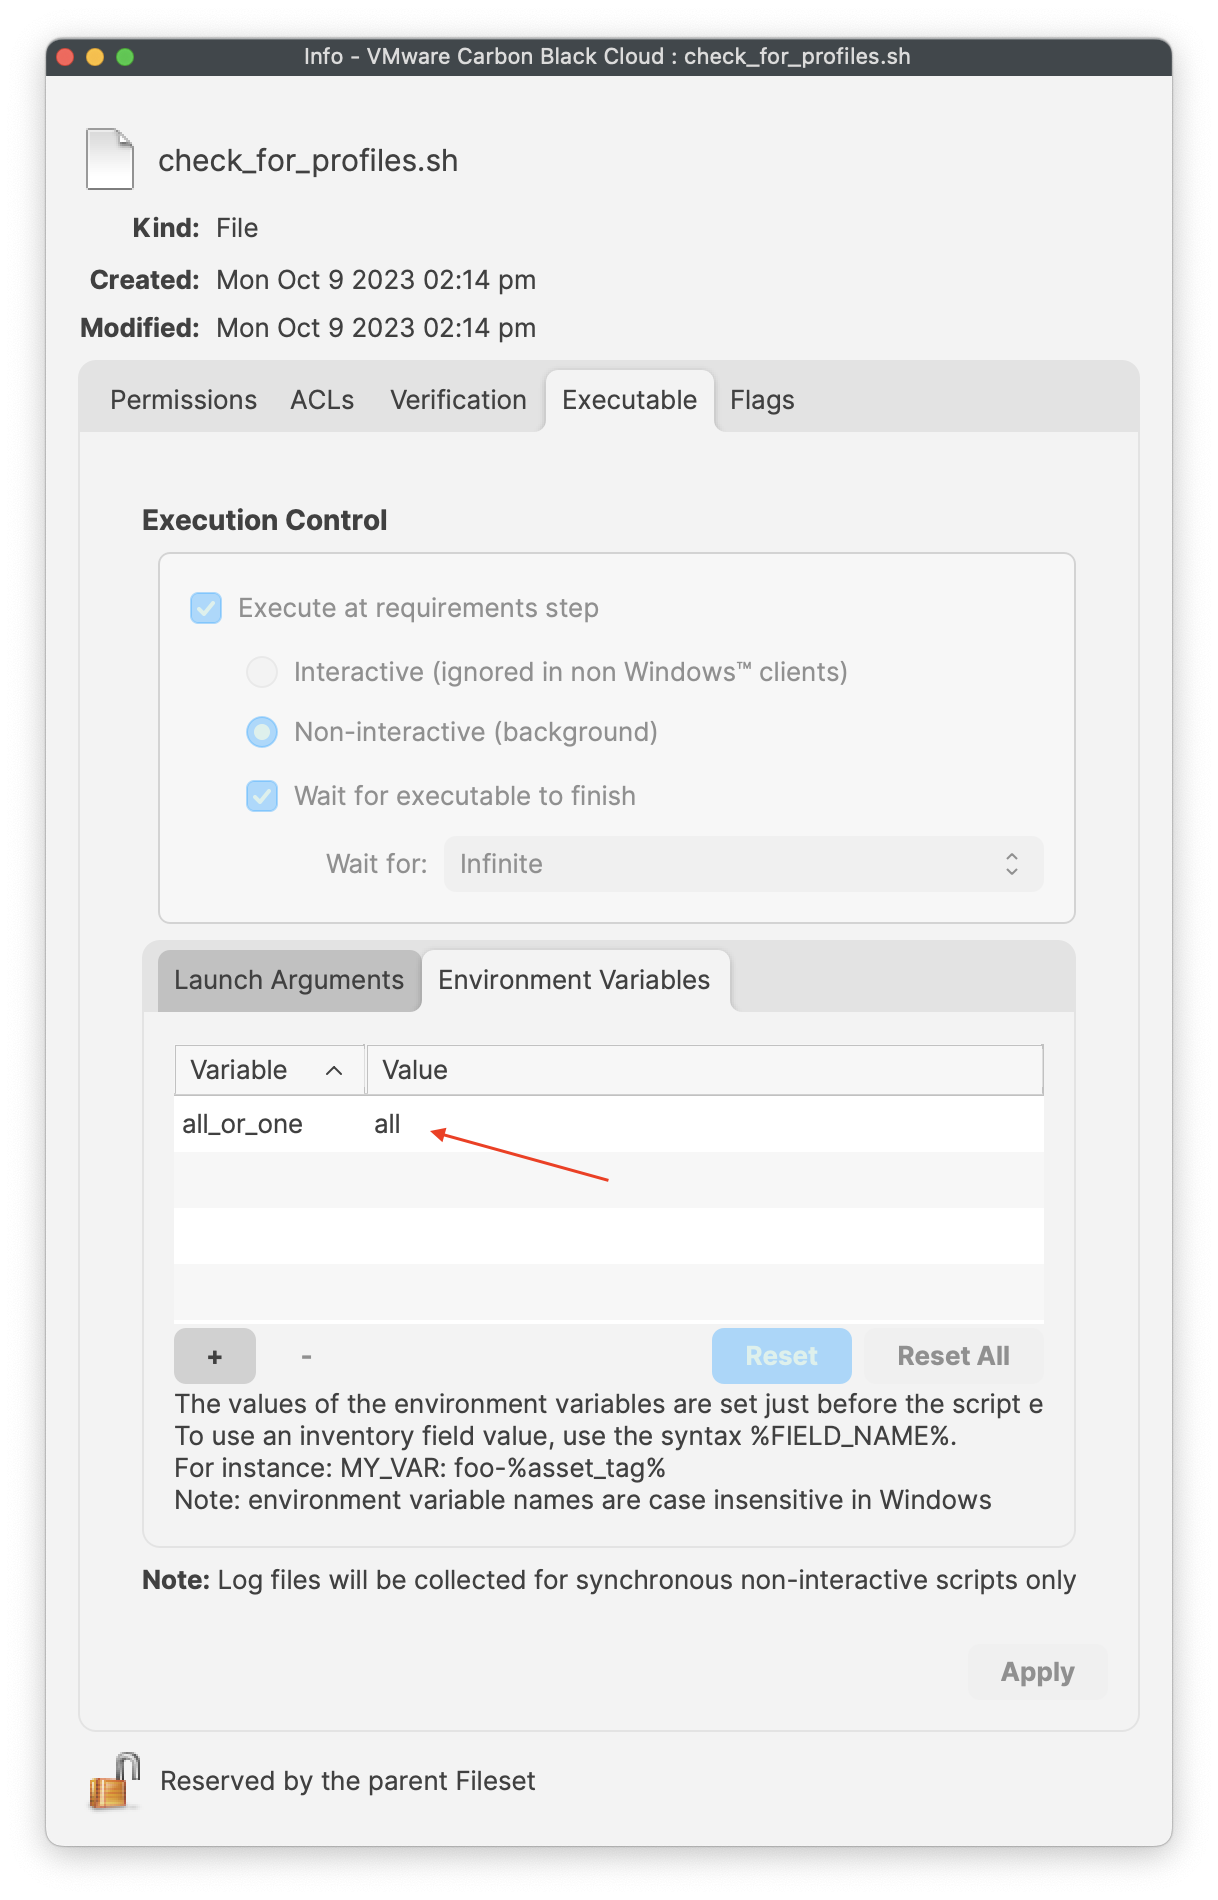](https://kb.filewave.com/uploads/images/gallery/2023-10/PIliyt0wE87MKISJ-environmentvariables.png) |
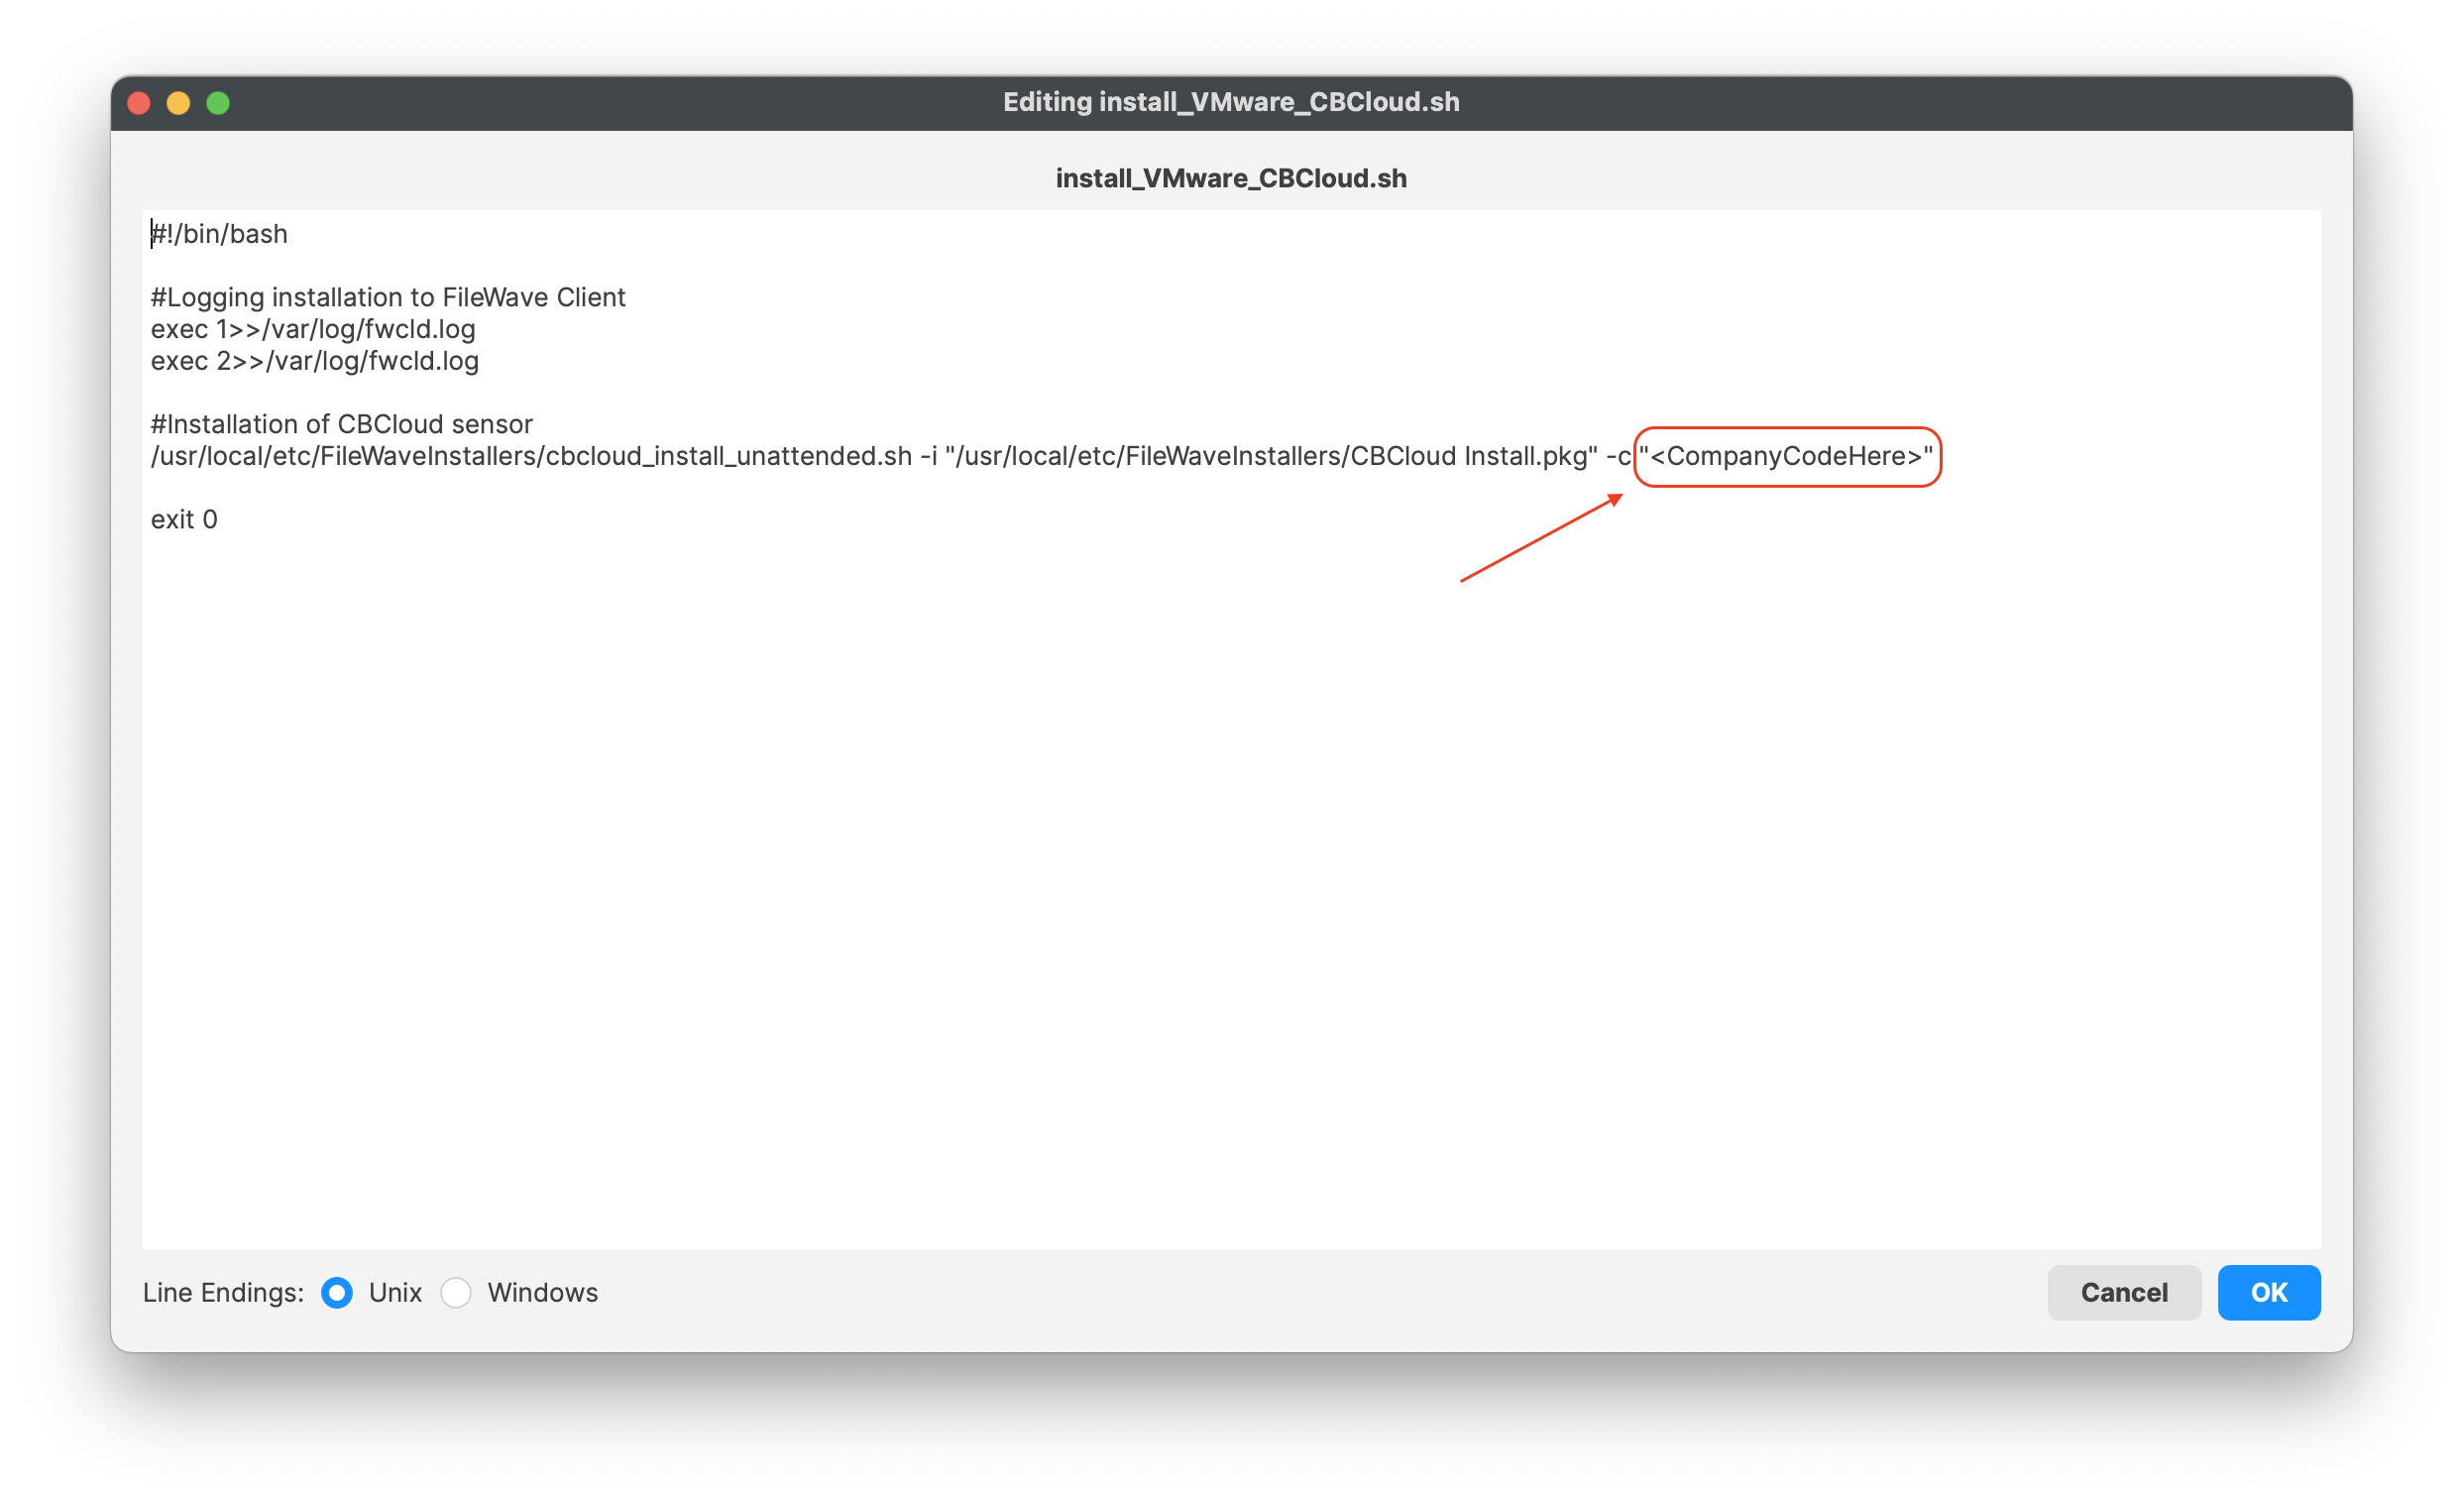
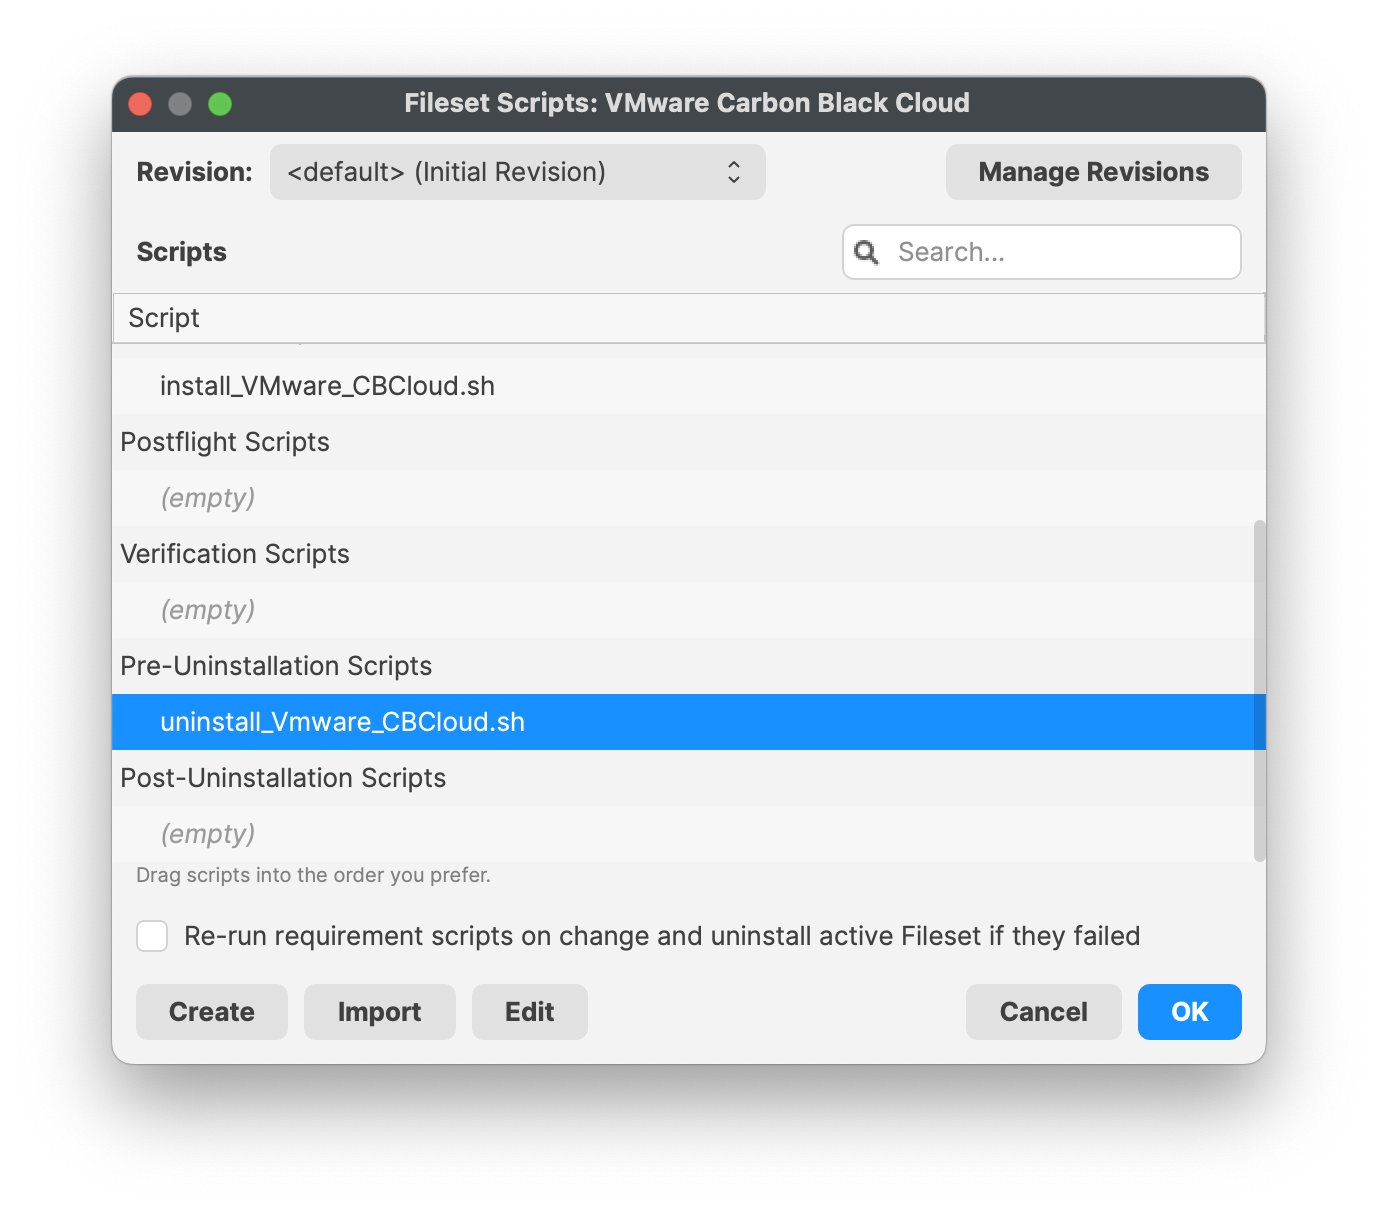
### Vmware uninstall script
This is optional and not required!
If you have a company code to allow uninstallation of the VMware Carbon sensor, you may enter your code into the script under:
- Line 12 **<CompanyCodeHere>**; replace with your code and remove the <>
uninstall\_Vmware\_CBCloud.sh
```
#!/bin/bash
#Logging uninstallation
exec 1>>/var/log/fwcld.log
exec 2>>/var/log/fwcld.log
#Uninstalling VMware CBCloud sensor
# There are two command line options:
# -c If specified by the policy active on the endpoint, this option and uninstall code will be required.
# -y Skips the interactive prompt to confirm that uninstallation is desired. Recommended for unattended uninstall.
/Applications/VMware\ Carbon\ Black\ Cloud/uninstall.bundle/Contents/MacOS/uninstall -c -y
exit 0
```
| [](https://kb.filewave.com/uploads/images/gallery/2023-10/eBdJZDqYR4ybZUqN-uninstallscript.png) | [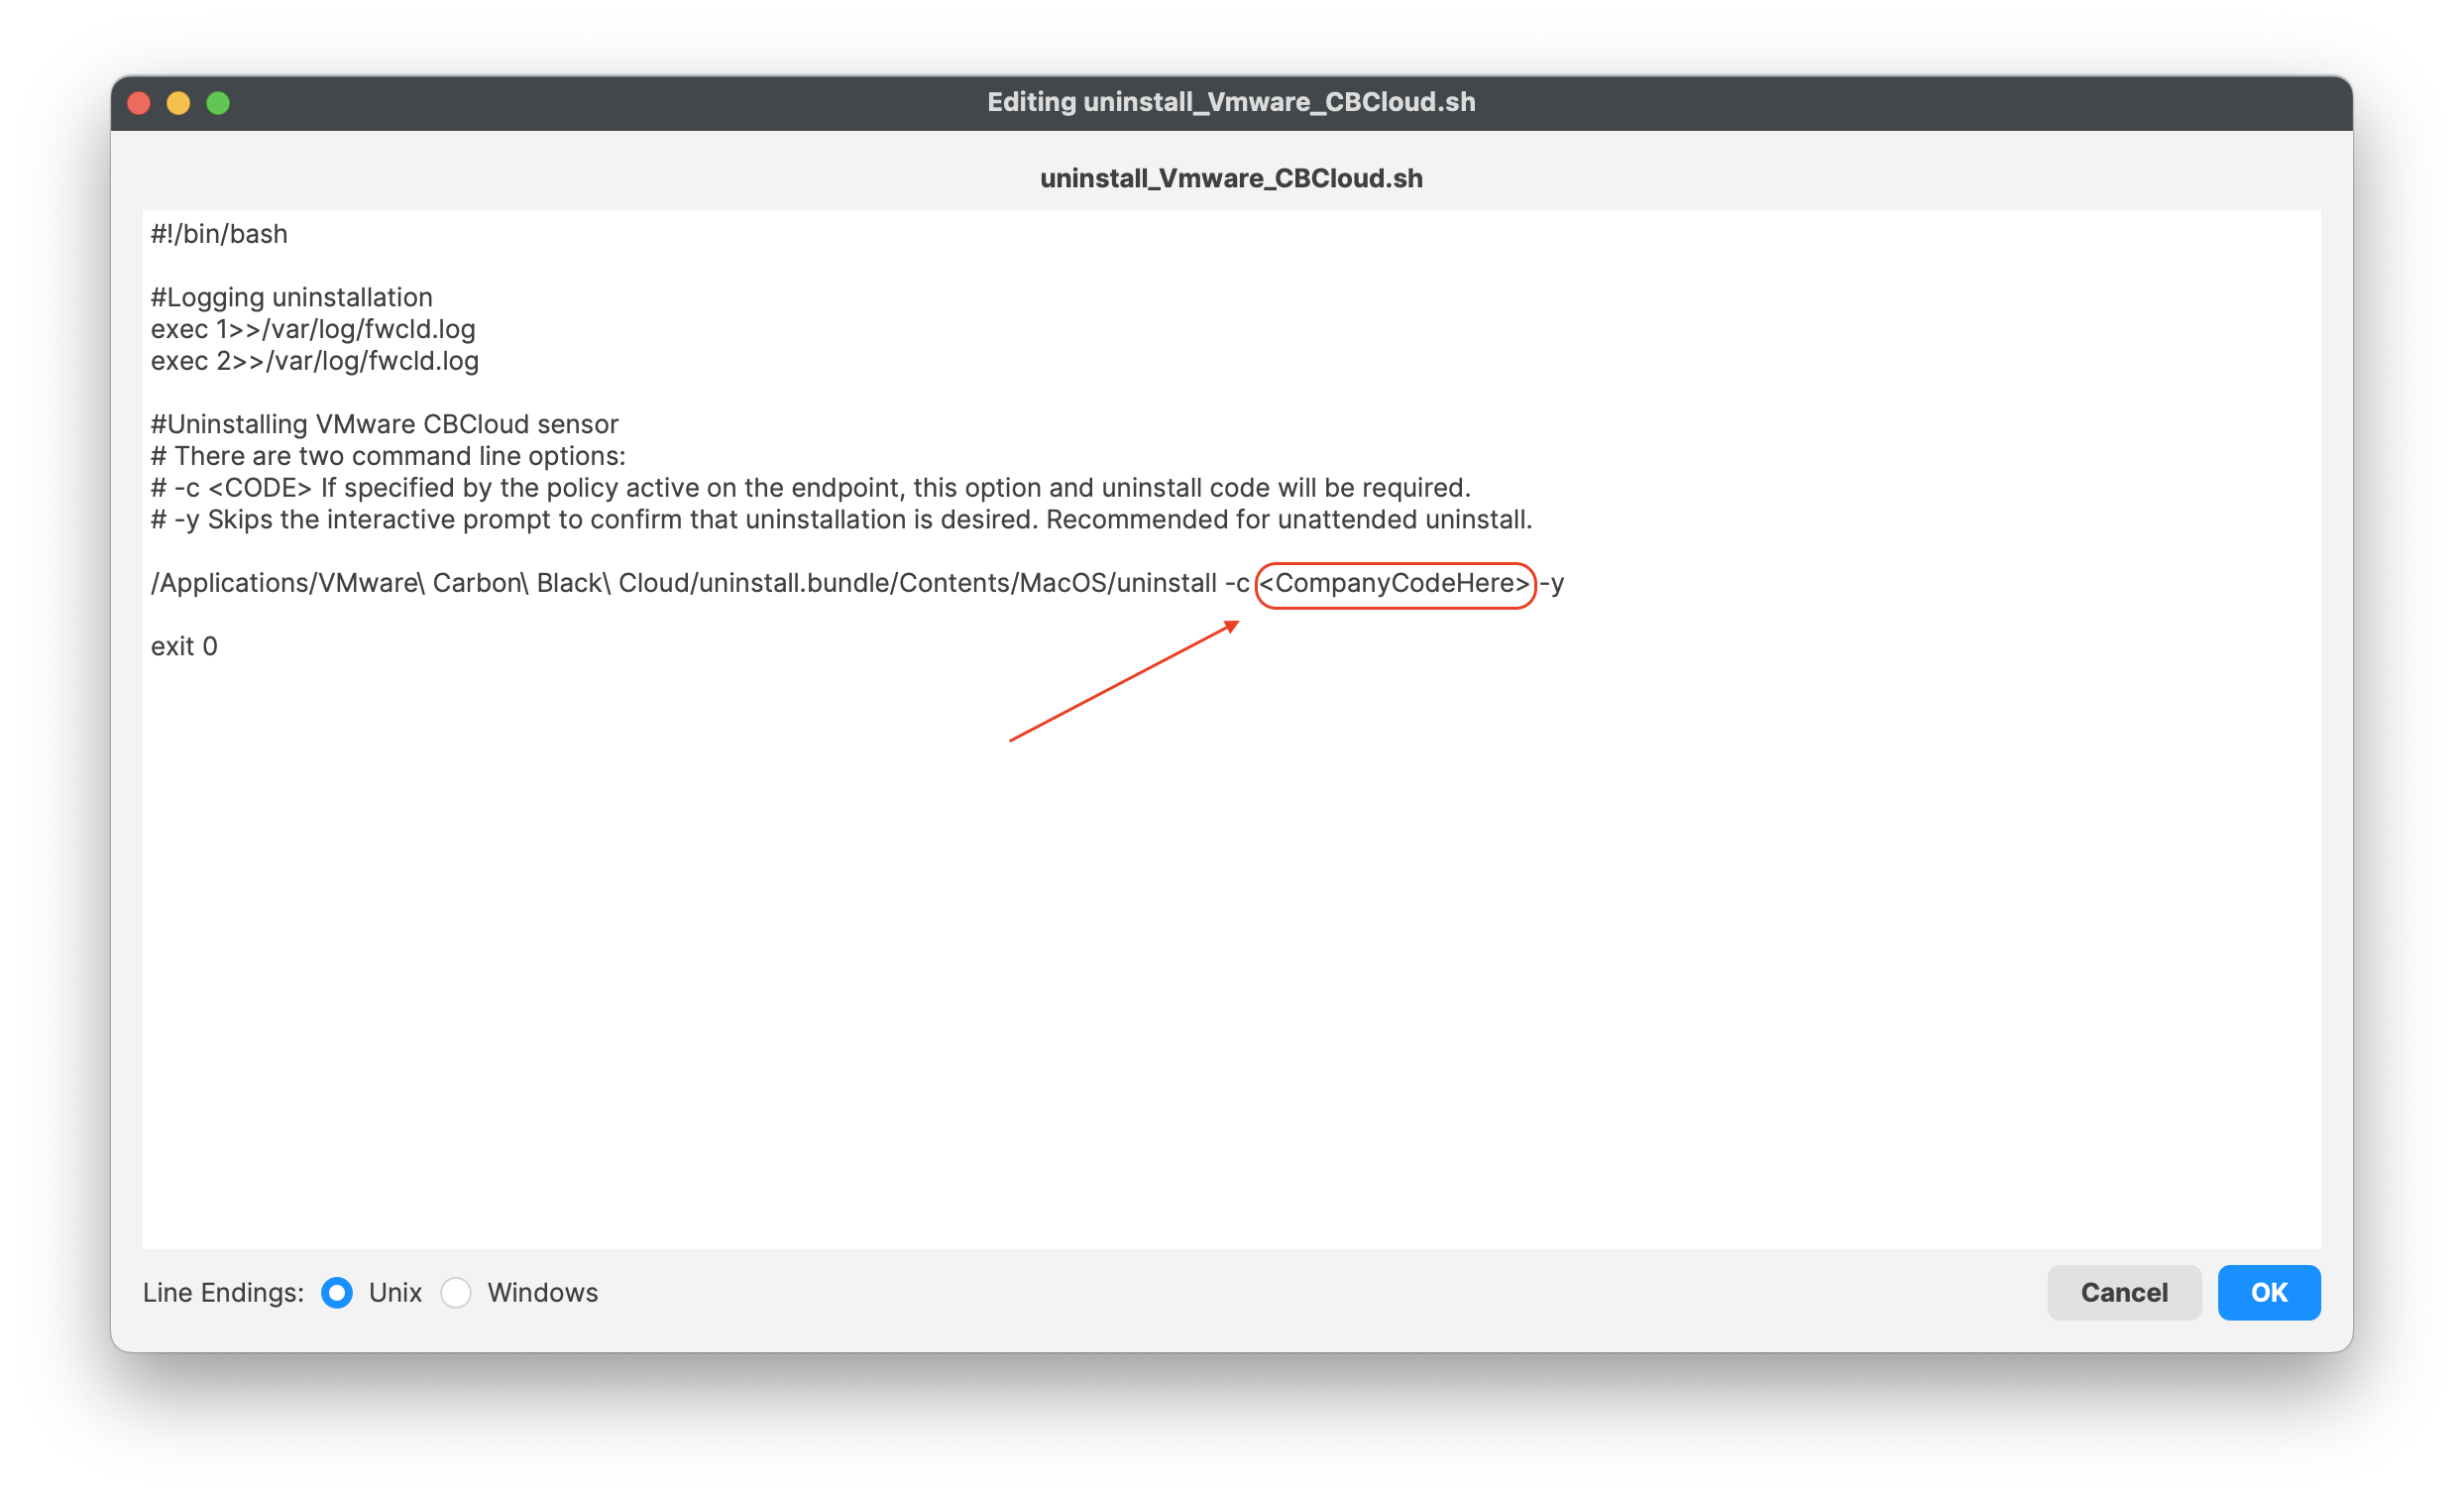](https://kb.filewave.com/uploads/images/gallery/2023-10/C3iHoyW3Pp78Ihek-uninstallscript02.png)
|
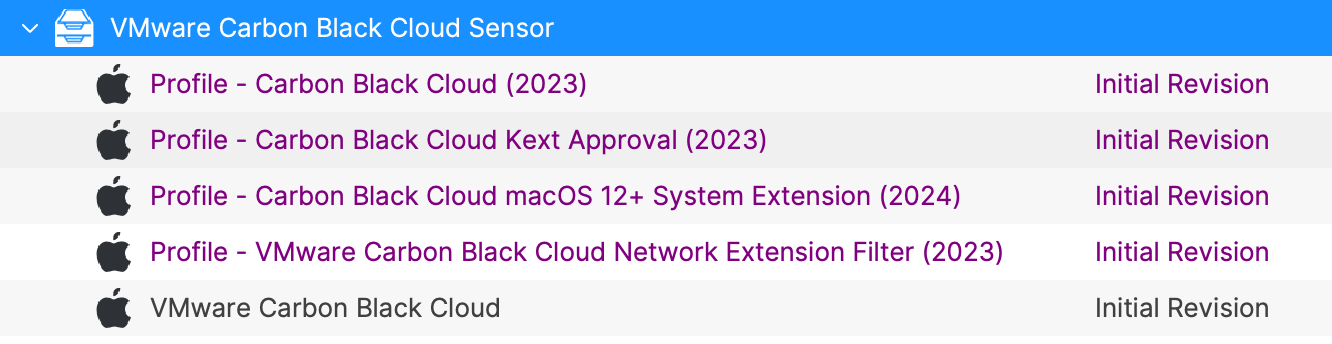
### Fileset Group
Once the Fileset and Profiles have been created, the best practice is to create a Fileset group. Organizing and keeping multiple profiles and Filesets within the same group for the same application and its configurations is great management and organization.
Profiles should be installed first. The VMware Carbon Black Cloud Fileset has a requirement script to ensure profiles are installed, before commencing with download and activation of the Fileset.
[](https://kb.filewave.com/uploads/images/gallery/2024-03/rsEOGRlovWPLJ4SI-vmware-ccb-fs-group.png)
Remember to always test Fileset to a few devices before mass deployment.
## Related Content
- [VMware Carbon Black Cloud release notes](https://docs.vmware.com/en/VMware-Carbon-Black-Cloud/3.7.4.53/rn/vmware-carbon-black-cloud-macos-sensor-37453-release-notes/index.html)  `
`