Software Deployment Recipes (Microsoft)
The Software Deployment Recipes (Microsoft) section provides a curated collection of practical guides and step-by-step instructions for efficiently deploying software and applications in Microsoft environments. Discover proven techniques and best practices for automating software deployments, managing configurations, and optimizing compatibility on Windows devices. Whether you're a system administrator or an IT professional, these recipes offer valuable insights to streamline your software deployment processes, enhance productivity, and ensure a seamless experience across your Microsoft devices.
- 7zip (Windows MSI)
- Adobe Creative Cloud (Windows EXE)
- Adobe Air (Windows EXE)
- CrowdStrike Falcon Protection (Windows EXE)
- Firefox Configuration Recipe (Windows)
- Google Chrome Extension Management (Windows)
- Google Chrome Managed (Windows)
- Installing SOLIDWORKS (Windows EXE)
- Java (Windows EXE)
- Microsoft Defender Recipe (Win)
- Microsoft Office Deployment for Windows: Office 2019/2021, Office LTSC 2024, and Microsoft 365 Apps
- SentinelOne (Windows EXE)
- Upgrading or Repairing the Visual C++ Redistributable on Windows (Windows script)
7zip (Windows MSI)
Description
Example recipe for deploying 7zip with new MSI parameters in FileWave 15.2.0.
Ingredients
-
FW Admin
-
7zip MSI installer
Be sure to review 7zip FAQs to use the proper install path. FileWave will force a silent install when using MSI installers.
Directions
-
Download the 7zip MSI installer from 7zip: Download
- Upload MSI installer by creating New Desktop Fileset and choose MSI / PKG to create
- Highlight the newly created MSI Fileset, and select Properties
- Scroll down to the Custom MSI install options
- Enter in the desired path for 7zip
 Example here is installing to C:\Program Files\7-Zip
 - Click OK to save
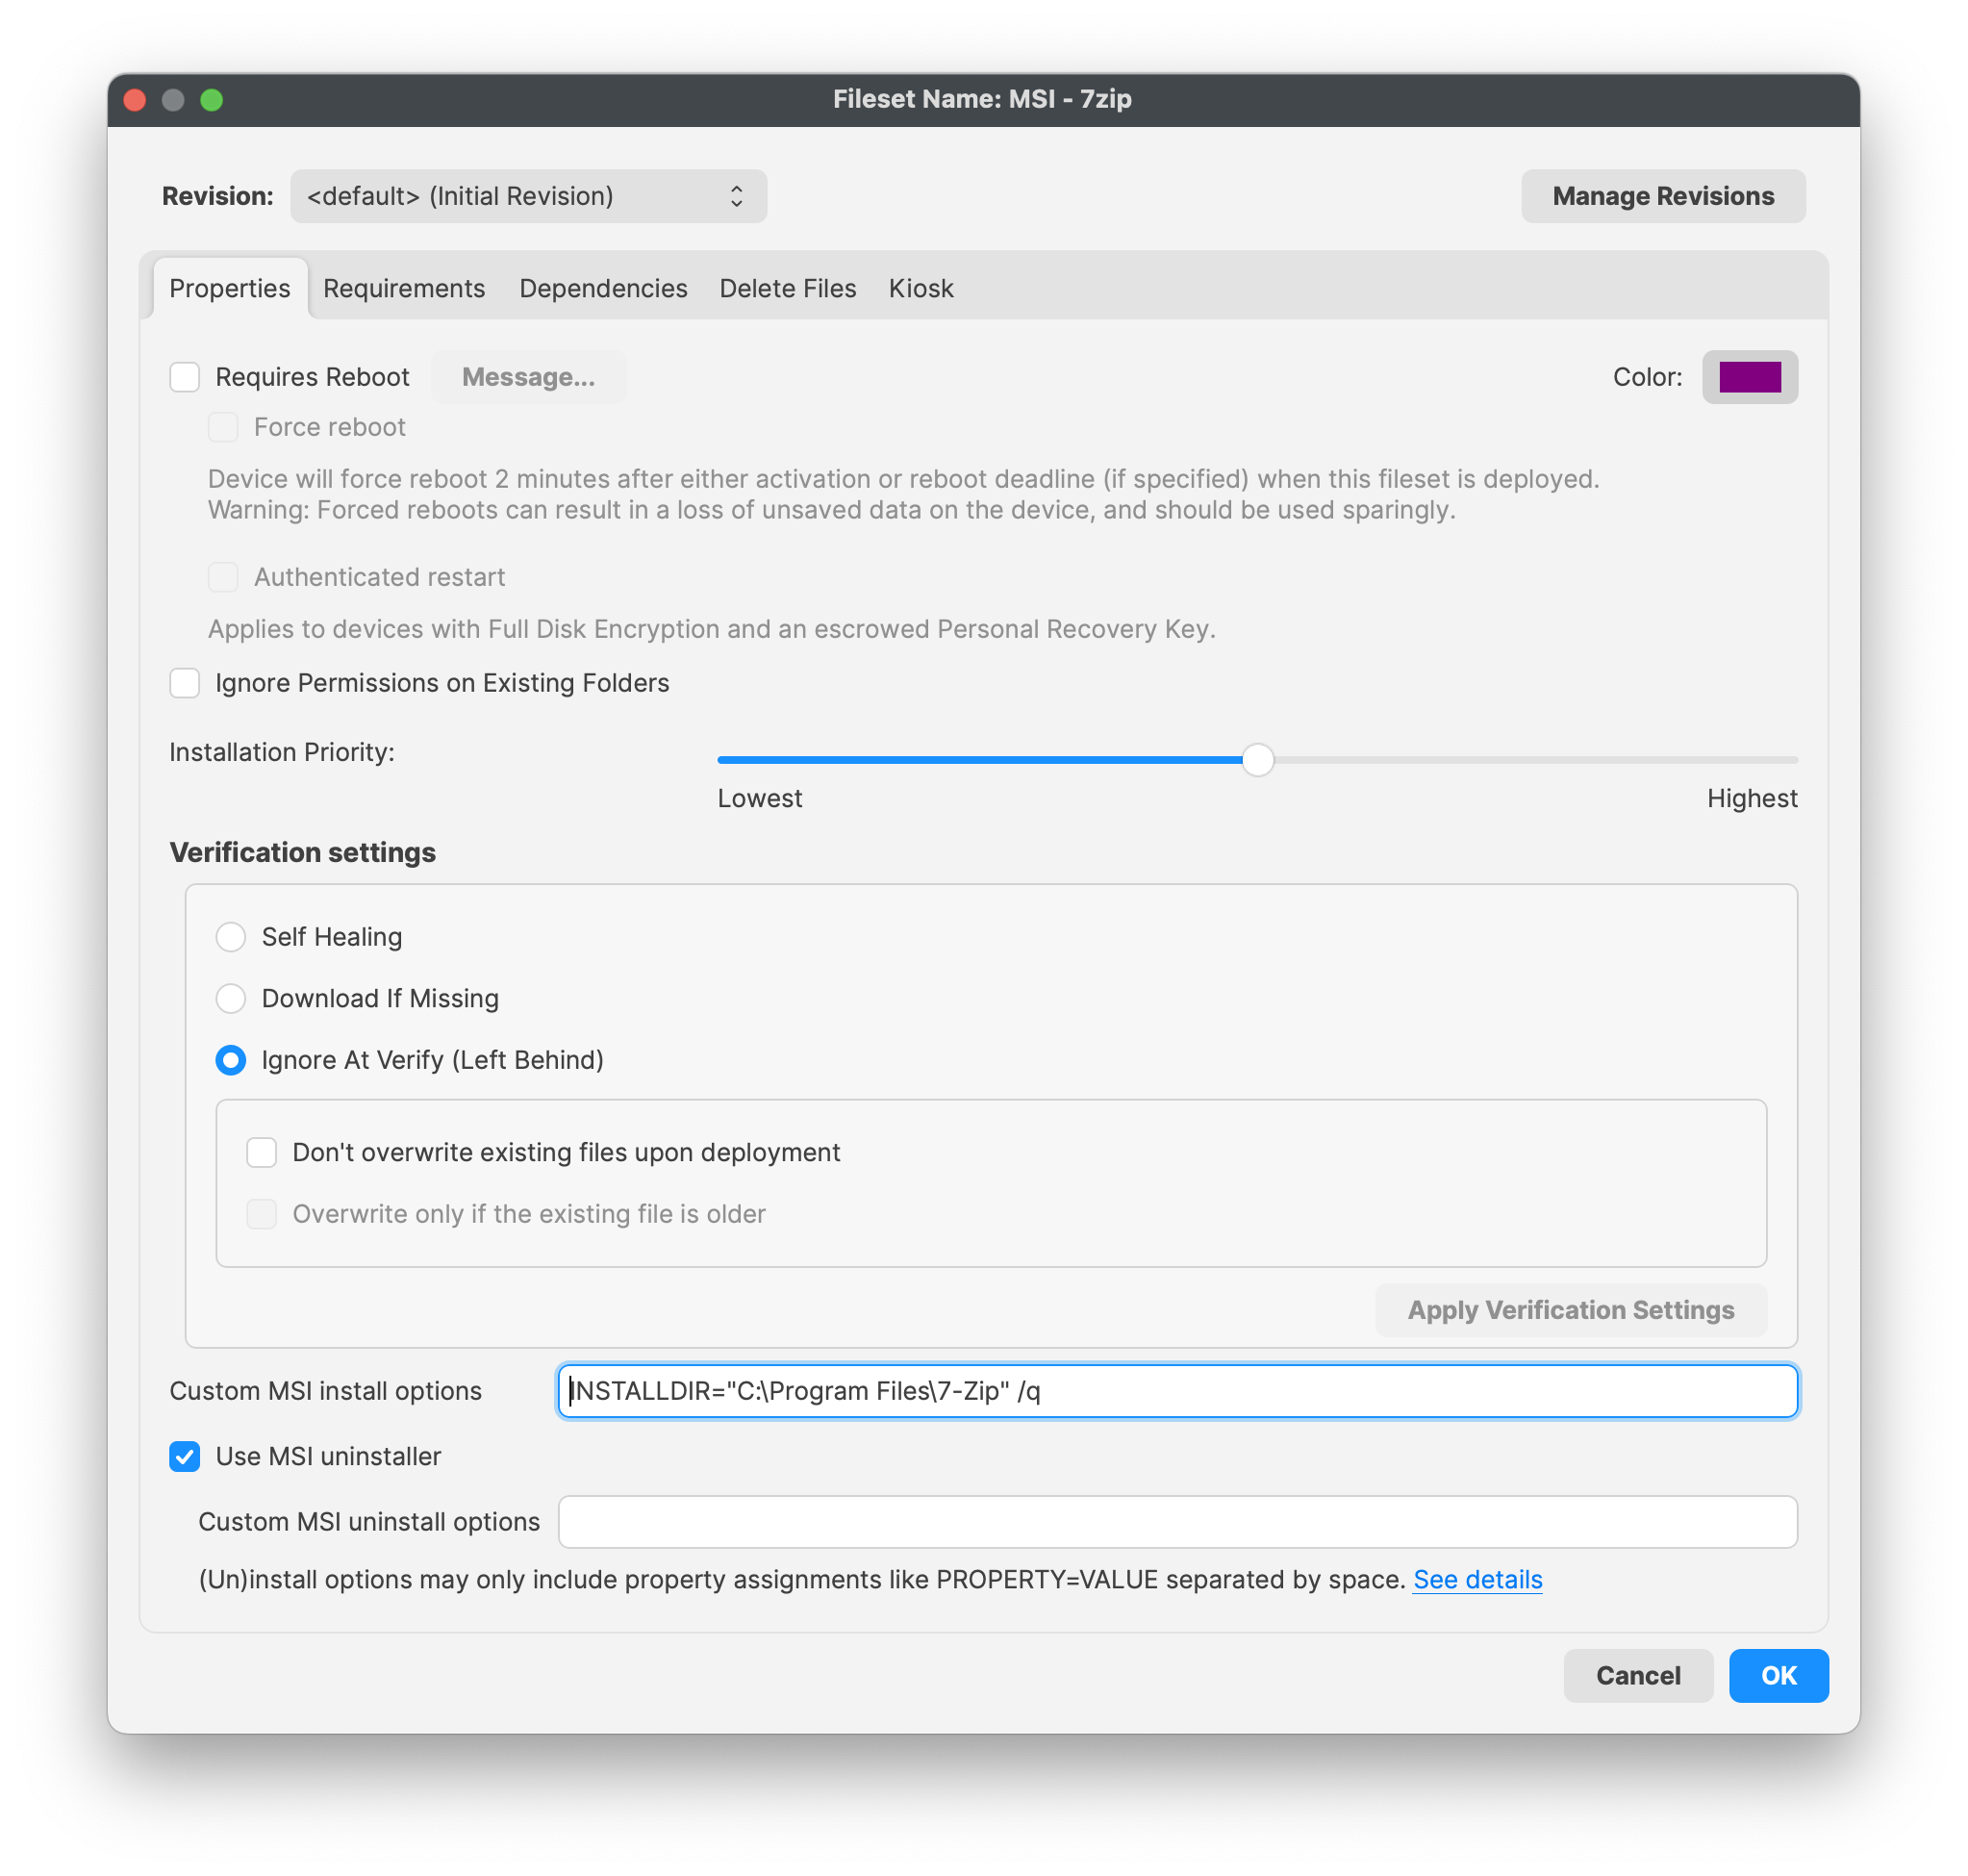
Always test deployment for both successful installation and uninstallations. If you were assigning via Self Service Kiosk, and then end users decides to uninstall, want to be sure it does uninstall successfully.
Assign to Devices
Once testing has been completed and is successful, assign your Fileset to your devices. By way of either a 'Deployment' or 'Association' within FileWave, assign the Fileset to your devices.
Related Content
Adobe Creative Cloud (Windows EXE)
Description
This recipe walks through deploying an Adobe Creative Cloud for Windows package, created in the Adobe Admin Console, as a FileWave desktop Fileset.
Adobe's current packaging workflow is in Admin Console > Packages. Creative Cloud Packager is still referenced in some Adobe tools/documentation, but Adobe notes that Creative Cloud Packager is no longer in development and recommends using the package workflows in the Admin Console.
Ingredients
- FileWave Central
- Adobe Admin Console access with permission to create or download packages
- A Windows Adobe package from the Admin Console
Directions
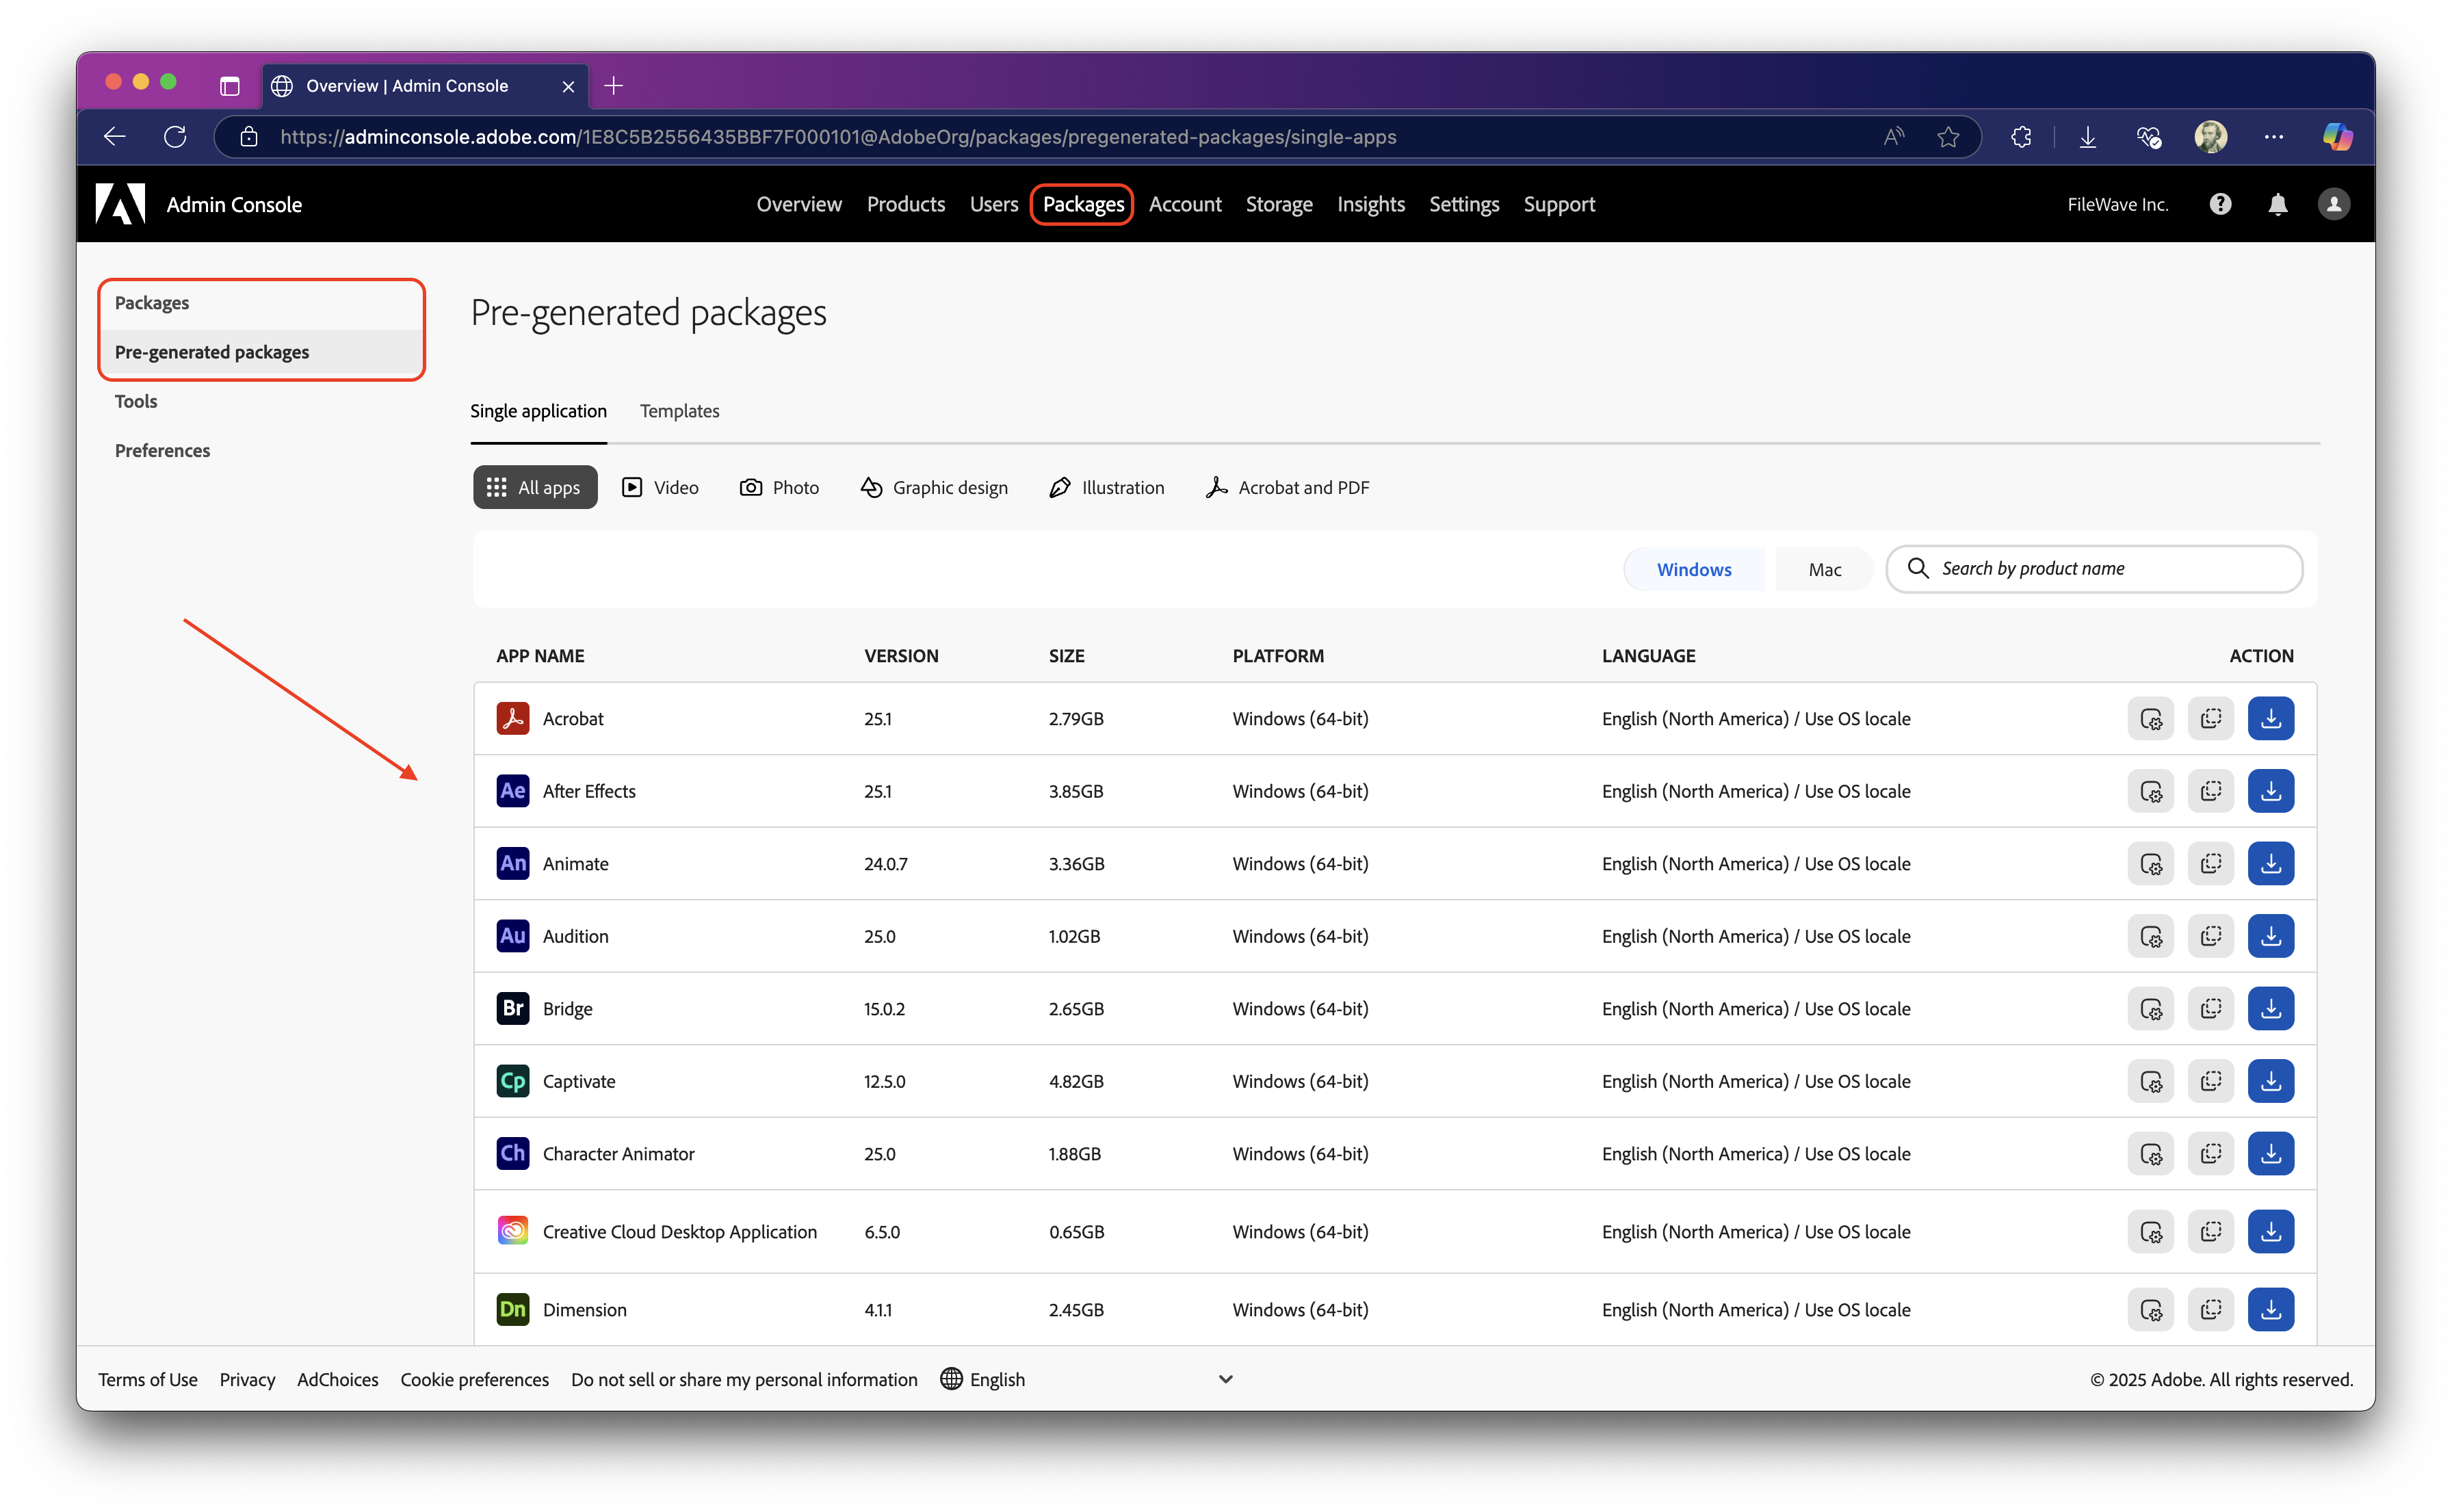
- Log in to the Adobe Admin Console and open Packages. The Admin Console is where Adobe manages packaging, product selection, and deployment settings for Creative Cloud enterprise/teams customers.

- Create or select the package you want to deploy. Choose Windows as the platform for a Windows deployment.
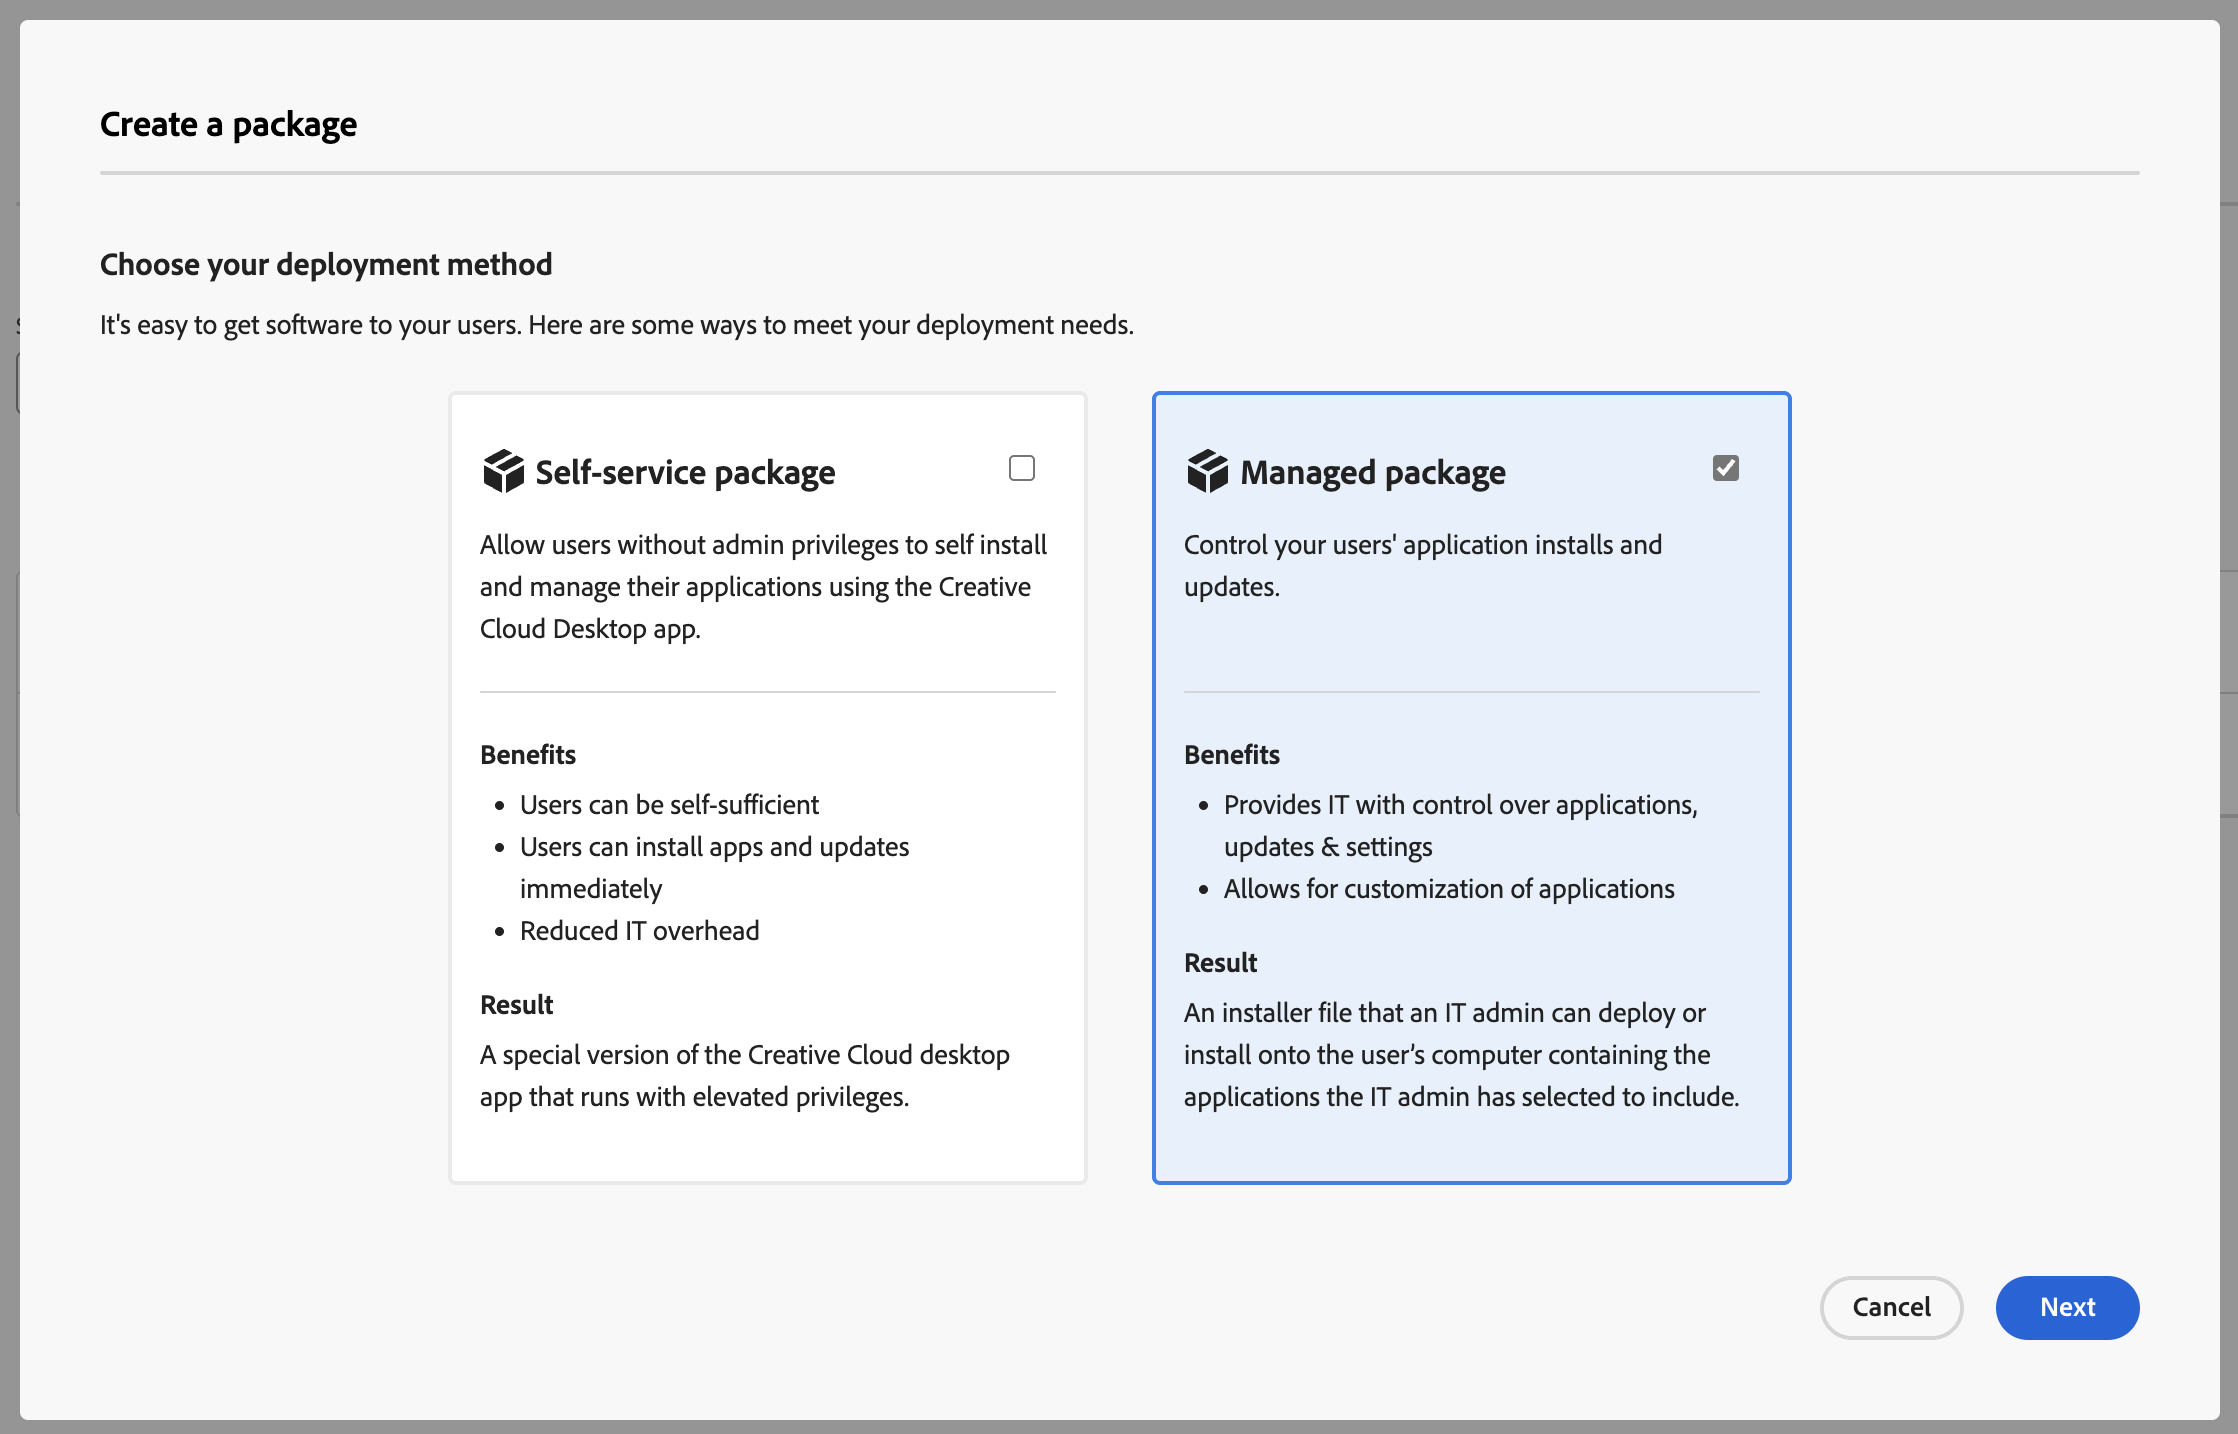
- For a managed deployment, create a Managed package, or use a pre-generated package if it already matches the applications and settings you need.

- Select the Adobe applications and options required for your users. Keep the package focused; smaller, role-specific packages are easier to test and troubleshoot.
- Download the completed package from Adobe.
- In FileWave Central, create a New Desktop Fileset > Empty Fileset, then upload the Adobe package contents while preserving the package folder structure.
- Assign the Fileset to a small Windows test group first.
- Update the model and verify the installation before broad deployment.
For Windows packages, Adobe documents setup.exe inside the package's Build folder. Adobe also notes that deploying a package containing Acrobat by MSI instead of setup.exe can skip Acrobat, so use setup.exe unless you have a verified reason to do otherwise.
Configure the EXE in FileWave
After the Adobe package has been uploaded to the Fileset, configure FileWave to run the Adobe setup.exe installer during activation.
- Open FileWave Admin and navigate to the uploaded Adobe Creative Cloud Fileset.
- Double-click the Fileset to open Fileset Contents.
- If needed, clear Hide unused folders so the package folders are visible.
- Navigate to the Adobe package's
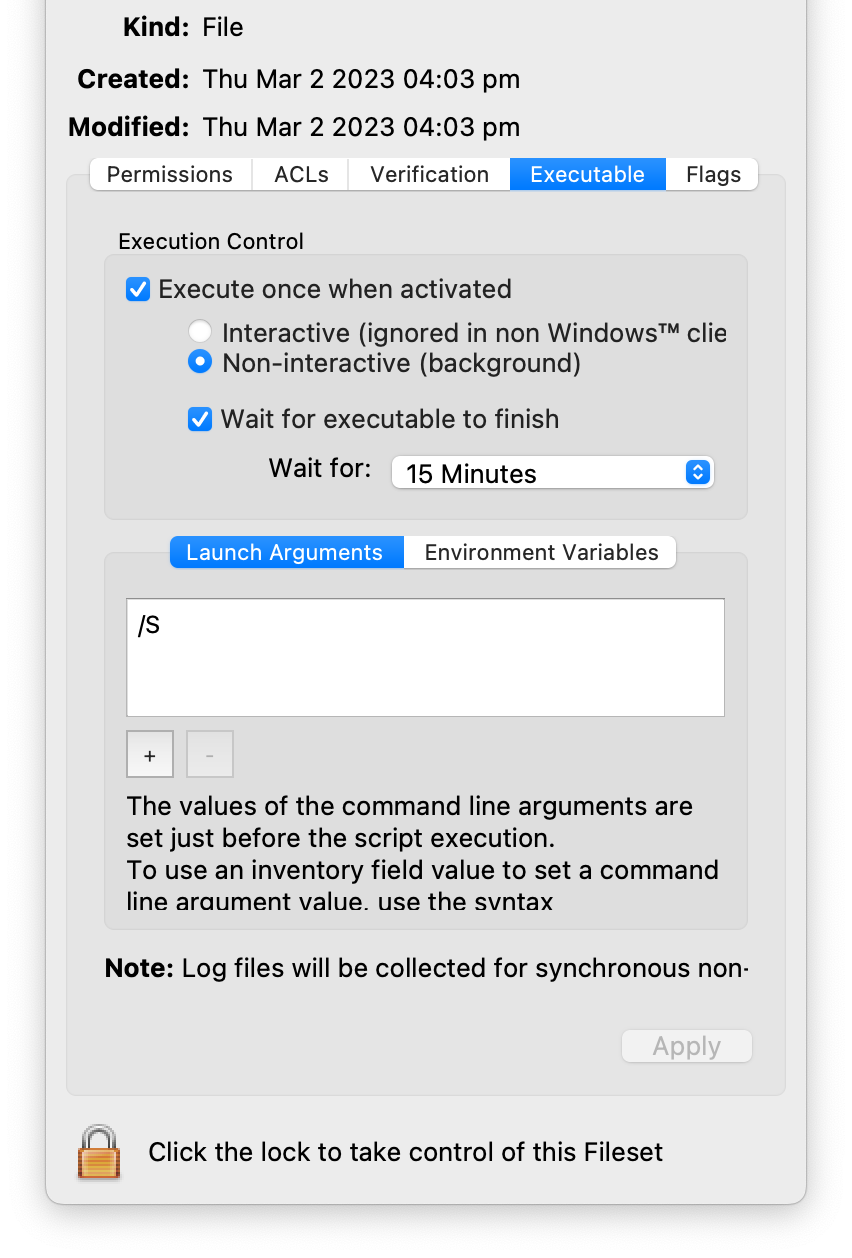
Buildfolder and selectsetup.exe. - Choose Get Info from the menu bar.
- Open the Executable tab.
- Enable Execute once when activated and Non-interactive (background).
- Enable Wait for executable to finish and set a practical timeout. The existing recipe uses 15 minutes; increase that if your selected Adobe apps routinely take longer in your environment.
- Add launch arguments with the + button if you need silent installation or custom install options.
Syntax:
setup [--silent] [--ADOBEINSTALLDIR=] [--INSTALLLANGUAGE=]
[ADOBEINSTALLDIR] is the installation directory where apps are installed on the client machine.
[INSTALLLANGUAGE] is the locale used for the installed apps.
Syntax example:
setup.exe --silent --ADOBEINSTALLDIR="C:\InstallDir" --INSTALLLANGUAGE=en_US- Click Apply to save the executable settings, then close the Get Info window.
- Close Fileset Contents.
- The Fileset will show as Modified until the model is updated. Update the model when you are ready to save the change.
As always, test deploy the Fileset to a few devices before mass deployment.
Related Content
- Adobe Creative Cloud: Deploy and deliver apps and updates
- Adobe Creative Cloud: Packaging apps via the Admin Console
- Adobe Creative Cloud: Deploy packages
- FileWave Recipe: Adobe Creative Cloud (macOS)
Adobe Air (Windows EXE)
Description
Use this recipe when you need to deploy the Adobe AIR runtime to Windows devices with a FileWave Fileset. Adobe transferred AIR maintenance to HARMAN, so use HARMAN's current Adobe AIR runtime download page rather than older Adobe download links.
Ingredients
-
Adobe AIR runtime installer from HARMAN
-
FileWave Central
Directions
-
Download the current Adobe AIR runtime installer from https://airsdk.harman.com/runtime.
-
Extract and import the AdobeAIR-Installer.fileset.zip into FileWave Central and open it. This Fileset contains a script that calls the Adobe AIR installer.
Starting the installation this way allows it to succeed even if no user is logged on to the target system.start "" C:\Windows\temp\AdobeAIRInstaller.exe -silent -
Import the Adobe AIR installer into the
C:\Windows\tempfolder. -
Set the Adobe AIR installer verification behavior to "Ignore at verify" using the "apply to enclosed" button shown below.

-
Close the Fileset and associate it with a test client before wider deployment.
CrowdStrike Falcon Protection (Windows EXE)
Description
Needing to deploy to Crowdstrike Falcon antivirus to your Windows fleet? FileWave has you covered.
CrowdStrike's flagship product is called Falcon, which is a cloud-native platform that combines next-generation antivirus, endpoint detection and response (EDR), threat intelligence, and proactive threat hunting. Falcon aims to provide real-time visibility into endpoint activity, rapid threat detection, and automated response to security incidents.
Ingredients
- FileWave Admin Central
- Crowdstrike EXE installer
- Crowdstrike License code
- CrowdStrike Windows Installation.fileset.zip
Directions
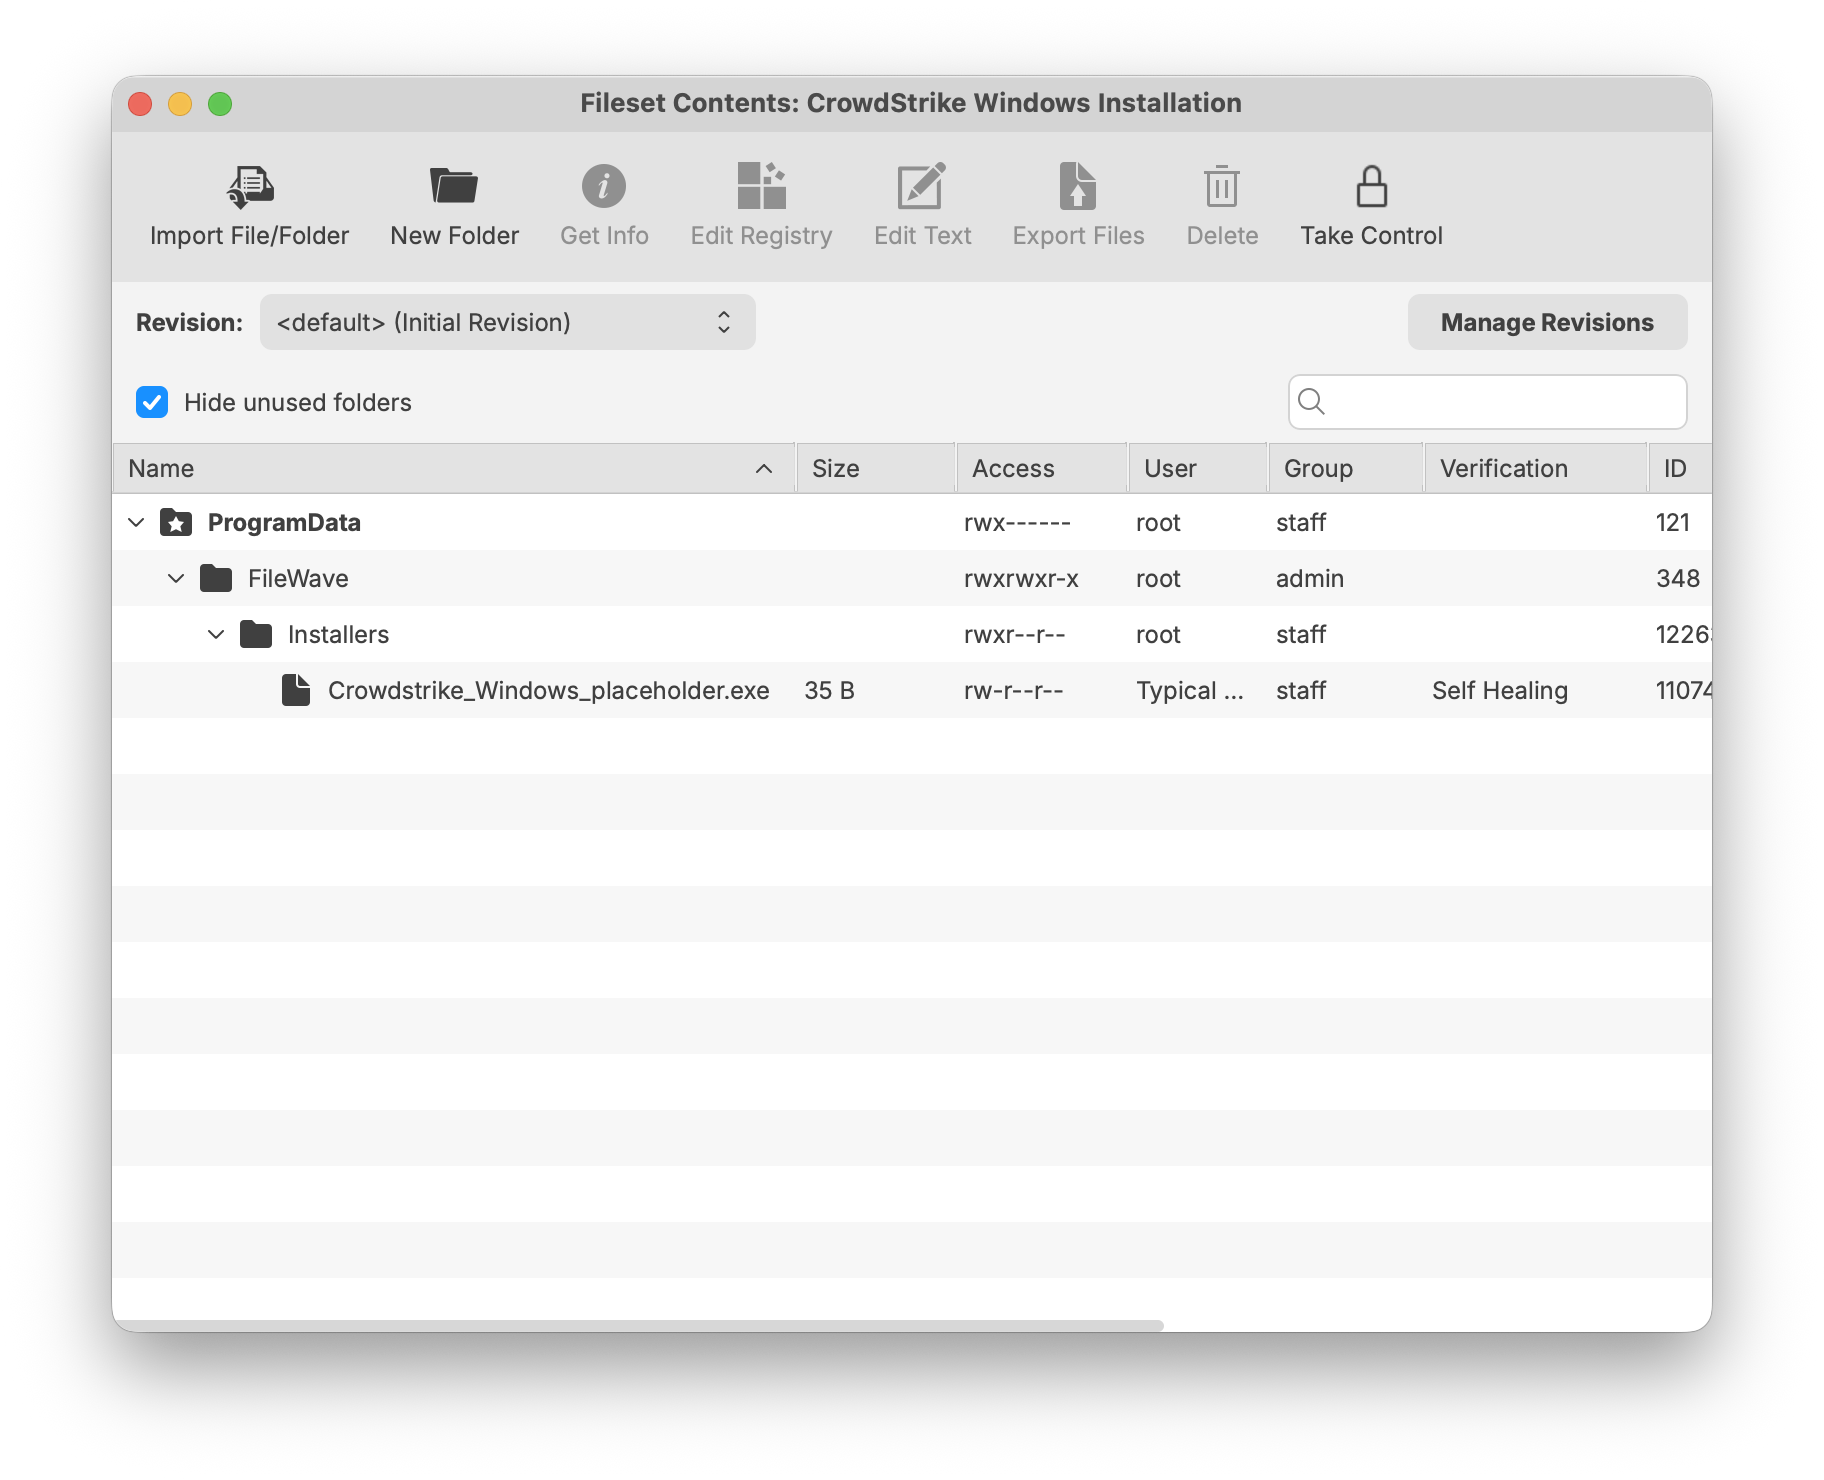
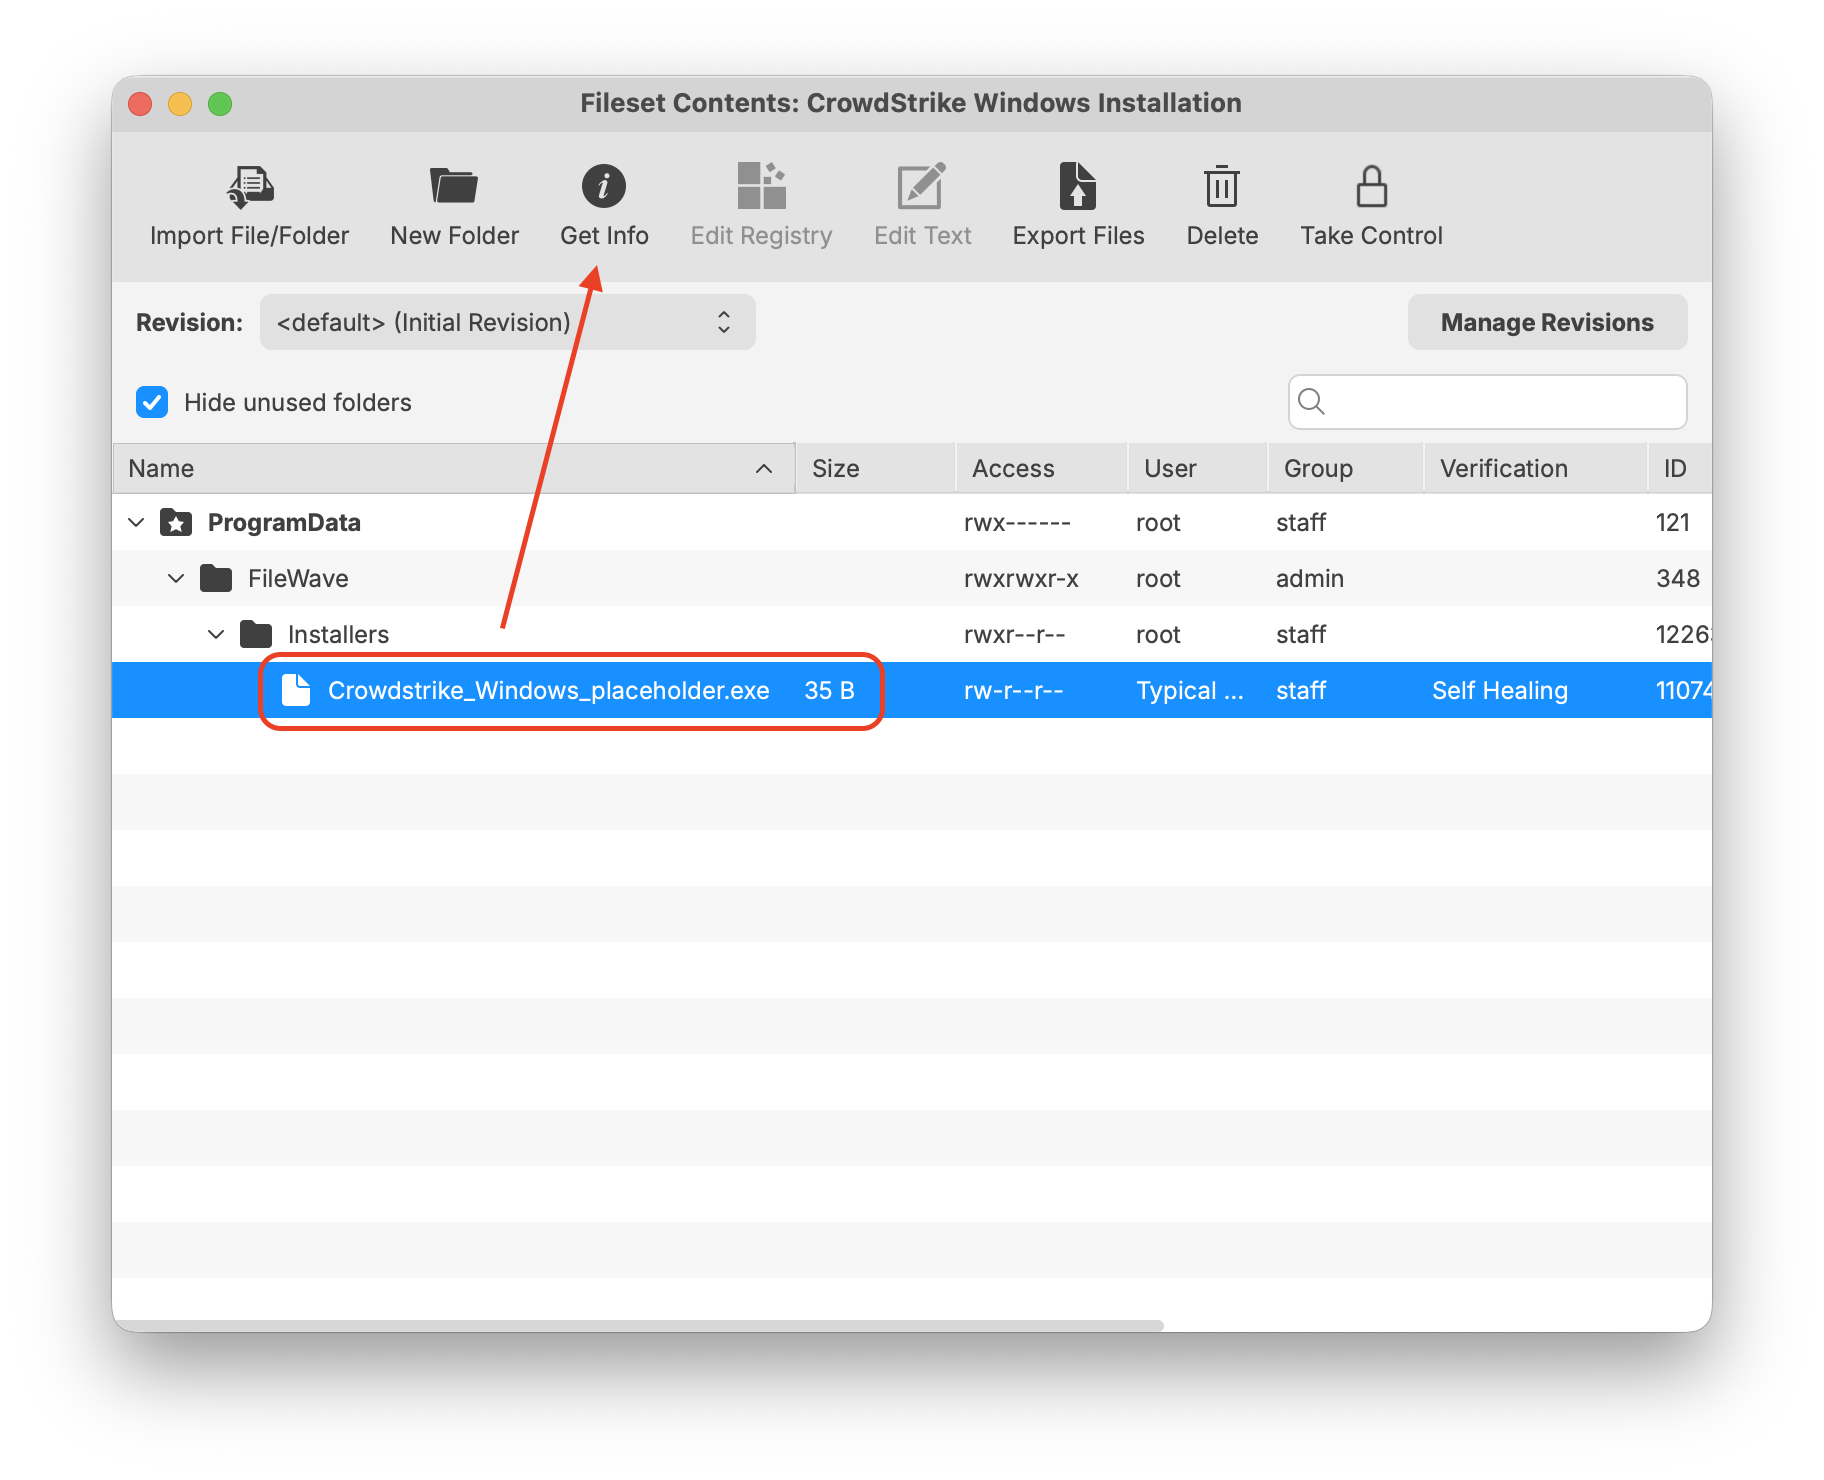
Deploying the Crowdstrike Falcon to your devices
CrowdStrike deployment for Windows devices has one Fileset. This Fileset includes a placeholder for your EXE installer with template launch arguments.
The Fileset included has a placeholder for your EXE installer. Be sure to replace with your EXE installer provided by CrowdStrike.
CrowdStrike Windows Installation.fileset.zip
Customizing the Installation EXE
|
Editing the Fileset EXE
|
 |
|
Enter in your CrowdStrike EXE installer switches/parameters and license code
|
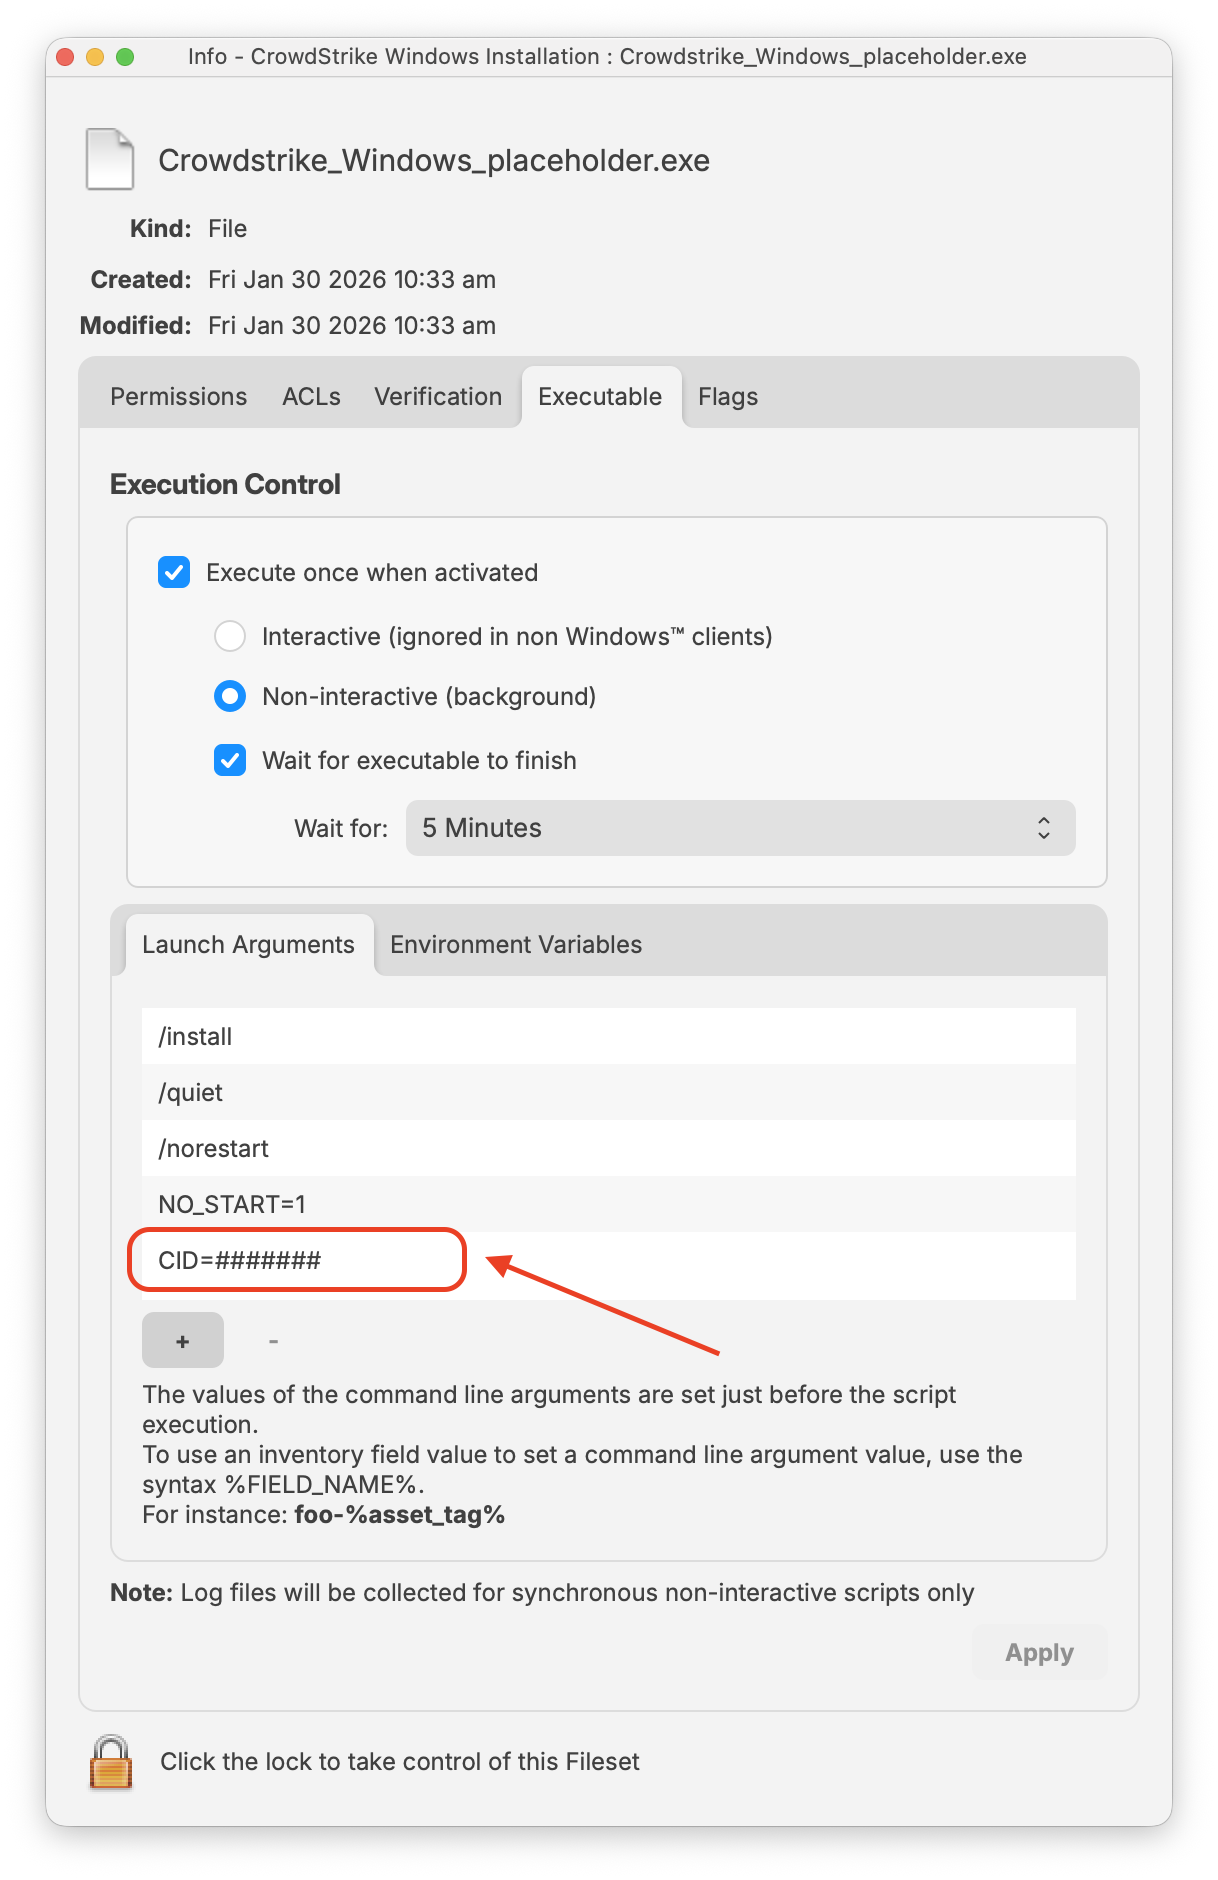 |
Please Note: Launch Argument NO_START=1 prevents the CrowdStrike Falcon Sensor service from starting immediately after installation. Use it only when you intentionally want the sensor to start after the next reboot, such as when preparing an image. For normal deployment to active Windows devices, remove NO_START=1 from the Launch Arguments so the sensor can start after installation.
Crowdstirke CLI switches
These CLI switches not case senstive:
| Switch | Required | Purpose |
|---|---|---|
| /install | Yes | Installs the CrowdStrike Falcon Sensor. |
| /passive | No | The installer shows a minimal UI with no prompts. |
| /quiet | No | Suppresses UI and prompts. |
| /norestart | No | Prevents the host from restarting after installation. |
| /log | No | Changes the default installation log directory from %Temp% to a new location. The new location must be contained in quotation marks (""). |
Crowdstrike CLI parameters
These parameters are case senstive:
| Parameter | Value | Required | Purpose |
|---|---|---|---|
| CID= | CID license | Yes | Uses customer identification (CID) to associate sensor to CrowdStrike Falcon Console. |
| NO_START= | 0 (Default) | No | Starts the sensor immediately after installation. |
| NO_START= | 1 | No | Prevents the sensor from starting after installation. The next time the host boots, the sensor is assigned an agent ID (AID). |
| VDI= | 1 | No | Configures sensor for a virtual desktop infrastructure (VDI) environment. Updates AID after system initialization. |
| APP_PROXYNAME= | proxy.domain.com | No | Configures sensor to use a proxy connection. Cannot be used with PACURL=. |
| APP_PROXYPORT= | 1234 | No | Specifies APP_PROXYPORT= port. |
| PACURL= | See Examples | No | Configures a proxy connection using a PAC file. Cannot be used with either APP_PROXYNAME or APP_PROXYPORT. |
| PROXYDISABLE= | 0 (Default) | No | Attempts to connect to CrowdStrike Falcon Console using any available proxy connections. |
| PROXYDISABLE= | 1 | No | The parameter ignores any automatic proxy connection. |
| ProvNoWait= | 0 (Default) | No | The parameter uninstalls the sensor if unable to connect to CrowdStrike Falcon Console within 10 minutes. |
| ProvNoWait= | 1 | No | The parameter prevents uninstall if unable to connect to CrowdStrike Falcon Console. |
Creating a Fileset Group
Keeping your Filesets organized is good practice, especially if there are multiple Filesets for software deployment or organziation based on specific platform of deployment.
You may create a New Fileset Group, label it CrowdStrike Falcon (Windows 2023), and move the Fileset you created into this Group. Then associate the Fileset Group labeled CrowdStrike Flacon (Windows 2023) to your devices versus individual Filesets.
When ready, associate the Fileset Group labeled CrowdStrike Falcon (Windows 2023) to a few devices as a test. This is to verify and confirm that the software is installed properly based on your license code configured.
For best practice, always test a few devices before mass deployment.
FileWave Custom Fields to validate installation
Monitoring the CrowdStrike Falcon Sensor through FileWave custom fields helps ensure endpoint protection remains active and compliant. By validating that the Falcon service is running and reporting the installed sensor version, administrators can quickly detect inactive or outdated agents that may leave devices exposed. This custom fields includes both macOS and Windows.

| Sensor State | Output Value |
| Installed | Installed | version_number |
| Not Installed | Not Installed |
Related Content
Firefox Configuration Recipe (Windows)
Description
After installing Firefox, some configuration may be desirable, examples may include:
- Block auto updates
- Set home page
- Disable Mozilla First Run Pages
Firefox Documentation
The details of the Fileset are based upon: Firefox Configuration
This is known to work with version 60, upwards. It may work with earlier versions, but testing on placement of files may vary with earlier versions.
Ingredients
- FW Admin
- Firefox installer application already as a Fileset
- The provided configuration Fileset: Windows - FirefoxConfig.fileset.zip
Directions
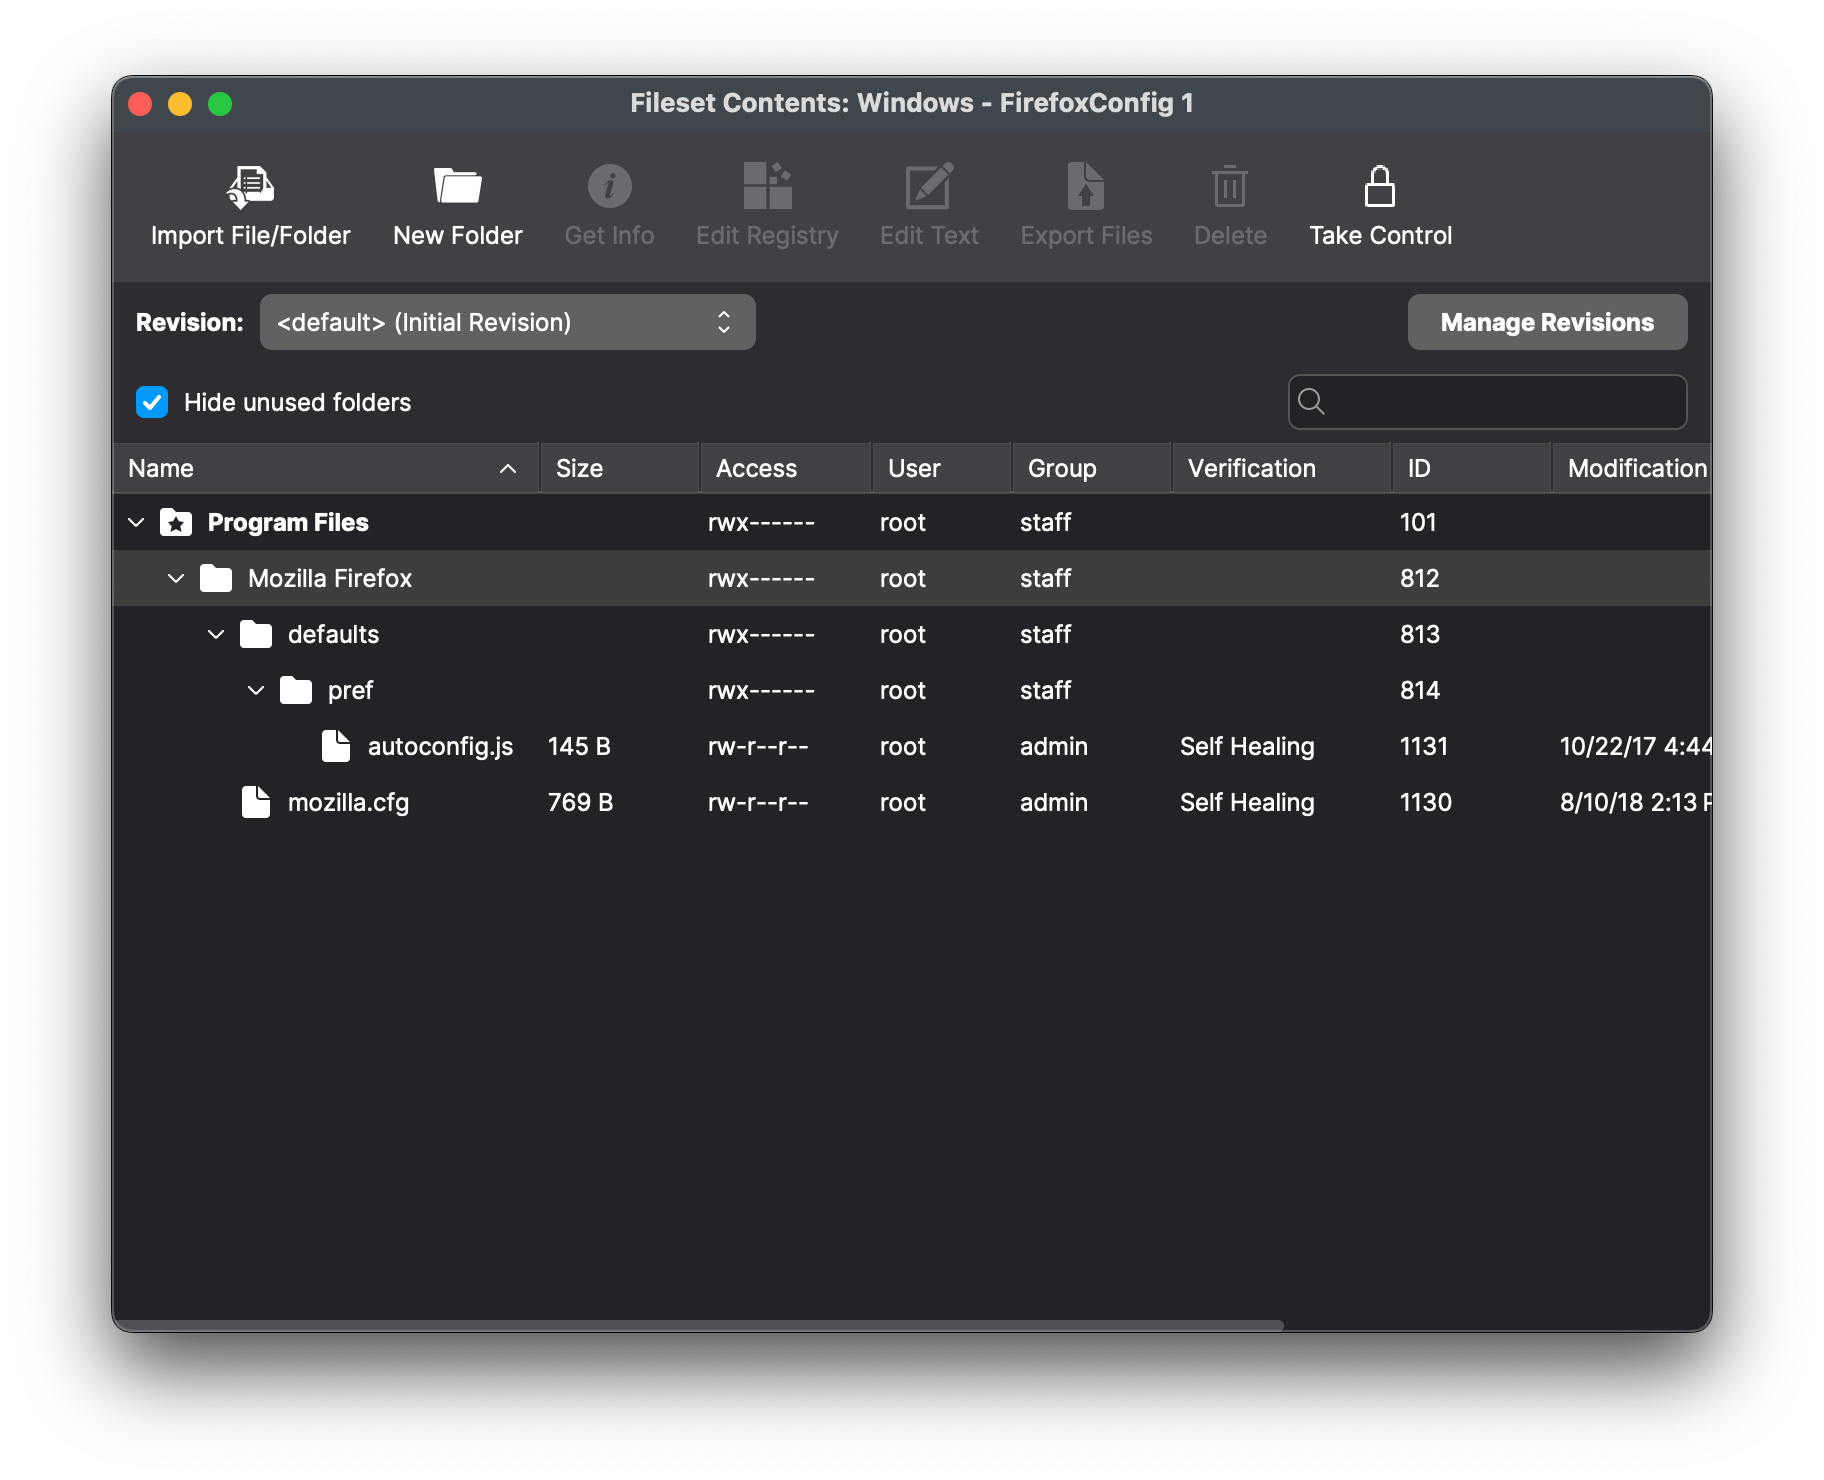
- Download the Fileset zip file, expand and drag into FileWave > Filesets
- Two files are present in the Fileset.

- The autoconfig.js file specifies the file to be used for configuration. In this Fileset the name of the file has been set to 'mozilla.cfg':
// Any comment. You must start the file with a comment!
pref("general.config.filename", "mozilla.cfg");
pref("general.config.obscure_value", 0);- To specify any desired settings, edit the mozilla.cfg file. The provided file is designed to prevent Firefox updates, disable privacy telemetry, disable the first run Mozilla home pages and set the user's homepage:
// Any comment. You must start the file with a comment!
// Disable updater
lockPref("app.update.enabled", false);
lockPref("app.update.auto", false);
lockPref("app.update.mode", 0);
lockPref("app.update.service.enabled", false);
// Set Homepage and stop Mozilla startup pages
lockPref("browser.startup.firstrunSkipsHomepage", false);
pref("browser.startup.homepage","http://www.filewave.com");
lockPref("browser.startup.homepage_override.mstone", "ignore");
// Disable Privacy telemetry
lockPref("datareporting.policy.firstRunURL",);
lockPref("datareporting.healthreport.service.enabled", false);
lockPref("datareporting.healthreport.uploadEnabled", false);
lockPref("datareporting.policy.dataSubmissionEnabled", false);
lockPref("toolkit.telemetry.unified", false);Preference Overview
Preference types can include: pref, defaultPref, lockPref, amongst others. Details can be found at: https://support.mozilla.org/en-US/kb/customizing-firefox-using-autoconfig
pref
This is used to set a preference that can be overridden by the user, but on next launch of the application it will revert back to the setting within the configuration file
lockPref
A lockPref cannot be overridden by the user
defaultPref
This is used to set a preference that can be overridden by the user. The user's setting will persist until the user resets them, at which point the defaultPref will be used on next launch of the application
Association
When associating, to ensure the configuration is installed with the Application, consider creating a Fileset Group:

Associating the 'Firefox' Fileset Group will ensure both the Application and Configuration are associated to devices.

When there is an update to Firefox, replace the version in the Fileset Group with the latest version after testing.

To ensure users may not circumvent management by changing the locale, enable 'BlockAboutConfig' (already set as TRUE in the template file)
Related Content
Google Chrome Extension Management (Windows)
Description
Chrome extensions can be managed with FileWave on multiple device types.
If Chrome is already managed in Google Admin Console, keep that management there unless you have a reason to use FileWave. FileWave can also deploy Chrome extension policy to macOS and Windows devices.
Ingredients
- Chrome installation
- Google Translate Chrome extension ID from the Chrome Web Store, or another target extension ID
Windows
Use a Fileset with a PowerShell activation script to force-install a managed Chrome extension and optionally block other extensions. This example uses the Google Translate extension ID, aapbdbdomjkkjkaonfhkkikfgjllcleb. Replace it with another target extension ID if needed, associate the Fileset to test devices, test it, then deploy it to production devices.
The script creates the required Chrome policy registry settings.
Script contents:
if ( -Not (Test-Path -Path "HKLM:\SOFTWARE\Policies\Google\Chrome\ExtensionSettings\*") ) {
New-Item -Path "HKLM:\SOFTWARE\Policies\Google\Chrome\ExtensionSettings\" -Name "*" -Force
New-ItemProperty -Path 'HKLM:\SOFTWARE\Policies\Google\Chrome\ExtensionSettings\*\' -Name "installation_mode" -Value "blocked"
New-Item -Path "HKLM:\SOFTWARE\Policies\Google\Chrome\ExtensionSettings\" -Name "aapbdbdomjkkjkaonfhkkikfgjllcleb" -Force
New-ItemProperty -Path "HKLM:\SOFTWARE\Policies\Google\Chrome\ExtensionSettings\aapbdbdomjkkjkaonfhkkikfgjllcleb\" -Name "comment" -Value "Google Translate"
New-ItemProperty -Path "HKLM:\SOFTWARE\Policies\Google\Chrome\ExtensionSettings\aapbdbdomjkkjkaonfhkkikfgjllcleb\" -Name "installation_mode" -Value "force_installed"
New-ItemProperty -Path "HKLM:\SOFTWARE\Policies\Google\Chrome\ExtensionSettings\aapbdbdomjkkjkaonfhkkikfgjllcleb\" -Name "update_url" -Value "https://clients2.google.com/service/update2/crx"
}
If another policy already manages Chrome extensions, this example's if block can skip the Google Translate extension settings. Adjust the script conditions before deployment if extension policy already exists.
Notes
This example also creates a wildcard ExtensionSettings key that blocks all other Chrome extensions. Remove or change that key if you only want to force-install Google Translate without blocking others.
Restart Chrome before testing. Chrome does not apply these policy settings to an already-running browser session.
Related Content
Google Chrome Managed (Windows)
Description
Chrome browser user experience may be managed on multiple device types by way of a Google Management Token available through the Google Admin Console.
Details on obtaining a token and Chrome management can be found in the following KB:
The directions below describe applying the token to Windows devices.
Ingredients
- Chrome App Fileset
- Chrome Browser Enrolment Token (only available via Google Admin Console)
Directions
A Chrome Application Fileset will be required to instal Chrome onto devices. There are multiple ways to achieve this.
Winget is built into FileWave and Google Chrome is available via Winget:
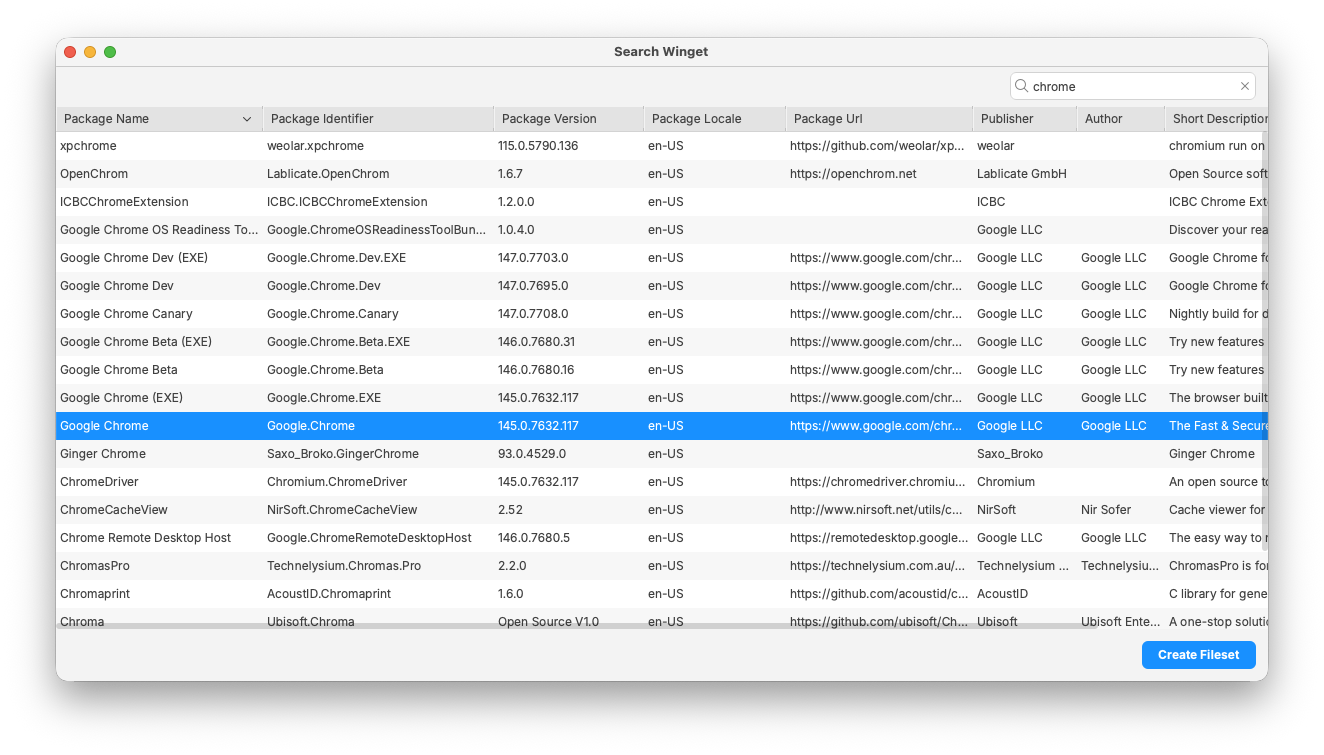
If preferred, a standalone installer could be downloaded and delivered as an installer or converted to a file level installation by way of Fileset Magic.
Likewise, there is more than one way to apply the token to manage the Chrome browser. Registry diff files can be used, but this example offers a scripted method.
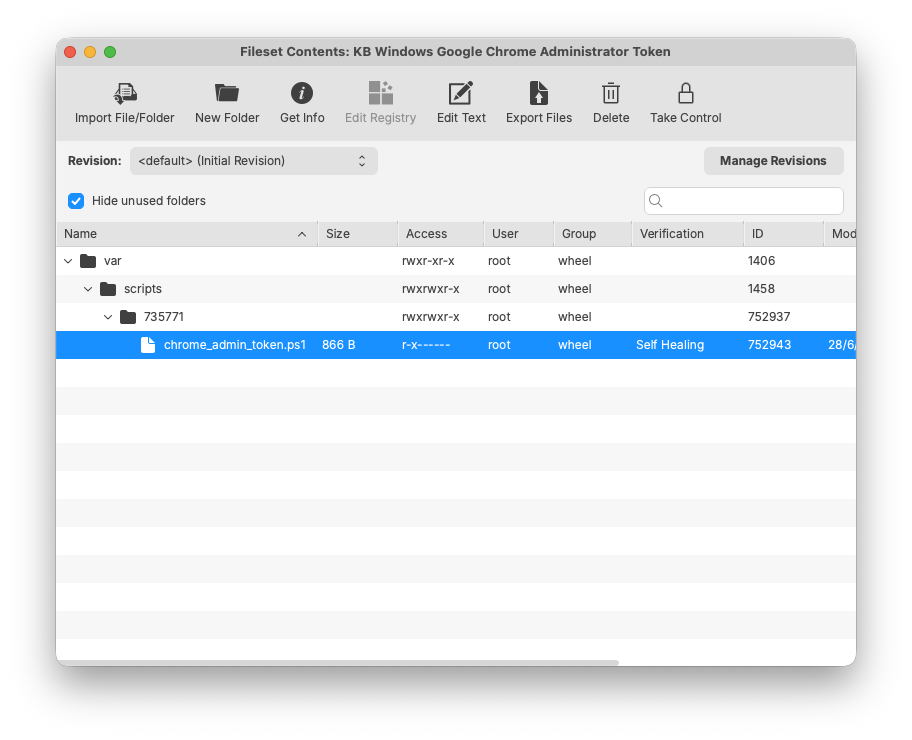
KB Windows Google Chrome Administrator Token.fileset.zip
- Create a Fileset Group for Windows Chrome
- Add the created Google Chrome Installer Fileset into this group
- Download the above Fileset
- Unzip and drag the Fileset into this same Fileset Group

- Open the scripted Fileset for the Administrator token and select the containing PowerShell script:

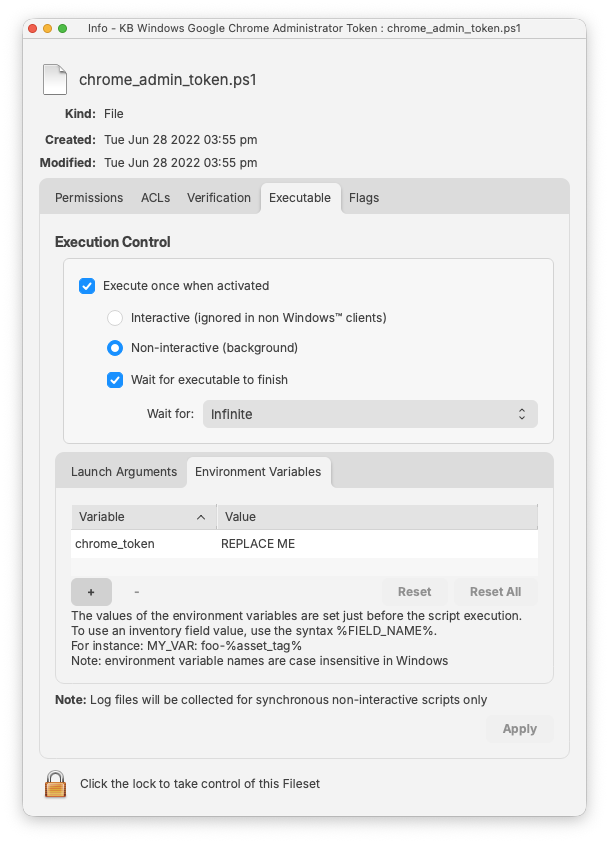
- Choose Get Info > Executable > Environment Variable

- Edit the value of the chrome_token variable with the copied Google Management Token from the Google Admin Console

With the Fileset created, assign the 'Windows - Google Chrome' group with devices. On activation, Chrome browser should be installed and manageable via the Google Admin Console.
Assigning the 'Windows - Google Chrome' Fileset Group will ensure Application and Configuration are associated to devices. When there is an update to Google Chrome, replace the version in the Fileset Group with the latest version (after testing) or switch to a new Fileset Revision if desired.
Installing SOLIDWORKS (Windows EXE)
What
Need to deploy and install SolidWorks on Windows clients? Not a problem – FileWave has you covered. We need a few components from SolidWorks and some scripting tips to get deployment-ready.
Required components:
-
FileWave Central
-
SolidWorks Administrative Image Creator
When/Why
We will need to download and install the SolidWorks Administrative Image Creator on your Windows machine with FileWave Admin installed. This is to create the SolidWorks image that can be used for deployment and installation. You may review the SolidWorks documentation for further details on setting up and configuring here: Creating an Administrative Image.
This “image” you created will be downloaded and placed onto the Windows machine under the default file path:
C:\SOLIDWORKS Admin\SOLIDWORKS 2022 SP2.0
Once completed, it will be ready to be uploaded into FIleWave Admin.
How
The SolidWorks image containing the contents of the installation will need to be uploaded into a Fileset. Below is a Fileset template with an included Powershell script to install SolidWorks and remove the shortcut links from the Users Desktop. More information on Script Best Practices and Windows Software.
| SolidWorks Template Fileset |
 |
The final version of the Fileset should be around 23Gb in size (with included SolidWorks image).

Here is the PowerShell script used in this Fileset.
#############################################################################
#SolidWorks Installation
#############################################################################
If ( [IntPtr]::Size * 8 -ne 64 )
{
C:\Windows\SysNative\WindowsPowerShell\v1.0\PowerShell.exe -File $MyInvocation.MyCommand.Path
}
Else
{
# Hide Wizard
$regPath = 'Registry::HKEY_LOCAL_MACHINE\SOFTWARE\SolidWorks'
New-Item $regPath -ErrorAction SilentlyContinue | Out-Null
Set-ItemProperty -Path $regPath -Name UnattendedAccessWizardShown -Value 1 -Type DWord -ErrorAction SilentlyContinue | Out-Null
}
# Install MSI
$options = '/i', '/qb', '/s', '/v', '/qn', "C:\SOLIDWORKS Admin\SOLIDWORKS 2022 SP2.0\startswinstall.exe"
echo "Installing with options: $options"
Start-Process -FilePath "C:\SOLIDWORKS Admin\SOLIDWORKS 2022 SP2.0\startswinstall.exe" -ArgumentList $options -NoNewWindow -Wait -PassThru
# Remove Desktop Icon
Remove-Item -Path "C:\Users\Public\Desktop\SOLIDWORKS 2022.lnk� -ErrorAction SilentlyContinue
Remove-Item -Path "C:\Users\Public\Desktop\eDrawings 2022 x64 Edition.lnk" -ErrorAction SilentlyContinue
Remove-Item -Path "C:\Users\Public\Desktop\SOLIDWORKS Composer 2022.lnk" -ErrorAction SilentlyContinue
Remove-Item -Path "C:\Users\Public\Desktop\SOLIDWORKS Composer Player 2022.lnk" -ErrorAction SilentlyContinue
Remove-Item -Path "C:\Users\Public\Desktop\SOLIDWORKS Electrical.lnk" -ErrorAction SilentlyContinue
Remove-Item -Path "C:\Users\Public\Desktop\SOLIDWORKS Manage 2022.lnk" -ErrorAction SilentlyContinue
Remove-Item -Path "C:\Users\Public\Desktop\SOLIDWORKS Visualize 2022.lnk" -ErrorAction SilentlyContinue
#############################################################################
#End
#############################################################################Java (Windows EXE)
Description
This recipe shows you the steps you need to follow to make a Java Fileset for Windows.
Ingredients
- FileWave Central
- Java Installer (EXE)
Directions
-
Download the offline EXE update from: Oracle Download Page
-
Create an empty Fileset and drag the Java install EXE to an appropriate location, e.g. ProgramData > fwEXE
-
Select the EXE and choose Get Info > Executable
-
Set to 'Execute once when activated'
-
Add the below Launch Argument to silently instal and remove older installed versions
"/s REMOVEOUTOFDATEJRES=1" -
Test


Digging Deeper
Oracle's Configuration Documentation
Applicable to online and offline installers only (.exe files and wrappers). Enables uninstallation of existing out-of-date JREs during JRE install.
REMOVEOUTOFDATEJRES
- REMOVEOUTOFDATEJRES=0 leaves all out-of-date Java versions on the system.
- REMOVEOUTOFDATEJRES=1 removes all out-of-date Java versions from the system.
For example, running jre1.8.0_60.exe /s REMOVEOUTOFDATEJRES=1 will remove all JREs below the security baseline.
JREs above the security baseline will not be uninstalled.
Details of baseline may be observed from Oracle's release notes:
https://www.oracle.com/technetwork/java/javase/8all-relnotes-2226344.html
Legacy Installers
Although recommendation is to always use the latest version, legacy versions are available from Oracle's archive
Microsoft Defender Recipe (Win)
Description
Example recipe for onboarding Windows devices to Microsoft Defender for Endpoint by running Microsoft's local onboarding script through a FileWave Fileset.
Ingredients
On Windows devices, the recipe needs two pieces:
- Microsoft Defender for Endpoint onboarding package for Windows, downloaded from the Microsoft Defender portal.
- The example FileWave Fileset attached below.
Downloads:
Import the example Fileset first, but do not associate it with production devices until you have replaced the placeholder script with the tenant-specific Microsoft script and tested the result.
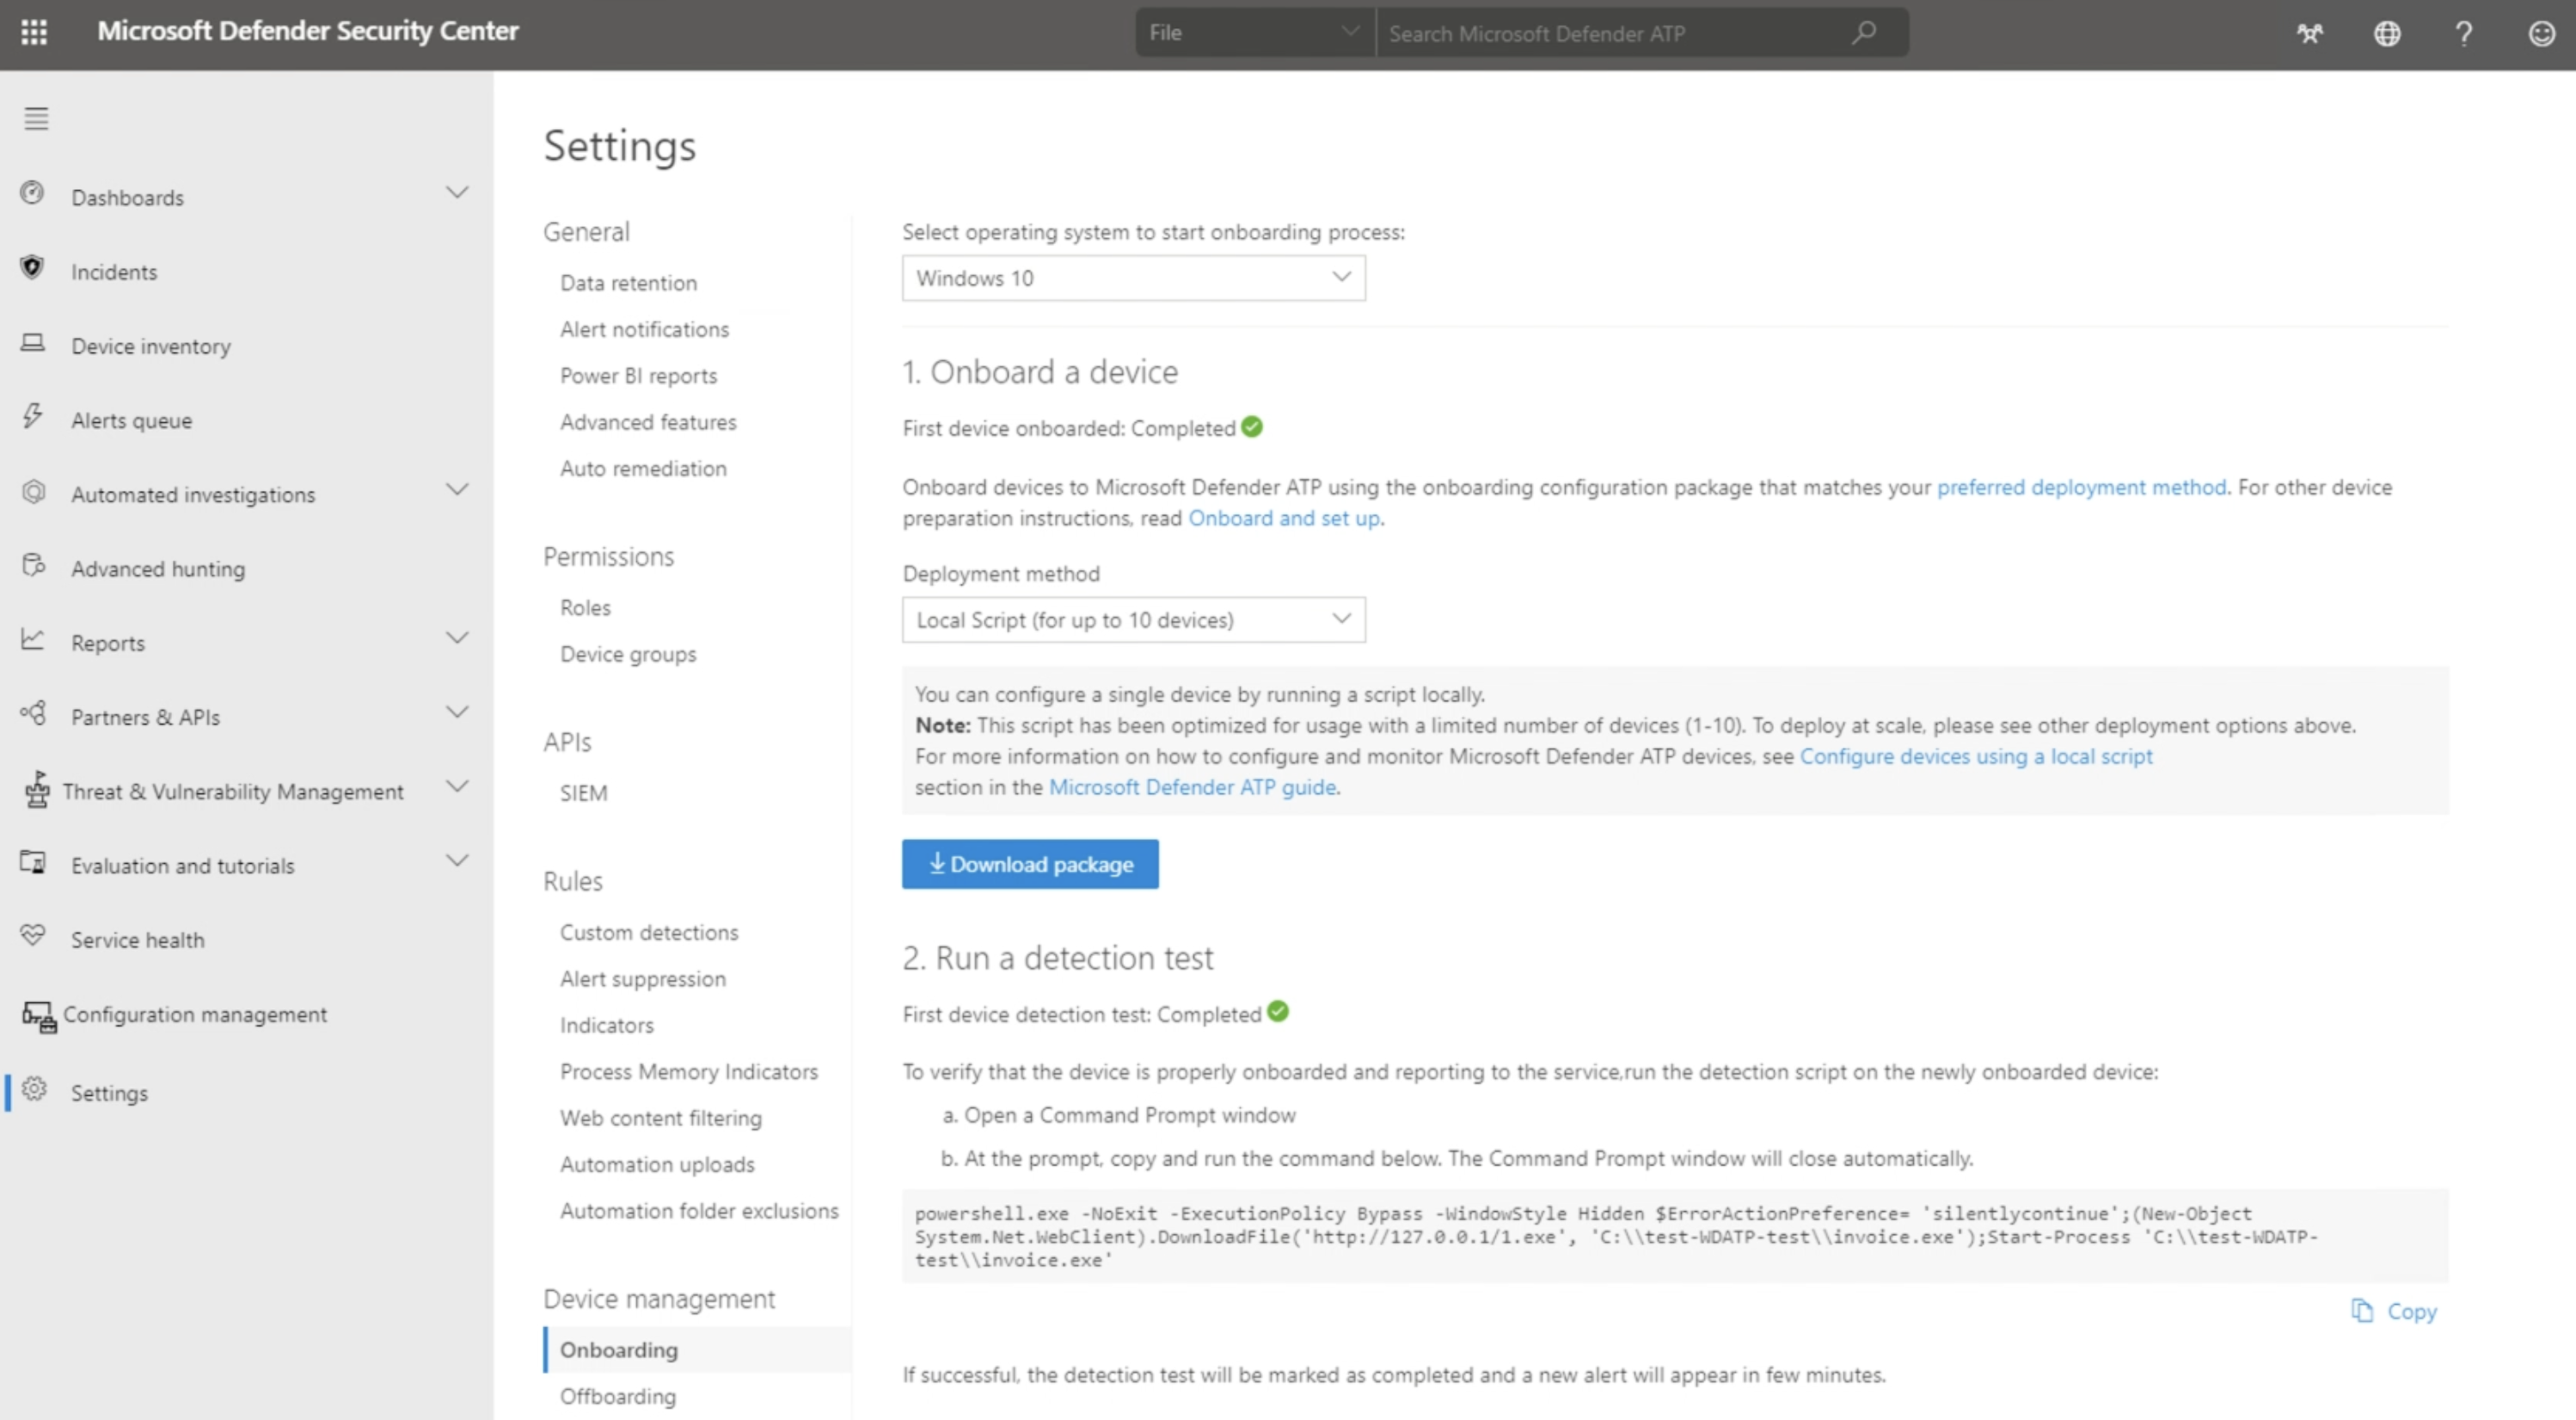
In the Microsoft Defender portal, go to System > Settings > Endpoints > Device management > Onboarding. Select Windows 10 and 11 and the local script deployment method, then download the onboarding package. Microsoft documents the current Windows onboarding flow here: Onboard Windows client devices to Microsoft Defender for Endpoint. Microsoft also documents the local script method here: Onboard devices using a local script.
The Microsoft-generated onboarding script contains tenant-specific onboarding data. Treat it as tenant-specific configuration; do not reuse it across tenants or paste a script generated from another customer account.
The tenant-specific data can be seen in the script near the OnboardingInfo registry value, for example:
REG add "HKLM\SOFTWARE\Policies\Microsoft\Windows Advanced Threat Protection" /v OnboardingInfo /t REG_SZ /f /d "{\"body\":\"{\\\"previousOrgIds\\\":[],\\\"orgId\\\":\\\"Directions
- Download the example Fileset and import it into FileWave.
- In the imported Fileset, edit the placeholder script file. Microsoft currently provides the local onboarding script in the downloaded ZIP package as
WindowsDefenderATPLocalOnboardingScript.cmd. If the example Fileset uses a.batplaceholder, paste the Microsoft-generated script contents into that placeholder and keep the Fileset execution settings pointed at the same file.


Assign to devices
Assign the Fileset to a small test group first, preferably by using a Deployment for new workflows. Associations can still be used where appropriate. Update the Model, let the test devices check in, and confirm the devices appear correctly in the Microsoft Defender portal before expanding the scope.
If you adapt this recipe for offboarding, download a fresh offboarding package from Microsoft when needed. Microsoft states that local offboarding packages expire seven days after download.
Microsoft Office Deployment for Windows: Office 2019/2021, Office LTSC 2024, and Microsoft 365 Apps
Description
Need to deploy Microsoft Office to Windows devices with FileWave? This recipe covers deployment of current Click-to-Run Office packages, including:
- Microsoft 365 Apps for enterprise / business
- Office LTSC Professional Plus 2024
- Office LTSC Standard 2024
- Office LTSC 2021 / Office 2019 volume-license deployments
- Optional Project and Visio deployments
This recipe uses the Microsoft Office Deployment Tool, also called ODT, to download Office installation files, create an offline/local deployment source, and silently install or uninstall Office through a FileWave Fileset.
Microsoft recommends using the latest Office Deployment Tool and the Office Customization Tool to build the configuration XML
Note the Fileset below is based on the Microsoft Article listed here: https://learn.microsoft.com/en-us/office/ltsc/2024/deploy
Ingredients
This Fileset utilizes scripts to install and uninstall Office. After the Fileset is deployed and activated it can take a few minutes for the Office installation to be completed. When the Office Fileset is removed from the device (by removing the association in FileWave) a script will start that will uninstall Office from the clients.
Do not mix 32-bit and 64-bit Office on the same device. If Office is already installed and your XML specifies a different architecture, the installation can fail unless you intentionally use architecture migration options.
Set up and Configurations
For silent deployment, use:
<Display Level="None" AcceptEULA="TRUE" />Microsoft documents that Level="None" suppresses the Office installation UI and that administrators should set AcceptEULA="TRUE" for silent installations.
Common Office product IDs and channels
| Deployment type | Product ID example | Channel example |
|---|---|---|
| Microsoft 365 Apps for enterprise | O365ProPlusRetail |
Current, MonthlyEnterprise, or SemiAnnual |
| Microsoft 365 Apps for business | O365BusinessRetail |
Current, MonthlyEnterprise, or SemiAnnual |
| Microsoft 365 Apps enterprise, no Teams | O365ProPlusEEANoTeamsRetail |
Current, MonthlyEnterprise, or SemiAnnual |
| Microsoft 365 Apps business, no Teams | O365BusinessEEANoTeamsRetail |
Current, MonthlyEnterprise, or SemiAnnual |
| Office LTSC Professional Plus 2024 | ProPlus2024Volume |
PerpetualVL2024 |
| Office LTSC Standard 2024 | Standard2024Volume |
PerpetualVL2024 |
| Project Professional 2024 | ProjectPro2024Volume |
PerpetualVL2024 |
| Project Standard 2024 | ProjectStd2024Volume |
PerpetualVL2024 |
| Visio Professional 2024 | VisioPro2024Volume |
PerpetualVL2024 |
| Visio Standard 2024 | VisioStd2024Volume |
PerpetualVL2024 |
| Office LTSC Professional Plus 2021 | ProPlus2021Volume |
PerpetualVL2021 |
| Office Professional Plus 2019 | ProPlus2019Volume |
PerpetualVL2019 |
Microsoft’s supported product ID list includes Microsoft 365 product IDs, Office 2024 volume product IDs, Project 2024, Visio 2024, and Office 2021 IDs. Microsoft also documents that Office LTSC 2024 uses PerpetualVL2024, Office LTSC 2021 uses PerpetualVL2021, and Office 2019 uses PerpetualVL2019.
Recommended Fileset structure
Create one Fileset per Office deployment type, for example:
Office-2024-ProPlus-Windows.fileset
Office-365-Apps-Enterprise-Windows.fileset
Office-365-Apps-Business-Windows.fileset
Office-2024-Visio-Project-Windows.filesetInside the Fileset, use a consistent folder path such as:
C:\ProgramData\FileWave\Installers\OfficeRecommended Fileset contents:
C:\ProgramData\FileWave\Installers\Office\setup.exe
C:\ProgramData\FileWave\Installers\Office\configuration.xml
C:\ProgramData\FileWave\Installers\Office\Data
C:\ProgramData\FileWave\Installers\Office\install-office.ps1
C:\ProgramData\FileWave\Installers\Office\uninstall-office.ps1The Office folder is created by ODT when using /download. Microsoft notes that after a download, the source folder should contain an Office folder with a Data subfolder and versioned download content.
Directions
Step 1: Download the Office Deployment Tool
Download the latest Office Deployment Tool from Microsoft and extract it to a working folder on your technician machine, for example:
C:\OfficeDeployment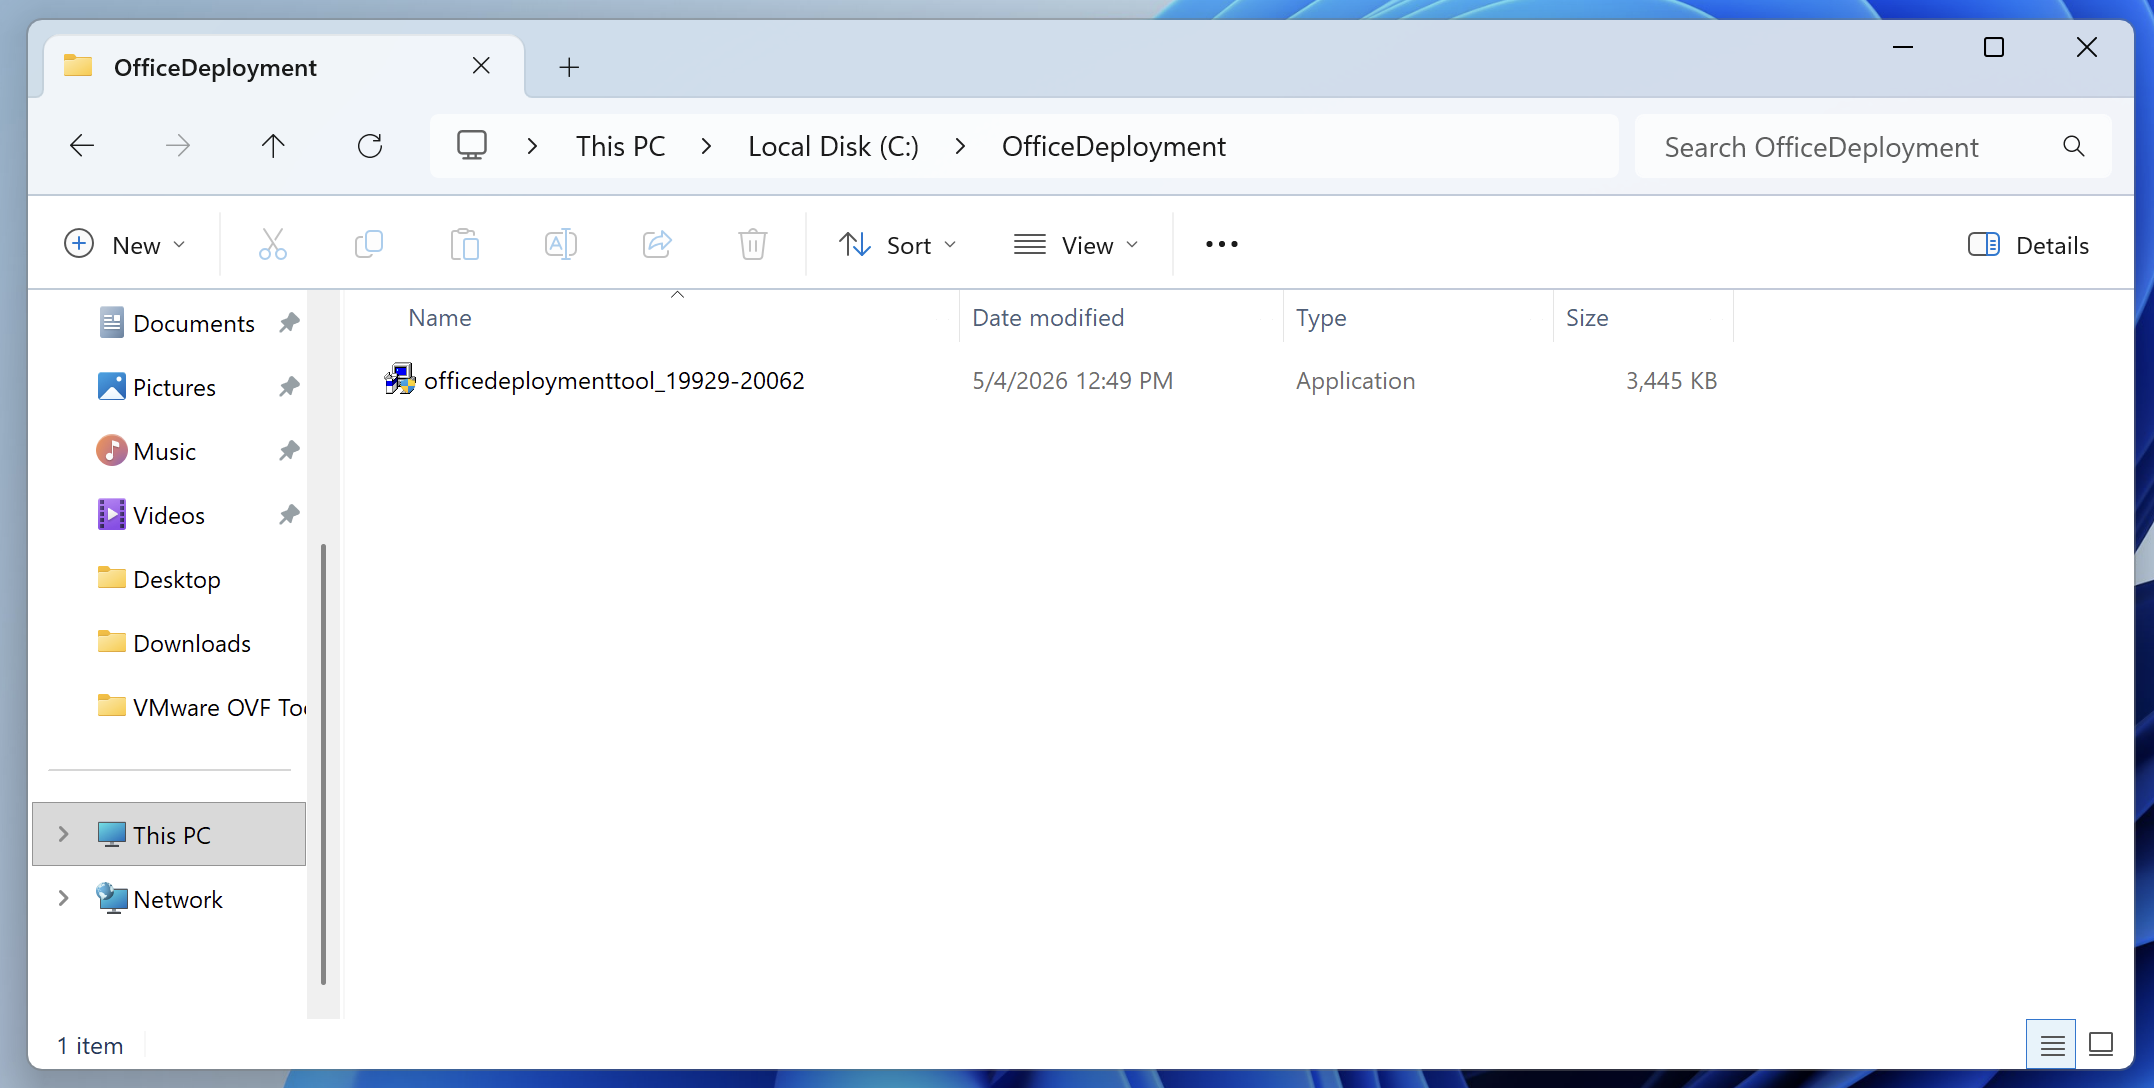
After extraction, the folder should contain:
setup.exe
configuration.xml or configuration-Office365-x64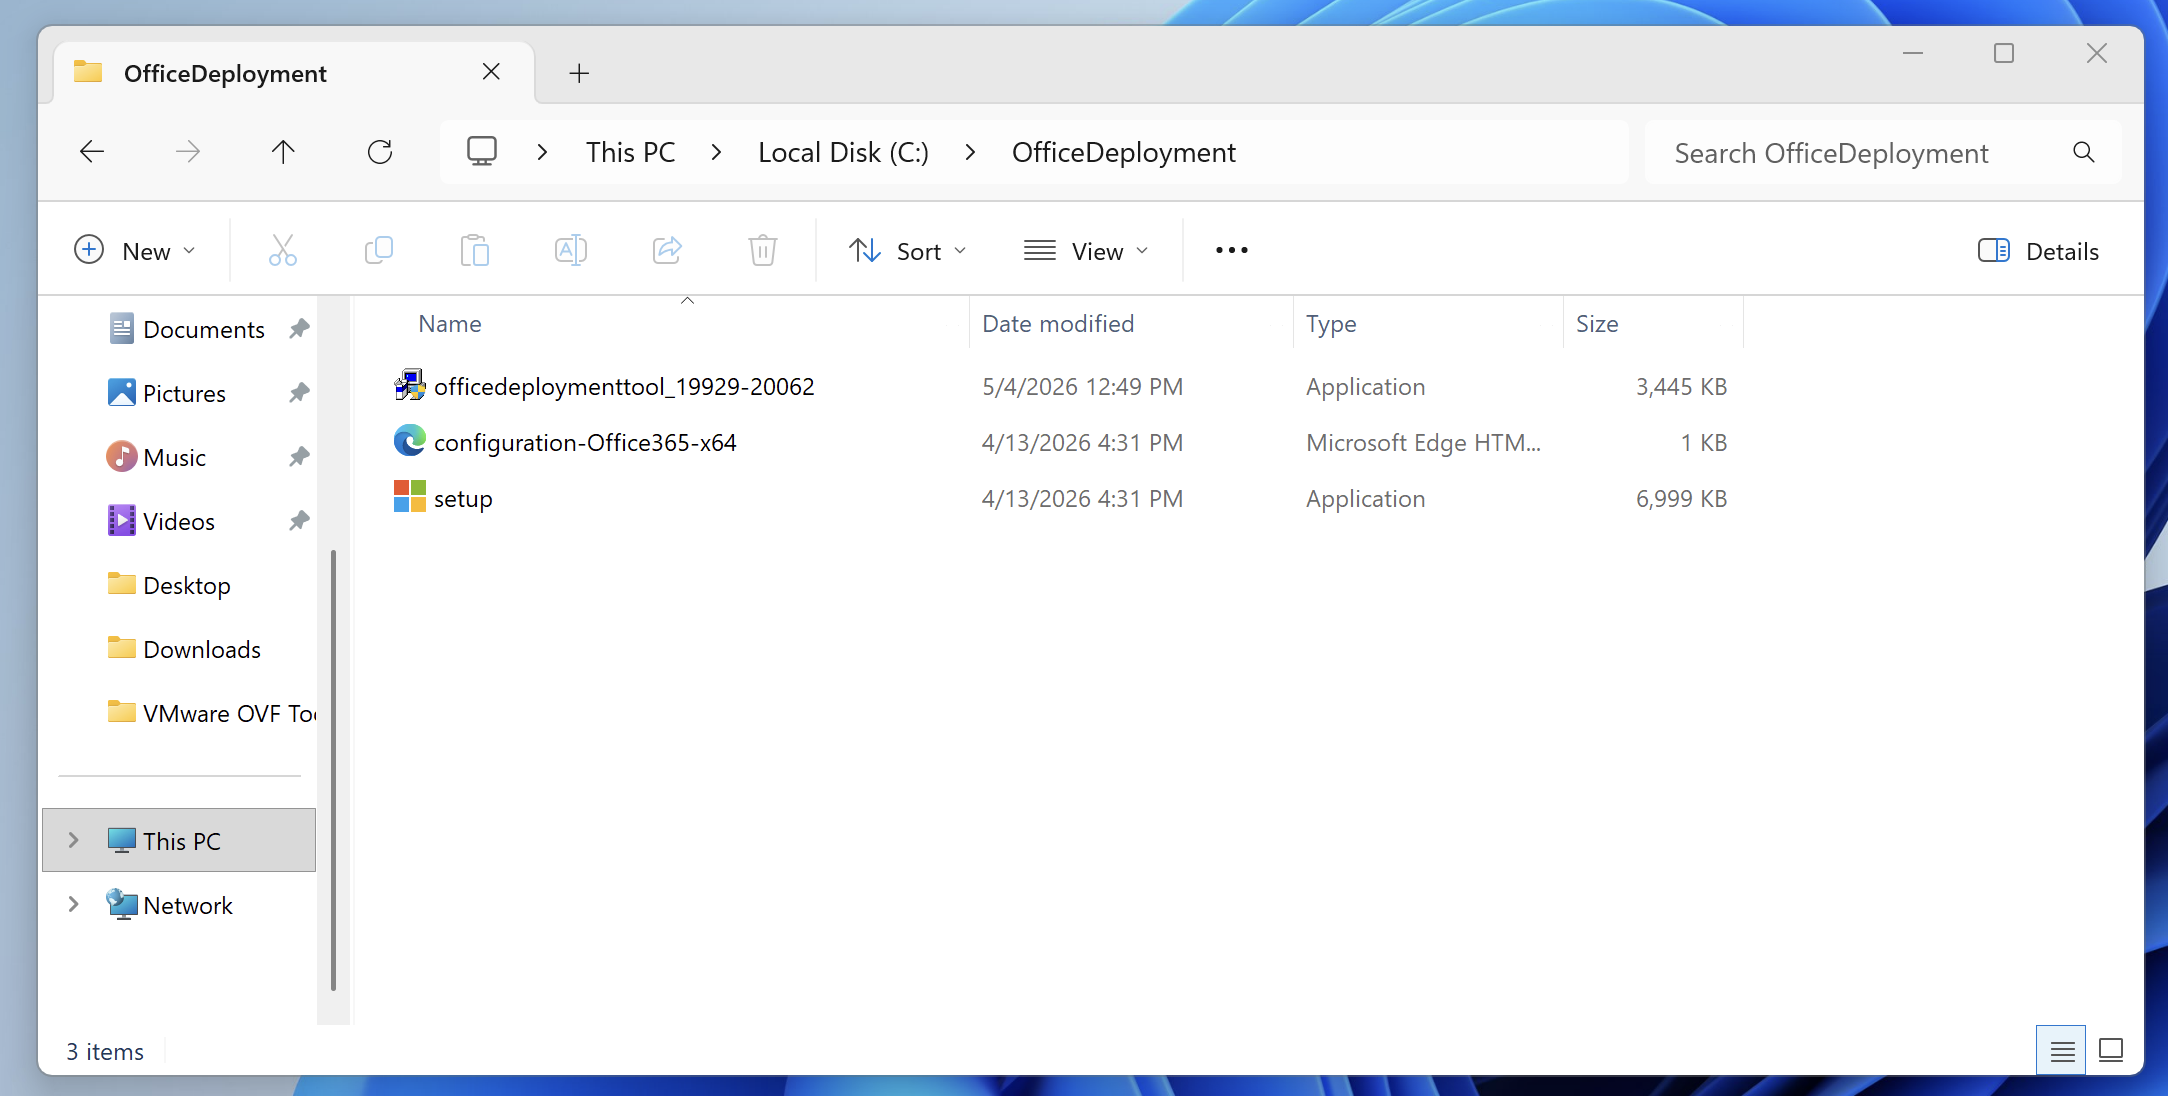
The setup.exe file is the Office Deployment Tool command-line executable which we will use later in Step 3.
Step 2: Create the configuration XML
Use Microsoft’s Office Customization Tool to generate your XML. Microsoft recommends using the Office Customization Tool rather than manually writing XML, because it helps define products, languages, update behavior, display behavior, and licensing settings.
When creating the XML, confirm the following:
- Product matches the license type.
- Channel matches the Office family.
- Architecture is correct, usually 64-bit.
- Display level is set to hidden/silent.
- EULA is accepted.
- Previous MSI versions are removed if needed.
- Source path points to the local Fileset path or is omitted if installing from the CDN.
Source path example:
C:\ProgramData\FileWave\Installers\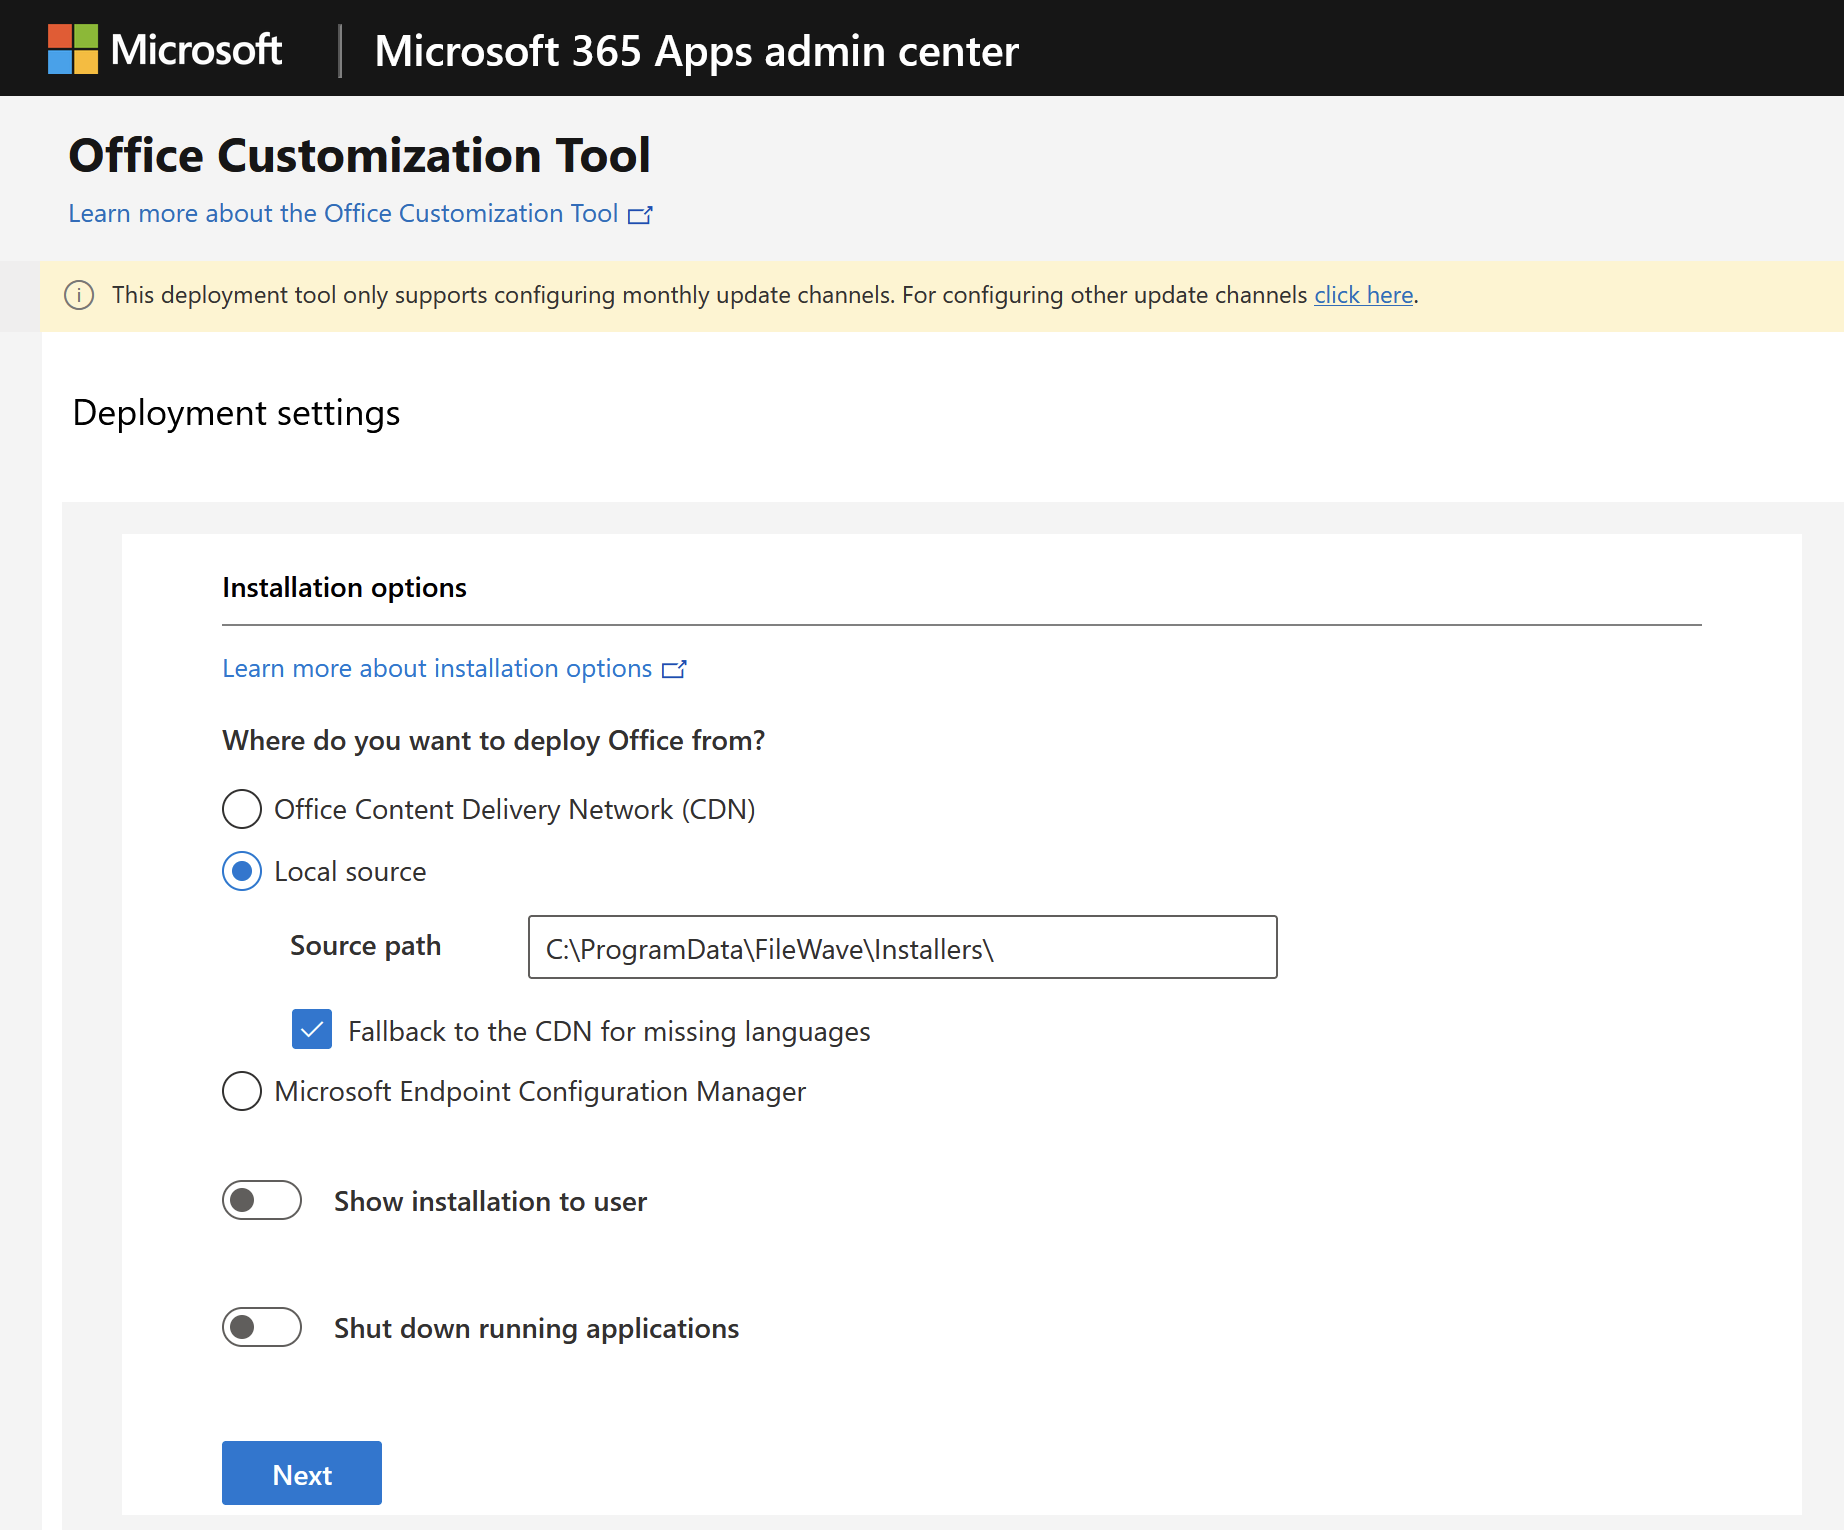
Example XMLs:
Office LTSC Professional Plus 2024
Use this style of XML for Office LTSC 2024 volume-license deployments:
Office LTSC Professional Plus 2024
<Configuration>
<Add OfficeClientEdition="64" Channel="PerpetualVL2024" SourcePath="C:\ProgramData\FileWave\Installers\Office">
<Product ID="ProPlus2024Volume">
<Language ID="en-us" />
<!-- Optional exclusions -->
<!-- <ExcludeApp ID="Access" /> -->
<!-- <ExcludeApp ID="Publisher" /> -->
</Product>
</Add>
<RemoveMSI />
<Display Level="None" AcceptEULA="TRUE" />
<!-- For MAK activation, add your MAK key if required:
<Property Name="PIDKEY" Value="XXXXX-XXXXX-XXXXX-XXXXX-XXXXX" />
-->
<Property Name="AUTOACTIVATE" Value="1" />
</Configuration>
Office LTSC Standard 2024
Office LTSC Standard 2024
<Configuration>
<Add OfficeClientEdition="64" Channel="PerpetualVL2024" SourcePath="C:\ProgramData\FileWave\Installers\Office">
<Product ID="Standard2024Volume">
<Language ID="en-us" />
</Product>
</Add>
<RemoveMSI />
<Display Level="None" AcceptEULA="TRUE" />
<Property Name="AUTOACTIVATE" Value="1" />
</Configuration>
Microsoft 365 Apps
Use this style of XML for Microsoft 365 Apps deployments:
Microsoft 365 Apps for enterprise
<Configuration>
<Add OfficeClientEdition="64" Channel="MonthlyEnterprise" SourcePath="C:\ProgramData\FileWave\Installers\Office" AllowCdnFallback="True">
<Product ID="O365ProPlusRetail">
<Language ID="en-us" />
<!-- Optional exclusions -->
<!-- <ExcludeApp ID="Access" /> -->
<!-- <ExcludeApp ID="Publisher" /> -->
<!-- <ExcludeApp ID="Teams" /> -->
<!-- <ExcludeApp ID="OutlookForWindows" /> -->
</Product>
</Add>
<RemoveMSI />
<Updates Enabled="TRUE" Channel="MonthlyEnterprise" />
<Display Level="None" AcceptEULA="TRUE" />
</Configuration>
AllowCdnFallback="True" can help when language files are missing from the local source, because ODT can retrieve missing language content from Microsoft’s CDN.
Microsoft 365 Apps for business
<Configuration>
<Add OfficeClientEdition="64" Channel="Current" SourcePath="C:\ProgramData\FileWave\Installers\Office" AllowCdnFallback="True">
<Product ID="O365BusinessRetail">
<Language ID="en-us" />
</Product>
</Add>
<RemoveMSI />
<Updates Enabled="TRUE" Channel="Current" />
<Display Level="None" AcceptEULA="TRUE" />
</Configuration>
Export the configuration xml file, label as configuration.xml or your desired name. Make sure to update the XML file to match this exported file name within the install-office.ps1 script.
Step 3: Download the Office installation files
From an elevated Command Prompt or PowerShell window on your technician machine, run:
C:\OfficeDeployment\setup.exe /download C:\OfficeDeployment\configuration.xml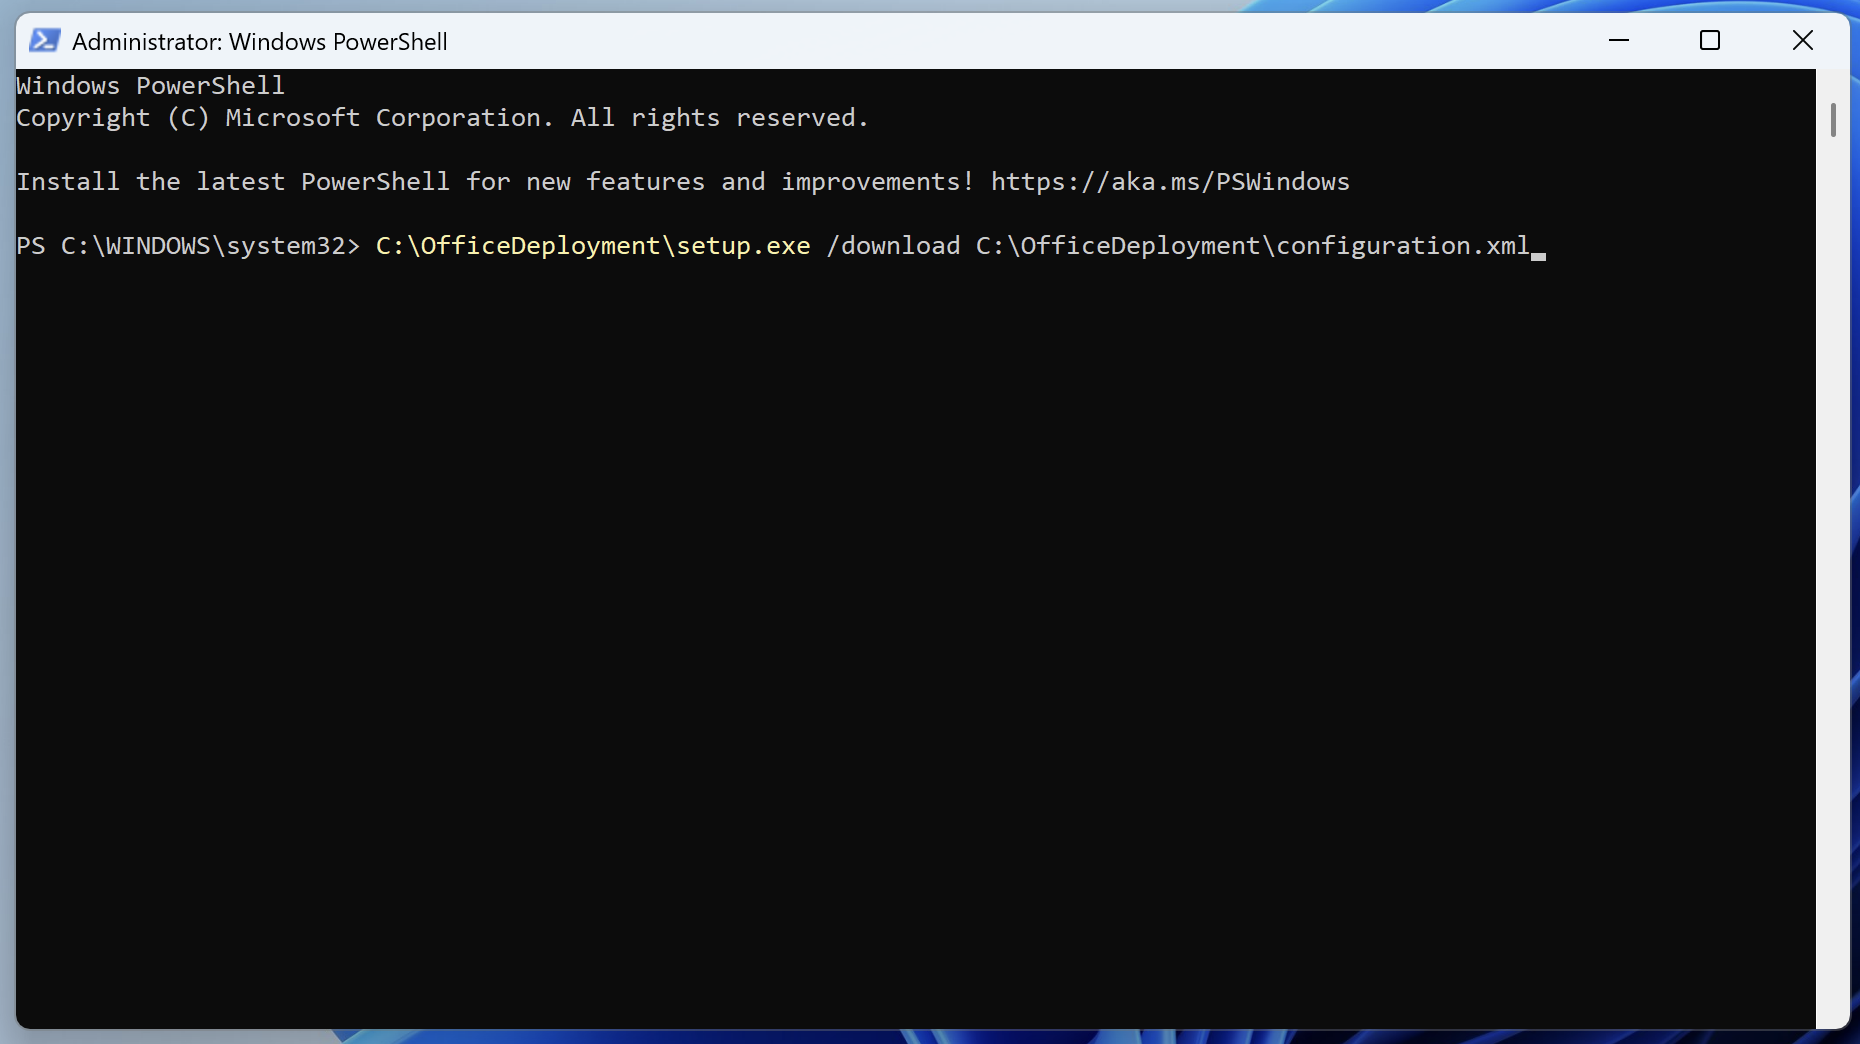
This downloads the Office source files into the path defined by SourcePath from the configuration xml file. If SourcePath is omitted, ODT downloads the files to the same folder where setup.exe is located. Microsoft documents /download for downloading Office LTSC 2024 files and /configure for installing from the XML.
After the download completes, confirm that an Office folder exists:
C:\ProgramData\FileWave\Installers\Office\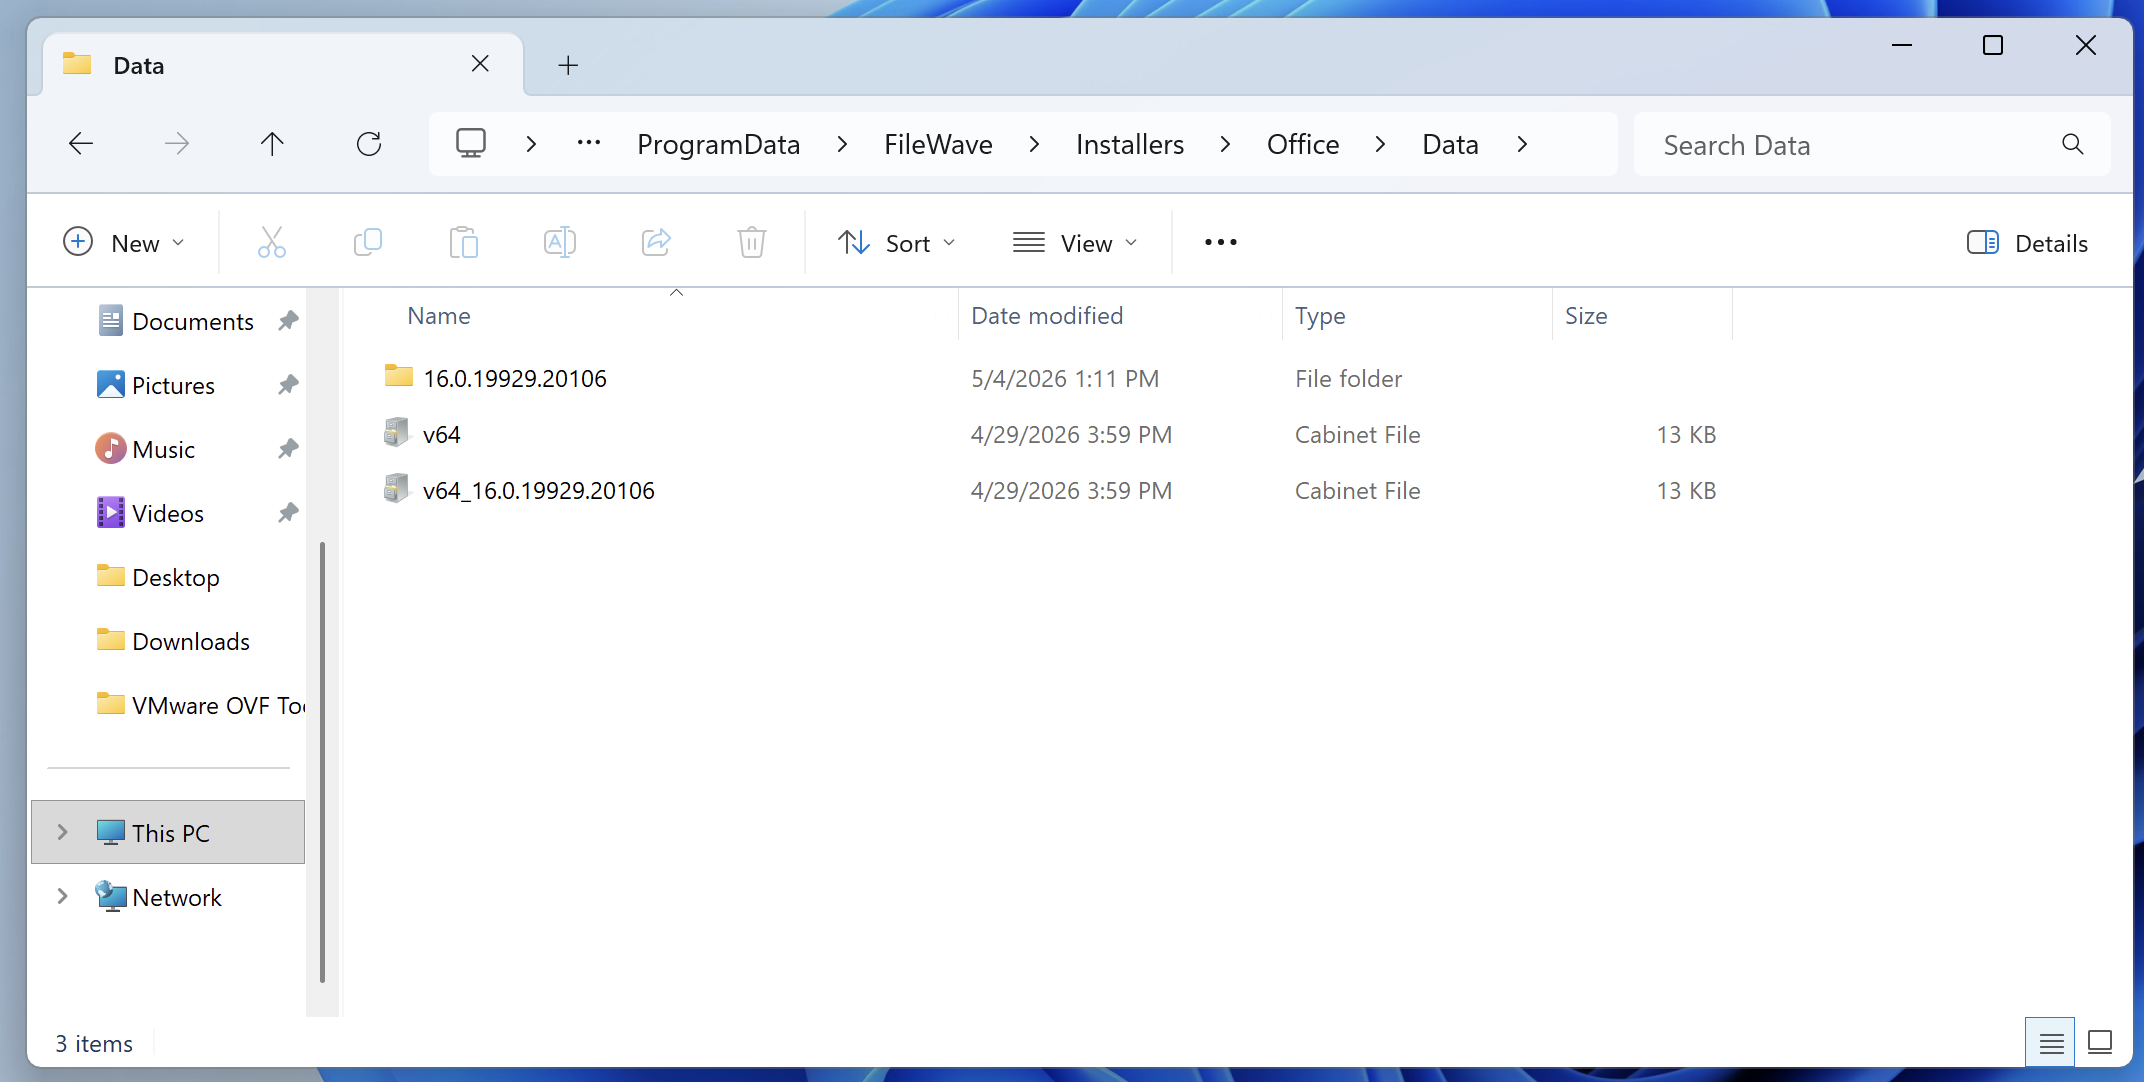
The source folder should contain an Office folder with a Data subfolder and versioned download content.
Step 4: Build the FileWave Fileset
Upload the following into the Fileset:
Office\
setup.exe
configuration.xml
install-office.ps1
uninstall-office.ps1Place them under:
C:\ProgramData\FileWave\Installers\Office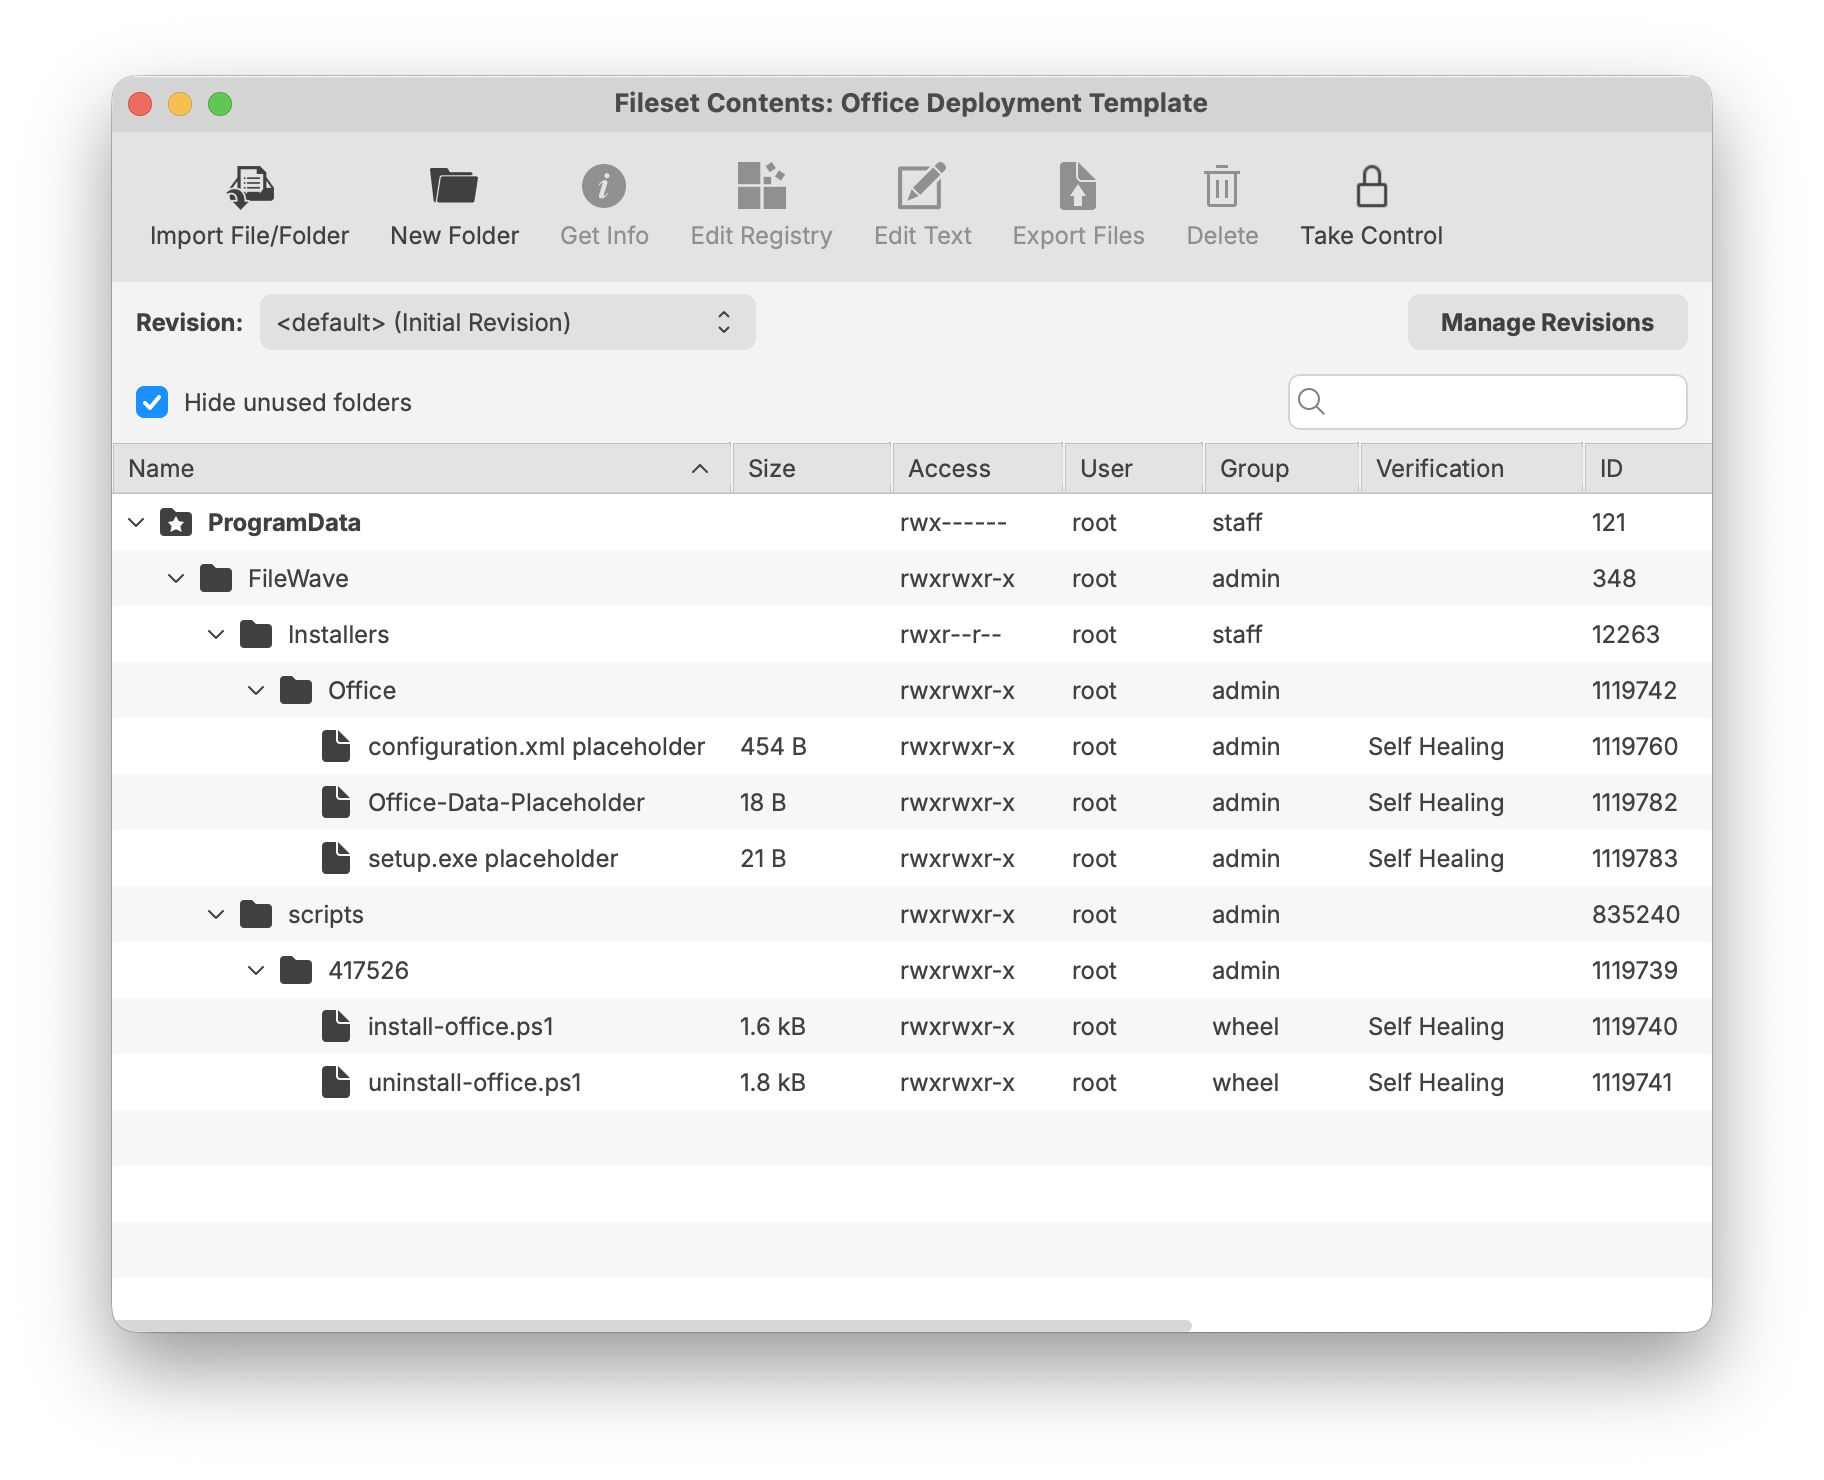
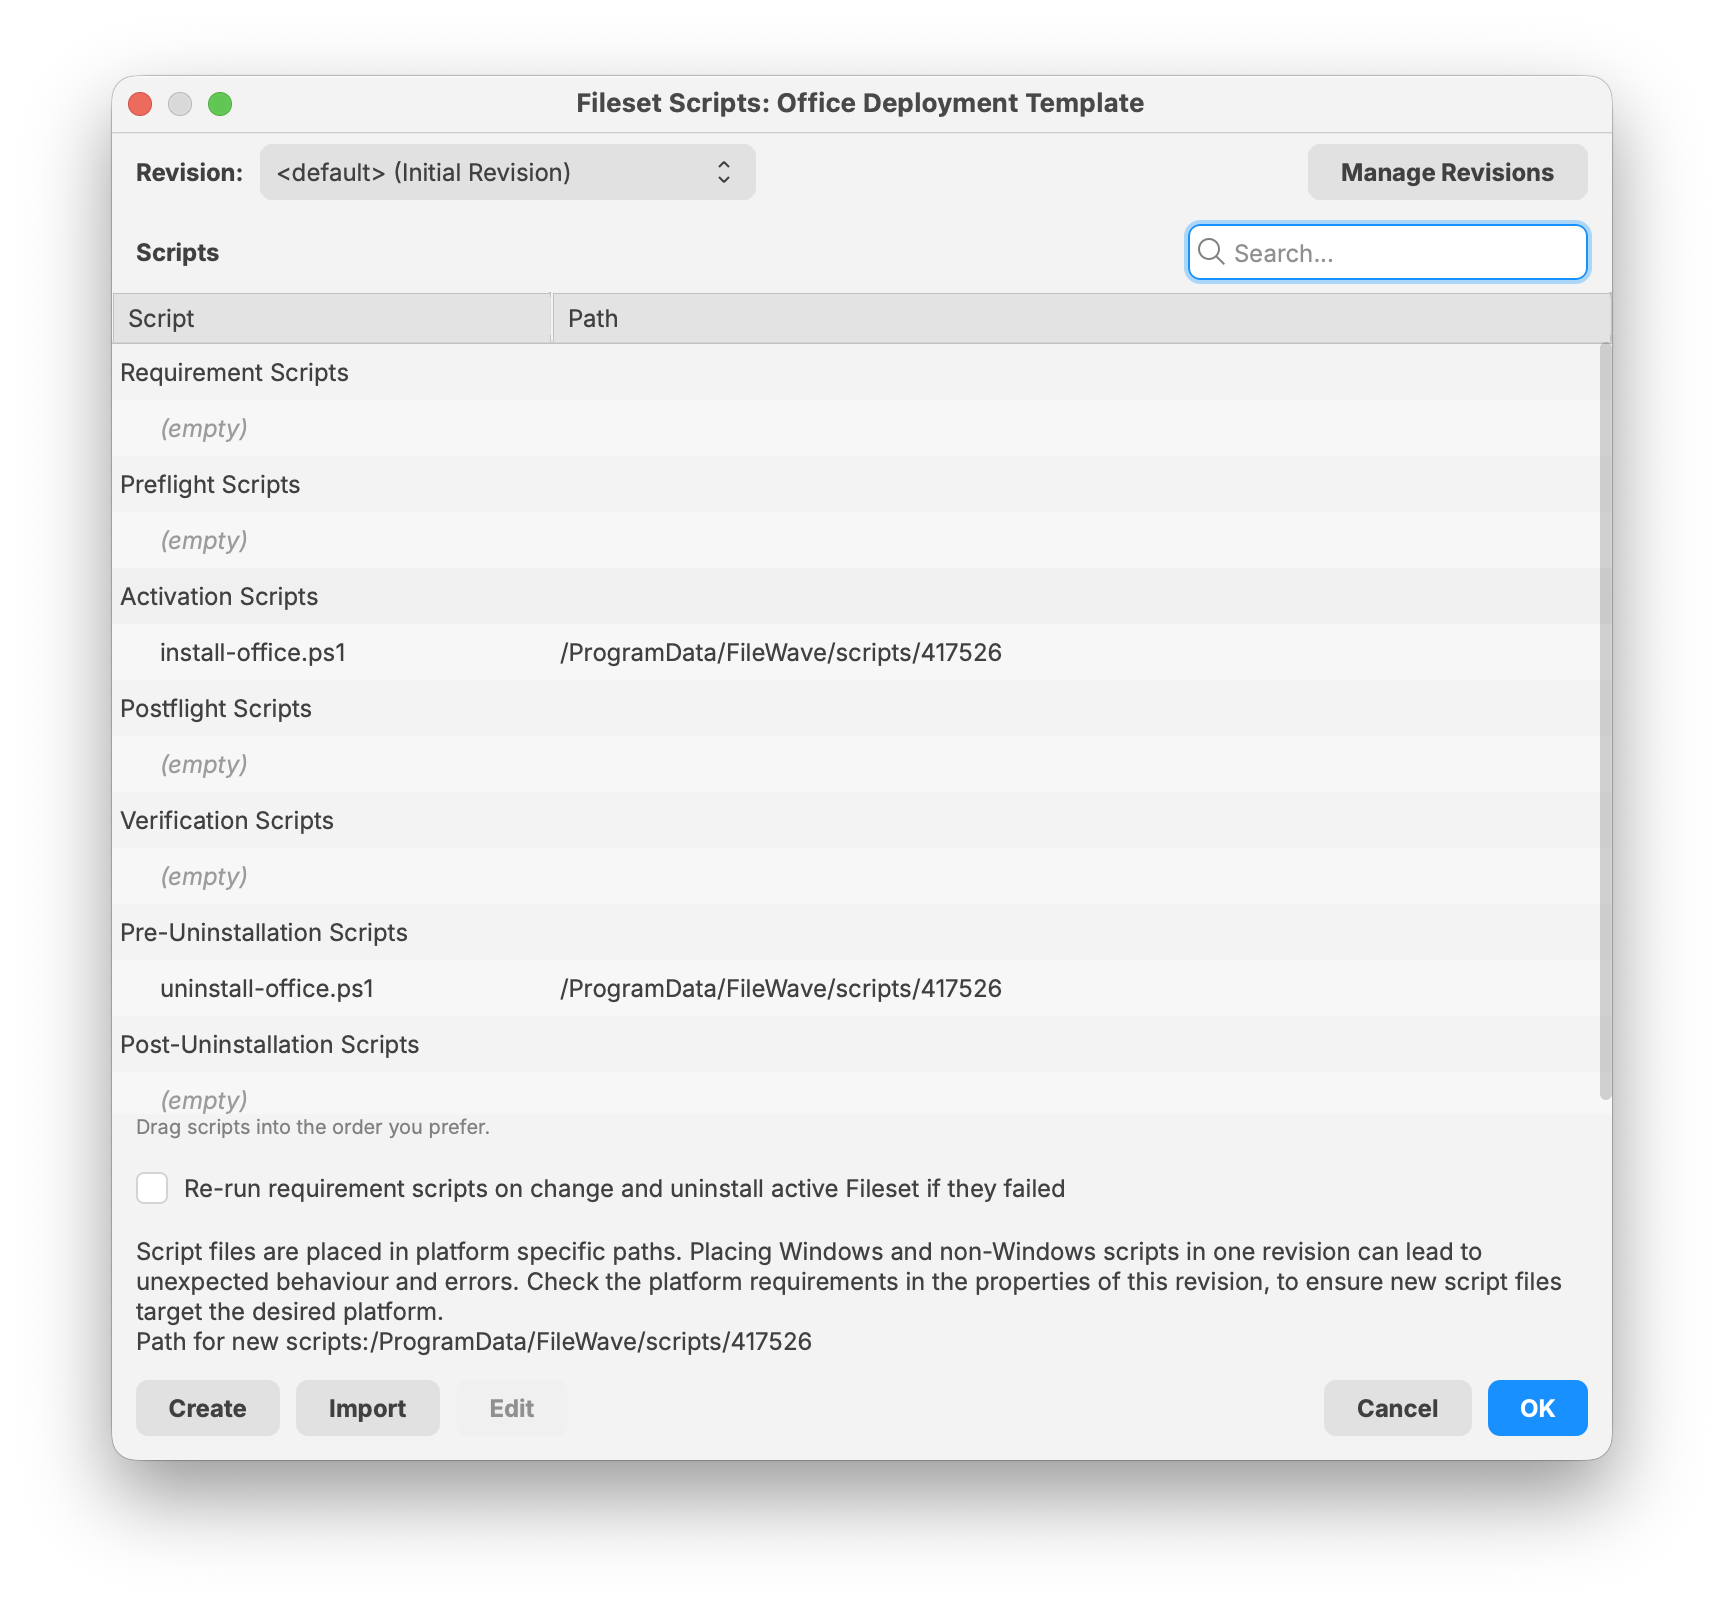
Step 5: Add the installation script
Use a PowerShell activation script with the following:
install-office.ps1
# install-office.ps1
# Installs Microsoft Office using the Office Deployment Tool and the configuration XML
# included in this FileWave Fileset.
$OfficeRoot = "C:\ProgramData\FileWave\Installers\Office"
$SetupExe = Join-Path $OfficeRoot "setup.exe"
$ConfigXml = Join-Path $OfficeRoot "configuration.xml"
$LogRoot = "C:\ProgramData\FileWave\Logs"
$LogFile = Join-Path $LogRoot "office-install.log"
# Ensure logging directory exists.
if (-not (Test-Path $LogRoot)) {
New-Item -Path $LogRoot -ItemType Directory -Force | Out-Null
}
function Write-Log {
param (
[string]$Message
)
$Timestamp = Get-Date -Format "yyyy-MM-dd HH:mm:ss"
"$Timestamp $Message" | Tee-Object -FilePath $LogFile -Append
}
Write-Log "Starting Microsoft Office installation."
# Validate required files before attempting installation.
if (-not (Test-Path $SetupExe)) {
Write-Log "ERROR: setup.exe not found at $SetupExe"
exit 1
}
if (-not (Test-Path $ConfigXml)) {
Write-Log "ERROR: configuration.xml not found at $ConfigXml"
exit 1
}
try {
$Process = Start-Process -FilePath $SetupExe `
-ArgumentList "/configure `"$ConfigXml`"" `
-Wait `
-PassThru `
-WindowStyle Hidden
Write-Log "Office Deployment Tool exited with code $($Process.ExitCode)."
if ($Process.ExitCode -ne 0) {
Write-Log "ERROR: Office installation failed."
exit $Process.ExitCode
}
Write-Log "Microsoft Office installation completed successfully."
exit 0
}
catch {
Write-Log "ERROR: $($_.Exception.Message)"
exit 1
}
Step 6: Add the uninstallation script
Use a pre-uninstallation script with the following:
uninstall-office.ps1
# uninstall-office.ps1
# Removes Click-to-Run Office products using the Office Deployment Tool.
# This script is intended to run as a FileWave pre-uninstallation script
# when the Office Fileset association is removed.
$OfficeRoot = "C:\ProgramData\FileWave\Installers\Office"
$SetupExe = Join-Path $OfficeRoot "setup.exe"
$RemoveXml = Join-Path $OfficeRoot "remove-office.xml"
$LogRoot = "C:\ProgramData\FileWave\Logs"
$LogFile = Join-Path $LogRoot "office-uninstall.log"
if (-not (Test-Path $LogRoot)) {
New-Item -Path $LogRoot -ItemType Directory -Force | Out-Null
}
function Write-Log {
param (
[string]$Message
)
$Timestamp = Get-Date -Format "yyyy-MM-dd HH:mm:ss"
"$Timestamp $Message" | Tee-Object -FilePath $LogFile -Append
}
Write-Log "Starting Microsoft Office removal."
if (-not (Test-Path $SetupExe)) {
Write-Log "ERROR: setup.exe not found at $SetupExe"
exit 1
}
# Remove all Click-to-Run Office products installed by ODT, including Office, Project, and Visio.
# Use a more targeted Remove XML if you only want to remove a specific product.
$RemoveXmlContent = @"
<Configuration>
<Remove All="TRUE" />
<Display Level="None" AcceptEULA="TRUE" />
</Configuration>
"@
$RemoveXmlContent | Out-File -FilePath $RemoveXml -Encoding utf8 -Force
try {
$Process = Start-Process -FilePath $SetupExe `
-ArgumentList "/configure `"$RemoveXml`"" `
-Wait `
-PassThru `
-WindowStyle Hidden
Write-Log "Office Deployment Tool exited with code $($Process.ExitCode)."
if ($Process.ExitCode -ne 0) {
Write-Log "ERROR: Office removal failed."
exit $Process.ExitCode
}
Write-Log "Microsoft Office removal completed successfully."
exit 0
}
catch {
Write-Log "ERROR: $($_.Exception.Message)"
exit 1
}
Microsoft documents the Remove element and notes that All="TRUE" removes Microsoft 365 Apps products and languages, including Project and Visio.
Step 7: Deploy the Fileset
Deploy the Office Fileset to a target Windows device.
After the Fileset activates, the install script runs:
setup.exe /configure configuration.xmlOffice installation can take several minutes depending on hardware, network speed, Office edition, language count, and whether the content is being installed from local Fileset content or Microsoft’s CDN.
Check the target Windows device for new installations of Micrsoft's Office applications.
Troubleshooting
Office 2024 does not install
Confirm that the XML uses:
Channel="PerpetualVL2024"and one of the correct Office LTSC 2024 product IDs, such as:
<Product ID="ProPlus2024Volume">or:
<Product ID="Standard2024Volume">Microsoft 365 Apps installs the wrong channel
Confirm both the <Add> channel and <Updates> channel. The channel on the <Add> element controls the channel used during installation, while the <Updates> element can control update behavior after installation.
Installation fails on devices with existing Office
Confirm whether the existing Office install is:
- MSI-based Office
- Click-to-Run Office
- 32-bit Office
- 64-bit Office
- Retail Office
- Volume Office
- Microsoft 365 Apps
Use <RemoveMSI /> for older MSI-based Office. For Click-to-Run Office 2019/2021/2024 or Microsoft 365 Apps, use a targeted <Remove> configuration or <Remove All="TRUE" /> when a full Office removal is intended.
32-bit to 64-bit migration fails
Do not simply change OfficeClientEdition from 32 to 64 on an existing Office installation. Microsoft documents the MigrateArch attribute for changing the architecture of an existing Microsoft 365 Apps installation.
Missing language files
If you use a local source and support multiple languages, make sure every required language was downloaded. For Microsoft 365 Apps, consider using:
AllowCdnFallback="True"so ODT can retrieve missing language content from Microsoft’s CDN when needed.
Updating Office source files later
For Microsoft 365 Apps, re-run ODT /download periodically using the same XML to refresh the Office source files. Microsoft notes that ODT conserves bandwidth by downloading only missing files when the target folder already contains the same build and language content.
For Office LTSC 2024, keep the source current according to the organization’s update strategy. Office LTSC 2024 can receive updates from the Office CDN by default or from a defined local update path.
SentinelOne (Windows EXE)
Description
SentinelOne provides endpoint protection for Windows devices. This recipe shows how to package the Windows EXE installer as a FileWave Fileset and pass the SentinelOne registration token as launch arguments.
Ingredients
-
FileWave Central
-
SentinelOne registration token
- SentinelOne EXE installer
Directions
- Download the EXE installer from SentinelOne.
-
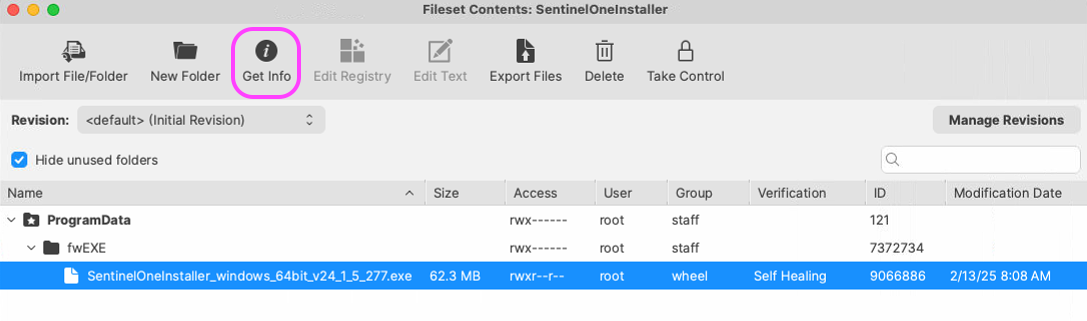
Upload the EXE installer into FileWave Central as a Fileset.
- Highlight the Fileset and double-click it to open Fileset Contents.
- Highlight the EXE file.
- Click Get Info.

- Select the Executable tab.
- Check Execute once when activated.
- Choose Non-interactive (background).
- Check Wait for executable to finish and select 15 Minutes.
- On the Launch Arguments tab, click the + icon.
- Enter the token argument, replacing
your_token_registrationwith your SentinelOne registration token.-t your_token_registration - Click the + icon to create another argument.
- Enter the quiet-install argument.
-q - Click Apply to save the Fileset.

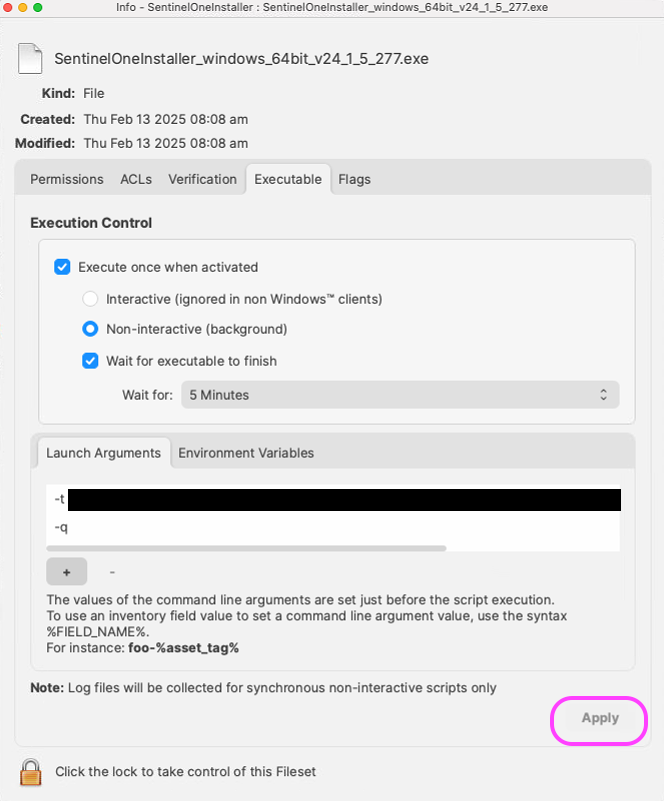
Notes
Use both launch arguments. The -q parameter makes the installer silent, and the -t parameter supplies the SentinelOne registration token. Without the token argument, a silent installation has no way to receive the token at install time. Keep the real token private; your_token_registration is only a placeholder.
Related Content
Upgrading or Repairing the Visual C++ Redistributable on Windows (Windows script)
Description
This article describes how to use the attached FileWave Fileset to install, update, or repair the Microsoft Visual C++ Redistributable on Windows devices. The Fileset downloads the latest supported Microsoft VC++ v14 Redistributable installers directly from Microsoft and runs them silently.
On 64-bit Windows, the script installs both the x64 and x86 redistributables because many 32-bit applications still depend on the x86 runtime. On 32-bit Windows, it installs only the x86 redistributable.
Ingredients
-
FileWave Central or FileWave Anywhere: Required to import, assign, and deploy the Fileset to Windows devices.
-
VC++ Redistributable Fileset: Download the Fileset using the link below.
| Windows VC++ Redistributable |
 |
Directions
-
Import the Fileset:
-
Download the Fileset from the link above.
-
Import the Fileset into FileWave Central or FileWave Anywhere.
-
-
Review the script in the Fileset:
-
The Fileset contains the following PowerShell script. It checks whether Windows is 64-bit, builds the required installer list, downloads the redistributable installers from Microsoft, runs them silently, accepts success or success-with-reboot exit codes, and removes the temporary installer files.
# Installs the latest supported Microsoft Visual C++ Redistributable. # On 64-bit Windows, this installs both x64 and x86 because many 32-bit apps still require the x86 runtime. # On 32-bit Windows, this installs only x86. $ErrorActionPreference = 'Stop' Write-Output "Detected PowerShell process architecture: $env:PROCESSOR_ARCHITECTURE" Write-Output "Detected OS is 64-bit: $([Environment]::Is64BitOperatingSystem)" # Microsoft aka.ms/vc14 links point to the current supported Visual C++ v14 runtime installers. # "v14" is Microsoft's runtime family name for Visual Studio 2015 and later supported releases. $Installers = @() if ([Environment]::Is64BitOperatingSystem) { $Installers += @{ Name = 'Visual C++ Redistributable x64' Url = 'https://aka.ms/vc14/vc_redist.x64.exe' Path = Join-Path $env:TEMP 'vc_redist.x64.exe' } $Installers += @{ Name = 'Visual C++ Redistributable x86' Url = 'https://aka.ms/vc14/vc_redist.x86.exe' Path = Join-Path $env:TEMP 'vc_redist.x86.exe' } } else { $Installers += @{ Name = 'Visual C++ Redistributable x86' Url = 'https://aka.ms/vc14/vc_redist.x86.exe' Path = Join-Path $env:TEMP 'vc_redist.x86.exe' } } foreach ($Installer in $Installers) { Write-Output "Downloading $($Installer.Name) from $($Installer.Url)" Invoke-WebRequest ` -Uri $Installer.Url ` -OutFile $Installer.Path ` -UseBasicParsing Write-Output "Installing $($Installer.Name)" $Process = Start-Process ` -FilePath $Installer.Path ` -ArgumentList '/install', '/quiet', '/norestart' ` -Wait ` -PassThru Write-Output "$($Installer.Name) installer exit code: $($Process.ExitCode)" # 0 = success # 3010 = success, reboot required if ($Process.ExitCode -notin @(0, 3010)) { throw "$($Installer.Name) failed with exit code $($Process.ExitCode)" } Remove-Item -Path $Installer.Path -Force -ErrorAction SilentlyContinue } Write-Output 'Visual C++ Redistributable installation completed successfully.'
-
-
Associate the Fileset:
-
Assign the Fileset to the Windows devices where the Visual C++ Redistributable needs to be installed, updated, or repaired.
-
Notes
-
Microsoft permalink URLs: The script uses Microsoft-maintained
aka.ms/vc14download links for the current supported Visual C++ v14 runtime family. In Microsoft's naming, v14 refers to the Visual C++ runtime generation that started with Visual Studio 2015 and continues through later supported Visual Studio releases. It does not mean the Fileset installs only the original 2015/14.0 redistributable. The links redirect to Microsoft's latest supported installers for that runtime family. -
Architecture behavior: The script checks the operating system bitness, not only the PowerShell process architecture. This prevents a 32-bit PowerShell process running on 64-bit Windows from causing the wrong installer set to be used.
-
Exit codes: The Microsoft installer exit code
0is treated as success. Exit code3010is also treated as success, but it means Windows reports that a reboot is required. -
Silent installation: The script runs each installer with
/install /quiet /norestart. It does not force a reboot, so handle any needed restart through your normal maintenance or deployment process. -
Network access: Devices must be able to reach Microsoft's
aka.msdownload URLs when the Fileset activates.