# CrowdStrike Falcon Protection (Windows EXE)

## Description

Needing to deploy to Crowdstrike Falcon antivirus to your Windows fleet? FileWave has you covered.

CrowdStrike's flagship product is called Falcon, which is a cloud-native platform that combines next-generation antivirus, endpoint detection and response (EDR), threat intelligence, and proactive threat hunting. Falcon aims to provide real-time visibility into endpoint activity, rapid threat detection, and automated response to security incidents.

## Ingredients

- FileWave Admin Central
- Crowdstrike EXE installer
- Crowdstrike License code
- [CrowdStrike Windows Installation.fileset.zip](https://kb.filewave.com/attachments/488)

## Directions

### Deploying the Crowdstrike Falcon to your devices

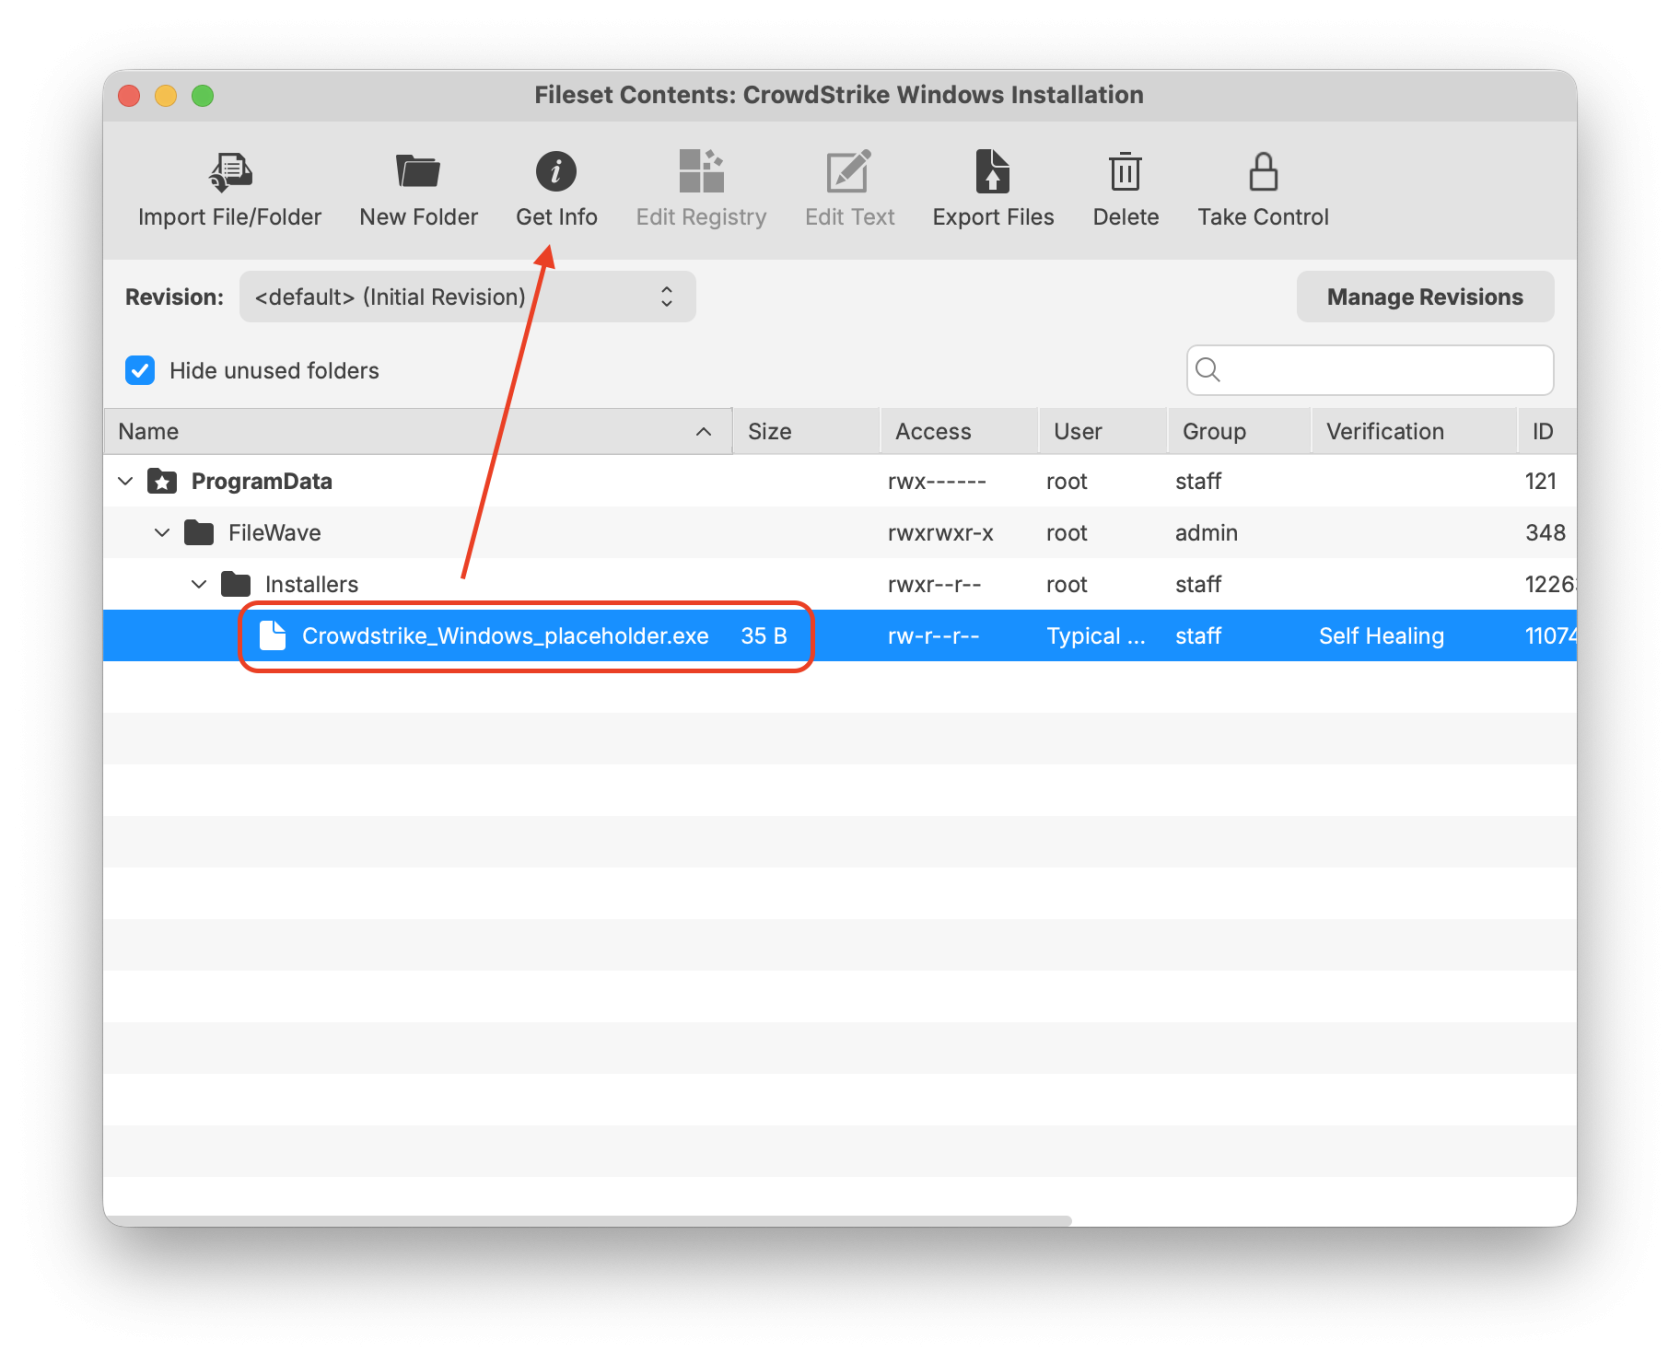
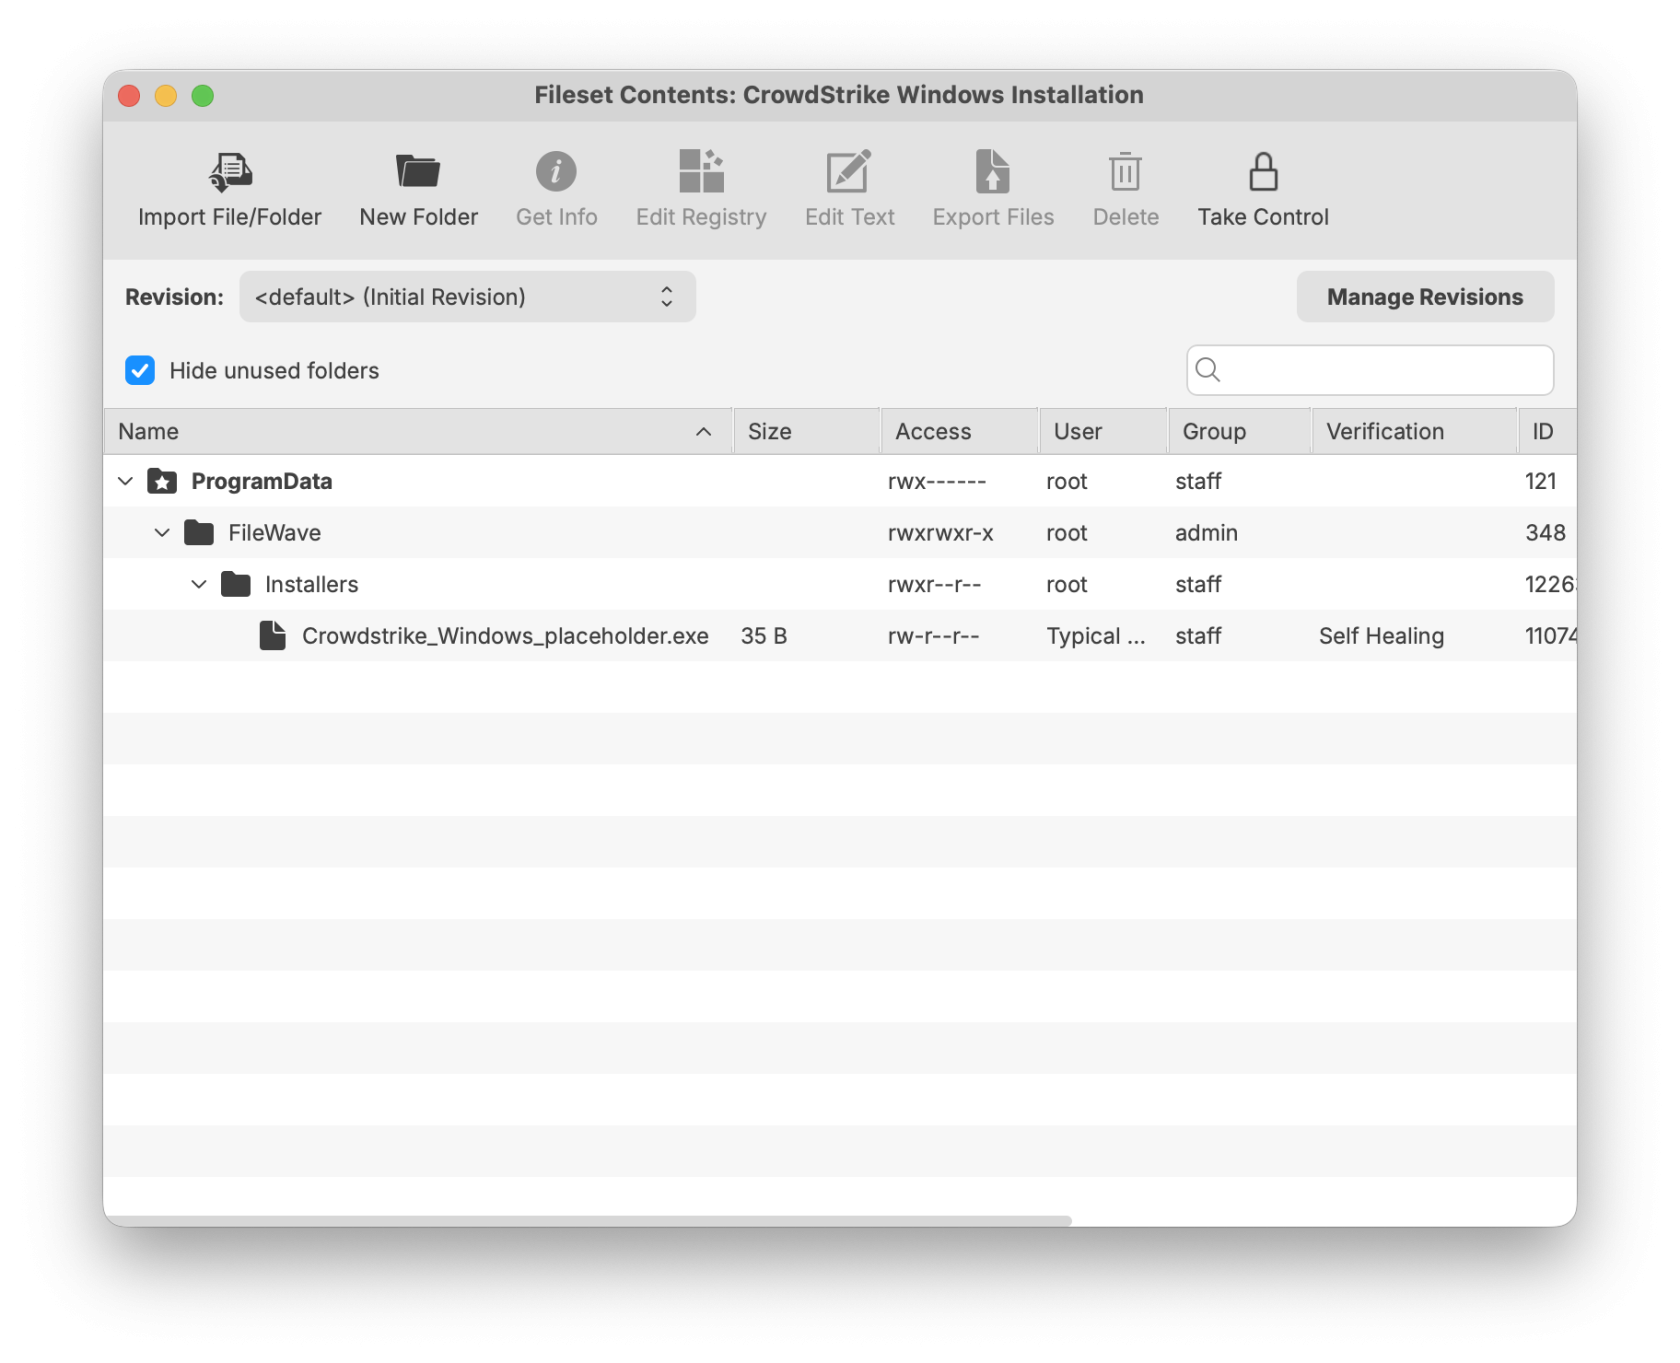
CrowdStrike deployment for Windows devices has one Fileset. This Fileset includes a placeholder for your EXE installer with template launch arguments.

<p class="callout warning">The Fileset included has a placeholder for your EXE installer. Be sure to replace with your EXE installer provided by CrowdStrike.</p>

[CrowdStrike Windows Installation.fileset.zip](https://kb.filewave.com/attachments/488)

[![WindowsCrowdstrikeContents.png](https://kb.filewave.com/uploads/images/gallery/2026-01/scaled-1680-/DQDnHIHmACITA3EA-windowscrowdstrikecontents.png)](https://kb.filewave.com/uploads/images/gallery/2026-01/DQDnHIHmACITA3EA-windowscrowdstrikecontents.png)
## Customizing the Installation EXE

<table border="1" id="bkmrk-editing-the-fileset-" style="border-collapse: collapse; width: 100%;"><colgroup><col style="width: 50%;"></col><col style="width: 50%;"></col></colgroup><tbody><tr><td>Editing the Fileset EXE

1. Highlight the CrowdStrike Windows Installation Fileset
2. Double-Click to open the Fileset Contents
3. Upload your EXE installer into the Installer folder
4. Remove the placeholder file after your EXE installer has been uploaded successfully
5. Highlight and select your uploaded .exe file.
6. Click on 'Get Info'

</td><td>[![WindowsCrowdstrikeGetInfo.png](https://kb.filewave.com/uploads/images/gallery/2026-01/scaled-1680-/xgVapgGXbEY5Eqzv-windowscrowdstrikegetinfo.png)](https://kb.filewave.com/uploads/images/gallery/2026-01/xgVapgGXbEY5Eqzv-windowscrowdstrikegetinfo.png)</td></tr><tr><td>Enter in your CrowdStrike EXE installer switches/parameters and license code

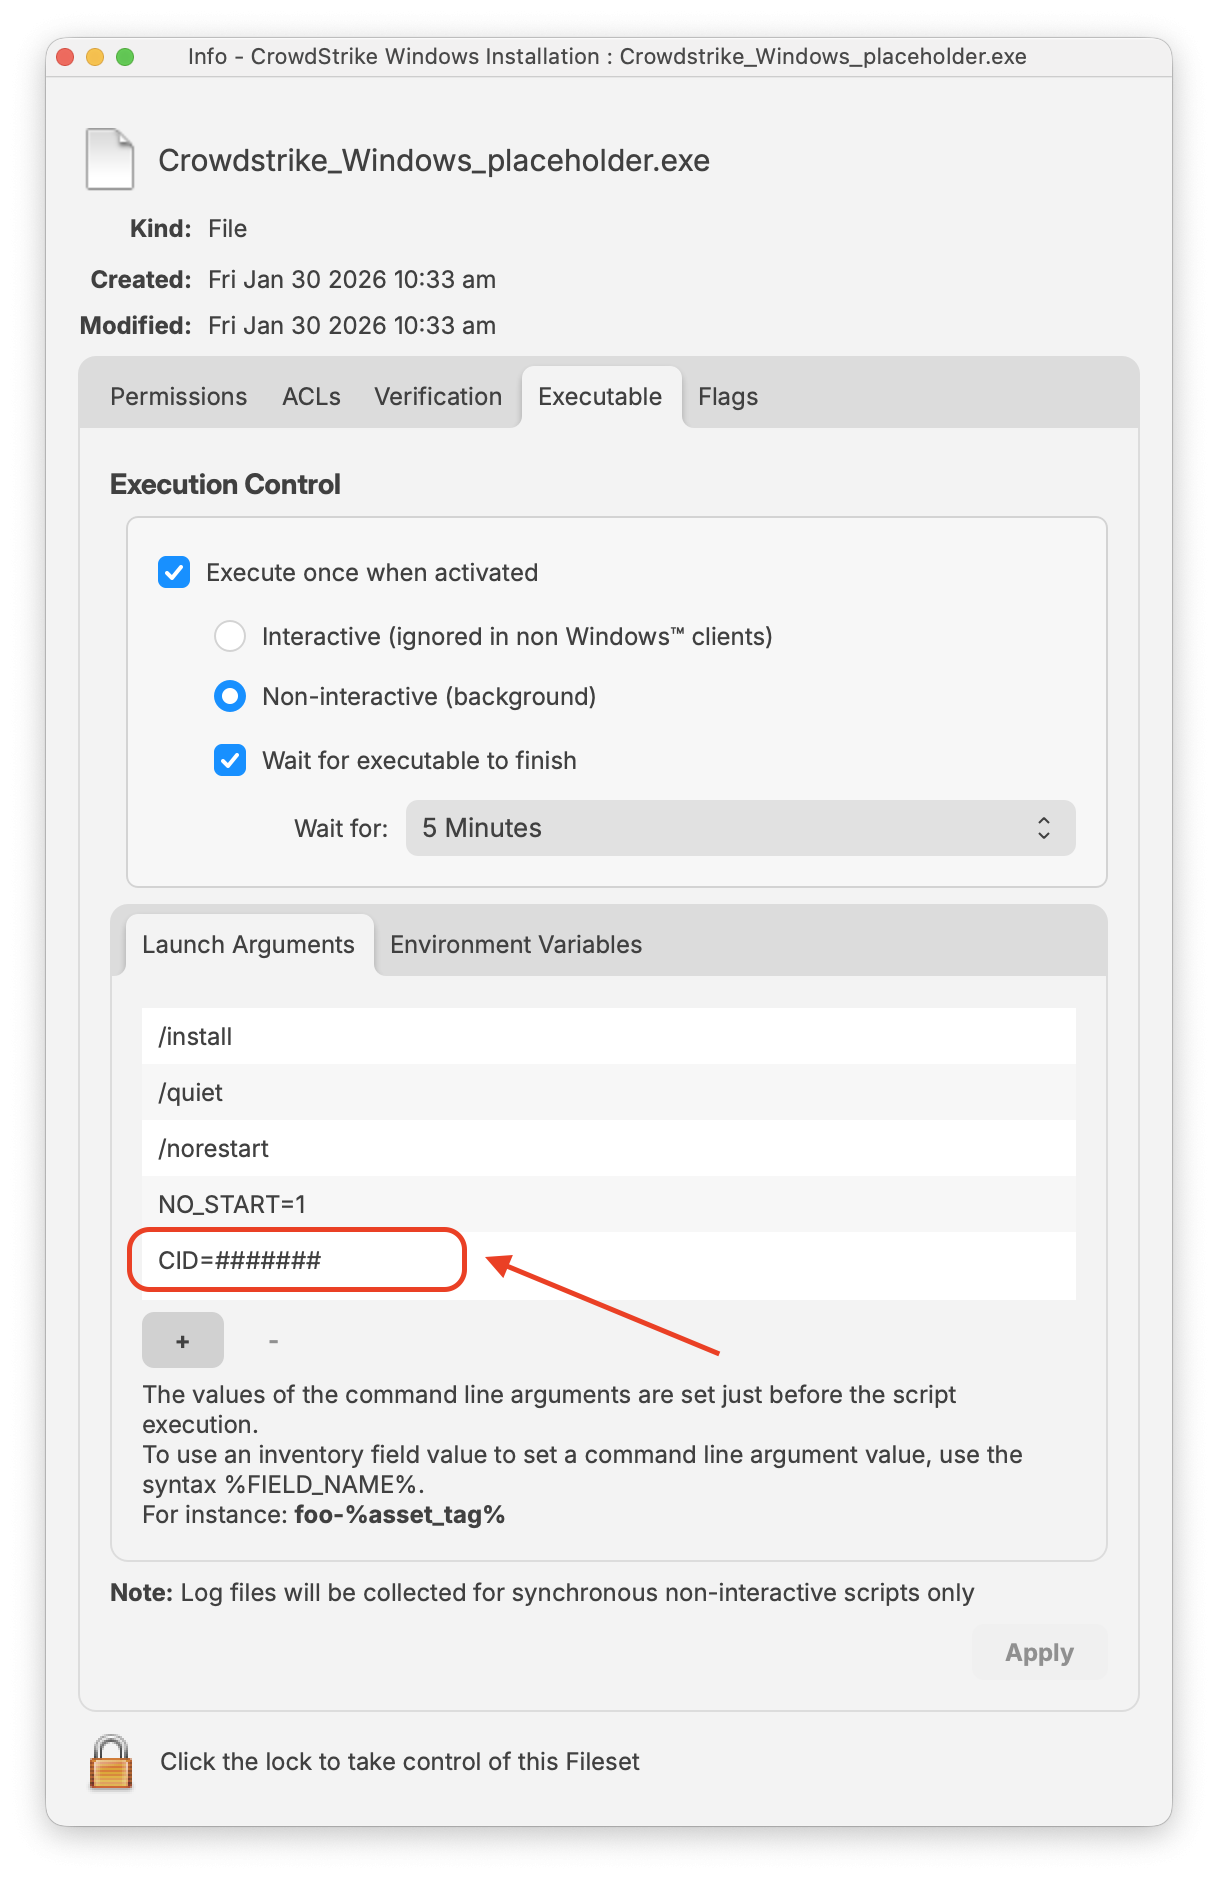
1. Select the tab 'Executable.'
2. Check the box for 'Execute once when activated'
3. Check the box for 'Wait for executable to finish' and choose 5 Minutes
4. Under the tab 'Launch Arguments' enter in the CLI switches to ensure proper installation; please review below for the complete list of EXE installer switches and parameters
5. Click the Apply to save your changes to the Launch Arguments
6. Close the Get Info Window to save your changes.

</td><td>[![WindowsCrowdstrikeLaunchArguments.png](https://kb.filewave.com/uploads/images/gallery/2026-01/scaled-1680-/8Rz6cskk4Ukh2DjA-windowscrowdstrikelauncharguments.png)](https://kb.filewave.com/uploads/images/gallery/2026-01/8Rz6cskk4Ukh2DjA-windowscrowdstrikelauncharguments.png)</td></tr></tbody></table>

<p class="callout warning">**Please Note**: Launch Argument **NO\_START=1** is intended if the desired outcome<span class="ui-provider a b c d e f g h i j k l m n o p q r s t u v w x y z ab ac ae af ag ah ai aj ak" dir="ltr"> if you want CrowdStrike to start after the first reboot post-install. If not, remove NO\_START=1 from the Launch Argument list.</span></p>

#### <span class="ui-provider a b c d e f g h i j k l m n o p q r s t u v w x y z ab ac ae af ag ah ai aj ak" dir="ltr">Crowdstirke CLI switches</span>

<span class="ui-provider a b c d e f g h i j k l m n o p q r s t u v w x y z ab ac ae af ag ah ai aj ak" dir="ltr">These CLI switches not case senstive:</span>

<table border="1" cellspacing="0" id="bkmrk-switch-required-purp" style="width: 101.071%;"><tbody><tr><th colspan="1" rowspan="1" style="width: 12.3957%;">**Switch**</th><th colspan="1" rowspan="1" style="width: 13.23%;">**Required**</th><th colspan="1" rowspan="1" style="width: 74.3743%;">**Purpose**</th></tr></tbody><tbody><tr><td colspan="1" rowspan="1" style="width: 12.3957%;">/install</td><td colspan="1" rowspan="1" style="width: 13.23%;">Yes</td><td colspan="1" rowspan="1" style="width: 74.3743%;">Installs the CrowdStrike Falcon Sensor.</td></tr><tr><td colspan="1" rowspan="1" style="width: 12.3957%;">/passive</td><td colspan="1" rowspan="1" style="width: 13.23%;">No</td><td colspan="1" rowspan="1" style="width: 74.3743%;">The installer shows a minimal UI with no prompts.</td></tr><tr><td colspan="1" rowspan="1" style="width: 12.3957%;">/quiet</td><td colspan="1" rowspan="1" style="width: 13.23%;">No</td><td colspan="1" rowspan="1" style="width: 74.3743%;">Suppresses UI and prompts.</td></tr><tr><td colspan="1" rowspan="1" style="width: 12.3957%;">/norestart</td><td colspan="1" rowspan="1" style="width: 13.23%;">No</td><td colspan="1" rowspan="1" style="width: 74.3743%;">Prevents the host from restarting after installation.</td></tr><tr><td colspan="1" rowspan="1" style="width: 12.3957%;">/log</td><td colspan="1" rowspan="1" style="width: 13.23%;">No</td><td colspan="1" rowspan="1" style="width: 74.3743%;">Changes the default installation log directory from %Temp% to a new location. The new location must be contained in quotation marks ("").</td></tr></tbody></table>

#### Crowdstrike CLI parameters

These parameters are case senstive:

<table border="1" cellspacing="0" id="bkmrk-parameter-value-requ" style="width: 100%;"><tbody><tr><th colspan="1" rowspan="1" style="width: 17.5224%;">**Parameter**</th><th colspan="1" rowspan="1" style="width: 17.7577%;">**Value**</th><th colspan="1" rowspan="1" style="width: 8.93921%;">**Required**</th><th colspan="1" rowspan="1" style="width: 55.7807%;">**Purpose**</th></tr></tbody><tbody><tr><td colspan="1" rowspan="1" style="width: 17.5224%;">CID=</td><td colspan="1" rowspan="1" style="width: 17.7577%;">CID license</td><td colspan="1" rowspan="1" style="width: 8.93921%;">Yes</td><td colspan="1" rowspan="1" style="width: 55.7807%;">Uses customer identification (CID) to associate sensor to CrowdStrike Falcon Console.</td></tr><tr><td colspan="1" rowspan="1" style="width: 17.5224%;">NO\_START=</td><td colspan="1" rowspan="1" style="width: 17.7577%;">0 (Default)</td><td colspan="1" rowspan="1" style="width: 8.93921%;">No</td><td colspan="1" rowspan="1" style="width: 55.7807%;">Starts the sensor immediately after installation.</td></tr><tr><td colspan="1" rowspan="1" style="width: 17.5224%;">NO\_START=</td><td colspan="1" rowspan="1" style="width: 17.7577%;">1</td><td colspan="1" rowspan="1" style="width: 8.93921%;">No</td><td colspan="1" rowspan="1" style="width: 55.7807%;">Prevents the sensor from starting after installation. The next time the host boots, the sensor is assigned an agent ID (AID).</td></tr><tr><td colspan="1" rowspan="1" style="width: 17.5224%;">VDI=</td><td colspan="1" rowspan="1" style="width: 17.7577%;">1</td><td colspan="1" rowspan="1" style="width: 8.93921%;">No</td><td colspan="1" rowspan="1" style="width: 55.7807%;">Configures sensor for a virtual desktop infrastructure (VDI) environment. Updates AID after system initialization.</td></tr><tr><td colspan="1" rowspan="1" style="width: 17.5224%;">APP\_PROXYNAME=</td><td colspan="1" rowspan="1" style="width: 17.7577%;">proxy.domain.com</td><td colspan="1" rowspan="1" style="width: 8.93921%;">No</td><td colspan="1" rowspan="1" style="width: 55.7807%;">Configures sensor to use a proxy connection. Cannot be used with PACURL=.</td></tr><tr><td colspan="1" rowspan="1" style="width: 17.5224%;">APP\_PROXYPORT=</td><td colspan="1" rowspan="1" style="width: 17.7577%;">1234</td><td colspan="1" rowspan="1" style="width: 8.93921%;">No</td><td colspan="1" rowspan="1" style="width: 55.7807%;">Specifies APP\_PROXYPORT= port.</td></tr><tr><td colspan="1" rowspan="1" style="width: 17.5224%;">PACURL=</td><td colspan="1" rowspan="1" style="width: 17.7577%;">See Examples</td><td colspan="1" rowspan="1" style="width: 8.93921%;">No</td><td colspan="1" rowspan="1" style="width: 55.7807%;">Configures a proxy connection using a PAC file. Cannot be used with either APP\_PROXYNAME or APP\_PROXYPORT.</td></tr><tr><td colspan="1" rowspan="1" style="width: 17.5224%;">PROXYDISABLE=</td><td colspan="1" rowspan="1" style="width: 17.7577%;">0 (Default)</td><td colspan="1" rowspan="1" style="width: 8.93921%;">No</td><td colspan="1" rowspan="1" style="width: 55.7807%;">Attempts to connect to CrowdStrike Falcon Console using any available proxy connections.</td></tr><tr><td colspan="1" rowspan="1" style="width: 17.5224%;">PROXYDISABLE=</td><td colspan="1" rowspan="1" style="width: 17.7577%;">1</td><td colspan="1" rowspan="1" style="width: 8.93921%;">No</td><td colspan="1" rowspan="1" style="width: 55.7807%;">The parameter ignores any automatic proxy connection.</td></tr><tr><td colspan="1" rowspan="1" style="width: 17.5224%;">ProvNoWait=</td><td colspan="1" rowspan="1" style="width: 17.7577%;">0 (Default)</td><td colspan="1" rowspan="1" style="width: 8.93921%;">No</td><td colspan="1" rowspan="1" style="width: 55.7807%;">The parameter uninstalls the sensor if unable to connect to CrowdStrike Falcon Console within 10 minutes.</td></tr><tr><td colspan="1" rowspan="1" style="width: 17.5224%;">ProvNoWait=</td><td colspan="1" rowspan="1" style="width: 17.7577%;">1</td><td colspan="1" rowspan="1" style="width: 8.93921%;">No</td><td colspan="1" rowspan="1" style="width: 55.7807%;">The parameter prevents uninstall if unable to connect to CrowdStrike Falcon Console.</td></tr></tbody></table>

## Creating a Fileset Group

Keeping your Filesets organized is good practice, especially if there are multiple Filesets for software deployment or organziation based on specific platform of deployment.

You may create a New Fileset Group, label it CrowdStrike Falcon (Windows 2023), and move the Fileset you created into this Group. Then associate the Fileset Group labeled CrowdStrike Flacon (Windows 2023) to your devices versus individual Filesets.

When ready, associate the Fileset Group labeled CrowdStrike Falcon (Windows 2023) to a few devices as a test. This is to verify and confirm that the software is installed properly based on your license code configured.

For best practice, always test a few devices before mass deployment.

## FileWave Custom Fields to validate installation

Monitoring the CrowdStrike Falcon Sensor through FileWave custom fields helps ensure endpoint protection remains active and compliant. By validating that the Falcon service is running and reporting the installed sensor version, administrators can quickly detect inactive or outdated agents that may leave devices exposed. This custom fields includes both macOS and Windows.

- [FileWave Custom Fields for CrowdStrike.customfields.zip](https://kb.filewave.com/attachments/494)

[![ExampleCrowdStrikeCF.png](https://kb.filewave.com/uploads/images/gallery/2026-02/scaled-1680-/cSRJ8oolocnroquC-examplecrowdstrikecf.png)](https://kb.filewave.com/uploads/images/gallery/2026-02/cSRJ8oolocnroquC-examplecrowdstrikecf.png)

<table border="1" id="bkmrk-sensor-state-output-" style="font-family: 'IBM Plex Sans', sans-serif; font-size: 14px; width: 100%; height: 119.188px;"><colgroup><col style="width: 50%;"></col><col style="width: 50%;"></col></colgroup><thead><tr style="height: 29.7969px;"><td style="height: 29.7969px;">**Sensor State**</td><td style="height: 29.7969px;">**Output Value**</td></tr></thead><tbody><tr style="height: 29.7969px;"><td style="height: 29.7969px;">Installed</td><td style="height: 29.7969px;">Installed | version\_number</td></tr><tr style="height: 29.7969px;"><td style="height: 29.7969px;">Not Installed</td><td style="height: 29.7969px;">Not Installed</td></tr></tbody></table>

## Related Content

- [CrowdStrike Falcon Protection (macOS)](https://kb.filewave.com/books/software-deployment-recipes-macos/page/crowdstrike-falcon-protection-macos "CrowdStrike Falcon Protection (macOS)")