Software Updates (Windows)
The Software Updates (Windows) section provides essential information and guidance on keeping your Windows operating system and third-party software up to date. Stay informed about the latest updates, including security patches, bug fixes, and new features, to enhance the performance, stability, and security of your Windows devices. Learn how to check for and install updates, manage update settings, and optimize compatibility with third-party applications. By regularly updating your Windows operating system and software, you can ensure an optimized and secure computing experience while taking advantage of the latest improvements and enhancements.
- Windows Software Update Reporting
- Installing Windows Updates that are not able to be automatically packaged
- Automated Windows OS Updates Policy
- Understanding and Utilizing the Windows Update Build Revision (UBR) Number
Windows Software Update Reporting
What
Starting from FileWave version 14.7+ there is a better overview of updates that should be deployed to the Windows devices managed by FileWave so that you can easier identify possible risks and deploy needed patches.
- The number of missing updates is reported for each Windows device
- A list of all installed updates is reported for each Windows device
- A list of all requested updates is reported for each Windows device
- Regardless of the enrolment type, all devices are reporting the status
Software Update management has been revisited for FileWave 16.0. Specifically for Windows:
- Windows Updates are now relying on managed devices reporting what they need rather than the offline catalog. This removes the need for parsing offline catalog, which was resource consuming and due to Microsoft limitations not covering all existing updates.
- Updates are downloaded directly from Microsoft and installed using Microsoft Update tools, which allows support for an increased number of update types.
- Updates themselves are not imported in FileWave server (only metadata), which speeds up the process. Clients and Boosters download updates directly from Microsoft CDNs. FileWave boosters can be used to cache updates to avoid Network load and use a new port on the Boosters.
- FileWave Client is not stuck anymore if Windows Update Service is hanging on the device.
- On Windows, update installation history is now made available, even for updates not installed via FileWave.
When/Why
Security is more important every day. Knowing the state of security of your endpoints is critical to protecting your environment so this enhancement will help with more detailed reporting around Microsoft patches. The data is collected every 1 hour from devices. Read the OS Software Updates article for more details on applying the updates to Apple or Microsoft Windows devices.
How
In the Native Admin, there is a new tab in the Client Info window, called "Software Updates"
- The Software Updates section displays all installed patches
- The Software Updates section displays all requested patches
- The device reports the status regardless of the way how it was patched (FW, manually, other tools)
- Additionally, a new property called Category is displayed to show what type of update is listed
It is possible to filter at the top of the table by:
- requested (default status), installed, all
- category (those with at least one result will be listed)
- critical (yes/no)

In the Web Admin, there are two new information items in the Software Updates section of Device Info.
- The overall number of missing and the number of (missing) critical updates are displayed
- Both link to the Software Updates tab with the responding filter applied
- In case of no results, the value "0" is displayed, but the link does not exist
- Regardless of the enrolment type, this section is available and functional for all Windows devices

In the Web Admin when going to the Software Updates tab of a device there is additional filtering and reporting of missing and installed software updates.
Starting in FileWave 16.3, Windows updates deployed through FileWave Policy are labeled Triggered by Policy in the Software Update status view in FileWave Central and FileWave Anywhere. That status is also recorded in inventory for reporting and auditing.
- Filters can be applied to the whole table:
- All / Missing / Installed
- Columns can be filtered:
- Critical (dropdown)
- Categories (multiselection)
- Status (multiselection)

In both the Native and Web Admins there are new fields that are usable for reporting on Windows patches.
|
As shown here KBArticle, MsrcSeverity, Support URL, Category, and Description are the new fields. |
|
|
This is an example of Support URL, KBArticle, and MsrcSeverity used in a report. |
|
|
These examples show Category and then Description. |
|


Related Content
Installing Windows Updates that are not able to be automatically packaged
What
Use this workflow when FileWave reports a Windows update as missing, but the update is not one FileWave can automatically package as a Software Updates Fileset. This is the manual MSU deployment path for admins searching for Windows Update Catalog installs, offline Windows update installation, or updates that show as missing but cannot be auto-packaged.
When/Why
FileWave can report missing Windows updates even when it cannot build a Fileset for a specific update automatically. This is common for standalone .msu packages from the Microsoft Update Catalog.
How
Windows updates can come as .msu files for the Windows Update Standalone Installer. Install those packages with %windir%\System32\wusa.exe.
For example, if the Windows6.0-KB934307-x86.msu file is in the D:\934307 folder, type the following command at a command prompt to install the update package:
wusa.exe /quiet /norestart d:\934307\Windows6.0-KB934307-x86.msuIn FileWave, start by downloading the update from the Microsoft Update Catalog. Then add the MSU file to an empty Fileset.
Next, create a Fileset by making an Empty Fileset and then add the update as seen here:

To install the MSU you will need to add an Activation Script to it.

Here is the text of install.bat.
The screenshots and script use a shortened MSU filename to keep the example readable. If you keep the original download filename, copy the full filename into the script. Keep the quotation marks around the path if the filename or folder path contains spaces.
Install.bat
REM For all script types, returning an exit code of 0 (success) means the
REM script execution completed successfully.
REM Add the contents of your script below:

%windir%\System32\wusa.exe /quiet /norestart "c:\programdata\FileWave\Installers\windows10.0-kb5012599.msu"

exit 0
The example uses /norestart. If the update requires a restart, configure the Fileset properties so FileWave controls the reboot prompt and timing.

wusa.exe exits cleanly when the update is already installed or does not apply to the device. If you want FileWave to skip the Fileset before activation, add a Requirements script that checks whether the KB is already installed and exits accordingly.
After installation, inventory must update before the Software Updates section shows the patch as installed. Wait for the normal verification cycle (every 24 hours or after restart), or send an explicit Verify command. Repeat this process for any MSU file that you need to deploy with FileWave.
Related Content
Digging Deeper
More information on wusa.exe is here:
When you are testing it may be difficult to repeat your testing once an update installs, but wusa has an /uninstall switch as well that can save you time. Below is an example that would remove a patch. Another alternative is to use a Virtual Machine for testing and use snapshots to be able to install and then roll back to before the update was installed.
wusa /uninstall /kb: KB5000802 /quiet /promptrestartFor troubleshooting to view the Windows Update Standalone Installer event log on a client device, follow these steps:
- Click Start, type event viewer in the Start Search box, and then click Event Viewer in the Programs list.
- In Event Viewer, expand Windows Logs, and then click Setup.
- Setup events appear in the middle pane.
- In the Actions pane, click Filter Current Log.
- In the Event sources list, click to select the WUSA check box, and then click OK.
Automated Windows OS Updates Policy
What
There may be Windows OS updates that you want to simply apply without needing to create a Fileset or manage in FileWave. This new option will allow you to set it and forget it. FileWave 16.2.0 introduces a new concept to simplify Windows OS patching.
When/Why
If you have a very lightly managed environment or have certain updates that you always want to have applied then this option may be for you.
How
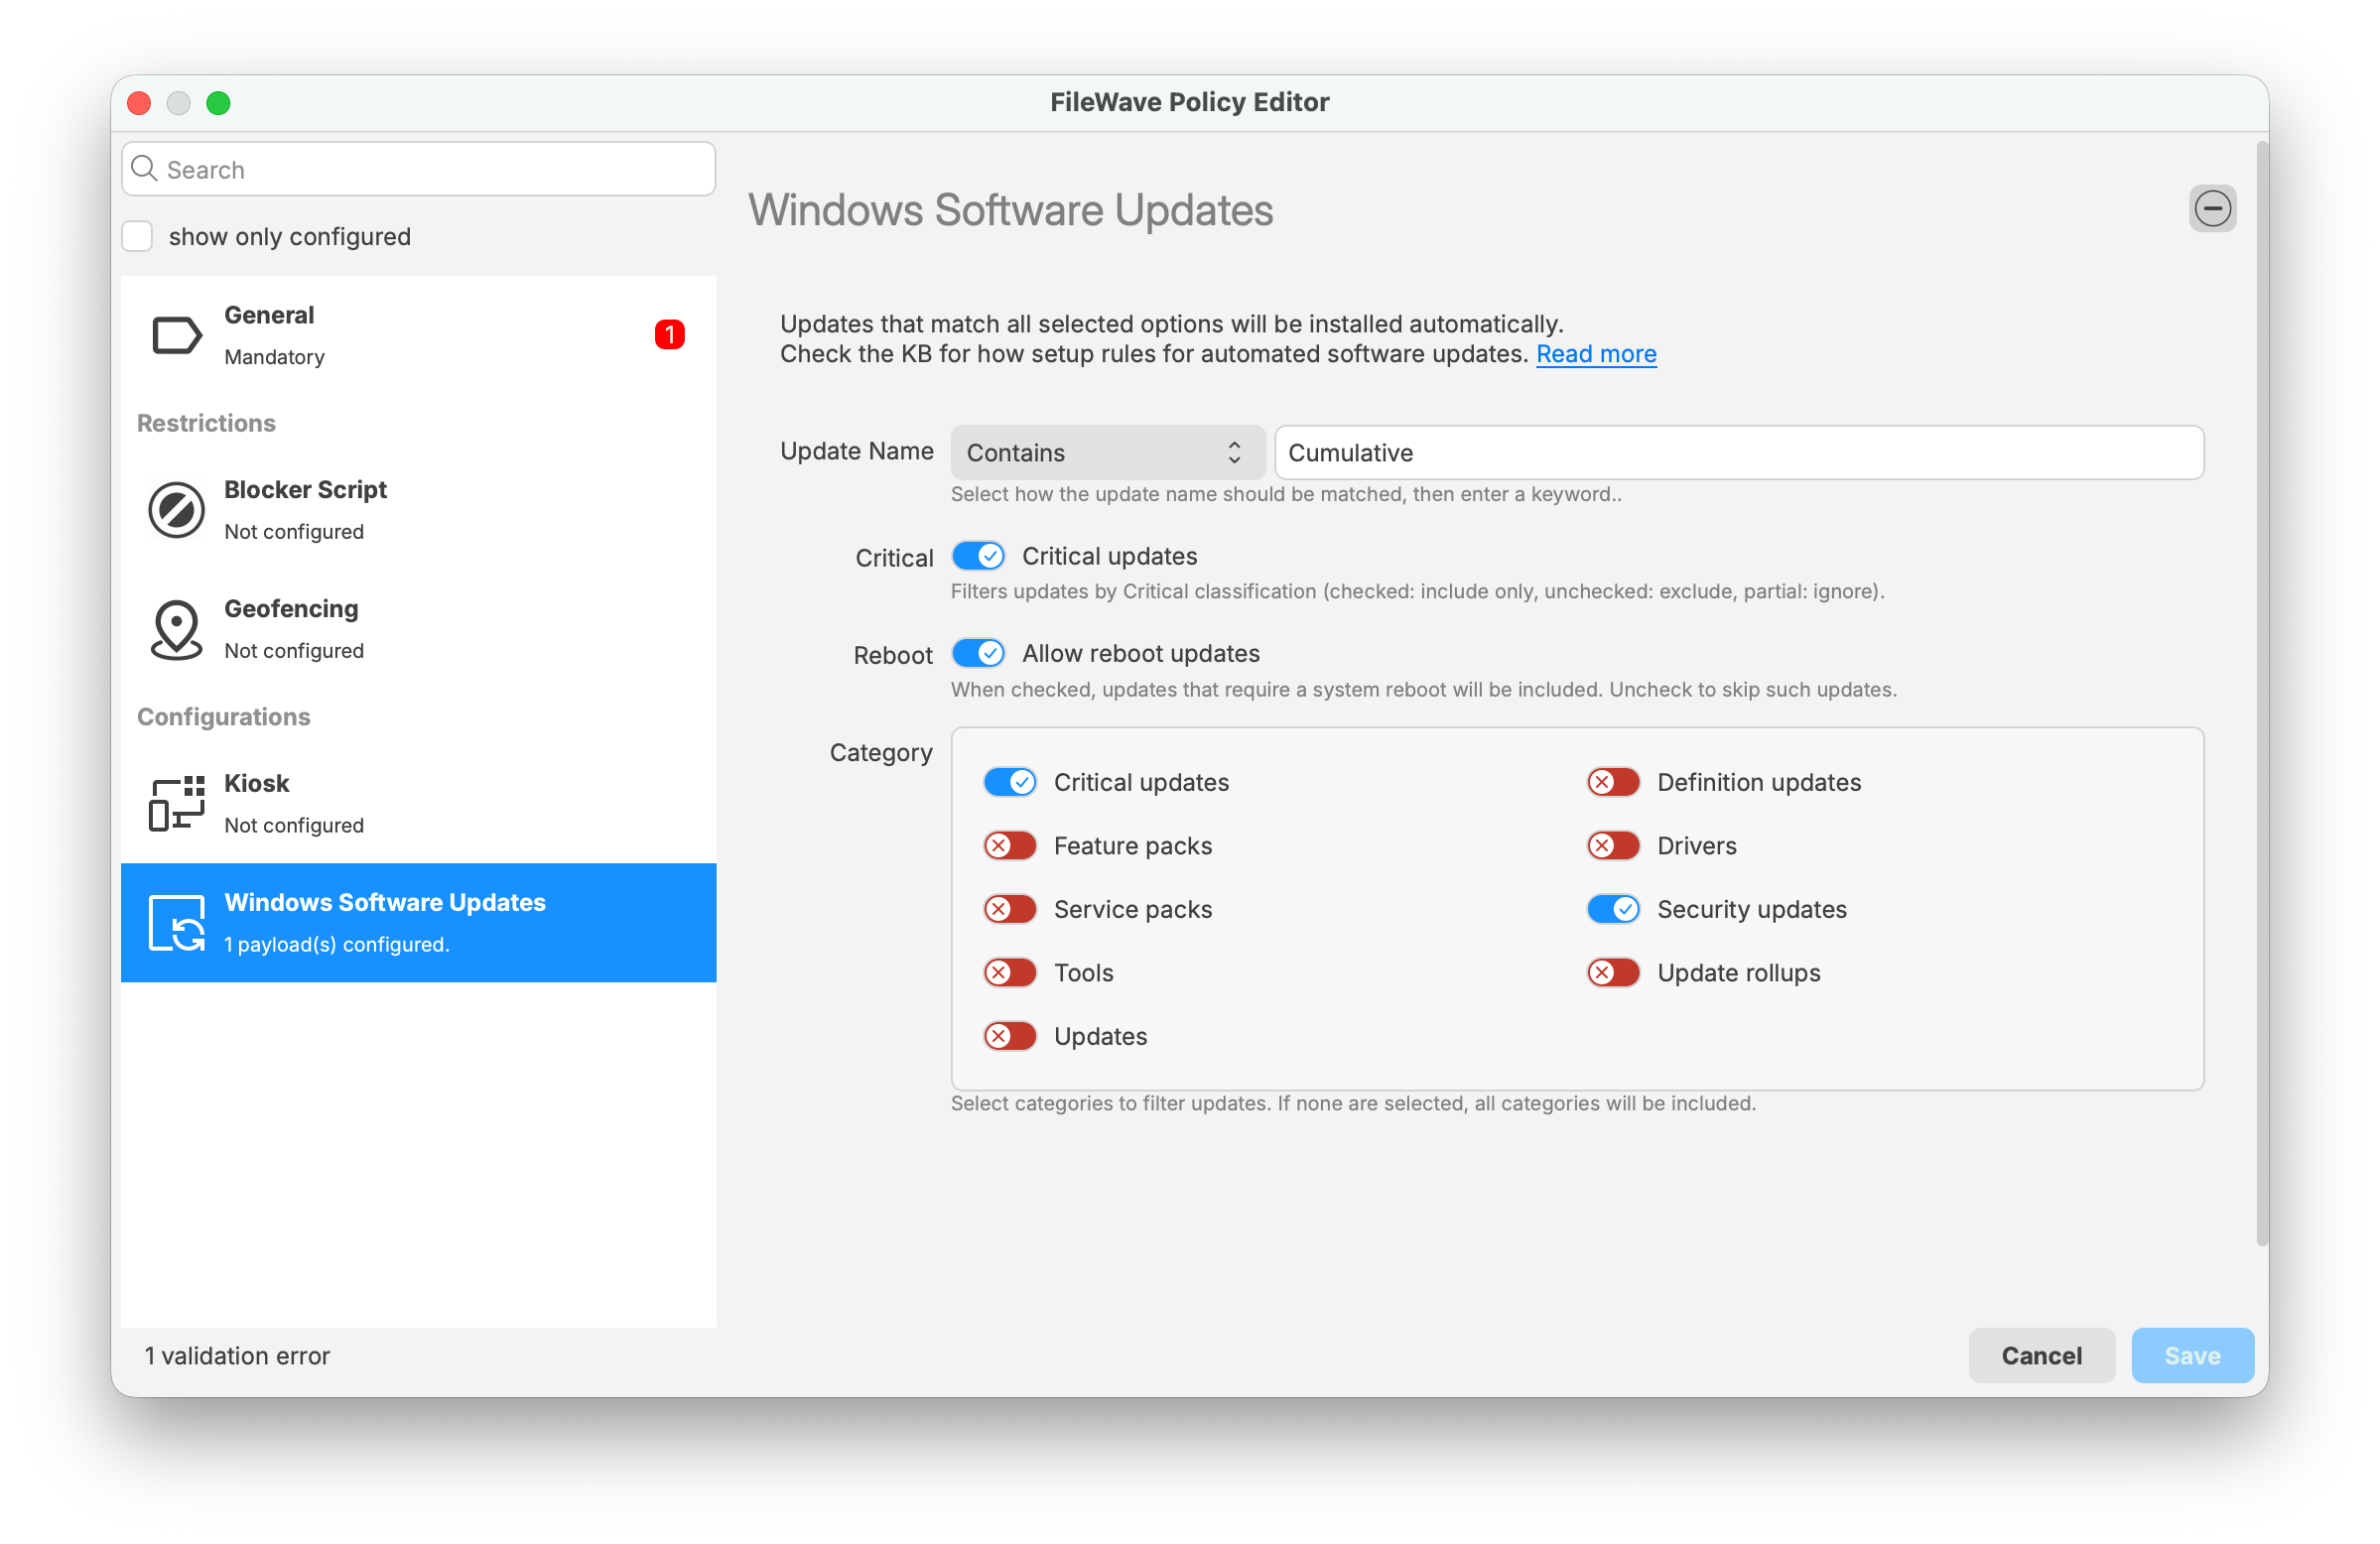
When you create a new Fileset in FileWave 16.2.0 or higher you can pick General -> Policy to create a FileWave Policy. In the below image you can see the options for the Windows Software Updates component of FileWave Policy. This type of Fileset can also be used for customizing the Kiosk appearance, Geofencing for Android, and Blocker Scripts.
You will give the Policy a name on the General section and then go to the Windows Software Updates section and set the rules. Anything that matches will apply.
- Update Name - Here you may want to use "Contains" as the rule if you are looking for a certain name but you can leave this blank if you are just setting the type of update with the switches. Note that the text is localized so if in your language it would be a different word then use what you usually see in Windows Updates.
- Critical - Any update marked by Microsoft as Critical. If enabled then they will be considered.
- Reboot - Any update marked as requiring a reboot. If you do not want reboot updates to be pushed automatically then do not enable this, but know that many Microsoft updates require a reboot.
- Category - Enabled Categories will be considered.
When setting this up consider the example below. For any update where "Cumulative" is in the name, the update MUST be Critical, the update may or may not reboot, and the update is ONLY an update of the two categories; Critical updates OR Security updates.
Starting in FileWave 16.3, updates deployed through this Windows Software Update Policy are labeled Triggered by Policy in the Software Update status view in FileWave Central and FileWave Anywhere, and that status is also recorded in inventory.
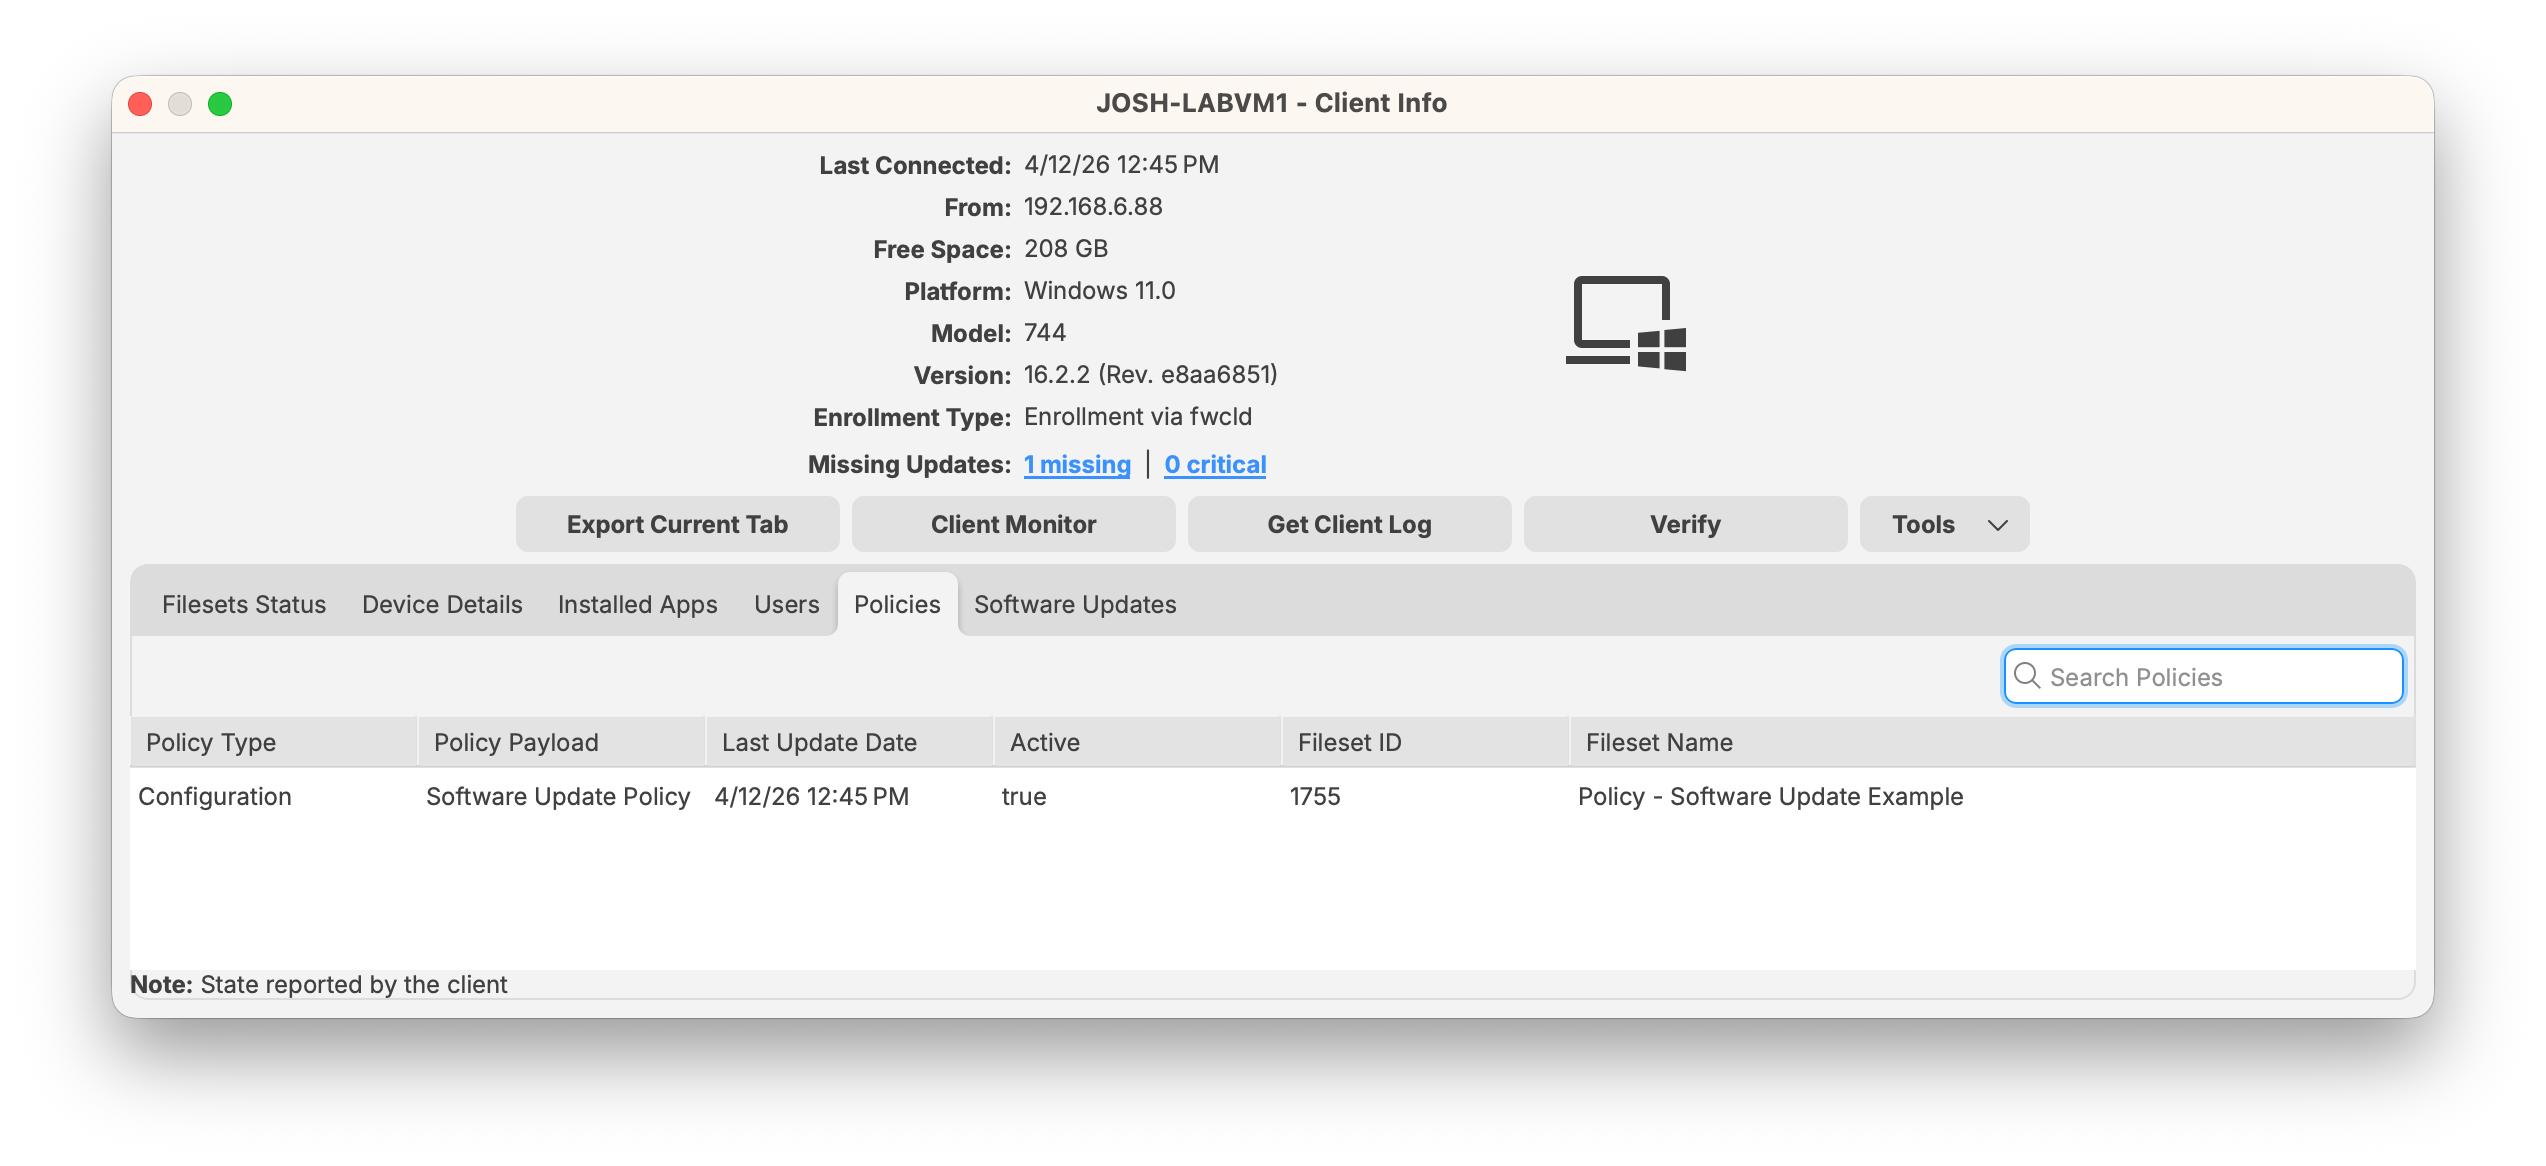
You can also confirm that the policy itself is active on the device in Client Info > Policies, as shown below.
You can also deploy updates with finer control by following the guidance in Best Practice Guide: Software Update Deployment (16.0+)
Related Content
- Description of the standard terminology that is used to describe Microsoft software updates
- Windows Patching Automations for Fileset creation
Understanding and Utilizing the Windows Update Build Revision (UBR) Number
What
The Update Build Revision (UBR) number is a unique identifier for individual updates in Windows 10 and Windows 11 operating systems. It allows IT administrators to track, monitor, and ensure that their devices are up-to-date with the latest security patches, bug fixes, and feature improvements. The UBR number is not reported by FileWave by default; however, you can use Custom Fields in FileWave to collect and report on this information.
When/Why
Keeping devices updated is crucial for maintaining security, stability, and optimal performance. By monitoring UBR numbers, IT administrators can:
- Identify devices that are not up-to-date with the latest updates.
- Plan and execute update deployments effectively.
- Verify the success of update installations.
- Maintain compliance with internal and external policies or regulations.
This is particularly relevant for Education organizations, corporations, and state and local government agencies that rely on FileWave for their Unified Endpoint Management needs.
How
Using the below PowerShell code you can get the UBR from the Registry:
$ubr_version =(Get-ItemProperty "HKLM:\SOFTWARE\Microsoft\Windows NT\CurrentVersion").UBR
echo "$ubr_version"
exit 0
Using the below PowerShell code you can see how you can get both the OS version together with the UBR if that is desired:
$os_version = (Get-WmiObject -Class win32_OperatingSystem).Version
$sub_build_version = (Get-ItemProperty "HKLM:\SOFTWARE\Microsoft\Windows NT\CurrentVersion").UBR
echo "$os_version.$sub_build_version"
exit 0
To implement this very easily simply:
- Download the below Custom Field file: Windows UBR.customfields.zip
- Extract the zip archive
- In FileWave Central go to Assistants → Custom Fields → Edit Custom Fields
- Click Import and pick the file you extracted
- Now make sure for one or both fields that you make sure to check the box to assign it to all devices so that they can report in their values. Then you can use the Custom Fields in any Query/Report/Smart Group