Top Tips
Cool ideas, taking your admin game to the next level.
- Desktop A-Game
- Desktop Fileset Timed Events
- Apple Profiles & Dependencies
- Policy Loops
- Updating 3rd Party Software
- Uninstall Filesets
- Inventory Items in Scripts
- Script Logging
- Apple MDM
- Android EMM
- OS Patching
Desktop A-Game
Desktop Fileset Timed Events
Description
Filesets can activate at a specific date and time. For daily maintenance windows, such as installing software only after hours, use a Policy Blocker Script with Custom Fields to decide when the Fileset may continue.

Policy Blocker Scripts normally pause client management until the script returns exit status 0. Because this script type runs every 5 minutes on clients, it can also be used as a time-window gate for a Fileset.
Custom Fields make the active and inactive times adjustable per device or group without editing the script each time.
Ingredients
- One (or more) Custom Fields; 3 provided - Active Time Custom Fields.customfields
- Policy Blocker Scripts
| macOS | Windows |
| Policy - Timed Event macOS.fileset.zip | Policy - Timed Event Windows.fileset.zip |
Directions
- Download and import the provided Custom Fields
- Download and import the appropriate Fileset(s) (macOS and/or Windows)
Set the Custom Field values for the inactive and active times you need. Time values use hours, minutes, and seconds without leading zeros. Examples:
| Desired Time (HH:MM) | Custom Field Value (HHMMSS not including leading zeros) |
| 09:30 | 93000 |
| 12:55 | 125500 |
| 18:00 | 180000 |
If you change a Custom Field value for a device that is already running the policy, the client may need two later Model Updates for an immediate-looking result. The blocker script runs before the device reads the new Custom Field value during the first update. The next Model Update, or a later inventory update, lets the blocker script evaluate the new value.
Time Order
Times can be either way around.
Examples:
Consider working hours to begin at 08:30 and end at 18:00
Example 1
An item should only be considered outside of standard working hours.
- Disable Active Time: 83000
- Enable Active Time: 180000

Example 2
Alternatively, an item should be considered during working hours:
- Enable Active Time: 83000
- Disable Active Time: 180000

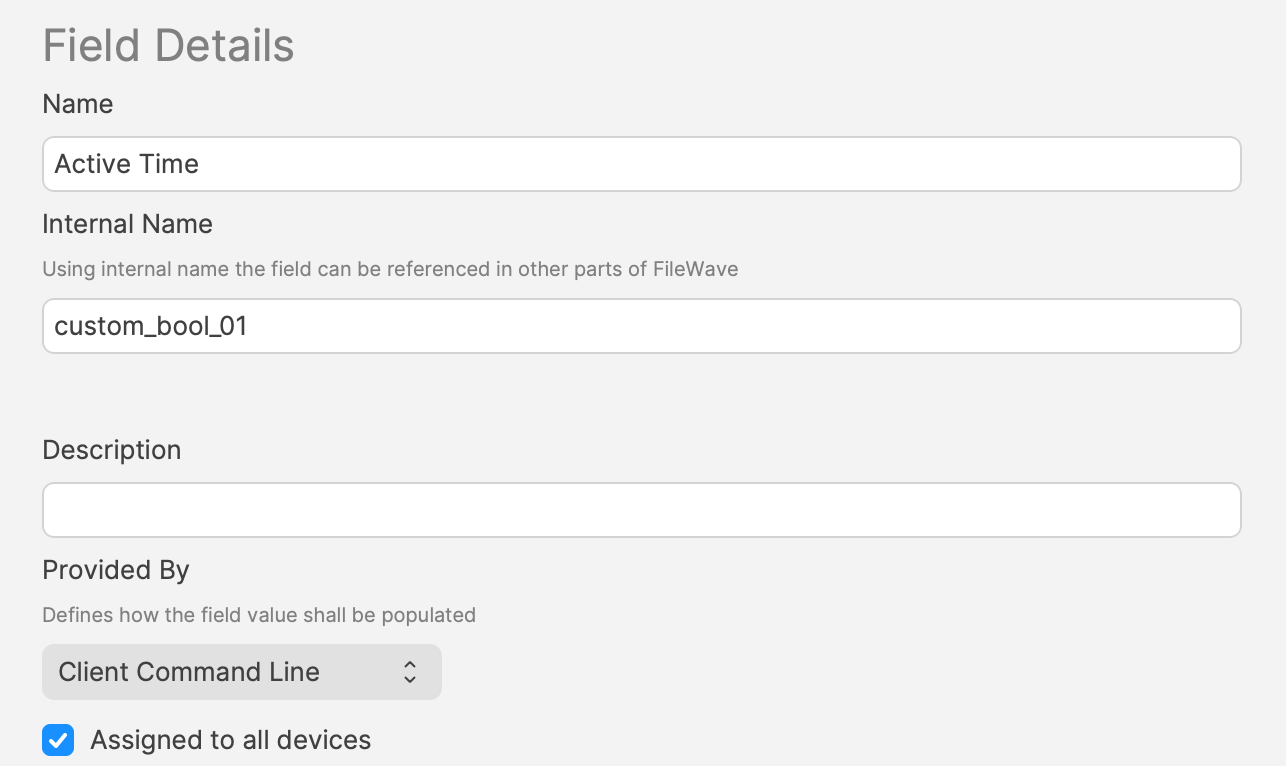
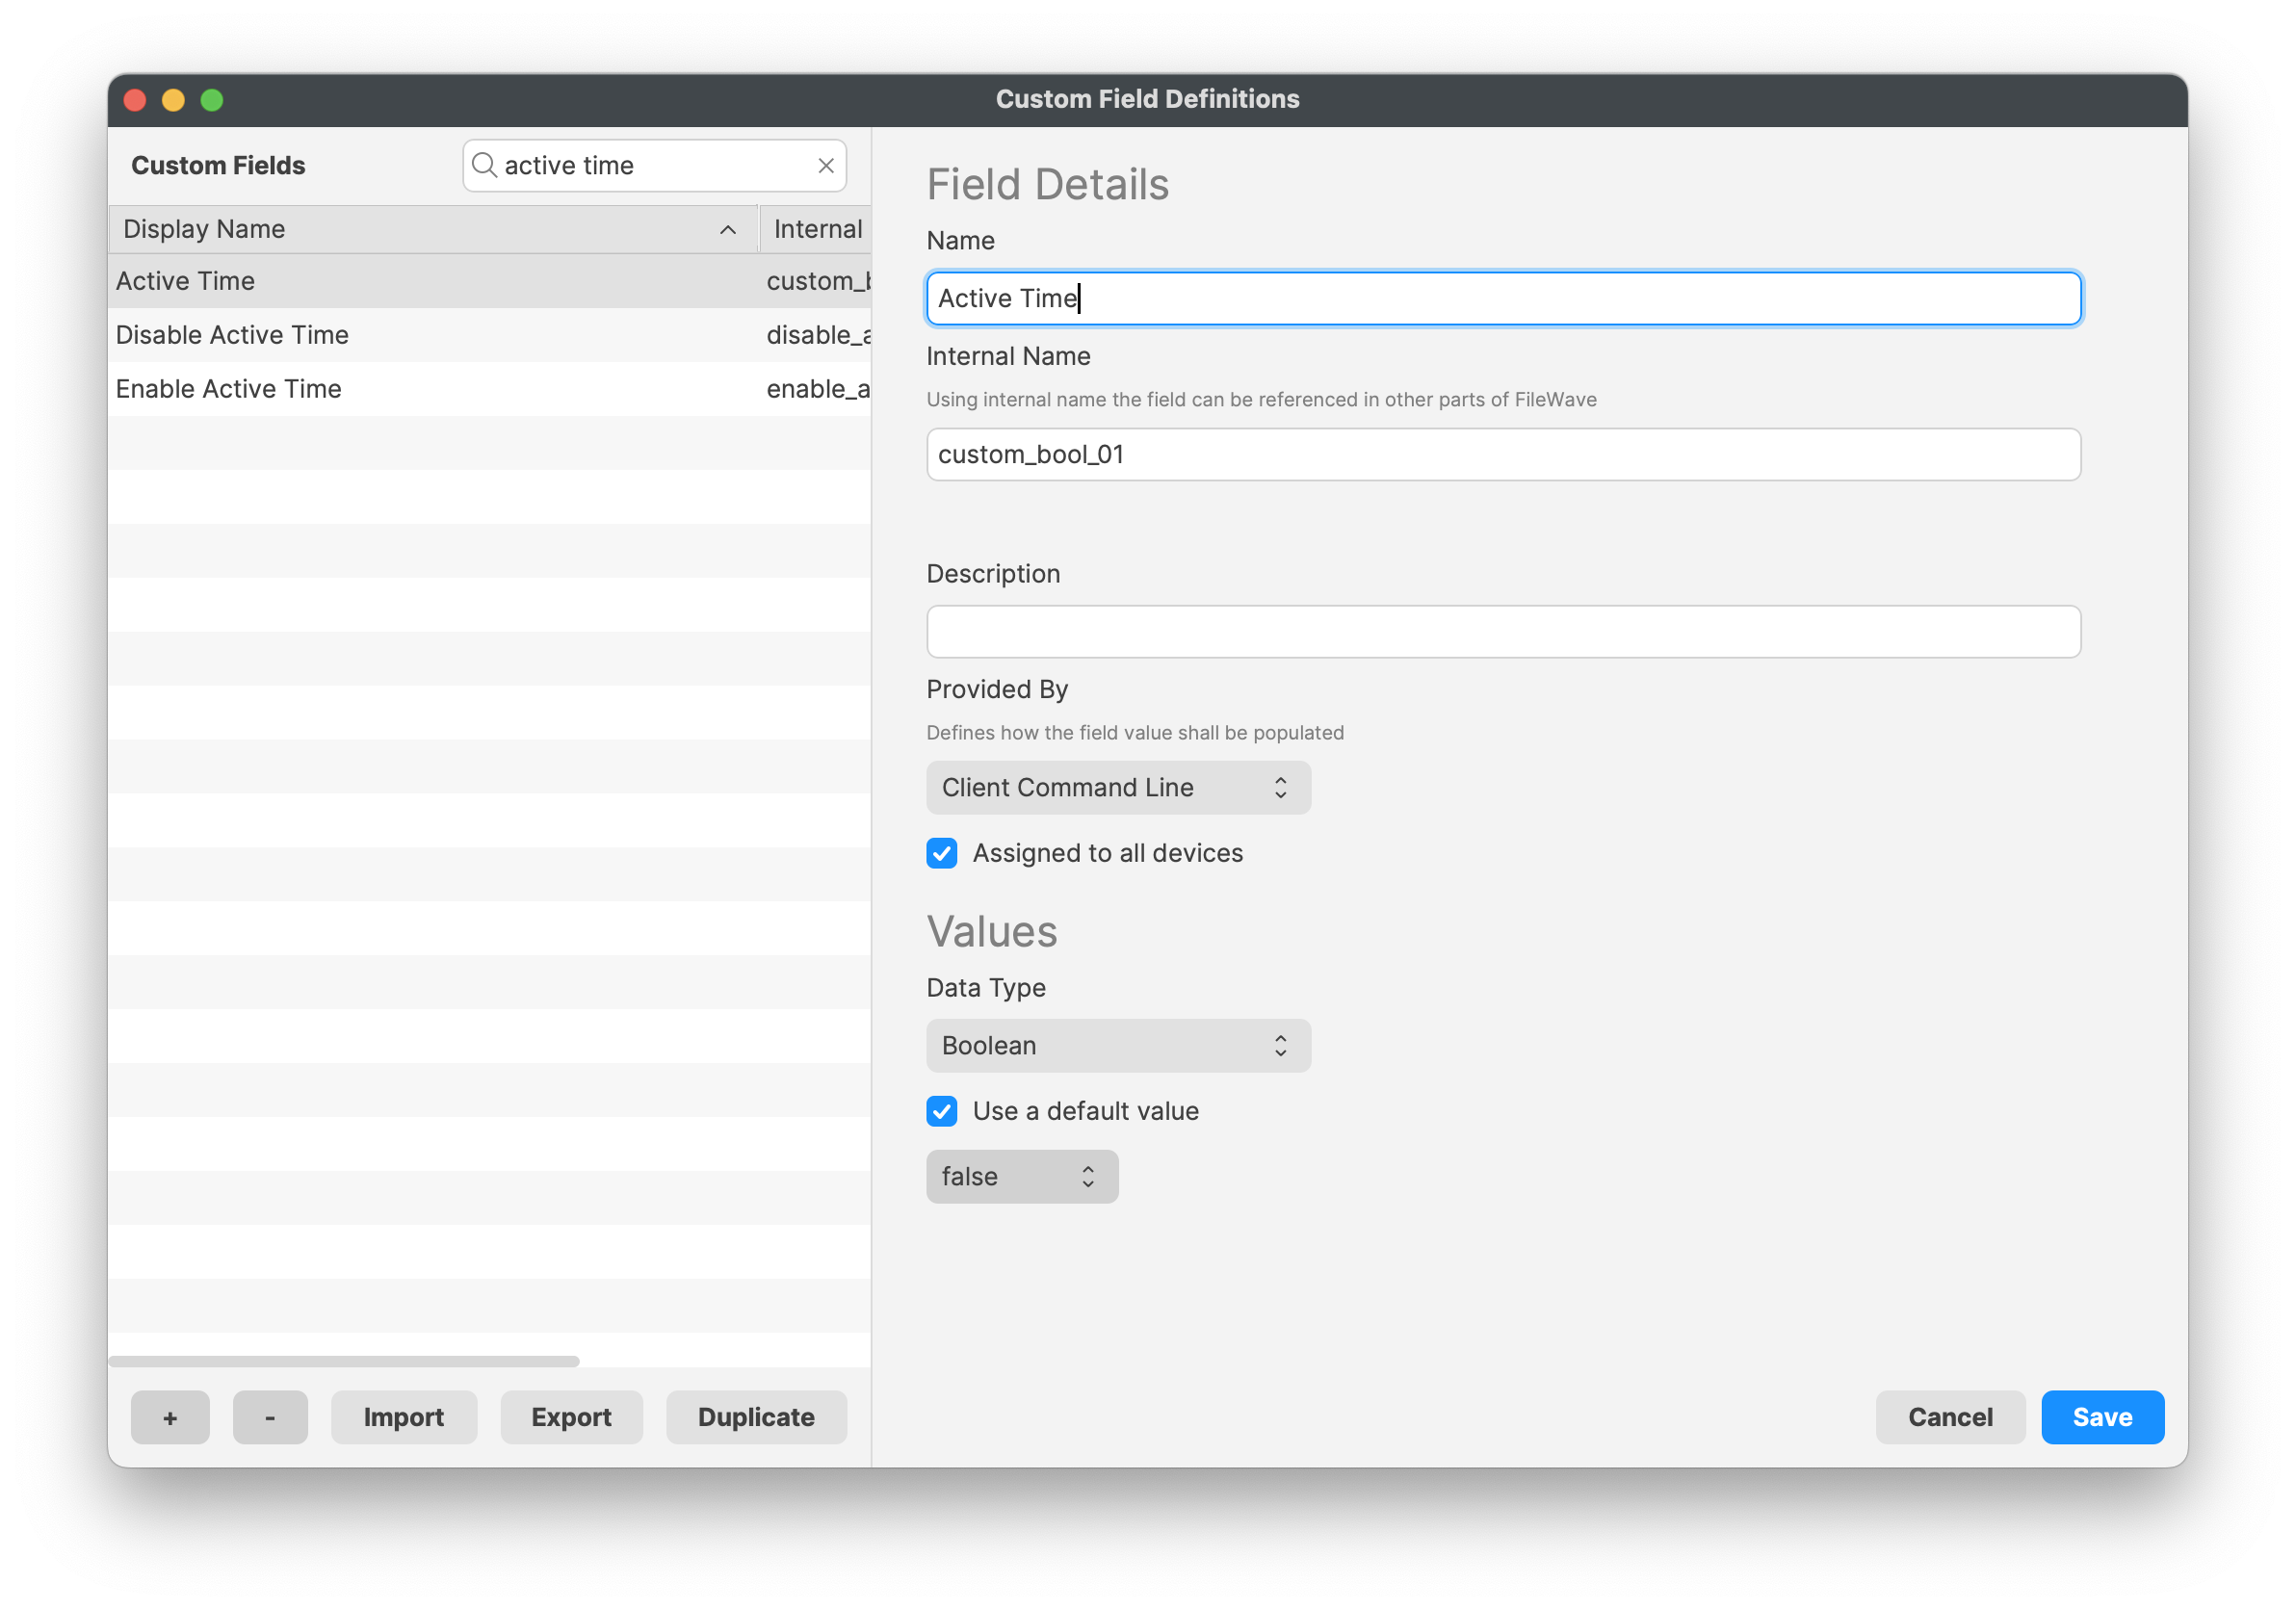
Imported Custom Fields are disabled for all devices by default. Once tested, consider using the option to assign to all devices for each Custom Field imported. The file provided contains all 3 Custom Fields.
Smart Groups
A third Custom Field stores a true/false value. A Smart Group can use that value to decide whether a Fileset should be associated at the current time.
This Custom Field uses custom_bool_01. If that value is already in use, choose another Custom Bool number in the script environment variables.
The script uses the following method to set these values.
Example
An update to Firefox needs to occur after 17:00 or before 09:30
- Disable Active Time = 93000
- Enable Active Time = 170000
Between these times, the 3rd Custom Field ‘Active Time’ should be False/0. Outside of these times, the ‘Active Time’ Custom Field should be True/1.
Smart Group can be based upon the following:
- Is Active Time True/1
- Is the version of Firefox matching that within the Fileset
Do not base the Smart Group only on the active time unless that is intentional. Devices will enter and leave that Smart Group every day, and associated Filesets can trigger each time the device enters the group.
Deeper Dive
The Policy Blocker script has 2 considerations initially:
- The hours between which the timed event should occur
- The current time
This means there is a time beyond which the desired action may occur and a time beyond which the action should not occur and this needs to be compared with the current time.
The enable/disable active times are provided by way of Executable Environments. Taking this a step further, these times are defined using Administrator Custom Fields. This way the times can more easily be altered if required.
A third Custom Field is being used to indicate if the current time is one of activity allowance or not, but this time a Client Command Line Custom Field.
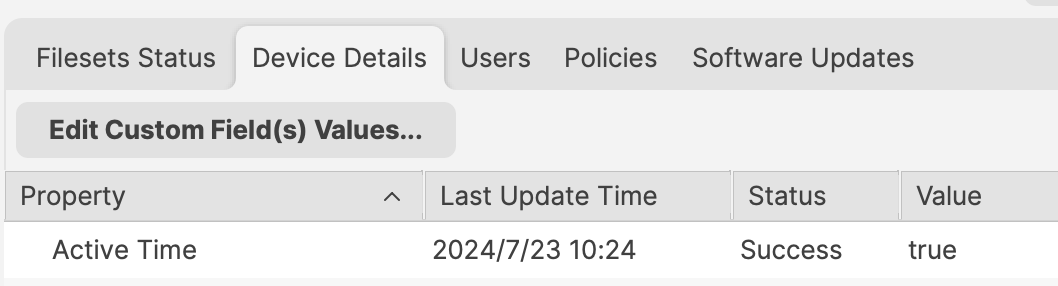
Client Command Line Custom Fields are stored locally on the device and then this value is available to the server, both for visibility, but can also be used in queries, for Smart Groups.
Client Command Line Custom Fields can be changed in FileWave Central, but the client value is pushed back to the server the next time the device reports inventory.
Apple Profiles & Dependencies
Description
FileWave dependencies are useful when one Fileset must install before another. Apple MDM profile Filesets need extra care because profile delivery depends on APNs and the device's MDM check-in timing, not just the FileWave Client sequence.
Fileset Activation Quick Re-cap
Standard Fileset
- The client checks in.
- The client receives its manifest.
- New items are downloaded and activated.
Apple MDM Fileset (Profiles)
- FileWave sends an APNs request to Apple.
- The device receives the queued APNs notification.
- The device contacts the FileWave Server for the MDM command.
- The device checks in.
- FileWave sends the queued MDM command, such as
InstallProfile. - Profile installs.
For standard Filesets, FileWave controls the client communication sequence. For Apple MDM profiles, the install time depends on APNs delivery, device connectivity, and the device's next MDM check-in.
The Issue
Filesets install sequentially. If a standard Fileset could depend directly on an Apple MDM profile Fileset, the client could wait indefinitely for the profile to finish, which would delay other Filesets and configuration. For this reason, Apple MDM Filesets can depend on other Fileset types, but standard Filesets should not depend directly on Apple MDM Filesets.
Requirement Scripts
Requirement Scripts let a Fileset fail its requirement check, allow the client to continue, and try the requirement again 2 minutes later. The requirement keeps retrying while the script returns a non-zero exit code. Use this pattern to delay a Fileset until the required Apple profiles are installed.
Ingredients
- Fileset designed to use a Requirement Script to ensure Profile is installed prior to activation
- Associated Profile ID(s)
Profile Dependency Fileset Template.fileset.zip
Directions
Download the Fileset, import it into FileWave, and edit it to match your requirements. Select the check_for_profile.sh script and click Get Info:

The Launch Arguments will initially appear empty.

For each Profile that must be installed before this Fileset, add the Profile ID to the Launch Arguments list. Use one launch argument per Profile ID. You can find the Profile ID in the payload details of the Profile Fileset.
For each Profile that must be installed, open the Profile for editing, highlight the Identifier, and copy it.

Copy these IDs into the Launch Arguments of the Fileset. The example below shows 5 Profile IDs added for a Microsoft Defender installer.

The script supports either matching behavior through the all_or_one environment variable. Set the value that matches your deployment:
| all | All of the listed Profiles must be installed prior to the Fileset becoming active. |
| one | At least one of the included Profiles must be installed prior to the Fileset becoming active. |
The example below shows a Fileset that requires all Profiles to be installed before Fileset activation for the same Microsoft Defender deployment:

With this set, add the installers that should run after the required Profiles are installed.
Create a Fileset Group and add this Fileset plus the required Profiles to the same group. This is optional, but it keeps the deployment easier to manage.
For example:

Associate the Fileset Group, test on a small scope, and then roll it out to more devices when the result is correct.
This Fileset is particularly useful with Apple TCC Privacy Settings Profiles. Privacy settings give software the access permissions it needs to function. These Profiles usually need to be installed before the protected app or service starts. If the software installs first, the software process may need to be restarted after the Profile installs. With this Fileset, the installer waits until the required Profile is in place before it downloads and installs.
Policy Loops
What
A policy loop happens when a Smart Group's criteria are changed by the Fileset or association assigned to that same Smart Group. The device enters the group, receives an action, then no longer matches the criteria. On the next Smart Group refresh it may leave the group, remove or change the Fileset, and then qualify again. The result can be repeated installs, removals, downgrades, or confusing association churn.
When/Why
The risk is highest when group membership is based on the exact state that the Fileset changes, such as an application version, installed-file presence, or another inventory value that changes immediately after activation.
Example 1: version-based installer loop
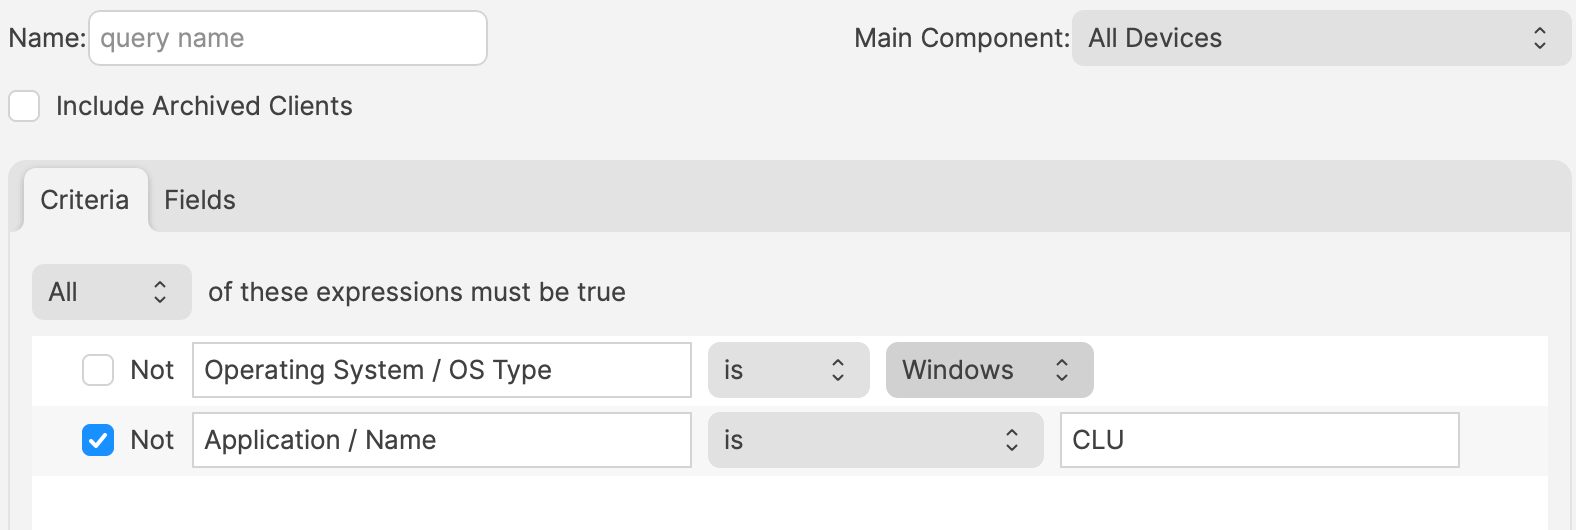
Imagine a PKG macOS installer Fileset for an app called CLU.app, version 1.0. It is associated to all devices based on two criteria:
- Device OS is macOS
- Device does not have CLU.app version 1.0 installed
Once the software is installed, those devices no longer belong to the group because version 1.0 is now installed.
A new version of the software is released: CLU.app version 1.1. A new association is created with a different Smart Group using similar criteria:
- Device OS is macOS
- Device does not have CLU.app version 1.1 installed
Devices running version 1.0 will join the new Smart Group at the next refresh. The new Fileset activates, the software upgrades from 1.0 to 1.1, and the devices then leave the version 1.1 group because they no longer match its criteria.
The problem appears on the next Smart Group refresh. Because version 1.0 is no longer installed, those same devices may qualify again for the older version 1.0 Smart Group. If the older PKG can install over the newer version, the software is downgraded back to 1.0. Once that happens, the device qualifies again for the 1.1 group, and the cycle repeats.
This is a policy loop: the device keeps moving between groups because each successful deployment changes the criteria used to target the next deployment.
Example 2: self-healing Fileset loop
The same principle can happen with one group. In this example, CLU.exe version 1.0 is delivered as a file-level self-healing Fileset for Windows.
The Smart Group criteria are:
- Device OS is Windows
- Device does not have this software installed
Windows devices without the software enter the Smart Group, receive the Fileset, and report that the software is now installed. At the next Smart Group refresh, those devices no longer meet the criteria and leave the group.
Because the Fileset is self-healing, leaving the association can remove the software. The user loses the application, the next refresh sees the device as missing the software again, and the device re-enters the group. The software is then installed again, removed again, and the loop continues.
Avoiding the loop
- Do not leave old and new version associations active when each group only means "does not have version X installed." Retire or supersede the older deployment association when the newer version becomes the intended state.
- Use stable targeting criteria where possible, such as department, building, device role, enrollment workflow, or a curated group that represents deployment intent instead of current application state.
- If application or file presence is needed as a safety check, make sure the device does not leave the long-term deployment target solely because the Fileset succeeded.
- Test the Smart Group and association on a small set of devices, then verify membership again after client inventory and Smart Group refresh have both run.
The answer is not to avoid Smart Groups or self-healing Filesets. Both are core FileWave workflows. The important part is to design criteria so a successful deployment does not immediately undo its own targeting logic.
Fast Smart Group Evaluation can be useful for time-sensitive membership changes, but it does not fix a policy loop. If the criteria are unstable, faster evaluation can simply make the loop show up sooner.
Related Content
- Using Queries to create Smart Groups
- Fast Smart Group Evaluation
- Fileset Association types and precedence
Updating 3rd Party Software
What
Third-party software needs a clear update plan. Decide which apps FileWave should update directly, which apps may use their own updater, and how you will roll back if an update causes trouble.
Managed store apps, such as Apple VPP apps, can update through the platform. Software deployed with PKG, MSI, EXE, or file-level Filesets needs a separate decision. Either let the vendor updater run, or build and deploy updated Filesets yourself.
Some vendor updaters work without local admin rights. Others fail silently, require user prompts, or need FileWave to push the update. Test the updater behavior before you rely on it.
Why
The main choice is per application. Allow the software to update itself, or block the updater and deploy a new Fileset for each approved version. Base that choice on the factors below.
For example:
- Is the software being deployed critical to business
- Are there company restrictions that prevent software being updated before approval
- Does the software even have an auto updater
- How easy is it to prevent the software from updating, where an auto update does exist
- Do you trust the software supplier enough to allow updates to occur without prior testing
- What impact could occur if an update went wrong and what is the rollback option
- Is a reboot required after the update
How
The details below help you choose the right Fileset behavior for each update model.
Denying AutoUpdates
For software with an updater, first identify how the updater is configured. Then confirm how to disable it safely.

Many vendors expose update controls through a Windows registry value, a macOS plist preference, an enterprise policy, or an installer option. Vendor documentation or other admin posts may identify the setting. Some applications still require testing to confirm what changes.
One practical method is to compare files and settings before and after changing the application's update preferences. Fileset Magic can help with that comparison. It takes a snapshot before the change and another snapshot afterward. You can then compare the two snapshots to see what changed.
Allowing AutoUpdates
Not every application needs tightly controlled updates. For lower-risk apps, allowing vendor updates can reduce packaging work. Apple VPP apps are platform-managed, so they follow a different update path. Confirm that auto-updates are actually enabled. Also confirm they work when users do not have local admin rights.
If the updater fails for standard users, manage that application with the same FileWave-controlled update process you would use when blocking vendor updates.
Considerations
For either method, there are some additional considerations, which mostly centre around self-healing.
Denying Autoupdates
When using a file level Fileset to deploy software, files should be set as self-healing.
Self-healing helps FileWave keep deployed files in their expected state. When you associate a new version in the same Model, disassociate the older version at the same time.
If both Filesets stay associated, FileWave may keep files from the older version while also adding files from the newer version. That can leave removed or renamed application files behind. Those leftovers can break an application if the newer version still finds and loads them.
Allowing AutoUpdates
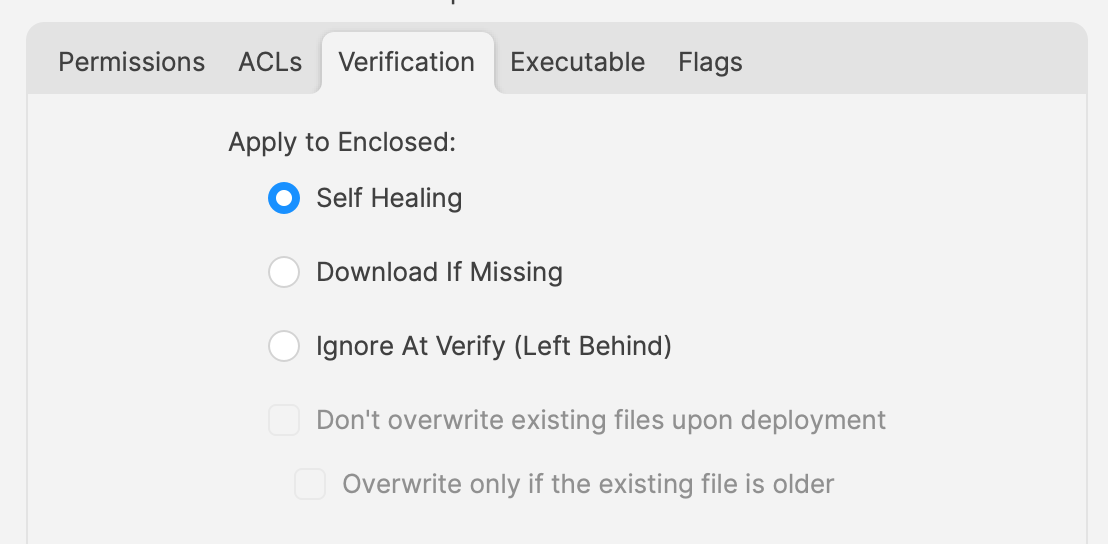
For software that is allowed to auto-update, file-level Filesets usually should not use self-healing for the application files.
When software updates itself, it changes files that FileWave originally deployed. If those files are set to self-heal, the next verification can replace updated files with the older Fileset copy. Self-healing can also restore files the updater removed. That can leave the application in a mixed state. For this update model, Ignore at Verify is usually the better choice.
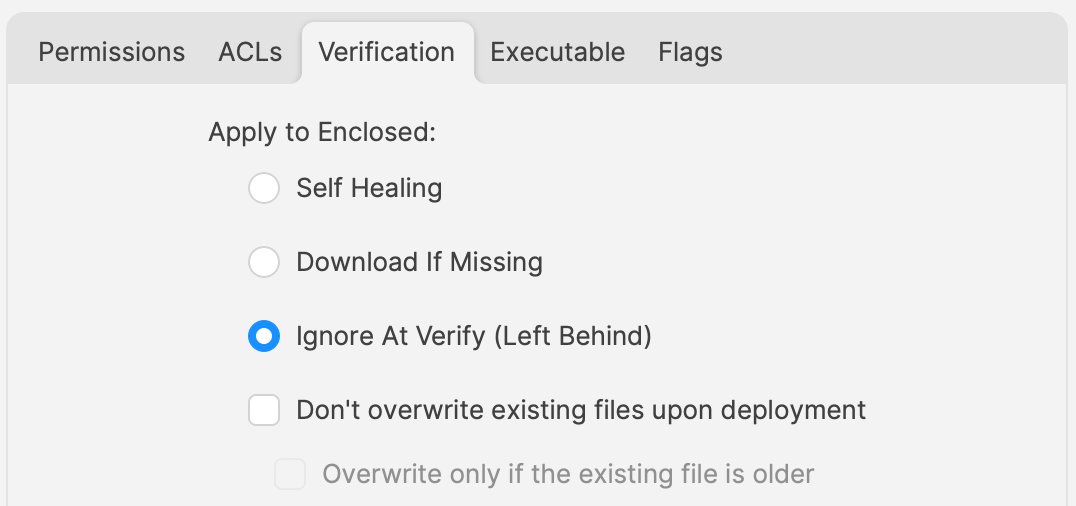
Ignore at Verify creates two follow-up questions.
Un-installing.
Uninstallers can take several forms. In the allowed auto-updater example, self-healing is not the removal method. Plan a separate uninstall path. FileWave can still handle that with an uninstall script or a dedicated removal Fileset.
Rollback
When software auto-updates, FileWave may only have the original installer version available unless you also package later versions. If you need to roll back, you may need to build and test the rollback Fileset before it can be deployed.
Overview
Choose the update model per application, document the uninstall and rollback path, and test with standard-user accounts before rolling it out broadly.
Uninstall Filesets
What
When software is no longer needed, the removal method depends on how it was originally deployed. This article outlines the common FileWave uninstall paths and where a custom uninstaller is still required.
Options
Self-Healing
If a Fileset uses Self Healing and Download if Missing for tracked files, disassociating the Fileset removes the files that are part of that Fileset.
MSI
Windows MSI Filesets are different because MSI packages can expose an uninstall action. When the Fileset is configured to use that feature, disassociating the Fileset can trigger the MSI uninstaller.

PKG/EXE
PKG and EXE installers do not provide the same built-in uninstall behavior as MSI packages. In many cases the Fileset only tracks the installer itself, not every file created by the installation. If the software vendor does not provide a separate uninstall PKG, EXE, or script, you will usually need to build your own removal script.
Apple VPP & Android Play Store
Disassociating these Filesets sends a command to remove the application.
Other Files
Applications often create supporting files after first launch, such as preferences, caches, or user data. If you need to remove those items too, you will normally need a separate cleanup method.
Why
Removing unused software helps keep devices clean, reduces confusion for users, and can support security and license-management goals.
When
Knowing how to uninstall software is only half of the job. You also need to decide when the uninstall should run.
At first glance it may seem natural to place a pre- or post-uninstaller script inside the same Fileset as the installer. That can work against you when the application is updated.
As vendors release updates, you may replace the installer with a new Fileset or a new Fileset revision. Self-Healing handles matching files cleanly during that swap, but any uninstall script inside the installer Fileset can also run during the change, which is usually not what you want.
How
A common way to control this is to separate installation and removal logic by using a Fileset Group.
In the example below, the Fileset Group for Microsoft Defender includes the installer Fileset, related profiles, and a separate uninstaller Fileset. Devices are associated with the Fileset Group, not directly with the uninstaller.

The uninstaller Fileset uses a pre-uninstallation script:

This makes installer updates straightforward. You can replace the installer Fileset or swap revisions inside the group without firing the uninstall. The uninstall runs only when the Fileset Group itself is disassociated from the device.
PKG/EXE Uninstallers
If a vendor supplies an uninstall PKG, it is usually cleaner to place that PKG in an otherwise empty Fileset and trigger it from an uninstall script, similar to the Microsoft Defender example above.
Trying to auto-associate a separate uninstall PKG exactly when the original installer is disassociated can be difficult to control reliably.
EXE-based uninstallers have the same issue. A practical pattern is to upload the uninstall EXE to an empty Fileset and call it from a pre- or post-uninstallation script.

This gives you a dedicated uninstaller Fileset that can be added to a Fileset Group and triggered only when you actually want removal to occur.
Inventory Items in Scripts
What
- Each inventory item, including each Custom Field, has an internal name.
- Scripts can use that internal name to read inventory values supplied by FileWave.
- Add the internal name as either a launch argument or an environment variable for the script.
- This applies to Custom Field scripts, Policy Blocker scripts, and Fileset scripts.
When
Find the internal name in the Inventory Report editor (formerly the Inventory Query Editor). The example below shows the internal name ‘device_product_name’.

Add that value to the script as either a launch argument or an environment variable.

But, which should be used?
How
Either method can work. Choose the one that makes the script easiest to read and maintain:
- Launch Arguments are referenced by their numerical position
- Environment Variables are referenced by a chosen name
- Custom Fields have an abbreviated name and a full name. Custom Field names could overlap with a built-in Inventory Item.
Built-In Inventory
In most cases, environment variables are easier to read because the script can use a meaningful variable name instead of relying on launch-argument position.
For example:

Could be referenced in a script as:
| macOS shell | echo $1 |
| Windows Powershell | echo $args[0] |
But to make the parameters more easily recognisable for anyone reading the script, it could be desirable to name them:
| macOS shell |
|
| Windows Powershell |
|
References to the provided inventory parameters in the script now makes more sense, but as mentioned, Environment Variables take this a step further:

A variable name is already defined and this can be referenced in the script directly
echo $product_nameImprovements
First Improvement
To improve the readability of the script further, consider setting the variable name to match the value, e.g:

echo $device_product_nameSecond Improvement
When referencing a Custom Field in a script, it could be referenced in one of two ways.
Example Custom Field: State

Note, the description has been used to indicate this is a Custom Field. Inventory Query editor shows Description.
This could be referenced with:

and
echo $stateHowever, there is a built-in Inventory Item called State. So there are now two Internal Names of ‘state’


The above scripted example for 'state' would actually report the built-in value, not the Custom Field. There is, though, a hidden prefix that can be used.
This Custom Field could be referenced as either:
- %state%
- %CustomFields.state%
The latter prevents an unexpected collision with the matching built-in internal name. To make the parameters obvious when reading the script:

echo $custom_fields_state
echo $internal_device_product_nameNotice, despite no prefix existing for built-in Inventory Items, by including a prefix for both variables in the Environment Variables definitions, reading the script will be much clearer.
Anyone reading the script is now aware that state is a Custom Field, without having to cross reference anything. Likewise, the reader also is aware that the device_product_name also comes from Inventory, again, without any cross reference necessary.
Unknown Inventory
Not all Inventory Items are available as parameters.
The FileWave Client builds the inventory report and returns it to the server. Custom Fields, including server-side Administrator Custom Fields, are available to the client. Inventory returned only by MDM is not available to client-side scripts because the client does not know those server-side values.
%CustomFields.location%
Script Logging
What
For scripts added to FileWave Filesets using the Script view, logging is enabled by default.

When
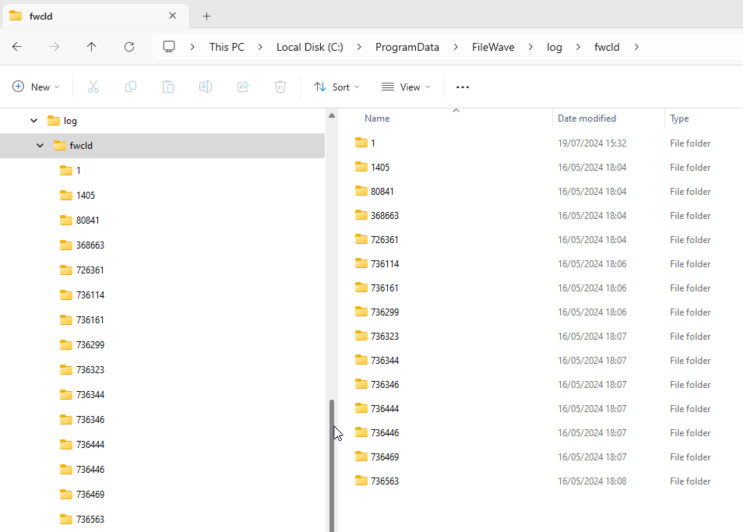
Each time a Script (as built above) is actioned on a device, a log file is created or added to, with anything that the script outputs. The logs of these Scripts are located in the following directories, within subfolders named after the Fileset ID:
macOS
# ls -al /private/var/log/fwcld/
total 0
drwxrwxrwx 17 root wheel 544 Mar 5 16:01 .
drwxr-xr-x 83 root wheel 2656 Jul 31 08:27 ..
drwxrwxrwx 3 root wheel 96 Aug 1 2023 1
drwxrwxrwx 5 root wheel 160 Sep 25 2023 54231
drwxrwxrwx 6 root wheel 192 Sep 26 2023 54235
drwxrwxrwx 3 root wheel 96 Nov 9 2023 54367
drwxrwxrwx 3 root wheel 96 Nov 9 2023 54368
drwxrwxrwx 3 root wheel 96 Nov 9 2023 54374
drwxrwxrwx 3 root wheel 96 Nov 9 2023 54379
drwxrwxrwx 3 root wheel 96 Nov 10 2023 54384
drwxrwxrwx 3 root wheel 96 Nov 10 2023 54396
drwxrwxrwx 3 root wheel 96 Nov 10 2023 54401
drwxrwxrwx 3 root wheel 96 Nov 10 2023 54406
drwxrwxrwx 3 root wheel 96 Dec 15 2023 54417
drwxrwxrwx 3 root wheel 96 Dec 15 2023 54419
drwxrwxrwx 3 root wheel 96 Dec 15 2023 54421
drwxrwxrwx 3 root wheel 96 Mar 5 16:01 55188Windows
Example:
macOS example, but the principle is the same for Windows.
Consider this simple shell script that runs a command to output the username that ran the command:

On running the command, the user running the command will be reported. For example, running this locally on a device might reply:
% whoami
sholdenViewing the log generated by FileWave:
# cat /private/var/log/fwcld/54421/whoami.sh.log
----------------------- HEADER - Date: (Fri Dec 15 2023) - Time: (16:40:21) -----------------------
root
----------------------- FOOTER - Date: (Fri Dec 15 2023) - Time: (16:40:22) - Exit code: (0) -----------------------The output presents:
Improvement
The Script may or may not provide output, depending upon the command used. However, why not add additional echo commands (or similar) to output extra details to provide more information from the script running.
Here is an example of a Fileset Requirement Script, waiting for confirmation of a Profile to be installed before activating the Fileset:

The script is outputting additional information, showing the ID of the Profile, found or not. On success, exit 0, else exit 1.
Requirement Scripts will retry every 2 minutes, until successful, unless coded otherwise
----------------------- HEADER - Date: (Thu Jul 31 2024) - Time: (11:03:12) -----------------------
Did not find ml1063.local.aa0bd493-960d-4dc0-9631-a3fea189191e.Configuration.aa0bd493-960d-4dc0-9631-a3fea189191e
Did not find ml1063.local.5a57bcb9-7293-4cba-a20b-126eb2660b25.Configuration.5a57bcb9-7293-4cba-a20b-126eb2660b25
----------------------- FOOTER - Date: (Thu Jul 31 2024) - Time: (11:03:12) - Exit code: (1) -----------------------
----------------------- HEADER - Date: (Thu Jul 31 2024) - Time: (11:05:12) -----------------------
Found installed profile: ml1063.local.aa0bd493-960d-4dc0-9631-a3fea189191e.Configuration.aa0bd493-960d-4dc0-9631-a3fea189191e
----------------------- FOOTER - Date: (Thu Jul 31 2024) - Time: (11:05:12) - Exit code: (0) -----------------------On first attempt, the log shows two Profiles were searched and not found, with the script exiting a value of 1. On second attempt, the first Profile ID is now showing as installed and the script exited with a value of 0.
No Logs
Some scripts ran through FileWave, e.g. Policy Blocker Scripts, do not provide logs, with some mention in the Client Log alone, that the Script ran.
However, it is entirely possible to choose to create a custom log file within a script, for any script, and echo any output desired to provide additional logging.
Consider how the script will grow and how to either overwrite or append appropriately.
Apple MDM
Profile Payload Planning
What
- Apple Profiles contain Payloads
- Payloads provide configuration options
- As of macOS 11, Profiles may only be delivered to devices which are also MDM enrolled. (MDM is the only enrolment option for iOS and similar OS types).
That’s the fundamentals of Profiles in a nutshell, but there is more consideration.
FileWave 16.4 and later: Use Checking Apple Profile Compatibility to compare the profile with Apple’s published platform, operating-system, and enrollment requirements before deployment.
Key aspects:
- A Profile may contain multiple Payload types
- Multiple Profiles may be pushed to each device
- macOS devices have an additional option: should the Profile be set against the User or the System?
Example Profile with multiple Payloads:

For the same above Payload, the Settings show:

Apple’s implementation is such, that only one local user can be managed (the first user after enrolment). However, any amount of directory users can be managed. This restriction applies to User set Profiles only.
Not all Payload types can be User or System. Some may only be User or only System, rather than the choice. From the screenshot above, the Settings show System is the only choice and is therefore greyed out.
Possibly, one of the most important consideration:
Where multiple Profiles are assigned which contain the same Payload type (but differing settings), Apple do not guarantee the experience. There used to be a suggestion for restrictive Payload settings, the most restrictive wins, but other Payload types have always had this mention.
How
Firstly, overlapping Payloads should be avoided, to ensure experience is by design, not luck.
Next, from the above, Profiles can contain many Payloads, but should they? Consider:
- Having an experience that is undesired in the Profile
- Needing to ‘Force Reinstall’ a Profile
Undesired Experience:
More items in the Profile makes it harder to identify anything occurring that is undesired.
Removing the undesired experience temporarily, whilst identifying, involves removing the entire Profile, which could easily be undesirable in its own right. By creating multiple Profiles with different Payloads, instead of one massive Profile with lots of Payloads, makes identifying and resolving unexpected experiences, much more easily with less impact.
Force Reinstall
This option can be desirable for a few reasons, but consider this example:
- Profile contains a Payload with a value that is set by way of a Custom Field or Inventory item.
- Custom Field or Inventory Item is altered and devices need that new value to be applied within the Profile Payload
An example Web Clip Payload, using a Custom Field to populate the value:

When a Profile is altered, FileWave will note the Profile as Modified and the Profile will be redelivered with the new settings. However, when changing Custom Field or Inventory values, there is no change to the Profile. The Payload referencing the Custom Field or Inventory item is still referencing this, it is only during delivery that the value is noted and entered in the Profile. As such, if the referenced Custom Field or Inventory values are altered for devices, the current Profile will need to be reinstalled. A ‘Force Reinstall’ will ensure this occurs, but two things occur from this action. The current Profile is removed and the updated Profile is installed. Consider, what is the consequence of Profile removal?
With the above in mind, always consider what is being included in a Profile and therefore keep each Profile lean in content; try not to overload too many Payloads into one Profile.
Overlapping Payloads
What is an overlapping Payload. This is when two or more Profiles are trying to manage the same thing, but with different settings. This shouldn’t be confused with multiple allowed Payloads.
For example:
Profiles to manage the Dock. One Profile sets the dock on the right and the other on the left. This is overlapping and should be avoided:


If both of the above were assigned to a device, how could the device possible determine which should be obeyed?
Profile to provide certificates. One Profile provides one certificate and another Profile provides a different certificate. This isn’t overlapping. Providing multiple certificates is desirable and need not be from one single Profile.
User vs System
Within the settings of Profiles is an option to define whether the Profile should apply to users or system. Some Payloads may be set as User or System only, but not either, whilst others may be either. A Profile must have a setting, so a default will be used when a Profile Payload is first added. Always check to confirm it is set as desired.
A Profile may only have one setting applied. FileWave will therefore prevent the addition of a User only Payload to a Profile already containing another Payload set as System. However, where Payloads may be either, if a Profile already contains a Payload, any additional Payloads that can be added will all be set with the same setting.
For example:
- Create a new Profile and add the Login Window Payload
- Save the Profile and re-open to observe the Settings (should be shown as System and greyed out)
- Create another new Profile and add a Dock Payload
- Save the Profile and re-open to observe the Settings (should show as either System or User, but defaulted to System).
- Change to User, save and re-observe the change
It can be seen that the Login Window is System only, yet the Dock Payload could be either
- Re-open the Login Window Profile created above and add the Dock Payload to this Profile
- Save and re-open to observe the Settings
The Settings remain as System and the applied Dock Payload will therefore be set for the System and not User. If a Dock Profile of User were required, it should not be included in a Profile that already contains a Payload that is set as System.
Why
Should all of the above be of consideration? Why would User be chosen over System? If System will work for all users, why not just set all Profiles as System where possible. However, what if the settings included were only for users, but not for a hidden Admin account. This local admin account is not managed by MDM. By setting System level, any Profiles built this way will impact this user, along with the managed local user and any directory users. This may be undesirable. Passcode policy could be an example.
Some Payload types require certain types of enrolment. Many Payload settings require Supervision, for example. macOS devices managed via User Enrolment, do not qualify as Supervised.

FileWave 16.4 Profile Editor considerations
Configure Dock settings independently
FileWave 16.4 extends granular configuration to the macOS Dock payload. Configure only the Dock settings the profile should manage—for example, the required Dock applications—without forcing unrelated properties such as size or animation behavior.
Granular settings make focused profiles easier, but they do not make overlapping Dock profiles safe. Keep the profile narrow and use Checking Apple Profile Compatibility before targeting mixed macOS versions.
Allow List and Deny List terminology
FileWave 16.4 follows Apple’s current Allow List and Deny List terminology in the Profile Editor. Existing profiles created with the former Whitelist/Blacklist field names continue to work without being rebuilt. When a profile is edited, FileWave maintains compatibility with older and newer Apple operating systems so a mixed-version fleet does not require duplicate profiles solely for the terminology change.
Planning
The above comes down to planning.
Profiles could contain multiple Payloads based upon functionality and for User or System determined targeting. Who needs to be managed? Local user (all or just managed) and/or directory users.
Consider the impact if a Profile were ‘Force Reinstalled’ or if it was deemed necessary to temporarily remove the association to one or more devices, for whatever reason.
Also give thought to how devices will be purchased and enrolled depending upon what needs to be managed. Using a BYOD scheme and only using User Enrolment will greatly reduce what can be managed, whist ADE(DEP) gives the maximum amount of control through Profiles.
Will the choice made, incur additional concerns over security, if desired management cannot be achieved?
Inventory Items in Profiles
What
- Each Inventory Items has an Internal Name, including Custom Fields which provide extended inventory
- The Internal Name can be used to reference any Inventory Items in Profiles
When
Internal Name of an Inventory Item may be located from the Inventory Query Editor. Example shows the Internal Name: ‘device_product_name’
This may be added into a Profile, effectively customising the Profile per device or user:


Custom Fields
Associated Custom Fields may also be used with Payloads settings of Profiles. Extending the above example, consider a Custom Field for Asset Tag:
Custom Field Definition

Profile Payload

Lock Screen

Improvement
When referencing a Custom Field in a Profile Payload, it could be referenced in one of two ways. From the above example, it could be either:
- %asset_tag%
- %custom_field.asset_tag%
The additional prefix indicates more clearly that this is a Custom Field Inventory Item. If there was an Inventory Item with a matching name provided by FileWave, the first item in the list would report the provided Inventory Item value for the device and not the Custom Field.
For demonstration, imagine creating a Custom Field called 'My Device Product Name' with Internal Name: device_product_name.

There are now two Inventory Items with the Internal Name: device_product_name:

and

With the values:

Altering the above example Lock Message to use both of these:

The device clearly demonstrates how the value without a prefix uses the FileWave provided Custom Field value:

To prevent confusion with overlapping Inventory Items between Custom Field and built-in Inventory, always consider using the prefix for Custom Fields
User Customisation
Although FileWave doesn't manage users, if users are associated with devices, this extends the ability to customise Profiles for users.
User details from enrolment may be used, but to extend beyond this, LDAP servers set for extraction can greatly increase the Inventory Items available for Parameters via LDAP Custom Fields.
An example of Profile customisation for users:

One Profile can therefore be used for multiple devices, tailoring the Payload to the users of those devices.
Checking Apple Profile Compatibility (16.4+)
What
FileWave Central 16.4 adds profile compatibility information for Apple profiles. It uses Apple’s published device-management definitions to show which platforms, operating-system versions, and enrollment types support each payload and setting before you deploy the profile.
Version boundary: The Compatibility view and checker described here require FileWave Central and FileWave Server 16.4 or later.
When/Why
Check compatibility while planning or reviewing a profile that will target different Apple platforms, operating-system versions, or enrollment methods. The results can expose requirements that are easy to miss in the payload editor, including settings that require Automated Device Enrollment (ADE), supervision, User Approved MDM, or a newer operating system.
Compatibility data is planning guidance, not deployment proof. The results are based on Apple’s official profile definitions and do not replace a pilot deployment on representative devices.
How
Open compatibility information for a profile
- In FileWave Central, create or open an Apple profile.
- Open the profile properties and select Compatibility.
- Review the operating systems and enrollment types reported for the profile’s payloads and settings.
Check a target combination
- Select the Apple Platform you intend to manage.
- Enter the target operating-system Version.
- Select the applicable Enrollment Type.
- Select Check.
- Review the result for every payload and setting in the profile.
Run the check again for each materially different device group. A profile that is compatible with a supervised Mac enrolled through ADE may not have the same result for an iPhone, iPad, Apple Vision Pro, or a device enrolled through another method.
Interpret the results
| Result or requirement | What to do |
|---|---|
| Supported for the selected platform, version, and enrollment type | Continue with a pilot deployment. Compatibility does not confirm that certificates, identifiers, dependencies, or service-side configuration are correct. |
| Requires ADE, supervision, or User Approved MDM | Confirm that every target device meets that enrollment requirement. Split the deployment when the target group contains mixed enrollment types. |
| Introduced in a newer operating system | Raise the target OS requirement or avoid that setting for older devices. Do not assume older systems will enforce an unknown key. |
| Removed or unavailable on the selected platform | Remove the incompatible setting or build a separate profile for the affected platform or OS range. |
| Compatibility information unknown | Reopen the profile and retry the check while Central has a working Server connection. If the result remains unknown, use Apple’s published definition for that payload and contact FileWave Support before relying on the result. |
Plan for mixed Apple fleets
- Check each platform and OS range that the Deployment will actually target.
- Use separate profiles when the required settings or enrollment conditions differ materially.
- Keep deployment targets aligned with the profile’s compatible platforms instead of relying on devices to ignore unsupported settings.
- Test on representative hardware and enrollment types before broad rollout.
- Recheck compatibility after adding payloads or changing individual settings.
Compatibility data source
FileWave evaluates the profile against Apple’s published device-management profile definitions. Apple can revise those definitions as platforms evolve, so use the current FileWave maintenance release and verify important deployment decisions against Apple’s current documentation.
Related articles
- Profile Payload Planning
- Apple Profiles & Dependencies
- Upload a Configuration Profile in FileWave Anywhere
Android EMM
Android Policy Planning
What
Android EMM Policies can contain several configuration types, and multiple Policies can be assigned to one device. Good policy design keeps each Policy’s intent, enrollment scope, and removal impact clear.
The core rule is simple: separate settings by purpose and avoid conflicting Policies that manage the same value differently.

Why separate Policies
- Troubleshooting: Smaller, purpose-specific Policies make an unexpected result easier to isolate.
- Safe removal: A Policy can be removed and reinstalled without also removing unrelated certificates, restrictions, or network settings.
- Clear scope: BYOD, fully managed, and Dedicated Device deployments can receive settings appropriate to their enrollment mode.
- Predictable ownership: Each managed setting has one authoritative source instead of competing Policies.
Overlapping Policies
An overlap occurs when two or more Policies manage the same setting with different values. The device may appear correct until one Policy is changed or removed, at which point the effective behavior can change unexpectedly.
Do not design around accidental precedence. Avoid assigning conflicting values and document which Policy owns each setting.
Multiple Policies are fine when they manage different things. For example, separate Policies can deliver different certificates without conflict.
FileWave 16.4 policy planning
FileWave 16.4 adds controls that should be separated by purpose so enrollment type, operational role, and app trust remain explicit.
| Control | Planning decision |
|---|---|
| System Update | Choose Automatic, Windowed, or Postpone based on device availability requirements. Use Freeze Periods only for defined business-critical dates and document when normal patching resumes. |
| Compliance: Password | May be used independently, including for supported BYOD/work-profile deployments. |
| Compliance: Keyguard | Use only where a Dedicated Device or single-app design requires it; do not include it in BYOD policy scope. |
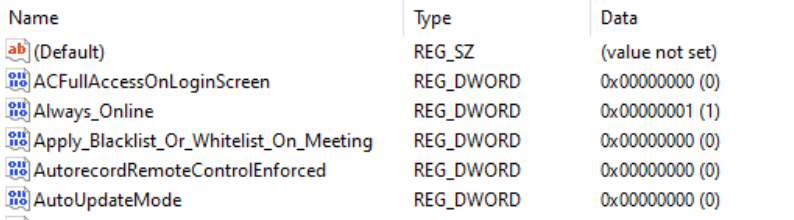
| App Auto Update Mode | Set the intended behavior on each Android app Fileset: Unspecified, Default, Postponed, or High Priority. |
| Credential Provider | Keep the default deny posture and explicitly allow only trusted credential-management apps on Android 14 and later. |
Recommended separation
- Keep System Update behavior separate from Password and Keyguard compliance so maintenance windows can change without disturbing security policy.
- Separate BYOD compliance from Dedicated Device compliance because Keyguard is not applicable to BYOD.
- Use the Android Default Policy for Permission and Credential Provider baselines. Configure Auto Update Mode on each Android app Fileset.
- Name Policies for their purpose and scope, such as BYOD – Password Compliance or Dedicated Devices – Windowed System Updates.
Planning checklist
- Which enrollment modes receive this Policy?
- Does another Policy or app Fileset already manage the same setting?
- What unrelated controls would be removed if this Policy had to be withdrawn?
- Is the global default appropriate, or is a narrowly scoped override required?
- How will the Policy be tested before production assignment?
- Who owns the date for ending a Postpone or Freeze Period?
Related Content
OS Patching
Best Practice Guide: Software Update Deployment (16.0+)
What
With FileWave Version 16+, the system for patching devices with Operating system updates has been overhauled, and your current workflows likely should be as well. This article will review how you can best cleanup, reorganize, and overall simplify your patch management processes.
Note that you want to avoid assigning Windows OS updates to pre-16.0.0 clients because they will not function correctly. You can simply add a criteria to your SmartGroup to check if the "FileWave Client Version" begins with "16." and that would protect you until you can work to upgrade all of your devices.
Also note that Windows OS updates from before FileWave 16 should be purged from your server to free up disk space, and because they will not function correctly. This transition from the old format to this new format should be a one-time exercise to remove the old style of Windows OS updates and ensure your clients are upgraded to FileWave 16.0 or higher.
When/Why
Patch management of devices in your environment is the most important thing an IT manager does in almost every single organization. FileWave 16+ does operating system patching differently than before, but we feel confident if you follow this guide, and tailor it to your environment, that you'll find the new solution much more elegant and relatively care free.
For the purposes of this document, we'll use an example of a common deployment scenario, Alpha, Beta, then Production patching. That is, a system where you fist test new patches against a small set of devices (your alpha group) to ensure patches work without issue. Later, you would deploy to the larger beta group to ensure distribution is good. Only when both Alpha and Beta are good would you deploy to Production.
In some environments, folks go straight from test to production directly for OS patching. This will work fine as well, and you can tailor the below accordingly.
How
This concept was discussed on Discord so you can check out this video as well as the rest of this article to get more details;
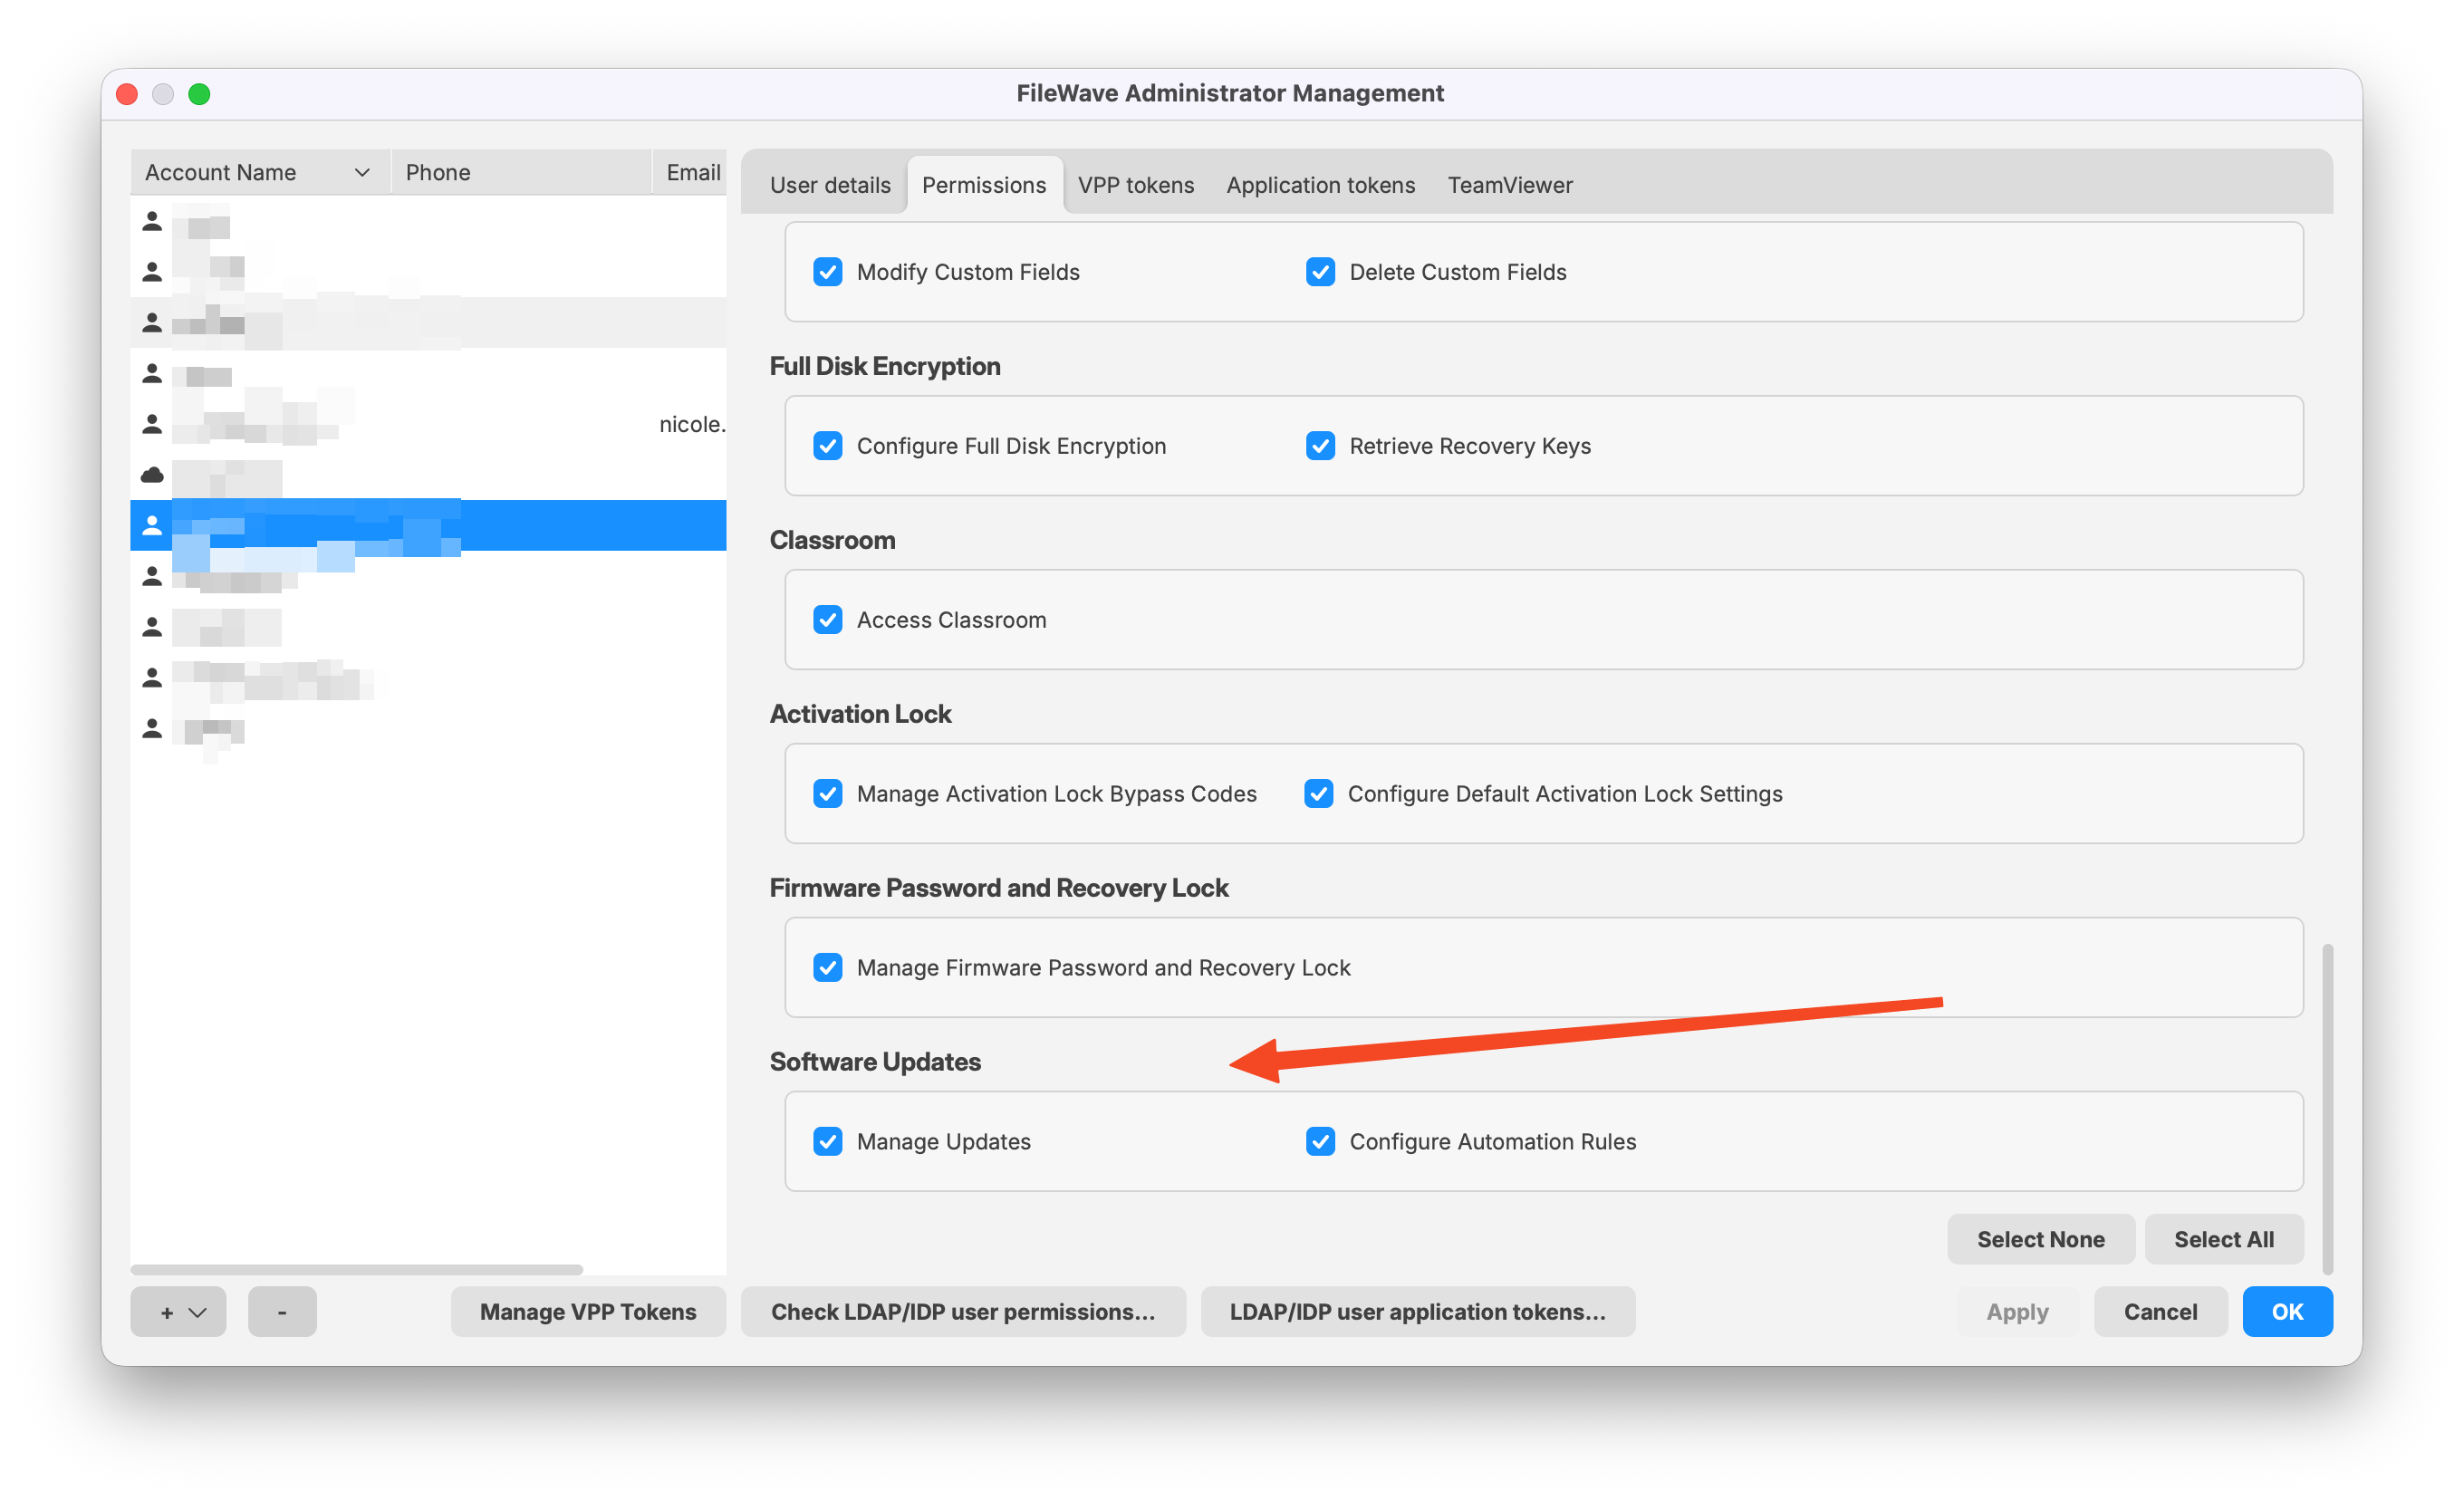
First it is important that your account has permissions to perform these actions. In Assistants -> Manage Administrators as shown in the below image notice if you have Manage Updates and Configure Automation Rules enabled.
As stated above, in our example organization, we patch as follows:
- Each Monday we evaluate newly offered patches, and if we want to deploy them to test, we assign them to our Alpha group.
- On Wednesday of each week, if Alpha testing was good, we'll assign these same patches to the Beta group.
- And on the following Monday, if all is still well, we assign the same patches to our Production groups.
But if we are starting from scratch, how best do we do this? We need three sets of objects to make all of the above happen. Device groups, fileset groups, and deployments.
Note: We are using Deployments here instead of associations on purpose. Deployments maintain their settings regardless of "new" content, and are much easier to use to add device exceptions (i.e. in this test, exclude Device A)
Device Groups
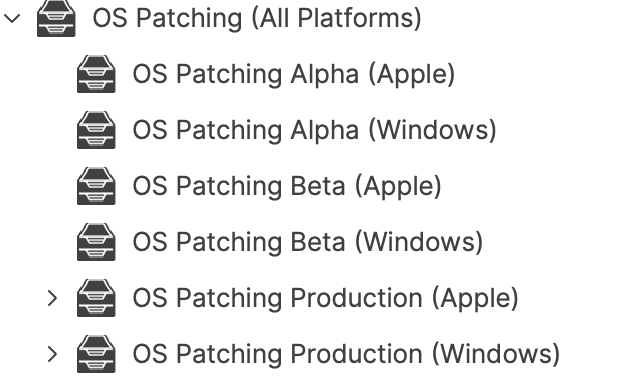
The device groups will be built like this:

The top level group is only for organizational purposes, and includes three groups. There is a manual group for Alpha Devices and for Beta Devices (we'll put select devices in each group manually). The Production groups are smart groups based on operating systems we manage. In our case, Apple devices and Windows.
Note that once these groups are established, we will likely not need to edit them regularly. The "Production" smart group definition is shown below for Windows and then Apple. It's important for server performance to group them this way.
OS Patching Production (Windows)

OS Patching Production (Apple)

Fileset Groups
FileWave Version 16+ makes bulk-creating and storing patches MUCH easier. For our example patching workflow we are going to create Fileset groups to match our device groups. Note again that we've added a top level group for organizational purposes.
Deployments
Deployments are the way we'll relate the other two building blocks above. That is, we'll use deployments to relate Patches to Devices using the fileset groups and device groups we built above. Alpha patches to Alpha devices, etc. Notice that the "Beta" assignment contains both Alpha and Beta Groups...we do that because they are manual groups and we want to make sure those devices all receive the assignments. The Production deployment doesn't need that, because it is by platform and covers all devices no matter what groups they are in.

Note that the assignments above are critical to the workflow, and you'll see that in the How to Use section below.
How to Use?
Now that we have our building blocks in place, we can start patching. Let's pretend that it is Monday morning of a new week. Let's go into the Software Updates view to see what new patches are available to us:
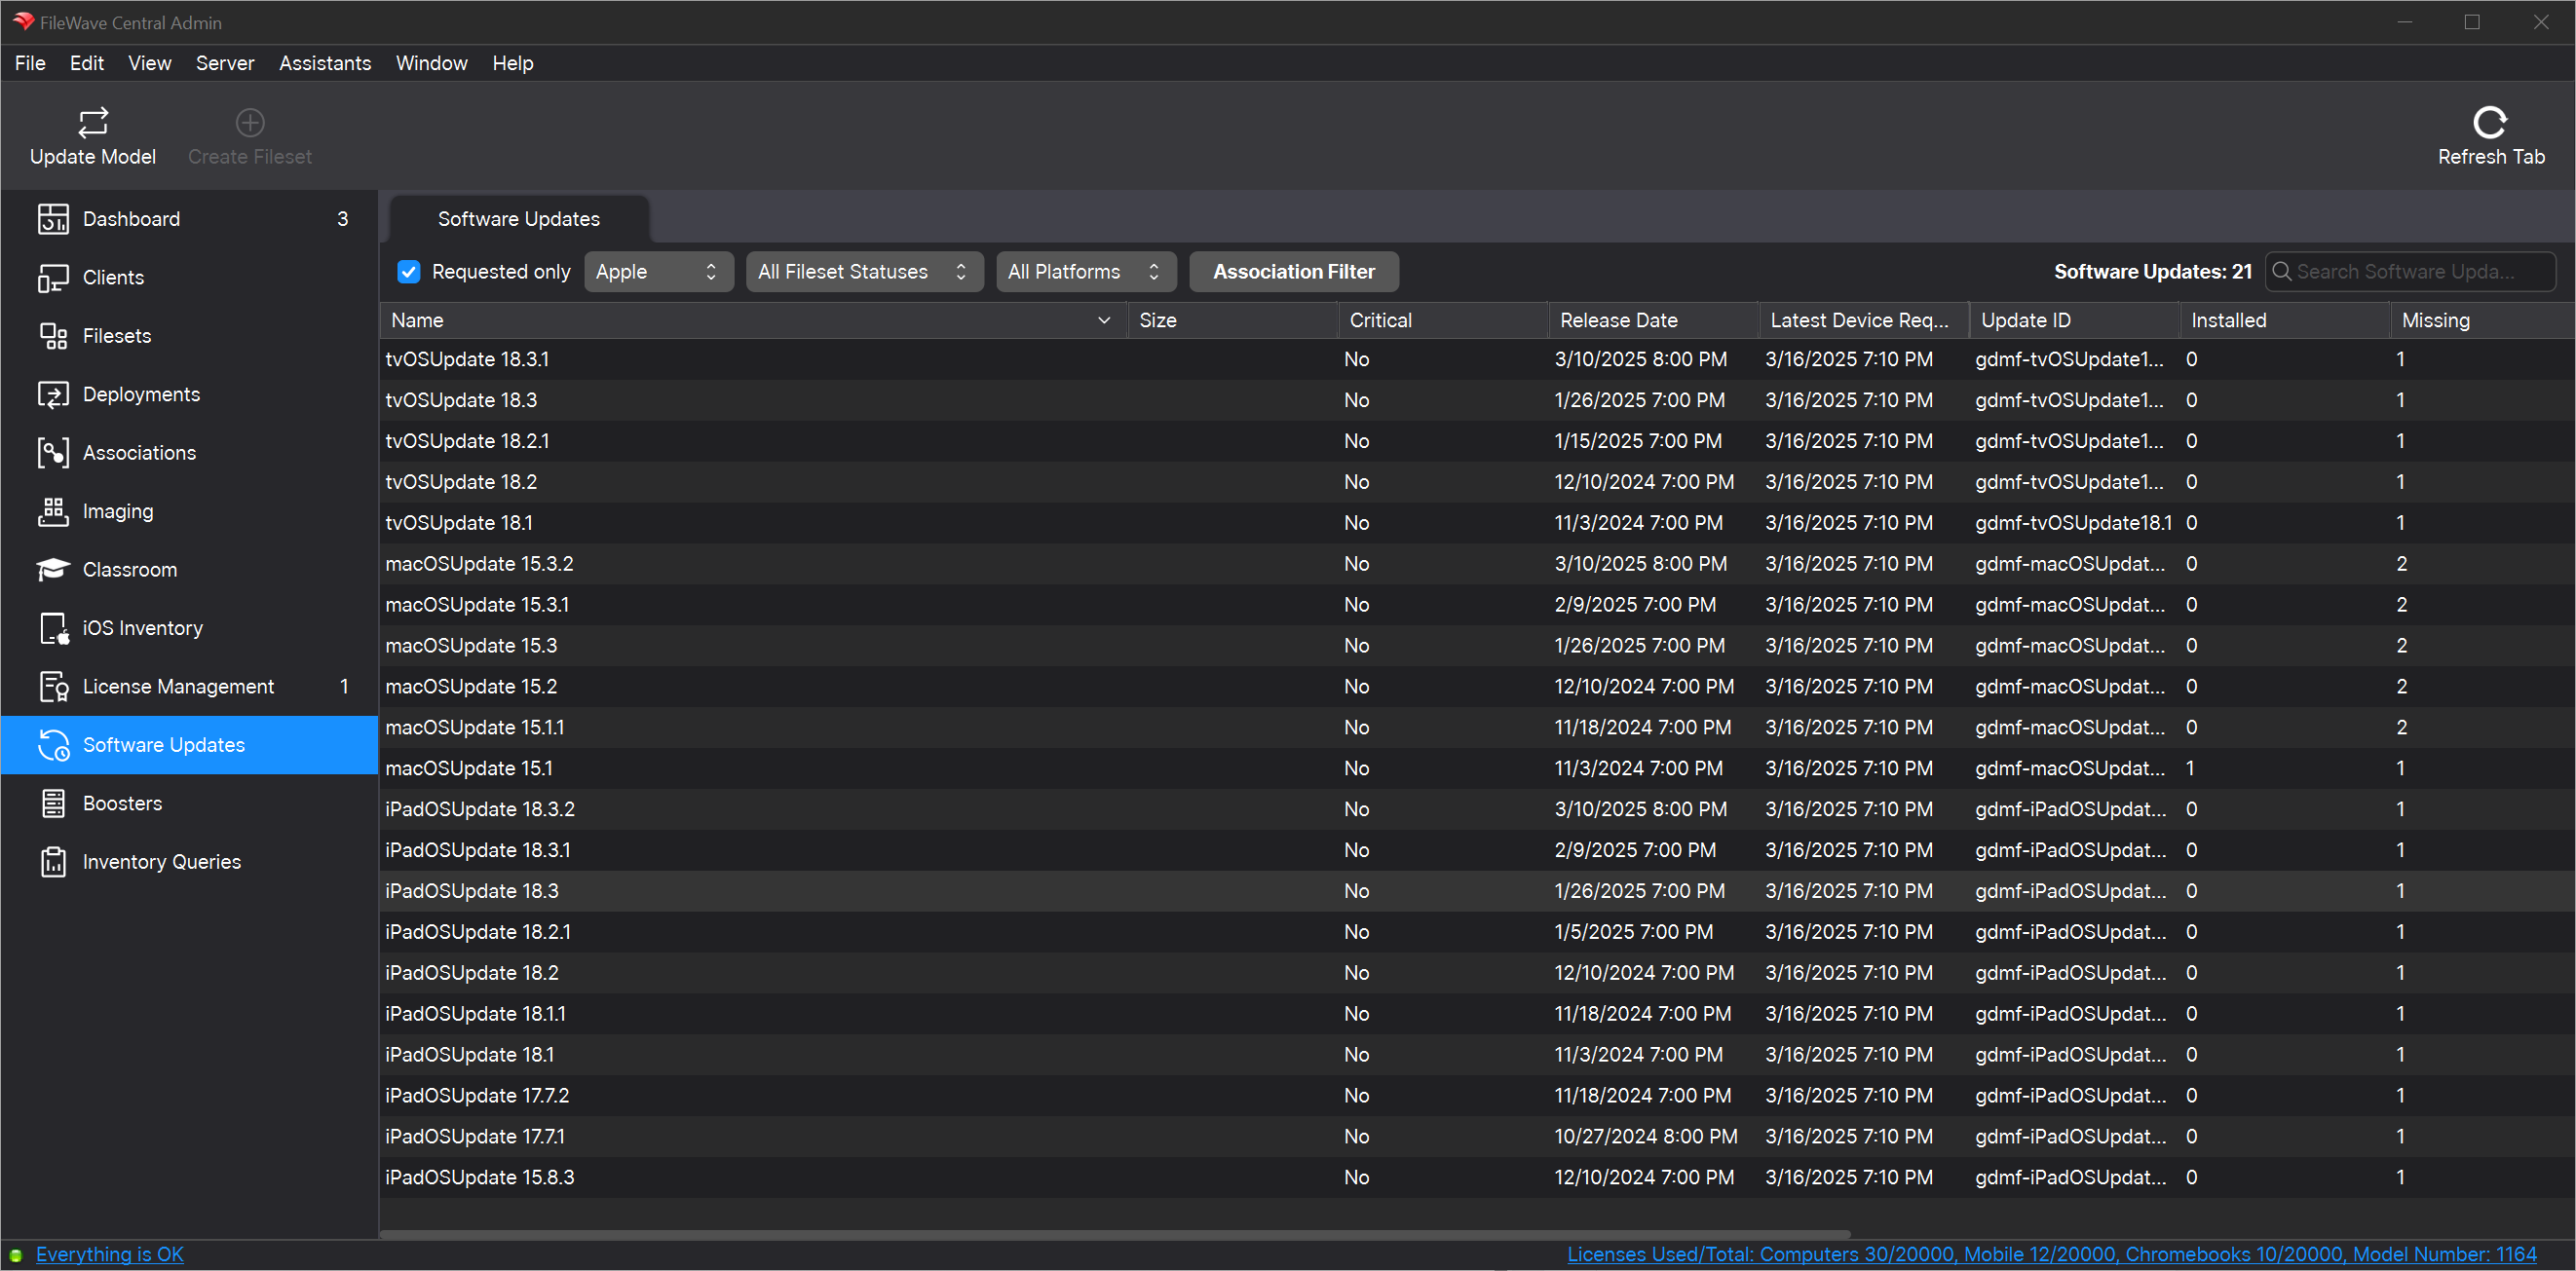
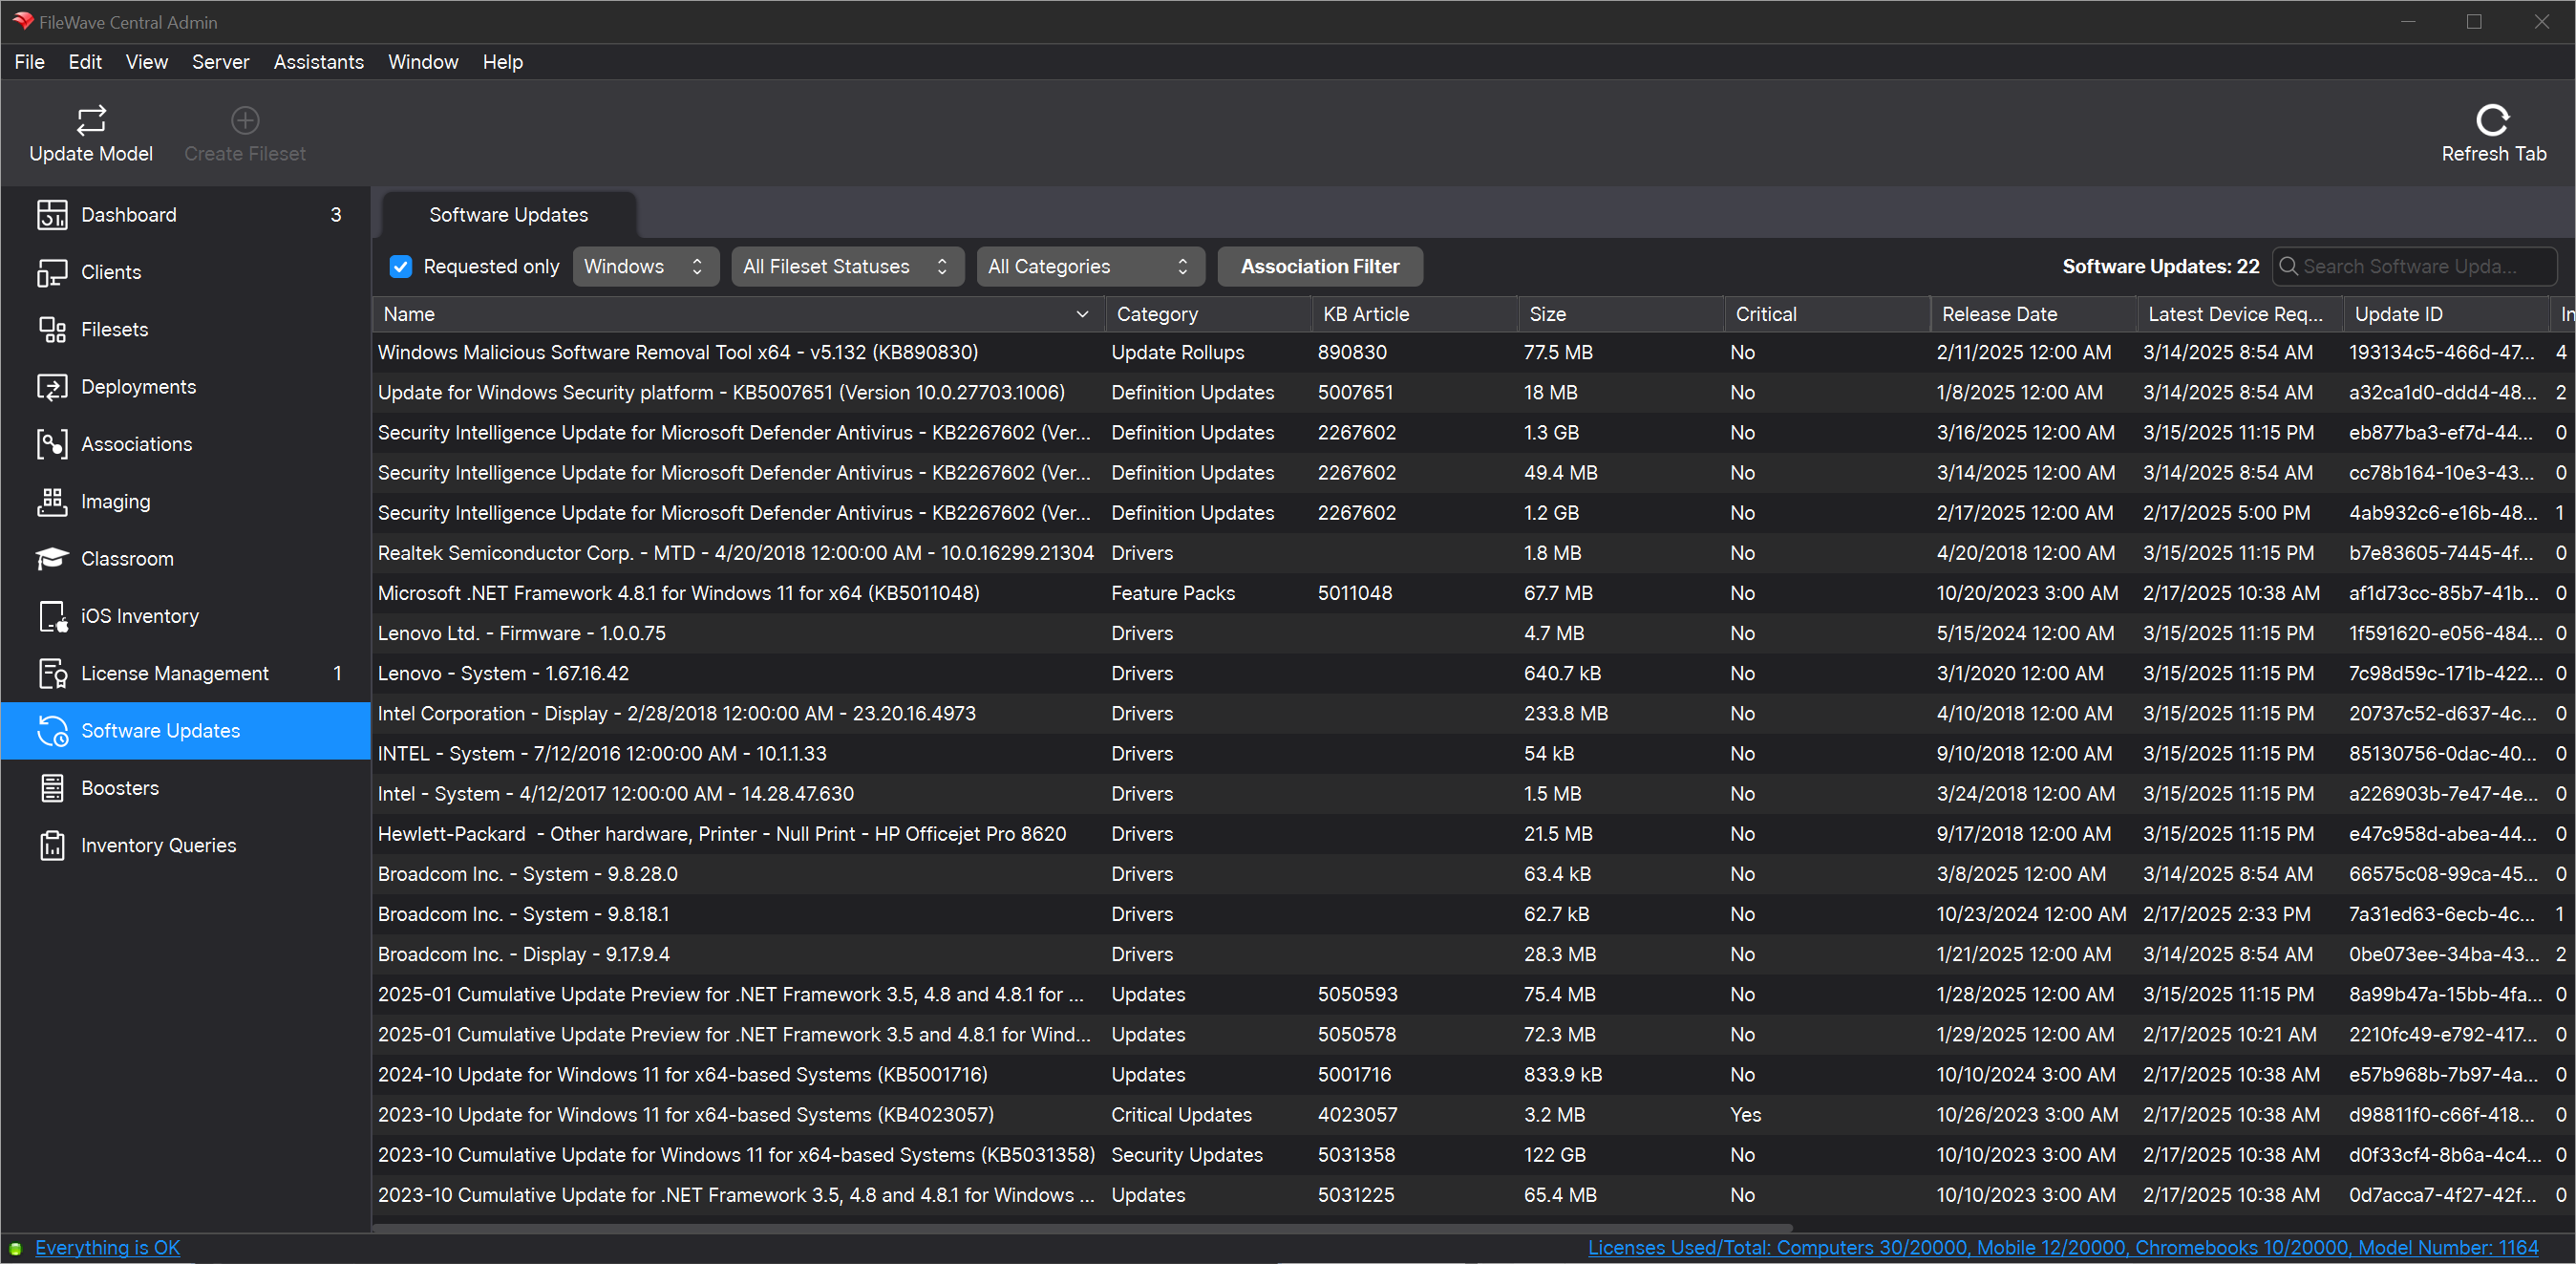
And in our environment it is a lot of patches indeed, since it is the first time we are setting up the mechanism. But don't worry, it is now easy to create everything at once, and there are several filters to help you. Examples:
- Requested Only filter is used to only show patches requested by devices in your environment...you'll likely always have this turned on
- Platform filter can be used to toggle between Apple and Windows patch views
- Fileset Status Filter: "No Fileset"...we can use this filter to ONLY show us patches we haven't "created" yet...we'll likely use this one all the time in our workflow
- Categories can be used to narrow down to Critical, Security or other patch categories
Let's assume for now though that "we want to patch everything".
Validate coverage before creating or promoting patches in FileWave 16.4
FileWave 16.4 makes it easier to confirm policy coverage and avoid duplicate update Filesets before moving an update into the Alpha, Beta, and Production workflow.
- Filter the Software Updates view to the platform, category, request state, and Fileset status you intend to manage.
- From an update, locate its existing Fileset or Fileset Group when one exists.
- Review which Software Update Policy Filesets already cover the update.
- Preview the intended Software Update Policy to confirm which updates match its criteria.
- For Windows auto-install policies, restrict the preview to updates currently requested by devices when validating against active requirements.
- Create a new Alpha Fileset only when the update is not already covered by the intended policy or Fileset workflow.
Run the preview again after changing policy criteria. The preview validates matching and coverage; it does not replace staged testing or create the Filesets for you.
Patch Creation (Alpha)
Because we always start with our Alpha groups, that is the Fileset group location we'll use every Monday (and any other time we create new patch Filesets). Creating the Filesets couldn't be simpler...we'll just select them all, right-click, choose create, and then choose the destination (our Alpha Fileset groups)
Note that we put ALL patches for Windows in the same Windows Fileset group, and all Apple patches in the Apple Fileset group...that is on purpose. As soon as we update model, all "Alpha" patches for all "Alpha" devices will be assigned, and start to deploy...it's as easy as that.
Patch Assignment (Beta and Production)
Because we always start with our Alpha group, we never have to "create" patches for the Beta testers or Production users. On our "Wednesday" Beta testing the ONLY thing we have to do is MOVE the filesets from our Alpha Fileset Group to our Beta Fileset Group. And the following Monday we'll move patches from Beta to Production. Job well done.
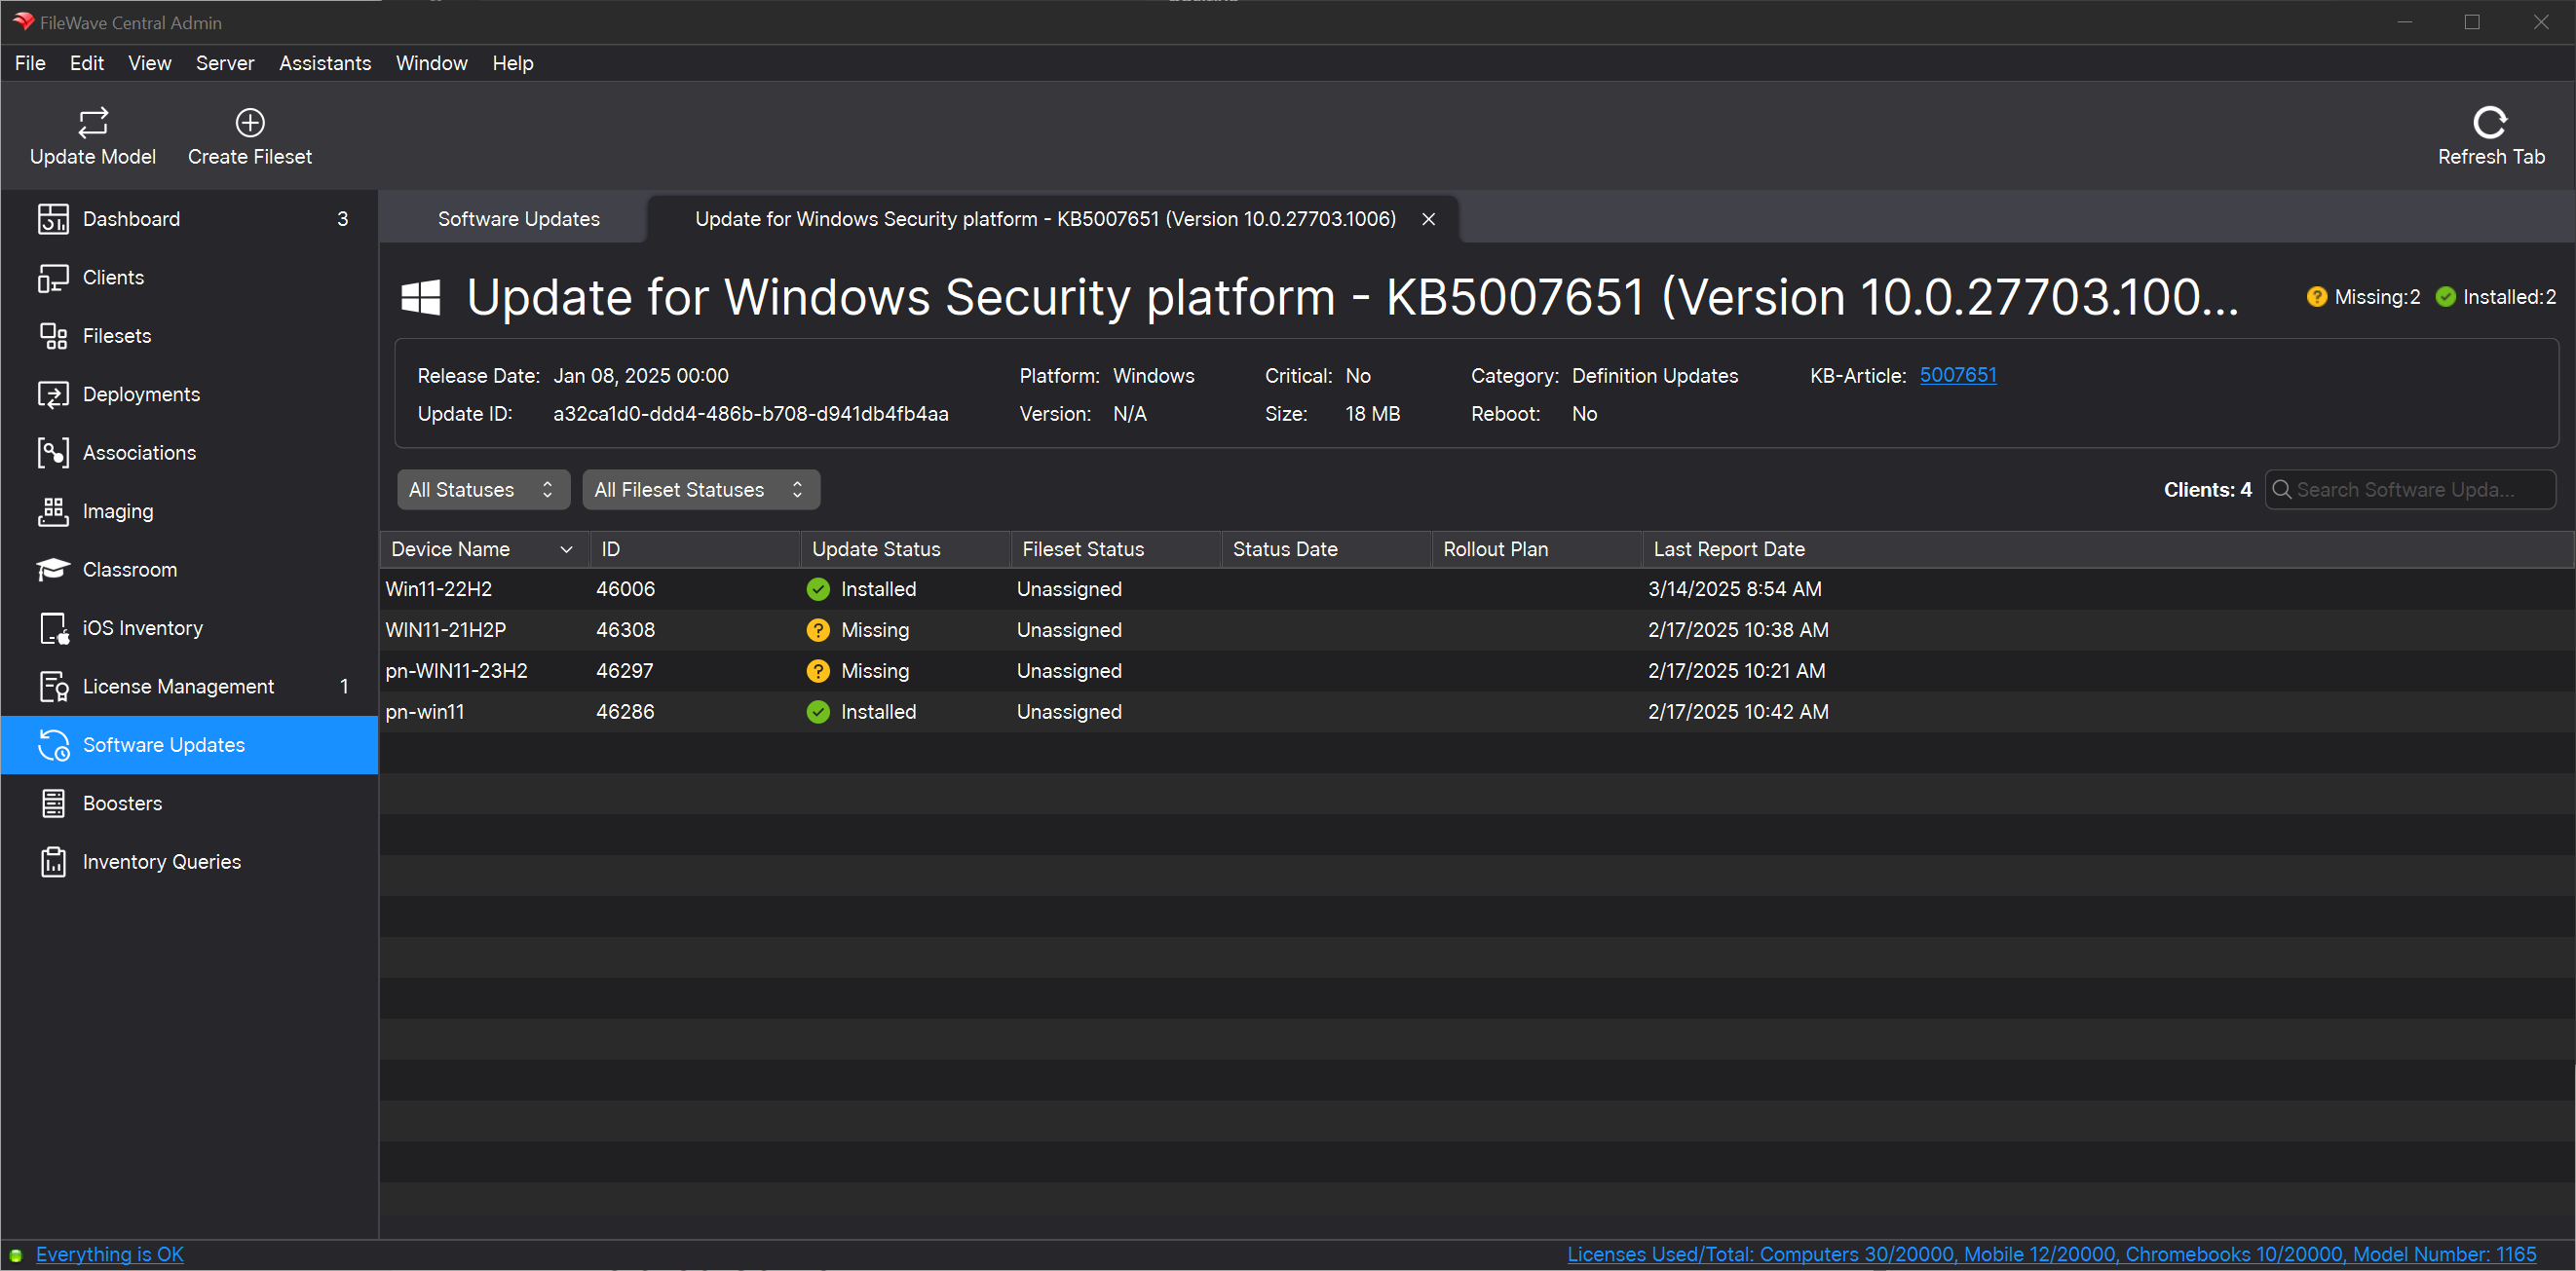
Tracking Progress
And, when evaluating how your patching is going, remember there is a new view for any individual software update where you can see assignment (and results) from all devices.
Windows BIOS/UEFI Firmware and Driver Updates
The latest Windows Software Update filesets now include BIOS/UEFI firmware updates from certain OEM vendors (e.g., Dell, HP, Lenovo). While these updates may appear alongside OS patches, please be careful when deploying.
The latest Windows Software Update filesets now also includes third-party driver updates, such as those for monitors, audio devices, and peripheral hardware. While these updates can improve compatibility and stability, they often have the following impact:
- Many of these drivers require a reboot to complete installation.
- Automatic deployment may result in unexpected restarts, potentially disrupting end-user workflows.
To maintain a smooth user experience and prevent unplanned reboots, you may want to deploy driver updates via Self-Service Kiosk instead of automatic enforcement.