Windows Scripting
The Windows Scripting shelf is your hub for automation and customization on Windows devices managed through FileWave. Here you’ll find guidance, examples, and best practices for using PowerShell, Batch, and other Windows scripting languages to streamline administration, enforce configurations, and extend FileWave’s capabilities.
Whether you’re deploying software, collecting system data, adjusting settings, or remediating issues, these scripts help you go beyond standard policies and leverage the full power of Windows automation within FileWave.
- Active Directory Join (Windows)
- Adding A Printer for All Users (Windows)
- Create local admin accounts on Windows
- Deploy SSL Certificates (Windows)
- Installing Windows Fonts
- Local Group Policy Object Utility (Windows EXE)
- Rename Windows Hostname based FileWave Client Name
- Store BitLocker Recovery Keys in a FileWave Custom Field
- Upgrade Windows 10 and 11
- Notify Users with a dialog (Windows)
- Windows Wallpaper via CSP Personalization
Active Directory Join (Windows)
Description
This Fileset is designed to bind Windows computers to a Directory structure. By associating this Fileset the binding process can be automated.
Ingredients
- Active Directory domain
- Windows 10 or 11 filewave client
- FileWave Admin
Directions
- Download the Active Directory join fileset template: Active Directory Join.fileset.zip
- Unzip and import the fileset into FileWave Admin.
- Open the Fileset, highlight the join_ad.ps1 script and choose Get Info > Executable > Environment Variables.
- Modify these variables to reflect the Active Directory environment:
user password domain ou
THIS SCRIPT WILL FORCE THE MACHINE TO RESTART. IF THAT IS NOT THE BEHAVIOR THAT IS DESIRED REMOVE THIS LINE FROM THE JOINDOMAIN.PS1 FILE:
Restart-Computer -Force
THIS SCRIPT WILL DELETE ITSELF ONCE IT HAS RUN ON THE CLIENT MACHINE LOCALLY.
Example:

For the user, please use full path like
e.g. "domain\username"
Save changes and associate the Fileset to either Windows 10 or 11 client machines!
Adding A Printer for All Users (Windows)
The task at hand seems simple enough...install a printer for a Windows user for a printer on a Print Server. In our example, I'll use a print share called BigDill on a print server named Arkone.
Easy, right? A quick web search for "powershell add printer" takes me to the add-printer cmdlet, and it is pretty easy to use for a print server. The command looks like this (don't use this example!):
import-module printmanagement
add-printer -ConnectionName \\arkone\BigDill
I tested it locally outside of FileWave in the PowerShell ISE and it worked fine. I ran the command, and it added the printer for me. So, I created a fileset for the exact same thing and tried it out. The result: nothing whatsoever. The script seemed to run fine, but the user logged in didn't see a new printer!
So, why did this happen? For two important reasons:
- The Add-Printer cmdlet is great, but it ONLY adds a printer for the current user
- When FileWave runs a script, it is always run under the context of the System account
When I investigated further by opening a command prompt as system, I found that in fact my fileset had run fine, and added the printer, but only for the system account.
Testing Scripts for Use in FileWave
Review our KB Script Best Practices which demonstrates the use of psexec to run scripts on Windows as if they were run through FileWave (as System User and 32bit).
So, a little more research was required, and PowerShell in this instance is not the answer. Instead, we are going to use a command-line utility in a batch file called printui.exe. PrintUI can be used in many ways: Microsoft PrintUI Documentation
We won't get into all of the options of this command here, but printui can add a printer globally for all users using the /ga command line option (/gd is a global delete if you happen to want to add a removal script as well). So our new batch file (Activation Script) code looks like this:
@echo off
printui /ga /n\\arkone\BigDill
exit 0
And our results, in this case, were excellent...the printer is added for every user at their next login. (Given this, you may want to make this a reboot fileset)
And, for completeness' sake, if we wanted to add a post-uninstallation script to "clean-up" if this fileset were removed, we could do:
@echo off
printui /gd /n\\arkone\BigDill
exit 0
Related Content
Create local admin accounts on Windows
Description
Need to manage local admin accounts on your Windows devices? FileWave has you covered. Below is the recipe with Fileset to create your local admin account with username, password and full name. In addition, if needing to remove the local admin account, there is a removal script included.
Ingredients
-
FW Admin
Directions
-
Download and unzip the Fileset
- Import into your server via FileWave Admin
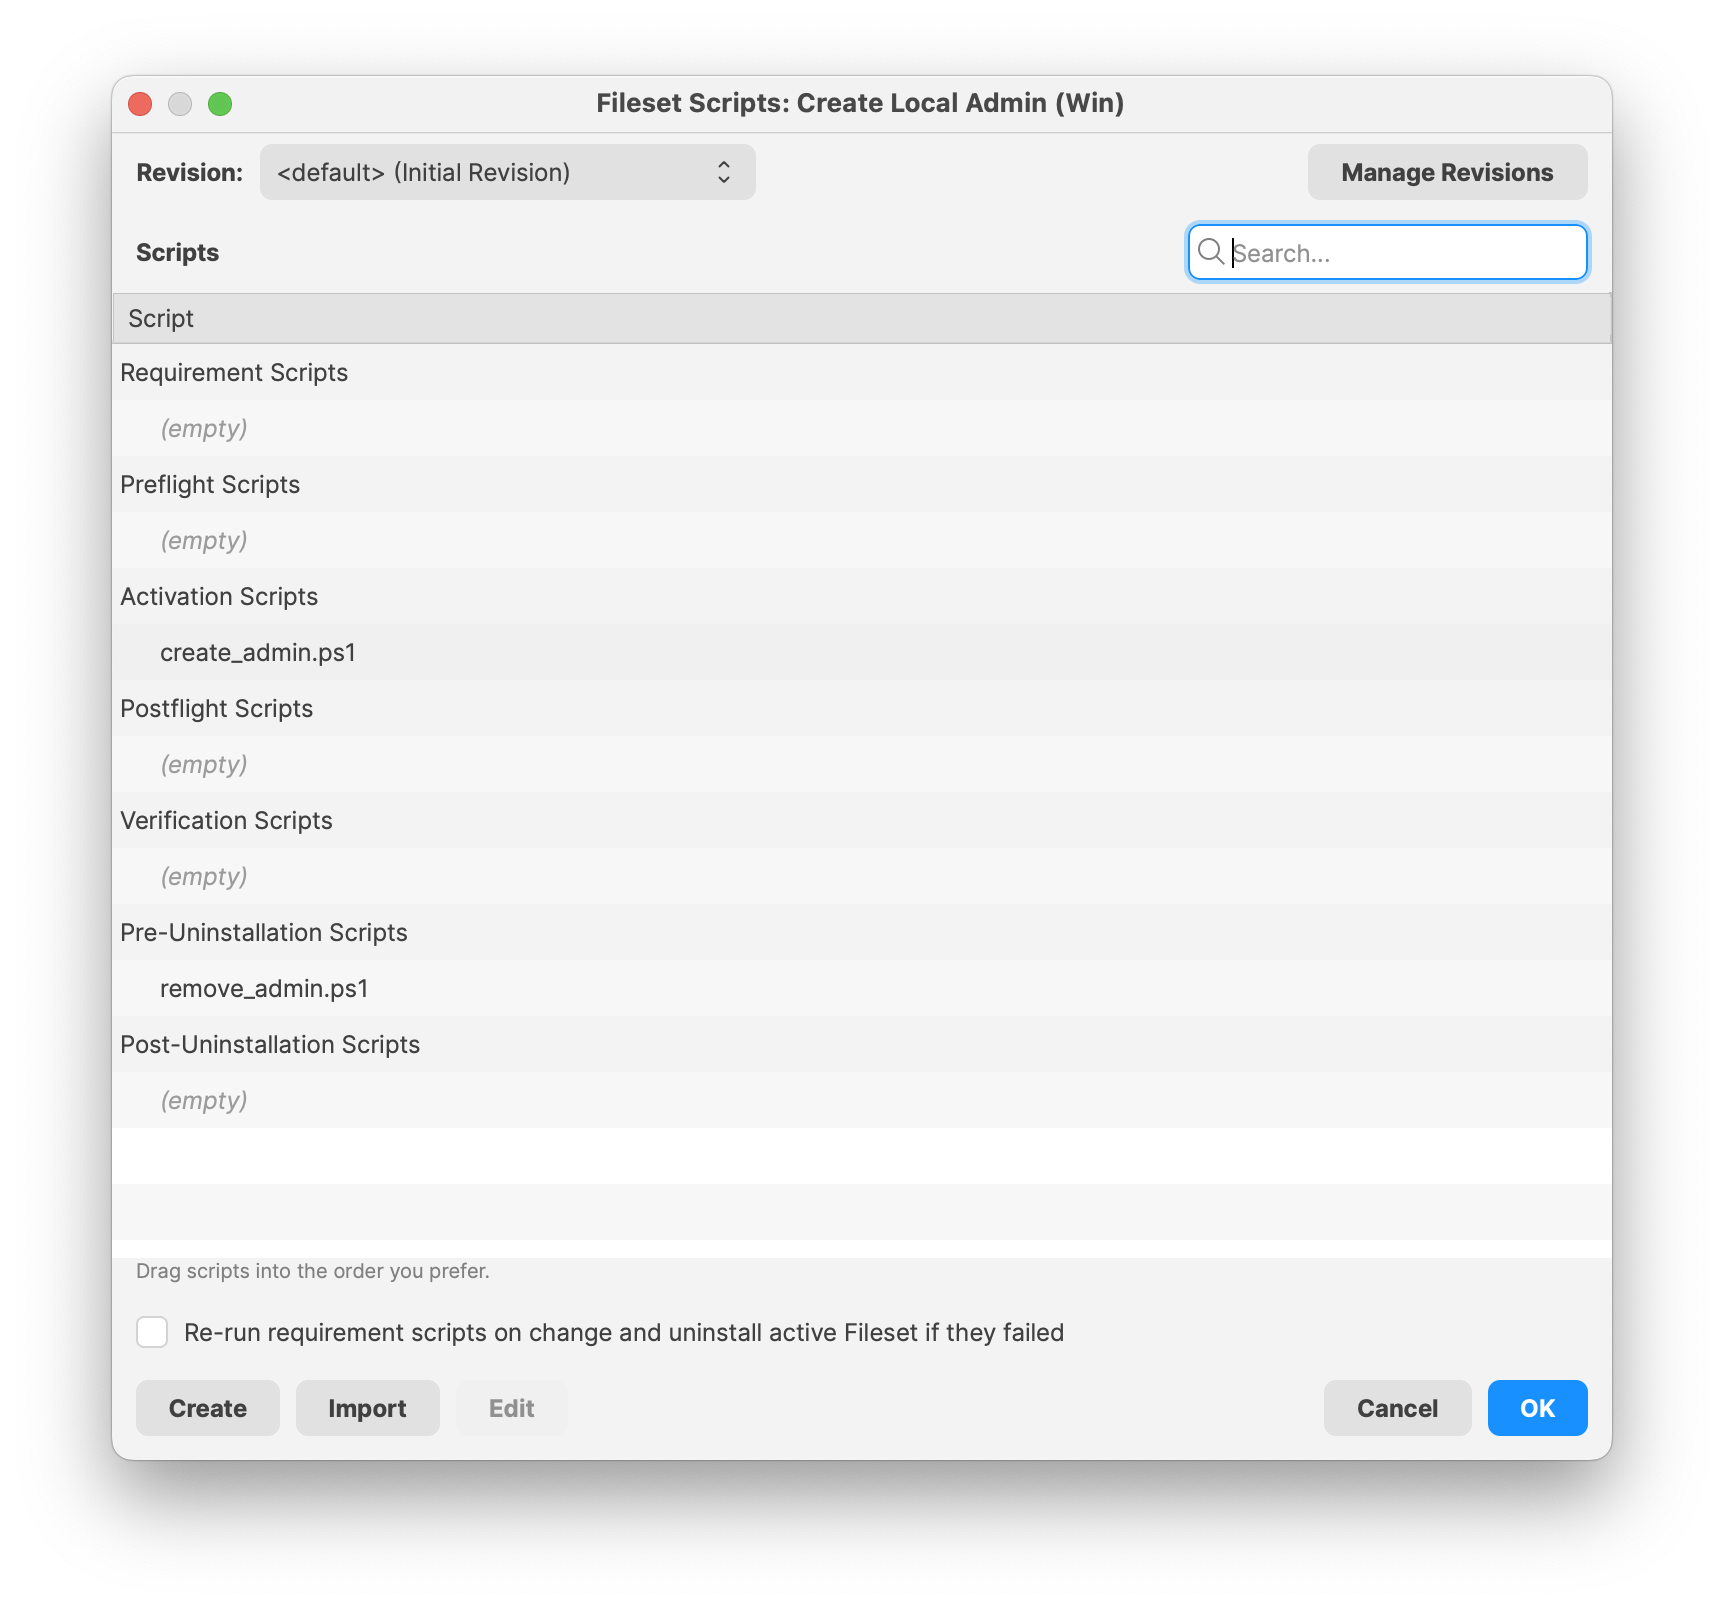
- Highlight the Fileset and select "Scripts" for this Fileset
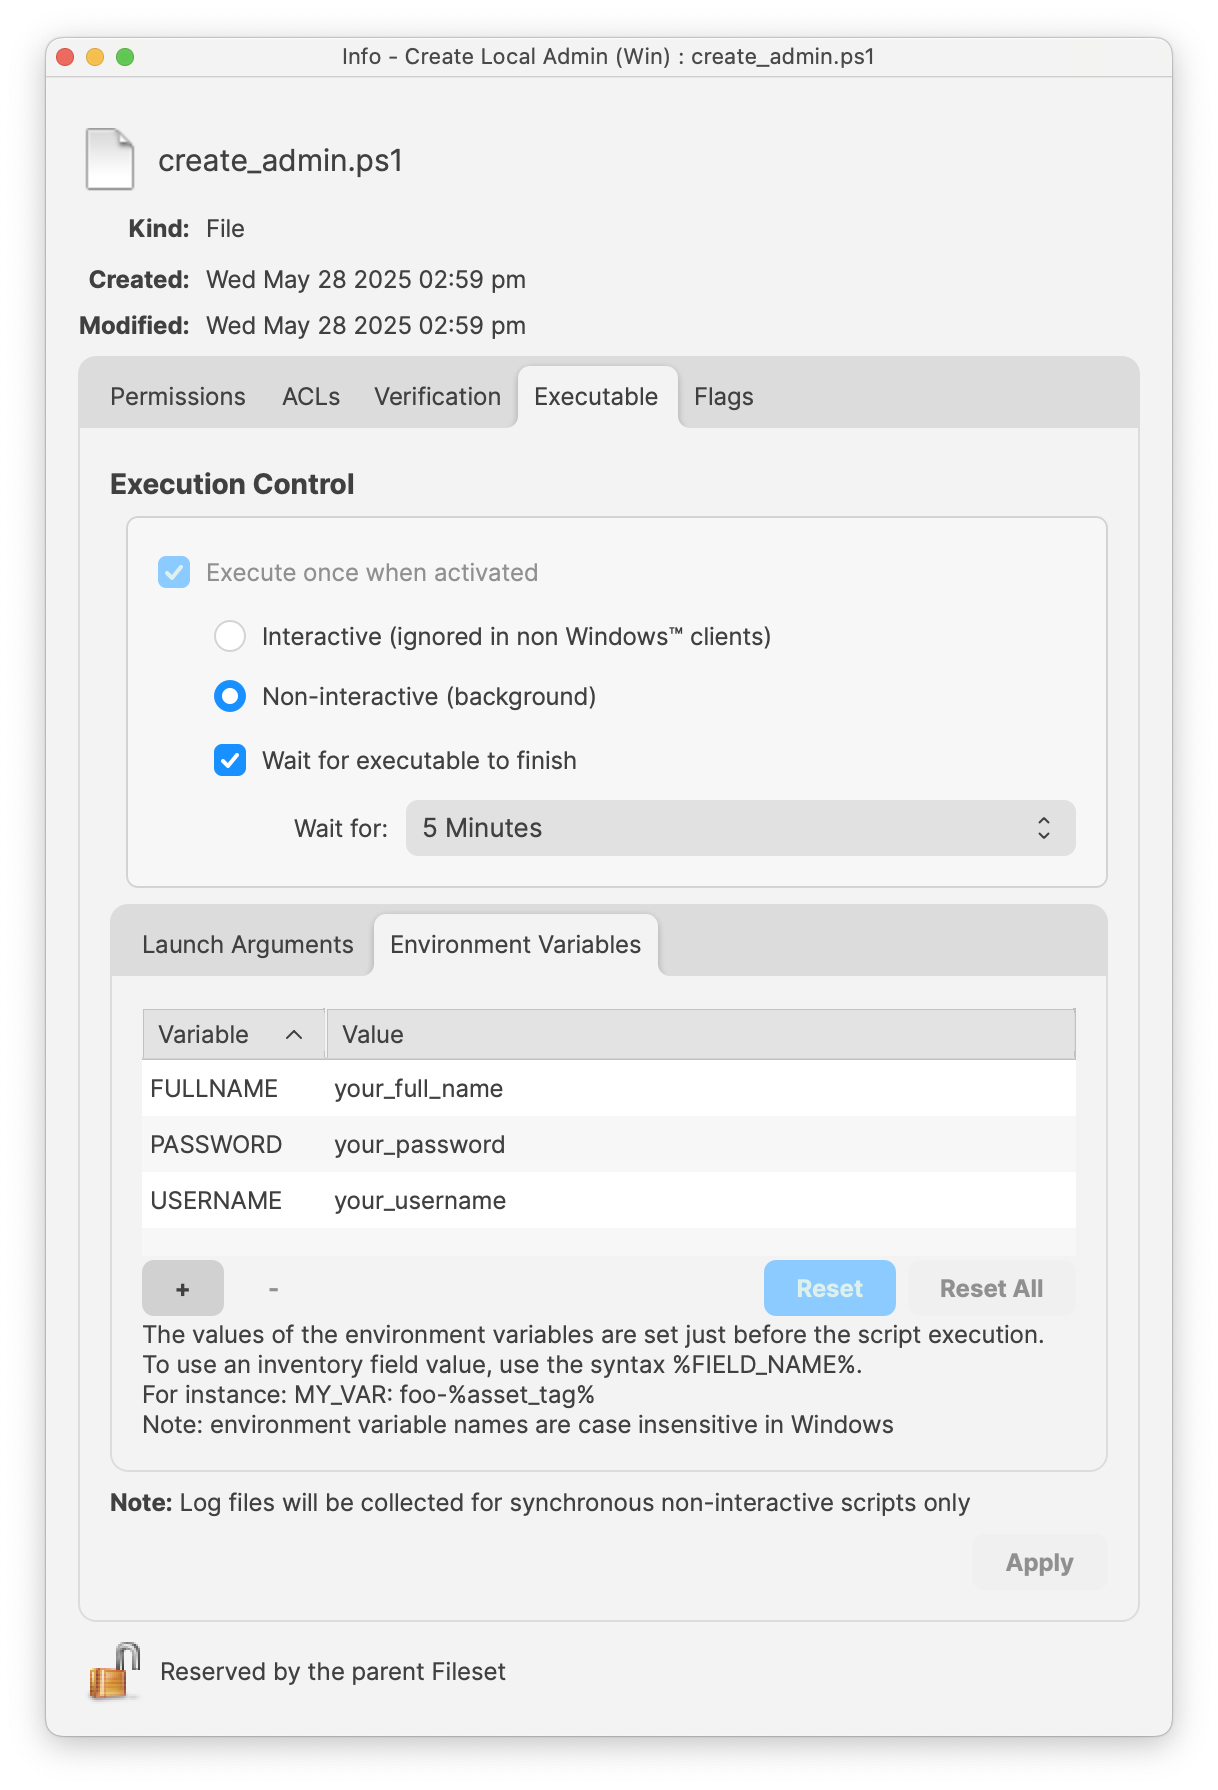
- Select the create_admin.ps1 to open the script properties

- Enter in your local admin Username, Password and Full Name for the desired account

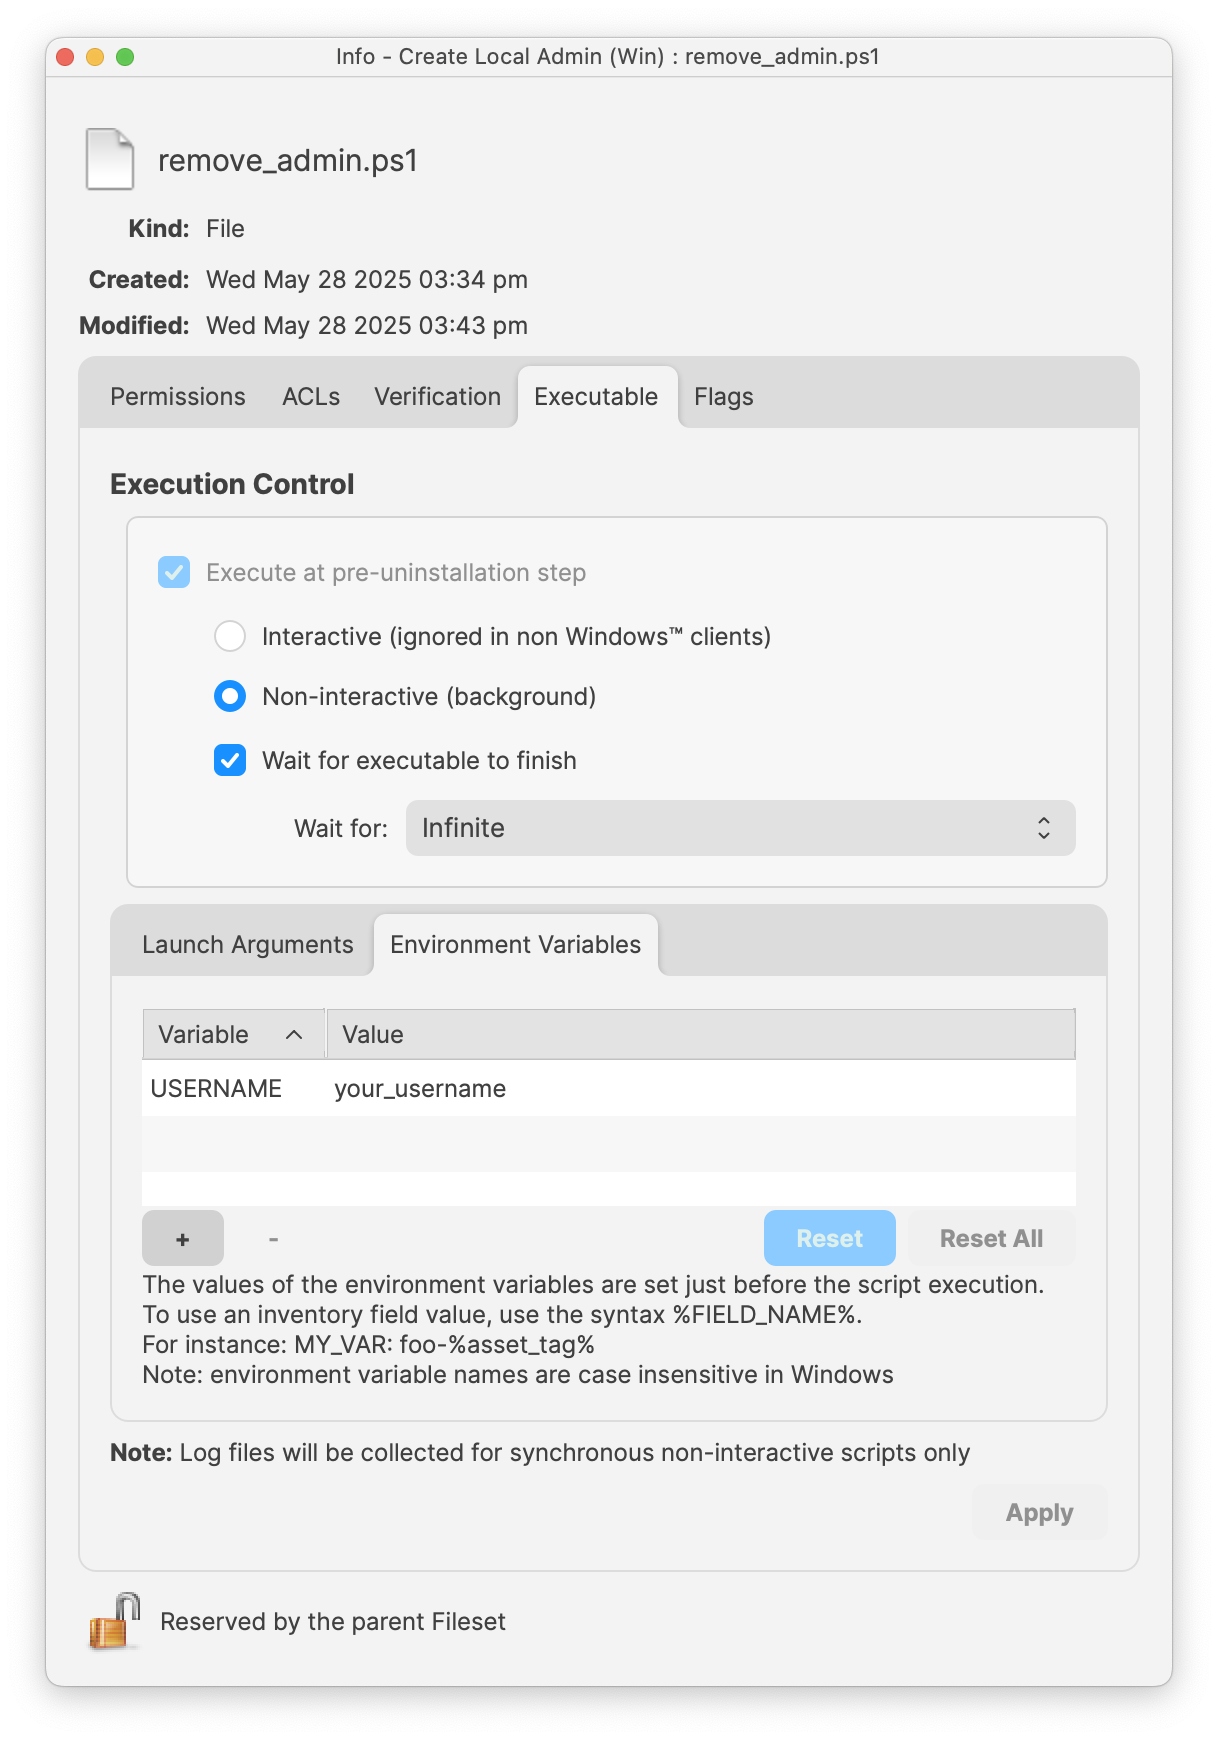
- Repeat the process for the remove_admin.ps1 and enter in the desired Username to remove
The remove_admin.ps1 script environment variable needs to match the Username found on the machine or in the create_admin.ps1. If it does not match it will not successfully remove the admin account.

- Close the Script window to Save
- Assign to a test device
- Perform a Model Update to deploy
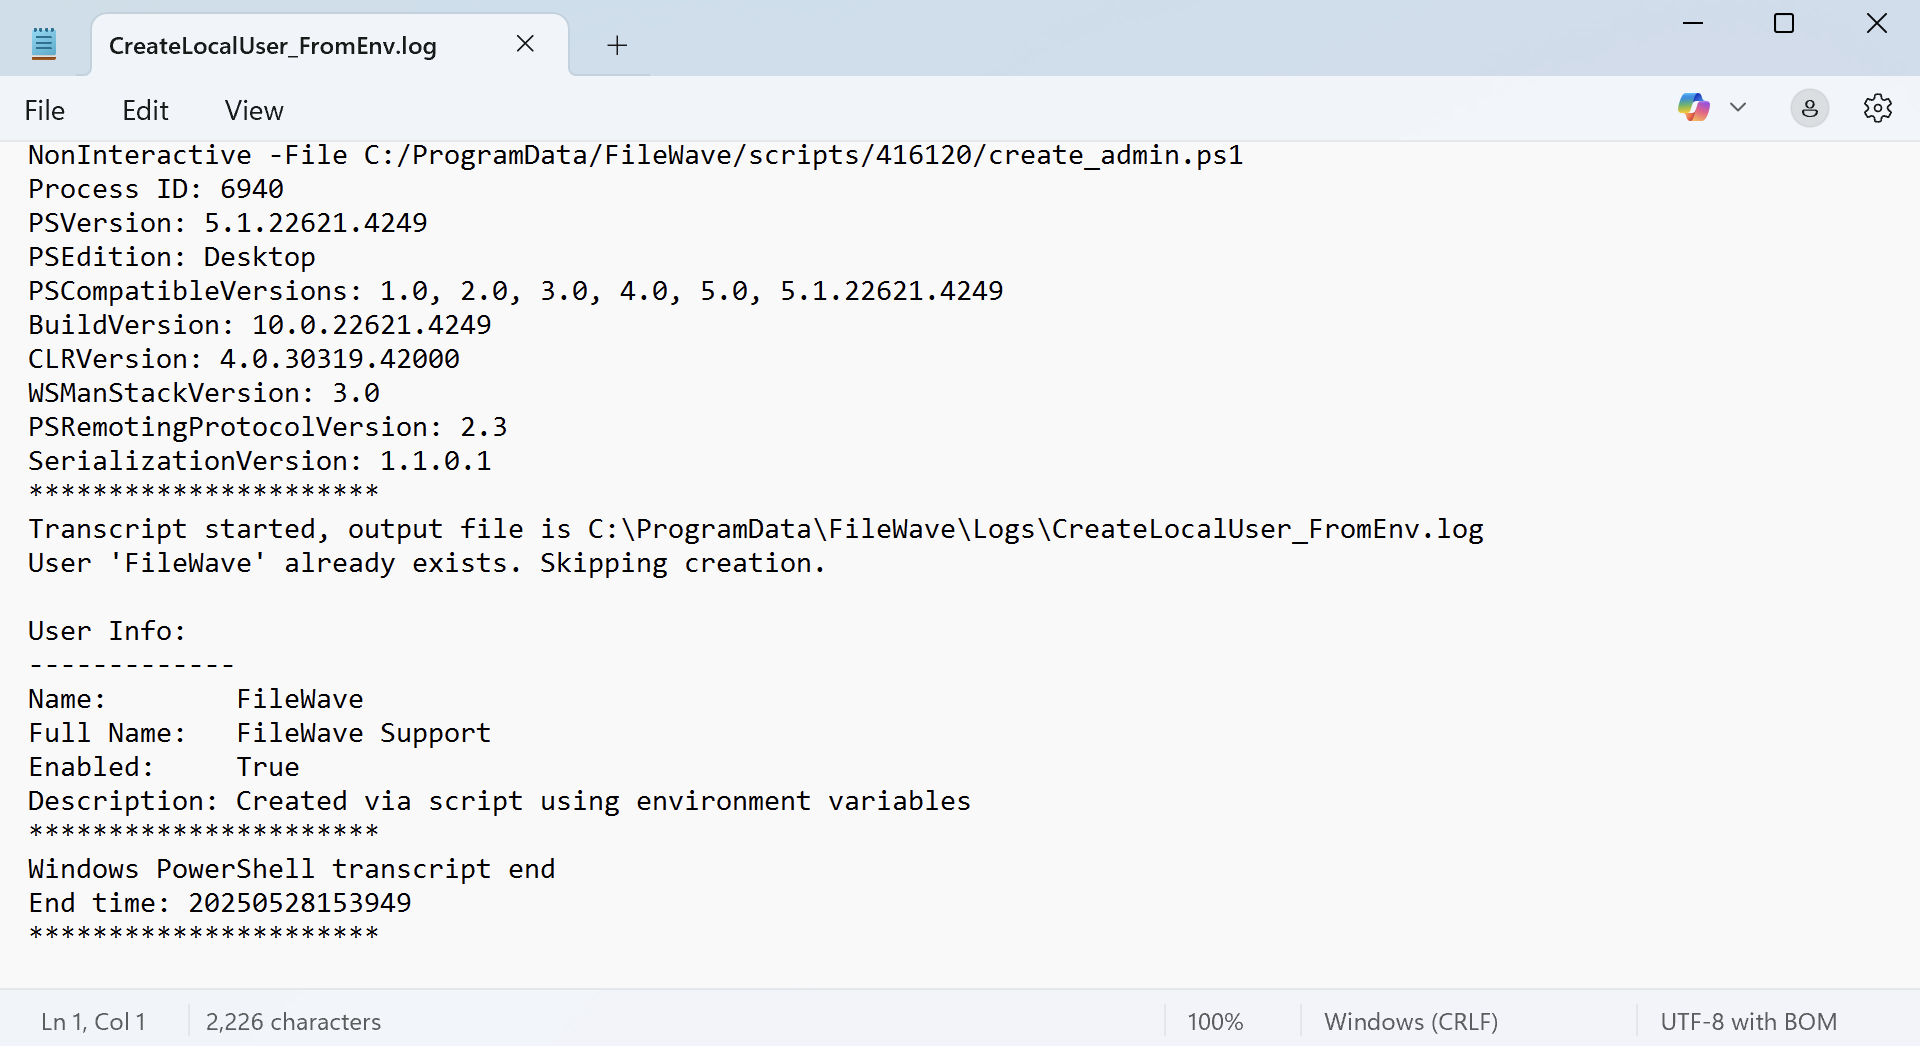
Confirmation of local admin created, you may open the Windows Settings > Accounts > Other Users to view the newly created local admin account.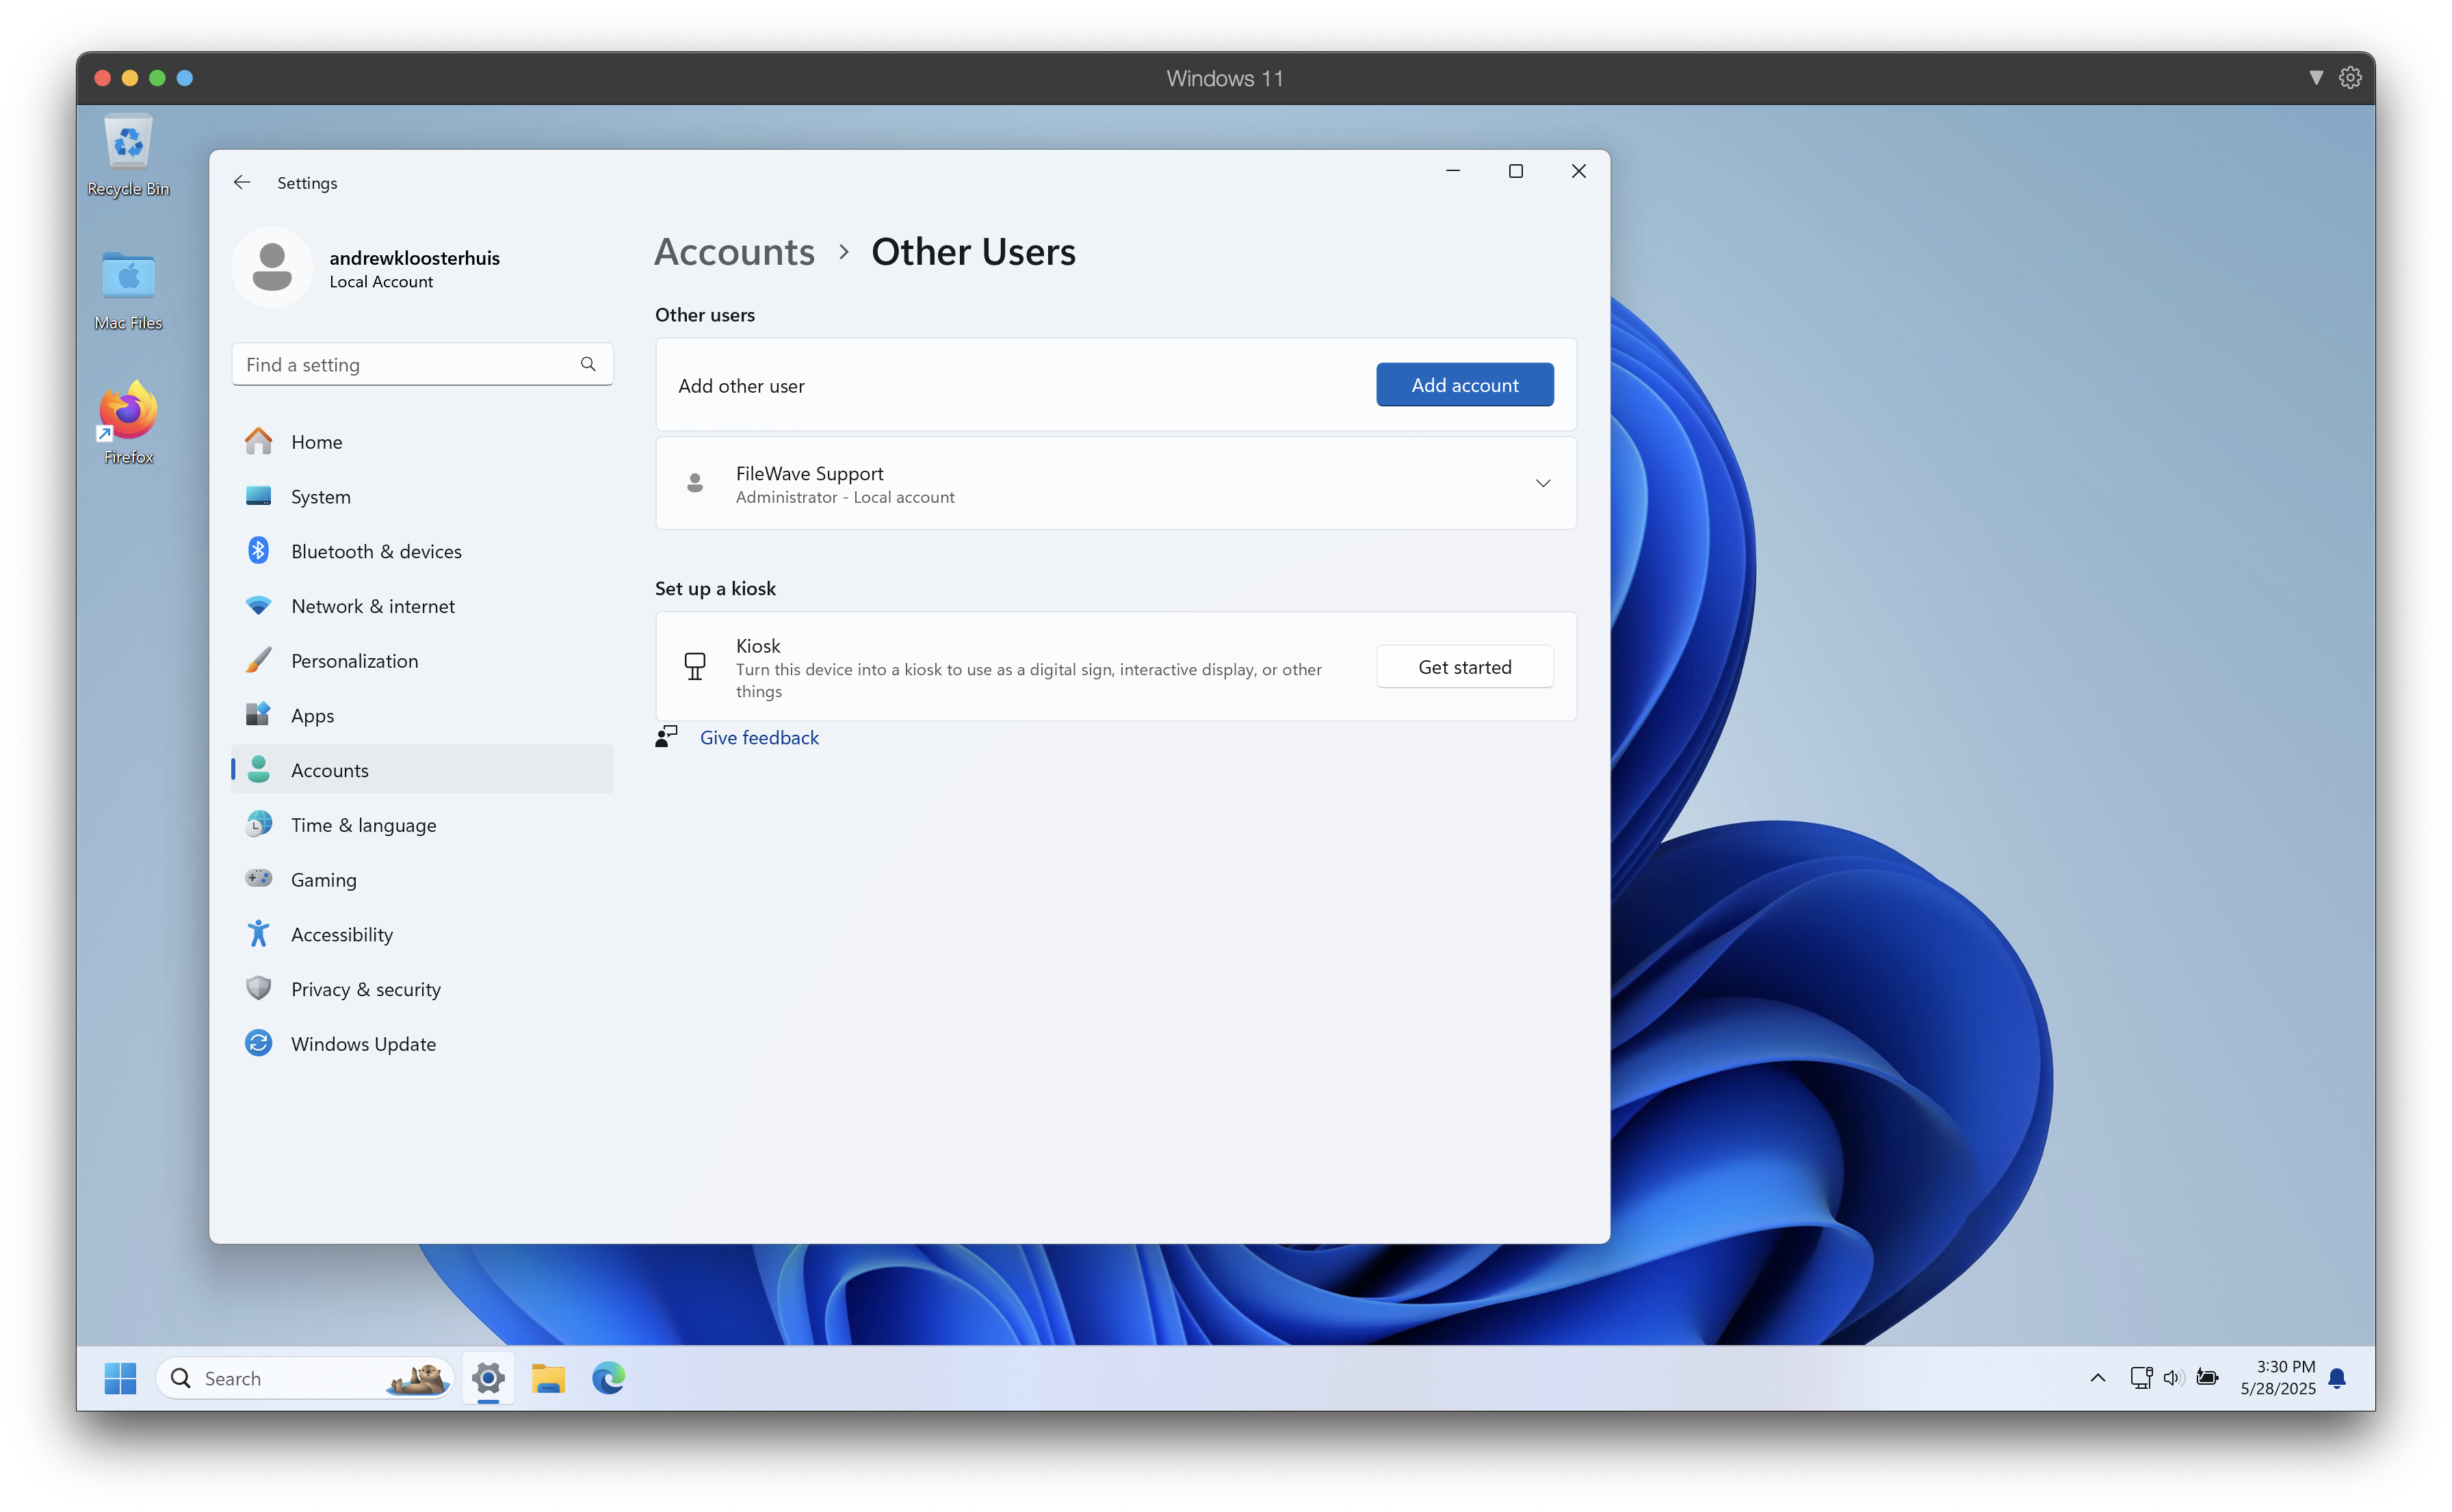
Notes
Both scripts will output their executed tasks for detailed logging. These logs may be found in:
C:\ProgramData\FileWave\Logs\The create_admin script log will be labeled: CreateLocalUser_FromEnv.log
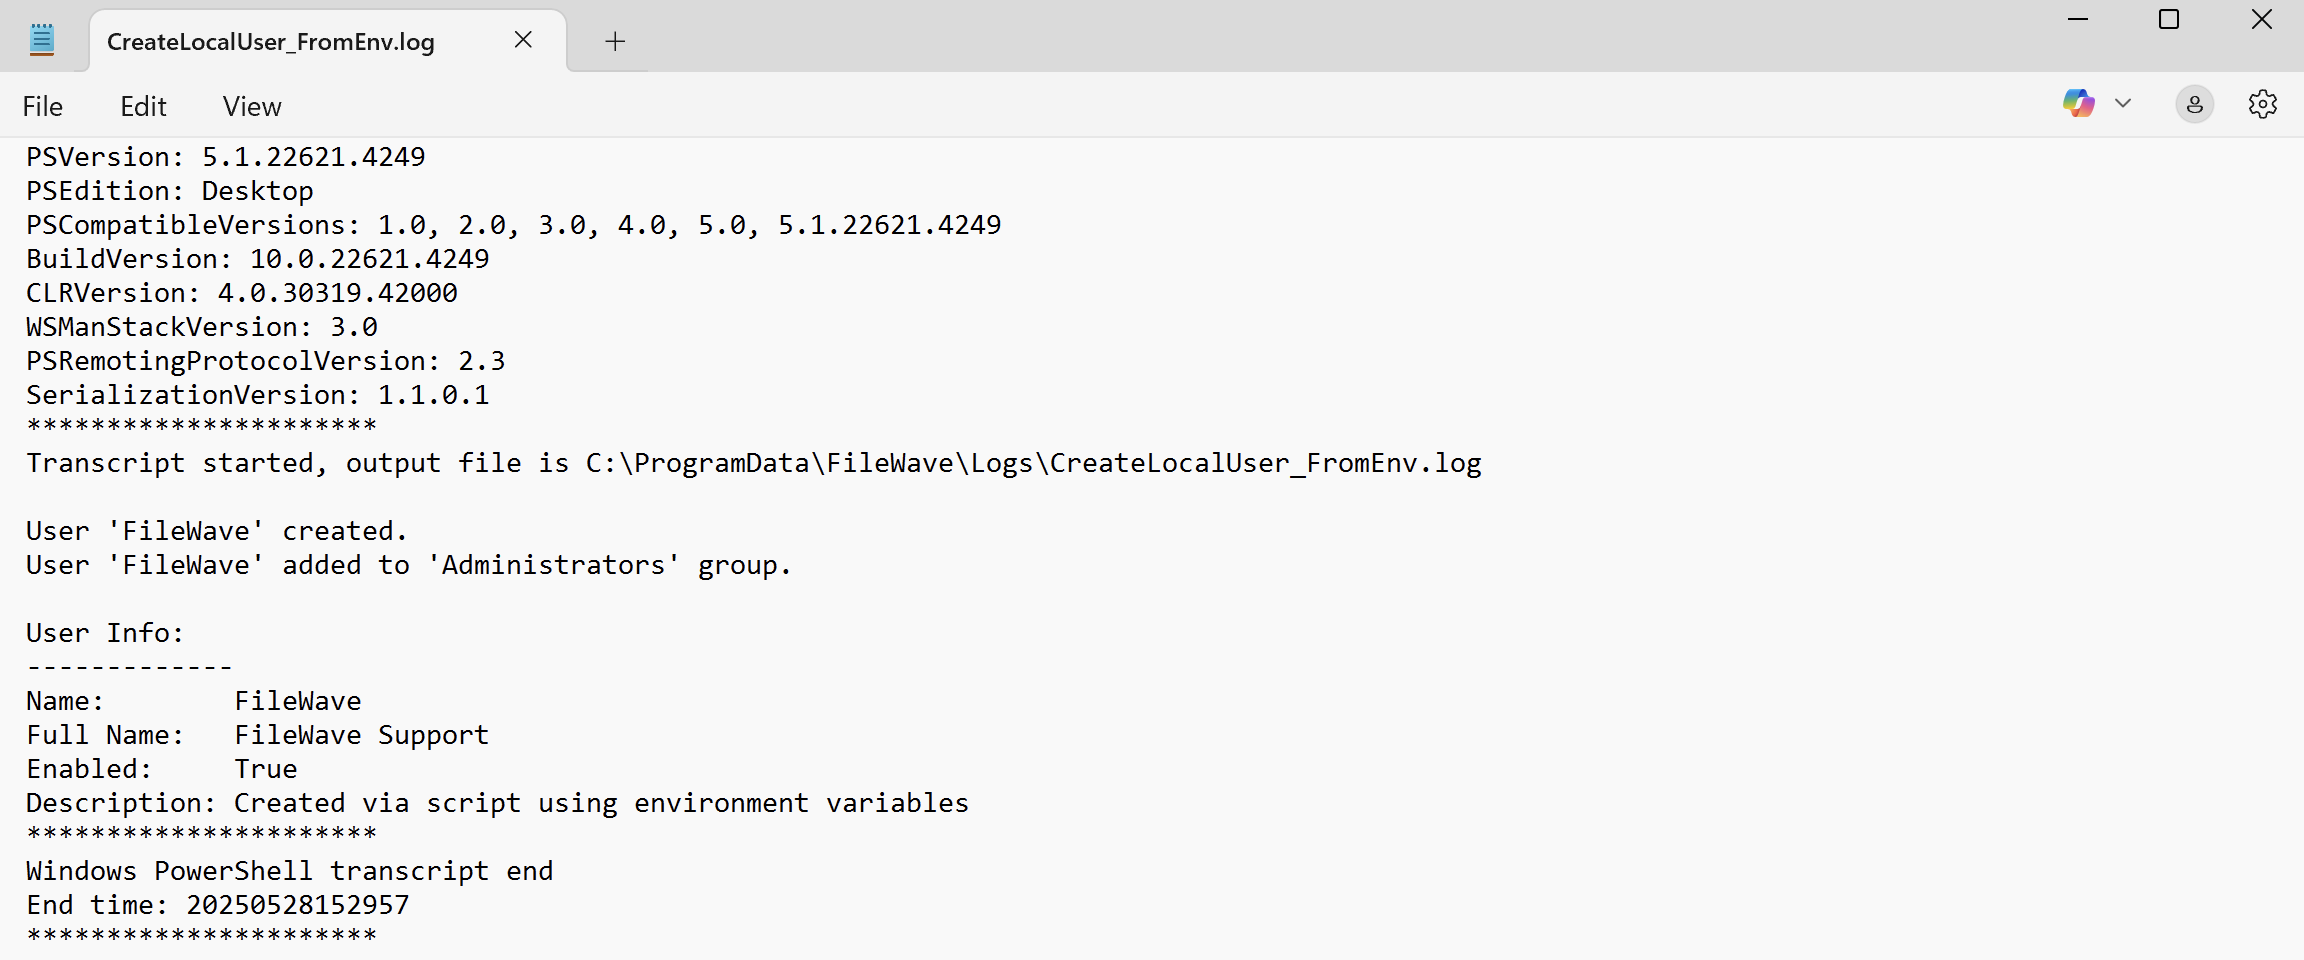
The remove_admin script log will be labeled: RemoveLocalUser_FullCleanup.log
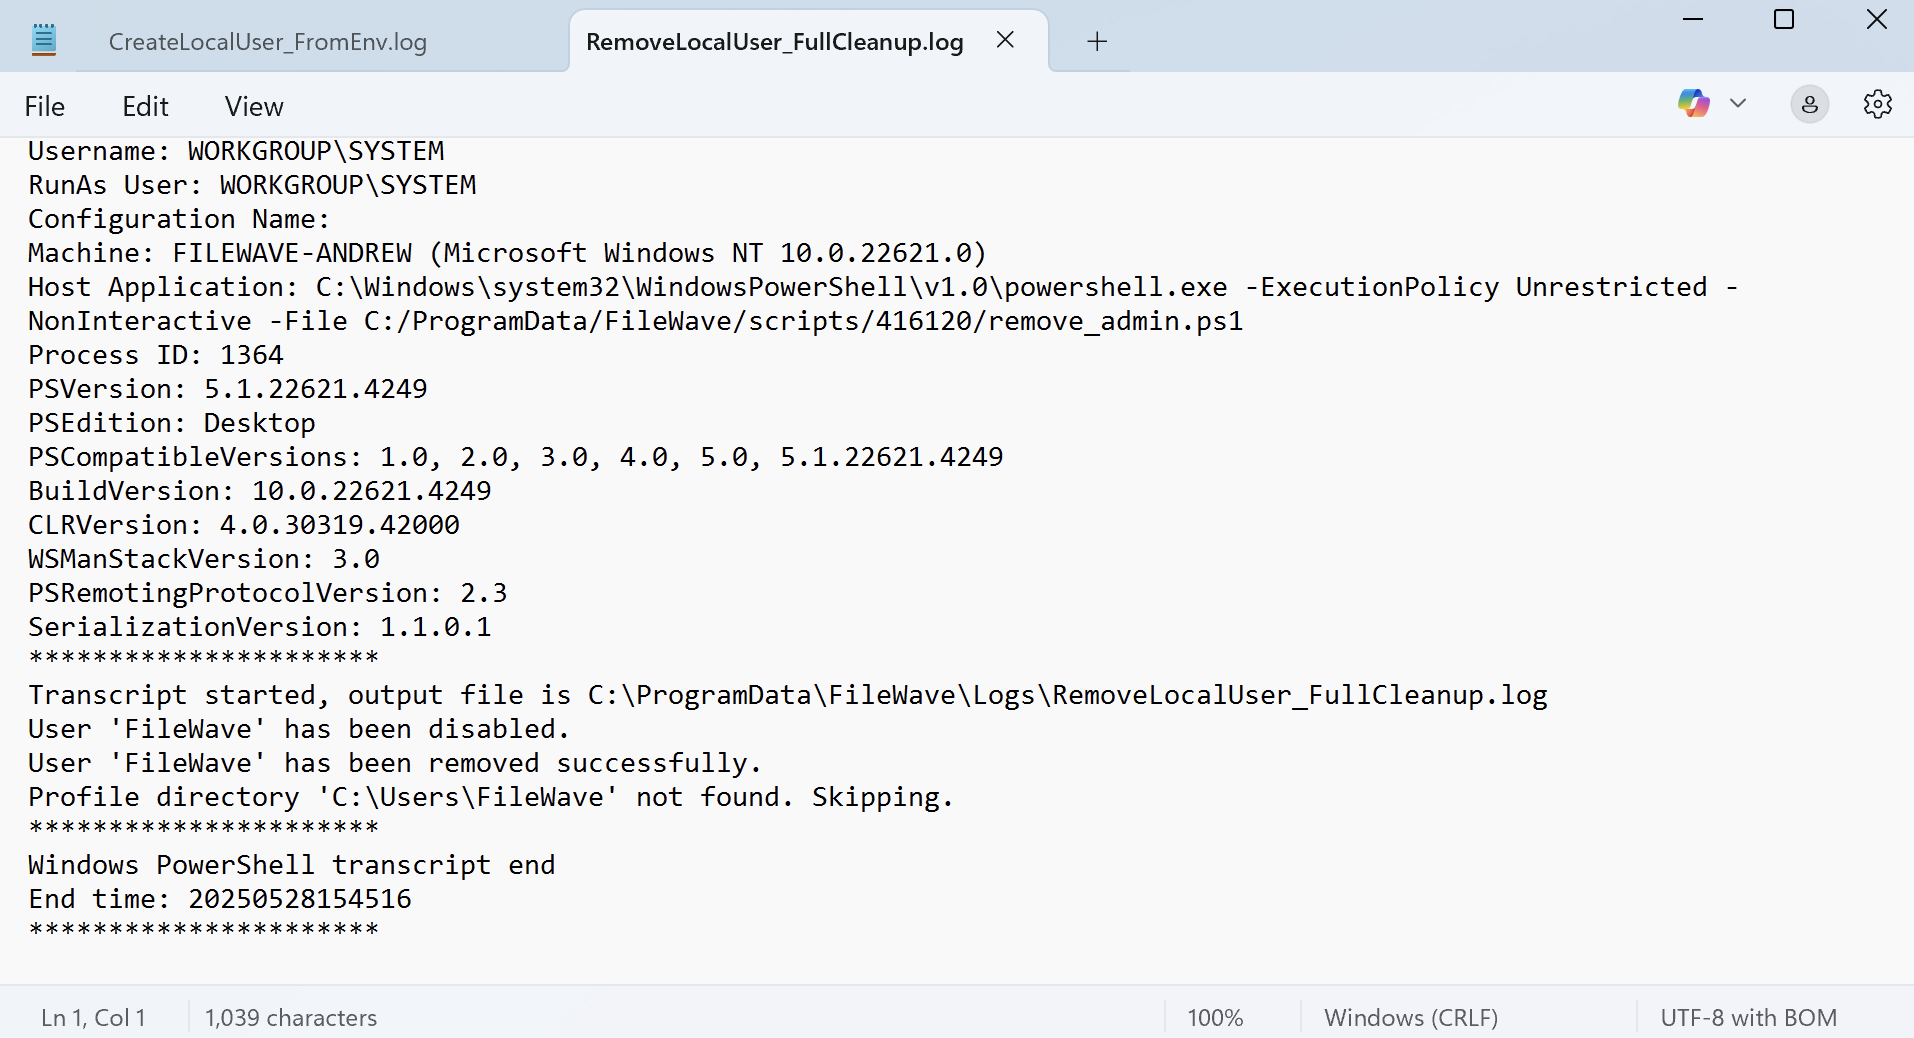
The create admin script will skip if there is an username already exists.
Related Content
Deploy SSL Certificates (Windows)
Deploy SSL certificates to Windows "Trusted Root Certification Authorities" certificate store for use in secure services such as web content filters.
Step-by-step guide
- Download, unzip, and import the following Fileset Template into FileWave Central - Windows - Install SSL Certificate.fileset.zip
- Import the desired SSL certificate into the Fileset's "\temp\ssl\" directory and delete "placeholder.pem".

- Select the "install_ssl.bat" file, click "Edit Text", and replace "placeholder.pem" with the full file name of the newly uploaded certificate.

This script will add the desired SSL certificate to the Windows "Trusted Root Certification Authorities" certificate store for both the Local Machine (-enterprise) and the Current User (-user).
- Associate and deploy the Fileset to a test machine and verify the installation on the Windows machine.
- Open "certlm.msc" for the Local Machine (-enterprise) Certificate Store or "certmgr.msc" for the Current User (-user) Certificate Store via Windows Run dialog (Win + R) or Command Prompt.
- Navigate to "Trusted Root Certification Authorities>Certificates" and verify the name of the newly added certificate.


Additional Information
More information and options for the "certutil" program can be found on Microsoft Docs.
Related articles
Installing Windows Fonts
Description
Installing a Windows font requires more than copying the font file into C:\Windows\Fonts. Windows also needs the matching registry entries. This Fileset installs TrueType fonts by copying the prepared font files into place and registering each one.
Supported font type
This Fileset was tested with TrueType (.ttf) fonts on Windows 10 Pro 1803 and 1903. Test the edited Fileset on your current Windows build before broad deployment.
Registry Editing
This Fileset edits the Windows registry. Follow the setup steps carefully so only the font files you intend to deploy exist in the suggested folder.
Information
Download and import the Fileset, then replace the placeholder with the fonts you want to deploy.
Windows Instal Fonts.fileset.zip
Description
The Fileset consists of:
- An activation script
- A folder for the font files, with a placeholder file

Adding Fonts
- Select the font files in macOS Finder or Windows Explorer.
- Drag them into the Fileset folder Windows > Temp > Fonts.
- Select the Fonts folder in the Fileset, choose Get Info > Verification, then set Ignore At Verify and Apply to Enclosed.
- Remove the
placeholder.removefile.
Example, Montserrat font:

Deployment
On association and activation, the script will:
- Copy all files from
C:\Windows\Temp\FontstoC:\Windows\Fontsif they do not already exist. - Create a registry entry for each copied file if one does not already exist.
- Remove each file from the temporary directory:
C:\Windows\Temp\Fonts.
Changing Temporary Folder
To use a different temporary folder:
- Drag the fonts to the desired location in the Fileset.
- Change the launch argument to match: InstalFonts.ps1 > Get Info > Executable.

Test on a small group of appropriate Windows devices before deploying broadly.
Local Group Policy Object Utility (Windows EXE)
What
LGPO.exe is Microsoft’s Local Group Policy Object utility. It lets administrators import, export, and apply local Windows Group Policy settings from the command line. This can be useful when deploying security baselines or local policy settings to Windows devices that are not managed through Active Directory Group Policy.
When/Why
LGPO.exe can help apply required local policy settings to Windows devices so they meet your organization’s security and compliance requirements.
Features:
- Import settings into local group policy from GPO backups or from individual policy component files, including Registry Policy (registry.pol), security templates, and advanced auditing CSV files.
- Export local policy to a GPO backup.
- Parse a Registry Policy (
registry.pol) file into readable “LGPO text.” The output can be redirected to a file, edited, and imported back into local policy. - Build a new Registry Policy (registry.pol) file from "LGPO text".
- Enable group policy client-side extensions for local policy processing.
Before you begin
- Test LGPO changes on a non-production device first.
- Run LGPO.exe with administrator privileges.
- Back up the current local policy before applying new settings.
- Policy changes may affect security, login behavior, Windows Update behavior, browser settings, or other system behavior depending on the imported policy.
- Some changes may require
gpupdate /force, a sign-out/sign-in, or a reboot.
Example: Deploy LGPO.exe with FileWave
- Download LGPO.zip.
- Add the required policy files to the same Fileset, such as:
registry.polGptTmpl.infAudit.csvlgpo.txt
- Create a Windows script in the Fileset.
- Use the LGPO command that matches the policy file you are deploying, for example:
LGPO.exe /m "%~dp0registry.pol" /v gpupdate /force - Associate the Fileset with a test device first.
- After validation, deploy to the intended device group.
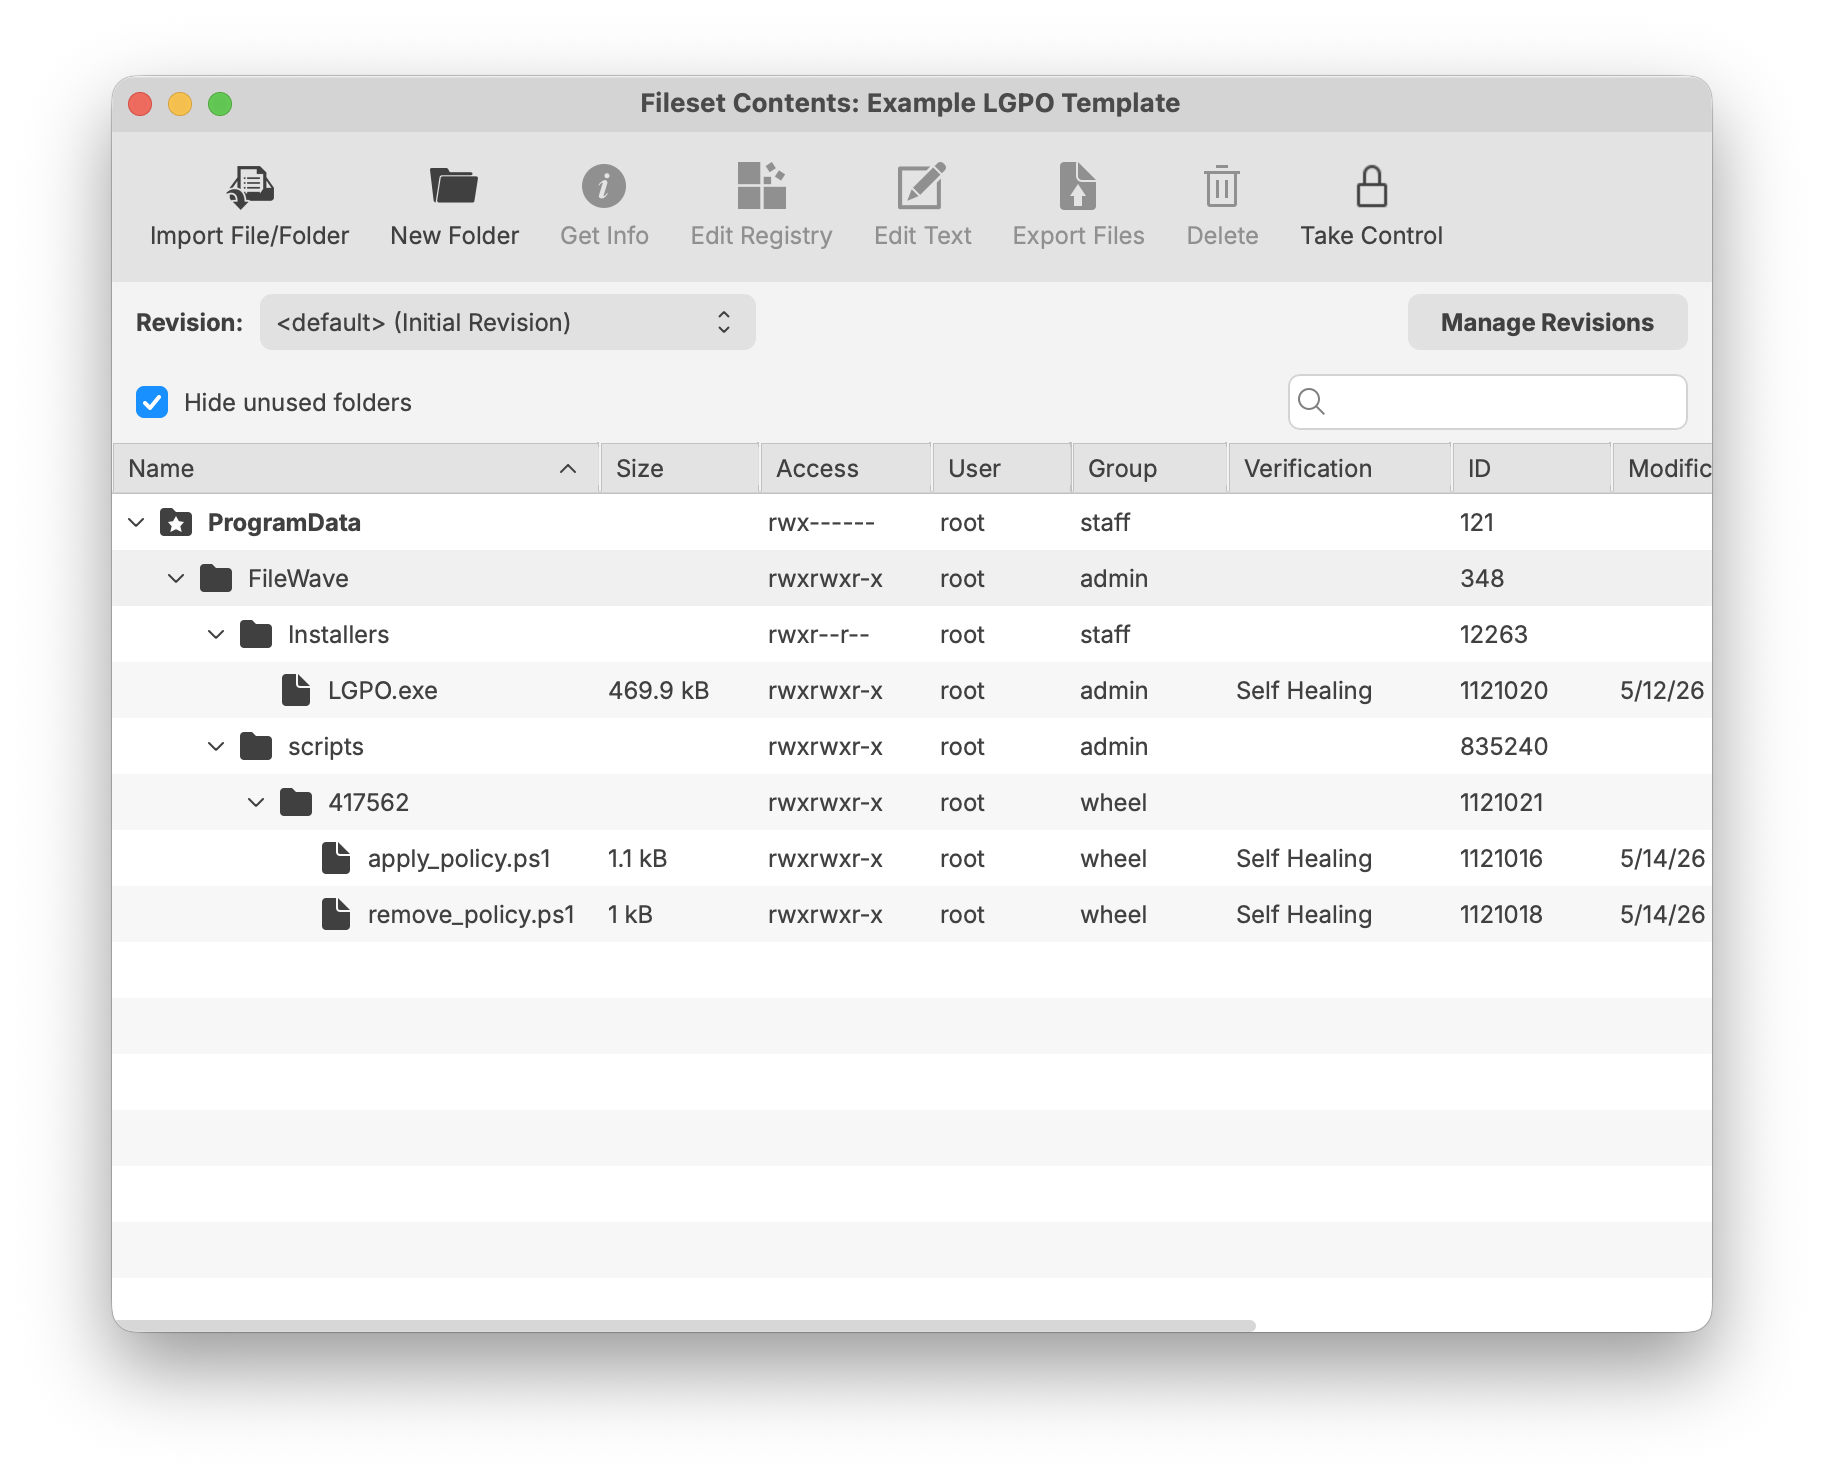
LGPO Policy Example Template
Example Template Fileset:
Use the template variable examples below to apply or remove one Windows local policy value.
You only need to set a few environment variables:
- apply_policy.ps1 applies the policy.
- remove_policy.ps1 removes the policy value.
Example Fileset Contents
Example contents: LGPO.exe, apply_policy.ps1, and remove_policy.ps1. GeneratedPolicy.txt is created by the script at runtime.
Required Variables
FW_POLICY_TYPE and FW_POLICY_DATA are required when applying a policy. They are not required when removing a policy.
| Variable | Example | Notes |
|---|---|---|
| FW_POLICY_KEY | Software\Policies\Microsoft\Windows\Installer | Registry policy path. You may also use a full HKLM:\... path. |
| FW_POLICY_VALUE | DisableMSI | Registry value name. |
| FW_POLICY_TYPE | DWORD | Required for apply. Common values: DWORD, SZ, QWORD, EXPAND_SZ, MULTI_SZ. |
| FW_POLICY_DATA | 2 | Required for apply. |
Optional Variables
For User policies, include LGPO.exe and use LGPO text import. Direct registry fallback is intended for Computer policies because FileWave often runs scripts as LocalSystem.
| Variable | Default | Notes |
|---|---|---|
| FW_POLICY_SCOPE | Computer | Use Computer for HKLM policy or User for HKCU policy. |
| FW_LGPO_EXE | .\LGPO.exe | Custom path to LGPO.exe. |
| FW_LGPO_TEXT_PATH | .\GeneratedPolicy.txt | Where the generated LGPO text file is written. |
| FW_RUN_GPUPDATE | true | Runs gpupdate.exe /force. |
| FW_DIRECT_REGISTRY_FALLBACK | true | Directly writes simple Computer policies if enabled. |
Example: Disable Windows Installer
$env:FW_POLICY_KEY = "Software\Policies\Microsoft\Windows\Installer"
$env:FW_POLICY_VALUE = "DisableMSI"
$env:FW_POLICY_TYPE = "DWORD"
$env:FW_POLICY_DATA = "2"
.\apply_policy.ps1$env:FW_POLICY_KEY = "Software\Policies\Microsoft\Windows\Installer"
$env:FW_POLICY_VALUE = "DisableMSI"
.\remove_policy.ps1The attached zip contains LGPO.exe, Microsoft’s Local Group Policy Object utility: LGPO.zip
| Goal | Recommended Command |
| Apply LGPO text policy | LGPO.exe /t path\lgpo.txt |
| Apply a full GPO backup | LGPO.exe /g path |
| Apply machine policy settings | LGPO.exe /m path\registry.pol |
| Apply user policy settings | LGPO.exe /u path\registry.pol |
| Apply a security template | LGPO.exe /s path\GptTmpl.inf |
| Apply advanced audit settings | LGPO.exe /a path\Audit.csv |
| Export current local policy | LGPO.exe /b path [/n GPO-name] |
| Convert Registry.pol to readable text | LGPO.exe /parse /m path\registry.pol |
| Build Registry.pol from LGPO text | LGPO.exe /r path\lgpo.txt /w path\registry.pol |
LGPO.exe has four modes:
- Import and apply policy settings;
- Export local policy to a GPO backup;
- Parse a registry.pol file to "LGPO text" format;
- Build a registry.pol file from "LGPO text".
To apply policy settings, use one or more of the following LGPO.exe options. Each option can be repeated as needed:
/g path import settings from one or more GPO backups under "path"
/m path\registry.pol import settings from registry.pol into machine config
/u path\registry.pol import settings from registry.pol into user config
/s path\GptTmpl.inf apply security template
/a[c] path\Audit.csv apply advanced auditing settings; /ac to clear policy first
/t path\lgpo.txt apply registry commands from LGPO text
/e <name>|<guid> enable GP extension for local policy processing; specify a GUID, or one of these names:
** "zone" for IE zone mapping extension
** "mitigation" for mitigation options, including font blocking
** "audit" for advanced audit policy configuration
/boot reboot after applying policies
/v verbose output
/q quiet output (no headers)To create a GPO backup from local policy:
LGPO.exe /b path [/n GPO-name]
/b path Create GPO backup in "path"
/n GPO-name Optional GPO display name (use quotes if it contains spaces)To parse a Registry.pol file to LGPO text (stdout):
LGPO.exe /parse [/q] {/m|/u} path\registry.pol
/m path\registry.pol parse registry.pol as machine config commands
/u path\registry.pol parse registry.pol as user config commands
/q quiet output (no headers)To build a Registry.pol file from LGPO text:
LGPO.exe /r path\lgpo.txt /w path\registry.pol [/v]
/r path\lgpo.txt Read input from LGPO text file
/w path\registry.pol Write new registry.pol fileValidate the policy
After deployment, you can validate the result on the Windows device using one or more of the following:
gpupdate /force
gpresult /h C:\Temp\gpresult.html /fYou can also review the relevant local policy settings using the Local Group Policy Editor, where applicable.
Troubleshooting
- Confirm the script is running as administrator or LocalSystem.
- Confirm paths are correct. When deploying through FileWave, use paths relative to the script location when possible.
- Use
/vfor verbose output during testing. - Check whether the policy is machine-based or user-based before choosing
/mor/u. - Reboot the device if the policy requires it.
- Test rollback or backup procedures before broad deployment.
Related Content
Digging Deeper
Rename Windows Hostname based FileWave Client Name
Description
This Fileset renames a Windows computer so its Windows hostname matches the FileWave Client Name shown in FileWave Admin.
With this Fileset associated, the FileWave Client Name becomes the source of truth. If the Windows hostname is changed directly in Windows, Active Directory, or another tool, the Fileset changes it back to the FileWave Client Name the next time the rename workflow runs.
Use a FileWave Client Name that follows the Windows computer naming conventions. Avoid spaces, underscores, apostrophes, and names longer than the NetBIOS limit. There is no name-checking logic in these scripts.
Good name examples:
- FILEWAVE-PC
- TCE-3453234
- PRINT-SRV
Bad name examples:
- Jerry's Desktop Computer
- GO_BEARS!
- THISNAMEISMUCHLONGERTHAN15CHARACTERS
Ingredients
- FileWave Client for Windows
- Windows - Rename Windows Hostname (No Domain) PowerShell.fileset.zip
- Windows - Rename Windows Hostname (Domain Joined) PowerShell.fileset.zip
Older batch-file versions are still attached for reference, but the PowerShell Filesets are the current examples to start from:
- Windows - Rename Windows Hostname (No Domain).fileset.zip
- Windows - Rename Windows Hostname (Domain Joined).fileset.zip
Machines not joined to Active Directory
- Download, unzip, and import the Windows - Rename Windows Hostname (No Domain) PowerShell Fileset into FileWave Admin.
- Associate the Fileset with the Windows devices that should follow their FileWave Client Name.
- Rename the device in FileWave Admin.
- Update Model.
- Wait for the client to check in and run the Fileset. The included workflow is designed around the normal FileWave preflight/tickle timing.
- The user receives a reboot prompt, and the device reboots after the configured timeout.
- The Windows hostname is changed to the FileWave Client Name after reboot.
- FileWave Client communication is not affected by the rename.
Machines joined to Active Directory
- Download, unzip, and import the Windows - Rename Windows Hostname (Domain Joined) PowerShell Fileset into FileWave Admin.
- Review the included scripts before deployment and update the domain account placeholders for your environment.
- Test with a small group first. Domain-joined renames depend on Active Directory permissions, DNS/domain health, and the reboot completing successfully.
- Associate the Fileset with the Windows devices that should follow their FileWave Client Name.
- Rename the device in FileWave Admin.
- Update Model.
- Wait for the client to check in and run the Fileset.
- The user receives a reboot prompt, and the device reboots after the configured timeout.
- The Windows hostname is changed to the FileWave Client Name after reboot.
- FileWave Client communication is not affected by the rename.
Customize the reboot prompt or timeout
The current PowerShell Filesets include the reboot prompt and timeout in the imported script. Review that line before broad deployment if you want a different delay or message.
For the older batch-file Filesets, the same behavior is controlled by this shutdown command:
%windir%\System32\shutdown.exe /r /t 60 /c "Computer renamed to %fwClientName%. Rebooting in 60 seconds." /f /d p:4:1Change the /t 60 value for the timeout in seconds, and update the text after /c if you want the user prompt to say something different.
Sync Computer Name
When a client is manually renamed in FileWave Admin, FileWave disables Sync Computer Name for that client. That allows the Fileset to apply the FileWave Client Name to Windows instead of having Windows immediately sync its old computer name back into FileWave.
Store BitLocker Recovery Keys in a FileWave Custom Field
This recipe uses a FileWave Custom Field client script to report the BitLocker recovery key for each protected Windows volume. Use it when you do not already escrow recovery keys in Microsoft Entra ID or another approved system. Recovery keys are sensitive, so restrict access to the Custom Field and any reports that display its values.
Import the Custom Field
- Download BitLocker Key Custom Field.customfields.
- In FileWave Central, open Assistants > Custom Fields > Edit Custom Fields > Import, then select the downloaded file.
- Save the changes in the Custom Fields dialog.

Here is the script from the Custom Field:
# FileWave client will execute this script. The output will be used as the value of the custom field.
#
# Below is an example of how to read the value of one ENVIRONMENT VARIABLE in your script:
# $my_var = $Env:ENV_VAR_NAME
#
# Identify all the Bitlocker volumes.
$BitlockerVolumers = Get-BitLockerVolume
# For each volume, get the RecoveryPassowrd and display it.
$BitlockerVolumers |
ForEach-Object {
$MountPoint = $_.MountPoint
$RecoveryKey = [string]($_.KeyProtector).RecoveryPassword
if ($RecoveryKey.Length -gt 5) {
Write-Output ("$MountPoint,$RecoveryKey")
}
}
exit 0Assign the Custom Field to devices
- Start with a small set of Windows devices. In Clients, right-click a target device and select Edit Custom Field(s) Associations.
- Enable the imported BitLocker Custom Field and wait for fresh inventory before checking the result.
- For a wider rollout, associate it with a Smart Group whose criterion is Client OS Platform [equals] Windows. You can also select Assigned to all Devices in the Custom Field definition because only Windows devices run this client script.
Check the results
The value reports each mount point and recovery key as a comma-separated pair. Confirm that every expected encrypted volume appears on the pilot devices before assigning the field more broadly.

Related articles
Upgrade Windows 10 and 11
Description
Although Software Updates are available as standard catalogue, Feature Updates are not. The following method may be used to update Windows devices using Feature Updates, e.g. 1909, 21H1. Last tested upgrading 20H2 to 21H1
Ingredients
- Latest Windows 10 ISO or Windows 11 ISO – If downloading from a Windows 10 device, please use the steps linked here to access the appropriate ISO download page.
- Following Fileset Recipe:
| ↓ Windows |
|---|
| Windows - Feature Upgrade.fileset.zip |
Directions
Test manually launching the ISO on one or more typical example machines. Not only will this provide an idea of how long the update may take, but the installer may highlight additional criteria required when pushing the Fileset. Depending upon setup and desired options, differing arguments can be supplied to the Fileset to meet requirements.
Microsoft may change these options with differing versions. For example, there is a new argument /EULA which has been introduced for Windows 11, whilst the /DynamicUpdate argument has additional options available since Windows 10, 2004.
Examples could include Dynamic Updates or Compatibility (which have been included in the provided Fileset)
Dynamic Updates (DynamicUpdate):

Compatibility (Compat):

Defining Dynamic Updates is optional (Microsoft default values will be applied if not supplied), but where warnings are received, if Compatibility is not defined, the Fileset will fail to instal the update.
- Upload the provided Fileset using FileWave Admin
- Upload the downloaded ISO into the same folder as the Placeholder within the Fileset; approximately 5GB in size. (The .placeholder_windows_iso file may be removed). Ensure the ISO has the same name as the below screenshot: 'Windows_Upgrade.iso"

- Select "FeatureUpgrade.ps1" from the Fileset contents and click "Get Info" from the top menu bar.

- Select the "Executable" tab within the "Get Info" window.

- Modify the "Launch Arguments" as desired and click "Apply" to save changes. Remove any unwanted or add any additional arguments from Microsoft's above KB. Please consider the following:
- Launch Arguments as a bare minimum:
- /auto upgrade
- /quiet
- Launch Arguments for Windows 11:
-
/auto upgrade
- /quiet
- /noreboot
- /eula accept
- /dynamicupdate disable
- /copylogs C:\Temp\win11upgradelogs
-
- IMPORTANT NOTE: Compat mode will be required if warnings prevent the installer from completing.
More details on Windows 11 Launch Arguments here: Windows 11 Setup Command Line Options
- Launch Arguments as a bare minimum:
- Associate Fileset to machines and wait patiently for the upgrade to complete.
Testing
When testing, consider disabling the Reboot option in the Fileset properties, such that the Windows interface is still available during the initial process of the upgrade. Windows Task Manager will show "Modern Host Setup" process whilst upgrade is in progress.
Timings will vary depending upon chosen options, device usage and network bandwidth. It could take 30-40 minutes or more before the device shows the Windows Update blue screen; as the update prepares the device and other possible updates. It should also be expected that the device may reboot multiple times.
It could also be possible to have the ISO available via a network mount and adapt the script to mount the shared ISO rather than pushing the ISO via FileWave.
User Experience
Due to the nature of how Microsoft Feature Updates work, there can be a substantial amount of time between the launch of the update and the device continuing to the Blue Updates Screen. Where the Reboot option is selected for the Fileset, this wait will not commence util the user accepts the update. As such the FileWave user prompt may be on the screen for a lengthy period of time. If the reboot option is not selected, although the user will not be impacted by this preliminary stage of the Feature Upgrade, once completed, the user will suddenly be dropped out of their user session, without warning, for the installation and reboots to take place.
Notify Users with a dialog (Windows)
Description
Use this Windows Fileset when you want FileWave to show users a notification while Filesets download, install, or finish activating. The example monitors the FileWave Client log and raises Windows Notification Center messages when the configured text patterns appear.

The Fileset is designed to:
- Create a Windows service that monitors Fileset changes
- When a Fileset changes, begin monitoring the FileWave Client log file
- When configured text strings appear in the log file, send a notification to Windows Notification Center
- Stop monitoring when the configured completion text appears
The service starts automatically when the user logs in. If the Fileset is disassociated, its pre-uninstallation script removes the service so the watcher does not keep running.
Ingredients
- Provided Fileset:
|
↓ Windows |
|
|

Directions
For the example provided:
- Download the necessary provided Fileset
- Upload it in FileWave Central
- Associate to the appropriate devices
- Update the model.
You can adjust the Fileset scripts for your environment. The local Windows service runs the script and uses pattern matching against the FileWave Client log. Add or remove patterns to control which client events trigger a user notification.
Windows
Locate the "BallonTipSwitchWatcher.ps1" file within the Fileset and choose to edit. In the following code block snippet from this script, the switch statement is pattern matching text. In the provided example the script is looking for lines that contain any one of the following:
- Model version
- Downloading Fileset
- Done activating
- Activate all
Where found, the 'ShowBalloonTipInfo' function is being used to prompt the user:
BallonTipSwitchWatcher.ps1
$changeAction = Get-Content C:\ProgramData\FileWave\FWClient\fwcld.log -tail 1 -wait | ForEach-Object {
switch($_) {
{ $_ -match "Model version" -or $_ -match "Downloading Fileset" -or $_ -match "Done activating" -or $_ -match "Activate all" } { ShowBalloonTipInfo ("FileWave: ",$_.split("|")[4]) }
The second part of the switch statement is causing the script to exit. The pattern match this time, is any line that contains:
- Installation
BallonTipSwitchWatcher.ps1
{ $_ -match "Installation" } { break }Notes
This example uses a Windows service to notify users about Fileset activity. You can adapt the same pattern for other user messages or different points in the deployment workflow.
Related Content
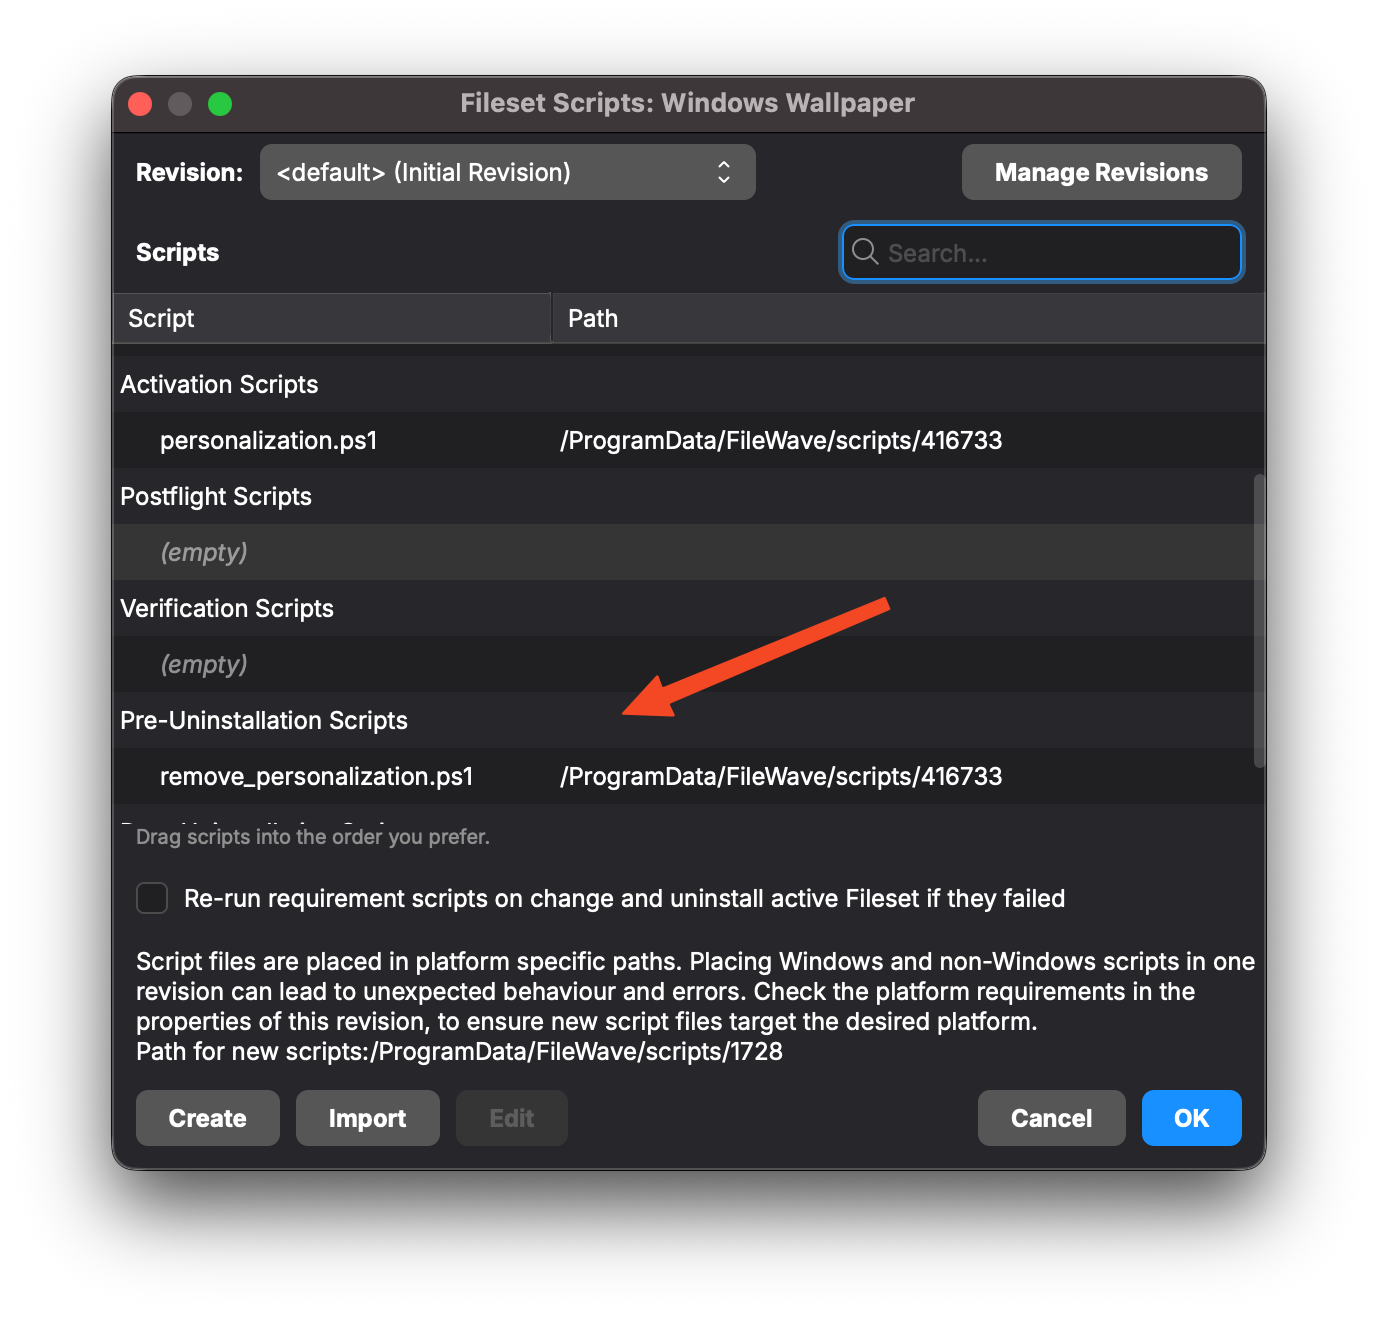
Windows Wallpaper via CSP Personalization
Description
This article explains how to enforce and remove a desktop and/or lock screen wallpaper on Windows 10 and Windows 11 devices using the MDM Personalization CSP through PowerShell. These scripts leverage the WMI Bridge Provider, allowing configuration at the device level via FileWave without requiring Active Directory Group Policy.
Two PowerShell scripts are provided:
-
Wallpaper Deployment Script: Applies a desktop and/or lock screen image.
-
Wallpaper Removal Script: Removes the applied configuration, returning wallpaper control to the end user.
These scripts are designed for deployment through FileWave as a Custom Fileset and run under the SYSTEM account to ensure MDM Bridge access. This is provided for those who don't use Windows MDM but want to still push a CSP.
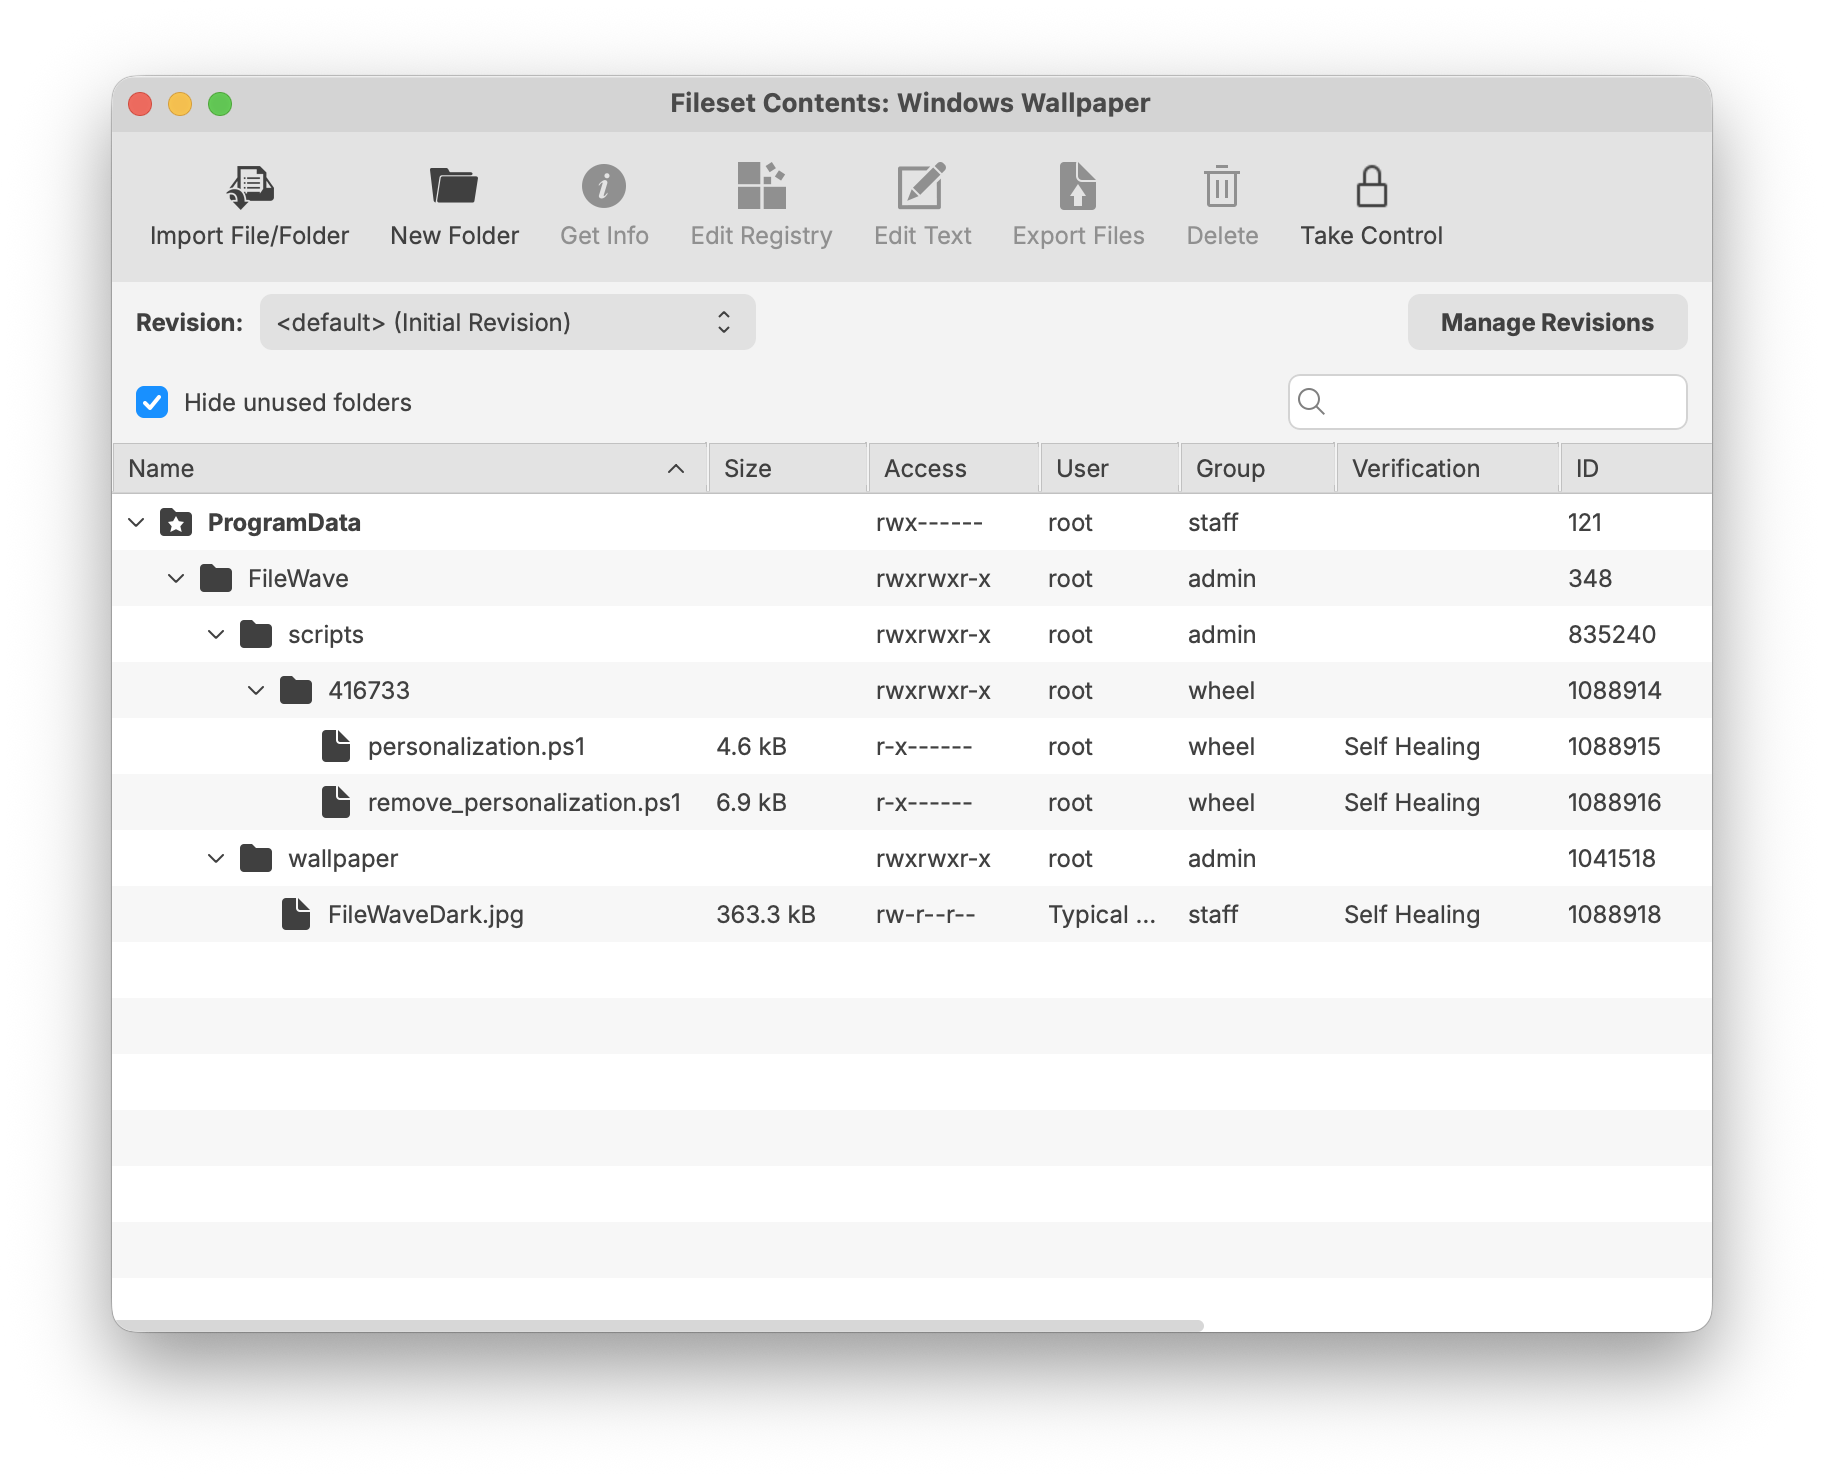
Ingredients
- FileWave Central
-
Windows 10/11 Enterprise or Education (Pro supported only if SharedPC Edu Policies are applied)
-
SYSTEM-level PowerShell execution (default for FileWave scripts but important for testing outside of FileWave)
-
Custom wallpaper image(s) deployed via FileWave
| Example Wallpaper Fileset |
 |
Directions
Configure the Wallpaper Deployment script
-
-
In FileWave Central, import the attached Fileset, and we will use it for this example.
-
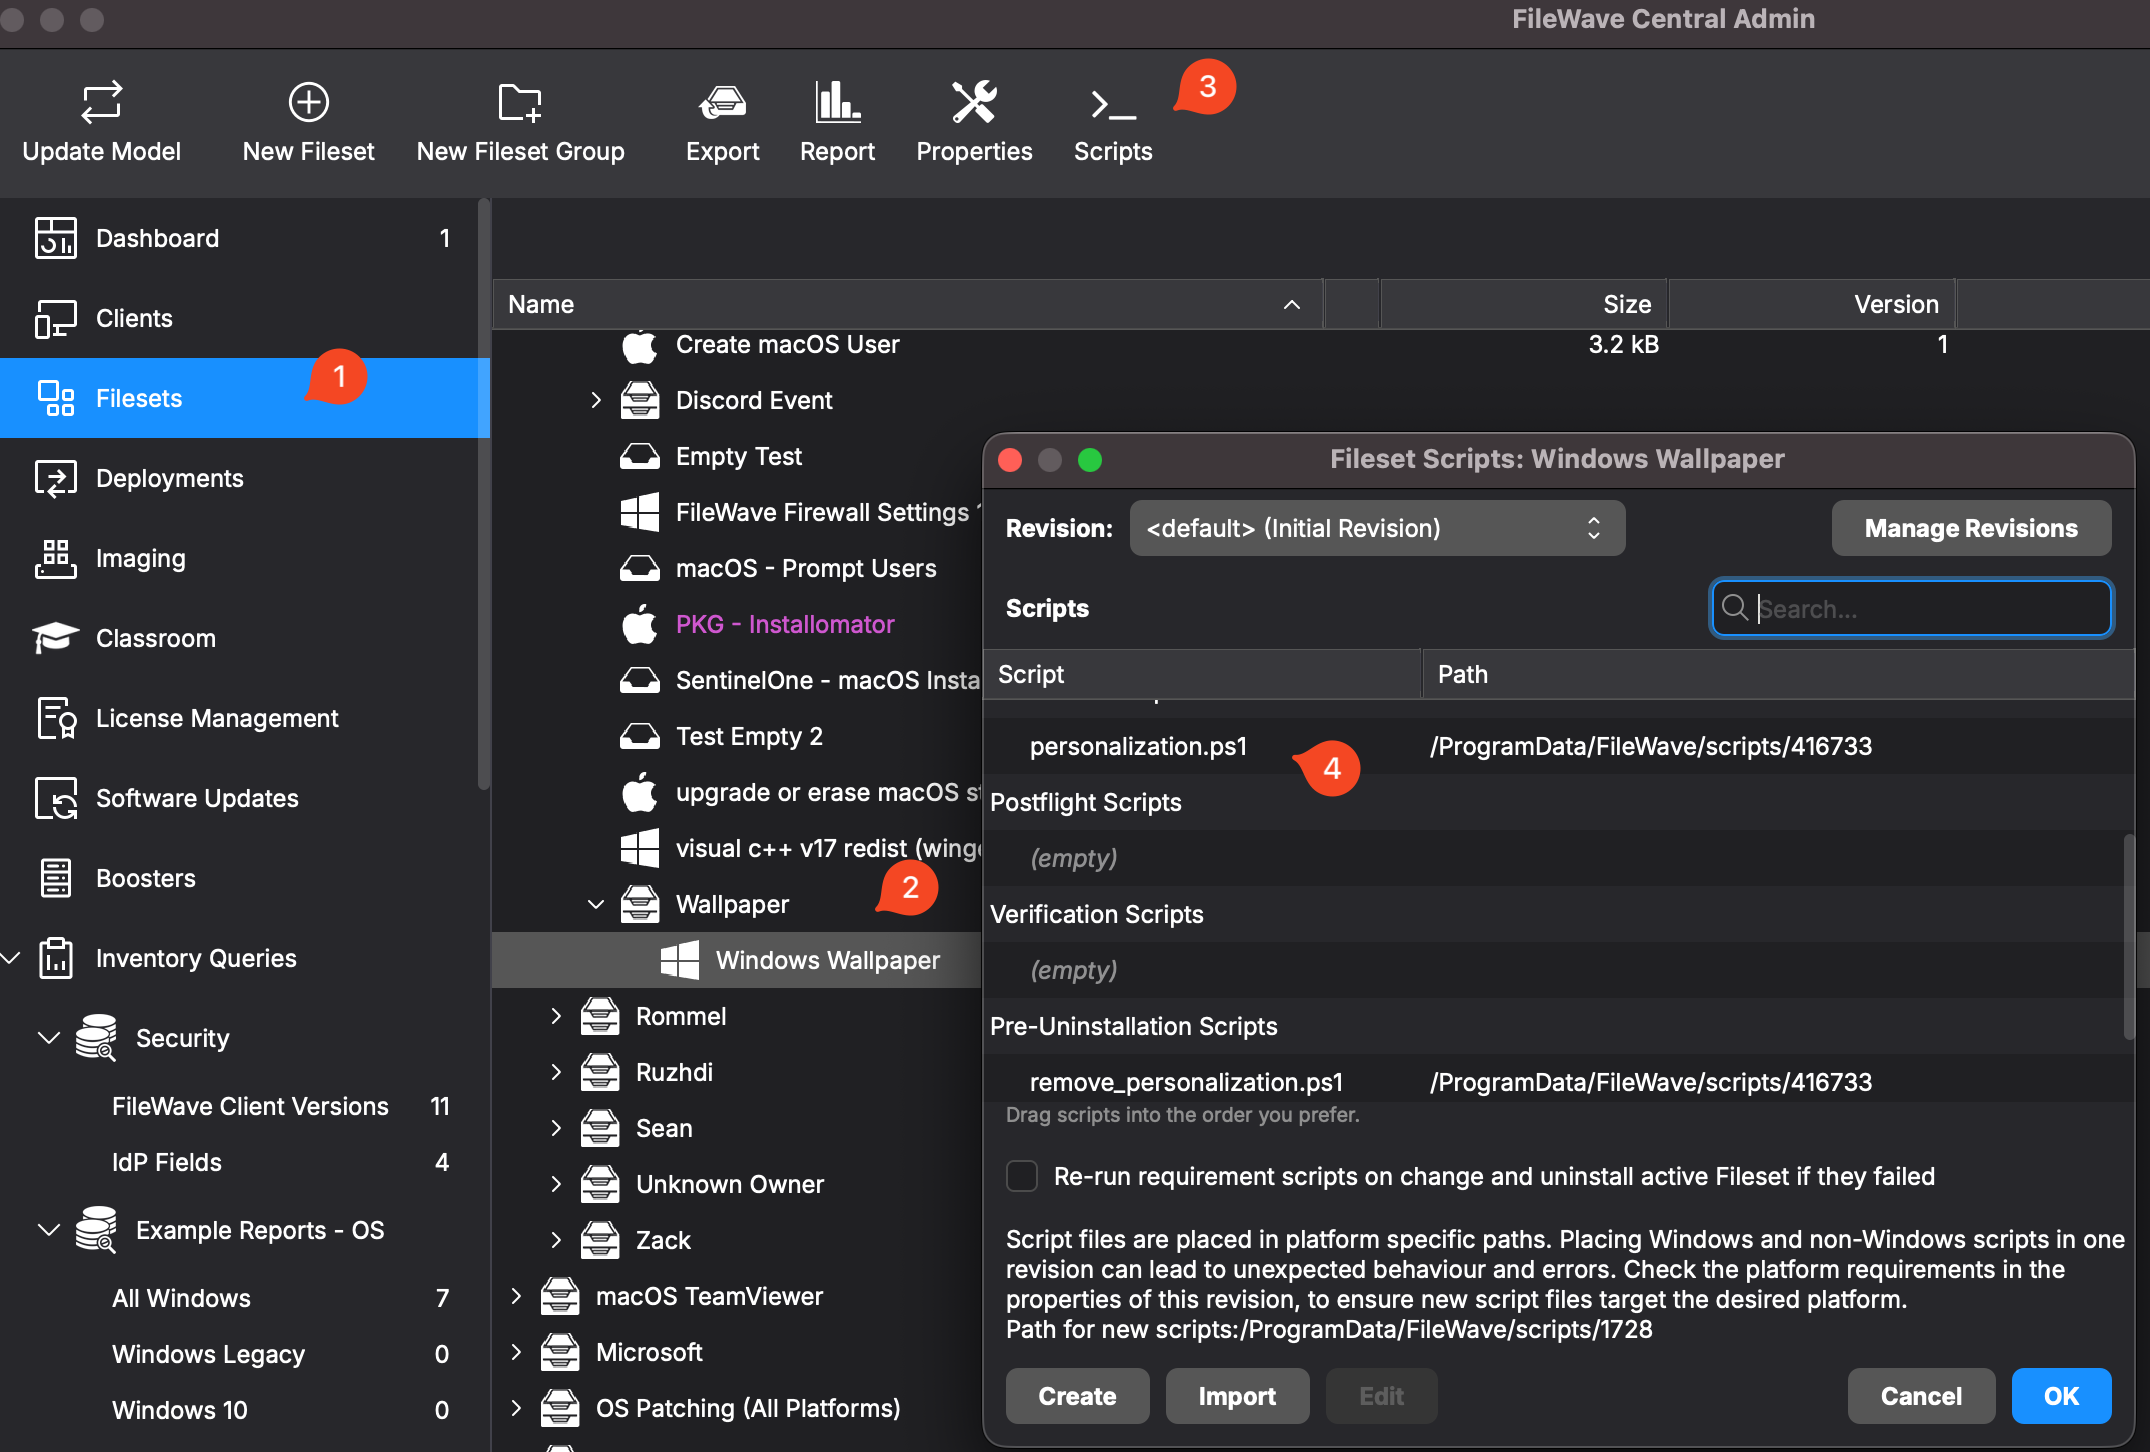
Use the example Windows Fileset to edit the PowerShell Activation Script. (
Filesets -> Select Fileset -> Scripts -> Select the script -> Right Click -> Properties)
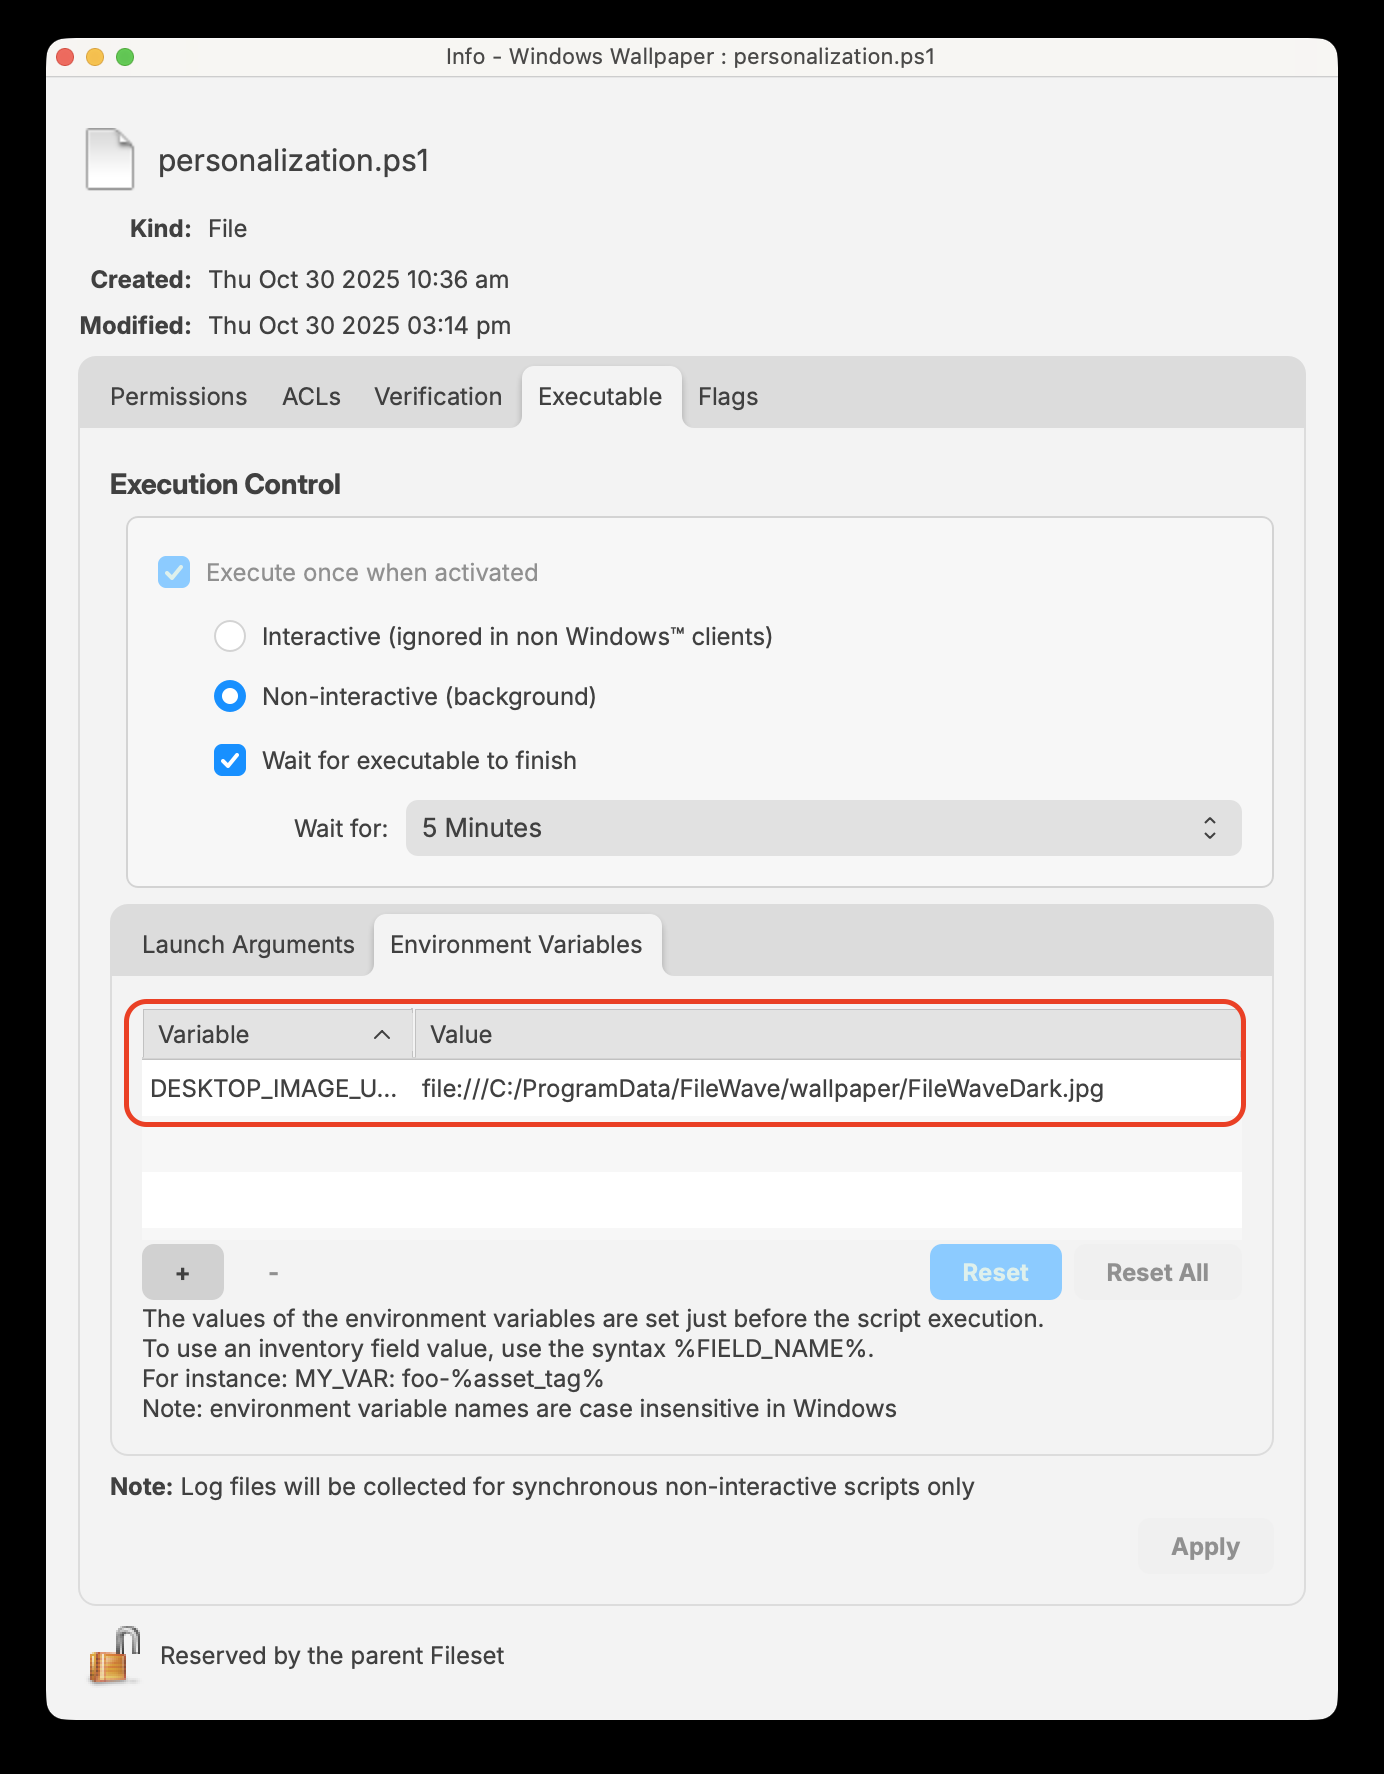
-
Configure Environment Variables on the Executable tab of properties for the script:
-
DESKTOP_IMAGE_URL=file:///C:/ProgramData/FileWave/wallpaper/FileWaveDark.jpg -
(Optional)
LOCKSCREEN_IMAGE_URL= same or alternate image URI
NOTE: The files should either already exist, or you should include them in the Fileset
-
-
Associate the Fileset.

-
Deploy the wallpaper; verify in logs, example output:
-
[2025-10-30T16:20:32] [INFO] Normalized DesktopImageUrl -> file:///C:/ProgramData/FileWave/wallpaper/FileWaveDark.jpg
[2025-10-30T16:20:33] [INFO] Setting DesktopImageUrl: file:///C:/ProgramData/FileWave/wallpaper/FileWaveDark.jpg
[2025-10-30T16:20:33] [INFO] CSP values committed via WMI Bridge.
[2025-10-30T16:20:43] [INFO] DesktopImageStatus=1 (Success)
[2025-10-30T16:20:43] [INFO] Wallpaper configuration completed.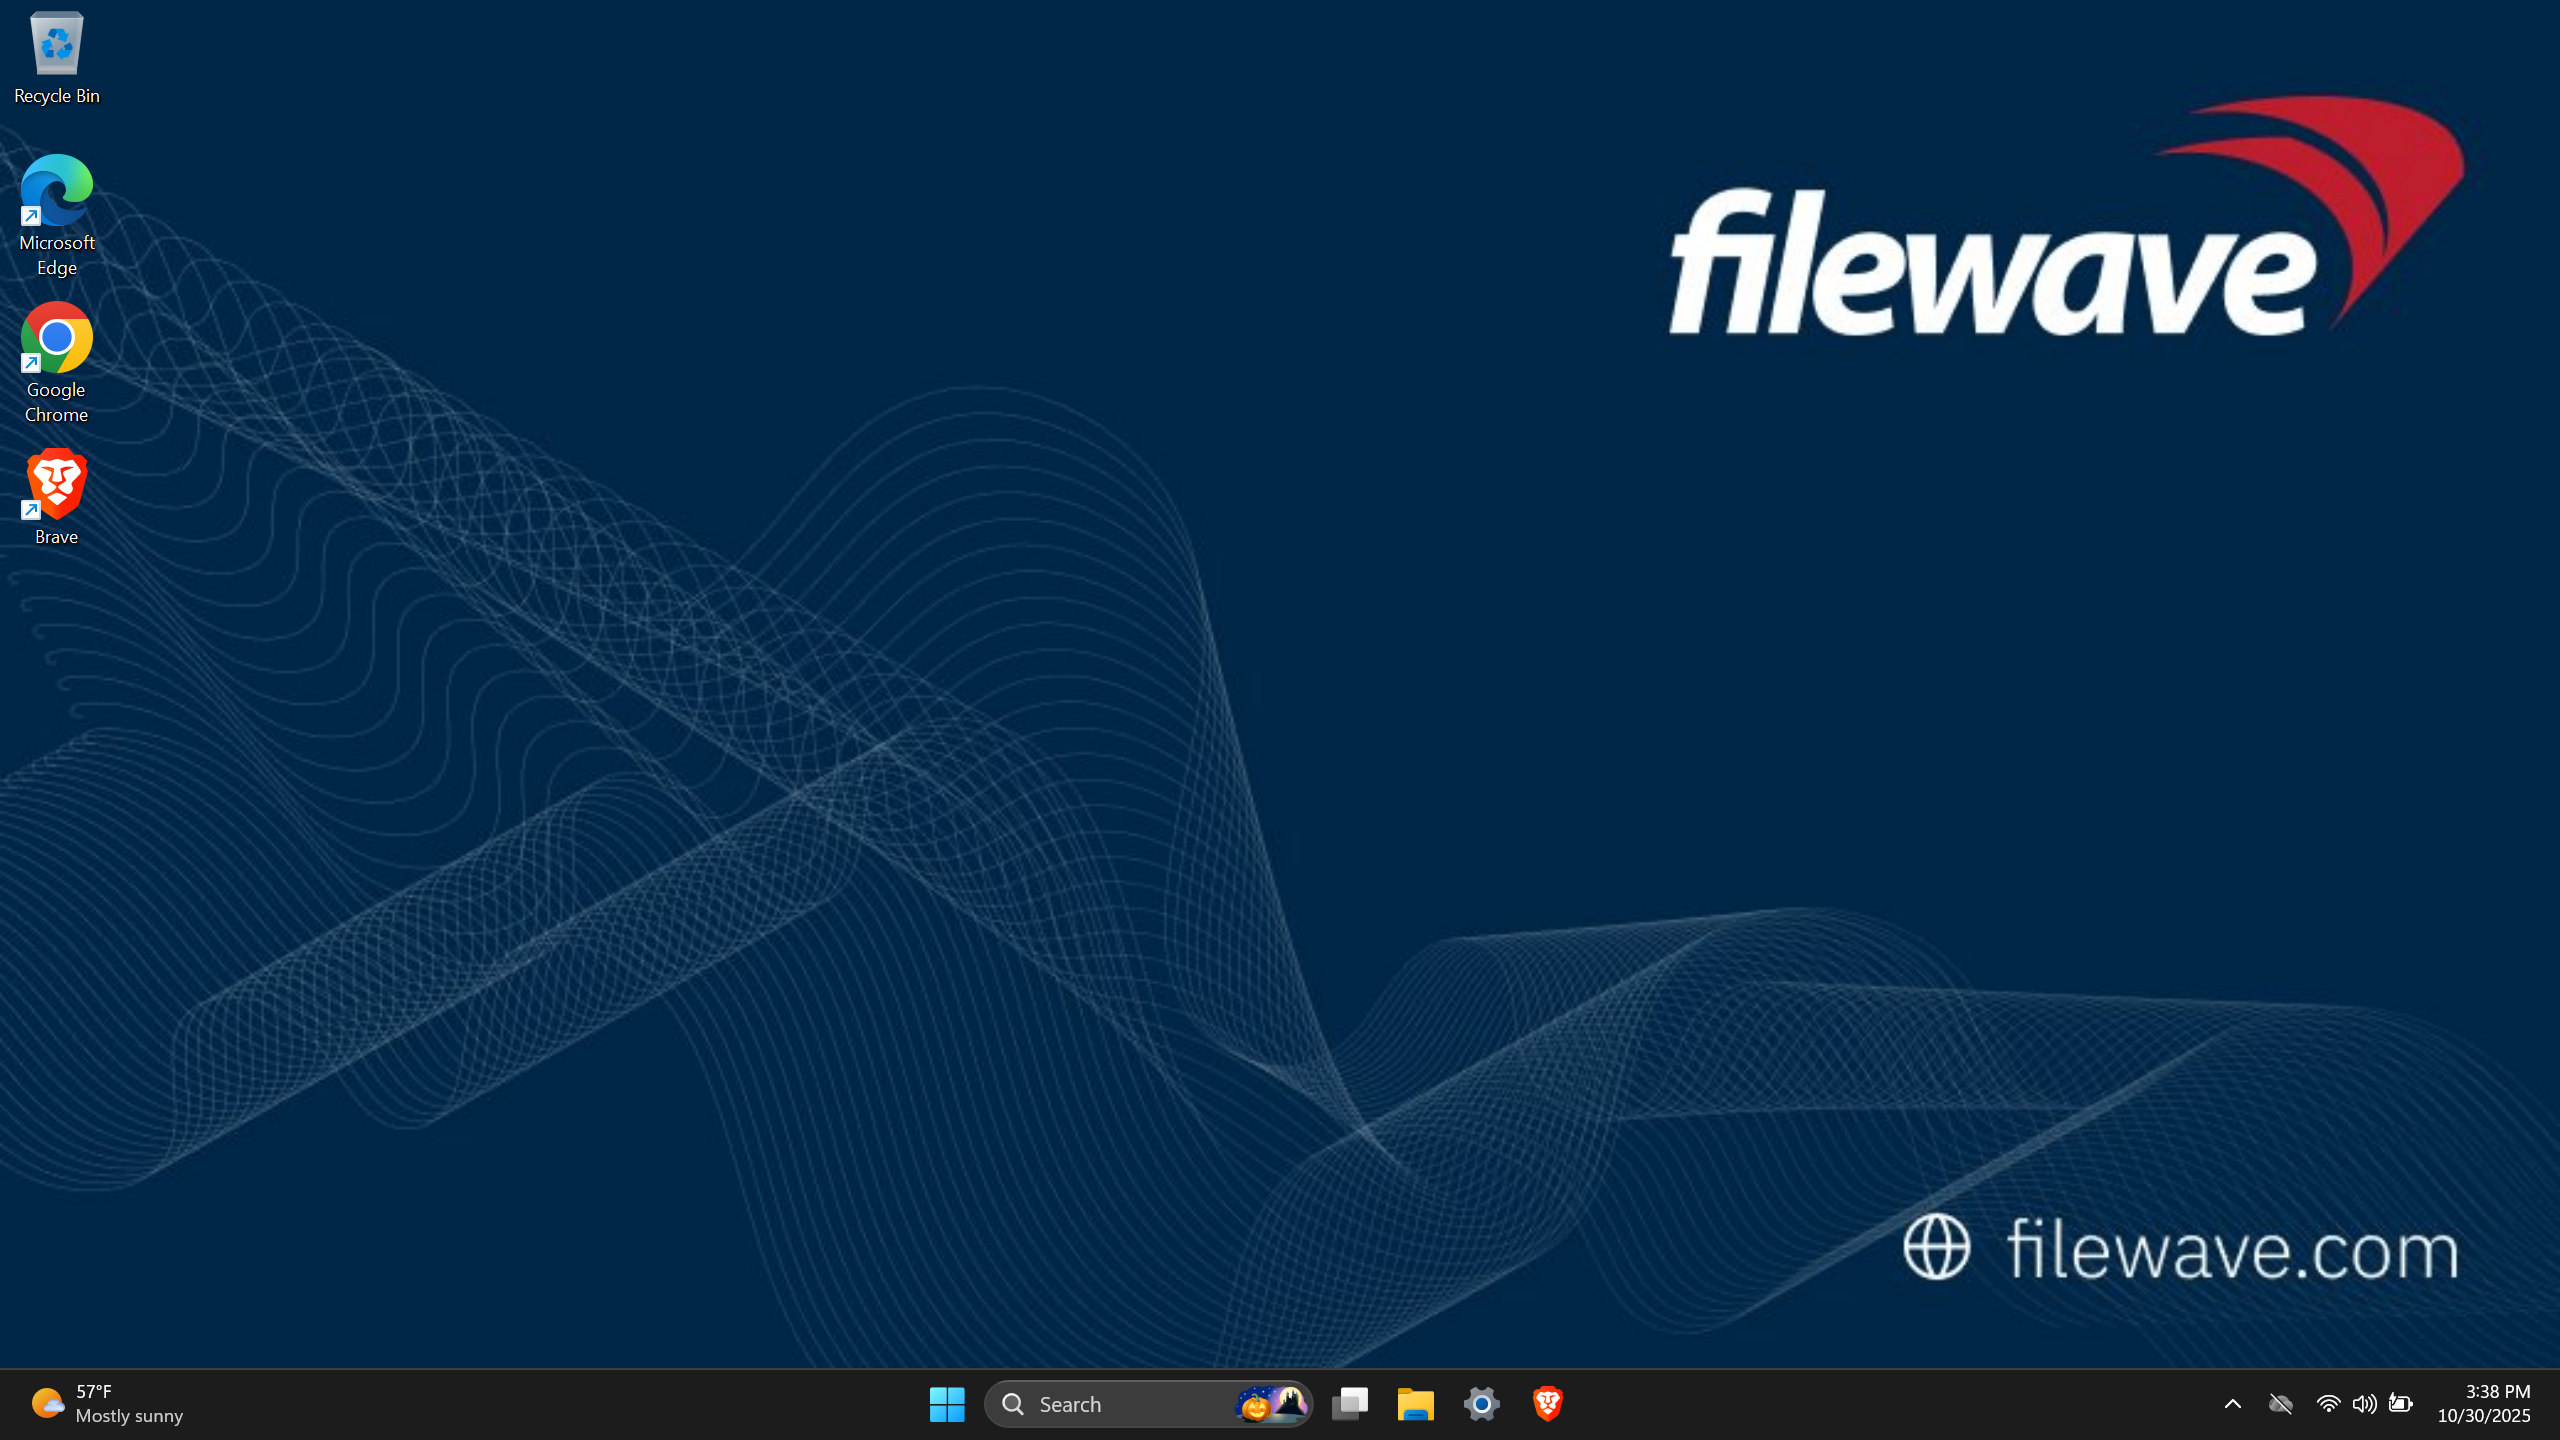
Configure the Wallpaper Removal script
-
Configure the Windows Wallpaper Fileset.
-
If you look at the example Windows Fileset in the scripts dialog, you will see the Post-Uninstallation script. Keep in mind that by default, with the example Fileset, it will uninstall the wallpaper if you remove the Deployment/Association, so you may want to review these steps to make sure it is how you want. You could also take this script and make it an Activation Script in its own Fileset that you could deploy when you want to clear the managed wallpaper.

-
Configure optional Environment Variables:
-
CLEAR_DESKTOP=true|false -
CLEAR_LOCKSCREEN=true|false -
REG_CLEANUP=true(recommended) -
RESTART_EXPLORER=true(optional, for immediate effect)
-
-
Associate this Fileset with a device to set the Wallpaper and/or Lock Screen. Remove the Association/Deployment and see it removed when the removal script runs.
Expected log output:
[2025-10-30T16:09:26] [INFO] Wallpaper removal script initiated.
[2025-10-30T16:09:26] [INFO] Options: CLEAR_DESKTOP=True, CLEAR_LOCKSCREEN=True, REG_CLEANUP=True, RESTART_EXPLORER=True
[2025-10-30T16:09:27] [INFO] Connected to MDM Bridge Provider successfully.
[2025-10-30T16:09:27] [INFO] Cleared DesktopImageUrl via null assignment (CSP Delete).
[2025-10-30T16:09:27] [WARN] Null clear failed for LockScreenImageUrl. Trying empty string...
[2025-10-30T16:09:27] [ERROR] Failed to clear LockScreenImageUrl. The requested operation is not supported.
[2025-10-30T16:09:27] [INFO] DesktopImageUrl now='' (Status= Unknown)
[2025-10-30T16:09:27] [INFO] LockScreenImageUrl now='' (Status= Unknown)
[2025-10-30T16:09:27] [INFO] Restarting Explorer shell...
[2025-10-30T16:09:27] [INFO] Explorer restarted.
[2025-10-30T16:09:27] [INFO] Wallpaper policy removal completed successfully.Notes
-
Both scripts must execute as SYSTEM to access the MDM Bridge Provider.
- If the wallpaper has not yet been applied, a device restart should trigger the deployment. To enforce this, enable the Force Reboot option on the Fileset.
-
Enterprise/Education SKUs support these CSPs natively; Pro requires SharedPC Edu Policies.
-
Image URIs must be valid:
-
For local paths →
file:///C:/path/to/image.jpg -
For network/HTTP →
https://domain.com/wallpaper.jpg
-
-
Using
file:///path improves reliability because it doesn’t rely on external network access, and if you use https:// you should only use a URL that is on a server you control because otherwise that image could go away or could change at any time.. -
When enforced via CSP, the wallpaper is locked, and users cannot change it until the CSP node is cleared.
-
Registry mirror cleanup ensures Settings no longer display stale wallpaper values.