FileWave Virtual Appliances
This book covers how to import our provided OVA's and VHD's into your virtual environments.
- Importing FileWave OVA (VirtualBox)
- FileWave Appliances on an Apple Silicon macOS system
- Importing FileWave VHD (Hyper-V)
- Importing FileWave OVF (Vmware ESXI)
- Importing a FileWave Appliance into Scale Computing (OVA → QCOW2)
- Importing FileWave OVF (VMware Fusion)
- Importing FileWave OVF (VMware Workstation)
Importing FileWave OVA (VirtualBox)
Step-by-step guide
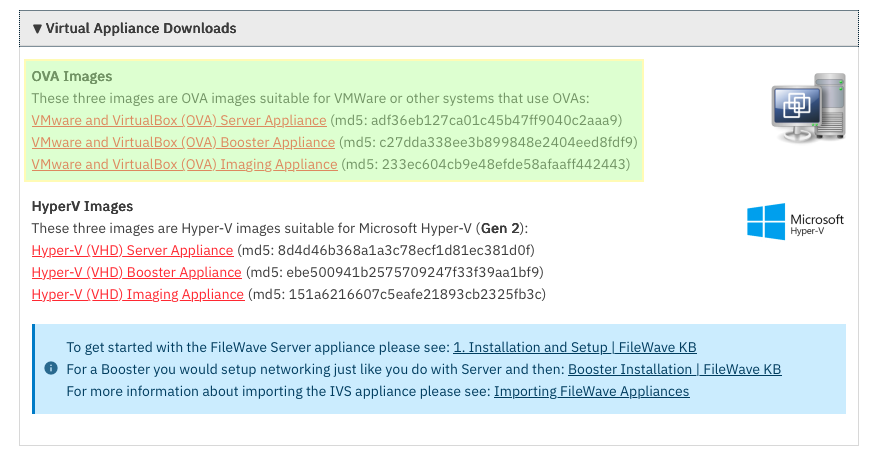
1. First, you'll need to download and unzip the virtual appliance from FileWave Downloads

2. Open Oracle VirtualBox. Click “File” and “Import Appliance".

3. Browse your machine for the unzipped OVA/OVF from FileWave and click “Open”.

4. Click "Continue/Next"

5. Then you will select "Import/Finish" to begin the import process.

6. Once imported successfully, select "Settings" to change the Storage settings.

7. Select "Storage" and move the .vdi file from SCSI to SATA.

8. Click "Start" to verify that the appliance starts successfully.

You've successfully imported the IVS Appliance! For next steps, please be sure to complete Changing the IP Address of your IVS (Static) and, if importing version 15.5+, please see: Setting the Password on First Login to FileWave Appliances (15.5+)
FileWave Appliances on an Apple Silicon macOS system
What
You may want to know how to load one of the Debian based FileWave Appliances for Server, Booster, or IVS so that you can test something, but your computer is an Apple Silicon Mac and so the x86 Appliances will not natively run on ARM based computers.
When/Why
Usually, this is for testing purposes. There does not appear to be an emulator that runs on Apple Silicon that also directly supports OVA files like the ones used by VMWare. UTM can emulate x86 hardware and has a tool to convert the hard disk to allow this as explained below.
How
Outline of the work
- Download the OVA image from Downloads
- Convert OVA to QCOW2 on your Mac
- Install Homebrew to get the qemu conversion utility
- Convert the hard disk image
- Import the converted disk in to UTM
- Launch
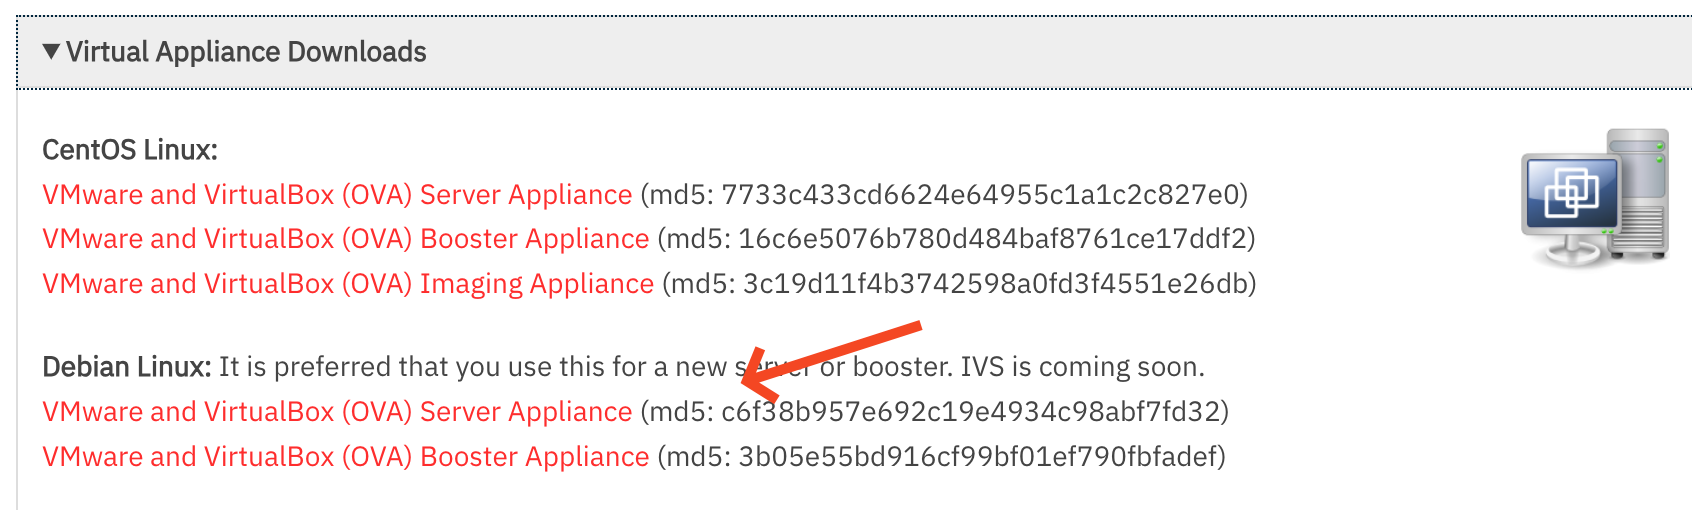
Download the OVA image from Downloads
This step is simple. Just go to the Downloads page. Go to the most recent version of FileWave, and then download the Debian Server, Booster or IVS image.
Convert OVA to QCOW2 on your Mac
Extract the disk image included in ova with the command tar -xvf
tar -xvf FileWave_Server_Debian_15.2.1.ovaOnce extracted you will have several files in the same folder as the OVA:
-rw-r--r--@ 1 jlevitsk staff 2861168640 Dec 12 13:23 FileWave_Server_Debian-disk-0.vmdk
-rw-r--r--@ 1 jlevitsk staff 8684 Dec 12 13:23 FileWave_Server_Debian-disk-1.nvram
-rw-r--r--@ 1 jlevitsk staff 320 Dec 12 13:23 FileWave_Server_Debian.mf
-rw-r--r--@ 1 jlevitsk staff 9185 Dec 12 13:23 FileWave_Server_Debian.ovf
-rw-r--r--@ 1 jlevitsk staff 2861199360 Jan 12 09:47 FileWave_Server_Debian_15.2.1.ovaInstall Homebrew to get the qemu conversion utility
If you've never used Homebrew before then this is an amazing tool you will come to love. Visit their website in case anything has changed but traditionally this command is what you'll want to install it. You will paste the entire line in to Terminal.app. They do now also have a PKG you can download from their Homebrew's latest GitHub release page.
/bin/bash -c "$(curl -fsSL https://raw.githubusercontent.com/Homebrew/install/HEAD/install.sh)"Once Homebrew is installed you can install the qemu utilities with this command in Terminal.app:
brew install qemuConvert the hard disk image
For the next step you'll use the qemu-img command to convert the VMDK disk image over to QCOW2 that is used by UTM. The below command is done in Terminal.app, and you should consider if the file name differs, but it will be the VMDK that you extracted in the earlier step using tar and then the QCOW2 file won't exist until after you do this conversion command.
qemu-img convert -O qcow2 FileWave_Server_Debian-disk-0.vmdk FileWave_Server_Debian-disk-0.qcow2Import the converted disk in to UTM
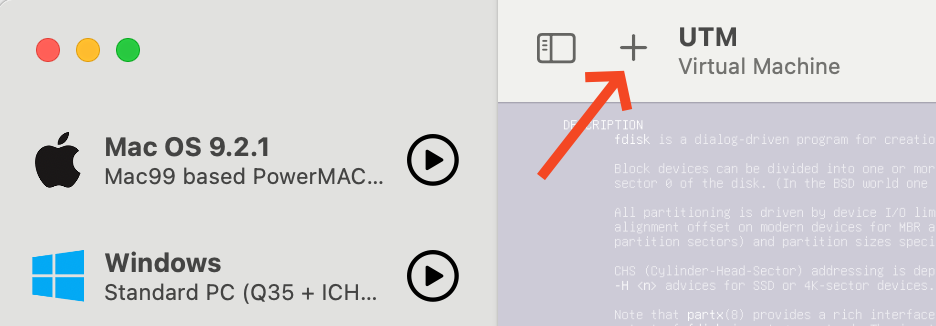
- Press the + button in the upper left corner.

-
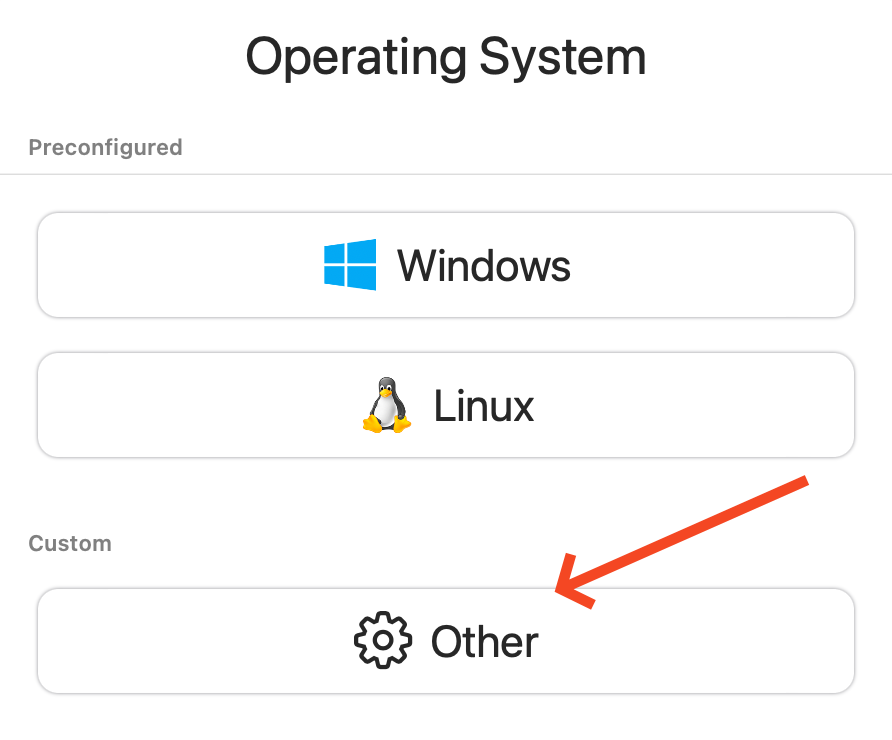
Select Emulate

- Select Other

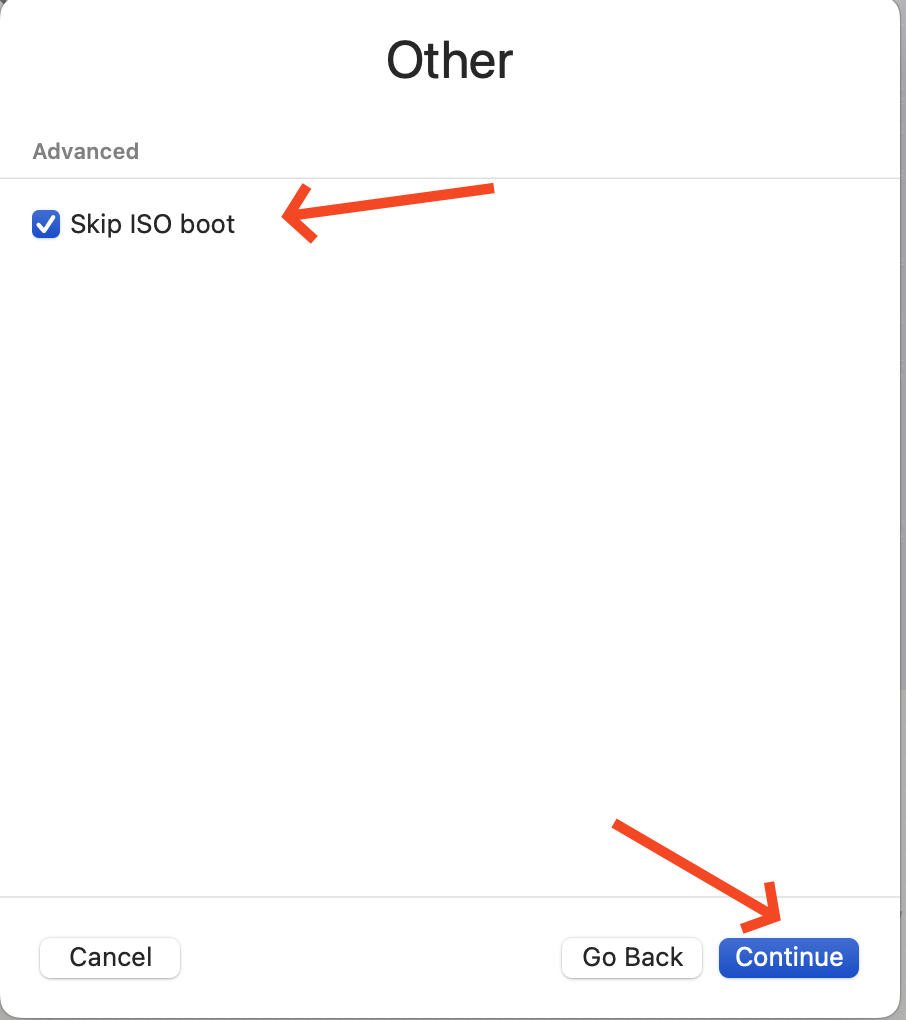
- Check Skip ISO boot and then click Continue

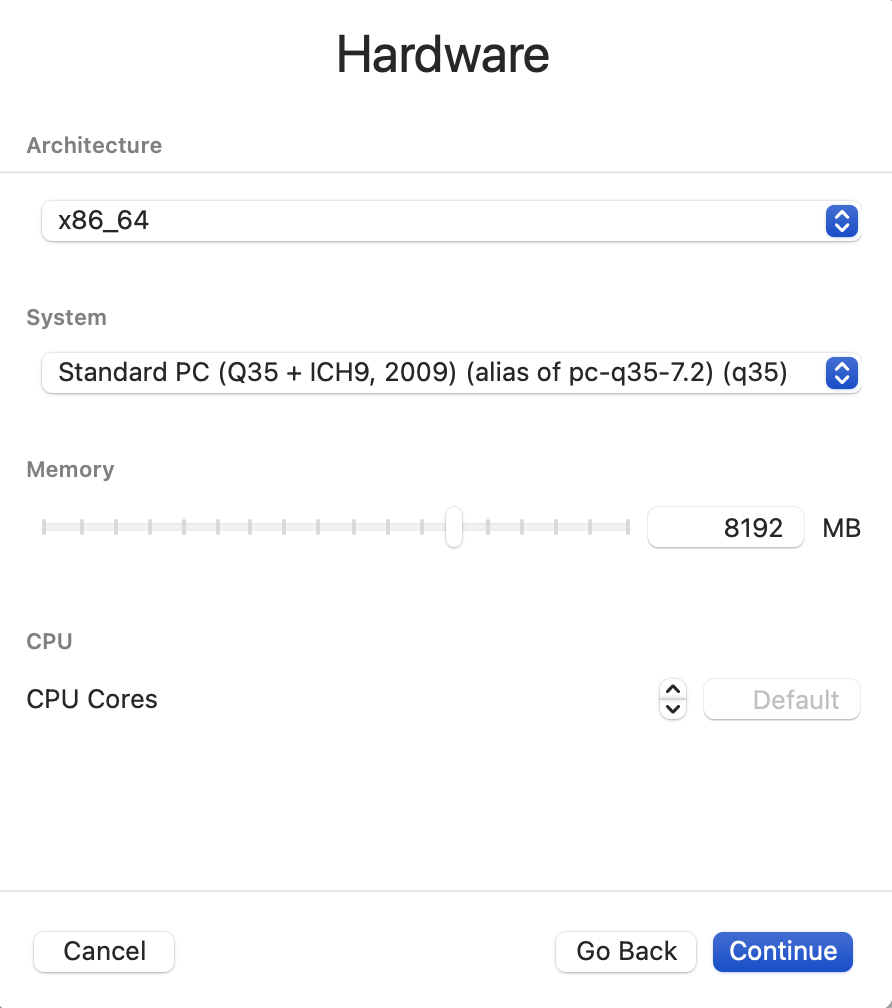
- On this step the most important thing is to pick x86_64 for the Architecture and to ensure you have at least 8192Mb of RAM.

- The size of storage won't matter because we will be deleting it later.

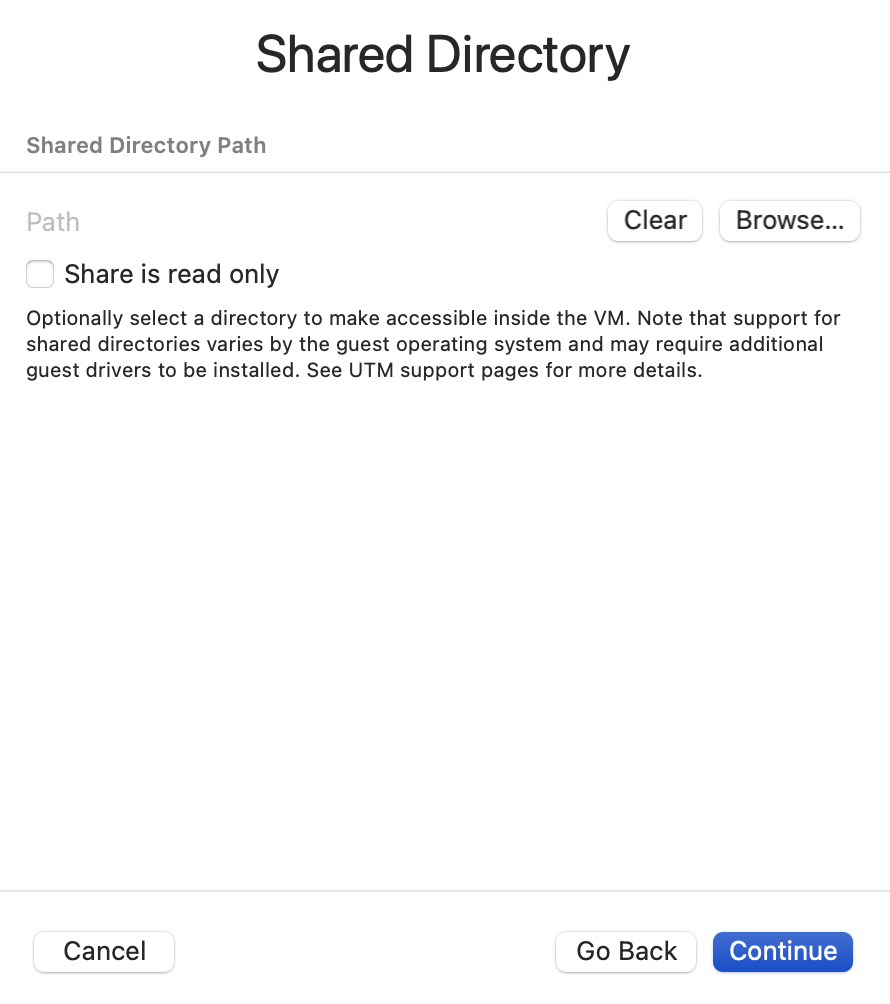
- The Shared Directory is not something I've been using. This is up to you but may need some drivers installed for it to work.

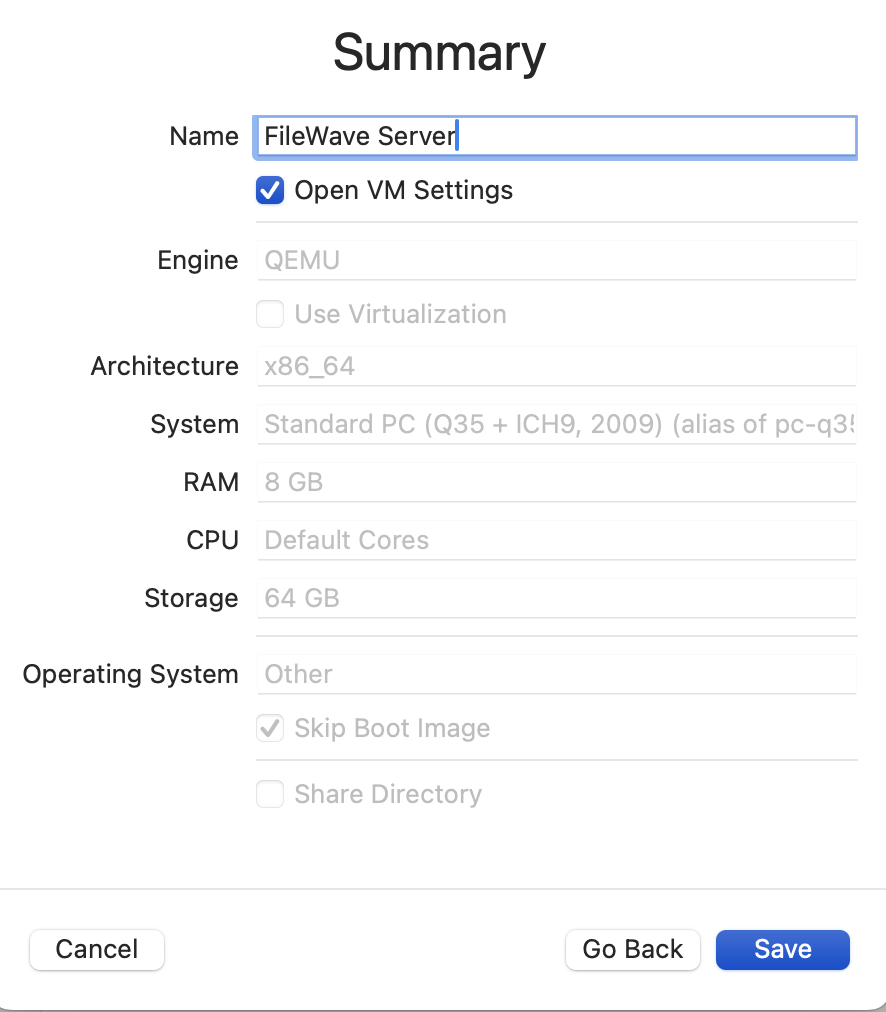
- Give the VM a name and check the Open VM settings box. Click Save to pick up the VM Setting screen. If you forget to check the box for this to appear then you can right-click the VM and pick Settings to access the same screen.

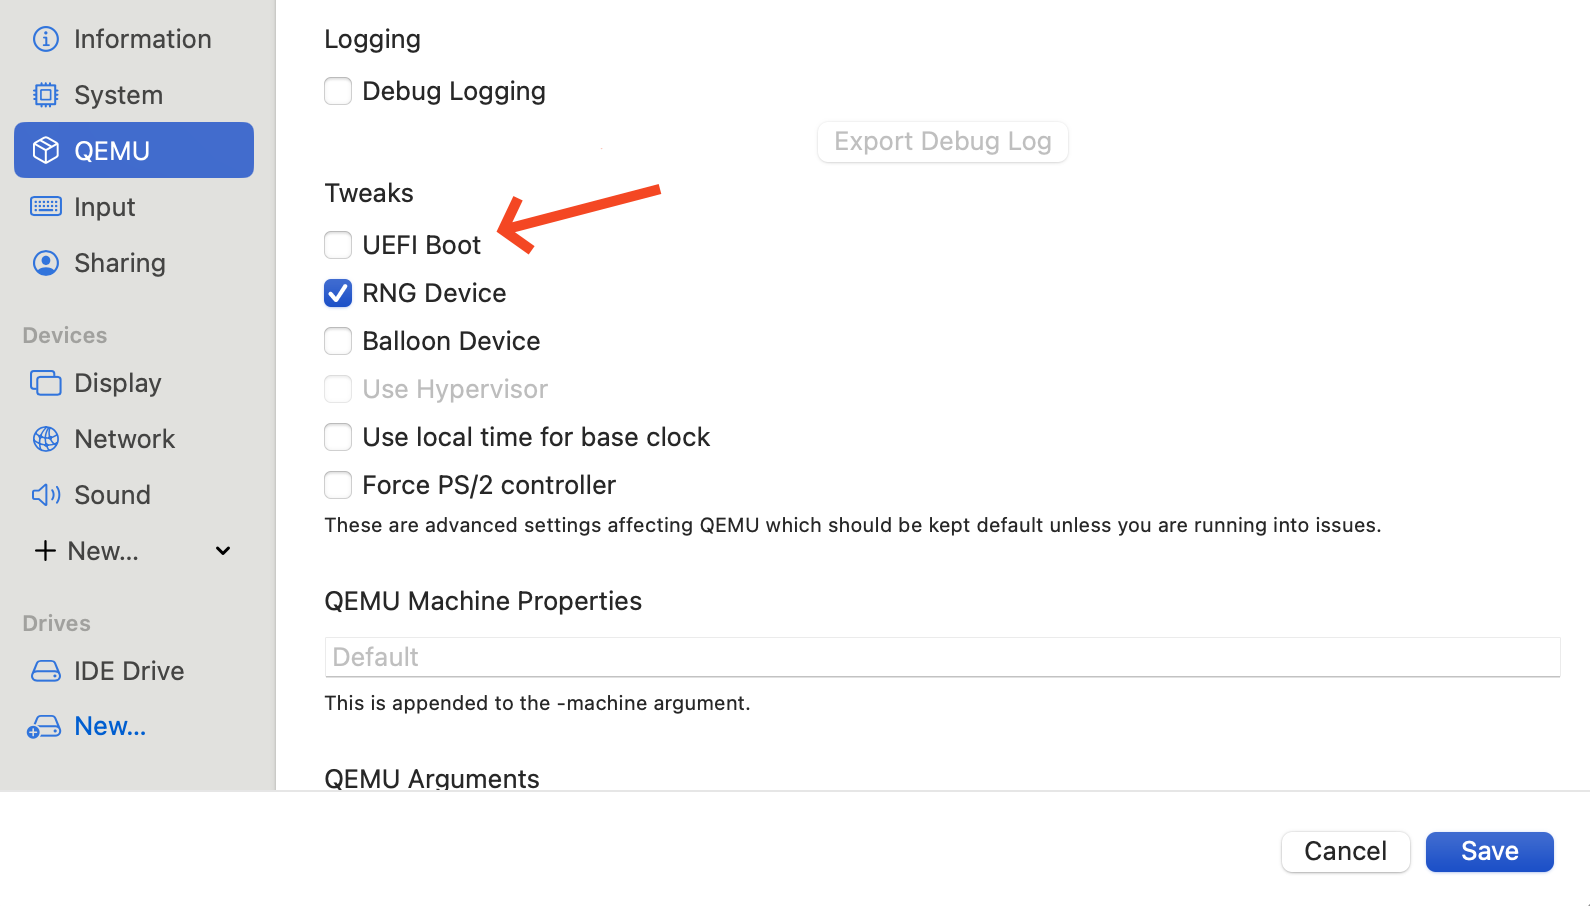
- You need to uncheck UEFI Boot or the appliance will not boot until you do.

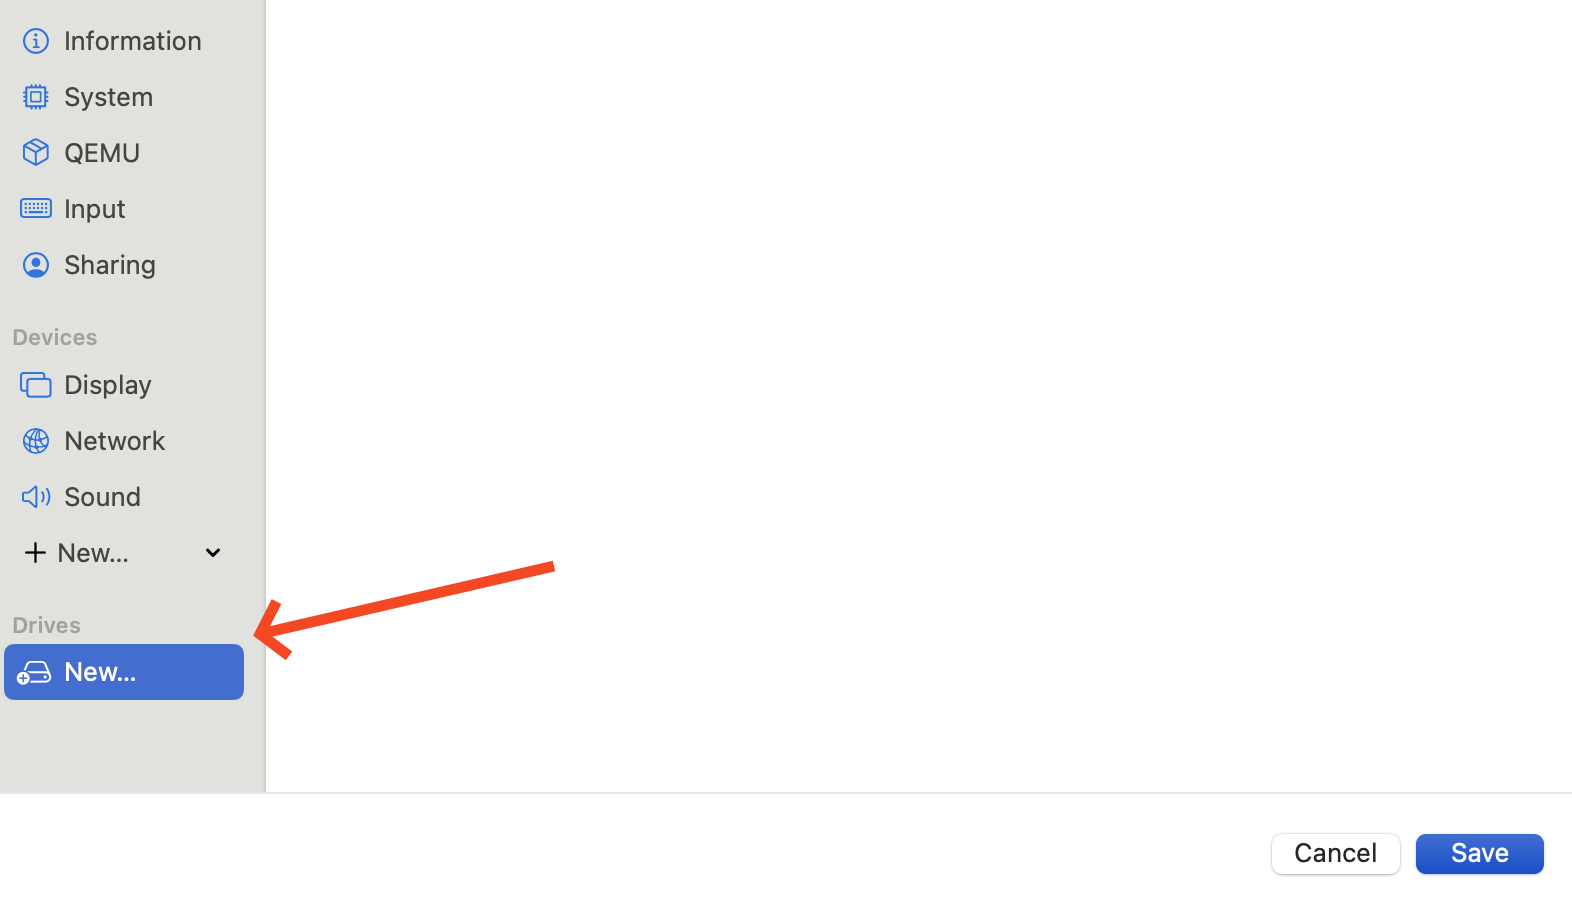
- Delete the existing IDE Drive.

- Click New... to make a new drive. This is where we will import the QCOW2 file.

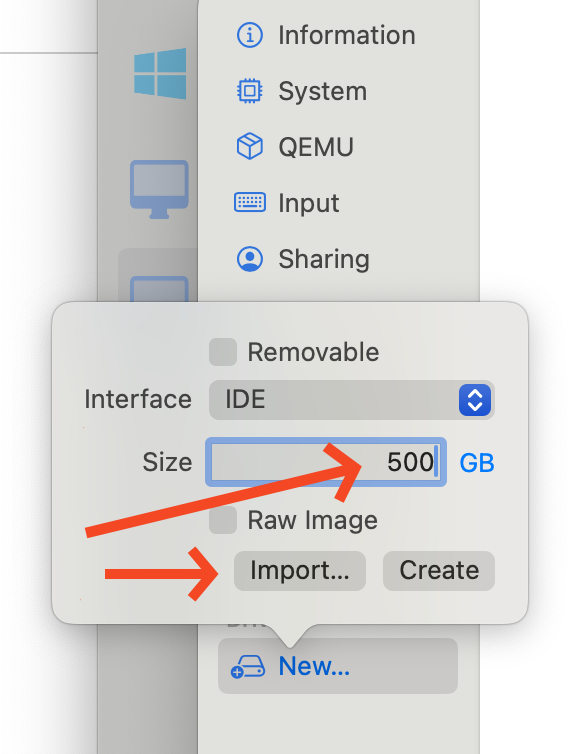
- When you clicked New... you should put 500 GB for the size and then click Import...

- Browse to the QCOW2 file from the conversion step and select it. Now you can pick Save on the Settings page to finish.


Launch
You'll now have the virtual machine listed and if you pick the play button to start it up it should boot up fully.
Once booted you can login as the user fwadmin with password filewave and then you can change the fwadmin password (First Login to FileWave Appliances) or use Webmin to change it.
Related Content
- UTM | Virtual machines for Mac (getutm.app)
- Homebrew — The Missing Package Manager for macOS (or Linux)
- Convert ova to qcow2 and start it with UTM | by Simo | Medium (The source for this article)
Importing FileWave VHD (Hyper-V)
FileWave's Hyper-V VMs are usually built using the latest version of Hyper-V, typically the same one that comes with the newest version of Windows Server. When importing the FileWave Server, IVS, or on older Windows OS'es, the Hyper-V Manager console may not be able to detect the VM due to changes in the formatting of the VM XML definition file. This doesn't mean you can't add them to Hyper-V though.
Instead of importing the Hyper-V VM, add a new VM and point it to the existing VHD for the FileWave IVS. Then specify the following hardware configuration to replace the missing info that was lost by discarding the VM XML definition file.
IVS - 4 CPUs, 8 GB RAM
Step-by-step guide
Follow these steps for the FileWave server component you wish to add to Hyper-V
- Copy the .vhdx file for the desired FileWave server component to the same folder where the VHDs for all your other VMs reside. Rename it as desired so you know which FileWave component it's for, e.g. FileWave_IVS.vhdx.
- Go to Action > New > Virtual Machine.
- Select "Generation 1" or "Generation 2" for the firmware type, depending on which you downloaded.
- Assign 8192 MB for Startup memory and check "Use Dynamic Memory" for this virtual machine.
- Connect the NIC to an external virtual switch where the server can pick up an IP address on your LAN.
- Pick "Use an existing virtual hard disk" and browse to the .vhdx file for your VM.
Note that the IVS has two virtual NICs although only one of them will pick up an IP address. There's already one present by default so you'll have to edit the settings for the VM and add a second one by picking Add Hardware at the top of the Hardware section on the left-hand pane. Choose Network Adapter on the right and click the Add button.
Connect this second adapter to your virtual switch and click the Apply button.

All FileWave server components should have a static IP rather than a dynamic one. You can either assign them a static IP outside of your DHCP pool or set a client reservation for them so they get the same IP address from the DHCP pool every time. For client reservations, you'll need to configure the virtual NICs with static MAC addresses since the MAC address is needed to set the client reservation. In the Advanced Features section for each virtual NIC change the MAC address to Static.

You've successfully imported the IVS Appliance! For next steps, please be sure to complete Changing the IP Address of your IVS (Static) and, if importing version 15.5+, please see: Setting the Password on First Login to FileWave Appliances (15.5+)
Importing FileWave OVF (Vmware ESXI)
Step-by-Step Guide
1. Open your vSphere Client software and connect to ESXI. Click “File” and “Deploy OVF Template".

2. Browse your machine for the unzipped OVA/OVF from FileWave and click “Next”.

3. The OVF Details will be presented to you. Click “Next”.

4. Give your Server a Name and select the Datacenter and Location where you would like to store it.

5. Select which ESXI server will host the OVF.

6. Select the datastore where you would like to store your OVF.

7. Choose the desired format for the virtual disks.

8. Map the OVF/Server to the desired VM Network.

9. Click "Finish" to begin importing the OVF.
Note: You may receive a message that the import failed because OVF specification conformance. Clicking "Retry" will resolve that and continue the import.


10. Once the OVF has imported successfully, turn it on and open a console window to ensure that it starts successfully.


You've successfully imported the IVS Appliance! For next steps, please be sure to complete Changing the IP Address of your IVS (Static) and, if importing version 15.5+, please see: Setting the Password on First Login to FileWave Appliances (15.5+)
Importing a FileWave Appliance into Scale Computing (OVA → QCOW2)
Overview
This article explains how to deploy a FileWave Server appliance (OVA) on a Scale Computing HyperCore cluster.
Scale does not natively support VMware/VirtualBox OVA imports. To run the FileWave appliance, you must:
-
Extract the OVA
-
Convert the virtual disk
-
Create a VM manually
-
Attach the converted disk
This guide provides step-by-step instructions for macOS and Windows.
Prerequisites
-
Scale HyperCore cluster access
-
~2x disk space of the OVA size
- Required Tools:
- macOS:
- Terminal
- Homebrew
- qemu
- Windows:
- QEMU (CLI) OR StarWind V2V Converter (GUI)
- macOS:
Step 1: Download the Appliance
Step 2: Extract the OVA
The OVA is a tar archive.
macOS / Linux
#Make a directory for the .ova files to be extracted to
mkdir ~/Downloads/fw-ova/
cd ~/Downloads/fw-ova/
#Extract the files
#If the file wasn't saved to your Downloads, change the directory
tar -xvf ../FileWave_Server_Debian_*.ovaWindows
-
Right-click → Extract (7-Zip or WinRAR)
Expected output:
FileWave_Server_Debian.ovf
FileWave_Server_Debian.mf
FileWave_Server_Debian-disk-0.vmdk
FileWave_Server_Debian-disk-1.nvram👉 Only the .vmdk file is required.
Step 3: Convert VMDK → QCOW2
Scale works best with QCOW2 disks.
macOS
Install QEMU:
brew install qemuConvert:
cd ~/Downloads/fw-ova/
qemu-img convert -p -f vmdk -O qcow2 FileWave_Server_Debian-disk-0.vmdk FileWave_Server.qcow2Windows (QEMU CLI)
qemu-img.exe convert -p -f vmdk -O qcow2 FileWave_Server_Debian-disk-0.vmdk FileWave_Server.qcow2Windows (GUI Option)
Using StarWind V2V Converter:
-
Open StarWind V2V
-
Select VMDK
-
Output format: QCOW2
-
Complete wizard
Step 4: Create a VM in Scale
Create a new VM manually.
Required Settings
| Setting | Value |
|---|---|
| Firmware | BIOS (Legacy) |
| CPU | 4–8 vCPU |
| RAM | 8–16 GB |
| NIC | Intel E1000 |
⚠️ Critical:
-
Do NOT use UEFI
-
Do NOT attach disk yet (or remove placeholder disk)
Step 5: Upload & Attach Disk

Disk Configuration
Disk Type: IDE
Disk Slot: 0
Bootable: YesBoot Order
IDE Disk (slot 0) → First
Step 6: Boot the Appliance
Start the VM.
Expected result:
-
Debian boots
-
FileWave login prompt appears
Default Credentials
Username: fwadmin
Password: filewaveYou will be prompted to change the password.
Troubleshooting
❌ No Bootable Device
-
VM must be BIOS
-
Disk must be IDE
-
Boot order must point to the disk
❌ Kernel Panic / Root FS Missing
-
Disk conversion issue
-
Retry conversion
-
Ensure the correct VMDK is used
Why This Works (Important)
The FileWave appliance is built for VMware:
Disk Controller: LSI Logic SCSI
NIC: VMXNET3
Firmware: BIOSScale uses different virtual hardware:
Disk: IDE / VirtIO
NIC: E1000 / VirtIOBecause Scale does not support VMware’s SCSI or VMXNET3 directly:
-
The disk must be converted
-
The VM must be recreated with compatible hardware
-
IDE is used for maximum boot compatibility
Optimization (Optional)
After successful boot:
-
Test switching disk to VirtIO
-
Test switching NIC to VirtIO
⚠️ Only do this after confirming a stable boot
Summary
-
Download OVA
-
Extract files
-
Convert VMDK → QCOW2
-
Create BIOS VM
-
Attach the disk as IDE
-
Boot
Support
If you encounter issues, please contact FileWave Support or your Professional Services representative.
Importing FileWave OVF (VMware Fusion)
Step-by-step guide
1. First, you'll need to download and unzip the virtual appliance from filewave.com
2. Then, open VMware Fusion. Click “File” and “Import".

3. Now, browse your machine for the unzipped OVA/OVF from FileWave and click “Open”.

4. Name the OVF/Server and select where you would like to save it. Click "Save".

5. The appliance should start for you automatically, but if it doesn't, just click the "Start" button.


You've successfully imported the IVS Appliance! For next steps, please be sure to complete Changing the IP Address of your IVS (Static) and, if importing version 15.5+, please see: Setting the Password on First Login to FileWave Appliances (15.5+)
Importing FileWave OVF (VMware Workstation)
Step-by-Step Guide
1. Open VMware Workstation. Click "Open a Virtual Machine".

2. Browse your machine for the unzipped OVA/OVF from FileWave and click “Open”.

3. Name the Virtual Machine and select a storage location. Click “Import”.

Note: You may receive a message that the import failed because OVF specification conformance. Clicking "Retry" will resolve that and continue the import.

4. Once the OVF has imported successfully, turn it on to ensure that it starts successfully.

You've successfully imported the IVS Appliance! For next steps, please be sure to complete Changing the IP Address of your IVS (Static) and, if importing version 15.5+, please see: Setting the Password on First Login to FileWave Appliances (15.5+)